Embed Size (px)
Citation preview
Measuring and Folding Guidelines 1
MEASURING AND FOLDING GUIDELINES
How-to-Measure Guidelines Apparel Preparation for Measuring
• Table surface must be smooth and flat. • Garment must be buttoned and/or zipped unless otherwise specified. • Garment with non-closure must be overlapped. • Gently smooth out all folds, wrinkles or creases, being careful not to stretch or distort
garment. Garment Measuring
• Take all measurements to the nearest 1/8” using a flexible tape measure • Be sure to indicate on the spec sheet if measurements are full or ½ • All measurements are edge to edge unless inside to inside is specified • All measurements should be taken from wearer’s left side • For curved seams, such as rises and armholes, stand tape on edge and walk along seam
to be measured • For extended minimum measurements, fully extend garment until minimum extension is
reached without rupturing seams or distorting garment Measurement Placement
• All measurement should be taken from the middle size of the size run Term Abbreviations
• BK = Back • BLW = Below • BTTN = Button • CB = Center Back • CF = Center Front • FM = From • FT = Front • HPS = High Point Shoulder • W/O = Without • W/B = Waistband • MSRMNT = Measurement • SHLDR = Shoulder • CNTR = Center • BTTM = Bottom • “V”
o CF “V” neck drop is where the left and right fronts meet and create a “V”. o “V” hip measurement for pants: measure 8” down from side seam and center front to
create the “V”.
Measuring and Folding Guidelines 2
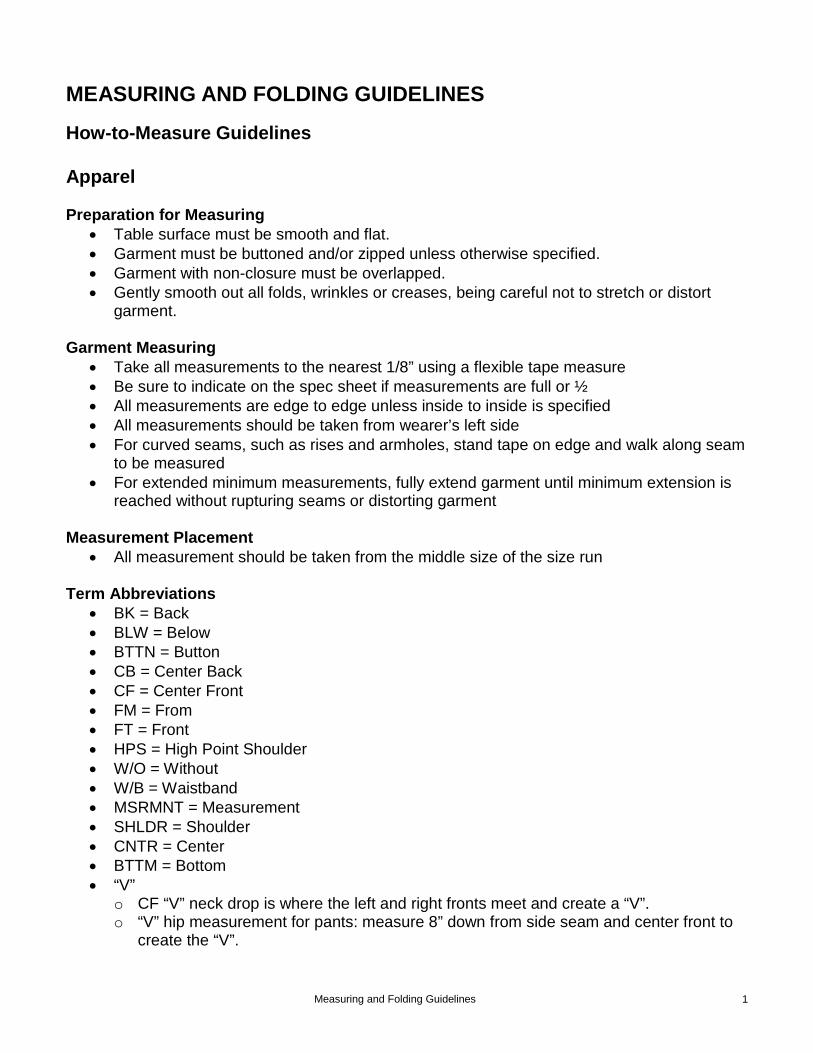
Tops, Blazers, Jackets, Dresses and Jumpsuits Back Length (1): Measure straight down from high point shoulder to bottom edge of garment. Shoulder (2): Measure from shoulder point to shoulder point, straight across back. Center Back Sleeve Length (9): Fold neck in half to find center, or use center back seam. Measure from center back neck to shoulder point, pivot and follow top of sleeve line to bottom edge of sleeve, including cuff.
Measuring and Folding Guidelines 3
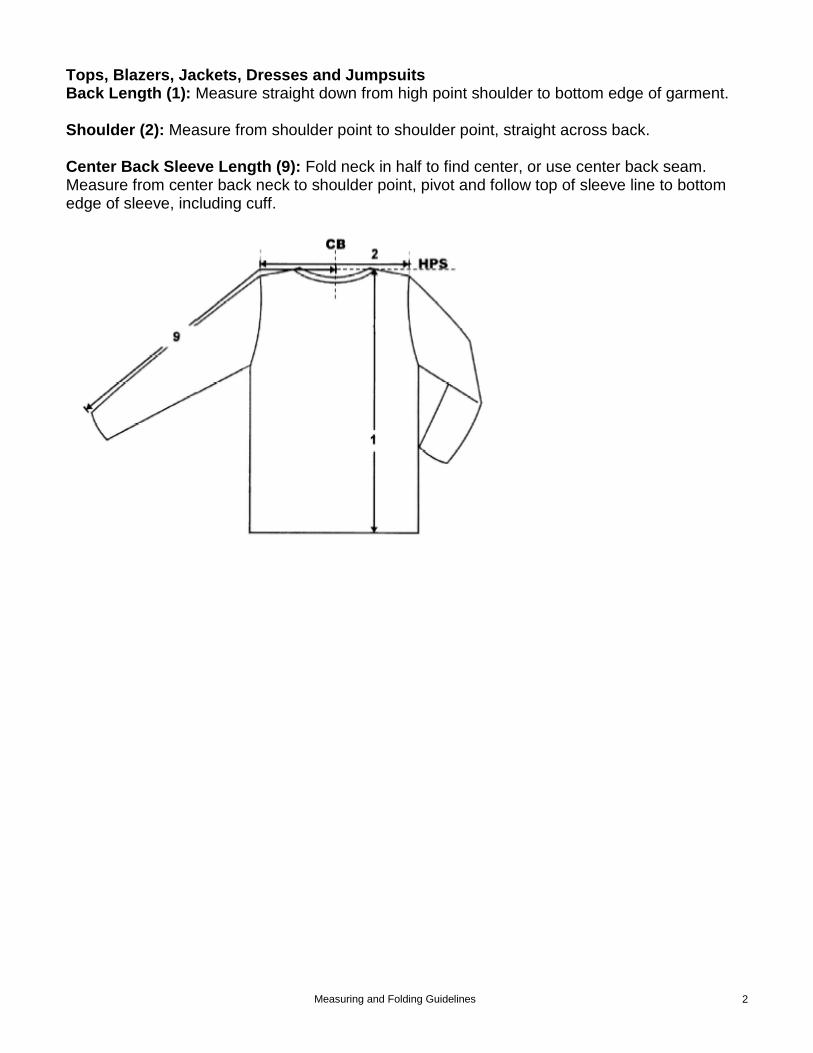
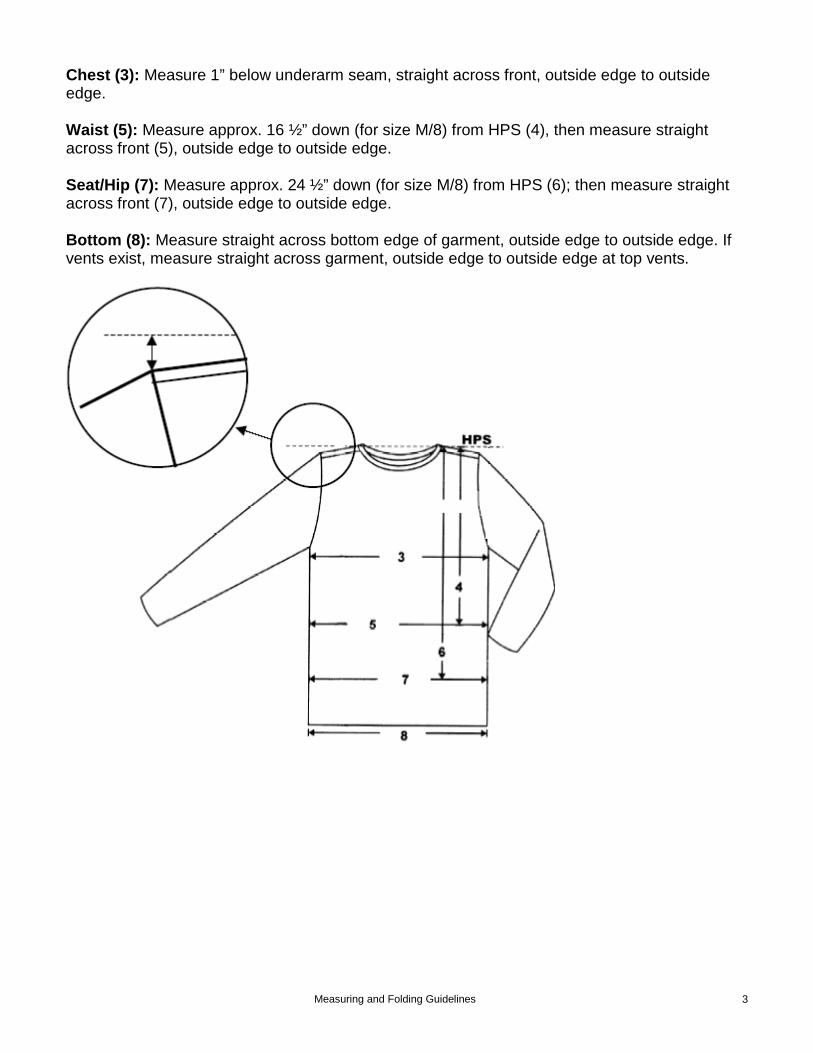
Chest (3): Measure 1” below underarm seam, straight across front, outside edge to outside edge. Waist (5): Measure approx. 16 ½” down (for size M/8) from HPS (4), then measure straight across front (5), outside edge to outside edge. Seat/Hip (7): Measure approx. 24 ½” down (for size M/8) from HPS (6); then measure straight across front (7), outside edge to outside edge. Bottom (8): Measure straight across bottom edge of garment, outside edge to outside edge. If vents exist, measure straight across garment, outside edge to outside edge at top vents.
Measuring and Folding Guidelines 4
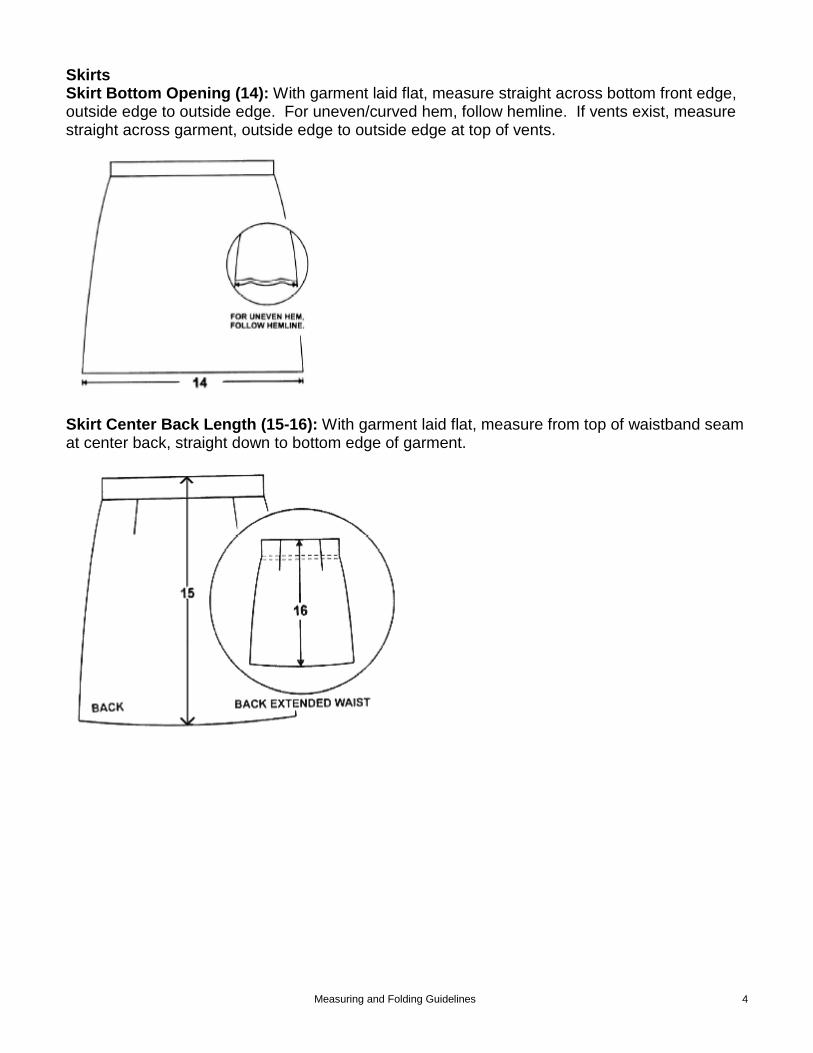
Skirts Skirt Bottom Opening (14): With garment laid flat, measure straight across bottom front edge, outside edge to outside edge. For uneven/curved hem, follow hemline. If vents exist, measure straight across garment, outside edge to outside edge at top of vents.
Skirt Center Back Length (15-16): With garment laid flat, measure from top of waistband seam at center back, straight down to bottom edge of garment.
Measuring and Folding Guidelines 5
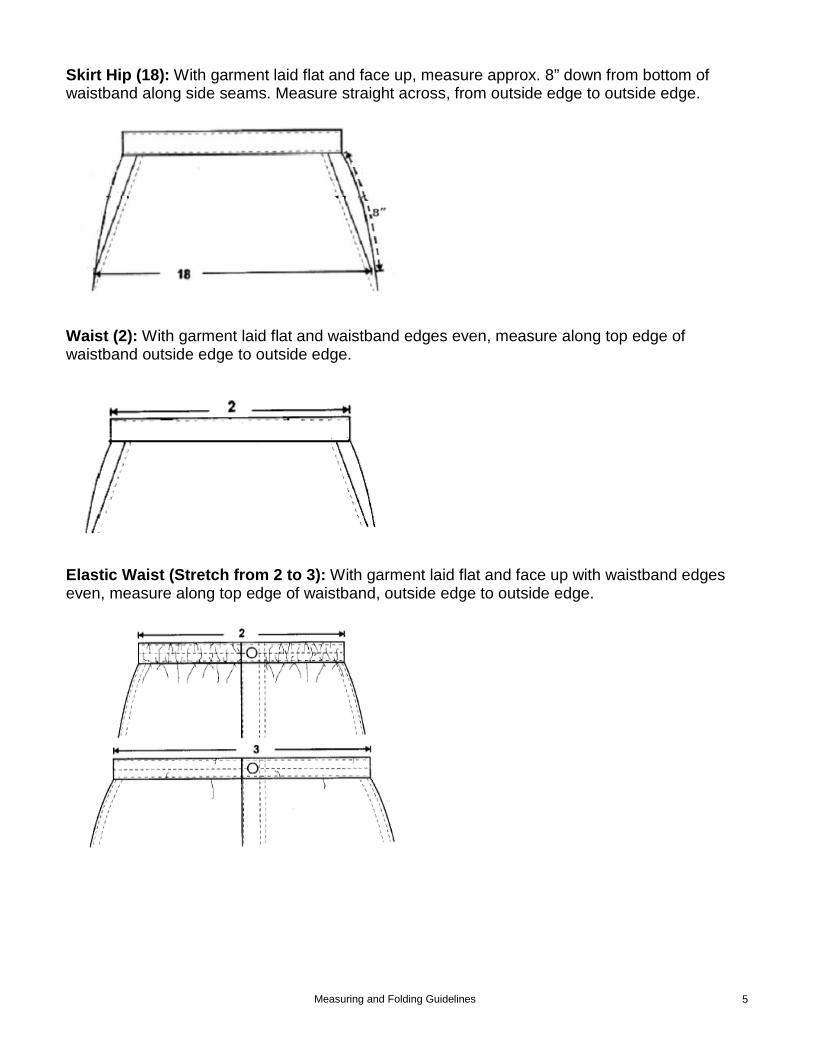
Skirt Hip (18): With garment laid flat and face up, measure approx. 8” down from bottom of waistband along side seams. Measure straight across, from outside edge to outside edge.
Waist (2): With garment laid flat and waistband edges even, measure along top edge of waistband outside edge to outside edge.
Elastic Waist (Stretch from 2 to 3): With garment laid flat and face up with waistband edges even, measure along top edge of waistband, outside edge to outside edge.
Measuring and Folding Guidelines 6
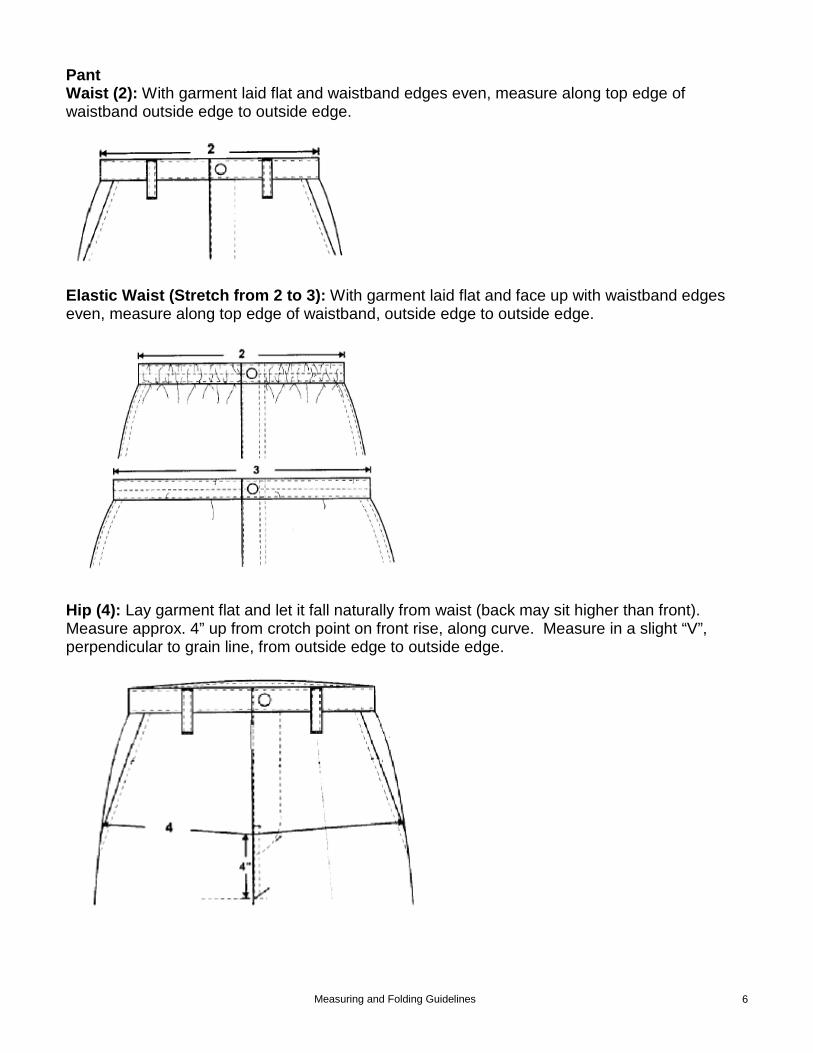
Pant Waist (2): With garment laid flat and waistband edges even, measure along top edge of waistband outside edge to outside edge.
Elastic Waist (Stretch from 2 to 3): With garment laid flat and face up with waistband edges even, measure along top edge of waistband, outside edge to outside edge.
Hip (4): Lay garment flat and let it fall naturally from waist (back may sit higher than front). Measure approx. 4” up from crotch point on front rise, along curve. Measure in a slight “V”, perpendicular to grain line, from outside edge to outside edge.

Measuring and Folding Guidelines 7
Front Rise (6): With garment laid flat, measure along curve from crotch point to bottom of waistband. Back Rise (8): With garment laid flat, measure along curve from crotch point to bottom of waistband.
Inseam (10): With garment laid flat, measure left leg from crotch point to bottom of hem following the inseam.
Leg Opening (13): With garment laid flat, measure left leg straight across bottom edge, outside edge to outside edge.
Measuring and Folding Guidelines 8
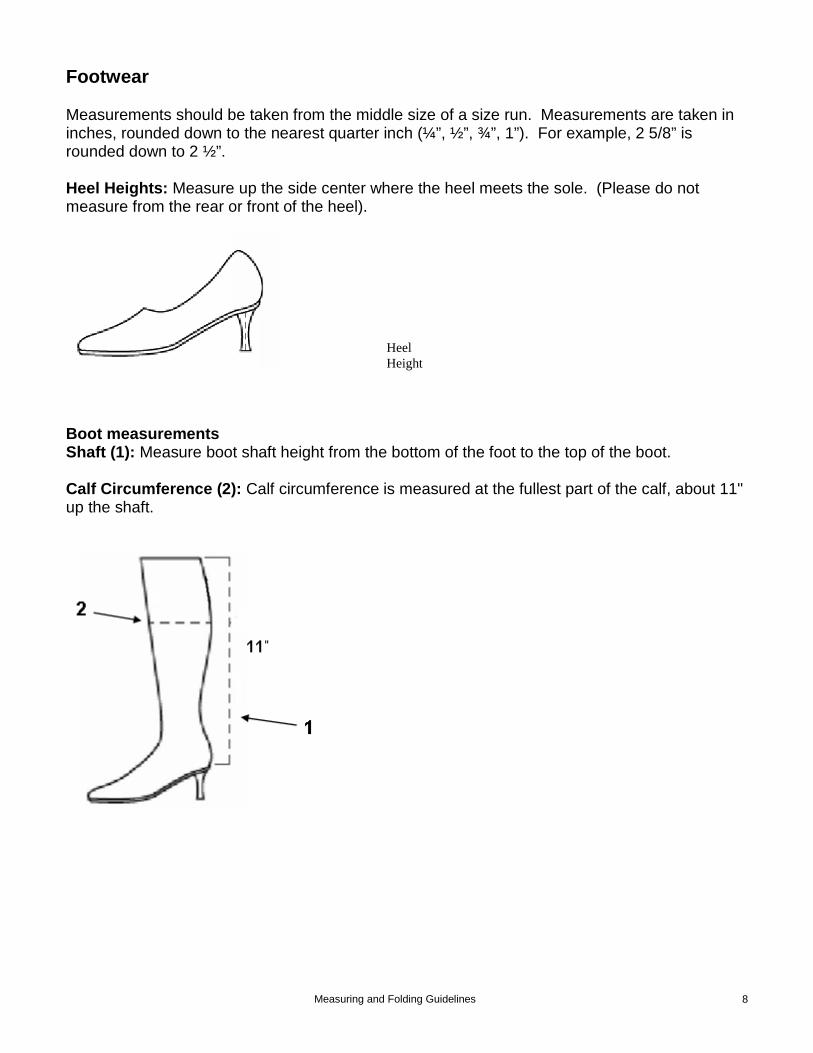
Footwear Measurements should be taken from the middle size of a size run. Measurements are taken in inches, rounded down to the nearest quarter inch (¼”, ½”, ¾”, 1”). For example, 2 5/8” is rounded down to 2 ½”. Heel Heights: Measure up the side center where the heel meets the sole. (Please do not measure from the rear or front of the heel).
Boot measurements Shaft (1): Measure boot shaft height from the bottom of the foot to the top of the boot. Calf Circumference (2): Calf circumference is measured at the fullest part of the calf, about 11" up the shaft.
Heel Height
Measuring and Folding Guidelines 9
Accessories Hair Accessories Preparation for Measuring
• Table surface must be smooth and flat • Item should be laid out smoothly, if applicable
Hair Accessories Measuring
• Take all measurements to the nearest 1/8” using a flexible tape measure • For curved items stand tape on edge and walk along top edge • Each size should be measured, if applicable
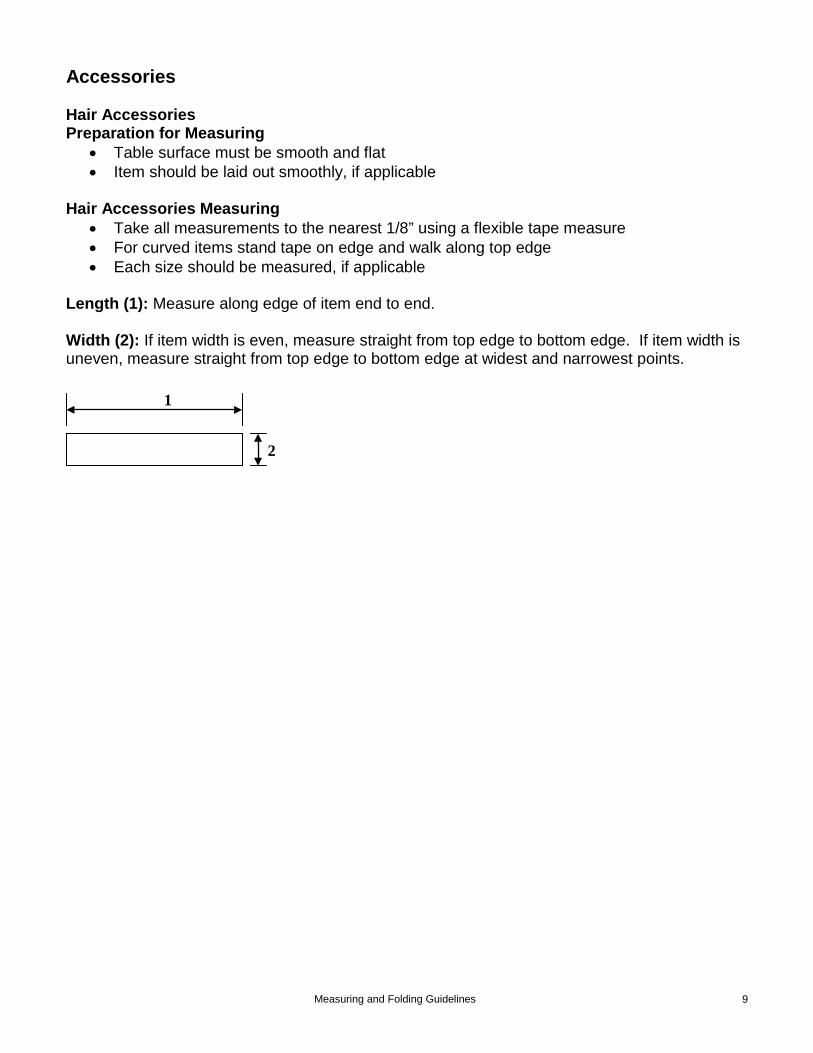
Length (1): Measure along edge of item end to end. Width (2): If item width is even, measure straight from top edge to bottom edge. If item width is uneven, measure straight from top edge to bottom edge at widest and narrowest points.
2
1
Measuring and Folding Guidelines 10
Handbags Preparation for Measuring
• Table surface must be smooth and flat • Handbag should be laid out smoothly
Handbag Measuring
• Take all measurements to the nearest 1/8” using a flexible tape measure • For curved seams stand tape on edge and walk along edge of seam
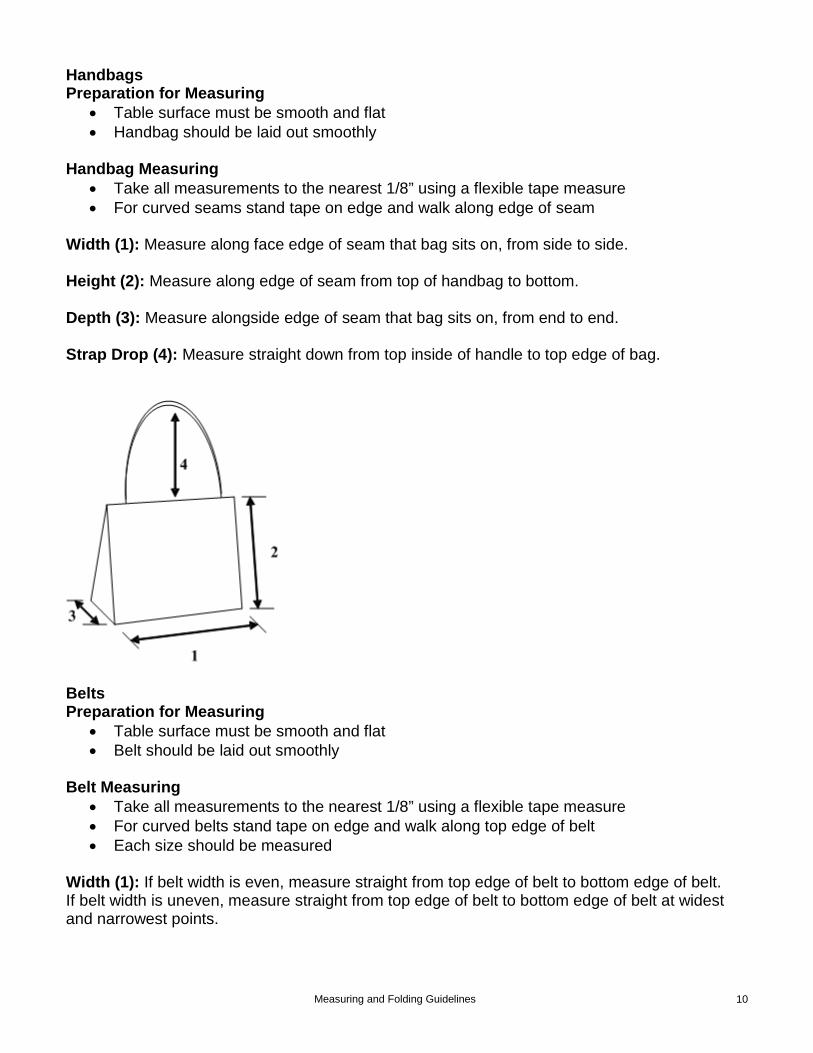
Width (1): Measure along face edge of seam that bag sits on, from side to side. Height (2): Measure along edge of seam from top of handbag to bottom. Depth (3): Measure alongside edge of seam that bag sits on, from end to end. Strap Drop (4): Measure straight down from top inside of handle to top edge of bag.
Belts Preparation for Measuring
• Table surface must be smooth and flat • Belt should be laid out smoothly
Belt Measuring
• Take all measurements to the nearest 1/8” using a flexible tape measure • For curved belts stand tape on edge and walk along top edge of belt • Each size should be measured
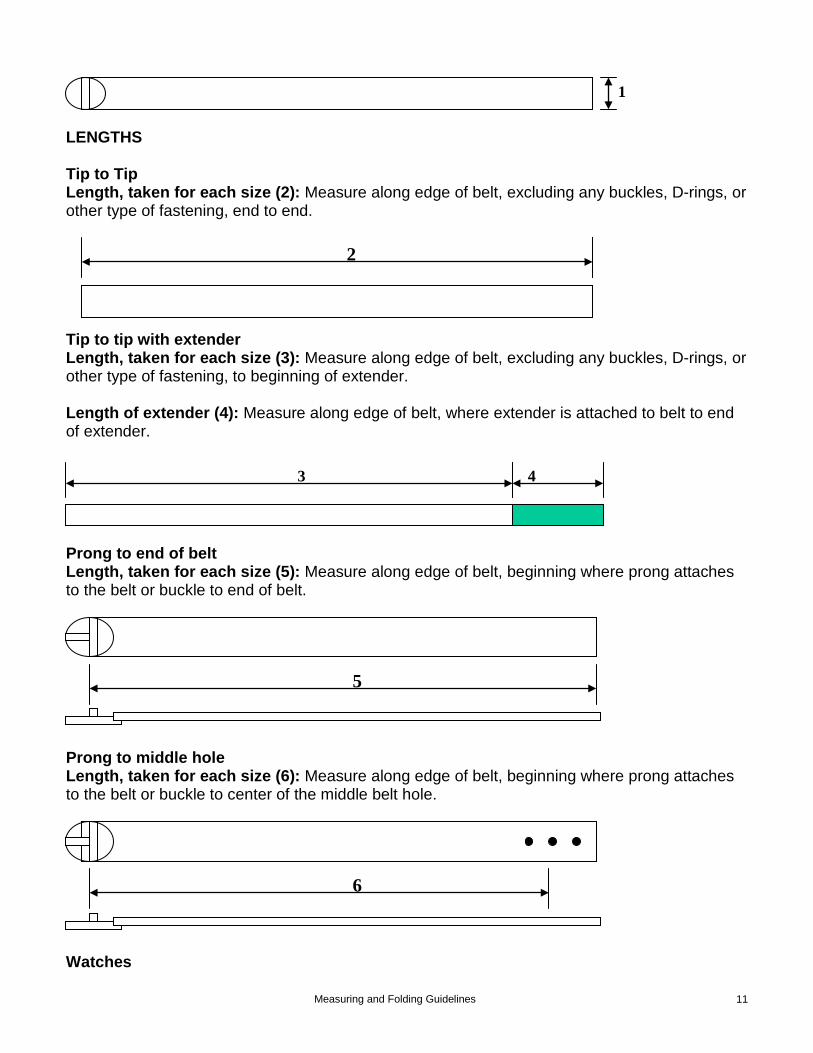
Width (1): If belt width is even, measure straight from top edge of belt to bottom edge of belt. If belt width is uneven, measure straight from top edge of belt to bottom edge of belt at widest and narrowest points.
Measuring and Folding Guidelines 11
LENGTHS Tip to Tip Length, taken for each size (2): Measure along edge of belt, excluding any buckles, D-rings, or other type of fastening, end to end.
Tip to tip with extender Length, taken for each size (3): Measure along edge of belt, excluding any buckles, D-rings, or other type of fastening, to beginning of extender. Length of extender (4): Measure along edge of belt, where extender is attached to belt to end of extender.
Prong to end of belt Length, taken for each size (5): Measure along edge of belt, beginning where prong attaches to the belt or buckle to end of belt.
Prong to middle hole Length, taken for each size (6): Measure along edge of belt, beginning where prong attaches to the belt or buckle to center of the middle belt hole.
Watches
6
5
4 3
2
1
Measuring and Folding Guidelines 12
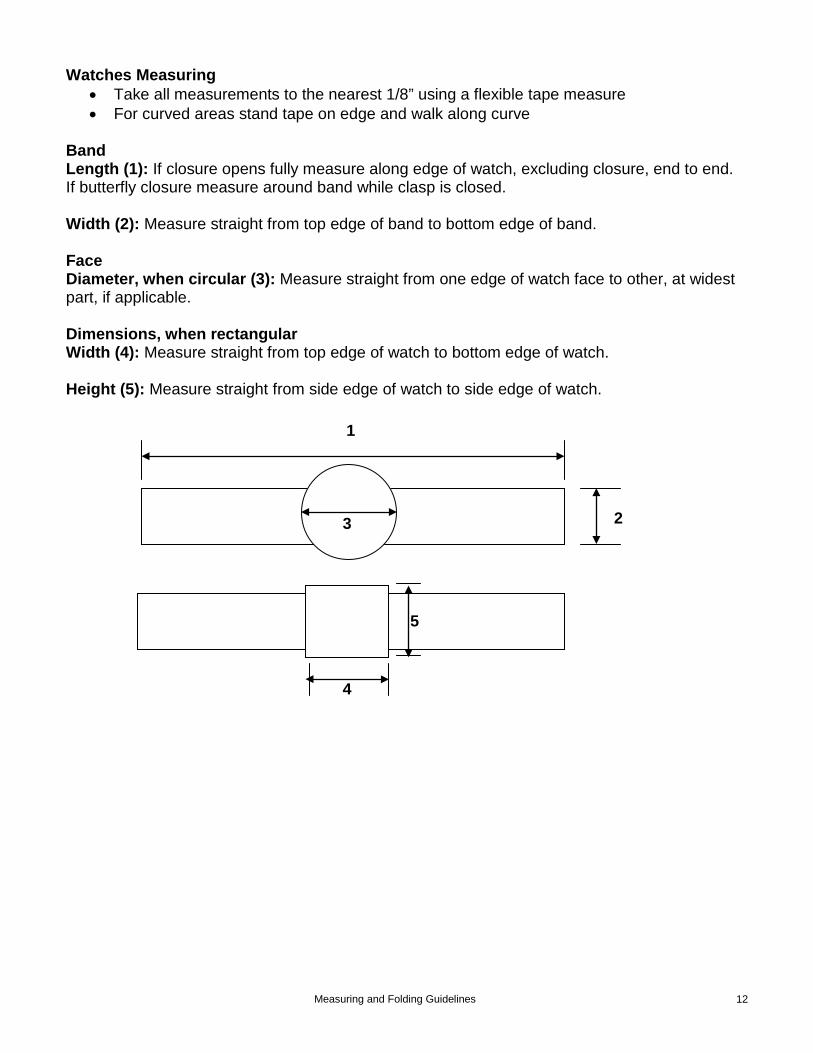
Watches Measuring • Take all measurements to the nearest 1/8” using a flexible tape measure • For curved areas stand tape on edge and walk along curve
Band Length (1): If closure opens fully measure along edge of watch, excluding closure, end to end. If butterfly closure measure around band while clasp is closed. Width (2): Measure straight from top edge of band to bottom edge of band. Face Diameter, when circular (3): Measure straight from one edge of watch face to other, at widest part, if applicable. Dimensions, when rectangular Width (4): Measure straight from top edge of watch to bottom edge of watch. Height (5): Measure straight from side edge of watch to side edge of watch.
1
3
4
5
2
Measuring and Folding Guidelines 13
Folding Guidelines NW01 Blouses Finished Dimensions after Folding
Approximate folded dimensions should be either 10” x 12” or 10” x 14”. Polybag Size
Use polybag size 11” x 14” or 11” x 16” (for exceptions, use polybag size 11” x 20”). Do not allow more than 1” of space between edge of garment and polybag.
Shipping Carton These items must be shipped in the narrow shipping carton (23” x 10” x 12”).
Notes to Remember • Do not use pins, stiffeners or cardboard without prior approval • Brightly colored silk blouses must be packaged in opaque bags • Blouses made of very lightweight materials (i.e., rayon, silk) may require tissue paper
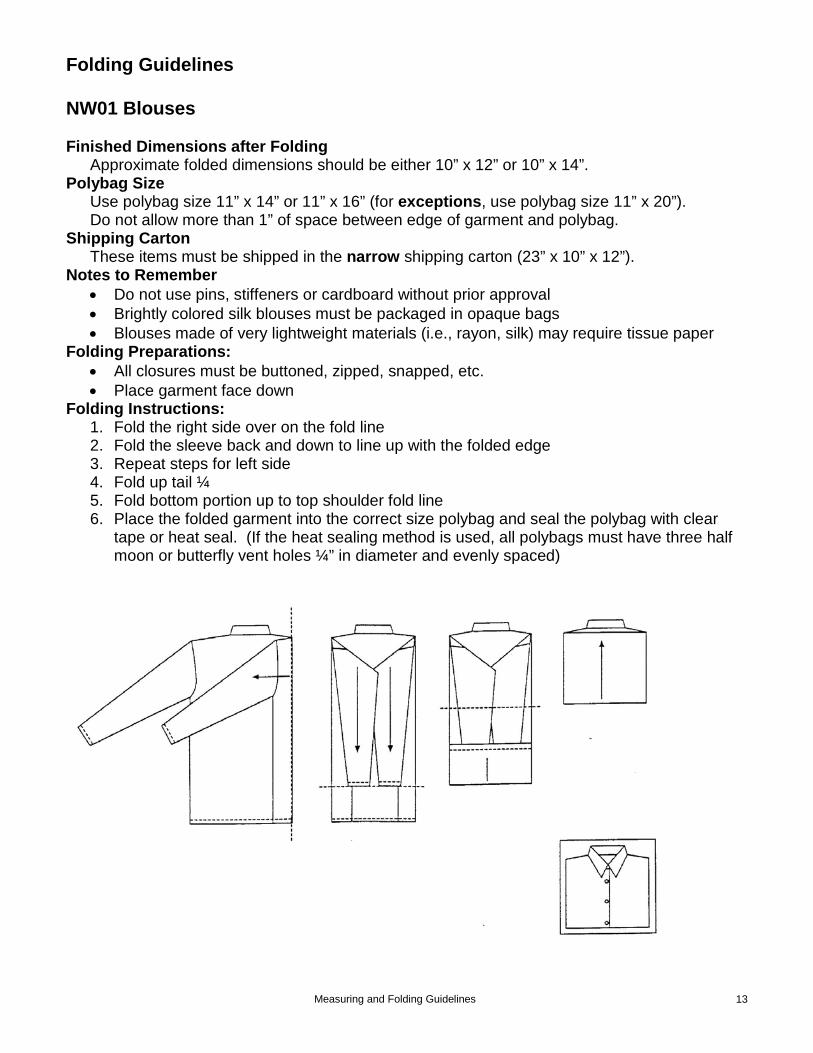
Folding Preparations: • All closures must be buttoned, zipped, snapped, etc. • Place garment face down
Folding Instructions: 1. Fold the right side over on the fold line 2. Fold the sleeve back and down to line up with the folded edge 3. Repeat steps for left side 4. Fold up tail ¼ 5. Fold bottom portion up to top shoulder fold line 6. Place the folded garment into the correct size polybag and seal the polybag with clear
tape or heat seal. (If the heat sealing method is used, all polybags must have three half moon or butterfly vent holes ¼” in diameter and evenly spaced)

Measuring and Folding Guidelines 14
NW02 Shirts, Dresses and Jumpers Finished Dimensions after Folding
Approximate folded dimensions should be either 10” x 12” or 10” x 14”. Exceptions are allowed for larger size shirts and dresses, which may be folded to 10” x 19”.
Polybag Size Use polybag size 11” x 14” or 11 x 16 (for exceptions, use polybag size 11” x 20”). Garments made of heavy weight material may be folded into a compliant size gusseted polybag (11” x 14” x 3” or 11” x 16” x 3”). Do not allow more than 1” of space between edge of garment and polybag.
Shipping Carton These items must be shipped in the narrow shipping carton (23”x 10” x 12”).
Notes to Remember • Do not use pins, clips, stiffeners or cardboard without prior approval • Brightly colored silk items must be packaged in opaque bags • Tissue may be used on lightweight fabrics (i.e., silks, rayon, polyester, etc.)
Folding Preparations: • Place garment face down • All closures must be buttoned, zipped, snapped, etc.
Folding Instructions: 1. If the item has shoulder pads, fold arms and shoulder pads to the back 2. Fold the right sleeve over on the fold line 3. Fold remaining portion back across center 4. Repeat for the left side 5. Fold in half by bringing the bottom of the shirt up to the top of the shirt (exception: for
larger size or longer shirts, fold bottom of shirt up 1/3 and fold 1/3 to the top) 6. Dresses should be folded in half by bringing the bottom of the dress up to the top of the
dress and then folding in half again 7. Place the folded garment into the correct size polybag and seal the polybag with clear
tape or heat seal (if the heat sealing method is used, all polybags must have three half moon or butterfly vent holes ¼” in diameter and evenly spaced)

Measuring and Folding Guidelines 15
NW03 Women’s Sweaters, Knit Tops & Lightweight Quilted Jackets Finished Dimensions after Folding
Approximate folded dimensions should be either 10” x 12” or 10” x 14” (exceptions may be folded to 10” x 19”).
Polybag Size Use polybag size 11” x 14” or 11” x 16”. For thick or bulky sweaters, use compliant size polybag with gusset 11” x 14” x 3” or 11” x 16” x 3” (exceptions: use polybag size 11” x 20”).
Shipping Carton These items must be shipped in the narrow shipping carton (23” x 10” x 12”).
Note to Remember • Do not use pins, clips, stiffeners or cardboard without prior approval
Folding Preparations: • Place garment face down • All closures must be buttoned, zipped, snapped, etc. • If the item has shoulder pads, fold arms and shoulder pads to the back
Folding Instructions: 1. Fold the right sleeve over on the fold line 2. Fold remaining portion back across center 3. Repeat for the left side 4. Fold in half by bringing the bottom of the sweater to the top of the sweater (exception:
fold in thirds if item is too long to fold in half) 5. Place the folded garment into the correct size polybag and seal the polybag with clear
tape or heat seal (if the heat sealing method is used, all polybags must have three half moon or butterfly vent holes ¼” in diameter and evenly spaced)

Measuring and Folding Guidelines 16
NW04 Women’s Knit Tops Finished Dimensions after folding
Approximate folded dimensions should be either 10” x 12” or 10” x 14” (exceptions may be folded to 10” x 19”).
Polybag Size Use polybag size 11” x 14” or 11” x 16” (for exceptions, use polybag size 11” x 20”).
Shipping Carton These items must be shipped in the narrow shipping carton (23” x 10” x 12”).
Note to Remember • Do not use pins, clips, stiffeners or cardboard without prior approval
Folding Preparations: • Place garment face down • All closures must be buttoned, zipped, snapped, etc. • If the item has shoulder pads, fold arms and shoulder pads to the back • For turtleneck, fold collar down toward the front of the garment
Folding Instructions: 1. Fold the right sleeve over on the fold line 2. Fold remaining portion back across center 3. Repeat for the left side 4. Fold in half by bringing the bottom of the sweater to the top of the sweater (exception:
Fold in thirds if item is too long to fold in half) 5. Place the folded garment into the correct size polybag and seal the polybag with clear
tape or heat seal (if the heat sealing method is used, all polybags must have three half moon or butterfly vent holes ¼” in diameter and evenly spaced)
Measuring and Folding Guidelines 17
NW05 Women’s Denim Jeans and Shorts Finished Dimensions after Folding
Approximate folded dimensions should be either 10” x 12” or 10” x 14”. Exceptions are allowed for larger size jeans or shorts, which may be folded to 10” x 19”.
Polybag size Use polybag size 11” x 14” or 11” x 16” (for exceptions, use polybag size 11” x 20”). Do not allow more than 1” of space between edge of garment and polybag.
Shipping Carton These items must be shipped in the narrow shipping carton (23” x 10” x 12”).
Notes to Remember • Do not use pins, clips, stiffeners or cardboard without prior approval • Clips may be used on pants with belts • Tissue may be used for lightweight materials (i.e., rayon or silk)
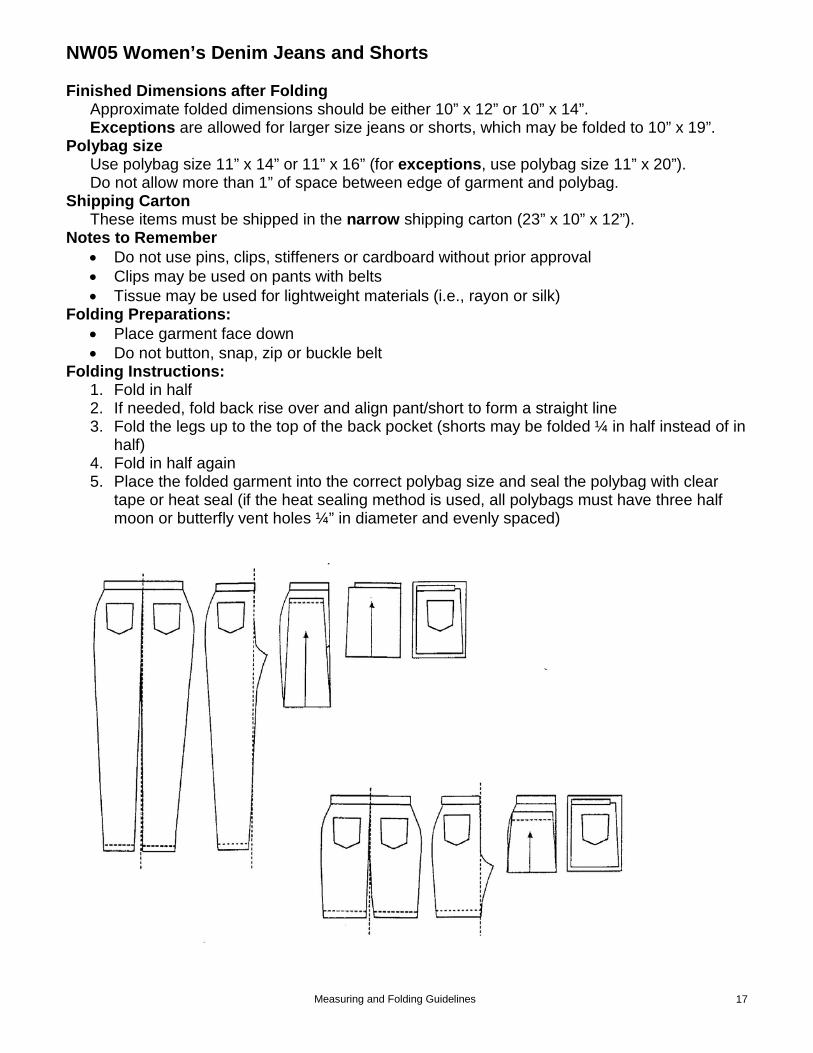
Folding Preparations: • Place garment face down • Do not button, snap, zip or buckle belt
Folding Instructions: 1. Fold in half 2. If needed, fold back rise over and align pant/short to form a straight line 3. Fold the legs up to the top of the back pocket (shorts may be folded ¼ in half instead of in
half) 4. Fold in half again 5. Place the folded garment into the correct polybag size and seal the polybag with clear
tape or heat seal (if the heat sealing method is used, all polybags must have three half moon or butterfly vent holes ¼” in diameter and evenly spaced)
Measuring and Folding Guidelines 18
NW06 Women’s Dress Pants, Shorts, Leggings & Stirrup Pants Finished Dimensions after Folding
Approximate folded dimensions should be either 10” x 12 or 10” x 14”. Exceptions are allowed for larger size pants, which may be folded to 10” x 19”.
Polybag Size Use polybag size 11” x 14” or 11” x 16” (for exceptions, use polybag size 11” x 20”). Do not allow more than 1” of space between edge of garment and polybag.
Shipping Carton These items must be shipped in the narrow shipping carton (23” x 10” x 12”).
Notes to Remember • Do not use pins, clips, stiffeners or cardboard without prior approval • Clips may be used on pants with belts • Tissue may be used for lightweight materials (i.e., rayon or silk)
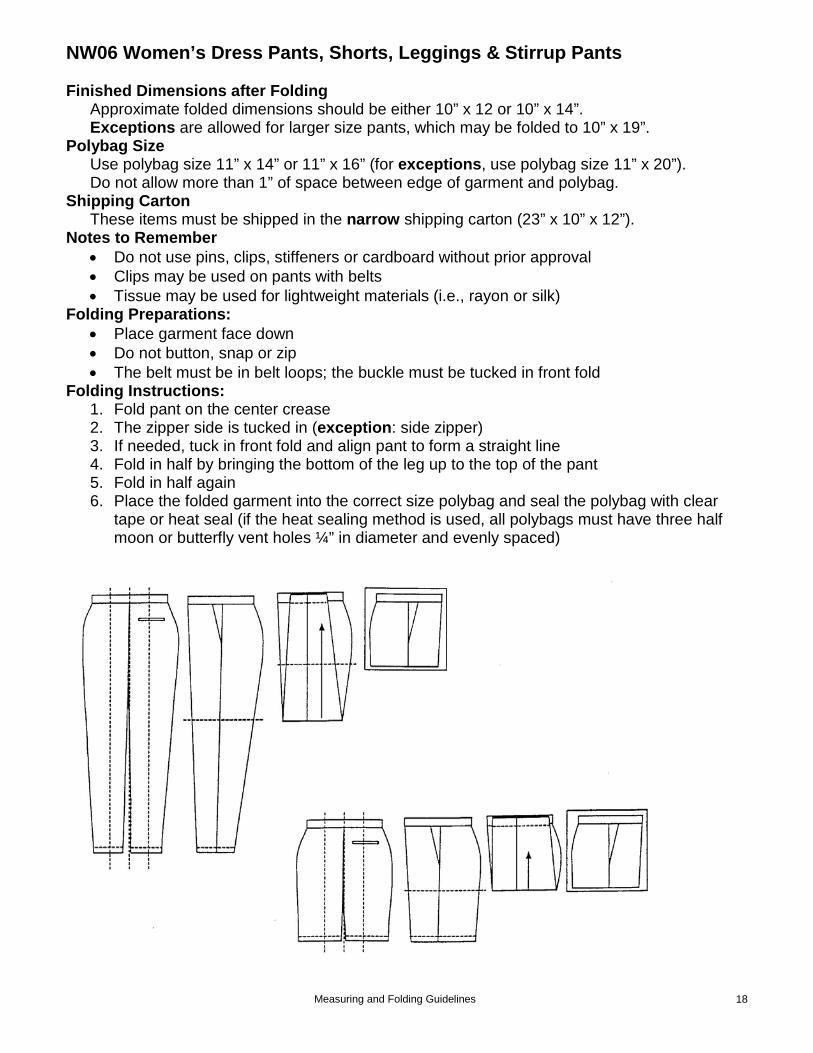
Folding Preparations: • Place garment face down • Do not button, snap or zip • The belt must be in belt loops; the buckle must be tucked in front fold
Folding Instructions: 1. Fold pant on the center crease 2. The zipper side is tucked in (exception: side zipper) 3. If needed, tuck in front fold and align pant to form a straight line 4. Fold in half by bringing the bottom of the leg up to the top of the pant 5. Fold in half again 6. Place the folded garment into the correct size polybag and seal the polybag with clear
tape or heat seal (if the heat sealing method is used, all polybags must have three half moon or butterfly vent holes ¼” in diameter and evenly spaced)
Measuring and Folding Guidelines 19
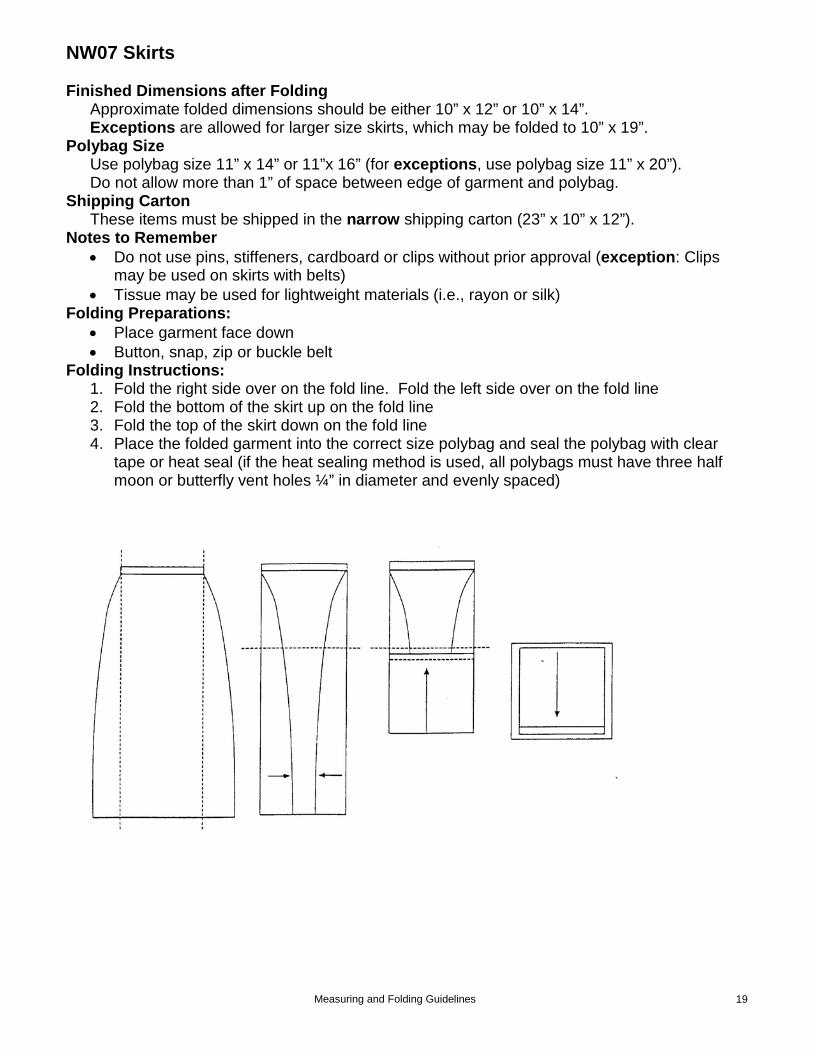
NW07 Skirts Finished Dimensions after Folding
Approximate folded dimensions should be either 10” x 12” or 10” x 14”. Exceptions are allowed for larger size skirts, which may be folded to 10” x 19”.
Polybag Size Use polybag size 11” x 14” or 11”x 16” (for exceptions, use polybag size 11” x 20”). Do not allow more than 1” of space between edge of garment and polybag.
Shipping Carton These items must be shipped in the narrow shipping carton (23” x 10” x 12”).
Notes to Remember • Do not use pins, stiffeners, cardboard or clips without prior approval (exception: Clips
may be used on skirts with belts) • Tissue may be used for lightweight materials (i.e., rayon or silk)
Folding Preparations: • Place garment face down • Button, snap, zip or buckle belt
Folding Instructions: 1. Fold the right side over on the fold line. Fold the left side over on the fold line 2. Fold the bottom of the skirt up on the fold line 3. Fold the top of the skirt down on the fold line 4. Place the folded garment into the correct size polybag and seal the polybag with clear
tape or heat seal (if the heat sealing method is used, all polybags must have three half moon or butterfly vent holes ¼” in diameter and evenly spaced)
Measuring and Folding Guidelines 20
NW08 Broomstick Skirt & Crinkle Skirts Finished Dimensions after Folding
Approximate folded dimensions must not exceed 11” x 14”. Shipping Carton
These items must be shipped in the narrow shipping carton (23” x 10” x 12”). Note to Remember
• Do not use pins, clips, stiffeners or cardboard without prior approval • Include care instructions on maintenance of crinkle effect
Folding Instructions: 1. Twist garment until it twists in half 2. Secure at both ends to ensure that skirt remains twisted 3. Place the twisted garment into the correct size polybag and seal the polybag with clear
tape or heat seal (if the heat sealing method is used, all polybags must have three half moon or butterfly vent holes ¼” in diameter and evenly spaced)
Measuring and Folding Guidelines 21
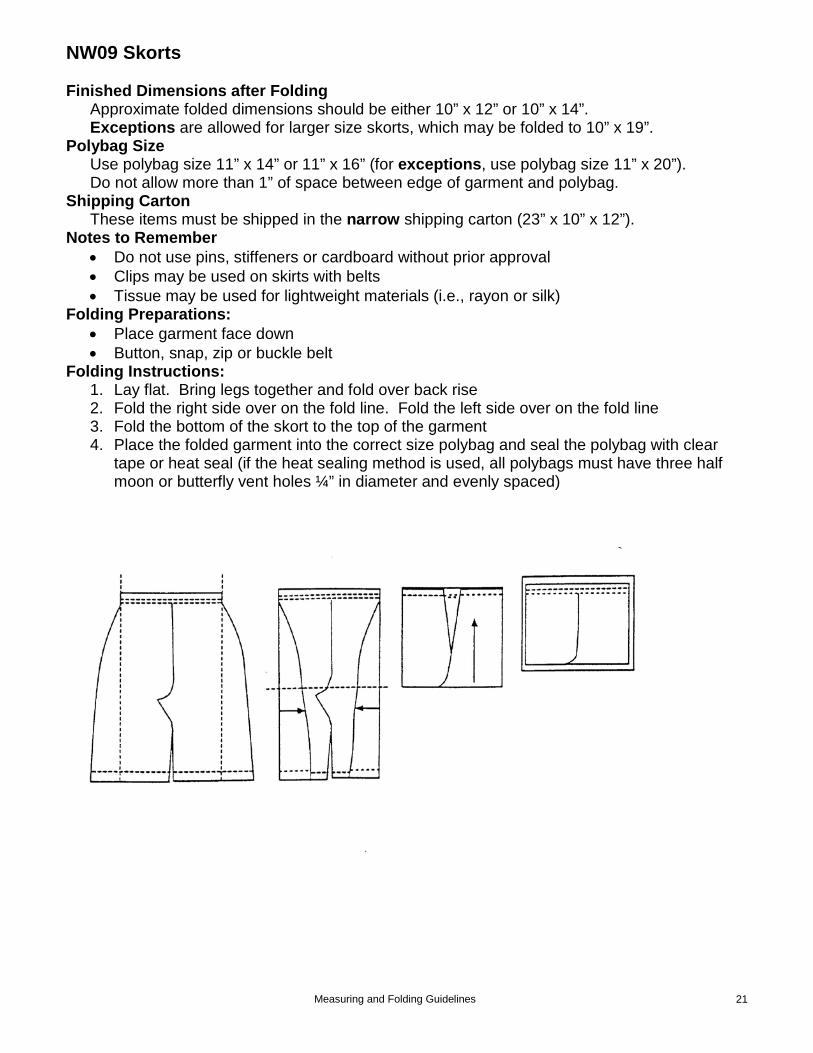
NW09 Skorts Finished Dimensions after Folding
Approximate folded dimensions should be either 10” x 12” or 10” x 14”. Exceptions are allowed for larger size skorts, which may be folded to 10” x 19”.
Polybag Size Use polybag size 11” x 14” or 11” x 16” (for exceptions, use polybag size 11” x 20”). Do not allow more than 1” of space between edge of garment and polybag.
Shipping Carton These items must be shipped in the narrow shipping carton (23” x 10” x 12”).
Notes to Remember • Do not use pins, stiffeners or cardboard without prior approval • Clips may be used on skirts with belts • Tissue may be used for lightweight materials (i.e., rayon or silk)
Folding Preparations: • Place garment face down • Button, snap, zip or buckle belt
Folding Instructions: 1. Lay flat. Bring legs together and fold over back rise 2. Fold the right side over on the fold line. Fold the left side over on the fold line 3. Fold the bottom of the skort to the top of the garment 4. Place the folded garment into the correct size polybag and seal the polybag with clear
tape or heat seal (if the heat sealing method is used, all polybags must have three half moon or butterfly vent holes ¼” in diameter and evenly spaced)
Measuring and Folding Guidelines 22
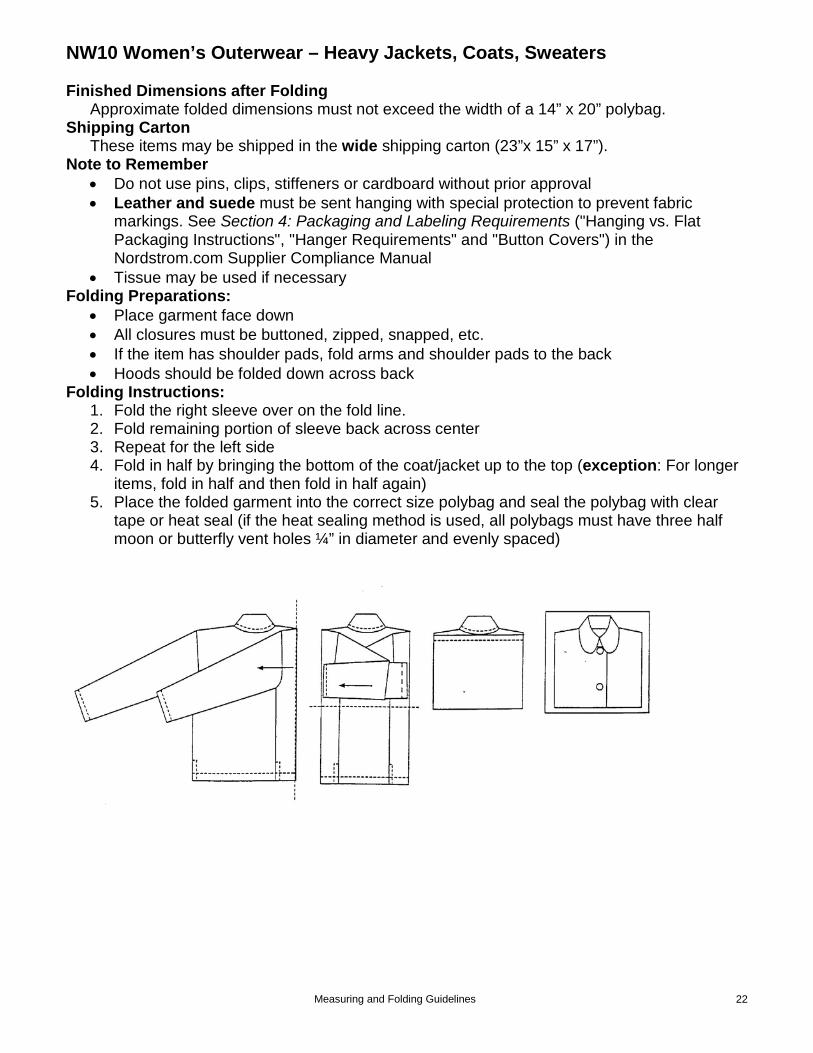
NW10 Women’s Outerwear – Heavy Jackets, Coats, Sweaters Finished Dimensions after Folding
Approximate folded dimensions must not exceed the width of a 14” x 20” polybag. Shipping Carton
These items may be shipped in the wide shipping carton (23”x 15” x 17”). Note to Remember
• Do not use pins, clips, stiffeners or cardboard without prior approval • Leather and suede must be sent hanging with special protection to prevent fabric
markings. See Section 4: Packaging and Labeling Requirements ("Hanging vs. Flat Packaging Instructions", "Hanger Requirements" and "Button Covers") in the Nordstrom.com Supplier Compliance Manual
• Tissue may be used if necessary Folding Preparations:
• Place garment face down • All closures must be buttoned, zipped, snapped, etc. • If the item has shoulder pads, fold arms and shoulder pads to the back • Hoods should be folded down across back
Folding Instructions: 1. Fold the right sleeve over on the fold line. 2. Fold remaining portion of sleeve back across center 3. Repeat for the left side 4. Fold in half by bringing the bottom of the coat/jacket up to the top (exception: For longer
items, fold in half and then fold in half again) 5. Place the folded garment into the correct size polybag and seal the polybag with clear
tape or heat seal (if the heat sealing method is used, all polybags must have three half moon or butterfly vent holes ¼” in diameter and evenly spaced)
Measuring and Folding Guidelines 23
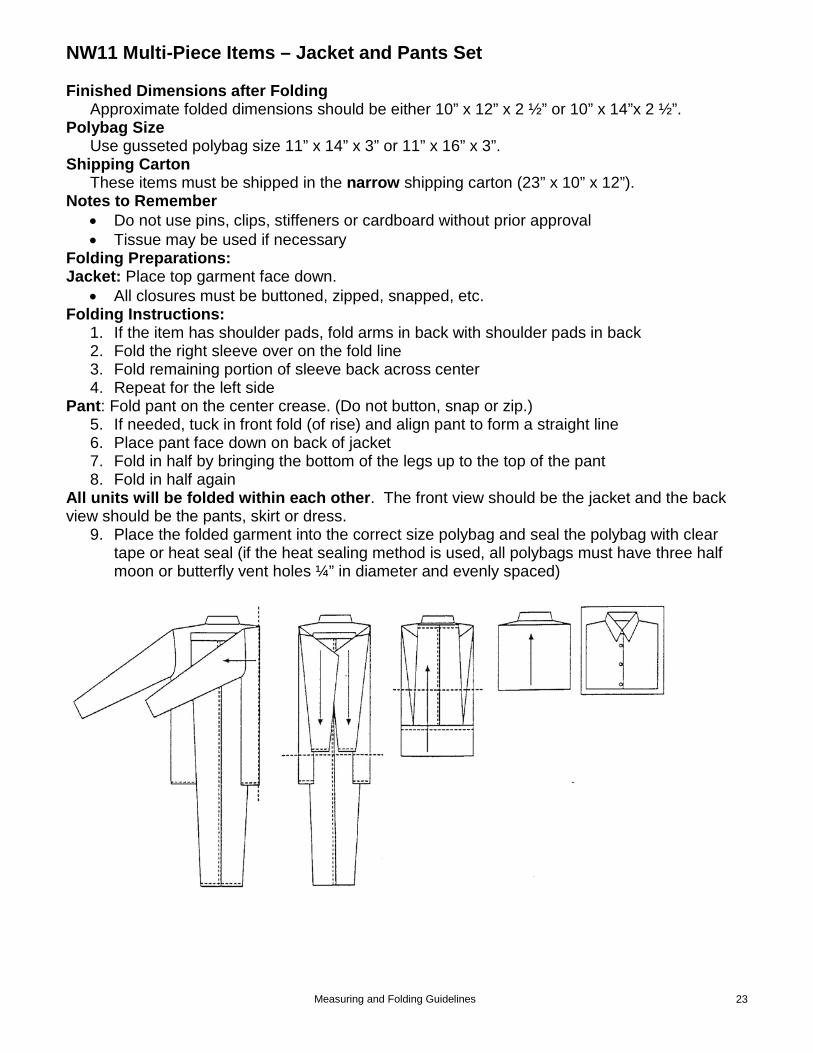
NW11 Multi-Piece Items – Jacket and Pants Set Finished Dimensions after Folding
Approximate folded dimensions should be either 10” x 12” x 2 ½” or 10” x 14”x 2 ½”. Polybag Size
Use gusseted polybag size 11” x 14” x 3” or 11” x 16” x 3”. Shipping Carton
These items must be shipped in the narrow shipping carton (23” x 10” x 12”). Notes to Remember
• Do not use pins, clips, stiffeners or cardboard without prior approval • Tissue may be used if necessary
Folding Preparations: Jacket: Place top garment face down.
• All closures must be buttoned, zipped, snapped, etc. Folding Instructions:
1. If the item has shoulder pads, fold arms in back with shoulder pads in back 2. Fold the right sleeve over on the fold line 3. Fold remaining portion of sleeve back across center 4. Repeat for the left side
Pant: Fold pant on the center crease. (Do not button, snap or zip.) 5. If needed, tuck in front fold (of rise) and align pant to form a straight line 6. Place pant face down on back of jacket 7. Fold in half by bringing the bottom of the legs up to the top of the pant 8. Fold in half again
All units will be folded within each other. The front view should be the jacket and the back view should be the pants, skirt or dress.
9. Place the folded garment into the correct size polybag and seal the polybag with clear tape or heat seal (if the heat sealing method is used, all polybags must have three half moon or butterfly vent holes ¼” in diameter and evenly spaced)
Measuring and Folding Guidelines 24
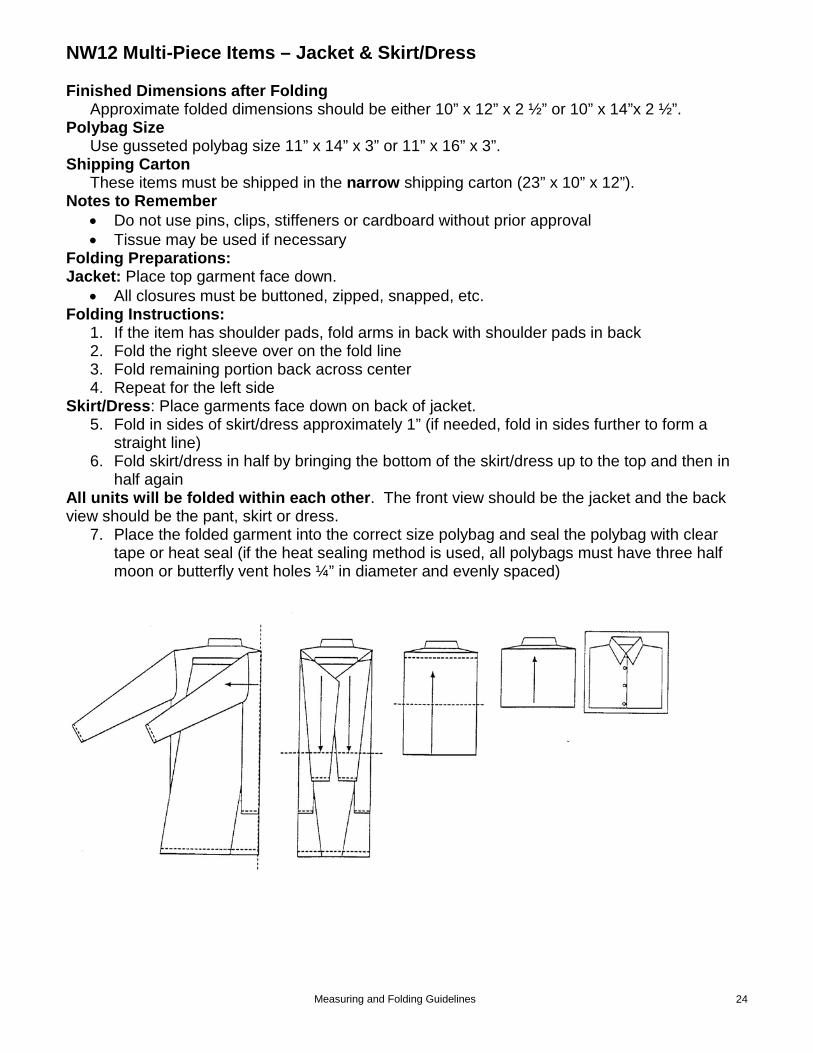
NW12 Multi-Piece Items – Jacket & Skirt/Dress Finished Dimensions after Folding
Approximate folded dimensions should be either 10” x 12” x 2 ½” or 10” x 14”x 2 ½”. Polybag Size
Use gusseted polybag size 11” x 14” x 3” or 11” x 16” x 3”. Shipping Carton
These items must be shipped in the narrow shipping carton (23” x 10” x 12”). Notes to Remember
• Do not use pins, clips, stiffeners or cardboard without prior approval • Tissue may be used if necessary
Folding Preparations: Jacket: Place top garment face down.
• All closures must be buttoned, zipped, snapped, etc. Folding Instructions:
1. If the item has shoulder pads, fold arms in back with shoulder pads in back 2. Fold the right sleeve over on the fold line 3. Fold remaining portion back across center 4. Repeat for the left side
Skirt/Dress: Place garments face down on back of jacket. 5. Fold in sides of skirt/dress approximately 1” (if needed, fold in sides further to form a
straight line) 6. Fold skirt/dress in half by bringing the bottom of the skirt/dress up to the top and then in
half again All units will be folded within each other. The front view should be the jacket and the back view should be the pant, skirt or dress.
7. Place the folded garment into the correct size polybag and seal the polybag with clear tape or heat seal (if the heat sealing method is used, all polybags must have three half moon or butterfly vent holes ¼” in diameter and evenly spaced)
Measuring and Folding Guidelines 25
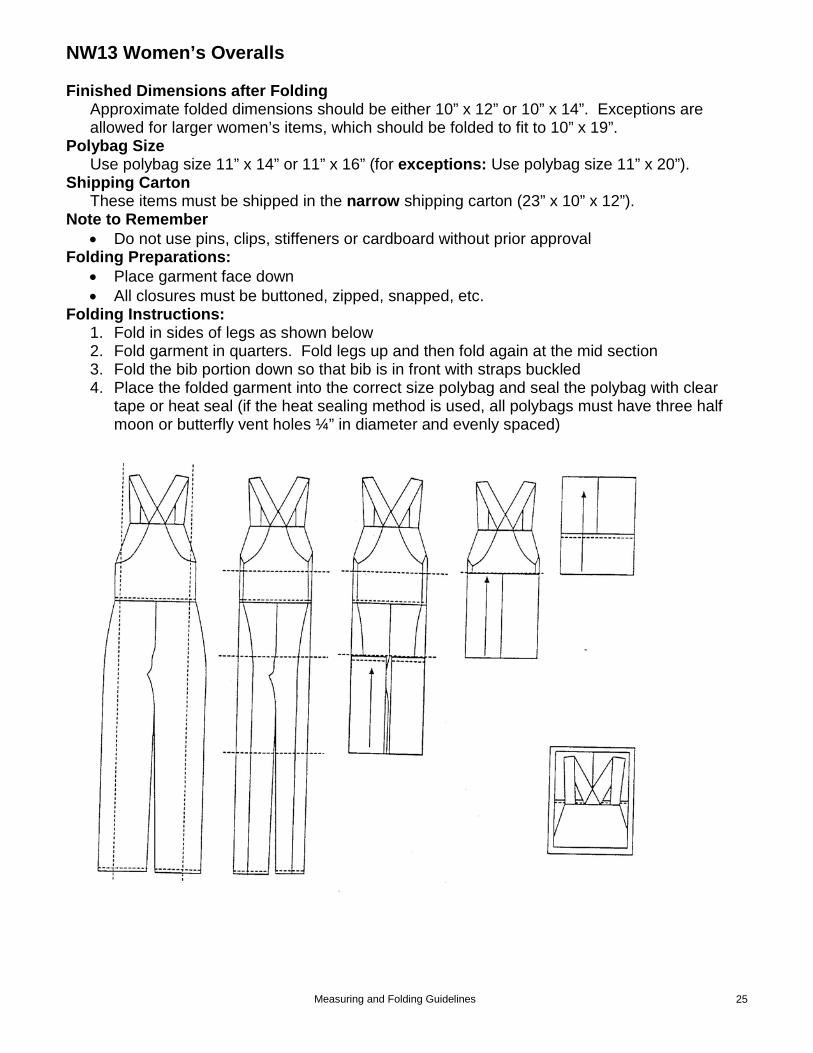
NW13 Women’s Overalls Finished Dimensions after Folding
Approximate folded dimensions should be either 10” x 12” or 10” x 14”. Exceptions are allowed for larger women’s items, which should be folded to fit to 10” x 19”.
Polybag Size Use polybag size 11” x 14” or 11” x 16” (for exceptions: Use polybag size 11” x 20”).
Shipping Carton These items must be shipped in the narrow shipping carton (23” x 10” x 12”).
Note to Remember • Do not use pins, clips, stiffeners or cardboard without prior approval
Folding Preparations: • Place garment face down • All closures must be buttoned, zipped, snapped, etc.
Folding Instructions: 1. Fold in sides of legs as shown below 2. Fold garment in quarters. Fold legs up and then fold again at the mid section 3. Fold the bib portion down so that bib is in front with straps buckled 4. Place the folded garment into the correct size polybag and seal the polybag with clear
tape or heat seal (if the heat sealing method is used, all polybags must have three half moon or butterfly vent holes ¼” in diameter and evenly spaced)
Measuring and Folding Guidelines 26
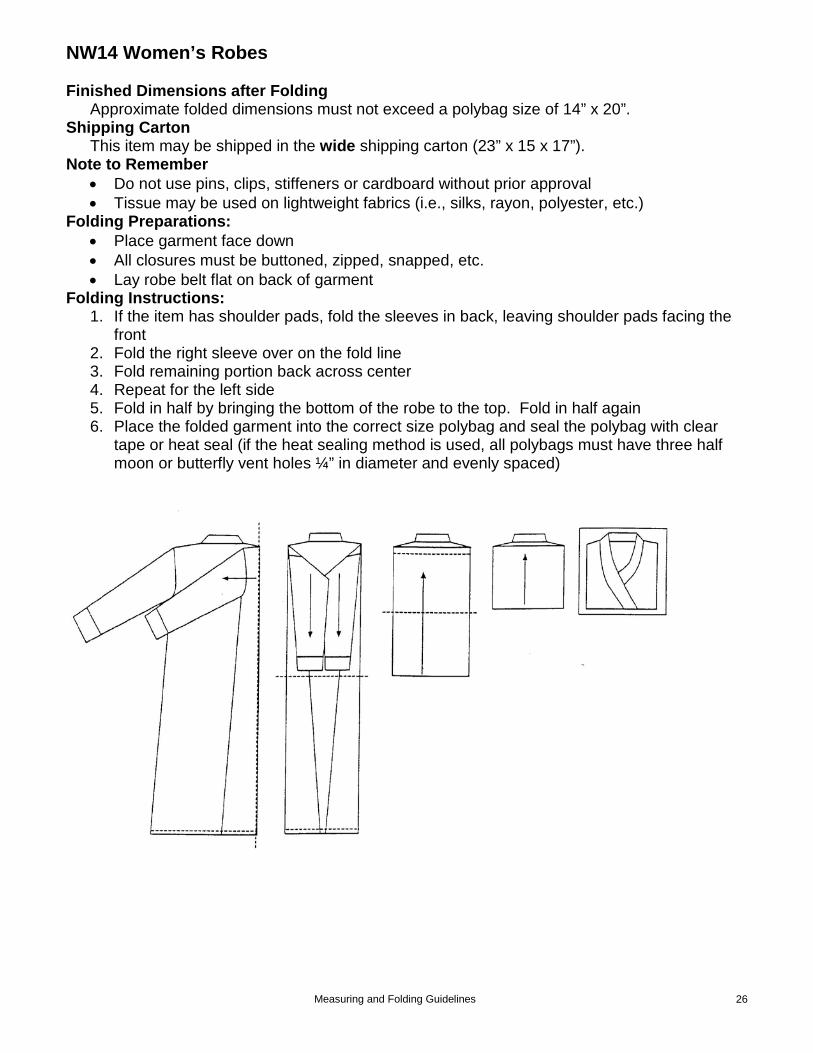
NW14 Women’s Robes Finished Dimensions after Folding
Approximate folded dimensions must not exceed a polybag size of 14” x 20”. Shipping Carton
This item may be shipped in the wide shipping carton (23” x 15 x 17”). Note to Remember
• Do not use pins, clips, stiffeners or cardboard without prior approval • Tissue may be used on lightweight fabrics (i.e., silks, rayon, polyester, etc.)
Folding Preparations: • Place garment face down • All closures must be buttoned, zipped, snapped, etc. • Lay robe belt flat on back of garment
Folding Instructions: 1. If the item has shoulder pads, fold the sleeves in back, leaving shoulder pads facing the
front 2. Fold the right sleeve over on the fold line 3. Fold remaining portion back across center 4. Repeat for the left side 5. Fold in half by bringing the bottom of the robe to the top. Fold in half again 6. Place the folded garment into the correct size polybag and seal the polybag with clear
tape or heat seal (if the heat sealing method is used, all polybags must have three half moon or butterfly vent holes ¼” in diameter and evenly spaced)
Measuring and Folding Guidelines 27
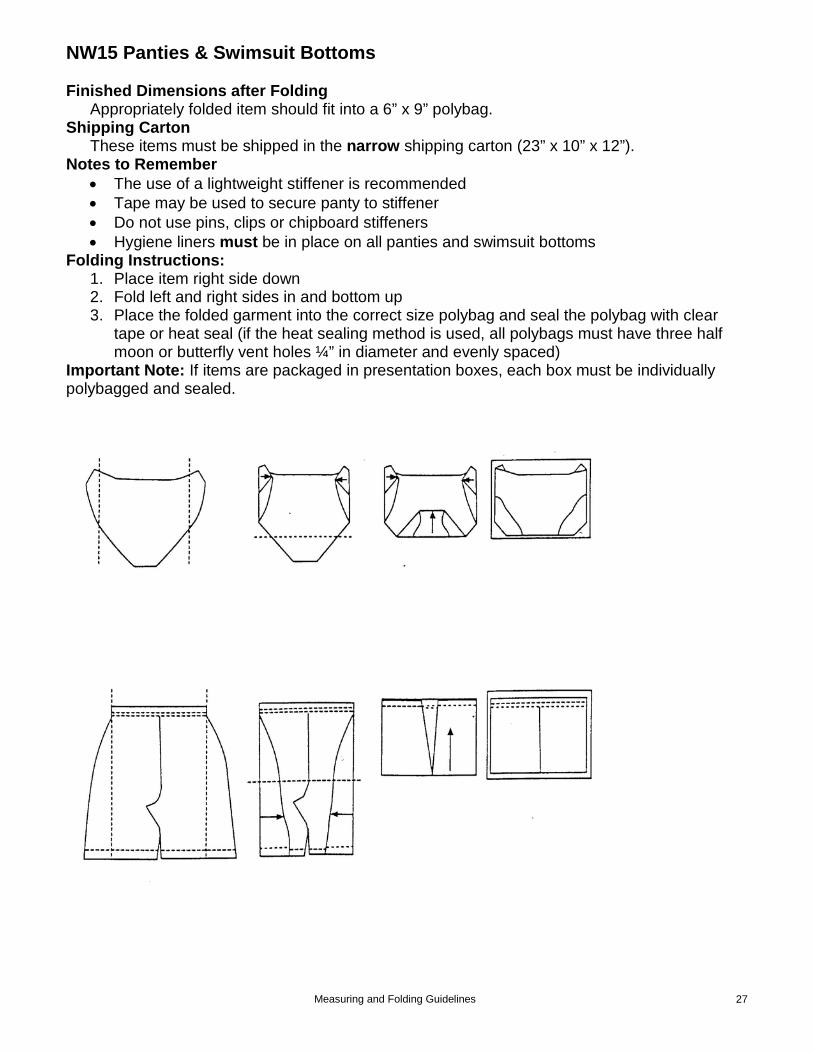
NW15 Panties & Swimsuit Bottoms Finished Dimensions after Folding
Appropriately folded item should fit into a 6” x 9” polybag. Shipping Carton
These items must be shipped in the narrow shipping carton (23” x 10” x 12”). Notes to Remember
• The use of a lightweight stiffener is recommended • Tape may be used to secure panty to stiffener • Do not use pins, clips or chipboard stiffeners • Hygiene liners must be in place on all panties and swimsuit bottoms
Folding Instructions: 1. Place item right side down 2. Fold left and right sides in and bottom up 3. Place the folded garment into the correct size polybag and seal the polybag with clear
tape or heat seal (if the heat sealing method is used, all polybags must have three half moon or butterfly vent holes ¼” in diameter and evenly spaced)
Important Note: If items are packaged in presentation boxes, each box must be individually polybagged and sealed.

Measuring and Folding Guidelines 28
NW16 Bras & Swimsuit Tops Finished Dimensions after Folding
Appropriately folded item should fit into a 6” x 9” polybag. Shipping Carton
These items must be shipped in the narrow shipping carton (23” x 10” x 12”). Notes to Remember
• The use of a lightweight stiffener is recommended • Tape may be used to secure item to stiffener • Do not use pins, clips or chipboard stiffeners
Folding Instructions: 1. With closures fastened, fold straps back into cups 2. Fold in half 3. Place the folded garment into the correct size polybag and seal the polybag with clear
tape or heat seal (if the heat sealing method is used, all polybags must have three half moon or butterfly vent holes ¼” in diameter and evenly spaced)
Measuring and Folding Guidelines 29
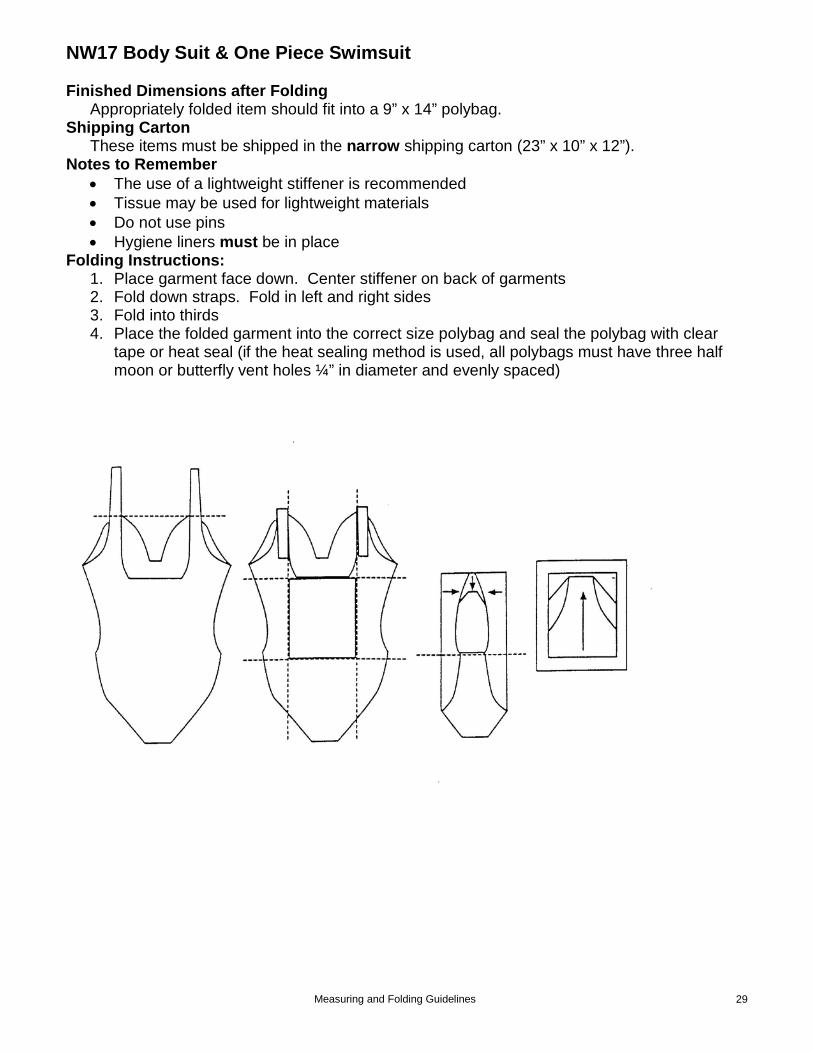
NW17 Body Suit & One Piece Swimsuit Finished Dimensions after Folding
Appropriately folded item should fit into a 9” x 14” polybag. Shipping Carton
These items must be shipped in the narrow shipping carton (23” x 10” x 12”). Notes to Remember
• The use of a lightweight stiffener is recommended • Tissue may be used for lightweight materials • Do not use pins • Hygiene liners must be in place
Folding Instructions: 1. Place garment face down. Center stiffener on back of garments 2. Fold down straps. Fold in left and right sides 3. Fold into thirds 4. Place the folded garment into the correct size polybag and seal the polybag with clear
tape or heat seal (if the heat sealing method is used, all polybags must have three half moon or butterfly vent holes ¼” in diameter and evenly spaced)
Measuring and Folding Guidelines 30
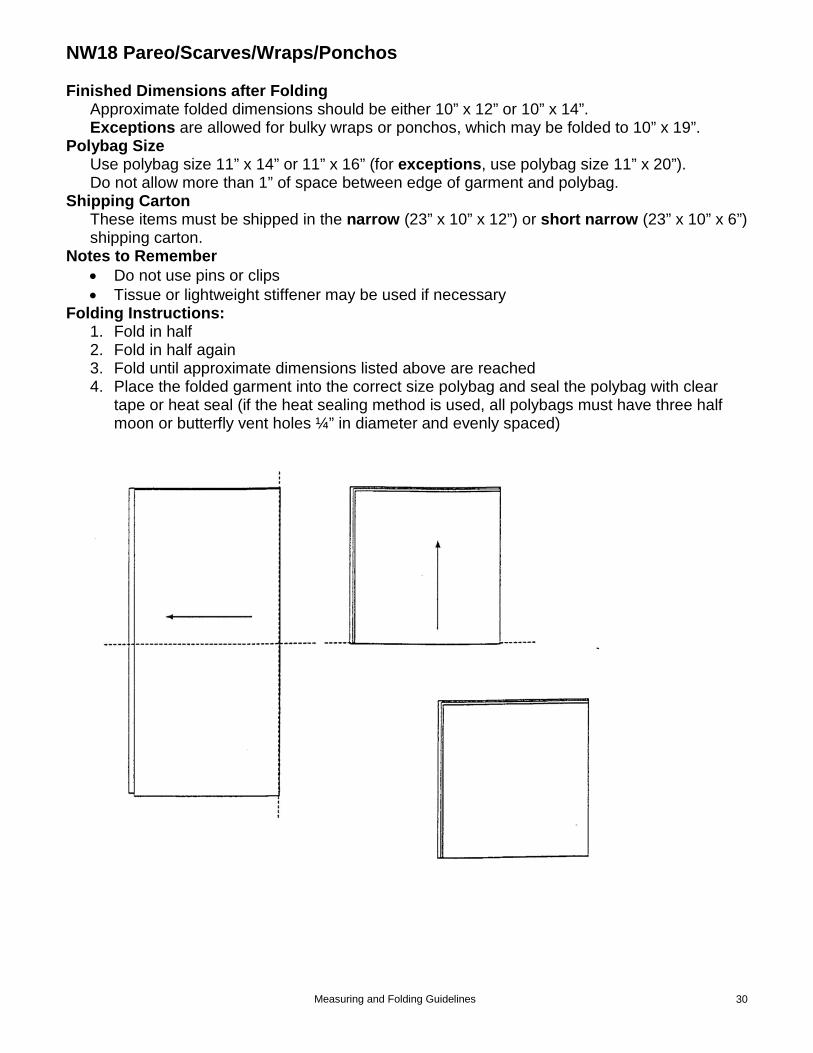
NW18 Pareo/Scarves/Wraps/Ponchos Finished Dimensions after Folding
Approximate folded dimensions should be either 10” x 12” or 10” x 14”. Exceptions are allowed for bulky wraps or ponchos, which may be folded to 10” x 19”.
Polybag Size Use polybag size 11” x 14” or 11” x 16” (for exceptions, use polybag size 11” x 20”). Do not allow more than 1” of space between edge of garment and polybag.
Shipping Carton These items must be shipped in the narrow (23” x 10” x 12”) or short narrow (23” x 10” x 6”) shipping carton.
Notes to Remember • Do not use pins or clips • Tissue or lightweight stiffener may be used if necessary
Folding Instructions: 1. Fold in half 2. Fold in half again 3. Fold until approximate dimensions listed above are reached 4. Place the folded garment into the correct size polybag and seal the polybag with clear
tape or heat seal (if the heat sealing method is used, all polybags must have three half moon or butterfly vent holes ¼” in diameter and evenly spaced)
Measuring and Folding Guidelines 31
NU01 Socks & Hosiery Polybag size
Use a polybag size that best fits the item to be packaged, not exceeding 11” x 14”. Try to allow no more than 1” of space between the edge of the garment and the polybag.
Shipping Carton These items must be shipped in the narrow (23” x 10” x 12”) or short narrow (23” x 10” x 6”) shipping carton.
Notes to Remember • Place item in the correct size polybag and seal the polybag with clear tape or heat seal
Measuring and Folding Guidelines 32
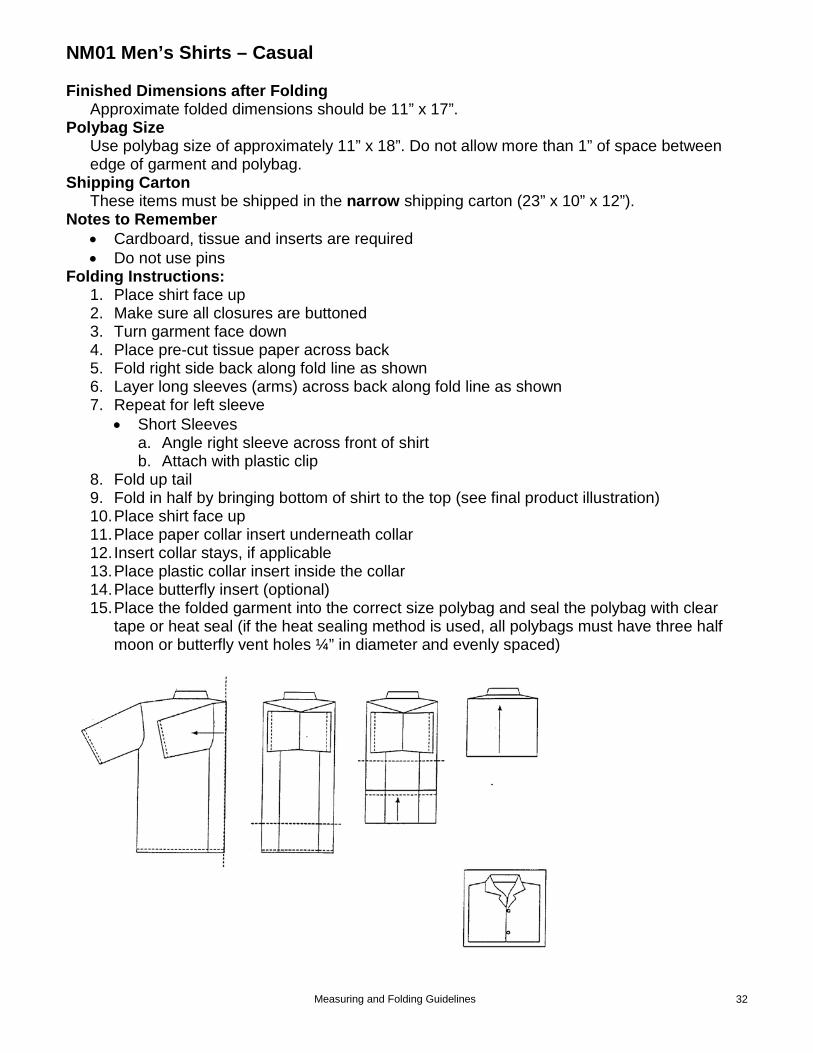
NM01 Men’s Shirts – Casual Finished Dimensions after Folding
Approximate folded dimensions should be 11” x 17”. Polybag Size
Use polybag size of approximately 11” x 18”. Do not allow more than 1” of space between edge of garment and polybag.
Shipping Carton These items must be shipped in the narrow shipping carton (23” x 10” x 12”).
Notes to Remember • Cardboard, tissue and inserts are required • Do not use pins
Folding Instructions: 1. Place shirt face up 2. Make sure all closures are buttoned 3. Turn garment face down 4. Place pre-cut tissue paper across back 5. Fold right side back along fold line as shown 6. Layer long sleeves (arms) across back along fold line as shown 7. Repeat for left sleeve
• Short Sleeves a. Angle right sleeve across front of shirt b. Attach with plastic clip
8. Fold up tail 9. Fold in half by bringing bottom of shirt to the top (see final product illustration) 10. Place shirt face up 11. Place paper collar insert underneath collar 12. Insert collar stays, if applicable 13. Place plastic collar insert inside the collar 14. Place butterfly insert (optional) 15. Place the folded garment into the correct size polybag and seal the polybag with clear
tape or heat seal (if the heat sealing method is used, all polybags must have three half moon or butterfly vent holes ¼” in diameter and evenly spaced)
Measuring and Folding Guidelines 33
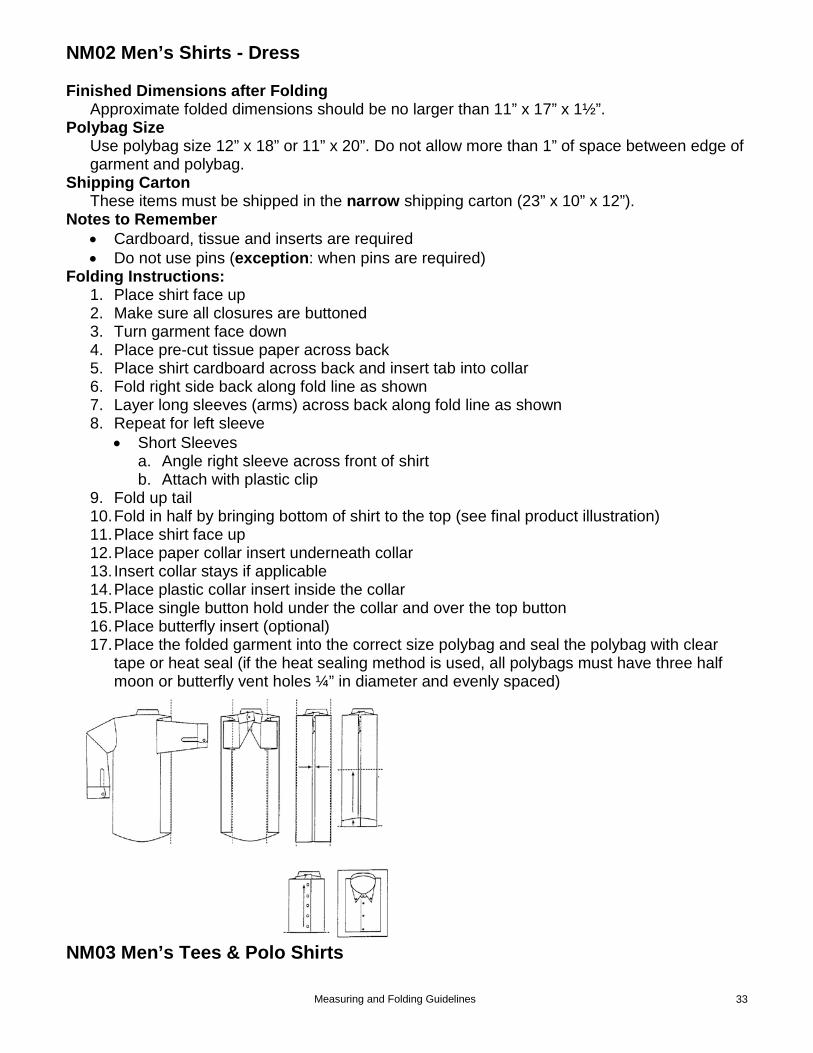
NM02 Men’s Shirts - Dress Finished Dimensions after Folding
Approximate folded dimensions should be no larger than 11” x 17” x 1½”. Polybag Size
Use polybag size 12” x 18” or 11” x 20”. Do not allow more than 1” of space between edge of garment and polybag.
Shipping Carton These items must be shipped in the narrow shipping carton (23” x 10” x 12”).
Notes to Remember • Cardboard, tissue and inserts are required • Do not use pins (exception: when pins are required)
Folding Instructions: 1. Place shirt face up 2. Make sure all closures are buttoned 3. Turn garment face down 4. Place pre-cut tissue paper across back 5. Place shirt cardboard across back and insert tab into collar 6. Fold right side back along fold line as shown 7. Layer long sleeves (arms) across back along fold line as shown 8. Repeat for left sleeve
• Short Sleeves a. Angle right sleeve across front of shirt b. Attach with plastic clip
9. Fold up tail 10. Fold in half by bringing bottom of shirt to the top (see final product illustration) 11. Place shirt face up 12. Place paper collar insert underneath collar 13. Insert collar stays if applicable 14. Place plastic collar insert inside the collar 15. Place single button hold under the collar and over the top button 16. Place butterfly insert (optional) 17. Place the folded garment into the correct size polybag and seal the polybag with clear
tape or heat seal (if the heat sealing method is used, all polybags must have three half moon or butterfly vent holes ¼” in diameter and evenly spaced)
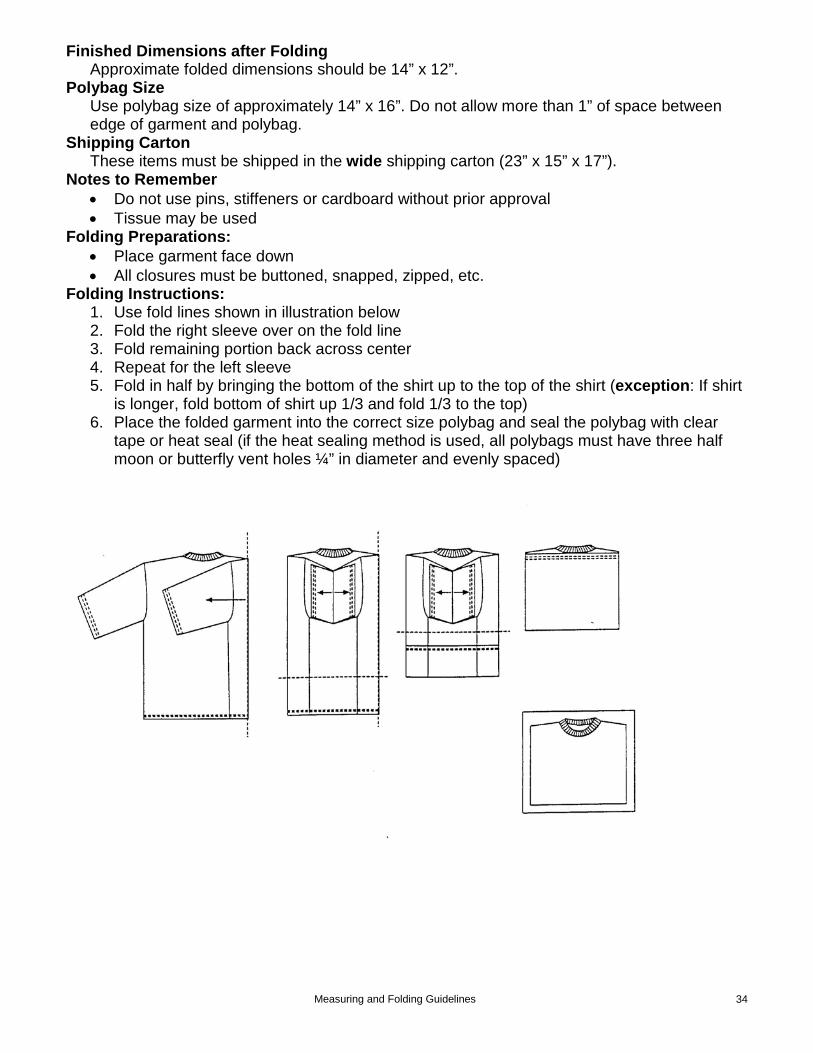
NM03 Men’s Tees & Polo Shirts
Measuring and Folding Guidelines 34
Finished Dimensions after Folding Approximate folded dimensions should be 14” x 12”.
Polybag Size Use polybag size of approximately 14” x 16”. Do not allow more than 1” of space between edge of garment and polybag.
Shipping Carton These items must be shipped in the wide shipping carton (23” x 15” x 17”).
Notes to Remember • Do not use pins, stiffeners or cardboard without prior approval • Tissue may be used
Folding Preparations: • Place garment face down • All closures must be buttoned, snapped, zipped, etc.
Folding Instructions: 1. Use fold lines shown in illustration below 2. Fold the right sleeve over on the fold line 3. Fold remaining portion back across center 4. Repeat for the left sleeve 5. Fold in half by bringing the bottom of the shirt up to the top of the shirt (exception: If shirt
is longer, fold bottom of shirt up 1/3 and fold 1/3 to the top) 6. Place the folded garment into the correct size polybag and seal the polybag with clear
tape or heat seal (if the heat sealing method is used, all polybags must have three half moon or butterfly vent holes ¼” in diameter and evenly spaced)
Measuring and Folding Guidelines 35
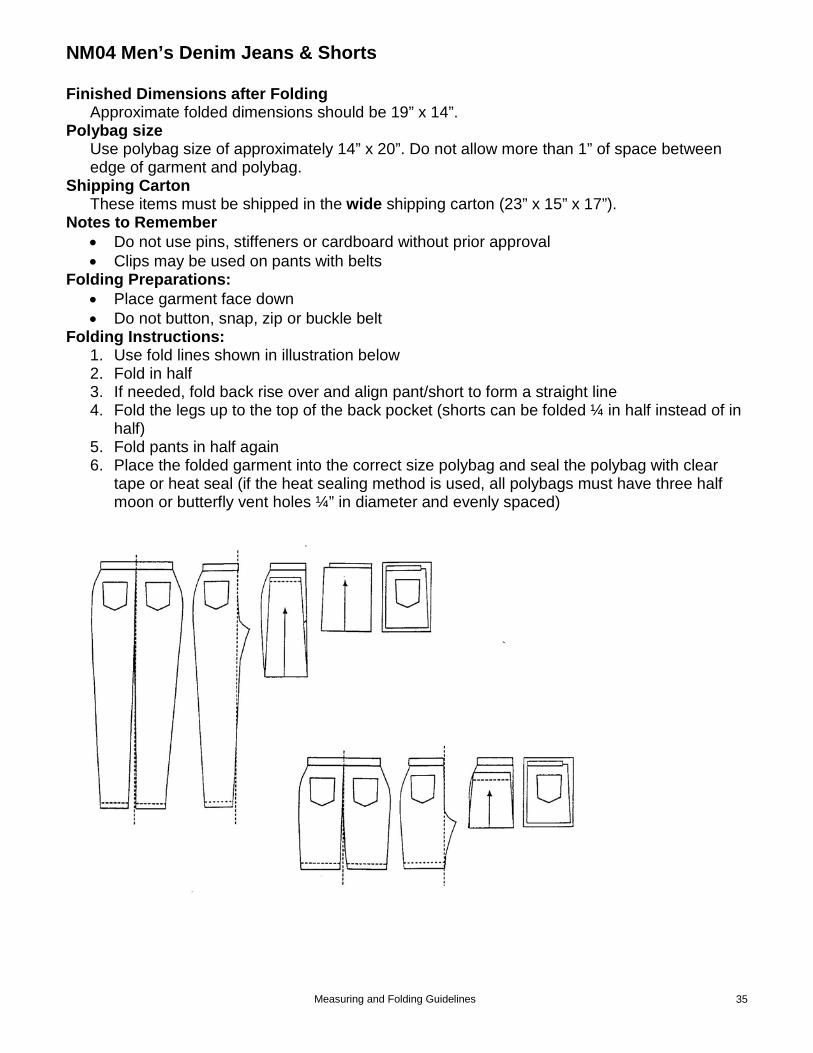
NM04 Men’s Denim Jeans & Shorts Finished Dimensions after Folding
Approximate folded dimensions should be 19” x 14”. Polybag size
Use polybag size of approximately 14” x 20”. Do not allow more than 1” of space between edge of garment and polybag.
Shipping Carton These items must be shipped in the wide shipping carton (23” x 15” x 17”).
Notes to Remember • Do not use pins, stiffeners or cardboard without prior approval • Clips may be used on pants with belts
Folding Preparations: • Place garment face down • Do not button, snap, zip or buckle belt
Folding Instructions: 1. Use fold lines shown in illustration below 2. Fold in half 3. If needed, fold back rise over and align pant/short to form a straight line 4. Fold the legs up to the top of the back pocket (shorts can be folded ¼ in half instead of in
half) 5. Fold pants in half again 6. Place the folded garment into the correct size polybag and seal the polybag with clear
tape or heat seal (if the heat sealing method is used, all polybags must have three half moon or butterfly vent holes ¼” in diameter and evenly spaced)
Measuring and Folding Guidelines 36
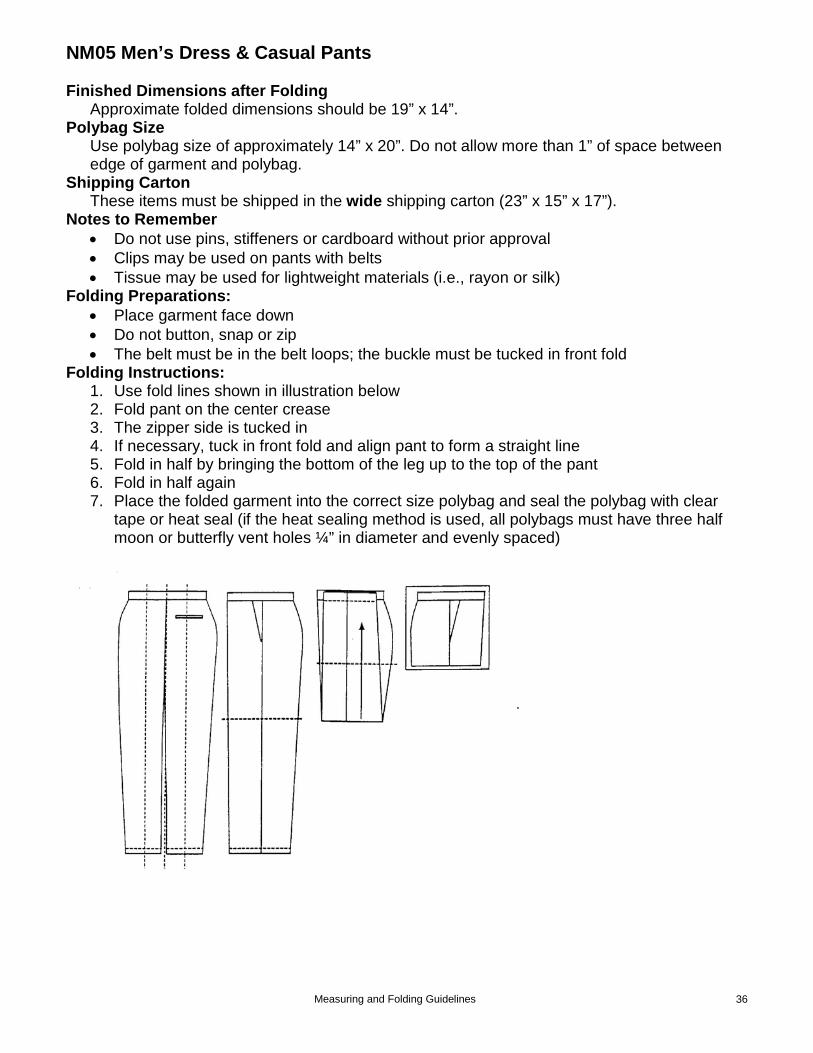
NM05 Men’s Dress & Casual Pants Finished Dimensions after Folding
Approximate folded dimensions should be 19” x 14”. Polybag Size
Use polybag size of approximately 14” x 20”. Do not allow more than 1” of space between edge of garment and polybag.
Shipping Carton These items must be shipped in the wide shipping carton (23” x 15” x 17”).
Notes to Remember • Do not use pins, stiffeners or cardboard without prior approval • Clips may be used on pants with belts • Tissue may be used for lightweight materials (i.e., rayon or silk)
Folding Preparations: • Place garment face down • Do not button, snap or zip • The belt must be in the belt loops; the buckle must be tucked in front fold
Folding Instructions: 1. Use fold lines shown in illustration below 2. Fold pant on the center crease 3. The zipper side is tucked in 4. If necessary, tuck in front fold and align pant to form a straight line 5. Fold in half by bringing the bottom of the leg up to the top of the pant 6. Fold in half again 7. Place the folded garment into the correct size polybag and seal the polybag with clear
tape or heat seal (if the heat sealing method is used, all polybags must have three half moon or butterfly vent holes ¼” in diameter and evenly spaced)
Measuring and Folding Guidelines 37
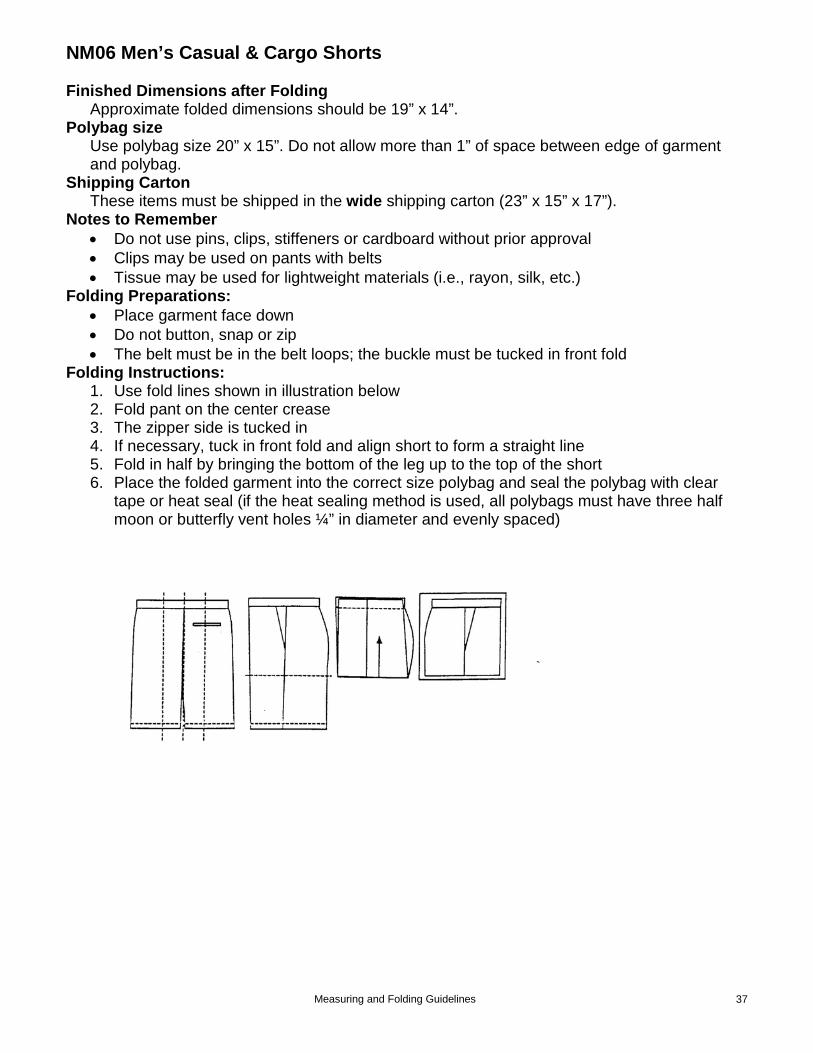
NM06 Men’s Casual & Cargo Shorts Finished Dimensions after Folding
Approximate folded dimensions should be 19” x 14”. Polybag size
Use polybag size 20” x 15”. Do not allow more than 1” of space between edge of garment and polybag.
Shipping Carton These items must be shipped in the wide shipping carton (23” x 15” x 17”).
Notes to Remember • Do not use pins, clips, stiffeners or cardboard without prior approval • Clips may be used on pants with belts • Tissue may be used for lightweight materials (i.e., rayon, silk, etc.)
Folding Preparations: • Place garment face down • Do not button, snap or zip • The belt must be in the belt loops; the buckle must be tucked in front fold
Folding Instructions: 1. Use fold lines shown in illustration below 2. Fold pant on the center crease 3. The zipper side is tucked in 4. If necessary, tuck in front fold and align short to form a straight line 5. Fold in half by bringing the bottom of the leg up to the top of the short 6. Place the folded garment into the correct size polybag and seal the polybag with clear
tape or heat seal (if the heat sealing method is used, all polybags must have three half moon or butterfly vent holes ¼” in diameter and evenly spaced)

Measuring and Folding Guidelines 38
NM07 Men’s Sweatpants & Sports Shorts Finished Dimensions after Folding
Approximate folded dimensions should be 16” x 14”. Polybag size
Use polybag size of approximately 14” x 20”. Do not allow more than 1” of space between edge of garment and polybag.
Shipping Carton These items must be shipped in the narrow shipping carton (23” x 10” x 12”).
Notes to Remember • Do not use pins, stiffeners or cardboard without prior approval • Clips may be used on pants with belts
Folding Preparations: • Place garment face down • Do not button, snap, zip or buckle belt
Folding Instructions: 1. Use fold lines shown in illustration below 2. Fold in half 3. If necessary, fold back rise over and align pant to form a straight line 4. Fold the legs up to the top of the back waistline (shorts may be folded ¼ instead of half.) 5. Fold pants in half again 6. Place the folded garment into the correct size polybag and seal the polybag with clear
tape or heat seal (if the heat sealing method is used, all polybags must have three half moon or butterfly vent holes ¼” in diameter and evenly spaced)
Measuring and Folding Guidelines 39
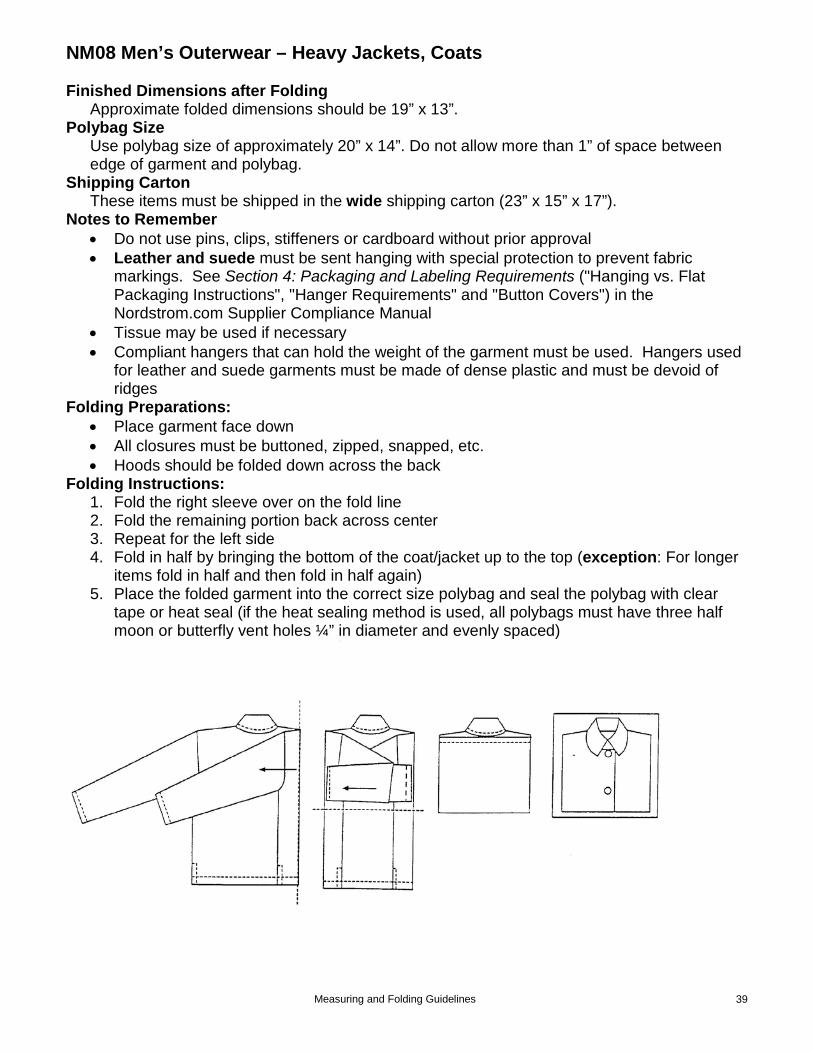
NM08 Men’s Outerwear – Heavy Jackets, Coats Finished Dimensions after Folding
Approximate folded dimensions should be 19” x 13”. Polybag Size
Use polybag size of approximately 20” x 14”. Do not allow more than 1” of space between edge of garment and polybag.
Shipping Carton These items must be shipped in the wide shipping carton (23” x 15” x 17”).
Notes to Remember • Do not use pins, clips, stiffeners or cardboard without prior approval • Leather and suede must be sent hanging with special protection to prevent fabric
markings. See Section 4: Packaging and Labeling Requirements ("Hanging vs. Flat Packaging Instructions", "Hanger Requirements" and "Button Covers") in the Nordstrom.com Supplier Compliance Manual
• Tissue may be used if necessary • Compliant hangers that can hold the weight of the garment must be used. Hangers used
for leather and suede garments must be made of dense plastic and must be devoid of ridges
Folding Preparations: • Place garment face down • All closures must be buttoned, zipped, snapped, etc. • Hoods should be folded down across the back
Folding Instructions: 1. Fold the right sleeve over on the fold line 2. Fold the remaining portion back across center 3. Repeat for the left side 4. Fold in half by bringing the bottom of the coat/jacket up to the top (exception: For longer
items fold in half and then fold in half again) 5. Place the folded garment into the correct size polybag and seal the polybag with clear
tape or heat seal (if the heat sealing method is used, all polybags must have three half moon or butterfly vent holes ¼” in diameter and evenly spaced)
Measuring and Folding Guidelines 40
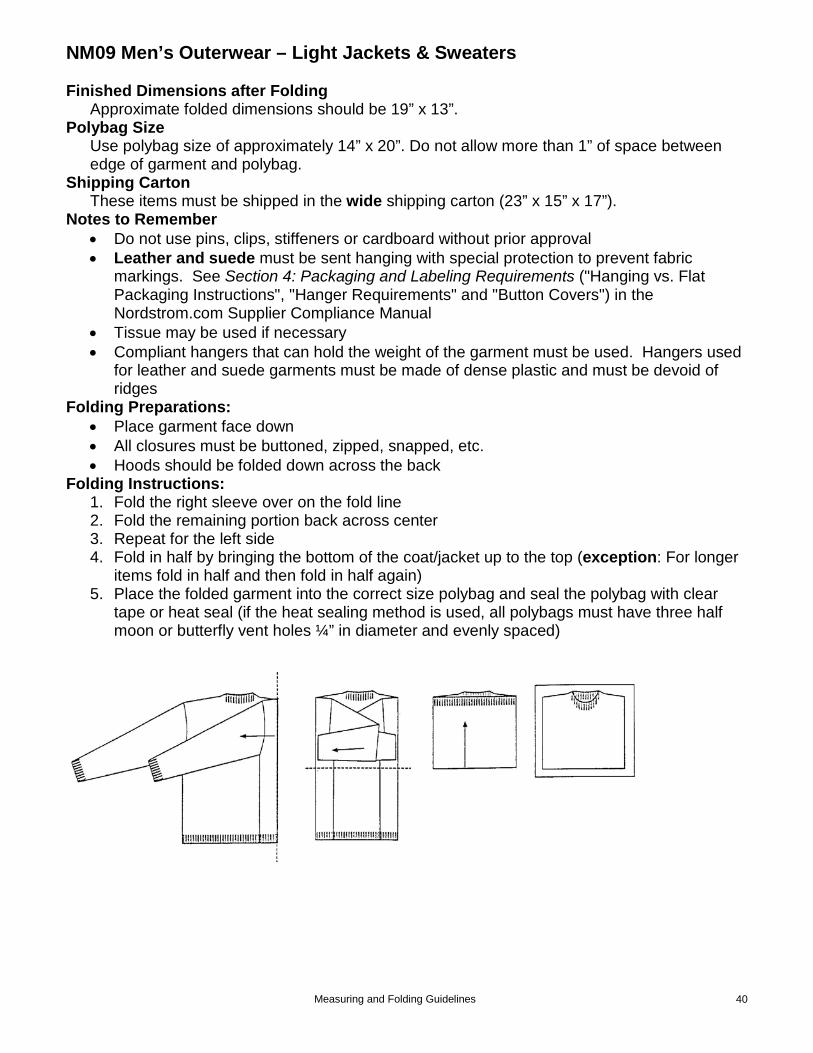
NM09 Men’s Outerwear – Light Jackets & Sweaters Finished Dimensions after Folding
Approximate folded dimensions should be 19” x 13”. Polybag Size
Use polybag size of approximately 14” x 20”. Do not allow more than 1” of space between edge of garment and polybag.
Shipping Carton These items must be shipped in the wide shipping carton (23” x 15” x 17”).
Notes to Remember • Do not use pins, clips, stiffeners or cardboard without prior approval • Leather and suede must be sent hanging with special protection to prevent fabric
markings. See Section 4: Packaging and Labeling Requirements ("Hanging vs. Flat Packaging Instructions", "Hanger Requirements" and "Button Covers") in the Nordstrom.com Supplier Compliance Manual
• Tissue may be used if necessary • Compliant hangers that can hold the weight of the garment must be used. Hangers used
for leather and suede garments must be made of dense plastic and must be devoid of ridges
Folding Preparations: • Place garment face down • All closures must be buttoned, zipped, snapped, etc. • Hoods should be folded down across the back
Folding Instructions: 1. Fold the right sleeve over on the fold line 2. Fold the remaining portion back across center 3. Repeat for the left side 4. Fold in half by bringing the bottom of the coat/jacket up to the top (exception: For longer
items fold in half and then fold in half again) 5. Place the folded garment into the correct size polybag and seal the polybag with clear
tape or heat seal (if the heat sealing method is used, all polybags must have three half moon or butterfly vent holes ¼” in diameter and evenly spaced)
Measuring and Folding Guidelines 41
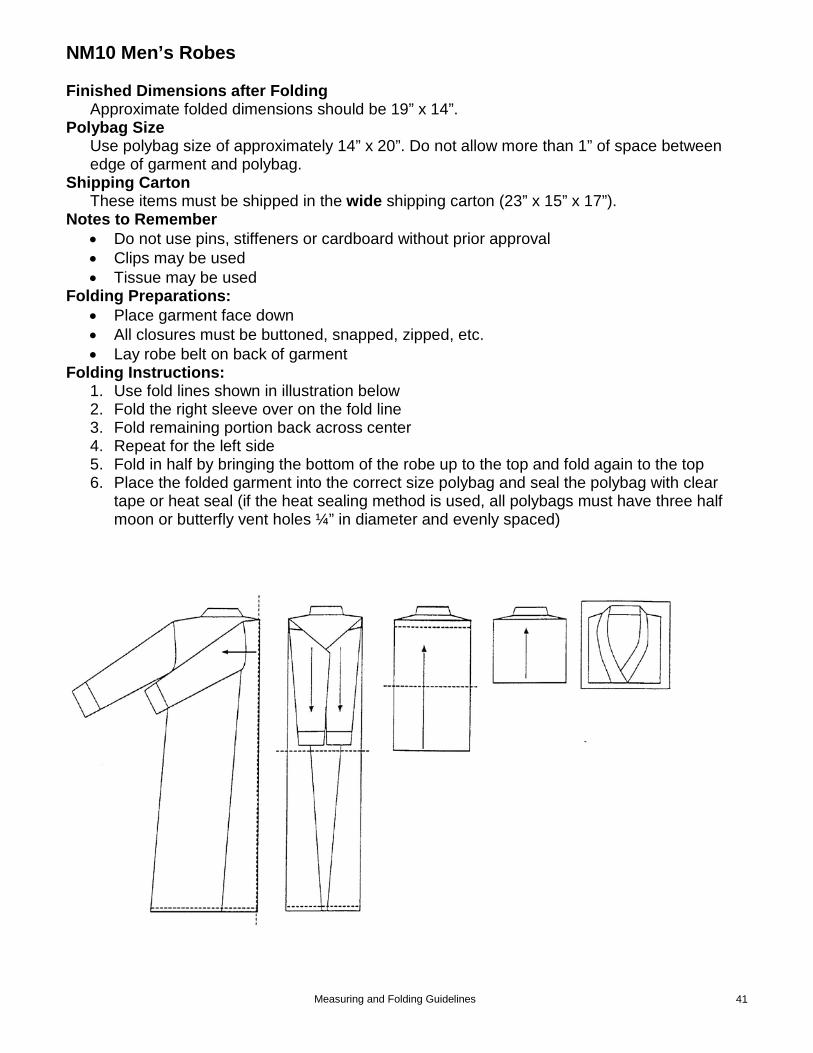
NM10 Men’s Robes Finished Dimensions after Folding
Approximate folded dimensions should be 19” x 14”. Polybag Size
Use polybag size of approximately 14” x 20”. Do not allow more than 1” of space between edge of garment and polybag.
Shipping Carton These items must be shipped in the wide shipping carton (23” x 15” x 17”).
Notes to Remember • Do not use pins, stiffeners or cardboard without prior approval • Clips may be used • Tissue may be used
Folding Preparations: • Place garment face down • All closures must be buttoned, snapped, zipped, etc. • Lay robe belt on back of garment
Folding Instructions: 1. Use fold lines shown in illustration below 2. Fold the right sleeve over on the fold line 3. Fold remaining portion back across center 4. Repeat for the left side 5. Fold in half by bringing the bottom of the robe up to the top and fold again to the top 6. Place the folded garment into the correct size polybag and seal the polybag with clear
tape or heat seal (if the heat sealing method is used, all polybags must have three half moon or butterfly vent holes ¼” in diameter and evenly spaced)
Measuring and Folding Guidelines 42
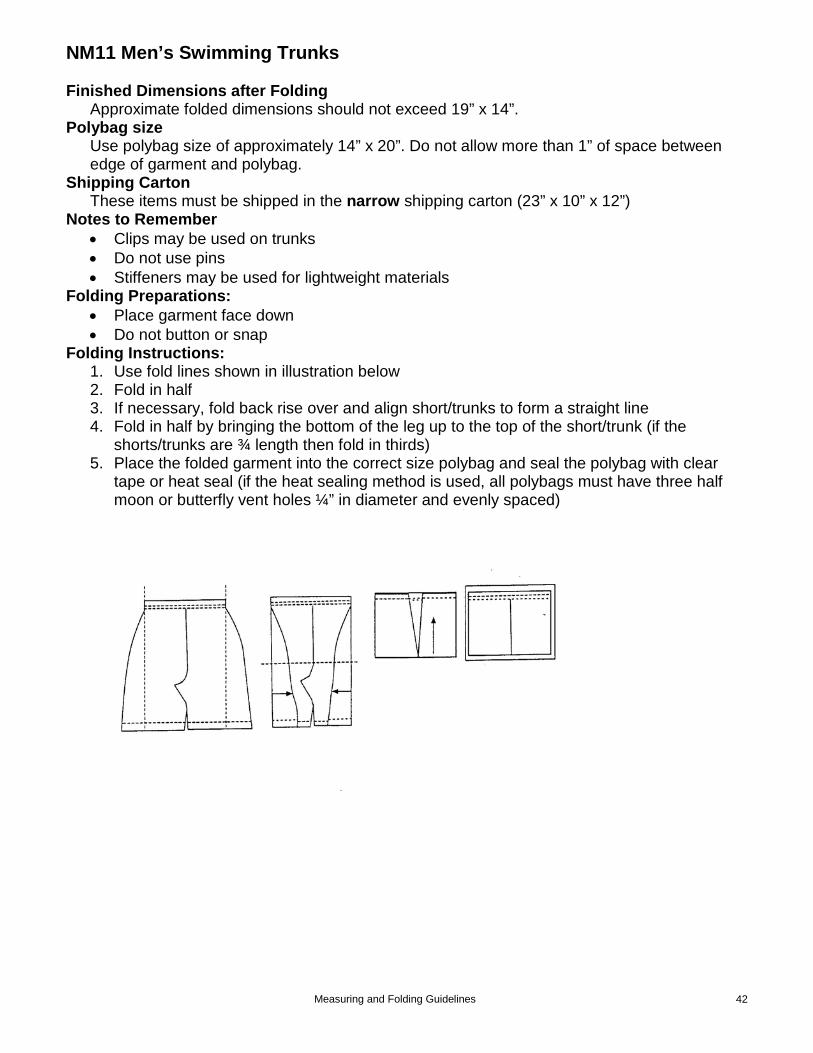
NM11 Men’s Swimming Trunks Finished Dimensions after Folding
Approximate folded dimensions should not exceed 19” x 14”. Polybag size
Use polybag size of approximately 14” x 20”. Do not allow more than 1” of space between edge of garment and polybag.
Shipping Carton These items must be shipped in the narrow shipping carton (23” x 10” x 12”)
Notes to Remember • Clips may be used on trunks • Do not use pins • Stiffeners may be used for lightweight materials
Folding Preparations: • Place garment face down • Do not button or snap
Folding Instructions: 1. Use fold lines shown in illustration below 2. Fold in half 3. If necessary, fold back rise over and align short/trunks to form a straight line 4. Fold in half by bringing the bottom of the leg up to the top of the short/trunk (if the
shorts/trunks are ¾ length then fold in thirds) 5. Place the folded garment into the correct size polybag and seal the polybag with clear
tape or heat seal (if the heat sealing method is used, all polybags must have three half moon or butterfly vent holes ¼” in diameter and evenly spaced)
Measuring and Folding Guidelines 43
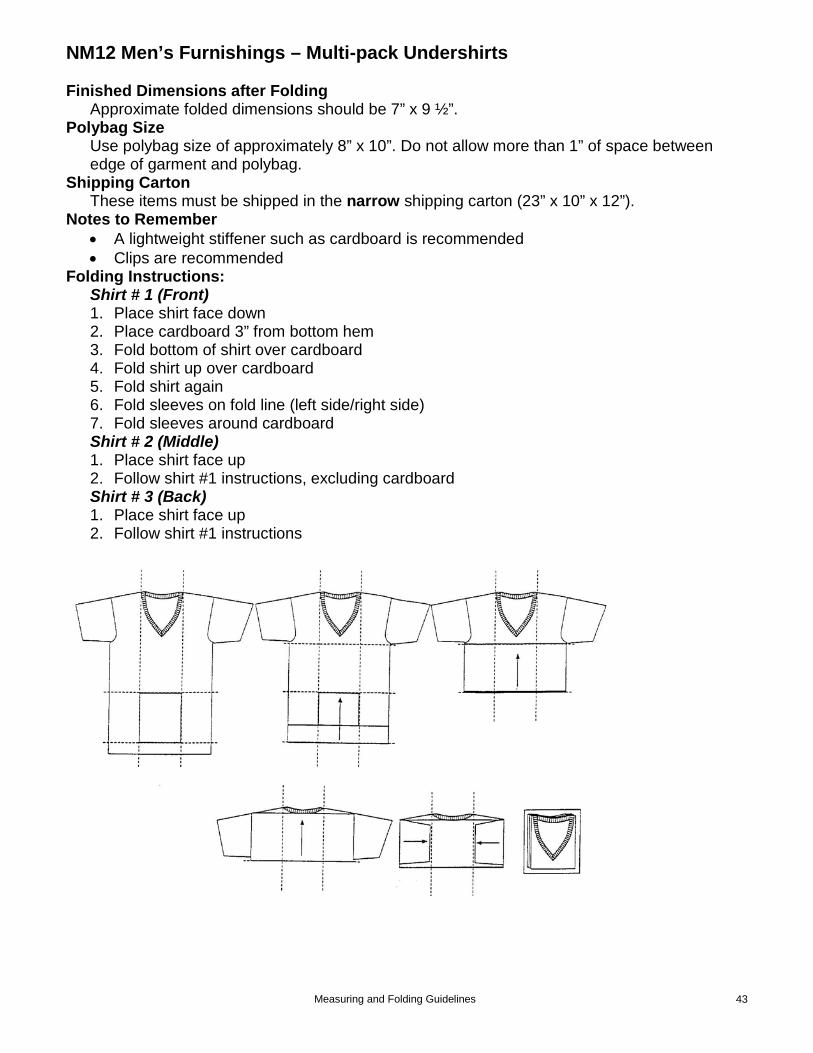
NM12 Men’s Furnishings – Multi-pack Undershirts Finished Dimensions after Folding
Approximate folded dimensions should be 7” x 9 ½”. Polybag Size
Use polybag size of approximately 8” x 10”. Do not allow more than 1” of space between edge of garment and polybag.
Shipping Carton These items must be shipped in the narrow shipping carton (23” x 10” x 12”).
Notes to Remember • A lightweight stiffener such as cardboard is recommended • Clips are recommended
Folding Instructions: Shirt # 1 (Front) 1. Place shirt face down 2. Place cardboard 3” from bottom hem 3. Fold bottom of shirt over cardboard 4. Fold shirt up over cardboard 5. Fold shirt again 6. Fold sleeves on fold line (left side/right side) 7. Fold sleeves around cardboard Shirt # 2 (Middle) 1. Place shirt face up 2. Follow shirt #1 instructions, excluding cardboard Shirt # 3 (Back) 1. Place shirt face up 2. Follow shirt #1 instructions
Measuring and Folding Guidelines 44
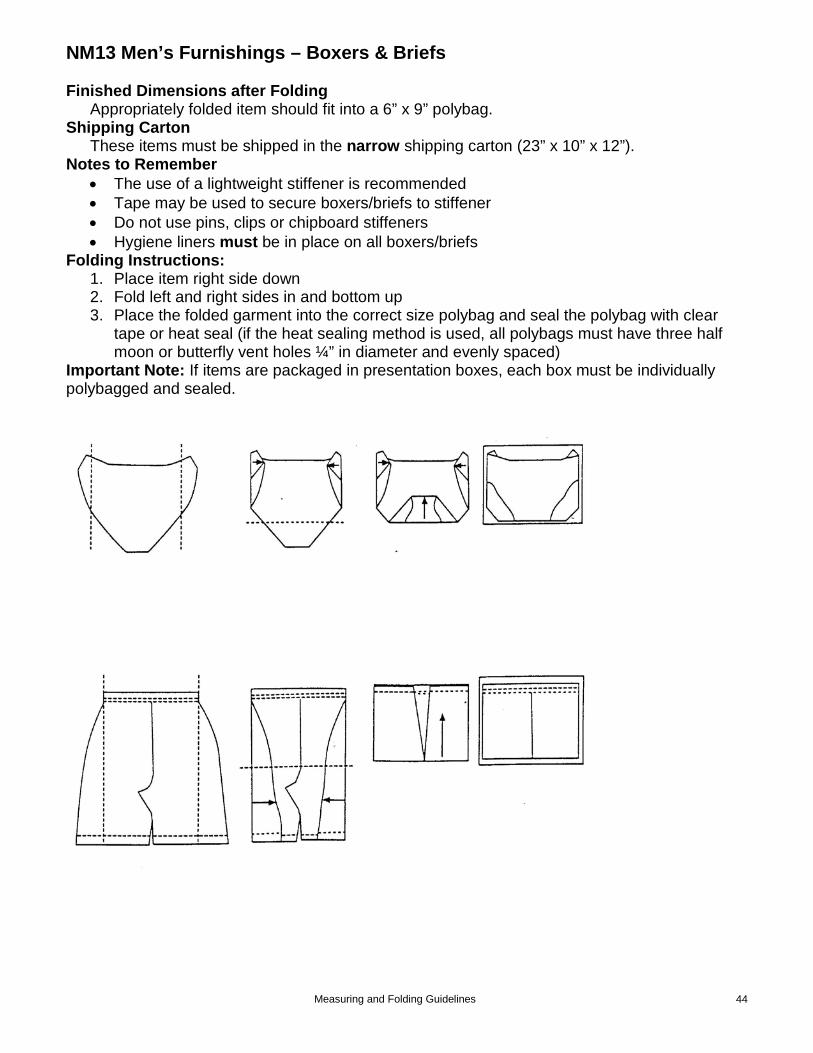
NM13 Men’s Furnishings – Boxers & Briefs Finished Dimensions after Folding
Appropriately folded item should fit into a 6” x 9” polybag. Shipping Carton
These items must be shipped in the narrow shipping carton (23” x 10” x 12”). Notes to Remember
• The use of a lightweight stiffener is recommended • Tape may be used to secure boxers/briefs to stiffener • Do not use pins, clips or chipboard stiffeners • Hygiene liners must be in place on all boxers/briefs
Folding Instructions: 1. Place item right side down 2. Fold left and right sides in and bottom up 3. Place the folded garment into the correct size polybag and seal the polybag with clear
tape or heat seal (if the heat sealing method is used, all polybags must have three half moon or butterfly vent holes ¼” in diameter and evenly spaced)
Important Note: If items are packaged in presentation boxes, each box must be individually polybagged and sealed.
Measuring and Folding Guidelines 45
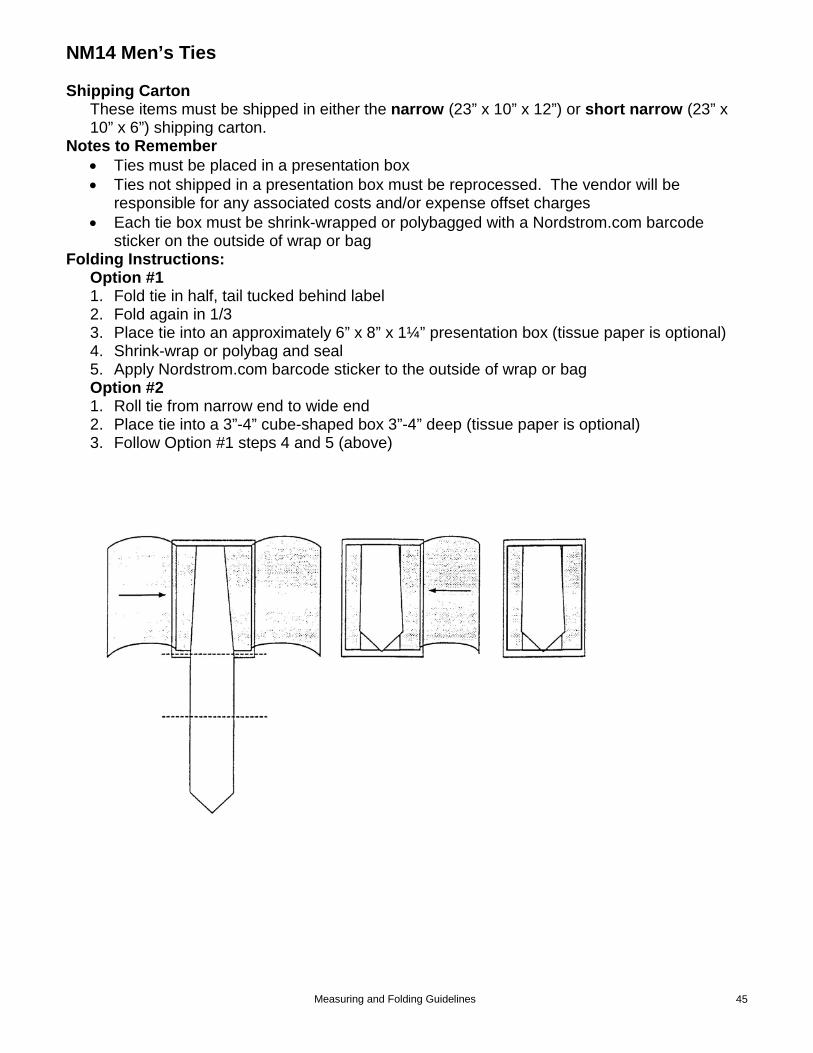
NM14 Men’s Ties Shipping Carton
These items must be shipped in either the narrow (23” x 10” x 12”) or short narrow (23” x 10” x 6”) shipping carton.
Notes to Remember • Ties must be placed in a presentation box • Ties not shipped in a presentation box must be reprocessed. The vendor will be
responsible for any associated costs and/or expense offset charges • Each tie box must be shrink-wrapped or polybagged with a Nordstrom.com barcode
sticker on the outside of wrap or bag Folding Instructions:
Option #1 1. Fold tie in half, tail tucked behind label 2. Fold again in 1/3 3. Place tie into an approximately 6” x 8” x 1¼” presentation box (tissue paper is optional) 4. Shrink-wrap or polybag and seal 5. Apply Nordstrom.com barcode sticker to the outside of wrap or bag Option #2 1. Roll tie from narrow end to wide end 2. Place tie into a 3”-4” cube-shaped box 3”-4” deep (tissue paper is optional) 3. Follow Option #1 steps 4 and 5 (above)