Embed Size (px)
Citation preview
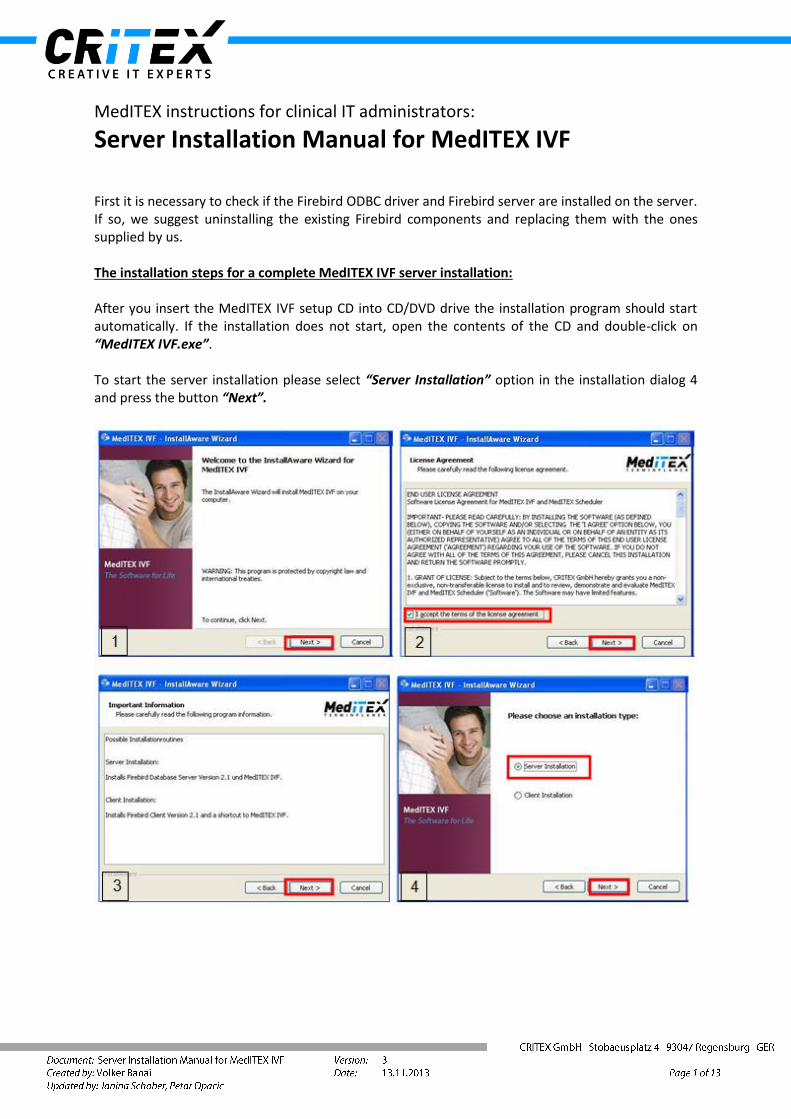
MedITEX instructions for clinical IT administrators:
Server Installation Manual for MedITEX IVF First it is necessary to check if the Firebird ODBC driver and Firebird server are installed on the server. If so, we suggest uninstalling the existing Firebird components and replacing them with the ones supplied by us.
The installation steps for a complete MedITEX IVF server installation: After you insert the MedITEX IVF setup CD into CD/DVD drive the installation program should start automatically. If the installation does not start, open the contents of the CD and double-click on “MedITEX IVF.exe”. To start the server installation please select “Server Installation” option in the installation dialog 4 and press the button “Next”.
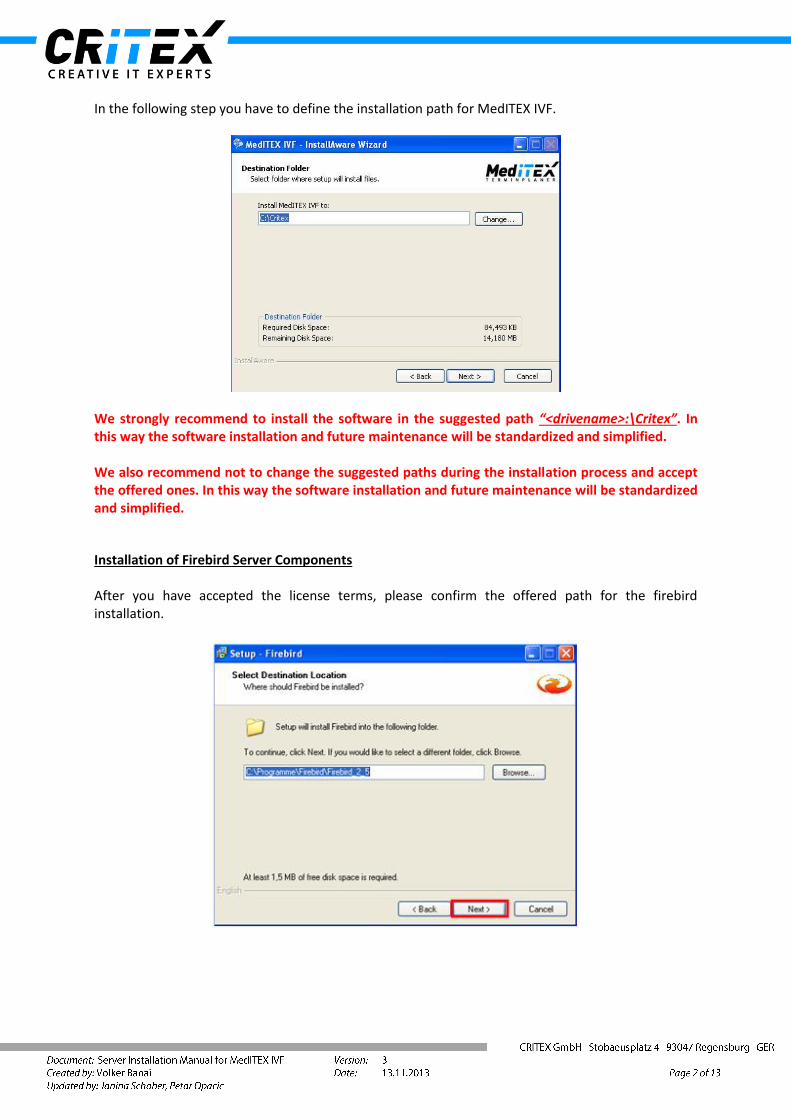
In the following step you have to define the installation path for MedITEX IVF.
We strongly recommend to install the software in the suggested path “<drivename>:\Critex”. In this way the software installation and future maintenance will be standardized and simplified. We also recommend not to change the suggested paths during the installation process and accept the offered ones. In this way the software installation and future maintenance will be standardized and simplified.
Installation of Firebird Server Components After you have accepted the license terms, please confirm the offered path for the firebird installation.
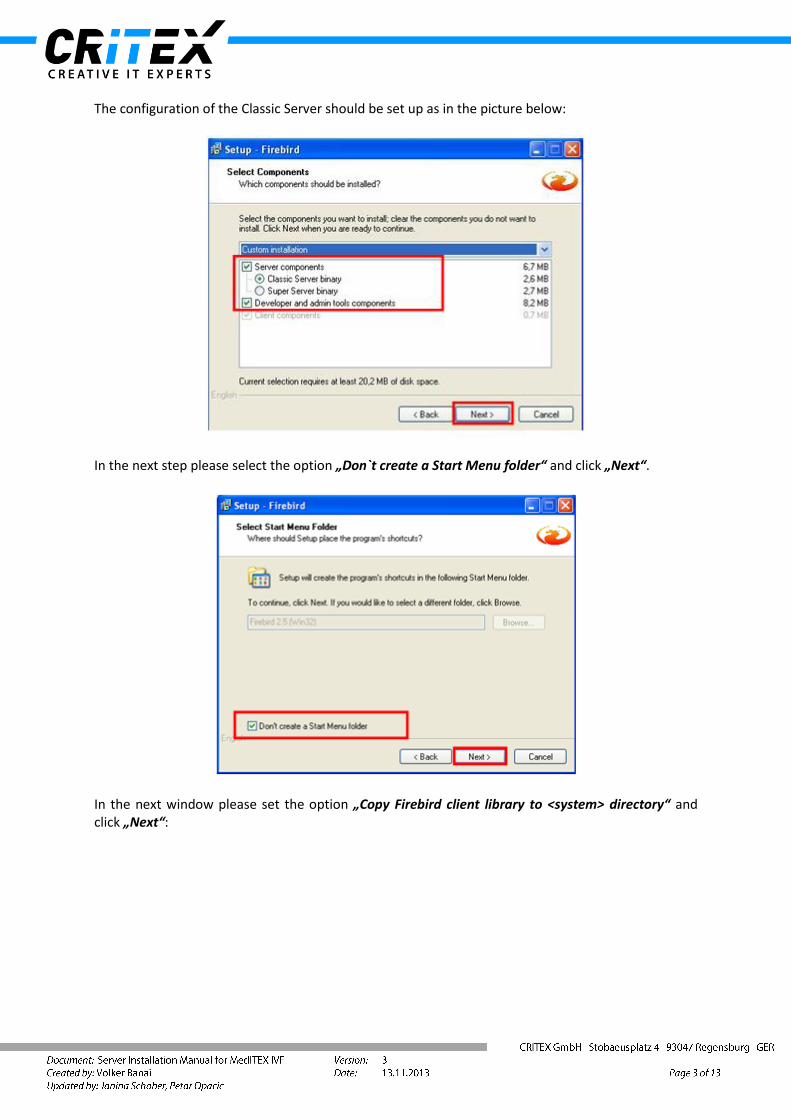
The configuration of the Classic Server should be set up as in the picture below:
In the next step please select the option „Don`t create a Start Menu folder“ and click „Next“.
In the next window please set the option „Copy Firebird client library to <system> directory“ and click „Next“:
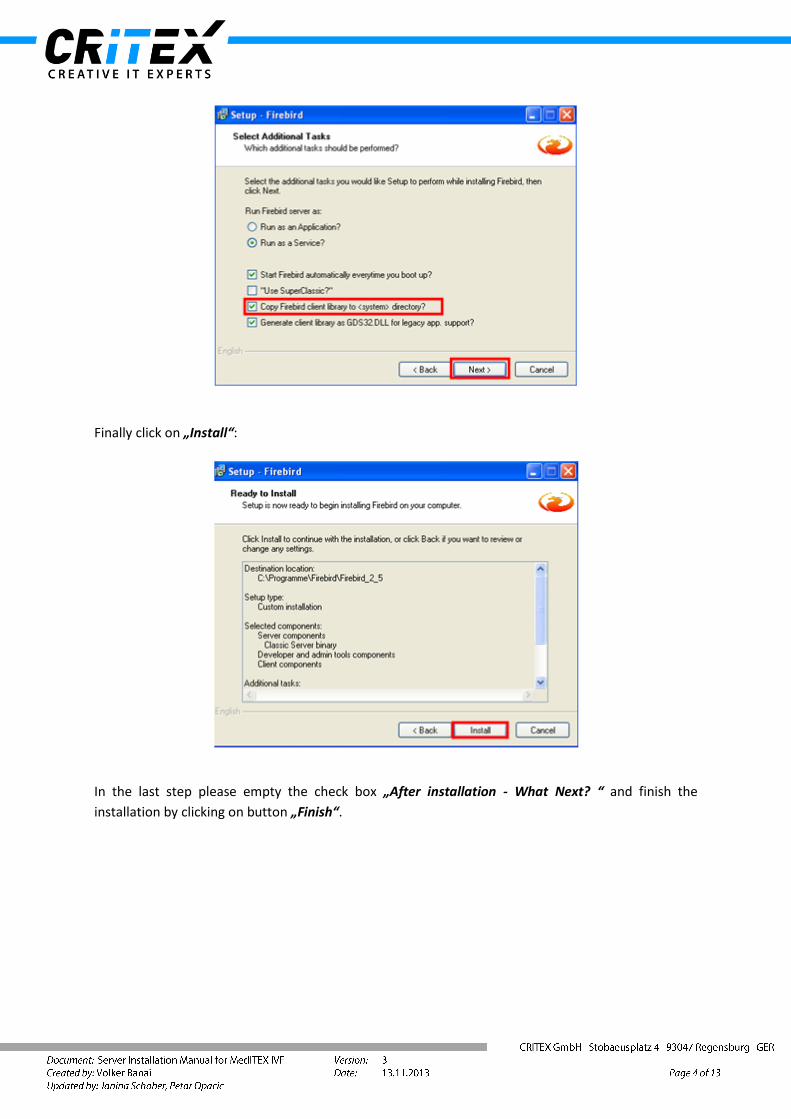
Finally click on „Install“:
In the last step please empty the check box „After installation - What Next? “ and finish the
installation by clicking on button „Finish“.
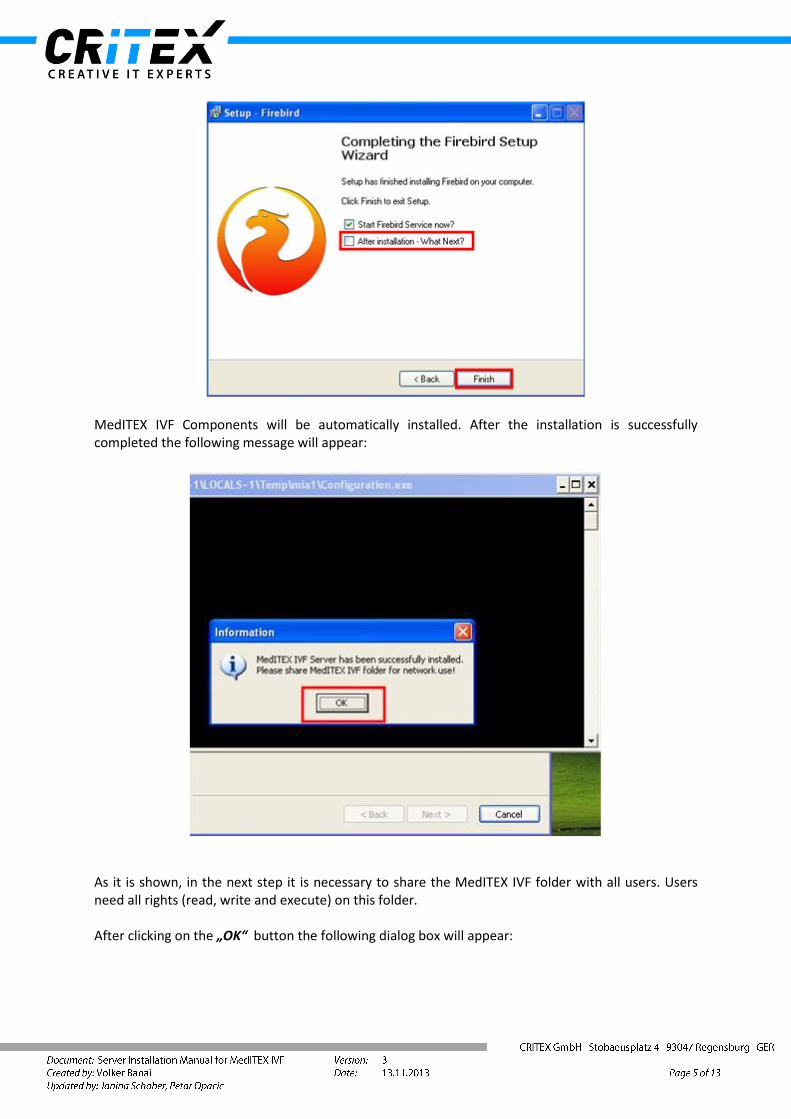
MedITEX IVF Components will be automatically installed. After the installation is successfully completed the following message will appear:
As it is shown, in the next step it is necessary to share the MedITEX IVF folder with all users. Users need all rights (read, write and execute) on this folder. After clicking on the „OK“ button the following dialog box will appear:
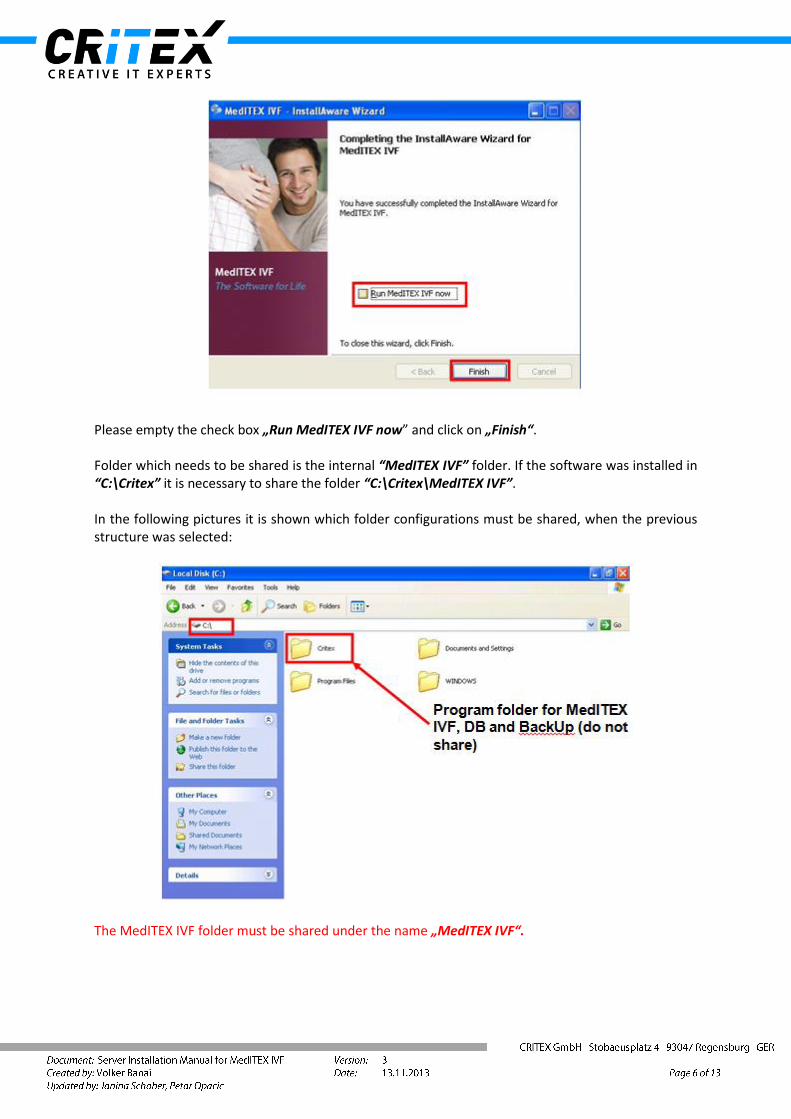
Please empty the check box „Run MedITEX IVF now” and click on „Finish“. Folder which needs to be shared is the internal “MedITEX IVF” folder. If the software was installed in “C:\Critex” it is necessary to share the folder “C:\Critex\MedITEX IVF”. In the following pictures it is shown which folder configurations must be shared, when the previous structure was selected:
The MedITEX IVF folder must be shared under the name „MedITEX IVF“.
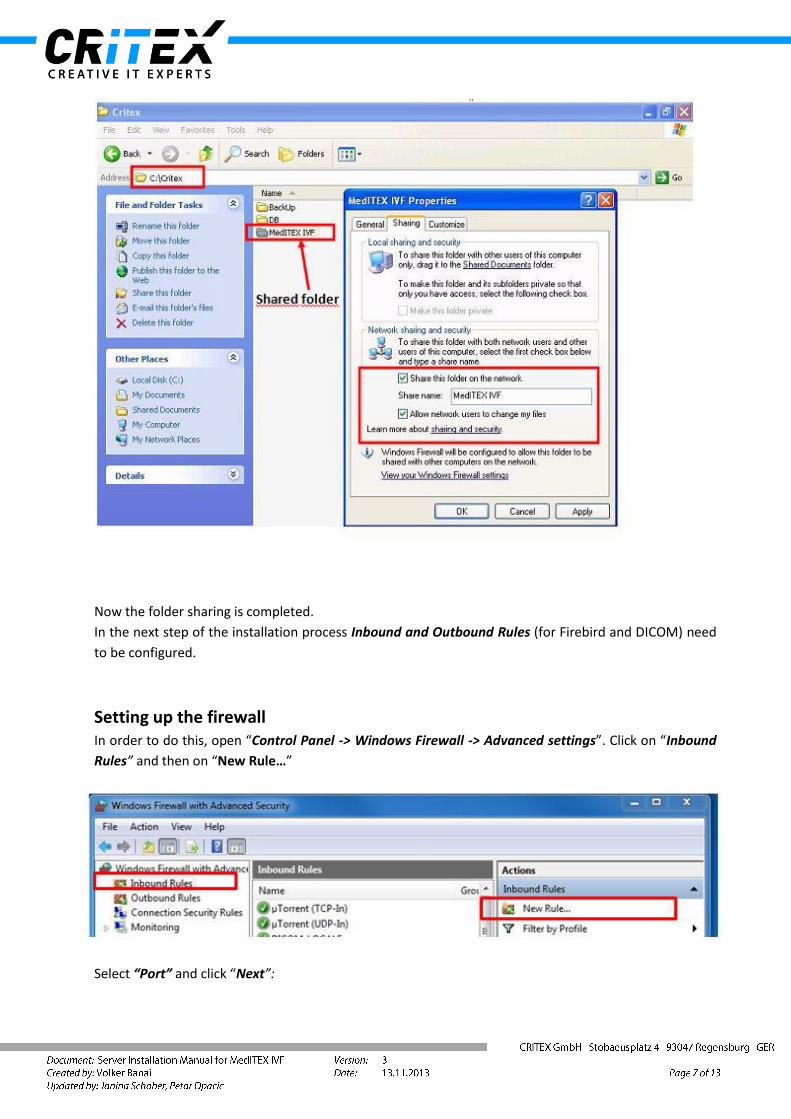
Now the folder sharing is completed.
In the next step of the installation process Inbound and Outbound Rules (for Firebird and DICOM) need
to be configured.
Setting up the firewall In order to do this, open “Control Panel -> Windows Firewall -> Advanced settings”. Click on “Inbound
Rules” and then on “New Rule…”
Select “Port” and click “Next”:
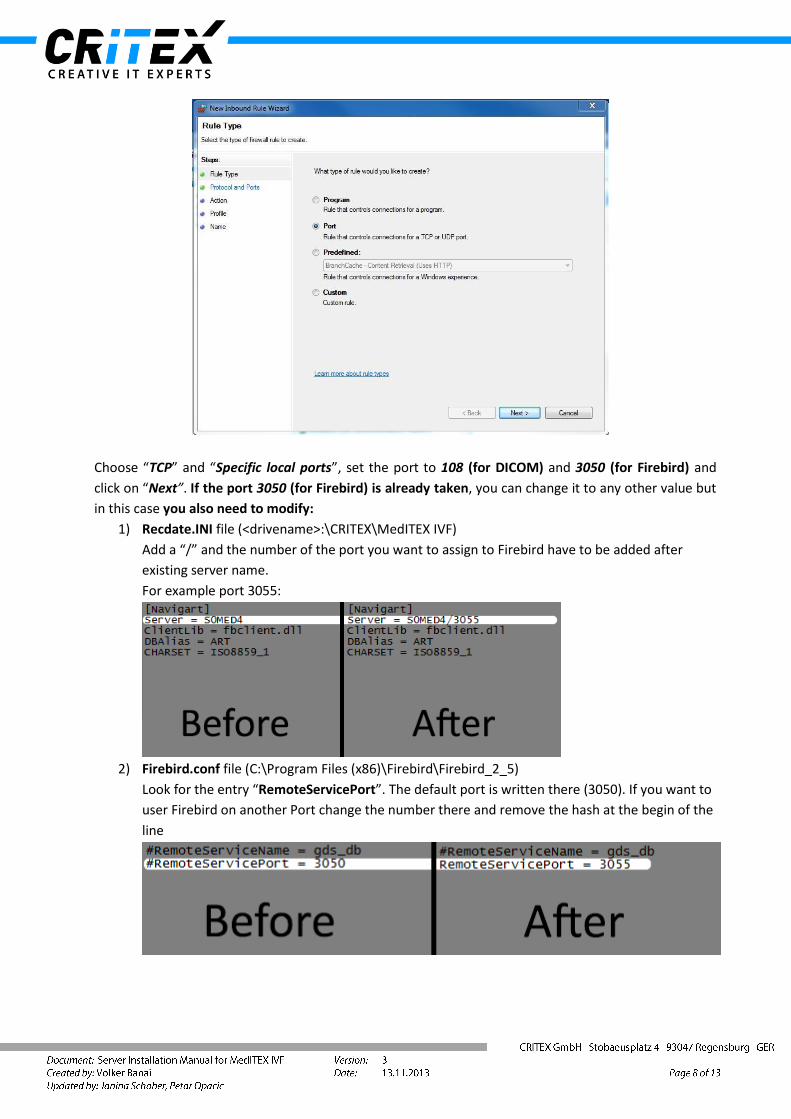
Choose “TCP” and “Specific local ports”, set the port to 108 (for DICOM) and 3050 (for Firebird) and
click on “Next”. If the port 3050 (for Firebird) is already taken, you can change it to any other value but
in this case you also need to modify:
1) Recdate.INI file (<drivename>:\CRITEX\MedITEX IVF)
Add a “/” and the number of the port you want to assign to Firebird have to be added after
existing server name.
For example port 3055:
2) Firebird.conf file (C:\Program Files (x86)\Firebird\Firebird_2_5)
Look for the entry “RemoteServicePort”. The default port is written there (3050). If you want to
user Firebird on another Port change the number there and remove the hash at the begin of the
line
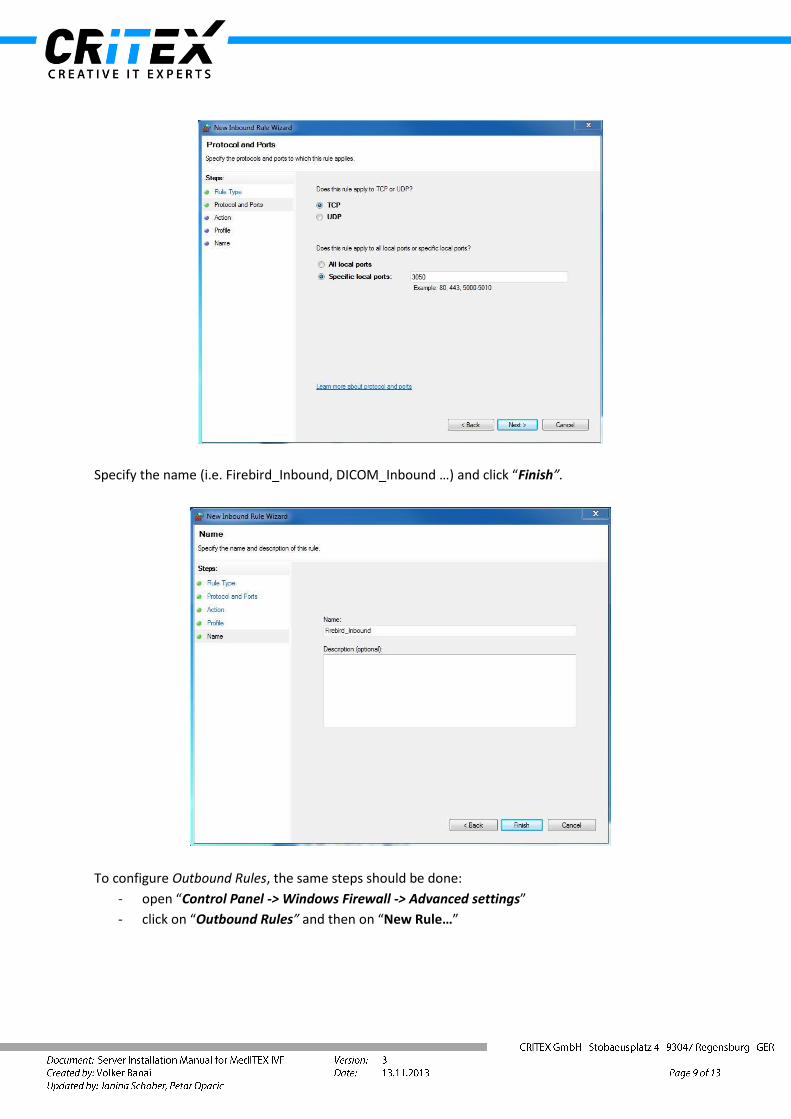
Specify the name (i.e. Firebird_Inbound, DICOM_Inbound …) and click “Finish”.
To configure Outbound Rules, the same steps should be done:
- open “Control Panel -> Windows Firewall -> Advanced settings”
- click on “Outbound Rules” and then on “New Rule…”
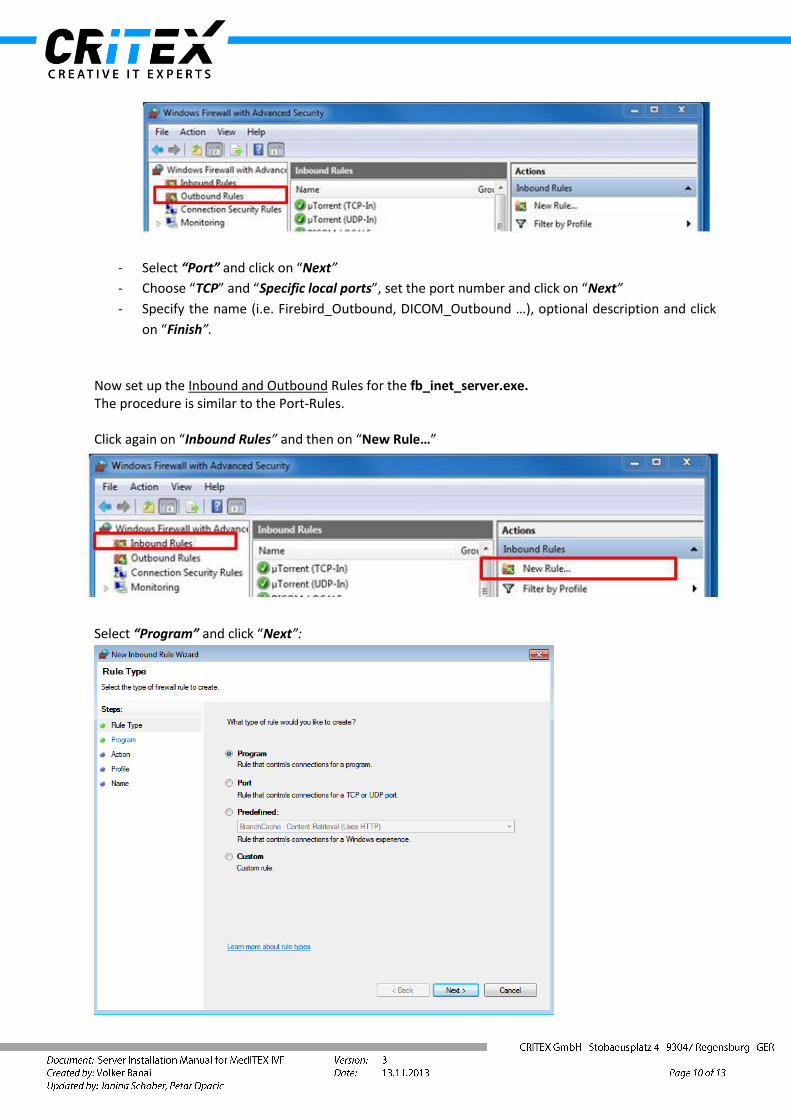
- Select “Port” and click on “Next”
- Choose “TCP” and “Specific local ports”, set the port number and click on “Next”
- Specify the name (i.e. Firebird_Outbound, DICOM_Outbound …), optional description and click
on “Finish”.
Now set up the Inbound and Outbound Rules for the fb_inet_server.exe. The procedure is similar to the Port-Rules. Click again on “Inbound Rules” and then on “New Rule…”
Select “Program” and click “Next”:
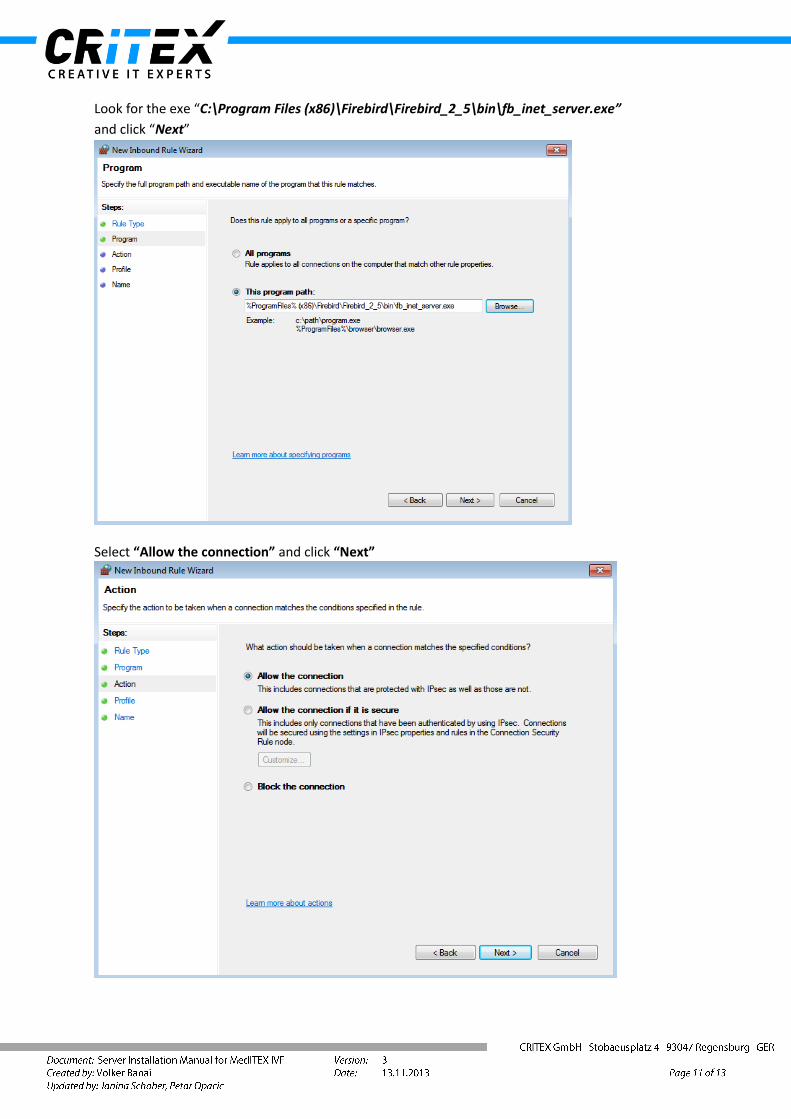
Look for the exe “C:\Program Files (x86)\Firebird\Firebird_2_5\bin\fb_inet_server.exe”
and click “Next”
Select “Allow the connection” and click “Next”
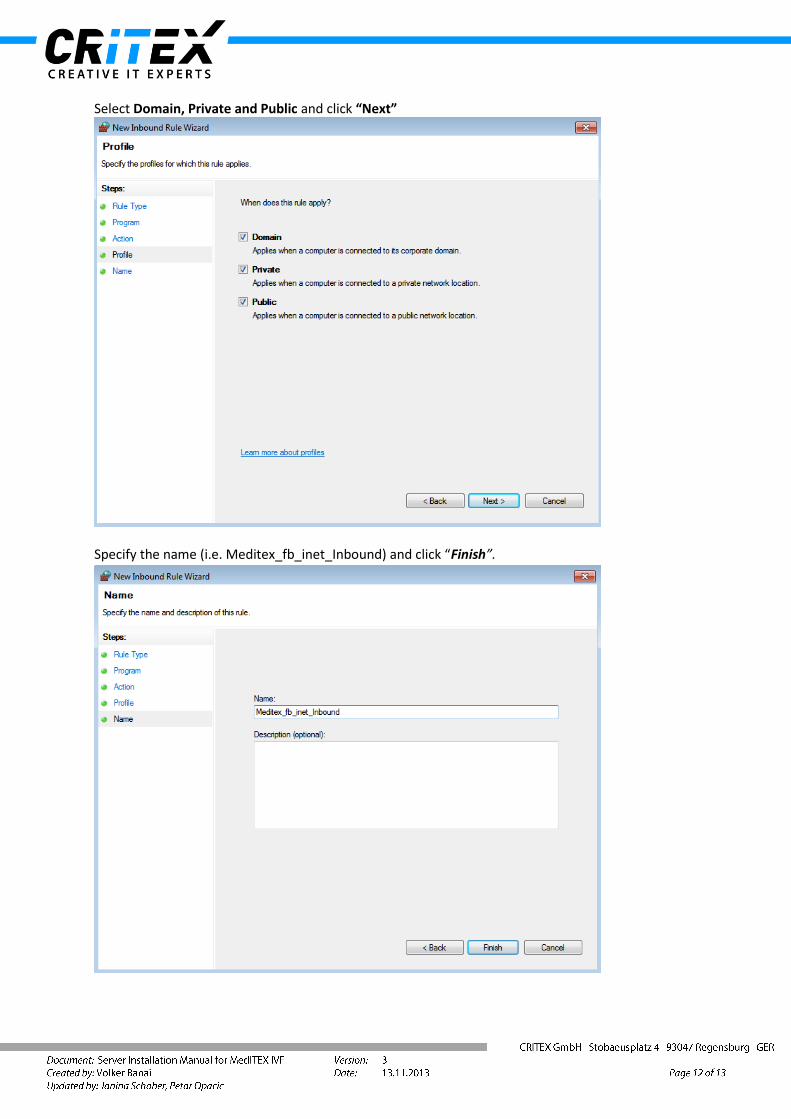
Select Domain, Private and Public and click “Next”
Specify the name (i.e. Meditex_fb_inet_Inbound) and click “Finish”.
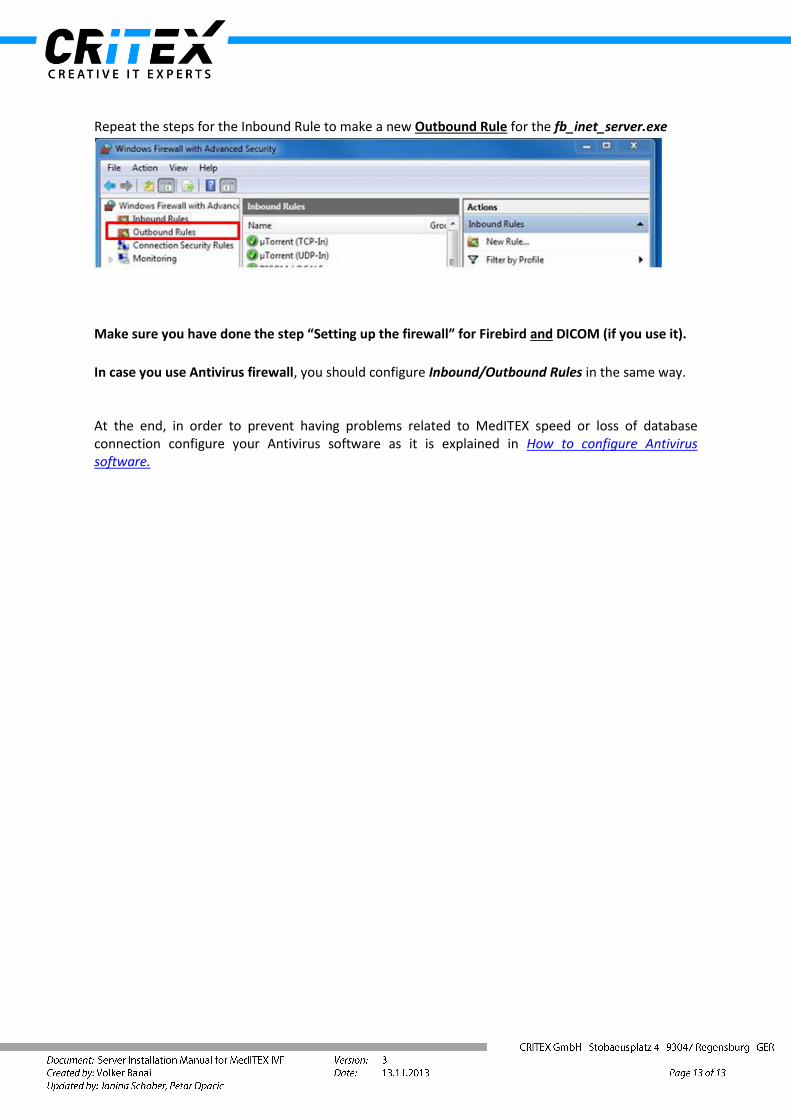
Repeat the steps for the Inbound Rule to make a new Outbound Rule for the fb_inet_server.exe
Make sure you have done the step “Setting up the firewall” for Firebird and DICOM (if you use it).
In case you use Antivirus firewall, you should configure Inbound/Outbound Rules in the same way. At the end, in order to prevent having problems related to MedITEX speed or loss of database connection configure your Antivirus software as it is explained in How to configure Antivirus software.