Embed Size (px)
Citation preview
MICA PHOTOGRAPHY DEPARTMENT
Black and White FilmPhotography Handbook
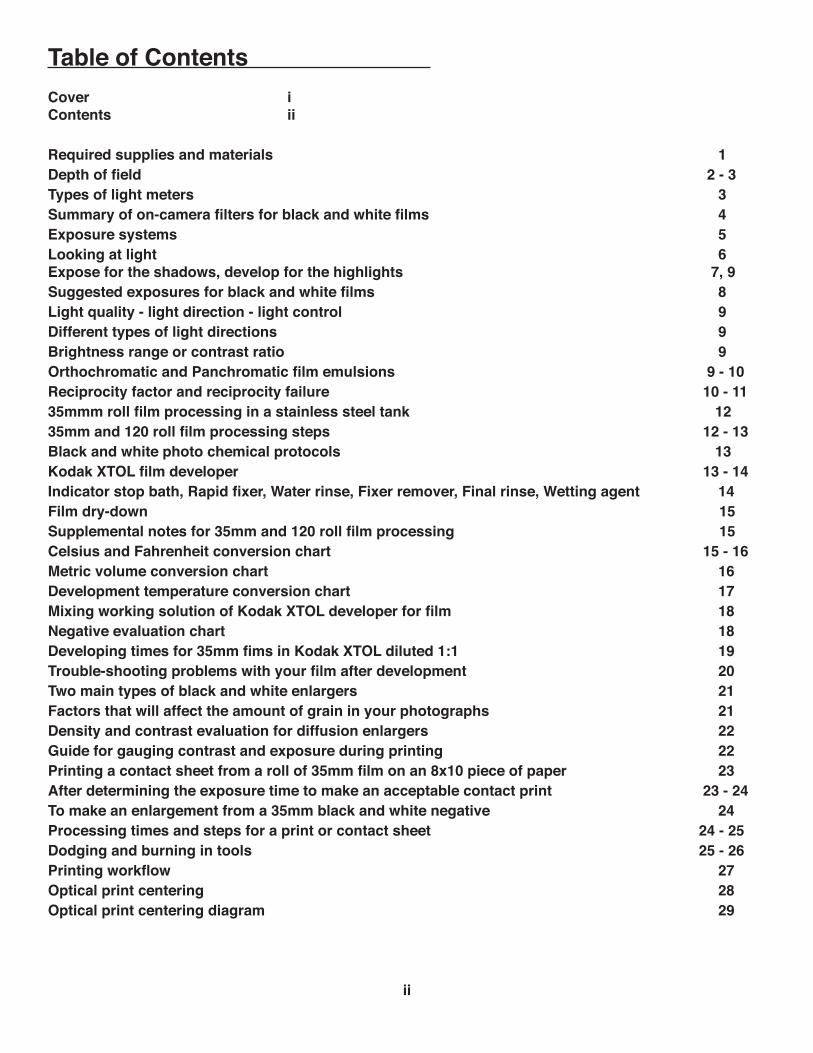
Table of Contents Cover iContents ii
Required supplies and materials 1Depth of field 2 - 3Types of light meters 3Summary of on-camera filters for black and white films 4 Exposure systems 5 Looking at light 6Expose for the shadows, develop for the highlights 7, 9Suggested exposures for black and white films 8Light quality - light direction - light control 9Different types of light directions 9Brightness range or contrast ratio 9Orthochromatic and Panchromatic film emulsions 9 - 10Reciprocity factor and reciprocity failure 10 - 1135mmm roll film processing in a stainless steel tank 12 35mm and 120 roll film processing steps 12 - 13Black and white photo chemical protocols 13Kodak XTOL film developer 13 - 14Indicator stop bath, Rapid fixer, Water rinse, Fixer remover, Final rinse, Wetting agent 14 Film dry-down 15Supplemental notes for 35mm and 120 roll film processing 15Celsius and Fahrenheit conversion chart 15 - 16Metric volume conversion chart 16Development temperature conversion chart 17Mixing working solution of Kodak XTOL developer for film 18Negative evaluation chart 18Developing times for 35mm fims in Kodak XTOL diluted 1:1 19Trouble-shooting problems with your film after development 20Two main types of black and white enlargers 21Factors that will affect the amount of grain in your photographs 21Density and contrast evaluation for diffusion enlargers 22Guide for gauging contrast and exposure during printing 22Printing a contact sheet from a roll of 35mm film on an 8x10 piece of paper 23After determining the exposure time to make an acceptable contact print 23 - 24To make an enlargement from a 35mm black and white negative 24Processing times and steps for a print or contact sheet 24 - 25Dodging and burning in tools 25 - 26Printing workflow 27Optical print centering 28Optical print centering diagram 29
ii
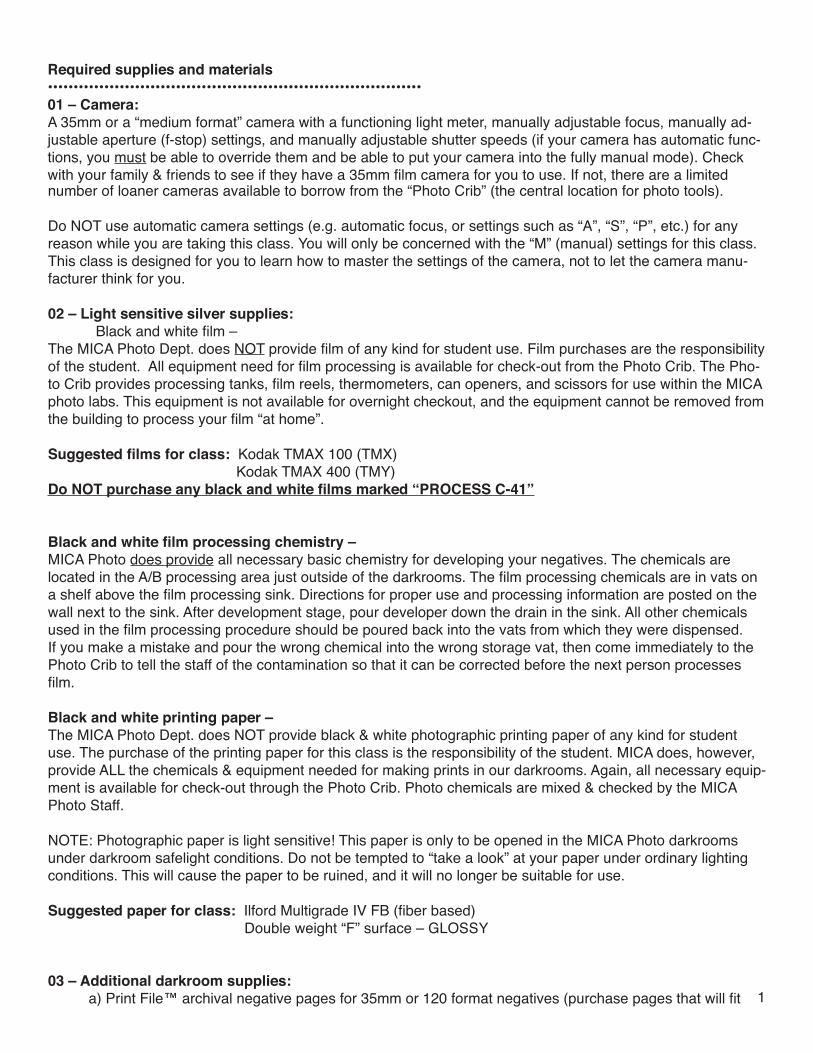
Required supplies and materials•••••••••••••••••••••••••••••••••••••••••••••••••••••••••••••••••••••••••01 – Camera:A 35mm or a “medium format” camera with a functioning light meter, manually adjustable focus, manually ad-justable aperture (f-stop) settings, and manually adjustable shutter speeds (if your camera has automatic func-tions, you must be able to override them and be able to put your camera into the fully manual mode). Check with your family & friends to see if they have a 35mm film camera for you to use. If not, there are a limited number of loaner cameras available to borrow from the “Photo Crib” (the central location for photo tools).
Do NOT use automatic camera settings (e.g. automatic focus, or settings such as “A”, “S”, “P”, etc.) for any reason while you are taking this class. You will only be concerned with the “M” (manual) settings for this class. This class is designed for you to learn how to master the settings of the camera, not to let the camera manu-facturer think for you.
02 – Light sensitive silver supplies: Black and white film – The MICA Photo Dept. does NOT provide film of any kind for student use. Film purchases are the responsibility of the student. All equipment need for film processing is available for check-out from the Photo Crib. The Pho-to Crib provides processing tanks, film reels, thermometers, can openers, and scissors for use within the MICA photo labs. This equipment is not available for overnight checkout, and the equipment cannot be removed from the building to process your film “at home”.
Suggested films for class: Kodak TMAX 100 (TMX) Kodak TMAX 400 (TMY)Do NOT purchase any black and white films marked “PROCESS C-41”
Black and white film processing chemistry –MICA Photo does provide all necessary basic chemistry for developing your negatives. The chemicals are located in the A/B processing area just outside of the darkrooms. The film processing chemicals are in vats on a shelf above the film processing sink. Directions for proper use and processing information are posted on the wall next to the sink. After development stage, pour developer down the drain in the sink. All other chemicals used in the film processing procedure should be poured back into the vats from which they were dispensed. If you make a mistake and pour the wrong chemical into the wrong storage vat, then come immediately to the Photo Crib to tell the staff of the contamination so that it can be corrected before the next person processes film.
Black and white printing paper – The MICA Photo Dept. does NOT provide black & white photographic printing paper of any kind for student use. The purchase of the printing paper for this class is the responsibility of the student. MICA does, however, provide ALL the chemicals & equipment needed for making prints in our darkrooms. Again, all necessary equip-ment is available for check-out through the Photo Crib. Photo chemicals are mixed & checked by the MICA Photo Staff.
NOTE: Photographic paper is light sensitive! This paper is only to be opened in the MICA Photo darkrooms under darkroom safelight conditions. Do not be tempted to “take a look” at your paper under ordinary lighting conditions. This will cause the paper to be ruined, and it will no longer be suitable for use.
Suggested paper for class: Ilford Multigrade IV FB (fiber based) Double weight “F” surface – GLOSSY
03 – Additional darkroom supplies: a) Print File™ archival negative pages for 35mm or 120 format negatives (purchase pages that will fit 1
into a 3-ring binder).b) 3-ring binder for holding negative pages.c) Rubber dishwashing gloves (not latex), apron, several small cotton towels, and a small notebook with pencil.
Clearly labeling everything for this class will greatly decrease the chance for errors, and the tendency for your items to disappear. Use a Sharpie™ pen to label your items, your photo paper. Make sure you also put your name on all your removable data storage devices while at MICA.
04 – Photographic supplies and information:
MICA College Store Service Photo B&H Photo/Video Freestyle Photo 1200 Mt. Royal Ave. 3838Falls Rd. 420 Ninth Ave. 5124 W. Sunset Blvd Baltimore, MD Baltimore, MD New York, NY 10001 Los Angeles CA, 90027 410.225.2276 410.235.6200 1.800.947.9002 1.800.292.6137www.micacollegestores.yahoo.net www.servicephoto.com www.bhphotovideo.com www.freestylephoto.biz
Online Resources:Orphan Cameras Lens specifications & reviews Digital Truth www.bulkus.org www.photodo.com www.digitaltruth.com
Depth of Field•••••••••••••••••••••••••••••••••••••••••••••••••••••••••••••••••••••••••
In most photographs, a portion of the image will appear to be in sharp focus while another section may appear “soft”, or out of focus. The area in which a given image is focused is known as the “Plane of Critical Focus”. This is the area in your photograph that will appear sharp in your final image.
The “Depth of Field” in a photograph refers to the space in the photograph that is visibly sharp. The Depth of Field includes portions of the scene in front of the Plane of Critical Focus (towards the camera) as well as beyond the Plane of Critical Focus (away from the camera).This area of sharpness (depth of field) extends 1/3 into the scene to where you have the lens focused, and 2/3 beyond the Plane of Critical Focus.
Depth of Field is controlled by three factors:
- The aperture of the lens: A smaller aperture opening produces a greater depth of field (e.g. f/16, f/22, etc.). A larger aperture opening produces less depth of field (e.g. f/2.8).
- The focal length of the lens: A shorter focal length yields a greater depth of field (e.g. 24mm wide angle lens) A longer focal length yields a shallower depth of field (e.g. 200mm telephoto lens)
- The distance of the subject to the camera lens: The further the the subject is from the focusing distance of the lens, the greater the depth of field. Subjects placed closer to the focusing distance of the lens will produce less depth of field.
2
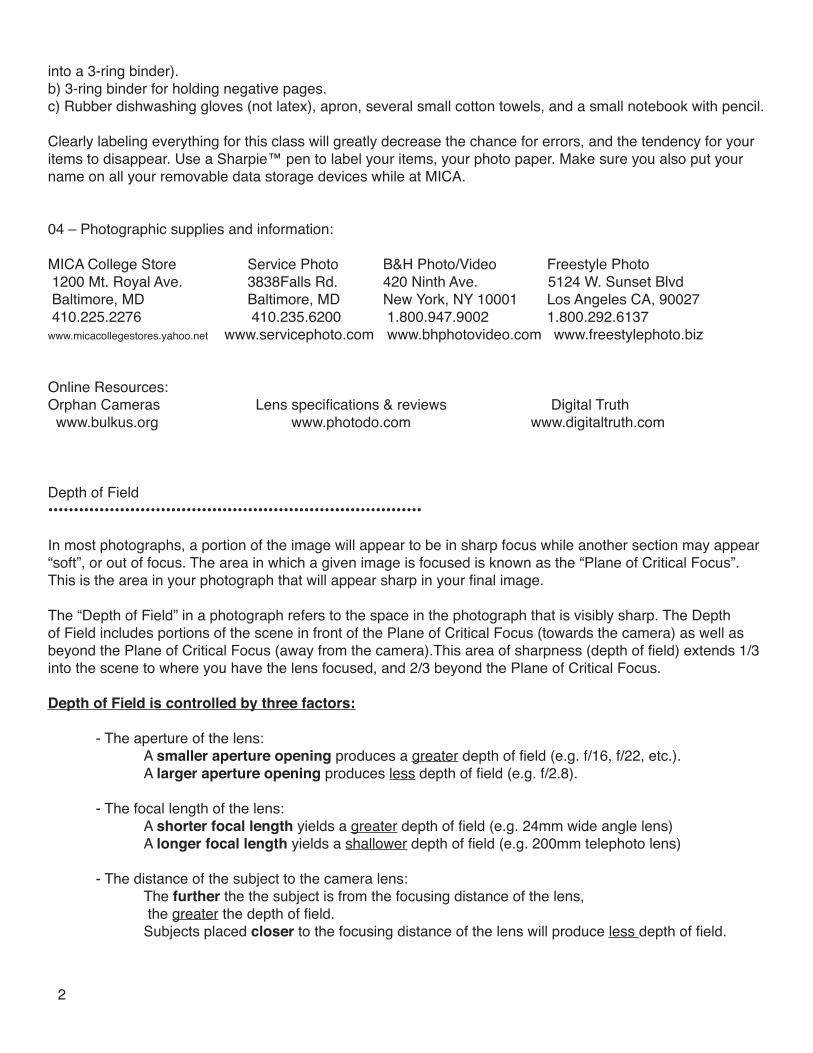
How to manipulate the Depth of Field in your image:
- To achieve a greater amount of depth of field (sharpness in image throughout): • Use a shorter focal length lens (e.g. 20mm, 24mm, 35mm wide angle lenses) • Use a smaller aperture opening (e.g. f/16, f/22, etc.) • Stand further away from subject (20 feet or more preferably)
- To achieve a lower amount of depth of field (image sharp only in a small area): • Use a longer focal length lens (e.g. 200mm, 300mm telephoto lenses) • Use a larger aperture opening (e.g. f/16, f/22, etc.) • Stand closer to subject (1 foot or less - depending on the lens you are using)
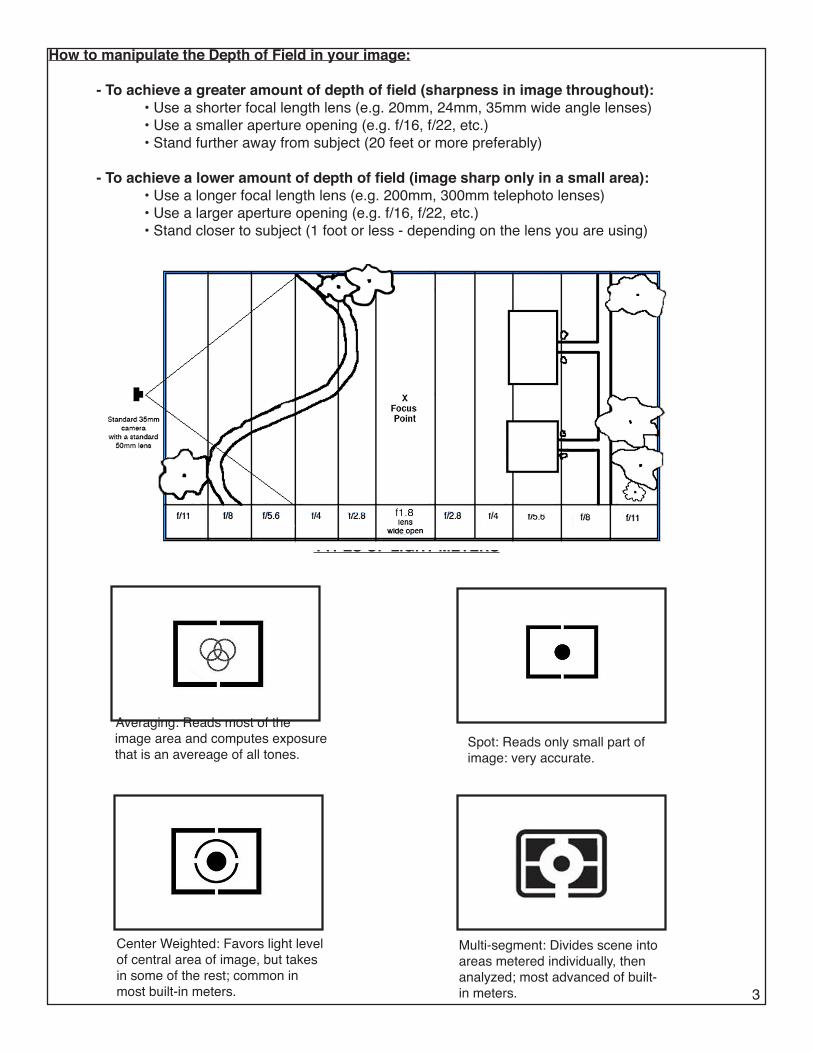
TYPES OF LIGHT METERS
Averaging: Reads most of the image area and computes exposure that is an avereage of all tones.
Spot: Reads only small part of image: very accurate.
Center Weighted: Favors light level of central area of image, but takes in some of the rest; common in most built-in meters.
Multi-segment: Divides scene into areas metered individually, then analyzed; most advanced of built-in meters. 3
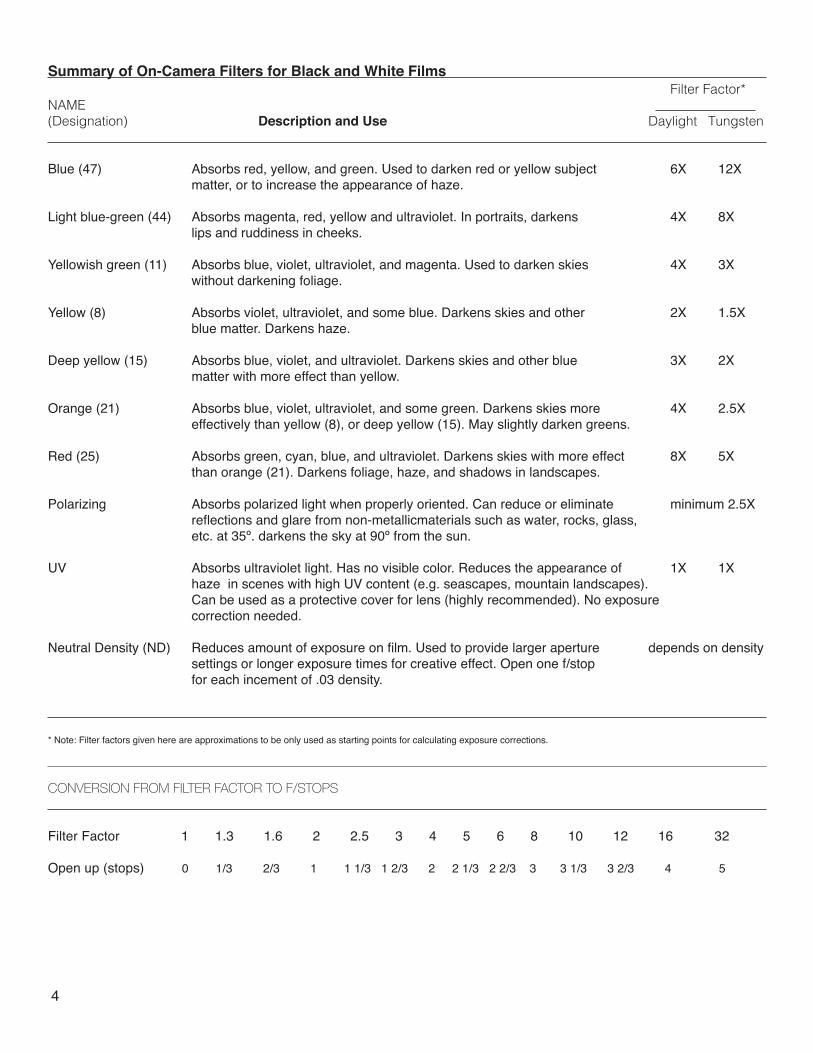
Summary of On-Camera Filters for Black and White Films Filter Factor*NAME (Designation) Description and Use Daylight Tungsten
Blue (47) Absorbs red, yellow, and green. Used to darken red or yellow subject 6X 12X matter, or to increase the appearance of haze.
Light blue-green (44) Absorbs magenta, red, yellow and ultraviolet. In portraits, darkens 4X 8X lips and ruddiness in cheeks.
Yellowish green (11) Absorbs blue, violet, ultraviolet, and magenta. Used to darken skies 4X 3X without darkening foliage.
Yellow (8) Absorbs violet, ultraviolet, and some blue. Darkens skies and other 2X 1.5X blue matter. Darkens haze.
Deep yellow (15) Absorbs blue, violet, and ultraviolet. Darkens skies and other blue 3X 2X matter with more effect than yellow.
Orange (21) Absorbs blue, violet, ultraviolet, and some green. Darkens skies more 4X 2.5X effectively than yellow (8), or deep yellow (15). May slightly darken greens.
Red (25) Absorbs green, cyan, blue, and ultraviolet. Darkens skies with more effect 8X 5X than orange (21). Darkens foliage, haze, and shadows in landscapes.
Polarizing Absorbs polarized light when properly oriented. Can reduce or eliminate minimum 2.5X reflections and glare from non-metallicmaterials such as water, rocks, glass, etc. at 35º. darkens the sky at 90º from the sun.
UV Absorbs ultraviolet light. Has no visible color. Reduces the appearance of 1X 1X haze in scenes with high UV content (e.g. seascapes, mountain landscapes). Can be used as a protective cover for lens (highly recommended). No exposure correction needed.
Neutral Density (ND) Reduces amount of exposure on film. Used to provide larger aperture depends on density settings or longer exposure times for creative effect. Open one f/stop for each incement of .03 density.
* Note: Filter factors given here are approximations to be only used as starting points for calculating exposure corrections.
CONVERSION FROM FILTER FACTOR TO F/STOPS
Filter Factor 1 1.3 1.6 2 2.5 3 4 5 6 8 10 12 16 32
Open up (stops) 0 1/3 2/3 1 1 1/3 1 2/3 2 2 1/3 2 2/3 3 3 1/3 3 2/3 4 5
4
Exposure Systems•••••••••••••••••••••••••••••••••••••••••••••••••••••••••••••••••••••••••
All light meters measure light and read every tone as a neutral grey (18% grey).
Taking a general light meter reading - A general light meter reading of the subject is a good place to start for an accurate exposure if the light in the scene appears to be “average” (meaning that there appears to be equal areas of lights, darks, and mid-tones). In this case, use the meter’s suggested reading.
Expose for the shadows, develop for the highlights - (Yields greater accuracy in controlling exposures for black and white film)
Take a meter reading of the darkest part of your subject where you want to still be able to see detail when you print your final image. Physically move in close to the area you want to meter (filling the frame), and take a me-ter reading. Then, return to your original composition , and make an exposure using the settings you achieved when you metered up close. This technique ensures that you will record detail in the important shadow areas on your film.
Using an 18% grey card - Place the grey card in front of your subject, and move in closer to take a reading off of the grey card with your camrea’s meter (being careful to not cast your shadow on the card). Remove the grey card, and recopmose your image using the settings suggested by your meter.
Averaging the shadows and highlights - If a scene has distinct dark and light ares, take a meter reading of the dark area (e.g. 1/30th second @ f/4) and then, take a meter reading of the light area (e.g. 1/125th second @ f/4)
Average the two readings (1/60th second @ f/4), and make an exposure using this averaged setting.
Bracketing - “Bracketing” is a term for shooting additional negatives on either side of the meter’s suggested reading.
1) If your meter reads, 1/60th @ f/11, take your first exposure at that setting, then... 2) Take another exposure one stop under exposed (less than) your original exposure e.g. 1/60th @ f/16 or 1/125@ f/11 3) Take another exposure one stop over exposed (more than) your original exposure e.g. 1/60th @ f/8 or 1/30@ f/11
This will result in three negatives of the same scene...all with differing densitites. At first glance, all will apear similar, but each will posses a differnt negative density which will be helpful when it comes to final printing. This also gives you a second negative as “insurance” in case one becomes badly damaged and/or scratched.
Metering for predominantly white or light subject matter - If your subject is mostly white you must allow for MORE exposure than the meter reading advises. Either in-crease the size of the aperture (use a lower number), or decrease the shutter speed (use slower speed) by one or more stops.
Metering for predominantly black or dark subject matter - If your subject is mostly white you must allow for LESS exposure than the meter reading advises. Either in-crease the aperture (use higher number), or increase the shutter speed (use a faster speed) by one or more stops.
5
Metering the incidental light -The previous metering techniques all involve “reflected” light meters that read the light reflected back to the camera.You can also use a separate “incident” light meter that reads the amount of light actually falling on the subject. These meters are hand-held, placed in the subject’s position, and pointed back at the camera. These meters provide an extremely accurate overall exposure (like the grey card), and are used extensively in the studio as well as on location.
Pro tip:When in doubt, it is better to slightly overexpose black and white film, than to underexpose it. Overexposure helps to ensure that you have shaow detail and adequate density on your negative. For this reason, many pho-tographers prefer to shoot ISO 100 at ISO 50 (one stop over exposure), or ISO 400 at ISO 200 (one stop over exposure). This is a personal decision, and should be based on testing your camera and meter with specific film and devleoper combinations to suit what best fits your personal style of shooting and printing.
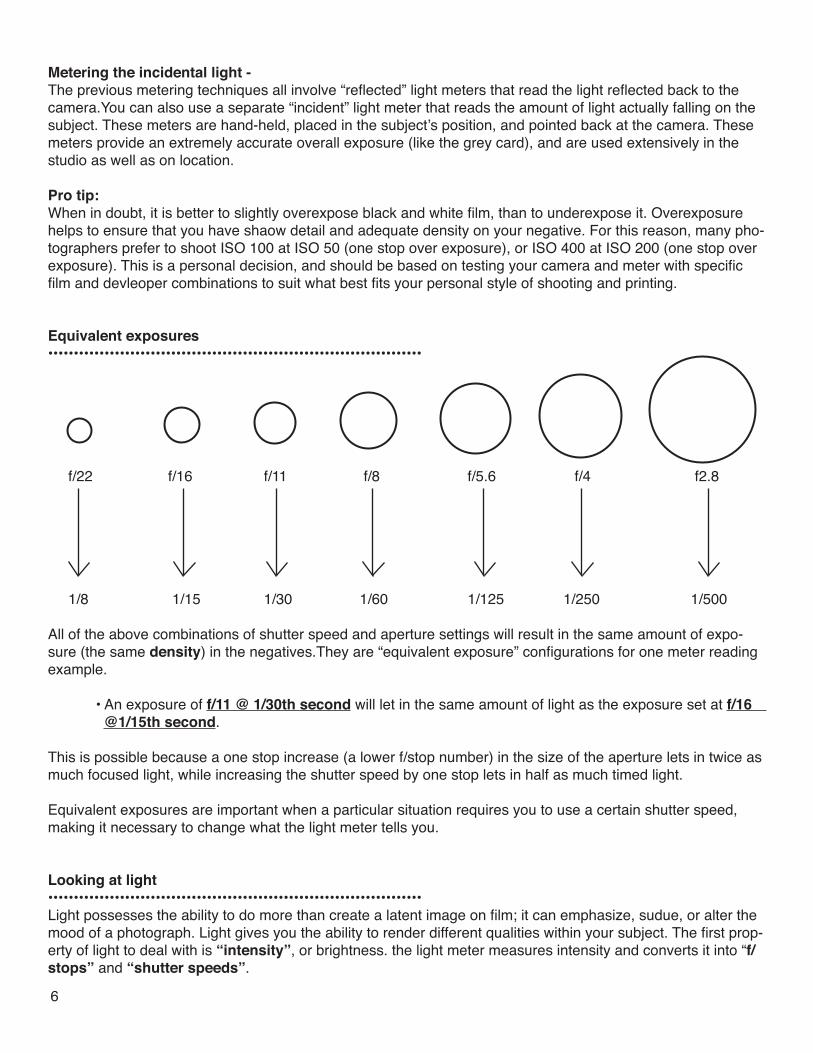
Equivalent exposures•••••••••••••••••••••••••••••••••••••••••••••••••••••••••••••••••••••••••
f/22 f/16 f/11 f/8 f/5.6 f/4 f2.8
1/8 1/15 1/30 1/60 1/125 1/250 1/500
All of the above combinations of shutter speed and aperture settings will result in the same amount of expo-sure (the same density) in the negatives.They are “equivalent exposure” configurations for one meter reading example.
• An exposure of f/11 @ 1/30th second will let in the same amount of light as the exposure set at f/16 @1/15th second.
This is possible because a one stop increase (a lower f/stop number) in the size of the aperture lets in twice as much focused light, while increasing the shutter speed by one stop lets in half as much timed light.
Equivalent exposures are important when a particular situation requires you to use a certain shutter speed, making it necessary to change what the light meter tells you.
Looking at light•••••••••••••••••••••••••••••••••••••••••••••••••••••••••••••••••••••••••Light possesses the ability to do more than create a latent image on film; it can emphasize, sudue, or alter the mood of a photograph. Light gives you the ability to render different qualities within your subject. The first prop-erty of light to deal with is “intensity”, or brightness. the light meter measures intensity and converts it into “f/stops” and “shutter speeds”. 6
The light that enters a camera is either:
• DIRECTED LIGHT from a light source such as the sun or light bulb or • REFLECTED LIGHT that comes from a light source that has been reflected off of objects and “bounced” into your scene.
The light meter measures the light that it sees, and must convert that information into a proper exposure. Most cameras use an average of all of the light that falls on the center circle section of the built-in viewfinder. This quality of light is converted into a combination of aperture and shutter speeds based on the “ISO” (Inter-national Standard Order) of the film. This combination will establish a series of grey tones exposed onto the film. A shade of grey that is halfway between white and black is referred to as a “neutral grey”. Neutral grey is a shade of grey that is the same on a negative as it is in real life., and is referred to as “18% grey” since it reflects back only 18% of the light that falls on it.
Sometimes, using the average type light meter is a mistake. If a light meter is aimed at a scene that has a bright spot within the frame, it will throw off the reading as higher. If a light meter is aimed at a scene that has a dark spot within the frame, it will throw off the reading as lower. A snow scene, or a night shot/concert will fool a light meter. To cure this issue, some photographers use a “spot meter” that measures only a small portion of a scene or frame, at a time.
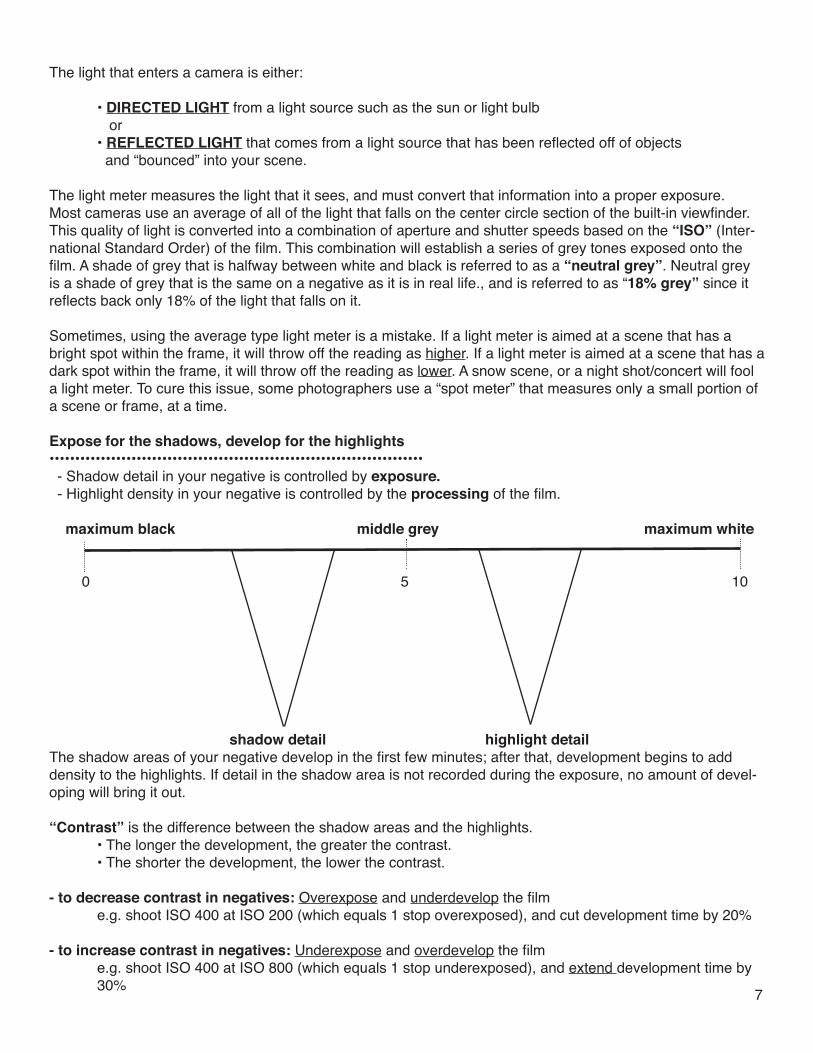
Expose for the shadows, develop for the highlights••••••••••••••••••••••••••••••••••••••••••••••••••••••••••••••••••••••••• - Shadow detail in your negative is controlled by exposure. - Highlight density in your negative is controlled by the processing of the film.
maximum black middle grey maximum white 0 5 10
shadow detail highlight detailThe shadow areas of your negative develop in the first few minutes; after that, development begins to add density to the highlights. If detail in the shadow area is not recorded during the exposure, no amount of devel-oping will bring it out.
“Contrast” is the difference between the shadow areas and the highlights. • The longer the development, the greater the contrast. • The shorter the development, the lower the contrast.
- to decrease contrast in negatives: Overexpose and underdevelop the film e.g. shoot ISO 400 at ISO 200 (which equals 1 stop overexposed), and cut development time by 20%
- to increase contrast in negatives: Underexpose and overdevelop the film e.g. shoot ISO 400 at ISO 800 (which equals 1 stop underexposed), and extend development time by 30% 7
8
Expose for the shadows, develop for the highlights (cont.)•••••••••••••••••••••••••••••••••••••••••••••••••••••••••••••••••••••••••••••••••••••••••
“Push processing film” is achieved by increasing the film speed (underexposing), and then overdeveloping the film to compensate for low-light conditions.
e.g. Shoot ISO 400 film with the ISO set to ISO 1600 (or the equivalent of two stops underexposed. Film development time would then be increased by 100 - 150%.
Light quality - light direction - light control•••••••••••••••••••••••••••••••••••••••••••••••••••••••••••••••••••••••••
Light quality is the most important characteristic of light of it sets the mood of an image. Light quality breaks down into two main types: Hard light and Soft light.
Hard light trows distinct shadows...it comes from a single point light source such as the sun or an electronic flash. It is a harsh light, and often can cause a person to squint or need to put on sunglasses. Hard light can be further broken down according to the direction it is coming from. the direction of the light will determine where the shadows will be. By looking at the shadows in a picture, you can determine where the light was comng from. The terminology for the directions of light are given from the subject’s point of view. Thus, backlight is a light that points toward the camera lens.
Soft light comes from a reflected, or broad source. It is often indirect light, and is frequently found in the shade or as light that reflects into a shaded area from the surroundings. Light quality is mostly affected by a change in the position of the subject, position of the camera, and the use of reflectors or fill flash.
Different types of light directions •••••••••••••••••••••••••••••••••••••••••••••••••••••••••••••••••••••••••“Front light” is used to show detail. Few photographers use this type of light because it tends to eliminate texture. This is the type of light that a built-in flash attachment produces. It is a harsh type of light, and it would be better if diffused (if that choice is an option).
“Side light” emphasizes texture and shape of a subject. A strong side light from a window or a sunset caus-es long shadows, and a dark-side/light-side relationship on a subject. To meter such a light, the photographer may want to avereage a close-up meter reading of both the light and dark sides of the subject.
“Back light” softens the quality of the light as the subject receives mostly reflected light on it’s surface. If the light is placed directly behind the subject, a “Rim light” can be the result. This is a very dramatic type of light. This type of light does a good job at separating the subject from the background, but requires careful metering.
Brightnes range or contrast ratio•••••••••••••••••••••••••••••••••••••••••••••••••••••••••••••••••••••••••“Brightnes range” or “contrast ratio” is how much difference there is between the brightest part of a scene and the darkest part. On most black and white films, the brightness range tat the film can record is about 5 (five) f-stops difference between the light and dark areas. On a bright day, it is possible to be up to 8 or 9 (eight or nine) f-stops difference. On an overcast day, the contrasdt is lowered by only 1 or 2 (one or two) f-stops difference between the lightest and darkest parts of an image. This resuls in prints that are considerably low in contrast.Orthochromatic and Panchromatic film emulsions•••••••••••••••••••••••••••••••••••••••••••••••••••••••••••••••••••••••••The “visible spectrum” is the portion of the electromagnetic color spectrum that is visible to the human eye. Any black and white emulsion can be forced to react to a limited portion of, or to the entire range of, the “visi-ble spectrum”. This is possible by adding different types of sensitizing dyes in the emulsion during the pro
9
duction of the emulsion. This response to the different wavelengths of light is referred to as “color sensitivity”.
• Panchromatic - is a term for black and white films and papers with an emulsion that is sensitve all of the wavelengths of the visible color spectrum. Panchromatic films & papers must be handled in total darkness during processing to avoid unwanted exposure (fogging). Most black and white films available today are pan-chromatic films. The Kodak T-Max line of films we will be using in this class are all made with panchromatic emulsions.
• Othochromatic - is a term for and papers with an emulsion that is sensitve only to the blue and green wavelength portions of the visible spectrum. Orthocromatic films are not sensitive to the red wavelength of light. Orthocromatic emulsions can be safely handled under a dim red “safelight” during processing. Most black and white printing papers (such as the Ilford Multigrade printing paper we will use in this class) are orthochro-matic, and can only be safely handled under a red safelight.Orthochromatic films were first produced by Hermann Vogel in 1873 by adding small amounts of certain aniline based dyes to ordinary photo emulsions.
Reciprocity factor and reciprocity failure•••••••••••••••••••••••••••••••••••••••••••••••••••••••••••••••••••••••••The “reciprocity law” states: exposure = intensity x time
In photography, reciprocity factor refers to the inverse relationship between the light intensity, and the light duration that determines an acceptable exposure for light sensitive materials.
10
• From a light meter reading, a series of equivalent exposures can be achieved by:
- Reducing the light duration (time), and increasing the light intensity (brightness) or by - Increasing the light duration (time), and decreasing the light intensity (brightness)
If an exposure of long duration (typically one second or longer) is required to properly expose a light sensitive material, the sensitivity of the material will be inversely reduced, and “reciprocity failure” will result. To com-pensate for reciprocity failure, you should allow for an exposure of greater/longer light duration (time) than the the one that your light meter suggests, and not by increasing the light intensity (brightness). If you can correct for the reciprocity failure by adjusting the light intensity (brightness), you will reduce the amount of depth of field in your image since the light intensity (brightness) is controlled by the aperture.
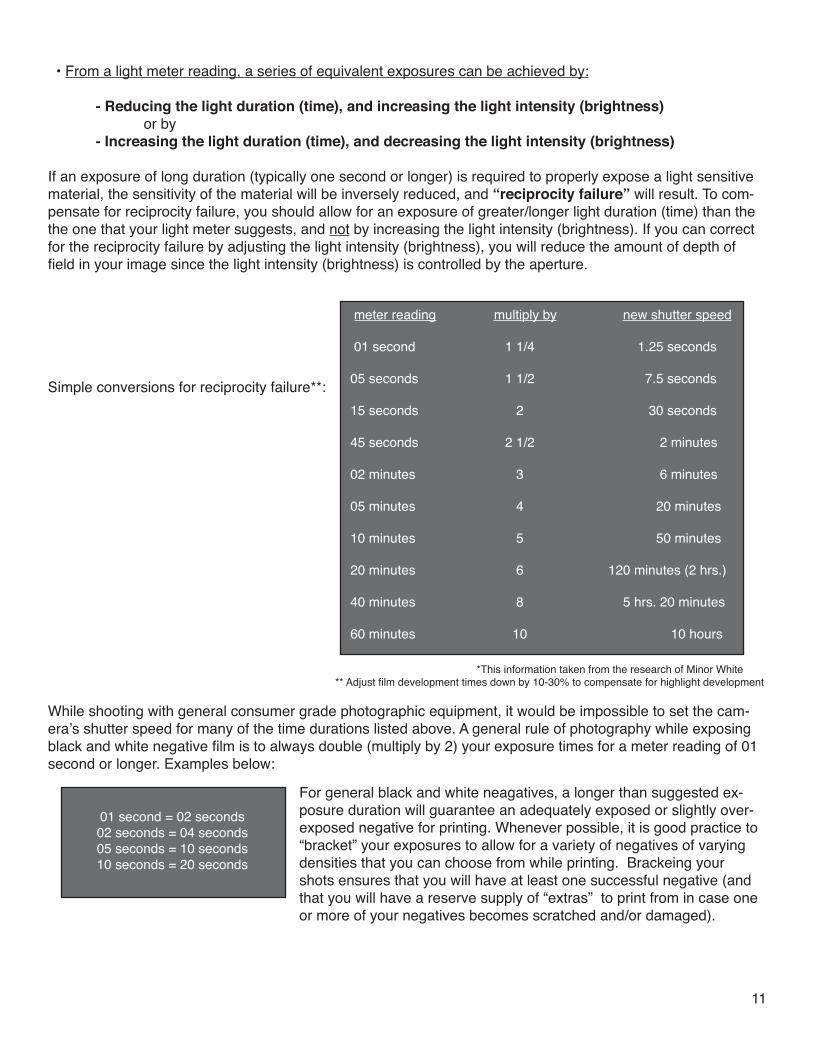
Simple conversions for reciprocity failure**:
*This information taken from the research of Minor White ** Adjust film development times down by 10-30% to compensate for highlight development
While shooting with general consumer grade photographic equipment, it would be impossible to set the cam-era’s shutter speed for many of the time durations listed above. A general rule of photography while exposing black and white negative film is to always double (multiply by 2) your exposure times for a meter reading of 01 second or longer. Examples below:
meter reading multiply by new shutter speed
01 second 1 1/4 1.25 seconds
05 seconds 1 1/2 7.5 seconds
15 seconds 2 30 seconds
45 seconds 2 1/2 2 minutes
02 minutes 3 6 minutes
05 minutes 4 20 minutes
10 minutes 5 50 minutes
20 minutes 6 120 minutes (2 hrs.)
40 minutes 8 5 hrs. 20 minutes
60 minutes 10 10 hours
01 second = 02 seconds02 seconds = 04 seconds05 seconds = 10 seconds10 seconds = 20 seconds
For general black and white neagatives, a longer than suggested ex-posure duration will guarantee an adequately exposed or slightly over-exposed negative for printing. Whenever possible, it is good practice to “bracket” your exposures to allow for a variety of negatives of varying densities that you can choose from while printing. Brackeing your shots ensures that you will have at least one successful negative (and that you will have a reserve supply of “extras” to print from in case one or more of your negatives becomes scratched and/or damaged).
11
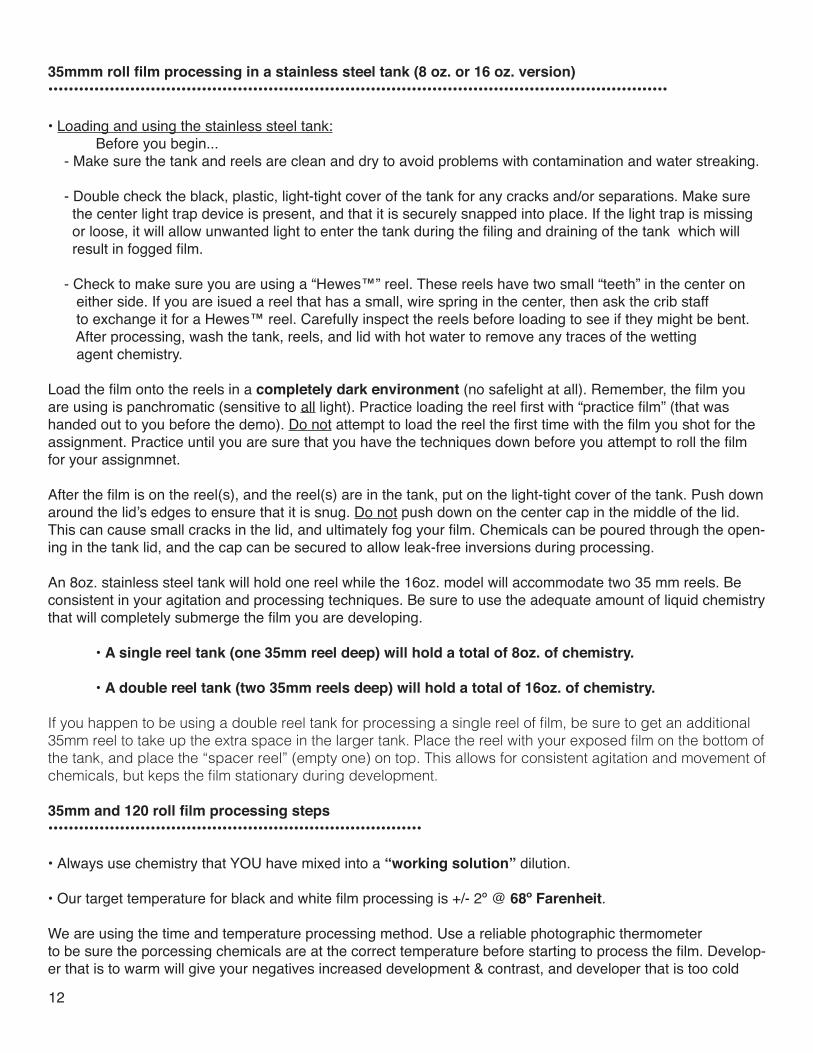
35mmm roll film processing in a stainless steel tank (8 oz. or 16 oz. version)•••••••••••••••••••••••••••••••••••••••••••••••••••••••••••••••••••••••••••••••••••••••••••••••••••••••••••••••••••••••••
• Loading and using the stainless steel tank: Before you begin... - Make sure the tank and reels are clean and dry to avoid problems with contamination and water streaking. - Double check the black, plastic, light-tight cover of the tank for any cracks and/or separations. Make sure the center light trap device is present, and that it is securely snapped into place. If the light trap is missing or loose, it will allow unwanted light to enter the tank during the filing and draining of the tank which will result in fogged film.
- Check to make sure you are using a “Hewes™” reel. These reels have two small “teeth” in the center on either side. If you are isued a reel that has a small, wire spring in the center, then ask the crib staff to exchange it for a Hewes™ reel. Carefully inspect the reels before loading to see if they might be bent. After processing, wash the tank, reels, and lid with hot water to remove any traces of the wetting agent chemistry.
Load the film onto the reels in a completely dark environment (no safelight at all). Remember, the film you are using is panchromatic (sensitive to all light). Practice loading the reel first with “practice film” (that was handed out to you before the demo). Do not attempt to load the reel the first time with the film you shot for the assignment. Practice until you are sure that you have the techniques down before you attempt to roll the film for your assignmnet.
After the film is on the reel(s), and the reel(s) are in the tank, put on the light-tight cover of the tank. Push down around the lid’s edges to ensure that it is snug. Do not push down on the center cap in the middle of the lid. This can cause small cracks in the lid, and ultimately fog your film. Chemicals can be poured through the open-ing in the tank lid, and the cap can be secured to allow leak-free inversions during processing.
An 8oz. stainless steel tank will hold one reel while the 16oz. model will accommodate two 35 mm reels. Be consistent in your agitation and processing techniques. Be sure to use the adequate amount of liquid chemistry that will completely submerge the film you are developing.
• A single reel tank (one 35mm reel deep) will hold a total of 8oz. of chemistry.
• A double reel tank (two 35mm reels deep) will hold a total of 16oz. of chemistry.
If you happen to be using a double reel tank for processing a single reel of film, be sure to get an additional 35mm reel to take up the extra space in the larger tank. Place the reel with your exposed film on the bottom of the tank, and place the “spacer reel” (empty one) on top. This allows for consistent agitation and movement of chemicals, but keps the film stationary during development.
35mm and 120 roll film processing steps•••••••••••••••••••••••••••••••••••••••••••••••••••••••••••••••••••••••••
• Always use chemistry that YOU have mixed into a “working solution” dilution.
• Our target temperature for black and white film processing is +/- 2º @ 68º Farenheit.
We are using the time and temperature processing method. Use a reliable photographic thermometer to be sure the porcessing chemicals are at the correct temperature before starting to process the film. Develop-er that is to warm will give your negatives increased development & contrast, and developer that is too cold
12
will result in a low contrast (thin) negative.
Be careful as can be in timing the agitation cycles. The development controls film contrast, and the agitation of the chemicals controls the activity of the developer on the film surface. Under-agitation will give low contrast negatives that may be streaked and mottled. Over-agitation will give too much contrast to your negatives, and can overdevelop the edges of the image area.
Black and white photo chemical protocols•••••••••••••••••••••••••••••••••••••••••••••••••••••••••••••••••••••••••MICA provides all the chemistry you will be using to develop your black and white negatives. You will notice a shelf above the sinks in the A/B film processing area that holds large storage vats for the photographic pro-cessing chemistry. These vats are maintained by the MICA Photo Staff, and should be ready for you to use at any time.
NOTE: Be sure you are properly “recycling” the chemicals you are using to process your film. Note which chemicals are to go back into the vats, and which are not. If you make a mistake, and accidentally contaminate the vat with the incorrect chemical, do NOT panic. Simply stop what you are doing, and come get the crib staff to take care of the issue. You won’t be “in trouble”...in fact the MICA Photo Staff welcomes it when they are given information in a timely manner so they can address the issue as quickly as possible. This will also ensure that the mistake does not affect anyone else’s process or good results. Remember that the staff is here to sup-port, and encourage, you to successful results. Please tell them if there is any problem you encounter.
• Pre-wet your film with water at the same temperature as the chemistry you will be using. Fill & dump twice with temperature controlled water before adding developer.
Pro tip: Tilting the tank slightly as you pour in your chemistry will allow the liquid to pour in feel without causing air bubbles to “burp” out. If bubbling occurs, you could lose some of the volume of the chemistry you need to properly submerse your film during processing. Pour quickly, but carefully.
Kodak XTOL film developer•••••••••••••••••••••••••••••••••••••••••••••••••••••••••••••••••••••••••Make SURE you dilute the XTOL developer that comes from the storage vat! You need to dilute the XTOL to make a “working solution” that will correctly develop your film. The correct dilution for the XTOL developer is 1:1 (e.g. using 8oz. of “straight” developer from the vat, you would need to add the same exact amount of wa-ter to the decanted developer...add 8 oz. of temperature controlled water to make a working solution of 16oz. total volume.
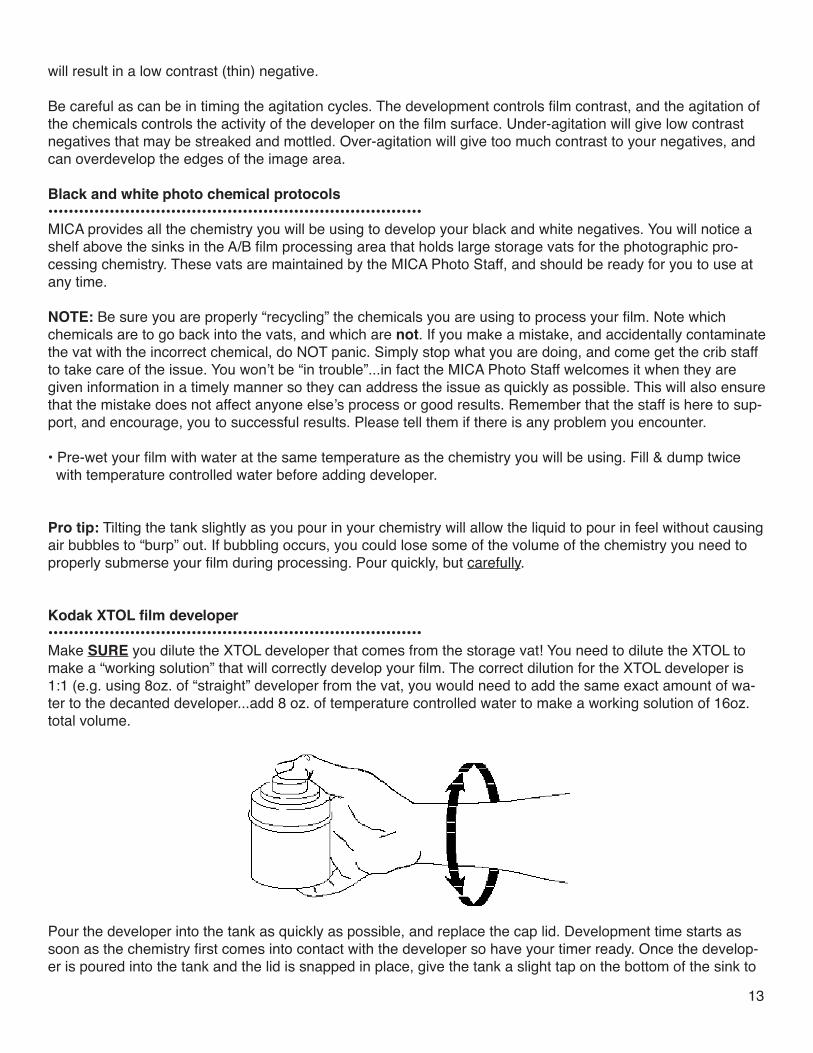
Pour the developer into the tank as quickly as possible, and replace the cap lid. Development time starts as soon as the chemistry first comes into contact with the developer so have your timer ready. Once the develop-er is poured into the tank and the lid is snapped in place, give the tank a slight tap on the bottom of the sink to
13
Film processing (cont.)help dislodge any air bubbles that might have formed on your film surface. Immedaitely begin the initial agita-tion by inverting the tank 10-12 times for 10 seconds. Extend your arm over the sink and twist your wrist in 180º circles in a vigorous fashion. Use a smooth motion with each inversion, and remember you’re not mixing paint...gentle, small circles at the same pace each time.
Continue the agitation cycles until the last 15 seconds of the development time. With 15 seconds remaining, remove small center cap cover, and pour the developer down the drain in the sink. A 15 second drain time is inculded at the end of each step during processing. Do not remove the lid of the tank at this stage...the film is still sensitive to light, and would be ruined if exposed to light.
Indicator stop bath•••••••••••••••••••••••••••••••••••••••••••••••••••••••••••••••••••••••••As soon as the developer is poured out of the tank, pour in the Indicator Stop Bath solution, replace the center cap, and agitate using inversions for 30 seconds continuously. The “indicator” in the Stop Bath will turn a pur-ple-ish blue when it is exhausted. When the step is finished, pour stop bath back into labeled vat above sink.
Rapid fixer•••••••••••••••••••••••••••••••••••••••••••••••••••••••••••••••••••••••••Use Rapid Fixer in large vats above sink. The fixer stage lasts for 5 minutes. Pour in fixer, and begin agitating continuously for the first 30 seconds using the inversion techniques with 180º circles that was discussed previ-ously. Then, agitate again for ten seconds after every 30 second break has passed until time runs out for this stage. Pour all fixer back into the large storage vat above the sink when you complete this step.
Note: TMAX films contain an “anti-halation” dye that requires vigorous agitation for the entire time of the fixing stage to ensure that this dye layer is completely removed from the film base.
Water rinse•••••••••••••••••••••••••••••••••••••••••••••••••••••••••••••••••••••••••After fixing, the lid of the tank can be removed since the film is no longer sensitive to light. Use the “Hurricane” film washing tube for one minute, or simply fill & dump your tank with fresh, temperature controlled running water for one minute.
Fixer remover•••••••••••••••••••••••••••••••••••••••••••••••••••••••••••••••••••••••••Use the vat above the sink to decant enough chemistry to fill your tank, replace the lid, and agitate for one min-ute. When the step is finished, pour fixer remover back into labeled vat above sink.
Final rinse•••••••••••••••••••••••••••••••••••••••••••••••••••••••••••••••••••••••••Place the film back in the “Hurricane” film washing tube for five minutes, place a hose in your tank, or simply fill & dump your tank with fresh, temperature controlled running water for five minutes.
Wetting agent•••••••••••••••••••••••••••••••••••••••••••••••••••••••••••••••••••••••••Wetting agent helps to eliminate water marks and mineral deposits on your film during the drying stage. Decant enough chemistry to fill your tank, replace the lid, and agitate gently for one minute. After step is finished, pour contents down the drain.
Film dry-down•••••••••••••••••••••••••••••••••••••••••••••••••••••••••••••••••••••••••Hang your film in one of the vertical film drying cabinets. Remember, before you open the cabinet door, turn off
14
motor switch and wait for ten (10) seconds before you open the door to allow the circulating air in the cabinet come to rest. After the film is completely dry, cut the film into strips and place them immediately into negative sleeves (PrintFile). Dry negatives are very delicate! Handle by the edges only to avoid scratches and other potential damage.
Supplemental notes for 35mm and 120 roll film processing•••••••••••••••••••••••••••••••••••••••••••••••••••••••••••••••••••••••••••••••••••••••••••••••••••••
- Tank development times should never be less than 5 minutes.
- Development times for film are based on the manufacturer’s recommendations and should be considered as a suggestion, or starting point. Proecessing times may need to be adjusted based on your personal techniqu, camera meter, film batch, film age, your trained visual preference, and your darkroom craft.
- If your negatives are consistently high contrast, reduce the development by 10-12% to help lower the contrast (this should be accompanied by a slight increase in exposure). If your negatives are consistently too flat and lack contrast, increase the development by 10-12% to help increase the contrast .
- If your negatives lack detail in the shadow areas, they are underexposed. Try increasing your exposure by lowering your exposure index (shooting TMAX 400 film with the light meter set at ISO 200).
- Keep the temperature of all developing solutions as close to 68ºF (+/- 1º) as possible. If necessary, place the tank in a bath of water at 68ºF during development to keep the temperature consistent. Do not hold the tank in your hands between agitation steps. Your body tempreature will be transferred into the film development tank, altering the temperature of the chemistry, and resulting in over development.
- TMAX films exhaust the fixer more rapily than other films. Check the fixer you use often to make sure it is still viable. The MICA Photo Staff does monitor the chemicals for freshness, but if you notice that a chemical is not performing as it should, alert the staff immediately to the issue.
- After processing, check the “leader” portion of the film (the portion of the film that was used to load the film into the camera and was exposed to unfocused light). If the leader is grey and transparent, the film was underdeveloped. The leader should appear black and opaque.
- After processing, also check the frame numbers on the sides of the film next to the sprocket holes. If the frame numbers are very dense and blocked up, the film was overdeveloped. If there are no edge numbers and the film is completely blank, that means the film was not developed at all and the fixer has permanently cleared the film.
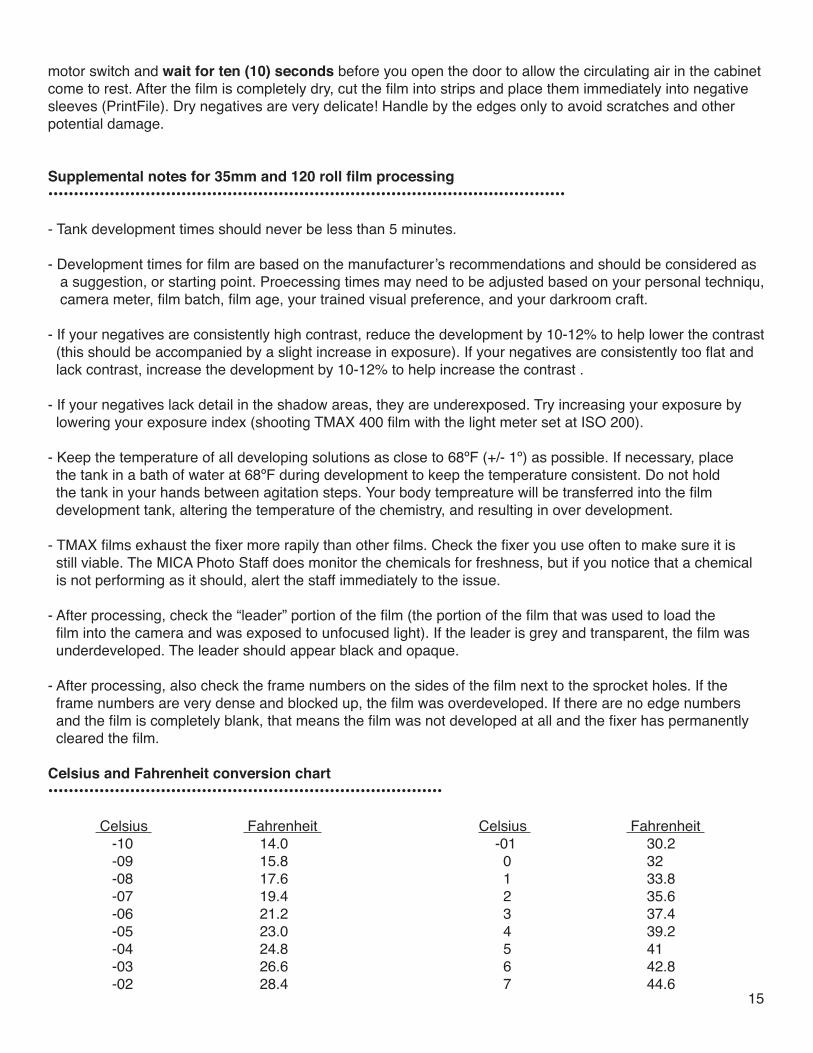
Celsius and Fahrenheit conversion chart•••••••••••••••••••••••••••••••••••••••••••••••••••••••••••••••••••••••••••••
Celsius Fahrenheit Celsius Fahrenheit -10 14.0 -01 30.2 -09 15.8 0 32 -08 17.6 1 33.8 -07 19.4 2 35.6 -06 21.2 3 37.4 -05 23.0 4 39.2 -04 24.8 5 41 -03 26.6 6 42.8 -02 28.4 7 44.6
15
Celsius and Fahrenheit (cont.)•••••••••••••••••••••••••••••••••••••••••••••••••••••••••••••••••••••••••••••
Celsius Fahrenheit Celsius Fahrenheit 8 46.4 21 69.8 9 48.2 22 71.6 10 50 23 73.4 11 51.8 24 75.2 12 53.6 25 77.0 13 55.4 26 78.8 14 57.2 27 80.6 15 59 28 82.4 16 60.8 29 84.2 17 62.6 30 86 18 64.4 31 87.8 19 66.2 32 89.6 20 68.0 33 91.4
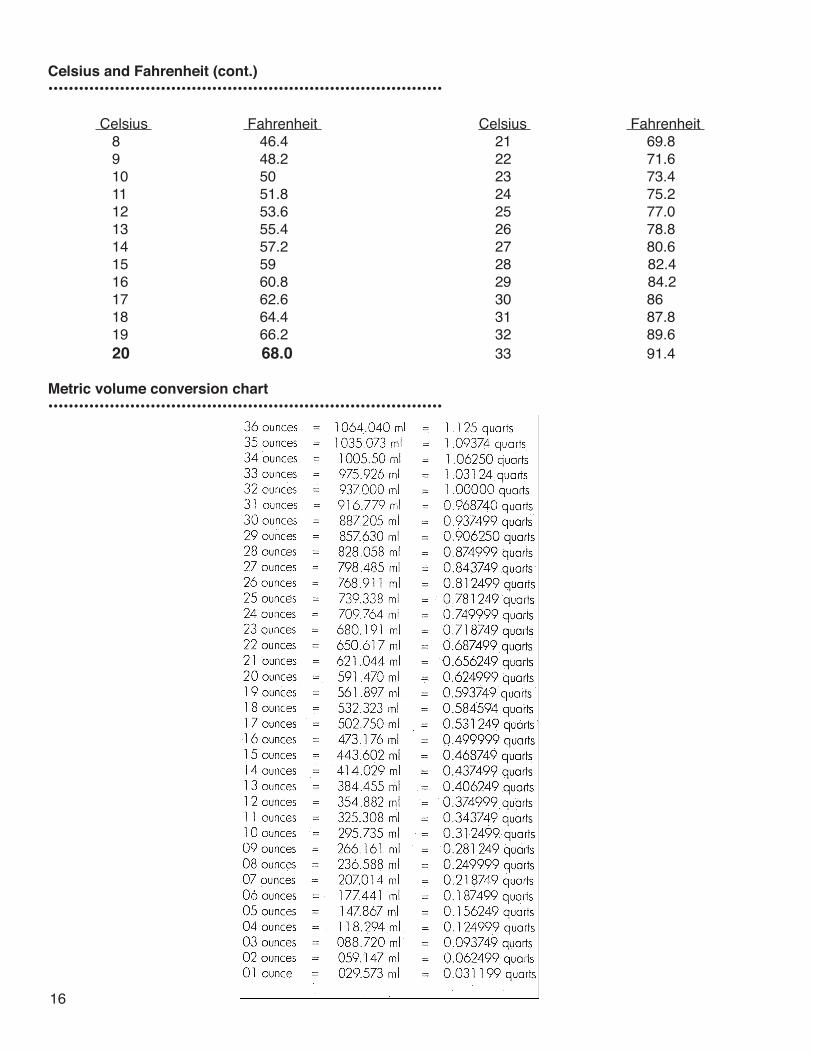
Metric volume conversion chart•••••••••••••••••••••••••••••••••••••••••••••••••••••••••••••••••••••••••••••
16
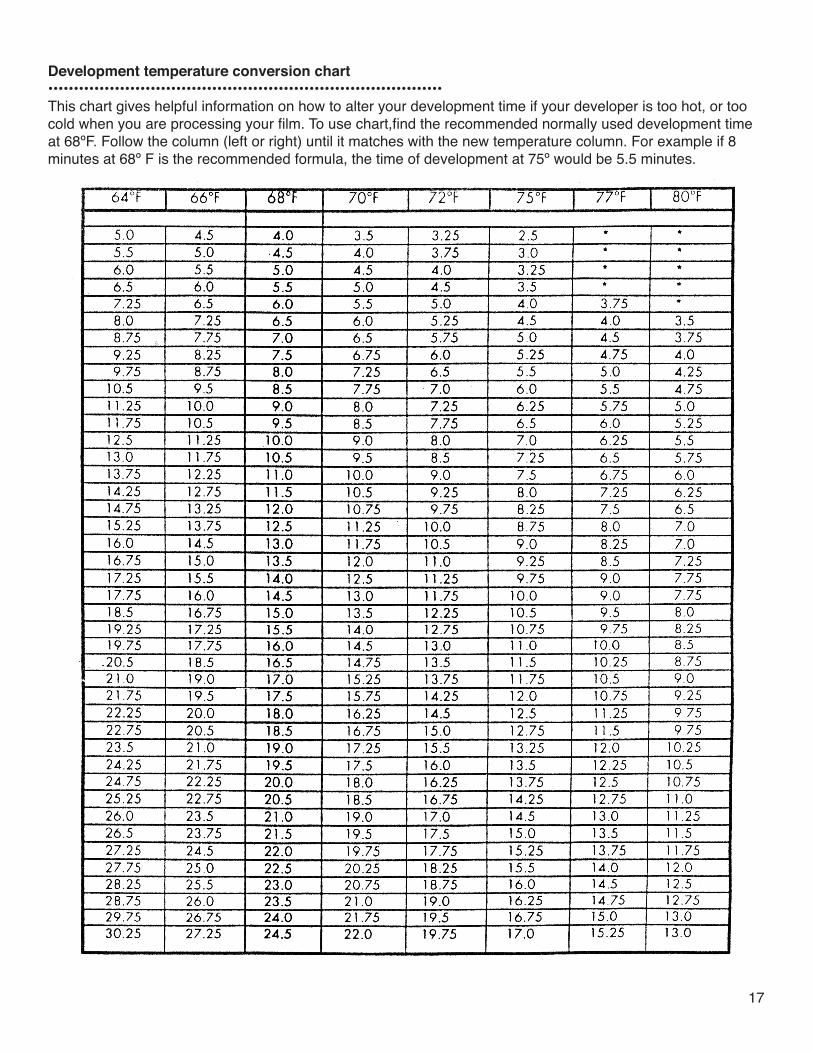
Development temperature conversion chart•••••••••••••••••••••••••••••••••••••••••••••••••••••••••••••••••••••••••••••This chart gives helpful information on how to alter your development time if your developer is too hot, or too cold when you are processing your film. To use chart,find the recommended normally used development time at 68ºF. Follow the column (left or right) until it matches with the new temperature column. For example if 8 minutes at 68º F is the recommended formula, the time of development at 75º would be 5.5 minutes.
17

Mixing working solution of Kodak XTOL developer for film•••••••••••••••••••••••••••••••••••••••••••••••••••••••••••••••••••••••••••••••••••••••
You will notice a shelving unit above the sink in the wash area of A/B. This is where the film development chemicals are stored (along with the corresponding mixing cups below). Only use the coreect color coded cup for decanting each chemical from the vats above. The color coding reduces the chances for mistakes and/or accidental contamination. As always, thoroughly rinse and dry each mixing cup you use during processing. This is a community working environment, so cleaning up after yourself is paramount.
• To make a “working solution” from the “concentrated” XTOL solution in the vat: - Dilute concetrate sloution 1:1 (1 part XTOL concentrate to 1 part water) with temperature controlled water. Examples: Dilute 500ml concentrate solution with 500ml of water to yield 1 liter of “working solution”.
Dilute 17oz. concentrate solution with 17oz. of water to yield 34 oz. of “working solution”.
*** ALL OTHER BLACK & WHITE FILM PROCESSING CHEMISTRY IN THE STORAGE VATS ARE MIXED AT THE PROPER “WORKING SOLUTION”. XTOL IS THE ONLY EXCEPTION. ***
Negative evaluation chart•••••••••••••••••••••••••••••••••••••••••••••••••••••••••••••••••••••••••••••••••••••••
If your negative
is....underexposed
unde
rdev
elop
ed
overexposed
over
deve
lope
d
normal
norm
ally
deve
lped
Negatives will be thin overall, lacks density in both the shadows & highlights.
Negatives will have good shadow desity, but it will apee-
ar thin in the highlights.
Print will be low in contrast but will have full details in both the
shadows and highlights.
Negatives will be thin overall, and lacks shadow density.
Print will be low in contrast, and have little or no detail in
the shadows.
Negatives will have good den-sity overall, but lack shadow
density.
Print will be high in contrast, and have little or no shadow detail. Print will show grain.
Negatives will have adequate density in shadows & highlights,
but will be overall dense.
Print will be low in contrast, with a decent range of tones with a
possible loss of sharpness.
Negatives will have adequate density in shadows & highlights.
Print will have average contrast, with a full of details in both the
shadows & highlights.
Negatives will have full shadow density, but the highlights will be
too dense.Print will be high in contrast, with
good shadow detail but high-lightswill be too bright. Print will
have increased grain & reduced sharpness.
Negatives will be too dense, and have opaque highlights.
Print will have low to normal contrast, with full shadow detail.Highlights will be washed out.
Print will be grainy & have reduced sharpness.
Negatives will be too dense over-all, with lots of shadow details but highlightsmay be blocked -up or
opaque.Print will have average contrast, with full shadow detail.Highlights may be too light. Print will have
more grain & reduced sharpness.
18`
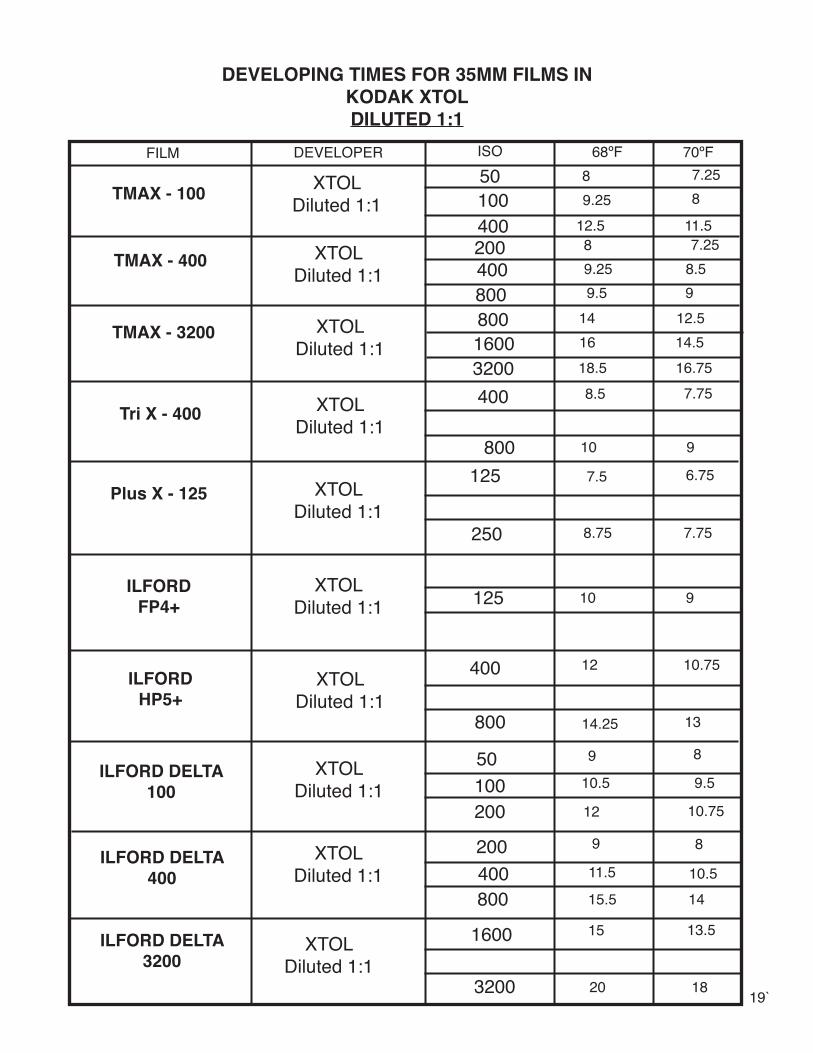
DEVELOPING TIMES FOR 35MM FILMS IN KODAK XTOL DILUTED 1:1
FILM DEVELOPER ISO 68ºF 70ºF
TMAX - 100
Tri X - 400
ILFORD DELTA100
Plus X - 125
TMAX - 400
TMAX - 3200
ILFORDFP4+
ILFORDHP5+
ILFORD DELTA400
ILFORD DELTA3200
XTOLDiluted 1:1
XTOLDiluted 1:1
XTOLDiluted 1:1
XTOLDiluted 1:1
XTOLDiluted 1:1
XTOLDiluted 1:1
XTOLDiluted 1:1
XTOLDiluted 1:1
XTOLDiluted 1:1
XTOLDiluted 1:1
3200
125
400
100
3200
400
125
8001600
250
800
400200
800
400
1600
50
100200
50
400
800
12.5
7.5
910
8
14.518.5 16.75
7.75
16
6.75
7.75
8
8.5
7.25
14
9.25
10
8.75
9
8
200
800
11.57.25
9.25 8.59.5 9
12.5
10.75
13
14
12
14.25
10.5
10.5
18
15.5
11.5
9 8
9.5
12 10.75
9 8
20
13.515
19`
Trouble-shooting problems with your film after development•••••••••••••••••••••••••••••••••••••••••••••••••••••••••••••••••••••••••••••••••••••••••••••••••••••••••••••
- If the film leader is grey and the film numbers are very light:This is a sign that the film has been underdeveloped. this problem is irreversible, and you cannot do anything to improve the thin density of the film. Doulbe check your film developer to make sure it was diluted correctly, and that it has not become oxidized. Be sure you are properly agitiating your film for the entire recommended time.
- The film has an overall grey cast, or totally black cast in random areas:This means the film was fogged while in the camera due to a light leak, or the camera back being opened while fim was in the camera. The film could also have been fogged while loading it onto the reels before processing. Check the lid of the tank for any cracks.
- The frame numbers are very black and blocked up: This is a sign that the film was overdeveloped. Watch the time for developing, and watch that you do not ex-cessively agitate the film. This could also be a sign that the temperature of the chemistry was too high when you applied the chemistry to the film.
- The film is completely clear, and there are no film numbers:This means that either fixer was used in place of the developer by mistake, or that your developer was totally exhausted (or was mixed incorrectly). To avoid this, make sure you are decanting the correct chemical from the storage vats for film processing.
- The film is completely clear, however the frame numbers are black and readable:This shows that the film never was exposed while in the camera. The film was loaded in the camera, but did not advace through the camera while shooting. Check the shutter as well to make sure it is functioning proper-ly. Double check the advancement of the film as you load the camera (often by looking at the film rewind knob to see if it is rotating as you advance the film) before you close the back.
- The negative is thin, but the frame numbers are black and readable:This is a sign that the film was underexposed. Watch your exposure settings, check your light meter readings, and double check your ISO setting of the camera in relation to the film being shot.
- The negative has a series of pinkish and milky blotches after development:This means that the film was improerly loaded onto the stainless steel reels. The blotches are a sign that the film has come into contact with itself while wet, preventing the even distribution of developer onto the film surface during processing. Try reloading the film onto the reel, and run it through the fixer step again. This will clear the film, and remove the blotches, but it won’t rescue any “lost” (damaged) frames.
- Crescent shaped makings on the negatives:This is a sign of rough and/or excessive film handling which crimped the film while it was loaded onto the reel. This crescent shape will show in a print from the negative. To aviod this, hold the film lightly on it’s edges be-tween two fingers with adequate tension to allow for easy loading onto the film reels. Also avoid unnecessary bending & twisting of the film as this contributes to the crimping.
- A magenta color cast on the film with adequately developed negatives:This means that there was insufficient fixing of the film. Check to make sure the fixer is not exhausted (ask the crib staff to check), and fix the film again using fresh fixer to remove the remaining color cast. Do not pour fixer down the drain.
20
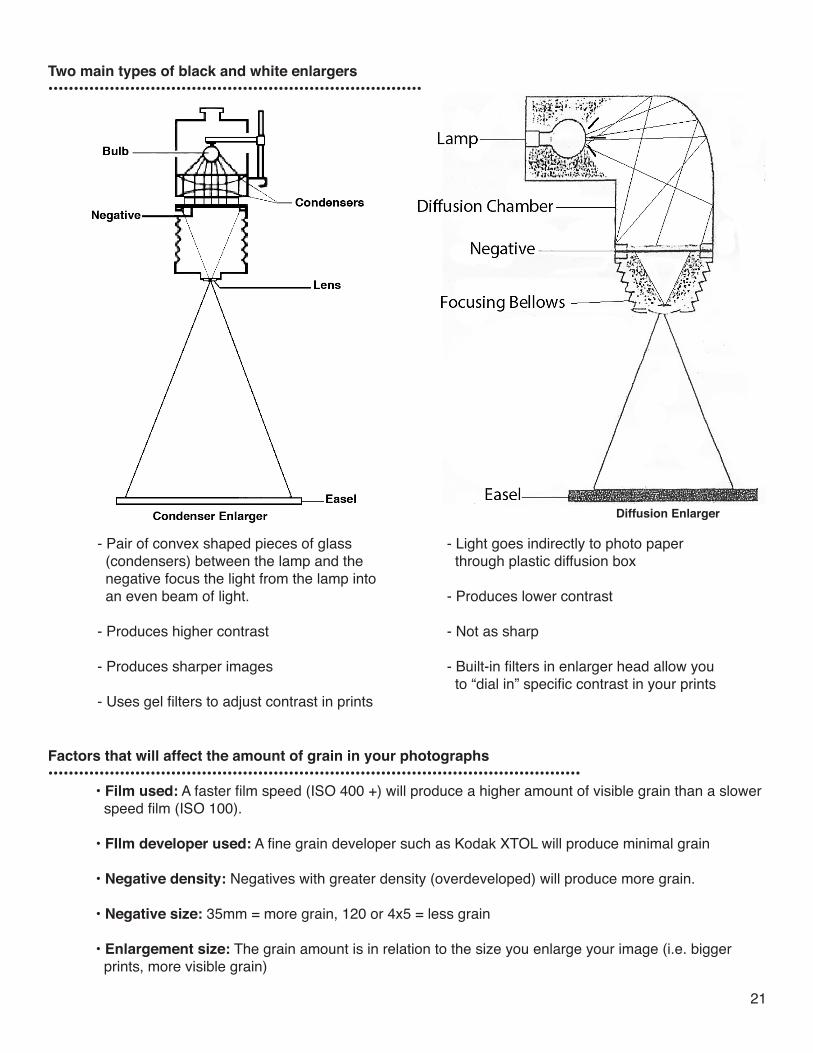
Two main types of black and white enlargers•••••••••••••••••••••••••••••••••••••••••••••••••••••••••••••••••••••••••
Factors that will affect the amount of grain in your photographs•••••••••••••••••••••••••••••••••••••••••••••••••••••••••••••••••••••••••••••••••••••••••••••••••••••••• • Film used: A faster film speed (ISO 400 +) will produce a higher amount of visible grain than a slower speed film (ISO 100). • FIlm developer used: A fine grain developer such as Kodak XTOL will produce minimal grain • Negative density: Negatives with greater density (overdeveloped) will produce more grain. • Negative size: 35mm = more grain, 120 or 4x5 = less grain • Enlargement size: The grain amount is in relation to the size you enlarge your image (i.e. bigger prints, more visible grain)
- Pair of convex shaped pieces of glass (condensers) between the lamp and the negative focus the light from the lamp into an even beam of light.
- Produces higher contrast
- Produces sharper images
- Uses gel filters to adjust contrast in prints
- Light goes indirectly to photo paper through plastic diffusion box
- Produces lower contrast
- Not as sharp
- Built-in filters in enlarger head allow you to “dial in” specific contrast in your prints
Diffusion Enlarger
21
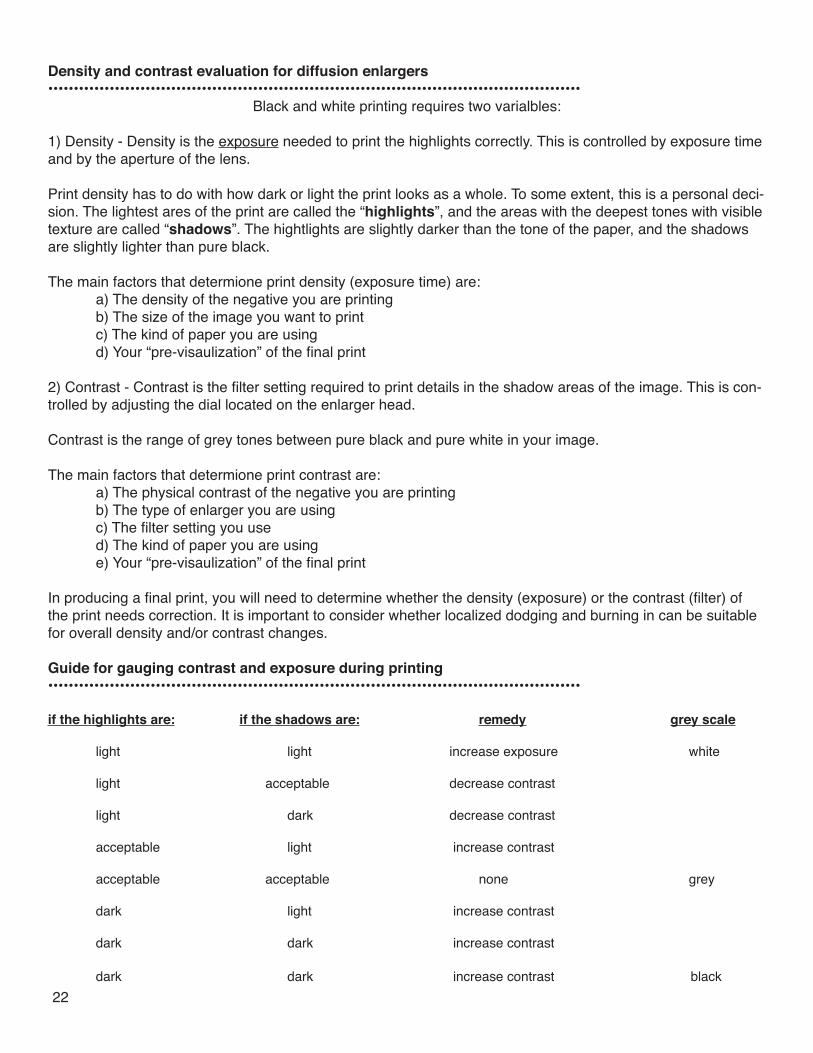
Density and contrast evaluation for diffusion enlargers••••••••••••••••••••••••••••••••••••••••••••••••••••••••••••••••••••••••••••••••••••••••••••••••••••••••
Black and white printing requires two varialbles:
1) Density - Density is the exposure needed to print the highlights correctly. This is controlled by exposure time and by the aperture of the lens.
Print density has to do with how dark or light the print looks as a whole. To some extent, this is a personal deci-sion. The lightest ares of the print are called the “highlights”, and the areas with the deepest tones with visible texture are called “shadows”. The hightlights are slightly darker than the tone of the paper, and the shadows are slightly lighter than pure black.
The main factors that determione print density (exposure time) are: a) The density of the negative you are printing b) The size of the image you want to print c) The kind of paper you are using d) Your “pre-visaulization” of the final print
2) Contrast - Contrast is the filter setting required to print details in the shadow areas of the image. This is con-trolled by adjusting the dial located on the enlarger head.
Contrast is the range of grey tones between pure black and pure white in your image.
The main factors that determione print contrast are: a) The physical contrast of the negative you are printing b) The type of enlarger you are using c) The filter setting you use d) The kind of paper you are using e) Your “pre-visaulization” of the final print
In producing a final print, you will need to determine whether the density (exposure) or the contrast (filter) of the print needs correction. It is important to consider whether localized dodging and burning in can be suitable for overall density and/or contrast changes.
Guide for gauging contrast and exposure during printing••••••••••••••••••••••••••••••••••••••••••••••••••••••••••••••••••••••••••••••••••••••••••••••••••••••••
if the highlights are: if the shadows are: remedy grey scale
light light increase exposure white
light acceptable decrease contrast
light dark decrease contrast
acceptable light increase contrast
acceptable acceptable none grey
dark light increase contrast
dark dark increase contrast
dark dark increase contrast black22
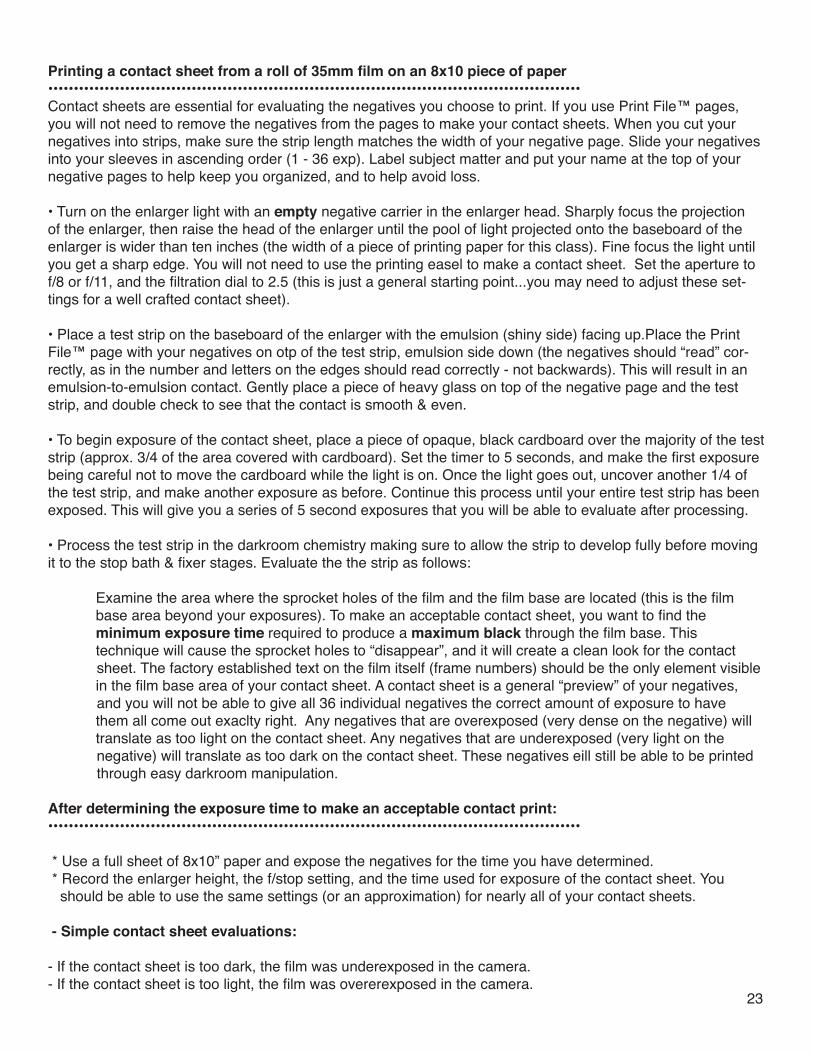
Printing a contact sheet from a roll of 35mm film on an 8x10 piece of paper••••••••••••••••••••••••••••••••••••••••••••••••••••••••••••••••••••••••••••••••••••••••••••••••••••••••Contact sheets are essential for evaluating the negatives you choose to print. If you use Print File™ pages, you will not need to remove the negatives from the pages to make your contact sheets. When you cut your negatives into strips, make sure the strip length matches the width of your negative page. Slide your negatives into your sleeves in ascending order (1 - 36 exp). Label subject matter and put your name at the top of your negative pages to help keep you organized, and to help avoid loss.
• Turn on the enlarger light with an empty negative carrier in the enlarger head. Sharply focus the projection of the enlarger, then raise the head of the enlarger until the pool of light projected onto the baseboard of the enlarger is wider than ten inches (the width of a piece of printing paper for this class). Fine focus the light until you get a sharp edge. You will not need to use the printing easel to make a contact sheet. Set the aperture to f/8 or f/11, and the filtration dial to 2.5 (this is just a general starting point...you may need to adjust these set-tings for a well crafted contact sheet).
• Place a test strip on the baseboard of the enlarger with the emulsion (shiny side) facing up.Place the Print File™ page with your negatives on otp of the test strip, emulsion side down (the negatives should “read” cor-rectly, as in the number and letters on the edges should read correctly - not backwards). This will result in an emulsion-to-emulsion contact. Gently place a piece of heavy glass on top of the negative page and the test strip, and double check to see that the contact is smooth & even.
• To begin exposure of the contact sheet, place a piece of opaque, black cardboard over the majority of the test strip (approx. 3/4 of the area covered with cardboard). Set the timer to 5 seconds, and make the first exposure being careful not to move the cardboard while the light is on. Once the light goes out, uncover another 1/4 of the test strip, and make another exposure as before. Continue this process until your entire test strip has been exposed. This will give you a series of 5 second exposures that you will be able to evaluate after processing.
• Process the test strip in the darkroom chemistry making sure to allow the strip to develop fully before moving it to the stop bath & fixer stages. Evaluate the the strip as follows:
Examine the area where the sprocket holes of the film and the film base are located (this is the film base area beyond your exposures). To make an acceptable contact sheet, you want to find the minimum exposure time required to produce a maximum black through the film base. This technique will cause the sprocket holes to “disappear”, and it will create a clean look for the contact sheet. The factory established text on the film itself (frame numbers) should be the only element visible in the film base area of your contact sheet. A contact sheet is a general “preview” of your negatives, and you will not be able to give all 36 individual negatives the correct amount of exposure to have them all come out exaclty right. Any negatives that are overexposed (very dense on the negative) will translate as too light on the contact sheet. Any negatives that are underexposed (very light on the negative) will translate as too dark on the contact sheet. These negatives eill still be able to be printed through easy darkroom manipulation.
After determining the exposure time to make an acceptable contact print:••••••••••••••••••••••••••••••••••••••••••••••••••••••••••••••••••••••••••••••••••••••••••••••••••••••••
* Use a full sheet of 8x10” paper and expose the negatives for the time you have determined. * Record the enlarger height, the f/stop setting, and the time used for exposure of the contact sheet. You should be able to use the same settings (or an approximation) for nearly all of your contact sheets.
- Simple contact sheet evaluations:
- If the contact sheet is too dark, the film was underexposed in the camera.- If the contact sheet is too light, the film was overerexposed in the camera.
23
- Simple contact sheet evaluations (cont.):
- If the contact sheet has too much contrast, the film was overdeveloped.- If the contact sheet is “flat”, the film was underdeveloped.
To make an enlargement from a 35mm black and white negative••••••••••••••••••••••••••••••••••••••••••••••••••••••••••••••••••••••••••••••••••••••••••••••••••••••••
1) Place the negative you have chosen to print in the negative carrier with the emulsion side down. The emul-sion side of the film is the side that appears duller than the other side, and is usually on the inside curve on dry film. When you look at your negative and you can read the numbers and words correctly (the image is not backwards), you are looking at the film base (shiny) side.
2) Brush the negative with a Staticmaster™ brush, or blow the dust off with an air blower.
3) Place the negative carrier in the enlarger, and lower the head into position. set your printing easel to the correct size of enlargement you desire (around 6x9” is good for a full frame 35mm image on an 8x10” piece of photo paper), and insert a “focus sheet” (the back of an old print or contact sheet works fine) into the slit of the easel. Turn on the enlarger light by using the switch of the timer. Use the fine focus knob to focus the image with the lens wide open (brightest output of light). Place a grain focuser under the light, and use it to find your critical fine focus.Close the lens 1-2 stops if you need aid in finding the sharpest focus. Let your eye become accustomed to the light, and slowly twist the fine focus knob until you can see sharp, tiny specs of grain in the film. Go past the sharpest point, and bring it back, until you get the absolute sharpest focus in the grain finder.
NOTE: These enlargers have a “white light” lever to provide more light for focusing. Be sure to shut it off before you make a print, or your print will receive unfiltered white light.
4) Remove the grain focuser, and the ‘focus sheet” you used in the previous step. Turn off enlarger light, and place a fresh, unexposed sheet pf photographic paper emulsion side up (shiny side) in the slot in the printing easel, and let the easel frame come down to hold the paper securely in place.
5) Now use your pre-set time on your timer (determined from your test strip) to make the intial exposure for your print. Hit the switch, and when the light goes out, remove the paper and process your print in the chemis-try that is set up in the sink.
Processing times and steps for a print or contact sheet•••••••••••••••••••••••••••••••••••••••••••••••••••••••••••••••••••••••••••••••••••••••••••••••••••••••••The chemicals for printing are mixed and monitored by the MICA Photo crib staff. That being said, if you en-counter any problems with the chemisrty in the darkrooms, please go to the crib immediately and tell the staff about the issue.
Always use the print tongs to handle the prints while they are in the chemistry trays. Never put your bare hands into the photo chemicals. If you get chemistry on your skin, rinse the area thoroughly with water, and then go to the restroom to wash again with soap. Contamination is not a joke, and you must be diligent in all your pro-cesses to be organized, clean and safe.
Each tray in the darkroom has a separate pair of tongs for labeled specifically for use in each solution. Do not mix up the tongs, or it will ruin the chmeistry in the tray and leave contamination marks on your print. After you have placed your print in the Fixer for a minimum of 30 seconds, it will no longer be sensitive to light. It is safe to view and evaluate your print in the light, but remember to replace your print in the fixer for the complete processing time once you have made your initial evaluation. NOTE: You will NOT be able to darken or alter the print further by placing it back under the enlarger light at this stage.
24
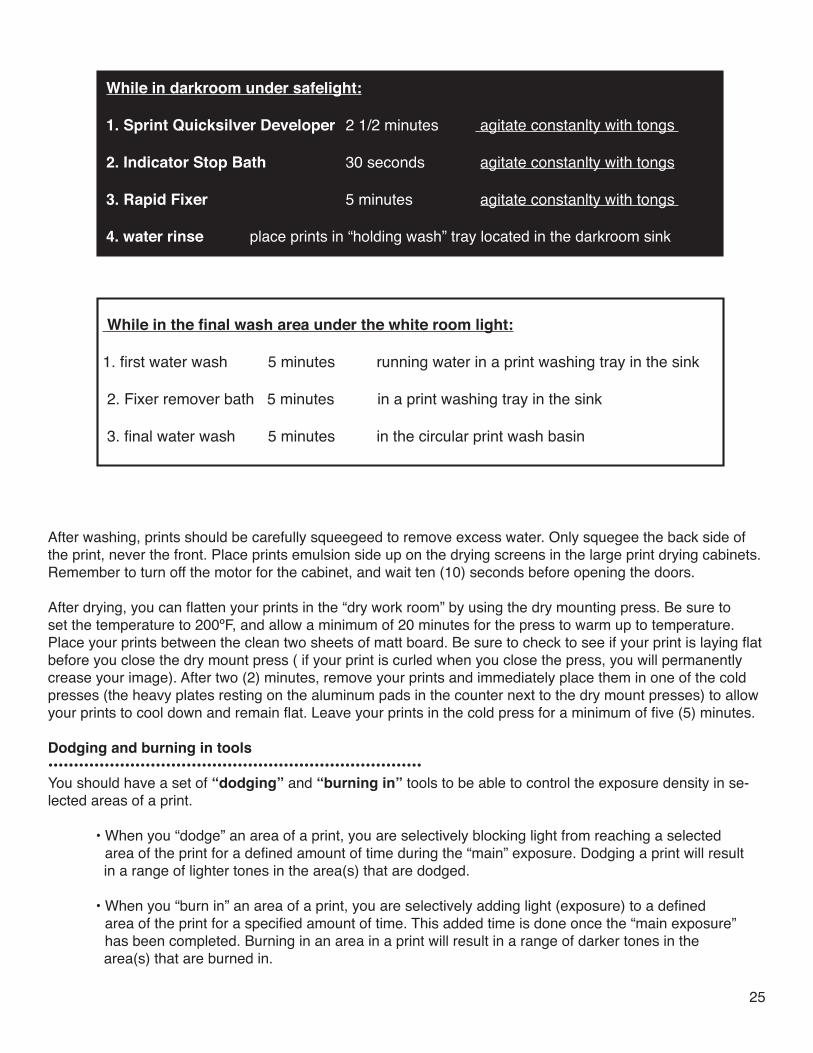
While in the final wash area under the white room light:
1. first water wash 5 minutes running water in a print washing tray in the sink
2. Fixer remover bath 5 minutes in a print washing tray in the sink
3. final water wash 5 minutes in the circular print wash basin
While in darkroom under safelight:
1. Sprint Quicksilver Developer 2 1/2 minutes agitate constanlty with tongs
2. Indicator Stop Bath 30 seconds agitate constanlty with tongs
3. Rapid Fixer 5 minutes agitate constanlty with tongs
4. water rinse place prints in “holding wash” tray located in the darkroom sink
After washing, prints should be carefully squeegeed to remove excess water. Only squegee the back side of the print, never the front. Place prints emulsion side up on the drying screens in the large print drying cabinets.Remember to turn off the motor for the cabinet, and wait ten (10) seconds before opening the doors.
After drying, you can flatten your prints in the “dry work room” by using the dry mounting press. Be sure to set the temperature to 200ºF, and allow a minimum of 20 minutes for the press to warm up to temperature. Place your prints between the clean two sheets of matt board. Be sure to check to see if your print is laying flat before you close the dry mount press ( if your print is curled when you close the press, you will permanently crease your image). After two (2) minutes, remove your prints and immediately place them in one of the cold presses (the heavy plates resting on the aluminum pads in the counter next to the dry mount presses) to allow your prints to cool down and remain flat. Leave your prints in the cold press for a minimum of five (5) minutes.
Dodging and burning in tools•••••••••••••••••••••••••••••••••••••••••••••••••••••••••••••••••••••••••You should have a set of “dodging” and “burning in” tools to be able to control the exposure density in se-lected areas of a print.
• When you “dodge” an area of a print, you are selectively blocking light from reaching a selected area of the print for a defined amount of time during the “main” exposure. Dodging a print will result in a range of lighter tones in the area(s) that are dodged.
• When you “burn in” an area of a print, you are selectively adding light (exposure) to a defined area of the print for a specified amount of time. This added time is done once the “main exposure” has been completed. Burning in an area in a print will result in a range of darker tones in the area(s) that are burned in.
25
Dodging and burning in tools (cont.)•••••••••••••••••••••••••••••••••••••••••••••••••••••••••••••••••••••••••
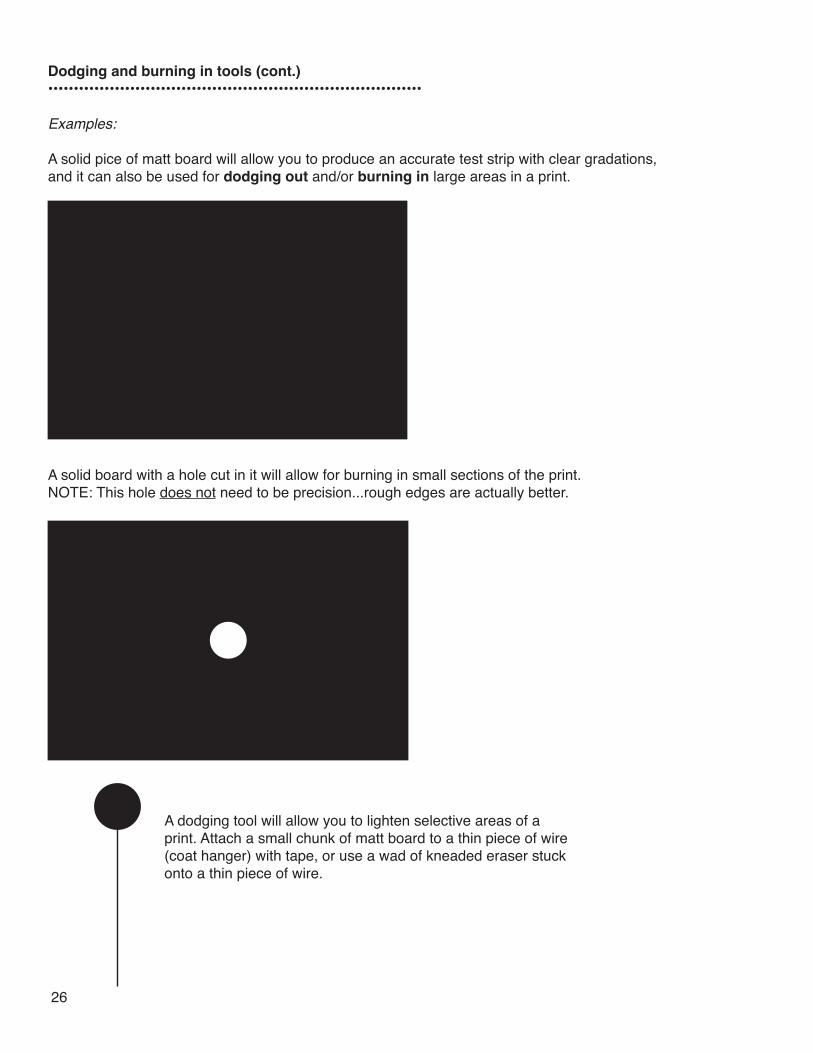
Examples:
A solid pice of matt board will allow you to produce an accurate test strip with clear gradations, and it can also be used for dodging out and/or burning in large areas in a print.
A solid board with a hole cut in it will allow for burning in small sections of the print. NOTE: This hole does not need to be precision...rough edges are actually better.
A dodging tool will allow you to lighten selective areas of a print. Attach a small chunk of matt board to a thin piece of wire (coat hanger) with tape, or use a wad of kneaded eraser stuck onto a thin piece of wire.
26
Printing workflow•••••••••••••••••••••••••••••••••••••••••••••••••••••••••••••••••••••••••1) Set up easel (adjust size of the window) - paper goes in slot - raising, lowering enlarger head, focusing - aspect ratio - enlarge image “full frame”; do not crop using enlarger - make sure image fills hole in negative carrier (“filed out” negative carriers available in crib for black-edged prints) - NO GLASS
2) Enlarger lens - 50mm lens for 35mm film; 80mm lens for 120 film - lens has f-stops; each full stop opening represents one stop more, or less, exposure (e.g. 20 seconds at f/11 = 10 seconds with aperture set at f/8) - when focusing the negaitve, make sure your lens is all the way open (all the way to the RIGHT; brightest output of light)
exposure (# seconds x f-stop) = whites contrast (filter number) = blacks
3) Workflow (3 factors = time, lens opening, contrast filter) - insert negative, open lens, focus enlarger (grain focuser?), close down lens, make test strip using 5 second increments. (If too light, open lens: if too dark, close down lens. If lens is already closed, increase time increments to 10 seconds per exposure)
- Select a time zone that looks good for whites, and make another test strip using the time you just selected
- Evaluate test print in full light for correct time and contrast
- Make your adjustments to time and contrast, and make a whole print on a full sheet of 8x10 paper
- Evaluate results in full light, and make fine tuned adjustments for dodging and burning
- Refocus enlarger before making attempt at final print
4) Dodging and burning - Dodging: lightens shadow areas; must be done during the original exposure • Don’t use fingers, pencils, etc. to make dodging tools • Keep dodging tool moving to “feather” edges of dodged areas • Dodge for 1/2 total exposure time for immediately visible results; adjust time if needed - Burning: adds exposure to the highlight areas; done after original exposure, as additional time • Don’t use hands; make a proper burn card • Begin with “main exposure”, and burn an area using the same amount of time as the “main exposure”, moving the hole in the card around the area to be burned. Develop print, evaluate in light, adjust time and repeat if necessary. *** It may take several attempts to get all the factors together for a “finished” print.***
5) Flattening print - Use dry mount press for 30 seconds to 1 minute at 200ºF (make sure prints are protected by matt board) - Protect prints by placing them in a rigid folder with watercolor paper or tracing paper between prints
27
Optical print centering•••••••••••••••••••••••••••••••••••••••••••••••••••••••••••••••••••••••••Pro Tip:Before you start the mounting process, turn on the dry-mount press so that it will be pre-heating as you pre-pare your images for dry-mounting. The dry-mount press usually takes approximately 25 minutes to come up to the proper temperature.
* Use a tacking iron to anchor a sheet of dry-mount tissue to the back of your photograph.
Before attempting to center the print on the matt board, make sure the edges and corners are “trued” and “squared” (not a trapezoid shape). Use the Roto-Trim™ cutters to make any trim adjustments to your final prints. You can double check the squareness of your corners and edges with a ruler, t-square, or by laying your prints on the dry work room tables, and comparing your edges to the grid visible trough the tabletop.
Supplies needed for “Optical Print Centering”:- soft pencil (an “8B, 9B, or HB wooden pencil - no mechanical pencils please!)- pencil sharpener (located on the door to the cleaning closet just outside of the A/B wash area in the hallway)- clean gum eraser ( these are given away free at the Blick art supply store just past the Meyerhoff)- clean ruler with cork back, or a t-square (both are available for check-out from the MICA Photo crib)
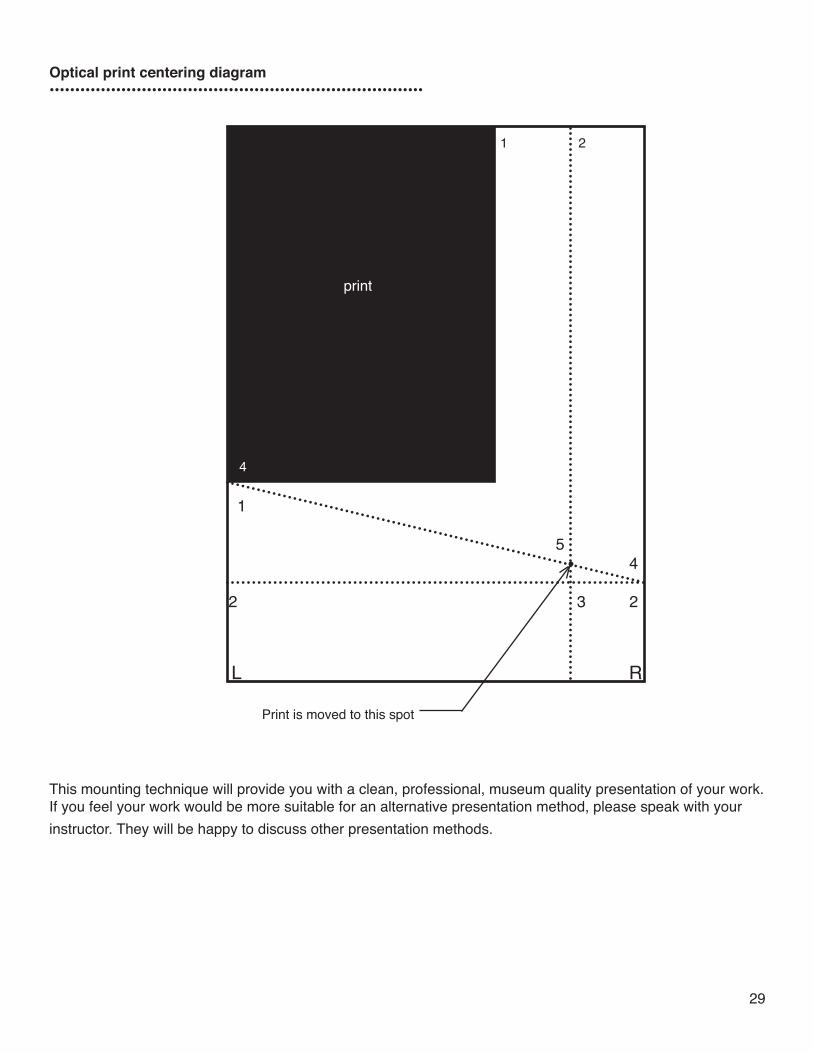
Steps for “Optical Print Centering”:1) Place the trimmed print to be mounted in the upper left-hand corner on the matt board, and make a small mark at both the top right and bottom left of the print’s edges.
2) a. Bisect the remaining vertical area of the matt board from the right of the print to the edge of the matt board.Lay a ruler flat on the line Draw a very light line in the lower right area of the matt board (it is not neces-sary to draw a long solid line here, as you will have to erase it later).
b. Bisect the remaining horizontal area of the matt board from the bottom of the print to the edge of the matt board. Lay a ruler flat on the line and draw a very light line in the lower right area of the matt board. It is not necessary to draw a long solid line here, as you will have to erase it later, but do continue the line to the right-hand edge of the matt board for a reference point.
3) Make a slightly bolder mark on the matt board where the lines from steps 2a & 2b intersect for a reference point.
4) Draw a diagonal line by placing a straight-edge (ruler) on the mark from where the horizontal line was es-tablished from step 2b ends at the right-hand edgeof the matt board , to the mark at the bottom of the left-hand corner where the print originally was in step #1. Mark the spot in the line where the diagonal line crosses the vertical line with a slightly bolder mark.
5) Place the lower right-hand corner of the print at the intersection point (at the “print is moved ot this spot”) from step #4. Double check that the print is parallel to the edges of the matt board, and using a tacking iron,. carefully tack down one corner of the dry-mount tissue to the matt board. Move to the diagonal corner, tack down the tissue, and then place the board & tacked print into the pre-heated dry-mount press for a minumum of 3 minutes.
Pro Tip: To avoid curvature in your mounted piece, place your freshly mounted print under the cold press while you are mounting your remaining images. You can stack prints in the cold presses as you mount, and they will stay flat as you continue working.
28
1 2
1
5 4
2 3 2
Optical print centering diagram•••••••••••••••••••••••••••••••••••••••••••••••••••••••••••••••••••••••••
L R
Print is moved to this spot
This mounting technique will provide you with a clean, professional, museum quality presentation of your work. If you feel your work would be more suitable for an alternative presentation method, please speak with your instructor. They will be happy to discuss other presentation methods.
4
29

MICA Photo Black & White Handbookupdated: 08.13.2015