Embed Size (px)
Citation preview
Microsoft Outlook 2010 Reference Guide for Lotus Notes Users
ContentsWelcome to Office Outlook 2010..................................................................... 2
Mail ..................................................................................................................................... 3 Viewing Messages ........................................................................................................................................................................... 4 Working with Messages ............................................................................................................................................................... 7 Responding to Messages .......................................................................................................................................................... 11 Organizing Messages ................................................................................................................................................................. 15 Performing Advanced Mail Functions .................................................................................................................................. 20
Calendar ........................................................................................................................... 31 Viewing Appointments ............................................................................................................................................................... 33 Working with Appointments ................................................................................................................................................... 33 Working with Meeting Requests ............................................................................................................................................ 35 Responding to Meeting Requests ......................................................................................................................................... 39 Performing Advanced Calendar Functions ........................................................................................................................ 40
Contacts ............................................................................................................................ 44 Viewing Contacts .......................................................................................................................................................................... 45 Working with Contacts ............................................................................................................................................................... 45 Performing Advanced Contacts Functions ......................................................................................................................... 47
Tasks ................................................................................................................................. 49 Viewing Tasks ................................................................................................................................................................................. 50 Working with Tasks ..................................................................................................................................................................... 50 Performing Advanced Task Functions ................................................................................................................................. 52
Personal Settings ............................................................................................................. 54 Setting Junk E-Mail Options .................................................................................................................................................... 54 Setting Delegates ......................................................................................................................................................................... 55
Advanced Options ........................................................................................................... 58 Understanding Presence Indicators ...................................................................................................................................... 58 Using the Trust Center ............................................................................................................................................................... 58 Adding RSS Feeds ........................................................................................................................................................................ 59 Using Outlook Web Access to Access Mail ....................................................................................................................... 61 Using Cached Exchange Mode ............................................................................................................................................... 62 Adding Additional Mail Accounts .......................................................................................................................................... 63 Accessing a Hotmail Account .................................................................................................................................................. 66
Terminology Mapping .................................................................................................... 68
Frequently Asked Questions: Comparing Notes to Office Outlook 2010 .................. 69
Office Outlook 2010 User Interface ............................................................................... 71 Customizing the Ribbon ............................................................................................................................................................ 71 Configuring Mail ........................................................................................................................................................................... 71 Configuring Calendar.................................................................................................................................................................. 75
Page 2 of 75
Welcome to Office Outlook 2010 This reference guide for Microsoft
® Office Outlook
® 2010 is designed to give Lotus Notes mail users a
clear guide to streamline their transitions to the new communication environment. This guide includes
terminology mapping; procedures about how to use the most useful features and functions in Office
Outlook Mail, Calendar, Tasks, and Contacts; and frequently asked questions.
Office Outlook 2010 Mail, Calendar, Tasks, and Contacts are very different than the Lotus Notes
environment that you have been using, so you can use the following features to help configure your
Office Outlook 2010 environment:
• No Location Settings needed
Unlike Lotus Notes, Office Outlook 2010 does not use different location settings. You can
connect to the Microsoft Exchange Server and access and download your mail whenever you
have a network connection. For information about configuring mobile access, similar to e-mail
replication in Lotus Notes, see “Using Cached Exchange Mode” on page 62. This mode
automatically provides bidirectional synchronization for your mail account.
• Expanded Ribbon
First introduced in Microsoft Office Outlook 2007, the ribbon is part of the Microsoft Office
Fluent user interface. It is designed to help you quickly find the commands that you need to
complete a task. Commands are organized in logical groups that are collected together under
tabs. In Outlook 2010, the ribbon has replaced the former menus in the main Outlook window.
In addition, the ribbon can be customized to include custom tabs that you can personalize to
better match your work style.
• See More of your Messages
An improved conversation view is now available when you work with your messages. This view
improves tracking and managing related messages, regardless of the folder that contains the
messages. You can see the complete course of the conversation, including your responses, find
the most recent responses, and more easily determine the message most important to you. You
can also easily categorize or ignore a complete conversation. For more information, see page 5.
• Advanced Archiving
Your Microsoft Outlook 2010 mailbox grows as you create and receive items. To manage the
space in your mailbox or on the mail server you are using, you can move old items that are
important, but rarely used, to an archive location. This storage process occurs automatically
with AutoArchive, but you can customize most of the default settings. For more information
see “Performing Advanced Mail Functions” on page 28.
• Personal Contacts and Contact Groups
When you migrate your mail, your personal contacts and distribution lists should be converted
to your new Office Outlook 2010 account. For more information about accessing those
contacts, see “Viewing Contacts” on page 45, and for more information about sending them
messages, see “Working with Contacts” on page 45.
• Work Smarter with your Messages
Outlook 2010 includes MailTips, which help you avoid common, but potentially costly or
embarrassing mistakes. MailTips alerts can be triggered by actions including clicking Reply All
to a large recipient list, sending sensitive information to someone outside your organization, or
sending a message to someone who is out of office. For more information, see page 9.
• Reduce Noise in your Inbox
If a conversation is no longer relevant to you, you can prevent additional responses from
appearing in your Inbox. The Ignore command moves the whole Conversation and any future
messages that arrive in the Conversation to the Deleted Items folder. For more information, see
page 5.
Page 3 of 75
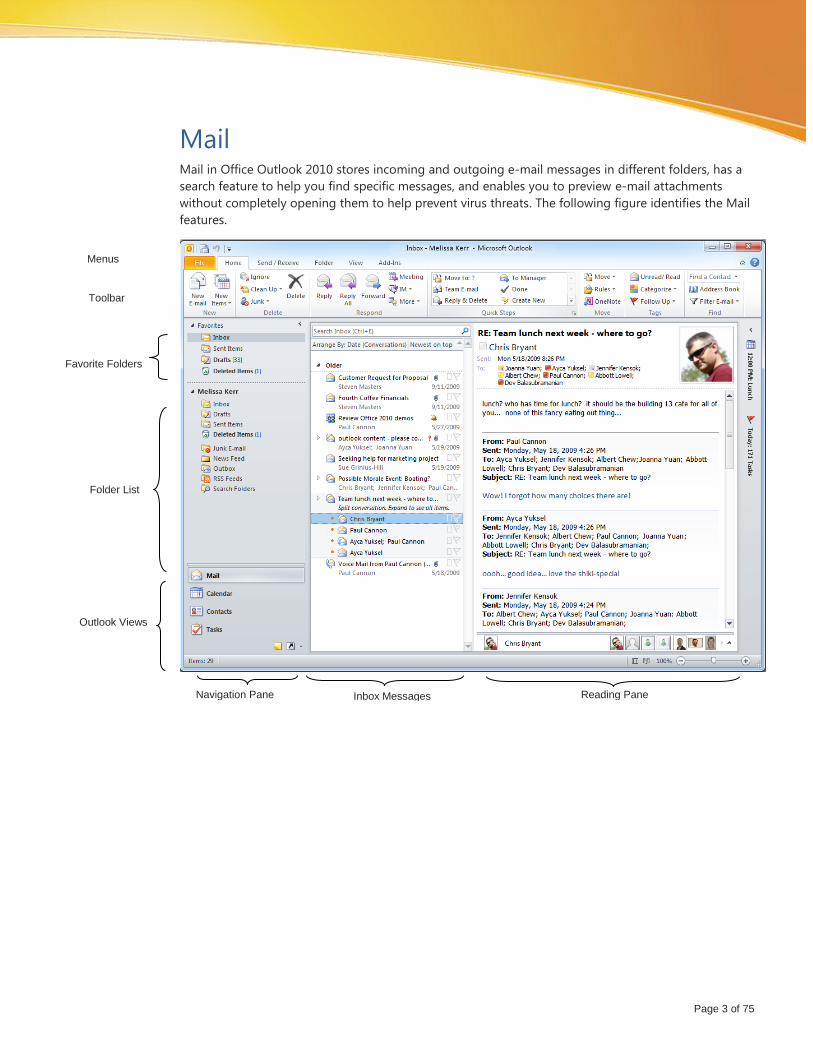
Mail Mail in Office Outlook 2010 stores incoming and outgoing e-mail messages in different folders, has a
search feature to help you find specific messages, and enables you to preview e-mail attachments
without completely opening them to help prevent virus threats. The following figure identifies the Mail
features.
Navigation Pane Inbox Messages Reading Pane
Menus
Toolbar
Favorite Folders
Folder List
Outlook Views
Page 4 of 75
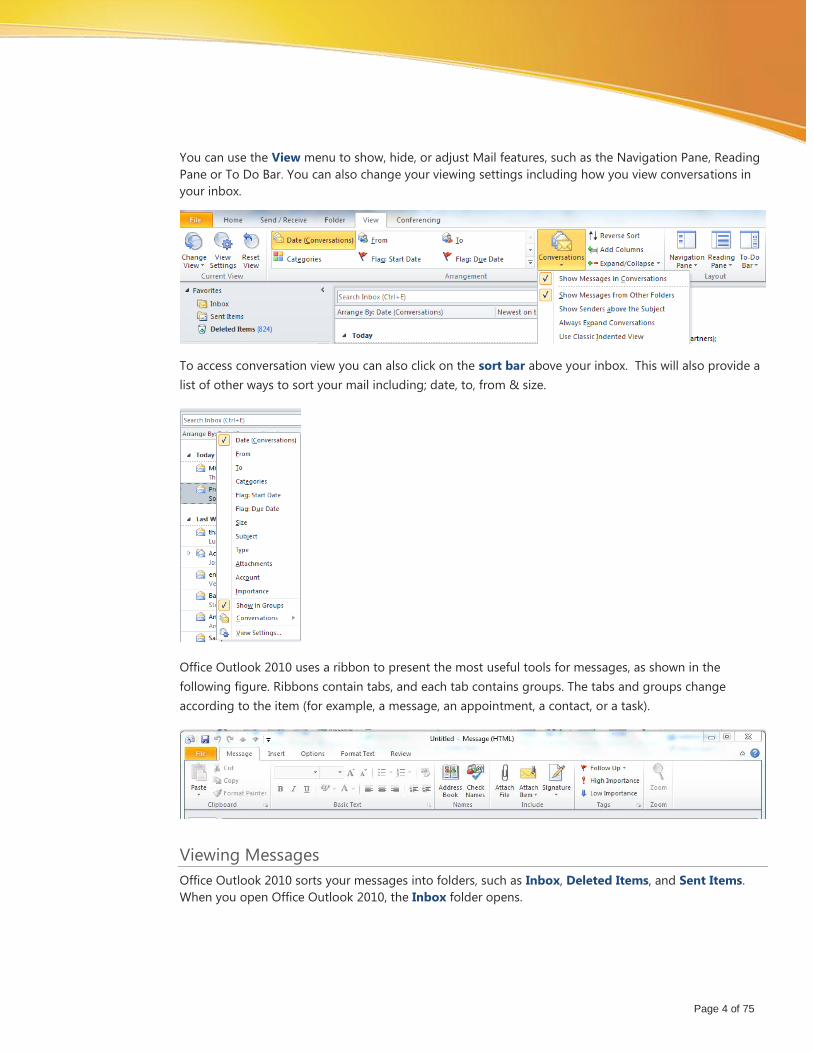
You can use the View menu to show, hide, or adjust Mail features, such as the Navigation Pane, Reading
Pane or To Do Bar. You can also change your viewing settings including how you view conversations in
your inbox.
To access conversation view you can also click on the sort bar above your inbox. This will also provide a
list of other ways to sort your mail including; date, to, from & size.
Office Outlook 2010 uses a ribbon to present the most useful tools for messages, as shown in the
following figure. Ribbons contain tabs, and each tab contains groups. The tabs and groups change
according to the item (for example, a message, an appointment, a contact, or a task).
Viewing Messages
Office Outlook 2010 sorts your messages into folders, such as Inbox, Deleted Items, and Sent Items.
When you open Office Outlook 2010, the Inbox folder opens.
Page 5 of 75
Sorting Messages in the Inbox Folder
By default, Office Outlook 2010 sorts all of your messages by date and then displays the newest
messages on top. However, you can change how Office Outlook 2010 sorts your messages by
using one of the predefined arrangements to sort by or by creating your own custom
arrangement.
Outlook 2010 will default to sort your messages by the new Conversation View. This view will
arrange your messages by the topic of conversation and date, condensing all related messages
to one apparent thread (this includes messages in your sent or deleted items folders or other
folders).
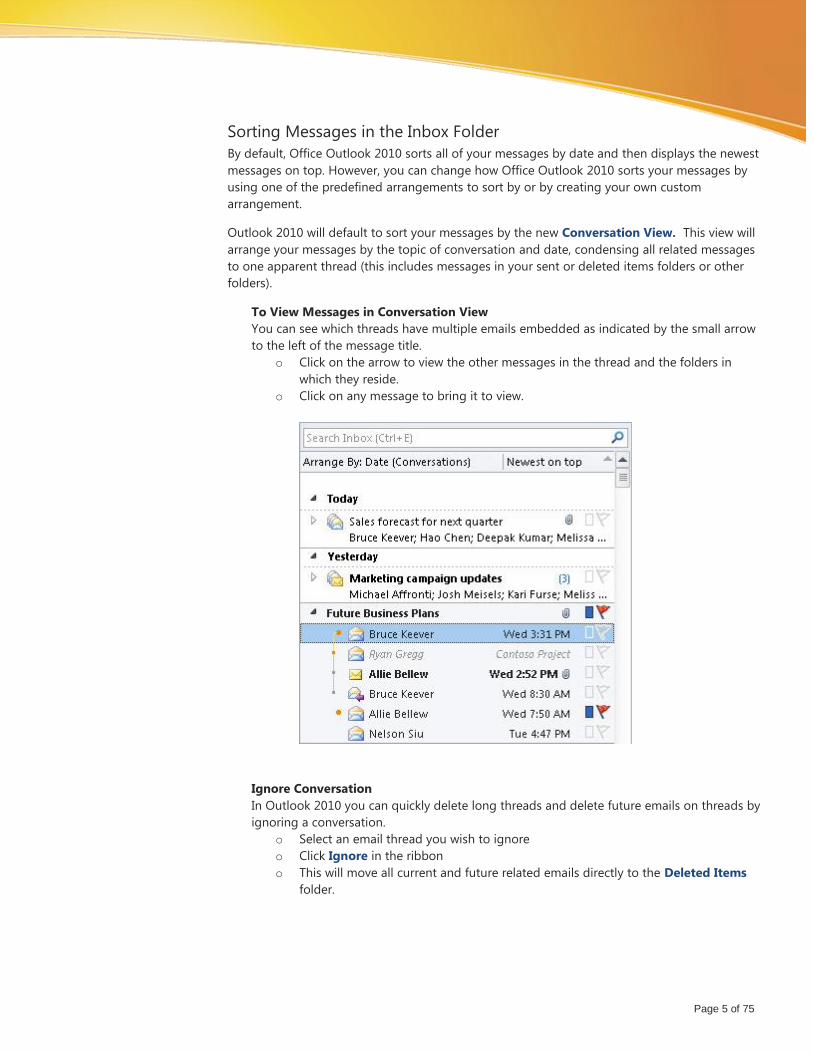
To View Messages in Conversation View
You can see which threads have multiple emails embedded as indicated by the small arrow
to the left of the message title.
o Click on the arrow to view the other messages in the thread and the folders in
which they reside.
o Click on any message to bring it to view.
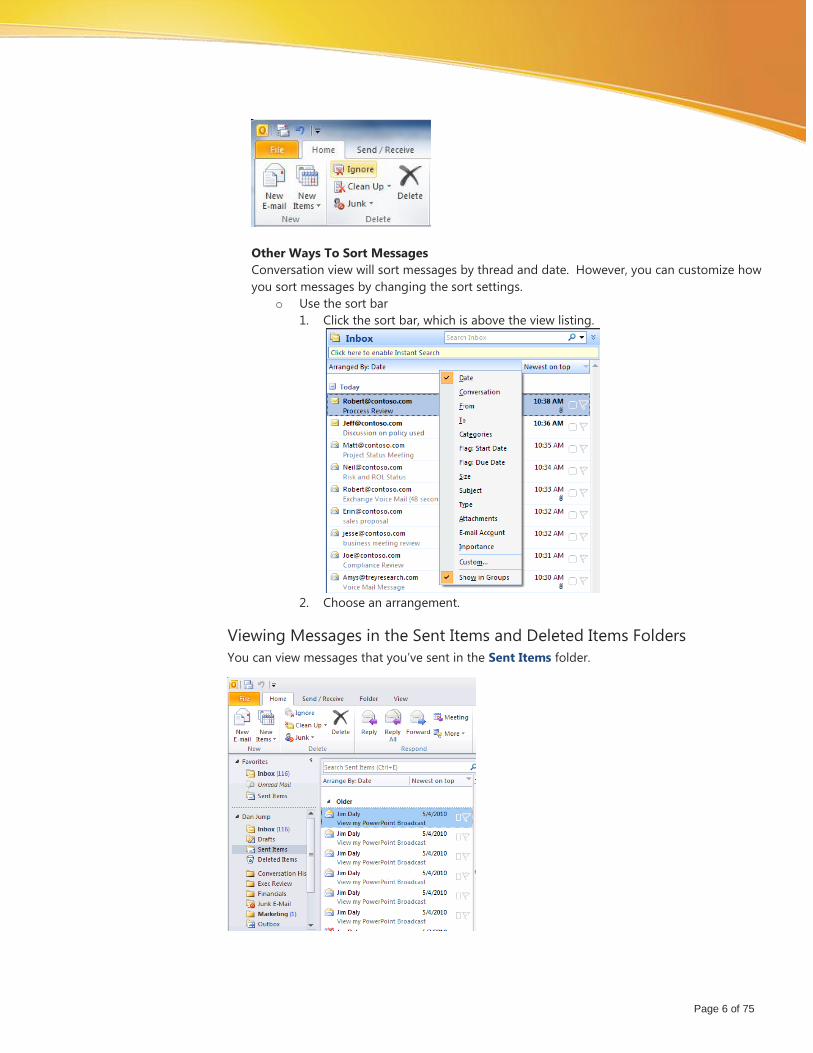
Ignore Conversation
In Outlook 2010 you can quickly delete long threads and delete future emails on threads by
ignoring a conversation.
o Select an email thread you wish to ignore
o Click Ignore in the ribbon
o This will move all current and future related emails directly to the Deleted Items
folder.
Page 6 of 75
Other Ways To Sort Messages
Conversation view will sort messages by thread and date. However, you can customize how
you sort messages by changing the sort settings.
o Use the sort bar
1. Click the sort bar, which is above the view listing.
2. Choose an arrangement.
Viewing Messages in the Sent Items and Deleted Items Folders
You can view messages that you’ve sent in the Sent Items folder.
Page 7 of 75
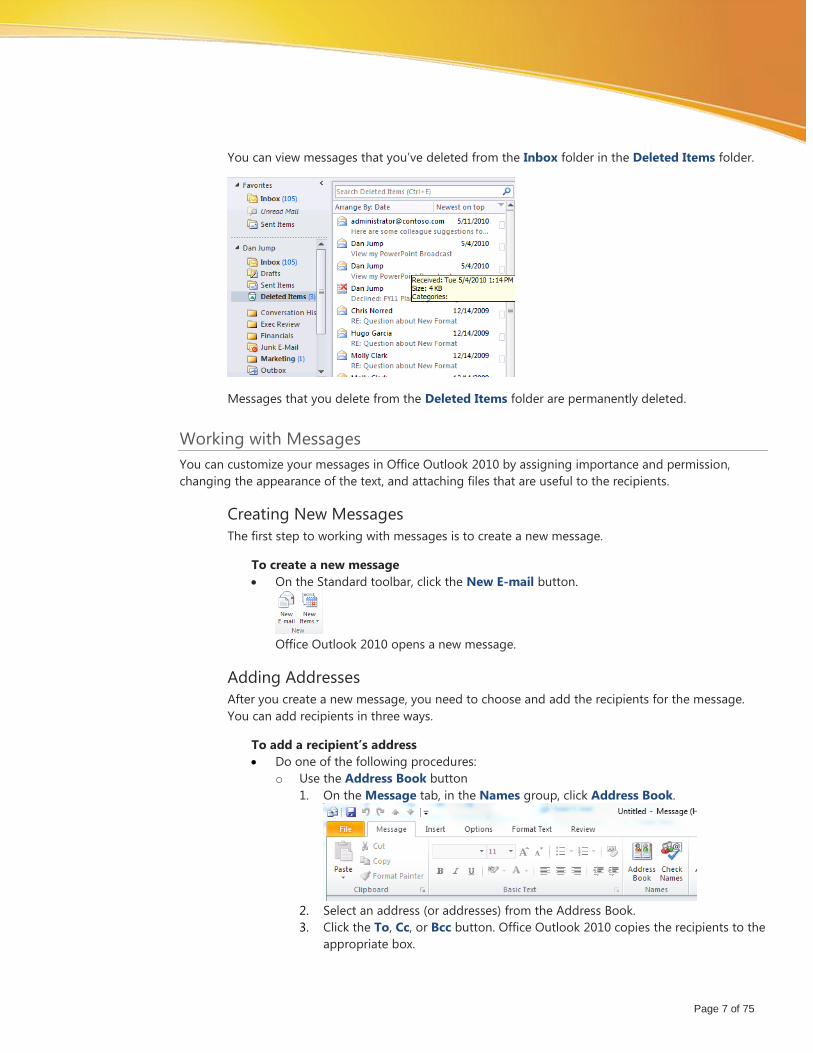
You can view messages that you’ve deleted from the Inbox folder in the Deleted Items folder.
Messages that you delete from the Deleted Items folder are permanently deleted.
Working with Messages
You can customize your messages in Office Outlook 2010 by assigning importance and permission,
changing the appearance of the text, and attaching files that are useful to the recipients.
Creating New Messages
The first step to working with messages is to create a new message.
To create a new message
On the Standard toolbar, click the New E-mail button.
Office Outlook 2010 opens a new message.
Adding Addresses
After you create a new message, you need to choose and add the recipients for the message.
You can add recipients in three ways.
To add a recipient’s address
Do one of the following procedures:
o Use the Address Book button
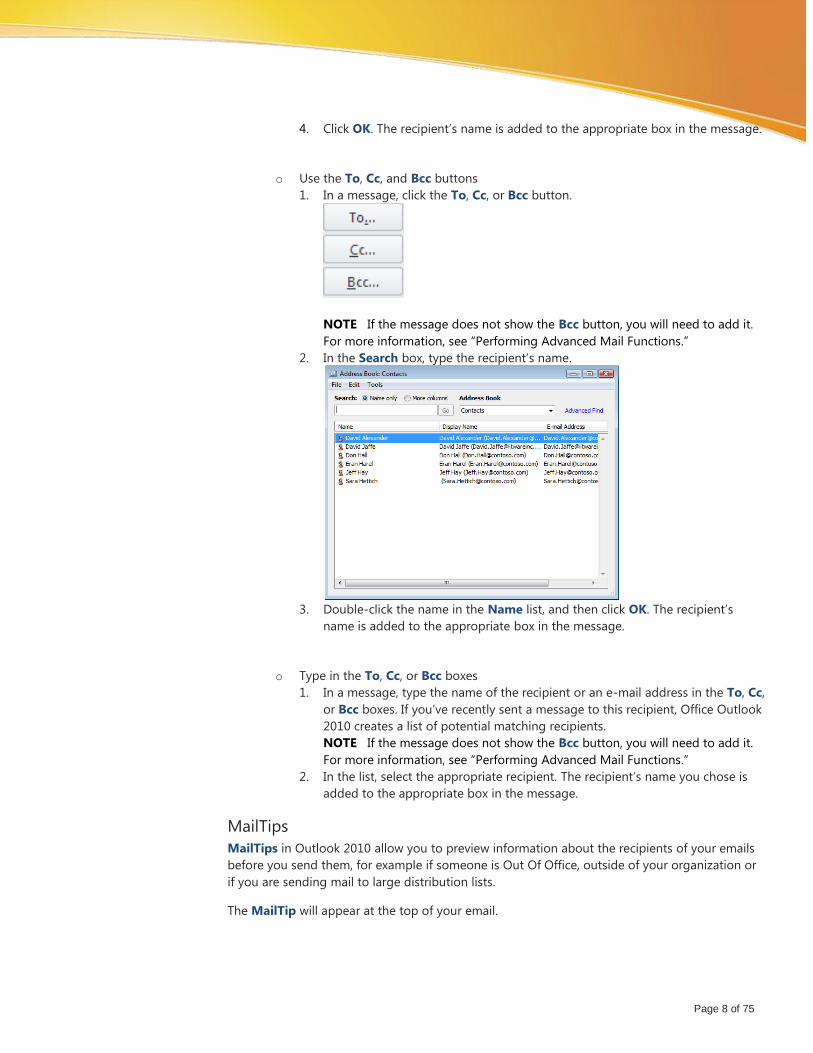
1. On the Message tab, in the Names group, click Address Book.
2. Select an address (or addresses) from the Address Book.
3. Click the To, Cc, or Bcc button. Office Outlook 2010 copies the recipients to the
appropriate box.
Page 8 of 75
4. Click OK. The recipient’s name is added to the appropriate box in the message.
o Use the To, Cc, and Bcc buttons
1. In a message, click the To, Cc, or Bcc button.
NOTE If the message does not show the Bcc button, you will need to add it.
For more information, see “Performing Advanced Mail Functions.”
2. In the Search box, type the recipient’s name.
3. Double-click the name in the Name list, and then click OK. The recipient’s
name is added to the appropriate box in the message.
o Type in the To, Cc, or Bcc boxes
1. In a message, type the name of the recipient or an e-mail address in the To, Cc,
or Bcc boxes. If you’ve recently sent a message to this recipient, Office Outlook
2010 creates a list of potential matching recipients.
NOTE If the message does not show the Bcc button, you will need to add it.
For more information, see “Performing Advanced Mail Functions.”
2. In the list, select the appropriate recipient. The recipient’s name you chose is
added to the appropriate box in the message.
MailTips
MailTips in Outlook 2010 allow you to preview information about the recipients of your emails
before you send them, for example if someone is Out Of Office, outside of your organization or
if you are sending mail to large distribution lists.
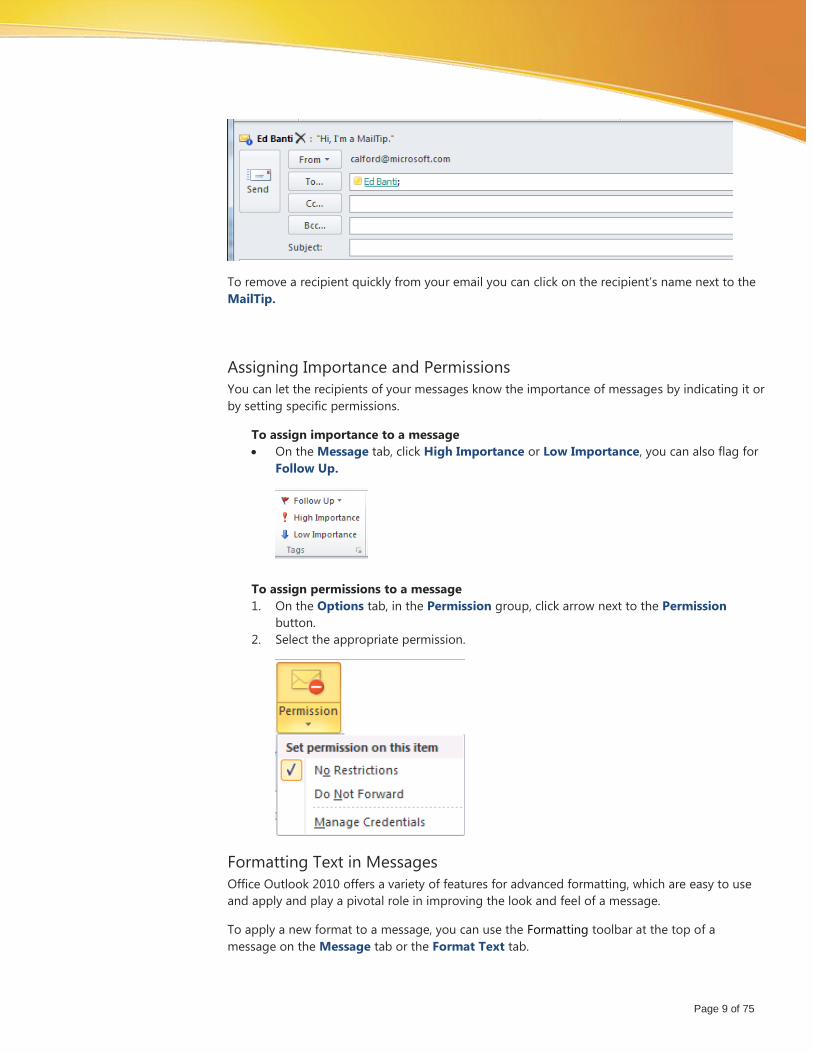
The MailTip will appear at the top of your email.
Page 9 of 75
To remove a recipient quickly from your email you can click on the recipient’s name next to the
MailTip.
Assigning Importance and Permissions
You can let the recipients of your messages know the importance of messages by indicating it or
by setting specific permissions.
To assign importance to a message
On the Message tab, click High Importance or Low Importance, you can also flag for
Follow Up.
To assign permissions to a message
1. On the Options tab, in the Permission group, click arrow next to the Permission
button.
2. Select the appropriate permission.
Formatting Text in Messages
Office Outlook 2010 offers a variety of features for advanced formatting, which are easy to use
and apply and play a pivotal role in improving the look and feel of a message.
To apply a new format to a message, you can use the Formatting toolbar at the top of a
message on the Message tab or the Format Text tab.
Page 10 of 75
OR
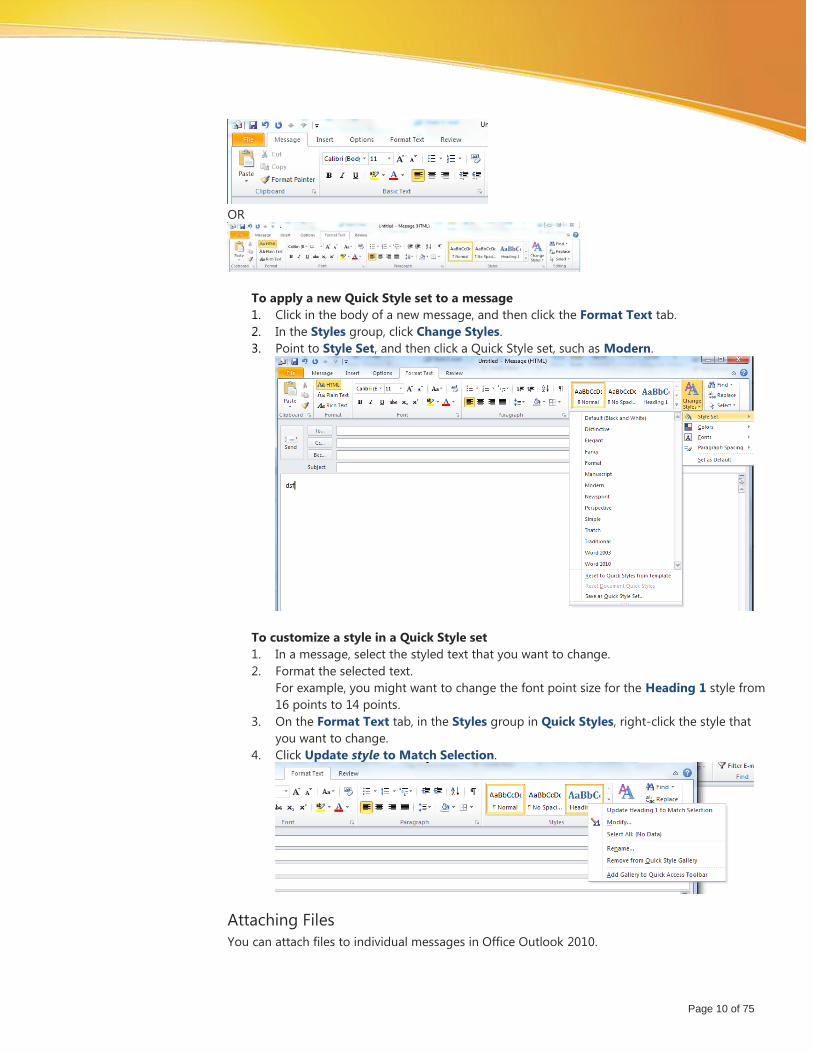
To apply a new Quick Style set to a message
1. Click in the body of a new message, and then click the Format Text tab.
2. In the Styles group, click Change Styles.
3. Point to Style Set, and then click a Quick Style set, such as Modern.
To customize a style in a Quick Style set
1. In a message, select the styled text that you want to change.
2. Format the selected text.
For example, you might want to change the font point size for the Heading 1 style from
16 points to 14 points.
3. On the Format Text tab, in the Styles group in Quick Styles, right-click the style that
you want to change.
4. Click Update style to Match Selection.
Attaching Files
You can attach files to individual messages in Office Outlook 2010.

Page 11 of 75
To attach files
1. In a message on the Message tab, click Attach File.
2. In the Insert File dialog box, browse to find the file that you want to attach.
3. Select the file, and then click Insert. Office Outlook 2010 attaches the file to the
message.
NOTE If message format is set to Rich Text, the attachment box does not appear in
the message. To verify the message format is set to Rich Text, click the Format Text
tab. In the Format group, verify that Rich Text is selected.
Sending Messages
After you’ve customized your messages, you can send them to the people or groups whose e-
mail addresses are in the To, Cc, and Bcc boxes.
To send a message
In the message, click Send.
Responding to Messages
When you receive messages in Office Outlook 2010, you may need to reply to them or open any
attachments.
Replying to Messages
Depending on the message, you may want to reply to only the sender of the message, to the
sender and all of the recipients of the message, or attach a file to your response.
To reply to only the sender of the message
1. Do one of the following:
Select the message you want to respond to, and then click Reply in the Standard
toolbar. Office Outlook 2010 adds the address of the sender to the To box.
Page 12 of 75
Double-click the message you want to respond to, and then click Reply in the
Respond group on the Message tab. Office Outlook 2010 adds the address of the
sender to the To box.
2. In the message, type your reply.
3. Click Send.
To reply to the sender of the message and all of the recipients
1. Do one of the following:
Select the message you want to respond to, and then click Reply to All in the
Standard toolbar. Office Outlook 2010 adds the address of the sender to the To
box.
Double-click the message you want to respond to, and then click Reply to All in
the Respond group on the Message tab. Office Outlook 2010 adds the address of
the sender to the To box.
2. In the message, type your reply.
3. Click Send.
In Office Outlook 2010, when you reply to a message that has attachment, the attachment does
not attach to your response. If you want to send an attachment with your response, you have to
attach it.
To reply to the sender of the message and include an attachment
1. Do one of the following:
Select the message you want to respond to, and then click Reply in the Standard
toolbar. Office Outlook 2010 adds the address of the sender to the To box.
Page 13 of 75
Double-click the message you want to respond to, and then click Reply in the
Respond group on the Message tab. Office Outlook 2010 adds the address of the
sender to the To box.
2. On the Message tab, in the Include group, click Attach File.
3. In the Insert File dialog box, browse to find the file that you want to attach.
4. Select the file, and then click Insert. Office Outlook 2010 attaches the file to the
message.
5. In the message, type your reply.
6. Click Send.
To reply to the sender of the message and all of the recipients and include an
attachment
1. Do one of the following:
Select the message you want to respond to, and then click Reply to All in the
Standard toolbar. Office Outlook 2010 adds the address of the sender to the To
box.
Double-click the message you want to respond to, and then click Reply to All in
the Respond group on the Message tab. Office Outlook 2010 adds the address of
the sender to the To box.
2. On the Message tab, in the Include group, click Attach File.
3. In the Insert File dialog box, browse to find the file that you want to attach.
4. Select the file, and then click Insert. Office Outlook 2010 attaches the file to the
message.
5. In the message, type your reply.
6. Click Send.
Page 14 of 75
Previewing Attachments
If messages you receive have attachments in Outlook 2010 you can preview the attachment
before opening it. You can preview any type of attachment – a Word, Excel or PowerPoint
document, an email or PDF.
To preview an attachment
1. Select the message that has the attachment you want to read.
2. In the Reading Pane, click once on the attached file.
Opening Attachments
If messages you receive have attachments, you can open the attachments to read them, save
them, or remove them from the messages.
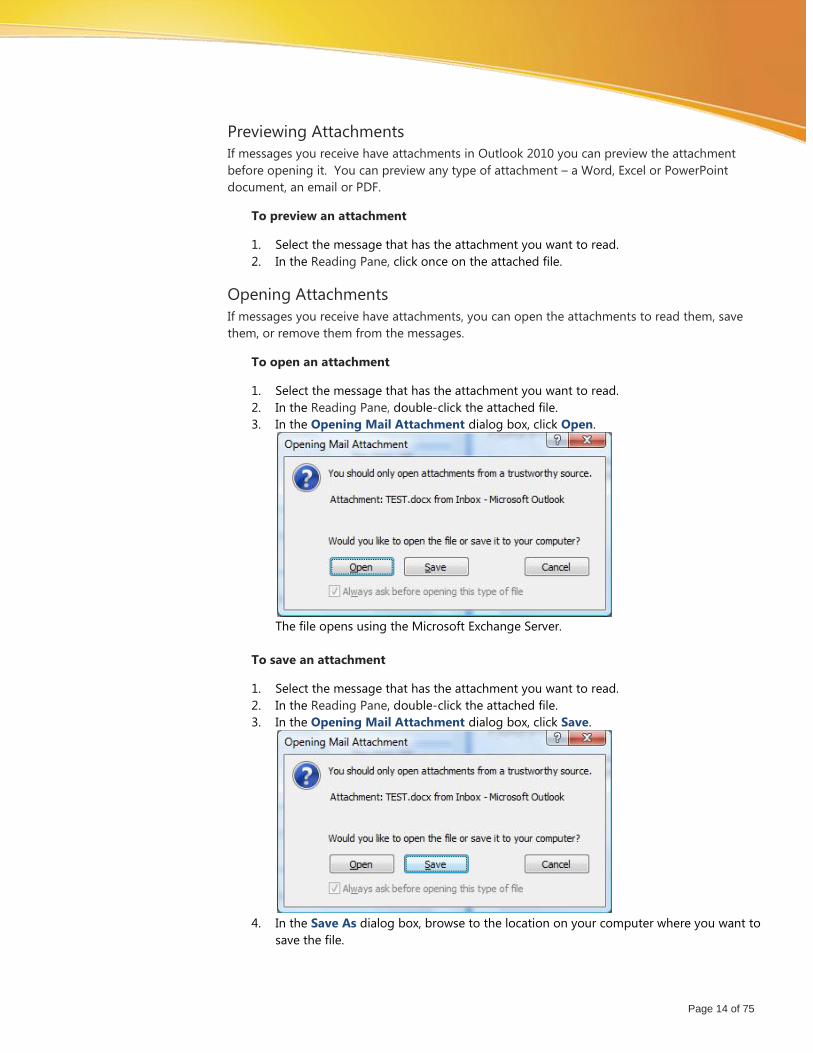
To open an attachment
1. Select the message that has the attachment you want to read.
2. In the Reading Pane, double-click the attached file.
3. In the Opening Mail Attachment dialog box, click Open.
The file opens using the Microsoft Exchange Server.
To save an attachment
1. Select the message that has the attachment you want to read.
2. In the Reading Pane, double-click the attached file.
3. In the Opening Mail Attachment dialog box, click Save.
4. In the Save As dialog box, browse to the location on your computer where you want to
save the file.
Page 15 of 75
5. Click Save.
To reduce the amount of space messages and attachments use in your mailbox, you may want
to remove attachments from messages.
NOTE If you remove an attachment from a message without saving the attachment to your
computer, the attachment is permanently deleted.
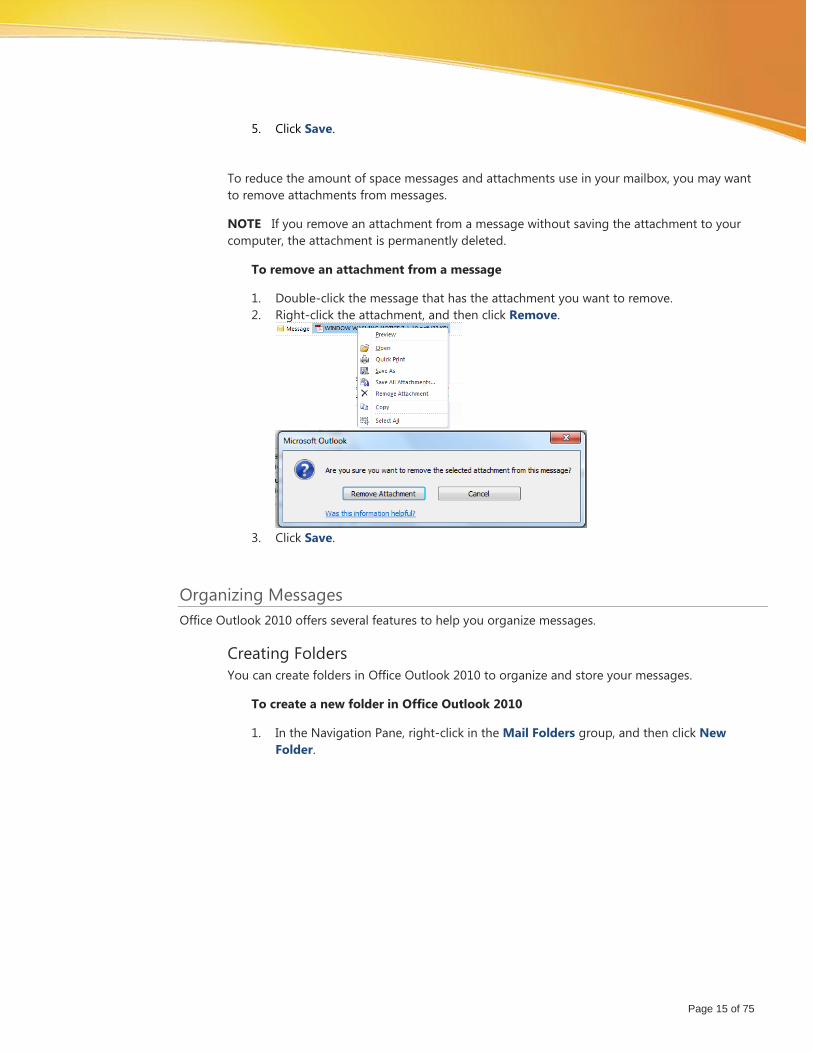
To remove an attachment from a message
1. Double-click the message that has the attachment you want to remove.
2. Right-click the attachment, and then click Remove.
3. Click Save.
Organizing Messages
Office Outlook 2010 offers several features to help you organize messages.
Creating Folders
You can create folders in Office Outlook 2010 to organize and store your messages.
To create a new folder in Office Outlook 2010
1. In the Navigation Pane, right-click in the Mail Folders group, and then click New
Folder.

Page 16 of 75
2. Rename the new folder, and then press ENTER.
To move one message to the new folder
Drag a message to the new folder.
To move several messages to the new folder at once
1. Press and hold CTRL and click the messages you would like to move.
2. Release CTRL.
3. Drag the selected group of messages to the new folder.
Categorizing Messages
Color categories give you a quick, visual way to customize and distinguish messages from one
another, making it easy to locate information.
To apply a color category to a message
Do one of the following procedures:
o Use the Categorize button
1. Select the message that you want to categorize.
2. On the Standard toolbar, click Categorize.
3. Select the appropriate category.
Page 17 of 75
o Use the shortcut menu
1. Right-click the message that you want to categorize.
2. Point to Categorize, and then select the appropriate category.
If you frequently apply one type of category to messages, you can set a Quick Click color
category.
To set a Quick Click color category
1. On the Standard toolbar, click Categorize, and then click Set Quick Click.
2. In the Set Quick Click dialog box, select a color category from the drop-down list.
3. Click OK.
To apply the Quick Click color category
On the message that you want to apply the Quick Click color category to, click the
category column next to the message you want to assign a category to.
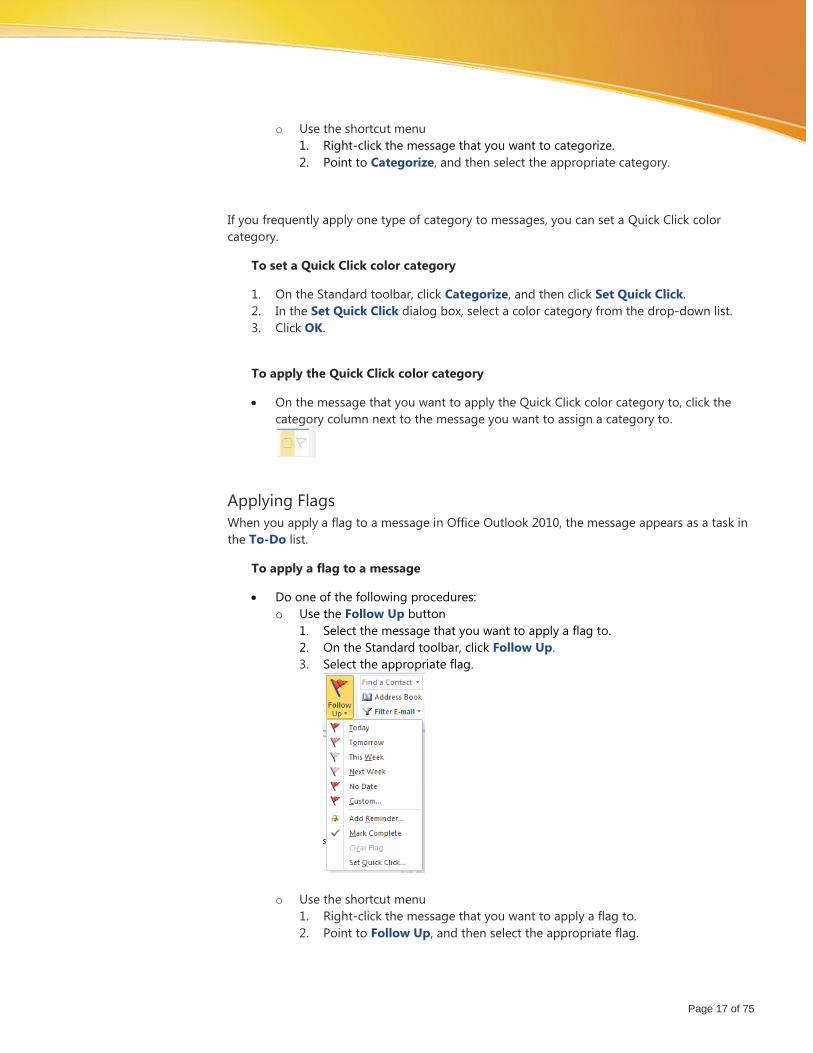
Applying Flags
When you apply a flag to a message in Office Outlook 2010, the message appears as a task in
the To-Do list.
To apply a flag to a message
Do one of the following procedures:
o Use the Follow Up button
1. Select the message that you want to apply a flag to.
2. On the Standard toolbar, click Follow Up.
3. Select the appropriate flag.
o Use the shortcut menu
1. Right-click the message that you want to apply a flag to.
2. Point to Follow Up, and then select the appropriate flag.
Page 18 of 75
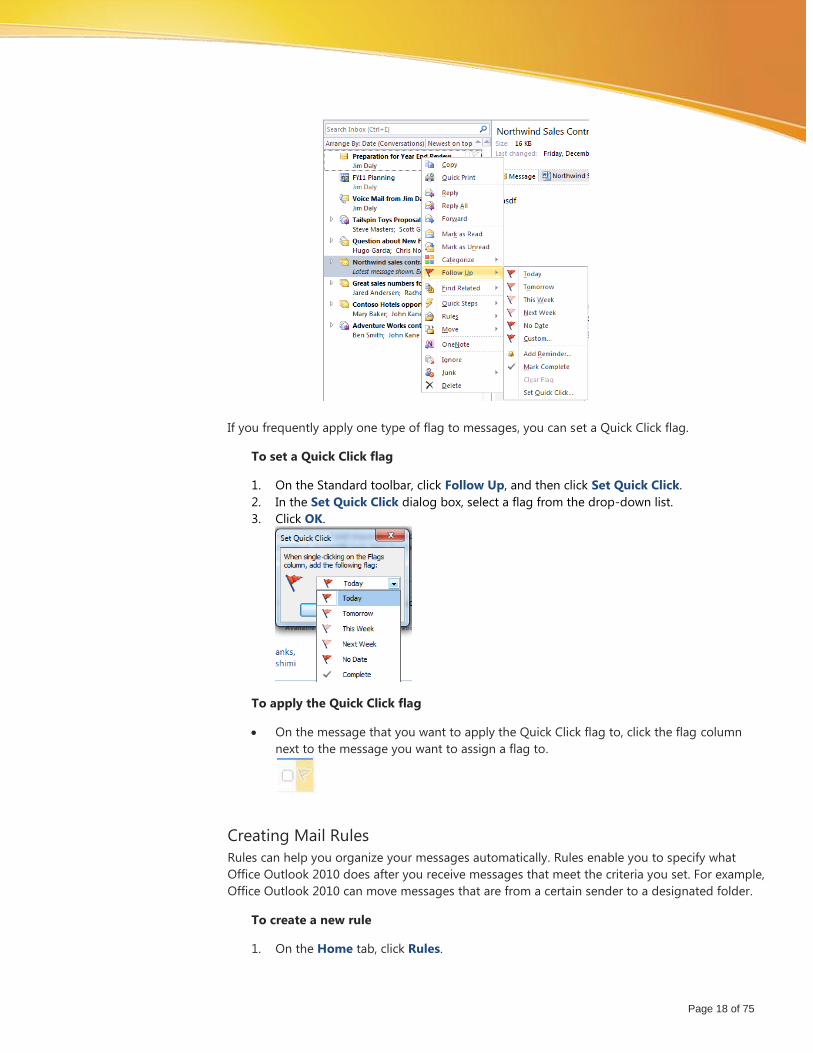
If you frequently apply one type of flag to messages, you can set a Quick Click flag.
To set a Quick Click flag
1. On the Standard toolbar, click Follow Up, and then click Set Quick Click.
2. In the Set Quick Click dialog box, select a flag from the drop-down list.
3. Click OK.
To apply the Quick Click flag
On the message that you want to apply the Quick Click flag to, click the flag column
next to the message you want to assign a flag to.
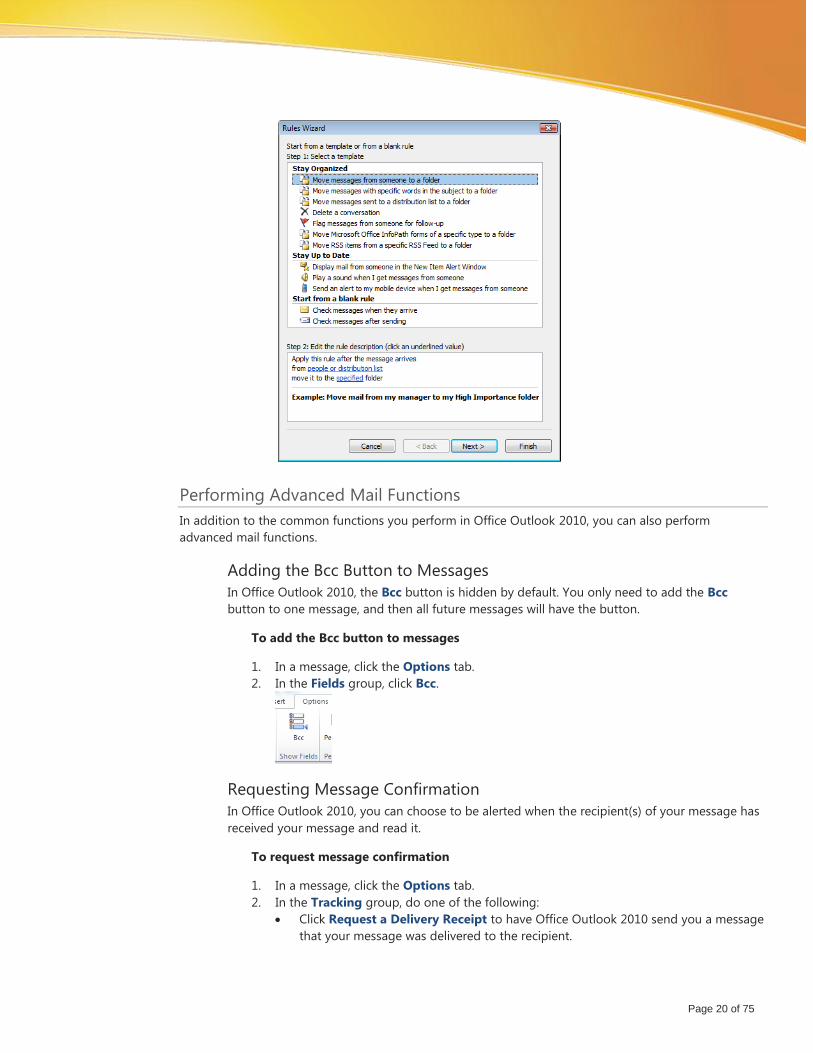
Creating Mail Rules
Rules can help you organize your messages automatically. Rules enable you to specify what
Office Outlook 2010 does after you receive messages that meet the criteria you set. For example,
Office Outlook 2010 can move messages that are from a certain sender to a designated folder.
To create a new rule
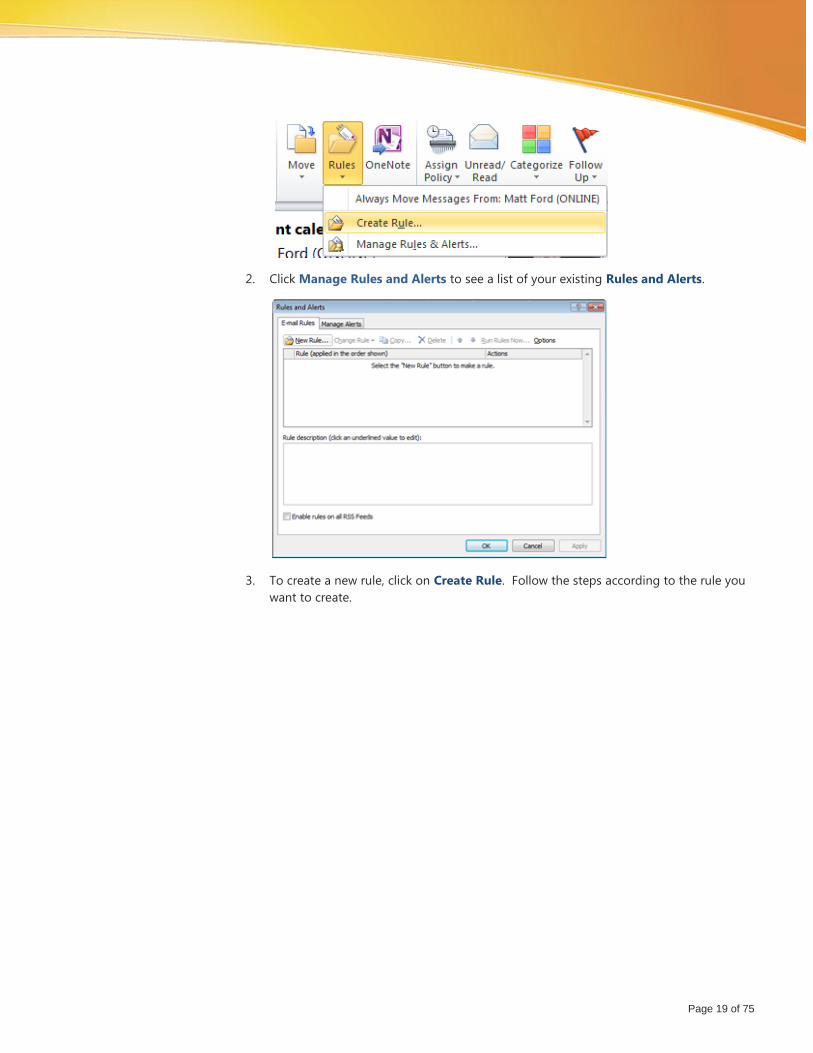
1. On the Home tab, click Rules.
Page 19 of 75
2. Click Manage Rules and Alerts to see a list of your existing Rules and Alerts.
3. To create a new rule, click on Create Rule. Follow the steps according to the rule you
want to create.
Page 20 of 75
Performing Advanced Mail Functions
In addition to the common functions you perform in Office Outlook 2010, you can also perform
advanced mail functions.
Adding the Bcc Button to Messages
In Office Outlook 2010, the Bcc button is hidden by default. You only need to add the Bcc
button to one message, and then all future messages will have the button.
To add the Bcc button to messages
1. In a message, click the Options tab.
2. In the Fields group, click Bcc.
Requesting Message Confirmation
In Office Outlook 2010, you can choose to be alerted when the recipient(s) of your message has
received your message and read it.
To request message confirmation
1. In a message, click the Options tab.
2. In the Tracking group, do one of the following:
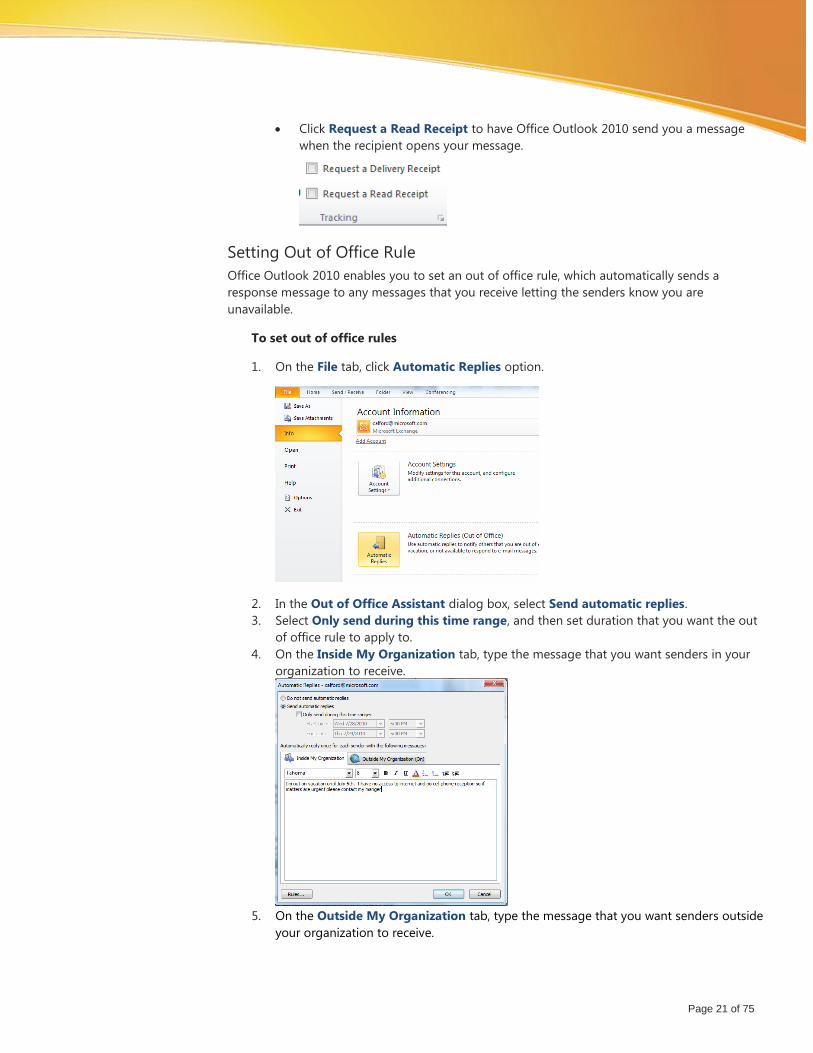
Click Request a Delivery Receipt to have Office Outlook 2010 send you a message
that your message was delivered to the recipient.
Page 21 of 75
Click Request a Read Receipt to have Office Outlook 2010 send you a message
when the recipient opens your message.
Setting Out of Office Rule
Office Outlook 2010 enables you to set an out of office rule, which automatically sends a
response message to any messages that you receive letting the senders know you are
unavailable.
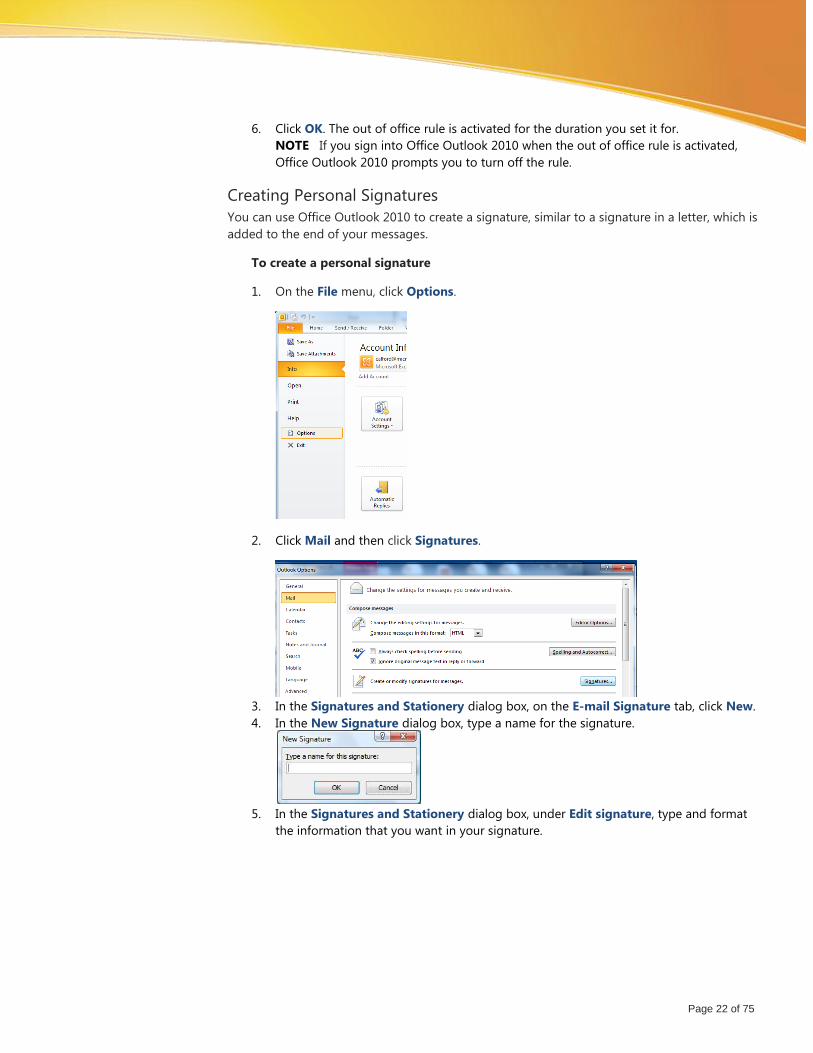
To set out of office rules
1. On the File tab, click Automatic Replies option.
2. In the Out of Office Assistant dialog box, select Send automatic replies.
3. Select Only send during this time range, and then set duration that you want the out
of office rule to apply to.
4. On the Inside My Organization tab, type the message that you want senders in your
organization to receive.
5. On the Outside My Organization tab, type the message that you want senders outside
your organization to receive.
Page 22 of 75
6. Click OK. The out of office rule is activated for the duration you set it for.
NOTE If you sign into Office Outlook 2010 when the out of office rule is activated,
Office Outlook 2010 prompts you to turn off the rule.
Creating Personal Signatures
You can use Office Outlook 2010 to create a signature, similar to a signature in a letter, which is
added to the end of your messages.
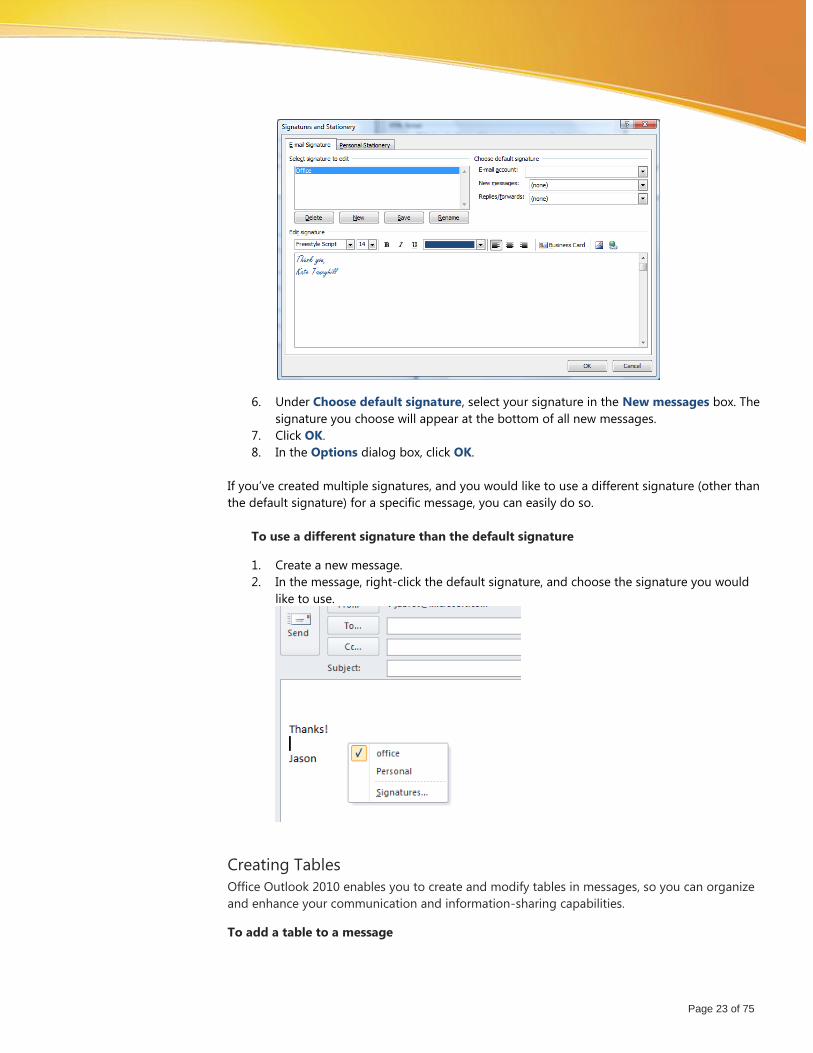
To create a personal signature
1. On the File menu, click Options.
2. Click Mail and then click Signatures.
3. In the Signatures and Stationery dialog box, on the E-mail Signature tab, click New.
4. In the New Signature dialog box, type a name for the signature.
5. In the Signatures and Stationery dialog box, under Edit signature, type and format
the information that you want in your signature.
Page 23 of 75
6. Under Choose default signature, select your signature in the New messages box. The
signature you choose will appear at the bottom of all new messages.
7. Click OK.
8. In the Options dialog box, click OK.
If you’ve created multiple signatures, and you would like to use a different signature (other than
the default signature) for a specific message, you can easily do so.
To use a different signature than the default signature
1. Create a new message.
2. In the message, right-click the default signature, and choose the signature you would
like to use.
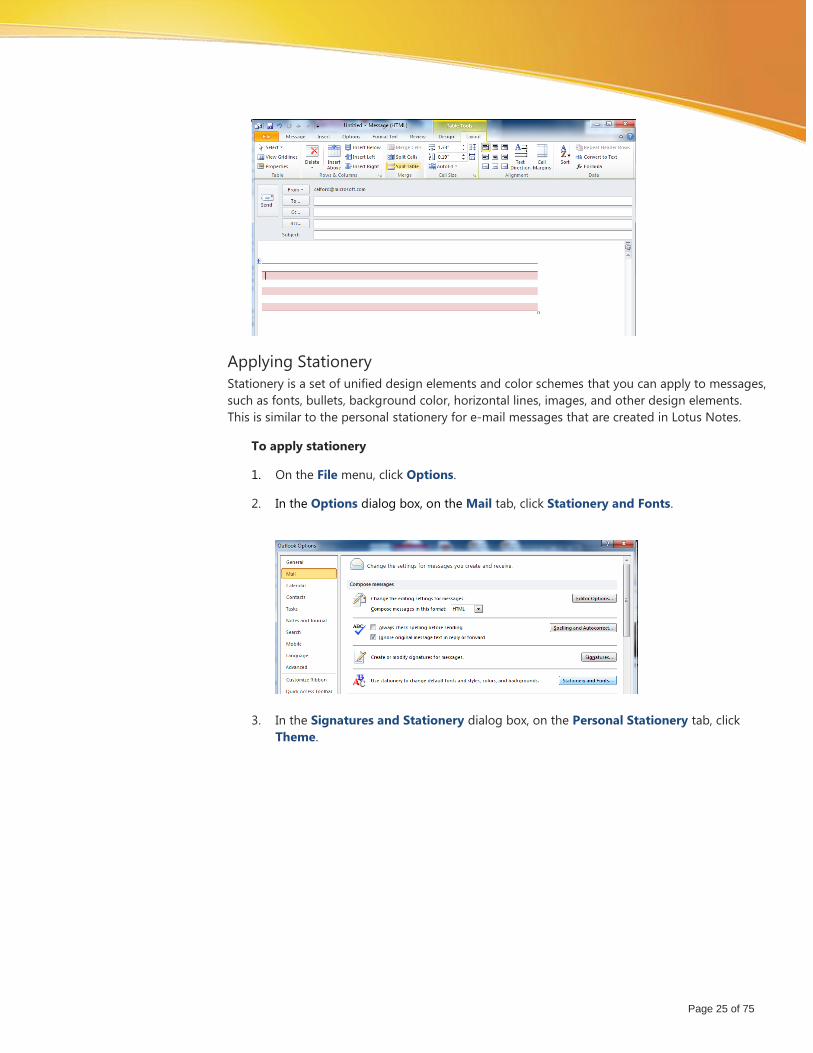
Creating Tables
Office Outlook 2010 enables you to create and modify tables in messages, so you can organize
and enhance your communication and information-sharing capabilities.
To add a table to a message
Page 24 of 75
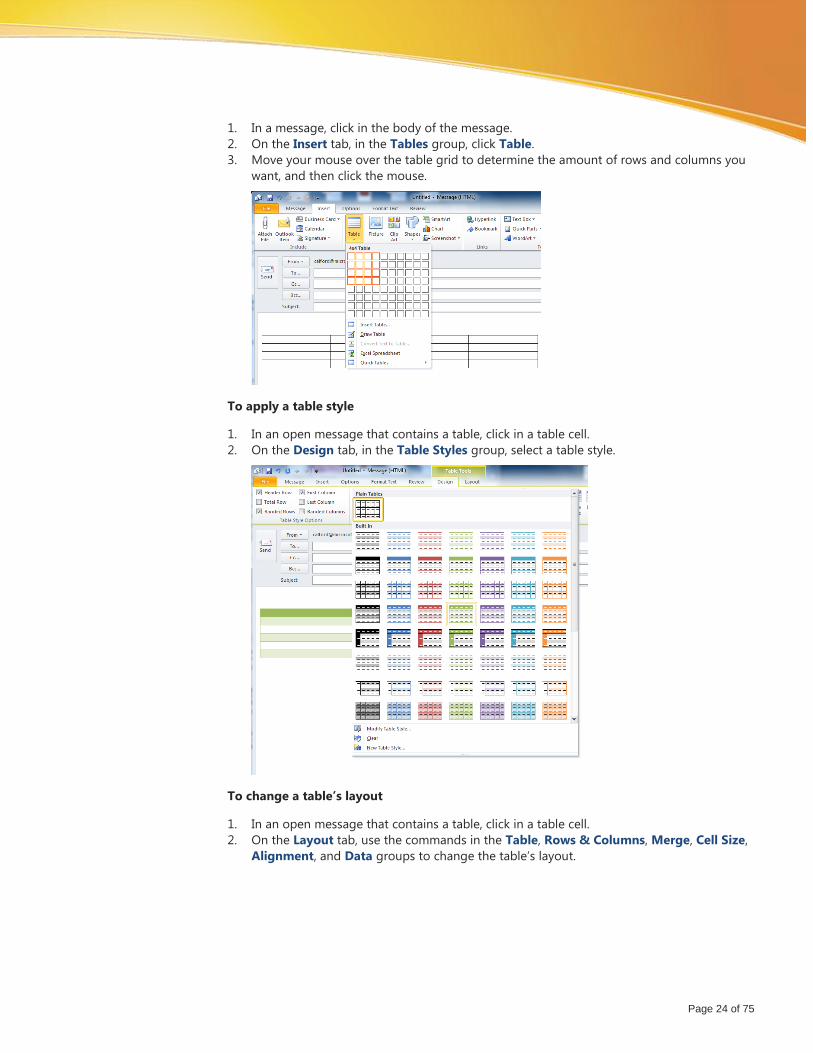
1. In a message, click in the body of the message.
2. On the Insert tab, in the Tables group, click Table.
3. Move your mouse over the table grid to determine the amount of rows and columns you
want, and then click the mouse.
To apply a table style
1. In an open message that contains a table, click in a table cell.
2. On the Design tab, in the Table Styles group, select a table style.
To change a table’s layout
1. In an open message that contains a table, click in a table cell.
2. On the Layout tab, use the commands in the Table, Rows & Columns, Merge, Cell Size,
Alignment, and Data groups to change the table’s layout.
Page 25 of 75
Applying Stationery
Stationery is a set of unified design elements and color schemes that you can apply to messages,
such as fonts, bullets, background color, horizontal lines, images, and other design elements.
This is similar to the personal stationery for e-mail messages that are created in Lotus Notes.
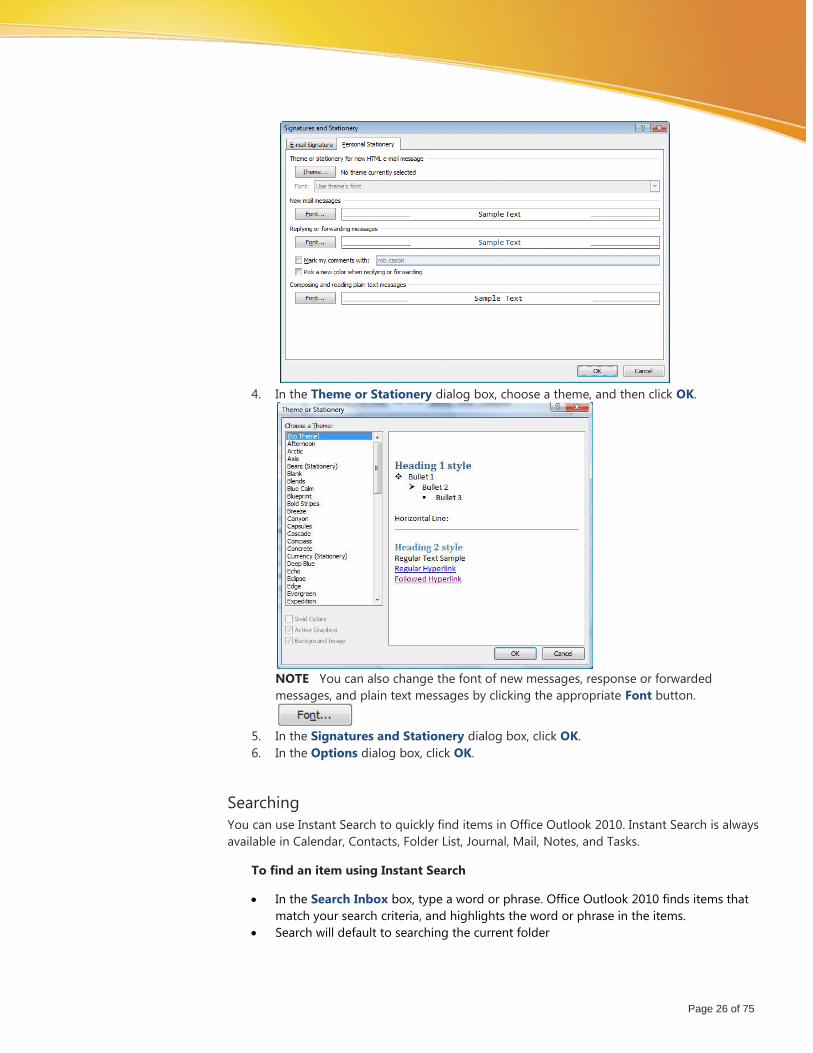
To apply stationery
1. On the File menu, click Options.
2. In the Options dialog box, on the Mail tab, click Stationery and Fonts.
3. In the Signatures and Stationery dialog box, on the Personal Stationery tab, click
Theme.
Page 26 of 75
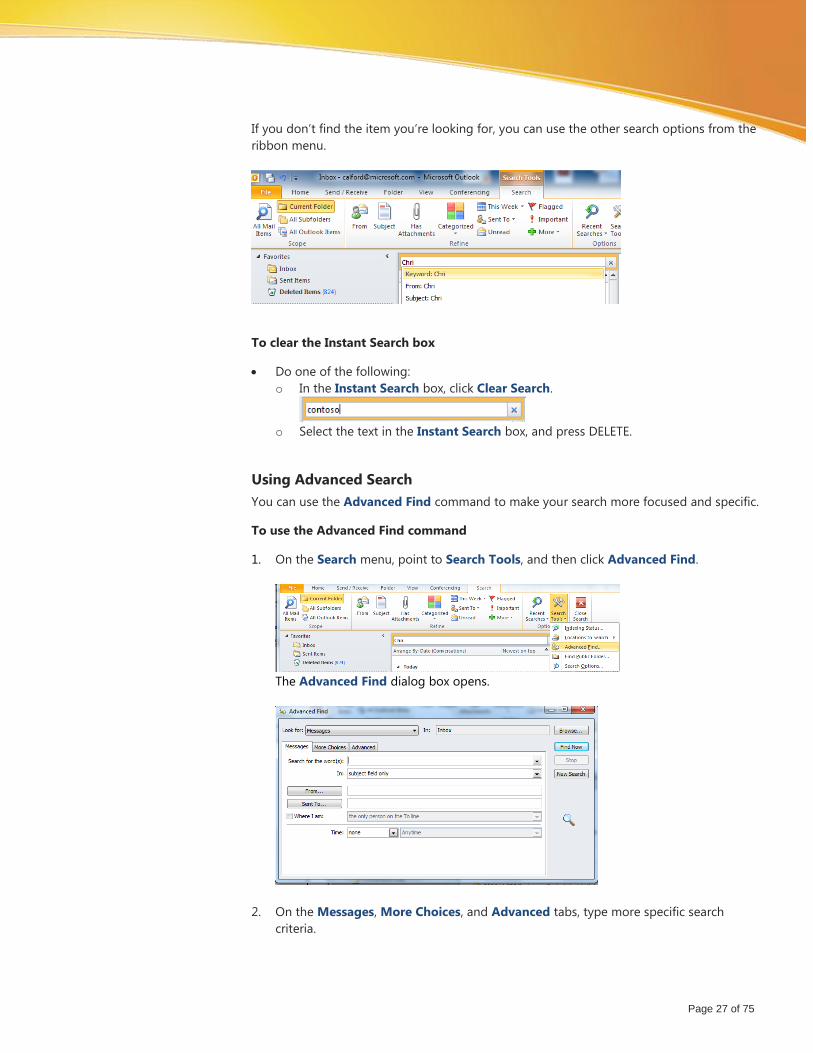
4. In the Theme or Stationery dialog box, choose a theme, and then click OK.
NOTE You can also change the font of new messages, response or forwarded
messages, and plain text messages by clicking the appropriate Font button.
5. In the Signatures and Stationery dialog box, click OK.
6. In the Options dialog box, click OK.
Searching
You can use Instant Search to quickly find items in Office Outlook 2010. Instant Search is always
available in Calendar, Contacts, Folder List, Journal, Mail, Notes, and Tasks.
To find an item using Instant Search
In the Search Inbox box, type a word or phrase. Office Outlook 2010 finds items that
match your search criteria, and highlights the word or phrase in the items.
Search will default to searching the current folder
Page 27 of 75
If you don’t find the item you’re looking for, you can use the other search options from the
ribbon menu.
To clear the Instant Search box
Do one of the following:
o In the Instant Search box, click Clear Search.
o Select the text in the Instant Search box, and press DELETE.
Using Advanced Search
You can use the Advanced Find command to make your search more focused and specific.
To use the Advanced Find command
1. On the Search menu, point to Search Tools, and then click Advanced Find.
The Advanced Find dialog box opens.
2. On the Messages, More Choices, and Advanced tabs, type more specific search
criteria.
Page 28 of 75
Archiving
You can manually or automatically store and archive old items that are important, but not
frequently used, in another location to help manage the space in your mailbox or on your mail
server.
To manually archive items, you can drag items to the Archive Folders in the Navigation Pane.
You can create new folders and subfolders under Archive Folders to help organize the archived
items.
You can also set the AutoArchive feature in Office Outlook 2010 that automatically archives
items.
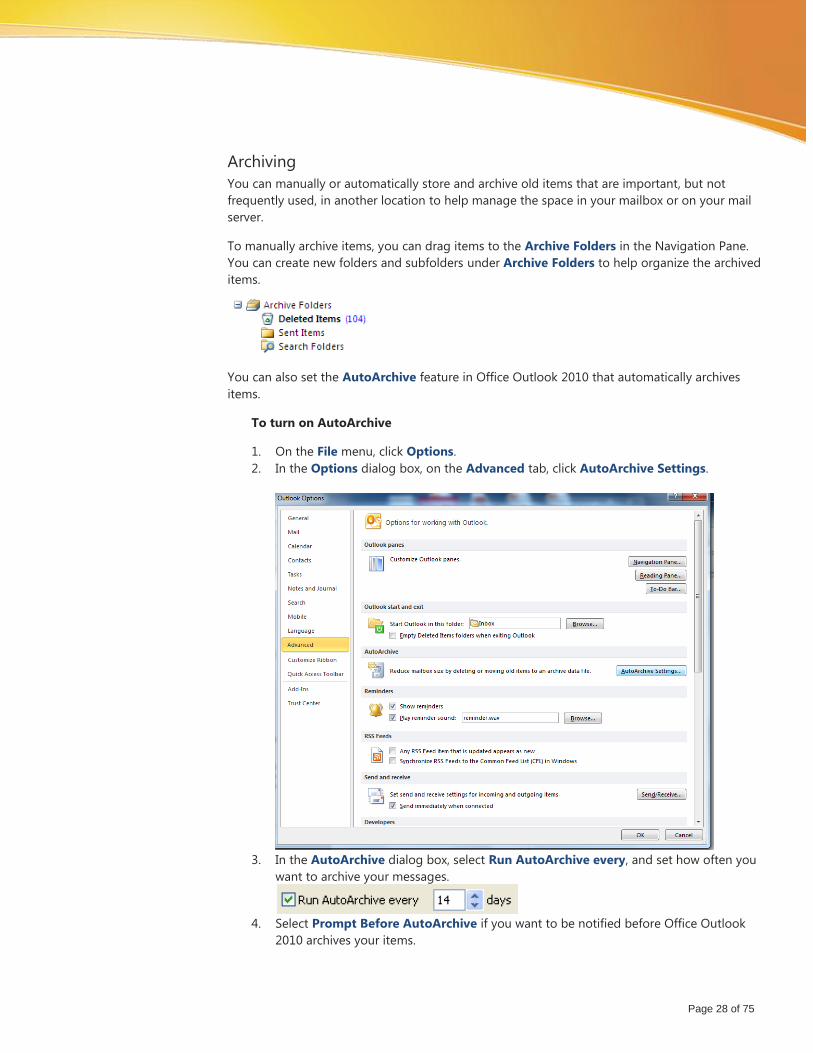
To turn on AutoArchive
1. On the File menu, click Options.
2. In the Options dialog box, on the Advanced tab, click AutoArchive Settings.
3. In the AutoArchive dialog box, select Run AutoArchive every, and set how often you
want to archive your messages.
4. Select Prompt Before AutoArchive if you want to be notified before Office Outlook
2010 archives your items.
Page 29 of 75
5. Under During AutoArchive, adjust the archive settings to your needs, and then click
OK.
6. In the Options dialog box, click OK.
To turn on AutoArchive for a specific folder
1. In the Folder List, right-click the folder that you want to AutoArchive, and then click
Properties.
2. In the Properties dialog box, click the AutoArchive tab.
3. Select Archive this folder using these settings.
4. In the Clean out items older than box, set how often you want the items in this folder
to be automatically moved to the archive folder.
5. Adjust the archive settings to your needs, and then click OK.
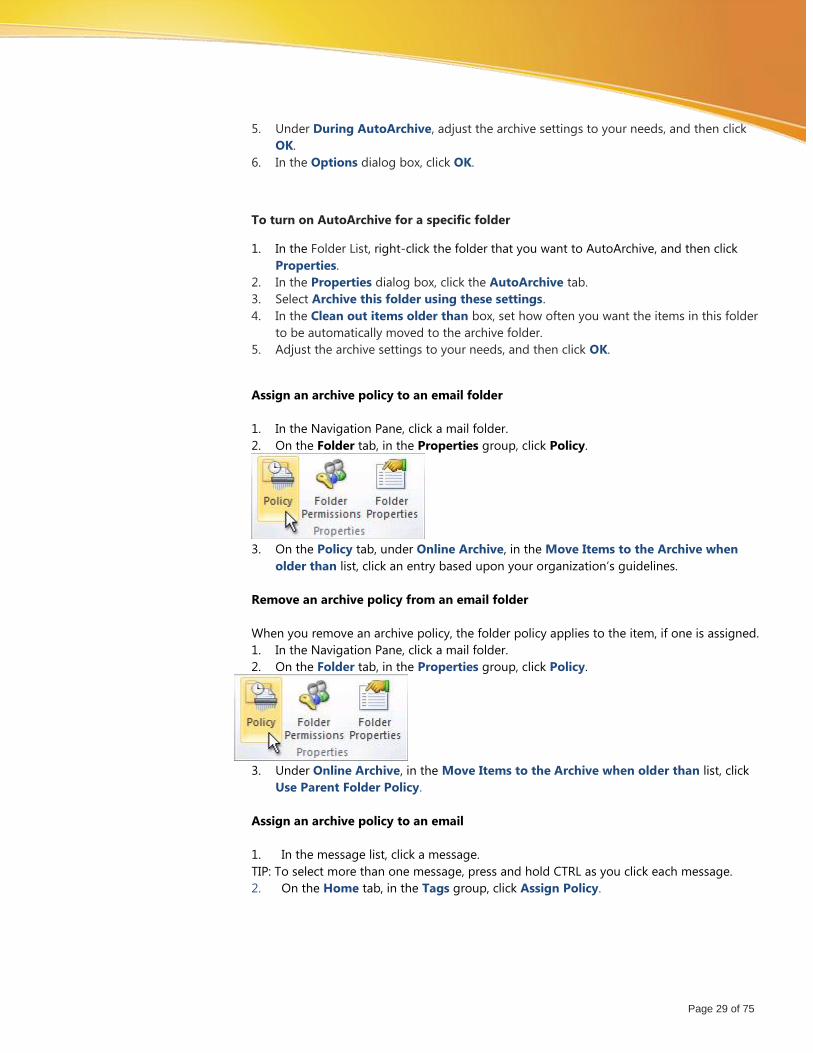
Assign an archive policy to an email folder
1. In the Navigation Pane, click a mail folder.
2. On the Folder tab, in the Properties group, click Policy.
3. On the Policy tab, under Online Archive, in the Move Items to the Archive when
older than list, click an entry based upon your organization’s guidelines.
Remove an archive policy from an email folder
When you remove an archive policy, the folder policy applies to the item, if one is assigned.
1. In the Navigation Pane, click a mail folder.
2. On the Folder tab, in the Properties group, click Policy.
3. Under Online Archive, in the Move Items to the Archive when older than list, click
Use Parent Folder Policy.
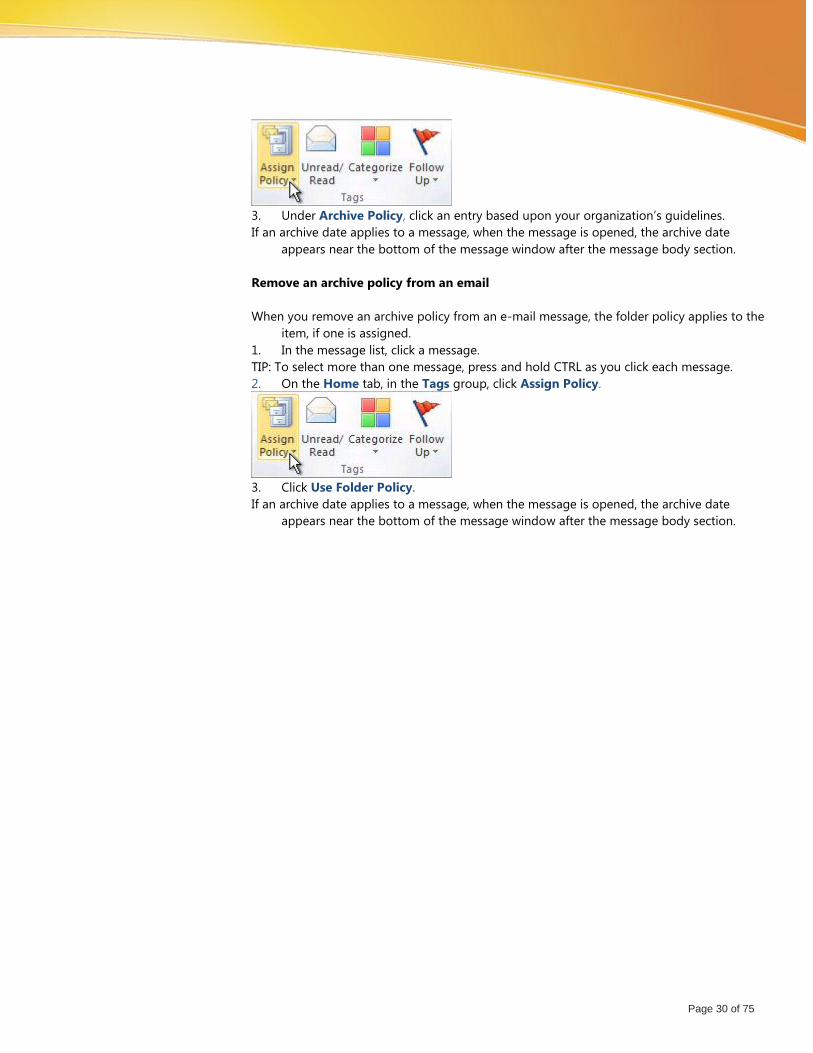
Assign an archive policy to an email
1. In the message list, click a message.
TIP: To select more than one message, press and hold CTRL as you click each message.
2. On the Home tab, in the Tags group, click Assign Policy.
Page 30 of 75
3. Under Archive Policy, click an entry based upon your organization’s guidelines.
If an archive date applies to a message, when the message is opened, the archive date
appears near the bottom of the message window after the message body section.
Remove an archive policy from an email
When you remove an archive policy from an e-mail message, the folder policy applies to the
item, if one is assigned.
1. In the message list, click a message.
TIP: To select more than one message, press and hold CTRL as you click each message.
2. On the Home tab, in the Tags group, click Assign Policy.
3. Click Use Folder Policy.
If an archive date applies to a message, when the message is opened, the archive date
appears near the bottom of the message window after the message body section.
Page 31 of 75
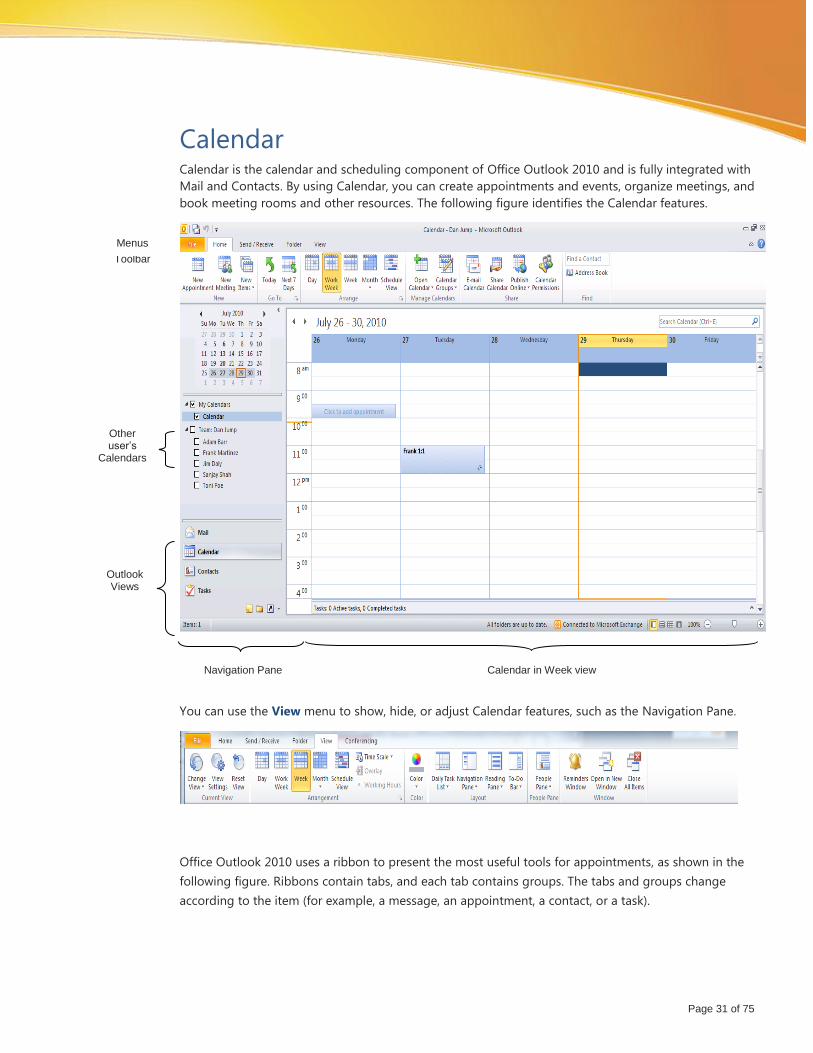
Calendar Calendar is the calendar and scheduling component of Office Outlook 2010 and is fully integrated with
Mail and Contacts. By using Calendar, you can create appointments and events, organize meetings, and
book meeting rooms and other resources. The following figure identifies the Calendar features.
You can use the View menu to show, hide, or adjust Calendar features, such as the Navigation Pane.
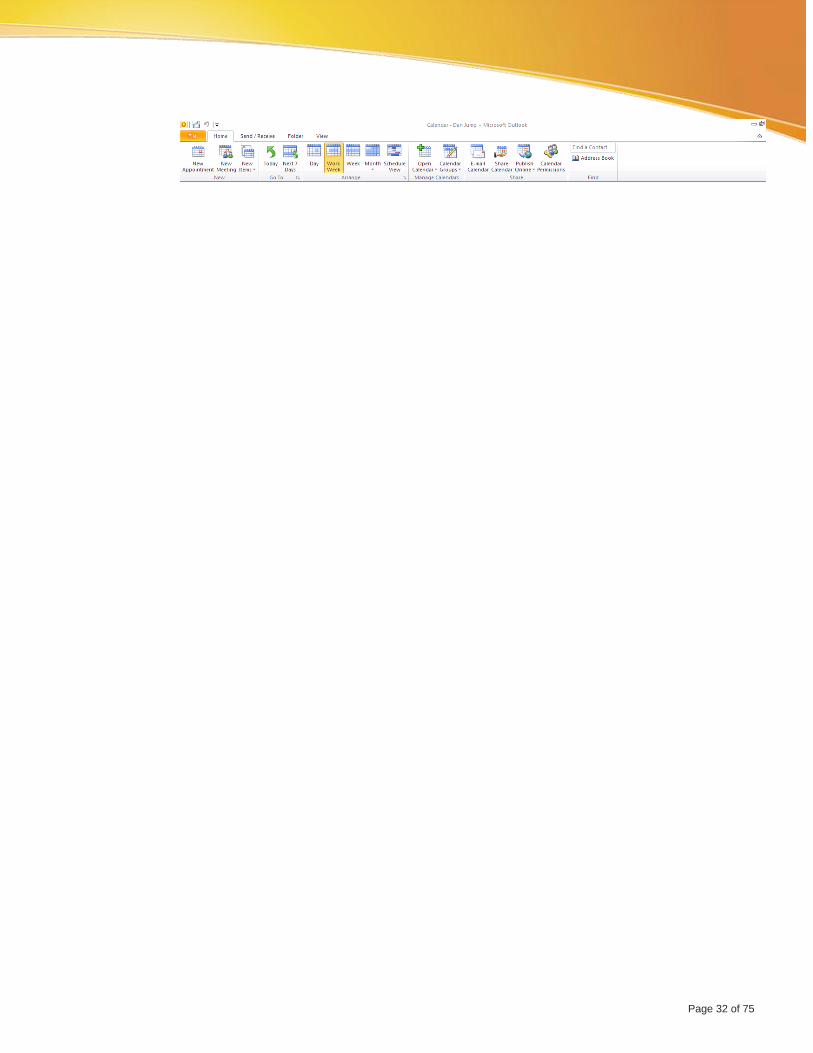
Office Outlook 2010 uses a ribbon to present the most useful tools for appointments, as shown in the
following figure. Ribbons contain tabs, and each tab contains groups. The tabs and groups change
according to the item (for example, a message, an appointment, a contact, or a task).
Toolbar
Menus
Navigation Pane Calendar in Week view
Outlook Views
Other user’s
Calendars
Page 32 of 75
Page 33 of 75
Viewing Appointments
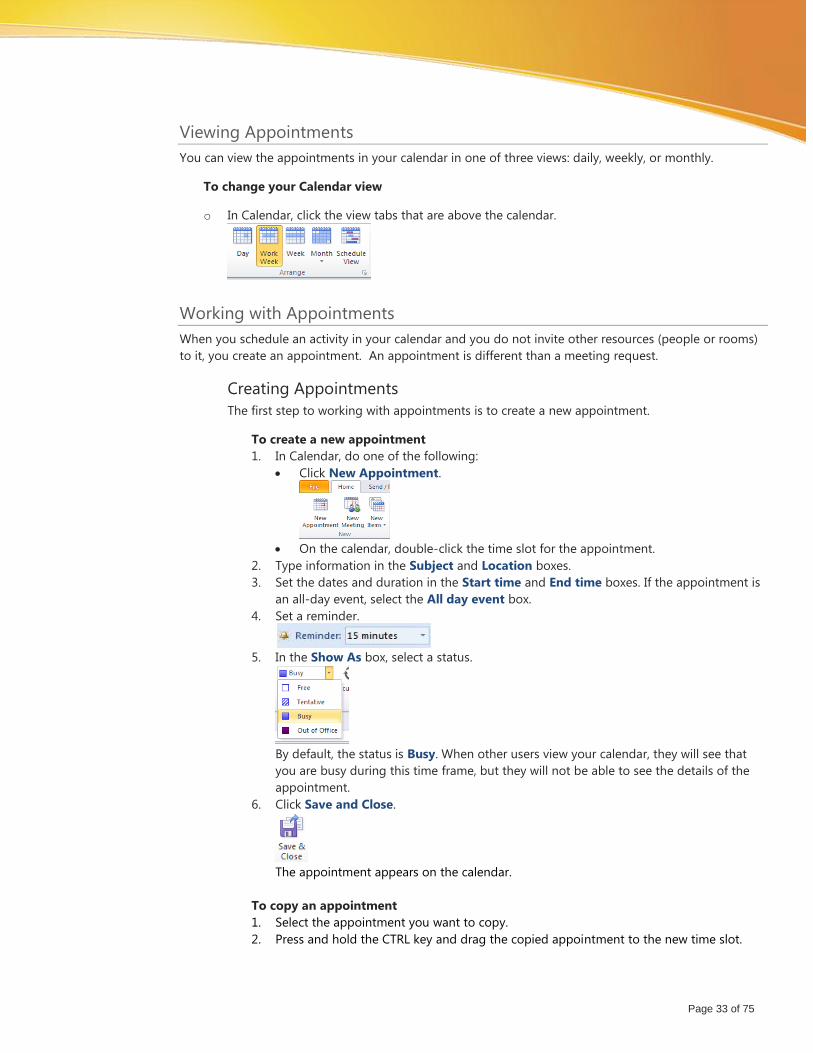
You can view the appointments in your calendar in one of three views: daily, weekly, or monthly.
To change your Calendar view
o In Calendar, click the view tabs that are above the calendar.
Working with Appointments
When you schedule an activity in your calendar and you do not invite other resources (people or rooms)
to it, you create an appointment. An appointment is different than a meeting request.
Creating Appointments
The first step to working with appointments is to create a new appointment.
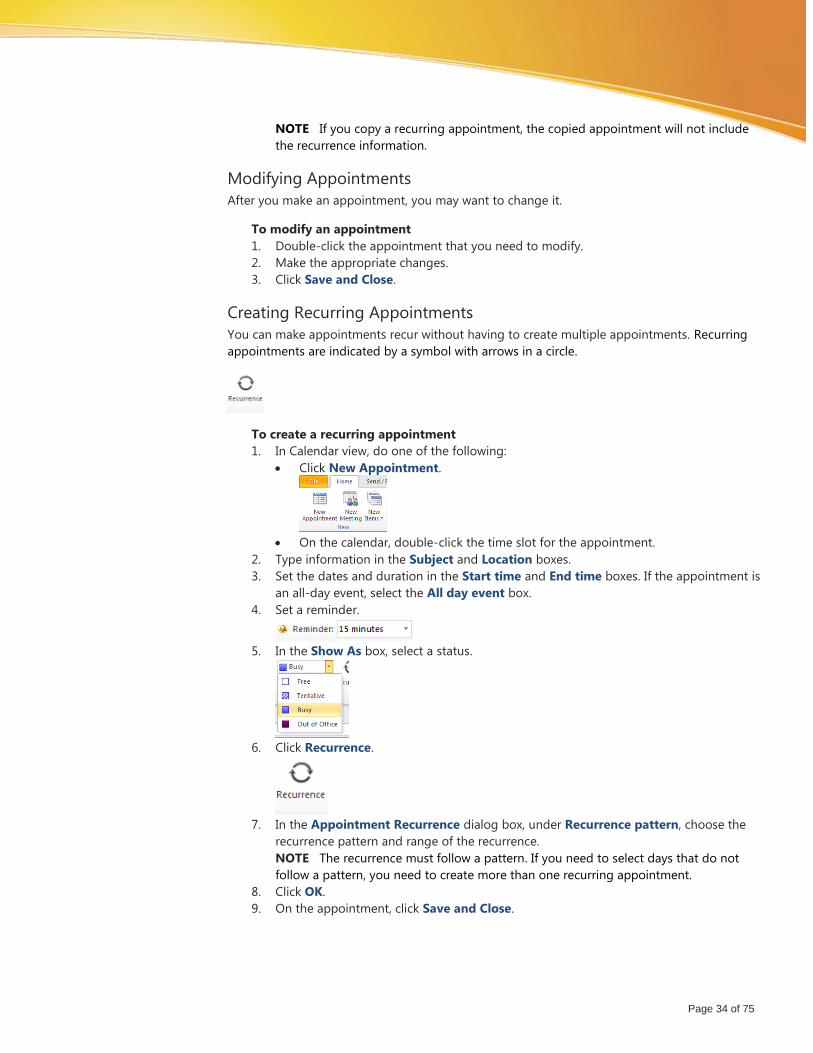
To create a new appointment
1. In Calendar, do one of the following:
Click New Appointment.
On the calendar, double-click the time slot for the appointment.
2. Type information in the Subject and Location boxes.
3. Set the dates and duration in the Start time and End time boxes. If the appointment is
an all-day event, select the All day event box.
4. Set a reminder.
5. In the Show As box, select a status.
By default, the status is Busy. When other users view your calendar, they will see that
you are busy during this time frame, but they will not be able to see the details of the
appointment.
6. Click Save and Close.
The appointment appears on the calendar.
To copy an appointment
1. Select the appointment you want to copy.
2. Press and hold the CTRL key and drag the copied appointment to the new time slot.
Page 34 of 75
NOTE If you copy a recurring appointment, the copied appointment will not include
the recurrence information.
Modifying Appointments
After you make an appointment, you may want to change it.
To modify an appointment
1. Double-click the appointment that you need to modify.
2. Make the appropriate changes.
3. Click Save and Close.
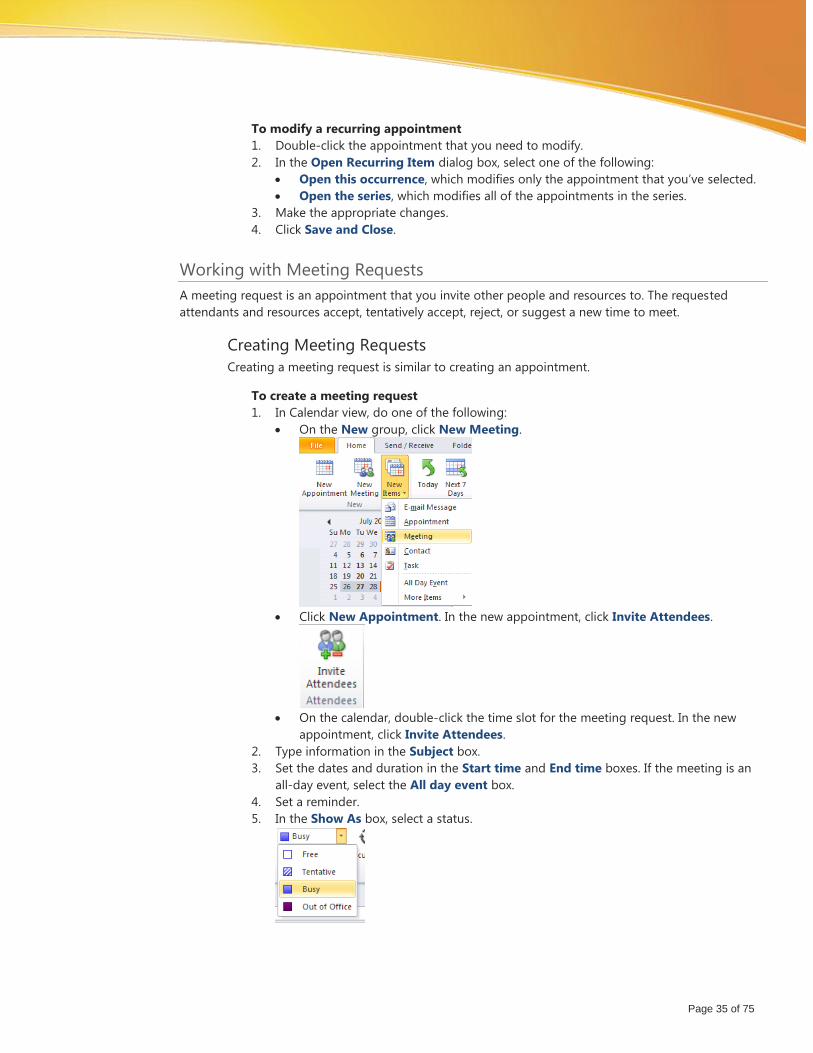
Creating Recurring Appointments
You can make appointments recur without having to create multiple appointments. Recurring
appointments are indicated by a symbol with arrows in a circle.
To create a recurring appointment
1. In Calendar view, do one of the following:
Click New Appointment.
On the calendar, double-click the time slot for the appointment.
2. Type information in the Subject and Location boxes.
3. Set the dates and duration in the Start time and End time boxes. If the appointment is
an all-day event, select the All day event box.
4. Set a reminder.
5. In the Show As box, select a status.
6. Click Recurrence.
7. In the Appointment Recurrence dialog box, under Recurrence pattern, choose the
recurrence pattern and range of the recurrence.
NOTE The recurrence must follow a pattern. If you need to select days that do not
follow a pattern, you need to create more than one recurring appointment.
8. Click OK.
9. On the appointment, click Save and Close.
Page 35 of 75
To modify a recurring appointment
1. Double-click the appointment that you need to modify.
2. In the Open Recurring Item dialog box, select one of the following:
Open this occurrence, which modifies only the appointment that you’ve selected.
Open the series, which modifies all of the appointments in the series.
3. Make the appropriate changes.
4. Click Save and Close.
Working with Meeting Requests
A meeting request is an appointment that you invite other people and resources to. The requested
attendants and resources accept, tentatively accept, reject, or suggest a new time to meet.
Creating Meeting Requests
Creating a meeting request is similar to creating an appointment.
To create a meeting request
1. In Calendar view, do one of the following:
On the New group, click New Meeting.
Click New Appointment. In the new appointment, click Invite Attendees.
On the calendar, double-click the time slot for the meeting request. In the new
appointment, click Invite Attendees.
2. Type information in the Subject box.
3. Set the dates and duration in the Start time and End time boxes. If the meeting is an
all-day event, select the All day event box.
4. Set a reminder.
5. In the Show As box, select a status.
Page 36 of 75
6. Type additional information about the meeting (such as an agenda) in the body of the
request.
NOTE All attendees will be able to see the information, including notes and
comments, you add to the meeting request. If you need to add information to a
meeting request that you do not want the attendees to see, you can create a personal
appointment.
Adding Attendees
After you create a new meeting request, you need to choose and add the attendees.
To add attendees to a meeting request
In a meeting request, do one of the following procedures:
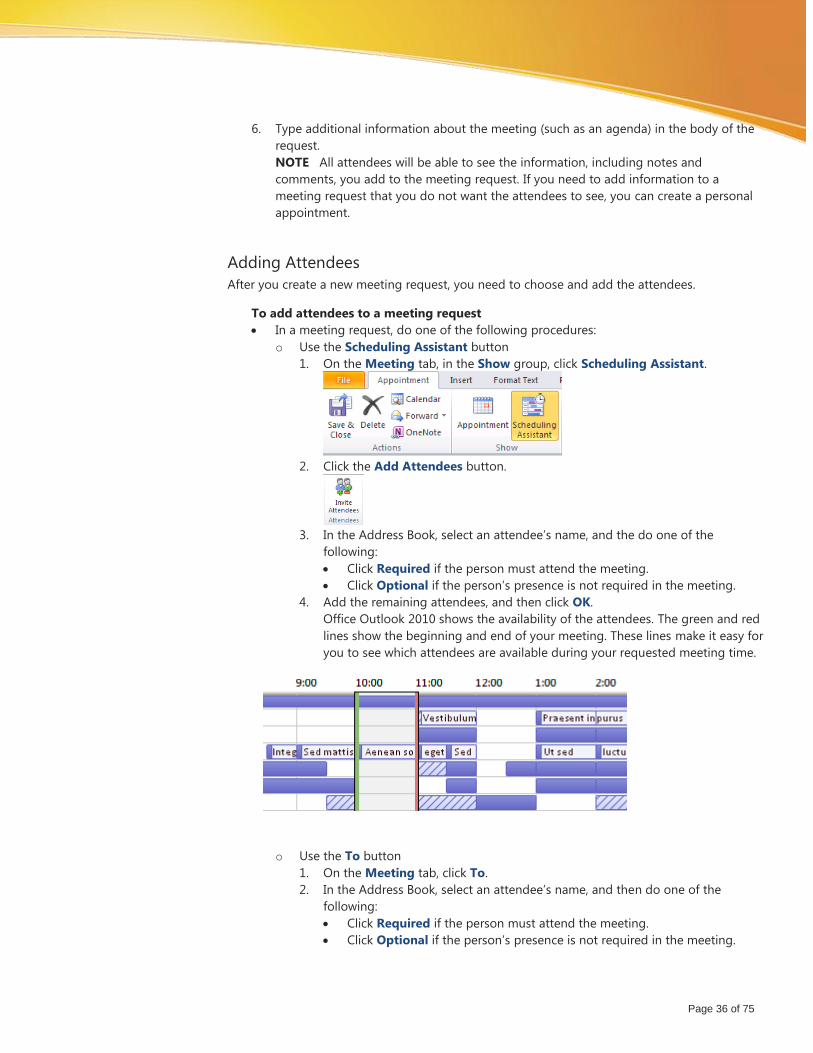
o Use the Scheduling Assistant button
1. On the Meeting tab, in the Show group, click Scheduling Assistant.
2. Click the Add Attendees button.
3. In the Address Book, select an attendee’s name, and the do one of the
following:
Click Required if the person must attend the meeting.
Click Optional if the person’s presence is not required in the meeting.
4. Add the remaining attendees, and then click OK.
Office Outlook 2010 shows the availability of the attendees. The green and red
lines show the beginning and end of your meeting. These lines make it easy for
you to see which attendees are available during your requested meeting time.
o Use the To button
1. On the Meeting tab, click To.
2. In the Address Book, select an attendee’s name, and then do one of the
following:
Click Required if the person must attend the meeting.
Click Optional if the person’s presence is not required in the meeting.
Page 37 of 75
3. Add the remaining attendees, and then click OK.
Adding Rooms
After you add attendees to a meeting request, you need to choose and add a room.
To add a room to a meeting request
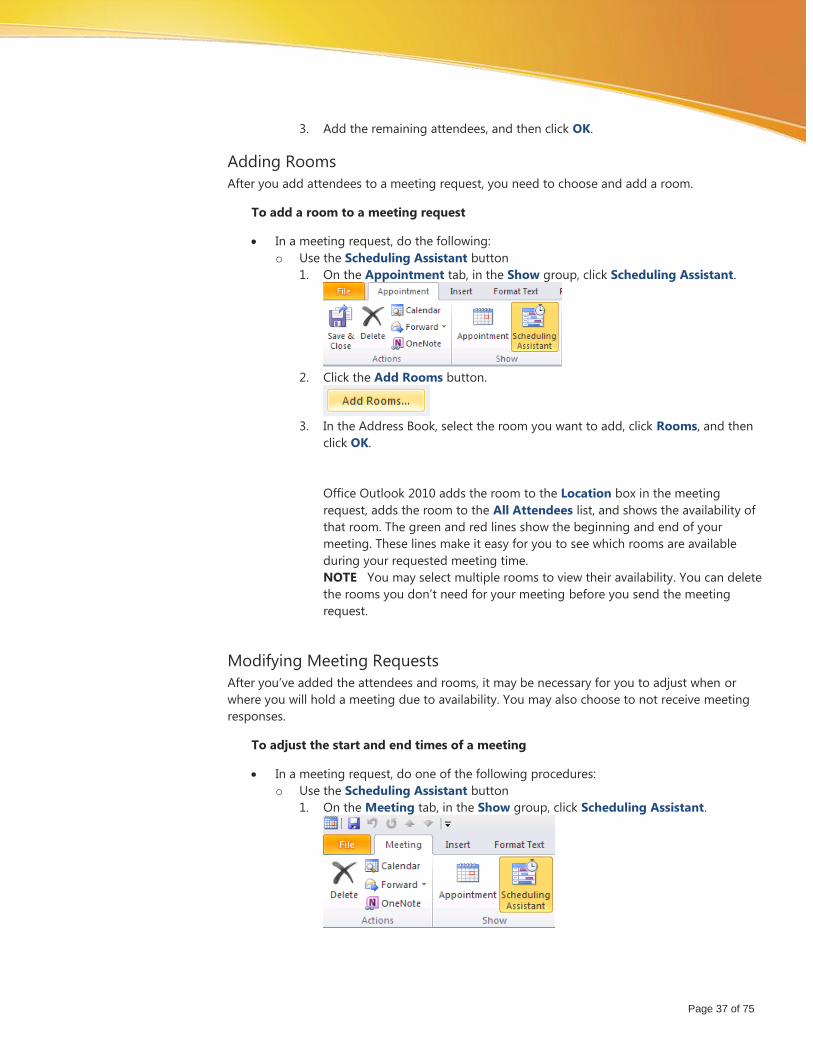
In a meeting request, do the following:
o Use the Scheduling Assistant button
1. On the Appointment tab, in the Show group, click Scheduling Assistant.
2. Click the Add Rooms button.
3. In the Address Book, select the room you want to add, click Rooms, and then
click OK.
Office Outlook 2010 adds the room to the Location box in the meeting
request, adds the room to the All Attendees list, and shows the availability of
that room. The green and red lines show the beginning and end of your
meeting. These lines make it easy for you to see which rooms are available
during your requested meeting time.
NOTE You may select multiple rooms to view their availability. You can delete
the rooms you don’t need for your meeting before you send the meeting
request.
Modifying Meeting Requests
After you’ve added the attendees and rooms, it may be necessary for you to adjust when or
where you will hold a meeting due to availability. You may also choose to not receive meeting
responses.
To adjust the start and end times of a meeting
In a meeting request, do one of the following procedures:
o Use the Scheduling Assistant button
1. On the Meeting tab, in the Show group, click Scheduling Assistant.

Page 38 of 75
2. Drag the green start time line to a start time where all attendees and rooms are
available.
3. Drag the red end time line to an end time where all attendees and rooms are
available.
Office Outlook 2010 updates the start and end times for the meeting request
according to where you moved the green and red lines.
o Modify the Start time and End time values
1. On the Meeting tab, modify the Start time value.
2. Modify the End time value.
To turn off meeting responses from attendees
In a meeting request, on the Messages tab, in the Attendees group, click Responses,
and then clear Request Responses.
NOTE When you turn off responses from attendees, you will no longer be about to
track who will attend the meeting.
Page 39 of 75
Sending Meeting Requests
After you’ve customized meeting requests, you can send them to the attendees and resources.
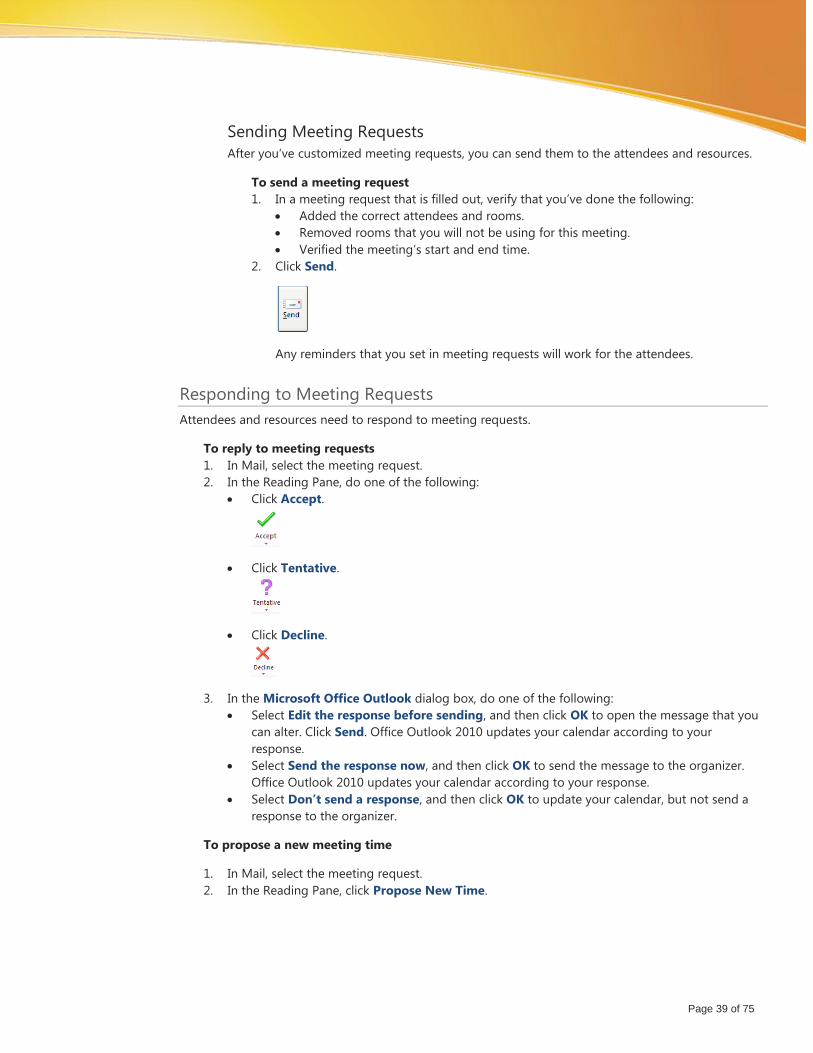
To send a meeting request
1. In a meeting request that is filled out, verify that you’ve done the following:
Added the correct attendees and rooms.
Removed rooms that you will not be using for this meeting.
Verified the meeting’s start and end time.
2. Click Send.
Any reminders that you set in meeting requests will work for the attendees.
Responding to Meeting Requests
Attendees and resources need to respond to meeting requests.
To reply to meeting requests
1. In Mail, select the meeting request.
2. In the Reading Pane, do one of the following:
Click Accept.
Click Tentative.
Click Decline.
3. In the Microsoft Office Outlook dialog box, do one of the following:
Select Edit the response before sending, and then click OK to open the message that you
can alter. Click Send. Office Outlook 2010 updates your calendar according to your
response.
Select Send the response now, and then click OK to send the message to the organizer.
Office Outlook 2010 updates your calendar according to your response.
Select Don’t send a response, and then click OK to update your calendar, but not send a
response to the organizer.
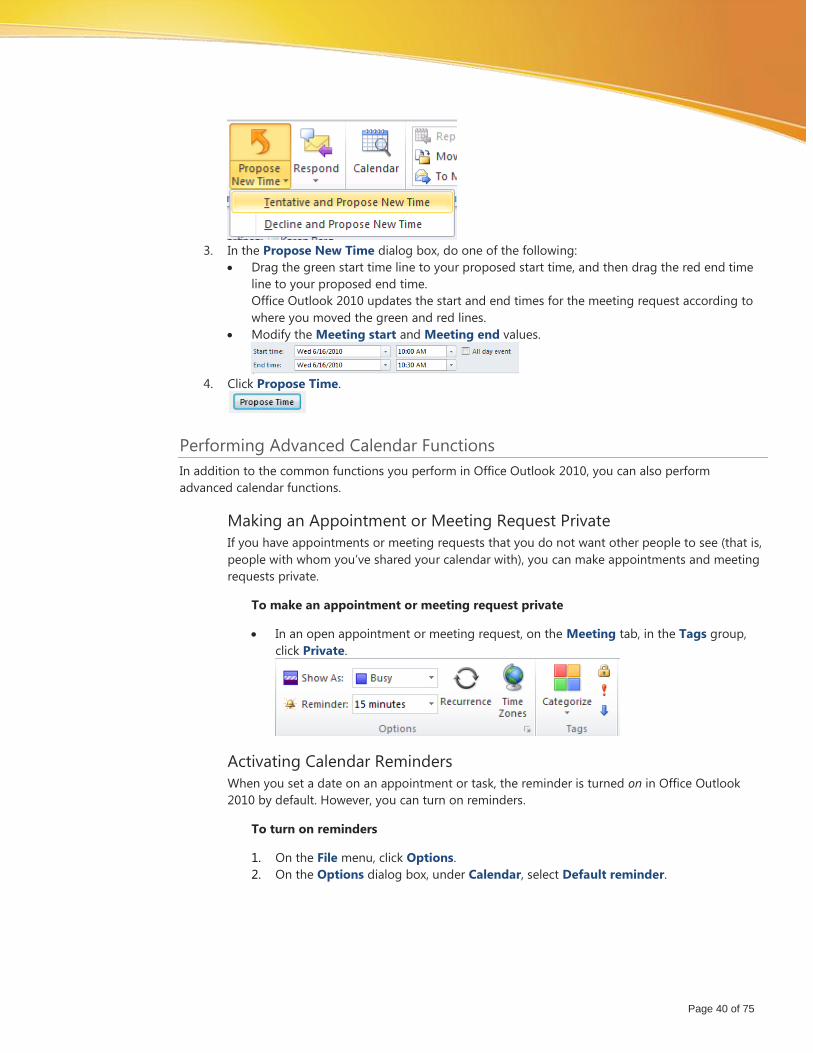
To propose a new meeting time
1. In Mail, select the meeting request.
2. In the Reading Pane, click Propose New Time.
Page 40 of 75
3. In the Propose New Time dialog box, do one of the following:
Drag the green start time line to your proposed start time, and then drag the red end time
line to your proposed end time.
Office Outlook 2010 updates the start and end times for the meeting request according to
where you moved the green and red lines.
Modify the Meeting start and Meeting end values.
4. Click Propose Time.
Performing Advanced Calendar Functions
In addition to the common functions you perform in Office Outlook 2010, you can also perform
advanced calendar functions.
Making an Appointment or Meeting Request Private
If you have appointments or meeting requests that you do not want other people to see (that is,
people with whom you’ve shared your calendar with), you can make appointments and meeting
requests private.
To make an appointment or meeting request private
In an open appointment or meeting request, on the Meeting tab, in the Tags group,
click Private.
Activating Calendar Reminders
When you set a date on an appointment or task, the reminder is turned on in Office Outlook
2010 by default. However, you can turn on reminders.
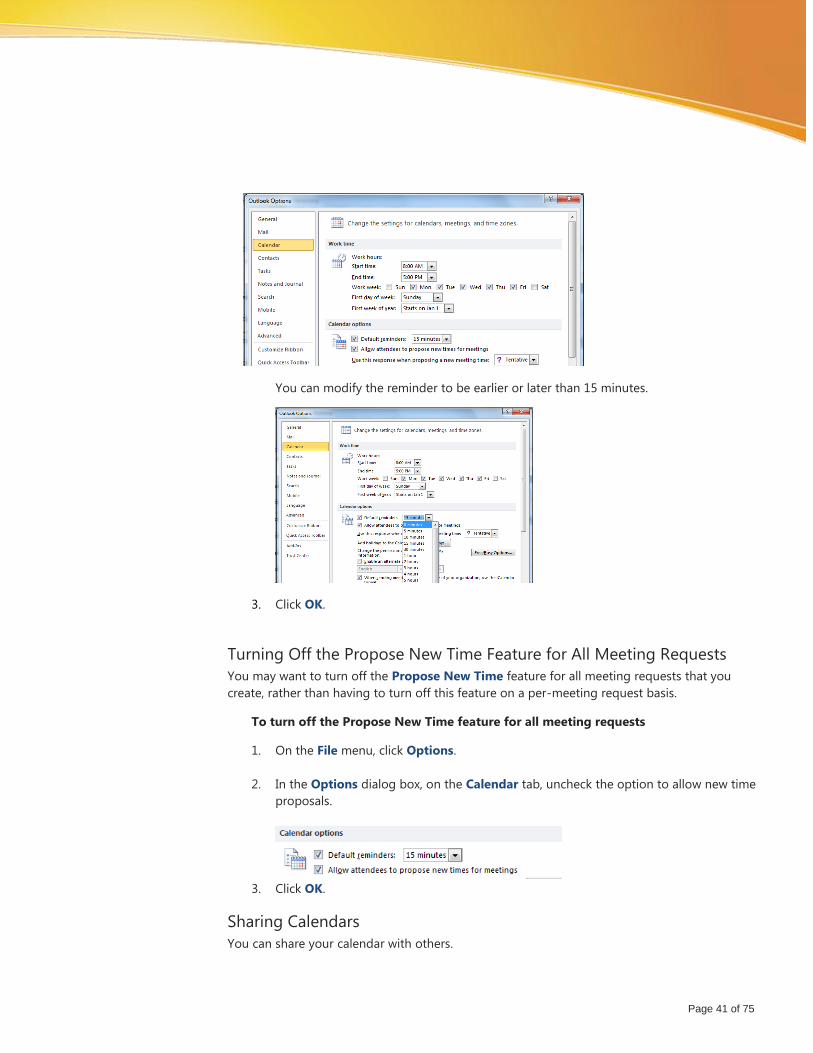
To turn on reminders
1. On the File menu, click Options.
2. On the Options dialog box, under Calendar, select Default reminder.
Page 41 of 75
You can modify the reminder to be earlier or later than 15 minutes.
3. Click OK.
Turning Off the Propose New Time Feature for All Meeting Requests
You may want to turn off the Propose New Time feature for all meeting requests that you
create, rather than having to turn off this feature on a per-meeting request basis.
To turn off the Propose New Time feature for all meeting requests
1. On the File menu, click Options.
2. In the Options dialog box, on the Calendar tab, uncheck the option to allow new time
proposals.
3. Click OK.
Sharing Calendars
You can share your calendar with others.
Page 42 of 75
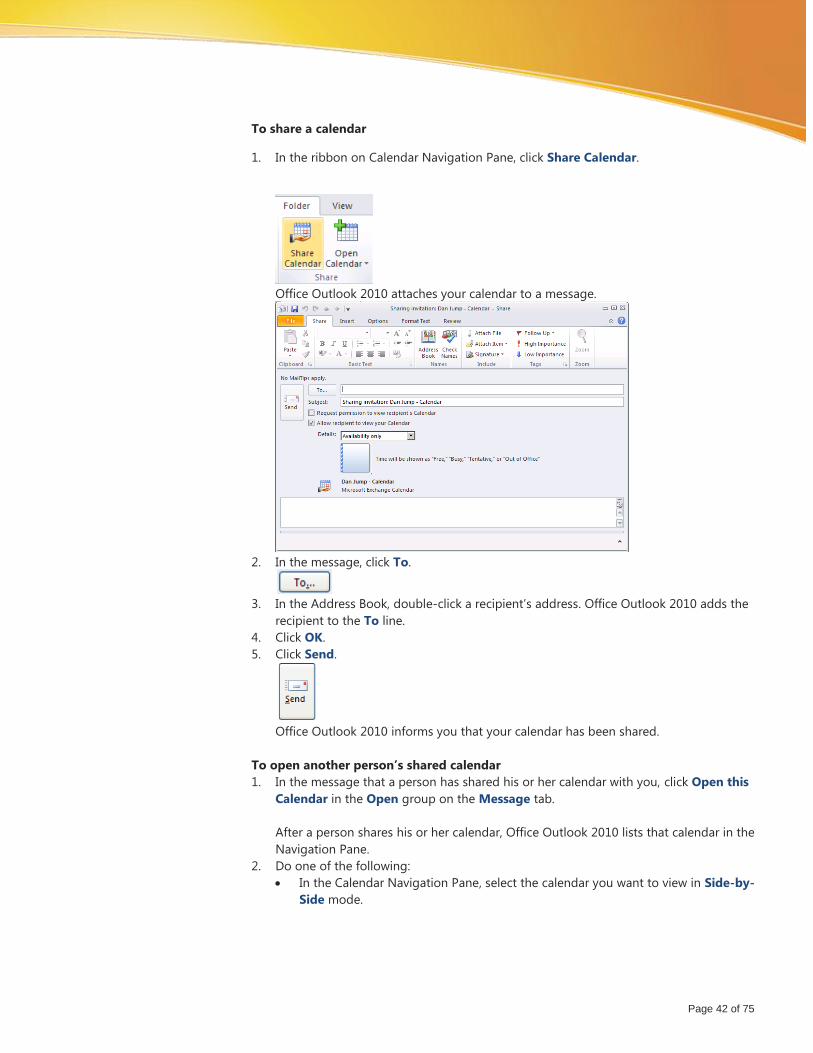
To share a calendar
1. In the ribbon on Calendar Navigation Pane, click Share Calendar.
Office Outlook 2010 attaches your calendar to a message.
2. In the message, click To.
3. In the Address Book, double-click a recipient’s address. Office Outlook 2010 adds the
recipient to the To line.
4. Click OK.
5. Click Send.
Office Outlook 2010 informs you that your calendar has been shared.
To open another person’s shared calendar
1. In the message that a person has shared his or her calendar with you, click Open this
Calendar in the Open group on the Message tab.
After a person shares his or her calendar, Office Outlook 2010 lists that calendar in the
Navigation Pane.
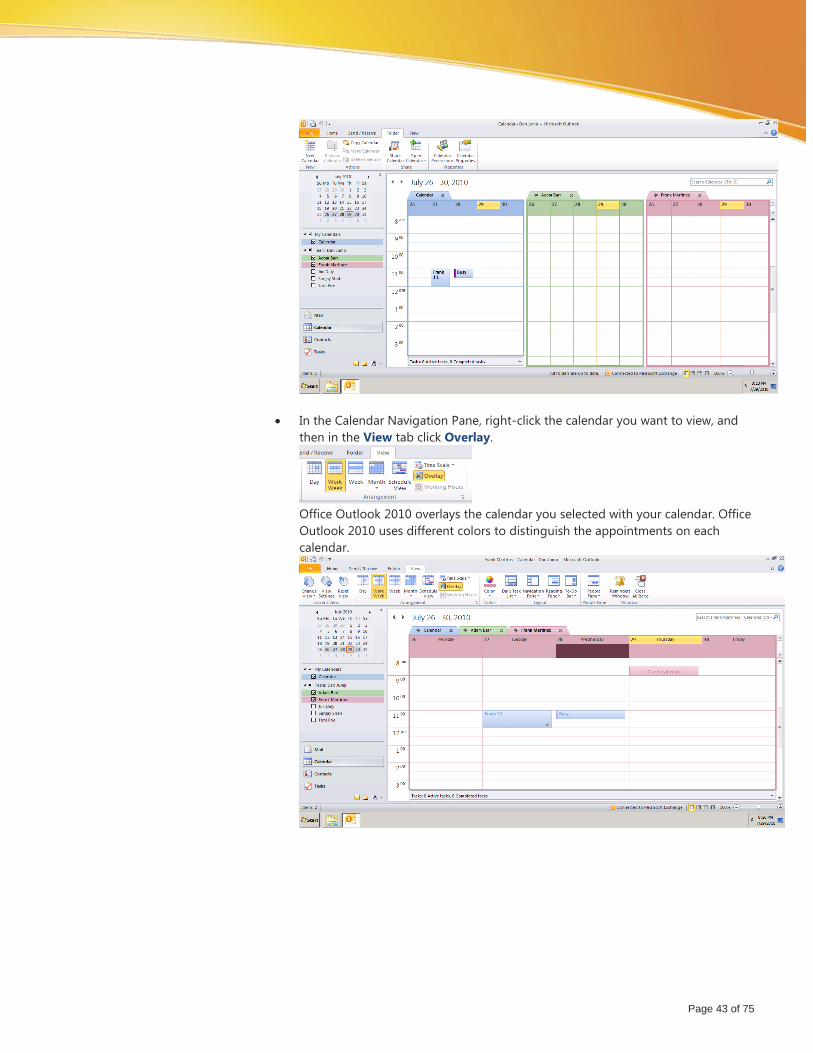
2. Do one of the following:
In the Calendar Navigation Pane, select the calendar you want to view in Side-by-
Side mode.
Page 43 of 75
In the Calendar Navigation Pane, right-click the calendar you want to view, and
then in the View tab click Overlay.
Office Outlook 2010 overlays the calendar you selected with your calendar. Office
Outlook 2010 uses different colors to distinguish the appointments on each
calendar.
Page 44 of 75
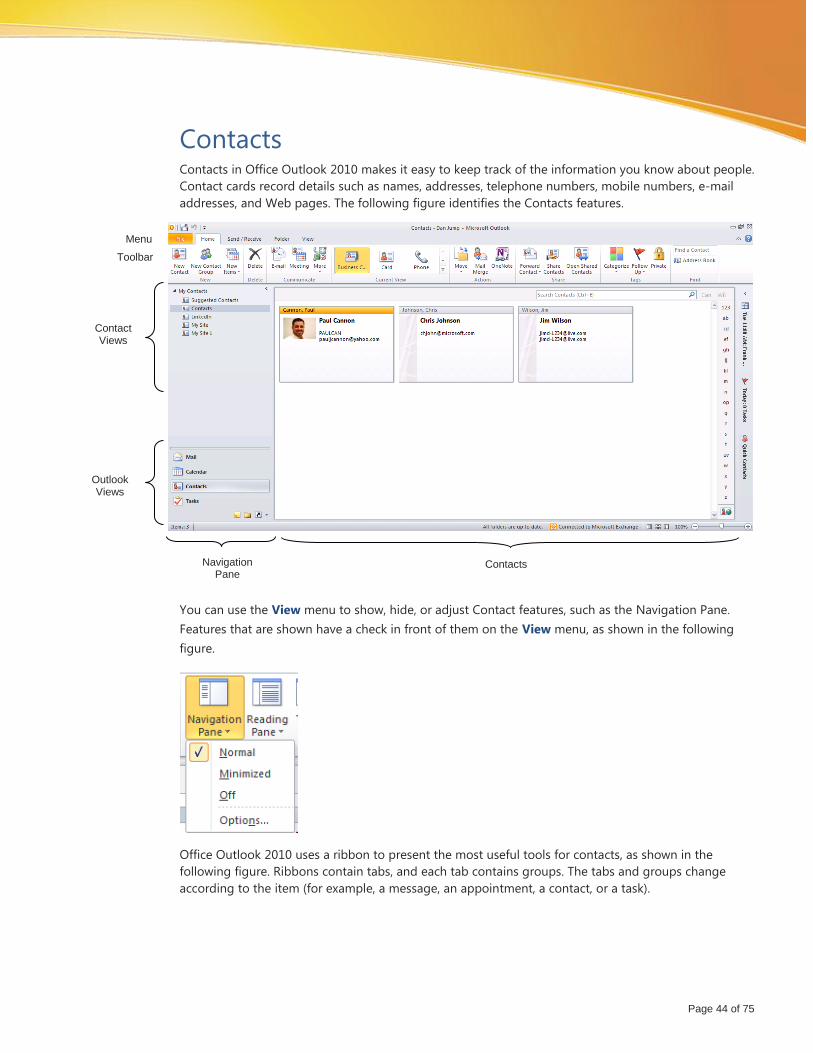
Contacts Contacts in Office Outlook 2010 makes it easy to keep track of the information you know about people.
Contact cards record details such as names, addresses, telephone numbers, mobile numbers, e-mail
addresses, and Web pages. The following figure identifies the Contacts features.
You can use the View menu to show, hide, or adjust Contact features, such as the Navigation Pane.
Features that are shown have a check in front of them on the View menu, as shown in the following
figure.
Office Outlook 2010 uses a ribbon to present the most useful tools for contacts, as shown in the
following figure. Ribbons contain tabs, and each tab contains groups. The tabs and groups change
according to the item (for example, a message, an appointment, a contact, or a task).
Menu
Toolbar
Contact Views
Outlook Views
Navigation Pane
Contacts
Page 45 of 75
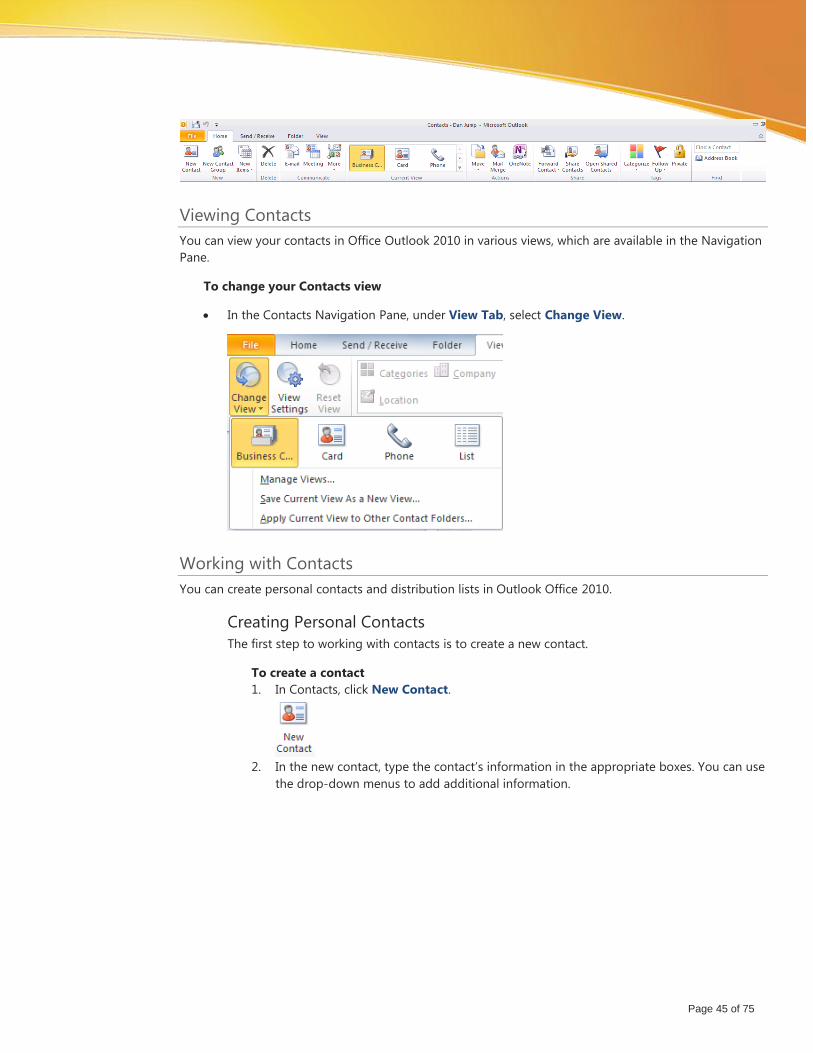
Viewing Contacts
You can view your contacts in Office Outlook 2010 in various views, which are available in the Navigation
Pane.
To change your Contacts view
In the Contacts Navigation Pane, under View Tab, select Change View.
Working with Contacts
You can create personal contacts and distribution lists in Outlook Office 2010.
Creating Personal Contacts
The first step to working with contacts is to create a new contact.
To create a contact
1. In Contacts, click New Contact.
2. In the new contact, type the contact’s information in the appropriate boxes. You can use
the drop-down menus to add additional information.
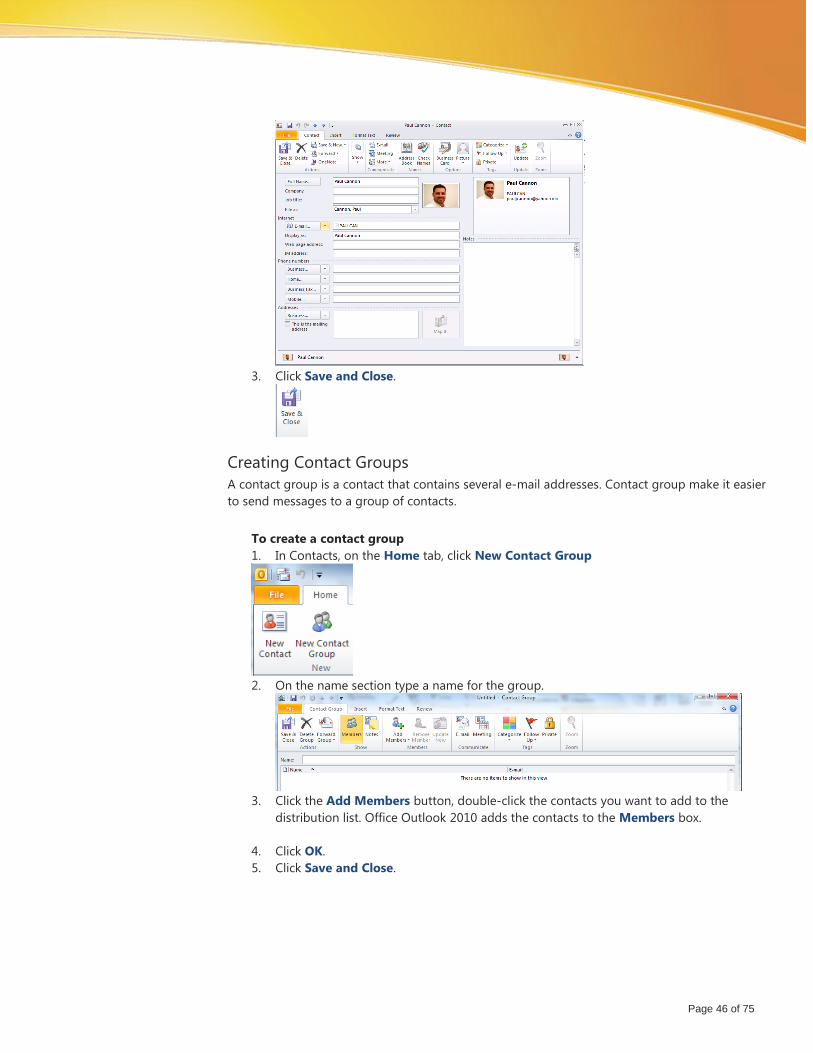
Page 46 of 75
3. Click Save and Close.
Creating Contact Groups
A contact group is a contact that contains several e-mail addresses. Contact group make it easier
to send messages to a group of contacts.
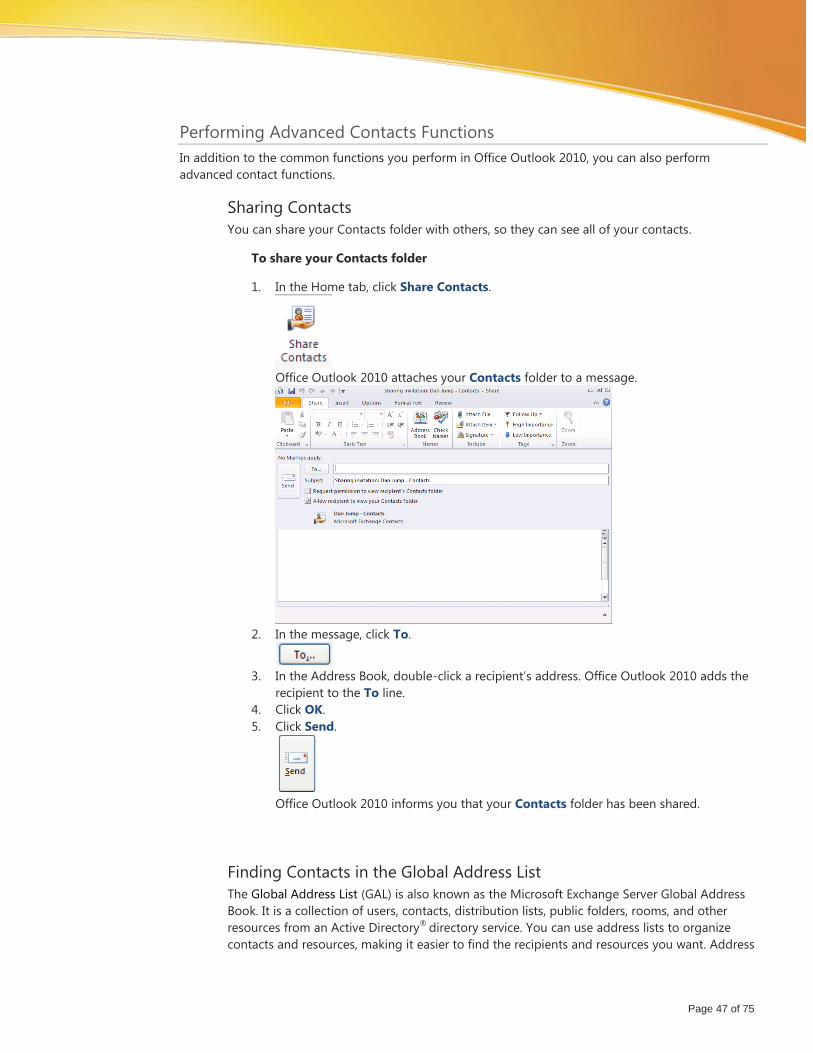
To create a contact group
1. In Contacts, on the Home tab, click New Contact Group
2. On the name section type a name for the group.
3. Click the Add Members button, double-click the contacts you want to add to the
distribution list. Office Outlook 2010 adds the contacts to the Members box.
4. Click OK.
5. Click Save and Close.
Page 47 of 75
Performing Advanced Contacts Functions
In addition to the common functions you perform in Office Outlook 2010, you can also perform
advanced contact functions.
Sharing Contacts
You can share your Contacts folder with others, so they can see all of your contacts.
To share your Contacts folder
1. In the Home tab, click Share Contacts.
Office Outlook 2010 attaches your Contacts folder to a message.
2. In the message, click To.
3. In the Address Book, double-click a recipient’s address. Office Outlook 2010 adds the
recipient to the To line.
4. Click OK.
5. Click Send.
Office Outlook 2010 informs you that your Contacts folder has been shared.
Finding Contacts in the Global Address List
The Global Address List (GAL) is also known as the Microsoft Exchange Server Global Address
Book. It is a collection of users, contacts, distribution lists, public folders, rooms, and other
resources from an Active Directory®
directory service. You can use address lists to organize
contacts and resources, making it easier to find the recipients and resources you want. Address
Page 48 of 75
lists are updated dynamically. Therefore, when your organization adds new users, they are
automatically added to the appropriate address lists. Only system administrators can create new
entries in the GAL.
Comparing the GAL to the Contacts folder, the Contacts folder is a place for you to store the
names, addresses, e-mail addresses, phone numbers, and other information about the people
with whom you frequently correspond. If you create a distribution list, Office Outlook 2010
stores it in this folder.
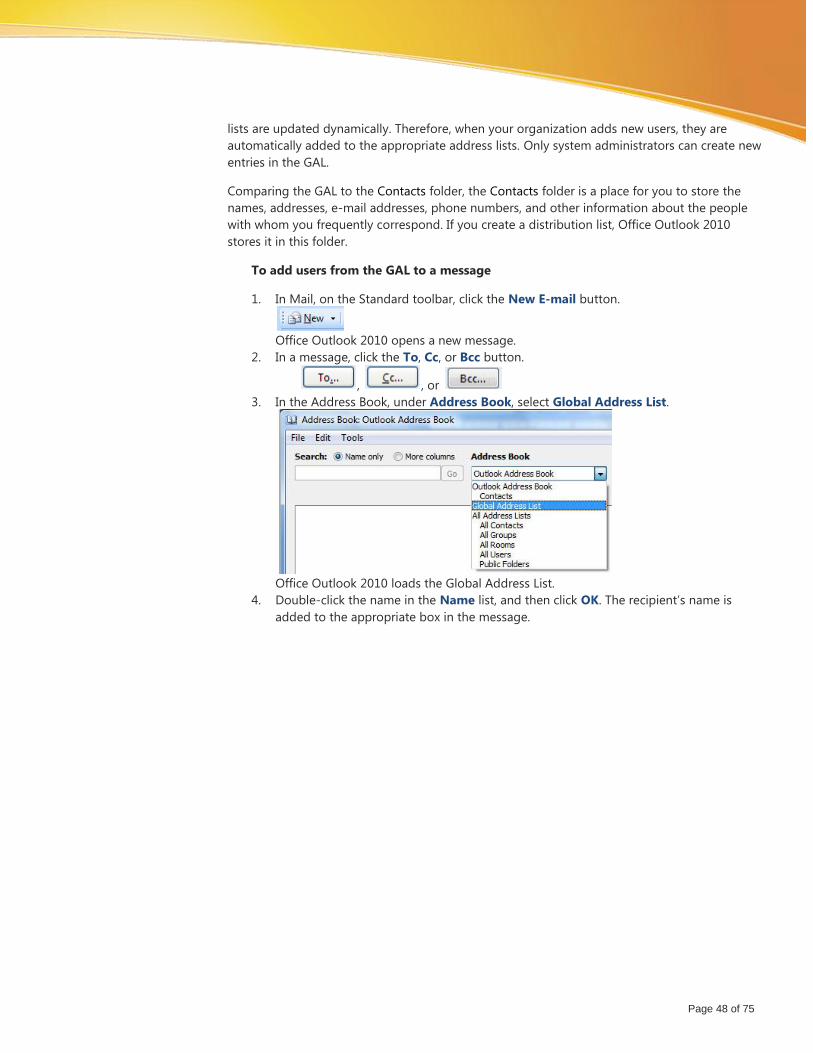
To add users from the GAL to a message
1. In Mail, on the Standard toolbar, click the New E-mail button.
Office Outlook 2010 opens a new message.
2. In a message, click the To, Cc, or Bcc button.
, , or
3. In the Address Book, under Address Book, select Global Address List.
Office Outlook 2010 loads the Global Address List.
4. Double-click the name in the Name list, and then click OK. The recipient’s name is
added to the appropriate box in the message.
Page 49 of 75
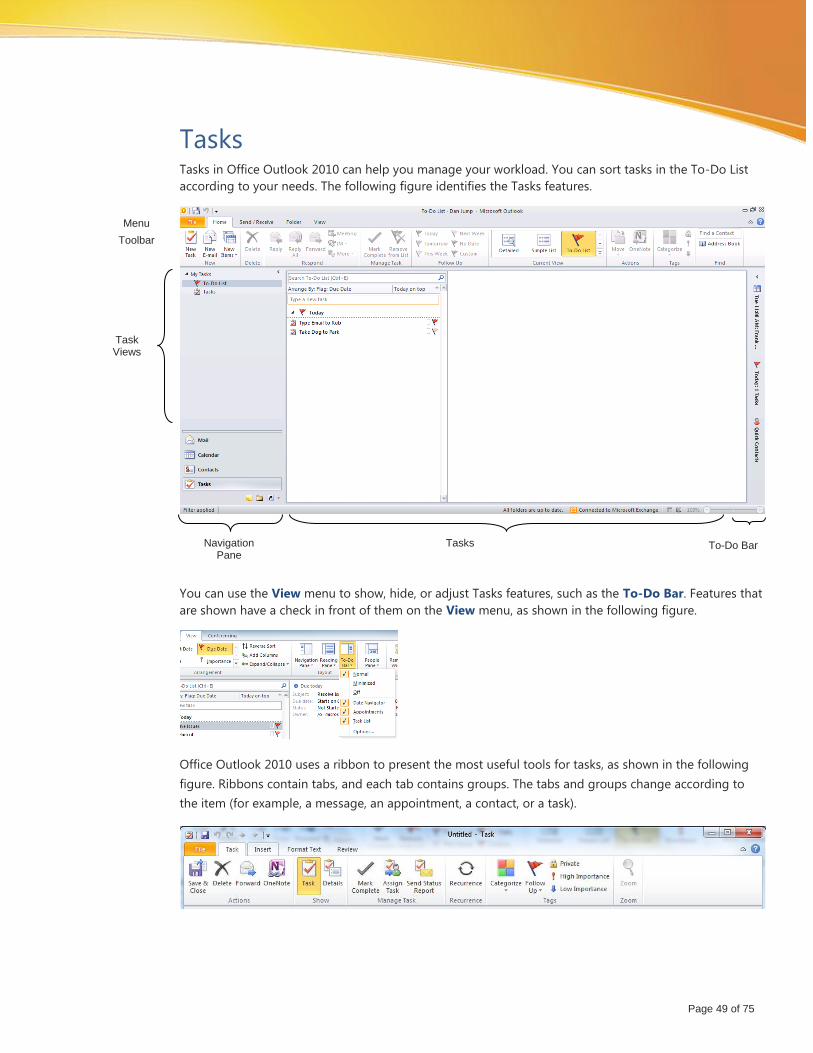
Tasks Tasks in Office Outlook 2010 can help you manage your workload. You can sort tasks in the To-Do List
according to your needs. The following figure identifies the Tasks features.
You can use the View menu to show, hide, or adjust Tasks features, such as the To-Do Bar. Features that
are shown have a check in front of them on the View menu, as shown in the following figure.
Office Outlook 2010 uses a ribbon to present the most useful tools for tasks, as shown in the following
figure. Ribbons contain tabs, and each tab contains groups. The tabs and groups change according to
the item (for example, a message, an appointment, a contact, or a task).
Task Views
Menu
Toolbar
Navigation Pane
Tasks To-Do Bar
Page 50 of 75
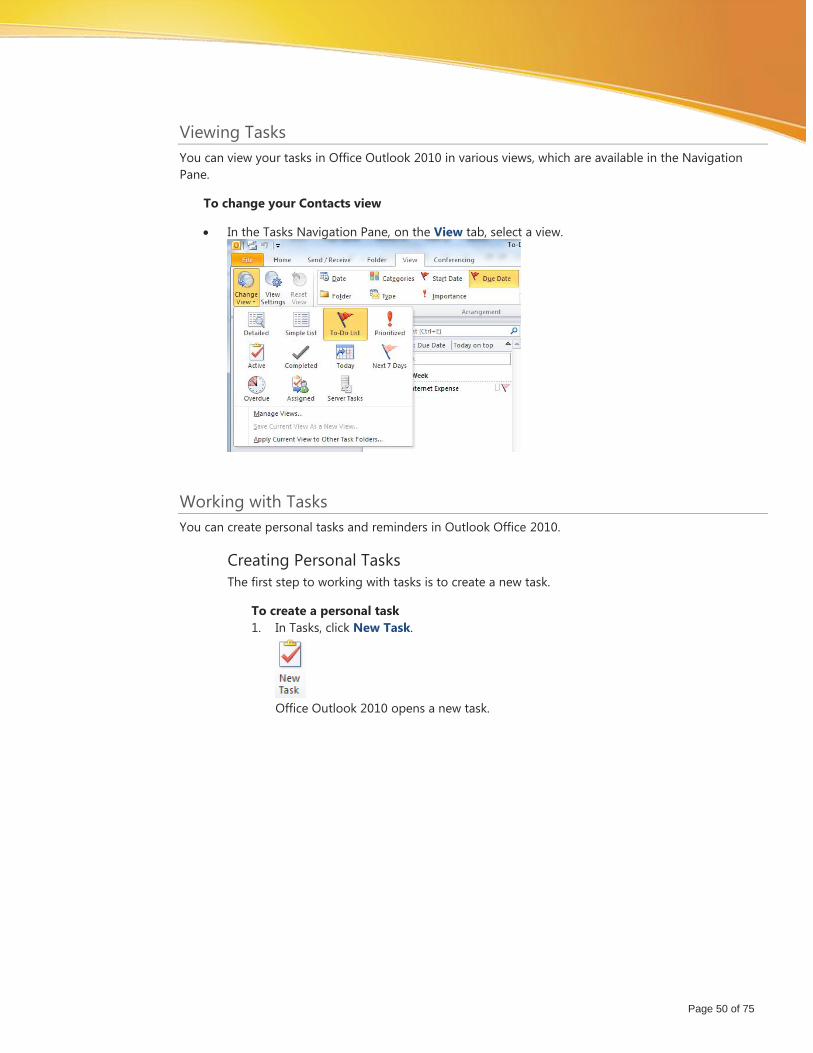
Viewing Tasks
You can view your tasks in Office Outlook 2010 in various views, which are available in the Navigation
Pane.
To change your Contacts view
In the Tasks Navigation Pane, on the View tab, select a view.
Working with Tasks
You can create personal tasks and reminders in Outlook Office 2010.
Creating Personal Tasks
The first step to working with tasks is to create a new task.
To create a personal task
1. In Tasks, click New Task.
Office Outlook 2010 opens a new task.
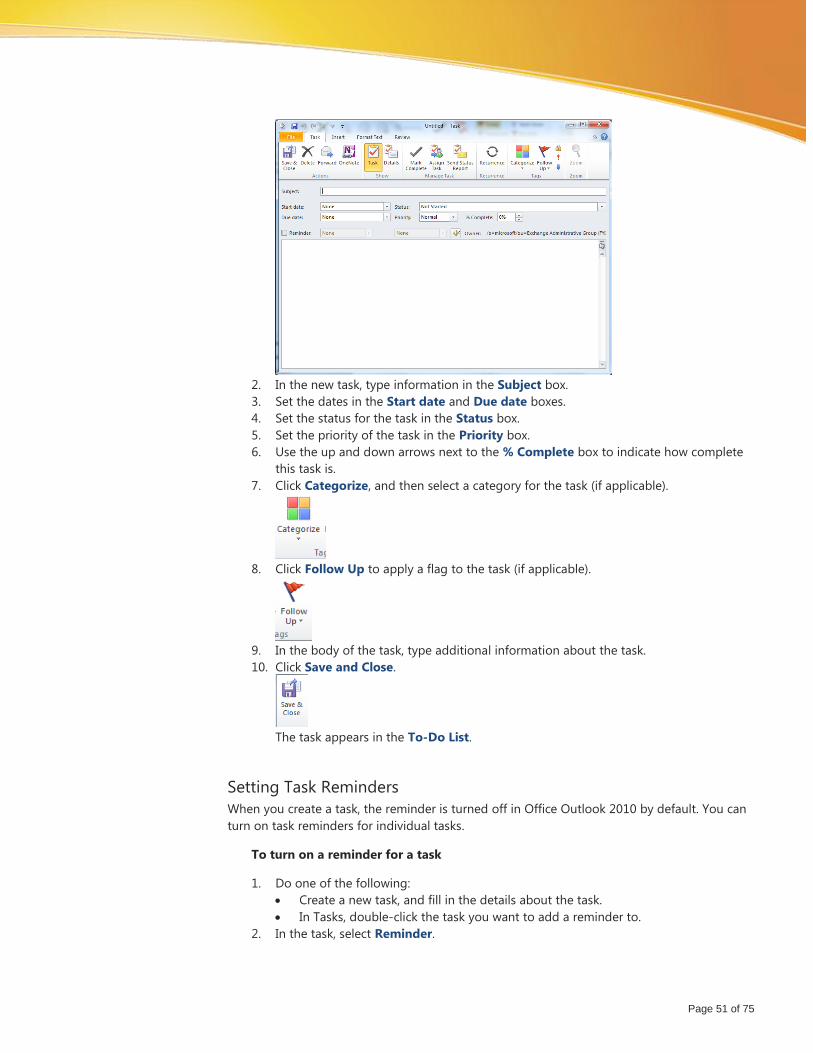
Page 51 of 75
2. In the new task, type information in the Subject box.
3. Set the dates in the Start date and Due date boxes.
4. Set the status for the task in the Status box.
5. Set the priority of the task in the Priority box.
6. Use the up and down arrows next to the % Complete box to indicate how complete
this task is.
7. Click Categorize, and then select a category for the task (if applicable).
8. Click Follow Up to apply a flag to the task (if applicable).
9. In the body of the task, type additional information about the task.
10. Click Save and Close.
The task appears in the To-Do List.
Setting Task Reminders
When you create a task, the reminder is turned off in Office Outlook 2010 by default. You can
turn on task reminders for individual tasks.
To turn on a reminder for a task
1. Do one of the following:
Create a new task, and fill in the details about the task.
In Tasks, double-click the task you want to add a reminder to.
2. In the task, select Reminder.
Page 52 of 75
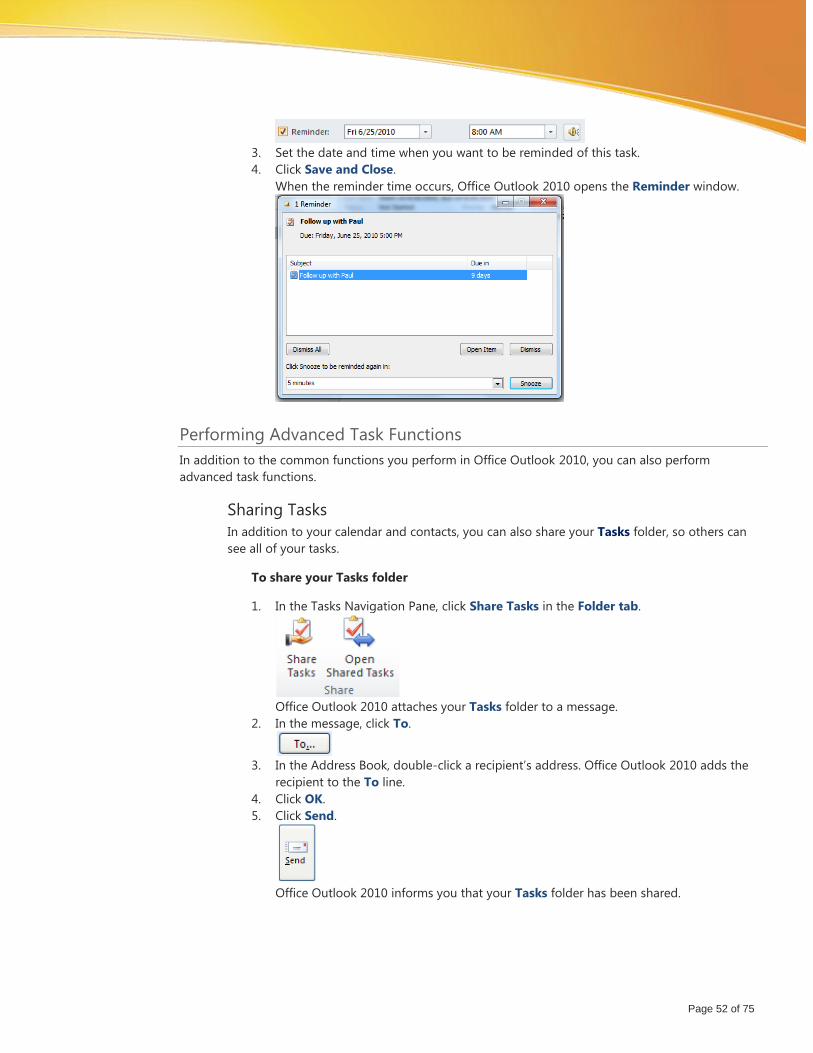
3. Set the date and time when you want to be reminded of this task.
4. Click Save and Close.
When the reminder time occurs, Office Outlook 2010 opens the Reminder window.
Performing Advanced Task Functions
In addition to the common functions you perform in Office Outlook 2010, you can also perform
advanced task functions.
Sharing Tasks
In addition to your calendar and contacts, you can also share your Tasks folder, so others can
see all of your tasks.
To share your Tasks folder
1. In the Tasks Navigation Pane, click Share Tasks in the Folder tab.
Office Outlook 2010 attaches your Tasks folder to a message.
2. In the message, click To.
3. In the Address Book, double-click a recipient’s address. Office Outlook 2010 adds the
recipient to the To line.
4. Click OK.
5. Click Send.
Office Outlook 2010 informs you that your Tasks folder has been shared.
Page 53 of 75
Assigning Tasks
In Office Outlook 2010, you can assign tasks to other people.
To assign a task
1. Do one of the following:
Create a new task, and fill in the details about the task.
In Tasks, double-click the task you want to add a reminder to.
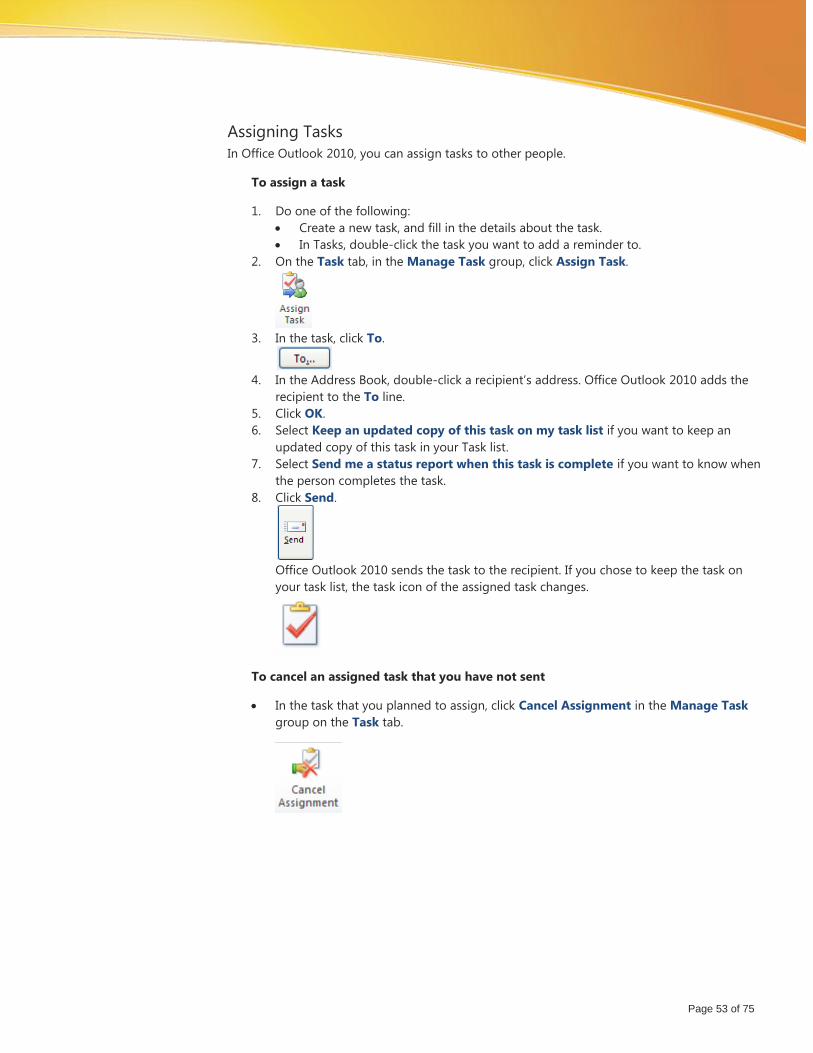
2. On the Task tab, in the Manage Task group, click Assign Task.
3. In the task, click To.
4. In the Address Book, double-click a recipient’s address. Office Outlook 2010 adds the
recipient to the To line.
5. Click OK.
6. Select Keep an updated copy of this task on my task list if you want to keep an
updated copy of this task in your Task list.
7. Select Send me a status report when this task is complete if you want to know when
the person completes the task.
8. Click Send.
Office Outlook 2010 sends the task to the recipient. If you chose to keep the task on
your task list, the task icon of the assigned task changes.
To cancel an assigned task that you have not sent
In the task that you planned to assign, click Cancel Assignment in the Manage Task
group on the Task tab.
Page 54 of 75
Personal Settings In addition to Mail, Calendar, Contacts, and Tasks, Office Outlook 2010 enables you to customize several
features. This guide helps you set the options that help Office Outlook 2010 filter junk e-mail; organize
your messages by using a wizard; and set delegates (that is, grant permission to people so they can open
your folders, read, create, and respond to items [including meeting requests] on your behalf).
Setting Junk E-Mail Options
Office Outlook 2010 features an improved junk e-mail filter that sorts out unwanted e-mail messages
more than ever before. Office Outlook 2010 also protects against phishing (the use of fraudulent e-mail
messages that might trick you into divulging personal information). Office Outlook 2010 detects
suspicious e-mail messages and helps protect you by automatically disabling links in such messages until
you approve them. E-mail messages warn you about potentially threatening or malicious sites.
Occasionally, messages that are not junk are filtered into the Junk E-mail folder, so you should check the
filtered messages for non-junk messages.
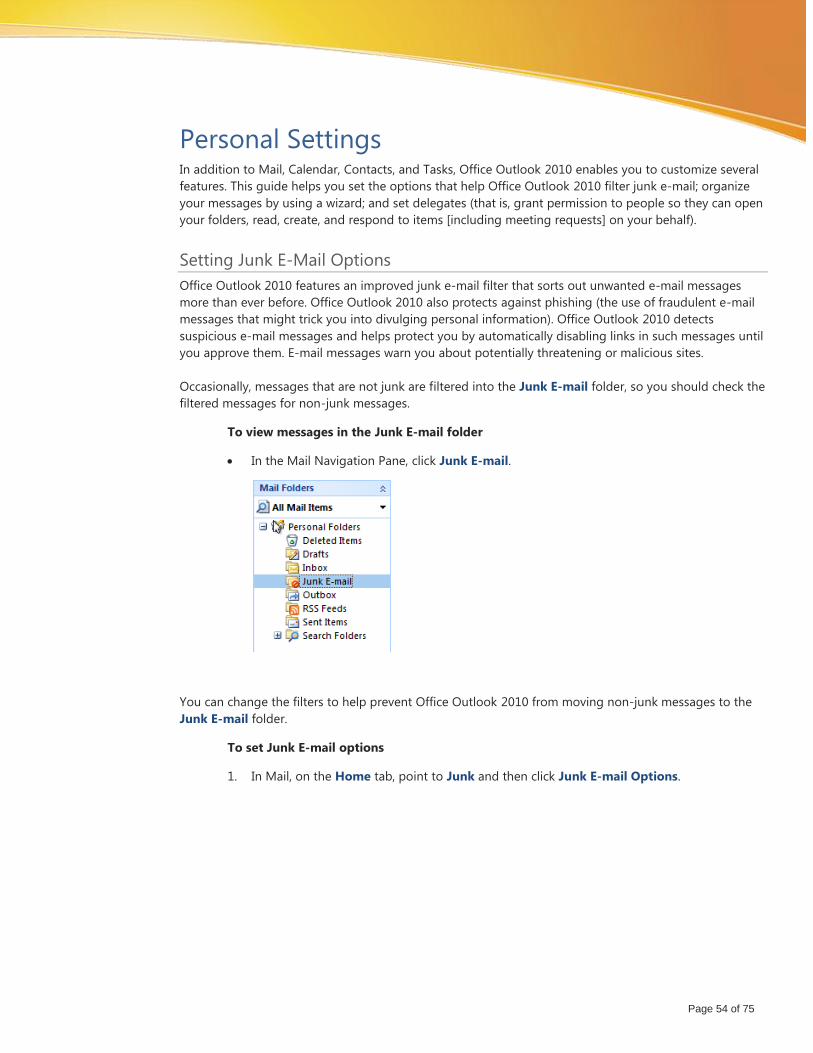
To view messages in the Junk E-mail folder
In the Mail Navigation Pane, click Junk E-mail.
You can change the filters to help prevent Office Outlook 2010 from moving non-junk messages to the
Junk E-mail folder.
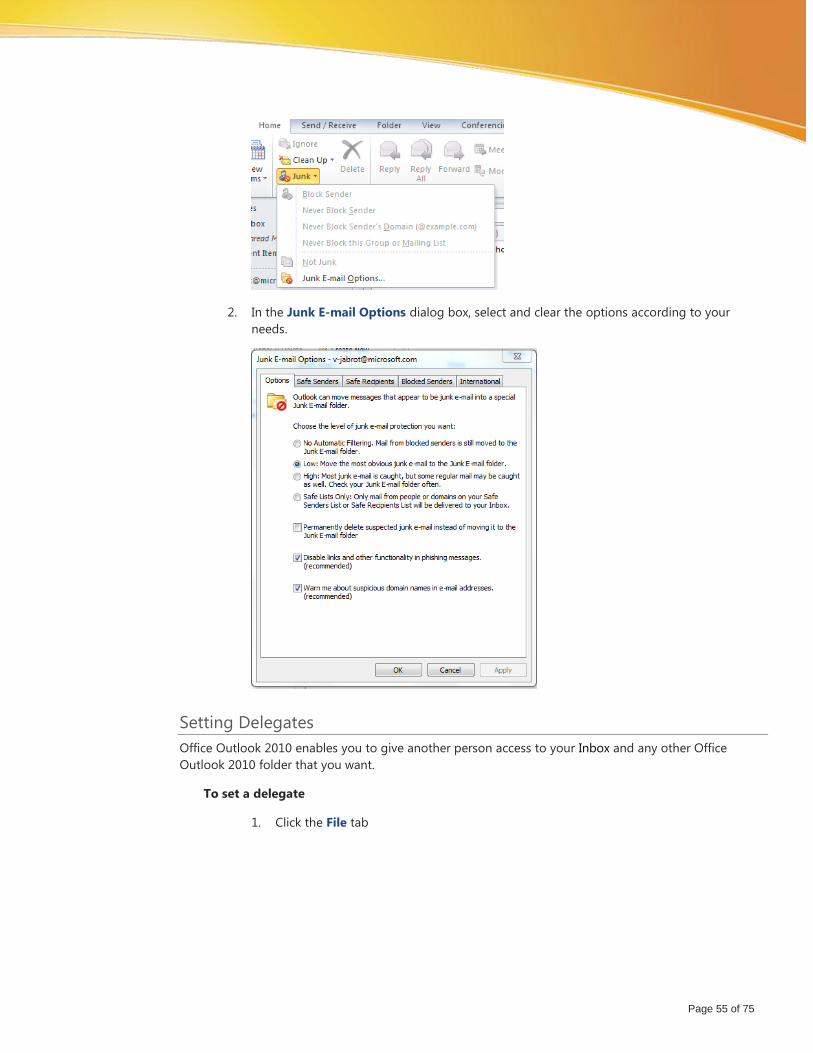
To set Junk E-mail options
1. In Mail, on the Home tab, point to Junk and then click Junk E-mail Options.
Page 55 of 75
2. In the Junk E-mail Options dialog box, select and clear the options according to your
needs.
Setting Delegates
Office Outlook 2010 enables you to give another person access to your Inbox and any other Office
Outlook 2010 folder that you want.
To set a delegate
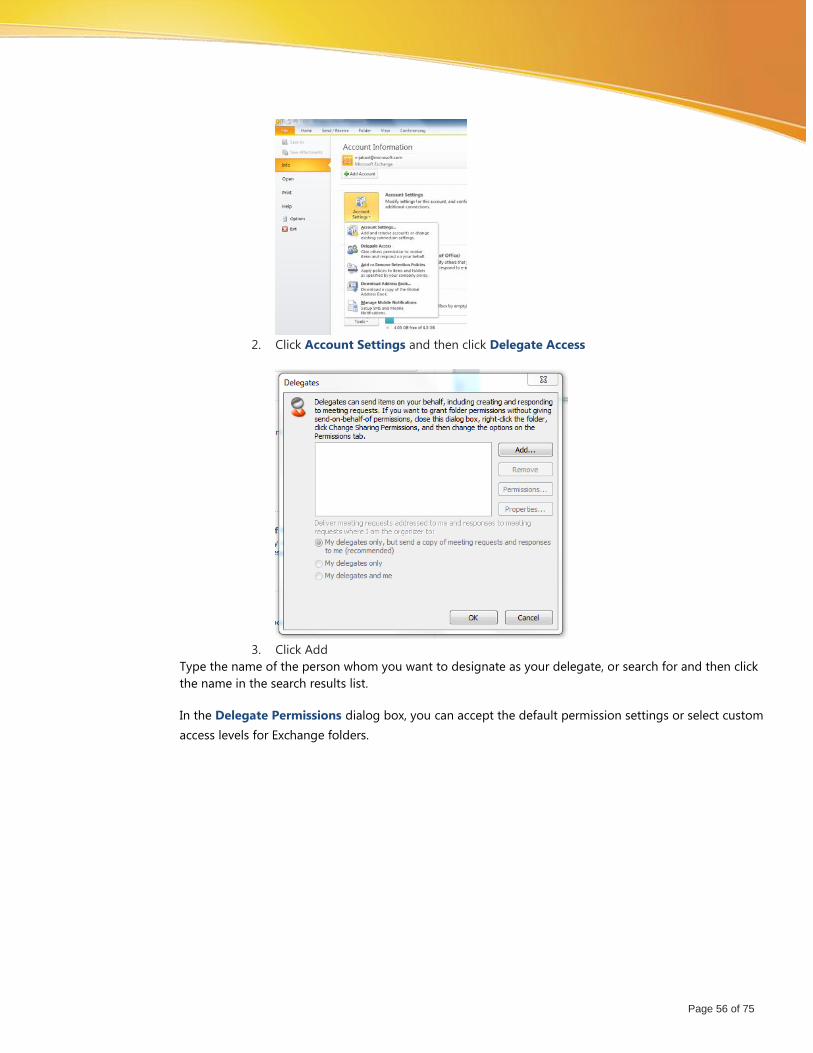
1. Click the File tab
Page 56 of 75
2. Click Account Settings and then click Delegate Access
3. Click Add
Type the name of the person whom you want to designate as your delegate, or search for and then click
the name in the search results list.
In the Delegate Permissions dialog box, you can accept the default permission settings or select custom
access levels for Exchange folders.
Page 57 of 75
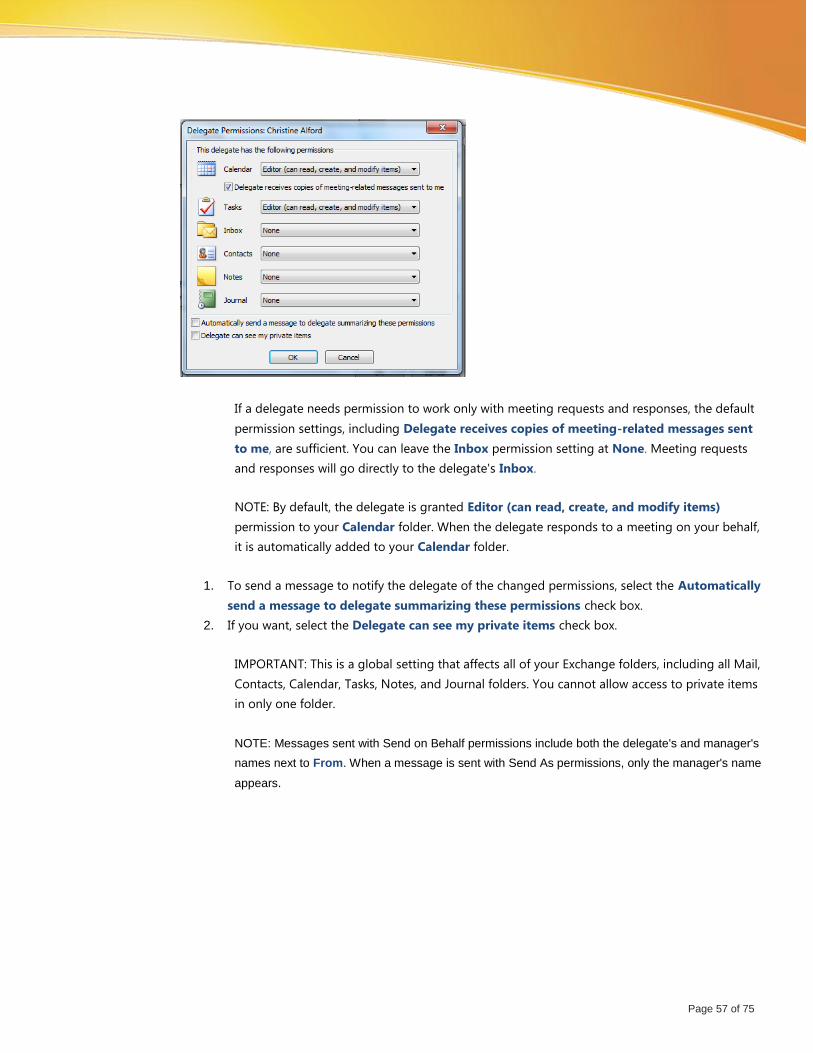
If a delegate needs permission to work only with meeting requests and responses, the default
permission settings, including Delegate receives copies of meeting-related messages sent
to me, are sufficient. You can leave the Inbox permission setting at None. Meeting requests
and responses will go directly to the delegate's Inbox.
NOTE: By default, the delegate is granted Editor (can read, create, and modify items)
permission to your Calendar folder. When the delegate responds to a meeting on your behalf,
it is automatically added to your Calendar folder.
1. To send a message to notify the delegate of the changed permissions, select the Automatically
send a message to delegate summarizing these permissions check box.
2. If you want, select the Delegate can see my private items check box.
IMPORTANT: This is a global setting that affects all of your Exchange folders, including all Mail,
Contacts, Calendar, Tasks, Notes, and Journal folders. You cannot allow access to private items
in only one folder.
NOTE: Messages sent with Send on Behalf permissions include both the delegate's and manager's
names next to From. When a message is sent with Send As permissions, only the manager's name
appears.
Page 58 of 75
Advanced Options Office Outlook 2010 offers several advanced options that you can customize to fit your needs.
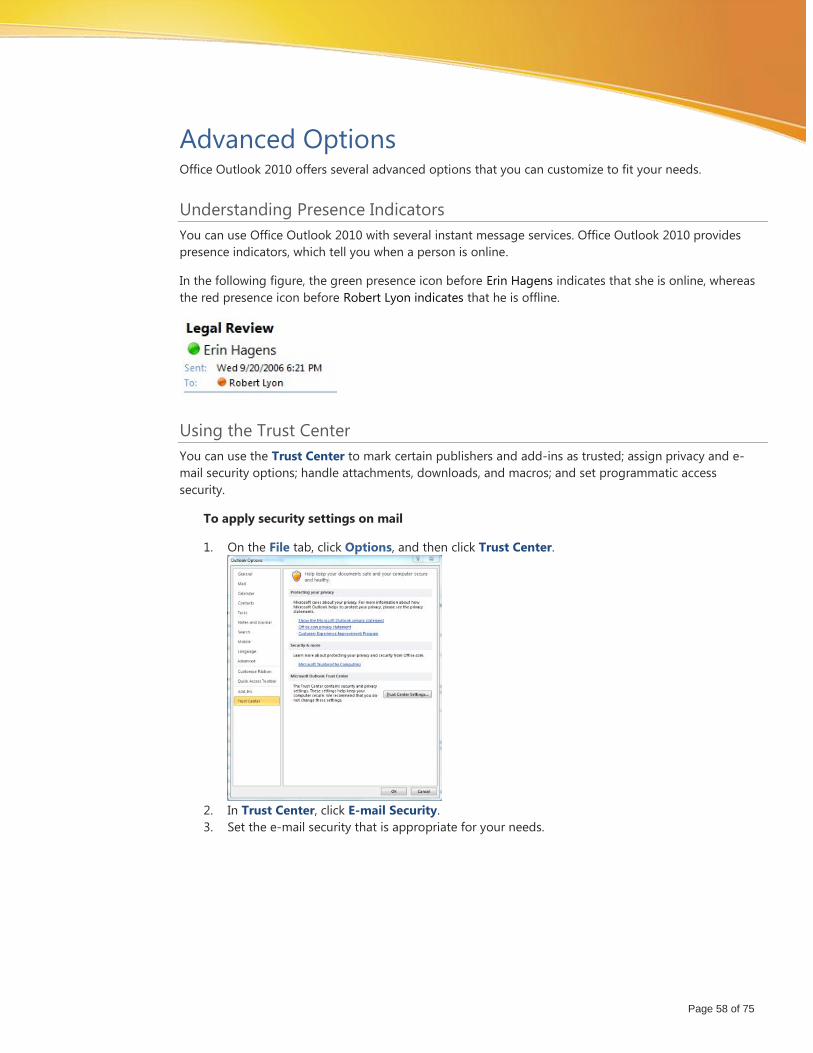
Understanding Presence Indicators
You can use Office Outlook 2010 with several instant message services. Office Outlook 2010 provides
presence indicators, which tell you when a person is online.
In the following figure, the green presence icon before Erin Hagens indicates that she is online, whereas
the red presence icon before Robert Lyon indicates that he is offline.
Using the Trust Center
You can use the Trust Center to mark certain publishers and add-ins as trusted; assign privacy and e-
mail security options; handle attachments, downloads, and macros; and set programmatic access
security.
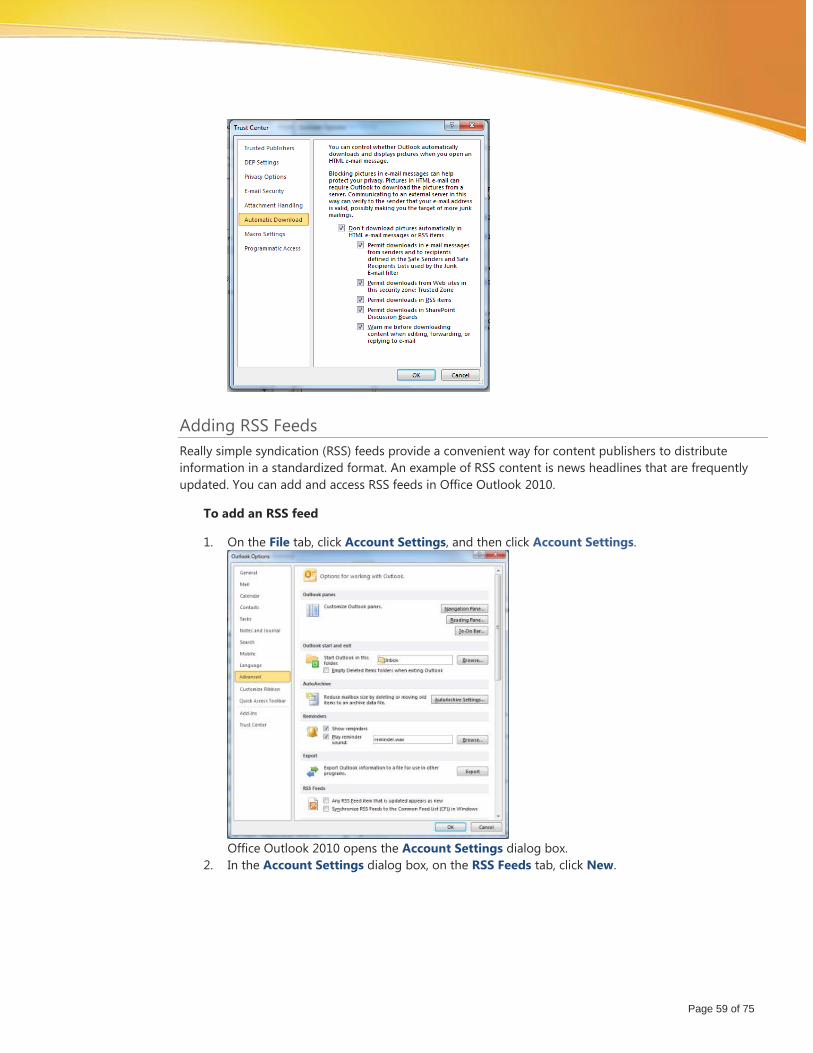
To apply security settings on mail
1. On the File tab, click Options, and then click Trust Center.
2. In Trust Center, click E-mail Security.
3. Set the e-mail security that is appropriate for your needs.
Page 59 of 75
Adding RSS Feeds
Really simple syndication (RSS) feeds provide a convenient way for content publishers to distribute
information in a standardized format. An example of RSS content is news headlines that are frequently
updated. You can add and access RSS feeds in Office Outlook 2010.
To add an RSS feed
1. On the File tab, click Account Settings, and then click Account Settings.
Office Outlook 2010 opens the Account Settings dialog box.
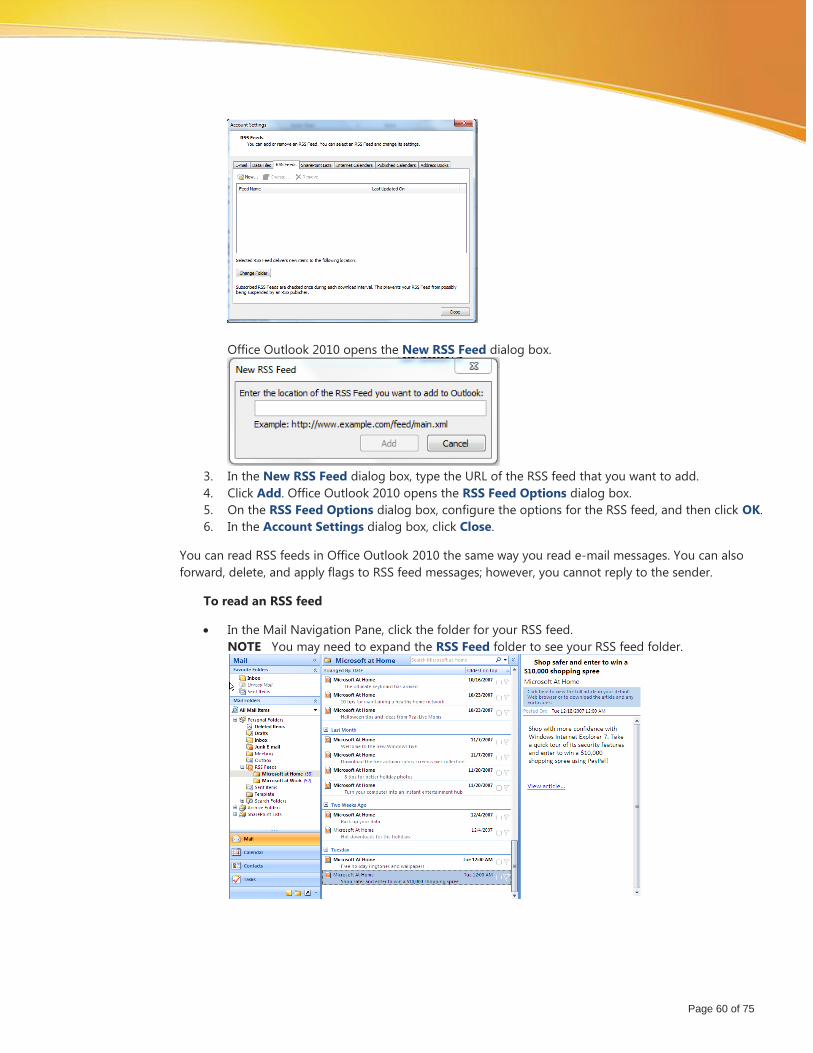
2. In the Account Settings dialog box, on the RSS Feeds tab, click New.
Page 60 of 75
Office Outlook 2010 opens the New RSS Feed dialog box.
3. In the New RSS Feed dialog box, type the URL of the RSS feed that you want to add.
4. Click Add. Office Outlook 2010 opens the RSS Feed Options dialog box.
5. On the RSS Feed Options dialog box, configure the options for the RSS feed, and then click OK.
6. In the Account Settings dialog box, click Close.
You can read RSS feeds in Office Outlook 2010 the same way you read e-mail messages. You can also
forward, delete, and apply flags to RSS feed messages; however, you cannot reply to the sender.
To read an RSS feed
In the Mail Navigation Pane, click the folder for your RSS feed.
NOTE You may need to expand the RSS Feed folder to see your RSS feed folder.
Page 61 of 75
Using Outlook Web Access to Access Mail
In Microsoft Office Outlook Web Access, you can use a Web browser to access your Microsoft Exchange
Server mailbox from any computer that has an Internet connection.
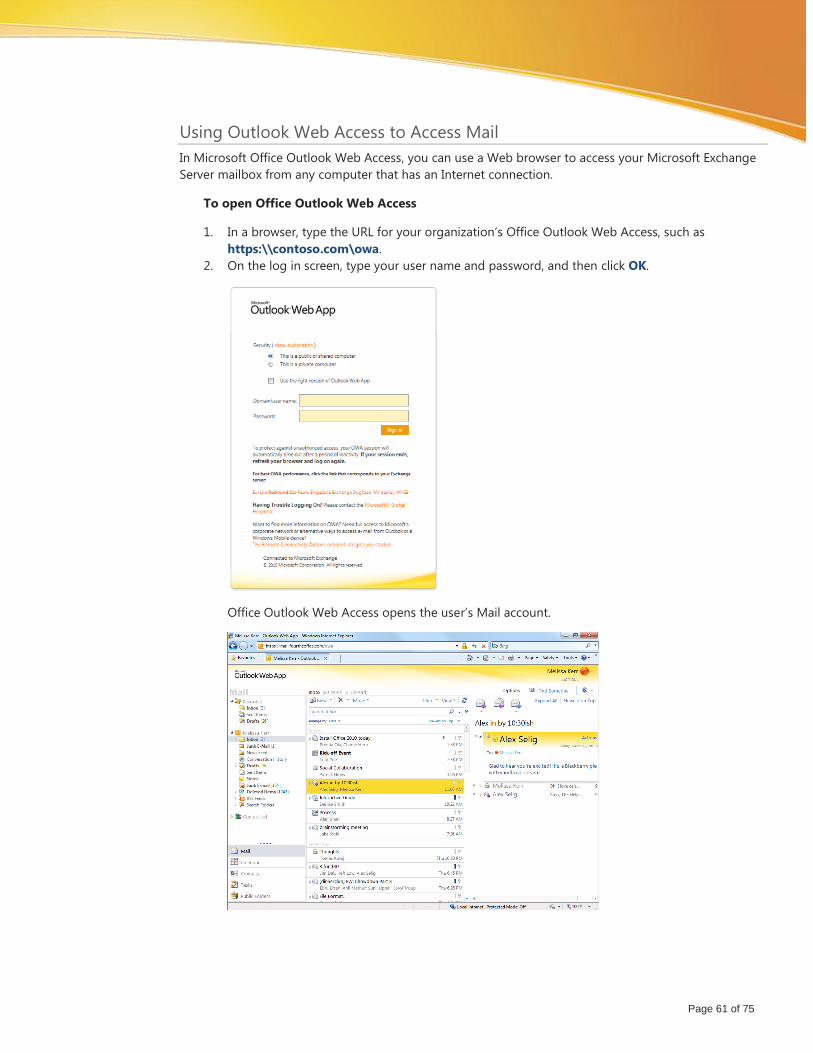
To open Office Outlook Web Access
1. In a browser, type the URL for your organization’s Office Outlook Web Access, such as
https:\\contoso.com\owa.
2. On the log in screen, type your user name and password, and then click OK.
Office Outlook Web Access opens the user’s Mail account.
Page 62 of 75
Using Cached Exchange Mode
Being able to use Office Outlook 2010 in cached mode is a very important and useful feature. Cached
Exchange Mode provides better online and offline experiences when you use a Microsoft Exchange
Server e-mail account because a copy of your mailbox is stored on your computer. This copy provides
quick access to your data and is frequently updated with the mail server.
If you work offline, whether by choice or due to a connection problem, your data is still available to you.
If a connection from your computer to the computer that runs the Exchange Server isn't available, Office
Outlook 2010 tries to connect or disconnects from the server. If the connection is restored, Office
Outlook 2010 automatically connects. Any changes you make while you are not connected to the server
are synchronized automatically when a connection is available. You can continue to work while changes
are synchronized.
For example, you may use a laptop computer and connect via a network cable to your corporate local
area network (LAN) at your office. When you disconnect the laptop from the LAN, Office Outlook 2010
switches to the Trying to connect status. You can continue to work uninterrupted with your data. If the
connection remains unavailable, Office Outlook 2010 switches to the Disconnected status and
periodically checks for server availability. If you have wireless access, Office Outlook 2010 could
reestablish a connection to the server and switch back to the Connected status. You don’t have to
change any settings or restart Office Outlook 2010.
In Cached Exchange Mode, the Offline Address Book contains all of the properties of users (such as e-
mail addresses and names) that Office Outlook 2010 requires. With an offline address book, Office
Outlook 2010 does not have to connect to the global catalog to resolve names, and it doesn’t have to
open a user’s details record. Instead, Office Outlook 2010 easily obtains this information from the local
offline address book. In Cached Exchange Mode, Active Directory replication has to take place. In
medium- to large-sized environments Active Directory replication is very important because there is a
good chance that when you update the Offline Address List, the Offline Address Book generation server
will be reading the Global Address List objects from a domain controller that has not received the new
objects that were created.
The benefits of using Cached Exchange Mode are:
Shielding the user from network and server connection issues.
Switching from online to offline status for mobile users.
Turning on Cached Exchange Mode
When you configure an Office Outlook 2010 account to use the Cached Exchange Mode, Office
Outlook 2010 works from a local copy of a user's Exchange Server mailbox, which is stored in an
offline folder file (that is, an OST file) on the user's computer, and the Offline Address Book. The
cached mailbox and Offline Address Book are updated periodically from the Exchange Server.
The Cache Exchange Mode requires you to use a Microsoft Exchange Server e-mail account.
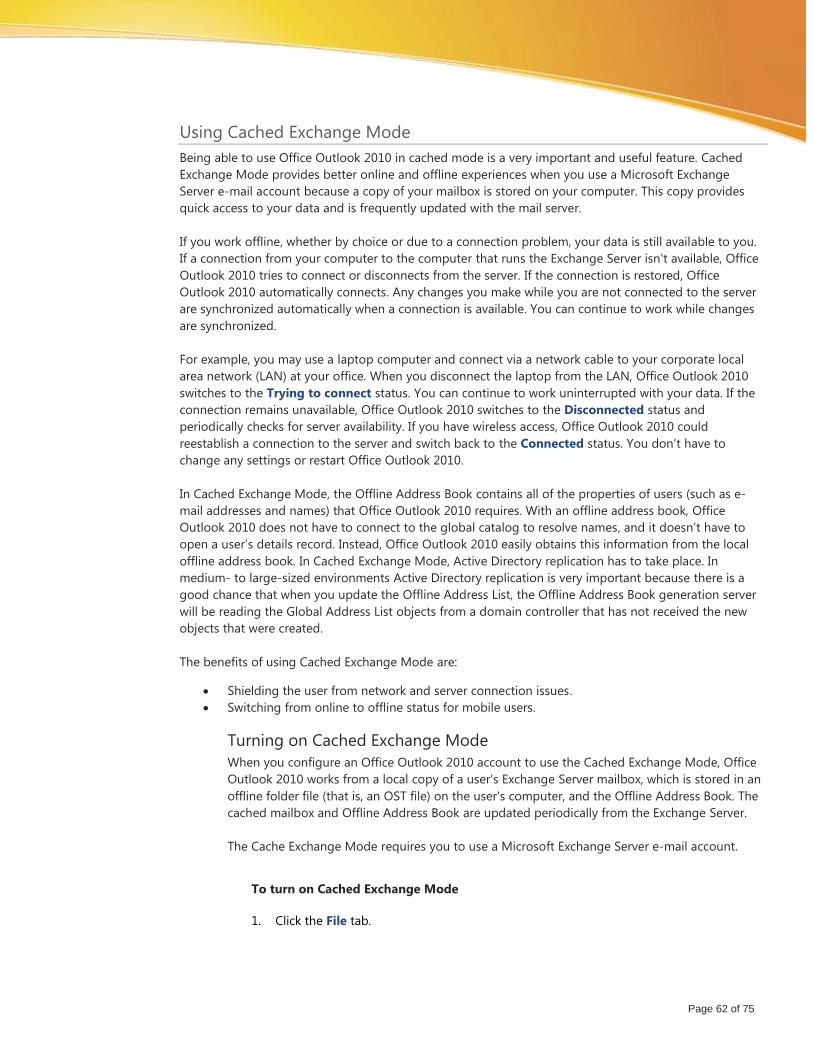
To turn on Cached Exchange Mode
1. Click the File tab.
Page 63 of 75
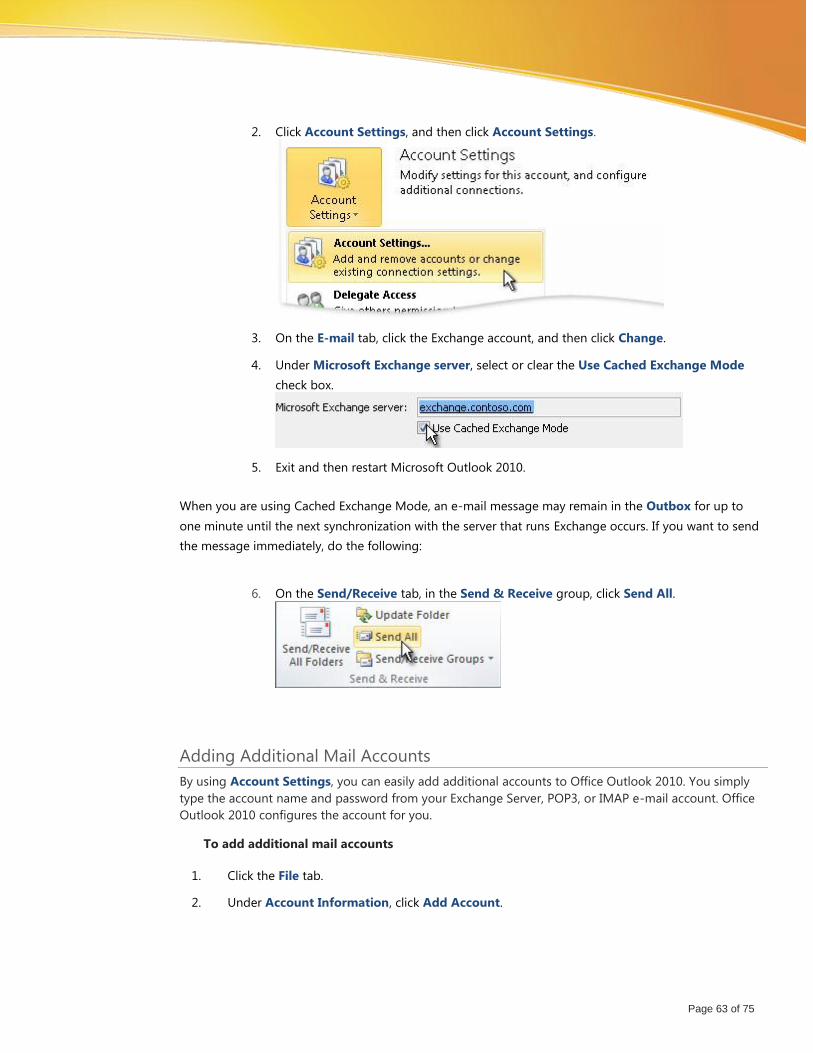
2. Click Account Settings, and then click Account Settings.
3. On the E-mail tab, click the Exchange account, and then click Change.
4. Under Microsoft Exchange server, select or clear the Use Cached Exchange Mode
check box.
5. Exit and then restart Microsoft Outlook 2010.
When you are using Cached Exchange Mode, an e-mail message may remain in the Outbox for up to
one minute until the next synchronization with the server that runs Exchange occurs. If you want to send
the message immediately, do the following:
6. On the Send/Receive tab, in the Send & Receive group, click Send All.
Adding Additional Mail Accounts
By using Account Settings, you can easily add additional accounts to Office Outlook 2010. You simply
type the account name and password from your Exchange Server, POP3, or IMAP e-mail account. Office
Outlook 2010 configures the account for you.
To add additional mail accounts
1. Click the File tab.
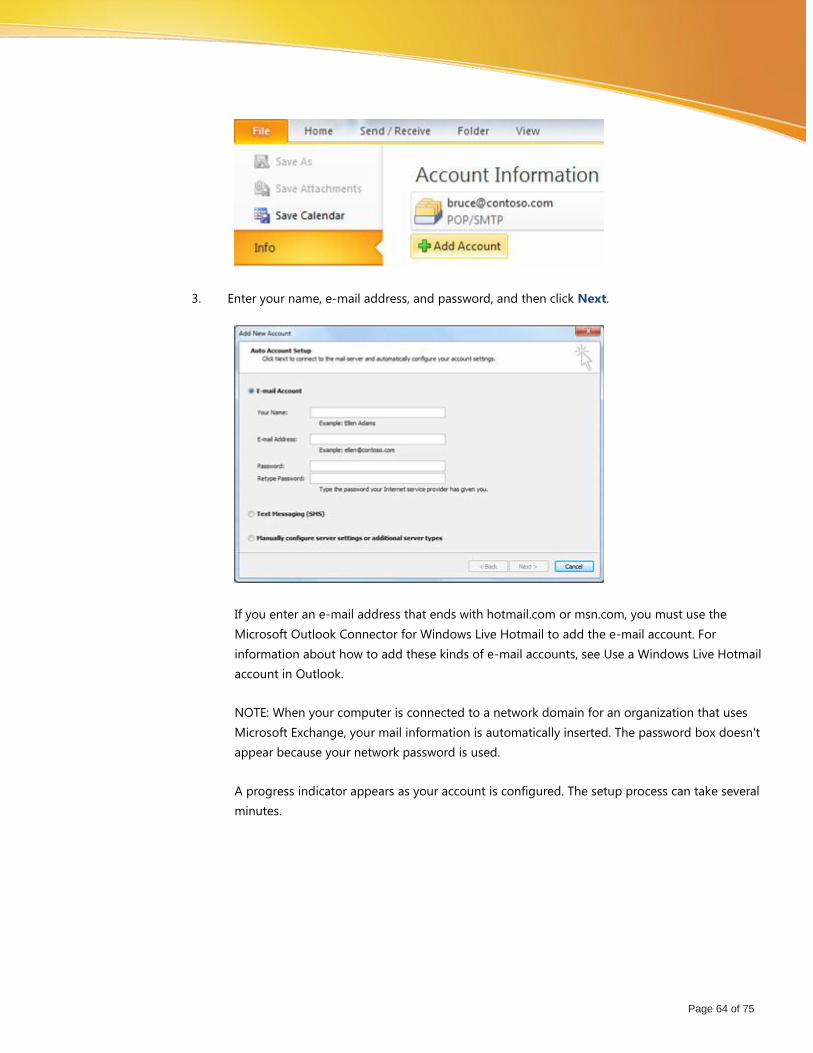
2. Under Account Information, click Add Account.
Page 64 of 75
3. Enter your name, e-mail address, and password, and then click Next.
If you enter an e-mail address that ends with hotmail.com or msn.com, you must use the
Microsoft Outlook Connector for Windows Live Hotmail to add the e-mail account. For
information about how to add these kinds of e-mail accounts, see Use a Windows Live Hotmail
account in Outlook.
NOTE: When your computer is connected to a network domain for an organization that uses
Microsoft Exchange, your mail information is automatically inserted. The password box doesn't
appear because your network password is used.
A progress indicator appears as your account is configured. The setup process can take several
minutes.
Page 65 of 75
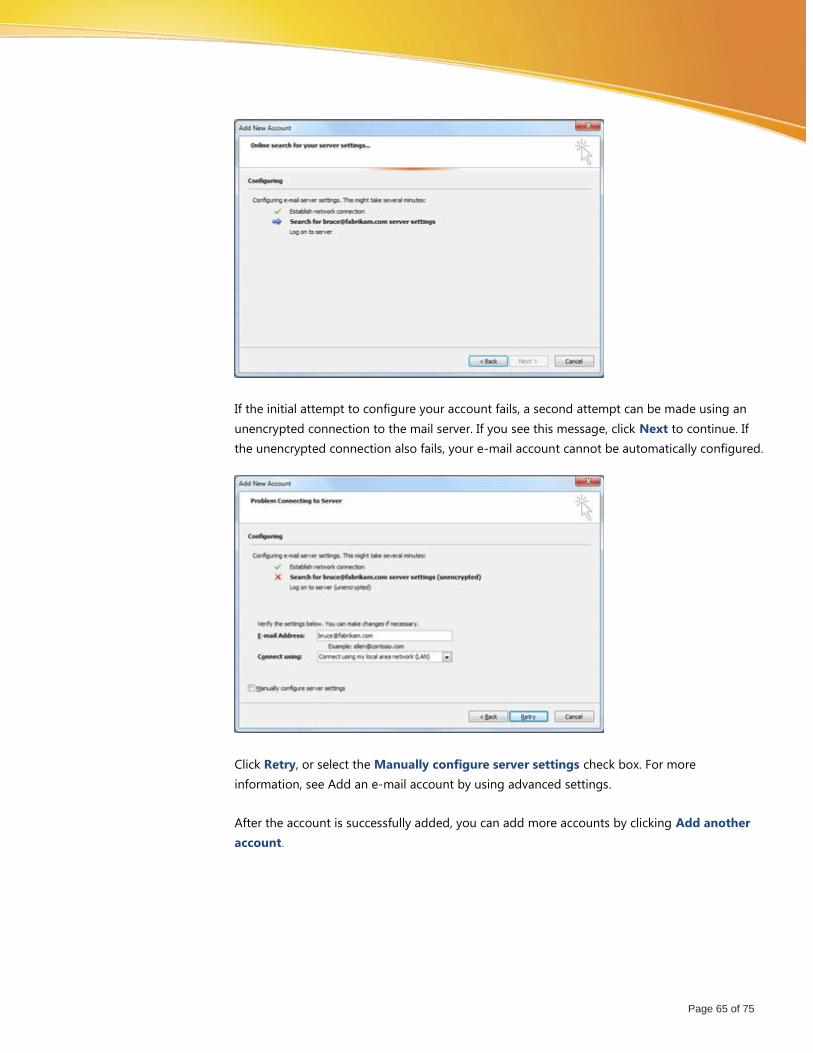
If the initial attempt to configure your account fails, a second attempt can be made using an
unencrypted connection to the mail server. If you see this message, click Next to continue. If
the unencrypted connection also fails, your e-mail account cannot be automatically configured.
Click Retry, or select the Manually configure server settings check box. For more
information, see Add an e-mail account by using advanced settings.
After the account is successfully added, you can add more accounts by clicking Add another
account.
Page 66 of 75
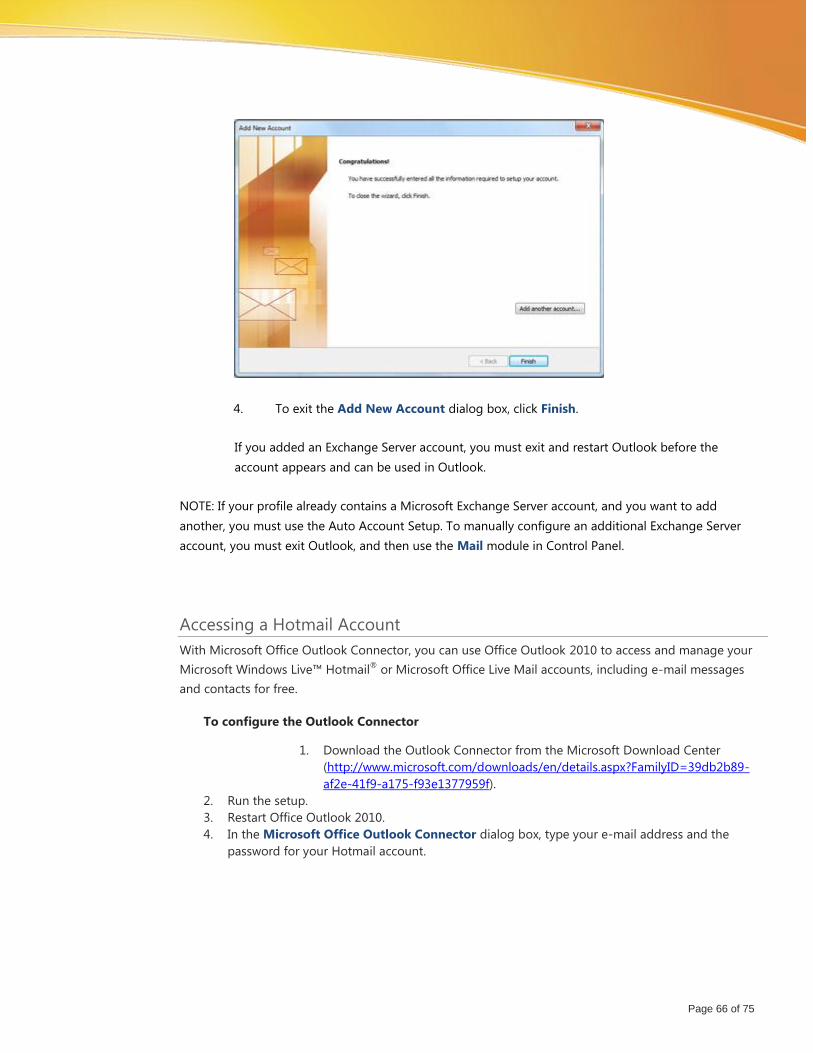
4. To exit the Add New Account dialog box, click Finish.
If you added an Exchange Server account, you must exit and restart Outlook before the
account appears and can be used in Outlook.
NOTE: If your profile already contains a Microsoft Exchange Server account, and you want to add
another, you must use the Auto Account Setup. To manually configure an additional Exchange Server
account, you must exit Outlook, and then use the Mail module in Control Panel.
Accessing a Hotmail Account
With Microsoft Office Outlook Connector, you can use Office Outlook 2010 to access and manage your
Microsoft Windows Live™ Hotmail®
or Microsoft Office Live Mail accounts, including e-mail messages
and contacts for free.
To configure the Outlook Connector
1. Download the Outlook Connector from the Microsoft Download Center
(http://www.microsoft.com/downloads/en/details.aspx?FamilyID=39db2b89-
af2e-41f9-a175-f93e1377959f).
2. Run the setup.
3. Restart Office Outlook 2010.
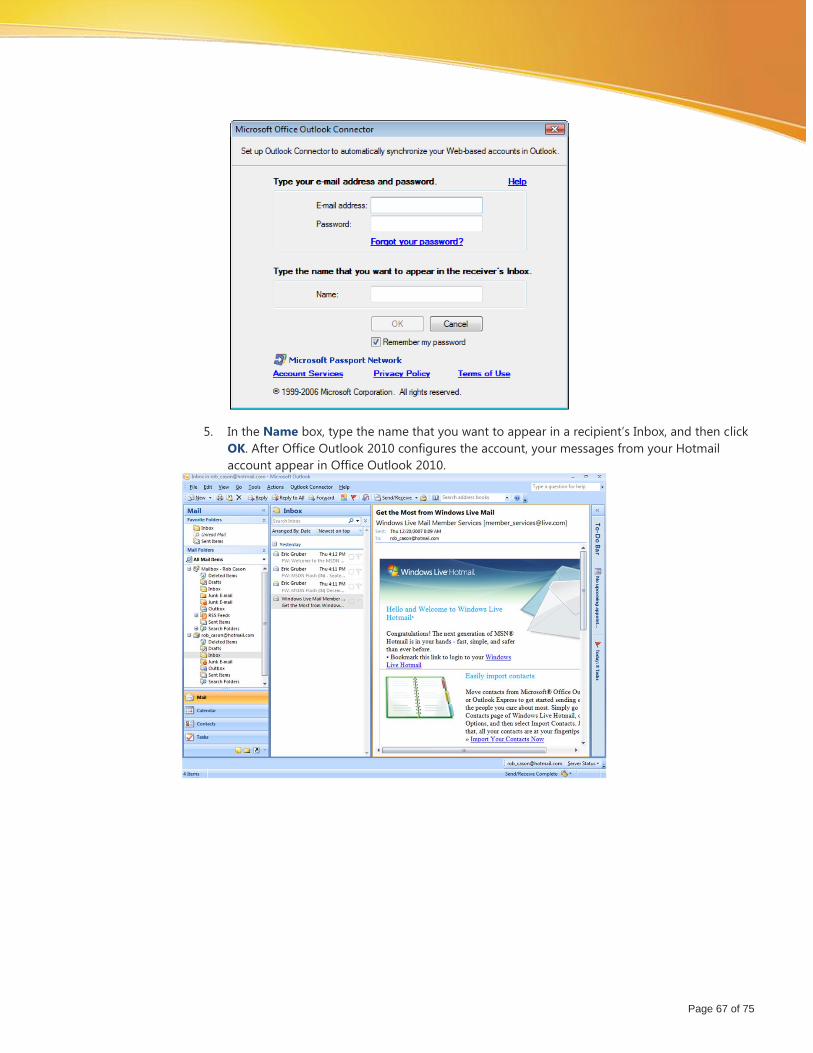
4. In the Microsoft Office Outlook Connector dialog box, type your e-mail address and the
password for your Hotmail account.
Page 67 of 75
5. In the Name box, type the name that you want to appear in a recipient’s Inbox, and then click
OK. After Office Outlook 2010 configures the account, your messages from your Hotmail
account appear in Office Outlook 2010.
Page 68 of 75
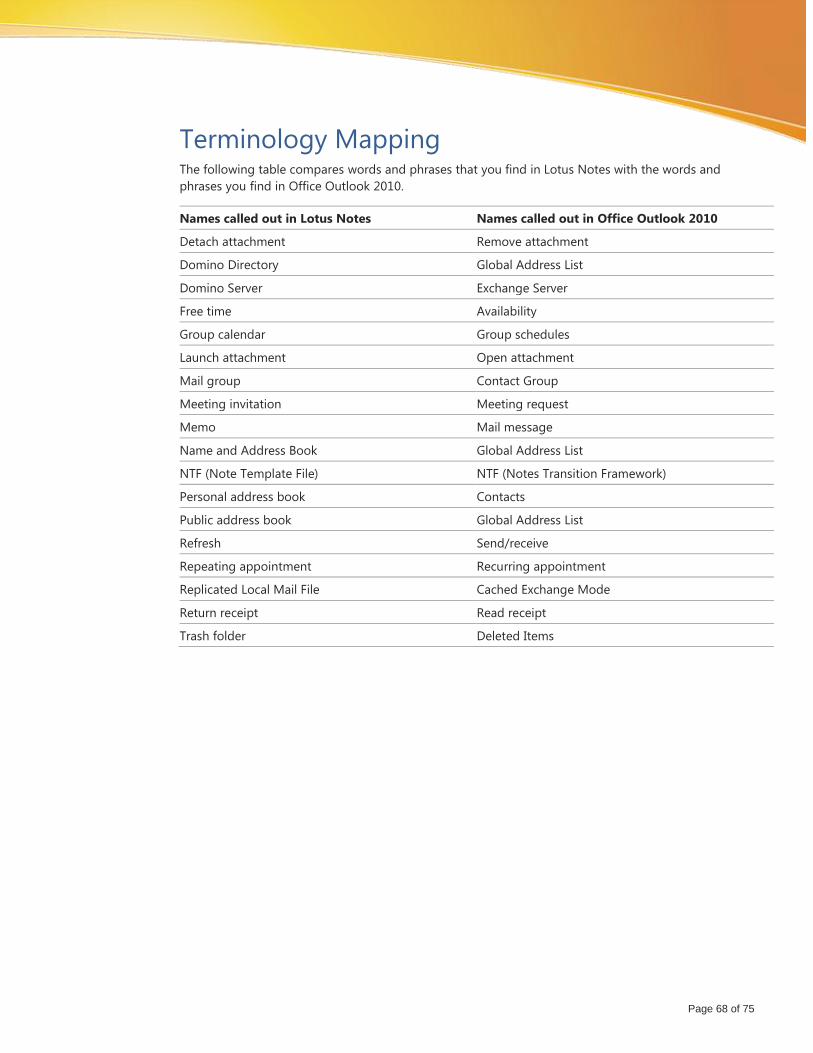
Terminology Mapping The following table compares words and phrases that you find in Lotus Notes with the words and
phrases you find in Office Outlook 2010.
Names called out in Lotus Notes Names called out in Office Outlook 2010
Detach attachment Remove attachment
Domino Directory Global Address List
Domino Server Exchange Server
Free time Availability
Group calendar Group schedules
Launch attachment Open attachment
Mail group Contact Group
Meeting invitation Meeting request
Memo Mail message
Name and Address Book Global Address List
NTF (Note Template File) NTF (Notes Transition Framework)
Personal address book Contacts
Public address book Global Address List
Refresh Send/receive
Repeating appointment Recurring appointment
Replicated Local Mail File Cached Exchange Mode
Return receipt Read receipt
Trash folder Deleted Items
Page 69 of 75
Frequently Asked Questions: Comparing Notes to
Office Outlook 2010 The following are frequently asked questions that compare Notes to Office Outlook 2010.
Scheduling a meeting
Q: In Notes, I can schedule a meeting for an executive and type information about the logistics (such as
catering, presentations, and handouts) in the meeting body that only I can see. Anyone who views my
calendar cannot see this information. How can I do this in Office Outlook 2010?
A: To hide meeting information that you do not want other invitees to see, you can create a separate
meeting or appointment in your calendar and mark it as private. For more information, see “Performing
Advanced Calendar Functions.”
Customizing recurring meetings
Q: In Notes, I can choose “custom” dates in my calendar for setting up recurring meetings. For example,
I could create a meeting that has the same invitees and agenda and that occurs every other week on
Tuesday and every other week on Thursday. How can I do this in Office Outlook 2010?
A: If the meetings occur in the same week, you can create a meeting that recurs on Tuesday and
Thursday. If the meetings occur in opposite weeks, you would set up one recurring meeting for Tuesday
and a separate recurring meeting for Thursday. For more information, see “Creating Recurring
Appointments.”
Turning off meeting responses from attendees
Q: Is there a setting that I can use to not receive meeting responses?
A: You can indicate that you do not want to receive a response in meeting requests, but you have to set
this feature per meeting request. For more information, see “Modifying Meeting Requests.”
Viewing other calendars
Q: In Notes, I can toggle between my account and the executives or team members who I support (that
is, full account access). How do I do this in Office Outlook 2010?
A: You can view other people’s calendars or tasks only if they share these folders with you or if you are a
delegate for that person. For more information, see “Sharing Calendars” or “Setting Delegates.”
Requesting confirmation for messages
Q: Can I request a delivery or read confirmation for messages like I can in Notes?
Page 70 of 75
A: Yes, you can request a confirmation when a message is delivered and when the recipient opens the
message. For more information, see “Requesting Message Confirmation.”
Deleting messages
Q: If I have multiple copies of a message in separate folders and I delete one copy in one folder, will
Office Outlook 2010 delete the message from the other folders like in Notes?
A: No, all messages are stored as independent copies in Office Outlook 2010.
Creating message templates
Q: In Notes, I could create e-mail templates by using the Stationary feature. Can I do the same in Office
Outlook 2010?
A: Yes, you can create e-mail templates by creating a form in Office Outlook 2010. For more
information, see “Outlook forms” in Office Outlook 2010 Help.
Formatting messages
Q: I like to format my unread messages to be a specific color. How can I do this in Office Outlook 2010?
A: You can apply a color category to messages in Office Outlook 2010. For more information, see
“Categorizing Messages.”
Prohibiting invitees from proposing new times to all meeting requests
Q: Is there a way to prevent meeting invitees from using the Propose New Time feature?
A: Yes, you can turn off the Propose New Time feature in Office Outlook 2010. For more information,
see “Turning Off the Propose New Time Feature for All Meeting Requests.”
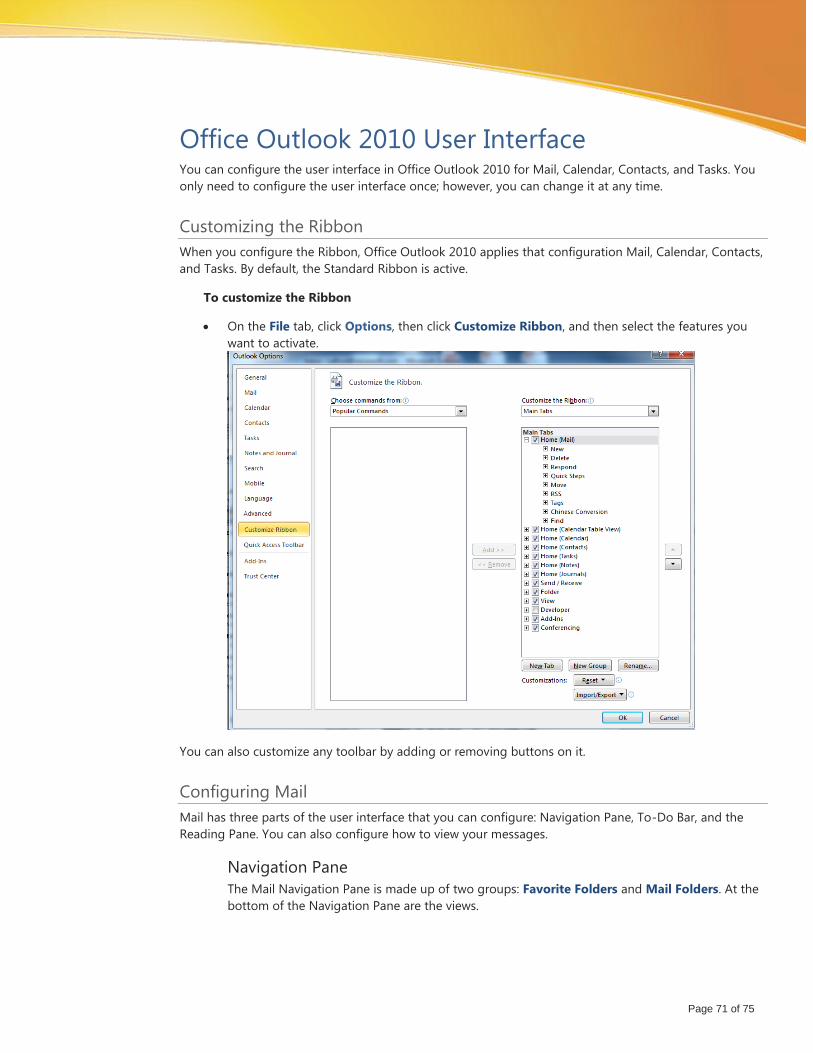
Page 71 of 75
Office Outlook 2010 User Interface You can configure the user interface in Office Outlook 2010 for Mail, Calendar, Contacts, and Tasks. You
only need to configure the user interface once; however, you can change it at any time.
Customizing the Ribbon
When you configure the Ribbon, Office Outlook 2010 applies that configuration Mail, Calendar, Contacts,
and Tasks. By default, the Standard Ribbon is active.
To customize the Ribbon
On the File tab, click Options, then click Customize Ribbon, and then select the features you
want to activate.
You can also customize any toolbar by adding or removing buttons on it.
Configuring Mail
Mail has three parts of the user interface that you can configure: Navigation Pane, To-Do Bar, and the
Reading Pane. You can also configure how to view your messages.
Navigation Pane
The Mail Navigation Pane is made up of two groups: Favorite Folders and Mail Folders. At the
bottom of the Navigation Pane are the views.
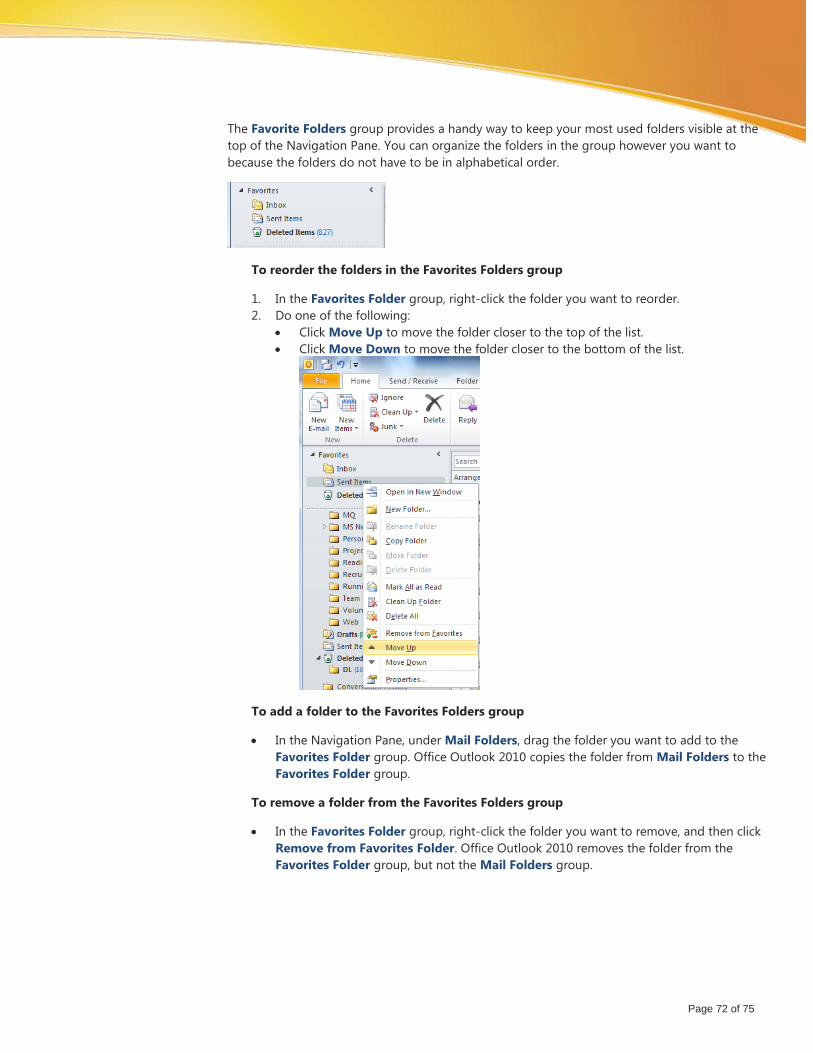
Page 72 of 75
The Favorite Folders group provides a handy way to keep your most used folders visible at the
top of the Navigation Pane. You can organize the folders in the group however you want to
because the folders do not have to be in alphabetical order.
To reorder the folders in the Favorites Folders group
1. In the Favorites Folder group, right-click the folder you want to reorder.
2. Do one of the following:
Click Move Up to move the folder closer to the top of the list.
Click Move Down to move the folder closer to the bottom of the list.
To add a folder to the Favorites Folders group
In the Navigation Pane, under Mail Folders, drag the folder you want to add to the
Favorites Folder group. Office Outlook 2010 copies the folder from Mail Folders to the
Favorites Folder group.
To remove a folder from the Favorites Folders group
In the Favorites Folder group, right-click the folder you want to remove, and then click
Remove from Favorites Folder. Office Outlook 2010 removes the folder from the
Favorites Folder group, but not the Mail Folders group.
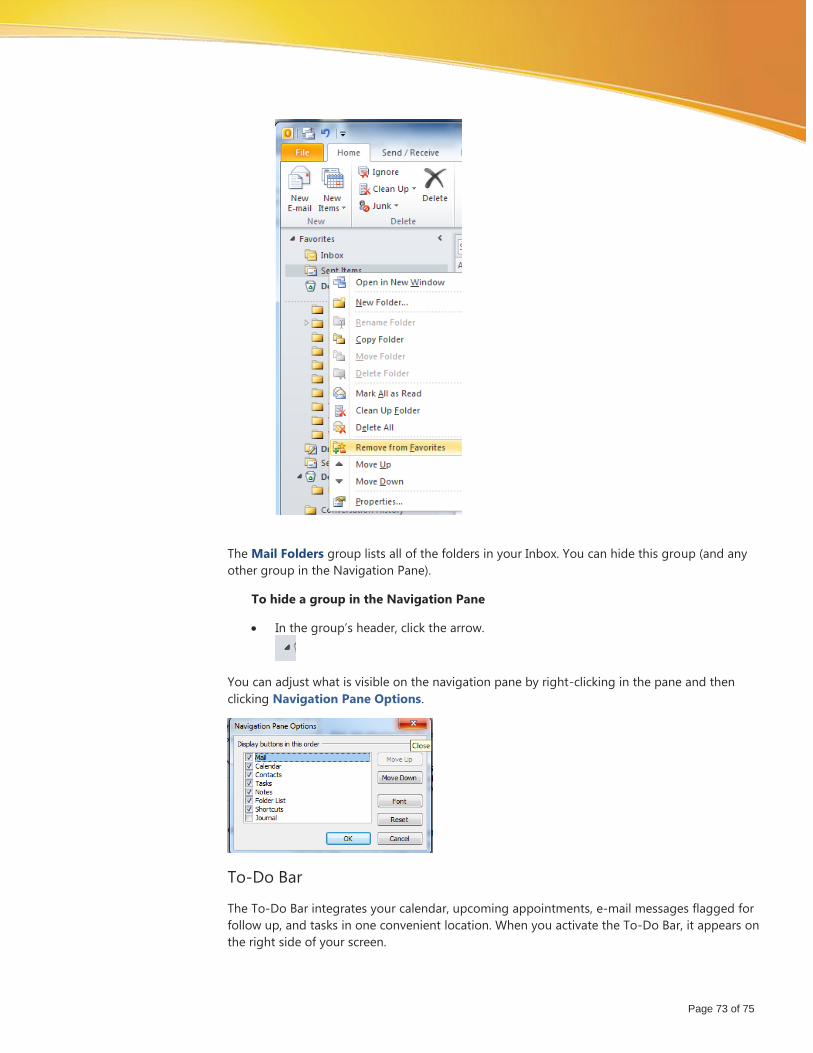
Page 73 of 75
The Mail Folders group lists all of the folders in your Inbox. You can hide this group (and any
other group in the Navigation Pane).
To hide a group in the Navigation Pane
In the group’s header, click the arrow.
You can adjust what is visible on the navigation pane by right-clicking in the pane and then
clicking Navigation Pane Options.
To-Do Bar
The To-Do Bar integrates your calendar, upcoming appointments, e-mail messages flagged for
follow up, and tasks in one convenient location. When you activate the To-Do Bar, it appears on
the right side of your screen.
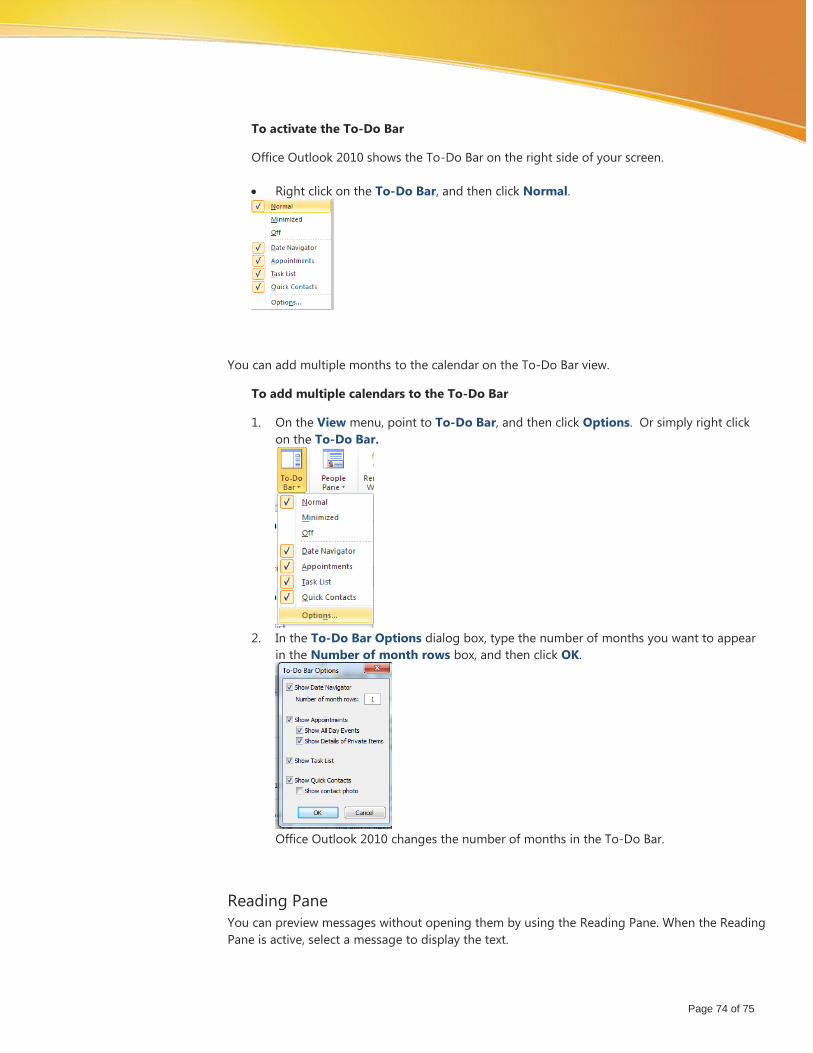
Page 74 of 75
To activate the To-Do Bar
Office Outlook 2010 shows the To-Do Bar on the right side of your screen.
Right click on the To-Do Bar, and then click Normal.
You can add multiple months to the calendar on the To-Do Bar view.
To add multiple calendars to the To-Do Bar
1. On the View menu, point to To-Do Bar, and then click Options. Or simply right click
on the To-Do Bar.
2. In the To-Do Bar Options dialog box, type the number of months you want to appear
in the Number of month rows box, and then click OK.
Office Outlook 2010 changes the number of months in the To-Do Bar.
Reading Pane
You can preview messages without opening them by using the Reading Pane. When the Reading
Pane is active, select a message to display the text.
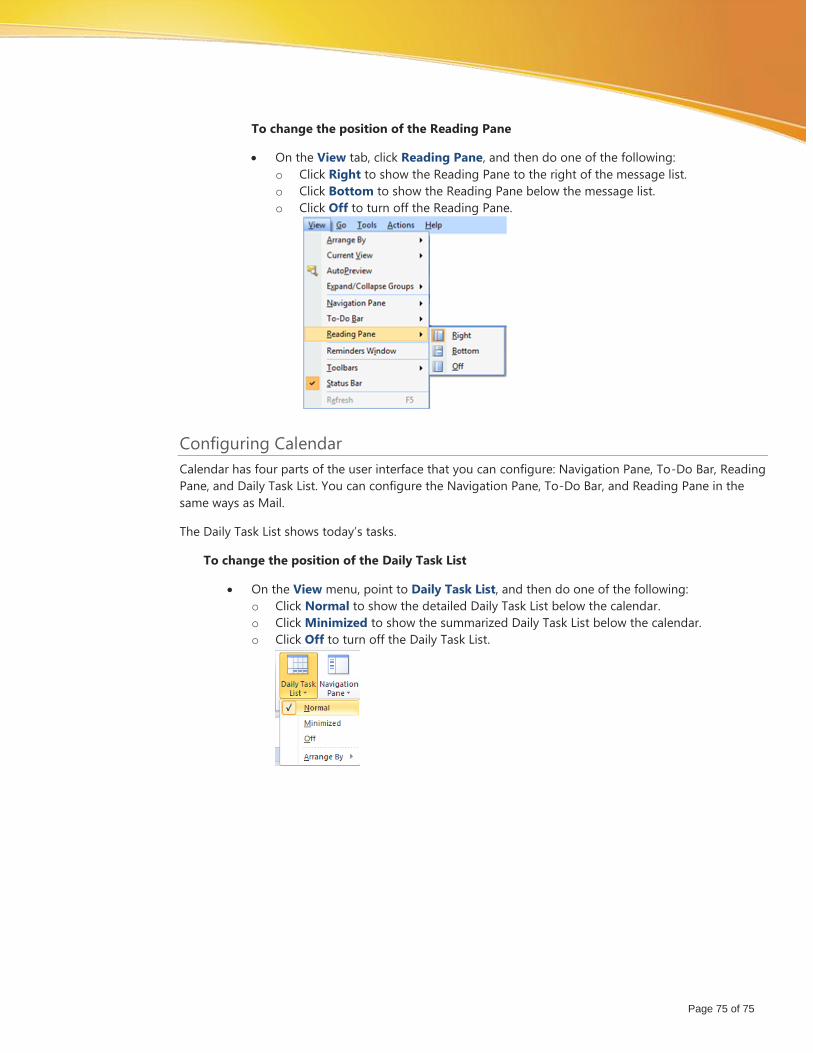
Page 75 of 75
To change the position of the Reading Pane
On the View tab, click Reading Pane, and then do one of the following:
o Click Right to show the Reading Pane to the right of the message list.
o Click Bottom to show the Reading Pane below the message list.
o Click Off to turn off the Reading Pane.
Configuring Calendar
Calendar has four parts of the user interface that you can configure: Navigation Pane, To-Do Bar, Reading
Pane, and Daily Task List. You can configure the Navigation Pane, To-Do Bar, and Reading Pane in the
same ways as Mail.
The Daily Task List shows today’s tasks.
To change the position of the Daily Task List
On the View menu, point to Daily Task List, and then do one of the following:
o Click Normal to show the detailed Daily Task List below the calendar.
o Click Minimized to show the summarized Daily Task List below the calendar.
o Click Off to turn off the Daily Task List.