Embed Size (px)
Citation preview

For additional resources, visit http://www.necdsx.com.
Empowered by Innovation
ML440 Wireless IP DECTQuick Setup Guide
P/N 1093100ML440Printed in U.S.A.
This manual has been developed by NEC Corporation of America. It is intended for the use of its customers and service personnel, and should be read in its entirety before attempting to install or program the system. Any comments or suggestions for improving this manual would be appreciated. Forward your remarks to:
NEC Corporation of AmericaGeneral Channel
Shelton, CT 06484
Nothing contained in this manual shall be deemed to be, and this manual does not constitute, a warranty of, or representation with respect to, any of the equipment covered. This manual is subject to change without notice and NEC Corporation of America has no obligation to provide any updates or corrections to this manual. Further, NEC Corporation of America also reserves the right, without prior notice, to make changes in equipment design or components as it deems appropriate. No representation is made that this manual is complete or accurate in all respects and NEC Corporation of America shall not be liable for any errors or omissions. In no event shall NEC Corporation of America be liable for any incidental or consequential damages in connection with the use of this manual. This document contains proprietary information that is protected by copyright. All rights are reserved. No part of this document may be photocopied or reproduced without prior written consent of NEC Corporation of America.
©2011 by NEC Corporation of America. All Rights Reserved.Printed in U.S.A.
Table of Contents
ML440 Wireless IP DECT Quick Reference Guide...........................................................5ML440 Wireless IP DECT Installation Checklist....................................................................................6
Step 1. Before Going On-Site......................................................................................................6
Step 2. Connect the AP20 Access Point to the Site Router..........................................................6
Step 3. Obtain the AP20 Access Point IP Address.......................................................................7
Step 4. Program the AP20 Access Point.......................................................................................7
Step 5. Program the DSX.............................................................................................................8
Step 6. Register the ML440 handsets with the AP20 and the DSX ............................................8
Step 7. Use the ML440 and AP20 to do a Quick Site Survey......................................................9
Step 8. (Optional) Set up a Multicell Installation.......................................................................10
Step 9. (Optional) Default the AP20 Access Point Database.....................................................11
ML440 Handset......................................................................................................................................13
ML440 Handset Key Layout......................................................................................................13
ML440 Feature Key Assignments..........................................................................................................14
ML440 Key Assignments Chart.................................................................................................14
ML440 Handset Features.......................................................................................................................18
Account Codes...........................................................................................................................18
Barge In (Intrusion)....................................................................................................................18
Call Coverage Keys....................................................................................................................18
Call Forwarding..........................................................................................................................19
Call Timer...................................................................................................................................20
Call Waiting / Camp On.............................................................................................................20
Callback......................................................................................................................................20
Caller ID.....................................................................................................................................20
Central Office Calls, Answering................................................................................................21
Central Office Calls, Placing......................................................................................................21
Conference.................................................................................................................................22
Directed Call Pickup..................................................................................................................22
Distinctive Ringing.....................................................................................................................22
Do Not Disturb...........................................................................................................................23
Do Not Disturb Override............................................................................................................23
Door Box....................................................................................................................................23
Extension Hunting......................................................................................................................24
Flash...........................................................................................................................................24
Forced Line Disconnect..............................................................................................................24
Group Call Pickup......................................................................................................................25
Group Ring.................................................................................................................................25
Hold............................................................................................................................................25
Home Automation Integration....................................................................................................26
Hotline........................................................................................................................................26
Intercom.....................................................................................................................................27
DSX | TOC | 3
XML to PDF by RenderX XEP XSL-FO Formatter, visit us at http://www.renderx.com/
Intercom Queue Key...................................................................................................................28
Last Number Redial...................................................................................................................28
Line Queuing / Line Callback....................................................................................................28
Line Schedules...........................................................................................................................29
Meet Me Conference..................................................................................................................29
Message Waiting........................................................................................................................30
Microphone Mute.......................................................................................................................30
Monitor / Silent Monitor............................................................................................................30
Night Service / Night Ring.........................................................................................................31
Paging.........................................................................................................................................31
Park.............................................................................................................................................31
Prime Line Preference................................................................................................................32
Privacy Release Groups..............................................................................................................32
Removing Lines and Extensions From Service.........................................................................33
Ringdown Extension..................................................................................................................33
Ringing Line Preference.............................................................................................................34
Save Number Dialed..................................................................................................................34
Speed Dial..................................................................................................................................34
Tandem Calls / Unsupervised Conference.................................................................................35
Transfer......................................................................................................................................36
Voice Mail (IntraMail)................................................................................................................37
Voice Over..................................................................................................................................38
AP20 Programming Screens..................................................................................................................40
ML440 Wireless IP DECT Frequently Asked Questions.......................................................................51
Capacity......................................................................................................................................51
Installation..................................................................................................................................51
Technology.................................................................................................................................51
4 | DSX | TOC
XML to PDF by RenderX XEP XSL-FO Formatter, visit us at http://www.renderx.com/
ML440 Wireless IP DECT Quick ReferenceGuide
XML to PDF by RenderX XEP XSL-FO Formatter, visit us at http://www.renderx.com/
ML440 Wireless IP DECT Installation Checklist
Step 1. Before Going On-Site
1. You must have 802.3af-2003 PoE (Power over Ethernet) capability at the installation site.
The site must be equipped with a PoE Ethernet switch or a DSX IPA (IP Phone Adaptor P/N 1091045B) topower the AP20 Access Point. The AP20 does not have a separate external power supply and obtains poweronly from PoE.
2. The router at the installation site must be set up as a DHCP server.
By default, the AP20 Access Point is set as a DHCP client and can obtain an IP address for programmingonly from a DHCP server.
3. Make sure at least one of the ML440 handsets is adequately charged.
Once the site AP20 Access Point is up and running, you'll use an ML440 handset to find the AP20 IP addressfor programming.
Step 2. Connect the AP20 Access Point to the Site Router
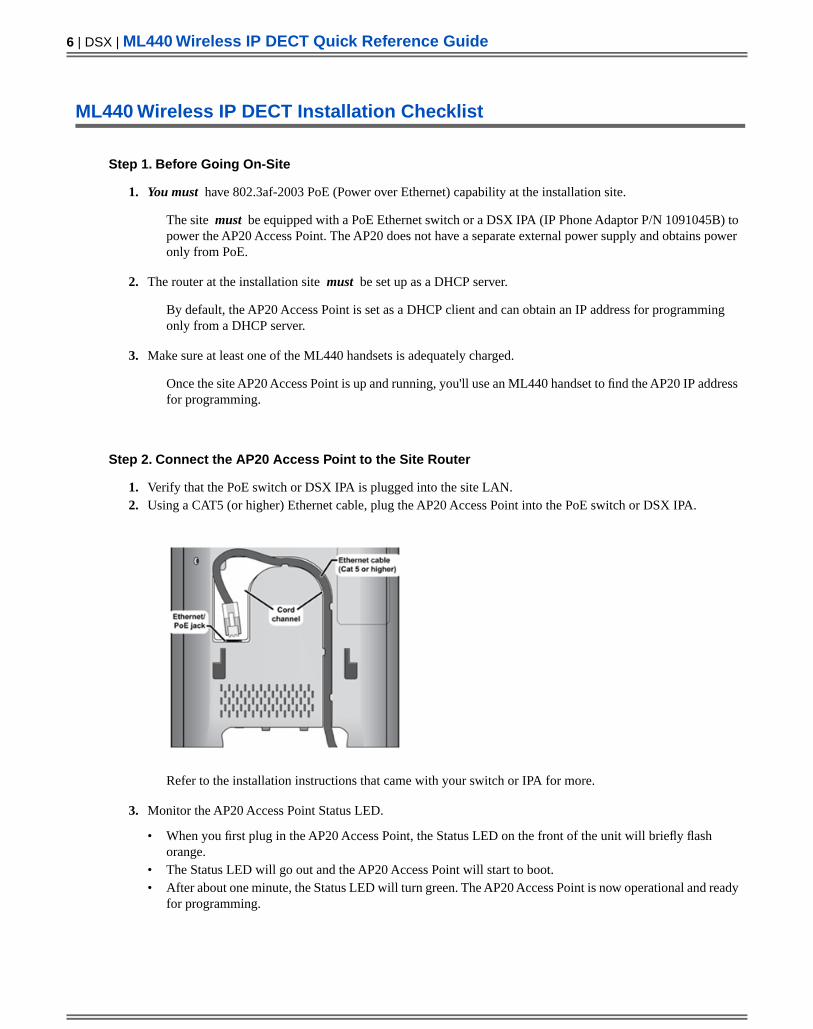
1. Verify that the PoE switch or DSX IPA is plugged into the site LAN.2. Using a CAT5 (or higher) Ethernet cable, plug the AP20 Access Point into the PoE switch or DSX IPA.
Refer to the installation instructions that came with your switch or IPA for more.
3. Monitor the AP20 Access Point Status LED.
• When you first plug in the AP20 Access Point, the Status LED on the front of the unit will briefly flashorange.
• The Status LED will go out and the AP20 Access Point will start to boot.• After about one minute, the Status LED will turn green. The AP20 Access Point is now operational and ready
for programming.
6 | DSX | ML440 Wireless IP DECT Quick Reference Guide
XML to PDF by RenderX XEP XSL-FO Formatter, visit us at http://www.renderx.com/
Step 3. Obtain the AP20 Access Point IP Address
1. From an adequately charged ML440 Handset, press MENU.
2. Press MENU and dial *IP* (*47*).3. The IP address of the AP20 Access Point will show on the handset display. Make a note of it.
Step 4. Program the AP20 Access Point
1. From a PC on the site LAN (same subnet as the AP20 Access Point), launch a web browser.2. In the browser address line, type the IP address of the AP20 Access Point and press Enter.3. Log into the AP20 Access Point Administration Program using the default credentials.
Username = adminPassword = admin
4. In the Servers screen:
SIP Server: Enter the DSX LAN IP address followed by the SIP port (e.g., 172.16.3.3:5060)Registration time(s): Leave at default.DTMF Signalling: Select RFC 2833.Codec Priority: Remove all codecs except for G711U.Click Save to save your entries.
5. In the Network screen:
IP settings: Leave DHCP/Static IP: set at DHCP.VLAN Settings: Leave at default. These settings are not used by DSX.DHCP Options: Set Plug-n-Play to Disabled.NAT Settings: NAT Traversal is currently not supported in the AP20 Access Point. Leave at default (Disabled).SIP/RTP Settings: Set Local SIP port: to 5060 and SIP registration mode: to Static. Leave the other optionsat default.Click Save to save your entries.
6. In the Extensions screen, click Add extension and make these entries for each ML440 Handset you want toregister:
Extension: Enter the DSX IP extension number that will be assigned to the ML440 handset.Authentication User Name: As above, enter the DSX IP extension number that will be assigned to the ML440handset.Authentication Password: Enter the password for the DSX IP extension assigned in Stations: Config: Setup:VoIP: Password (2106-02).Display name: For simplicity, enter the name for the DSX IP extension assigned in Stations: Config: Setup:Type: Name (2101-02). The ML440 automatically uses the extension name programmed into the DSX.Server: Normally, there is only one server in the list and it corresponds to the entries you made for the DSXsystem in the Servers screen.Click Save to save your entries and return to the previous screen.
DSX | ML440 Wireless IP DECT Quick Reference Guide | 7
XML to PDF by RenderX XEP XSL-FO Formatter, visit us at http://www.renderx.com/
Step 5. Program the DSX
1. Set up the VoIP Profile for the AP20 Access Point.
In System: VoIP: Profile (1811), select an unused profile and set it up to use only G.711 @ 20mS. Othercodex choices will cause poor speech quality.
2. Assign the VoIP Profile to the DSX IP extensions.
For each DSX IP extension that will have a corresponding ML440 handset, in Stations: Config: Setup: VoIP:Profile (2106-01), select the profile that offers only G.711 @ 20mS.
3. Program the passwords for the ML440 handsets.
For each DSX IP extension that will have a corresponding ML440 handset, in Stations: Config: Setup: VoIP:Password (2106-02), program the extension's password.The entry you make here must match the entry in the AP20 Access Point Extensions screen.
4. Program the extension name.
In Stations: Config: Setup: Type: Name (2102-02), enter a suitable name for each DSX IP extension that willhave a corresponding ML440 handset. After initial installation, the ML440 handset will use this name, notthe one programmed in the AP20 Access Point.
Step 6. Register the ML440 handsets with the AP20 and the DSX .
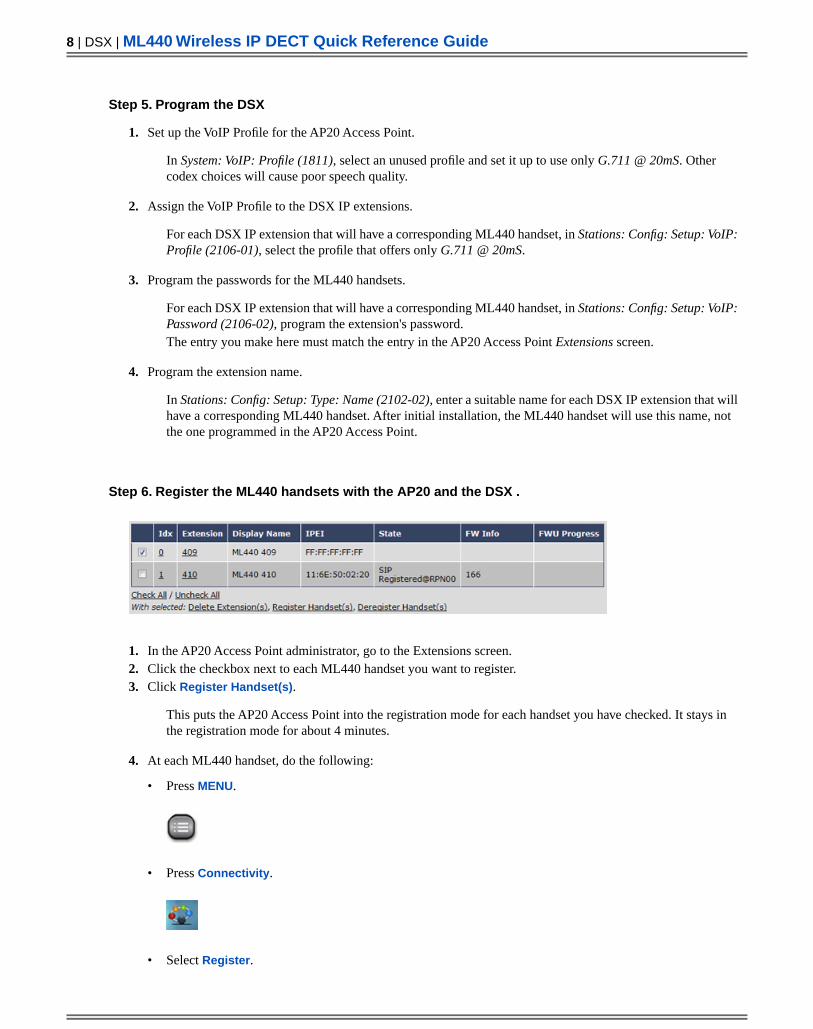
1. In the AP20 Access Point administrator, go to the Extensions screen.2. Click the checkbox next to each ML440 handset you want to register.3. Click Register Handset(s).
This puts the AP20 Access Point into the registration mode for each handset you have checked. It stays inthe registration mode for about 4 minutes.
4. At each ML440 handset, do the following:
• Press MENU.
• Press Connectivity.
• Select Register.
8 | DSX | ML440 Wireless IP DECT Quick Reference Guide
XML to PDF by RenderX XEP XSL-FO Formatter, visit us at http://www.renderx.com/
• Enter the Registration Access Code (0000).• Press Ok (soft key 1).• The ML440 handset will return to idle. After a few seconds the ML440 handset display should show that it
is registered.
Step 7. Use the ML440 and AP20 to do a Quick Site Survey.
You can use an ML440 handset registered to an AP20 Access Point as a site survey tool. This will help you determinethe relative DECT 6.0 signal strength in various parts of the site. If the signal strength is marginal in certain areas,consider installing additional AP20 Access Points to extend the coverage.
The AP20 does not have to be programmed for the site DSX and the ML440 does not have to be a real DSXextension. The only requirement is that the ML440 be registered with the AP20. For example, you can use a demounit that is part of a pre-sale site visit to get a quick estimate of the number of AP20 Access Points required.
To do a site survey:
1. Make sure the ML440 handset is properly registered with the AP20 Access Point.2. Place the AP20 Access Point in a central location, plug it into an IPA or 802.3af-2003 PoE device, and let it start
up.
• If the AP20 is not connected to the LAN, the status LED will flash red after the AP20 boots. This is OK andwill not interfere with the survey.
3. From an ML440 handset registered with the AP20 Access Point, wake the handset and do the following:
a. Press MENU.b. Dial *SERVICE* (*7378423).c. Scroll to Site survey mode and turn it on.d. Press END twice to return the handset to idle with the Site Survey Mode displayed.
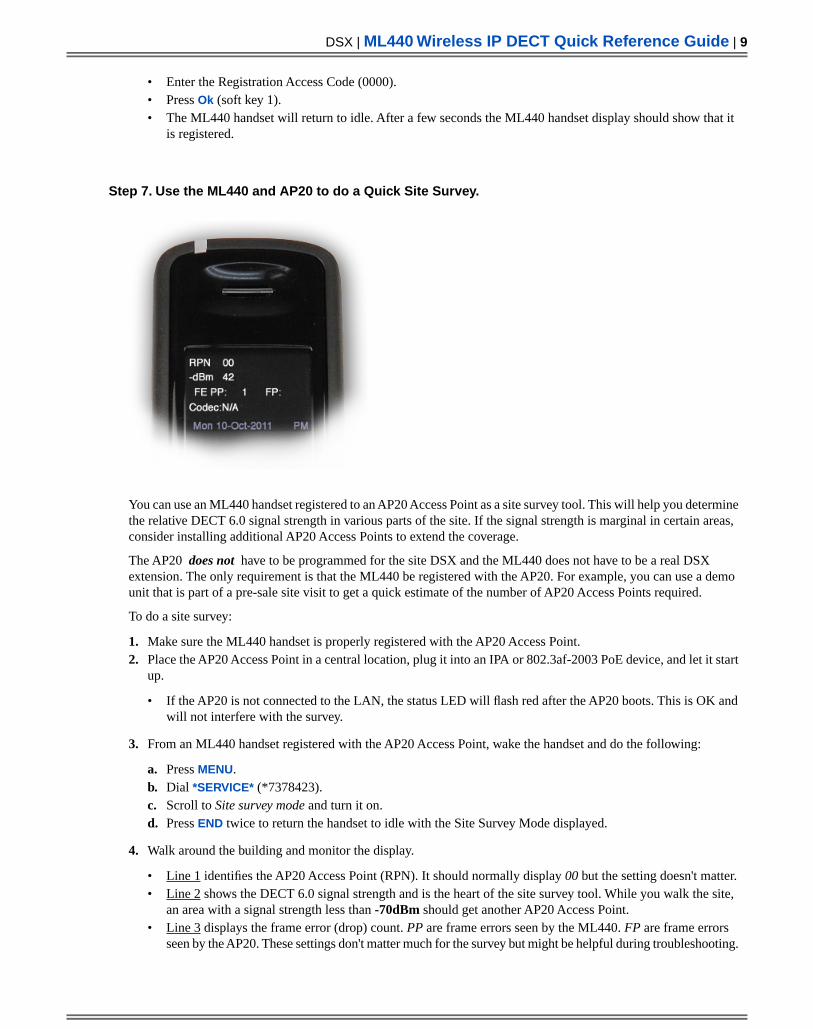
4. Walk around the building and monitor the display.
• Line 1 identifies the AP20 Access Point (RPN). It should normally display 00 but the setting doesn't matter.• Line 2 shows the DECT 6.0 signal strength and is the heart of the site survey tool. While you walk the site,
an area with a signal strength less than -70dBm should get another AP20 Access Point.• Line 3 displays the frame error (drop) count. PP are frame errors seen by the ML440. FP are frame errors
seen by the AP20. These settings don't matter much for the survey but might be helpful during troubleshooting.
DSX | ML440 Wireless IP DECT Quick Reference Guide | 9
XML to PDF by RenderX XEP XSL-FO Formatter, visit us at http://www.renderx.com/
• Line 4 is the audio codec used between the ML440 and AP20 Access Point. While the handset is on a call,it should show G.726. If the ML440 is idle, it will show N/A. For the site survey, this setting doesn't matter.
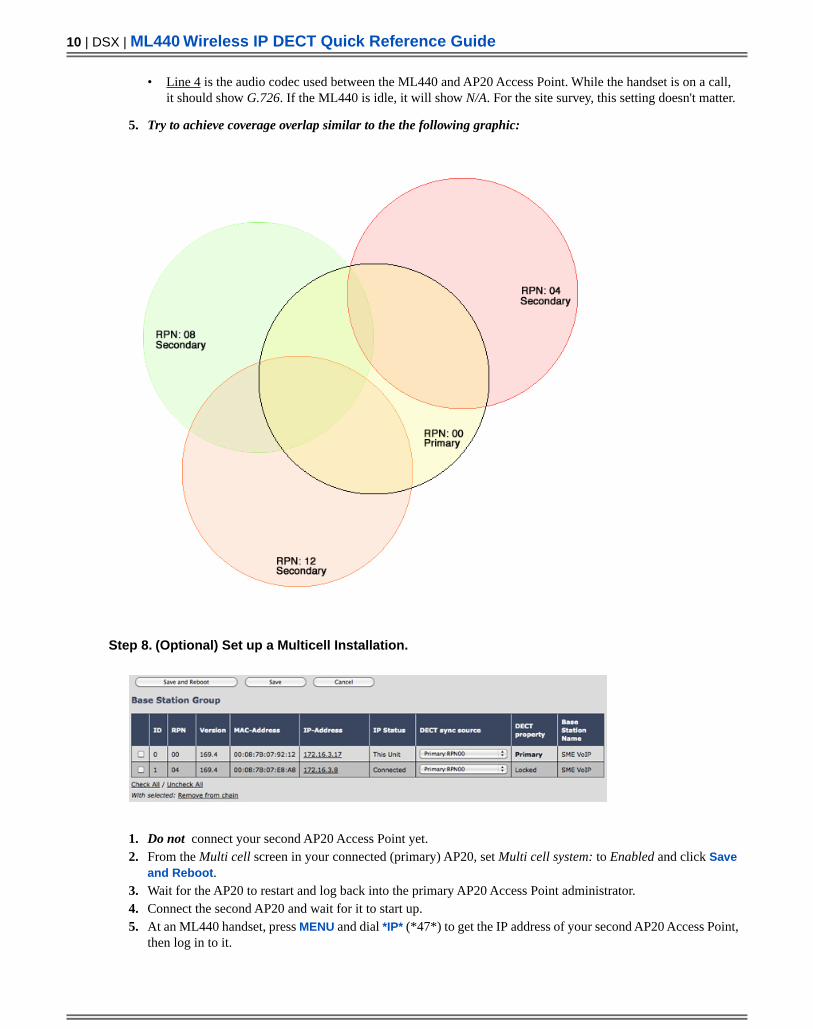
5. Try to achieve coverage overlap similar to the the following graphic:
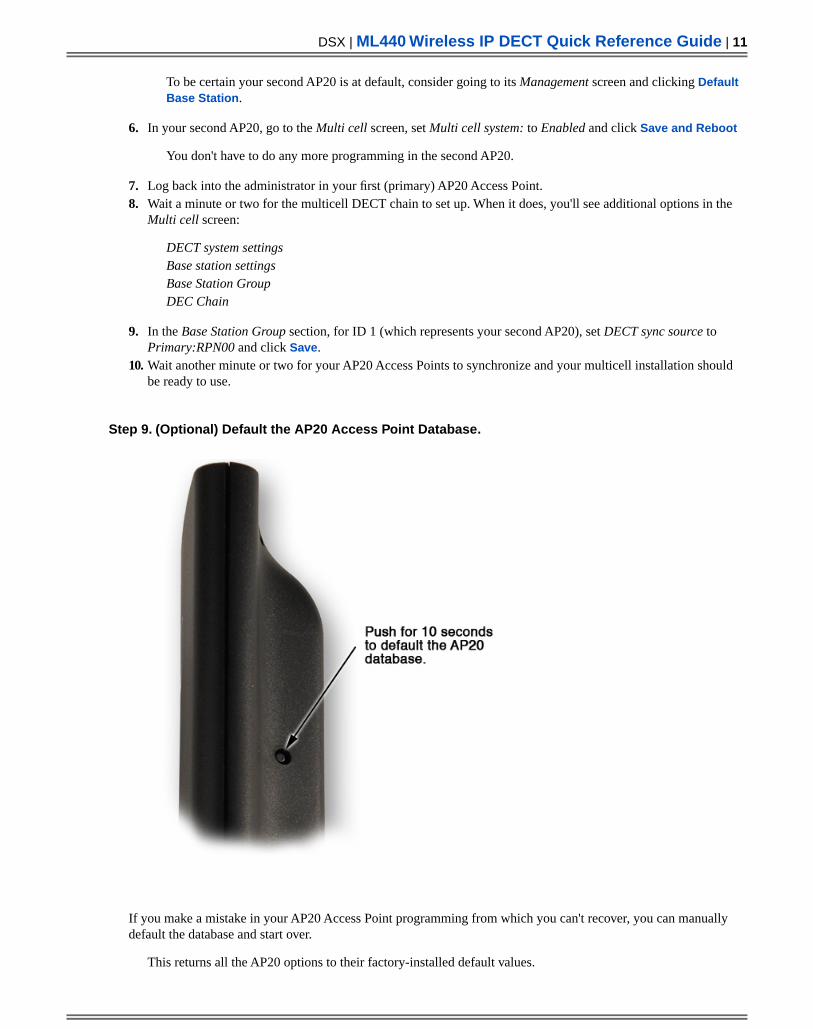
Step 8. (Optional) Set up a Multicell Installation.
1. Do not connect your second AP20 Access Point yet.2. From the Multi cell screen in your connected (primary) AP20, set Multi cell system: to Enabled and click Save
and Reboot.3. Wait for the AP20 to restart and log back into the primary AP20 Access Point administrator.4. Connect the second AP20 and wait for it to start up.5. At an ML440 handset, press MENU and dial *IP* (*47*) to get the IP address of your second AP20 Access Point,
then log in to it.
10 | DSX | ML440 Wireless IP DECT Quick Reference Guide
XML to PDF by RenderX XEP XSL-FO Formatter, visit us at http://www.renderx.com/
To be certain your second AP20 is at default, consider going to its Management screen and clicking DefaultBase Station.
6. In your second AP20, go to the Multi cell screen, set Multi cell system: to Enabled and click Save and Reboot
You don't have to do any more programming in the second AP20.
7. Log back into the administrator in your first (primary) AP20 Access Point.8. Wait a minute or two for the multicell DECT chain to set up. When it does, you'll see additional options in the
Multi cell screen:
DECT system settingsBase station settingsBase Station GroupDEC Chain
9. In the Base Station Group section, for ID 1 (which represents your second AP20), set DECT sync source toPrimary:RPN00 and click Save.
10. Wait another minute or two for your AP20 Access Points to synchronize and your multicell installation shouldbe ready to use.
Step 9. (Optional) Default the AP20 Access Point Database.
If you make a mistake in your AP20 Access Point programming from which you can't recover, you can manuallydefault the database and start over.
This returns all the AP20 options to their factory-installed default values.
DSX | ML440 Wireless IP DECT Quick Reference Guide | 11
XML to PDF by RenderX XEP XSL-FO Formatter, visit us at http://www.renderx.com/
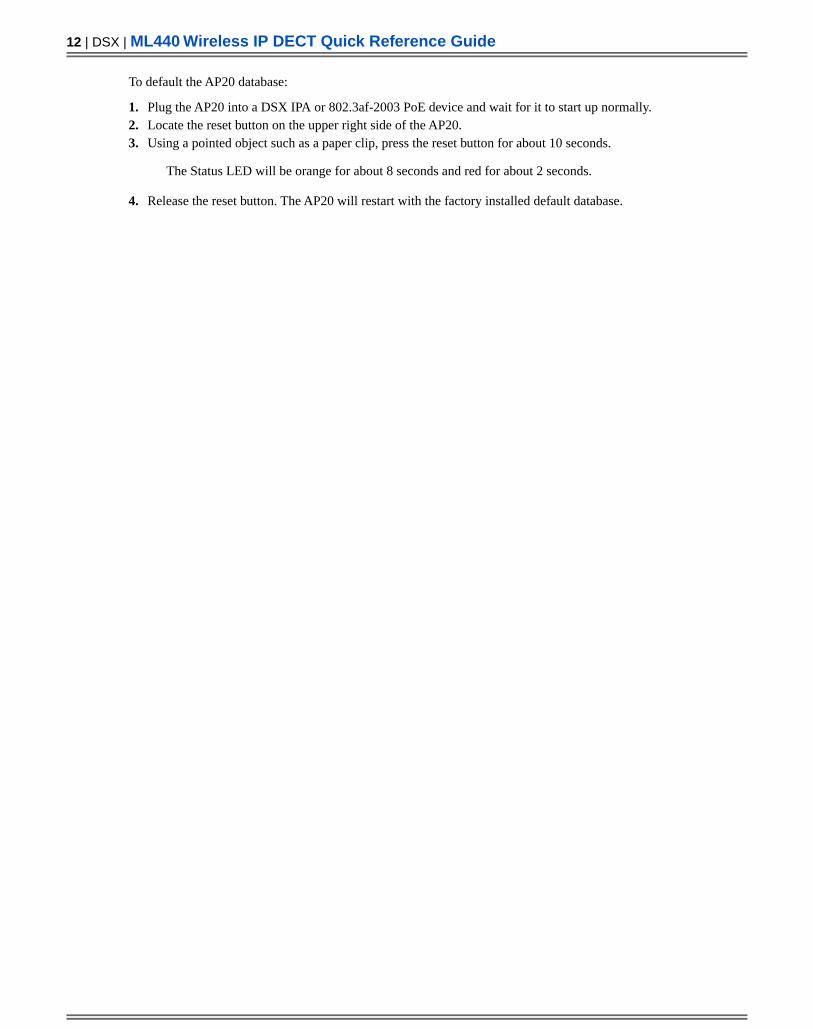
To default the AP20 database:
1. Plug the AP20 into a DSX IPA or 802.3af-2003 PoE device and wait for it to start up normally.2. Locate the reset button on the upper right side of the AP20.3. Using a pointed object such as a paper clip, press the reset button for about 10 seconds.
The Status LED will be orange for about 8 seconds and red for about 2 seconds.
4. Release the reset button. The AP20 will restart with the factory installed default database.
12 | DSX | ML440 Wireless IP DECT Quick Reference Guide
XML to PDF by RenderX XEP XSL-FO Formatter, visit us at http://www.renderx.com/
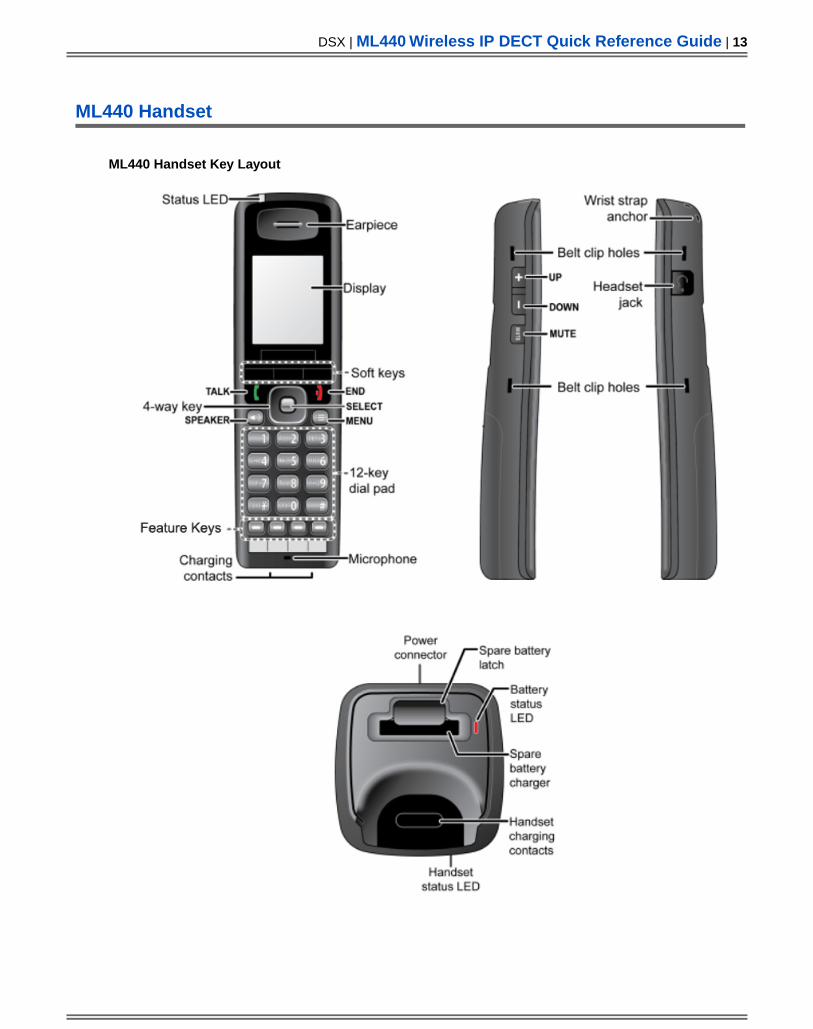
ML440 Handset
ML440 Handset Key Layout
DSX | ML440 Wireless IP DECT Quick Reference Guide | 13
XML to PDF by RenderX XEP XSL-FO Formatter, visit us at http://www.renderx.com/
ML440 Feature Key Assignments
ML440 Key Assignments Chart
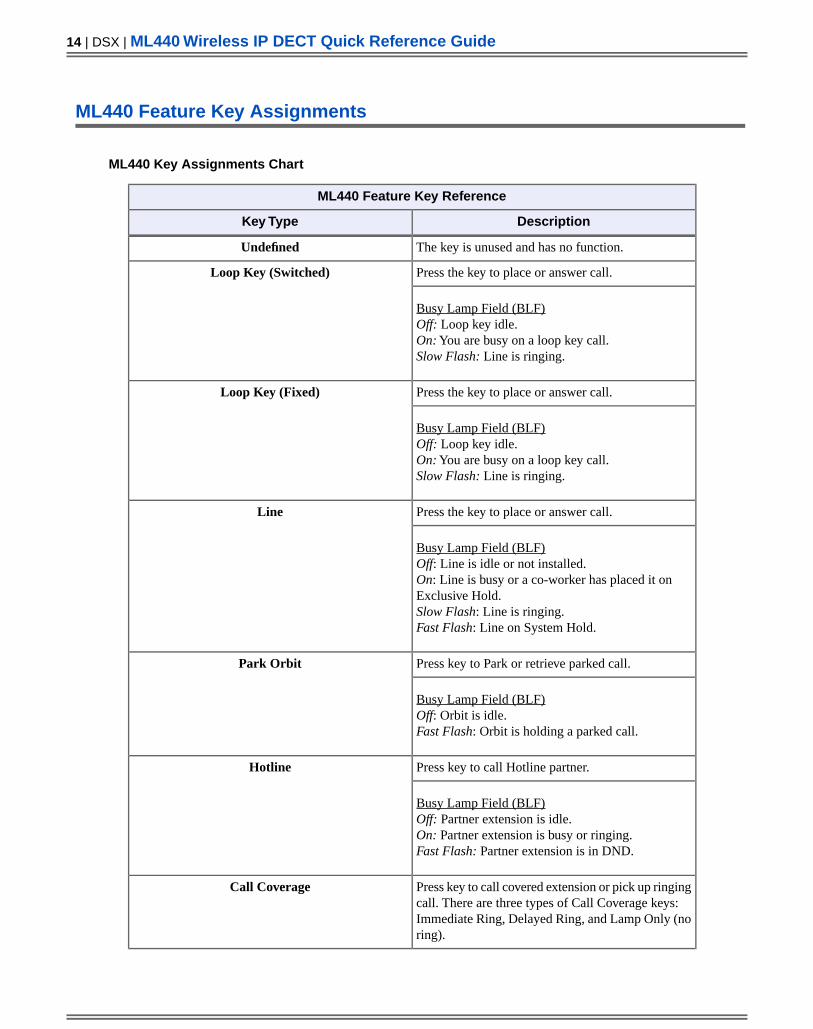
ML440 Feature Key Reference
DescriptionKey Type
The key is unused and has no function.Undefined
Press the key to place or answer call.Loop Key (Switched)
Busy Lamp Field (BLF)Off: Loop key idle.On: You are busy on a loop key call.Slow Flash: Line is ringing.
Press the key to place or answer call.Loop Key (Fixed)
Busy Lamp Field (BLF)Off: Loop key idle.On: You are busy on a loop key call.Slow Flash: Line is ringing.
Press the key to place or answer call.Line
Busy Lamp Field (BLF)Off: Line is idle or not installed.On: Line is busy or a co-worker has placed it onExclusive Hold.Slow Flash: Line is ringing.Fast Flash: Line on System Hold.
Press key to Park or retrieve parked call.Park Orbit
Busy Lamp Field (BLF)Off: Orbit is idle.Fast Flash: Orbit is holding a parked call.
Press key to call Hotline partner.Hotline
Busy Lamp Field (BLF)Off: Partner extension is idle.On: Partner extension is busy or ringing.Fast Flash: Partner extension is in DND.
Press key to call covered extension or pick up ringingcall. There are three types of Call Coverage keys:
Call Coverage
Immediate Ring, Delayed Ring, and Lamp Only (noring).
14 | DSX | ML440 Wireless IP DECT Quick Reference Guide
XML to PDF by RenderX XEP XSL-FO Formatter, visit us at http://www.renderx.com/
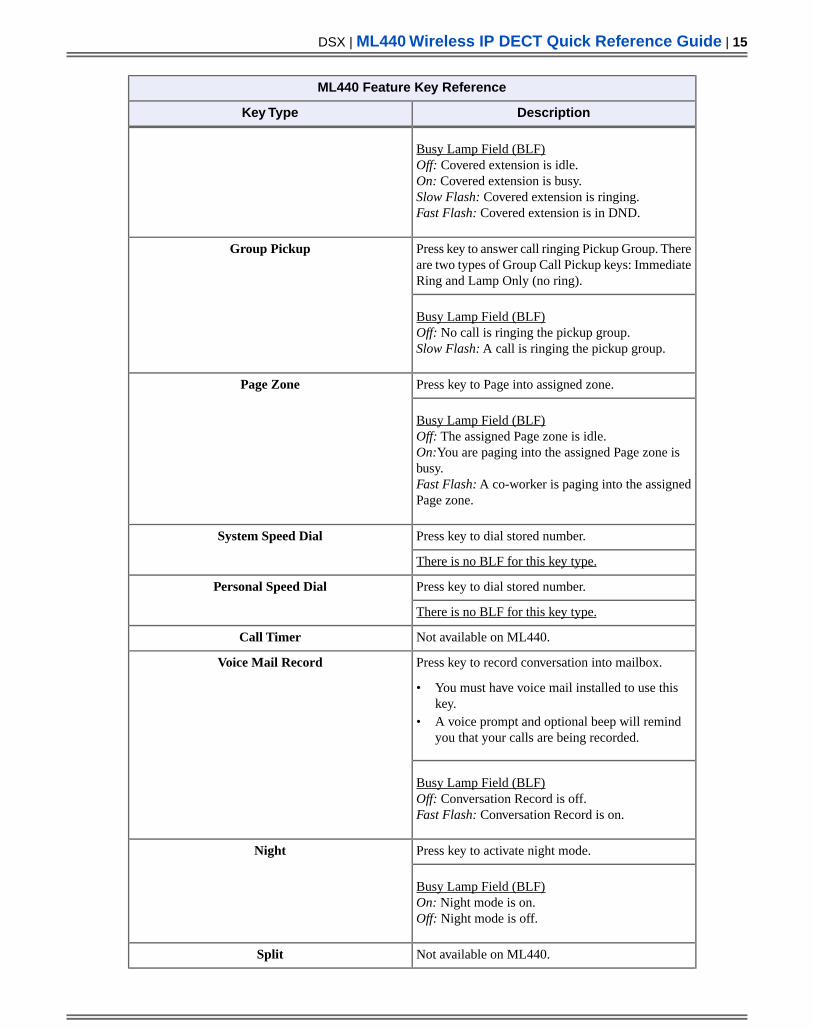
ML440 Feature Key Reference
DescriptionKey Type
Busy Lamp Field (BLF)Off: Covered extension is idle.On: Covered extension is busy.Slow Flash: Covered extension is ringing.Fast Flash: Covered extension is in DND.
Press key to answer call ringing Pickup Group. Thereare two types of Group Call Pickup keys: ImmediateRing and Lamp Only (no ring).
Group Pickup
Busy Lamp Field (BLF)Off: No call is ringing the pickup group.Slow Flash: A call is ringing the pickup group.
Press key to Page into assigned zone.Page Zone
Busy Lamp Field (BLF)Off: The assigned Page zone is idle.On:You are paging into the assigned Page zone isbusy.Fast Flash: A co-worker is paging into the assignedPage zone.
Press key to dial stored number.System Speed Dial
There is no BLF for this key type.
Press key to dial stored number.Personal Speed Dial
There is no BLF for this key type.
Not available on ML440.Call Timer
Press key to record conversation into mailbox.Voice Mail Record
• You must have voice mail installed to use thiskey.
• A voice prompt and optional beep will remindyou that your calls are being recorded.
Busy Lamp Field (BLF)Off: Conversation Record is off.Fast Flash: Conversation Record is on.
Press key to activate night mode.Night
Busy Lamp Field (BLF)On: Night mode is on.Off: Night mode is off.
Not available on ML440.Split
DSX | ML440 Wireless IP DECT Quick Reference Guide | 15
XML to PDF by RenderX XEP XSL-FO Formatter, visit us at http://www.renderx.com/
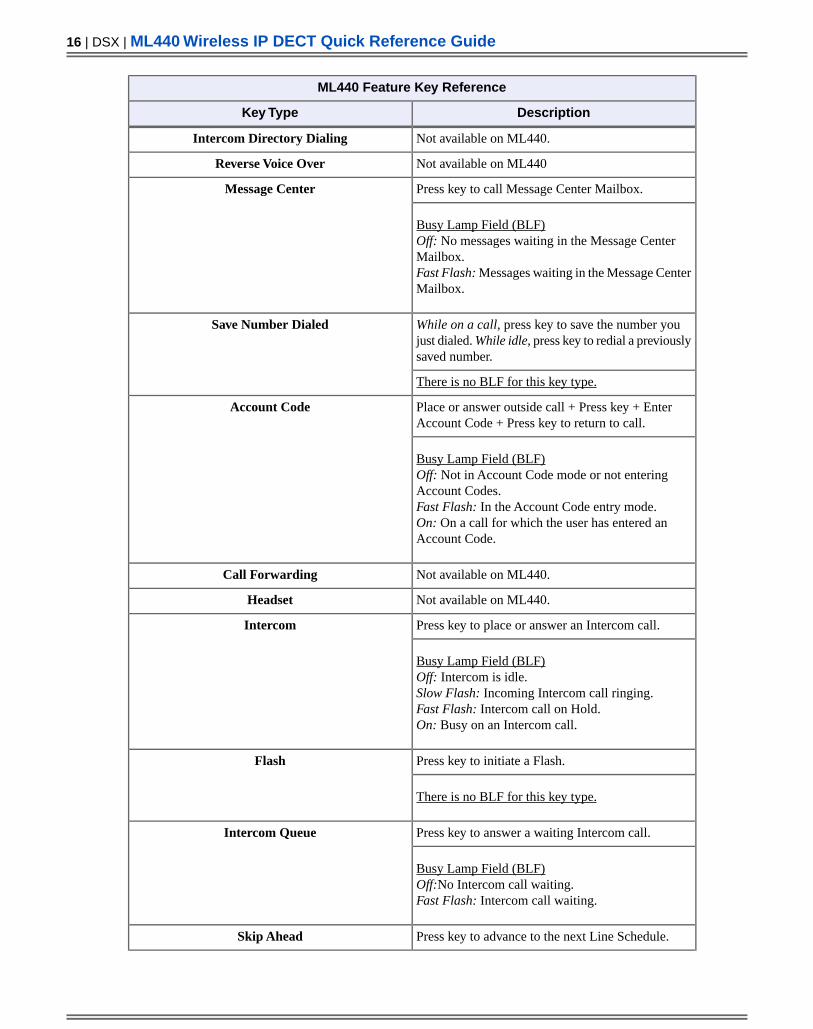
ML440 Feature Key Reference
DescriptionKey Type
Not available on ML440.Intercom Directory Dialing
Not available on ML440Reverse Voice Over
Press key to call Message Center Mailbox.Message Center
Busy Lamp Field (BLF)Off: No messages waiting in the Message CenterMailbox.Fast Flash: Messages waiting in the Message CenterMailbox.
While on a call, press key to save the number youjust dialed. While idle, press key to redial a previouslysaved number.
Save Number Dialed
There is no BLF for this key type.
Place or answer outside call + Press key + EnterAccount Code + Press key to return to call.
Account Code
Busy Lamp Field (BLF)Off: Not in Account Code mode or not enteringAccount Codes.Fast Flash: In the Account Code entry mode.On: On a call for which the user has entered anAccount Code.
Not available on ML440.Call Forwarding
Not available on ML440.Headset
Press key to place or answer an Intercom call.Intercom
Busy Lamp Field (BLF)Off: Intercom is idle.Slow Flash: Incoming Intercom call ringing.Fast Flash: Intercom call on Hold.On: Busy on an Intercom call.
Press key to initiate a Flash.Flash
There is no BLF for this key type.
Press key to answer a waiting Intercom call.Intercom Queue
Busy Lamp Field (BLF)Off:No Intercom call waiting.Fast Flash: Intercom call waiting.
Press key to advance to the next Line Schedule.Skip Ahead
16 | DSX | ML440 Wireless IP DECT Quick Reference Guide
XML to PDF by RenderX XEP XSL-FO Formatter, visit us at http://www.renderx.com/
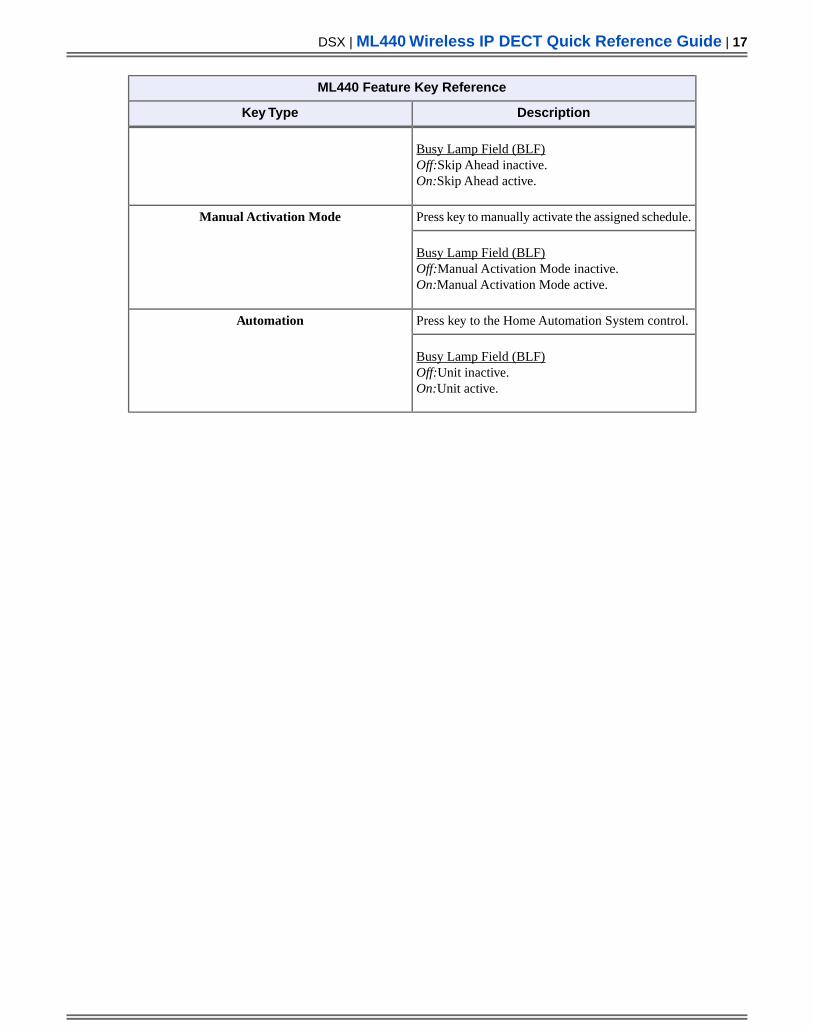
ML440 Feature Key Reference
DescriptionKey Type
Busy Lamp Field (BLF)Off:Skip Ahead inactive.On:Skip Ahead active.
Press key to manually activate the assigned schedule.Manual Activation Mode
Busy Lamp Field (BLF)Off:Manual Activation Mode inactive.On:Manual Activation Mode active.
Press key to the Home Automation System control.Automation
Busy Lamp Field (BLF)Off:Unit inactive.On:Unit active.
DSX | ML440 Wireless IP DECT Quick Reference Guide | 17
XML to PDF by RenderX XEP XSL-FO Formatter, visit us at http://www.renderx.com/
ML440 Handset Features
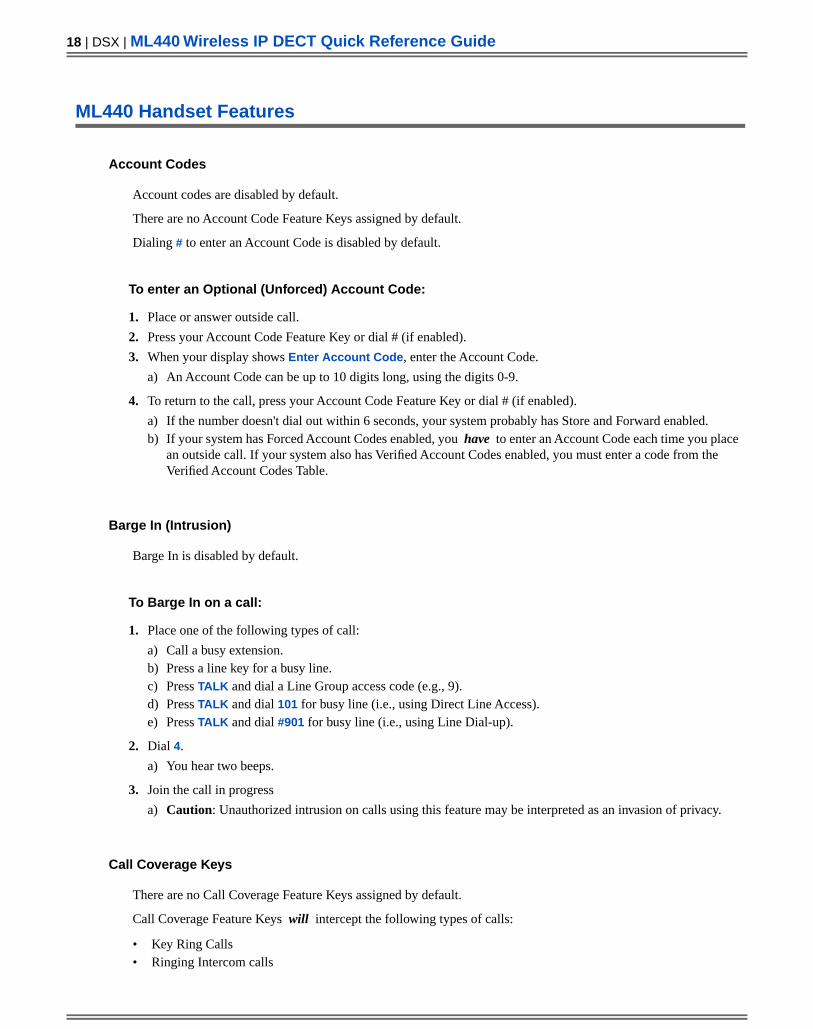
Account Codes
Account codes are disabled by default.
There are no Account Code Feature Keys assigned by default.
Dialing # to enter an Account Code is disabled by default.
To enter an Optional (Unforced) Account Code:
1. Place or answer outside call.
2. Press your Account Code Feature Key or dial # (if enabled).
3. When your display shows Enter Account Code, enter the Account Code.
a) An Account Code can be up to 10 digits long, using the digits 0-9.
4. To return to the call, press your Account Code Feature Key or dial # (if enabled).
a) If the number doesn't dial out within 6 seconds, your system probably has Store and Forward enabled.b) If your system has Forced Account Codes enabled, you have to enter an Account Code each time you place
an outside call. If your system also has Verified Account Codes enabled, you must enter a code from theVerified Account Codes Table.
Barge In (Intrusion)
Barge In is disabled by default.
To Barge In on a call:
1. Place one of the following types of call:
a) Call a busy extension.b) Press a line key for a busy line.c) Press TALK and dial a Line Group access code (e.g., 9).d) Press TALK and dial 101 for busy line (i.e., using Direct Line Access).e) Press TALK and dial #901 for busy line (i.e., using Line Dial-up).
2. Dial 4.
a) You hear two beeps.
3. Join the call in progress
a) Caution: Unauthorized intrusion on calls using this feature may be interpreted as an invasion of privacy.
Call Coverage Keys
There are no Call Coverage Feature Keys assigned by default.
Call Coverage Feature Keys will intercept the following types of calls:
• Key Ring Calls• Ringing Intercom calls
18 | DSX | ML440 Wireless IP DECT Quick Reference Guide
XML to PDF by RenderX XEP XSL-FO Formatter, visit us at http://www.renderx.com/
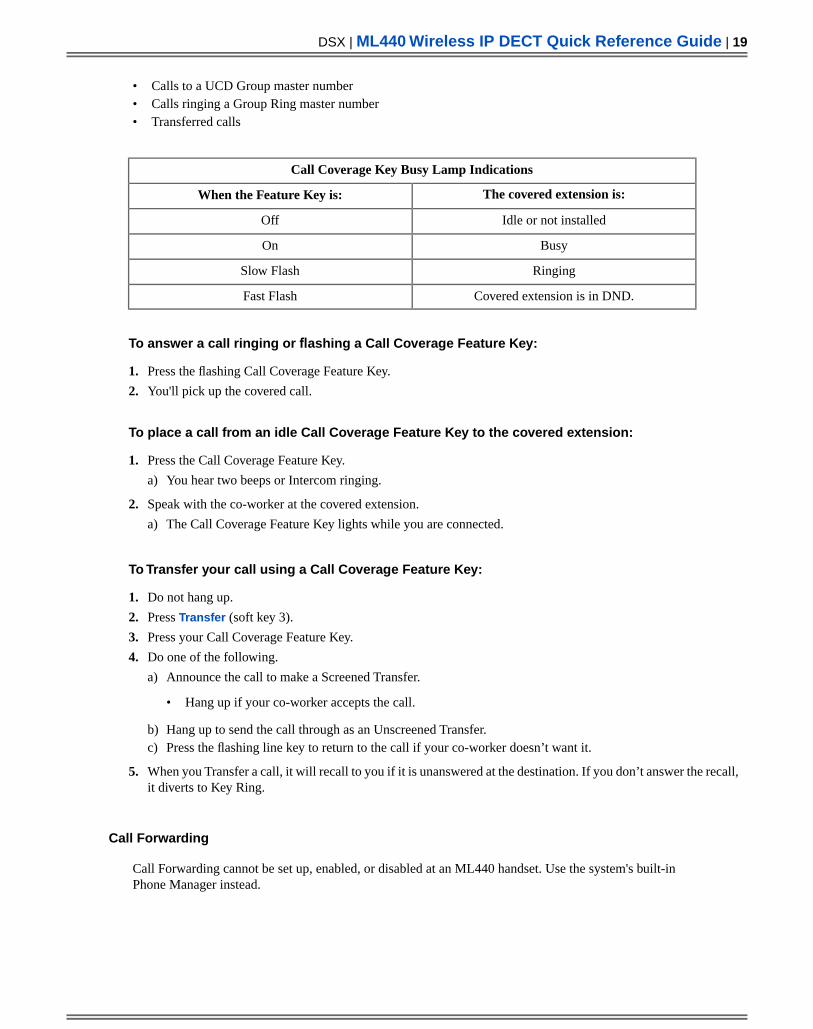
• Calls to a UCD Group master number• Calls ringing a Group Ring master number• Transferred calls
Call Coverage Key Busy Lamp Indications
The covered extension is:When the Feature Key is:
Idle or not installedOff
BusyOn
RingingSlow Flash
Covered extension is in DND.Fast Flash
To answer a call ringing or flashing a Call Coverage Feature Key:
1. Press the flashing Call Coverage Feature Key.
2. You'll pick up the covered call.
To place a call from an idle Call Coverage Feature Key to the covered extension:
1. Press the Call Coverage Feature Key.
a) You hear two beeps or Intercom ringing.
2. Speak with the co-worker at the covered extension.
a) The Call Coverage Feature Key lights while you are connected.
To Transfer your call using a Call Coverage Feature Key:
1. Do not hang up.
2. Press Transfer (soft key 3).
3. Press your Call Coverage Feature Key.
4. Do one of the following.
a) Announce the call to make a Screened Transfer.
• Hang up if your co-worker accepts the call.
b) Hang up to send the call through as an Unscreened Transfer.c) Press the flashing line key to return to the call if your co-worker doesn’t want it.
5. When you Transfer a call, it will recall to you if it is unanswered at the destination. If you don’t answer the recall,it diverts to Key Ring.
Call Forwarding
Call Forwarding cannot be set up, enabled, or disabled at an ML440 handset. Use the system's built-inPhone Manager instead.
DSX | ML440 Wireless IP DECT Quick Reference Guide | 19
XML to PDF by RenderX XEP XSL-FO Formatter, visit us at http://www.renderx.com/
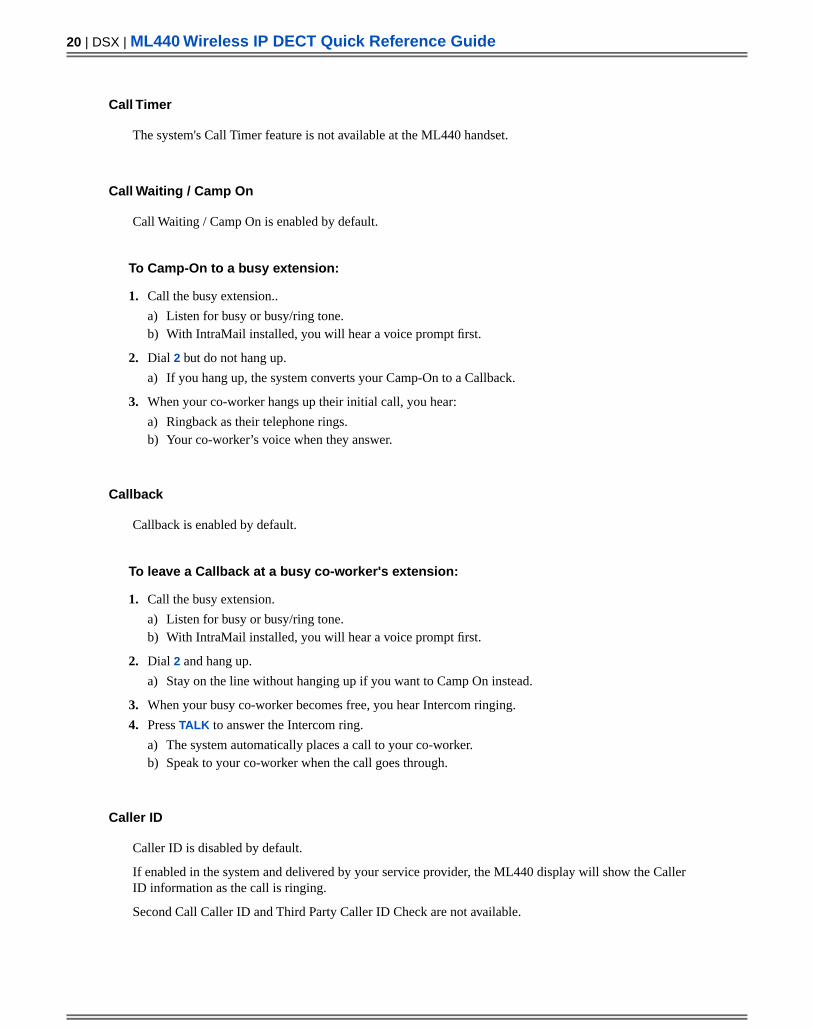
Call Timer
The system's Call Timer feature is not available at the ML440 handset.
Call Waiting / Camp On
Call Waiting / Camp On is enabled by default.
To Camp-On to a busy extension:
1. Call the busy extension..
a) Listen for busy or busy/ring tone.b) With IntraMail installed, you will hear a voice prompt first.
2. Dial 2 but do not hang up.
a) If you hang up, the system converts your Camp-On to a Callback.
3. When your co-worker hangs up their initial call, you hear:
a) Ringback as their telephone rings.b) Your co-worker’s voice when they answer.
Callback
Callback is enabled by default.
To leave a Callback at a busy co-worker's extension:
1. Call the busy extension.
a) Listen for busy or busy/ring tone.b) With IntraMail installed, you will hear a voice prompt first.
2. Dial 2 and hang up.
a) Stay on the line without hanging up if you want to Camp On instead.
3. When your busy co-worker becomes free, you hear Intercom ringing.
4. Press TALK to answer the Intercom ring.
a) The system automatically places a call to your co-worker.b) Speak to your co-worker when the call goes through.
Caller ID
Caller ID is disabled by default.
If enabled in the system and delivered by your service provider, the ML440 display will show the CallerID information as the call is ringing.
Second Call Caller ID and Third Party Caller ID Check are not available.
20 | DSX | ML440 Wireless IP DECT Quick Reference Guide
XML to PDF by RenderX XEP XSL-FO Formatter, visit us at http://www.renderx.com/
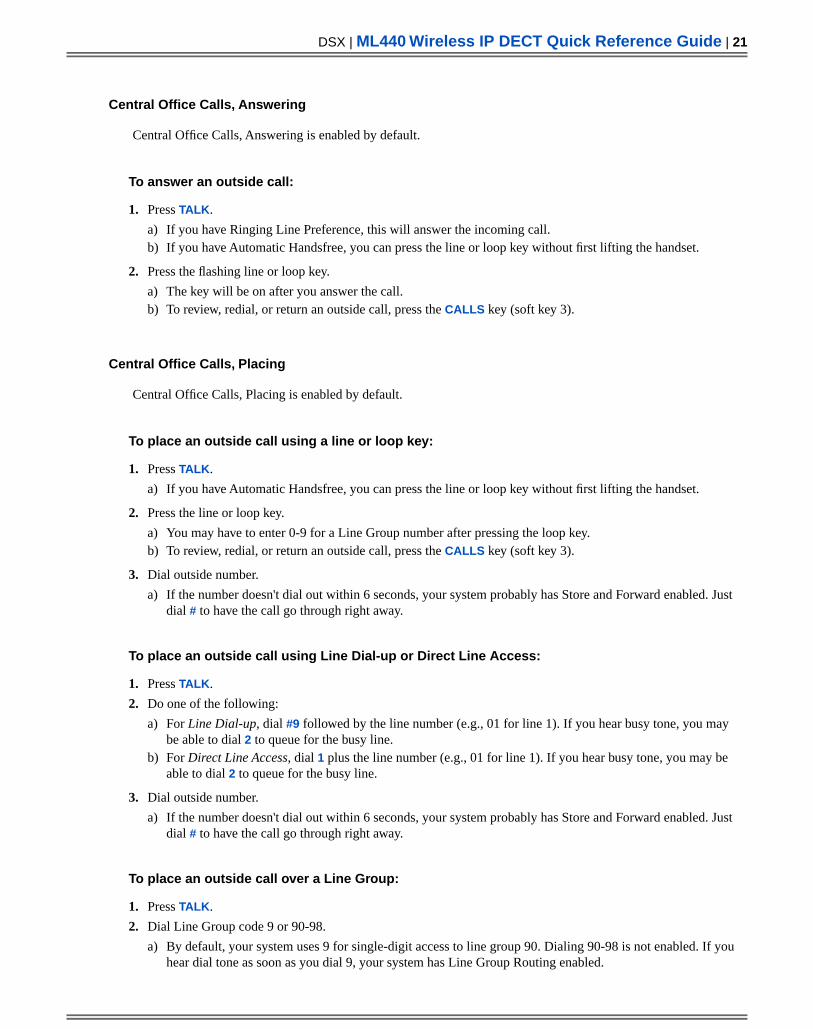
Central Office Calls, Answering
Central Office Calls, Answering is enabled by default.
To answer an outside call:
1. Press TALK.
a) If you have Ringing Line Preference, this will answer the incoming call.b) If you have Automatic Handsfree, you can press the line or loop key without first lifting the handset.
2. Press the flashing line or loop key.
a) The key will be on after you answer the call.b) To review, redial, or return an outside call, press the CALLS key (soft key 3).
Central Office Calls, Placing
Central Office Calls, Placing is enabled by default.
To place an outside call using a line or loop key:
1. Press TALK.
a) If you have Automatic Handsfree, you can press the line or loop key without first lifting the handset.
2. Press the line or loop key.
a) You may have to enter 0-9 for a Line Group number after pressing the loop key.b) To review, redial, or return an outside call, press the CALLS key (soft key 3).
3. Dial outside number.
a) If the number doesn't dial out within 6 seconds, your system probably has Store and Forward enabled. Justdial # to have the call go through right away.
To place an outside call using Line Dial-up or Direct Line Access:
1. Press TALK.
2. Do one of the following:
a) For Line Dial-up, dial #9 followed by the line number (e.g., 01 for line 1). If you hear busy tone, you maybe able to dial 2 to queue for the busy line.
b) For Direct Line Access, dial 1 plus the line number (e.g., 01 for line 1). If you hear busy tone, you may beable to dial 2 to queue for the busy line.
3. Dial outside number.
a) If the number doesn't dial out within 6 seconds, your system probably has Store and Forward enabled. Justdial # to have the call go through right away.
To place an outside call over a Line Group:
1. Press TALK.
2. Dial Line Group code 9 or 90-98.
a) By default, your system uses 9 for single-digit access to line group 90. Dialing 90-98 is not enabled. If youhear dial tone as soon as you dial 9, your system has Line Group Routing enabled.
DSX | ML440 Wireless IP DECT Quick Reference Guide | 21
XML to PDF by RenderX XEP XSL-FO Formatter, visit us at http://www.renderx.com/
b) By default, pressing TALK and dialing 911 will not call emergency services.
3. Dial outside number.
a) If the number doesn't dial out within 6 seconds, your system probably has Store and Forward enabled. Justdial # to have the call go through right away.
Conference
Conference is enabled by default.
To set up a Conference:
1. Establish an Intercom or outside call.
2. Press the Conf. soft key (soft key 2).
a) Your hear Intercom dial tone.b) Your caller hears Music on Hold (if installed) while they wait for you to set up the Conference.
3. Do one of the following:
a) Dial extension you want to add.b) Place or answer an outside call.c) Retrieve a call from Park Orbit.
4. Press Conf. (soft key 2) to set up the Conference.
a) If you cannot add additional parties to your Conference, you have exceeded the system’s Conference limit.
5. Repeat steps 2-4 to add additional parties to your Conference.
a) To optionally place a Conference on Hold, press Hold (soft key 1).b) To retrieve the Conference from Hold, press TALK (to show the soft keys) and then press Hold (soft key 1).
6. To exit the Conference, press END.
a) The remaining parties can continue their conversation uninterrupted.b) If you were in Conference with two outside lines, this may set up a Tandem Call (Unsupervised Conference).
Directed Call Pickup
Directed Call Pickup is enabled by default.
To intercept a call ringing a co-worker’s extension:
1. Press TALK.
2. Dial ** .
3. Dial the number of the extension whose call you want to intercept.
a) To intercept a call ringing an attendant, dial the attendant’s extension number (e.g., 301). Do not dial 0 or01-04.
Distinctive Ringing
The capability to change ring tones and ring volume is built into the ML440 handset.
22 | DSX | ML440 Wireless IP DECT Quick Reference Guide
XML to PDF by RenderX XEP XSL-FO Formatter, visit us at http://www.renderx.com/
To access the ML440 ring audio controls:
1. Press Menu.
2. Select Audio.
3. Adjust Ring volume, Ring melody, and Vibrator as desired.
a) Additional audio controls are also available in this section.
Do Not Disturb
Do Not Disturb is not available in the ML440 handset.
Do Not Disturb Override
Do Not Disturb Override is not available by default.
To override an extension's Do Not Disturb:
1. Call the extension that is in Do Not Disturb.
a) You hear DND tone and see Do Not Disturb in your displayb) With IntraMail installed, you will hear a voice prompt first.c) If you hear busy or ring/busy tone instead, your co-worker is busy on a call.
2. Dial 1.
a) You can alternately press the Hotline Feature Key for your co-worker.
3. The system automatically places a ringing Intercom call to your co-worker.
Door Box
Door Boxes are not installed and programmed by default.
In order to ring the ML440 handset, the Door Box must be programmed for Door Chime None.
To place a call to the Door Box:
1. Press TALK.
2. Dial the Door Box extension number.
a) You hear conversation with the visitor at the door.
DSX | ML440 Wireless IP DECT Quick Reference Guide | 23
XML to PDF by RenderX XEP XSL-FO Formatter, visit us at http://www.renderx.com/
b) You can press a Hotline or Call Coverage Feature Key for the Door Box instead of dialing the extensionnumber.
To answer Door Box ringing:
1. Press TALK.
2. Talk to the visitor at the door.
To activate the Door Box relay (which in turn controls the door strike):
1. Place or answer a Door Box call.
2. Push a specially-programmed Flash Feature Key to open or close the Door Box relay.
Extension Hunting
Extension Hunting is disabled by default.
To temporarily install or remove your extension from your UCD group:
1. Press TALK.
2. Dial *5.
3. Do one of the following:
a) Dial 4 to return your extension to your group.b) Dial 6 to remove your extension from your group.
Flash
Flash is enabled by default, but the ML440 handset does not have a specially-programmed Flash FeatureKey.
To Flash the outside line you are on:
1. Press your specially-programmed Flash Feature Key.
2. The system will send a Flash signal to the outside line.
Forced Line Disconnect
Forced Line Disconnect is disabled by default.
To disconnect a busy line:
1. Do one of the following
a) Press the line key for the busy line.b) Press TALK and dial the line’s extension number (e.g., 101 for line 1).
2. When you hear busy tone, dial # to disconnect the line.
3. You hear Intercom dial tone and the line key goes out.
a) You can now place a new call on the line.
24 | DSX | ML440 Wireless IP DECT Quick Reference Guide
XML to PDF by RenderX XEP XSL-FO Formatter, visit us at http://www.renderx.com/
Group Call Pickup
Group Call Pickup is disabled by default.
There are no Group Call Pickup Feature Keys by default.
To answer an outside call ringing a phone in your Pickup Group:
1. Press TALK and dial *#, or
2. Press the flashing Group Pickup Feature Key.
Group Ring
Group Ring is disabled by default.
To answer a call ringing into your Ring Group:
1. Press TALK.
a) If the call appears on a line or loop key, you may be able to press the flashing line or loop key instead.
2. Speak with the caller.
To answer a call ringing another Ring Group (of which you are not a member):
1. Press TALK.
2. Dial ** and the Ring Group number (e.g., 601).
3. Speak with the caller.
To make an Intercom call to a Ring Group:
1. Press TALK.
2. Dial the Ring Group number (e.g., 601).
3. Wait for your co-worker to answer.
To Transfer your call to a Ring Group:
1. Press Transfer (soft key 3).
2. Dial the Ring Group number (e.g., 601).
3. Wait for a Ring Group member to answer or press END to Transfer the call unscreened.
Hold
Hold is enabled by default.
To place an outside call on System Hold:
1. Press Hold (soft key 1).
2. Press End to hang up.
DSX | ML440 Wireless IP DECT Quick Reference Guide | 25
XML to PDF by RenderX XEP XSL-FO Formatter, visit us at http://www.renderx.com/
The line key flashes to indicate that it is on Hold. The line will recall if you leave it on Hold too long.a)
To place an outside call on Exclusive Hold:
1. Press Hold (soft key 1) twice .
2. Press End to hang up.
a) For you, the line key flashes while on Hold or recalling.b) For your co-workers, the line key is on (red) while on Exclusive Hold and flashes slowly (red) while recalling.
To pick up an outside call you placed on Hold:
1. Press TALK.
2. Press the flashing line key.
To pick up an outside call on System Hold at a co-worker’s extension:
1. Press TALK.
2. Dial *4.
3. Dial the number of the line that is on Hold.
a) For example, dial 01 for line 1.b) You must know the number of the line that is on Hold.
To place an Intercom call Hold:
1. Press Hold (soft key 1).
2. Press End to hang up.
a) If you have a specially programmed Intercom Feature Key, the key flashes to indicate that it is on Hold. Thecall will recall if you leave it on Hold too long.
To pick up an Intercom call you placed on Hold:
1. Press TALK.
2. You connect to the co-worker you placed on Hold.
Home Automation Integration
Home Automation Integration disabled by default.
Automation Feature Keys not assigned by default.
To directly control a Home Automation Integration device:
1. Press the Automation Feature Key.
2. The key lights when the control is active.
Hotline
There are no Hotline Feature Keys assigned by default.
26 | DSX | ML440 Wireless IP DECT Quick Reference Guide
XML to PDF by RenderX XEP XSL-FO Formatter, visit us at http://www.renderx.com/
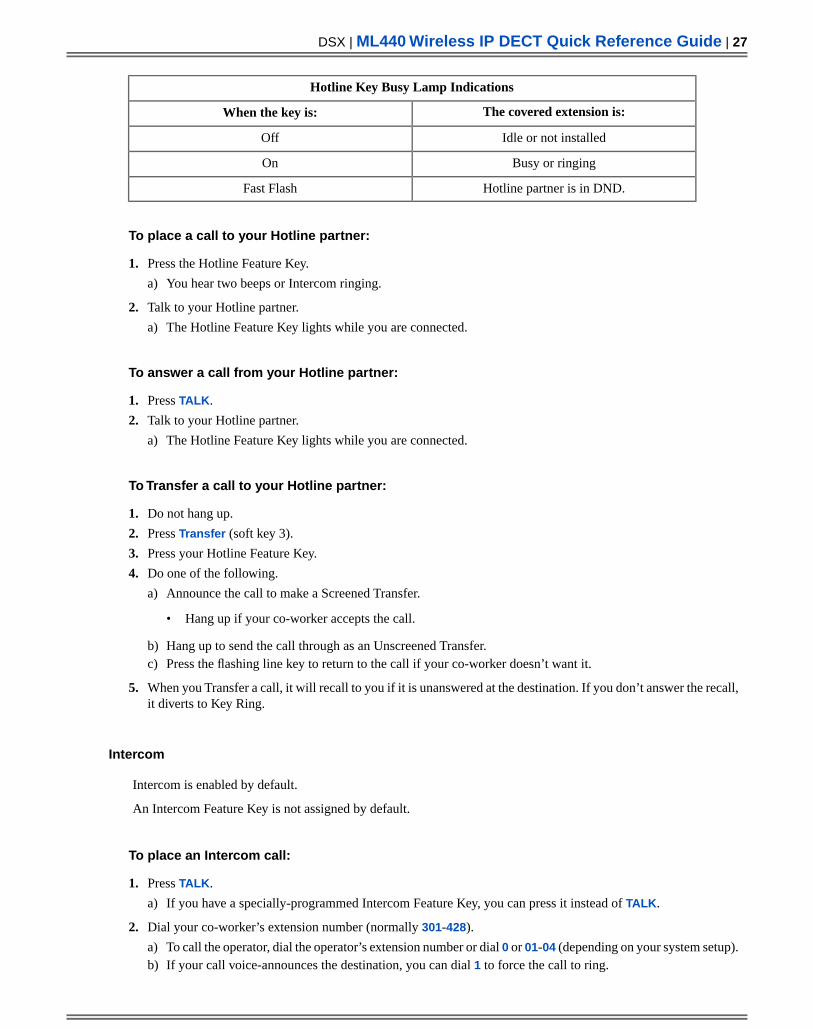
Hotline Key Busy Lamp Indications
The covered extension is:When the key is:
Idle or not installedOff
Busy or ringingOn
Hotline partner is in DND.Fast Flash
To place a call to your Hotline partner:
1. Press the Hotline Feature Key.
a) You hear two beeps or Intercom ringing.
2. Talk to your Hotline partner.
a) The Hotline Feature Key lights while you are connected.
To answer a call from your Hotline partner:
1. Press TALK.
2. Talk to your Hotline partner.
a) The Hotline Feature Key lights while you are connected.
To Transfer a call to your Hotline partner:
1. Do not hang up.
2. Press Transfer (soft key 3).
3. Press your Hotline Feature Key.
4. Do one of the following.
a) Announce the call to make a Screened Transfer.
• Hang up if your co-worker accepts the call.
b) Hang up to send the call through as an Unscreened Transfer.c) Press the flashing line key to return to the call if your co-worker doesn’t want it.
5. When you Transfer a call, it will recall to you if it is unanswered at the destination. If you don’t answer the recall,it diverts to Key Ring.
Intercom
Intercom is enabled by default.
An Intercom Feature Key is not assigned by default.
To place an Intercom call:
1. Press TALK.
a) If you have a specially-programmed Intercom Feature Key, you can press it instead of TALK.
2. Dial your co-worker’s extension number (normally 301-428).
a) To call the operator, dial the operator’s extension number or dial 0 or 01-04 (depending on your system setup).b) If your call voice-announces the destination, you can dial 1 to force the call to ring.
DSX | ML440 Wireless IP DECT Quick Reference Guide | 27
XML to PDF by RenderX XEP XSL-FO Formatter, visit us at http://www.renderx.com/
c) To review, redial, or return an Intercom call, press the CALLS key (soft key 3).
To answer an Intercom call:
1. When you hear ringing, press TALK.
a) If you have a specially-programmed Intercom Feature Key, you can press it instead of TALK.
2. Talk to your co-worker.
a) To review, redial, or return an Intercom call, press the CALLS key (soft key 3).
Intercom Queue Key
An Intercom Queue Feature Key is not assigned by default.
To answer a call waiting on your Intercom Queue Key:
1. Press the flashing Intercom Queue Feature Key.
a) You answer the waiting call.
2. Press the key repeatedly to answer additional waiting calls.
Last Number Redial
Last Number Redial is enabled in the ML440 handset by default.
To redial a call:
1. While idle, press Calls (idle soft key 3).
2. Scroll down to the number you want to redial.
a) If you are redialing an Intercom number, press Call (soft key 1). Do not go to steps 3-5.
3. Press more (soft key 3) and then scroll down to Edit before call.
4. Press Select to go into the number edit mode.
5. Scroll to the first character of the number, enter the line access code (e.g., 9), and press Call (soft key 1).
a) The stored number will dial.
Line Queuing / Line Callback
Line Queuing and Line Callback are disabled by default.
To queue or leave a callback for a busy line:
1. Press TALK.
28 | DSX | ML440 Wireless IP DECT Quick Reference Guide
XML to PDF by RenderX XEP XSL-FO Formatter, visit us at http://www.renderx.com/
2. Do one of the following
a) Press the line key for the busy line.b) Dial the line’s extension number (e.g., 101 for line 1).
3. When you hear busy tone, dial 2 and do one of the following:
a) Wait on the line without hanging up for Line Queuing.b) Hang up for Line Callback.
4. When the line becomes free, do one of the following:
a) For Line Queuing, listen for outside dial tone and then place your call.b) For Line Callback, you hear the Line Callback ring. If you answer the ring, wait for outside dial tone and
then place your call.
Line Schedules
Line Schedules are disabled by default.
There are no Skip Ahead or Manual Activation Feature keys assigned by default.
To activate a Manual Schedule:
1. Press the Manual Activation Feature Key.
a) The key is on when the assigned schedule has been manually activated.
2. When the programmed start time for the manually activated schedule occurs, the schedule will run.
To skip ahead to the next schedule entry:
1. Press the Skip Ahead Feature Key for the schedule.
a) The key is on when the Skip Ahead is activated.
2. The Skip Ahead Feature Key goes out when the schedule to which the system has skipped becomes current.
Meet Me Conference
Meet Me Conference is enabled by default.
To set up a Meet-Me Conference:
1. Page your co-workers and announce the Meet-Me Conference location code (#11 or #12).
2. Press Transfer (soft key 3).
3. Dial the announced Meet-Me Conference code.
a) Wait for your co-workers to join. You and your co-workers must join the conference within the Meet-MeConference time.
To join a Meet-Me Conference:
1. When you hear the Page announcing the Meet-Me Conference, press TALK.
2. Dial the announced Meet-Me Conference location code (#11 or #12).
a) You must join the conference within the Meet-Me Conference time.
DSX | ML440 Wireless IP DECT Quick Reference Guide | 29
XML to PDF by RenderX XEP XSL-FO Formatter, visit us at http://www.renderx.com/
Message Waiting
Message Waiting is available by default, but only in systems without voice mail installed.
To leave a Message Waiting:
1. Place Intercom call to co-worker.
2. Dial 8, then press END to hang up.
a) The extension you call can be unanswered or busy.
To answer a Message Waiting:
1. Your ML440 Status LED flashes slowly when you have a Message Waiting.
a) You should also see the Missed Call icon at the top of the telephone display.
2. Press TALK and dial *8.
a) The system cancels the Message Waiting if the extension you call is busy, doesn’t answer, or is Do NotDisturb.
b) If the extension you call doesn’t answer, dial *8 to automatically leave them a Message Waiting.c) If your Status LED continues to flash, you have additional messages waiting.
Microphone Mute
Microphone Mute is available in the ML440 handset by default.
To mute your handset’s microphone:
1. While on a handset or speakerphone call, press MUTE on the side of your handset.
2. The Mute icon at the top of the handset display indicates that the microphone is muted.
a) To cancel Microphone Mute, press MUTE again.b) Microphone Mute also cancels when you press END to hang up.
Monitor / Silent Monitor
Monitor / Silent Monitor is disabled by default.
To Monitor a call:
1. Place an Intercom call to the busy extension.
a) Listen for busy or busy/ring tone.b) With IntraMail installed, you will hear a voice prompt first.
2. Dial 6.
3. Listen to the conversation in progress.
a) Caution: Monitor provides no warning tones prior to intrusion. Monitor may be interpreted as an invasionof privacy.
30 | DSX | ML440 Wireless IP DECT Quick Reference Guide
XML to PDF by RenderX XEP XSL-FO Formatter, visit us at http://www.renderx.com/

Night Service / Night Ring
Night Service is disabled by default.
You may be able to answer a call ringing the Paging system.
To activate or deactivate Night Service:
1. Press a specially-programmed Night Feature Key on your handset.
a) Your display shows the system's night mode status.b) Your Night Feature Key is off when the system is in the day mode; on when the system is in the night mode.
2. Press END to hang up.
To answer a call you hear ringing over the Paging system:
1. Press TALK.
2. Dial *0.
a) If this doesn't answer the call, your system is using a Paging system that doesn't provide this feature.
3. Talk to the caller.
Paging
The capability to make a Page is enabled by default.
There are no Page Feature Keys assigned by default.
The ML440 handset cannot receive Paging announcements.
To make an Internal Paging Announcement:
1. Press TALK.
2. Dial *1.
3. Dial the Page Zone number (1-7 or 0 for All Call)
a) You can now place a new call on the line.
To talk to the Page initiator (if you have a Page Feature Key):
1. Press the flashing Page Feature Key.
2. The page announcement stops and you connect over the Intercom to the Page initiator.
a) This feature does not apply to the IntraMail Park and Page feature.
Park
Park is available by default.
There are no Park Feature Keys assigned by default.
DSX | ML440 Wireless IP DECT Quick Reference Guide | 31
XML to PDF by RenderX XEP XSL-FO Formatter, visit us at http://www.renderx.com/
To Park your current outside call in a System Park Orbit:
1. Do one of the following:
a) Press Transfer (soft key 3), dial *, and then dial the System Park Orbit (60-69).b) Press a Park Feature Key.
The Park Feature Key flashes while the call is parked.
2. Press END to hang up.
To retrieve a call parked in a System Park Orbit:
1. Press TALK.
2. Do one of the following:
a) Dial * then the announced System Park Orbit (60-69).b) Press a Park Feature Key.
3. Talk to the outside caller.
To Park your current outside call at a co-worker's extension (Personal Park):
1. Press Transfer (soft key 3).
2. Dial ** then the number of the extension at which you want to Park the call.
3. Press END to hang up.
a) The line key flashes while the call is parked.
To retrieve a call parked at a co-worker's extension (Personal Park):
1. Press TALK.
2. Dial ** then the number of the extension at which the call is parked.
3. Talk to the outside caller.
Prime Line Preference
Prime Line Preference is set to Intercom by default.
To place a call on your Prime Line:
1. Press TALK.
2. Dial the call normally.
a) To bypass your Prime Line, press another line key before pressing TALK.b) If you don't have Intercom Prime Line Preference enabled, be sure your handset is programmed with an
Intercom Feature Key. Otherwise, you won't be able to place Intercom calls.
Privacy Release Groups
Privacy Release Groups is disabled by default.
32 | DSX | ML440 Wireless IP DECT Quick Reference Guide
XML to PDF by RenderX XEP XSL-FO Formatter, visit us at http://www.renderx.com/
To join an outside call with a member of your Privacy Release Group:
1. Press the busy line key.
a) Id your co-worker has a keyset, their line key will be orange.
2. Your display shows Conference Call and you join the conversation on the line.
To prevent a member of your Privacy Release Group from joining your call:
1. Place or answer an outside call on a line key.
2. Press the line key.
a) If your co-worker has a keyset, their line key changes from orange to red.
3. Press the line key again to allow a co-worker to join in.
a) If your co-worker has a keyset, their line key changes from red to orange.
Removing Lines and Extensions From Service
Removing Lines and Extensions From Service is disabled by default.
To remove a line or extension from service:
1. Press TALK.
2. Dial #40.
3. Do one of the following:
a) Dial the number of the extension you want to remove from service (e.g., 302).b) Dial the extension number of the line you want to remove from service (e.g., 101 for line 1).
4. Dial 6 to remove the line or extension from service.
a) At the extension removed from service, you see Out of Service.b) The line key for a line removed from service will be on (red).
5. Press END to hang up.
To return a line or extension to service:
1. Press TALK.
2. Dial #40.
3. Do one of the following:
a) Dial the number of the extension you want to remove from service (e.g., 302).b) Dial the extension number of the line you want to remove from service (e.g., 101 for line 1).
4. Dial 4 to return the line or extension to service.
5. Press END to hang up.
Ringdown Extension
Ringdown Extension is disabled by default.
Ringdown Extension requires that Prime Line Preference be None.
DSX | ML440 Wireless IP DECT Quick Reference Guide | 33
XML to PDF by RenderX XEP XSL-FO Formatter, visit us at http://www.renderx.com/
To use Ringdown Extension:
1. Press TALK.
a) To bypass the ringdown, press a Feature Key first.
2. The handset automatically connects to the programmed ringdown destination.
Ringing Line Preference
Ringing Line Preference is enabled by default.
To use Ringing Line Preference:
1. Press TALK.
2. You automatically answer the ringing call.
a) If Ringing Line Preference is disabled and an outside call is ringing, pressing TALK will get Intercom dialtone.
To bypass Ringing Line Preference:
1. Do not press TALK.
2. Press a Feature Key (e.g., line, loop, or Intercom).
3. You will not connect to the ringing call.
Save Number Dialed
Save Number Dialed is enabled by default.
The ML440 handset does not have any Save Number Dialed Feature Keys assigned.
To save the outside number you just dialed (up to 20 digits):
1. Press your Save Number Dialed Feature Key.
2. The number is saved in memory.
To redial a saved number:
1. (Optional) Press a line key to preselect a line for the call.
2. Press your Save Number Dialed Feature Key.
a) If you hear busy, you may be able to dial 2 and wait for the line to become free.
Speed Dial
There are no Speed Dial Numbers stored by default.
The ML440 handset does not have any Personal or System Speed Dial Feature Keys assigned.
Speed Dial numbers cannot be stored from the ML440 handset.
34 | DSX | ML440 Wireless IP DECT Quick Reference Guide
XML to PDF by RenderX XEP XSL-FO Formatter, visit us at http://www.renderx.com/
To call a System Speed Dial number:
1. Press TALK and dial #.
2. Dial the System Speed Dial entry number (e.g., 201).
a) You can optionally press a System Speed Dial Feature Key and skip steps 1 and 2.
To call a Personal Speed Dial number:
1. Press TALK and dial #.
2. Dial the Personal Speed Dial entry number (701-720).
a) You can optionally press a Personal Speed Dial Feature Key and skip steps 1 and 2.
Some other Speed Dial options:
1. To chain (link) stored numbers, wait for the first number to dial out and then press a Speed Dial Feature Key forthe second number.You cannot chain (link) Intercom numbers.
2. If the programmed route is busy, you can press an idle line key to reroute the call.
Tandem Calls / Unsupervised Conference
Tandem Calls are disabled by default.
To set up a Tandem Call:
1. Place or answer an outside call.
2. Press the Conf. soft key (soft key 2).
a) Your hear Intercom dial tone.b) Your caller hears Music on Hold (if installed) while they wait for you to set up the Conference.
3. Place or answer another outside call.
a) You can optionally retrieve a call from Park Orbit.
4. Press Conf. (soft key 2) to set up the Conference.
a) If you cannot add additional parties to your Conference, you have exceeded the system’s Conference limit.
5. Press END to hang up.
a) The line/loop keys for the outside lines stay on.b) If the outside parties immediately disconnect, the lines you selected or your extension does not have Tandem
Call capability.
To disconnect a Tandem Call (using Forced Line Disconnect):
1. Do one of the following:
a) Press the line key for one of the busy lines.b) Press TALK and dial the line’s Direct Line Access code (e.g., 101 for line 1).
2. Dial # to disconnect the Tandem Call.
3. Press END to hang up.
DSX | ML440 Wireless IP DECT Quick Reference Guide | 35
XML to PDF by RenderX XEP XSL-FO Formatter, visit us at http://www.renderx.com/
To Barge In on a Tandem Call:
1. Do one of the following:
a) Press the line key for one of the busy lines.b) Press TALK and dial the line’s Direct Line Access code (e.g., 101 for line 1).
2. Dial 4.
3. Talk to the callers in Conference.
To place a Tandem Call on Hold (after Barging In):
1. Press Hold (soft key 1).
a) While on Hold, the tandem callers can continue talking with each other.
2. To rejoin the Tandem Call you have placed on Hold, press one of the line keys involved in the Tandem Call.
To set up a Line-to-Line Transfer:
1. Place or answer an outside call.
a) This is a type of Tandem Call in which you never have to join in with your outside callers.
2. Press Transfer (soft key 3).
3. Place or answer another outside call.
4. Press END to hang up.
a) The two outside callers join together, just line a normal Tandem Call.b) The line/loop keys for the outside lines stay on.c) If the outside parties immediately disconnect, the lines you selected or your extension does not have Tandem
Call capability.
Transfer
Transfer is enabled by default.
To Transfer your call:
1. Do not hang up.
2. Press Transfer (soft key 3).
3. Do one of the following
a) Dial your co-worker's extension.b) Press a Call Coverage or Hotline Feature Key. (Also see Hotline Automatic Transfer below.)c) Dial a Ring Group or UCD Group master number.
4. Do one of the following:
a) Announce the call to make a Screened Transfer, then press END to hang up.b) Press the flashing line key to return to the call if your co-worker doesn't want it.c) Press END to hang up and send the call through unscreened.d) Dial 8 to Transfer the call to your co-worker's mailbox.
5. If unanswered, your call will recall to you. If you don't answer the recall, the call normally diverts to Key Ring.
36 | DSX | ML440 Wireless IP DECT Quick Reference Guide
XML to PDF by RenderX XEP XSL-FO Formatter, visit us at http://www.renderx.com/
To Transfer your call directly to a co-worker's mailbox:
1. Do not hang up.
2. Press Transfer (soft key 3).
3. Press your own Message Center Feature Key.
4. Dial your co-worker's extension number.
5. Press END to hang up.
To Transfer your call using Hotline Automatic Transfer:
1. Do not hang up.
2. Press a Hotline Feature Key.
a) If you don't have Hotline Automatic Transfer enabled for your extension, hanging up in this step disconnectsthe call.
3. Do one of the following:
a) Announce the call to make a Screened Transfer, then press END to hang up.b) Press the flashing line key to return to the call if your co-worker doesn't want it.c) Press END to hang up and send the call through unscreened.d) Press your own Message Center Feature Key to Transfer the call to your co-worker's mailbox.
4. If you haven't already, press END to hang up.
To Transfer a call to your co-worker’s speakerphone using Handsfree Transfer:
1. While on an outside call, do one of the following:
a) Press Transfer (soft key 3) and dial a co-worker's extension number.b) Press Hotline Feature Key for your co-worker
2. Listen for two beeps.
a) If you hear ringing instead of two beeps, you cannot use Handsfree Transfer.
3. Press your Flash Feature Key to send the call directly to your co-worker's speakerphone.
4. Press END to hang up.
Voice Mail (IntraMail)
Voice Mail is disabled by default.
The ML440 handset does not have a Message Center Feature Key assigned by default.
The Status LED on the top left of the ML440 handset flashes when you have new messages.
The ML440 handset does not have a Voice Mail Feature Key assigned by default.
To call your mailbox:
1. Do one of the following:
a) Press TALK and dial *8.b) Press your own Message Center Feature Key.
2. If requested, enter your Security Code.
a) When you log into your mailbox, your display shows you the number of new and saved messages.
DSX | ML440 Wireless IP DECT Quick Reference Guide | 37
XML to PDF by RenderX XEP XSL-FO Formatter, visit us at http://www.renderx.com/
b) You may have a Group Mailbox shared among you and some of your co-workers. Group members accessthe same mailbox and process the same messages when they log in.
To leave a message in the mailbox of an unanswered extension:
1. Call your co-worker's extension.
a) The extension can be unanswered, busy, or in Do Not Disturb.b) The extension can even be a Virtual Extension: an active mailbox for an extension that is not physically
installed.
2. Do one of the following:
a) Dial 8.b) Press your own Message Center Feature Key.
3. When prompted, leave your message and press END to hang up.
To activate or cancel Call Forwarding to your mailbox:
Use the system's built-in Phone Manager.
There are no ML440 dial codes for this option.
To record your active call in your Mailbox:
1. While on a call, press your Voice Mail Record Feature Key.
a) You can have Voice Mail Record Feature Keys for your own mailbox as well as mailboxes for co-workers.b) Your Voice Mail Record Feature Key lights while the system calls your mailbox. Once recording begins, the
key flashes fast and you hear the voice prompt, “Recording.”
2. To stop the recording, press your Voice Mail Record Feature Key again.
To call the Message Center:
1. Press the Message Center Feature Key
a) The Message Center Feature Key flashes when there are new messages in the Message Center Mailbox.b) You can have a Message Center Feature Key for your own mailbox, if desired. It behaves much like a keyset
V-MAIL key.
2. If prompted, enter your Security Code.
To Transfer a call to the Message Center:
1. Do not hang up.
2. Press the Message Center Feature Key.
3. Press END to hang up.
a) Your caller will be prompted to leave a message in the Message Center mailbox.b) If you press your own Message Center Feature Key, your caller routes to the Automated Attendant.
Voice Over
The capability to send a voice over is disabled at the destination extension by default.
The ML440 handset cannot receive a Voice Over from a co-worker.
38 | DSX | ML440 Wireless IP DECT Quick Reference Guide
XML to PDF by RenderX XEP XSL-FO Formatter, visit us at http://www.renderx.com/
To initiate a Voice Over to a busy co-worker:
1. Listen for busy/ring tone.
a) If you don’t hear busy ring, you cannot Voice Over.b) If your system has IntraMail, you will hear a voice prompt first.
2. Dial 9 and then speak to your busy co-worker.
a) Your co-worker at a keyset can press MUTE to respond to your Voice Over.
DSX | ML440 Wireless IP DECT Quick Reference Guide | 39
XML to PDF by RenderX XEP XSL-FO Formatter, visit us at http://www.renderx.com/
AP20 Programming Screens
Table 1: Home/Status
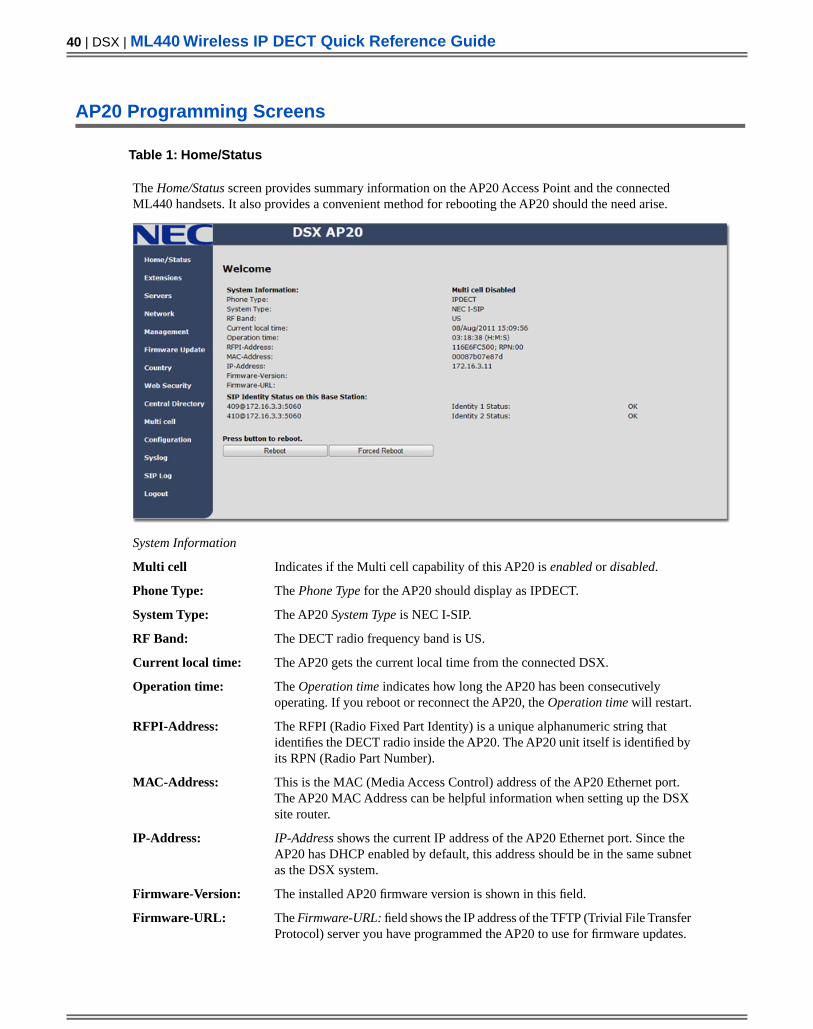
The Home/Status screen provides summary information on the AP20 Access Point and the connectedML440 handsets. It also provides a convenient method for rebooting the AP20 should the need arise.
System Information
Indicates if the Multi cell capability of this AP20 is enabled or disabled.Multi cell
The Phone Type for the AP20 should display as IPDECT.Phone Type:
The AP20 System Type is NEC I-SIP.System Type:
The DECT radio frequency band is US.RF Band:
The AP20 gets the current local time from the connected DSX.Current local time:
The Operation time indicates how long the AP20 has been consecutivelyoperating. If you reboot or reconnect the AP20, the Operation time will restart.
Operation time:
The RFPI (Radio Fixed Part Identity) is a unique alphanumeric string thatidentifies the DECT radio inside the AP20. The AP20 unit itself is identified byits RPN (Radio Part Number).
RFPI-Address:
This is the MAC (Media Access Control) address of the AP20 Ethernet port.The AP20 MAC Address can be helpful information when setting up the DSXsite router.
MAC-Address:
IP-Address shows the current IP address of the AP20 Ethernet port. Since theAP20 has DHCP enabled by default, this address should be in the same subnetas the DSX system.
IP-Address:
The installed AP20 firmware version is shown in this field.Firmware-Version:
The Firmware-URL: field shows the IP address of the TFTP (Trivial File TransferProtocol) server you have programmed the AP20 to use for firmware updates.
Firmware-URL:
40 | DSX | ML440 Wireless IP DECT Quick Reference Guide
XML to PDF by RenderX XEP XSL-FO Formatter, visit us at http://www.renderx.com/
This field shows the SIP details and status of each registered ML440 handset.Normally, each handset should be registered to the DSX system LAN IP addresson port 5060.
SIP Identity Status on thisBase Station:
Table 2: Extensions
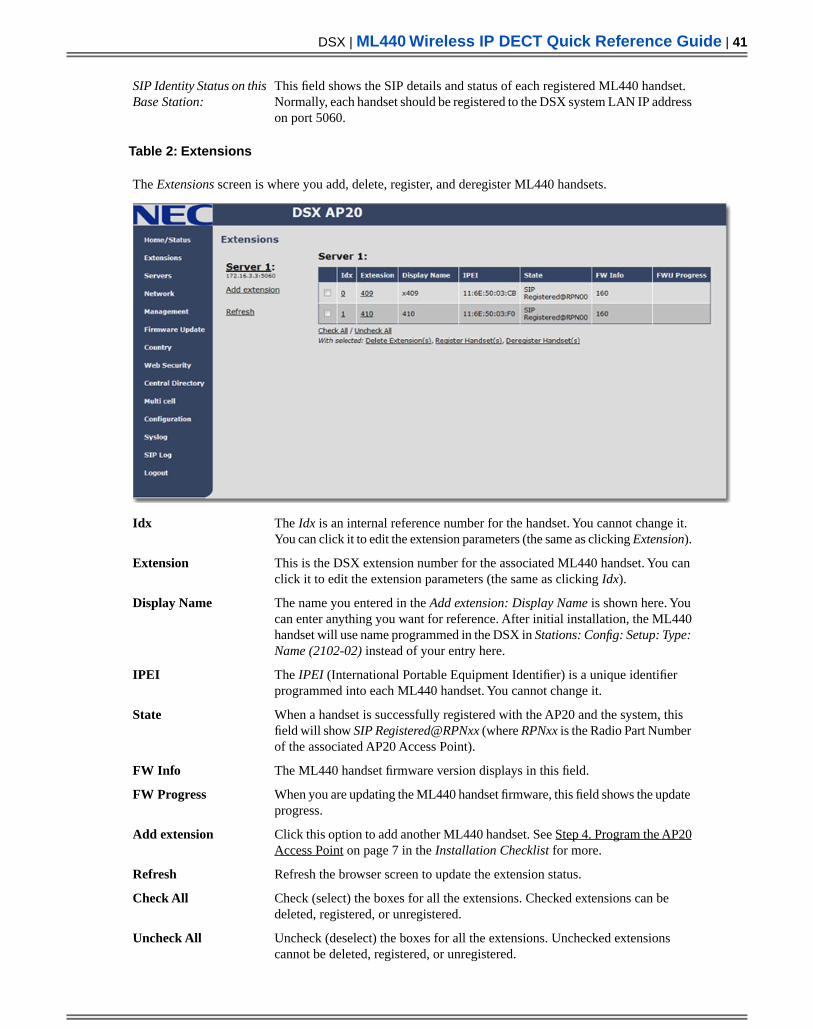
The Extensions screen is where you add, delete, register, and deregister ML440 handsets.
The Idx is an internal reference number for the handset. You cannot change it.You can click it to edit the extension parameters (the same as clicking Extension).
Idx
This is the DSX extension number for the associated ML440 handset. You canclick it to edit the extension parameters (the same as clicking Idx).
Extension
The name you entered in the Add extension: Display Name is shown here. Youcan enter anything you want for reference. After initial installation, the ML440
Display Name
handset will use name programmed in the DSX in Stations: Config: Setup: Type:Name (2102-02) instead of your entry here.
The IPEI (International Portable Equipment Identifier) is a unique identifierprogrammed into each ML440 handset. You cannot change it.
IPEI
When a handset is successfully registered with the AP20 and the system, thisfield will show SIP Registered@RPNxx (where RPNxx is the Radio Part Numberof the associated AP20 Access Point).
State
The ML440 handset firmware version displays in this field.FW Info
When you are updating the ML440 handset firmware, this field shows the updateprogress.
FW Progress
Click this option to add another ML440 handset. See Step 4. Program the AP20Access Point on page 7 in the Installation Checklist for more.
Add extension
Refresh the browser screen to update the extension status.Refresh
Check (select) the boxes for all the extensions. Checked extensions can bedeleted, registered, or unregistered.
Check All
Uncheck (deselect) the boxes for all the extensions. Unchecked extensionscannot be deleted, registered, or unregistered.
Uncheck All
DSX | ML440 Wireless IP DECT Quick Reference Guide | 41
XML to PDF by RenderX XEP XSL-FO Formatter, visit us at http://www.renderx.com/
Unregister and delete the selected extension from the AP20.Delete Extension(s)
Enable the registration mode in the AP20 for the selected handsets. Theregistration mode stays active for about 4 minutes so you have time to start the
Register Handset(s)
registration process in the ML440 handset. See Step 6. Register the ML440handsets with the AP20 and the DSX . on page 8 in the Installation Checklistfor more.
Deregister the selected handsets. This does not delete the extensions from theAP20 - it only deregisters (disables) them.
Deregister Handset(s)
Table 3: Servers
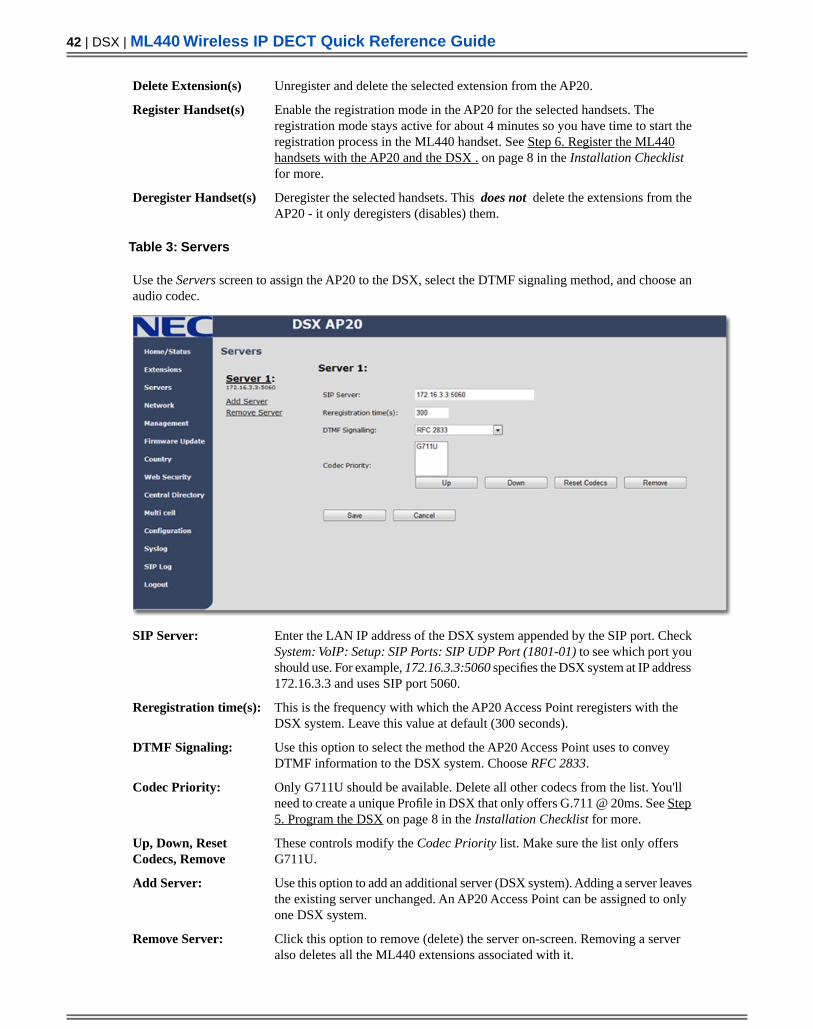
Use the Servers screen to assign the AP20 to the DSX, select the DTMF signaling method, and choose anaudio codec.
Enter the LAN IP address of the DSX system appended by the SIP port. CheckSystem: VoIP: Setup: SIP Ports: SIP UDP Port (1801-01) to see which port you
SIP Server:
should use. For example, 172.16.3.3:5060 specifies the DSX system at IP address172.16.3.3 and uses SIP port 5060.
This is the frequency with which the AP20 Access Point reregisters with theDSX system. Leave this value at default (300 seconds).
Reregistration time(s):
Use this option to select the method the AP20 Access Point uses to conveyDTMF information to the DSX system. Choose RFC 2833.
DTMF Signaling:
Only G711U should be available. Delete all other codecs from the list. You'llneed to create a unique Profile in DSX that only offers G.711 @ 20ms. See Step5. Program the DSX on page 8 in the Installation Checklist for more.
Codec Priority:
These controls modify the Codec Priority list. Make sure the list only offersG711U.
Up, Down, ResetCodecs, Remove
Use this option to add an additional server (DSX system). Adding a server leavesthe existing server unchanged. An AP20 Access Point can be assigned to onlyone DSX system.
Add Server:
Click this option to remove (delete) the server on-screen. Removing a serveralso deletes all the ML440 extensions associated with it.
Remove Server:
42 | DSX | ML440 Wireless IP DECT Quick Reference Guide
XML to PDF by RenderX XEP XSL-FO Formatter, visit us at http://www.renderx.com/
Save the on-screen server settings.Save:
Cancel any new entries you have made to the on-screen server settings. Thesettings will return to their previously saved values.
Cancel:
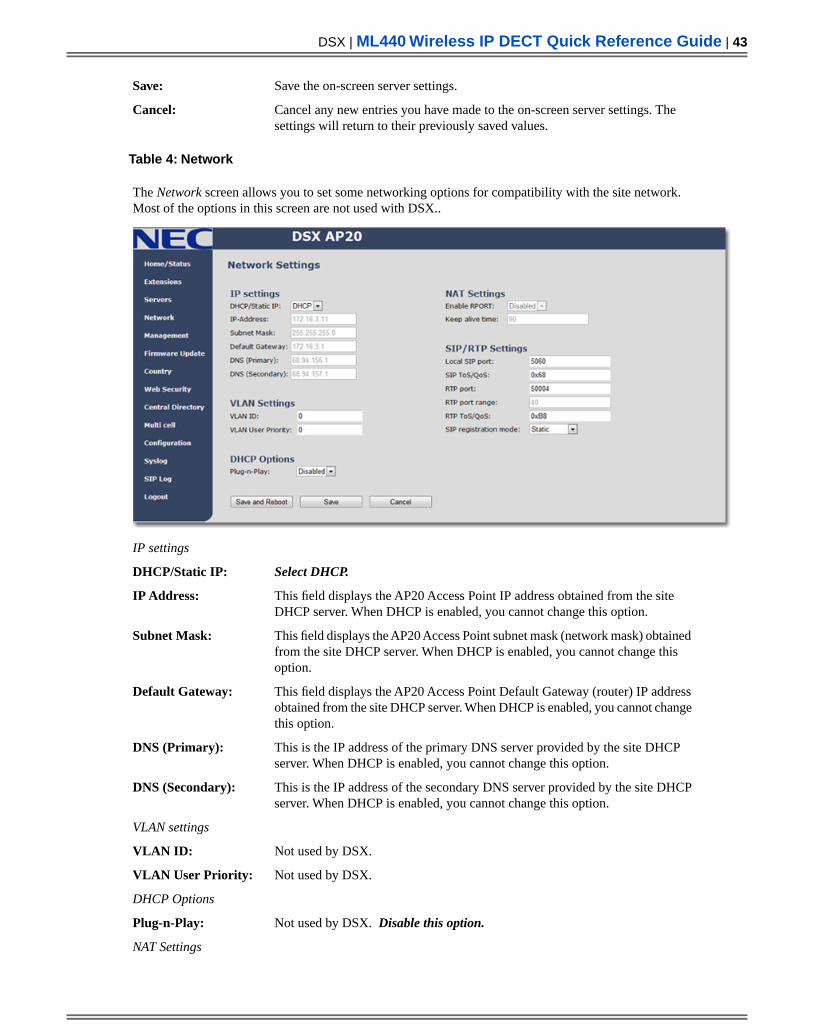
Table 4: Network
The Network screen allows you to set some networking options for compatibility with the site network.Most of the options in this screen are not used with DSX..
IP settings
Select DHCP.DHCP/Static IP:
This field displays the AP20 Access Point IP address obtained from the siteDHCP server. When DHCP is enabled, you cannot change this option.
IP Address:
This field displays the AP20 Access Point subnet mask (network mask) obtainedfrom the site DHCP server. When DHCP is enabled, you cannot change thisoption.
Subnet Mask:
This field displays the AP20 Access Point Default Gateway (router) IP addressobtained from the site DHCP server. When DHCP is enabled, you cannot changethis option.
Default Gateway:
This is the IP address of the primary DNS server provided by the site DHCPserver. When DHCP is enabled, you cannot change this option.
DNS (Primary):
This is the IP address of the secondary DNS server provided by the site DHCPserver. When DHCP is enabled, you cannot change this option.
DNS (Secondary):
VLAN settings
Not used by DSX.VLAN ID:
Not used by DSX.VLAN User Priority:
DHCP Options
Not used by DSX. Disable this option.Plug-n-Play:
NAT Settings
DSX | ML440 Wireless IP DECT Quick Reference Guide | 43
XML to PDF by RenderX XEP XSL-FO Formatter, visit us at http://www.renderx.com/
This option is not yet available.Enable RPORT:
This option is not yet available.Keep alive time:
SIP/RTP Settings
Leave this setting at default (5060).Local SIP port:
Not used by DSX.SIP ToS/QoS::
Leave this setting at default (50004).RTP port:
This option is not yet available.RTP port range:
Not used by DSX.RTP ToS/QoS:
Set to Static. Plug-n-Play is not applicable to DSX.SIP registration mode:
Save the entries on this page and immediately reboot the AP20 Access Point.With DSX you would not normally have to do this.
Save and Reboot:
Save all the entries on the page.Save:
Cancel any new entries you have made to the on-screen settings. The settingswill return to their previously saved values.
Cancel:
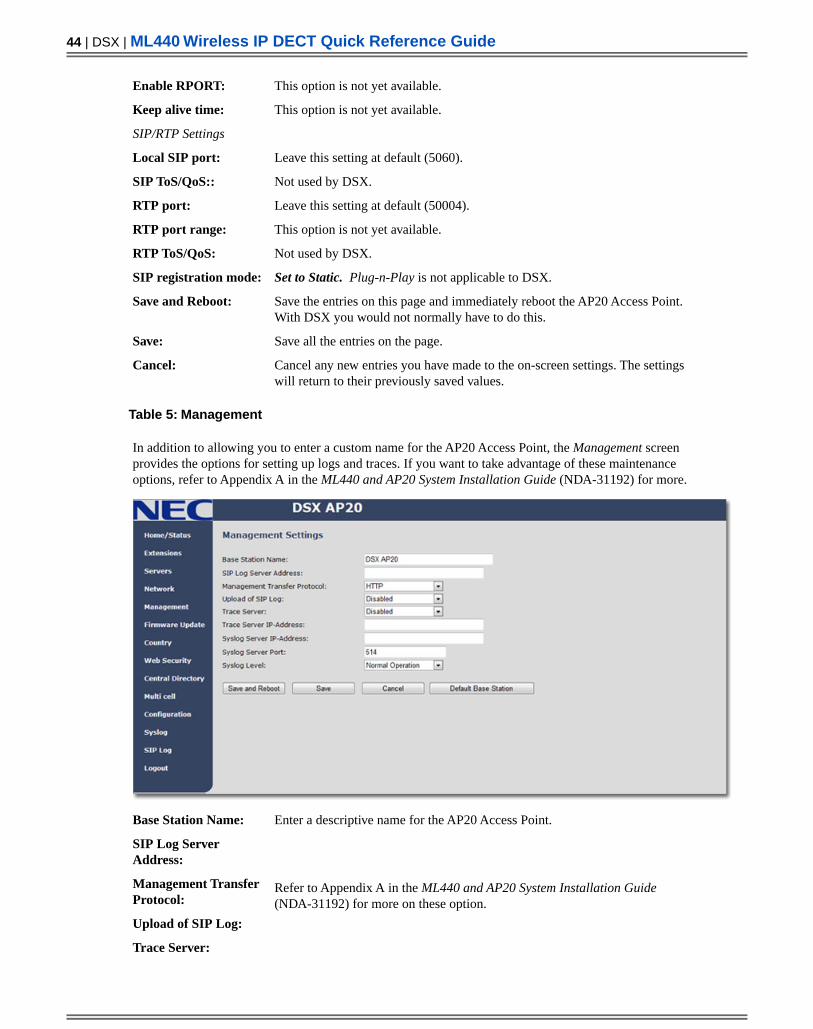
Table 5: Management
In addition to allowing you to enter a custom name for the AP20 Access Point, the Management screenprovides the options for setting up logs and traces. If you want to take advantage of these maintenanceoptions, refer to Appendix A in the ML440 and AP20 System Installation Guide (NDA-31192) for more.
Enter a descriptive name for the AP20 Access Point.Base Station Name:
Refer to Appendix A in the ML440 and AP20 System Installation Guide(NDA-31192) for more on these option.
SIP Log ServerAddress:
Management TransferProtocol:
Upload of SIP Log:
Trace Server:
44 | DSX | ML440 Wireless IP DECT Quick Reference Guide
XML to PDF by RenderX XEP XSL-FO Formatter, visit us at http://www.renderx.com/
Trace ServerIP-Address:
Syslog ServerIP-Address:
Syslog Server Port:
Syslog Level:
Save the entries on this page and immediately reboot the AP20 Access Point.With DSX you would not normally have to do this.
Save and Reboot:
Save all the entries on the page.Save:
Cancel any new entries you have made to the on-screen settings. The settingswill return to their previously saved values.
Cancel:
Clicking this option erases all your custom programming in the AP20 AccessPoint and returns all the options to their factory set default values.
Default Base Station:
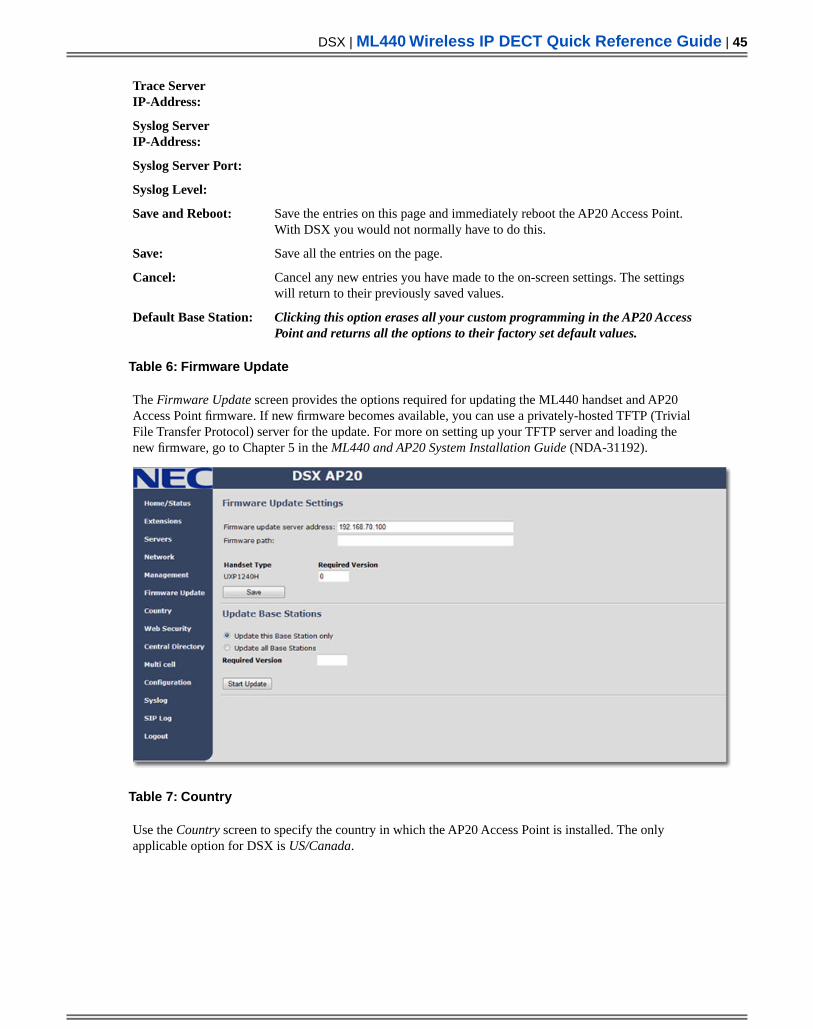
Table 6: Firmware Update
The Firmware Update screen provides the options required for updating the ML440 handset and AP20Access Point firmware. If new firmware becomes available, you can use a privately-hosted TFTP (TrivialFile Transfer Protocol) server for the update. For more on setting up your TFTP server and loading thenew firmware, go to Chapter 5 in the ML440 and AP20 System Installation Guide (NDA-31192).
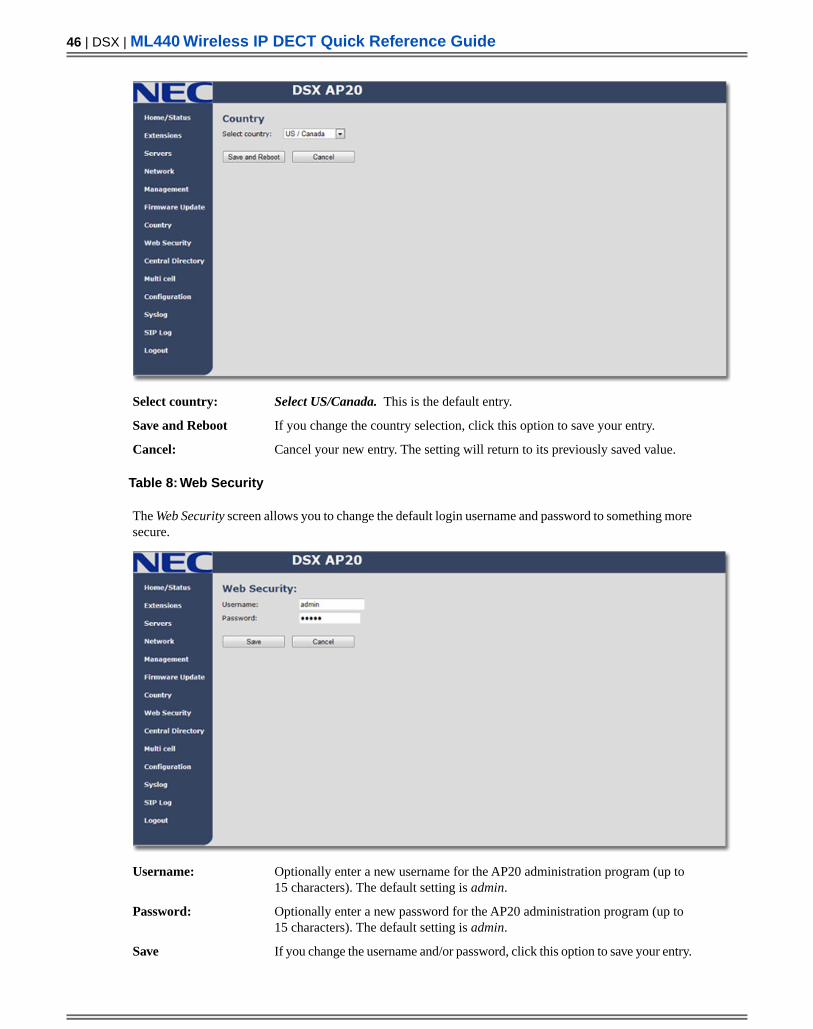
Table 7: Country
Use the Country screen to specify the country in which the AP20 Access Point is installed. The onlyapplicable option for DSX is US/Canada.
DSX | ML440 Wireless IP DECT Quick Reference Guide | 45
XML to PDF by RenderX XEP XSL-FO Formatter, visit us at http://www.renderx.com/
Select US/Canada. This is the default entry.Select country:
If you change the country selection, click this option to save your entry.Save and Reboot
Cancel your new entry. The setting will return to its previously saved value.Cancel:
Table 8: Web Security
The Web Security screen allows you to change the default login username and password to something moresecure.
Optionally enter a new username for the AP20 administration program (up to15 characters). The default setting is admin.
Username:
Optionally enter a new password for the AP20 administration program (up to15 characters). The default setting is admin.
Password:
If you change the username and/or password, click this option to save your entry.Save
46 | DSX | ML440 Wireless IP DECT Quick Reference Guide
XML to PDF by RenderX XEP XSL-FO Formatter, visit us at http://www.renderx.com/
Cancel your new entries. The settings will return to their previously saved values.Cancel:
Table 9: Central Directory
Use the Central Directory screen to upload a specially-prepared csv (comma separated value) file, containingnames and telephone numbers, into the Central Directory. The Central Directory can contain up to 200numbers which are available to all ML440 handsets registered with the AP20 Access Point. Refer toAppendix A in the ML440 and AP20 System Installation Guide (NDA-31192) for more on the CentralDirectory.
Import Central Directory:
Click in the data entry area or click Browse to select the csv file on your PChard drive to load into the Central Directory.
Filename:
Once you have selected the csv file in the Filename option, click this option toload the csv file into the AP20 Access Point.
Load:
Table 10: Multi cell
The Multi cell screen lets you extend the range of your ML440 handsets by setting up a chain of AP20Access Points. For an in-depth discussion of chaining and load balancing, refer to Chapter 4: Multiple BaseConfiguration in the ML440 and AP20 System Installation Guide (NDA-31192)
DSX | ML440 Wireless IP DECT Quick Reference Guide | 47
XML to PDF by RenderX XEP XSL-FO Formatter, visit us at http://www.renderx.com/
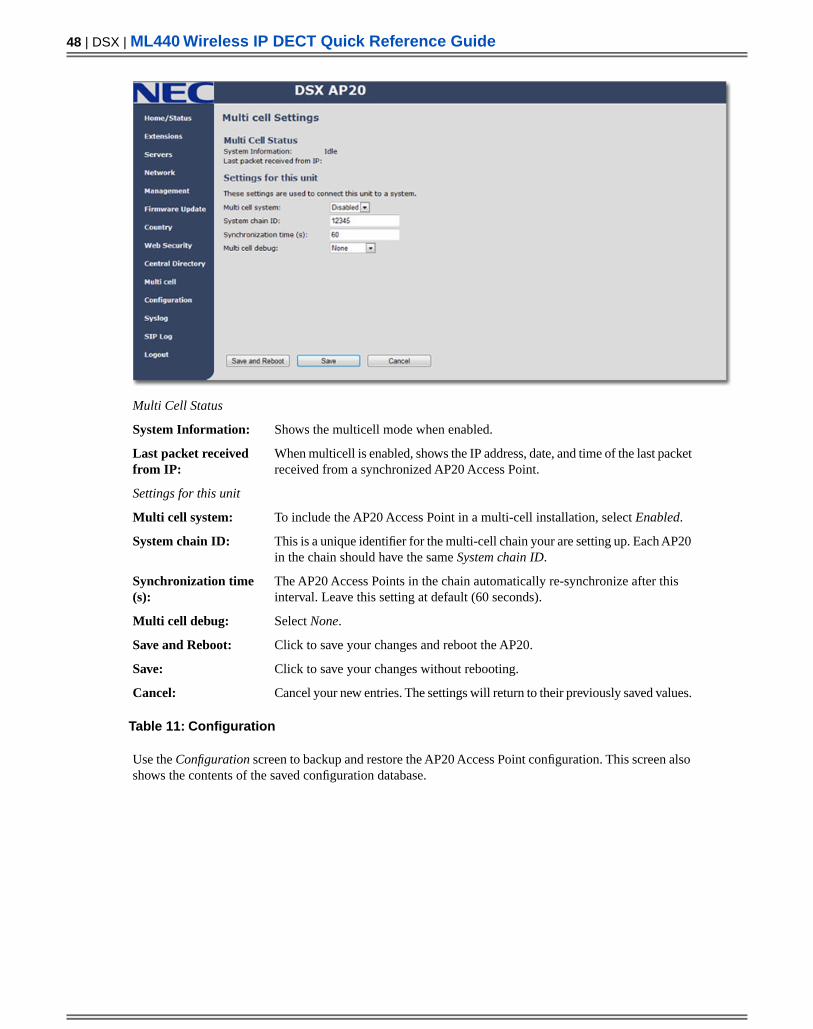
Multi Cell Status
Shows the multicell mode when enabled.System Information:
When multicell is enabled, shows the IP address, date, and time of the last packetreceived from a synchronized AP20 Access Point.
Last packet receivedfrom IP:
Settings for this unit
To include the AP20 Access Point in a multi-cell installation, select Enabled.Multi cell system:
This is a unique identifier for the multi-cell chain your are setting up. Each AP20in the chain should have the same System chain ID.
System chain ID:
The AP20 Access Points in the chain automatically re-synchronize after thisinterval. Leave this setting at default (60 seconds).
Synchronization time(s):
Select None.Multi cell debug:
Click to save your changes and reboot the AP20.Save and Reboot:
Click to save your changes without rebooting.Save:
Cancel your new entries. The settings will return to their previously saved values.Cancel:
Table 11: Configuration
Use the Configuration screen to backup and restore the AP20 Access Point configuration. This screen alsoshows the contents of the saved configuration database.
48 | DSX | ML440 Wireless IP DECT Quick Reference Guide
XML to PDF by RenderX XEP XSL-FO Formatter, visit us at http://www.renderx.com/
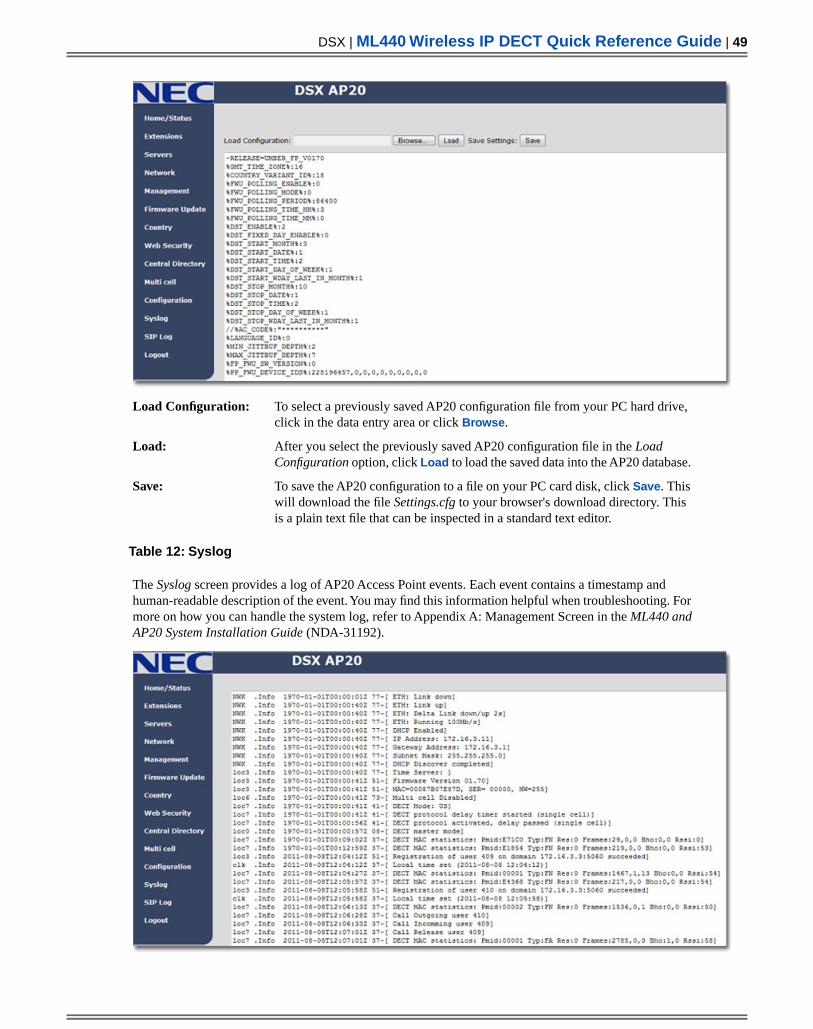
To select a previously saved AP20 configuration file from your PC hard drive,click in the data entry area or click Browse.
Load Configuration:
After you select the previously saved AP20 configuration file in the LoadConfiguration option, click Load to load the saved data into the AP20 database.
Load:
To save the AP20 configuration to a file on your PC card disk, click Save. Thiswill download the file Settings.cfg to your browser's download directory. Thisis a plain text file that can be inspected in a standard text editor.
Save:
Table 12: Syslog
The Syslog screen provides a log of AP20 Access Point events. Each event contains a timestamp andhuman-readable description of the event. You may find this information helpful when troubleshooting. Formore on how you can handle the system log, refer to Appendix A: Management Screen in the ML440 andAP20 System Installation Guide (NDA-31192).
DSX | ML440 Wireless IP DECT Quick Reference Guide | 49
XML to PDF by RenderX XEP XSL-FO Formatter, visit us at http://www.renderx.com/
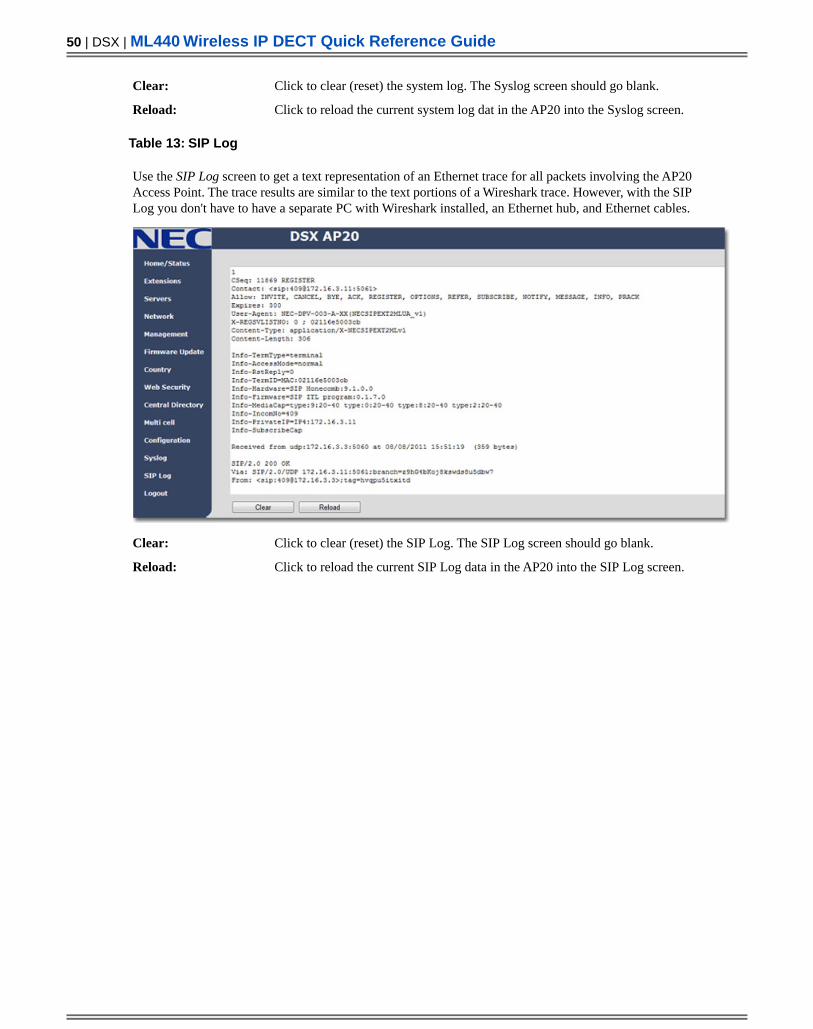
Click to clear (reset) the system log. The Syslog screen should go blank.Clear:
Click to reload the current system log dat in the AP20 into the Syslog screen.Reload:
Table 13: SIP Log
Use the SIP Log screen to get a text representation of an Ethernet trace for all packets involving the AP20Access Point. The trace results are similar to the text portions of a Wireshark trace. However, with the SIPLog you don't have to have a separate PC with Wireshark installed, an Ethernet hub, and Ethernet cables.
Click to clear (reset) the SIP Log. The SIP Log screen should go blank.Clear:
Click to reload the current SIP Log data in the AP20 into the SIP Log screen.Reload:
50 | DSX | ML440 Wireless IP DECT Quick Reference Guide
XML to PDF by RenderX XEP XSL-FO Formatter, visit us at http://www.renderx.com/
ML440 Wireless IP DECT Frequently Asked Questions
Capacity
How many ML440 handsets can I install in DSX?
Up to 32. This is the maximum number of IP extensions allowed in DSX.
How many AP20 Access Points do I need?
The AP20 can register 30 ML440 handsets and handle 10 simultaneous calls. If this meets your needs, you onlyneed one AP20 Access Point.
I have a large building. How to I extend the range of the ML440 handsets?
Set up a Multiple Cell installation. You can have up to 20 AP20 Access Points linked together for seamlesshandover.In a Multiple Cell installation, each AP20 Access Point can support up to 8 simultaneous calls. The total numberof registered handsets per access point (30) is unchanged.
Installation
Are there any special installation requirements?
Yes. You must have 802.3af-2003 PoE (Power over Ethernet) capability at the installation site. The site mustbe equipped with a PoE Ethernet switch or a DSX IPA (IP Phone Adaptor P/N 1091045B) to power the AP20Access Point. The AP20 does not have a separate external power supply and obtains power only from PoE.
What type of network is required at the installation site?
The router at the installation site must be set up as a DHCP server. By default, the AP20 Access Point is set asa DHCP client and can obtain an IP address for programming only from a DHCP server.Additionally, all AP20 Access Points must be on the same subnet.
Do I need any special VoIP licenses?
No, the licensing for the ML440 is the same as for any other IP extension.You do not need a license to register an ML440 handset with the system, and you do not need a license tomake a P2P (peer-to-peer) call to another IP extension.
Technology
What type of technology is used in the ML440?
The ML440 uses WiFi friendly DECT 6.0 operating at 1.9 GHz. It does not interfere with standard WiFi networks.
What is the range?
All DECT 6.0 devices have a similar range. In an unobstructed environment it is possible for the ML440 tomaintain contact with the AP20 for up to 100 yards. Range within an actual office environment will be significantlyless.
DSX | ML440 Wireless IP DECT Quick Reference Guide | 51
XML to PDF by RenderX XEP XSL-FO Formatter, visit us at http://www.renderx.com/

ML440 Capabilities
DescriptionFeature
ML440 Handset
Yes (name and number).Caller ID, Call logging
Yes (4)Programmable keys
20 Hours / 220 HoursTalk time / standby
TFT Color LCD, 262K pixels (176 x 220)Display
Yes (white)Illuminated keys
YesVibrator
YesSpeakerphone
NoBluetooth
YesHeadset
Yes (side of handset)Volume keys
Yes (side of handset)Mute key
Off-Hook, Hold, Transfer, ConferenceSoft key call status
NoText messaging
AP20 Access Point
1920 -1930 MHzFrequency Range
YesOmni-directional
YesDECT authentication and encryption
10 (single AP) 8 (multiple APs)Concurrent calls per access point
YesLAN connection
YesPeer-to-peer
YesNEC iSIP support
NoNAT Traversal
G.711Codecs Supported
802.3afPower requirements
YesRoHS compliant
Wall (standard) or Ceiling (optional)Mounting options
YesWEB Based Configuration andManagement
52 | DSX | ML440 Wireless IP DECT Quick Reference Guide
XML to PDF by RenderX XEP XSL-FO Formatter, visit us at http://www.renderx.com/


(1093100ML440) Printed in U.S.A.
NEC Corporation of AmericaGeneral Channel4 Forest Parkway
Shelton, CT 06484www.necdsx.com