Embed Size (px)
Citation preview

Model 766V-L
Mini Circular Saw
1

2

General Power Tool Safety Warnings: Read all safety warnings and instructions. Failure to follow
the warnings and instructions may result in electric shock, fire and/or serious injury.
Save all warnings and instructions for future reference.The term ″ power tool ″ in the warnings refers to your mains-operated (corded) power tools or battery-operated (cordless) power tools.
1.Work Area Safetya.Keep work area clean and well lit. Cluttered or dark areas invite accidents.b.Do not operate power tools in explosive atmospheres, such as in the pres- ence of flammable liquids, gases or dust. Power tools create sparks which may ignite the dust or fumes.c.Keep children and bystanders away while operating a power tool. Distrac- tions can cause you to lose control.
2.Electrical Safetya.Power tool plugs must match the outlet. Never modify the plug in any way. Do not use any adapter plugs with grounded power tools. Unmodified plugs and match- ing outlets will reduce risk of electric shock.b.Avoid body contact with grounded surfaces such as pipes, radia- tors, ranges and refrigerators. There is an increased risk of electric shock if your body is grounded.c.Do not expose power tools to rain or wet conditions. Water entering a power tool will increase the risk of electric shock.d.Do not abuse the cord. Never use the cord for carrying, pulling or unplug- ging the power tool. Keep cord away from heat, oil, sharp edges or moving parts. Damaged or entangled cords increase the risk of electric shock.e.When operating a power tool outdoors, use an extension cord suit- able for outdoor use. Use of a cord suitable for outdoor use reduces the risk of elec-tric shock.f.If operating a power tool in a damp location is unavoidable, use a residual current device (RCD) protected supply.Use of a RCD reduces the risk of elec-tric shock.
.01.
3

:The term residual current device (RCD) may be replaced by the term ground fault circuit interrupter (GFCI) or earth leakage circuit breaker (ELCB)
3.Personal Safetya.Stay alert, watch what you are doing and use common sense when operating a power tool. Do not use a power tool while you are tired or under the influence of drugs, alcohol or medication. A moment of inattention while operating power tools may result in serious personal injury.b.Use personal protective equipment. Always wear eye protection. Protective equipment such as dust mask, non-skid safety shoes, hard hat, or hearing protec- tion used for appropriate conditions will reduce personal injuries.c.Prevent unintentional starting. Ensure the switch is in the off-position before connecting to power source and/or battery pack, picking up or carrying the tool. Carrying power tools with your finger on the switch or energising power tools that have the switch on invites accidents.d.Remove any adjusting key or wrench before turning the power tool on. A wrench or a key left attached to a rotating part of the power tool may result in personal injury.e.Do not overreach. Keep proper footing and balance at all times. This enables better control of the power tool in unexpected situations.f.Dress properly. Do not wear loose clothing or jewellery. Keep your hair, clothing and gloves away from moving parts. Loose clothes, jewellery or long hair can be caught in moving parts.g.If devices are provided for the connection of dust extraction and collection facili- ties, ensure these are connected and properly used. Use of dust collection can reduce dust-related hazards.
4.Power Tool Use and Carea.Do not force the power tool. Use the correct power tool for your application. The correct power tool will do the job better and safer at the rate for which it was de-signed.b.Do not use the power tool if the switch does not turn it on and off. Any power tool that cannot be controlled with the switch is dangerous and must be repaired. c.Disconnect the plug from the power source and/or the battery pack from the power tool before making any adjustments, changing accessories, or storing power tools. Such preventive safety measures reduce the risk of starting the
.02.
4

power tool accidentally.d.Store idle power tools out of the reach of children and do not allow persons unfa- miliar with the power tool or these instructions to operate the power tool. Power tools are dangerous in the hands of untrained users.e.Maintain power tools. Check for misalignment or binding of moving parts, break- age of parts and any other condition that may affect the power tools operation. If damaged, have the power tool repaired before use. Many accidents are caused by poorly maintained power tools.f.Keep cutting tools sharp and clean. Properly maintained cutting tools with sharp cutting edges are less likely to bind and are easier to control.g.Use the power tool, accessories and tool bits etc. in accordance with these instructions, taking into account the working conditions and the work to be performed. Use of the power tool for operations different from those intended could result in a hazardous situation.
ServiceHave your power tool serviced by a qualified repair person using only identical replacement parts. This will ensure that the safety of the power tool is maintained.
5.Specific Safety Rulesa.DANGER: Keep hands away from cutting area and blade. Keep your second hand on auxiliary handle or motor housing. If both hands are holding the saw, they cannot be cut by the Original instructions blade.b.Do not reach underneath the workpiece. The guard cannot protect you from the blade below the workpiece.c.Adjust the cutting depth to the thickness of the workpiece. Less than a full tooth of the blade teeth should be visible below the workpiece.d.Never hold piece being cut in your hands or across your leg. Secure the work- piece to a stable platform. It is important to support the work properly to minimize body exposure, blade binding, or loss of control.e.Hold power tool by insulated gripping surfaces when performing an operation where the cutting tool may contact hidden wiring or its own cord. Contact with a “live” wire will also make exposed metal parts of the power tool “live” and shock the operator.f.When ripping always use a rip fence or straight edge guide. This improves theaccuracy of cut and reduces the chance of blade binding.
.03.
5
g.Always use blades with correct size and shape (diamond versus round) of arbor holes. Blades that do not match the mounting hardware of the saw will run eccen-tri- cally, causing loss of control.h.Never use damaged or incorrect blade washers or bolt. The blade washers and bolt were specially designed for your saw, for optimum performance and safety of operation.
Causes and operator prevention of kickback:a.Kickback is a sudden reaction to a pinched, bound or misaligned saw blade, caus- ing an uncontrolled saw to lift up and out of the workpiece toward the opera-tor;b.When the blade is pinched or bound tightly by the kerf closing down, the blade stalls and the motor reaction drives the unit rapidly back toward the operator;c.If the blade becomes twisted or misaligned in the cut, the teeth at the back edge of the blade can dig into the top surface of the wood causing the blade to climb out of the kerf and jump back toward the operator.Kickback is the result of saw misuse and/or incorrect operating procedures or conditions and can be avoided by taking proper precautions as given below.a.Maintain a firm grip with both hands on the saw and position your arms to resist kickback forces. Position your body to either side of the blade, but not in line with the blade.b.When blade is binding, or when interrupting a cut for any reason, release the trigger and hold the saw motionless in the material until the blade comes to a com- plete stop. Never attempt to remove the saw from the work or pull the saw back- ward while the blade is in motion or kickback may occur.c.When restarting a saw in the work-piece, centre the saw blade in the kerf and check that saw teeth are not engaged into the material.d.Support large panels to minimize the risk of blade pinching and kickback.e.Do not use dull or damaged blades. Unsharpened or improperly set blades pro-duce narrow kerf causing excessive friction, blade binding and kickback. f.Blade depth and bevel adjusting locking levers must be tight and secure before making cut. If blade adjustment shifts while cutting, it may cause binding and kickback.f.Use extra caution when sawing into existing walls or other blind areas. Theprotruding blade may cut objects that can cause kickback.
.04.
6

6.Lower guard functiona.Check lower guard for proper closing before each use. Do not operate the saw if lower guard does not move freely and close instantly. Never clamp or tie the lower guard into the open position. If saw is accidentally dropped, lower guard may be bent. Raise the lower guard with the retracting handle and make sure it moves freely and does not touch the blade or any other part, in all angles and depths of cut. b.Check the operation of the lower guard spring. If the guard and the spring are not operating properly, they must be serviced before use. Lower guard may operate sluggishly due to damaged parts, gummy deposits, or a build-up of debris.c.The lower guard may be retracted manually only for special cuts such as “plunge cuts and compound cuts” . Raise the lower guard by retracting the handle and as soon as the blade enters the material, release the lower guard. For all other sawing operations, the lower guard should operate automatically.d.Always observe that the lower guard is covering the blade before placing saw down on bench or floor. An unprotected, coasting blade will cause the saw to walk backwards, cutting whatever is in its path. Be aware of the time it takes for the blade to stop after switch is released.
7.SYMBOLSa.Some of the following symbols may appear on this product. Study these symbols and learn their meanings. Proper interpretation of these sym- bols will allow for more efficient and safer operation of this product.
SYMBOL DESCRIPTION
Class II construction Double Insulated construction
Read the manual before set-up and/or use.
Wear safety glasses, ear protection and respiratory protection.
Use dust mask. Dust which is injurious to health can be generated when working on wood and other materials.
Never use the device to work on any materials containing asbestos.
.05.
7

b.TECHNICAL SPECIFICATIONS
c.FUNCTION DESCRIPTION
Do not dispose with house-hold waste.
Voltage & Frequency:Input Power:No Load Speed:Blade Size:Max. cutting depth:
120V~ 60Hz5.8A (PEAK 9.0 Amp)3500 min-1
4-1/2"1-11/16" @90degree1-1/8" @45degree
1.Saw Blade2.Lower Blade Guard 3.Base plate4.Lower Guard Lever5.Dust Extraction Port 6.Upper Blade Guard 7.Rip Guide 8.Vacuum Adaptor9.Allen Wrench for Blade 10.Bevel Scale Bracket 11.Bevel Clamp Lever 12.Rip Guide Locking Screw 13.Blade Bolt & Washer 14.Lock-Off Button 15.ON/OFF Switch 16.Depth Guide Bracket 17.Depth Clamp Lever 18.Rear Motor19.Spindle Lock Button 20.Allen Wrench Storage 21.Laser
18
15
17
3
10
5
1619
20
12
11
11
10
6
18
20
1415
4
132
1
7
93
12
21
8
.06.

8.Assembly: Before any work on the machine itself, keep the mains plug
out of the supply.To avoid accidental starting, make sure Lock-Off button is not engaged prior to plugging in tool and you finger is not touching the on/off switch trigger.
Mounting/Replacing the Saw BladeFor changing the cutting tool, it is best to place the machine on the face side of the motor housing.
Removal of the Saw Bladea.Press the lock button (19) and keep it pressed.The The spindle lock button (19) may be actuated only when the saw spindle is at a standstill. Otherwise, the power tool can be damaged.b.With the allen wrench (9), unscrew the bolt (13) turning in rotation direc-tion.c.Tilt back the retracting blade guard (2) and hold firmly.d.Remove the clamping flange (13) and the saw blade (1) from the ma-chine.
Mounting the Saw Bladea.Clean the saw blade (1) and all clamping parts to be assembled.b.Tilt back the retracting blade guard (2) and hold firmly.c.Place the saw blade (1) on to the mounting bolt (13). The cutting direc-tion of the teeth (direction or arrow on saw blade) and the direction-of-rota-tion arrow on the blade guard (2) must correspond.d.Mount the blot & screw (13) in turning in rotation direction.e.Press the spindle lock button (19) and keep it pressed.f.With the allen wrench (9), tighten the clamping bolt (13) turning in rota-tion direction.
Install the Rip GuideTo install the rip guide on the machine, perform the following steps.a.Unplug your circular saw.b.Insert the rip guide (7) through all three slots on the base plate (3) at the
.07.
9
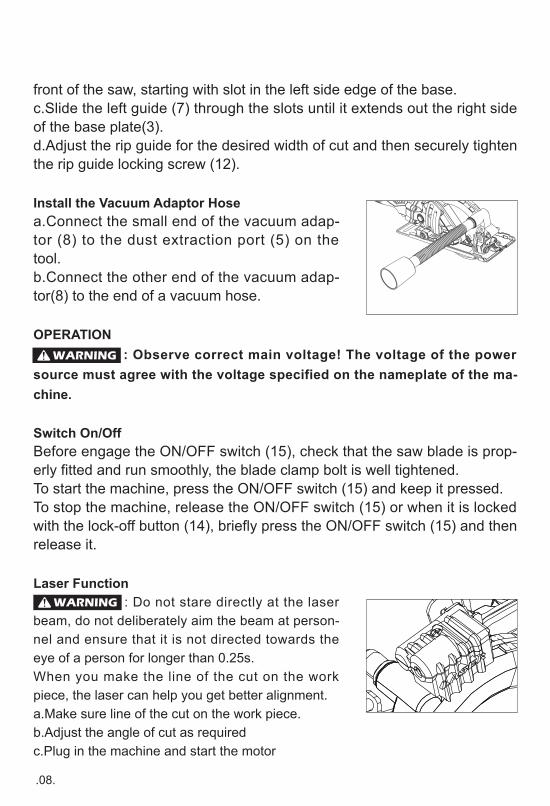
front of the saw, starting with slot in the left side edge of the base.c.Slide the left guide (7) through the slots until it extends out the right side of the base plate(3).d.Adjust the rip guide for the desired width of cut and then securely tighten the rip guide locking screw (12).
Install the Vacuum Adaptor Hose a.Connect the small end of the vacuum adap-tor (8) to the dust extraction port (5) on the tool.b.Connect the other end of the vacuum adap-tor(8) to the end of a vacuum hose.
OPERATION: Observe correct main voltage! The voltage of the power
source must agree with the voltage specified on the nameplate of the ma-chine.
Switch On/OffBefore engage the ON/OFF switch (15), check that the saw blade is prop-erly fitted and run smoothly, the blade clamp bolt is well tightened.To start the machine, press the ON/OFF switch (15) and keep it pressed.To stop the machine, release the ON/OFF switch (15) or when it is locked with the lock-off button (14), briefly press the ON/OFF switch (15) and then release it.
Laser Function: Do not stare directly at the laser
beam, do not deliberately aim the beam at person-nel and ensure that it is not directed towards the eye of a person for longer than 0.25s.When you make the line of the cut on the work piece, the laser can help you get better alignment.a.Make sure line of the cut on the work piece.b.Adjust the angle of cut as requiredc.Plug in the machine and start the motor
.08.
10

d.When the blade is at its maximum speed (approximately 2 seconds), place the saw on the work-piece.e.Switch on the laser from the laser aperture using the laser switch (21). f.Align the beam with the mark on the work-piece and slowly push the saw forward using both hands, keeping the red light beam on the mark.Switch off the laser beam when completed the cut.
Cutting MethodsParallel Cut Adjustmenta.Loosen the lock knob of edge guide.b.Slide the edge guide through the slots in the shoe to the desired width. c.Tighten the lock bolt to secure it in the position.d.Ensure that the edge guide rests against the wood along its entire length to give a consistent parallel cuts.
Pocket CutsA pocket cut is a cut that must be made inside the area of the work-piece rather than starting from an outside edge and working inward. Pocket cuts can be very danger- ous for the novice to attempt because of the need to manually retract the lower guard and perform a plunge cut which is potential hazardous.a.Hold the lower blade guard by the handle.b.Rest the front of the base flat against the work-piece with the rear handle related so the blade does not touch the work-piece.c.Start the saw and let the blade reach full speed.d.Guide the saw down into the work-piece and make the cut.
: Always cut in a forward direction when pocket cutting. Cutting in the reverse direction could cause the saw to climb up on the work-piece and back toward you.
Depth Adjustmenta.Unplug your circular saw.b.Loosen the depth clamp lever (17)on the depth guide at the back of saw.c.Hold the base plate (3) against the edge of the work piece and lift the body of the saw until the blade is at
.09.
11
the right depth determined by the depth gauge (align the scale line).d.Secure the base plate(3) by tightening the lever(17).
: Always maintain the correct blade depth setting. For all cuts the blade depth should not exceed 1/4” below the material being cut. Excessive blade depth increases the chance of saw KICKBACK.
Angle Adjustmenta.Loosen the bevel scale bracket (10) for angle adjustment. b.Adjust the base plate (3) to the desired angle between 0°to45° Tighten the bevel scale bracket(10).
9.MaintenanceNever use aggressive detergents or solvents for cleaning.a.To prevent accidents, always unplug the saw from the power source beforecleaning or performing any maintenance the saw may be cleaned most effectively using compressed air.Always wear safety goggles when using compressed air. If compressed air is not available, use a brush to remove dust and chips from the saw.b.Motor ventilation vents and switch levers must be kept clean and free of foreign matter. Do not attempt to clean by inserting pointed objects through open- ings.c.Never use any caustic agents to clean plastic parts. Such as: gasoline, carbon tetrachloride, chlorinated cleaning solvents, ammonia and household cleaners containing ammonia. Do not use any of these to clean the saw.d.Have an authorized service center examine and/or replace the worn carbon brushes in the event of excessive parking.e.Blades become dull even when cutting regular lumber, a sure sign of a dull blade is the need to force the saw forward instead of guiding it while making a cut. Take the blade to a service center for sharpening.f.Keep the machine clean all the time.
.10.
ATTENTION
12

g.If you discover any damage, consult the exploded drawing and parts list to de-termine exactly which replacement part you need to order from our customer ser-vice department.h.Clean the housing only with a damp cloth. Do not use any solvents! Dry thor-oughly afterwards.i.If the supply cord of this power tool is damaged, it must be replaced by a similar cord available through the service organization or a qualified authoritative techni-cian.
: Do not use cleaning agents to clean the plastic parts of the tool. A mild detergent on a damp cloth is recommended. Water must never come into contact with the tool.
10.TransportTurn the motor off and disconnect the mains plug. While transporting, be careful not to drop, or shock the machine. For transport, the machine has to be fixed against slipping and tipping over. Do not place objects on the machine.
11.Meaning of crossed –out wheeled dustbin:Do not dispose of electrical appliances as unsorted municipal waste, use separate collection facilities. Contact your local government for information regarding the collection systems available. If electrical appliances are disposed of in landfills or dumps, hazardous substances can leak into the groundwater and get into the food chain,damaging your health and well-being
12.After-Sales Service HotmailFor questions about this or any other FastCraft Products, please email us: [email protected].
We hereby declare that the machine:Model NO:766V-Lare produced according to the following EU directives:2006/42/ECFollowing standards has been used:EN 60745-1:2009+A11 EN 60745-2-5:2010
.11.

AFPS GS 2014:01
.12.
14

14 15

16