Embed Size (px)
Citation preview
MOJO 61USER'S MANUAL
Firmware version 1.0
www.Crumar.it
CRUMAR MOJO 61 USER'S MANUAL - Page 1/28

CRUMAR MOJO 61 USER'S MANUAL - Page 2/28

Congratulations! You are now the lucky owner of a Crumar Mojo 61, one of thefinest digital keyboards of the modern era. The Mojo 61 is a high quality instrument thatwas entirely conceived, developed and built in Italy with premium quality parts. Thisinstrument is the the result of years of research in sound design, quality electronics andhas been assembled with first class craftsmanship. We wish you many years of enjoymentand good music with your new Mojo 61, and, if we may give you a small piece of advice...you guessed it... please read this manual in its entirety and keep it in a safe place for futurereference! Have fun!
The Crumar Gang.
SAFETY INFORMATION
– Do not open the instrument. Please don't! The instrument can be opened andrepaired only by qualified personnel, who, much likely, isn't you. Unauthorizedopening voids the warranty.
– Do not expose the instrument to rain or moisture, it gets ugly.– Do not expose the instrument to direct sunlight. Who wants a tanned
keyboard?– Be careful not to infiltrate powders and liquids inside the instrument. Nor on
the outside.– If liquids get inside the unit, remove the power immediately to prevent the risk
of electric shock and contact a service center as soon as possible. Don't use anhair dryer, it's a bad idea.
– Do not clean using abrasive cleaners as they may damage the surface anderase some of the beautiful prints.
– Please keep all packaging in case you need to transport the instrument to aservice center, even though we hope this will never happen.
– The supplied power adapter can be used in any Country that has a mainsvoltage between 100 Vac and 240 Vac. Please use only the supplied PSU.
– Do not touch the AC adapter with wet hands.
WARRANTY
– Crumar Mojo 61 is subject to 12 months manufacturer's warranty.– Warranty extensions are at the discretion of the retailer.– Damages caused by misuse, improper maintenance or transportation are not
covered by this warranty.– During the warranty period, the customer is entitled to repair or replacement
of any parts considered defective at no charge.– The possible replacement of the entire product is at the manufacturer's
discretion.
CRUMAR MOJO 61 USER'S MANUAL - Page 3/28
CHAPTER SUMMARY:
1. The sounds of Mojo 61 p. 52. The effects p. 73. The command panel part 1 p. 84. The command panel part 2 p. 95. The command panel part 3 p. 106. The rear panel p. 117. Connecting control accessories p. 128. How to turn the Mojo 61 on p. 129. All about VB3 p. 1310. Playing the Pipe Organ p. 1611. Fun with the Combo Organs p. 1712. Electric Piano delight p. 1813. Applying effects to Combo Organs and Electric Pianos p. 1914. The SHIFT button and the alternate functions p. 1915. Connecting to the Wi-Fi Editor p. 2016. Using the Editor Web-App p. 2117. Shortcuts p. 2318. The USB ports p. 2319. MIDI Functions and implementation chart p. 2420. MIDI Map p. 2521. Specifications p. 26
CONVENTIONS USED IN THIS MANUAL
Every time a button, an LED or any other control is referenced, it is done by thenumber that has been associated to it in the drawings found in chapters 3 to 8. Whenyou're invited to “press & hold” a button, it is intended that the button should be keptdepressed for at least 2 seconds.
You will find that some concepts might be repeated more than once, this happensbecause there could be a mention in a chapter, and a detailed explication in a laterchapter. “Repetita iuvant”. It's latin for “repetition is useful”.
We recommend you to read this manual with the instrument in front of you, so youcan put what you read into practice and have an instant feedback of the notions hereexplained. Also because reading the manual alone without accessing the instrumentis no much fun, right?
CRUMAR MOJO 61 USER'S MANUAL - Page 4/28
1. THE SOUNDS OF MOJO 61
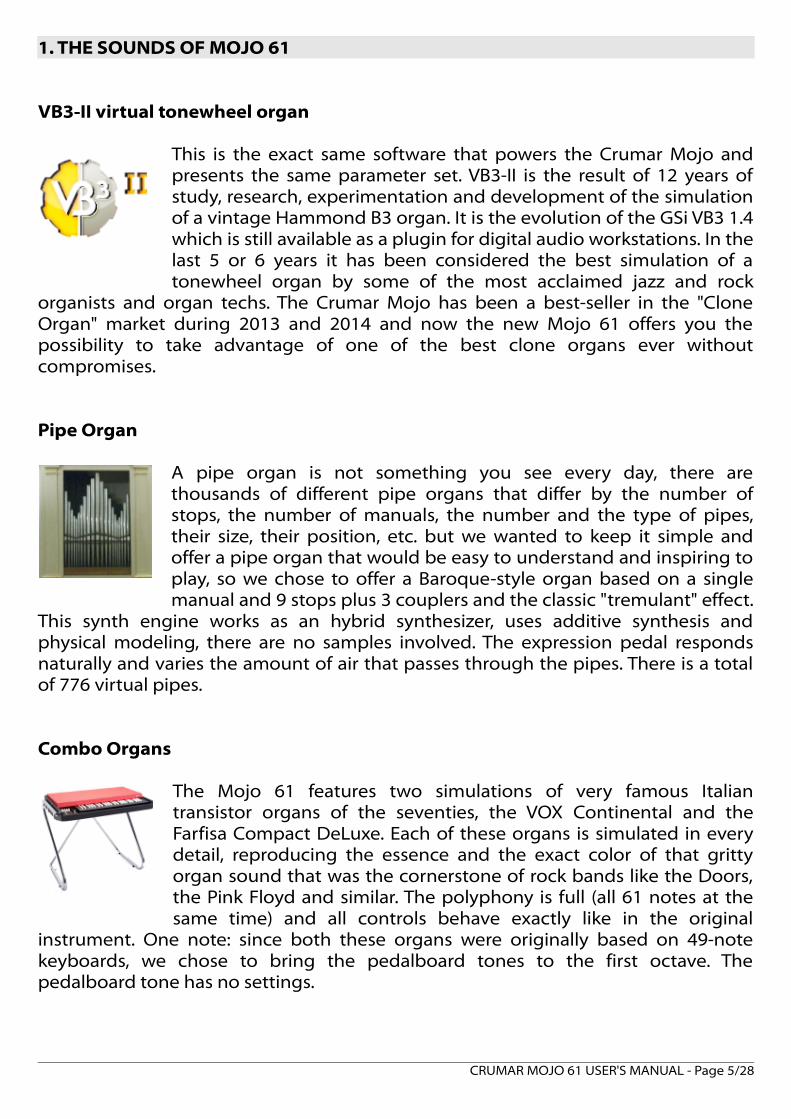
VB3-II virtual tonewheel organ
This is the exact same software that powers the Crumar Mojo andpresents the same parameter set. VB3-II is the result of 12 years ofstudy, research, experimentation and development of the simulationof a vintage Hammond B3 organ. It is the evolution of the GSi VB3 1.4which is still available as a plugin for digital audio workstations. In thelast 5 or 6 years it has been considered the best simulation of atonewheel organ by some of the most acclaimed jazz and rock
organists and organ techs. The Crumar Mojo has been a best-seller in the "CloneOrgan" market during 2013 and 2014 and now the new Mojo 61 offers you thepossibility to take advantage of one of the best clone organs ever withoutcompromises.
Pipe Organ
A pipe organ is not something you see every day, there arethousands of different pipe organs that differ by the number ofstops, the number of manuals, the number and the type of pipes,their size, their position, etc. but we wanted to keep it simple andoffer a pipe organ that would be easy to understand and inspiring toplay, so we chose to offer a Baroque-style organ based on a singlemanual and 9 stops plus 3 couplers and the classic "tremulant" effect.
This synth engine works as an hybrid synthesizer, uses additive synthesis andphysical modeling, there are no samples involved. The expression pedal respondsnaturally and varies the amount of air that passes through the pipes. There is a totalof 776 virtual pipes.
Combo Organs
The Mojo 61 features two simulations of very famous Italiantransistor organs of the seventies, the VOX Continental and theFarfisa Compact DeLuxe. Each of these organs is simulated in everydetail, reproducing the essence and the exact color of that grittyorgan sound that was the cornerstone of rock bands like the Doors,the Pink Floyd and similar. The polyphony is full (all 61 notes at thesame time) and all controls behave exactly like in the original
instrument. One note: since both these organs were originally based on 49-notekeyboards, we chose to bring the pedalboard tones to the first octave. Thepedalboard tone has no settings.
CRUMAR MOJO 61 USER'S MANUAL - Page 5/28
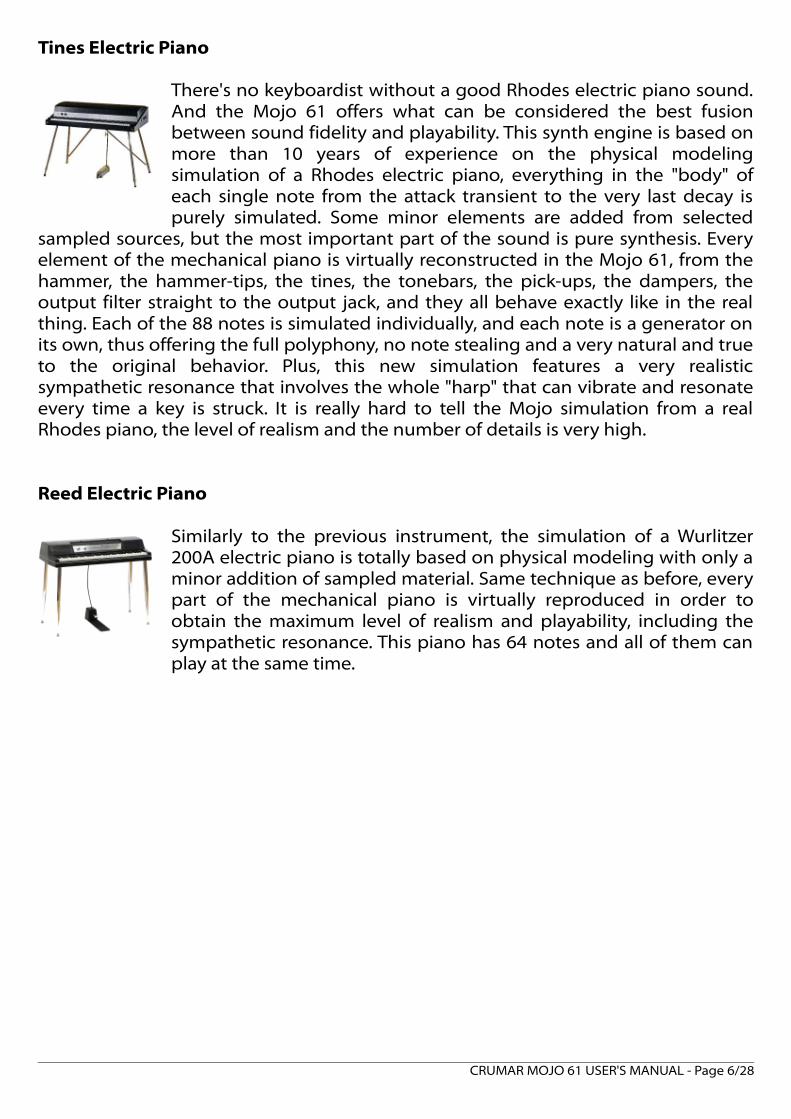
Tines Electric Piano
There's no keyboardist without a good Rhodes electric piano sound.And the Mojo 61 offers what can be considered the best fusionbetween sound fidelity and playability. This synth engine is based onmore than 10 years of experience on the physical modelingsimulation of a Rhodes electric piano, everything in the "body" ofeach single note from the attack transient to the very last decay ispurely simulated. Some minor elements are added from selected
sampled sources, but the most important part of the sound is pure synthesis. Everyelement of the mechanical piano is virtually reconstructed in the Mojo 61, from thehammer, the hammer-tips, the tines, the tonebars, the pick-ups, the dampers, theoutput filter straight to the output jack, and they all behave exactly like in the realthing. Each of the 88 notes is simulated individually, and each note is a generator onits own, thus offering the full polyphony, no note stealing and a very natural and trueto the original behavior. Plus, this new simulation features a very realisticsympathetic resonance that involves the whole "harp" that can vibrate and resonateevery time a key is struck. It is really hard to tell the Mojo simulation from a realRhodes piano, the level of realism and the number of details is very high.
Reed Electric Piano
Similarly to the previous instrument, the simulation of a Wurlitzer200A electric piano is totally based on physical modeling with only aminor addition of sampled material. Same technique as before, everypart of the mechanical piano is virtually reproduced in order toobtain the maximum level of realism and playability, including thesympathetic resonance. This piano has 64 notes and all of them canplay at the same time.
CRUMAR MOJO 61 USER'S MANUAL - Page 6/28
2. THE EFFECTS
Tremolo / Auto-panner / Ring modulator
Mojo 61 offers electric pianos and organs, so how could we miss such an importanteffect in the chain? It is a must in mono mode when combined with the Reed EP,sounds great in square stereo with the Tines EP.
Stereo Phaser
This is a 4-stage stereo phaser (two individual phasers slightly shifted), and offersparameters such as LFO speed and depth. Sounds great on the electric piano sounds.
Stereo Chorus
We've been listening to a selection of chorus effects for keyboards and guitars,ranging from the early analog BBD choruses up to the modern digital ones, but onethat works really great on a vast variety of sounds is the two-voice BBD-based stereochorus that Roland included in the RD-1000 and in many others of their instrumentsof the eighties. This is a simulation of that very chorus and sounds really great withthe electric pianos.
Amp Simulator
And here comes the boutique amp collection. This processor simulates five amongthe most used guitar and bass amps of all times: the Fender Twin, the Marshall JCM-800, the Vox AC30, the Roland Jazz Chorus and the Fender BassMan. Each ampfeatures a 3-way equalizer and an adjustable overdrive.
Rotary Effect Simulator
There's no VB3-II without a great rotary effect. This is the exact same rotary effectfeatured in the Crumar Mojo, offering the same control set and the same sound.
Digital Reverb
This is a great sounding digital reverb that brings light and air to your sound. Soundssoft, smooth and deep, precise and alive, airy and so much realistic that's a real joy tohave some in the mix.
Equalizer
This section contains a very basic 3-band equalizer. Use it to shape your sound for aperfect match with your amplification system.
CRUMAR MOJO 61 USER'S MANUAL - Page 7/28
3. THE COMMAND PANEL – part 1
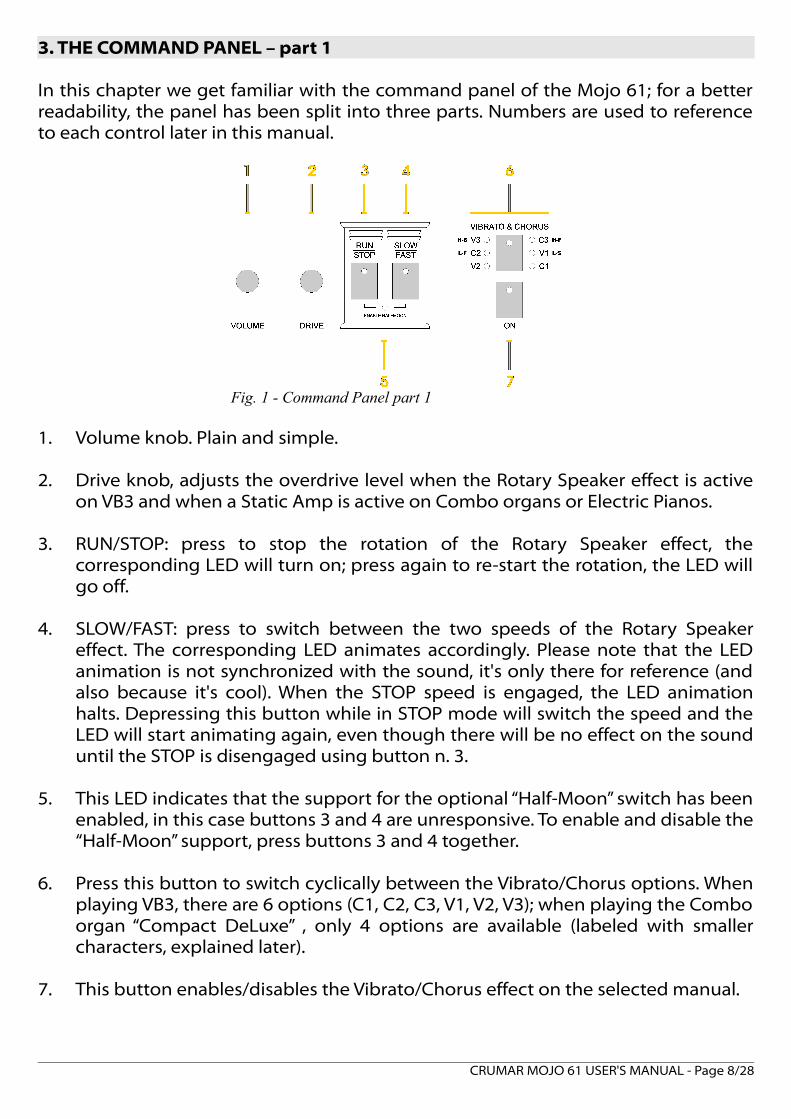
In this chapter we get familiar with the command panel of the Mojo 61; for a betterreadability, the panel has been split into three parts. Numbers are used to referenceto each control later in this manual.
1. Volume knob. Plain and simple.
2. Drive knob, adjusts the overdrive level when the Rotary Speaker effect is activeon VB3 and when a Static Amp is active on Combo organs or Electric Pianos.
3. RUN/STOP: press to stop the rotation of the Rotary Speaker effect, thecorresponding LED will turn on; press again to re-start the rotation, the LED willgo off.
4. SLOW/FAST: press to switch between the two speeds of the Rotary Speakereffect. The corresponding LED animates accordingly. Please note that the LEDanimation is not synchronized with the sound, it's only there for reference (andalso because it's cool). When the STOP speed is engaged, the LED animationhalts. Depressing this button while in STOP mode will switch the speed and theLED will start animating again, even though there will be no effect on the sounduntil the STOP is disengaged using button n. 3.
5. This LED indicates that the support for the optional “Half-Moon” switch has beenenabled, in this case buttons 3 and 4 are unresponsive. To enable and disable the“Half-Moon” support, press buttons 3 and 4 together.
6. Press this button to switch cyclically between the Vibrato/Chorus options. Whenplaying VB3, there are 6 options (C1, C2, C3, V1, V2, V3); when playing the Comboorgan “Compact DeLuxe” , only 4 options are available (labeled with smallercharacters, explained later).
7. This button enables/disables the Vibrato/Chorus effect on the selected manual.
CRUMAR MOJO 61 USER'S MANUAL - Page 8/28
Fig. 1 - Command Panel part 1
4. THE COMMAND PANEL – part 2
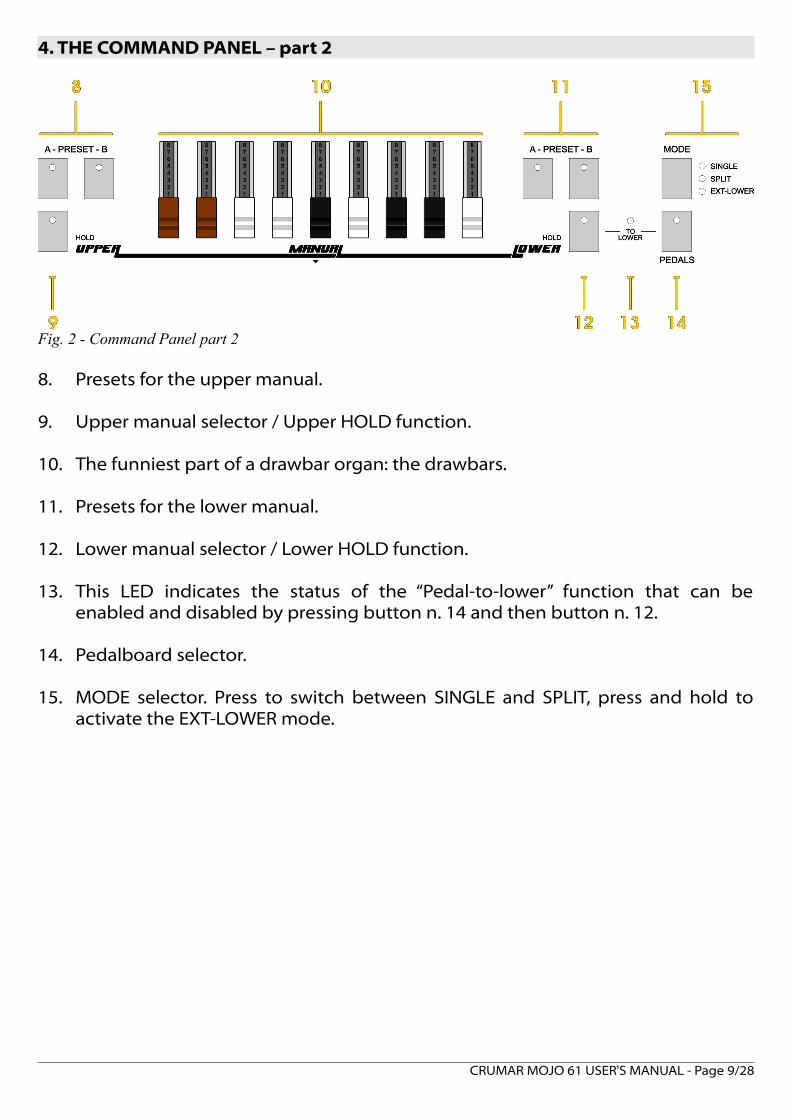
8. Presets for the upper manual.
9. Upper manual selector / Upper HOLD function.
10. The funniest part of a drawbar organ: the drawbars.
11. Presets for the lower manual.
12. Lower manual selector / Lower HOLD function.
13. This LED indicates the status of the “Pedal-to-lower” function that can beenabled and disabled by pressing button n. 14 and then button n. 12.
14. Pedalboard selector.
15. MODE selector. Press to switch between SINGLE and SPLIT, press and hold toactivate the EXT-LOWER mode.
CRUMAR MOJO 61 USER'S MANUAL - Page 9/28
Fig. 2 - Command Panel part 2
5. THE COMMAND PANEL – part 3
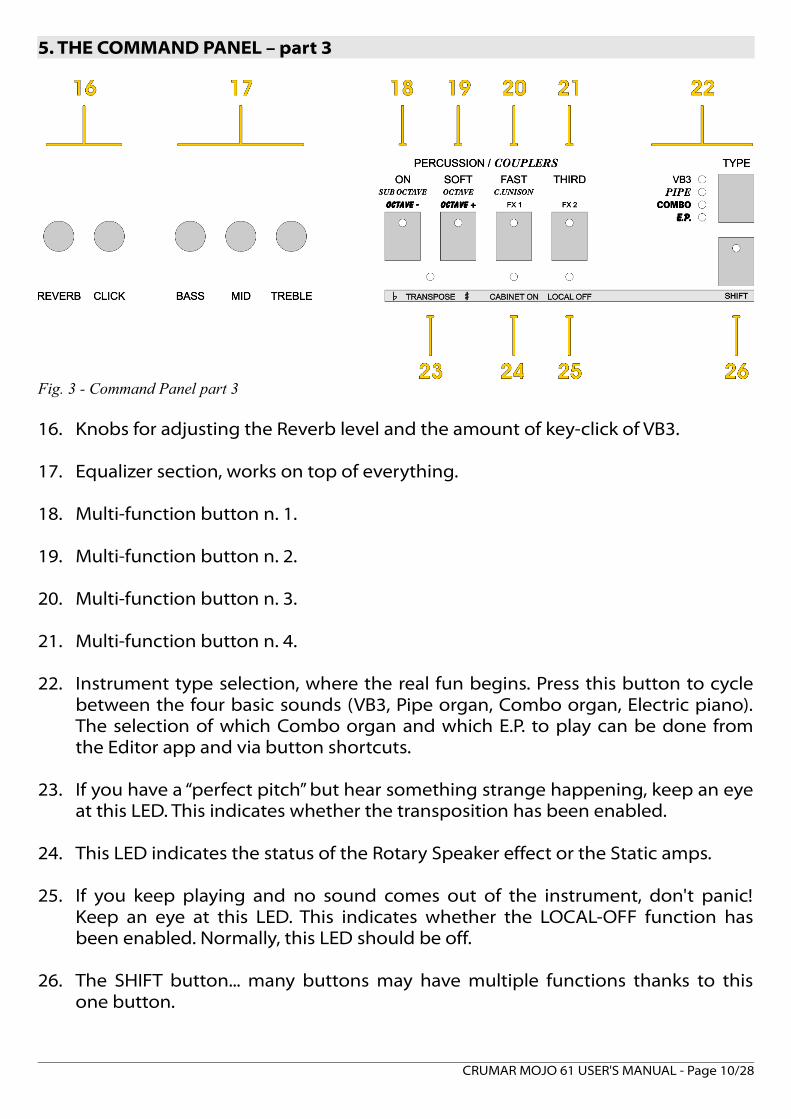
16. Knobs for adjusting the Reverb level and the amount of key-click of VB3.
17. Equalizer section, works on top of everything.
18. Multi-function button n. 1.
19. Multi-function button n. 2.
20. Multi-function button n. 3.
21. Multi-function button n. 4.
22. Instrument type selection, where the real fun begins. Press this button to cyclebetween the four basic sounds (VB3, Pipe organ, Combo organ, Electric piano).The selection of which Combo organ and which E.P. to play can be done fromthe Editor app and via button shortcuts.
23. If you have a “perfect pitch” but hear something strange happening, keep an eyeat this LED. This indicates whether the transposition has been enabled.
24. This LED indicates the status of the Rotary Speaker effect or the Static amps.
25. If you keep playing and no sound comes out of the instrument, don't panic!Keep an eye at this LED. This indicates whether the LOCAL-OFF function hasbeen enabled. Normally, this LED should be off.
26. The SHIFT button... many buttons may have multiple functions thanks to thisone button.
CRUMAR MOJO 61 USER'S MANUAL - Page 10/28
Fig. 3 - Command Panel part 3
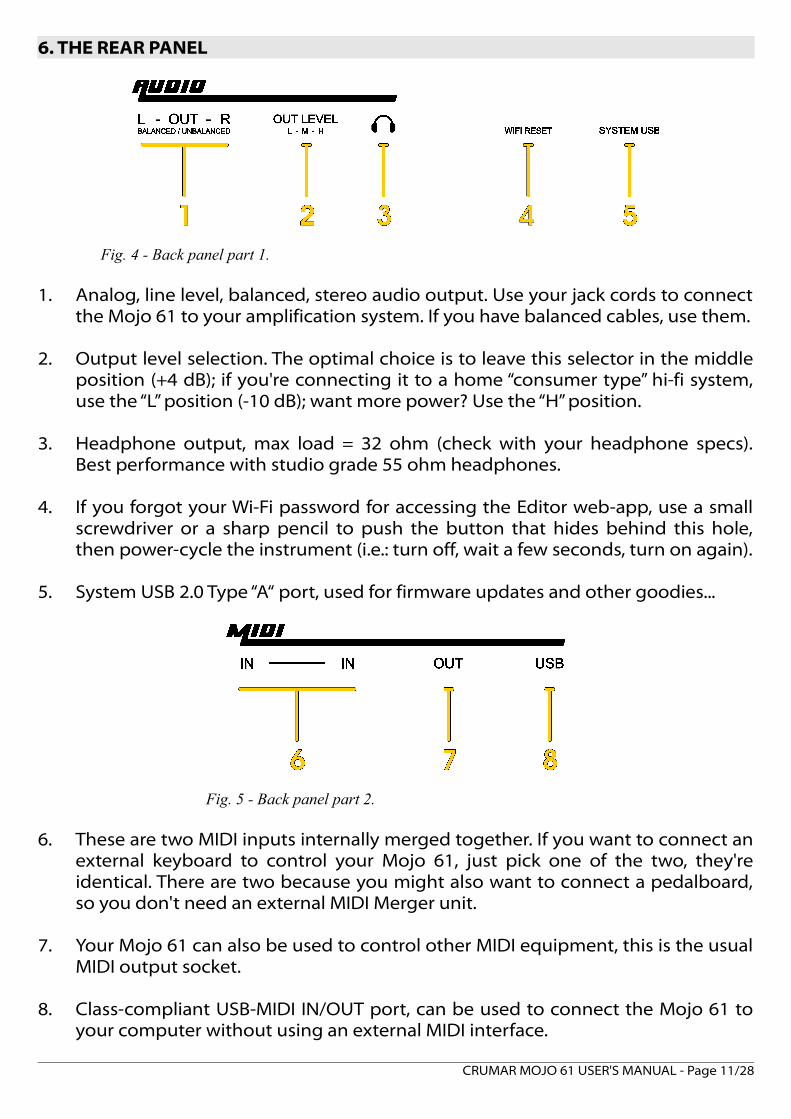
6. THE REAR PANEL
1. Analog, line level, balanced, stereo audio output. Use your jack cords to connectthe Mojo 61 to your amplification system. If you have balanced cables, use them.
2. Output level selection. The optimal choice is to leave this selector in the middleposition (+4 dB); if you're connecting it to a home “consumer type” hi-fi system,use the “L” position (-10 dB); want more power? Use the “H” position.
3. Headphone output, max load = 32 ohm (check with your headphone specs).Best performance with studio grade 55 ohm headphones.
4. If you forgot your Wi-Fi password for accessing the Editor web-app, use a smallscrewdriver or a sharp pencil to push the button that hides behind this hole,then power-cycle the instrument (i.e.: turn off, wait a few seconds, turn on again).
5. System USB 2.0 Type “A“ port, used for firmware updates and other goodies...
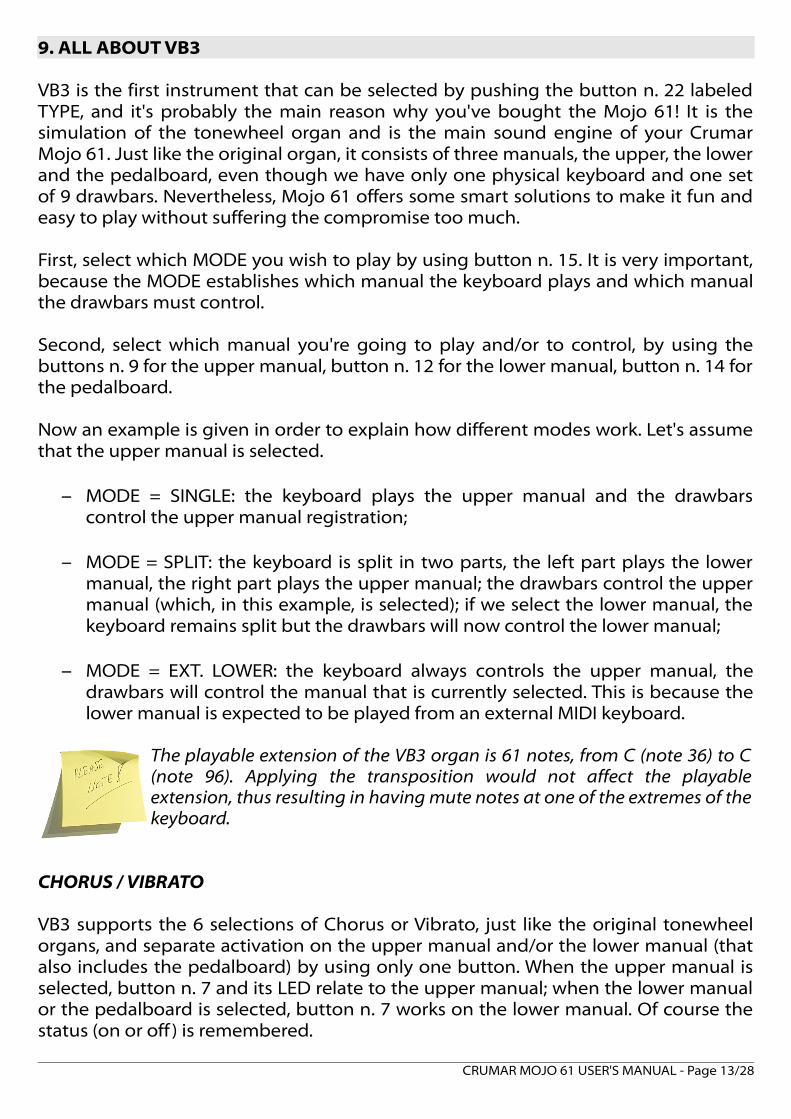
6. These are two MIDI inputs internally merged together. If you want to connect anexternal keyboard to control your Mojo 61, just pick one of the two, they'reidentical. There are two because you might also want to connect a pedalboard,so you don't need an external MIDI Merger unit.
7. Your Mojo 61 can also be used to control other MIDI equipment, this is the usualMIDI output socket.
8. Class-compliant USB-MIDI IN/OUT port, can be used to connect the Mojo 61 toyour computer without using an external MIDI interface.
CRUMAR MOJO 61 USER'S MANUAL - Page 11/28
Fig. 4 - Back panel part 1.
Fig. 5 - Back panel part 2.

7. CONNECTING CONTROL ACCESSORIES
There are three additional Jack sockets on the back of the Mojo 61 that are used toconnect pedals or the “half-moon” 3-way switch.
9. Half-Moon or Foot Switch input socket. Here you can connect our dual footswitch or our half-moon switch; the latter can only be attached to the optionallower manual keyboard, and is activated by pushing the buttons n. 3 and n. 4together; normally, this socket accepts the dual foot switch that worksconcurrently with the panel buttons dedicated to the Rotary Speaker speedbuttons.
10. Connect a 10-K ohm expression pedal to this jack; our Crumar long-throw pedalis the perfect choice, but other 3rd party pedals might be compatible as well.
11. Connect a traditional sustain pedal to this jack; the polarity is automaticallydetected when the instrument is powered on, so make sure that the pedal isalready connected before powering on.
ABOUT THE SUSTAIN PEDAL
The sustain pedal is normally used when the Electric Piano sound is active andfunctions as a normal piano sustain pedal. However, when VB3 is active and theRotary Speaker effect is on, the sustain pedal can be used to switch between SLOWand FAST speeds; when the speed is set to STOP by using button n. 3, the sustainpedal can be used to deactivate the rotary brake and return to the previous speed.
8. HOW TO TURN THE MOJO 61 ON AND START WOWING THE CROWD
You should have been given an external PSU (Power Supply Unit),one end goes to the power outlet, the other end goes to the powersocket on the back of your Mojo, labeled with number 12.
Then, push the button n. 13, after a second you will see all thelights illuminating the control panel, and after 8 more seconds theinstrument is ready to be played.
CRUMAR MOJO 61 USER'S MANUAL - Page 12/28
Fig. 6 - Pedal inputs.
Fig. 7 – Power section.
9. ALL ABOUT VB3
VB3 is the first instrument that can be selected by pushing the button n. 22 labeledTYPE, and it's probably the main reason why you've bought the Mojo 61! It is thesimulation of the tonewheel organ and is the main sound engine of your CrumarMojo 61. Just like the original organ, it consists of three manuals, the upper, the lowerand the pedalboard, even though we have only one physical keyboard and one setof 9 drawbars. Nevertheless, Mojo 61 offers some smart solutions to make it fun andeasy to play without suffering the compromise too much.
First, select which MODE you wish to play by using button n. 15. It is very important,because the MODE establishes which manual the keyboard plays and which manualthe drawbars must control.
Second, select which manual you're going to play and/or to control, by using thebuttons n. 9 for the upper manual, button n. 12 for the lower manual, button n. 14 forthe pedalboard.
Now an example is given in order to explain how different modes work. Let's assumethat the upper manual is selected.
– MODE = SINGLE: the keyboard plays the upper manual and the drawbarscontrol the upper manual registration;
– MODE = SPLIT: the keyboard is split in two parts, the left part plays the lowermanual, the right part plays the upper manual; the drawbars control the uppermanual (which, in this example, is selected); if we select the lower manual, thekeyboard remains split but the drawbars will now control the lower manual;
– MODE = EXT. LOWER: the keyboard always controls the upper manual, thedrawbars will control the manual that is currently selected. This is because thelower manual is expected to be played from an external MIDI keyboard.
The playable extension of the VB3 organ is 61 notes, from C (note 36) to C(note 96). Applying the transposition would not affect the playableextension, thus resulting in having mute notes at one of the extremes of thekeyboard.
CHORUS / VIBRATO
VB3 supports the 6 selections of Chorus or Vibrato, just like the original tonewheelorgans, and separate activation on the upper manual and/or the lower manual (thatalso includes the pedalboard) by using only one button. When the upper manual isselected, button n. 7 and its LED relate to the upper manual; when the lower manualor the pedalboard is selected, button n. 7 works on the lower manual. Of course thestatus (on or off ) is remembered.
CRUMAR MOJO 61 USER'S MANUAL - Page 13/28
DRAWBARS
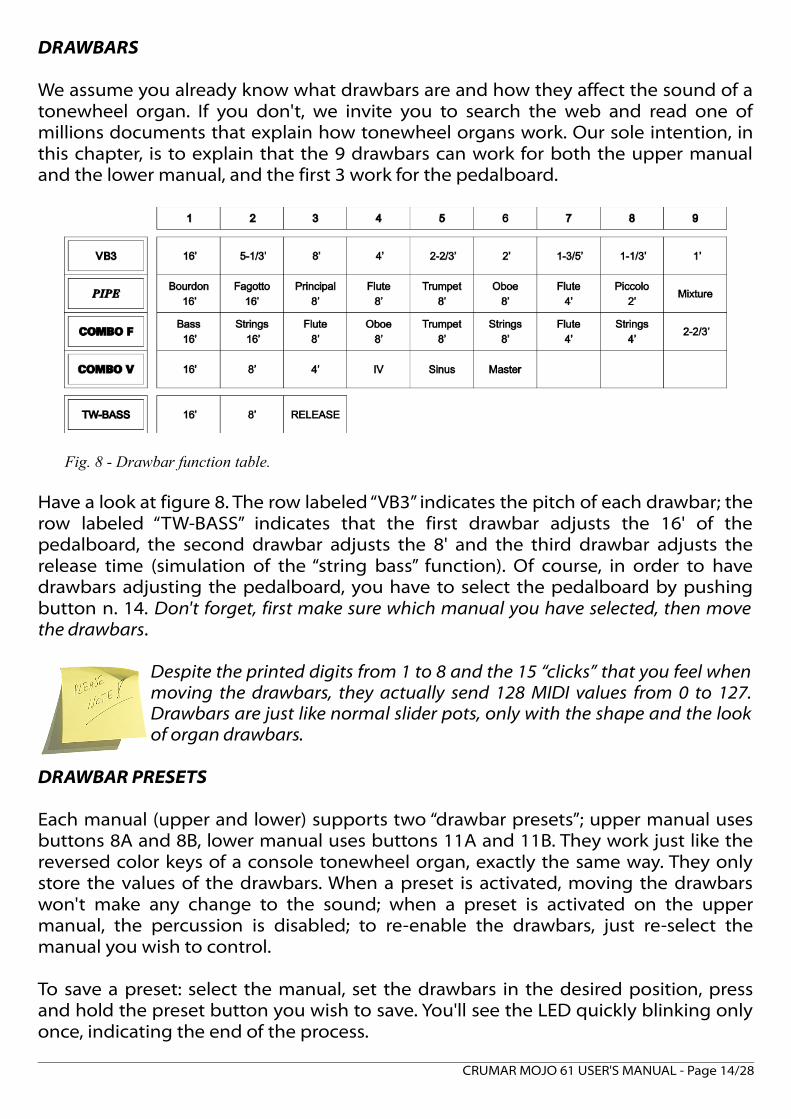
We assume you already know what drawbars are and how they affect the sound of atonewheel organ. If you don't, we invite you to search the web and read one ofmillions documents that explain how tonewheel organs work. Our sole intention, inthis chapter, is to explain that the 9 drawbars can work for both the upper manualand the lower manual, and the first 3 work for the pedalboard.
Have a look at figure 8. The row labeled “VB3” indicates the pitch of each drawbar; therow labeled “TW-BASS” indicates that the first drawbar adjusts the 16' of thepedalboard, the second drawbar adjusts the 8' and the third drawbar adjusts therelease time (simulation of the “string bass” function). Of course, in order to havedrawbars adjusting the pedalboard, you have to select the pedalboard by pushingbutton n. 14. Don't forget, first make sure which manual you have selected, then movethe drawbars.
Despite the printed digits from 1 to 8 and the 15 “clicks” that you feel whenmoving the drawbars, they actually send 128 MIDI values from 0 to 127.Drawbars are just like normal slider pots, only with the shape and the lookof organ drawbars.
DRAWBAR PRESETS
Each manual (upper and lower) supports two “drawbar presets”; upper manual usesbuttons 8A and 8B, lower manual uses buttons 11A and 11B. They work just like thereversed color keys of a console tonewheel organ, exactly the same way. They onlystore the values of the drawbars. When a preset is activated, moving the drawbarswon't make any change to the sound; when a preset is activated on the uppermanual, the percussion is disabled; to re-enable the drawbars, just re-select themanual you wish to control.
To save a preset: select the manual, set the drawbars in the desired position, pressand hold the preset button you wish to save. You'll see the LED quickly blinking onlyonce, indicating the end of the process.
CRUMAR MOJO 61 USER'S MANUAL - Page 14/28
Fig. 8 - Drawbar function table.
THE HOLD FUNCTION
Probably you've noticed that, next to the labels “Upper” and “Lower”, there's a smallerlabel that reads “HOLD”. This is a special function that, when activated, momentarilydisconnects the drawbars from the sound, allowing you to adjust the drawbarswithout affecting the sound, and get instantly to the new registration, as if it were astored preset, the exact moment you deactivate the HOLD function.
Example: select the upper manual, set the drawbars the way you like and play achord; now press the upper manual selection button again (button n. 9), you'll noticethat the corresponding LED starts flashing; now move the drawbars to a newregistration while still keeping the chord playing... hear, nothing changes to thesound; now push the HOLD button again, et voilà! New registration is now playing.
This is pretty much what organists use to do with console organs that have twodrawbar sets per each manual.
PEDALS TO LOWER
To activate or deactivate this function, first press and hold the pedalboard selectionbutton n. 14 and then press lower selection button n. 12. The yellow LED n. 13 stayson if this function is enabled.
This function makes it possible to play the pedalboard tones along with the lowermanual, one stacked on top of the other, with the difference that the lower manualwill play across the whole keyboard, while the pedalboard will only play across thelower 25 notes.
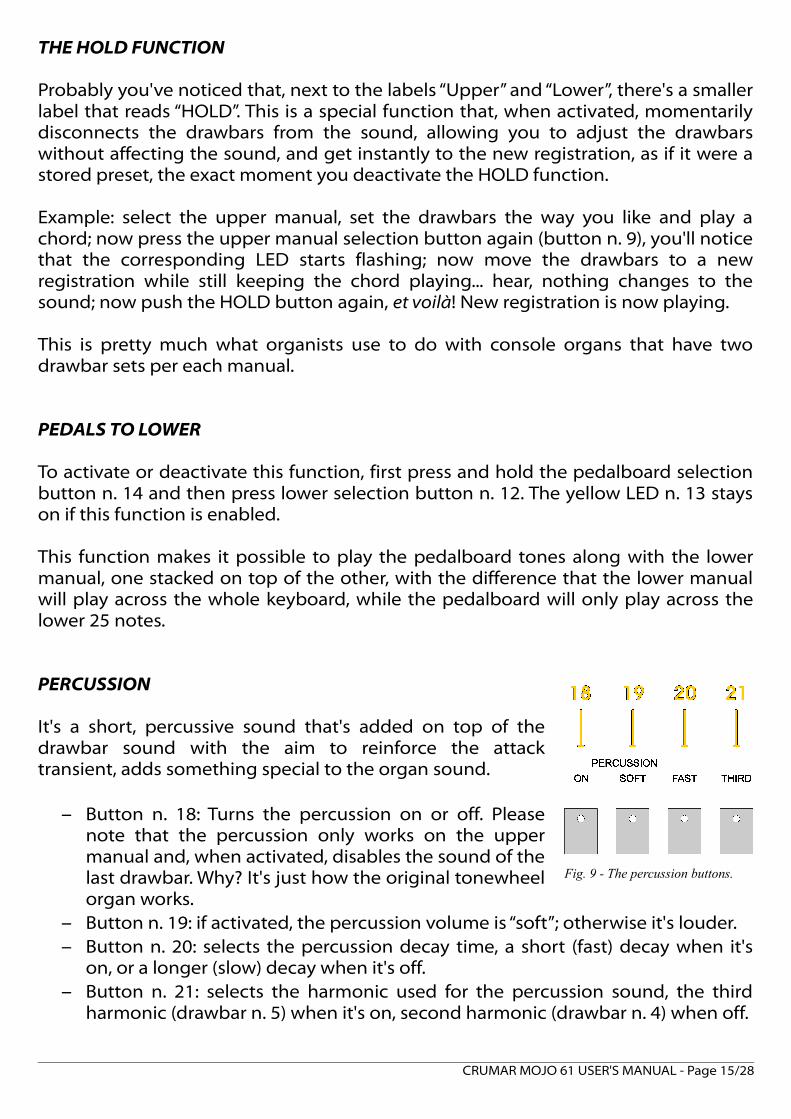
PERCUSSION
It's a short, percussive sound that's added on top of thedrawbar sound with the aim to reinforce the attacktransient, adds something special to the organ sound.
– Button n. 18: Turns the percussion on or off. Pleasenote that the percussion only works on the uppermanual and, when activated, disables the sound of thelast drawbar. Why? It's just how the original tonewheelorgan works.
– Button n. 19: if activated, the percussion volume is “soft”; otherwise it's louder.– Button n. 20: selects the percussion decay time, a short (fast) decay when it's
on, or a longer (slow) decay when it's off.– Button n. 21: selects the harmonic used for the percussion sound, the third
harmonic (drawbar n. 5) when it's on, second harmonic (drawbar n. 4) when off.
CRUMAR MOJO 61 USER'S MANUAL - Page 15/28
Fig. 9 - The percussion buttons.
10. PLAYING THE PIPE ORGAN
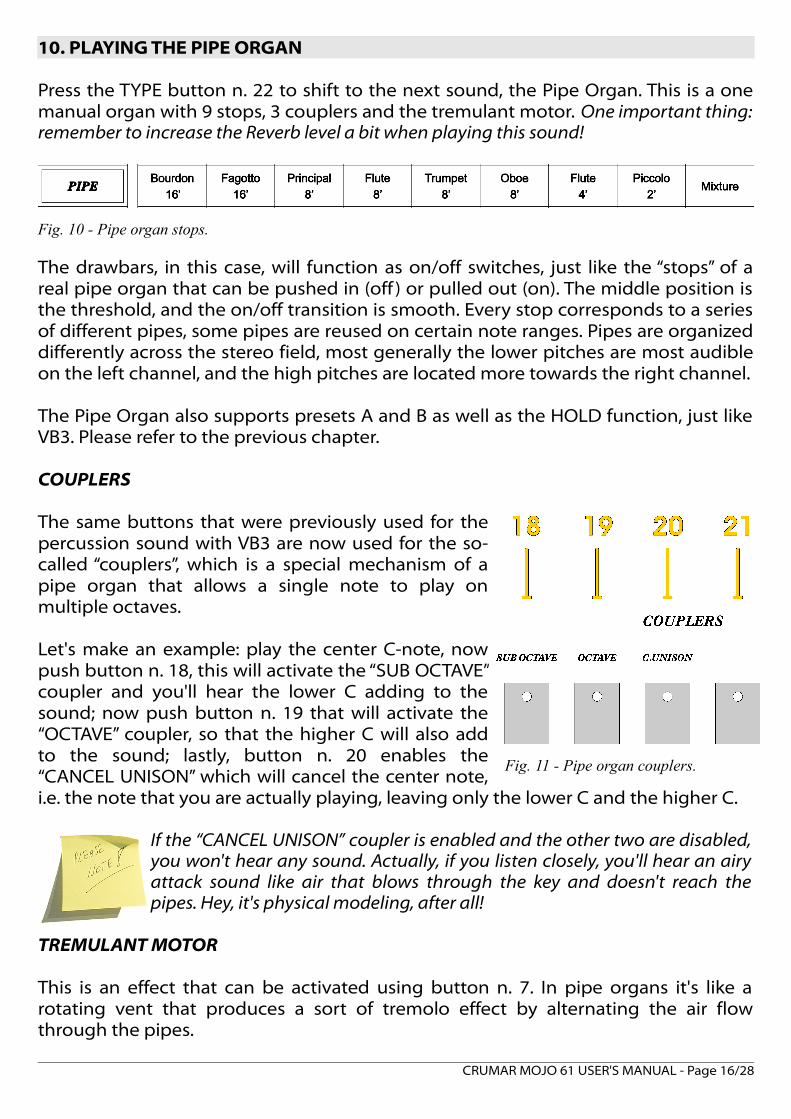
Press the TYPE button n. 22 to shift to the next sound, the Pipe Organ. This is a onemanual organ with 9 stops, 3 couplers and the tremulant motor. One important thing:remember to increase the Reverb level a bit when playing this sound!
The drawbars, in this case, will function as on/off switches, just like the “stops” of areal pipe organ that can be pushed in (off ) or pulled out (on). The middle position isthe threshold, and the on/off transition is smooth. Every stop corresponds to a seriesof different pipes, some pipes are reused on certain note ranges. Pipes are organizeddifferently across the stereo field, most generally the lower pitches are most audibleon the left channel, and the high pitches are located more towards the right channel.
The Pipe Organ also supports presets A and B as well as the HOLD function, just likeVB3. Please refer to the previous chapter.
COUPLERS
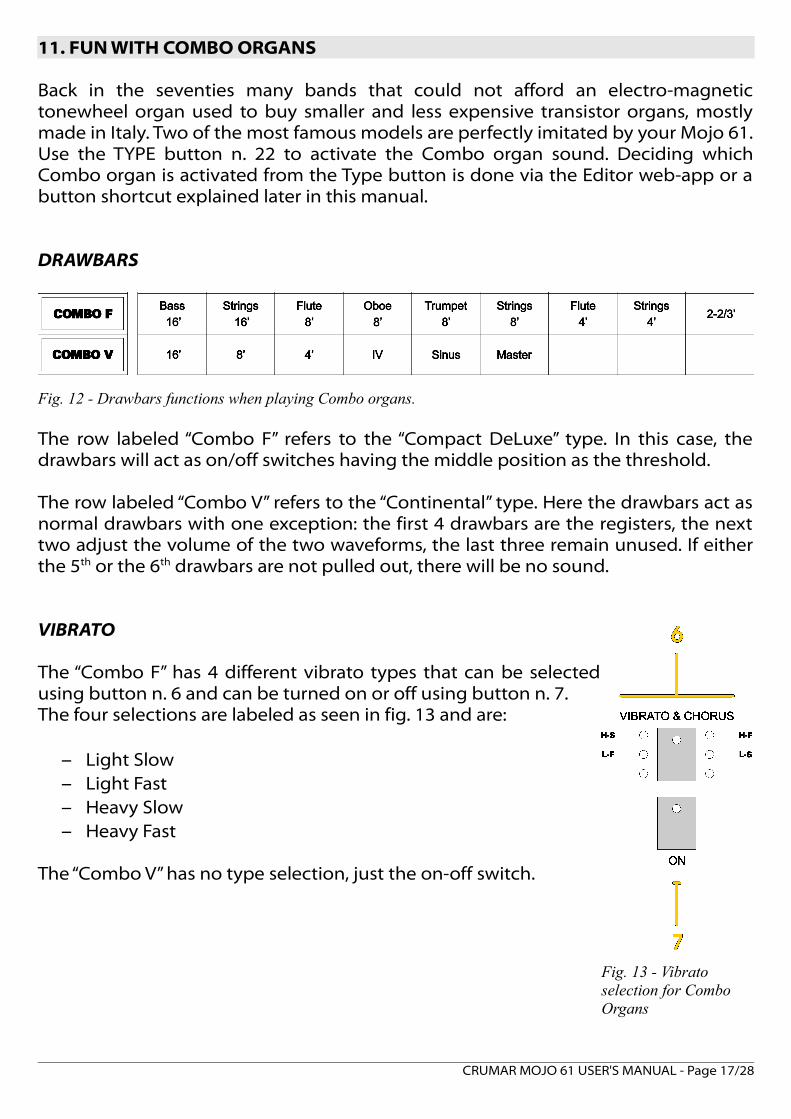
The same buttons that were previously used for thepercussion sound with VB3 are now used for the so-called “couplers”, which is a special mechanism of apipe organ that allows a single note to play onmultiple octaves.
Let's make an example: play the center C-note, nowpush button n. 18, this will activate the “SUB OCTAVE”coupler and you'll hear the lower C adding to thesound; now push button n. 19 that will activate the“OCTAVE” coupler, so that the higher C will also addto the sound; lastly, button n. 20 enables the“CANCEL UNISON” which will cancel the center note,i.e. the note that you are actually playing, leaving only the lower C and the higher C.
If the “CANCEL UNISON” coupler is enabled and the other two are disabled,you won't hear any sound. Actually, if you listen closely, you'll hear an airyattack sound like air that blows through the key and doesn't reach thepipes. Hey, it's physical modeling, after all!
TREMULANT MOTOR
This is an effect that can be activated using button n. 7. In pipe organs it's like arotating vent that produces a sort of tremolo effect by alternating the air flowthrough the pipes.
CRUMAR MOJO 61 USER'S MANUAL - Page 16/28
Fig. 10 - Pipe organ stops.
Fig. 11 - Pipe organ couplers.
11. FUN WITH COMBO ORGANS
Back in the seventies many bands that could not afford an electro-magnetictonewheel organ used to buy smaller and less expensive transistor organs, mostlymade in Italy. Two of the most famous models are perfectly imitated by your Mojo 61.Use the TYPE button n. 22 to activate the Combo organ sound. Deciding whichCombo organ is activated from the Type button is done via the Editor web-app or abutton shortcut explained later in this manual.
DRAWBARS
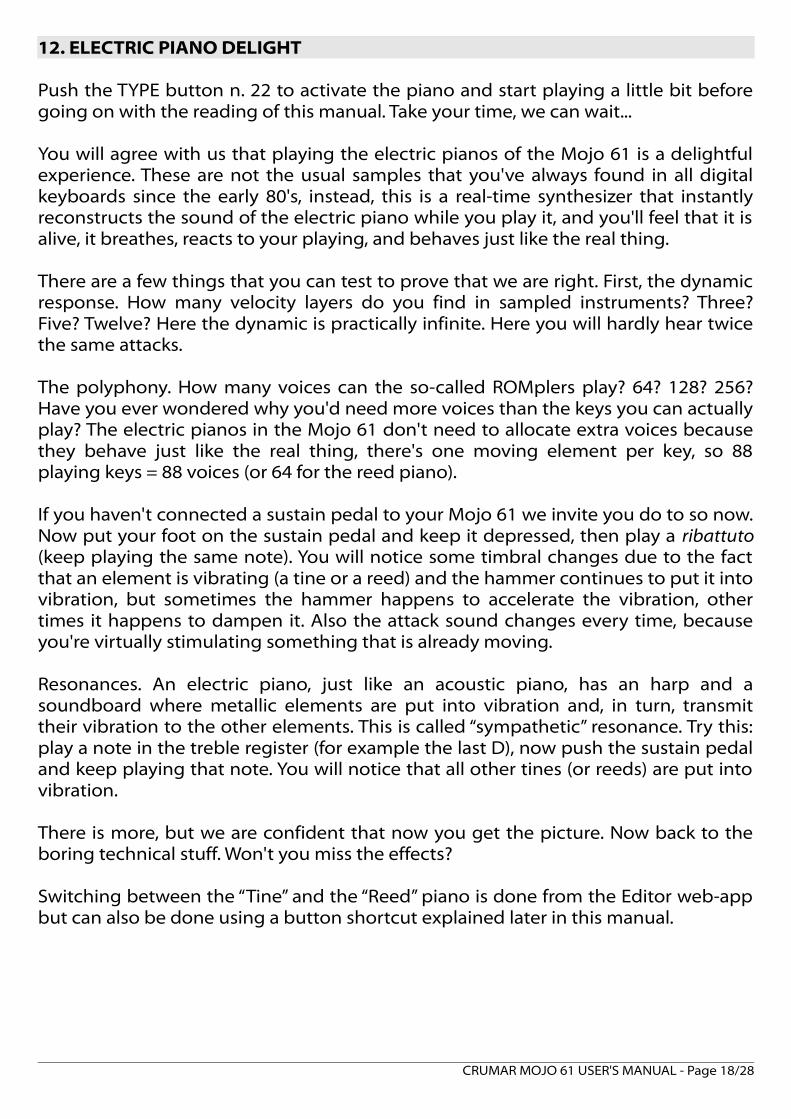
The row labeled “Combo F” refers to the “Compact DeLuxe” type. In this case, thedrawbars will act as on/off switches having the middle position as the threshold.
The row labeled “Combo V” refers to the “Continental” type. Here the drawbars act asnormal drawbars with one exception: the first 4 drawbars are the registers, the nexttwo adjust the volume of the two waveforms, the last three remain unused. If eitherthe 5th or the 6th drawbars are not pulled out, there will be no sound.
VIBRATO
The “Combo F” has 4 different vibrato types that can be selectedusing button n. 6 and can be turned on or off using button n. 7.The four selections are labeled as seen in fig. 13 and are:
– Light Slow– Light Fast– Heavy Slow– Heavy Fast
The “Combo V” has no type selection, just the on-off switch.
CRUMAR MOJO 61 USER'S MANUAL - Page 17/28
Fig. 12 - Drawbars functions when playing Combo organs.
Fig. 13 - Vibrato selection for Combo Organs
12. ELECTRIC PIANO DELIGHT
Push the TYPE button n. 22 to activate the piano and start playing a little bit beforegoing on with the reading of this manual. Take your time, we can wait...
You will agree with us that playing the electric pianos of the Mojo 61 is a delightfulexperience. These are not the usual samples that you've always found in all digitalkeyboards since the early 80's, instead, this is a real-time synthesizer that instantlyreconstructs the sound of the electric piano while you play it, and you'll feel that it isalive, it breathes, reacts to your playing, and behaves just like the real thing.
There are a few things that you can test to prove that we are right. First, the dynamicresponse. How many velocity layers do you find in sampled instruments? Three?Five? Twelve? Here the dynamic is practically infinite. Here you will hardly hear twicethe same attacks.
The polyphony. How many voices can the so-called ROMplers play? 64? 128? 256?Have you ever wondered why you'd need more voices than the keys you can actuallyplay? The electric pianos in the Mojo 61 don't need to allocate extra voices becausethey behave just like the real thing, there's one moving element per key, so 88playing keys = 88 voices (or 64 for the reed piano).
If you haven't connected a sustain pedal to your Mojo 61 we invite you do to so now.Now put your foot on the sustain pedal and keep it depressed, then play a ribattuto(keep playing the same note). You will notice some timbral changes due to the factthat an element is vibrating (a tine or a reed) and the hammer continues to put it intovibration, but sometimes the hammer happens to accelerate the vibration, othertimes it happens to dampen it. Also the attack sound changes every time, becauseyou're virtually stimulating something that is already moving.
Resonances. An electric piano, just like an acoustic piano, has an harp and asoundboard where metallic elements are put into vibration and, in turn, transmittheir vibration to the other elements. This is called “sympathetic” resonance. Try this:play a note in the treble register (for example the last D), now push the sustain pedaland keep playing that note. You will notice that all other tines (or reeds) are put intovibration.
There is more, but we are confident that now you get the picture. Now back to theboring technical stuff. Won't you miss the effects?
Switching between the “Tine” and the “Reed” piano is done from the Editor web-appbut can also be done using a button shortcut explained later in this manual.
CRUMAR MOJO 61 USER'S MANUAL - Page 18/28
13. APPLYING EFFECTS TO COMBO ORGANS AND ELECTRIC PIANOS
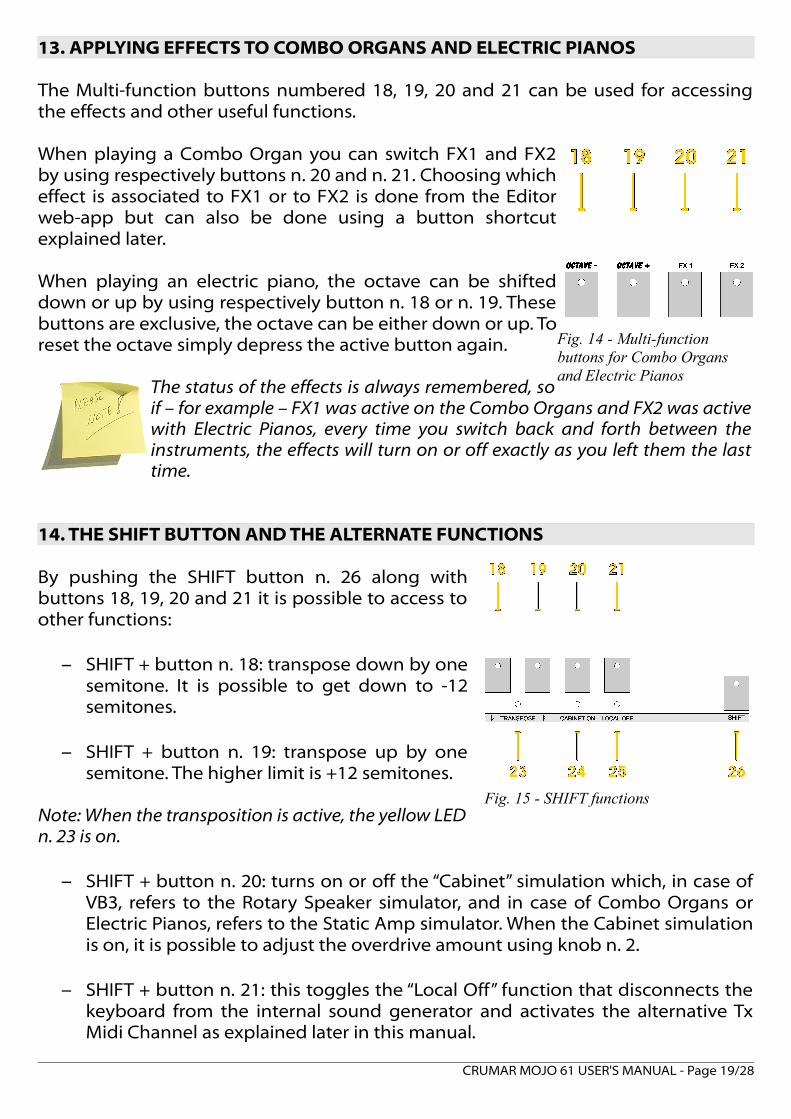
The Multi-function buttons numbered 18, 19, 20 and 21 can be used for accessingthe effects and other useful functions.
When playing a Combo Organ you can switch FX1 and FX2by using respectively buttons n. 20 and n. 21. Choosing whicheffect is associated to FX1 or to FX2 is done from the Editorweb-app but can also be done using a button shortcutexplained later.
When playing an electric piano, the octave can be shifteddown or up by using respectively button n. 18 or n. 19. Thesebuttons are exclusive, the octave can be either down or up. Toreset the octave simply depress the active button again.
The status of the effects is always remembered, soif – for example – FX1 was active on the Combo Organs and FX2 was activewith Electric Pianos, every time you switch back and forth between theinstruments, the effects will turn on or off exactly as you left them the lasttime.
14. THE SHIFT BUTTON AND THE ALTERNATE FUNCTIONS
By pushing the SHIFT button n. 26 along withbuttons 18, 19, 20 and 21 it is possible to access toother functions:
– SHIFT + button n. 18: transpose down by onesemitone. It is possible to get down to -12semitones.
– SHIFT + button n. 19: transpose up by onesemitone. The higher limit is +12 semitones.
Note: When the transposition is active, the yellow LEDn. 23 is on.
– SHIFT + button n. 20: turns on or off the “Cabinet” simulation which, in case ofVB3, refers to the Rotary Speaker simulator, and in case of Combo Organs orElectric Pianos, refers to the Static Amp simulator. When the Cabinet simulationis on, it is possible to adjust the overdrive amount using knob n. 2.
– SHIFT + button n. 21: this toggles the “Local Off” function that disconnects thekeyboard from the internal sound generator and activates the alternative TxMidi Channel as explained later in this manual.
CRUMAR MOJO 61 USER'S MANUAL - Page 19/28
Fig. 14 - Multi-function buttons for Combo Organs and Electric Pianos
Fig. 15 - SHIFT functions
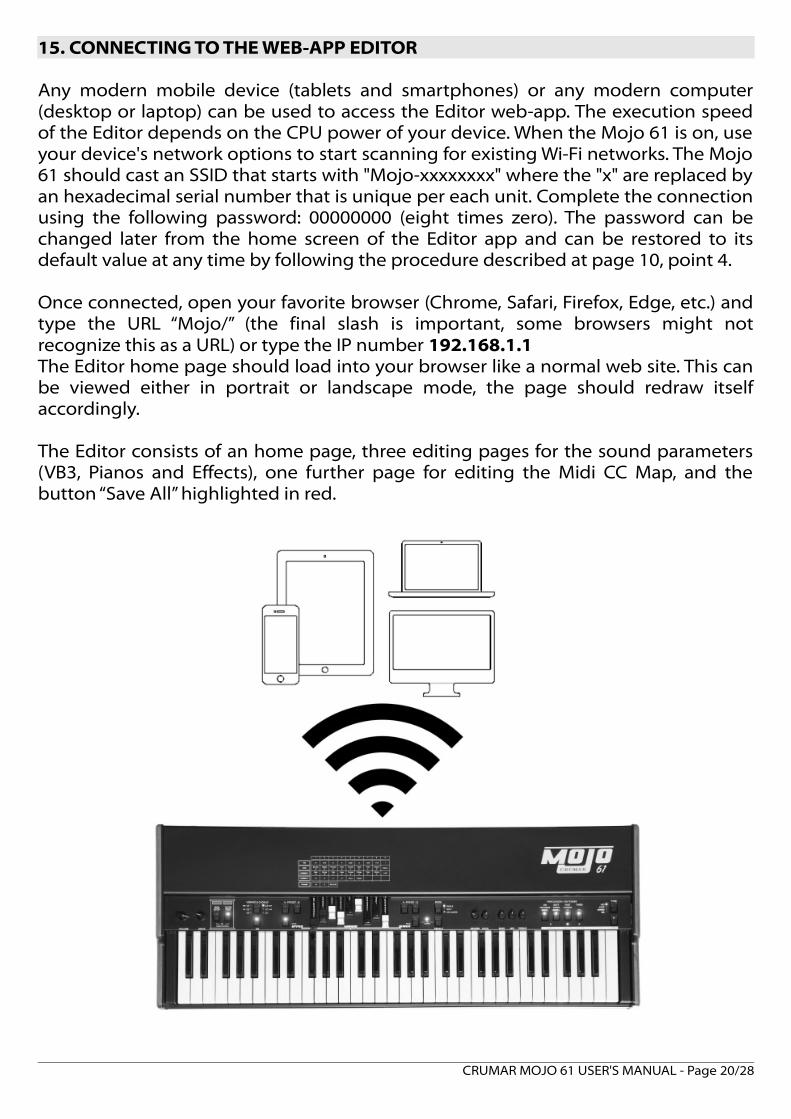
15. CONNECTING TO THE WEB-APP EDITOR
Any modern mobile device (tablets and smartphones) or any modern computer(desktop or laptop) can be used to access the Editor web-app. The execution speedof the Editor depends on the CPU power of your device. When the Mojo 61 is on, useyour device's network options to start scanning for existing Wi-Fi networks. The Mojo61 should cast an SSID that starts with "Mojo-xxxxxxxx" where the "x" are replaced byan hexadecimal serial number that is unique per each unit. Complete the connectionusing the following password: 00000000 (eight times zero). The password can bechanged later from the home screen of the Editor app and can be restored to itsdefault value at any time by following the procedure described at page 10, point 4.
Once connected, open your favorite browser (Chrome, Safari, Firefox, Edge, etc.) andtype the URL “Mojo/” (the final slash is important, some browsers might notrecognize this as a URL) or type the IP number 192.168.1.1 The Editor home page should load into your browser like a normal web site. This canbe viewed either in portrait or landscape mode, the page should redraw itselfaccordingly.
The Editor consists of an home page, three editing pages for the sound parameters(VB3, Pianos and Effects), one further page for editing the Midi CC Map, and thebutton “Save All” highlighted in red.
CRUMAR MOJO 61 USER'S MANUAL - Page 20/28
16. USING THE WEB-APP EDITOR
The Mojo 61 Editor is a Web-App, an interactive web site that can be used to adjustall sound parameters and other functions. Parameters are generally presented underthe form of horizontal sliders for more convenience when using the app from a touchdevice. However, the app can also be used with the mouse from a conventionalcomputer.
An in-line help can be recalled by clicking/tapping on the question mark iconon the top right corner, or on the parameter names in the editing pages.
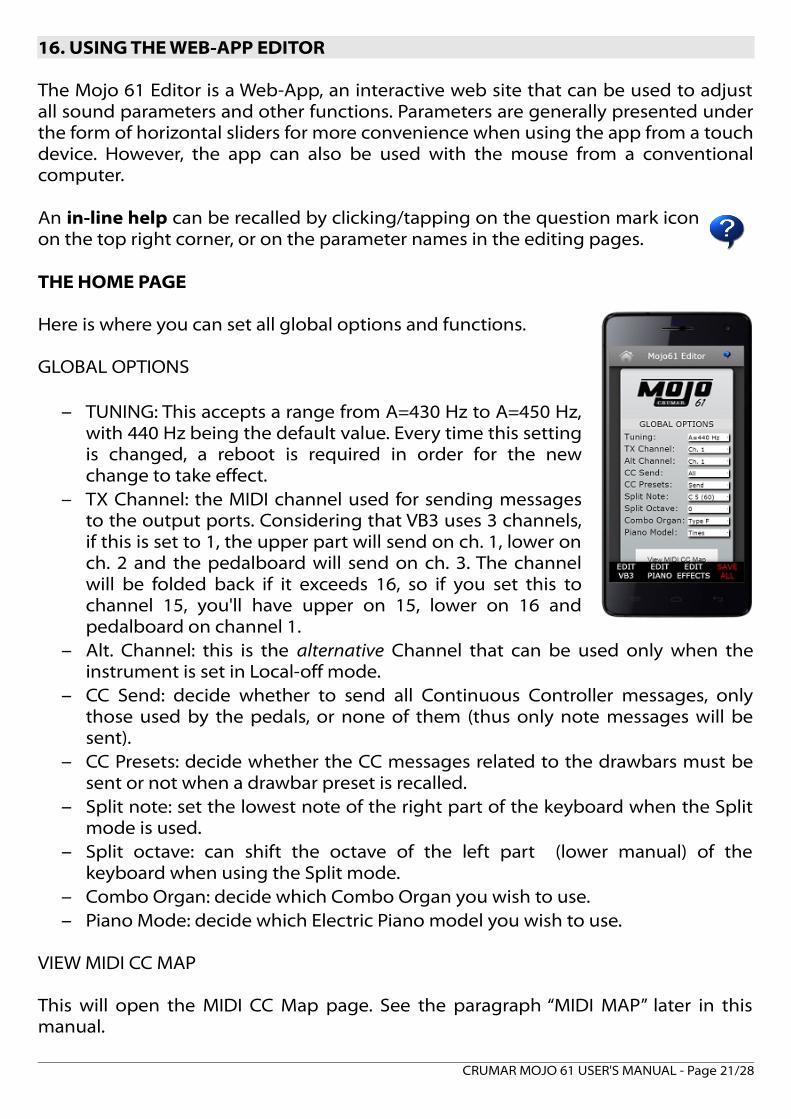
THE HOME PAGE
Here is where you can set all global options and functions.
GLOBAL OPTIONS
– TUNING: This accepts a range from A=430 Hz to A=450 Hz,with 440 Hz being the default value. Every time this settingis changed, a reboot is required in order for the newchange to take effect.
– TX Channel: the MIDI channel used for sending messagesto the output ports. Considering that VB3 uses 3 channels,if this is set to 1, the upper part will send on ch. 1, lower onch. 2 and the pedalboard will send on ch. 3. The channelwill be folded back if it exceeds 16, so if you set this tochannel 15, you'll have upper on 15, lower on 16 andpedalboard on channel 1.
– Alt. Channel: this is the alternative Channel that can be used only when theinstrument is set in Local-off mode.
– CC Send: decide whether to send all Continuous Controller messages, onlythose used by the pedals, or none of them (thus only note messages will besent).
– CC Presets: decide whether the CC messages related to the drawbars must besent or not when a drawbar preset is recalled.
– Split note: set the lowest note of the right part of the keyboard when the Splitmode is used.
– Split octave: can shift the octave of the left part (lower manual) of thekeyboard when using the Split mode.
– Combo Organ: decide which Combo Organ you wish to use.– Piano Mode: decide which Electric Piano model you wish to use.
VIEW MIDI CC MAP
This will open the MIDI CC Map page. See the paragraph “MIDI MAP” later in thismanual.
CRUMAR MOJO 61 USER'S MANUAL - Page 21/28
WI-FI PASSWORD
The default password for connecting to the Mojo 61 is "00000000", it can be changedto any word of a max. length of 8 characters. It's preferable to use only letters andnumbers and avoid special characters. Setting a custom password prevents others toconnect to the Mojo 61 while we are performing on the stage. However, the Wi-Firadio in the Mojo 61 is powered enough to serve a connection in a range of max. 5 –10 meters (30 feet) - even though this distance may vary according to possibleinterferences - and accepts only one connection at a time, so there's no risk that twopeople are commanding the Mojo 61 at the same time.
PAGE: EDIT VB3
This page shows all parameters related to the VB3 engine and the Rotary Speakereffect. Every time you scroll a fader left or right, you can read the current value ontop of it.
PAGE: EDIT PIANO
This page shows all parameters related to the two electric piano simulations.
PAGE: EDIT EFFECTS
This page shows the parameters related to the effects that can be used with theCombo Organs and the Electric Pianos. Effects are organized in colored boxes.
PAGE: MIDI MAP
The MIDI Map page can be reached from the button in the home page or byclicking/tapping on the MIDI CC assigned to each parameter. It is possible to assignany of the 127 CC numbers to any parameter, and more than one parameter can beassigned to the same CC, if necessary, but this means that when that specific CCnumber is received, all parameters assigned to it will change accordingly.
BUTTON: SAVE ALL
Click or tap this button in order to make all changes permanent.
No further informations are given in this manual about the soundparameters accessible from the editor because they are explained in detailin the in-line help. If you have any doubts while editing your sound, click ortap the name of the parameter you wish to know more about and a pop upwindow will appear with the informations you need.
CRUMAR MOJO 61 USER'S MANUAL - Page 22/28
17. SHORTCUTS
Some of the functions that are normally accessed from the Editor web-app can alsobe accessed using key-combinations on the command panel. Here's a summary:
– Switch between Combo Organ “F” and “V”: press SHIFT + the TYPE button n. 22while playing the Combo Organ.
– Switch between Electric Piano “Tine” and “Reed”: press SHIFT + the TYPE buttonn. 22 while playing the Electric Piano.
– Switch between Square, Triangle and Mono Tremolo: press & hold the multi-function button n. 20 labeled “FX1”, the effect turns off for a short while thenturns on again with the new setting.
– Switch between Phaser and Chorus: press & hold the multi-function button n.21 labeled “FX2”, the effect turns off for a short while then turns on again withthe new setting.
– Set the split point: press SHIFT + MODE button n. 15, the Split LED startsblinking, now play the desired split note on the keyboard (you won't hear anysound), the LED restores its previous position and the split point is now set andsaved.
– Reset the transposition: press SHIFT + press & hold either button n. 18 or n. 19,the transpose LED n. 23 should turn off and the transpose amount is nowzeroed.
18. THE USB PORTS
The Mojo 61 includes a Type-A “host” USB 2.0 port. This is mainly used for updatingthe software in case a new release is available.
But the most interesting use for this port is to connect a “Class-compliant USB-MIDIdevice”, i.e. one of the many MIDI devices that don't need special drivers when theyare connected to a computer. The Mojo 61 will recognize USB-MIDI devices and willuse them along with any other MIDI equipment connected to either one or both theclassic MIDI inputs located on the rear panel. This way you can connect up to 3 MIDIdevices to the Mojo 61, for example a keyboard, a pedalboard and a control surface.
Please avoid connecting unsupported devices to this port.
An additional Type-B USB 2.0 port is present at the back side of the Mojo 61 thatprovides Class-compliant USB-MIDI IN/OUT connection to your computer. Use thisport to connect the Mojo 61 to your computer software. No drivers are needed.
CRUMAR MOJO 61 USER'S MANUAL - Page 23/28
19. MIDI FUNCTIONS AND IMPLEMENTATION CHART
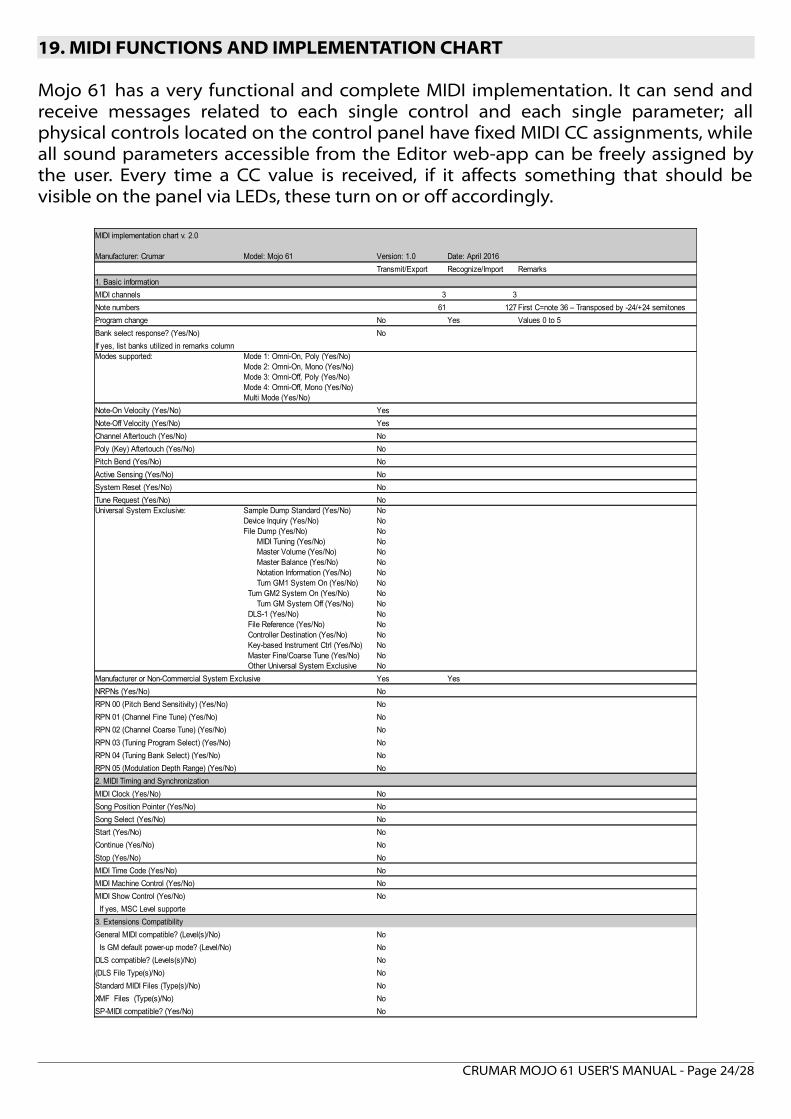
Mojo 61 has a very functional and complete MIDI implementation. It can send andreceive messages related to each single control and each single parameter; allphysical controls located on the control panel have fixed MIDI CC assignments, whileall sound parameters accessible from the Editor web-app can be freely assigned bythe user. Every time a CC value is received, if it affects something that should bevisible on the panel via LEDs, these turn on or off accordingly.
CRUMAR MOJO 61 USER'S MANUAL - Page 24/28
Model: Mojo 61
3 3
61 127
No
No
No
No
No
No
No
NoNoNoNoNoNoNoNoNoNoNoNoNoNoNoNoNo
No
No
No
No
No
No
No
No
No
No
No
No
No
No
No
No
No
No
No
No
No
No
No
MIDI implementation chart v. 2.0
Manufacturer: Crumar Version: 1.0 Date: April 2016
Transmit/Export Recognize/Import Remarks
1. Basic information
MIDI channels
Note numbers First C=note 36 – Transposed by -24/+24 semitones
Program change Yes Values 0 to 5
Bank select response? (Yes/No)
If yes, list banks utilized in remarks columnModes supported: Mode 1: Omni-On, Poly (Yes/No)
Mode 2: Omni-On, Mono (Yes/No)Mode 3: Omni-Off, Poly (Yes/No)Mode 4: Omni-Off, Mono (Yes/No)Multi Mode (Yes/No)
Note-On Velocity (Yes/No) Yes
Note-Off Velocity (Yes/No) Yes
Channel Aftertouch (Yes/No)
Poly (Key) Aftertouch (Yes/No)
Pitch Bend (Yes/No)
Active Sensing (Yes/No)
System Reset (Yes/No)
Tune Request (Yes/No)Universal System Exclusive: Sample Dump Standard (Yes/No)
Device Inquiry (Yes/No)File Dump (Yes/No) MIDI Tuning (Yes/No) Master Volume (Yes/No) Master Balance (Yes/No) Notation Information (Yes/No) Turn GM1 System On (Yes/No) Turn GM2 System On (Yes/No) Turn GM System Off (Yes/No) DLS-1 (Yes/No) File Reference (Yes/No) Controller Destination (Yes/No) Key-based Instrument Ctrl (Yes/No) Master Fine/Coarse Tune (Yes/No) Other Universal System Exclusive
Manufacturer or Non-Commercial System Exclusive Yes Yes
NRPNs (Yes/No)
RPN 00 (Pitch Bend Sensitivity) (Yes/No)
RPN 01 (Channel Fine Tune) (Yes/No)
RPN 02 (Channel Coarse Tune) (Yes/No)
RPN 03 (Tuning Program Select) (Yes/No)
RPN 04 (Tuning Bank Select) (Yes/No)
RPN 05 (Modulation Depth Range) (Yes/No)
2. MIDI Timing and Synchronization
MIDI Clock (Yes/No)
Song Position Pointer (Yes/No)
Song Select (Yes/No)
Start (Yes/No)
Continue (Yes/No)
Stop (Yes/No)
MIDI Time Code (Yes/No)
MIDI Machine Control (Yes/No)
MIDI Show Control (Yes/No)
If yes, MSC Level supporte
3. Extensions Compatibility
General MIDI compatible? (Level(s)/No)
Is GM default power-up mode? (Level/No)
DLS compatible? (Levels(s)/No)
(DLS File Type(s)/No)
Standard MIDI Files (Type(s)/No)
XMF Files (Type(s)/No)
SP-MIDI compatible? (Yes/No)
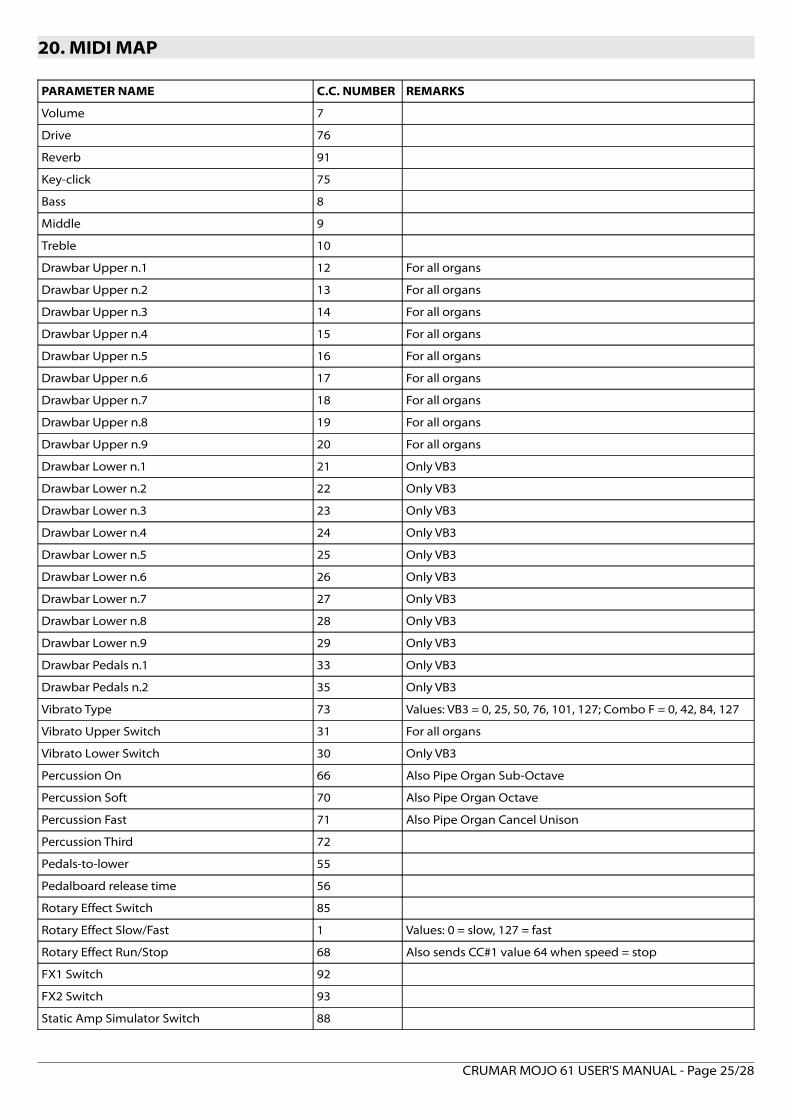
20. MIDI MAP
PARAMETER NAME C.C. NUMBER REMARKS
Volume 7
Drive 76
Reverb 91
Key-click 75
Bass 8
Middle 9
Treble 10
Drawbar Upper n.1 12 For all organs
Drawbar Upper n.2 13 For all organs
Drawbar Upper n.3 14 For all organs
Drawbar Upper n.4 15 For all organs
Drawbar Upper n.5 16 For all organs
Drawbar Upper n.6 17 For all organs
Drawbar Upper n.7 18 For all organs
Drawbar Upper n.8 19 For all organs
Drawbar Upper n.9 20 For all organs
Drawbar Lower n.1 21 Only VB3
Drawbar Lower n.2 22 Only VB3
Drawbar Lower n.3 23 Only VB3
Drawbar Lower n.4 24 Only VB3
Drawbar Lower n.5 25 Only VB3
Drawbar Lower n.6 26 Only VB3
Drawbar Lower n.7 27 Only VB3
Drawbar Lower n.8 28 Only VB3
Drawbar Lower n.9 29 Only VB3
Drawbar Pedals n.1 33 Only VB3
Drawbar Pedals n.2 35 Only VB3
Vibrato Type 73 Values: VB3 = 0, 25, 50, 76, 101, 127; Combo F = 0, 42, 84, 127
Vibrato Upper Switch 31 For all organs
Vibrato Lower Switch 30 Only VB3
Percussion On 66 Also Pipe Organ Sub-Octave
Percussion Soft 70 Also Pipe Organ Octave
Percussion Fast 71 Also Pipe Organ Cancel Unison
Percussion Third 72
Pedals-to-lower 55
Pedalboard release time 56
Rotary Effect Switch 85
Rotary Effect Slow/Fast 1 Values: 0 = slow, 127 = fast
Rotary Effect Run/Stop 68 Also sends CC#1 value 64 when speed = stop
FX1 Switch 92
FX2 Switch 93
Static Amp Simulator Switch 88
CRUMAR MOJO 61 USER'S MANUAL - Page 25/28
KEYBOARD VELOCITY
Mojo 61 can send notes with or without velocity according to the instrumentselected with the Type button n. 22. If VB3 or Combo Organ is selected, notes aresent with a fixed velocity value of 127 but the first key contact is used (fast keytriggering). If Pipe Organ or EP is selected, velocity is sent. Key-off velocity is alwayssent. Any transposition or octave shifting applied to the internal sound generator isalso applied to the transmitted note messages.
PEDALS
The sustain pedal sends CC #64 with values 0 or 127 only when the EP is selected. The expression (Swell) pedal sends CC #11.
OTHER
The instrument type selection can be remotely done by sending Program Changeevents with the following values: 0 = VB3, 1 = Pipe Organ, 2 = Combo “F”, 3 = Combo“V”, 4 = Tine Piano, 5 = Reed Piano.
21. SPECIFICATIONS
Technical specifications:– power rating: 9 ~ 12 Volts– output level: selectable -10 dBu, +4 dBu, High Gain (~ +10 dBu)– headphone output max load: 32 ohm– dimensions: 92,3 cm X 35 cm X 12 cm / 36,3” x 13,7” x 4,7”– weight: 11,5 Kg / 25,35 lbs
Crumar Mojo 61 is a digital Musical Instrument designed and built in Italy. All rights reserved.
All trademarks used herein are the property of their respective owners. Crumar is a trademark owned by:
V.M. ConnectionVia Pascoli, 44/A - 30020 Quarto d'Altino (VE) - Italywww.Crumar.it
CRUMAR MOJO 61 USER'S MANUAL - Page 26/28

CRUMAR MOJO 61 USER'S MANUAL - Page 27/28

CRUMAR MOJO 61 USER'S MANUAL - Page 28/28


![Mojo magazine[1]](https://img.pdfslide.net/doc/110x75/5560da83d8b42a3c158b5973/mojo-magazine1.jpg)