Embed Size (px)
Citation preview

Lesson A7–3
Operating, Calibrating, and Maintaining
Agricultural Planting Systems
Unit A. Mechanical Systems and Technology
Problem Area 7. Agricultural Equipment Systems
Lesson 3. Operating, Calibrating, and Maintaining Agricultural Planting Systems
New Mexico Content Standard:
Pathway Strand: Power, Structural and Technical Systems
Standard: II: Apply principles of operation and maintenance to mechanical equipment,
structures, biological systems, land treatment, power utilization, and technology.
Benchmark: II-A: Perform scheduled services routines to maintain machinery and equip-
ment.
Performance Standard: 2. Ensure presence and function of safety systems and hardware.
7. Maintain vehicle, machinery, and equipment cleanliness and appearance. 11. Cali-
brate metering, monitoring, and sensing equipment.
Student Learning Objectives. Instruction in this lesson should result in students
achieving the following objectives:
1. Describe the operating principles of planting equipment.
2. Identify the types of planting equipment.
3. Identify the components of row-crop planting equipment.
4. Identify the components of solid planting equipment.
5. Explain the calibration of planting equipment.
6. Identify maintenance procedures for planting equipment.
New Mexico Agricultural Mechanics and Technology Lesson Plan Library
Unit A. Problem Area 7. Lesson 3. Page 1.

List of Resources. The following resources may be useful in teaching this lesson:
Recommended Resources. One of the following resources should be selected to accompany the
lesson:
Breece, H. Edward, et al. Fundamentals of Machine Operation—Planting. Moline,
Illinois; Deere & Company, 1992.
Row-Crop Planters (VAS 3021a). University of Illinois, Urbana, Illinois: ITCS
Instructional Materials.
List of Equipment, Tools, Supplies, and Facilities
Writing surface
Overhead projector
Transparencies from attached masters
Copies of student lab sheets
Corn planter, grain drill or parts from them
Terms. The following terms are presented in this lesson (shown in bold italics):
Broadcasting
Checkrow planting
Field calibration
Germination
Hill drop planting
Population
Row-crop planting
Solid planting
Starter fertilizer
Interest Approach. Use an interest approach that will prepare the students for the les-
son. Teachers often develop approaches for their unique class and student situations. A possible
approach is included here.
Show students a kernel of corn, and a small, average, and large ear of corn. Lead a discussion on where
the kernel and the ears came from. Ask students what causes the different sizes of ears of corn and why is
the size of an ear of corn important?
Another approach would be to have parts from an older and a newer corn planter on hand. Ask the stu-
dents to compare the technologies involved in each.
New Mexico Agricultural Mechanics and Technology Lesson Plan Library
Unit A. Problem Area 7. Lesson 3. Page 2.

Summary of Content and Teaching Strategies
Objective 1: Describe the operating principles of planting equipment.
Anticipated Problem: What are the operating principles of planting equipment?
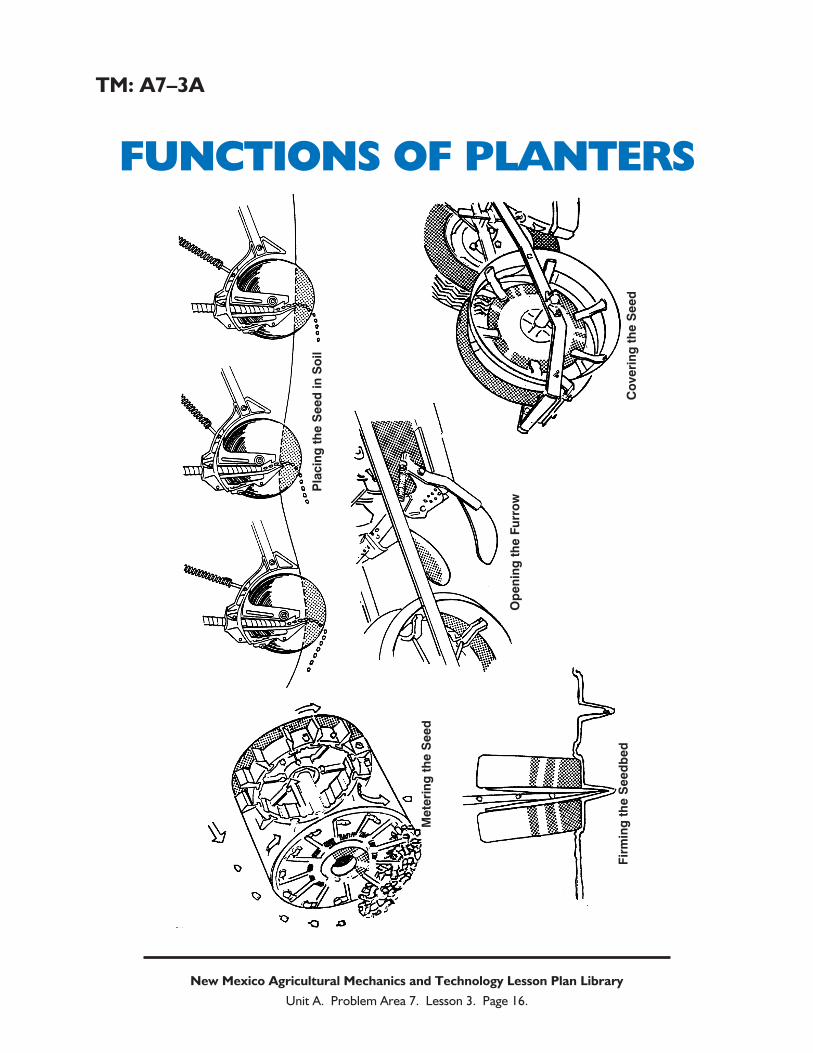
I. The purpose of most planters and grain drills, excluding broadcast planters, is to plant seeds
evenly in rows or on beds. To do this in the manner desired, the planter must perform five
basic functions:
A. Opening a furrow in the soil—The grain must be placed in moisture for the grain to ger-
minate. Germination is the change from a dormant condition to one of activity and
growth. The grain should be an equal depth, regardless of the soil conditions. The furrow
opener on planters and drills allows for both of these conditions to be met.
B. Meter the seed to the soil—In order to obtain maximum yields, the seeds must be
planted at specific rates. This is accomplished by use of metering devices on planters and
drills, which regulate when seeds are put into the soil.
C. Placing the seed in the soil—Crop yields depend heavily upon depth and space between
seeds. Yield is affected because placement has a bearing on emerged plant population.
This function is accomplished by the two previous functions. The furrow opener pro-
vides a uniform depth for the seeds, while the metering device allows for equal spacing
between plants.
D. Covering the seed in the soil—The seed must be covered for protection against such fac-
tors as temperature, moisture and rodents. If the seeds were not covered, these factors
and others would decrease the possibilities of the seeds germinating and thus decrease
yields. This function is usually accomplished by the use of press wheels on planters, and
by the chains or drags on drills.
E. Firming the seedbed—Provides for adequate seed to soil contact, which aids in faster
germination, and reduces crust formation. The press wheels and drag chains accomplish
this function.
Use TM: A7–3A to emphasize the functions of planters. An alternative approach is to transfer the infor-
mation from the transparency masters to a multimedia presentation. Use text material to strengthen stu-
dent understanding of concepts. Chapter 1 in Fundamentals of Machine Operation—Planting and Sec-
tion 1 in Row-Crop Planters (VAS 3021a) are recommended.
Objective 2: Identify the types of planting equipment.
Anticipated Problem: What are the types of planting equipment?
II. Planting or seeding equipment is generally divided into four types.
A. Row-crop planting is generally used for crops such as corn, sorghum, soybeans, and cot-
ton, which require precise row spacing and even spacing of the plants within the row.
New Mexico Agricultural Mechanics and Technology Lesson Plan Library
Unit A. Problem Area 7. Lesson 3. Page 3.

These crops are planted in rows to aid in weed control as well as harvesting. There are
three general types of row-crop planters based on the method by which the seeds are
planted in the rows.
1. The drill planting method is commonly used in planting corn, soybeans, sorghum
and cotton. The seeds are dropped individually in the row at a given distance.
Spacing depends on the desired population. Population is the number of seeds or
plants per acre.
2. The hill-drop planting method, where the seeds are located in hills of two to five
seeds per hill, is less common for corn planting today than a few years ago. To hill
drop, the seeds are accumulated within the planter and dropped as a group into the
seedbed, or they may be accumulated beneath the seed plate and dropped or carried
to the soil.
3. The third row-crop planting method is checkrow planting, where three to five seeds
are dropped in each hill when using this method. The hills are generally separated
within the row the same distance as the rows are wide and aligned perpendicular to
the direction of travel. Checkrow planting of corn was once popular when there was
a need for cross cultivation for weed control.
B. Grain drills and air seeders are used to sow or plant seeds such as oats, barley, and other
small grains and soybeans. These seeds are planted as high-population crops.
C. Broadcast seeders are used to broadcast small grains such as oats, wheat, barley, and
grass or legume seed. Broadcast seeders are not used as a cash-crop planter due to inac-
curacy of seeding. Broadcasting is where the seeds are scattered on a random, non-row
basis on the top of the seedbed. Another field operation is then required to cover the
seed.
D. Specialized planters are designed for special planting operations. They vary in row
widths, metering methods, furrow openers, covering methods, and type of seed-placing
mechanisms. Examples of specialized planters are the potato planter, vegetable planter,
and transplanters.
Use text material to strengthen student understanding of concepts. Chapter 1 in Fundamentals of
Machine Operation—Planting and Section 1 in Row-Crop Planters (VAS 3021a) are recommended.
Objective 3: Identify the components of row-crop planting equipment.
Anticipated Problem: What are the components of row-crop planting equipment?
III. If the crop is planted in rows far enough apart to permit the operation of machinery, such as
cultivators and harvesters, this is called row-crop planting. Planters are designed to plant
large numbers of different crops in many soil conditions.
A. Three categories of frames are used on planters.
1. The drawn or trailing planter has its own carrying wheels which are in contact with
the soil when the planter is in the raised (transport) or lowered (planting) positions.
The planter units are mounted on a main frame which is attached to the tractor by
New Mexico Agricultural Mechanics and Technology Lesson Plan Library
Unit A. Problem Area 7. Lesson 3. Page 4.

the planter tongue. The planter is raised and lowered by remote hydraulic cylinders
attached to the tractor hydraulic system.
2. The integral planter frame may be attached to the three-point hitch of the tractor or
to the frame of the tractor.
3. The tool-bar planter has unit type planters each having its own frame and drive. The
units may be attached to an implement tool bar and mounted on the three-point
hitch of the tractor or on drawn or integral frames of other implements .
B. Planter drives must deliver the correct spacing of seeds in the row at varying travel
speeds and under varying soil and topographic conditions. Planter drives are usually
either ground or hydraulic driven.
1. The three types of ground wheel drives commonly used to turn the seeding mecha-
nism are carrying-wheel drives, gauge-wheel drives and press-wheel drives.
a. Carrying-wheel drives are used on most drawn or trailing type planters. Power to
drive the seeding mechanism is transmitted from the transport wheels through a
series of chains and sprockets, shafts and gears, or a gear box to a central drive
for the metering mechanisms. Seeding population is adjusted by changing to dif-
ferent sizes of drive and driven sprockets.
b. Gauge-wheel drive is commonly used on tool-bar planters or integral-mounted
planters. Power to drive the seeding mechanism is the same as the carrying-wheel
drive. Seeding population is adjusted by changing to different sizes of drive and
driven sprockets.
c. Press-wheel drive may be used when unit type planters are mounted on a tool
bar. Power to turn the seeding metering mechanism is transmitted through a
drive chain and sprockets. Slippage of the press-wheel drive may be greater
because the press-wheel is running in soil loosened by the furrow opener and the
weight or down pressure on the wheel may not be enough to prevent slippage.
Seeding population is adjusted by changing to different sizes of drive and driven
sprockets.
2. Hydraulic driven planter drives are operated by the tractor’s hydraulic system.
a. A hydraulic motor is mounted on the planter and drives the metering system
through a chain and sprockets.
b. Seeding population is controlled from the tractor operator’s compartment using
variable rate technology (VRT).
c. A radar gun or Global Positioning System (GPS) equipment is used to automati-
cally adjusted the population, depending on the ground speed.
C. The major function of the furrow opener is to open a well defined groove in the soil
where the seed may be placed at the proper depth and in firm contact with the soil to
provide for optimum germination and seedling emergence. The major types of furrow
openers used are the V-trench, disk, runner, combination runner and disk, and shovel
openers.
New Mexico Agricultural Mechanics and Technology Lesson Plan Library
Unit A. Problem Area 7. Lesson 3. Page 5.

1. The V-trench openers are effective in most soil conditions and can be used in both
conventional and conservation tillage systems. Two sharply angled disks and close
hugging gauge wheels are used to make a V-shaped planting trench. The wheels not
only gauge the depth where the seed enters the ground, they also firm and mold the
soil around the trench cut by the disks.
2. Disk openers are popular where minimum tillage systems are used and where there is
a greater amount of trash left on the surface. Two sharply angled disks are used to
make a V-shaped planting trench cut by the disks.
3. Runner openers are used when planting crops in ground that has been convention-
ally tilled. A runner opener widens from the front to rear. The seeds are dropped
through an opening at the rear of the runner which has formed a furrow of the
desired depth for seed placement.
4. The combination runner and double-disk opener has the advantages of both types of
openers.
5. Shovel openers are used to prepare a seed slot or groove in sticky soil conditions.
D. The function of the seed metering system is to select the seeds from the hopper either
individually or randomly and deliver it to the seed placing mechanism at a selected rate.
Seed metering systems may be classified as seed plate, finger-pickup, air devices or vol-
ume devices.
1. The seed plate metering system has a seed plate with openings or cells that rotates at
the bottom of a seed hopper.
a. As the seed plate turns, seeds fall into the openings or cells of the seed plate. If
the cells of the seed plate are the proper size, only one kernel will fall into each
cell. A spring loaded cutoff pawl keeps seeds other than the one in the seed plate
cell from dropping from the hopper into the discharge tube. When a cell contain-
ing a seed passes over the discharge hole in the hopper bottom, a spring loaded
knockout pawl ejects the seed through this opening to the seed placement
device.
b. Individual seed plates are designed to select seed of a specific size. Seed plates
have to be changed every time seed size changes.
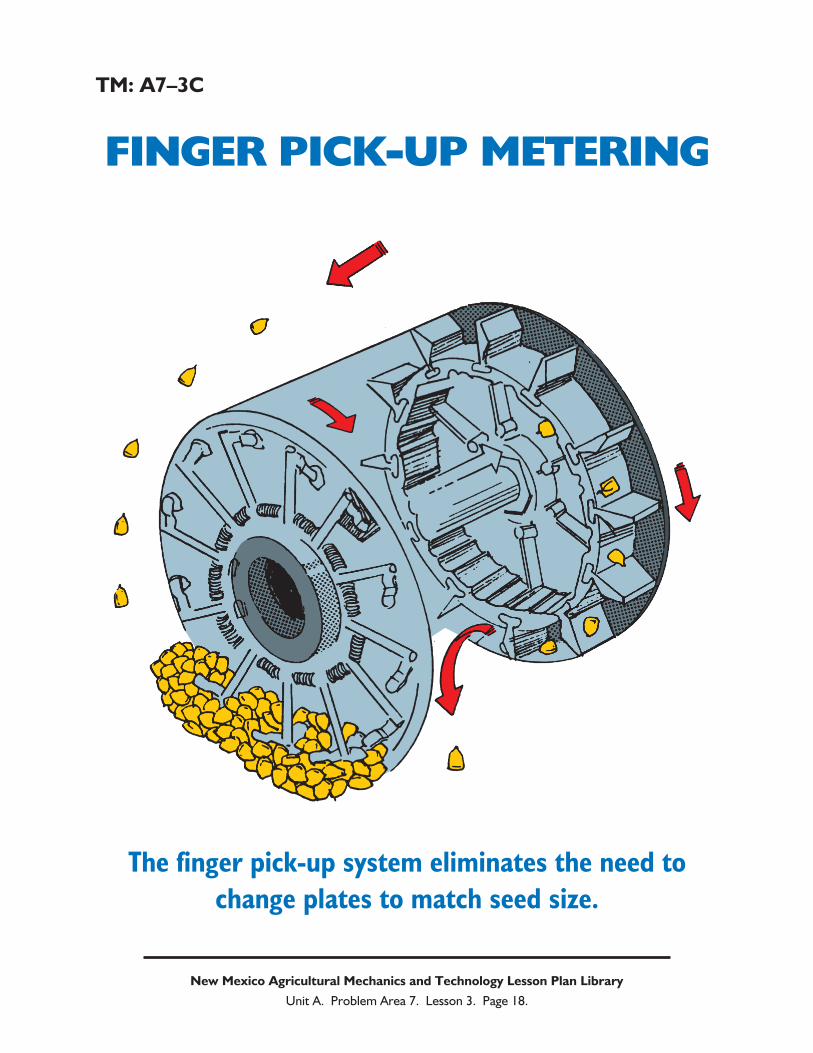
2. The finger-pickup metering system was developed to eliminate the changing of
plates for various sizes of seeds.
a. The finger-pickup will pickup individual kernels of various sizes and shapes with
a high degree of accuracy.
b. The finger pickup assembly has twelve spring-loaded fingers that are opened and
closed by a cam as they rotate. The corn is fed from a hopper into a reservoir by
gravity. As the fingers move through the corn in the reservoir, they close and
trap the kernel between the finger and the stationary plate. As the finger moves
clockwise, additional kernels which may have been trapped beneath the finger
fall away as they pass over two indented areas in the stationary plate. The one
remaining kernel, held securely by spring tension, is then carried to the discharge
hole where it is ejected into the seed placement mechanism.
New Mexico Agricultural Mechanics and Technology Lesson Plan Library
Unit A. Problem Area 7. Lesson 3. Page 6.
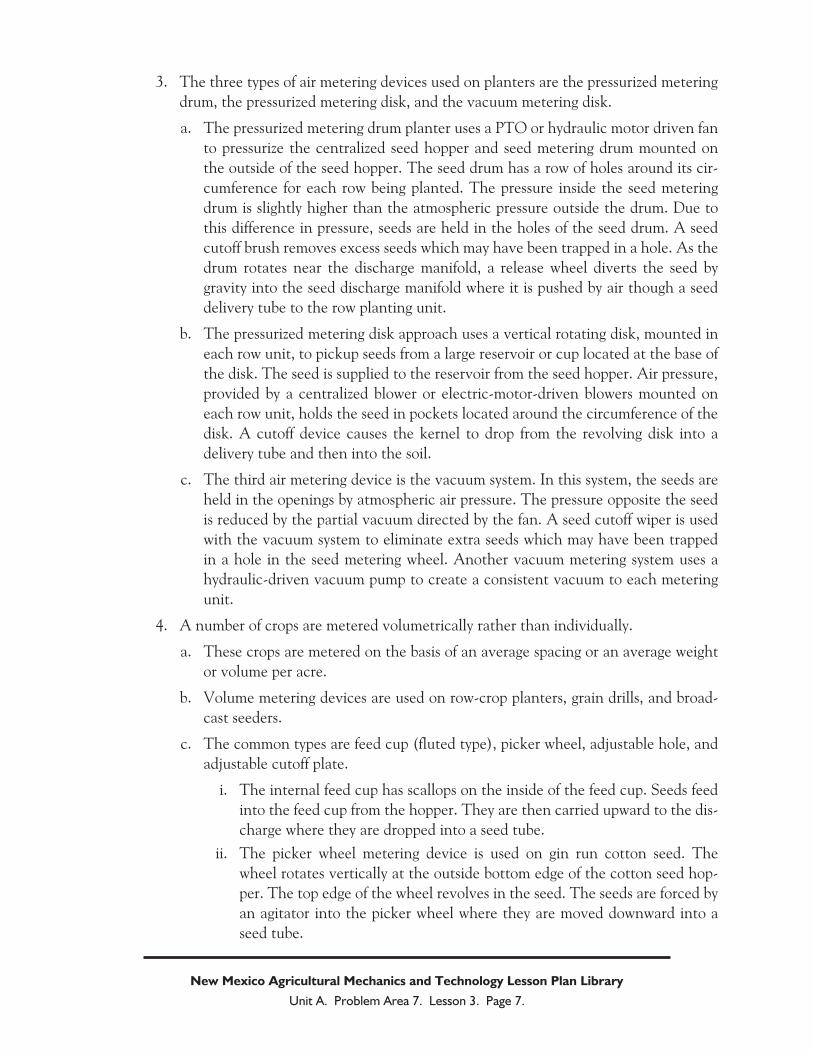
3. The three types of air metering devices used on planters are the pressurized metering
drum, the pressurized metering disk, and the vacuum metering disk.
a. The pressurized metering drum planter uses a PTO or hydraulic motor driven fan
to pressurize the centralized seed hopper and seed metering drum mounted on
the outside of the seed hopper. The seed drum has a row of holes around its cir-
cumference for each row being planted. The pressure inside the seed metering
drum is slightly higher than the atmospheric pressure outside the drum. Due to
this difference in pressure, seeds are held in the holes of the seed drum. A seed
cutoff brush removes excess seeds which may have been trapped in a hole. As the
drum rotates near the discharge manifold, a release wheel diverts the seed by
gravity into the seed discharge manifold where it is pushed by air though a seed
delivery tube to the row planting unit.
b. The pressurized metering disk approach uses a vertical rotating disk, mounted in
each row unit, to pickup seeds from a large reservoir or cup located at the base of
the disk. The seed is supplied to the reservoir from the seed hopper. Air pressure,
provided by a centralized blower or electric-motor-driven blowers mounted on
each row unit, holds the seed in pockets located around the circumference of the
disk. A cutoff device causes the kernel to drop from the revolving disk into a
delivery tube and then into the soil.
c. The third air metering device is the vacuum system. In this system, the seeds are
held in the openings by atmospheric air pressure. The pressure opposite the seed
is reduced by the partial vacuum directed by the fan. A seed cutoff wiper is used
with the vacuum system to eliminate extra seeds which may have been trapped
in a hole in the seed metering wheel. Another vacuum metering system uses a
hydraulic-driven vacuum pump to create a consistent vacuum to each metering
unit.
4. A number of crops are metered volumetrically rather than individually.
a. These crops are metered on the basis of an average spacing or an average weight
or volume per acre.
b. Volume metering devices are used on row-crop planters, grain drills, and broad-
cast seeders.
c. The common types are feed cup (fluted type), picker wheel, adjustable hole, and
adjustable cutoff plate.
i. The internal feed cup has scallops on the inside of the feed cup. Seeds feed
into the feed cup from the hopper. They are then carried upward to the dis-
charge where they are dropped into a seed tube.
ii. The picker wheel metering device is used on gin run cotton seed. The
wheel rotates vertically at the outside bottom edge of the cotton seed hop-
per. The top edge of the wheel revolves in the seed. The seeds are forced by
an agitator into the picker wheel where they are moved downward into a
seed tube.
New Mexico Agricultural Mechanics and Technology Lesson Plan Library
Unit A. Problem Area 7. Lesson 3. Page 7.

iii. Using an agitator over an adjustable hole is another type of random-
metering method. The agitator keeps the seeds distributed over a hole. As
the seeds are moved over the hole, a random number fall into the seed
delivery tube.
iv. The adjustable cutoff plate is very gentle and capable of handling fragile
seeds. The seeds from the hopper flow through a stationary cutoff plate
onto a rotating-dome-type seed plate. The rotation of the seed plate plus
the sloping surface causes the seeds to be carried to the discharge point.
E. The function of the seed placement mechanism is to accept the seed from the metering
device, drop it through the seed tube and deliver it to the furrow so that the seeds or
hills are properly spaced.
1. The gravity drop seed placement device is the simplest and least expensive mecha-
nism.
a. It has the disadvantage of not placing the seeds uniformly in the row, because a
row-crop planter is moving, the seed is likely to come to rest 8 to 12 inches from
where it first contacts the soil.
b. If a seed bounces around in the tube on its way to the furrow while another seed
falls straight through, kernel spacing can be greatly affected.
2. To improve the accuracy of seed placement in the row, four power-drop systems
have been developed.
a. The seed conveyor belt is designed for use with the finger pickup metering
assembly. The seeds are ejected into the seed wheel or belt and carried down to
the row-crop unit where they are delivered to the soil in a manner that reduces
the effect of the forward travel of the planter, seed roll is nearly eliminated, and
seed placement is extremely accurate.
b. The rotary-valve seed drop mechanism is designed for use with the plate-type
metering system. The valve holds and prevents the seed from falling by gravity to
the bottom of the furrow. The valve holds the seed until the lobe ejects the seed
rearward into the furrow.
c. The chain drop or conveyor system picks up the seed at the bottom of the seed
metering mechanism and carries it to a point just above the soil. The seed is then
ejected rearward to reduce seed roll.
d. The air seed drop system uses air velocity to transport the seed to the furrow.
F. The seeds must all be planted at nearly the same depth to get good germination and
seedling emergence.
1. Some type of gauging or depth control device is required since the seed bed is never
perfectly flat and soils vary in their firmness.
2. Gauge wheels can be found in several different locations on the planting unit. The
best location of the gauge wheel is beside the furrow opener at the point where the
seed is discharged into the furrow.
New Mexico Agricultural Mechanics and Technology Lesson Plan Library
Unit A. Problem Area 7. Lesson 3. Page 8.

3. Depth bands and gauge shoes control the depth of planting at the point of seed dis-
charge into the soil. They should not be used in soils that tend to stick to them, since
that would cause the depth of planting to be decreased.
G. To insure the seed is in contact with the soil and that it is not lying in a void or air space,
seed covering devices are used. These devices could be a shovel, knife, disk, or chain.
1. The shovel cover is used in sticky soil conditions.
2. The knife cover works well in conventionally tilled soils but plugs in trashy condi-
tions.
3. The disk cover will either cut through surface residue or ride over it.
4. The chain cover is attached to the rear of the furrow opener.
H. In most soils it is desirable to firm the soil around the seed to obtain good seed-to-soil
contact.
1. Seed-firming wheels serve a dual purpose in that they close the seed furrow and firm
the seedbed. To prevent crusting and aid in seedling emergence, the surface of the
soil directly over the seed is not packed.
2. Press wheels are used in soil conditions where obtaining good seed-to-soil contact is
not a problem.
I. The seed hopper may be either the individual type or the centralized type. They can be
made out of metal or fiberglass.
J. To achieve maximum yields, seed must be planted at the correct population rate with
the proper spacing. Seed monitors are helpful in order to know what is being planted.
1. The function of the seed monitor is to alert the operator at the time the malfunction
occurs. A plugged seed tube or other undiscovered malfunction in a planting unit
can greatly reduce the yield at harvest time.
2. The monitoring process starts with the sensor mounted in the seed tube of each
planting unit. The sensor, which is a photoelectric cell, senses the presence of each
seed as it falls trough the seed tube. The sensor then transmits this information to
the monitor console using electrical signals. The monitor processes the information
and displays it to the operator.
K. Attachments used on planters could include fertilizer, herbicide, insecticide or tillage.
1. Fertilizer applied at planting time is considered starter fertilizer.
2. Fertilizers, herbicides, and insecticides may be applied ether as a dry, granular mate-
rial or as a liquid.
3. Tillage attachments used while planting enable the farmer to reduce the number of
trips over the field.
Use TM: A7–3B, A7–3C, A7–3D, A7–3E and A7–3F to show examples of various metering devices.
An alternative approach is to transfer the information from the transparency masters to a multimedia pre-
sentation. Use text material to strengthen student understanding of concepts. Chapter 1 in Fundamentals
of Machine Operation—Planting and Section 1 and 2 in Row-Crop Planters (VAS 3021a) are recom-
mended.
New Mexico Agricultural Mechanics and Technology Lesson Plan Library
Unit A. Problem Area 7. Lesson 3. Page 9.

Objective 4: Identify the components of solid planting equipment.
Anticipated Problem: What are the components of solid planting equipment?
IV. If the row spacing is too close to permit cultivating or other cultural practices between them,
it is referred to as solid planting. Solid planting is accomplished by using grain drills, air seed-
ers, broadcast seeders, airplanes or helicopters.
A. Grain drills provide a more accurate distribution of seeds and a more uniform seeding
depth than broadcast type planting equipment. There are three major types of grain
drills.
1. The end-wheel drill has wheels that support and drive the drill.
2. A press-wheel drill has press-wheel gangs mounted on the rear of the drill that firm
the soil over the seed, drive the metering mechanisms and support the rear of the
drill.
3. The tiling seeder is an end-wheel type drill with power-driven cutter wheels that pre-
pares a seedbed for each seed drop on the grain drill.
B. Solid planting equipment have several components.
1. The metering system is driven through sprockets and chains, and gears.
2. Fluted-feed and double-run feed are the two types of seed metering devices used on
solid planting equipment.
a. The fluted feed is made up of a fluted wheel which runs inside the feed-run cup,
a stationary cutoff, an adjustable feed gate, and feed-gate lever. There is one
fluted feed for each furrow opener.
b. The double-run feeds have a feed wheel that has two sides which meter seeds.
3. The seed tube is attached to each metering unit and to the furrow opener.
4. Furrow openers make a trench in the soil and place the seed at the desired depth.
5. The depth of solid planters is controlled by the position of an adjustable stop on the
remote hydraulic cylinder and the amount of spring pressure.
6. Covering and firming the soil around the seed is accomplished by the use of a drag
chain or press wheel. Some drills have no attachment for covering the seed, the
design of the furrow opener permits the soil to fall back into the trench.
Use text material to strengthen student understanding of concepts. Chapter 4 in Fundamentals of
Machine Operation—Planting and Section 1 and 2 in Row-Crop Planters (VAS 3021a) are recom-
mended.
New Mexico Agricultural Mechanics and Technology Lesson Plan Library
Unit A. Problem Area 7. Lesson 3. Page 10.

Objective 5: Explain the calibration of planting equipment.
Anticipated Problem: How is planting equipment calibrated?
V. Proper field adjustment and operation of planting equipment can contribute to increased
yields. The operator’s manual for the planting equipment should serve as a guide for initial
planter settings. Field calibration is the process of actually checking and making final adjust-
ments to the equipment. A check of actual planting populations can easily be made by using
one of the following methods.
A. The following method is reasonably accurate and is used when the operator wants to fine
tune the planter.
1. Fill the seed hoppers at least half full to simulate average planter weight. Add pow-
dered graphite if recommended by the planter operator’s manual.
2. Tie up covering wheels so that seeds can be easily counted. A small chain with and
S-hook at each end works well for this.
3. Mark row distance equal to 1/1000 acre.
4. Plant the measured distance at the speed you intend to use during planting. Start
planting before reaching first mark and continue past last mark.
5. Uncover seeds within the measured distance and count them. Do not use bare hands
if the seed is treated with an insecticide.
6. Multiply the number of seeds by 1000. This equals the planting population for one
acre.
7. To be accurate check each row.
8. Measure planting depth at this time.
9. Check average distance between seeds to determine accurate seed placement.
10. Make required adjustments for rate of seeding and depth of planting and recheck by
repeating steps 1 through 4.
B. The following method is less accurate than the first, but is faster.
1. Fill the hoppers and plant several feet.
2. Measure 3 feet along each row.
3. Count number of seeds uncovered in this distance and determine the average num-
ber of seeds found per row.
4. Multiply the average number of seeds by the appropriate factor and multiply by 1000.
C. For hydraulic driven planters, the process is fairly fast and simple and can be done with-
out going to the field. The planter is left in transport position and a collection container
is placed under each row. The drive is turned on for a set time or distance and the seeds
dispensed are counted.
D. Since manufactures vary in their calibration steps, follow the guidelines in your owner’s
manual. Planter travel speed may be checked by using either of the following methods.
1. Determining miles per hour (mph) using the time method: Measure and mark out a
distance of 88 feet. Check the number of seconds required to drive the 88 feet.
New Mexico Agricultural Mechanics and Technology Lesson Plan Library
Unit A. Problem Area 7. Lesson 3. Page 11.

Divide 60 by the number of seconds it took to travel the 88 feet. The result is the
speed in miles per hour (mph).
2. Determining miles per hour (mph) using the feet method: Measure the number of
feet traveled in one minute. Divide the number of feet traveled by 88. The result is
the speed in mph.
Use TM: A7–3G and A7–3H to reinforce planter calibration. An alternative approach is to transfer the
information from the transparency masters to a multimedia presentation. Use text material to strengthen
student understanding of concepts. Chapter 3 in Fundamentals of Machine Operation—Planting and
Section 3 in Row-Crop Planters (VAS 3021a) are recommended.
Objective 6: Identify maintenance procedures for planting equipment.
Anticipated Problem: What are the maintenance procedures for planting equipment?
VI. Proper servicing of planting equipment can mean the difference between a profitable crop
and high losses. Planting equipment are precision instruments, and like any precision
machines, they require a large amount of care. Such care includes:
A. Servicing of the planting equipment at the beginning of the season:
1. Cleaning the planter thoroughly.
2. Checking to see that there are no obstructions in the planter units to keep the mech-
anism from operating properly.
3. Inspecting the metering system for worn or broken parts; repair or replace damaged
parts.
4. Checking all bolts and hoses for tightness.
B. Servicing of the planting equipment during the season includes:
1. Storing the planting equipment inside overnight or covering it to prevent moisture
accumulation in the materials storage hoppers.
2. Using the correct type of lubricant. Lubricate the machine at the time intervals rec-
ommended in the operator’s manual. To avoid getting dirt into bearings, always wipe
off fittings before lubricating.
C. Servicing of planting equipment before storage includes:
1. Emptying and cleaning all boxes, hoppers, and hopper bottoms to prevent rust and
corrosion.
2. Checking for worn or broken parts and replacing them before the next planting sea-
son.
3. Coating the furrow openers, knife and disk covers and any other polished areas with
oil, grease or a protective covering.
4. Painting any exposed metal surfaces to prevent rusting.
5. Lubricating all bearings.
6. Storing the planter in a building.
New Mexico Agricultural Mechanics and Technology Lesson Plan Library
Unit A. Problem Area 7. Lesson 3. Page 12.

7. Blocking up the planter with the wheels off the ground or floor.
Use text material to strengthen student understanding of concepts. Chapter 3 in Fundamentals of
Machine Operation—Planting and Section 4 and 5 in Row-Crop Planters (VAS 3021a) are recom-
mended.
Review/Summary. Review should focus around student comprehension of the lessons’s
learning objectives. Use classroom discussion to summarize the content and to identify any areas
that need to be covered in more detail.
Evaluation. Evaluation should be based on student comprehension of the lesson’s learning
objectives. A sample written test is attached to aid in assessing student understanding.
Application. The following lab activities will be helpful to students in applying the lesson’s
content:
A7–3A—Effects of Seed Depth on Germination
A7–3B—Planter Data Sheet
A7–3C—Field Calibration of Seed Rate
Answers to Sample Test:
Part One: Matching
1 = b, 2 = e, 3 = h, 4 = a, 5 = f, 6 = g, 7 = d, 8 = c
Part Two: Completion
1. covering
2. metering
3. depth
4. drives
5. placement
6. furrow opener
Part Three: Short Answer
1. Open the soil, Meter the seed, Place the seed, Cover the seed, Firm the seedbed.
2. Even emergence, correct spacing, correct ear size, economics, insuring the machine is
working.
New Mexico Agricultural Mechanics and Technology Lesson Plan Library
Unit A. Problem Area 7. Lesson 3. Page 13.

Sample Test Name_____________________________________
Test
Lesson A7–3: Operating, Calibrating, and
Maintaining Agricultural Planting Systems
Part One: Matching
Instructions. Match the term with the correct response. Write the letter of the term by the defini-tion.
a. broadcast d. germination g. row crop
b. calibration e. hill drop h. solid planting
c. checkrow f. population
_______ 1. Process of checking and making final adjustments to the equipment.
_______ 2. Seeds are located in hills of two to five seeds per hill.
_______ 3. Row spacing is too close to permit cultivating or other cultural practices between
them.
_______ 4. Seeds are scattered randomly on top of the seedbed.
_______ 5. Number of seeds or plants per acre.
_______ 6. Crop is planted in rows far enough apart to permit the operation of machinery be-
tween them.
_______ 7. Change from a dormant condition to one of activity and growth.
_______ 8. Hills are separated within the row the same distance as the rows are wide and
aligned perpendicular to direction of travel.
Part Two: Completion
Instructions. Provide the word or words to complete the following statements.
1. To insure the seed is in contact with the soil and that it is not lying in a void or air space,
seed ___________________ devices are used.
2. Seed ___________________ devices select the seeds from the hopper and delivers them to
the seed placing mechanism at a selected rate.
3. The seeds must all be planted at nearly the same __________________ to get good germi-
nation and seedling emergence.
4. Planter ___________________ deliver the correct spacing of seeds in the row at varying
travel speeds and under varying soil and topographic conditions.
New Mexico Agricultural Mechanics and Technology Lesson Plan Library
Unit A. Problem Area 7. Lesson 3. Page 14.

5. Seed ____________________ accepts the seed form the metering device, drops it through
the seed tube and delivers it to the furrow.
6. The ____________________________ opens a well defined groove in the soil where the
seed may placed at the proper depth, in firm contact with the soil.
Part Three: Short Answer.
Instructions. Provide information to answer the following questions. Use complete sentences.
1. What are the five basic functions of a planter?
2. Why is calibration of the planter important?
New Mexico Agricultural Mechanics and Technology Lesson Plan Library
Unit A. Problem Area 7. Lesson 3. Page 15.
TM: A7–3A
FUNCTIONS OF PLANTERS
New Mexico Agricultural Mechanics and Technology Lesson Plan Library
Unit A. Problem Area 7. Lesson 3. Page 16.
Pla
cin
gth
eS
ee
din
So
il
Me
teri
ng
the
Se
ed
Op
en
ing
the
Fu
rro
w
Fir
min
gth
eS
ee
db
ed
Co
ve
rin
gth
eS
ee
d

TM: A7–3B
SEED PLATE-TYPE
METERING
Seed plates must be changed each time
seed size changes.
New Mexico Agricultural Mechanics and Technology Lesson Plan Library
Unit A. Problem Area 7. Lesson 3. Page 17.
TM: A7–3C
FINGER PICK-UP METERING
The finger pick-up system eliminates the need to
change plates to match seed size.
New Mexico Agricultural Mechanics and Technology Lesson Plan Library
Unit A. Problem Area 7. Lesson 3. Page 18.

TM: A7–3D
PRESSURIZED METERING
DISK
New Mexico Agricultural Mechanics and Technology Lesson Plan Library
Unit A. Problem Area 7. Lesson 3. Page 19.
Direction of
Travel
Blower
Seed Disk
Seed
Delivery Tube

TM: A7–3E
PRESSURIZED METERING
DRUM
New Mexico Agricultural Mechanics and Technology Lesson Plan Library
Unit A. Problem Area 7. Lesson 3. Page 20.
FanAtmospheric pressure islower than air pressure
inside drumSeed
Seed Drum
Air pressureinside drumholds seedsagainst holes
Pressurized air holds seeds in place.
Seed ReleaseWheel
Seed Drum
Two Seeds
Seed
Seed
Cutoff
Brush
Discharge
Manifold
Discharge Tube
Seed cutoff and release mechanisms.

TM: A7–3F
AIR METERING DEVICES
New Mexico Agricultural Mechanics and Technology Lesson Plan Library
Unit A. Problem Area 7. Lesson 3. Page 21.
FanAtmospheric pressure islower than air pressure
inside drumSeed
Seed Drum
Air pressureinside drumholds seedsagainst holes
Pressurized air holds seeds in place.
Seed ReleaseWheel
Seed Drum
Two Seeds
Seed
Seed
Cutoff
Brush
Discharge
Manifold
Discharge Tube
Seed cutoff and release mechanisms.
Pressurized Metering Drum
Seed
Disk
Blower
Seed
Delivery Tube
Direction of
Travel
Pressurized Metering Disk
Direction of
Travel
Seed Disk
To
Vacuum
Fan
Seed Cutoff
Wiper
Vacuum Metering Disk

TM: A7–3G
New Mexico Agricultural Mechanics and Technology Lesson Plan Library
Unit A. Problem Area 7. Lesson 3. Page 22.
CA
LIB
RA
TIO
NO
FT
HE
CO
RN
PLA
NT
ER
PLA
NT
-TO
-PLA
NT
SP
AC
ING
SFO
R
VA
RIO
US
PLA
NT
PO
PU
LA
TIO
NS
Inches
betw
een
kernels
Seed
s/ac
20in
chro
w28
inch
row
30in
chro
w36
inch
row
38in
chro
w40
inch
row
15,0
00
20.9
14.9
13.9
11.6
11.0
10.5
16,0
00
19.6
14.0
13.1
10.9
10.3
9.8
17,0
00
18.4
13.2
12.3
10.2
9.7
9.2
18,0
00
17.4
12.4
11.6
9.7
9.2
8.7
19,0
00
16.5
11.8
11.0
9.2
8.7
8.3
20,0
00
15.7
11.2
10.5
8.7
8.3
7.8
22,0
00
14.3
10.2
9.5
7.9
7.5
7.1
24,0
00
13.1
9.3
8.7
7.3
6.9
6.5
26,0
00
12.1
8.6
8.0
6.7
6.3
6.0
28,0
00
11.2
8.0
7.5
6.2
5.9
5.6
30,0
00
10.5
7.5
7.0
5.8
5.5
5.2
32,0
00
9.8
7.0
6.5
5.4
5.2
4.9

TM: A7–3H
CALIBRATION OF THE
CORN PLANTER
LENGTH OF ROW EQUAL TO 1/1000TH ACRE
Length of single row toRow widthequal 1/1000th of an acre
Inches Feet Inches
6 87 1
7 74 8
8 65 4
10 52 3
15 34 10
20 26 2
28 18 8
30 17 5
32 16 4
36 14 6
38 13 9
40 13 1
New Mexico Agricultural Mechanics and Technology Lesson Plan Library
Unit A. Problem Area 7. Lesson 3. Page 23.

LS: A7–3A Name_____________________________________
Lab Sheet
Effects of Seed Depth on Germination
Materials:
Growing flat (12 inches W × 18 inches L × 5 inches D), growing media, and corn seed.
Procedures:
1. Place ½ inch of soil or growing media in the flat and plant one row of corn seed. Plant the
same number of seeds in each row.
2. Add 1 inch of soil or growing media and plant a second row of corn 3 inches from the first
row.
3. Add 1 inch of soil or growing media and plant a third row of corn 3 inches from the second
row.
4. Continue planting sequence until the last row is planted ½ inch deep.
5. Tightly pack the soil or growing media on ½ of each row.
6. Students are to care for the flat and keep a daily record of observations.
Observations to be made are: germination rate, time of germination per row, time of germination
on packed and unpacked rows, characteristics of first leaves to appear, and characteristics of plant
from germination through Stage 1. The students could also identify any weeds germinating in the
flat.
Questions:
1. Which row had the highest germination rate?
2. Which row germinated first? _____________________ Last? ________________
3. What effect did the packing of the soil have on germination time?
On % germination?
Why?
New Mexico Agricultural Mechanics and Technology Lesson Plan Library
Unit A. Problem Area 7. Lesson 3. Page 24.

LS: A7–3B Name_____________________________________
Lab Sheet
Planter Data SheetDirections: Complete the following data sheet for a planter owned by a local producer or equip-ment dealer.
1. Make ______________________________ Model _______________________________
2. Number of rows ____________________ Row width _____________________________
3. Type of Frame _____________________________________________________________
4. Can the planter be used for conventional and no-till? ______________________________
How can you tell?___________________________________________________________
5. Does the planter have individual hoppers or one main hopper? _______________________
6. Type of furrow opener _______________________________________________________
7. Type of depth control _______________________________________________________
8. Type of drive mechanism _____________________________________________________
9. Type of metering system _____________________________________________________
10. Type of seed placement ______________________________________________________
11. Does the planter have a seed monitor system? ____________ If so what type and how
does it work?_______________________________________________________________
12. Type of seed covering system __________________________________________________
13. Type of seed firming system ___________________________________________________
14. Does the planter have any attachments (starter fertilizer, pesticide application, etc.)?
_________________________________________________________________________
If so, what type, and form and method of application? ______________________________
_________________________________________________________________________
_________________________________________________________________________
New Mexico Agricultural Mechanics and Technology Lesson Plan Library
Unit A. Problem Area 7. Lesson 3. Page 25.

LS: A7–3C Name_____________________________________
Lab Sheet
Field Calibration of Seed Rate
Materials:
Corn planter and tractor
Seed corn
CAUTION: Use protective gear when handling treated seed.
Procedure:
1. Fill the seed hoppers at least half full to simulate average planter weight. Add powdered
graphite if recommended by the planter operator’s manual.
2. Tie up covering wheels so that seeds can be easily counted. A small chain with and S-hook
at each end works well for this.
3. Mark row distance equal to 1/1000 acre.
4. Plant the measured distance at the speed you intend to use during planting. Start planting
before reaching first mark and continue past last mark.
5. Uncover seeds within the measure distance and count them. Do not use bare hands if the
seed is treated with an insecticide.
6. Multiply the number of seeds by 1000. This equals the planting population for one acre.
7. To be accurate check each row.
8. Measure planting depth at this time.
9. Check average distance between seeds to determine accurate seed placement.
Questions:
1. Which row had the highest population rate?______________________________________
2. Which row had the lowest population rate? ______________________________________
3. What was the average population for the planter? _________________________________
4. How are population adjustments made? _________________________________________
5. How deep was the seed planted? _______________________________________________
Is this the proper depth?______________________________________________________
6. How is the depth of planting adjusted? __________________________________________
New Mexico Agricultural Mechanics and Technology Lesson Plan Library
Unit A. Problem Area 7. Lesson 3. Page 26.