Embed Size (px)
Citation preview
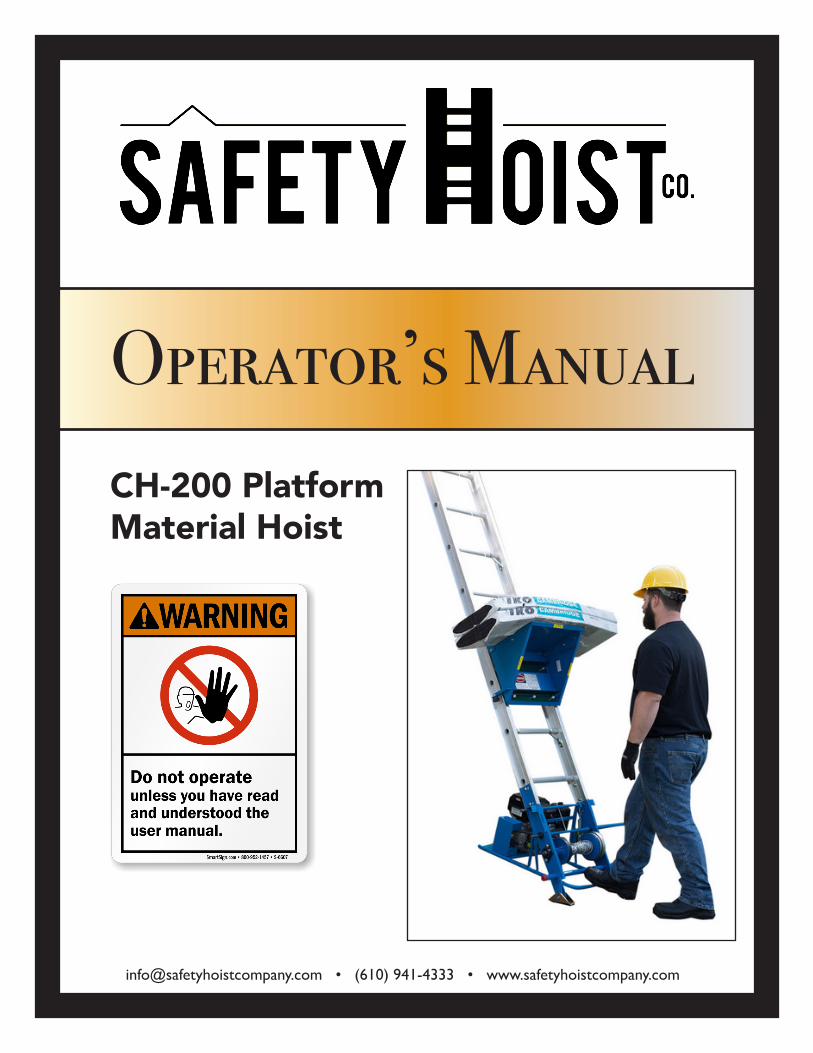
Operator’s ManualCH-200 Platform Material Hoist
[email protected] • (610) 941-4333 • www.safetyhoistcompany.com
[email protected] • (610) 941-4333 • www.safetyhoistcompany.com
Operator’s Manual CH-200 Platform Material Hoist
TABLE OF CONTENTS
GENERAL RECOMMENDATIONS & ADVICE ..............................................................................................................................................1
GENERAL SAFETY INSTRUCTIONS ............................................................................................................................................................2-3
SAFE OPERATION ..........................................................................................................................................................................................................4
SPECIFICATIONS .............................................................................................................................................................................................................5
HOW TO ASSEMBLE YOUR HOIST ................................................................................................................................................................6-7
HOW TO OPERATE YOUR HOIST ...............................................................................................................................................................8-10
DISASSEMBLY AND STORAGE .........................................................................................................................................................................10
PARTS LIST .................................................................................................................................................................................................................11-14
ENGINE RECOMMENDATIONS .........................................................................................................................................................................15
SAFETY HOIST COMPANY - LIMITED WARRANTY ............................................................................................................................16
[email protected] • (610) 941-4333 • www.safetyhoistcompany.com • 1
Operator’s Manual CH-200 Platform Material Hoist
EVERY TIME A SAFETY HOIST IS SET UP FOR OPERATION YOU MUST:
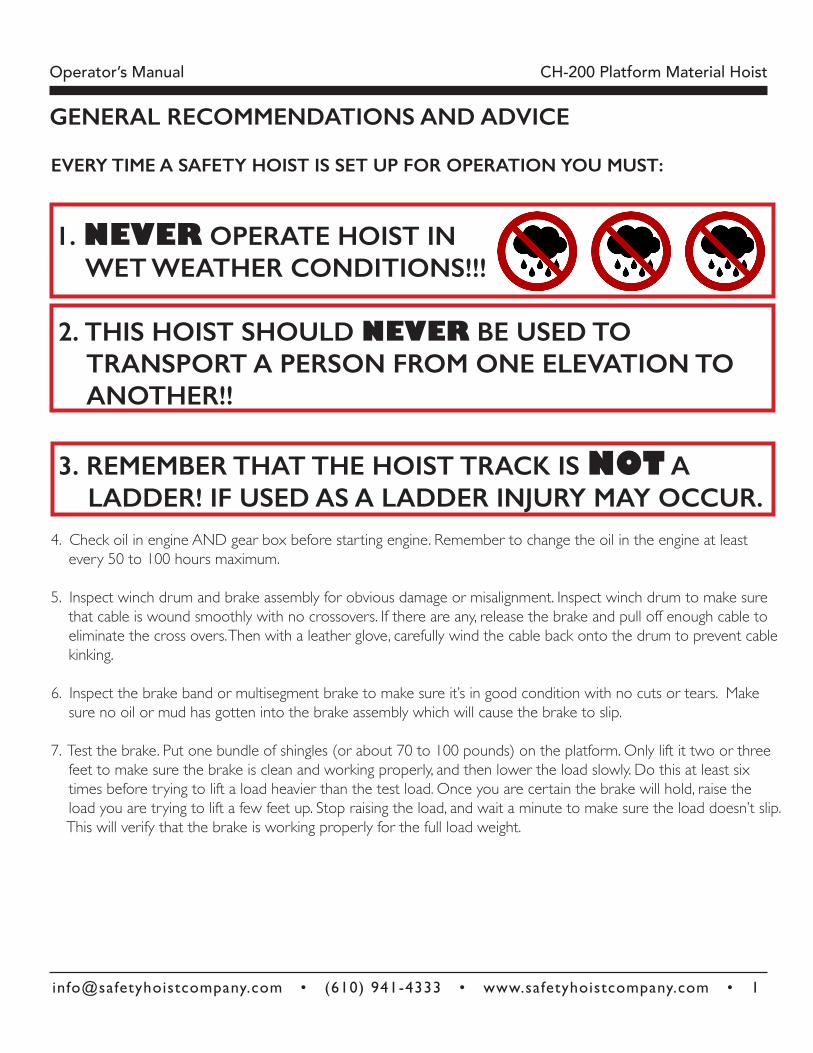
1. NEVER OPERATE HOIST IN WET WEATHER CONDITIONS!!!
2. THIS HOIST SHOULD NEVER BE USED TO TRANSPORT A PERSON FROM ONE ELEVATION TO ANOTHER!!
3. REMEMBER THAT THE HOIST TRACK IS NOT A LADDER! IF USED AS A LADDER INJURY MAY OCCUR. 4. Check oil in engine AND gear box before starting engine. Remember to change the oil in the engine at least every 50 to 100 hours maximum. 5. Inspect winch drum and brake assembly for obvious damage or misalignment. Inspect winch drum to make sure that cable is wound smoothly with no crossovers. If there are any, release the brake and pull off enough cable to eliminate the cross overs. Then with a leather glove, carefully wind the cable back onto the drum to prevent cable kinking.
6. Inspect the brake band or multisegment brake to make sure it’s in good condition with no cuts or tears. Make sure no oil or mud has gotten into the brake assembly which will cause the brake to slip.
7. Test the brake. Put one bundle of shingles (or about 70 to 100 pounds) on the platform. Only lift it two or three feet to make sure the brake is clean and working properly, and then lower the load slowly. Do this at least six times before trying to lift a load heavier than the test load. Once you are certain the brake will hold, raise the load you are trying to lift a few feet up. Stop raising the load, and wait a minute to make sure the load doesn’t slip. This will verify that the brake is working properly for the full load weight.
GENERAL RECOMMENDATIONS AND ADVICE

[email protected] • (610) 941-4333 • www.safetyhoistcompany.com • 2
Operator’s Manual CH-200 Platform Material Hoist
GENERAL SAFETY INSTRUCTIONSThe safety instructions and warnings in this section and throughout this manual must be read carefully before assembling or operating the hoist. These safety instructions and warnings are not substitutes for routine accident prevention measures which must also be immplemented to eliminate potential risks and hazards. Failure to obey these safety warnings may result in injury to you or others, or damage to the hoist or other property.
A. UNPACKING YOUR HOIST - When unpacking, carefully inspect for any damage that may have occured during transit. DO NOT ASSEMBLE OR USE THE HOIST IS ANY PART OR PARTS ARE DAMAGED!! Return the damaged part or parts to place of purchase for replacement.
B. SAFETY LABELS - Observe all labels and instructions attached to the various parts of the hoist.
C. PROPER PARTS - For your safety, use only attachments and accessories approved by the manufacturer for use with the hoist. Using substitute parts will void the warranty.
D. SAFETY CHECK - Check assembled parts (splice plates, bolts, engine mounting, belts, pulleys, hoist cable, etc.) for proper tightness and fit before using the hoist, and during frequent periods of use, be certain the equipment is in safe working condition. Recheck for bolt tightness after every 4 hours of operation.
E. TRANSPORTING - To avoid damage, handle hoist component parts with care when transporting. Secure hoist to truck bed with cord rope or bungee cord. Damaged parts MAY make hoist not SAFE to operate. NOTE: Transporting hoist in the rain may cause road oils to be deposited on brake band and or brake pulley. Cover brake area with plastic sheet and inspect prior to use. See page 6 - How To Assemble Your Hoist.
F. BRACING YOUR HOIST - Never place or operate the hoist on a slippery surface and make certain it is properly leveled and secured at the base to prevent slippage or unexpected movement. Make sure the hoist is braced against a building or solid surface at the correct angle as described herein.
G. HOUSEKEEPING - Clear the area around the base of the hoist to avoid slipping, tripping, or falling against the hoist.

[email protected] • (610) 941-4333 • www.safetyhoistcompany.com • 3
Operator’s Manual CH-200 Platform Material Hoist
GENERAL SAFETY INSTRUCTIONS Continued
The safety instructions and warnings in this section and throughout this manual must be read carefully before assembling or operating the hoist. These safety instructions and warnings are not substitutes for routine accident prevention measures which must also be immplemented to eliminate potential risks and hazards. Failure to obey these safety warnings may result in injury to you or others, or damage to the hoist or other property.
H. SECURING YOUR HOIST - Secure track to the roof with a rope. Tie the rope to a rung or the peak and then secure other end of rope to the building. Do not tie to the rail because the rope will interfere with the travel of the carriage.
I. FUELING - Handle fuel with care. Fuel is extremely flammable and highly explosive under certain conditions. • NEVER smoke or allow open flames or sparks to be present in the area when the fuel tank is being filled. • Use an approved fuel container. • NEVER add fuel to a hot or running engine. • Replace fuel caps securely on the supply container and engine tank and wipe fuel spilled before starting engine.
[email protected] • (610) 941-4333 • www.safetyhoistcompany.com • 4
Operator’s Manual CH-200 Platform Material Hoist
SAFE OPERATION
HAZARD! - DO NOT PLACE OR USE THIS MATERIAL HOIST IN AN AREA WHERE IT COULD COME IN CONTACT WITH ELECTRICAL WIRING CIRCUITS OR ANY OTHER HAZARDOUS OBSTRUCTION.
A. PROPER INSTRUCTIONS - DO NOT ALLOW ANYONE TO OPERATE THE HOIST WHO HAS NOT BEEN PROPERLY AND THOROUGHLY TRAINED IN ITS OPERATION AND USE.
B. ENCLOSED AREAS - Do not operate the engine indoors. Exhaust fumes can be hazardous in enclosed areas.
C. WARNING: - USE THE HOIST FOR LIFTING MATERIALS ONLY. THE HOIST SHOULD NEVER BE USED TO TRANSPORT A PERSON FROM ONE ELEVATION TO ANOTHER. NEVER USE THE HOIST FOR LOWERING ANYTHING.
D. MAXIMUM CAPACITY - THE MAXIMUM CAPACITY OF THE HOIST IS 200 POUNDS. DO NOT OVERLOAD!!
E. WARNING - Keep hands, feet, other body parts and clothing away from the track and moving or rotating parts of the hoist when starting the engine or operating the hoist.
F. MOLTEN SUBSTANCES - Do NOT use the hoist to lift buckets of hot asphalt or any other hot or liquid substance, unless contents are in a closed and sealed container.
G. SUPERVISION - ALWAYS stop the engine whenever you leave the vicinity of the hoist.
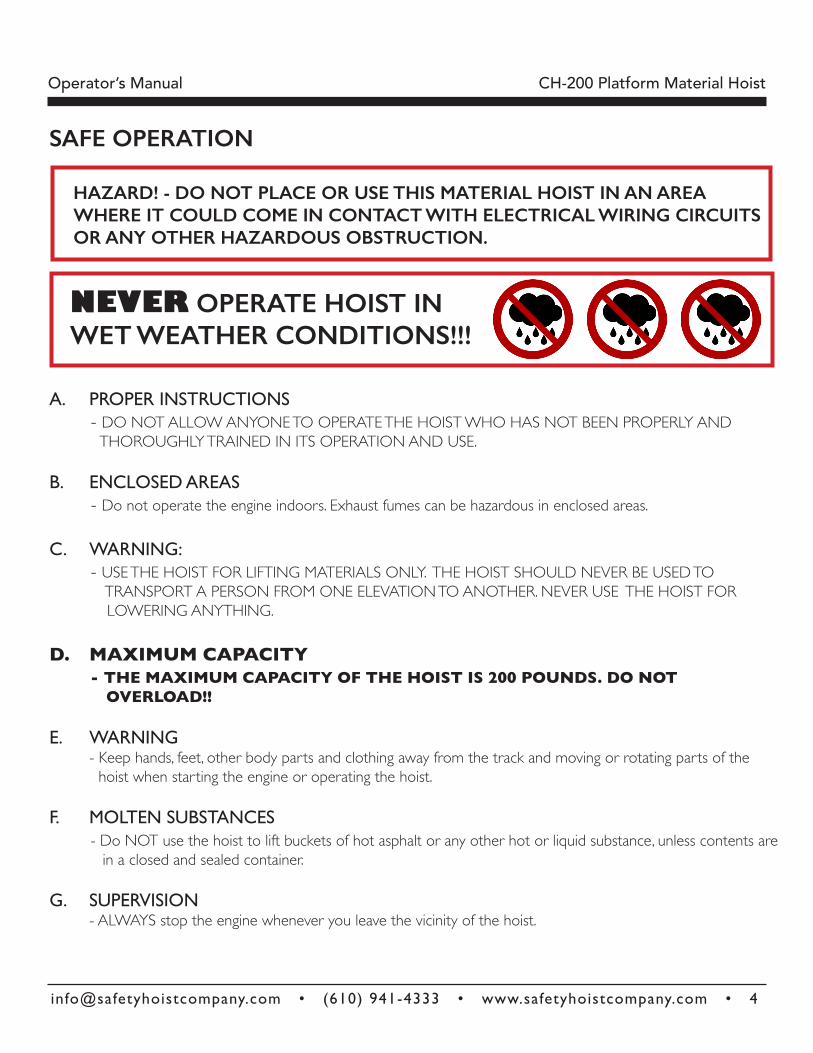
NEVER OPERATE HOIST IN WET WEATHER CONDITIONS!!!

[email protected] • (610) 941-4333 • www.safetyhoistcompany.com • 5
Operator’s Manual CH-200 Platform Material Hoist
SPECIFICATIONS1. ONE (1) - 4.0 HP Gasoline engine on base (Briggs & Stratton or Honda)
2. ONE (1) - CH-200 Peak
3. ONE (1) - Steel carriage with solid steel rollers and flap
4. ONE (1) - 2 1/2 ft. steel base with 100% ball bearing winch
5. ONE (1) - Brake release handle
6. THREE (3) - 8 ft. aluminum track sections
7. ONE (1) - Hardware package
We recommend that you view the instructional videos on our YouTube page for your Safety Hoist™ model.
@Safety Hoist Company
Scan the QR Code to go directly to our YouTube channel!
[email protected] • (610) 941-4333 • www.safetyhoistcompany.com • 6
Operator’s Manual CH-200 Platform Material Hoist
HOW TO ASSEMBLE YOUR HOIST 1. Unpack ALL parts of the hoist and lay them flat on the ground. - See previous page for specifications of included parts
and materials.
2. Note that the engine is shipped without gas or oil. - Oil needs to be added in the crank case and the gear
reduction unit. Please refer to the engines instructionalmanual for oil type and quality.
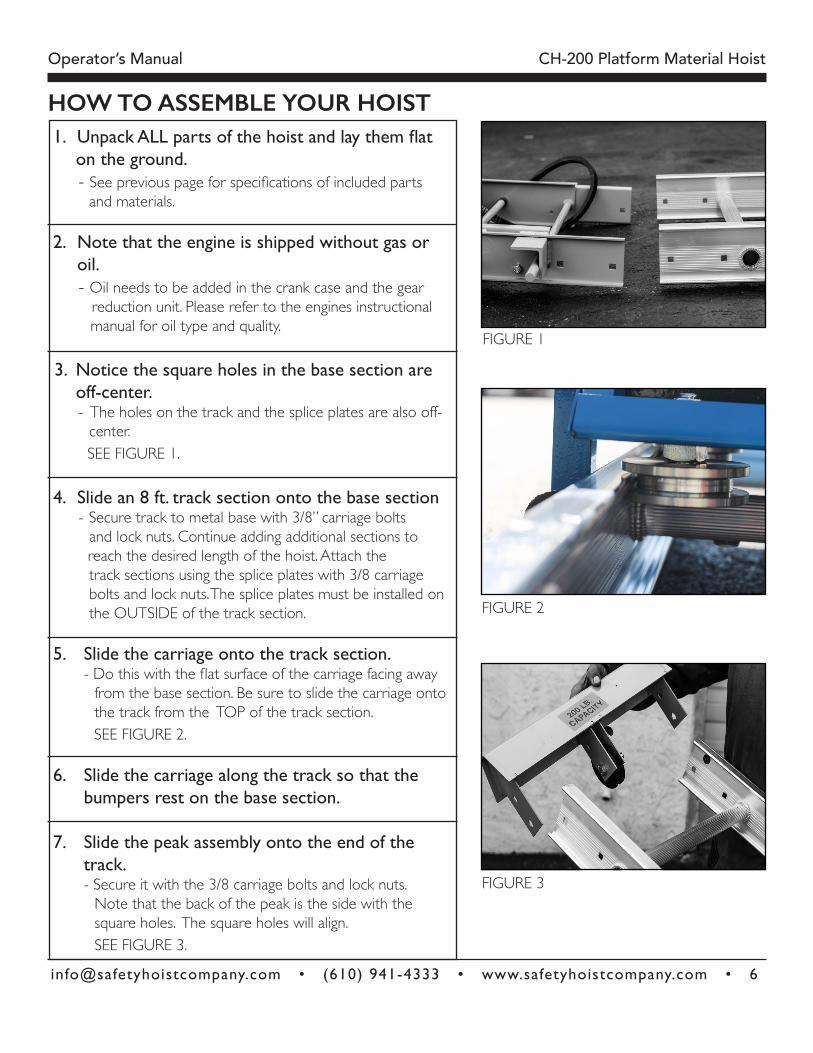
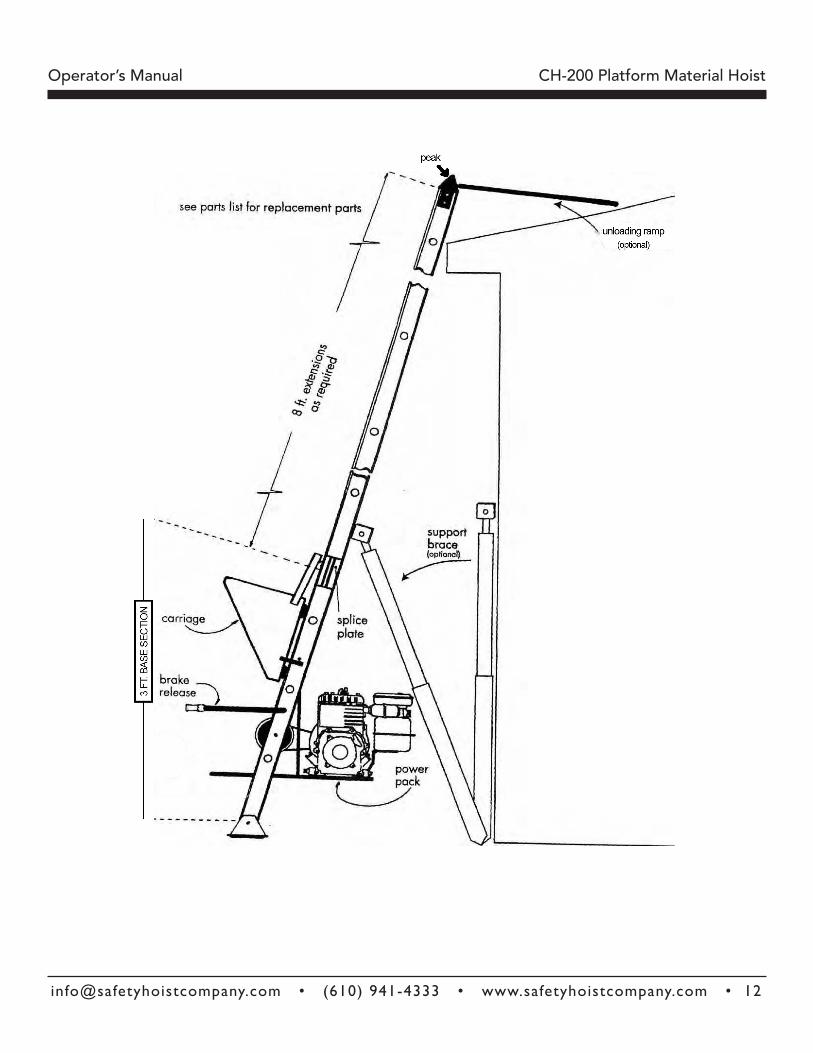
3. Notice the square holes in the base section are off-center.
- The holes on the track and the splice plates are also off- center. SEE FIGURE 1.
4. Slide an 8 ft. track section onto the base section
- Secure track to metal base with 3/8” carriage boltsand lock nuts. Continue adding additional sections to reach the desired length of the hoist. Attach the track sections using the splice plates with 3/8 carriage bolts and lock nuts. The splice plates must be installed on the OUTSIDE of the track section.
5. Slide the carriage onto the track section. - Do this with the flat surface of the carriage facing away from the base section. Be sure to slide the carriage onto the track from the TOP of the track section. SEE FIGURE 2.
6. Slide the carriage along the track so that the bumpers rest on the base section.
7. Slide the peak assembly onto the end of the track. - Secure it with the 3/8 carriage bolts and lock nuts. Note that the back of the peak is the side with the square holes. The square holes will align. SEE FIGURE 3.
FIGURE 1
FIGURE 2
FIGURE 3
[email protected] • (610) 941-4333 • www.safetyhoistcompany.com • 7
Operator’s Manual CH-200 Platform Material Hoist
HOW TO ASSEMBLE YOUR HOIST Continued
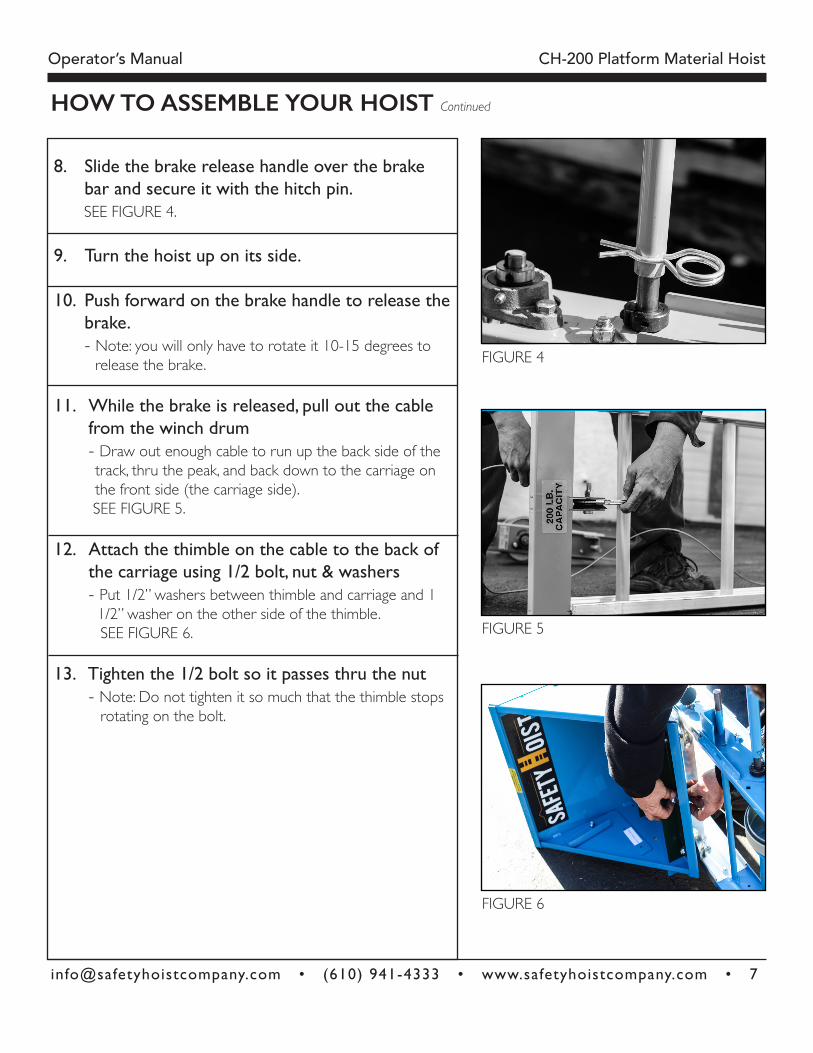
8. Slide the brake release handle over the brake bar and secure it with the hitch pin. SEE FIGURE 4.
9. Turn the hoist up on its side.
10. Push forward on the brake handle to release the brake. - Note: you will only have to rotate it 10-15 degrees to release the brake.
11. While the brake is released, pull out the cable from the winch drum - Draw out enough cable to run up the back side of the track, thru the peak, and back down to the carriage on the front side (the carriage side). SEE FIGURE 5.
12. Attach the thimble on the cable to the back of the carriage using 1/2 bolt, nut & washers - Put 1/2” washers between thimble and carriage and 1 1/2” washer on the other side of the thimble. SEE FIGURE 6.
13. Tighten the 1/2 bolt so it passes thru the nut - Note: Do not tighten it so much that the thimble stops rotating on the bolt.
FIGURE 4
FIGURE 5
FIGURE 6
1. You are now ready to lift the hoist into place - WARNING: When setting up your hoist please take note of all overhead obstructions and/or electrical wires. Select a location that isfreeoftrafficandpedestrians.
2. Once the hoist is in place against the building, secure the hoist to the building - Tie it off with a rope going around the peak. Ensure that the off-set holes in the track are closer to the building rather than the operator.
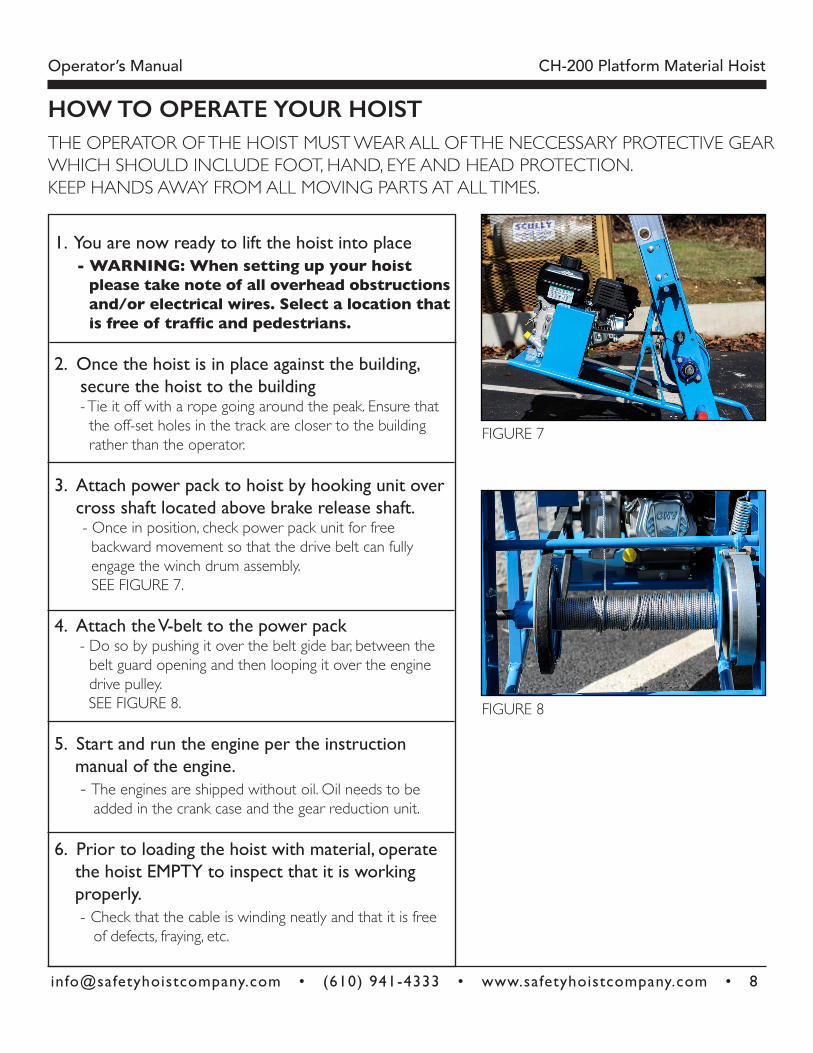
3. Attach power pack to hoist by hooking unit over cross shaft located above brake release shaft. - Once in position, check power pack unit for free backward movement so that the drive belt can fully engage the winch drum assembly. SEE FIGURE 7.
4. Attach the V-belt to the power pack - Do so by pushing it over the belt gide bar, between the belt guard opening and then looping it over the engine drive pulley. SEE FIGURE 8.
5. Start and run the engine per the instruction manual of the engine. - The engines are shipped without oil. Oil needs to be added in the crank case and the gear reduction unit.
6. Prior to loading the hoist with material, operate the hoist EMPTY to inspect that it is working properly. - Check that the cable is winding neatly and that it is free of defects, fraying, etc.
[email protected] • (610) 941-4333 • www.safetyhoistcompany.com • 8
Operator’s Manual CH-200 Platform Material Hoist
HOW TO OPERATE YOUR HOISTTHE OPERATOR OF THE HOIST MUST WEAR ALL OF THE NECCESSARY PROTECTIVE GEAR WHICH SHOULD INCLUDE FOOT, HAND, EYE AND HEAD PROTECTION. KEEP HANDS AWAY FROM ALL MOVING PARTS AT ALL TIMES.
FIGURE 7
FIGURE 8
[email protected] • (610) 941-4333 • www.safetyhoistcompany.com • 9
Operator’s Manual CH-200 Platform Material Hoist
HOW TO OPERATE YOUR HOIST Continued
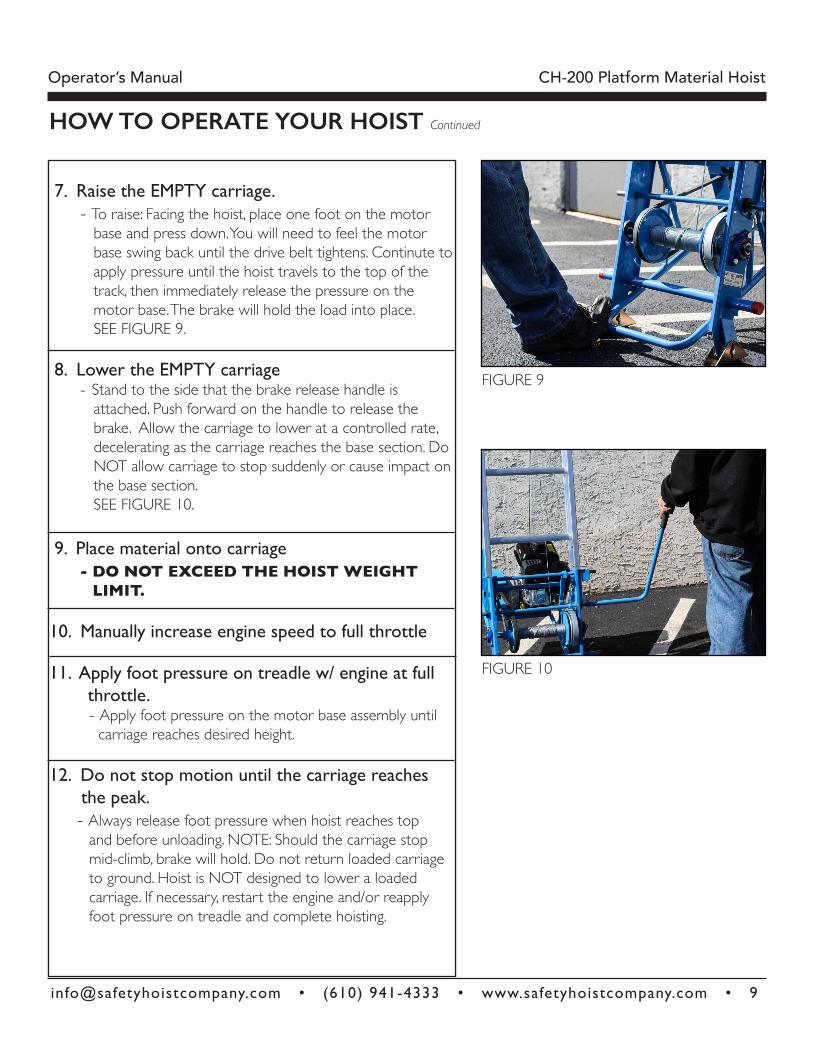
7. Raise the EMPTY carriage. - To raise: Facing the hoist, place one foot on the motor base and press down. You will need to feel the motor base swing back until the drive belt tightens. Continute to apply pressure until the hoist travels to the top of the track, then immediately release the pressure on the motor base. The brake will hold the load into place. SEE FIGURE 9.
8. Lower the EMPTY carriage - Stand to the side that the brake release handle is attached. Push forward on the handle to release the brake. Allow the carriage to lower at a controlled rate, decelerating as the carriage reaches the base section. Do NOT allow carriage to stop suddenly or cause impact on the base section. SEE FIGURE 10.
9. Place material onto carriage - DO NOT EXCEED THE HOIST WEIGHT LIMIT.
10. Manually increase engine speed to full throttle
11. Apply foot pressure on treadle w/ engine at full throttle. - Apply foot pressure on the motor base assembly until carriage reaches desired height.
12. Do not stop motion until the carriage reaches the peak. - Always release foot pressure when hoist reaches top and before unloading. NOTE: Should the carriage stop mid-climb, brake will hold. Do not return loaded carriage to ground. Hoist is NOT designed to lower a loaded carriage. If necessary, restart the engine and/or reapply foot pressure on treadle and complete hoisting.
FIGURE 9
FIGURE 10

[email protected] • (610) 941-4333 • www.safetyhoistcompany.com • 10
Operator’s Manual CH-200 Platform Material Hoist
HOW TO OPERATE YOUR HOIST Continued
13. Once load is unloaded onto roof: - Remember that the brake is always on. Therefore, by lifting up on the brake release handle, brake will release. Carriage will then lower. CAUTION: Upon releasing brake, carriage will free-fall. Allow the carriage to lower about 12 inches at a time as it descends by pushing on the brake release handle slowly at steady intervals. LET GO OF THE HANDLE to stop the carriage.
IMPORTANT!
If carriage does not move down after load is removed and the brake release handle is lifted, it may be caused by a new brake band or the first few uses of a new hoist. To wear in new brake band, raise one or two bundles up and down a few times to wear in.
Depend on the weight - DO NOT EXCEED WEIGHT LIMIT OF HOIST. LEAVE 1 BUNDLE OF SHINGLES ON CARRIAGE AND LOWER CARRIAGE SLOWLY. DO THIS FOR A DAY OR TWO UNTIL YOU CAN RAISE AND LOWER CARRIAGE WITH NO WEIGHT ON IT.
DISASSEMBLEY AND STORAGE1. After stopping the engine, wait for all moving parts to stop, and for the engine to cool before disassembling.
2. Disconnect the spark plug wire from the plug.
3. Never store the engine in any enclosure before cooling.
4. Never store the power unit with fuel in its tank in any enclosure where flames or sparks may be present.
5. Store the power pack upright and hang the track parts from a side wall to prevent damage.

[email protected] • (610) 941-4333 • www.safetyhoistcompany.com • 11
Operator’s Manual CH-200 Platform Material Hoist
[email protected] • (610) 941-4333 • www.safetyhoistcompany.com • 12
Operator’s Manual CH-200 Platform Material Hoist

[email protected] • (610) 941-4333 • www.safetyhoistcompany.com • 13
Operator’s Manual CH-200 Platform Material Hoist
[email protected] • (610) 941-4333 • www.safetyhoistcompany.com • 14
Operator’s Manual CH-200 Platform Material Hoist
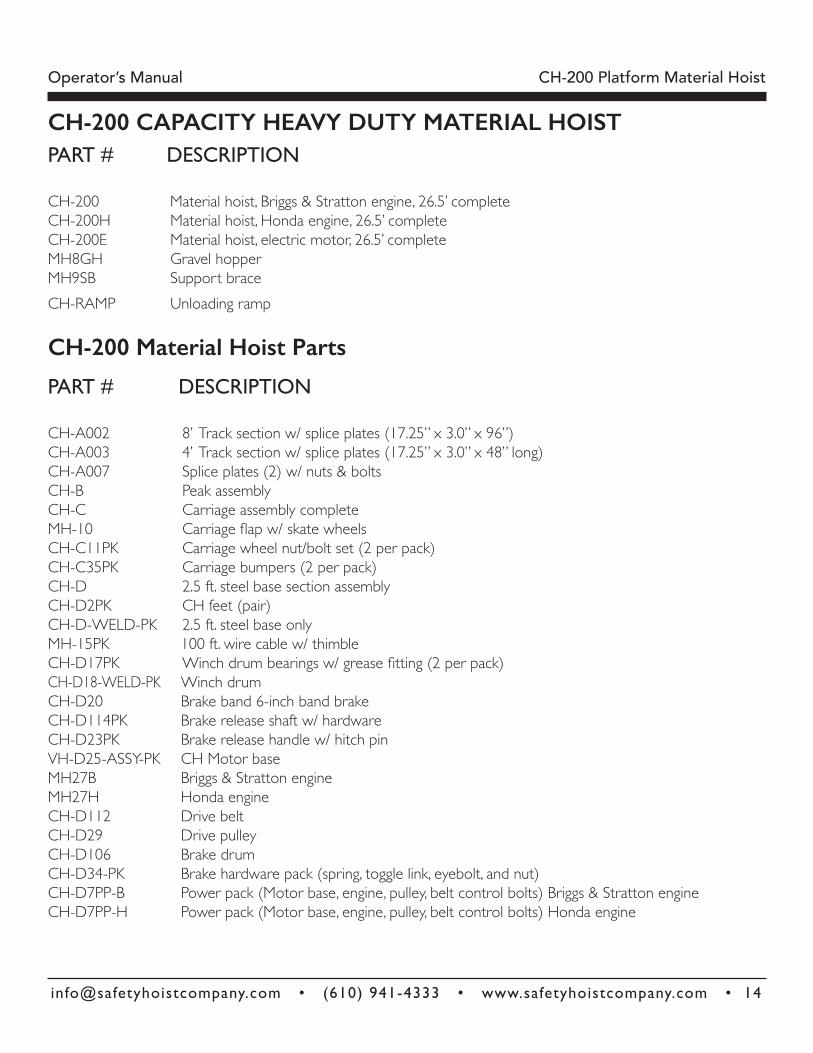
CH-200 CAPACITY HEAVY DUTY MATERIAL HOISTPART # DESCRIPTION
CH-200 Material hoist, Briggs & Stratton engine, 26.5’ completeCH-200H Material hoist, Honda engine, 26.5’ completeCH-200E Material hoist, electric motor, 26.5’ completeMH8GH Gravel hopperMH9SB Support braceCH-RAMP Unloading ramp
CH-200 Material Hoist Parts
PART # DESCRIPTION
CH-A002 8’ Track section w/ splice plates (17.25” x 3.0” x 96”)CH-A003 4’ Track section w/ splice plates (17.25” x 3.0” x 48” long) CH-A007 Splice plates (2) w/ nuts & boltsCH-B Peak assemblyCH-C Carriage assembly complete MH-10 Carriage flap w/ skate wheelsCH-C11PK Carriage wheel nut/bolt set (2 per pack) CH-C35PK Carriage bumpers (2 per pack) CH-D 2.5 ft. steel base section assemblyCH-D2PK CH feet (pair) CH-D-WELD-PK 2.5 ft. steel base onlyMH-15PK 100 ft. wire cable w/ thimbleCH-D17PK Winch drum bearings w/ grease fitting (2 per pack)CH-D18-WELD-PK Winch drumCH-D20 Brake band 6-inch band brakeCH-D114PK Brake release shaft w/ hardwareCH-D23PK Brake release handle w/ hitch pinVH-D25-ASSY-PK CH Motor baseMH27B Briggs & Stratton engineMH27H Honda engineCH-D112 Drive beltCH-D29 Drive pulleyCH-D106 Brake drumCH-D34-PK Brake hardware pack (spring, toggle link, eyebolt, and nut)CH-D7PP-B Power pack (Motor base, engine, pulley, belt control bolts) Briggs & Stratton engineCH-D7PP-H Power pack (Motor base, engine, pulley, belt control bolts) Honda engine

[email protected] • (610) 941-4333 • www.safetyhoistcompany.com • 15
Operator’s Manual CH-200 Platform Material Hoist
ENGINE RECOMMENDATIONS
ALL OPERATIONAL AND MAINTENANCE RECOMMENDATIONS, INCLUDING OIL WEIGHTS, LOCATION OF OIL FILLS FOR ENGINE AND GEAR BOX, SPARK PLUG NUMBER, AIR FILTER LOCATIONS AS WELL AS TROUBLE SHOOTING AND WIRING DIAGRAMS ARE FOUND IN THE ENGINE MANUFACTURER’S ENGINE MANUAL. THIS IS PACKED WITH EVERY HOIST SOLD BY SAFETY HOIST COMPANY.
IMPORTANT! ENGINES ARE SHIPPED WITHOUT OIL IN THE
ENGINE OR THE GEAR REDUCTION BOX. OIL MUST BE ADDED TO BOTH LOCATIONS OR
SERIOUS DAMAGE WILL OCCUR!
PLEASE NOTE: ENGINE WARRANTY IS SERVICED BY AUTHORIZED ENGINE DEALERS. ALL ENGINE QUESTIONS OR PROBLEMS MUST BE DIRECTED TO YOUR LOCAL DEALER. DEALER LOCATIONS CAN BE FOUND ON THE ENGINE MANUFACTURER’S WEBSITE.

[email protected] • (610) 941-4333 • www.safetyhoistcompany.com • 16
Operator’s Manual CH-200 Platform Material Hoist
SAFETY HOIST COMPANY - LIMITED WARRANTY
REPLACES ALL DATED OR UNDATED LIMITED WARRANTIES DATED BEFORE JUNE 25, 2017.
Safety Hoist Company will at is option, repair or replace any part or parts of the Safety Hoist material hoist that are defective in material or workmanship with the exclusion of the motor/engine which mantain a separate warranty provided by the manufacturer of the motor/engine. The terms of the warranty of the motor/engine are provided on the previous page.
The limited warranty on all parts except the motor/engine is in effect for 1 year form the date of purchase.
Safety Hoist Company reserves the right to inspect the equipment for misuse, abuse or failure to maintain the equipment properly.
Safety Hoist Company will make reasonable efforts to repair or replace defective equipment in a timely manner, but assumes no liability or expenses incurred for the time lost as a result of the repair or replacement.
The defective unit or parts should be returned to the dealer where the unit was puchased or contact Safety Hoist Company at 877-994-6478.
There is no other express warranty implied. Warranties including those of merchantability and fitness for a particular purpose are limited to one year from purpose or to the extent permitted by law. Some states do not allow limitation on how long an implied warranty lasts, so the above limitation may not apply to you. This is the exclusive remedy and liability for incidental and consequential damages under any and all warranties are excluded to the extent permitted by law. Some states do not allow the exclusion or limitation of incidental or consequential damages, so the above limitation may not apply to you. This warranty gives you specific legal rights and you may also have other rights which vary from state to state.
Safety Hoist Company shall be relieved of its performance of the duties under this warranty if any damage has been caused to the product as a result of misuse, abuse, failure to maintain the equipment or Act of God.