Embed Size (px)
Citation preview

CandleBASICS
CandleBASICS
Over 50 Great
Candlemaking Ideas for
Experienced and Novice
Crafters Alike
Over 50 Great
Candlemaking Ideas for
Experienced and Novice
Crafters Alike
Make exquisitelooking candles todecorate your ownhome and give tothe special people in your life!
Country Lane CandleSupplies make it easy tolook like a professionalcandle-maker! Our detailedproject instructions give youall the direction you’ll needto get started, and ourcreative alternatives willgive you plenty of creativeideas to try another day!
Start your project with oneof our high-quality candlewaxes, select your wicks,color and scents, and let usshow you the rest of theway! Each set of instructionsshows you exactly whatsupplies you’ll need tocomplete the finishedproject, as well as whatother ideas you may want totry in the future. Our firstpages will tell you thebasics of candle-making,and the rest of our bookwill give you theinspiration to learnmore about this artform. Explore yourcreativity withCountry LaneCandle Supplies.
Many thanks to Roxie Toews for her creativity, positive outlook and dedication to exploring new crafting opportunities.
SAFETY FIRSTSafety in your workspace is the most
important part of candlemaking. We allknow that waxes are flammable, so theseare a few precautions that can be takento protect yourself when working withthis flammable substance.
• Never leave melting wax unattended.• Never melt wax directly on a burner
(use a double boiler, or a melt bag inboiling water).
• Cover your work area with newspaperor aluminum foil to protect againstspills or leaks.
• Always use pot holders or oven mitts.• Keep an open box of baking soda or a
fire extinguisher nearby, in case of fire.• In case of burns, immediately apply cold
water to the burnt area.• Keep all scents, dyes, sprays, bottles and
hot waxes out of the reach of children.
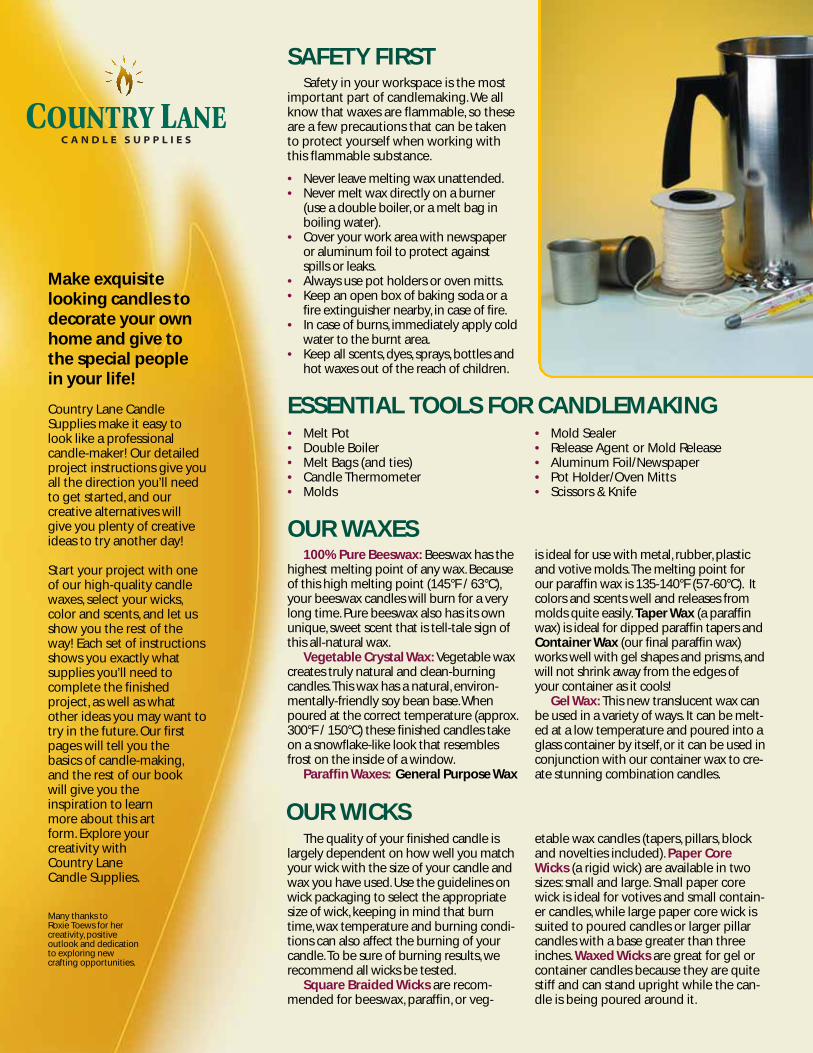
• Melt Pot• Double Boiler• Melt Bags (and ties)• Candle Thermometer• Molds
• Mold Sealer• Release Agent or Mold Release• Aluminum Foil/Newspaper• Pot Holder/Oven Mitts• Scissors & Knife
100% Pure Beeswax: Beeswax has thehighest melting point of any wax. Becauseof this high melting point (145°F / 63°C),your beeswax candles will burn for a verylong time. Pure beeswax also has its ownunique, sweet scent that is tell-tale sign ofthis all-natural wax.
Vegetable Crystal Wax: Vegetable waxcreates truly natural and clean-burningcandles.This wax has a natural, environ-mentally-friendly soy bean base.Whenpoured at the correct temperature (approx.300°F / 150°C) these finished candles takeon a snowflake-like look that resemblesfrost on the inside of a window.
Paraffin Waxes: General Purpose Wax
is ideal for use with metal, rubber, plasticand votive molds.The melting point forour paraffin wax is 135-140°F (57-60°C). Itcolors and scents well and releases frommolds quite easily. Taper Wax (a paraffinwax) is ideal for dipped paraffin tapers andContainer Wax (our final paraffin wax)works well with gel shapes and prisms, andwill not shrink away from the edges ofyour container as it cools!
Gel Wax: This new translucent wax canbe used in a variety of ways. It can be melt-ed at a low temperature and poured into aglass container by itself, or it can be used inconjunction with our container wax to cre-ate stunning combination candles.
The quality of your finished candle islargely dependent on how well you matchyour wick with the size of your candle andwax you have used. Use the guidelines onwick packaging to select the appropriatesize of wick, keeping in mind that burntime, wax temperature and burning condi-tions can also affect the burning of yourcandle.To be sure of burning results, werecommend all wicks be tested.
Square Braided Wicks are recom-mended for beeswax, paraffin, or veg-
etable wax candles (tapers, pillars, blockand novelties included). Paper CoreWicks (a rigid wick) are available in twosizes: small and large. Small paper corewick is ideal for votives and small contain-er candles, while large paper core wick issuited to poured candles or larger pillarcandles with a base greater than threeinches. Waxed Wicks are great for gel orcontainer candles because they are quitestiff and can stand upright while the can-dle is being poured around it.
ESSENTIAL TOOLS FOR CANDLEMAKING
OUR WAXES
OUR WICKS

CONTENTS
Basic Poured Candle 2
Chunk Candle 3
Layered Candle 4
Swirl Candle 5
Snowball Candle 6
Scented Votives and Floaters 7
Gel Shapes Candle 8
Glitter Gel Floaters 9
Grape Gelly Jar Candle 10
Gel Champagne Glass Candle 11
Veggie Wax Pyramid 12
Veggie Dip Candle 13
Beeswax Pillar 14
Poured Glitter Candle 15
Dipped Tapers 16
Floral Pillar 17
1
©2002 ImageHill Inc. No part of this publication may bereproduced or utilized in any form or by any means,including photocopying, without permission in writingfrom the publisher. The information in this book is pres-ent in good faith. Guarantees are not given as to theoutcome of the designs. ImageHill Inc. disclaims any lia-bility for untoward results.
OUR MOLDSMetal Molds are constructed of heavy,
durable metal, and with reasonable careshould last an entire lifetime of candle-making.These molds have the smallinconvenience of having a seam line onthem, which must be polished off afteryour candle is removed from the mold.
The unique Geometric Plastic Two-Part Molds come with their own stand tokeep them upright while pouring.Geometric Plastic Molds produce severalcreative shapes of candles, but also requirethe removal of a seam mark from your fin-ished candle.
Polycarb Molds are made of heavy,translucent plastic that makes them veryeasy to work with.When used in conjunc-tion with mold release, your candles arevery easy to remove from the mold.Theycreate candles without a seam line andthe exciting shapes of these molds aresure to suit any of your candle projects.
Mold Sealer is a sticky substance thatis used to seal the wick hole in the bot-tom of a mold. It can be re-used andstored indefinitely and helps reduce therisk of spills and leaks when using molds.Mold Release is a specially formulatedrinse that assists in the release of candlesfrom molds. A light coating on all sides of
the mold is all that is required to makeremoval of your candles quick and easy.Mold Cleaner is an easy way to cleanyour molds after use. Simply pour a smallamount of Mold Cleaner into the candlemold and rinse the mold thoroughly.Then pour the excess rinse back into itsbottle for reuse.
There are several different substancesthat can be added to your waxes while inthe candle-making process. These addi-tives change the characteristics of yourwax to provide you with a higher qualityfinished product. (See packaging forrequired usage amounts.)
Stearine can be added to melted waxto intensify the color of your candles andto make your finished candles burn moreslowly, by changing the wax to be harder.Opaque Crystals make your wax whiterand more opaque and can also work tomake your candles harder, slower burn-ing, and give them a lustrous sheen.Translucent Crystals are ideally suited tocreating “glow” candles as these crystalspreserve the natural translucency of thewax, allowing special additions to showthrough to the outside of your candle.Translucent Crystals also make your can-dles harder and give them a glossy sheen.
HELPFUL ITEMS WHEN WORKINGWITH MOLDS
WAX ADDITIVES
2
BASIC POUREDCandle
BASIC POUREDCandle
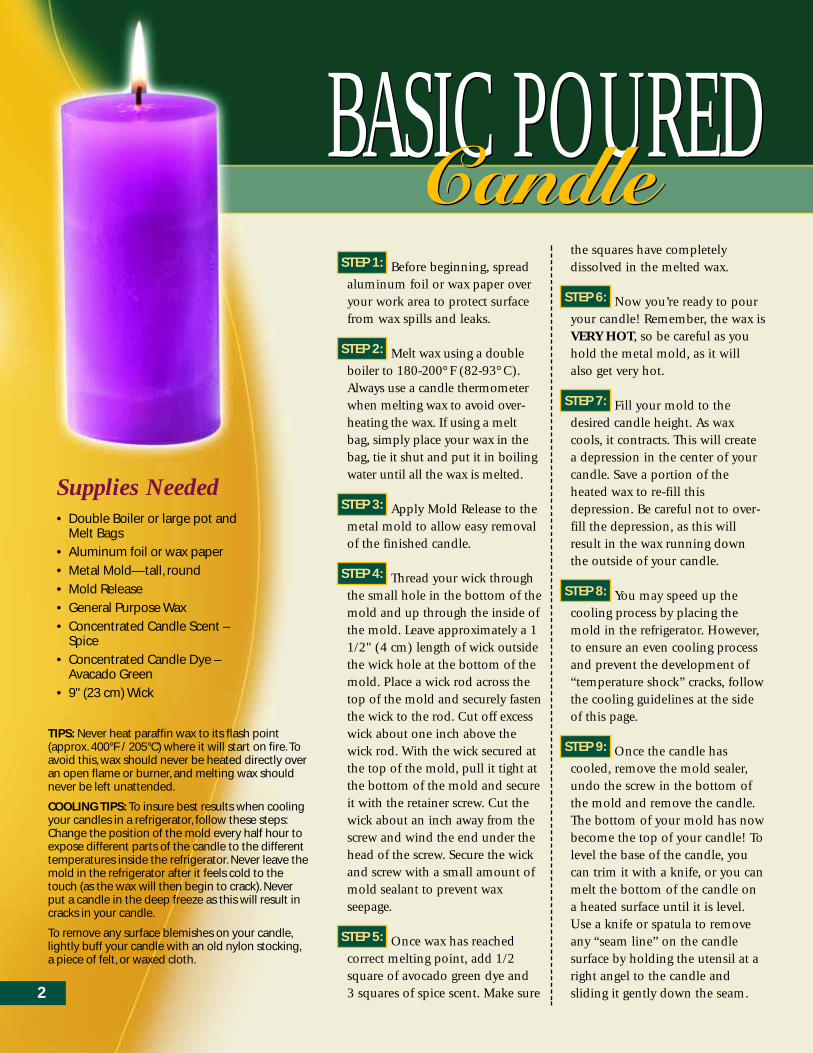
Before beginning, spreadaluminum foil or wax paper overyour work area to protect surfacefrom wax spills and leaks.
Melt wax using a doubleboiler to 180-200°F (82-93°C).Always use a candle thermometerwhen melting wax to avoid over-heating the wax. If using a meltbag, simply place your wax in thebag, tie it shut and put it in boilingwater until all the wax is melted.
Apply Mold Release to themetal mold to allow easy removalof the finished candle.
Thread your wick throughthe small hole in the bottom of themold and up through the inside ofthe mold. Leave approximately a 11/2" (4 cm) length of wick outsidethe wick hole at the bottom of themold. Place a wick rod across thetop of the mold and securely fastenthe wick to the rod. Cut off excesswick about one inch above thewick rod. With the wick secured atthe top of the mold, pull it tight atthe bottom of the mold and secureit with the retainer screw. Cut thewick about an inch away from thescrew and wind the end under thehead of the screw. Secure the wickand screw with a small amount ofmold sealant to prevent waxseepage.
Once wax has reachedcorrect melting point, add 1/2square of avocado green dye and 3 squares of spice scent. Make sure
the squares have completelydissolved in the melted wax.
Now you’re ready to pouryour candle! Remember, the wax isVERY HOT, so be careful as youhold the metal mold, as it willalso get very hot.
Fill your mold to thedesired candle height. As waxcools, it contracts. This will createa depression in the center of yourcandle. Save a portion of theheated wax to re-fill thisdepression. Be careful not to over-fill the depression, as this willresult in the wax running downthe outside of your candle.
You may speed up thecooling process by placing themold in the refrigerator. However,to ensure an even cooling processand prevent the development of“temperature shock” cracks, followthe cooling guidelines at the sideof this page.
Once the candle hascooled, remove the mold sealer,undo the screw in the bottom ofthe mold and remove the candle.The bottom of your mold has nowbecome the top of your candle! Tolevel the base of the candle, youcan trim it with a knife, or you canmelt the bottom of the candle ona heated surface until it is level.Use a knife or spatula to removeany “seam line” on the candlesurface by holding the utensil at aright angel to the candle andsliding it gently down the seam.
STEP 9:
STEP 8:
STEP 7:
STEP 6:
STEP 5:
STEP 4:
STEP 3:
STEP 2:
STEP 1:
Supplies Needed• Double Boiler or large pot and
Melt Bags
• Aluminum foil or wax paper
• Metal Mold—tall, round
• Mold Release
• General Purpose Wax
• Concentrated Candle Scent –Spice
• Concentrated Candle Dye –Avacado Green
• 9" (23 cm) Wick
TIPS: Never heat paraffin wax to its flash point(approx. 400°F / 205°C) where it will start on fire. Toavoid this, wax should never be heated directly overan open flame or burner, and melting wax shouldnever be left unattended.
COOLING TIPS: To insure best results when coolingyour candles in a refrigerator, follow these steps:Change the position of the mold every half hour toexpose different parts of the candle to the differenttemperatures inside the refrigerator. Never leave themold in the refrigerator after it feels cold to thetouch (as the wax will then begin to crack). Neverput a candle in the deep freeze as this will result incracks in your candle.
To remove any surface blemishes on your candle,lightly buff your candle with an old nylon stocking,a piece of felt, or waxed cloth.
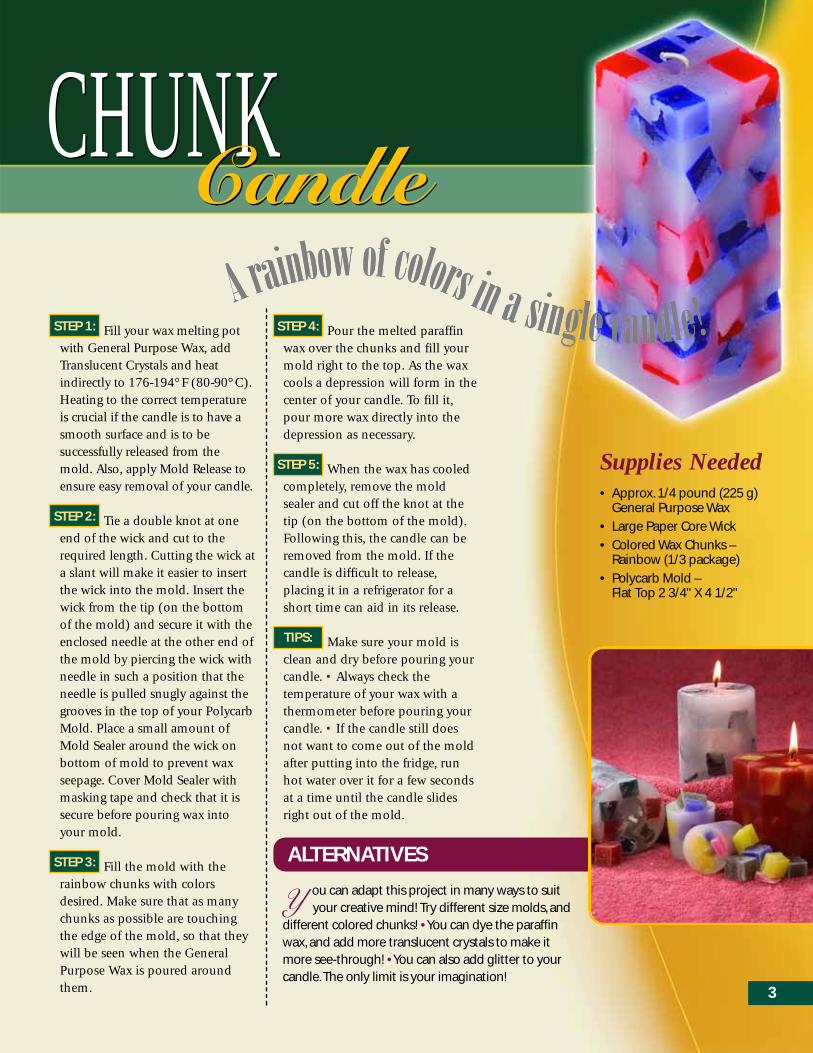
Fill your wax melting potwith General Purpose Wax, addTranslucent Crystals and heatindirectly to 176-194°F (80-90°C).Heating to the correct temperatureis crucial if the candle is to have asmooth surface and is to besuccessfully released from themold. Also, apply Mold Release toensure easy removal of your candle.
Tie a double knot at oneend of the wick and cut to therequired length. Cutting the wick ata slant will make it easier to insertthe wick into the mold. Insert thewick from the tip (on the bottomof the mold) and secure it with theenclosed needle at the other end ofthe mold by piercing the wick withneedle in such a position that theneedle is pulled snugly against thegrooves in the top of your PolycarbMold. Place a small amount ofMold Sealer around the wick onbottom of mold to prevent waxseepage. Cover Mold Sealer withmasking tape and check that it issecure before pouring wax intoyour mold.
Fill the mold with therainbow chunks with colorsdesired. Make sure that as manychunks as possible are touchingthe edge of the mold, so that theywill be seen when the GeneralPurpose Wax is poured aroundthem.
Pour the melted paraffinwax over the chunks and fill yourmold right to the top. As the waxcools a depression will form in thecenter of your candle. To fill it,pour more wax directly into thedepression as necessary.
When the wax has cooledcompletely, remove the moldsealer and cut off the knot at thetip (on the bottom of the mold).Following this, the candle can beremoved from the mold. If thecandle is difficult to release,placing it in a refrigerator for ashort time can aid in its release.
Make sure your mold isclean and dry before pouring yourcandle. • Always check thetemperature of your wax with athermometer before pouring yourcandle. • If the candle still doesnot want to come out of the moldafter putting into the fridge, runhot water over it for a few secondsat a time until the candle slidesright out of the mold.
TIPS:
STEP 5:
STEP 4:
STEP 3:
STEP 2:
STEP 1:
Supplies Needed• Approx. 1/4 pound (225 g)
General Purpose Wax
• Large Paper Core Wick
• Colored Wax Chunks –Rainbow (1/3 package)
• Polycarb Mold – Flat Top 2 3/4" X 4 1/2"
ALTERNATIVES
Y ou can adapt this project in many ways to suityour creative mind! Try different size molds, and
different colored chunks! • You can dye the paraffinwax, and add more translucent crystals to make itmore see-through! • You can also add glitter to yourcandle.The only limit is your imagination!
3
CHUNKCandle
CHUNKCandleA rainb
ow of colors in a single candle!A rainb
ow of colors in a single candle!
4
LAYEREDCandle
LAYEREDCandle
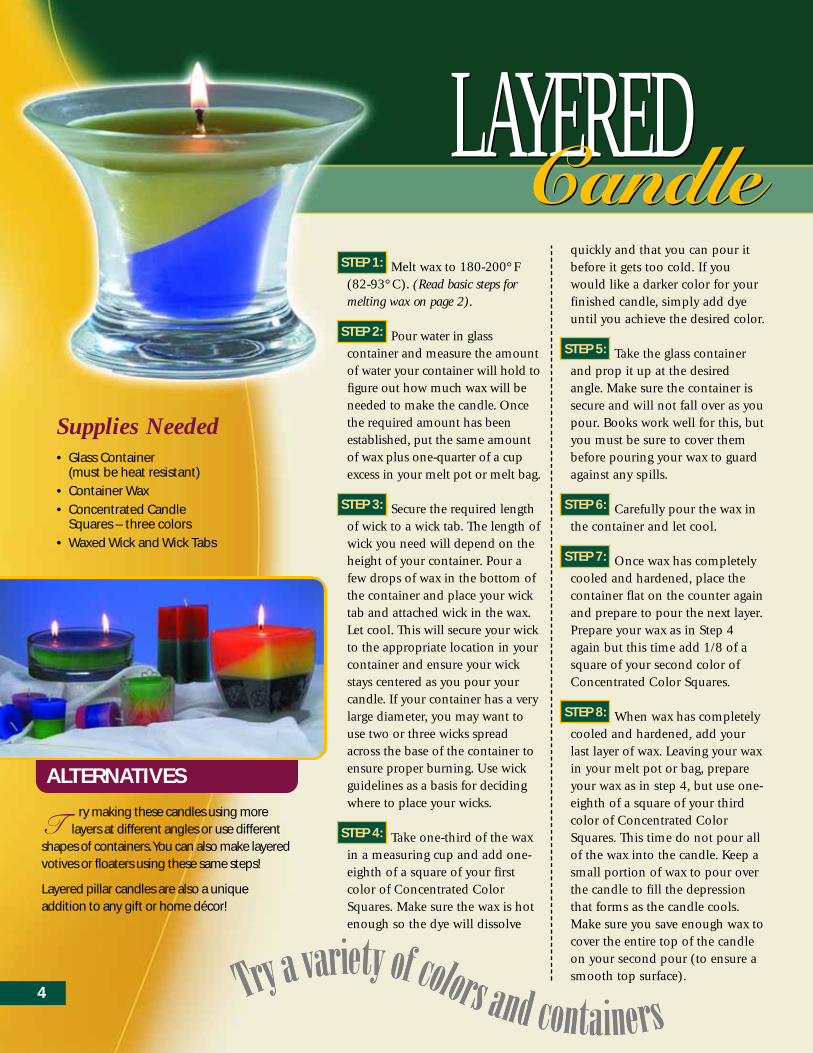
Melt wax to 180-200°F(82-93°C). (Read basic steps formelting wax on page 2).
Pour water in glasscontainer and measure the amountof water your container will hold tofigure out how much wax will beneeded to make the candle. Oncethe required amount has beenestablished, put the same amountof wax plus one-quarter of a cupexcess in your melt pot or melt bag.
Secure the required lengthof wick to a wick tab. The length ofwick you need will depend on theheight of your container. Pour afew drops of wax in the bottom ofthe container and place your wicktab and attached wick in the wax.Let cool. This will secure your wickto the appropriate location in yourcontainer and ensure your wickstays centered as you pour yourcandle. If your container has a verylarge diameter, you may want touse two or three wicks spreadacross the base of the container toensure proper burning. Use wickguidelines as a basis for decidingwhere to place your wicks.
Take one-third of the waxin a measuring cup and add one-eighth of a square of your firstcolor of Concentrated ColorSquares. Make sure the wax is hotenough so the dye will dissolve
quickly and that you can pour itbefore it gets too cold. If youwould like a darker color for yourfinished candle, simply add dyeuntil you achieve the desired color.
Take the glass containerand prop it up at the desiredangle. Make sure the container issecure and will not fall over as youpour. Books work well for this, butyou must be sure to cover thembefore pouring your wax to guardagainst any spills.
Carefully pour the wax inthe container and let cool.
Once wax has completelycooled and hardened, place the container flat on the counter againand prepare to pour the next layer.Prepare your wax as in Step 4again but this time add 1/8 of asquare of your second color ofConcentrated Color Squares.
When wax has completelycooled and hardened, add yourlast layer of wax. Leaving your waxin your melt pot or bag, prepareyour wax as in step 4, but use one-eighth of a square of your thirdcolor of Concentrated ColorSquares. This time do not pour allof the wax into the candle. Keep asmall portion of wax to pour overthe candle to fill the depressionthat forms as the candle cools.Make sure you save enough wax tocover the entire top of the candleon your second pour (to ensure asmooth top surface).
STEP 8:
STEP 7:
STEP 6:
STEP 5:
STEP 4:
STEP 3:
STEP 2:
STEP 1:
Supplies Needed• Glass Container
(must be heat resistant)
• Container Wax
• Concentrated CandleSquares – three colors
• Waxed Wick and Wick Tabs
ALTERNATIVES
Try making these candles using more
layers at different angles or use differentshapes of containers.You can also make layeredvotives or floaters using these same steps!
Layered pillar candles are also a uniqueaddition to any gift or home décor!
Try a variety of colors and containers
Try a variety of colors and containers

In separate pots melt theGeneral Purpose Wax and the Gel Wax.
Prepare mold by securingwick, applying Mold Sealer on thebottom and spraying the moldwith Mold Release. (See page 3 formore details.)
When the paraffin wax isapproximately 175-200°F (80-93°C), pour into mold. Fill themold one-half to three-quartersfull to leave room to pour the GelWax into your candle.
While the paraffin wax iscooling, prepare the Gel Wax. Addapproximately two to three dropsof red dye to 1/4 of a cup of GelWax and stir. You may want to dyeyour gel wax in a separatemeasuring cup, so that you onlyhave to dye a small amount of your
Gel Wax. Make sure the Gel Wax isquite hot before dying because youdo not want it to harden before youhave time to dye it and pour it intoyour mold. Make sure to dye yourgel only after the paraffin wax hascooled for several minutes.
Let the paraffin wax cooluntil there is about 1/4 inch(6 mm) of hardened wax on thetop. Puncture this skin on the waxand pour your dyed Gel Waxthrough the hole.
Let the candle coolcompletely, and remove it fromyour mold. No two candles willever look the same, so every timeyou complete this project, you willmake a 100% unique candle!
STEP 6:
STEP 5:
STEP 4:
STEP 3:
STEP 2:
STEP 1:
Supplies Needed• Polycarb
Pyramid Mold
• 6" (15 cm) – 2/0 Wick
• General Purpose Wax
• Gel Wax
• Liquid Gel Dye – Red
• Mold Release
• Mold Sealer
ALTERNATIVES
Try dying your parrafin wax
before you add your Gel Wax to the candle. Be sure to use complementarycolors as the waxes will mix as they cool! •Use this swirl method as a layer in acontainer candle! • Add glitter to your GelWax before pouring, and watch thesparkle spread throughout your candle!
5
SWIRLCandle
SWIRLCandle
No two candles are ever the same!No two candles are ever the same!

6
SNOWBALLCandle
SNOWBALLCandle
Place wick in ball mold.Melt wax and add peppermintscent to wax as desired. Pour yourcandle, referring to page 3 fordetailed instructions. Allow candleto cool and then re-fill depressionin the center of the candle. Coolcompletely and remove finishedcandle from mold.
Add peppermint scentand 1 teaspoon (5 ml) of glitterto 1 to 2 cups (250-500 ml) ofmelted paraffin wax and stir.Place melted paraffin in a deepbowl. Cool wax until a thin skinforms over the surface of the wax.
Then, using an electric mixer oregg beater, whip melted wax untilit becomes light and fluffy.
Now, you must workQUICKLY. The whipped wax willcool quickly and become hard andunmanageable. Apply the whippedwax to the outside of the ballcandle with a fork. Cover thewhole candle in this manner,holding the candle by the wick sothat you can work on the entirecandle at once. Be careful! The waxcan still be quite hot at thebeginning of this process. If waxbecomes too cool to work with,reheat and whip again.
STEP 3:
STEP 2:
STEP 1:
Supplies Needed• 3 1/4" Diameter Polycarb
Ball Mold
• 5" (12.5 cm) – 2/0 wick
• Concentrated ScentSquares – Peppermint
• General Purpose Wax
• Iridescent Glitter
ALTERNATIVES
Whipped wax is great for topping off
candles to make it look like whippedcream, on floats, or even ice cream. • Create alight and airy Snowman Candle by formingballs of whipped wax around your wick withyour hands. • Use whipped wax to add textureto any finished product. • Experiment withletting the wax cool longer to produce differenttextures for different projects!
Topoff your candles with whipped w
ax
Topoff your candles with whipped w
ax
Fill the melting pot withBeeswax and General Purpose Waxand heat indirectly until all thewax is melted.
Add 8 tablespoons (120 ml) of Stearine to the meltedwax. This will make your finishedcandles harder and also make yourcandles burn longer.
Add 5 squares of burgundycolor to the melting wax and meltat a low temperature until colorsquare and wax are completelymelted. Test color by placing adrop of dyed wax on aluminumfoil or wax paper and let cool. Thecolor of the wax will change as itcools. Additional ConcentratedColor Squares may be added ifyou prefer your finished candles tobe darker than the sample of wax.
Add 6 squares of cranberryscent to the melting wax as well.More or less scent can be added tocreate the strength of scent thatyou desire.
For votive candles, applyMold Release to your votive moldsand pour wax into the mold.Immediately insert the Pre-WickedVotive Tab into the wax and center
it in the middle of the mold.(Make sure the wick is standingstraight up from the tab beforeinserting it into the wax.) Forfloating candles, follow this sameprocess using Floater Molds andPre-Wicked Tealight Tabs.
As the wax cools, adepression will form in the centerof the candle. Re-fill thisdepression as the wax cools.Remember: You must save somewax from the previous step inorder to have enough wax to fillthese indentations in your candles.
Once completely cooled(place in refrigerator to quickencooling process), remove candlesfrom mold.
Votive candles achieve bestburning results when burned in avotive holder. Wax liquidizes asthe candle burns and will spillaway from the candle if not burntin a proper votive holder. • If yourcandle does not come out of themold easily, try placing it in therefrigerator for a few minutes. Ifthis does not work, try pouring asmall amount of hot water overthe mold, and this should helpease the candle out.
TIPS:
STEP 7:
STEP 6:
STEP 5:
STEP 4:
STEP 3:
STEP 2:
STEP 1:
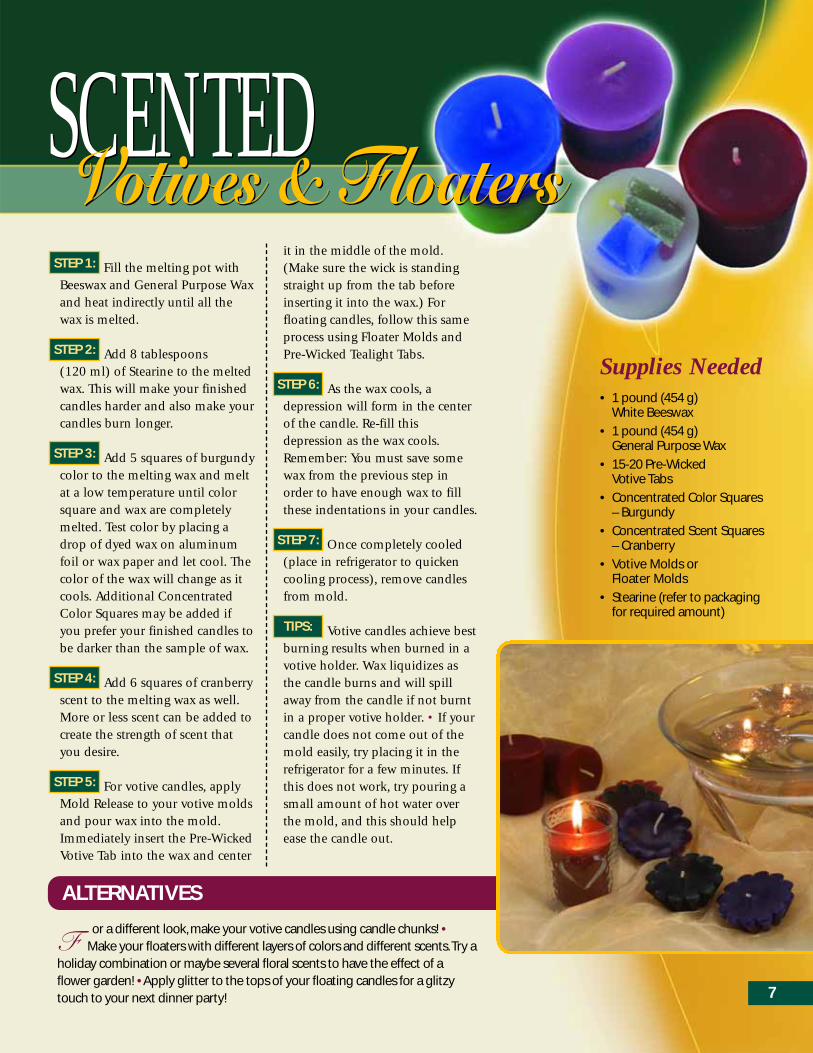
Supplies Needed• 1 pound (454 g)
White Beeswax
• 1 pound (454 g)General Purpose Wax
• 15-20 Pre-Wicked Votive Tabs
• Concentrated Color Squares– Burgundy
• Concentrated Scent Squares– Cranberry
• Votive Molds or Floater Molds
• Stearine (refer to packagingfor required amount)
ALTERNATIVES
For a different look, make your votive candles using candle chunks! •
Make your floaters with different layers of colors and different scents.Try aholiday combination or maybe several floral scents to have the effect of aflower garden! • Apply glitter to the tops of your floating candles for a glitzytouch to your next dinner party! 7
SCENTEDVotives & Floaters
SCENTEDVotives & Floaters
8
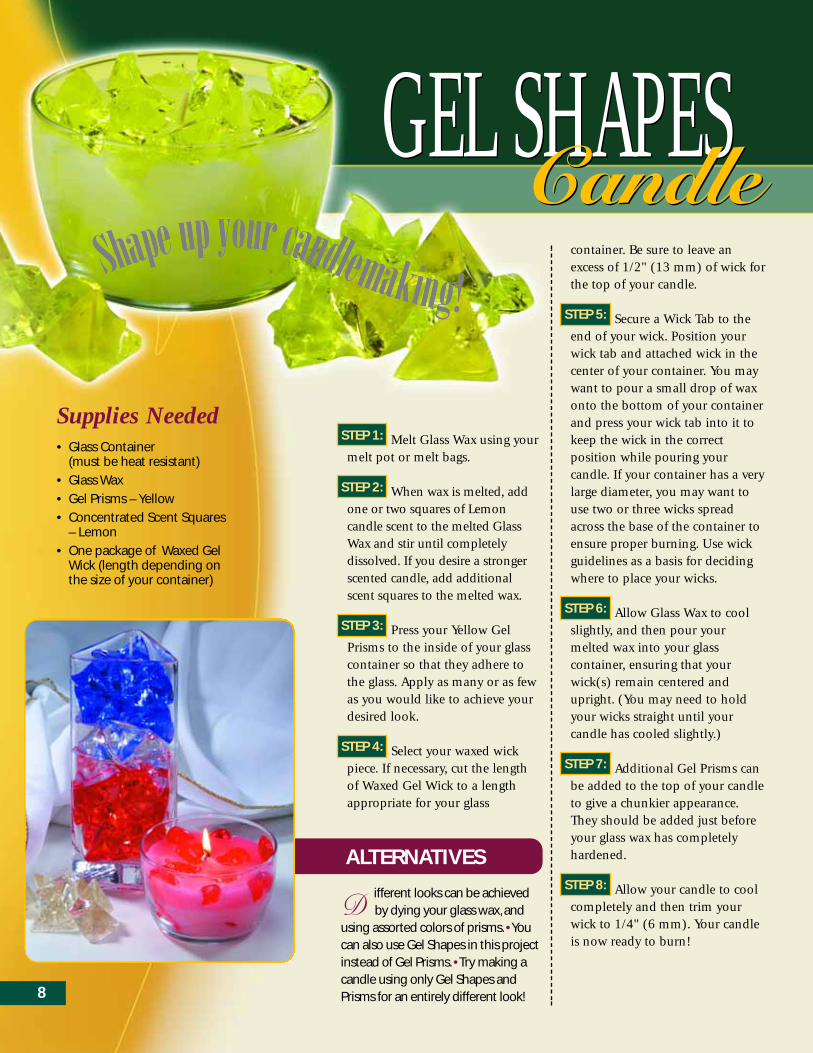
GEL SHAPESCandle
GEL SHAPESCandle
Melt Glass Wax using yourmelt pot or melt bags.
When wax is melted, addone or two squares of Lemoncandle scent to the melted GlassWax and stir until completelydissolved. If you desire a strongerscented candle, add additionalscent squares to the melted wax.
Press your Yellow GelPrisms to the inside of your glasscontainer so that they adhere tothe glass. Apply as many or as fewas you would like to achieve yourdesired look.
Select your waxed wickpiece. If necessary, cut the lengthof Waxed Gel Wick to a lengthappropriate for your glass
container. Be sure to leave anexcess of 1/2" (13 mm) of wick forthe top of your candle.
Secure a Wick Tab to theend of your wick. Position yourwick tab and attached wick in thecenter of your container. You maywant to pour a small drop of waxonto the bottom of your containerand press your wick tab into it tokeep the wick in the correctposition while pouring yourcandle. If your container has a verylarge diameter, you may want touse two or three wicks spreadacross the base of the container toensure proper burning. Use wickguidelines as a basis for decidingwhere to place your wicks.
Allow Glass Wax to coolslightly, and then pour yourmelted wax into your glasscontainer, ensuring that yourwick(s) remain centered andupright. (You may need to holdyour wicks straight until yourcandle has cooled slightly.)
Additional Gel Prisms canbe added to the top of your candleto give a chunkier appearance.They should be added just beforeyour glass wax has completelyhardened.
Allow your candle to coolcompletely and then trim yourwick to 1/4" (6 mm). Your candleis now ready to burn!
STEP 8:
STEP 7:
STEP 6:
STEP 5:
STEP 4:
STEP 3:
STEP 2:
STEP 1:Supplies Needed• Glass Container
(must be heat resistant)
• Glass Wax
• Gel Prisms – Yellow
• Concentrated Scent Squares– Lemon
• One package of Waxed GelWick (length depending onthe size of your container)
ALTERNATIVES
Different looks can be achievedby dying your glass wax, and
using assorted colors of prisms. • Youcan also use Gel Shapes in this projectinstead of Gel Prisms. • Try making acandle using only Gel Shapes andPrisms for an entirely different look!
Shape up your candlemaking!
Shape up your candlemaking!
Melt Gel Wax by heating itat a low temperature until itcompletely liquifies. DO NOTBRING GEL WAX TO A BOIL! Ifyou find that your Gel Wax ismaking popping noises as it heats,it may be the result of somemoisture in your container or meltpot. Do not be alarmed, andcontinue to gently heat your GelWax until it has melted.
Add two or three drops ofYellow Gel Dye and stir untilblended. If you would like astronger color, continue addingdye a drop at a time until your GelWax is the color you desire.
Add one teaspoon (5 ml)of Gold Glitter to melted Gel Waxand stir well. Prepare your moldby applying Mold Release to itssurface.
Let Gel Wax cool until itbegins to thicken, and then stiragain just before you pour yourGel Wax into floater molds. Allowcandle to cool completely beforehandling finished product.
Carefully pry the gelcandle out of the metal mold. Ithelps to pry all top edges awayfirst so you can avoid ripping thecandle when taking it out of themold.
Carefully press the Pre-Wicked Tealight Tab from thebottom center to the top of thecandle. The base of the wick tabshould be flush with the bottomof the floater.
Gently place your floater ina bowl of water, light and enjoy!
STEP 7:
STEP 6:
STEP 5:
STEP 4:
STEP 3:
STEP 2:
STEP 1:
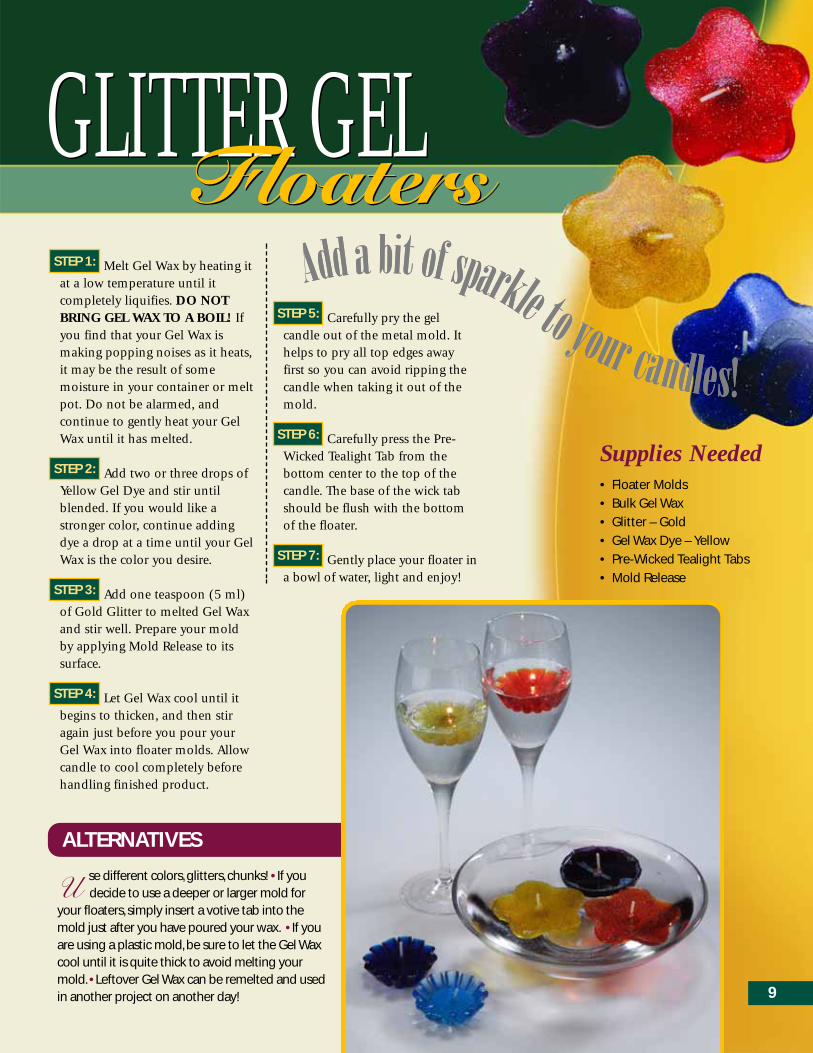
Supplies Needed• Floater Molds
• Bulk Gel Wax
• Glitter – Gold
• Gel Wax Dye – Yellow
• Pre-Wicked Tealight Tabs
• Mold Release
ALTERNATIVES
Use different colors, glitters, chunks! • If youdecide to use a deeper or larger mold for
your floaters, simply insert a votive tab into themold just after you have poured your wax. • If youare using a plastic mold, be sure to let the Gel Waxcool until it is quite thick to avoid melting yourmold. • Leftover Gel Wax can be remelted and usedin another project on another day! 9
GLITTER GELFloaters
GLITTER GELFloaters
Add a bit of sparkle to your candles!
Add a bit of sparkle to your candles!
10
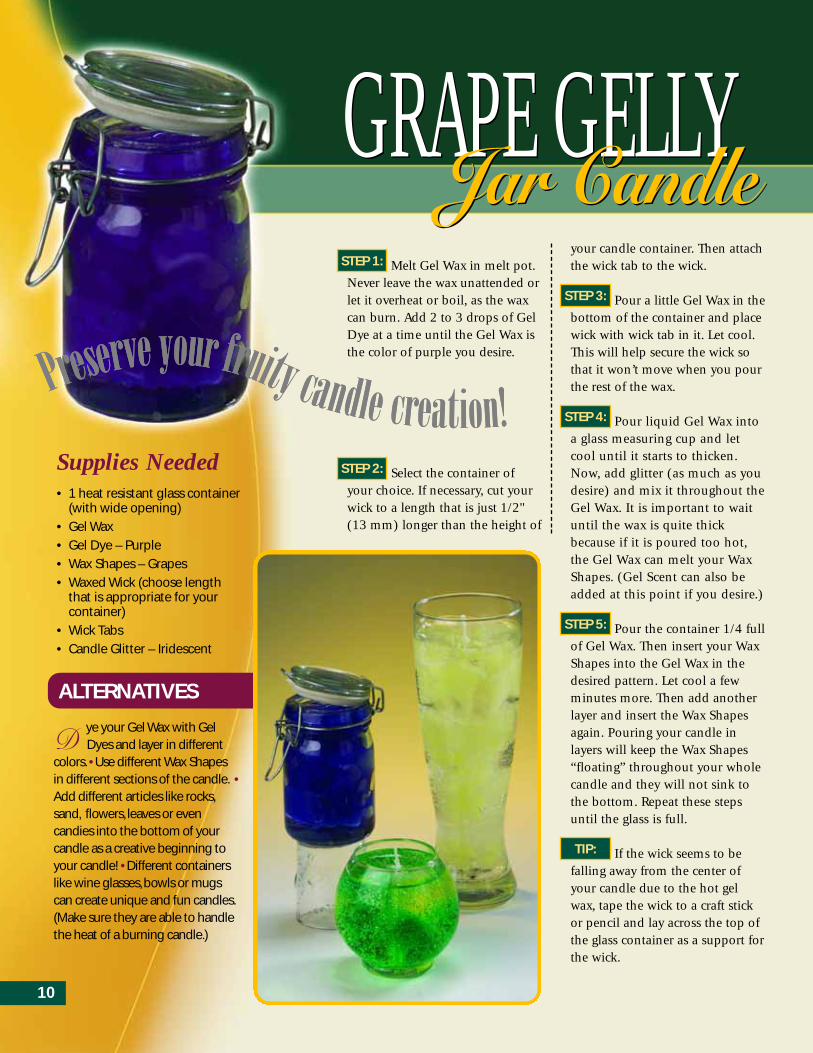
GRAPE GELLYJar Candle
GRAPE GELLY Jar Candle
Melt Gel Wax in melt pot.Never leave the wax unattended orlet it overheat or boil, as the waxcan burn. Add 2 to 3 drops of GelDye at a time until the Gel Wax isthe color of purple you desire.
Select the container ofyour choice. If necessary, cut yourwick to a length that is just 1/2"(13 mm) longer than the height of
your candle container. Then attachthe wick tab to the wick.
Pour a little Gel Wax in thebottom of the container and placewick with wick tab in it. Let cool.This will help secure the wick sothat it won’t move when you pourthe rest of the wax.
Pour liquid Gel Wax intoa glass measuring cup and letcool until it starts to thicken.Now, add glitter (as much as youdesire) and mix it throughout theGel Wax. It is important to waituntil the wax is quite thickbecause if it is poured too hot,the Gel Wax can melt your WaxShapes. (Gel Scent can also beadded at this point if you desire.)
Pour the container 1/4 fullof Gel Wax. Then insert your WaxShapes into the Gel Wax in thedesired pattern. Let cool a fewminutes more. Then add anotherlayer and insert the Wax Shapesagain. Pouring your candle inlayers will keep the Wax Shapes“floating” throughout your wholecandle and they will not sink tothe bottom. Repeat these stepsuntil the glass is full.
If the wick seems to befalling away from the center ofyour candle due to the hot gelwax, tape the wick to a craft stickor pencil and lay across the top ofthe glass container as a support forthe wick.
TIP:
STEP 5:
STEP 4:
STEP 3:
STEP 2:
STEP 1:
Supplies Needed• 1 heat resistant glass container
(with wide opening)
• Gel Wax
• Gel Dye – Purple
• Wax Shapes – Grapes
• Waxed Wick (choose lengththat is appropriate for yourcontainer)
• Wick Tabs
• Candle Glitter – Iridescent
ALTERNATIVES
Dye your Gel Wax with GelDyes and layer in different
colors. • Use different Wax Shapesin different sections of the candle. •Add different articles like rocks,sand, flowers, leaves or evencandies into the bottom of yourcandle as a creative beginning toyour candle! • Different containerslike wine glasses, bowls or mugscan create unique and fun candles.(Make sure they are able to handlethe heat of a burning candle.)
Preserve your fruity candle creation!
Preserve your fruity candle creation!

Cut your Gel Prisms intosmall chunks with a pair ofscissors. Place your wick in yourglass and secure with the blue andclear chunks all around it. Fill theglass half full with the two colorsof chunks.
Melt Gel Wax in meltingpot or melt bag to 195°F (90°C).Please note that for this projectyou don’t want the wax too hotbecause you want it to formbubbles in the candle. If nobubbles are desired, pour the waxat a hotter temperature.
Once the Gel Wax hasmelted, add Iridescent Glitter
(1/2 tsp / 2 ml) and Sea BreezeGel Candle Scent (2 to 3 drops).Stir. As you stir in the glitter, it willhelp create the “bubbly” look inthe candle.
Pour the melted clear GelWax over the chunks until the GelWax is to the top of the container.You may need to hold the wick inplace until the wax has some timeto harden.
When working with GelWax, do NOT get any amount ofwater in the wax. Water will causethe wax to bubble, crack, snap andpop. • Always wash hands afterworking with Gel Wax.
TIPS:
STEP 4:
STEP 3:
STEP 2:
STEP 1:
Supplies Needed• Bulk Gel Wax
• Blue and Clear Gel Prisms(cut into small chunks)
• Waxed Wick
• Candle Glitter – Iridescent
• Gel Candle Scent – Sea Breeze
• 1 champagne glass (make sure this glass canwithstand hot temperaturesfor burning)
ALTERNATIVES
Create a rainbow of color in your candleby using different glitters throughout. •
Make this candle with Gel Shapes instead ofchunks for an entirely different look!
11
GEL CHAMPAGNEGlass Candle
GEL CHAMPAGNEGlass Candle
Create a glittery, bubbling glass of champagne
!Create a glittery, bubbling glass of champagne
!

12
VEGETABLE WAXPyramid
VEGETABLE WAXPyramid
Melt Vegetable Wax in pot.Note that the hotter you make thewax, the more the wax will create asnowflake look on the candle. Donot exceed 200°F (93°C).
Add 1/4 square of Avocadocolor and 4 to 5 drops of spearmintessential oil.
Tie a double knot at theend of the wick and cut to therequired length. A slanting cut willmake it easier to insert the wickinto the mold. Insert the wickfrom the tip and secure it with theenclosed needle at the other endof the mold.(pierce wick withneedle). Place a small amount ofMold Sealer on bottom of mold toprevent wax seepage. Cover sealerwith masking tape.
Before pouring wax intothe mold, double check that theMold Sealer is secure because thiswax is quite hot and will spill onthe counter if the Mold Sealer isnot secure. Also do not forget touse Mold Release.
Pour liquid Vegetable Waxinto the mold and let cool. Oncethe wax has cooled enough toproduce a thick layer of cooledwax, put the candle in therefrigerator to speed up thecooling process for the rest of thecandle.
Remove Mold Sealer andcut the knot at the top and pullout. Vegetable Wax is quite hard soyou should not have any troublereleasing it from the mold.
STEP 6:
STEP 5:
STEP 4:
STEP 3:
STEP 2:
STEP 1:
Supplies Needed• 6 1/2" (16 cm) – 2/0 wick
• Conical 2 1/2" x 5 1/2"Polycarb mold
• Mold Sealer
• 3/4 lb (350 g) Vegetable Wax
• Concentrated ColorSquares – Avocado
• Candle Essential Oil– Spearmint
Create unique patterns every time!Create unique patterns every time!
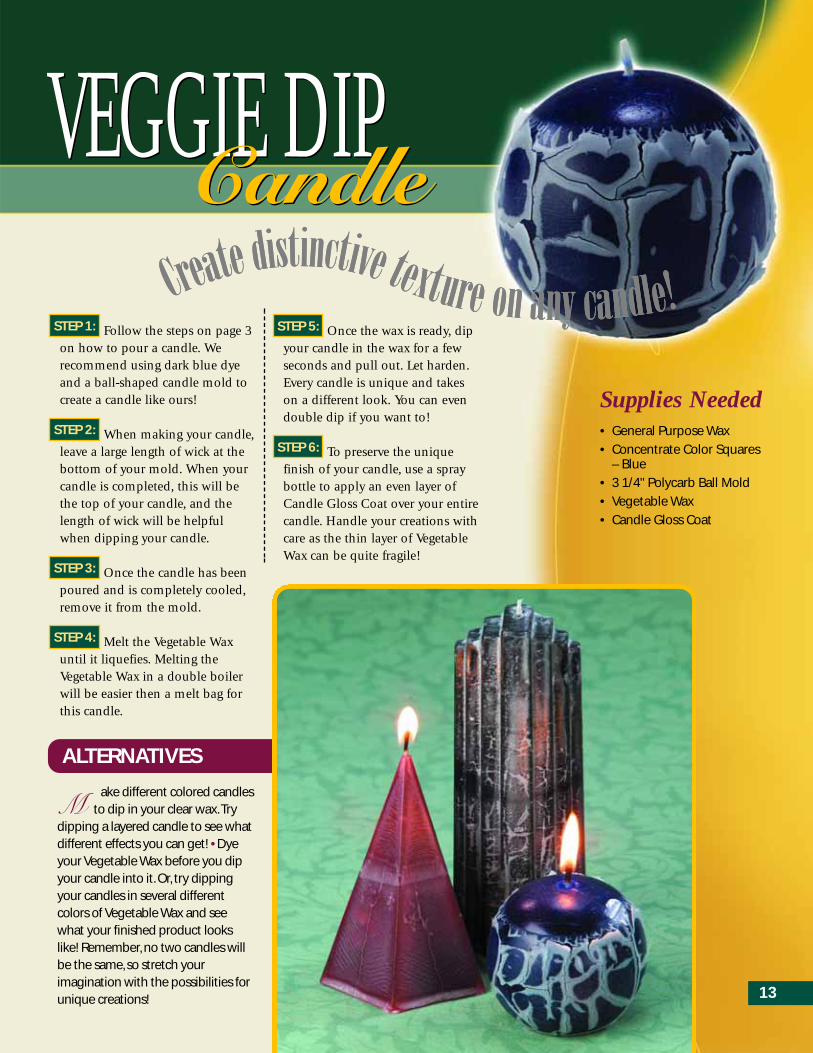
Follow the steps on page 3on how to pour a candle. Werecommend using dark blue dyeand a ball-shaped candle mold tocreate a candle like ours!
When making your candle,leave a large length of wick at thebottom of your mold. When yourcandle is completed, this will bethe top of your candle, and thelength of wick will be helpfulwhen dipping your candle.
Once the candle has beenpoured and is completely cooled,remove it from the mold.
Melt the Vegetable Waxuntil it liquefies. Melting theVegetable Wax in a double boilerwill be easier then a melt bag forthis candle.
Once the wax is ready, dipyour candle in the wax for a fewseconds and pull out. Let harden.Every candle is unique and takeson a different look. You can evendouble dip if you want to!
To preserve the uniquefinish of your candle, use a spraybottle to apply an even layer ofCandle Gloss Coat over your entirecandle. Handle your creations withcare as the thin layer of VegetableWax can be quite fragile!
STEP 6:
STEP 5:
STEP 4:
STEP 3:
STEP 2:
STEP 1:
Supplies Needed• General Purpose Wax
• Concentrate Color Squares– Blue
• 3 1/4" Polycarb Ball Mold
• Vegetable Wax
• Candle Gloss Coat
ALTERNATIVES
Make different colored candles
to dip in your clear wax.Trydipping a layered candle to see whatdifferent effects you can get! • Dyeyour Vegetable Wax before you dipyour candle into it. Or, try dippingyour candles in several differentcolors of Vegetable Wax and seewhat your finished product lookslike! Remember, no two candles willbe the same, so stretch yourimagination with the possibilities forunique creations! 13
VEGGIE DIPCandle
VEGGIE DIPCandleCreate
distinctive texture on any candle!Createdistinctive texture on any candle!

14
BEESWAXPillar
BEESWAXPillar
Beeswax is very different from otherwaxes. It is a pure, natural wax thathas different traits than other waxes.It burns cleaner, and slower than otherwaxes, and it has a honey aroma.When using polycarb molds (andwhen the wax is poured at the correcttemperature) mold release is notneeded with 100% Beeswax candles.You may notice some wax shrinkageoccurring when your beeswax cools,but following the instructions belowwill help you create a beautiful,clean-burning candle.
Prepare mold as instructedon page 3, leaving out the MoldRelease. The mold we are using forthis candle is a 3 1/4" Polycarb BallMold. Make sure the wick is tightinside the mold as the beeswax cancause it to move as it hardens.
Melt the beeswax in a meltbag or double boiler to 200°F(93°C). It is very important to pourthe wax at the correct temperature,so please use a candlethermometer. If poured at 200°F(93°C). the candle should comeout of the mold quite easily.
If desired add dye, scent oressential oils to wax at this time.
Pour wax into the mold inone constant motion. Fill to thetop of the mold.
Let harden about 6-8hours or until it is cool to thetouch. Puncture the wax layer atthe top of the mold with a kitchenknife. Push your knife into thecandle until you reach the holesinside. Then pour your wax intothe holes. Pour this wax 10°F(5°C) warmer than the originalpour to help it melt and attach tothe original pour. You may need tocomplete this step more thanonce.
Once the holes inside thecandle have been filled and re-filled until they are very small,pour the final pour on top of thecandle. Make sure that you do notpour the wax higher than theoriginal pour level. (If youoverpour, it may be hard to getyour candle out of the mold.)Remove Mold Sealer, the knot inyour wick, and remove yourcandle from its mold.
Place a metal pie plate onan element at a low temperature.Place your candle in the plate for afew seconds to melt and level thebottom of the candle. Then, if youwould like a very shiny finish onyour candle, apply Candle GlossCoat to the entire surface of thecandle.
Please remember to burncandles a maximum of 3 hours ata time. Burning longer can causewax to pour out the sides of yourcandle.
TIPS:
STEP 7:
STEP 6:
STEP 5:
STEP 4:
STEP 3:
STEP 2:
STEP 1:
Supplies Needed• Wick (select based on wick
packaging)
• Natural or White Beeswax
• 3 1/4" Polycarb Ball Mold
• Candle Gloss Coat
Purely natural beauty!Purely natural beauty!

Melt Beeswax. Onceliquefied, add cranberry dye (2squares) and cranberry scent (5squares, or as desired). Pour intoMetal Mold (following all steps onpage 2). The reason we are usingbeeswax in this project is becauseit is stickier and will allow theglitter to stick to it.
Once the candle has beencooled and released from themold, apply masking tape tocandle. On one side of the candleapply tape at an angle from thetop right corner to bottom leftcorner. Make sure the tape is onthe edge of the candle cornerwhen you start. Then measure3/4" (19 mm) to the left andtape a piece at the exact angle ofthe first piece. Do the same to theright. When you are done youshould have three angled piecesof tape applied to the outside ofyour candle. You now have theangles for the rest of the candle.[To consistently keep the sameangle, it may help to measure3/4" (19 mm) from the tape onthe top and bottom of the candleto find the correct angle.]
Turn candle to the left andcontinue the left piece of tapearound the corner from the topangle to the bottom of the candle.Once you have finished that,measure another 3/4" (19 mm) tothe left and place another piece oftape. Do this again and you shouldnow have three angled pieces oftape on this side of the candle.
Continue step 3 until allthe sides have masking tape onthem. Once all the way around thetape should match up. If it doesnot, adjust tape slightly to makethe tape pieces line up evenly.
Pour Regal Red Glitter on apiece of newspaper or wax paper.Roll the candle in the glitter, andthen rub it in with your fingers. If itdoes not stick or the candle is quitecold, warm it up with a heat gun orblow dryer. Be careful not to meltthe surface of the candle.
After all the glitter has beenapplied to the sides of the candle,glitter the top of the candle.
Remove tape carefullyfrom the candle and spray withCandle Gloss Coat to help seal inthe glitter and give the candle abeautiful shine.
STEP 7:
STEP 6:
STEP 5:
STEP 4:
STEP 3:
STEP 2:
STEP 1:
Supplies Needed• 1lb (454 g) Beeswax
• Concentrated ColorSquares – Cranberry
• Concentrated ScentSquares – Cranberry
• 6 1/2" (16 cm) #3 Wick
• Regal Red Glitter
• 3/4" (19 mm) Masking Tape
• Short Square Metal Mold
• Candle Gloss Coat
15
POUREDGlitter Candle
POUREDGlitter Candle
Makethe ordinary extraordinary!Makethe ordinary extraordinary!
16
DIPPEDTapers
DIPPEDTapers
Bend a metal coat hangerinto a rectangle with hookcentered at top, making sure thatthe width and height will fit to dipentirely into your large, metal pot.
Tie lengths of wickvertically between the top andbottom of the frame. Make sure tospace the wicks a few inches apart,so that your candles will not touchas they are dipped.
Place wax in a deep pot,such as our melting pot. Place in apan of water and place on thestove top. Melt the wax in thisdouble boiler and keep thetemperature of the wax a steady160°F (71°C). If the wax is toohot, it will not adhere to yourwicks. If the wax is too cool, thesurface of your finished candle willbe lumpy.
If color is desired, addyour color squares to the wax onceit is completely melted. Make surethe color squares have beendissolved before starting to dip thecandles.
The dipped tapers aremade easily by repeatedly dipping
the wick in the wax. Start withdipping the frame all the waydown into wax in a slow smoothmotion. Slowly pull frame straightup and cool for 3 or 4 minutes.Continue to dip, holding candlesin the wax for about 3 secondsand cooling for 3 or 4 minutesbetween each dip. It is importantto move slowly, smoothly and toalways dip to the same level. After6 or 7 dips, you will have a candleabout the size of a pencil.
As you dip, your framewill also fill up with wax.Periodically push this build updown the sides of the frame intothe pot to remelt.
Continue dipping untilyou have the candle diameter youdesire. Please note that the candlewill automatically form into arounded, taper shape when thecandle is dipped fully each time.
Using scissors, trim wick atthe bottom of each candle.Suspend your frame and letcandles hang until completelycool. Then cut wicks at the top ofthe frame and level the bottom ofeach candle in a warmed tin pan.
STEP 8:
STEP 7:
STEP 6:
STEP 5:
STEP 4:
STEP 3:
STEP 2:
STEP 1:
Supplies Needed• Coat hanger
• Beeswax (or Taper wax)
• 2/0 wick
• Concentrated ColorSquares (of your choice)
• Large metal pot
Traditional elegance created in your own ho
meTraditional elegance created in your own ho
me!

Following instructions onpage 14, make beeswax pouredcandle. Just be sure to change yourmold to the 2 3/4" x 4 1/2" roundmold with flat top if you wouldlike your candle to look exactlylike ours!
Once your candle iscompletely cooled, remove it fromthe mold.
Select the dried flowers ofyour choice. These can bepurchased at some craft stores, oryou can press flowers from yourown garden between several heavybooks (for several days) and usethem on your candle!
Warm the surface of yourcandle with a hair dryer andposition the flowers on the candleas desired. Be careful not to meltthe surface of your candle as thiswill result in an uneven exterior on
the candle. Once the flowers are inplace and sticking to the candle,take a small paint brush and dip itin liquid wax. Brush the edges ofthe flowers and greenery with athin layer of wax to make sure thatthe entire arrangement sticks tothe candle.
Let this wax harden a fewminutes and then apply the CandleGloss Coat. This can be done inseveral ways. First you could dip thecandle in the candle gloss. Second,you could mist the candle withgloss from a spray bottle, or finally,you could brush the gloss on with asmall, soft paint brush. You need towork quickly with the Candle GlossCoat as it dries quickly. Also makesure to cover your work area, as thegloss will stick to the surface if notcovered.
STEP 5:
STEP 4:
STEP 3:
STEP 2:
STEP 1:
Supplies Needed• Natural or White beeswax
• Wick (select according towick packaging)
• 2 3/4" x 4 1/2" Round withFlat Top Polycarb Mold
• Pressed Flowers
• Small Paint Brush
• Candle Gloss Coat
ALTERNATIVES
Apply your flowers to a dyed candlefor an entirely different look! Or try
applying dried leaves to a fall-coloredcandle to add a natural touch toThanksgiving centerpieces.You may alsowant to apply greenery to your candle toadd an extra special touch!
17
FLORALPillar
FLORALPillar
Bring summ
er blooms indoors to enjoy year-round!
Bring summ
er blooms indoors to enjoy year-round!
North Kansas City, MO 64116
In Canada: MacGregor, MB R0H 0R0
Visit our web site at:
www.clcs.com
P R I N T E D I N C A N A D A