Embed Size (px)
Citation preview
ArcGIS®
9ArcReader™ Tutorial

Copyright © 2003–2006 ESRI
All Rights Reserved.
Printed in the United States of America.
The information contained in this document is the exclusive property of ESRI. This work is protected under United States copyright law and thecopyright laws of the given countries of origin and applicable international laws, treaties, and/or conventions. No part of this work may be reproducedor transmitted in any form or by any means, electronic or mechanical, including photocopying or recording, or by any information storage or retrievalsystem, except as expressly permitted in writing by ESRI. All requests should be sent to Attention: Contracts Manager, ESRI, 380 New York Street,Redlands, CA 92373-8100, USA.
The information contained in this document is subject to change without notice.
CONTRIBUTING WRITERS
Katherine Dalton, Mark Bockenhauer
U.S. GOVERNMENT RESTRICTED/LIMITED RIGHTS
Any software, documentation, and/or data delivered hereunder is subject to the terms of the License Agreement. In no event shall the U.S. Governmentacquire greater than RESTRICTED/LIMITED RIGHTS. At a minimum, use, duplication, or disclosure by the U.S. Government is subject to restrictionsas set forth in FAR §52.227-14 Alternates I, II, and III (JUN 1987); FAR §52.227-19 (JUN 1987) and/or FAR §12.211/12.212 (Commercial TechnicalData/Computer Software); and DFARS §252.227-7015 (NOV 1995) (Technical Data) and/or DFARS §227.7202 (Computer Software), as applicable.Contractor/Manufacturer is ESRI, 380 New York Street, Redlands, CA 92373-8100, USA.
ESRI, the ESRI globe logo, ArcReader, ArcGIS, the ArcGIS logo, GIS by ESRI, ArcMap, Geography Network, ArcCatalog, ArcSDE, ArcIMS, SpatialDatabase Engine, SDE, www.geographynetwork.com, and www.esri.com are trademarks, registered trademarks, or service marks of ESRI in the UnitedStates, the European Community, or certain other jurisdictions.
Other companies and products mentioned herein are trademarks or registered trademarks of their respective trademark owners.
Attribution.pmd 05/19/2006, 1:21 PM1
1
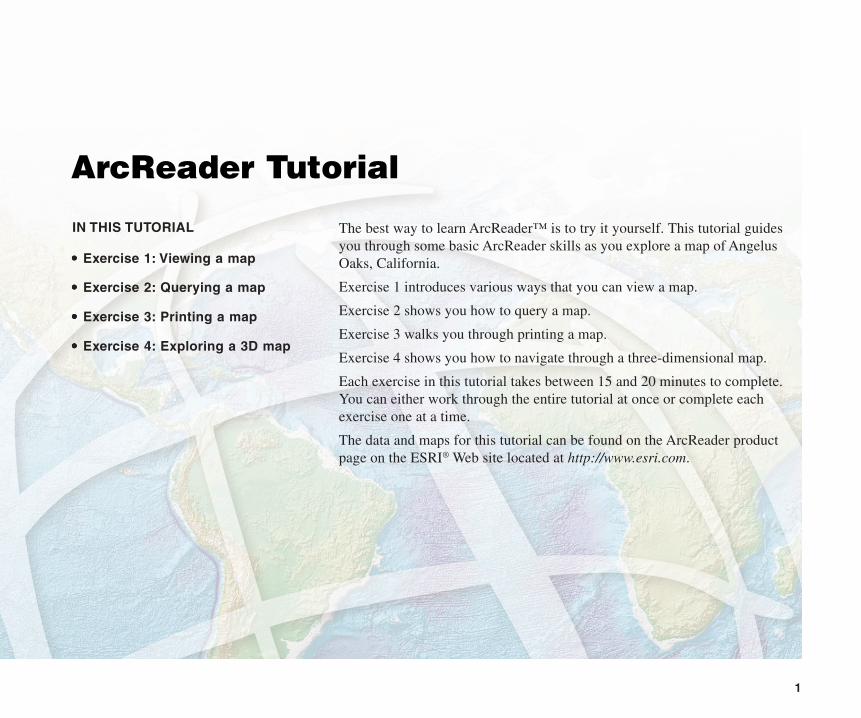
IN THIS TUTORIAL
ArcReader Tutorial
••••• Exercise 1: Viewing a map
••••• Exercise 2: Querying a map
••••• Exercise 3: Printing a map
••••• Exercise 4: Exploring a 3D map
The best way to learn ArcReader™ is to try it yourself. This tutorial guidesyou through some basic ArcReader skills as you explore a map of AngelusOaks, California.
Exercise 1 introduces various ways that you can view a map.
Exercise 2 shows you how to query a map.
Exercise 3 walks you through printing a map.
Exercise 4 shows you how to navigate through a three-dimensional map.
Each exercise in this tutorial takes between 15 and 20 minutes to complete.You can either work through the entire tutorial at once or complete eachexercise one at a time.
The data and maps for this tutorial can be found on the ArcReader productpage on the ESRI® Web site located at http://www.esri.com.
Ch02_AngelusOaks.pmd 9/5/2006, 4:07 PM1
2 ARCREADER TUTORIAL
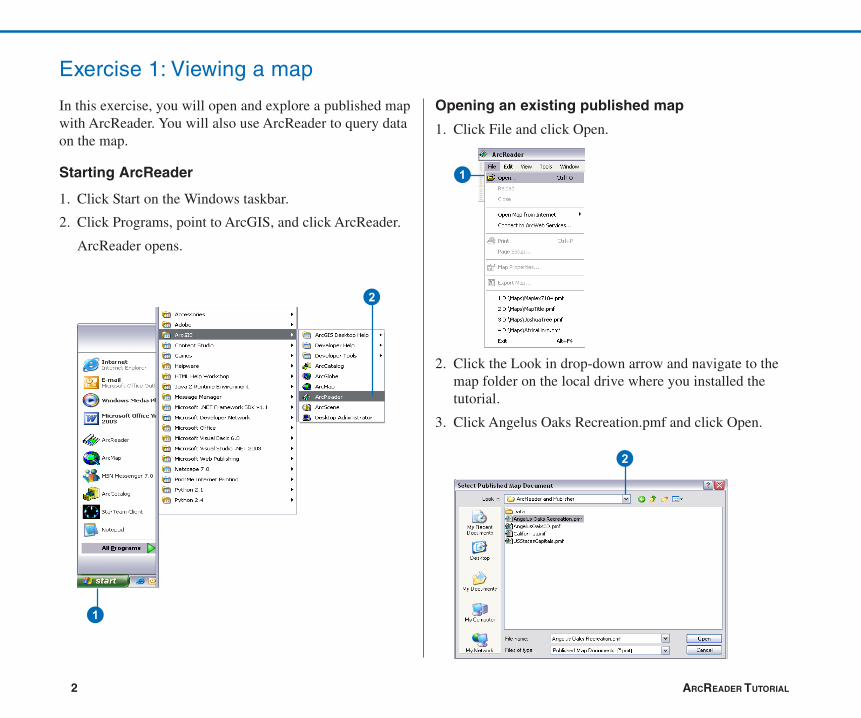
In this exercise, you will open and explore a published mapwith ArcReader. You will also use ArcReader to query dataon the map.
Starting ArcReader
1. Click Start on the Windows taskbar.
2. Click Programs, point to ArcGIS, and click ArcReader.
ArcReader opens.
Exercise 1: Viewing a map
2
1
1
2
Opening an existing published map
1. Click File and click Open.
2. Click the Look in drop-down arrow and navigate to themap folder on the local drive where you installed thetutorial.
3. Click Angelus Oaks Recreation.pmf and click Open.
Ch02_AngelusOaks.pmd 9/5/2006, 4:07 PM2

ARCREADER TUTORIAL 3
ArcReader can open published map files (.pmf) that havebeen created in ArcMap and ArcGlobe with the ArcGISPublisher extension. These published maps do not actuallystore the data shown on the map but rather reference thedata, which may be stored on a local disk, anothercomputer, or the Internet. The map document stores mapelements, such as titles, scale bars, and north arrows.
A data frame is a frame on the map that groups the layersyou want to display together.
This map contains four data frames. Most of the tutorialexercises will use the Angelus Oaks Recreation Area dataframe. The other three data frames will be discussed laterin this tutorial. The layers contained in the Angelus OaksRecreation Area data frame are described in the followinglist:
Layers What layers represent
Houses Locations of residences
City Buildings Public buildings and businesses inAngelus Oaks
Landmarks Locations of major recreationalitems in Angelus Oaks, includingpicnic areas, trailheads, andviewing points
Residential Streets Locations of roads in AngelusOaks residential areas
California Mountain Locations of California mountainPeaks peaks in the area
Roads, Trails, and Locations of major highways,Creeks trails, and creeks
Lakes Locations of major lakes inAngelus Oaks
California State of California outline
Angelus Oaks Angelus Oaks mosaicked raster
The map portrays Angelus Oaks and the surroundingregion. Notice that there are check boxes next to each layername in the table of contents (except Angelus Oaks). Alllayers that are checked are drawn in the map display area.Notice that the check box next to the Houses layer isunavailable, and a small scale bar appears underneath thecheck box. This is because there is a visible scale range setfor that layer. In this case, the Houses layer will onlydisplay when you are zoomed in close to the residentialarea.
This is an example of a .pmf—the Angelus Oaks Recreation.pmf.
Table ofcontents
Datatoolbar Map display
Ch02_AngelusOaks.pmd 9/5/2006, 4:07 PM3
4 ARCREADER TUTORIAL
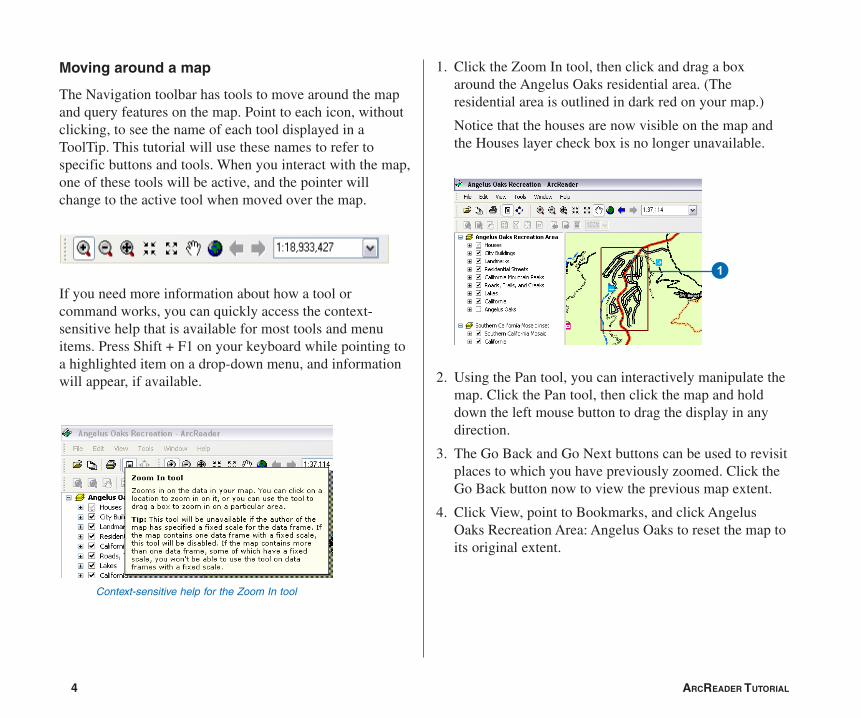
1. Click the Zoom In tool, then click and drag a boxaround the Angelus Oaks residential area. (Theresidential area is outlined in dark red on your map.)
Notice that the houses are now visible on the map andthe Houses layer check box is no longer unavailable.
2. Using the Pan tool, you can interactively manipulate themap. Click the Pan tool, then click the map and holddown the left mouse button to drag the display in anydirection.
3. The Go Back and Go Next buttons can be used to revisitplaces to which you have previously zoomed. Click theGo Back button now to view the previous map extent.
4. Click View, point to Bookmarks, and click AngelusOaks Recreation Area: Angelus Oaks to reset the map toits original extent.
Moving around a map
The Navigation toolbar has tools to move around the mapand query features on the map. Point to each icon, withoutclicking, to see the name of each tool displayed in aToolTip. This tutorial will use these names to refer tospecific buttons and tools. When you interact with the map,one of these tools will be active, and the pointer willchange to the active tool when moved over the map.
If you need more information about how a tool orcommand works, you can quickly access the context-sensitive help that is available for most tools and menuitems. Press Shift + F1 on your keyboard while pointing toa highlighted item on a drop-down menu, and informationwill appear, if available.
Context-sensitive help for the Zoom In tool
1
Ch02_AngelusOaks.pmd 9/5/2006, 4:07 PM4
ARCREADER TUTORIAL 5
Turning layers on and off
The table of contents is where you turn map layers on andoff. To display a layer, check the check box next to thelayer’s name. To turn the layer off, uncheck the box. It isimportant to remember that layers will draw on the map inthe order they appear in the table of contents. In theAngelus Oaks example, the Houses layer will draw on topof all other layers, while the Angelus Oaks layer will drawbeneath all other layers.
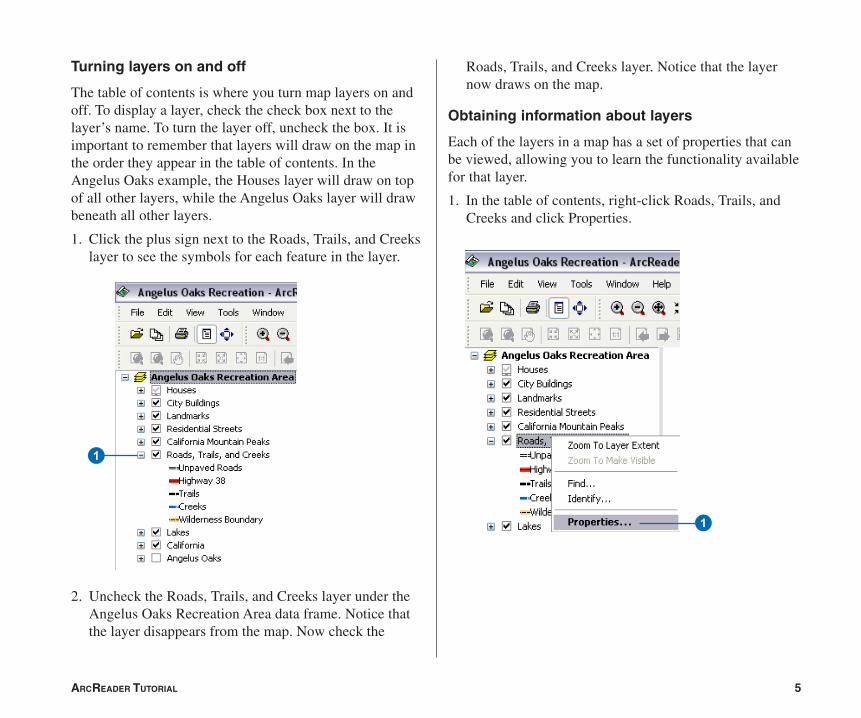
1. Click the plus sign next to the Roads, Trails, and Creekslayer to see the symbols for each feature in the layer.
2. Uncheck the Roads, Trails, and Creeks layer under theAngelus Oaks Recreation Area data frame. Notice thatthe layer disappears from the map. Now check the
Obtaining information about layers
Each of the layers in a map has a set of properties that canbe viewed, allowing you to learn the functionality availablefor that layer.
1. In the table of contents, right-click Roads, Trails, andCreeks and click Properties.
1
Roads, Trails, and Creeks layer. Notice that the layernow draws on the map.
1
Ch02_AngelusOaks.pmd 9/5/2006, 4:07 PM5
6 ARCREADER TUTORIAL
3
2
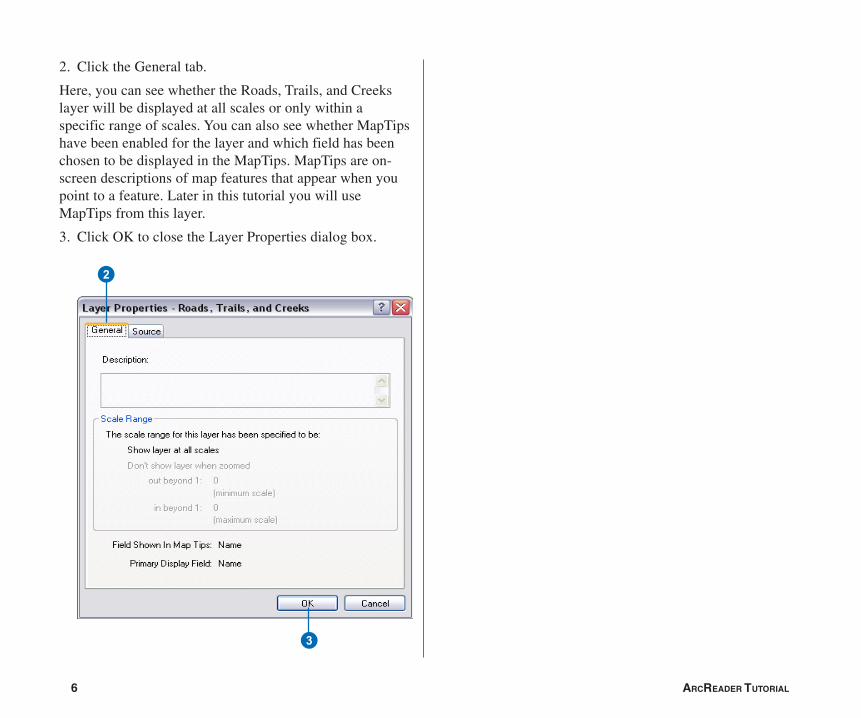
2. Click the General tab.
Here, you can see whether the Roads, Trails, and Creekslayer will be displayed at all scales or only within aspecific range of scales. You can also see whether MapTipshave been enabled for the layer and which field has beenchosen to be displayed in the MapTips. MapTips are on-screen descriptions of map features that appear when youpoint to a feature. Later in this tutorial you will useMapTips from this layer.
3. Click OK to close the Layer Properties dialog box.
Ch02_AngelusOaks.pmd 9/5/2006, 4:07 PM6
ARCREADER TUTORIAL 7
Using the Magnifier Window
There are times when you may not want to change thelocation displayed on the map but still need to see moredetail. The ArcReader Magnifier Window allows you to dothis.
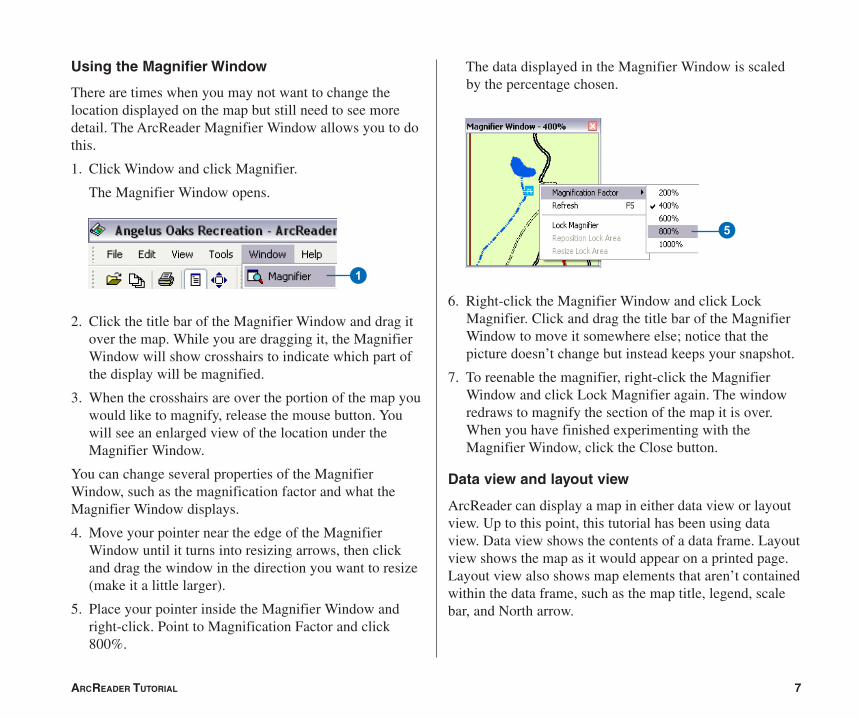
1. Click Window and click Magnifier.
The Magnifier Window opens.
2. Click the title bar of the Magnifier Window and drag itover the map. While you are dragging it, the MagnifierWindow will show crosshairs to indicate which part ofthe display will be magnified.
3. When the crosshairs are over the portion of the map youwould like to magnify, release the mouse button. Youwill see an enlarged view of the location under theMagnifier Window.
You can change several properties of the MagnifierWindow, such as the magnification factor and what theMagnifier Window displays.
4. Move your pointer near the edge of the MagnifierWindow until it turns into resizing arrows, then clickand drag the window in the direction you want to resize(make it a little larger).
5. Place your pointer inside the Magnifier Window andright-click. Point to Magnification Factor and click800%.
The data displayed in the Magnifier Window is scaledby the percentage chosen.
6. Right-click the Magnifier Window and click LockMagnifier. Click and drag the title bar of the MagnifierWindow to move it somewhere else; notice that thepicture doesn’t change but instead keeps your snapshot.
7. To reenable the magnifier, right-click the MagnifierWindow and click Lock Magnifier again. The windowredraws to magnify the section of the map it is over.When you have finished experimenting with theMagnifier Window, click the Close button.
Data view and layout view
ArcReader can display a map in either data view or layoutview. Up to this point, this tutorial has been using dataview. Data view shows the contents of a data frame. Layoutview shows the map as it would appear on a printed page.Layout view also shows map elements that aren’t containedwithin the data frame, such as the map title, legend, scalebar, and North arrow.
5
1
Ch02_AngelusOaks.pmd 9/5/2006, 4:07 PM7
8 ARCREADER TUTORIAL
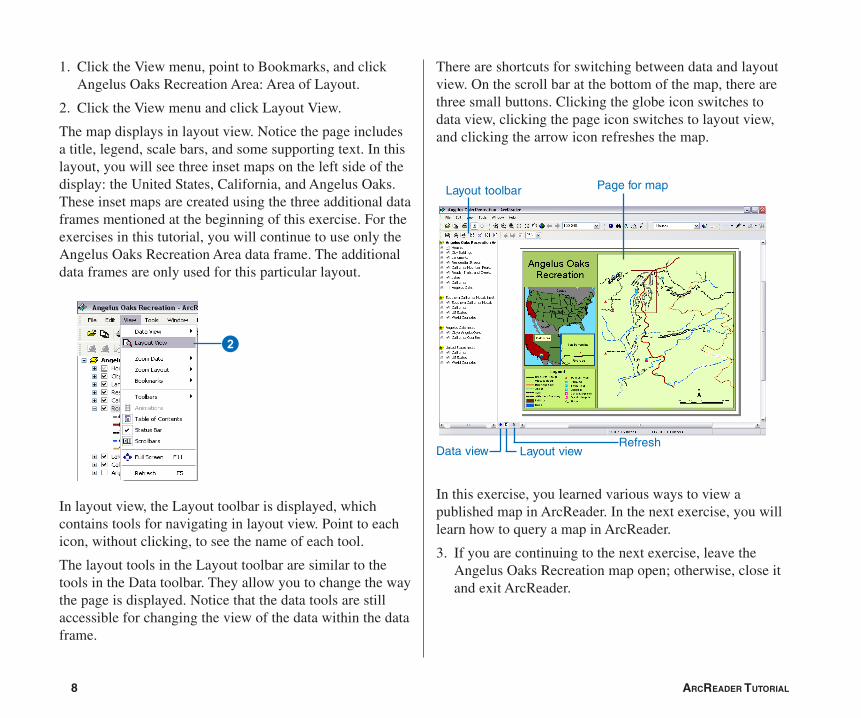
1. Click the View menu, point to Bookmarks, and clickAngelus Oaks Recreation Area: Area of Layout.
2. Click the View menu and click Layout View.
The map displays in layout view. Notice the page includesa title, legend, scale bars, and some supporting text. In thislayout, you will see three inset maps on the left side of thedisplay: the United States, California, and Angelus Oaks.These inset maps are created using the three additional dataframes mentioned at the beginning of this exercise. For theexercises in this tutorial, you will continue to use only theAngelus Oaks Recreation Area data frame. The additionaldata frames are only used for this particular layout.
In layout view, the Layout toolbar is displayed, whichcontains tools for navigating in layout view. Point to eachicon, without clicking, to see the name of each tool.
The layout tools in the Layout toolbar are similar to thetools in the Data toolbar. They allow you to change the waythe page is displayed. Notice that the data tools are stillaccessible for changing the view of the data within the dataframe.
2
There are shortcuts for switching between data and layoutview. On the scroll bar at the bottom of the map, there arethree small buttons. Clicking the globe icon switches todata view, clicking the page icon switches to layout view,and clicking the arrow icon refreshes the map.
In this exercise, you learned various ways to view apublished map in ArcReader. In the next exercise, you willlearn how to query a map in ArcReader.
3. If you are continuing to the next exercise, leave theAngelus Oaks Recreation map open; otherwise, close itand exit ArcReader.
Data view Layout viewRefresh
Page for mapLayout toolbar
Ch02_AngelusOaks.pmd 9/5/2006, 4:07 PM8
ARCREADER TUTORIAL 9
A map in ArcReader typically contains more informationthan you initially see. For example, a feature may holdattribute information that is not labeled or displayed on themap. With ArcReader, you can query that information oruse MapTips to find a feature on the map.
Using MapTips
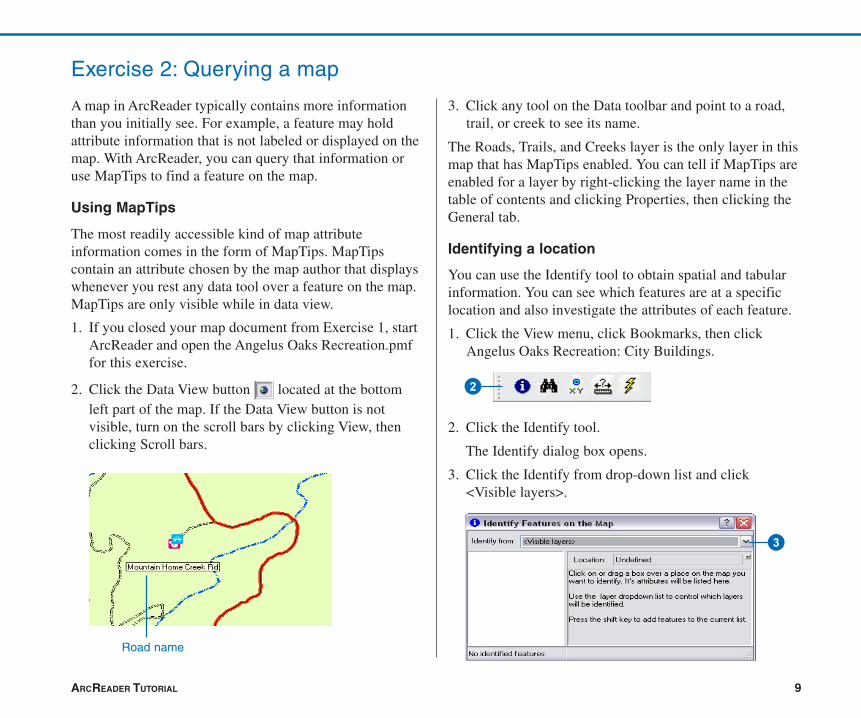
The most readily accessible kind of map attributeinformation comes in the form of MapTips. MapTipscontain an attribute chosen by the map author that displayswhenever you rest any data tool over a feature on the map.MapTips are only visible while in data view.
1. If you closed your map document from Exercise 1, startArcReader and open the Angelus Oaks Recreation.pmffor this exercise.
2. Click the Data View button located at the bottomleft part of the map. If the Data View button is notvisible, turn on the scroll bars by clicking View, thenclicking Scroll bars.
Exercise 2: Querying a map
3. Click any tool on the Data toolbar and point to a road,trail, or creek to see its name.
The Roads, Trails, and Creeks layer is the only layer in thismap that has MapTips enabled. You can tell if MapTips areenabled for a layer by right-clicking the layer name in thetable of contents and clicking Properties, then clicking theGeneral tab.
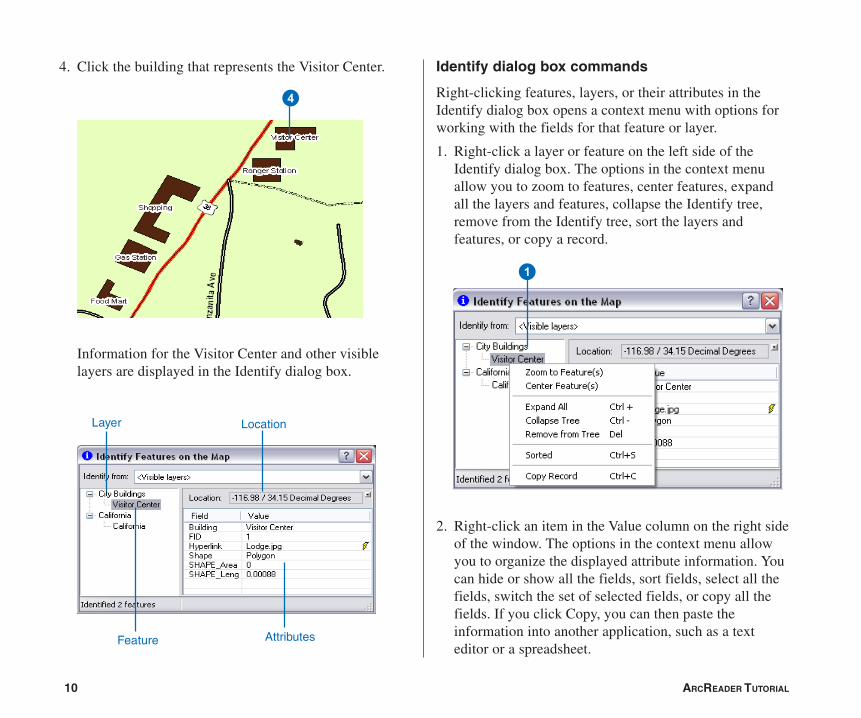
Identifying a location
You can use the Identify tool to obtain spatial and tabularinformation. You can see which features are at a specificlocation and also investigate the attributes of each feature.
1. Click the View menu, click Bookmarks, then clickAngelus Oaks Recreation: City Buildings.
2. Click the Identify tool.
The Identify dialog box opens.
3. Click the Identify from drop-down list and click<Visible layers>.
Road name
2
3
Ch02_AngelusOaks.pmd 9/5/2006, 4:07 PM9
10 ARCREADER TUTORIAL
4
Identify dialog box commands
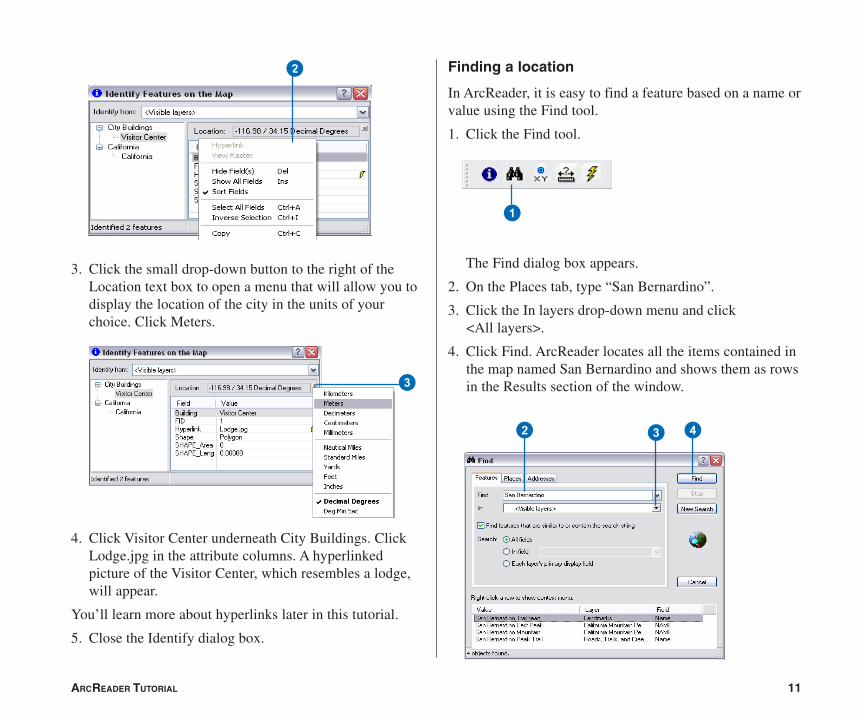
Right-clicking features, layers, or their attributes in theIdentify dialog box opens a context menu with options forworking with the fields for that feature or layer.
1. Right-click a layer or feature on the left side of theIdentify dialog box. The options in the context menuallow you to zoom to features, center features, expandall the layers and features, collapse the Identify tree,remove from the Identify tree, sort the layers andfeatures, or copy a record.
2. Right-click an item in the Value column on the right sideof the window. The options in the context menu allowyou to organize the displayed attribute information. Youcan hide or show all the fields, sort fields, select all thefields, switch the set of selected fields, or copy all thefields. If you click Copy, you can then paste theinformation into another application, such as a texteditor or a spreadsheet.
1
4. Click the building that represents the Visitor Center.
Information for the Visitor Center and other visiblelayers are displayed in the Identify dialog box.
Feature Attributes
Layer Location
Ch02_AngelusOaks.pmd 9/5/2006, 4:07 PM10
ARCREADER TUTORIAL 11
3. Click the small drop-down button to the right of theLocation text box to open a menu that will allow you todisplay the location of the city in the units of yourchoice. Click Meters.
4. Click Visitor Center underneath City Buildings. ClickLodge.jpg in the attribute columns. A hyperlinkedpicture of the Visitor Center, which resembles a lodge,will appear.
You’ll learn more about hyperlinks later in this tutorial.
5. Close the Identify dialog box.
2
3
Finding a location
In ArcReader, it is easy to find a feature based on a name orvalue using the Find tool.
1. Click the Find tool.
The Find dialog box appears.
2. On the Places tab, type “San Bernardino”.
3. Click the In layers drop-down menu and click<All layers>.
4. Click Find. ArcReader locates all the items contained inthe map named San Bernardino and shows them as rowsin the Results section of the window.
3 42
1
Ch02_AngelusOaks.pmd 9/5/2006, 4:07 PM11
12 ARCREADER TUTORIAL
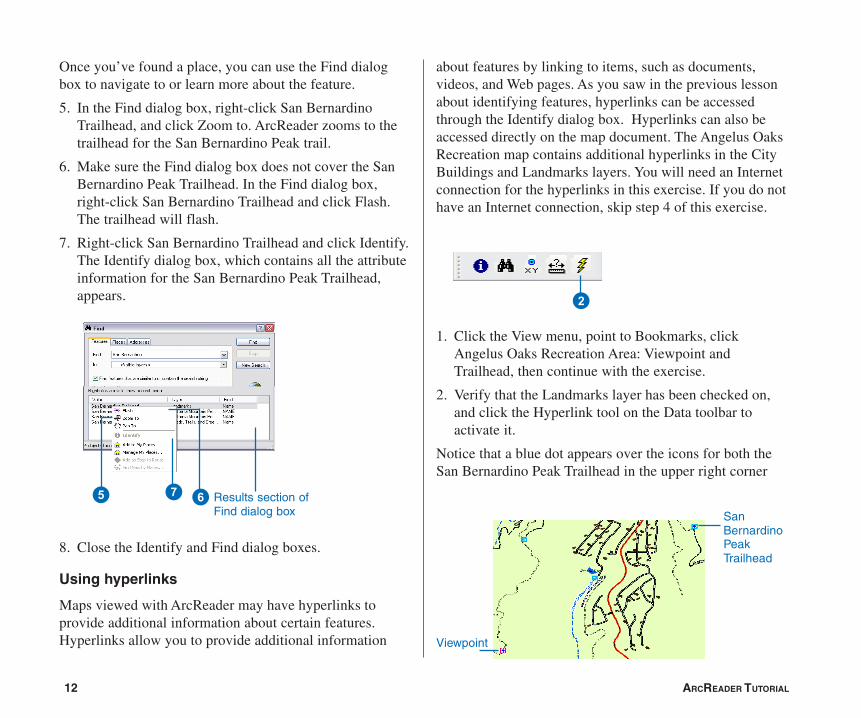
about features by linking to items, such as documents,videos, and Web pages. As you saw in the previous lessonabout identifying features, hyperlinks can be accessedthrough the Identify dialog box. Hyperlinks can also beaccessed directly on the map document. The Angelus OaksRecreation map contains additional hyperlinks in the CityBuildings and Landmarks layers. You will need an Internetconnection for the hyperlinks in this exercise. If you do nothave an Internet connection, skip step 4 of this exercise.
1. Click the View menu, point to Bookmarks, clickAngelus Oaks Recreation Area: Viewpoint andTrailhead, then continue with the exercise.
2. Verify that the Landmarks layer has been checked on,and click the Hyperlink tool on the Data toolbar toactivate it.
Notice that a blue dot appears over the icons for both theSan Bernardino Peak Trailhead in the upper right corner
Once you’ve found a place, you can use the Find dialogbox to navigate to or learn more about the feature.
5. In the Find dialog box, right-click San BernardinoTrailhead, and click Zoom to. ArcReader zooms to thetrailhead for the San Bernardino Peak trail.
6. Make sure the Find dialog box does not cover the SanBernardino Peak Trailhead. In the Find dialog box,right-click San Bernardino Trailhead and click Flash.The trailhead will flash.
7. Right-click San Bernardino Trailhead and click Identify.The Identify dialog box, which contains all the attributeinformation for the San Bernardino Peak Trailhead,appears.
8. Close the Identify and Find dialog boxes.
Using hyperlinks
Maps viewed with ArcReader may have hyperlinks toprovide additional information about certain features.Hyperlinks allow you to provide additional information
SanBernardinoPeakTrailhead
Viewpoint
2
7 6 Results section ofFind dialog box
5
Ch02_AngelusOaks.pmd 9/5/2006, 4:07 PM12
ARCREADER TUTORIAL 13
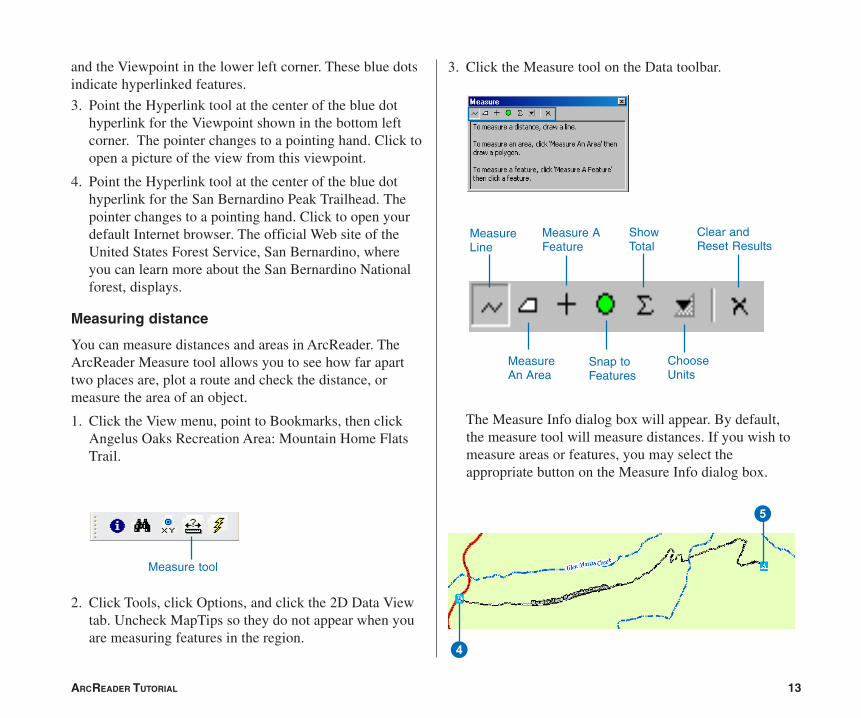
3. Point the Hyperlink tool at the center of the blue dothyperlink for the Viewpoint shown in the bottom leftcorner. The pointer changes to a pointing hand. Click toopen a picture of the view from this viewpoint.
4. Point the Hyperlink tool at the center of the blue dothyperlink for the San Bernardino Peak Trailhead. Thepointer changes to a pointing hand. Click to open yourdefault Internet browser. The official Web site of theUnited States Forest Service, San Bernardino, whereyou can learn more about the San Bernardino Nationalforest, displays.
Measuring distance
You can measure distances and areas in ArcReader. TheArcReader Measure tool allows you to see how far aparttwo places are, plot a route and check the distance, ormeasure the area of an object.
1. Click the View menu, point to Bookmarks, then clickAngelus Oaks Recreation Area: Mountain Home FlatsTrail.
2. Click Tools, click Options, and click the 2D Data Viewtab. Uncheck MapTips so they do not appear when youare measuring features in the region.
The Measure Info dialog box will appear. By default,the measure tool will measure distances. If you wish tomeasure areas or features, you may select theappropriate button on the Measure Info dialog box.
Measure tool
5
4
3. Click the Measure tool on the Data toolbar.and the Viewpoint in the lower left corner. These blue dotsindicate hyperlinked features.
MeasureLine
MeasureAn Area
Measure AFeature
Snap toFeatures
ShowTotal
Clear andReset Results
ChooseUnits
Ch02_AngelusOaks.pmd 9/5/2006, 4:07 PM13
14 ARCREADER TUTORIAL
3
4. Click the Mountain Home Flats Trailhead on the leftside of the map, then trace along the trail to the campsiteby clicking each time you want to change directions.
5. Double-click the campsite to finish measuring.
The line you drew disappears.
The measurement information is contained in the MeasureInfo dialog box. The total distance you have measuredshould be approximately 2,509 meters.
6. Click the View menu, point to Bookmarks, then clickAngelus Oaks Recreation Area: Shadow Lake.
7. Click the Measure Features button on the Measure Infodialog box.
8. Click once inside the perimeter of the lake, and themeasurement information will appear in the dialog box.
Interactively revealing layers
It is often useful to see how certain layers overlay otherlayers. The Swipe tool in ArcReader allows you to see thelayers underneath a particular layer without turning it off inthe table of contents. Before beginning this exercise, makesure you are in data view.
1. Click View, point to Bookmarks, and click AngelusOaks Recreation: Angelus Oaks.
2. In the Angelus Oaks Recreation Area data frame, turnoff the California layer (uncheck the box) and turn onthe Angelus Oaks layer (check the box), to reveal theAngelus Oaks image layer.
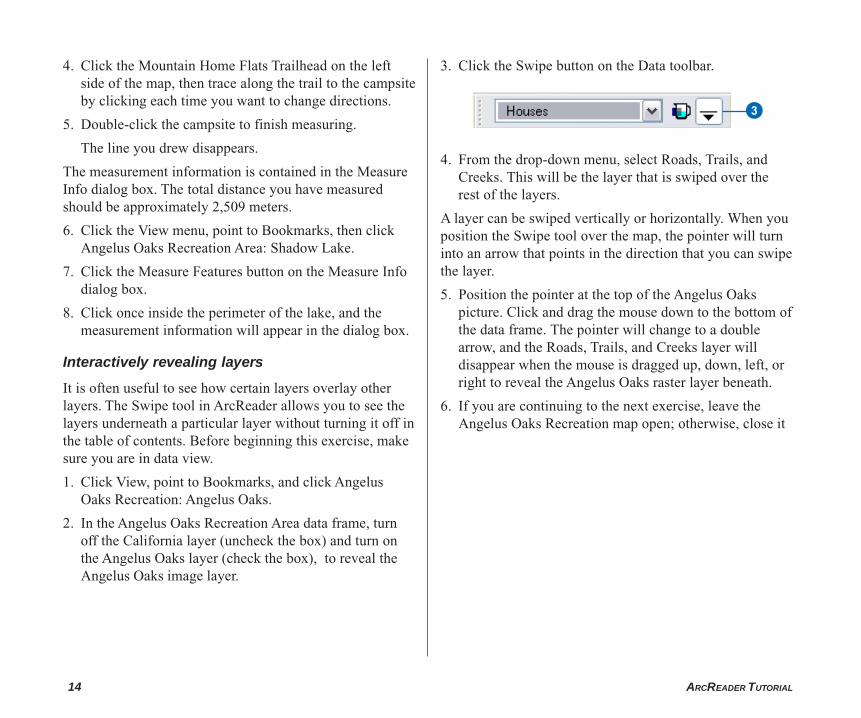
3. Click the Swipe button on the Data toolbar.
4. From the drop-down menu, select Roads, Trails, andCreeks. This will be the layer that is swiped over therest of the layers.
A layer can be swiped vertically or horizontally. When youposition the Swipe tool over the map, the pointer will turninto an arrow that points in the direction that you can swipethe layer.
5. Position the pointer at the top of the Angelus Oakspicture. Click and drag the mouse down to the bottom ofthe data frame. The pointer will change to a doublearrow, and the Roads, Trails, and Creeks layer willdisappear when the mouse is dragged up, down, left, orright to reveal the Angelus Oaks raster layer beneath.
6. If you are continuing to the next exercise, leave theAngelus Oaks Recreation map open; otherwise, close it
Ch02_AngelusOaks.pmd 9/22/2006, 10:56 AM14
ARCREADER TUTORIAL 15
To perform the following exercise, you will need to have aprinter available. The printer should be able to print a lettersize (or A4) sheet of paper and can be either a black-and-white or color printer.
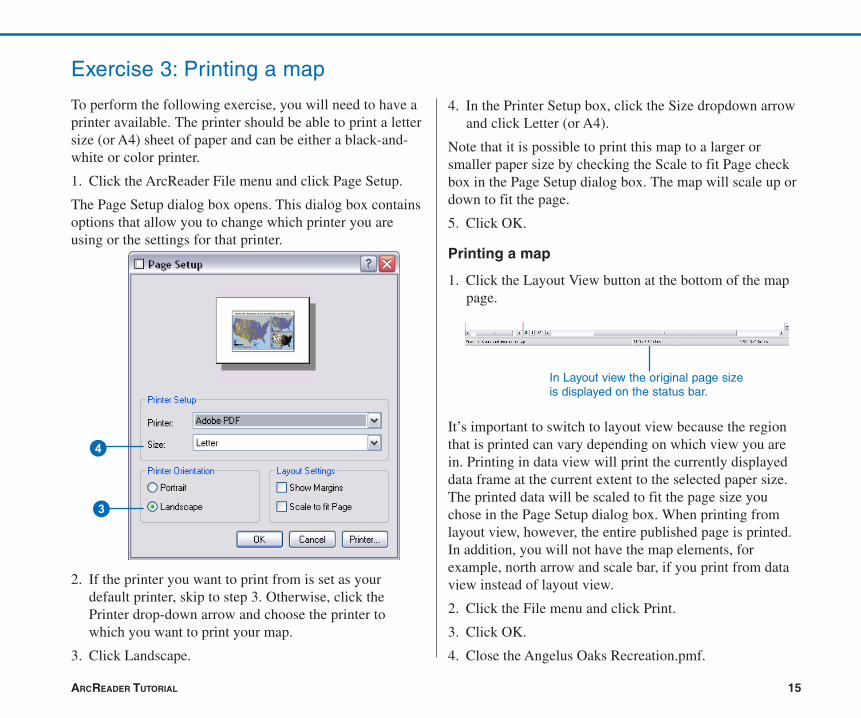
1. Click the ArcReader File menu and click Page Setup.
The Page Setup dialog box opens. This dialog box containsoptions that allow you to change which printer you areusing or the settings for that printer.
2. If the printer you want to print from is set as yourdefault printer, skip to step 3. Otherwise, click thePrinter drop-down arrow and choose the printer towhich you want to print your map.
3. Click Landscape.
Exercise 3: Printing a map
Printing a map
1. Click the Layout View button at the bottom of the mappage.
It’s important to switch to layout view because the regionthat is printed can vary depending on which view you arein. Printing in data view will print the currently displayeddata frame at the current extent to the selected paper size.The printed data will be scaled to fit the page size youchose in the Page Setup dialog box. When printing fromlayout view, however, the entire published page is printed.In addition, you will not have the map elements, forexample, north arrow and scale bar, if you print from dataview instead of layout view.
2. Click the File menu and click Print.
3. Click OK.
4. Close the Angelus Oaks Recreation.pmf.
4
3
In Layout view the original page sizeis displayed on the status bar.
4. In the Printer Setup box, click the Size dropdown arrowand click Letter (or A4).
Note that it is possible to print this map to a larger orsmaller paper size by checking the Scale to fit Page checkbox in the Page Setup dialog box. The map will scale up ordown to fit the page.
5. Click OK.
Ch02_AngelusOaks.pmd 9/5/2006, 4:07 PM15
16 ARCREADER TUTORIAL
In this exercise, you will open and explore a 3D mappublished from ArcGlobe that contains 3D views andfeatures. With 3D .pmfs, you are still able to find, measure,identify, use hyperlinks, and swipe layers as you did in theprevious exercises with the 2D map. In addition, the 3Dglobe environment allows for rotating the globe in manydirections and flying through various geographic locations.
Starting ArcReader and opening a 3D .pmf
1. Start ArcReader and navigate to your local drive whereyour tutorial data is stored.
2. Click AngelusOaks3D.pmf and click Open.
The AngelusOaks3D.pmf opens with a full extent view ofthe globe. Notice that the Data toolbar is the same as with a2D .pmf. In addition, there is a new Globe toolbar withtools specifically designed for interacting with 3D maps.The Globe toolbar will be discussed in a future lesson.
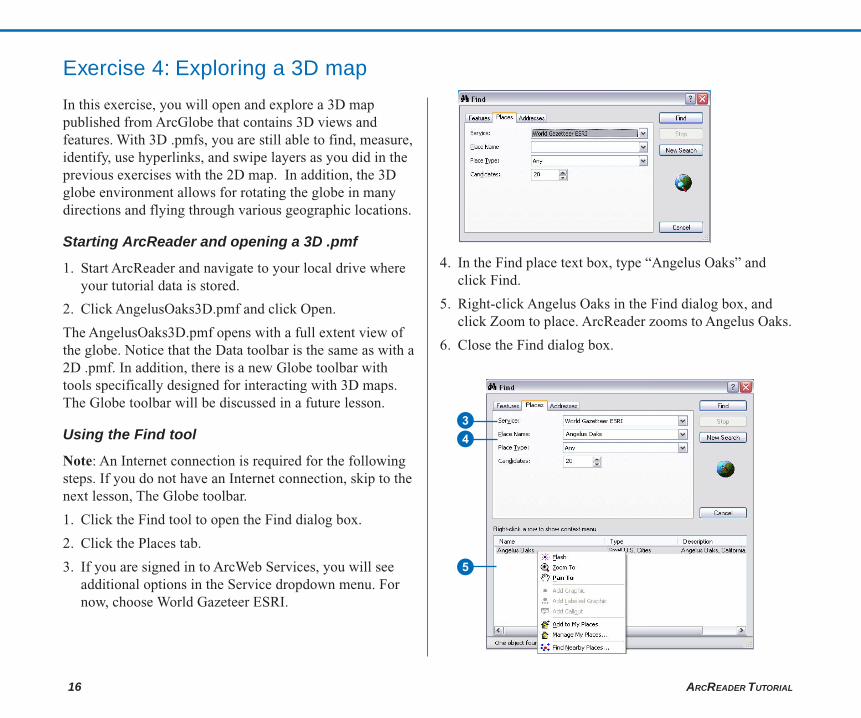
Using the Find tool
Note: An Internet connection is required for the followingsteps. If you do not have an Internet connection, skip to thenext lesson, The Globe toolbar.
1. Click the Find tool to open the Find dialog box.
2. Click the Places tab.
3. If you are signed in to ArcWeb Services, you will seeadditional options in the Service dropdown menu. Fornow, choose World Gazeteer ESRI.
4. In the Find place text box, type “Angelus Oaks” andclick Find.
5. Right-click Angelus Oaks in the Find dialog box, andclick Zoom to place. ArcReader zooms to Angelus Oaks.
6. Close the Find dialog box.
Exercise 4: Exploring a 3D map
34
5
Ch02_AngelusOaks.pmd 9/22/2006, 10:56 AM16
ARCREADER TUTORIAL 17
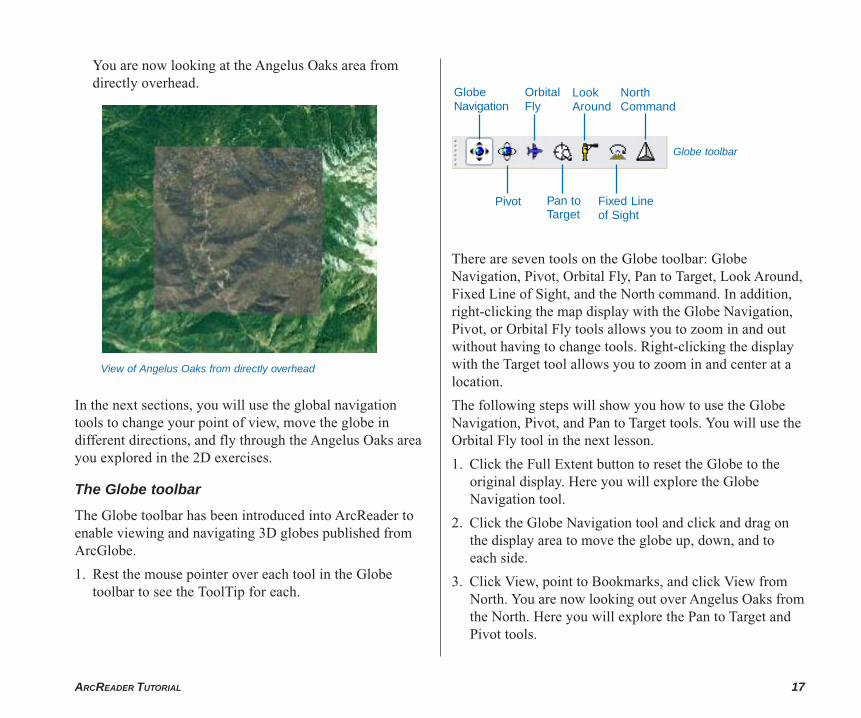
You are now looking at the Angelus Oaks area fromdirectly overhead.
In the next sections, you will use the global navigationtools to change your point of view, move the globe indifferent directions, and fly through the Angelus Oaks areayou explored in the 2D exercises.
The Globe toolbar
The Globe toolbar has been introduced into ArcReader toenable viewing and navigating 3D globes published fromArcGlobe.
1. Rest the mouse pointer over each tool in the Globetoolbar to see the ToolTip for each.
There are seven tools on the Globe toolbar: GlobeNavigation, Pivot, Orbital Fly, Pan to Target, Look Around,Fixed Line of Sight, and the North command. In addition,right-clicking the map display with the Globe Navigation,Pivot, or Orbital Fly tools allows you to zoom in and outwithout having to change tools. Right-clicking the displaywith the Target tool allows you to zoom in and center at alocation.
The following steps will show you how to use the GlobeNavigation, Pivot, and Pan to Target tools. You will use theOrbital Fly tool in the next lesson.
1. Click the Full Extent button to reset the Globe to theoriginal display. Here you will explore the GlobeNavigation tool.
2. Click the Globe Navigation tool and click and drag onthe display area to move the globe up, down, and toeach side.
3. Click View, point to Bookmarks, and click View fromNorth. You are now looking out over Angelus Oaks fromthe North. Here you will explore the Pan to Target andPivot tools.
Globe toolbar
Pivot
OrbitalFly
Pan toTarget
GlobeNavigation
LookAround
Fixed Lineof Sight
NorthCommand
View of Angelus Oaks from directly overhead
Ch02_AngelusOaks.pmd 9/22/2006, 10:56 AM17
18 ARCREADER TUTORIAL
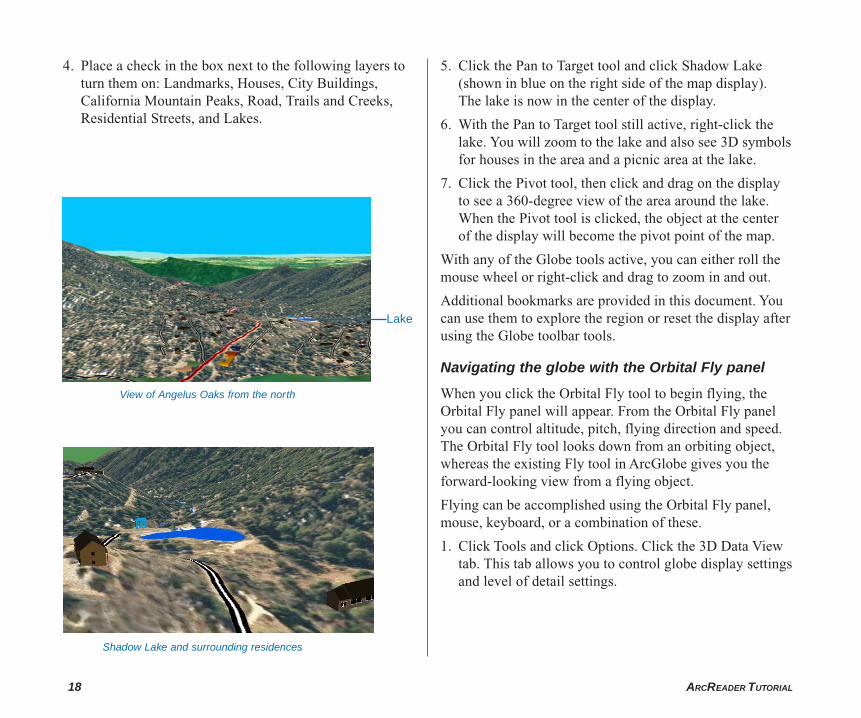
4. Place a check in the box next to the following layers toturn them on: Landmarks, Houses, City Buildings,California Mountain Peaks, Road, Trails and Creeks,Residential Streets, and Lakes.
5. Click the Pan to Target tool and click Shadow Lake(shown in blue on the right side of the map display).The lake is now in the center of the display.
6. With the Pan to Target tool still active, right-click thelake. You will zoom to the lake and also see 3D symbolsfor houses in the area and a picnic area at the lake.
7. Click the Pivot tool, then click and drag on the displayto see a 360-degree view of the area around the lake.When the Pivot tool is clicked, the object at the centerof the display will become the pivot point of the map.
With any of the Globe tools active, you can either roll themouse wheel or right-click and drag to zoom in and out.
Additional bookmarks are provided in this document. Youcan use them to explore the region or reset the display afterusing the Globe toolbar tools.
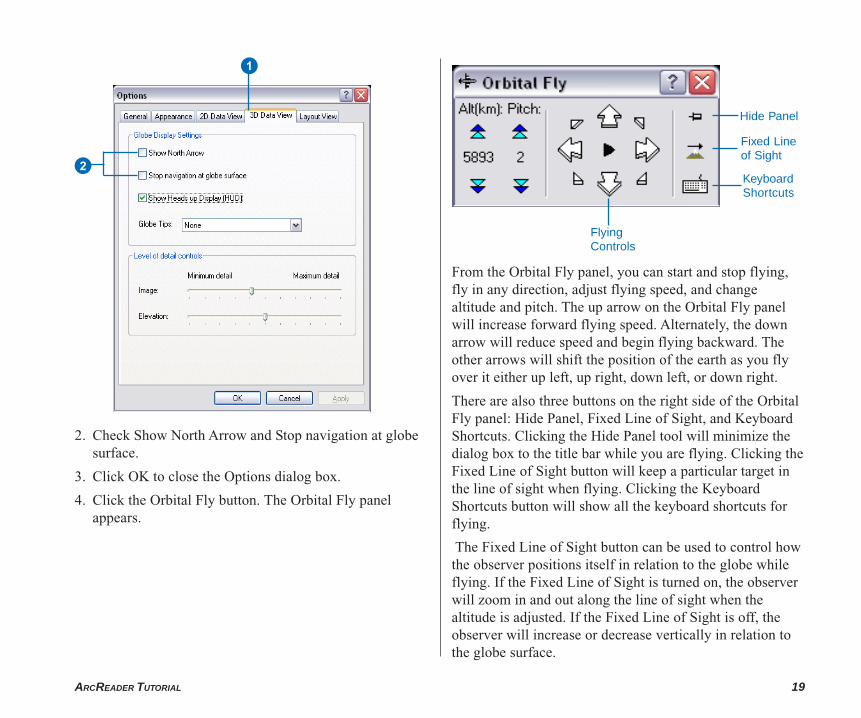
Navigating the globe with the Orbital Fly panel
When you click the Orbital Fly tool to begin flying, theOrbital Fly panel will appear. From the Orbital Fly panelyou can control altitude, pitch, flying direction and speed.The Orbital Fly tool looks down from an orbiting object,whereas the existing Fly tool in ArcGlobe gives you theforward-looking view from a flying object.
Flying can be accomplished using the Orbital Fly panel,mouse, keyboard, or a combination of these.
1. Click Tools and click Options. Click the 3D Data Viewtab. This tab allows you to control globe display settingsand level of detail settings.
Shadow Lake and surrounding residences
View of Angelus Oaks from the north
Lake
Ch02_AngelusOaks.pmd 9/22/2006, 10:56 AM18
ARCREADER TUTORIAL 19
From the Orbital Fly panel, you can start and stop flying,fly in any direction, adjust flying speed, and changealtitude and pitch. The up arrow on the Orbital Fly panelwill increase forward flying speed. Alternately, the downarrow will reduce speed and begin flying backward. Theother arrows will shift the position of the earth as you flyover it either up left, up right, down left, or down right.
There are also three buttons on the right side of the OrbitalFly panel: Hide Panel, Fixed Line of Sight, and KeyboardShortcuts. Clicking the Hide Panel tool will minimize thedialog box to the title bar while you are flying. Clicking theFixed Line of Sight button will keep a particular target inthe line of sight when flying. Clicking the KeyboardShortcuts button will show all the keyboard shortcuts forflying.
The Fixed Line of Sight button can be used to control howthe observer positions itself in relation to the globe whileflying. If the Fixed Line of Sight is turned on, the observerwill zoom in and out along the line of sight when thealtitude is adjusted. If the Fixed Line of Sight is off, theobserver will increase or decrease vertically in relation tothe globe surface.
2. Check Show North Arrow and Stop navigation at globesurface.
3. Click OK to close the Options dialog box.
4. Click the Orbital Fly button. The Orbital Fly panelappears.
Hide Panel
Fixed Lineof Sight
KeyboardShortcuts
FlyingControls
1
2
Ch02_AngelusOaks.pmd 9/22/2006, 10:56 AM19
20 ARCREADER TUTORIAL
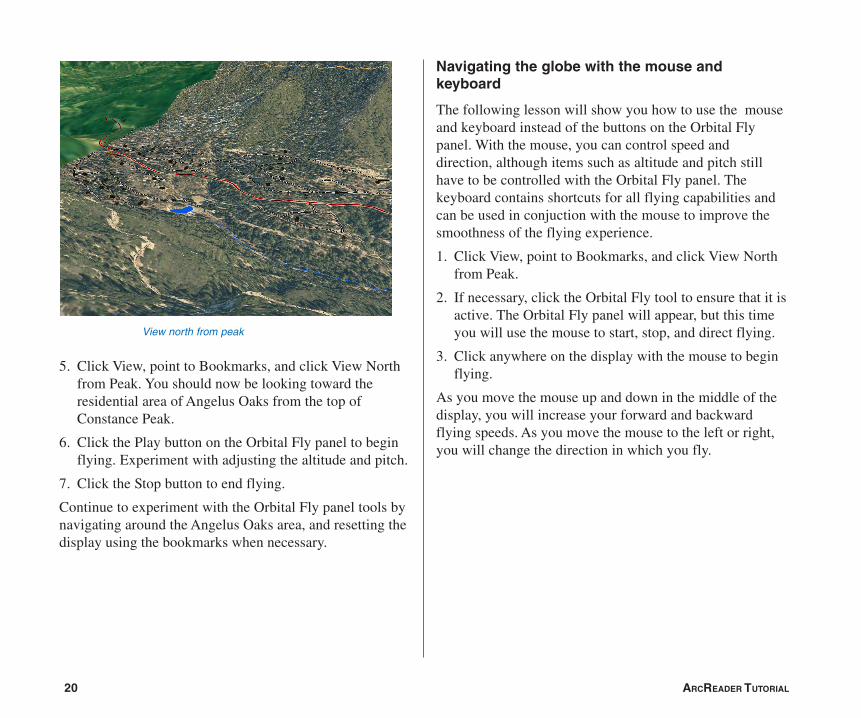
5. Click View, point to Bookmarks, and click View Northfrom Peak. You should now be looking toward theresidential area of Angelus Oaks from the top ofConstance Peak.
6. Click the Play button on the Orbital Fly panel to beginflying. Experiment with adjusting the altitude and pitch.
7. Click the Stop button to end flying.
Continue to experiment with the Orbital Fly panel tools bynavigating around the Angelus Oaks area, and resetting thedisplay using the bookmarks when necessary.
Navigating the globe with the mouse andkeyboard
The following lesson will show you how to use the mouseand keyboard instead of the buttons on the Orbital Flypanel. With the mouse, you can control speed anddirection, although items such as altitude and pitch stillhave to be controlled with the Orbital Fly panel. Thekeyboard contains shortcuts for all flying capabilities andcan be used in conjuction with the mouse to improve thesmoothness of the flying experience.
1. Click View, point to Bookmarks, and click View Northfrom Peak.
2. If necessary, click the Orbital Fly tool to ensure that it isactive. The Orbital Fly panel will appear, but this timeyou will use the mouse to start, stop, and direct flying.
3. Click anywhere on the display with the mouse to beginflying.
As you move the mouse up and down in the middle of thedisplay, you will increase your forward and backwardflying speeds. As you move the mouse to the left or right,you will change the direction in which you fly.
View north from peak
Ch02_AngelusOaks.pmd 9/5/2006, 4:07 PM20
ARCREADER TUTORIAL 21
4. Click again to stop flying, or press the Esc key to endflying.
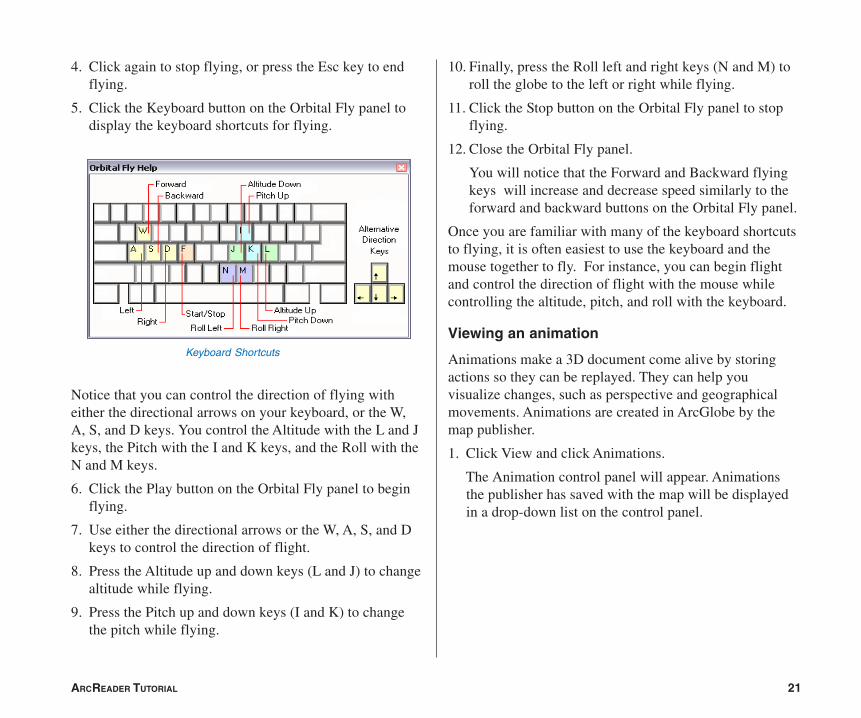
5. Click the Keyboard button on the Orbital Fly panel todisplay the keyboard shortcuts for flying.
Notice that you can control the direction of flying witheither the directional arrows on your keyboard, or the W,A, S, and D keys. You control the Altitude with the L and Jkeys, the Pitch with the I and K keys, and the Roll with theN and M keys.
6. Click the Play button on the Orbital Fly panel to beginflying.
7. Use either the directional arrows or the W, A, S, and Dkeys to control the direction of flight.
8. Press the Altitude up and down keys (L and J) to changealtitude while flying.
9. Press the Pitch up and down keys (I and K) to changethe pitch while flying.
10. Finally, press the Roll left and right keys (N and M) toroll the globe to the left or right while flying.
11. Click the Stop button on the Orbital Fly panel to stopflying.
12. Close the Orbital Fly panel.
You will notice that the Forward and Backward flyingkeys will increase and decrease speed similarly to theforward and backward buttons on the Orbital Fly panel.
Once you are familiar with many of the keyboard shortcutsto flying, it is often easiest to use the keyboard and themouse together to fly. For instance, you can begin flightand control the direction of flight with the mouse whilecontrolling the altitude, pitch, and roll with the keyboard.
Viewing an animation
Animations make a 3D document come alive by storingactions so they can be replayed. They can help youvisualize changes, such as perspective and geographicalmovements. Animations are created in ArcGlobe by themap publisher.
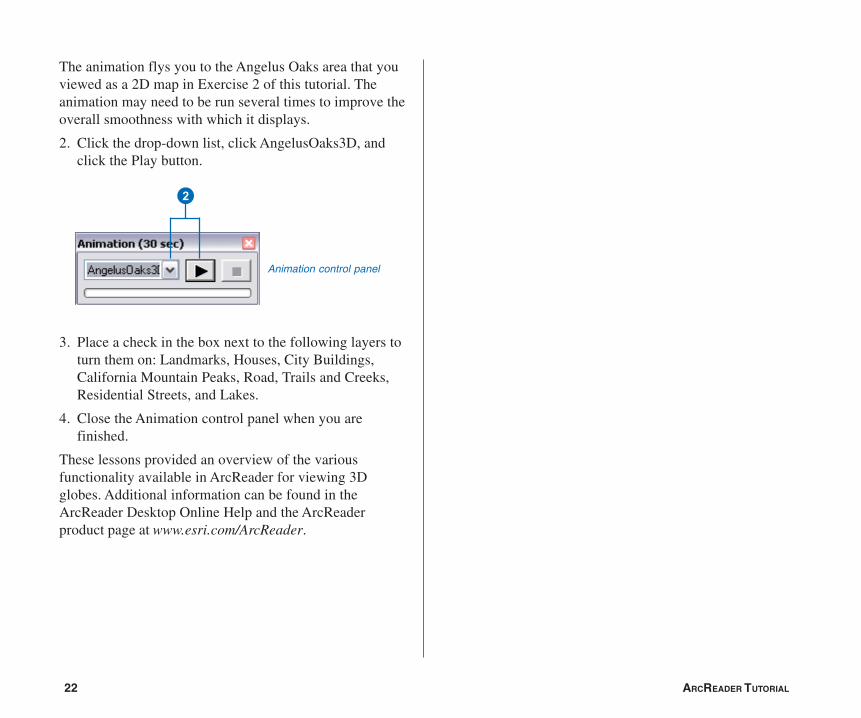
1. Click View and click Animations.
The Animation control panel will appear. Animationsthe publisher has saved with the map will be displayedin a drop-down list on the control panel.
Keyboard Shortcuts
Ch02_AngelusOaks.pmd 9/5/2006, 4:07 PM21
22 ARCREADER TUTORIAL
The animation flys you to the Angelus Oaks area that youviewed as a 2D map in Exercise 2 of this tutorial. Theanimation may need to be run several times to improve theoverall smoothness with which it displays.
2. Click the drop-down list, click AngelusOaks3D, andclick the Play button.
3. Place a check in the box next to the following layers toturn them on: Landmarks, Houses, City Buildings,California Mountain Peaks, Road, Trails and Creeks,Residential Streets, and Lakes.
4. Close the Animation control panel when you arefinished.
These lessons provided an overview of the variousfunctionality available in ArcReader for viewing 3Dglobes. Additional information can be found in theArcReader Desktop Online Help and the ArcReaderproduct page at www.esri.com/ArcReader.
Animation control panel
2
Ch02_AngelusOaks.pmd 9/5/2006, 4:07 PM22