Embed Size (px)
Citation preview
photodex corporation
ProShow Gold
U S E R ’ S G U I D E

b
Revision 3.5
This document copyright © 2008 Photodex Corporation. All rights reserved. As of publication, ProShow, CompuPic and CompuPic Pro software copyright © 1995-2008, portions copyright © 1991-2006.
Photodex, ProShow, the ProShow logo, CompuPic, and the Photodex logo are registered trademarks of Photodex Corporation.
The information contained in this manual is subject to change without notice and does not represent a commitment on the part of Photodex Corporation.
The ProShow Gold program and all files distributed with ProShow Gold are the property of or distributed through a distribution license held by Photodex Corporation. Distribution in any modified form is expressly forbidden without written permission from Photodex Corporation, which shall not be unreasonable withheld. Any exploitation of ProShow Gold for profit is forbidden without written permission from Photodex Corporation.
Microsoft, DirectDraw, DirectX, FrontPage and Windows are either registered trademarks or trademarks of Microsoft Corporation in the United States and/or other countries. QuickTime and the QuickTime logo are trademarks or registered trademarks of Apple Computer, Inc., used under license. Macromedia, Flash, and Dreamweaver are trademarks or registered trademarks of Macromedia, Inc. in the United States and/or other countries.
Portions copyright © 1988-94 Sam Leffler, and copyright © 1991-94 Silicon Graphics, Inc.Portions copyright © 1996 Frank Pilhofer.Portions copyright © 2001 Michael David Adams.
Portions of this software are based, in part, on the work of the Independent JPEG Group.
MPEG-2 Applicable Use NoticeANY USE OF THIS PRODUCT OTHER THAN CONSUMER PERSONAL USE MAY IN ANY MANNER THAT COMPLIES WITH THE MPEG-2 STANDARD FOR ENCODING VIDEO INFORMATION FOR PACKAGED MEDIA IS EXPRESSLY PROHIBITED WITHOUT A LICENSE UNDER APPLICABLE PATENTS IN THE MPEG-2 PATENT PORTFOLIO, WHICH LICENSE IS AVAILABLE FROM MPEG LA, L.L.C., 250 STEELE STREET, SUITE 300, DENVER, COLORADO 80206.
T A B L E O F C O N T E N T S | ProShow Gold 1
Getting StartedInstallation and Registration.............................................................. 1System Requirements ........................................................................ 3About Registration ............................................................................ 3Support............................................................................................. 4
The Work AreaLaunching ProShow Gold ................................................................. 5About the Work Area........................................................................ 5Preferences ..................................................................................... 14
Creating Your First ShowCreating Shows in ProShow Gold ................................................... 19Work Flow for Creating a Show ...................................................... 19Show Components.......................................................................... 20Saving the Show ............................................................................. 27Creating Show Output .................................................................... 28
Customizing SlidesUsing the Slide List ......................................................................... 29Managing Slides ............................................................................. 29Customizing Slides ......................................................................... 30Slide Options.................................................................................. 31Layers ............................................................................................. 32Editing ............................................................................................ 34
Table of Contents
P H O T O D E X | ProShow Gold2
Motion............................................................................................ 35Captions ......................................................................................... 37Sounds............................................................................................ 39Slide Background............................................................................ 40
Customizing Your ShowUsing Show Options....................................................................... 43Show Options................................................................................. 44Show Captions................................................................................ 45Soundtrack ..................................................................................... 47Show Background........................................................................... 49
Overview of OutputChoosing an Output Format............................................................ 51About Show Sizes ........................................................................... 52Photodex Presenter Web Plug-In..................................................... 52
Customizing MenusUsing Menu Customizations ........................................................... 55About Menus .................................................................................. 55Menu Options Overview ................................................................ 56
DVD CreationUsing DVD Creation....................................................................... 61DVD Options Overview ................................................................. 61
Blu-ray CreationUsing Blu-ray Creation ................................................................... 67Blu-ray Options Overview .............................................................. 67
Creating Video For DevicesUsing Video For Devices ................................................................ 73Supported Devices.......................................................................... 73Custom Device Options.................................................................. 74
Video CD CreationUsing Video CD Creation ............................................................... 75Video CD Options Overview.......................................................... 75
T A B L E O F C O N T E N T S | ProShow Gold 3
Video File CreationUsing Video File Creation............................................................... 81Video File Output Formats .............................................................. 81Video File Options.......................................................................... 82
Sharing Shows OnlineUsing Show Sharing........................................................................ 83Share Show Online Options Overview ........................................... 83
Web Show CreationUsing Web Show Creation.............................................................. 87Web Show Options Overview ........................................................ 87Placing Shows on Your Website ..................................................... 90
Flash CreationUsing Flash Creation....................................................................... 93Flash Show Options Overview........................................................ 93Placing Shows on Your Website ..................................................... 96
E-mailing ShowsUsing the E-mail Show Feature ....................................................... 97E-Mail Show Options Overview...................................................... 97Composing Your E-Mail ................................................................ 100
Autorun CD CreationUsing Autorun CD Creation.......................................................... 103Autorun CD Options Overview .................................................... 103
Executable CreationUsing Executable Creation............................................................ 109Executable Options Overview ...................................................... 109
Screen Saver CreationUsing Screen Saver Creation......................................................... 113Screen Saver Options Overview ................................................... 113
Video For YouTubeUsing Video For YouTube............................................................. 117Notes on YouTube Video.............................................................. 118
P H O T O D E X | ProShow Gold4
ProShow FilesUnderstanding ProShow Files ....................................................... 119Types of ProShow Files ................................................................. 119Find Missing Files ......................................................................... 121Collecting Show Files ................................................................... 122Backup and Recovery ................................................................... 122
Overview of LayersUsing Multiple Layers ................................................................... 125About Layers................................................................................. 125Adding and Removing Layers ....................................................... 126Working with Layers in Preview Windows.................................... 126Applying Motion to Layers ............................................................ 127Copying Layers ............................................................................. 127Carrying Layers Across Slides........................................................ 127About Images with Transparency .................................................. 128Creating and Using Borders with Transparency............................. 129
Audio and Video UtilitiesAudio and Video in ProShow........................................................ 131Audio ........................................................................................... 131Audio CDs and ProShow .............................................................. 133Video............................................................................................ 134
Text Macros And SymbolsAvailable EXIF Fields .................................................................... 136
Supported File FormatsSupported Output Formats ............................................................ 141
Television Standards by CountryTable of Television Standards ....................................................... 147
Notes
1
C h a p t e r 1
P A R T O N E Working in ProShow Gold
CH
AP
TE
R 1
| G
etti
ng S
tart
ed
Getting Started
Installation and RegistrationYou may install ProShow Gold from the ProShow Gold CD or by downloading a copy from our web site, www.photodex.com. Be sure to close any CD–R or DVD authoring applications to ensure proper installation.
To Install from CD:
1 Insert the ProShow Gold CD into your computer's CD drive.
2 If the CD does not start automatically, open 'My Computer'. Select your CD drive from the available drives and open it. Double-click on the installation program.
3 Follow the on-screen instructions to install the software.
To Install from a Download:
1 Go to www.photodex.com and select the product you wish to download.
2 When download is complete, double-click the downloaded file.
3 Follow the on-screen instructions to install the software.
NOTE: If you are using Windows XP or Windows 2000, you must have administrator privileges to install ProShow Gold. You may be unable to cre-ate DVDs or CDs of your show unless an admin-istrator installs the software.
Step-by-Step Installation
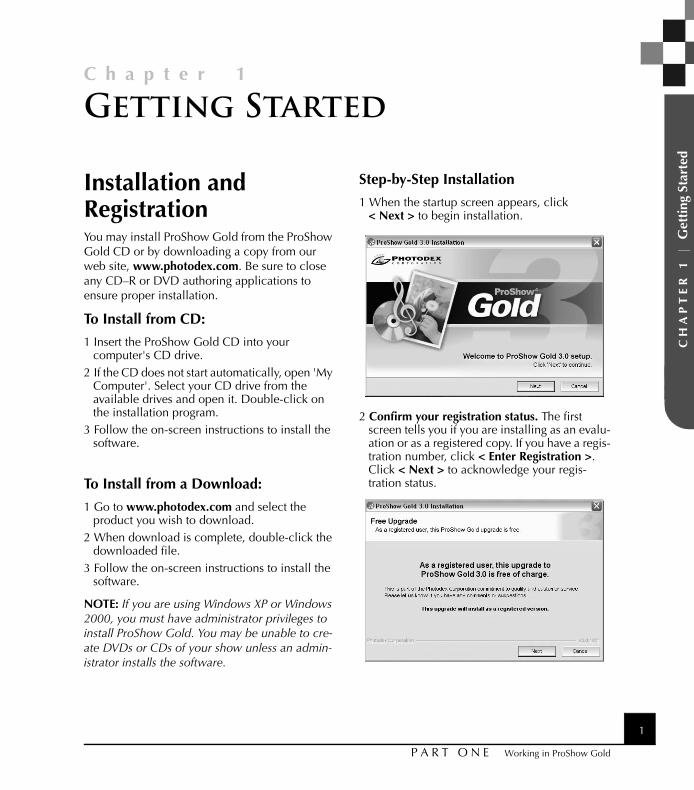
1 When the startup screen appears, click < Next > to begin installation.
2 Confirm your registration status. The first screen tells you if you are installing as an evalu-ation or as a registered copy. If you have a regis-tration number, click < Enter Registration >. Click < Next > to acknowledge your regis-tration status.
P H O T O D E X | ProShow Gold2
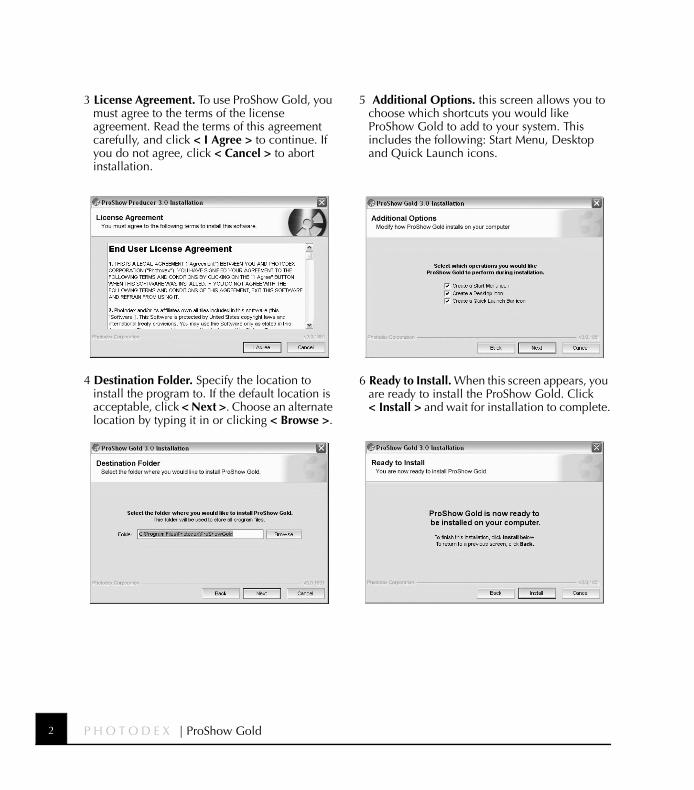
3 License Agreement. To use ProShow Gold, you must agree to the terms of the license agreement. Read the terms of this agreement carefully, and click < I Agree > to continue. If you do not agree, click < Cancel > to abort installation.
4 Destination Folder. Specify the location to install the program to. If the default location is acceptable, click < Next >. Choose an alternate location by typing it in or clicking < Browse >.
5 Additional Options. this screen allows you to choose which shortcuts you would like ProShow Gold to add to your system. This includes the following: Start Menu, Desktop and Quick Launch icons.
6 Ready to Install. When this screen appears, you are ready to install the ProShow Gold. Click < Install > and wait for installation to complete.
C H A P T E R 1 | Getting Started 3
P A R T O N E Working in ProShow Gold
System RequirementsRecommended:
• 1 GHz+ processor
• 1GB system memory
• DirectX 9.0 or better
• Super VGA (800 x 600) or higher resolution video adapter & monitor
• DVD+R/RW / -R /RW writer for disc authoring
• Accelerated 3D graphics card with 64 MB RAM
• Windows® XP
• 70 MB hard drive space for installation
Required:
• 500MHz+ higher
• 512 MB system memory
• DirectX 8.0 or better
• Super VGA (800 x 600) or higher resolution video adapter & monitor
• CD/DVD writer for disc authoring
• Windows®/ 2000 / Me / 98
• 70 MB hard drive space for installation
A variety of factors can influence rendering and playback performance. The required specifications are the minimum necessary for the program to function. Performance may be compromised on a system meeting only the minimum requirements.
About RegistrationProShow Gold is distributed as “try before you buy” software. It runs as a trial version until you enter your registration key. During the trial period, you may evaluate all the functions and features of the software. When the trial ends, you must either purchase the software or uninstall it. If you purchased ProShow Gold, you will receive a software registration key.
The Software Registration Key allows you to run ProShow Gold. You will receive this code via e-mail when you purchase the software.
Registration Key:
1 After installing, open ProShow Gold.2 Choose Help > Enter Registration Key(s).3 In the window that appears, carefully enter your
name, phone number and registration key EXACTLY as they appear in the e-mail you received from Photodex.
4 Click < Activate Registration >.
UpgradesRegistered users of Photodex presentation products receive free software upgrades for one year following registration. Checking for upgrades is simple:
To Check for Upgrades:
1 Open ProShow Gold.2 Choose Help > Check for Updates.3 Review the update status.
P H O T O D E X | ProShow Gold4
To Upgrade Your Software:
1 Go to www.photodex.com/downloads.2 Click < Upgrades >.3 Download and install the latest version.
During installation, you will be notified if you are still within your year of free updates. If the free update period has expired, you may try an evaluation version of the updated software to see if it is right for you.
SupportIf you encounter problems with ProShow Gold, there are several resources available.
• This User’s Guide contains details on every feature in ProShow Gold. To view a PDF ver-sion of this User’s Guide, visit www.photo-dex.com.
• Help is built into the software and contains hundreds of pages of reference material. To access this material while you are working in ProShow Gold, choose Help > Contents.
• Photodex Online offers additional information on technical support.
• Photodex E-mail and Phone Support puts you in contact with a Photodex Support Represen-tative to resolve any problem you have with ProShow Gold.
Using Photodex SupportWe do our best to ensure that our product documentation is clear and comprehensive, but some problems do require technical support. If you have a question or problem related to ProShow Gold, use the following steps to most efficiently find the solution:
To Resolve Issues in ProShow Gold:
1 Consult this User’s Guide or Help.2 Visit the Photodex website and view Support’s
Frequently Asked Questions at www.photodex.com/support/faqs.
3 E-mail a Photodex Support Representative at [email protected] explaining the issue you have encountered in detail.
4 Contact a Photodex Support Representative on the phone by calling 1 800 37 PHOTO.
5
CH
AP
TE
R 2
| T
he W
ork
Are
a
C h a p t e r 2
P A R T O N E Working in ProShow Gold
The Work Area
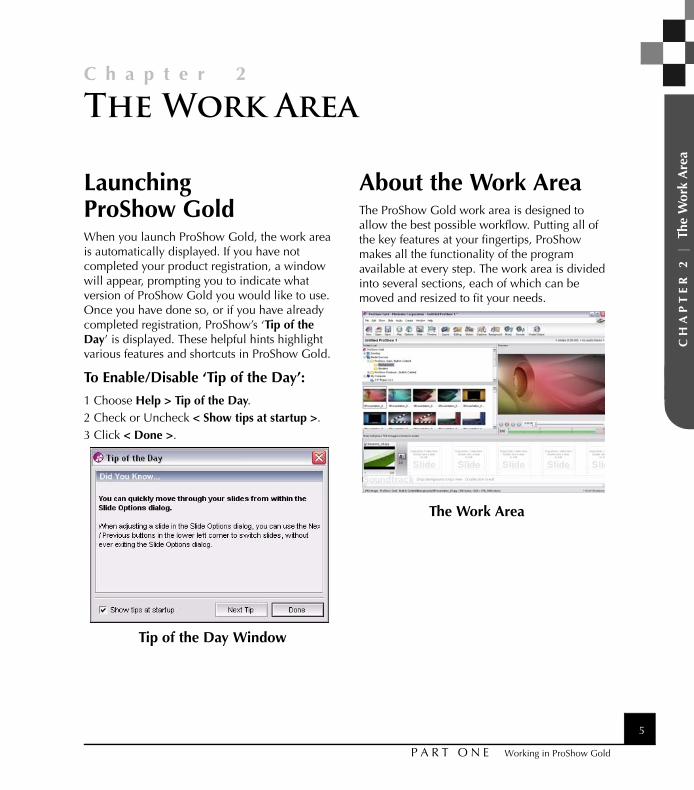
Launching ProShow GoldWhen you launch ProShow Gold, the work area is automatically displayed. If you have not completed your product registration, a window will appear, prompting you to indicate what version of ProShow Gold you would like to use. Once you have done so, or if you have already completed registration, ProShow’s ‘Tip of the Day’ is displayed. These helpful hints highlight various features and shortcuts in ProShow Gold.
To Enable/Disable ‘Tip of the Day’:
1 Choose Help > Tip of the Day.2 Check or Uncheck < Show tips at startup >.3 Click < Done >.
About the Work AreaThe ProShow Gold work area is designed to allow the best possible workflow. Putting all of the key features at your fingertips, ProShow makes all the functionality of the program available at every step. The work area is divided into several sections, each of which can be moved and resized to fit your needs.
Tip of the Day Window
The Work Area
P H O T O D E X | ProShow Gold6
Panes in the Work Area• Menu Bar contains options that allow you to
access all program functions and features.
• Main Toolbar provides shortcuts to access commonly-used program features.
• Folder List contains a list of all folders on you computer.
• Favorites List displays your frequently accessed folders. This pane is hidden by default.
• File List shows any ProShow-compatible files available in the folder selected in the folder list.
• Task Monitor displays tasks the program is run-ning, such as files importing.
• Show Summary displays the show name, num-ber of slides and audio tracks in the show, and the length of each.
• Light Box offers an alternative view of the slide list that displays more slides at once. This pane is hidden by default.
• Preview Window previews a selected file, slide or show.
• Sizing Pane indicates the size of your show in various output formats.
• Slide List/Timeline shows the order and timing of all content in your show.
Working with Work Area PanesTo Hide or Show a Pane:
1 Choose Window.2 Select the pane to show or hide.3 Checking the pane will make it visible.
Unchecking the pane will hide it.
To Move a Pane:
Most panes can be moved, but some may not be moved due to size, shape or placement.
1 Click and drag the title bar at the top edge of the pane. For panes without a title bar, click and drag the vertical bar at the left edge.
2 Drag the pane to the desired location. As you move around the work area, a highlighted rectangle will appear, showing you where you can drop the pane.
3 Release the mouse button and drop the pane in the desired location.
To Resize a Pane:
Most panes can be resized, but some may not be resized due to shape or placement.
1 Click and drag the separator between two panes.
2 When you have reached the desired size, release the mouse button.
To Float a Pane as a Separate Window:
1 Click and drag the title bar along the top of the pane.
2 Drag the pane outside of the work area and release the mouse button.
C H A P T E R 2 | The Work Area 7
P A R T O N E Working in ProShow Gold
Using Window LayoutsIn ProShow Gold, you can easily save and load layouts for your work area. Layouts save the location, shape and size of all the panes in the work area. These layouts are configured using the steps explained in the previous section.
To Save a Work Area Layout:
1 Arrange and size the panes in the work area as desired.
2 Choose Window > Save Window Layout.3 Enter the name of your new layout in the blank
provided.4 Click < Save >.
To Load a Window Layout:
1 Choose Window > Apply Custom Layout.2 Select the desired layout from the list.3 Click < Apply >.
To Restore Default Layout:
1 Choose Window > Default Window Layout.If your layout has hidden the menu, press < CTRL+SHIFT+ALT+0 >.
The Menu BarFrom the Menu Bar, you can access all ProShow Gold functions and features. Most instructions in this book use the Menu Bar to navigate to options and dialogs, but remember that you can also use the main toolbar, double-click actions and right-click menus to quickly access most features.
• File accesses features for working with show files, including open, close, new and collect show files.
• Edit shows options for editing different ele-ments in ProShow Gold, including copy, cut, paste and preferences.
• Show provides options for customizing your entire show.
• Slide provides options for customizing individ-ual slides.
• Audio provides options for customizing the show soundtrack.
• Create allows you to select the desired output format.
• Window contains options for modifying the work area.
• Help links to various resources for learning about ProShow Gold, getting help or upgrading your software.
P H O T O D E X | ProShow Gold8
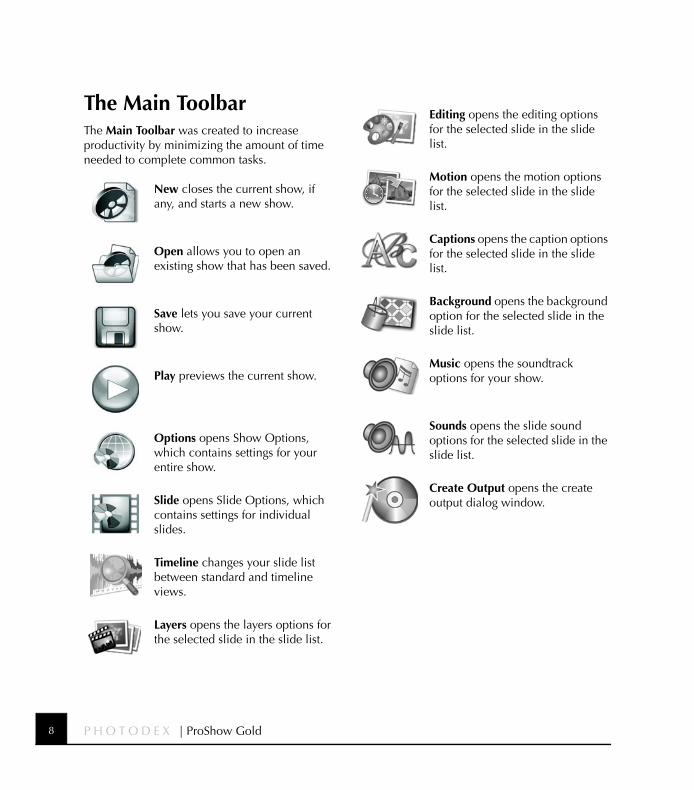
The Main ToolbarThe Main Toolbar was created to increase productivity by minimizing the amount of time needed to complete common tasks.
New closes the current show, if any, and starts a new show.
Open allows you to open an existing show that has been saved.
Save lets you save your current show.
Play previews the current show.
Options opens Show Options, which contains settings for your entire show.
Slide opens Slide Options, which contains settings for individual slides.
Timeline changes your slide list between standard and timeline views.
Layers opens the layers options for the selected slide in the slide list.
Editing opens the editing options for the selected slide in the slide list.
Motion opens the motion options for the selected slide in the slide list.
Captions opens the caption options for the selected slide in the slide list.
Background opens the background option for the selected slide in the slide list.
Music opens the soundtrack options for your show.
Sounds opens the slide sound options for the selected slide in the slide list.
Create Output opens the create output dialog window.
C H A P T E R 2 | The Work Area 9
P A R T O N E Working in ProShow Gold
The Folder ListProShow Gold’s Folder List allows you to easily navigate through the Folders on your computer and network to locate show content. The Folder List also allows you to choose which folders will be displayed. To use the Folder List, do any of the following:
• Click on a folder or drive to view its contents in the file list.
• Double-click any folder or drive to expand it and show any sub-folders.
• Right-click to add or remove folders or to add folders to the Favorites List.
The Favorites ListThe Favorites List allows you to add frequently-used folders to this pane for easy access. You can create new folders and sub folders to organize content in a way that makes it easier for you to work in ProShow Gold. To use the Favorites List, do any of the following:
• Add a folder to the favorites list by right-click-ing on it in the file list and selecting < Add to Favorites >.
• Click on a folder to view its contents in the file list.
• Right-click in the favorites list to create a new folder, remove a favorite or rename a folder.
The File ListProShow Gold’s File List allows you to view the contents of the Folders on your computer or network. In the File List, choose the content to be added to your show. If a selected Folder does not contain any compatible content, the File List will be blank. To add files from the File List to your show, do any of the following:
• Click any file to select and drag it into the slide list to add it to your show.
• Select multiple files by pressing < CTRL+SHIFT > while clicking on files.
• Select all files in the file list by selecting any single file and choosing Edit > Select All or right-click and select < Select All > or press < CTRL+ A >.
• With multiple files selected, drag any number of files into the slide list to add them to your show.
File List Viewing Modes
The file list displays your files in one of two different ways:
• Thumbnail displays small previews of each file. Icons are displayed for any content that can’t be thumbnailed, such as audio content.
• Details displays more information about each file, including complete filenames. This view is helpful for selecting music files for your show.
P H O T O D E X | ProShow Gold10
File List Sorting
There are a number of different choices for sorting your files in the File List. To rearrange your files using a different sorting method, simply right-click in the File List and choose < Sort by >, then select the desired sorting option.
Task MonitorThe Task Monitor displays any processes that are running in ProShow Gold. Often, when you add content to your show, the Task Monitor will indicate that Gold is loading files, so you may not be able to use the program for a few moments. Resize the Task Monitor to view multiple processes at once. Also, you can access all workspace display features by right-clicking on the Task Monitor, including the following:
• Right-click and select a window from the list to hide or show windows in the workspace.
• Apply, save or reset window layout.
• Set display options for folder list, file list, slide list and toolbar display.
The Light BoxProShow Gold has many features that optimize workflow. One such feature is the Light Box view, a variation of the slide list that allows you to work with more than one row of slides at a time. The number of slides shown in the Light Box is limited only by the size of your screen. Since it is not visible by default, you must do one of the following to enable the Light Box view:
• Choose Window > Show > Light Box.
• Press < ALT + F11 >.
Light Box Controls
• Show Options opens the show options dialog.
• Slide Options opens the slide options dialog.
• Insert Blank Slide adds a blank slide before the selected slide.
• Insert Title Slide adds a blank slide before the selected slide and then opens the captions sec-tion of slide options so that you can add a title.
• Cut Slide removes the selected slide and cop-ies it.
• Copy Slide copies the selected slide.
• Paste Slide inserts any copied slides into the show before the selected slide.
• Delete Slide removes the selected slides from the show.
C H A P T E R 2 | The Work Area 11
P A R T O N E Working in ProShow Gold
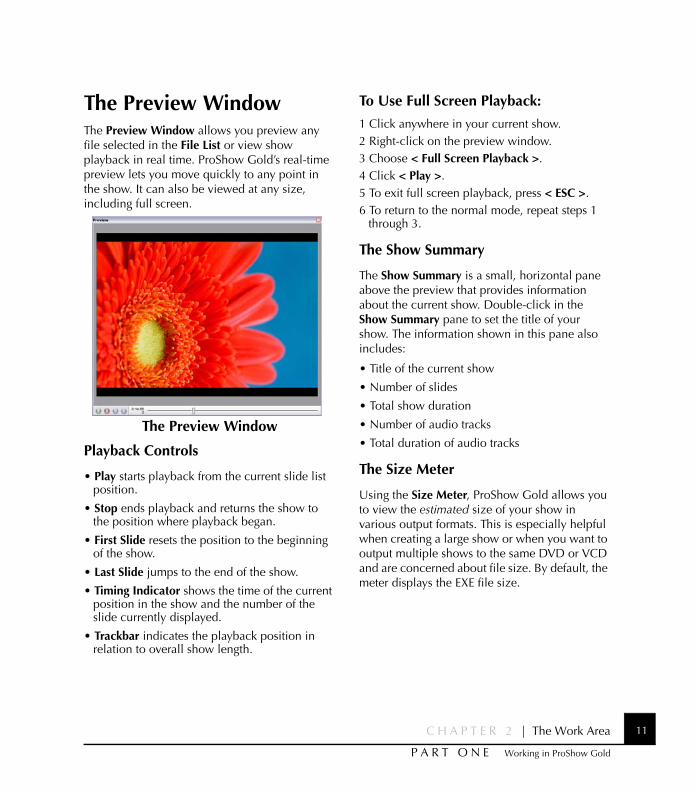
The Preview WindowThe Preview Window allows you preview any file selected in the File List or view show playback in real time. ProShow Gold’s real-time preview lets you move quickly to any point in the show. It can also be viewed at any size, including full screen.
Playback Controls
• Play starts playback from the current slide list position.
• Stop ends playback and returns the show to the position where playback began.
• First Slide resets the position to the beginning of the show.
• Last Slide jumps to the end of the show.
• Timing Indicator shows the time of the current position in the show and the number of the slide currently displayed.
• Trackbar indicates the playback position in relation to overall show length.
To Use Full Screen Playback:
1 Click anywhere in your current show.2 Right-click on the preview window.3 Choose < Full Screen Playback >.4 Click < Play >.5 To exit full screen playback, press < ESC >.6 To return to the normal mode, repeat steps 1
through 3.
The Show Summary
The Show Summary is a small, horizontal pane above the preview that provides information about the current show. Double-click in the Show Summary pane to set the title of your show. The information shown in this pane also includes:
• Title of the current show
• Number of slides
• Total show duration
• Number of audio tracks
• Total duration of audio tracks
The Size Meter
Using the Size Meter, ProShow Gold allows you to view the estimated size of your show in various output formats. This is especially helpful when creating a large show or when you want to output multiple shows to the same DVD or VCD and are concerned about file size. By default, the meter displays the EXE file size.
The Preview Window
P H O T O D E X | ProShow Gold12
To Change Output Format in the Size Meter:
1 Click the output format button on the Size Meter. Notice the scale changes depending on the output format.
2 To view the file’s estimated size numerically, simply let the mouse pointer hover over the output format you have selected.
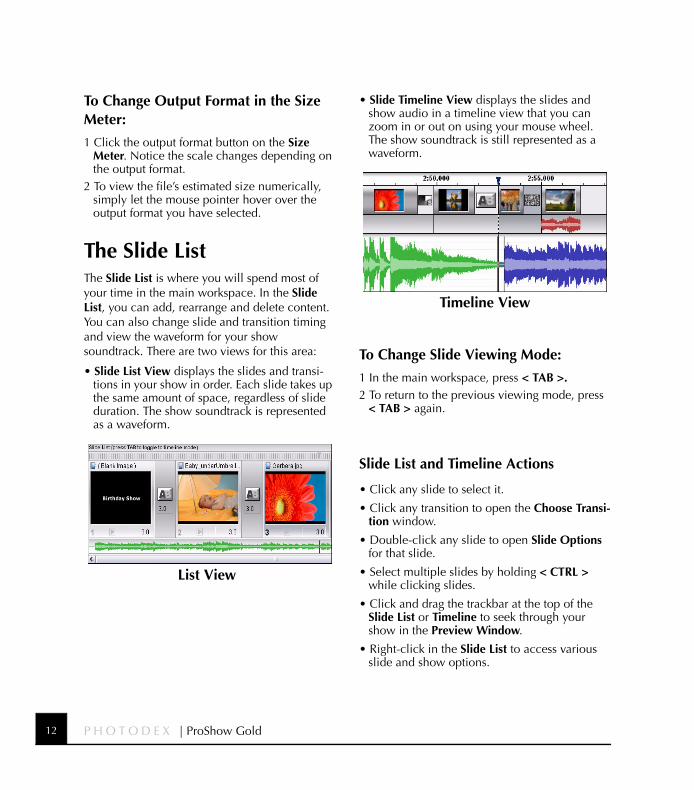
The Slide ListThe Slide List is where you will spend most of your time in the main workspace. In the Slide List, you can add, rearrange and delete content. You can also change slide and transition timing and view the waveform for your show soundtrack. There are two views for this area:
• Slide List View displays the slides and transi-tions in your show in order. Each slide takes up the same amount of space, regardless of slide duration. The show soundtrack is represented as a waveform.
• Slide Timeline View displays the slides and show audio in a timeline view that you can zoom in or out on using your mouse wheel. The show soundtrack is still represented as a waveform.
To Change Slide Viewing Mode:
1 In the main workspace, press < TAB >.2 To return to the previous viewing mode, press
< TAB > again.
Slide List and Timeline Actions
• Click any slide to select it.
• Click any transition to open the Choose Transi-tion window.
• Double-click any slide to open Slide Options for that slide.
• Select multiple slides by holding < CTRL > while clicking slides.
• Click and drag the trackbar at the top of the Slide List or Timeline to seek through your show in the Preview Window.
• Right-click in the Slide List to access various slide and show options.
List View
Timeline View
C H A P T E R 2 | The Work Area 13
P A R T O N E Working in ProShow Gold
Slide List/Timeline Controls
• Trackbar allows you to seek to any point in the show.
• Image Name displays the name of the image or video in the first layer of the slide. This is only available in the slide list view.
• Thumbnail shows a preview of the slide in the middle of the slide time.
• Slide Sound denotes whether or not there is a slide sound or voice-over for that slide. This is also represented as a red waveform.
• Slide Number indicates the number of the slide in the show. In the Slide Timeline view, mouse over the slide to see the slide number.
• Slide Time displays the slide’s duration, in sec-onds. In the Slide Timeline view, mouse over the slide to see the slide time.
• Transition Icon shows the selected transition between two slides.
• Transition Time displays the transition’s dura-tion, in seconds. In the Slide Timeline view, mouse over the slide to see the transition time.
The Audio Waveform
Your show soundtrack and slide sounds are represented by waveform in the Slide List or Slide Timeline. The show soundtrack is shown in green and blue while slide sounds are shown in red. The filenames for files used in the show soundtrack are listed below the Audio Waveform in both views. The filenames for slide sounds are viewed by mousing over the red waveform in the Slide List and Slide Timeline.
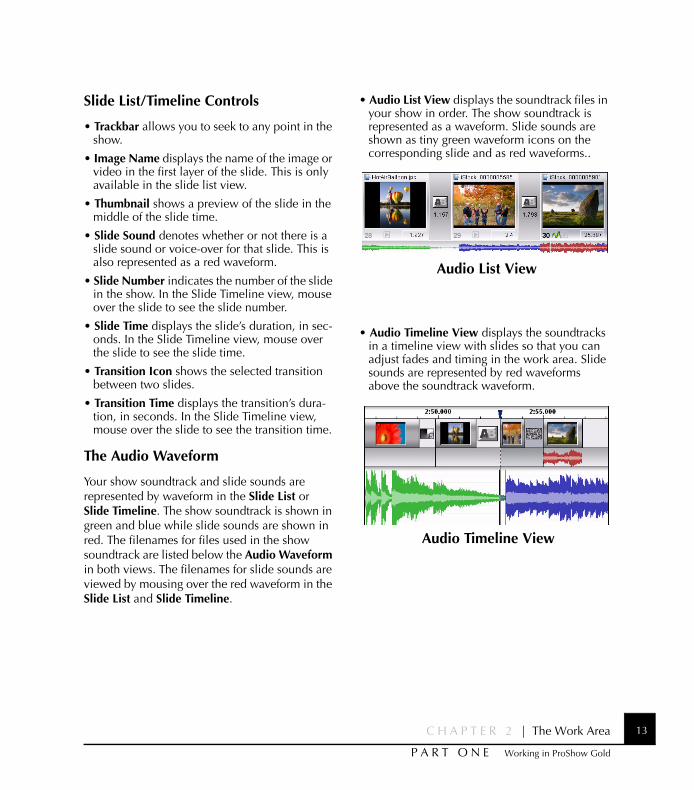
• Audio List View displays the soundtrack files in your show in order. The show soundtrack is represented as a waveform. Slide sounds are shown as tiny green waveform icons on the corresponding slide and as red waveforms..
• Audio Timeline View displays the soundtracks in a timeline view with slides so that you can adjust fades and timing in the work area. Slide sounds are represented by red waveforms above the soundtrack waveform.
Audio List View
Audio Timeline View
P H O T O D E X | ProShow Gold14
Audio List View Actions
• Double-click or right-click in the audio wave-form and select < Manage Soundtracks > to open the show soundtrack section of show options.
• Right-click in the audio waveform and select < Edit Fades and Timing > to launch the built-in audio trimmer. See Chapter 22: Audio and Video Utilities for more information.
• Right-click in the audio waveform and select < Remove Soundtrack > to delete the song from the show.
Audio Timeline View Actions
• Double-click or right-click in the audio wave-form and select < Manage Soundtracks > to open the show soundtrack section of Show Options.
• Right-click in the audio waveform and select < Edit Fades and Timing > to launch the built-in audio trimmer. See Chapter 22: Audio and Video Utilities for more information.
• Right-click in the audio waveform and select < Remove Soundtrack > to delete the song from the show.
• Hold down < CTRL > on your keyboard to dis-play and use the Audio Timeline controls. Change Offsets by moving the middle square on either end of the waveform. Adjust Fades by moving the fade bar from left to right. Adjust Volume by moving top and bottom squares up and down.
PreferencesThe Preferences options in ProShow Gold control various software settings related to appearance, Internet connectivity, editing, startup and sound effects.
To Access Preferences:
1 Choose Edit > Preferences.2 Select a category from the list on the left.3 Make adjustments to the settings.4 Click < Close >.
Appearance PreferencesThe Appearance category controls the way user interface of ProShow Gold looks and behaves.
To Change Appearance Preferences:
1 Choose Edit > Preferences.2 Click < Appearance > in the list on the left.3 Make adjustments to the settings.4 Click < Close >.
Menu and Toolbar
• Use Gradient Background for the Main Menu disables and enables the gradient that appears behind the main menu.
• Textured Toolbars controls the background that appears behind the main toolbar.
C H A P T E R 2 | The Work Area 15
P A R T O N E Working in ProShow Gold
Buttons
• Use Stylized Buttons controls the custom look of the standard buttons in dialogs.
• Add close button (x) to docked panes adds a close button to any panes you have moved and docked in the main workspace.
File List
• Use Shaded Selection in the File List changes the look of the selected area in the file list.
• Colorize Selected Thumbnails in the File List changes the appearance of selected files in the file list.
External EditorsThe External Editors category of preferences allows you to configure which programs are used to edit your show content. There are a
number of places throughout ProShow Gold where you can click < Edit > to launch an external editor.
To Access External Editor Preferences:
1 Choose Edit > Preferences.2 Click External Editors in the list on the left.3 Make adjustments to the settings.4 Click < Close >.
Default Image Editor
• Image Editor specifies the editor to be used for editing photos and images.
Default Sound Editor
• Sound Editor specifies the editor to be used for editing audio files.
Default Video Editor
• Video Editor specifies the editor to be used for editing video clips.
Internet and E-mail Preferences
The Internet preferences contain settings for your web browser and e-mail server.
To Access Internet Preferences:
1 Choose Edit > Preferences.2 Click Internet in the list on the left.3 Make adjustments to the settings.4 Click < Close >.
Outgoing E-mail Server (SMTP)
• E-mail Address specifies the e-mail address that is used to send your show when using the e-mail show output.
• Outgoing (SMTP) Server specifies the mail server to use when sending an e-mail with e-mail show output. This information is provided by your Internet Service Provider.
• Account Name is the login name for your out-going mail server, if required. Check with your Internet Service Provider to see if your outgo-ing SMTP server requires a login.

P H O T O D E X | ProShow Gold16
• Password is the password for your outgoing mail server. Check with your Internet Service Provider to see if your outgoing SMTP server requires a login.
Incoming E-mail Server
• Incoming (POP3) Server specifies the name of the mail server used to check e-mail. Check with your Internet Service Provider to see if a login is required.
• Account Name is the login name used for your incoming mail server, if a POP3 login is required.
• Password is the password used for your incom-ing mail server, if a POP3 login is required.
Web Browser
• Web Browser specifies the program used to view web pages.
Miscellaneous PreferencesMiscellaneous preferences contains settings for various options in ProShow Gold.
To Access Miscellaneous Preferences:
1 Choose Edit > Preferences.2 Click Miscellaneous Preferences in the list on
the left.3 Make adjustments to the settings.4 Click < Close >.
DirectDraw Support
• Enable DirectDraw Support controls the use of DirectDraw for high-performance playback.
• Currently Using DirectDraw Support is dis-played for informational purposes only to indi-cate whether or not ProShow Gold is using DirectDraw.
Transition Edges
• Use Thin Black Edge in Pixel Transition Effects controls the small black line on the edges of certain transitions.
Maximum Internal Rendering Resolu-tion
• Maximum Internal Rendering Resolution spec-ifies the size, in pixels, used by ProShow Gold to prepare your show for playback in the Pre-view window.
C H A P T E R 2 | The Work Area 17
P A R T O N E Working in ProShow Gold
General Startup Options
• Hide Startup Screen After Loaded changes the time at which the startup screen is hidden.
• Show Tips at Startup controls the ‘Tip of the Day’ display that appears when the program loads.
Startup Folder
• Last Folder Used loads the last folder used in the folder list.
• This Folder loads a specified folder every time ProShow Gold opens. Click < Browse > to specify which folder.
Favorites
• Automatically track favorites based on file usage designates files that you use regularly as ‘Favorites’.
Show Defaults PreferencesIn Show Defaults, you can configure the default settings for a new show. This allows you to apply
your most commonly used settings to every new show you create in ProShow Gold, saving time.
To Access Show Default Preferences:
1 Choose Edit > Preferences.2 Click Show Defaults in the list on the left.3 Make adjustments to the settings.4 Click < Close >.
Default Slide Settings
• Default Slide Duration sets the default slide timing for the show.
• Default Transition Duration sets the default transition timing for the show
• Default Transition Effect sets the default effect for transitions.
Default Image Settings
• Scaling sets the default size for content in a slide. There are a number of options you can use to scale content. Fill Frame sizes the con-tent to fill the entire frame and may crop off the edges of the image. Fit Frame sizes the content so that the entire image is visible, sometimes filling only part of the frame. Stretch to Frame stretches the content so that it fills the entire slide, potentially distorting the image. Fill Safe Zone is much like fill frame, but it sizes the content to fill the safe zone. Fit to Safe Zone is much like fit frame, but it sizes the content to fit in the safe zone.
P H O T O D E X | ProShow Gold18
Sound Effects PreferencesThe Sound Effects preferences enable, disable and configure sound effects used in Gold.
To Access Sound Effects Preferences:
• Choose Edit > Preferences.
• Click Sound Effects in the list on the left.
• Make adjustments to the settings.
• Click < Close >.
Enable Sound Effects
• Enable Sound Effects controls the use of sound effects in the program.
Dialog Sound Effects
• Open Dialog controls the sound that occurs when a window or dialog box is opened.
• Close Dialog controls the sound that occurs when a window or dialog box is closed.
Miscellaneous Sound Effects
• Action Done controls the sound that occurs when a background process is complete.
Sounds When Minimized
• Play ‘Action Done’ when Minimized controls the sound that occurs when an action is com-pleted while ProShow Gold is minimized.
• Play ‘Open Dialog’ when Minimized controls the sound that occurs when a dialog opens while ProShow Gold is minimized.
• Play ‘Close Dialog’ when Minimized controls the sound that occurs when a task is completed while ProShow Gold is minimized.
19
C h a p t e r 3
P A R T O N E Working in ProShow Gold
CH
AP
TE
R 3
| C
reat
ing
Your
Fir
st S
how
Creating Your First Show
Creating Shows in ProShow GoldCreating simple shows in ProShow Gold only takes a few minutes, but you still have the power to make your shows as complex and customized as you like. This makes getting started in Gold very quick and easy without limiting your creativity.
To Create a Quick Show:
1 Using the folder and file lists, locate the desired content for your show.
2 Drag the selected images and video into the slide list.
3 Select any slide, then choose Edit > Select All.4 Choose Slide > Randomize Slide Order.5 Choose Slide > Randomize Motion Effects.6 Using the folder and file lists, locate the desired
soundtrack for your show.7 Drag the selected audio file from the file list into
the audio list.8 Choose Audio > Sync Show to set the show
timing.9 Click < Play > in the main toolbar to view a
preview of your show.
Work Flow for Creating a ShowIn ProShow Gold, you can spend as little or as much time as you like creating a show. The amount of time you spend on show creation depends on how detailed you want to be when composing your show. This is a suggested work flow for building a show:
• Add Content to the Show. Drag content, images, videos and audio, from the file list into your show.
• Set the Timing. Change the slide timing and transition timing.
• Choose the Transitions. Select transitions from over 280 different transition effects.
• Apply Editing, Motion and Captions. Access the slide Options to customize slides.
• Save the Show. Be sure to save frequently while you are working and when you are fin-ished composing your show.
• Preview the Show. Click < Play > in the Pre-view window to view the show at any time.
• Create the Show Output. Choose an output format when the show is complete.
P H O T O D E X | ProShow Gold20
Show ComponentsWhen you are creating a show, you need to think about the components that make up a show.
• Content is the substance of your show. Every show starts with your files.
• Timing is crucial to the mood and feel of your show.
• Transitions add interest to your show for a more dynamic feel.
• Editing, Motion and Captions add interest and assist in creating the mood of your show.
ContentYour show Content consists of all images, video and audio in your show. In order to let you spend more time customizing your show, ProShow Gold makes it very easy to get started by letting you drag and drop content into your show.
ProShow Gold supports a wide range of file formats for images. For a complete list of supported file
types, please see Chapter 24: Supported File Formats. ProShow Gold also supports any video file with a corresponding codec on your computer. You can use video in the same way that you use image files in your show.
In addition to still images and videos, you can add multiple audio tracks to your show. You can also
easily add slide sounds by dragging audio files from the file list and dropping them on slides. Supported audio formats For a complete list of supported file types, please see Chapter 24: Supported File Formats.
To Add Show Content:
1 Use the folder and file lists to browse for images, videos and audio files.
2 In the file list, select the files you would like to add to your show.
3 Drag the selected image, video and audio files into the slide and audio lists.
4 You can also create a new slide by adding a blank slide and then adding content or captions.
To Add a Blank Slide:
1 In the slide list, click on the slide that you want to come after your blank slide.
2 Choose Slide > Insert Blank Slide.
Since blank slides do not contain any content, they are perfect for creating title slides. Title Slides are simply blank slides with captions added.
C H A P T E R 3 | Creating Your First Show 21
P A R T O N E Working in ProShow Gold
To Add a Title Slide:
1 In the slide list, click on the slide that you would like to follow your blank slide.
2 Choose Slide > Insert Blank Slide.3 Select the blank slide in the slide list by clicking
on it.4 Choose Slide > Slide Options and click on the
Captions button.5 Add a caption and customize it in Caption
Options.
To Drop in Slides Between Other Slides:
1 Use the folder and file lists to browse for images or videos.
2 In the file list, select the file(s) you would like to add to your show.
3 Drag the selected image and video to the slide list and hover over the position where you would like to add the new slide(s).
4 A vertical rectangle will be highlighted on the left side of the slide that will follow your new slide(s). The new slides will take on the slide and transition times of the slide they are closest to when you drop them in.
You can also create a new slide by adding a blank slide and then adding content or captions.In ProShow Gold, you can add unlimited layers to slides. Each layer can have independent motion effects. For a more in-depth look at using multiple layers, please see Chapter 21: Overview of Layers.
To Add Additional Layers to a Slide:
1 Add a single image or video to the slide list to create a slide.
2 Drag additional images or videos to the slide list and drop them on the existing slide while holding < CTRL >.
TimingProShow Gold gives you complete control over the timing of your show. You can choose to create a fast-paced, high-energy show or a slow, relaxing show. It’s entirely up to you.
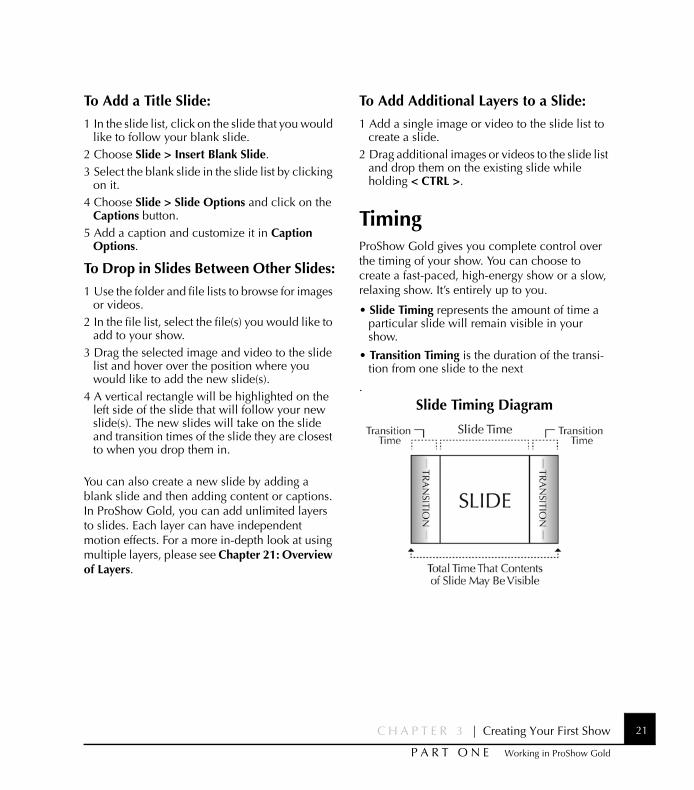
• Slide Timing represents the amount of time a particular slide will remain visible in your show.
• Transition Timing is the duration of the transi-tion from one slide to the next
.
Slide Timing Diagram
P H O T O D E X | ProShow Gold22
Slide Timing
Slide times determine how long each slide will be visible. By increasing or decreasing the slide time, you change the image or video’s effect on the viewer. The slide time is displayed below the slide thumbnail in the slide list.
To Set Slide Timing:
1 In the slide list, click on the slide time below the selected slide’s thumbnail.
2 Enter a new time in seconds.3 Press < Enter > to apply the change.
To Set Slide Timing for Multiple Slides:
1 In the slide list, select the slides to be changed by holding < CTRL > while clicking the slides.
2 Enter a new time in seconds.3 Press < Enter > to apply the change to the
selected slides. All the selected slides now have the same slide time.
To Set Slide Timing for the Entire Show:
1 In the slide list, click any slide to select it.2 Press < CTRL+A > to select all slides.3 Enter a new time in seconds on any one of the
selected slides.4 Press < Enter > to apply the change to all slides.
Transition Timing
ProShow Gold allows you to configure the exact length of each transition effect. Transition Timing does not affect your slide timing in any way. The transition effect will occur as
quickly or as slowly as you want, based on the Transition Timing.
To Set Transition Timing:
1 In the slide list, click on the transition time below the transition icon.
2 Enter a new time in seconds.3 Press < Enter > to apply the change.
To Set Transition Timing for Multiple Slides:
1 In the slide list, select the transitions to be changed by holding < CTRL > while clicking the slides before the transitions you would like to change.
2 Enter a new time in seconds.3 Press < Enter > to apply the change to the
selected slides.
To Set Transition Timing for the Entire Show:
1 In the slide list, click any slide to select it.2 Press < CTRL+A > to select all slides.3 Enter a new time in seconds for any one of the
selected transitions.4 Press < Enter > to apply the change to the
selected slides.
C H A P T E R 3 | Creating Your First Show 23
P A R T O N E Working in ProShow Gold
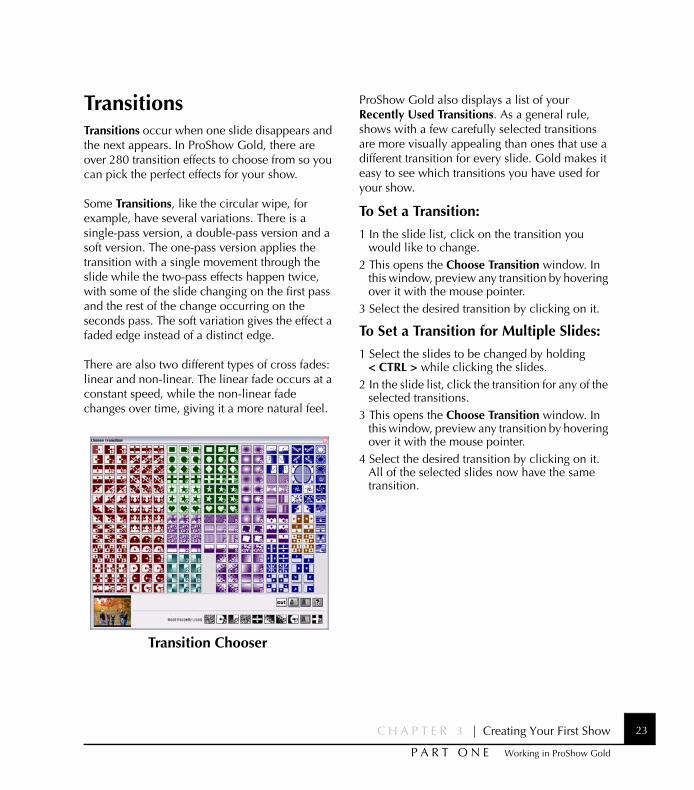
TransitionsTransitions occur when one slide disappears and the next appears. In ProShow Gold, there are over 280 transition effects to choose from so you can pick the perfect effects for your show.
Some Transitions, like the circular wipe, for example, have several variations. There is a single-pass version, a double-pass version and a soft version. The one-pass version applies the transition with a single movement through the slide while the two-pass effects happen twice, with some of the slide changing on the first pass and the rest of the change occurring on the seconds pass. The soft variation gives the effect a faded edge instead of a distinct edge.
There are also two different types of cross fades: linear and non-linear. The linear fade occurs at a constant speed, while the non-linear fade changes over time, giving it a more natural feel.
ProShow Gold also displays a list of your Recently Used Transitions. As a general rule, shows with a few carefully selected transitions are more visually appealing than ones that use a different transition for every slide. Gold makes it easy to see which transitions you have used for your show.
To Set a Transition:
1 In the slide list, click on the transition you would like to change.
2 This opens the Choose Transition window. In this window, preview any transition by hovering over it with the mouse pointer.
3 Select the desired transition by clicking on it.
To Set a Transition for Multiple Slides:
1 Select the slides to be changed by holding < CTRL > while clicking the slides.
2 In the slide list, click the transition for any of the selected transitions.
3 This opens the Choose Transition window. In this window, preview any transition by hovering over it with the mouse pointer.
4 Select the desired transition by clicking on it. All of the selected slides now have the same transition.
Transition Chooser
P H O T O D E X | ProShow Gold24
To Set a Transition for the Entire Show:
1 Click any slide in the slide list to select it.2 Press < CTRL+A > to select all slides.3 In the slide list, click the transition for any of the
selected transitions.4 This opens the Choose Transition window. In
this window, preview any transition by hovering over it with the mouse pointer.
5 Select the desired transition by clicking on it. All of the selected slides now have the same transition.
Random Transitions
ProShow Gold provides two different types of Random Transitions. One type randomly selects the transition for you and the other randomly selects transitions each time you play the show.
• Randomize Transitions selects, at random, a transition for each slide. The transitions selected can be changed as desired. To select the random transitions to use for your show, Chapter 5: Customizing Your Show.
• Random Transition randomly selects a transi-tion every time you play the show. To select the random transitions to use for your show, Chapter 5: Customizing Your Show.
To Apply Random Transitions to the Entire Show:
1 In the slide list, select the slides that you would like to add a random transition to.
2 Choose Slide > Randomize Transitions.3 Transitions will be selected at random.
To Add a Random Transition to a Slide:
1 Select the transition to be changed by clicking the transition icon.
2 This will open the Choose Transition window. Select the Random Transition effect by clicking on the question mark graphic.
3 The selected slide will have the Random Transition effect.
Editing, Motion and CaptionsThe customizations that you can apply to slide layers and captions are virtually unlimited in ProShow Gold. To access these options from the work area, simply double-click on any slide in the slide list. This will launch the slide Options dialog, which contains options for modifying slides.
Editing
You can make simple modifications to your images and videos in the Editing options in ProShow Gold’s
slide Options.
Editing Tools
• Rotate rotates the selected layer by 90, 180 or 270 degrees. Select the degree of rotation from the drop-down menu.
• Flip allows you to flip the selected layer hori-zontally, vertically, or both. Check the box next to the desired effect.
• Red-Eye enables and disables red-eye correc-tion of the selected layer. Click < Red-Eye > to launch the red-eye dialog.
C H A P T E R 3 | Creating Your First Show 25
P A R T O N E Working in ProShow Gold
• Crop enables and disables layer cropping. Click < Crop > to launch the crop dialog.
Adjustments
Reset any of these options by clicking the Reset button next to the desired adjustment tool.
• Brightness allows you to lighten or darken the layer. Increase the value to lighten, decrease to darken.
• White Point determines the brightest point in the layer and allows you to adjust the layer accordingly.
• Black Point determines the darkest point in the layer and allows you to adjust the layer accord-ingly.
• Contrast allows you to increase and decrease the contrast between the light and dark parts of the layer.
• Hue allows you to change the overall hue of the layer.
• Sharpen allows you to make edges more defined in the layer.
Outline
• Outline enables and disables the addition of an outline to the layer.
• Set Color specifies the outline color.
Drop Shadow
• Drop Shadow enables and disables the addi-tion of a drop shadow to the layer.
• Set Color specifies the drop shadow color.
Colorize
• Colorize enables and disables layer coloriza-tion.
• Set Color specifies the color used to colorize the layer.
• Strength sets the intensity of layer colorization.
To Make Image Adjustments:
1 Select the slide to adjust by clicking on the slide in the slide list.
2 Choose Slide > Slide Options and click on the Editing button.
3 Select the layer to adjust by choosing it from the Selected Layer list.
4 Make image adjustments using sliders and check-boxes.
5 Click < Done >.
P H O T O D E X | ProShow Gold26
Motion
Using ProShow Gold, you can pan, zoom and rotate content to create a variety of dramatic effects.
• Pan changes the position of the content in the slide.
• Zoom changes the size of the content.
• Rotate changes the angle of the content.
To Pan a Layer:
1 Select the slide to apply panning to by clicking on the slide in the slide list.
2 Choose Slide > Slide Options and click on the Motion button.
3 Select the layer you would like to apply panning to.
4 Click and drag the layer in the previews to set starting and ending positions.
5 Click < Done >.
To Zoom a Layer:
1 Select the slide to apply motion to by clicking on the slide in the slide list.
2 Choose Slide > Slide Options and click on the Motion button.
3 Select the layer you would like to apply zooming to.
4 Using the Zoom sliders, resize the selected layer in the previews to set starting and ending size.
5 Click < Done >.
To Rotate a Layer:
1 Select the slide to apply rotation to by clicking on the slide in the slide list.
2 Choose Slide > Slide Options and click on the Motion button.
3 Select the layer you would like to apply rotation to.
4 Using the Rotation slider, rotate the selected layer to set starting and ending rotation.
5 Click < Done >.
Captions
ProShow Golds lets you add fully customizable Captions to your show. Each Caption is rendered
with unmatched quality to give a clean, professional appearance.
To Add a Caption to a Slide:
1 Select the slide to add a caption to by clicking on the slide in the slide list.
2 Choose Slide > Slide Options and click the Captions button.
3 Click < Add > in the captions list to create a new caption.
4 Enter the text of the caption in the text area.5 Position your caption by clicking on it and
dragging it.6 Select color, font, size and effects.7 Click < Done >.
C H A P T E R 3 | Creating Your First Show 27
P A R T O N E Working in ProShow Gold
To Add a Caption to the Entire Show:
1 Choose Show > Show Options and click on the Show Captions button.
2 Click < Add > in the captions list to create a new caption.
3 Enter the text of your caption in the Text area.4 Position the caption by clicking on it and
dragging it.5 Select color, font, size and effects.6 Click < Done >.
Saving the ShowWhen you have finished creating your show in ProShow Gold, make sure you save your work.
To Save Your Show:
1 Choose File > Save.2 Name your show and select a destination for
the file.3 Click < Save >.
Previewing the ShowProShow Gold provides a real-time preview that allows you to view your progress as you compose a show. The integrated Preview
window appears as part of the main workspace, complete with playback controls and a time display.
To Preview Entire Show:
1 Select the first slide in your show to ensure that playback starts at the beginning of your show.
2 Click < Play > to begin playback.3 Click < Stop > to end playback or let the show
play through to the end.
To Preview from a Specific Slide:
1 Select the slide from which you would like to begin the preview.
2 Click < Play > to begin playback.3 Click < Stop > to end playback.
To Seek through a Show at Any Speed:
1 Click in the slide list trackbar located at the top of the slide list.
2 Drag the indicator to seek forward or backward.
P H O T O D E X | ProShow Gold28
To Preview Full Screen:
1 Click in the slide list to make it active in the Preview window.
2 Right-click in the preview window.3 Select < Full Screen Playback > from the menu.4 Click < Play > to begin playback.5 Press < Esc > to exit full screen playback.6 To return to normal preview mode, right-click
in the preview window and uncheck < Full Screen Playback >.
Creating Show OutputProShow Gold features more output formats than any other slide show or presentation product. From a single
show, you can easily create output for your TV, PC or the Web.
To Create Output:
1 Save the show by choosing File > Save.2 Choose Create, then select your output format
from the create output dialog window. Customize your output in output options.
3 Click < Create >.
For more information on the wide range of output formats, see Chapter 6: Overview of Output.
29
C h a p t e r 4
P A R T O N E Working in ProShow Gold
CH
AP
TE
R 4
| C
usto
miz
ing
Slid
es
Customizing Slides
Using the Slide ListThe slide list is where you spend most of your time creating your show. ProShow Gold’s slide list is a drag and drop interface, so it’s easy to add content to your presentation.
In ProShow Gold, you have the option of using the normal Slide List, which appears by default, or the Slide Timeline, an alternate view that shows a timeline of your show. The Slide Timeline is helpful when you are synchronizing your shows to your show soundtrack. To zoom in and out of the Slide Timeline, simply move your mouse wheel up and down.
Slide List Actions
• Add, delete and move slides.
• Double-click any slide to open Slide Options for that slide.
• Add layers to slides.
• Click and drag in the trackbar along the top of the slide list to seek through your show in the Preview window.
• Right-click in the slide list to access slide options and Show Options
Managing SlidesCreating, moving and deleting slides is very easy in ProShow Gold. All can be done in the slide list.
To Add a Slide:
1 Use the folder and file lists to browse for slide content.
2 In the file list, select the file you would like to add to your show.
3 Drag the selected file into the slide list.
To Add a Blank Slide:
1 In the slide list, click on the slide that you would like to follow your blank slide.
2 Choose Slide > Insert Blank Slide.
To Add a Title Slide:
1 In the slide list, click on the slide that you would like to follow your blank slide.
2 Choose Slide > Insert Blank Slide.3 Select the Blank Slide in the slide list by clicking
on it.4 Choose Slide > Slide Options and click on the
Captions button on the left side of the window.5 Add a caption and customize it as desired.6 Click < OK >.
P H O T O D E X | ProShow Gold30
To Move a Slide:
1 In the slide list, select the slide to be moved by clicking on it.
2 Drag the slide to a new position in the slide list.3 Release the mouse button to drop it into
position.
To Copy a Slide:
1 In the slide list, select the slide to be copied by clicking on it.
2 Choose Edit > Copy or press < CTRL + C >.3 Click on the slide that you would like to follow
the copied slide.4 Choose Edit > Paste or press < CTRL + V > to
paste the slide.
To Delete a Slide:
1 In the slide list, select the slide to be deleted by clicking on it.
2 Choose Edit > Cut or press < Delete > or < CTRL + X > on your keyboard or choose Slide > Delete Slide.
To Add Additional Layers to a Slide:
1 Add a slide by choosing Slide > Insert Blank Slide or drag and drop a single image or video to the slide list to create a slide.
2 Drag additional images or videos to the slide list and drop them on the existing slide while holding < CTRL >.
Customizing SlidesSlides are customized using the Slide Options window. From Slide Options, you can add captions and motion, make editing adjustments and more. Here are some of the attributes that can be customized:
• Slide Layers
• Image Scaling, Position and Rotation
• Brightness, White Point, Black Point and Hue
• Drop Shadow, Outline and Outline Color
• Colorization
• Panning Motion Effect
• Zooming Motion Effect
• Rotation Motion Effect
• Text Captions
• Effect, Colors and Fonts for Captions
• Slide Sounds and Voice-overs
• Volume and Fading for Slide Sounds
• Background Color
• Background Image
• Adjustments for Background Image
• Interactivity
C H A P T E R 4 | Customizing Slides 31
P A R T O N E Working in ProShow Gold
Slide OptionsThere are a number of different ways to access Slide Options.
To Access Slide Options:
1 In the slide list, click on the slide you would like to modify.
2 Choose Slide > Slide Options or double-click the slide you would like to modify to launch the slide options window.
3 To exit the slide options window, click < Done >.
Slide Options ControlsThe Slide Options Controls are designed to give you maximum creative control over you slides.
Precision Preview allows you to edit and preview slides to increase control and precision.
The Precision Preview is resizable and is used to accurately control keyframing and timing.
Large/Regular Preview displays a larger version of the slide options window you are working in.
Play/Pause begins and ends playback preview within slide options.
Other Controls
• Previous/Next Slide lets you move between slides within slide options.
• Slide Duration sets the duration of the slide within slide options.
• Done applies changes to slide options and closes the dialog to return you to the main workspace.
• Cancel disregards any changes you have made since opening the Slide Options window.
P H O T O D E X | ProShow Gold32
Slide Options Categories
Layers sets default layer options such as scaling, position, masking and aspect ratio.
Editing applies adjustments such as color correction, rotation and drop shadows to a layer in the slide.
Motion adds and controls motion effects like pan and zoom.
Captions allows you to insert text on a slide and customize the font style, color and effects for text.
Sounds adds sounds and records voice-overs for a slide, controls sound interactions during a show.
Background sets a custom background for a slide that overrides the show background.
LayersLayer options control the basic settings for the content of your slide. Among other things, you can do the
following in this window:
• Add, remove and re-order layers.
• Change slide content.
• View content information.
• Set slide timing.
• Set the volume and length of video clips.
To Access Layers Options:
1 In the slide list, click on the slide you would like to modify.
2 Choose Slide > Slide Options and click on the Layers button on the left side of the window.
3 Make adjustments to the selected layer.4 Click < Done >.
Layer OptionsSlide Contents
• Add adds a new layer to a slide. Choose from Add Image or Video or Add from Media Source to create a new layer.
• Del removes the selected layer from the slide.
• Up moves the selected layer up the list, placing it on top of other layers in the slide.
• Down moves the selected layer down the list, placing it under other layers in the slide.
C H A P T E R 4 | Customizing Slides 33
P A R T O N E Working in ProShow Gold
Selected Layer
• Source File Information displays information about the current layer. The information includes filename, resolution, file size and type. This option is not available for gradient or solid color layers.
• Select File allows you to choose content for the slide. This option is not available for gradient or solid color layers.
• Edit File launches the external editor config-ured in Preferences.
• Properties displays the file information pre-view and other information for the selected layer. This information is not available for gra-dient or solid color layers.
Layer Settings
• Scaling lets you select the default size for con-tent in a slide. There are a number of options you can use to scale a layer. Fill Frame sizes the layer to fill the entire frame and may crop off the edges of the layer. Fit Frame sizes the layer so that the entire layer is visible, sometimes fill-ing only part of the frame. Stretch to Frame stretches the layer so that it fills the entire slide, potentially distorting the image. Fill Safe Zone is much like fill frame, but it sizes the layer to fill the safe zone. Fit to Safe Zone is much like fit frame, but it sizes the layer to fit in the safe zone.
• Position sets the default position of the layer on the slide. Click and drag the layer in the pre-view window or specify coordinates in the position value boxes. Settings applied in Motion will override this setting.
• Zoom sets the default size of the layer in the slide. If motion is applied in Motion Effects, it will override this setting. Increase and decrease the zoom to make the layer larger and smaller, respectively.
• Aspect sets the aspect ratio of the layer, deter-mining how it will appear when viewed.
Video Clip Settings
• Trim Clip launches the Video Trimmer, which allows you to set the starting and ending point visually, with accuracy down to a single frame. Please see Chapter 22: Audio and Video Utili-ties for more information.
• Loop Video enables and disables continuous video looping.
• Set Slide Time to Video Length matches slide duration to video clip length.
• Volume sets the volume level of the video clip. To turn off sound for a video, set the volume to zero.
• Speed specifies the speed of video clip play-back.
P H O T O D E X | ProShow Gold34
EditingThe Editing options let you make basic changes to your slide content before you add motion and
adjustment effects. These adjustments are settings that are saved only in ProShow Gold, so they do not affect your original content.
To Access Editing:
1 In the slide list, click on the slide you would like to modify.
2 Choose Slide > Slide Options and click on the Editing button on the left side of the window.
3 Make adjustments to the selected layer.4 Click < Done >.
Editing OptionsSelected Layer Options
• Selected Layer lets you choose which layer to adjust.
• Before and After previews the original content next to the adjusted content.
Editing Tools
• Rotate allows you to rotate the selected layer by 90, 180 or 270 degrees. Select the degree of rotation from the drop-down menu.
• Flip allows you to flip the selected layer hori-zontally, vertically or both. Check the box next to the desired effect.
• Red-Eye enables and disables red-eye correc-tion of the selected layer. Click < Red-Eye > to launch the red-eye dialog.
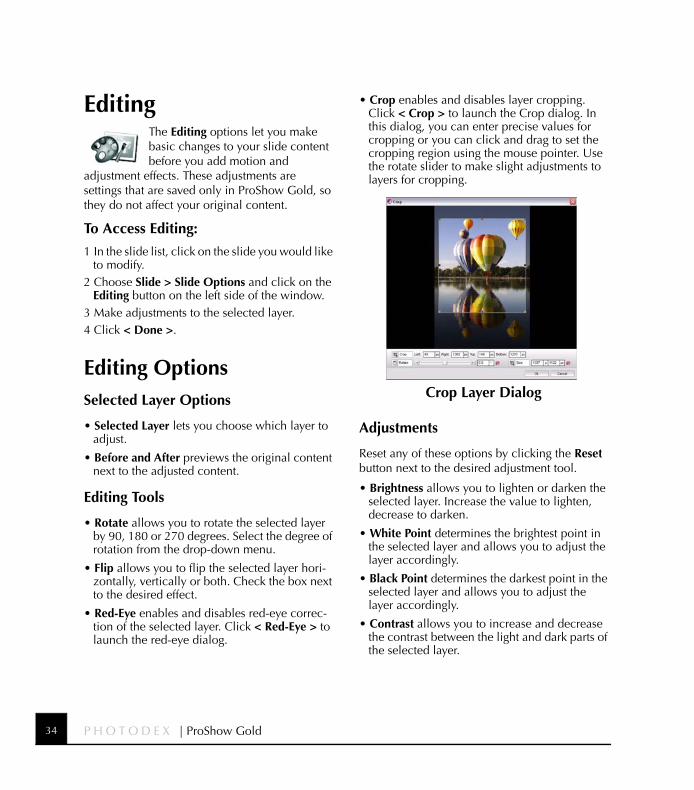
• Crop enables and disables layer cropping. Click < Crop > to launch the Crop dialog. In this dialog, you can enter precise values for cropping or you can click and drag to set the cropping region using the mouse pointer. Use the rotate slider to make slight adjustments to layers for cropping.
Adjustments
Reset any of these options by clicking the Reset button next to the desired adjustment tool.
• Brightness allows you to lighten or darken the selected layer. Increase the value to lighten, decrease to darken.
• White Point determines the brightest point in the selected layer and allows you to adjust the layer accordingly.
• Black Point determines the darkest point in the selected layer and allows you to adjust the layer accordingly.
• Contrast allows you to increase and decrease the contrast between the light and dark parts of the selected layer.
Crop Layer Dialog
C H A P T E R 4 | Customizing Slides 35
P A R T O N E Working in ProShow Gold
• Hue allows you to change the overall hue of the selected layer.
• Sharpen allows you to make edges more defined in the selected layer.
Colorize
• Colorize enables and disables layer coloriza-tion.
• Set Color specifies the color used to colorize the selected layer.
Outline
• Outline enables and disables the addition of an outline to the selected layer.
• Set Color specifies the outline color.
Drop Shadow
• Drop Shadow enables and disables the addi-tion of a drop shadow to the selected layer.
• Set Color specifies the drop shadow color.
• Contrast allows you to increase and decrease the contrast between the light and dark parts of the selected layer.
• Hue allows you to change the overall hue of the selected layer.
• Sharpen allows you to make edges more defined in the selected layer.
Colorize Layer
• Colorize enables and disables layer coloriza-tion.
• Set Color specifies the color used to colorize the selected layer.
• Strength sets the intensity of layer colorization.
MotionMotion options control the motion of layers in your slide. With ProShow Gold, you can use pan,
zoom and rotate to create a variety of effects. Motion is configured using the starting and ending position of your layers. Each layer in a slide has independent motion settings and timing to give you maximum flexibility in creating interesting effects like the following, all on one slide:
• Bouncing Ball makes a layer look as though it is bouncing up and down across the screen.
• Stacking Images places layers on top of one another at staggered intervals, giving a feel of 3-dimensional movement.
• Image Tiling creates a mosaic effect over time, placing images randomly into a grid pattern.
• Supplemental Visuals Over a Video overlays image layers on a video, giving a ‘newscast’ effect. Images appear over the video, stop on the screen and then move off of the screen, all while the video plays in the background.
To Access Motion Effects:
1 In the slide list, click on the slide you would like to modify.
2 Choose Slide > Slide Options and click on the Motion button on the left side of the window.
3 Make adjustments to the selected layer.4 Click < Done >.

P H O T O D E X | ProShow Gold36
Motion OptionsSelected Layer
• Selected Layer lets you choose which layer to add motion effects to.
Matching Options
Matching Options allows you to match layers within slides or from one slide to the next to create fluid motion effects. Matching also automatically updates related layers so that you can make changes once and the matched layers will also reflect that change.
• Match Starting Frame to End of Previous Slide matches the layer position of the selected layer to the previous slide.
• Match Ending Frame to Start of Next Slide matches the layer position of the selected layer to the next slide.
Starting/Ending Position
Each layer has a starting point and ending point, shown in the starting and ending previews. Any differences between the starting and ending point will create a motion effect as the slide moves from one slide to the next.
• Position sets the default position of the selected layer on the slide. Click and drag the layer in the preview window or specify coordinates in the position value boxes.
• Zoom sets the size of the selected layer. Set zoom by clicking the layer in the preview win-dow and using your mouse wheel to zoom in or out. To enable and disable zooming x and y coordinates individually, click the link button.
• Rotate allows you to rotate the selected layer. Use the rotation slider or click and drag the blue triangle on the preview.
• Smoothing smooths motion paths, eliminating rough, jerky motion effects.
C H A P T E R 4 | Customizing Slides 37
P A R T O N E Working in ProShow Gold
Copy Features
Select the Copybutton between the starting and ending position preview windows to open the copy settings dialog window.
• Copy Start to End copies the selected layer from starting position to ending position.
• Copy Start to End(All Layers) copies all slide layers from starting position to ending position.
• Copy End to Next Slide copies the ending posi-tion of the selected layer to the next slide.
• Copy End to Next Slide (All Layers) copies all the ending positions of all slide layers to the next slide.
Motion Style
The motion sytle options are found in drop down lists between the starting and ending position movement sliders. The default value for motion is Smooth.
• Linear moves the specified layer at a constant speed for the duration of the motion.
• Smooth moves the layer slowly at first, speeds up in the middle, and slows down at the end of the motion.
• Accelerate moves the layer slowly at first, speeds up as the motion progresses, and reaches full speed when the motion ends.
• Decelerate moves the layer quickly at first, then slows more and more until the motion ends.
CaptionsThe Captions options let you add customized text to the current slide. Captions include any type of text,
macros or symbols, each configured with different settings, motion, effects and interactivity settings.
To Access Captions:
1 In the slide list, click on the slide you would like to modify.
2 Choose Slide > Slide Options and click on the Captions button on the left side of the window.
3 Add captions to the selected slide.4 Click < Done >.
P H O T O D E X | ProShow Gold38
Caption OptionsCaptions List
• Captions List shows which captions have been added to this slide. Each caption has three boxes next to it, Global/Slide, Visible and Transitions. Global/Slide makes the caption a global caption, so that it is seen on all slides in your show, or a slide caption that will only appear on the current slide. Visible hides and shows this caption. Transitions determines whether or not the caption is affected by the slide’s transition effects.
• Add adds a new caption.
• Del removes the selected caption.
• Up moves the selected caption up the list, placing it on top of other captions in the slide.
• Down moves the selected caption down the list, placing it under other captions in the slide.
Text
• Text Field edits the text of the selected caption.
• Font sets the font to be used for the caption. ProShow Gold supports all TrueType fonts installed on your computer.
• Font Size sets the size of the caption text. Pick a size from the drop-down menu or manually enter a specific value.
• Bold, Italic, Shadow sets the attributes for the caption.
• Macro launches the insert macro window, where you can select a macro, special charac-ter, or EXIF data to insert in the selected cap-tion.
Preview Area
• Preview Position allows you to click and drag any caption to position or resize it in your slide.
Caption Placement
• Align moves the text anchor point between Left, Right, Center and Fill.
• Position allows you to specify numerical val-ues for caption position.
Caption Color
• Caption Color allows you to colorize the selected caption using a selected color. Click < Set Color >, click on the desired color in the color wheel, and click < Set Color > again to apply the effect.
Outline Caption
• Outline Caption enables and disables the out-line around caption characters for the selected caption.
• Outline Color sets the color for the caption outline. Click < Set Color >, click on the desired color in the color wheel, and click < Set Color> again to apply the effect.
Drop Shadow
• Drop Shadow enables and disables the use of a drop shadow on the selected caption.
• Set Color sets the color for the drop shadow. Click < Set Color >, click on the desired color in the color wheel, and click < Set Color> again to apply the effect.
C H A P T E R 4 | Customizing Slides 39
P A R T O N E Working in ProShow Gold
SoundsThe Sounds category lets you add sounds to the current slide. You can use slide sounds to add voice-overs,
sound effects and more without having to edit your soundtrack.
To Add a Slide Sound:
1 In the slide list, click on the slide you would like to add a sound to.
2 Choose Slide > Slide Options and click on the Sounds button on the left side of the window.
3 Add sounds to the selected slide and set options as desired.
4 Click < Done >.
Sound OptionsSlide Sound
• Sound specifies the sound file to be used as a slide sound. Click < Browse > to select a sound file.
• Preview Sound previews the current slide sound. Click < Play > to preview the current slide sound.
• Remove Sound removes the current sound. Click the Reset button to remove the current sound.
• Record Voice-Over begins recording the voice-over for the selected slide. Click < Edit > to launch the external editor configured in Pref-erences.
Timing and Playback
• Offset specifies when the sound will begin playing after the previous slide is over. A posi-tive value is the number of seconds into the new slide where the sound will begin. A nega-tive value is the number of seconds before the slide (in the previous slide) where the sounds will begin.
• Trim Audio launches the Audio Trimmer, which allows you to set the starting and ending point visually, with accuracy down to a single frame. For more information, see Chapter 22: Audio and Video Utilities.
• Set Slide Time to Sound Length increases or decreases slide duration to match the length of the slide sound exactly.
• Continue Playback of Sound After Slide Ends enables and disables slide sound playback after the slide ends. The sound will play until the clip ends when enabled.
Custom Slide Sound Settings
These settings override the slide sound settings in the show options.
• Custom Slide Sound Settings enables and dis-ables a custom sound for the slide.
• Volume specifies the volume of the slide sound.
• Fade In sets the amount of time that the slide sound will take to fade in, in seconds. For no fade, specify zero seconds.
• Fade Out sets the amount of time that the slide sound will take to fade out, in seconds. For no fade, specify zero seconds.
P H O T O D E X | ProShow Gold40
Override Soundtrack During This Sound
• Override Soundtrack During This Sound allows you to override the defaults configured in the Soundtrack Options for the show. To enable this override, you must check the Over-ride Soundtrack During This Sound Checkbox.
• Volume specifies the volume of the soundtrack while the slide sound plays.
• Fade Out sets the amount of time that the soundtrack will take to fade out, in seconds. For no fade, specify zero seconds.
• Fade In sets the amount of time that the soundtrack will take to fade in, in seconds. For no fade, specify zero seconds.
Slide BackgroundThe Slide Background options allow you to apply a background color or image to an individual slide. The
changes made to the slide background will only affect the selected slide unless you specifically choose to apply the background settings to your entire show. You can select a background for the entire show in the Background section of Show Options.
To Access Slide Background:
1 In the slide list, click on the slide you would like to modify.
2 Choose Slide > Slide Options and click on the Background button on the left side of the window.
3 To modify one or more of the Slide Background settings, first check the Override Show Background Options for this Slide box to open the background for editing.
4 Make changes to the slide background settings.5 Click < Done >.
Slide Background OptionsEnable Slide Background
• Override Show Background Options for this Slide enables and disables the background options for this slide. All other slide back-ground options are deactivated until this option is selected and the slide will use the default show background configured in show options.
• Type sets the type of background to apply to the slide. Choose from Solid Color, Gradient and Image.
Solid Color
• Background Color Selection allows you to set a color for your background. Click < Set Color >, click on the desired color in the color wheel, and click < Set Color > again to apply the effect.
C H A P T E R 4 | Customizing Slides 41
P A R T O N E Working in ProShow Gold
Background Image
• Use Background Image allows you to choose an image for the background. Click < Browse > to select an image file. Click < Edit > to launch the external editor configured in Preferences.
• Scaling lets you select the default size for the background image. There are a number of options you can use to scale the background image. Fill Frame sizes the layer to fill the entire frame and may crop off the edges of the background image. Fit Frame sizes the back-ground image so that the entire layer is visible, sometimes filling only part of the frame. Stretch to Frame stretches the background image so that it fills the entire slide, potentially distorting it. Fill Safe Zone is much like fill frame, but it sizes the background image to fill the safe zone. Fit to Safe Zone is much like fit frame, but it sizes the background imager to fit in the safe zone.
Adjustments
• Brightness allows you to lighten or darken the background image. Increase the value to lighten, decrease to darken.
• White Point determines the brightest point in the image and allows you to adjust the back-ground image accordingly.
• Black Point determines the darkest point in the image and allows you to adjust the background image accordingly.
• Contrast allows you to increase and decrease the contrast between the light and dark parts of the background image.
• Hue allows you to change the overall hue of the background image.
• Sharpen allows you to make edges more clearly defined in the background image.
Rotation
• Rotation rotates the background image by 90, 180 or 270 degrees. Select the degree of rota-tion from the drop-down menu.
Flip
• Flip allows you to flip your image horizontally, vertically or both. Check the box next to the desired effect.
Colorize Image
• Colorize Image allows you to colorize the background image using a selected color. Click < Set Color >, click on the desired color in the color wheel, and click < Set Color > again to apply the effect.

P H O T O D E X | ProShow Gold42
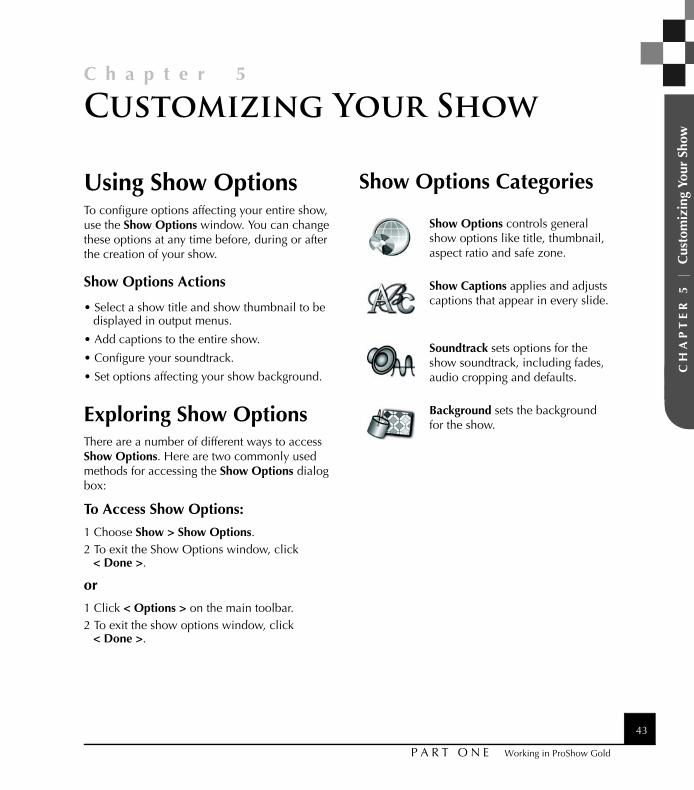
43
C h a p t e r 5
P A R T O N E Working in ProShow Gold
CH
AP
TE
R 5
| C
usto
miz
ing
Your
Sho
w
Customizing Your Show
Using Show OptionsTo configure options affecting your entire show, use the Show Options window. You can change these options at any time before, during or after the creation of your show.
Show Options Actions
• Select a show title and show thumbnail to be displayed in output menus.
• Add captions to the entire show.
• Configure your soundtrack.
• Set options affecting your show background.
Exploring Show OptionsThere are a number of different ways to access Show Options. Here are two commonly used methods for accessing the Show Options dialog box:
To Access Show Options:
1 Choose Show > Show Options.2 To exit the Show Options window, click
< Done >.
or
1 Click < Options > on the main toolbar.2 To exit the show options window, click
< Done >.
Show Options Categories
Show Options controls general show options like title, thumbnail, aspect ratio and safe zone.
Show Captions applies and adjusts captions that appear in every slide.
Soundtrack sets options for the show soundtrack, including fades, audio cropping and defaults.
Background sets the background for the show.

P H O T O D E X | ProShow Gold44
Show OptionsShow Options control the basic settings that affect your overall show. You can access these options
at any time, even before adding slides to your show. You can do the following from this window:
• Set the show title that appears in the show info bar and on menus.
• Specify the aspect ratio of the show.
• Set the size of the safe zone indicators in the preview.
• Specify certain transitions for random transition effects.
To Access General Show Options:
1 Choose Show > Show Options and click on the Show Options button on the left side of the window.
2 Make changes to the settings as desired.3 Click < Done >.
Show Title and Thumbnail
The Show Title and Thumbnail are displayed in output menus. By default, the Show Title is ‘Untitled ProShow’ and the Show Thumbnail is the first slide of your show.
• Show Title specifies the title that will be used as the show title.
• Select Thumbnail sets a different slide or image as the show thumbnail.
Preview Area
• Preview Position displays the Safe Zone for the show.
Aspect Ratio
The Aspect Ratio of your show affects how your show appears in previews and output. The Aspect Ratio affects the relationship between the height and width of your show, not the exact dimensions.
• Aspect Ratio specifies the aspect ratio for your show. The 4:3 setting is the standard for fullscreen television and computer displays. The 16:9 setting produces a widescreen dis-play. Click < Custom > to specify a custom aspect ratio.
Safe Zone for Television Display
The Safe Zone is the area around the edges of your show that may not be visible when the show is viewed on some televisions. Even modern televisions clip off small amounts of the edges of the images displayed so that the entire screen is filled. If you place important show content too close to the edges of the screen it may be clipped off. There is no way to predict how much will be clipped. Every television is different. The Safe Zone percentages in ProShow Gold have no effect on your output except for objects that are scaled to Fit to Safe Zone. The shaded area is only there to help ensure that your content stays on the screen during TV playback.
• Safe Zone specifies the percentage of the screen width and height to be shaded to serve as the safe zone.
C H A P T E R 5 | Customizing Your Show 45
P A R T O N E Working in ProShow Gold
Random Transition Effects
• Random Effects specifies which transitions are used when you select the random transition effect. Click < Select > to launch the random effects chooser.
Show CaptionsIn Show Captions options, you can quickly and easily add captions to your entire show. Use Show
Captions to quickly add copyright notices, contact information, file names and slide numbers. You can do the following from this window:
• Add captions that appear on every slide in your show.
• Set the font, size, color, and placement of a show caption.
• Add effects and behaviors to show captions.
• Control the order of captions when multiple captions are used.
To Access Show Captions:
1 Choose Show > Show Options and click on the Show Captions button on the left side of the window.
2 Add captions and set the options as desired.3 Click < Done >.
Captions List
• Captions List shows which captions have been added to the entire show.
• Add adds a new caption.
• Del removes the selected caption.
• Up moves the selected caption up the list, placing it on top of other captions in the show.
• Down moves the selected caption down the list, placing it under other captions in the show.
Text
• Text Field edits the text of the selected show caption.
• Font sets the font to be used for the selected show caption. ProShow Gold supports all True-Type fonts currently installed on your com-puter.
• Font Size sets the size of the selected show caption text. Pick a size from the drop-down menu or manually enter a specific value.
• Bold, Italic, Shadow sets the attributes for the selected show caption.
• Macro launches the insert macro window, where you can select a macro, special charac-ter, EXIF or IPTC field to insert in the selected show caption.
Preview Area
• Preview Position allows you to click and drag any show caption to position it in your show or resize it as desired.
P H O T O D E X | ProShow Gold46
Caption Placement
• Align moves the text anchor point between Left, Right, Center and Fill.
• Position allows you to specify numerical val-ues for caption position.
Caption Color
• Caption Color allows you to colorize the selected show caption using a selected color. Click < Set Color >, click on the desired color in the color wheel, and click < Set Color > again to apply the effect.
Outline Caption
• Outline Caption enables and disables the out-line around caption characters for the selected caption.
• Outline Color sets the color for the show cap-tion outline. Click < Set Color >, click on the desired color in the color wheel, and click < Set Color> again to apply the effect.
Drop Shadow
• Drop Shadow enables and disables the use of a drop shadow on the selected caption.
• Set Color sets the color for the drop shadow. Click < Set Color >, click on the desired color in the color wheel, and click < Set Color> again to apply the effect.
Text Effects
Text Effects controls how the caption behaves when it appears on the slide, when it is sitting on the slide and when it leaves the slide.
• Fly In sets the text effect used when the caption appears on the slide. Click < Select > to launch the choose caption effects dialog.
• Normal sets the behavior of the caption while it is displayed on the slide. Click < Select > to launch the choose caption effects dialog.
• Fly Out sets the text effect used when the cap-tion leaves the slide. Click < Select > to launch the choose caption effects dialog.
• Show Fly-In, Normal and Fly-Out effects com-bined in preview previews all three caption effects at once in the choose caption effects dialog.
C H A P T E R 5 | Customizing Your Show 47
P A R T O N E Working in ProShow Gold
SoundtrackIn the Soundtrack category of the show options, you can configure all of the settings related to the audio
track that make up your soundtrack. You can do the following from this window:
• Set the volume for your show.
• Add, remove and re-order tracks.
• Set fades for audio tracks.
• Trim or crop your audio track.
• Specify defaults for soundtrack interaction with slide sounds.
To Access Soundtrack options:
1 Choose Show > Show Options and click on the Soundtrack button on the left side of the window.
2 Add tracks and set the options as desired.3 Click < Done >.
Master Soundtrack Volume
• Master Volume sets the overall volume of the show. This setting affects the volume of all sounds in your show.
Tracks
• Track List displays the individual audio tracks that make up the soundtrack. These tracks are listed in the order in which they will play.
• Add adds a new audio track to the soundtrack.
• Del removes the selected audio track from the soundtrack.
• Up moves the selected audio track up the list, placing it before other audio tracks in the soundtrack.
• Down moves the selected audio track down the list, placing it after other audio tracks in the Soundtrack.
• Volume specifies the volume of the selected audio track.
• Fade In sets the amount of time that the selected audio track will take to fade in, in sec-onds. For no fade, specify zero seconds.
• Fade Out sets the amount of time that the selected audio track will take to fade out, in seconds. For no fade, specify zero seconds.
• Offset specifies the number of seconds from the end of the previous track to the beginning of the current track. A positive number will cre-ate a gap of silence between tracks while a negative number will create a crossfade.
• Trim Audio lets you select the part of your audio file that you would like to use for the show. Click < Edit Fades and Timing > to open the Audio Trimmer. Click < Edit Track > to launch the external audio editor configured in the preferences.
Defaults for Other Sounds
These settings are the defaults for slide sounds. They will be used unless they are overridden in Slide Options > Sounds.
• Volume specifies the volume of the selected slide sound.
• Fade Out sets the amount of time that the selected slide sound will take to fade out, in seconds. For no fade, specify zero seconds.
• Fade In sets the amount of time that the selected slide sound will take to fade in, in sec-onds. For no fade, specify zero seconds
P H O T O D E X | ProShow Gold48
Override Soundtrack During This Sound
These settings are the defaults for how the soundtrack behaves when a slide sound plays.
• Volume specifies the volume of the selected audio track during the slide sound.
• Fade Out sets the amount of time that the selected audio track will take to fade out when a slide sound plays, in seconds. For no fade, specify zero seconds.
• Fade In sets the amount of time that the selected audio track will take to fade in when a slide sound plays, in seconds. For no fade, specify zero seconds.
Sync and Music Buttons
• Save Music From CD activates the Audio CD feature, allowing you to use a track directly from a CD.
• Record Slide Timing launches the record slide timing feature for timing the show to specific slides. For more information, please see Chap-ter 22: Audio and Video Utilities.
• Sync Show to Audio makes all the slide times the same length so that they add up to equal the length of your soundtrack.
• Sync Selected Slides uses the existing slide times and increases them proportionately so that they add up to equal the length of your soundtrack.
C H A P T E R 5 | Customizing Your Show 49
P A R T O N E Working in ProShow Gold
Show BackgroundThe Background options allow you to apply a background color or image to the entire show. The
changes made to the Show Background will affect the entire show, unless you specifically choose to apply a different background to an individual slide. You can do the following from this window:
• Set the default background color for your show.
• Set the background image for your show.
• Apply adjustments to you background image.
To Access Show Background:
1 Choose Show > Show Options and click on the Background button on the left side of the window.
2 Select background type and set the options as desired.
3 Click < Done >.
Show Background
• Type sets the type of background to apply to the show. Choose from Solid Color and Image.
Solid Color
• Background Color Selection allows you to set a color for your background. Click < Set Color >, click on the desired color in the color wheel, and click < Set Color > again to apply the effect.
Background Image
• Use Background Image allows you to choose an image for the background. Click < Browse > to select an image file. Click < Edit > to launch the external editor configured in the prefer-ences.
• Scaling lets you select the size for your back-ground image. There are a number of options you can use to scale the image. Fill Frame sizes the image to fill the entire frame and may crop off the edges of the layer. Fit Frame sizes the image so that the entire image is visible, some-times filling only part of the frame. Stretch to Frame stretches the image so that it fills the entire slide, potentially distorting the image. Fill Safe Zone is much like fill frame, but it sizes the image to fit in the safe zone. Fit to Safe Zone is much like fit frame, but it sizes the image to fit in the safe zone.
Adjustments
• Brightness allows you to lighten or darken the background image. Increase the value to lighten, decrease to darken.
• White Point determines the brightest point in the image and allows you to adjust the back-ground image accordingly.
• Black Point determines the darkest point in the image and allows you to adjust the background image accordingly.
P H O T O D E X | ProShow Gold50
• Contrast allows you to increase and decrease the contrast between the light and dark parts of the background image.
• Hue allows you to change the overall hue of the background image.
• Sharpen allows you to make edges more clearly defined in the background image.
Rotation
• Rotation allows you to rotate the background image by 90, 180 or 270 degrees. Select the degree of rotation from the drop-down menu.
Flip
• Flip allows you to flip the background image horizontally, vertically or both. Check the box next to the desired effect.
Colorize Image
• Colorize Image allows you to colorize the background image using a selected color. Click < Set Color >, click on the desired color in the color wheel, and click < Set Color > again to apply the effect.
51
C h a p t e r 6
P A R T T W O Output in ProShow Gold
CH
AP
TE
R 6
| O
verv
iew
of
Out
put
Overview of Output
Choosing an Output FormatOnce you finish composing your presentation, you are ready to move on to the next step in the slide show creation process: choosing an appropriate output format. This is a very important step when you consider that the output format you choose must match your audience’s needs. With so many output options, there’s guaranteed to be a suitable format for your show.
• DVD Creation is the best option for playback on a DVD player. Include an optional PC Auto-run for hassle-free PC playback.
• Blu-ray Creation gives you the ability to create high definition shows to harness your HD tele-vision and Blu-ray player.
• Device Creation gives you the ability to view your slideshow on a wide variety of multime-dia devices available from modern game con-soles to iPods.
• Video CD Creation is a good option if you don’t have a DVD burner or DVD media. Video CDs will play on most DVD players.
• Video File Creation lets you choose from a wide variety of video file formats, including AVI, WMV, MPEG 1 and 2 and HD Video.
• Share Show Online creates your show output and uploads it to the www.photodex.com online sharing service so you can share your shows for free.
• Web Show Creation outputs your show and generates the HTML code for your website. Show playback is controlled by Photodex Pre-senter, a free web plug-in.
• Flash Show Creation outputs your show for web playback to FLV so that it can be easily integrated into your website. No Flash experi-ence required!
• E-mailing Shows creates an executable file then e-mails it from within ProShow Gold using your preconfigured e-mail preferences.
• Autorun CD Creation creates a disc containing your show that runs automatically when loaded into a Windows PC. Requires no addi-tional software to replay shows.
• Executable Creation makes a stand-alone slide show that will play on any Windows PC with-out any additional software.
• YouTube gives you the ability to upload your shows directly to YouTube and share them on one of the most popular video sites on the Internet.
• Screen Saver Creation creates a screen saver of your show that will play when your computer is idle.
For a complete list of supported output formats, please see Chapter 24: Supported File Formats

P H O T O D E X | ProShow Gold52
About Show SizesThere is no set limit on the number of files you have in a slide show. There are limitations, though, depending on what output format you choose. These can be separated into three categories:
• DVD and Video CD slide shows are limited by the length of the show time (length) that will fit on the disk.
• Video CD still shows are limited to 99 images. This is a limitation of the Video CD format.
• YouTube video is limited to either 10 minutes of length or 100 megabytes of size.
• All other formats, executables and web shows, for example, can have any number of slides, but you need to keep the output file size in mind. For example, some systems limit execut-able size to 2.1GB. This is based on your sys-tem and will vary
Photodex Presenter Web Plug-InSome of the output formats require Photodex Presenter for playback. Photodex Presenter is a free plug-in for your web browser that allows you to view streaming ProShow presentations on the web. Presenter provides superior playback quality and performance in addition to supporting all the effects found in DVDs and PC executables created in ProShow Gold. The
Photodex Presenter is automatically installed with ProShow Gold.
C H A P T E R 6 | Overview of Output 53
P A R T T W O Output in ProShow Gold
Photodex Presenter Frequently Asked Questions
Do I need ProShow to use Presenter?No. Presenter simply lets you view slide shows that have been created in ProShow. Presenter is also the plug-in that allows you to share and view videos online.
Is Photodex Presenter safe?Every copy of Photodex Presenter is digitally signed to ensure that it comes directly from Photodex. All our software products are designed to be safe and secure.
Why use Photodex Presenter?Playback clarity and quality is better than any other streaming web format. With Presenter, the maximum amount of information is retained without compromising file size and the outputted file size is actually far smaller than video.
Using Photodex PresenterAfter you have installed the Photodex Presenter web plug-in, simply visit a web page that contains a ProShow slide show and it will begin to play automatically. With built-in controls, you control show playback in your web browser. You can also use the right-click menu to access additional playback features.
Presenter Controls
• Pause/Play temporarily pauses or resumes playback of the show. The current slide will be displayed until show playback is resumed.
• Stop ends show playback and either returns to the menu or to the beginning of the show, if there is no menu.
• Previous Slide returns to the previous slide in the show.
• Next Slide advances to the next slide in the show.
• Sound On/Off enables and disables sound for the show.
• Volume Control sets the volume level for show sound.
Right-Click Presenter Menu
• Pause/Play temporarily pauses or resumes playback of the show. The current slide will be displayed until show playback is resumed.
• Stop ends show playback and either returns to the menu or to the beginning of the show, if there is no menu.
• Full Screen enables and disables full screen playback. Press < ESC > to exit full screen play-back.
• Mute disables sound for the show.
• Volume Control sets the volume level for show sound.
• About Photodex Presenter displays the version number and publisher information for Pre-senter in an About Show window.
P H O T O D E X | ProShow Gold54
Presenter Security and SafetyPhotodex Corporation is committed to ensuring that Presenter is safe for use on your computer or network. As the exclusive publisher of Presenter, Photodex digitally signs every copy to ensure that the software you receive on your computer came directly from Photodex and is in its unmodified form. Presenter only uses components developed and maintained by Photodex Corporation. No third party software is ever included with Presenter.
The Presenter plug-in is designed specifically to play back ProShow presentations over the web. It contains no components for any other task. This helps keep Presenter secure by limiting Presenter’s capabilities.
55
C h a p t e r 7
P A R T T W O Output in ProShow Gold
CH
AP
TE
R 7
| C
usto
miz
ing
Men
us
Customizing Menus
Using Menu Customizations
ProShow Gold includes a complete menu authoring system that allows you to create fully customized
menus for most of the output formats. With complete creative control over how your menu looks and behaves, you can create professional, Hollywood-style menus with multiple pages, links and background music. In the customize menu window, you can do the following:
• Create and save custom themes and layouts.
• Add text, including copyright information, to menu pages.
• Configure all images and backgrounds.
• Add ‘Special Features’ to your show.
• Control the layout of each menu page.
• Customize a new or existing theme or layout using the customize options.
• Customize special effects in your menu.
To Access Customize Menu Options:
1 Click Save to save your show.2 Select an output format that supports menus,
like DVD, Web Show or Executable.3 Click the Menu icon on the left side of the
output creation window.4 Click < Customize > to launch the Customize
Menu window.5 Customize the settings as desired.6 Click < OK >.
About MenusProShow Gold divides menus into two components: themes and layouts. These themes and layouts are combined to create a complete menu. Gold allows you to save themes, layouts or menus, depending on which aspect of the menu you would like to re-use. Select Themes and Layouts in the Menus section of your output format.
• Theme controls the options affecting the appearance of your menu. When you save a Theme, you are saving the colors, text settings, images, music and pages in your menu.
• Layout saves only the position of shows and navigation objects on each menu page.
• Menu saves a combined Theme and Layout. Any Theme and Layout can be combined to create a Menu.
P H O T O D E X | ProShow Gold56
Menu Options Overview
Settings manages the appearance of the page in your menu.
Layers specifies images and videos displayed on a menu page. Adjusts size and layout of objects.
Editing applies adjustments, like color correction and rotation to any photo or video on a page.
Captions allows you to insert text on a menu page. Customizes font style, size and color of the text.
Music allows you to add audio to a menu. Uses any MP3 or WAV file or pulls songs directly from a CD.
General Options
• Zoom (Icon) switches between the small and large customize menu window size.
• Next / Previous Page (Icon) moves from one menu page to the next.
• Menu Page Display shows the page number of the current menu page.
• Save Theme saves the current theme settings for future use.
• Save Layout saves the current layout settings for future use.
• Ok applies all changes and closes the custom-ize menu window.
• Cancel removes all changes and closes the Customize Menu window.
SettingsThe Settings category of the customize menu dialog controls the appearance of your menu. From
here, you can change the title, add navigation options, or change your background.
To Access Menu Pages Options:
1 After you have chosen your output format, click on the Menus icon on the left side of the window.
2 Click < Customize Menu >.3 Click on the Settings icon on the left side of the
window.4 Customize the settings as desired.5 Click < OK >.
C H A P T E R 7 | Customizing Menus 57
P A R T T W O Output in ProShow Gold
Main Menu Title
• Main Menu Title sets the title of the main menu.
Navigation Settings
• Loop All adds or removes the Loop All function from the menu. Loop All allows the viewer to watch the shows in a continuous repeating loop.
• Play All adds or removes the play all function from the menu. Play All allows the viewer to watch the shows once, in order.
Default Background Color
• Set Color specifies the default background color to be used on all menu pages.
Custom Color for this Page
• Set Color overrides the default background color and specifies a custom background color to be used on the selected menu page.
Default Menu Background Image
• Browse allows you to browse for the image that you would like to use on all menu pages.
• Scaling specifies how the image will be applied to the menu background. Choose from Fill to Frame, Fill Frame or Stretch to Frame.
• Pause inactive video thumbnails enables and disables playback of video thumbnails when the thumbnails are inactive.
LayersThe Layers options let you edit objects on the menu page.
To Access Layers Options:
1 After you have chosen your output format, click on the Menus icon on the left side of the window.
2 Click < Customize Menu>.3 Click on the Layers icon on the left side of the
window.4 Customize the settings as desired.5 Click < OK >.
Selected Layer Options
• Select File allows you to select a new file to replace the current one.
• Edit File launches the pre-configured external image editor.
• Properties displays the meta-data for the selected file.
• Source displays the source file for the selected object.
• Resolution shows the resolution of the selected file.
• Size displays the file size of the selected object.
• Type shows the file type of the selected object.
• Length displays the length of the selected file if the file is a video clip.
P H O T O D E X | ProShow Gold58
Layer Settings
• Position specifies the position of the selected object on the menu page. Click and drag the object into position or specify exact x and y coordinates in the space provided.
• Zoom increases and decreases the size of the selected object. Click the object and move your mouse wheel or move the zoom slider to adjust thumbnail size.
Video Clip Settings
• Trim Clip launches the built-in video trimmer. Specify clip length and video offset. For more information, please see Chapter 22: Audio and Video Utilities.
• Volume sets the volume of the video clip.
EditingThe Editing options allow you to make quick changes to your menu page content. These adjustments are
simply settings saved in ProShow Gold, so they do not affect your original content.
Selected Layer
• Selected Layer lists the objects that make up the page. The selected layer is highlighted.
Adjustments
• Opacity specifies how opaque or transparent the current layer will appear to be. As the value nears 0%, it will become more and more trans-parent. Note that opacity options are only available for menu customization.
• Brightness allows you to lighten or darken the layer. Increase the value to lighten, decrease to darken.
• White Point determines the brightest point in your layer and allows you to adjust the layer accordingly.
• Black Point determines the darkest point in your layer and allows you to adjust the layer accordingly.
• Contrast allows you to increase and decrease the contrast between the light and dark parts of the selected layer.
• Hue allows you to change to overall hue of your layer.
• Sharpen allows you to make edges more clearly defined in your layer.

C H A P T E R 7 | Customizing Menus 59
P A R T T W O Output in ProShow Gold
Rotation
• Rotation allows you to rotate your image by 90, 180 or 270 degrees. Select the degree of rotation from the drop-down menu.
Flip
• Flip Horizontal flips the selected layer horizon-tally.
• Flip Vertical flips the selected layer vertically.
Shadow
• Drop Shadow on Object enables and disables the use of a drop shadow on the selected layer.
Outline Layer
• Set Color specifies a color to be used for the outline of the selected layer. Click < Set Color >, click on the desired color in the color wheel, and click < Set Color > again to apply the effect.
Colorize Object
• Set Color allows you to colorize your image using a selected color. Click < Set Color >, click on the desired color in the color wheel, and click < Set Color > again to apply the effect.
CaptionsYou can add any number of text elements to your menu using Captions options. ProShow Gold
gives you complete control over the placement and appearance the captions in your show menu.
Text
• Text Field edits the text of the selected caption.
• Font sets the font to be used for the caption. ProShow Gold supports compatible fonts cur-rently installed on your computer.
• Font Size sets the size of the caption text.
• Bold applies the bold attribute to the caption.
• Italic applies the italic attribute to the caption.
Caption Placement
• Align moves the text anchor point between left, right and center.
• Position shows numerical values for the cap-tion’s position so that you can set precise posi-tions for multiple captions.
Text Color
• Set Color specifies a color to be used for the selected caption. Click < Set Color >, click on the desired color in the color wheel, and click < Set Color > again to apply the effect.
P H O T O D E X | ProShow Gold60
MusicProShow Gold lets you choose back-ground music that will play while your menu is displayed. In Music op-
tions, you control all the settings related to music that plays on all pages of the menu, as well as cus-tom music settings for individual pages.
Default Menu Music
• Music displays the audio file that you have selected for the default menu music. Click < Browse > to select an audio file.
• Save From CD activates the audio CD feature, allowing you to use a track directly from the CD.
• Edit Track launches the external audio editor configured in the preferences, allowing your to edit the selected audio track. See Chapter 2: The Work Area for more information about configuring your preferences.
• Volume specifies the volume of the selected audio track.
• Fade In sets the amount of time that the selected audio track will take to fade in, in sec-onds. For no fade, specify zero seconds.
• Fade Out sets the amount of time that the selected audio track will take to fade out, in seconds. For no fade, specify zero seconds.
• Trim Audio launches the built-in audio trim-mer. Click < Edit Fades and Timing > to open the Audio Trimmer so you can adjust the length of the selected audio track and set fade times using a waveform.
61
C h a p t e r 8
P A R T T W O Output in ProShow Gold
CH
AP
TE
R 8
| D
VD
Cre
atio
n
DVD Creation
Using DVD CreationProShow Gold allows you to create DVDs of your slide shows to share with clients, friends and family. The DVD format is very popular because it will play on most DVD players and it has the highest quality TV playback. Also, you have the option to include a PC executable on a DVD for hassle-free PC playback.
Standard resolution for DVD output is 720 x 480 (720 x 576 for PAL). This is much lower resolution in comparison to PC playback resolution. Photographers or professionals may notice the reduced resolution, but most consumers will not as they are used to the DVD format.
To Create a DVD:
1 Click Save to save your show.2 Click the Create Output button in the main
toolbar.3 Click on DVD from the create output window.4 Customize your DVD using the various
category options in the Create DVD Disc dialog.
5 Click < Create >.
DVD Options Overview
Menus allows you to customize the menu that appears on your DVD. Sets layout, content and music.
Shows adds and removes shows from the DVD. Sets show titles and thumbnails.
Output Options controls output quality, Video Standard selection and video options.
Disc Burning contains options for writing to a disc. Sets speed, DVD drive and number of copies.
PC Autorun adds an optional PC Executable to the DVD. Controls playback and protection options.
P H O T O D E X | ProShow Gold62
MenusFrom the Menu options, you can control all aspects of your DVD menu. The Menu options control
the theme and layout, as well as additional customizations.
To Access DVD Menu Options:
1 Click Create Output > DVD in the main toolbar or go to Create > Create DVD to launch the create DVD disc window.
2 Click on the Menus icon on the left side of the window.
3 Customize the settings as desired.4 Click < Create >.
Menu Themes and Layouts
• Theme selects which category of themes to dis-play in the theme list.
• Layout displays various layouts for how shows are displayed on a menu page.
• Load Menu loads a saved menu.
• Save Menu saves the current theme and layout for future use.
Menu Settings
• Title specifies the main title for the menu.
• Aspect specifies the aspect ratio for the show, which is dependent on how the show will be viewed.
• Thumbnails allows you to set video loops of a show as a thumbnail.
Customize Menu
• Customize launches the Customize Menu win-dow, which contains additional authoring capabilities. Please see Chapter 7: Customiz-ing Menus for more information.
ShowsThis category of options lets you add shows and video clips to your DVD. Since you can combine any number
of shows and videos in your DVD, you will need to use the Shows window to manage them. Among other things, you can do the following from the Shows options:
• Add and remove shows on your DVD.
• Change the order of shows on your DVD.
• Set the title for each show appearing on your menu.
• Select a thumbnail for each show appearing on your menu.
• Enable and disable an intro show that will play before the menu.
• Specify which intro show to add to your DVD.
To Access DVD Show Options:
1 Click Create Output > DVD in the main toolbar or choose Create > Create DVD to launch the create DVD disc window.
2 Click on the Shows icon on the left side of the window.
3 Customize the settings as desired.4 Click < Create >.
C H A P T E R 8 | DVD Creation 63
P A R T T W O Output in ProShow Gold
Included Shows
• Add adds a new show to the DVD. When clicked, you will be prompted to select a saved show to add to the DVD.
• Del removes the selected show from the DVD.
• Up moves the selected show up the list, plac-ing it before other shows in the menu.
• Down moves the selected show down the list, placing it after other shows in the menu.
Selected Show
This area previews the selected show thumbnail, along with information about the show.
• Set Menu Title sets a new title for the selected show.
• Set Menu Thumbnail allows you to select an image or video that will represent the selected show in the DVD menu.
Include Intro Show
The Intro Show plays before the DVD menu appears.
• Include Intro Show enables and disables the intro show. This box is checked by default.
• Select Show specifies which show will be used for the intro show.
Output OptionsThe Output Options controls all of the settings related to DVD format, quality and more. In this window,
you can do the following:
• Select DVD format.
• Select the video standard for the DVD.
• Enable and disable anti-flicker and desatura-tion.
• Specify DVD quality options.
To Access DVD Output Options:
1 Click Create Output > DVD in the main toolbar or choose Create > Create DVD to launch the create DVD disc window.
2 Click on the Output Options icon on the left side of the window.
3 Customize the settings as desired.4 Click < Create >.
DVD Type
• DVD Type specifies the quality for the DVD. Choose from the drop-down menu and view related information, including capacity, in the DVD Type Information section.
Video Standard
• TV System selects the television standard to be used on the DVD. For a complete list of televi-sion standards, please see Chapter 25: Televi-sion Standards by Country.

P H O T O D E X | ProShow Gold64
Audio Format
• Audio Type specifies audio encoding format for the DVD. For a complete list of supported file types, please see Chapter 24: Supported File Formats.
DVD Output Options
• Anti-Flicker enables and disables the anti-flicker filter during rendering. Anti-flicker will prevent the flickering effect that appears with some images and effects due to the nature of the DVD format. This does result, however, in a small loss of sharpness.
• Desaturation enables and disables the desatu-ration of the video to a specified percentage, preventing the colors in the video from becom-ing too extreme and resulting in an unnatural-looking video.
Video Clip Output Options
• Encoding Quality sets the encoding quality of video clips used in slides in your show.
DVD Type Information
This information provides an overview of the DVD type selected in the drop-down menu.
Disc BurningThe Disc Burning options control all of the settings related to DVD burning, burner selection and more.
In this window, you can do the following:
• Specify which DVD writer you would like to use.
• Set the speed of the DVD writer and the num-ber of copies to be burned.
• Enable and disable inclusion of original show files.
To Access DVD Disc Options:
1 Click Create Output > DVD in the main toolbar or choose Create > Create DVD to launch the create DVD disc window.
2 Click on the Disc Burning icon on the left side of the window.
3 Customize the settings as desired.4 Click < Create >.
DVD Writer
• Writer selects the drive that will be used to burn the DVD. In addition to the available drives on your machine, you may want to write to an ISO image file, which you can import into other DVD/CD authoring programs.
Disc Options
• Speed sets the speed at which the DVD is writ-ten. The default is the maximum speed for your DVD burner.
• Disc Type specifies whether you are burning to a DVD disc or a CD.
• Simulate enables and disables testing the burn-ing process without wasting a disk. DVD burn-ers do not support this, so this feature only works when you choose the CD Media (MiniDVD) disc type.
C H A P T E R 8 | DVD Creation 65
P A R T T W O Output in ProShow Gold
Multiple Copies
• Copies specifies the number of copies of the DVD to be burned.
DVD+R/RW Compatibility
• Bitsetting specifies the bitsetting method used for the DVD. Bitsetting reconfigures DVD+R/RW media to make it more compatible with standalone DVD players. Bitsetting only works with +R/RW media. In addition, not all writers support bitsetting.
• Detect determines whether or not your DVD writer supports bitsetting. Do not use bitsetting if your DVD writer does not support it.
• ISO Creation enables and disables the creation of an ISO disc image during creation of your DVD.
Include Original Files
• Include original files on DVD specifies whether or not the original files used in your show will be included on the DVD. These files will be accessible by the user.
PC AutorunThe PC Autorun options let you add a PC executable to your DVD. When the DVD is loaded into the
computer, a PC executable version of the slide show will automatically play; the user does not have to have DVD playback software on their computer. In addition, the PC executable takes advantage of the higher resolution supported by computer displays, providing superior quality versus DVD playback on a computer. You can adjust the following options in this window:
• Enable and disable the addition of a PC exe-cutable to your DVD.
• Control the size of your PC executable when it launches (i.e. full screen).
• Specify the display settings for the PC execut-able.
• Configure the settings that affect the file size of the PC executable.
• Apply copy protection to the PC executable.
To Access DVD PC Autorun Options:
1 Click Create Output > DVD in the main toolbar or choose Create > Create DVD to launch the create DVD disc window.
2 Click on the PC Autorun icon on the left side of the window.
3 Customize the settings as desired.4 Click < Create >.
Enable PC Autorun
• Include PC Autorun on DVD enables and dis-ables the use of a PC executable on your DVD.

P H O T O D E X | ProShow Gold66
Executable Startup
• Window Size specifies the startup size of the PC executable included on the DVD.
• Image Size determines the largest size at which images in the show will be stored in the show file.
• Monitor specifies which monitor the show will play on when it launches.
• Loop Show enables and disables continuous show looping. A show menu will override this feature.
Quality/Performance Settings
• Rendering sets the maximum size for your show during internal rendering. This does not affect the display size of your show.
• Resizing specifies how your photos are resized before being rendered. This eliminates the need to resize your images before bringing them into ProShow Gold.
• Image Quality determines the quality setting used for image compression.
Video Output Quality
• Resolution allows you to specify the video res-olution of video clips used in slides in your show.
• Quality sets the general quality level used to encode the video clips used in slides in your show.
Protection
• By Days limits the usage of the PC executable to a specified number of days.
• By Runs limits the usage of the PC executable to a specified number of runs.
• Registration Key allows you to specify a regis-tration key or password that will unlock the PC executable for unlimited use.
• Info URL specifies a website for the user to visit for more information about the show.
• Info Link Text specifies the text that represents the link to the Info URL.
Audio Output Quality
• Quality sets the general quality level used to encode your audio for the show.
67
C h a p t e r 9
P A R T T W O Output in ProShow Gold
CH
AP
TE
R 9
| B
lu-r
ay C
reat
ion
Blu-ray Creation
Using Blu-ray CreationProShow Producer allows you to create high definition Blu-ray versions of your slide shows to share with clients, friends and family. The Blu-ray show format is enormously powerful because it is capable of showing off the best HD televisions and Blu-ray players have to offer. There is no higher resolution format available for displaying your shows. You still have the option to include a PC executable on a Blu-ray show for hassle-free PC playback.
Blu-ray shows can be created in any HD resolution, up to 1080p (1920x1080). This is far higher resolution than Blu-ray show and most PC video formats, allowing photographers to show their photos at nearly the same resolution that they were originally taken in. This is the best selection that can be made when quality and clarity cannot be compromised.
To Create a Blu-ray Slideshow:
1 Click Save to save your show.2 Click the Create Output button in the main
toolbar.3 Click on Blu-ray from the create output
window.4 Customize your Blu-ray show using the various
category options in the Create Blu-ray dialog.5 Click < Create >.
Blu-ray Options Overview
Menus allows you to customize the menu that appears on your Blu-ray show. Sets layout, content and music.
Shows adds and removes shows from the Blu-ray show. Sets show titles and thumbnails.
Output Options controls output quality, Video Standard selection and video options.
Disc Burning contains options for writing to a disc. Sets speed, disc drive and number of copies.
PC Autorun adds an optional PC Executable to the Blu-ray show. Controls playback and protection options.
P H O T O D E X | ProShow Gold68
MenusFrom the Menu options, you can control all aspects of your Blu-ray menu. The Menu options control
the theme and layout, as well as additional customizations.
To Access Blu-ray Menu Options:
1 Click Create Output > Blu-ray in the main toolbar or go to Create > Create Blu-ray to launch the create Blu-ray disc window.
2 Click on the Menus icon on the left side of the window.
3 Customize the settings as desired.4 Click < Create >.
Menu Themes and Layouts
• Theme selects which category of themes to dis-play in the theme list.
• Layout displays various layouts for how shows are displayed on a menu page.
• Load Menu loads a saved menu.
• Save Menu saves the current theme and layout for future use.
Menu Settings
• Title specifies the main title for the menu.
• Aspect specifies the aspect ratio for the show, which is dependent on how the show will be viewed.
• Thumbnails allows you to set video loops of a show as a thumbnail.
Customize Menu
• Customize launches the Customize Menu win-dow, which contains additional authoring capabilities. Please see Chapter 7: Customiz-ing Menus for more information.
ShowsThis category of options lets you add shows and video clips to your Blu-ray show. Since you can combine
any number of shows and videos in your Blu-ray show, you will need to use the Shows window to manage them. Among other things, you can do the following from the Shows options:
• Add and remove shows on your Blu-ray show.
• Change the order of shows on your Blu-ray show.
• Set the title for each show appearing on your menu.
• Select a thumbnail for each show appearing on your menu.
• Enable and disable an intro show that will play before the menu.
• Specify which intro show to add to your Blu-ray show.
To Access Blu-ray Show Options:
1 Click Create Output > Blu-ray in the main toolbar or choose Create > Create Blu-ray to launch the create Blu-ray disc window.
2 Click on the Shows icon on the left side of the window.
3 Customize the settings as desired.4 Click < Create >.
C H A P T E R 9 | Blu-ray Creation 69
P A R T T W O Output in ProShow Gold
Included Shows
• Add adds a new show to the Blu-ray show. When clicked, you will be prompted to select a saved show to add to the Blu-ray show.
• Del removes the selected show from the Blu-ray show.
• Up moves the selected show up the list, plac-ing it before other shows in the menu.
• Down moves the selected show down the list, placing it after other shows in the menu.
Selected Show
This area previews the selected show thumbnail, along with information about the show.
• Set Menu Title sets a new title for the selected show.
• Set Menu Thumbnail allows you to select an image or video that will represent the selected show in the Blu-ray menu.
Include Intro Show
The Intro Show plays before the Blu-ray menu appears.
• Include Intro Show enables and disables the intro show. This box is checked by default.
• Select Show specifies which show will be used for the intro show.
Output OptionsThe Output Options controls all of the settings related to Blu-ray format, quality and more. In this
window, you can do the following:
• Select Blu-ray format.
• Select the video standard for the Blu-ray show.
• Enable and disable anti-flicker and desatura-tion.
• Specify Blu-ray quality options.
To Access Blu-ray Output Options:
1 Click Create Output > Blu-ray in the main toolbar or choose Create > Create Blu-ray to launch the create Blu-ray window.
2 Click on the Output Options icon on the left side of the window.
3 Customize the settings as desired.4 Click < Create >.
Disc Type
• Disc Type specifies the resolution for the Blu-ray show. Choose from the drop-down menu and view related information, including capac-ity, in the Blu-ray Output Information section.
Video Settings
• Framerate selects the television standard and framerate to be used on the Blu-ray show. For a complete list of television standards, please see Chapter 25: Television Standards by Coun-try.
• Quality selects the visual quality of the video. The higher the quality, the less video time can be stored on the disc.
P H O T O D E X | ProShow Gold70
Blu-ray Output Options
• Anti-Flicker enables and disables the anti-flicker filter during rendering. Anti-flicker will prevent the flickering effect that appears with some images and effects due to the nature of the Blu-ray show format. This does result, how-ever, in a small loss of sharpness.
• Desaturation enables and disables the desatu-ration of the video to a specified percentage, preventing the colors in the video from becom-ing too extreme and resulting in an unnatural-looking video.
Video Clip Output Options
• Encoding Quality sets the encoding quality of video clips used in slides in your show.
Blu-ray Output Information
This information provides an overview of the Blu-ray show type selected in the drop-down menu.
Disc BurningThe Disc Burning options control all of the settings related to Blu-ray show burning, burner selection and
more. In this window, you can do the following:
• Specify which Blu-ray writer you would like to use.
• Set the speed of the Blu-ray writer and the number of copies to be burned.
• Enable and disable inclusion of original show files.
To Access Blu-ray Options for Disc Burning:
1 Click Create Output > Blu-ray in the main toolbar or choose Create > Create Blu-ray to launch the create Blu-ray show disc window.
2 Click on the Disc Burning icon on the left side of the window.
3 Customize the settings as desired.4 Click < Create >.
Disc Writer
• Writer selects the drive that will be used to burn the Blu-ray show. In addition to the avail-able drives on your machine, you may want to write to an ISO image file, which you can import into other Blu-ray authoring programs.
Disc Options
• Speed sets the speed at which the Blu-ray show is written. The default is the maximum speed for your Blu-ray burner.
• Simulate enables and disables testing the burn-ing process without wasting a disk.
C H A P T E R 9 | Blu-ray Creation 71
P A R T T W O Output in ProShow Gold
Multiple Copies
• Copies specifies the number of copies of the Blu-ray show to be burned.
Include Original Files
• Include original files on disc specifies whether or not the original files used in your show will be included on the Blu-ray show. These files will be accessible by the user.
PC AutorunThe PC Autorun options let you add a PC executable to your Blu-ray show. When the Blu-ray show is
loaded into the computer, a PC executable version of the slide show will automatically play; the user does not have to have Blu-ray playback software on their computer. You can adjust the following options in this window:
• Enable and disable the addition of a PC exe-cutable to your Blu-ray show.
• Control the size of your PC executable when it launches (i.e. full screen).
• Specify the display settings for the PC execut-able.
• Configure the settings that affect the file size of the PC executable.
To Access Blu-ray PC Autorun Options:
1 Click Create Output > Blu-ray in the main toolbar or choose Create > Create Blu-ray to launch the create Blu-ray show disc window.
2 Click on the PC Autorun icon on the left side of the window.
3 Customize the settings as desired.4 Click < Create >.
Enable PC Autorun
• Include PC Autorun on Disc enables and dis-ables the use of a PC executable on your Blu-ray show.

P H O T O D E X | ProShow Gold72
Executable Startup
• Window Size specifies the startup size of the PC executable included on the Blu-ray show.
• Image Size determines the largest size at which images in the show will be stored in the show file.
• Monitor specifies which monitor the show will play on when it launches.
• Loop Show enables and disables continuous show looping. A show menu will override this feature.
Quality/Performance Settings
• Rendering sets the maximum size for your show during internal rendering. This does not affect the display size of your show.
• Resizing specifies how your photos are resized before being rendered. This eliminates the need to resize your images before bringing them into ProShow Gold.
• Image Quality determines the quality setting used for image compression.
Video Output Quality
• Resolution allows you to specify the video res-olution of video clips used in slides in your show.
• Quality sets the general quality level used to encode the video clips used in slides in your show.
Protection
• By Days limits the usage of the PC executable to a specified number of days.
• By Runs limits the usage of the PC executable to a specified number of runs.
• Registration Key allows you to specify a regis-tration key or password that will unlock the PC executable for unlimited use.
• Info URL specifies a website for the user to visit for more information about the show.
• Info Link Text specifies the text that represents the link to the Info URL.
Audio Output Quality
• Quality sets the general quality level used to encode your audio for the show.
73
C h a p t e r 1 0
P A R T T W O Output in ProShow Gold
CH
AP
TE
R 1
0 |
Cre
atin
g V
ideo
For
Creating Video For Devices
Using Video For DevicesThe Device output in ProShow Gold generates a digital video file of your show that can be added directly to a device. You can choose from a list of devices for a pre-made profile. If your device is not on the list, you can create and save a custom profile. This makes it possible for you to view and share slide shows on all sorts of devices, from cell phones to DVRs to video game consoles.
To Create a Video File for a Device:
1 Click Save to save your show.2 Click the Create Output button in the main
toolbar.3 Click on Device from the create ouput window
that appears.4 Select your Device from the list of profiles on
the left. If your Device is not listed, click Add to enter a new profile. Save the new profile and it will be added to the list.
5 Select a location to save the file to and set the Profile quality.
6 Click < Create >.
Supported DevicesProShow Gold supports a number of Devices
• Game Consoles, like Nintendo Wii and Sony PSP
• Media Players, including iPods and Microsoft Zunes
• Mobile Phones with video playback
• PDAs,
• Television Devices
Custom Device Profiles
When you choose the Custom format, you can enter in the custom settings requires to support a device. If you don’t find your device in the list of supported devices, simply click the < Add > button. This will launch the custom device video output window.
Downloading New Profiles
You can download new and updated profiles from Photodex at any time by doing the following:
• Click on Get New Profiles
• Click on Yes when asked to continue
• Click on Yes to confirm you would like to download available updates
P H O T O D E X | ProShow Gold74
Custom Device Options Device Information
• Manufacturer allows you to enter the brand name of a device.
• Model specifies the model name and/or num-ber of a device.
Profiles for Device
• Add saves a custom profile and adds it to the Profiles for Device list.
• Delete removes the selected custom profile from the Profiles for Device list.
Profile Settings
• Profile Name allows you to enter a name for the custom profile.
• Format allows you to choose from the avail-able video encoding formats.
• File Extension displays the file extension that appears at the end of the video file name.
Video Settings
• Compression specifies the compression rate for the video. The available compression type var-ies depending on which video encoding For-mat you choose.
• Resolution sets the actual dimensions, in pix-els, of your video file.
• Frame Rate determines the number of frames per second used in the video.
• Aspect Ratio specifies the Aspect Ratio for the video. The 1:1 setting is for PC playback only, the 4:3 setting is the standard for fullscreen television and computer displays and the 16:9
setting produces a widescreen display for both PC and television playback. Use caution when changing this setting as it may result in image distortion. It is recommended that you set the aspect ratio in Slide Options before you begin creating your show.
• Bitrate controls the size and quality of the video output.
Audio Settings
• Audio Format allows you to choose from the available audio encoding formats.
• Channels lets you choose between Mono and Stereo sound.
• Sampling Rate sets the rate at which samples of the analog audio signal are taken for digital conversion. A higher Sampling Rate will pro-duce better quality sound than a lower one.
• Bitrate controls the file size and quality of the audio output.
Not all Sampling Rate/Bitrate combinations are allowed. The allowed combinations differ by codec. If you enter an incompatible combination, you will not be allowed to save the Custom Profile.
When creating a custom device profile it is best to consult your device documentation to determine if your device has specific requirements in order to play your video.
75
C h a p t e r 1 1
P A R T T W O Output in ProShow Gold
CH
AP
TE
R 1
1 |
Vid
eo C
D C
reat
ion
Video CD Creation
Using Video CD CreationIn ProShow Gold, you can easily create a Video CD in order to view your shows on a TV. Video CDs work like DVDs, but they are created on a CD-R or CD-RW. Video CDs have lower quality and compatibility than DVDs. There are two types of shows that you can create using the Video CD output format:
• Video Shows are the slide shows that you cre-ate, complete with motion effects and transi-tions. Video Shows are limited in length based on the amount of space available on your CD. They support Video Menus, which can have video thumbnails and background music.
• Still Shows display higher resolution images, but they do not include any motion effects or transitions. Still Shows are limited to 99 images and they contain Still Menus, which is a solid, still image.
To Create a Video CD:
1 Click Save to save your show.2 Click the Create Output button in the main
toolbar.3 Click on VCD Disc from the create output
window.4 Customize your Video CD using the various
category options in the Create Video CD dialog.
5 Click < Create >.
Video CD Options Overview
Menus allows you to customize the menu that appears on your Video CD. Sets theme, layout and music.
Shows adds and removes shows from the Video CD. Sets show titles and thumbnails.
Output Options controls options for quality level, video standard selection and video options
.Disc Burning contains options for writing to a disc. Sets speed, CD drive and number of copies.
PC Autorun adds an optional PC executable to the CD. Controls playback and protection options.
P H O T O D E X | ProShow Gold76
MenusFrom the Menus options, you can control all aspects of your Video CD menu. The Menu options control
the theme and layout, as well as additional customizations.
To Access Video CD Menu Options:
1 Click Create Output > VCD Disc in the main toolbar or choose Create > Create Video CD to launch the create Video CD window.
2 Click on the Menus icon on the left side of the window.
3 Customize the settings as desired.4 Click < Create >.
Menu Themes and Layouts
• Theme selects which category of themes to dis-play in the theme list.
• Layout displays various layouts for shows that are displayed on a menu page.
• Load Menu loads a saved menu.
• Save Menu saves the current theme and layout for future use.
Menu Settings
• Title specifies the main title for the menu.
• Aspect specifies the aspect ratio for the show, which is dependent on how the show will be viewed.
• Thumbnails allows you to set video loops of a show as a thumbnail. This option is only avail-able for Video menus, not for Still menus.
Customize Menu
• Customize launches the Customize Menu win-dow, which contains additional authoring capabilities. For more information, please see Chapter 7: Customizing Menus.
ShowsThis category of options lets you add shows and video clips to your Video CD. Since you can combine any
number of shows and videos in your Video CD, you will need to use the Shows window to manage them. Among other things, you can do the following from the Shows options:
• Add and remove shows on your Video CD.
• Change the order of shows on your Video CD.
• Set the title for each show appearing on your menu.
• Select a thumbnail for each show appearing on your menu.
• Enable and disable an intro show that will play before the menu.
• Specify which intro show to add to your Video CD.
To Access Video CD Show Options:
1 Click Create Output > VCD Disc in the main toolbar or choose Create > Create Video CD to launch the create Video CD window.
2 Click on the Shows icon on the left side of the window.
3 Customize the settings as desired.4 Click < Create >.
C H A P T E R 1 1 | Video CD Creation 77
P A R T T W O Output in ProShow Gold
Included Shows
• Add adds a new show to the Video CD. When clicked, you will be prompted to select a saved show to add to the Video CD.
• Del removes the selected show from the Video CD.
• Up moves the selected show up the list, plac-ing it before other shows in the menu.
• Down moves the selected show down the list, placing it after other shows in the menu.
Selected Show
This area previews the selected show thumbnail, along with information about the show.
• Set Menu Title sets a new title for the selected show.
• Set Menu Thumbnail selects an image or video that will represent the selected show in the Video CD menu.
Include Intro Show
The intro show plays before the Video CD menu appears.
• Include Intro Show enables and disables the Intro Show. This box is checked by default.
• Select Show specifies which show will be used for the Intro Show.
Output OptionsThe Output Options controls all of the settings related to Video CD format, quality and more. In this
window, you can do the following:
• Select Video CD format.
• Select the video standard for the Video CD.
• Enable and disable anti-flicker and desatura-tion.
• Specify Video CD quality options.
• Choose between Video Shows and Still Shows, or include both on the Video CD.
To Access Video CD Output Options:
1 Click Create Output > VCD Disc in the main toolbar or choose Create > Create Video CD to launch the create Video CD Disc window.
2 Click on the Output Options icon on the left side of the window.
3 Customize the settings as desired.4 Click < Create >.
Video CD Type
• Video CD Type specifies the quality for the Video CD. Choose from the drop-down menu and view related information, including capac-ity, in the Video CD Type Information section.
• Show Types allows you to include video shows and/or still shows on the Video CD. Video Shows are simply the slide shows that you cre-ate, complete with motion effects and transi-tions. Still shows display higher resolution images, but they do not include any motion effects or transitions.
P H O T O D E X | ProShow Gold78
• Default Show specifies which show will open by default at Video CD playback. You can choose between Video Shows and Still Shows.
Video Standard
• TV System selects the television standard to be used on the Video CD. For a complete list of television standards, please see Chapter 25: Television Standards by Country.
Audio Format
• Audio Type specifies audio encoding format for the Video CD. For a complete list of supported file types, please see Chapter 24: Supported File Formats.
Video CD Output Options
• Anti-Flicker enables and disables the anti-flicker filter during rendering. Anti-flicker will prevent the flickering effect that appears with some images and effects due to the nature of interlaced video. This does result, however, in a small loss of sharpness. For Video CD output, this option only affects still shows and SVCD.
• Desaturation enables and disables the desatu-ration of the video to a specified percentage, preventing the colors in the video from becom-ing too extreme and resulting in an unnatural-looking video.
• Menu Type enables and disables the use of Still Menus. Still menus are a solid, still image, while the default menus are, or can be, video menus. Some players only support still menus and some only support video menus, so you have both options to choose from.
Video Clip Output Options
• Encoding Quality sets the encoding quality of video clips used in slides in your show.
Video CD Type Information
This information provides an overview of the Video CD Type selected in the drop-down menu.
Disc BurningThe Disc Burning options control all of the settings related to Video CD burning, burner selection and more.
In this window, you can do the following:
• Specify which CD writer you would like to use.
• Set the speed of the CD writer and the number of copies to be burned.
• Enable and disable inclusion of original show files.
To Access Video CD Disc Options:
1 Click Create Output > VCD Disc in the main toolbar or choose Create > Create Video CD to launch the Create Video CD window.
2 Click on the Disc Burning icon on the left side of the window.
3 Customize the settings as desired.4 Click < Create >.
C H A P T E R 1 1 | Video CD Creation 79
P A R T T W O Output in ProShow Gold
CD Writer
• Writer selects the drive that will be used to burn the CD. In addition to the available drives on your machine, you may want to write to an CUE/BIN image file, which you can import into other DVD/CD authoring programs.
Disc Options
• Speed sets the speed at which the CD is writ-ten. The default is the maximum speed for your CD burner.
• Simulate enables and disables testing the burn-ing process without wasting a disk.
Multiple Copies
• Copies specifies the number of copies of the CD to be burned.
Include Original Files
• Include original files on Video CD specifies whether or not the original files used in your show will be included on the Video CD. These files will be accessible by the user.
PC AutorunThe PC Autorun options let you add a PC executable to your Video CD. When the Video CD is loaded into
the computer, a PC executable version of the slide show will automatically play; the user does not have to have Video CD recognition software on their computer. In addition, the PC executable takes advantage of the higher resolution supported by computer displays, providing superior quality versus Video CD playback on a computer. You can adjust the following options in this window:
• Enable and disable the addition of a PC exe-cutable to your Video CD.
• Control the size of your PC executable when it launches (i.e. full screen).
• Specify the display settings for the PC execut-able.
• Configure the settings that affect the file size of the PC executable.
• Apply copy protection to the PC executable.
To Access Video CD PC Autorun Options:
1 Click Create Output > VCD Disc in the main toolbar or choose Create > Create Video CD to launch the create Video CD window.
2 Click on the PC Autorun icon on the left side of the window.
3 Customize the settings as desired.4 Click < Create >.
P H O T O D E X | ProShow Gold80
Enable PC Autorun
• Include PC Autorun on Video CD enables and disables the use of a PC executable on your Video CD.
Executable Startup
• Window Size specifies the startup size of the PC executable included on the Video CD.
• Image Size determines the largest size at which images in the show will be stored in the show file.
• Monitor specifies which monitor the show will play on when it launches.
• Loop Show enables and disables continuous show looping. A show menu will override this feature.
Quality/Performance Settings
• Rendering sets the maximum size for your show during internal rendering. This does not affect the display size of your show.
• Resizing specifies how your photos are resized before being rendered. This eliminates the need to resize your images before bringing them into ProShow Gold.
• Image Quality determines the quality setting used for image compression.
Video Output Quality
• Resolution allows you to specify the video res-olution.
• Quality sets the general quality level used to encode your video clips for the show.
Protection
• By Days limits the usage of the PC executable to a specified number of days.
• By Runs limits the usage of the PC executable to a specified number of runs.
• Registration Key allows you to specify a regis-tration key or password that will unlock the PC executable for unlimited use.
• Info URL specifies a website for the user to visit for more information about the show.
• Info Link Text specifies the text that represents the link to the Info URL.
Audio Output Quality
• Quality sets the general quality level used to encode your audio for the show.
81
C h a p t e r 1 2
P A R T T W O Output in ProShow Gold
CH
AP
TE
R 1
2 |
Vid
eo F
ile C
reat
ion
Video File Creation
Using Video File CreationThe Video File Creation options in ProShow Gold give you the ability to generate a digital video file of your show. Video files are easily integrated into other projects, applications and ProShows. With many different file formats to choose from, ProShow Gold gives you maximum control in customizing video file output.
To Create a Video File:
1 Click Save to save your show.2 Click the Create Output button in the main
toolbar.3 Click on Video File in the create output
window.4 Customize your video file using the various
settings in the Create Video File dialog.5 Click < Create >.
Video File Output FormatsThere are a number of different uses for video files, so ProShow Gold includes numerous different formats to suit your needs. The video file formats available are:
• DVD creates a video file that can be burned to a DVD using external DVD authoring software.
• HD creates a video file that can be burned to a DVD or HD disc format using external DVD authoring software.
• Video CD creates a video file that can be burned to a CD using external Video CD authoring software.
• PC creates a high-quality video file for PC play-back only.
• Custom allows you to choose from a number of customizable video files formats. See below for more information.
Custom File Formats
When you choose the Custom format, you may select from any of the following formats to create your video file.
• Flash Video is a video file that is very small in size. (FLV)
• MPEG 1 provides a video file of medium qual-ity and moderate compression. This is the for-mat used in some Video CDs. (MPG)
• MPEG 2 provides a video file with better qual-ity and compression than MPEG 1. This is the format used in DVDs and some Video CDs. (MPG)
• QuickTime provides a video file with high quality and recognition over a number of dif-ferent platforms. Requires the QuickTime Movie Player for playback. (MOV)
• Windows Media is the Windows proprietary video format that provides quality comparable to MPEG 2, often with a smaller file size. (WMV)
P H O T O D E X | ProShow Gold82
Video File Options Video Format Preset
• Type specifies the type of video file to be ren-dered. There are five preset formats and a cus-tom format, which is configured in the Format Settings options.
• Quality sets the quality level for rendering the video. The available quality settings vary depending on which Type of video output you choose.
• TV System selects the television standard to be used on the video file. For a complete list of television standards, please see Chapter 25: Television Standards by Country.
Format Settings Options
• Format allows you to choose from the avail-able video encoding formats when Custom is selected.
• Compression specifies the compression rate for the video. The available compression type var-ies depending on which video encoding For-mat you choose.
• Settings specifies compression settings for available file types. For MPEG 1 and 2 and Flash output, you can specify custom settings. For the other output formats under custom, the settings are dependent on the codecs currently installed on your machine.
• Resolution sets the actual dimensions, in pix-els, of your video file.
• Frame Rate determines the number of frames per second used in the video.
• Audio enables and disables audio in your video.
Display
• Aspect Ratio specifies the aspect ratio for the video. The 1:1 setting is for PC playback only, the 4:3 setting is the standard for fullscreen television and computer displays and the 16:9 setting produces a widescreen display for both PC and television playback. Use caution when changing this setting as it may result in image distortion. It is recommended that you set the aspect ratio in Slide Options before you begin creating your show.
• Encoding sets the encoding quality used to cre-ate the video.
• Color Profile determines which color profile is to be used when rendering the video.
• Desaturate images to enables the desaturation of the video, preventing the colors in the video from becoming too extreme and resulting in an unnatural-looking video.
• Apply anti-flicker to this video enables and disables the anti-flicker filter during video ren-dering.
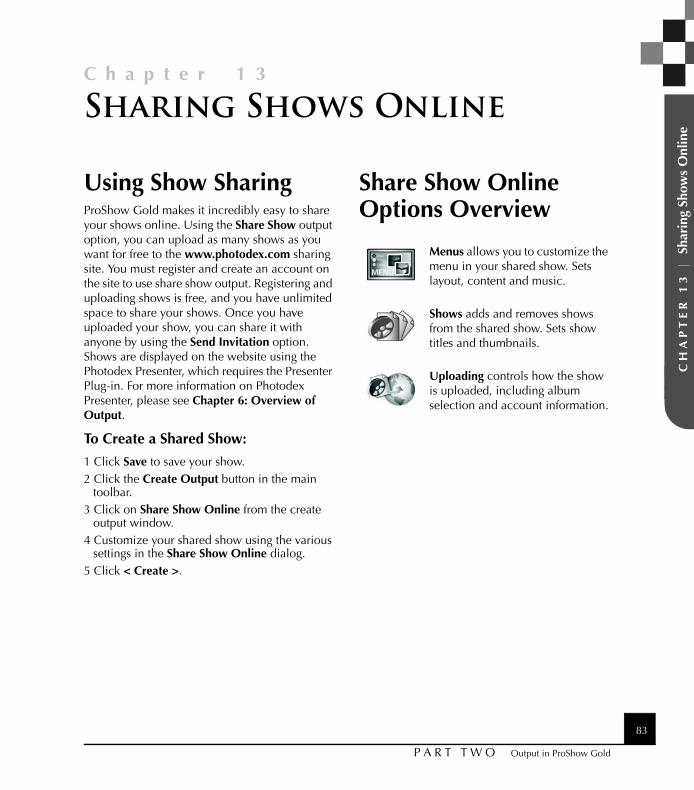
83
C h a p t e r 1 3
P A R T T W O Output in ProShow Gold
CH
AP
TE
R 1
3 |
Sha
ring
Sho
ws
Onl
ine
Sharing Shows Online
Using Show SharingProShow Gold makes it incredibly easy to share your shows online. Using the Share Show output option, you can upload as many shows as you want for free to the www.photodex.com sharing site. You must register and create an account on the site to use share show output. Registering and uploading shows is free, and you have unlimited space to share your shows. Once you have uploaded your show, you can share it with anyone by using the Send Invitation option. Shows are displayed on the website using the Photodex Presenter, which requires the Presenter Plug-in. For more information on Photodex Presenter, please see Chapter 6: Overview of Output.
To Create a Shared Show:
1 Click Save to save your show.2 Click the Create Output button in the main
toolbar.3 Click on Share Show Online from the create
output window.4 Customize your shared show using the various
settings in the Share Show Online dialog.5 Click < Create >.
Share Show Online Options Overview
Menus allows you to customize the menu in your shared show. Sets layout, content and music.
Shows adds and removes shows from the shared show. Sets show titles and thumbnails.
Uploading controls how the show is uploaded, including album selection and account information.
P H O T O D E X | ProShow Gold84
MenusFrom the Menu options window, you can control all aspects of your shared show menu. The Menu
options control the theme and layout, as well as additional customizations.
To Access Share Show Menu Options:
1 Click Create Output > Share Show Online in the main toolbar or go to Create > Share Show Online to launch the share show online window.
2 Click on the Menus icon on the left side of the window.
3 Customize the settings as desired.4 Click < Create >.
Menu Themes and Layouts
• Theme selects which category of themes to dis-play in the theme list.
• Layout displays various layouts for how shows are displayed on a menu page.
• Load Menu loads a saved menu.
• Save Menu saves the current theme and layout for future use.
Customize Menu
• Customize launches the Customize Menu win-dow, which contains additional authoring capabilities. For more information, please see Chapter 7: Customizing Menus.
Menu Settings
• Title specifies the main title for the menu.
• Aspect specifies the aspect ratio for the show, which is dependent on how the show will be viewed.
• Thumbnails allows you to set a video loop of a show as a thumbnail.
ShowsThis category of the options lets you add shows and video clips to your shared show. Since you can
combine any number of shows and videos in your shared show, you will need to use the Shows window to manage them. Remember, the number of shows that you can add to a shared show is virtually unlimited, but each additional show will increase the amount of time it takes to upload. Among other things, you can do the following from the Shows options:
• Add and remove shows from your shared show.
• Change the order of shows in your shared show.
• Set the title for each show appearing on your menu.
• Select a thumbnail for each show appearing on your menu.
• Enable and disable an intro show that will play before the menu.
• Specify which intro show to add to your shared show.
C H A P T E R 1 3 | Sharing Shows Online 85
P A R T T W O Output in ProShow Gold
To Access Shared Show Options:
1 Click Create Output > Share Show Online in the main toolbar or choose Create > Share Show Online to launch the share show online window.
2 Click on the Shows icon on the left side of the window.
3 Customize the settings as desired.4 Click < Create >.
Included Shows
• Add adds a new show to the shared show. When clicked, you will be prompted to select a saved show to add to the shared show.
• Del removes the selected show from the shared show.
• Up moves the selected show up the list, plac-ing it before other shows in the menu.
• Down moves the selected show down the list, placing it after other shows in the menu.
Selected Show
This area previews the selected show thumbnail, along with information about the show.
• Set Menu Title sets a new title for the selected show.
• Set Menu Thumbnail selects an image or video that will represent the selected show in the shared show menu.
Include Intro Show
The intro show plays before the show menu appears.
• Include Intro Show enables and disables the intro show. This box is checked by default.
• Select Show specifies which show will be used for the intro show.
UploadingThe Uploading options for share show online let you specify which account you would like to use to
upload your photos to the Photodex website (www.photodex.com/sharing). You can complete the following tasks in Uploading options:
• Specify which account to use to upload shared shows.
• Select an album where your shared shows will be stored.
• Apply special tags to a shared show.
To Access Share Show Online Uploading Options:
1 Click Create Output > Share Show Online in the main toolbar or choose Create > Share Show Online to launch the Share Show Online window.
2 Click on the Uploading icon on the left side of the window.
3 Customize the settings as desired.4 Click < Create >.
P H O T O D E X | ProShow Gold86
Show Sharing Service
• Upload To specifies which online sharing ser-vice to use to upload shared shows.
• View Website opens a web browser displaying the selected sharing site.
Account Information
• Member Name specifies the member name for your online sharing account.
• Password specifies the password for your online sharing account.
• View Albums launches a web browser display-ing your account and online show collection.
• Create Account launches a web browser dis-playing the selected online sharing service so that you can set up an account.
Album Selection
• Album lists the available albums in your online sharing account. Select one of these albums as the destination for your shared show.
• Show Caption specifies the caption for your shared show as it will appear on the sharing site.
Uploading Options
• Mature Content indicates whether or not the show includes content that may not be suitable for all audiences. For information on the rules related to sharing mature content, please refer to the membership agreement for the sharing service that you are using.
• Privacy makes your show visible only to you. Guests who visit your albums will not be able to view this show.
87
C h a p t e r 1 4
P A R T T W O Output in ProShow Gold
CH
AP
TE
R 1
4 |
Web
Sho
w C
reat
ion
Web Show Creation
Using Web Show CreationA web show is a streaming show that plays over the Internet from your own website. ProShow Gold automatically generates the HTML code along with the show so that you can easily add it to your website. Shows are displayed on a website using the Photodex Presenter, which requires the Presenter plug-in. For more information on Photodex Presenter, please see Chapter 6: Overview of Output.
To Create a Web Show:
1 Click Save to save your show.2 Click the Create Output button in the main
toolbar.3 Click Web Show from the create output
window.4 Customize your web show using the various
category options in the Create Web Show dialog.
5 Click < Create >.
Web Show Options Overview
Menus customizes the menu that appears on your web show. Sets layout, content and music.
Shows adds and removes shows from the web show. Sets show titles and thumbnails.
Output Options controls options for web show playback size, rendering options and protection.
P H O T O D E X | ProShow Gold88
MenusFrom the Menu options window, you can control all aspects of your web show menu. Menu options
control the theme and layout, as well as additional customizations.
To Access Web Show Menu Options:
1 Click Create Ouput > Web Show in the main toolbar or go to Create > Create Web Show to launch the create web show window.
2 Click on the Menus icon on the left side of the window.
3 Customize the settings as desired.4 Click < Create >.
Menu Themes and Layouts
• Theme selects which category of themes to dis-play in the theme list.
• Layout displays various layouts for how shows are displayed on a menu page.
• Load Menu loads a saved menu.
• Save Menu saves the current theme and layout for future use.
Customize Menu
• Customize launches the Customize Menu win-dow, which contains additional authoring capabilities. For more information, please see Chapter 7: Customizing Menus.
Menu Settings
• Title specifies the main title for the menu.
• Aspect specifies the aspect ratio for the show, which is dependent on how the show will be viewed.
• Thumbnails allows you to set a video loop of a show as a thumbnail.
ShowsThis category of the menu options lets you add shows and video clips to your web show. Since you can
combine any number of shows and videos in your web show, you will need to use the Shows window to manage them. Remember, the number of shows that you can add to a web show is virtually unlimited, but each additional show will increase the size of your overall upload. Among other things, you can do the following from the Shows options:
• Add and remove shows on your web show.
• Change the order of shows on your web show.
• Set the title for each show appearing on your menu.
• Select a thumbnail for each show appearing on your menu.
• Enable and disable an intro show that will play before the menu.
• Specify which intro show to add to your web show.
C H A P T E R 1 4 | Web Show Creation 89
P A R T T W O Output in ProShow Gold
To Access Web Show Options:
1 Click Create Ouput > Web Show in the main toolbar or go to Create > Create Web Show to launch the create web show window.
2 Click on the Shows icon on the left side of the window.
3 Customize the settings as desired.4 Click < Create >.
Included Shows
• Add adds a new show to the web show. When clicked, you will be prompted to select a saved show to add to the web show.
• Del removes the selected show from the web show.
• Up moves the selected show up the list, plac-ing it before other shows in the menu.
• Down moves the selected show down the list, placing it after other shows in the menu.
Selected Show
This area previews the selected show thumbnail, along with information about the show.
• Set Menu Title sets a new title for the selected show.
• Set Menu Thumbnail selects an image or video that will represent the selected show in the web show menu.
Include Intro Show
The Intro Show plays before the menu appears.
• Include Intro Show enables and disables the Intro Show. This box is checked by default.
• Select Show specifies which show will be used for the Intro Show.
Output OptionsThe Output Options controls settings related to generating the web show, including playback size,
rendering options and protection. In this window, you can do the following:
• Select the default size of your web show.
• Specify web show quality options.
• Control settings that affect the file size of your show stream.
• Apply protection to your show.
To Access Web Show Output Options:
1 Click Create Ouput > Web Show in the main toolbar or go to Create > Create Web Show to launch the create web show window.
2 Click on the Output Options icon on the left side of the window.
3 Customize the settings as desired.4 Click < Create >.
Web Show Playback
• Display Size specifies the size of the show in pixels. This is used for generating the sample HTML for your website.
• Image Size determines the largest size at which images in the show will be displayed during playback.
• Loop Show enables and disables continuous show looping.

P H O T O D E X | ProShow Gold90
Quality / Performance Settings
• Rendering sets the maximum size for your show during internal rendering. This does not affect the display size of your show.
• Resizing specifies how your photos are resized before being rendered. This eliminates the need to resize your images before bringing them into ProShow Gold.
• Image Quality determines the quality setting used for image compression.
Video Output Quality
• Resolution allows you to specify the video res-olution.
• Quality sets the general quality level used to encode your video clips for the show.
Audio Output Quality
• Quality sets the general quality level used to encode audio for the show.
Protection
• By Days limits the usage of the web show to a specified number of days.
• By Runs limits the usage of the web show to a specified number of runs.
• Registration Key allows you to specify a regis-tration key or password that will unlock the web show for unlimited use.
• Info URL specifies a website for the user to visit for more information about the show.
• Info Link Text specifies the text that represents the link to the Info URL.
Web Page Options
• Create HTML generates the HTML code used to create a web page with your show on it. Click the box next to Create web page to enable this feature.
• Open launches the web page once the code is generated and rendering is complete. Create web page must be checked in order to check the box next to View when complete.
• View HTML launches an HTML viewer so that you can see the code for the web page that has been created. Check the box next to Open HTML viewer to activate this option.
Placing Shows on Your WebsiteThe create web show feature in ProShow Gold lets you create a streaming web show that you can add to your own web site. You also have the options to generate a complete web page to add to your website. To use these features, you will need the following:
• Your own website,
• Access to your server to upload files, and
• Ability to write and edit HTML.
ProShow Gold’s web shows are in PX format, a streaming format for slide shows. The shows are played using the Presenter Web plug-in, which plays your shows inside a web page. Presenter must be installed, the HTML on your page must be properly configured and the web show must be uploaded to your web server for it to play properly.
C H A P T E R 1 4 | Web Show Creation 91
P A R T T W O Output in ProShow Gold
Adding a web show to a web page requires adding a few lines of custom HTML and JavaScript code. You must be familiar with these technologies to use a web show. If you are using a visual editor to create your website, you must be able to edit the source code of your web page directly. You cannot use the visual editing features in those programs to add a web show.
To Add a Web Show to Your Website:
1 Click < View HTML > in the Create Web Show dialog to generate the code.
2 Create the PX file by clicking Create in the Create Web Show dialog.
3 Upload the PX files to your web server using FTP.
4 Add the HTML and JavaScript code to your web page. Edit the HTML code as necessary.
To Add a Created Page to your Website:
1 In the Create Web Show dialog, click the Output Options icon.
2 In the Web Page Options section, check the box next to Create Web Page.
3 Click < Create >.4 The file containing the new web page will be
saved to the same folder as your web show.5 Upload the PX file and the generated web page
to your web server using FTP. Edit the HTML code as necessary.
Be sure to read the following “Adding Code to Your Web Page” section for complete information on adding generated HTML code to your web page.
Options and InformationUploading the PX File
When creating a web show in ProShow Gold, your output file is a PX file containing streaming web show data. In order to play this show on the web, you must copy this file to your web server. To do this, you must FTP the show to your server in binary format. Consult the documentation for your FTP program if you do not know how to do this.
Be sure that you upload the PX file to the correct folder. Every website has a different structure, so you must know the correct folder to upload to. The folder you choose determines the URL for your show and it may affect the HTML code that must be added to your website.
Adding Code to Your Web Page
You must manually add some specific code to your page in order to use your PX file. The following sample code is broken down, line by line, to explain what it does in your web page.
Sample Code
<script language="javascript" src="http://www.photodex.com/presenter.js"></script>
<script>
PhotodexObject("ProShow","[object name]","[URL to PX file]",[width],[height]);
PresenterControls("[object name]", [width]);
</script>
P H O T O D E X | ProShow Gold92
• Line 1 includes the ‘presenter.js’ script library from the Photodex server, which contains the routines that embed your show in the page and enables show controls.
• Line 2 begins a new JavaScript block.
• Line 3 calls the PhotodexObject function, which embeds your show. This function is passed several parameters. ProShow is the type of object being included. In this case, a ProShow slide show. Object name is the unique name of your object. You cannot use the same object name twice on one page. URL to PX file is the link to the web show PX file that you uploaded to your server (i.e. http://www.yourserver.com/slideshow.px). Width and Height are the dimensions at which you want to display the show on your web page.
• Line 4 calls the PresenterControls function to add the control bar below your show. This function is passed two parameters. Object name is the unique name of your object speci-fied in Line 3. This tells the controls which object they are controlling. Width sets the width of the control bar, usually identical to your show width designated in Line 3.
• Line 5 closes the JavaScript block and ends the section of included code.
You have the options of writing this code yourself or using the View HTML feature in web show creation. Click < View HTML > to view the code.
Troubleshooting Web Shows
If your web show is not working on your web page, try some of the following tests to see if you have uploaded and embedded the show correctly.
• Make sure your PX show is where you think it is. Type the URL for the PX file in your web browser. It should prompt you to save the file. If not, you have the wrong URL for your web show. Correct the URL in the Line 3.
• Make sure your web server can deliver PX files. Some web servers are configured to reject unrecognized file types. Consult your server administrator for more information. Remember, your server must be able to deliver PX files as binary octet streams.
• Make sure that the Presenter Web Plug-In is properly installed and functioning. Test this by viewing any shows on the Photodex website (www.photodex.com).
93
C h a p t e r 1 5
P A R T T W O Output in ProShow Gold
CH
AP
TE
R 1
5 |
Fla
sh C
reat
ion
Flash Creation
Using Flash CreationYou can easily output your slide shows to Flash with ProShow Gold. Flash video is a mainstay of web development that was previously inaccessible to the general public due to a steep learning curve. ProShow Gold flattens this learning, allowing you to create Flash videos with zero Flash experience. Choose Flash video (FLV) playback to create output for your web page.
Since the Flash format is low quality, it is recommended that you offer both a Flash version and a PX file (Photodex Stream File) version of your show. This give the audience the choice between the low-quality Flash version of your show and a high-quality version that can be viewed using the Photodex Presenter. For more information on Photodex Presenter, please see Chapter 6: Overview of Output.
To create a Flash Show:
1 Click Save to save your show.2 Click the Create Output button in the main
toolbar.3 Click on Flash from the create output window.4 Customize your Flash show using the various
category options in the Create Flash Show dialog.
5 Click < Create >.
Flash Show Options Overview
Menus allows you to customize the menu in your Flash show. Specifies theme, layout, content and music.
Shows adds and removes shows from the Flash show. Sets show titles and thumbnails.
Output Options controls options for the Flash show playback size, rendering options and protection.
P H O T O D E X | ProShow Gold94
MenusFrom the Menus window, you can control all aspects of your Flash show menu. The Menu options
control the theme and layout, as well as additional customizations.
To Access Flash Menu Options:
1 Click Create Ouput > Flash in the main toolbar or go to Create > Create Flash Show to launch the create Flash show window.
2 Click on the Menus icon on the left side of the window.
3 Customize the settings as desired.4 Click < Create >.
Menu Themes and Layouts
• Theme selects which category of themes to dis-play in the theme list.
• Layout displays various layouts for how shows are displayed on a menu page.
• Load Menu loads a saved menu.
• Save Menu saves the current theme and layout for future use.
Menu Settings
• Title specifies the main title for the menu.
• Aspect specifies the aspect ratio for the show, which is dependent on how the show will be viewed.
Customize Menu
• Customize launches the Customize Menu win-dow, which contains additional authoring capabilities. For more information, please see Chapter 7: Customizing Menus.
ShowsThis category of the options lets you add shows and video clips to your Flash show. Since you can combine
any number of shows and videos in your Flash show, you will need to use the Shows window to manage them. Remember, the number of shows that you can add to a Flash show is virtually unlimited, but each additional show will increase the size of your file. Among other things, you can do the following from the Shows options:
• Add and remove shows on your Flash show.
• Change the order of shows on your Flash show.
• Set the title for each show appearing on your menu.
• Select a thumbnail for each show appearing on your menu.
• Enable and disable an intro show that will play before the menu.
• Specify which intro show to add to your Flash show.

C H A P T E R 1 5 | Flash Creation 95
P A R T T W O Output in ProShow Gold
To Access Flash Show Options:
1 Click Create Ouput > Flash in the main toolbar or go to Create > Create Flash Show to launch the create Flash show window.
2 Click on the Shows icon on the left side of the window.
3 Customize the settings as desired.4 Click < Create >.
Included Shows
• Add adds a new show to the Flash show. When clicked, you will be prompted to select a saved show to add to the Flash show.
• Del removes the selected show from the Flash show.
• Up moves the selected show up the list, plac-ing it before other shows in the menu.
• Down moves the selected show down the list, placing it after other shows in the menu.
Selected Show
This area previews the selected show thumbnail, along with information about the show.
• Set Menu Title sets a new title for the selected show.
• Set Menu Thumbnail selects an image or video that will represent the selected show in the Flash show menu.
Include Intro Show
The Intro Show plays before the menu appears.
• Include Intro Show enables and disables the Intro Show. This box is checked by default.
• Select Show specifies which show will be used for the intro show.
Output OptionsThe Output Options controls options for generating the Flash show, including playback size,
rendering options and protection. In this window, you can do the following:
• Specify Flash show quality options.
• Change the bitrate settings for your Flash show.
• Generate the HTML needed to put your Flash show on a webpage.
To Access Flash Show Output Options:
1 Click Create Ouput > Flash in the main toolbar or go to Create > Create Flash Show to launch the create Flash show window.
2 Click on the Output Options icon on the left side of the window.
3 Customize the settings as desired.4 Click < Create >.
Output Options
• Resolution specifies the resolution for the Flash show.
• Frame Rate specifies the number of frames per second to be displayed in your Flash show.
• Loop Show allows you to set the show to repeat when no menu has been added to the show.
P H O T O D E X | ProShow Gold96
Video Options (FLV)
• Video Bitrate controls the size and quality of the output.
Video Player Options (FLV)
• Show Controls enables and disables the appearance of show controls in your Flash show.
Web Page Options
• Create HTML generates the HTML code used to create a web page with your show on it. Click the box next to Create web page to enable this feature.
• Open launches the web page once the code is generated and rendering is complete. Create web page must be checked in order to check the box next to View when complete.
• View HTML launches an HTML viewer so that you can see the code for the web page that has been created. Check the box next to Open HTML viewer to activate this option.
Placing Shows on Your WebsiteThe create Flash feature in ProShow Gold lets you create a streaming Flash movie that you can add to your own web site. You also have the options to generate a complete web page to add to your website. To use these features, you will need the following:
• Your own website,
• Access to your server to upload files, and
• Ability to write and edit HTML.
The HTML on your page must be properly configured and the Flash show must be uploaded to your web server for it to play properly.
Adding a Flash show to a web page requires adding a few lines of custom HTML and JavaScript code. You must be familiar with these technologies to use a Flash show. If you are using a visual editor to create your website, you must be able to edit the source code of your web page directly. You cannot use the visual editing features in those programs to add a Flash show.
To Add a Web Show to Your Website:
1 Create the Flash show by clicking Create in the Create Flash Show dialog.
2 Upload the Flash show to your web server using FTP.
3 Click < View HTML > in the Create Flash Show dialog to generate the code.
4 Add the HTML and JavaScript code to your web page. Edit the HTML code as necessary.
To Add a Created Page to your Website:
1 In the Create Flash dialog, click the Output Options icon.
2 In the Flash Options section, check the box next to Create Web Page.
3 Click < Create >.4 The file containing the new web page will be
saved to the same folder as your web show.5 Upload the Flash show and the generated web
page to your web server using FTP. Edit the HTML code as necessary.

97
C h a p t e r 1 6
P A R T T W O Output in ProShow Gold
CH
AP
TE
R 1
6 |
E-m
ailin
g Sh
ows
E-mailing Shows
Using the E-mail Show FeatureE-mailing slide shows has never been easier! When you select the E-mail show feature, Gold automatically creates an executable of your show that you can e-mail to anyone from within the program. Before you e-mail a show, be sure to configure your e-mail settings as described in Chapter 2: The Work Area.
To E-mail a Show:
1 Click Save to save your show.2 Click the Create Ouput button in the main
toolbar.3 Click on E-Mail Executable in the create output
window.4 Customize the PC executable of your show
using the various category options in the E-Mail Show dialog.
5 Click < Create >.
E-Mail Show Options Overview
Menus allows you to customize the menu on the PC executable. Sets layout, content and music.
Shows adds and removes shows from the PC executable. Sets show titles and thumbnails.
Output Options controls options for quality level, Video Standard selection and video options.

P H O T O D E X | ProShow Gold98
MenusFrom the Menu options window, you can control all aspects of your PC executable menu. The Menu
options control the theme and layout, as well as additional customizations.
To Access E-Mail Shows Menu Options:
1 Click Create Output > E-Mail Executable in the main toolbar or go to Create > Send as E-Mail to launch the e-mail show window.
2 Click on the Menus icon on the left side of the window.
3 Customize the settings as desired.4 Click < Create >.
Menu Themes and Layouts
• Theme selects which category of themes to dis-play in the theme list.
• Layout displays various layouts for how shows are displayed on a menu page.
• Load Menu loads a saved menu.
• Save Menu saves the current theme and layout for future use.
Customize Menu
• Customize launches the Customize Menu win-dow, which contains additional authoring capabilities. For more information, please see Chapter 7: Customizing Menus.
Menu Settings
• Title specifies the main title for the menu.
• Aspect specifies the aspect ratio for the show, which is dependent on how the show will be viewed.
• Thumbnails allows you to set a video loop of a show as a thumbnail.
ShowsThis category of the options lets you add shows and video clips to your PC executable. Since you can
combine any number of shows and videos in your PC executable, you will need to use the Shows window to manage them. Remember, the number of shows that you can e-mail depends on the size of the destination e-mail server and user account. Among other things, you can do the following from the Shows options:
• Add and remove shows on your PC execut-able.
• Change the order of shows on your PC execut-able.
• Set the title for each show appearing on your menu.
• Select a thumbnail for each show appearing on your menu.
• Enable and disable an intro show that will play before the menu.
• Specify which intro show to add to your PC executable.
C H A P T E R 1 6 | E-mailing Shows 99
P A R T T W O Output in ProShow Gold
To Access E-Mail Show Options:
1 Click Create Output > E-Mail Executable in the main toolbar or go to Create > Send as E-Mail to launch the e-mail show window.
2 Click on the Shows icon on the left side of the window.
3 Customize the settings as desired.4 Click < Create >.
Included Shows
• Add adds a new show to the PC executable. When clicked, you will be prompted to select a saved show to add to the PC executable.
• Del removes the selected show from the PC executable.
• Up moves the selected show up the list, plac-ing it before other shows in the slide.
• Down moves the selected show down the list, placing it under other layers in the slide.
Selected Show
This area previews the selected show thumbnail, along with information about the show.
• Set Menu Title sets a new title for the selected show.
• Set Menu Thumbnail selects an image or video that will represent the selected show in the PC executable menu.
Include Intro Show
The intro show plays before the menu appears.
• Include Intro Show enables and disables the intro show. This box is checked by default.
• Select Show specifies which show will be used for the intro show.
Output OptionsThe Output Options window controls options for generating the PC executable for E-mail Show
output, including playback size, rendering options and protection. In this window, you can do the following:
• Select the default size of your PC executable.
• Specify PC executable quality options.
• Control settings that affect the file size of your show stream.
• Apply protection to your show.
To Access E-Mail Output Options:
1 Click Create Output > E-Mail Executable in the main toolbar or go to Create > Send as E-Mail to launch the e-mail show window.
2 Click on the Output Options icon on the left side of the window.
3 Customize the settings as desired.4 Click < Create >.
Executable Startup
• Window Size specifies the startup size of the PC executable to be e-mailed.
• Image Size determines the largest size at which images in the show will be stored in the show file.
• Monitor specifies which monitor the show will play on when it launches.
• Loop Show enables and disables continuous show looping. A show menu will override this feature.
P H O T O D E X | ProShow Gold100
Quality / Performance Settings
• Rendering sets the maximum size for your show during internal rendering. This does not affect the display size of your show.
• Resizing specifies how your photos are resized before being rendered. This eliminates the need to resize your images before bringing them into ProShow Gold.
• Image Quality determines the quality setting used for image compression.
Video Output Quality
• Resolution allows you to specify the video res-olution of video clips used in slides in your show.
• Quality sets the general quality level used to encode the video clips used in slides in your show.
Audio Output Quality
• Quality sets the general quality level used to encode your audio for the show.
Protection
• By Days limits the usage of the PC executable to a specified number of days.
• By Runs limits the usage of the PC executable to a specified number of runs.
• Registration Key allows you to specify a regis-tration key or password that will unlock the PC executable for unlimited use.
• Info URL specifies a website for the user to visit for more information about the show.
• Info Link Text specifies the text that represents the link to the Info URL.
Composing Your E-MailWhen you click the create button in the e-mail show window, ProShow Gold will create the PC executable and launch the e-mail composition window. Be sure to configure your e-mail preferences before you choose e-mail show as your output option. You can complete the following tasks from this window:
• Specify who will receive the e-mail.
• Specify the e-mail address used to send the e-mail.
• Compose the subject and text of your e-mail.
• Change the encoding method of the e-mail.
• Send your e-mail message.
To Compose Your E-Mail:
1 Click < Create > in the e-mail show window and wait for the composition window to appear.
2 Enter the recipient’s e-mail address in the To: field.
3 Complete the CC, BCC, From and Subject fields as desired.
4 Enter your e-mail message in the space provided.
5 Click < Send > to send you message.
Message
• Address Book Icons opens the Windows address book so that you can add e-mail addresses to your message. This address book is a standard feature included in Windows.
• To specifies the e-mail address of your intended recipient(s). The address will be visi-ble to everyone who views the e-mail.
C H A P T E R 1 6 | E-mailing Shows 101
P A R T T W O Output in ProShow Gold
• CC (Carbon Copy) sets the e-mail address of additional intended recipient(s). The address will be visible to everyone who views the e-mail.
• BCC (Blind Carbon Copy) specifies the e-mail address of additional intended recipient(s). The address will be not be visible to everyone who views the e-mail.
• From sets the sender’s (your) e-mail address. The address will be visible to everyone who views the e-mail.
• Subject specifies the subject of your e-mail.
• Message specifies the text of your e-mail.
Encoding Method
• Encoding Method determines how the mes-sage is encoded for delivery. ProShow Gold defaults to Base64, the most common encod-ing format. This option does not affect your show in any way, it only affects the way that the message is e-mailed. You should not change this setting unless you have a specific need to do so.

P H O T O D E X | ProShow Gold102
103
C h a p t e r 1 7
P A R T T W O Output in ProShow Gold
CH
AP
TE
R 1
7 |
Aut
orun
CD
Cre
atio
n
Autorun CD Creation
Using Autorun CD CreationIn ProShow Gold, you can easily create an autorun CD in order to view your shows on a PC. autorun CDs are burned to a CD-R or CD-RW, and they are configured to play automatically. Any PC user can play an autorun CD back on their PC with no additional software.
To Create an Autorun CD:
1 Click Save to save your show.2 Click the Create Output button in the main
toolbar.3 Click on Autorun CD in the create output
window.4 Customize your autorun CD using the various
category options in the Create Autorun CD dialog.
5 Click < Create >.
Autorun CD Options Overview
Menus allows you to customize the menu that appears on your CD. Sets theme, layout, and music.
Shows adds and removes shows from the autorun CD. Sets show titles and thumbnails.
Output Options controls output quality, Video Standard selection and video options.
Disc Burning contains options for writing to a disc. Sets speed, CD drive and number of copies.
P H O T O D E X | ProShow Gold104
MenusFrom the Menu options, you can control all aspects of your autorun CD menu. The Menu options
control the theme and layout, as well as additional customizations.
To Access Autorun CD Menu Options:
1 Click Create Output > Autorun CD in the main toolbar or choose Create > Create Autorun CD to launch the create autorun CD window.
2 Click on the Menus icon on the left side of the window.
3 Customize the settings as desired.4 Click < Create >.
Menu Themes and Layouts
• Theme selects which category of themes to dis-play in the theme list.
• Layout displays various layouts for how shows are displayed on a menu page.
• Load Menu loads a saved menu.
• Save Menu saves the current theme and layout for future use.
Menu Settings
• Title specifies the main title for the menu.
• Aspect specifies the aspect ratio for the show, which is dependent on how the show will be viewed.
• Thumbnails allows you to set video loops of a show as a thumbnail.
Customize Menu
• Customize launches the Customize Menu win-dow, which contains additional authoring capabilities. For more information, please see Chapter 7: Customizing Menus.
ShowsThis category of the options lets you add shows and video clips to your autorun CD. Since you can combine
any number of shows and videos in your autorun CD, you will need to use the Shows window to manage them. Remember, the number of shows that you can add to an autorun CD is determined by the length of the shows. Among other things, you can do the following from the Shows options:
• Add and remove shows on your autorun CD.
• Change the order of shows on your autorun CD.
• Set the title for each show appearing on your menu.
• Select a thumbnail for each show appearing on your menu.
• Enable and disable an intro show that will play before the menu.
• Specify which intro show to add to your auto-run CD.
C H A P T E R 1 7 | Autorun CD Creation 105
P A R T T W O Output in ProShow Gold
To Access Autorun CD Show Options:
1 Click Create Output > Autorun CD in the main toolbar or choose Create > Create Autorun CD to launch the create autorun CD window.
2 Click on the Shows icon on the left side of the window.
3 Customize the settings as desired.4 Click < Create >.
Included Shows
• Add adds a new show to the autorun CD. When clicked, you will be prompted to select a saved show to add to the autorun CD.
• Del removes the selected show from the auto-run CD.
• Up moves the selected show up the list, plac-ing it before other shows in the menu.
• Down moves the selected show down the list, placing it after other shows in the menu.
Selected Show
This area previews the selected show thumbnail, along with information about the show.
• Set Menu Title sets a new title for the selected show.
• Set Menu Thumbnail selects an image or video that will represent the selected show in the autorun CD menu.
Include Intro Show
The intro show plays before the autorun CD menu appears.
• Include Intro Show enables and disables the intro show. This box is checked by default.
• Select Show specifies which show will be used for the intro show.
Output OptionsThe Output Options controls all of the settings related to autorun CD format, burner selection and more.
In this window, you can do the following:
• Control the size of your autorun CD show when it launches (i.e. full screen).
• Specify the display settings for the autorun CD show.
• Configure the settings that affect the files size of the autorun CD show.
• Apply copy protection to the autorun CD.
To Access Autorun CD Output Options:
1 Click Create Output > Autorun CD in the main toolbar or choose Create > Create Autorun CD to launch the create autorun CD window.
2 Click on the Output Options icon on the left side of the window.
3 Customize the settings as desired.4 Click < Create >.
P H O T O D E X | ProShow Gold106
Executable Startup
• Window Size specifies the startup size of the shows included on the autorun CD.
• Image Size determines the largest size at which images in the show will be stored in the show file.
• Monitor specifies which monitor the show will play on when it launches.
• Loop Show enables and disables continuous show looping. A show menu will override this feature.
Quality/Performance Settings
• Rendering sets the maximum size for your show during internal rendering. This does not affect the display size of your show.
• Resizing specifies how your photos are resized before being rendered. This eliminates the need to resize your images before bringing them into ProShow Gold.
• Image Quality determines the quality setting used for image compression.
Video Output Quality
• Resolution allows you to specify the video res-olution of video clips used in slides in your show.
• Quality sets the general quality level used to encode the video clips used in slides in your show.
Audio Output Quality
• Quality sets the general quality level used to encode your audio for the show.
Protection
• By Days limits the usage of the autorun CD to a specified number of days.
• By Runs limits the usage of the autorun CD to a specified number of runs.
• Registration Key allows you to specify a regis-tration key or password that will unlock the autorun CD for unlimited use.
• Info URL specifies a website for the user to visit for more information about the show.
• Info Link Text specifies the text that represents the link to the Info URL.
Disc BurningThe Disc Burning options control all of the settings related to autorun CD burning, burner selection and more.
In this window, you can do the following:
• Specify which CD writer you would like to use.
• Set the speed of the CD writer and the number of copies to be burned.
• Enable and disable inclusion of original show files.
C H A P T E R 1 7 | Autorun CD Creation 107
P A R T T W O Output in ProShow Gold
To Access Autorun CD Disc Options:
1 Click Create Output > Autorun CD in the main toolbar or choose Create > Create Autorun CD to launch the create autorun CD window.
2 Click on the Disc Burning icon on the left side of the window.
3 Customize the settings as desired.4 Click < Create >.
CD Writer
• Writer selects the drive that will be used to burn the autorun CD. In addition to the avail-able drives on your machine, you may want to write to an ISO image file, which you can import into other DVD/CD authoring pro-grams.
Disc Options
• Speed sets the speed at which the CD is writ-ten. The default is the maximum speed for your CD burner.
• Simulate enables and disables testing the burn-ing process without wasting a disk.
Multiple Copies
• Copies specifies the number of copies of the autorun CD to be burned.
Include Original Files
• Include original files on Autorun CD specifies whether or not the original files used in your show will be included on the autorun CD. These files will be accessible by the user.

P H O T O D E X | ProShow Gold108
109
C h a p t e r 1 8
P A R T T W O Output in ProShow Gold
CH
AP
TE
R 1
8 |
Exe
cuta
ble
Cre
atio
n
Executable Creation
Using Executable CreationAn executable is a standalone slide show that runs on any Windows PC. ProShow Gold includes all of the information needed for playback; no additional software is required. Ease of playback makes the executable output a widely-used format for sharing shows.
To Create an Executable:
1 Click Save to save your show.2 Click the Create Output button in the main
toolbar.3 Click on PC Executable from the create output
window.4 Customize your Executable using the various
category options in the Create Executable dialog.
5 Click < Create >.
Executable Options Overview
Menus allows you to customize the menu on your executable. Sets theme, layout, content and music.
Shows adds and removes shows from the executable. Sets show titles and thumbnails.
Output Options controls how the executable is created, including default settings.
P H O T O D E X | ProShow Gold110
MenusFrom the Menu options window, you can control all aspects of your executable menu. The Menu
options control the theme and layout, as well as additional customizations.
To Access Executable Menu Options:
1 Click Create Output > Executable in the main toolbar or choose Create > Create Executable to launch the executable window.
2 Click on the Menus icon on the left side of the window.
3 Customize the settings as desired.4 Click < Create >.
Menu Themes and Layouts
• Theme selects which category of themes to dis-play in the theme list.
• Layout displays various layouts for how shows are displayed on a menu page.
• Load Menu loads a saved menu.
• Save Menu saves the current theme and layout for future use.
Menu Settings
• Title specifies the main title for the menu.
• Aspect specifies the aspect ratio for the show, which is dependent on how the show will be viewed.
• Thumbnails allows you to set a video loop of a show as a thumbnail.
Customize Menu
• Customize launches the Customize Menu win-dow, which contains additional authoring capabilities. For more information, please see Chapter 7: Customizing Menus.
ShowsThis category of the options lets you add shows and video clips to your executable. Since you can combine
any number of shows and videos in your executable you will need to use the Shows window to manage them. Remember, the number of shows that you can add to an executable is virtually unlimited, but each additional show will increase the size of the executable file. Among other things, you can do the following from the Shows options:
• Add and remove shows on your executable.
• Change the order of shows on your executable.
• Set the title for each show appearing on your menu.
• Select a thumbnail for each show appearing on your menu.
• Enable and disable an intro show that will play before the menu.
• Specify which intro show to add to your exe-cutable.
C H A P T E R 1 8 | Executable Creation 111
P A R T T W O Output in ProShow Gold
To Access Executable Show Options:
1 Click Create Output > Executable in the main toolbar or choose Create > Create Executable to launch the create executable window.
2 Click on the Shows icon on the left side of the window.
3 Customize the settings as desired.4 Click < Create >.
Included Shows
• Add adds a new show to the executable. When clicked, you will be prompted to select a saved show to add to the executable.
• Del removes the selected show from the exe-cutable.
• Up moves the selected show up the list, plac-ing it before other shows in the menu.
• Down moves the selected show down the list, placing it after other shows in the menu.
Selected Show
This area previews the selected show thumbnail, along with information about the show.
• Set Menu Title sets a new title for the selected show.
• Set Menu Thumbnail selects an image or video that will represent the selected show in the executable menu.
Include Intro Show
The intro show plays before the menu appears.
• Include Intro Show enables and disables the intro show. This box is checked by default.
• Select Show specifies which show will be used for the intro show.
Output OptionsOutput Options controls all of the settings related to executable format output. In this window, you can do
the following:
• Specify the size of the executable at launch.
• Set the display quality of your executable.
• Control the file size of your executable.
• Apply protection to your executable.
To Access Executable Output Options:
1 Click Create Output > Executable in the main toolbar or choose Create > Create Executable to launch the create executable window.
2 Click on the Output Options icon on the left side of the window.
3 Customize the settings as desired.4 Click < Create >.
Executable Startup
• Window Size specifies the startup size of the executable.
• Image Size determines the largest size at which images in the show will be stored in the show file.
• Monitor specifies which monitor the show will play on when it launches.
• Loop Show enables and disables show loop-ing. A show menu will override this feature.
P H O T O D E X | ProShow Gold112
Quality / Performance Settings
• Rendering sets the maximum size for your show during internal rendering. This does not affect the display size of your show.
• Resizing specifies how your photos are resized before being rendered. This eliminates the need to resize your images before bringing them into ProShow Gold.
• Image Quality determines the quality setting used for image compression.
Video Output Quality
• Resolution allows you to specify the video res-olution.
• Quality sets the general quality level used to encode your video clips for the show.
Audio Output Quality
• Quality sets the general quality level used to encode your audio for the show.
Protection
• By Days limits the usage of the executable to a specified number of days.
• By Runs limits the usage of the executable to a specified number of runs.
• Registration Key allows you to specify a regis-tration key or password that will unlock the executable for unlimited use.
• Info URL specifies a website for the user to visit for more information about the show.
• Info Link Text specifies the text that represents the link to the Info URL.
113
C h a p t e r 1 9
P A R T T W O Output in ProShow Gold
CH
AP
TE
R 1
9 |
Scr
een
Save
r C
reat
ion
Screen Saver Creation
Using Screen Saver CreationA screen saver is a program that runs when you are not using your computer to ensure that you monitor is not damaged, or ‘burned’, by static images. ProShow Gold allows you to create a screen saver from any show you make so that it will be displayed anytime the computer is idle.
To Create a Screen Saver:
1 Click Save to save your show.2 Click the Create Output button in the main
toolbar.3 Click on PC Screen Saver from the create
output window.4 Customize your screen saver using the various
category options in the Create Screen Saver dialog.
5 Click < Create >.
Screen Saver Options Overview
Shows adds and removes shows from the screen saver. Sets screen saver title and thumbnail.
Output Options contains options for rendering size, resolution and protection.
P H O T O D E X | ProShow Gold114
ShowsThis category of the options lets you add shows and video clips to your screen saver. Since you can
combine any number of shows and videos in your screen saver, you will need to use the Shows window to manage them. Remember, the number of shows that you can add to a screen saver is virtually unlimited, but each additional show will increase the size of the screen saver. For Windows Me, 98 and 95, the file size cannot exceed 2.1GB. Among other things, you can do the following from the Shows options:
• Add and remove shows on your screen saver.
• Change the order of shows on your screen saver.
• Enable and disable an intro show that will play before the menu.
• Specify which intro show to add to your screen saver.
To Access Screen Saver Show Options:
1 Click Create Output > PC Screen Saver in the main toolbar or choose Create > Create Screen Saver to launch the create screen saver window.
2 Click on the Shows icon on the left side of the window.
3 Customize the settings as desired.4 Click < Create >.
Included Shows
• Add adds a new show to the screen saver. When clicked, you will be prompted to select a saved show to add to the screen saver.
• Del removes the selected show from the screen saver.
• Up moves the selected show up the list, plac-ing it before other shows in the menu.
• Down moves the selected show down the list, placing it after other shows in the menu.
Selected Show
This area previews the selected show thumbnail, along with information about the show.
• Set Menu Title sets a new title for the selected show.
• Set Menu Thumbnail selects an image or video that will represent the selected show.
Include Intro Show
The intro show plays before the menu appears.
• Include Intro Show enables and disables the intro show. This box is checked by default.
• Select Show specifies which show will be used for the intro show.
Output OptionsThe Output Options controls all of the settings related to screen saver output. In this window, you can do
the following:
• Enable and disable audio in your screen saver.
• Set the display quality of your screen saver.
• Control the size of your screen saver.
• Apply protection to your screen saver.
C H A P T E R 1 9 | Screen Saver Creation 115
P A R T T W O Output in ProShow Gold
To Access Screen Saver Output Options:
1 Click Create Output > PC Screen Saver in the main toolbar or choose Create > Create Screen Saver to launch the create screen saver window.
2 Click on the Output Options icon on the left side of the window.
3 Customize the settings as desired.4 Click < Create >.
Audio Playback
• Enable audio in screen saver enables and dis-ables audio in the screen saver.
Quality / Performance Settings
• Rendering sets the maximum size for your show during internal rendering. This does not affect the display size of your show.
• Resizing specifies how your photos are resized before being rendered. This eliminates the need to resize your images before bringing them into ProShow Gold.
• Image Quality determines the quality setting used for image compression.
Video Output Quality
• Resolution allows you to specify the video res-olution of video clips used in slides in your show.
• Quality sets the general quality level used to encode the video clips used in slides in your show.
Protection
• By Days limits the usage of the screen saver to a specified number of days.
• By Runs limits the usage of the screen saver to a specified number of runs.
• Registration Key allows you to specify a regis-tration key or password that will unlock the screen saver for unlimited use.
• Info URL specifies a website for the user to visit for more information about the show.
• Info Link Text specifies the text that represents the link to the Info URL.

P H O T O D E X | ProShow Gold116
117
C h a p t e r 2 0
P A R T T W O Output in ProShow Gold
CH
AP
TE
R 2
0 |
Vid
eo F
or Y
ouTu
be
Video For YouTube
Using Video For YouTubeThe YouTube output in ProShow Gold generates a digital video file of your show that is automatically updated to your YouTube account through Gold. It uses YouTube video creation standards to ensure that your slide show will be of the highest quality YouTube supports. Using this option, you can quickly and easily share your slide shows with viewers on the most popular video site on the Internet.
To Create a Video File for YouTube:
1 Click Save to save your show.2 Click the Create Output button in the main
toolbar.3 Click on YouTube from the create output
window that appears.4 Enter your YouTube account username and
password. If you do not have a YouTube account, you can create one at www.youtube.com.
5 Enter your video information and video catego-rization.
6 Click < Upload >.
Account Information
In the account information section of the YouTube upload window you can:
• Enter your YouTube username
• Enter your YouTube password
Video Information
The video information section is where you enter details about your video. You can enter your:
• Title, which is the name of your video once uploaded
• Description, which is a brief summary of the contents of your video
• You must completely fill out this section in order to upload your video.
Video Categorization
Video categorization allows you to enter information that will make your video more visible to those searching YouTube.
• Tags are the key words that are used to find your video when a viewer searches YouTube. You can enter as many tags as you feel are rele-vant to your video.
• Video Category is the category that YouTube will use when you upload your video..
• You must completely fill out this section in order to upload your video.

P H O T O D E X | ProShow Gold118
Notes on YouTube Video Upload Delay
YouTube must approve all video content that is uploaded to the site which means that you may experience a delay from the time you upload your video to the time it is available for viewing. Check your account profile on YouTube for information on your existing or pending videos.
Size Limitations
YouTube restricts the size or length of the videos you can upload. You cannot upload a show that is greater than 100 megabytes in size, or longer than 10 minutes in length.
119
C h a p t e r 2 1
P A R T T H R E E Features In-depth in ProShow Gold
CH
AP
TE
R 2
1 |
Pro
Show
File
s
ProShow Files
Understanding ProShow FilesAdvanced users may find it helpful to understand how ProShow Gold saves shows to your computer. ProShow Gold creates a number of different files for various uses, including backup file caching and customizing your workspace.
Types of ProShow FilesThe ProShow Gold show files fall into four main categories based on how they relate to the program. The categories are as follows:
• Show Files are the various components that make up your show and they can be used to recover your work in the event of a system crash.
• Menu Files save menu, theme and/or layouts created in the authoring stage of show creation.
• Output Files relate to certain aspects of the output functions in ProShow Gold.
• Workspace Files consist of custom window layout files you can use to load custom work-space settings and configurations.
Show Files• PSH File (Photodex Slide Show File) is the
main file for you show. This file contains all the settings and options ProShow Gold needs to
load, create and play your show. This file does not contain any of your show content. ProShow Gold simply links to your files and does not alter or move them. This PSH File is what you would save in order to save a show. If the file is deleted, your show no longer exists, but the content included in the show remains in its original location.
The PSH File contains a list of all the other files used in your show. If you move the PSH file, ProShow may not be able to link to your content properly. If you attempt to load a show and the content cannot be found, ProShow Gold will prompt you to locate the files in order to load the show properly.
If you wish to backup your show, you must backup both the PSH File and the original content used in your show. The collect show files feature will automate this process and ensure that all content is copied correctly.
• Backup Show Files are created by ProShow Gold to automatically back up your show file each time you save your show. This allows you to revert to previous versions of your show at any time. These backup files are stored in the same folder as your show. The files have the same name as your show, but extensions like .BAK, .BK1, .BK2, etc. Do not delete these files if you would like to revert back to them while working on your show.
• Show Content Files (Images, Music, Video) are the files used in your show. When you add content to your show, ProShow Gold does not copy or modify the file. ProShow simply notes
P H O T O D E X | ProShow Gold120
where the original content is saved on your computer and links to the files when they are used in the show. If your original content moves, your show will not be able to link to those files. The collect show files function cop-ies all your content into a single folder, allow-ing you to move your original files as desired.
• PXC Files (Photodex Cache File) are created when you load a ProShow Gold slide show. The PXC file is a cache file, which means that ProShow Gold can access it very quickly to load the show that you are working on. This file is generated automatically while you work on your show, and it can be deleted at any time. You cannot load a show or recover lost content from a PXC file.
• PST Files (Show Templates) are saved show templates. ProShow Gold’s template feature lets you create reusable show templates from any show. When you save a template, it is stored as a PST file in the Templates folder in ProShow Gold’s installation folder.
• Autosave Files are automatically created by ProShow Gold every five minutes in case of a system crash. When autosave occurs, a copy of the current show is saved in the ProShow Gold program folder as autosave.psh. This file is cleared when you save the show. Do not delete these files if you would like to revert back to them in the event that your system crashes.
• Temporary Files are created and removed by ProShow Gold as you use the application. These files are stored in you Windows tempo-rary folder and will usually be named px*.tmp and _px*.tmp. These files will be deleted by ProShow Gold when the application no longer needs them. Do not delete these files while ProShow Gold is running.
Menu Files• MNU Files (Menus) are saved menus. With
ProShow Gold’s advanced menu authoring sys-tem, you can save completed menu designs for later use. These files can be saved in any loca-tion.
• LAY Files (Menu Layouts) are saved menu lay-outs. With ProShow Gold’s advanced menu authoring system, you can save layouts that can be matched with saved themes to create menus. These files are saved under Application Data/Photodex/ProShow Gold/Menu Layouts.
• THM Files (Menu Themes) are saved menu themes. With ProShow Gold’s advanced menu authoring system, you can save themes that can be matched with saved lay-outs to create menus. These files are saved under Application Data/Photodex/ProShow Gold/Menu Layouts.
Output Files• ISO and CUE/BIN Files are disc images used
to burn CDs and DVDs. These files include all information and data necessary to write a disc. These files are created when authoring a DVD, VCD or Autorun CD and you have the option of saving these files rather than writing a disc. Most CD and DVD burning applications can read these files and create a final disc from that information.
• PX Files (Photodex Stream File) are ProShow Web Shows that are created when you choose the Web Show or Share Show output format. The file is a compressed web stream that is copied to a web server for playback over the Internet. A PX file cannot be edited or used to
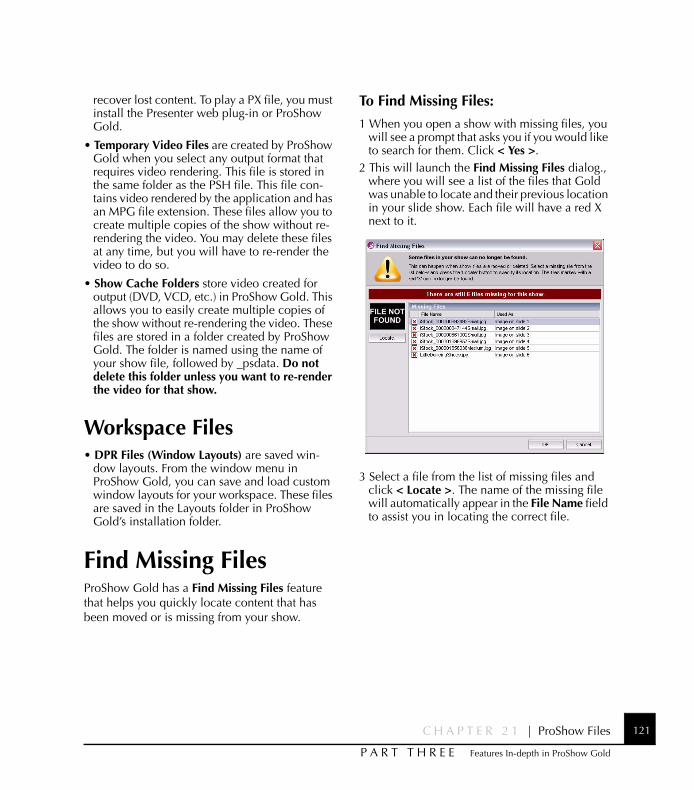
C H A P T E R 2 1 | ProShow Files 121
P A R T T H R E E Features In-depth in ProShow Gold
recover lost content. To play a PX file, you must install the Presenter web plug-in or ProShow Gold.
• Temporary Video Files are created by ProShow Gold when you select any output format that requires video rendering. This file is stored in the same folder as the PSH file. This file con-tains video rendered by the application and has an MPG file extension. These files allow you to create multiple copies of the show without re-rendering the video. You may delete these files at any time, but you will have to re-render the video to do so.
• Show Cache Folders store video created for output (DVD, VCD, etc.) in ProShow Gold. This allows you to easily create multiple copies of the show without re-rendering the video. These files are stored in a folder created by ProShow Gold. The folder is named using the name of your show file, followed by _psdata. Do not delete this folder unless you want to re-render the video for that show.
Workspace Files• DPR Files (Window Layouts) are saved win-
dow layouts. From the window menu in ProShow Gold, you can save and load custom window layouts for your workspace. These files are saved in the Layouts folder in ProShow Gold’s installation folder.
Find Missing FilesProShow Gold has a Find Missing Files feature that helps you quickly locate content that has been moved or is missing from your show.
To Find Missing Files:
1 When you open a show with missing files, you will see a prompt that asks you if you would like to search for them. Click < Yes >.
2 This will launch the Find Missing Files dialog., where you will see a list of the files that Gold was unable to locate and their previous location in your slide show. Each file will have a red X next to it.
3 Select a file from the list of missing files and click < Locate >. The name of the missing file will automatically appear in the File Name field to assist you in locating the correct file.
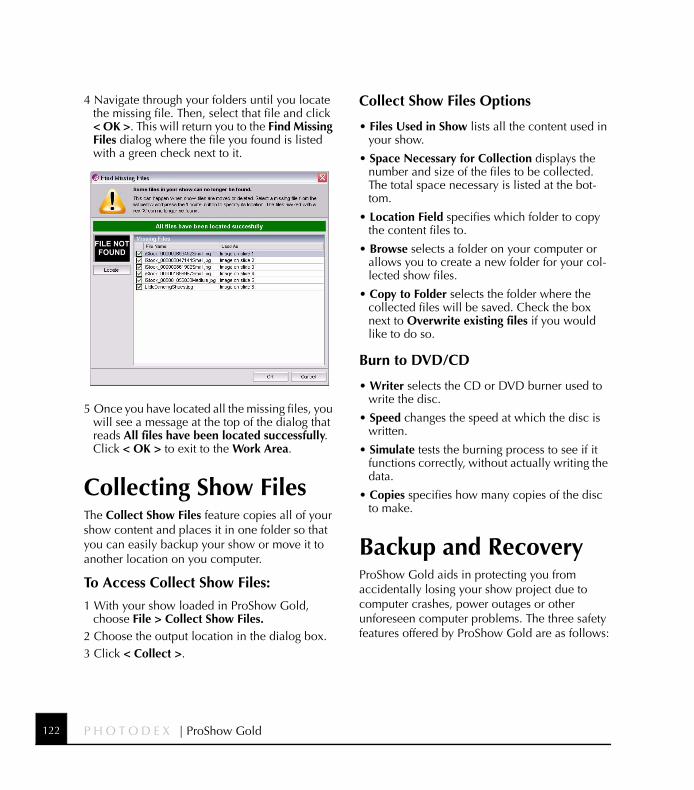
P H O T O D E X | ProShow Gold122
4 Navigate through your folders until you locate the missing file. Then, select that file and click < OK >. This will return you to the Find Missing Files dialog where the file you found is listed with a green check next to it.
5 Once you have located all the missing files, you will see a message at the top of the dialog that reads All files have been located successfully. Click < OK > to exit to the Work Area.
Collecting Show FilesThe Collect Show Files feature copies all of your show content and places it in one folder so that you can easily backup your show or move it to another location on you computer.
To Access Collect Show Files:
1 With your show loaded in ProShow Gold, choose File > Collect Show Files.
2 Choose the output location in the dialog box.3 Click < Collect >.
Collect Show Files Options
• Files Used in Show lists all the content used in your show.
• Space Necessary for Collection displays the number and size of the files to be collected. The total space necessary is listed at the bot-tom.
• Location Field specifies which folder to copy the content files to.
• Browse selects a folder on your computer or allows you to create a new folder for your col-lected show files.
• Copy to Folder selects the folder where the collected files will be saved. Check the box next to Overwrite existing files if you would like to do so.
Burn to DVD/CD
• Writer selects the CD or DVD burner used to write the disc.
• Speed changes the speed at which the disc is written.
• Simulate tests the burning process to see if it functions correctly, without actually writing the data.
• Copies specifies how many copies of the disc to make.
Backup and RecoveryProShow Gold aids in protecting you from accidentally losing your show project due to computer crashes, power outages or other unforeseen computer problems. The three safety features offered by ProShow Gold are as follows:
C H A P T E R 2 1 | ProShow Files 123
P A R T T H R E E Features In-depth in ProShow Gold
• Autosave automatically saves your work every five minutes. This happens in the background as you work and requires no action on your part. If, for any reason, your show is not prop-erly saved, ProShow Gold will automatically ask if you would like to restore the last auto-saved show the next time you launch the appli-cation. This guarantees that the most that you can lose is what was done in the last five min-utes, or since your last save, whichever is most recent. All you need to do to recover your show is launch ProShow Gold.
• Backup ensures that your last 10 saves are automatically backed up. This feature allows you to undo an unwanted change, even if you have already saved your show changes. This happens automatically, every time you save your show.
• Recovery allows you to revert back to saved versions of your show, the last auto-saved ver-sion or any available backups using the Revert to Backup feature.
To Revert to Previous Versions of Your Show:
1 Choose File > Revert to Backup.2 Select the version your would like to recover
from the Available Backups list.3 Click < Open >.

P H O T O D E X | ProShow Gold124
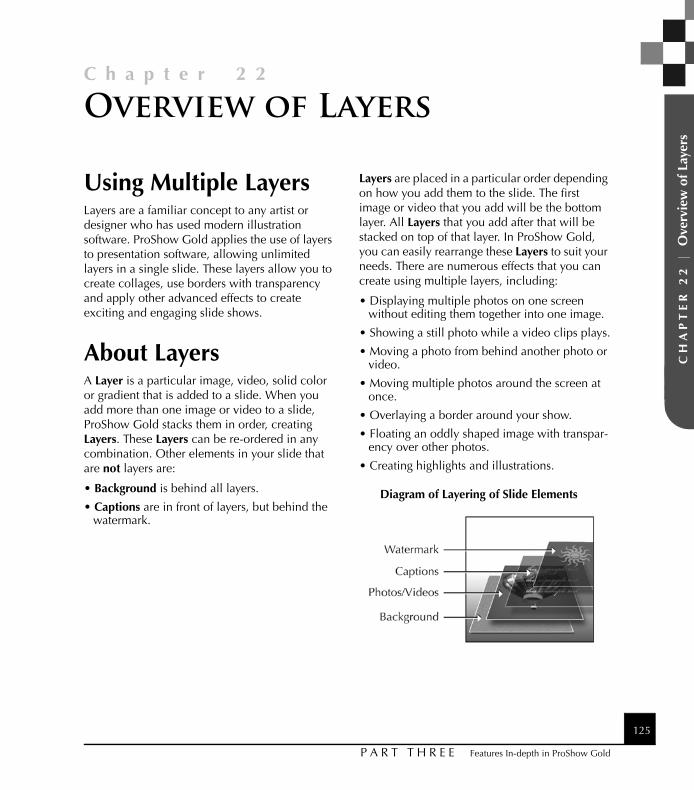
125
C h a p t e r 2 2
P A R T T H R E E Features In-depth in ProShow Gold
CH
AP
TE
R 2
2 |
Ove
rvie
w o
f Lay
ers
Overview of Layers
Using Multiple LayersLayers are a familiar concept to any artist or designer who has used modern illustration software. ProShow Gold applies the use of layers to presentation software, allowing unlimited layers in a single slide. These layers allow you to create collages, use borders with transparency and apply other advanced effects to create exciting and engaging slide shows.
About LayersA Layer is a particular image, video, solid color or gradient that is added to a slide. When you add more than one image or video to a slide, ProShow Gold stacks them in order, creating Layers. These Layers can be re-ordered in any combination. Other elements in your slide that are not layers are:
• Background is behind all layers.
• Captions are in front of layers, but behind the watermark.
Layers are placed in a particular order depending on how you add them to the slide. The first image or video that you add will be the bottom layer. All Layers that you add after that will be stacked on top of that layer. In ProShow Gold, you can easily rearrange these Layers to suit your needs. There are numerous effects that you can create using multiple layers, including:
• Displaying multiple photos on one screen without editing them together into one image.
• Showing a still photo while a video clips plays.
• Moving a photo from behind another photo or video.
• Moving multiple photos around the screen at once.
• Overlaying a border around your show.
• Floating an oddly shaped image with transpar-ency over other photos.
• Creating highlights and illustrations.
Diagram of Layering of Slide Elements
P H O T O D E X | ProShow Gold126
Adding and Removing LayersAdding and Removing Layers in ProShow Gold is very simple. Layers can be images or videos.
To Add Layers from the Main Window:
1 Use the folder and file lists to browse for slide content.
2 In the file list, select the file(s) you would like to add to your show.
3 Drag the selected files into the slide list.4 Press < CTRL > as you drop the file(s) on the
desired slide.
To Add Layers from Slide Options:
1 Select the slide you would like to add additional layers to.
2 Choose Slide > Slide Options and click the Layers button on the left side of the window.
3 Click < Add > in the vontent of dlide list.4 Choose < Add Image or Video >.5 Follow the on-screen instructions to add a new
layer.
To Remove Layers from Slide Options:
1 Select the slide you would like to remove additional layers from.
2 Choose Slide > Slide Options and click the Layers button on the left side of the window.
3 Select the layer you would like to delete from the Slide Contents list.
4 Click < Del > in the content of slide section.
To Copy Layers from Slide Options:
1 In Slide Options, right-click on the layer you would like to copy in the Slide Contents list.
2 Choose Copy To > All Slides to copy that layer to all slides in your show.
3 Choose Copy To > Selected Slides to copy that layer to the slides you have selected in your slide list.
Working with Layers in Preview WindowsThe preview windows in the slide options dialogs show layers just as they appear in your slide. You can easily set the position and size for layers in the preview windows. Adjustments you can make in the preview windows include:
• Clicking on any layer to select that layer.
• Dragging layers around the preview window to position them.
• Clicking on any layer and using the mouse wheel to resize the layer.
Adjusting LayersEach layer in ProShow Gold is adjusted separately. This allows you to make specific corrections to individual slides while leaving the others untouched. In Slide Options, there are two places to make adjustments to layers:
• Layers allows you to size and position your content, set the aspect ratio and edit video clips.
• Editing contains options including color cor-rection, drop shadows and colorizing.
C H A P T E R 2 2 | Overview of Layers 127
P A R T T H R E E Features In-depth in ProShow Gold
To Change Image/Video Settings for a Layer:
1 In the slide list, click on the slide you would like to modify.
2 Choose Slide > Slide Options and click on the Layers button on the left side of the window.
3 Make adjustments to the selected layer.4 To exit the slide options window, click
< Done >.
To Change Adjustments Settings for a Layer:
1 In the slide list, click on the slide you would like to modify.
2 Choose Slide > Slide Options and click on the Editing button on the left side of the window.
3 Make adjustments to the selected layer.4 To exit the slide options window, click
< Done >.
Applying Motion to LayersMotion effects can be applied to each layer independently. Using this feature, you can create slides with multiple layers moving independently of one another. By adding motion to one layer at a time, you have the ability to give each element in your slide a unique motion path.
Copying LayersYou may find that you want to copy a layer from the current slide to the next slide that you are working on in order to create complex motion effects. ProShow Gold makes this a one-click operation.
To Copy a Single Layer to the Next Slide:
1 In the slide list, click on the slide containing the layer you would like to copy.
2 Choose Slide > Slide Options and click on the motion effects button on the left side of the window.
3 In the selected layer box, click on the layer you would like to copy.
4 Click < Copy >.5 Click on Copy End to Next Slide.6 Select another layer to copy or click < Done >.
Carrying Layers Across SlidesWhen creating a show with layers, it is often helpful to carry the same photo or video clip across multiple slides. This allows you to give the layer a different motion path on each slide, resulting in a complex motion path that adds interest to your show.
When you match a layer to the next slide, the ending position of the layer in the first slide matches the starting position of the layer in the
P H O T O D E X | ProShow Gold128
next slide. You can also match to the previous slide, which sets the ending position of the layer’s first slide to match the starting position of the layer in the next slide.
ProShow Gold lets you match any layer in one slide to any layer on the next slide, even if they are different images. This allows you to use transition effect to add interest to your show.
To Match a Layer to the Next or Previ-ous Slide:
1 In the slide list, click on the slide you would like to modify.
2 Choose Slide > Slide Options and click on the Motion button on the left side of the window.
3 In the selected layer box, click on the layer you want to apply motion to.
4 Click on the Not Matched button beneath either preview window and specify the layer to match.
5 Click < Done >.
About Images with TransparencyImages with transparency can be created in a number of different photo editors. In images with transparency, part of an image is designated as transparent, while the rest of the image is opaque. When you view a transparent image in the file list, the transparent portion appears to be black, but when you add it to a slide on top of another layer, you will be able to see the transparency effect. Only certain types of images support transparency, and the files must be
created in a graphics editor. The following file formats support transparency:
• Adobe Photoshop Image (.psd)
• Portable Network Graphic (.png)
• Graphics Interchange Format (.gif)
• Tagged Image File Format (.tiff)
Consult the documentation for your graphics editor to determine how to create images with transparency.
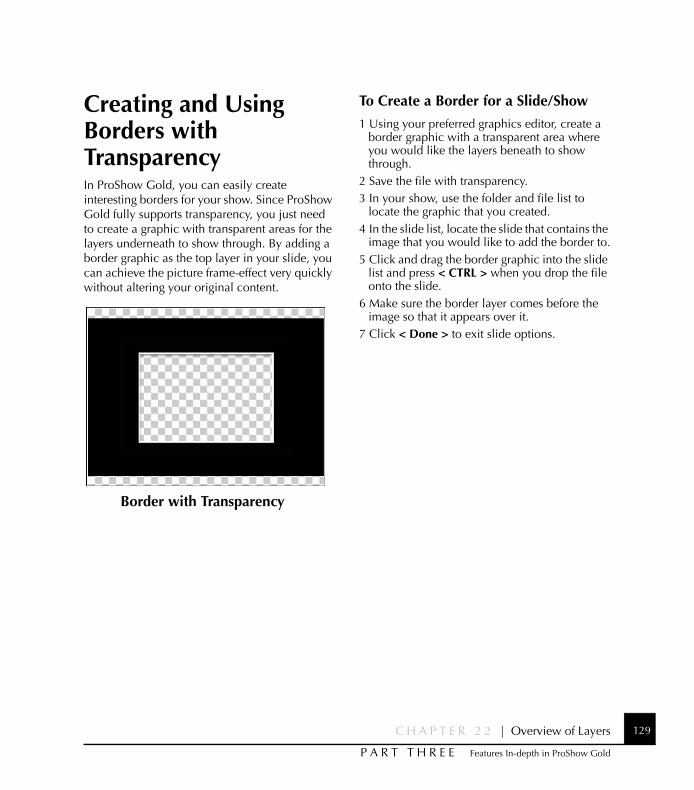
C H A P T E R 2 2 | Overview of Layers 129
P A R T T H R E E Features In-depth in ProShow Gold
Creating and Using Borders with TransparencyIn ProShow Gold, you can easily create interesting borders for your show. Since ProShow Gold fully supports transparency, you just need to create a graphic with transparent areas for the layers underneath to show through. By adding a border graphic as the top layer in your slide, you can achieve the picture frame-effect very quickly without altering your original content.
To Create a Border for a Slide/Show
1 Using your preferred graphics editor, create a border graphic with a transparent area where you would like the layers beneath to show through.
2 Save the file with transparency.3 In your show, use the folder and file list to
locate the graphic that you created.4 In the slide list, locate the slide that contains the
image that you would like to add the border to.5 Click and drag the border graphic into the slide
list and press < CTRL > when you drop the file onto the slide.
6 Make sure the border layer comes before the image so that it appears over it.
7 Click < Done > to exit slide options.
Border with Transparency

P H O T O D E X | ProShow Gold130
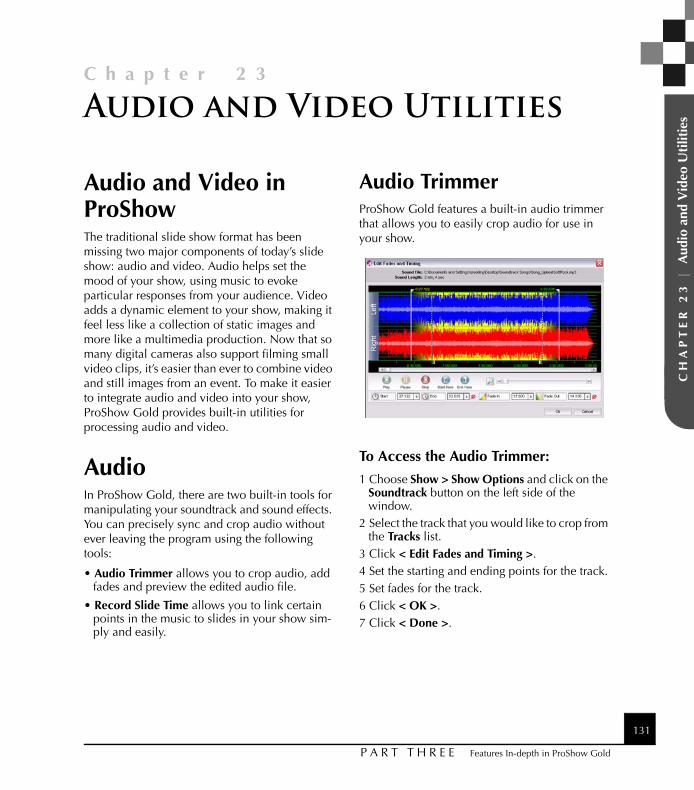
131
C h a p t e r 2 3
P A R T T H R E E Features In-depth in ProShow Gold
CH
AP
TE
R 2
3 |
Aud
io a
nd V
ideo
Uti
litie
sAudio and Video Utilities
Audio and Video in ProShowThe traditional slide show format has been missing two major components of today’s slide show: audio and video. Audio helps set the mood of your show, using music to evoke particular responses from your audience. Video adds a dynamic element to your show, making it feel less like a collection of static images and more like a multimedia production. Now that so many digital cameras also support filming small video clips, it’s easier than ever to combine video and still images from an event. To make it easier to integrate audio and video into your show, ProShow Gold provides built-in utilities for processing audio and video.
AudioIn ProShow Gold, there are two built-in tools for manipulating your soundtrack and sound effects. You can precisely sync and crop audio without ever leaving the program using the following tools:
• Audio Trimmer allows you to crop audio, add fades and preview the edited audio file.
• Record Slide Time allows you to link certain points in the music to slides in your show sim-ply and easily.
Audio TrimmerProShow Gold features a built-in audio trimmer that allows you to easily crop audio for use in your show.
To Access the Audio Trimmer:
1 Choose Show > Show Options and click on the Soundtrack button on the left side of the window.
2 Select the track that you would like to crop from the Tracks list.
3 Click < Edit Fades and Timing >.4 Set the starting and ending points for the track.5 Set fades for the track.6 Click < OK >.7 Click < Done >.
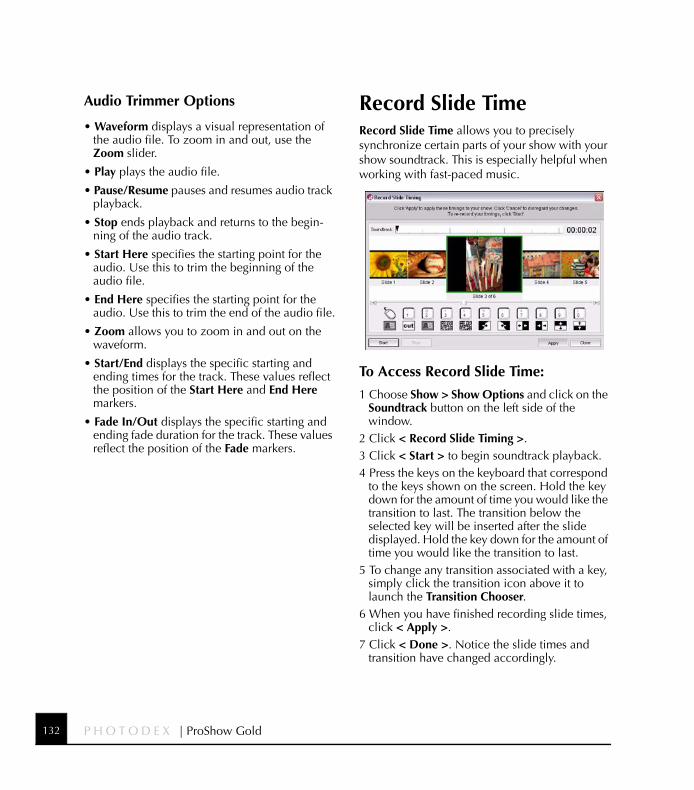
P H O T O D E X | ProShow Gold132
Audio Trimmer Options
• Waveform displays a visual representation of the audio file. To zoom in and out, use the Zoom slider.
• Play plays the audio file.
• Pause/Resume pauses and resumes audio track playback.
• Stop ends playback and returns to the begin-ning of the audio track.
• Start Here specifies the starting point for the audio. Use this to trim the beginning of the audio file.
• End Here specifies the starting point for the audio. Use this to trim the end of the audio file.
• Zoom allows you to zoom in and out on the waveform.
• Start/End displays the specific starting and ending times for the track. These values reflect the position of the Start Here and End Here markers.
• Fade In/Out displays the specific starting and ending fade duration for the track. These values reflect the position of the Fade markers.
Record Slide TimeRecord Slide Time allows you to precisely synchronize certain parts of your show with your show soundtrack. This is especially helpful when working with fast-paced music.
To Access Record Slide Time:
1 Choose Show > Show Options and click on the Soundtrack button on the left side of the window.
2 Click < Record Slide Timing >.3 Click < Start > to begin soundtrack playback. 4 Press the keys on the keyboard that correspond
to the keys shown on the screen. Hold the key down for the amount of time you would like the transition to last. The transition below the selected key will be inserted after the slide displayed. Hold the key down for the amount of time you would like the transition to last.
5 To change any transition associated with a key, simply click the transition icon above it to launch the Transition Chooser.
6 When you have finished recording slide times, click < Apply >.
7 Click < Done >. Notice the slide times and transition have changed accordingly.
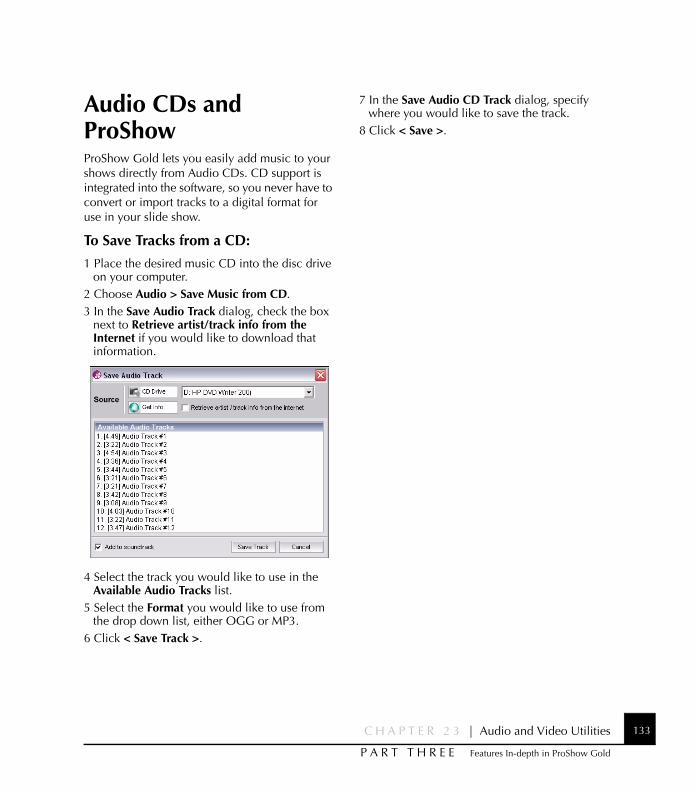
C H A P T E R 2 3 | Audio and Video Utilities 133
P A R T T H R E E Features In-depth in ProShow Gold
Audio CDs and ProShowProShow Gold lets you easily add music to your shows directly from Audio CDs. CD support is integrated into the software, so you never have to convert or import tracks to a digital format for use in your slide show.
To Save Tracks from a CD:
1 Place the desired music CD into the disc drive on your computer.
2 Choose Audio > Save Music from CD.3 In the Save Audio Track dialog, check the box
next to Retrieve artist/track info from the Internet if you would like to download that information.
4 Select the track you would like to use in the Available Audio Tracks list.
5 Select the Format you would like to use from the drop down list, either OGG or MP3.
6 Click < Save Track >.
7 In the Save Audio CD Track dialog, specify where you would like to save the track.
8 Click < Save >.
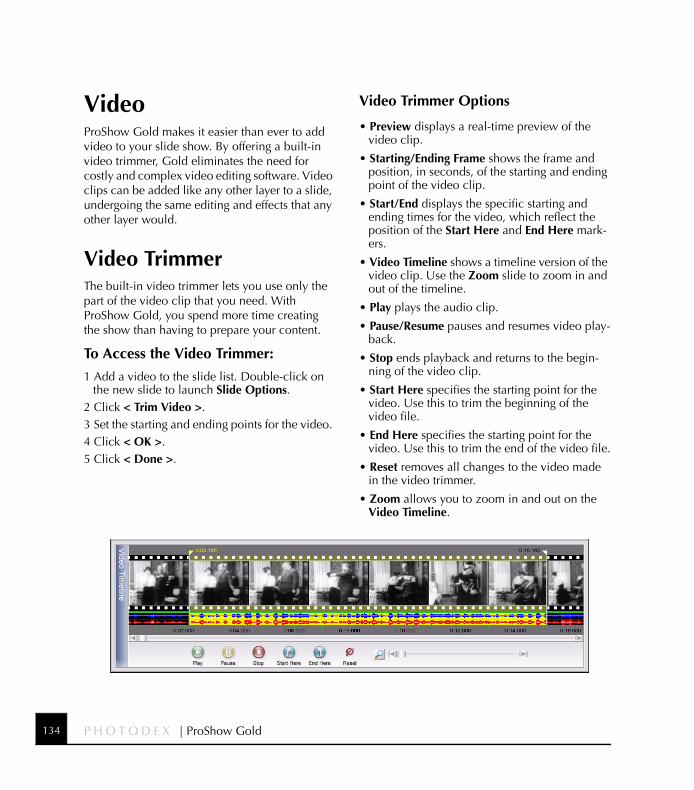
P H O T O D E X | ProShow Gold134
Video ProShow Gold makes it easier than ever to add video to your slide show. By offering a built-in video trimmer, Gold eliminates the need for costly and complex video editing software. Video clips can be added like any other layer to a slide, undergoing the same editing and effects that any other layer would.
Video TrimmerThe built-in video trimmer lets you use only the part of the video clip that you need. With ProShow Gold, you spend more time creating the show than having to prepare your content.
To Access the Video Trimmer:
1 Add a video to the slide list. Double-click on the new slide to launch Slide Options.
2 Click < Trim Video >.3 Set the starting and ending points for the video. 4 Click < OK >.5 Click < Done >.
Video Trimmer Options
• Preview displays a real-time preview of the video clip.
• Starting/Ending Frame shows the frame and position, in seconds, of the starting and ending point of the video clip.
• Start/End displays the specific starting and ending times for the video, which reflect the position of the Start Here and End Here mark-ers.
• Video Timeline shows a timeline version of the video clip. Use the Zoom slide to zoom in and out of the timeline.
• Play plays the audio clip.
• Pause/Resume pauses and resumes video play-back.
• Stop ends playback and returns to the begin-ning of the video clip.
• Start Here specifies the starting point for the video. Use this to trim the beginning of the video file.
• End Here specifies the starting point for the video. Use this to trim the end of the video file.
• Reset removes all changes to the video made in the video trimmer.
• Zoom allows you to zoom in and out on the Video Timeline.
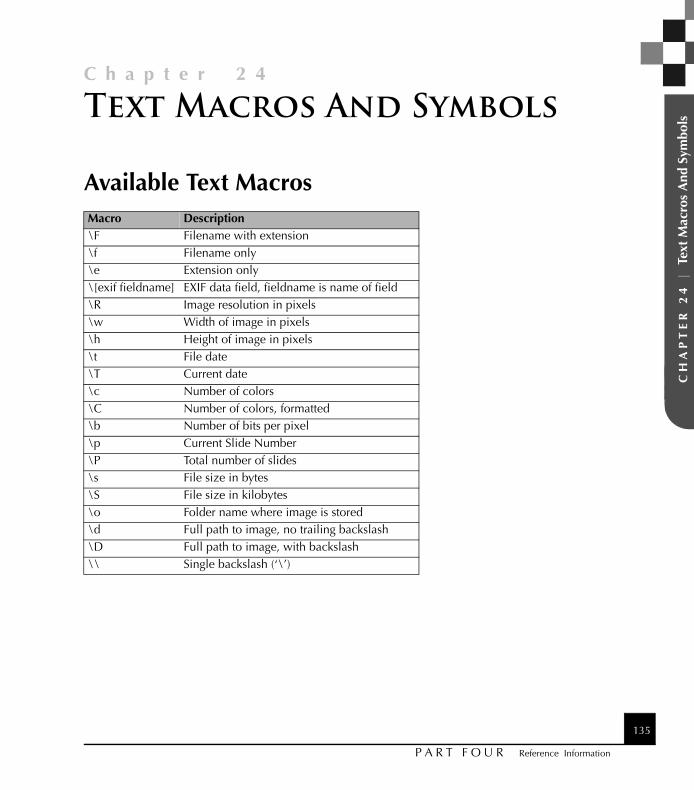
135
C h a p t e r 2 4
P A R T F O U R Reference Information
CH
AP
TE
R 2
4 |
Tex
t M
acro
s A
nd S
ymbo
lsText Macros And Symbols
Available Text MacrosMacro Description\F Filename with extension\f Filename only\e Extension only\[exif fieldname] EXIF data field, fieldname is name of field\R Image resolution in pixels\w Width of image in pixels\h Height of image in pixels\t File date\T Current date\c Number of colors\C Number of colors, formatted\b Number of bits per pixel\p Current Slide Number\P Total number of slides\s File size in bytes\S File size in kilobytes\o Folder name where image is stored\d Full path to image, no trailing backslash\D Full path to image, with backslash\\ Single backslash (‘\’)
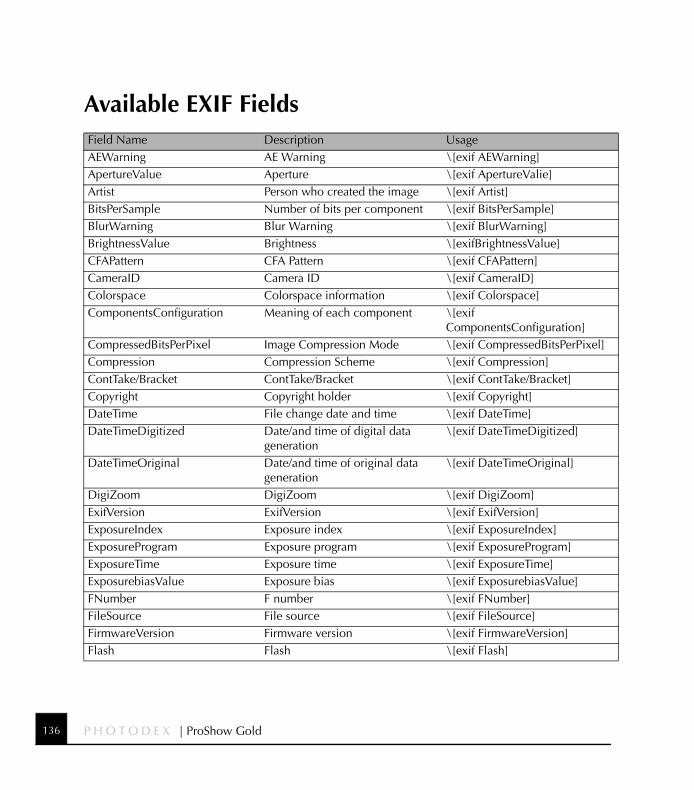
P H O T O D E X | ProShow Gold136
Available EXIF FieldsField Name Description UsageAEWarning AE Warning \[exif AEWarning]ApertureValue Aperture \[exif ApertureValie]Artist Person who created the image \[exif Artist]BitsPerSample Number of bits per component \[exif BitsPerSample]BlurWarning Blur Warning \[exif BlurWarning]BrightnessValue Brightness \[exifBrightnessValue]CFAPattern CFA Pattern \[exif CFAPattern]CameraID Camera ID \[exif CameraID]Colorspace Colorspace information \[exif Colorspace]ComponentsConfiguration Meaning of each component \[exif
ComponentsConfiguration]CompressedBitsPerPixel Image Compression Mode \[exif CompressedBitsPerPixel]Compression Compression Scheme \[exif Compression]ContTake/Bracket ContTake/Bracket \[exif ContTake/Bracket]Copyright Copyright holder \[exif Copyright]DateTime File change date and time \[exif DateTime]DateTimeDigitized Date/and time of digital data
generation\[exif DateTimeDigitized]
DateTimeOriginal Date/and time of original data generation
\[exif DateTimeOriginal]
DigiZoom DigiZoom \[exif DigiZoom]ExifVersion ExifVersion \[exif ExifVersion]ExposureIndex Exposure index \[exif ExposureIndex]ExposureProgram Exposure program \[exif ExposureProgram]ExposureTime Exposure time \[exif ExposureTime]ExposurebiasValue Exposure bias \[exif ExposurebiasValue]FNumber F number \[exif FNumber]FileSource File source \[exif FileSource]FirmwareVersion Firmware version \[exif FirmwareVersion]Flash Flash \[exif Flash]
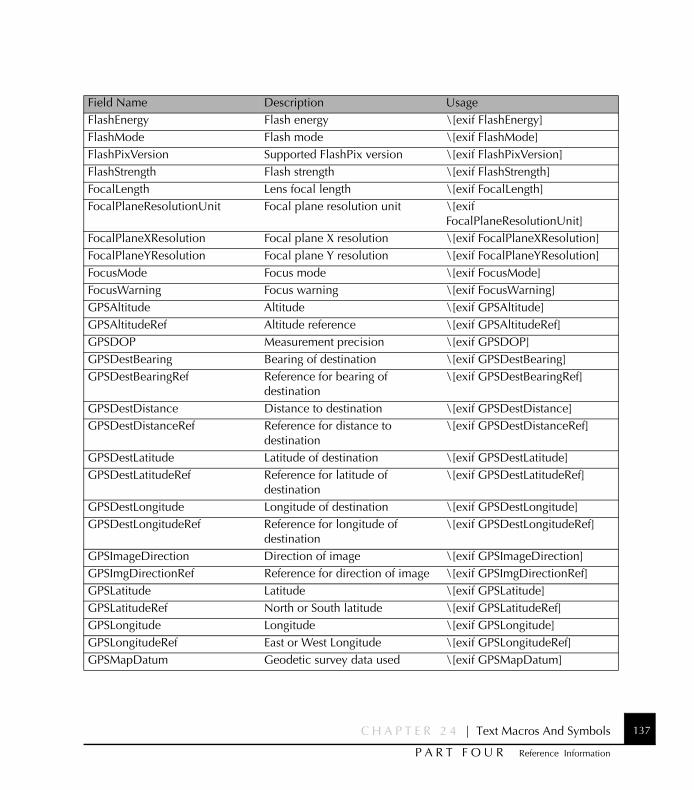
C H A P T E R 2 4 | Text Macros And Symbols 137
P A R T F O U R Reference Information
FlashEnergy Flash energy \[exif FlashEnergy]FlashMode Flash mode \[exif FlashMode]FlashPixVersion Supported FlashPix version \[exif FlashPixVersion]FlashStrength Flash strength \[exif FlashStrength]FocalLength Lens focal length \[exif FocalLength]FocalPlaneResolutionUnit Focal plane resolution unit \[exif
FocalPlaneResolutionUnit]FocalPlaneXResolution Focal plane X resolution \[exif FocalPlaneXResolution]FocalPlaneYResolution Focal plane Y resolution \[exif FocalPlaneYResolution]FocusMode Focus mode \[exif FocusMode]FocusWarning Focus warning \[exif FocusWarning]GPSAltitude Altitude \[exif GPSAltitude]GPSAltitudeRef Altitude reference \[exif GPSAltitudeRef]GPSDOP Measurement precision \[exif GPSDOP]GPSDestBearing Bearing of destination \[exif GPSDestBearing]GPSDestBearingRef Reference for bearing of
destination\[exif GPSDestBearingRef]
GPSDestDistance Distance to destination \[exif GPSDestDistance]GPSDestDistanceRef Reference for distance to
destination\[exif GPSDestDistanceRef]
GPSDestLatitude Latitude of destination \[exif GPSDestLatitude]GPSDestLatitudeRef Reference for latitude of
destination\[exif GPSDestLatitudeRef]
GPSDestLongitude Longitude of destination \[exif GPSDestLongitude]GPSDestLongitudeRef Reference for longitude of
destination\[exif GPSDestLongitudeRef]
GPSImageDirection Direction of image \[exif GPSImageDirection]GPSImgDirectionRef Reference for direction of image \[exif GPSImgDirectionRef]GPSLatitude Latitude \[exif GPSLatitude]GPSLatitudeRef North or South latitude \[exif GPSLatitudeRef]GPSLongitude Longitude \[exif GPSLongitude]GPSLongitudeRef East or West Longitude \[exif GPSLongitudeRef]GPSMapDatum Geodetic survey data used \[exif GPSMapDatum]
Field Name Description Usage

P H O T O D E X | ProShow Gold138
GPSMeasureMode GPS measurement mode \[exif GPSMeasureMode]GPSSatelites GPS satelite used for
measurement\[exif GPSSatelites]
GPSSpeed Speed of GPS receiver \[exif GPSSpeed]GPSSpeedRef Speed unit \[exif GPSSpeedRef]GPSStatus GPS receiver status \[exif GPSStatus]GPSTimeStamp GPS time (atomic clock) \[exif GPSTimeStamp]GPSTrack Direction of movement \[exif GPSTrack]GPSTrackRef Reference for direction of
movement\[exif GPSTrackRef]
GPSVersionID GPS Tag version \[exif GPSVersionID]ISOSpeedRatings ISO Speed rating \[exif ISOSpeedRatings]ImageDescription Image title \[exif ImageDescription]ImageLength Image Height \[exif ImageLength]ImageNumber Image number \[exif ImageNumber]ImageType Image type \[exif ImageType]ImageWidth Image Width \[exif ImageWidth]InteroperabilityIndex Interoperability index \[exif InteroperabilityIndex]InteroperabilityVersion Interoperability version \[exif InteroperabilityVersion]JPEGInterchangeFormat Offset to JPEG SOI \[exif JPEGInterchangeFormat]JPEGInterchangeFormatLength Bytes of JPEG Data \[exif
JPEGInterchangeFormatLength]LightSource Light source \[exif LightSource]Macro Macro \[exif Macro]Make Image input equipment
manufacturer\[exif Make]
MakerNote Manufacturer notes \[exif MakerNote]MaxApertureValue Maximum lens aperture \[exif MaxApertureValue]MeteringMode Metering mode \[exif MeteringMode]Model Image input equipment model \[exif Model]OECF Optoelectric conversion factor \[exif OECF]Orientation Orientation of image \[exif Orientation]
Field Name Description Usage
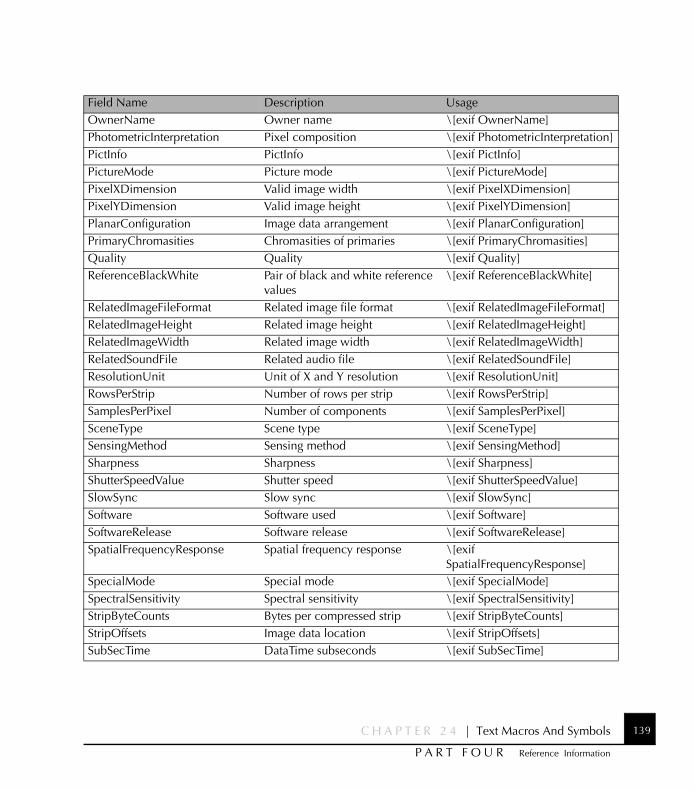
C H A P T E R 2 4 | Text Macros And Symbols 139
P A R T F O U R Reference Information
OwnerName Owner name \[exif OwnerName]PhotometricInterpretation Pixel composition \[exif PhotometricInterpretation]PictInfo PictInfo \[exif PictInfo]PictureMode Picture mode \[exif PictureMode]PixelXDimension Valid image width \[exif PixelXDimension]PixelYDimension Valid image height \[exif PixelYDimension]PlanarConfiguration Image data arrangement \[exif PlanarConfiguration]PrimaryChromasities Chromasities of primaries \[exif PrimaryChromasities]Quality Quality \[exif Quality]ReferenceBlackWhite Pair of black and white reference
values\[exif ReferenceBlackWhite]
RelatedImageFileFormat Related image file format \[exif RelatedImageFileFormat]RelatedImageHeight Related image height \[exif RelatedImageHeight]RelatedImageWidth Related image width \[exif RelatedImageWidth]RelatedSoundFile Related audio file \[exif RelatedSoundFile]ResolutionUnit Unit of X and Y resolution \[exif ResolutionUnit]RowsPerStrip Number of rows per strip \[exif RowsPerStrip]SamplesPerPixel Number of components \[exif SamplesPerPixel]SceneType Scene type \[exif SceneType]SensingMethod Sensing method \[exif SensingMethod]Sharpness Sharpness \[exif Sharpness]ShutterSpeedValue Shutter speed \[exif ShutterSpeedValue]SlowSync Slow sync \[exif SlowSync]Software Software used \[exif Software]SoftwareRelease Software release \[exif SoftwareRelease]SpatialFrequencyResponse Spatial frequency response \[exif
SpatialFrequencyResponse]SpecialMode Special mode \[exif SpecialMode]SpectralSensitivity Spectral sensitivity \[exif SpectralSensitivity]StripByteCounts Bytes per compressed strip \[exif StripByteCounts]StripOffsets Image data location \[exif StripOffsets]SubSecTime DataTime subseconds \[exif SubSecTime]
Field Name Description Usage
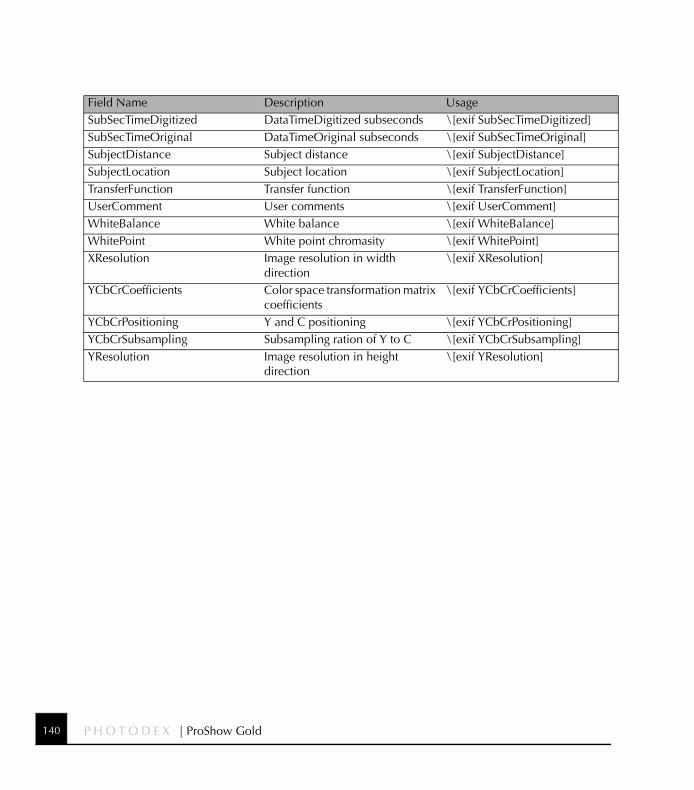
P H O T O D E X | ProShow Gold140
SubSecTimeDigitized DataTimeDigitized subseconds \[exif SubSecTimeDigitized]SubSecTimeOriginal DataTimeOriginal subseconds \[exif SubSecTimeOriginal]SubjectDistance Subject distance \[exif SubjectDistance]SubjectLocation Subject location \[exif SubjectLocation]TransferFunction Transfer function \[exif TransferFunction]UserComment User comments \[exif UserComment]WhiteBalance White balance \[exif WhiteBalance]WhitePoint White point chromasity \[exif WhitePoint]XResolution Image resolution in width
direction\[exif XResolution]
YCbCrCoefficients Color space transformation matrix coefficients
\[exif YCbCrCoefficients]
YCbCrPositioning Y and C positioning \[exif YCbCrPositioning]YCbCrSubsampling Subsampling ration of Y to C \[exif YCbCrSubsampling]YResolution Image resolution in height
direction\[exif YResolution]
Field Name Description Usage
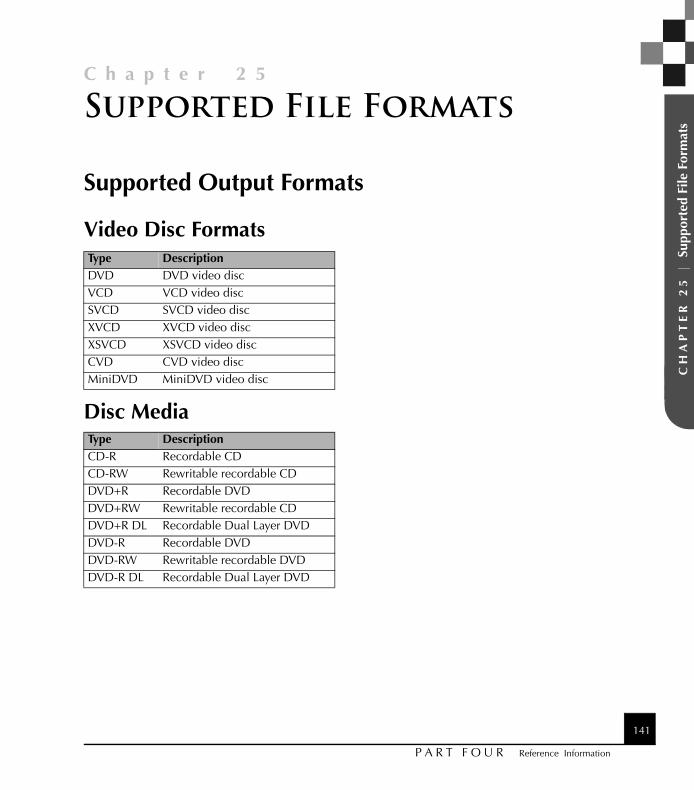
141
C h a p t e r 2 5
P A R T F O U R Reference Information
CH
AP
TE
R 2
5 |
Sup
port
ed F
ile F
orm
ats
Supported File Formats
Supported Output Formats
Video Disc Formats
Disc Media
Type DescriptionDVD DVD video discVCD VCD video discSVCD SVCD video discXVCD XVCD video discXSVCD XSVCD video discCVD CVD video discMiniDVD MiniDVD video disc
Type DescriptionCD-R Recordable CDCD-RW Rewritable recordable CDDVD+R Recordable DVDDVD+RW Rewritable recordable CDDVD+R DL Recordable Dual Layer DVDDVD-R Recordable DVDDVD-RW Rewritable recordable DVDDVD-R DL Recordable Dual Layer DVD
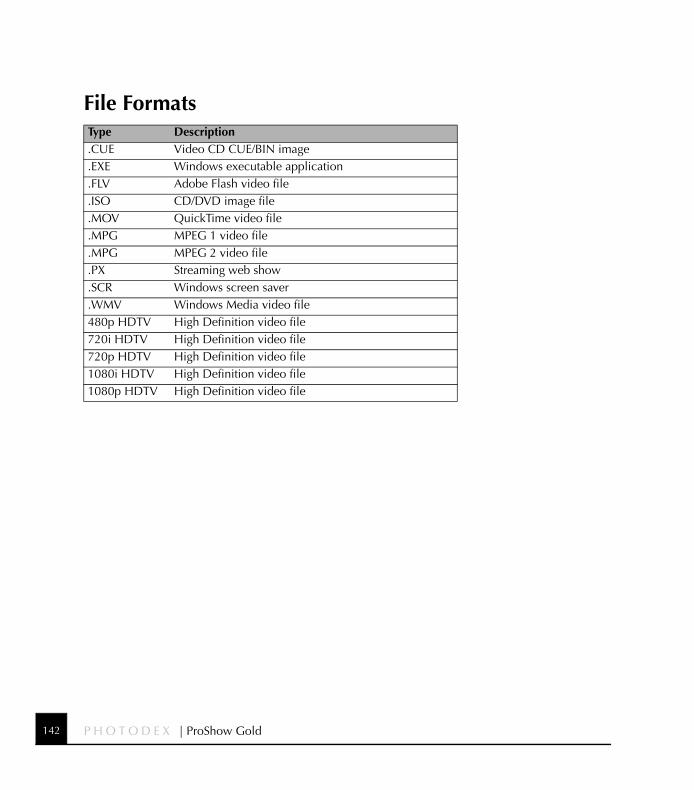
P H O T O D E X | ProShow Gold142
File FormatsType Description.CUE Video CD CUE/BIN image.EXE Windows executable application.FLV Adobe Flash video file.ISO CD/DVD image file.MOV QuickTime video file.MPG MPEG 1 video file.MPG MPEG 2 video file.PX Streaming web show.SCR Windows screen saver.WMV Windows Media video file480p HDTV High Definition video file720i HDTV High Definition video file720p HDTV High Definition video file1080i HDTV High Definition video file1080p HDTV High Definition video file
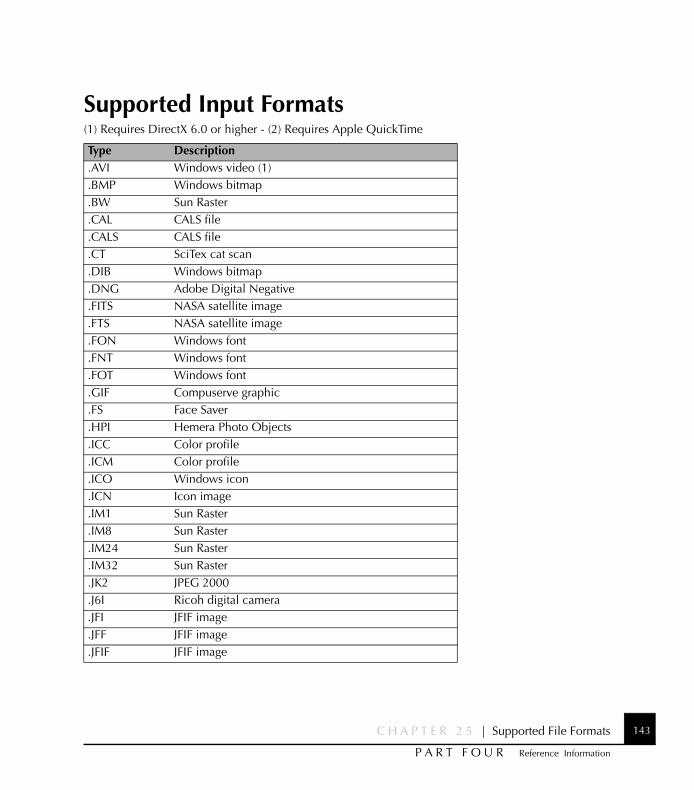
C H A P T E R 2 5 | Supported File Formats 143
P A R T F O U R Reference Information
Supported Input Formats(1) Requires DirectX 6.0 or higher - (2) Requires Apple QuickTime
Type Description.AVI Windows video (1).BMP Windows bitmap.BW Sun Raster.CAL CALS file.CALS CALS file.CT SciTex cat scan.DIB Windows bitmap.DNG Adobe Digital Negative.FITS NASA satellite image.FTS NASA satellite image.FON Windows font.FNT Windows font.FOT Windows font.GIF Compuserve graphic.FS Face Saver.HPI Hemera Photo Objects.ICC Color profile.ICM Color profile.ICO Windows icon.ICN Icon image.IM1 Sun Raster.IM8 Sun Raster.IM24 Sun Raster.IM32 Sun Raster.JK2 JPEG 2000.J6I Ricoh digital camera.JFI JFIF image.JFF JFIF image.JFIF JFIF image
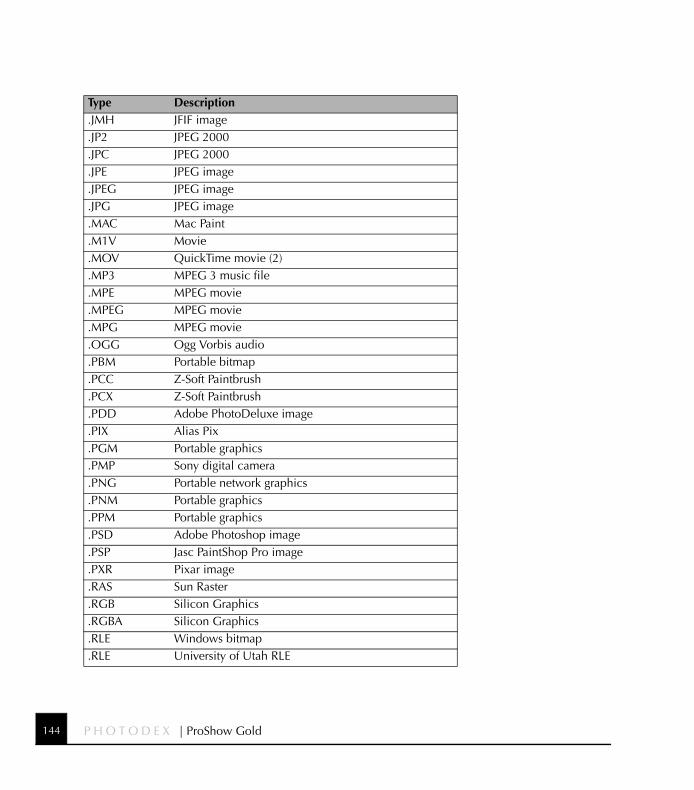
P H O T O D E X | ProShow Gold144
.JMH JFIF image
.JP2 JPEG 2000
.JPC JPEG 2000
.JPE JPEG image
.JPEG JPEG image
.JPG JPEG image
.MAC Mac Paint
.M1V Movie
.MOV QuickTime movie (2)
.MP3 MPEG 3 music file
.MPE MPEG movie
.MPEG MPEG movie
.MPG MPEG movie
.OGG Ogg Vorbis audio
.PBM Portable bitmap
.PCC Z-Soft Paintbrush
.PCX Z-Soft Paintbrush
.PDD Adobe PhotoDeluxe image
.PIX Alias Pix
.PGM Portable graphics
.PMP Sony digital camera
.PNG Portable network graphics
.PNM Portable graphics
.PPM Portable graphics
.PSD Adobe Photoshop image
.PSP Jasc PaintShop Pro image
.PXR Pixar image
.RAS Sun Raster
.RGB Silicon Graphics
.RGBA Silicon Graphics
.RLE Windows bitmap
.RLE University of Utah RLE
Type Description
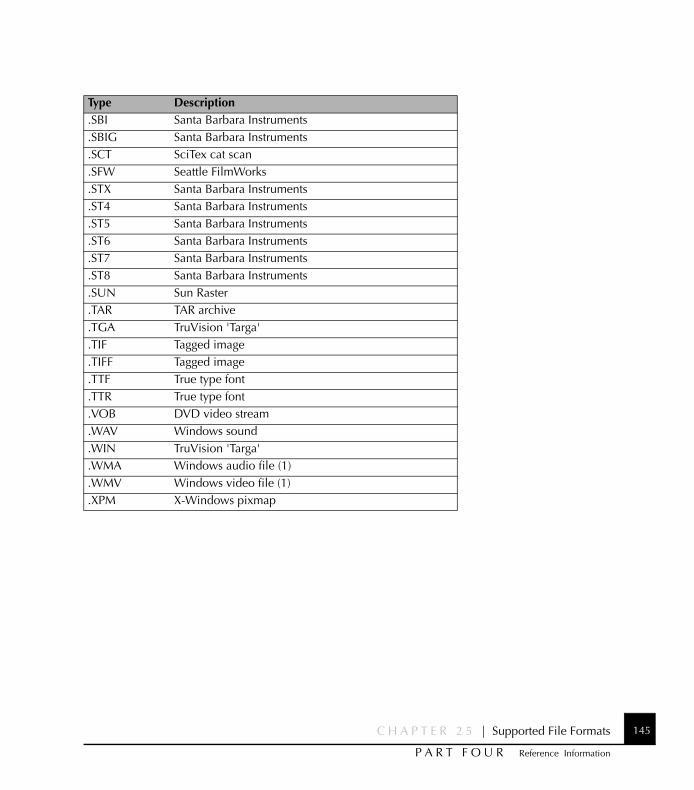
C H A P T E R 2 5 | Supported File Formats 145
P A R T F O U R Reference Information
.SBI Santa Barbara Instruments
.SBIG Santa Barbara Instruments
.SCT SciTex cat scan
.SFW Seattle FilmWorks
.STX Santa Barbara Instruments
.ST4 Santa Barbara Instruments
.ST5 Santa Barbara Instruments
.ST6 Santa Barbara Instruments
.ST7 Santa Barbara Instruments
.ST8 Santa Barbara Instruments
.SUN Sun Raster
.TAR TAR archive
.TGA TruVision 'Targa'
.TIF Tagged image
.TIFF Tagged image
.TTF True type font
.TTR True type font
.VOB DVD video stream
.WAV Windows sound
.WIN TruVision 'Targa'
.WMA Windows audio file (1)
.WMV Windows video file (1)
.XPM X-Windows pixmap
Type Description

P H O T O D E X | ProShow Gold146

147
C h a p t e r 2 6
P A R T F O U R Reference Information
CH
AP
TE
R 2
6 |
Tel
evis
ion
Stan
dard
s by
Television Standards by
Country
Table of Television StandardsThe following table shows the television standard used in each country. This standard should be chosen when using video output in ProShow to ensure compatibility with televisions and DVD players in your country.
The SECAM standard is similar to PAL, and in most cases will be supported by selecting the PAL format in ProShow
Country TV StandardAbu Dhabi PALAfghanistan PAL (SECAM)Alaska NTSCAlbania PALAlgeria PALAmerican Samoa NTSCAndorra PAL(SECAM)Angola PALAntigua NTSCAntilles (Dutch) NTSCArgentina PALAruba NTSCAscension Island PALAustralia PALAustria PALAzores PALAzerbaijan PAL (SECAM)Bahamas NTSC
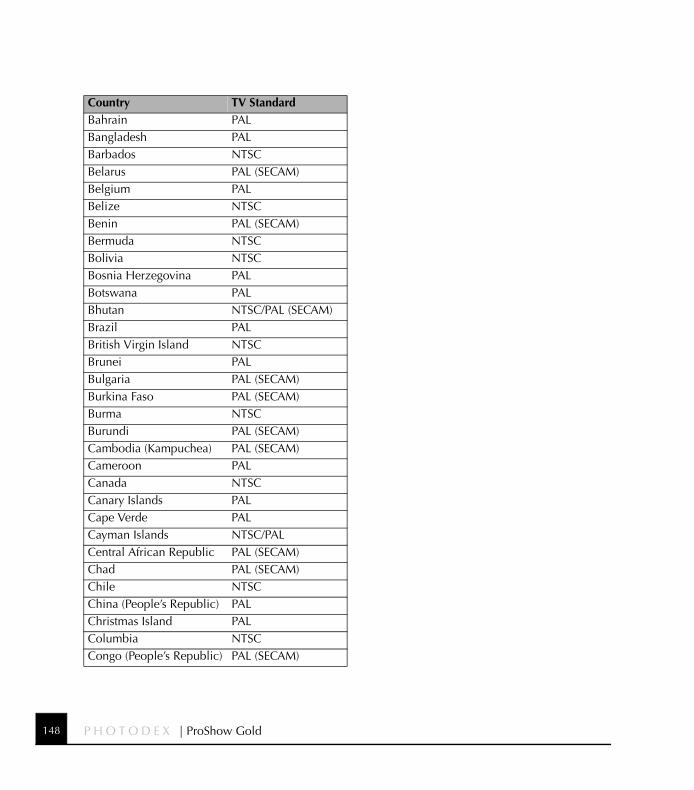
P H O T O D E X | ProShow Gold148
Bahrain PALBangladesh PALBarbados NTSCBelarus PAL (SECAM)Belgium PALBelize NTSCBenin PAL (SECAM)Bermuda NTSCBolivia NTSCBosnia Herzegovina PALBotswana PALBhutan NTSC/PAL (SECAM)Brazil PALBritish Virgin Island NTSCBrunei PALBulgaria PAL (SECAM)Burkina Faso PAL (SECAM)Burma NTSCBurundi PAL (SECAM)Cambodia (Kampuchea) PAL (SECAM)Cameroon PALCanada NTSCCanary Islands PALCape Verde PALCayman Islands NTSC/PALCentral African Republic PAL (SECAM)Chad PAL (SECAM)Chile NTSCChina (People’s Republic) PALChristmas Island PALColumbia NTSCCongo (People’s Republic) PAL (SECAM)
Country TV Standard
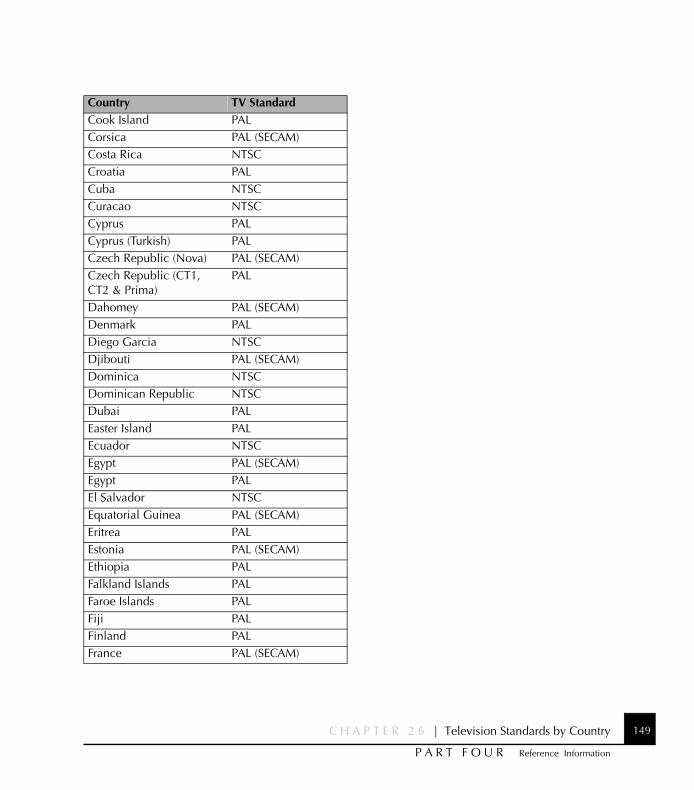
C H A P T E R 2 6 | Television Standards by Country 149
P A R T F O U R Reference Information
Cook Island PALCorsica PAL (SECAM)Costa Rica NTSCCroatia PALCuba NTSCCuracao NTSCCyprus PALCyprus (Turkish) PALCzech Republic (Nova) PAL (SECAM)Czech Republic (CT1, CT2 & Prima)
PAL
Dahomey PAL (SECAM)Denmark PALDiego Garcia NTSCDjibouti PAL (SECAM)Dominica NTSCDominican Republic NTSCDubai PALEaster Island PALEcuador NTSCEgypt PAL (SECAM)Egypt PALEl Salvador NTSCEquatorial Guinea PAL (SECAM)Eritrea PALEstonia PAL (SECAM)Ethiopia PALFalkland Islands PALFaroe Islands PALFiji PALFinland PALFrance PAL (SECAM)
Country TV Standard
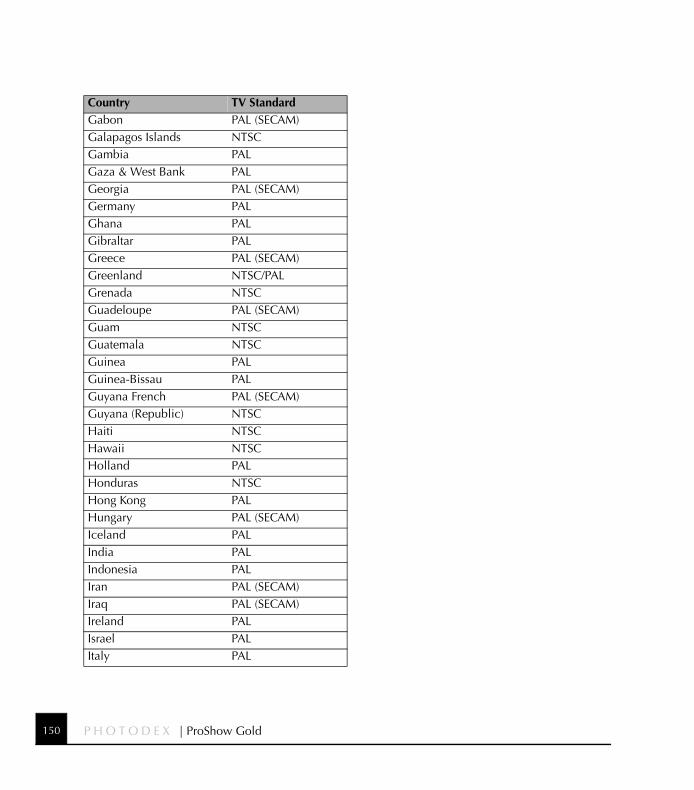
P H O T O D E X | ProShow Gold150
Gabon PAL (SECAM)Galapagos Islands NTSCGambia PALGaza & West Bank PALGeorgia PAL (SECAM)Germany PALGhana PALGibraltar PALGreece PAL (SECAM)Greenland NTSC/PALGrenada NTSCGuadeloupe PAL (SECAM)Guam NTSCGuatemala NTSCGuinea PALGuinea-Bissau PALGuyana French PAL (SECAM)Guyana (Republic) NTSCHaiti NTSCHawaii NTSCHolland PALHonduras NTSCHong Kong PALHungary PAL (SECAM)Iceland PALIndia PALIndonesia PALIran PAL (SECAM)Iraq PAL (SECAM)Ireland PALIsrael PALItaly PAL
Country TV Standard

C H A P T E R 2 6 | Television Standards by Country 151
P A R T F O U R Reference Information
Ivory Coast PAL (SECAM)Jamaica NTSCJapan NTSCJohnston Islands NTSCJordan PALKampuchea PAL (SECAM)Kazakhstan PAL (SECAM)Kenya PALKiribati PALKorea North PAL (SECAM)Korea South NTSCKuwait PALKyrgyzstan PAL (SECAM)Laos PALLatvia PALLebanon PALLeeward Islands NTSCLesotho PALLiberia PALLibya PAL (SECAM)Liechtenstein PALLithuania PALLithuania PAL (SECAM)Luxembourg PALLuxembourg PAL (SECAM)Macau PALMacedonia PALMadagascar PAL (SECAM)Madeira PALMalawi PALMalaysia PALMaldives PAL
Country TV Standard
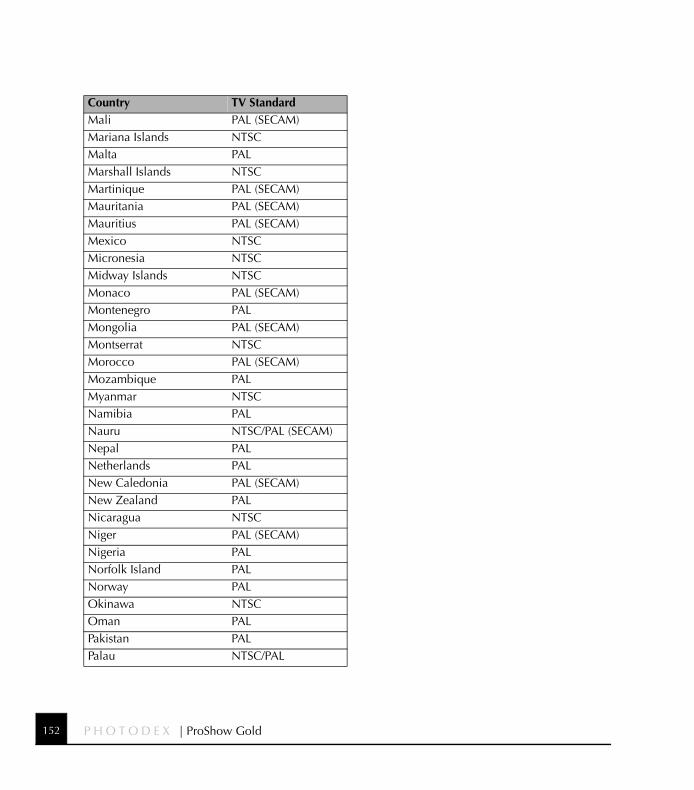
P H O T O D E X | ProShow Gold152
Mali PAL (SECAM)Mariana Islands NTSCMalta PALMarshall Islands NTSCMartinique PAL (SECAM)Mauritania PAL (SECAM)Mauritius PAL (SECAM)Mexico NTSCMicronesia NTSCMidway Islands NTSCMonaco PAL (SECAM)Montenegro PALMongolia PAL (SECAM)Montserrat NTSCMorocco PAL (SECAM)Mozambique PALMyanmar NTSCNamibia PALNauru NTSC/PAL (SECAM)Nepal PALNetherlands PALNew Caledonia PAL (SECAM)New Zealand PALNicaragua NTSCNiger PAL (SECAM)Nigeria PALNorfolk Island PALNorway PALOkinawa NTSCOman PALPakistan PALPalau NTSC/PAL
Country TV Standard
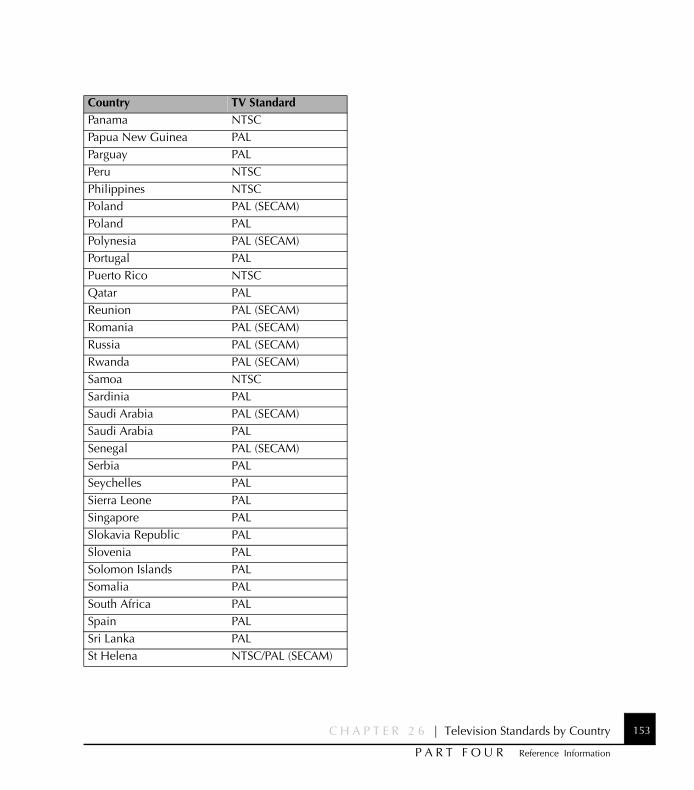
C H A P T E R 2 6 | Television Standards by Country 153
P A R T F O U R Reference Information
Panama NTSCPapua New Guinea PALParguay PALPeru NTSCPhilippines NTSCPoland PAL (SECAM)Poland PALPolynesia PAL (SECAM)Portugal PALPuerto Rico NTSCQatar PALReunion PAL (SECAM)Romania PAL (SECAM)Russia PAL (SECAM)Rwanda PAL (SECAM)Samoa NTSCSardinia PALSaudi Arabia PAL (SECAM)Saudi Arabia PALSenegal PAL (SECAM)Serbia PALSeychelles PALSierra Leone PALSingapore PALSlokavia Republic PALSlovenia PALSolomon Islands PALSomalia PALSouth Africa PALSpain PALSri Lanka PALSt Helena NTSC/PAL (SECAM)
Country TV Standard
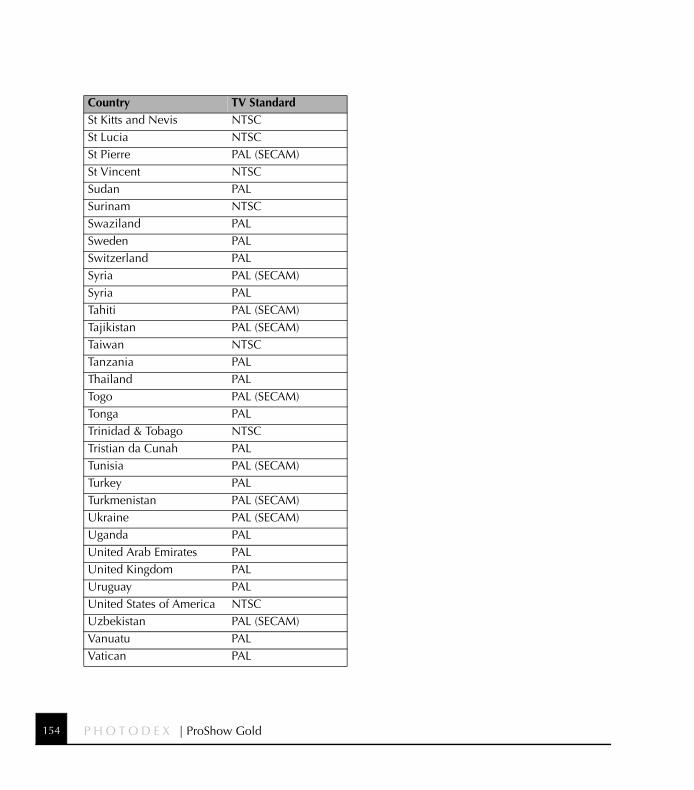
P H O T O D E X | ProShow Gold154
St Kitts and Nevis NTSCSt Lucia NTSCSt Pierre PAL (SECAM)St Vincent NTSCSudan PALSurinam NTSCSwaziland PALSweden PALSwitzerland PALSyria PAL (SECAM)Syria PALTahiti PAL (SECAM)Tajikistan PAL (SECAM)Taiwan NTSCTanzania PALThailand PALTogo PAL (SECAM)Tonga PALTrinidad & Tobago NTSCTristian da Cunah PALTunisia PAL (SECAM)Turkey PALTurkmenistan PAL (SECAM)Ukraine PAL (SECAM)Uganda PALUnited Arab Emirates PALUnited Kingdom PALUruguay PALUnited States of America NTSCUzbekistan PAL (SECAM)Vanuatu PALVatican PAL
Country TV Standard
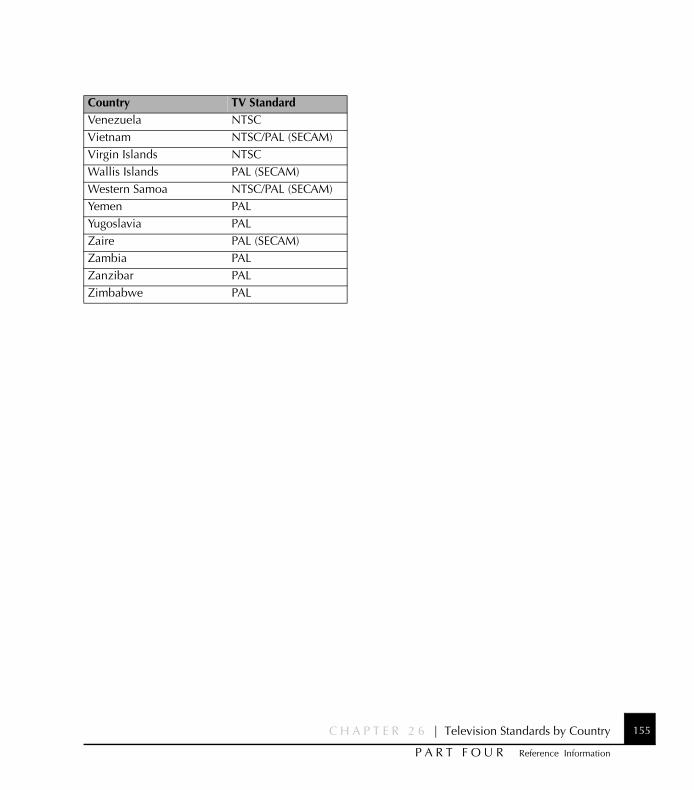
C H A P T E R 2 6 | Television Standards by Country 155
P A R T F O U R Reference Information
Venezuela NTSCVietnam NTSC/PAL (SECAM)Virgin Islands NTSCWallis Islands PAL (SECAM)Western Samoa NTSC/PAL (SECAM)Yemen PALYugoslavia PALZaire PAL (SECAM)Zambia PALZanzibar PALZimbabwe PAL
Country TV Standard

P H O T O D E X | ProShow Gold156

157
C h a p t e r 2 7
P A R T F O U R Reference Information
CH
AP
TE
R 2
7 |
Not
es
Notes

P H O T O D E X | ProShow Gold158
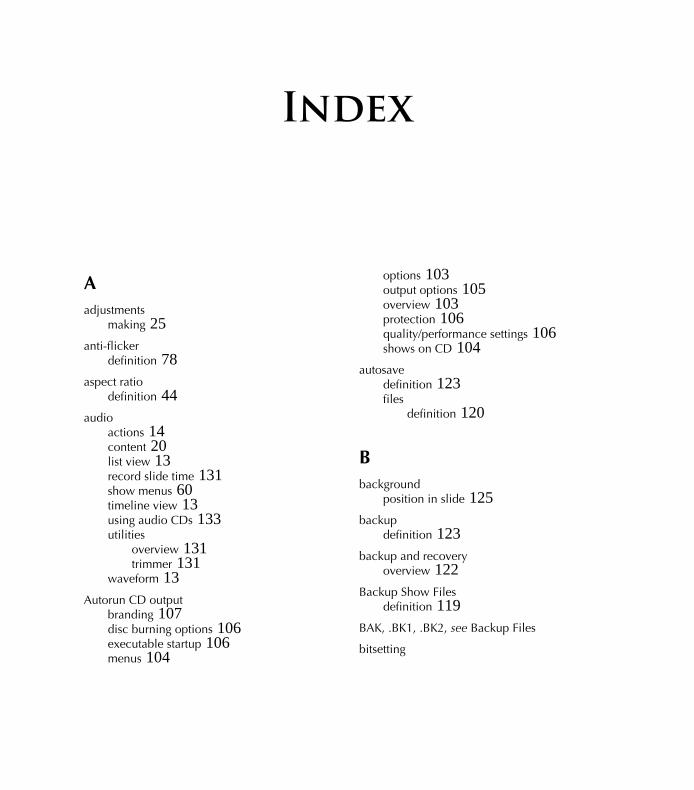
Aadjustments
making 25anti-flicker
definition 78aspect ratio
definition 44audio
actions 14content 20list view 13record slide time 131show menus 60timeline view 13using audio CDs 133utilities
overview 131trimmer 131
waveform 13Autorun CD output
branding 107disc burning options 106executable startup 106menus 104
options 103output options 105overview 103protection 106quality/performance settings 106shows on CD 104
autosavedefinition 123files
definition 120
Bbackground
position in slide 125backup
definition 123backup and recovery
overview 122Backup Show Files
definition 119BAK, .BK1, .BK2, see Backup Files
bitsetting
Index
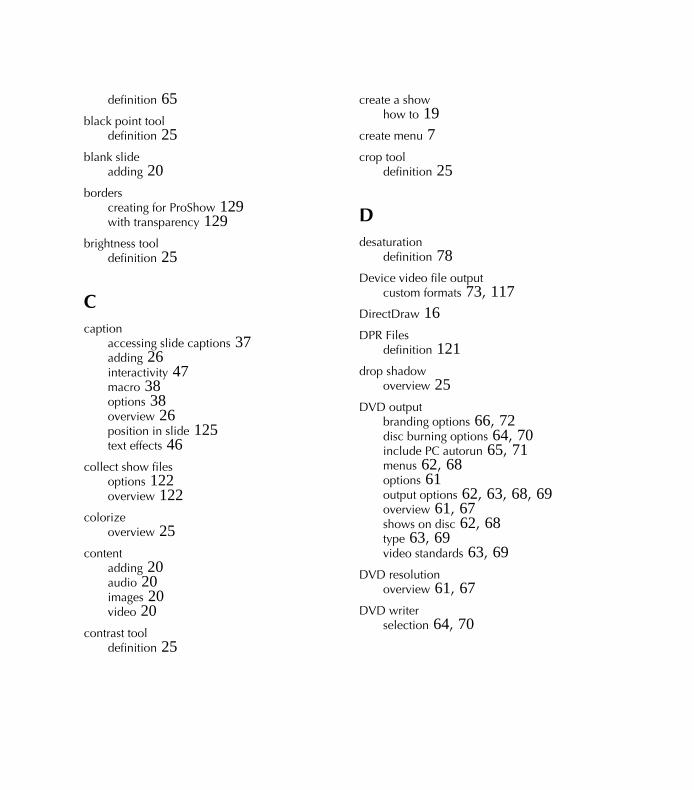
2
definition 65black point tool
definition 25blank slide
adding 20borders
creating for ProShow 129with transparency 129
brightness tooldefinition 25
Ccaption
accessing slide captions 37adding 26interactivity 47macro 38options 38overview 26position in slide 125text effects 46
collect show filesoptions 122overview 122
colorizeoverview 25
contentadding 20audio 20images 20video 20
contrast tooldefinition 25
create a showhow to 19
create menu 7crop tool
definition 25
Ddesaturation
definition 78Device video file output
custom formats 73, 117DirectDraw 16DPR Files
definition 121drop shadow
overview 25DVD output
branding options 66, 72disc burning options 64, 70include PC autorun 65, 71menus 62, 68options 61output options 62, 63, 68, 69overview 61, 67shows on disc 62, 68type 63, 69video standards 63, 69
DVD resolutionoverview 61, 67
DVD writerselection 64, 70
Eediting
accessing 34options 34overview 34tools 24, 34
effectskeyframe
overview 35overview 35
E-mail Show ouputbranding 100e-mail composition 100included shows 98menus 98options 97output options 99overview 97protection 100quality/performance settings 100
Executable outputbranding 112included shows 110menus 110options 109output options 111overview 109protection 112quality/performance settings 112
external editorsoverview 15
Ffavorites list 6
overview 9file list 6
actions 9overview 9sorting 10viewing modes 9
fill framedefinition 17
fill safe zonedefinition 17
find missing filesoverview 121
fit framedefinition 17
fit to safe zonedefinition 17
Flash outputadding shows to web page 96definition 81included shows 94menus in show 94options 93output options 95overview 93video bitrate 96web page options 96
fly indefinition 46
fly outdefinition 46
folder list 6overview 9
4
HHD-DVD
definition 81help menu
about 4accessing 7
hue tooldefinition 25
Iimage
content 20image editor 15image effects, see effects
images settingsdefault 17
installationfrom CD 1from download 1how to 1
internal rendering resolutionmaximum 16
Intro Showoverview 111
ISO and CUE/BIN Filesdefinition 120
ISO Creationoverview 65
LLAY Files
definition 120layers
adding 126adding to slides 21applying motion 127copying 126, 127
across slides 127definition 125editing 126overview 32, 125removing 126uses 125
light box 6overview 10toolbar 10
Mmain toolbar 6
icons 8overview 8
matching optionsoverview 36
menu bar 6list of menus 7overview 7
Menu Filesoverview 119
menus, see show menus
MNU Filesdefinition 120
motion
accessing 35copy features 37examples 35matching options 36options 36overview 35
motion styletypes 37
MPEG 1definition 81
MPEG 2definition 81
Ooffset
definition 39outline
overview 25output
choosing a format 51files
overview 119overview 51shows sizes 52video clip options 64, 70
Ppan
definition 26how to 26
panesfloating 6moving 6
resizing 6restore default 7
PC autorun outputoverview 65, 71
Photodex online 4Photodex Presenter
controls 53frequently asked questions 53overview 52right-click menu 53safety and security 54
precision previewdefinition 31
preferencesaccessing 15appearances 14editors 15internet and e-mail 15miscellaneous 16overview 14sound effects 18web browser 16
Presenter, see Photodex Presenter
preview windowcontrols 11overview 11work area 6
previewingfull screen 28how to 27overview 27
ProShow Show Filesoverview 119types 119
6
PSH Filedefinition 119
PST Filesdefinition 120
PX Filesdefinition 120
px*.tmp, _px*.tmp, seeTemporary Files
PXC Filesdefinition 120
QQuickTime
definition 81
Rrecord slide time
definition 132record voice-over
definition 39recovery
definition 123red-eye tool
definition 24registration
about 3how to 3overview 1
revert to previous versionsaccessing 123
rotatedefinition 26
how to 26
Ssafe zone
overview 44save a show
how to 27Save Tracks from a CD
how to 133scaling
definiton 17Screen Saver output
branding 115included shows 114options 113output options 114overview 113protection 115quality/performance settings 115
sharpen tooldefinition 25
show backgroundoverview 49tools 49
Show Cache Foldersdefinition 121
show captionaccessing 45overview 45tools 45
show componentsoverview 20
Show Content Files
definition 119show defaults
accessing 17overview 17
Show Filesoverview 119
show menusaccessing 55captions 59music 60navigation settings 57options 56overview 55page
custom music 60shows in menu 57
show optionsaccessing 43background 49captions 45categories 43overview 43soundtrack 47
show outputoverview 28to create 28
Show Sharingaccount creation 86color profiles 86menus 84options 83overview 83services 86shows in menu 84uploading 85
show summary 6
overview 11show title and thumbnail
overview 44size meter 11sizing pane 6slide
adding 29blank slide 29layers 30title slide 29
copying 30customizing 29, 30deleting 30moving 30options 31setting timing 22
slide backgroundaccessing 40enable and disable 40image 41options 40overview 40tools 41
slide list 6actions 12, 29audio 13controls 13in-depth 29list view 12overview 12timeline view 12
slide optionsaccessing 31categories 32controls 31layers tab 32
8
slide settingsdefault 17
slide timeline 6sound
custom settings 39editor 15options 39overview 39trim audio 39
sound effectsaccessing 18preferences 18
soundtrackaccessing 47custom settings 40overview 47
startup optionsfolder 17
stretch to framedefinition 17
supporte-mail and phone 4overview 4to access 4
system requirements 3
Ttask monitor 6
overview 10Temporary Files
definition 120Temporary Video Files
definition 121
text effectsoverview 46
THM Filesdefinition 120
timingcaption 39overview 21
tip of the dayenable and disable 5
title slideadding 21
transitionedges 16random 24randomize 24recently used 23setting 23setting timing 22timing 22types and variations 23types of fades 23
transparencyborders 129supported file types 128
trim audiodefinition 39
Uupgrades
check for 3how to 4overview 3
user’s guide 4
Vvideo
clip settings 33in-depth 134looping 33speed 33timeline 134trim clip 33utilities
overview 131trimmer 134
volume 33Video CD output
branding options 80disc burning options 78include PC autorun 79menu type 78menus 76options 75output options 77overview 75shows on disc 76still shows 75type 77video shows 75
video editor 15Video File output
compression 74, 82custom formats 81display options 74, 82formats 81options 74, 82overview 81quality 82resolution 74, 82type 82
Wwatermark
overview 50Web Show output
color profiles 90menus 88options 87output options 89overview 87placing shows on your site 90protection 90quality/performace settings 90shows in menu 88uploading
options and info 91troubleshooting 92
white point tooldefinition 25
window layoutsloading 7overview 7saving 7
Windows Mediadefinition 81
work areaabout 5panes
overview 6window layouts 7
work flowshow creation 19
Workspace Filesoverview 119

10
Zzoom
definition 26how to 26