Embed Size (px)
Citation preview
2 © Millbank Investments Ltd, 2012
Design and produce business documents BNIT Edition (Office 2010)
This book supports BSBITU306A Design and produce business documents in the Business Services Training Package and Financial Services Training Package.
© Copyright Millbank Investments Ltd, NZ, June 2012
The Software Publications Writing Team
ISBN 978-1-922012-25-8
Disclaimer
All rights reserved. No part of this publication may be reproduced or transmitted in any form or by any means, electronic or mechanical, including photocopying, scanning, recording, or any information storage and retrieval system, without permission in writing from Millbank Investments Ltd, NZ or Software Publications Pty Ltd. No patent liability is assumed with respect to the use of the information contained herein. While every precaution has been taken in the preparation of this book, the publisher and authors assume no responsibility for errors or omissions. Neither is any liability assumed for damages resulting from the use of the information contained herein. Software Publications Pty Ltd (ABN 75 078 026 150) Head Office - Sydney Unit 10 171 Gibbes Street Chatswood NSW 2067
Phone: (02) 9882 1000 Fax: (02) 9882 1800 Australia Toll Free Numbers: Phone: 1 800 146 542 Fax: 1 800 146 539 Web address:
www.SoftwarePublications.com.au
Published and printed in Australia
© Millbank Investments Ltd, 2012 3
Introduction
This unit standard requires learners to use a variety of programs to create business documents. The following programs have been included:
• Microsoft Word 2010 • Microsoft Excel 2010 • Microsoft Access 2010 • Microsoft PowerPoint 2010 The BSBITU306A part of the book starts on page 262. It has been arranged into workplace scenarios with tasks using the above programs. A task sheet is included at the beginning of each section.
The following is a synopsis of the book. Section 1
Care Cosmetics – This includes the creation of Word documents such as letters, memos, faxes, and mail merges along with the creation and use of templates and styles. It also includes basic spreadsheets and charts.
Section 2
Care Cosmetics (continued) – Word and Excel documents are copied and pasted, linked and embedded in this section. The student also learns how to update links. A simple database is opened and viewed and then one is created which is used in a Word mail merge. A PowerPoint presentation combining previous tasks ends this scenario.
Section 3
Hillside College – In this section students use different functions in Excel within a student grade worksheet. Charts will be created which will be linked to a Word memo. Next, a template is compiled for future student results. A PowerPoint presentation with transitions is used to link the information and to show these results at a teachers’ meeting.
Section 4
Accurate Training Pty Ltd – For this computer training company students use a database to create queries, e.g. student details, exam results, extract specific students etc. These queries will be used to perform a mail merge and to analyse data in Excel. The PivotChart feature is used to arrange data to display results. Charts created in Excel are linked to a Word document.
Section 5
Main Mags Bookstore – This challenging scenario with advanced features and tasks requires the student to use the four Microsoft programs to produce documents for the opening of a new store. This includes more difficult database features and queries, Word hyperlinking, spreadsheet calculations and creation of a presentation.
This workbook is prefaced with the following introductory sections: • Office Procedures and Document Planning • Word 2010 Introduction • PowerPoint 2010 Introduction • Access 2010 Introduction

34 © Millbank Investments Ltd, 2012
Windows Explorer – Windows XP
1 Click on the Start button .
2 Select All Programs, then Accessories.
3 Click on Windows Explorer.
Drives and Folders will be displayed on the left (in the Folders Pane) and folders and files on the right.
If the Folders Pane is not displayed, click on the Folders button on the Standard Buttons toolbar.
The Folders Pane The directory tree is displayed in the Folders Pane at the left of the Windows Explorer window. Click on a drive or folder in the Folders Pane to display the content at the right of the window. When a is displayed next to a yellow folder it indicates that there are subfolders to be displayed. When a is displayed next to a yellow folder it indicates that all subfolders are displayed. If My Computer displays as click on the next to My Computer to display all drives.
Directory Tree
Folders Pane

© Millbank Investments Ltd, 2012 35
Drives Drives are identified by icons, such as the following.
• Desktop
• C: drive (hard drive)
• USB drive
• D: drive (CD/DVD)
• Network drive
My Documents Folder My Documents is the default storage location when saving documents.
It is usually located at the top of the directory tree in the Folders Pane.
Viewing Files and Folders on a Network If your computer is connected to a Local Area Network (LAN), you may be able to view and possibly access files and folders stored on that network. This will depend on how your network is set up and what rights your network administrator has given you.
If you have access to a network drive, it will be listed under in the directory tree.
Creating New Folders
1 Select the location for the new folder in the Folders Pane, e.g. My Documents.
2 Choose [File] New, Folder.
3 A new folder is displayed in the list of files. The New Folder box is ready for you to type in the name of the new folder.
4 Type a new name for the folder and press Enter.
Renaming Files or Folders Renaming a file or folder only changes the name; it does not alter the contents of either.
1 Select the file to be renamed in the Details Pane.
2 Choose [File] Rename.
3 Enter the new name for the file.
4 Press Enter.
Deleting a File
1 Select the file to be deleted.
2 Press the Delete key.
3 Click on Yes to send the file to the Recycle Bin.
Closing Windows Explorer Choose [File] Close to exit Windows Explorer.
F2
Delete
36 © Millbank Investments Ltd, 2012
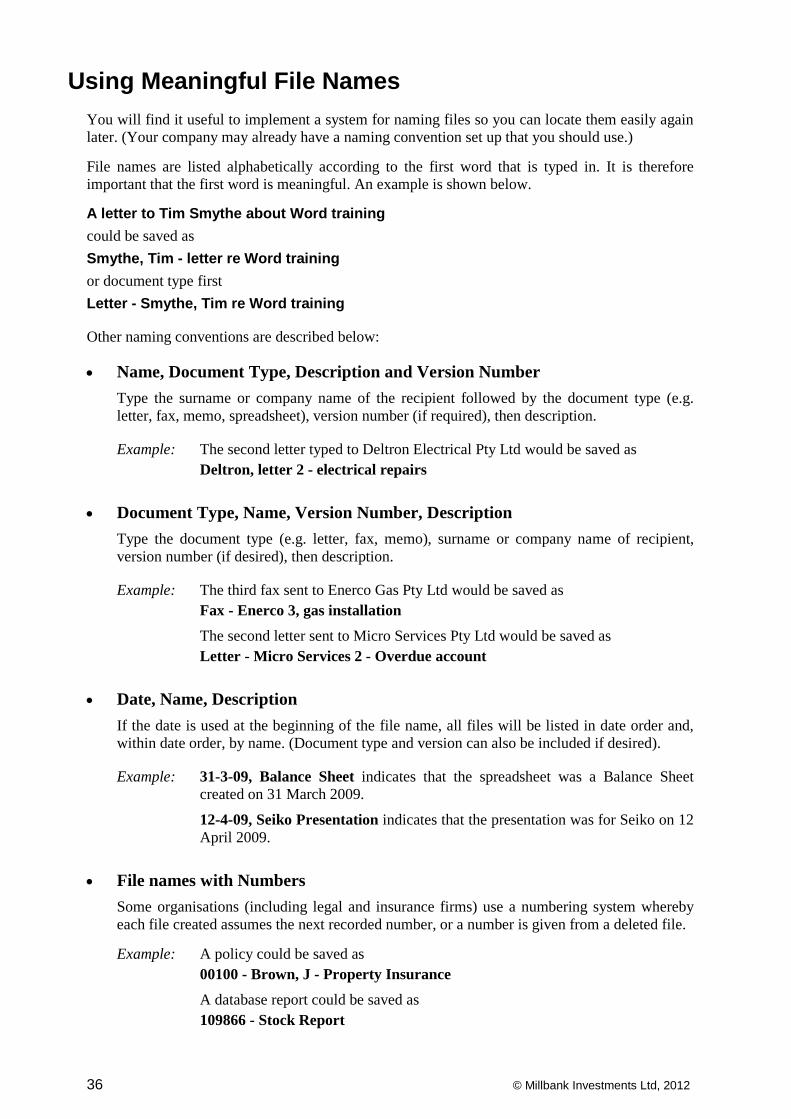
Using Meaningful File Names You will find it useful to implement a system for naming files so you can locate them easily again later. (Your company may already have a naming convention set up that you should use.)
File names are listed alphabetically according to the first word that is typed in. It is therefore important that the first word is meaningful. An example is shown below.
A letter to Tim Smythe about Word training could be saved as Smythe, Tim - letter re Word training or document type first Letter - Smythe, Tim re Word training
Other naming conventions are described below:
• Name, Document Type, Description and Version Number
Type the surname or company name of the recipient followed by the document type (e.g. letter, fax, memo, spreadsheet), version number (if required), then description.
Example: The second letter typed to Deltron Electrical Pty Ltd would be saved as Deltron, letter 2 - electrical repairs
• Document Type, Name, Version Number, Description
Type the document type (e.g. letter, fax, memo), surname or company name of recipient, version number (if desired), then description.
Example: The third fax sent to Enerco Gas Pty Ltd would be saved as Fax - Enerco 3, gas installation The second letter sent to Micro Services Pty Ltd would be saved as Letter - Micro Services 2 - Overdue account
• Date, Name, Description
If the date is used at the beginning of the file name, all files will be listed in date order and, within date order, by name. (Document type and version can also be included if desired).
Example: 31-3-09, Balance Sheet indicates that the spreadsheet was a Balance Sheet created on 31 March 2009.
12-4-09, Seiko Presentation indicates that the presentation was for Seiko on 12 April 2009.
• File names with Numbers
Some organisations (including legal and insurance firms) use a numbering system whereby each file created assumes the next recorded number, or a number is given from a deleted file.
Example: A policy could be saved as 00100 - Brown, J - Property Insurance
A database report could be saved as 109866 - Stock Report
© Millbank Investments Ltd, 2012 37
Organising and Prioritising The ability to organise and prioritise work is an essential skill. When you are given several different tasks to perform you need to decide which task to perform first. Ensure you write down every task required, as soon as it is allocated to you.
In many cases you will be given a deadline – a due date at which a project must be completed by. It is important that you record this due date and work out how much time you need to allocate to it. You can then organise your work tasks so that the deadline is met. Deadlines should be negotiated with your supervisor or manager. You will both need to ensure the timeframe allocated to the task will be sufficient to complete it to the required standard.
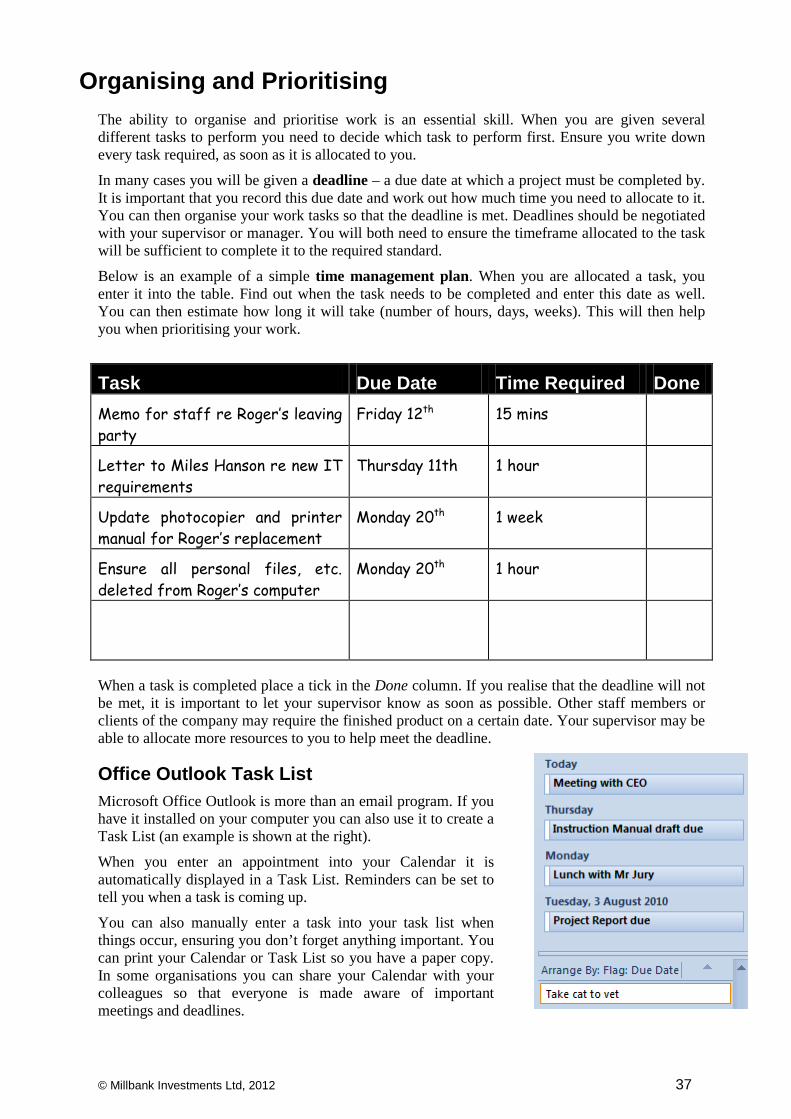
Below is an example of a simple time management plan. When you are allocated a task, you enter it into the table. Find out when the task needs to be completed and enter this date as well. You can then estimate how long it will take (number of hours, days, weeks). This will then help you when prioritising your work.
Task Due Date Time Required Done Memo for staff re Roger’s leaving party
Friday 12th 15 mins
Letter to Miles Hanson re new IT requirements
Thursday 11th 1 hour
Update photocopier and printer manual for Roger’s replacement
Monday 20th 1 week
Ensure all personal files, etc. deleted from Roger’s computer
Monday 20th 1 hour
When a task is completed place a tick in the Done column. If you realise that the deadline will not be met, it is important to let your supervisor know as soon as possible. Other staff members or clients of the company may require the finished product on a certain date. Your supervisor may be able to allocate more resources to you to help meet the deadline.
Office Outlook Task List Microsoft Office Outlook is more than an email program. If you have it installed on your computer you can also use it to create a Task List (an example is shown at the right).
When you enter an appointment into your Calendar it is automatically displayed in a Task List. Reminders can be set to tell you when a task is coming up.
You can also manually enter a task into your task list when things occur, ensuring you don’t forget anything important. You can print your Calendar or Task List so you have a paper copy. In some organisations you can share your Calendar with your colleagues so that everyone is made aware of important meetings and deadlines.
66 © Millbank Investments Ltd, 2012
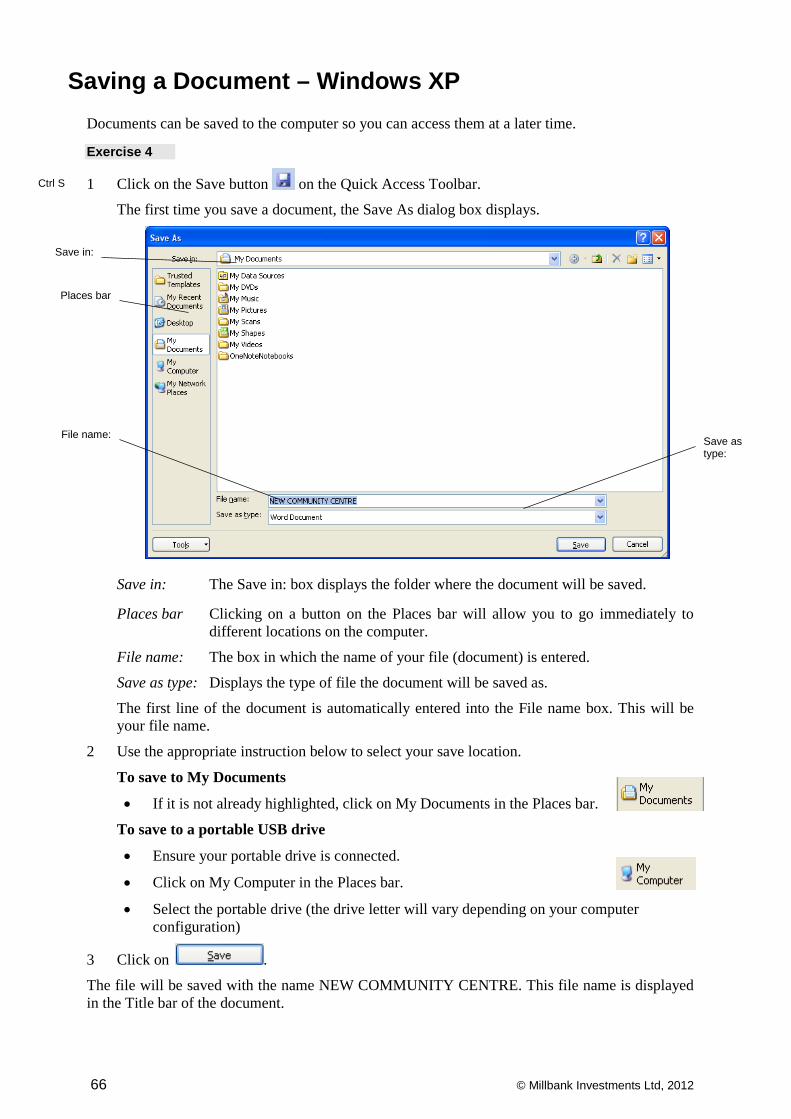
Saving a Document – Windows XP Documents can be saved to the computer so you can access them at a later time.
Exercise 4
1 Click on the Save button on the Quick Access Toolbar.
The first time you save a document, the Save As dialog box displays.
Save in: The Save in: box displays the folder where the document will be saved.
Places bar Clicking on a button on the Places bar will allow you to go immediately to different locations on the computer.
File name: The box in which the name of your file (document) is entered.
Save as type: Displays the type of file the document will be saved as.
The first line of the document is automatically entered into the File name box. This will be your file name.
2 Use the appropriate instruction below to select your save location.
To save to My Documents
• If it is not already highlighted, click on My Documents in the Places bar.
To save to a portable USB drive
• Ensure your portable drive is connected.
• Click on My Computer in the Places bar.
• Select the portable drive (the drive letter will vary depending on your computer configuration)
3 Click on .
The file will be saved with the name NEW COMMUNITY CENTRE. This file name is displayed in the Title bar of the document.
Places bar
Save in:
File name: Save as type:
Ctrl S

© Millbank Investments Ltd, 2012 67
Saving a Document – Windows 7
When a document is saved with a file name it is stored on your computer system and can be opened at a later time.
Exercise 5
1 Click on the Save button on the Quick Access Toolbar.
The first time you save a document, the Save As dialog box appears waiting for you to type the file name for the document.
The first line of the document is automatically entered into the File name: box. This will be your file name.
2 Use the appropriate instruction below to select your save location.
To save to the Documents Library
• If it is not already selected, click on Documents in the list of Libraries in the Navigation Pane.
To save to a portable USB drive
• Ensure your portable drive is connected.
• Select the portable drive from the Navigation Pane (the drive letter will vary depending on your computer configuration)
3 Click on .
The file will be saved with the name NEW COMMUNITY CENTRE. This file name is displayed in the Title bar of the document.
Navigation Pane
File name:
Save as type:
Ctrl S
Current save location
180 © Millbank Investments Ltd, 2012
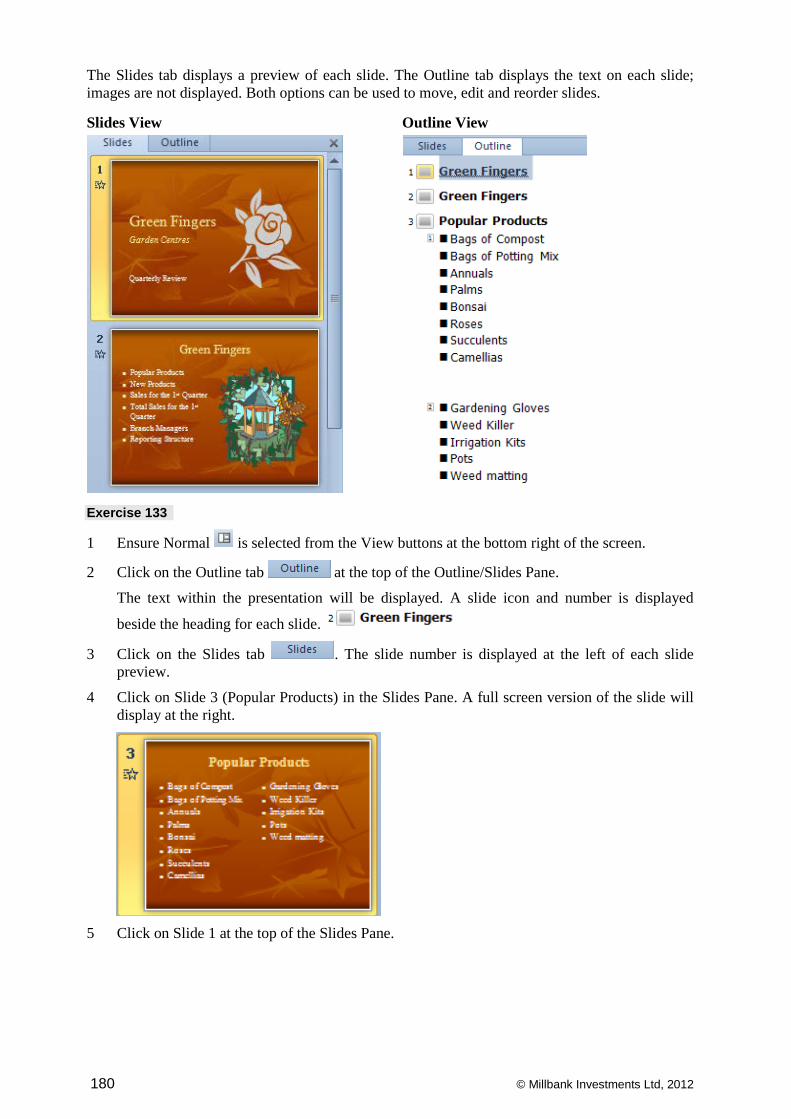
The Slides tab displays a preview of each slide. The Outline tab displays the text on each slide; images are not displayed. Both options can be used to move, edit and reorder slides.
Slides View Outline View
Exercise 133
1 Ensure Normal is selected from the View buttons at the bottom right of the screen.
2 Click on the Outline tab at the top of the Outline/Slides Pane.
The text within the presentation will be displayed. A slide icon and number is displayed
beside the heading for each slide.
3 Click on the Slides tab . The slide number is displayed at the left of each slide preview.
4 Click on Slide 3 (Popular Products) in the Slides Pane. A full screen version of the slide will display at the right.
5 Click on Slide 1 at the top of the Slides Pane.

© Millbank Investments Ltd, 2012 181
6 Click on the Slide Sorter button at the bottom right of the screen. All the slides in the presentation will be displayed as icons. This view is used primarily to reorder slides.
7 Click on the Slide Show button to run the file as an on screen presentation. The first slide will be displayed full screen.
8 Once all the text has appeared on the first slide, click the left mouse button or press the Space
bar. The next slide in the presentation will be displayed.
9 Keep pressing the Space bar or clicking the mouse to move from slide to slide – remember to wait until the text or objects have finished appearing before moving to the next slide. You can press the Esc key at the top left of the keyboard to exit the presentation at any time.
10 Once you reach the end of the slide show the screen will appear black with the following text at the top of the screen . Click with the mouse to exit the slide show.
11 Click on the Normal View button .
Backstage View Exercise 134
1 Click on the File tab . The Backstage view of the current document will be displayed.
2 Ensure is selected from the menu at the left of Backstage. This displays information about the file such as previous versions, permissions set, file size.
3 To exit from the Backstage and display the document again, click on the Home tab of the
Ribbon (or click on again).

224 © Millbank Investments Ltd, 2012
Viewing a Query A query displays only the records which meet certain criteria. In the following exercise, a query will be opened which displays data about books supplied by the Paper Books company. Exercise 187
1 Double click on to open the query in Datasheet View. This displays the results of the query. Note that only books supplied by Paper Books are listed.
2 Check the Home Ribbon is displayed.
3 Click on the arrow at the bottom of the View button .
4 Select Design View . The query design will be displayed.
5 Note that the words “Paper Books” are included in the query grid . This is how the query is limited to only show books from this supplier.
6 Click on to close the query.
7 Click on and select to close the Stock Database.

© Millbank Investments Ltd, 2012 225
Different Types of Databases There are two main types of databases – flat file and relational.
Flat File (Single Table) All data is stored in and accessed from one table. Data is often repeated; in the example below, the details about the sales reps is repeated. This is because one sales rep will look after multiple companies.
Company Code
Company Name
Contact Phone Sales Rep Sales Rep Extension
Sales Rep Bonus
SAT001 Strings and Things
Judy Wallace (08) 55873342 Brian Granger Ex4456 10%
TSS001 The Stationery Shoppe
Dinesh Gupter (08) 3452 9879 Brian Granger Ex4456 10%
MST001 Mainly Stationery
Nigel Planner (08) 70776324 Brian Granger Ex4456 10%
LAN001 Letters Anonymous
Angela Wong (08) 66034445 Tony Ryan Ex5509 15%
TCA001 Table Cards Peter Major (08) 70091123 Tony Ryan Ex5509 15%
Relational (Multiple Tables) Data is divided into separate tables, all of which are related to each other. Links between the tables enable data to be used simultaneously from different tables.
Sales Rep Table
Sales Rep Code Sales Rep Name Sales Rep Extension
Sales Rep Bonus
SR001BG Brian Granger Ex4456 10%
SR002TR Tony Ryan Ex5509 15%
Company Table
Company Code Company Name Contact Phone Sales Rep Code
SAT001 Strings and Things Judy Wallace (08) 55873342 SR001BG
TSS001 The Stationery Shoppe Dinesh Gupter (08) 3452 9879 SR001BG
MST001 Mainly Stationery Nigel Planner (08) 70776324 SR001BG
LAN001 Letters Anonymous Angela Wong (08) 66034445 SR002TR
TCA001 Table Cards Peter Major (08) 70091123 SR002TR
Relationships In a relational database, tables are linked together. This is referred to as a ‘relationship’ between the tables. In order for two tables to be related they must share a common element. In the example above, the Sales Rep table can be related to the Company table because they share a common element: the Sales Rep Code.
Sales Rep Table Company Table Sales Rep Code Sales Rep Name Sales Rep Extension Sales Rep Bonus
Company Code Company Name Contact Phone Sales Rep Code
A relationship allows data to be pulled from the different tables and manipulated to produce the required information. This information is then presented in queries or reports.
© Millbank Investments Ltd, 2012 253
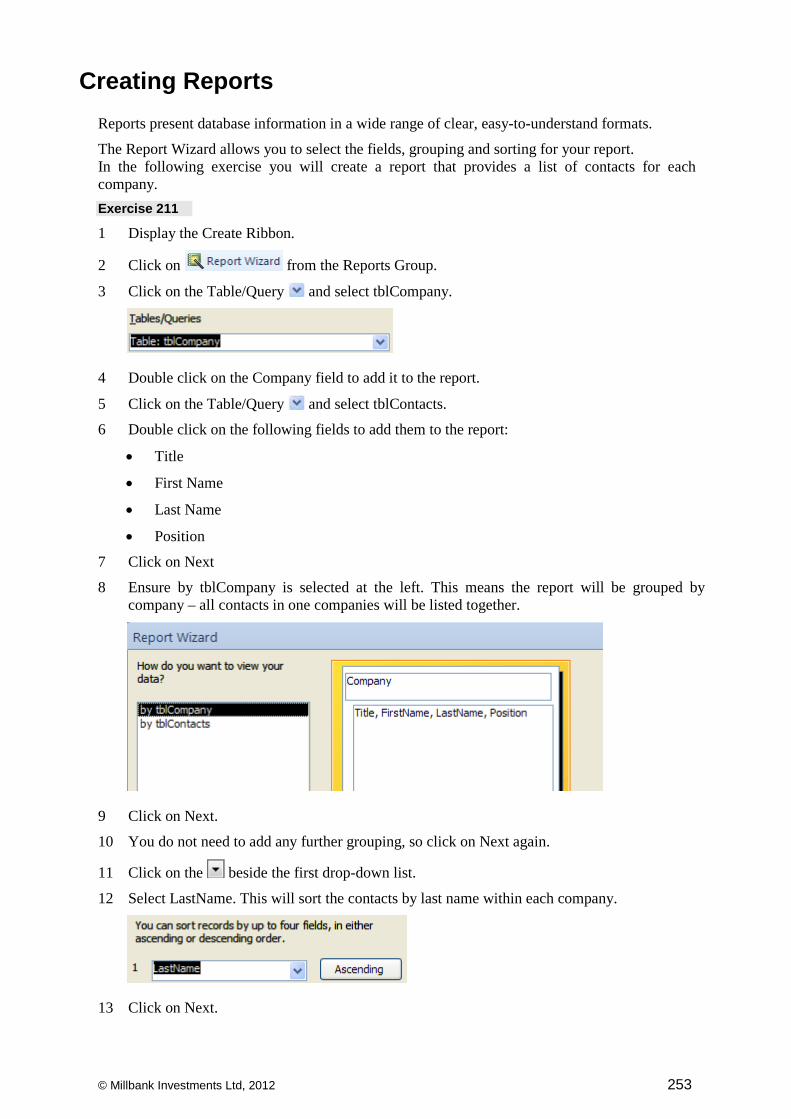
Creating Reports Reports present database information in a wide range of clear, easy-to-understand formats.
The Report Wizard allows you to select the fields, grouping and sorting for your report. In the following exercise you will create a report that provides a list of contacts for each company. Exercise 211
1 Display the Create Ribbon.
2 Click on from the Reports Group.
3 Click on the Table/Query and select tblCompany.
4 Double click on the Company field to add it to the report.
5 Click on the Table/Query and select tblContacts.
6 Double click on the following fields to add them to the report:
• Title
• First Name
• Last Name
• Position
7 Click on Next
8 Ensure by tblCompany is selected at the left. This means the report will be grouped by company – all contacts in one companies will be listed together.
9 Click on Next.
10 You do not need to add any further grouping, so click on Next again.
11 Click on the beside the first drop-down list.
12 Select LastName. This will sort the contacts by last name within each company.
13 Click on Next.

254 © Millbank Investments Ltd, 2012
14 Select Stepped and Portrait.
15 Click on Next.
16 Enter the report name: rptContacts by Company.
17 Click on Finish. The report will display in print preview.
18 Scroll down and view the report. Note that the report is organised by company. Within each company, the contacts are sorted by contact last name.
19 Click on the Close Print Preview button . The report will be displayed in Design View.
Editing Reports The report needs to be amended. The title in the report header needs to be edited and the Last Name field is in the wrong position. Exercise 212
1 Select the text in the Report Header at the top of the report:
2 Type: Contact Details by Company Name and click outside of the text box.
3 In the Page Header section click on the Last Name field. This is the unbound control for the Last Name field .
4 Hold down the Shift key and click on the LastName field in the Detail section. This is the bound control for the LastName field.
5 Release the Shift key.