Embed Size (px)
Citation preview
EDIT 2014 – User manual Page 1 / 59 Document Version 2.7
EUROPEAN COMMISSION
EUROSTAT Directorate G: Global business statistics Unit G-2: Structural Business Statistics and global value chains
Quick guide to validation procedure
using
data validation tool EDIT
for
SBS, IFATS, BD
Date: 19/05/2017
Version: 2.7
EDIT version: 14.0.4.10.3
Contact: [email protected]
Public: Yes
EDIT 2014 – User manual Page 2 / 59 Document Version 2.7
Table of contents
1. INTRODUCTION .............................................................................................................. 4 1.1 Purpose of the Document ............................................................................................... 4 1.2 Scope of the Document ................................................................................................... 4
2. STARTING EDIT 2014 ...................................................................................................... 5 2.1 Starting the EDIT 2014 server.......................................................................................... 5
3. LOGGING INTO EDIT ....................................................................................................... 6 3.1 Login to SBS domain ........................................................................................................ 6 3.2 Login to IFATS domain ..................................................................................................... 6 3.3 Login to BD domain ......................................................................................................... 6 3.4 Login to all three domains ............................................................................................... 6
4. EDIT FOR SBS ................................................................................................................. 8 4.1 Importing a dataset ......................................................................................................... 8
4.1.1 Importing a dataset – Home menu – Datasets menu ............................................. 8 4.1.2 Importing a dataset – Selecting the data source .................................................... 9 4.1.3 Importing a dataset – Selecting the data format .................................................. 11 4.1.4 Importing the file Growth and Inflation rates – Selecting the data format .......... 11 4.1.5 Exchange rates file ................................................................................................ 12 4.1.6 Naming the datasets and launching the import process ...................................... 12 4.1.7 Loading new lists of codes ..................................................................................... 13
4.2 Validation procedure ..................................................................................................... 14 4.2.1 Single Series validation .......................................................................................... 15 4.2.2 Inter-Series validation ........................................................................................... 20 4.2.3 Year-to-Year validation .......................................................................................... 22 4.2.4 Validation job list ................................................................................................... 23
4.3 Reporting ....................................................................................................................... 24 4.3.1 Automatic Generation of Error Reports ................................................................ 25 4.3.2 Confauditerrorlog .................................................................................................. 26 4.3.3 Confauditoutput .................................................................................................... 26 4.3.4 Errorlog .................................................................................................................. 28
5. EDIT FOR IFATS............................................................................................................. 29 5.1 Importing a dataset ....................................................................................................... 29
5.1.1 Importing a dataset – Home menu – Datasets menu ........................................... 29 5.1.2 Importing a dataset – Selecting the data source .................................................. 30 5.1.3 Importing a dataset – Selecting the data format .................................................. 31 5.1.4 Naming the datasets and launching the import process ...................................... 31
5.2 Validation procedure ..................................................................................................... 32 5.2.1 Single Series Validation ......................................................................................... 33 5.2.2 Inter-Series validation 1G-1G2 .............................................................................. 38 5.2.3 Inter-Series validation 1G-SBS ............................................................................... 39 5.2.4 Validation job list ................................................................................................... 40
5.3 Reporting ....................................................................................................................... 41 5.3.1 Automatic Generation of Error Reports ................................................................ 42 5.3.2 Confauditerrorlog .................................................................................................. 42 5.3.3 Dataconfidentiality ................................................................................................ 42 5.3.4 Errorlog .................................................................................................................. 44
6. EDIT FOR BD ................................................................................................................. 45 6.1 Importing a dataset ....................................................................................................... 45
6.1.1 Importing data set from Home menu and running Single Series validation ......... 45
EDIT 2014 – User manual Page 3 / 59 Document Version 2.7
6.1.2 Importing a dataset from the Datasets menu ...................................................... 46 6.1.3 Importing a dataset – Selecting the data format .................................................. 48 6.1.4 Importing Growth rates – Selecting the data format ............................................ 48 6.1.5 Naming the datasets and launching the import process ...................................... 49
6.2 Validation procedure ..................................................................................................... 50 6.2.1 Single Series validation .......................................................................................... 52 6.2.2 Inter-Series validation ........................................................................................... 53 6.2.3 Year-to-Year validation for Series 9B and 9F ......................................................... 54 6.2.4 Validation job list ................................................................................................... 55
6.3 Reporting ....................................................................................................................... 56 6.3.1 Automatic Generation of Error Reports ................................................................ 57 6.3.2 Confauditerrorlog .................................................................................................. 57 6.3.3 Confauditoutput .................................................................................................... 58 6.3.4 Errorlog .................................................................................................................. 59
EDIT 2014 – User manual Page 4 / 59 Document Version 2.7
1. Introduction
1.1 Purpose of the Document
The purpose of this document is to provide quick guidelines for using the EDIT validation tool.
The guide shows how to use the tool on the SBS (Structural Business Statistics) domain, Inward
FATS (Foreign Affiliates Statistics), and BD (Business Demography). Illustrations in this
document only refer to MS Windows environment.
1.2 Scope of the Document
This document provides the users with a short description of the four steps towards the SBS,
IFATS and BD data validation:
1. Starting EDIT 2014
2. Importing data
3. Processing validation jobs:
a. Single Series,
b. Inter-Series, and
c. Year-to-Year validation
4. Reporting
EDIT 2014 – User manual Page 5 / 59 Document Version 2.7
2. Starting EDIT 2014
2.1 Starting the EDIT 2014 server
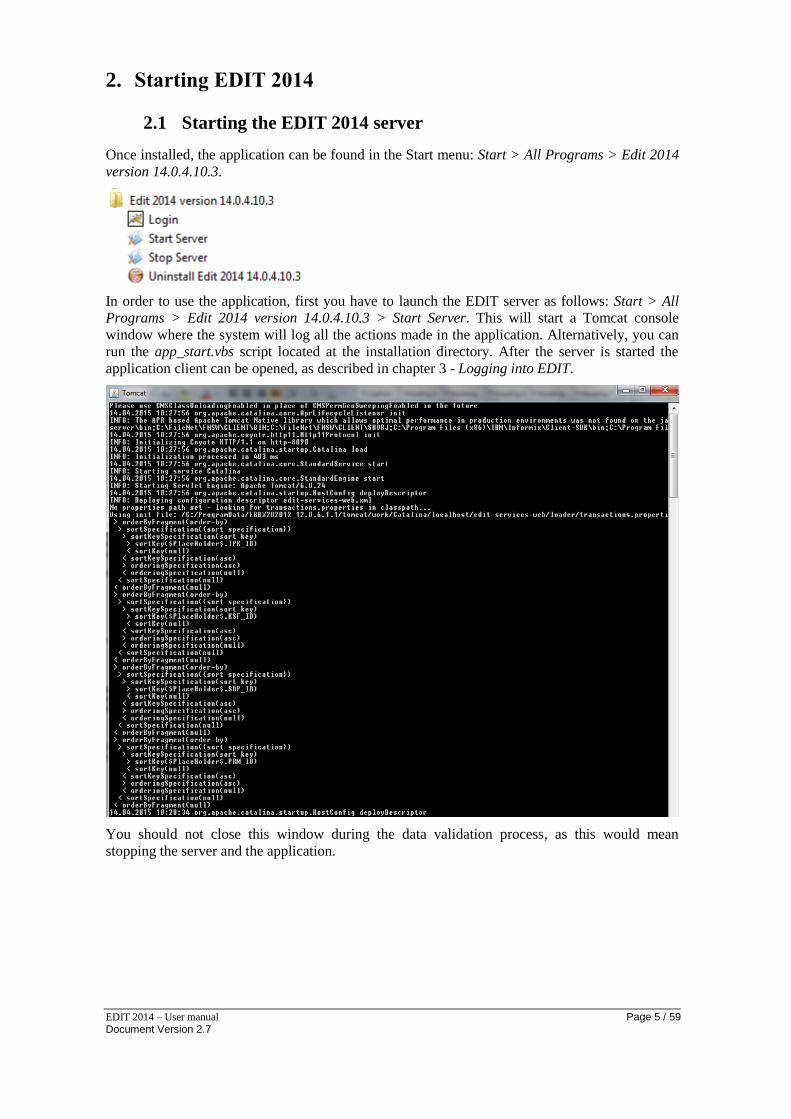
Once installed, the application can be found in the Start menu: Start > All Programs > Edit 2014
version 14.0.4.10.3.
In order to use the application, first you have to launch the EDIT server as follows: Start > All
Programs > Edit 2014 version 14.0.4.10.3 > Start Server. This will start a Tomcat console
window where the system will log all the actions made in the application. Alternatively, you can
run the app_start.vbs script located at the installation directory. After the server is started the
application client can be opened, as described in chapter 3 - Logging into EDIT.
You should not close this window during the data validation process, as this would mean
stopping the server and the application.
EDIT 2014 – User manual Page 6 / 59 Document Version 2.7
3. Logging into EDIT
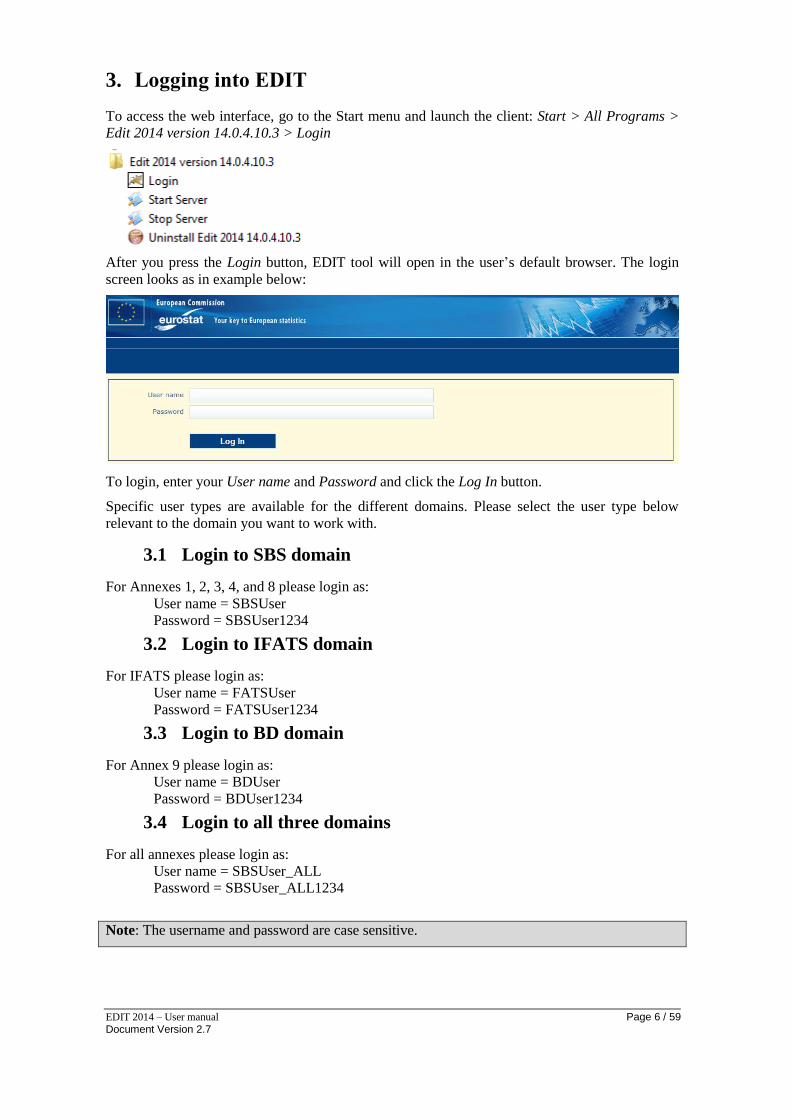
To access the web interface, go to the Start menu and launch the client: Start > All Programs >
Edit 2014 version 14.0.4.10.3 > Login
After you press the Login button, EDIT tool will open in the user’s default browser. The login
screen looks as in example below:
To login, enter your User name and Password and click the Log In button.
Specific user types are available for the different domains. Please select the user type below
relevant to the domain you want to work with.
3.1 Login to SBS domain
For Annexes 1, 2, 3, 4, and 8 please login as:
User name = SBSUser
Password = SBSUser1234
3.2 Login to IFATS domain
For IFATS please login as:
User name = FATSUser
Password = FATSUser1234
3.3 Login to BD domain
For Annex 9 please login as:
User name = BDUser
Password = BDUser1234
3.4 Login to all three domains
For all annexes please login as:
User name = SBSUser_ALL
Password = SBSUser_ALL1234
Note: The username and password are case sensitive.
EDIT 2014 – User manual Page 7 / 59 Document Version 2.7
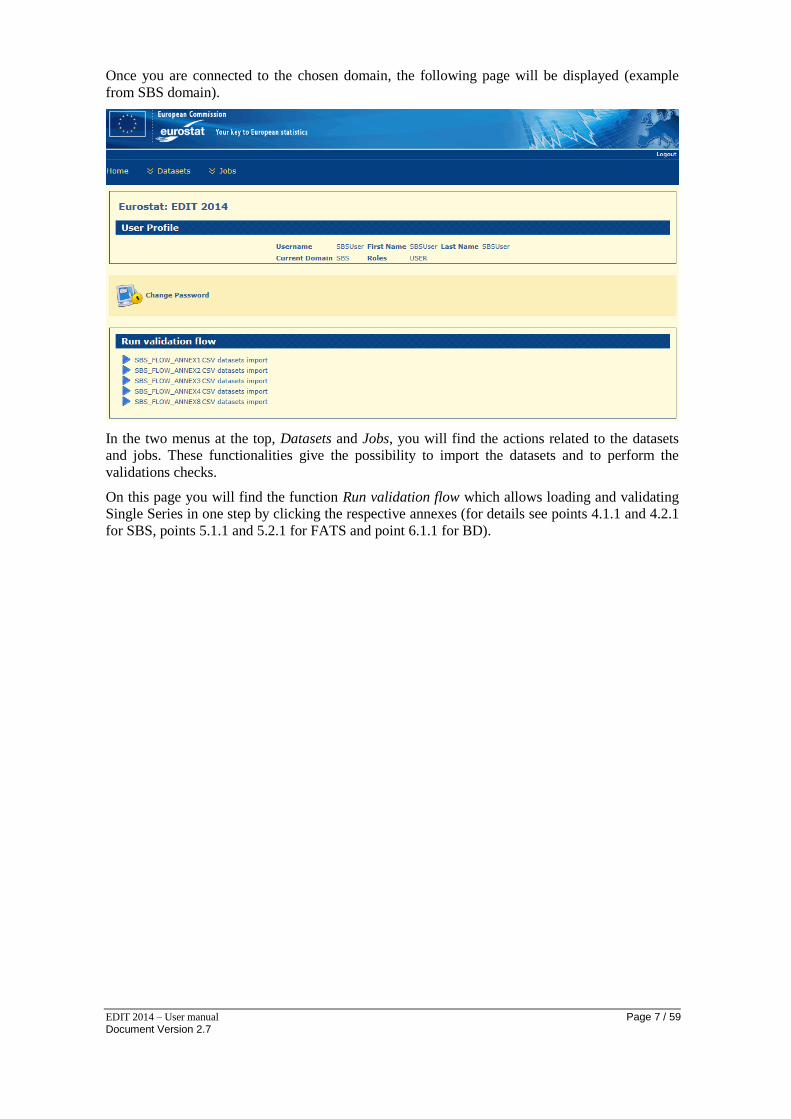
Once you are connected to the chosen domain, the following page will be displayed (example
from SBS domain).
In the two menus at the top, Datasets and Jobs, you will find the actions related to the datasets
and jobs. These functionalities give the possibility to import the datasets and to perform the
validations checks.
On this page you will find the function Run validation flow which allows loading and validating
Single Series in one step by clicking the respective annexes (for details see points 4.1.1 and 4.2.1
for SBS, points 5.1.1 and 5.2.1 for FATS and point 6.1.1 for BD).
EDIT 2014 – User manual Page 8 / 59 Document Version 2.7
4. EDIT for SBS
4.1 Importing a dataset
Importing the datasets is the first action to be done when starting a validation procedure. The data
to be validated must be loaded into EDIT to become a dataset.
A dataset is based on a format. For example, the data to be validated will have the SBS_DATA
format, whereas the Growth and Inflation rate dataset will use the SBSRATES format.
4.1.1 Importing a dataset – Home menu – Datasets menu
There are two possibilities of importing a dataset.
1st possibility:
Data can be imported directly from the Home menu by using function Run validation flow. Single
Series validation checks will also be run automatically (for details see point 4.2.1).
Datasets imported for these automated Single Series validation can also be used for running the
other types of validations (Inter-Series and Year-to-Year).
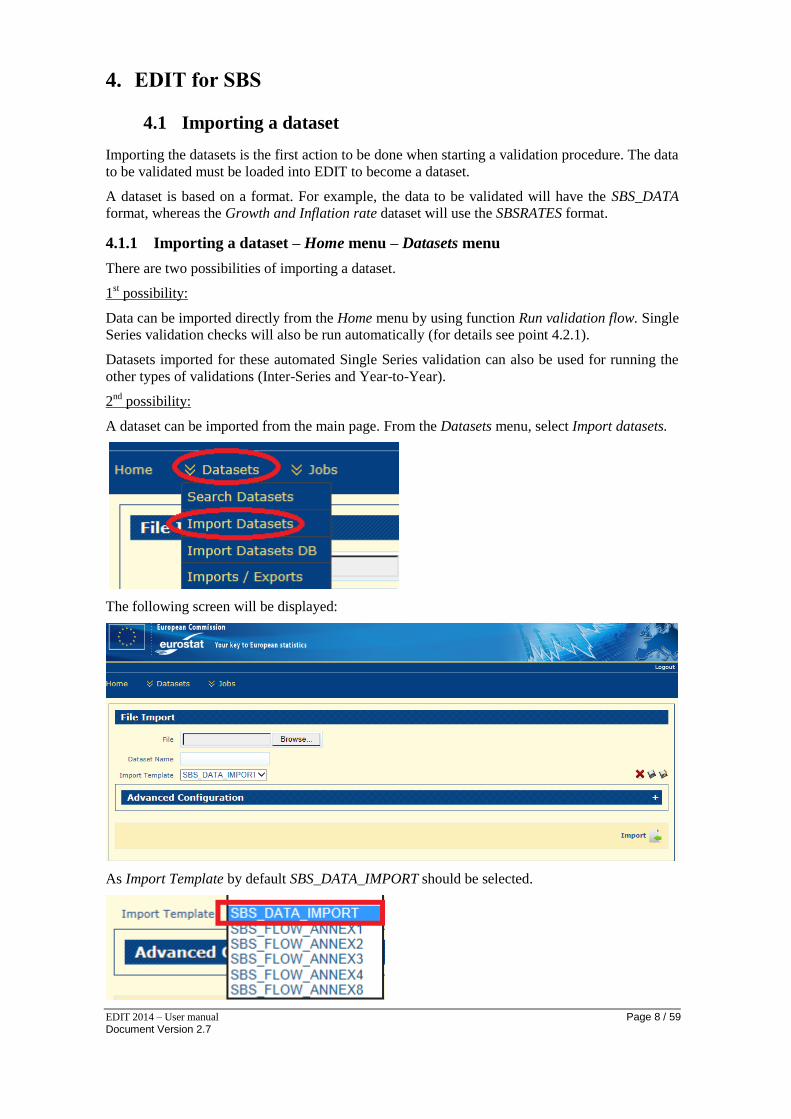
2nd
possibility:
A dataset can be imported from the main page. From the Datasets menu, select Import datasets.
The following screen will be displayed:
As Import Template by default SBS_DATA_IMPORT should be selected.
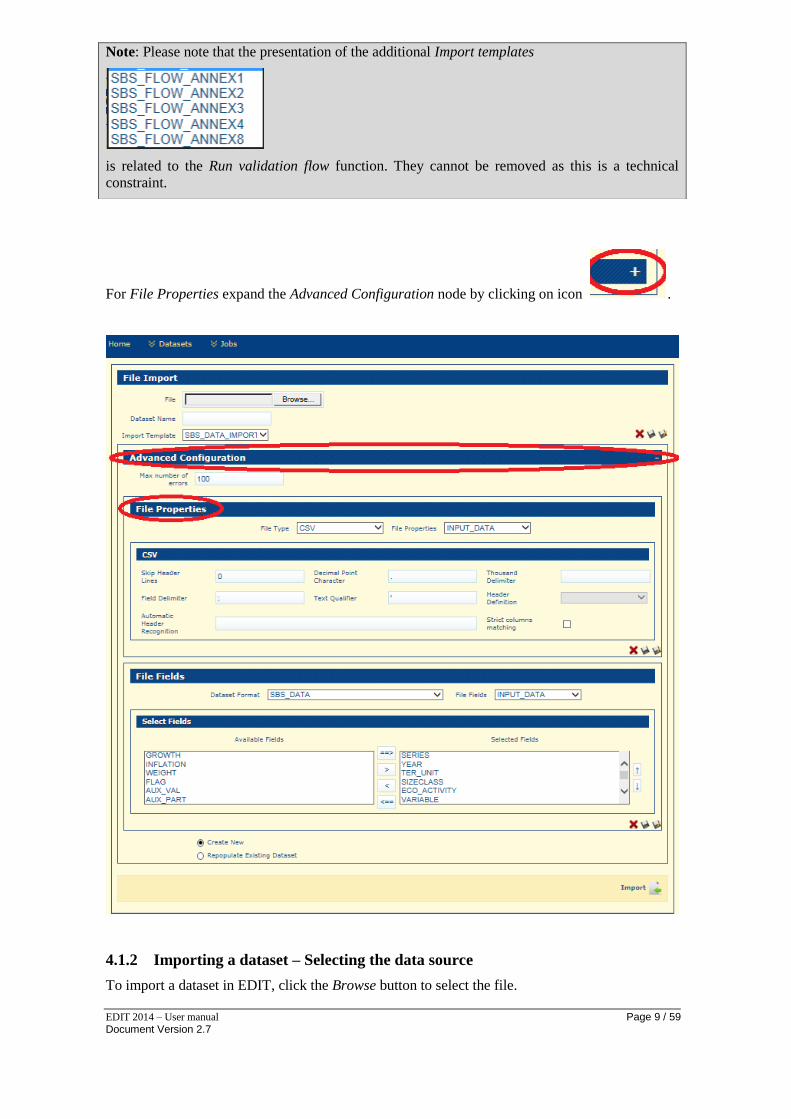
EDIT 2014 – User manual Page 9 / 59 Document Version 2.7
For File Properties expand the Advanced Configuration node by clicking on icon .
4.1.2 Importing a dataset – Selecting the data source
To import a dataset in EDIT, click the Browse button to select the file.
Note: Please note that the presentation of the additional Import templates
is related to the Run validation flow function. They cannot be removed as this is a technical
constraint.
EDIT 2014 – User manual Page 10 / 59 Document Version 2.7
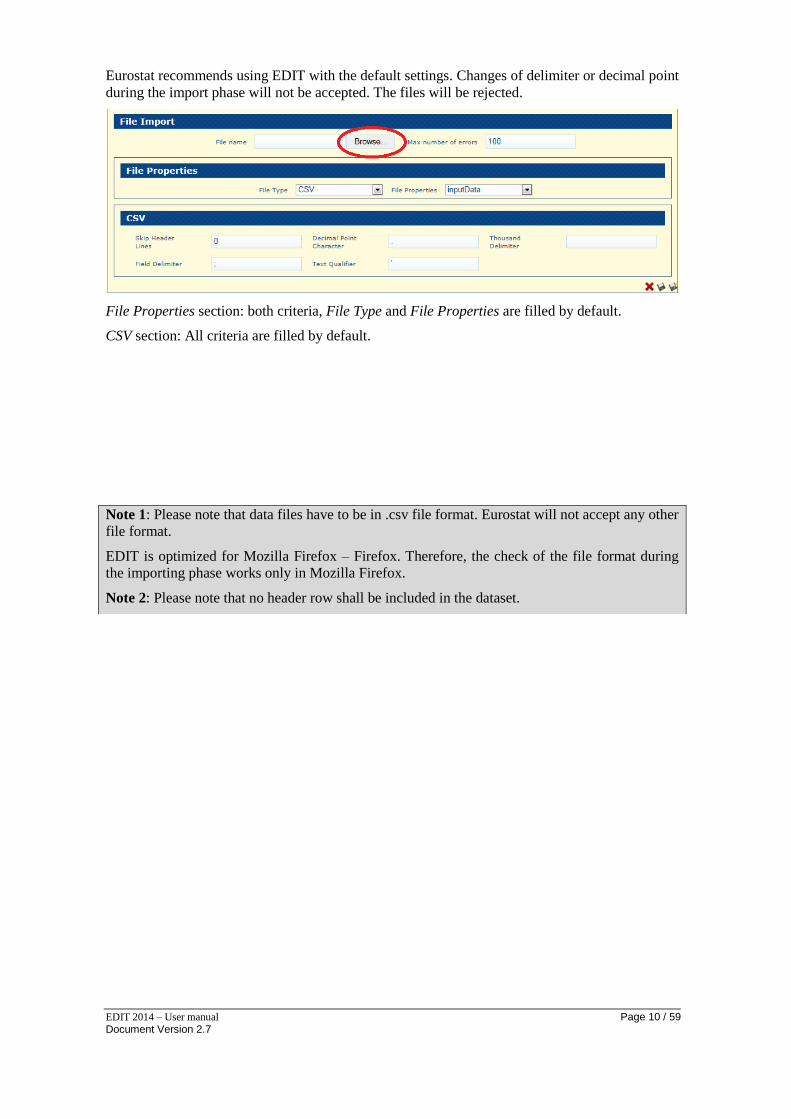
Eurostat recommends using EDIT with the default settings. Changes of delimiter or decimal point
during the import phase will not be accepted. The files will be rejected.
File Properties section: both criteria, File Type and File Properties are filled by default.
CSV section: All criteria are filled by default.
Note 1: Please note that data files have to be in .csv file format. Eurostat will not accept any other
file format.
EDIT is optimized for Mozilla Firefox – Firefox. Therefore, the check of the file format during
the importing phase works only in Mozilla Firefox.
Note 2: Please note that no header row shall be included in the dataset.
EDIT 2014 – User manual Page 11 / 59 Document Version 2.7
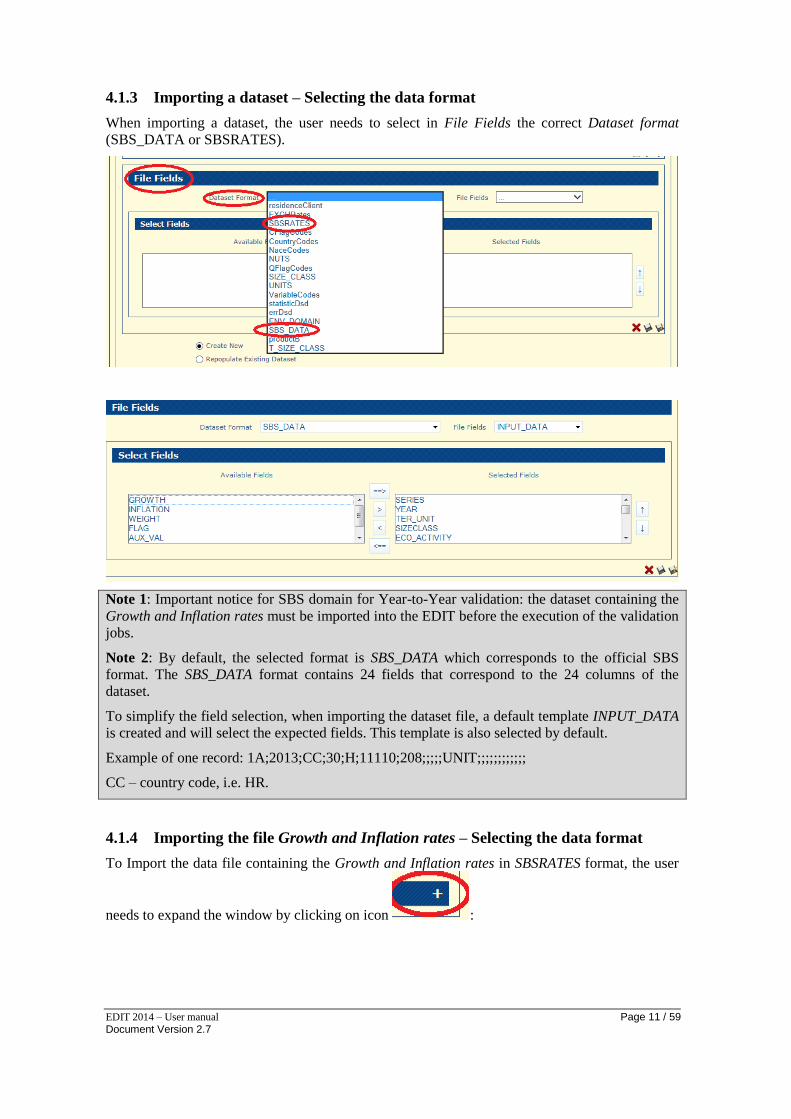
4.1.3 Importing a dataset – Selecting the data format
When importing a dataset, the user needs to select in File Fields the correct Dataset format
(SBS_DATA or SBSRATES).
Note 1: Important notice for SBS domain for Year-to-Year validation: the dataset containing the
Growth and Inflation rates must be imported into the EDIT before the execution of the validation
jobs.
Note 2: By default, the selected format is SBS_DATA which corresponds to the official SBS
format. The SBS_DATA format contains 24 fields that correspond to the 24 columns of the
dataset.
To simplify the field selection, when importing the dataset file, a default template INPUT_DATA
is created and will select the expected fields. This template is also selected by default.
Example of one record: 1A;2013;CC;30;H;11110;208;;;;;UNIT;;;;;;;;;;;;
CC – country code, i.e. HR.
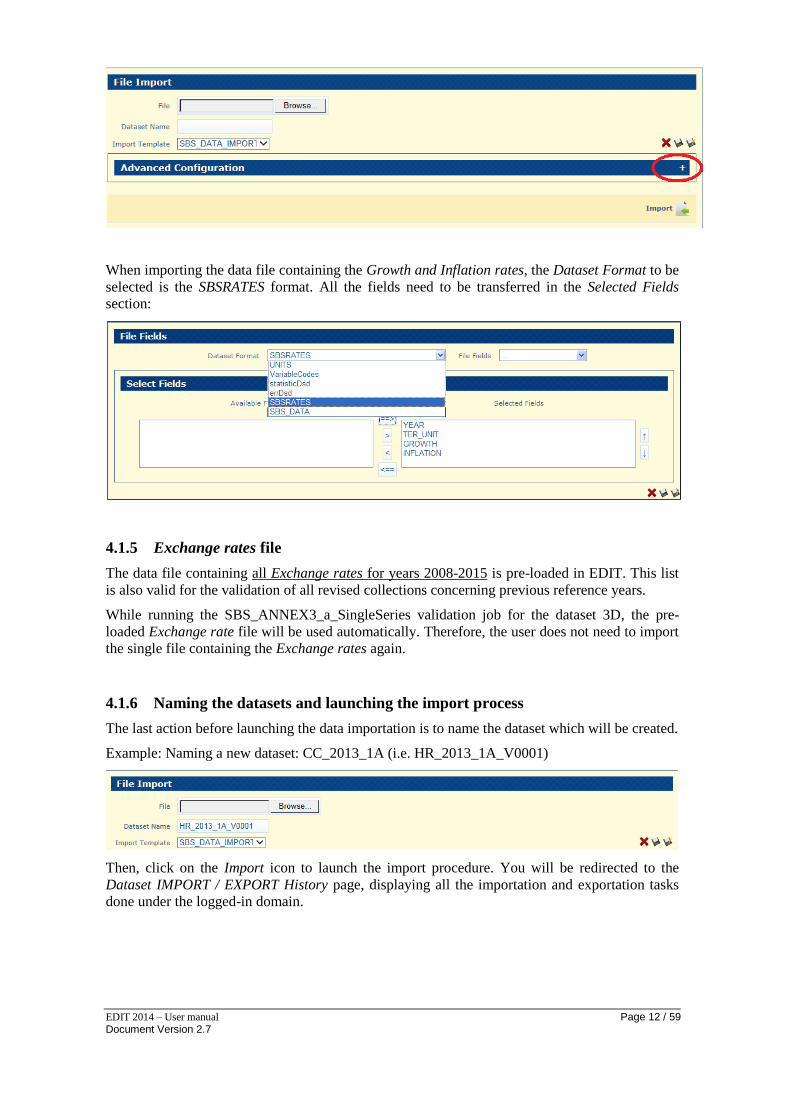
4.1.4 Importing the file Growth and Inflation rates – Selecting the data format
To Import the data file containing the Growth and Inflation rates in SBSRATES format, the user
needs to expand the window by clicking on icon :
EDIT 2014 – User manual Page 12 / 59 Document Version 2.7
When importing the data file containing the Growth and Inflation rates, the Dataset Format to be
selected is the SBSRATES format. All the fields need to be transferred in the Selected Fields
section:
4.1.5 Exchange rates file
The data file containing all Exchange rates for years 2008-2015 is pre-loaded in EDIT. This list
is also valid for the validation of all revised collections concerning previous reference years.
While running the SBS_ANNEX3_a_SingleSeries validation job for the dataset 3D, the pre-
loaded Exchange rate file will be used automatically. Therefore, the user does not need to import
the single file containing the Exchange rates again.
4.1.6 Naming the datasets and launching the import process
The last action before launching the data importation is to name the dataset which will be created.
Example: Naming a new dataset: CC_2013_1A (i.e. HR_2013_1A_V0001)
Then, click on the Import icon to launch the import procedure. You will be redirected to the
Dataset IMPORT / EXPORT History page, displaying all the importation and exportation tasks
done under the logged-in domain.
EDIT 2014 – User manual Page 13 / 59 Document Version 2.7
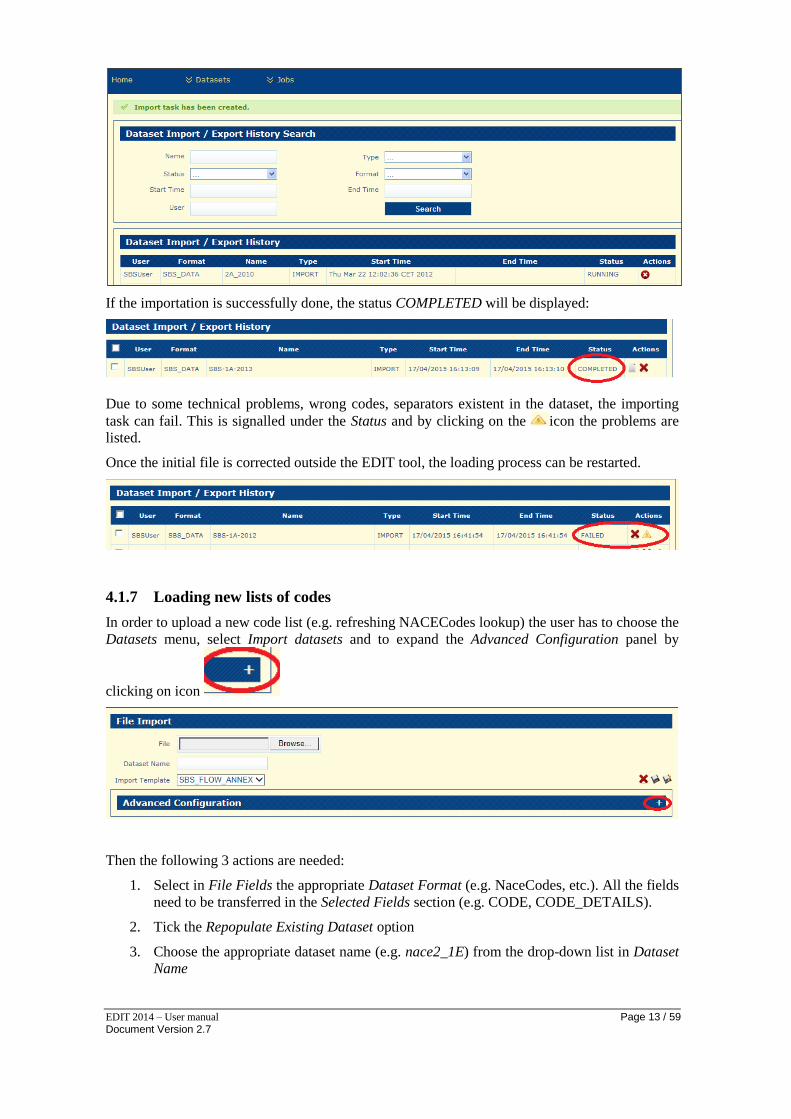
If the importation is successfully done, the status COMPLETED will be displayed:
Due to some technical problems, wrong codes, separators existent in the dataset, the importing
task can fail. This is signalled under the Status and by clicking on the icon the problems are
listed.
Once the initial file is corrected outside the EDIT tool, the loading process can be restarted.
4.1.7 Loading new lists of codes
In order to upload a new code list (e.g. refreshing NACECodes lookup) the user has to choose the
Datasets menu, select Import datasets and to expand the Advanced Configuration panel by
clicking on icon
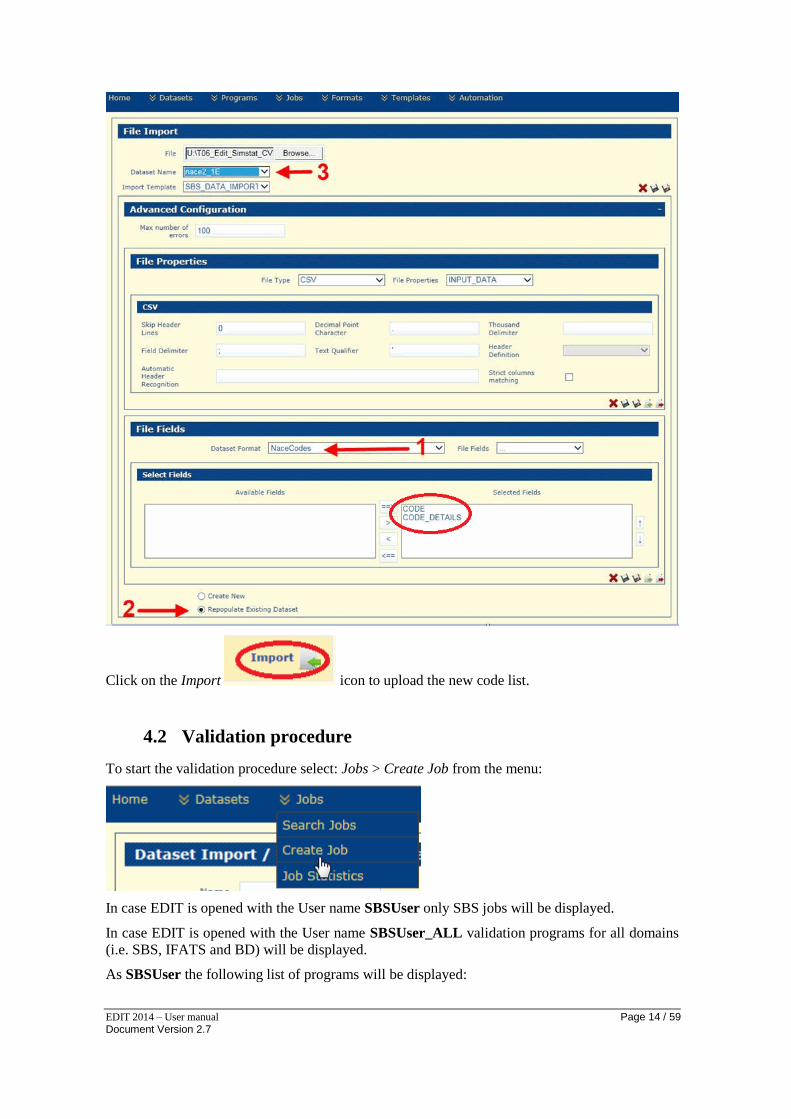
Then the following 3 actions are needed:
1. Select in File Fields the appropriate Dataset Format (e.g. NaceCodes, etc.). All the fields
need to be transferred in the Selected Fields section (e.g. CODE, CODE_DETAILS).
2. Tick the Repopulate Existing Dataset option
3. Choose the appropriate dataset name (e.g. nace2_1E) from the drop-down list in Dataset
Name
EDIT 2014 – User manual Page 14 / 59 Document Version 2.7
Click on the Import icon to upload the new code list.
4.2 Validation procedure
To start the validation procedure select: Jobs > Create Job from the menu:
In case EDIT is opened with the User name SBSUser only SBS jobs will be displayed.
In case EDIT is opened with the User name SBSUser_ALL validation programs for all domains
(i.e. SBS, IFATS and BD) will be displayed.
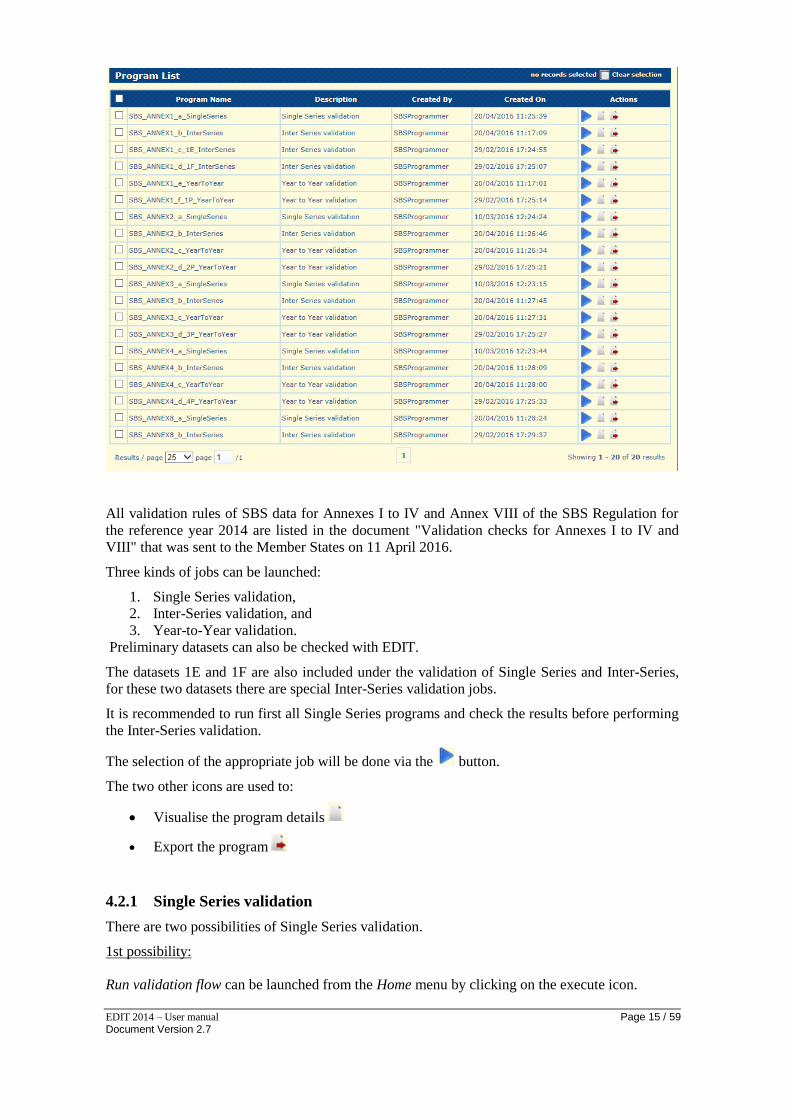
As SBSUser the following list of programs will be displayed:
EDIT 2014 – User manual Page 15 / 59 Document Version 2.7
All validation rules of SBS data for Annexes I to IV and Annex VIII of the SBS Regulation for
the reference year 2014 are listed in the document "Validation checks for Annexes I to IV and
VIII" that was sent to the Member States on 11 April 2016.
Three kinds of jobs can be launched:
1. Single Series validation,
2. Inter-Series validation, and
3. Year-to-Year validation.
Preliminary datasets can also be checked with EDIT.
The datasets 1E and 1F are also included under the validation of Single Series and Inter-Series,
for these two datasets there are special Inter-Series validation jobs.
It is recommended to run first all Single Series programs and check the results before performing
the Inter-Series validation.
The selection of the appropriate job will be done via the button.
The two other icons are used to:
Visualise the program details
Export the program
4.2.1 Single Series validation
There are two possibilities of Single Series validation.
1st possibility:
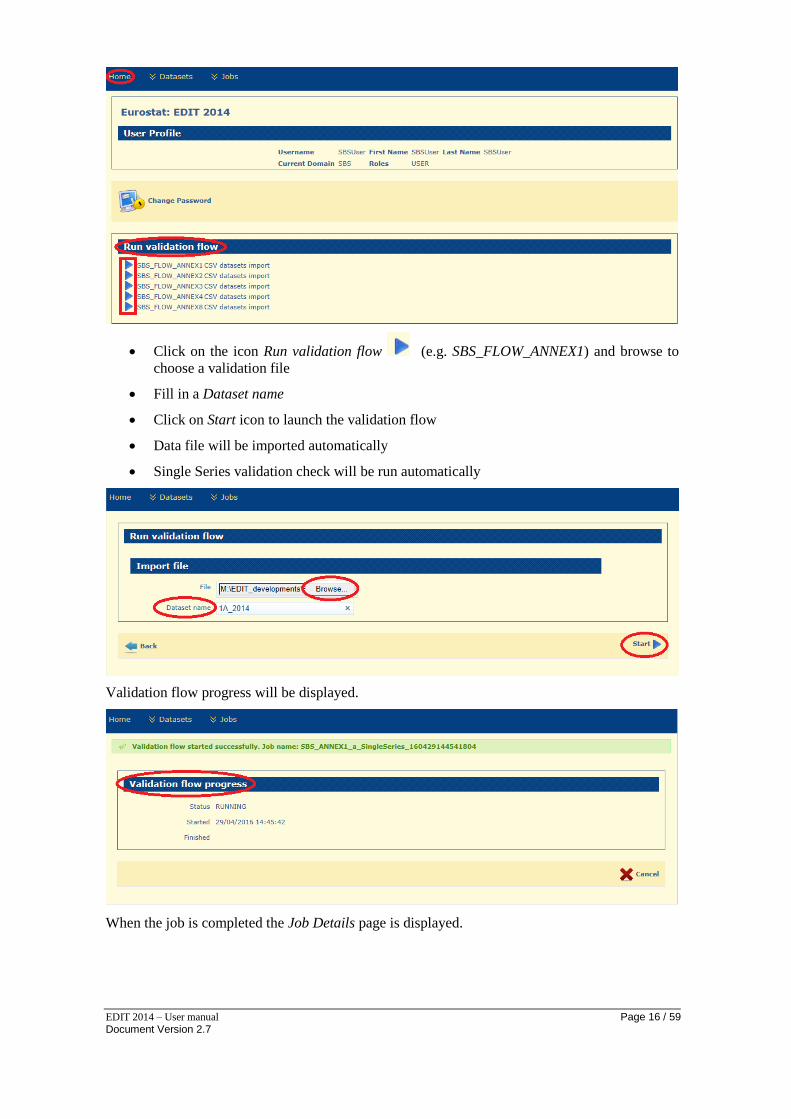
Run validation flow can be launched from the Home menu by clicking on the execute icon.
EDIT 2014 – User manual Page 16 / 59 Document Version 2.7
Click on the icon Run validation flow (e.g. SBS_FLOW_ANNEX1) and browse to
choose a validation file
Fill in a Dataset name
Click on Start icon to launch the validation flow
Data file will be imported automatically
Single Series validation check will be run automatically
Validation flow progress will be displayed.
When the job is completed the Job Details page is displayed.
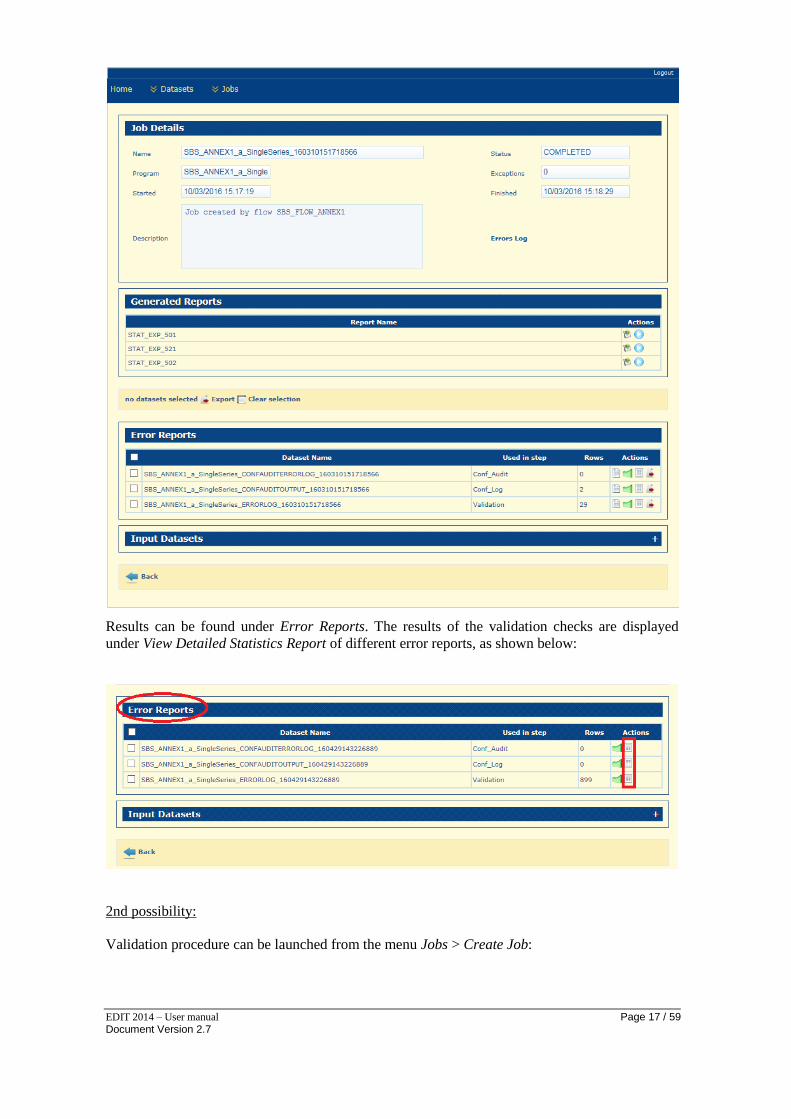
EDIT 2014 – User manual Page 17 / 59 Document Version 2.7
Results can be found under Error Reports. The results of the validation checks are displayed
under View Detailed Statistics Report of different error reports, as shown below:
2nd possibility:
Validation procedure can be launched from the menu Jobs > Create Job:
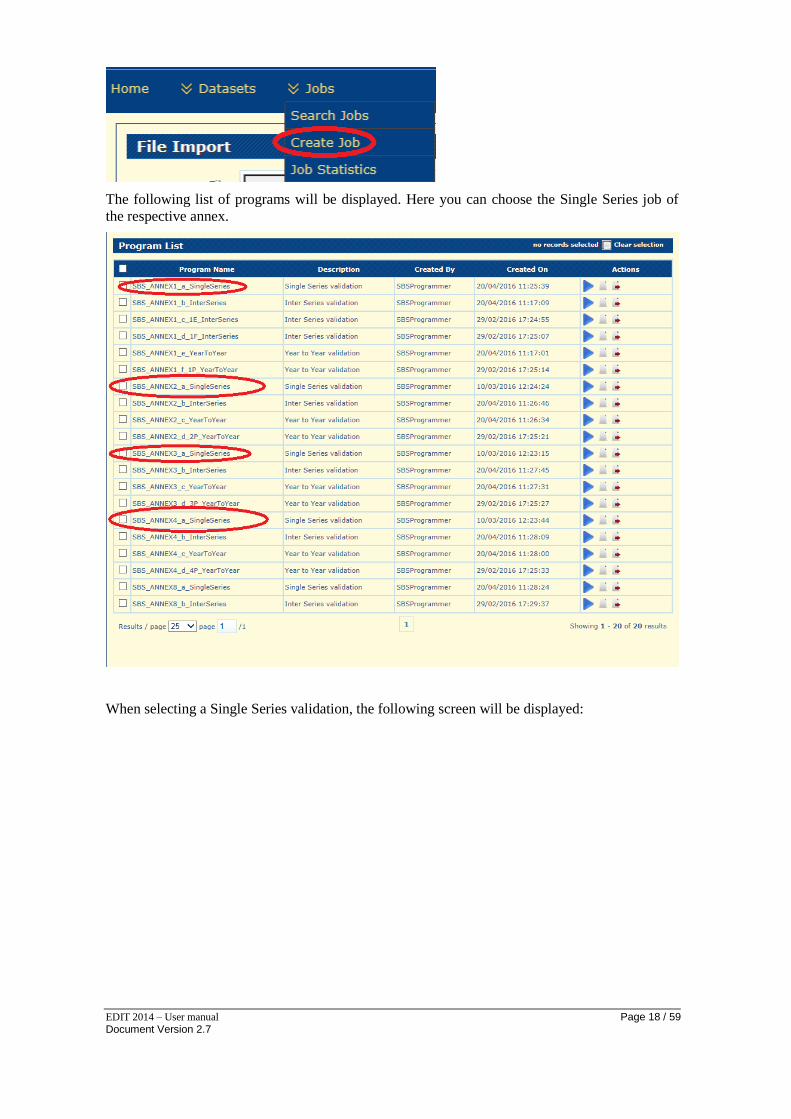
EDIT 2014 – User manual Page 18 / 59 Document Version 2.7
The following list of programs will be displayed. Here you can choose the Single Series job of
the respective annex.
When selecting a Single Series validation, the following screen will be displayed:
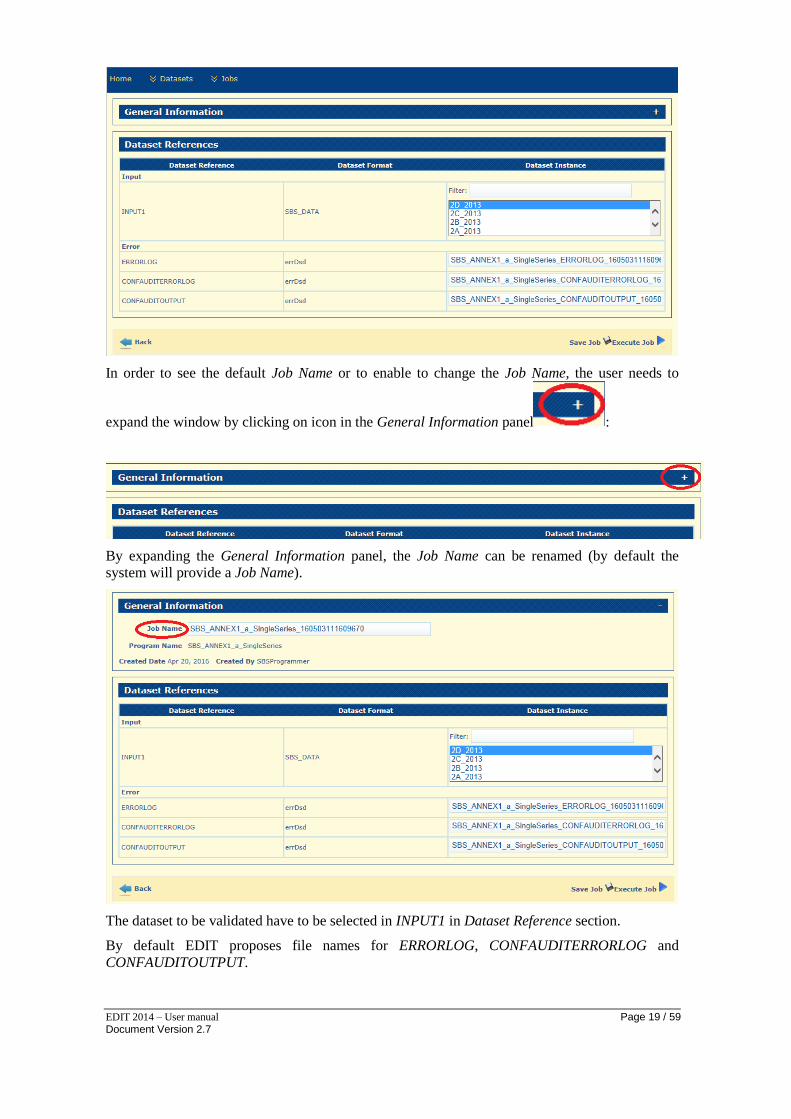
EDIT 2014 – User manual Page 19 / 59 Document Version 2.7
In order to see the default Job Name or to enable to change the Job Name, the user needs to
expand the window by clicking on icon in the General Information panel :
By expanding the General Information panel, the Job Name can be renamed (by default the
system will provide a Job Name).
The dataset to be validated have to be selected in INPUT1 in Dataset Reference section.
By default EDIT proposes file names for ERRORLOG, CONFAUDITERRORLOG and
CONFAUDITOUTPUT.
EDIT 2014 – User manual Page 20 / 59 Document Version 2.7
At the end of the default information the dataset naming can be complemented by the respective
series number in order to identify the check reports.
Click on the Execute Job button to launch the job.
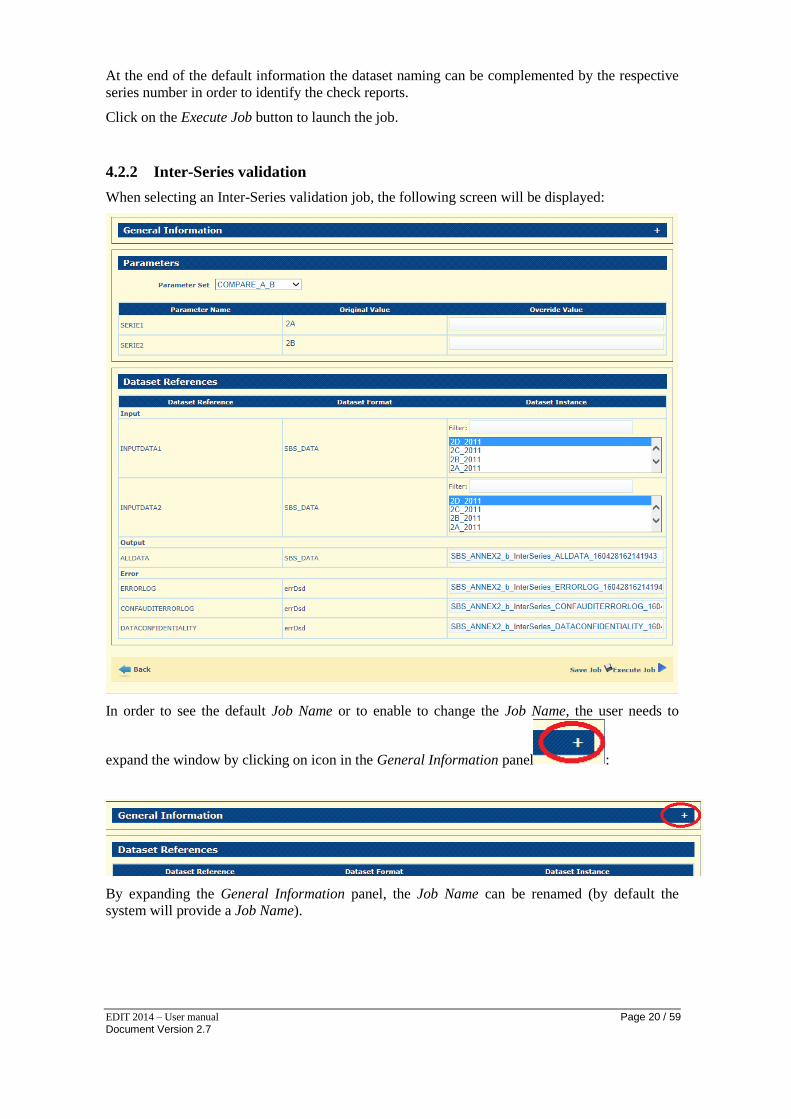
4.2.2 Inter-Series validation
When selecting an Inter-Series validation job, the following screen will be displayed:
In order to see the default Job Name or to enable to change the Job Name, the user needs to
expand the window by clicking on icon in the General Information panel :
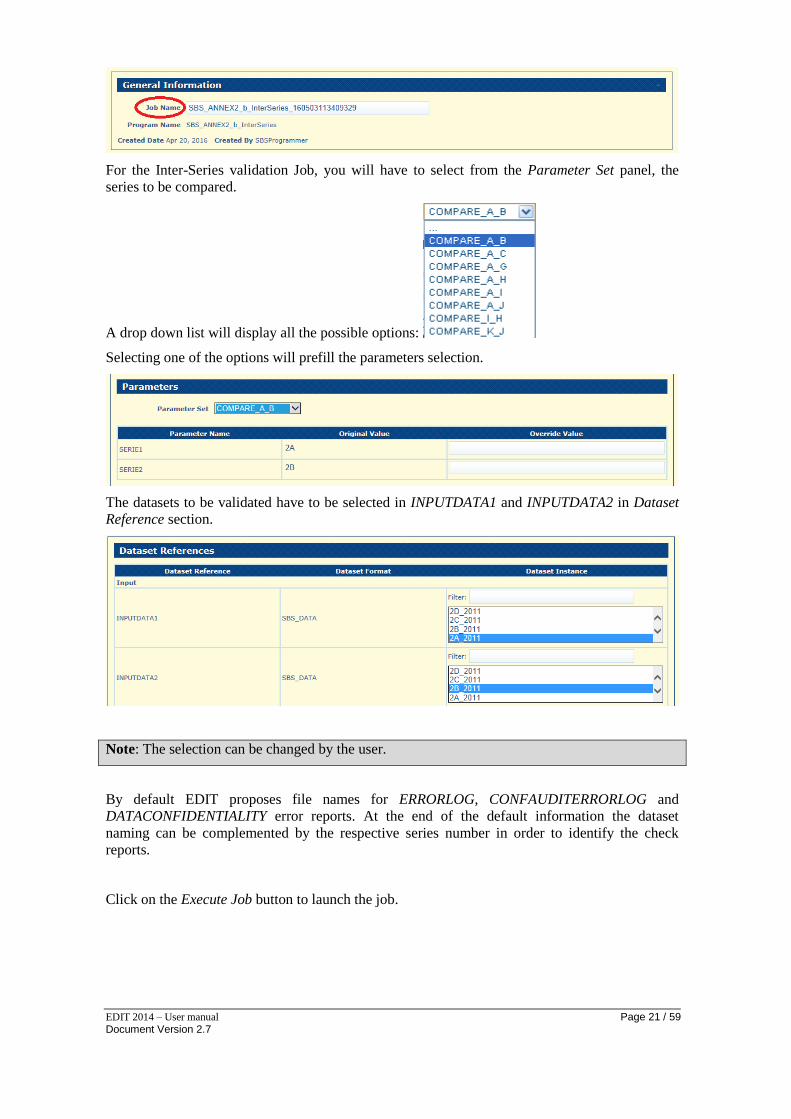
By expanding the General Information panel, the Job Name can be renamed (by default the
system will provide a Job Name).
EDIT 2014 – User manual Page 21 / 59 Document Version 2.7
For the Inter-Series validation Job, you will have to select from the Parameter Set panel, the
series to be compared.
A drop down list will display all the possible options:
Selecting one of the options will prefill the parameters selection.
The datasets to be validated have to be selected in INPUTDATA1 and INPUTDATA2 in Dataset
Reference section.
Note: The selection can be changed by the user.
By default EDIT proposes file names for ERRORLOG, CONFAUDITERRORLOG and
DATACONFIDENTIALITY error reports. At the end of the default information the dataset
naming can be complemented by the respective series number in order to identify the check
reports.
Click on the Execute Job button to launch the job.
EDIT 2014 – User manual Page 22 / 59 Document Version 2.7
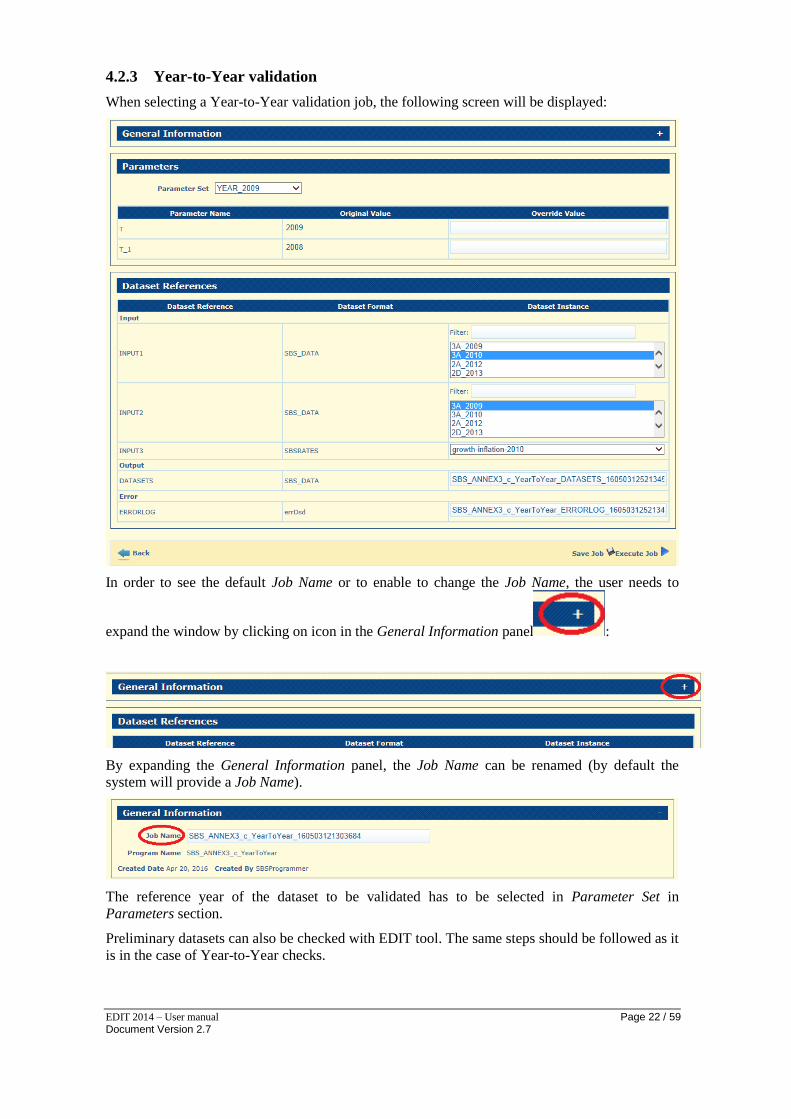
4.2.3 Year-to-Year validation
When selecting a Year-to-Year validation job, the following screen will be displayed:
In order to see the default Job Name or to enable to change the Job Name, the user needs to
expand the window by clicking on icon in the General Information panel :
By expanding the General Information panel, the Job Name can be renamed (by default the
system will provide a Job Name).
The reference year of the dataset to be validated has to be selected in Parameter Set in
Parameters section.
Preliminary datasets can also be checked with EDIT tool. The same steps should be followed as it
is in the case of Year-to-Year checks.
EDIT 2014 – User manual Page 23 / 59 Document Version 2.7
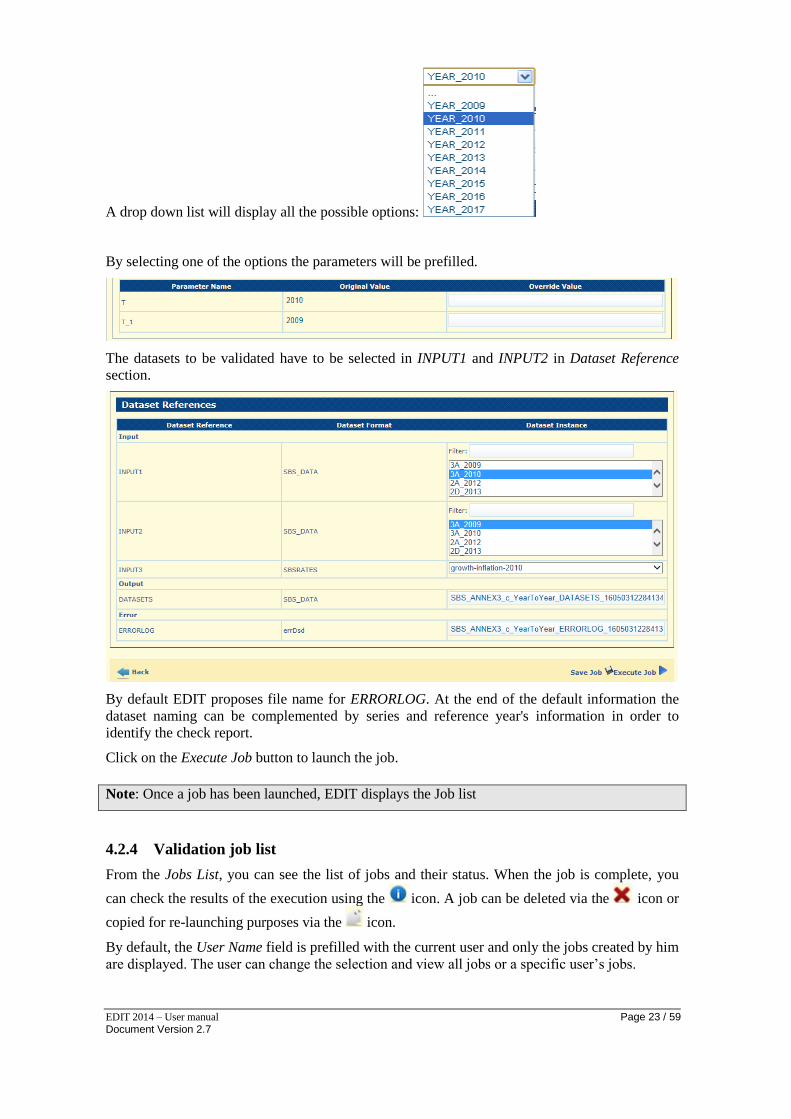
A drop down list will display all the possible options:
By selecting one of the options the parameters will be prefilled.
The datasets to be validated have to be selected in INPUT1 and INPUT2 in Dataset Reference
section.
By default EDIT proposes file name for ERRORLOG. At the end of the default information the
dataset naming can be complemented by series and reference year's information in order to
identify the check report.
Click on the Execute Job button to launch the job.
4.2.4 Validation job list
From the Jobs List, you can see the list of jobs and their status. When the job is complete, you
can check the results of the execution using the icon. A job can be deleted via the icon or
copied for re-launching purposes via the icon.
By default, the User Name field is prefilled with the current user and only the jobs created by him
are displayed. The user can change the selection and view all jobs or a specific user’s jobs.
Note: Once a job has been launched, EDIT displays the Job list
EDIT 2014 – User manual Page 24 / 59 Document Version 2.7
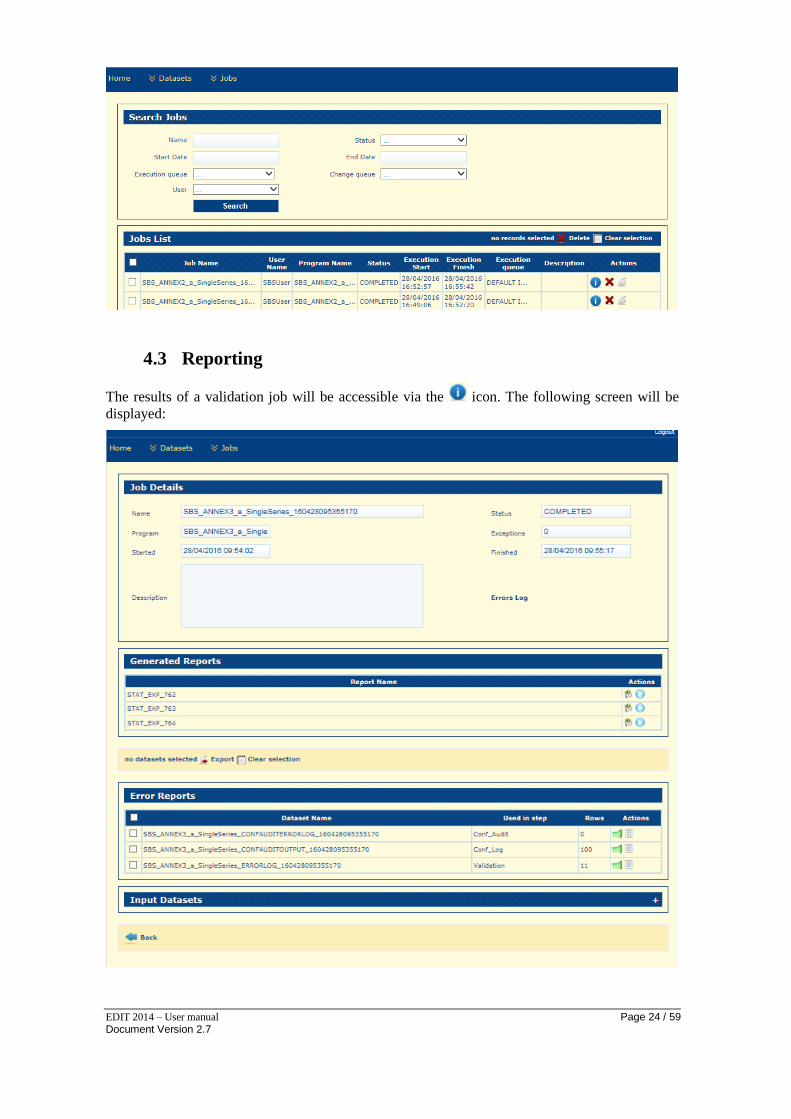
4.3 Reporting
The results of a validation job will be accessible via the icon. The following screen will be
displayed:
EDIT 2014 – User manual Page 25 / 59 Document Version 2.7
This screen provides access to the job reports and will enable the visualisation of the dataset used
for validation.
From the Error reports, the following actions will be available from the icons located under the
Action section :
View statistics error within EDIT 2014
View detailed statistics report
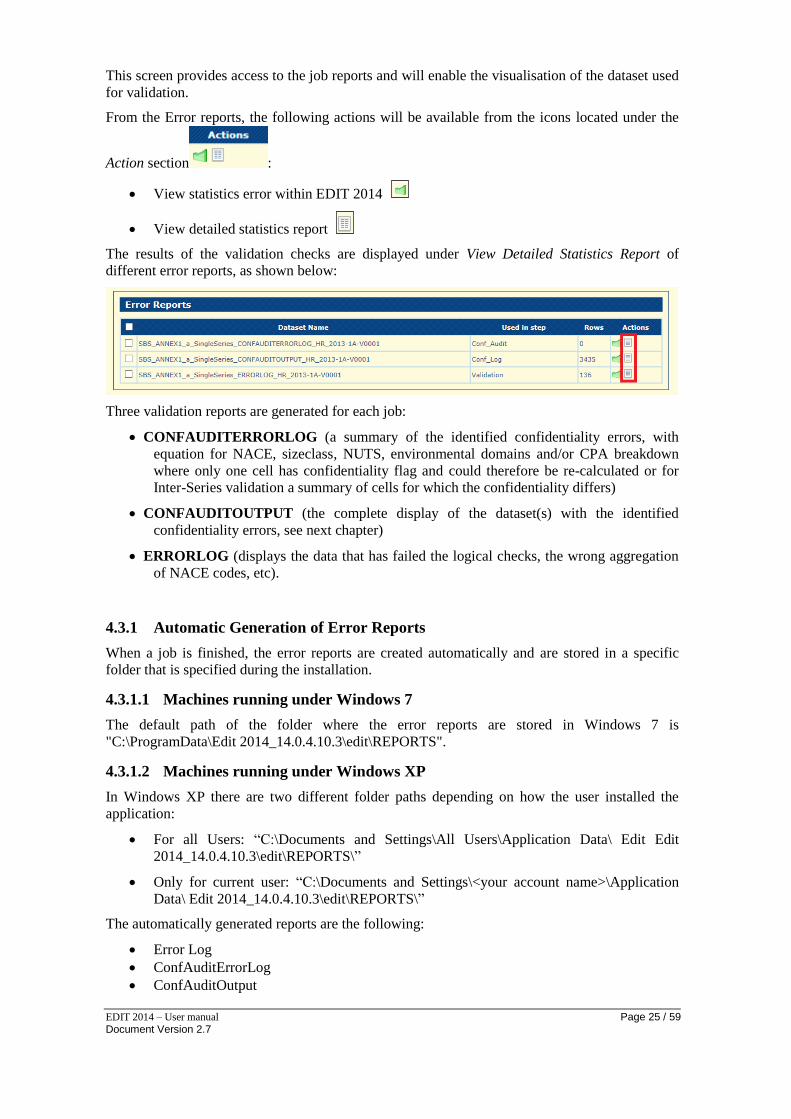
The results of the validation checks are displayed under View Detailed Statistics Report of
different error reports, as shown below:
Three validation reports are generated for each job:
CONFAUDITERRORLOG (a summary of the identified confidentiality errors, with
equation for NACE, sizeclass, NUTS, environmental domains and/or CPA breakdown
where only one cell has confidentiality flag and could therefore be re-calculated or for
Inter-Series validation a summary of cells for which the confidentiality differs)
CONFAUDITOUTPUT (the complete display of the dataset(s) with the identified
confidentiality errors, see next chapter)
ERRORLOG (displays the data that has failed the logical checks, the wrong aggregation
of NACE codes, etc).
4.3.1 Automatic Generation of Error Reports
When a job is finished, the error reports are created automatically and are stored in a specific
folder that is specified during the installation.
4.3.1.1 Machines running under Windows 7
The default path of the folder where the error reports are stored in Windows 7 is
"C:\ProgramData\Edit 2014_14.0.4.10.3\edit\REPORTS".
4.3.1.2 Machines running under Windows XP
In Windows XP there are two different folder paths depending on how the user installed the
application:
For all Users: “C:\Documents and Settings\All Users\Application Data\ Edit Edit
2014_14.0.4.10.3\edit\REPORTS\”
Only for current user: “C:\Documents and Settings\<your account name>\Application
Data\ Edit 2014_14.0.4.10.3\edit\REPORTS\”
The automatically generated reports are the following:
Error Log
ConfAuditErrorLog
ConfAuditOutput
EDIT 2014 – User manual Page 26 / 59 Document Version 2.7
The auto-generated files follow a naming convention: Series_Year_ReportType_Timestamp.csv
an example 1A_2013_null_data_err_stat_20170503_1654.CSV
4.3.2 Confauditerrorlog
Confidentiality Audit Errorlog gives a summary of the identified confidentiality errors, with
equation for NACE, sizeclass and/or legal form breakdown where only one cell has
confidentiality flag and could therefore be re-calculated or for Inter-Series validation a summary
of cells for which the confidentiality differs. This report can be accessed by selecting the View
Detailed Statistics Report button corresponding to the CONFAUDITERRORLOG_ reference, as
shown below.
The report will be downloaded as a CSV file and can be opened in Excel.
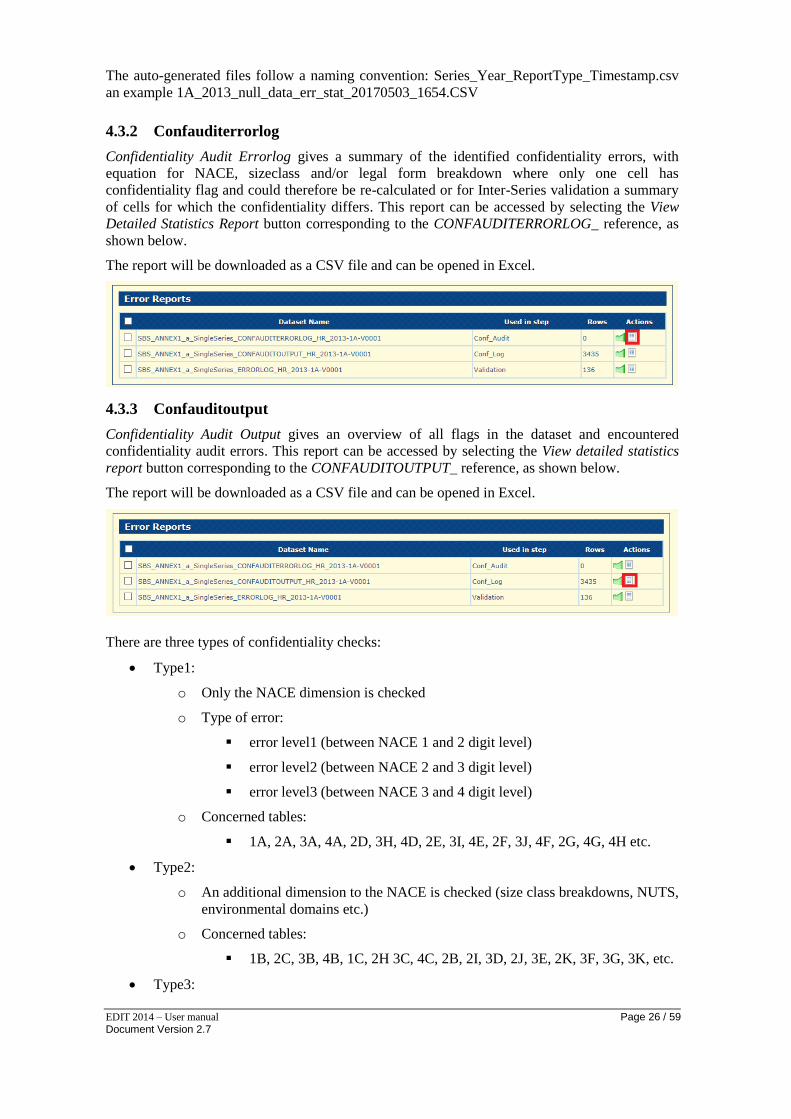
4.3.3 Confauditoutput
Confidentiality Audit Output gives an overview of all flags in the dataset and encountered
confidentiality audit errors. This report can be accessed by selecting the View detailed statistics
report button corresponding to the CONFAUDITOUTPUT_ reference, as shown below.
The report will be downloaded as a CSV file and can be opened in Excel.
There are three types of confidentiality checks:
Type1:
o Only the NACE dimension is checked
o Type of error:
error level1 (between NACE 1 and 2 digit level)
error level2 (between NACE 2 and 3 digit level)
error level3 (between NACE 3 and 4 digit level)
o Concerned tables:
1A, 2A, 3A, 4A, 2D, 3H, 4D, 2E, 3I, 4E, 2F, 3J, 4F, 2G, 4G, 4H etc.
Type2:
o An additional dimension to the NACE is checked (size class breakdowns, NUTS,
environmental domains etc.)
o Concerned tables:
1B, 2C, 3B, 4B, 1C, 2H 3C, 4C, 2B, 2I, 3D, 2J, 3E, 2K, 3F, 3G, 3K, etc.
Type3:
EDIT 2014 – User manual Page 27 / 59 Document Version 2.7
o Checks on consistency of linked series:
1B/1A, 2B/2A, 3B/3A, 4B/4A, 1C/1A, 2C/2A, 3C/3A, 4C/4A etc.
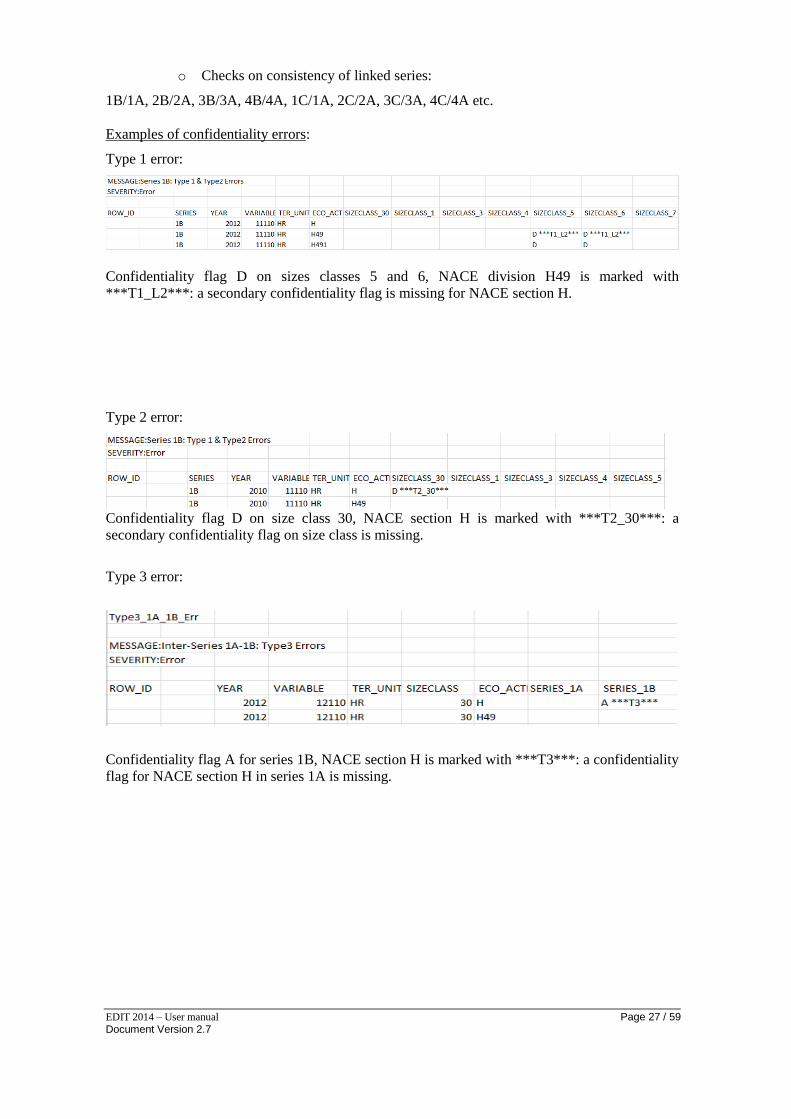
Examples of confidentiality errors:
Type 1 error:
Confidentiality flag D on sizes classes 5 and 6, NACE division H49 is marked with
***T1_L2***: a secondary confidentiality flag is missing for NACE section H.
Type 2 error:
Confidentiality flag D on size class 30, NACE section H is marked with ***T2_30***: a
secondary confidentiality flag on size class is missing.
Type 3 error:
Confidentiality flag A for series 1B, NACE section H is marked with ***T3***: a confidentiality
flag for NACE section H in series 1A is missing.
EDIT 2014 – User manual Page 28 / 59 Document Version 2.7
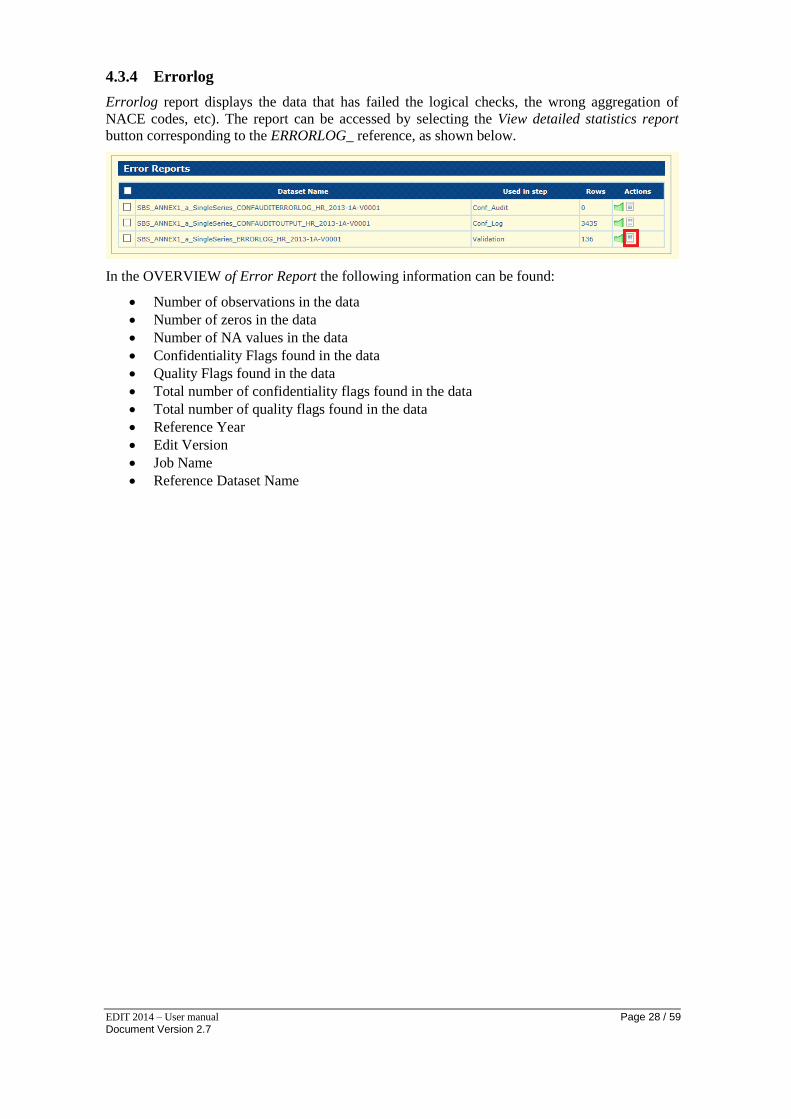
4.3.4 Errorlog
Errorlog report displays the data that has failed the logical checks, the wrong aggregation of
NACE codes, etc). The report can be accessed by selecting the View detailed statistics report
button corresponding to the ERRORLOG_ reference, as shown below.
In the OVERVIEW of Error Report the following information can be found:
Number of observations in the data
Number of zeros in the data
Number of NA values in the data
Confidentiality Flags found in the data
Quality Flags found in the data
Total number of confidentiality flags found in the data
Total number of quality flags found in the data
Reference Year
Edit Version
Job Name
Reference Dataset Name
EDIT 2014 – User manual Page 29 / 59 Document Version 2.7
5. EDIT for IFATS
The information mentioned in Chapters 1 to 3 is common for all SBS annexes and IFATS.
5.1 Importing a dataset
Importing datasets is the first action to be done when starting a validation procedure. The data to
be validated must be loaded into EDIT to become a dataset.
A dataset is based on a format. For example, the data to be validated will have the FATS_DATA
format for IFATS datasets, and SBS_DATA for SBS datasets.
5.1.1 Importing a dataset – Home menu – Datasets menu
There are two possibilities of importing a dataset.
1st possibility:
Data can be imported directly from the Home menu by using function Run validation flow. Single
Series validation checks will also be run automatically (for details see point 5.2.1).
Datasets imported for these automated Single Series validation can also be used for Inter-Series
validation.
2nd
possibility:
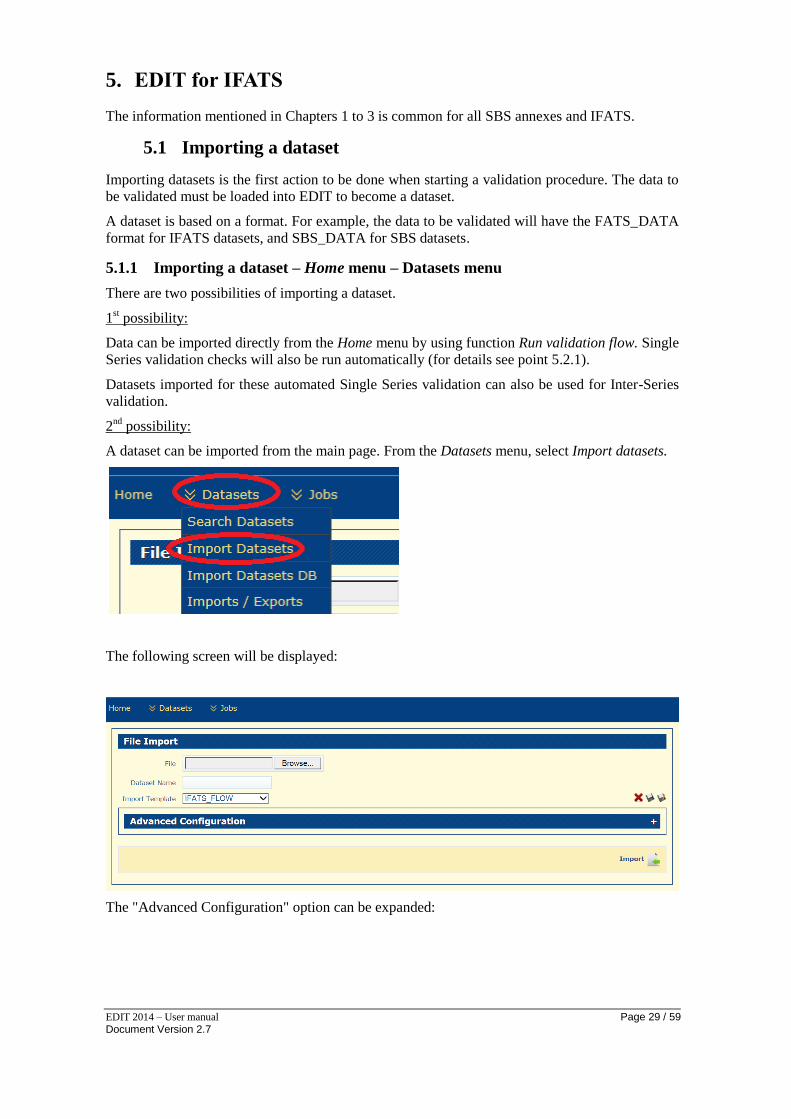
A dataset can be imported from the main page. From the Datasets menu, select Import datasets.
The following screen will be displayed:
The "Advanced Configuration" option can be expanded:
EDIT 2014 – User manual Page 30 / 59 Document Version 2.7
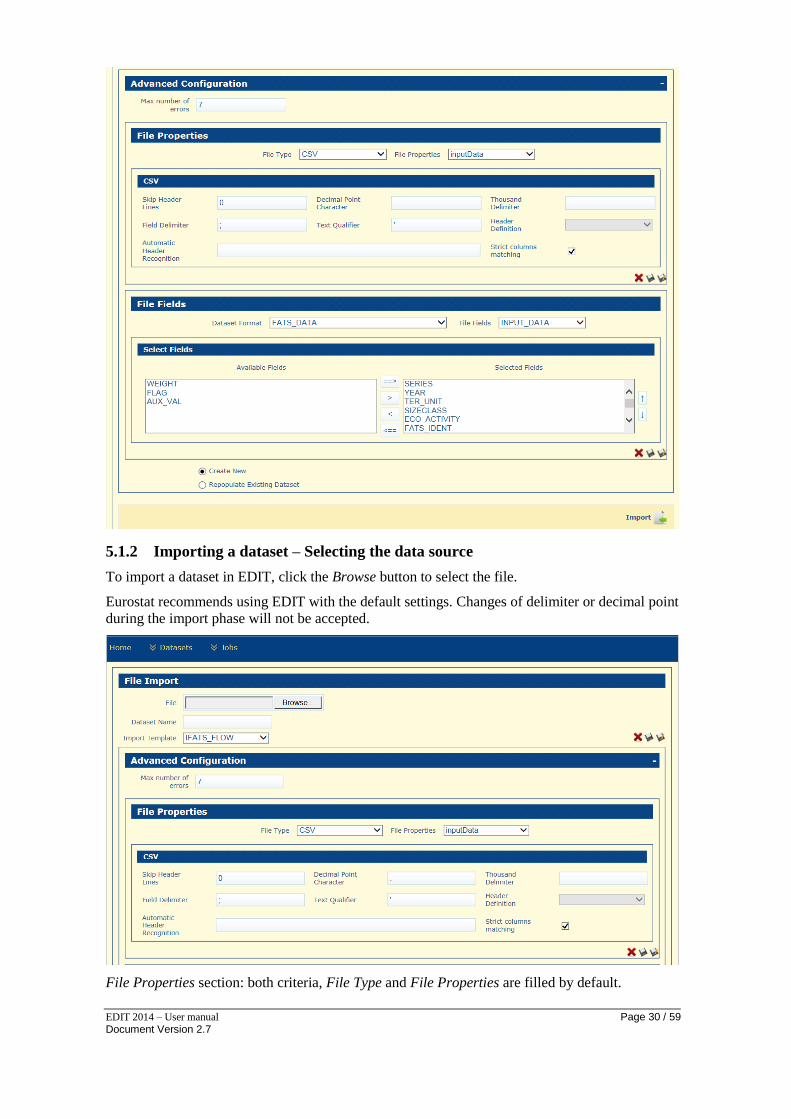
5.1.2 Importing a dataset – Selecting the data source
To import a dataset in EDIT, click the Browse button to select the file.
Eurostat recommends using EDIT with the default settings. Changes of delimiter or decimal point
during the import phase will not be accepted.
File Properties section: both criteria, File Type and File Properties are filled by default.
EDIT 2014 – User manual Page 31 / 59 Document Version 2.7
CSV section: All criteria are filled by default.
Note 1: Please note that data files have to be in .csv file format. Eurostat will not accept any other
file format.
EDIT is optimized for Mozilla Firefox – Firefox. Therefore, the check of the file format during
the importing phase works only in Mozilla Firefox.
Note 2: Please note that no header row shall be included in the dataset.
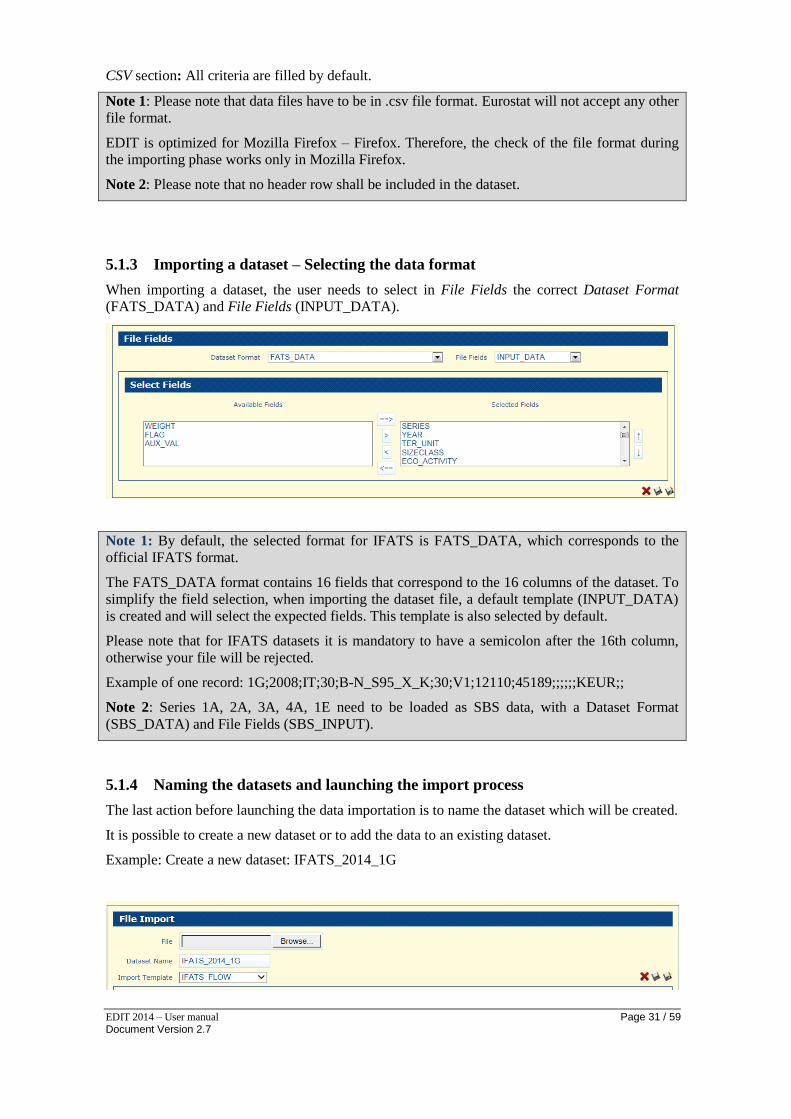
5.1.3 Importing a dataset – Selecting the data format
When importing a dataset, the user needs to select in File Fields the correct Dataset Format
(FATS_DATA) and File Fields (INPUT_DATA).
Note 1: By default, the selected format for IFATS is FATS_DATA, which corresponds to the
official IFATS format.
The FATS_DATA format contains 16 fields that correspond to the 16 columns of the dataset. To
simplify the field selection, when importing the dataset file, a default template (INPUT_DATA)
is created and will select the expected fields. This template is also selected by default.
Please note that for IFATS datasets it is mandatory to have a semicolon after the 16th column,
otherwise your file will be rejected.
Example of one record: 1G;2008;IT;30;B-N_S95_X_K;30;V1;12110;45189;;;;;;KEUR;;
Note 2: Series 1A, 2A, 3A, 4A, 1E need to be loaded as SBS data, with a Dataset Format
(SBS_DATA) and File Fields (SBS_INPUT).
5.1.4 Naming the datasets and launching the import process
The last action before launching the data importation is to name the dataset which will be created.
It is possible to create a new dataset or to add the data to an existing dataset.
Example: Create a new dataset: IFATS_2014_1G
EDIT 2014 – User manual Page 32 / 59 Document Version 2.7
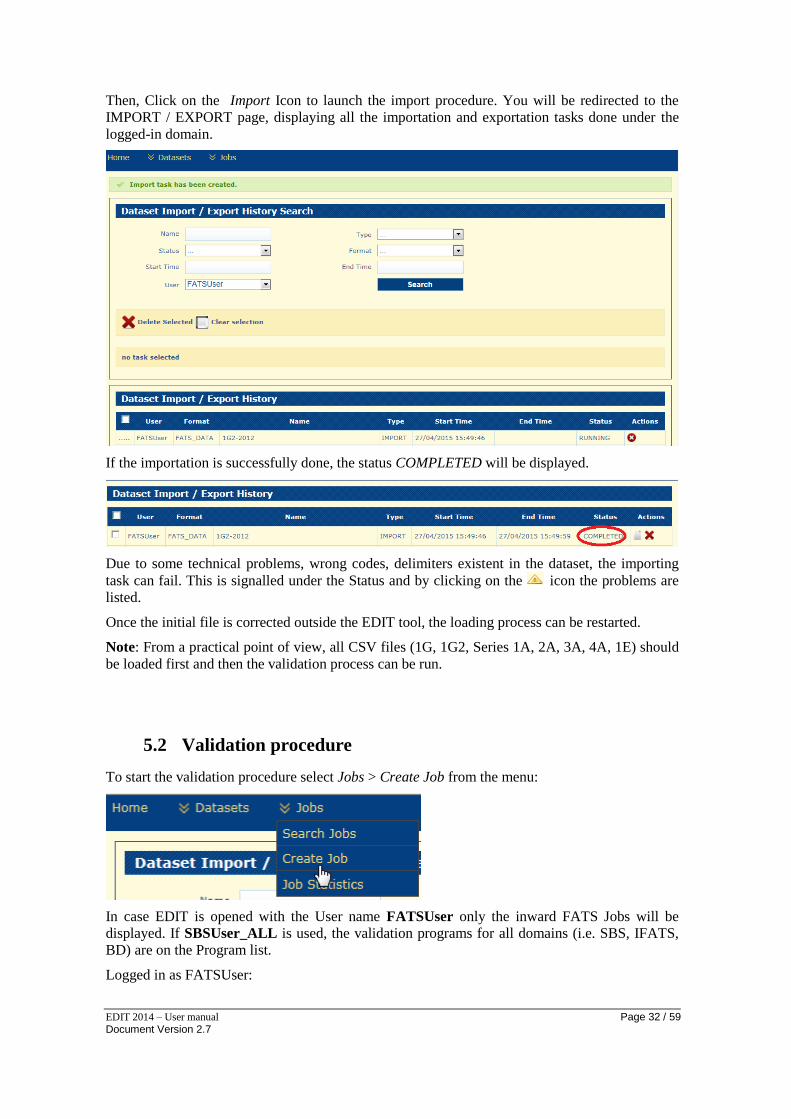
Then, Click on the Import Icon to launch the import procedure. You will be redirected to the
IMPORT / EXPORT page, displaying all the importation and exportation tasks done under the
logged-in domain.
If the importation is successfully done, the status COMPLETED will be displayed.
Due to some technical problems, wrong codes, delimiters existent in the dataset, the importing
task can fail. This is signalled under the Status and by clicking on the icon the problems are
listed.
Once the initial file is corrected outside the EDIT tool, the loading process can be restarted.
Note: From a practical point of view, all CSV files (1G, 1G2, Series 1A, 2A, 3A, 4A, 1E) should
be loaded first and then the validation process can be run.
5.2 Validation procedure
To start the validation procedure select Jobs > Create Job from the menu:
In case EDIT is opened with the User name FATSUser only the inward FATS Jobs will be
displayed. If SBSUser_ALL is used, the validation programs for all domains (i.e. SBS, IFATS,
BD) are on the Program list.
Logged in as FATSUser:
EDIT 2014 – User manual Page 33 / 59 Document Version 2.7
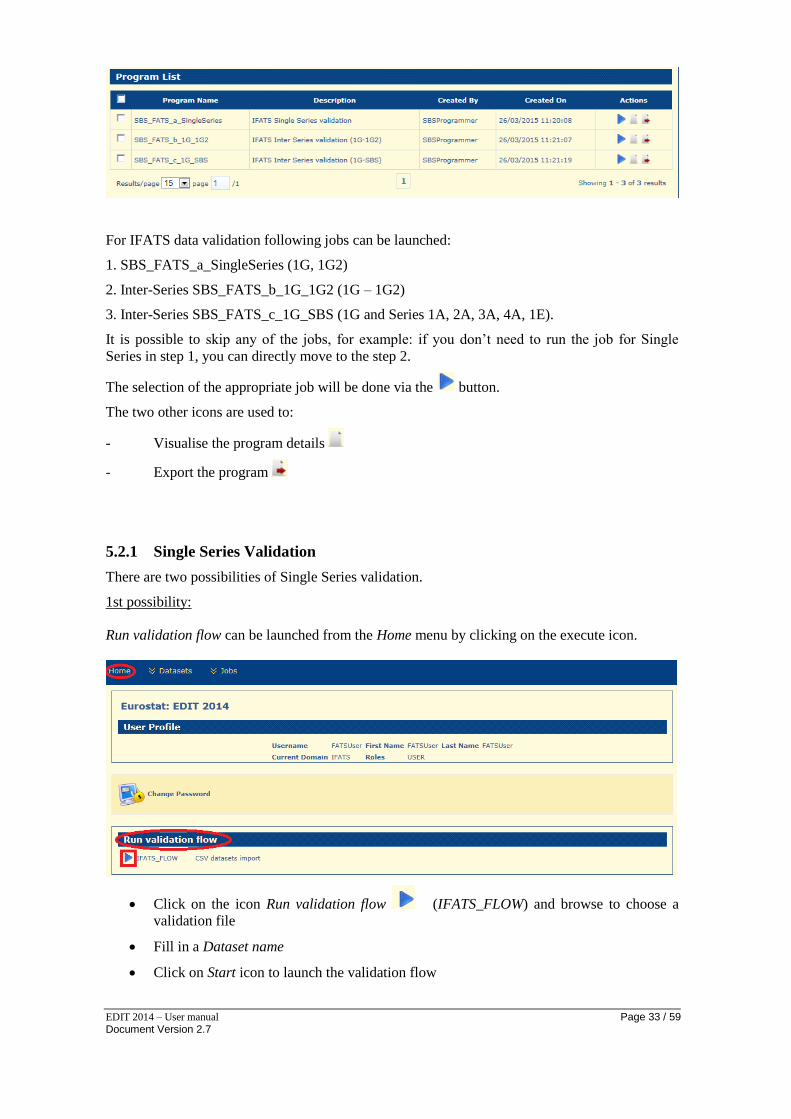
For IFATS data validation following jobs can be launched:
1. SBS_FATS_a_SingleSeries (1G, 1G2)
2. Inter-Series SBS_FATS_b_1G_1G2 (1G – 1G2)
3. Inter-Series SBS_FATS_c_1G_SBS (1G and Series 1A, 2A, 3A, 4A, 1E).
It is possible to skip any of the jobs, for example: if you don’t need to run the job for Single
Series in step 1, you can directly move to the step 2.
The selection of the appropriate job will be done via the button.
The two other icons are used to:
- Visualise the program details
- Export the program
5.2.1 Single Series Validation
There are two possibilities of Single Series validation.
1st possibility:
Run validation flow can be launched from the Home menu by clicking on the execute icon.
Click on the icon Run validation flow (IFATS_FLOW) and browse to choose a
validation file
Fill in a Dataset name
Click on Start icon to launch the validation flow
EDIT 2014 – User manual Page 34 / 59 Document Version 2.7
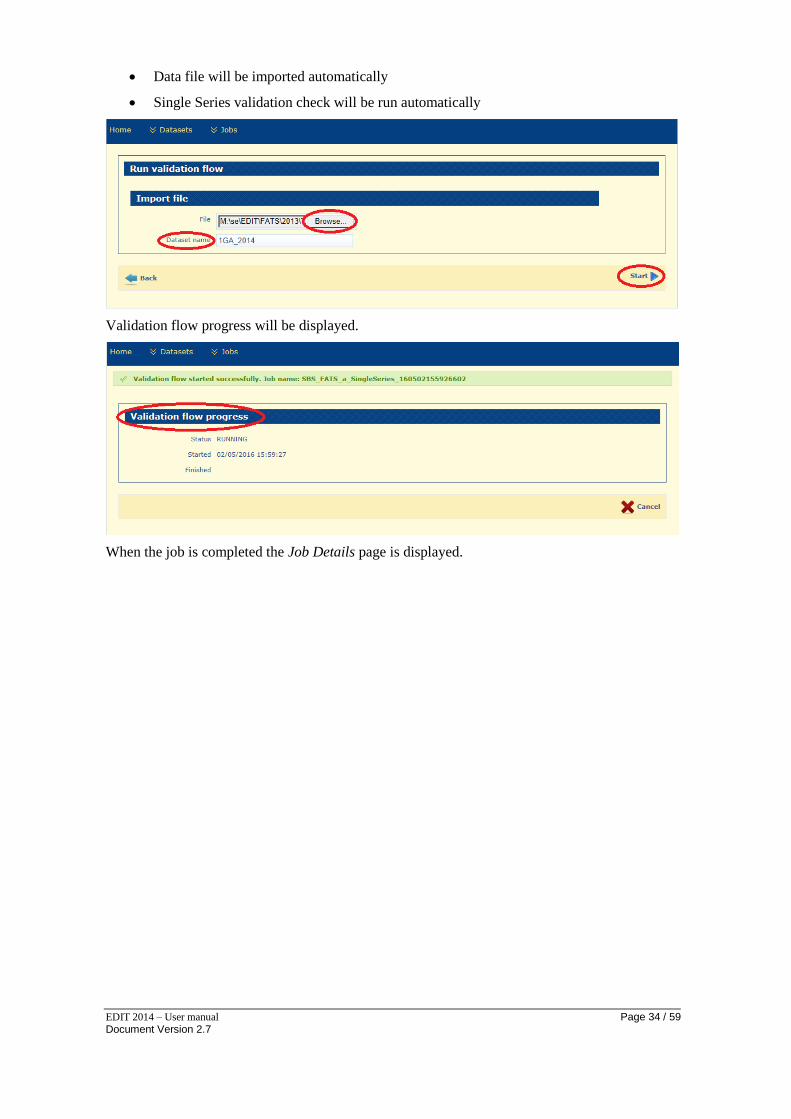
Data file will be imported automatically
Single Series validation check will be run automatically
Validation flow progress will be displayed.
When the job is completed the Job Details page is displayed.
EDIT 2014 – User manual Page 35 / 59 Document Version 2.7
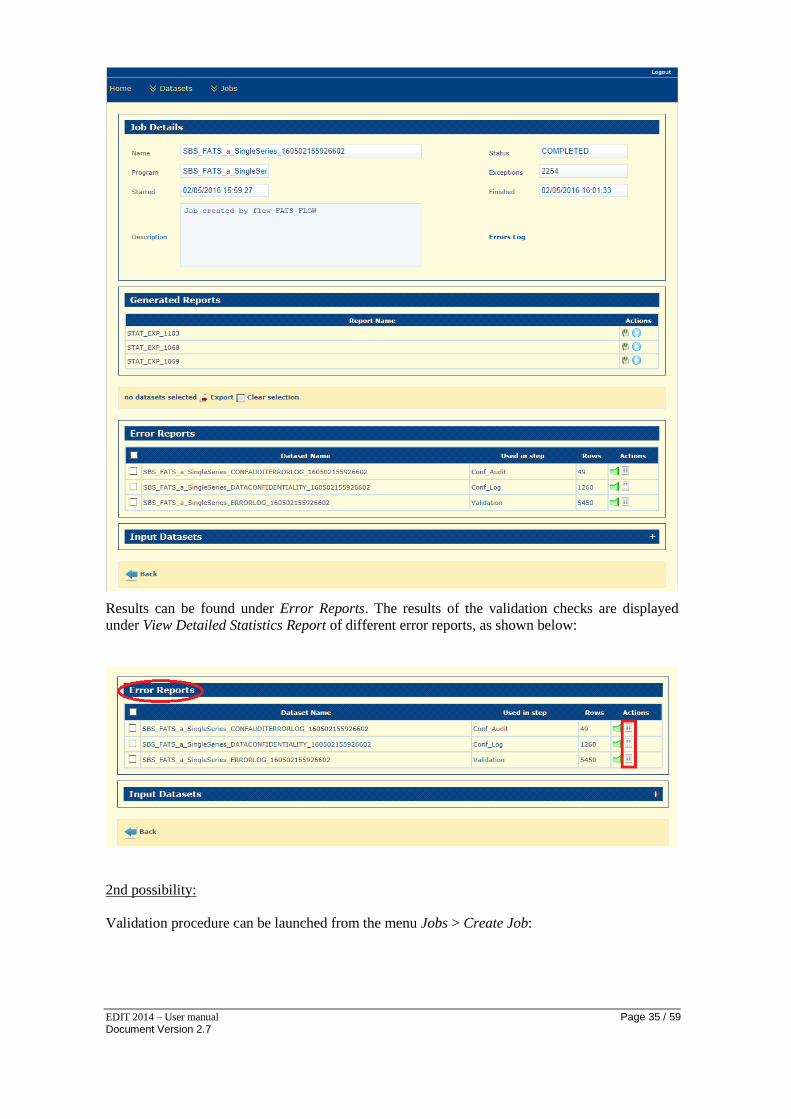
Results can be found under Error Reports. The results of the validation checks are displayed
under View Detailed Statistics Report of different error reports, as shown below:
2nd possibility:
Validation procedure can be launched from the menu Jobs > Create Job:
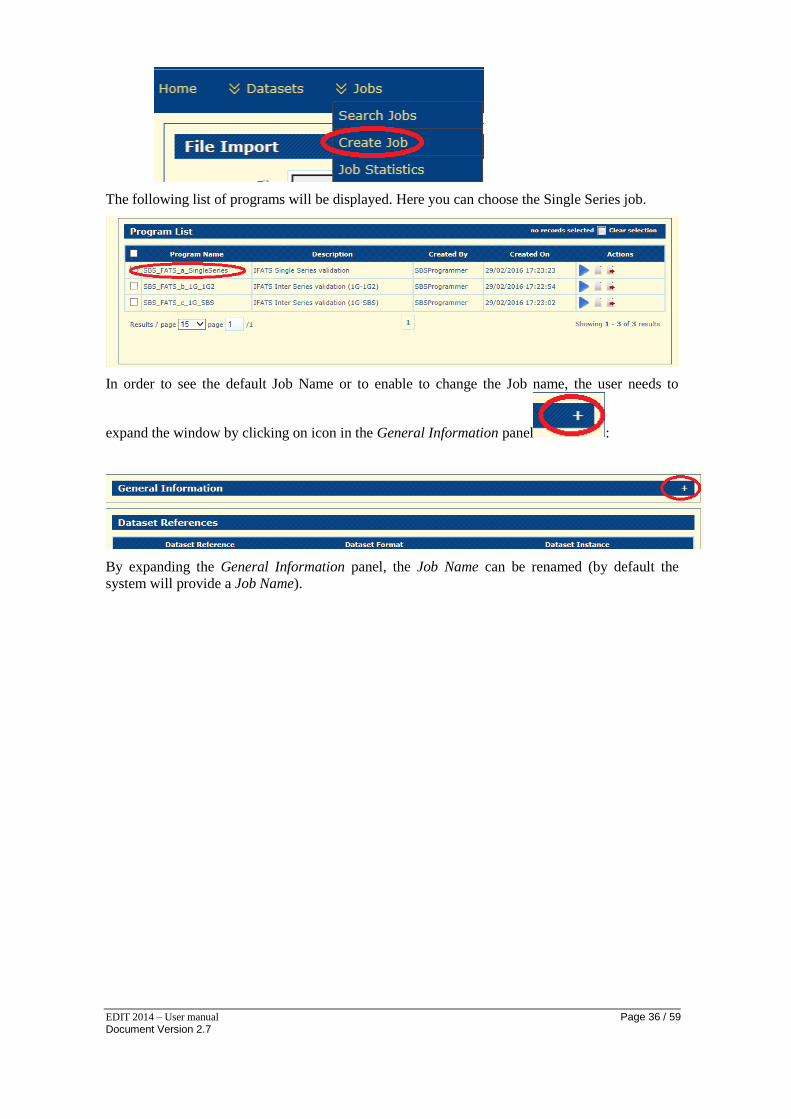
EDIT 2014 – User manual Page 36 / 59 Document Version 2.7
The following list of programs will be displayed. Here you can choose the Single Series job.
In order to see the default Job Name or to enable to change the Job name, the user needs to
expand the window by clicking on icon in the General Information panel :
By expanding the General Information panel, the Job Name can be renamed (by default the
system will provide a Job Name).
EDIT 2014 – User manual Page 37 / 59 Document Version 2.7
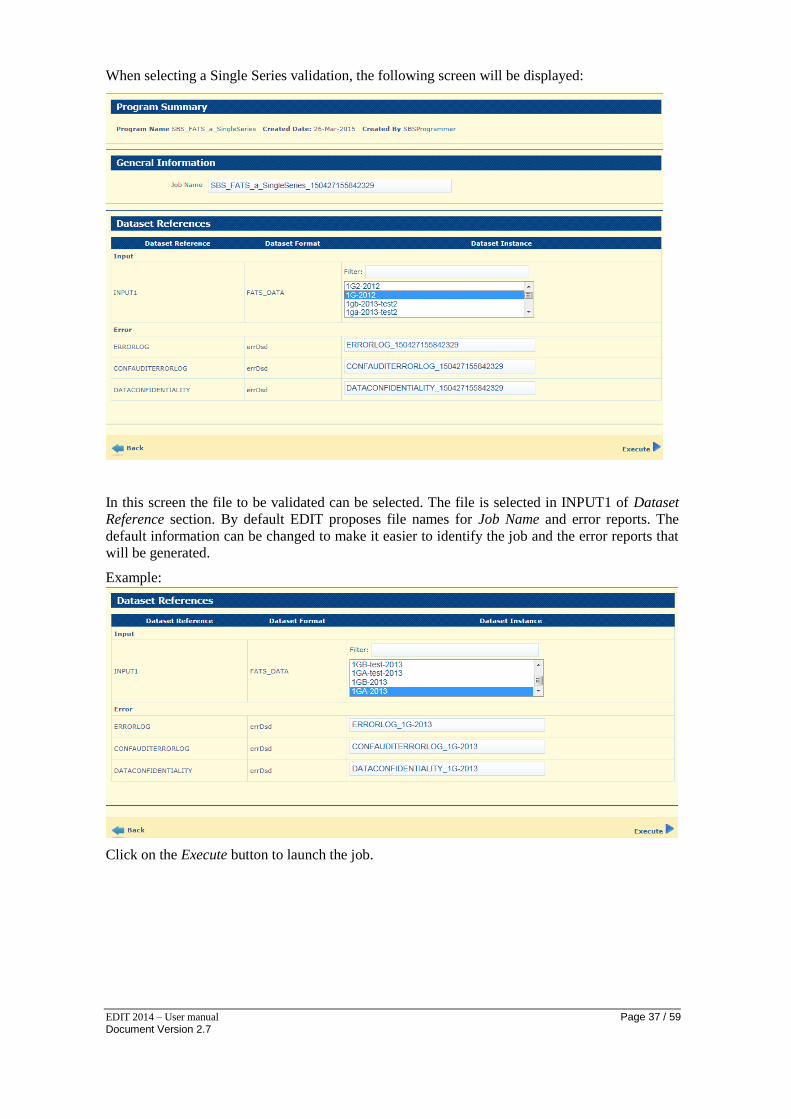
When selecting a Single Series validation, the following screen will be displayed:
In this screen the file to be validated can be selected. The file is selected in INPUT1 of Dataset
Reference section. By default EDIT proposes file names for Job Name and error reports. The
default information can be changed to make it easier to identify the job and the error reports that
will be generated.
Example:
Click on the Execute button to launch the job.
EDIT 2014 – User manual Page 38 / 59 Document Version 2.7
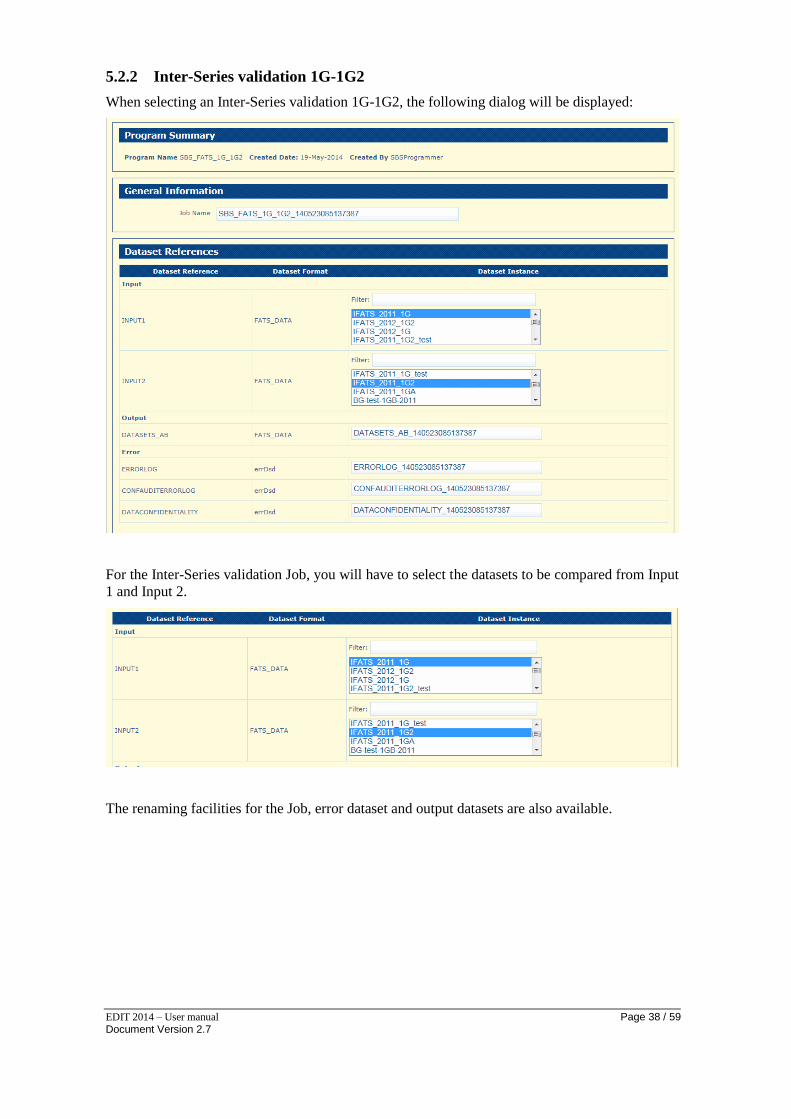
5.2.2 Inter-Series validation 1G-1G2
When selecting an Inter-Series validation 1G-1G2, the following dialog will be displayed:
For the Inter-Series validation Job, you will have to select the datasets to be compared from Input
1 and Input 2.
The renaming facilities for the Job, error dataset and output datasets are also available.
EDIT 2014 – User manual Page 39 / 59 Document Version 2.7
Example: ERRORLOG_1G_1G2_2011
Click on the Execute button to launch the job.
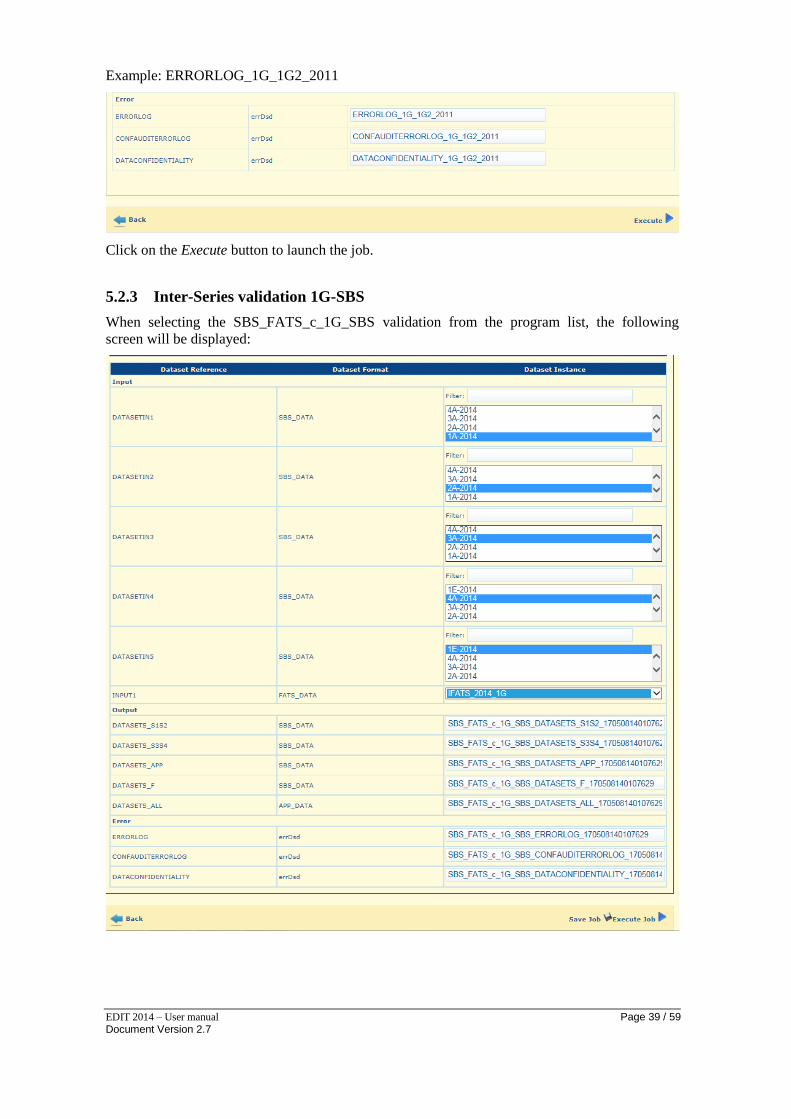
5.2.3 Inter-Series validation 1G-SBS
When selecting the SBS_FATS_c_1G_SBS validation from the program list, the following
screen will be displayed:
EDIT 2014 – User manual Page 40 / 59 Document Version 2.7
The validation check between 1G and the SBS series 1A, 2A, 3A, 4A and 1E is performed on one
program where all datasets can be selected from the available imported files. DATASETIN 1-5
are SBS datasets and in the field INPUT1 inward FATS series 1G should be selected.
The renaming facilities for the Job, error dataset and output datasets are also available.
Example: ERRORLOG_1G_SBS_2014
Click on the Execute button to launch the job.
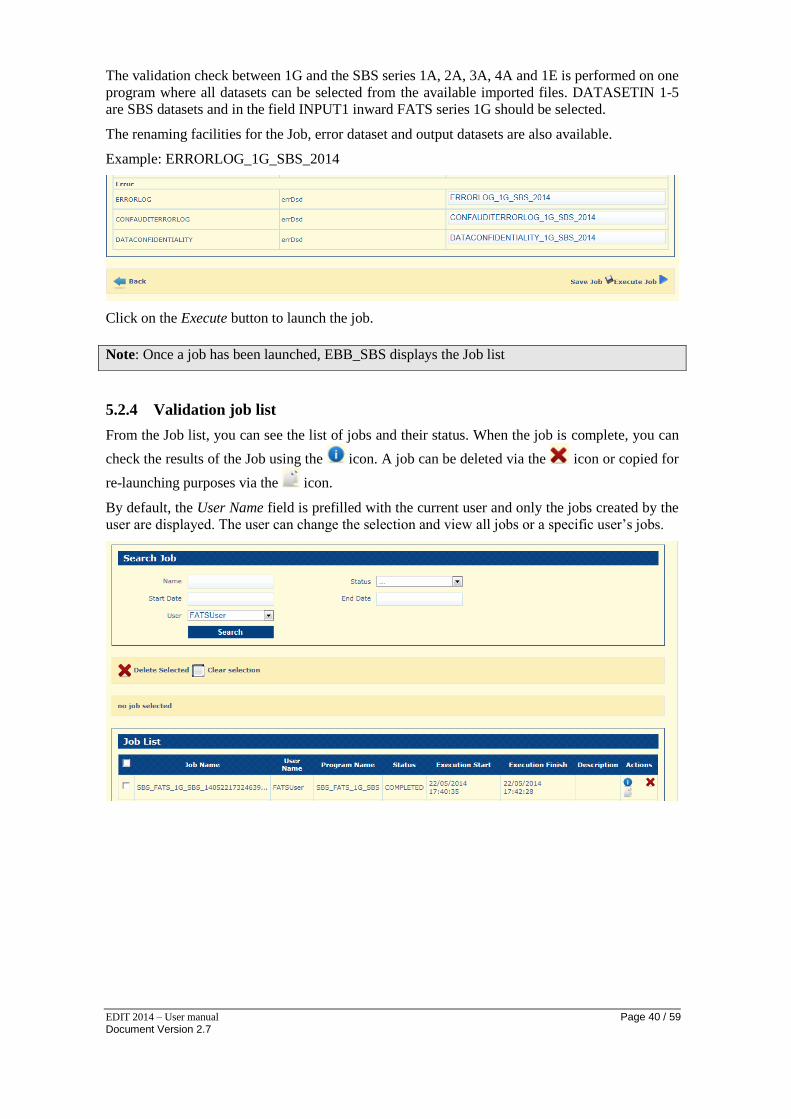
5.2.4 Validation job list
From the Job list, you can see the list of jobs and their status. When the job is complete, you can
check the results of the Job using the icon. A job can be deleted via the icon or copied for
re-launching purposes via the icon.
By default, the User Name field is prefilled with the current user and only the jobs created by the
user are displayed. The user can change the selection and view all jobs or a specific user’s jobs.
Note: Once a job has been launched, EBB_SBS displays the Job list
EDIT 2014 – User manual Page 41 / 59 Document Version 2.7
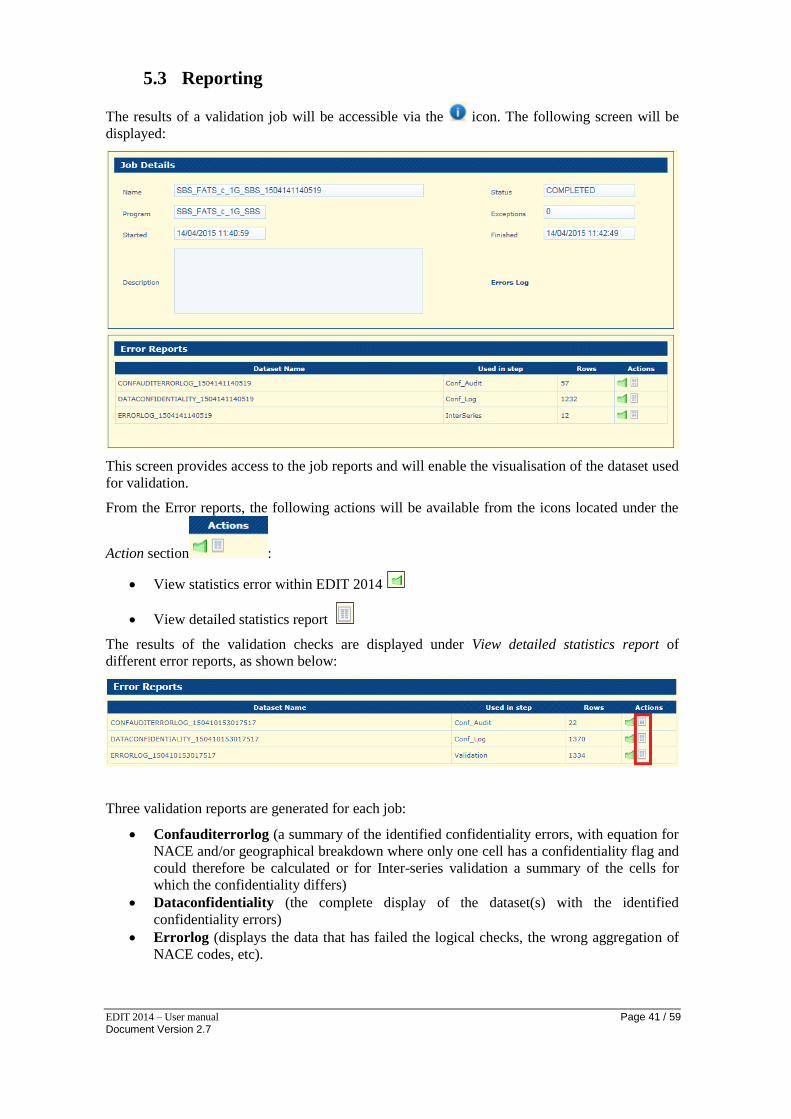
5.3 Reporting
The results of a validation job will be accessible via the icon. The following screen will be
displayed:
This screen provides access to the job reports and will enable the visualisation of the dataset used
for validation.
From the Error reports, the following actions will be available from the icons located under the
Action section :
View statistics error within EDIT 2014
View detailed statistics report
The results of the validation checks are displayed under View detailed statistics report of
different error reports, as shown below:
Three validation reports are generated for each job:
Confauditerrorlog (a summary of the identified confidentiality errors, with equation for
NACE and/or geographical breakdown where only one cell has a confidentiality flag and
could therefore be calculated or for Inter-series validation a summary of the cells for
which the confidentiality differs)
Dataconfidentiality (the complete display of the dataset(s) with the identified
confidentiality errors)
Errorlog (displays the data that has failed the logical checks, the wrong aggregation of
NACE codes, etc).
EDIT 2014 – User manual Page 42 / 59 Document Version 2.7
5.3.1 Automatic Generation of Error Reports
When a job is finished, the error reports are created automatically and are stored in a specific
folder that is specified during the installation.
5.3.1.1 Machines running under Windows 7
The default path of the folder where the error report are stored in Windows 7 is
“C:\ProgramData\ Edit 2014_14.0.4.10.3\edit\REPORTS\”.
5.3.1.2 Machines running under Windows XP
In Windows XP there are two different folder paths depending on how the user installed the
application:
For all Users: “C:\Documents and Settings\All Users\Application Data\ Edit
2014_14.0.4.10.3\edit\REPORTS\”
Only for current user: “C:\Documents and Settings\<your account name>\Application
Data\ Edit 2014_14.0.4.10.3\edit\REPORTS\”
The automatically generated reports are the following:
Error Log
ConfAuditErrorLog
ConfAuditOutput
The auto-generated files follow a naming convention: Series_Year_ReportType_Timestamp.csv
an example 1G_2013_null_data_err_stat_20150421_1241.csv
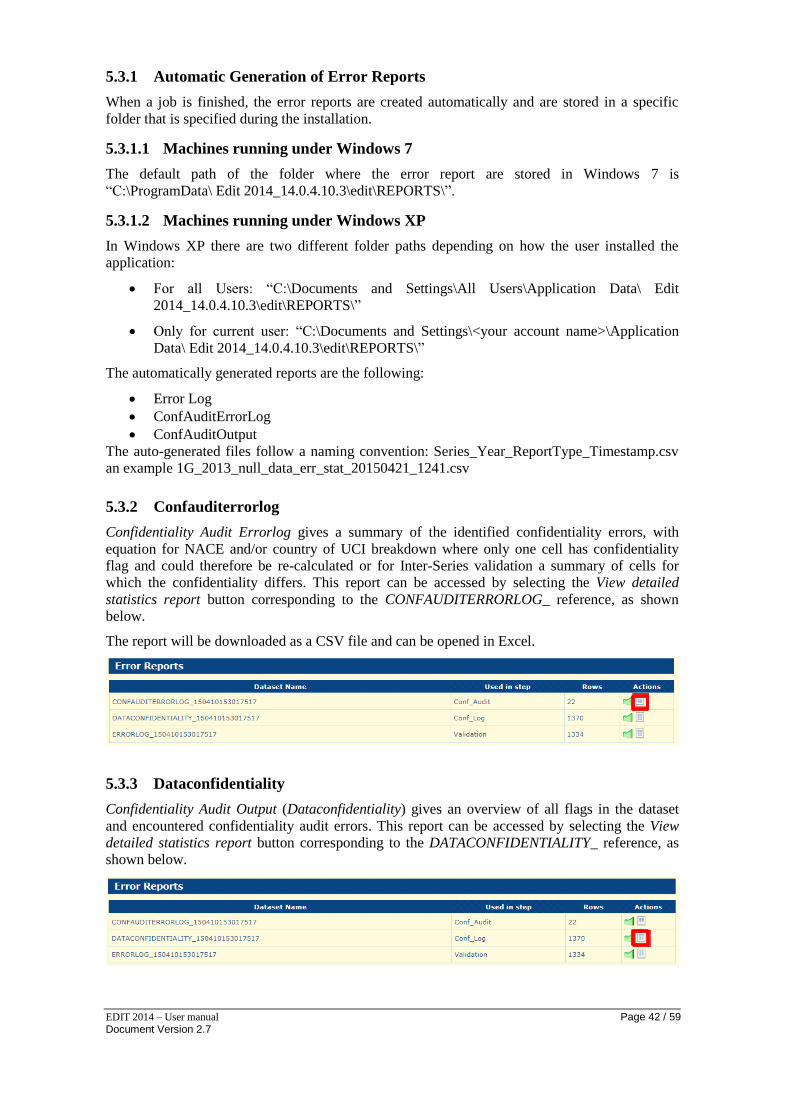
5.3.2 Confauditerrorlog
Confidentiality Audit Errorlog gives a summary of the identified confidentiality errors, with
equation for NACE and/or country of UCI breakdown where only one cell has confidentiality
flag and could therefore be re-calculated or for Inter-Series validation a summary of cells for
which the confidentiality differs. This report can be accessed by selecting the View detailed
statistics report button corresponding to the CONFAUDITERRORLOG_ reference, as shown
below.
The report will be downloaded as a CSV file and can be opened in Excel.
5.3.3 Dataconfidentiality
Confidentiality Audit Output (Dataconfidentiality) gives an overview of all flags in the dataset
and encountered confidentiality audit errors. This report can be accessed by selecting the View
detailed statistics report button corresponding to the DATACONFIDENTIALITY_ reference, as
shown below.
EDIT 2014 – User manual Page 43 / 59 Document Version 2.7
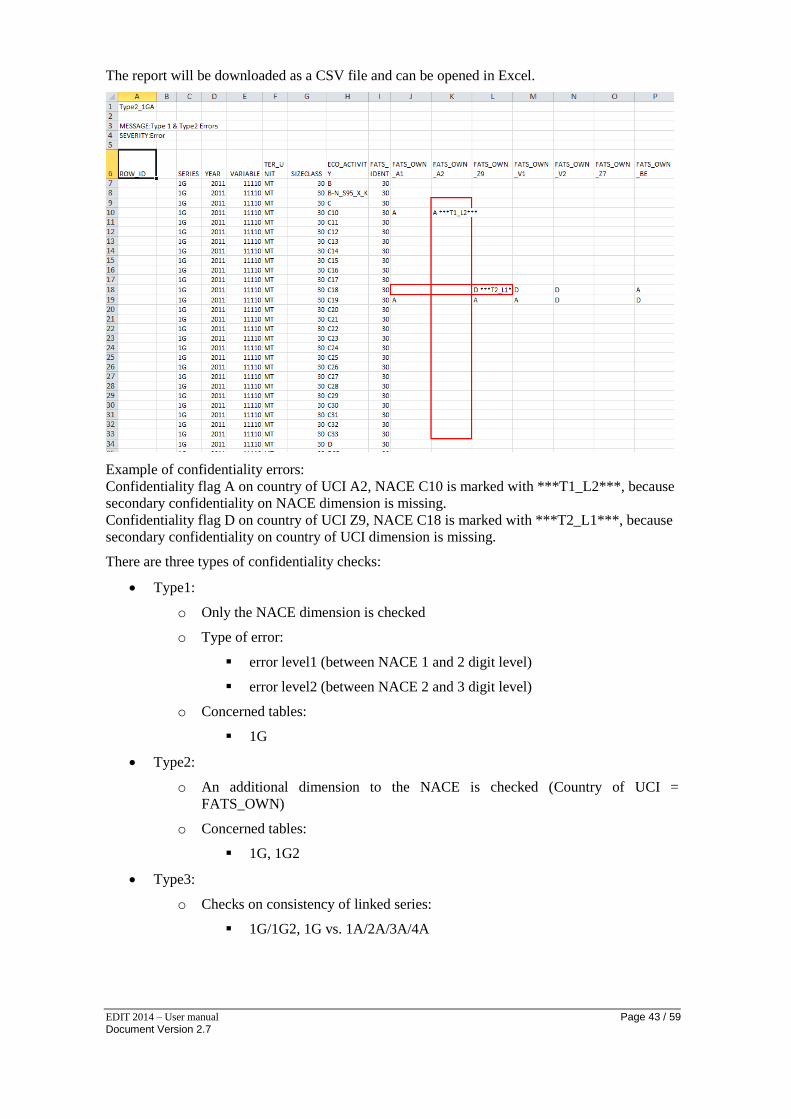
The report will be downloaded as a CSV file and can be opened in Excel.
Example of confidentiality errors:
Confidentiality flag A on country of UCI A2, NACE C10 is marked with ***T1_L2***, because
secondary confidentiality on NACE dimension is missing.
Confidentiality flag D on country of UCI Z9, NACE C18 is marked with ***T2_L1***, because
secondary confidentiality on country of UCI dimension is missing.
There are three types of confidentiality checks:
Type1:
o Only the NACE dimension is checked
o Type of error:
error level1 (between NACE 1 and 2 digit level)
error level2 (between NACE 2 and 3 digit level)
o Concerned tables:
1G
Type2:
o An additional dimension to the NACE is checked (Country of UCI =
FATS_OWN)
o Concerned tables:
1G, 1G2
Type3:
o Checks on consistency of linked series:
1G/1G2, 1G vs. 1A/2A/3A/4A
EDIT 2014 – User manual Page 44 / 59 Document Version 2.7
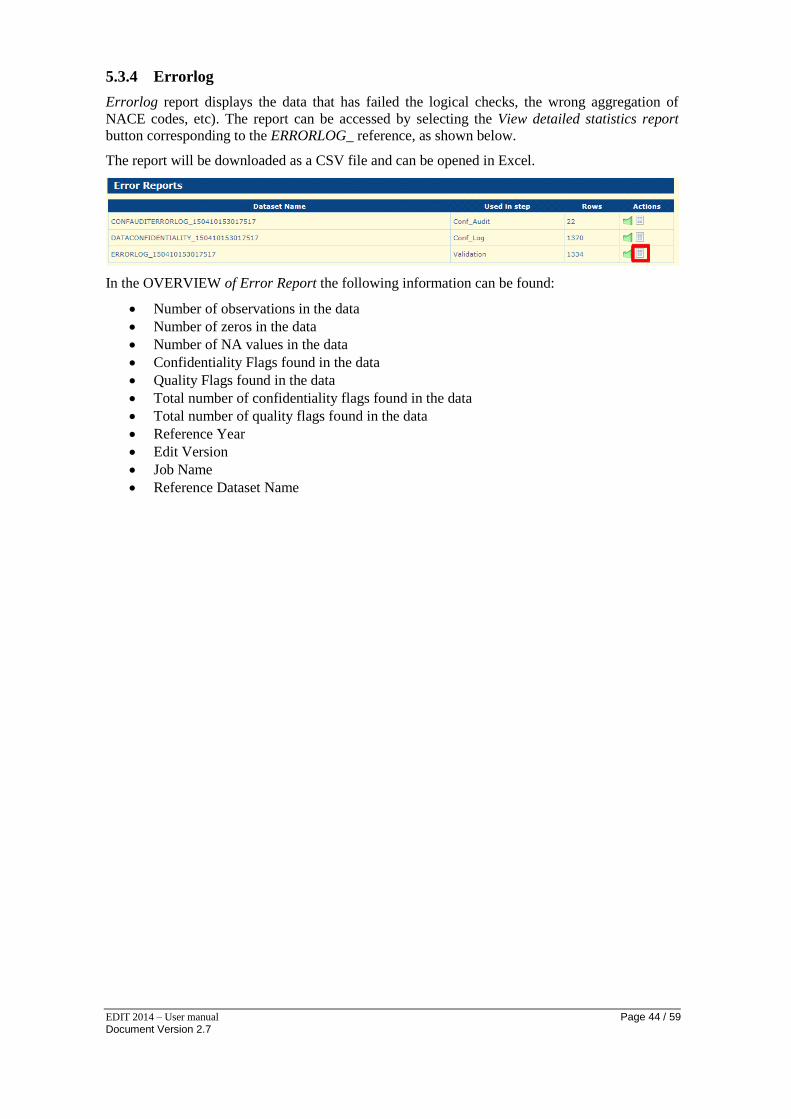
5.3.4 Errorlog
Errorlog report displays the data that has failed the logical checks, the wrong aggregation of
NACE codes, etc). The report can be accessed by selecting the View detailed statistics report
button corresponding to the ERRORLOG_ reference, as shown below.
The report will be downloaded as a CSV file and can be opened in Excel.
In the OVERVIEW of Error Report the following information can be found:
Number of observations in the data
Number of zeros in the data
Number of NA values in the data
Confidentiality Flags found in the data
Quality Flags found in the data
Total number of confidentiality flags found in the data
Total number of quality flags found in the data
Reference Year
Edit Version
Job Name
Reference Dataset Name
EDIT 2014 – User manual Page 45 / 59 Document Version 2.7
6. EDIT for BD
The information mentioned in Introduction, Starting EDIT and Logging into EDIT is common for
all SBS annexes and IFATS.
6.1 Importing a dataset
Importing datasets is the first action to be done when starting a validation procedure. The data to
be validated must be loaded into EDIT to become a dataset.
A dataset is based on a format. For example, the data to be validated in BD domain will have the
SBS_DATA format.
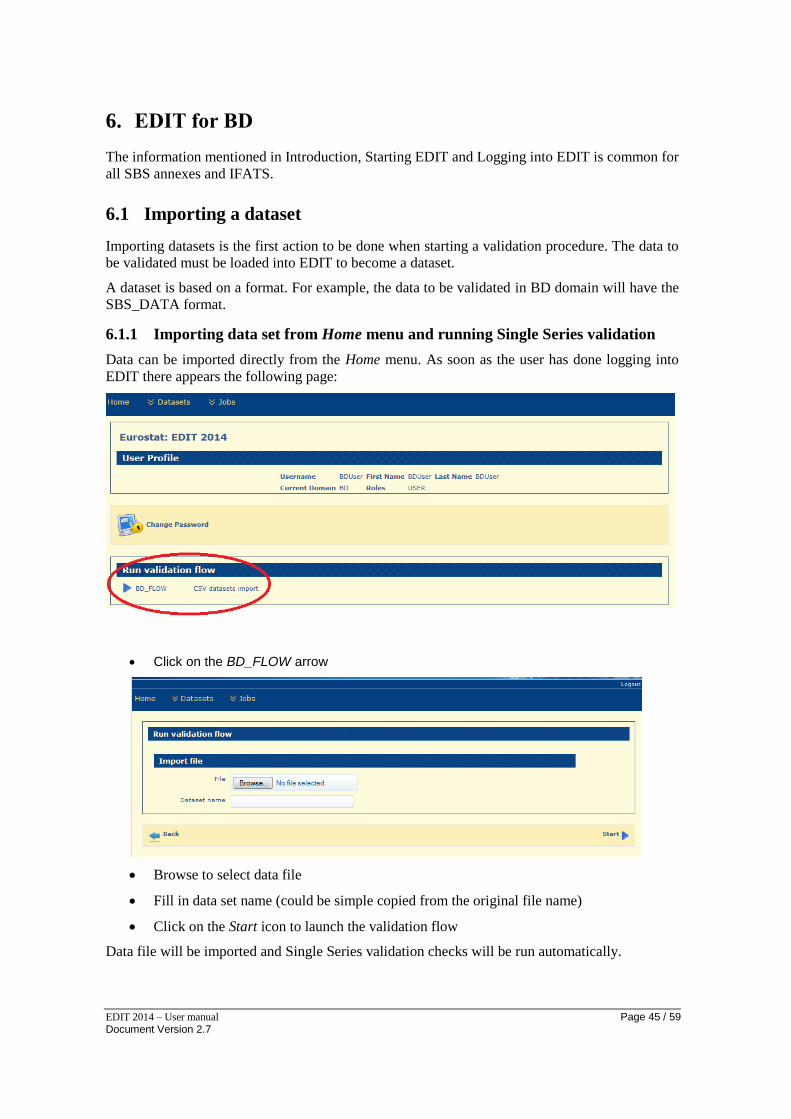
6.1.1 Importing data set from Home menu and running Single Series validation
Data can be imported directly from the Home menu. As soon as the user has done logging into
EDIT there appears the following page:
Click on the BD_FLOW arrow
Browse to select data file
Fill in data set name (could be simple copied from the original file name)
Click on the Start icon to launch the validation flow
Data file will be imported and Single Series validation checks will be run automatically.
EDIT 2014 – User manual Page 46 / 59 Document Version 2.7
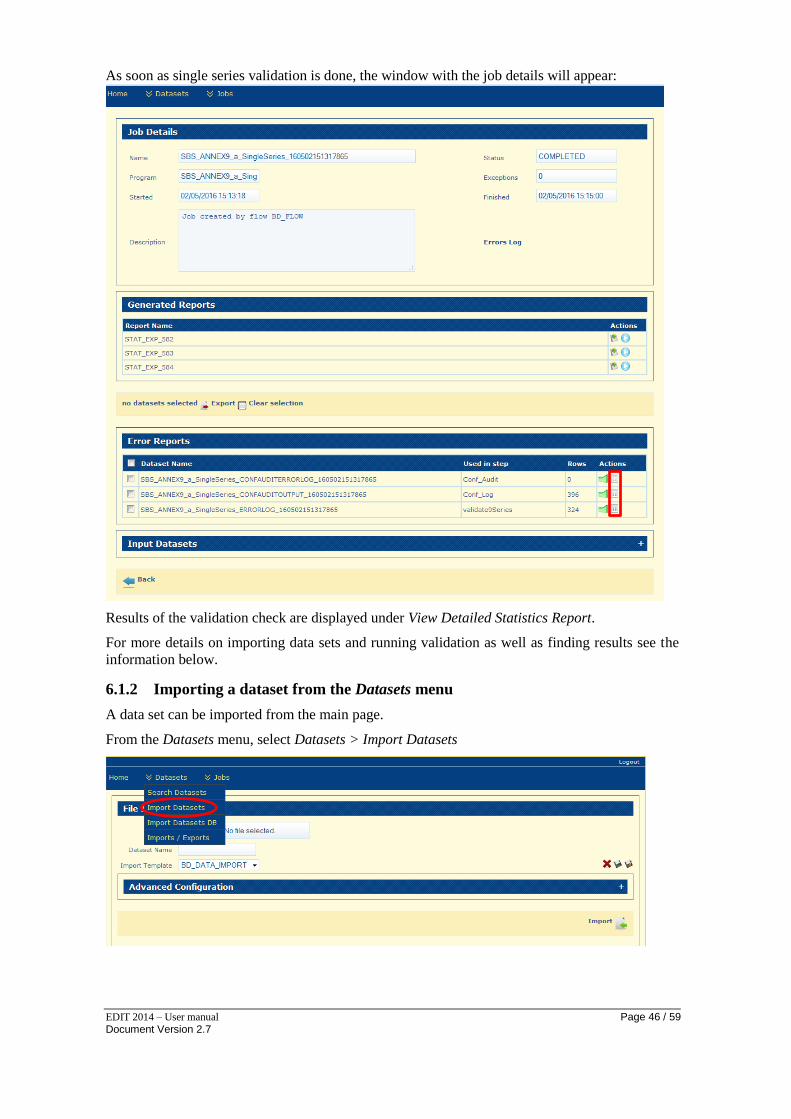
As soon as single series validation is done, the window with the job details will appear:
Results of the validation check are displayed under View Detailed Statistics Report.
For more details on importing data sets and running validation as well as finding results see the
information below.
6.1.2 Importing a dataset from the Datasets menu
A data set can be imported from the main page.
From the Datasets menu, select Datasets > Import Datasets
EDIT 2014 – User manual Page 47 / 59 Document Version 2.7
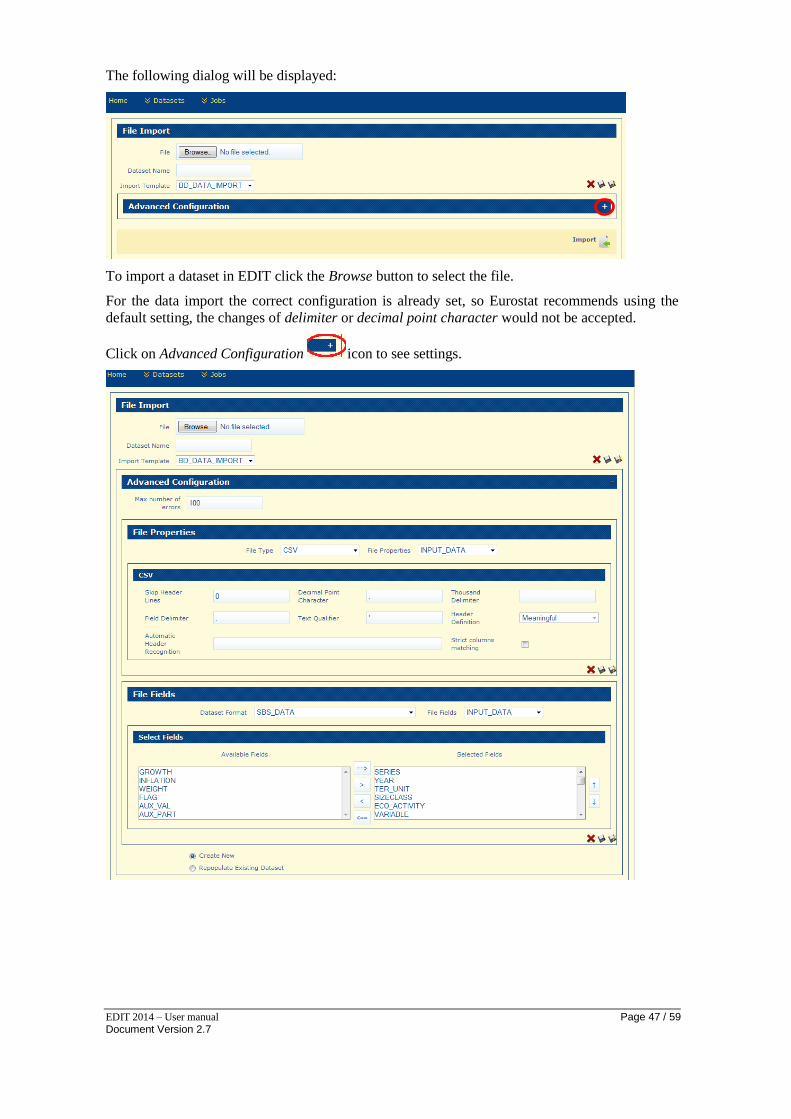
The following dialog will be displayed:
To import a dataset in EDIT click the Browse button to select the file.
For the data import the correct configuration is already set, so Eurostat recommends using the
default setting, the changes of delimiter or decimal point character would not be accepted.
Click on Advanced Configuration icon to see settings.
EDIT 2014 – User manual Page 48 / 59 Document Version 2.7
Note 1: Please note that data files have to be in .csv file format.
EDIT is optimized for Mozilla Firefox – Firefox. Therefore, the check of the file format during
the importing phase works only in Mozilla Firefox.
Note 2: Please note that no header row shall be included in the dataset.
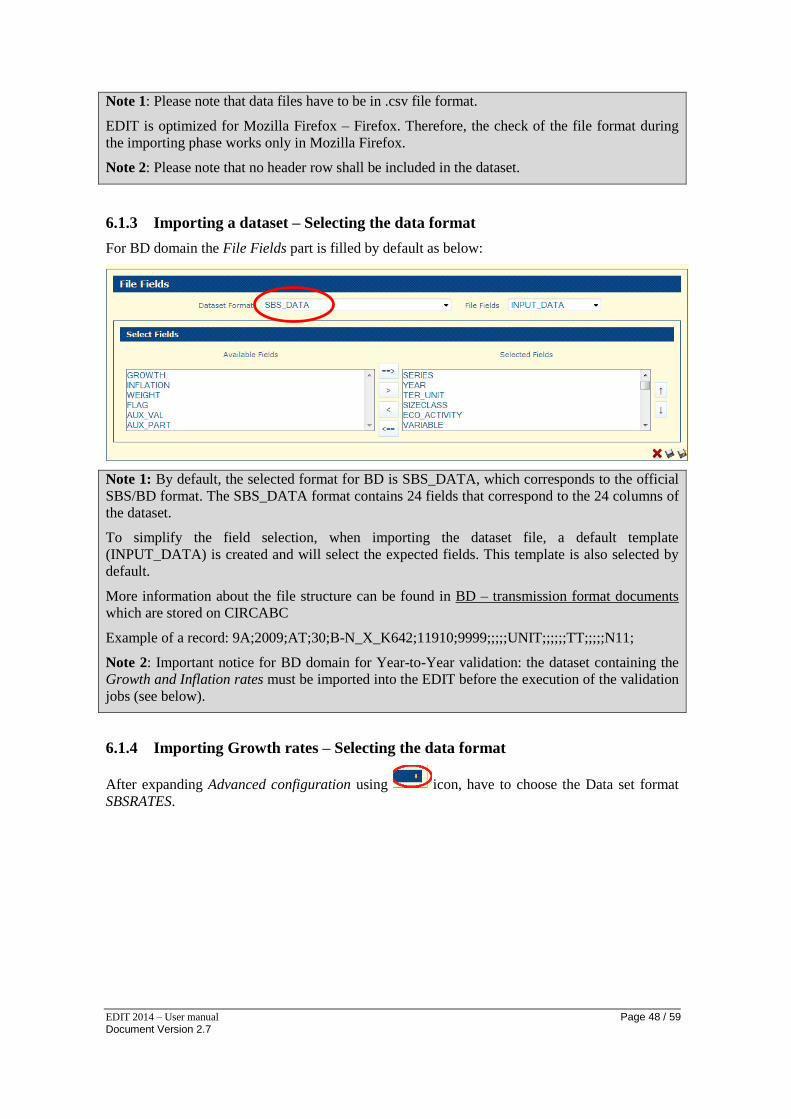
6.1.3 Importing a dataset – Selecting the data format
For BD domain the File Fields part is filled by default as below:
Note 1: By default, the selected format for BD is SBS_DATA, which corresponds to the official
SBS/BD format. The SBS_DATA format contains 24 fields that correspond to the 24 columns of
the dataset.
To simplify the field selection, when importing the dataset file, a default template
(INPUT_DATA) is created and will select the expected fields. This template is also selected by
default.
More information about the file structure can be found in BD – transmission format documents
which are stored on CIRCABC
Example of a record: 9A;2009;AT;30;B-N_X_K642;11910;9999;;;;;UNIT;;;;;;TT;;;;;N11;
Note 2: Important notice for BD domain for Year-to-Year validation: the dataset containing the
Growth and Inflation rates must be imported into the EDIT before the execution of the validation
jobs (see below).
6.1.4 Importing Growth rates – Selecting the data format
After expanding Advanced configuration using icon, have to choose the Data set format
SBSRATES.
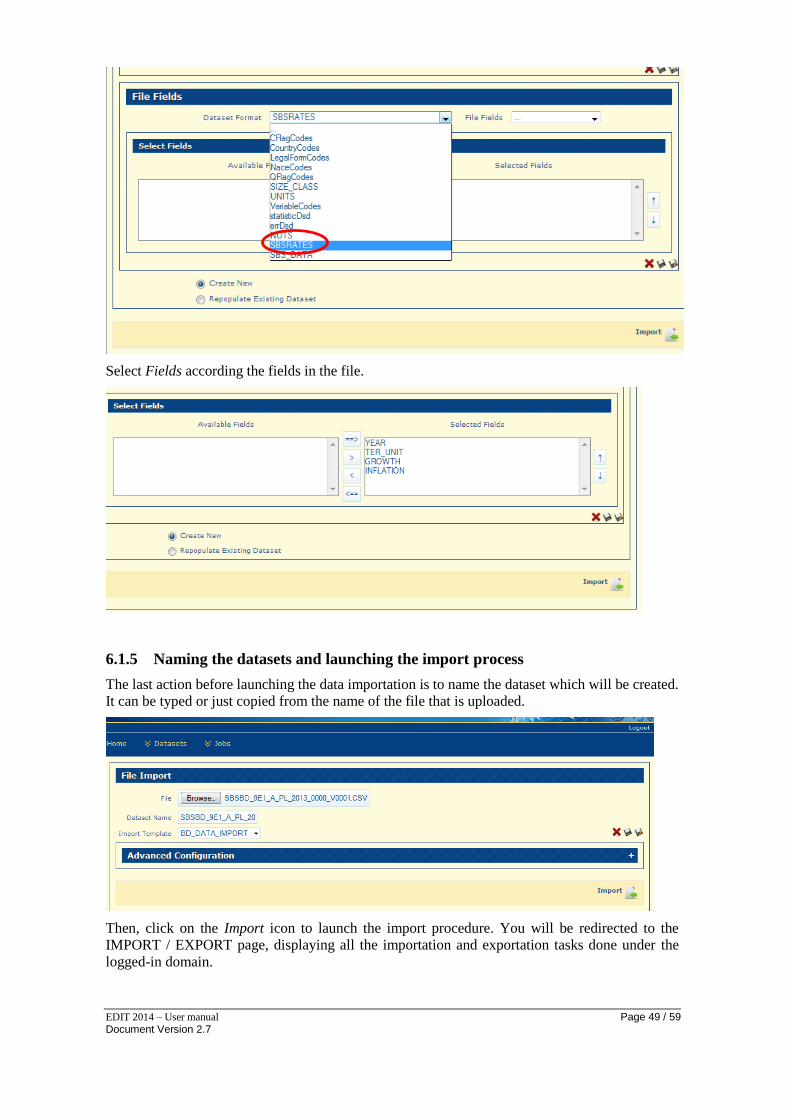
EDIT 2014 – User manual Page 49 / 59 Document Version 2.7
Select Fields according the fields in the file.
6.1.5 Naming the datasets and launching the import process
The last action before launching the data importation is to name the dataset which will be created.
It can be typed or just copied from the name of the file that is uploaded.
Then, click on the Import icon to launch the import procedure. You will be redirected to the
IMPORT / EXPORT page, displaying all the importation and exportation tasks done under the
logged-in domain.
EDIT 2014 – User manual Page 50 / 59 Document Version 2.7
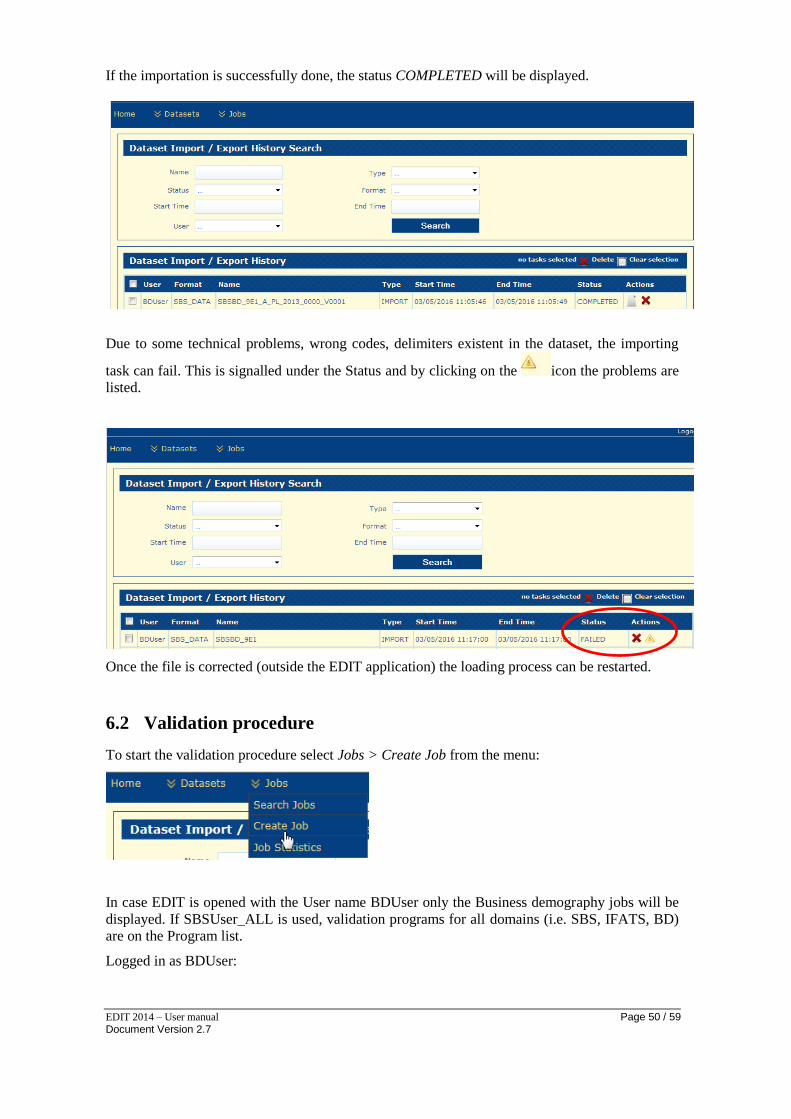
If the importation is successfully done, the status COMPLETED will be displayed.
Due to some technical problems, wrong codes, delimiters existent in the dataset, the importing
task can fail. This is signalled under the Status and by clicking on the icon the problems are
listed.
Once the file is corrected (outside the EDIT application) the loading process can be restarted.
6.2 Validation procedure
To start the validation procedure select Jobs > Create Job from the menu:
In case EDIT is opened with the User name BDUser only the Business demography jobs will be
displayed. If SBSUser_ALL is used, validation programs for all domains (i.e. SBS, IFATS, BD)
are on the Program list.
Logged in as BDUser:

EDIT 2014 – User manual Page 51 / 59 Document Version 2.7
Note 1: All validation rules of Business demography data are listed in BD working group
document, May 2016: “BD validation rules 2016” (stored on CIRCABC).
For validation of BD data several programs can be launched:
Single Series validation,
Inter-Series validation,
Year-to-Year validation.
Overview of programs:
Program Name Applicable for series SBS_ANNEX9_a_SingleSeries 9A, 9B, 9C, 9D
9E, 9F, 9G, 9H
9M, 9P, 9N
9R1, 9R2, 9R3, 9R4, 9R5
SBS_ANNEX9_b_InterSeries 9E-9F, 9E-9G, 9F-9H, 9G-9H,
9A-9B, 9A-9C, 9B-9D, 9C-9D,
9A-9E, 9B-9F, 9C-9G, 9D-9H,
9A-9M,
9R1-9B, 9R2-9B, 9R3-9F, 9R4-9F, 9R5-
9M
SBS_ANNEX9_c_YearToYear_selectedVar 9B (t) compared to 9B (t-1),
9F (t) compared to 9F (t-1)
It is recommended to let run first all Single Series programs and check the result before doing the
Inter-Series validation. As mentioned in the point 6.1.1 it can be done also automatically while
importing file using BD_FLOW on the Home page.
It is possible to skip Single Series validation: e.g. data for Series 9A has already been validated in
June. In August, when series 9E is required, it is not needed to reload series 9A and run the
Single Series program of Series 9A.
EDIT 2014 – User manual Page 52 / 59 Document Version 2.7
The selection of the appropriate job will be done via the button.
The two other icons are used respectively to:
- Visualise the program details
- Export the program
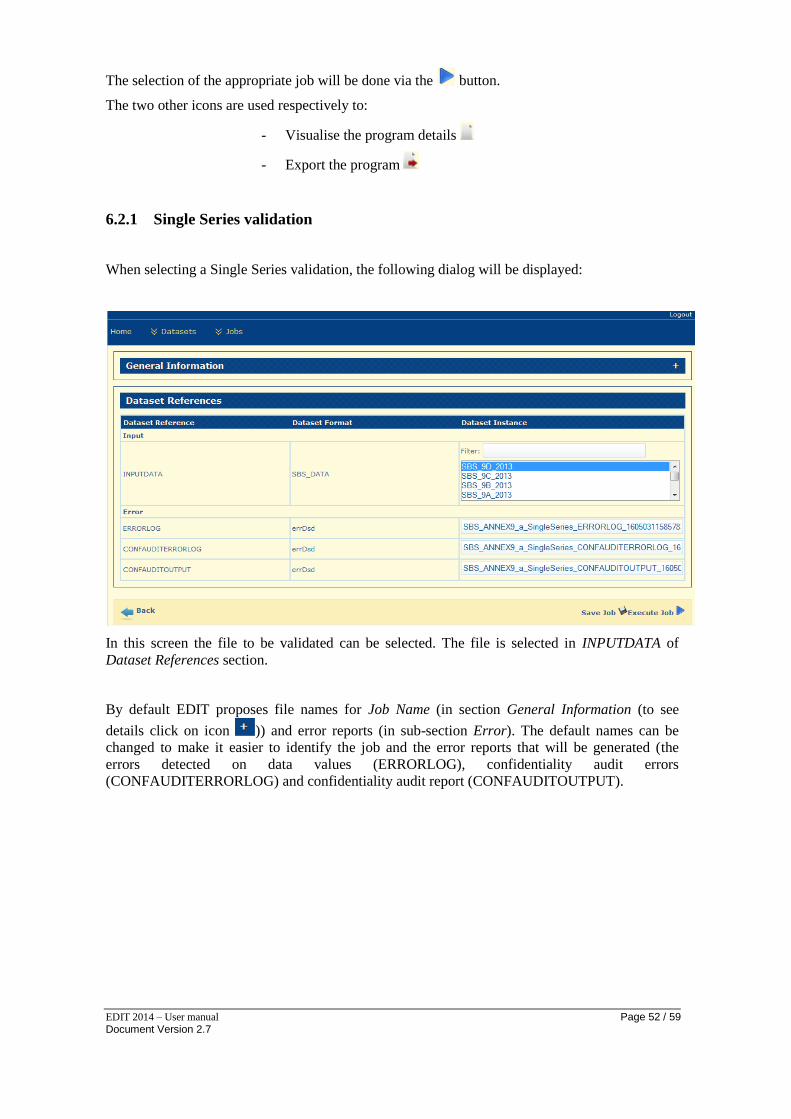
6.2.1 Single Series validation
When selecting a Single Series validation, the following dialog will be displayed:
In this screen the file to be validated can be selected. The file is selected in INPUTDATA of
Dataset References section.
By default EDIT proposes file names for Job Name (in section General Information (to see
details click on icon )) and error reports (in sub-section Error). The default names can be
changed to make it easier to identify the job and the error reports that will be generated (the
errors detected on data values (ERRORLOG), confidentiality audit errors
(CONFAUDITERRORLOG) and confidentiality audit report (CONFAUDITOUTPUT).
EDIT 2014 – User manual Page 53 / 59 Document Version 2.7
Example after renaming job name and error reporting files:
Click on the Execute Job button to launch the job.
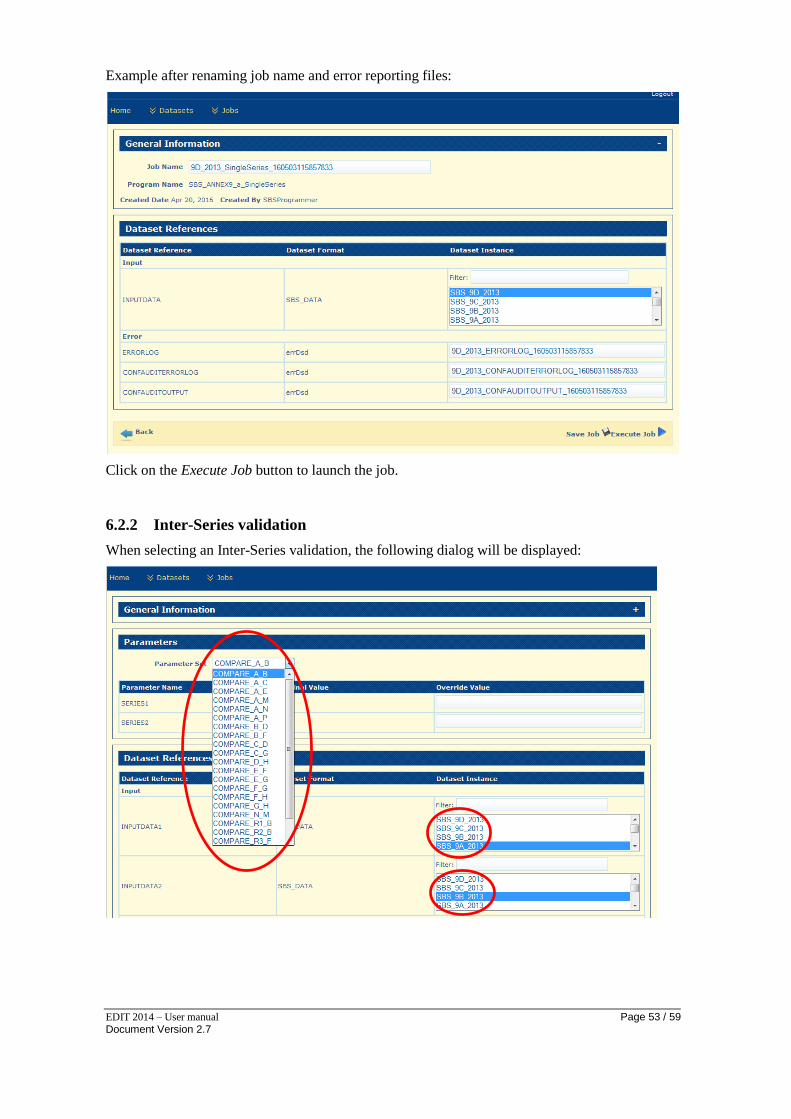
6.2.2 Inter-Series validation
When selecting an Inter-Series validation, the following dialog will be displayed:

EDIT 2014 – User manual Page 54 / 59 Document Version 2.7
For the Inter-Series validation Job, you will have to select
the series to be compared from the Parameter Set (in the case above Series 9A are compared to Series 9B);
the datasets in INPUT1 and INPUT2.
The renaming facilities for the Job, error dataset and output datasets are also available.
Example Inter-Series validation series 9A – 9B:
Click on the Execute Job button to launch the job.
6.2.3 Year-to-Year validation for Series 9B and 9F
When selecting the SBS_ANNEX9_c_YearToYear_selectedVar validation, the following dialog
will be displayed:

EDIT 2014 – User manual Page 55 / 59 Document Version 2.7
For the Year-to-Year validation variables, have to select the datasets to be compared from
INPUT1 and INPUT2. INPUT3 with SBS Rates that were imported in the beginning of
validation process is already preselected.
The renaming facilities for the Job, error dataset and output datasets are also available.
Example Year-to-Year validation for series 9B, years 2012 and 2013:
Click on the Execute button to launch the job.
Once a job has been launched, EDIT displays the Job list or jobs could be found also via Search
Jobs.
6.2.4 Validation job list
From the Job list, you can see the list of jobs and their status.
When the job is completed, you can check the results of the Job using the icon. A job can be
deleted via the icon or copied for re-launching purposes via the icon.
By default, the User field is prefilled with the current user and only the jobs created by the user
are displayed. The user can change the selection and view all jobs or a specific user’s jobs.
EDIT 2014 – User manual Page 56 / 59 Document Version 2.7
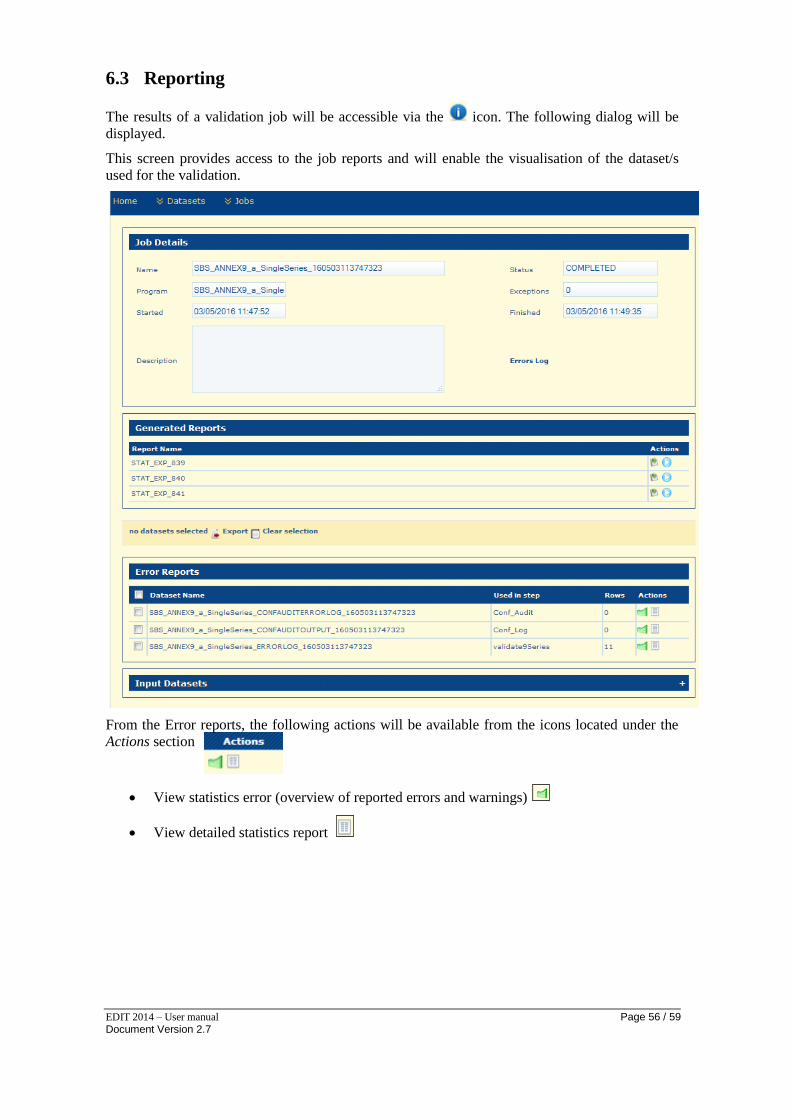
6.3 Reporting
The results of a validation job will be accessible via the icon. The following dialog will be
displayed.
This screen provides access to the job reports and will enable the visualisation of the dataset/s
used for the validation.
From the Error reports, the following actions will be available from the icons located under the
Actions section
View statistics error (overview of reported errors and warnings)
View detailed statistics report
EDIT 2014 – User manual Page 57 / 59 Document Version 2.7
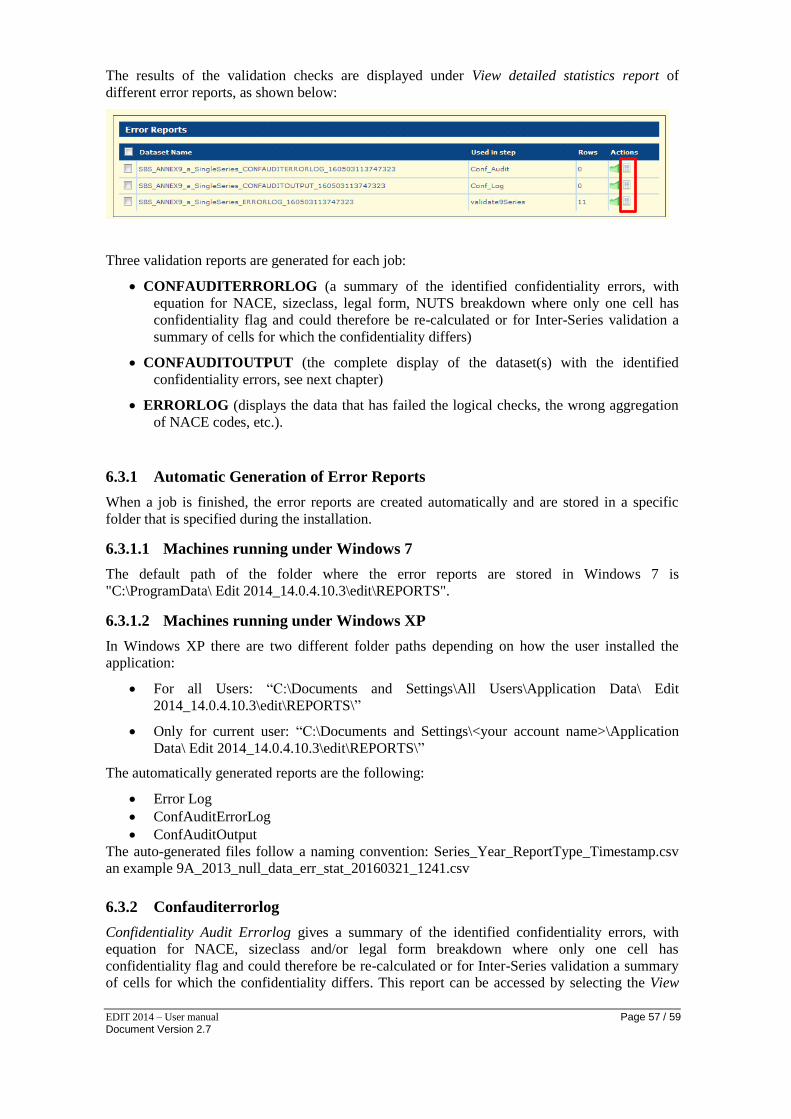
The results of the validation checks are displayed under View detailed statistics report of
different error reports, as shown below:
Three validation reports are generated for each job:
CONFAUDITERRORLOG (a summary of the identified confidentiality errors, with
equation for NACE, sizeclass, legal form, NUTS breakdown where only one cell has
confidentiality flag and could therefore be re-calculated or for Inter-Series validation a
summary of cells for which the confidentiality differs)
CONFAUDITOUTPUT (the complete display of the dataset(s) with the identified
confidentiality errors, see next chapter)
ERRORLOG (displays the data that has failed the logical checks, the wrong aggregation
of NACE codes, etc.).
6.3.1 Automatic Generation of Error Reports
When a job is finished, the error reports are created automatically and are stored in a specific
folder that is specified during the installation.
6.3.1.1 Machines running under Windows 7
The default path of the folder where the error reports are stored in Windows 7 is
"C:\ProgramData\ Edit 2014_14.0.4.10.3\edit\REPORTS".
6.3.1.2 Machines running under Windows XP
In Windows XP there are two different folder paths depending on how the user installed the
application:
For all Users: “C:\Documents and Settings\All Users\Application Data\ Edit
2014_14.0.4.10.3\edit\REPORTS\”
Only for current user: “C:\Documents and Settings\<your account name>\Application
Data\ Edit 2014_14.0.4.10.3\edit\REPORTS\”
The automatically generated reports are the following:
Error Log
ConfAuditErrorLog
ConfAuditOutput
The auto-generated files follow a naming convention: Series_Year_ReportType_Timestamp.csv
an example 9A_2013_null_data_err_stat_20160321_1241.csv
6.3.2 Confauditerrorlog
Confidentiality Audit Errorlog gives a summary of the identified confidentiality errors, with
equation for NACE, sizeclass and/or legal form breakdown where only one cell has
confidentiality flag and could therefore be re-calculated or for Inter-Series validation a summary
of cells for which the confidentiality differs. This report can be accessed by selecting the View
EDIT 2014 – User manual Page 58 / 59 Document Version 2.7
detailed statistics report button corresponding to the CONFAUDITERRORLOG_ reference, as
shown below.
The report will be downloaded as a CSV file and can be opened in Excel.
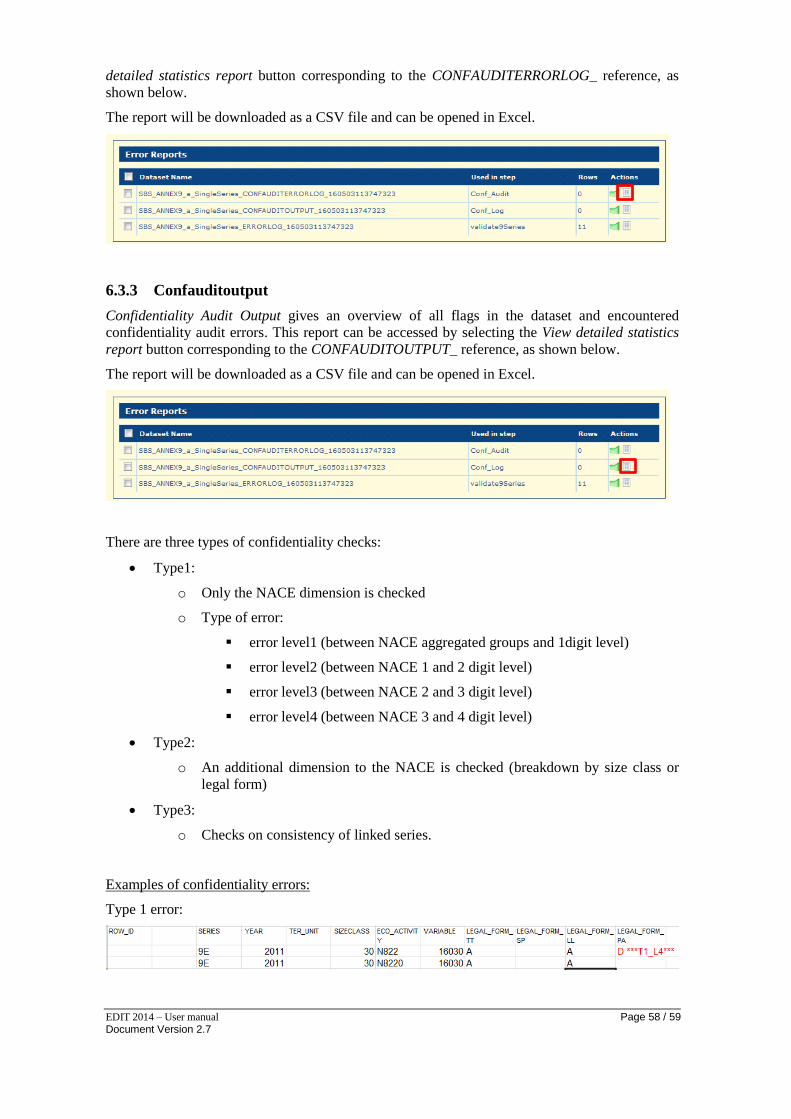
6.3.3 Confauditoutput
Confidentiality Audit Output gives an overview of all flags in the dataset and encountered
confidentiality audit errors. This report can be accessed by selecting the View detailed statistics
report button corresponding to the CONFAUDITOUTPUT_ reference, as shown below.
The report will be downloaded as a CSV file and can be opened in Excel.
There are three types of confidentiality checks:
Type1:
o Only the NACE dimension is checked
o Type of error:
error level1 (between NACE aggregated groups and 1digit level)
error level2 (between NACE 1 and 2 digit level)
error level3 (between NACE 2 and 3 digit level)
error level4 (between NACE 3 and 4 digit level)
Type2:
o An additional dimension to the NACE is checked (breakdown by size class or
legal form)
Type3:
o Checks on consistency of linked series.
Examples of confidentiality errors:
Type 1 error:
EDIT 2014 – User manual Page 59 / 59 Document Version 2.7
Confidentiality flag D on Legal form PA, NACE N822 is marked with ***T1_L4***: a
secondary confidentiality flag is missing for NACE class N8220 (error on level4).
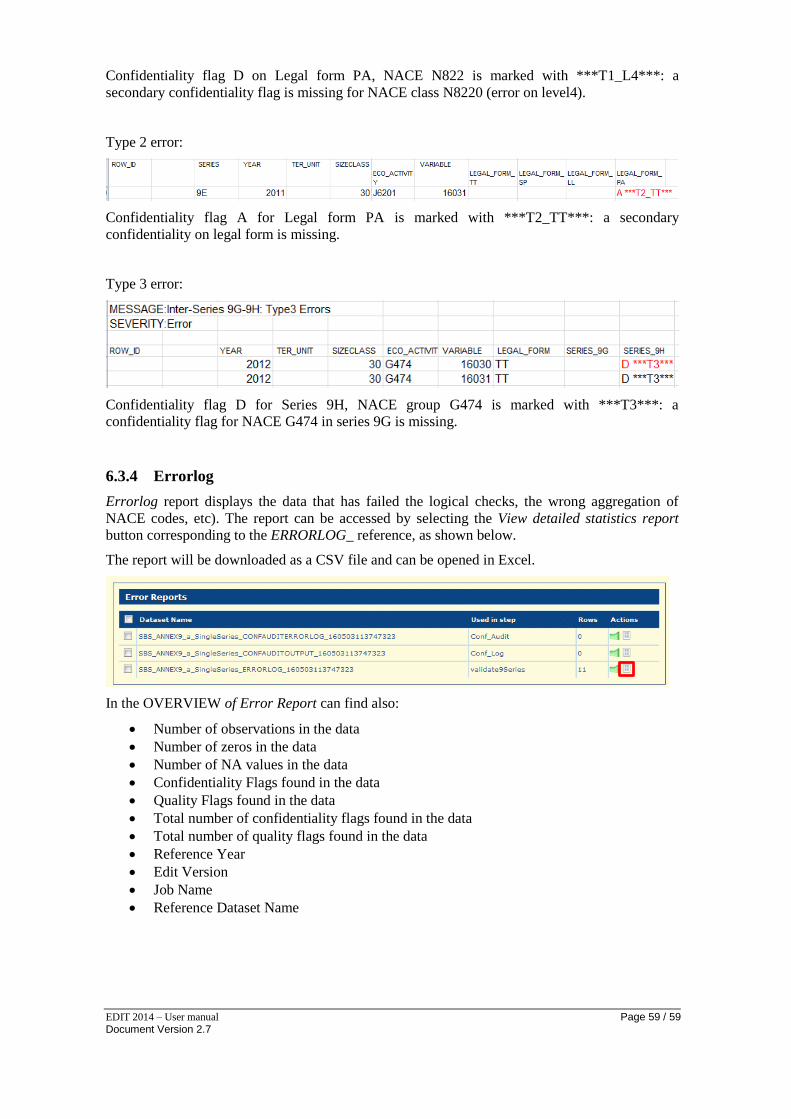
Type 2 error:
Confidentiality flag A for Legal form PA is marked with ***T2_TT***: a secondary
confidentiality on legal form is missing.
Type 3 error:
Confidentiality flag D for Series 9H, NACE group G474 is marked with ***T3***: a
confidentiality flag for NACE G474 in series 9G is missing.
6.3.4 Errorlog
Errorlog report displays the data that has failed the logical checks, the wrong aggregation of
NACE codes, etc). The report can be accessed by selecting the View detailed statistics report
button corresponding to the ERRORLOG_ reference, as shown below.
The report will be downloaded as a CSV file and can be opened in Excel.
In the OVERVIEW of Error Report can find also:
Number of observations in the data
Number of zeros in the data
Number of NA values in the data
Confidentiality Flags found in the data
Quality Flags found in the data
Total number of confidentiality flags found in the data
Total number of quality flags found in the data
Reference Year
Edit Version
Job Name
Reference Dataset Name