Embed Size (px)
Citation preview
Recording a PowerPoint Using Camtasia Studio
Recording a PowerPoint With Sound:
1. Open the Camtasia Studio application
2. In the Welcome window, click on the New PowerPoint Recording button.
o If this screen doesn't show up for you, you can click on the Record the screen
drop-down menu on the left hand side of the screen and select Record
PowerPoint.
o If the Microsoft PowerPoint application was already opened, the computer will
switch to that program. Otherwise it will open PowerPoint automatically and
switch to it. Select and open the presentation for which you would like to record
narration.
3. Click on the Add-Ins tab in Microsoft PowerPoint to see the Camtasia Studio recording
toolbar.
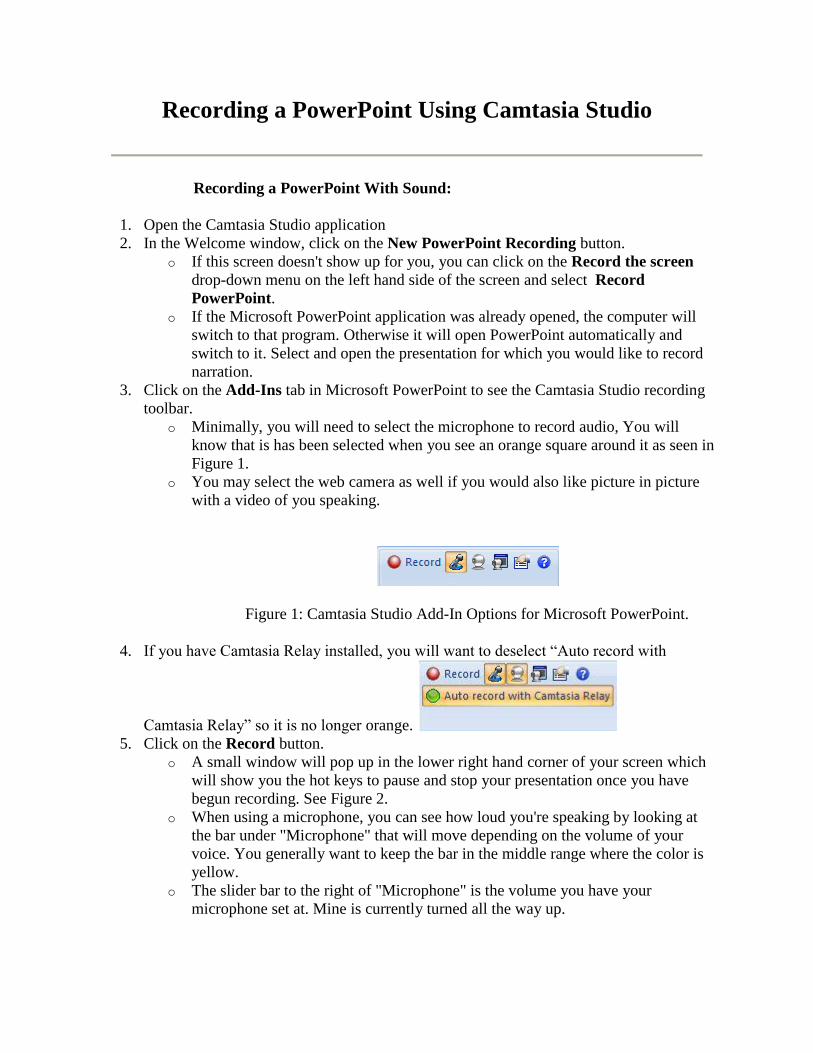
o Minimally, you will need to select the microphone to record audio, You will
know that is has been selected when you see an orange square around it as seen in
Figure 1.
o You may select the web camera as well if you would also like picture in picture
with a video of you speaking.
Figure 1: Camtasia Studio Add-In Options for Microsoft PowerPoint.
4. If you have Camtasia Relay installed, you will want to deselect “Auto record with
Camtasia Relay” so it is no longer orange.
5. Click on the Record button.
o A small window will pop up in the lower right hand corner of your screen which
will show you the hot keys to pause and stop your presentation once you have
begun recording. See Figure 2.
o When using a microphone, you can see how loud you're speaking by looking at
the bar under "Microphone" that will move depending on the volume of your
voice. You generally want to keep the bar in the middle range where the color is
yellow.
o The slider bar to the right of "Microphone" is the volume you have your
microphone set at. Mine is currently turned all the way up.
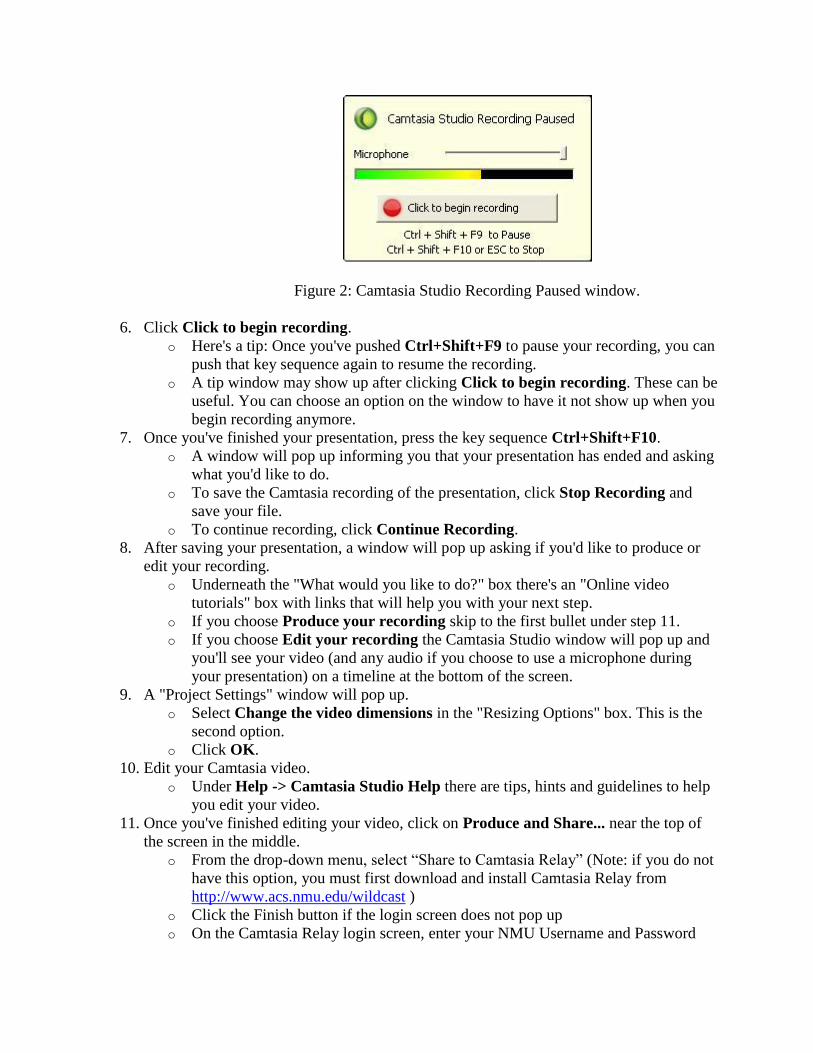
Figure 2: Camtasia Studio Recording Paused window.
6. Click Click to begin recording.
o Here's a tip: Once you've pushed Ctrl+Shift+F9 to pause your recording, you can
push that key sequence again to resume the recording.
o A tip window may show up after clicking Click to begin recording. These can be
useful. You can choose an option on the window to have it not show up when you
begin recording anymore.
7. Once you've finished your presentation, press the key sequence Ctrl+Shift+F10.
o A window will pop up informing you that your presentation has ended and asking
what you'd like to do.
o To save the Camtasia recording of the presentation, click Stop Recording and
save your file.
o To continue recording, click Continue Recording.
8. After saving your presentation, a window will pop up asking if you'd like to produce or
edit your recording.
o Underneath the "What would you like to do?" box there's an "Online video
tutorials" box with links that will help you with your next step.
o If you choose Produce your recording skip to the first bullet under step 11.
o If you choose Edit your recording the Camtasia Studio window will pop up and
you'll see your video (and any audio if you choose to use a microphone during
your presentation) on a timeline at the bottom of the screen.
9. A "Project Settings" window will pop up.
o Select Change the video dimensions in the "Resizing Options" box. This is the
second option.
o Click OK.
10. Edit your Camtasia video.
o Under Help -> Camtasia Studio Help there are tips, hints and guidelines to help
you edit your video.
11. Once you've finished editing your video, click on Produce and Share... near the top of
the screen in the middle.
o From the drop-down menu, select “Share to Camtasia Relay” (Note: if you do not
have this option, you must first download and install Camtasia Relay from
http://www.acs.nmu.edu/wildcast )
o Click the Finish button if the login screen does not pop up
o On the Camtasia Relay login screen, enter your NMU Username and Password
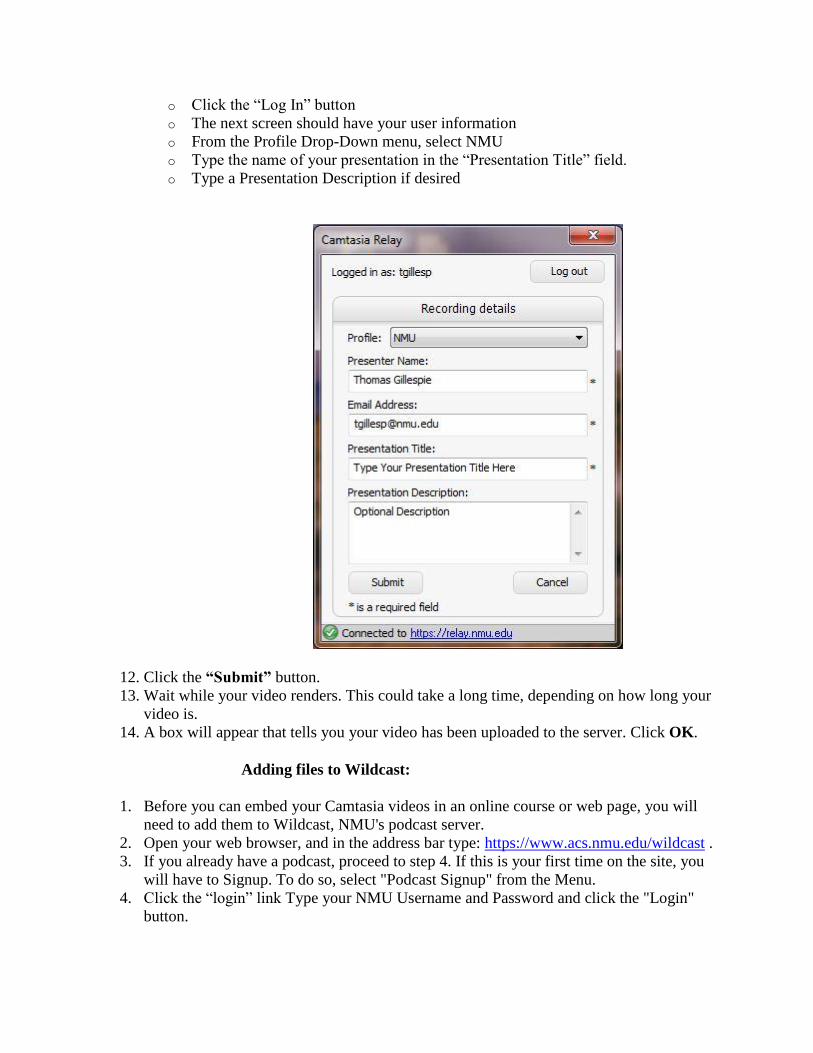
o Click the “Log In” button
o The next screen should have your user information
o From the Profile Drop-Down menu, select NMU
o Type the name of your presentation in the “Presentation Title” field.
o Type a Presentation Description if desired
12. Click the “Submit” button.
13. Wait while your video renders. This could take a long time, depending on how long your
video is.
14. A box will appear that tells you your video has been uploaded to the server. Click OK.
Adding files to Wildcast:
1. Before you can embed your Camtasia videos in an online course or web page, you will
need to add them to Wildcast, NMU's podcast server.
2. Open your web browser, and in the address bar type: https://www.acs.nmu.edu/wildcast .
3. If you already have a podcast, proceed to step 4. If this is your first time on the site, you
will have to Signup. To do so, select "Podcast Signup" from the Menu.
4. Click the “login” link Type your NMU Username and Password and click the "Login"
button.

5. If you wish to place the uploaded Camtasia Relay episode into an existing podcast,
proceed with step 6. If you want to create a new podcast first, proceed to step 8.
6. Under Camtasia Relay Episodes, you will see the episode you just uploaded. It may take
a while to process this file. Once it has been processed, you will be able to select the
podcast into which you would like to place the episode.
7. From the “Select a Podcast” drop-down menu, choose the podcast into which you would
like to place the episode and click the “Select” button. This concludes the process for
adding your files to Wildcast. If you would like to add podcast episodes to EduCat,
proceed to the “Embedding the Podcast Episode in EduCat” section of this document.
8. Select "Manage Podcasts."
9. Select the "Create a New Podcast" button.
10. Type a title, course sequence number, date, description, location of the PodCast and
academic term.
11. Click the “Create This Podcast” button.
12. Click the “Home” Link and proceed to step 6
Embedding the PodCast Episode into EduCat:
1. Under the section of your PodCast on NMU WildCast, select the episode name from the
drop-down menu section of "Episode".
2. Click the "Edit Episode" button.
3. In the "Embed Video", select the code (it will turn blue when selected).
4. Right-Click and choose copy.
5. Log into the course you'd like the video uploaded to in EduCat.
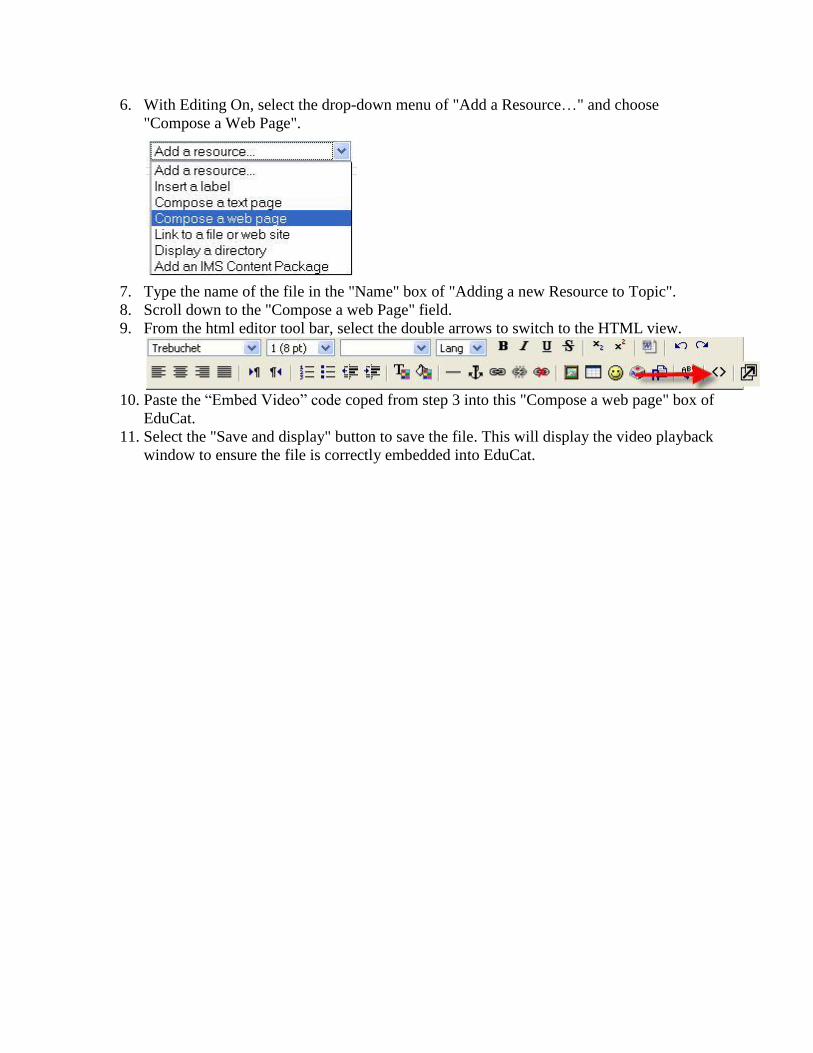
6. With Editing On, select the drop-down menu of "Add a Resource…" and choose
"Compose a Web Page".
7. Type the name of the file in the "Name" box of "Adding a new Resource to Topic".
8. Scroll down to the "Compose a web Page" field.
9. From the html editor tool bar, select the double arrows to switch to the HTML view.
10. Paste the “Embed Video” code coped from step 3 into this "Compose a web page" box of
EduCat.
11. Select the "Save and display" button to save the file. This will display the video playback
window to ensure the file is correctly embedded into EduCat.


![Camtasia Studio [.pdf]](https://img.pdfslide.net/doc/110x75/58a2fc2b1a28ab722c8bac6b/camtasia-studio-pdf.jpg)