Embed Size (px)
Citation preview
RESIDENT TEACHING
SKILLS MANUAL
5th Revision
Created by:
Jeffrey E. Pettit, PhD Office of Consultation and Research in Medical Education
ii
Foreword
Teaching is an integral role of the practicing physician regardless of career path or
specialty. Teaching responsibilities begin early in medical education, but the most
dramatic shift from learner to teacher occurs during the transition from internship to
residency. Many studies have shown that residents are often the primary teachers of
medical students and junior house staff and spend as much as 20 – 25% of their time
teaching. (Bensinger, et al. 2005.)
Residents at teaching hospitals also play an integral part in the accreditation of medical
institutions. Organizations such as Association of American Medical Colleges (AAMC),
Liaison Council on Medical Education (LCME), and Accreditation Council for Graduate
Medical Education (ACGME) require “residents who supervise or teach medical
students to be familiar with the educational objectives and be prepared for their roles in
teaching and evaluation.” (LCME 2006 – 2007: Standards for Accreditation)
Purpose of Manual
This manual is intended to be a resource to assist residents in their day-to-day
teaching encounters. It is intended to: 1) provide “how – to” guidelines for the novice
and experienced teaching resident, 2) identify additional resources [with information
pertinent to educating others], and 3) be a quick reference guide for common teaching
situations.
Fifth Revision:
2012
iii
Acknowledgements
With deep appreciation to the OCRMErs who contributed
to the development of this manual. With all your other
activities, you were still nice enough to go over the
manual one more time to make it better. Without the
corrections, suggestions, and interesting ideas, this
manual would not be as effective.
Revision 5 Changes
The section on “Teaching in the Presence of the Patient”
was expanded. A new section on “Multiple Levels of
Learners” was added. A new section on “Seven Mistakes to
Avoid in Teaching Medical Students” was added.
iv
Table of Contents Foreword ..................................................................................................................................................... ii
Acknowledgements ...................................................................................................................................... iii
Table of Contents ........................................................................................................................................ iv
Introduction ................................................................................................................................................. vi
BEGINNING THE ROTATION .................................................................................................... 1
Setting Goals and Expectations ........................................................................................................................... 2
Orientation .......................................................................................................................................................... 4
Motivating Learners ............................................................................................................................................ 8
Learning Styles ..................................................................................................................................................... 9
Principles of Adult Learning .............................................................................................................................. 10
Teacher-Centered vs. Learner-Centered ........................................................................................................... 11
DURING THE ROTATION ........................................................................................................ 12
Priming the Learner ........................................................................................................................................... 14
Teachable Moments .......................................................................................................................................... 16
Small Group Teaching ........................................................................................................................................ 17
Asking the Right Questions ............................................................................................................................... 19
Managing Challenging Learners ........................................................................................................................ 20
Teaching in the Presence of the Patient ........................................................................................................... 23
One-Minute Observations ................................................................................................................................. 25
Evidence-Based Medicine ................................................................................................................................. 26
Rounding with Attending .................................................................................................................................. 29
Multiple Levels of Learners ............................................................................................................................... 30
Microskills Teaching .......................................................................................................................................... 32
Teaching Psychomotor Skills ............................................................................................................................. 33
Interactive Lecturing ......................................................................................................................................... 35
Conference Room .............................................................................................................................................. 37
Giving Feedback ................................................................................................................................................ 38
Receiving Feedback ........................................................................................................................................... 40
Soliciting Feedback ............................................................................................................................................ 40
Daily Debriefing ................................................................................................................................................. 41
v
AFTER THE ROTATION ........................................................................................................... 42
Evaluating Teaching ........................................................................................................................................... 43
Evaluating Learners ........................................................................................................................................... 45
Hidden Curriculum ............................................................................................................................................ 46
ADDITIONAL TEACHING OPPORTUNITIES ............................................................................... 47
Teaching Patients .............................................................................................................................................. 48
Time Management ............................................................................................................................................ 50
Grand Rounds .................................................................................................................................................... 52
Teaching in the Operating Room ...................................................................................................................... 53
Large Group Presentations ................................................................................................................................ 55
Top Ten Tips for Talks ........................................................................................................................................ 57
Overcoming Nervousness.................................................................................................................................. 58
Visual Presentations .......................................................................................................................................... 59
TEACHING NEXT STEPS ....................................................................................................... 61
Suggestions for Continued Improvement ......................................................................................................... 62
Teaching Skills Self-Assessment ........................................................................................................................ 63
Coaching ............................................................................................................................................................ 64
Mentoring .......................................................................................................................................................... 66
TEACHING RESOURCES .......................................................................................................... 68
Articles ............................................................................................................................................................... 69
Books ................................................................................................................................................................. 70
Websites ............................................................................................................................................................ 70
BIBLIOGRAPHY ...................................................................................................................... 72
The 10 EQUATIONS ............................................................................................................... 75
Seven Mistakes to Avoid in Teaching Medical Students .......................................................... 76
vi
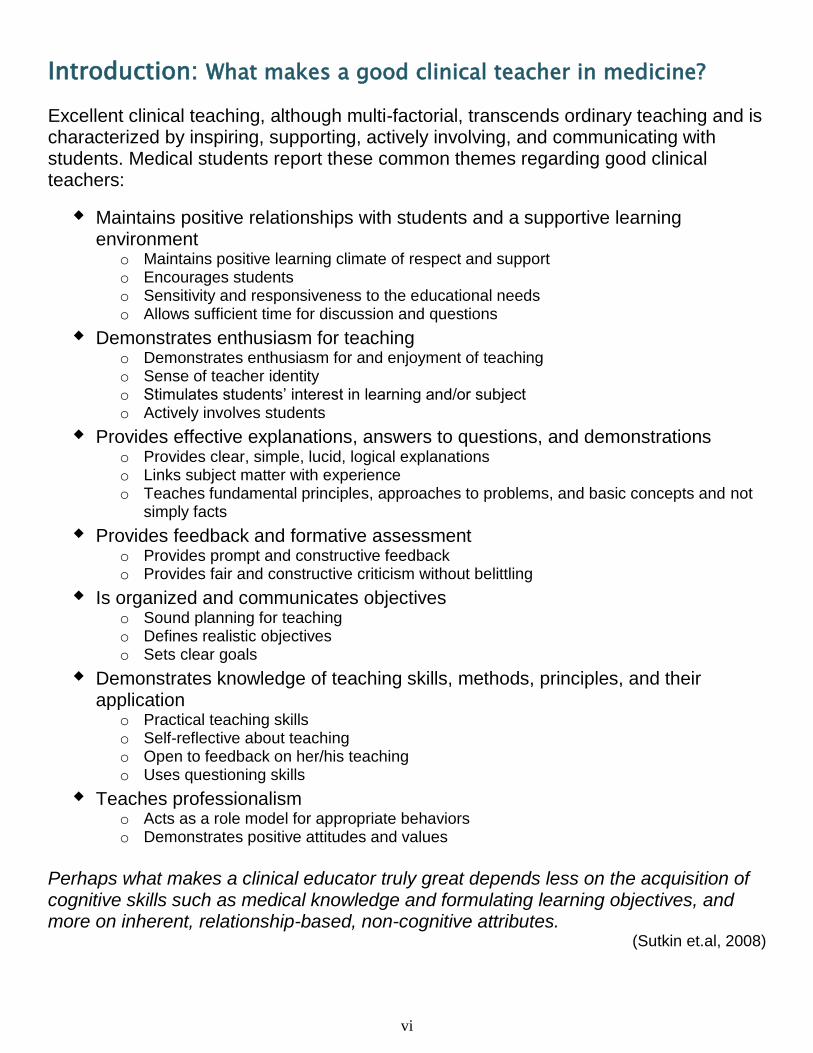
Introduction: What makes a good clinical teacher in medicine?
Excellent clinical teaching, although multi-factorial, transcends ordinary teaching and is characterized by inspiring, supporting, actively involving, and communicating with students. Medical students report these common themes regarding good clinical teachers:
Maintains positive relationships with students and a supportive learning environment
o Maintains positive learning climate of respect and support o Encourages students o Sensitivity and responsiveness to the educational needs o Allows sufficient time for discussion and questions
Demonstrates enthusiasm for teaching o Demonstrates enthusiasm for and enjoyment of teaching o Sense of teacher identity o Stimulates students’ interest in learning and/or subject o Actively involves students
Provides effective explanations, answers to questions, and demonstrations o Provides clear, simple, lucid, logical explanations o Links subject matter with experience o Teaches fundamental principles, approaches to problems, and basic concepts and not
simply facts Provides feedback and formative assessment
o Provides prompt and constructive feedback o Provides fair and constructive criticism without belittling
Is organized and communicates objectives o Sound planning for teaching o Defines realistic objectives o Sets clear goals
Demonstrates knowledge of teaching skills, methods, principles, and their application
o Practical teaching skills o Self-reflective about teaching o Open to feedback on her/his teaching o Uses questioning skills
Teaches professionalism o Acts as a role model for appropriate behaviors o Demonstrates positive attitudes and values
Perhaps what makes a clinical educator truly great depends less on the acquisition of cognitive skills such as medical knowledge and formulating learning objectives, and more on inherent, relationship-based, non-cognitive attributes.
(Sutkin et.al, 2008)
1
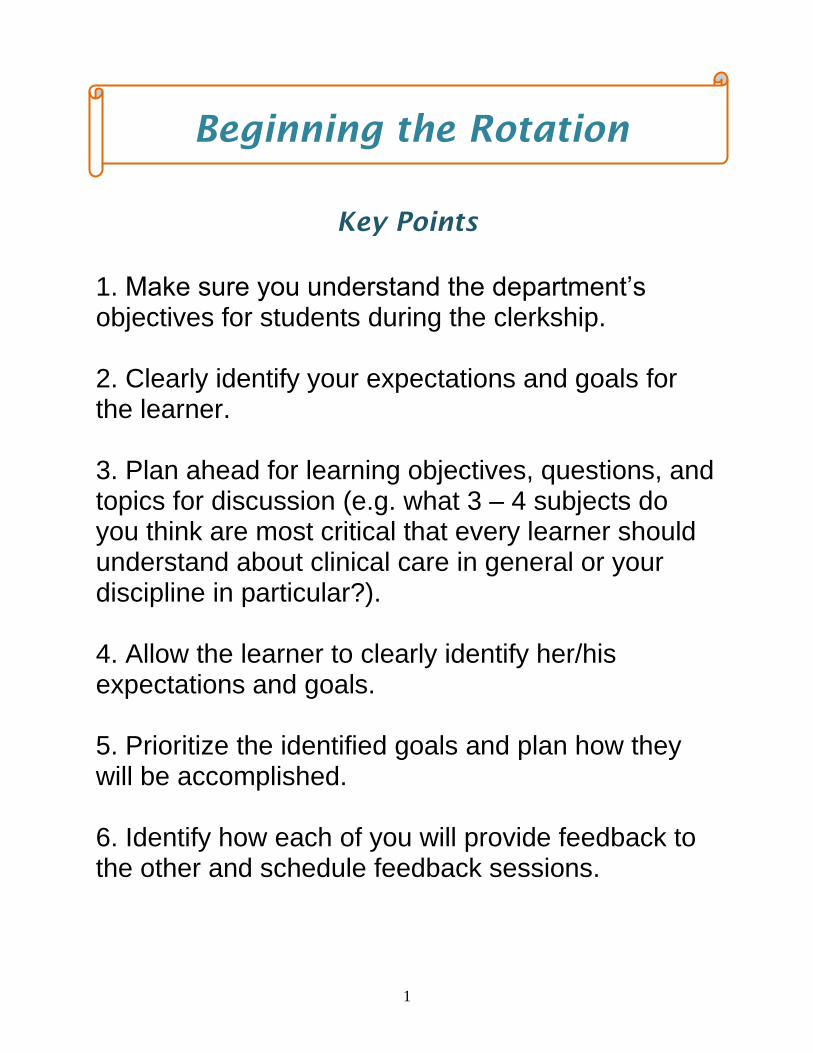
Key Points
1. Make sure you understand the department’s objectives for students during the clerkship. 2. Clearly identify your expectations and goals for the learner. 3. Plan ahead for learning objectives, questions, and topics for discussion (e.g. what 3 – 4 subjects do you think are most critical that every learner should understand about clinical care in general or your discipline in particular?). 4. Allow the learner to clearly identify her/his expectations and goals. 5. Prioritize the identified goals and plan how they will be accomplished. 6. Identify how each of you will provide feedback to the other and schedule feedback sessions.
Beginning the Rotation

2
Setting Goals and Expectations Clearly identifying your goals and expectations at the beginning of the rotation will help prevent or eliminate many of the performance problems that learners experience. There are two areas of goals and expectations you will need to clarify with your junior team members:
A. Job Performance – typical day-to-day functions while a member of your team.
B. Professionalism – behavioral actions that demonstrate proper
demeanor and respect for patients and staff.
1. Review department objectives and clarify roles and tasks of the new learner
2. Tell learners your goals and expectations at the beginning of the rotation (“I expect you to ask questions when you are not sure of a medication’s effects.”)
3. Ask learners for their expectations and encourage them to pick at least three personal goals they would like to accomplish during the rotation
4. Anticipate challenges such as: whom to contact if absent; how to handle emergencies; call expectations; what to do during downtime; and resources for independent learning
The resident and each learner should determine:
Which goals should be met (e.g., prioritize the list of goals and the criteria for successful completion)
How the learner will achieve those goals (e.g., through independent study or through activities that you plan)
What is the timeframe for achieving the goals (e.g., completed at the end of the rotation, every Friday, etc.)
How accomplishment of the goals will be judged (e.g., presentation, small group discussion, one-on-one, written report, etc.)
Clear goals and expectations will help to ensure no surprise evaluations at the end of the rotation.
3
Setting Goals and Expectations In the following space, identify 3 expectations you believe should be communicated to every new learner:
In the following space, indentify 3 goals you believe every new learner should focus on:
4
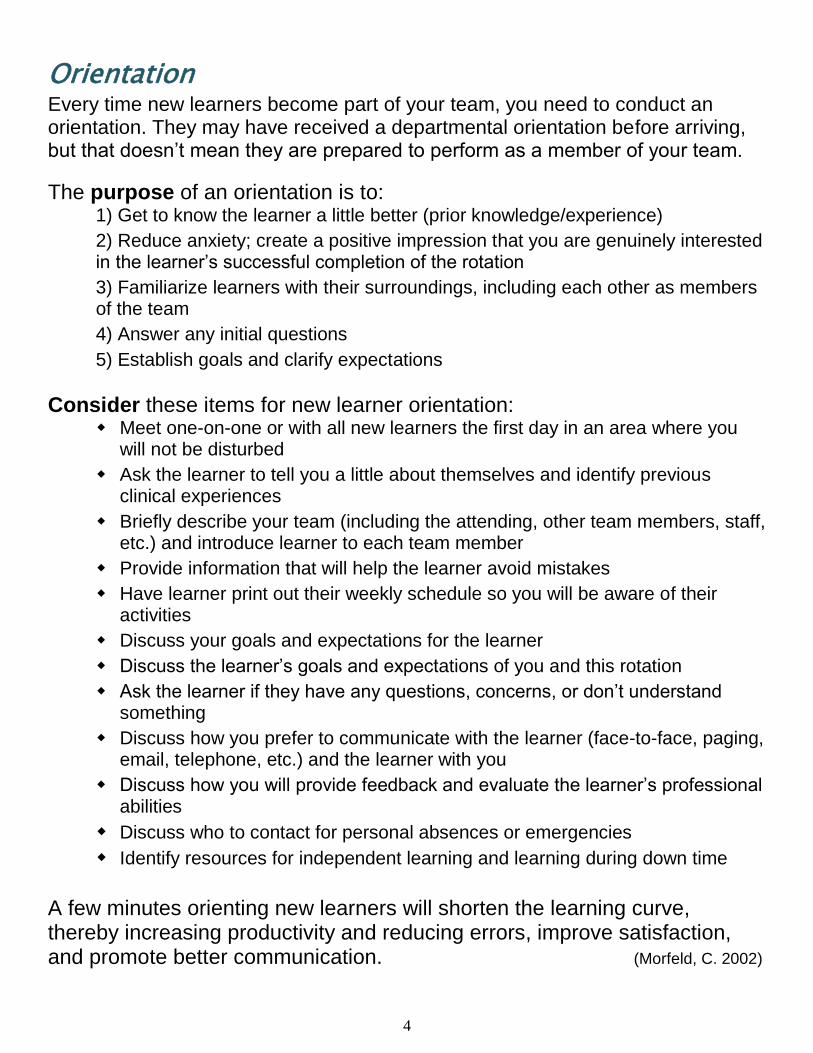
Orientation Every time new learners become part of your team, you need to conduct an orientation. They may have received a departmental orientation before arriving, but that doesn’t mean they are prepared to perform as a member of your team.
The purpose of an orientation is to: 1) Get to know the learner a little better (prior knowledge/experience)
2) Reduce anxiety; create a positive impression that you are genuinely interested in the learner’s successful completion of the rotation
3) Familiarize learners with their surroundings, including each other as members of the team
4) Answer any initial questions
5) Establish goals and clarify expectations
Consider these items for new learner orientation: Meet one-on-one or with all new learners the first day in an area where you
will not be disturbed
Ask the learner to tell you a little about themselves and identify previous clinical experiences
Briefly describe your team (including the attending, other team members, staff, etc.) and introduce learner to each team member
Provide information that will help the learner avoid mistakes
Have learner print out their weekly schedule so you will be aware of their activities
Discuss your goals and expectations for the learner
Discuss the learner’s goals and expectations of you and this rotation
Ask the learner if they have any questions, concerns, or don’t understand something
Discuss how you prefer to communicate with the learner (face-to-face, paging, email, telephone, etc.) and the learner with you
Discuss how you will provide feedback and evaluate the learner’s professional abilities
Discuss who to contact for personal absences or emergencies
Identify resources for independent learning and learning during down time
A few minutes orienting new learners will shorten the learning curve, thereby increasing productivity and reducing errors, improve satisfaction, and promote better communication. (Morfeld, C. 2002)
5
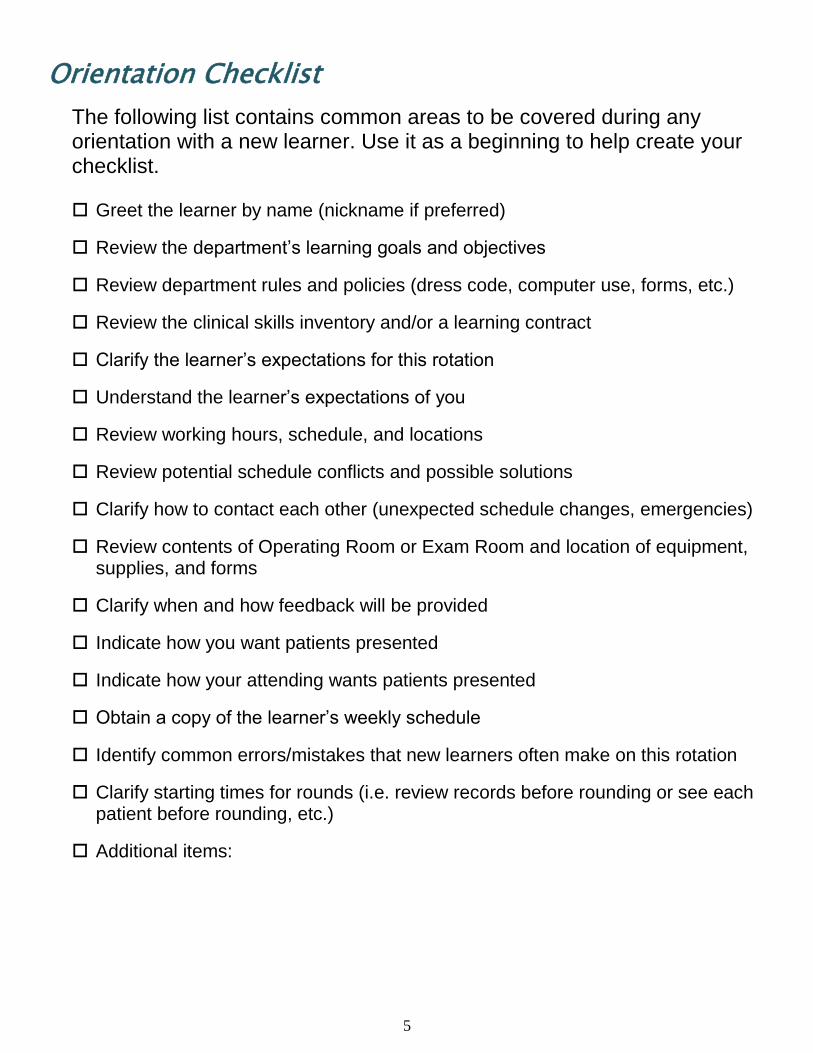
Orientation Checklist
The following list contains common areas to be covered during any orientation with a new learner. Use it as a beginning to help create your checklist. Greet the learner by name (nickname if preferred)
Review the department’s learning goals and objectives
Review department rules and policies (dress code, computer use, forms, etc.)
Review the clinical skills inventory and/or a learning contract
Clarify the learner’s expectations for this rotation
Understand the learner’s expectations of you
Review working hours, schedule, and locations
Review potential schedule conflicts and possible solutions
Clarify how to contact each other (unexpected schedule changes, emergencies)
Review contents of Operating Room or Exam Room and location of equipment, supplies, and forms
Clarify when and how feedback will be provided
Indicate how you want patients presented
Indicate how your attending wants patients presented
Obtain a copy of the learner’s weekly schedule
Identify common errors/mistakes that new learners often make on this rotation
Clarify starting times for rounds (i.e. review records before rounding or see each patient before rounding, etc.)
Additional items:
6
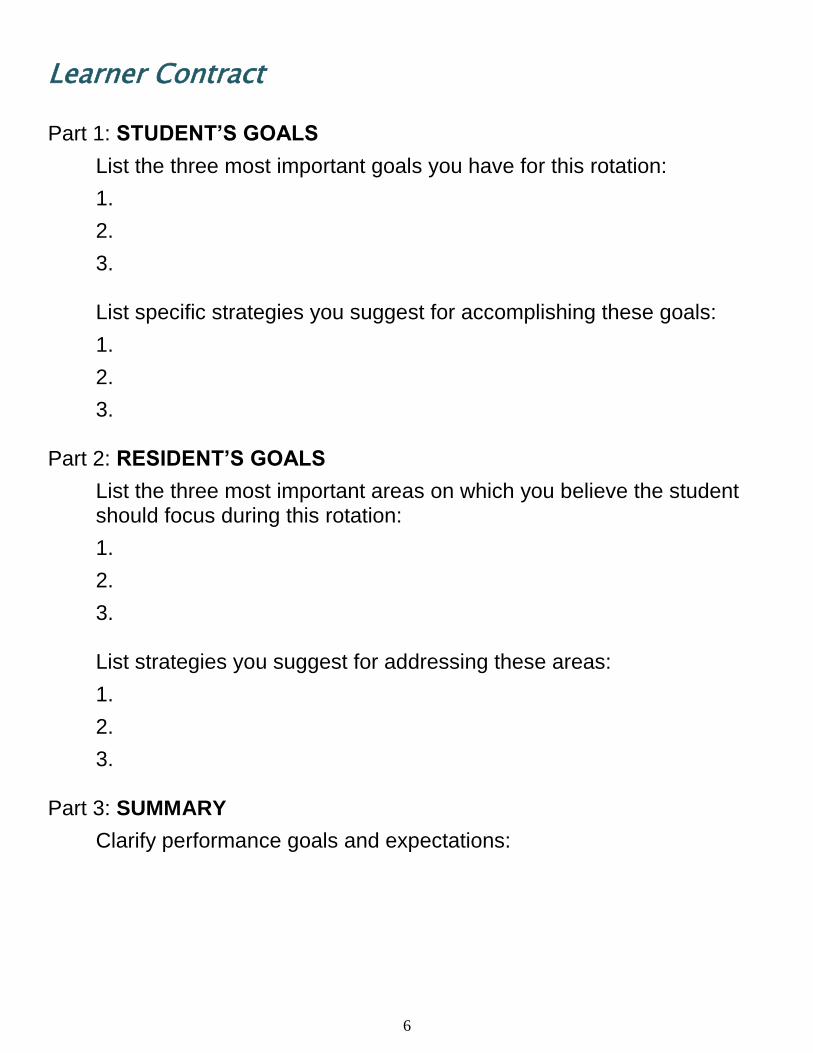
Learner Contract
Part 1: STUDENT’S GOALS
List the three most important goals you have for this rotation:
1.
2.
3. List specific strategies you suggest for accomplishing these goals:
1.
2.
3. Part 2: RESIDENT’S GOALS
List the three most important areas on which you believe the student should focus during this rotation:
1.
2.
3. List strategies you suggest for addressing these areas:
1.
2.
3. Part 3: SUMMARY
Clarify performance goals and expectations:
7
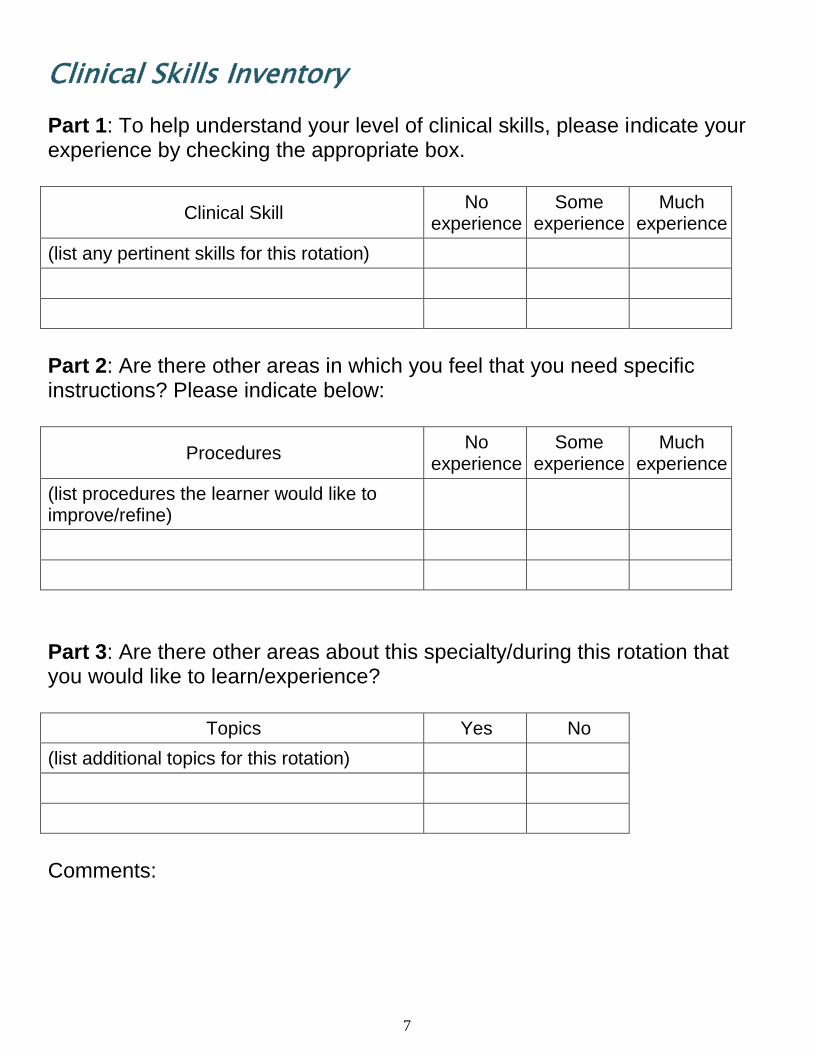
Clinical Skills Inventory Part 1: To help understand your level of clinical skills, please indicate your experience by checking the appropriate box.
Clinical Skill No
experience Some
experience Much
experience
(list any pertinent skills for this rotation)
Part 2: Are there other areas in which you feel that you need specific instructions? Please indicate below:
Procedures No
experience Some
experience Much
experience
(list procedures the learner would like to improve/refine)
Part 3: Are there other areas about this specialty/during this rotation that you would like to learn/experience?
Topics Yes No
(list additional topics for this rotation)
Comments:
8
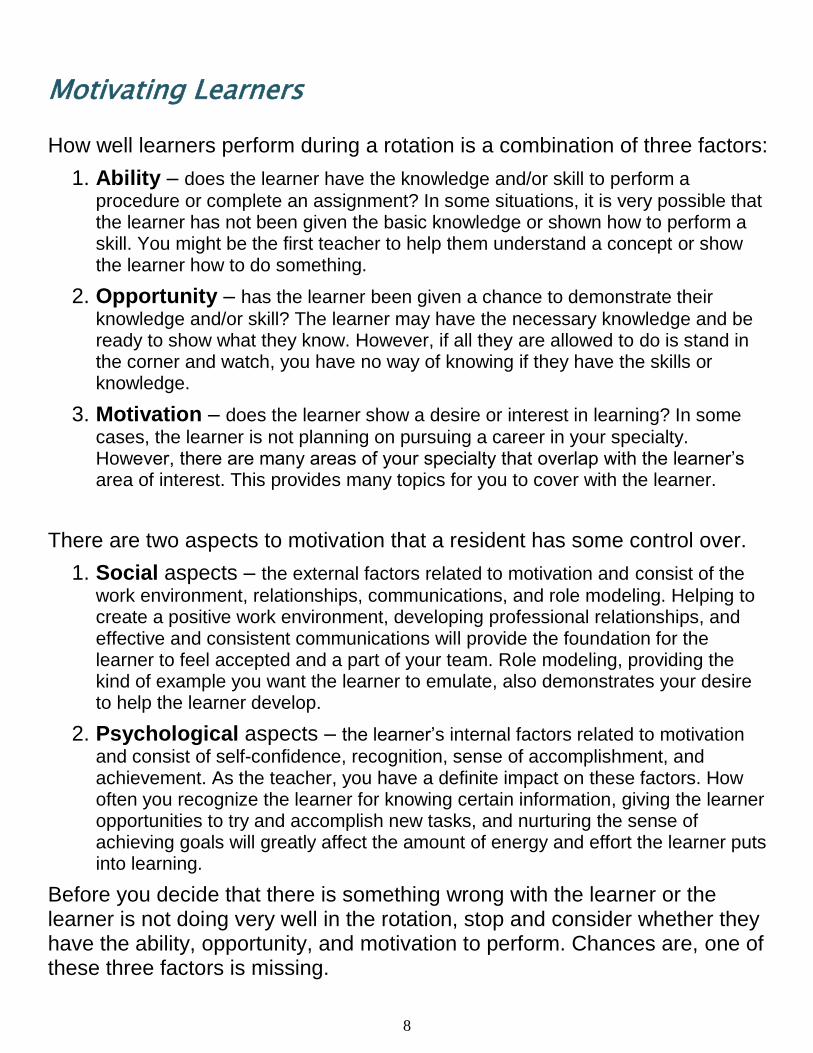
Motivating Learners How well learners perform during a rotation is a combination of three factors:
1. Ability – does the learner have the knowledge and/or skill to perform a
procedure or complete an assignment? In some situations, it is very possible that the learner has not been given the basic knowledge or shown how to perform a skill. You might be the first teacher to help them understand a concept or show the learner how to do something.
2. Opportunity – has the learner been given a chance to demonstrate their
knowledge and/or skill? The learner may have the necessary knowledge and be ready to show what they know. However, if all they are allowed to do is stand in the corner and watch, you have no way of knowing if they have the skills or knowledge.
3. Motivation – does the learner show a desire or interest in learning? In some
cases, the learner is not planning on pursuing a career in your specialty. However, there are many areas of your specialty that overlap with the learner’s area of interest. This provides many topics for you to cover with the learner.
There are two aspects to motivation that a resident has some control over.
1. Social aspects – the external factors related to motivation and consist of the
work environment, relationships, communications, and role modeling. Helping to create a positive work environment, developing professional relationships, and effective and consistent communications will provide the foundation for the learner to feel accepted and a part of your team. Role modeling, providing the kind of example you want the learner to emulate, also demonstrates your desire to help the learner develop.
2. Psychological aspects – the learner’s internal factors related to motivation
and consist of self-confidence, recognition, sense of accomplishment, and achievement. As the teacher, you have a definite impact on these factors. How often you recognize the learner for knowing certain information, giving the learner opportunities to try and accomplish new tasks, and nurturing the sense of achieving goals will greatly affect the amount of energy and effort the learner puts into learning.
Before you decide that there is something wrong with the learner or the learner is not doing very well in the rotation, stop and consider whether they have the ability, opportunity, and motivation to perform. Chances are, one of these three factors is missing.
9
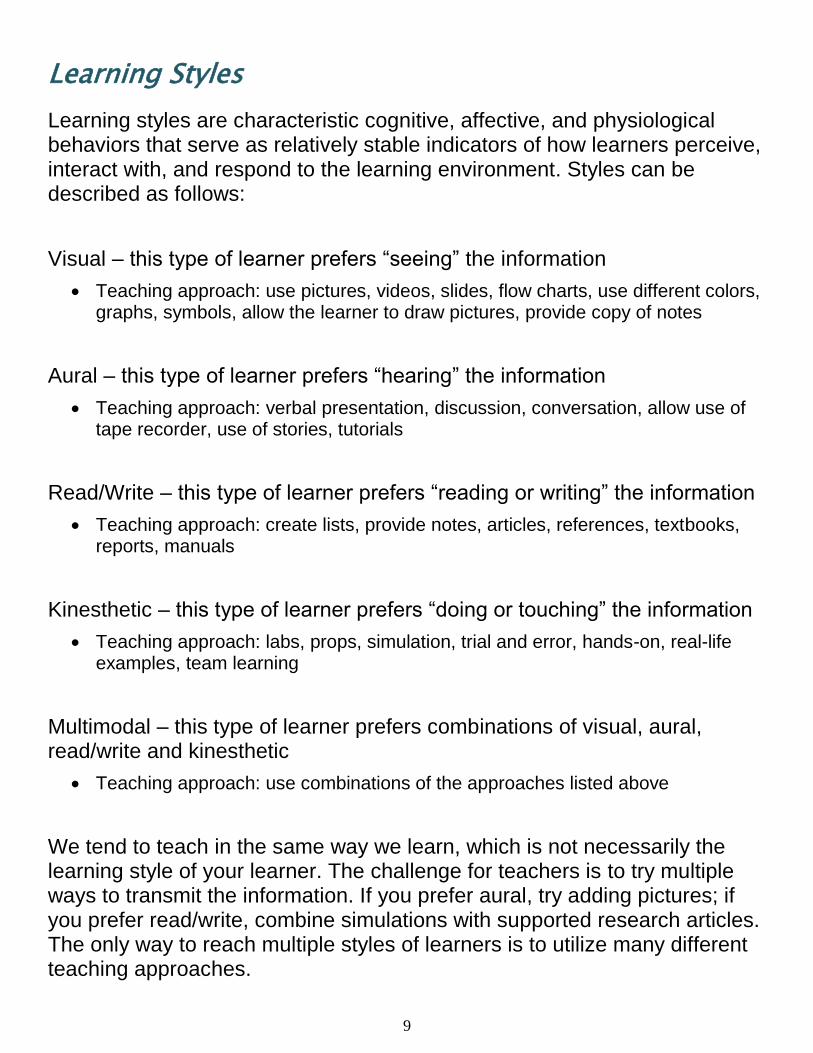
Learning Styles
Learning styles are characteristic cognitive, affective, and physiological behaviors that serve as relatively stable indicators of how learners perceive, interact with, and respond to the learning environment. Styles can be described as follows:
Visual – this type of learner prefers “seeing” the information
Teaching approach: use pictures, videos, slides, flow charts, use different colors, graphs, symbols, allow the learner to draw pictures, provide copy of notes
Aural – this type of learner prefers “hearing” the information
Teaching approach: verbal presentation, discussion, conversation, allow use of tape recorder, use of stories, tutorials
Read/Write – this type of learner prefers “reading or writing” the information
Teaching approach: create lists, provide notes, articles, references, textbooks, reports, manuals
Kinesthetic – this type of learner prefers “doing or touching” the information
Teaching approach: labs, props, simulation, trial and error, hands-on, real-life examples, team learning
Multimodal – this type of learner prefers combinations of visual, aural, read/write and kinesthetic
Teaching approach: use combinations of the approaches listed above
We tend to teach in the same way we learn, which is not necessarily the learning style of your learner. The challenge for teachers is to try multiple ways to transmit the information. If you prefer aural, try adding pictures; if you prefer read/write, combine simulations with supported research articles. The only way to reach multiple styles of learners is to utilize many different teaching approaches.
10
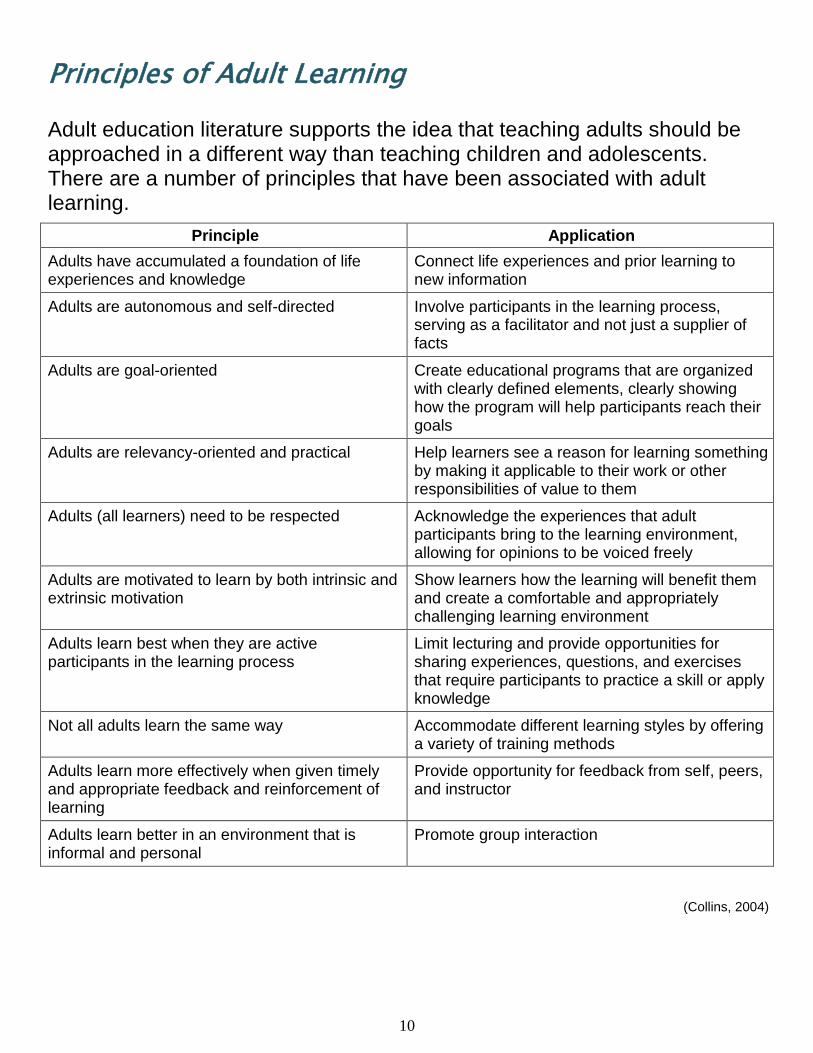
Principles of Adult Learning Adult education literature supports the idea that teaching adults should be approached in a different way than teaching children and adolescents. There are a number of principles that have been associated with adult learning.
Principle Application
Adults have accumulated a foundation of life experiences and knowledge
Connect life experiences and prior learning to new information
Adults are autonomous and self-directed Involve participants in the learning process, serving as a facilitator and not just a supplier of facts
Adults are goal-oriented Create educational programs that are organized with clearly defined elements, clearly showing how the program will help participants reach their goals
Adults are relevancy-oriented and practical Help learners see a reason for learning something by making it applicable to their work or other responsibilities of value to them
Adults (all learners) need to be respected Acknowledge the experiences that adult participants bring to the learning environment, allowing for opinions to be voiced freely
Adults are motivated to learn by both intrinsic and extrinsic motivation
Show learners how the learning will benefit them and create a comfortable and appropriately challenging learning environment
Adults learn best when they are active participants in the learning process
Limit lecturing and provide opportunities for sharing experiences, questions, and exercises that require participants to practice a skill or apply knowledge
Not all adults learn the same way Accommodate different learning styles by offering a variety of training methods
Adults learn more effectively when given timely and appropriate feedback and reinforcement of learning
Provide opportunity for feedback from self, peers, and instructor
Adults learn better in an environment that is informal and personal
Promote group interaction
(Collins, 2004)
11
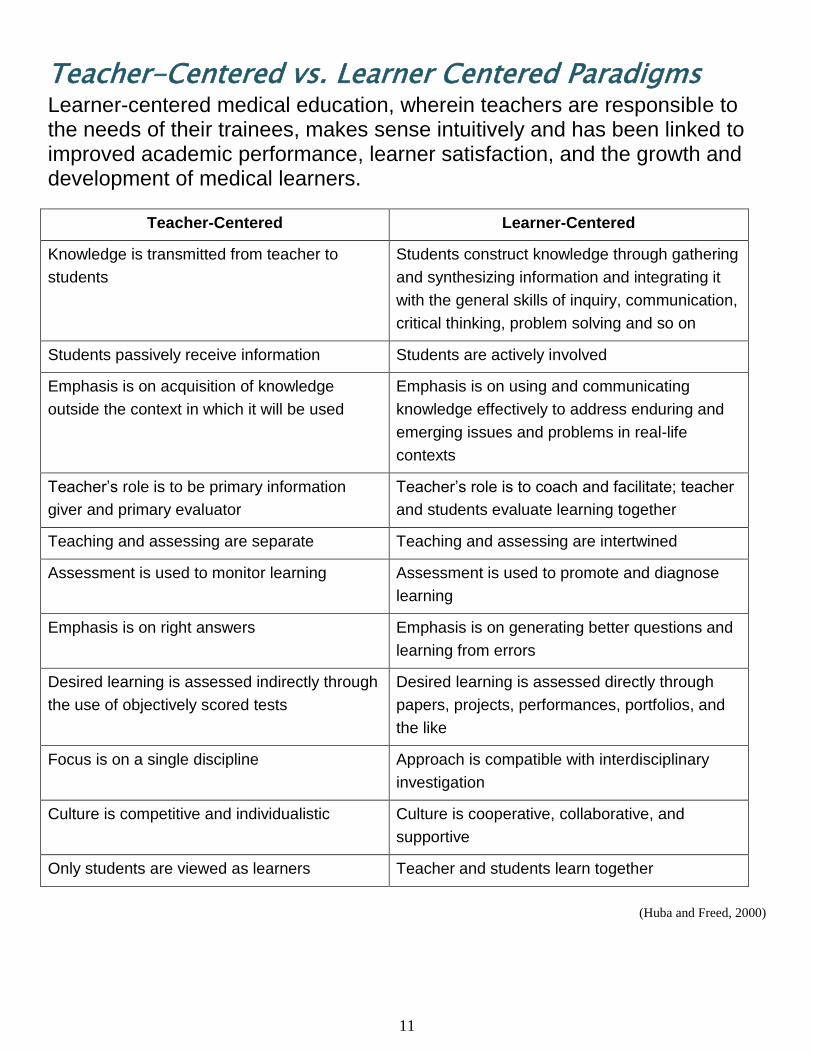
Teacher-Centered vs. Learner Centered Paradigms Learner-centered medical education, wherein teachers are responsible to the needs of their trainees, makes sense intuitively and has been linked to improved academic performance, learner satisfaction, and the growth and development of medical learners.
Teacher-Centered Learner-Centered
Knowledge is transmitted from teacher to
students
Students construct knowledge through gathering
and synthesizing information and integrating it
with the general skills of inquiry, communication,
critical thinking, problem solving and so on
Students passively receive information Students are actively involved
Emphasis is on acquisition of knowledge
outside the context in which it will be used
Emphasis is on using and communicating
knowledge effectively to address enduring and
emerging issues and problems in real-life
contexts
Teacher’s role is to be primary information
giver and primary evaluator
Teacher’s role is to coach and facilitate; teacher
and students evaluate learning together
Teaching and assessing are separate Teaching and assessing are intertwined
Assessment is used to monitor learning Assessment is used to promote and diagnose
learning
Emphasis is on right answers Emphasis is on generating better questions and
learning from errors
Desired learning is assessed indirectly through
the use of objectively scored tests
Desired learning is assessed directly through
papers, projects, performances, portfolios, and
the like
Focus is on a single discipline Approach is compatible with interdisciplinary
investigation
Culture is competitive and individualistic Culture is cooperative, collaborative, and
supportive
Only students are viewed as learners Teacher and students learn together
(Huba and Freed, 2000)
12
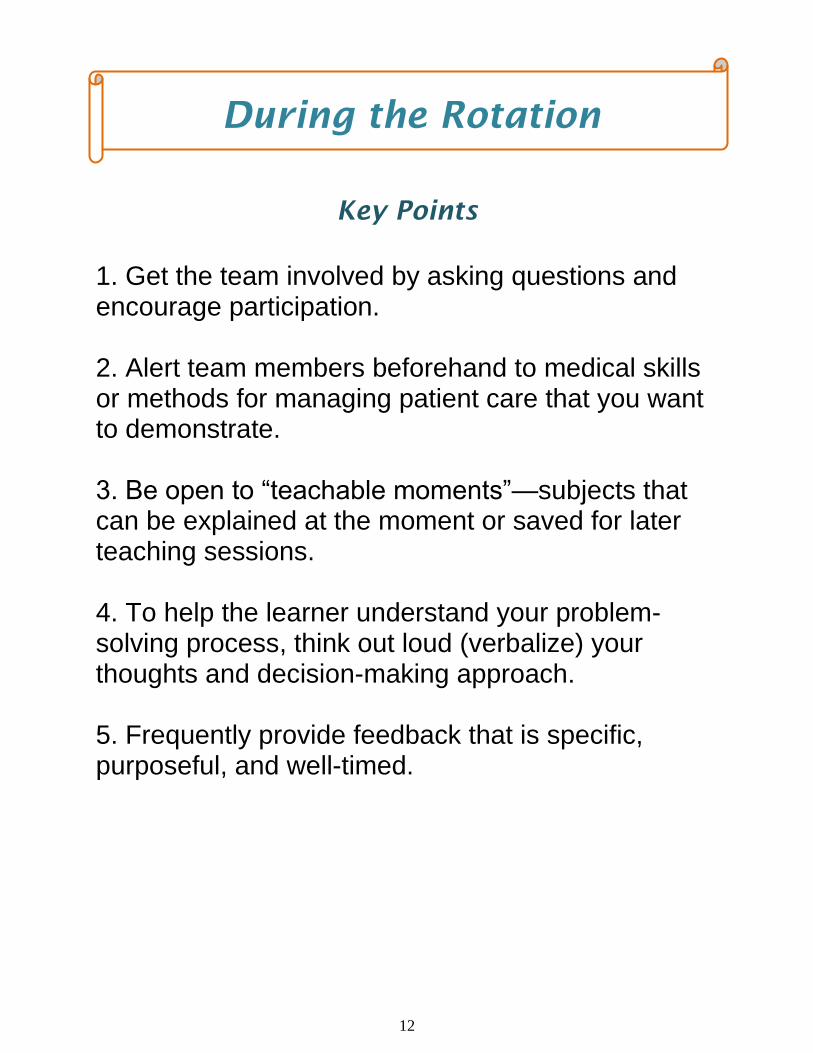
Key Points
1. Get the team involved by asking questions and encourage participation. 2. Alert team members beforehand to medical skills or methods for managing patient care that you want to demonstrate. 3. Be open to “teachable moments”—subjects that can be explained at the moment or saved for later teaching sessions. 4. To help the learner understand your problem-solving process, think out loud (verbalize) your thoughts and decision-making approach. 5. Frequently provide feedback that is specific, purposeful, and well-timed.
During the Rotation
13
Priming the Learner It is not possible for you to teach learners about every possible patient. Briefly preparing learners for patient encounters allows for focusing on relevant information, saving time, and providing advanced organization. In order to be more efficient, focus on the following:
Problem Oriented Learning
Approach a day’s clinic with a common learning theme based on class of patients, patient issues, or process issues
Examples of themes (developmental assessment, health behavior change, organized presentation, cost effective care)
Supplement the learning through learner preparation and reflection on particular issue
Selecting Patients
Review the day’s schedule for types of patients
Find out learner’s prior experiences with different types of patients and assign patients who present new learning opportunities
Establish goals regarding what the learner should focus on with new experiences
Debrief at end of day about learner’s experiences
Before entering the patient room, focus learning on:
Tasks: What learner will do and for how long
Resident Role: When and how resident will reconnect with learner
Patient: If known, review any pertinent patient information and/or chief complaint o New patient (differential focus)
o Return patient (health maintenance or management of chronic illness)
Product: Clear description of what expected (e.g., patient note, 3 minute focused presentation)
14
Priming the Learner B.I.D. Method
Briefing
o Short (2-3 minute) interaction at the scrub sink
The purpose of the interaction is to assess the needs of the learner
To cause the learner to assess her/his own learning needs
To jointly establish learning objectives to guide both learner and teacher
The teaching surgeon assists by prompting and guiding the formulation of the objectives
Intraoperative Teaching
o Focus on one or two learning objectives from surgery
o This ensures that the teaching is not simply a nonspecific flow of talk, but instead, discussion focused on mutually shared learning goals
Debriefing
o Reflection
The teacher asks the learner to reflect on his/ her performance and attainment of stated objective
This allows the teacher to understand the perspective of the learner, and to diagnose any problems the learner is having with his perception of the encounter
Most importantly it requires the learner to assemble his/her own thoughts about what was learned during the encounter.
o Rules
The learner should leave the encounter with some rule to guide future practice
Ideally, it is a rule the learner has formulated based on dialogue with the teacher
o Reinforcement
The teacher should reinforce what was done right. The purpose for doing so is threefold:
First, the reinforcement phase again calls attention to learning objectives of the encounter
Second, learning to perform operations can be stressful and difficult, and providing reinforcement assists the learner in being able to maintain the effort necessary to persist
Third, and just as important, sometimes learners don’t know that what they have done is worthy of replication
o Correction
Correcting mistakes, especially mistakes in thinking, is a crucial part of the encounter.
This phase takes advantage of the reflection phase
The focus is on what led up to the mistake and how that chain of events can be avoided in the future
When the mistakes may prove embarrassing to the learner, they should be addressed apart from other operating room personnel.
(Roberts et.al, 2009)
15
Teachable Moments Every case has a teaching point, and dozens of “teaching moments.” These are opportune moments during daily routines that allow for educational instruction.
Guidelines:
Requires the teacher to be observant and open to situations
Best done as closely to the event as possible
Involves being sensitive to both patient care issues as well as learner needs and issues
Think out loud (openly discuss to the learner) as you problem-solve
If time does not allow teaching, have the learner write down the topic on a 3x5 index card, PDA, or white board in your conference room so it can be used as a future topic for learning
Examples of Teachable Moments
Chart review (e.g., Documenting tetanus prophylaxis in wound care—teach importance of documentation; teach indications for passive and active immunizations)
Presentations (e.g., Disjointed presentations—teach organization of presentations; teach formal versus consultant presentation)
Patient Interactions (e.g., Observing history-taking in difficult patient—teach bedside manner techniques; teach alternative sources of medical information)
Bedside teaching (e.g., Observing physical examination—teach patient comfort measures; teach techniques to improve examination findings)
Management plans (e.g., Stabilization of patient in acute respiratory distress—teach evaluation of the airway; management of patient in ventricular tachycardia—teach stable versus unstable VT; teach recognition of VT; teach differentiation of VT vs. aberrancy)
(Birnbaumer, D. 2004.)
16
Teachable Moments
Recommendations:
Before you begin, consider what your goal is during the interaction with the learner. This will help you stay focused and keep the interaction brief. Is your goal:
o Clarification of a procedure
o Explain a diagnosis
o Develop more differentials
o Provide understanding about pharmacology
o Show an easier way to do something
o Investigate the learner’s level of knowledge
o Share some of your experiences
o Prevent mistakes in the future
Don’t try to teach too many ideas/concepts at once
Tailor the teaching to the situation
Interpret the learner’s readiness to absorb new material
Don’t try to find a teachable moment with every patient encounter
Grab the opportunity—patients are your best source for teaching
Keep the teaching short & simple—no long lectures or recitations
Be creative in how you teach—use questions, change parameters about the patient’s demographics, create a story around your topic, play twenty questions, etc.
Reverse roles and have the learner be your teacher
If you are conducting the education in the presence of the patient or family, be sure to inform them that your teaching may not directly relate to the patient
What not to do:
Withhold teaching because you think you don’t know everything about the topic. Your basic level of knowledge is typically well above the learners’ level.
Not conduct the teaching because you believe it has to be a formal presentation
If you can’t do the teaching at that moment, wait until a more appropriate time. Don’t by-pass the teaching just because the situation isn’t conducive to learning.
17
Small Group Teaching Residents interact with one another, with faculty, and with learners in a number of groups from rounding to conferences. These small groups tend to be the nucleus of learning—learners observe and emulate resident behavior, get involved in discussions, and work with patients and other staff. Here are approaches to teaching in a small group:
1. Responsibilities of a facilitator
Act in a non-threatening manner
Make expectations clear, define the learning environment (supportive and non-threatening)
Emphasize the process over the “right” answer
Withhold your assumptions about what students do and do not know
Make the patient real – how would the student talk to the patient?
Don’t fall into the trap of always being the “Answer Person”
Model critical thinking by thinking out loud as you problem solve
Encourage expansive thinking – don’t just focus on one differential
Let the group work and learn from mistakes
Provide timely and appropriate feedback (see section on “Giving Feedback”)
2. Questioning
If possible, plan your questions ahead of time
Use open-ended vs. closed ended questions
Ask questions that maintain learner involvement
Ask questions to help assess the learner’s educational needs
Emphasize questions beyond recall—investigating inference and evaluation (see
section on “Asking the Right Question”)
3. Power of ‘Silence’
Wait 3 – 5 seconds after asking the question
Wait 3 – 5 seconds after a learner’s response
Waiting allows learners to give longer, more complex and correct answers
More learners tend to respond; increased interactions (Ferguson, K. 2006.)

18
Small Group Teaching
4. Responding to questions
Acknowledging and reinforcing the response encourages participation
Direct answering can discourage interaction and independent learning
Redirecting and guiding encourages problem-solving process and allows for corrections
Avoid “yes, but…” or “guess what I am thinking” type questions; replace the word ‘but’ with the word ‘and’
Learning is enhanced when a small group:
Has a non-threatening group climate
Approaches learning as a team rather than as individual competitors
Covers content adequately and efficiently
Is attended by all students and a single faculty facilitator
Has students and a faculty facilitator who are prepared
Has active participation by all
Most small groups have learners at different knowledge levels. Ways in which you can effectively manage this include:
Ask the most junior person a basic question. After it is answered, modify the question (change the age, gender, social background, etc.) and ask the next junior person. Increase the question’s challenge as you move up the levels of learners
Identify a topic, differential, medication, or other higher-level subject and then direct one of the junior residents to teach the students
Create “knowledge” teams (split the group into smaller equal groups) and develop a knowledge masters competition
Have a junior resident and new learner pair up and make a presentation about an interesting question, patient diagnosis, or other little known information
Reverse roles where you are the new learner and another member of the group is the senior resident and have them ask questions or stimulate discussion
19
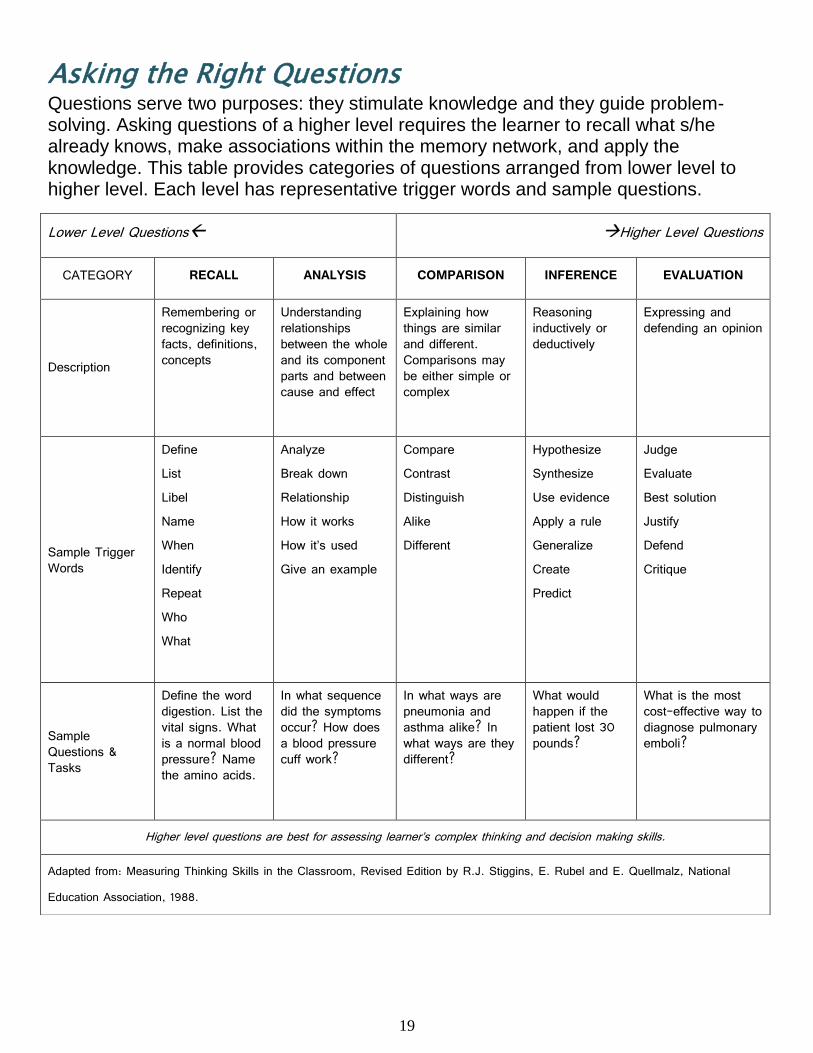
Asking the Right Questions Questions serve two purposes: they stimulate knowledge and they guide problem-solving. Asking questions of a higher level requires the learner to recall what s/he already knows, make associations within the memory network, and apply the knowledge. This table provides categories of questions arranged from lower level to higher level. Each level has representative trigger words and sample questions.
Lower Level Questions Higher Level Questions
CATEGORY RECALL ANALYSIS COMPARISON INFERENCE EVALUATION
Description
Remembering or recognizing key facts, definitions, concepts
Understanding relationships between the whole and its component parts and between cause and effect
Explaining how things are similar and different. Comparisons may be either simple or complex
Reasoning inductively or deductively
Expressing and defending an opinion
Sample Trigger Words
Define List Libel Name When Identify Repeat Who What
Analyze Break down Relationship How it works How it’s used Give an example
Compare Contrast Distinguish Alike Different
Hypothesize Synthesize Use evidence Apply a rule Generalize Create Predict
Judge Evaluate Best solution Justify Defend Critique
Sample Questions & Tasks
Define the word digestion. List the vital signs. What is a normal blood pressure? Name the amino acids.
In what sequence did the symptoms occur? How does a blood pressure cuff work?
In what ways are pneumonia and asthma alike? In what ways are they different?
What would happen if the patient lost 30 pounds?
What is the most cost-effective way to diagnose pulmonary emboli?
Higher level questions are best for assessing learner’s complex thinking and decision making skills.
Adapted from: Measuring Thinking Skills in the Classroom, Revised Edition by R.J. Stiggins, E. Rubel and E. Quellmalz, National Education Association, 1988.
20
Managing Challenging Learners Occasionally you will be challenged with a learner that, for many different reasons, will require special teaching skills. Preventing the problem before it occurs: Know the department/course objectives
Orient the learner (see ‘Beginning the Rotation’ section)
Set clear expectations and goals
Determine the learner’s goals and expectations
Reassess objectives/goals/expectations during the rotation
Early Detection:
Pay attention to your intuition (hunches/clues)
Do something—don’t wait
Initiate assessment of problem early (i.e., use S.O.A.P. strategy)
o Subjective (chief complaint – slow, lazy, disruptive)
Get input from others and the learner
Understand these are impressions, not objective criteria
o Objective (define the specific behaviors)
Behavior – i.e., late three times
Attitude – i.e., spoke harshly to staff
Cognitive – i.e. unable to recall info on medication after having been asked to review it the previous day
o Assessment of the learner (differential diagnosis)
Cognitive – knowledge base is weak; not paying attention
Affective – expresses anxiety, fear, depression
Valuative – does not value this rotation/clerkship; differing personality traits: outgoing, reserved, timid
Environmental – inpatient/outpatient conflict, rural/urban area preference
Medical – substance abuse, medical illness, etc.
o Plan (process for improvement/correction)
Gather more data
Intervene or refer to faculty/staff
“If your management approach isn’t working – Seek Help”
(Haessig, C. 2001)
21
Managing Challenging Learners
Here are some examples that may occur during conferences or small group teaching and suggestions of ways to respond:
Rambling – wandering around and off the subject. Using far-fetched examples or
analogies. Responses: refocus attention by restating relevant point; direct questions to
individual/group that is back on the subject; ask how topic relates to current topic being discussed
Shyness or Silence – lack of participation.
Responses: give strong positive reinforcement for any contribution; involve by directly asking him/her a question; make eye contact
Talkativeness – knowing everything, manipulation, chronic whining.
Responses: acknowledge comments made; give limited time to express viewpoint or feelings, and then move on; break eye contact; discuss situation with her/him; say “That’s an interesting point. Now let’s see what other people think.”
Sharpshooting – trying to shoot you down or trip you up.
Responses: admit that you do not know the answer and redirect the question to the individual/group who asked it; acknowledge that this is a joint learning experience; ignore the behavior
Heckling/Arguing – disagreeing with everything you say; making personal attacks.
Responses: redirect question to individual/group; recognize learner’s feelings and move on; acknowledge positive points; say “It’s looks like we disagree” and move on
Side Conversations – may be related to subject or personal; distracts learners and
you. Responses: ask their opinion on topic being discussed; ask talkers if they would
share their ideas; make eye contact; direct question to a learner nearby; as a last resort, stop and wait
(Adapted from: California Nurses Association, AIDS Train the Trainer Program for Health Care
Providers.1988.)
Learners with these behaviors may benefit most from one-on-one feedback on how their behavior affects group dynamics and your ability to assess all learners’ knowledge.
22
Managing Challenging Learners
The Slow Learner
Typically has a good attitude
Rapidly gains insight after feedback
Reasons for slowness: o Unfamiliarity with the time expectations or limitations o Poor knowledge and/or skills for the role o Fear of failure o Avoiding new tasks
Plan for improvement o Time problems – should be addressed directly with concrete examples o Knowledge problems – explanation of useful sources; opportunity for extra practice time o Failure problems – clear expectations and encouragement; reassurance that mistakes
are expected; have learner think out loud to understand and correct thought process o Avoidance problems – should be addressed directly with clear explanation of
expectations
Learner with Poor Interaction Skills
Examples include unusually brusque, uncaring to patients and staff, unkind in comments or nonverbal expressions, outwardly condescending or insulting, or unacceptably familiar
Plan for improvement o See if learner understands how he/she is being received (use data and/or concrete
examples) o Make the learner aware of your view of the behavior o Set clear standards of acceptable rules of conduct o Share you challenges to meet such standards now or in past o Establish time to revisit these concerns and adhere to plan
The Unmotivated Learner
Teacher must assess whether proper efforts have been made to provide relevant learning opportunities and clear directions as to expectations, responsibilities, and value of the information and experiences to be mastered
Teacher must ascertain whether the lack of motivation is: o A long-standing concern – should student be in medicine? o An acute concern – extenuating circumstances (family, health, stress, etc.)? o Based on subject matter – not interested in specialty?
Plan for improvement o Response by teacher depends on accurate diagnosis of reason o Uncovering reason may take time and empathy o Understanding the cause is vital to fashioning a response o Provide clear expectations and evaluate accurately as to effort and performance
(Mahan, 2007)
23
Teaching in the Presence of the Patient The challenge of simultaneously addressing the patient’s emotional and physical needs and the learner’s needs makes teaching with a patient a delicate exercise. Time constraints, concern for patient comfort, lack of experience and discomfort with teaching are potential obstacles. Learners feel that the bedside is an excellent place to learn a wide variety of skills and often value this teaching more highly than their teachers.
(Whitman, N. 1990.)
Considerations for teaching with a patient present include:
1. Before seeing the patient, cover expectations and goals. Clarify the roles and responsibilities of each learner for each interaction with a patient.
2. When possible, alert learners beforehand to behaviors that you want to demonstrate with the patient. If no forewarning can be given, be sure to address your behavior in follow-up discussions.
3. Respect the patient’s dignity while teaching in their presence. Allow patient and family participation.
4. Introduce yourself and the learners to the patient. Explain to the patient that you will be teaching the learner(s) and that much of what you discuss may not directly apply to the patient.
5. When possible, actively demonstrate to the learner ways of discovering physical findings. Teaching psychomotor skills is particularly beneficial with a patient. Allow learners to get experience in taking medical histories and conducting examinations.
6. Observe the learner’s efforts to discover findings; reinforce their efforts and engage them in non-threatening discussion about findings. Provide feedback (both positive and constructive) as necessary.
7. Because learners will be at different levels of knowledge and experience, it may not be necessary for all learners to visit all patients. Instead, have learners visit their own patients and selected patients from whom they might learn a great deal.
8. Base all teaching on data generated by or about the patient. Identify topics that can be used as teaching moments.
9. Be a model for professional behavior, demonstrating positive interpersonal and communication skills.
10. Thank the patient and family for their cooperation.
Once you are away from the patient:
1. Develop a plan for the patient’s continued healthcare.
24
Teaching in the Presence of the Patient
2. Bring closure to both patient management issues and the teaching process. Clarify responsibilities and actions regarding the interaction.
3. Provide feedback (both positive and constructive) as necessary.
(Lowry, G. 2006.)
P.I.R.P. Technique
Step 1: Prepare
1. Set general expectations to maintain a safe learning environment
2. Prime patient/family, staff, residents, and students
3. Select patients with potential teaching points
4. Prime learners before each encounter
a. Expectations and/or goals
b. Identify roles of team members
Step 2: In the Room
1. Review patient; anticipate teaching points
2. Focus teaching – 1 or 2 points
3. Use lay terms and include patient and family
4. Avoid embarrassing learners
Step 3: Reflect & Plan
1. Solicit feedback immediately
a. How do you think (specific behavior and/or action) went?
b. Anything we could do differently?
2. Give feedback immediately
3. Review each day and plan for the next (Hanna, 2011)
Teaching in the presence of patients provides unique and valuable opportunities
to integrate the knowledge and skills of medicine for the direct benefit of the
patient. The teacher is able to role model skills and attitudes which are vital, but
which are hard to communicate with words.
25
One-Minute Observation This process allows you to observe, first hand, the learner’s level of performance
without the commitment of large blocks of time. The advantage of this strategy is the
opportunity it affords you to observe the clinical skills of the learner. The process is
focused, time efficient, and reassuring to the patient. Furthermore, learners at all levels
appreciate the opportunity to receive feedback, and this particular technique is well
received by them. The steps involved in successfully using this strategy are:
1. Explain the purpose of the observation to the learner
2. Explain how the observation will occur
3. Select one skill for observation
4. Inform the patient of what will take place
5. Observe for a brief period of time without interrupting
6. Leave the room and have the learner join you when finished with the patient
7. Provide immediate feedback on what you observed
8. Use the information gained to plan your teaching
9. Repeat the process observing other skills
10. Evaluate the learner’s skills over time, using multiple, brief periods of observation
Another approach using this technique is to identify what skills you want to observe
with each learner over a period of time. For example, you might want to observe
communication skills, collecting part of a history, performing part of a physical exam,
dealing with challenging patients, explaining the diagnosis, or delivering bad news.
This series of observations becomes excellent information for providing feedback and
evaluating the learner at the end of your time together.
(Alguire et. al, 2001)
26
Evidence-Based Medicine Evidence-Based Medicine is best defined as a process used to solve patient management problems. Practicing in an evidence-based fashion necessitates a willingness to acknowledge what is unknown and then pursue best available evidence from clinical research to inform clinical decision-making for individual patients. Specific skills are needed to:
1. Deal with ruminating uncertainty and translate it into specific clinical questions
2. Align questions with the most effective and efficient information sources
3. Critically assess the validity and importance of ‘best available evidence’
4. Thoughtfully and judiciously apply the evidence to patient care
EBM is not just about statistics or critical appraisal or memorizing guidelines. EBM can come alive as a teaching opportunity at any step within your effort to practice in an explicit evidence-based fashion. Below are a few suggestions to consider as you take advantage of these engaging, relevant, and patient-centered opportunities:
To Teach EBM, You MUST USE IT in Your Own Clinical Practice
This common sense point is often forgotten. Your confidence will grow as you pursue your own learning issues that are tied to the care of your patients. This repetitive process – and the answers you find – will help you build a growing cache of evidence-based answers for recurring issues. You’ll also become familiar with where your learners might stumble or get stuck in solving a given problem … these can actually yield very engaging opportunities to teach them how to get unstuck.
Assess Your Learner’s EBM Readiness
Your enthusiasm to teach EBM may not be matched by your learner’s ability to swallow what you present. Quickly assess what their day is like and where they are with their EBM skills so that you can judiciously choose what & when to teach.
Diagnose Both the Patient and the Learner
This involves listening carefully during the case presentation, attending first to what’s wrong with the patient, and then concentrating on how well the learner understands the patient’s illness. Doing this well helps you focus teaching with evidence on the relevant clinical needs of the patient and the learning needs of your resident.
27
Evidence-Based Medicine
Find and Build Their Questions from the Case Start with the main decision being made and consider what knowledge you and the resident most need to make that decision wisely. Knowledge needs often remain muddled in a silent ruminating stage. Help the resident articulate them, often by initially labeling the type of issue (e.g. differential diagnosis or therapy) with which they are wrestling. Then together you can sculpt a well-built clinical question by delving deeper into more specifics like which patients, which interventions, which outcomes, etc.
Select Which Clinical Question(s) to Pursue
We usually have more questions than time, so don’t let your clinical learners feel paralyzed by all that they don’t know. Help them choose wisely which ones to answer. Select the issue that is most relevant to this patient and this learner now, considering also what is most urgent, interesting, feasible to answer, and/or likely to recur.
Match Questions to Specific Information Resources
Since many learners haven’t been exposed yet to which resources have the highest yield for various types of questions, try doing this step out loud and coaching them through it.
Cultivate Curiosity by Showing Your Own and Celebrate It in Others
Saying “I don’t know” and then pursuing and sharing what you’ve learned are powerful examples for your residents. Be explicit as you articulate your own uncertainty and questions … and your enthusiasm will become contagious.
Balance EBM Excursions with Teaching Other Doctoring Skills
Remember that your residents need background knowledge, clinical skills, and EBM. Address them all and they will respect you as a clinically relevant teacher.
Bite Off Less than You Can Chew
Accept that time limitations exist. It’s OK – and advisable – to teach digestible slices of evidence-based teaching. Modulate your teaching plans based on the learner’s needs/receptivity as well as based on their clinical load.
28
Evidence-Based Medicine
Use Pre-Appraised Evidence Resources These include electronic synopses of evidence like ACP Journal Club, Clinical Evidence, and Evidence-Based On-Call which are feasible to obtain and use quickly at the point of care. Also systematic reviews and other syntheses like well-constructed practice guidelines typically have already appraised available evidence.
Emphasize Interpreting & Applying Evidence in Decision-Making
Help your residents get to this “pay-off” or learning reward as often as possible. Explicitly role model how you are integrating the evidence alongside other important aspects of your clinical decisions.
Put It in ‘English’
Jargon terms can be stumbling blocks for our clinical learners. Try to explain the concept first, and then label it with the term afterward. Also help learners translate study results into meaningful ‘English’ statements for their colleagues and patients.
Go Fishin’ in Lakes You Know are Stocked … and also in New Lakes
You’ll gain confidence quickly if you engage residents in issues about which you already know that high-quality evidence exists. And – as with your own clinical practice – don’t forget to role-model the process of identifying and filling new knowledge gaps about problems for which you don’t know if helpful evidence exists.
Exploit the Learning Opportunity … NOT the Learner
As you encourage your residents to show you their knowledge gaps, don’t leave them feeling that you’re just ‘whacking the gopher’. Make sure you share the responsibility for tracking down and reporting back with the best evidence.
Be Fearless!
“Just Do It!” Accept that you must start weaving a more evidence-based approach into your clinical teaching well before you’ve mastered your own EBM skills. Just Start Somewhere … and then build your knowledge, skills, and confidence from there.
29
Rounding with Attending When rounding with staff or faculty, residents can assist with teaching. A resident can:
Prompt learners to give answers and responses
Elaborate on what the staff or faculty physician is explaining or demonstrating
Elicit teaching from the staff or faculty physician (Weinholtz, D. et al., 1992.)
Considerations for the resident when rounding with faculty:
Before rounding, discuss with the staff or faculty physician how you can support teaching the learner
Before rounding, clarify learning objectives and the role of students and junior residents
Be active—observe learner behavior, ask questions, look for teachable moments, support the staff or faculty
Avoid standing around the bedside; get the team involved by asking questions and participating
Use silence effectively; avoid answering too many questions
Identify topics that can be used as teachable moments
Diplomatically give learners cues to remember knowledge but do not camouflage a learner’s deficiencies
Check to see if the learner has any questions
Ensure learners understand their responsibility for following up with recommendations by the staff or faculty
A large amount of information is exchanged, usually in the hallway before
and after visiting the patient. Make sure the learner records any pertinent
data, acknowledges the next steps and follows up.
30
Multiple Levels of Learners What strategies can be used to effectively engage and teach multiple levels
of learners during teaching rounds? Here are 5 common approaches.
1. Learner-centered education – centers teaching on learners’ interests, stage of
learning and learners’ strengths and areas for improvement.
A. Assess learners’ interests: ask learners what they are and are not comfortable with and
about topics they are interested in learning.
B. Assess learners’ knowledge: gather information about learners’ knowledge and skills.
C. Learner-appropriate questioning and teaching: question to learners’ specific level of
experience; use more complex questions for higher-level learners.
D. Feedback: consistent, individualized feedback to learners about performance, progress
and areas for improvement.
E. Generalizing/integrating information: use information that pertains to a specific patient
and discuss how it applies to multiple patients and specialties
2. Interaction among learners – fostering communication/interaction among team
members
A. Developmental questioning: directs questions about knowledge, diagnosis and/or
treatment to the lowest level of learner first, then moves ‘up the ladder’ asking
progressively higher levels of learners the same question to reach a correct
answer (knowledge) and/or review the positives and negatives of diagnostic
reasoning or decision making.
B. Collaborative problem solving: have team members of different levels work out
problems together.
C. Residents and Fellows as teachers: have residents and/or fellows explain
information to other learners; direct learners’ questions to residents and/or
fellows.
3. Dedicated teaching time – explicit blocking of time strictly for teaching, before or
after rounds
A. Clinical scenarios: create scenarios in which learners are questioned and
encouraged to discuss.
31
Multiple Levels of Learners
B. Learning issue reports: learners research a topic identified during rounds and
give short presentation at subsequent teaching sessions.
C. Literature reading: distribute literature in preparation for a specific teaching
session or short discussion.
D. Burst teaching: teaching in bursts (10 minutes or less) that is clearly set aside for
learning during rounds, as opposed to teaching steadily throughout rounds.
4. Making it real to learners – accurately simulating what it will be like in the “real
world” of patient care for learners
A. Accountability: convey that learners are responsible for the care of their patients
including being accountable for learning information applicable to these patients.
B. Learners lead rounds/interaction with patient: resident more of a facilitator than
the primary leader.
C. Learners take part in procedures: encourage learners to take active part and
provide opportunities to demonstrate knowledge and skills.
D. Putting learners ‘on the spot’: expect learners to commit to answering questions
and making decisions in relation to the patients they are seeing.
E. Acting as team member rather than leader: eliminating the hierarchy of the group
and considering everyone a colleague.
5. Role modeling – act as a role model for learners by demonstrating skills, decision
making and reasoning
A. Interactively modeling clinical reasoning and decision making: instead of just answering
learners’ questions, walk learners through the thought process of finding the right
answer—a.k.a. thinking out loud.
B. Skills demonstration: learners observe interaction with patient and then debrief;
demonstrate physical exam skills.
C. Past experiences: describe experiences with past patients and the relevance to current
patients.
D. Cooperation among fields: demonstrate or discuss use of consultation and other
disciplines in management of a patient and highlight the cooperation of multiple health
care fields.
(Rosenbaum, 2011)
32
Microskills Teaching Microskills, or the one-minute preceptor, facilitates the instructional process by enabling teachers to effectively assess, instruct, and give feedback efficiently. Microskills are most useful in situations with only a few minutes available for teaching (rounds, ambulatory teaching).
1. Get a commitment. Ask learners to make a hypothesis about what might be
happening with the patient and explain why that is the most likely diagnosis. Examples: What other information do you think we need? What do you think is going on with this patient? What would you like to accomplish in this visit?
2. Probe for supporting evidence. Before offering your opinion, ask learners for
evidence to support her/his hypothesis. Examples: What were the major findings that led to your diagnosis? What facts in this case do not support your conclusion? What else did you consider? What kept you from that choice?
3. Teach general rules. Learners often remember general principles in the context
of a particular patient, so the extent that a given patient is typical or atypical can be an important teaching point. Examples: When this happens, do X.” “When a patient only has cellulitis, you have to wait until the infected area becomes fluctuant to drain it.”
4. Tell them what they did right. Be specific and let the learner know what effect
his/her actions had on the patient or the treatment plan. Examples: “Specifically, you did an excellent job of…which results in this outcome.” “You didn’t immediately jump into solving the patient’s problem but kept your mind open until they revealed their real agenda for coming in today.”
5. Correct mistakes. As soon after the mistake as possible, but in an appropriate
time and place, let the learners know what was wrong and how to avoid or correct the error in the future. Example: “Next time this happens, try this.” (Neher, J. 1992)
General pointers:
Use the model to diagnose the learner
What is the level of knowledge and skill?
What does the learner need to know?
You cannot teach everything in one case
Take advantage of teachable moment
Brief, simple, focused, recallable
You may not be ample to implement all 5 steps every time
33
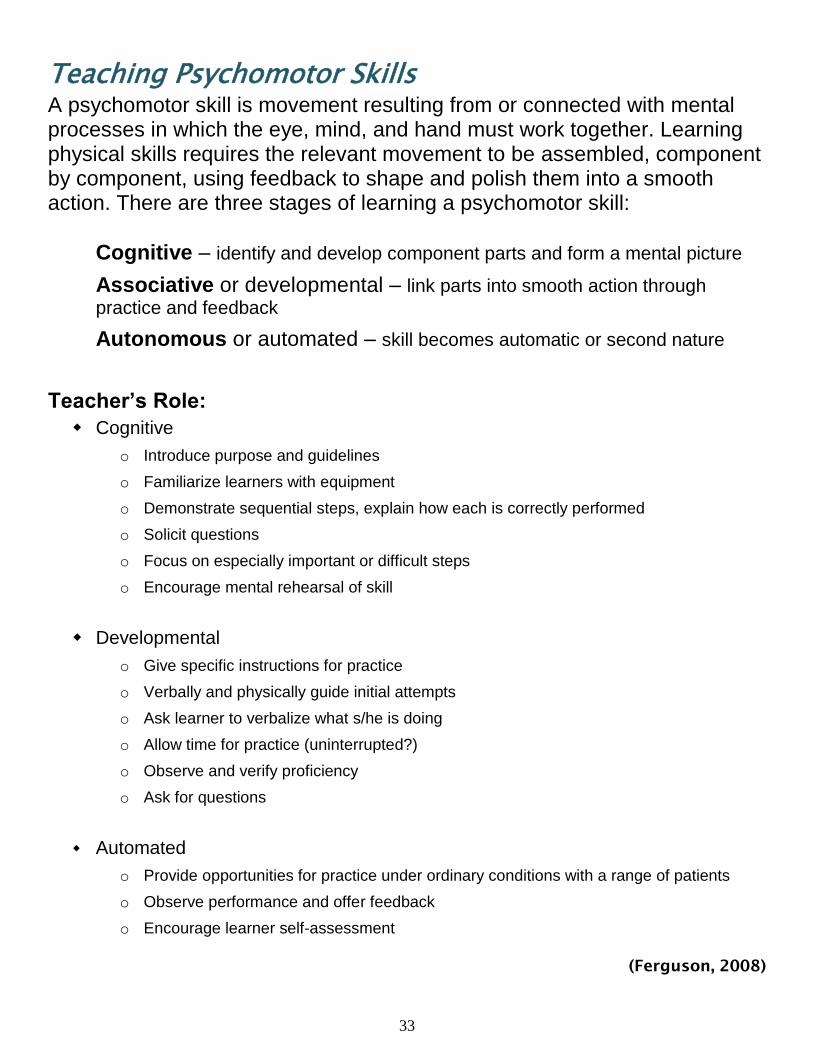
Teaching Psychomotor Skills A psychomotor skill is movement resulting from or connected with mental processes in which the eye, mind, and hand must work together. Learning physical skills requires the relevant movement to be assembled, component by component, using feedback to shape and polish them into a smooth action. There are three stages of learning a psychomotor skill:
Cognitive – identify and develop component parts and form a mental picture
Associative or developmental – link parts into smooth action through
practice and feedback
Autonomous or automated – skill becomes automatic or second nature
Teacher’s Role:
Cognitive
o Introduce purpose and guidelines
o Familiarize learners with equipment
o Demonstrate sequential steps, explain how each is correctly performed
o Solicit questions
o Focus on especially important or difficult steps
o Encourage mental rehearsal of skill
Developmental
o Give specific instructions for practice
o Verbally and physically guide initial attempts
o Ask learner to verbalize what s/he is doing
o Allow time for practice (uninterrupted?)
o Observe and verify proficiency
o Ask for questions
Automated
o Provide opportunities for practice under ordinary conditions with a range of patients
o Observe performance and offer feedback
o Encourage learner self-assessment
(Ferguson, 2008)
34
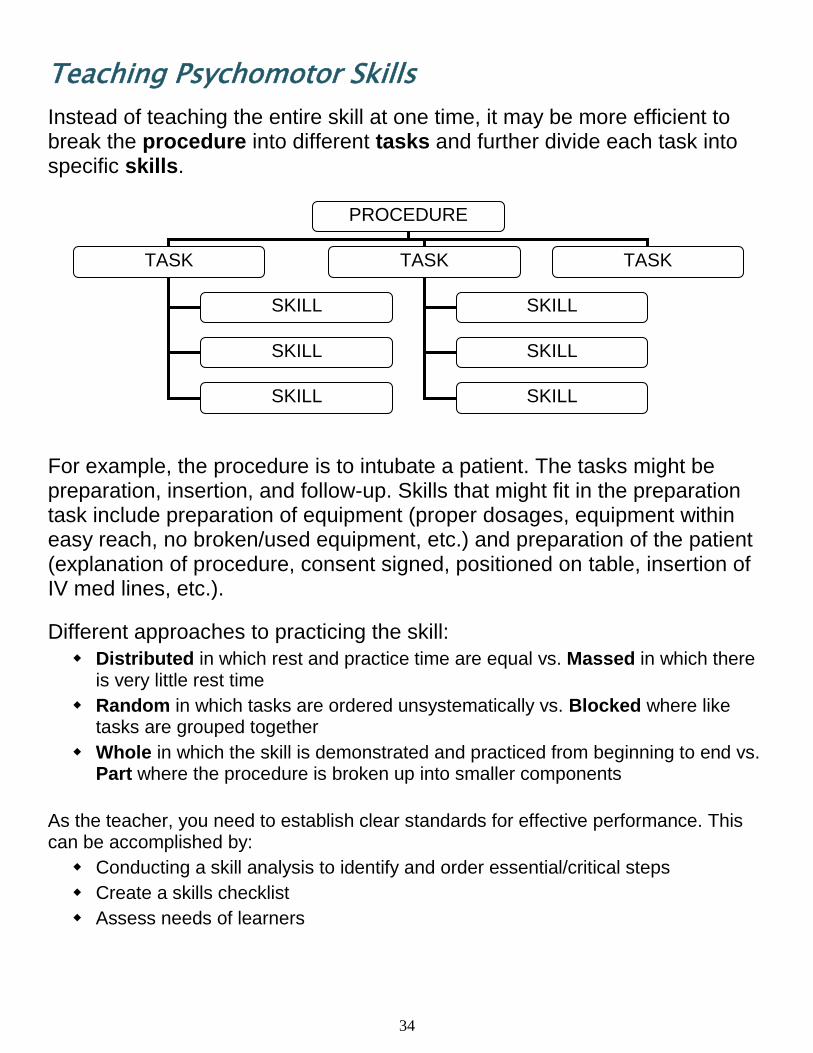
PROCEDURE
TASK TASK TASK
SKILL
SKILL
SKILL
SKILL
SKILL
SKILL
Teaching Psychomotor Skills
Instead of teaching the entire skill at one time, it may be more efficient to break the procedure into different tasks and further divide each task into specific skills.
For example, the procedure is to intubate a patient. The tasks might be preparation, insertion, and follow-up. Skills that might fit in the preparation task include preparation of equipment (proper dosages, equipment within easy reach, no broken/used equipment, etc.) and preparation of the patient (explanation of procedure, consent signed, positioned on table, insertion of IV med lines, etc.).
Different approaches to practicing the skill:
Distributed in which rest and practice time are equal vs. Massed in which there is very little rest time
Random in which tasks are ordered unsystematically vs. Blocked where like tasks are grouped together
Whole in which the skill is demonstrated and practiced from beginning to end vs. Part where the procedure is broken up into smaller components
As the teacher, you need to establish clear standards for effective performance. This can be accomplished by:
Conducting a skill analysis to identify and order essential/critical steps
Create a skills checklist
Assess needs of learners
35
Interactive Lecturing Interactive lecturing implies active involvement and participation by the audience so that students are no longer passive in the learning process. (see
section on “Large Group Presentation” for additional information)
Goals of effective teaching
Attract attention
Maintain attention
Promote learning
Methods for attracting attention
Stories/anecdotes – relating stories or anecdotes that are directly related to the topic will catch the audience’s attention
Problem – beginning with a problem and using the lecture information to solve it keeps the audience focused
Test question – showing how the material will be used in testing is effective
Humor – as long as the humor is appropriate for the audience
Startling fact – facts, figures, data are ways to “wake up” the audience
Surveying student knowledge – making sure the information is relevant to the topic and the audience indicates the importance of the material
Methods for maintaining attention
Organizing the material, presenting the organization, reinforcing the organization during the lecture, and summarizing using the organization help keep the audience on track with your presentation
The adult attention span = 10-20 minutes under same stimulus; change the stimulus often using a variety of techniques:
o Video
o Demonstration
o Role play
o Small groups or partnering
Methods for promoting learning
Pausing after a general topic allows the audience to check and/or correct their notes, gives an opportunity for questions, indicates a change between topics
Limit content to 50% new information
Limit content to 2-3 main points
Select content based on what you want them to remember (Rosenbaum, 2008)
36
Interactive Lecturing
General strategies to help make the lecture more interactive:
Be willing to take risks and overcome your fears
Be cognizant of your fears
Maintain your sense of humor
Be prepared for the unexpected
Prepare and practice
Practicing will assist with effective time management
Preparation will improve and focus management of content
Preparing and practicing will identify ways to increase audience participation
Decreased nervousness
Be clear in your objectives and cut down on your material.
Remember that less is more; consider your three most important points
Do not try to cover every topic in detail
Provide readings and handouts to supplement the material
Ensure your lecture in point of fact covers your objectives
Prepare students for their role in interactive lectures
Set rules at the beginning
Outline how your session will be conducted
Clearly indicate when you want audience participation
Remain flexible
Don’t try to incorporate all methods for interactive lecturing at one time
Focus on a couple of techniques and ones that you are comfortable with
Realize that everything will not go according to your plan
Be prepared to modify/change your approach or information if your audience appears to be totally lost
(Steinart & Snell, 1999)
37
Conference Rooms The conference room, the hallway, and the bedside are three locations where most teaching occurs during rounds. Faculty members, in particular, are likely to allocate more of their time to hallway and conference room sessions. Residents can do quite a lot of teaching in the conference room as they conduct “sit-down” rounds or at special times set aside for teaching and learning. The teacher must fulfill two roles simultaneously—diagnosing the patient’s condition and the learner’s abilities. The conference room is perhaps the best place to focus on clinical problem solving.
Recommendations:
While rounding, assign a scribe to record any questions that cannot be answered. Transfer these questions to the whiteboard for future learning.
Limit interruptions of the case presentation by learners and house staff, reserving the majority of questions and comments until after the presentation is completed.
Take two columns of notes during presentation—one for the patient’s issues and the other for the learner’s issues
After case presentation, actively engage in discussions, using probing questions to assess understanding and to provoke thought.
Frequently use illustrative devices (e.g., chalkboard, x-ray, EKG strip, etc.) to emphasize important information and make abstract points more concrete.
Ask the staff or faculty physician to occasionally deliver brief talks on pertinent topics from her/his subspecialty area or on general topics in which the faculty or staff is particularly well versed.
Provide team members with relevant readings or references and encourage team members to share information obtained through their readings and consultations.
It is important to validate learner’s contributions, even if the learner’s comments would lead the discussion in another direction.
Help participants explore differences in opinion with openness and curiosity.
Allows the teacher to role model the use of additional sources of information.
(Weinholtz, D. et.al. 1992.)
38
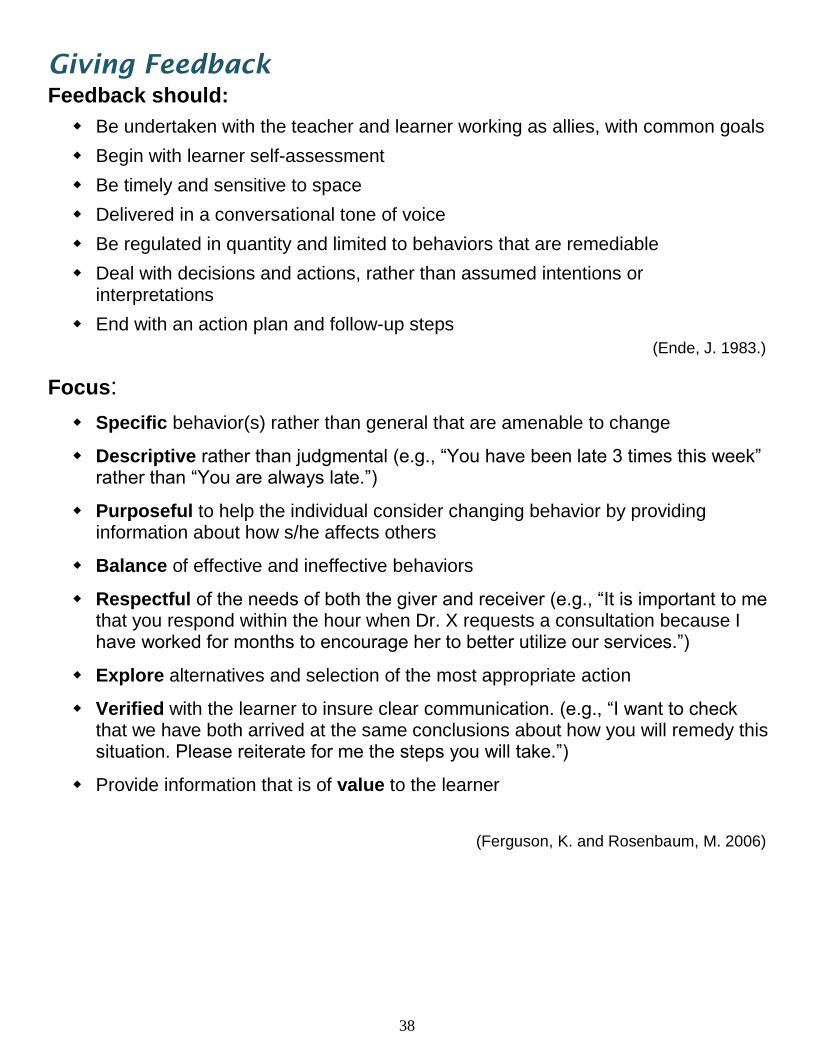
Giving Feedback
Feedback should:
Be undertaken with the teacher and learner working as allies, with common goals
Begin with learner self-assessment
Be timely and sensitive to space
Delivered in a conversational tone of voice
Be regulated in quantity and limited to behaviors that are remediable
Deal with decisions and actions, rather than assumed intentions or interpretations
End with an action plan and follow-up steps
(Ende, J. 1983.)
Focus:
Specific behavior(s) rather than general that are amenable to change
Descriptive rather than judgmental (e.g., “You have been late 3 times this week” rather than “You are always late.”)
Purposeful to help the individual consider changing behavior by providing information about how s/he affects others
Balance of effective and ineffective behaviors
Respectful of the needs of both the giver and receiver (e.g., “It is important to me that you respond within the hour when Dr. X requests a consultation because I have worked for months to encourage her to better utilize our services.”)
Explore alternatives and selection of the most appropriate action
Verified with the learner to insure clear communication. (e.g., “I want to check that we have both arrived at the same conclusions about how you will remedy this situation. Please reiterate for me the steps you will take.”)
Provide information that is of value to the learner
(Ferguson, K. and Rosenbaum, M. 2006)
39
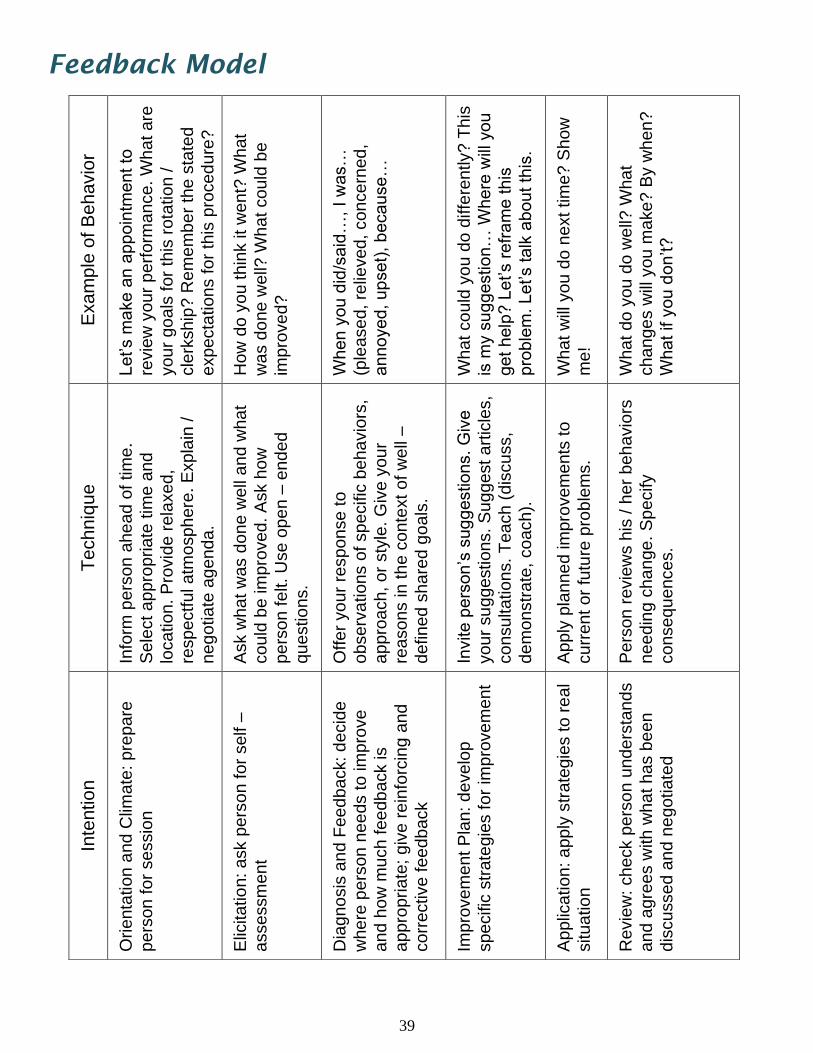
Feedback Model
Exa
mp
le o
f B
eh
avio
r
Let’s m
ake a
n a
pp
oin
tment to
revie
w y
our
perf
orm
ance. W
hat are
your
go
als
for
this
rota
tion /
cle
rkship
? R
em
em
be
r th
e s
tate
d
expecta
tions f
or
this
pro
ced
ure
?
How
do y
ou t
hin
k it
went?
What
was d
one w
ell?
Wh
at could
be
impro
ve
d?
When y
ou d
id/s
aid
…, I w
as…
(ple
ase
d, re
lieved,
concern
ed,
annoye
d, up
set)
, b
ecause…
What co
uld
yo
u d
o d
iffe
rently? T
his
is m
y s
ug
ge
stio
n…
Wh
ere
will
yo
u
get help
? L
et’s r
efr
am
e this
pro
ble
m. Let’s talk
about th
is.
What w
ill y
ou d
o n
ext tim
e? S
how
me!
What do
you d
o w
ell?
What
change
s w
ill y
ou m
ake? B
y w
hen
?
What if y
ou d
on’t?
Te
ch
niq
ue
Info
rm p
ers
on
ahe
ad
of tim
e.
Sele
ct a
ppro
priate
tim
e a
nd
loca
tio
n.
Pro
vid
e r
ela
xe
d,
respectf
ul atm
osph
ere
. E
xpla
in /
negotia
te a
genda
.
Ask w
ha
t w
as d
one
well
an
d w
ha
t
could
be im
pro
ved.
Ask h
ow
pers
on f
elt. U
se o
pe
n –
end
ed
questio
ns.
Offer
yo
ur
response
to
observ
ations o
f sp
ecific
beha
vio
rs,
appro
ach, or
sty
le.
Giv
e y
our
reasons in th
e c
onte
xt of w
ell
–
defined
share
d g
oals
.
Invite p
ers
on’s
sug
gestions.
Giv
e
your
su
ggestions.
Su
ggest art
icle
s,
consultations.
Teach
(dis
cuss,
dem
onstr
ate
, coach).
Apply
pla
nne
d im
pro
vem
ents
to
curr
ent
or
futu
re p
rob
lem
s.
Pers
on r
evie
ws h
is /
her
beh
avio
rs
needin
g c
ha
nge.
Sp
ecify
conseq
uences.
Inte
ntio
n
Orienta
tion a
nd C
limate
: pre
pare
pers
on f
or
sessio
n
Elic
itatio
n: ask p
ers
on for
self –
assessm
ent
Dia
gno
sis
an
d F
ee
dback: d
ecid
e
where
pers
on
nee
ds t
o im
pro
ve
and h
ow
much fee
db
ack is
appro
pri
ate
; giv
e r
ein
forc
ing a
nd
corr
ective fee
dback
Impro
ve
ment
Pla
n:
develo
p
specific
str
ate
gie
s f
or
impro
ve
ment
Applic
ation: a
pply
str
ate
gie
s t
o r
eal
situatio
n
Re
vie
w:
ch
eck p
ers
on
un
de
rsta
nd
s
and a
gre
es w
ith w
ha
t has b
een
dis
cussed a
nd n
egotiate
d

40
Receiving Feedback
Being able to receive feedback is just as critical as being able to provide effective feedback. When receiving feedback, keep the following in mind:
Will the feedback help you obtain your goal?
Listen to all the information – don’t interrupt
Don’t defend, contradict, argue, or interrogate the person giving you feedback
Ask for clarification if needed
Accept the feedback as one bit of data; it will take a lot of bits to understand the full picture
You do not have to immediately try to change your behaviors
Consider how this information fits with other information you have received
Soliciting Feedback
Many of us expect feedback to be given and wait for it instead of actively requesting feedback. Consider these guidelines when soliciting feedback:
Request feedback early and as close to the event as possible
Highlight exactly what you are looking for – be specific in your request (don’t just say “give me some feedback”)
Choose specific people (respected, trusted) to give you feedback
Make sure it is directly related to your goals
Use helpful opening phrases (i.e., “I think I missed the patient’s reaction. What do you think?”)
Ask for recommendations but you do not have to act on any of them
Never openly compare the feedback given to you by different sources
Thank them for their information
Decide what you want to do with the input
Consider it one data point or one puzzle piece; complete the picture before making behavioral changes
41
Daily Debriefing
During the day, it may not be possible to work with the learner and follow-up on their learning and experiences. Reconnecting with the learner at the end of the day will be a way to synthesize the day’s learning experiences. This also helps to promote continued learning. Recommendations for debriefing:
Have the learner self-reflect on the day’s experiences
o Identify one new bit of information gained from the day
o What was the most difficult experience today?
o What medical knowledge do you consider weak/needs improvement?
o Given the condition of one patient, what would you do differently if they were older? younger? different gender? allergic to medication?
o Instruct the learner to teach you about a diagnosis or differential
o What topic/information could they present in a brief presentation the next day?
If there are groups of learners:
o Assign small groups to research a topic related to one of their patient experiences
o Have small group teach the others what they learned from a patient encounter
o Have the group identify common themes from the day’s activities
Other opportunities for debriefing:
o After leaving rounds, ask the learner about one thing they learned or have a question about
o After leaving Grand Rounds, ask the learner to identify one thing they learned from the session
o After leaving M&M, question the learner about the focus of the session
o After observing an interaction with a family, question the learner about how they would handle a similar/different situation
42
Key Points
1. Schedule time with the learner to discuss your evaluation. Try to avoid interruptions during the discussion. 2. The evaluation should be conducted in a conversational tone. 3. Review the goals and expectations as determined at the beginning of the rotation. 4. Suggestions for improvement should be given verbally during the rotation. There should be no surprises during the evaluation. This does not allow the learner an opportunity to work on improvements. Any performance issue should have been addressed during the rotation. 5. After the rotation, take time to reflect on your teaching skills and methods. Identify one aspect you want to work on with the next learner.
After the Rotation
43
Evaluating Teaching For many teachers, reflection after teaching provides the impetus for change and improvement. Assessing what went well and what went wrong are key steps in this self-evaluation process. Excellent teachers use this information to make their teaching more effective and relevant for the learner. Less effective teachers never change or even consider the need to change. Questions to ask yourself:
What are common errors and how can I address these in my teaching?
In what areas have students shown particular strengths, weaknesses, interests and why might this be so?
What misconceptions are evident in students’ work and how can I address these in my teaching?
What levels of intellectual achievement are revealed in students’ work? For example, do they simply appear to rote learn or is there evidence of analysis and critical thinking?
What feedback will I give students and how will I do this?
This process of questioning and thinking about one’s teaching is a fertile way of developing an understanding of student learning so that you can modify teaching and provide additional assistance to students if this is indicated.
(Newble & Cannon, 2001)
Teaching failures will occur; they are an integral part of the process. However, when confronted with failure, there are several things you can do. First, be realistic; even the best of teachers have bad days when nothing seems to work. Second, keep your “antennae” out to recognize the parts that were and were not successful. If you are lucky, you can ask for and receive useful feedback; however, this often will not occur, so you must personally observe what engages the learner and adjust your teaching accordingly.
(Alguire, et. al, 2001)

44
Evaluating Learners Evaluation should be an ongoing process during a rotation to help learners improve their skills and behaviors. It is part of the learning process and can help build the learner’s confidence. Guidelines for evaluating student learning: Prior to the meeting:
Know precisely what is required/expected of the learner at this level/time of education
Gather data about the learner’s knowledge/attitude/skills from faculty, peers and direct observation
Compare the required/expected competencies and the learner’s performance
Document progress to date and create a plan for continued growth
During the meeting:
Conduct evaluation sessions in a private, relaxed, and supportive atmosphere
Outline an agenda for the session
Allow the learner to discuss his/her experience or performance first
Be a good listener
Share your information; link to the learner’s goals
Comments should be constructive and non-judgmental. Example areas for comment on learner evaluations include:
o Attendance
o Attitude toward rotation
o Evidence of collateral reading
o Assessment of knowledge base
Thoroughness and accuracy of assessments
o Interpersonal manner with patients, families, staff, peers, residents, and attendings
o Professionalism (acting with integrity, respect, and compassion)
Compare your assessment with the learner’s and discuss
Follow feedback guidelines to ensure specific, descriptive and purposeful information
Establish follow-up plans
Summarize
45
Evaluating Learners
Anyone who evaluates another person’s performance is prone to make one or more rating errors. There are many reasons for this occurrence (don’t understand the rating form, not taking time to consider, not aware of rating items, lazy scoring, etc.). Being aware of common rating errors will help reduce their impact. (Alguire, et.al, 2001)
The “Halo/Horn” Effect
When we consider a person good (or bad) in one category, we are likely to make a similar evaluation in other categories.
We assume that because people are good at doing A they will be good at doing B, C and D (or the reverse—because they are bad at doing A they will be bad at doing B, C and D).…
Halo effects happen especially if the perceiver does not have enough information about all traits, so that she/he makes assumptions based on one or two prominent traits
Correcting Error: make an effort to observe all categories, not rate on your expectations, or use ‘not observed’ instead of rating the item
Restriction of Range The tendency to circle the same numerical rating for all competencies Not making full use of the evaluation range Rating all “3” so as to be non-committal; lazy rating Correcting Error: take time to consider each characteristic individually and rate it
independently
Rating Non-Performance Attributes Allowing actions unrelated to the category to influence the rating Considering attributes such as personality, gender, ethnicity, religious beliefs, or
origins to decide ratings instead of actual performance Correcting Error: focus on competencies and disregard non-performance
attributes
Recency Error Evaluation is based on most recent events in memory Inability to remember events over the entire period of observation Correcting Error: use index cards to jot down both positive and negative actions
and performance; keep in a file for use at evaluation time
46
Hidden Curriculum In addition to the intentional teaching of knowledge and skills to trainees and protégés is the unintended, often unrealized transmission of implicit beliefs, attitudes, and behaviors through a process called the hidden curriculum.
Three levels of teaching:
Formal – formulaic or planned instruction such as a classroom or skills lab
Informal – opportunistic or unplanned instruction being offered when appropriate learning
opportunities arise such as the clinical setting
Hidden – unintended transmissions of implicit social and cultural rules and regulations such
as beliefs and attitudes
The hidden curriculum is a function not only of the institution’s implicitly held values, but perhaps more so of the individuals by whom the trainee is surrounded personally. There is a disconnect between what we formally teach medical students and residents in lectures and syllabi and how things really operate in clinical settings, most often related to the attitudes and behaviors of attendings and residents in informal teaching situations.
“Thus, we are teaching far more than we know. Every word we speak, every action we perform, every time we choose not to speak or act, every smile, every curse, every sigh, is a lesson in the hidden curriculum.”
(Grofton & Regehr, 2006)
Awareness of a resident’s part in the hidden curriculum:
Role modeling – learners are constantly observing your behavior. How you
respond or don’t respond in a situation, whether you take time to teach, or your acknowledgement or lack of the learner’s presence provides many hidden messages.
Cultural diversity – how you react to patients from any particular background,
whether you treat genders equally, or how you use questions to uncover information also reinforce learning and contribute to the hidden curriculum.
Attitude – do you consider the presence of a learner an obligation or an
opportunity? Learners can quickly sense how important they are under your direction. Do you know their first name? Do you use it frequently? Asking or not asking what the learner’s goals are indicates your attitude as well.
47
Key Points
1. Determine the type of audience you will be presenting to and organize your presentation accordingly. 2. The presentation should have a logical beginning, middle, and ending containing information that people need. 3. Practice your presentation with emphasis on timing, identifying key points, and developing smooth transitions. Have a peer or coach provide feedback on your presentation beforehand. 4. If you are using electronic equipment (laptop, projector, sound), test the equipment before your presentation. If necessary, provide backup. 5. If the presentation uses visual aids, make sure the material is readable, color coordinated, and uses a minimum of special effects. 6. Be confident and visualize success!
Additional Teaching Opportunities
48
Teaching Patients The biggest mistake health care providers make is that they try to teach patients everything they know. You cannot teach ten years of learning in ten minutes and it really doesn’t pay to overwhelm someone who just found out they are going to live the rest of their life with a chronic disease. So think about what they really need to learn.
The “Do-Know-Deficit”
What do they have to do? (i.e., take medication, change a dressing, etc.)
What do they need to know in order to do it? (i.e., side effects of the medication, aseptic technique, etc.)
What do they already know? Ask them. Have them show you, Validate that it’s correct.
Teach the deficit. Please give the patient the respect they deserve and find out what
they already know. Do not waste their time and yours by teaching them something they already know.
Now what are the components?
Needs to know. What are the survival skills, basic safety issues, i.e.
medications, treatments, etc? In diabetes, it’s the four Ms: meal planning, medications, monitoring and movement. The rest can come later
Wants to know. They have things they want to know and you need to address
that or they won’t hear anything else you have to say. So ask, “What questions do you have?”
Nice to know. These are the fun things but not really necessary at this time.
Sometimes we teach a subject because we like these topics. If the patient doesn’t need it, don’t waste their time.
(Kanzer-Lewis, 2008)
49
Teaching Patients Common Teaching Mistakes
Ignoring the restrictions of the patient’s environment
Failing to accept that patients have the right to change their mind
Using medical jargon
Failing to negotiate goals
Duplicating teaching that other team members have done
Overloading the patient with information
Choosing the wrong time for teaching
Not evaluating what the patient has learned
Not reviewing educational media or relying exclusively on media
The bottom line is that patients control what they do with the health teaching you provide. Your responsibility is to assist patients in achieving and maintaining health by sharing knowledge, helping with the practical problems of carrying out instructions, and supporting patients as they integrate new knowledge and skills. The first step is to make sure that health care instructions are understandable
and compatible with patient goals. The next step is to include the patient as a partner in the process rather than as a
passive recipient of health teaching. The third step is to view the patient teaching as a process that requires a strong
interpersonal relationship with the patient and his or her family.
The key to effective health teaching is to develop an equal partnership that enables patients and families to manage health care problems with skill and confidence.
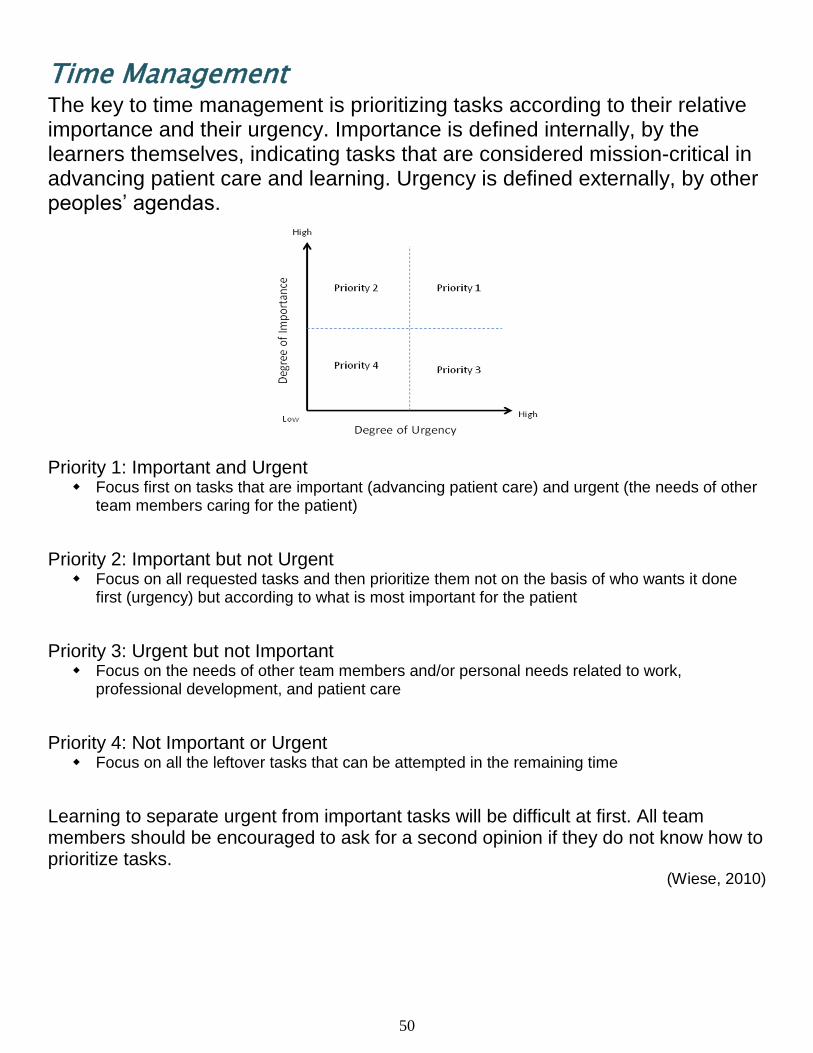
50
Time Management The key to time management is prioritizing tasks according to their relative importance and their urgency. Importance is defined internally, by the learners themselves, indicating tasks that are considered mission-critical in advancing patient care and learning. Urgency is defined externally, by other peoples’ agendas.
Priority 1: Important and Urgent Focus first on tasks that are important (advancing patient care) and urgent (the needs of other
team members caring for the patient)
Priority 2: Important but not Urgent Focus on all requested tasks and then prioritize them not on the basis of who wants it done
first (urgency) but according to what is most important for the patient
Priority 3: Urgent but not Important Focus on the needs of other team members and/or personal needs related to work,
professional development, and patient care
Priority 4: Not Important or Urgent Focus on all the leftover tasks that can be attempted in the remaining time
Learning to separate urgent from important tasks will be difficult at first. All team members should be encouraged to ask for a second opinion if they do not know how to prioritize tasks.
(Wiese, 2010)
51
Control Time Wasters More Effectively Taming the telephone
o Plan time for phone calls and “batch them” together so that you are not constantly
interrupted
o Make your calls brief; and enlist help, either by asking someone else to screen and
delegate your calls, or to make certain calls on your behalf
o Accept the fact that time on the telephone is an important component of your work;
adjust your expectations
Controlling email and the Internet o Limit the time you spend on the computer
o Don’t use email to replace social discourse
o Control your “impulse” to check the computer frequently
o Once you have found the information, resist the urge to continue looking for more data
Dealing with interruptions o Monitor your interruptions so that you get a better sense of what they are and when they
occur
o Delegate more responsibilities to others
o Establishing your hours of availability and “blocking out” protected time
Managing paper o Handle a piece of paper only once
o Set aside time for handling paperwork and reading
o Establish a good filing system and when in doubt, throw it out
Avoiding perfectionism o Consider the cost and consequences of your perfectionism and dare to be average
o Learn to accept anxiety that results from “loose ends” and imperfection
o Stop anticipating failure before something has happened
o Estimate how much time a project is worth and stick to your estimate
o Try to do something “imperfect” on purpose
Overcoming procrastination o Analyze why you procrastinate
o Consider the cost of your procrastination
o Break large tasks into smaller, more manageable tasks
o Set deadlines that you have to follow
o Force yourself to do high priority tasks when you are energetic
(Steinert, 2000)
52
Grand Rounds These are formal meetings dedicated to continuing education of physicians. Their frequency tends to vary but typically conducted weekly. These meetings may include topics such as clinical case presentations, lectures from visiting faculty, educational training sessions, presentations of current research, morbidity and mortality lectures, and interactions with patients for educational purposes. Residents may be involved with Grand Rounds in two ways: 1. As the Presenter:
If you will be making a formal presentation, review the section “Large Group Presentations” and “Visual Presentations.”
2. With Learner(s) after the presentation:
Review with learners the information presented. Use the section “Asking the Right Questions” to investigate higher level learning.
Identify two pieces of information that you learned to turn into “Teachable Moments.”
Randomly designate learners to research a component of the presentation and make an oral report to your team.
If possible, have the presenter make brief additional comments to your team during conference.
Discuss with learners how the information might be applicable in their medical career.
53
Teaching in the Operating Room Teaching in the OR provides a unique and challenging opportunity for teaching. The approach to teaching encompasses helping the learner develop complex thinking skills as well as acquiring new knowledge. It requires balancing the need to impart scientific knowledge, challenge assumptions, guide experiential learning and, at the same time, ensure patient care and safety.
(Cleave-Hogg & Benedict, 1997)
To have a truly effective learning experience, students need to learn:
A. To negotiate the physical environment of the OR; to learn the protocols, to familiarize themselves with the working culture; to learn to cope with the emotional impact and tensions that may arise
B. To have a clear sense of the learning objectives, while attending to the formal assessment requires set by the department
C. To negotiate the social relations of work; to find a legitimate role to play in order to participate
(Lyon, 2004)
Components for an effective learning experience in the OR:
Identify the learner’s basic level of knowledge
Help the learner develop a learning plan or identify goals
Clarify your expectations and those of the learner
Provide a basic orientation to the room—location & name of equipment, introductions to staff, common procedures/guidelines, what to do in case of emergencies
Identify the best ways & times to asks questions
Provide information about the social dynamics surrounding the attending—how to respond when asked a question, how to provide equipment, where to observe from
For any teachable moment, have a focus or goal as to what you are trying to teach
Use low and high level questions to expand cognitive development (see section on
Asking the Right Questions)
Provide immediate and honest feedback in a constructive manner
Recognize the learner’s efforts to be productive and learn new knowledge
The most valuable learning experiences occur when the learner is engaged by getting involved, standing scrubbed in and feeling a part of the social and physical environment.
54
Teaching in the Operating Room
The challenges for teaching in the operating room lie in three domains: Managing the Demands of the Working Environment
Students have to learn to negotiate the physical environment of the OR as a workplace, to learn the protocols, familiarize themselves with the culture, and cope with the emotional impact of surgery
The surgical procedure, its type, rarity, complexity, and progress determine the timing of all events
Particularly complex procedures require intense concentration and offer little opportunity for teaching during the procedure
Teaching material cannot be distilled easily to extract only the most interesting, useful or critical bits
Managing the Educational Tasks, Determining the Learning Objectives and Relevance
Students who have a clearer idea of the practical relevance of learning in the OR found the time in OR more useful
Teachers and students should clearly identify objectives related to the day’s schedule or types of patients or types of procedures
The OR presents an opportunity to learn in a particular way that helps understanding, with integration, and with retention of knowledge
Managing Learning and the Social Relations of Work in the OR
There are multiple levels of learners in the OR at any given time
Students find they have to promote themselves to earn their place on the team
Students are observing all team members and looking to the physician as the role model for team leadership
Establishing credibility, negotiating a role to play, participating in the team, and having that participation supported and acknowledged as legitimate is crucial to student learning
(Lyon, 2003)
55
Large Group Presentations Presentations are a way of communicating ideas and information to a group. A good presentation has:
1. Content – it contains information that people need.
a. Know your audience – expected numbers; level of education and interest in subject; diversity; challenging or passive.
b. Proofread all printed material – have a peer or friend review the material.
c. Clarify the topic for your presentation – what should you cover; are there specific learning areas; suggestions to make the presentation more interesting.
2. Structure – it has a logical beginning, middle, and end. It must be sequenced
and paced so that the audience can understand it.
a. Clearly identify the objectives (3-5) at the beginning of the session.
b. Keep to the time schedule—but don’t rush.
c. Keep your opening simple and exciting. Most audiences give you only 30-120 seconds to convince them they want to listen to you.
d. Present your material in a well-organized manner, yet be flexible to adjust to your audience – make your organization transparent.
e. At the completion, review the objectives of your presentation.
f. Depending on the audience, you may have to build in time for questions and answers.
3. Packaging – it must be well prepared.
a. Test all audiovisual equipment. Do not rely on technology to work. Carry backup files.
b. Make your presentation interactive and break up the long talk by posing questions or using small groups.
c. Handouts can supplement the presentation, but don’t read them.
d. Don’t be too gimmicky with computer graphics and pictures.
e. Don’t read your slides—face the audience and talk to them.
f. Timing of your presentation (early morning, after lunch, end of day)
56
Large Group Presentations
4. Human Element – a good presentation will be remembered much more than a
good report because it has a person attached to it.
a. The voice is probably the most valuable tool of the presenter—use it effectively and creatively i. Talk slowly to emphasize a point ii. Vary your voice tone throughout the talk
iii. Alternate the speed of your words for emphasis
b. Your body communicates different impressions to the audience. People not only listen to you, they also watch you. i. Standing behind the podium places a barrier between you and the audience—not
connected to the audience; gripping the podium may indicate nervousness ii. Open arms and palms towards the audience indicates openness; crossed arms
indicates defensiveness iii. Facial expressions (smiling, frowning, looking down, making faces) are effective if used
appropriately iv. Walking away from your notes indicates confidence v. Occasionally making eye contact with different areas of the audience keeps you
connected vi. Appropriate dress for the occasion helps you connect with the audience
c. Do not criticize or allow criticism of participants
d. Maintain confidentiality—do not use names of actual people in stories or references that can identify someone
e. Talk to your audience, not at them. Use a conversational tone and not a parent – child lecturing approach
f. Deal with passive audiences: i. Use interactive exercises
ii. Use small group discussions
iii. Ask questions and reward answers (recognition)
iv. Ask the audience for their input and knowledge of the topic
Most of all, ENJOY the time in front of your audience. It will be reflected back to you through participation and good reviews.
(Clark, D. 2000.)

57
Top Ten Tips for Talks 10. Meet the Needs of the Audience The most important thing a speaker can do is to determine what the audience wants to know or
needs to know about the topic being presented.
9. Understand Your Own Goals for the Presentation Lecturers should be clear in their own minds about exactly what they hope to accomplish during
their presentation.
8. Hook Them Early Answer the questions like what it’s about, who should care, and what’s in it for me at the beginning
of the presentation.
7. Keep It Lean (and Interesting) Cut down the information that you present and keep your key messages simple. The body should
emphasize only a limited number of points.
6. Finish Strongly Have a strong closing. The audience remembers your summary better than any other part of the
presentation.
5. Mind the Clock There is little more upsetting to an audience than speakers who exceed the allotted time for their
presentation.
4. Concentrate on Delivery Your delivery will make the difference between a memorable or forgettable presentation. Arrive
early to set up the area and equipment. Use pauses for emphasis. Speak clearly and comfortably (slow down if needed). Cut down on filler words (um, ah, like)
3. Don’t Just Talk, Perform Smile; tell stories; show pictures that are connected to your topic. Show your enthusiasm. Use
humor if you are comfortable and it is appropriate.
2. Learn How to Handle Nervousness See next page for suggestions
1. Practice, Practice, Practice Rehearsing allows for time management, concentrating on delivery, and clarifying rough spots
before the true presentation. (Skeff & Stratos, 2010)
58
Overcoming Nervousness People are sometimes nervous because they fear being in the spotlight or that they will perform badly. They may be afraid of their listeners. They may think their ideas aren't good enough, or that they are personally not good enough. People tend to be anxious about the unknown, and this fear may generate those feelings of nervousness that are so common among us all. Such fears can be valuable to a speaker who knows how to channel them constructively. There are twelve things you can do to channel any feelings of fear and nervousness that you might experience:
Keep your fear to yourself – believe the audience wants you to succeed
Visualize yourself being successful
Practice body motions that will reinforce your topics
Remember a good feeling
Know and understand your listeners
Check out all the arrangements carefully
Talk only about things you know and care about
Practice before a mirror and/or another person
Remind yourself that nervousness is normal
Pause briefly before you start
Use your audience (i.e., make eye contact; look for nodding heads-agreeing with you)
Give yourself permission to make mistakes
(Speeches 101: Handling Nervousness. 2004.)
59
Visual Presentations Graphics provide ways to engage your audience as they:
Show structure and function
Graphically represent data
Illustrate a process
Provide a framework for the presentation
Clarify concepts with pictures
Can be used to surprise or shock the audience Density & Legibility
10 lines and 10 words per line for overhead transparencies
Use a simple style of lettering (Arial, Times New Roman, Verdana, Lucinda
Sans)
Limit use of italics, underlining, bold and CAPITALIZATION
Use special effects sparingly (shadowing, 3-D)
Use 4 – 5 colors maximum
Increase color contrast with color hue and brightness Keep it Simple
Effective slides emphasize and illustrate what the speaker says
Slides present information succinctly
Slides present information that is self-explanatory Layout
Use horizontal (landscape) slides rather than vertical (portrait)
Try to be consistent where you place information on the slide
o Titles, bullets, logos, etc. should have a designated spot
May be formal and balanced (entries centered/left-justified) or informal (entries off-centered yet balanced)
Color
Use contrasting colors for text and background (light/dark)
Use 4 – 5 colors per slide and be consistent
Highlight important information with contrasting color
Light-colored lettering or lines on dark background often preferred
60
Visual Presentations Text
About 7 lines per slide with about 8 words each for text slides
Font size should be at least 18
Use an active “voice” that emphasizes key words or phrases (present or future tense, i.e. is, are, will, ‘ing)
Avoid decorative or ornamental styles of font (Lucinda Calligraphy, Mistral,
Broadway)
Spacing between lines should be about equal to the height of a capital letter or 1 ½ lines
Punctuation is often unnecessary to end a line of text
ALL UPPER CASE LETTERING IS MORE DIFFICULT TO READ A test for legibility: When you display the slide on your monitor, can you read it from 6 feet away?
Illustrations
Charts and graphs must be simpler than those on a printed page
Eliminate non-essential grid lines and frames that may clutter the image
Make sure the illustration fills the slide reasonably well
3-D and shadow effects add interest but also make the visual more complex – use sparingly
On line graphs, try to limit the number of lines to 4; assign highest contrast color to the line you want the audience to focus on
On bar graphs, try to limit the number of bars to 6 – 8; if appropriate, arrange in ascending or descending order
On pie charts, limit to 2 pies per slide; label slices on the outside of pie
Keep images simple
Slide Shows
Keep animation and transitions simple
Animations/transitions may act differently on different computers
Use simple “appear” or “uncover”
Test your slide show before your presentation on the system you will use
Carry backup files and copies
(Lenoch, S. 2006.)
61
Key Points
1. Conduct a self-assessment of your teaching skills. 2. Attend classes or training sessions focused on improving teaching skills. 3. Ask a peer or faculty member to observe your teaching session and give you feedback. 4. Videotape your teaching session and review for areas of improvement. 5. Participate in an Observed Structured Teaching Exercise (OSTE) and discuss the results with a teaching expert. 6. Observe teachers that have been recognized for teaching excellence.
Teaching: Next Steps
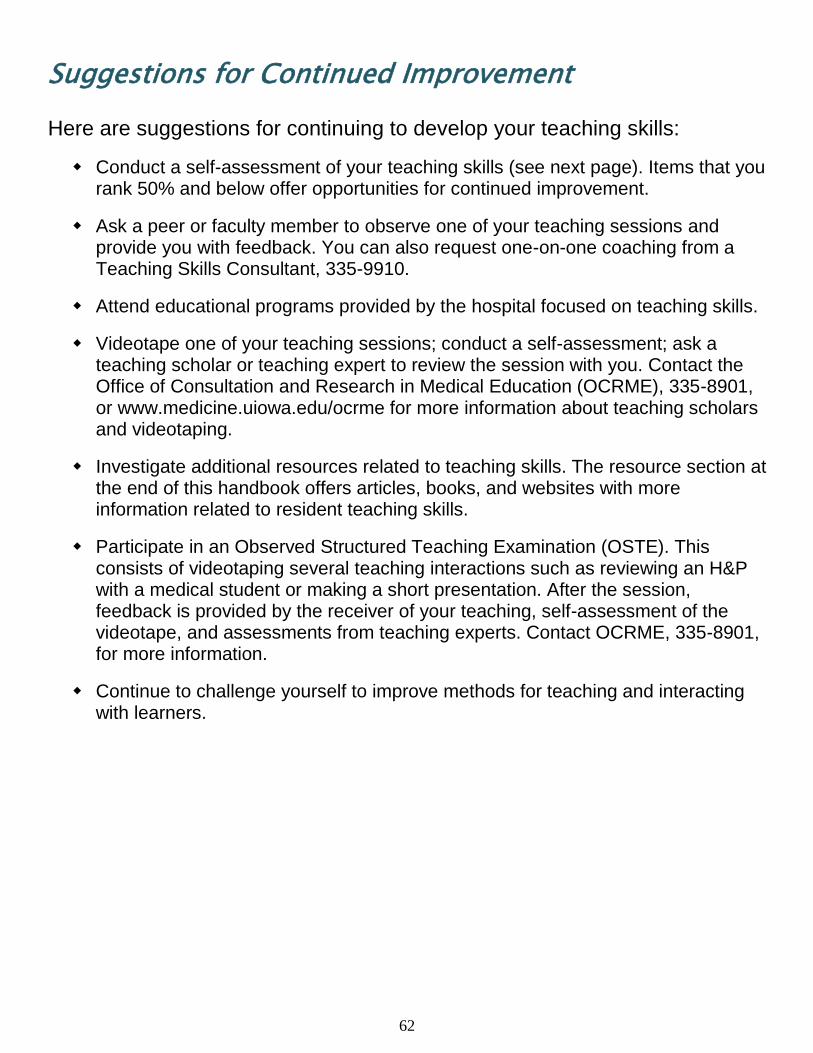
62
Suggestions for Continued Improvement
Here are suggestions for continuing to develop your teaching skills:
Conduct a self-assessment of your teaching skills (see next page). Items that you rank 50% and below offer opportunities for continued improvement.
Ask a peer or faculty member to observe one of your teaching sessions and provide you with feedback. You can also request one-on-one coaching from a Teaching Skills Consultant, 335-9910.
Attend educational programs provided by the hospital focused on teaching skills.
Videotape one of your teaching sessions; conduct a self-assessment; ask a teaching scholar or teaching expert to review the session with you. Contact the Office of Consultation and Research in Medical Education (OCRME), 335-8901, or www.medicine.uiowa.edu/ocrme for more information about teaching scholars and videotaping.
Investigate additional resources related to teaching skills. The resource section at the end of this handbook offers articles, books, and websites with more information related to resident teaching skills.
Participate in an Observed Structured Teaching Examination (OSTE). This consists of videotaping several teaching interactions such as reviewing an H&P with a medical student or making a short presentation. After the session, feedback is provided by the receiver of your teaching, self-assessment of the videotape, and assessments from teaching experts. Contact OCRME, 335-8901, for more information.
Continue to challenge yourself to improve methods for teaching and interacting with learners.
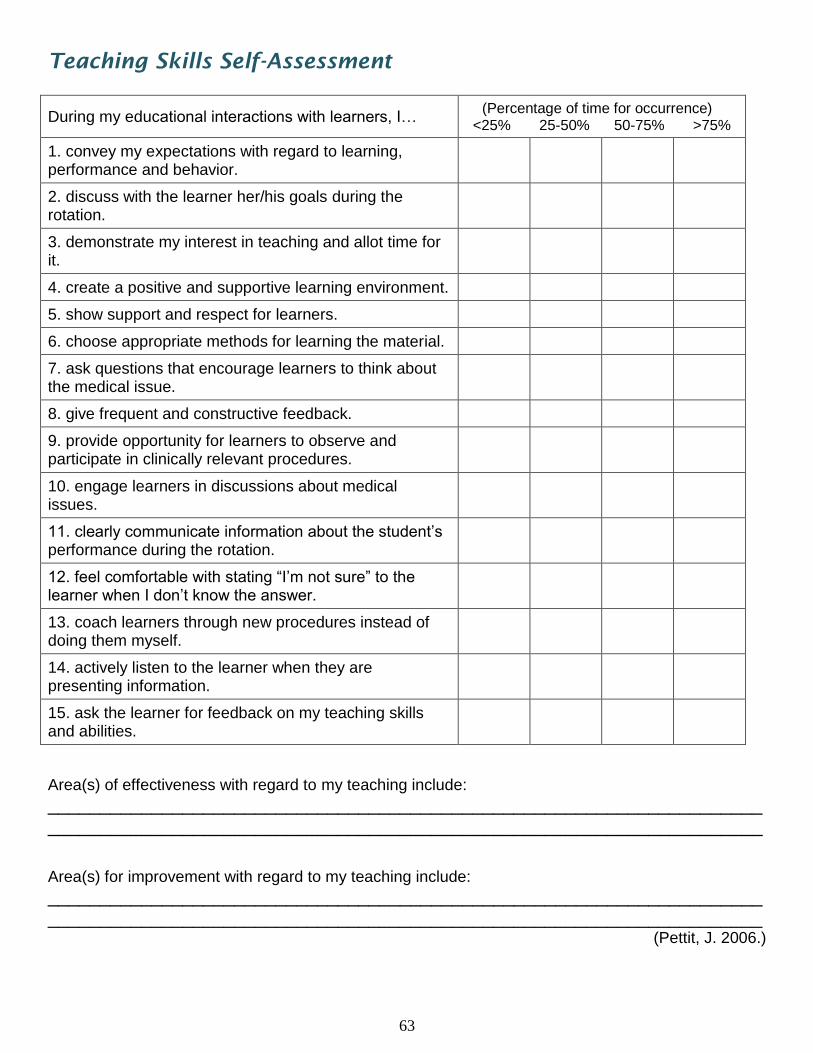
63
Teaching Skills Self-Assessment
During my educational interactions with learners, I… (Percentage of time for occurrence)
<25% 25-50% 50-75% >75%
1. convey my expectations with regard to learning, performance and behavior.
2. discuss with the learner her/his goals during the rotation.
3. demonstrate my interest in teaching and allot time for it.
4. create a positive and supportive learning environment.
5. show support and respect for learners.
6. choose appropriate methods for learning the material.
7. ask questions that encourage learners to think about the medical issue.
8. give frequent and constructive feedback.
9. provide opportunity for learners to observe and participate in clinically relevant procedures.
10. engage learners in discussions about medical issues.
11. clearly communicate information about the student’s performance during the rotation.
12. feel comfortable with stating “I’m not sure” to the learner when I don’t know the answer.
13. coach learners through new procedures instead of doing them myself.
14. actively listen to the learner when they are presenting information.
15. ask the learner for feedback on my teaching skills and abilities.
Area(s) of effectiveness with regard to my teaching include:
__________________________________________________________________________________________________________________________________________
Area(s) for improvement with regard to my teaching include:
__________________________________________________________________________________________________________________________________________
(Pettit, J. 2006.)
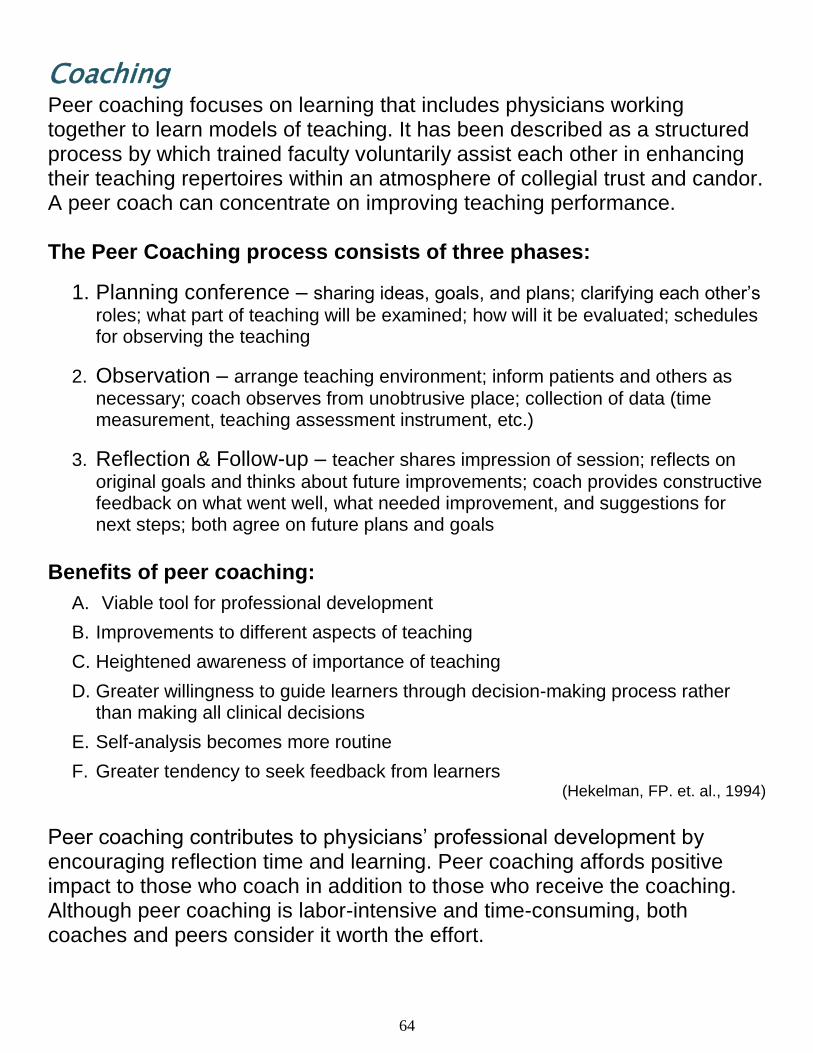
64
Coaching Peer coaching focuses on learning that includes physicians working together to learn models of teaching. It has been described as a structured process by which trained faculty voluntarily assist each other in enhancing their teaching repertoires within an atmosphere of collegial trust and candor. A peer coach can concentrate on improving teaching performance. The Peer Coaching process consists of three phases:
1. Planning conference – sharing ideas, goals, and plans; clarifying each other’s
roles; what part of teaching will be examined; how will it be evaluated; schedules for observing the teaching
2. Observation – arrange teaching environment; inform patients and others as
necessary; coach observes from unobtrusive place; collection of data (time measurement, teaching assessment instrument, etc.)
3. Reflection & Follow-up – teacher shares impression of session; reflects on
original goals and thinks about future improvements; coach provides constructive feedback on what went well, what needed improvement, and suggestions for next steps; both agree on future plans and goals
Benefits of peer coaching:
A. Viable tool for professional development
B. Improvements to different aspects of teaching
C. Heightened awareness of importance of teaching
D. Greater willingness to guide learners through decision-making process rather than making all clinical decisions
E. Self-analysis becomes more routine
F. Greater tendency to seek feedback from learners (Hekelman, FP. et. al., 1994)
Peer coaching contributes to physicians’ professional development by encouraging reflection time and learning. Peer coaching affords positive impact to those who coach in addition to those who receive the coaching. Although peer coaching is labor-intensive and time-consuming, both coaches and peers consider it worth the effort.
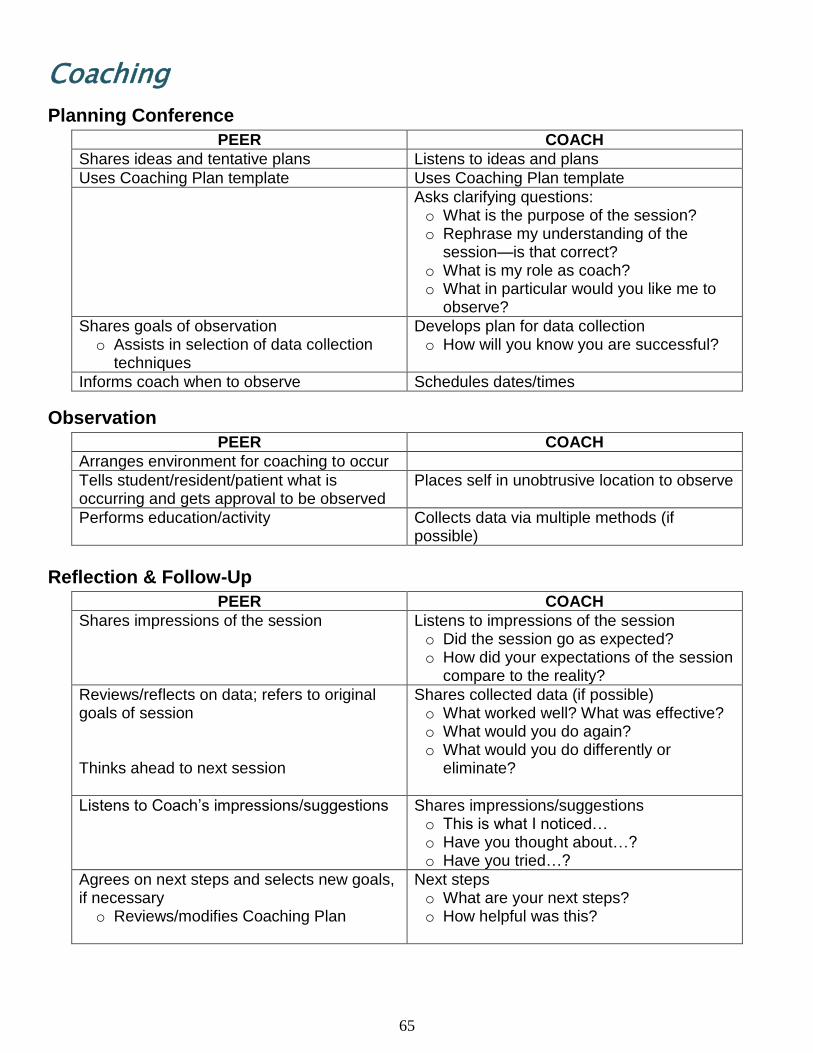
65
Coaching
Planning Conference
PEER COACH
Shares ideas and tentative plans Listens to ideas and plans
Uses Coaching Plan template Uses Coaching Plan template
Asks clarifying questions: o What is the purpose of the session? o Rephrase my understanding of the
session—is that correct? o What is my role as coach? o What in particular would you like me to
observe?
Shares goals of observation o Assists in selection of data collection
techniques
Develops plan for data collection o How will you know you are successful?
Informs coach when to observe Schedules dates/times
Observation
PEER COACH
Arranges environment for coaching to occur
Tells student/resident/patient what is occurring and gets approval to be observed
Places self in unobtrusive location to observe
Performs education/activity Collects data via multiple methods (if possible)
Reflection & Follow-Up
PEER COACH
Shares impressions of the session Listens to impressions of the session o Did the session go as expected? o How did your expectations of the session
compare to the reality?
Reviews/reflects on data; refers to original goals of session Thinks ahead to next session
Shares collected data (if possible) o What worked well? What was effective? o What would you do again? o What would you do differently or
eliminate?
Listens to Coach’s impressions/suggestions Shares impressions/suggestions o This is what I noticed… o Have you thought about…? o Have you tried…?
Agrees on next steps and selects new goals, if necessary o Reviews/modifies Coaching Plan
Next steps o What are your next steps? o How helpful was this?
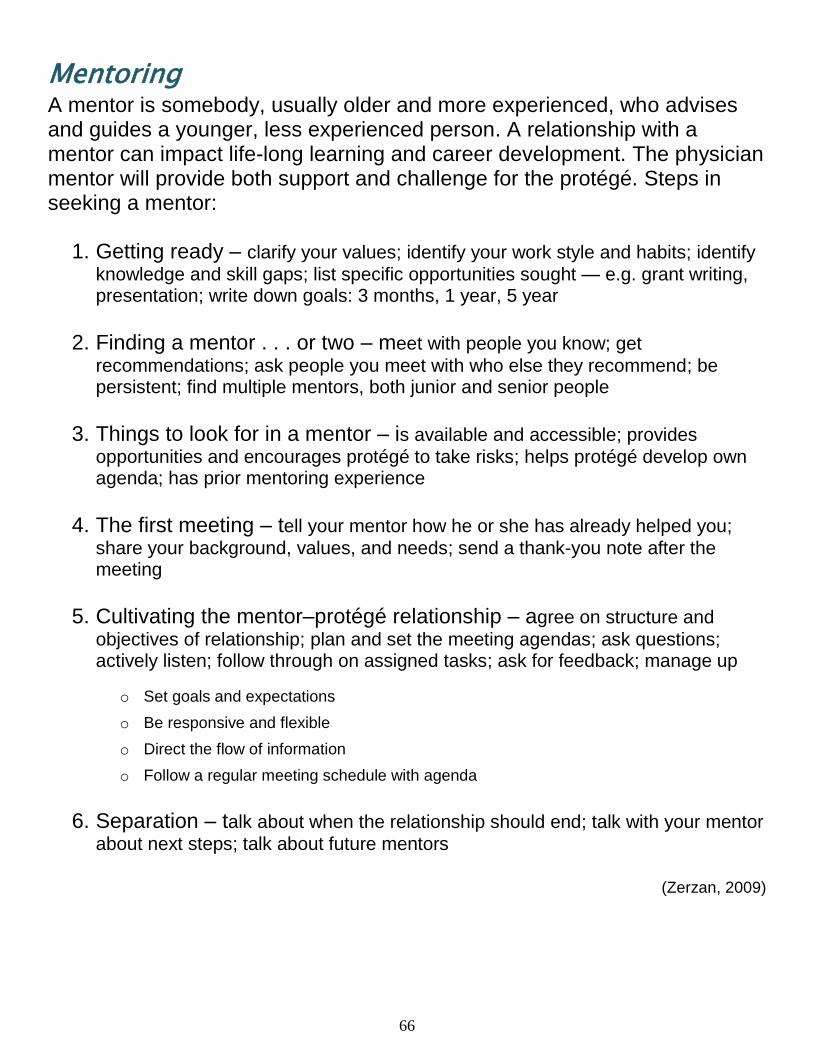
66
Mentoring A mentor is somebody, usually older and more experienced, who advises and guides a younger, less experienced person. A relationship with a mentor can impact life-long learning and career development. The physician mentor will provide both support and challenge for the protégé. Steps in seeking a mentor:
1. Getting ready – clarify your values; identify your work style and habits; identify
knowledge and skill gaps; list specific opportunities sought — e.g. grant writing, presentation; write down goals: 3 months, 1 year, 5 year
2. Finding a mentor . . . or two – meet with people you know; get
recommendations; ask people you meet with who else they recommend; be persistent; find multiple mentors, both junior and senior people
3. Things to look for in a mentor – is available and accessible; provides
opportunities and encourages protégé to take risks; helps protégé develop own agenda; has prior mentoring experience
4. The first meeting – tell your mentor how he or she has already helped you;
share your background, values, and needs; send a thank-you note after the meeting
5. Cultivating the mentor–protégé relationship – agree on structure and
objectives of relationship; plan and set the meeting agendas; ask questions; actively listen; follow through on assigned tasks; ask for feedback; manage up
o Set goals and expectations
o Be responsive and flexible
o Direct the flow of information
o Follow a regular meeting schedule with agenda
6. Separation – talk about when the relationship should end; talk with your mentor
about next steps; talk about future mentors
(Zerzan, 2009)
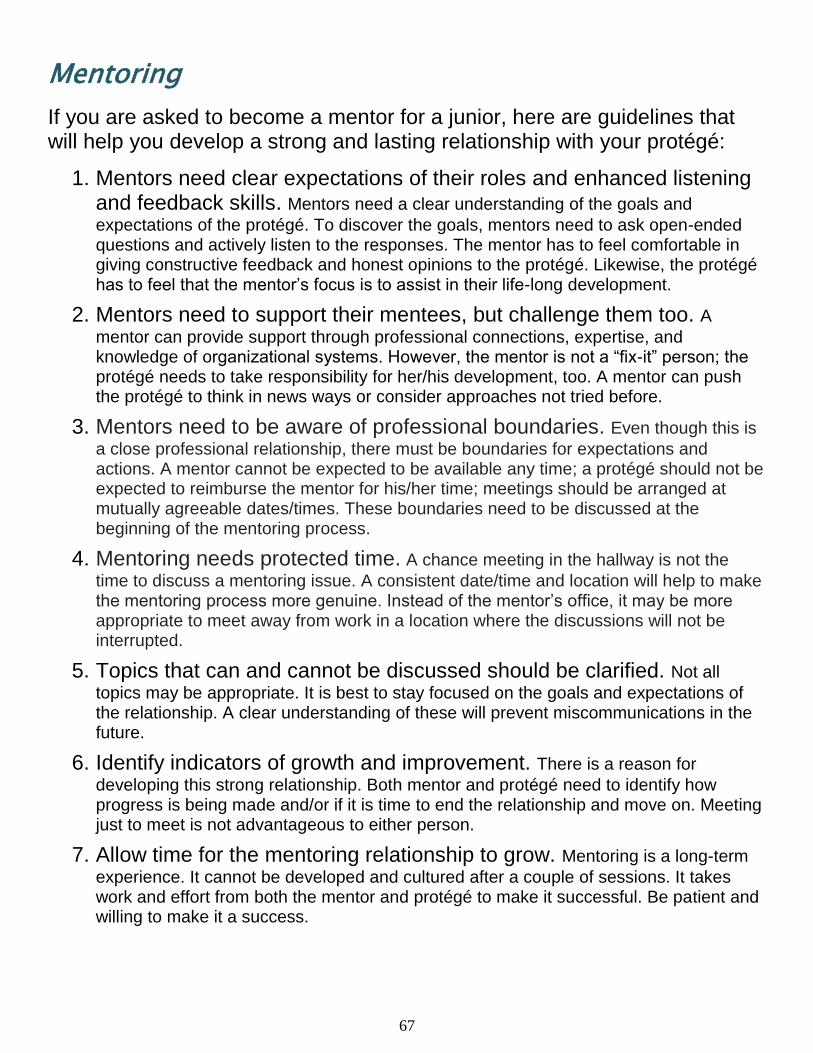
67
Mentoring
If you are asked to become a mentor for a junior, here are guidelines that will help you develop a strong and lasting relationship with your protégé:
1. Mentors need clear expectations of their roles and enhanced listening and feedback skills. Mentors need a clear understanding of the goals and
expectations of the protégé. To discover the goals, mentors need to ask open-ended questions and actively listen to the responses. The mentor has to feel comfortable in giving constructive feedback and honest opinions to the protégé. Likewise, the protégé has to feel that the mentor’s focus is to assist in their life-long development.
2. Mentors need to support their mentees, but challenge them too. A
mentor can provide support through professional connections, expertise, and knowledge of organizational systems. However, the mentor is not a “fix-it” person; the protégé needs to take responsibility for her/his development, too. A mentor can push the protégé to think in news ways or consider approaches not tried before.
3. Mentors need to be aware of professional boundaries. Even though this is
a close professional relationship, there must be boundaries for expectations and actions. A mentor cannot be expected to be available any time; a protégé should not be expected to reimburse the mentor for his/her time; meetings should be arranged at mutually agreeable dates/times. These boundaries need to be discussed at the beginning of the mentoring process.
4. Mentoring needs protected time. A chance meeting in the hallway is not the
time to discuss a mentoring issue. A consistent date/time and location will help to make the mentoring process more genuine. Instead of the mentor’s office, it may be more appropriate to meet away from work in a location where the discussions will not be interrupted.
5. Topics that can and cannot be discussed should be clarified. Not all
topics may be appropriate. It is best to stay focused on the goals and expectations of the relationship. A clear understanding of these will prevent miscommunications in the future.
6. Identify indicators of growth and improvement. There is a reason for
developing this strong relationship. Both mentor and protégé need to identify how progress is being made and/or if it is time to end the relationship and move on. Meeting just to meet is not advantageous to either person.
7. Allow time for the mentoring relationship to grow. Mentoring is a long-term
experience. It cannot be developed and cultured after a couple of sessions. It takes work and effort from both the mentor and protégé to make it successful. Be patient and willing to make it a success.
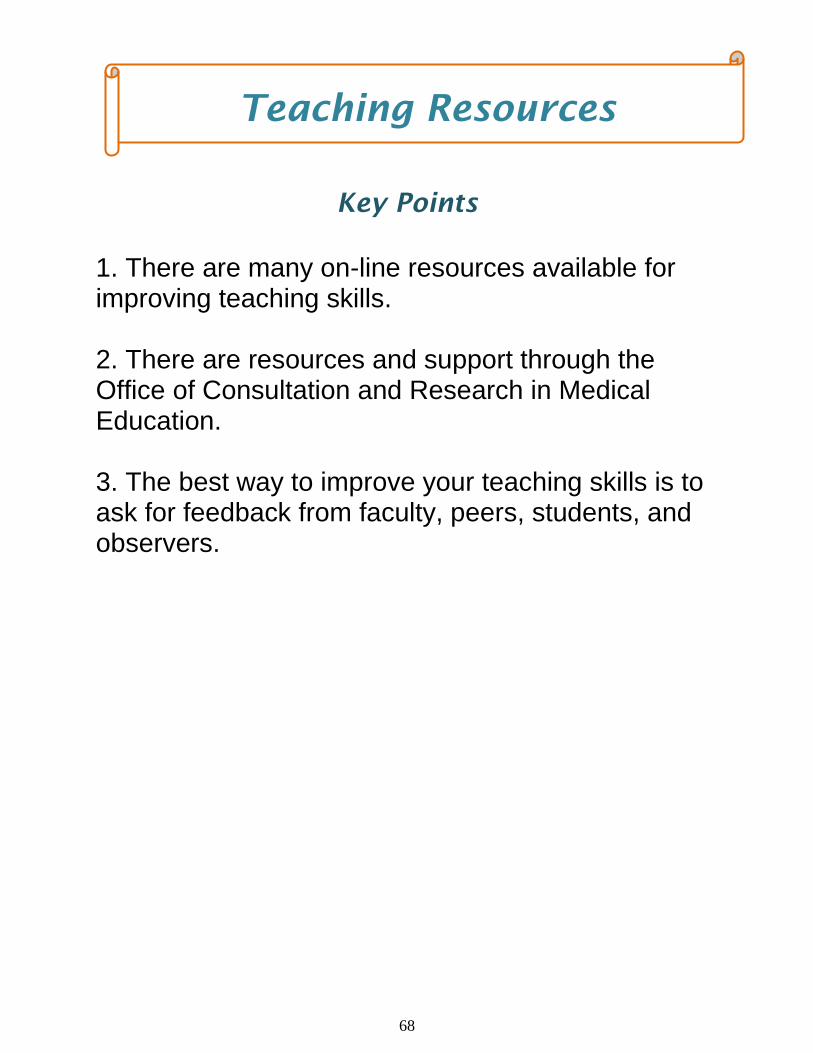
68
Key Points
1. There are many on-line resources available for improving teaching skills. 2. There are resources and support through the Office of Consultation and Research in Medical Education. 3. The best way to improve your teaching skills is to ask for feedback from faculty, peers, students, and observers.
Teaching Resources
69
Resources
Articles
Bensinger LD; Meah YS; Smith LG. Resident as Teacher: The Mount Sinai Experience and a Review of the Literature. Mount Sinai J Med 2005; 72:307-311. [a successful,
multidisciplinary curriculum to improve teaching and leadership skills]
Busari JO; Prince KJAH; Scherpbier AJJA; Van Der Vleuten CPM; Essed GGM. How residents perceive their teaching role in the clinical setting: a qualitative study. Med Teacher 2002; 24:57-61. [perceived benefits of teaching and the role of residents in
the teaching process]
Busari JO; Scherpbier AJ. Why residents should teach: A literature review. J Postgrad Med 2004 Mar; 50:205-210. [evidence that teaching influenced the perceived professional
competency of physicians positively]
Edwards, Paul N. How to Give an Academic Talk: Changing the Culture of Public Speaking in the Humanities. 2004; School of Information University of Michigan. [guidelines for speaking in academia]
Gunderman, R. et al. Teaching the Teachers. Radiol 2002; 222:599-603. [rationale,
curriculum and methods for teaching teachers]
Hafler, Janet P. Residents as Teachers: A Process for Training and Development. J Nutr 2003;133:544S-546S. [addresses how residents can learn to be effective teachers
without taxing an already-overloaded schedule]
Harden RM; Crosby J. AMEE Guide No. 20: The good teacher is more than a lecturer—the twelve roles of the teacher. Med Teacher 2000; 22:334-347. [this
guide looks at teaching and what it involves]
Hesketh EA; Laidlaw JM. Developing the teaching instinct: Feedback. Med Teacher 2002; 24:245-248. [beginning of a series of short educational programs covering a range of
teaching topics]
Lake FR. Teaching on the run tips: doctors as teachers. Med J Aust 2004; 180: 415-416. [beginning of a series of practical teaching tips]
Post RE; Auattlebaum G; Benich JJ. Residents-as-Teachers Curricula: A Critical Review. Acad Med 2009; 84:374-380. [to provide an updated systematic review of the
literature on curricula to determine the most evidence-based curricula and evaluation strategy]
Ramani, Subha. Twelve tips to improve bedside teaching. Med Teacher 2003; 25:112–115. [detailed description of teaching strategies that could facilitate a return to the bedside for
clinical teaching]
Reznick RK; MacRae H. Teaching Surgical Skills —Changes in the Wind. N Engl J Med 2006; 355:2664-9. [new training techniques based on established theories of the
ways in which motor skills are acquired and expertise is developed]
70
Rittenberger, Jon and Pacella, Charissa. The Resident as a “Bedside Teacher.” Newsletter of the Society for Academic Emergency Medicine. 2005; 17:16-17. [an
educational framework for resident teachers and specific suggestions to improve bedside teaching interactions]
Wamsley MA, Julian KA, Wipf JE. A literature review of "resident-as-teacher" curricula: do teaching courses make a difference? J Gen Intern Med 2004; 19:574-81. [to
examine the evaluation methods of resident teaching courses and to estimate the effectiveness of these teaching courses]
Books
Alguire PC; DeWitt DE; Pinsky LE; Ferenchick GS. Teaching in Your Office: A Guide to Instructing Medical Students and Residents. 2001: American College of Physicians.
Bain, Ken. What the best college teachers do. 2004: Harvard University Press. [collective scholarship on some of the best teachers in the United States]
Edwards, Janine C.; Friedland, Joan A.; and Bing-You, Robert. Residents’ Teaching Skills. 2002: Springer Series on Medical Education. [practical guidance to plan,
organize, and run a teaching skills program for medical residents]
Newble D; Cannon R. A Handbook for Medical Teachers, 4th Edition. 2001: Kluwer Academic Publishers.
Weinholtz, Donn and Edwards, Janine. Teaching During Rounds: A Handbook for Attending Physicians and Residents. 1992: The John Hopkins University Press. [a compact, practical handbook designed to help attending physicians and residents improve their teaching skills]
Whitman, Neal. Creative Medical Teaching. 1990: University of Utah School of Medicine. [provides brief comments on scores of topics presented in alphabetical order]
Websites
A Berkeley Compendium of Suggestions for Teaching with Excellence, Barbara Gross Davis, Lynn Wood, Robert C. Wilson: http://teaching.berkeley.edu/compendium/ [Presented as a series of suggestions for improving teaching]
Alliance for Academic Internal Medicine http://www.im.org/toolbox/curriculum/residentsasteachers/Pages/default.aspx [modules with practical and efficient strategies to help residents become more effective teachers in the course of their normal work duties]
Allyn & Bacon Communication Studies Website http://www.abacon.com/commstudies/ [modules on small group communication,
interpersonal communication, public speaking, teaching resources, and references]]
71
Association of Professors of Obstetrics and Gynecology: http://www.apgo.org/getinfo/teaching-tips.cfm [This page offers tips to help medical
educators in their teaching endeavors]
Bringing Education & Service Together (BEST), Clinical Teaching Skills Curricula, University of Southern California: http://residentteachers.usc.edu [clinical teaching
skills curricula]
Center for Teaching Excellence, University of Medicine & Dentistry of New Jersey: http://cte.umdnj.edu/clinical_education/clined_tips.cfm [clinical education tips &
tutorials]
Designing Effective Visuals: on-line tutorials intended to aid the user in effective scientific communication, Kansas University Medical Center: http://www.kumc.edu/SAH/OTEd/jradel/Effective_visuals/VisStrt.html [on-line
tutorials intended to aid the user in effective scientific communication]
Handbook for Teaching Assistants, The University of Iowa, 2002. http://centeach.uiowa.edu/library/handbook/documents/TAHandbook-9thEdition.pdf [teaching handbook and resource for new and continuing teachers]
Large Lectures & Technology, The University of Iowa. http://its.uiowa.edu/instruction/lectures/index.shtml. [offers strategies to enhance
active learning, ideas to streamline large-lecture instruction, suggestions for effectively incorporating teaching technologies, and tips about using ICON as both a course management and a teaching tool in the context of large lectures]
New York Macy Initiative on Health Communication Faculty Development. http://nyumacy.med.nyu.edu/facultydev/index.html [topics include managing difficult
patient situations, conducting a videotape review, feedback, microskills, and small group]
Office of Consultation and Research in Medical Education (OCRME), The University of Iowa. http://www.medicine.uiowa.edu/ocrme/ [links research with educational practice
through its work with faculty, staff, and students]
Psychiatric Residents as Teachers: A Practical Guide, American Psychiatric Association: http://www.psych.org/MainMenu/EducationCareerDevelopment/ResidentsMembersinTraining/residentasteacher.aspx [designed to help psychiatry residents become
better teachers]
Resident as teacher: developing skills for bedside teaching on ward rounds, Thomas Jefferson University: http://jdc.jefferson.edu/resteach/ [series of vignettes]
Resources and Information for Residents Who Teach, Florida State University College of Medicine: http://med.fsu.edu/index.cfm?page=facultyDevelopment.residentsWhoTeach [skills enhancement, planning, teaching strategies, evaluation and additional resources]
72
Strategies in Clinical Teaching, The University of Kansas School of Medicine: http://wichita.kumc.edu/strategies/index.html [description and procedures for teaching in
a busy practice, microskills, observation & feedback, bedside teaching, evidence-based medicine, and the 10 minute talk]
Bibliography Alguire PC; DeWitt DE; Pinsky LE; Ferenchick GS. Teaching in Your Office: A Guide to Instructing
Medical Students and Residents. 2001: American College of Physicians.
Bensinger L. et al. Resident as Teacher: The Mount Sinai Experience and a Review of the Literature. The Mount Sinai J Med 2005; 72:307-311.
Birnbaumer D. Bedside Teaching. Department of Emergency Medicine, Harbor-UCLA Medical Center: www.cordem.org/facdev/2004meeting/birn1.doc.
California Nurses Association, AIDS Train the Trainer Program for Health Care Providers. http://honolulu.hawaii.edu/intranet/committees/FacDevCom/guidebk/teachtip/behavior.htm. 1988.
Clark DR. Big Dog’s Leadership Page – Presentation Skills. nwlink.com/~donclark/leader/leadpres.html. 2000.
Cleave-Hogg D; Benedict C. Characteristics of good anesthesia teachers. Can J Anaesth 1997; 44:587-591.
Collins J. Education Techniques for Lifelong Learning: Principles of Adult Learning. RadioGraphics 2004; 24:1483-1489.
Ende J. M.D. Feedback in clinical medical education. JAMA. 1983; 250:777-781.
Ferguson K. Adapted from “Small Group Teaching” presentation. Office of Consultation and Research in Medical Education, Carver College of Medicine, The University of Iowa, 2006.
Ferguson K. Adapted from “Teaching Psychomotor Skills” presentation. Office of Consultation and Research in Medical Education, Carver College of Medicine, The University of Iowa, 2008.
Ferguson K; Rosenbaum M. .Adapted from “Giving Feedback” presentation. Office of Consultation and Research in Medical Education, Carver College of Medicine, The University of Iowa, 2006.
Gofton W; Regehr G. What We Don’t Know We Are Teaching. Clin Ortho Related Research 2006; 449:20-27.
Haessig C. Preceptors Guide for Teaching Dietetic Interns. State University of New York College at Oneonta Dietetic Internship Preceptors, 2001.
Hanna E. Adapted from “Bedside Teaching Tips” presentation. Department of Pediatrics, The University of Iowa Hospitals & Clinics, 2011.
Hekelman FP; Flynn SP; Glover PB; Galazka SS; Phillips JA. Peer Coaching in Clinical Teaching. Eval & Health Prof 1994; 17:366-381.
Hewson MG. Giving Feedback in Medical Education. J Gen Intern Med 1998; 13:111-116.
73
Huba ME; Freed JE. Learner-Centered Assessment on College Campuses: Shifting the Focus from Teaching to Learning. 2000: Allyn & Bacon.
Kanzer-Lewis G. Teaching patients in a time crunch. Patient Education Update. Winter 2008. http://www.patienteducationupdate.com/2008-11-01/article4.asp
Lenoch S. Adapted from “Visuals” presentation. Office of Consultation and Research in Medical Education, Carver College of Medicine, The University of Iowa, 2006.
Liaison Council on Medical Education Requirements (LCME) 2006 – 2007: Standards for Accreditation of Medical Education Programs Leading to the Medical Doctor Degree.
Lowry G. Adapted from “Teaching in the Presence of the Patient” presentation, 2006
Lyon PMA. Making the most of learning in the operating theatre: student strategies and curricular initiatives. Med Educ 2003; 37:680-688.
Lyon PMA. A model for teaching and learning in the operating theatre. Med Educ 2004; 38:1278-1287.
Mahan JD. Dealing with Difficult Students: The Slow, the Rude, and the Uncaring. The Clinical Teaching Handbook, 2nd Edition. Ohio State University College of Medicine
Morfeld C. Focus Remains on New Hires During Effective Employee Orientations. Society of Human Resources White Paper, 2002.
Neher J. et al. A five-step “microskills” model of clinical teaching. J Am Board Fam Pract 1992; 5:419-424.
Newble D; Cannon R. A Handbook for Medical Teachers, 4th Edition. 2001: Kluwer Academic Publishers.
Pettit J. Teaching Skills Self-Assessment. Office of Consultation and Research in Medical Education, 2006.
Ramani S; Gruppen L; Kachur EK. Twelve tips for developing effective mentors. Med Teacher 2006; 28:404–408.
Roberts NK; Williams RG; Kim MJ; Dunnington GL. The Briefing, Intraoperative Teaching, Debriefing Model for Teaching in the Operating Room. J Am Coll Surg 2009; 28:299-303.
Rosenbaum M. Adapted from “Interactive Lecturing” presentation. Office of Consultation and Research in Medical Education, Carver College of Medicine, The University of Iowa, 2008.
Rosenbaum M. Adapted from “Teaching Multiple Levels of Learners” presentation. Office of Consultation and Research in Medical Education, Carver College of Medicine, The University of Iowa, 2011.
Sekerka LE; Chao J. Peer Coaching as a Technique to Foster Professional Development in Clinical Ambulatory Settings. J Continuing Edu Health Prof 2003; 23:30-37.
Skeff KM; Stratos GA. Methods for Teaching Medicine. ACP Teaching Medicine Series. 2010.
Speeches 101: Handling Nervousness. www.espeeches.com/nervousness.htm, 2004.
Steinert Y. Time Management for Physicians. Can J CME 2000; 12:139-145.
Steinart Y; Snell LS. Interactive lecturing: strategies for increasing participation in large group presentations. Med Teacher 1999; 21:37-42.
74
Stiggins R; Rubel E; Quellmalz E. Measuring Thinking Skills in the Classroom, Revised Edition. 1988. National Education Association.
Sutkin G; Wagner E; Harris I; Schiffer R. What Makes a Good Clinical Teacher in Medicine? A Review of the Literature. Acad Med 2008; 83:452-466.
Wear D; Skillicorn J. Hidden in Plain Sight: The Formal, Informal, and Hidden Curricula of a Psychiatry Clerkship. Acad Med 2009; 84:451–458.
Weinholtz D; Edwards J. Teaching During Rounds: A Handbook for Attending Physicians and Residents. 1992: The John Hopkins University Press.
Weise J. Teaching in the Hospital. ACP Teaching Medicine Series. 2010.
Whitman N. Creative Medical Teaching. Department of Family and Preventive Medicine, University of Utah School of Medicine, 1990.
Whitman N; Schwenk TL. Preceptors as Teachers. Salt Lake City: University of Utah School of Medicine, 1984.
Zerzan JT; Hess R; Schur E; Phillips RS; Rigotti N. Making the Most of Mentors: A Guide for Mentees. Acad Med 2009; 84:140–144.
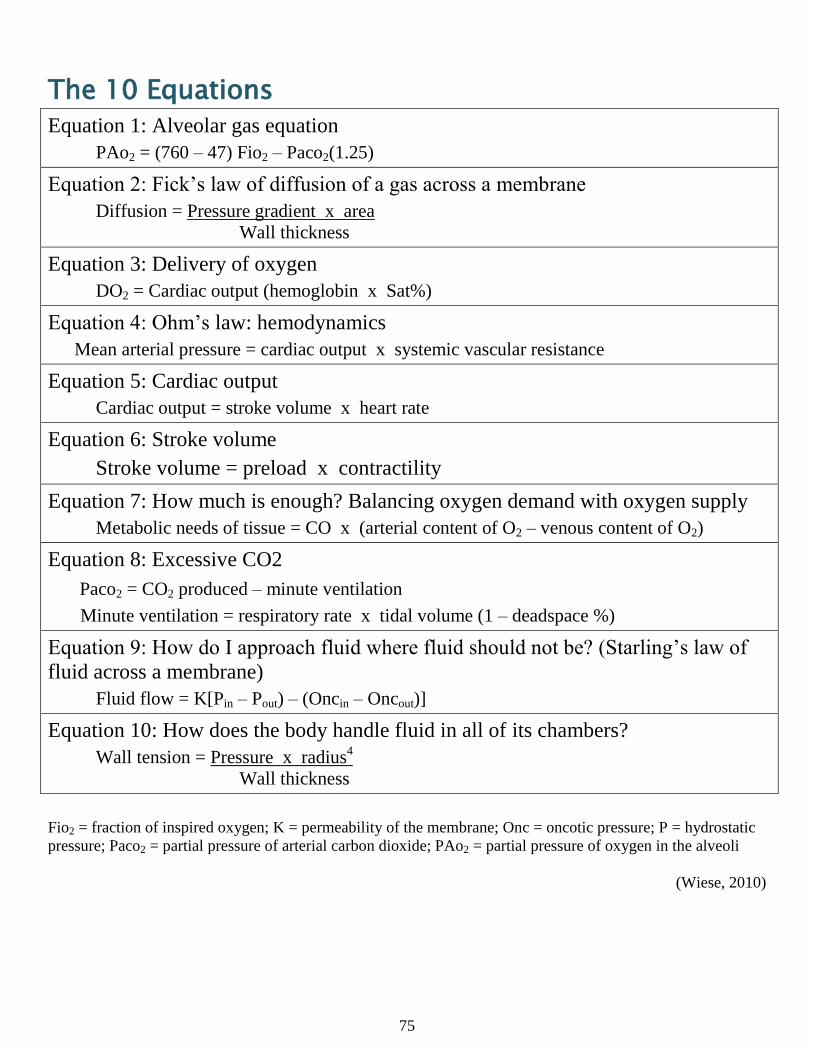
75
The 10 Equations
Equation 1: Alveolar gas equation
PAo2 = (760 – 47) Fio2 – Paco2(1.25)
Equation 2: Fick’s law of diffusion of a gas across a membrane
Diffusion = Pressure gradient x area
Wall thickness
Equation 3: Delivery of oxygen
DO2 = Cardiac output (hemoglobin x Sat%)
Equation 4: Ohm’s law: hemodynamics
Mean arterial pressure = cardiac output x systemic vascular resistance
Equation 5: Cardiac output
Cardiac output = stroke volume x heart rate
Equation 6: Stroke volume
Stroke volume = preload x contractility
Equation 7: How much is enough? Balancing oxygen demand with oxygen supply
Metabolic needs of tissue = CO x (arterial content of O2 – venous content of O2)
Equation 8: Excessive CO2
Paco2 = CO2 produced – minute ventilation
Minute ventilation = respiratory rate x tidal volume (1 – deadspace %)
Equation 9: How do I approach fluid where fluid should not be? (Starling’s law of
fluid across a membrane)
Fluid flow = K[Pin – Pout) – (Oncin – Oncout)]
Equation 10: How does the body handle fluid in all of its chambers?
Wall tension = Pressure x radius4
Wall thickness
Fio2 = fraction of inspired oxygen; K = permeability of the membrane; Onc = oncotic pressure; P = hydrostatic
pressure; Paco2 = partial pressure of arterial carbon dioxide; PAo2 = partial pressure of oxygen in the alveoli
(Wiese, 2010)
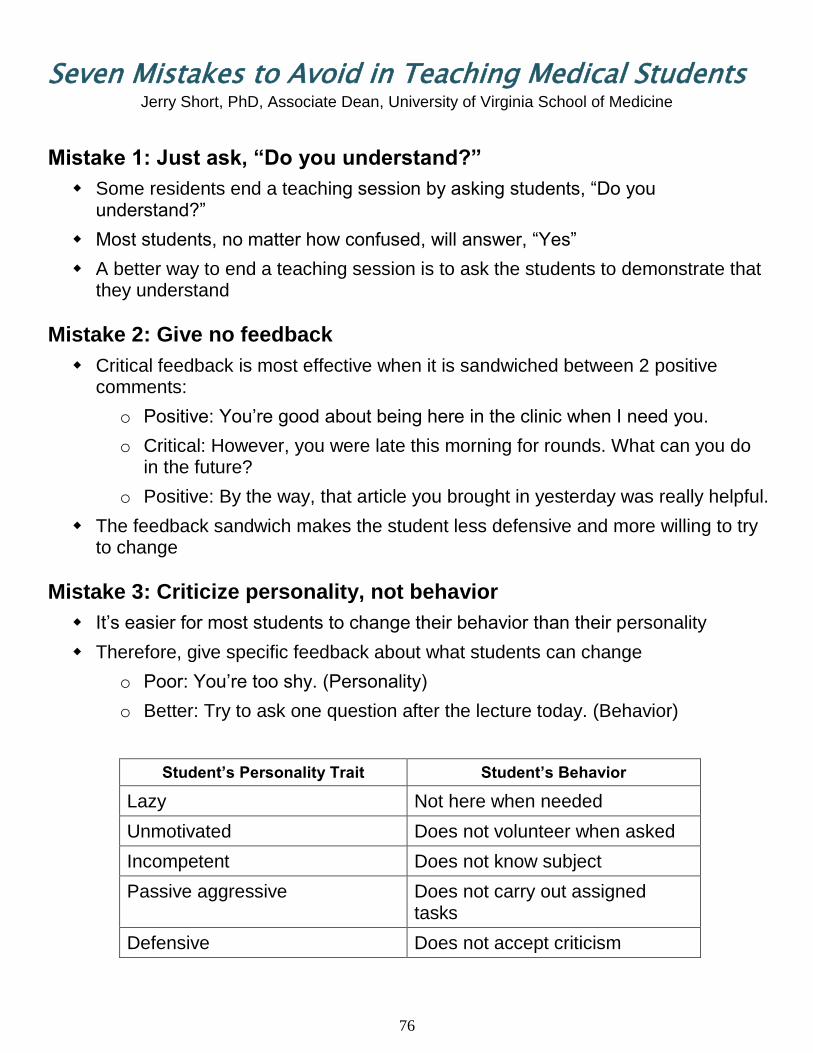
76
Seven Mistakes to Avoid in Teaching Medical Students Jerry Short, PhD, Associate Dean, University of Virginia School of Medicine
Mistake 1: Just ask, “Do you understand?”
Some residents end a teaching session by asking students, “Do you understand?”
Most students, no matter how confused, will answer, “Yes”
A better way to end a teaching session is to ask the students to demonstrate that they understand
Mistake 2: Give no feedback
Critical feedback is most effective when it is sandwiched between 2 positive comments:
o Positive: You’re good about being here in the clinic when I need you.
o Critical: However, you were late this morning for rounds. What can you do in the future?
o Positive: By the way, that article you brought in yesterday was really helpful.
The feedback sandwich makes the student less defensive and more willing to try to change
Mistake 3: Criticize personality, not behavior
It’s easier for most students to change their behavior than their personality
Therefore, give specific feedback about what students can change
o Poor: You’re too shy. (Personality)
o Better: Try to ask one question after the lecture today. (Behavior)
Student’s Personality Trait Student’s Behavior
Lazy Not here when needed
Unmotivated Does not volunteer when asked
Incompetent Does not know subject
Passive aggressive Does not carry out assigned tasks
Defensive Does not accept criticism
77
Seven Mistakes to Avoid in Teaching Medical Students
Mistake 4: No objective
If you don’t know where you want to go, it’s hard to get there
Begin a teaching session by telling the students what they are going to learn
Do this for every teaching session, whether it’s a brief teaching moment of for a one-hour lesson
Mistake 5: Just talk to the student when you teach
Most students prefer active learning over passive listening
You can teach and test in the same lesson
Follow the 3 minute rule: Don’t talk for more than 3 minutes without asking the student to do something
Mistake 6: Don’t find time to teach
Some students complain that some residents never have time to teach them
Some students praise residents who are always teaching while they work
Try to make sure that every contact you have with a student includes a teaching moment
Mistake 7: Be bored with teaching
If a resident is unenthusiastic about teaching, the student will know it
Boredom is catching—so is enthusiasm!
The good teacher is often a good actor—fake enthusiasm if you don’t feel it; it may even help you feel enthusiasm
Which would you prefer? An instructor who talks in a monotone or one who is animated?

78
Contact Information:
Jeffrey E. Pettit, PhD, Education Consultant
Office of Consultation and Research in Medical Education
1-201 Medical Education Building
Carver College of Medicine, The University of Iowa
Iowa City, IA 52242
Tel: 319-335-9910