Embed Size (px)
Citation preview
Print Article
Issue Date: Model Airplane News March 2006, Posted On: 9/22/2008
SBD DAUNTLESS TORPEDO BOMBER Mark Rittinger
PHOTOS BY JIM BEST
A CLASSIC SOUTH PACIFIC WARBIRD•ELECTRIFIED!
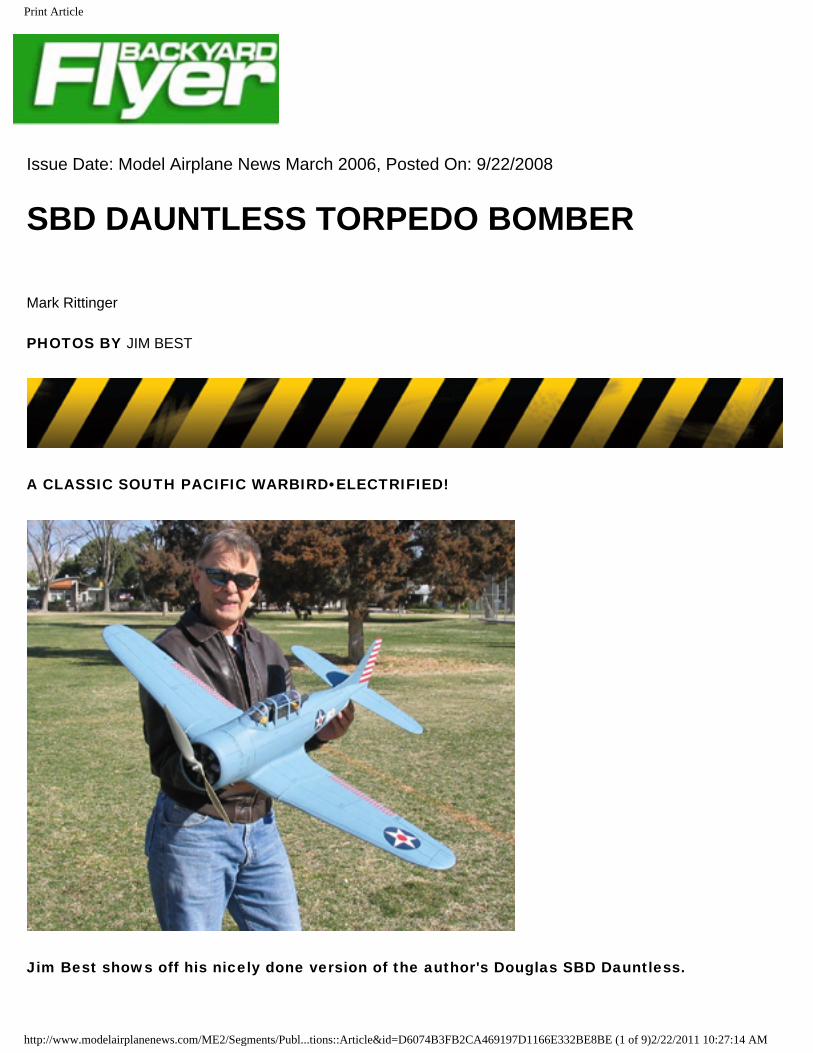
Jim Best shows off his nicely done version of the author's Douglas SBD Dauntless.
http://www.modelairplanenews.com/ME2/Segments/Publ...tions::Article&id=D6074B3FB2CA469197D1166E332BE8BE (1 of 9)2/22/2011 10:27:14 AM
Print Article
Often referred to as •Slow But Deadly,• the Douglas SBD Dauntless was the U.S. Navy's frontline dive-bomber from 1939 through 1944. Considered obsolete at the time it entered regular service, the Dauntless nonetheless went on to sink more Japanese ships than any other U.S. aircraft. Heavily armed with up to two forward-facing and two rearward-facing machine guns, a centerline 1,000-pound bomb and two, 250-pound wing-mounted bombs or depth charges, this aircraft became quite a formidable weapon in the South Pacific. Because nearly 6,000 of them were built, including the U.S. Army Air Corps' A-24 variant, there is no shortage of colorful schemes to model.
My modeling friend Jim Best asked me to design a Dauntless that would fit with my •Warbird Series• of models, all of which are powered by the inexpensive Magnetic Mayhem Reverse (MMR) motor from Great Planes and the Master Airscrew 3.5:1 gearbox. The model is almost exactly 1/12 scale, and Jim built the one pictured in this article. His version uses an AstroFlight brushless 020 geared motor, but the MMR works just as well. Let's get building!
FUSELAGE
Begin by laminating a sheet of 1/16-inch balsa cross-grain with another sheet of 1/16-inch balsa to produce an ?-inch-thick sheet of •plywood.• Cut formers F2 through F7 out of this material. Cut F1 out of ?-inch aircraft plywood. Pin F1 through F4 over the top view of the plans, and place the side and bottom stringers into position; then glue them into place.
Set F5, F6 and F7 into place on the stringers, and prop up the tail 2 9/16 inches from the board to the bottom stringer. When everything is again straight, glue these into place followed by the top •-inch-square stringers front and rear. The top side stringer should be perfectly straight when viewed from the side. Sheet the sides with 1/32-inch balsa where the doublers are from the front of F1 to the rear of F4. Wet the 1/32 sheet to achieve the bends. Fair the doublers into the stringers with some 1/32•-inch balsa. I used Zap CA throughout the construction.
•Designed by Mark Rittinger, the Douglas SBD Dauntless is the newest addition to his •Warbird Series' of electric-powered military airplanes. It has a built-up wood fuselage and a foam-core wing.
Begin sheeting the sides with 3/32-inch light balsa from the top side stringer to the lower full-length stringer. Again, wet the outside with hot water to bend the balsa without breaking it. By now, the fuselage should be getting very rigid. Next, sheet the top sections of the fuselage on each side. You should be able to remove the fuselage from your building board in one piece and add the bottom rear foam section. Cut and sand the foam block to shape after you've glued it to the fuselage. Use 1-inch-thick balsa or foam for the cowl in front of the firewall, and sand it to rough shape.
The plans show a mount for the Multiplex 480-4 motor with a 4.4:1 gearbox•a great choice for this bird. A plywood box might be needed to position the motor far enough forward, depending on what you use for power. Add the lower front fuselage block, and then get to work on the hatch.
? SPECIFICATIONS
● MODEL: Douglas SBD Dauntless
● TYPE: 1/12-scale sport-scale electric warbird
● WINGSPAN: 42 in.
● LENGTH: 32 in.
http://www.modelairplanenews.com/ME2/Segments/Publ...tions::Article&id=D6074B3FB2CA469197D1166E332BE8BE (2 of 9)2/22/2011 10:27:14 AM
Print Article
● WEIGHT: 45 oz.
● WING AREA: 336 sq. in.
● WING LOADING: 19.5 oz./sq. ft.
● MOTOR USED: AstroFlight 020 geared 3.3:1
● PROP USED: APC 11•7
● RADIO REQ'D: 3-channel (throttle, aileron, elevator) rudder optional.
● RADIO USED: Futaba 9CAP
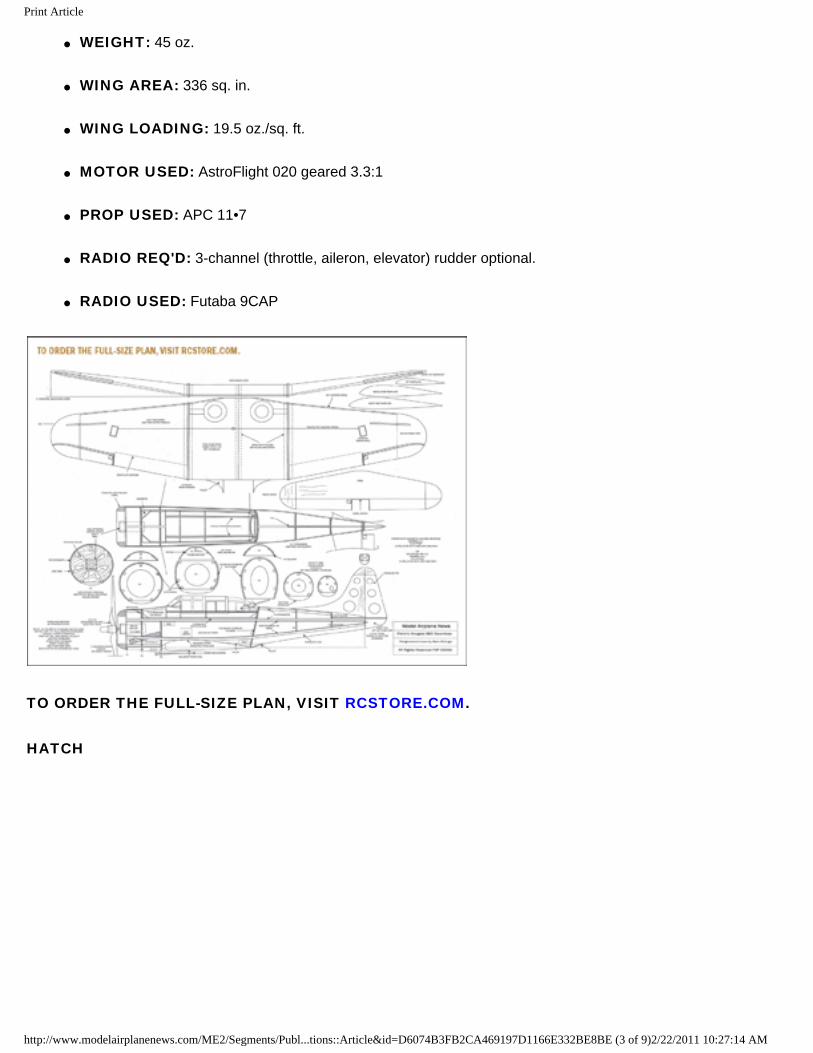
TO ORDER THE FULL-SIZE PLAN, VISIT RCSTORE.COM.
HATCH
http://www.modelairplanenews.com/ME2/Segments/Publ...tions::Article&id=D6074B3FB2CA469197D1166E332BE8BE (3 of 9)2/22/2011 10:27:14 AM
Print Article
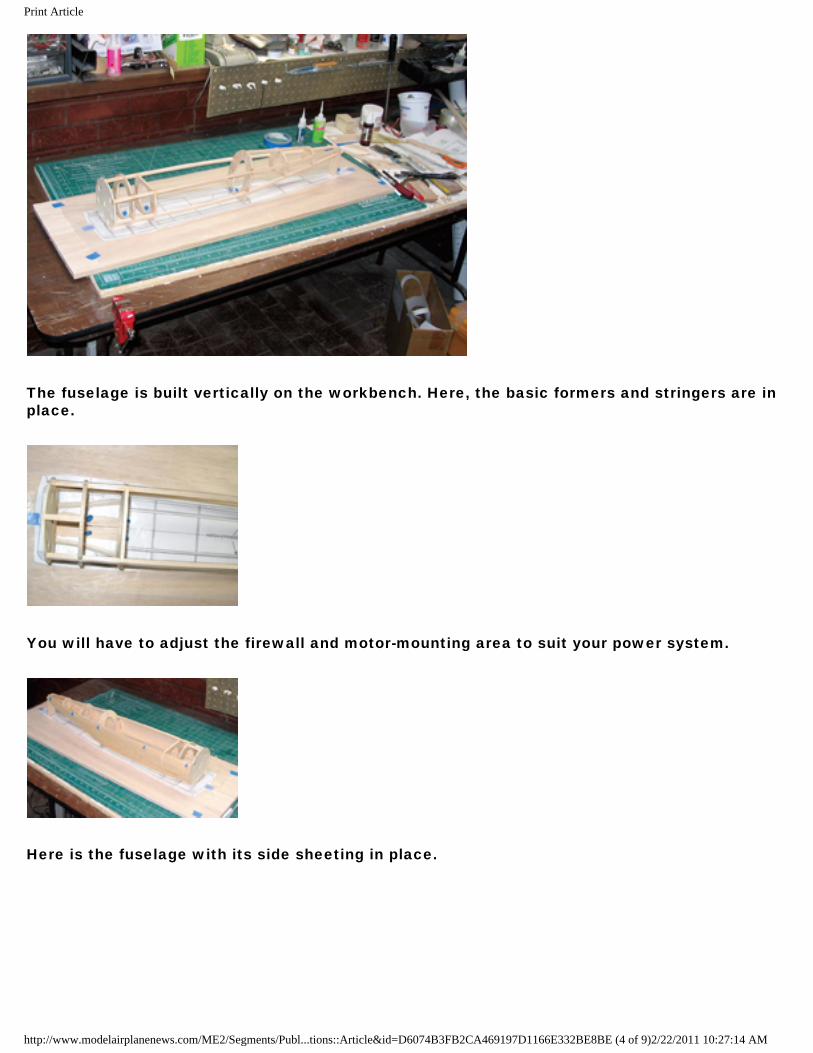
The fuselage is built vertically on the workbench. Here, the basic formers and stringers are in place.
You will have to adjust the firewall and motor-mounting area to suit your power system.
Here is the fuselage with its side sheeting in place.
http://www.modelairplanenews.com/ME2/Segments/Publ...tions::Article&id=D6074B3FB2CA469197D1166E332BE8BE (4 of 9)2/22/2011 10:27:14 AM
Print Article
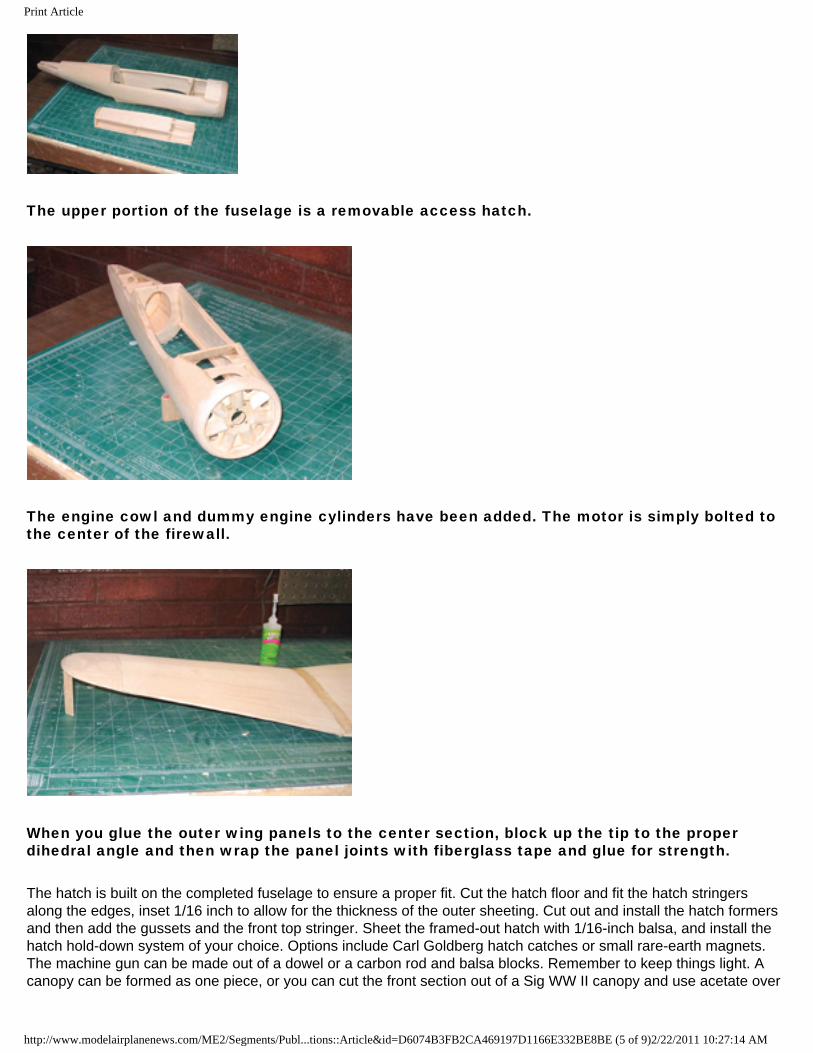
The upper portion of the fuselage is a removable access hatch.
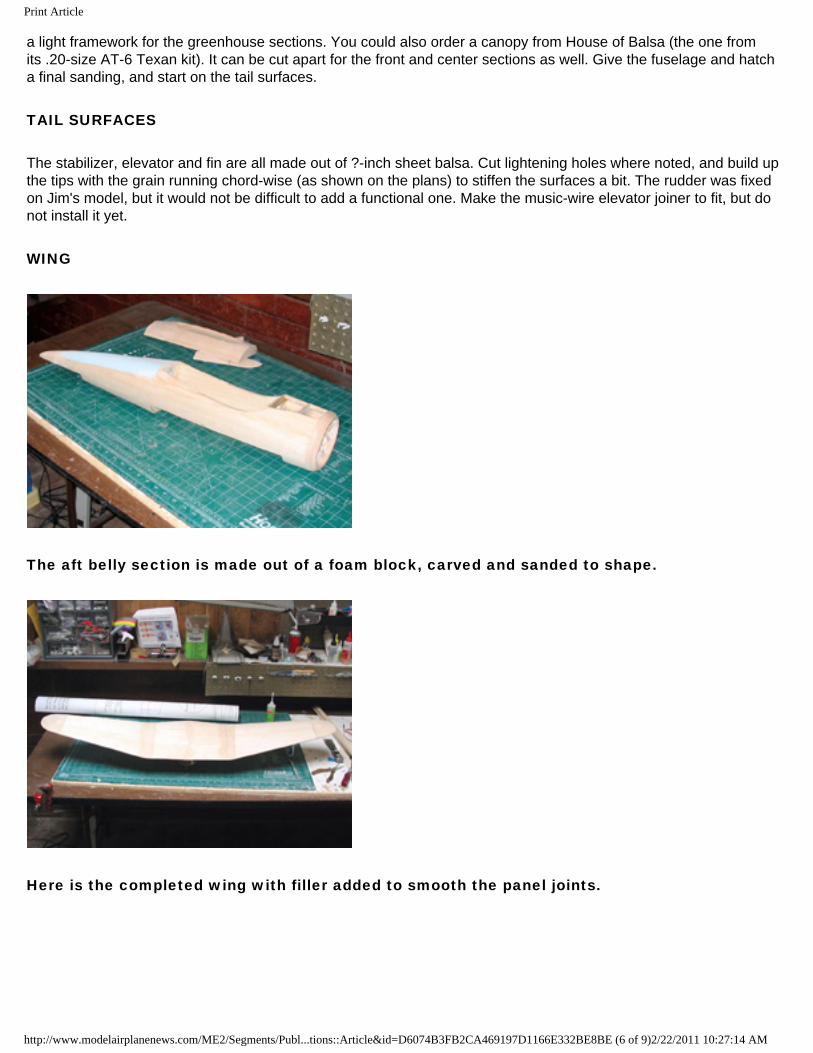
The engine cowl and dummy engine cylinders have been added. The motor is simply bolted to the center of the firewall.
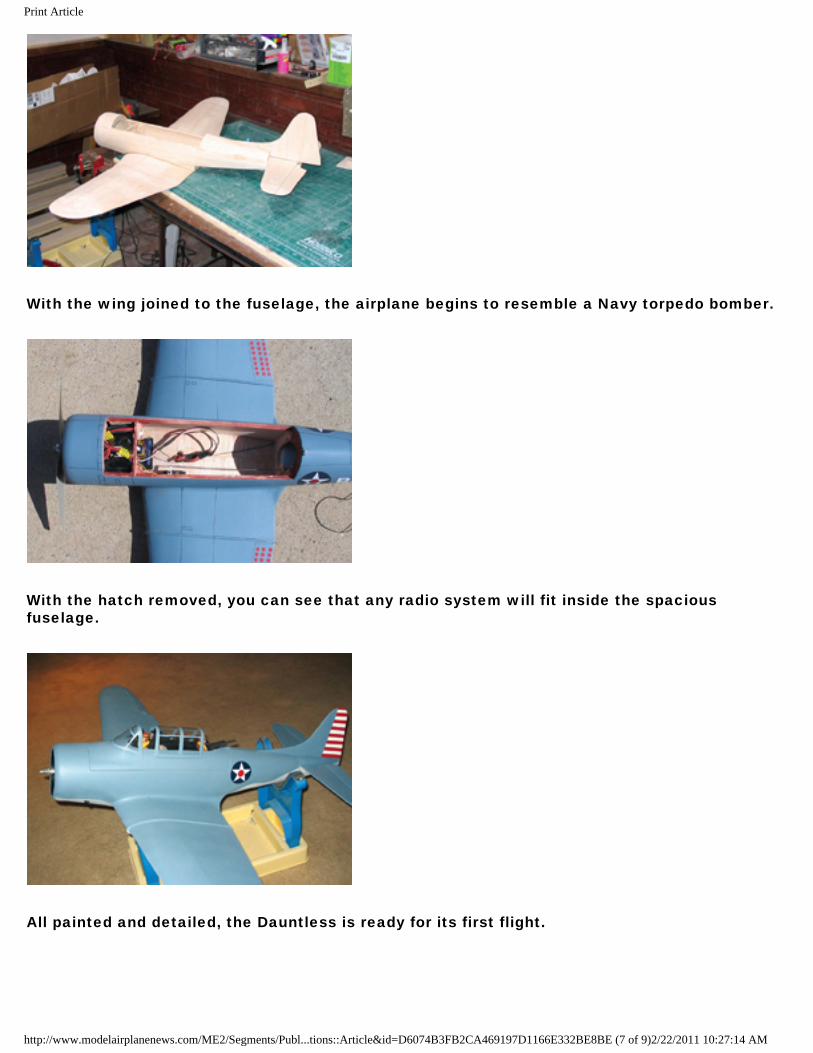
When you glue the outer wing panels to the center section, block up the tip to the proper dihedral angle and then wrap the panel joints with fiberglass tape and glue for strength.
The hatch is built on the completed fuselage to ensure a proper fit. Cut the hatch floor and fit the hatch stringers along the edges, inset 1/16 inch to allow for the thickness of the outer sheeting. Cut out and install the hatch formers and then add the gussets and the front top stringer. Sheet the framed-out hatch with 1/16-inch balsa, and install the hatch hold-down system of your choice. Options include Carl Goldberg hatch catches or small rare-earth magnets. The machine gun can be made out of a dowel or a carbon rod and balsa blocks. Remember to keep things light. A canopy can be formed as one piece, or you can cut the front section out of a Sig WW II canopy and use acetate over
http://www.modelairplanenews.com/ME2/Segments/Publ...tions::Article&id=D6074B3FB2CA469197D1166E332BE8BE (5 of 9)2/22/2011 10:27:14 AM
Print Article
a light framework for the greenhouse sections. You could also order a canopy from House of Balsa (the one from its .20-size AT-6 Texan kit). It can be cut apart for the front and center sections as well. Give the fuselage and hatch a final sanding, and start on the tail surfaces.
TAIL SURFACES
The stabilizer, elevator and fin are all made out of ?-inch sheet balsa. Cut lightening holes where noted, and build up the tips with the grain running chord-wise (as shown on the plans) to stiffen the surfaces a bit. The rudder was fixed on Jim's model, but it would not be difficult to add a functional one. Make the music-wire elevator joiner to fit, but do not install it yet.
WING
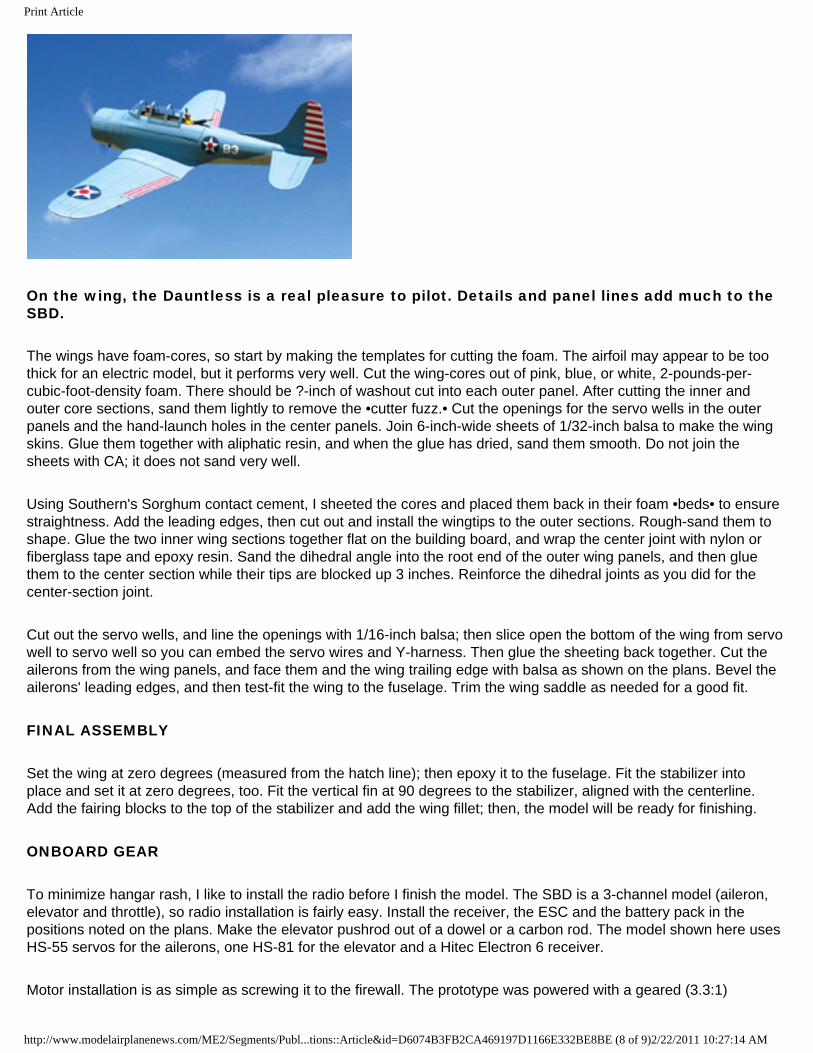
The aft belly section is made out of a foam block, carved and sanded to shape.
Here is the completed wing with filler added to smooth the panel joints.
http://www.modelairplanenews.com/ME2/Segments/Publ...tions::Article&id=D6074B3FB2CA469197D1166E332BE8BE (6 of 9)2/22/2011 10:27:14 AM
Print Article
With the wing joined to the fuselage, the airplane begins to resemble a Navy torpedo bomber.
With the hatch removed, you can see that any radio system will fit inside the spacious fuselage.
All painted and detailed, the Dauntless is ready for its first flight.
http://www.modelairplanenews.com/ME2/Segments/Publ...tions::Article&id=D6074B3FB2CA469197D1166E332BE8BE (7 of 9)2/22/2011 10:27:14 AM
Print Article
On the wing, the Dauntless is a real pleasure to pilot. Details and panel lines add much to the SBD.
The wings have foam-cores, so start by making the templates for cutting the foam. The airfoil may appear to be too thick for an electric model, but it performs very well. Cut the wing-cores out of pink, blue, or white, 2-pounds-per-cubic-foot-density foam. There should be ?-inch of washout cut into each outer panel. After cutting the inner and outer core sections, sand them lightly to remove the •cutter fuzz.• Cut the openings for the servo wells in the outer panels and the hand-launch holes in the center panels. Join 6-inch-wide sheets of 1/32-inch balsa to make the wing skins. Glue them together with aliphatic resin, and when the glue has dried, sand them smooth. Do not join the sheets with CA; it does not sand very well.
Using Southern's Sorghum contact cement, I sheeted the cores and placed them back in their foam •beds• to ensure straightness. Add the leading edges, then cut out and install the wingtips to the outer sections. Rough-sand them to shape. Glue the two inner wing sections together flat on the building board, and wrap the center joint with nylon or fiberglass tape and epoxy resin. Sand the dihedral angle into the root end of the outer wing panels, and then glue them to the center section while their tips are blocked up 3 inches. Reinforce the dihedral joints as you did for the center-section joint.
Cut out the servo wells, and line the openings with 1/16-inch balsa; then slice open the bottom of the wing from servo well to servo well so you can embed the servo wires and Y-harness. Then glue the sheeting back together. Cut the ailerons from the wing panels, and face them and the wing trailing edge with balsa as shown on the plans. Bevel the ailerons' leading edges, and then test-fit the wing to the fuselage. Trim the wing saddle as needed for a good fit.
FINAL ASSEMBLY
Set the wing at zero degrees (measured from the hatch line); then epoxy it to the fuselage. Fit the stabilizer into place and set it at zero degrees, too. Fit the vertical fin at 90 degrees to the stabilizer, aligned with the centerline. Add the fairing blocks to the top of the stabilizer and add the wing fillet; then, the model will be ready for finishing.
ONBOARD GEAR
To minimize hangar rash, I like to install the radio before I finish the model. The SBD is a 3-channel model (aileron, elevator and throttle), so radio installation is fairly easy. Install the receiver, the ESC and the battery pack in the positions noted on the plans. Make the elevator pushrod out of a dowel or a carbon rod. The model shown here uses HS-55 servos for the ailerons, one HS-81 for the elevator and a Hitec Electron 6 receiver.
Motor installation is as simple as screwing it to the firewall. The prototype was powered with a geared (3.3:1)
http://www.modelairplanenews.com/ME2/Segments/Publ...tions::Article&id=D6074B3FB2CA469197D1166E332BE8BE (8 of 9)2/22/2011 10:27:14 AM
Print Article
AstroFlight 020 brushless motor spinning an APC 11•7 electric prop. A Castle Creations 25A brushless programmable ESC and two Thunder Power 3S-1P 1900mAh Li-poly packs wired in parallel provide the power. Another great option would be the new Tanic 3S-1P 2450mAh 12C Li-poly packs. The standard MMR motor power system uses a 12•10 prop.
PAINT & FINISH
The prototype was finished with •-ounce fiber-glass cloth and finishing resin. Low-temp covering film can also be used; just be sure to finish the foam bits with fiberglass first. Use your preferred method to hinge the moving surfaces. Jim's Dauntless was painted with Model Master acrylic navy blue gray and camo gray.
After adding details and paint, check the model's CG to make sure that it is correct, and balance the model laterally. Double-check the surface-deflection directions and amounts. The aileron should be about ? inch up and down; elevator should be 5/16 up and down.
FLYING
The SBD has ample wing area and can be hand-launched easily if it weighs less than 45 ounces. Line up into the wind, add full power, and launch overhead with its wings level and the nose up about 10 degrees. The Dauntless has few problems getting airborne.
With its scale wing dihedral and large fin, the model tracks very well. It is a rather draggy bird, but it penetrates the wind decently. Stalls are subtle and gentle, and the Dauntless performs nearly all aileron/elevator maneuvers. It looks best, however, in a 45-degree dive or during long banking turns past the flightline. Its top speed is in the 45mph range.
I hope you enjoy building and flying the Navy's finest WW II torpedo bomber! It's a terrific bird that's rarely modeled. If any help is required, please contact me at [email protected]. Good luck, good flying, and always check your six!
See the Source Guide on page 154 for manufacturers' contact information.
FOR ADDITIONAL CONSTRUCTION NOTES & PHOTOS
MODELAIRPLANENEWS.COM
http://www.modelairplanenews.com/ME2/Segments/Publ...tions::Article&id=D6074B3FB2CA469197D1166E332BE8BE (9 of 9)2/22/2011 10:27:14 AM


![G.3 (Military aircraft) G.IV (Bomber) G5 automobile · G.III (Bomber) USEFriedrichshafen G.III (Bomber) G.IV (Bomber) USEAEG G.IV (Bomber) G-machine (Computer) (Not Subd Geog) [QA76.8.G]](https://img.pdfslide.net/doc/110x75/5f09a0207e708231d427bb82/g3-military-aircraft-giv-bomber-g5-automobile-giii-bomber-usefriedrichshafen.jpg)