Embed Size (px)
Citation preview

web bonus at McCallsQuilting.com Page 1 of 3 July/August 2011
Designed by virginiA robertson
SKILL LEVELConfident beginner
Finished Bag Size 12G˝ high x 12H˝ wide x 5˝ deep
Project RequirementsMuslin (foundation for bag back/front piecing) L yd.*Assorted prints (bag, handles, button loop) 1J-1H yds. totalAqua mottle (lining, pocket) L yd.**Fusible batting 22˝ x 32˝ pieceAssorted buttons***Felt circles****based on usable width of at least 30˝.**based on usable width of at least 42H˝.***see Planning.
old Dog, new tricks Web bonus: scrappy bag

Planning Have fun designing your own custom bag with this quick pattern. the one-piece bag front/back is created using a quilt-as-you-go technique. Piece it using all 2H˝-wide print strips, as in our pattern, or vary strip width to highlight specific fabrics. virginia cut strips from 1H˝ to 4H˝ wide, depending on the size of fabric motifs she wished to feature. You can even combine multiple fabrics to piece a strip before sewing it to the founda-tion, for additional design interest. Use a teflon® pressing sheet or parchment paper to protect your iron when pressing fusible batting.
virginia used 3 stacked buttons (2K ,̋ 1I ,̋ and 1J˝ in diameter), with small felt circles layered between them for extra dimension, for her bag closure. Do likewise if you wish, or use any size button(s) of your choice.
be sure to select a lining fabric that looks good with your assorted prints (aqua mottle in the featured bag). A G˝ strip of lining fabric will be visible at top of bag.
Cutting Instructions(cut in order listed)Muslin 1 rectangle 18˝ x 30˝Assorted prints—cut a total of: 2 strips 4˝ x 20-22˝ (handles) *12 strips 2H˝ x 22˝ *2 strips 2H˝ x 16˝ *2 strips 2H˝ x 12˝ *2 strips 2H˝ x 6˝ 1 strip 1H˝ x 8˝ (button loop)Aqua mottle 1 rectangle 18˝ x 30˝ (lining) 1 rectangle 12H˝ x 18˝ (pocket)Fusible batting 1 rectangle 18˝ x 30˝ 2 strips 1˝ x 20-22˝ (handles)*see Planning.
Making the Bag Front/Back1 Following manufacturer’s instructions, fuse 1 side of batting rectangle to muslin rectangle. Make a mark 8˝ from corner on 1 long side of batting (Diagram I-A). Draw line connecting mark and opposite corner. Mark several parallel lines across batting to use as guides to keep strips straight.
2 Position assorted 2H˝ x 22˝ strip along any marked line, right side up. Place a 2nd assorted 2H˝ x 22˝ strip on 1st strip, right sides together (Diagram I-B). sew G˝ from raw edge of strips, through all layers.
open and press 2nd strip (Diagram I-C).
in similar manner, continue to add assorted strips, using shorter strips as you approach rectangle corners (Diagrams I-D and E), until entire foundation is covered (Diagram I-F).
turn foundation over and trim strip ends even with muslin (Diagram I-G).
web bonus at McCallsQuilting.com Page 2 of 3 July/August 2011
Diagram I-A
18˝ x 30˝
8˝
Diagram I-B
2½˝ x 22˝
Diagram I-C
Diagram I-D
6˝12
˝16˝
2½˝ x 22˝
Diagram I-E
Diagram I-F
6˝12
˝16
˝
Diagram I-G
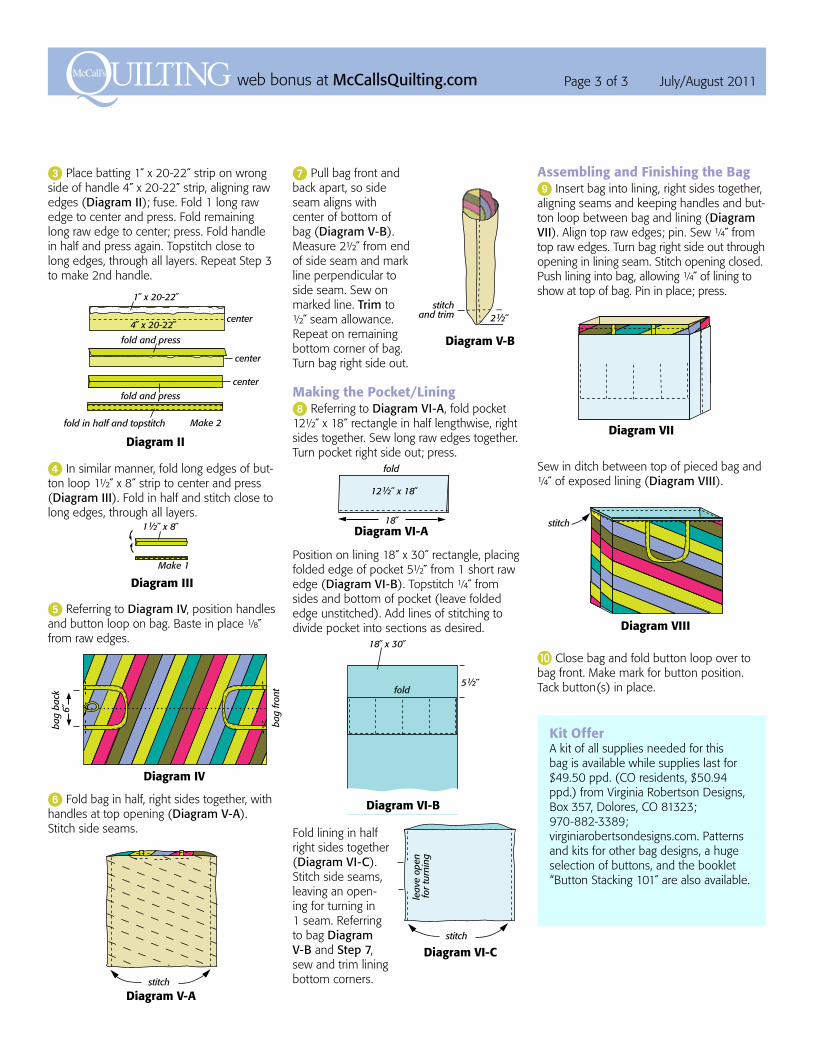
3 Place batting 1˝ x 20-22˝ strip on wrong side of handle 4˝ x 20-22˝ strip, aligning raw edges (Diagram II); fuse. Fold 1 long raw edge to center and press. Fold remaining long raw edge to center; press. Fold handle in half and press again. topstitch close to long edges, through all layers. repeat step 3 to make 2nd handle.
4 in similar manner, fold long edges of but-ton loop 1H˝ x 8˝ strip to center and press (Diagram III). Fold in half and stitch close to long edges, through all layers.
5 referring to Diagram IV, position handles and button loop on bag. baste in place J˝ from raw edges.
6 Fold bag in half, right sides together, with handles at top opening (Diagram V-A). stitch side seams.
7 Pull bag front and back apart, so side seam aligns with center of bottom of bag (Diagram V-B). Measure 2H˝ from end of side seam and mark line perpendicular to side seam. sew on marked line. Trim to H˝ seam allowance. repeat on remaining bottom corner of bag. turn bag right side out.
Making the Pocket/Lining8 referring to Diagram VI-A, fold pocket 12H˝ x 18˝ rectangle in half lengthwise, right sides together. sew long raw edges together. turn pocket right side out; press.
Position on lining 18˝ x 30˝ rectangle, placing folded edge of pocket 5H˝ from 1 short raw edge (Diagram VI-B). topstitch G˝ from sides and bottom of pocket (leave folded edge unstitched). Add lines of stitching to divide pocket into sections as desired.
Fold lining in half right sides together (Diagram VI-C). stitch side seams, leaving an open-ing for turning in 1 seam. referring to bag Diagram V-B and Step 7, sew and trim lining bottom corners.
Assembling and Finishing the Bag 9 insert bag into lining, right sides together, aligning seams and keeping handles and but-ton loop between bag and lining (Diagram VII). Align top raw edges; pin. sew G˝ from top raw edges. turn bag right side out through opening in lining seam. stitch opening closed. Push lining into bag, allowing G˝ of lining to show at top of bag. Pin in place; press.
sew in ditch between top of pieced bag and G˝ of exposed lining (Diagram VIII).
J Close bag and fold button loop over to bag front. Make mark for button position. tack button(s) in place.
web bonus at McCallsQuilting.com Page 3 of 3 July/August 2011
leav
e op
enfo
r tu
rnin
g
Diagram VI-Cstitch
Diagram VII
Diagram VIII
stitch
fold
18˝ x 30˝
5½˝
Diagram VI-BDiagram VI-B
Kit OfferA kit of all supplies needed for this bag is available while supplies last for $49.50 ppd. (Co residents, $50.94 ppd.) from virginia robertson Designs, box 357, Dolores, Co 81323; 970-882-3389; virginiarobertsondesigns.com. Patterns and kits for other bag designs, a huge selection of buttons, and the booklet “button stacking 101˝ are also available.
Diagram II
center
center
center
fold and press
fold and press
fold in half and topstitch Make 2
1˝ x 20-22˝
4˝ x 20-22˝
Diagram III
Make 1
1½˝ x 8˝
Diagram V-Astitch
fold
12½˝ x 18˝
Diagram VI-A18˝
stitchand trim 2½˝
Diagram V-B
bag
back
bag
fron
t
18˝ x 30˝18˝ x 30˝
6˝
Diagram IV