Embed Size (px)
Citation preview
Revised 6/29/18
SERVICE CENTER User Manual

Of f ice Al ly | P.O . Bo x 872020 | Van cou ver, WA 98687 www.of f iceal ly.co m
Phone: 360-975-7000 Fax: 360-896-2151
TABLE OF CONTENTS
Table of Contents ............................................................................................................................................................................................. 2
Contact Information and Support Options ………………………………………………………………………………………………………………………………………………… 3
Payer List Look Up ………………………………………………………………………………………………………………………………………………………………………..…………… 4
Pre-Enrollment Requirements …………………………………………………………………………………………………………………………………………………………………… 4
Logging into Office Ally …………......................................................................................................................................................................... 5
Claim Submission ............................................................................................................................................................................................. 6
Uploading Claims …………………………..……………………......................................................................................................................... 6-7
Online Claim Entry ........................................................................................................................................................................ 7-10
Claims Awaiting Batch ..................................................................................................................................................................... 11
Claim Fix ………………………………………………………………………………………………………………………………………………………………..…………….. 11-12
Office Ally Reports ......................................................................................................................................................................................... 12
File Summary Report .................................................................................................................................................................. 13-14
EDI Status Report ............................................................................................................................................................................. 14
Download EOB/ERA 835 ............................................................................................................................................................. 15-17
Inventory Reporting ................................................................................................................................................................................ 18 - 19
Real Time Eligibility Checking (Manual) .................................................................................................................................................. 20 - 21
Real Time Claim Status Checking (Manual) ............................................................................................................................................. 22 - 24
View Claim History ......................................................................................................................................................................................... 25
Code Search ……………...................................................................................................................................................................................... 26
Patient Look Up Tool ...................................................................................................................................................................................... 27

Of f ice Al ly | P.O . Bo x 872020 | Van cou ver, WA 98687
www.of f iceal ly.co m
Phone: 360-975-7000 Fax: 360-896-2151
CONTACT INFORMATION & SUPPORT OPTIONS
Business Hours: Monday thru Friday 5:00am PST to 9:00pm PST Saturday and Sunday 6:00am PST to 5:00pm PST
Email: [email protected] or [email protected]
Customer Service: (360) 975-7000 Option 1 Technical Support: (360) 975-7000 Option 2 Enrollments: (360) 975-7000 Option 3 Accounting: (360) 975-7000 Option 4Scheduling (FREE Training Appointments): (360) 975-7000 Option 5
General Fax Number: (360) 896-2151 Enrollments Fax Number: (360) 314-2184 Accounting (Auto Pay) Fax Number: (360) 953-8427
Live Chat Available (6am – 5pm PST): Click HERE or enter https://support.officeally.com/ into your browser to access Live Chat, Claim Rejection Solutions, Troubleshooter, News and more!
Online Video Tutorials: Click HERE or enter https://cms.officeally.com/Home/VideoLibrary.aspx into your browser to access video tutorials covering Online Claim Entry, Inventory Reporting, Secondary Claims and more!
Become an Office Ally User TODAY!
ENROLL NOW
Of f ice Al ly | P.O . Bo x 872020 | Van cou ver, WA 98687
www.of f iceal ly.co m
Phone: 360-975-7000 Fax: 360-896-2151
PAYER LIST LOOK UP
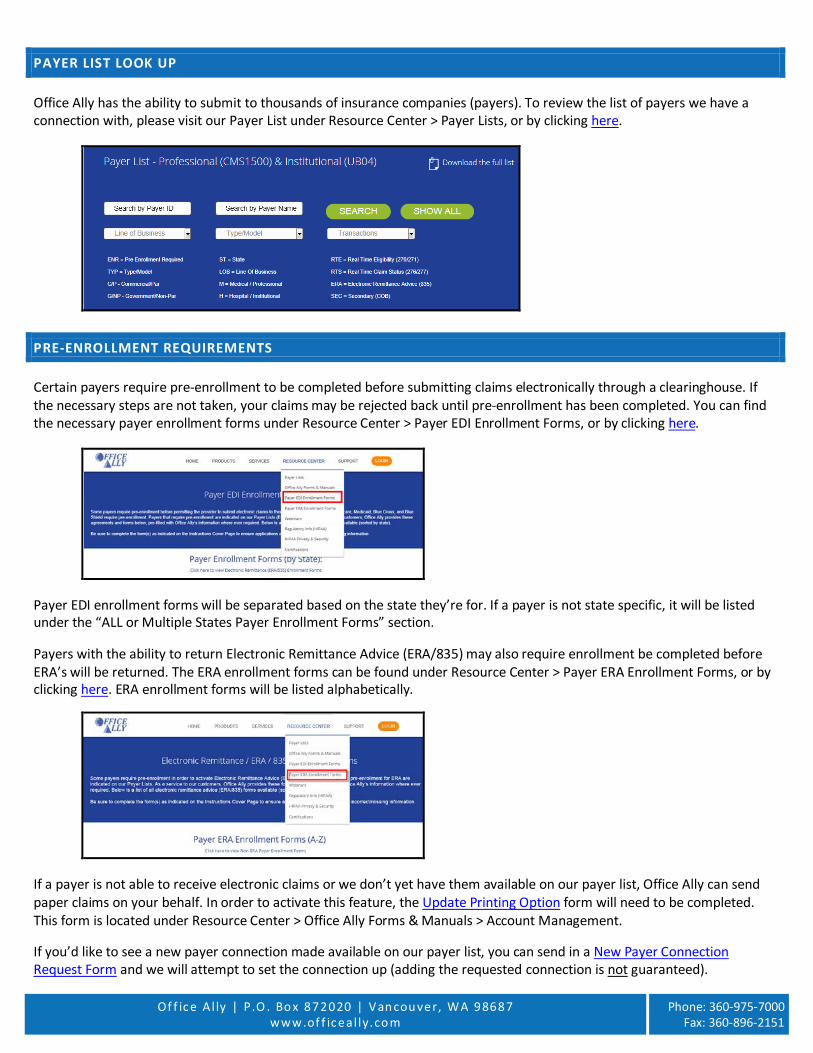
Office Ally has the ability to submit to thousands of insurance companies (payers). To review the list of payers we have a connection with, please visit our Payer List under Resource Center > Payer Lists, or by clicking here.
PRE-ENROLLMENT REQUIREMENTS
Certain payers require pre-enrollment to be completed before submitting claims electronically through a clearinghouse. If the necessary steps are not taken, your claims may be rejected back until pre-enrollment has been completed. You can find the necessary payer enrollment forms under Resource Center > Payer EDI Enrollment Forms, or by clicking here.
Payer EDI enrollment forms will be separated based on the state they’re for. If a payer is not state specific, it will be listed under the “ALL or Multiple States Payer Enrollment Forms” section.
Payers with the ability to return Electronic Remittance Advice (ERA/835) may also require enrollment be completed before ERA’s will be returned. The ERA enrollment forms can be found under Resource Center > Payer ERA Enrollment Forms, or by clicking here. ERA enrollment forms will be listed alphabetically.
If a payer is not able to receive electronic claims or we don’t yet have them available on our payer list, Office Ally can send paper claims on your behalf. In order to activate this feature, the Update Printing Option form will need to be completed. This form is located under Resource Center > Office Ally Forms & Manuals > Account Management.
If you’d like to see a new payer connection made available on our payer list, you can send in a New Payer Connection Request Form and we will attempt to set the connection up (adding the requested connection is not guaranteed).
Of f ice Al ly | P.O . Bo x 872020 | Van cou ver, WA 98687
www.of f iceal ly.co m
Phone: 360-975-7000 Fax: 360-896-2151
LOGGING INTO YOUR ACCOUNT
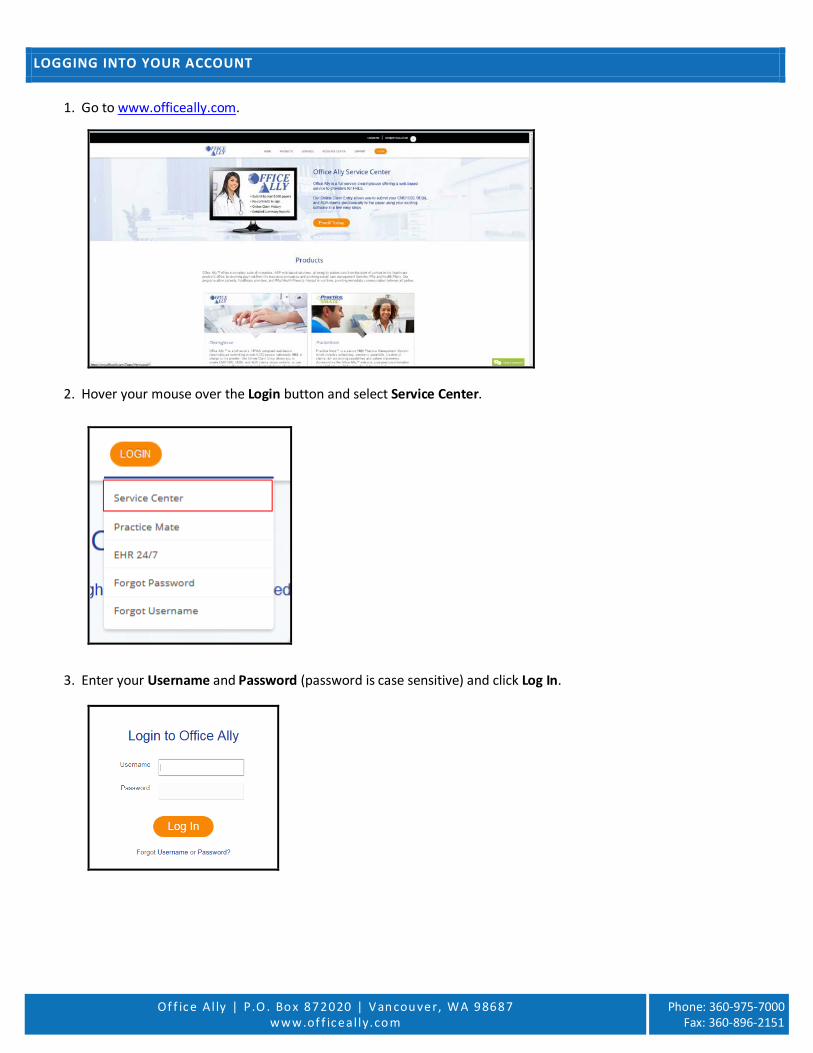
1. Go to www.officeally.com.
2. Hover your mouse over the Login button and select Service Center.
3. Enter your Username and Password (password is case sensitive) and click Log In.
Of f ice Al ly | P.O . Bo x 872020 | Van cou ver, WA 98687
www.of f iceal ly.co m
Phone: 360-975-7000 Fax: 360-896-2151
UPLOADING CLAIMS (THIRD PARTY SOFTWARE)
For those that utilize a third party software system for file creation, we accept the following formats:
• ANSI 837P/837I Files
• HCFA/CMS1500/UB92/UB04 Print Image Files
• NSF Files (HCFA only)
• Proprietary (Delimited) Files (HCFA only – contact Customer Service for format specifications)
To review Office Ally’s ISA/GS requirements, click here.
To review Office Ally’s testing requirements, click here.
THIRD PARTY SOFTWARE SUBMITTERS (MANUAL UPLOAD)
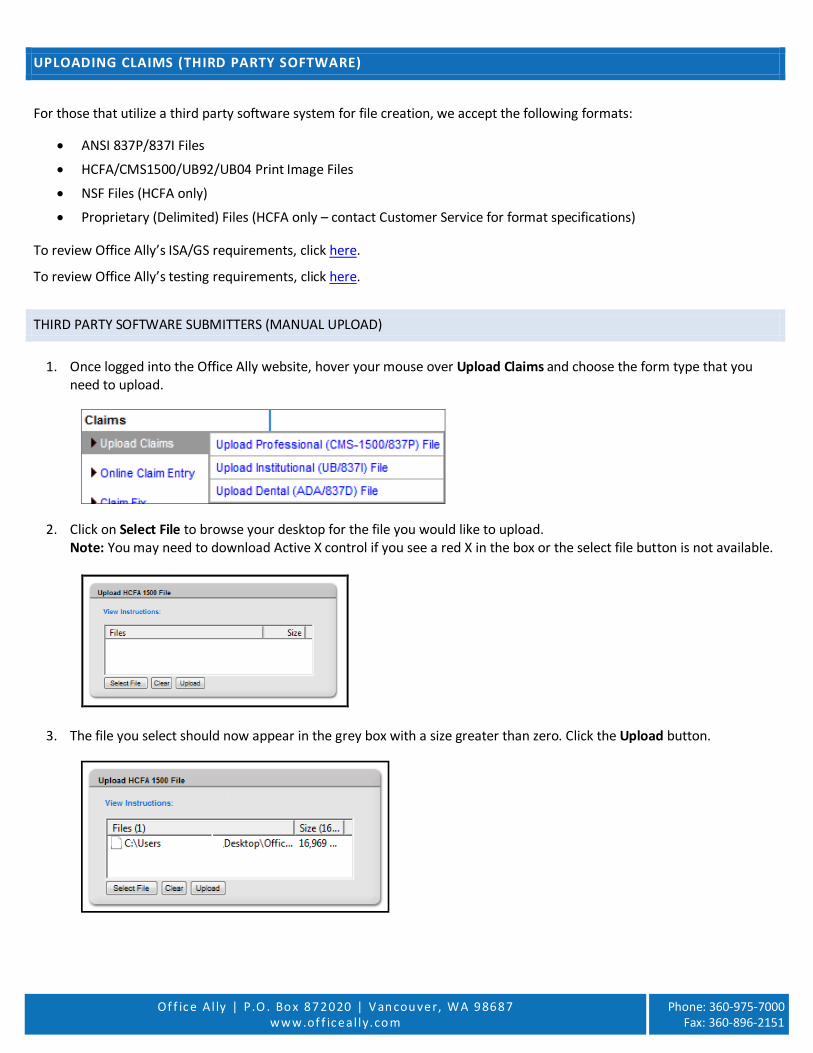
1. Once logged into the Office Ally website, hover your mouse over Upload Claims and choose the form type that you need to upload.
2. Click on Select File to browse your desktop for the file you would like to upload. Note: You may need to download Active X control if you see a red X in the box or the select file button is not available.
3. The file you select should now appear in the grey box with a size greater than zero. Click the Upload button.
Of f ice Al ly | P.O . Bo x 872020 | Van cou ver, WA 98687
www.of f iceal ly.co m
Phone: 360-975-7000 Fax: 360-896-2151
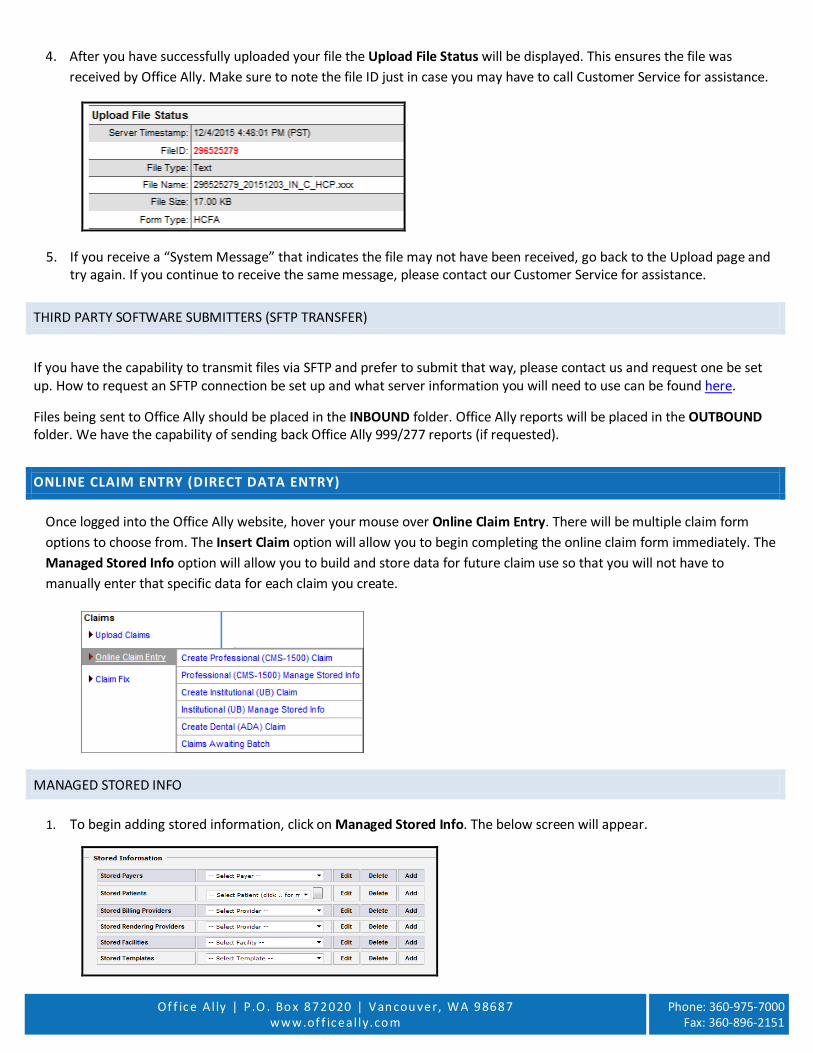
4. After you have successfully uploaded your file the Upload File Status will be displayed. This ensures the file was received by Office Ally. Make sure to note the file ID just in case you may have to call Customer Service for assistance.
5. If you receive a “System Message” that indicates the file may not have been received, go back to the Upload page and try again. If you continue to receive the same message, please contact our Customer Service for assistance.
THIRD PARTY SOFTWARE SUBMITTERS (SFTP TRANSFER)
If you have the capability to transmit files via SFTP and prefer to submit that way, please contact us and request one be set up. How to request an SFTP connection be set up and what server information you will need to use can be found here.
Files being sent to Office Ally should be placed in the INBOUND folder. Office Ally reports will be placed in the OUTBOUND folder. We have the capability of sending back Office Ally 999/277 reports (if requested).
ONLINE CLAIM ENTRY (DIRECT DATA ENTRY)
Once logged into the Office Ally website, hover your mouse over Online Claim Entry. There will be multiple claim form options to choose from. The Insert Claim option will allow you to begin completing the online claim form immediately. The Managed Stored Info option will allow you to build and store data for future claim use so that you will not have to manually enter that specific data for each claim you create.
MANAGED STORED INFO
1. To begin adding stored information, click on Managed Stored Info. The below screen will appear.
Of f ice Al ly | P.O . Bo x 872020 | Van cou ver, WA 98687
www.of f iceal ly.co m
Phone: 360-975-7000 Fax: 360-896-2151
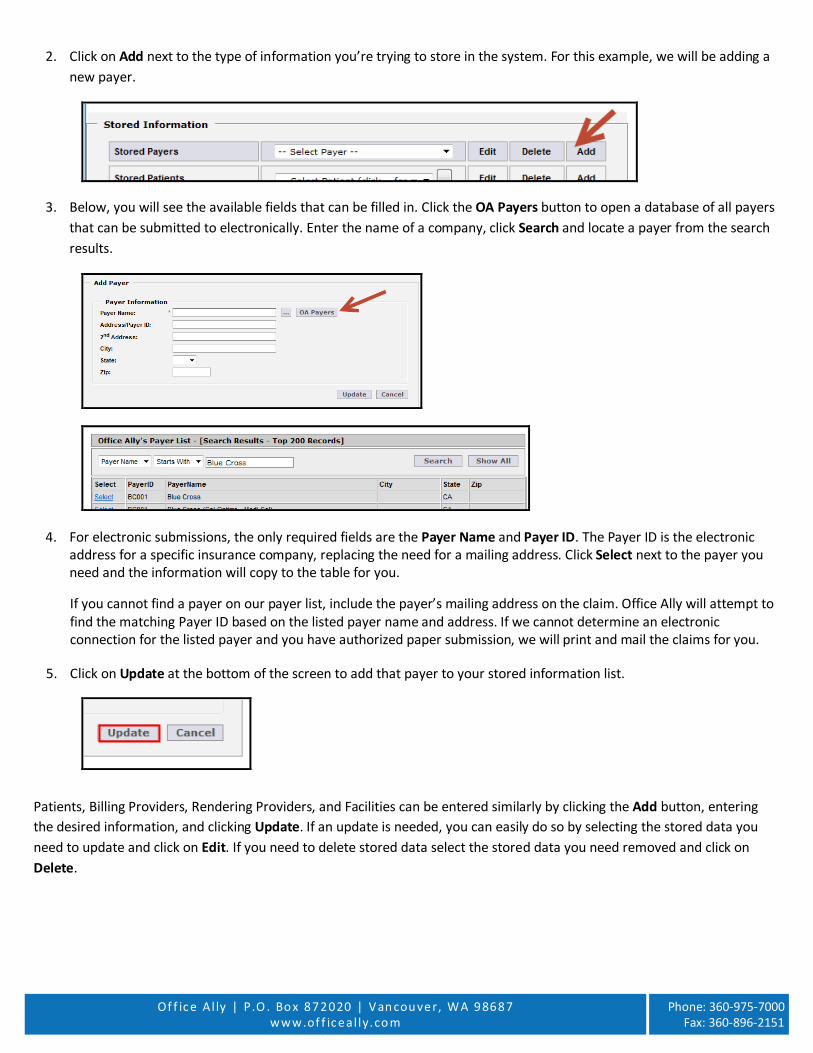
2. Click on Add next to the type of information you’re trying to store in the system. For this example, we will be adding a new payer.
3. Below, you will see the available fields that can be filled in. Click the OA Payers button to open a database of all payers that can be submitted to electronically. Enter the name of a company, click Search and locate a payer from the search results.
4. For electronic submissions, the only required fields are the Payer Name and Payer ID. The Payer ID is the electronic address for a specific insurance company, replacing the need for a mailing address. Click Select next to the payer you need and the information will copy to the table for you.
If you cannot find a payer on our payer list, include the payer’s mailing address on the claim. Office Ally will attempt to find the matching Payer ID based on the listed payer name and address. If we cannot determine an electronic connection for the listed payer and you have authorized paper submission, we will print and mail the claims for you.
5. Click on Update at the bottom of the screen to add that payer to your stored information list.
Patients, Billing Providers, Rendering Providers, and Facilities can be entered similarly by clicking the Add button, entering the desired information, and clicking Update. If an update is needed, you can easily do so by selecting the stored data you need to update and click on Edit. If you need to delete stored data select the stored data you need removed and click on Delete.
Of f ice Al ly | P.O . Bo x 872020 | Van cou ver, WA 98687
www.of f iceal ly.co m
Phone: 360-975-7000 Fax: 360-896-2151
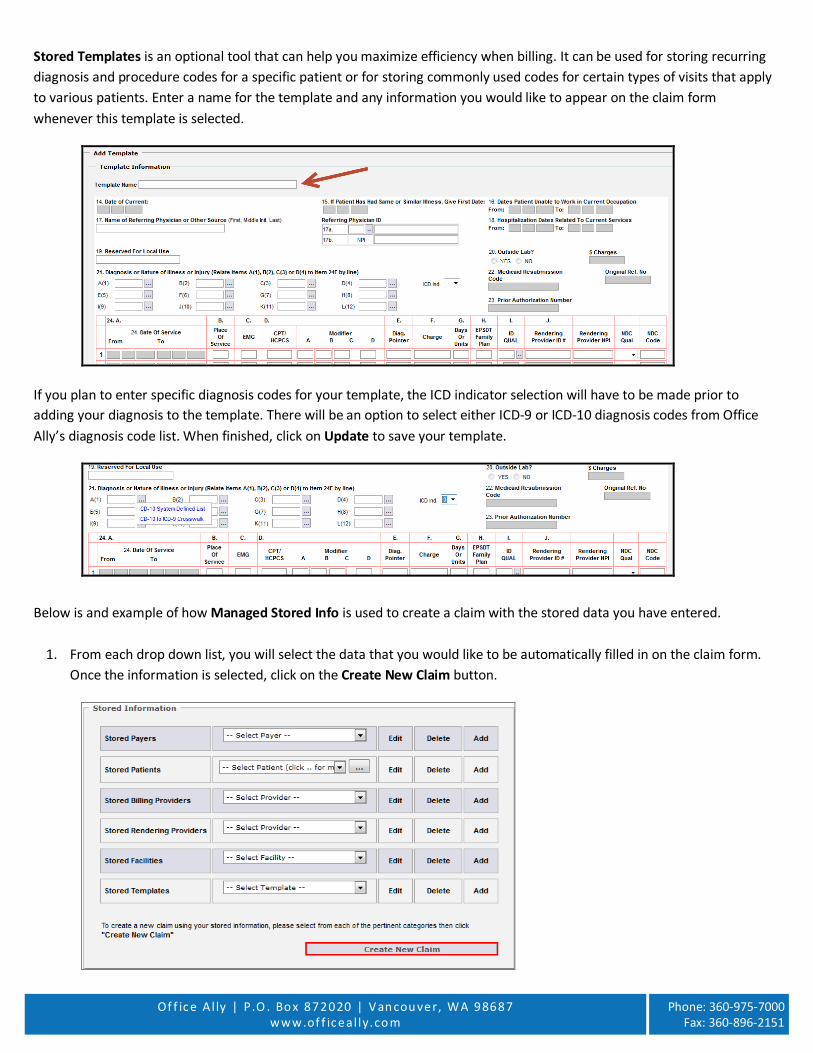
Stored Templates is an optional tool that can help you maximize efficiency when billing. It can be used for storing recurring diagnosis and procedure codes for a specific patient or for storing commonly used codes for certain types of visits that apply to various patients. Enter a name for the template and any information you would like to appear on the claim form whenever this template is selected.
If you plan to enter specific diagnosis codes for your template, the ICD indicator selection will have to be made prior to adding your diagnosis to the template. There will be an option to select either ICD-9 or ICD-10 diagnosis codes from Office Ally’s diagnosis code list. When finished, click on Update to save your template.
Below is and example of how Managed Stored Info is used to create a claim with the stored data you have entered.
1. From each drop down list, you will select the data that you would like to be automatically filled in on the claim form. Once the information is selected, click on the Create New Claim button.
Of f ice Al ly | P.O . Bo x 872020 | Van cou ver, WA 98687
www.of f iceal ly.co m
Phone: 360-975-7000 Fax: 360-896-2151
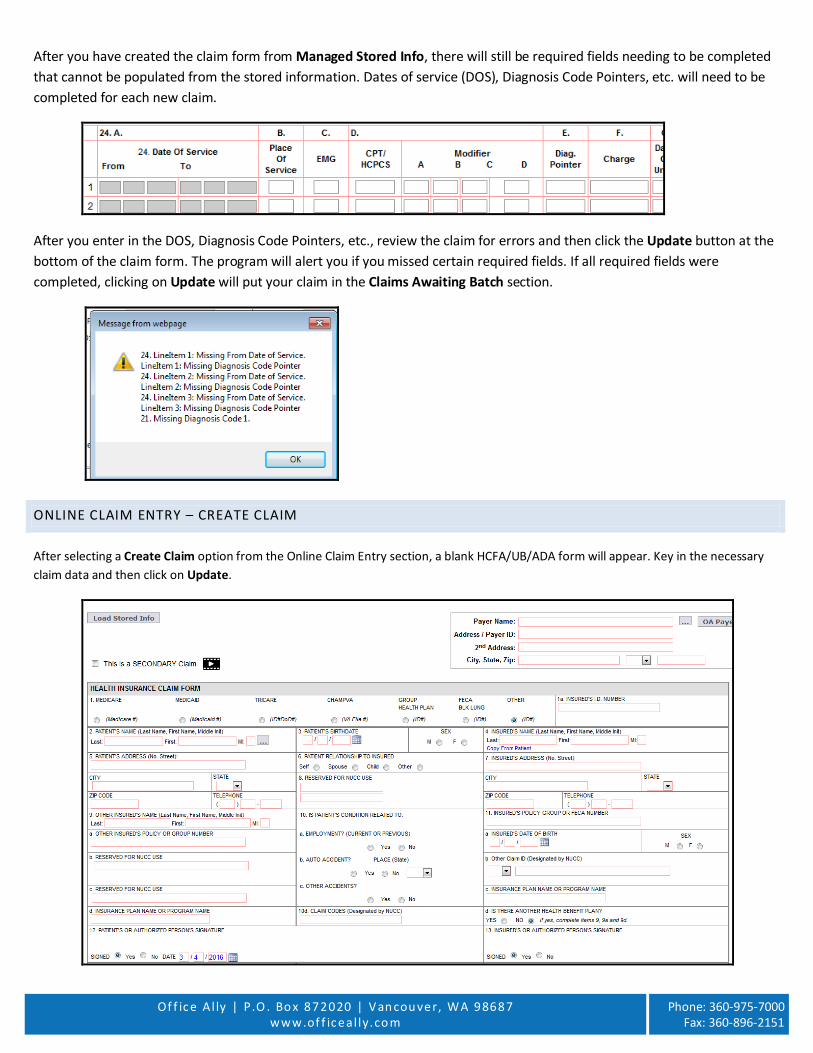
After you have created the claim form from Managed Stored Info, there will still be required fields needing to be completed that cannot be populated from the stored information. Dates of service (DOS), Diagnosis Code Pointers, etc. will need to be completed for each new claim.
After you enter in the DOS, Diagnosis Code Pointers, etc., review the claim for errors and then click the Update button at the bottom of the claim form. The program will alert you if you missed certain required fields. If all required fields were completed, clicking on Update will put your claim in the Claims Awaiting Batch section.
ONLINE CLAIM ENTRY – CREATE CLAIM
After selecting a Create Claim option from the Online Claim Entry section, a blank HCFA/UB/ADA form will appear. Key in the necessary claim data and then click on Update.
Of f ice Al ly | P.O . Bo x 872020 | Van cou ver, WA 98687
www.of f iceal ly.co m
Phone: 360-975-7000 Fax: 360-896-2151
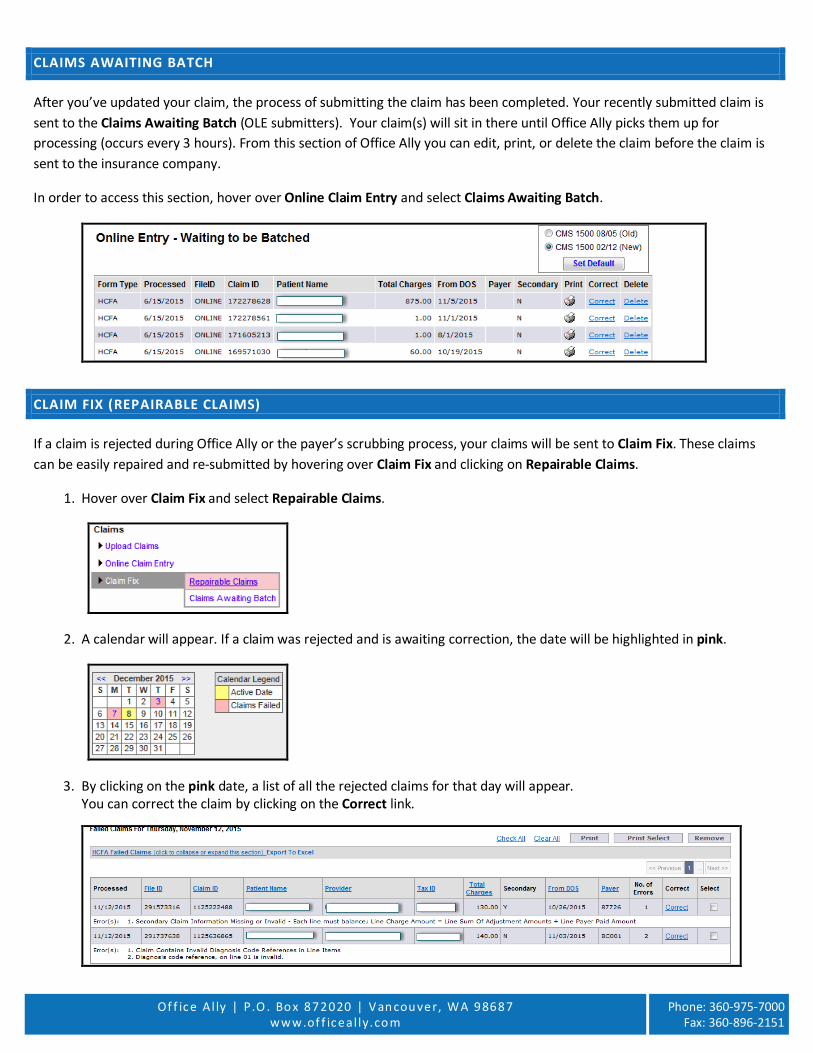
CLAIMS AWAITING BATCH
After you’ve updated your claim, the process of submitting the claim has been completed. Your recently submitted claim is sent to the Claims Awaiting Batch (OLE submitters). Your claim(s) will sit in there until Office Ally picks them up for processing (occurs every 3 hours). From this section of Office Ally you can edit, print, or delete the claim before the claim is sent to the insurance company.
In order to access this section, hover over Online Claim Entry and select Claims Awaiting Batch.
CLAIM FIX (REPAIRABLE CLAIMS)
If a claim is rejected during Office Ally or the payer’s scrubbing process, your claims will be sent to Claim Fix. These claims can be easily repaired and re-submitted by hovering over Claim Fix and clicking on Repairable Claims.
1. Hover over Claim Fix and select Repairable Claims.
2. A calendar will appear. If a claim was rejected and is awaiting correction, the date will be highlighted in pink.
3. By clicking on the pink date, a list of all the rejected claims for that day will appear. You can correct the claim by clicking on the Correct link.
Of f ice Al ly | P.O . Bo x 872020 | Van cou ver, WA 98687
www.of f iceal ly.co m
Phone: 360-975-7000 Fax: 360-896-2151
4. Once you click on Correct, a copy of the claim image you previously submitted will appear. The reason for rejection will be displayed at the top of the claim image.
5. Once you have made all necessary corrections, click on the Update button.
6. Once resubmitted, the claim will go into the Claims Awaiting Batch until Office Ally picks it up for processing.
NOTE: Claims that are rejected will remain in the Claim Fix until they are either corrected or removed. Claims that reject for being a Duplicate will not appear in Claim Fix.
NOTE: When you see a question mark icon next to an error code, this means we have rejection guidance available. Click on the icon to get insight as to why the claim rejected and what can be done to correct it. Additionally, by clicking Support Suite, you’ll be redirected to our Claim Rejection Knowledgebase for further assistance (including our Live Chat feature).
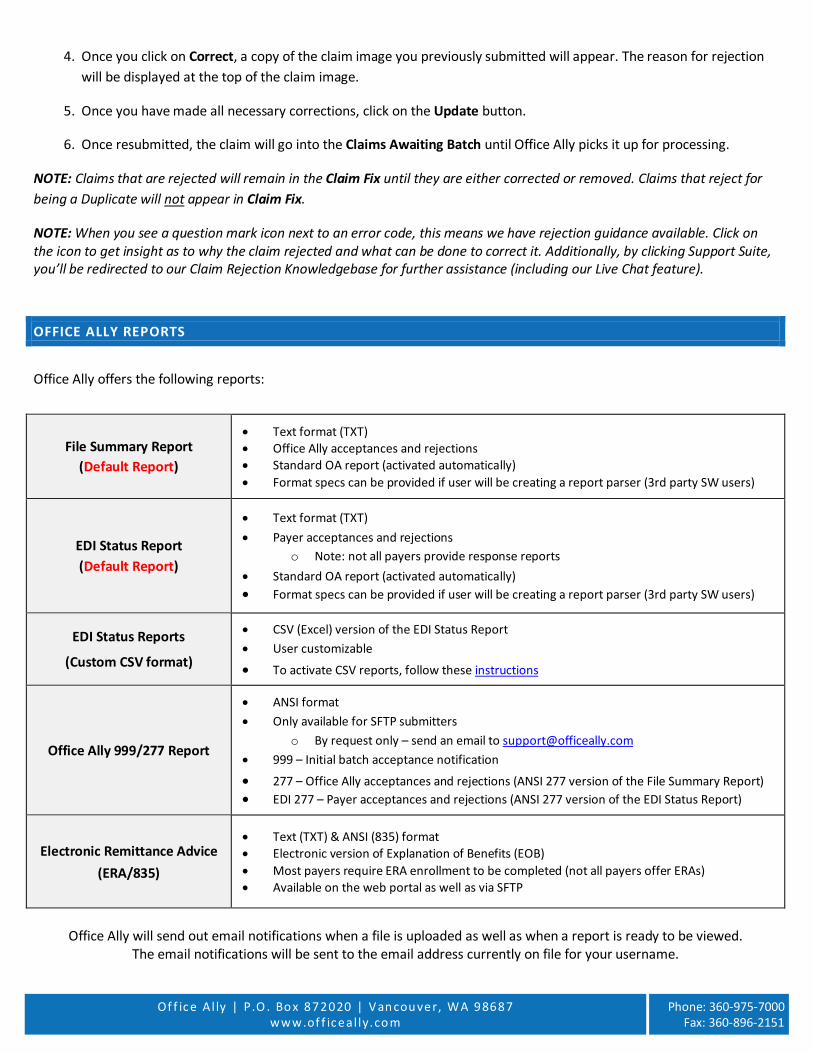
OFFICE ALLY REPORTS
Office Ally offers the following reports:
Office Ally will send out email notifications when a file is uploaded as well as when a report is ready to be viewed.
The email notifications will be sent to the email address currently on file for your username.
File Summary Report (Default Report)
• Text format (TXT) • Office Ally acceptances and rejections • Standard OA report (activated automatically) • Format specs can be provided if user will be creating a report parser (3rd party SW users)
EDI Status Report (Default Report)
• Text format (TXT) • Payer acceptances and rejections
o Note: not all payers provide response reports • Standard OA report (activated automatically) • Format specs can be provided if user will be creating a report parser (3rd party SW users)
EDI Status Reports
(Custom CSV format)
• CSV (Excel) version of the EDI Status Report • User customizable
• To activate CSV reports, follow these instructions
Office Ally 999/277 Report
• ANSI format • Only available for SFTP submitters
o By request only – send an email to [email protected] • 999 – Initial batch acceptance notification
• 277 – Office Ally acceptances and rejections (ANSI 277 version of the File Summary Report) • EDI 277 – Payer acceptances and rejections (ANSI 277 version of the EDI Status Report)
Electronic Remittance Advice (ERA/835)
• Text (TXT) & ANSI (835) format • Electronic version of Explanation of Benefits (EOB) • Most payers require ERA enrollment to be completed (not all payers offer ERAs) • Available on the web portal as well as via SFTP
Of f ice Al ly | P.O . Bo x 872020 | Van cou ver, WA 98687
www.of f iceal ly.co m
Phone: 360-975-7000 Fax: 360-896-2151
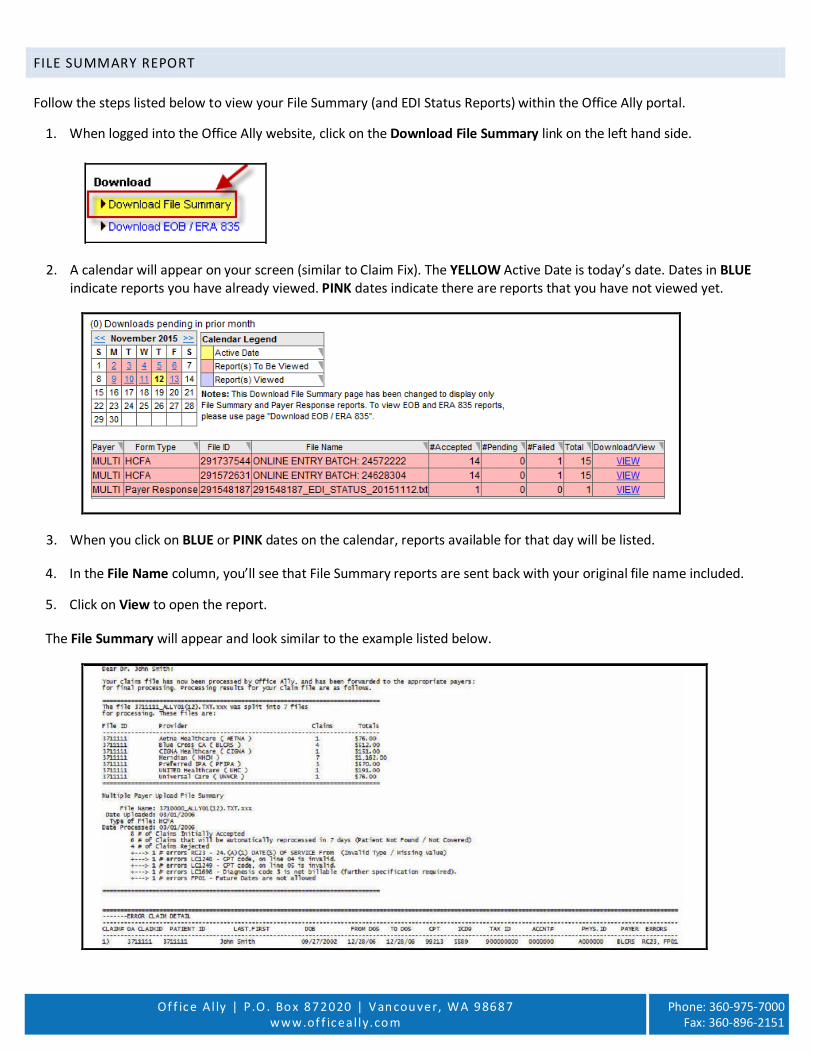
FILE SUMMARY REPORT
Follow the steps listed below to view your File Summary (and EDI Status Reports) within the Office Ally portal.
1. When logged into the Office Ally website, click on the Download File Summary link on the left hand side.
2. A calendar will appear on your screen (similar to Claim Fix). The YELLOW Active Date is today’s date. Dates in BLUE indicate reports you have already viewed. PINK dates indicate there are reports that you have not viewed yet.
3. When you click on BLUE or PINK dates on the calendar, reports available for that day will be listed.
4. In the File Name column, you’ll see that File Summary reports are sent back with your original file name included.
5. Click on View to open the report.
The File Summary will appear and look similar to the example listed below.
Of f ice Al ly | P.O . Bo x 872020 | Van cou ver, WA 98687
www.of f iceal ly.co m
Phone: 360-975-7000 Fax: 360-896-2151
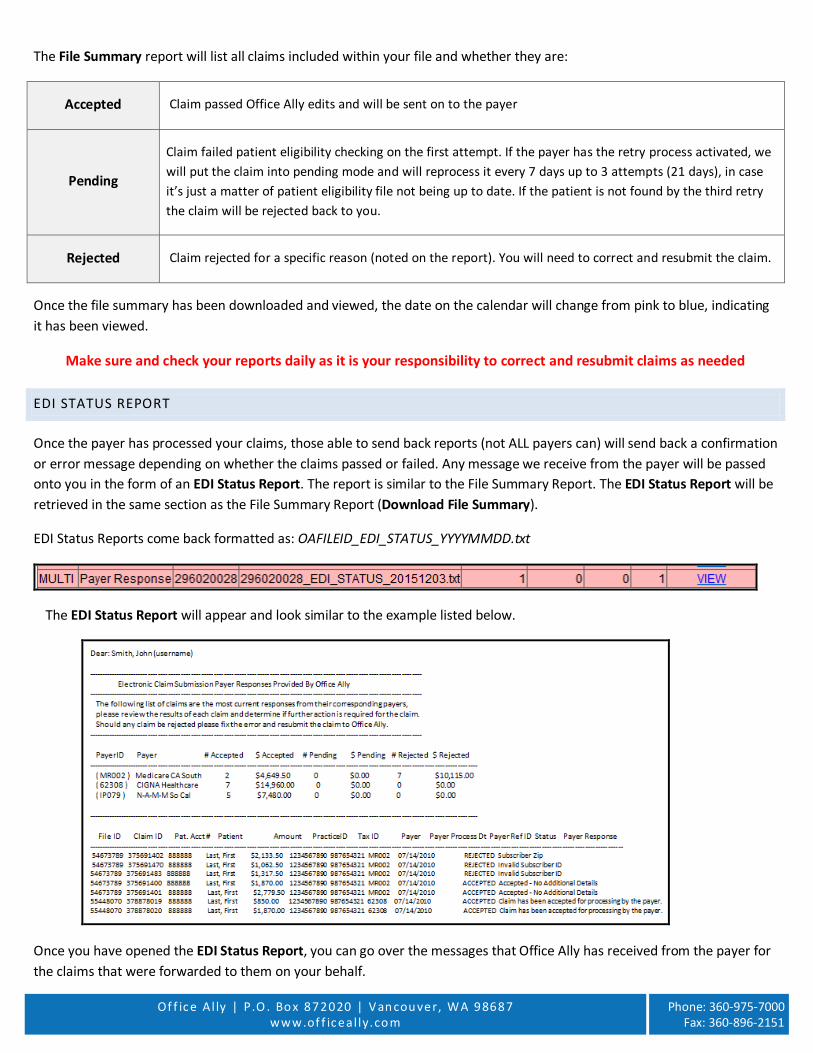
The File Summary report will list all claims included within your file and whether they are:
Accepted Claim passed Office Ally edits and will be sent on to the payer
Pending
Claim failed patient eligibility checking on the first attempt. If the payer has the retry process activated, we will put the claim into pending mode and will reprocess it every 7 days up to 3 attempts (21 days), in case it’s just a matter of patient eligibility file not being up to date. If the patient is not found by the third retry the claim will be rejected back to you.
Rejected Claim rejected for a specific reason (noted on the report). You will need to correct and resubmit the claim.
Once the file summary has been downloaded and viewed, the date on the calendar will change from pink to blue, indicating it has been viewed.
Make sure and check your reports daily as it is your responsibility to correct and resubmit claims as needed
EDI STATUS REPORT
Once the payer has processed your claims, those able to send back reports (not ALL payers can) will send back a confirmation or error message depending on whether the claims passed or failed. Any message we receive from the payer will be passed onto you in the form of an EDI Status Report. The report is similar to the File Summary Report. The EDI Status Report will be retrieved in the same section as the File Summary Report (Download File Summary).
EDI Status Reports come back formatted as: OAFILEID_EDI_STATUS_YYYYMMDD.txt
The EDI Status Report will appear and look similar to the example listed below.
Once you have opened the EDI Status Report, you can go over the messages that Office Ally has received from the payer for the claims that were forwarded to them on your behalf.
Of f ice Al ly | P.O . Bo x 872020 | Van cou ver, WA 98687
www.of f iceal ly.co m
Phone: 360-975-7000 Fax: 360-896-2151
DOWNLOAD EOB/ERA 835
Electronic Remittance Advice (ERA/835) files are electronic transactions that contain the same information as your paper remittances (EOB). ERAs help increase the efficiency of your payment and adjustment posting process, and since they are delivered electronically, you get them sooner than you would get a paper remittance. You can use the ERA/835 to either post payments and adjustments automatically into your practice management software (if your vendor supports it), or you can view/print the information so you can post it the same as you would a paper remittance.
Most payers require that you fill out an ERA enrollment form to begin receiving ERAs. These forms are located on our website under: Resource Center > Payer ERA Enrollment forms. Once the payer starts sending your ERAs to Office Ally, they will be made available to you in your Office Ally account.
Office Ally will output two formats to you for each ERA file; Text (TXT) and 835 (ANSI). The 835 is an ANSI formatted file (non-readable). You must have some kind of software to load the non-readable file. If you don’t have any software to do this, you may download Medicare’s Free Easy Print Software by clicking here for the steps.
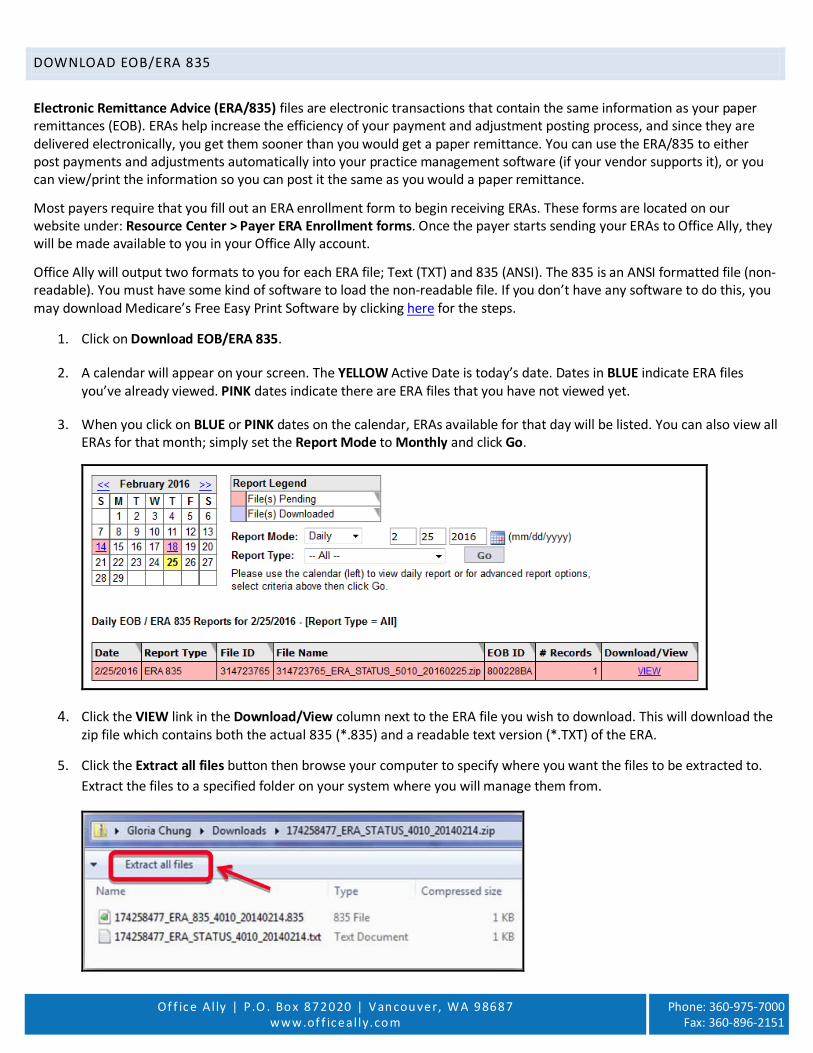
1. Click on Download EOB/ERA 835.
2. A calendar will appear on your screen. The YELLOW Active Date is today’s date. Dates in BLUE indicate ERA files you’ve already viewed. PINK dates indicate there are ERA files that you have not viewed yet.
3. When you click on BLUE or PINK dates on the calendar, ERAs available for that day will be listed. You can also view all ERAs for that month; simply set the Report Mode to Monthly and click Go.
4. Click the VIEW link in the Download/View column next to the ERA file you wish to download. This will download the zip file which contains both the actual 835 (*.835) and a readable text version (*.TXT) of the ERA.
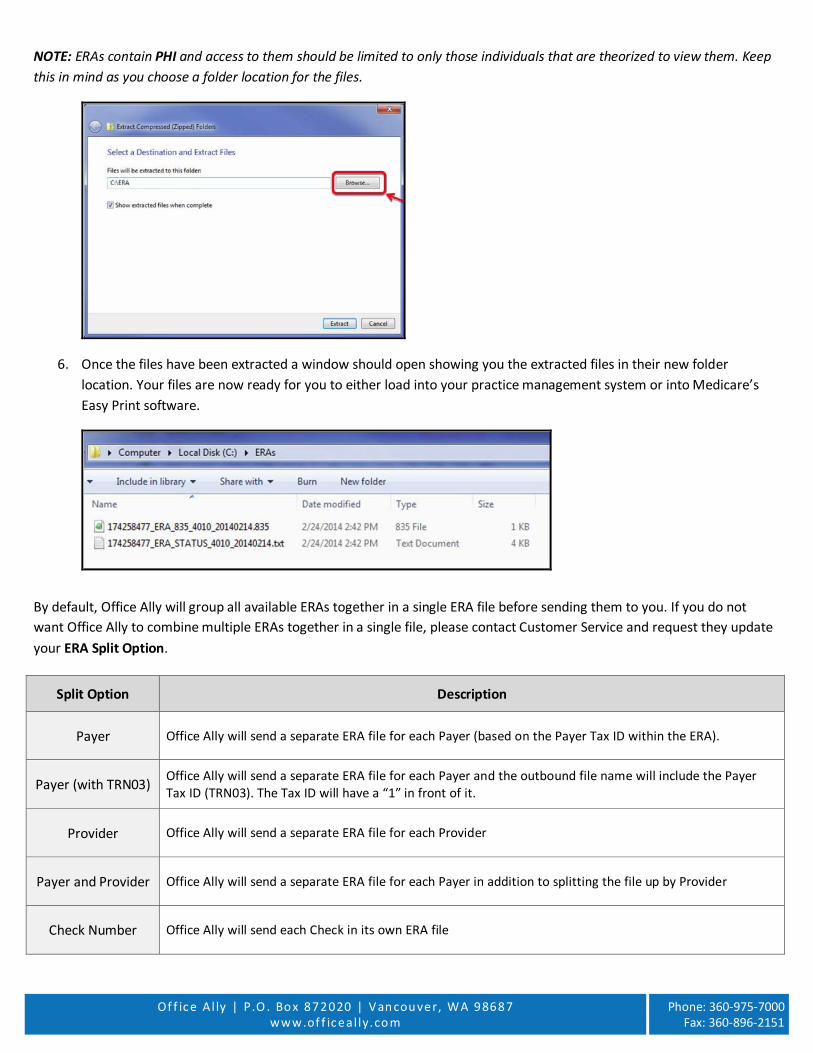
5. Click the Extract all files button then browse your computer to specify where you want the files to be extracted to. Extract the files to a specified folder on your system where you will manage them from.
Of f ice Al ly | P.O . Bo x 872020 | Van cou ver, WA 98687
www.of f iceal ly.co m
Phone: 360-975-7000 Fax: 360-896-2151
NOTE: ERAs contain PHI and access to them should be limited to only those individuals that are theorized to view them. Keep this in mind as you choose a folder location for the files.
6. Once the files have been extracted a window should open showing you the extracted files in their new folder location. Your files are now ready for you to either load into your practice management system or into Medicare’s Easy Print software.
By default, Office Ally will group all available ERAs together in a single ERA file before sending them to you. If you do not want Office Ally to combine multiple ERAs together in a single file, please contact Customer Service and request they update your ERA Split Option.
Split Option Description
Payer Office Ally will send a separate ERA file for each Payer (based on the Payer Tax ID within the ERA).
Payer (with TRN03) Office Ally will send a separate ERA file for each Payer and the outbound file name will include the Payer Tax ID (TRN03). The Tax ID will have a “1” in front of it.
Provider Office Ally will send a separate ERA file for each Provider
Payer and Provider Office Ally will send a separate ERA file for each Payer in addition to splitting the file up by Provider
Check Number Office Ally will send each Check in its own ERA file
Of f ice Al ly | P.O . Bo x 872020 | Van cou ver, WA 98687
www.of f iceal ly.co m
Phone: 360-975-7000 Fax: 360-896-2151
ALTERNATIVES TO USING THE ACTUAL 835 FILE
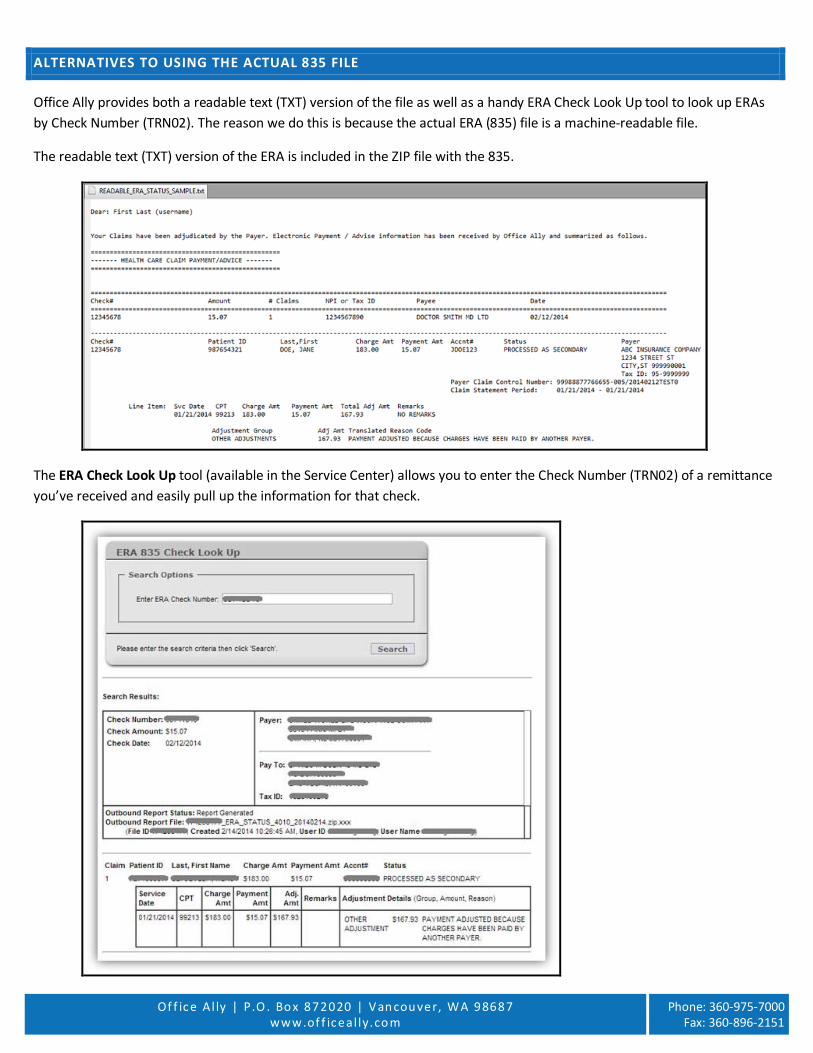
Office Ally provides both a readable text (TXT) version of the file as well as a handy ERA Check Look Up tool to look up ERAs by Check Number (TRN02). The reason we do this is because the actual ERA (835) file is a machine-readable file.
The readable text (TXT) version of the ERA is included in the ZIP file with the 835.
The ERA Check Look Up tool (available in the Service Center) allows you to enter the Check Number (TRN02) of a remittance you’ve received and easily pull up the information for that check.
Of f ice Al ly | P.O . Bo x 872020 | Van cou ver, WA 98687
www.of f iceal ly.co m
Phone: 360-975-7000 Fax: 360-896-2151
INVENTORY REPORTING
The Inventory Reporting tool allows you to search through and view all of the claims you’ve sent to Office Ally.
Results will include:
• Current status of the claim in Office Ally’s system (Passed, Pending, or Rejected) o Passed - Office Ally accepted the claim and it was sent to the payer o Pending - Claim failed member eligibility checking and it’ll go into pending mode until the next retry o Rejected - Claim was rejected (by OA or payer) and is in need of correction o Rejected+ - Claim was rejected (by OA or payer) and was either corrected or removed from Claim Fix o Rejected*- Claim was rejected for being a duplicate within 90 days and cannot be corrected/resubmitted
• Office Ally Claim ID and File ID • Payer ID the claim was processed under • Office Ally’s Receive Date • Patient’s First and Last Name • Patient Account Number • From and To Date of Service • Provider Tax ID • Insured ID • Total Charge
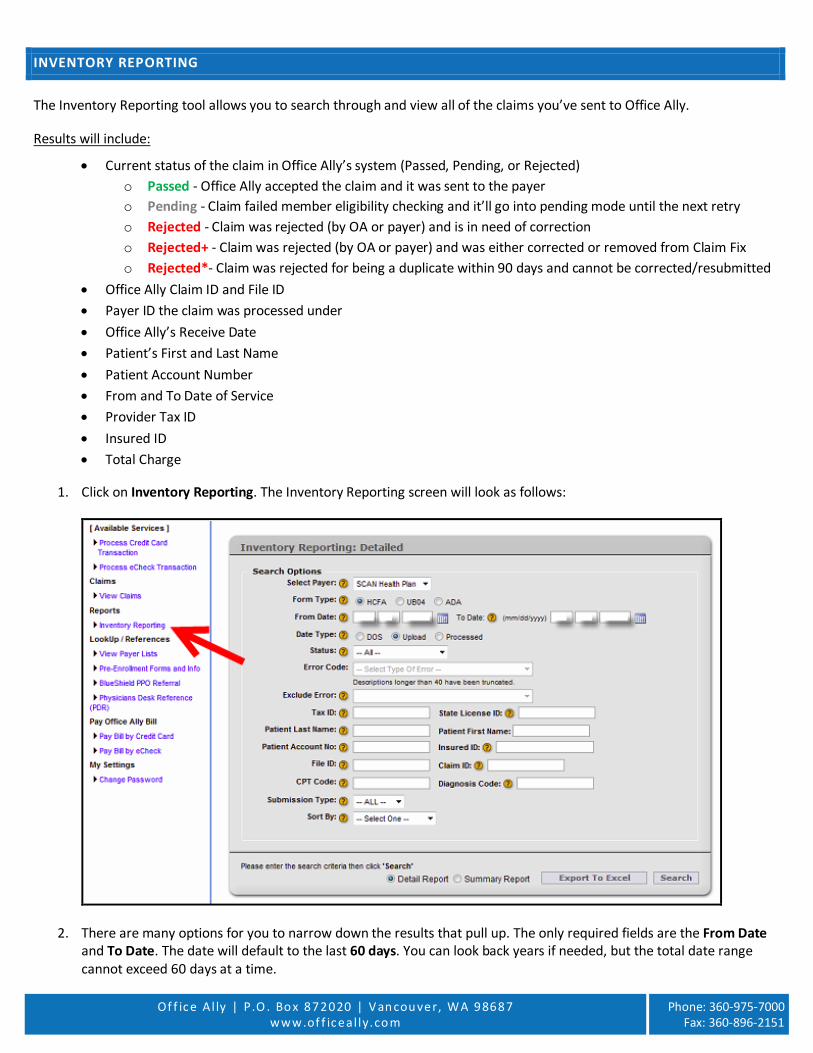
1. Click on Inventory Reporting. The Inventory Reporting screen will look as follows:
2. There are many options for you to narrow down the results that pull up. The only required fields are the From Date and To Date. The date will default to the last 60 days. You can look back years if needed, but the total date range cannot exceed 60 days at a time.
Of f ice Al ly | P.O . Bo x 872020 | Van cou ver, WA 98687
www.of f iceal ly.co m
Phone: 360-975-7000 Fax: 360-896-2151
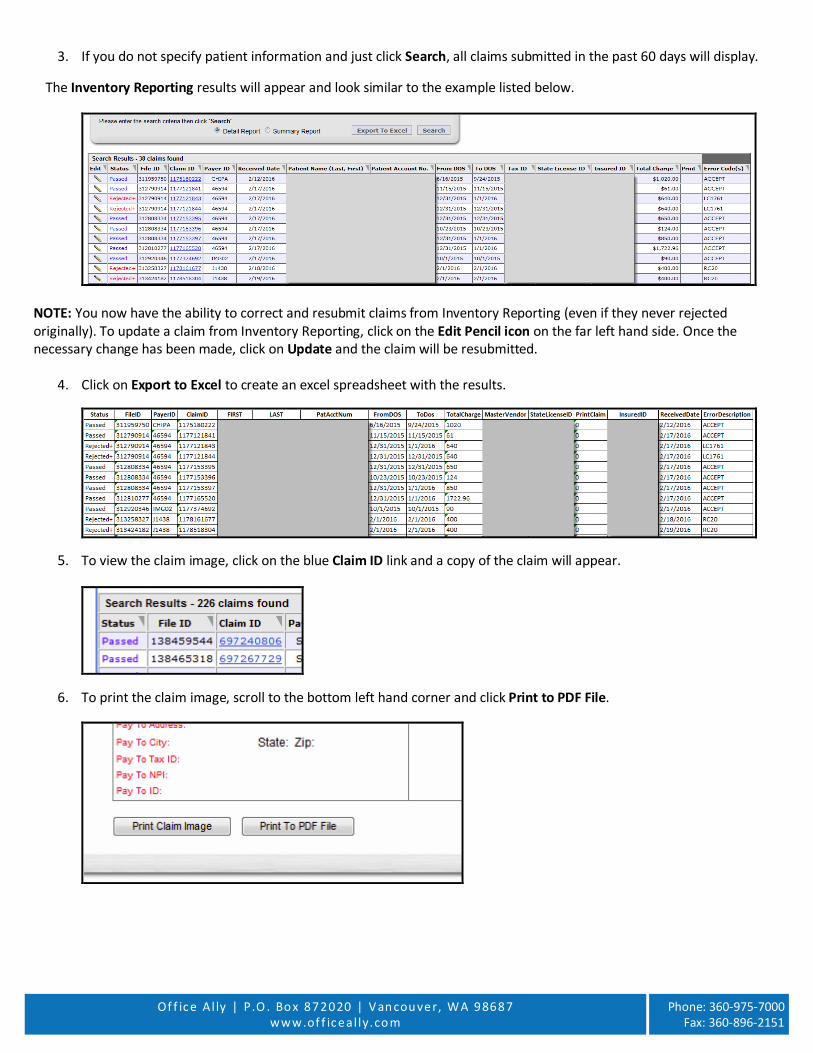
3. If you do not specify patient information and just click Search, all claims submitted in the past 60 days will display.
The Inventory Reporting results will appear and look similar to the example listed below.
NOTE: You now have the ability to correct and resubmit claims from Inventory Reporting (even if they never rejected originally). To update a claim from Inventory Reporting, click on the Edit Pencil icon on the far left hand side. Once the necessary change has been made, click on Update and the claim will be resubmitted.
4. Click on Export to Excel to create an excel spreadsheet with the results.
5. To view the claim image, click on the blue Claim ID link and a copy of the claim will appear.
6. To print the claim image, scroll to the bottom left hand corner and click Print to PDF File.
Of f ice Al ly | P.O . Bo x 872020 | Van cou ver, WA 98687
www.of f iceal ly.co m
Phone: 360-975-7000 Fax: 360-896-2151
REAL TIME ELIGIBILITY CHECKING (MANUAL)
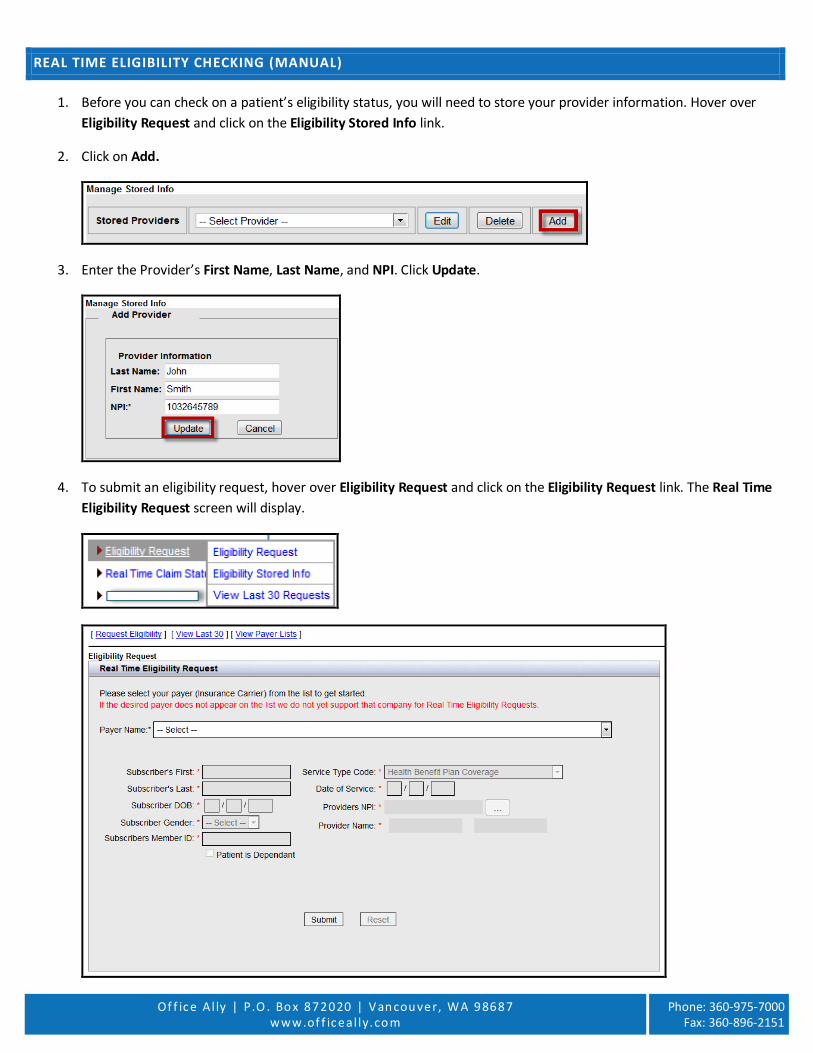
1. Before you can check on a patient’s eligibility status, you will need to store your provider information. Hover over Eligibility Request and click on the Eligibility Stored Info link.
2. Click on Add.
3. Enter the Provider’s First Name, Last Name, and NPI. Click Update.
4. To submit an eligibility request, hover over Eligibility Request and click on the Eligibility Request link. The Real Time Eligibility Request screen will display.
Of f ice Al ly | P.O . Bo x 872020 | Van cou ver, WA 98687
www.of f iceal ly.co m
Phone: 360-975-7000 Fax: 360-896-2151
5. Select the Payer for which the patient is covered under (check the Member ID Card to confirm).
6. You are REQUIRED to complete all sections in order to check eligibility:
• Subscriber First Name
• Subscriber Last Name
• Subscriber Date of Birth
• Subscriber Gender
• Subscriber Member ID
• Service Type Code (default: Health Benefit Plan Coverage)
• Date of service
7. Once the patient information is entered, you can now select your provider by clicking the ellipses button on the right of the provider NPI.
8. Click Select next to the provider. The provider’s information will be populated on the request screen.
9. Click Submit.
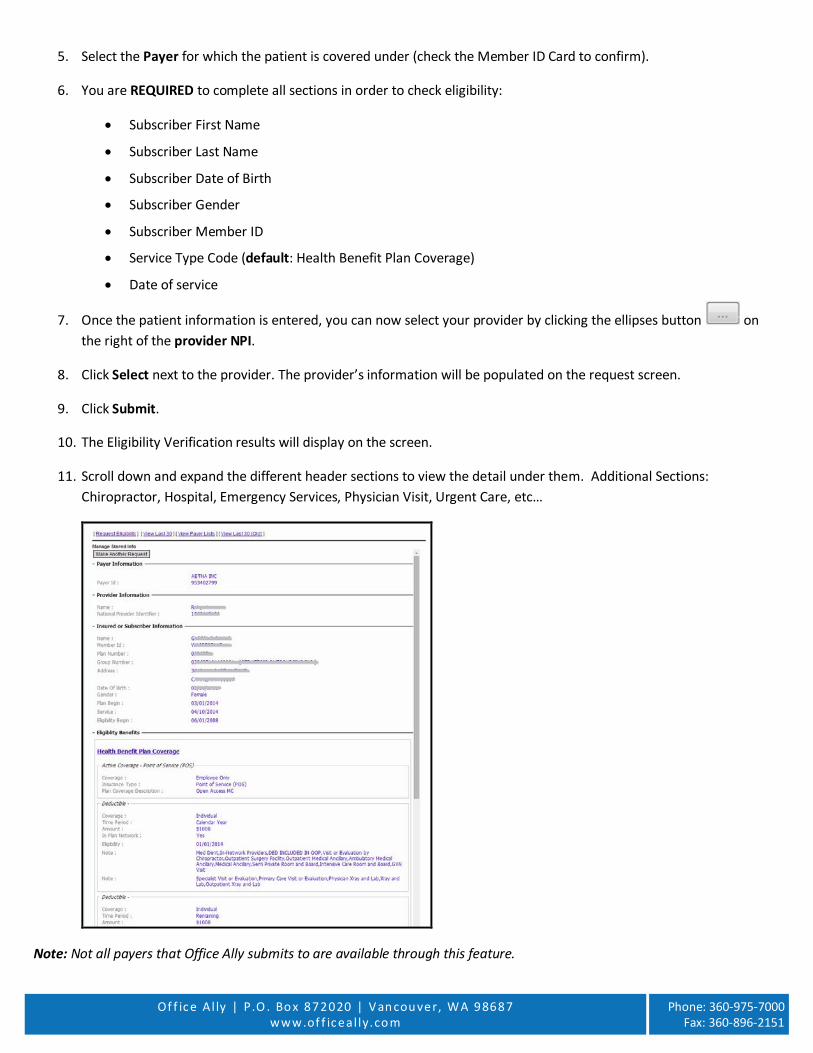
10. The Eligibility Verification results will display on the screen.
11. Scroll down and expand the different header sections to view the detail under them. Additional Sections: Chiropractor, Hospital, Emergency Services, Physician Visit, Urgent Care, etc…
Note: Not all payers that Office Ally submits to are available through this feature.
Of f ice Al ly | P.O . Bo x 872020 | Van cou ver, WA 98687
www.of f iceal ly.co m
Phone: 360-975-7000 Fax: 360-896-2151
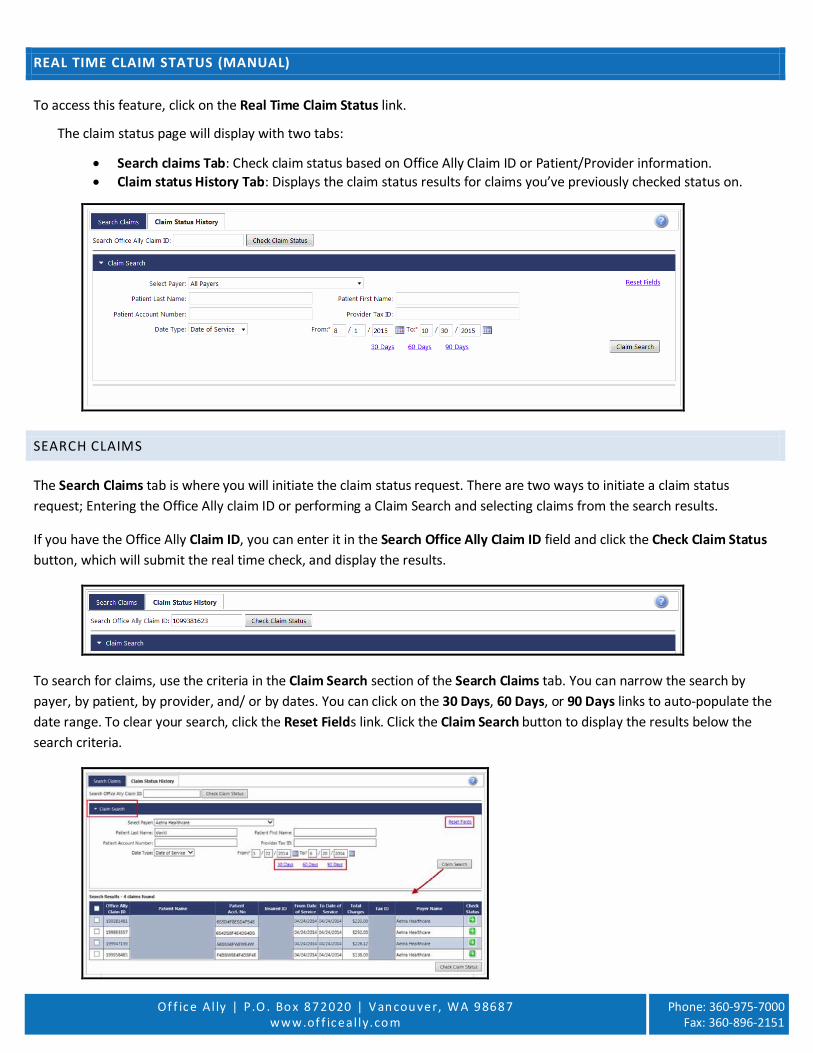
REAL TIME CLAIM STATUS (MANUAL)
To access this feature, click on the Real Time Claim Status link.
The claim status page will display with two tabs:
• Search claims Tab: Check claim status based on Office Ally Claim ID or Patient/Provider information. • Claim status History Tab: Displays the claim status results for claims you’ve previously checked status on.
SEARCH CLAIMS
The Search Claims tab is where you will initiate the claim status request. There are two ways to initiate a claim status request; Entering the Office Ally claim ID or performing a Claim Search and selecting claims from the search results.
If you have the Office Ally Claim ID, you can enter it in the Search Office Ally Claim ID field and click the Check Claim Status button, which will submit the real time check, and display the results.
To search for claims, use the criteria in the Claim Search section of the Search Claims tab. You can narrow the search by payer, by patient, by provider, and/ or by dates. You can click on the 30 Days, 60 Days, or 90 Days links to auto-populate the date range. To clear your search, click the Reset Fields link. Click the Claim Search button to display the results below the search criteria.
Of f ice Al ly | P.O . Bo x 872020 | Van cou ver, WA 98687
www.of f iceal ly.co m
Phone: 360-975-7000 Fax: 360-896-2151
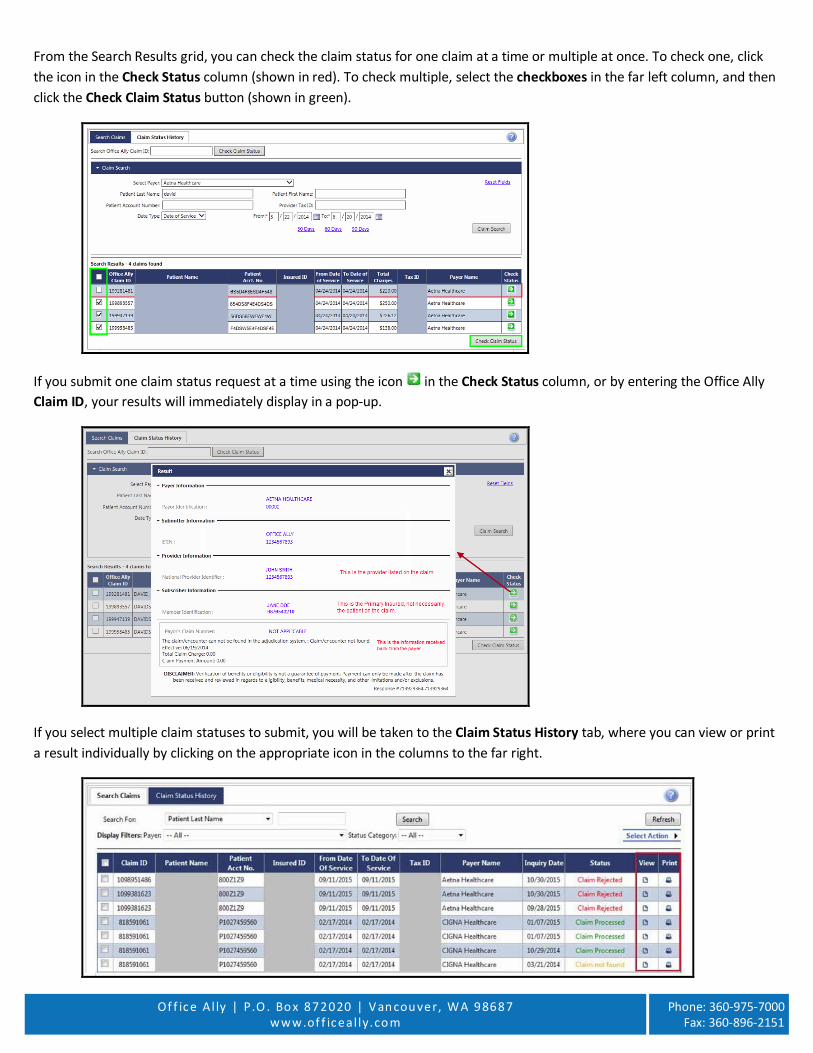
From the Search Results grid, you can check the claim status for one claim at a time or multiple at once. To check one, click the icon in the Check Status column (shown in red). To check multiple, select the checkboxes in the far left column, and then click the Check Claim Status button (shown in green).
If you submit one claim status request at a time using the icon in the Check Status column, or by entering the Office Ally Claim ID, your results will immediately display in a pop-up.
If you select multiple claim statuses to submit, you will be taken to the Claim Status History tab, where you can view or print a result individually by clicking on the appropriate icon in the columns to the far right.
Of f ice Al ly | P.O . Bo x 872020 | Van cou ver, WA 98687
www.of f iceal ly.co m
Phone: 360-975-7000 Fax: 360-896-2151
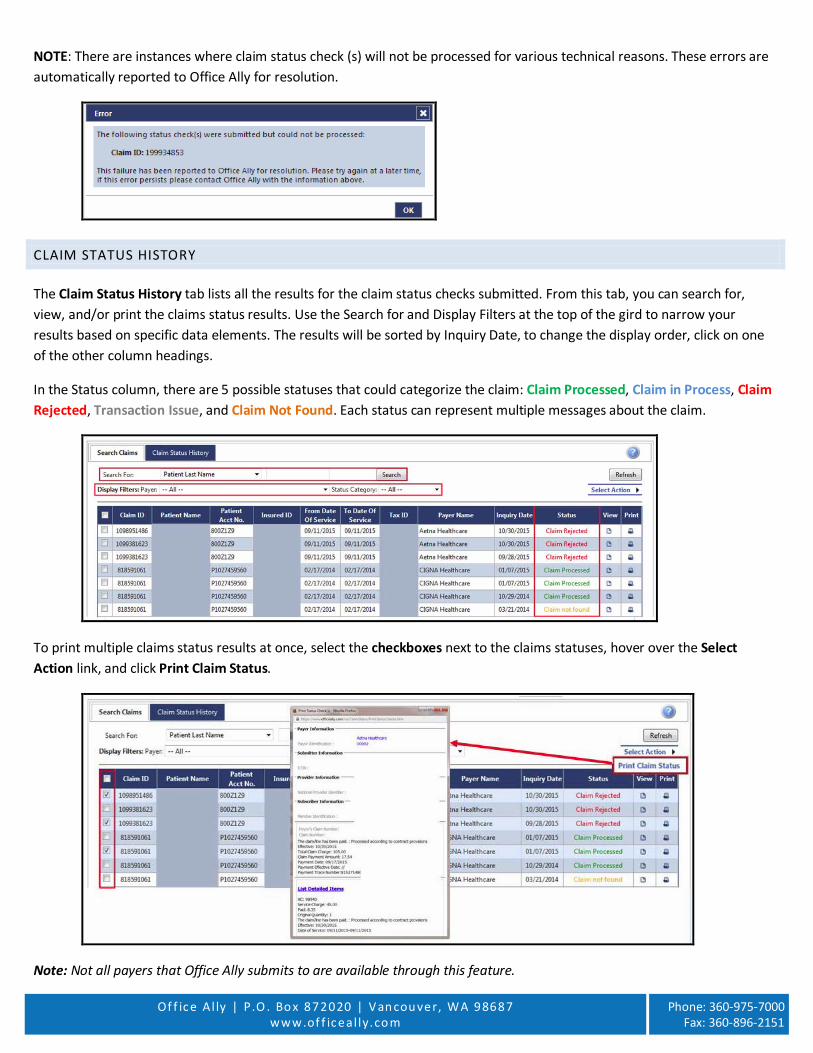
NOTE: There are instances where claim status check (s) will not be processed for various technical reasons. These errors are automatically reported to Office Ally for resolution.
CLAIM STATUS HISTORY
The Claim Status History tab lists all the results for the claim status checks submitted. From this tab, you can search for, view, and/or print the claims status results. Use the Search for and Display Filters at the top of the gird to narrow your results based on specific data elements. The results will be sorted by Inquiry Date, to change the display order, click on one of the other column headings.
In the Status column, there are 5 possible statuses that could categorize the claim: Claim Processed, Claim in Process, Claim Rejected, Transaction Issue, and Claim Not Found. Each status can represent multiple messages about the claim.
To print multiple claims status results at once, select the checkboxes next to the claims statuses, hover over the Select Action link, and click Print Claim Status.
Note: Not all payers that Office Ally submits to are available through this feature.
Of f ice Al ly | P.O . Bo x 872020 | Van cou ver, WA 98687
www.of f iceal ly.co m
Phone: 360-975-7000 Fax: 360-896-2151
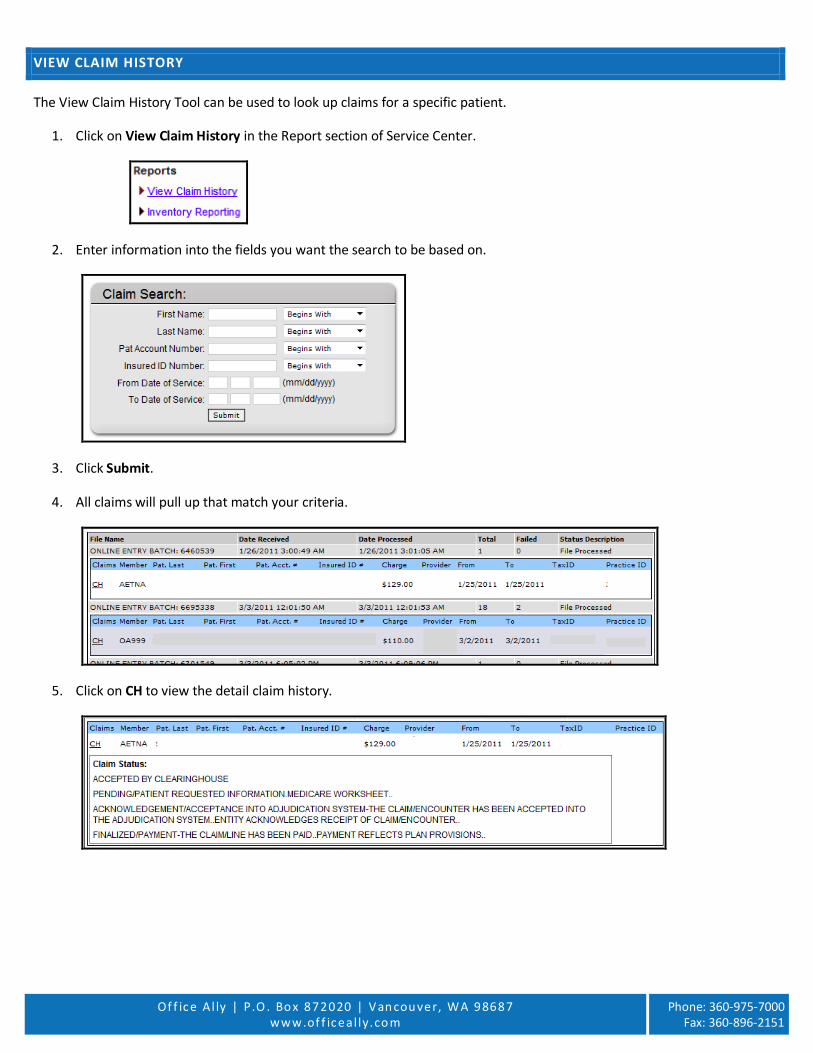
VIEW CLAIM HISTORY
The View Claim History Tool can be used to look up claims for a specific patient.
1. Click on View Claim History in the Report section of Service Center.
2. Enter information into the fields you want the search to be based on.
3. Click Submit.
4. All claims will pull up that match your criteria.
5. Click on CH to view the detail claim history.

Of f ice Al ly | P.O . Bo x 872020 | Van cou ver, WA 98687
www.of f iceal ly.co m
Phone: 360-975-7000 Fax: 360-896-2151
CODE SEARCH
The Code Search Tool can be used to verify what codes (ICD-9, ICD-10, Place of Service, and Modifiers) Office Ally shows as being billable at the time of the search.
1. Click on Code Search under the LookUp / References section.
2. Select the type of code you would like to search for (first dropdown list).
3. Select a method of searching you would like to use (second dropdown list).
4. Enter the code you’re trying to search for.
5. Click on the Search button to display your results.
Of f ice Al ly | P.O . Bo x 872020 | Van cou ver, WA 98687
www.of f iceal ly.co m
Phone: 360-975-7000 Fax: 360-896-2151
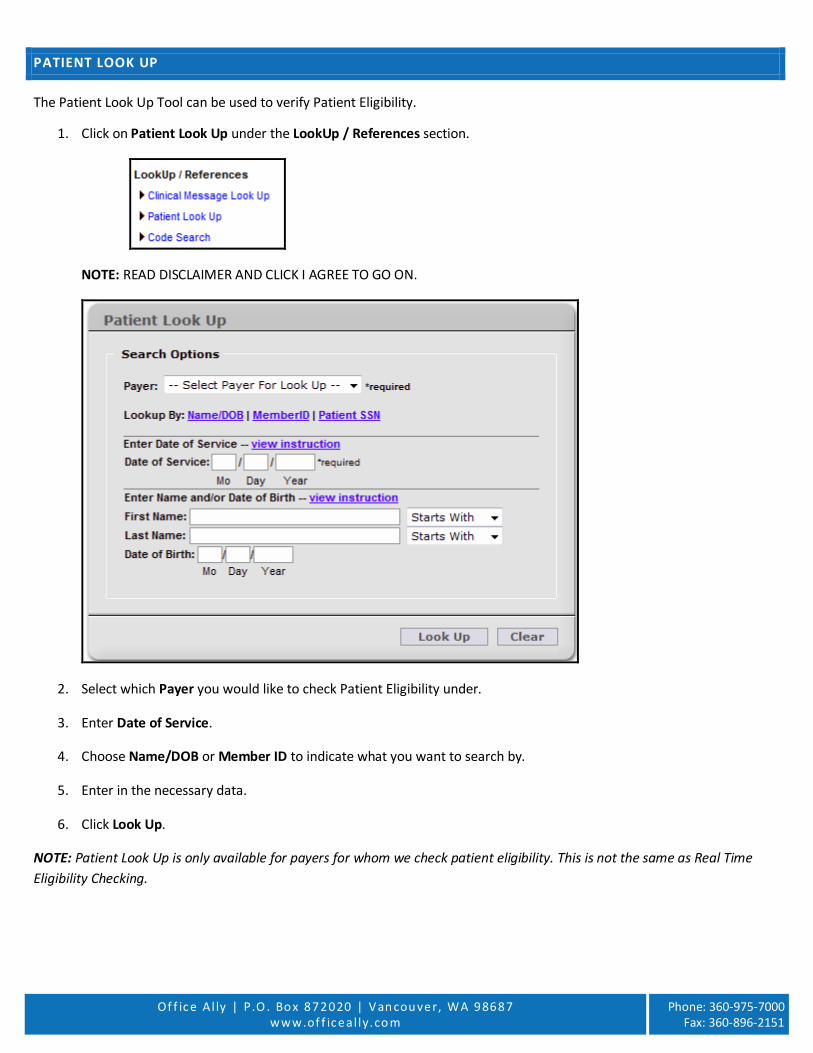
PATIENT LOOK UP
The Patient Look Up Tool can be used to verify Patient Eligibility.
1. Click on Patient Look Up under the LookUp / References section.
NOTE: READ DISCLAIMER AND CLICK I AGREE TO GO ON.
2. Select which Payer you would like to check Patient Eligibility under.
3. Enter Date of Service.
4. Choose Name/DOB or Member ID to indicate what you want to search by.
5. Enter in the necessary data.
6. Click Look Up.
NOTE: Patient Look Up is only available for payers for whom we check patient eligibility. This is not the same as Real Time Eligibility Checking.