Embed Size (px)
Citation preview
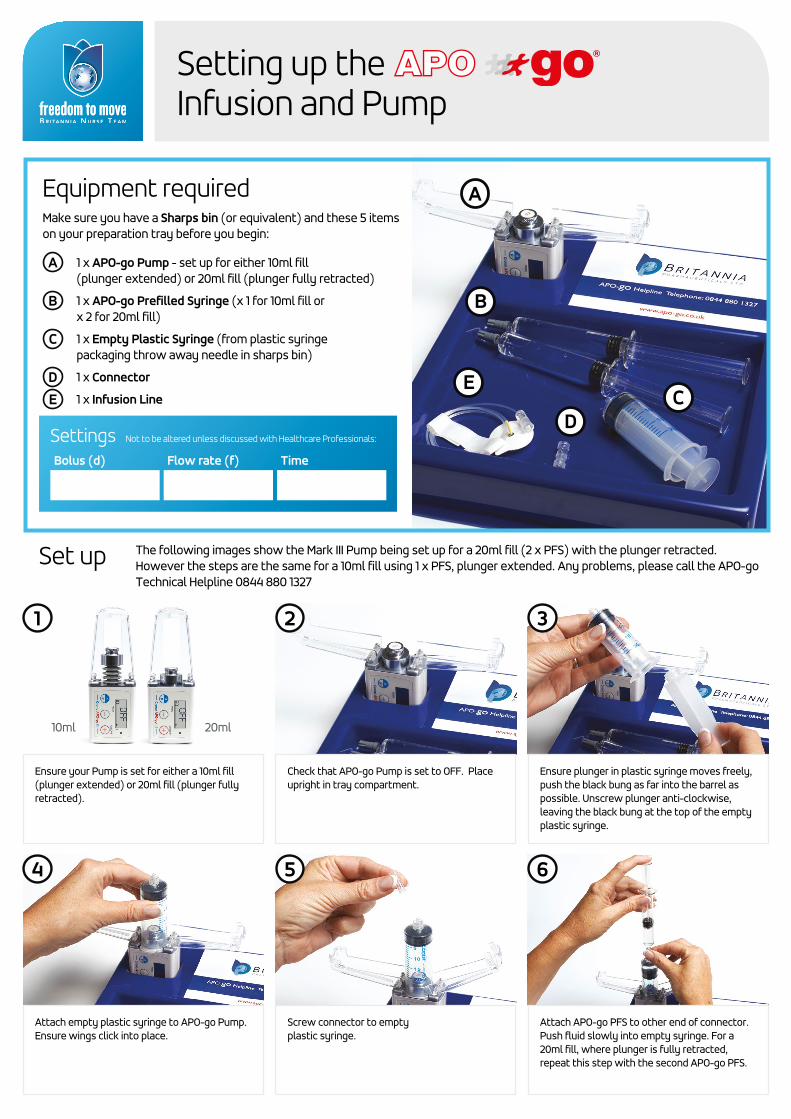
Setting up the Infusion and Pump
Equipment requiredMake sure you have a Sharps bin (or equivalent) and these 5 items on your preparation tray before you begin:
A 1 x APO-go Pump - set up for either 10ml fill (plunger extended) or 20ml fill (plunger fully retracted)
B 1 x APO-go Prefilled Syringe (x 1 for 10ml fill or x 2 for 20ml fill)
C 1 x Empty Plastic Syringe (from plastic syringe packaging throw away needle in sharps bin)
D 1 x Connector
E 1 x Infusion Line
A
B
CD
E
Settings Not to be altered unless discussed with Healthcare Professionals:
Bolus (d) Flow rate (f) Time
Set up The following images show the Mark III Pump being set up for a 20ml fill (2 x PFS) with the plunger retracted. However the steps are the same for a 10ml fill using 1 x PFS, plunger extended. Any problems, please call the APO-go Technical Helpline 0844 880 1327
Check that APO-go Pump is set to OFF. Place upright in tray compartment.
Screw connector to empty plastic syringe.
2
5
Ensure plunger in plastic syringe moves freely, push the black bung as far into the barrel as possible. Unscrew plunger anti-clockwise, leaving the black bung at the top of the empty plastic syringe.
Attach APO-go PFS to other end of connector. Push fluid slowly into empty syringe. For a 20ml fill, where plunger is fully retracted, repeat this step with the second APO-go PFS.
3
6
Ensure your Pump is set for either a 10ml fill (plunger extended) or 20ml fill (plunger fully retracted).
Attach empty plastic syringe to APO-go Pump. Ensure wings click into place.
20ml10ml
1
4

APO1-0515-6469 Date of preparation: August 2015
Adverse events should be reported. Reporting forms and information can be found at www.mhra.gov.uk/yellowcardAdverse events should also be reported to Medical Information on 0870 851 0207 or [email protected]
Britannia Pharmaceuticals Limited, 200 Longwater Avenue, Green Park, Reading, RG2 6GP
Attach infusion line to plastic syringe on the Pump. Then close plastic wings.
8
To switch Pump on, press and hold until you hear a beep - then release. To prime the infusion line, press and hold until you hear a long beep - then release.
9
Remove empty APO-go PFS and unscrew connector.
Insert needle in the usual way. Please refer to the APO-go Skin Management Guide.
7
10 Different needles require different injection techniques (needles vary according to local policy)
Infusion Needles: Flow-safer infusion line (25 gauge orange butterfly needle), should be sited slowly and gently, into a pinched skin fold, at a 45-degree angle to the skin.
Thumb-tack Needles, such as neria, should be sited slowly and gently into un-pinched skin at a 90-degree angle. When using this type of needle it is important to hold onto the infusion line tube just above the head (tack) of the needle, to ensure full depth of insertion.
To stop APO-go Infusion using the Mark III PumpRemember to always remove the infusion line before the Pump is retracted to the start position.
The plastic syringe must stay on the Pump until the plunger has retracted to the start position.
Note: If it is a 10ml fill, as shown in picture one, the plunger will only retract half way.
Should there be any problems with the Pump, please contact the APO-go Technical Helpline 0844 880 1327.
To switch OFF before the infusion is finished:
1. Press and hold until you hear a beep - then release. Screen will show "STOP"
2. Press to stop beeping
3. Take out the needle and remove infusion line
4. Press and hold and buttons together until display says “END”, leave Pump with syringe on while plunger retracts - this may take several minutes. Wait until display says “OFF” and then remove plastic syringe from Pump
An intermittent beep will sound 10 minutes and 5 minutes before the end of the set infusion. If the infusion has finished the Pump will show “END”
1. Take out the needle and remove infusion line
2. Press and hold button to stop the beeping. The plunger will retract to the start position, which may take a few minutes - leave the syringe in place until the display says "OFF"
3. The plastic syringe can now be removed from the Pump
apomorphine hydrochloridePUMP
APO-go Technical Helpline 0844 880 1327 www.apo-go.co.uk24 hours a day, 365 days a year