Embed Size (px)
Citation preview

Email: [email protected] 1 Website: www.polypipe.com/ventilation LAB1191R, Issue 1, May 2015
Silavent AMIE Air Quality Management for Indoor
Environments
Email: [email protected] 2 Website: www.polypipe.com/ventilation LAB1191R, Issue 1, May 2015
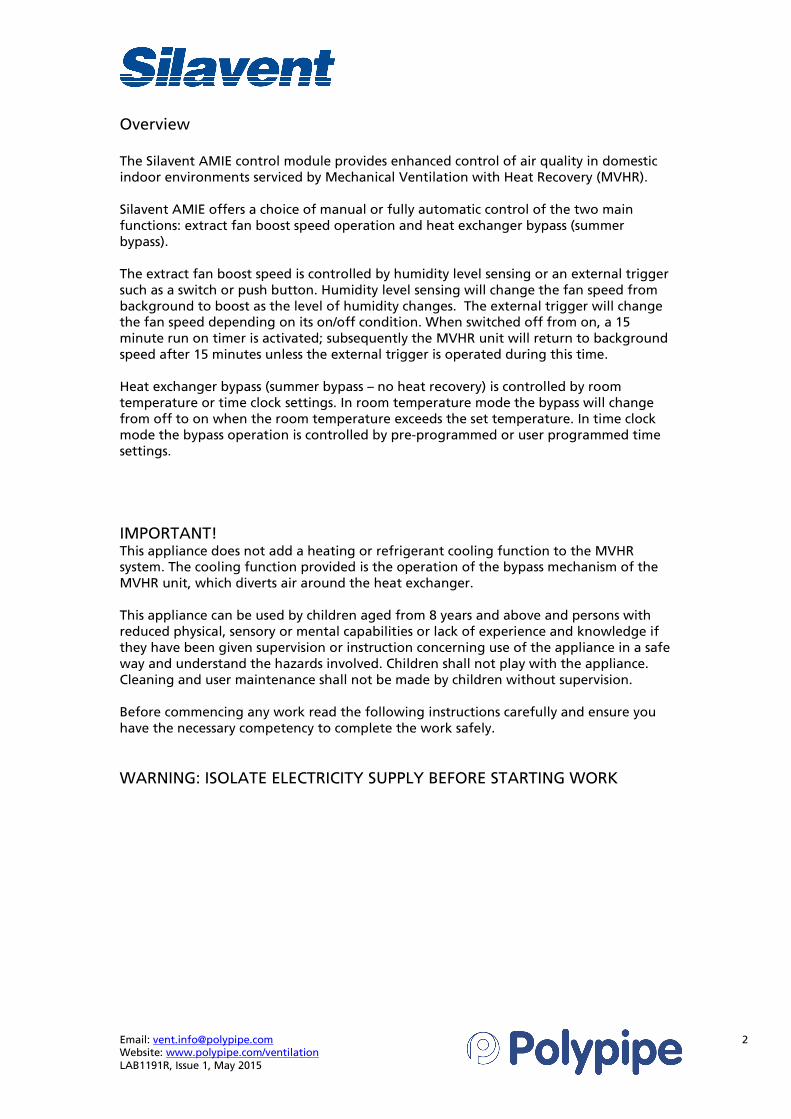
Overview The Silavent AMIE control module provides enhanced control of air quality in domestic indoor environments serviced by Mechanical Ventilation with Heat Recovery (MVHR). Silavent AMIE offers a choice of manual or fully automatic control of the two main functions: extract fan boost speed operation and heat exchanger bypass (summer bypass). The extract fan boost speed is controlled by humidity level sensing or an external trigger such as a switch or push button. Humidity level sensing will change the fan speed from background to boost as the level of humidity changes. The external trigger will change the fan speed depending on its on/off condition. When switched off from on, a 15 minute run on timer is activated; subsequently the MVHR unit will return to background speed after 15 minutes unless the external trigger is operated during this time. Heat exchanger bypass (summer bypass – no heat recovery) is controlled by room temperature or time clock settings. In room temperature mode the bypass will change from off to on when the room temperature exceeds the set temperature. In time clock mode the bypass operation is controlled by pre-programmed or user programmed time settings.
IMPORTANT! This appliance does not add a heating or refrigerant cooling function to the MVHR system. The cooling function provided is the operation of the bypass mechanism of the MVHR unit, which diverts air around the heat exchanger. This appliance can be used by children aged from 8 years and above and persons with reduced physical, sensory or mental capabilities or lack of experience and knowledge if they have been given supervision or instruction concerning use of the appliance in a safe way and understand the hazards involved. Children shall not play with the appliance. Cleaning and user maintenance shall not be made by children without supervision. Before commencing any work read the following instructions carefully and ensure you have the necessary competency to complete the work safely.
WARNING: ISOLATE ELECTRICITY SUPPLY BEFORE STARTING WORK

Email: [email protected] 3 Website: www.polypipe.com/ventilation LAB1191R, Issue 1, May 2015
Contents 1. Battery access and user controls
1.1. Battery and keyboard access 1.2. Display, keyboard and status LED
2. First time installation
2.1. Installing batteries 2.2. Time and date adjustment
3. Selecting a pre-set programme 4. User defined programmes
4.1. Creating a user defined programme
5. Temperature and humidity settings 6. Operating modes
6.1. Automatic operation 6.2. Manual operation 6.3. Timed override mode 6.4. Key lock mode
7. Filter maintenance reminder 8. Pre-set programmes 9. Installation and electrical connections 10. Technical specifications

Email: [email protected] 4 Website: www.polypipe.com/ventilation LAB1191R, Issue 1, May 2015
1. Battery access and user controls1. Battery access and user controls1. Battery access and user controls1. Battery access and user controls 1.1 Battery and keyboard access 1.2 Display, keyboard and status LED
Minus key Plus key
Validation key & status LED
Navigation key (left)
Escape key Programme key
Navigation key (right)
Programme number
Programme for current day
Filter cleaning required
Ambient actual value being displayed
Batteries low - replace
Temperature/humidity value
Day of week
Time
Key lock & programme
icons
Control mode Heat recovery mode
Boost mode
Email: [email protected] 5 Website: www.polypipe.com/ventilation LAB1191R, Issue 1, May 2015
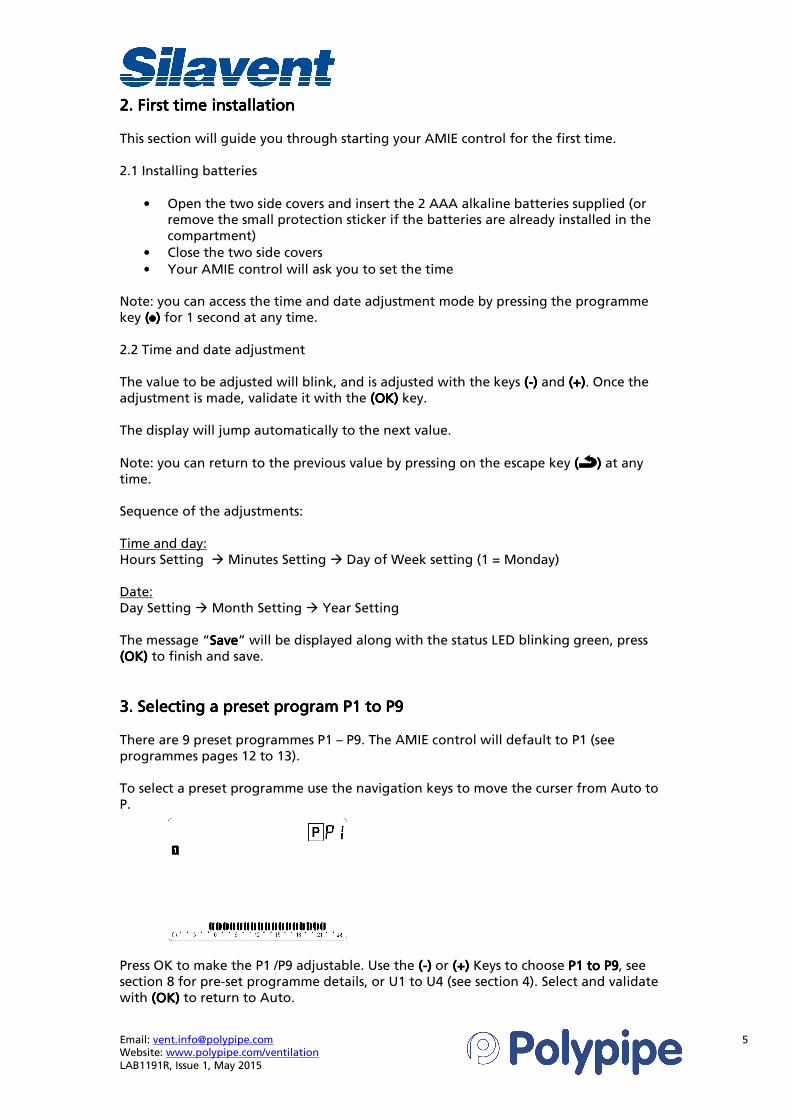
2.2.2.2. First First First First time itime itime itime installationnstallationnstallationnstallation This section will guide you through starting your AMIE control for the first time. 2.1 Installing batteries
• Open the two side covers and insert the 2 AAA alkaline batteries supplied (or remove the small protection sticker if the batteries are already installed in the compartment)
• Close the two side covers
• Your AMIE control will ask you to set the time Note: you can access the time and date adjustment mode by pressing the programme key (((( )))) for 1 second at any time. 2.2 Time and date adjustment The value to be adjusted will blink, and is adjusted with the keys ((((----) ) ) ) and ((((+)+)+)+). Once the adjustment is made, validate it with the (OK)(OK)(OK)(OK) key. The display will jump automatically to the next value.
Note: you can return to the previous value by pressing on the escape key (((( ) ) ) ) at any time. Sequence of the adjustments: Time and day: Hours Setting � Minutes Setting � Day of Week setting (1 = Monday) Date: Day Setting � Month Setting � Year Setting The message “SaveSaveSaveSave” will be displayed along with the status LED blinking green, press (OK) (OK) (OK) (OK) to finish and save.
3333. Se. Se. Se. Selecting a preset program P1 to P9lecting a preset program P1 to P9lecting a preset program P1 to P9lecting a preset program P1 to P9 There are 9 preset programmes P1 – P9. The AMIE control will default to P1 (see programmes pages 12 to 13). To select a preset programme use the navigation keys to move the curser from Auto to P. Press OK to make the P1 /P9 adjustable. Use the ((((----) ) ) ) or ((((+)+)+)+) Keys to choose P1 to P1 to P1 to P1 to P9P9P9P9, see section 8 for pre-set programme details, or U1 to U4 (see section 4). Select and validate with ((((OKOKOKOK)))) to return to Auto.

Email: [email protected] 6 Website: www.polypipe.com/ventilation LAB1191R, Issue 1, May 2015
4444.... User User User User ddddefinefinefinefined ped ped ped programmrogrammrogrammrogrammeeees s s s U1 to U4 U1 to U4 U1 to U4 U1 to U4 Pictograms to help programming will be displayed on the screen during programming.
First step of the day – heat recovery on, temperature controlled bypass activated What time do you require heat recovery to start? Temperature Temperature Temperature Temperature controlled heat recovercontrolled heat recovercontrolled heat recovercontrolled heat recovery set y set y set y set until next settinguntil next settinguntil next settinguntil next setting....
Intermediate step – heat recovery off, bypass activated What time do you require the comfort bypass to operate? Bypass set at this time until next settingBypass set at this time until next settingBypass set at this time until next settingBypass set at this time until next setting....
Intermediate step – heat recovery on, temperature controlled bypass activated What time do you require heat recovery to start again during the day? Temperature Temperature Temperature Temperature controlled heat recovery set controlled heat recovery set controlled heat recovery set controlled heat recovery set until next setting.until next setting.until next setting.until next setting.
Last step of the day – heat recovery off, bypass activated What time do you need heat recovery until? Bypass set at this time until Bypass set at this time until Bypass set at this time until Bypass set at this time until following morning.following morning.following morning.following morning. If the middle steps are not relevant or required, use the navigation keys to toggle and eliminate the mid sections. For example MMMMonday to Fridayonday to Fridayonday to Fridayonday to Friday
07:00 09:00 17:00 23:00 Saturday & SundaySaturday & SundaySaturday & SundaySaturday & Sunday
07:00 23:00 4.1 Creating user defined programmes Use the navigation keys to move from Auto to P and press (OK)(OK)(OK)(OK). Use the ((((----) ) ) ) or ((((+)+)+)+) Keys to choose P1 to P9, or U1 to U4U1 to U4U1 to U4U1 to U4
Email: [email protected] 7 Website: www.polypipe.com/ventilation LAB1191R, Issue 1, May 2015
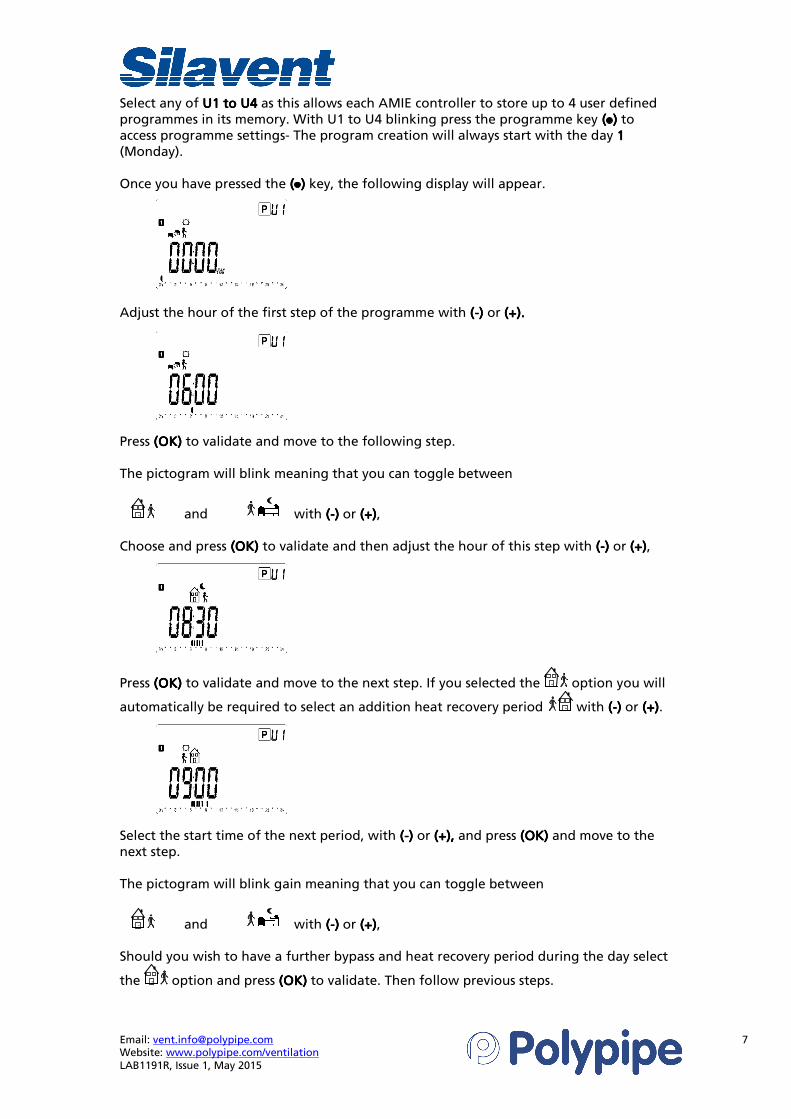
Select any of U1 to U4U1 to U4U1 to U4U1 to U4 as this allows each AMIE controller to store up to 4 user defined programmes in its memory. With U1 to U4 blinking press the programme key (((( ) ) ) ) to access programme settings- The program creation will always start with the day 1111 (Monday). Once you have pressed the (((( ) ) ) ) key, the following display will appear. Adjust the hour of the first step of the programme with ((((----) ) ) ) or (+).(+).(+).(+). Press (OK) (OK) (OK) (OK) to validate and move to the following step. The pictogram will blink meaning that you can toggle between
and with ((((----) ) ) ) or (+)(+)(+)(+), Choose and press (OK) (OK) (OK) (OK) to validate and then adjust the hour of this step with ((((----) ) ) ) or (+)(+)(+)(+),
Press (OK)(OK)(OK)(OK) to validate and move to the next step. If you selected the option you will
automatically be required to select an addition heat recovery period with ((((----) ) ) ) or (+)(+)(+)(+). Select the start time of the next period, with ((((----) ) ) ) or (+),(+),(+),(+), and press (OK)(OK)(OK)(OK) and move to the next step. The pictogram will blink gain meaning that you can toggle between
and with ((((----) ) ) ) or (+)(+)(+)(+), Should you wish to have a further bypass and heat recovery period during the day select
the option and press (OK)(OK)(OK)(OK) to validate. Then follow previous steps.

Email: [email protected] 8 Website: www.polypipe.com/ventilation LAB1191R, Issue 1, May 2015
To start the last period of heat recovery in the day select and press (OK)(OK)(OK)(OK) to validate. Note: the time will automatically advance by 30 minutes (minimum switching period). In the example below the start time of the last period of heat recovery is 18:00. Adjust the hour of this step with ((((----) ) ) ) or (+)(+)(+)(+).
Press (OK) (OK) (OK) (OK) to validate and move to finish the programme setting of day 1 (Monday). You can now choose to copy the program just created to subsequent days. To copy the programme to the next day press (OK). (OK). (OK). (OK). Should you wish to set a different programme for the next day use select no with ((((----) ) ) ) or (+),(+),(+),(+), and press (OK).(OK).(OK).(OK). Selecting no requires the above programming steps to be repeated for the next day. When all 7 days are programmed the message “SaveSaveSaveSave” with the blinking green LED will be displayed, press (OK) (OK) (OK) (OK) to save and return to Auto mode.
Note: you can return to the previous value by pressing on the escape key (((( ) ) ) ) at any time.

Email: [email protected] 9 Website: www.polypipe.com/ventilation LAB1191R, Issue 1, May 2015
5. Temperature and humidity settings5. Temperature and humidity settings5. Temperature and humidity settings5. Temperature and humidity settings To adjust the temperature or humidity set point press the ((((----) ) ) ) or ((((+) +) +) +) key from either the manual or automatic mode. The value to be adjusted will blink, and is adjusted with the keys ((((----) ) ) ) and ((((+)+)+)+), once the adjustment is made, validate it with the (OK)(OK)(OK)(OK) key. The display will change to first allow the temperature set point to be changed (the temperature at which the bypass function will operate). If no change to the temperature set point, validate it with the (OK)(OK)(OK)(OK) key. The display will now change to allow the humidity set point to be changed (the humidity level at which the boost function will operate).
6. Operating modes6. Operating modes6. Operating modes6. Operating modes The AMIE control has three selectable operating modes. Use the navigation keys to move the cursor between modes. Select the mode with the (OK)(OK)(OK)(OK) key. 6.1 Automatic operation When selected to automatic the AMIE control will operate the bypass and boost functions of the MVHR based on the temperature and humidity set points, and the programme selected (P1 to P9 or U1 to U4). During normal automatic operation the display will show the time, temperature and current operating status. The current ambient humidity level can be viewed by pressing
on the escape key (((( )))). 6.2 Manual operation When selected to manual the AMIE control will operate the bypass and boost functions of the MVHR based on the temperature and humidity set points. During normal manual operation the display will show the time, temperature and current operating status. The current ambient humidity level can be viewed by pressing
on the escape key (((( )))).
Manual
Timed override Automatic*
* Selectable stored programmes for use with Auto mode (see sections 3 & 4)

Email: [email protected] 10 Website: www.polypipe.com/ventilation LAB1191R, Issue 1, May 2015
6.3 Timed override mode When selected to timed override the AMIE control will operate the bypass and boost functions of the MVHR based on the humidity set point and override temperature set point, for a selected period of time between 1 hour and 44 days. During normal manual operation the display will show the time remaining, temperature and current operating status. The current ambient humidity level can be viewed by
pressing on the escape key (((( )))). To activate timed override press the ((((----) ) ) ) or ((((+) +) +) +) key immediately after pressing the (OK)(OK)(OK)(OK) key to enter the mode. The temperature set point value will blink, and is adjusted with the keys ((((----) ) ) ) and ((((+)+)+)+). Once the adjustment is made, validate it with the (OK)(OK)(OK)(OK) key. The time value (no) will blink, and is adjusted with the keys ((((----) ) ) ) and ((((+)+)+)+). Note: timed override mode can be edited by pressing the ((((----) ) ) ) or ((((+) +) +) +) key or exited by pressing the navigation keys to change the operating mode. The operating mode will return to automatic when the time elapses. 6.4 Key lock mode Use this function to prevent changes to the settings
To active the function, hold the escape key (((( ) ) ) ) and press on the programme key (((( )))) at the same time. The logo will now be displayed on the screen. Repeat the same procedure to unlock.

Email: [email protected] 11 Website: www.polypipe.com/ventilation LAB1191R, Issue 1, May 2015
7. Filter maintenance reminder7. Filter maintenance reminder7. Filter maintenance reminder7. Filter maintenance reminder We recommend that the filters of your MVHR unit are inspected and maintained on a regular basis to ensure optimum operation. The frequency of cleaning will vary from property to property and is dependent on a number of factors specific to the property. We recommend the filters are inspected every two to three months until the required frequency of inspection and maintenance can be determined. See MVHR operating instructions for details of filter removal and refitting. The AMIE control has the option to provide a filter cleaning reminder every 3,000 hours (approximately 4 months). Contact our technical department on 08443 715523 for more information about activating this function. If selected the display will show a filter cleaning message on screen and the (OK)(OK)(OK)(OK) key will illuminate red. Once the filters have been inspected and cleaned, validate it with the (OK)(OK)(OK)(OK) key. The AMIE control will display a filter change reminder every 9,000 hours (approximately 12 months). The display will show a filter change message on screen and the (OK(OK(OK(OK)))) key will illuminate red. Note: if the filters have been regularly maintained, the requirement to replace every 9,000 hours is reduced. Filters should be cleaned every time they are removed and inspected. Once the filters have been inspected and cleaned or replaced, validate it with the (OK)(OK)(OK)(OK) key.

Email: [email protected] 12 Website: www.polypipe.com/ventilation LAB1191R, Issue 1, May 2015
8. Pre8. Pre8. Pre8. Pre----set programmesset programmesset programmesset programmes AMIE is based on a different philosophy to other temperature controlled bypass systems.
• Senses room temperature and activates the bypass function according to the set point commanded by the user (heat recovery on, temperature controlled bypass activated)
• Features a fully programmable time controlled bypass function. This allows the user to command the bypass to activate irrespective of temperature – perfect for night time ventilation (heat recovery on, temperature controlled bypass activated)
• Is supplied with a number of pre-set bypass programmes. These provide the user with quick and easy access to a number of time controlled bypass options
Looking at the pre-set programmes (next page) it can be seen that the time control has a resolution of 30 minutes. Where the time segment is coloured black, the bypass function is temperature controlled. Where the segment is clear, the bypass function is time controlled. Taking P1 as an example, night cooling (MVHR unit in bypass mode) will start at 10pm and stop at 5am. This means that the home will be supplied with cooler air through the night, as the external air temperature falls, making a more comfortable environment for the occupants to get a good night’s sleep. In addition the fabric of the property will also be cooled, which means a lower initial temperature prior to the next day’s temperature increase. Pre-set programme options.
• P1 – Night cooling Activates the bypass during typically cooler night time hours (7 hours)
• P2 – Extended night cooling 1 Activates the bypass for a longer period during night time hours (12 hours)
• P3 – Extended night cooling 2 As P2 but further extended (14 hours)
• P4 – Reduced heat recovery 1 Activates the bypass during periods of typically higher activity where heat recovery is not required (can be used in conjunction with boosted fan speed – decrease humidity setting)
• P5 – Reduced heat recovery 2 As P4 but with revised weekend hours
• P6 – Daytime bypass As P4 but with revised hours
• P7 – Out of hours cooling (shop, office) As P1 but with revised hours (typical office working hours)
• P8 – Constant bypass Activates the bypass continually, no heat recovery at any time or temperature
• P9 – Temperature control bypass Activates the bypass dependent on user set temperature, no timed bypass operation
IMPORTANT! This appliance does not add a heating or refrigerant cooling function to the MVHR system. The cooling function provided is the operation of the bypass mechanism of the MVHR unit, which diverts air around the heat exchanger.

Email: [email protected] 13 Website: www.polypipe.com/ventilation LAB1191R, Issue 1, May 2015

Email: [email protected] 14 Website: www.polypipe.com/ventilation LAB1191R, Issue 1, May 2015
9. Installation and electrical connections9. Installation and electrical connections9. Installation and electrical connections9. Installation and electrical connections WARNING: ISOLATE ELECTRICITY SUPPLY BEFORE STARTING WORK WARNING: DO NOT APPLY EXTERNAL VOLTAGE TO TERMINALS
MARKED All wiring must be in accordance with the current IEE Wiring Regulations BS7671. The electrical installation should be inspected and tested by a suitably qualified person after completion. When installing the appliance, care should be taken not to damage any hidden utilities. The installer is responsible for the installation and electrical connection of the system on site. It is the responsibility of the installer to ensure that the equipment is safely and securely installed and left only when electrically and mechanically safe. All regulations and requirements must be strictly followed to prevent hazards to life and property, both during and after installation and any subsequent servicing or maintenance.
Email: [email protected] 15 Website: www.polypipe.com/ventilation LAB1191R, Issue 1, May 2015
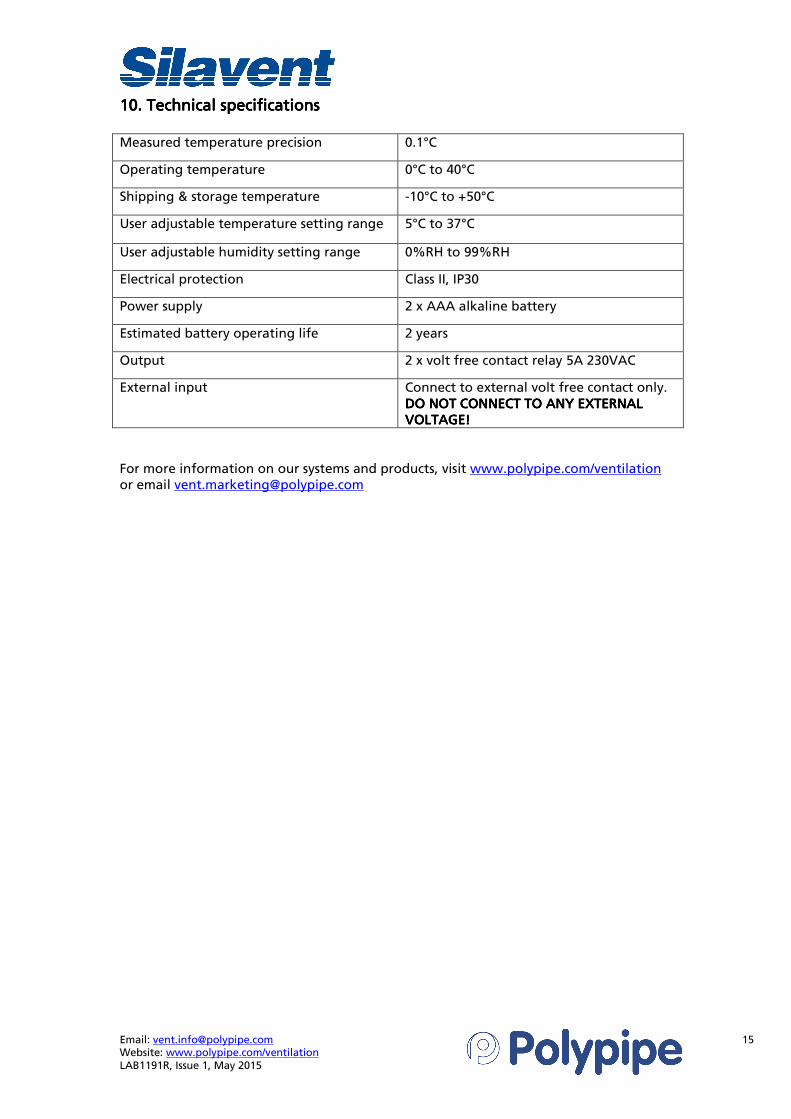
10. Technical specifications10. Technical specifications10. Technical specifications10. Technical specifications Measured temperature precision 0.1°C
Operating temperature 0°C to 40°C
Shipping & storage temperature -10°C to +50°C
User adjustable temperature setting range 5°C to 37°C
User adjustable humidity setting range 0%RH to 99%RH
Electrical protection Class II, IP30
Power supply 2 x AAA alkaline battery
Estimated battery operating life 2 years
Output 2 x volt free contact relay 5A 230VAC
External input Connect to external volt free contact only. DO NOT CONNECT TO ANY EXTERNAL DO NOT CONNECT TO ANY EXTERNAL DO NOT CONNECT TO ANY EXTERNAL DO NOT CONNECT TO ANY EXTERNAL VOLTAGE!VOLTAGE!VOLTAGE!VOLTAGE!
For more information on our systems and products, visit www.polypipe.com/ventilation or email [email protected]

Email: [email protected] 16 Website: www.polypipe.com/ventilation LAB1191R, Issue 1, May 2015
Polypipe VentilationPolypipe VentilationPolypipe VentilationPolypipe Ventilation Sandall Stones Road
Kirk Sandall Industrial Estate Kirk Sandall, Doncaster
DN3 1QR
Email: [email protected] Web: www.polypipe.com/ventilation
Tel: +44 (0)8443 715523 Fax: +44 (0)8443 715524
International Tel: +44 (0)1302 348878 International Fax: +44 (0)1302 348879