Embed Size (px)
Citation preview

Smart Recovery User’s Manual
Second Edition, August 2014
www.moxa.com/product
© 2014 Moxa Inc. All rights reserved.
Smart Recovery User’s Manual
The software described in this manual is furnished under a license agreement and may be used only in accordance with the terms of that agreement.
Copyright Notice
© 2014 Moxa Inc. All rights reserved.
Trademarks
The Moxa logo is a registered trademark of Moxa Inc. All other trademarks or registered marks in this manual belong to their respective manufacturers.
Disclaimer
Information in this document is subject to change without notice and does not represent a commitment on the part of Moxa. Moxa provides this document as is, without warranty of any kind, either expressed or implied, including, but not limited to, its particular purpose. Moxa reserves the right to make improvements and/or changes to this manual, or to the products and/or the programs described in this manual, at any time. Information provided in this manual is intended to be accurate and reliable. However, Moxa assumes no responsibility for its use, or for any infringements on the rights of third parties that may result from its use. This product might include unintentional technical or typographical errors. Changes are periodically made to the information herein to correct such errors, and these changes are incorporated into new editions of the publication.
Technical Support Contact Information
www.moxa.com/support
Moxa Americas Toll-free: 1-888-669-2872 Tel: +1-714-528-6777 Fax: +1-714-528-6778
Moxa China (Shanghai office) Toll-free: 800-820-5036 Tel: +86-21-5258-9955 Fax: +86-21-5258-5505
Moxa Europe Tel: +49-89-3 70 03 99-0 Fax: +49-89-3 70 03 99-99
Moxa Asia-Pacific Tel: +886-2-8919-1230 Fax: +886-2-8919-1231
Moxa India Tel: +91-80-4172-9088 Fax: +91-80-4132-1045
Table of Contents
1. Introduction ...................................................................................................................................... 1-1 System Requirements ......................................................................................................................... 1-2
Hardware ................................................................................................................................... 1-2 Operating System ....................................................................................................................... 1-2 Driver ........................................................................................................................................ 1-2 Installing the Visual Basic C++ Libraries ........................................................................................ 1-2
2. Installation and Uninstallation .......................................................................................................... 2-1 Acquiring Moxa Smart Recovery ........................................................................................................... 2-2 Installing Moxa Smart Recovery ........................................................................................................... 2-2 Uninstalling Smart Recovery ................................................................................................................ 2-5
Disabling the Watchdog Timer ....................................................................................................... 2-5 3. Getting Started.................................................................................................................................. 3-1
Launching Smart Recovery .................................................................................................................. 3-2 The Home Interface ............................................................................................................................ 3-3
4. Making Backup Images and Recovery Keys ....................................................................................... 4-1 Installing the Recovery Environment ..................................................................................................... 4-2
Installation of the Recovery Environment ....................................................................................... 4-2 Updating or Creating a Backup Image ............................................................................................ 4-2
Deleting a Saved System Image ........................................................................................................... 4-6 5. Recovery Automation Scenarios ........................................................................................................ 5-1
Manual Recovery Using a USB Key ........................................................................................................ 5-2 Fully Automated Recovery ................................................................................................................... 5-2 User-Initiated Recovery ....................................................................................................................... 5-3
6. Recovery Setup and Execution .......................................................................................................... 6-1 Smart Recovery Basics ........................................................................................................................ 6-2
Enabling Recovery Completion Notifications (Beeps) ........................................................................ 6-3 Setting Up a USB Key for Manual Recoveries .......................................................................................... 6-4 Setting Up a Fully Automated Recovery ................................................................................................. 6-7
Configuring a Fully Automated Recovery ........................................................................................ 6-7 Carrying Out a User-Initiated Recovery ............................................................................................... 6-10
7. Support Parameters .......................................................................................................................... 7-1 Support Parameters ............................................................................................................................ 7-2
8. BIOS Information .............................................................................................................................. 8-1 BIOS Options: The Watchdog & System Defaults .................................................................................... 8-2 Smart Recovery Command Line Notifications .......................................................................................... 8-3
1 1. Introduction
Moxa’s Smart Recovery is an automated platform rescue utility that allows users to easily back up and recover a device’s operating system and all installed applications and scripts. Most importantly, it is capable of full automation in a number of distinct configurations that may be applied to any industrial automation need.
Currently, Moxa Smart Recovery is only available for Moxa x86-Windows platforms.
The following topics are covered in this chapter:
System Requirements
Hardware
Operating System
Driver
Installing the Visual Basic C++ Libraries
Smart Recovery User's Manual Introduction
1-2
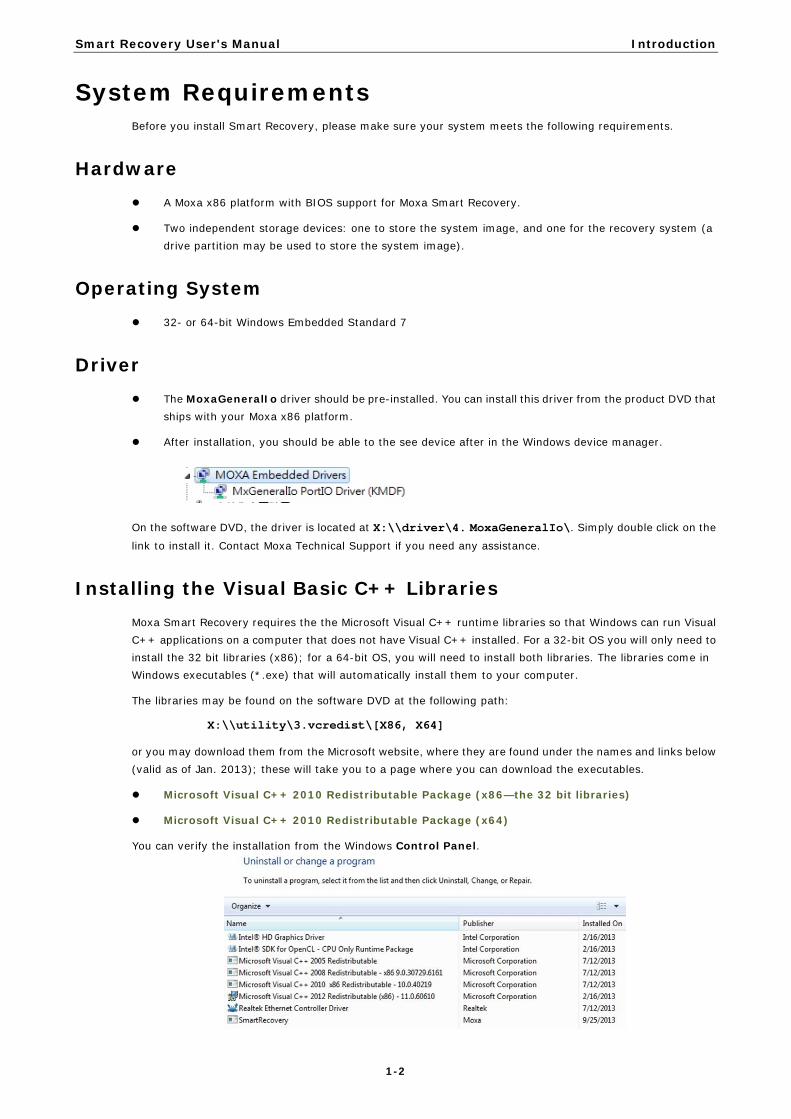
System Requirements Before you install Smart Recovery, please make sure your system meets the following requirements.
Hardware A Moxa x86 platform with BIOS support for Moxa Smart Recovery.
Two independent storage devices: one to store the system image, and one for the recovery system (a drive partition may be used to store the system image).
Operating System 32- or 64-bit Windows Embedded Standard 7
Driver The MoxaGeneralIo driver should be pre-installed. You can install this driver from the product DVD that
ships with your Moxa x86 platform.
After installation, you should be able to the see device after in the Windows device manager.
On the software DVD, the driver is located at X:\\driver\4. MoxaGeneralIo\. Simply double click on the
link to install it. Contact Moxa Technical Support if you need any assistance.
Installing the Visual Basic C++ Libraries Moxa Smart Recovery requires the the Microsoft Visual C++ runtime libraries so that Windows can run Visual C++ applications on a computer that does not have Visual C++ installed. For a 32-bit OS you will only need to install the 32 bit libraries (x86); for a 64-bit OS, you will need to install both libraries. The libraries come in Windows executables (*.exe) that will automatically install them to your computer.
The libraries may be found on the software DVD at the following path:
X:\\utility\3.vcredist\[X86, X64]
or you may download them from the Microsoft website, where they are found under the names and links below (valid as of Jan. 2013); these will take you to a page where you can download the executables.
Microsoft Visual C++ 2010 Redistributable Package (x86—the 32 bit libraries)
Microsoft Visual C++ 2010 Redistributable Package (x64)
You can verify the installation from the Windows Control Panel.
2 2. Installation and Uninstallation
This chapter describes how to install and uninstall Moxa Smart Recovery.
The following topics are covered in this chapter:
Acquiring Moxa Smart Recovery
Installing Moxa Smart Recovery
Uninstalling Smart Recovery
Disabling the Watchdog Timer
Smart Recovery User's Manual Installation and Uninstallation
2-2
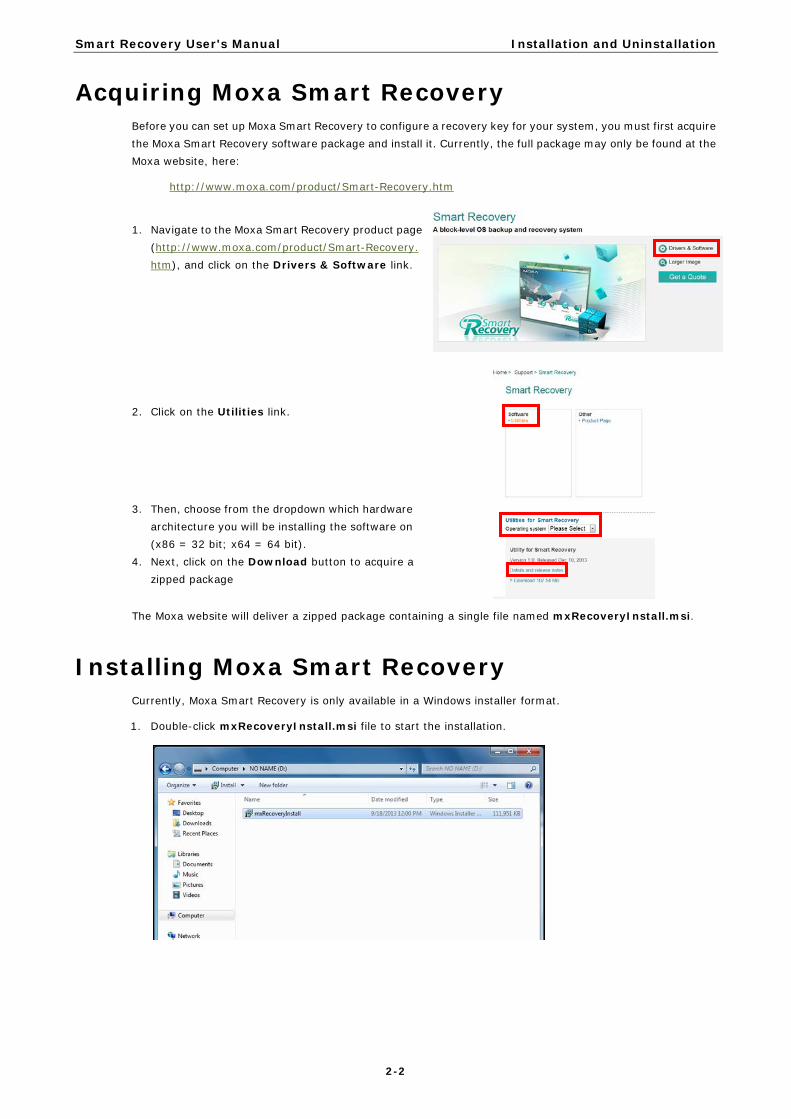
Acquiring Moxa Smart Recovery Before you can set up Moxa Smart Recovery to configure a recovery key for your system, you must first acquire the Moxa Smart Recovery software package and install it. Currently, the full package may only be found at the Moxa website, here:
http://www.moxa.com/product/Smart-Recovery.htm
1. Navigate to the Moxa Smart Recovery product page
(http://www.moxa.com/product/Smart-Recovery.htm), and click on the Drivers & Software link.
2. Click on the Utilities link.
3. Then, choose from the dropdown which hardware architecture you will be installing the software on (x86 = 32 bit; x64 = 64 bit).
4. Next, click on the Download button to acquire a zipped package
The Moxa website will deliver a zipped package containing a single file named mxRecoveryInstall.msi.
Installing Moxa Smart Recovery Currently, Moxa Smart Recovery is only available in a Windows installer format.
1. Double-click mxRecoveryInstall.msi file to start the installation.
Smart Recovery User's Manual Installation and Uninstallation
2-3
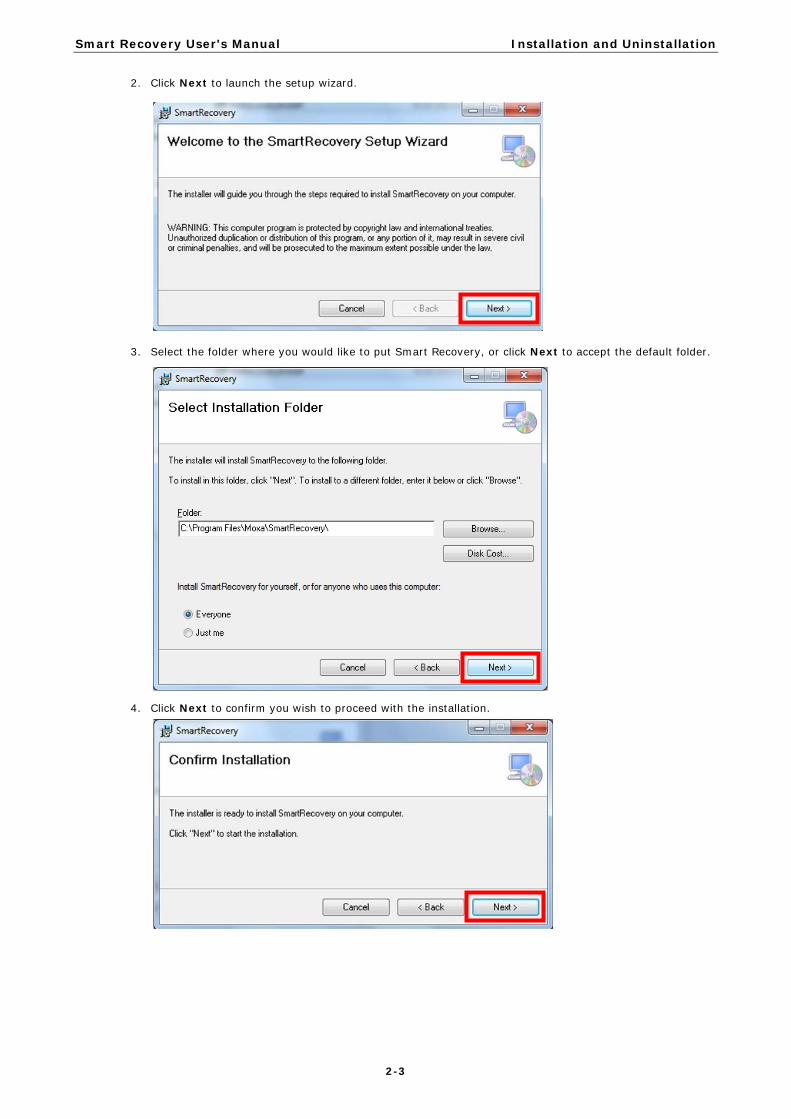
2. Click Next to launch the setup wizard.
3. Select the folder where you would like to put Smart Recovery, or click Next to accept the default folder.
4. Click Next to confirm you wish to proceed with the installation.

Smart Recovery User's Manual Installation and Uninstallation
2-4
5. Wait while Smart Recovery is being installed.
6. When finished, click Close to complete.
7. You must restart your computer before Smart Recovery may be used. Click Yes to restart your system immediately, or No to wait and restart it later.

Smart Recovery User's Manual Installation and Uninstallation
2-5
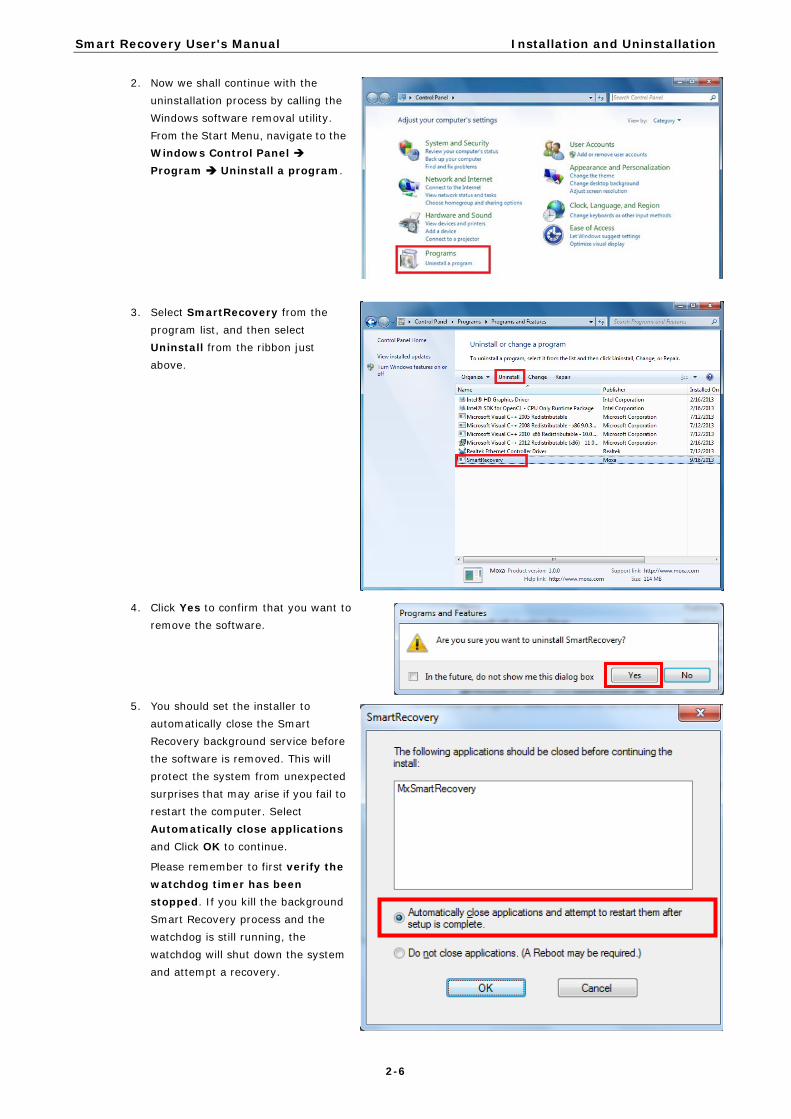
Uninstalling Smart Recovery Use the Windows Uninstall utility to remove Smart Recovery from your system.
1. If the computer from which you are removing Smart Recovery is configured for Fully Automated Recovery mode, then you must first disable the BIOS level watchdog timer before removing the user-space Smart Recovery software and processes. There are two ways to kill the watchdog: either by disabling Smart Recovery (or reconfiguring it for another recovery mode), or by resetting it at the BIOS level.
Disabling the Watchdog Timer Instructions for disabling the watchdog from the BIOS may be found elsewhere in this manual, in the chapter 8, under the section called BIOS Options: The Watchdog and System Defaults. To disable Smart Recovery from within the configuration and setup interface, follow the steps below:
1. Launch Smart Recovery, and then click Recovery.
2. The Smart Recovery control and setup screen will appear. Select Disabled from within the Recover Method :
3. Click Apply. Smart Recovery will now be disabled, and the watchdog timer process will be killed.
Smart Recovery User's Manual Installation and Uninstallation
2-6
2. Now we shall continue with the uninstallation process by calling the Windows software removal utility. From the Start Menu, navigate to the Windows Control Panel Program Uninstall a program.
3. Select SmartRecovery from the program list, and then select Uninstall from the ribbon just above.
4. Click Yes to confirm that you want to remove the software.
5. You should set the installer to automatically close the Smart Recovery background service before the software is removed. This will protect the system from unexpected surprises that may arise if you fail to restart the computer. Select Automatically close applications and Click OK to continue.
Please remember to first verify the watchdog timer has been stopped. If you kill the background Smart Recovery process and the watchdog is still running, the watchdog will shut down the system and attempt a recovery.
Smart Recovery User's Manual Installation and Uninstallation
2-7
WARNING
If you are uninstalling Smart Recovery from a machine that has been configured for Fully Automated Recovery mode, then you must first disable the watchdog timer before uninstalling the software package. The watchdog runs at the BIOS level, and will continue to check if the Smart Recovery service is running in the background even after the software has been removed. If the watchdog is not stopped before the background Smart Recovery service is killed, it will register the disappearance of the Smart Recovery service as a system hang, and will initiate a system restart and attempt a recovery procedure. There are two ways to disable the watchdog:
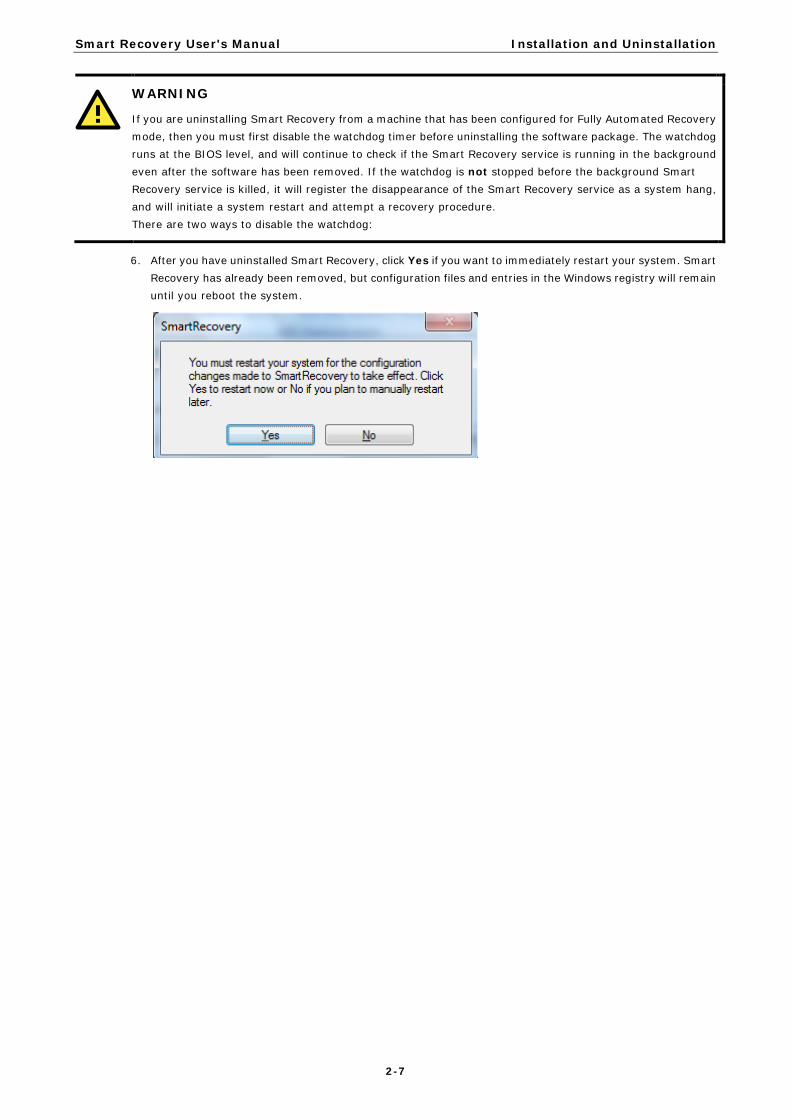
6. After you have uninstalled Smart Recovery, click Yes if you want to immediately restart your system. Smart Recovery has already been removed, but configuration files and entries in the Windows registry will remain until you reboot the system.

3 3. Getting Started
This chapter describes how to launch Smart Recovery and how to back up and recover the system.
The following topics are covered in this chapter:
Launching Smart Recovery
The Home Interface
Smart Recovery User's Manual Getting Started
3-2
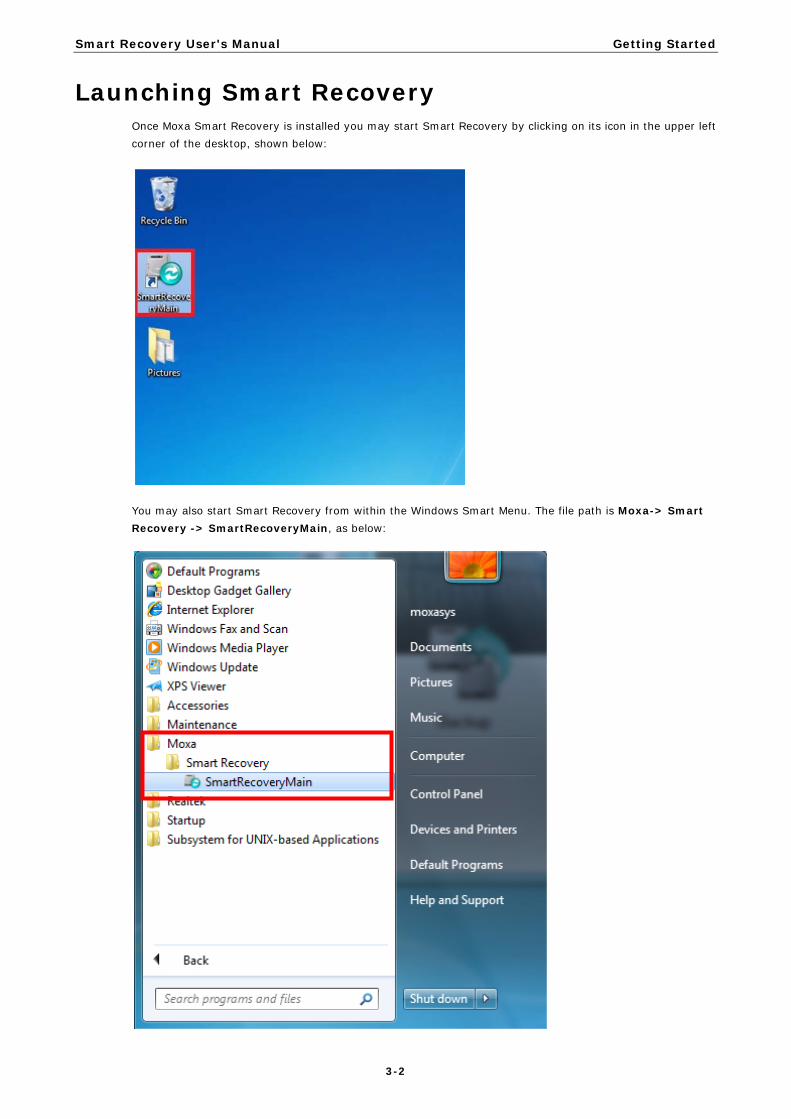
Launching Smart Recovery Once Moxa Smart Recovery is installed you may start Smart Recovery by clicking on its icon in the upper left corner of the desktop, shown below:
You may also start Smart Recovery from within the Windows Smart Menu. The file path is Moxa-> Smart Recovery -> SmartRecoveryMain, as below:
Smart Recovery User's Manual Getting Started
3-3
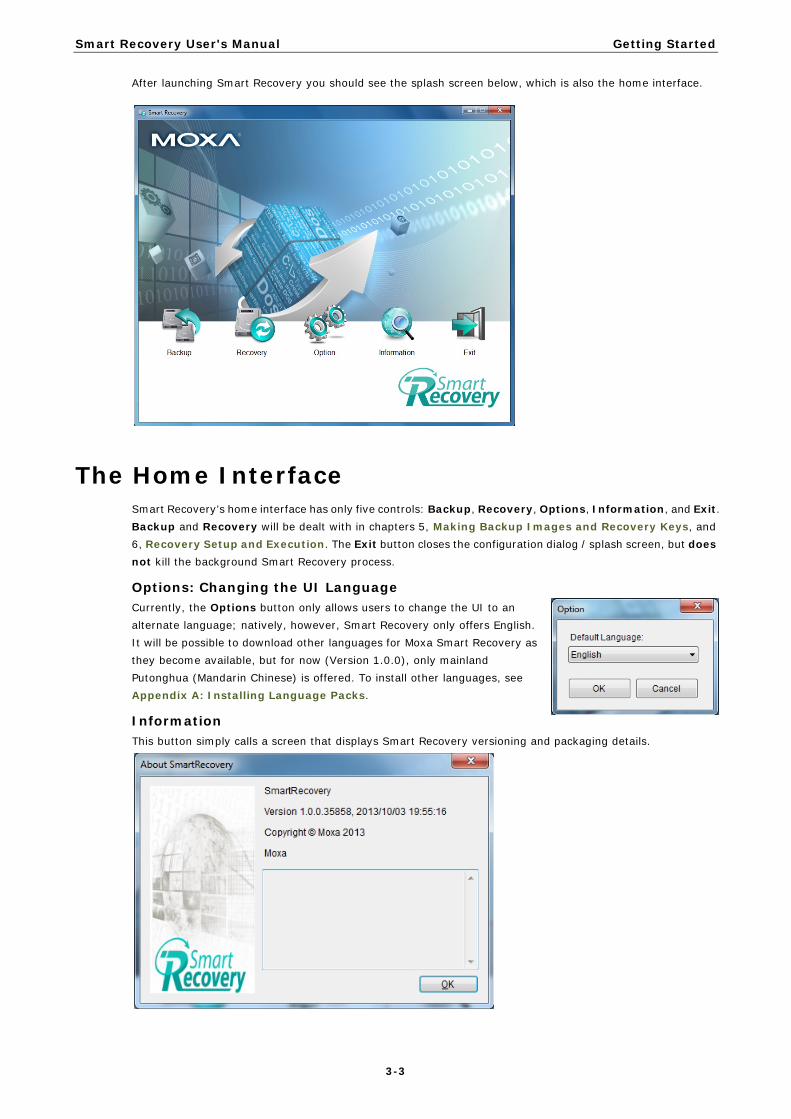
After launching Smart Recovery you should see the splash screen below, which is also the home interface.
The Home Interface Smart Recovery’s home interface has only five controls: Backup, Recovery, Options, Information, and Exit. Backup and Recovery will be dealt with in chapters 5, Making Backup Images and Recovery Keys, and 6, Recovery Setup and Execution. The Exit button closes the configuration dialog / splash screen, but does not kill the background Smart Recovery process.
Options: Changing the UI Language Currently, the Options button only allows users to change the UI to an alternate language; natively, however, Smart Recovery only offers English. It will be possible to download other languages for Moxa Smart Recovery as they become available, but for now (Version 1.0.0), only mainland Putonghua (Mandarin Chinese) is offered. To install other languages, see Appendix A: Installing Language Packs.
Information This button simply calls a screen that displays Smart Recovery versioning and packaging details.
4 4. Making Backup Images and Recovery Keys
This section takes you through the first step in setting up Smart Recovery: creating the recovery environment on a USB drive, and then saving a copy of the current system, to be used to recover the system later on.
The following topics are covered in this chapter:
Installing the Recovery Environment
Installation of the Recovery Environment
Updating or Creating a Backup Image
Deleting a Saved System Image
Smart Recovery User's Manual Making Backup Images and Recovery Keys
4-2
Installing the Recovery Environment Before you can use Smart Recovery you must first install the live recovery system on a bootable device. Removable USB, CompactFlash, or a second SATA drive (SSD or HDD) as well as an internal DOM may all be used as the live Smart Recovery device. Please remember that there can only be a single Smart Recovery environment per device; the BIOS will get confused if two systems are installed on the same device.
At the same time as you create the recovery environment, Smart Recovery will create and store a backup image of your system; if you have already installed the recovery environment and merely wish to create a new backup image then follow the instructions below.
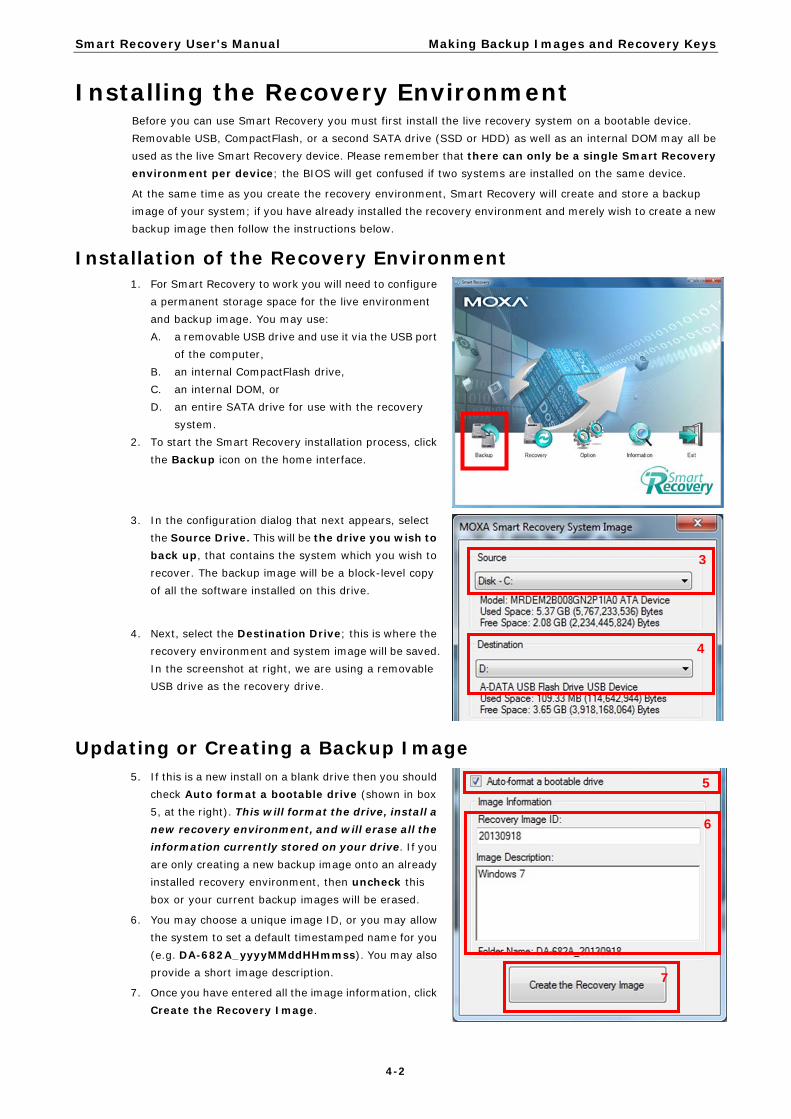
Installation of the Recovery Environment 1. For Smart Recovery to work you will need to configure
a permanent storage space for the live environment and backup image. You may use: A. a removable USB drive and use it via the USB port
of the computer, B. an internal CompactFlash drive, C. an internal DOM, or D. an entire SATA drive for use with the recovery
system. 2. To start the Smart Recovery installation process, click
the Backup icon on the home interface.
3. In the configuration dialog that next appears, select the Source Drive. This will be the drive you wish to back up, that contains the system which you wish to recover. The backup image will be a block-level copy of all the software installed on this drive.
4. Next, select the Destination Drive; this is where the recovery environment and system image will be saved. In the screenshot at right, we are using a removable USB drive as the recovery drive.
Updating or Creating a Backup Image 5. If this is a new install on a blank drive then you should
check Auto format a bootable drive (shown in box 5, at the right). This will format the drive, install a new recovery environment, and will erase all the information currently stored on your drive. If you are only creating a new backup image onto an already installed recovery environment, then uncheck this box or your current backup images will be erased.
6. You may choose a unique image ID, or you may allow the system to set a default timestamped name for you (e.g. DA-682A_yyyyMMddHHmmss). You may also provide a short image description.
7. Once you have entered all the image information, click Create the Recovery Image.
5
6
7
3
4
Smart Recovery User's Manual Making Backup Images and Recovery Keys
4-3
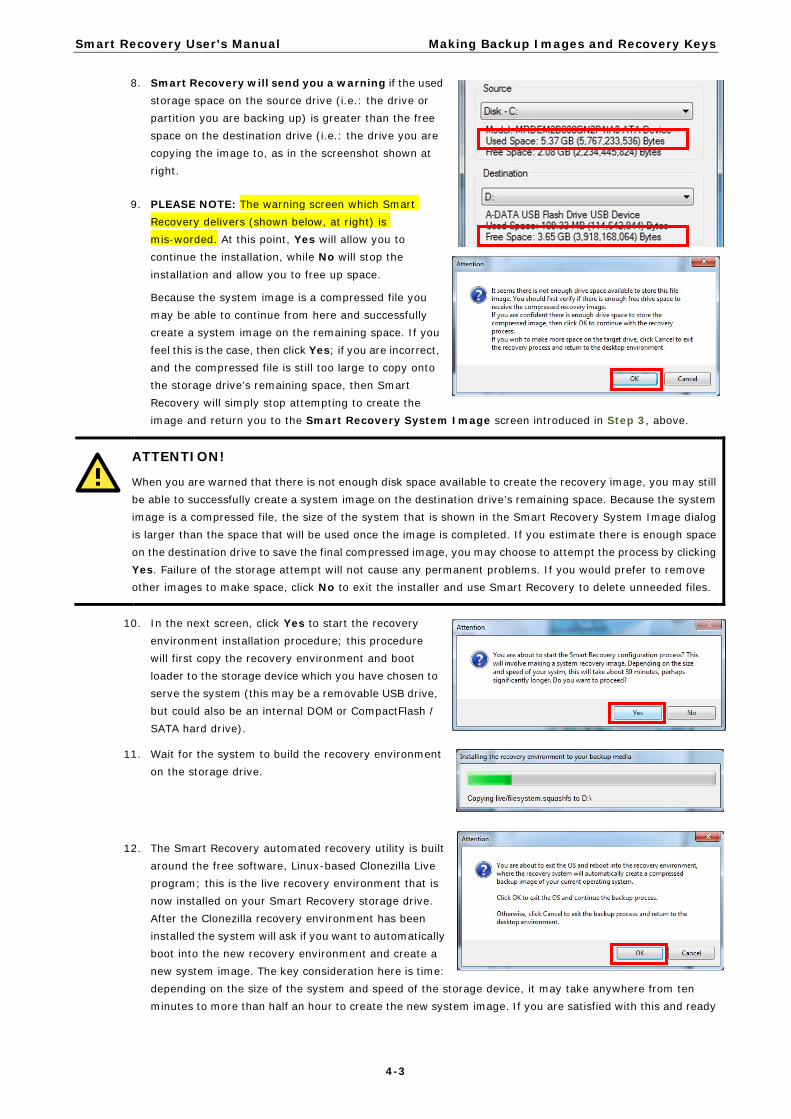
8. Smart Recovery will send you a warning if the used storage space on the source drive (i.e.: the drive or partition you are backing up) is greater than the free space on the destination drive (i.e.: the drive you are copying the image to, as in the screenshot shown at right.
9. PLEASE NOTE: The warning screen which Smart Recovery delivers (shown below, at right) is mis-worded. At this point, Yes will allow you to continue the installation, while No will stop the installation and allow you to free up space.
Because the system image is a compressed file you may be able to continue from here and successfully create a system image on the remaining space. If you feel this is the case, then click Yes; if you are incorrect, and the compressed file is still too large to copy onto the storage drive’s remaining space, then Smart Recovery will simply stop attempting to create the image and return you to the Smart Recovery System Image screen introduced in Step 3, above.
ATTENTION!
When you are warned that there is not enough disk space available to create the recovery image, you may still be able to successfully create a system image on the destination drive’s remaining space. Because the system image is a compressed file, the size of the system that is shown in the Smart Recovery System Image dialog is larger than the space that will be used once the image is completed. If you estimate there is enough space on the destination drive to save the final compressed image, you may choose to attempt the process by clicking Yes. Failure of the storage attempt will not cause any permanent problems. If you would prefer to remove other images to make space, click No to exit the installer and use Smart Recovery to delete unneeded files.
10. In the next screen, click Yes to start the recovery environment installation procedure; this procedure will first copy the recovery environment and boot loader to the storage device which you have chosen to serve the system (this may be a removable USB drive, but could also be an internal DOM or CompactFlash / SATA hard drive).
11. Wait for the system to build the recovery environment on the storage drive.
12. The Smart Recovery automated recovery utility is built around the free software, Linux-based Clonezilla Live program; this is the live recovery environment that is now installed on your Smart Recovery storage drive. After the Clonezilla recovery environment has been installed the system will ask if you want to automatically boot into the new recovery environment and create a new system image. The key consideration here is time: depending on the size of the system and speed of the storage device, it may take anywhere from ten minutes to more than half an hour to create the new system image. If you are satisfied with this and ready
Smart Recovery User's Manual Making Backup Images and Recovery Keys
4-4
to create the recovery image, click Yes here to reboot the system and enter the recovery environment. Once the system restarts, Smart Recovery will begin backing up the system.
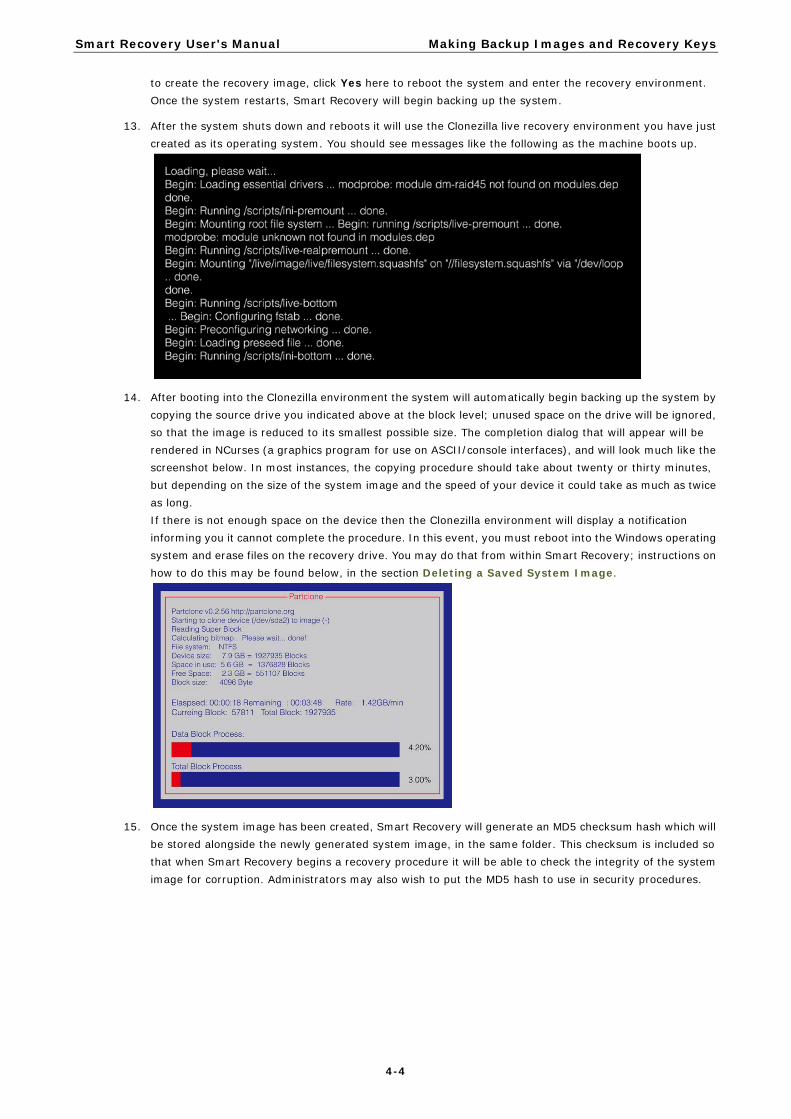
13. After the system shuts down and reboots it will use the Clonezilla live recovery environment you have just created as its operating system. You should see messages like the following as the machine boots up.
14. After booting into the Clonezilla environment the system will automatically begin backing up the system by copying the source drive you indicated above at the block level; unused space on the drive will be ignored, so that the image is reduced to its smallest possible size. The completion dialog that will appear will be rendered in NCurses (a graphics program for use on ASCII/console interfaces), and will look much like the screenshot below. In most instances, the copying procedure should take about twenty or thirty minutes, but depending on the size of the system image and the speed of your device it could take as much as twice as long. If there is not enough space on the device then the Clonezilla environment will display a notification informing you it cannot complete the procedure. In this event, you must reboot into the Windows operating system and erase files on the recovery drive. You may do that from within Smart Recovery; instructions on how to do this may be found below, in the section Deleting a Saved System Image.
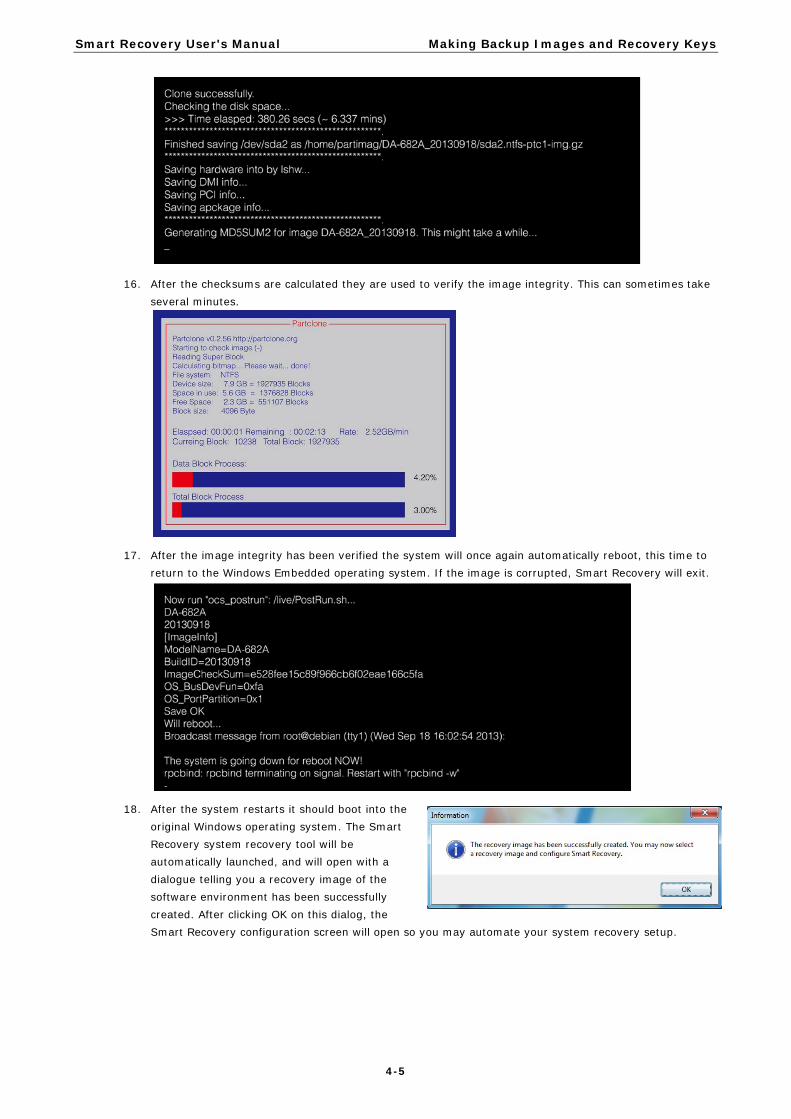
15. Once the system image has been created, Smart Recovery will generate an MD5 checksum hash which will be stored alongside the newly generated system image, in the same folder. This checksum is included so that when Smart Recovery begins a recovery procedure it will be able to check the integrity of the system image for corruption. Administrators may also wish to put the MD5 hash to use in security procedures.
Smart Recovery User's Manual Making Backup Images and Recovery Keys
4-5
16. After the checksums are calculated they are used to verify the image integrity. This can sometimes take several minutes.
17. After the image integrity has been verified the system will once again automatically reboot, this time to return to the Windows Embedded operating system. If the image is corrupted, Smart Recovery will exit.
18. After the system restarts it should boot into the original Windows operating system. The Smart Recovery system recovery tool will be automatically launched, and will open with a dialogue telling you a recovery image of the software environment has been successfully created. After clicking OK on this dialog, the Smart Recovery configuration screen will open so you may automate your system recovery setup.
Smart Recovery User's Manual Making Backup Images and Recovery Keys
4-6
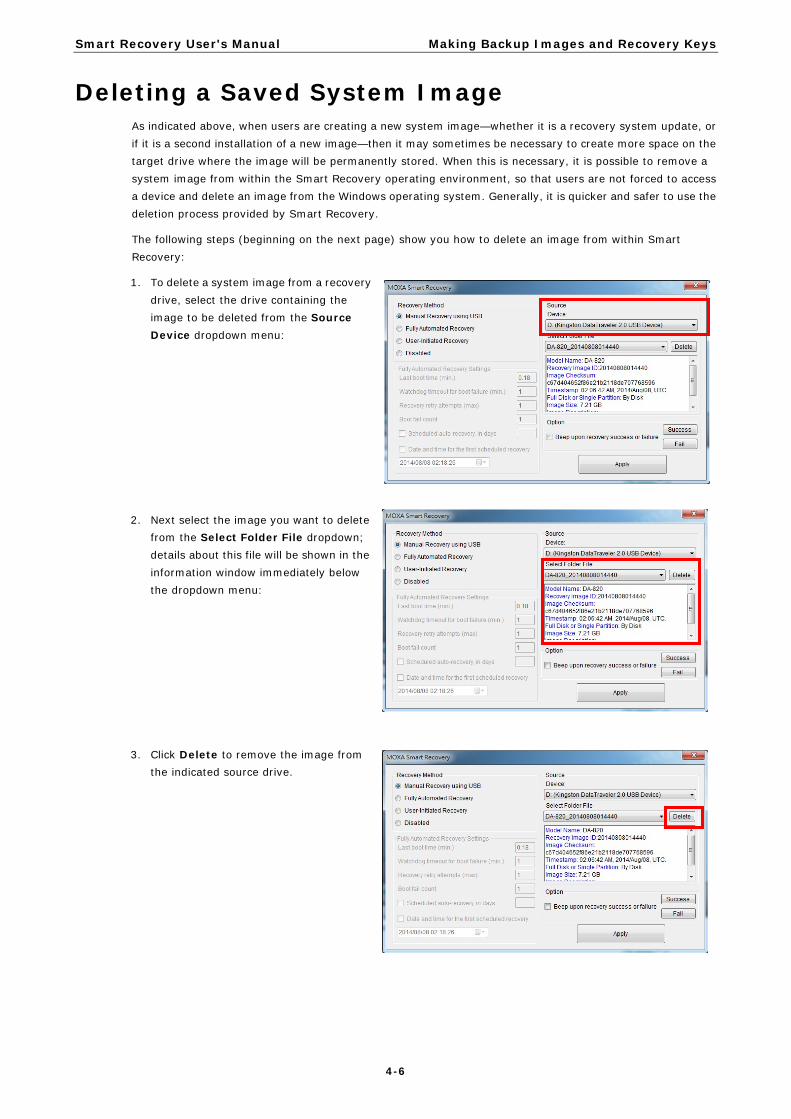
Deleting a Saved System Image As indicated above, when users are creating a new system image—whether it is a recovery system update, or if it is a second installation of a new image—then it may sometimes be necessary to create more space on the target drive where the image will be permanently stored. When this is necessary, it is possible to remove a system image from within the Smart Recovery operating environment, so that users are not forced to access a device and delete an image from the Windows operating system. Generally, it is quicker and safer to use the deletion process provided by Smart Recovery.
The following steps (beginning on the next page) show you how to delete an image from within Smart Recovery:
1. To delete a system image from a recovery drive, select the drive containing the image to be deleted from the Source Device dropdown menu:
2. Next select the image you want to delete from the Select Folder File dropdown; details about this file will be shown in the information window immediately below the dropdown menu:
3. Click Delete to remove the image from the indicated source drive.
5 5. Recovery Automation Scenarios
This chapter gives the precise details of the automated recovery scenarios that Smart Recovery provides.
The following topics are covered in this chapter:
Manual Recovery Using USB
Fully Automated Recovery
User-Initiated Recovery
Smart Recovery User's Manual Recovery Automation Scenarios
5-2
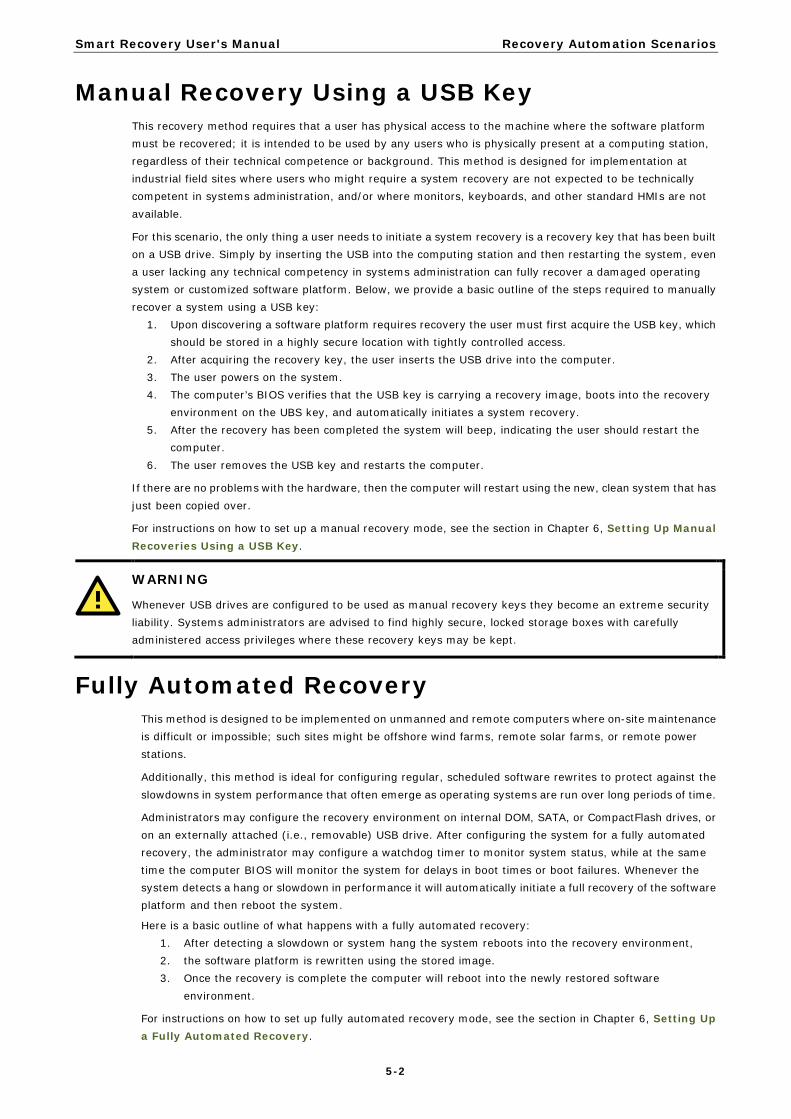
Manual Recovery Using a USB Key This recovery method requires that a user has physical access to the machine where the software platform must be recovered; it is intended to be used by any users who is physically present at a computing station, regardless of their technical competence or background. This method is designed for implementation at industrial field sites where users who might require a system recovery are not expected to be technically competent in systems administration, and/or where monitors, keyboards, and other standard HMIs are not available.
For this scenario, the only thing a user needs to initiate a system recovery is a recovery key that has been built on a USB drive. Simply by inserting the USB into the computing station and then restarting the system, even a user lacking any technical competency in systems administration can fully recover a damaged operating system or customized software platform. Below, we provide a basic outline of the steps required to manually recover a system using a USB key:
1. Upon discovering a software platform requires recovery the user must first acquire the USB key, which should be stored in a highly secure location with tightly controlled access.
2. After acquiring the recovery key, the user inserts the USB drive into the computer. 3. The user powers on the system. 4. The computer’s BIOS verifies that the USB key is carrying a recovery image, boots into the recovery
environment on the UBS key, and automatically initiates a system recovery. 5. After the recovery has been completed the system will beep, indicating the user should restart the
computer. 6. The user removes the USB key and restarts the computer.
If there are no problems with the hardware, then the computer will restart using the new, clean system that has just been copied over.
For instructions on how to set up a manual recovery mode, see the section in Chapter 6, Setting Up Manual Recoveries Using a USB Key.
WARNING
Whenever USB drives are configured to be used as manual recovery keys they become an extreme security liability. Systems administrators are advised to find highly secure, locked storage boxes with carefully administered access privileges where these recovery keys may be kept.
Fully Automated Recovery This method is designed to be implemented on unmanned and remote computers where on-site maintenance is difficult or impossible; such sites might be offshore wind farms, remote solar farms, or remote power stations.
Additionally, this method is ideal for configuring regular, scheduled software rewrites to protect against the slowdowns in system performance that often emerge as operating systems are run over long periods of time.
Administrators may configure the recovery environment on internal DOM, SATA, or CompactFlash drives, or on an externally attached (i.e., removable) USB drive. After configuring the system for a fully automated recovery, the administrator may configure a watchdog timer to monitor system status, while at the same time the computer BIOS will monitor the system for delays in boot times or boot failures. Whenever the system detects a hang or slowdown in performance it will automatically initiate a full recovery of the software platform and then reboot the system.
Here is a basic outline of what happens with a fully automated recovery: 1. After detecting a slowdown or system hang the system reboots into the recovery environment, 2. the software platform is rewritten using the stored image. 3. Once the recovery is complete the computer will reboot into the newly restored software
environment.
For instructions on how to set up fully automated recovery mode, see the section in Chapter 6, Setting Up a Fully Automated Recovery.
Smart Recovery User's Manual Recovery Automation Scenarios
5-3
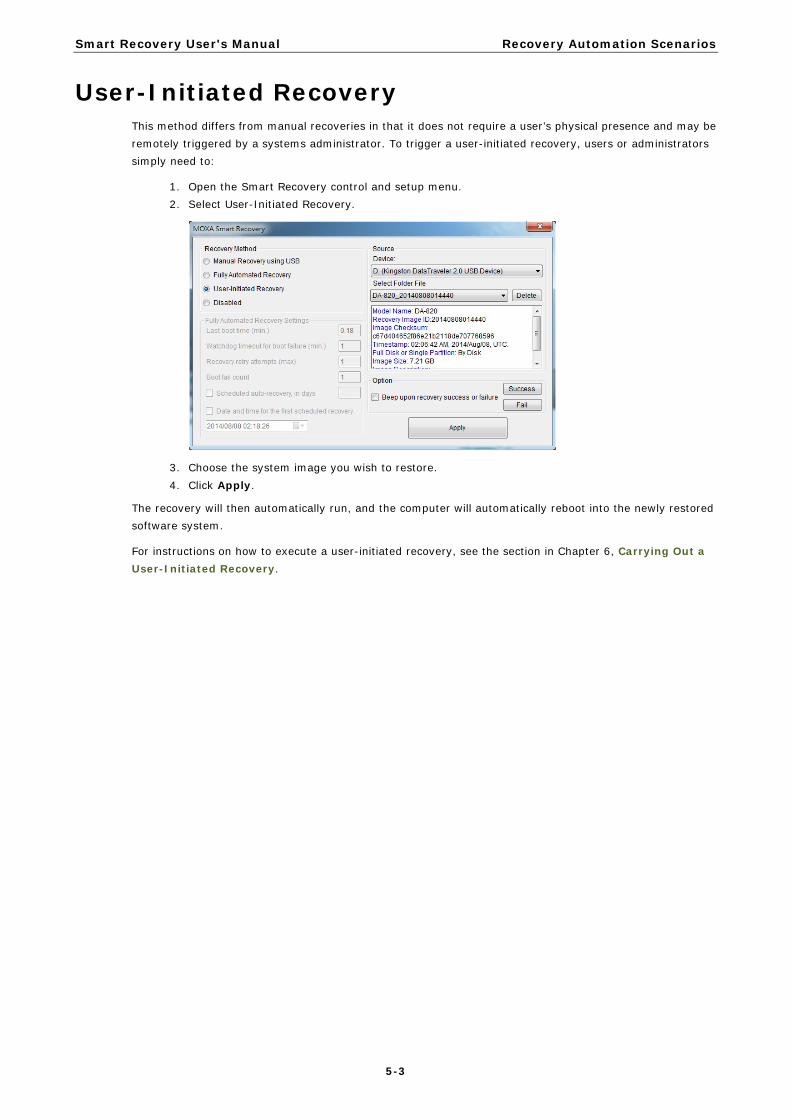
User-Initiated Recovery This method differs from manual recoveries in that it does not require a user’s physical presence and may be remotely triggered by a systems administrator. To trigger a user-initiated recovery, users or administrators simply need to:
1. Open the Smart Recovery control and setup menu. 2. Select User-Initiated Recovery.
3. Choose the system image you wish to restore. 4. Click Apply.
The recovery will then automatically run, and the computer will automatically reboot into the newly restored software system.
For instructions on how to execute a user-initiated recovery, see the section in Chapter 6, Carrying Out a User-Initiated Recovery.
6 6. Recovery Setup and Execution
This chapter describes the system limitations.
The following topics are covered in this chapter:
Smart Recovery Basics
Enabling Recovery Completion Notifications (Beeps
Setting Up a USB Key for Manual Recoveries
Setting Up a Fully Automated Recovery
Configuring a Fully Automated Recovery
Carrying Out a User-Initiated Recovery
Smart Recovery User's Manual Recovery Setup and Execution
6-2
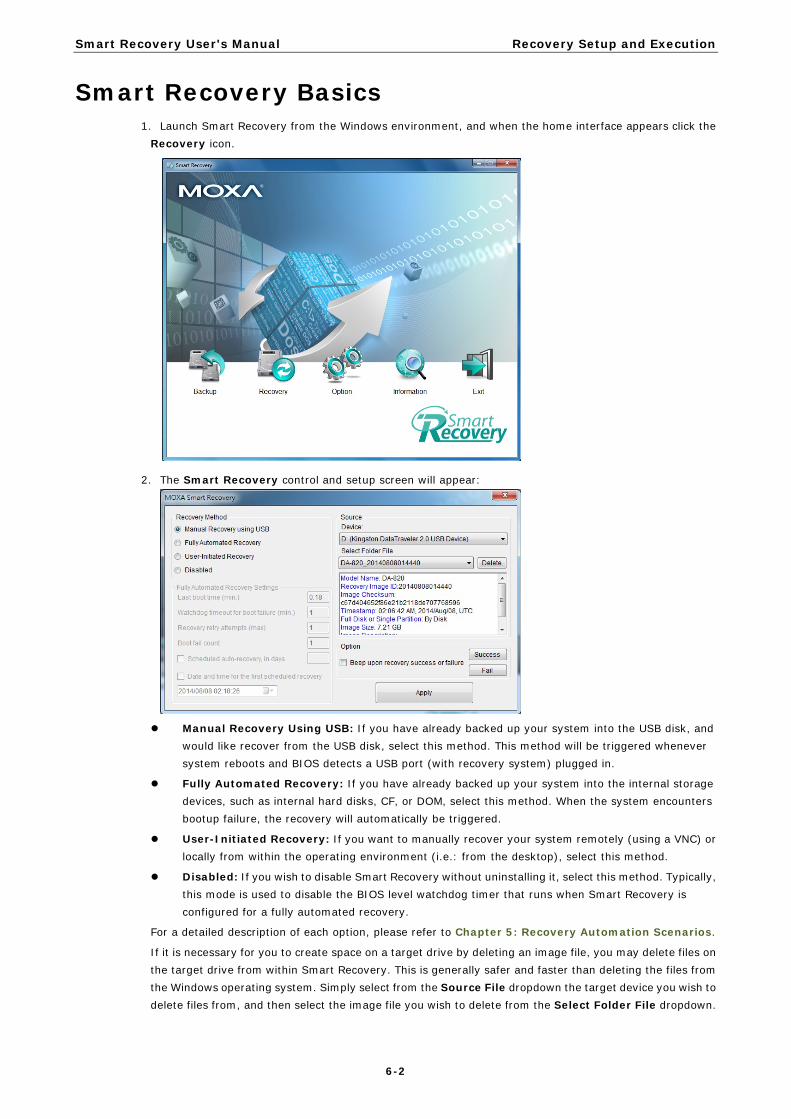
Smart Recovery Basics 1. Launch Smart Recovery from the Windows environment, and when the home interface appears click the
Recovery icon.
2. The Smart Recovery control and setup screen will appear:
Manual Recovery Using USB: If you have already backed up your system into the USB disk, and
would like recover from the USB disk, select this method. This method will be triggered whenever system reboots and BIOS detects a USB port (with recovery system) plugged in.
Fully Automated Recovery: If you have already backed up your system into the internal storage devices, such as internal hard disks, CF, or DOM, select this method. When the system encounters bootup failure, the recovery will automatically be triggered.
User-Initiated Recovery: If you want to manually recover your system remotely (using a VNC) or locally from within the operating environment (i.e.: from the desktop), select this method.
Disabled: If you wish to disable Smart Recovery without uninstalling it, select this method. Typically, this mode is used to disable the BIOS level watchdog timer that runs when Smart Recovery is configured for a fully automated recovery.
For a detailed description of each option, please refer to Chapter 5: Recovery Automation Scenarios.
If it is necessary for you to create space on a target drive by deleting an image file, you may delete files on the target drive from within Smart Recovery. This is generally safer and faster than deleting the files from the Windows operating system. Simply select from the Source File dropdown the target device you wish to delete files from, and then select the image file you wish to delete from the Select Folder File dropdown.
Smart Recovery User's Manual Recovery Setup and Execution
6-3
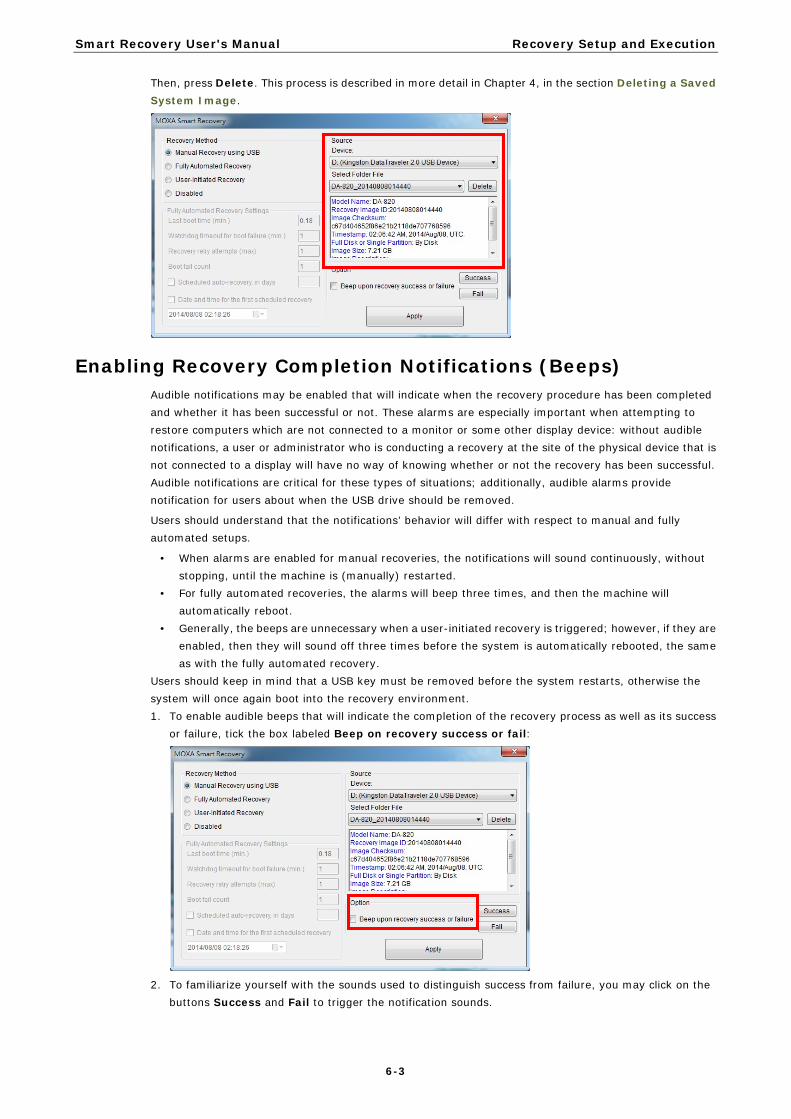
Then, press Delete. This process is described in more detail in Chapter 4, in the section Deleting a Saved System Image.
Enabling Recovery Completion Notifications (Beeps) Audible notifications may be enabled that will indicate when the recovery procedure has been completed and whether it has been successful or not. These alarms are especially important when attempting to restore computers which are not connected to a monitor or some other display device: without audible notifications, a user or administrator who is conducting a recovery at the site of the physical device that is not connected to a display will have no way of knowing whether or not the recovery has been successful. Audible notifications are critical for these types of situations; additionally, audible alarms provide notification for users about when the USB drive should be removed.
Users should understand that the notifications’ behavior will differ with respect to manual and fully automated setups.
• When alarms are enabled for manual recoveries, the notifications will sound continuously, without stopping, until the machine is (manually) restarted.
• For fully automated recoveries, the alarms will beep three times, and then the machine will automatically reboot.
• Generally, the beeps are unnecessary when a user-initiated recovery is triggered; however, if they are enabled, then they will sound off three times before the system is automatically rebooted, the same as with the fully automated recovery.
Users should keep in mind that a USB key must be removed before the system restarts, otherwise the system will once again boot into the recovery environment. 1. To enable audible beeps that will indicate the completion of the recovery process as well as its success
or failure, tick the box labeled Beep on recovery success or fail:
2. To familiarize yourself with the sounds used to distinguish success from failure, you may click on the
buttons Success and Fail to trigger the notification sounds.
Smart Recovery User's Manual Recovery Setup and Execution
6-4
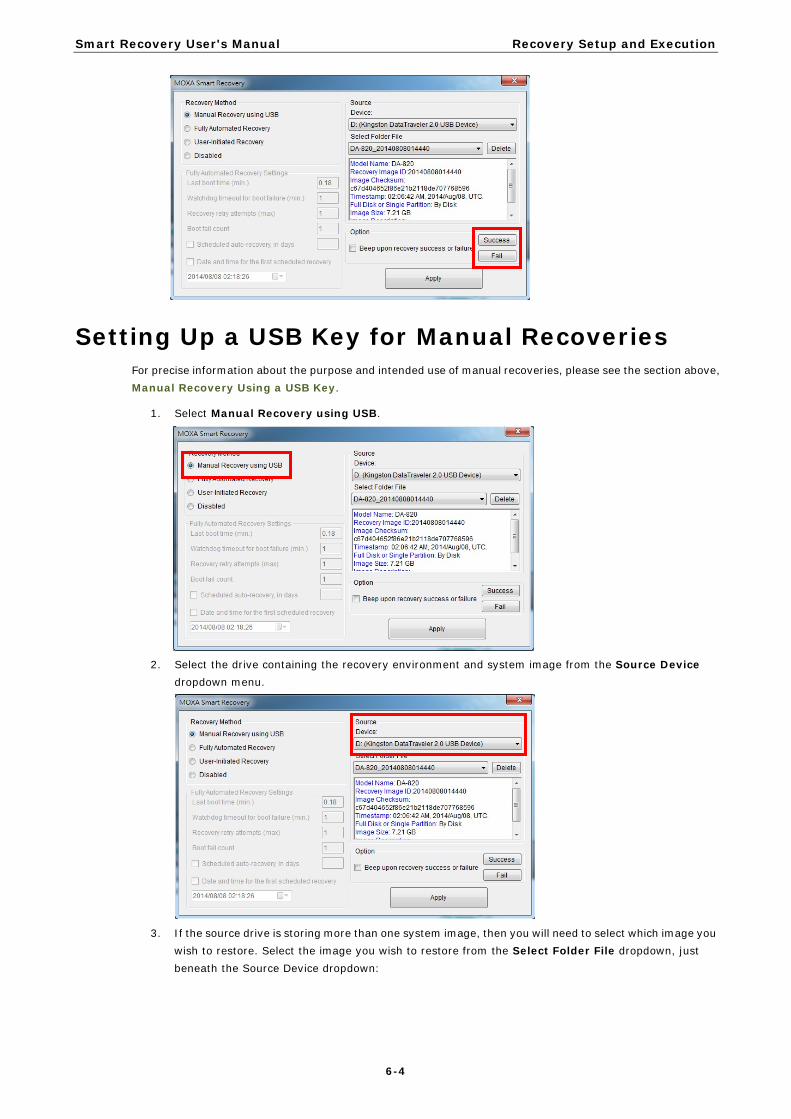
Setting Up a USB Key for Manual Recoveries For precise information about the purpose and intended use of manual recoveries, please see the section above, Manual Recovery Using a USB Key.
1. Select Manual Recovery using USB.
2. Select the drive containing the recovery environment and system image from the Source Device
dropdown menu.
3. If the source drive is storing more than one system image, then you will need to select which image you
wish to restore. Select the image you wish to restore from the Select Folder File dropdown, just beneath the Source Device dropdown:
Smart Recovery User's Manual Recovery Setup and Execution
6-5
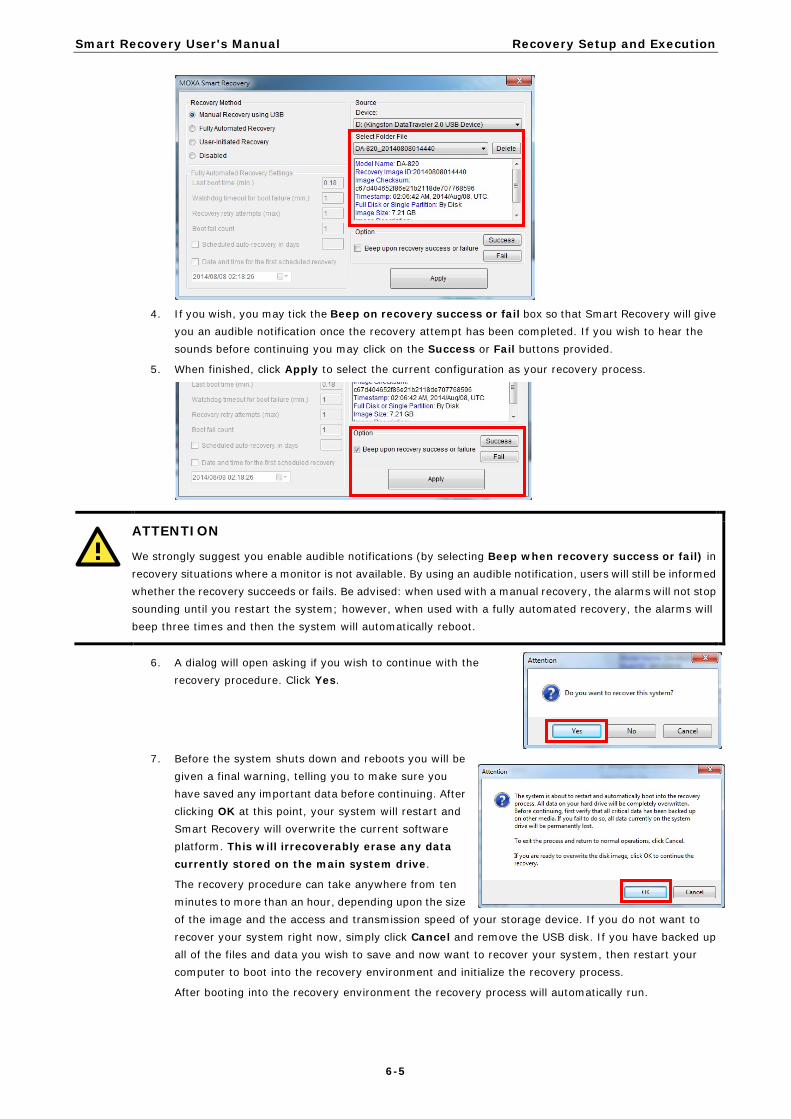
4. If you wish, you may tick the Beep on recovery success or fail box so that Smart Recovery will give
you an audible notification once the recovery attempt has been completed. If you wish to hear the sounds before continuing you may click on the Success or Fail buttons provided.
5. When finished, click Apply to select the current configuration as your recovery process.
ATTENTION
We strongly suggest you enable audible notifications (by selecting Beep when recovery success or fail) in recovery situations where a monitor is not available. By using an audible notification, users will still be informed whether the recovery succeeds or fails. Be advised: when used with a manual recovery, the alarms will not stop sounding until you restart the system; however, when used with a fully automated recovery, the alarms will beep three times and then the system will automatically reboot.
6. A dialog will open asking if you wish to continue with the recovery procedure. Click Yes.
7. Before the system shuts down and reboots you will be given a final warning, telling you to make sure you have saved any important data before continuing. After clicking OK at this point, your system will restart and Smart Recovery will overwrite the current software platform. This will irrecoverably erase any data currently stored on the main system drive.
The recovery procedure can take anywhere from ten minutes to more than an hour, depending upon the size of the image and the access and transmission speed of your storage device. If you do not want to recover your system right now, simply click Cancel and remove the USB disk. If you have backed up all of the files and data you wish to save and now want to recover your system, then restart your computer to boot into the recovery environment and initialize the recovery process.
After booting into the recovery environment the recovery process will automatically run.
Smart Recovery User's Manual Recovery Setup and Execution
6-6
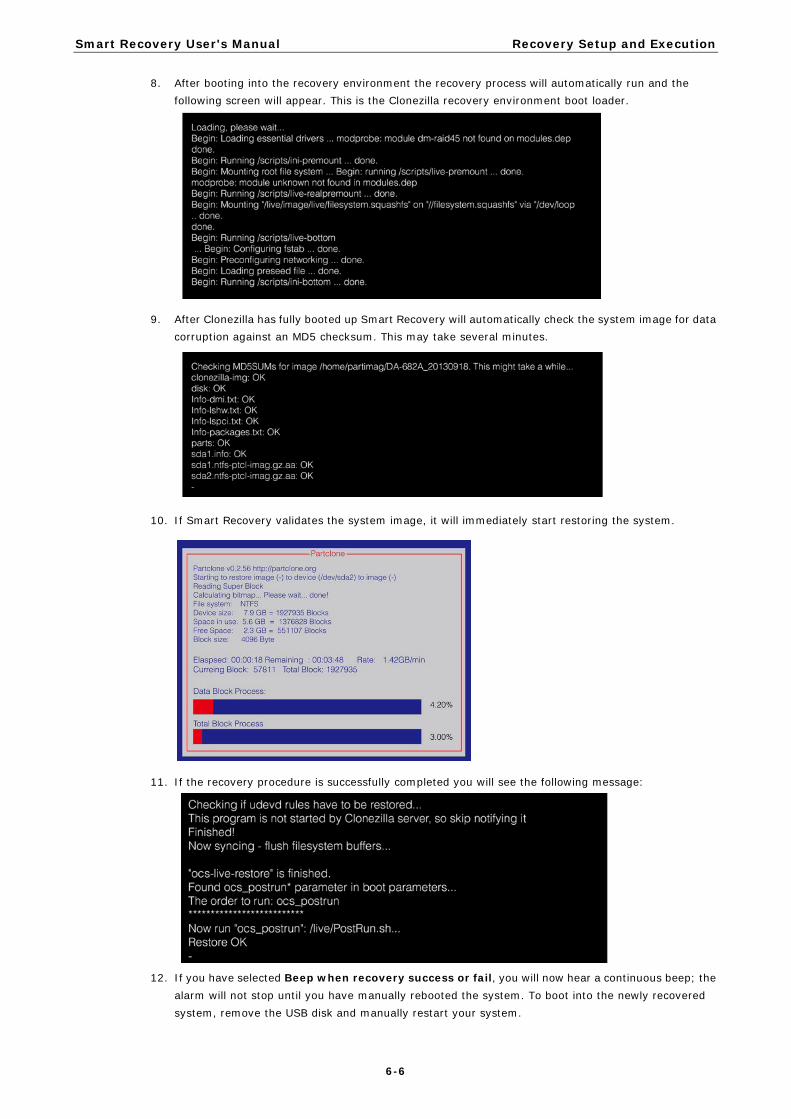
8. After booting into the recovery environment the recovery process will automatically run and the following screen will appear. This is the Clonezilla recovery environment boot loader.
9. After Clonezilla has fully booted up Smart Recovery will automatically check the system image for data corruption against an MD5 checksum. This may take several minutes.
10. If Smart Recovery validates the system image, it will immediately start restoring the system.
11. If the recovery procedure is successfully completed you will see the following message:
12. If you have selected Beep when recovery success or fail, you will now hear a continuous beep; the alarm will not stop until you have manually rebooted the system. To boot into the newly recovered system, remove the USB disk and manually restart your system.
Smart Recovery User's Manual Recovery Setup and Execution
6-7
If you have not selected Beep when recovery success or fail (and the recovery has been a success) then the system will restart automatically. It is important you remove the USB disk before it restarts, otherwise the system will once again boot into the Clonezilla recovery environment and begin the recovery procedure all over again.
13. The recovery has been completed once the system restarts and returns to the Windows desktop.
Setting Up a Fully Automated Recovery Fully Automated Recovery requires configuration of many parameters. Below is a detailed explanation of each configuration parameter. Using these, users may configure either scheduled rewrites of the software platform, or they may configure emergency rewrites upon boot failures or watchdog timer triggers.
Last boot time: This is an automatic benchmark taken by Smart Recovery. It is the time that the computer takes to go from the signal to reboot until the OS goes live, measured in minutes.
Watchdog timeout for boot failure: This sets the time, in minutes, that the computer will wait before deciding a boot attempt has failed and a system recovery must be initiated.
Recovery retry attempts: This sets the total number of times the computer will rewrite the system and attempt a restart before determining that the problem is unresolvable, and ceases attempting to recover the system.
Boot fail count: This setting only takes effect after the watchdog timer has determined that the boot process has failed. This entry sets the number of times the system will attempt a restart before deciding the software platform is broken and a system rewrite is required.
Scheduled auto-recovery in days: This sets the number of days that will pass before the system initiates a scheduled rewrite procedure.
Date and time for the first scheduled recovery: This box sets the starting date and time when scheduled recoveries will begin. To change the time, click the drop-down dialog and set the desired time by entering the hours, minutes and seconds using the keypad. All scheduled recoveries will take place at this time of day.
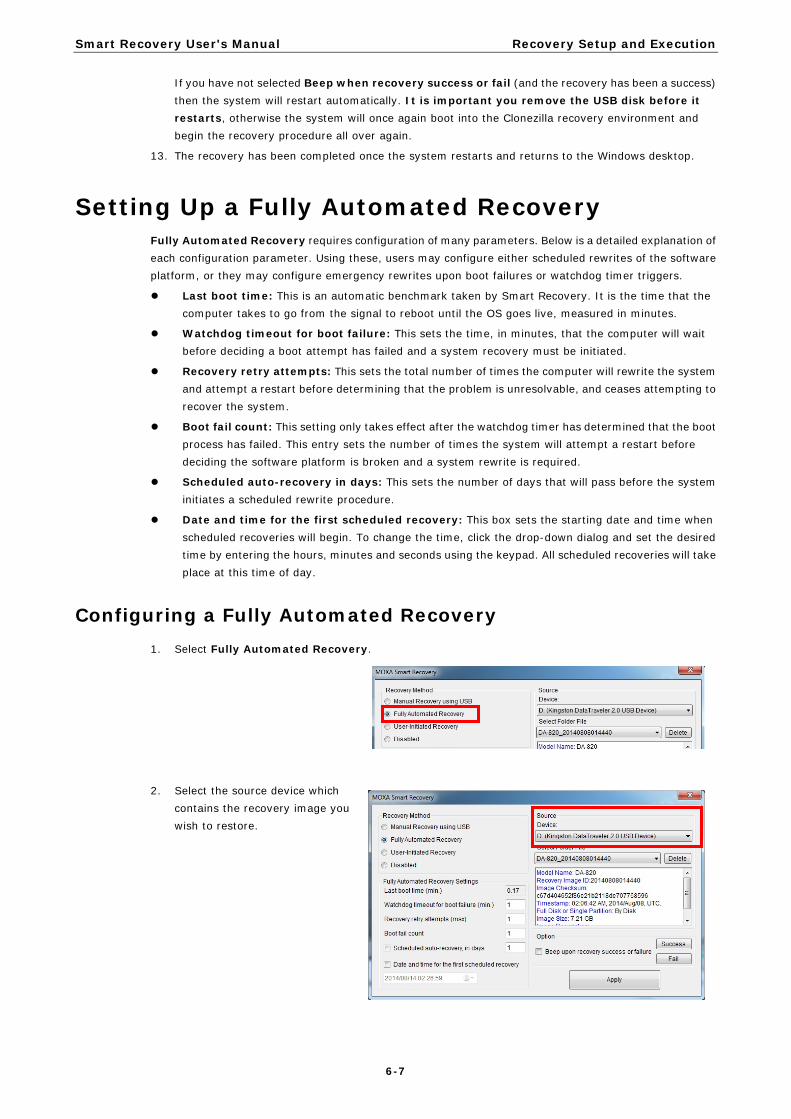
Configuring a Fully Automated Recovery 1. Select Fully Automated Recovery.
2. Select the source device which contains the recovery image you wish to restore.
Smart Recovery User's Manual Recovery Setup and Execution
6-8
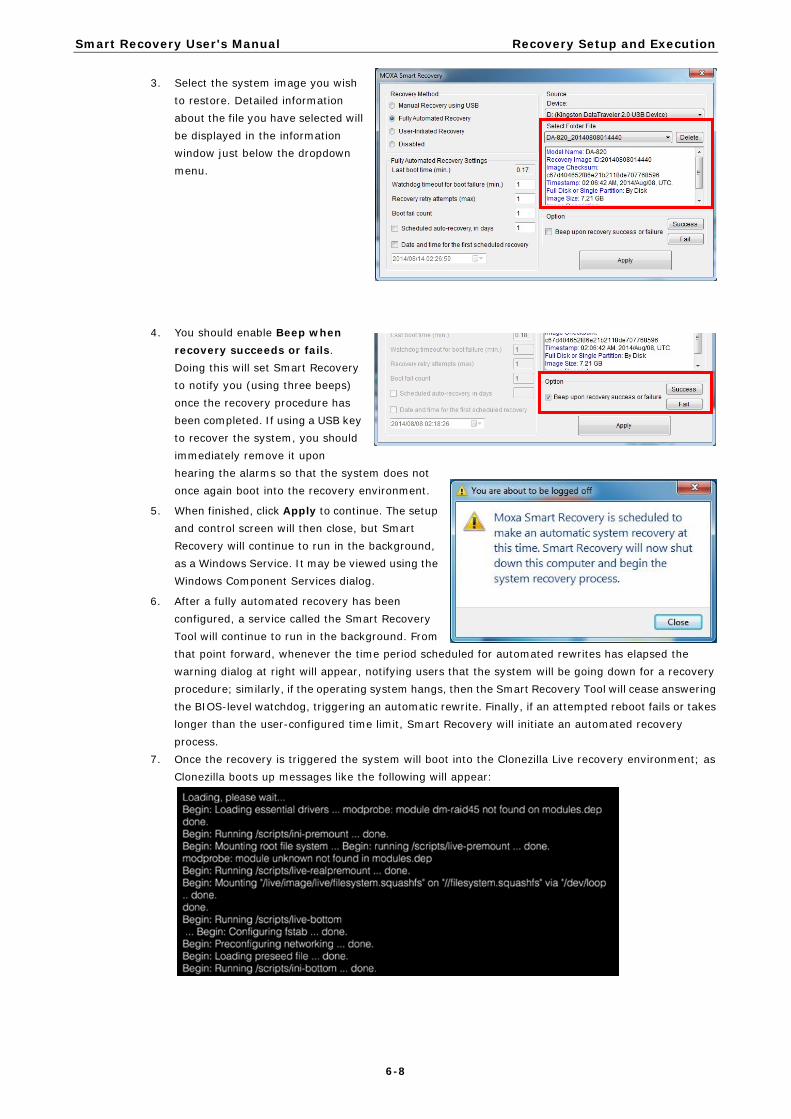
3. Select the system image you wish to restore. Detailed information about the file you have selected will be displayed in the information window just below the dropdown menu.
4. You should enable Beep when recovery succeeds or fails. Doing this will set Smart Recovery to notify you (using three beeps) once the recovery procedure has been completed. If using a USB key to recover the system, you should immediately remove it upon hearing the alarms so that the system does not once again boot into the recovery environment.
5. When finished, click Apply to continue. The setup and control screen will then close, but Smart Recovery will continue to run in the background, as a Windows Service. It may be viewed using the Windows Component Services dialog.
6. After a fully automated recovery has been configured, a service called the Smart Recovery Tool will continue to run in the background. From that point forward, whenever the time period scheduled for automated rewrites has elapsed the warning dialog at right will appear, notifying users that the system will be going down for a recovery procedure; similarly, if the operating system hangs, then the Smart Recovery Tool will cease answering the BIOS-level watchdog, triggering an automatic rewrite. Finally, if an attempted reboot fails or takes longer than the user-configured time limit, Smart Recovery will initiate an automated recovery process.
7. Once the recovery is triggered the system will boot into the Clonezilla Live recovery environment; as Clonezilla boots up messages like the following will appear:
Smart Recovery User's Manual Recovery Setup and Execution
6-9
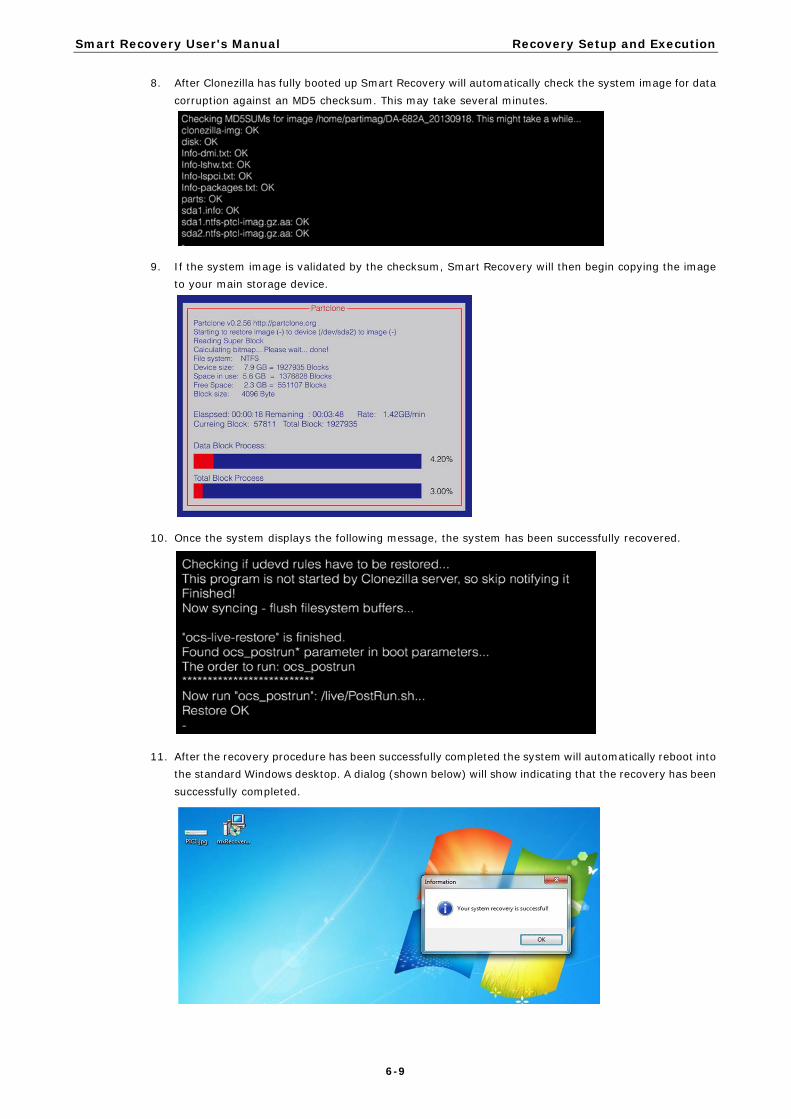
8. After Clonezilla has fully booted up Smart Recovery will automatically check the system image for data corruption against an MD5 checksum. This may take several minutes.
9. If the system image is validated by the checksum, Smart Recovery will then begin copying the image to your main storage device.
10. Once the system displays the following message, the system has been successfully recovered.
11. After the recovery procedure has been successfully completed the system will automatically reboot into the standard Windows desktop. A dialog (shown below) will show indicating that the recovery has been successfully completed.
Smart Recovery User's Manual Recovery Setup and Execution
6-10
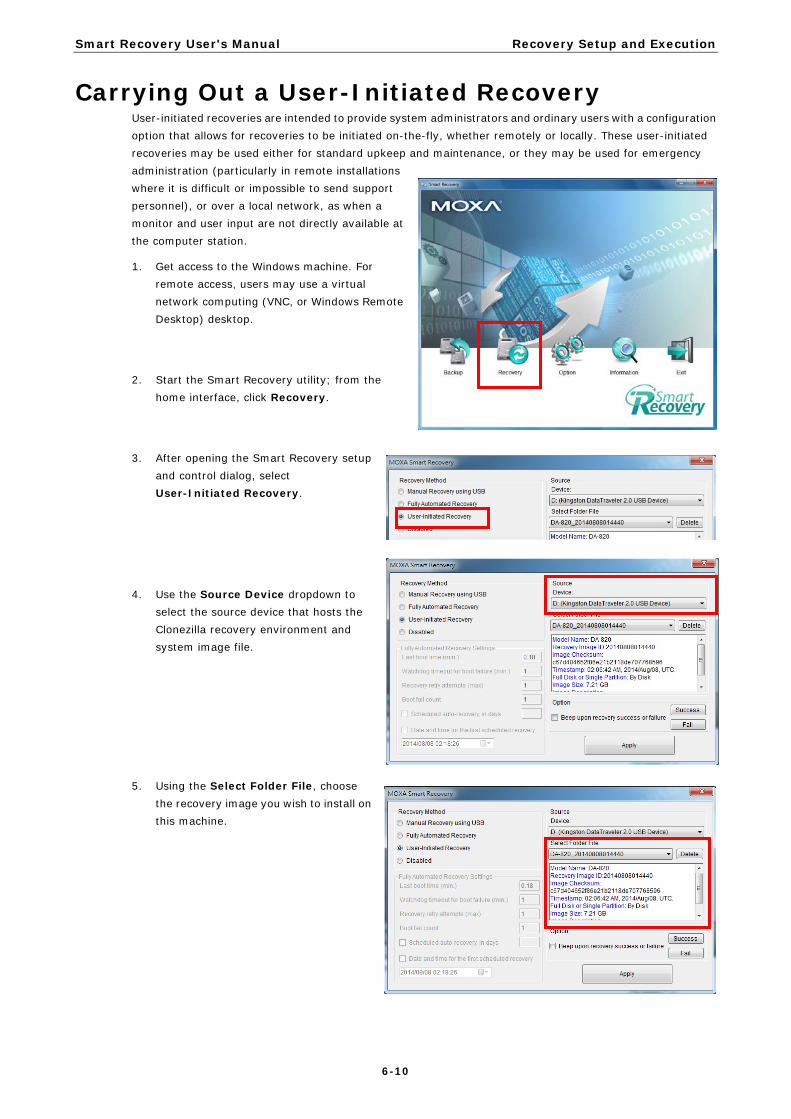
Carrying Out a User-Initiated Recovery User-initiated recoveries are intended to provide system administrators and ordinary users with a configuration option that allows for recoveries to be initiated on-the-fly, whether remotely or locally. These user-initiated recoveries may be used either for standard upkeep and maintenance, or they may be used for emergency administration (particularly in remote installations where it is difficult or impossible to send support personnel), or over a local network, as when a monitor and user input are not directly available at the computer station.
1. Get access to the Windows machine. For remote access, users may use a virtual network computing (VNC, or Windows Remote Desktop) desktop.
2. Start the Smart Recovery utility; from the home interface, click Recovery.
3. After opening the Smart Recovery setup and control dialog, select User-Initiated Recovery.
4. Use the Source Device dropdown to select the source device that hosts the Clonezilla recovery environment and system image file.
5. Using the Select Folder File, choose the recovery image you wish to install on this machine.
Smart Recovery User's Manual Recovery Setup and Execution
6-11
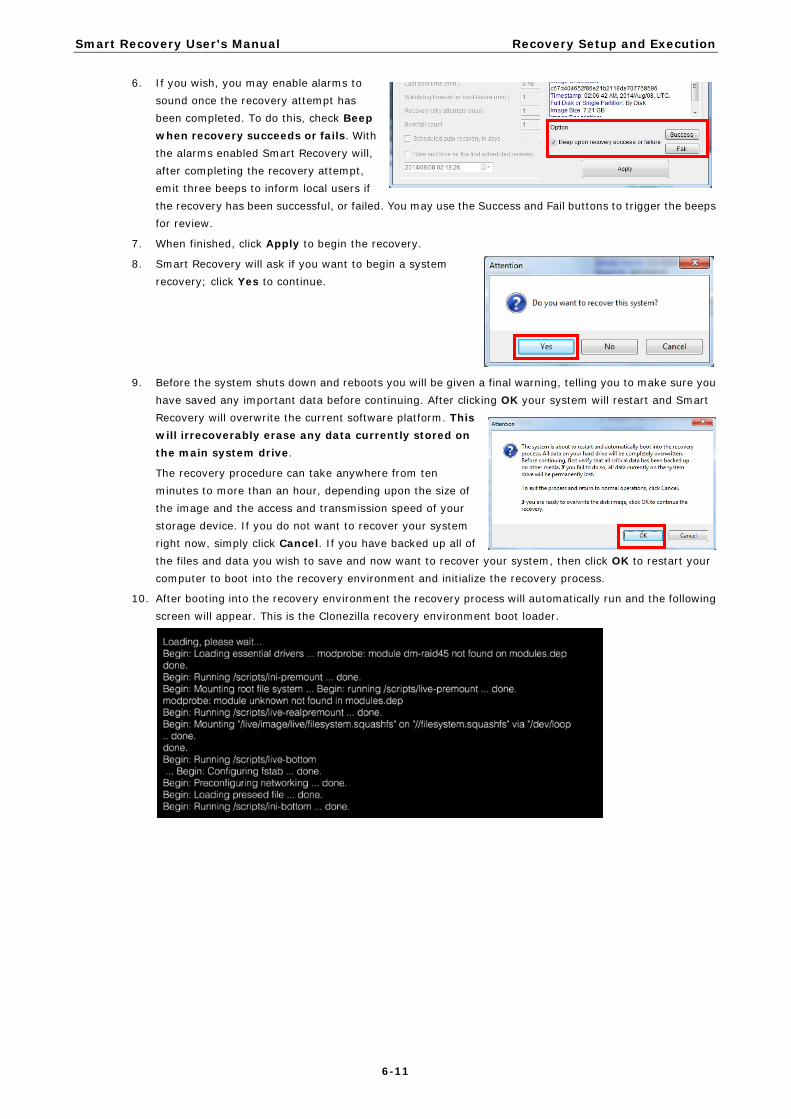
6. If you wish, you may enable alarms to sound once the recovery attempt has been completed. To do this, check Beep when recovery succeeds or fails. With the alarms enabled Smart Recovery will, after completing the recovery attempt, emit three beeps to inform local users if the recovery has been successful, or failed. You may use the Success and Fail buttons to trigger the beeps for review.
7. When finished, click Apply to begin the recovery.
8. Smart Recovery will ask if you want to begin a system recovery; click Yes to continue.
9. Before the system shuts down and reboots you will be given a final warning, telling you to make sure you have saved any important data before continuing. After clicking OK your system will restart and Smart Recovery will overwrite the current software platform. This will irrecoverably erase any data currently stored on the main system drive.
The recovery procedure can take anywhere from ten minutes to more than an hour, depending upon the size of the image and the access and transmission speed of your storage device. If you do not want to recover your system right now, simply click Cancel. If you have backed up all of the files and data you wish to save and now want to recover your system, then click OK to restart your computer to boot into the recovery environment and initialize the recovery process.
10. After booting into the recovery environment the recovery process will automatically run and the following screen will appear. This is the Clonezilla recovery environment boot loader.
Smart Recovery User's Manual Recovery Setup and Execution
6-12
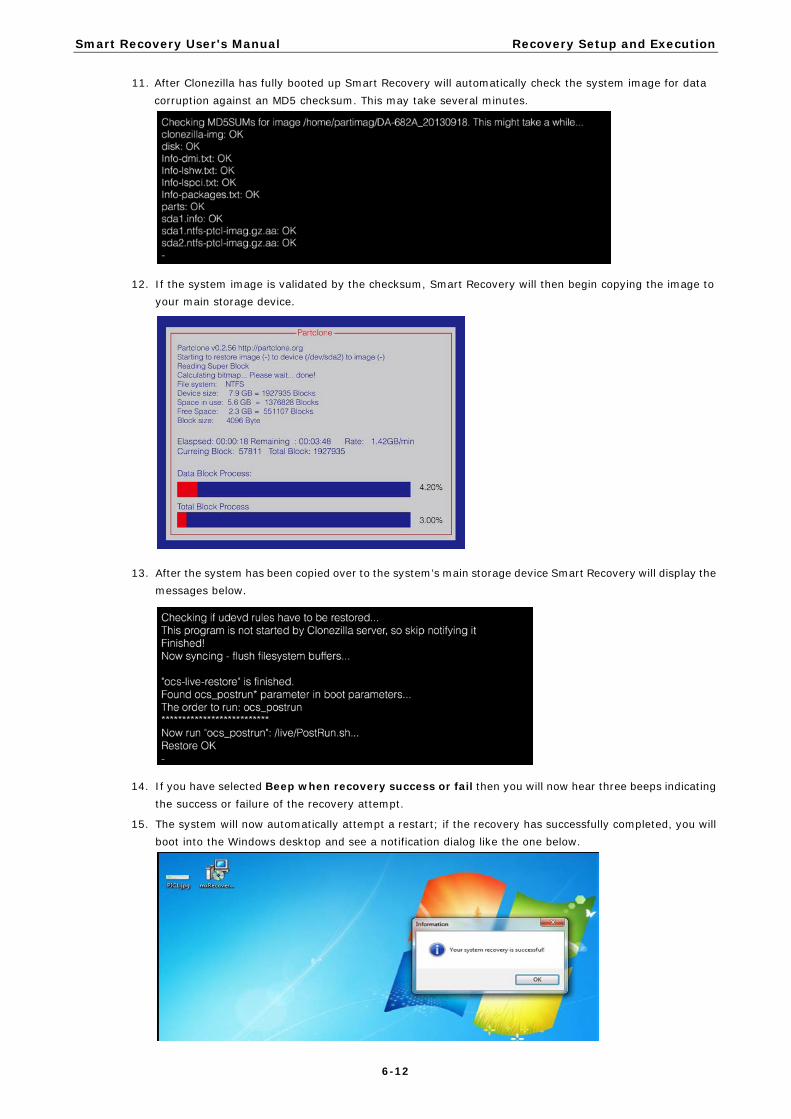
11. After Clonezilla has fully booted up Smart Recovery will automatically check the system image for data corruption against an MD5 checksum. This may take several minutes.
12. If the system image is validated by the checksum, Smart Recovery will then begin copying the image to your main storage device.
13. After the system has been copied over to the system’s main storage device Smart Recovery will display the messages below.
14. If you have selected Beep when recovery success or fail then you will now hear three beeps indicating the success or failure of the recovery attempt.
15. The system will now automatically attempt a restart; if the recovery has successfully completed, you will boot into the Windows desktop and see a notification dialog like the one below.

7 7. Support Parameters
This section details the hardware and configuration parameters within which Smart Recovery operates.
The following topics are covered in this chapter:
Support Parameters
Smart Recovery User's Manual Operation Limitations
7-2
Support Parameters Smart Recovery is subject to the following hardware limitations. Please note them carefully.
1. Disks which are arranged in a RAID configuration are not supported.
2. USB drives connected via a USB hub are not supported.
3. Drives added as extensions over a PCI or PCIe expansion bus are not supported.
4. Recovery images may only be used to restore the system back to the original storage device. For example, if your OS is installed on the DOM, the image can only be recovered back to the DOM; it may not be recovered to the SATA drive, USB, or CompactFlash card.
5. If you select Fully Automated Recovery then the recovery device must always be mounted and available; if it is a USB storage device, then the USB drive must always be inserted into the computer. However, you may also configure internal storage devices such as a SATA hard drive, CompactFlash card, or DOM to host the recovery environment and system image(s).
6. When the system recovery is performed, the entire target drive will be reformatted and restored using the stored system image. For this reason administrators must take care to separate the drive that contains the operating system and host applications from drives where important data will be stored. Otherwise, your data will be permanently lost every time the system is recovered.
7. Only one recovery system per device may be used; administrators should not try to install more than one recovery system per device, because this will cause problems.
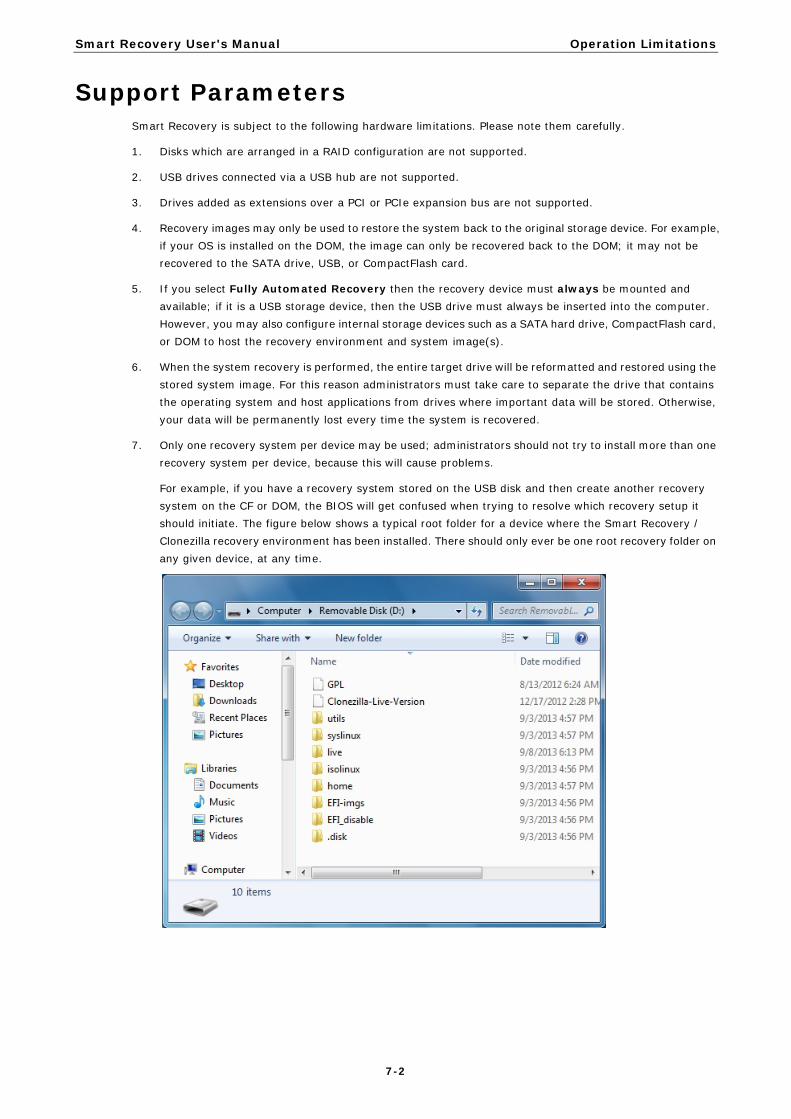
For example, if you have a recovery system stored on the USB disk and then create another recovery system on the CF or DOM, the BIOS will get confused when trying to resolve which recovery setup it should initiate. The figure below shows a typical root folder for a device where the Smart Recovery / Clonezilla recovery environment has been installed. There should only ever be one root recovery folder on any given device, at any time.
8 8. BIOS Information
This section of the manual shows you how to set up your system’s BIOS to interact with System Recovery’s user space software
The following topics are covered in this chapter:
BIOS Options: The Watchdog & System Defaults
Smart Recovery Command Line Notifications
Smart Recovery User's Manual BIOS Information
8-2
BIOS Options: The Watchdog & System Defaults This section of the manual shows you how to set up your system’s BIOS to interact with System Recovery’s user space software.
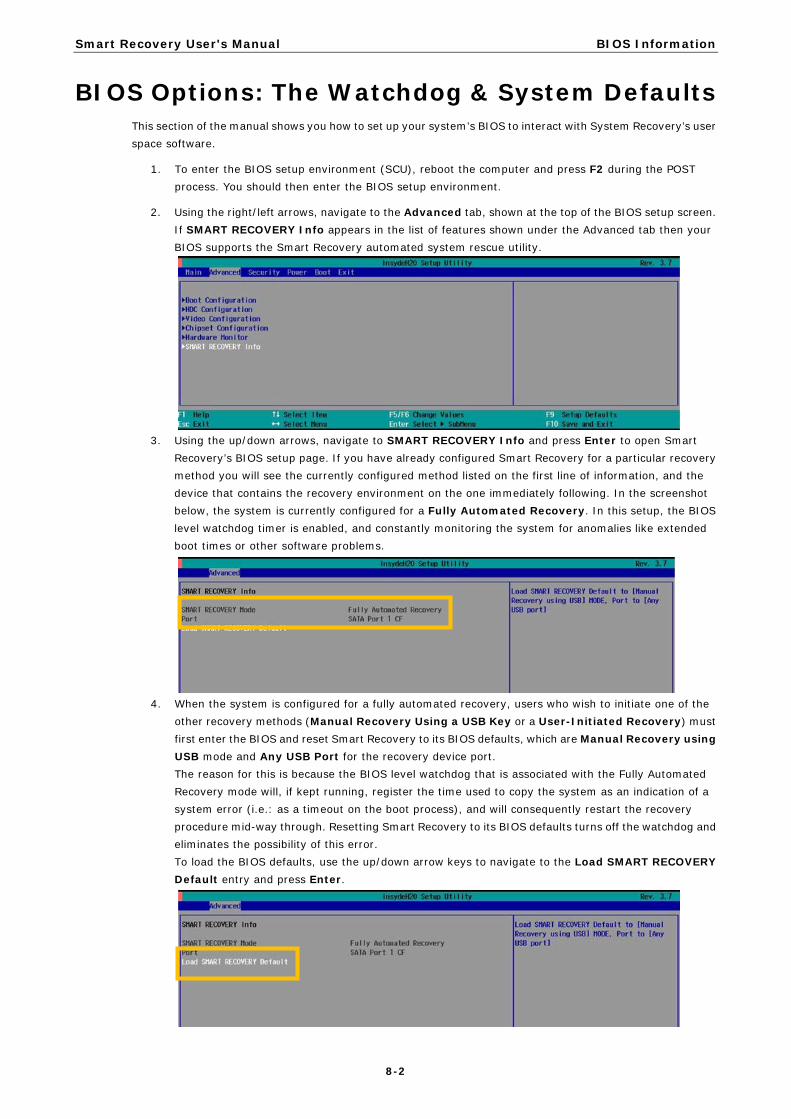
1. To enter the BIOS setup environment (SCU), reboot the computer and press F2 during the POST process. You should then enter the BIOS setup environment.
2. Using the right/left arrows, navigate to the Advanced tab, shown at the top of the BIOS setup screen. If SMART RECOVERY Info appears in the list of features shown under the Advanced tab then your BIOS supports the Smart Recovery automated system rescue utility.
3. Using the up/down arrows, navigate to SMART RECOVERY Info and press Enter to open Smart
Recovery’s BIOS setup page. If you have already configured Smart Recovery for a particular recovery method you will see the currently configured method listed on the first line of information, and the device that contains the recovery environment on the one immediately following. In the screenshot below, the system is currently configured for a Fully Automated Recovery. In this setup, the BIOS level watchdog timer is enabled, and constantly monitoring the system for anomalies like extended boot times or other software problems.
4. When the system is configured for a fully automated recovery, users who wish to initiate one of the
other recovery methods (Manual Recovery Using a USB Key or a User-Initiated Recovery) must first enter the BIOS and reset Smart Recovery to its BIOS defaults, which are Manual Recovery using USB mode and Any USB Port for the recovery device port. The reason for this is because the BIOS level watchdog that is associated with the Fully Automated Recovery mode will, if kept running, register the time used to copy the system as an indication of a system error (i.e.: as a timeout on the boot process), and will consequently restart the recovery procedure mid-way through. Resetting Smart Recovery to its BIOS defaults turns off the watchdog and eliminates the possibility of this error. To load the BIOS defaults, use the up/down arrow keys to navigate to the Load SMART RECOVERY Default entry and press Enter.
Smart Recovery User's Manual BIOS Information
8-3
ATTENTION Please note the following issues:
1. After configuring a machine for Fully Automated Recovery mode you must take care not to kill the background Smart Recovery Tool service. The Smart Recovery Tool is the service the watchdog monitors to validate the system is functioning normally; killing this background process while the watchdog is running will cause the system to reboot and attempt a system recovery.
2. When running a machine configured for a Fully Automated Recovery, the watchdog function will be enabled. This watchdog runs at the BIOS level. Consequently, if a user attempts a system recovery using either of the other methods (manual recovery or user-initiated recovery), the watchdog will register the operating system’s down time as a system failure and will interrupt the recovery process mid-way through to initiate its own configured procedure. To avoid this, users who are applying one of the other recovery procedures on a machine configured for a fully automated recover will need to stop the BIOS-level watchdog, either by selecting Manual Recovery using USB method, as described in the section j ust above, or by disabling the watchdog from within the Smart Recovery interface, as described in Chapter , above.
Smart Recovery Command Line Notifications 1. When performing a Manual Recovery Using a USB Key, you should see the following message; this
indicates that the BIOS has detected the USB drive with the recovery system.
USB port 3 have smart recovery system, boot to..
2. If a normal system restart fails and the system is configured for a Fully Automated Recovery then the notification below will appear just before the recovery procedure is attempted. In the screenshot below, the system was configured for a single retry of the boot process before entering the recovery procedure, and a USB drive mounted in port 3 was set as the recovery device.
Meet boot retry count 1 Enter Recovery Process Change Boot to USB, Port=3
3. If a fully automated recovery is attempted but the system fails to recover, the message below will appear. Pressing Enter at this point will exit Smart Recovery and return the device to the normal boot process.
Meet boot retry count 1 Enter Recovery Process Recovery Process Fail and meet retry limit. Return to normal process Press Enter to continue