Embed Size (px)
Citation preview

Contents
Before You BeginPage
2
Basic Steps Introduction1. Apply SpiceMASTER in Your Timeline2. Choose a Spice File3. Flip, Reverse, or Move the Effect4. Fine−Tune and Enhance the Effect
• Softness• Texture• Border• Shadow/Glow
5. Preview REAL−TIME6. Apply or Clear the Effect
• TUTORIAL: How to Apply a SpiceMASTER Transition• TUTORIAL: How to Animate Other Effects or Keys
3479
11121415182123
2426
Keyframing Introduction• How to Add/Delete a Completion Keyframe• Common Completion Adjustments• How to Move a Keyframe Precisely• Navigating in the Keyframes Graph• More Keyframing Tips
293031333436
Cool Tips • Working in the Library• Saved Settings, Presets, & Favorite Effects• Changing the Default Settings• Preferences• More Cool Tips
3739404142
Keyboard ShortcutsIndex
4445
SpiceMASTER 2.5 TFX Help | Pixelan Software | www.pixelan.com 1
Before You Begin
Welcome to SpiceMASTER™ 2.5 TFX
Welcome! This help guide holds everything you need to know about Pixelan Software's SpiceMASTER 2.5 TFX. Although SpiceMASTER is powerful, it does not have asteep learning curve −− a key benefit. Thus there is no need for a thick manual or training tape, or a large time investment by you to use it effectively. (Hooray!) The easy,enjoyable way to learn is to step through this concise guide with SpiceMASTER visible on your screen.
To see how to APPLY SpiceMASTER 2.5 TFX, view the Please Read FIRST file in your Start > Program Files > Pixelan > SpiceMASTER 2.5 menu. For a two−pageSUMMARY of all SpiceMASTER essentials, see the printable Quick Start in the same Start menu. We highly recommend that you look both documents over −− it willSAVE you time!
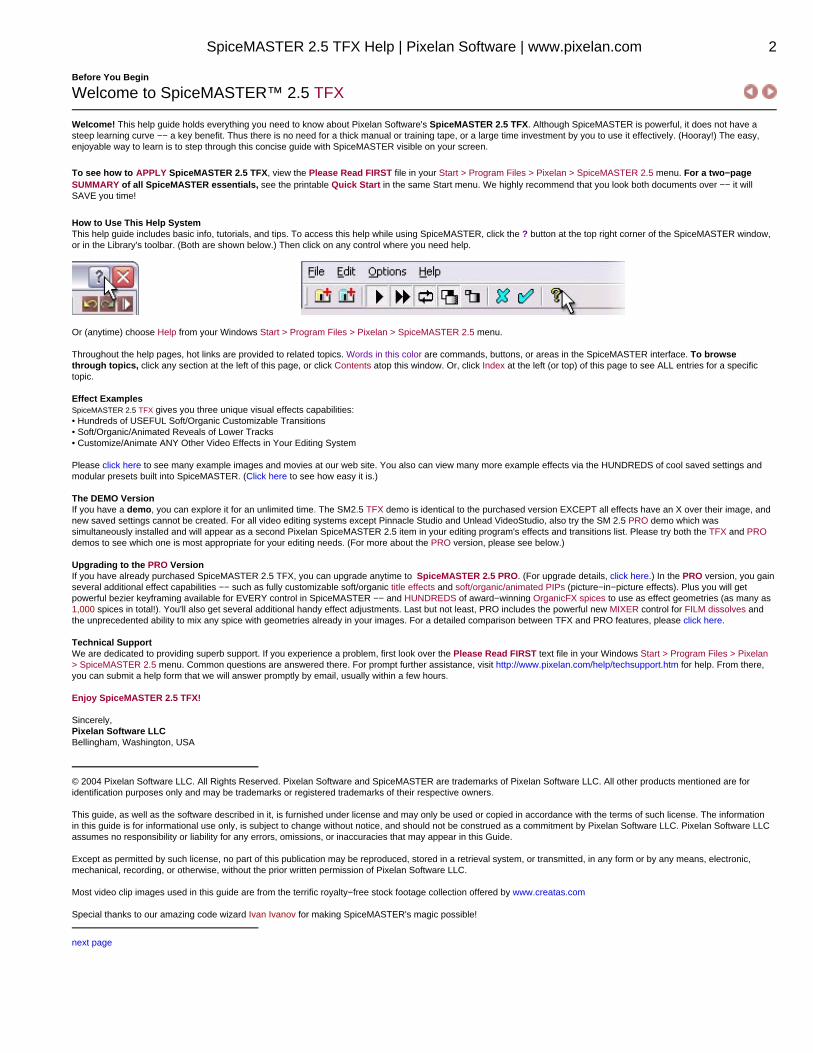
How to Use This Help SystemThis help guide includes basic info, tutorials, and tips. To access this help while using SpiceMASTER, click the ? button at the top right corner of the SpiceMASTER window,or in the Library's toolbar. (Both are shown below.) Then click on any control where you need help.
Or (anytime) choose Help from your Windows Start > Program Files > Pixelan > SpiceMASTER 2.5 menu.
Throughout the help pages, hot links are provided to related topics. Words in this color are commands, buttons, or areas in the SpiceMASTER interface. To browsethrough topics, click any section at the left of this page, or click Contents atop this window. Or, click Index at the left (or top) of this page to see ALL entries for a specifictopic.
Effect ExamplesSpiceMASTER 2.5 TFX gives you three unique visual effects capabilities:• Hundreds of USEFUL Soft/Organic Customizable Transitions• Soft/Organic/Animated Reveals of Lower Tracks• Customize/Animate ANY Other Video Effects in Your Editing System
Please click here to see many example images and movies at our web site. You also can view many more example effects via the HUNDREDS of cool saved settings andmodular presets built into SpiceMASTER. (Click here to see how easy it is.)
The DEMO VersionIf you have a demo, you can explore it for an unlimited time. The SM2.5 TFX demo is identical to the purchased version EXCEPT all effects have an X over their image, andnew saved settings cannot be created. For all video editing systems except Pinnacle Studio and Unlead VideoStudio, also try the SM 2.5 PRO demo which wassimultaneously installed and will appear as a second Pixelan SpiceMASTER 2.5 item in your editing program's effects and transitions list. Please try both the TFX and PROdemos to see which one is most appropriate for your editing needs. (For more about the PRO version, please see below.)
Upgrading to the PRO VersionIf you have already purchased SpiceMASTER 2.5 TFX, you can upgrade anytime to SpiceMASTER 2.5 PRO. (For upgrade details, click here.) In the PRO version, you gainseveral additional effect capabilities −− such as fully customizable soft/organic title effects and soft/organic/animated PIPs (picture−in−picture effects). Plus you will getpowerful bezier keyframing available for EVERY control in SpiceMASTER −− and HUNDREDS of award−winning OrganicFX spices to use as effect geometries (as many as1,000 spices in total!). You'll also get several additional handy effect adjustments. Last but not least, PRO includes the powerful new MIXER control for FILM dissolves andthe unprecedented ability to mix any spice with geometries already in your images. For a detailed comparison between TFX and PRO features, please click here.
Technical SupportWe are dedicated to providing superb support. If you experience a problem, first look over the Please Read FIRST text file in your Windows Start > Program Files > Pixelan> SpiceMASTER 2.5 menu. Common questions are answered there. For prompt further assistance, visit http://www.pixelan.com/help/techsupport.htm for help. From there,you can submit a help form that we will answer promptly by email, usually within a few hours.
Enjoy SpiceMASTER 2.5 TFX!
Sincerely,Pixelan Software LLCBellingham, Washington, USA
© 2004 Pixelan Software LLC. All Rights Reserved. Pixelan Software and SpiceMASTER are trademarks of Pixelan Software LLC. All other products mentioned are foridentification purposes only and may be trademarks or registered trademarks of their respective owners.
This guide, as well as the software described in it, is furnished under license and may only be used or copied in accordance with the terms of such license. The informationin this guide is for informational use only, is subject to change without notice, and should not be construed as a commitment by Pixelan Software LLC. Pixelan Software LLCassumes no responsibility or liability for any errors, omissions, or inaccuracies that may appear in this Guide.
Except as permitted by such license, no part of this publication may be reproduced, stored in a retrieval system, or transmitted, in any form or by any means, electronic,mechanical, recording, or otherwise, without the prior written permission of Pixelan Software LLC.
Most video clip images used in this guide are from the terrific royalty−free stock footage collection offered by www.creatas.com
Special thanks to our amazing code wizard Ivan Ivanov for making SpiceMASTER's magic possible!
next page
SpiceMASTER 2.5 TFX Help | Pixelan Software | www.pixelan.com 2
Basic Steps
Introduction
This section walks you through the basics of applying and customizing SpiceMASTER. Although SpiceMASTER's intuitive interface gives you easy access to its deeppower, please spend a few minutes to explore this section (ideally with SpiceMASTER open on your screen). After all, you don't want to miss the many cool features andconveniences we've included in SpiceMASTER!
1. Apply SpiceMASTER in Your Timeline2. Choose a Spice File3. Flip, Reverse, or Move the Effect4. Fine−Tune and Enhance the Effect
• Softness• Texture• Border• Shadow/Glow
5. Preview REAL−TIME6. Apply or Clear the Effect
Click here for a basic tutorial that summarizes the above steps.
While exploring, keep these tips in mind:
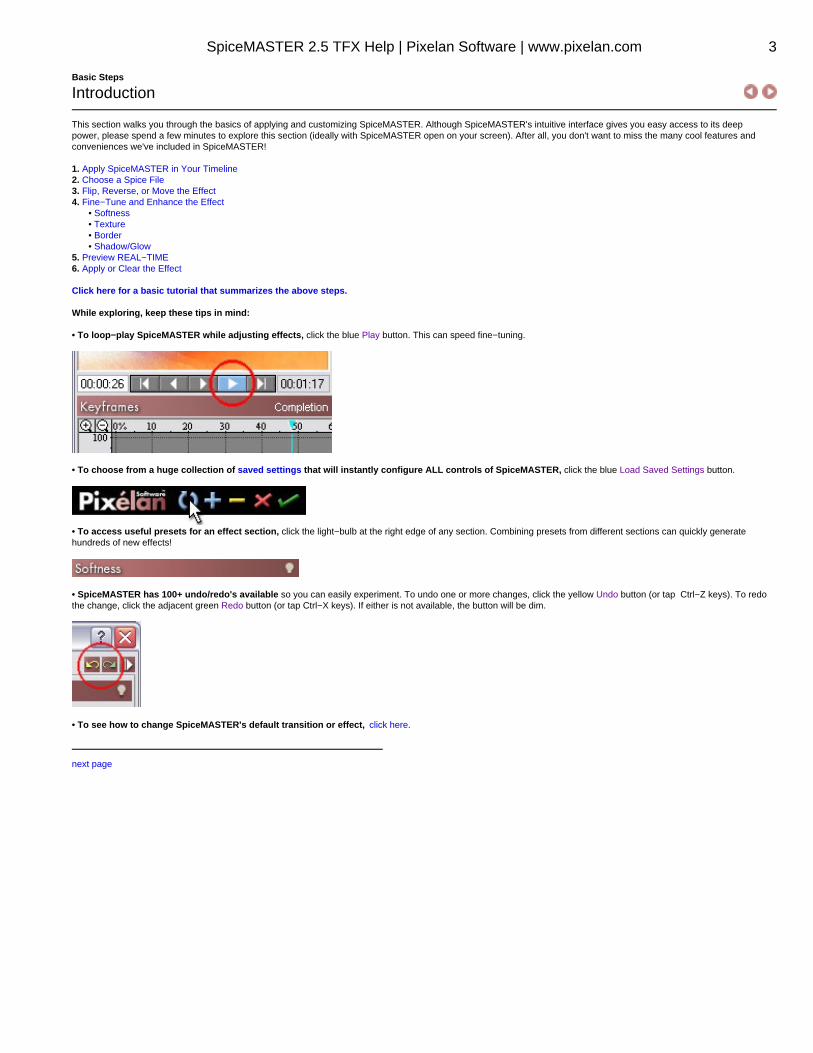
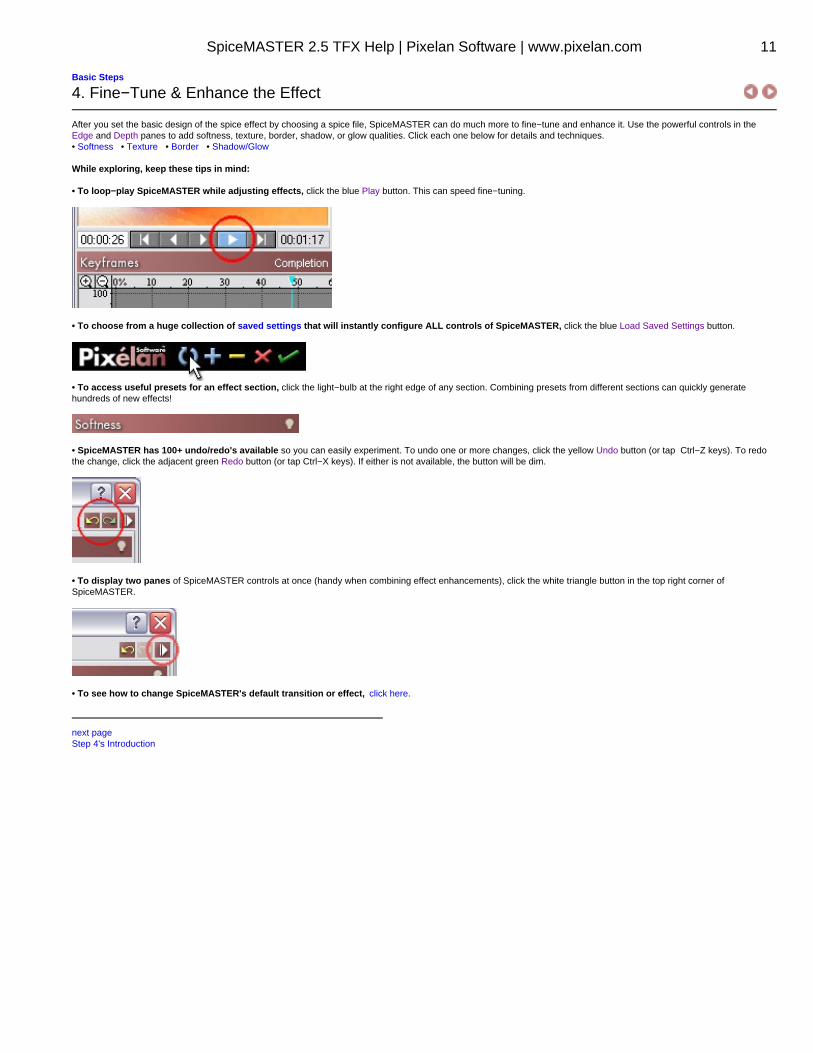
• To loop−play SpiceMASTER while adjusting effects, click the blue Play button. This can speed fine−tuning.
• To choose from a huge collection of saved settings that will instantly configure ALL controls of SpiceMASTER, click the blue Load Saved Settings button.
• To access useful presets for an effect section, click the light−bulb at the right edge of any section. Combining presets from different sections can quickly generatehundreds of new effects!
• SpiceMASTER has 100+ undo/redo's available so you can easily experiment. To undo one or more changes, click the yellow Undo button (or tap Ctrl−Z keys). To redothe change, click the adjacent green Redo button (or tap Ctrl−X keys). If either is not available, the button will be dim.
• To see how to change SpiceMASTER's default transition or effect, click here.
next page
SpiceMASTER 2.5 TFX Help | Pixelan Software | www.pixelan.com 3
Basic Steps
1. Apply SpiceMASTER in Your Timeline
Applying SpiceMASTER in the timeline of your video editing software is much like applying built−in effects. To see the steps, click the video editing software below that youuse.Adobe Premiere ProAdobe Premiere 6.xDPS VelocityPinnacle Liquid EditionSony VegasUlead MediaStudioUlead VideoStudio (6.0 or later)
How to Apply in Adobe Premiere Pro
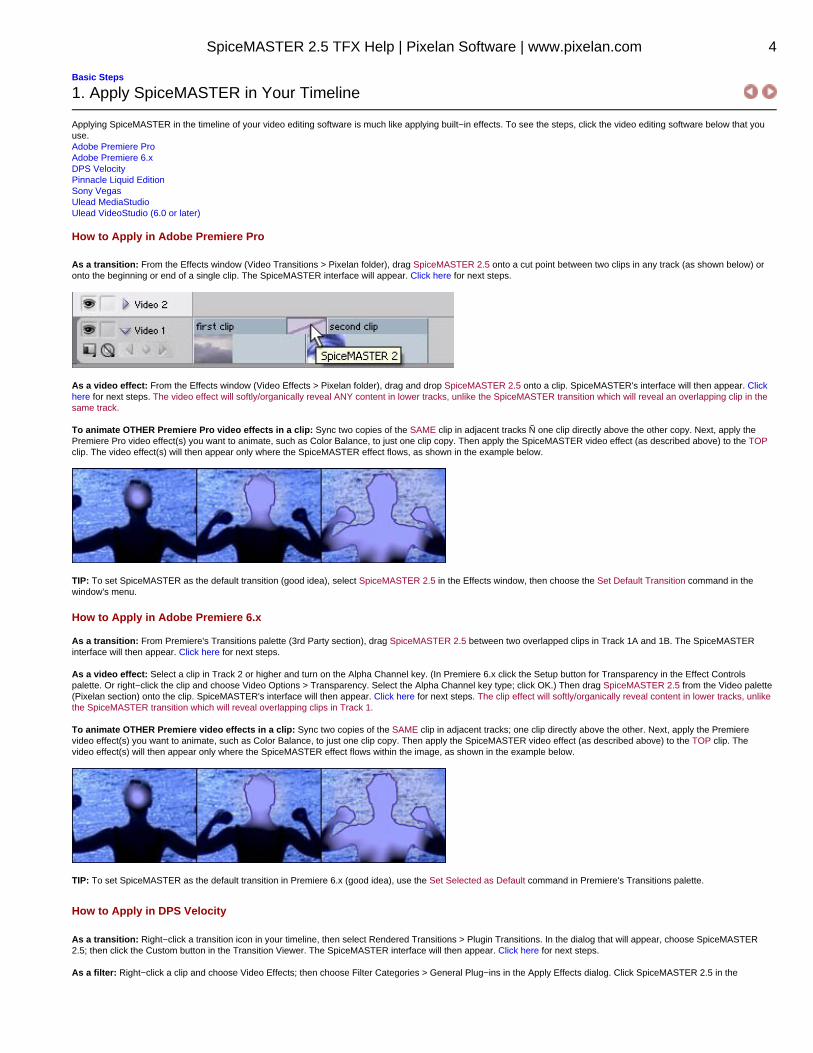
As a transition: From the Effects window (Video Transitions > Pixelan folder), drag SpiceMASTER 2.5 onto a cut point between two clips in any track (as shown below) oronto the beginning or end of a single clip. The SpiceMASTER interface will appear. Click here for next steps.
As a video effect: From the Effects window (Video Effects > Pixelan folder), drag and drop SpiceMASTER 2.5 onto a clip. SpiceMASTER's interface will then appear. Clickhere for next steps. The video effect will softly/organically reveal ANY content in lower tracks, unlike the SpiceMASTER transition which will reveal an overlapping clip in thesame track.
To animate OTHER Premiere Pro video effects in a clip: Sync two copies of the SAME clip in adjacent tracks Ñ one clip directly above the other copy. Next, apply thePremiere Pro video effect(s) you want to animate, such as Color Balance, to just one clip copy. Then apply the SpiceMASTER video effect (as described above) to the TOPclip. The video effect(s) will then appear only where the SpiceMASTER effect flows, as shown in the example below.
TIP: To set SpiceMASTER as the default transition (good idea), select SpiceMASTER 2.5 in the Effects window, then choose the Set Default Transition command in thewindow's menu.
How to Apply in Adobe Premiere 6.x
As a transition: From Premiere's Transitions palette (3rd Party section), drag SpiceMASTER 2.5 between two overlapped clips in Track 1A and 1B. The SpiceMASTERinterface will then appear. Click here for next steps.
As a video effect: Select a clip in Track 2 or higher and turn on the Alpha Channel key. (In Premiere 6.x click the Setup button for Transparency in the Effect Controlspalette. Or right−click the clip and choose Video Options > Transparency. Select the Alpha Channel key type; click OK.) Then drag SpiceMASTER 2.5 from the Video palette(Pixelan section) onto the clip. SpiceMASTER's interface will then appear. Click here for next steps. The clip effect will softly/organically reveal content in lower tracks, unlikethe SpiceMASTER transition which will reveal overlapping clips in Track 1.
To animate OTHER Premiere video effects in a clip: Sync two copies of the SAME clip in adjacent tracks; one clip directly above the other. Next, apply the Premierevideo effect(s) you want to animate, such as Color Balance, to just one clip copy. Then apply the SpiceMASTER video effect (as described above) to the TOP clip. Thevideo effect(s) will then appear only where the SpiceMASTER effect flows within the image, as shown in the example below.
TIP: To set SpiceMASTER as the default transition in Premiere 6.x (good idea), use the Set Selected as Default command in Premiere's Transitions palette.
How to Apply in DPS Velocity
As a transition: Right−click a transition icon in your timeline, then select Rendered Transitions > Plugin Transitions. In the dialog that will appear, choose SpiceMASTER2.5; then click the Custom button in the Transition Viewer. The SpiceMASTER interface will then appear. Click here for next steps.
As a filter: Right−click a clip and choose Video Effects; then choose Filter Categories > General Plug−ins in the Apply Effects dialog. Click SpiceMASTER 2.5 in the
SpiceMASTER 2.5 TFX Help | Pixelan Software | www.pixelan.com 4
Available Filters list, then click Add. The SpiceMASTER interface will then appear. Click here for next steps. The filter will softly/organically reveal content in lower tracks,unlike the transition which will reveal an overlapping clip in the same track.
To animate OTHER Velocity filters: Sync two copies of the SAME clip in adjacent tracks; one copy directly above the other. Next, apply the filter(s) you want to animate toone clip copy. Then apply the SpiceMASTER 2.5 filter (as described above) to the TOP clip. The filters will then appear only where the SpiceMASTER filter flows within theimage.
TIP: To save a particular SpiceMASTER effect for later use, set up the effect, then click the Save FX Macro button in the Apply Effects window. A new .flt file will be createdthat you can load by clicking the Load FX Macro button.
How to Apply in Pinnacle Liquid Edition
As a transition: From the FX tab of the Project window or Browser, choose Plug In Transition FX > Added, then drag SpiceMASTER 2.5 onto the cut point between twoadjacent clips in the same track. Right−click that transition, then elect Edit. The SpiceMASTER interface will then appear. Click here for next steps.
TIP: Make sure the playback icon is ON for the track you are applying SpiceMASTER in, otherwise the effect will not be accessible. Also make sure the two clips you aretransitioning have been trimmed to allow their content to overlap during the transition.
As a clip effect: From the FX tab, apply Clip FX > Keying Editor onto a clip that is above other track(s) of content you want to softly/organically reveal with SpiceMASTER.In the Keying Editor controls, for Key Type choose Chroma Key (with no settings). Now in the Project window or Browser, choose Plug In Clip FX > Added, then dragSpiceMASTER 2.5 onto the same clip. Right−click the * button in the clip and choose Edit. (Or right−click the clip and choose FX Properties, then double−clickSpiceMASTER 2.5.) The SpiceMASTER interface will then appear. Click here for next steps.
TIP: SpiceMASTER must be above Keying Editor in the clip's effect order or the effect will not appear on playback.TIP: To repeat a SpiceMASTER effect, right−click the effect icon in the right upper corner of the first clip you applied it to, then select Copy. Then apply it to any other clip.To open a new project with pre−built favorite SpiceMASTER effects already on hand, in the Start > Projects menu save a project with the SpiceMASTER effects (and otheroften used elements) as a template. Then choose that template when you create a new project.
To animate OTHER Liquid Edition clip effects: Sync two copies of the SAME clip in adjacent tracks Ñ one clip directly above the other copy. Next, apply the clip effect(s)you want to animate to just one clip copy. Then apply the SpiceMASTER 2.5 clip effect (as described above) to the TOP clip. The clip effect(s) will then appear only wherethe SpiceMASTER effect flows within the image, as shown in the example below.
How to Apply in Sony Vegas
As a transition: Overlap two events in the SAME video track, automatically creating a crossfade transition, as shown below.
"Expanded" track view "Collapsed" track view
Then drag Pixelan SpiceMASTER 2.5 from the Transitions (or Plug−Ins) window/pane onto the crossfade. Or right−click the crossfade and choose Transition Properties,then double−click Pixelan SpiceMASTER 2.5. In the Event FX window for SpiceMASTER that will appear (shown below), make sure the Sync Cursor button is off, then click
SpiceMASTER 2.5 TFX Help | Pixelan Software | www.pixelan.com 5
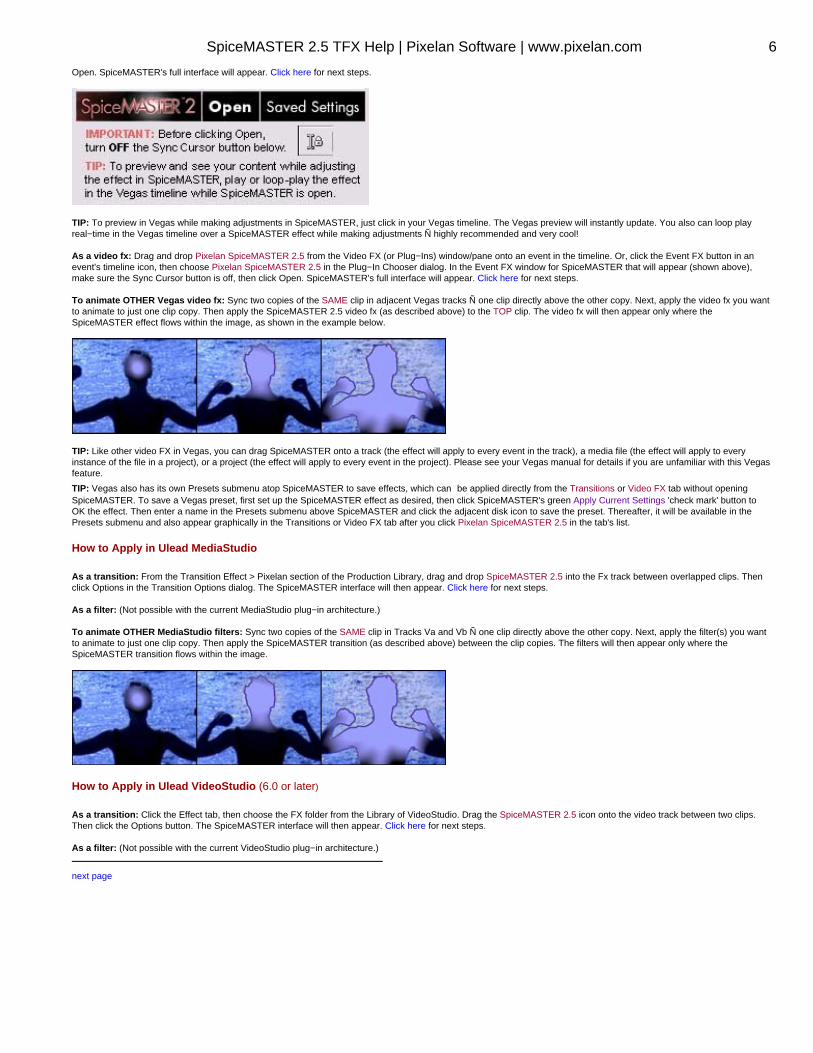
Open. SpiceMASTER's full interface will appear. Click here for next steps.
TIP: To preview in Vegas while making adjustments in SpiceMASTER, just click in your Vegas timeline. The Vegas preview will instantly update. You also can loop playreal−time in the Vegas timeline over a SpiceMASTER effect while making adjustments Ñ highly recommended and very cool!
As a video fx: Drag and drop Pixelan SpiceMASTER 2.5 from the Video FX (or Plug−Ins) window/pane onto an event in the timeline. Or, click the Event FX button in anevent's timeline icon, then choose Pixelan SpiceMASTER 2.5 in the Plug−In Chooser dialog. In the Event FX window for SpiceMASTER that will appear (shown above),make sure the Sync Cursor button is off, then click Open. SpiceMASTER's full interface will appear. Click here for next steps.
To animate OTHER Vegas video fx: Sync two copies of the SAME clip in adjacent Vegas tracks Ñ one clip directly above the other copy. Next, apply the video fx you wantto animate to just one clip copy. Then apply the SpiceMASTER 2.5 video fx (as described above) to the TOP clip. The video fx will then appear only where theSpiceMASTER effect flows within the image, as shown in the example below.
TIP: Like other video FX in Vegas, you can drag SpiceMASTER onto a track (the effect will apply to every event in the track), a media file (the effect will apply to everyinstance of the file in a project), or a project (the effect will apply to every event in the project). Please see your Vegas manual for details if you are unfamiliar with this Vegasfeature.
TIP: Vegas also has its own Presets submenu atop SpiceMASTER to save effects, which can be applied directly from the Transitions or Video FX tab without openingSpiceMASTER. To save a Vegas preset, first set up the SpiceMASTER effect as desired, then click SpiceMASTER's green Apply Current Settings 'check mark' button toOK the effect. Then enter a name in the Presets submenu above SpiceMASTER and click the adjacent disk icon to save the preset. Thereafter, it will be available in thePresets submenu and also appear graphically in the Transitions or Video FX tab after you click Pixelan SpiceMASTER 2.5 in the tab's list.
How to Apply in Ulead MediaStudio
As a transition: From the Transition Effect > Pixelan section of the Production Library, drag and drop SpiceMASTER 2.5 into the Fx track between overlapped clips. Thenclick Options in the Transition Options dialog. The SpiceMASTER interface will then appear. Click here for next steps.
As a filter: (Not possible with the current MediaStudio plug−in architecture.)
To animate OTHER MediaStudio filters: Sync two copies of the SAME clip in Tracks Va and Vb Ñ one clip directly above the other copy. Next, apply the filter(s) you wantto animate to just one clip copy. Then apply the SpiceMASTER transition (as described above) between the clip copies. The filters will then appear only where theSpiceMASTER transition flows within the image.
How to Apply in Ulead VideoStudio (6.0 or later)
As a transition: Click the Effect tab, then choose the FX folder from the Library of VideoStudio. Drag the SpiceMASTER 2.5 icon onto the video track between two clips.Then click the Options button. The SpiceMASTER interface will then appear. Click here for next steps.
As a filter: (Not possible with the current VideoStudio plug−in architecture.)
next page
SpiceMASTER 2.5 TFX Help | Pixelan Software | www.pixelan.com 6
Basic Steps
2. Choose a Spice File
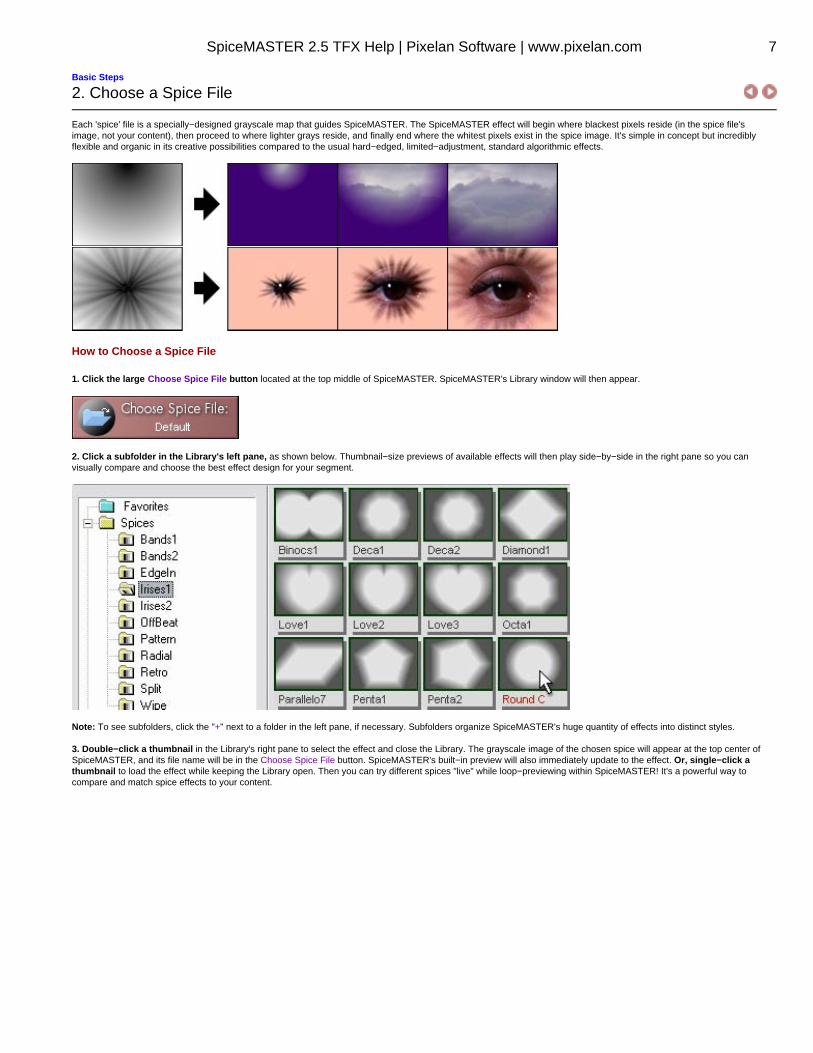
Each 'spice' file is a specially−designed grayscale map that guides SpiceMASTER. The SpiceMASTER effect will begin where blackest pixels reside (in the spice file'simage, not your content), then proceed to where lighter grays reside, and finally end where the whitest pixels exist in the spice image. It's simple in concept but incrediblyflexible and organic in its creative possibilities compared to the usual hard−edged, limited−adjustment, standard algorithmic effects.
How to Choose a Spice File
1. Click the large Choose Spice File button located at the top middle of SpiceMASTER. SpiceMASTER's Library window will then appear.
2. Click a subfolder in the Library's left pane, as shown below. Thumbnail−size previews of available effects will then play side−by−side in the right pane so you canvisually compare and choose the best effect design for your segment.
Note: To see subfolders, click the "+" next to a folder in the left pane, if necessary. Subfolders organize SpiceMASTER's huge quantity of effects into distinct styles.
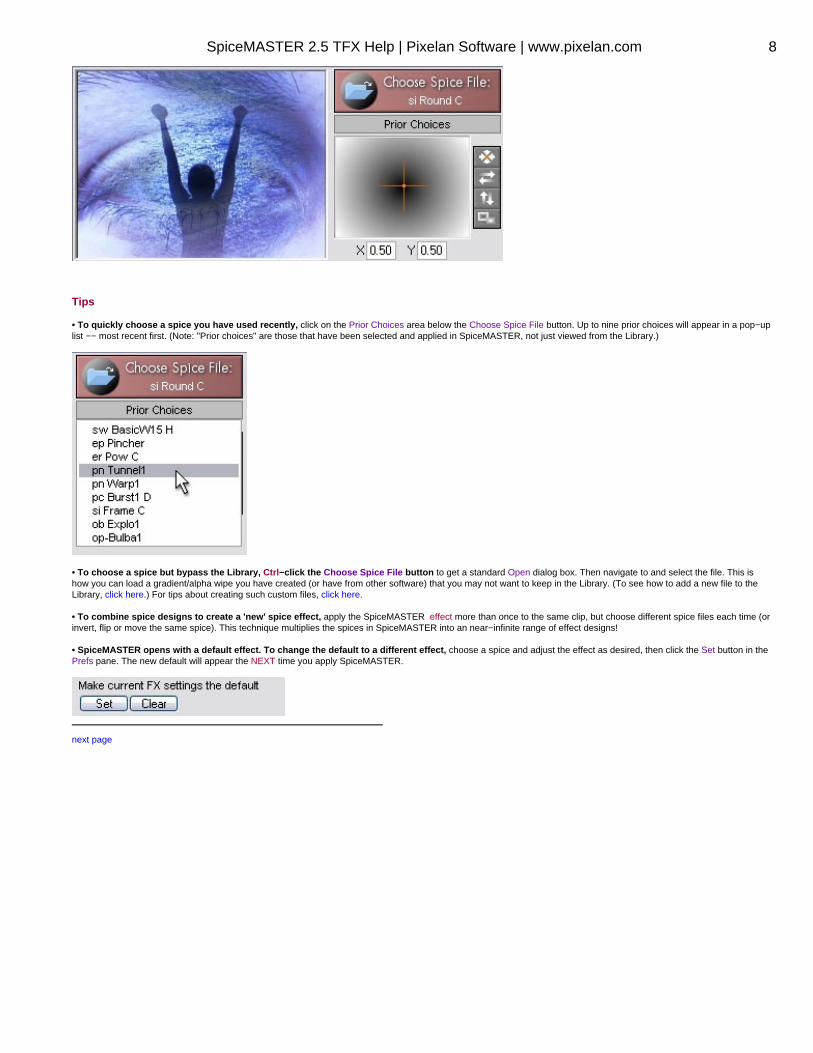
3. Double−click a thumbnail in the Library's right pane to select the effect and close the Library. The grayscale image of the chosen spice will appear at the top center ofSpiceMASTER, and its file name will be in the Choose Spice File button. SpiceMASTER's built−in preview will also immediately update to the effect. Or, single−click athumbnail to load the effect while keeping the Library open. Then you can try different spices "live" while loop−previewing within SpiceMASTER! It's a powerful way tocompare and match spice effects to your content.
SpiceMASTER 2.5 TFX Help | Pixelan Software | www.pixelan.com 7
Tips
• To quickly choose a spice you have used recently, click on the Prior Choices area below the Choose Spice File button. Up to nine prior choices will appear in a pop−uplist −− most recent first. (Note: "Prior choices" are those that have been selected and applied in SpiceMASTER, not just viewed from the Library.)
• To choose a spice but bypass the Library, Ctrl−click the Choose Spice File button to get a standard Open dialog box. Then navigate to and select the file. This ishow you can load a gradient/alpha wipe you have created (or have from other software) that you may not want to keep in the Library. (To see how to add a new file to theLibrary, click here.) For tips about creating such custom files, click here.
• To combine spice designs to create a 'new' spice effect, apply the SpiceMASTER effect more than once to the same clip, but choose different spice files each time (orinvert, flip or move the same spice). This technique multiplies the spices in SpiceMASTER into an near−infinite range of effect designs!
• SpiceMASTER opens with a default effect. To change the default to a different effect, choose a spice and adjust the effect as desired, then click the Set button in thePrefs pane. The new default will appear the NEXT time you apply SpiceMASTER.
next page
SpiceMASTER 2.5 TFX Help | Pixelan Software | www.pixelan.com 8
Basic Steps
3. Flip, Reverse, or Move the Effect
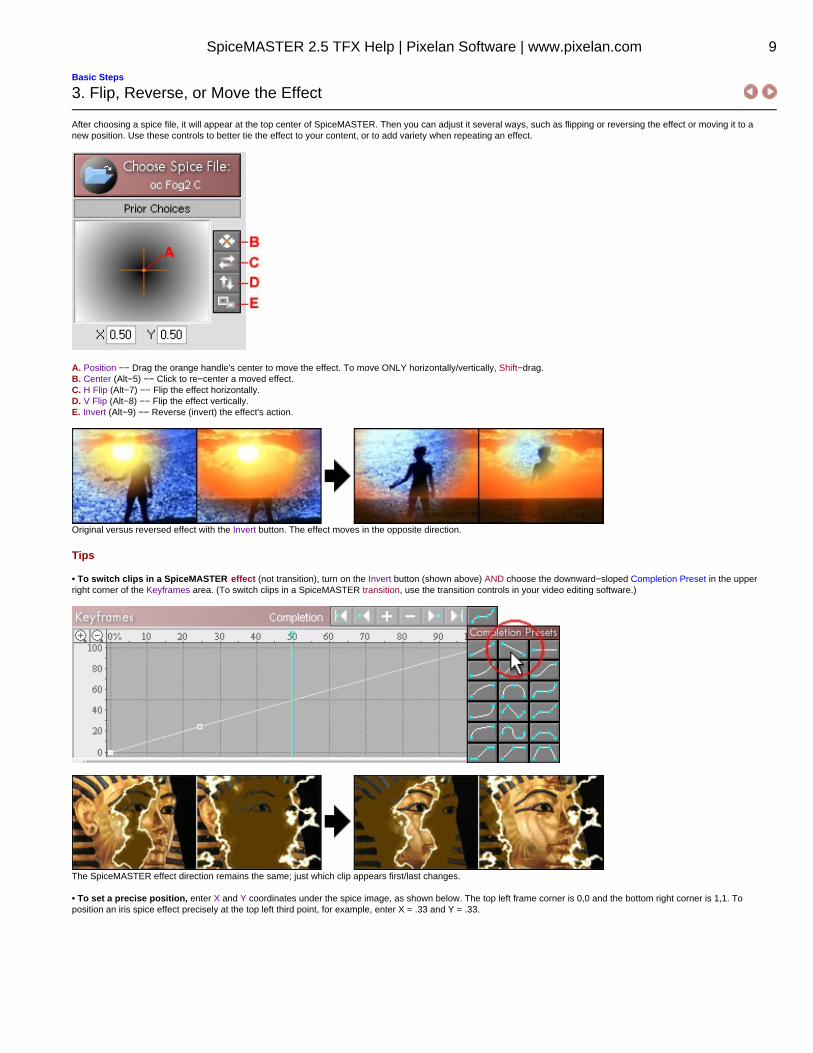
After choosing a spice file, it will appear at the top center of SpiceMASTER. Then you can adjust it several ways, such as flipping or reversing the effect or moving it to anew position. Use these controls to better tie the effect to your content, or to add variety when repeating an effect.
A. Position −− Drag the orange handle's center to move the effect. To move ONLY horizontally/vertically, Shift−drag.B. Center (Alt−5) −− Click to re−center a moved effect.C. H Flip (Alt−7) −− Flip the effect horizontally.D. V Flip (Alt−8) −− Flip the effect vertically.E. Invert (Alt−9) −− Reverse (invert) the effect's action.
Original versus reversed effect with the Invert button. The effect moves in the opposite direction.
Tips
• To switch clips in a SpiceMASTER effect (not transition), turn on the Invert button (shown above) AND choose the downward−sloped Completion Preset in the upperright corner of the Keyframes area. (To switch clips in a SpiceMASTER transition, use the transition controls in your video editing software.)
The SpiceMASTER effect direction remains the same; just which clip appears first/last changes.
• To set a precise position, enter X and Y coordinates under the spice image, as shown below. The top left frame corner is 0,0 and the bottom right corner is 1,1. Toposition an iris spice effect precisely at the top left third point, for example, enter X = .33 and Y = .33.
SpiceMASTER 2.5 TFX Help | Pixelan Software | www.pixelan.com 9

• Note that iris−like spices enlarge slightly as you move them toward the frame edge −− to ensure the spice effect will cover the entire frame.
• Moving a spice's position may reduce the range of grayscales in the visible frame. Thus the effect will not start or end exactly at the actual beginning or end of the effect.To compensate (especially if an iris−like effect), manually adjust the effect's first (and/or last) Completion keyframes up (and/or down, such as 20% − 80% instead of thedefault 0% − 100%) to fine−tune the effect's visual timing.
Click here for the next step of applying SpiceMASTER.
SpiceMASTER 2.5 TFX Help | Pixelan Software | www.pixelan.com 10
Basic Steps
4. Fine−Tune & Enhance the Effect
After you set the basic design of the spice effect by choosing a spice file, SpiceMASTER can do much more to fine−tune and enhance it. Use the powerful controls in theEdge and Depth panes to add softness, texture, border, shadow, or glow qualities. Click each one below for details and techniques.• Softness • Texture • Border • Shadow/Glow
While exploring, keep these tips in mind:
• To loop−play SpiceMASTER while adjusting effects, click the blue Play button. This can speed fine−tuning.
• To choose from a huge collection of saved settings that will instantly configure ALL controls of SpiceMASTER, click the blue Load Saved Settings button.
• To access useful presets for an effect section, click the light−bulb at the right edge of any section. Combining presets from different sections can quickly generatehundreds of new effects!
• SpiceMASTER has 100+ undo/redo's available so you can easily experiment. To undo one or more changes, click the yellow Undo button (or tap Ctrl−Z keys). To redothe change, click the adjacent green Redo button (or tap Ctrl−X keys). If either is not available, the button will be dim.
• To display two panes of SpiceMASTER controls at once (handy when combining effect enhancements), click the white triangle button in the top right corner ofSpiceMASTER.
• To see how to change SpiceMASTER's default transition or effect, click here.
next pageStep 4's Introduction
SpiceMASTER 2.5 TFX Help | Pixelan Software | www.pixelan.com 11
Basic Steps
4. Fine−Tune & Enhance the Effect: Softness
Softness is a simple but compelling treatment that is creatively useful for many types of SpiceMASTER effects. It is also one of SpiceMASTER's advantages over moststandard video effects. Applying a spice hard usually doesn't cut it!
More examples
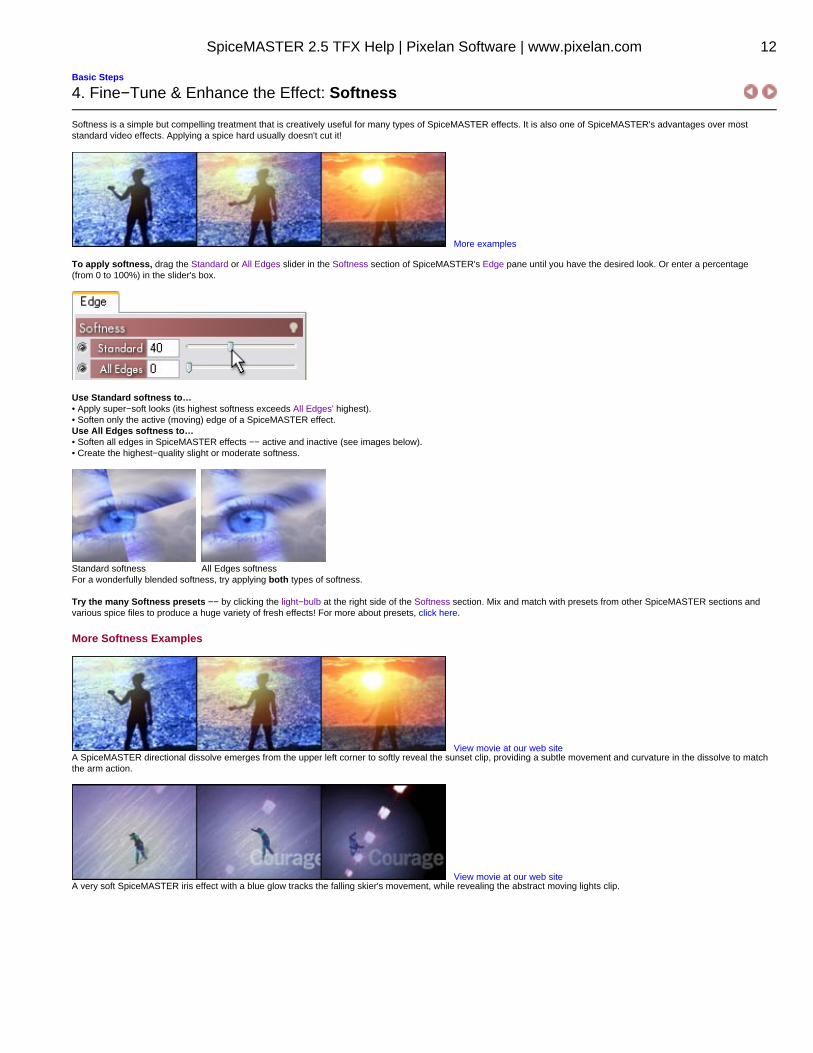
To apply softness, drag the Standard or All Edges slider in the Softness section of SpiceMASTER's Edge pane until you have the desired look. Or enter a percentage(from 0 to 100%) in the slider's box.
Use Standard softness to…• Apply super−soft looks (its highest softness exceeds All Edges' highest).• Soften only the active (moving) edge of a SpiceMASTER effect.Use All Edges softness to…• Soften all edges in SpiceMASTER effects −− active and inactive (see images below).• Create the highest−quality slight or moderate softness.
Standard softness All Edges softnessFor a wonderfully blended softness, try applying both types of softness.
Try the many Softness presets −− by clicking the light−bulb at the right side of the Softness section. Mix and match with presets from other SpiceMASTER sections andvarious spice files to produce a huge variety of fresh effects! For more about presets, click here.
More Softness Examples
View movie at our web siteA SpiceMASTER directional dissolve emerges from the upper left corner to softly reveal the sunset clip, providing a subtle movement and curvature in the dissolve to matchthe arm action.
View movie at our web siteA very soft SpiceMASTER iris effect with a blue glow tracks the falling skier's movement, while revealing the abstract moving lights clip.
SpiceMASTER 2.5 TFX Help | Pixelan Software | www.pixelan.com 12
View movie at our web siteA softened EnergyFX/Radiant spice subtly adds "soft rays" to reveal the emerging athlete. The effect's center also is keyframed to move right slightly with the footage.
View movie at our web siteA softened spice with Texture added is used to position, organically animate and reveal a color effect within a single clip.
next pageStep 4's Introduction
SpiceMASTER 2.5 TFX Help | Pixelan Software | www.pixelan.com 13
Basic Steps
4. Fine−Tune & Enhance the Effect: Texture
Texture provides additional organic edge control in your effect. It can add trailing sparkles, powders, visual noise, edge texture and animation to SpiceMASTER effects. Itcan also build organic, cutting−edge new looks from existing spice effects.
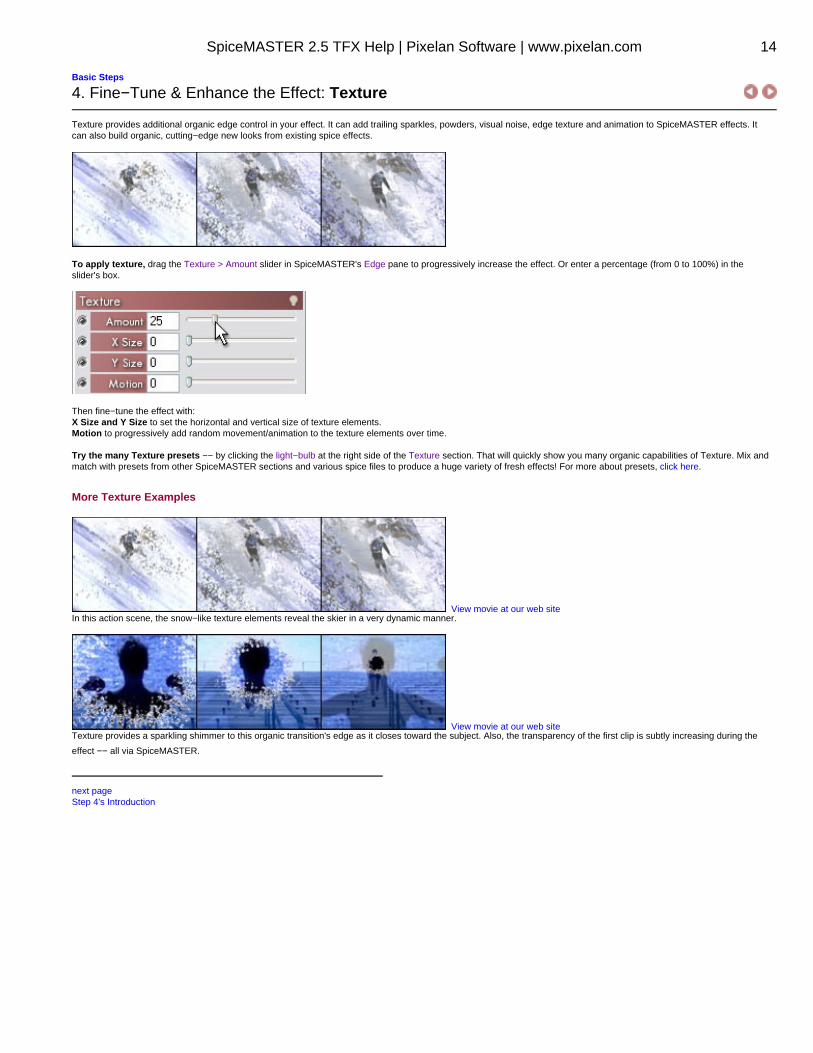
To apply texture, drag the Texture > Amount slider in SpiceMASTER's Edge pane to progressively increase the effect. Or enter a percentage (from 0 to 100%) in theslider's box.
Then fine−tune the effect with:X Size and Y Size to set the horizontal and vertical size of texture elements.Motion to progressively add random movement/animation to the texture elements over time.
Try the many Texture presets −− by clicking the light−bulb at the right side of the Texture section. That will quickly show you many organic capabilities of Texture. Mix andmatch with presets from other SpiceMASTER sections and various spice files to produce a huge variety of fresh effects! For more about presets, click here.
More Texture Examples
View movie at our web siteIn this action scene, the snow−like texture elements reveal the skier in a very dynamic manner.
View movie at our web siteTexture provides a sparkling shimmer to this organic transition's edge as it closes toward the subject. Also, the transparency of the first clip is subtly increasing during the
effect −− all via SpiceMASTER.
next pageStep 4's Introduction
SpiceMASTER 2.5 TFX Help | Pixelan Software | www.pixelan.com 14
Basic Steps
4. Fine−Tune & Enhance the Effect: Border
SpiceMASTER's powerful Border controls can create multicolor gradient borders that can seamlessly change width, color, softness, opacity, and position over time. Theintuitive control shows a cross−section of the border, making fine adjustments easy. Adding a border can:• visually separate transitioning scenes clearly when desired;• more strongly define animated effect regions in an image;• create flowing motion−graphic effects (see images below);• create stunning abstract looks.
More about Border techniques are below:How to Apply a Border and Adjust ThicknessHow to Modify the Entire Border or a PointHow to Change the Border ColorHow to Alter the Border Softness/OpacityHow to Alter the Border PositionTipsMore Examples
How to Apply a Border and Adjust Thickness
To apply a border, drag the Amount slider in the Border section of SpiceMASTER's Edge pane until you have the desired border thickness. Or enter a percentage (from 0to 100%) in the slider's text box.
Try the many Border presets −− by clicking the light−bulb at the right side of the Border section. That will quickly show you many creative possibilities. Mix and match withpresets from other SpiceMASTER sections and various spice files to produce a huge variety of fresh effects! For more about presets, click here.
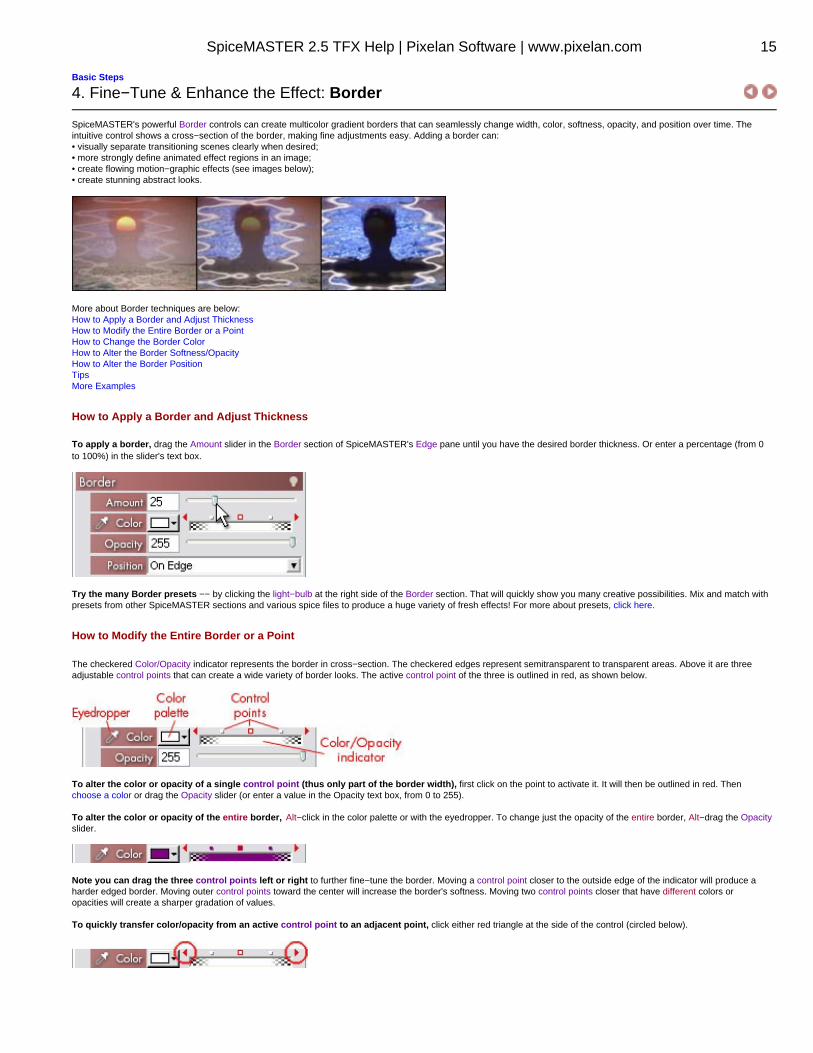
How to Modify the Entire Border or a Point
The checkered Color/Opacity indicator represents the border in cross−section. The checkered edges represent semitransparent to transparent areas. Above it are threeadjustable control points that can create a wide variety of border looks. The active control point of the three is outlined in red, as shown below.
To alter the color or opacity of a single control point (thus only part of the border width), first click on the point to activate it. It will then be outlined in red. Thenchoose a color or drag the Opacity slider (or enter a value in the Opacity text box, from 0 to 255).
To alter the color or opacity of the entire border, Alt−click in the color palette or with the eyedropper. To change just the opacity of the entire border, Alt−drag the Opacityslider.
Note you can drag the three control points left or right to further fine−tune the border. Moving a control point closer to the outside edge of the indicator will produce aharder edged border. Moving outer control points toward the center will increase the border's softness. Moving two control points closer that have different colors oropacities will create a sharper gradation of values.
To quickly transfer color/opacity from an active control point to an adjacent point, click either red triangle at the side of the control (circled below).
SpiceMASTER 2.5 TFX Help | Pixelan Software | www.pixelan.com 15
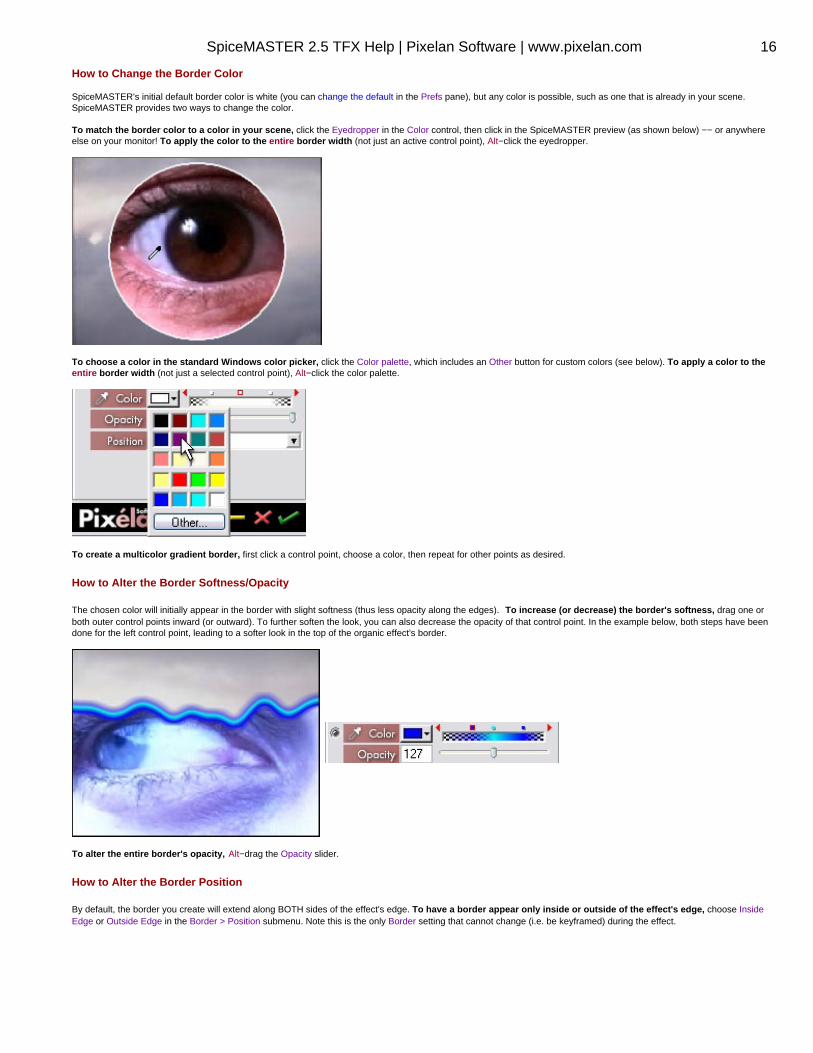
How to Change the Border Color
SpiceMASTER's initial default border color is white (you can change the default in the Prefs pane), but any color is possible, such as one that is already in your scene.SpiceMASTER provides two ways to change the color.
To match the border color to a color in your scene, click the Eyedropper in the Color control, then click in the SpiceMASTER preview (as shown below) −− or anywhereelse on your monitor! To apply the color to the entire border width (not just an active control point), Alt−click the eyedropper.
To choose a color in the standard Windows color picker, click the Color palette, which includes an Other button for custom colors (see below). To apply a color to theentire border width (not just a selected control point), Alt−click the color palette.
To create a multicolor gradient border, first click a control point, choose a color, then repeat for other points as desired.
How to Alter the Border Softness/Opacity
The chosen color will initially appear in the border with slight softness (thus less opacity along the edges). To increase (or decrease) the border's softness, drag one orboth outer control points inward (or outward). To further soften the look, you can also decrease the opacity of that control point. In the example below, both steps have beendone for the left control point, leading to a softer look in the top of the organic effect's border.
To alter the entire border's opacity, Alt−drag the Opacity slider.
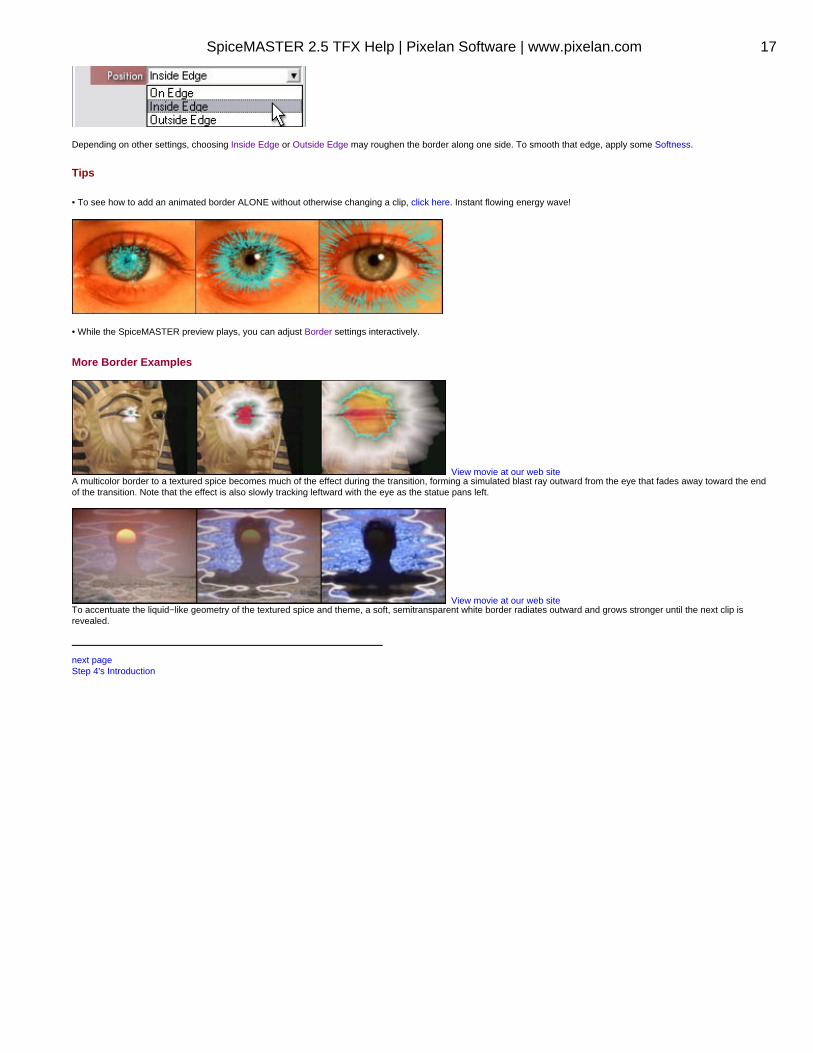
How to Alter the Border Position
By default, the border you create will extend along BOTH sides of the effect's edge. To have a border appear only inside or outside of the effect's edge, choose InsideEdge or Outside Edge in the Border > Position submenu. Note this is the only Border setting that cannot change (i.e. be keyframed) during the effect.
SpiceMASTER 2.5 TFX Help | Pixelan Software | www.pixelan.com 16
Depending on other settings, choosing Inside Edge or Outside Edge may roughen the border along one side. To smooth that edge, apply some Softness.
Tips
• To see how to add an animated border ALONE without otherwise changing a clip, click here. Instant flowing energy wave!
• While the SpiceMASTER preview plays, you can adjust Border settings interactively.
More Border Examples
View movie at our web siteA multicolor border to a textured spice becomes much of the effect during the transition, forming a simulated blast ray outward from the eye that fades away toward the endof the transition. Note that the effect is also slowly tracking leftward with the eye as the statue pans left.
View movie at our web siteTo accentuate the liquid−like geometry of the textured spice and theme, a soft, semitransparent white border radiates outward and grows stronger until the next clip isrevealed.
next pageStep 4's Introduction
SpiceMASTER 2.5 TFX Help | Pixelan Software | www.pixelan.com 17
Basic Steps
4. Fine−Tune & Enhance the Effect: Shadow/Glow
Placing a realistic shadow or glow along a SpiceMASTER effect's edge is easy. Such depth effects can:• create the illusion of one image growing, flowing or eroding above another• simulate thickness in an image (a powerful way to add depth);• emphasize the dynamic edge of a spice effect or custom matte;• add a keyframable shadow to titles, graphics and backgrounds.
You can control several shadow qualities: shadow style, opacity, softness, color and depth. All but shadow style are keyframable.
More about shadow/glow techniques are below:How to Apply a ShadowHow to Change the Shadow's Strength, Depth or AngleHow to Change the Shadow/Glow ColorHow to Apply a GlowTipsMore Examples
How to Apply a Shadow
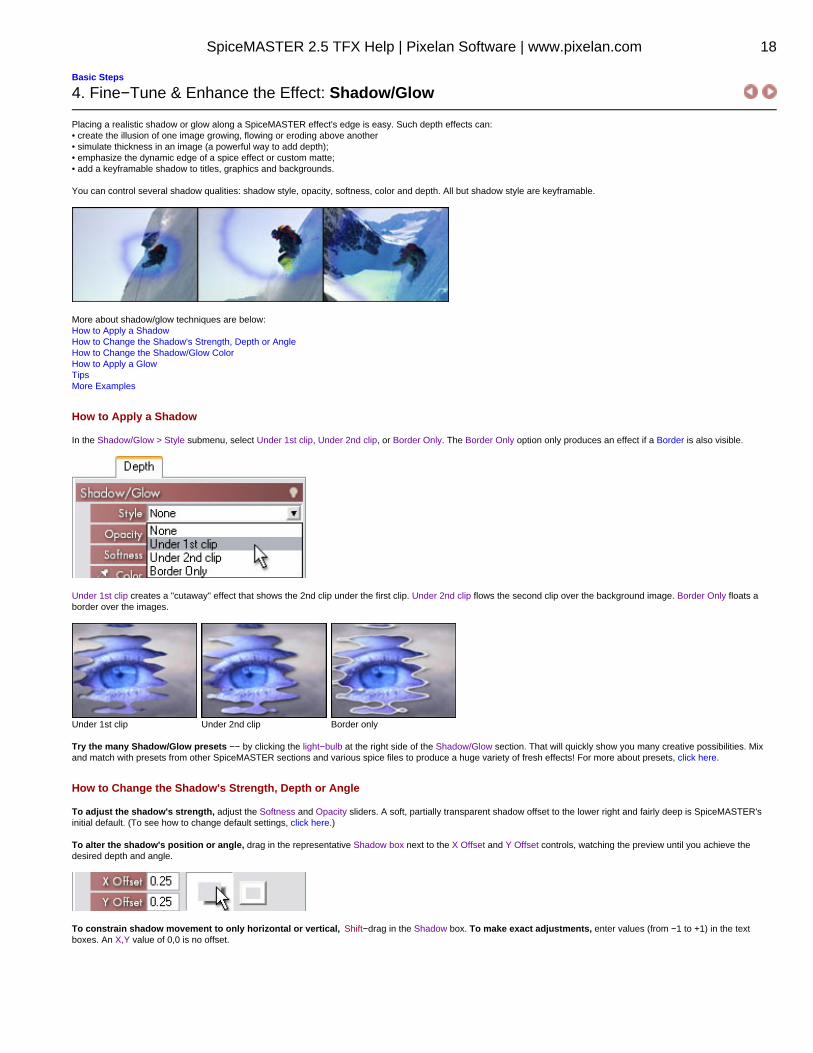
In the Shadow/Glow > Style submenu, select Under 1st clip, Under 2nd clip, or Border Only. The Border Only option only produces an effect if a Border is also visible.
Under 1st clip creates a "cutaway" effect that shows the 2nd clip under the first clip. Under 2nd clip flows the second clip over the background image. Border Only floats aborder over the images.
Under 1st clip Under 2nd clip Border only
Try the many Shadow/Glow presets −− by clicking the light−bulb at the right side of the Shadow/Glow section. That will quickly show you many creative possibilities. Mixand match with presets from other SpiceMASTER sections and various spice files to produce a huge variety of fresh effects! For more about presets, click here.
How to Change the Shadow's Strength, Depth or Angle
To adjust the shadow's strength, adjust the Softness and Opacity sliders. A soft, partially transparent shadow offset to the lower right and fairly deep is SpiceMASTER'sinitial default. (To see how to change default settings, click here.)
To alter the shadow's position or angle, drag in the representative Shadow box next to the X Offset and Y Offset controls, watching the preview until you achieve thedesired depth and angle.
To constrain shadow movement to only horizontal or vertical, Shift−drag in the Shadow box. To make exact adjustments, enter values (from −1 to +1) in the textboxes. An X,Y value of 0,0 is no offset.
SpiceMASTER 2.5 TFX Help | Pixelan Software | www.pixelan.com 18
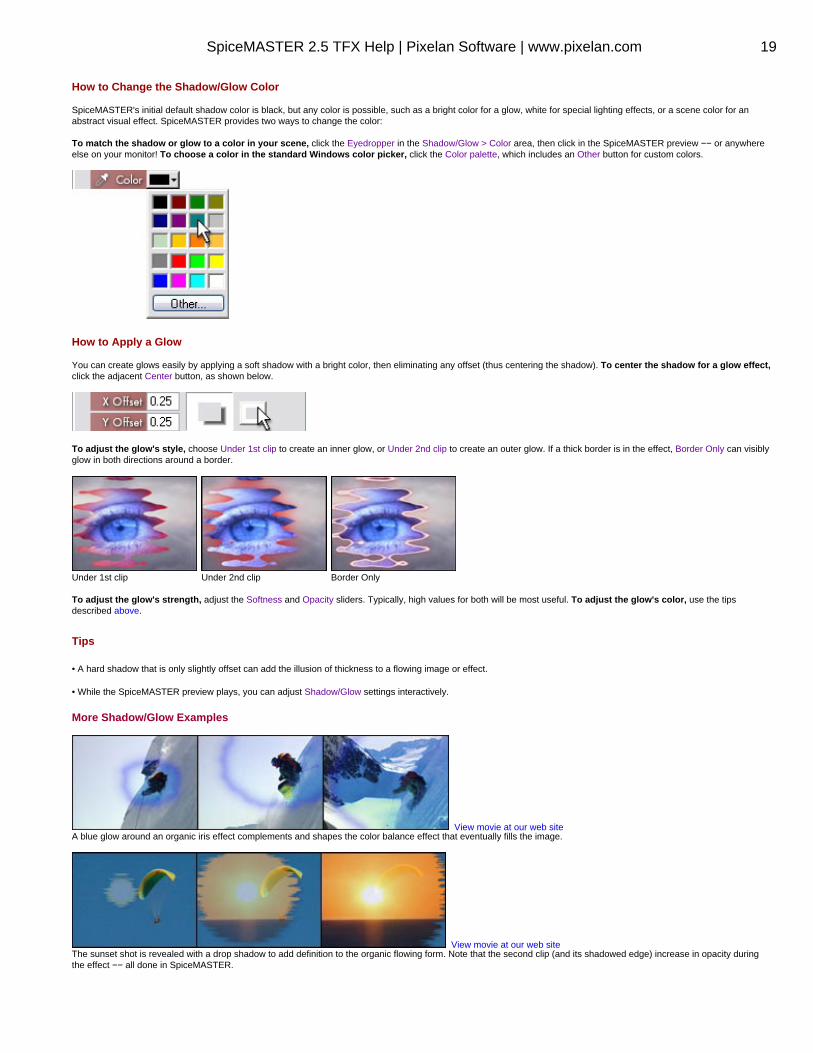
How to Change the Shadow/Glow Color
SpiceMASTER's initial default shadow color is black, but any color is possible, such as a bright color for a glow, white for special lighting effects, or a scene color for anabstract visual effect. SpiceMASTER provides two ways to change the color:
To match the shadow or glow to a color in your scene, click the Eyedropper in the Shadow/Glow > Color area, then click in the SpiceMASTER preview −− or anywhereelse on your monitor! To choose a color in the standard Windows color picker, click the Color palette, which includes an Other button for custom colors.
How to Apply a Glow
You can create glows easily by applying a soft shadow with a bright color, then eliminating any offset (thus centering the shadow). To center the shadow for a glow effect,click the adjacent Center button, as shown below.
To adjust the glow's style, choose Under 1st clip to create an inner glow, or Under 2nd clip to create an outer glow. If a thick border is in the effect, Border Only can visiblyglow in both directions around a border.
Under 1st clip Under 2nd clip Border Only
To adjust the glow's strength, adjust the Softness and Opacity sliders. Typically, high values for both will be most useful. To adjust the glow's color, use the tipsdescribed above.
Tips
• A hard shadow that is only slightly offset can add the illusion of thickness to a flowing image or effect.
• While the SpiceMASTER preview plays, you can adjust Shadow/Glow settings interactively.
More Shadow/Glow Examples
View movie at our web siteA blue glow around an organic iris effect complements and shapes the color balance effect that eventually fills the image.
View movie at our web siteThe sunset shot is revealed with a drop shadow to add definition to the organic flowing form. Note that the second clip (and its shadowed edge) increase in opacity duringthe effect −− all done in SpiceMASTER.
SpiceMASTER 2.5 TFX Help | Pixelan Software | www.pixelan.com 19

View movie at our web siteA drop shadow under the powdery border effect adds depth to the transition.
next pageStep 4's Introduction
SpiceMASTER 2.5 TFX Help | Pixelan Software | www.pixelan.com 20
Basic Steps
5. Preview REAL−TIME
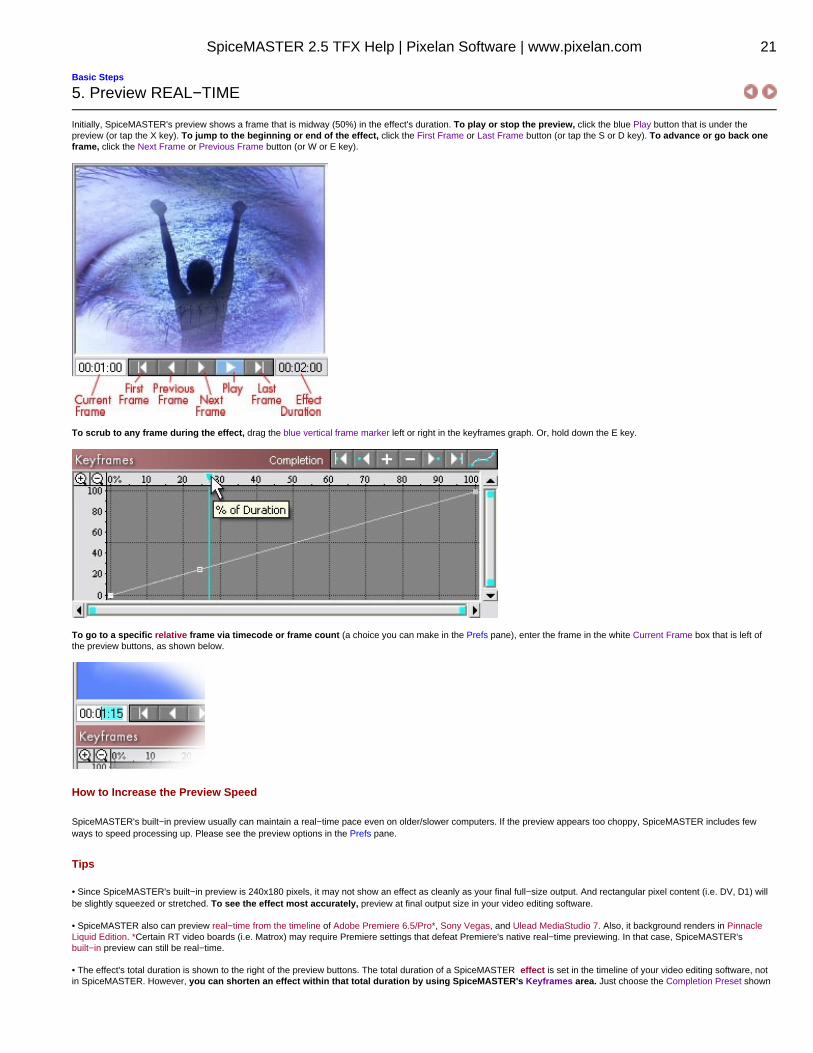
Initially, SpiceMASTER's preview shows a frame that is midway (50%) in the effect's duration. To play or stop the preview, click the blue Play button that is under thepreview (or tap the X key). To jump to the beginning or end of the effect, click the First Frame or Last Frame button (or tap the S or D key). To advance or go back oneframe, click the Next Frame or Previous Frame button (or W or E key).
To scrub to any frame during the effect, drag the blue vertical frame marker left or right in the keyframes graph. Or, hold down the E key.
To go to a specific relative frame via timecode or frame count (a choice you can make in the Prefs pane), enter the frame in the white Current Frame box that is left ofthe preview buttons, as shown below.
How to Increase the Preview Speed
SpiceMASTER's built−in preview usually can maintain a real−time pace even on older/slower computers. If the preview appears too choppy, SpiceMASTER includes fewways to speed processing up. Please see the preview options in the Prefs pane.
Tips
• Since SpiceMASTER's built−in preview is 240x180 pixels, it may not show an effect as cleanly as your final full−size output. And rectangular pixel content (i.e. DV, D1) willbe slightly squeezed or stretched. To see the effect most accurately, preview at final output size in your video editing software.
• SpiceMASTER also can preview real−time from the timeline of Adobe Premiere 6.5/Pro*, Sony Vegas, and Ulead MediaStudio 7. Also, it background renders in PinnacleLiquid Edition. *Certain RT video boards (i.e. Matrox) may require Premiere settings that defeat Premiere's native real−time previewing. In that case, SpiceMASTER'sbuilt−in preview can still be real−time.
• The effect's total duration is shown to the right of the preview buttons. The total duration of a SpiceMASTER effect is set in the timeline of your video editing software, notin SpiceMASTER. However, you can shorten an effect within that total duration by using SpiceMASTER's Keyframes area. Just choose the Completion Preset shown
SpiceMASTER 2.5 TFX Help | Pixelan Software | www.pixelan.com 21
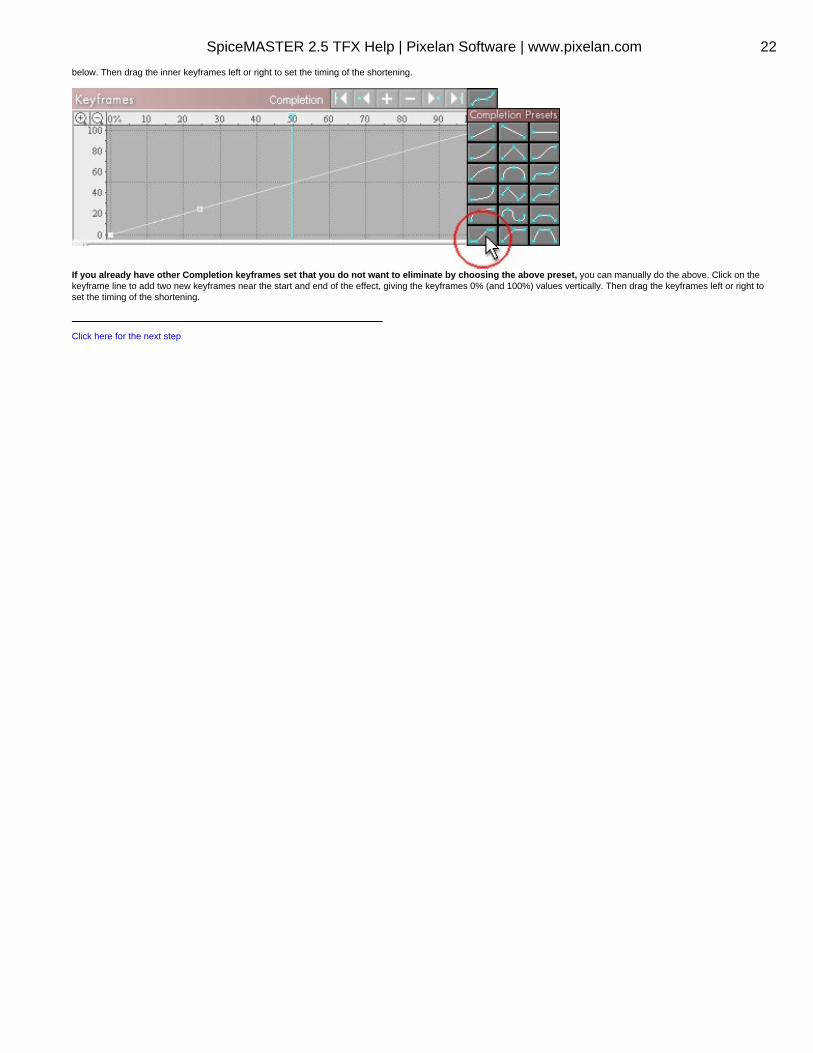
below. Then drag the inner keyframes left or right to set the timing of the shortening.
If you already have other Completion keyframes set that you do not want to eliminate by choosing the above preset, you can manually do the above. Click on thekeyframe line to add two new keyframes near the start and end of the effect, giving the keyframes 0% (and 100%) values vertically. Then drag the keyframes left or right toset the timing of the shortening.
Click here for the next step
SpiceMASTER 2.5 TFX Help | Pixelan Software | www.pixelan.com 22
Basic Steps
6. Apply or Clear the Effect
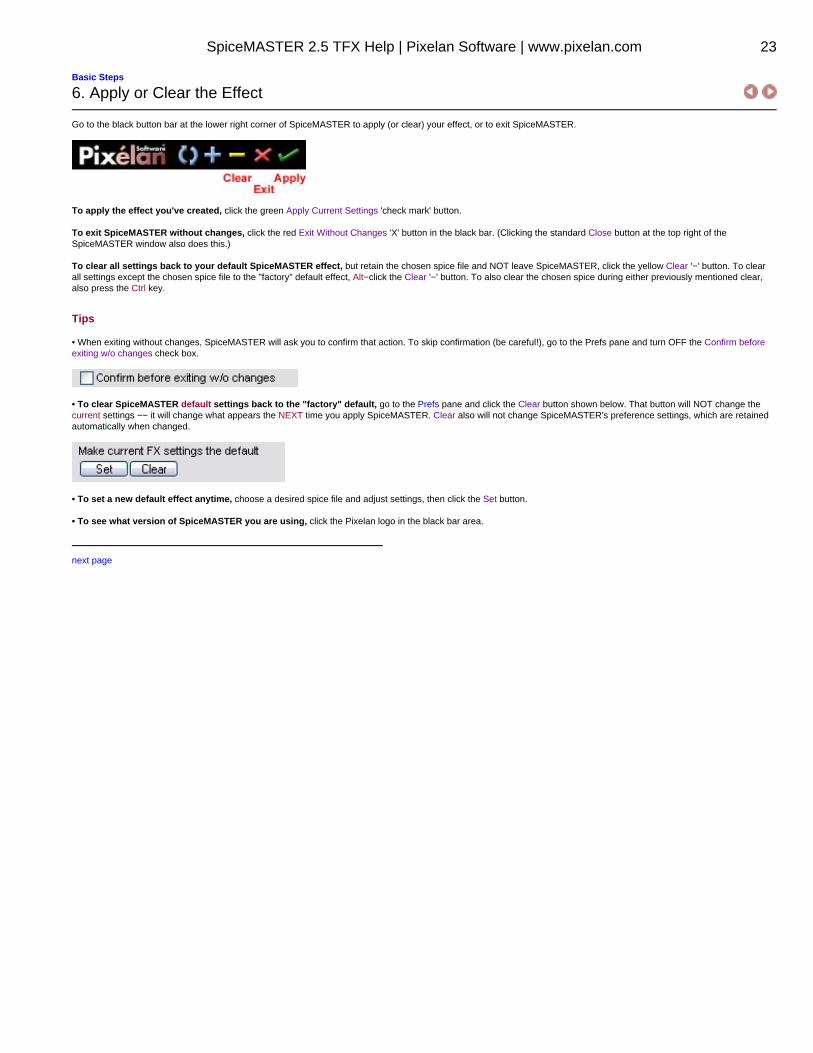
Go to the black button bar at the lower right corner of SpiceMASTER to apply (or clear) your effect, or to exit SpiceMASTER.
To apply the effect you've created, click the green Apply Current Settings 'check mark' button.
To exit SpiceMASTER without changes, click the red Exit Without Changes 'X' button in the black bar. (Clicking the standard Close button at the top right of theSpiceMASTER window also does this.)
To clear all settings back to your default SpiceMASTER effect, but retain the chosen spice file and NOT leave SpiceMASTER, click the yellow Clear '−' button. To clearall settings except the chosen spice file to the "factory" default effect, Alt−click the Clear '−' button. To also clear the chosen spice during either previously mentioned clear,also press the Ctrl key.
Tips
• When exiting without changes, SpiceMASTER will ask you to confirm that action. To skip confirmation (be careful!), go to the Prefs pane and turn OFF the Confirm beforeexiting w/o changes check box.
• To clear SpiceMASTER default settings back to the "factory" default, go to the Prefs pane and click the Clear button shown below. That button will NOT change thecurrent settings −− it will change what appears the NEXT time you apply SpiceMASTER. Clear also will not change SpiceMASTER's preference settings, which are retainedautomatically when changed.
• To set a new default effect anytime, choose a desired spice file and adjust settings, then click the Set button.
• To see what version of SpiceMASTER you are using, click the Pixelan logo in the black bar area.
next page
SpiceMASTER 2.5 TFX Help | Pixelan Software | www.pixelan.com 23

Basic Steps
Tutorial: How to Apply a SpiceMASTER Transition
1. Apply the SpiceMASTER 2 transition in the timeline of your video editing software. Click here for the specific steps. SpiceMASTER's dialog will then appear.
2. Open SpiceMASTER's Library. Click the large Choose Spice File button located at the top middle of SpiceMASTER. SpiceMASTER's Library window will then appear.
3. Choose an effect design. Click a subfolder in the Library's left pane, as shown below. The hundreds of effect designs are organized into subfolders by style. Thendouble−click a desired effect design playing in the Library's right pane. Or SINGLE−click a thumbnail to load the effect into SpiceMASTER without closing the Library. Bykeeping the Library open, you can switch spices while continuously previewing within SpiceMASTER! It's a powerful way to compare and match spice effects to yourcontent.
4. Adjust the effect. The grayscale image of the chosen spice will then appear at the top center of SpiceMASTER, and its file name will be in the Choose Spice File button.Use the controls below to better position and tie the effect to your content, or to add variety when repeating an effect.
A. Position −− Drag the orange handle's center to move the effect. To move ONLY horizontally/vertically, Shift−drag.
B. Center (Alt−5) −− Click to re−center a moved effect.C. H Flip (Alt−7) −− Flip the effect horizontally.D. V Flip (Alt−8) −− Flip the effect vertically.E. Invert (Alt−9) −− Reverse (invert) the effect's action.
5. Set the effect qualities. After you set the basic design and position of the spice effect, SpiceMASTER can do much more to fine−tune and enhance it. Use the powerfulcontrols in the Edge and Depth panes to add softness, texture, border, shadow, glow, bevel or ripple qualities. Click each one below for details and techniques.• Softness • Texture • Border • Shadow/Glow
To access useful presets for any of the above, click the light−bulb at the top right edge of a control section, as shown below for Texture. Presets can be combined intothousands of fresh effects!
To easily experiment with different settings, SpiceMASTER has 100+ undo/redo levels −− click the buttons circled below (or tap Ctrl−Z / Ctrl−X keys respectively). If eitheris not available, the button will be dim.
SpiceMASTER 2.5 TFX Help | Pixelan Software | www.pixelan.com 24
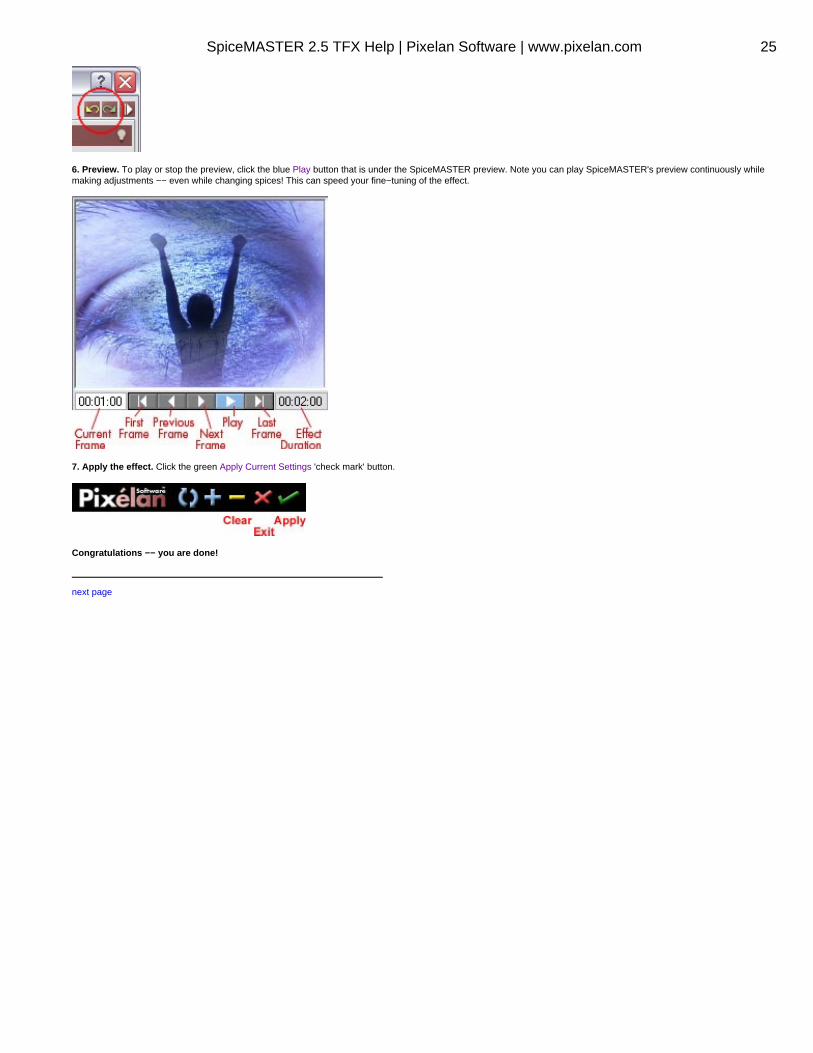
6. Preview. To play or stop the preview, click the blue Play button that is under the SpiceMASTER preview. Note you can play SpiceMASTER's preview continuously whilemaking adjustments −− even while changing spices! This can speed your fine−tuning of the effect.
7. Apply the effect. Click the green Apply Current Settings 'check mark' button.
Congratulations −− you are done!
next page
SpiceMASTER 2.5 TFX Help | Pixelan Software | www.pixelan.com 25
Basic Steps
TUTORIAL: How to Animate Other Effects or Keys
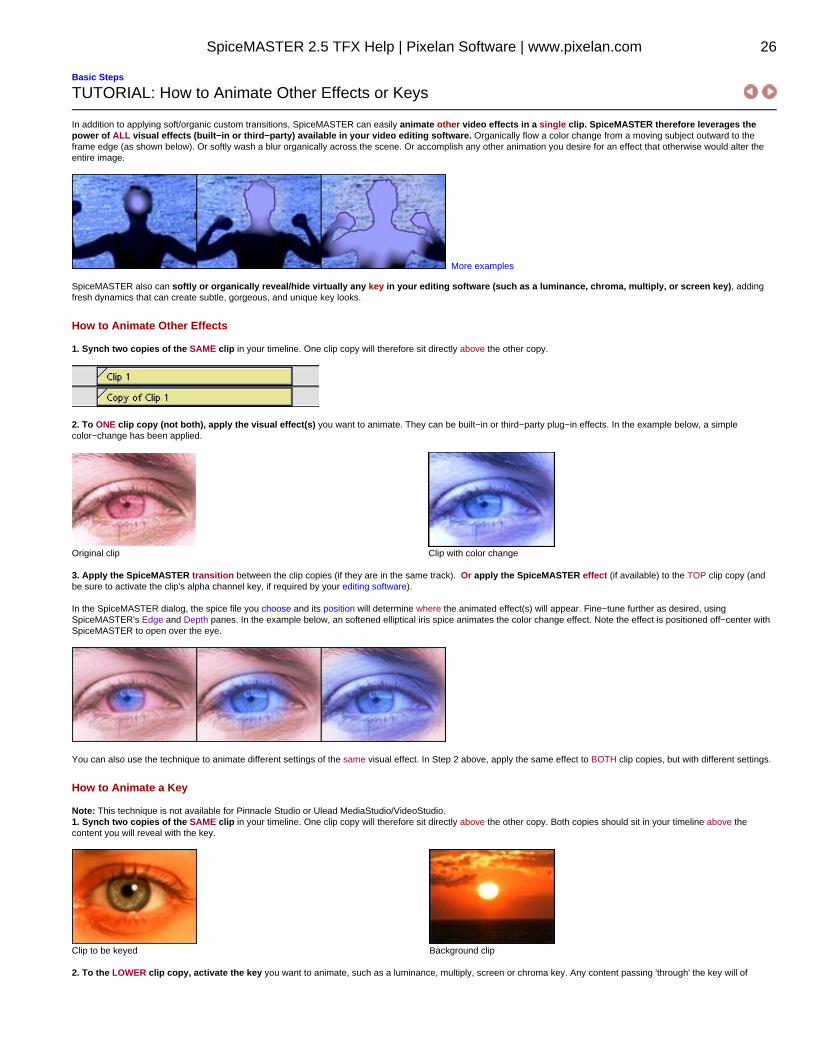
In addition to applying soft/organic custom transitions, SpiceMASTER can easily animate other video effects in a single clip. SpiceMASTER therefore leverages thepower of ALL visual effects (built−in or third−party) available in your video editing software. Organically flow a color change from a moving subject outward to theframe edge (as shown below). Or softly wash a blur organically across the scene. Or accomplish any other animation you desire for an effect that otherwise would alter theentire image.
More examples
SpiceMASTER also can softly or organically reveal/hide virtually any key in your editing software (such as a luminance, chroma, multiply, or screen key), addingfresh dynamics that can create subtle, gorgeous, and unique key looks.
How to Animate Other Effects
1. Synch two copies of the SAME clip in your timeline. One clip copy will therefore sit directly above the other copy.
2. To ONE clip copy (not both), apply the visual effect(s) you want to animate. They can be built−in or third−party plug−in effects. In the example below, a simplecolor−change has been applied.
Original clip Clip with color change
3. Apply the SpiceMASTER transition between the clip copies (if they are in the same track). Or apply the SpiceMASTER effect (if available) to the TOP clip copy (andbe sure to activate the clip's alpha channel key, if required by your editing software).
In the SpiceMASTER dialog, the spice file you choose and its position will determine where the animated effect(s) will appear. Fine−tune further as desired, usingSpiceMASTER's Edge and Depth panes. In the example below, an softened elliptical iris spice animates the color change effect. Note the effect is positioned off−center withSpiceMASTER to open over the eye.
You can also use the technique to animate different settings of the same visual effect. In Step 2 above, apply the same effect to BOTH clip copies, but with different settings.
How to Animate a Key
Note: This technique is not available for Pinnacle Studio or Ulead MediaStudio/VideoStudio.1. Synch two copies of the SAME clip in your timeline. One clip copy will therefore sit directly above the other copy. Both copies should sit in your timeline above thecontent you will reveal with the key.
Clip to be keyed Background clip
2. To the LOWER clip copy, activate the key you want to animate, such as a luminance, multiply, screen or chroma key. Any content passing 'through' the key will of
SpiceMASTER 2.5 TFX Help | Pixelan Software | www.pixelan.com 26
course then appear in the output.
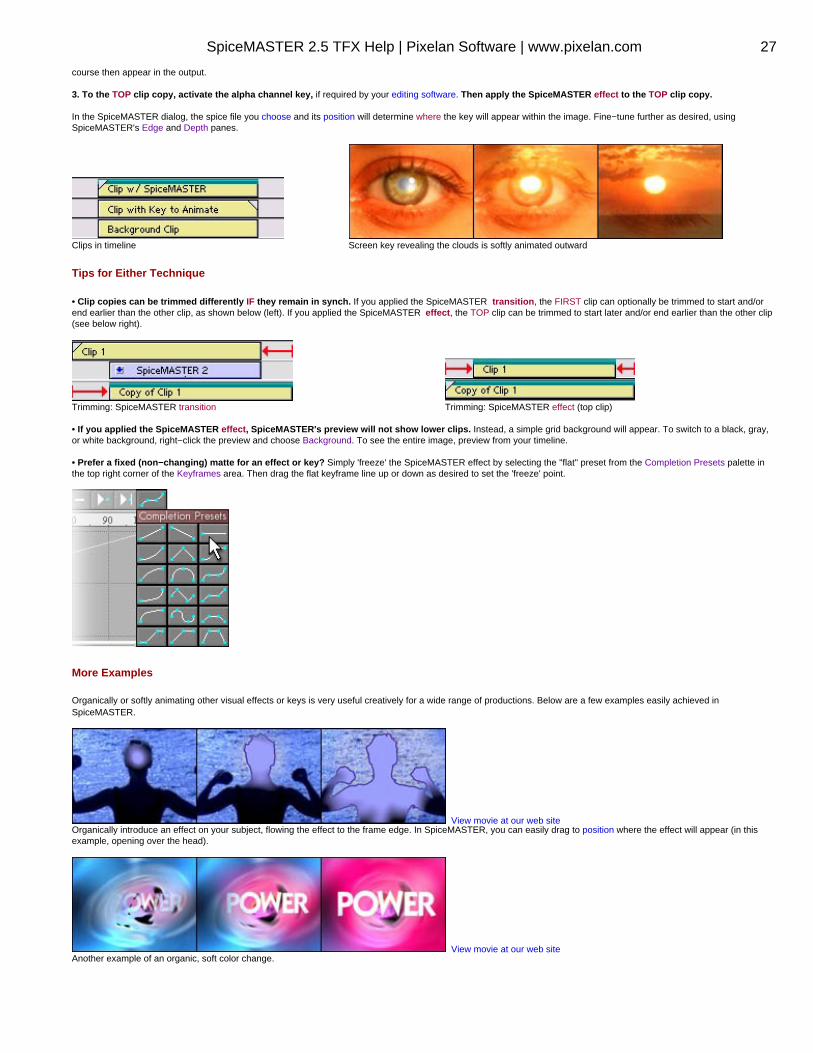
3. To the TOP clip copy, activate the alpha channel key, if required by your editing software. Then apply the SpiceMASTER effect to the TOP clip copy.
In the SpiceMASTER dialog, the spice file you choose and its position will determine where the key will appear within the image. Fine−tune further as desired, usingSpiceMASTER's Edge and Depth panes.
Clips in timeline Screen key revealing the clouds is softly animated outward
Tips for Either Technique
• Clip copies can be trimmed differently IF they remain in synch. If you applied the SpiceMASTER transition, the FIRST clip can optionally be trimmed to start and/orend earlier than the other clip, as shown below (left). If you applied the SpiceMASTER effect, the TOP clip can be trimmed to start later and/or end earlier than the other clip(see below right).
Trimming: SpiceMASTER transition Trimming: SpiceMASTER effect (top clip)
• If you applied the SpiceMASTER effect, SpiceMASTER's preview will not show lower clips. Instead, a simple grid background will appear. To switch to a black, gray,or white background, right−click the preview and choose Background. To see the entire image, preview from your timeline.
• Prefer a fixed (non−changing) matte for an effect or key? Simply 'freeze' the SpiceMASTER effect by selecting the "flat" preset from the Completion Presets palette inthe top right corner of the Keyframes area. Then drag the flat keyframe line up or down as desired to set the 'freeze' point.
More Examples
Organically or softly animating other visual effects or keys is very useful creatively for a wide range of productions. Below are a few examples easily achieved inSpiceMASTER.
View movie at our web siteOrganically introduce an effect on your subject, flowing the effect to the frame edge. In SpiceMASTER, you can easily drag to position where the effect will appear (in thisexample, opening over the head).
View movie at our web siteAnother example of an organic, soft color change.
SpiceMASTER 2.5 TFX Help | Pixelan Software | www.pixelan.com 27
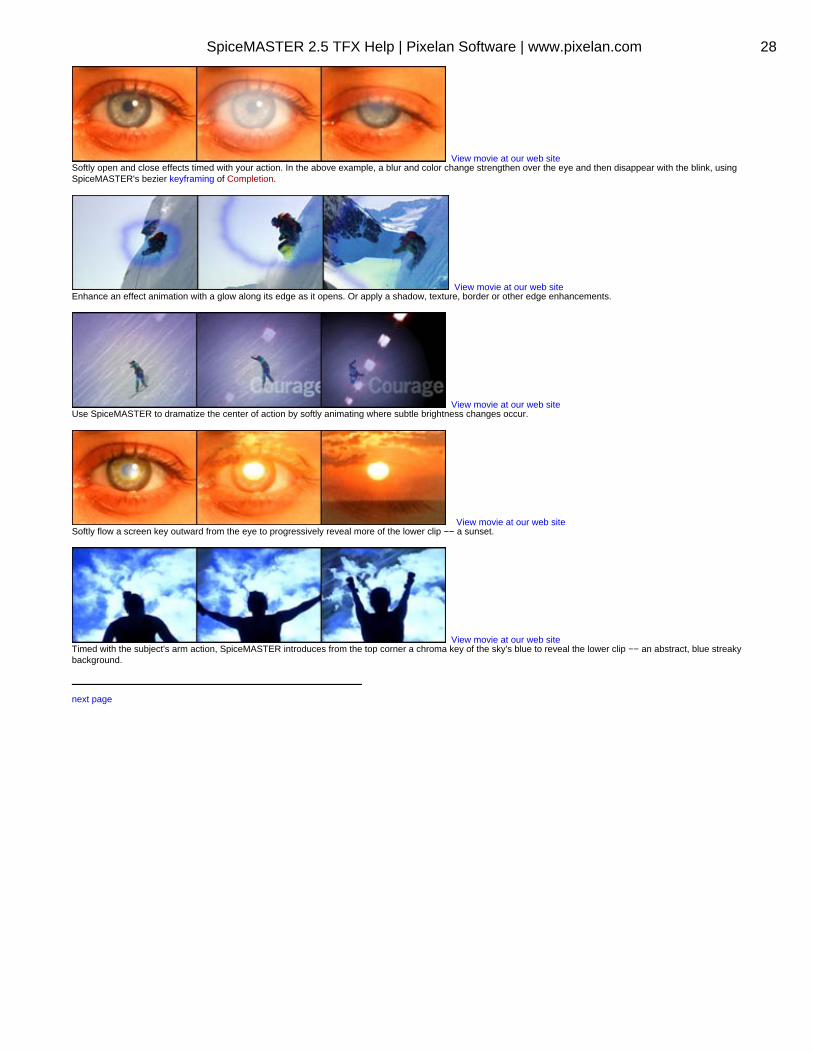
View movie at our web siteSoftly open and close effects timed with your action. In the above example, a blur and color change strengthen over the eye and then disappear with the blink, usingSpiceMASTER's bezier keyframing of Completion.
View movie at our web siteEnhance an effect animation with a glow along its edge as it opens. Or apply a shadow, texture, border or other edge enhancements.
View movie at our web siteUse SpiceMASTER to dramatize the center of action by softly animating where subtle brightness changes occur.
View movie at our web siteSoftly flow a screen key outward from the eye to progressively reveal more of the lower clip −− a sunset.
View movie at our web siteTimed with the subject's arm action, SpiceMASTER introduces from the top corner a chroma key of the sky's blue to reveal the lower clip −− an abstract, blue streakybackground.
next page
SpiceMASTER 2.5 TFX Help | Pixelan Software | www.pixelan.com 28
Keyframing
Introduction
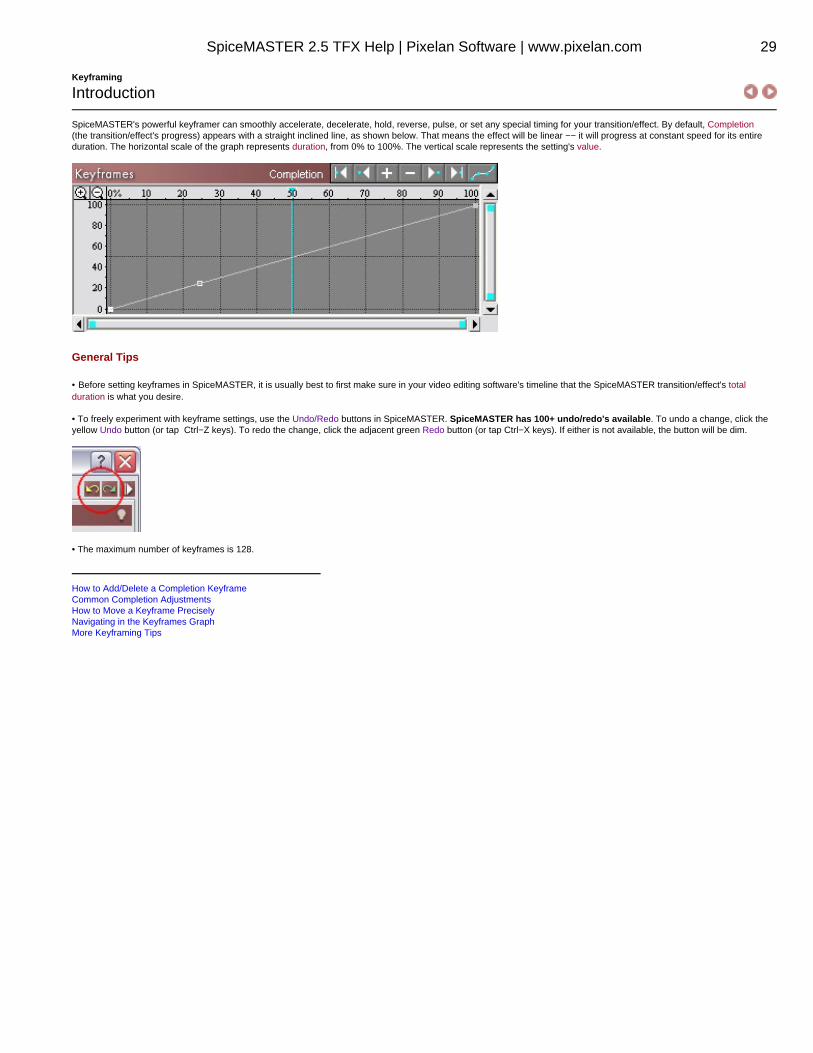
SpiceMASTER's powerful keyframer can smoothly accelerate, decelerate, hold, reverse, pulse, or set any special timing for your transition/effect. By default, Completion(the transition/effect's progress) appears with a straight inclined line, as shown below. That means the effect will be linear −− it will progress at constant speed for its entireduration. The horizontal scale of the graph represents duration, from 0% to 100%. The vertical scale represents the setting's value.
General Tips
• Before setting keyframes in SpiceMASTER, it is usually best to first make sure in your video editing software's timeline that the SpiceMASTER transition/effect's totalduration is what you desire.
• To freely experiment with keyframe settings, use the Undo/Redo buttons in SpiceMASTER. SpiceMASTER has 100+ undo/redo's available. To undo a change, click theyellow Undo button (or tap Ctrl−Z keys). To redo the change, click the adjacent green Redo button (or tap Ctrl−X keys). If either is not available, the button will be dim.
• The maximum number of keyframes is 128.
How to Add/Delete a Completion KeyframeCommon Completion AdjustmentsHow to Move a Keyframe PreciselyNavigating in the Keyframes GraphMore Keyframing Tips
SpiceMASTER 2.5 TFX Help | Pixelan Software | www.pixelan.com 29
Keyframing
How to Add/Delete a Completion Keyframe
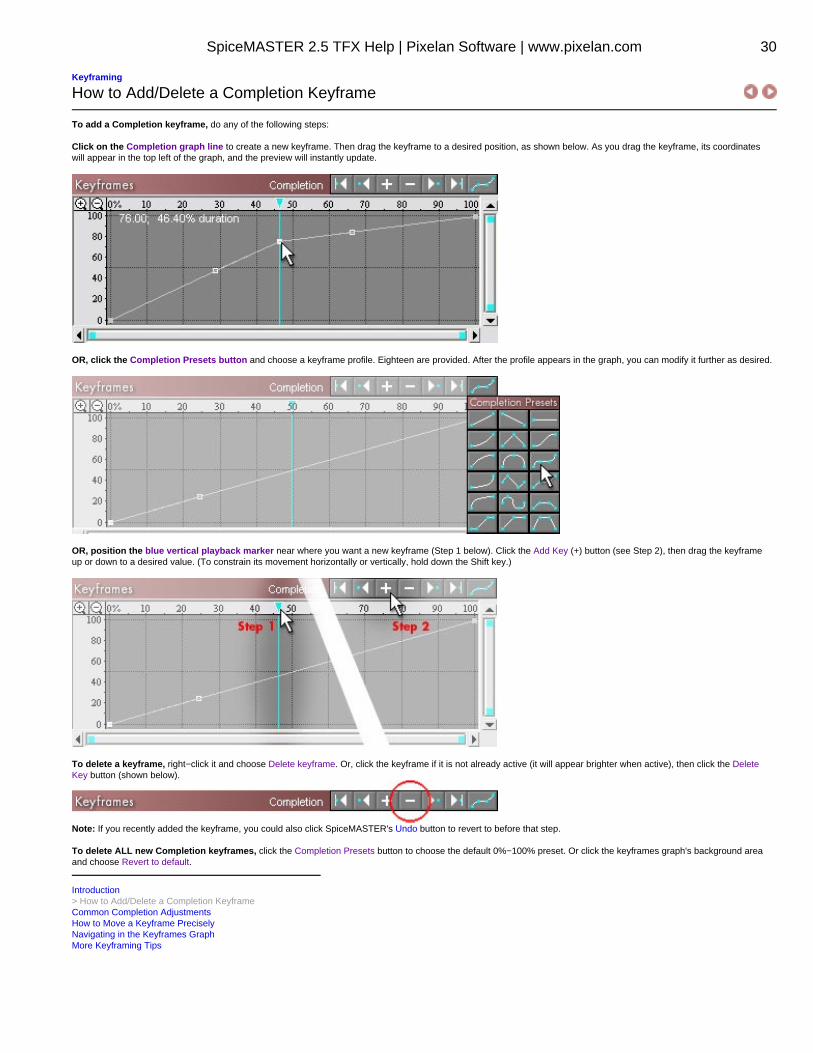
To add a Completion keyframe, do any of the following steps:
Click on the Completion graph line to create a new keyframe. Then drag the keyframe to a desired position, as shown below. As you drag the keyframe, its coordinateswill appear in the top left of the graph, and the preview will instantly update.
OR, click the Completion Presets button and choose a keyframe profile. Eighteen are provided. After the profile appears in the graph, you can modify it further as desired.
OR, position the blue vertical playback marker near where you want a new keyframe (Step 1 below). Click the Add Key (+) button (see Step 2), then drag the keyframeup or down to a desired value. (To constrain its movement horizontally or vertically, hold down the Shift key.)
To delete a keyframe, right−click it and choose Delete keyframe. Or, click the keyframe if it is not already active (it will appear brighter when active), then click the DeleteKey button (shown below).
Note: If you recently added the keyframe, you could also click SpiceMASTER's Undo button to revert to before that step.
To delete ALL new Completion keyframes, click the Completion Presets button to choose the default 0%−100% preset. Or click the keyframes graph's background areaand choose Revert to default.
Introduction> How to Add/Delete a Completion KeyframeCommon Completion AdjustmentsHow to Move a Keyframe PreciselyNavigating in the Keyframes GraphMore Keyframing Tips
SpiceMASTER 2.5 TFX Help | Pixelan Software | www.pixelan.com 30
Keyframing
Common Completion Adjustments
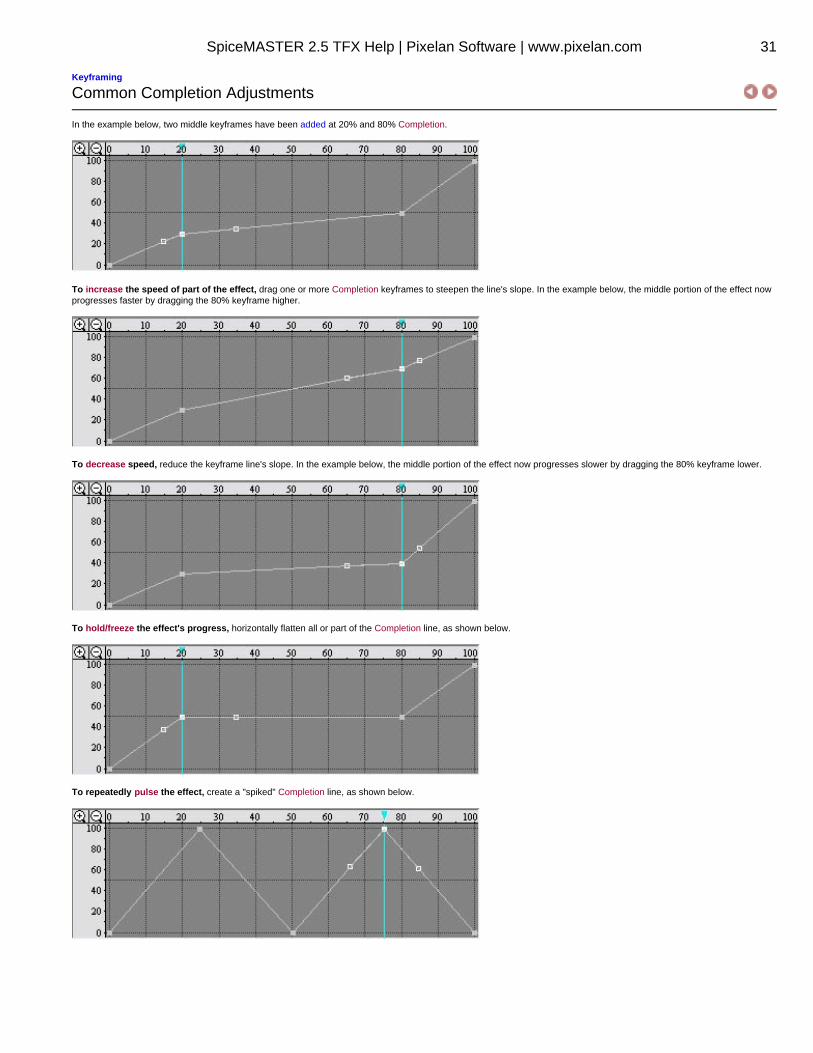
In the example below, two middle keyframes have been added at 20% and 80% Completion.
To increase the speed of part of the effect, drag one or more Completion keyframes to steepen the line's slope. In the example below, the middle portion of the effect nowprogresses faster by dragging the 80% keyframe higher.
To decrease speed, reduce the keyframe line's slope. In the example below, the middle portion of the effect now progresses slower by dragging the 80% keyframe lower.
To hold/freeze the effect's progress, horizontally flatten all or part of the Completion line, as shown below.
To repeatedly pulse the effect, create a "spiked" Completion line, as shown below.
SpiceMASTER 2.5 TFX Help | Pixelan Software | www.pixelan.com 31
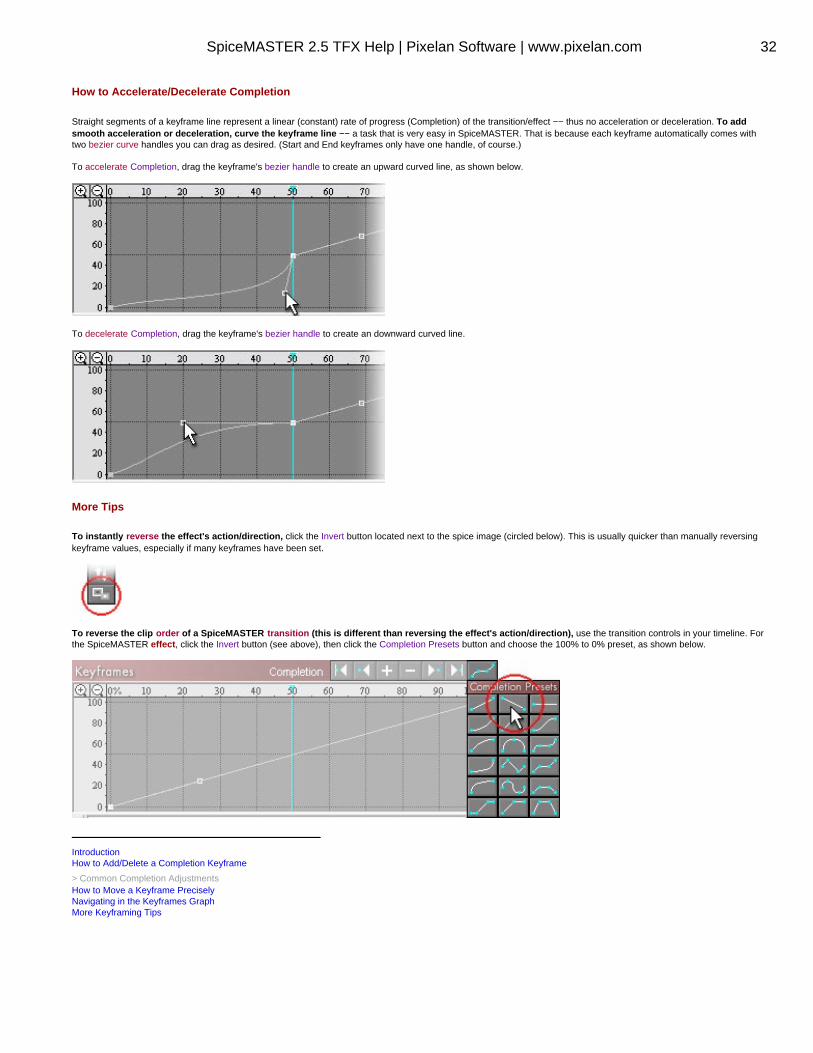
How to Accelerate/Decelerate Completion
Straight segments of a keyframe line represent a linear (constant) rate of progress (Completion) of the transition/effect −− thus no acceleration or deceleration. To addsmooth acceleration or deceleration, curve the keyframe line −− a task that is very easy in SpiceMASTER. That is because each keyframe automatically comes withtwo bezier curve handles you can drag as desired. (Start and End keyframes only have one handle, of course.)
To accelerate Completion, drag the keyframe's bezier handle to create an upward curved line, as shown below.
To decelerate Completion, drag the keyframe's bezier handle to create an downward curved line.
More Tips
To instantly reverse the effect's action/direction, click the Invert button located next to the spice image (circled below). This is usually quicker than manually reversingkeyframe values, especially if many keyframes have been set.
To reverse the clip order of a SpiceMASTER transition (this is different than reversing the effect's action/direction), use the transition controls in your timeline. Forthe SpiceMASTER effect, click the Invert button (see above), then click the Completion Presets button and choose the 100% to 0% preset, as shown below.
IntroductionHow to Add/Delete a Completion Keyframe
> Common Completion AdjustmentsHow to Move a Keyframe PreciselyNavigating in the Keyframes GraphMore Keyframing Tips
SpiceMASTER 2.5 TFX Help | Pixelan Software | www.pixelan.com 32

Keyframing
How to Move a Keyframe Precisely
Although dragging a keyframe in the Keyframes graph is the easiest way to position it, sometimes you may want more precision. To move a keyframe only horizontally orvertically in the Keyframes graph, Shift−drag. To fine−tune the position, click the Zoom (+) button (shown below) to zoom into the graph and then drag as needed. (Formore zoom techniques, click here.)
To precisely position an existing keyframe, right−click the keyframe and choose Enter coordinates. Then enter the desired values as percentages (from 0% to 100%), asshown below. Note that the keyframe's Time position may not end up exactly as entered if there are not enough frames in the effect to precisely match the percentage.
To give a keyframe the exact value (vertical in the graph) of another keyframe, right−click the keyframe that has the desired value, then choose Copy value. Thenright−click the other keyframe and choose Paste value.
IntroductionHow to Add/Delete a Completion KeyframeCommon Completion Adjustments> How to Move a Keyframe PreciselyNavigating in the Keyframes GraphMore Keyframing Tips
SpiceMASTER 2.5 TFX Help | Pixelan Software | www.pixelan.com 33
Keyframing
Navigating in the Keyframes Graph
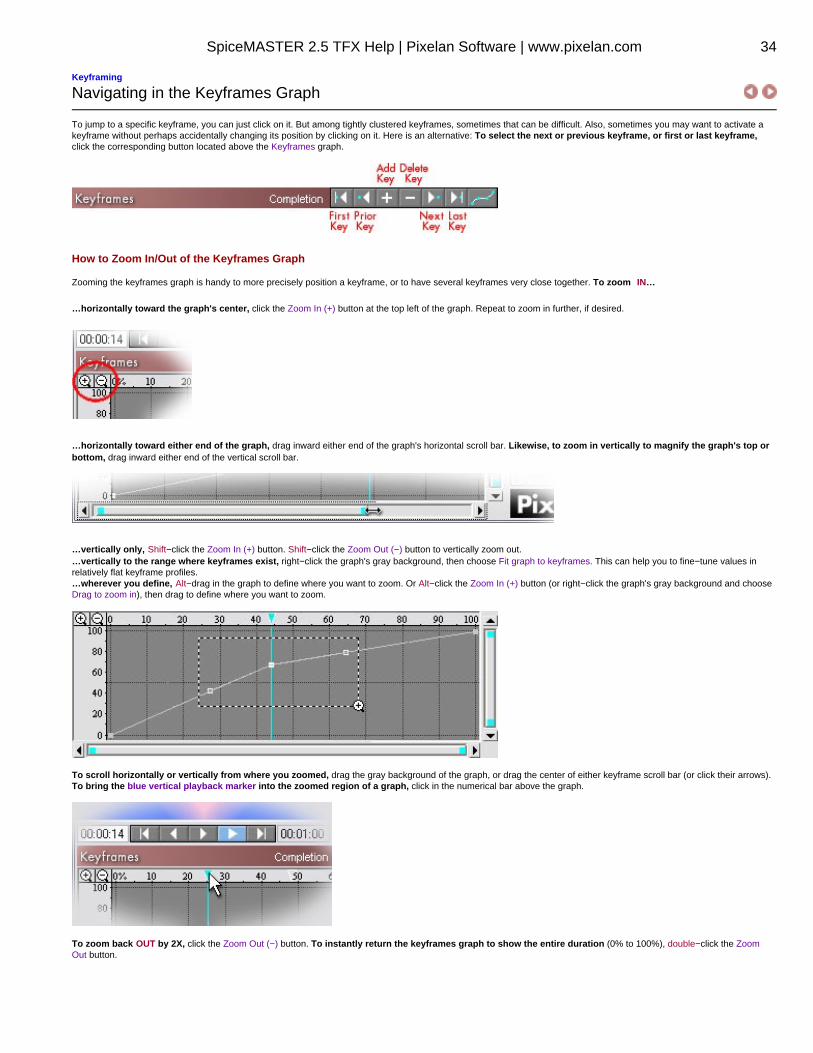
To jump to a specific keyframe, you can just click on it. But among tightly clustered keyframes, sometimes that can be difficult. Also, sometimes you may want to activate akeyframe without perhaps accidentally changing its position by clicking on it. Here is an alternative: To select the next or previous keyframe, or first or last keyframe,click the corresponding button located above the Keyframes graph.
How to Zoom In/Out of the Keyframes Graph
Zooming the keyframes graph is handy to more precisely position a keyframe, or to have several keyframes very close together. To zoom IN…
…horizontally toward the graph's center, click the Zoom In (+) button at the top left of the graph. Repeat to zoom in further, if desired.
…horizontally toward either end of the graph, drag inward either end of the graph's horizontal scroll bar. Likewise, to zoom in vertically to magnify the graph's top orbottom, drag inward either end of the vertical scroll bar.
…vertically only, Shift−click the Zoom In (+) button. Shift−click the Zoom Out (−) button to vertically zoom out.…vertically to the range where keyframes exist, right−click the graph's gray background, then choose Fit graph to keyframes. This can help you to fine−tune values inrelatively flat keyframe profiles.…wherever you define, Alt−drag in the graph to define where you want to zoom. Or Alt−click the Zoom In (+) button (or right−click the graph's gray background and chooseDrag to zoom in), then drag to define where you want to zoom.
To scroll horizontally or vertically from where you zoomed, drag the gray background of the graph, or drag the center of either keyframe scroll bar (or click their arrows).To bring the blue vertical playback marker into the zoomed region of a graph, click in the numerical bar above the graph.
To zoom back OUT by 2X, click the Zoom Out (−) button. To instantly return the keyframes graph to show the entire duration (0% to 100%), double−click the ZoomOut button.
SpiceMASTER 2.5 TFX Help | Pixelan Software | www.pixelan.com 34

Tips
• To jump to a different area of a zoomed graph, first double−click the Zoom Out (−) button to return to the graph's default (full) view. Then Alt−drag in the graph to definewhere you want to jump to.
• You can drag a keyframe horizontally beyond a zoomed graph area. Although the graph will not scroll horizontally as you drag, you can use the coordinates reported in thetop left corner of the graph to see your position. Or, use the graph's horizontal scroll bar to reveal the target area before dragging.
IntroductionHow to Add/Delete a Completion KeyframeCommon Completion AdjustmentsHow to Move a Keyframe Precisely> Navigating in the Keyframes GraphMore Keyframing Tips
SpiceMASTER 2.5 TFX Help | Pixelan Software | www.pixelan.com 35
Keyframing
More Keyframing Tips
Below are additional handy tips that will enhance your keyframing in SpiceMASTER.
• How to delay the start of an effect (or advance the end of an effect)A SpiceMASTER transition's duration is set in your video editing software's timeline, usually by adjusting the length of the transition's icon. Likewise, a SpiceMASTER effect(if available for your video editing software) automatically takes on the entire duration of the clip it is applied to. However, sometimes you may want a SpiceMASTER effectto appear only during part of the clip, by delaying the start of the effect or advancing the effect's end. To do that, choose the preset below from the Completion Presetspalette, then manually adjust the inner keyframes as desired.
• How to move a bezier handle that is on top of a keyframeIf you happen to drag a bezier handle directly on top of a keyframe, later dragging may move both points. To move only the bezier handle, first click the keyframe that"owns" that handle −− to activate it. Then Ctrl−drag the bezier handle where desired.
• How to stay at a frame while adjusting keyframes elsewhereSpiceMASTER's default behavior is to show the image that corresponds to wherever you drag or adjust a keyframe in the graph. The blue vertical playback marker thereforefollows your movement in the graph. Sometimes, however, you may want to keep viewing a particular frame while adjusting a keyframe elsewhere. Perhaps you want toadjust a bezier curve while seeing how it alters an earlier or later frame's look. To do that, right−click in the graph's gray background and deselect Sync preview.
• How to snap a keyframe to the vertical playback marker positionWhen Sync preview is off (see above), sometimes you may need to move a keyframe to the blue vertical playback marker position, such as when aligning a keyframe in onegraph to a keyframe in another graph. To do that, position the playback marker where desired, then right−click the keyframe you want to move and choose Snap to Time.The keyframe will then move to the frame the playback marker is on. If that position is not possible because it is beyond an adjacent keyframe, the command will not beavailable.
IntroductionHow to Add/Delete a Completion KeyframeCommon Completion AdjustmentsHow to Move a Keyframe PreciselyNavigating in the Keyframes Graph> More Keyframing Tips
Go to the next section of this Guide
SpiceMASTER 2.5 TFX Help | Pixelan Software | www.pixelan.com 36
Cool Tips
Working in the Library
Choosing a "spice" file is a key step to applying SpiceMASTER. That's because your effect's design will be based on the spice file's design. With hundreds of availablespices, choosing could be a tedious process. Fortunately, SpiceMASTER includes a visual, interactive Library −− a great tool to compare and select the best spice for yourdesired effect. The Library shows spices as small side−by−side thumbnail animations −− much better than trying to choose from a long list of file names or icons!
The essentials of how to choose a spice file are covered in the earlier Basic Steps: 2. Choose a Spice File page. This page supplements that by showing how you cancustomize the Library and use its powerful management features. For example, you can create virtual folders of favorite (or project specific) spices. Spice file names can becolor−coded for later reference or to help you mark and narrow choices. Also, you can adjust viewing options to tailor the Library to your working style.
Customizing the Library DisplayOrganizing Existing Effects in the LibraryAdding/Deleting Effects in the LibraryOther Library Features
Customizing the Library Display
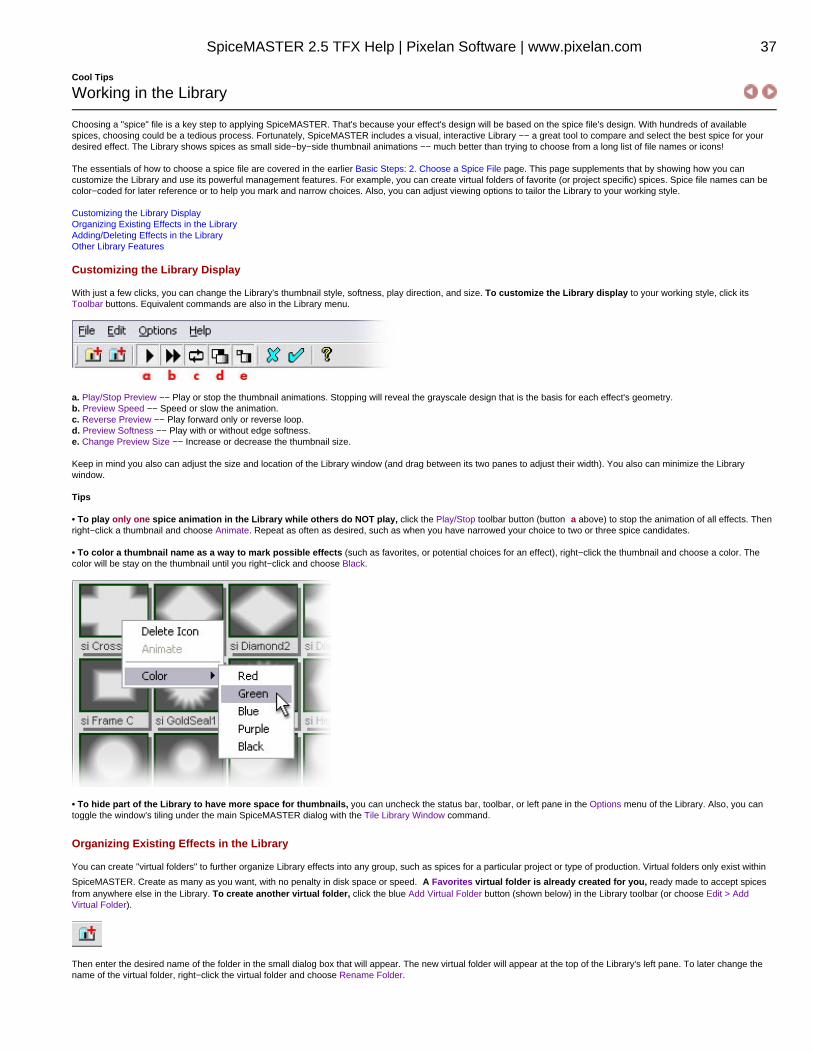
With just a few clicks, you can change the Library's thumbnail style, softness, play direction, and size. To customize the Library display to your working style, click itsToolbar buttons. Equivalent commands are also in the Library menu.
a. Play/Stop Preview −− Play or stop the thumbnail animations. Stopping will reveal the grayscale design that is the basis for each effect's geometry.b. Preview Speed −− Speed or slow the animation.c. Reverse Preview −− Play forward only or reverse loop.d. Preview Softness −− Play with or without edge softness.e. Change Preview Size −− Increase or decrease the thumbnail size.
Keep in mind you also can adjust the size and location of the Library window (and drag between its two panes to adjust their width). You also can minimize the Librarywindow.
Tips
• To play only one spice animation in the Library while others do NOT play, click the Play/Stop toolbar button (button a above) to stop the animation of all effects. Thenright−click a thumbnail and choose Animate. Repeat as often as desired, such as when you have narrowed your choice to two or three spice candidates.
• To color a thumbnail name as a way to mark possible effects (such as favorites, or potential choices for an effect), right−click the thumbnail and choose a color. Thecolor will be stay on the thumbnail until you right−click and choose Black.
• To hide part of the Library to have more space for thumbnails, you can uncheck the status bar, toolbar, or left pane in the Options menu of the Library. Also, you cantoggle the window's tiling under the main SpiceMASTER dialog with the Tile Library Window command.
Organizing Existing Effects in the Library
You can create "virtual folders" to further organize Library effects into any group, such as spices for a particular project or type of production. Virtual folders only exist within
SpiceMASTER. Create as many as you want, with no penalty in disk space or speed. A Favorites virtual folder is already created for you, ready made to accept spicesfrom anywhere else in the Library. To create another virtual folder, click the blue Add Virtual Folder button (shown below) in the Library toolbar (or choose Edit > AddVirtual Folder).
Then enter the desired name of the folder in the small dialog box that will appear. The new virtual folder will appear at the top of the Library's left pane. To later change thename of the virtual folder, right−click the virtual folder and choose Rename Folder.
SpiceMASTER 2.5 TFX Help | Pixelan Software | www.pixelan.com 37
To add an existing Library effect to the Favorites folder (or your virtual folder), display the effect in the Library's right pane, then drag and drop its thumbnail into theFavorites folder (or your virtual folder) in the Library's left pane. A duplicate will then reside there (no additional disk space required).
Tips
• To create a subfolder within a virtual folder, right−click the blue virtual folder in the left pane and choose Add SubFolder.
• To delete an unwanted spice or folder, right−click any thumbnail (or folder) in the Library, then choose Delete Icon (or Delete Folder). Or select a folder in the left paneand choose Edit > Delete Selected Folder. Either way, a warning dialog box that will appear to confirm your choice.
• To refresh/update a Library folder's contents after adding more effect files to that folder on your drive, right−click the folder in the Library's left pane, then chooseRefresh Folder. Note: If you accidentally delete a spice or spice subfolder from the Library, this technique on the main folder will quickly restore it.
Adding/Deleting Effects in the Library
The Library holds several hundred spices that ship with SpiceMASTER, a range wide enough to cover most effect designs you will ever need. However, the Library isopen−ended so you can add gradient/alpha wipes or custom mattes that you have created (or have acquired elsewhere). You can add an entire folder of those files orindividually add such effects to the Library. For more info about custom files, click here.
An existing Your Custom Files folder is already visible in the Library, which is handy for adding to the Library. That folder is located on your drive within theSpiceMASTER 2.5\Spices folder in your editing software folder. Simply place a new gradient/alpha wipe file or custom matte file in that folder and it will automatically appearthe next time you open the Library.
To add an individual effect to a different Library folder than the Your Custom Files folder, first create a virtual folder in the Library (unless you want to add it to theexisting Favorites virtual folder). Then right−click the virtual folder and choose Add Spice. (Or with that folder selected, click the Add Spice button in the toolbar, or chooseFile > Add Spice.) In the Open dialog that will appear, navigate to and select the desired file.
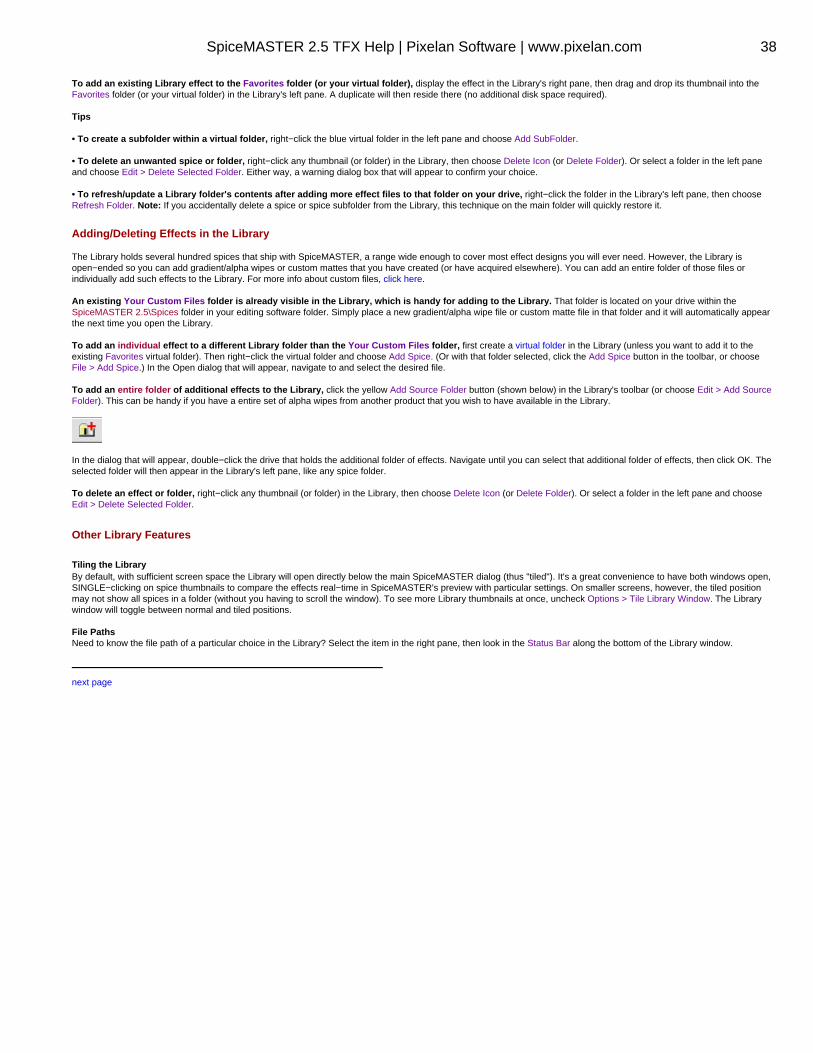
To add an entire folder of additional effects to the Library, click the yellow Add Source Folder button (shown below) in the Library's toolbar (or choose Edit > Add SourceFolder). This can be handy if you have a entire set of alpha wipes from another product that you wish to have available in the Library.
In the dialog that will appear, double−click the drive that holds the additional folder of effects. Navigate until you can select that additional folder of effects, then click OK. Theselected folder will then appear in the Library's left pane, like any spice folder.
To delete an effect or folder, right−click any thumbnail (or folder) in the Library, then choose Delete Icon (or Delete Folder). Or select a folder in the left pane and chooseEdit > Delete Selected Folder.
Other Library Features
Tiling the LibraryBy default, with sufficient screen space the Library will open directly below the main SpiceMASTER dialog (thus "tiled"). It's a great convenience to have both windows open,SINGLE−clicking on spice thumbnails to compare the effects real−time in SpiceMASTER's preview with particular settings. On smaller screens, however, the tiled positionmay not show all spices in a folder (without you having to scroll the window). To see more Library thumbnails at once, uncheck Options > Tile Library Window. The Librarywindow will toggle between normal and tiled positions.
File PathsNeed to know the file path of a particular choice in the Library? Select the item in the right pane, then look in the Status Bar along the bottom of the Library window.
next page
SpiceMASTER 2.5 TFX Help | Pixelan Software | www.pixelan.com 38
Cool Tips
Saved Settings, Presets, & Favorite Effects
SpiceMASTER includes a HUGE number of saved settings to instantly create a wide range of transitions and effects. You can also save your own custom effects. Favoriteeffects, or even just certain settings or keyframes, can be instantly reapplied, saving you time. Also, SpiceMASTER's 100+ undo/redo capability can temporarily retainsettings so you can experiment easily before applying an effect.
SpiceMASTER has two ways to apply previously created effects −− section presets and saved settings. Each offers different advantages to you: Section presets areaccessed by a "light bulb" button atop certain control sections −− they only affect controls in that section. Saved settings, unlike section presets, typically affect ALL controlsin SpiceMASTER.
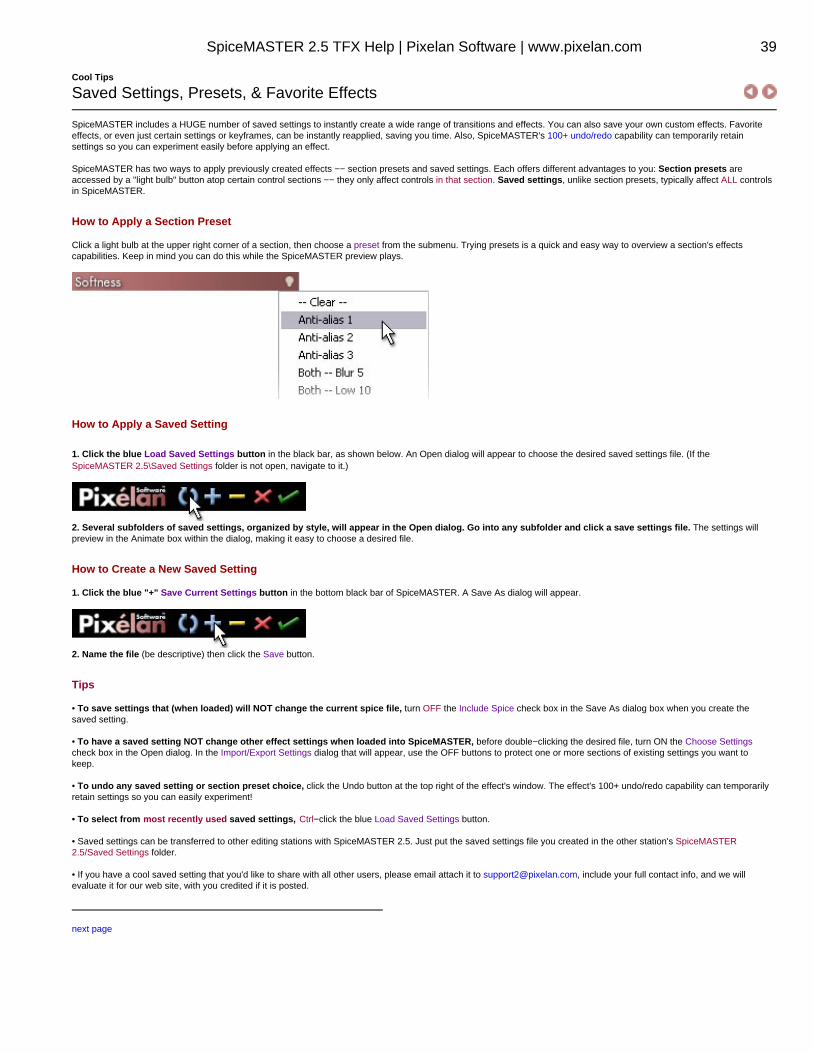
How to Apply a Section Preset
Click a light bulb at the upper right corner of a section, then choose a preset from the submenu. Trying presets is a quick and easy way to overview a section's effectscapabilities. Keep in mind you can do this while the SpiceMASTER preview plays.
How to Apply a Saved Setting
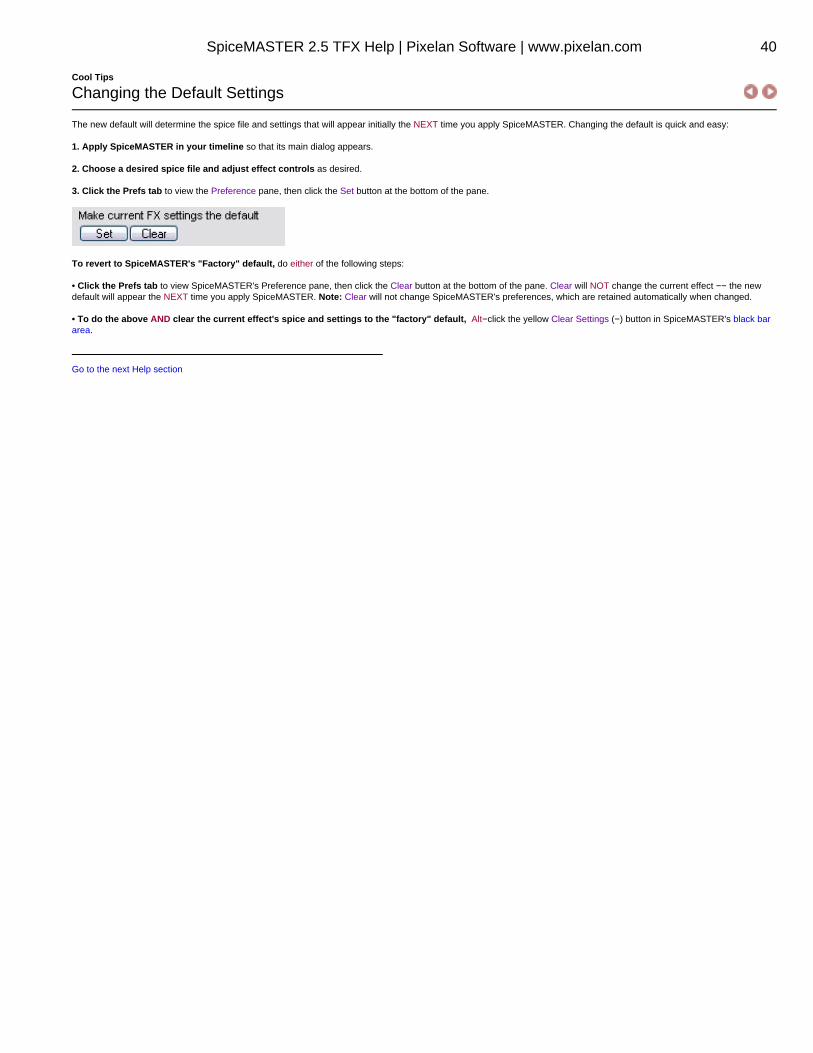
1. Click the blue Load Saved Settings button in the black bar, as shown below. An Open dialog will appear to choose the desired saved settings file. (If theSpiceMASTER 2.5\Saved Settings folder is not open, navigate to it.)
2. Several subfolders of saved settings, organized by style, will appear in the Open dialog. Go into any subfolder and click a save settings file. The settings willpreview in the Animate box within the dialog, making it easy to choose a desired file.
How to Create a New Saved Setting
1. Click the blue "+" Save Current Settings button in the bottom black bar of SpiceMASTER. A Save As dialog will appear.
2. Name the file (be descriptive) then click the Save button.
Tips
• To save settings that (when loaded) will NOT change the current spice file, turn OFF the Include Spice check box in the Save As dialog box when you create thesaved setting.
• To have a saved setting NOT change other effect settings when loaded into SpiceMASTER, before double−clicking the desired file, turn ON the Choose Settingscheck box in the Open dialog. In the Import/Export Settings dialog that will appear, use the OFF buttons to protect one or more sections of existing settings you want tokeep.
• To undo any saved setting or section preset choice, click the Undo button at the top right of the effect's window. The effect's 100+ undo/redo capability can temporarilyretain settings so you can easily experiment!
• To select from most recently used saved settings, Ctrl−click the blue Load Saved Settings button.
• Saved settings can be transferred to other editing stations with SpiceMASTER 2.5. Just put the saved settings file you created in the other station's SpiceMASTER2.5/Saved Settings folder.
• If you have a cool saved setting that you'd like to share with all other users, please email attach it to [email protected], include your full contact info, and we willevaluate it for our web site, with you credited if it is posted.
next page
SpiceMASTER 2.5 TFX Help | Pixelan Software | www.pixelan.com 39
Cool Tips
Changing the Default Settings
The new default will determine the spice file and settings that will appear initially the NEXT time you apply SpiceMASTER. Changing the default is quick and easy:
1. Apply SpiceMASTER in your timeline so that its main dialog appears.
2. Choose a desired spice file and adjust effect controls as desired.
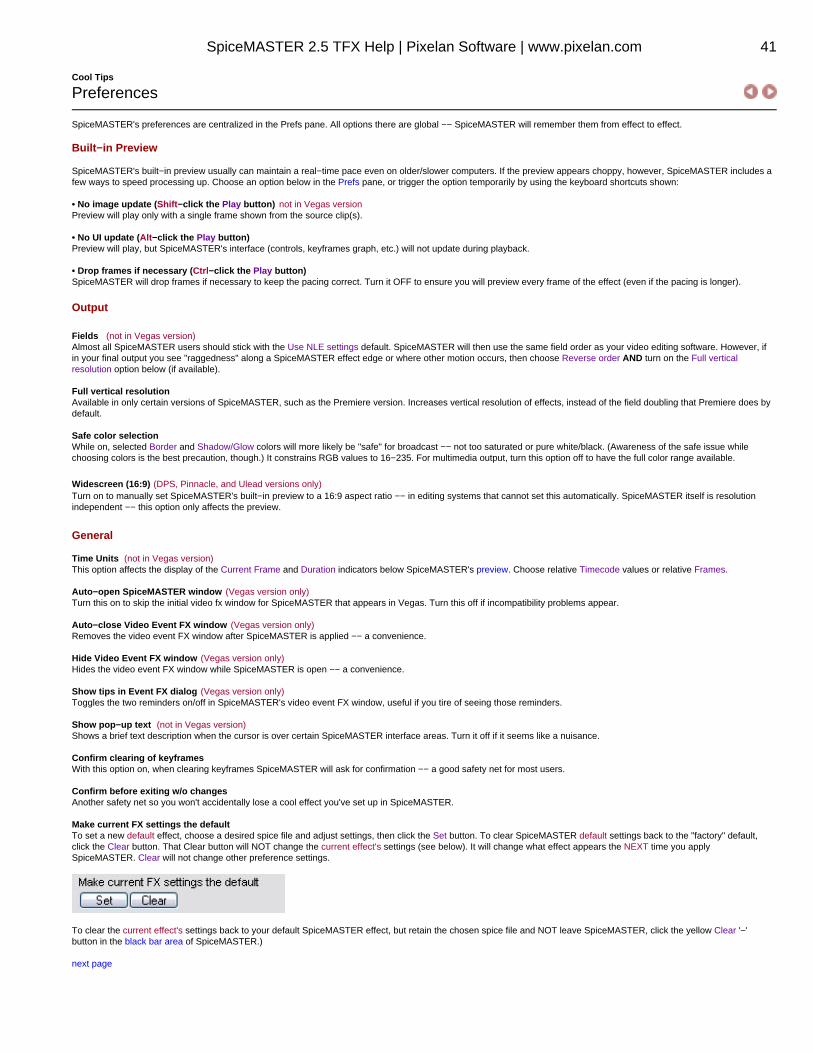
3. Click the Prefs tab to view the Preference pane, then click the Set button at the bottom of the pane.
To revert to SpiceMASTER's "Factory" default, do either of the following steps:
• Click the Prefs tab to view SpiceMASTER's Preference pane, then click the Clear button at the bottom of the pane. Clear will NOT change the current effect −− the newdefault will appear the NEXT time you apply SpiceMASTER. Note: Clear will not change SpiceMASTER's preferences, which are retained automatically when changed.
• To do the above AND clear the current effect's spice and settings to the "factory" default, Alt−click the yellow Clear Settings (−) button in SpiceMASTER's black bararea.
Go to the next Help section
SpiceMASTER 2.5 TFX Help | Pixelan Software | www.pixelan.com 40
Cool Tips
Preferences
SpiceMASTER's preferences are centralized in the Prefs pane. All options there are global −− SpiceMASTER will remember them from effect to effect.
Built−in Preview
SpiceMASTER's built−in preview usually can maintain a real−time pace even on older/slower computers. If the preview appears choppy, however, SpiceMASTER includes afew ways to speed processing up. Choose an option below in the Prefs pane, or trigger the option temporarily by using the keyboard shortcuts shown:
• No image update (Shift−click the Play button) not in Vegas versionPreview will play only with a single frame shown from the source clip(s).
• No UI update (Alt−click the Play button)Preview will play, but SpiceMASTER's interface (controls, keyframes graph, etc.) will not update during playback.
• Drop frames if necessary (Ctrl−click the Play button)SpiceMASTER will drop frames if necessary to keep the pacing correct. Turn it OFF to ensure you will preview every frame of the effect (even if the pacing is longer).
Output
Fields (not in Vegas version)Almost all SpiceMASTER users should stick with the Use NLE settings default. SpiceMASTER will then use the same field order as your video editing software. However, ifin your final output you see "raggedness" along a SpiceMASTER effect edge or where other motion occurs, then choose Reverse order AND turn on the Full verticalresolution option below (if available).
Full vertical resolutionAvailable in only certain versions of SpiceMASTER, such as the Premiere version. Increases vertical resolution of effects, instead of the field doubling that Premiere does bydefault.
Safe color selectionWhile on, selected Border and Shadow/Glow colors will more likely be "safe" for broadcast −− not too saturated or pure white/black. (Awareness of the safe issue whilechoosing colors is the best precaution, though.) It constrains RGB values to 16−235. For multimedia output, turn this option off to have the full color range available.
Widescreen (16:9) (DPS, Pinnacle, and Ulead versions only)Turn on to manually set SpiceMASTER's built−in preview to a 16:9 aspect ratio −− in editing systems that cannot set this automatically. SpiceMASTER itself is resolutionindependent −− this option only affects the preview.
General
Time Units (not in Vegas version)This option affects the display of the Current Frame and Duration indicators below SpiceMASTER's preview. Choose relative Timecode values or relative Frames.
Auto−open SpiceMASTER window (Vegas version only)Turn this on to skip the initial video fx window for SpiceMASTER that appears in Vegas. Turn this off if incompatibility problems appear.
Auto−close Video Event FX window (Vegas version only)Removes the video event FX window after SpiceMASTER is applied −− a convenience.
Hide Video Event FX window (Vegas version only)Hides the video event FX window while SpiceMASTER is open −− a convenience.
Show tips in Event FX dialog (Vegas version only)Toggles the two reminders on/off in SpiceMASTER's video event FX window, useful if you tire of seeing those reminders.
Show pop−up text (not in Vegas version)Shows a brief text description when the cursor is over certain SpiceMASTER interface areas. Turn it off if it seems like a nuisance.
Confirm clearing of keyframesWith this option on, when clearing keyframes SpiceMASTER will ask for confirmation −− a good safety net for most users.
Confirm before exiting w/o changesAnother safety net so you won't accidentally lose a cool effect you've set up in SpiceMASTER.
Make current FX settings the defaultTo set a new default effect, choose a desired spice file and adjust settings, then click the Set button. To clear SpiceMASTER default settings back to the "factory" default,click the Clear button. That Clear button will NOT change the current effect's settings (see below). It will change what effect appears the NEXT time you applySpiceMASTER. Clear will not change other preference settings.
To clear the current effect's settings back to your default SpiceMASTER effect, but retain the chosen spice file and NOT leave SpiceMASTER, click the yellow Clear '−'button in the black bar area of SpiceMASTER.)
next page
SpiceMASTER 2.5 TFX Help | Pixelan Software | www.pixelan.com 41
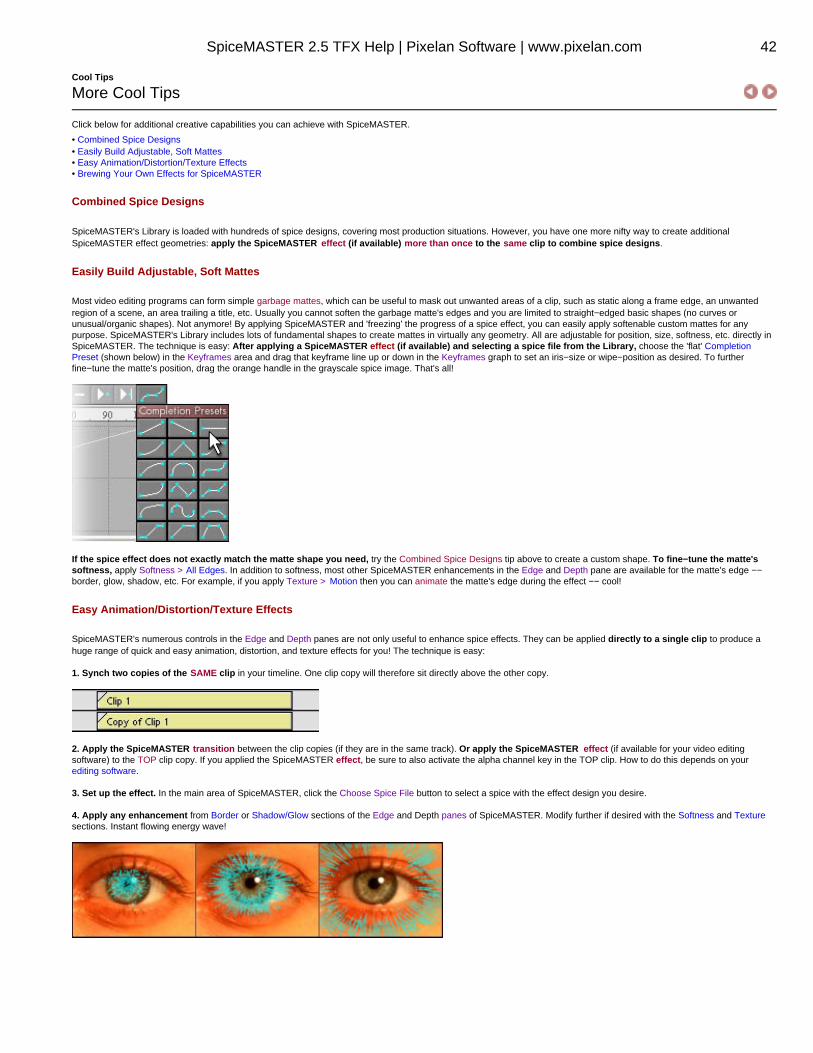
Cool Tips
More Cool Tips
Click below for additional creative capabilities you can achieve with SpiceMASTER.
• Combined Spice Designs• Easily Build Adjustable, Soft Mattes• Easy Animation/Distortion/Texture Effects• Brewing Your Own Effects for SpiceMASTER
Combined Spice Designs
SpiceMASTER's Library is loaded with hundreds of spice designs, covering most production situations. However, you have one more nifty way to create additionalSpiceMASTER effect geometries: apply the SpiceMASTER effect (if available) more than once to the same clip to combine spice designs.
Easily Build Adjustable, Soft Mattes
Most video editing programs can form simple garbage mattes, which can be useful to mask out unwanted areas of a clip, such as static along a frame edge, an unwantedregion of a scene, an area trailing a title, etc. Usually you cannot soften the garbage matte's edges and you are limited to straight−edged basic shapes (no curves orunusual/organic shapes). Not anymore! By applying SpiceMASTER and 'freezing' the progress of a spice effect, you can easily apply softenable custom mattes for anypurpose. SpiceMASTER's Library includes lots of fundamental shapes to create mattes in virtually any geometry. All are adjustable for position, size, softness, etc. directly inSpiceMASTER. The technique is easy: After applying a SpiceMASTER effect (if available) and selecting a spice file from the Library, choose the 'flat' CompletionPreset (shown below) in the Keyframes area and drag that keyframe line up or down in the Keyframes graph to set an iris−size or wipe−position as desired. To furtherfine−tune the matte's position, drag the orange handle in the grayscale spice image. That's all!
If the spice effect does not exactly match the matte shape you need, try the Combined Spice Designs tip above to create a custom shape. To fine−tune the matte'ssoftness, apply Softness > All Edges. In addition to softness, most other SpiceMASTER enhancements in the Edge and Depth pane are available for the matte's edge −−border, glow, shadow, etc. For example, if you apply Texture > Motion then you can animate the matte's edge during the effect −− cool!
Easy Animation/Distortion/Texture Effects
SpiceMASTER's numerous controls in the Edge and Depth panes are not only useful to enhance spice effects. They can be applied directly to a single clip to produce ahuge range of quick and easy animation, distortion, and texture effects for you! The technique is easy:
1. Synch two copies of the SAME clip in your timeline. One clip copy will therefore sit directly above the other copy.
2. Apply the SpiceMASTER transition between the clip copies (if they are in the same track). Or apply the SpiceMASTER effect (if available for your video editingsoftware) to the TOP clip copy. If you applied the SpiceMASTER effect, be sure to also activate the alpha channel key in the TOP clip. How to do this depends on yourediting software.
3. Set up the effect. In the main area of SpiceMASTER, click the Choose Spice File button to select a spice with the effect design you desire.
4. Apply any enhancement from Border or Shadow/Glow sections of the Edge and Depth panes of SpiceMASTER. Modify further if desired with the Softness and Texturesections. Instant flowing energy wave!
SpiceMASTER 2.5 TFX Help | Pixelan Software | www.pixelan.com 42

Brewing Your Own Effects for SpiceMASTER
Despite the hundreds of spice files included with SpiceMASTER and the near−infinite ways to modify and customize them, occasionally you may still want to create yourown "spice". Perhaps you need an effect that has the exact shape as a client's logo or graphic, or some other custom need. Since SpiceMASTER is open−ended, it willreadily accept any still−image as a spice. The file should have a wide range of grayscales −− from pure black to pure white −− to create an effect that changes over time(such as a transition). Or the file can be a simple black & white matte to load and enhance in SpiceMASTER.
To create such a custom file, use a graphics program such as Photoshop to (a) create a grayscale still−image at the same size as your final output (such as 720x480pixels), and (b) save the file in any format below. Then load the file directly into SpiceMASTER, or add it the Library for repeated future use. SpiceMASTER can load files inthe following formats: BITMAP (.bmp or .dib), TIFF (.tif), PNG (.png), PICT (.pct), JPEG (.jpg), and TARGA (.tga).
Go to the next section of this Guide
SpiceMASTER 2.5 TFX Help | Pixelan Software | www.pixelan.com 43
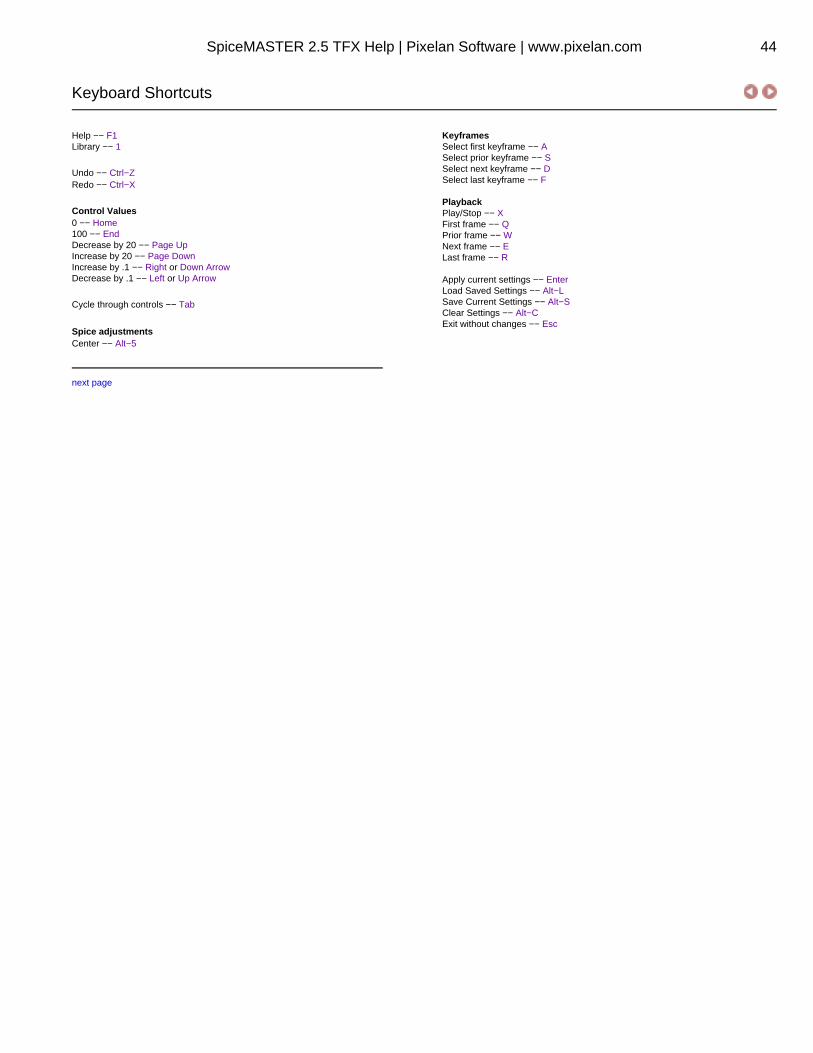
Keyboard Shortcuts
Help −− F1Library −− 1
Undo −− Ctrl−ZRedo −− Ctrl−X
Control Values0 −− Home100 −− EndDecrease by 20 −− Page UpIncrease by 20 −− Page DownIncrease by .1 −− Right or Down ArrowDecrease by .1 −− Left or Up Arrow
Cycle through controls −− Tab
Spice adjustmentsCenter −− Alt−5
KeyframesSelect first keyframe −− ASelect prior keyframe −− SSelect next keyframe −− DSelect last keyframe −− F
PlaybackPlay/Stop −− XFirst frame −− QPrior frame −− WNext frame −− ELast frame −− R
Apply current settings −− EnterLoad Saved Settings −− Alt−LSave Current Settings −− Alt−SClear Settings −− Alt−CExit without changes −− Esc
next page
SpiceMASTER 2.5 TFX Help | Pixelan Software | www.pixelan.com 44
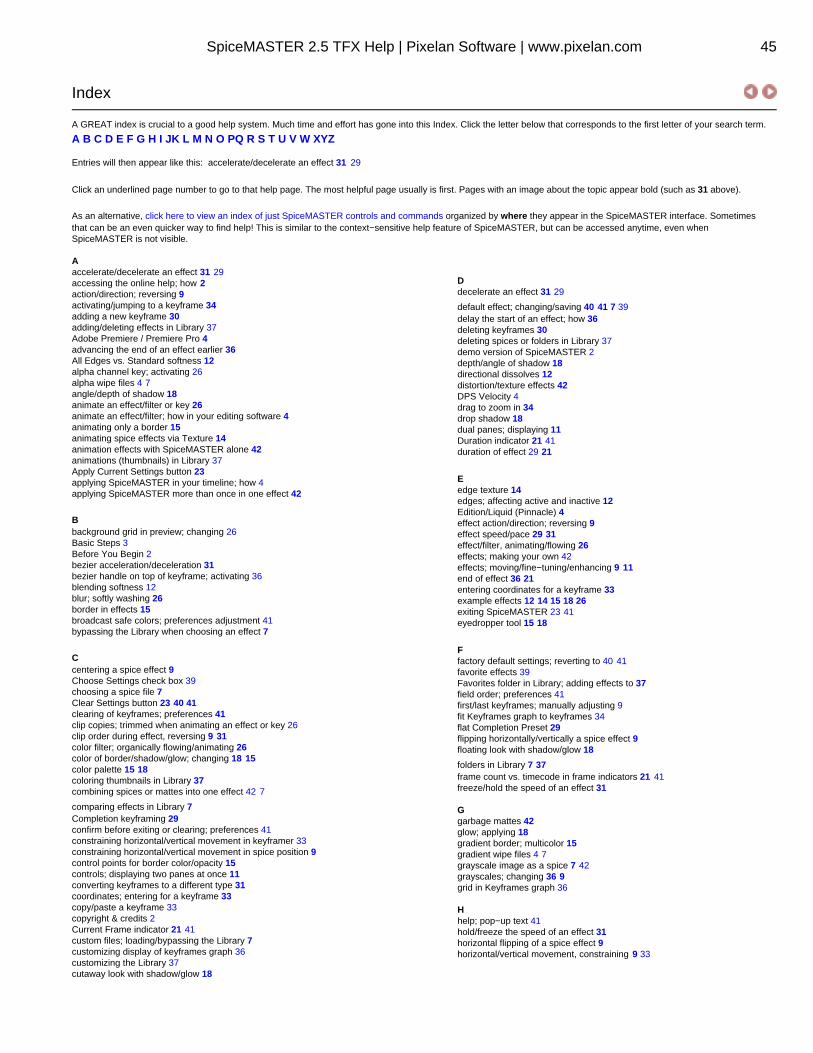
Index
A GREAT index is crucial to a good help system. Much time and effort has gone into this Index. Click the letter below that corresponds to the first letter of your search term.
A B C D E F G H I JK L M N O PQ R S T U V W XYZ
Entries will then appear like this: accelerate/decelerate an effect 31 29
Click an underlined page number to go to that help page. The most helpful page usually is first. Pages with an image about the topic appear bold (such as 31 above).
As an alternative, click here to view an index of just SpiceMASTER controls and commands organized by where they appear in the SpiceMASTER interface. Sometimesthat can be an even quicker way to find help! This is similar to the context−sensitive help feature of SpiceMASTER, but can be accessed anytime, even whenSpiceMASTER is not visible.
Aaccelerate/decelerate an effect 31 29accessing the online help; how 2action/direction; reversing 9activating/jumping to a keyframe 34adding a new keyframe 30adding/deleting effects in Library 37Adobe Premiere / Premiere Pro 4advancing the end of an effect earlier 36All Edges vs. Standard softness 12alpha channel key; activating 26alpha wipe files 4 7angle/depth of shadow 18animate an effect/filter or key 26animate an effect/filter; how in your editing software 4animating only a border 15animating spice effects via Texture 14animation effects with SpiceMASTER alone 42animations (thumbnails) in Library 37Apply Current Settings button 23applying SpiceMASTER in your timeline; how 4applying SpiceMASTER more than once in one effect 42
Bbackground grid in preview; changing 26Basic Steps 3Before You Begin 2bezier acceleration/deceleration 31bezier handle on top of keyframe; activating 36blending softness 12blur; softly washing 26border in effects 15broadcast safe colors; preferences adjustment 41bypassing the Library when choosing an effect 7
Ccentering a spice effect 9Choose Settings check box 39choosing a spice file 7Clear Settings button 23 40 41clearing of keyframes; preferences 41clip copies; trimmed when animating an effect or key 26clip order during effect, reversing 9 31color filter; organically flowing/animating 26color of border/shadow/glow; changing 18 15color palette 15 18coloring thumbnails in Library 37combining spices or mattes into one effect 42 7
comparing effects in Library 7Completion keyframing 29confirm before exiting or clearing; preferences 41constraining horizontal/vertical movement in keyframer 33constraining horizontal/vertical movement in spice position 9control points for border color/opacity 15controls; displaying two panes at once 11converting keyframes to a different type 31coordinates; entering for a keyframe 33copy/paste a keyframe 33copyright & credits 2Current Frame indicator 21 41custom files; loading/bypassing the Library 7customizing display of keyframes graph 36customizing the Library 37cutaway look with shadow/glow 18
Ddecelerate an effect 31 29
default effect; changing/saving 40 41 7 39delay the start of an effect; how 36deleting keyframes 30deleting spices or folders in Library 37demo version of SpiceMASTER 2depth/angle of shadow 18directional dissolves 12distortion/texture effects 42DPS Velocity 4drag to zoom in 34drop shadow 18dual panes; displaying 11Duration indicator 21 41duration of effect 29 21
Eedge texture 14edges; affecting active and inactive 12Edition/Liquid (Pinnacle) 4effect action/direction; reversing 9effect speed/pace 29 31effect/filter, animating/flowing 26effects; making your own 42effects; moving/fine−tuning/enhancing 9 11end of effect 36 21entering coordinates for a keyframe 33example effects 12 14 15 18 26exiting SpiceMASTER 23 41eyedropper tool 15 18
Ffactory default settings; reverting to 40 41favorite effects 39Favorites folder in Library; adding effects to 37field order; preferences 41first/last keyframes; manually adjusting 9fit Keyframes graph to keyframes 34flat Completion Preset 29flipping horizontally/vertically a spice effect 9floating look with shadow/glow 18
folders in Library 7 37frame count vs. timecode in frame indicators 21 41freeze/hold the speed of an effect 31
Ggarbage mattes 42glow; applying 18gradient border; multicolor 15gradient wipe files 4 7grayscale image as a spice 7 42grayscales; changing 36 9grid in Keyframes graph 36
Hhelp; pop−up text 41hold/freeze the speed of an effect 31horizontal flipping of a spice effect 9horizontal/vertical movement, constraining 9 33
SpiceMASTER 2.5 TFX Help | Pixelan Software | www.pixelan.com 45
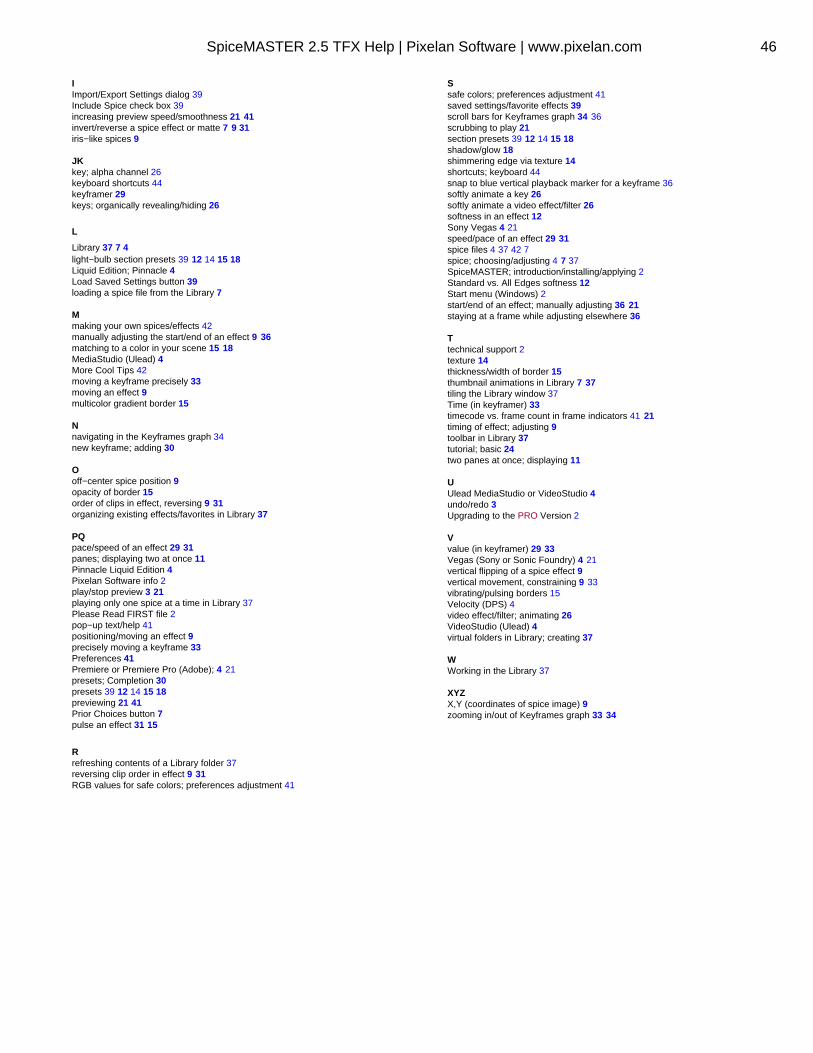
IImport/Export Settings dialog 39Include Spice check box 39increasing preview speed/smoothness 21 41invert/reverse a spice effect or matte 7 9 31iris−like spices 9
JKkey; alpha channel 26keyboard shortcuts 44keyframer 29keys; organically revealing/hiding 26
L
Library 37 7 4light−bulb section presets 39 12 14 15 18Liquid Edition; Pinnacle 4Load Saved Settings button 39loading a spice file from the Library 7
Mmaking your own spices/effects 42manually adjusting the start/end of an effect 9 36matching to a color in your scene 15 18MediaStudio (Ulead) 4More Cool Tips 42moving a keyframe precisely 33moving an effect 9multicolor gradient border 15
Nnavigating in the Keyframes graph 34new keyframe; adding 30
Ooff−center spice position 9opacity of border 15order of clips in effect, reversing 9 31organizing existing effects/favorites in Library 37
PQpace/speed of an effect 29 31panes; displaying two at once 11Pinnacle Liquid Edition 4Pixelan Software info 2play/stop preview 3 21playing only one spice at a time in Library 37Please Read FIRST file 2pop−up text/help 41positioning/moving an effect 9precisely moving a keyframe 33Preferences 41Premiere or Premiere Pro (Adobe); 4 21presets; Completion 30presets 39 12 14 15 18previewing 21 41Prior Choices button 7pulse an effect 31 15
Rrefreshing contents of a Library folder 37reversing clip order in effect 9 31RGB values for safe colors; preferences adjustment 41
Ssafe colors; preferences adjustment 41saved settings/favorite effects 39scroll bars for Keyframes graph 34 36scrubbing to play 21section presets 39 12 14 15 18shadow/glow 18shimmering edge via texture 14shortcuts; keyboard 44snap to blue vertical playback marker for a keyframe 36softly animate a key 26softly animate a video effect/filter 26softness in an effect 12Sony Vegas 4 21speed/pace of an effect 29 31spice files 4 37 42 7spice; choosing/adjusting 4 7 37SpiceMASTER; introduction/installing/applying 2Standard vs. All Edges softness 12Start menu (Windows) 2start/end of an effect; manually adjusting 36 21staying at a frame while adjusting elsewhere 36
Ttechnical support 2texture 14thickness/width of border 15thumbnail animations in Library 7 37tiling the Library window 37Time (in keyframer) 33timecode vs. frame count in frame indicators 41 21timing of effect; adjusting 9toolbar in Library 37tutorial; basic 24two panes at once; displaying 11
UUlead MediaStudio or VideoStudio 4undo/redo 3Upgrading to the PRO Version 2
Vvalue (in keyframer) 29 33Vegas (Sony or Sonic Foundry) 4 21vertical flipping of a spice effect 9vertical movement, constraining 9 33vibrating/pulsing borders 15Velocity (DPS) 4video effect/filter; animating 26VideoStudio (Ulead) 4virtual folders in Library; creating 37
WWorking in the Library 37
XYZX,Y (coordinates of spice image) 9zooming in/out of Keyframes graph 33 34
SpiceMASTER 2.5 TFX Help | Pixelan Software | www.pixelan.com 46
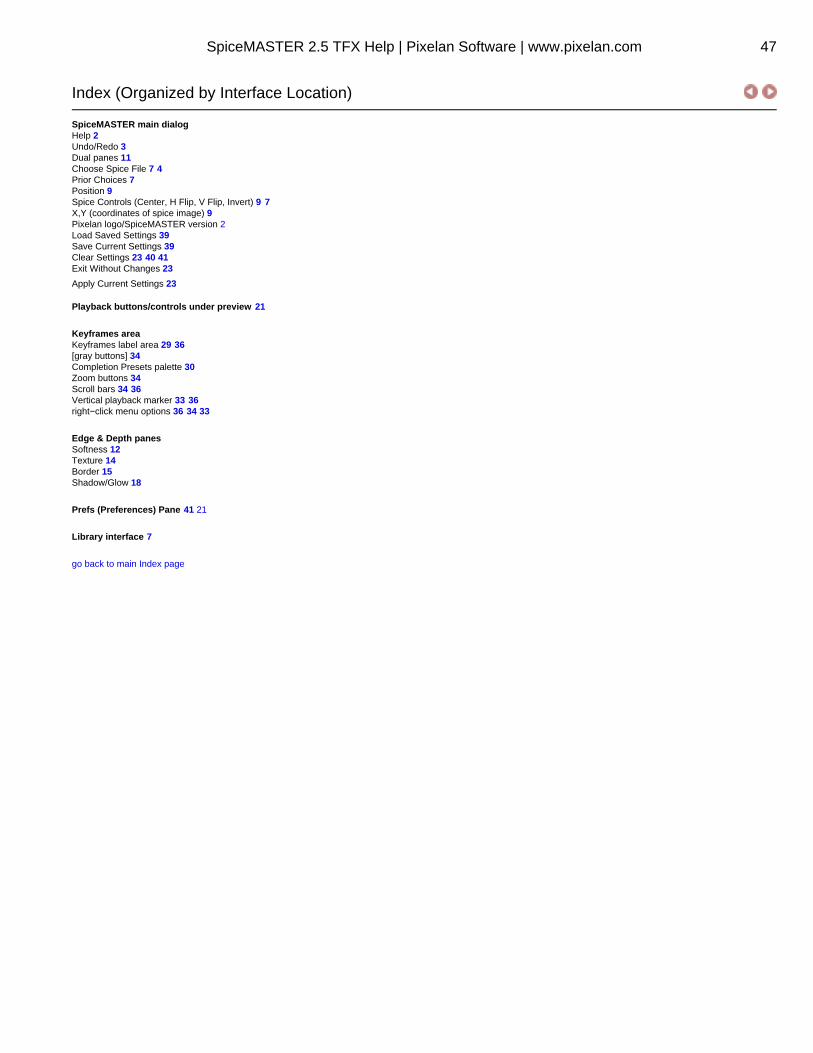
Index (Organized by Interface Location)
SpiceMASTER main dialogHelp 2Undo/Redo 3Dual panes 11Choose Spice File 7 4Prior Choices 7Position 9Spice Controls (Center, H Flip, V Flip, Invert) 9 7X,Y (coordinates of spice image) 9Pixelan logo/SpiceMASTER version 2Load Saved Settings 39Save Current Settings 39Clear Settings 23 40 41Exit Without Changes 23
Apply Current Settings 23
Playback buttons/controls under preview 21
Keyframes areaKeyframes label area 29 36[gray buttons] 34Completion Presets palette 30Zoom buttons 34Scroll bars 34 36Vertical playback marker 33 36right−click menu options 36 34 33
Edge & Depth panesSoftness 12Texture 14Border 15Shadow/Glow 18
Prefs (Preferences) Pane 41 21
Library interface 7
go back to main Index page
SpiceMASTER 2.5 TFX Help | Pixelan Software | www.pixelan.com 47