Embed Size (px)
Citation preview
z
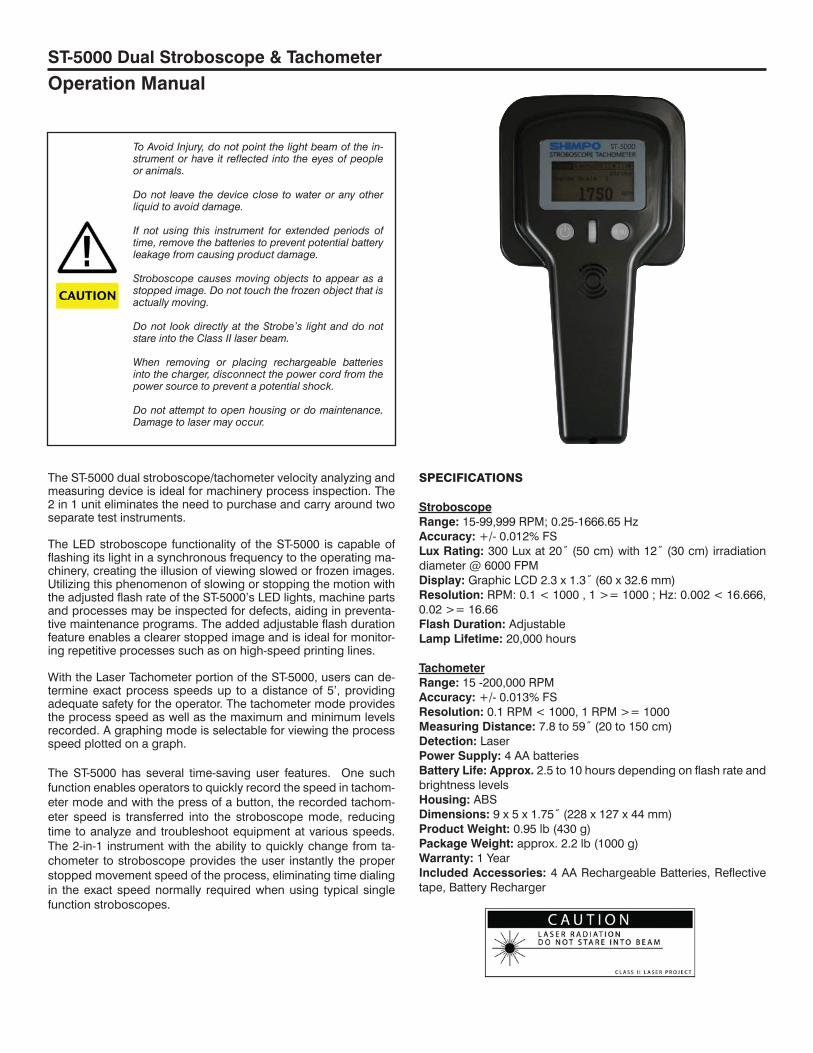
The ST-5000 dual stroboscope/tachometer velocity analyzing and measuring device is ideal for machinery process inspection. The 2 in 1 unit eliminates the need to purchase and carry around two separate test instruments.
The LED stroboscope functionality of the ST-5000 is capable of flashing its light in a synchronous frequency to the operating ma-chinery, creating the illusion of viewing slowed or frozen images. Utilizing this phenomenon of slowing or stopping the motion with the adjusted flash rate of the ST-5000’s LED lights, machine parts and processes may be inspected for defects, aiding in preventa-tive maintenance programs. The added adjustable flash duration feature enables a clearer stopped image and is ideal for monitor-ing repetitive processes such as on high-speed printing lines.
With the Laser Tachometer portion of the ST-5000, users can de-termine exact process speeds up to a distance of 5’, providing adequate safety for the operator. The tachometer mode provides the process speed as well as the maximum and minimum levels recorded. A graphing mode is selectable for viewing the process speed plotted on a graph.
The ST-5000 has several time-saving user features. One such function enables operators to quickly record the speed in tachom-eter mode and with the press of a button, the recorded tachom-eter speed is transferred into the stroboscope mode, reducing time to analyze and troubleshoot equipment at various speeds. The 2-in-1 instrument with the ability to quickly change from ta-chometer to stroboscope provides the user instantly the proper stopped movement speed of the process, eliminating time dialing in the exact speed normally required when using typical single function stroboscopes.
ST-5000 Dual Stroboscope & Tachometer
Operation Manual
To Avoid Injury, do not point the light beam of the in-strument or have it reflected into the eyes of people or animals.
Do not leave the device close to water or any other liquid to avoid damage.
If not using this instrument for extended periods of time, remove the batteries to prevent potential battery leakage from causing product damage.
Stroboscope causes moving objects to appear as a stopped image. Do not touch the frozen object that is actually moving.
Do not look directly at the Strobe’s light and do not stare into the Class II laser beam.
When removing or placing rechargeable batteries into the charger, disconnect the power cord from the power source to prevent a potential shock.
Do not attempt to open housing or do maintenance. Damage to laser may occur.
SPECIFICATIONS
StroboscopeRange: 15-99,999 RPM; 0.25-1666.65 HzAccuracy: +/- 0.012% FSLux Rating: 300 Lux at 20˝ (50 cm) with 12˝ (30 cm) irradiation diameter @ 6000 FPMDisplay: Graphic LCD 2.3 x 1.3˝ (60 x 32.6 mm)Resolution: RPM: 0.1 < 1000 , 1 >= 1000 ; Hz: 0.002 < 16.666, 0.02 >= 16.66Flash Duration: AdjustableLamp Lifetime: 20,000 hours
TachometerRange: 15 -200,000 RPMAccuracy: +/- 0.013% FSResolution: 0.1 RPM < 1000, 1 RPM >= 1000Measuring Distance: 7.8 to 59˝ (20 to 150 cm)Detection: LaserPower Supply: 4 AA batteriesBattery Life: Approx. 2.5 to 10 hours depending on flash rate and brightness levelsHousing: ABSDimensions: 9 x 5 x 1.75˝ (228 x 127 x 44 mm)Product Weight: 0.95 lb (430 g)Package Weight: approx. 2.2 lb (1000 g)Warranty: 1 YearIncluded Accessories: 4 AA Rechargeable Batteries, Reflective tape, Battery Recharger
OPERATION
Button FunctionsOn/Off Press to Turn On. While on, press and release to activate backlight. Press and release again to turn backlight off.
Press and hold two seconds to turn unit off.
Menu Button MENU Press and hold for approx. 1 second to switch between main menus: STROBE / TACH/ SET
Make a quick push and release to scroll through each menu’s sub-menus.
Scroll Dial Adjust the parameters in sub-menus by spin ning.
In Strobe sub-menu, press inward twice quickly to change the adjustment factor between 1 and 10.
In X2/2 sub-menu, spin to adjust multiplication (x) or division (÷) factor. Press inward once to take new Base RPM directly into Strobe sub- menu
Under TACH menu in the Measure sub-menu, press and hold inward to take tachometer’s reading rate directly over to the stroboscope mode. Press inward and release to reset the MAX and MIN recordings.
In Graph sub-menu, press inward to reset the graph.
Main Menus
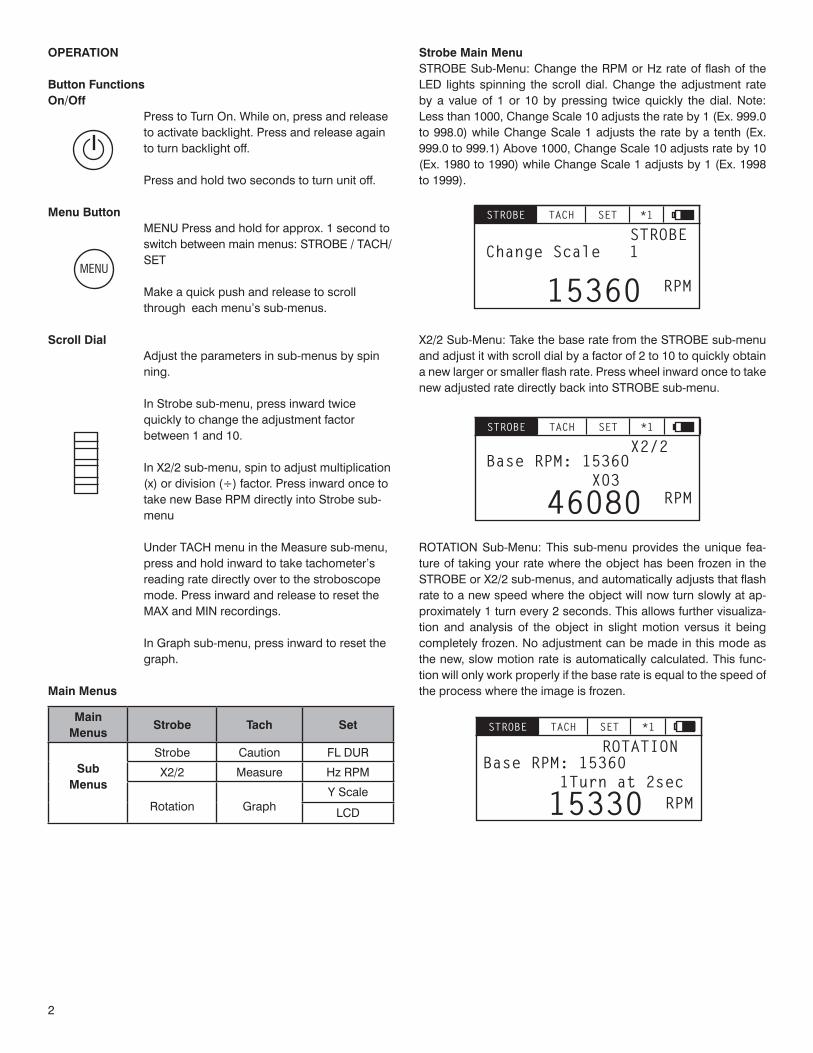
Strobe Main MenuSTROBE Sub-Menu: Change the RPM or Hz rate of flash of the LED lights spinning the scroll dial. Change the adjustment rate by a value of 1 or 10 by pressing twice quickly the dial. Note: Less than 1000, Change Scale 10 adjusts the rate by 1 (Ex. 999.0 to 998.0) while Change Scale 1 adjusts the rate by a tenth (Ex. 999.0 to 999.1) Above 1000, Change Scale 10 adjusts rate by 10 (Ex. 1980 to 1990) while Change Scale 1 adjusts by 1 (Ex. 1998 to 1999).
X2/2 Sub-Menu: Take the base rate from the STROBE sub-menu and adjust it with scroll dial by a factor of 2 to 10 to quickly obtain a new larger or smaller flash rate. Press wheel inward once to take new adjusted rate directly back into STROBE sub-menu.
ROTATION Sub-Menu: This sub-menu provides the unique fea-ture of taking your rate where the object has been frozen in the STROBE or X2/2 sub-menus, and automatically adjusts that flash rate to a new speed where the object will now turn slowly at ap-proximately 1 turn every 2 seconds. This allows further visualiza-tion and analysis of the object in slight motion versus it being completely frozen. No adjustment can be made in this mode as the new, slow motion rate is automatically calculated. This func-tion will only work properly if the base rate is equal to the speed of the process where the image is frozen.
MENU
Main Menus
Strobe Tach Set
Sub Menus
Strobe Caution FL DUR
X2/2 Measure Hz RPM
Rotation GraphY Scale
LCD
STROBE TACH SET *1
Change Scale 1STROBE
RPM15360
Base RPM: 15360 X03
X2/2
RPM46080
STROBE TACH SET *1
Base RPM: 15360 1Turn at 2sec
ROTATION
RPM15330
STROBE TACH SET *1
2
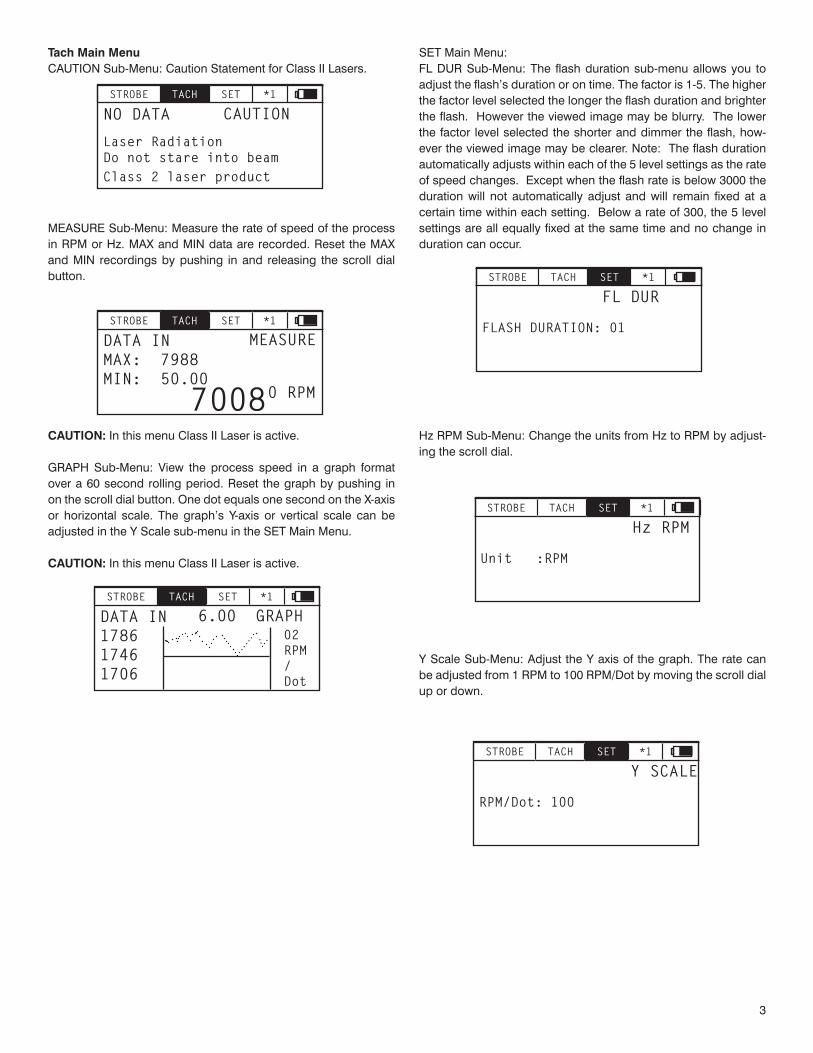
Tach Main MenuCAUTION Sub-Menu: Caution Statement for Class II Lasers.
MEASURE Sub-Menu: Measure the rate of speed of the process in RPM or Hz. MAX and MIN data are recorded. Reset the MAX and MIN recordings by pushing in and releasing the scroll dial button.
CAUTION: In this menu Class II Laser is active.
GRAPH Sub-Menu: View the process speed in a graph format over a 60 second rolling period. Reset the graph by pushing in on the scroll dial button. One dot equals one second on the X-axis or horizontal scale. The graph’s Y-axis or vertical scale can be adjusted in the Y Scale sub-menu in the SET Main Menu.
CAUTION: In this menu Class II Laser is active.
NO DATA
Laser RadiationDo not stare into beam
Class 2 laser product
CAUTION
STROBE TACH SET *1
DATA INMAX: 7988MIN: 50.00
MEASURESTROBE TACH SET *1
0 RPM7008
DATA IN178617461706
6.00 GRAPHSTROBE TACH SET *1
02RPM/Dot
SET Main Menu:FL DUR Sub-Menu: The flash duration sub-menu allows you to adjust the flash’s duration or on time. The factor is 1-5. The higher the factor level selected the longer the flash duration and brighter the flash. However the viewed image may be blurry. The lower the factor level selected the shorter and dimmer the flash, how-ever the viewed image may be clearer. Note: The flash duration automatically adjusts within each of the 5 level settings as the rate of speed changes. Except when the flash rate is below 3000 the duration will not automatically adjust and will remain fixed at a certain time within each setting. Below a rate of 300, the 5 level settings are all equally fixed at the same time and no change in duration can occur.
Hz RPM Sub-Menu: Change the units from Hz to RPM by adjust-ing the scroll dial.
Y Scale Sub-Menu: Adjust the Y axis of the graph. The rate can be adjusted from 1 RPM to 100 RPM/Dot by moving the scroll dial up or down.
FLASH DURATION: 01
FL DUR
STROBE TACH SET *1
Unit :RPM
Hz RPM
STROBE TACH SET *1
RPM/Dot: 100
Y SCALE
STROBE TACH SET *1
3
LCD Sub-Menu: Adjust the Contrast on the LCD by spinning the scroll wheel up and down.
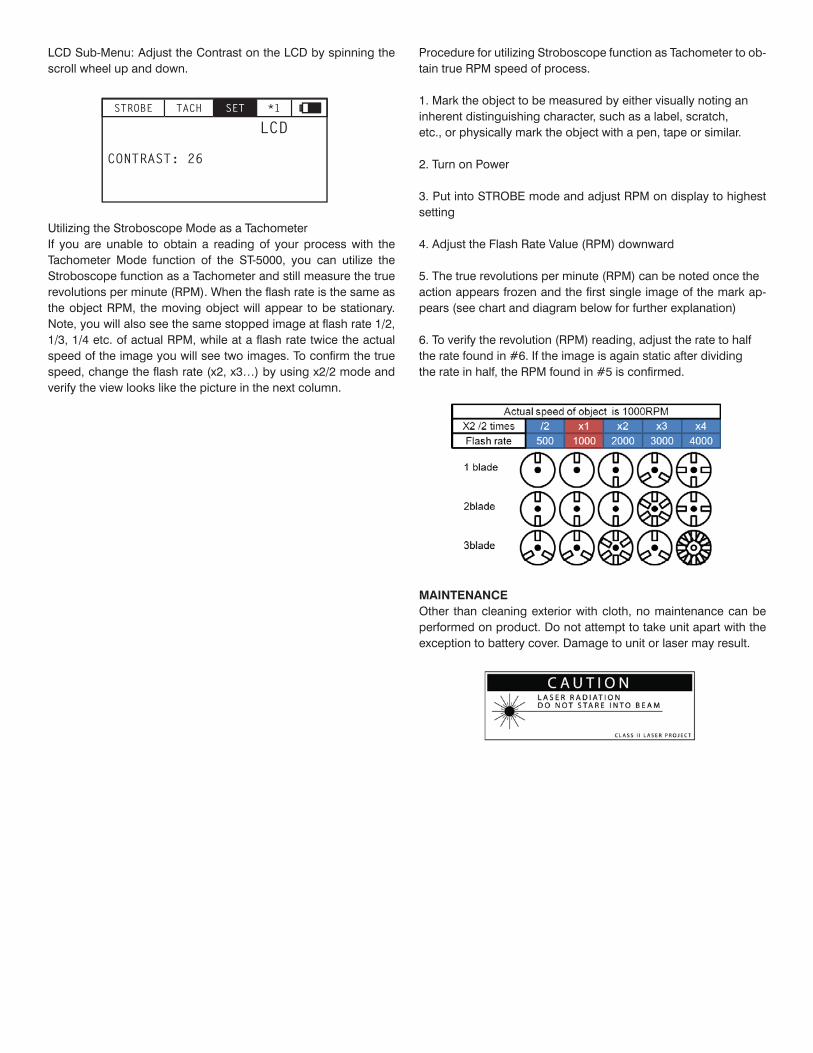
Utilizing the Stroboscope Mode as a Tachometer If you are unable to obtain a reading of your process with the Tachometer Mode function of the ST-5000, you can utilize the Stroboscope function as a Tachometer and still measure the true revolutions per minute (RPM). When the flash rate is the same as the object RPM, the moving object will appear to be stationary. Note, you will also see the same stopped image at flash rate 1/2, 1/3, 1/4 etc. of actual RPM, while at a flash rate twice the actual speed of the image you will see two images. To confirm the true speed, change the flash rate (x2, x3…) by using x2/2 mode and verify the view looks like the picture in the next column.
CONTRAST: 26
LCD
STROBE TACH SET *1
Procedure for utilizing Stroboscope function as Tachometer to ob-tain true RPM speed of process.
1. Mark the object to be measured by either visually noting aninherent distinguishing character, such as a label, scratch,etc., or physically mark the object with a pen, tape or similar.
2. Turn on Power
3. Put into STROBE mode and adjust RPM on display to highest setting
4. Adjust the Flash Rate Value (RPM) downward
5. The true revolutions per minute (RPM) can be noted once theaction appears frozen and the first single image of the mark ap-pears (see chart and diagram below for further explanation)
6. To verify the revolution (RPM) reading, adjust the rate to halfthe rate found in #6. If the image is again static after dividingthe rate in half, the RPM found in #5 is confirmed.
MAINTENANCEOther than cleaning exterior with cloth, no maintenance can be performed on product. Do not attempt to take unit apart with the exception to battery cover. Damage to unit or laser may result.