Embed Size (px)
Citation preview
15CHAPTER
In this chapter
Staying Organized with theOutlook Journal
In this chapter
Using Outlook’s Journal 362
Working with the Journal Folder 364
Setting Up Automatic Email Journaling 367
Using Journal’s Other Tracking Capabilities 370
Creating Journal Items Manually 373
Creating Custom Journal Entry Types 375
Troubleshooting 376
Improving Your Outlook 378
18 0789729563 CH15.i 8/29/03 11:56 AM Page 361
362 Chapter 15 Staying Organized with the Outlook Journal
Using Outlook’s JournalOutlook’s journal is a lot like a diary and contains a record of your daily activities. Unlike adiary, it’s somewhat limited to recording specific records, such as email you send andreceive, phone calls you make, and documents you work on. Although it does a good job ofautomatically tracking your usage of Microsoft Office applications, you must record journalentries for other events or applications yourself.
Among the activities you can automatically record in the journal are
■ Email you send and receive to selected contacts
■ Task requests and responses
■ Meeting requests, responses, and cancellations
■ Telephone calls you initiate to a contact
■ Office documents you work on
By automatically recording all documents you work on, all email sent to specific contacts,and phone calls made, the journal keeps logs of your activity. This is particularly useful toanyone who needs to know how long she worked on a document or spent on a phone callbecause the journal tracks the elapsed time along with the event.
When you manually create new journal entries, you’re limited in the entry types you canchoose. The predefined entry types cover basic business events, such as
■ Letters, documents, and faxes you send or receive
■ Telephone calls and conversations
■ Notes you take
■ Remote sessions you participate in
15
N O T EEven though you can’t create new entry types in the form, you can edit the Registry toadd additional types to the drop-down list. See “Creating Custom Journal Entry Types”later in this chapter to learn how to create your own journal entry types.
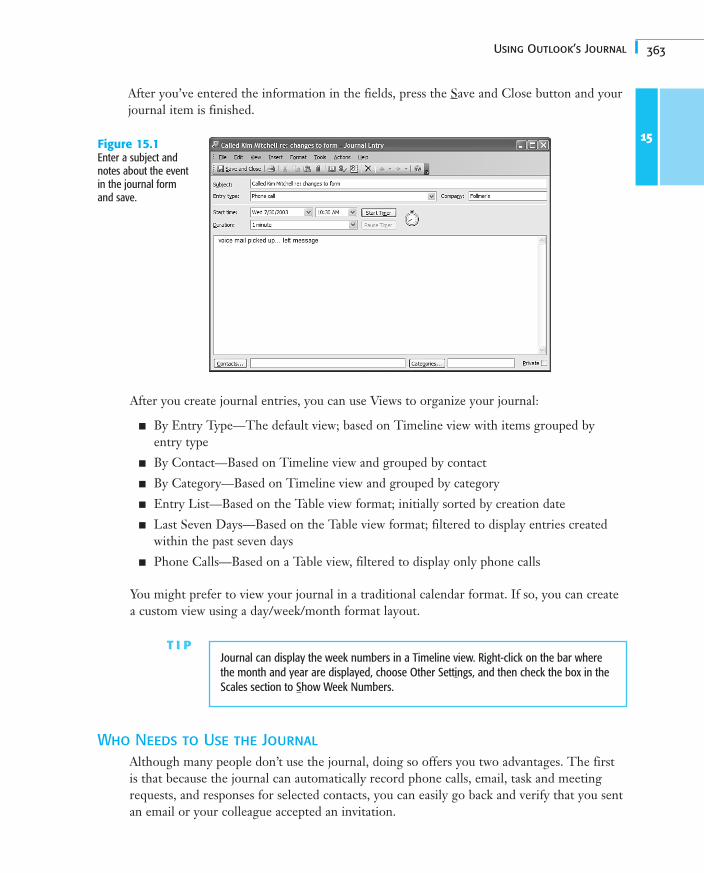
The journal form (see Figure 15.1) contains only a few basic fields:
■ Subject
■ Entry Type
■ Company
■ Start Time (includes time and date fields)
■ Duration
■ Notes
18 0789729563 CH15.i 8/29/03 11:56 AM Page 362
363Using Outlook’s Journal
After you’ve entered the information in the fields, press the Save and Close button and yourjournal item is finished.
15Figure 15.1Enter a subject andnotes about the eventin the journal formand save.
After you create journal entries, you can use Views to organize your journal:
■ By Entry Type—The default view; based on Timeline view with items grouped byentry type
■ By Contact—Based on Timeline view and grouped by contact
■ By Category—Based on Timeline view and grouped by category
■ Entry List—Based on the Table view format; initially sorted by creation date
■ Last Seven Days—Based on the Table view format; filtered to display entries createdwithin the past seven days
■ Phone Calls—Based on a Table view, filtered to display only phone calls
You might prefer to view your journal in a traditional calendar format. If so, you can createa custom view using a day/week/month format layout.
T I PJournal can display the week numbers in a Timeline view. Right-click on the bar wherethe month and year are displayed, choose Other Settings, and then check the box in theScales section to Show Week Numbers.
Who Needs to Use the JournalAlthough many people don’t use the journal, doing so offers you two advantages. The firstis that because the journal can automatically record phone calls, email, task and meetingrequests, and responses for selected contacts, you can easily go back and verify that you sentan email or your colleague accepted an invitation.
18 0789729563 CH15.i 8/29/03 11:56 AM Page 363

364 Chapter 15 Staying Organized with the Outlook Journal
Second, the journal records the duration you worked on a task. If you bill by the hour orjust want to know how long you spent writing a report, the journal can tell you. You don’thave to remember to set a timer; you need only select the option to automatically record allfiles created using specific Office applications.
One reason many people give for not using the journal is that journaling causes your mail-box store to grow very large. When the journal automatically creates entries for many ofyour contacts and for all Office documents, you could end up with several hundred entriesat the end of each week, many of which offer little or no additional value. Unless you useAutoArchive to clean out the journal regularly, you might have thousands of items in thejournal.
When the Journal Is HelpfulYou can let the journal automatically create records for Office documents or Outlook itemsyou create. Along with creating an automatic journal item for you, it also records the timeyou spent working on the documents.
Although journal entries aren’t automatically created for all activities you might want toinclude in your journal, it takes little effort to create journal entries for all the activities youdo. If you need to go back a few months and find a document you worked on, it’s often eas-ier to look in the journal and use views or Outlook’s advanced find to find the journal entrythan it is to search your computer’s hard drive for filenames you can’t remember.
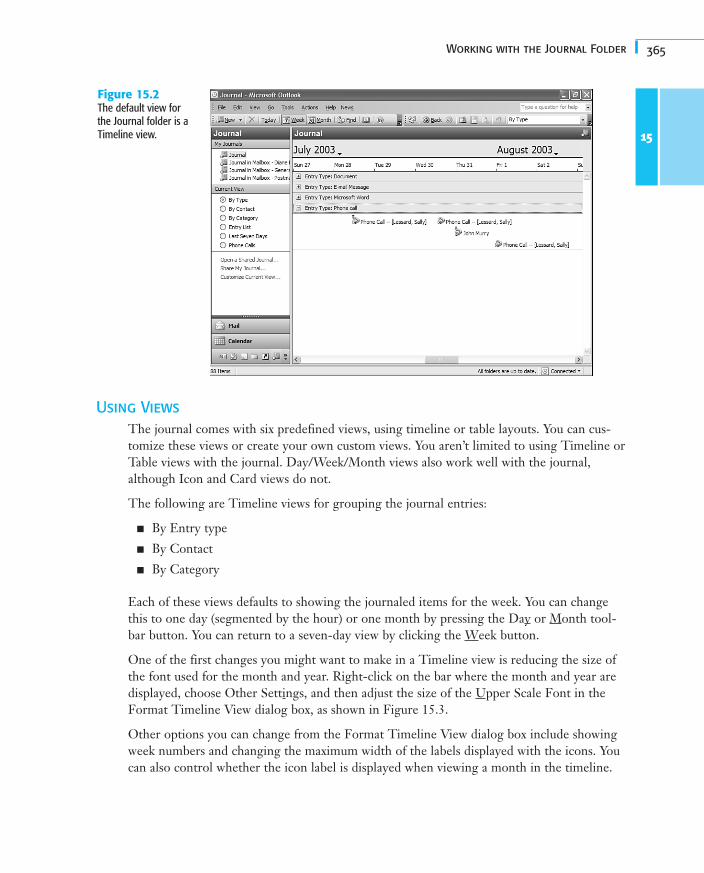
Working with the Journal FolderWhen you open the Journal folder, you’ll see the default By Type view: a timeline groupedby entry type. This view has the date running left to right across the top of the pane, withthe journal entries listed under the dates. The Timeline view default shows seven days, asshown in Figure 15.2.
Along with scrolling, you can right-click on the row with the month and year to display thedate picker or, on the date scale, choose Go to Date to move around the journal. Althoughthe Outlook bar has a link for opening shared journals, only Exchange Server users can openand use shared Journal folders.
Use the View menu to select different views of your Journal folder, including timelinesgrouped By Contact or By Category and Table views showing all items, or filtered by thelast seven days, or limit the display to phone calls only.
The Reading Pane is turned off on the Journal folder by default; however, you can turn it onusing the View, Reading Pane menu selection. You can use the Reading Pane with any view,including the Timeline view, and you can see all the journal fields in the Reading Pane. Forsecurity reasons, you can’t open shortcuts on the journal item from the Reading Pane; youhave to open the journal entry first. When the actual file is attached to the journal entry,you can open it from the Reading Pane. In most views, you’ll want the Reading Pane on thebottom of the window to maximize the viewing area for Timeline views.
15
18 0789729563 CH15.i 8/29/03 11:56 AM Page 364
365Working with the Journal Folder
Using ViewsThe journal comes with six predefined views, using timeline or table layouts. You can cus-tomize these views or create your own custom views. You aren’t limited to using Timeline orTable views with the journal. Day/Week/Month views also work well with the journal,although Icon and Card views do not.
The following are Timeline views for grouping the journal entries:
■ By Entry type
■ By Contact
■ By Category
Each of these views defaults to showing the journaled items for the week. You can changethis to one day (segmented by the hour) or one month by pressing the Day or Month tool-bar button. You can return to a seven-day view by clicking the Week button.
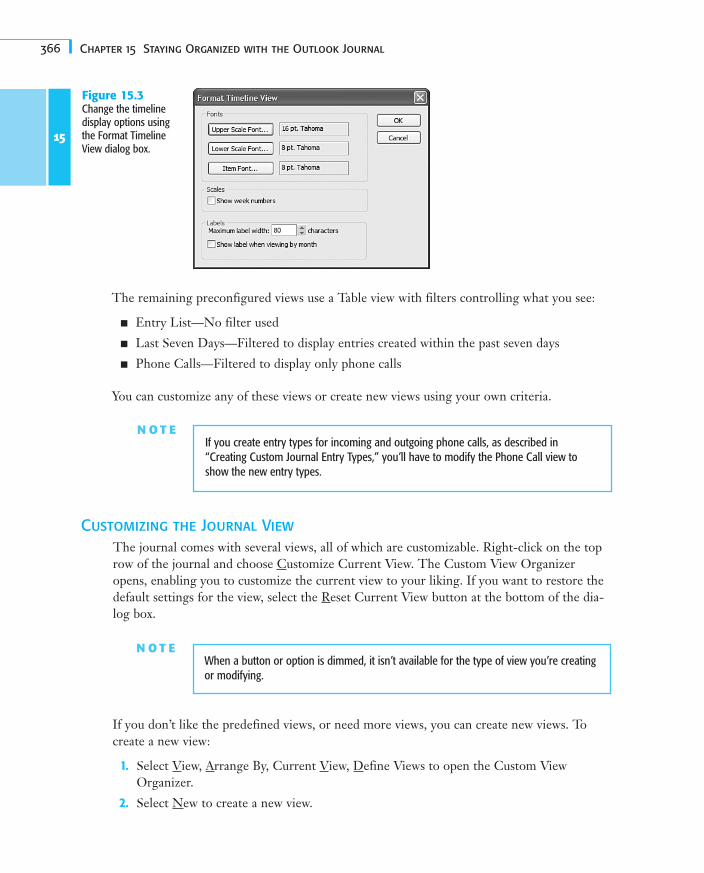
One of the first changes you might want to make in a Timeline view is reducing the size ofthe font used for the month and year. Right-click on the bar where the month and year aredisplayed, choose Other Settings, and then adjust the size of the Upper Scale Font in theFormat Timeline View dialog box, as shown in Figure 15.3.
Other options you can change from the Format Timeline View dialog box include showingweek numbers and changing the maximum width of the labels displayed with the icons. Youcan also control whether the icon label is displayed when viewing a month in the timeline.
15
Figure 15.2The default view forthe Journal folder is aTimeline view.
18 0789729563 CH15.i 8/29/03 11:56 AM Page 365
366 Chapter 15 Staying Organized with the Outlook Journal
The remaining preconfigured views use a Table view with filters controlling what you see:
■ Entry List—No filter used
■ Last Seven Days—Filtered to display entries created within the past seven days
■ Phone Calls—Filtered to display only phone calls
You can customize any of these views or create new views using your own criteria.
15
Figure 15.3Change the timelinedisplay options usingthe Format TimelineView dialog box.
N O T EIf you create entry types for incoming and outgoing phone calls, as described in“Creating Custom Journal Entry Types,” you’ll have to modify the Phone Call view toshow the new entry types.
Customizing the Journal ViewThe journal comes with several views, all of which are customizable. Right-click on the toprow of the journal and choose Customize Current View. The Custom View Organizeropens, enabling you to customize the current view to your liking. If you want to restore thedefault settings for the view, select the Reset Current View button at the bottom of the dia-log box.
N O T EWhen a button or option is dimmed, it isn’t available for the type of view you’re creatingor modifying.
If you don’t like the predefined views, or need more views, you can create new views. Tocreate a new view:
1. Select View, Arrange By, Current View, Define Views to open the Custom ViewOrganizer.
2. Select New to create a new view.
18 0789729563 CH15.i 8/29/03 11:56 AM Page 366
367Setting Up Automatic Email Journaling
3. Enter a name for your view and select the type of view you want to create. Day/Week/Month makes a nice journal view, but Icon and Card views aren’t very useful.
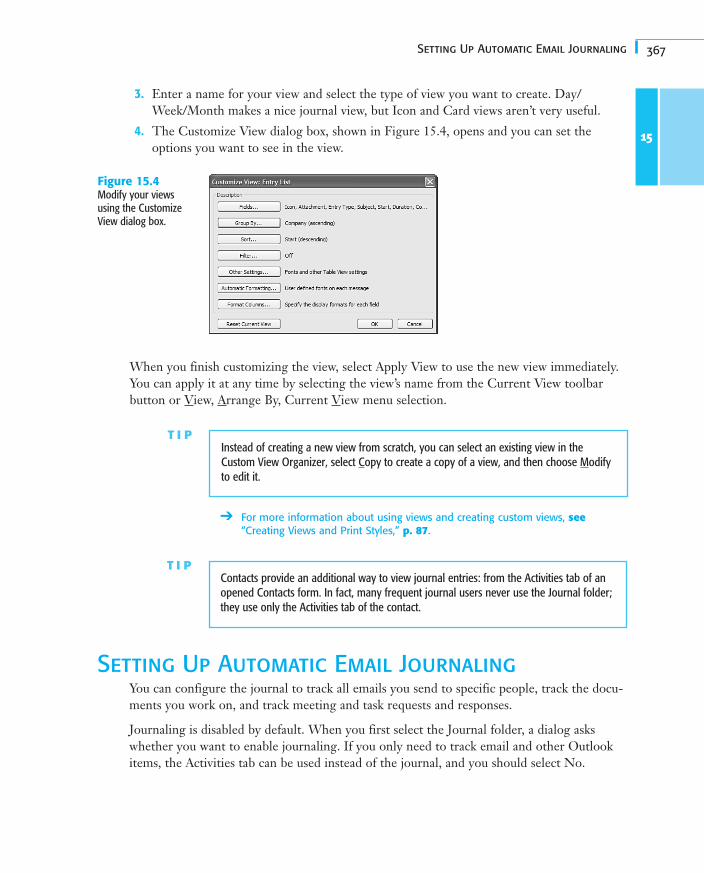
4. The Customize View dialog box, shown in Figure 15.4, opens and you can set theoptions you want to see in the view.
15
Figure 15.4Modify your viewsusing the CustomizeView dialog box.
When you finish customizing the view, select Apply View to use the new view immediately.You can apply it at any time by selecting the view’s name from the Current View toolbarbutton or View, Arrange By, Current View menu selection.
T I PInstead of creating a new view from scratch, you can select an existing view in theCustom View Organizer, select Copy to create a copy of a view, and then choose Modifyto edit it.
➔ For more information about using views and creating custom views, see“Creating Views and Print Styles,” p. 87.
T I PContacts provide an additional way to view journal entries: from the Activities tab of anopened Contacts form. In fact, many frequent journal users never use the Journal folder;they use only the Activities tab of the contact.
Setting Up Automatic Email JournalingYou can configure the journal to track all emails you send to specific people, track the docu-ments you work on, and track meeting and task requests and responses.
Journaling is disabled by default. When you first select the Journal folder, a dialog askswhether you want to enable journaling. If you only need to track email and other Outlookitems, the Activities tab can be used instead of the journal, and you should select No.
18 0789729563 CH15.i 8/29/03 11:56 AM Page 367
368 Chapter 15 Staying Organized with the Outlook Journal
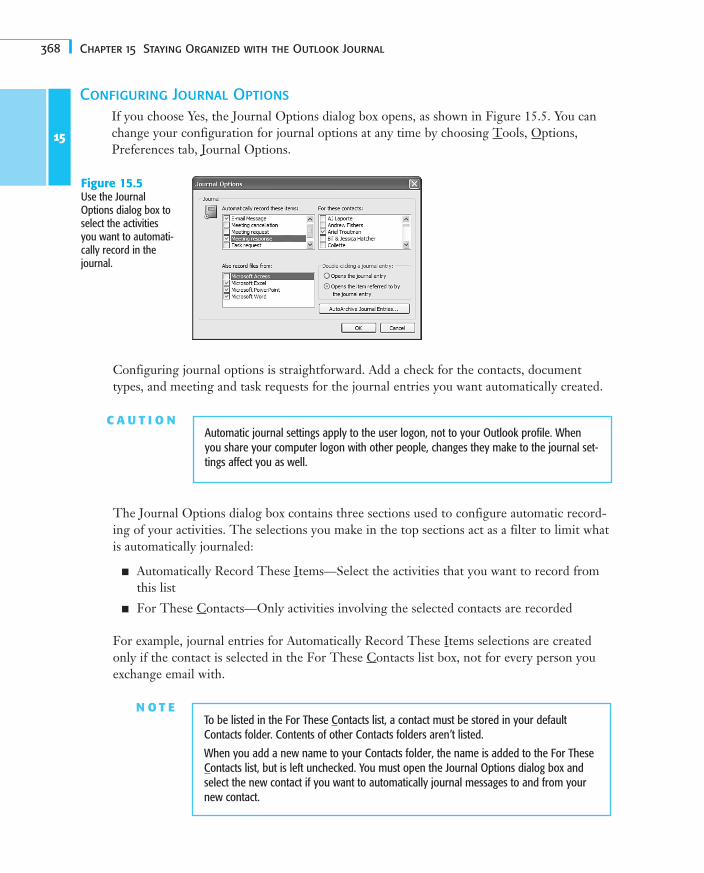
Configuring Journal OptionsIf you choose Yes, the Journal Options dialog box opens, as shown in Figure 15.5. You canchange your configuration for journal options at any time by choosing Tools, Options,Preferences tab, Journal Options.
15
Figure 15.5Use the JournalOptions dialog box toselect the activitiesyou want to automati-cally record in thejournal.
Configuring journal options is straightforward. Add a check for the contacts, documenttypes, and meeting and task requests for the journal entries you want automatically created.
C A U T I O NAutomatic journal settings apply to the user logon, not to your Outlook profile. Whenyou share your computer logon with other people, changes they make to the journal set-tings affect you as well.
The Journal Options dialog box contains three sections used to configure automatic record-ing of your activities. The selections you make in the top sections act as a filter to limit whatis automatically journaled:
■ Automatically Record These Items—Select the activities that you want to record fromthis list
■ For These Contacts—Only activities involving the selected contacts are recorded
For example, journal entries for Automatically Record These Items selections are createdonly if the contact is selected in the For These Contacts list box, not for every person youexchange email with.
N O T ETo be listed in the For These Contacts list, a contact must be stored in your defaultContacts folder. Contents of other Contacts folders aren’t listed.
When you add a new name to your Contacts folder, the name is added to the For TheseContacts list, but is left unchecked. You must open the Journal Options dialog box andselect the new contact if you want to automatically journal messages to and from yournew contact.
18 0789729563 CH15.i 8/29/03 11:56 AM Page 368
369Setting Up Automatic Email Journaling
In addition to the items checked in the Automatically Record These Items list, journalentries are automatically created for phone calls to a contact selected in the For TheseContacts list when you initiate a call to the contact using the Actions, Call Contact menu onan open Contacts form.
The third section, Also Record Files From, contains the list of document types that Outlookis capable of tracking and recording.
The remaining section found on this dialog box contains the settings for the default actionthat occurs when you double-click on a journal entry. The choices are Opens the JournalEntry or Opens the Item Referred to by the Journal Entry.
The final setting configured from this dialog box is your AutoArchive settings. You shouldconfigure AutoArchive Journal Settings if you’re journaling activities for a large number ofcontacts; otherwise, your message store may grow too large.
Do you want to remove programs from these lists? See “Prevent Changes to Automatic JournalingSettings” in the “Troubleshooting” section at the end of this chapter.
Configuring Contacts for Automatic JournalingYou typically use the Tools, Options, Journal Options dialog box to enable contacts forautomatic journaling. However, you can also do this from the Contacts form’s All Fields tabor when using the Phone List view.
Using views to enable or disable your contacts for automatic journaling is the easiest way toset or change the status for a large number of contacts:
1. Open your Contacts folder and choose Phone List view.
2. Scroll to the right. The Journal field is the next to the last column.
3. Add a check mark in the Journal field for each contact you want to automatically jour-nal; remove the check mark to stop automatic journaling for a contact.
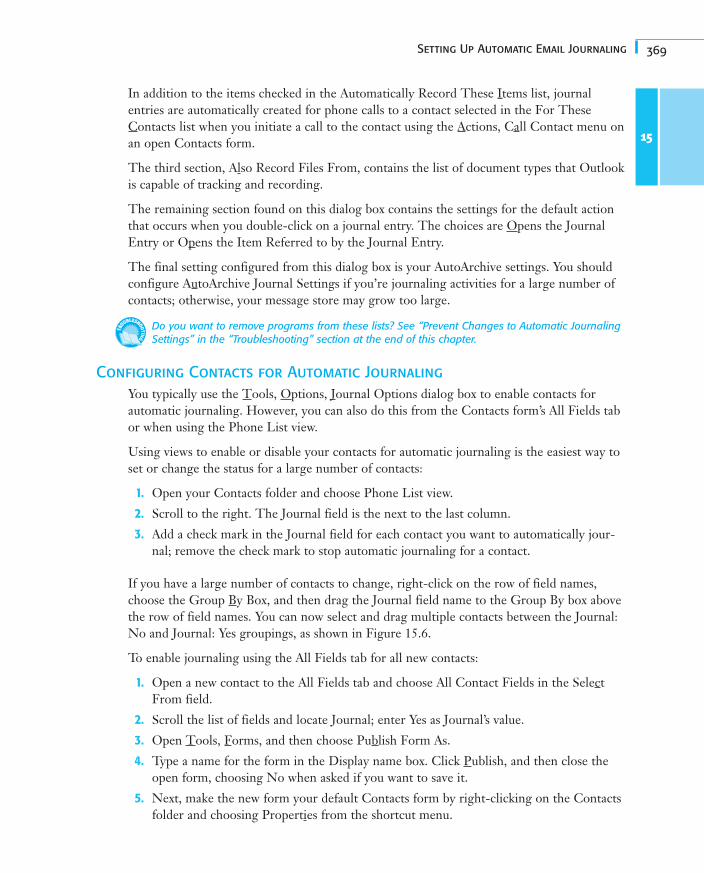
If you have a large number of contacts to change, right-click on the row of field names,choose the Group By Box, and then drag the Journal field name to the Group By box abovethe row of field names. You can now select and drag multiple contacts between the Journal:No and Journal: Yes groupings, as shown in Figure 15.6.
To enable journaling using the All Fields tab for all new contacts:
1. Open a new contact to the All Fields tab and choose All Contact Fields in the SelectFrom field.
2. Scroll the list of fields and locate Journal; enter Yes as Journal’s value.
3. Open Tools, Forms, and then choose Publish Form As.
4. Type a name for the form in the Display name box. Click Publish, and then close theopen form, choosing No when asked if you want to save it.
5. Next, make the new form your default Contacts form by right-clicking on the Contactsfolder and choosing Properties from the shortcut menu.
15
18 0789729563 CH15.i 8/29/03 11:56 AM Page 369
370 Chapter 15 Staying Organized with the Outlook Journal
6. On the General tab, find the When Posting to This Folder, Use list, select the formyou just published, and then click OK.
Now, all new contacts you create will use the form you published with journaling enabled. Ifyou want to stop journaling, repeat the last two steps in the preceding list and select theIPM.Contacts form instead.
Using Journal’s Other Tracking CapabilitiesOutlook’s journal isn’t limited to tracking email entries for you; you can easily create yourown entries for anything you want to keep in your journal. Some people like to create anentry when they complete home and car repairs or maintenance or visit their doctor. Eventhough Outlook doesn’t have entry types for these items, you can easily create new entrytypes that meet your unique needs. You might also want to create a second (or third) Journalfolder with a different archive setting on each. You may want to keep business and personalentries separate, or archive your business entries more often than you archive home repairs.
Tracking Telephone Calls AutomaticallyAlthough Phone Call isn’t listed in the Automatically Record These Items list, when youinitiate a call using the Actions, Call contact menu and the contact is in the For TheseContacts list, a new journal form loads automatically.
When you have the journal automatically creating journal entries, the journal form’s fieldspull name and company data from the Contacts form, the time and date fields update to the
15
Figure 15.6Change the journalsetting for many con-tacts at once bygrouping contacts bythe journal field.
18 0789729563 CH15.i 8/29/03 11:56 AM Page 370
371Using Journal’s Other Tracking Capabilities
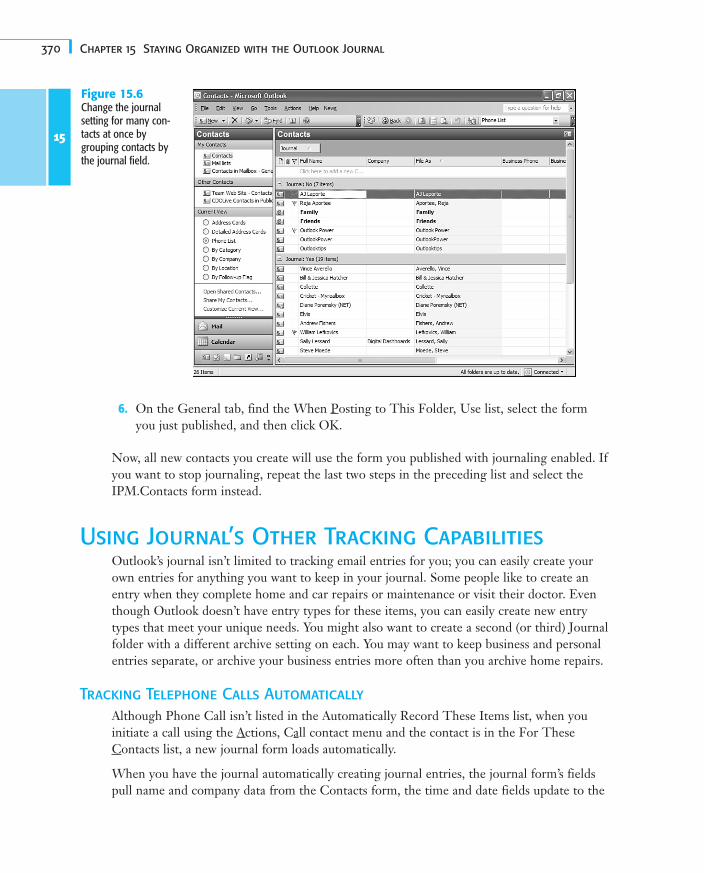
current time and date, and the timer starts, as shown in Figure 15.7. You don’t have to doanything except type notes and save the journal item when the call ends.
15Figure 15.7Outlook automaticallycreates a journalentry for any phonecall initialed usingOutlook’s phonedialer.
The format used in the Subject field is “Phone Call — [contact name]”; if the contact’sCompany field contains an entry, the Company field on the journal form is completed. Thecontact also links to the journal item, permitting you to locate the journal entry from thecontact’s Activities tab.
Are journal items missing from the contact’s Activities tab? See “Reconnecting Journal Entries toContacts” in the “Troubleshooting” section at the end of this chapter.
N O T EIf you’d like Phone Call to display in the Automatically Record These Items list, you can edit the Registry to display it. Open the Registry Editor, navigate to the HKEY_CURRENT_USER\Software\Microsoft\Shared Tools\Outlook\Journaling\Phone Call key, and change the AutoJournaled value to 1.
➔ See Appendix E if you need help editing the Registry.
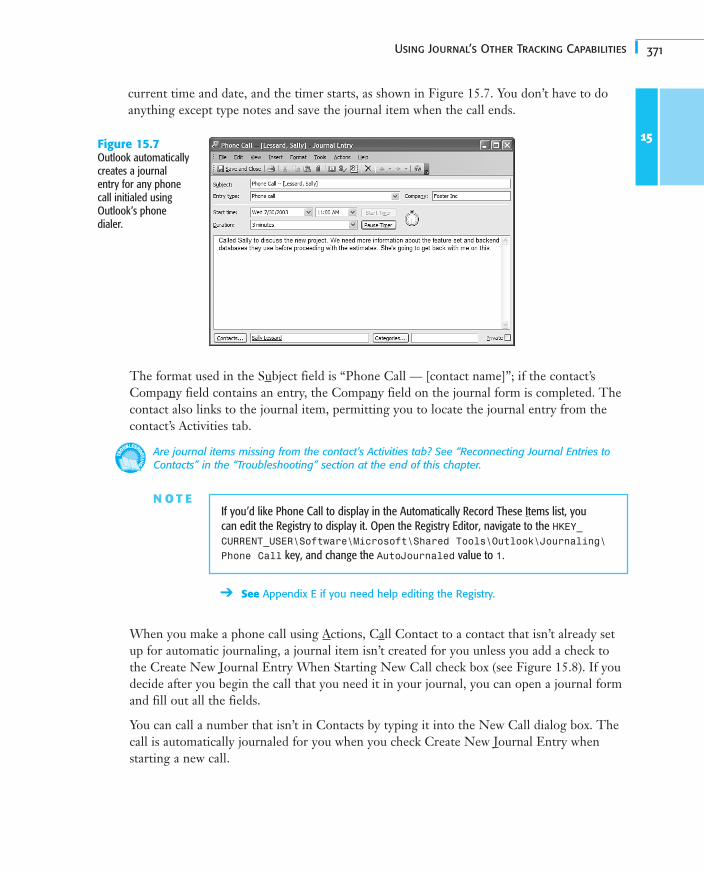
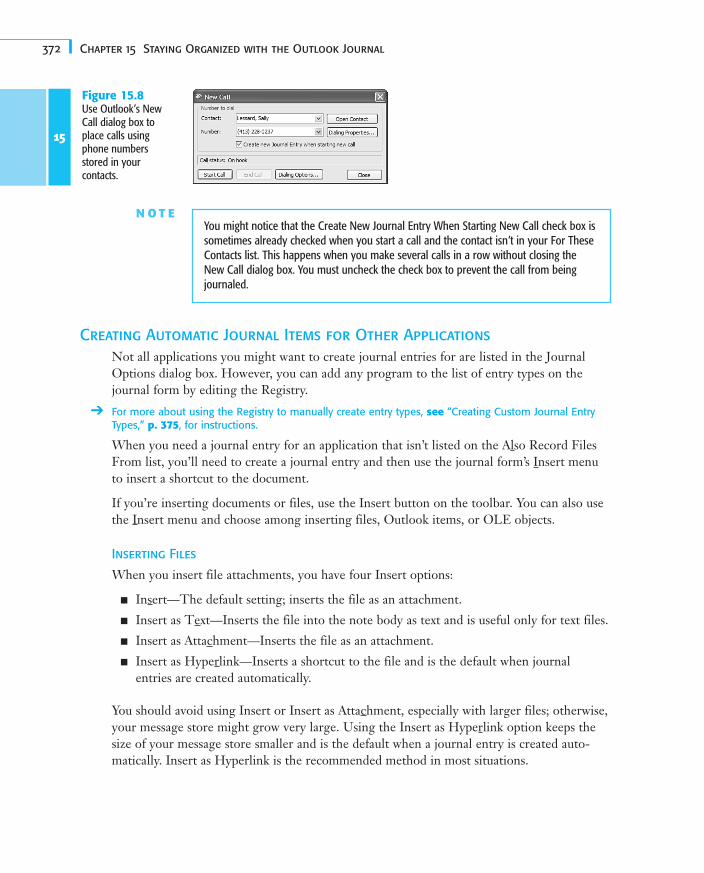
When you make a phone call using Actions, Call Contact to a contact that isn’t already setup for automatic journaling, a journal item isn’t created for you unless you add a check tothe Create New Journal Entry When Starting New Call check box (see Figure 15.8). If youdecide after you begin the call that you need it in your journal, you can open a journal formand fill out all the fields.
You can call a number that isn’t in Contacts by typing it into the New Call dialog box. Thecall is automatically journaled for you when you check Create New Journal Entry whenstarting a new call.
18 0789729563 CH15.i 8/29/03 11:56 AM Page 371
372 Chapter 15 Staying Organized with the Outlook Journal
Creating Automatic Journal Items for Other ApplicationsNot all applications you might want to create journal entries for are listed in the JournalOptions dialog box. However, you can add any program to the list of entry types on thejournal form by editing the Registry.
➔ For more about using the Registry to manually create entry types, see “Creating Custom Journal EntryTypes,” p. 375, for instructions.
When you need a journal entry for an application that isn’t listed on the Also Record FilesFrom list, you’ll need to create a journal entry and then use the journal form’s Insert menuto insert a shortcut to the document.
If you’re inserting documents or files, use the Insert button on the toolbar. You can also usethe Insert menu and choose among inserting files, Outlook items, or OLE objects.
Inserting Files
When you insert file attachments, you have four Insert options:
■ Insert—The default setting; inserts the file as an attachment.
■ Insert as Text—Inserts the file into the note body as text and is useful only for text files.
■ Insert as Attachment—Inserts the file as an attachment.
■ Insert as Hyperlink—Inserts a shortcut to the file and is the default when journalentries are created automatically.
You should avoid using Insert or Insert as Attachment, especially with larger files; otherwise,your message store might grow very large. Using the Insert as Hyperlink option keeps thesize of your message store smaller and is the default when a journal entry is created auto-matically. Insert as Hyperlink is the recommended method in most situations.
15
Figure 15.8Use Outlook’s NewCall dialog box toplace calls usingphone numbersstored in yourcontacts.
N O T EYou might notice that the Create New Journal Entry When Starting New Call check box issometimes already checked when you start a call and the contact isn’t in your For TheseContacts list. This happens when you make several calls in a row without closing theNew Call dialog box. You must uncheck the check box to prevent the call from beingjournaled.
18 0789729563 CH15.i 8/29/03 11:56 AM Page 372
373Creating Journal Items Manually
Inserting Outlook Items
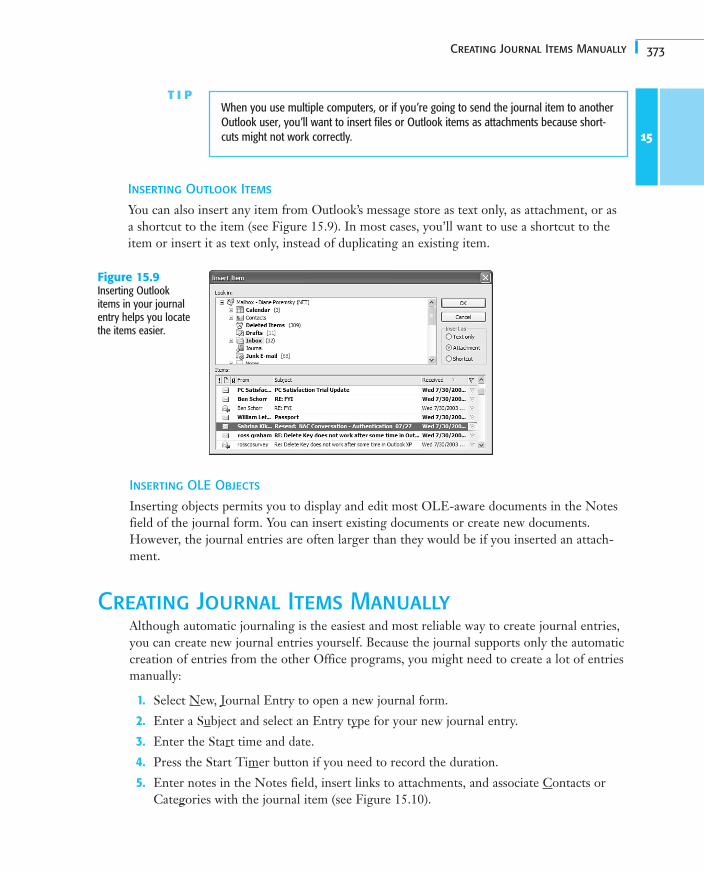
You can also insert any item from Outlook’s message store as text only, as attachment, or asa shortcut to the item (see Figure 15.9). In most cases, you’ll want to use a shortcut to theitem or insert it as text only, instead of duplicating an existing item.
15
T I PWhen you use multiple computers, or if you’re going to send the journal item to anotherOutlook user, you’ll want to insert files or Outlook items as attachments because short-cuts might not work correctly.
Figure 15.9Inserting Outlookitems in your journalentry helps you locatethe items easier.
Inserting OLE Objects
Inserting objects permits you to display and edit most OLE-aware documents in the Notesfield of the journal form. You can insert existing documents or create new documents.However, the journal entries are often larger than they would be if you inserted an attach-ment.
Creating Journal Items ManuallyAlthough automatic journaling is the easiest and most reliable way to create journal entries,you can create new journal entries yourself. Because the journal supports only the automaticcreation of entries from the other Office programs, you might need to create a lot of entriesmanually:
1. Select New, Journal Entry to open a new journal form.
2. Enter a Subject and select an Entry type for your new journal entry.
3. Enter the Start time and date.
4. Press the Start Timer button if you need to record the duration.
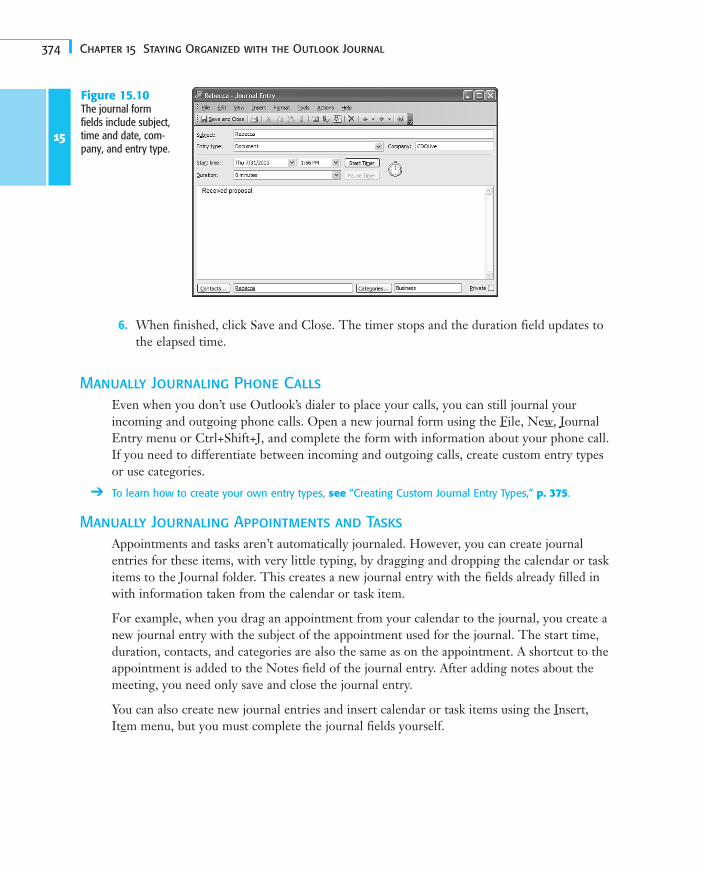
5. Enter notes in the Notes field, insert links to attachments, and associate Contacts orCategories with the journal item (see Figure 15.10).
18 0789729563 CH15.i 8/29/03 11:56 AM Page 373
374 Chapter 15 Staying Organized with the Outlook Journal
6. When finished, click Save and Close. The timer stops and the duration field updates tothe elapsed time.
Manually Journaling Phone CallsEven when you don’t use Outlook’s dialer to place your calls, you can still journal yourincoming and outgoing phone calls. Open a new journal form using the File, New, JournalEntry menu or Ctrl+Shift+J, and complete the form with information about your phone call.If you need to differentiate between incoming and outgoing calls, create custom entry typesor use categories.
➔ To learn how to create your own entry types, see “Creating Custom Journal Entry Types,” p. 375.
Manually Journaling Appointments and TasksAppointments and tasks aren’t automatically journaled. However, you can create journalentries for these items, with very little typing, by dragging and dropping the calendar or taskitems to the Journal folder. This creates a new journal entry with the fields already filled inwith information taken from the calendar or task item.
For example, when you drag an appointment from your calendar to the journal, you create anew journal entry with the subject of the appointment used for the journal. The start time,duration, contacts, and categories are also the same as on the appointment. A shortcut to theappointment is added to the Notes field of the journal entry. After adding notes about themeeting, you need only save and close the journal entry.
You can also create new journal entries and insert calendar or task items using the Insert,Item menu, but you must complete the journal fields yourself.
15
Figure 15.10The journal formfields include subject,time and date, com-pany, and entry type.
18 0789729563 CH15.i 8/29/03 11:56 AM Page 374
375Creating Custom Journal Entry Types
Creating Custom Journal Entry TypesThe journal comes with a predefined list of entry types that’s limited and might not meetyour specific needs. The list isn’t editable on the form, and you’re restricted to selecting anentry type from the list. Fortunately, because the Entry Type list is stored in the Registry,you can change what you see in the Entry Type drop-down list.
15
C A U T I O NAlthough the thought of editing the Registry scares many people, it isn’t difficult to do.You should always export the section of the Registry you’re working on before you begin,just in case you make a mistake.
If you’re up to the challenge, open the Registry Editor by selecting Start, Run and typingregedit in the box. Click OK.
➔ For more information on editing your registry, see “Working with the Windows Registry,” p. 935.
Once you have the Registry Editor open, navigate to this key:
HKEY_CURRENT_USER\Software\Microsoft\Shared Tools\Outlook\Journaling
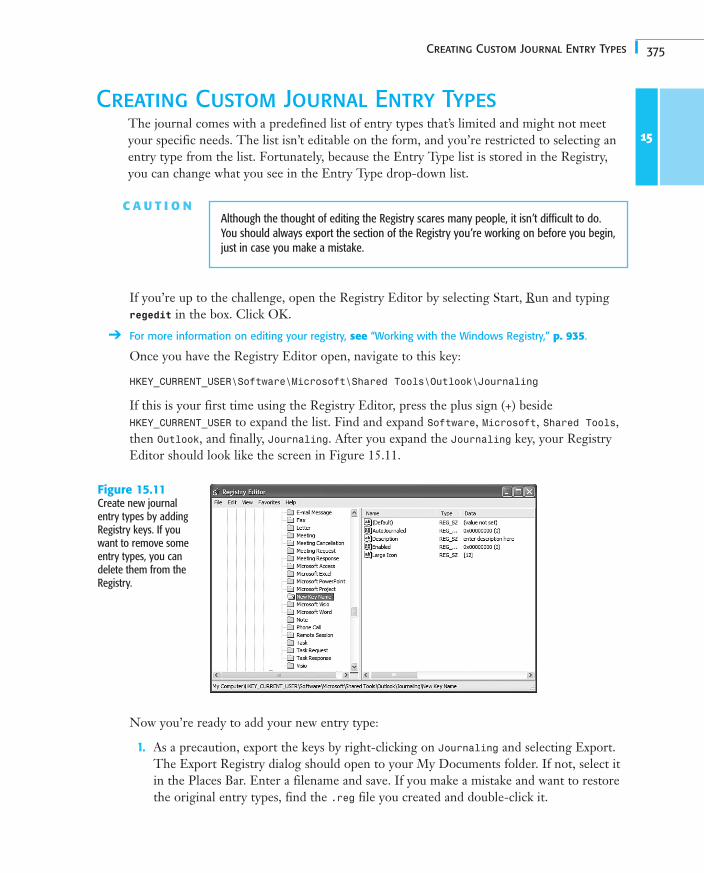
If this is your first time using the Registry Editor, press the plus sign (+) beside HKEY_CURRENT_USER to expand the list. Find and expand Software, Microsoft, Shared Tools,then Outlook, and finally, Journaling. After you expand the Journaling key, your RegistryEditor should look like the screen in Figure 15.11.
Figure 15.11Create new journalentry types by addingRegistry keys. If youwant to remove someentry types, you candelete them from theRegistry.
Now you’re ready to add your new entry type:
1. As a precaution, export the keys by right-clicking on Journaling and selecting Export.The Export Registry dialog should open to your My Documents folder. If not, select itin the Places Bar. Enter a filename and save. If you make a mistake and want to restorethe original entry types, find the .reg file you created and double-click it.
18 0789729563 CH15.i 8/29/03 11:56 AM Page 375
376 Chapter 15 Staying Organized with the Outlook Journal
2. Right-click on Journaling again and choose New, Key. Type a name for your new key.
3. Now you need to add values to your new key. You’ll need a minimum of two values:Description and Large Icon. Right-click in the right side of the Registry Editor andchoose New, String Value. Type Description to replace New Value #1. Double-click onDescription and type the text you want to show in the Entry Type field. This doesn’thave to match the name of the key, but it should be similar.
4. Repeat step 3, naming the new string value Large Icon and entering a value insidesquare brackets so that the value data looks like [12]. This entry controls the icon thatdisplays in the Journal folder. If you look through the other keys, you’ll see what num-bers represent other icons.
5. Open a new journal form. Your new entry type should be listed in the Entry Type drop-down list.
6. Close the Registry Editor.
You probably noticed the other keys under Journaling. You can delete the keys for theentries you don’t want listed in the Entry Type drop-down list. If you delete all the keys,you’ll discover Phone Call is hard-coded in the journal form. If you don’t want the Phonecall key listed, you’ll have to rename it to something you do want listed instead. Add aDescription string value with whatever text you like, such as Incoming Phone Call. You’llalso need to delete or rename the DescriptionID key.
15
T I PAfter creating your new journal entry keys, right-click on Journaling and export the keys.You can use the .reg file to change the entry types on other computers.
You might have noticed that there are entries for the other values, such as AutoJournal andEnabled. These values have no affect on your custom journal entries.
AutoJournal is a DWORD value that controls whether the entry displays in the Tools,Options, Journal Options dialog in the Automatically Record These Items and Also RecordFile From lists. If AutoJournal is present, a value of 0 means that it’s hidden from the lists,whereas a value of 1 means that it’s displayed in one of the lists. Enabled with a value 1means that the box beside the entry is checked; 0 indicates unchecked. Because your customentry types won’t automatically journal, you don’t need to create these keys.
TroubleshootingReconnecting Journal Entries to Contacts
I imported the contents of my old .pst into my new .pst and the journal entries no longer show upunder the Activities tab for my contacts. Why is that, and can I fix it without opening each journalitem and selecting the contact?
18 0789729563 CH15.i 8/29/03 11:56 AM Page 376
377Troubleshooting
Your first mistake was using Import. Use File, Open, Outlook Data File to open your old.psts, and then move the contents to the new personal folders.
Importing from or exporting to a .pst file breaks all the links between Microsoft Outlookitems and related contacts because it creates new items. Moving items within a mailboxdoesn’t break the links because you aren’t creating new items, you’re just moving them.
After you import items, Outlook doesn’t provide a method to reconnect the links to theirrelated contact items, other than to reenter the contact names in the Contacts box.
You have two options. The first is to start over and delete the imported items, open the.pst, and move the items to your current .pst. Deleting the imported entries isn’t difficult.You must create a view that shows all items and add, and then sort by, the Modified Datefield. The imported items will have the same modified date and you can select and thendelete them. You must do this for both the Journal and Contacts folders. Then move theitems to the current .pst.
However, if it isn’t possible to move the original items, you can use a VBA macro to repairthe links for most of your contacts. If you don’t known how to write VBA code, that’s not aproblem either; a subroutine named ReconnectLinks is available online. Look for a link to itat http://www.slipstick.com/addins/journal.htm.
You might need to update some entries the old-fashioned way by typing in their names, butthe majority of the links can be fixed using VBA.
Prevent Changes to Automatic Journaling Settings
I share my computer with another person and I want to automatically journal all my email, but hedoesn’t. We have our own profiles in Outlook. How can I prevent him from changing my options?
The easiest way to make everyone happy is to give him his own Windows user account.This isn’t always the most convenient method and there are many good reasons why somepeople don’t want separate user profiles. However, as you’ve discovered, many settingswithin Outlook are specific to the user account, not Outlook profile specific, and this is oneof them.
Not all is lost, however. You can edit the Registry to hide any entry in the AutomaticallyRecord These Items list. Open the Registry Editor toHKEY_CURRENT_USER\Software\Microsoft\Shared Tools\Outlook\Journaling\E-mail
Message. If the AutoJournaled value exists, change it to 0; otherwise, create a new DWORDnamed AutoJournaled with a value of 0.
Now open the Journal Options dialog box. Email Message is removed from theAutomatically Record These Items list, and as long as the JournalByContact value is set to 1,email for the checked contacts is journaled.
This stops others only from disabling the settings using the Journal Options dialog box. Youcan’t prevent them from editing the Registry to disable automatic journaling.
18 0789729563 CH15.i 8/29/03 11:56 AM Page 377
378 Chapter 15 Staying Organized with the Outlook Journal
Improving Your OutlookThe journal tracks your activities for you by providing a record of messages you’ve sent orreceived, calls you’ve made, and letters you’ve sent. Along with tracking the calls, the journalincludes a duration field so that you can easily see how long you spent on a project. Rebeccaowns a consulting business and uses these features to her advantage, resulting in more accu-rate accounting of the time spent on a project and customer billing.
She keeps all of her contacts in Outlook and when she needs to make a phone call, she usesOutlook to dial the phone. The journal item is created automatically and the duration islogged.
Rebecca has configured Outlook to create automatic entries for Word documents, so sheknows how much time she spends creating and editing each document. When Rebecca cre-ates her documents, she always completes the document properties dialog box and entersthe contact’s name as a keyword. Later, she can sort or group by keyword, and associate thecontact with the journal entries. After that, the journal items are listed on the contact’sActivities tab.
When Rebecca works with other programs, she creates a journal entry and includes short-cuts to any documents she created. She includes notes on each journal item to remind herexactly what the journal entry is about if the client has questions charges on their bills.
At the end of every month, Rebecca uses a custom view that shows only the items createdwithin the past 30 days. She adds up the time spent for each journaled item, and then pre-pares the bills to send. As her business grows, she knows she’ll need to automate the processand is reviewing some third-party Outlook add-ins she discovered at http://www.slip-stick.com. If she doesn’t find an add-in that does what she needs, Rebecca found some VBAsamples she can use to provide some automation.
Rebecca also uses the journal for personal business, such as house and car repairs, and torecord medical and dental information for her family members. She felt it would be easiestto use separate Journal folders for these records—one for repairs and one for medicalrecords—so that they wouldn’t be mixed with her business journal. She created custom jour-nal entry types to use, enters detailed notes for each entry, and scans her receipts and insertsthem in the journal entry and has a complete record of the work done. When she needs theinformation, the records are easy to locate and contain all the information in one file. At theend of each year, Rebecca prints out copies the journal entries for home repairs and storesthem with her tax records. When it’s time to sell the house, she can easily answer buyer’squestions about repairs and use the same records to help calculate her capital gains.
18 0789729563 CH15.i 8/29/03 11:56 AM Page 378