Embed Size (px)
Citation preview

Symantec Technical White Paper Version 1.0 Released
WH
ITE
PA
PE
R: W
OR
KF
LO
W A
ND
SE
RV
ICE
DE
SK
: BA
CK
UP
A
ND
RE
ST
OR
E
A Process for Backup and
Restore of Workflow Projects
and ServiceDesk
Workflow 7.1 and ServiceDesk 7.1: Backup and Restore Steven Riley, Technical Field Enablement Workflow Solution and ServiceDesk

Table of Contents
Introduction ........................................................................................................................................................................... 3
What to Back Up? ............................................................................................................................................................. 4
Before a Backup Starts .................................................................................................. 4 Process Manager Database ................................................................................... 4 SymQ Messaging Bus ............................................................................................... 5 Symantec Workflow ................................................................................................... 5 Internet Information Services 7.5 ......................................................................... 6
Steps for a Successful Backup ................................................................................ 10 When to Restore?.......................................................................................................................................................... 13
Database Failure ........................................................................................................... 13 ServiceDesk IIS or Workflow Failure ..................................................................... 16
Additional Reading and References ......................................................................................................... 21
White Paper: Workflow and ServiceDesk - Backup and Restore
A Process for Backup and Restore of
Workflow Projects and ServiceDesk
Workflow 7.1 and ServiceDesk 7.1: Backup and Restore

White Paper: Workflow and ServiceDesk: Backup and Restore
Introduction This paper presents the details about which pieces of a workflow or ServiceDesk are important to back up
to ensure a successful restore. It is important to understand that a number of architectural components of
a workflow cannot be backed up while the system is in use. This limitation is due to the nature of the
product. This means that ServiceDesk, which is built on the Symantec Workflow product, cannot simply be
backed up and restored with 100% of the data correctly in place. The details regarding these limitations
are explained in the appropriate sections of this document.
For the purposes of this document, the following infrastructure diagram provides the context on which
backup and restore methods are based.
DIAGRAM 1: INFRASTRUCTURE DIAGRAM
This paper focuses primarily on ServiceDesk, Symantec Workflow, IIS7.5, and the Process Manager
database.
Note: This paper does not discuss or account for failure of Symantec Management Platform. It also does not offer details about specialized configurations or customizations of ServicDesk. The paper does address basic concepts about backing up Symantec Workflow.

White Paper: Workflow and ServiceDesk: Backup and Restore
What to Back Up?
The following sections present the areas of the server that you must consider when performing a backup.
These sections provide the information to minimize data loss within ServiceDesk or any workflow projects.
Before a Backup Starts The environment of Symantec Workflow and ServiceDesk, as stated earlier in this document, includes
several architectural components and subcomponents that you must consider when performing a backup,
as follows:
• ProcessManager. The process manager database is used by ServiceDesk and Symantec Workflow
projects.
• SymQ. This sub-component of Symantec Workflow provides a messaging bus architecture that is
leveraged by all Symantec Workflow projects (in one way or another). ServiceDesk also uses this
message bus.
• Symantec Workflow Server. This windows service is the core engine of Symantec Workflow;
therefore, it is also used by ServiceDesk.
• IIS 7.5. Each workflow project, when published, creates a virtual folder on the IIS Server;
therefore, each running workflow is served by the Microsoft World Wide Web services (w3wp)
process of IIS.
The following sections go into a little more detail around the specifics to consider before you back up the
database server and the Workflow or ServiceDesk server. It also provides some suggested methods for
minimizing data loss during the backup process.
Process Manager Database Microsoft SQL can use the following recovery models when performing a backup:
• Simple
• Full
• Bulk-logged
For performance reasons Symantec recommends that customers of Altiris products use a simple recovery
model.
The simple model is defined as follows:
Model Description Work loss exposure Recover to point in
time?
Simple No log backups
Changes since the most recent backup are
unprotected. In the event of a disaster, those
changes must be redone.
Can recover only to the
end of a backup.

White Paper: Workflow and ServiceDesk: Backup and Restore
The simple recovery model minimizes administrative overhead for the transaction log because the
transaction log is not backed up. However, the simple recovery model does create a work-loss exposure
risk if the database is damaged. For this reason the database should be located on a RAID 10 drive or
similarly configured drives to minimize exposure. Data is recoverable only to the most recent backup of
the lost data; therefore, a short backup interval should be put in place to prevent loss of significant
amounts of data.
Symantec recommends that you consider using Symantec NetBackup or Symantec Backup Exec,
depending on the specific needs of the environment.
Note: Just because a database backup has occurred, do not assume that all data has been collected to restore the Symantec Workflow project or ServiceDesk to its original state.
SymQ Messaging Bus The messaging bus within Symantec Workflow provides a robust mechanism for orchestrating data and
shuttling it through your environment A bus can point to files, memory, a database located on another
sever, or even to a NULL (empty) pointer.
The bus acts like a highway for data, and like any highway, there is a high probability of some traffic when
data travels between point A (the entry point) and point B (the exit point) at any given time.
In addition, you can modify this bus into numerous different configurations, so it is important to capture
the core configuration data of the message bus every time you perform a backup.
To capture the configuration details of SymQ for Symantec Workflow, always back up the following
directory:
• C:\Program Files\Symantec\Workflow\Data
Note: To minimize the amount of data that could be lost, ensure that you shut down the Web services and Symantec Workflow Server service before you perform this task. See the following sections for details.
Symantec Workflow The Symantec Workflow Service provides the core functionality to the Workflow engine. It ensures that
tasks are shuttled along within any particular workflow, such as writing task information in the database
and escalating events when a user does not respond in a timely manner. Because of the heavy processing
load that this service performs, you should shut it down so that it does not attempt to perform any specific
processing while the database or workflow messaging environment is being backed up.

White Paper: Workflow and ServiceDesk: Backup and Restore
Because the process flows rely on this service, when you shut it down some data will be left in SymQ. This
data may be lost during a restore because there is no way to ensure that it is flushed to the database;
however, only an insignificant amount of data should be lost.
Note: By shutting down the service, the amount of data loss that can occur is minimized as this prevents data being placed into the SymQ or being processed within the workflows themselves.
To verify that you have shut down the service, check Symantec Workflow Explorer. When you run Symantec Workflow Explorer, you see the following processes under the Current Running Processes menu selection:
When you shut down the Symantec Workflow Server service, the running processes completely disappear, indicating that no processing is occurring:
Internet Information Services 7.5 The core pieces of IIS that need to be considered are primarily the metadata that can be backed up using
the appcmd command, which is located in the following directory:
• C:\Windows\System32\inetsrv
To perform a backup run the following command from the C:\Windows\System32\inetsrv directory:
• %systemroot%\system32\inetsrv\APPCMD add backup The output will look like the following:
• BACKUP object "20110901T000430" added This will be located in the following directory:

White Paper: Workflow and ServiceDesk: Backup and Restore
• C:\Windows\System32\inetsrv\backup\20110901T000430 To list all backups run the following command:
• %systemroot%\system32\inetsrv\APPCMD list backups
To restore a backup run the following command:
• %systemroot%\system32\inetsrv\APPCMD restore backup "20110901T000430"
The following files are found in the directory located under %systemroot%\system32\inetsrv and are backed up by the APPCMD command:
• administration.config • applicationHost.config • MBSchema.xml • MetaBase.xml • redirection.config
Note: The Application Host Helper Service by default in IIS 7.5 performs backups of the Schema and Metabase. These backups are located in the History folder under the inetsrv directory. You can also run the �appcmd list backups� command to see all the backups.
Symantec recommends that you stop the “Default Web Site” to ensure that all user interaction on the site is completely inactive while the environment is backed up. Following is the list of the Virtual Web sites that must exist, if you are restoring a database. Ensure that all these sites exist, at a minimum. Web Site and Virtual Directory with File Locations localhost/W3SVC/1/ROOT = "C:\inetpub\wwwroot" localhost/W3SVC/1/ROOT/SymWebInclude = "C:\Program Files\Symantec\Workflow\Shared\scripts" localhost/W3SVC/1/ROOT/SymWorkflowPages = "C:\Program Files\Symantec\Workflow\Workflow Pages" localhost/W3SVC/1/ROOT/SD.ReopenIncident = "C:\Program Files\Symantec\Workflow\WorkflowDeploy\Release\SD.ReopenIncident" localhost/W3SVC/1/ROOT/SD.KnowledgeBaseSearch = "C:\Program Files\Symantec\Workflow\WorkflowDeploy\Release\SD.KnowledgeBaseSearch" localhost/W3SVC/1/ROOT/SD.EmailServices = "C:\Program Files\Symantec\Workflow\WorkflowDeploy\Release\SD.EmailServices" localhost/W3SVC/1/ROOT/SD.DataServices = "C:\Program Files\Symantec\Workflow\WorkflowDeploy\Release\SD.DataServices" localhost/W3SVC/1/ROOT/SD.CloseIncidents = "C:\Program Files\Symantec\Workflow\WorkflowDeploy\Release\SD.CloseIncidents" localhost/W3SVC/1/ROOT/SD.AssetViewProject = "C:\Program Files\Symantec\Workflow\WorkflowDeploy\Release\SD.AssetViewProject" localhost/W3SVC/1/ROOT/SD.AttachProcessToChange = "C:\Program Files\Symantec\Workflow\WorkflowDeploy\Release\SD.AttachProcessToChange" localhost/W3SVC/1/ROOT/SD.LoginFailureForm = "C:\Program Files\Symantec\Workflow\WorkflowDeploy\Release\SD.LoginFailureForm" localhost/W3SVC/1/ROOT/SD.RoutingRules = "C:\Program Files\Symantec\Workflow\WorkflowDeploy\Release\SD.RoutingRules" localhost/W3SVC/1/ROOT/SD.BulletinBoardEntry = "C:\Program Files\Symantec\Workflow\WorkflowDeploy\Release\SD.BulletinBoardEntry" localhost/W3SVC/1/ROOT/SD.IncidentEscalation = "C:\Program Files\Symantec\Workflow\WorkflowDeploy\Release\SD.IncidentEscalation" localhost/W3SVC/1/ROOT/SD.ManageRecurringChanges = "C:\Program Files\Symantec\Workflow\WorkflowDeploy\Release\SD.ManageRecurringChanges" localhost/W3SVC/1/ROOT/SD.IMRemoveFromHold = "C:\Program Files\Symantec\Workflow\WorkflowDeploy\Release\SD.IMRemoveFromHold" localhost/W3SVC/1/ROOT/SD.CreateChatTask = "C:\Program Files\Symantec\Workflow\WorkflowDeploy\Release\SD.CreateChatTask" localhost/W3SVC/1/ROOT/SD.NotifyGroupsOnArticleCreation = "C:\Program Files\Symantec\Workflow\WorkflowDeploy\Release\SD.NotifyGroupsOnArticleCreation" localhost/W3SVC/1/ROOT/SD.ProblemManagement = "C:\Program Files\Symantec\Workflow\WorkflowDeploy\Release\SD.ProblemManagement" localhost/W3SVC/1/ROOT/SD.IncidentManagement = "C:\Program Files\Symantec\Workflow\WorkflowDeploy\Release\SD.IncidentManagement" localhost/W3SVC/1/ROOT/SD.ChangeManagement = "C:\Program Files\Symantec\Workflow\WorkflowDeploy\Release\SD.ChangeManagement" localhost/W3SVC/1/ROOT/SD.KBSubmission = "C:\Program Files\Symantec\Workflow\WorkflowDeploy\Release\SD.KBSubmission"
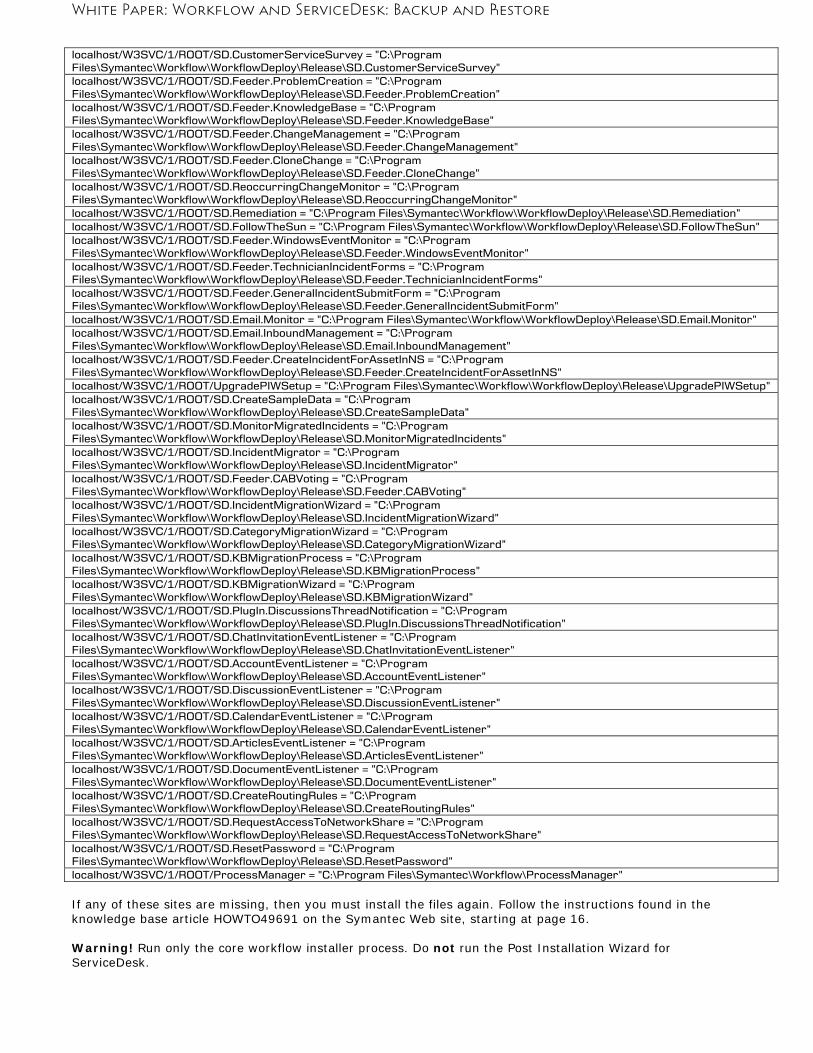
White Paper: Workflow and ServiceDesk: Backup and Restore
localhost/W3SVC/1/ROOT/SD.CustomerServiceSurvey = "C:\Program Files\Symantec\Workflow\WorkflowDeploy\Release\SD.CustomerServiceSurvey" localhost/W3SVC/1/ROOT/SD.Feeder.ProblemCreation = "C:\Program Files\Symantec\Workflow\WorkflowDeploy\Release\SD.Feeder.ProblemCreation" localhost/W3SVC/1/ROOT/SD.Feeder.KnowledgeBase = "C:\Program Files\Symantec\Workflow\WorkflowDeploy\Release\SD.Feeder.KnowledgeBase" localhost/W3SVC/1/ROOT/SD.Feeder.ChangeManagement = "C:\Program Files\Symantec\Workflow\WorkflowDeploy\Release\SD.Feeder.ChangeManagement" localhost/W3SVC/1/ROOT/SD.Feeder.CloneChange = "C:\Program Files\Symantec\Workflow\WorkflowDeploy\Release\SD.Feeder.CloneChange" localhost/W3SVC/1/ROOT/SD.ReoccurringChangeMonitor = "C:\Program Files\Symantec\Workflow\WorkflowDeploy\Release\SD.ReoccurringChangeMonitor" localhost/W3SVC/1/ROOT/SD.Remediation = "C:\Program Files\Symantec\Workflow\WorkflowDeploy\Release\SD.Remediation" localhost/W3SVC/1/ROOT/SD.FollowTheSun = "C:\Program Files\Symantec\Workflow\WorkflowDeploy\Release\SD.FollowTheSun" localhost/W3SVC/1/ROOT/SD.Feeder.WindowsEventMonitor = "C:\Program Files\Symantec\Workflow\WorkflowDeploy\Release\SD.Feeder.WindowsEventMonitor" localhost/W3SVC/1/ROOT/SD.Feeder.TechnicianIncidentForms = "C:\Program Files\Symantec\Workflow\WorkflowDeploy\Release\SD.Feeder.TechnicianIncidentForms" localhost/W3SVC/1/ROOT/SD.Feeder.GeneralIncidentSubmitForm = "C:\Program Files\Symantec\Workflow\WorkflowDeploy\Release\SD.Feeder.GeneralIncidentSubmitForm" localhost/W3SVC/1/ROOT/SD.Email.Monitor = "C:\Program Files\Symantec\Workflow\WorkflowDeploy\Release\SD.Email.Monitor" localhost/W3SVC/1/ROOT/SD.Email.InboundManagement = "C:\Program Files\Symantec\Workflow\WorkflowDeploy\Release\SD.Email.InboundManagement" localhost/W3SVC/1/ROOT/SD.Feeder.CreateIncidentForAssetInNS = "C:\Program Files\Symantec\Workflow\WorkflowDeploy\Release\SD.Feeder.CreateIncidentForAssetInNS" localhost/W3SVC/1/ROOT/UpgradePIWSetup = "C:\Program Files\Symantec\Workflow\WorkflowDeploy\Release\UpgradePIWSetup" localhost/W3SVC/1/ROOT/SD.CreateSampleData = "C:\Program Files\Symantec\Workflow\WorkflowDeploy\Release\SD.CreateSampleData" localhost/W3SVC/1/ROOT/SD.MonitorMigratedIncidents = "C:\Program Files\Symantec\Workflow\WorkflowDeploy\Release\SD.MonitorMigratedIncidents" localhost/W3SVC/1/ROOT/SD.IncidentMigrator = "C:\Program Files\Symantec\Workflow\WorkflowDeploy\Release\SD.IncidentMigrator" localhost/W3SVC/1/ROOT/SD.Feeder.CABVoting = "C:\Program Files\Symantec\Workflow\WorkflowDeploy\Release\SD.Feeder.CABVoting" localhost/W3SVC/1/ROOT/SD.IncidentMigrationWizard = "C:\Program Files\Symantec\Workflow\WorkflowDeploy\Release\SD.IncidentMigrationWizard" localhost/W3SVC/1/ROOT/SD.CategoryMigrationWizard = "C:\Program Files\Symantec\Workflow\WorkflowDeploy\Release\SD.CategoryMigrationWizard" localhost/W3SVC/1/ROOT/SD.KBMigrationProcess = "C:\Program Files\Symantec\Workflow\WorkflowDeploy\Release\SD.KBMigrationProcess" localhost/W3SVC/1/ROOT/SD.KBMigrationWizard = "C:\Program Files\Symantec\Workflow\WorkflowDeploy\Release\SD.KBMigrationWizard" localhost/W3SVC/1/ROOT/SD.PlugIn.DiscussionsThreadNotification = "C:\Program Files\Symantec\Workflow\WorkflowDeploy\Release\SD.PlugIn.DiscussionsThreadNotification" localhost/W3SVC/1/ROOT/SD.ChatInvitationEventListener = "C:\Program Files\Symantec\Workflow\WorkflowDeploy\Release\SD.ChatInvitationEventListener" localhost/W3SVC/1/ROOT/SD.AccountEventListener = "C:\Program Files\Symantec\Workflow\WorkflowDeploy\Release\SD.AccountEventListener" localhost/W3SVC/1/ROOT/SD.DiscussionEventListener = "C:\Program Files\Symantec\Workflow\WorkflowDeploy\Release\SD.DiscussionEventListener" localhost/W3SVC/1/ROOT/SD.CalendarEventListener = "C:\Program Files\Symantec\Workflow\WorkflowDeploy\Release\SD.CalendarEventListener" localhost/W3SVC/1/ROOT/SD.ArticlesEventListener = "C:\Program Files\Symantec\Workflow\WorkflowDeploy\Release\SD.ArticlesEventListener" localhost/W3SVC/1/ROOT/SD.DocumentEventListener = "C:\Program Files\Symantec\Workflow\WorkflowDeploy\Release\SD.DocumentEventListener" localhost/W3SVC/1/ROOT/SD.CreateRoutingRules = "C:\Program Files\Symantec\Workflow\WorkflowDeploy\Release\SD.CreateRoutingRules" localhost/W3SVC/1/ROOT/SD.RequestAccessToNetworkShare = "C:\Program Files\Symantec\Workflow\WorkflowDeploy\Release\SD.RequestAccessToNetworkShare" localhost/W3SVC/1/ROOT/SD.ResetPassword = "C:\Program Files\Symantec\Workflow\WorkflowDeploy\Release\SD.ResetPassword" localhost/W3SVC/1/ROOT/ProcessManager = "C:\Program Files\Symantec\Workflow\ProcessManager"
If any of these sites are missing, then you must install the files again. Follow the instructions found in the knowledge base article HOWTO49691 on the Symantec Web site, starting at page 16. Warning! Run only the core workflow installer process. Do not run the Post Installation Wizard for ServiceDesk.

White Paper: Workflow and ServiceDesk: Backup and Restore
You can use the following script to generate the above information on your local IIS server. To generate the information, create a file called enumvdirs.cmd and copy the following information into the file: REM------------------------START OF CODE------------------------- @IF NOT DEFINED _ECHO ECHO OFF SETLOCAL SET CMD_ADSUTIL=CSCRIPT.EXE //Nologo %SYSTEMDRIVE%\Inetpub\Adminscripts\ADSUTIL.VBS SET PROPERTY_TO_FIND=Path SET SERVERS="%1" IF ?%1? EQU ?? SET SERVERS="%COMPUTERNAME%" IF EXIST %SERVERS% SET SERVERS=%SERVERS:~1,-1% SET NEED_HELP=%SERVERS:?=% IF /I "%NEED_HELP%" NEQ "%SERVERS%" GOTO :Help FOR /F %%A IN ( %SERVERS% ) DO ( FOR /F "usebackq skip=1 tokens=*" %%I IN ( `%CMD_ADSUTIL% FIND %PROPERTY_TO_FIND% -s:%%A` ) DO ( FOR /F "usebackq tokens=3,*" %%J IN ( `%CMD_ADSUTIL% GET %%I/%PROPERTY_TO_FIND% -s:%%A` ) DO ( ECHO %%A/%%I = %%K ) ) ) ENDLOCAL GOTO :EOF :Help ECHO %0 [servername ^| file-list] ECHO. ECHO Where: ECHO servername is the name of the server to query. %COMPUTERNAME% by default ECHO file-list is filepath to text file containing list of servers, one per line GOTO :EOF REM------------------------END OF CODE------------------------- Once you have created the command file with the above code in it, execute the file using the following syntax:
• enumvdirs localhost > SD.VirtualDirs.txt Executing this command creates a TXT file called SD.VirtualDirs.txt that is 7,249 bytes in size if only ServiceDesk is installed on the machine you’re using. Study the output and ensure at a minimum that the information exists before you attempt a restore of any data in the environment.
Note: If you have installed or created workflows of your own, you will see them listed when you run this command. If you need to rebuild your environment you must republish any workflows that you have created.
REMEMBER that any customizations you have done within ServiceDesk will be lost if you run through the ServiceDesk installation process again. To restore custom data, you must create a backup of the directory path of all listed flows located through the above script so that you can restore them after the ServiceDesk installation process is finished.

White Paper: Workflow and ServiceDesk: Backup and Restore
Steps for a Successful Backup Following are recommended steps to perform a backup of your ServiceDesk environment and any
workflow projects you may have.
1. Shut down the “Symantec Workflow Server” service.
o Start the Microsoft Management Console
o Open “Services (Local)”
o Locate the “Symantec Workflow Server” service
o Click on “Stop the service”
2. Stop the “Default Web Site.”
o Start “Internet Information Services (IIS) Manager”
o Locate the “Default Web Site”
o Highlight the website
o Click on “Stop”
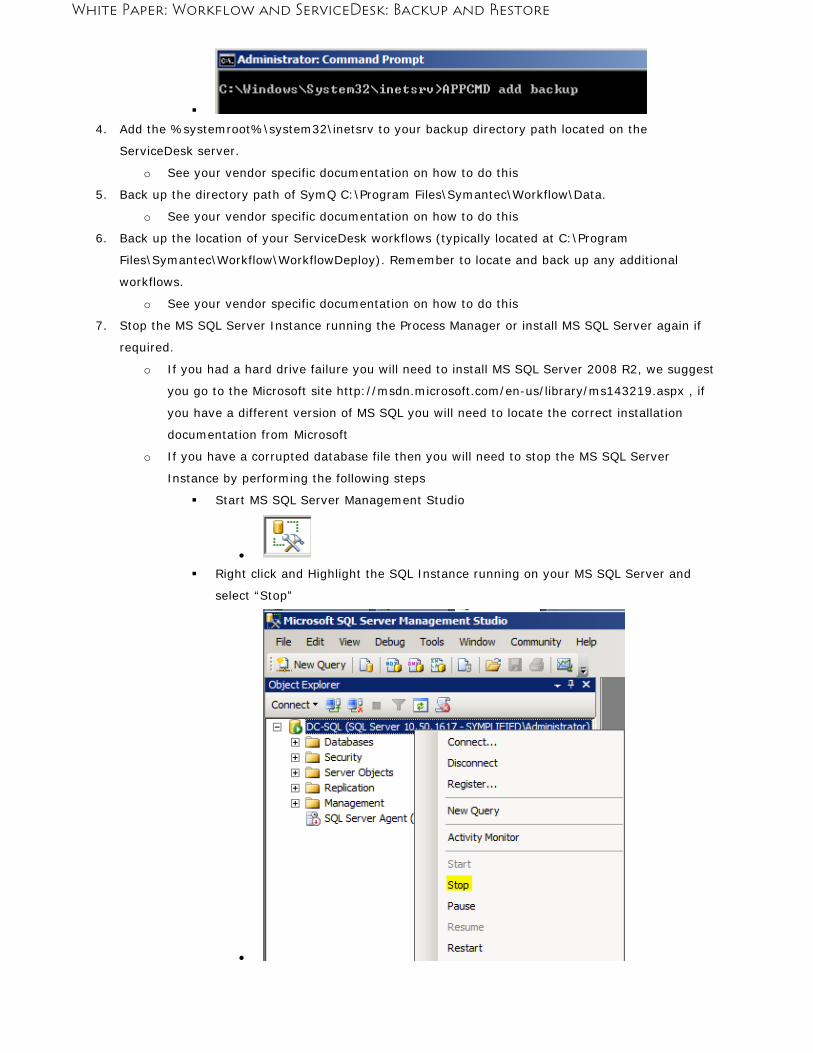
3. Run “%systemroot%\system32\inetsrv\APPCMD add backup” to ensure that you have a current
backup of the metabase.
4. Add the %systemroot%\system32\inetsrv to your backup directory path located on the
ServiceDesk server.

White Paper: Workflow and ServiceDesk: Backup and Restore
o See your vendor specific documentation on how to do this
5. Back up the directory path of SymQ C:\Program Files\Symantec\Workflow\Data.
o See your vendor specific documentation on how to do this
6. Back up the location of your ServiceDesk workflows (typically located at C:\Program
Files\Symantec\Workflow\WorkflowDeploy). Remember to locate and back up any additional
workflows.
o See your vendor specific documentation on how to do this
7. Now take a backup of the ProcessManager database located on the MS SQL Server.
o The database files can be located by looking at the properties of the database
“ProcessManager” from within the MS SQL Server Management Studio
o See your vendor specific documentation on how to do this
8. Start the “Default Web Site.”
o Start “Internet Information Services (IIS) Manager”
o Locate the “Default Web Site”
o Highlight the website
o Click on “Start”
9. Start the “Symantec Workflow Server” service.
o Start the Microsoft Management Console
o Open “Services (Local)”

White Paper: Workflow and ServiceDesk: Backup and Restore
o Locate the “Symantec Workflow Server” service
o Click on “Restart the service”

White Paper: Workflow and ServiceDesk: Backup and Restore
When to Restore? The restore process can be a little more complex and time consuming depending on what has actually
failed in your environment. The following section outlines common scenarios with appropriate steps to
follow to assist with a successful restoration. Remember that a small amount of data will more than likely
be lost as described in the Backup section of this paper.
Database Failure In the event that the Process Manager database has been corrupted—either through application error or
hard drive failure—use the following steps to perform the restoration:
1. On the ServiceDesk server, shut down the “Symantec Workflow Server” service.
o Start the Microsoft Management Console
o Open “Services (Local)”
o Locate the “Symantec Workflow Server” service
o Click on “Stop the service”
2. On the ServiceDesk server, stop the “Default Web Site.”
o Start “Internet Information Services (IIS) Manager”
o Locate the “Default Web Site”
o Highlight the website
o Click on “Stop”
3. Run “%systemroot%\system32\inetsrv\APPCMD add backup” to ensure you have a current backup
of the metabase.
White Paper: Workflow and ServiceDesk: Backup and Restore
4. Add the %systemroot%\system32\inetsrv to your backup directory path located on the
ServiceDesk server.
o See your vendor specific documentation on how to do this
5. Back up the directory path of SymQ C:\Program Files\Symantec\Workflow\Data.
o See your vendor specific documentation on how to do this
6. Back up the location of your ServiceDesk workflows (typically located at C:\Program
Files\Symantec\Workflow\WorkflowDeploy). Remember to locate and back up any additional
workflows.
o See your vendor specific documentation on how to do this
7. Stop the MS SQL Server Instance running the Process Manager or install MS SQL Server again if
required.
o If you had a hard drive failure you will need to install MS SQL Server 2008 R2, we suggest
you go to the Microsoft site http://msdn.microsoft.com/en-us/library/ms143219.aspx , if
you have a different version of MS SQL you will need to locate the correct installation
documentation from Microsoft
o If you have a corrupted database file then you will need to stop the MS SQL Server
Instance by performing the following steps
Start MS SQL Server Management Studio
•
Right click and Highlight the SQL Instance running on your MS SQL Server and
select “Stop”
•

White Paper: Workflow and ServiceDesk: Backup and Restore
10. Restore the ProcessManager MDF and LDF files.
o You should have located these files through the MS SQL Server Management Studio as
indicated in the backup section of this paper, following is the example
8. Start the MS SQL Server Instance and ensure that the database can be accessed and is attached.
o Start MS SQL Server Management Studio
o Right click and Highlight the SQL Instance running on your MS SQL Server and select
“Start”
9. Restore the directory path of SymQ C:\Program Files\Symantec\Workflow\Data from your backup
media.
o See your vendor specific documentation on how to do this
10. On the ServiceDesk server start the “Default Web Site.”
o Start “Internet Information Services (IIS) Manager”
o Locate the “Default Web Site”
o Highlight the website

White Paper: Workflow and ServiceDesk: Backup and Restore
o Click on “Start”
11. On the ServiceDesk server start the “Symantec Workflow Server” service.
o Start the Microsoft Management Console
o Open “Services (Local)”
o Locate the “Symantec Workflow Server” service
o Click on “Restart the service”
ServiceDesk IIS or Workflow Failure In the event that your ServiceDesk server fails (either data disks or the whole operating system), you will need to run a base installation process.
In this case, we assume that the operating system is functioning and that IIS 7.5 Web Services have been installed and started again.
Perform the following restoration steps to get your ServiceDesk or Workflow up and running again:
1. Back up the current ProcessManager database; you will need this later in your restore process. See the section on Steps for a Successful Backup.
o You should have located these files through the MS SQL Server Management Studio as
indicated in the backup section of this paper, following is the example

White Paper: Workflow and ServiceDesk: Backup and Restore
2. Detach the ProcessManager database and move it to a backup location on the disk.
o To detach a database start the MS SQL Server Management Studio
o Right click and Highlight the “ProcessManager“ database and select Tasks and Detach
o You should have located these files through the MS SQL Server Management Studio as
indicated in the backup section of this paper, following is the example
o Store the LDF and MDF file in a location on your server hard drove so you can easily
accessible so that you can restore them later.
3. Perform a NEW Install of ServiceDesk.

White Paper: Workflow and ServiceDesk: Backup and Restore
o Follow the Knowledge Base Article HOWTO49691 to install ServiceDesk
4. On the ServiceDesk server shut down the “Symantec Workflow Server” service.
o Start the Microsoft Management Console
o Open “Services (Local)”
o Locate the “Symantec Workflow Server” service
o Click on “Stop the service”
5. Stop the “WWW Services” on the ServiceDesk server.
o Start the Microsoft Management Console
o Open “Services (Local)”
o Locate the “World Wide Web Publishing Service” service
o Click on “Stop the service”
6. Delete the newly created ProcessManager database on the SQL Server.
o To delete a database start the MS SQL Server Management Studio
o Right click and Highlight the “ProcessManager“ database and select Delete

White Paper: Workflow and ServiceDesk: Backup and Restore
7. Copy the original ProcessManager database back onto the SQL Server.
o See step 2 above, copy the LDF and MDF files to the original location.
o You should have located these files through the MS SQL Server Management Studio as
indicated in the backup section of this paper, following is the example location.
8. Attached the original ProcessManager database on the SQL Server.
o To detach a database start the MS SQL Server Management Studio
o Right click and Highlight the “Databases“ folder and select Attach
o Click Add and locate the ProcessManager MDF and LDF files and then click OK to attach
the files again.
9. Restore the directory “%systemroot%\system32\inetsrv” from your backup media
o See your vendor specific documentation on how to do this
10. Restore the SymQ directory “C:\Program Files\Symantec\Workflow\Data” from your backup media
o See your vendor specific documentation on how to do this
11. Restore your ServiceDesk workflows from your backup media to C:\Program
Files\Symantec\Workflow\WorkflowDeploy. You will overwrite some content here, which is
expected. This action should restore any original ServiceDesk changes you made to your system
as they were before the failure.
12. Start the “WWW Services” on the ServiceDesk server.

White Paper: Workflow and ServiceDesk: Backup and Restore
o Start the Microsoft Management Console
o Open “Services (Local)”
o Locate the “World Wide Web Publishing Service” service
o Click on “Restart the service”
13. On the ServiceDesk server start the “Symantec Workflow Server” service.
o Start the Microsoft Management Console
o Open “Services (Local)”
o Locate the “Symantec Workflow Server” service
o Click on “Restart the service”

White Paper: Workflow and ServiceDesk: Backup and Restore
Summary
The process of backing up ServiceDesk and custom workflows is relatively easy. The complexity is in the
restoration process and the fact that you cannot capture all data because of the inherent workflow
architecture with the message bus. Due to this constraint, Symantec recommends that you use a
clustered MS SQL environment with appropriate failover along with fault-tolerant hardware for the
ServiceDesk. Using such an environment minimizes the total impact of an outage.
Additional Reading and References Symantec Backup: https://www-secure.symantec.com/business/index.jsp
Installing or Upgrading
ServiceDesk:http://www.symantec.com/business/support/index?page=content&id=HOWTO49691

White Paper: Workflow and ServiceDesk: Backup and Restore
For specific country offices and contact numbers, please visit our Web site. For product information in the U.S., call toll-free 1 (800) 745 6054.
Symantec CorporationWorld Headquarters 20330 Stevens Creek Boulevard Cupertino, CA 95014 USA +1 (408) 517 8000 +1 (800) 721 3934 www.symantec.com
Copyright � 2011 Symantec Corporation. All rights reserved. Symantec and the Symantec logo are trademarks or registered trademarks of Symantec Corporation or its affiliates in the U.S. and other countries. Other names may be trademarks of their respective owners.
About Symantec
Symantec is a global leader in providing security, storage and systems management solutions to help
businesses and consumers secure and manage their information. Headquartered in Cupertino, Calif.,
Symantec has operations in 40 countries. More information is available at www.symantec.com .