Embed Size (px)
Citation preview
Swift Water Rescue Techniques
Pedernales Fire Department
February 21, 2012
Post 8
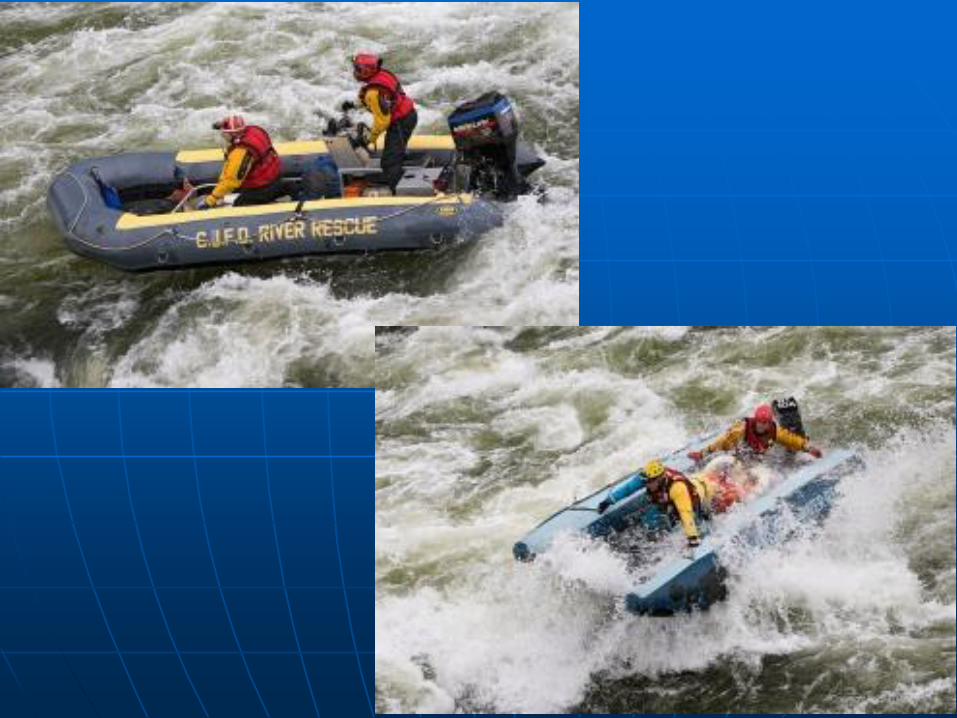
• Swiftwater rescue is one of the most dangerous of all technical rescue operations performed by fire-rescue teams.
• Nearly half of all deaths in swift water are would-be rescuers, including Good Samaritans. By endangering your life, you are also endangering the lives of others.
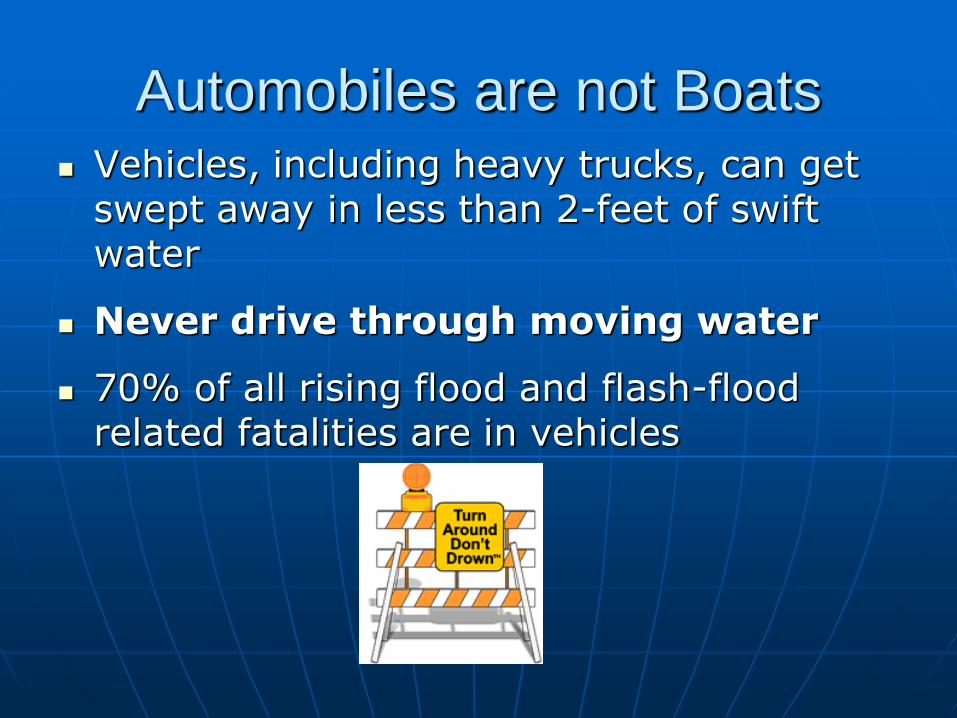
Automobiles are not Boats Vehicles, including heavy trucks, can get
swept away in less than 2-feet of swift water
Never drive through moving water
70% of all rising flood and flash-flood related fatalities are in vehicles
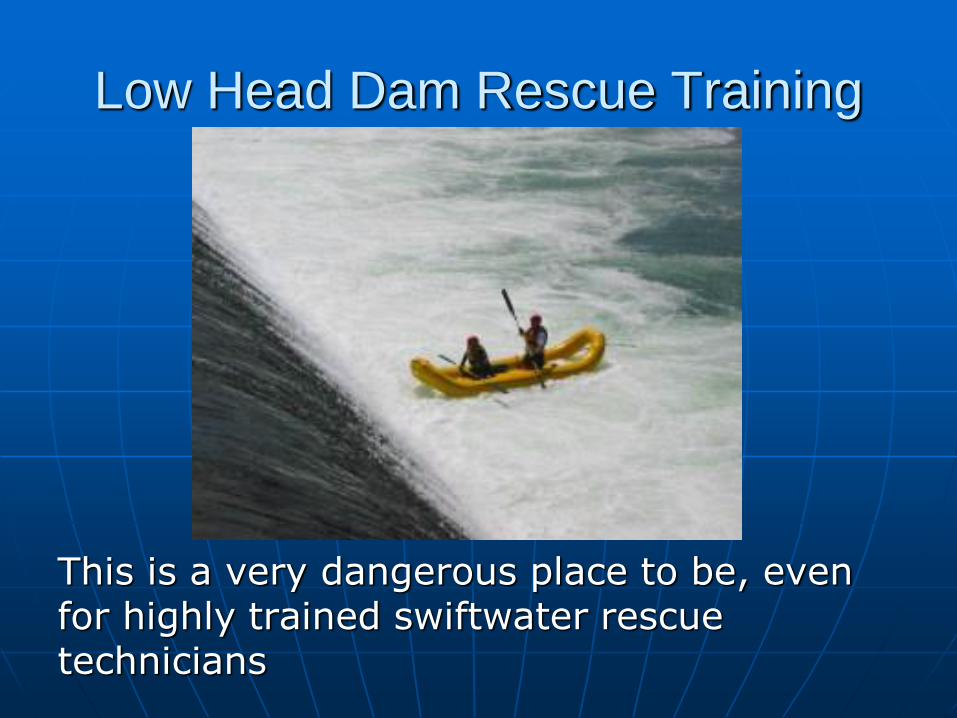
Low Head Dam Rescue Training
This is a very dangerous place to be, even for highly trained swiftwater rescue technicians
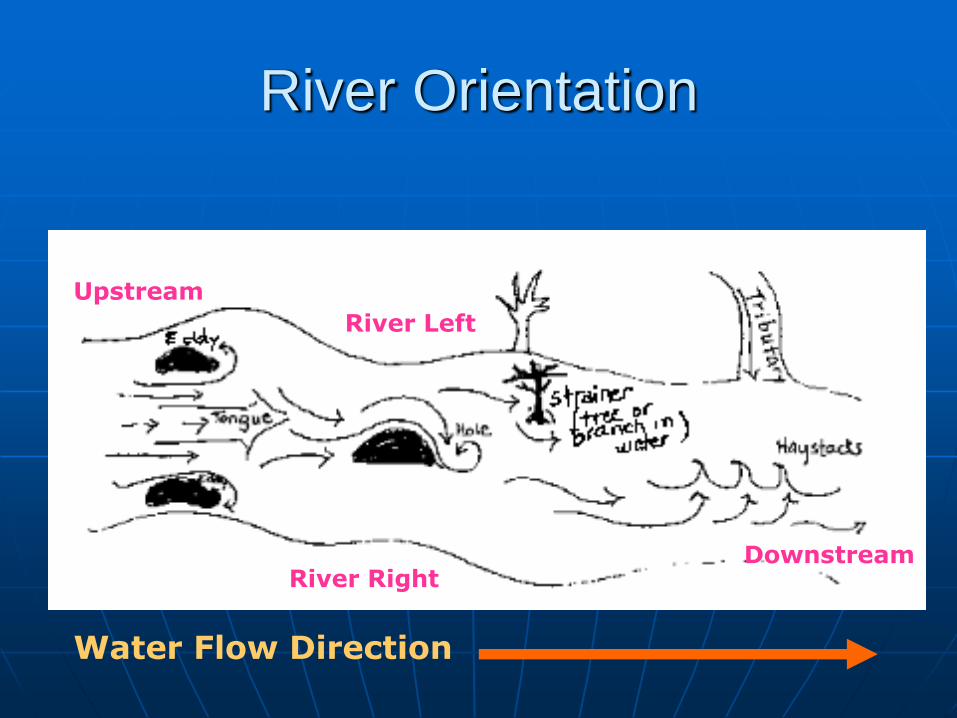
River Orientation
River Left
River Right Downstream
Upstream
Water Flow Direction
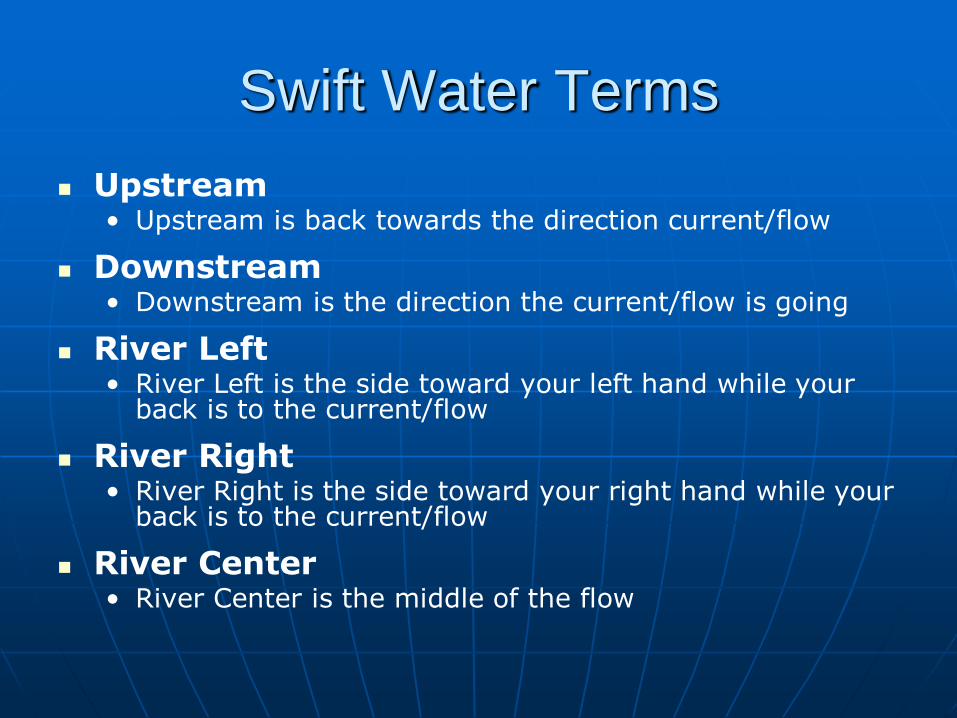
Swift Water Terms
Upstream • Upstream is back towards the direction current/flow
Downstream • Downstream is the direction the current/flow is going
River Left • River Left is the side toward your left hand while your
back is to the current/flow
River Right • River Right is the side toward your right hand while your
back is to the current/flow
River Center • River Center is the middle of the flow
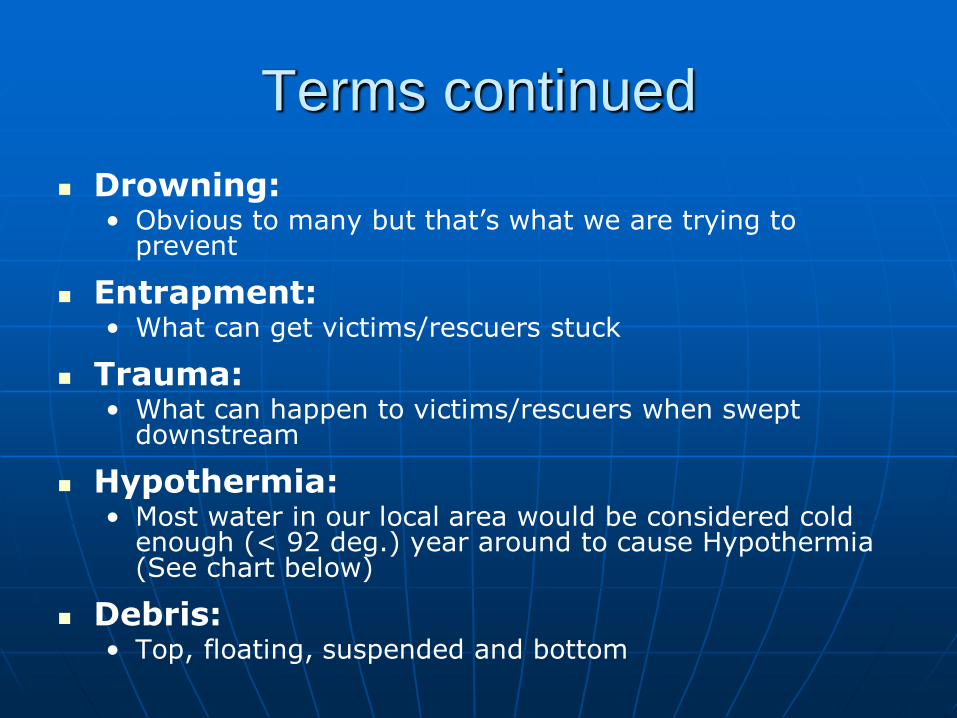
Terms continued
Drowning: • Obvious to many but that’s what we are trying to
prevent
Entrapment: • What can get victims/rescuers stuck
Trauma: • What can happen to victims/rescuers when swept
downstream
Hypothermia: • Most water in our local area would be considered cold
enough (< 92 deg.) year around to cause Hypothermia (See chart below)
Debris: • Top, floating, suspended and bottom
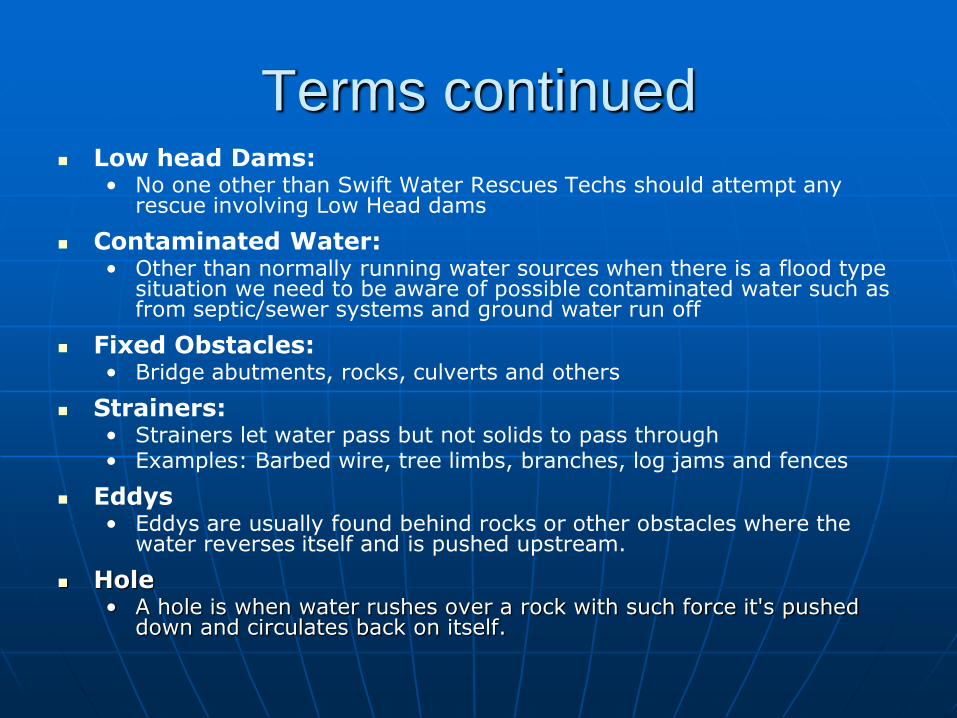
Terms continued Low head Dams:
• No one other than Swift Water Rescues Techs should attempt any rescue involving Low Head dams
Contaminated Water: • Other than normally running water sources when there is a flood type
situation we need to be aware of possible contaminated water such as from septic/sewer systems and ground water run off
Fixed Obstacles: • Bridge abutments, rocks, culverts and others
Strainers: • Strainers let water pass but not solids to pass through • Examples: Barbed wire, tree limbs, branches, log jams and fences
Eddys • Eddys are usually found behind rocks or other obstacles where the
water reverses itself and is pushed upstream.
Hole • A hole is when water rushes over a rock with such force it's pushed
down and circulates back on itself.
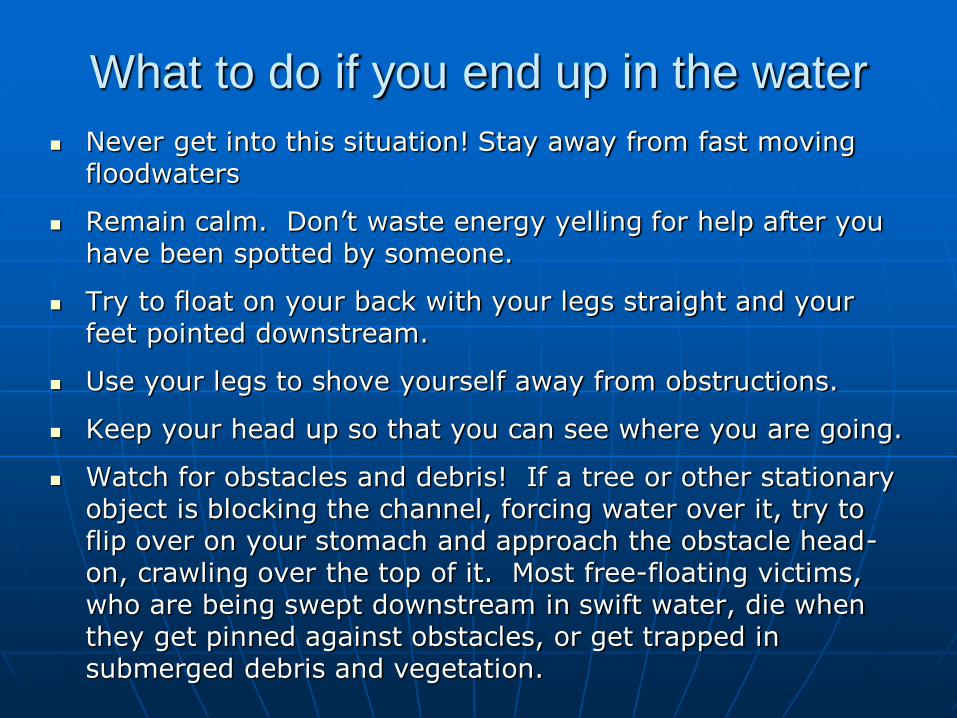
What to do if you end up in the water
Never get into this situation! Stay away from fast moving floodwaters
Remain calm. Don’t waste energy yelling for help after you have been spotted by someone.
Try to float on your back with your legs straight and your feet pointed downstream.
Use your legs to shove yourself away from obstructions.
Keep your head up so that you can see where you are going.
Watch for obstacles and debris! If a tree or other stationary object is blocking the channel, forcing water over it, try to flip over on your stomach and approach the obstacle head-on, crawling over the top of it. Most free-floating victims, who are being swept downstream in swift water, die when they get pinned against obstacles, or get trapped in submerged debris and vegetation.
Be Prepared!
All Department members need to prepare themselves for the possibility of responding to an incident that may involve swift water rescue.
Swift water rescue can be both challenging and dangerous, requiring skill, timing and teamwork in order to be effective.
Remember the time to prepare is now. When we are faced with only minutes to deploy our resources, we must have a well thought out plan to be able to implement an effective rescue with a minimal amount of risk to the first responder.
Be Prepared! continued
During inclement weather, make sure that the swift water rescue equipment on the apparatus in an area that is easily accessible.
Make certain that members have non-skid sole/shoes, or tennis shoes readily available in case they will be working around the water’s edge.
Personal flotation devices and swift water helmets should also be in a position where they can be quickly donned.
Rope throw bags and rescue equipment should be pre-rigged and ready for immediate deployment.

PFD Swift Water SOG
First arriving Company Officers will only initiate water rescue operations after a thorough risk/ benefits analysis
A water rescue should not be undertaken unless victim’s lives are in immediate peril or conditions are rapidly deteriorating

Operations-Level Water Rescue Equipment
Each PFD apparatus will maintain the following specialized water rescue equipment:
• One PFD (personal flotation device) and a swift water rescue helmet for each assigned firefighter riding on the unit
• At least one additional PFD (personal floatation device) for use by a victim.
• Two water rescue throw bags
When Dispatched…
All companies are reminded that during inclement weather, response times may be increased due to associated problems.
The “average” response time to a rescue site for deployment is approximately seven minutes, with an additional three and a half minutes to set-up for a rescue operation.
Arriving on Scene
Size-up – Situation Assessment: • swift water
• water evacuation
• report of persons in water
Risk / benefits analysis: • Life safety issues (victim and firefighters)
• Risks of initiating rescue operation versus delaying until arrival of trained special operations resources
Formulate incident action plan: • control scene
• ensure personnel safety
• initiate rescue
Rescue Operations
Ensure all personnel are equipped and wearing PFD and swift water rescue helmet
Emergency personnel on the scene of a swift water rescue incident shall not wear bunker gear
Establish hot zone – keep personnel and citizens away from water’s edge (minimum 15’)
Assign a Safety Officer.
Position personnel with throw bags, downstream, as back-up safeties should personnel or citizens be swept downstream
Position personnel upstream as spotters to notify of debris moving downstream or any other significant information that could impact downstream rescue operations.
Rescue Operations – Point Last Seen
Determine the speed of the flowing water by the use of an in-water visual indicator. (half filled wet water bottle with fire-line tape tail)
Question witnesses regarding the incident and the victim(s) that may be in the water. The information that will be needed includes: • Number of victims in the water • Age of victim(s) • Time in the water • Type/color of clothing • Swimming ability of victim(s)
Search the immediate area for victim(s)
Relay information downstream to other rescuers
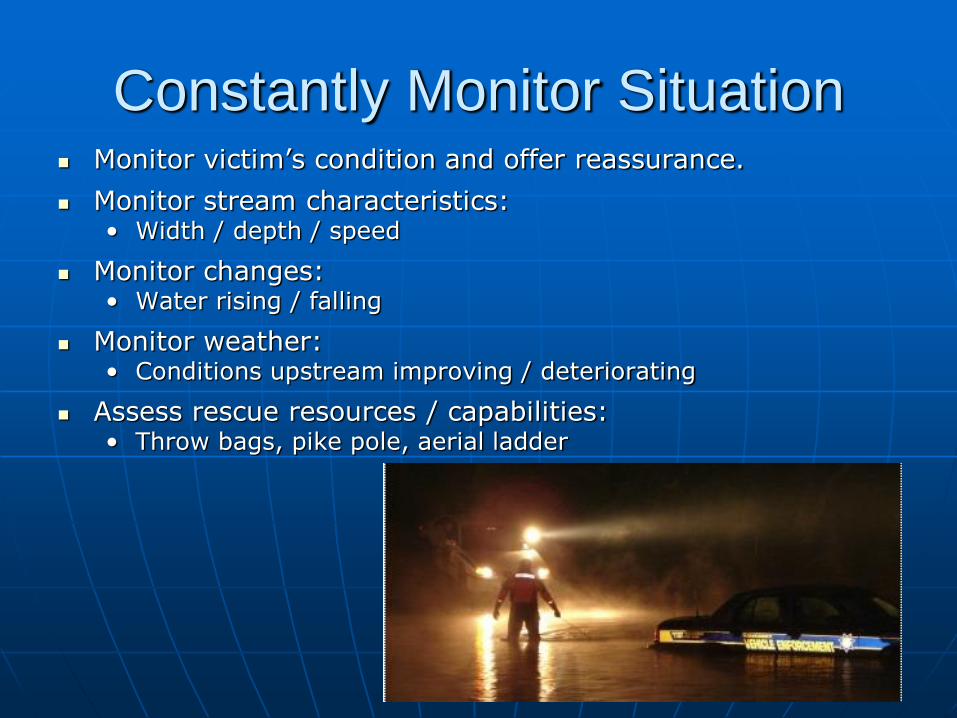
Constantly Monitor Situation Monitor victim’s condition and offer reassurance.
Monitor stream characteristics: • Width / depth / speed
Monitor changes: • Water rising / falling
Monitor weather: • Conditions upstream improving / deteriorating
Assess rescue resources / capabilities: • Throw bags, pike pole, aerial ladder
Rescue Operations continued
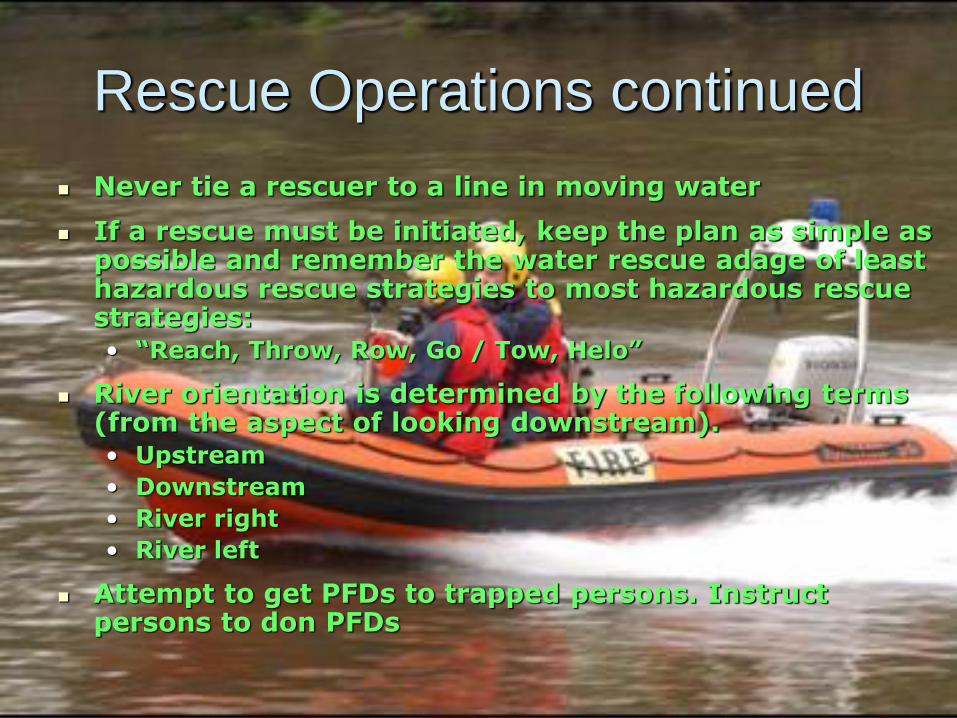
Never tie a rescuer to a line in moving water
If a rescue must be initiated, keep the plan as simple as possible and remember the water rescue adage of least hazardous rescue strategies to most hazardous rescue strategies: • “Reach, Throw, Row, Go / Tow, Helo”
River orientation is determined by the following terms (from the aspect of looking downstream). • Upstream
• Downstream
• River right
• River left
Attempt to get PFDs to trapped persons. Instruct persons to don PFDs
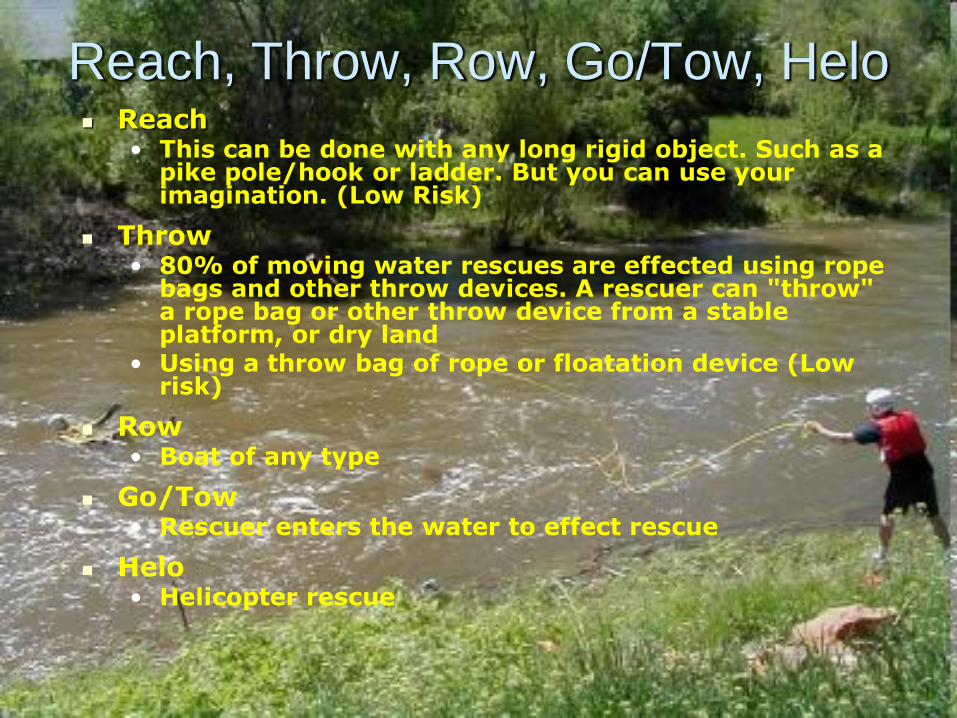
Reach, Throw, Row, Go/Tow, Helo Reach
• This can be done with any long rigid object. Such as a pike pole/hook or ladder. But you can use your imagination. (Low Risk)
Throw • 80% of moving water rescues are effected using rope
bags and other throw devices. A rescuer can "throw" a rope bag or other throw device from a stable platform, or dry land
• Using a throw bag of rope or floatation device (Low risk)
Row • Boat of any type
Go/Tow • Rescuer enters the water to effect rescue
Helo • Helicopter rescue
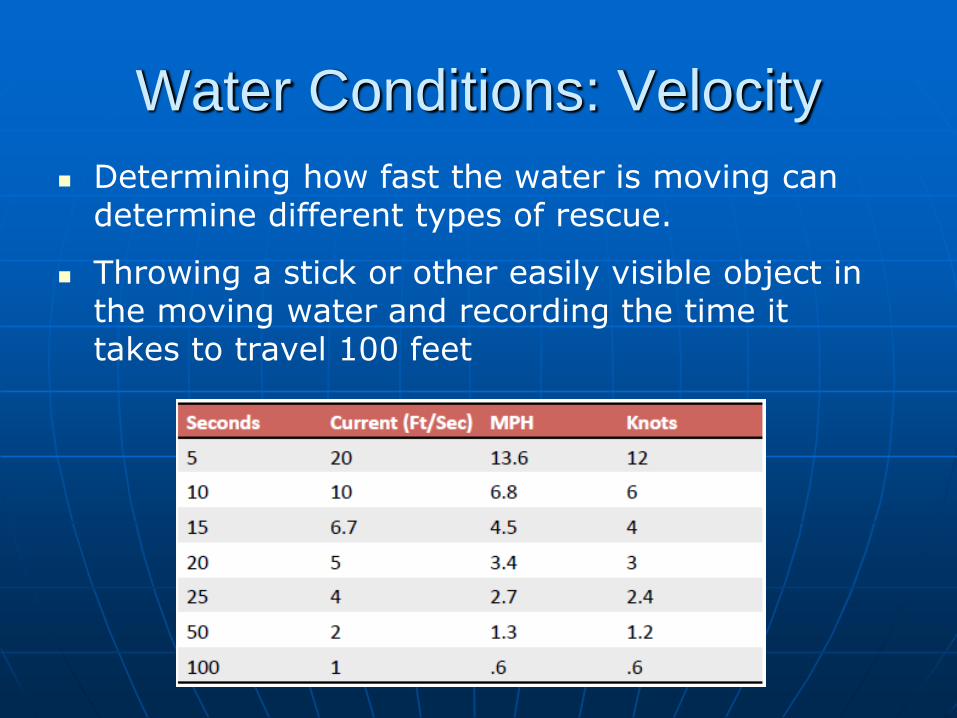
Water Conditions: Velocity
Determining how fast the water is moving can determine different types of rescue.
Throwing a stick or other easily visible object in the moving water and recording the time it takes to travel 100 feet
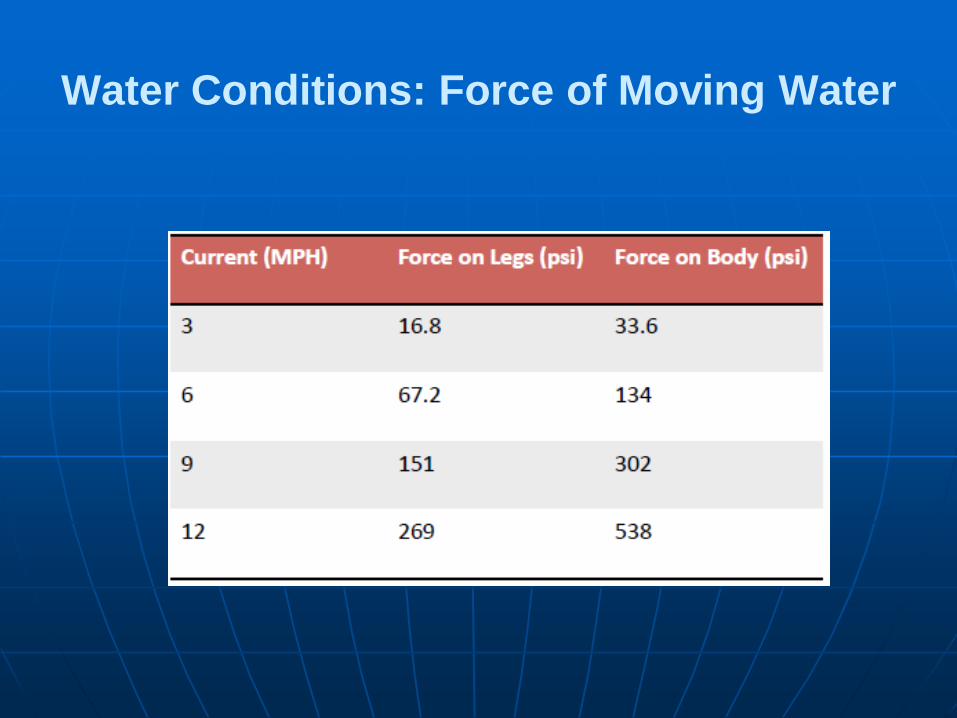
Water Conditions: Force of Moving Water

Water Conditions: Temperature
This chart does not distinguish between moving (dynamic) and still (static) water. But remember the following, A person suddenly immersed in cold water, especially that colder than 50 F, even if unhurt, immediately begins to suffer life threatening problems. Most of the winter local water temperatures average 50 F to 60 F
Questions?


![7.1 Swift Water Rescue Awareness [Read-Only]btutraining.org/images/SwiftWaterAwareness/Swift Water Rescue... · SL 3 Background • 1980 - Los Angeles – Man trying to save boy in](https://img.pdfslide.net/doc/110x75/5ab5504b7f8b9a2f438c667c/71-swift-water-rescue-awareness-read-only-water-rescuesl-3-background-.jpg)