Embed Size (px)
Citation preview
Instructions for Use
Prevista Dry urinal elementtelescopic
for urinal flush plates for Prevista
Model Year built (from)8560 03/2019
INT
Table of contents
1 About these instructions for use 3
1.1 Target groups 31.2 Labelling of notes 31.3 About this translated version 4
2 Product information 5
2.1 Standards and regulations 52.2 Intended use 5
2.2.1 Areas of use 5
2.3 Product description 52.3.1 Overview 52.3.2 Compatible components 62.3.3 Technical data 6
2.4 Accessories 7
3 Handling 8
3.1 Assembly information 83.1.1 Mounting conditions 83.1.2 Installation dimensions 9
3.2 Assembly 93.2.1 Mounting the element 93.2.2 Mounting the water connection 153.2.3 Set and clad the element 16
3.3 Disposal 18
Table of contents
Prevista Dry urinal element telescopic 2

1 About these instructions for use
Trade mark rights exist for this document; for further information, go toviega.com/legal.
1.1 Target groupsThe information in this instruction manual is directed at the followinggroups of people:
n Heating and sanitary professionals and trained personneln Drywall builder
Individuals without the abovementioned training or qualification are notpermitted to mount, install and, if required, maintain this product. Thisrestriction does not extend to possible operating instructions.
The installation of Viega products must take place in accordance withthe general rules of engineering and the Viega instructions for use.
1.2 Labelling of notesWarning and advisory texts are set aside from the remainder of the textand are labelled with the relevant pictographs.
DANGER! This symbol warns of possible life-threatening injury.
WARNING! This symbol warns of possible serious injury.
CAUTION! This symbol warns of possible injury.
NOTICE! This symbol warns of possible damage to property.
This symbol gives additional information and hints.
About these instructions for use
Prevista Dry urinal element telescopic 3
1.3 About this translated versionThis instruction for use contains important information about the choiceof product or system, assembly and commissioning as well as intendeduse and, if required, maintenance measures. The information about theproducts, their properties and application technology are based on thecurrent standards in Europe (e.g. EN) and/or in Germany(e.g. DIN/DVGW).
Some passages in the text may refer to technical codes in Europe/Germany. These should serve as recommendations in the absence ofcorresponding national regulations. The relevant national laws, stand‐ards, regulations, directives and other technical provisions take priorityover the German/European directives specified in this manual: Theinformation herein is not binding for other countries and regions; as saidabove, they should be understood as a recommendation.
About these instructions for use
Prevista Dry urinal element telescopic 4

2 Product information
2.1 Standards and regulationsThe following standards and regulations apply to Germany / Europe andare provided as a support feature.
Regulations from section: Fields of application / Mounting conditions
Scope / Notice Regulations applicable in Ger‐many
Suitable masonry walls EN 1996-1-1
Suitable concreted walls DIN 1045
Suitable support profiles DIN 18183
2.2 Intended use2.2.1 Areas of use
The Prevista Dry urinal element is suitable for mounting on masonry wallconstructions and support profiles pursuant to the regulations in sectionÄ „Regulations from section: Fields of application / Mounting condi‐tions“ on page 5 and can be used in a Prevista Dry Plus pre-wall con‐struction.
2.3 Product description2.3.1 Overview
The urinal element is equipped as follows:
Product information
Prevista Dry urinal element telescopic 5
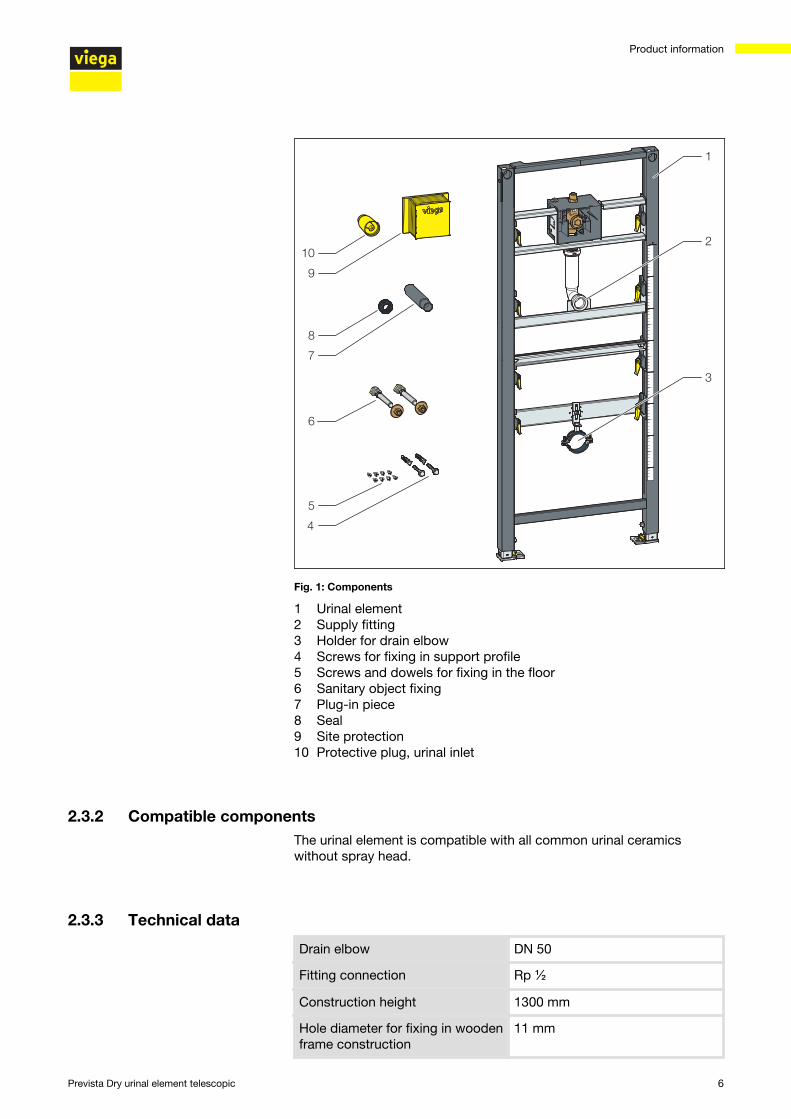
Fig. 1: Components
1 Urinal element2 Supply fitting3 Holder for drain elbow4 Screws for fixing in support profile5 Screws and dowels for fixing in the floor6 Sanitary object fixing7 Plug-in piece8 Seal9 Site protection10 Protective plug, urinal inlet
2.3.2 Compatible componentsThe urinal element is compatible with all common urinal ceramicswithout spray head.
2.3.3 Technical data
Drain elbow DN 50
Fitting connection Rp ½
Construction height 1300 mm
Hole diameter for fixing in woodenframe construction
11 mm
Product information
Prevista Dry urinal element telescopic 6
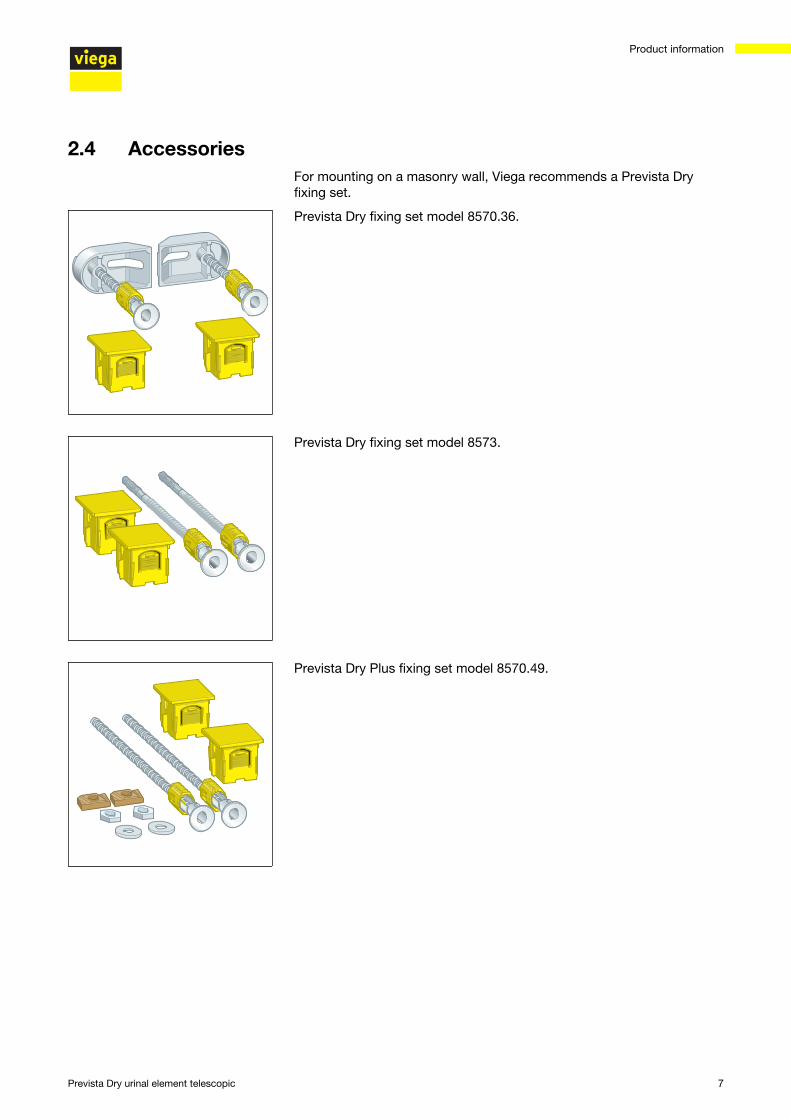
2.4 AccessoriesFor mounting on a masonry wall, Viega recommends a Prevista Dryfixing set.
Prevista Dry fixing set model 8570.36.
Prevista Dry fixing set model 8573.
Prevista Dry Plus fixing set model 8570.49.
Product information
Prevista Dry urinal element telescopic 7
3 Handling
3.1 Assembly information3.1.1 Mounting conditions
n Masonry wallsn Concreted wallsn Metal support profilesn Viega Prevista Dry Plus pre-wall constructions
The wall constructions must comply with the regulations in sectionÄ „Regulations from section: Fields of application / Mounting condi‐tions“ on page 5.
The urinal element may only be mounted on even wall surfaces.
The urinal element is suitable for construction heights of 1300 mm.
Suitable walls
Construction height
Handling
Prevista Dry urinal element telescopic 8
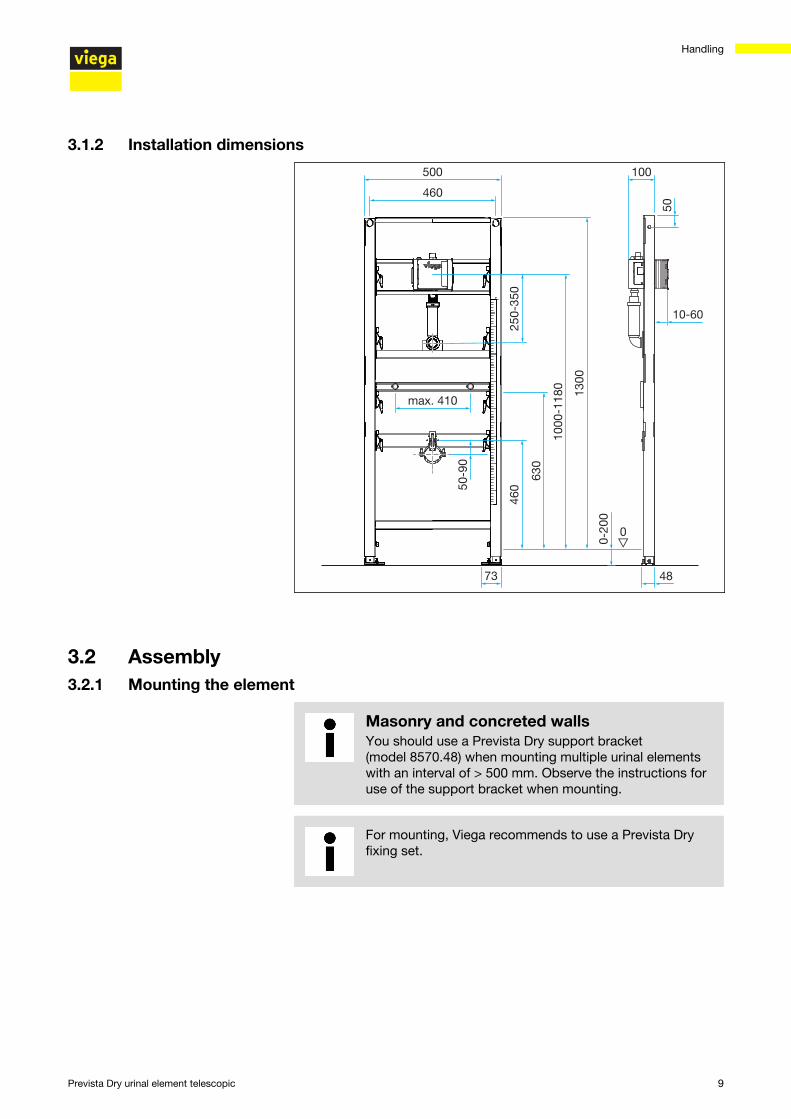
3.1.2 Installation dimensions
3.2 Assembly3.2.1 Mounting the element
Masonry and concreted wallsYou should use a Prevista Dry support bracket(model 8570.48) when mounting multiple urinal elementswith an interval of > 500 mm. Observe the instructions foruse of the support bracket when mounting.
For mounting, Viega recommends to use a Prevista Dryfixing set.
Handling
Prevista Dry urinal element telescopic 9
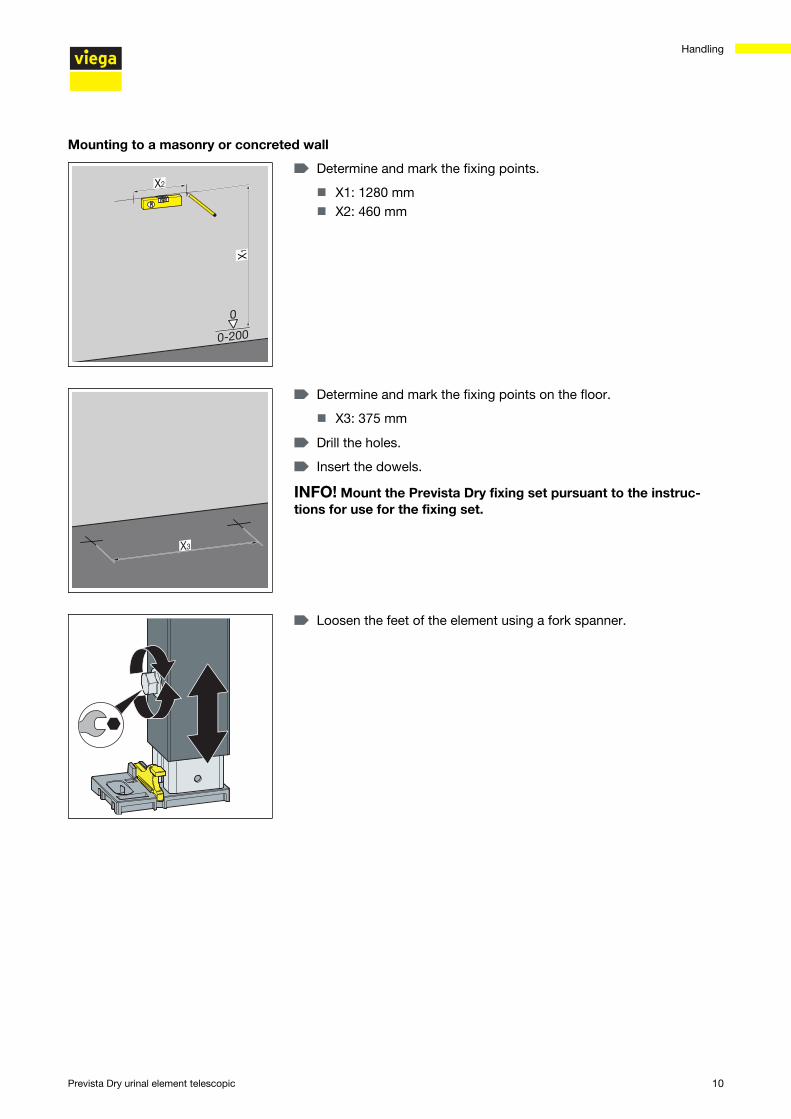
▶ Determine and mark the fixing points.
n X1: 1280 mmn X2: 460 mm
▶ Determine and mark the fixing points on the floor.
n X3: 375 mm
▶ Drill the holes.
▶ Insert the dowels.
INFO! Mount the Prevista Dry fixing set pursuant to the instruc‐tions for use for the fixing set.
▶ Loosen the feet of the element using a fork spanner.
Mounting to a masonry or concreted wall
Handling
Prevista Dry urinal element telescopic 10
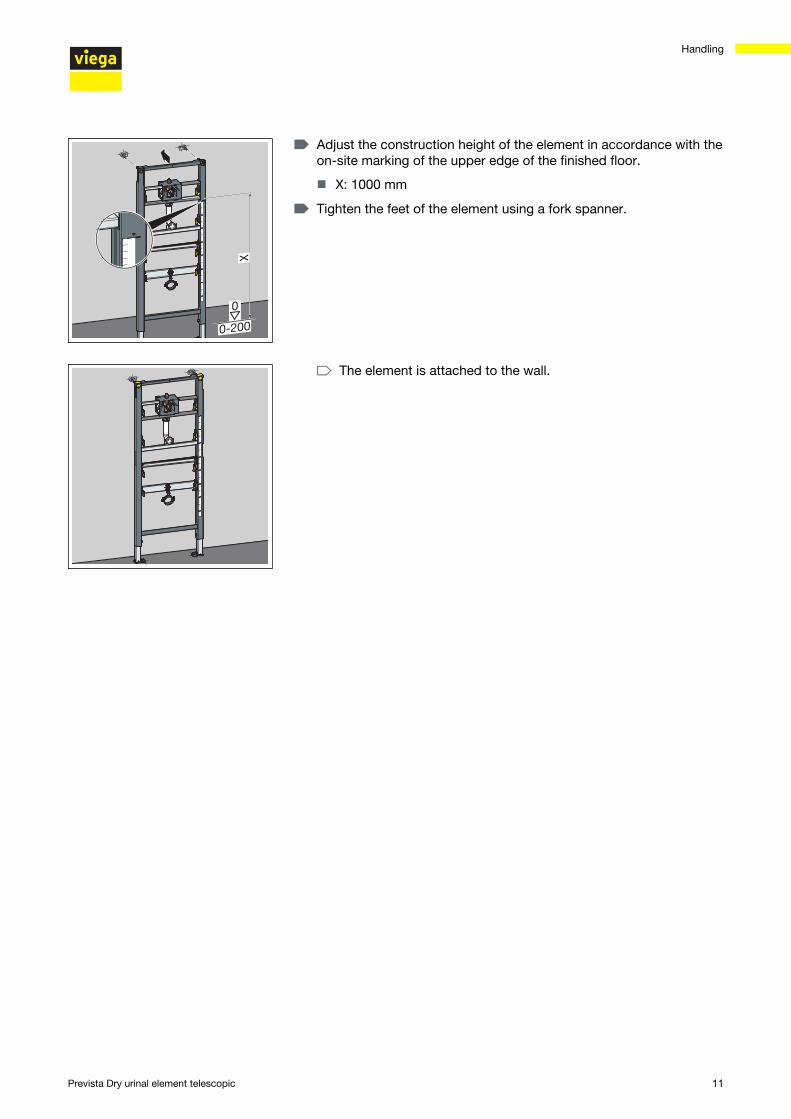
▶ Adjust the construction height of the element in accordance with theon-site marking of the upper edge of the finished floor.
n X: 1000 mm
▶ Tighten the feet of the element using a fork spanner.
▷ The element is attached to the wall.
Handling
Prevista Dry urinal element telescopic 11
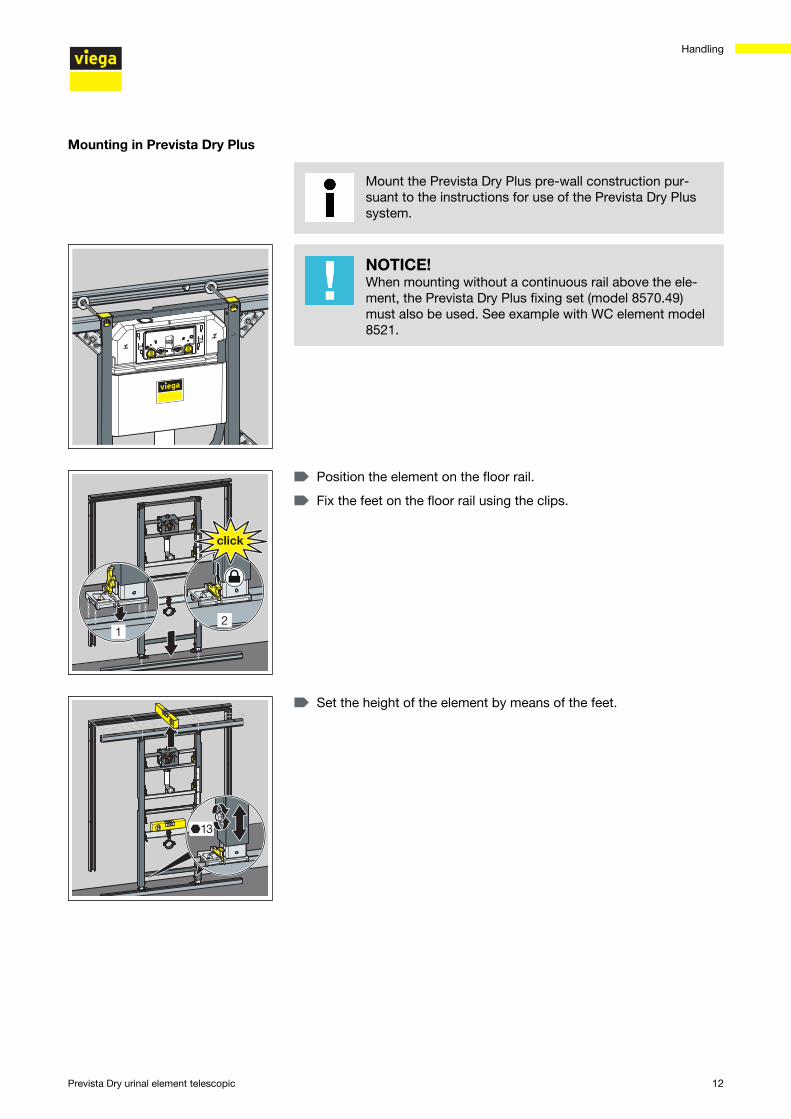
Mount the Prevista Dry Plus pre-wall construction pur‐suant to the instructions for use of the Prevista Dry Plussystem.
NOTICE! When mounting without a continuous rail above the ele‐ment, the Prevista Dry Plus fixing set (model 8570.49)must also be used. See example with WC element model8521.
▶ Position the element on the floor rail.
▶ Fix the feet on the floor rail using the clips.
▶ Set the height of the element by means of the feet.
Mounting in Prevista Dry Plus
Handling
Prevista Dry urinal element telescopic 12
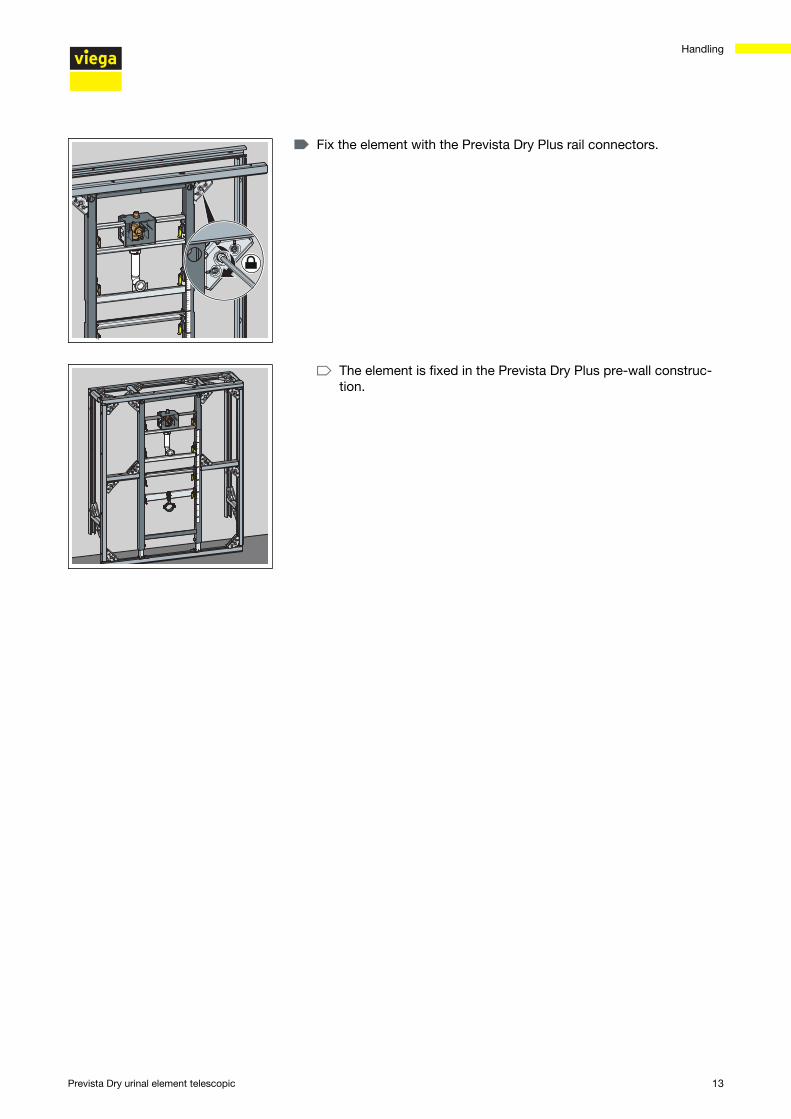
▶ Fix the element with the Prevista Dry Plus rail connectors.
▷ The element is fixed in the Prevista Dry Plus pre-wall construc‐tion.
Handling
Prevista Dry urinal element telescopic 13
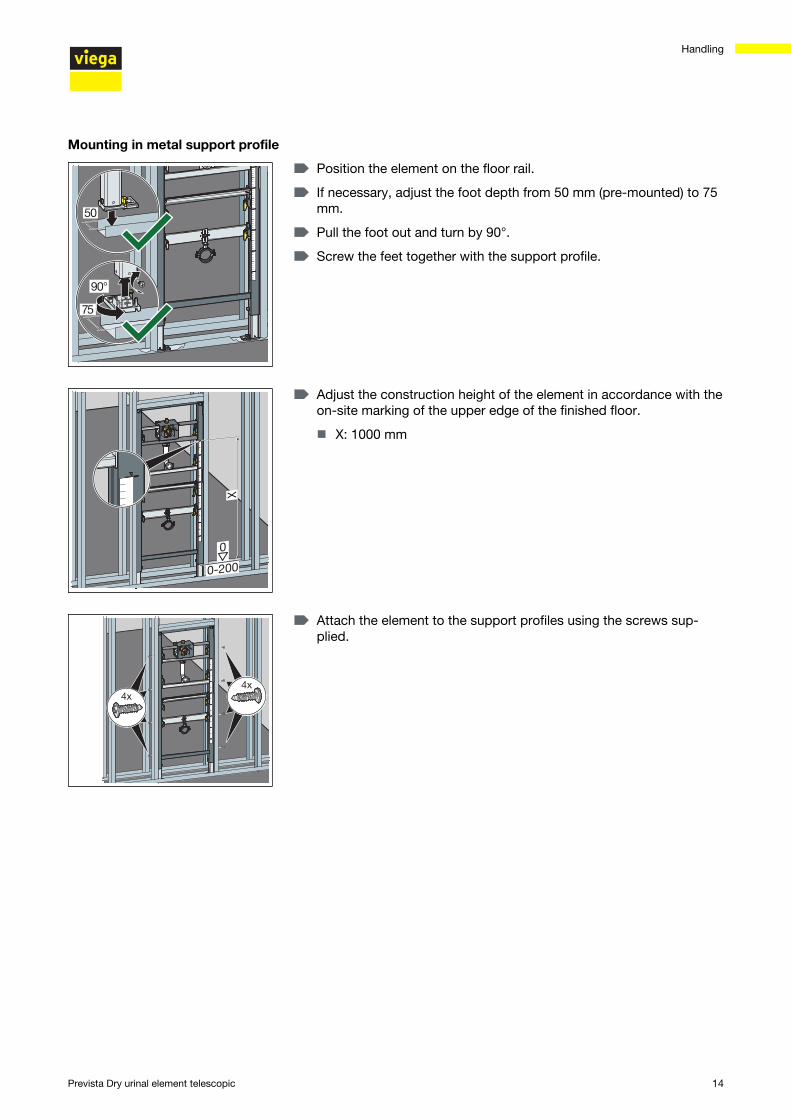
▶ Position the element on the floor rail.
▶ If necessary, adjust the foot depth from 50 mm (pre-mounted) to 75mm.
▶ Pull the foot out and turn by 90°.
▶ Screw the feet together with the support profile.
▶ Adjust the construction height of the element in accordance with theon-site marking of the upper edge of the finished floor.
n X: 1000 mm
▶ Attach the element to the support profiles using the screws sup‐plied.
Mounting in metal support profile
Handling
Prevista Dry urinal element telescopic 14
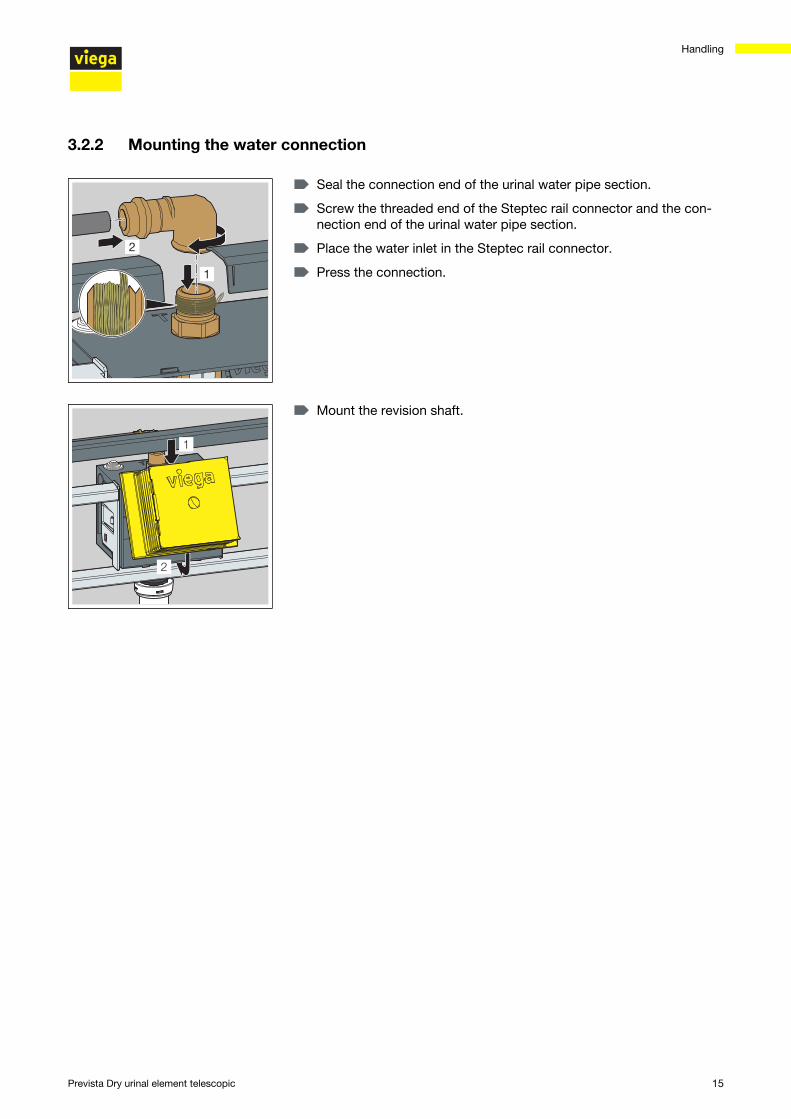
3.2.2 Mounting the water connection
▶ Seal the connection end of the urinal water pipe section.
▶ Screw the threaded end of the Steptec rail connector and the con‐nection end of the urinal water pipe section.
▶ Place the water inlet in the Steptec rail connector.
▶ Press the connection.
▶ Mount the revision shaft.
Handling
Prevista Dry urinal element telescopic 15
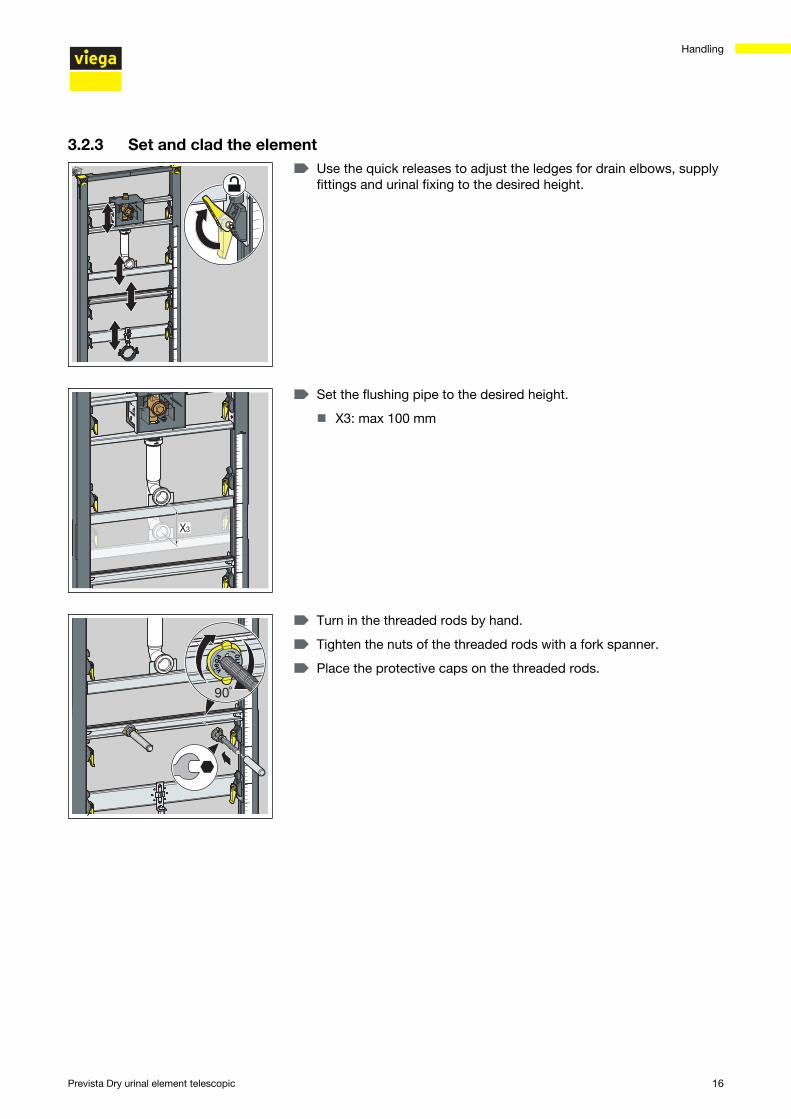
3.2.3 Set and clad the element▶ Use the quick releases to adjust the ledges for drain elbows, supply
fittings and urinal fixing to the desired height.
▶ Set the flushing pipe to the desired height.
n X3: max 100 mm
▶ Turn in the threaded rods by hand.
▶ Tighten the nuts of the threaded rods with a fork spanner.
▶ Place the protective caps on the threaded rods.
Handling
Prevista Dry urinal element telescopic 16
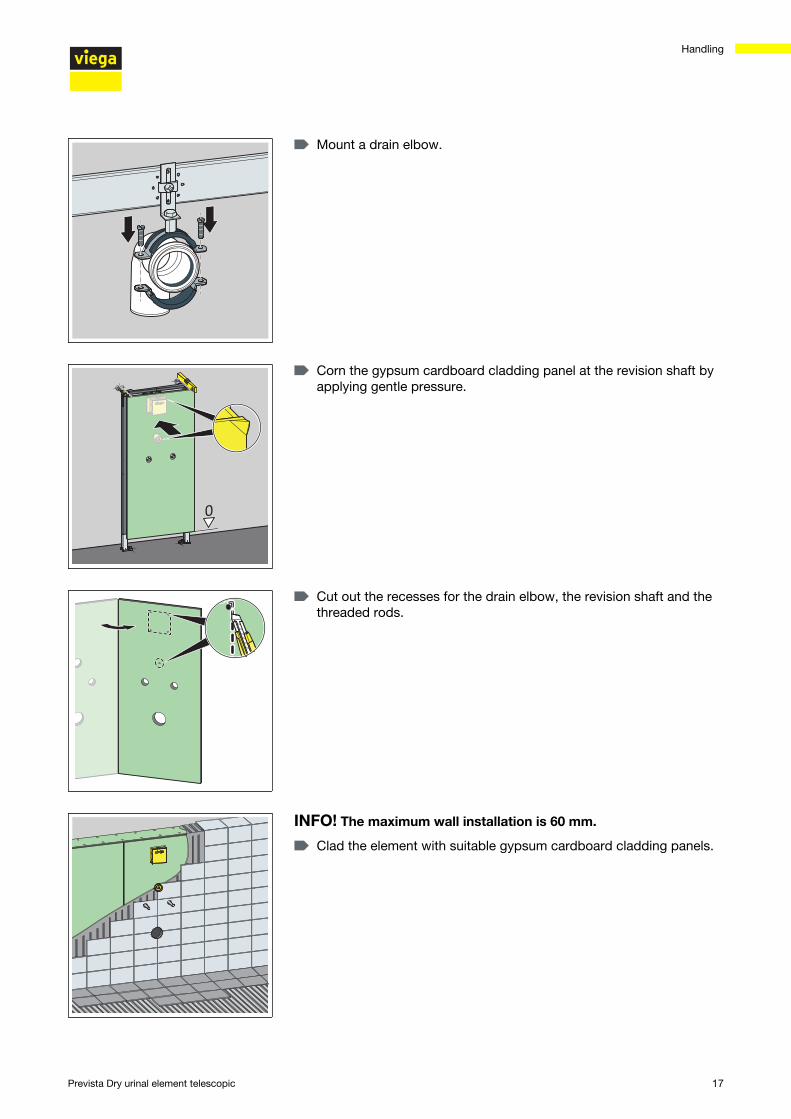
▶ Mount a drain elbow.
▶ Corn the gypsum cardboard cladding panel at the revision shaft byapplying gentle pressure.
▶ Cut out the recesses for the drain elbow, the revision shaft and thethreaded rods.
INFO! The maximum wall installation is 60 mm.
▶ Clad the element with suitable gypsum cardboard cladding panels.
Handling
Prevista Dry urinal element telescopic 17
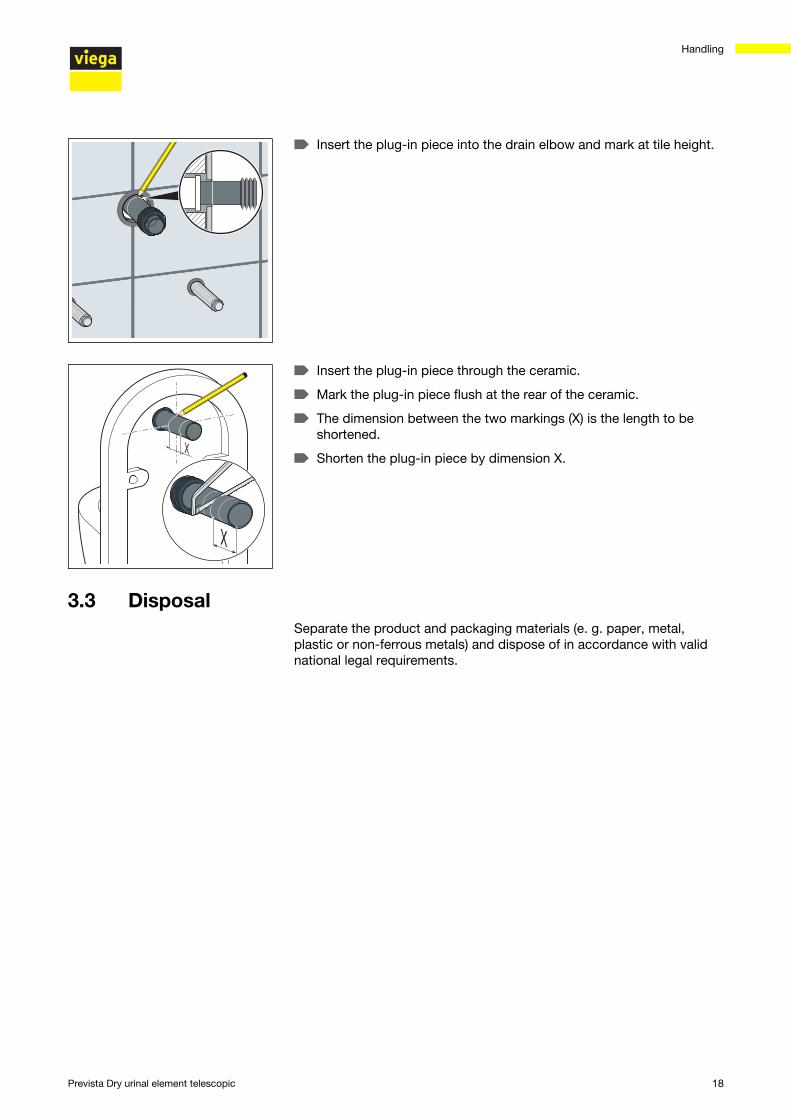
▶ Insert the plug-in piece into the drain elbow and mark at tile height.
▶ Insert the plug-in piece through the ceramic.
▶ Mark the plug-in piece flush at the rear of the ceramic.
▶ The dimension between the two markings (X) is the length to beshortened.
▶ Shorten the plug-in piece by dimension X.
3.3 DisposalSeparate the product and packaging materials (e. g. paper, metal,plastic or non-ferrous metals) and dispose of in accordance with validnational legal requirements.
Handling
Prevista Dry urinal element telescopic 18