Embed Size (px)
Citation preview

Specialist Control PanelsHEATING & VENTILATION
Sarum Electronics LtdClump Farm Industrial Estate, Shaftesbury LaneBlandford Forum, Dorset, DT11 7TDwww.sarumelectronics.co.uk | [email protected]
ENQUIRIES+44 (0)1258 480802
The information provided in the literature is believed to be accurate (subject to change without notice), however, use of such information shall be entirely at user’s own risk.
TM-619 DIGITAL TIMER
GENERAL INFORMATION
This Panel-Mount Digital Timer is equipped with a replaceable Lithium CR2032 battery.It has a 24 hour clock format.The Timer is designed with up to 6 possible ON/OFF eventsprograms per day.The Timer provides 15 combinations of daily programs (see Fig.1)
PROGRAMMING THE TIMER
A. Functional description of buttons on panel.1. MANUAL: To select ON, AUTO or OFF2. CLOCK: To adjust current day and time3. TIMER: Programs review & setting programs4. DAY: To adjust day of the week5. HOUR: To adjust the hour6. MIN: To adjust the minute7. P : Reset Timer’s settings8. LED: To indicate ON/OFF status
B. Adjusting the clockPress and hold CLOCK and then press DAY key, HOUR key, and MIN key to adjust the clock.
C. Programming the Timer1. Press TIMER key, the screen will show
2. Press DAY key to select on of the 15 combinations of days of the week (see Fig.1). Continue to press the DAY key unit the required selection is shown on the display.3. Press HOUR key and MIN key to set hour and minute for 1ON.4. After setting 1ON press TIMER key again. The screen will show
5. Press DAY key to select the days of the week combination.
NOTE: The days of the week combination for each ON/OFF program must be consistent.6. Repeat the programming procedure to step 3 to set the hour and minute for 1OFF.7. When setting of 1ON and 1OFF is complete press TIMER key. Screen will show
8. Repeat the programming procedure above to complete all the required ON/OFF event periods.9. When all ON/OFF periods have been set press CLOCK keyto activate the timer.
Specialist Control PanelsHEATING & VENTILATION
Sarum Electronics LtdClump Farm Industrial Estate, Shaftesbury LaneBlandford Forum, Dorset, DT11 7TDwww.sarumelectronics.co.uk | [email protected]
ENQUIRIES+44 (0)1258 480802
The information provided in the literature is believed to be accurate (subject to change without notice), however, use of such information shall be entirely at user’s own risk.
D. To review program settings press TIMER key to scroll through each of the ON/OFF events.E. To use the Override functionThe override function is only effective when the Timer is running in AUTO mode.Temporary override1. When the Timer’s output status is On press the
MANUAL key to change from AUTO to OFF. The Timer’s output status will turn to OFF and all programs will be overridden. Press MANUAL again to switch the Timer’s
status AUTO. The Timers output will remain OFF until the next program event call for ON. The Timer will then resume its automatic operation.
2. When the Timer’s output status is OFF press the MANUAL key to change from AUTO to ON. The Timer’s output status will turn to ON and all programs will be overridden. Press MANUAL again to switch the Timer’s status to AUTO. The Timer’s output will remain ON until the next program event calls for OFF. The Timer will then resume its automatic operation.
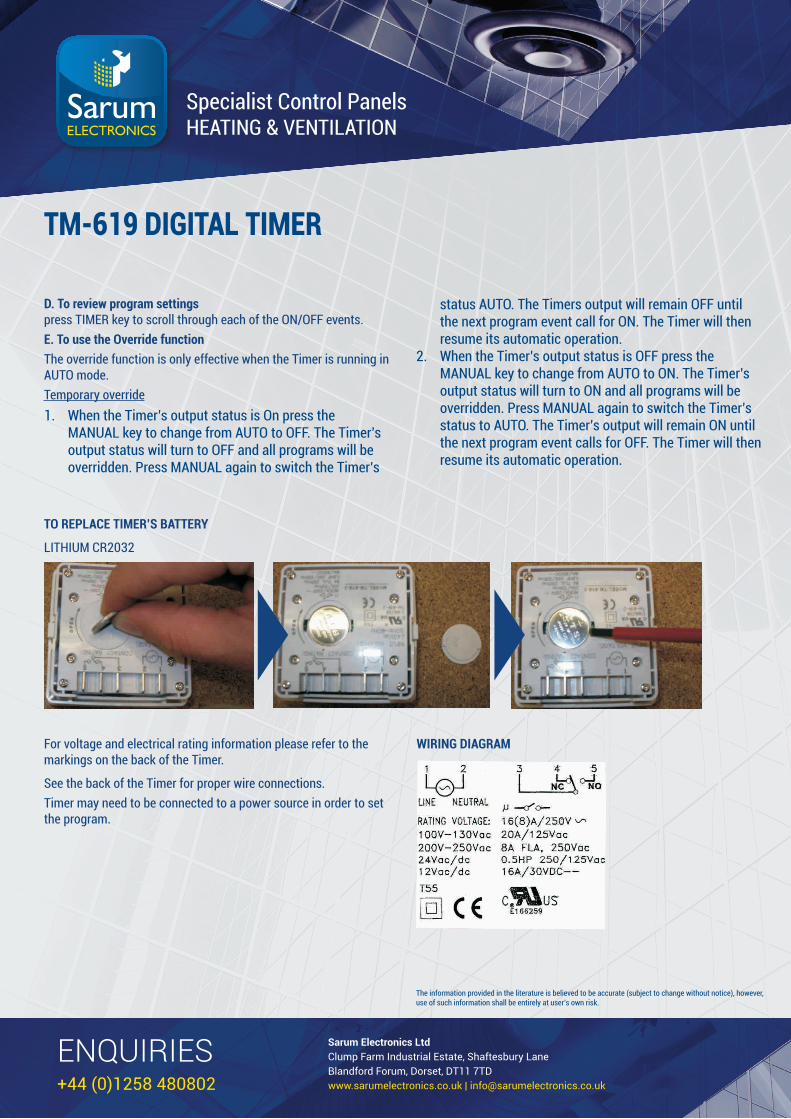
TO REPLACE TIMER’S BATTERY
LITHIUM CR2032
WIRING DIAGRAMFor voltage and electrical rating information please refer to the markings on the back of the Timer.
See the back of the Timer for proper wire connections.Timer may need to be connected to a power source in order to set the program.
TM-619 DIGITAL TIMER