Embed Size (px)
Citation preview
Toxicology
& Clinical Lab Portal
Quick Reference Guide
A user guide for ANY LAB TEST NOW® Franchisees and Employees
Revised July 15, 2011

2
ContentsPURPOSE OF THE TOXICOLOGY & Clinical LAB Test PORTAL .......................................... 4
GETTING STARTED .................................................................................................................... 4
Logging In and Out ..................................................................................................................... 4
Main Tabs and Navigation .......................................................................................................... 5
COLLECTION SITES .................................................................................................................... 7
ADD PORTAL USERS .................................................................................................................. 9
ADDING ACCOUNTS / CUSTOMERS ..................................................................................... 12
Add Account ............................................................................................................................. 12
View Employees Who Have Been Tested ................................................................................ 15
Add Employees/List for Random Drug Testing ....................................................................... 15
ONLINE USERS/CUSTOMERS ................................................................................................. 17
PHYSICIANS ............................................................................................................................... 20
ADD DRUG TEST (ADMINISTER A TEST) ............................................................................ 22
Individual Donor ....................................................................................................................... 28
Employee Donor ....................................................................................................................... 31
Additional Options from the Drug Test Screen ........................................................................ 32
ADD LAB TESTS (Administer Lab Tests) .................................................................................. 36
Uploading Test Results ............................................................................................................. 39
Printing, Faxing and Emailing Test Results ............................................................................. 42
Status of Tests ........................................................................................................................... 48
TESTING DEVICE ...................................................................................................................... 48
Devices ...................................................................................................................................... 48
Add New Device ....................................................................................................................... 49
Edit Device................................................................................................................................ 50
Device Tests .............................................................................................................................. 51
RANDOM TEST .......................................................................................................................... 53
BACKGROUND .......................................................................................................................... 55
SEARCH BOX ............................................................................................................................. 56

3
SUPPORT ..................................................................................................................................... 57
FREQUENTLY ASKED QUESTIONS ....................................................................................... 57
4
PURPOSE OF THE TOXICOLOGY & Clinical LAB Test PORTAL The Toxicology Portal software has been developed exclusively for use by ANY LAB TEST NOW® to provide rapid toxicology screens at a cost effective price for our clients. These results will be branded as ANY LAB TEST NOW® professional reports.
A major advantage of this software is the ability to create instant reports in just a few seconds, and results from the lab can be uploaded and faxed or emailed in one simple click. Employer accounts are easy to setup and manage providing access to their employees’ results online in a fast and easy interface.
The Clinical Lab Testing Portal makes it easy for MAs to handle test results, report them and look up results from past tests in an easily and quickly. Patients as well as physicians can look up test results online.
GETTING STARTED
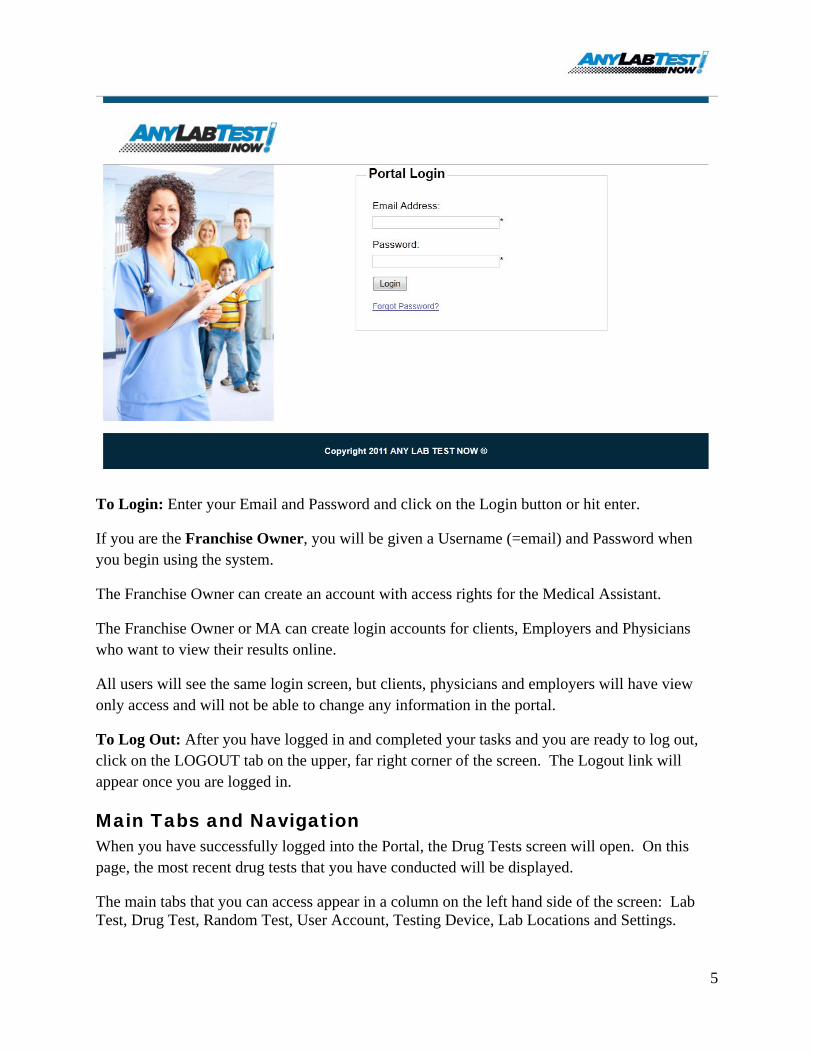
Logging In and Out The first step in using the Toxicology Portal is to log in to the system. The URL for accessing the Portal is http://www.mylabtestnow.com/portal/index.php. Once the program is opened, the log in screen will appear:
5
To Login: Enter your Email and Password and click on the Login button or hit enter.
If you are the Franchise Owner, you will be given a Username (=email) and Password when you begin using the system.
The Franchise Owner can create an account with access rights for the Medical Assistant.
The Franchise Owner or MA can create login accounts for clients, Employers and Physicians who want to view their results online.
All users will see the same login screen, but clients, physicians and employers will have view only access and will not be able to change any information in the portal.
To Log Out: After you have logged in and completed your tasks and you are ready to log out, click on the LOGOUT tab on the upper, far right corner of the screen. The Logout link will appear once you are logged in.
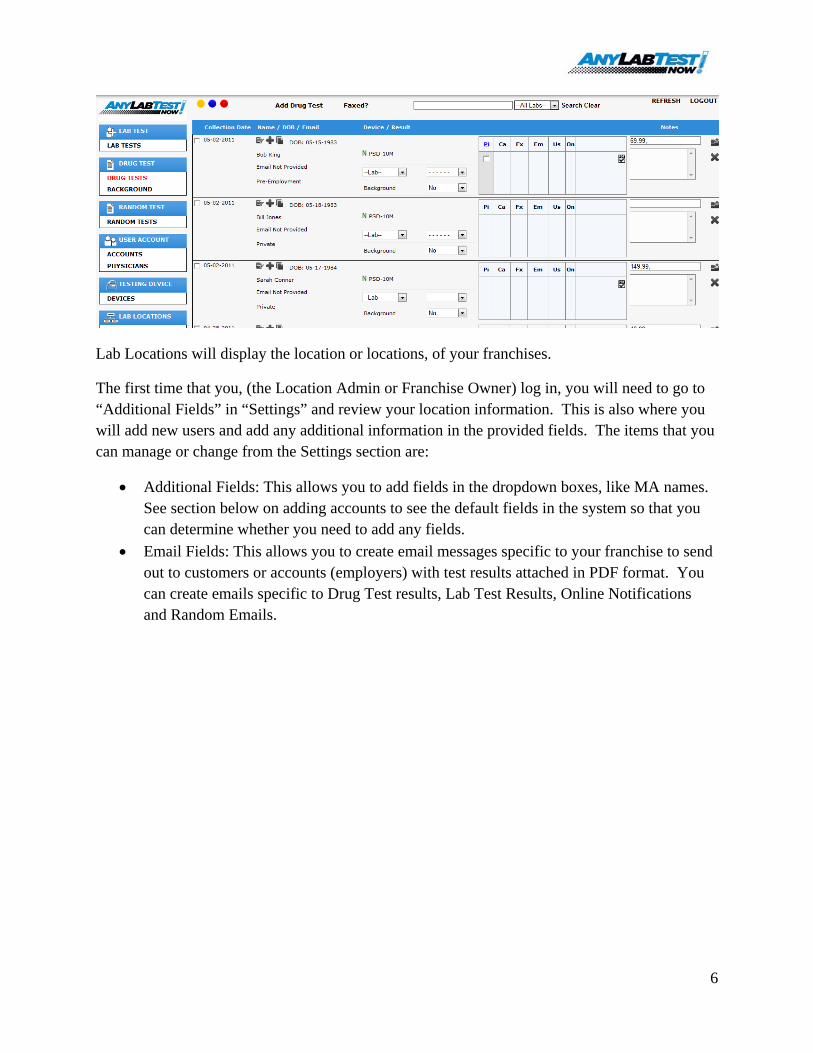
Main Tabs and Navigation When you have successfully logged into the Portal, the Drug Tests screen will open. On this page, the most recent drug tests that you have conducted will be displayed.
The main tabs that you can access appear in a column on the left hand side of the screen: Lab Test, Drug Test, Random Test, User Account, Testing Device, Lab Locations and Settings.
6
Lab Locations will display the location or locations, of your franchises.
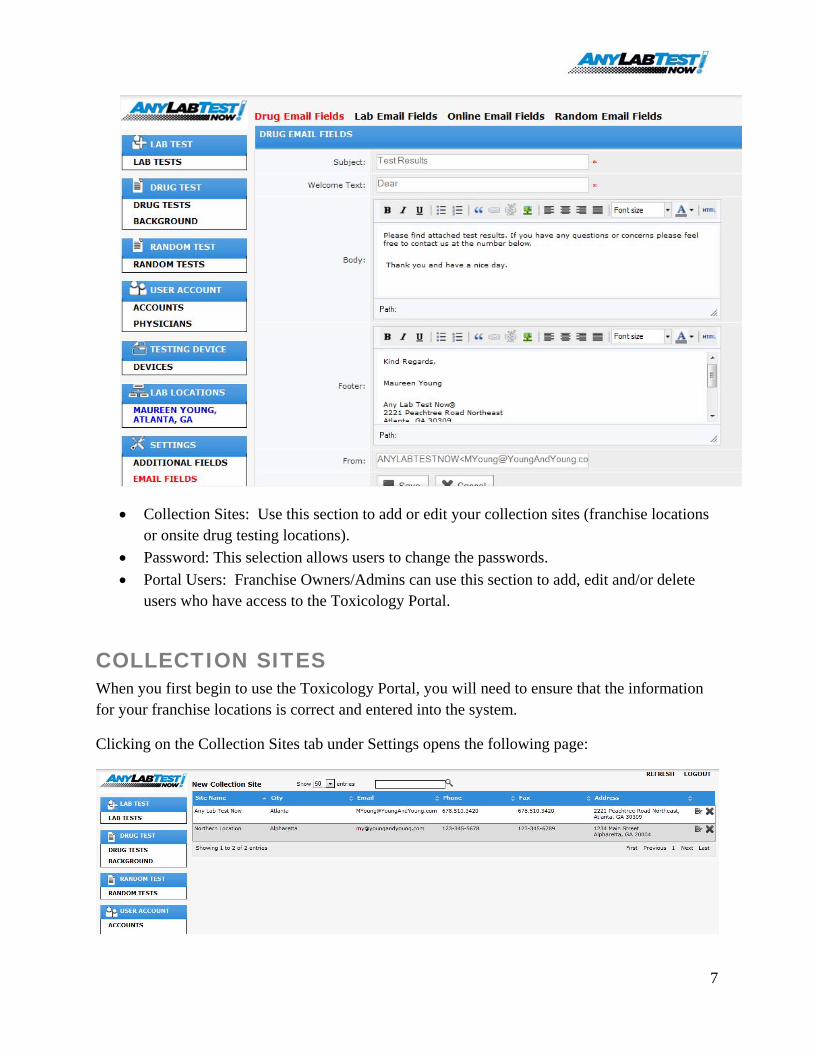
The first time that you, (the Location Admin or Franchise Owner) log in, you will need to go to “Additional Fields” in “Settings” and review your location information. This is also where you will add new users and add any additional information in the provided fields. The items that you can manage or change from the Settings section are:
• Additional Fields: This allows you to add fields in the dropdown boxes, like MA names. See section below on adding accounts to see the default fields in the system so that you can determine whether you need to add any fields.
• Email Fields: This allows you to create email messages specific to your franchise to send out to customers or accounts (employers) with test results attached in PDF format. You can create emails specific to Drug Test results, Lab Test Results, Online Notifications and Random Emails.
7
• Collection Sites: Use this section to add or edit your collection sites (franchise locations or onsite drug testing locations).
• Password: This selection allows users to change the passwords. • Portal Users: Franchise Owners/Admins can use this section to add, edit and/or delete
users who have access to the Toxicology Portal.
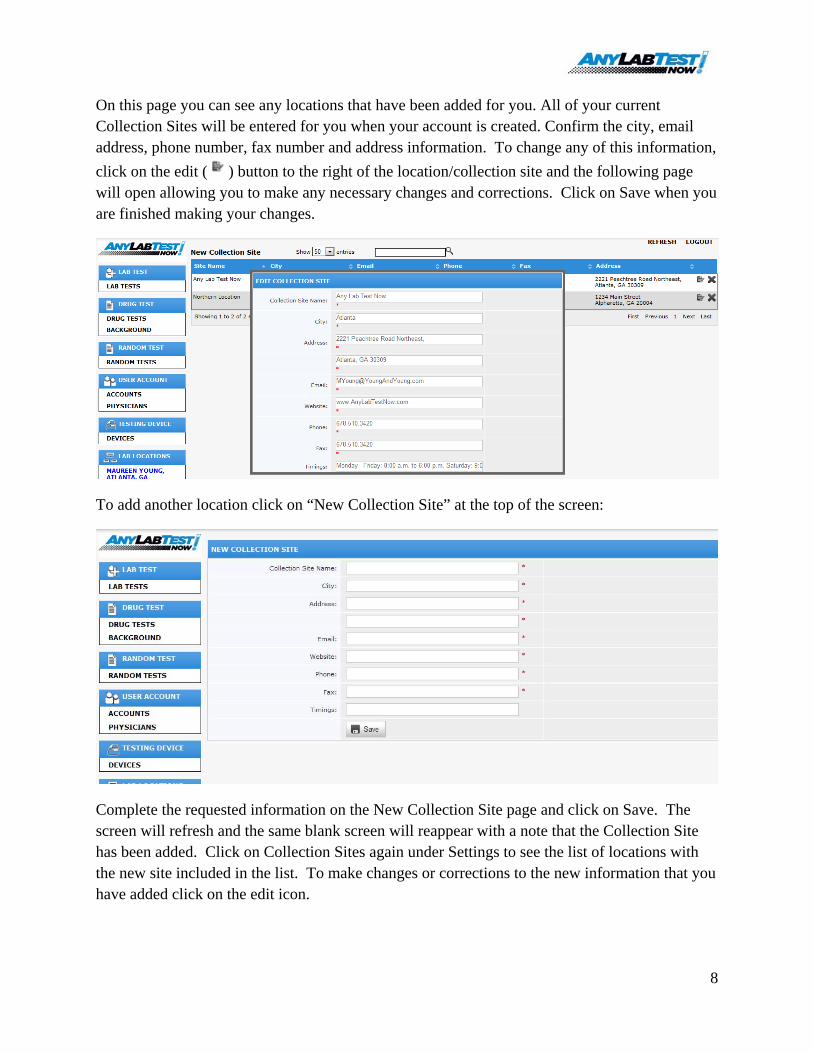
COLLECTION SITES When you first begin to use the Toxicology Portal, you will need to ensure that the information for your franchise locations is correct and entered into the system.
Clicking on the Collection Sites tab under Settings opens the following page:
8
On this page you can see any locations that have been added for you. All of your current Collection Sites will be entered for you when your account is created. Confirm the city, email address, phone number, fax number and address information. To change any of this information, click on the edit ( ) button to the right of the location/collection site and the following page will open allowing you to make any necessary changes and corrections. Click on Save when you are finished making your changes.
To add another location click on “New Collection Site” at the top of the screen:
Complete the requested information on the New Collection Site page and click on Save. The screen will refresh and the same blank screen will reappear with a note that the Collection Site has been added. Click on Collection Sites again under Settings to see the list of locations with the new site included in the list. To make changes or corrections to the new information that you have added click on the edit icon.

9
ADD PORTAL USERS Franchise Owners are automatically set up as the Admin who has the ability to create an account for a Medical Assistant to access the Portal. To begin adding your Medical Assistants, click on Portal Users and the following window will open:
On this page, the Franchise Owner can add a new MA account, Delete an MA account, and add or change permissions for the MA to access features in the system. To create a new account, click on Add Users in the top left of the screen. The following page will open:
Complete the following steps to create the new account:
1. Enter the required information. a. Medical Assistant’s username b. Password that the MA will use to access the system c. User’s email address
2. Click on the Save button. 3. The page will refresh and indicate that “User added successfully”.

10
To select the information that the user/MA can access click on Portal Users again, under Settings and the following page will open:
The new user will appear in the list of Portal Users. Under each user there are boxes to check that allows them the ability to view, add, edit and/or delete information:
V = View
A = Add
E = Edit
D = Delete
You will need to determine which permissions you will give them:
• Lab Test • Drug Tests • Accounts (Employers) • Physicians • Devices • Device Tests
11
• Additional Fields • Email Fields • Collection Sites
When creating a new user, some default selections have been set for an MA.
NOTE: ANY LAB TEST NOW® does not recommend that you give any employees access to delete results. This should be reserved for the admin user in your location. Deleting a result is a permanent action, and once the result has been deleted it cannot be retrieved.
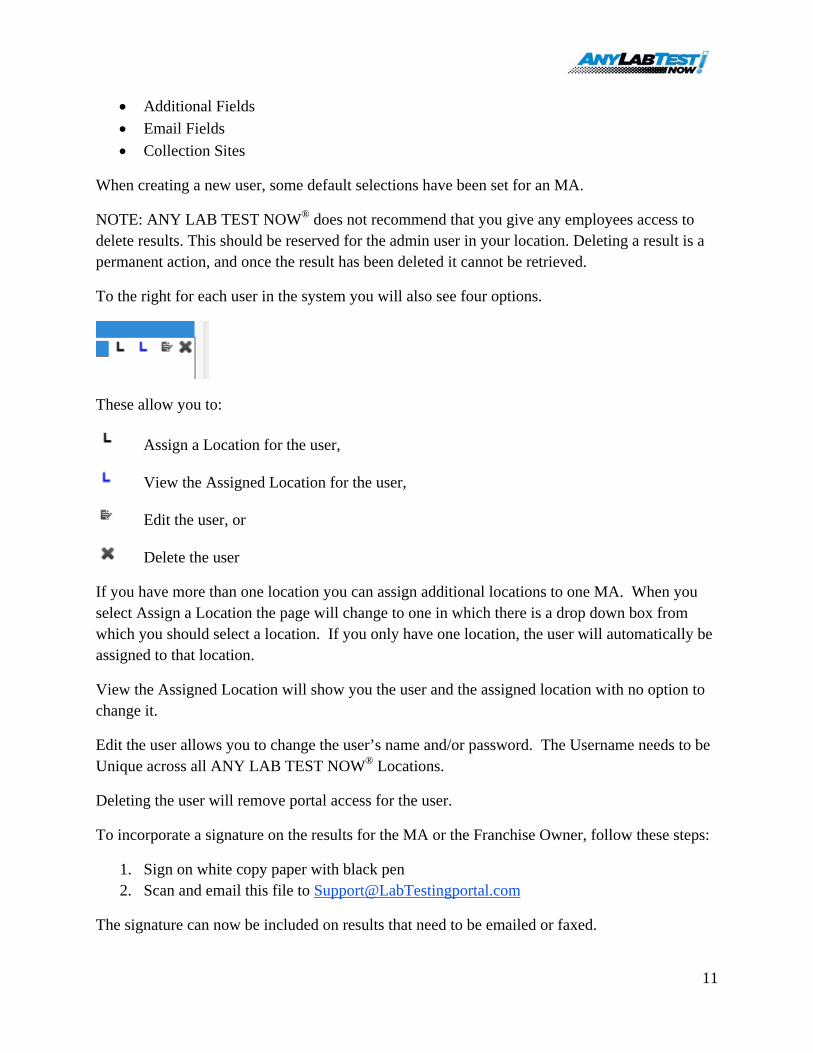
To the right for each user in the system you will also see four options.
These allow you to:
Assign a Location for the user,
View the Assigned Location for the user,
Edit the user, or
Delete the user
If you have more than one location you can assign additional locations to one MA. When you select Assign a Location the page will change to one in which there is a drop down box from which you should select a location. If you only have one location, the user will automatically be assigned to that location.
View the Assigned Location will show you the user and the assigned location with no option to change it.
Edit the user allows you to change the user’s name and/or password. The Username needs to be Unique across all ANY LAB TEST NOW® Locations.
Deleting the user will remove portal access for the user.
To incorporate a signature on the results for the MA or the Franchise Owner, follow these steps:
1. Sign on white copy paper with black pen 2. Scan and email this file to [email protected]
The signature can now be included on results that need to be emailed or faxed.
12
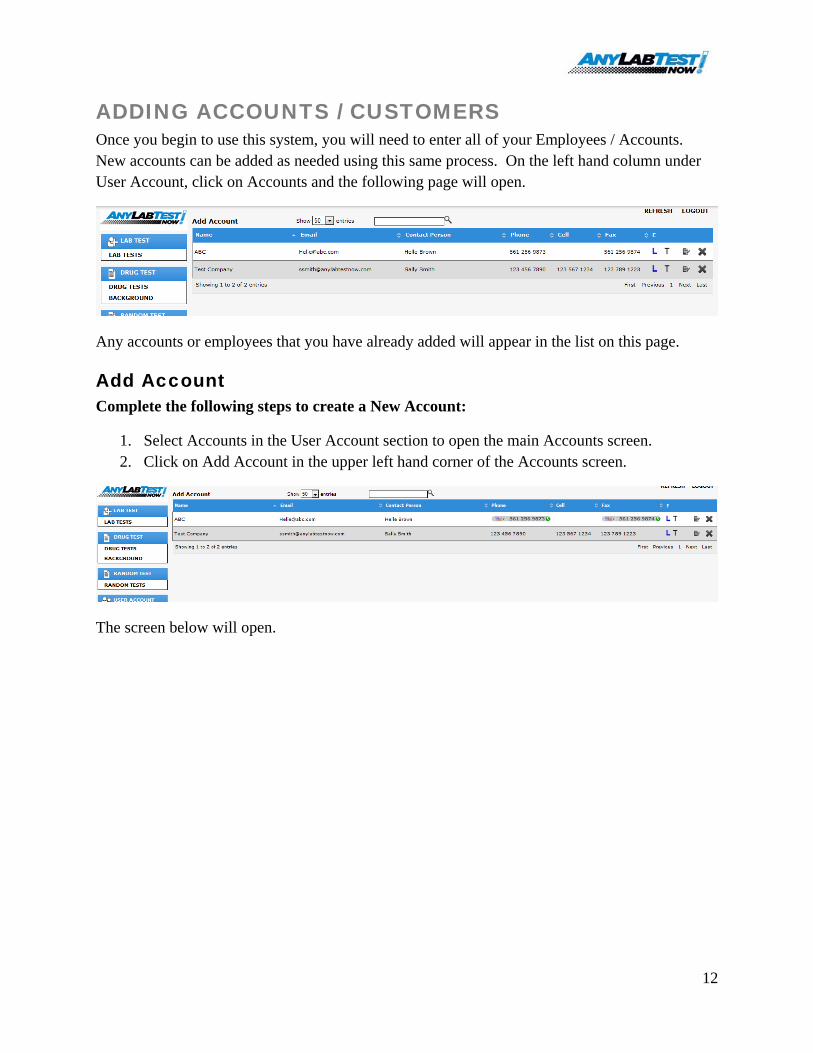
ADDING ACCOUNTS / CUSTOMERS Once you begin to use this system, you will need to enter all of your Employees / Accounts. New accounts can be added as needed using this same process. On the left hand column under User Account, click on Accounts and the following page will open.
Any accounts or employees that you have already added will appear in the list on this page.
Add Account Complete the following steps to create a New Account:
1. Select Accounts in the User Account section to open the main Accounts screen. 2. Click on Add Account in the upper left hand corner of the Accounts screen.
The screen below will open.
13
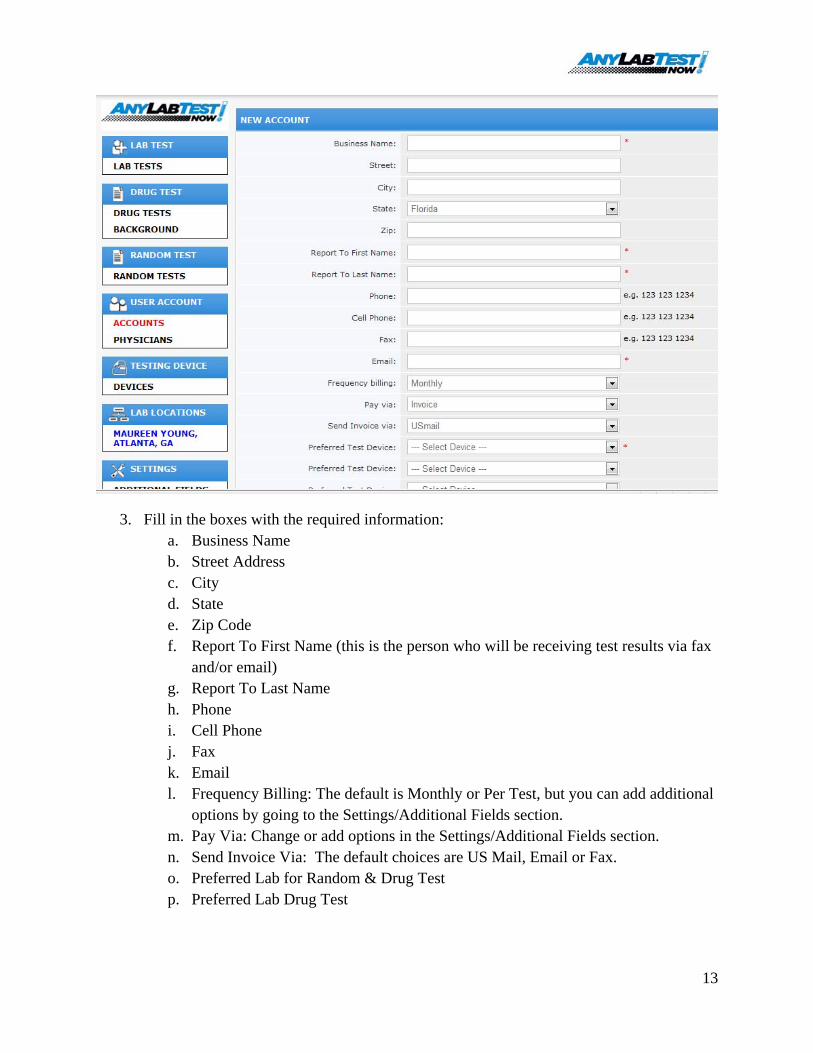
3. Fill in the boxes with the required information: a. Business Name b. Street Address c. City d. State e. Zip Code f. Report To First Name (this is the person who will be receiving test results via fax
and/or email) g. Report To Last Name h. Phone i. Cell Phone j. Fax k. Email l. Frequency Billing: The default is Monthly or Per Test, but you can add additional
options by going to the Settings/Additional Fields section. m. Pay Via: Change or add options in the Settings/Additional Fields section. n. Send Invoice Via: The default choices are US Mail, Email or Fax. o. Preferred Lab for Random & Drug Test p. Preferred Lab Drug Test
14
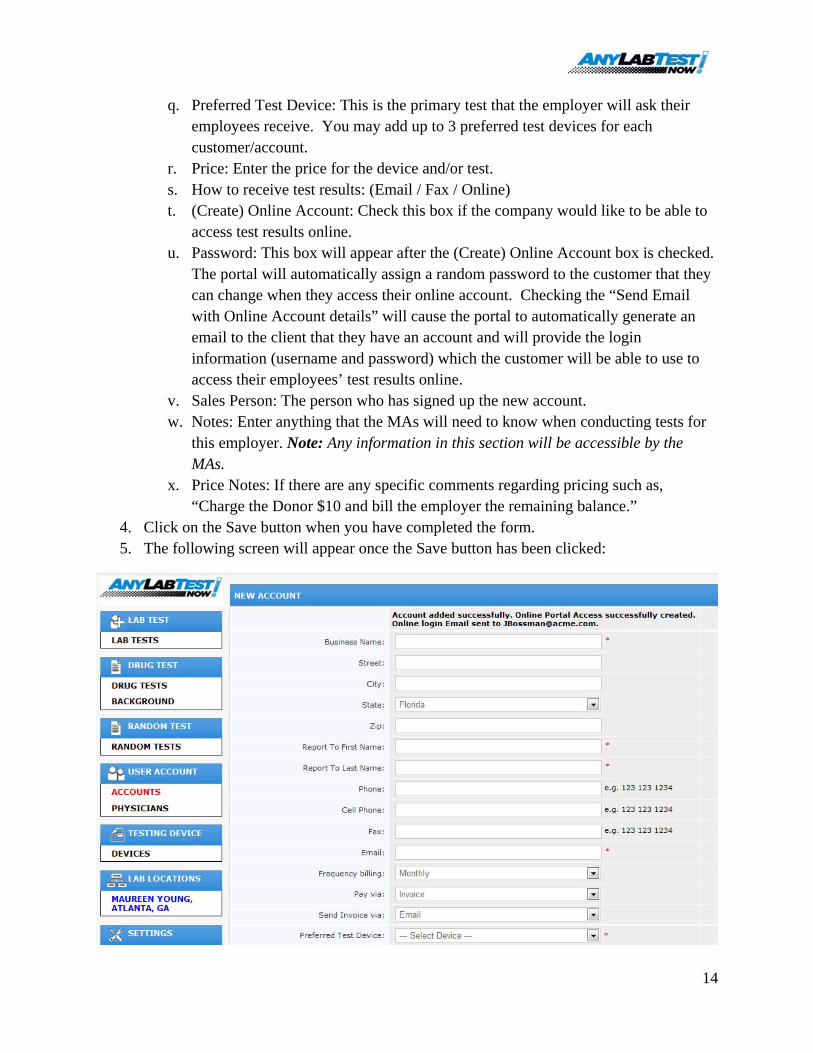
q. Preferred Test Device: This is the primary test that the employer will ask their employees receive. You may add up to 3 preferred test devices for each customer/account.
r. Price: Enter the price for the device and/or test. s. How to receive test results: (Email / Fax / Online) t. (Create) Online Account: Check this box if the company would like to be able to
access test results online. u. Password: This box will appear after the (Create) Online Account box is checked.
The portal will automatically assign a random password to the customer that they can change when they access their online account. Checking the “Send Email with Online Account details” will cause the portal to automatically generate an email to the client that they have an account and will provide the login information (username and password) which the customer will be able to use to access their employees’ test results online.
v. Sales Person: The person who has signed up the new account. w. Notes: Enter anything that the MAs will need to know when conducting tests for
this employer. Note: Any information in this section will be accessible by the MAs.
x. Price Notes: If there are any specific comments regarding pricing such as, “Charge the Donor $10 and bill the employer the remaining balance.”
4. Click on the Save button when you have completed the form. 5. The following screen will appear once the Save button has been clicked:
15
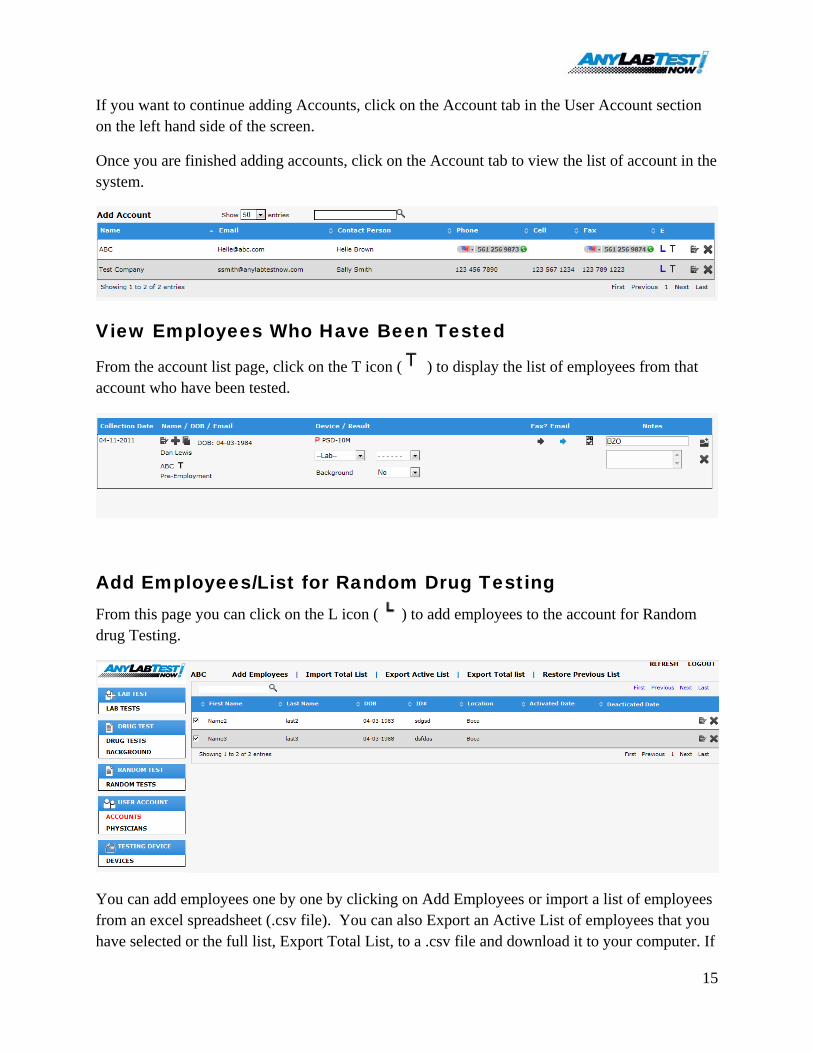
If you want to continue adding Accounts, click on the Account tab in the User Account section on the left hand side of the screen.
Once you are finished adding accounts, click on the Account tab to view the list of account in the system.
View Employees Who Have Been Tested
From the account list page, click on the T icon ( ) to display the list of employees from that account who have been tested.
Add Employees/List for Random Drug Testing From this page you can click on the L icon ( ) to add employees to the account for Random drug Testing.
You can add employees one by one by clicking on Add Employees or import a list of employees from an excel spreadsheet (.csv file). You can also Export an Active List of employees that you have selected or the full list, Export Total List, to a .csv file and download it to your computer. If

16
you made a mistake while adding or changing the list you can click on “Restore Previous List” to undo your changes and go to a previously saved list.
To add employees one at a time, click on Add Employees to open the dialog box:
Complete the request information: First Name, Last Name, Date of Birth (DOB), ID# (either Social Security number of Driver’s License Number) and location where they will be getting tested and click on Save. The information is saved with the notation Employee added successfully:
17
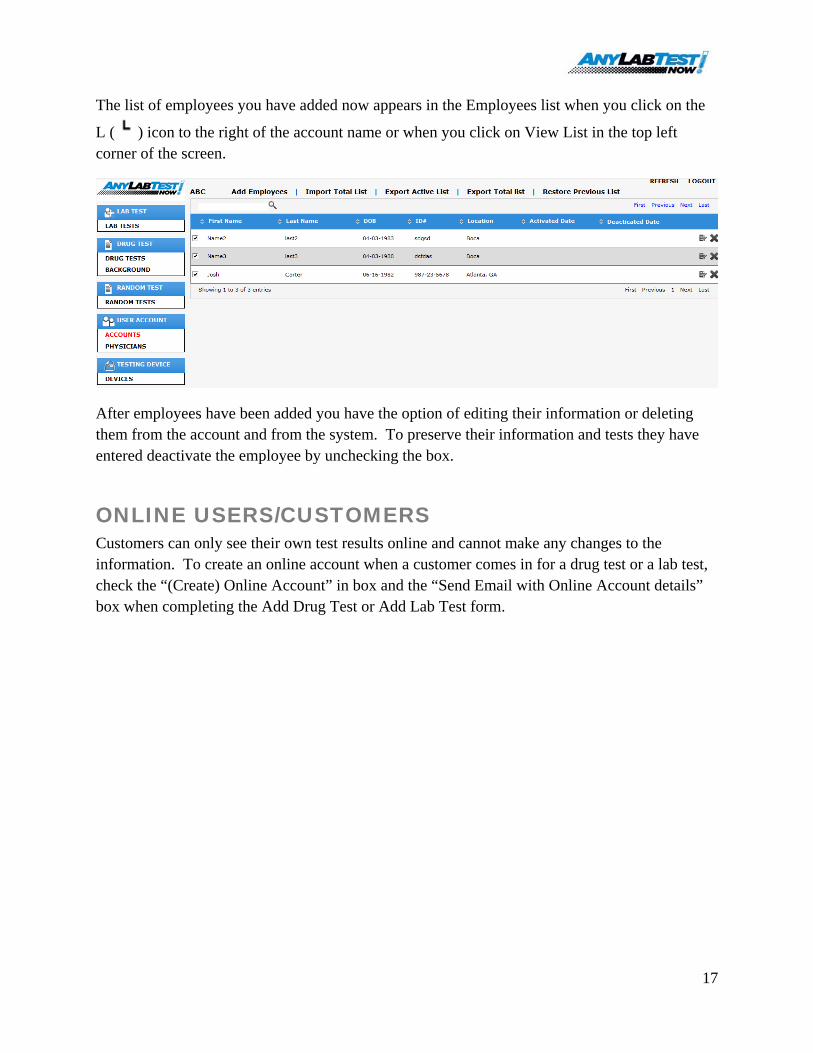
The list of employees you have added now appears in the Employees list when you click on the
L ( ) icon to the right of the account name or when you click on View List in the top left corner of the screen.
After employees have been added you have the option of editing their information or deleting them from the account and from the system. To preserve their information and tests they have entered deactivate the employee by unchecking the box.
ONLINE USERS/CUSTOMERS Customers can only see their own test results online and cannot make any changes to the information. To create an online account when a customer comes in for a drug test or a lab test, check the “(Create) Online Account” in box and the “Send Email with Online Account details” box when completing the Add Drug Test or Add Lab Test form.
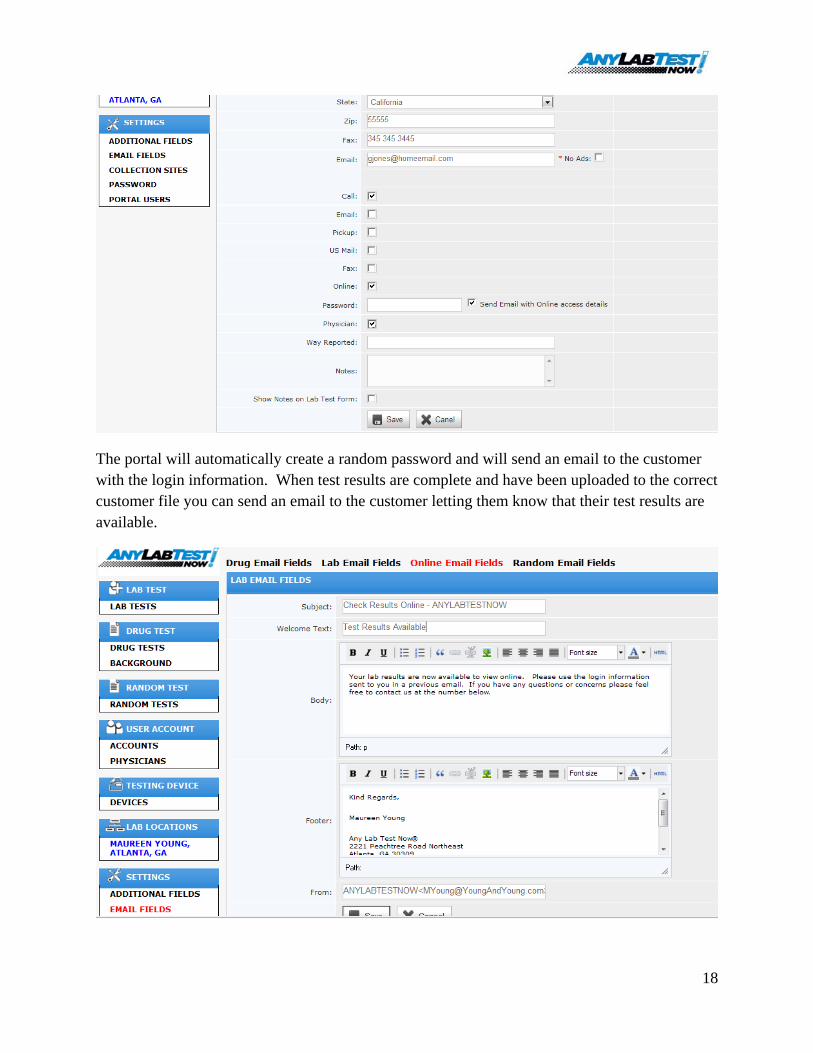
18
The portal will automatically create a random password and will send an email to the customer with the login information. When test results are complete and have been uploaded to the correct customer file you can send an email to the customer letting them know that their test results are available.
19
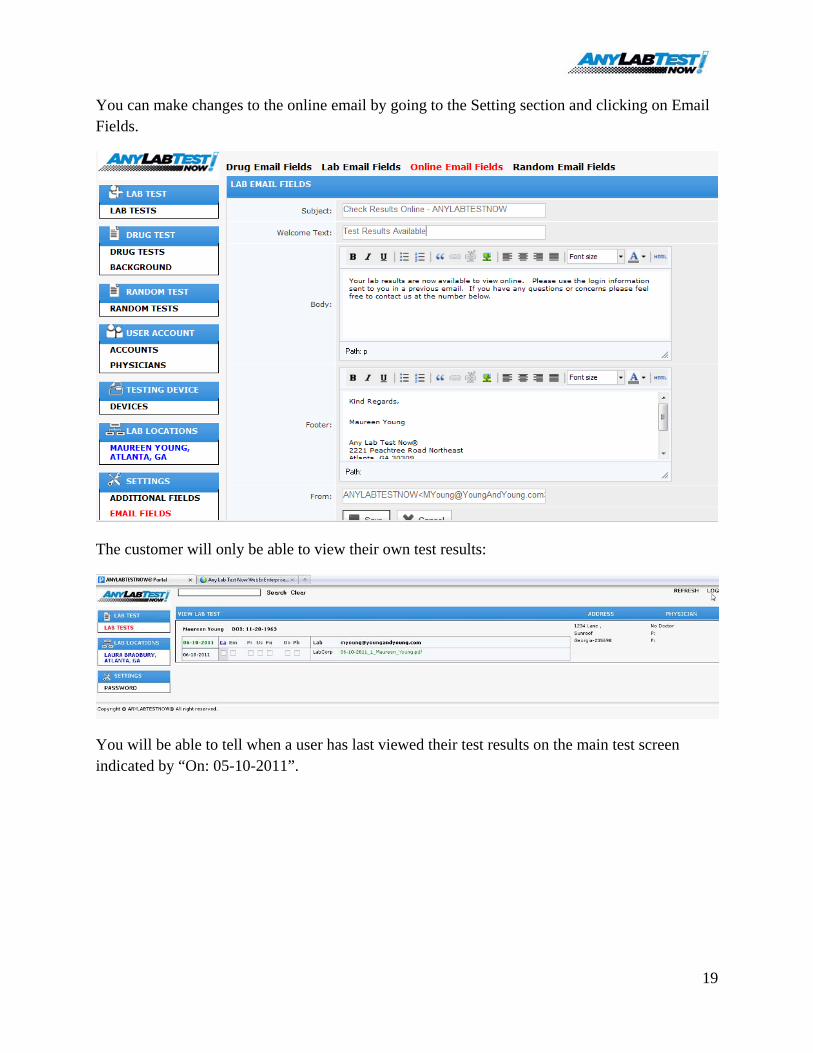
You can make changes to the online email by going to the Setting section and clicking on Email Fields.
The customer will only be able to view their own test results:
You will be able to tell when a user has last viewed their test results on the main test screen indicated by “On: 05-10-2011”.
20
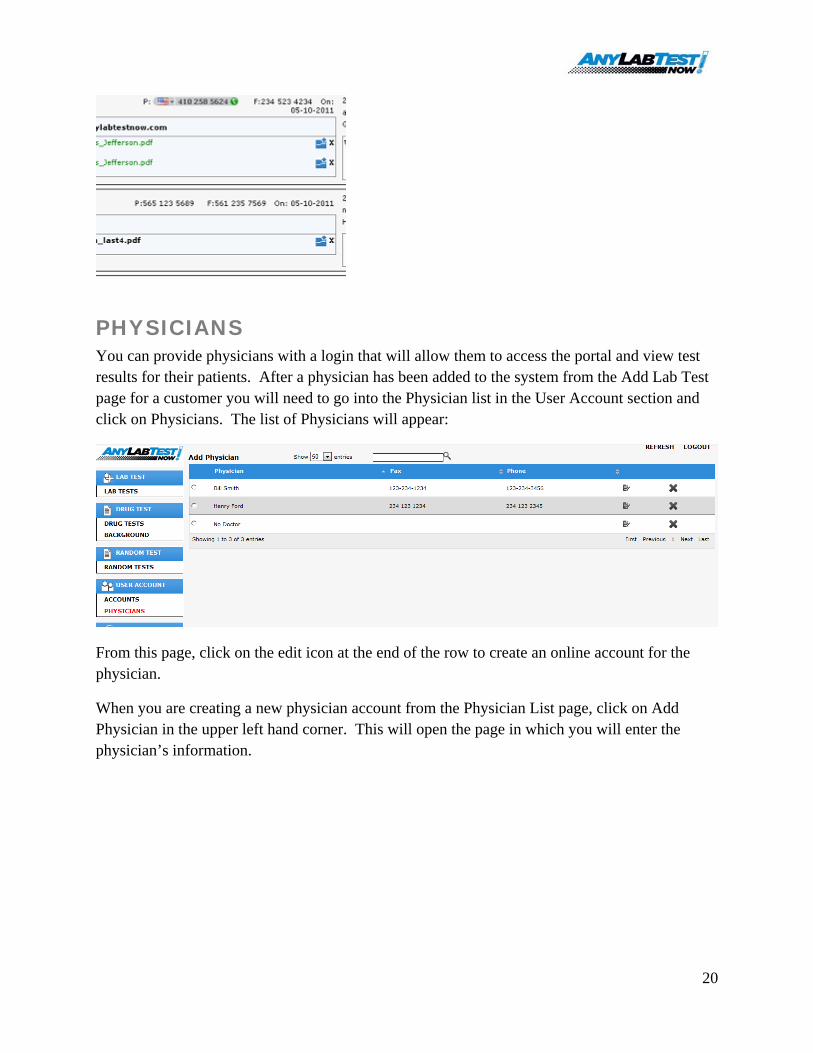
PHYSICIANS You can provide physicians with a login that will allow them to access the portal and view test results for their patients. After a physician has been added to the system from the Add Lab Test page for a customer you will need to go into the Physician list in the User Account section and click on Physicians. The list of Physicians will appear:
From this page, click on the edit icon at the end of the row to create an online account for the physician.
When you are creating a new physician account from the Physician List page, click on Add Physician in the upper left hand corner. This will open the page in which you will enter the physician’s information.
21
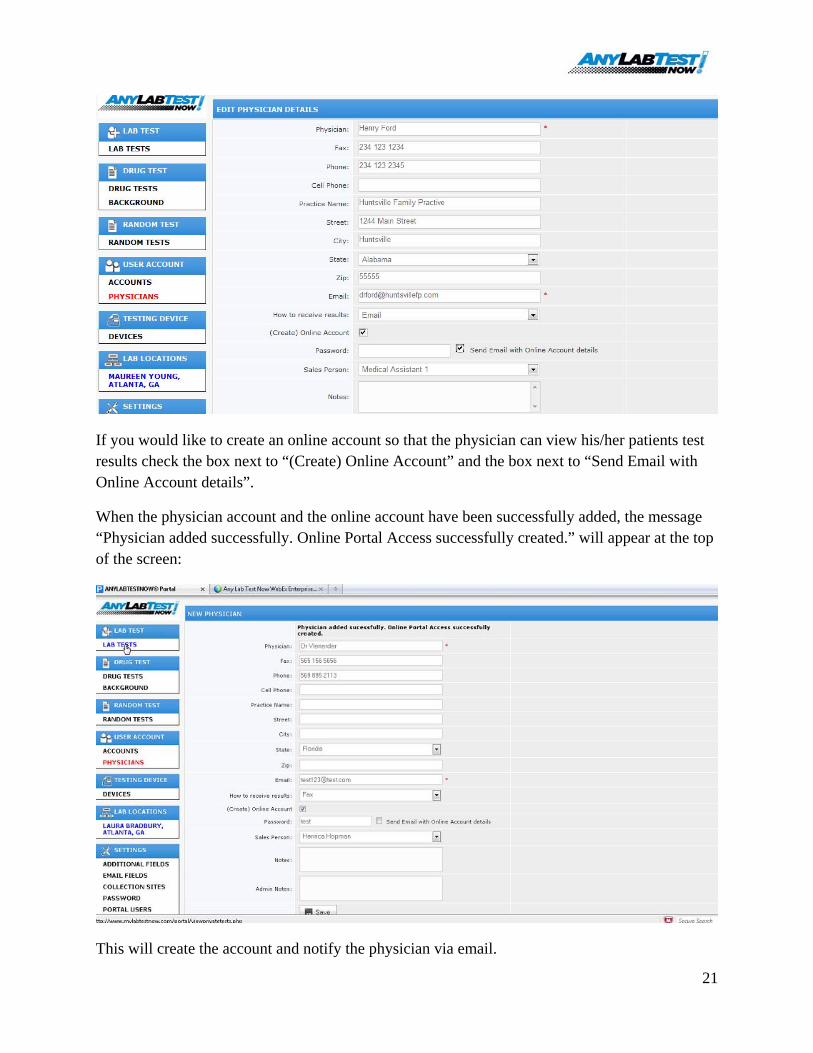
If you would like to create an online account so that the physician can view his/her patients test results check the box next to “(Create) Online Account” and the box next to “Send Email with Online Account details”.
When the physician account and the online account have been successfully added, the message “Physician added successfully. Online Portal Access successfully created.” will appear at the top of the screen:
This will create the account and notify the physician via email.

22
The physician will only be able to view results and will not be able to change anything.
ADD DRUG TEST (ADMINISTER A TEST) To request a new test for either a walk-in/individual or an employee of one or your accounts, go to the Drug Test section and click on “Drug Tests”. The main/opening page will open:
23
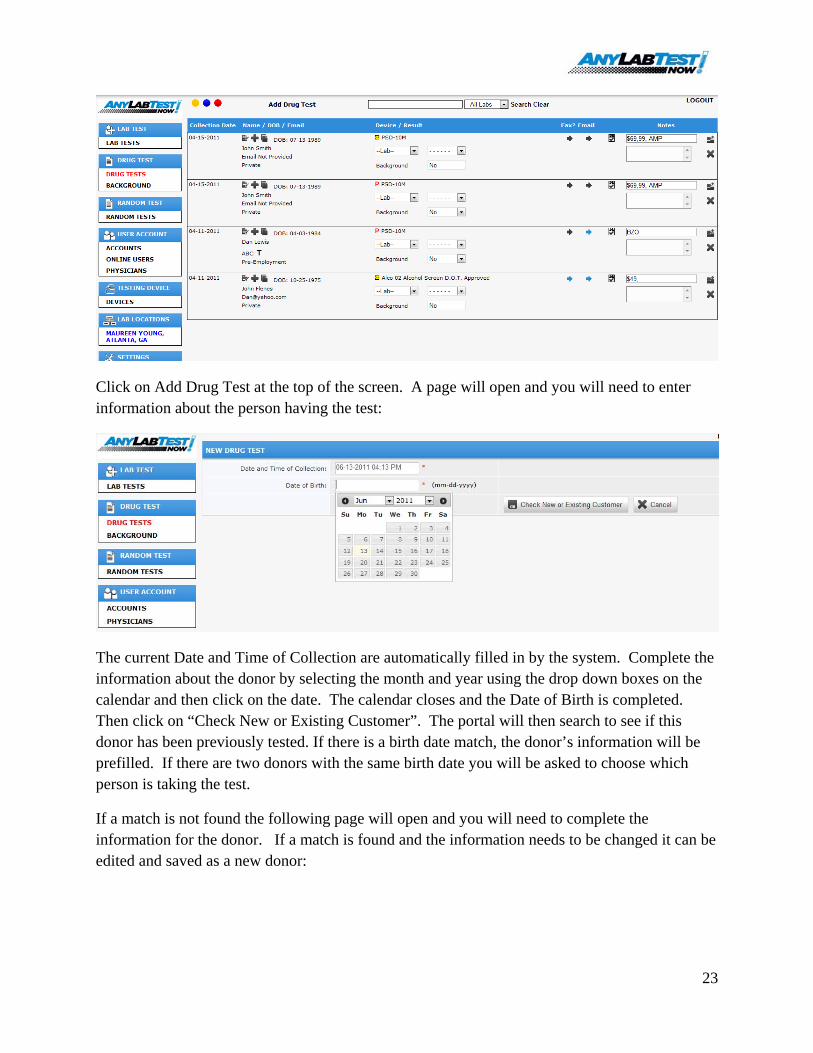
Click on Add Drug Test at the top of the screen. A page will open and you will need to enter information about the person having the test:
The current Date and Time of Collection are automatically filled in by the system. Complete the information about the donor by selecting the month and year using the drop down boxes on the calendar and then click on the date. The calendar closes and the Date of Birth is completed. Then click on “Check New or Existing Customer”. The portal will then search to see if this donor has been previously tested. If there is a birth date match, the donor’s information will be prefilled. If there are two donors with the same birth date you will be asked to choose which person is taking the test.
If a match is not found the following page will open and you will need to complete the information for the donor. If a match is found and the information needs to be changed it can be edited and saved as a new donor:

24
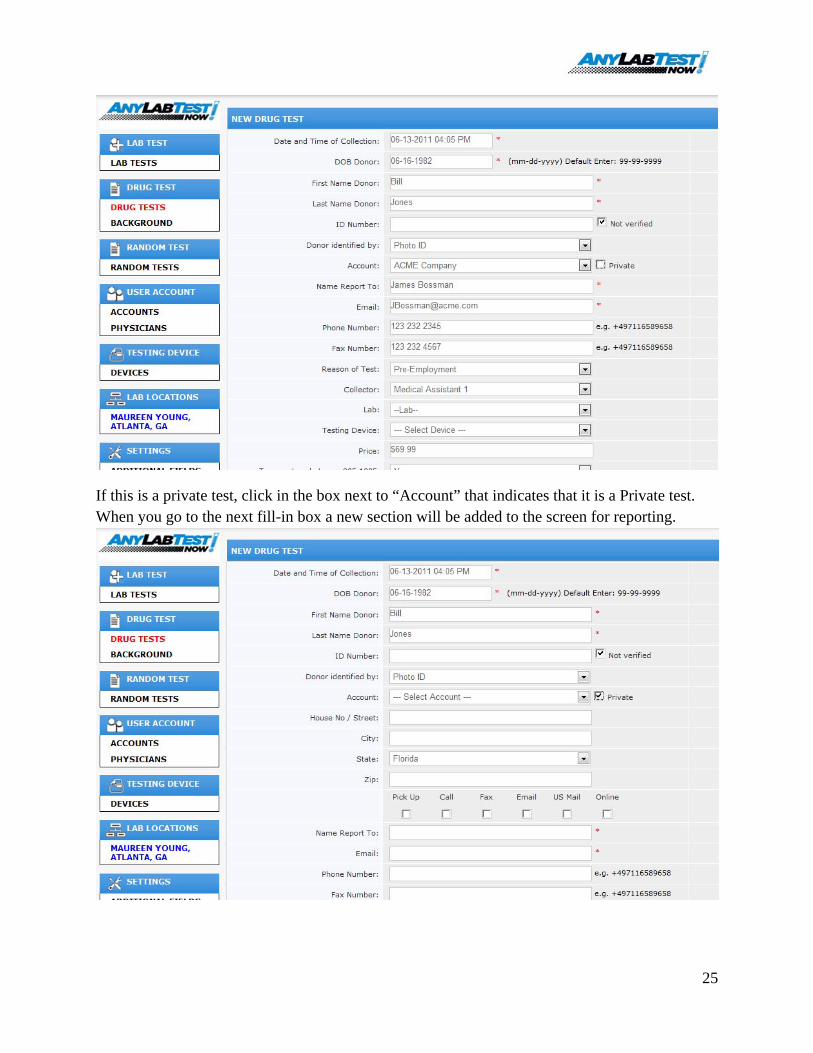
Select whether the donor is being tested for an account or is getting a private test. If the test is for a client account and you select the account, the account information will automatically be filled in after you select the account.
25
If this is a private test, click in the box next to “Account” that indicates that it is a Private test. When you go to the next fill-in box a new section will be added to the screen for reporting.

26
Fill out the demographic information and select the method of reporting that the individual has chosen: Pickup, Call, Fax, Email, US Mail, or Online.
If Online is selected, a new section will open.
You will need to select “Send Email with Online Access details” so that the customer will receive their login information in an email such as the one below:
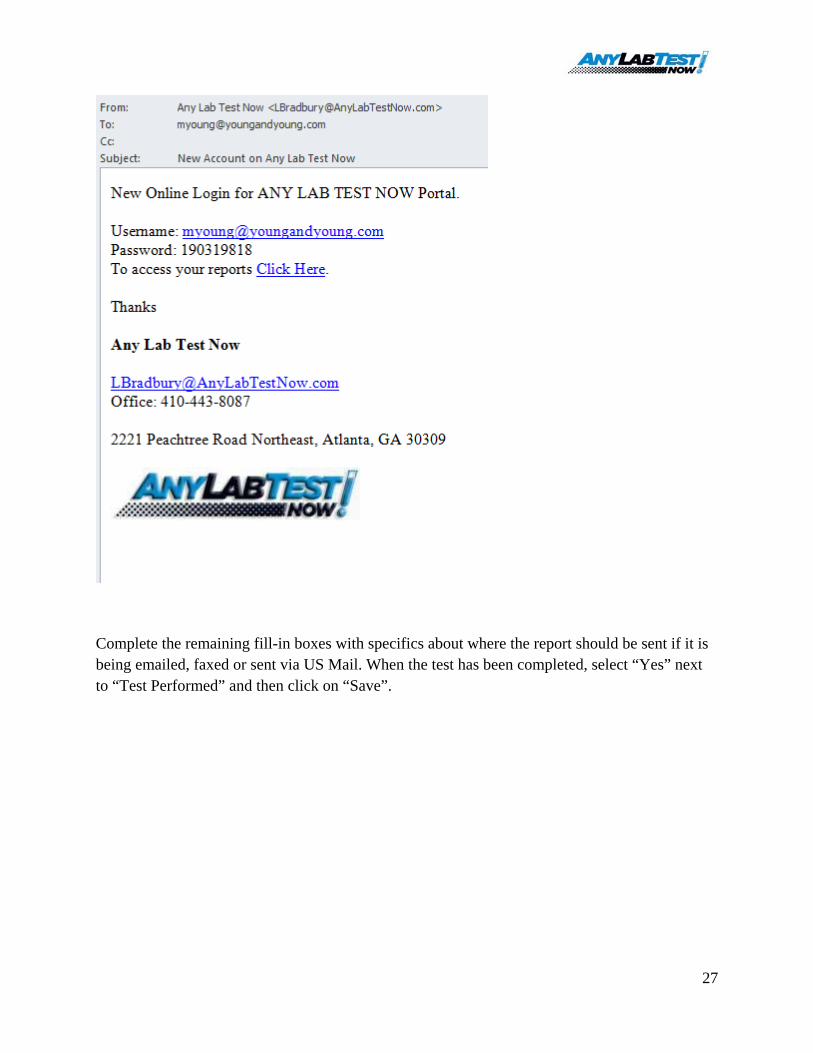
27
Complete the remaining fill-in boxes with specifics about where the report should be sent if it is being emailed, faxed or sent via US Mail. When the test has been completed, select “Yes” next to “Test Performed” and then click on “Save”.
28
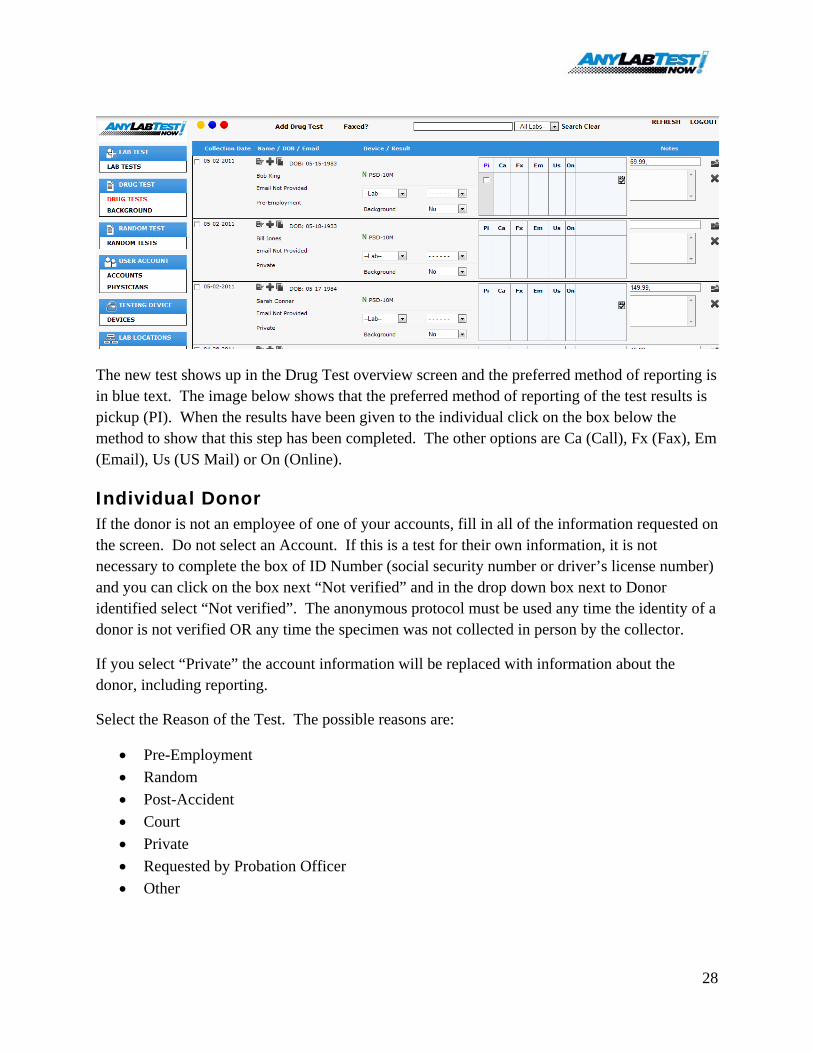
The new test shows up in the Drug Test overview screen and the preferred method of reporting is in blue text. The image below shows that the preferred method of reporting of the test results is pickup (PI). When the results have been given to the individual click on the box below the method to show that this step has been completed. The other options are Ca (Call), Fx (Fax), Em (Email), Us (US Mail) or On (Online).
Individual Donor If the donor is not an employee of one of your accounts, fill in all of the information requested on the screen. Do not select an Account. If this is a test for their own information, it is not necessary to complete the box of ID Number (social security number or driver’s license number) and you can click on the box next “Not verified” and in the drop down box next to Donor identified select “Not verified”. The anonymous protocol must be used any time the identity of a donor is not verified OR any time the specimen was not collected in person by the collector.
If you select “Private” the account information will be replaced with information about the donor, including reporting.
Select the Reason of the Test. The possible reasons are:
• Pre-Employment • Random • Post-Accident • Court • Private • Requested by Probation Officer • Other
29
Select the MA/user administering the test, the lab you will be using for the test, the specific Device/Panel you will be administering. Only Devices that have been selected as “Visible” from your Device list will appear in the drop down box. Enter the price of the Device.
Verify the lot number and expiration date of the specific device you are using. This information will be prefilled with the last entered information as it rarely changes, however it should be verified for each test.
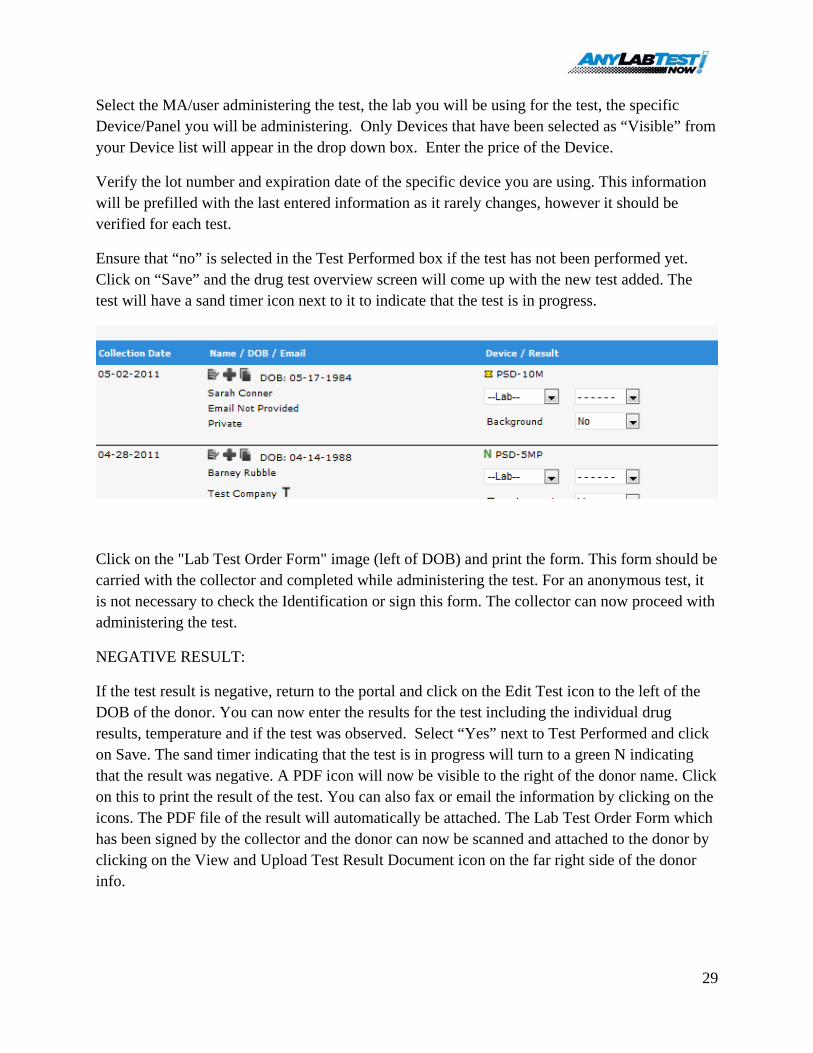
Ensure that “no” is selected in the Test Performed box if the test has not been performed yet. Click on “Save” and the drug test overview screen will come up with the new test added. The test will have a sand timer icon next to it to indicate that the test is in progress.
Click on the "Lab Test Order Form" image (left of DOB) and print the form. This form should be carried with the collector and completed while administering the test. For an anonymous test, it is not necessary to check the Identification or sign this form. The collector can now proceed with administering the test.
NEGATIVE RESULT:
If the test result is negative, return to the portal and click on the Edit Test icon to the left of the DOB of the donor. You can now enter the results for the test including the individual drug results, temperature and if the test was observed. Select “Yes” next to Test Performed and click on Save. The sand timer indicating that the test is in progress will turn to a green N indicating that the result was negative. A PDF icon will now be visible to the right of the donor name. Click on this to print the result of the test. You can also fax or email the information by clicking on the icons. The PDF file of the result will automatically be attached. The Lab Test Order Form which has been signed by the collector and the donor can now be scanned and attached to the donor by clicking on the View and Upload Test Result Document icon on the far right side of the donor info.

30
PRESUMPTIVE POSITIVE RESULT:
If the rapid test result is presumptive positive, a confirmation test should be ordered for any result that will be used for legal purposes or purposes of employment. The donor and the collector should both have visual contact with the specimen until the lab specimen bag is sealed in order to ensure the chain of custody will be kept intact. Select an Alere Onsite Drug Testing Custody and Control form. Complete the form indicating in step six only the drugs that should be confirmed. Place a 30 mL aliquot of the screened urine into a single specimen bottle and seal that bottle with the label on the form. The collector and the donor should also complete the Lab Test Order Form.
Return to the portal and click on the Edit Test icon to the left of the donor’s name. You can now enter the results for the test including the individual drug results, temperature and if the test was observed. Select “Yes” next to Test Performed and click on Save. The sand timer indicating that the test is in progress will turn to a red P indicating that the screen result was presumptive positive. This result is not the final result.
The list of recently administered tests (the main Drug Tests screen) opens and the new test is shown at the top of the list. Notice that positive test results appear with a red P and negative results are indicated with a Green N.
Next, select a lab from the Lab drop down menu underneath the red P. A sand timer will appear indicating that the lab test is in progress. When the result comes back from the lab, select the result, which will be the final result, from the drop down menu to the right of the lab. A red P will appear to the left of the lab if the result was positive.
Attach a PDF copy of the lab result by clicking on the blue envelope icon that now appears next to the lab and the positive that you have selected in the dropdown box, and the choice to report the results (e.g., email or fax) will appear.
31
Email or fax the lab result to the customer.
A PDF icon will now be visible to the right of the donor name. Click on this to print the result of the test. You can also fax or email the information by clicking on the icons. The PDF file of the result will automatically be attached. The Lab Test Order Form which has been signed by the collector and the donor can now be scanned and attached to the donor by clicking on the View and Upload Test Result Document icon on the far right side of the donor info.
Print, fax or email the test results as requested by the customer. See instructions below.
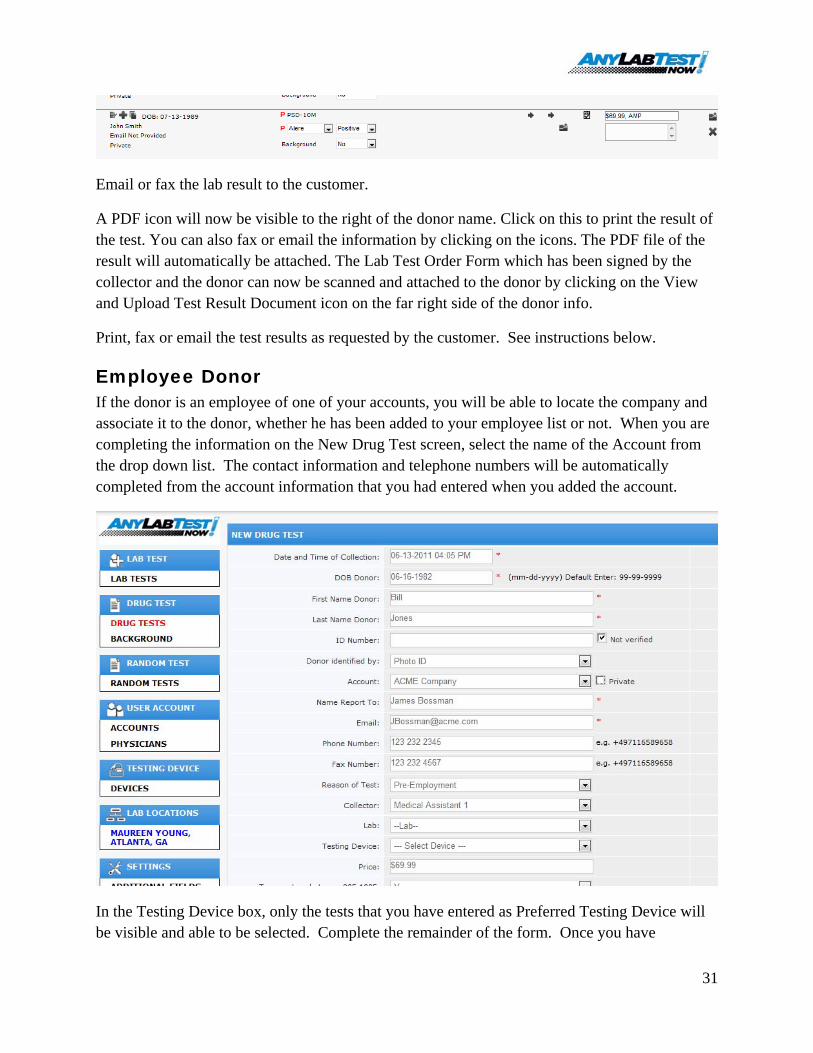
Employee Donor If the donor is an employee of one of your accounts, you will be able to locate the company and associate it to the donor, whether he has been added to your employee list or not. When you are completing the information on the New Drug Test screen, select the name of the Account from the drop down list. The contact information and telephone numbers will be automatically completed from the account information that you had entered when you added the account.
In the Testing Device box, only the tests that you have entered as Preferred Testing Device will be visible and able to be selected. Complete the remainder of the form. Once you have
32
administered the test and completed all of the information on the screen regarding the test results select “Yes” next to Test Performed and click on “Save”.
The drug test will now appear in your list of recent drug tests will appear on the screen. Proceed to print, fax or email the test results as appropriate for the account.
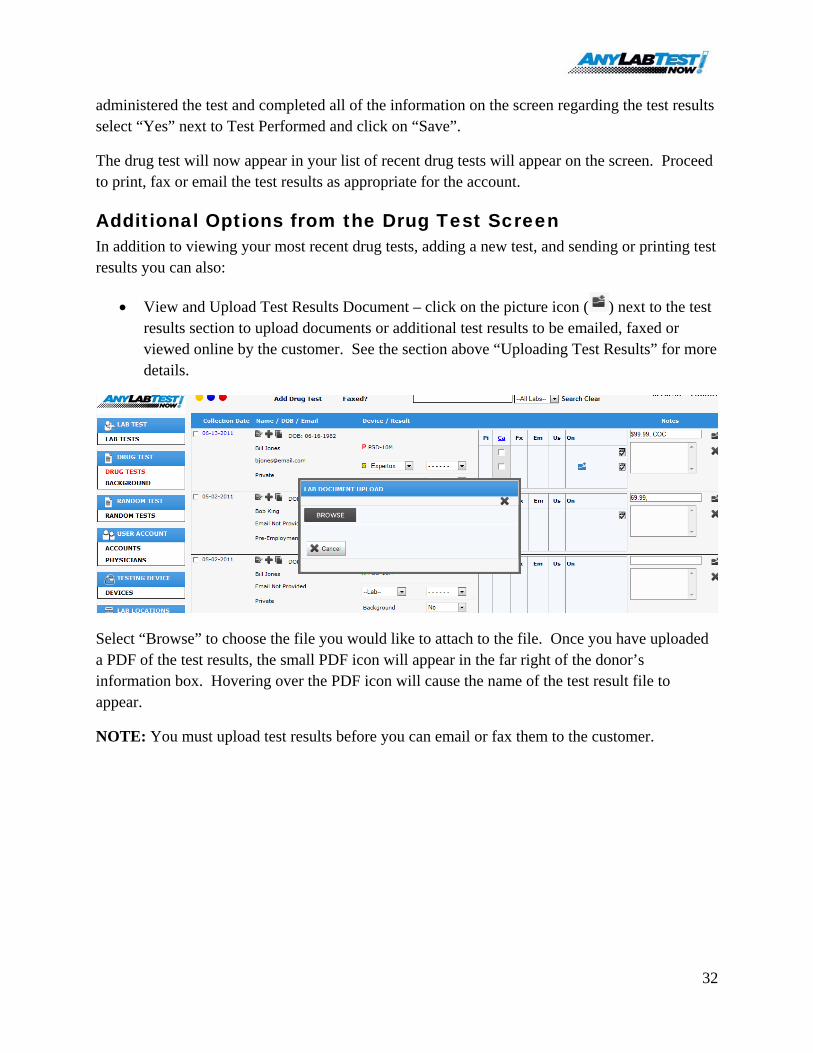
Additional Options from the Drug Test Screen In addition to viewing your most recent drug tests, adding a new test, and sending or printing test results you can also:
• View and Upload Test Results Document – click on the picture icon ( ) next to the test results section to upload documents or additional test results to be emailed, faxed or viewed online by the customer. See the section above “Uploading Test Results” for more details.
Select “Browse” to choose the file you would like to attach to the file. Once you have uploaded a PDF of the test results, the small PDF icon will appear in the far right of the donor’s information box. Hovering over the PDF icon will cause the name of the test result file to appear.
NOTE: You must upload test results before you can email or fax them to the customer.

33
• Upload Background Check document – From the Drug Test Screen, select “Yes” next to Background. A new document icon will appear next to the Background selection. Click on the document icon and the following screen will appear:
Select “Browse” to navigate to the Background document you would like to upload.
• Edit Test – Select the edit icon ( ) next to the donor’s name to edit or change the test results. The following screen will open allowing you to make changes:
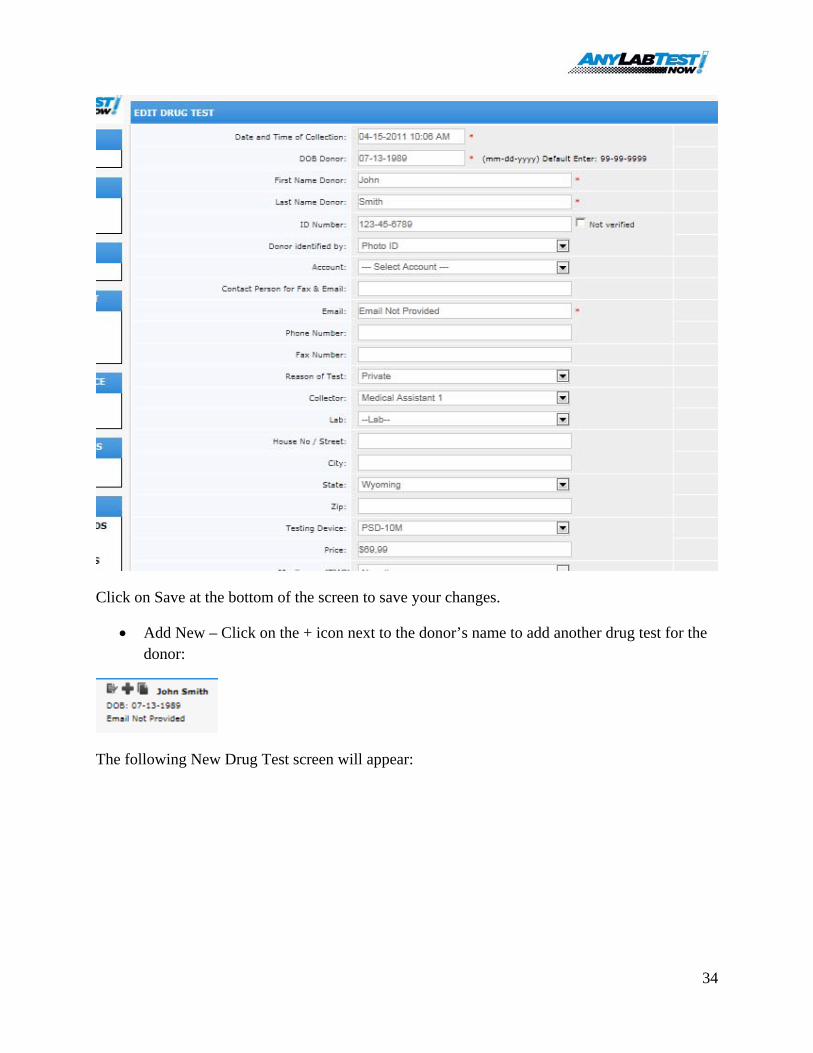
34
Click on Save at the bottom of the screen to save your changes.
• Add New – Click on the + icon next to the donor’s name to add another drug test for the donor:
The following New Drug Test screen will appear:

35
Click on Save after entering your information and administering the test to complete the new test.
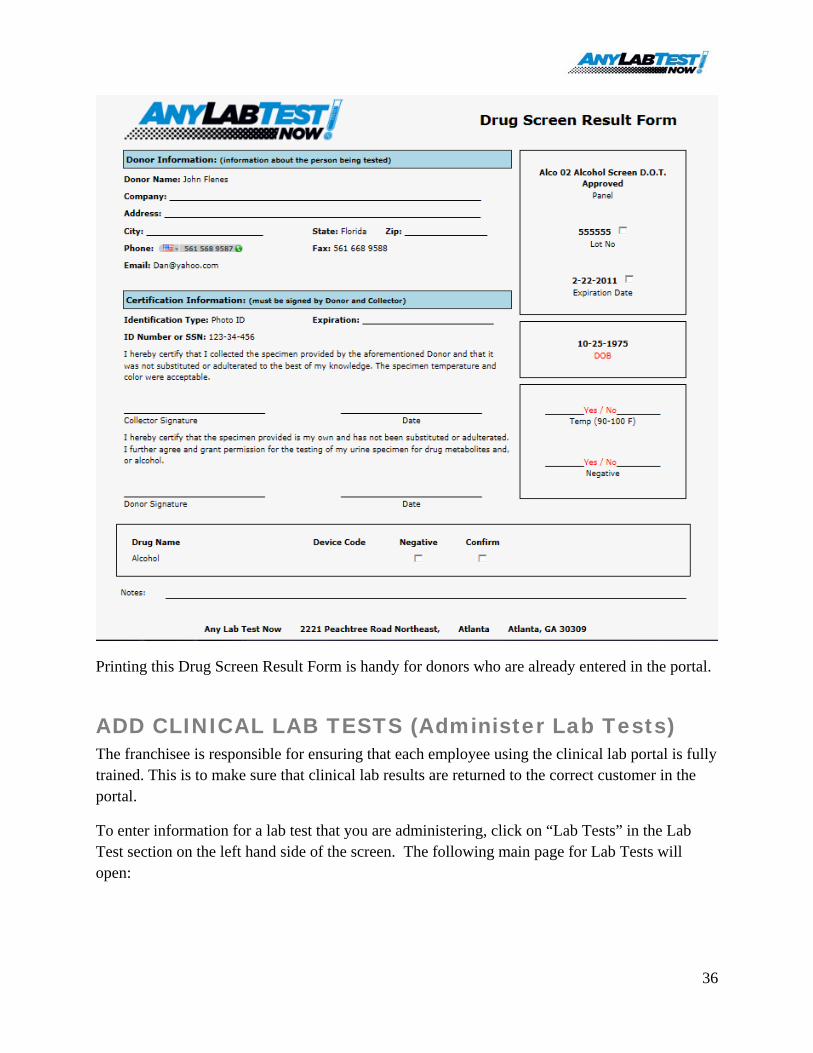
• Lab Test Order Form – Click on the page icon next to the donor’s name to open the Drug Screen Result Form. This form is used to note negative / presumed positives lab test results during the instant test. Print the form and conduct the drug test. Once the Instant test is completed update the information in the portal by following the directions for testing an individual donor.
36
Printing this Drug Screen Result Form is handy for donors who are already entered in the portal.
ADD CLINICAL LAB TESTS (Administer Lab Tests) The franchisee is responsible for ensuring that each employee using the clinical lab portal is fully trained. This is to make sure that clinical lab results are returned to the correct customer in the portal.
To enter information for a lab test that you are administering, click on “Lab Tests” in the Lab Test section on the left hand side of the screen. The following main page for Lab Tests will open:
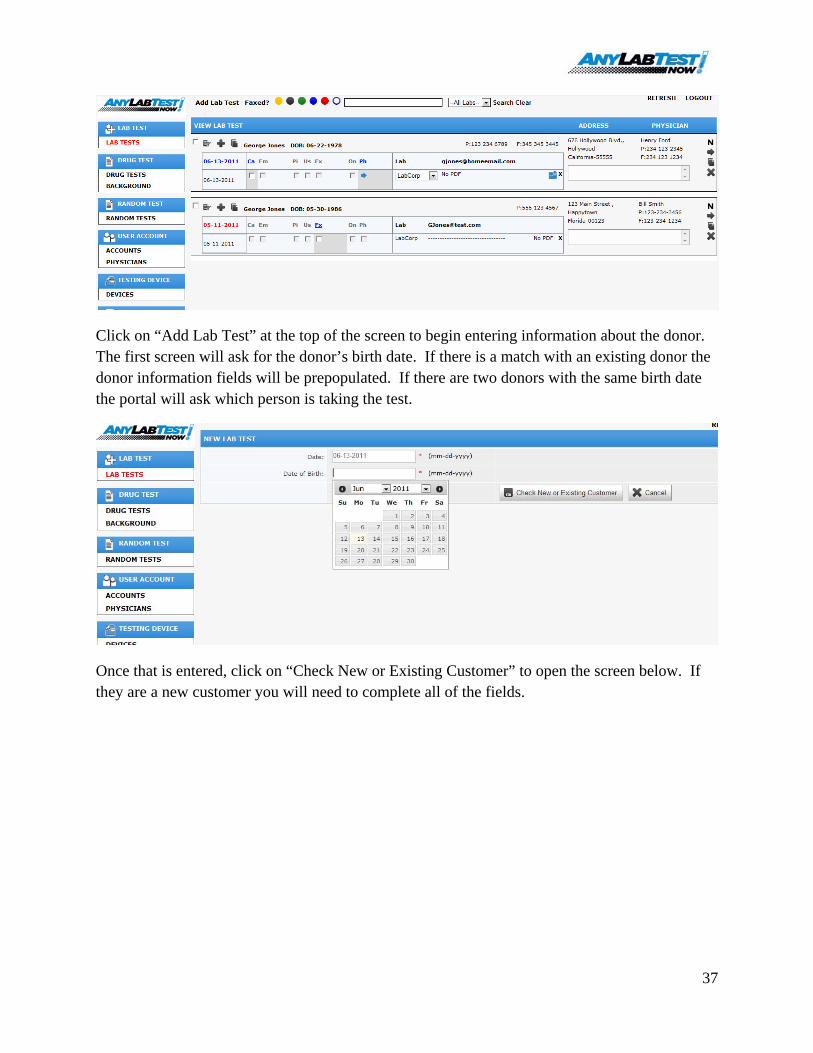
37
Click on “Add Lab Test” at the top of the screen to begin entering information about the donor. The first screen will ask for the donor’s birth date. If there is a match with an existing donor the donor information fields will be prepopulated. If there are two donors with the same birth date the portal will ask which person is taking the test.
Once that is entered, click on “Check New or Existing Customer” to open the screen below. If they are a new customer you will need to complete all of the fields.

38
Complete the information required about the donor. If they were referred by a doctor and you have previously entered the doctor’s information they will appear in the dropdown box.
If you would like to enter a new doctor who referred this customer, click on “Add New” in blue text to the right of the Physician box. A screen will open in which you should enter the name, fax number and phone number of the physician. Click on “Save” to add the physician’s information.
Continue to complete the bottom portion of the screen. Select the lab for the test, how many days the test will take for results to be available and if it is an STD test, check the box next to STD. This information is necessary for the correct release of STD results. Click on “Save” to add the test and customer information to the portal.
39
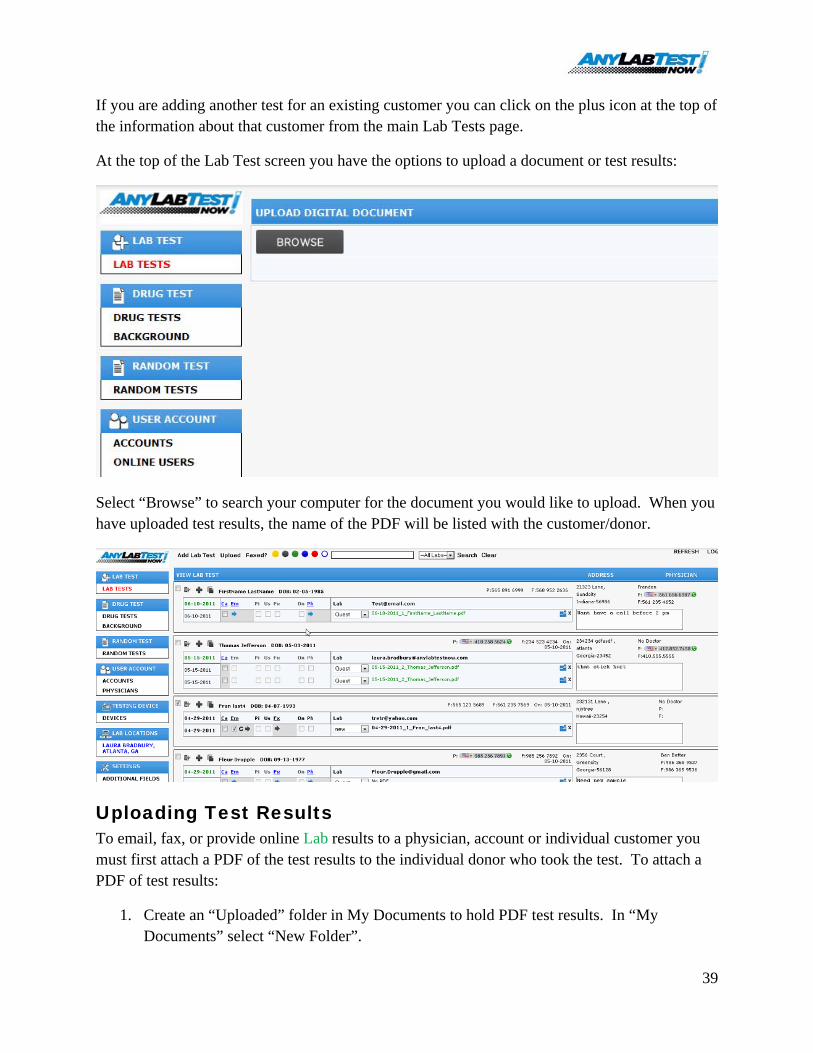
If you are adding another test for an existing customer you can click on the plus icon at the top of the information about that customer from the main Lab Tests page.
At the top of the Lab Test screen you have the options to upload a document or test results:
Select “Browse” to search your computer for the document you would like to upload. When you have uploaded test results, the name of the PDF will be listed with the customer/donor.
Uploading Test Results To email, fax, or provide online Lab results to a physician, account or individual customer you must first attach a PDF of the test results to the individual donor who took the test. To attach a PDF of test results:
1. Create an “Uploaded” folder in My Documents to hold PDF test results. In “My Documents” select “New Folder”.

40
2. Name the new folder, Upload.

41
3. Download the test results from the lab and save the PDF in the new Upload folder. To ensure that the correct result is attached to the customer, when saving the result from the clinical lab, you must save the result with the customer’s birth date in the file name. Be especially careful that you are attaching the proper result to the customer. Sending the result of another customer is a HIPPA violation.
4. Finally, attach the PDF to the appropriate donor by clicking on the icon ( ) next to the donor’s information. The box below will open allowing you to browse to the PDF that you downloaded from the lab site and uploaded and saved in your Upload folder.
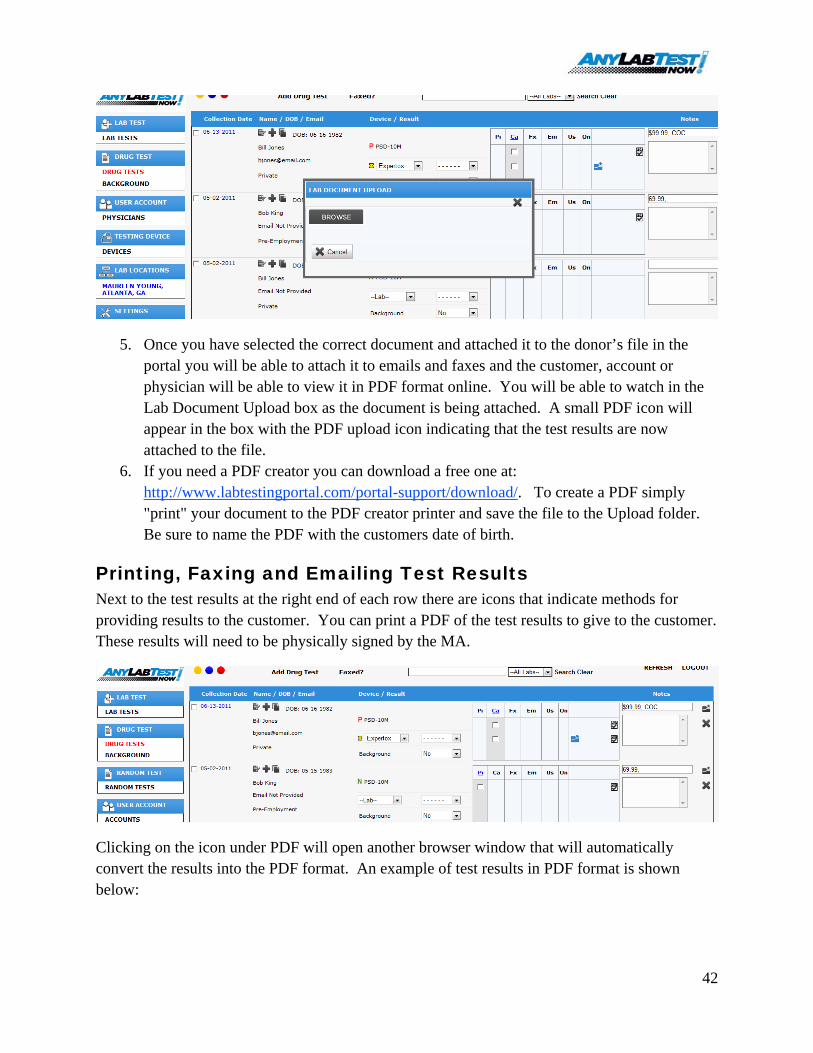
42
5. Once you have selected the correct document and attached it to the donor’s file in the portal you will be able to attach it to emails and faxes and the customer, account or physician will be able to view it in PDF format online. You will be able to watch in the Lab Document Upload box as the document is being attached. A small PDF icon will appear in the box with the PDF upload icon indicating that the test results are now attached to the file.
6. If you need a PDF creator you can download a free one at: http://www.labtestingportal.com/portal-support/download/. To create a PDF simply "print" your document to the PDF creator printer and save the file to the Upload folder. Be sure to name the PDF with the customers date of birth.
Printing, Faxing and Emailing Test Results Next to the test results at the right end of each row there are icons that indicate methods for providing results to the customer. You can print a PDF of the test results to give to the customer. These results will need to be physically signed by the MA.
Clicking on the icon under PDF will open another browser window that will automatically convert the results into the PDF format. An example of test results in PDF format is shown below:

43
Under Fax and Email options there are arrow icons. Clicking on these will launch screens for sending the test results automatically. The blue arrow indicates the preferred method for receiving results.
To fax results you will need to set up the online faxing service with Interfax. To open your online fax account, visit the Interfax website:
www.Interfax.net
You will be provided with a username and password for use in the system for faxing test results. You will need to enter your username and password for faxing test results in the Setting section.
44
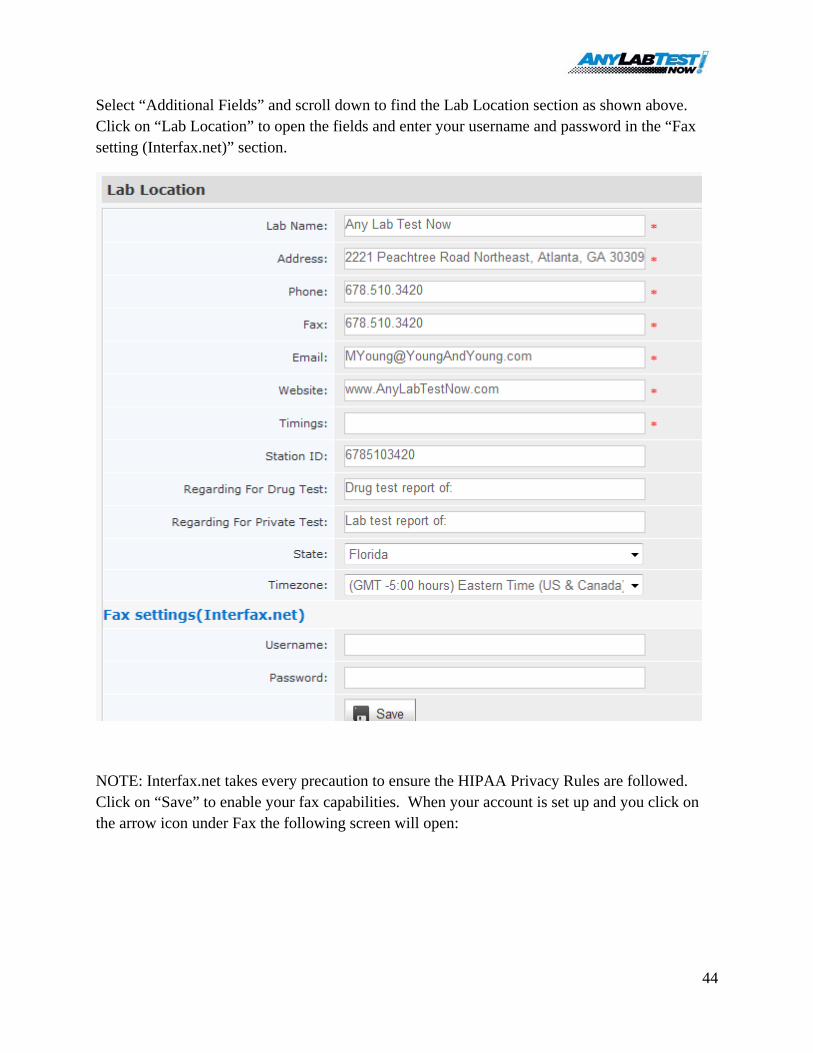
Select “Additional Fields” and scroll down to find the Lab Location section as shown above. Click on “Lab Location” to open the fields and enter your username and password in the “Fax setting (Interfax.net)” section.
NOTE: Interfax.net takes every precaution to ensure the HIPAA Privacy Rules are followed. Click on “Save” to enable your fax capabilities. When your account is set up and you click on the arrow icon under Fax the following screen will open:
45
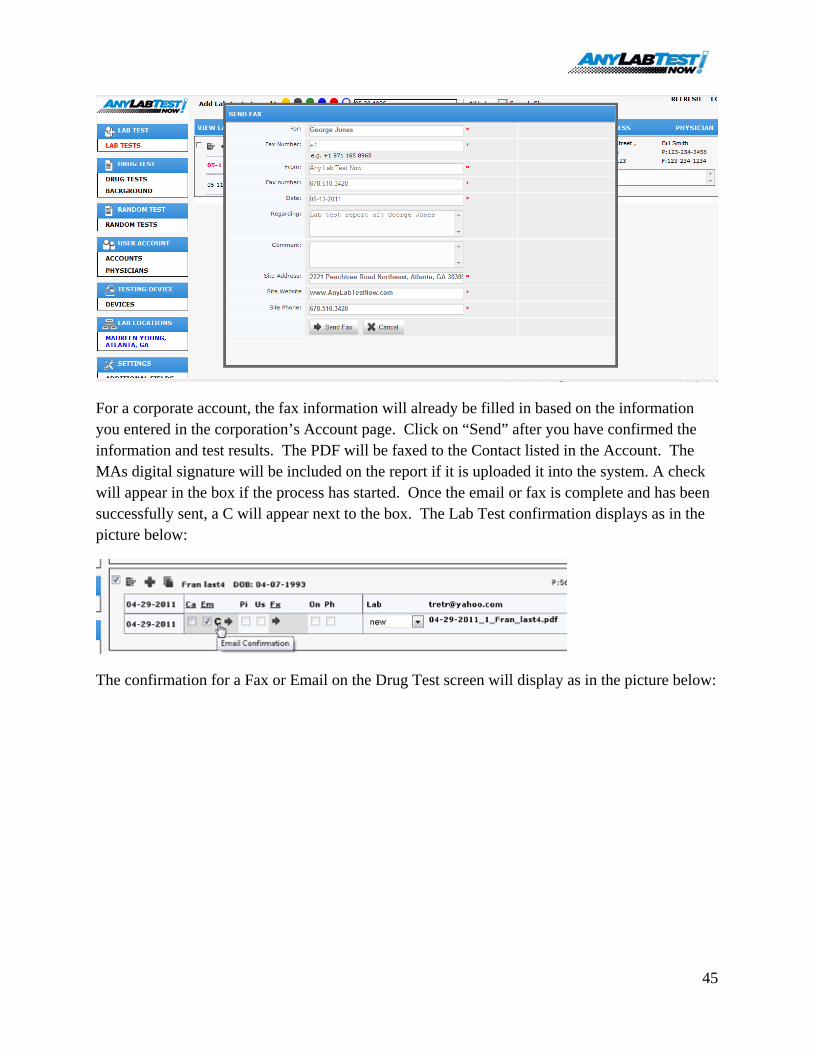
For a corporate account, the fax information will already be filled in based on the information you entered in the corporation’s Account page. Click on “Send” after you have confirmed the information and test results. The PDF will be faxed to the Contact listed in the Account. The MAs digital signature will be included on the report if it is uploaded it into the system. A check will appear in the box if the process has started. Once the email or fax is complete and has been successfully sent, a C will appear next to the box. The Lab Test confirmation displays as in the picture below:
The confirmation for a Fax or Email on the Drug Test screen will display as in the picture below:

46
Clicking on the “C” under Email or Fax will display a fax/email confirmation page showing the date and time the fax/email was sent.
To email test results, click on the arrow icon under Email. The following screen will appear:
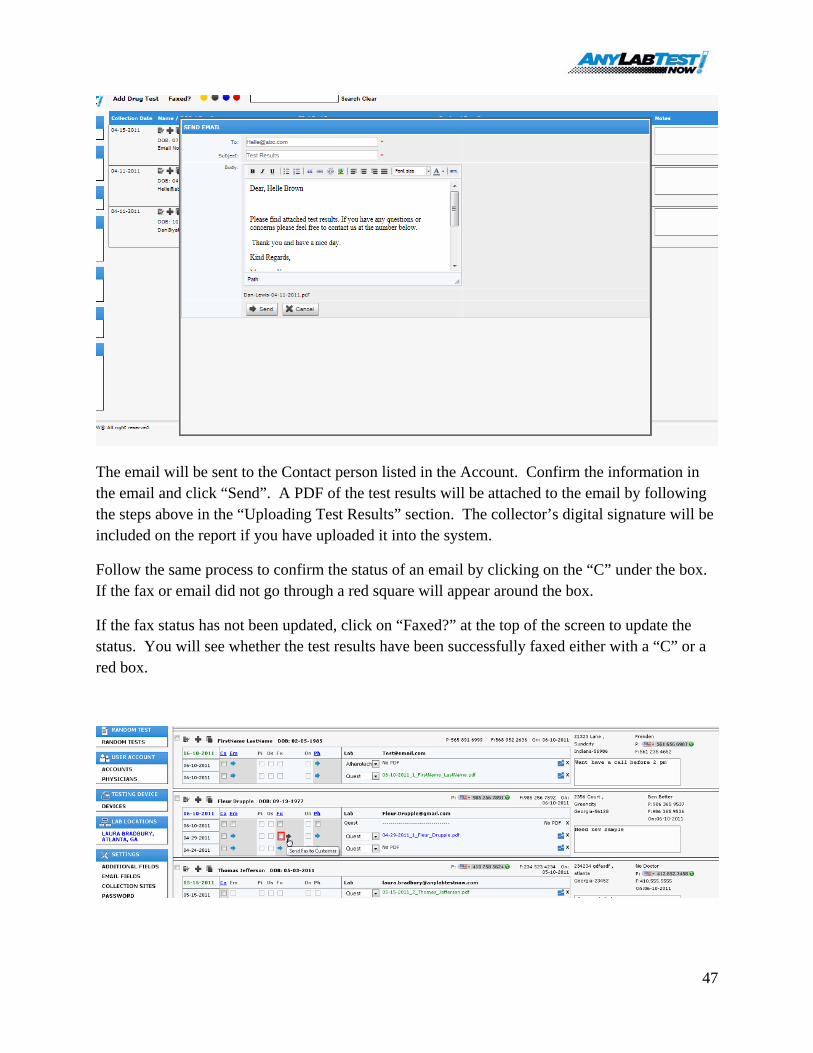
47
The email will be sent to the Contact person listed in the Account. Confirm the information in the email and click “Send”. A PDF of the test results will be attached to the email by following the steps above in the “Uploading Test Results” section. The collector’s digital signature will be included on the report if you have uploaded it into the system.
Follow the same process to confirm the status of an email by clicking on the “C” under the box. If the fax or email did not go through a red square will appear around the box.
If the fax status has not been updated, click on “Faxed?” at the top of the screen to update the status. You will see whether the test results have been successfully faxed either with a “C” or a red box.
48
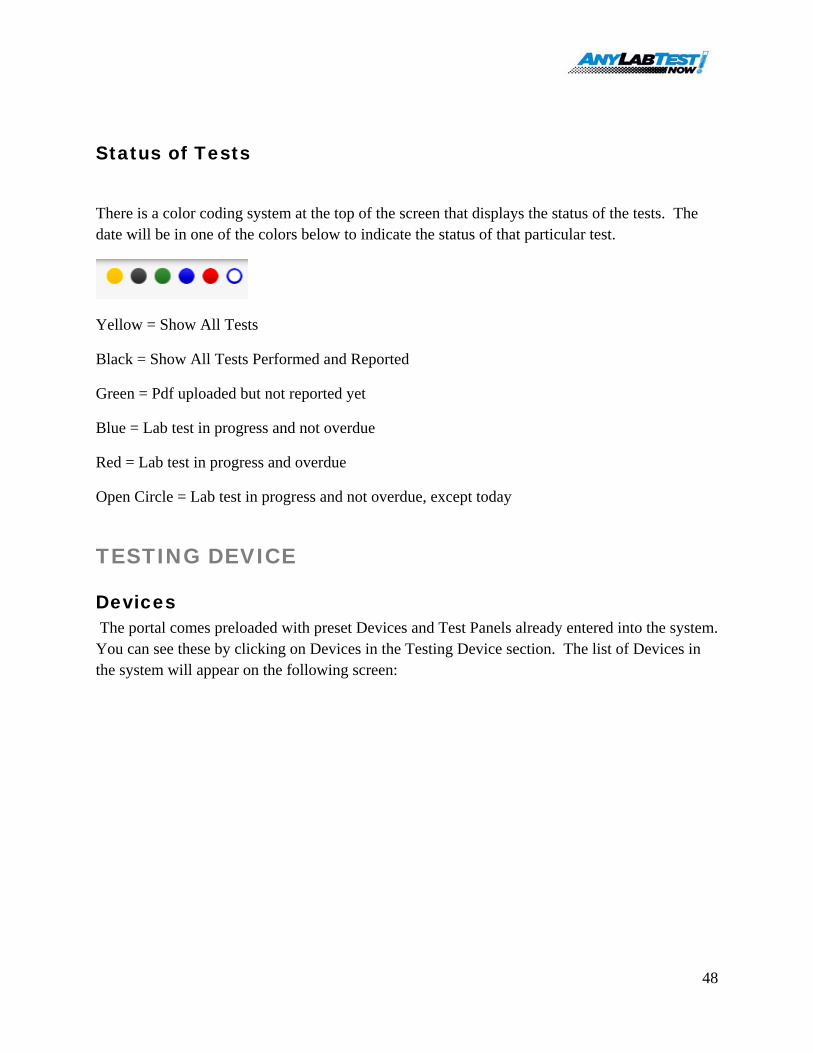
Status of Tests
There is a color coding system at the top of the screen that displays the status of the tests. The date will be in one of the colors below to indicate the status of that particular test.
Yellow = Show All Tests
Black = Show All Tests Performed and Reported
Green = Pdf uploaded but not reported yet
Blue = Lab test in progress and not overdue
Red = Lab test in progress and overdue
Open Circle = Lab test in progress and not overdue, except today
TESTING DEVICE
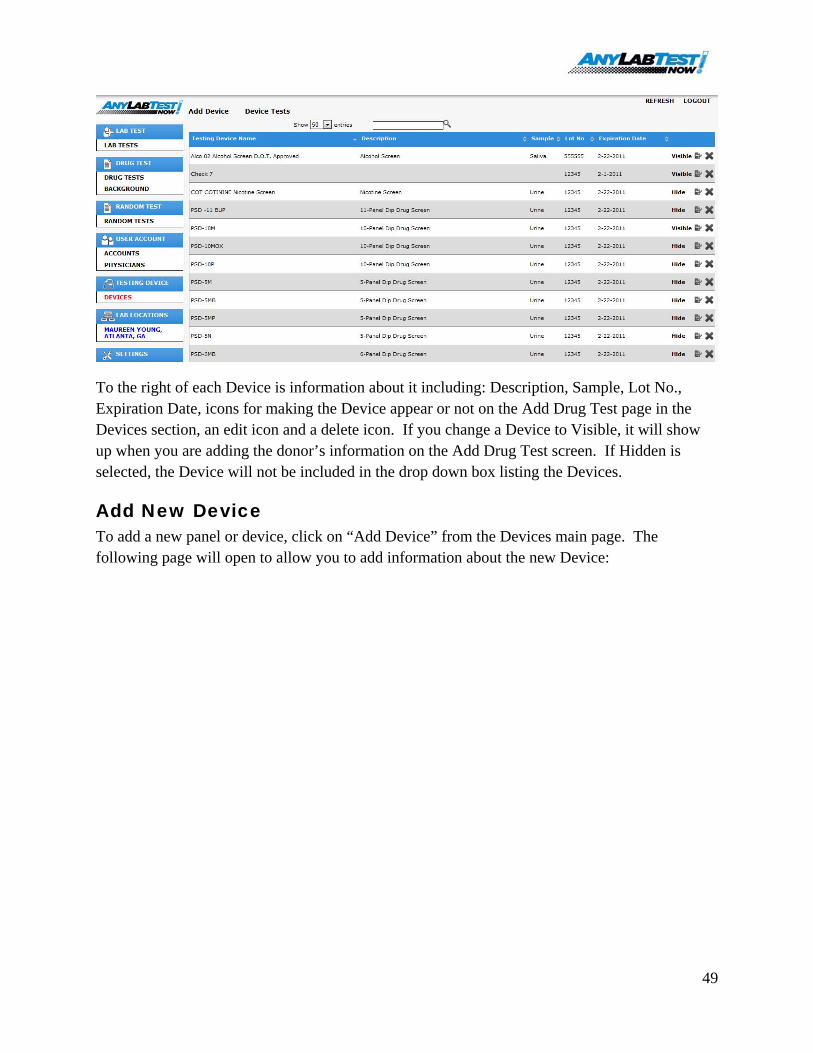
Devices The portal comes preloaded with preset Devices and Test Panels already entered into the system. You can see these by clicking on Devices in the Testing Device section. The list of Devices in the system will appear on the following screen:
49
To the right of each Device is information about it including: Description, Sample, Lot No., Expiration Date, icons for making the Device appear or not on the Add Drug Test page in the Devices section, an edit icon and a delete icon. If you change a Device to Visible, it will show up when you are adding the donor’s information on the Add Drug Test screen. If Hidden is selected, the Device will not be included in the drop down box listing the Devices.
Add New Device To add a new panel or device, click on “Add Device” from the Devices main page. The following page will open to allow you to add information about the new Device:
50
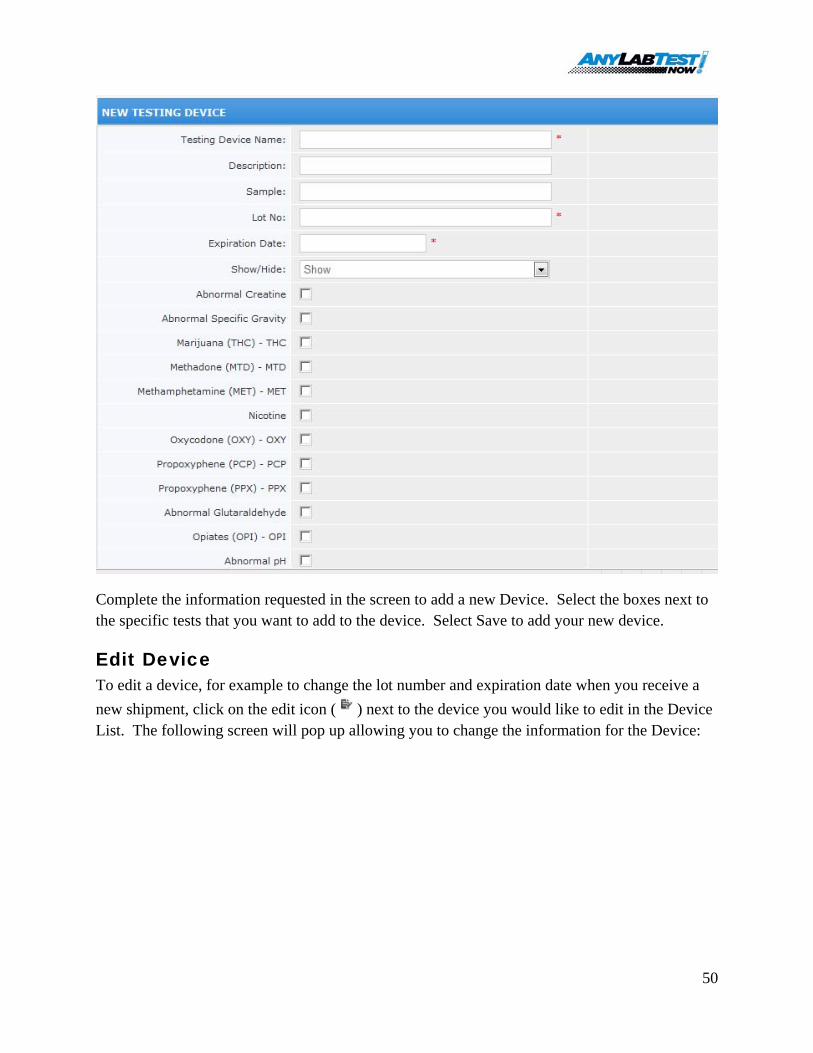
Complete the information requested in the screen to add a new Device. Select the boxes next to the specific tests that you want to add to the device. Select Save to add your new device.
Edit Device To edit a device, for example to change the lot number and expiration date when you receive a new shipment, click on the edit icon ( ) next to the device you would like to edit in the Device List. The following screen will pop up allowing you to change the information for the Device:

51
Complete the requested information and click on “Save”. Your changes will now appear for the Device in the Device List.
Device Tests To view or make changes to the specific tests click on “Device Tests” at the top of the Device Tests screen. The following list of specific tests will appear:

52
From this screen you have ability add, delete or edit a Device Test. To edit a test click on the edit icon to the right of the test name. The following screen will open allowing you to make changes. Click on “Save” when you have finished making changes and edits.
To add a new Device Test, click on “Add Device Test” in the upper left hand corner of the Device Test list. The screen below will open:
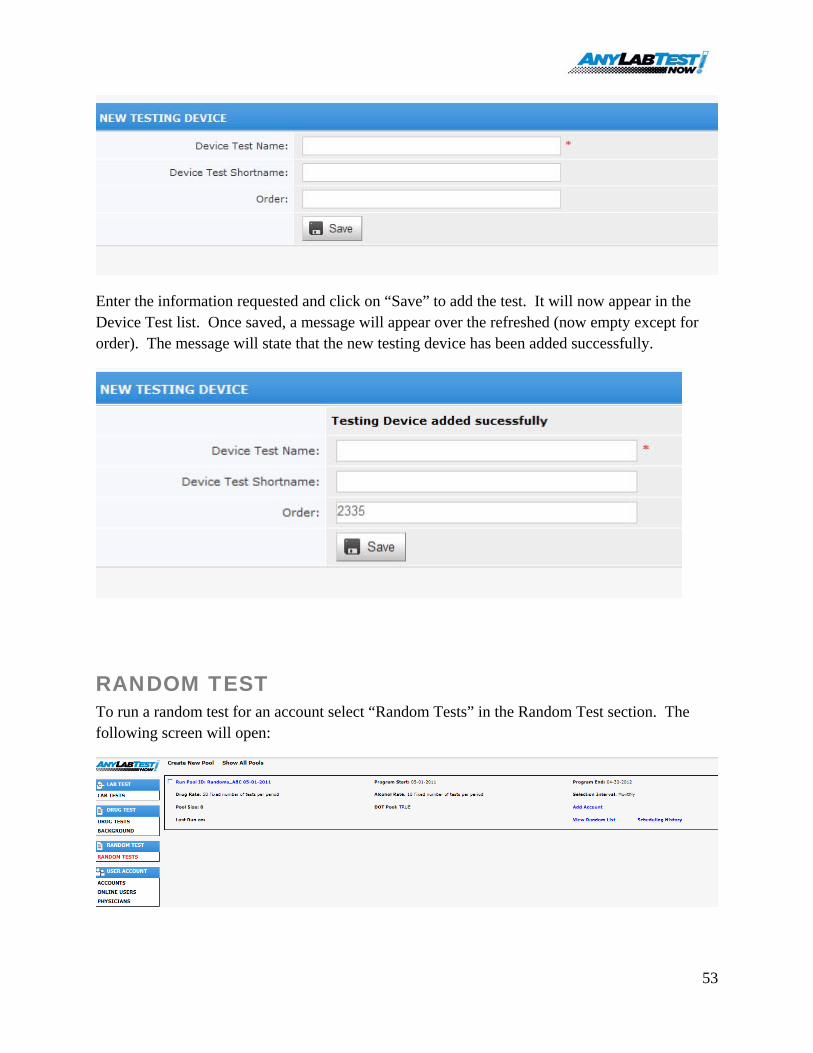
53
Enter the information requested and click on “Save” to add the test. It will now appear in the Device Test list. Once saved, a message will appear over the refreshed (now empty except for order). The message will state that the new testing device has been added successfully.
RANDOM TEST To run a random test for an account select “Random Tests” in the Random Test section. The following screen will open:
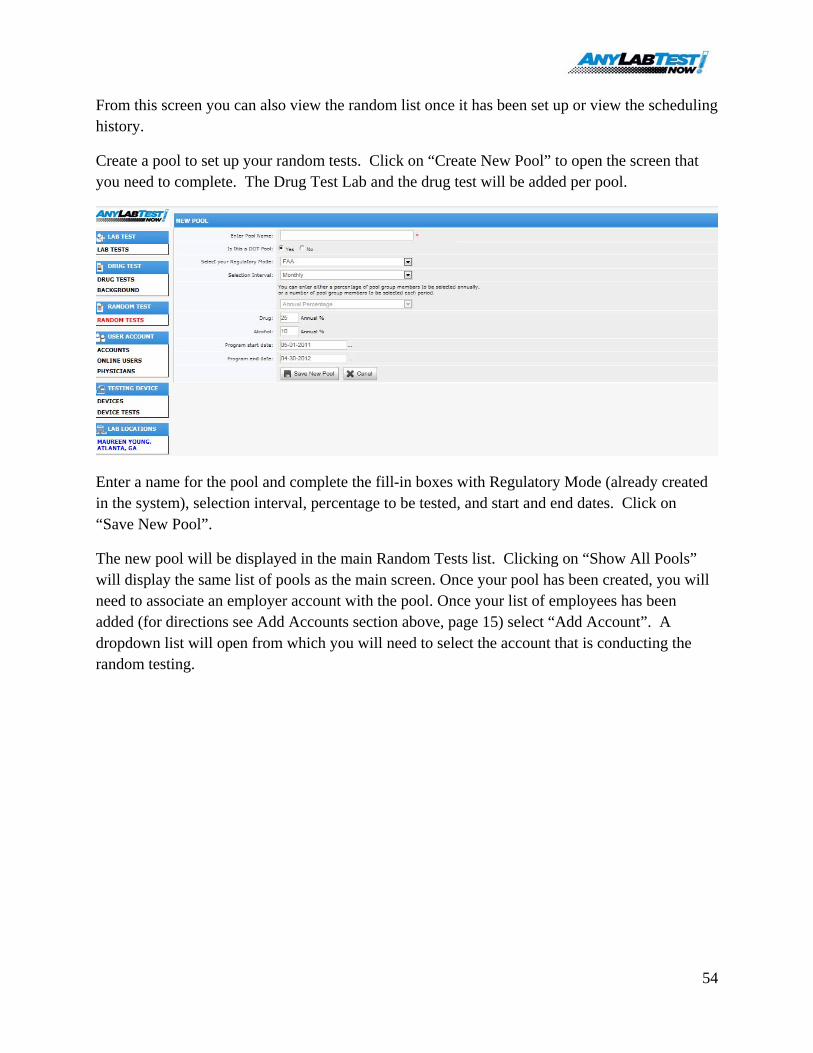
54
From this screen you can also view the random list once it has been set up or view the scheduling history.
Create a pool to set up your random tests. Click on “Create New Pool” to open the screen that you need to complete. The Drug Test Lab and the drug test will be added per pool.
Enter a name for the pool and complete the fill-in boxes with Regulatory Mode (already created in the system), selection interval, percentage to be tested, and start and end dates. Click on “Save New Pool”.
The new pool will be displayed in the main Random Tests list. Clicking on “Show All Pools” will display the same list of pools as the main screen. Once your pool has been created, you will need to associate an employer account with the pool. Once your list of employees has been added (for directions see Add Accounts section above, page 15) select “Add Account”. A dropdown list will open from which you will need to select the account that is conducting the random testing.

55
Click on the box next to Run Pool ID. This will generate a list of employees who need to be tested randomly for the new period. The Run Pool ID link will turn red once the new random test period has started. You can look up previous pool runs and update status for employees who came in to get the drug test using the "View Random List" link. In "Scheduling History" you can look up general statistical random pool data.
BACKGROUND The Background option, listed under Drug Test is a link to BCS Background Screening, LLC. The company can conduct Background checks on prospective employees for your Accounts/Employers. You will need to open an account with them to purchase this service.
56
SEARCH BOX Medical Assistants and Franchise Owners have access to the search box and can use it to locate the results for a specific customer or account.
In the header of each screen there is a search box which will search anything in the database. This box appears on the following screens:
• Lab Tests • Accounts • Physicians • Devices • Collection Sites • Portal Users
57
SUPPORT For questions and support on how to access and use the Portal, please send an email to:
For help online go to: http://www.labtestingportal.com/portal-support/help/
Or call 561-213-4002 for immediate assistance.
FREQUENTLY ASKED QUESTIONS
What if I have a customer who sends employees to multiple locations in my area?
Go to the FAQ section on the website. The address is: http://www.labtestingportal.com/portal-support/faq/


![[Toxicology] toxicology introduction](https://img.pdfslide.net/doc/110x75/55c46616bb61ebb3478b4643/toxicology-toxicology-introduction.jpg)