Embed Size (px)
Citation preview
Handbook for the SX-46 Full Frame camera Issue 2, 22nd March 2018
Trius SX-46CCD camera user manual
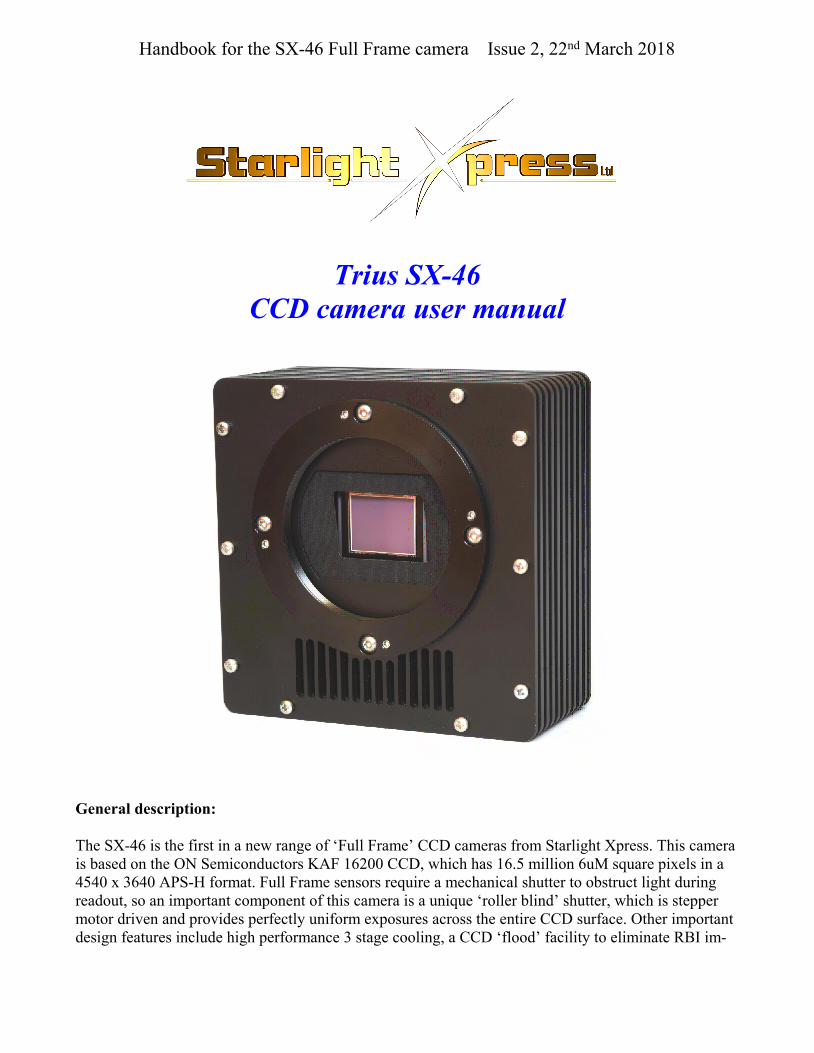
General description:
The SX-46 is the first in a new range of ‘Full Frame’ CCD cameras from Starlight Xpress. This camerais based on the ON Semiconductors KAF 16200 CCD, which has 16.5 million 6uM square pixels in a4540 x 3640 APS-H format. Full Frame sensors require a mechanical shutter to obstruct light duringreadout, so an important component of this camera is a unique ‘roller blind’ shutter, which is steppermotor driven and provides perfectly uniform exposures across the entire CCD surface. Other importantdesign features include high performance 3 stage cooling, a CCD ‘flood’ facility to eliminate RBI im-
Handbook for the SX-46 Full Frame camera Issue 2, 22nd March 2018
age residues and a unique coated synthetic sapphire front window to eliminate dewing by virtue of itsvery high thermal conductivity.
The SX-46 uses a high speed USB 2 interface with a fast 16 bit A/D converter to achieve a full framedownload time of less than 7 seconds in bin 1 x 1 mode. Power requirement is only 2 amps at 12v DC.
The SX-46 is housed in a 136 x 136 x 63 mm machined aluminium casing, with a 72 mm x 1 mm fe-male input thread. The CCD chamber is sealed by O rings and is filled with dry argon. Dual fans drawair through a grid of cooling fins to provide efficient heat extraction from the camera body.
‘Quick Starting’ your SX-46 system
In the shipping container you will find the following items:
1) The SX-46 camera head.2) A power supply module and cable.3) A 3 metre USB2 camera cable.4) An adaptor / spacer for 72mm x 1mm thread ‘Takahashi’ focuser assemblies.5) A guider cable for ‘ST4’ style mount guiding inputs.6) Three short USB leads for connecting to the hub ports.7) A CD with the SX-46 software and manual.
You will also need a PC computer with Windows XP, Windows 7, Windows 8 or Windows 10. Thismachine must have at least one USB2.0 port and at least 4Gb of memory. If you intend to view the fin-ished images on its screen, then you will also need a graphics card capable of displaying an image in aminimum of 1920 x 1080 pixels and 32 bit colour. A medium specification i5 with between 1GHz and3GHz processor speed is ideal. Please note that the SX-46 is not designed for USB1.1 operation andwill give inferior results if used on USB1.1. Most USB3 ports can be used without problems.
Installing the USB system:
First, find a free USB2.0 socket on your PC and plug in the USB cable (do not connect the camera atthis time).
The next operation is to run the software installer from the CD ROM provided. Insert the CD into thecomputer and wait for Windows Explorer to open with the list of folders on the ROM. Now find the ap-propriate Setup folder and run the SETUP.EXE file that it contains – this will initiate the self-installsoftware which will guide you through the process of installing the SX camera software and driversonto your computer. If the CD ROM is unavailable, or damaged, the drivers and software can be down-loaded from www.sxccd.com/downloads .
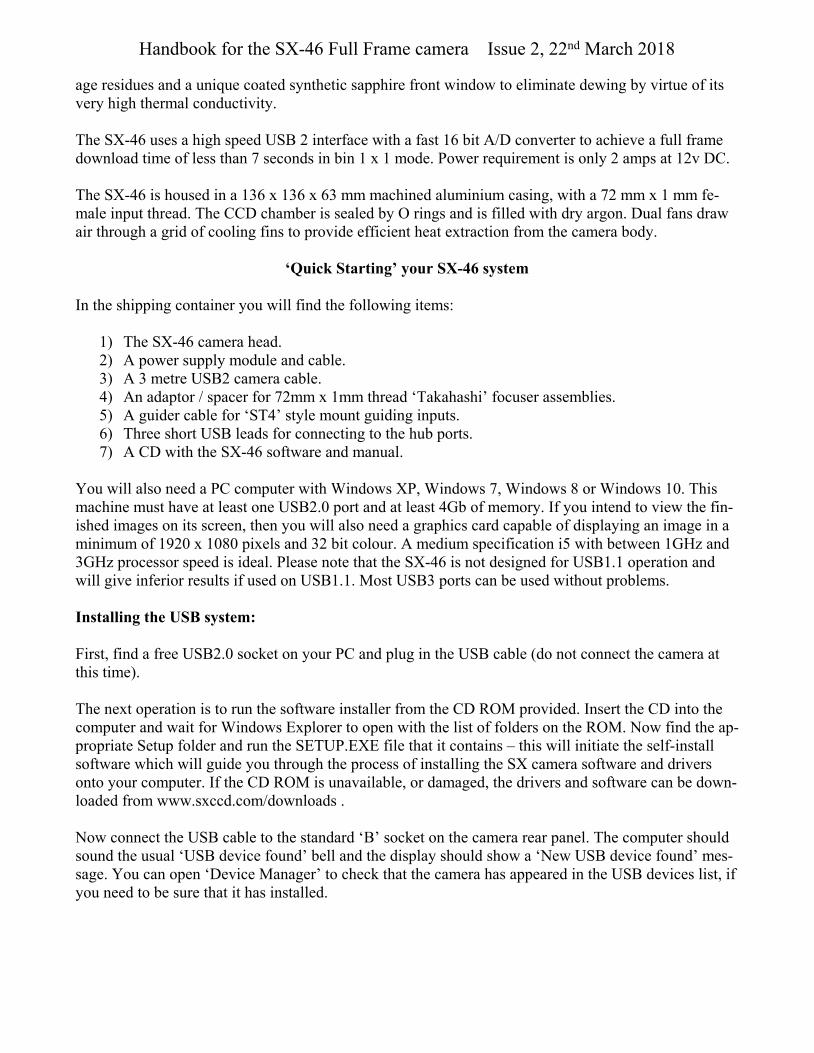
Now connect the USB cable to the standard ‘B’ socket on the camera rear panel. The computer shouldsound the usual ‘USB device found’ bell and the display should show a ‘New USB device found’ mes-sage. You can open ‘Device Manager’ to check that the camera has appeared in the USB devices list, ifyou need to be sure that it has installed.
Handbook for the SX-46 Full Frame camera Issue 2, 22nd March 2018
The SX software for this new camera is called ‘Starlight Vision’ and will perform most of the functionsthat are required for taking and saving images. It also includes some camera test functions and will alsohave some image processing functions in later versions (downloadable from sxccd.com). The softwaremay be started from the desktop icon and will automatically recognise the SX-46 when it is connected.
The CD also installs an ASCOM driver for the SX-46 and this allows camera access from popular thirdparty software, such as ‘Sequence Generator Pro’. It will also work with MaximDL, AstroArt, Nebulos-ity etc.
Testing the camera:
Plug the USB cable into the camera and then connect the +12v power cable. This sequence is importantto avoid firmware loading errors.
Do not leave the power connected for long periods when a USB connection is not available, as thiscan leave the electronics in an undefined state and may lead to overheating.
When first powered up, the camera may emit a loud ‘buzz’ as the shutter stepper motors attempt to setthe shutter into a closed state. Do not be concerned if this happens - it is normal. Once powered up,start the ‘Starlight Vision’ software, and check that the camera has been detected in the ‘Camera’ tabmenu.
Handbook for the SX-46 Full Frame camera Issue 2, 22nd March 2018
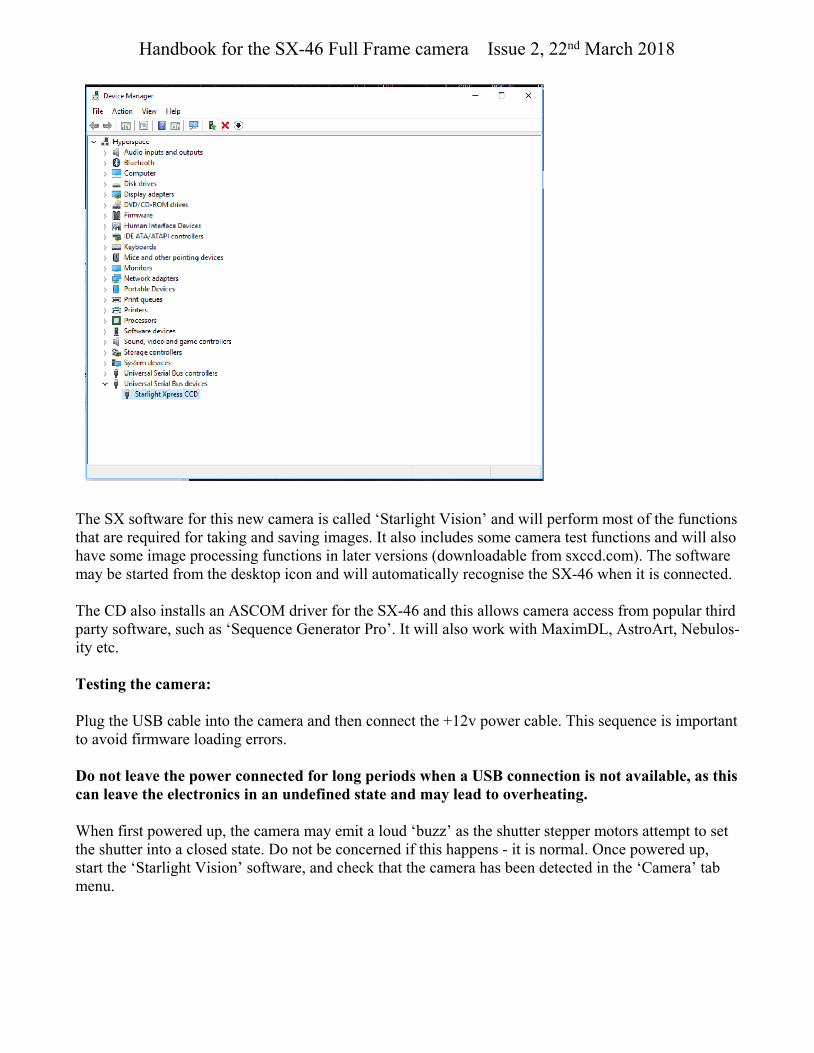
The camera control and image windows
At this time, the cooling will be switched off and the readout will show something close to ambient.Although it is not necessary for initial testing, you can turn on the cooling ‘radio button’ and check thatthe CCD temperature falls to the nominal -10C setting.
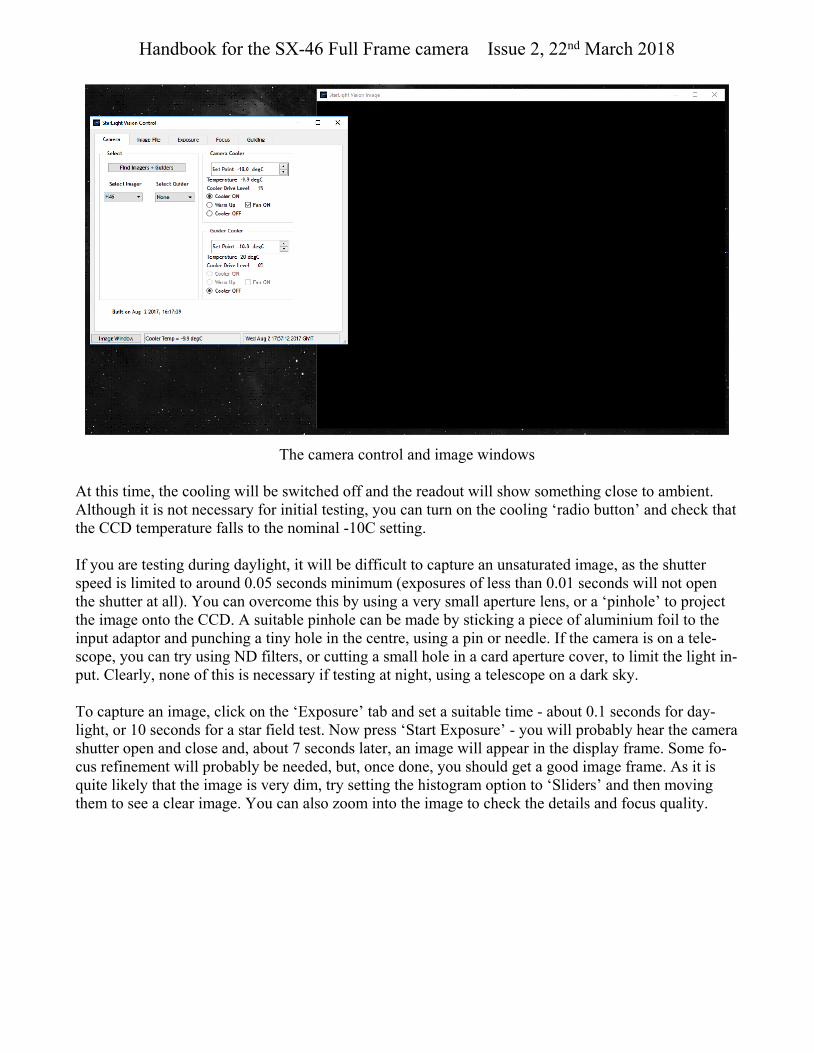
If you are testing during daylight, it will be difficult to capture an unsaturated image, as the shutterspeed is limited to around 0.05 seconds minimum (exposures of less than 0.01 seconds will not openthe shutter at all). You can overcome this by using a very small aperture lens, or a ‘pinhole’ to projectthe image onto the CCD. A suitable pinhole can be made by sticking a piece of aluminium foil to theinput adaptor and punching a tiny hole in the centre, using a pin or needle. If the camera is on a tele-scope, you can try using ND filters, or cutting a small hole in a card aperture cover, to limit the light in-put. Clearly, none of this is necessary if testing at night, using a telescope on a dark sky.
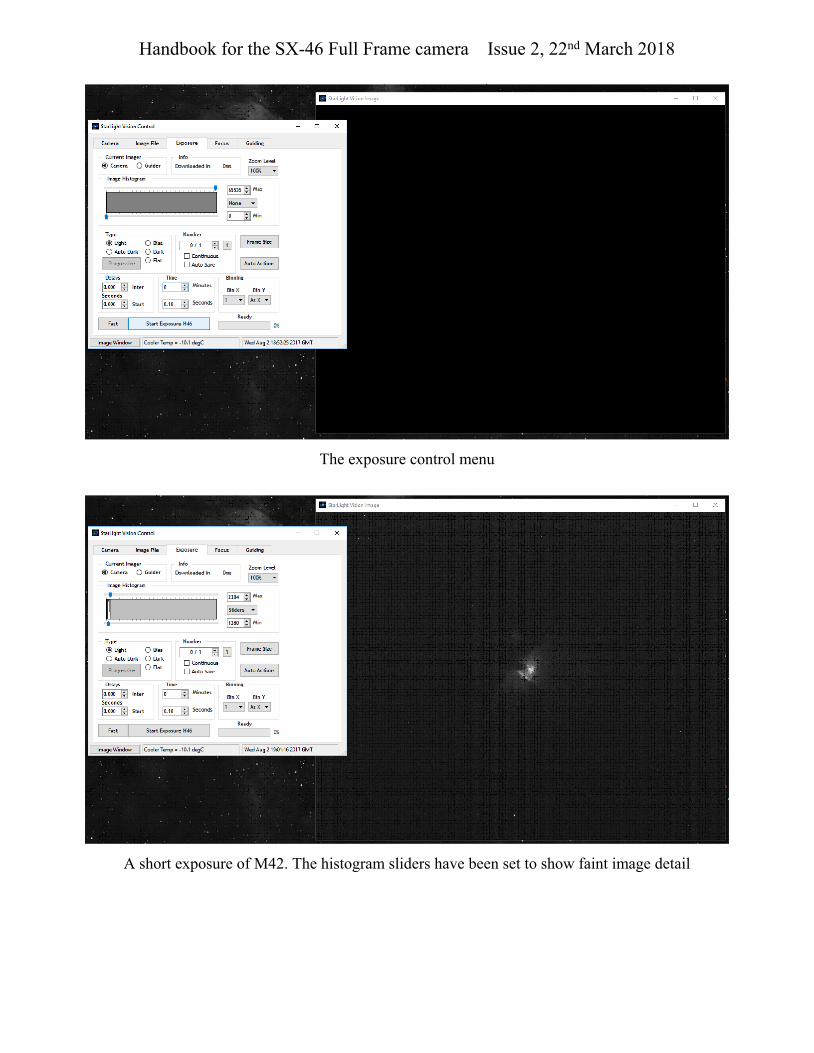
To capture an image, click on the ‘Exposure’ tab and set a suitable time - about 0.1 seconds for day-light, or 10 seconds for a star field test. Now press ‘Start Exposure’ - you will probably hear the camerashutter open and close and, about 7 seconds later, an image will appear in the display frame. Some fo-cus refinement will probably be needed, but, once done, you should get a good image frame. As it isquite likely that the image is very dim, try setting the histogram option to ‘Sliders’ and then movingthem to see a clear image. You can also zoom into the image to check the details and focus quality.
Handbook for the SX-46 Full Frame camera Issue 2, 22nd March 2018
The exposure control menu
A short exposure of M42. The histogram sliders have been set to show faint image detail
Handbook for the SX-46 Full Frame camera Issue 2, 22nd March 2018
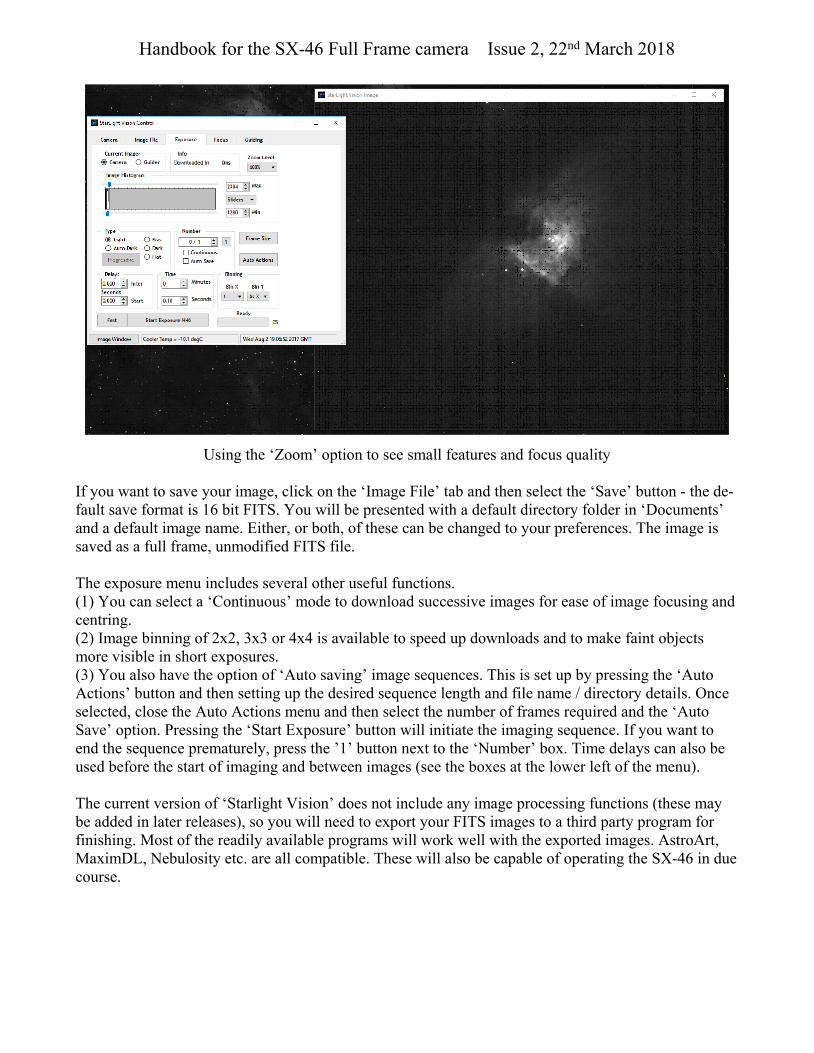
Using the ‘Zoom’ option to see small features and focus quality
If you want to save your image, click on the ‘Image File’ tab and then select the ‘Save’ button - the de-fault save format is 16 bit FITS. You will be presented with a default directory folder in ‘Documents’and a default image name. Either, or both, of these can be changed to your preferences. The image issaved as a full frame, unmodified FITS file.
The exposure menu includes several other useful functions.(1) You can select a ‘Continuous’ mode to download successive images for ease of image focusing andcentring.(2) Image binning of 2x2, 3x3 or 4x4 is available to speed up downloads and to make faint objectsmore visible in short exposures.(3) You also have the option of ‘Auto saving’ image sequences. This is set up by pressing the ‘AutoActions’ button and then setting up the desired sequence length and file name / directory details. Onceselected, close the Auto Actions menu and then select the number of frames required and the ‘AutoSave’ option. Pressing the ‘Start Exposure’ button will initiate the imaging sequence. If you want toend the sequence prematurely, press the ’1’ button next to the ‘Number’ box. Time delays can also beused before the start of imaging and between images (see the boxes at the lower left of the menu).
The current version of ‘Starlight Vision’ does not include any image processing functions (these maybe added in later releases), so you will need to export your FITS images to a third party program forfinishing. Most of the readily available programs will work well with the exported images. AstroArt,MaximDL, Nebulosity etc. are all compatible. These will also be capable of operating the SX-46 in duecourse.
Handbook for the SX-46 Full Frame camera Issue 2, 22nd March 2018
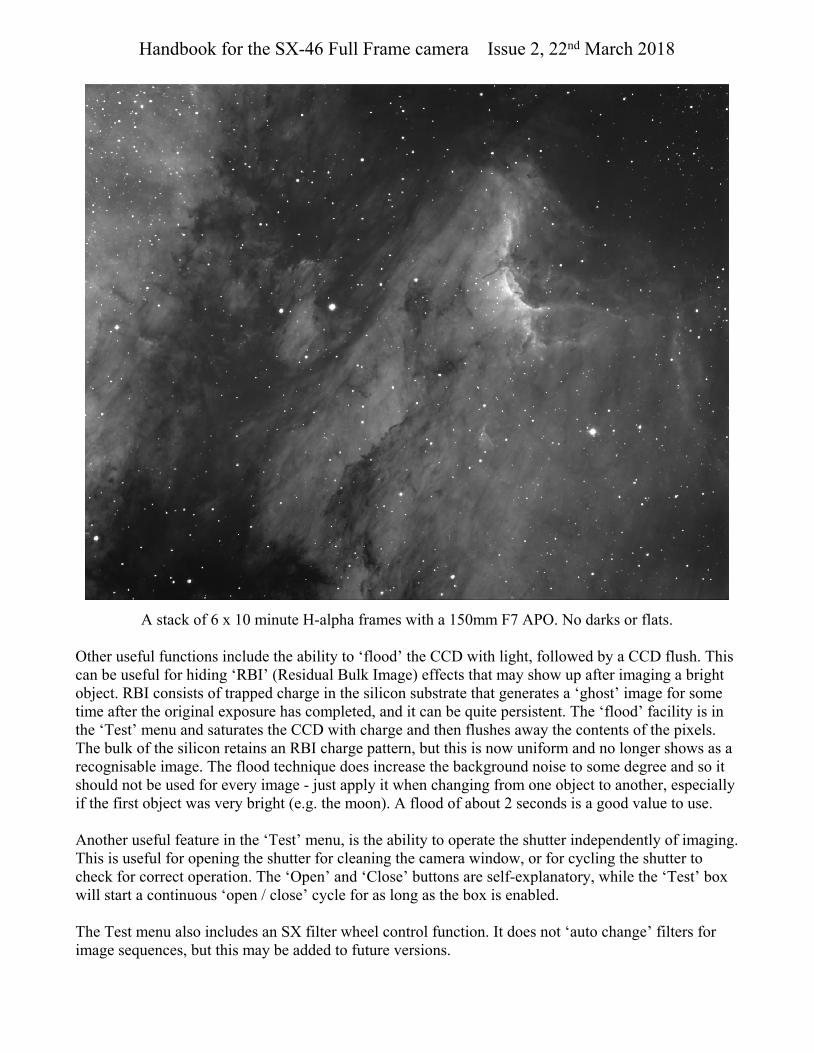
A stack of 6 x 10 minute H-alpha frames with a 150mm F7 APO. No darks or flats.
Other useful functions include the ability to ‘flood’ the CCD with light, followed by a CCD flush. Thiscan be useful for hiding ‘RBI’ (Residual Bulk Image) effects that may show up after imaging a brightobject. RBI consists of trapped charge in the silicon substrate that generates a ‘ghost’ image for sometime after the original exposure has completed, and it can be quite persistent. The ‘flood’ facility is inthe ‘Test’ menu and saturates the CCD with charge and then flushes away the contents of the pixels.The bulk of the silicon retains an RBI charge pattern, but this is now uniform and no longer shows as arecognisable image. The flood technique does increase the background noise to some degree and so itshould not be used for every image - just apply it when changing from one object to another, especiallyif the first object was very bright (e.g. the moon). A flood of about 2 seconds is a good value to use.
Another useful feature in the ‘Test’ menu, is the ability to operate the shutter independently of imaging.This is useful for opening the shutter for cleaning the camera window, or for cycling the shutter tocheck for correct operation. The ‘Open’ and ‘Close’ buttons are self-explanatory, while the ‘Test’ boxwill start a continuous ‘open / close’ cycle for as long as the box is enabled.
The Test menu also includes an SX filter wheel control function. It does not ‘auto change’ filters forimage sequences, but this may be added to future versions.

Handbook for the SX-46 Full Frame camera Issue 2, 22nd March 2018
Other features of the SX-46:The SX-46 incorporates a 3 port USB hub, which may be used to operate other low power peripheralaccessories. Examples are the SX Lodestar guide camera and the SX USB filter wheel. To use these de-vices, you will need suitable ‘mini B’ cables to interface with the port sockets on the rear of the cam-era. A set of suitable cables is supplied with the SX-46 and spares are available from SX Ltd. The hubis capable of supplying up to about 300mA per port.There is also an RJ12 style guider output port that can be used for controlling a telescope mount. Thisport may be used to feed correction signals to the telescope mount - either from the SX-46 itself, or viasoftware, from a guide camera. The outputs are arranged in the standard ‘ST4’ style pattern, as below:
Handbook for the SX-46 Full Frame camera Issue 2, 22nd March 2018
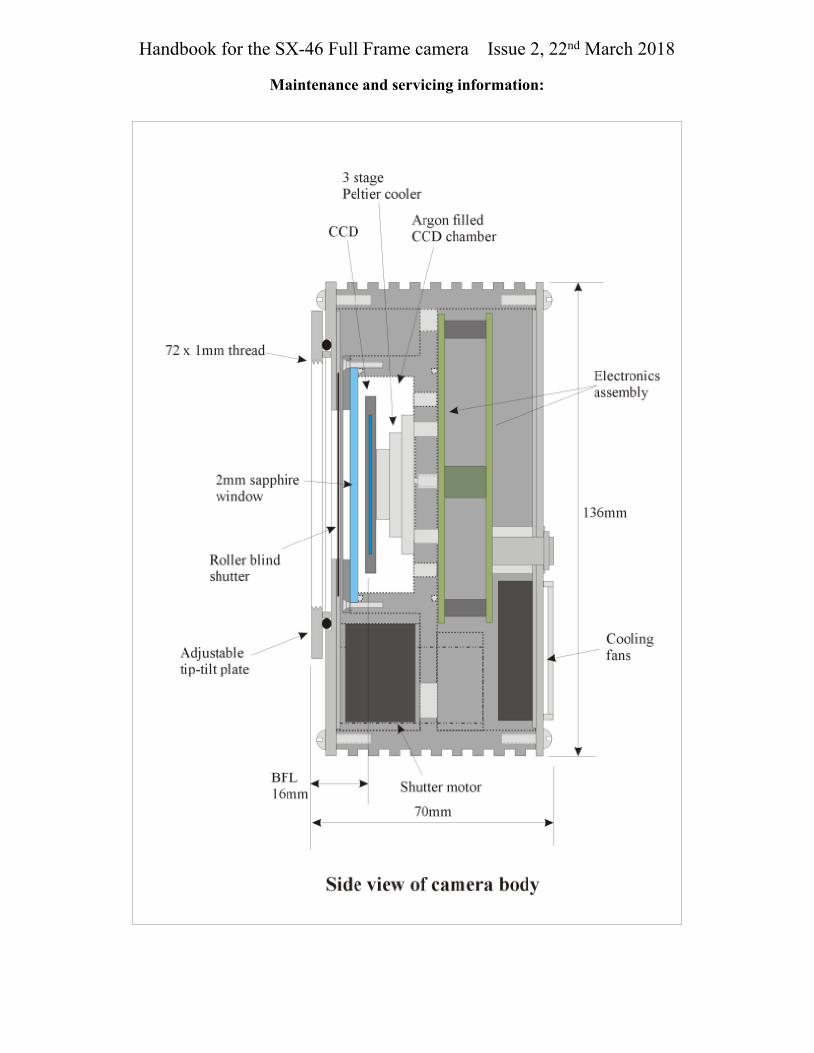
Maintenance and servicing information:
Handbook for the SX-46 Full Frame camera Issue 2, 22nd March 2018
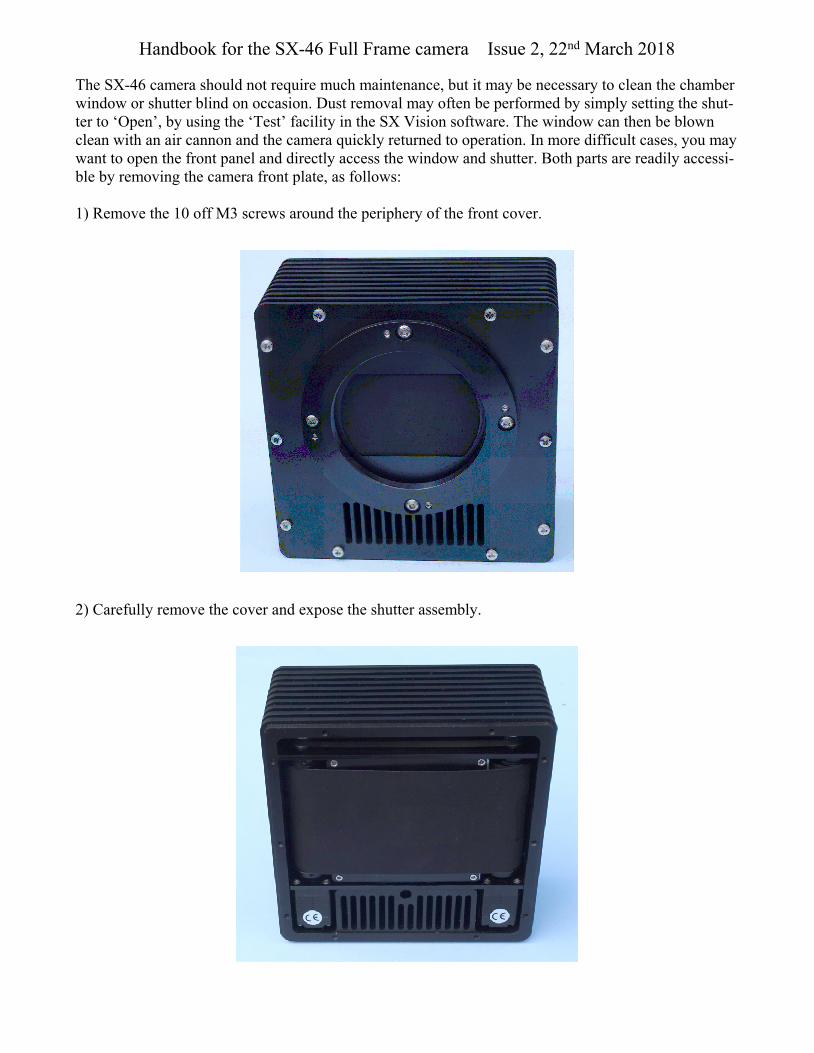
The SX-46 camera should not require much maintenance, but it may be necessary to clean the chamberwindow or shutter blind on occasion. Dust removal may often be performed by simply setting the shut-ter to ‘Open’, by using the ‘Test’ facility in the SX Vision software. The window can then be blownclean with an air cannon and the camera quickly returned to operation. In more difficult cases, you maywant to open the front panel and directly access the window and shutter. Both parts are readily accessi-ble by removing the camera front plate, as follows:
1) Remove the 10 off M3 screws around the periphery of the front cover.
2) Carefully remove the cover and expose the shutter assembly.
Handbook for the SX-46 Full Frame camera Issue 2, 22nd March 2018
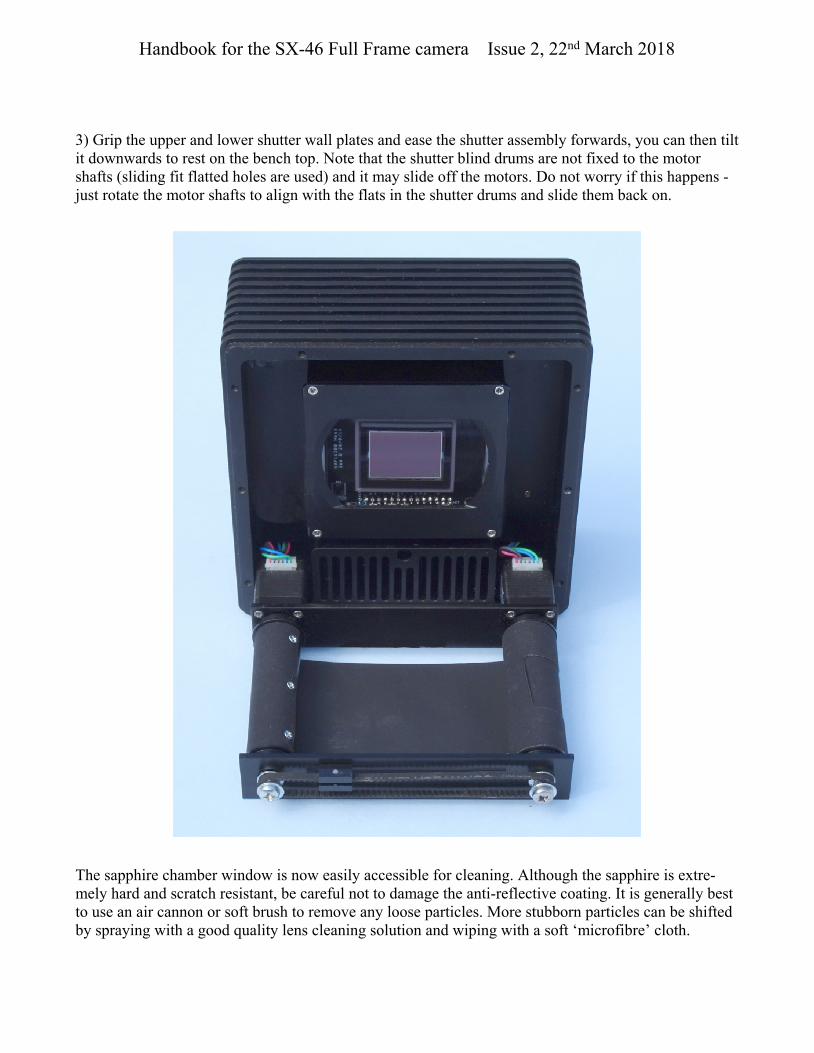
3) Grip the upper and lower shutter wall plates and ease the shutter assembly forwards, you can then tiltit downwards to rest on the bench top. Note that the shutter blind drums are not fixed to the motorshafts (sliding fit flatted holes are used) and it may slide off the motors. Do not worry if this happens -just rotate the motor shafts to align with the flats in the shutter drums and slide them back on.
The sapphire chamber window is now easily accessible for cleaning. Although the sapphire is extre-mely hard and scratch resistant, be careful not to damage the anti-reflective coating. It is generally bestto use an air cannon or soft brush to remove any loose particles. More stubborn particles can be shiftedby spraying with a good quality lens cleaning solution and wiping with a soft ‘microfibre’ cloth.
Handbook for the SX-46 Full Frame camera Issue 2, 22nd March 2018
Reassembly is a simple reversal of the above procedure, being careful to correctly position the shutterand front plate.
CCD chamber cleaning:
This is not normally required, as the chamber is sealed by vaccuum grease and O rings, but on rare oc-casions, you may want to remove particles from the CCD cover glass, or the inside surface of the sap-phire chamber window.
Please note that you will lose the dry argon fill if you open the chamber! The camera can operatesuccessfully with only air in the chamber, but you may promote CCD dewing if the air is not very dry.The argon fill can be renewed, but not without some mechanical work to make an adaptor to fit the gasinput port (see later).
SX Ltd do not recommend opening the chamber, but, if you are skilled in mechanical and optical work,the procedure is as follows:
1) Follow the procedure described on the previous pages to remove the front plate and shutter assem-bly.
2) Remove the four M2 countersunk screws at the corners of the window retaining plate. Be carefulthat the window does not fall out when the retaining plate is removed.
3) Hold a soft cloth in front of the camera and tip the camera body forwards. The sapphire window willfall out onto your cloth and the CCD will be exposed for cleaning.
Argon refill:
You will need a small cylinder of argon gas, a regulator valve and a length of 4mm OD gas tubing.These are easily available from car repair shops etc. (eg. Halfords) and cost only about 20 - 30 pounds($40) for a a small 1 litre cylinder of MIG welding argon and a regulator valve. One cylinder will lastfor many camera fills.You do not need any special expensive ‘dry argon’, as compressed gas is alwaysvery dry by default.
The argon ports are inside the rear of the camera and require the upper electronics board to be removedfor access.
1) Remove all of the 10 off M3 screws around the rear cover.
2) Remove the 8 mm power socket nut.
3) Lift off the rear cover and unplug the two fan leads from the board (not essential).
4) Remove the 4 off M3 screws from the corners of the electronics board. The board may then bepulled out of the camera (it is held only by friction in a socket and will lift out if you apply a littleforce).
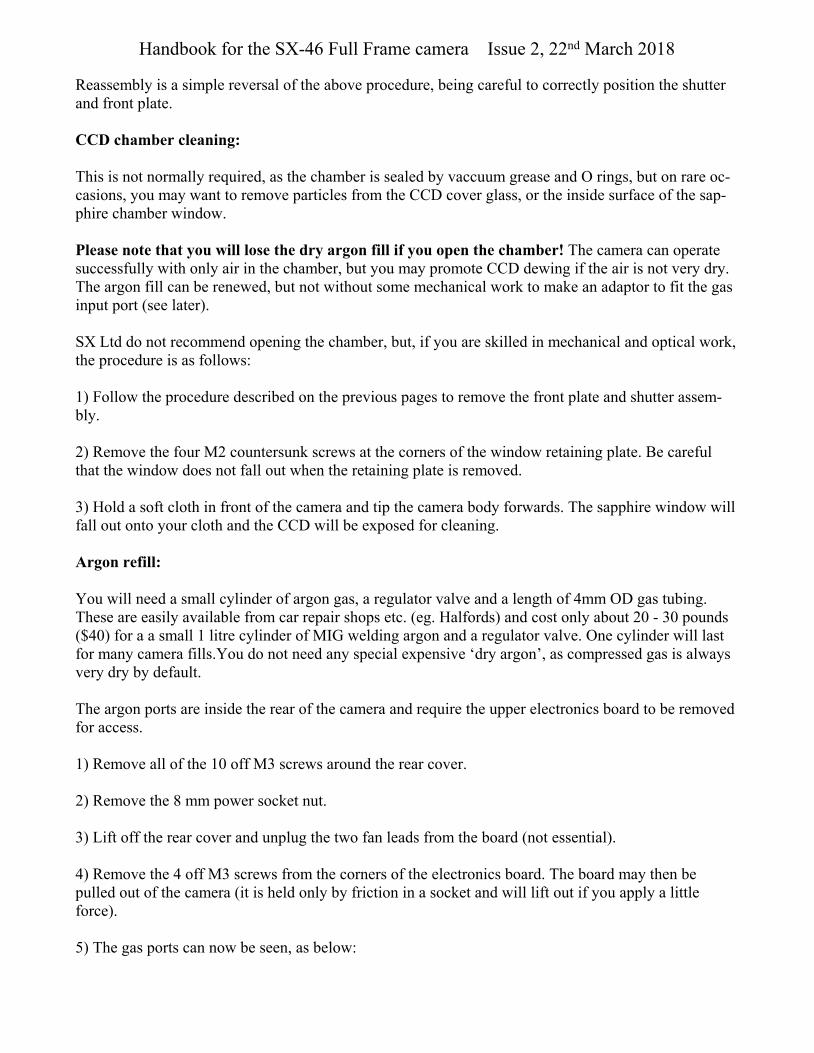
5) The gas ports can now be seen, as below:
Handbook for the SX-46 Full Frame camera Issue 2, 22nd March 2018
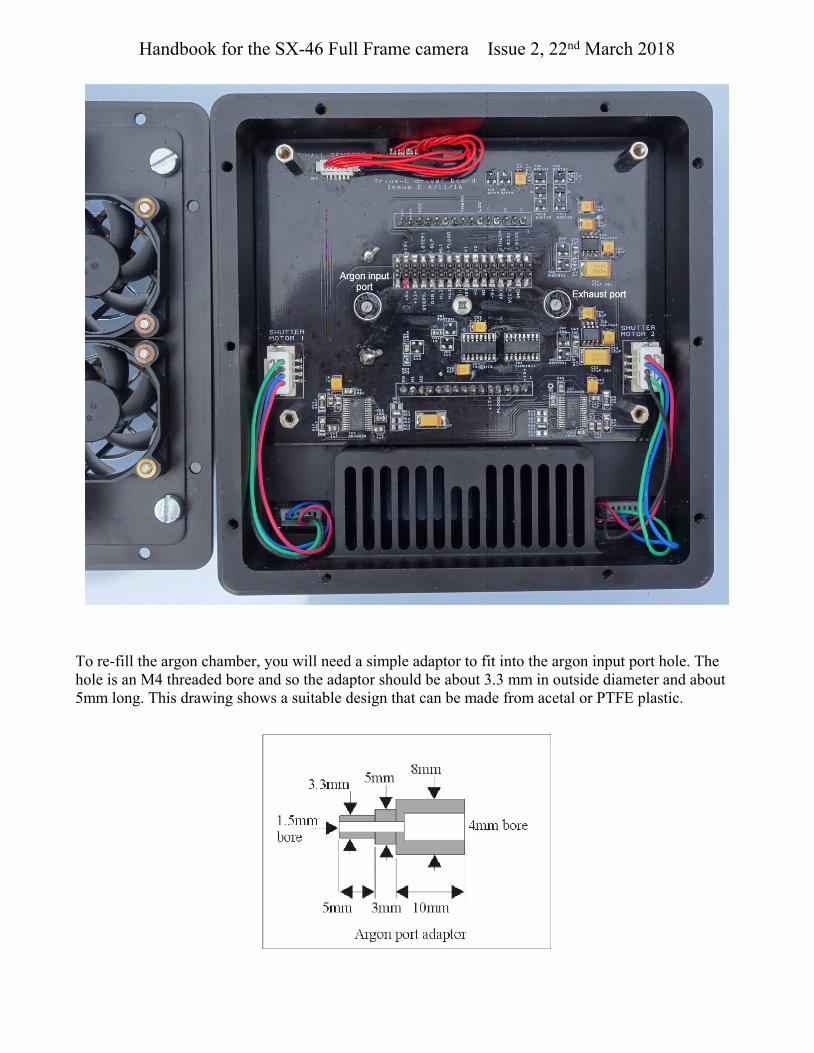
To re-fill the argon chamber, you will need a simple adaptor to fit into the argon input port hole. Thehole is an M4 threaded bore and so the adaptor should be about 3.3 mm in outside diameter and about5mm long. This drawing shows a suitable design that can be made from acetal or PTFE plastic.
Handbook for the SX-46 Full Frame camera Issue 2, 22nd March 2018
This adaptor is fitted to the end of about 500mm of 4mm gas tube that is connected to the argon regula-tor valve.
The re-fill process is quite simple. Remove the two sealing screws from the argon input port and the ex-haust port. Now insert the adaptor into the input port hole and gently turn on the argon cylinder valveuntil a gentle flow of gas is heard from the Exhaust port. Allow the gas to flow for about 10 secondsand then turn off the flow and re-fit the exhaust port sealing screw. Now pull the adaptor out of the in-put port and quickly re-fit the input port sealing screw.
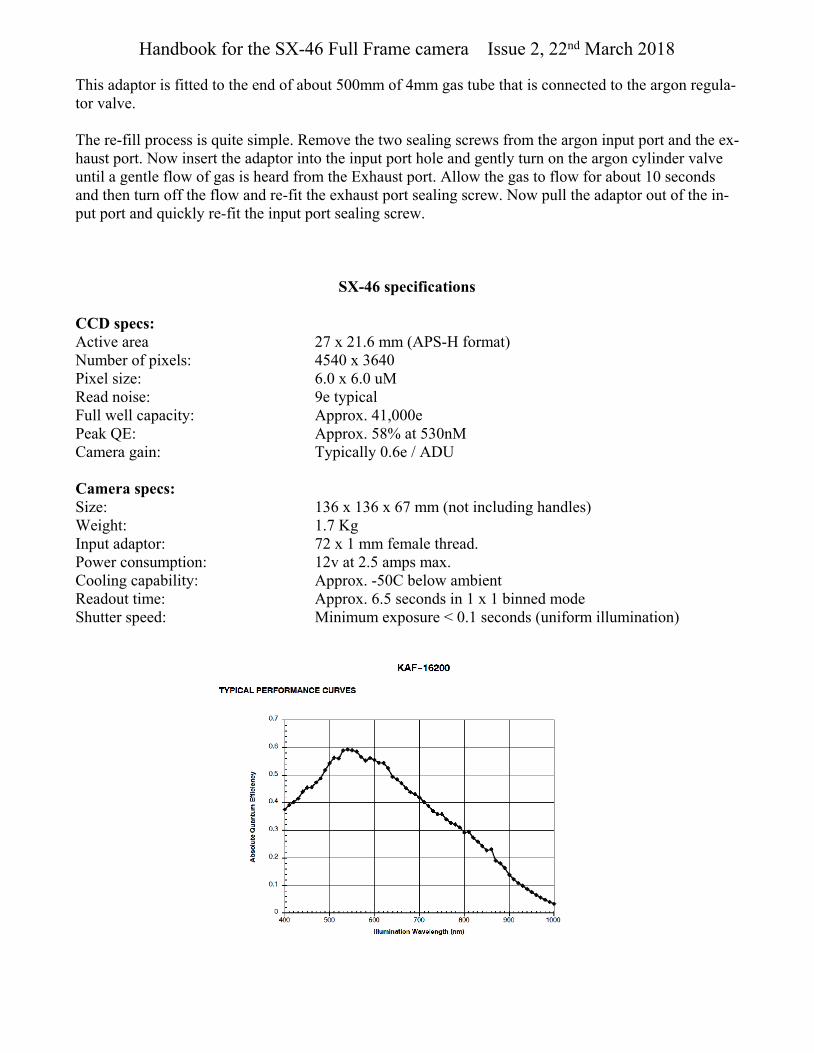
SX-46 specifications
CCD specs:Active area 27 x 21.6 mm (APS-H format)Number of pixels: 4540 x 3640Pixel size: 6.0 x 6.0 uMRead noise: 9e typicalFull well capacity: Approx. 41,000ePeak QE: Approx. 58% at 530nMCamera gain: Typically 0.6e / ADU
Camera specs:Size: 136 x 136 x 67 mm (not including handles)Weight: 1.7 KgInput adaptor: 72 x 1 mm female thread.Power consumption: 12v at 2.5 amps max.Cooling capability: Approx. -50C below ambientReadout time: Approx. 6.5 seconds in 1 x 1 binned modeShutter speed: Minimum exposure < 0.1 seconds (uniform illumination)

Handbook for the SX-46 Full Frame camera Issue 2, 22nd March 2018
Dear Observer,Thank you for purchasing a Starlight Xpress CCD Imaging System. We are confident that you will gain much satisfactionfrom this equipment, but please read carefully the accompanying instruction manual to ensure that you achieve the best per-formance that it is capable of providing.
As with most sophisticated equipment a certain amount of routine maintenance is necessary to keep the equipment operat-ing at its optimum performance. The maintenance has been kept to a minimum, and is fully described in the manual.
In the unfortunate instance when the equipment does not perform as expected might we recommend that you first study thefault finding information supplied. If this does not remedy the problem, then contact Starlight Xpress for further advice. Ourmessage board service on the Starlight Xpress web site will often provide solutions to any problems.
The equipment is covered by a 12-month guarantee covering faulty design, material or workmanship in addition to any stat-utory Consumer Rights of Purchasers.
CONDITIONS OF GUARANTEE
1) The equipment shall only be used for normal purposes described in the standard operating instructions, and within the re-levant safety standards of the country where the equipment is used.
2) Repairs under guarantee will be free of charge providing proof of purchase is produced, and that the equipment is re-turned to the Service Agent at the Purchaser’s expense and risk, and that the equipment proves to be defective.
3) The guarantee shall not apply to equipment damaged by fire, accident, wear an tear, misuse, unauthorised repairs, ormodified in any way whatsoever, or damage suffered in transit to or from the Purchaser.
4) The Purchaser’s sole and exclusive rights under this guarantee is for repair, or at our discretion the replacement of theequipment or any part thereof, and no remedy to consequential loss or damage whatsoever.
5) This guarantee shall not apply to components that have a naturally limited life.
6) Starlight Xpress’s decision in all matters is final, and any faulty component which has been replaced will become theproperty of Starlight Xpress Ltd.
For further info. or advice, please call:
Mr Michael Hattey,
Starlight Xpress Ltd.,
Unit 3, Brooklands Business Park,
Bottle Lane,
Binfield
Berkshire,
England. RG42 5QX
Tel: 01184026898
Email: [email protected]
Web site: http://www.sxccd.com