Embed Size (px)
Citation preview
2.Understanding the Final Cut Pro Interface | Final Cut Pro HD H•O•T
| 20 |
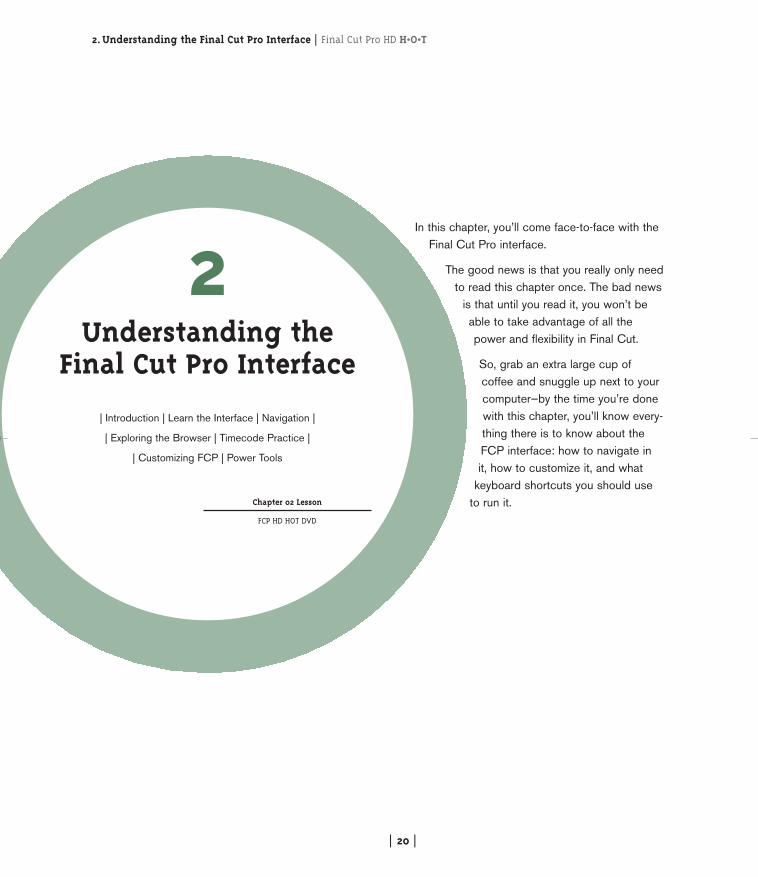
In this chapter, you’ll come face-to-face with theFinal Cut Pro interface.
The good news is that you really only needto read this chapter once. The bad news
is that until you read it, you won’t beable to take advantage of all thepower and flexibility in Final Cut.
So, grab an extra large cup ofcoffee and snuggle up next to yourcomputer—by the time you’re donewith this chapter, you’ll know every-thing there is to know about theFCP interface: how to navigate in it, how to customize it, and what
keyboard shortcuts you should use to run it.
2Understanding the
Final Cut Pro Interface
| Introduction | Learn the Interface | Navigation |
| Exploring the Browser | Timecode Practice |
| Customizing FCP | Power Tools
Chapter 02 Lesson
FCP HD HOT DVD
02 FCP HOT (20-61)v3.qxd 11/11/04 5:37 PM Page 20
Final Cut Pro HD H•O•T | 2.Understanding the Final Cut Pro Interface
| 21 |
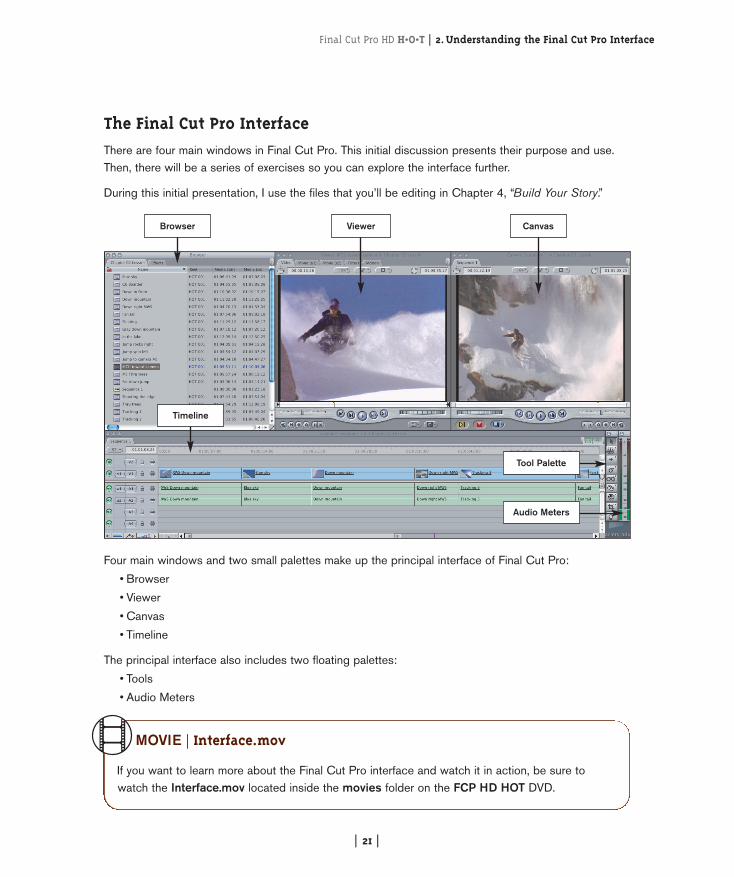
The Final Cut Pro InterfaceThere are four main windows in Final Cut Pro. This initial discussion presents their purpose and use.Then, there will be a series of exercises so you can explore the interface further.
During this initial presentation, I use the files that you’ll be editing in Chapter 4, “Build Your Story.”
Four main windows and two small palettes make up the principal interface of Final Cut Pro:
• Browser
• Viewer
• Canvas
• Timeline
The principal interface also includes two floating palettes:
• Tools
• Audio Meters
MOVIE | Interface.mov
If you want to learn more about the Final Cut Pro interface and watch it in action, be sure towatch the Interface.mov located inside the movies folder on the FCP HD HOT DVD.
Browser Viewer Canvas
Timeline
Tool Palette
Audio Meters
02 FCP HOT (20-61)v3.qxd 11/11/04 5:37 PM Page 21
2.Understanding the Final Cut Pro Interface | Final Cut Pro HD H•O•T
| 22 |
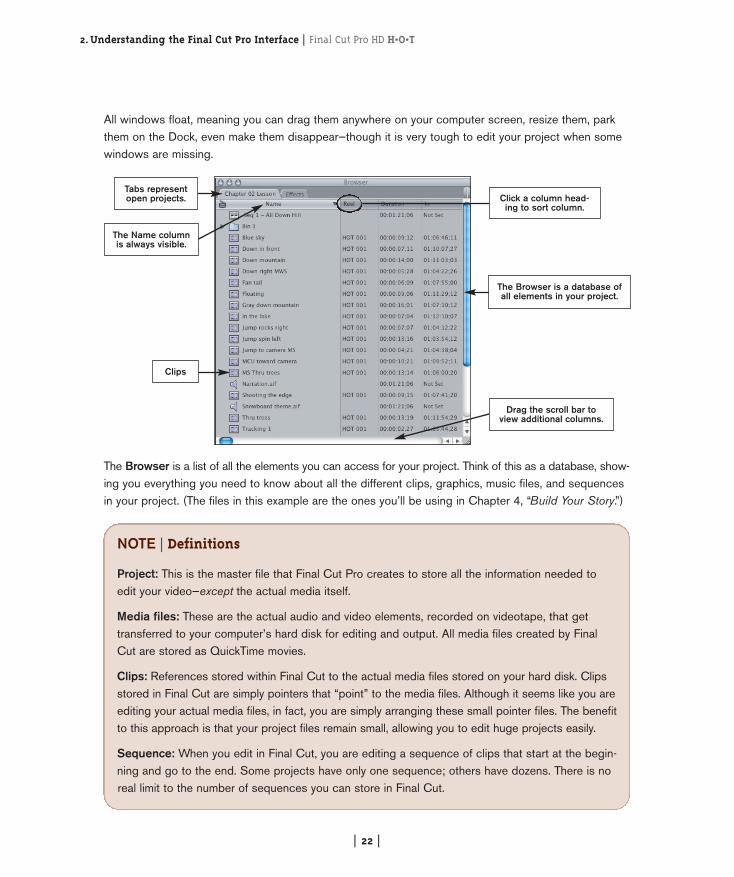
All windows float, meaning you can drag them anywhere on your computer screen, resize them, parkthem on the Dock, even make them disappear—though it is very tough to edit your project when somewindows are missing.
The Browser is a list of all the elements you can access for your project. Think of this as a database, show-ing you everything you need to know about all the different clips, graphics, music files, and sequencesin your project. (The files in this example are the ones you’ll be using in Chapter 4, “Build Your Story.”)
NOTE | Definitions
Project: This is the master file that Final Cut Pro creates to store all the information needed toedit your video—except the actual media itself.
Media files: These are the actual audio and video elements, recorded on videotape, that gettransferred to your computer’s hard disk for editing and output. All media files created by FinalCut are stored as QuickTime movies.
Clips: References stored within Final Cut to the actual media files stored on your hard disk. Clipsstored in Final Cut are simply pointers that “point” to the media files. Although it seems like you areediting your actual media files, in fact, you are simply arranging these small pointer files. The benefitto this approach is that your project files remain small, allowing you to edit huge projects easily.
Sequence: When you edit in Final Cut, you are editing a sequence of clips that start at the begin-ning and go to the end. Some projects have only one sequence; others have dozens. There is noreal limit to the number of sequences you can store in Final Cut.
Tabs representopen projects.
The Name columnis always visible.
Clips
Click a column head-ing to sort column.
The Browser is a database ofall elements in your project.
Drag the scroll bar toview additional columns.
02 FCP HOT (20-61)v3.qxd 11/11/04 5:37 PM Page 22
Final Cut Pro HD H•O•T | 2.Understanding the Final Cut Pro Interface
| 23 |
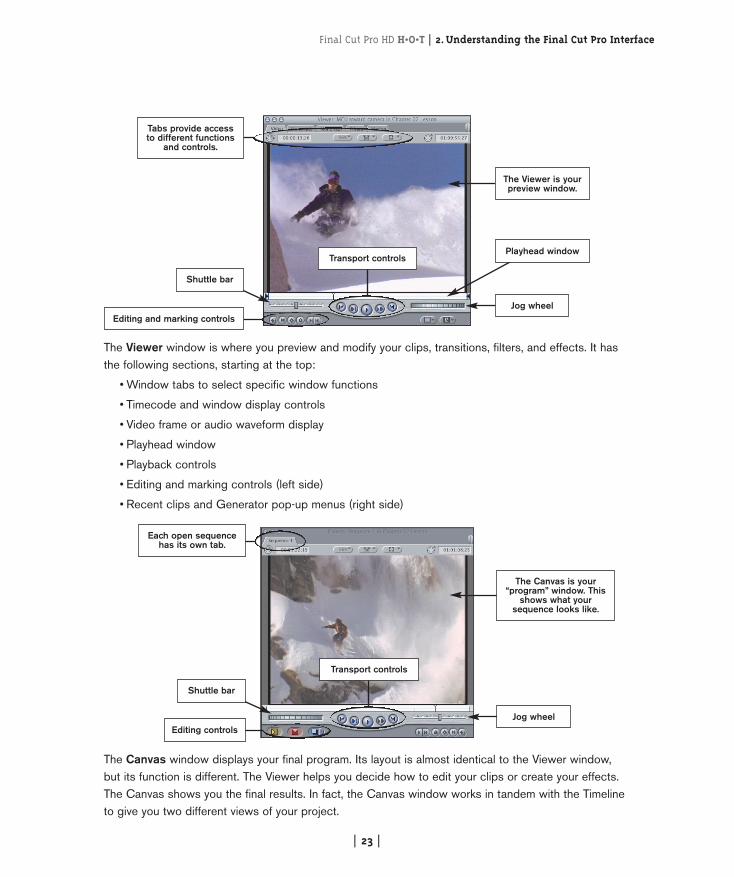
The Viewer window is where you preview and modify your clips, transitions, filters, and effects. It hasthe following sections, starting at the top:
• Window tabs to select specific window functions
• Timecode and window display controls
• Video frame or audio waveform display
• Playhead window
• Playback controls
• Editing and marking controls (left side)
• Recent clips and Generator pop-up menus (right side)
The Canvas window displays your final program. Its layout is almost identical to the Viewer window,but its function is different. The Viewer helps you decide how to edit your clips or create your effects.The Canvas shows you the final results. In fact, the Canvas window works in tandem with the Timelineto give you two different views of your project.
Editing and marking controls
Shuttle bar
Tabs provide accessto different functions
and controls.
Transport controls
Jog wheel
Playhead window
The Viewer is yourpreview window.
Editing controls
Shuttle bar
Each open sequencehas its own tab.
Transport controls
Jog wheel
The Canvas is your“program” window. This
shows what yoursequence looks like.
02 FCP HOT (20-61)v3.qxd 11/11/04 5:37 PM Page 23
2.Understanding the Final Cut Pro Interface | Final Cut Pro HD H•O•T
| 24 |
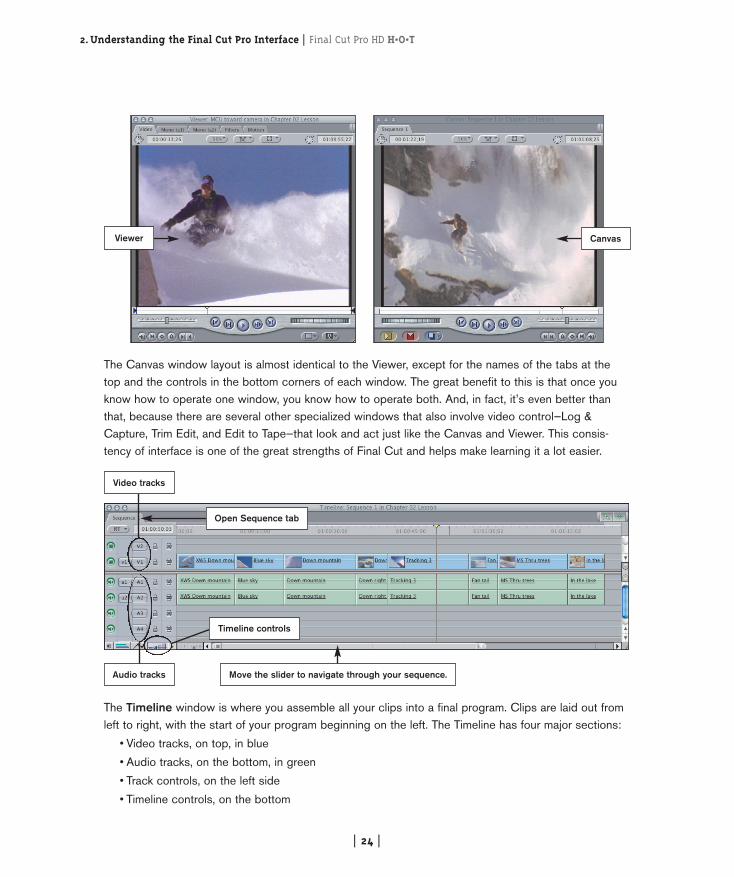
The Canvas window layout is almost identical to the Viewer, except for the names of the tabs at thetop and the controls in the bottom corners of each window. The great benefit to this is that once youknow how to operate one window, you know how to operate both. And, in fact, it’s even better thanthat, because there are several other specialized windows that also involve video control—Log &Capture, Trim Edit, and Edit to Tape—that look and act just like the Canvas and Viewer. This consis-tency of interface is one of the great strengths of Final Cut and helps make learning it a lot easier.
The Timeline window is where you assemble all your clips into a final program. Clips are laid out fromleft to right, with the start of your program beginning on the left. The Timeline has four major sections:
• Video tracks, on top, in blue
• Audio tracks, on the bottom, in green
• Track controls, on the left side
• Timeline controls, on the bottom
Viewer Canvas
Video tracks
Audio tracks Move the slider to navigate through your sequence.
Timeline controls
Open Sequence tab
02 FCP HOT (20-61)v3.qxd 11/11/04 5:37 PM Page 24
Final Cut Pro HD H•O•T | 2.Understanding the Final Cut Pro Interface
| 25 |
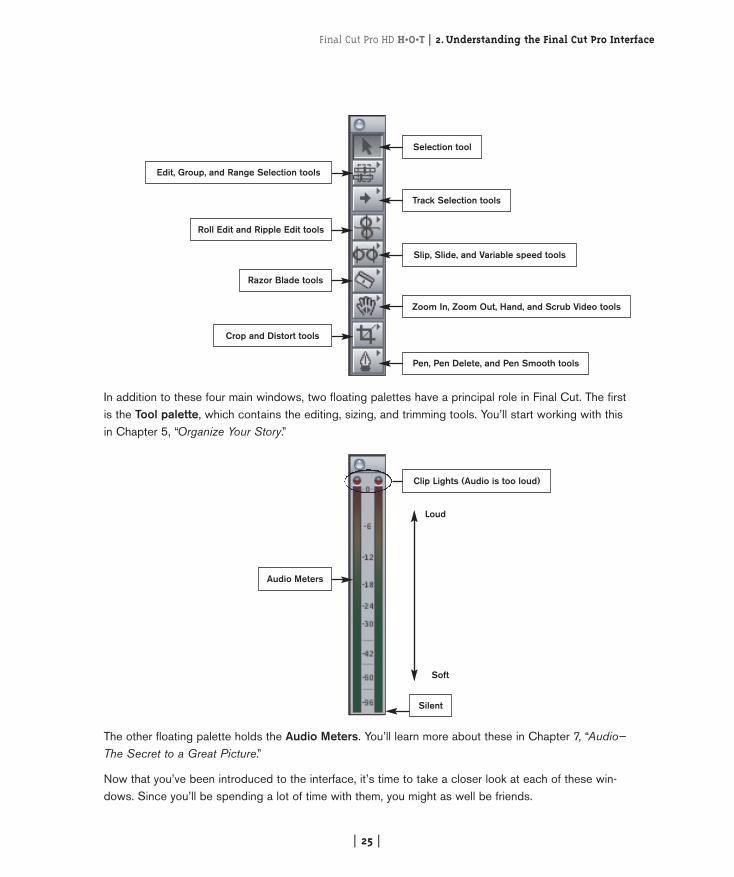
In addition to these four main windows, two floating palettes have a principal role in Final Cut. The firstis the Tool palette, which contains the editing, sizing, and trimming tools. You’ll start working with thisin Chapter 5, “Organize Your Story.”
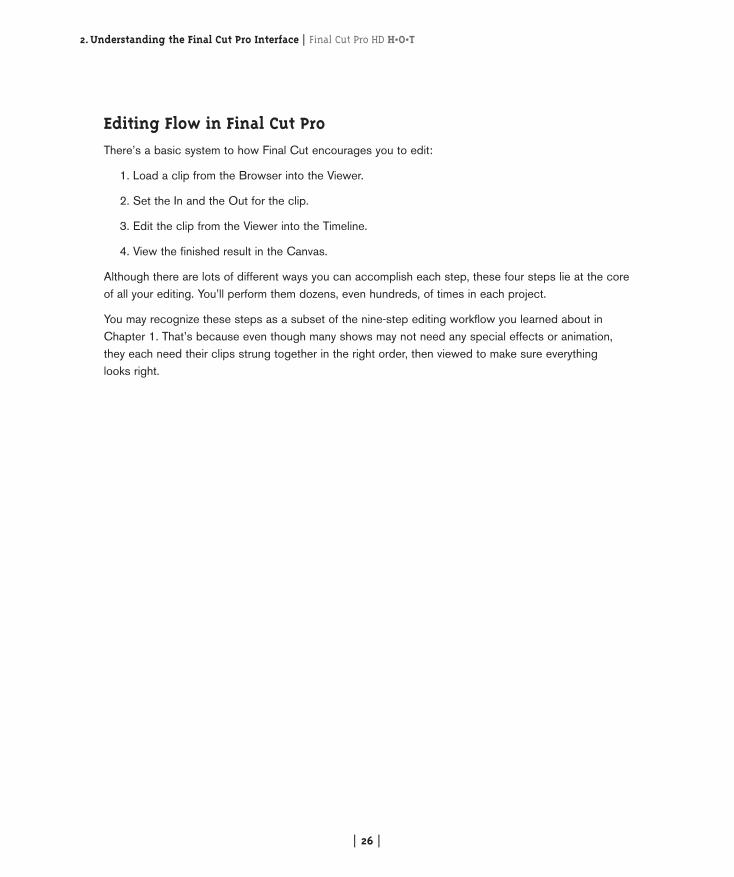
The other floating palette holds the Audio Meters. You’ll learn more about these in Chapter 7, “Audio—The Secret to a Great Picture.”
Now that you’ve been introduced to the interface, it’s time to take a closer look at each of these win-dows. Since you’ll be spending a lot of time with them, you might as well be friends.
Edit, Group, and Range Selection tools
Selection tool
Roll Edit and Ripple Edit tools
Razor Blade tools
Crop and Distort tools
Track Selection tools
Slip, Slide, and Variable speed tools
Zoom In, Zoom Out, Hand, and Scrub Video tools
Pen, Pen Delete, and Pen Smooth tools
Audio Meters
Silent
Clip Lights (Audio is too loud)
Loud
Soft
02 FCP HOT (20-61)v3.qxd 11/11/04 5:37 PM Page 25
2.Understanding the Final Cut Pro Interface | Final Cut Pro HD H•O•T
| 26 |
Editing Flow in Final Cut ProThere’s a basic system to how Final Cut encourages you to edit:
1. Load a clip from the Browser into the Viewer.
2. Set the In and the Out for the clip.
3. Edit the clip from the Viewer into the Timeline.
4. View the finished result in the Canvas.
Although there are lots of different ways you can accomplish each step, these four steps lie at the coreof all your editing. You’ll perform them dozens, even hundreds, of times in each project.
You may recognize these steps as a subset of the nine-step editing workflow you learned about inChapter 1. That’s because even though many shows may not need any special effects or animation,they each need their clips strung together in the right order, then viewed to make sure everything looks right.
02 FCP HOT (20-61)v3.qxd 11/11/04 5:37 PM Page 26
Final Cut Pro HD H•O•T | 2.Understanding the Final Cut Pro Interface
| 27 |
Explore the Browser
In this exercise, you’ll learn what the Browser is, how to organize column headings, how to create a new storage bin, and how to use clip labels.
1.
NOTE | How to Open Lesson Files
The lesson and media files you installed in the Introduction chapter are used throughoutthis book.
There are two ways to open lesson files.
Method 1
1. Open Final Cut Pro.
2. Choose File > Open (or press Cmd+O).
3. Open the boot disk (the one in the top-right corner of your Mac’s screen—oftencalled Macintosh HD, but not always).
4. Open the FCP Projects folder.
5. Open the FCP Hot files folder
6. Open the Lessons folder.
7. Select the project file you want to open, for example Chapter 02 Lesson.
8. Click Open.
Method 2
1. From the Finder, open the boot disk.
2. Locate and open the FCP Projects folder.
3. Open the FCP HOT files folder
4. Open the Lessons folder.
5. Double-click the project file you want to open, for example Chapter 02 Lesson.
You can select whichever of these two methods is most convenient for you to use.
After you’ve opened a lesson file, you can easily find it again by choosing File > OpenRecent from within Final Cut and selecting the file you want to reopen.
If you want to go back to the original project before you started making changes (or goback to the last time you saved the project), choose File > Revert. Click OK to agree tolosing all changes.
02 FCP HOT (20-61)v3.qxd 11/11/04 5:37 PM Page 27
2.Understanding the Final Cut Pro Interface | Final Cut Pro HD H•O•T
| 28 |
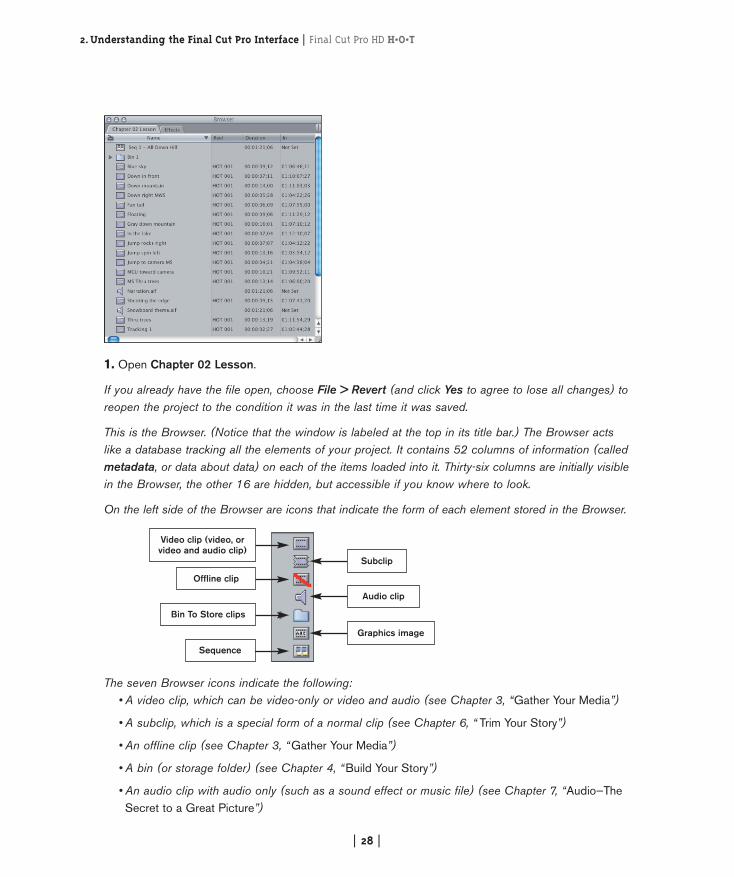
1. Open Chapter 02 Lesson.
If you already have the file open, choose File > Revert (and click Yes to agree to lose all changes) toreopen the project to the condition it was in the last time it was saved.
This is the Browser. (Notice that the window is labeled at the top in its title bar.) The Browser actslike a database tracking all the elements of your project. It contains 52 columns of information (calledmetadata, or data about data) on each of the items loaded into it. Thirty-six columns are initially visiblein the Browser, the other 16 are hidden, but accessible if you know where to look.
On the left side of the Browser are icons that indicate the form of each element stored in the Browser.
The seven Browser icons indicate the following:• A video clip, which can be video-only or video and audio (see Chapter 3, “Gather Your Media”)
• A subclip, which is a special form of a normal clip (see Chapter 6, “ Trim Your Story”)
• An offline clip (see Chapter 3, “Gather Your Media”)
• A bin (or storage folder) (see Chapter 4, “Build Your Story”)
• An audio clip with audio only (such as a sound effect or music file) (see Chapter 7, “Audio—TheSecret to a Great Picture”)
Subclip
Video clip (video, orvideo and audio clip)
Offline clip
Bin To Store clips
Sequence
Audio clip
Graphics image
02 FCP HOT (20-61)v3.qxd 11/11/04 5:37 PM Page 28

Final Cut Pro HD H•O•T | 2.Understanding the Final Cut Pro Interface
| 29 |
• Imported graphics file, such as a scanned image (see Chapter 9, “Text, Titles and Graphics”)
• Timeline sequence (see Chapter 4, “Build Your Story”)
You’ll work with all of these during this book.
2. For now, grab the window sizing tab in the lower-right corner of the Browser and drag it down andto the right to make the Browser bigger.
Notice, as you do so, all the additional columns of information that appear. Scroll around them usingthe horizontal scroll bar at the bottom of the Browser.
NOTE | Revealing the Hidden Secrets of the Browser
There are 36 columns of information displayed by default in the Browser, with another 16 columnsof less-used information initially hidden. To display a hidden column, Ctrl+click any column head-ing except the Name column, and choose one of the columns in the shortcut menu to display it inthe Browser.
To hide a column, Ctrl+click any column heading except the Name column and choose Hide Column.However, even though the column is hidden, Final Cut still keeps track of the information it contains.
02 FCP HOT (20-61)v3.qxd 11/11/04 5:37 PM Page 29
2.Understanding the Final Cut Pro Interface | Final Cut Pro HD H•O•T
| 30 |
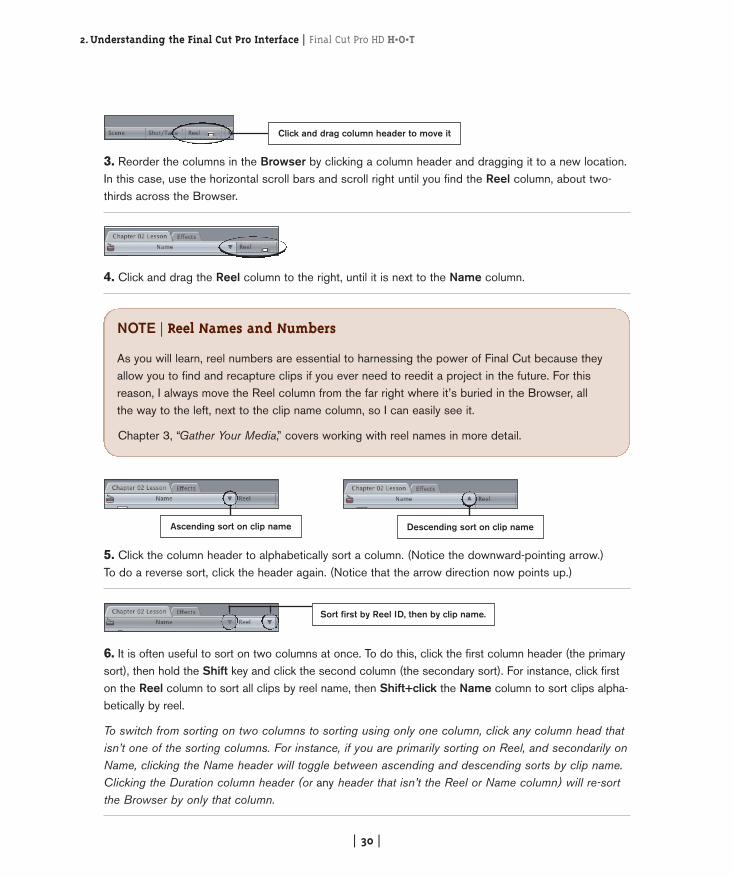
3. Reorder the columns in the Browser by clicking a column header and dragging it to a new location.In this case, use the horizontal scroll bars and scroll right until you find the Reel column, about two-thirds across the Browser.
4. Click and drag the Reel column to the right, until it is next to the Name column.
5. Click the column header to alphabetically sort a column. (Notice the downward-pointing arrow.) To do a reverse sort, click the header again. (Notice that the arrow direction now points up.)
6. It is often useful to sort on two columns at once. To do this, click the first column header (the primarysort), then hold the Shift key and click the second column (the secondary sort). For instance, click firston the Reel column to sort all clips by reel name, then Shift+click the Name column to sort clips alpha-betically by reel.
To switch from sorting on two columns to sorting using only one column, click any column head thatisn’t one of the sorting columns. For instance, if you are primarily sorting on Reel, and secondarily onName, clicking the Name header will toggle between ascending and descending sorts by clip name.Clicking the Duration column header (or any header that isn’t the Reel or Name column) will re-sortthe Browser by only that column.
NOTE | Reel Names and Numbers
As you will learn, reel numbers are essential to harnessing the power of Final Cut because theyallow you to find and recapture clips if you ever need to reedit a project in the future. For thisreason, I always move the Reel column from the far right where it’s buried in the Browser, all the way to the left, next to the clip name column, so I can easily see it.
Chapter 3, “Gather Your Media,” covers working with reel names in more detail.
Click and drag column header to move it
Ascending sort on clip name Descending sort on clip name
Sort first by Reel ID, then by clip name.
02 FCP HOT (20-61)v3.qxd 11/11/04 5:37 PM Page 30
Final Cut Pro HD H•O•T | 2.Understanding the Final Cut Pro Interface
| 31 |
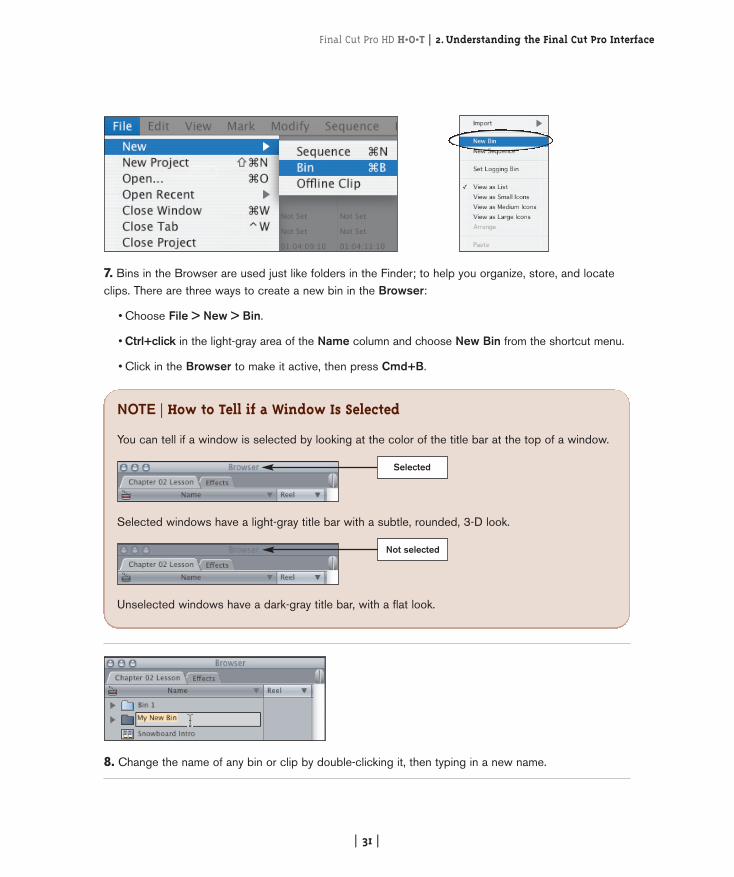
7. Bins in the Browser are used just like folders in the Finder; to help you organize, store, and locateclips. There are three ways to create a new bin in the Browser:
• Choose File > New > Bin.
• Ctrl+click in the light-gray area of the Name column and choose New Bin from the shortcut menu.
• Click in the Browser to make it active, then press Cmd+B.
8. Change the name of any bin or clip by double-clicking it, then typing in a new name.
NOTE | How to Tell if a Window Is Selected
You can tell if a window is selected by looking at the color of the title bar at the top of a window.
Selected windows have a light-gray title bar with a subtle, rounded, 3-D look.
Unselected windows have a dark-gray title bar, with a flat look.
Selected
Not selected
02 FCP HOT (20-61)v3.qxd 11/11/04 5:37 PM Page 31
2.Understanding the Final Cut Pro Interface | Final Cut Pro HD H•O•T
| 32 |
NOTE | Tips on Naming Bins
I use bins to keep similar things together: music files, sound effects, all answers from one inter-view guest, all B-roll, and so on. Generally, I try to keep the top level of the Browser pretty wellorganized and not have hundreds of files to scroll through.
For most projects, I find myself creating a similar series of bins:
• Interviews
• B-roll
• Music
• Graphics
• Sound Effects
Final Cut allows you to nest (which means to put something inside something else) bins up toeight levels deep. However, I’ve found that FCP has trouble if you get more than five or six binlevels deep (meaning a bin stored in a bin stored in a bin, and so on). Since there is no limit tothe number of bins you can create at a single level, and you can store hundreds of clips in asingle bin, I’ve not found this five- to six-level restriction a significant limit.
WARNING | Clip Names and Media Files
Changing a clip name does not change the name of the media file to which that clip points. If youplan to recapture the media for a project, for instance to convert from a low-resolution offline editto a high-resolution online edit, try not to change your clip names. Keeping file names consistentminimizes confusion in matching clips.
However, if you are working at your final resolution (i.e., DV) and don’t plan to recapture media,renaming clips in the Browser will not cause any problems.
02 FCP HOT (20-61)v3.qxd 11/11/04 5:37 PM Page 32
Final Cut Pro HD H•O•T | 2.Understanding the Final Cut Pro Interface
| 33 |
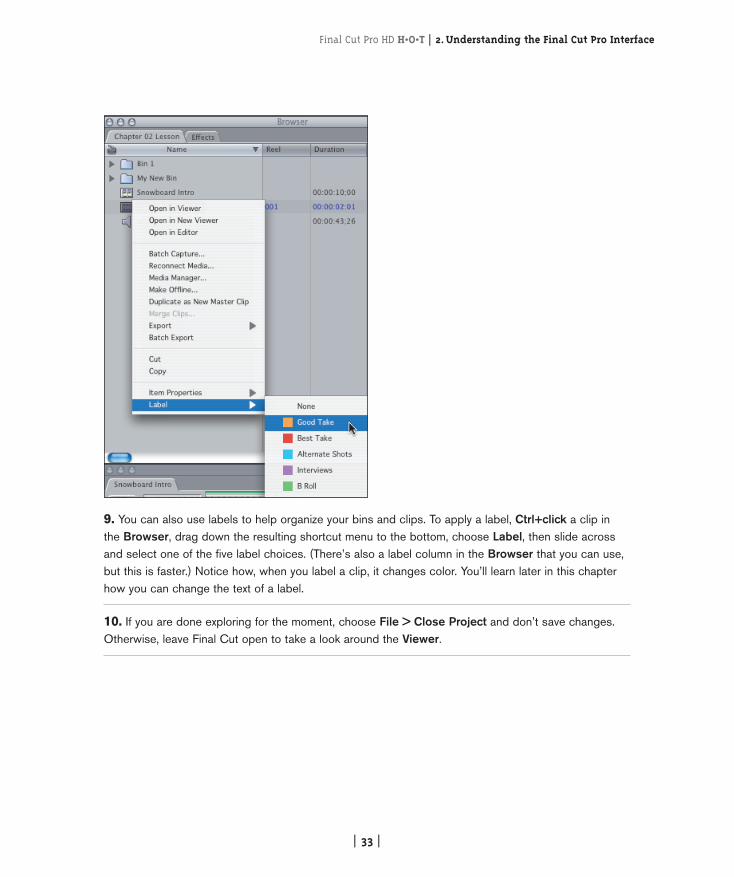
9. You can also use labels to help organize your bins and clips. To apply a label, Ctrl+click a clip in the Browser, drag down the resulting shortcut menu to the bottom, choose Label, then slide acrossand select one of the five label choices. (There’s also a label column in the Browser that you can use,but this is faster.) Notice how, when you label a clip, it changes color. You’ll learn later in this chapterhow you can change the text of a label.
10. If you are done exploring for the moment, choose File > Close Project and don’t save changes.Otherwise, leave Final Cut open to take a look around the Viewer.
02 FCP HOT (20-61)v3.qxd 11/11/04 5:37 PM Page 33
2.Understanding the Final Cut Pro Interface | Final Cut Pro HD H•O•T
| 34 |
Explore the Viewer
In this exercise, you will learn what the Viewer is, how it works, and how to navigate around in it.
The Viewer is your preview window. In it, you’ll set Ins and Outs, modify transitions, adjust filters andeffects, enter type, and create animations. Not, however, all in this lesson! Still, the Viewer is a highlyflexible device that gives you plenty of control over your program.
2.
NOTE | The Great “Mouse vs. Keyboard” Debate
I will confess right here near the beginning that I am a huge keyboard shortcuts fan;which is why you’ll find at the end of each chapter a summary of relevant keyboardshortcuts for that chapter.
On the other hand, I work with a very talented editor who does everything with themouse. In fact, Ed does everything he can to avoid touching the keyboard.
Fortunately, Final Cut is not so partisan. It doesn’t particularly care if you edit using justthe keyboard, just the mouse, or some combination of both. There are over 600 menucommands in Final Cut Pro. You can access them using menus, program them into key-board shortcuts, or create individual mouse button shortcuts (which you’ll learn how todo later in this chapter).
My goal is to show you the options, then let you pick the one that works best for you.
NOTE | Larry’s First Interface Rule of Final Cut Pro
Thinking about the Viewer brings to mind the first of my two interface rules for Final Cut Pro:
Select something, then do something to it.
Although this may not be as deep as “I think, therefore I am,” it is the underlying methodFinal Cut uses to determine what you want to do. You select a clip and edit it to theTimeline. You select a clip and delete it. You select an edit point and add a transition.You select an audio clip and apply a filter. And so on.
02 FCP HOT (20-61)v3.qxd 11/11/04 5:37 PM Page 34
Final Cut Pro HD H•O•T | 2.Understanding the Final Cut Pro Interface
| 35 |
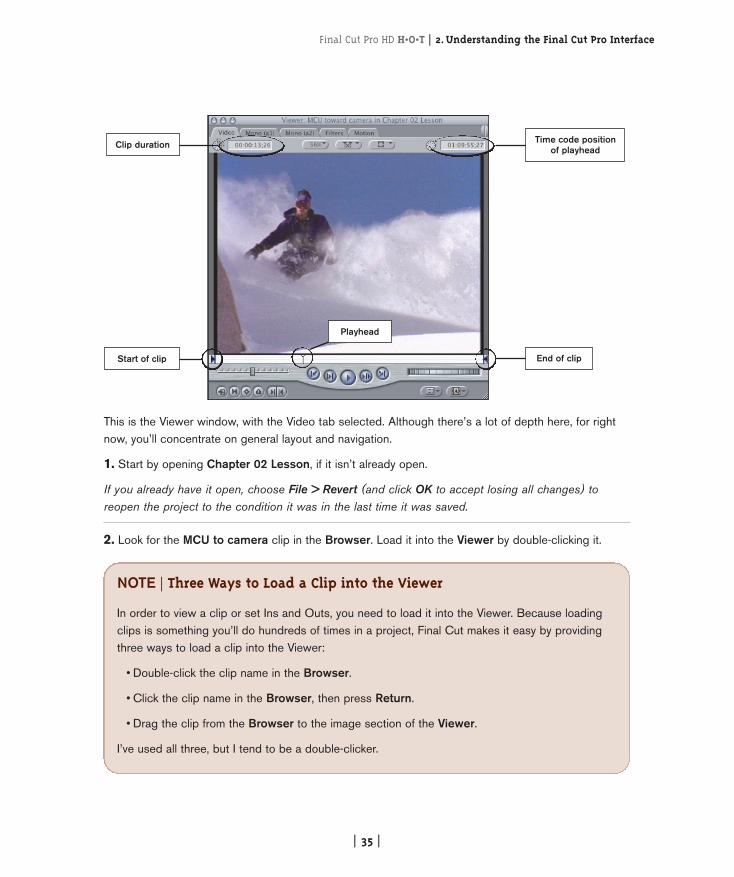
This is the Viewer window, with the Video tab selected. Although there’s a lot of depth here, for rightnow, you’ll concentrate on general layout and navigation.
1. Start by opening Chapter 02 Lesson, if it isn’t already open.
If you already have it open, choose File > Revert (and click OK to accept losing all changes) toreopen the project to the condition it was in the last time it was saved.
2. Look for the MCU to camera clip in the Browser. Load it into the Viewer by double-clicking it.
NOTE | Three Ways to Load a Clip into the Viewer
In order to view a clip or set Ins and Outs, you need to load it into the Viewer. Because loadingclips is something you’ll do hundreds of times in a project, Final Cut makes it easy by providingthree ways to load a clip into the Viewer:
• Double-click the clip name in the Browser.
• Click the clip name in the Browser, then press Return.
• Drag the clip from the Browser to the image section of the Viewer.
I’ve used all three, but I tend to be a double-clicker.
Clip duration
Start of clip
Time code positionof playhead
End of clip
Playhead
02 FCP HOT (20-61)v3.qxd 11/11/04 5:37 PM Page 35
2.Understanding the Final Cut Pro Interface | Final Cut Pro HD H•O•T
| 36 |
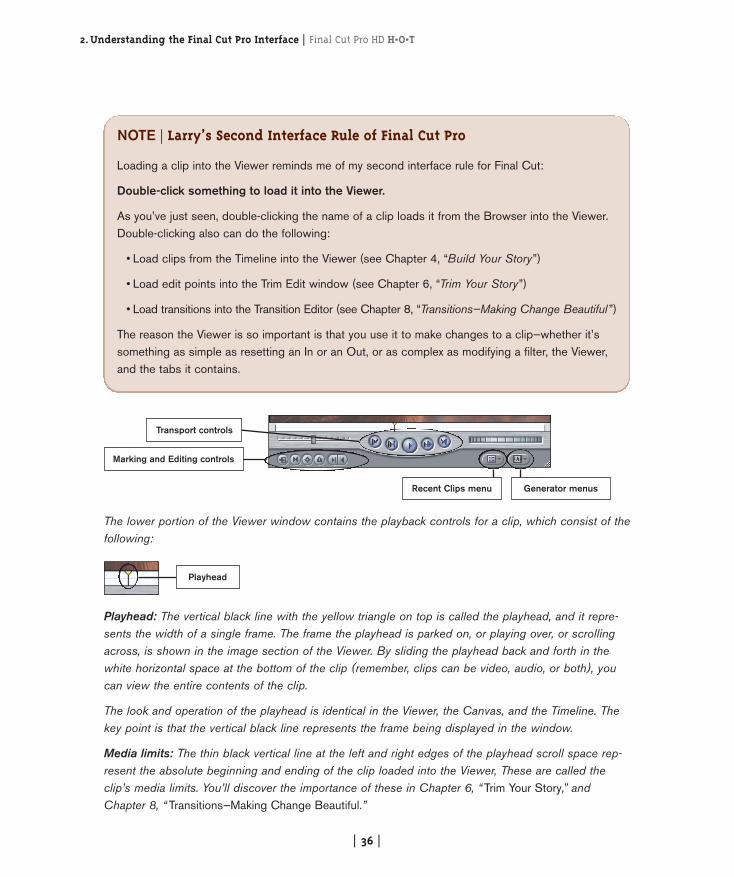
The lower portion of the Viewer window contains the playback controls for a clip, which consist of thefollowing:
Playhead: The vertical black line with the yellow triangle on top is called the playhead, and it repre-sents the width of a single frame. The frame the playhead is parked on, or playing over, or scrollingacross, is shown in the image section of the Viewer. By sliding the playhead back and forth in thewhite horizontal space at the bottom of the clip (remember, clips can be video, audio, or both), youcan view the entire contents of the clip.
The look and operation of the playhead is identical in the Viewer, the Canvas, and the Timeline. Thekey point is that the vertical black line represents the frame being displayed in the window.
Media limits: The thin black vertical line at the left and right edges of the playhead scroll space rep-resent the absolute beginning and ending of the clip loaded into the Viewer, These are called theclip’s media limits. You’ll discover the importance of these in Chapter 6, “ Trim Your Story,” andChapter 8, “ Transitions—Making Change Beautiful.”
NOTE | Larry’s Second Interface Rule of Final Cut Pro
Loading a clip into the Viewer reminds me of my second interface rule for Final Cut:
Double-click something to load it into the Viewer.
As you’ve just seen, double-clicking the name of a clip loads it from the Browser into the Viewer.Double-clicking also can do the following:
• Load clips from the Timeline into the Viewer (see Chapter 4, “Build Your Story”)
• Load edit points into the Trim Edit window (see Chapter 6, “Trim Your Story”)
• Load transitions into the Transition Editor (see Chapter 8, “Transitions—Making Change Beautiful ”)
The reason the Viewer is so important is that you use it to make changes to a clip—whether it’ssomething as simple as resetting an In or an Out, or as complex as modifying a filter, the Viewer,and the tabs it contains.
Marking and Editing controls
Transport controls
Recent Clips menu Generator menus
Playhead
02 FCP HOT (20-61)v3.qxd 11/11/04 5:37 PM Page 36
Final Cut Pro HD H•O•T | 2.Understanding the Final Cut Pro Interface
| 37 |
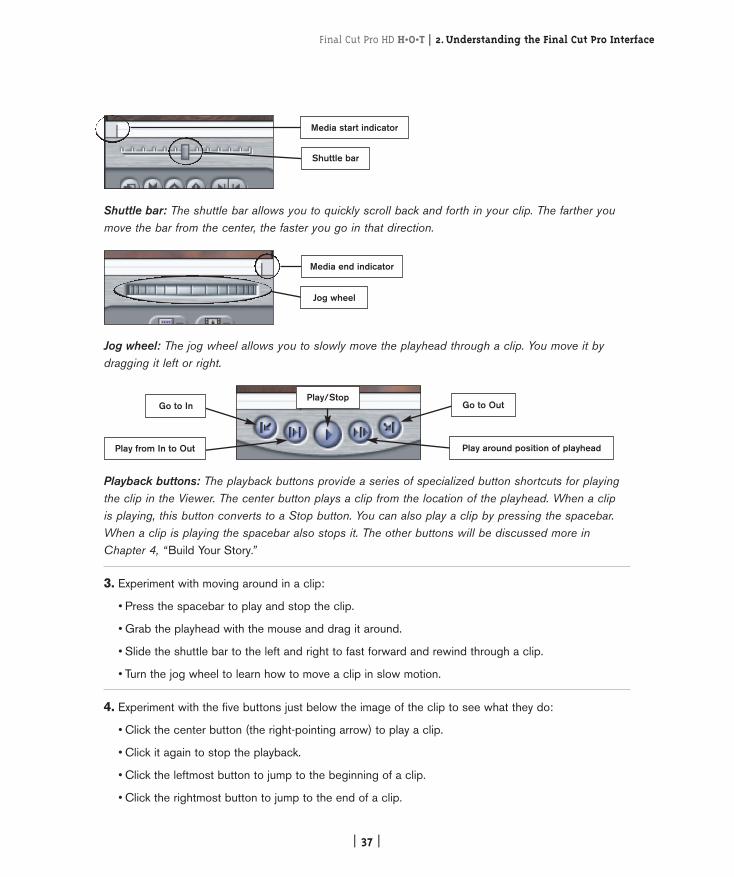
Shuttle bar: The shuttle bar allows you to quickly scroll back and forth in your clip. The farther youmove the bar from the center, the faster you go in that direction.
Jog wheel: The jog wheel allows you to slowly move the playhead through a clip. You move it bydragging it left or right.
Playback buttons: The playback buttons provide a series of specialized button shortcuts for playingthe clip in the Viewer. The center button plays a clip from the location of the playhead. When a clip is playing, this button converts to a Stop button. You can also play a clip by pressing the spacebar.When a clip is playing the spacebar also stops it. The other buttons will be discussed more inChapter 4, “Build Your Story.”
3. Experiment with moving around in a clip:
• Press the spacebar to play and stop the clip.
• Grab the playhead with the mouse and drag it around.
• Slide the shuttle bar to the left and right to fast forward and rewind through a clip.
• Turn the jog wheel to learn how to move a clip in slow motion.
4. Experiment with the five buttons just below the image of the clip to see what they do:
• Click the center button (the right-pointing arrow) to play a clip.
• Click it again to stop the playback.
• Click the leftmost button to jump to the beginning of a clip.
• Click the rightmost button to jump to the end of a clip.
Media start indicator
Shuttle bar
Media end indicator
Jog wheel
Go to In
Play from In to Out
Go to Out
Play around position of playhead
Play/Stop
02 FCP HOT (20-61)v3.qxd 11/11/04 5:37 PM Page 37
2.Understanding the Final Cut Pro Interface | Final Cut Pro HD H•O•T
| 38 |
• Click the second button from the left to play a clip from beginning to end. (You will learn about amore powerful function of this button in Chapter 4, “Build Your Story,” when you see it also allowsyou to play a clip from the In to the Out.)
• Click the second button from the right to play a clip starting a few seconds before the playheadand ending a few seconds after the playhead. (You’ll learn how to change the length of this pre-rolland post-roll in Chapter 4.)
But there are even more powerful tools you can use to play clips.
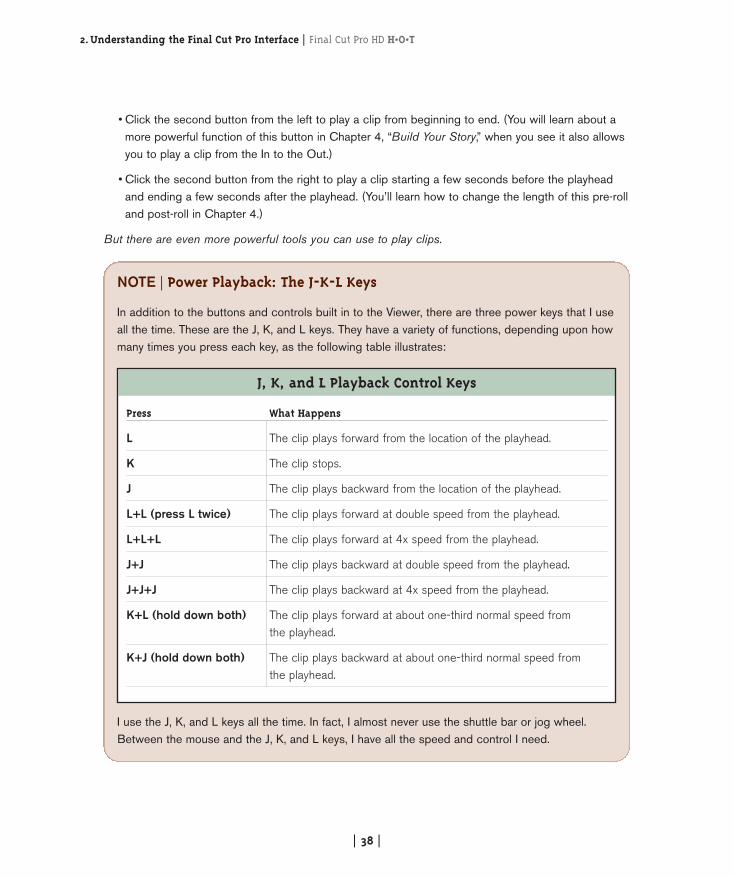
NOTE | Power Playback: The J-K-L Keys
In addition to the buttons and controls built in to the Viewer, there are three power keys that I useall the time. These are the J, K, and L keys. They have a variety of functions, depending upon howmany times you press each key, as the following table illustrates:
I use the J, K, and L keys all the time. In fact, I almost never use the shuttle bar or jog wheel.Between the mouse and the J, K, and L keys, I have all the speed and control I need.
J, K, and L Playback Control Keys
Press What Happens
L The clip plays forward from the location of the playhead.
K The clip stops.
J The clip plays backward from the location of the playhead.
L+L (press L twice) The clip plays forward at double speed from the playhead.
L+L+L The clip plays forward at 4x speed from the playhead.
J+J The clip plays backward at double speed from the playhead.
J+J+J The clip plays backward at 4x speed from the playhead.
K+L (hold down both) The clip plays forward at about one-third normal speed from the playhead.
K+J (hold down both) The clip plays backward at about one-third normal speed from the playhead.
02 FCP HOT (20-61)v3.qxd 11/11/04 5:37 PM Page 38
Final Cut Pro HD H•O•T | 2.Understanding the Final Cut Pro Interface
| 39 |
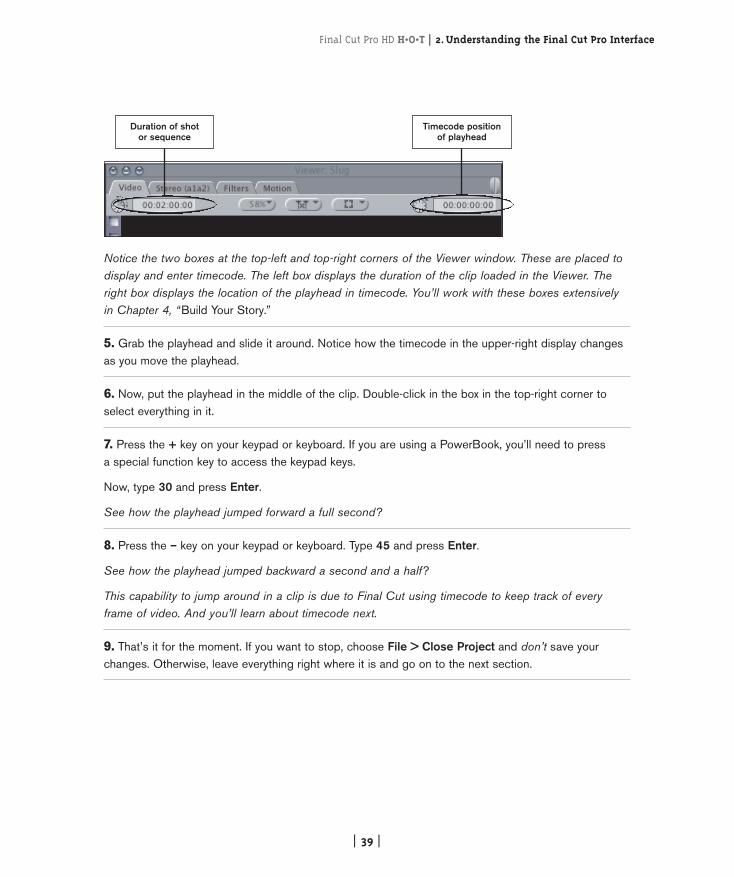
Notice the two boxes at the top-left and top-right corners of the Viewer window. These are placed todisplay and enter timecode. The left box displays the duration of the clip loaded in the Viewer. Theright box displays the location of the playhead in timecode. You’ll work with these boxes extensivelyin Chapter 4, “Build Your Story.”
5. Grab the playhead and slide it around. Notice how the timecode in the upper-right display changesas you move the playhead.
6. Now, put the playhead in the middle of the clip. Double-click in the box in the top-right corner toselect everything in it.
7. Press the + key on your keypad or keyboard. If you are using a PowerBook, you’ll need to press a special function key to access the keypad keys.
Now, type 30 and press Enter.
See how the playhead jumped forward a full second?
8. Press the – key on your keypad or keyboard. Type 45 and press Enter.
See how the playhead jumped backward a second and a half?
This capability to jump around in a clip is due to Final Cut using timecode to keep track of everyframe of video. And you’ll learn about timecode next.
9. That’s it for the moment. If you want to stop, choose File > Close Project and don’t save yourchanges. Otherwise, leave everything right where it is and go on to the next section.
Timecode positionof playhead
Duration of shot or sequence
02 FCP HOT (20-61)v3.qxd 11/11/04 5:37 PM Page 39
2.Understanding the Final Cut Pro Interface | Final Cut Pro HD H•O•T
| 40 |
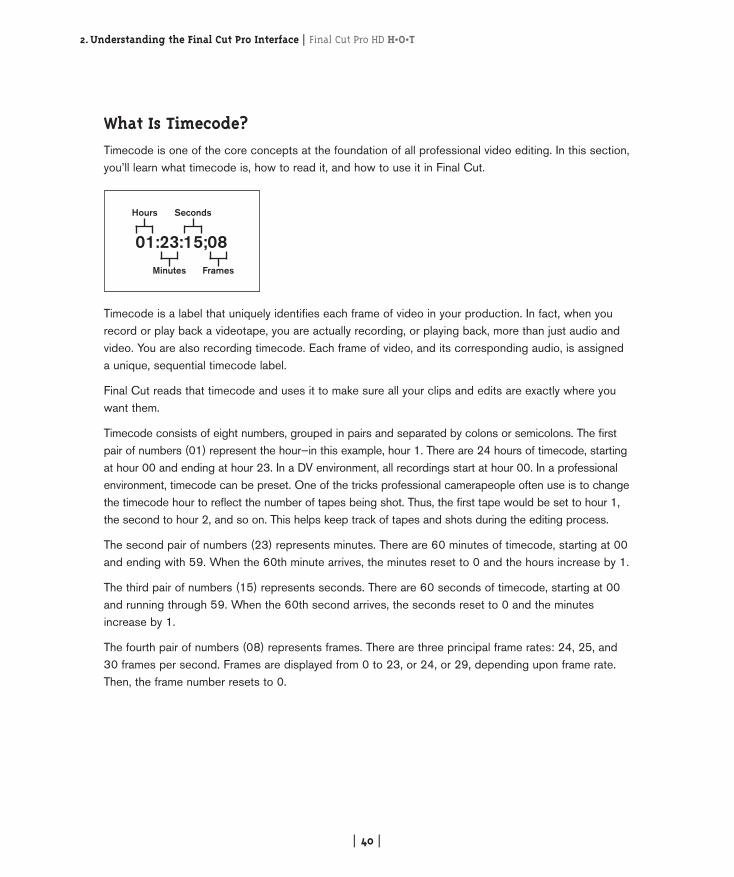
What Is Timecode?Timecode is one of the core concepts at the foundation of all professional video editing. In this section,you’ll learn what timecode is, how to read it, and how to use it in Final Cut.
Timecode is a label that uniquely identifies each frame of video in your production. In fact, when yourecord or play back a videotape, you are actually recording, or playing back, more than just audio andvideo. You are also recording timecode. Each frame of video, and its corresponding audio, is assigneda unique, sequential timecode label.
Final Cut reads that timecode and uses it to make sure all your clips and edits are exactly where youwant them.
Timecode consists of eight numbers, grouped in pairs and separated by colons or semicolons. The firstpair of numbers (01) represent the hour—in this example, hour 1. There are 24 hours of timecode, startingat hour 00 and ending at hour 23. In a DV environment, all recordings start at hour 00. In a professionalenvironment, timecode can be preset. One of the tricks professional camerapeople often use is to changethe timecode hour to reflect the number of tapes being shot. Thus, the first tape would be set to hour 1,the second to hour 2, and so on. This helps keep track of tapes and shots during the editing process.
The second pair of numbers (23) represents minutes. There are 60 minutes of timecode, starting at 00and ending with 59. When the 60th minute arrives, the minutes reset to 0 and the hours increase by 1.
The third pair of numbers (15) represents seconds. There are 60 seconds of timecode, starting at 00and running through 59. When the 60th second arrives, the seconds reset to 0 and the minutesincrease by 1.
The fourth pair of numbers (08) represents frames. There are three principal frame rates: 24, 25, and30 frames per second. Frames are displayed from 0 to 23, or 24, or 29, depending upon frame rate.Then, the frame number resets to 0.
01:23:15;08Minutes
Hours
Frames
Seconds
02 FCP HOT (20-61)v3.qxd 11/11/04 5:37 PM Page 40
Final Cut Pro HD H•O•T | 2.Understanding the Final Cut Pro Interface
| 41 |
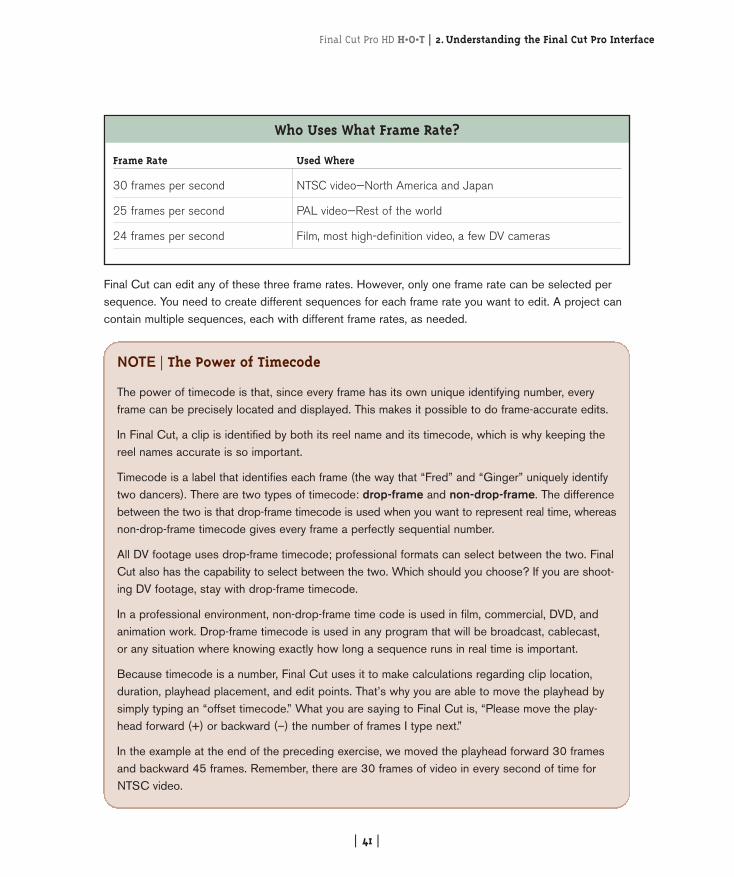
Final Cut can edit any of these three frame rates. However, only one frame rate can be selected persequence. You need to create different sequences for each frame rate you want to edit. A project cancontain multiple sequences, each with different frame rates, as needed.
NOTE | The Power of Timecode
The power of timecode is that, since every frame has its own unique identifying number, everyframe can be precisely located and displayed. This makes it possible to do frame-accurate edits.
In Final Cut, a clip is identified by both its reel name and its timecode, which is why keeping thereel names accurate is so important.
Timecode is a label that identifies each frame (the way that “Fred” and “Ginger” uniquely identifytwo dancers). There are two types of timecode: drop-frame and non-drop-frame. The differencebetween the two is that drop-frame timecode is used when you want to represent real time, whereasnon-drop-frame timecode gives every frame a perfectly sequential number.
All DV footage uses drop-frame timecode; professional formats can select between the two. FinalCut also has the capability to select between the two. Which should you choose? If you are shoot-ing DV footage, stay with drop-frame timecode.
In a professional environment, non-drop-frame time code is used in film, commercial, DVD, andanimation work. Drop-frame timecode is used in any program that will be broadcast, cablecast, or any situation where knowing exactly how long a sequence runs in real time is important.
Because timecode is a number, Final Cut uses it to make calculations regarding clip location,duration, playhead placement, and edit points. That’s why you are able to move the playhead bysimply typing an “offset timecode.” What you are saying to Final Cut is, “Please move the play-head forward (+) or backward (–) the number of frames I type next.”
In the example at the end of the preceding exercise, we moved the playhead forward 30 framesand backward 45 frames. Remember, there are 30 frames of video in every second of time forNTSC video.
Who Uses What Frame Rate?
Frame Rate Used Where
30 frames per second NTSC video—North America and Japan
25 frames per second PAL video—Rest of the world
24 frames per second Film, most high-definition video, a few DV cameras
02 FCP HOT (20-61)v3.qxd 11/11/04 5:37 PM Page 41
2.Understanding the Final Cut Pro Interface | Final Cut Pro HD H•O•T
| 42 |
Explore the Timeline
In this exercise, you’ll learn the basic operation of the Timeline and how clips are laid out in theTimeline, and discover the similarities between how the Viewer and Timeline play back clips.
The Timeline and the Canvas are, essentially, two views of the same thing. The Timeline allows you toorganize your clips from start to finish, whereas the Canvas displays the video under the Timeline play-head. You need both to be able to edit and view your program.
3.
1. Start by opening Chapter 02 Lesson, if it isn’t already open.
If you already have it open, choose File > Revert (and click OK to agree to lose allchanges) to reopen the project to the condition it was in the last time it was saved.
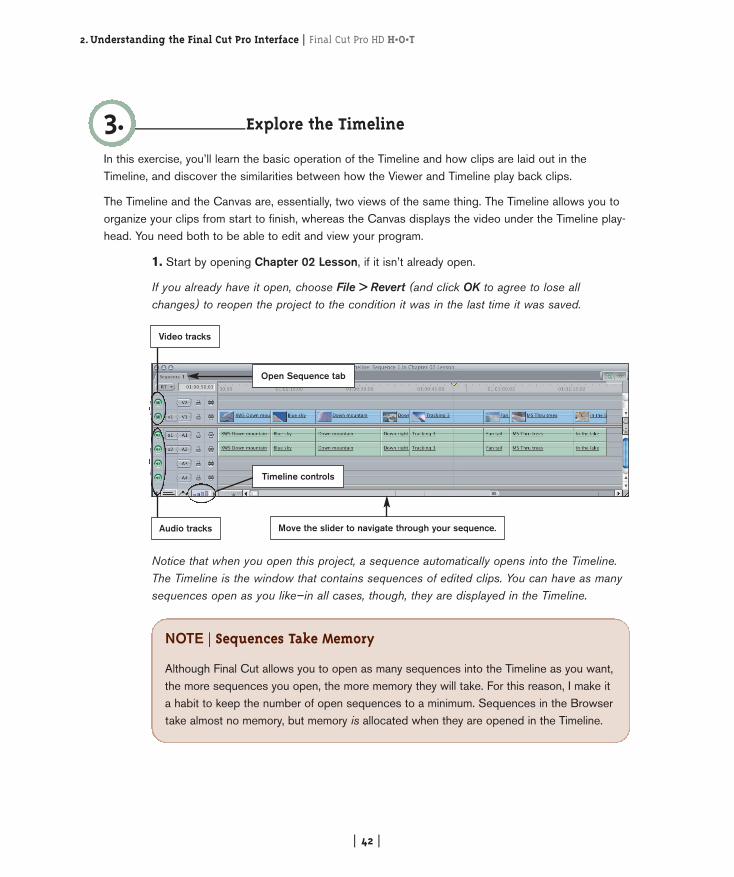
Notice that when you open this project, a sequence automatically opens into the Timeline.The Timeline is the window that contains sequences of edited clips. You can have as manysequences open as you like—in all cases, though, they are displayed in the Timeline.
NOTE | Sequences Take Memory
Although Final Cut allows you to open as many sequences into the Timeline as you want,the more sequences you open, the more memory they will take. For this reason, I make ita habit to keep the number of open sequences to a minimum. Sequences in the Browsertake almost no memory, but memory is allocated when they are opened in the Timeline.
Video tracks
Audio tracks
Open Sequence tab
Move the slider to navigate through your sequence.
Timeline controls
02 FCP HOT (20-61)v3.qxd 11/11/04 5:37 PM Page 42
Final Cut Pro HD H•O•T | 2.Understanding the Final Cut Pro Interface
| 43 |
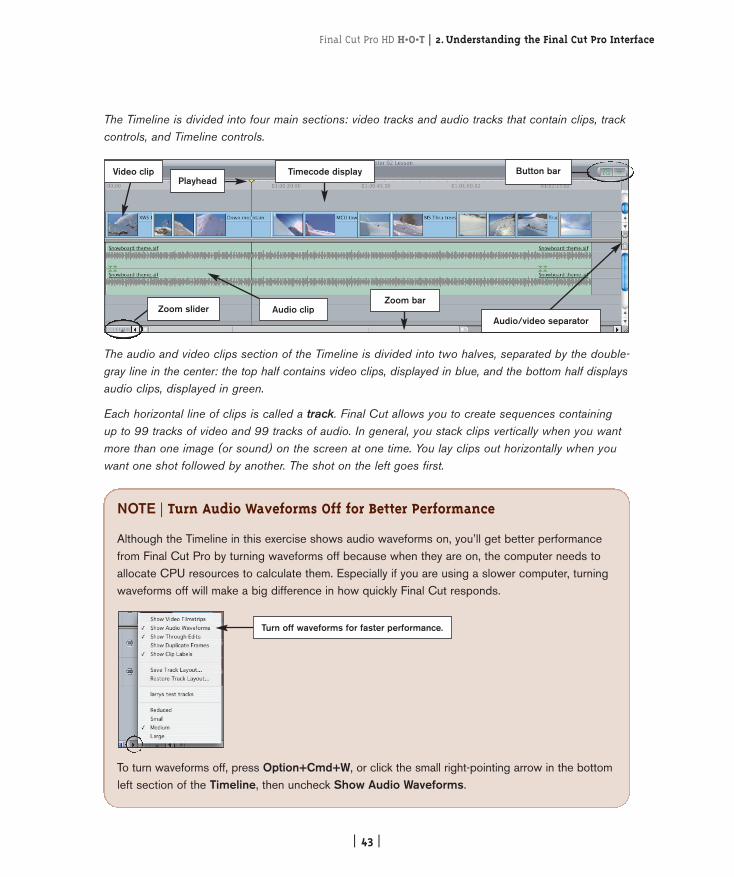
The Timeline is divided into four main sections: video tracks and audio tracks that contain clips, trackcontrols, and Timeline controls.
The audio and video clips section of the Timeline is divided into two halves, separated by the double-gray line in the center: the top half contains video clips, displayed in blue, and the bottom half displaysaudio clips, displayed in green.
Each horizontal line of clips is called a track. Final Cut allows you to create sequences containing up to 99 tracks of video and 99 tracks of audio. In general, you stack clips vertically when you wantmore than one image (or sound) on the screen at one time. You lay clips out horizontally when youwant one shot followed by another. The shot on the left goes first.
NOTE | Turn Audio Waveforms Off for Better Performance
Although the Timeline in this exercise shows audio waveforms on, you’ll get better performancefrom Final Cut Pro by turning waveforms off because when they are on, the computer needs toallocate CPU resources to calculate them. Especially if you are using a slower computer, turningwaveforms off will make a big difference in how quickly Final Cut responds.
To turn waveforms off, press Option+Cmd+W, or click the small right-pointing arrow in the bottomleft section of the Timeline, then uncheck Show Audio Waveforms.
PlayheadButton barVideo clip Timecode display
Zoom bar
Audio/video separatorZoom slider Audio clip
Turn off waveforms for faster performance.
02 FCP HOT (20-61)v3.qxd 11/11/04 5:37 PM Page 43
2.Understanding the Final Cut Pro Interface | Final Cut Pro HD H•O•T
| 44 |
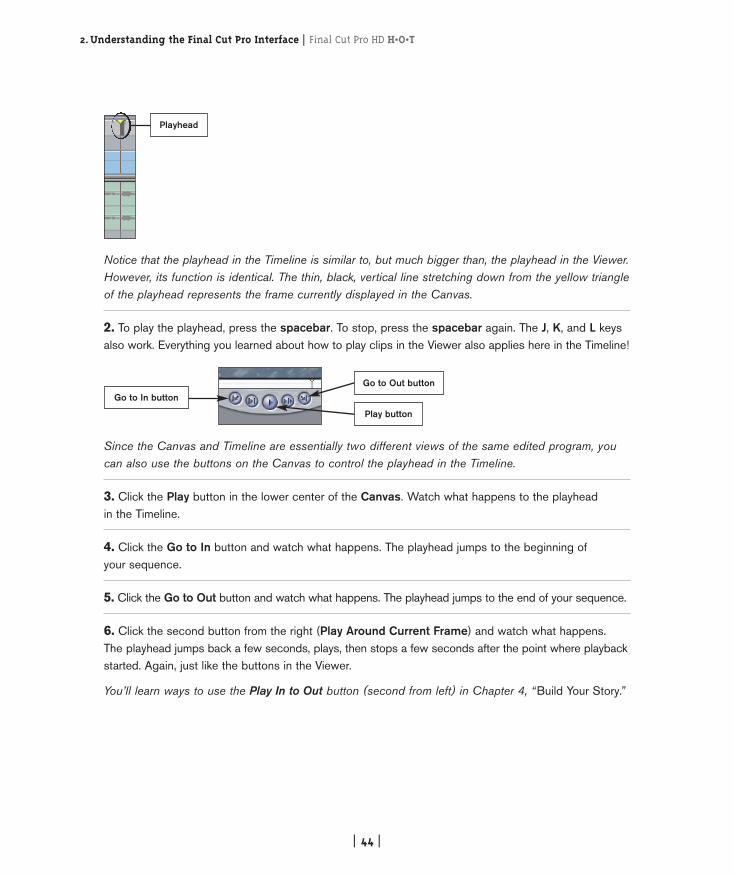
Notice that the playhead in the Timeline is similar to, but much bigger than, the playhead in the Viewer.However, its function is identical. The thin, black, vertical line stretching down from the yellow triangleof the playhead represents the frame currently displayed in the Canvas.
2. To play the playhead, press the spacebar. To stop, press the spacebar again. The J, K, and L keysalso work. Everything you learned about how to play clips in the Viewer also applies here in the Timeline!
Since the Canvas and Timeline are essentially two different views of the same edited program, youcan also use the buttons on the Canvas to control the playhead in the Timeline.
3. Click the Play button in the lower center of the Canvas. Watch what happens to the playhead in the Timeline.
4. Click the Go to In button and watch what happens. The playhead jumps to the beginning of your sequence.
5. Click the Go to Out button and watch what happens. The playhead jumps to the end of your sequence.
6. Click the second button from the right (Play Around Current Frame) and watch what happens. The playhead jumps back a few seconds, plays, then stops a few seconds after the point where playbackstarted. Again, just like the buttons in the Viewer.
You’ll learn ways to use the Play In to Out button (second from left) in Chapter 4, “Build Your Story.”
Playhead
Go to In button
Go to Out button
Play button
02 FCP HOT (20-61)v3.qxd 11/11/04 5:37 PM Page 44
Final Cut Pro HD H•O•T | 2.Understanding the Final Cut Pro Interface
| 45 |
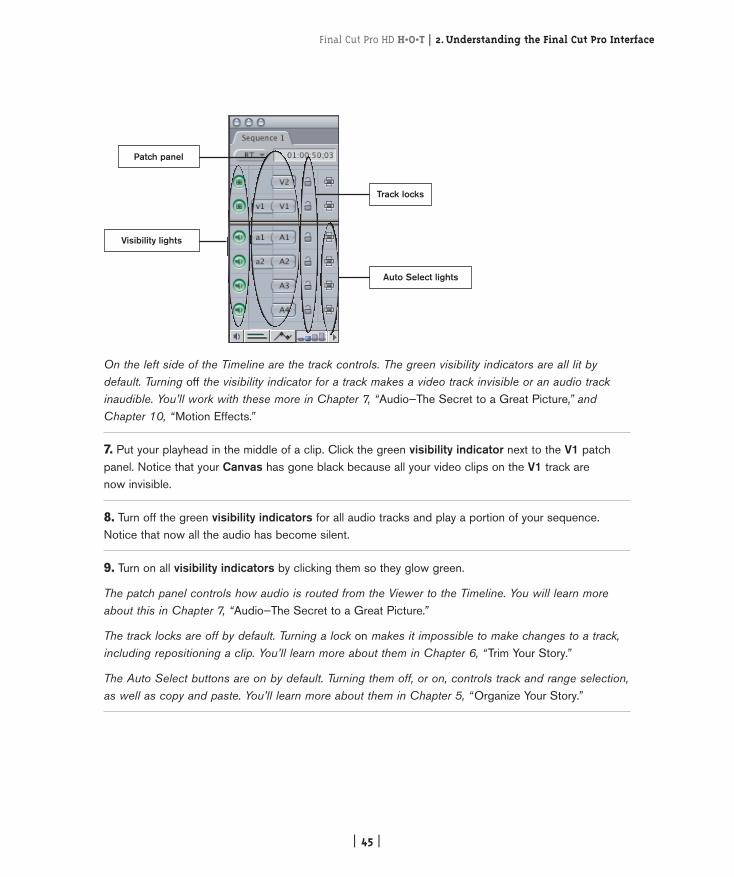
On the left side of the Timeline are the track controls. The green visibility indicators are all lit bydefault. Turning off the visibility indicator for a track makes a video track invisible or an audio trackinaudible. You’ll work with these more in Chapter 7, “Audio—The Secret to a Great Picture,” andChapter 10, “Motion Effects.”
7. Put your playhead in the middle of a clip. Click the green visibility indicator next to the V1 patchpanel. Notice that your Canvas has gone black because all your video clips on the V1 track are now invisible.
8. Turn off the green visibility indicators for all audio tracks and play a portion of your sequence.Notice that now all the audio has become silent.
9. Turn on all visibility indicators by clicking them so they glow green.
The patch panel controls how audio is routed from the Viewer to the Timeline. You will learn moreabout this in Chapter 7, “Audio—The Secret to a Great Picture.”
The track locks are off by default. Turning a lock on makes it impossible to make changes to a track,including repositioning a clip. You’ll learn more about them in Chapter 6, “Trim Your Story.”
The Auto Select buttons are on by default. Turning them off, or on, controls track and range selection,as well as copy and paste. You’ll learn more about them in Chapter 5, “Organize Your Story.”
Visibility lights
Patch panel
Auto Select lights
Track locks
02 FCP HOT (20-61)v3.qxd 11/11/04 5:37 PM Page 45
2.Understanding the Final Cut Pro Interface | Final Cut Pro HD H•O•T
| 46 |
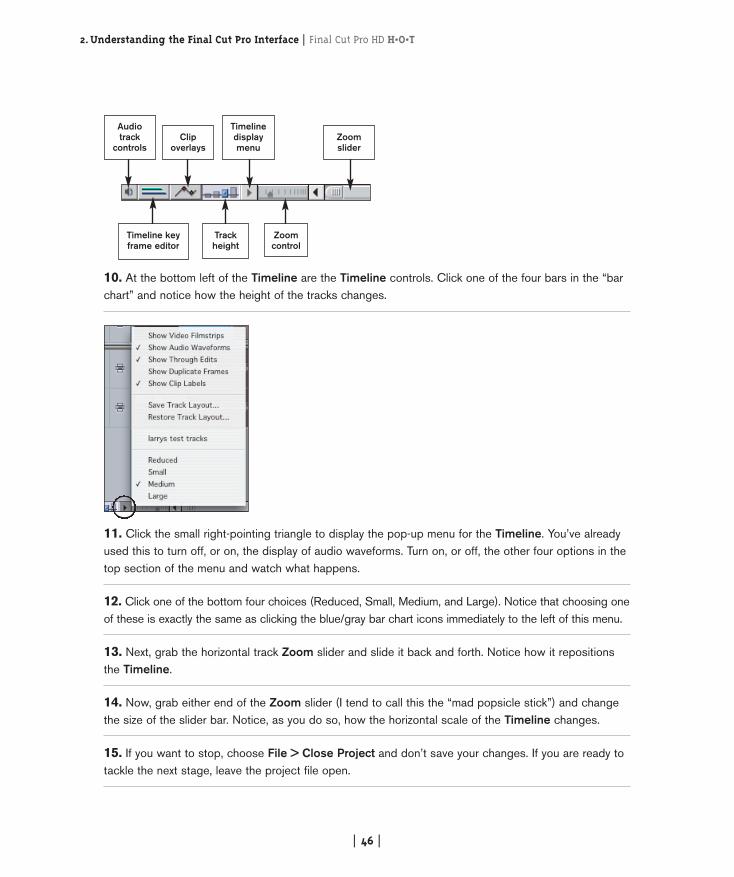
10. At the bottom left of the Timeline are the Timeline controls. Click one of the four bars in the “barchart” and notice how the height of the tracks changes.
11. Click the small right-pointing triangle to display the pop-up menu for the Timeline. You’ve alreadyused this to turn off, or on, the display of audio waveforms. Turn on, or off, the other four options in thetop section of the menu and watch what happens.
12. Click one of the bottom four choices (Reduced, Small, Medium, and Large). Notice that choosing oneof these is exactly the same as clicking the blue/gray bar chart icons immediately to the left of this menu.
13. Next, grab the horizontal track Zoom slider and slide it back and forth. Notice how it repositionsthe Timeline.
14. Now, grab either end of the Zoom slider (I tend to call this the “mad popsicle stick”) and changethe size of the slider bar. Notice, as you do so, how the horizontal scale of the Timeline changes.
15. If you want to stop, choose File > Close Project and don’t save your changes. If you are ready totackle the next stage, leave the project file open.
Audiotrack
controls
Timelinedisplaymenu
Zoomslider
Timeline keyframe editor
Zoomcontrol
Trackheight
Clipoverlays
02 FCP HOT (20-61)v3.qxd 11/11/04 5:37 PM Page 46
Final Cut Pro HD H•O•T | 2.Understanding the Final Cut Pro Interface
| 47 |
NOTE | Which Should You Use: Zoom Control or Zoom Slider?
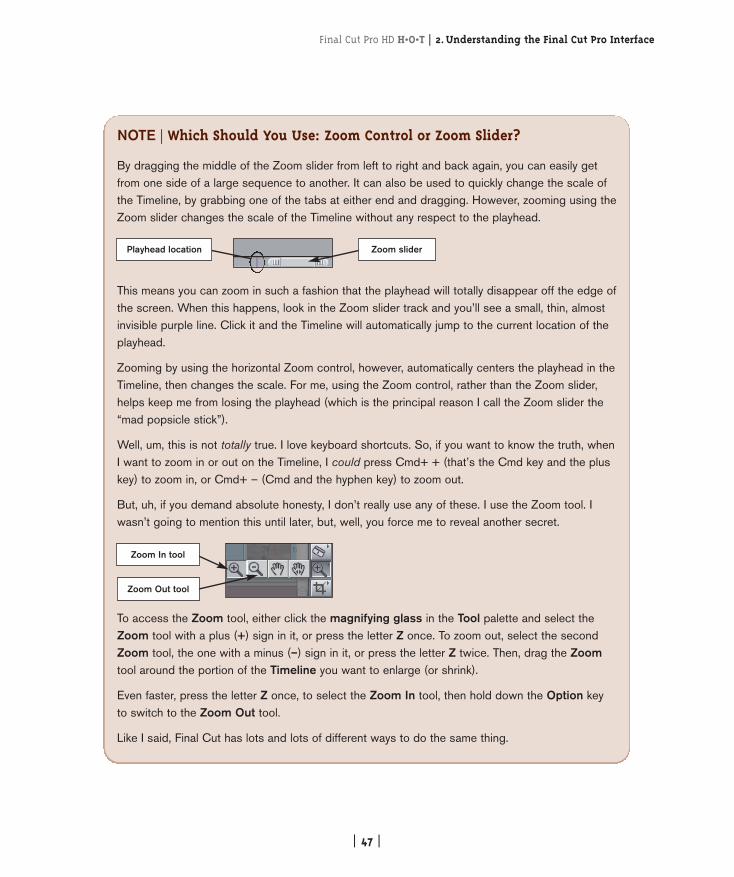
By dragging the middle of the Zoom slider from left to right and back again, you can easily getfrom one side of a large sequence to another. It can also be used to quickly change the scale ofthe Timeline, by grabbing one of the tabs at either end and dragging. However, zooming using theZoom slider changes the scale of the Timeline without any respect to the playhead.
This means you can zoom in such a fashion that the playhead will totally disappear off the edge ofthe screen. When this happens, look in the Zoom slider track and you’ll see a small, thin, almostinvisible purple line. Click it and the Timeline will automatically jump to the current location of theplayhead.
Zooming by using the horizontal Zoom control, however, automatically centers the playhead in theTimeline, then changes the scale. For me, using the Zoom control, rather than the Zoom slider,helps keep me from losing the playhead (which is the principal reason I call the Zoom slider the“mad popsicle stick”).
Well, um, this is not totally true. I love keyboard shortcuts. So, if you want to know the truth, whenI want to zoom in or out on the Timeline, I could press Cmd+ + (that’s the Cmd key and the pluskey) to zoom in, or Cmd+ – (Cmd and the hyphen key) to zoom out.
But, uh, if you demand absolute honesty, I don’t really use any of these. I use the Zoom tool. Iwasn’t going to mention this until later, but, well, you force me to reveal another secret.
To access the Zoom tool, either click the magnifying glass in the Tool palette and select theZoom tool with a plus (+) sign in it, or press the letter Z once. To zoom out, select the secondZoom tool, the one with a minus (–) sign in it, or press the letter Z twice. Then, drag the Zoomtool around the portion of the Timeline you want to enlarge (or shrink).
Even faster, press the letter Z once, to select the Zoom In tool, then hold down the Option keyto switch to the Zoom Out tool.
Like I said, Final Cut has lots and lots of different ways to do the same thing.
Playhead location Zoom slider
Zoom In tool
Zoom Out tool
02 FCP HOT (20-61)v3.qxd 11/11/04 5:37 PM Page 47
2.Understanding the Final Cut Pro Interface | Final Cut Pro HD H•O•T
| 48 |
Explore the Canvas
By now, you know almost everything you need to know to get started using the Canvas. (Not, however,everything about the Canvas there is to know.) In this exercise, you’ll review what you’ve learned aboutplaying video in the Viewer, then you’ll explore the Fit to Window and View pop-up menus.
Remember, the Canvas is simply another view of the Timeline. The Timeline shows the organization ofyour program on a clip-by-clip basis. The Canvas provides you a way to view it.
4.
1. Start by opening Chapter 02 Lesson, if it isn’t already open.
If you already have it open, choose File > Revert (and click OK to agree to lose allchanges) to reopen the project to the condition it was in the last time it was saved.
2. Notice that the Canvas window looks pretty darn near identical to the Viewer window.Spend a minute reassuring yourself that the spacebar; J, K, and L keys; shuttle bar; and jogwheel work exactly the same as in the Viewer. Because they do.
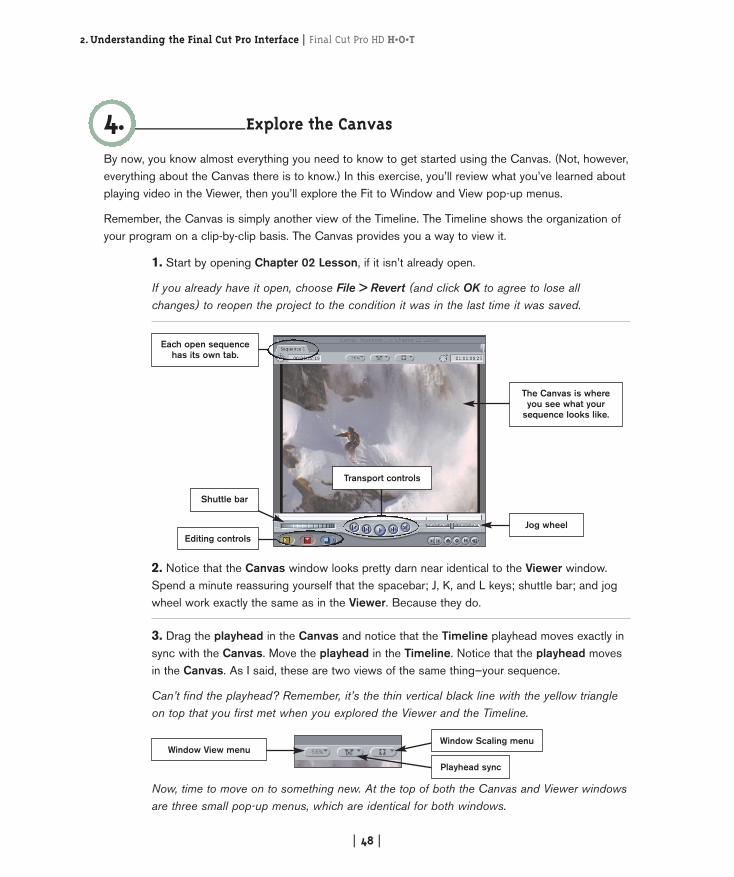
3. Drag the playhead in the Canvas and notice that the Timeline playhead moves exactly insync with the Canvas. Move the playhead in the Timeline. Notice that the playhead movesin the Canvas. As I said, these are two views of the same thing—your sequence.
Can’t find the playhead? Remember, it’s the thin vertical black line with the yellow triangleon top that you first met when you explored the Viewer and the Timeline.
Now, time to move on to something new. At the top of both the Canvas and Viewer windowsare three small pop-up menus, which are identical for both windows.
Editing controls
Shuttle bar
Each open sequencehas its own tab.
Transport controls
Jog wheel
The Canvas is whereyou see what your
sequence looks like.
Window View menuWindow Scaling menu
Playhead sync
02 FCP HOT (20-61)v3.qxd 11/11/04 5:38 PM Page 48
Final Cut Pro HD H•O•T | 2.Understanding the Final Cut Pro Interface
| 49 |
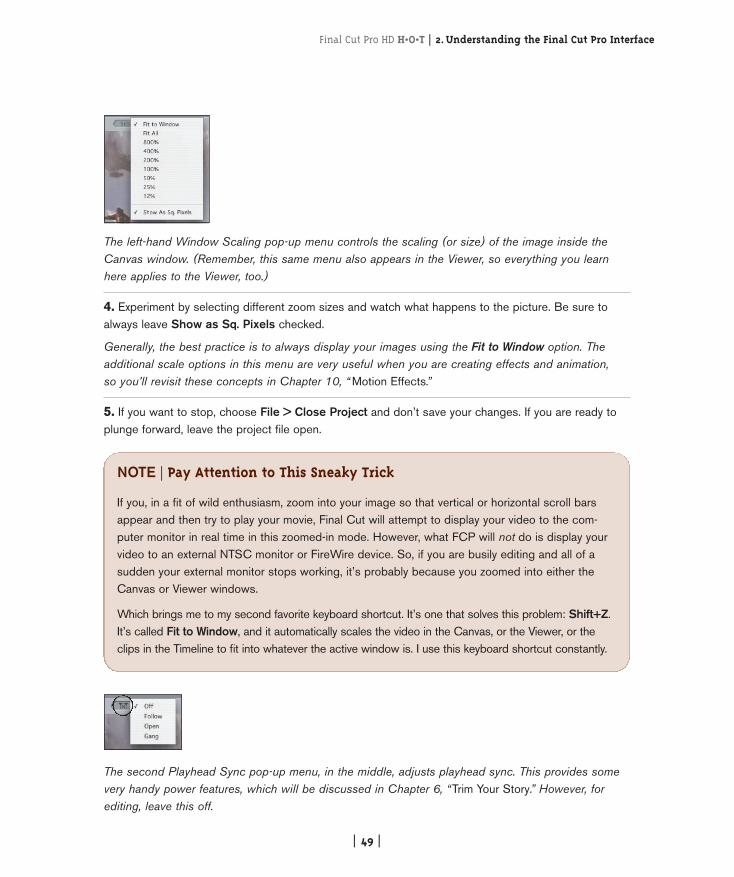
The left-hand Window Scaling pop-up menu controls the scaling (or size) of the image inside theCanvas window. (Remember, this same menu also appears in the Viewer, so everything you learnhere applies to the Viewer, too.)
4. Experiment by selecting different zoom sizes and watch what happens to the picture. Be sure toalways leave Show as Sq. Pixels checked.
Generally, the best practice is to always display your images using the Fit to Window option. Theadditional scale options in this menu are very useful when you are creating effects and animation, so you’ll revisit these concepts in Chapter 10, “ Motion Effects.”
5. If you want to stop, choose File > Close Project and don’t save your changes. If you are ready toplunge forward, leave the project file open.
The second Playhead Sync pop-up menu, in the middle, adjusts playhead sync. This provides somevery handy power features, which will be discussed in Chapter 6, “Trim Your Story.” However, forediting, leave this off.
NOTE | Pay Attention to This Sneaky Trick
If you, in a fit of wild enthusiasm, zoom into your image so that vertical or horizontal scroll barsappear and then try to play your movie, Final Cut will attempt to display your video to the com-puter monitor in real time in this zoomed-in mode. However, what FCP will not do is display yourvideo to an external NTSC monitor or FireWire device. So, if you are busily editing and all of asudden your external monitor stops working, it’s probably because you zoomed into either theCanvas or Viewer windows.
Which brings me to my second favorite keyboard shortcut. It’s one that solves this problem: Shift+Z.It’s called Fit to Window, and it automatically scales the video in the Canvas, or the Viewer, or theclips in the Timeline to fit into whatever the active window is. I use this keyboard shortcut constantly.
02 FCP HOT (20-61)v3.qxd 11/11/04 5:38 PM Page 49
2.Understanding the Final Cut Pro Interface | Final Cut Pro HD H•O•T
| 50 |
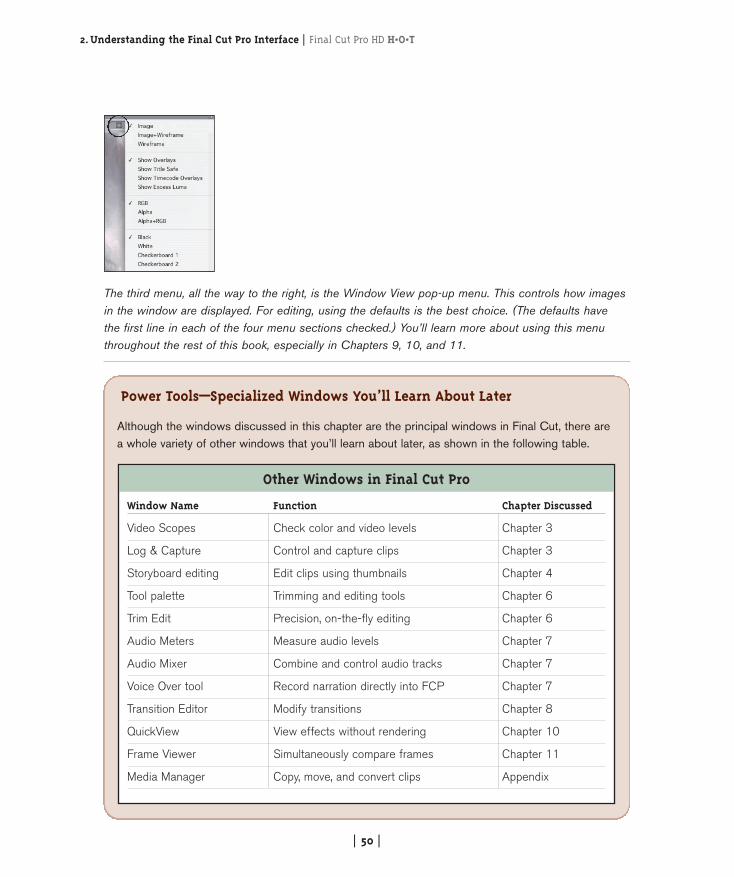
The third menu, all the way to the right, is the Window View pop-up menu. This controls how imagesin the window are displayed. For editing, using the defaults is the best choice. (The defaults have the first line in each of the four menu sections checked.) You’ll learn more about using this menuthroughout the rest of this book, especially in Chapters 9, 10, and 11.
Power Tools—Specialized Windows You’ll Learn About Later
Although the windows discussed in this chapter are the principal windows in Final Cut, there area whole variety of other windows that you’ll learn about later, as shown in the following table.
Other Windows in Final Cut Pro
Window Name Function Chapter Discussed
Video Scopes Check color and video levels Chapter 3
Log & Capture Control and capture clips Chapter 3
Storyboard editing Edit clips using thumbnails Chapter 4
Tool palette Trimming and editing tools Chapter 6
Trim Edit Precision, on-the-fly editing Chapter 6
Audio Meters Measure audio levels Chapter 7
Audio Mixer Combine and control audio tracks Chapter 7
Voice Over tool Record narration directly into FCP Chapter 7
Transition Editor Modify transitions Chapter 8
QuickView View effects without rendering Chapter 10
Frame Viewer Simultaneously compare frames Chapter 11
Media Manager Copy, move, and convert clips Appendix
02 FCP HOT (20-61)v3.qxd 11/11/04 5:38 PM Page 50
Final Cut Pro HD H•O•T | 2.Understanding the Final Cut Pro Interface
| 51 |
Customize Final Cut Pro
In this exercise, you’ll learn how to customize Final Cut Pro. The best tools, I’ve discovered, disappear asyou learn how to use them. Thus, with practice, you stop worrying about how to hold the hammer, andinstead concentrate on hitting the nail. You pay attention to your driving, not to how the spark plugs work.
This is also true for Final Cut Pro. As you get familiar with how it works, you’ll pay less attention to thesoftware and more to bringing the ideas in your mind out into your project. One of the ways Final Cutmakes this possible is through some truly extensive customization. This exercise explains how it works.
5.
1. Start by opening Chapter 02 Lesson, if it isn’t already open.
If you already have it open, choose File > Revert (and click OK to agree to lose allchanges) to reopen the project to the condition it was in the last time it was saved.
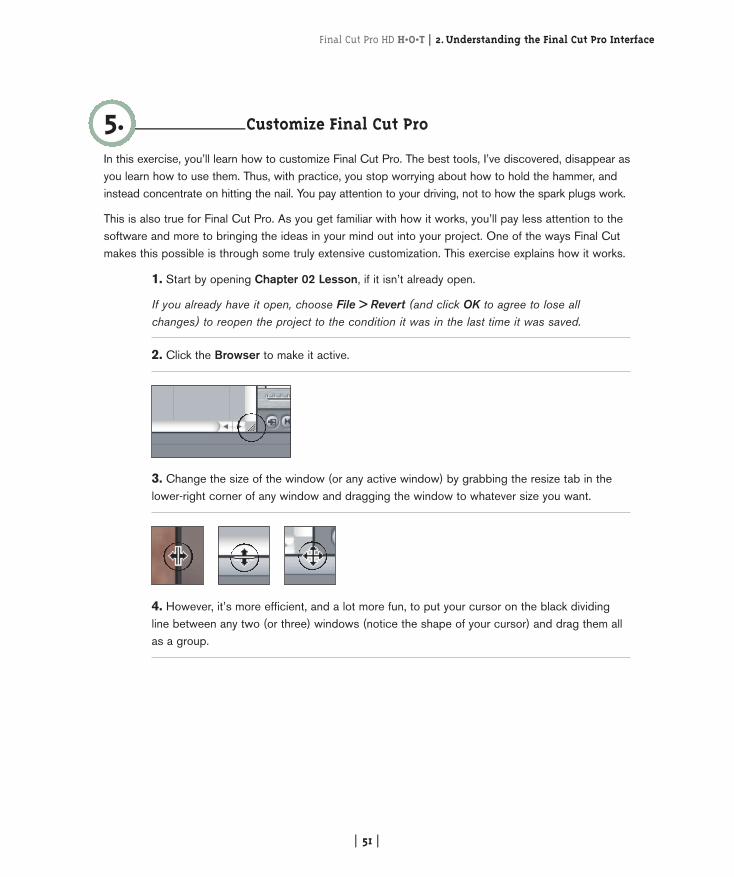
2. Click the Browser to make it active.
3. Change the size of the window (or any active window) by grabbing the resize tab in thelower-right corner of any window and dragging the window to whatever size you want.
4. However, it’s more efficient, and a lot more fun, to put your cursor on the black dividingline between any two (or three) windows (notice the shape of your cursor) and drag them allas a group.
02 FCP HOT (20-61)v3.qxd 11/11/04 5:38 PM Page 51
2.Understanding the Final Cut Pro Interface | Final Cut Pro HD H•O•T
| 52 |
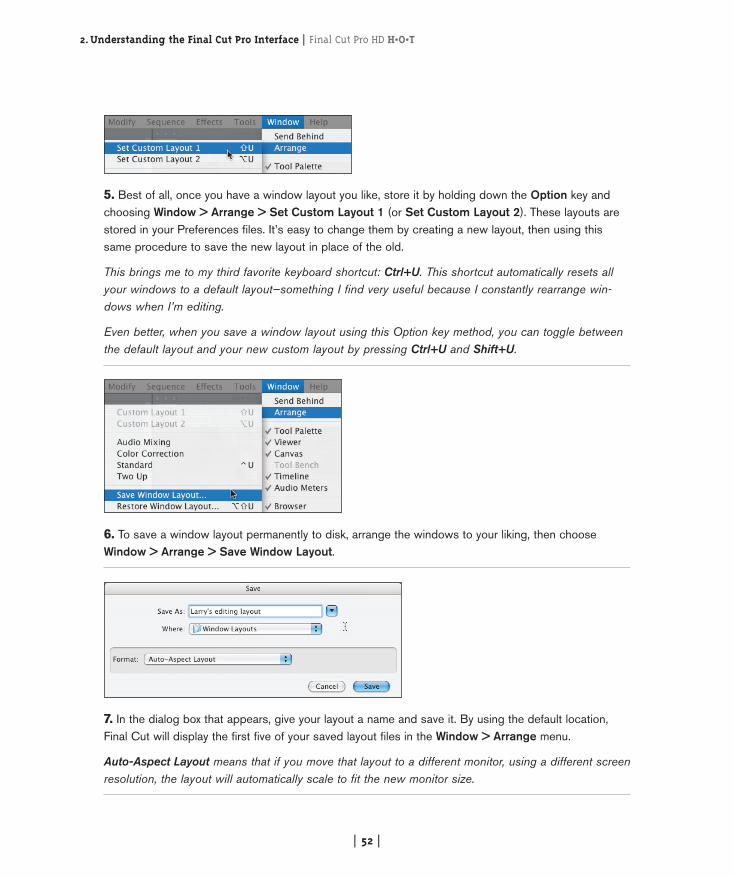
5. Best of all, once you have a window layout you like, store it by holding down the Option key andchoosing Window > Arrange > Set Custom Layout 1 (or Set Custom Layout 2). These layouts arestored in your Preferences files. It’s easy to change them by creating a new layout, then using thissame procedure to save the new layout in place of the old.
This brings me to my third favorite keyboard shortcut: Ctrl+U. This shortcut automatically resets allyour windows to a default layout—something I find very useful because I constantly rearrange win-dows when I’m editing.
Even better, when you save a window layout using this Option key method, you can toggle betweenthe default layout and your new custom layout by pressing Ctrl+U and Shift+U.
6. To save a window layout permanently to disk, arrange the windows to your liking, then chooseWindow > Arrange > Save Window Layout.
7. In the dialog box that appears, give your layout a name and save it. By using the default location,Final Cut will display the first five of your saved layout files in the Window > Arrange menu.
Auto-Aspect Layout means that if you move that layout to a different monitor, using a different screenresolution, the layout will automatically scale to fit the new monitor size.
02 FCP HOT (20-61)v3.qxd 11/11/04 5:38 PM Page 52
Final Cut Pro HD H•O•T | 2.Understanding the Final Cut Pro Interface
| 53 |
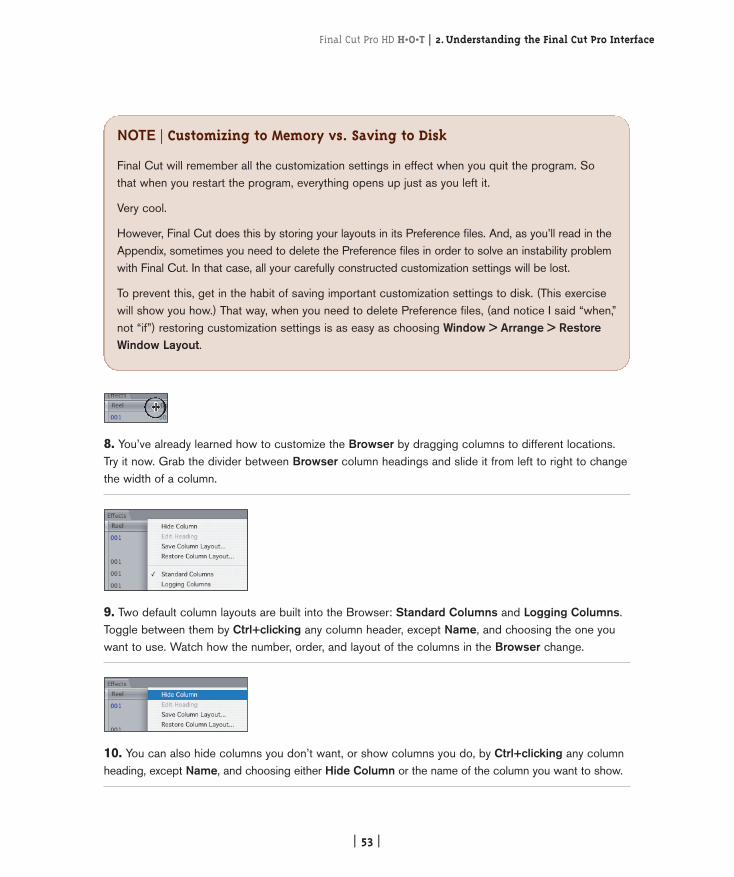
8. You’ve already learned how to customize the Browser by dragging columns to different locations.Try it now. Grab the divider between Browser column headings and slide it from left to right to changethe width of a column.
9. Two default column layouts are built into the Browser: Standard Columns and Logging Columns.Toggle between them by Ctrl+clicking any column header, except Name, and choosing the one youwant to use. Watch how the number, order, and layout of the columns in the Browser change.
10. You can also hide columns you don’t want, or show columns you do, by Ctrl+clicking any columnheading, except Name, and choosing either Hide Column or the name of the column you want to show.
NOTE | Customizing to Memory vs. Saving to Disk
Final Cut will remember all the customization settings in effect when you quit the program. Sothat when you restart the program, everything opens up just as you left it.
Very cool.
However, Final Cut does this by storing your layouts in its Preference files. And, as you’ll read in theAppendix, sometimes you need to delete the Preference files in order to solve an instability problemwith Final Cut. In that case, all your carefully constructed customization settings will be lost.
To prevent this, get in the habit of saving important customization settings to disk. (This exercisewill show you how.) That way, when you need to delete Preference files, (and notice I said “when,”not “if”) restoring customization settings is as easy as choosing Window > Arrange > RestoreWindow Layout.
02 FCP HOT (20-61)v3.qxd 11/11/04 5:38 PM Page 53
2.Understanding the Final Cut Pro Interface | Final Cut Pro HD H•O•T
| 54 |
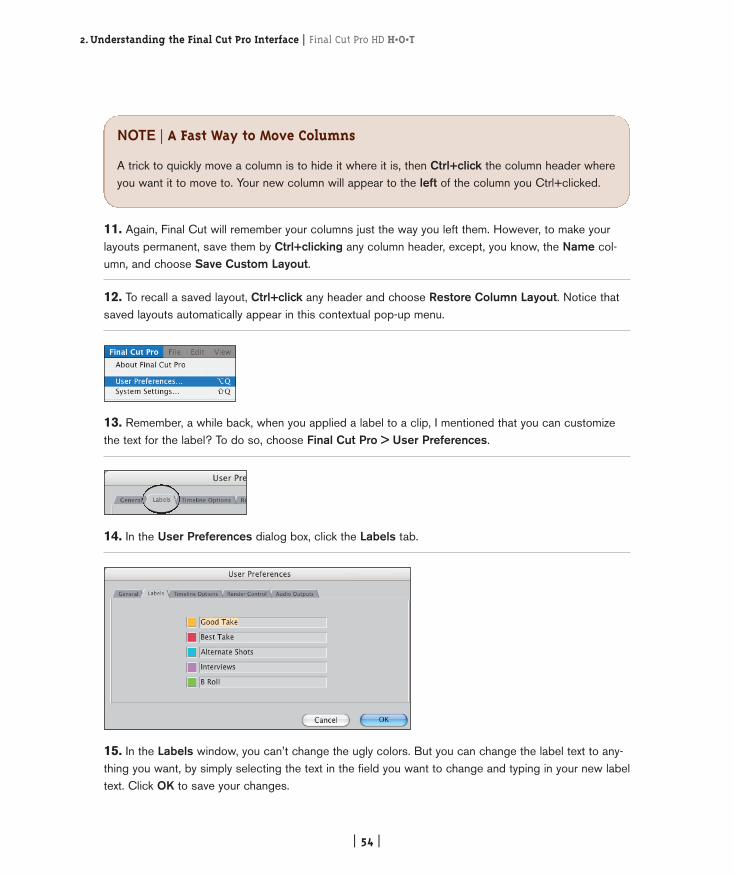
11. Again, Final Cut will remember your columns just the way you left them. However, to make yourlayouts permanent, save them by Ctrl+clicking any column header, except, you know, the Name col-umn, and choose Save Custom Layout.
12. To recall a saved layout, Ctrl+click any header and choose Restore Column Layout. Notice thatsaved layouts automatically appear in this contextual pop-up menu.
13. Remember, a while back, when you applied a label to a clip, I mentioned that you can customizethe text for the label? To do so, choose Final Cut Pro > User Preferences.
14. In the User Preferences dialog box, click the Labels tab.
15. In the Labels window, you can’t change the ugly colors. But you can change the label text to any-thing you want, by simply selecting the text in the field you want to change and typing in your new labeltext. Click OK to save your changes.
NOTE | A Fast Way to Move Columns
A trick to quickly move a column is to hide it where it is, then Ctrl+click the column header whereyou want it to move to. Your new column will appear to the left of the column you Ctrl+clicked.
02 FCP HOT (20-61)v3.qxd 11/11/04 5:38 PM Page 54
Final Cut Pro HD H•O•T | 2.Understanding the Final Cut Pro Interface
| 55 |
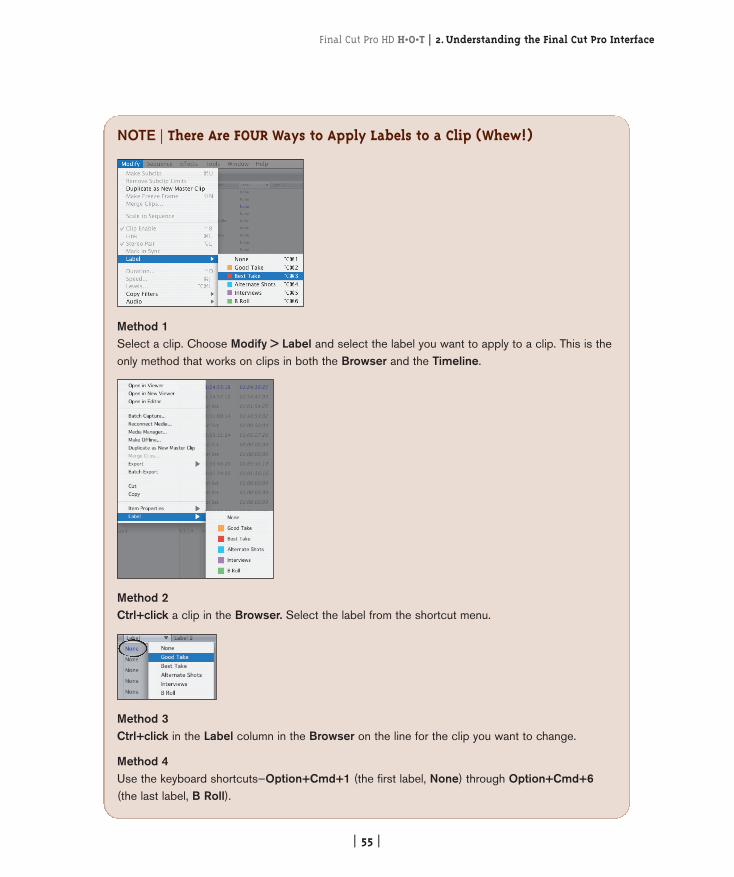
NOTE | There Are FOUR Ways to Apply Labels to a Clip (Whew!)
Method 1Select a clip. Choose Modify > Label and select the label you want to apply to a clip. This is theonly method that works on clips in both the Browser and the Timeline.
Method 2Ctrl+click a clip in the Browser. Select the label from the shortcut menu.
Method 3Ctrl+click in the Label column in the Browser on the line for the clip you want to change.
Method 4Use the keyboard shortcuts—Option+Cmd+1 (the first label, None) through Option+Cmd+6(the last label, B Roll).
02 FCP HOT (20-61)v3.qxd 11/11/04 5:38 PM Page 55
2.Understanding the Final Cut Pro Interface | Final Cut Pro HD H•O•T
| 56 |
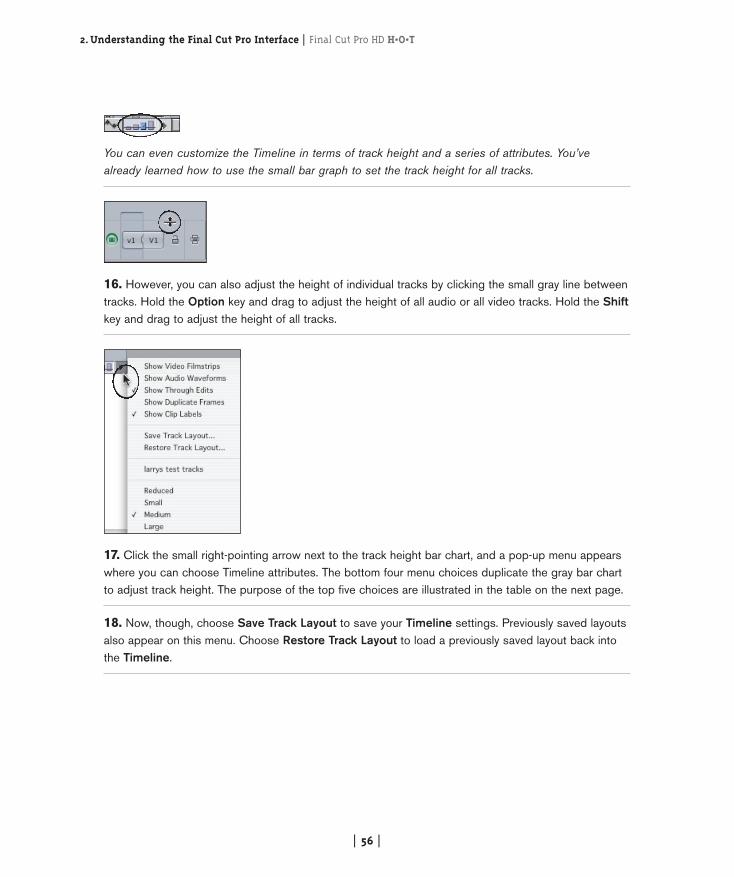
You can even customize the Timeline in terms of track height and a series of attributes. You’vealready learned how to use the small bar graph to set the track height for all tracks.
16. However, you can also adjust the height of individual tracks by clicking the small gray line betweentracks. Hold the Option key and drag to adjust the height of all audio or all video tracks. Hold the Shiftkey and drag to adjust the height of all tracks.
17. Click the small right-pointing arrow next to the track height bar chart, and a pop-up menu appearswhere you can choose Timeline attributes. The bottom four menu choices duplicate the gray bar chartto adjust track height. The purpose of the top five choices are illustrated in the table on the next page.
18. Now, though, choose Save Track Layout to save your Timeline settings. Previously saved layoutsalso appear on this menu. Choose Restore Track Layout to load a previously saved layout back intothe Timeline.
02 FCP HOT (20-61)v3.qxd 11/11/04 5:38 PM Page 56
Final Cut Pro HD H•O•T | 2.Understanding the Final Cut Pro Interface
| 57 |
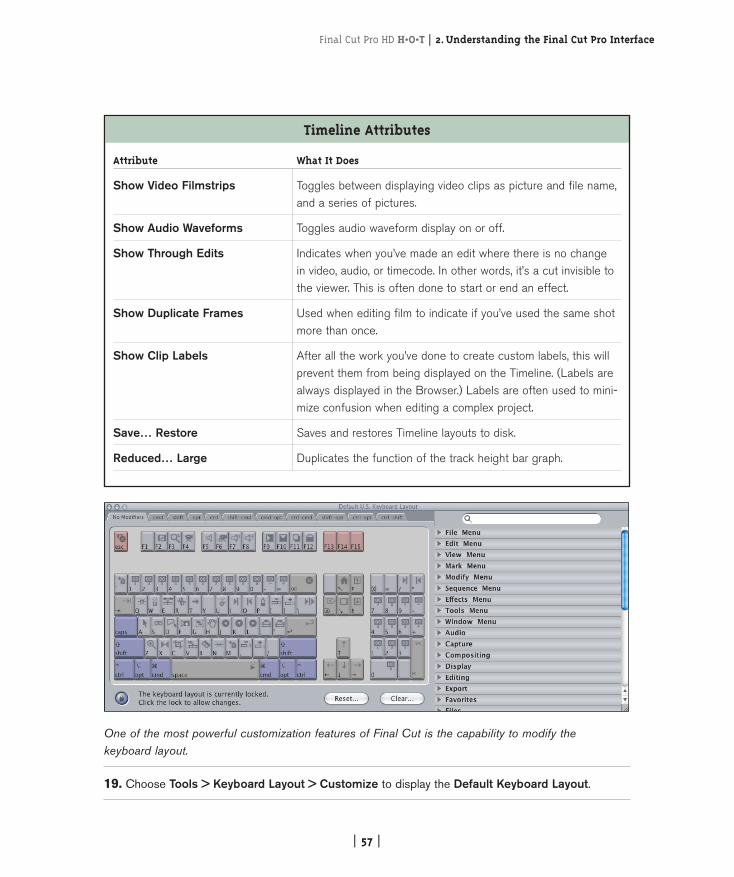
One of the most powerful customization features of Final Cut is the capability to modify the keyboard layout.
19. Choose Tools > Keyboard Layout > Customize to display the Default Keyboard Layout.
Timeline Attributes
Attribute What It Does
Show Video Filmstrips Toggles between displaying video clips as picture and file name,and a series of pictures.
Show Audio Waveforms Toggles audio waveform display on or off.
Show Through Edits Indicates when you’ve made an edit where there is no change in video, audio, or timecode. In other words, it’s a cut invisible tothe viewer. This is often done to start or end an effect.
Show Duplicate Frames Used when editing film to indicate if you’ve used the same shotmore than once.
Show Clip Labels After all the work you’ve done to create custom labels, this willprevent them from being displayed on the Timeline. (Labels arealways displayed in the Browser.) Labels are often used to mini-mize confusion when editing a complex project.
Save… Restore Saves and restores Timeline layouts to disk.
Reduced… Large Duplicates the function of the track height bar graph.
02 FCP HOT (20-61)v3.qxd 11/11/04 5:38 PM Page 57
2.Understanding the Final Cut Pro Interface | Final Cut Pro HD H•O•T
| 58 |
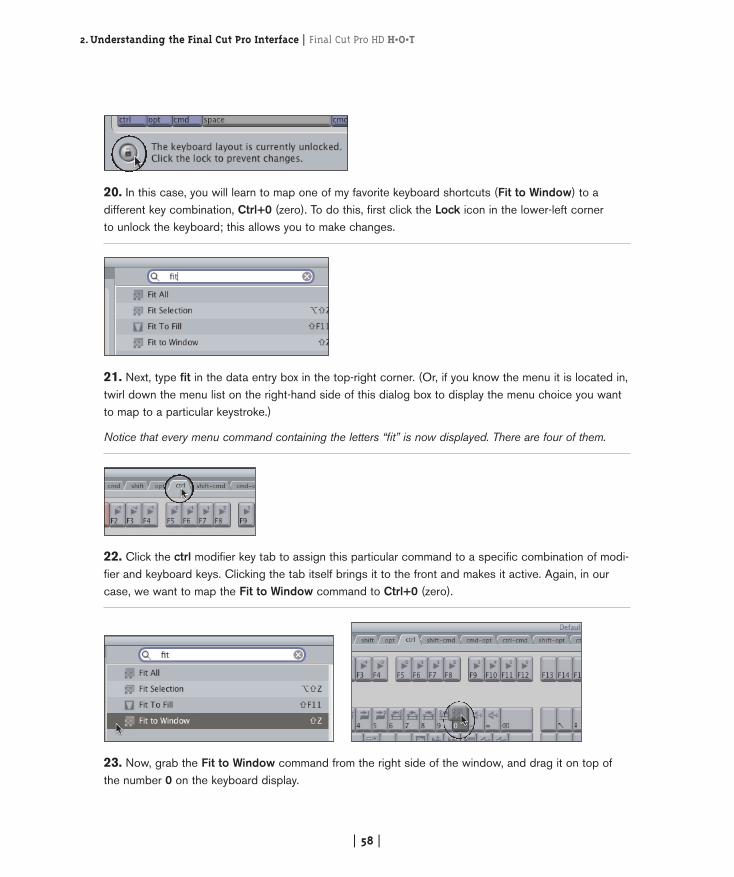
20. In this case, you will learn to map one of my favorite keyboard shortcuts (Fit to Window) to adifferent key combination, Ctrl+0 (zero). To do this, first click the Lock icon in the lower-left corner to unlock the keyboard; this allows you to make changes.
21. Next, type fit in the data entry box in the top-right corner. (Or, if you know the menu it is located in,twirl down the menu list on the right-hand side of this dialog box to display the menu choice you wantto map to a particular keystroke.)
Notice that every menu command containing the letters “fit” is now displayed. There are four of them.
22. Click the ctrl modifier key tab to assign this particular command to a specific combination of modi-fier and keyboard keys. Clicking the tab itself brings it to the front and makes it active. Again, in ourcase, we want to map the Fit to Window command to Ctrl+0 (zero).
23. Now, grab the Fit to Window command from the right side of the window, and drag it on top ofthe number 0 on the keyboard display.
02 FCP HOT (20-61)v3.qxd 11/11/04 5:38 PM Page 58
Final Cut Pro HD H•O•T | 2.Understanding the Final Cut Pro Interface
| 59 |
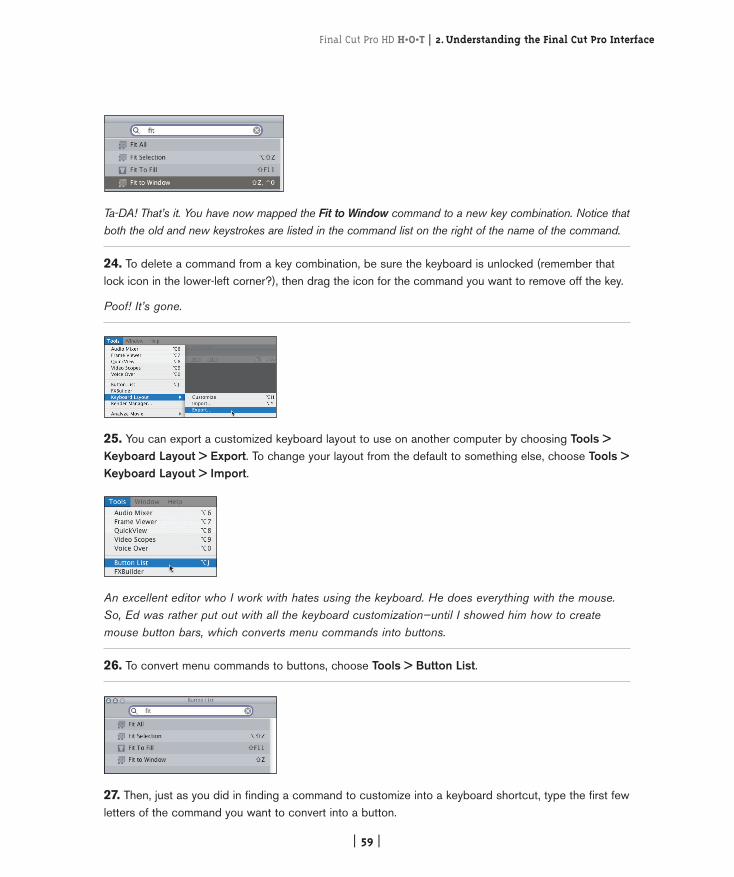
Ta-DA! That’s it. You have now mapped the Fit to Window command to a new key combination. Notice thatboth the old and new keystrokes are listed in the command list on the right of the name of the command.
24. To delete a command from a key combination, be sure the keyboard is unlocked (remember thatlock icon in the lower-left corner?), then drag the icon for the command you want to remove off the key.
Poof! It’s gone.
25. You can export a customized keyboard layout to use on another computer by choosing Tools >Keyboard Layout > Export. To change your layout from the default to something else, choose Tools >Keyboard Layout > Import.
An excellent editor who I work with hates using the keyboard. He does everything with the mouse.So, Ed was rather put out with all the keyboard customization—until I showed him how to createmouse button bars, which converts menu commands into buttons.
26. To convert menu commands to buttons, choose Tools > Button List.
27. Then, just as you did in finding a command to customize into a keyboard shortcut, type the first fewletters of the command you want to convert into a button.
02 FCP HOT (20-61)v3.qxd 11/11/04 5:38 PM Page 59
2.Understanding the Final Cut Pro Interface | Final Cut Pro HD H•O•T
| 60 |
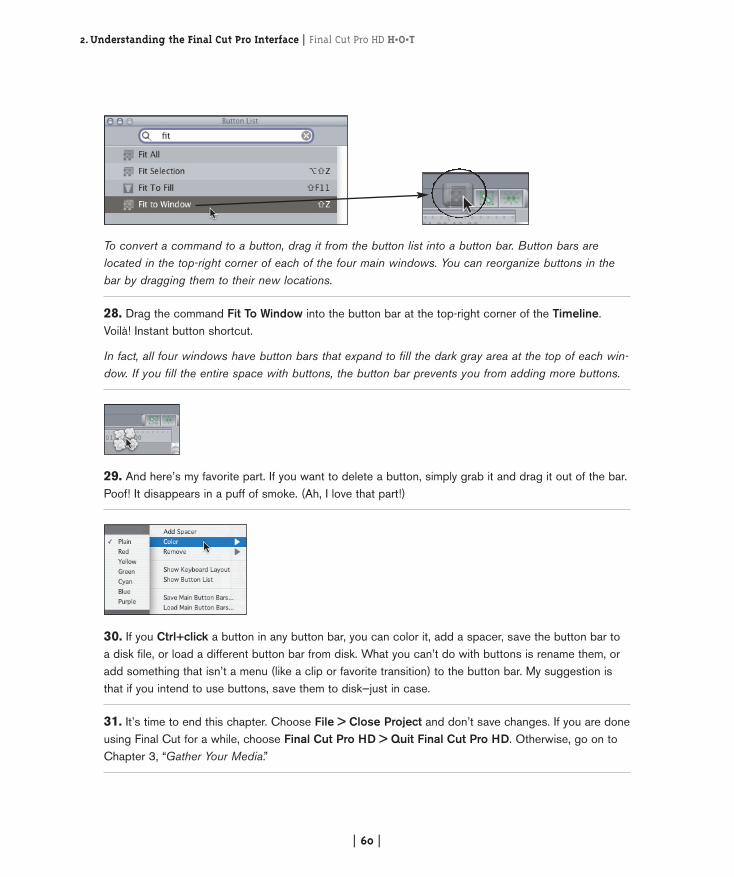
To convert a command to a button, drag it from the button list into a button bar. Button bars arelocated in the top-right corner of each of the four main windows. You can reorganize buttons in thebar by dragging them to their new locations.
28. Drag the command Fit To Window into the button bar at the top-right corner of the Timeline.Voilà! Instant button shortcut.
In fact, all four windows have button bars that expand to fill the dark gray area at the top of each win-dow. If you fill the entire space with buttons, the button bar prevents you from adding more buttons.
29. And here’s my favorite part. If you want to delete a button, simply grab it and drag it out of the bar.Poof! It disappears in a puff of smoke. (Ah, I love that part!)
30. If you Ctrl+click a button in any button bar, you can color it, add a spacer, save the button bar to a disk file, or load a different button bar from disk. What you can’t do with buttons is rename them, oradd something that isn’t a menu (like a clip or favorite transition) to the button bar. My suggestion isthat if you intend to use buttons, save them to disk—just in case.
31. It’s time to end this chapter. Choose File > Close Project and don’t save changes. If you are doneusing Final Cut for a while, choose Final Cut Pro HD > Quit Final Cut Pro HD. Otherwise, go on toChapter 3, “Gather Your Media.”
02 FCP HOT (20-61)v3.qxd 11/11/04 5:38 PM Page 60
Final Cut Pro HD H•O•T | 2.Understanding the Final Cut Pro Interface
| 61 |
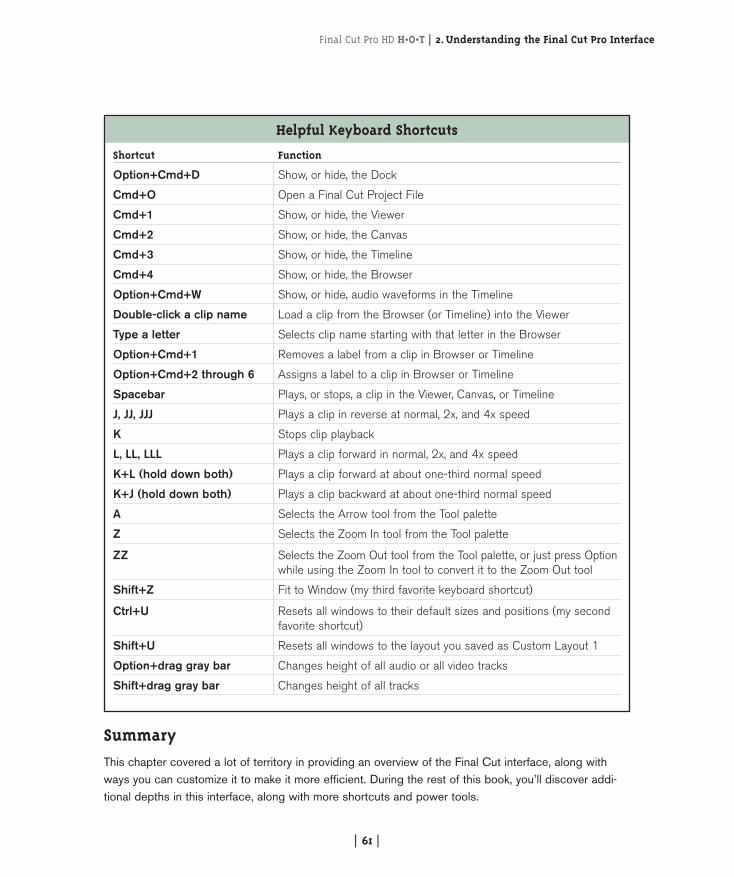
SummaryThis chapter covered a lot of territory in providing an overview of the Final Cut interface, along withways you can customize it to make it more efficient. During the rest of this book, you’ll discover addi-tional depths in this interface, along with more shortcuts and power tools.
Helpful Keyboard Shortcuts
Shortcut Function
Option+Cmd+D Show, or hide, the Dock
Cmd+O Open a Final Cut Project File
Cmd+1 Show, or hide, the Viewer
Cmd+2 Show, or hide, the Canvas
Cmd+3 Show, or hide, the Timeline
Cmd+4 Show, or hide, the Browser
Option+Cmd+W Show, or hide, audio waveforms in the Timeline
Double-click a clip name Load a clip from the Browser (or Timeline) into the Viewer
Type a letter Selects clip name starting with that letter in the Browser
Option+Cmd+1 Removes a label from a clip in Browser or Timeline
Option+Cmd+2 through 6 Assigns a label to a clip in Browser or Timeline
Spacebar Plays, or stops, a clip in the Viewer, Canvas, or Timeline
J, JJ, JJJ Plays a clip in reverse at normal, 2x, and 4x speed
K Stops clip playback
L, LL, LLL Plays a clip forward in normal, 2x, and 4x speed
K+L (hold down both) Plays a clip forward at about one-third normal speed
K+J (hold down both) Plays a clip backward at about one-third normal speed
A Selects the Arrow tool from the Tool palette
Z Selects the Zoom In tool from the Tool palette
ZZ Selects the Zoom Out tool from the Tool palette, or just press Optionwhile using the Zoom In tool to convert it to the Zoom Out tool
Shift+Z Fit to Window (my third favorite keyboard shortcut)
Ctrl+U Resets all windows to their default sizes and positions (my secondfavorite shortcut)
Shift+U Resets all windows to the layout you saved as Custom Layout 1
Option+drag gray bar Changes height of all audio or all video tracks
Shift+drag gray bar Changes height of all tracks
02 FCP HOT (20-61)v3.qxd 11/11/04 5:38 PM Page 61