Embed Size (px)
Citation preview

Unity 3.4.1.0 Election Management System
California Use Procedures
Election Systems & Software, LLCRevision 5.0. Released: June 22, 2016CA_U3410_UseProcedures

ES&S California Usage Manual, All rights reserved. Printed in the USA. 2015-2016 by Election Systems & Software, LLC11208 John Galt Blvd., Omaha, NE 68137-2364
This document, as well as the product described in it, is furnished under license and may be used or copied only in accordance with the terms of such license. The content of this document is furnished for informational use only, is subject to change without notice, and should not be construed as a commitment by Election Systems & Software, LLC (“ES&S”). ES&S assumes no responsibility or liability for any errors or inaccuracies that may appear in this document. Except as permitted by such license, no part of this publication may be reproduced, stored in a retrieval system, or transmitted, in any form or by any means, electronic, mechanical, recording, or otherwise, without the prior written permission of ES&S.
Disclaimer
Election Systems & Software, LLC (“ES&S”) does not extend any warranties by this document. All product information and material disclosure contained in this document is furnished subject to the terms and conditions of a purchase, lease or other agreement. The only warranties made by ES&S are contained in such agreements. Users should ensure that the use of the product complies with all legal or other obligations of their governmental jurisdictions.
All ES&S products and services described in this document are registered trademarks of Election Systems & Software, LLC. All other products mentioned are the sole property of their respective manufacturers.
United States Election Assistance Commission Notification for Approved Voting Systems
In accordance with the United States Election Assistance Commission (EAC) Testing and Certification Program Manual, Version 2.0, ES&S hereby notifies the purchaser that any changes or modifications to an EAC approved voting system which have not been tested and certified by the EAC will void the EAC certification for such EAC approved voting system.
Document Distribution
This document may contain product information and/or procedures that are confidential or sensitive to ES&S and is intended only for the use of the individual or entity named below. The information may not be used, disclosed or reproduced beyond the indicated entity without the prior written authorization of ES&S and those so authorized may only use the information for the purpose of evaluation consistent with such authorization.
Document Security Level | Customer Confidential – Contains product information or procedures that derive independent economic value. Approved for customer use only.

Table of Contents
CA_U3410_UseProceduresCalifornia Use ProceduresRevision 5.0. Released: June 22, 2016
Customer Confidential
Chapter 1: Introduction.......................................................................12System Description and Components ......................................................................12
M100....................................................................................................................12DS200 ..................................................................................................................13AutoMARK...........................................................................................................14M650....................................................................................................................15DS850 ..................................................................................................................17Election Management System (EMS) ..................................................................17
Terms and Definitions...............................................................................................20
Chapter 2: Paper Ballot Specifications ................................................23Overview...................................................................................................................23Ballot Source Files.....................................................................................................23
Format Ballots .....................................................................................................23Ballot Data...........................................................................................................24
Audit Information...........................................................................................24Ballot Information ..........................................................................................24Voter Marks....................................................................................................24
Printing Methods ......................................................................................................24Offset Production ................................................................................................27
Ballot Ink for Offset Production .....................................................................27Offset Pre-Press Preparation .........................................................................27Offset Preparation, Printing, and Proofing ....................................................28Offset Cutting, Scoring and Folding..............................................................30
Digital Printing.....................................................................................................31Preparation and Proofing...............................................................................31Printing Inspection .........................................................................................33
Paper Stock Requirements .......................................................................................34Ballot Stock Specifications and Tolerances.........................................................34
Ballot On Demand ....................................................................................................35C9600/C9650HDN Printer Trays .........................................................................35
Paper Insertion Into Trays ..............................................................................36Main Paper Guides.........................................................................................36C9600/C9650 Ballot Registration Guide .......................................................37Paper Insertion in Multi-purpose Tray ...........................................................39
Printer Consumable Information .........................................................................39Color Drum Life Expectancy ..........................................................................39Toner Cartridge Life Expectancy ...................................................................39
Set Okidata C711/9600/9650HDN as Default Printer ........................................40ConfigureC9650 Control Panel ...........................................................................40
Table of Contents

CA_U3410_UseProceduresCalifornia Use ProceduresRevision 5.0. Released: June 22, 2016
Customer Confidential
Required Settings .......................................................................................... 42Confirm Current Settings .............................................................................. 42Change Printer Settings ................................................................................ 43
Configure C711 Control Panel ........................................................................... 49Required Settings .......................................................................................... 51Confirm Current Settings .............................................................................. 51Change Printer Settings ................................................................................ 51
Print Options....................................................................................................... 59Duplex Printing.............................................................................................. 60C711 Print Quality ......................................................................................... 61
Open Ballot On Demand.................................................................................... 61Print with Ballot On Demand.............................................................................. 62
Color Strip Specifications......................................................................................... 64Approved Paper Stocks ........................................................................................... 65
Chapter 3: System Configuration and Acceptance Testing ................ 66System Installation.................................................................................................... 66Upgrading Firmware ................................................................................................ 66
M100 Scanner Firmware Update ........................................................................ 66DS200 Scanner Firmware Update....................................................................... 67AutoMARK Firmware Update ............................................................................. 68
VAT Firmware Compact Flash for Full Install ................................................ 68Remove AutoMARK Cover............................................................................ 69Full Installation of AutoMARK Firmware ....................................................... 71Calibrate AutoMARK Scanner ....................................................................... 75Replace AutoMARK Cover ............................................................................ 76
M650 Scanner Firmware Update ........................................................................ 77DS850 Firmware Update .................................................................................... 77
Acceptance Testing.................................................................................................. 78Software Pre-Test Procedures ............................................................................ 79
Audit Log Manager ....................................................................................... 79Election Data Manager.................................................................................. 79ESS Image Manager ...................................................................................... 80Hardware Programming Manager................................................................. 81AutoMARK Image Manager .......................................................................... 81
Hardware Acceptance Testing ........................................................................... 82M100 Acceptance Testing............................................................................. 82DS200 Acceptance Testing ........................................................................... 83M650 Acceptance Testing............................................................................. 85DS850 Acceptance Testing ........................................................................... 85AutoMARK Acceptance Testing.................................................................... 87
Software Post-Test Procedures .......................................................................... 87Election Reporting Manager ......................................................................... 87
Chapter 4: Election Setup and Definition ........................................... 89

CA_U3410_UseProceduresCalifornia Use ProceduresRevision 5.0. Released: June 22, 2016
Customer Confidential
Chapter 5: Logic and Accuracy Testing .............................................. 90Overview .................................................................................................................. 90M100 Logic and Accuracy Testing ........................................................................... 90
Load the Election Definition ............................................................................... 90Check the Election Definition for Accuracy ....................................................... 91Open the Polls .................................................................................................... 91Scan Test Ballots ................................................................................................ 92Close the Polls .................................................................................................... 92Upload Test Results to ERM ............................................................................... 92Clear Test Results ............................................................................................... 93
DS200 Logic and Accuracy Testing.......................................................................... 94Load the Election Definition ............................................................................... 94Check the Election Definition for Accuracy ........................................................ 94Test the Election ................................................................................................. 95Upload DS200 Test Results to ERM ................................................................... 96
AutoMARK Logic and Accuracy Testing .................................................................. 96Option #1............................................................................................................ 96
M650 Logic and Accuracy Testing ........................................................................... 97M650 Read Head Calibration ............................................................................. 97
Preparation .................................................................................................... 98Check Whitest and Darkest Levels ................................................................ 99Check 10% Shade Levels............................................................................. 100
Load the Election Definition ............................................................................. 101Scan the Test Deck and Check Reports............................................................ 102
DS850 Logic and Accuracy Testing........................................................................ 104Load the Election Definition ............................................................................. 104Scan the Test Deck and Check Reports............................................................ 105Export Data....................................................................................................... 106
EMS Accuracy Testing............................................................................................ 107Select Election .................................................................................................. 107Create Results Database................................................................................... 108Set Up Reports.................................................................................................. 111Zero Out Ballots Cast ....................................................................................... 114Process 100 Cards/200 Flash Drives................................................................. 115Processing for M100 ......................................................................................... 116Processing for DS200........................................................................................ 120Process Precincts Results Media....................................................................... 123Process M650 Results (Zip Disk) ....................................................................... 126
Store Results from Zip Disk ......................................................................... 126Update Group With 650 Results (No Network) .......................................... 127Update Group With 650 Results (Network) ................................................ 132
Update Results from DS850 (USB Media) ........................................................ 136Backing Up Logic and Accuracy Testing................................................................ 139
Backing Up Media............................................................................................. 139Backing Up EMS ............................................................................................... 139
Retention of Election Material ............................................................................... 140

CA_U3410_UseProceduresCalifornia Use ProceduresRevision 5.0. Released: June 22, 2016
Customer Confidential
Precinct Tabulator Election Material ................................................................ 140Checking Unused Ballots............................................................................. 140Post Official Canvass Period Disposition of Election Materials................... 140Certification by Unescorted Personnel ....................................................... 140
Retention of Central Tabulator Election Materials ........................................... 141
Chapter 6: Election Preparation ....................................................... 142L&A Backup............................................................................................................ 142Clear Logic and Accuracy Results .......................................................................... 142
Clear Results from the M100 ............................................................................ 142Clear Results from the DS200........................................................................... 142Clear Results from the M650 ............................................................................ 143Clear Results from the DS850........................................................................... 143Clear Results in ERM......................................................................................... 144Clear M650 Results ........................................................................................... 146
Hardware Maintenance .......................................................................................... 146Recommended Supplies ................................................................................... 146
M100 Supplies ............................................................................................. 146M650 Supplies ............................................................................................. 147DS200 Supplies ........................................................................................... 149DS850 Supplies ........................................................................................... 150
M100 Maintenance ........................................................................................... 152Tools for M100 Maintenance ...................................................................... 152Cleaning the M100...................................................................................... 152Clean the M100 Ballot Box.......................................................................... 153Replace the Paper Roll ................................................................................ 154M100 Battery Maintenance ......................................................................... 155
DS200 Maintenance.......................................................................................... 156Tools for DS200 Maintenance ..................................................................... 156Clean the DS200.......................................................................................... 157Clean the DS200 Ballot Box ........................................................................ 158Replace the Paper Roll ................................................................................ 159Maintain the DS200 Battery ........................................................................ 160
AutoMARK Maintenance .................................................................................. 163Tools for AutoMARK Maintenance ............................................................. 163Cleaning the AutoMARK ............................................................................. 163Install a New Ink Cartridge .......................................................................... 164Connecting a DSA Device ........................................................................... 165Charging the AutoMARK Battery................................................................ 165
M650 Maintenance ........................................................................................... 167Tools for M650 Maintenance ...................................................................... 167Replace the Pick Belt................................................................................... 167Clean and Replace the Retard Pads............................................................ 168Replace M650 Report Printer Ink Ribbon.................................................... 168Clean the Rollers ......................................................................................... 171Clean the Fiber Optic Sensors .................................................................... 171

CA_U3410_UseProceduresCalifornia Use ProceduresRevision 5.0. Released: June 22, 2016
Customer Confidential
DS850 Maintenance.......................................................................................... 171Tools for DS850 Maintenance ..................................................................... 171Clean the Rollers ......................................................................................... 172Clean the Cameras ...................................................................................... 172Clean the Scanner Case .............................................................................. 172Clean the Touch Screen .............................................................................. 172Replace DS850 Log Printer Ribbons ........................................................... 173Replace DS850 Report Printer Paper .......................................................... 176Replace DS850 Report Printer Toner .......................................................... 178Install the UPS.............................................................................................. 183
Chapter 7: Central Tabulations:Absentee and Mail Ballot Procedures .............................................. 185
Ballot Handling and Folding .................................................................................. 185Opening Envelopes .......................................................................................... 185Removal and Unfolding of Ballots .................................................................... 186Ballot Inspection ............................................................................................... 186
Tears and slices ........................................................................................... 186Damaged or missing timing or code channel marks................................... 187Smudges, smears, stains or foreign material .............................................. 187
Back-Bending Individual Ballots........................................................................ 187Crimps, stair-steps, or irregular folds .......................................................... 188Crimped top or bottom edge ..................................................................... 190Orienting Ballots in Stacks .......................................................................... 190
Back-Bending Stacks of Ballots......................................................................... 191Inspecting stacks ......................................................................................... 192
Avoiding Jams .................................................................................................. 194Scanning Damaged Ballots ............................................................................... 194 Folding Methods.............................................................................................. 195
Battery Backup ....................................................................................................... 198Install the UPS................................................................................................... 198Turn On the UPS............................................................................................... 200
Operating the M650 .............................................................................................. 201Loading an Election onto the M650 ................................................................. 201Producing a Zero Report .................................................................................. 202Scanning Ballots................................................................................................ 203Sort Options...................................................................................................... 204Deleting Precinct Results .................................................................................. 204
Procedure to Flush a Precinct ..................................................................... 205Saving Results ................................................................................................... 206
Save Results to the Internal Drive ............................................................... 206Save Results to a Zip Disk............................................................................ 206
Producing a Results Report .............................................................................. 207Shutting Down the M650.................................................................................. 208
Operating the DS850 ............................................................................................. 209
CA_U3410_UseProceduresCalifornia Use ProceduresRevision 5.0. Released: June 22, 2016
Customer Confidential
Loading an Election Onto the DS850 ............................................................... 209Producing a Zero Report .................................................................................. 209Scanning the Ballots ......................................................................................... 210
Save the Current Batch ............................................................................... 212Out-Stacked Ballots..................................................................................... 212
Bin Sorting ........................................................................................................ 213Clear Election Results ....................................................................................... 215Exporting Data.................................................................................................. 216Producing a Results Report .............................................................................. 220Shutting Down the DS850 ................................................................................ 221
Chapter 8: Early Voting Procedures: Precinct Scanners................... 222Ballot Preparation .................................................................................................. 222M100 Procedures ................................................................................................... 222
Loading an Election Definition ......................................................................... 222Producing a Zero Report .................................................................................. 223Scanning Ballots................................................................................................ 223M100 Security Locks and Seals......................................................................... 224Closing the Polls ............................................................................................... 226Producing the Results Report ........................................................................... 227Shutting Down the M100.................................................................................. 227
DS200 Procedures.................................................................................................. 228Load the Election Definition ............................................................................. 228
Check the Election Definition for Accuracy................................................. 229Producing a Zero Report .................................................................................. 229Scanning Ballots................................................................................................ 229DS200 Seals and Locks ..................................................................................... 230
Carrying Case and Ballot Bin Security Seals................................................ 231Steel Ballot Box Seals ........................................................................... 232
Close the Polls .................................................................................................. 233Producing the Results Report ........................................................................... 233
Transfer Results ........................................................................................... 234
Chapter 9: Election Day Procedures................................................. 235Precinct Supplies, Equipment Delivery, and Inspection ........................................ 235
Equipment Delivery .......................................................................................... 235Inspection.......................................................................................................... 235Set Up the AutoMARK Table............................................................................ 237Install M100 Paper Roll ..................................................................................... 240Install DS200 Paper Roll.................................................................................... 241
Opening the Polls................................................................................................... 243Open Polls on M100 ......................................................................................... 244Open Polls on DS200........................................................................................ 245Open Polls on AutoMARK ................................................................................ 247
Open the LCD for Use................................................................................. 247

CA_U3410_UseProceduresCalifornia Use ProceduresRevision 5.0. Released: June 22, 2016
Customer Confidential
Start Up Procedure...................................................................................... 249Set Up the AutoMARK for Voters ............................................................... 250
Polling Place Procedures........................................................................................ 250M100 Voting Instructions.................................................................................. 251
Operating the M100 on Battery Power....................................................... 251DS200 Voting Instructions ................................................................................ 251
Operating the DS200 on Battery Power ..................................................... 251AutoMARK Accessible Voting Instructions....................................................... 252
Marking the Ballot ....................................................................................... 253Using the AutoMARK with an AT Device .................................................... 254Operating the AutoMARK on Battery Power.............................................. 255
Provisional Voting ............................................................................................. 255Closing the Polls and Vote Reporting.................................................................... 256
Close Polls: M100 ............................................................................................. 256Close Polls: DS200............................................................................................ 257Close Polls on AutoMARK ................................................................................ 257Uncounted Ballots............................................................................................. 257
Audit Logs .............................................................................................................. 258Audit Logs: AutoMARK .................................................................................... 258Audit Logs: M100 Tabulator ............................................................................. 258
Exporting M100 Audit Logs ........................................................................ 259Audit Logs: M650 Tabulator ............................................................................. 259
Exporting M650 Audit Logs ........................................................................ 259Audit Logs: DS200 Scanner .............................................................................. 260Audit Logs: DS850 Scanner .............................................................................. 260
Exporting DS850 Audit Logs....................................................................... 260Audit Logs: Election Data Manager andES&S Image Manager ....................................................................................... 261
Exporting EDM and ESSIM Audit Logs ....................................................... 261Archive EDM Audit Logs ............................................................................. 261
Audit Logs: AutoMARK Information Management System.............................. 262Exporting AIMS Audit Logs......................................................................... 263Backup and Archive AIMS Audit Logs ........................................................ 263
Audit Logs: Hardware Programming Manager ................................................ 266Printing HPM Audit Logs............................................................................. 266Exporting HPM Audit Logs ......................................................................... 266
Audit Logs: Election Reporting Manager ......................................................... 266Exporting ERM Audit Logs.......................................................................... 266
Audit Logs: Audit Manager .............................................................................. 267Exporting AM Audit Logs............................................................................ 267Archive AM Audit Logs ............................................................................... 267
Chapter 10: Semi-Official Canvass Tabulation and Reporting .......... 268ERM Results Processing ......................................................................................... 268
Zeros Report ..................................................................................................... 268Process 100 Cards/200 Flash Drives................................................................. 268

CA_U3410_UseProceduresCalifornia Use ProceduresRevision 5.0. Released: June 22, 2016
Customer Confidential
Processing for M100 ......................................................................................... 269Processing for DS200 .................................................................................. 273Run 200 Results Accumulation .................................................................... 277
Process Precincts Results Media....................................................................... 279Process M650 Results (Zip Disk) ....................................................................... 282
Store Results from Zip Disk ......................................................................... 282Update Group With 650 Results (No Network) .......................................... 283Update Group With 650 Results (Network) ................................................ 287
Update Results from DS850 (USB Media) ........................................................ 291Precinct and Election Report Options .............................................................. 294
Selection Tab............................................................................................... 295Headings Tab .............................................................................................. 297Options Tab................................................................................................. 298Reporting Group Tab .................................................................................. 302Print Which Groups Tab .............................................................................. 303Precinct and Election Report Examples ...................................................... 310
Integration with County Systems and Calvoter ..................................................... 313Update ERM with SOS File Information ........................................................... 314Election Night Reporting .................................................................................. 318
Chapter 11: Official Canvass and Post-Election Procedures............. 320Purpose of the Official Canvass ............................................................................. 320Election Observer Panel......................................................................................... 320
Canvassing Precinct Returns............................................................................. 3201% Manual Recount Procedures ............................................................................ 321
Handling Ballot Exceptions(Definition of Vote, Determining Voter Intent) ................................................. 322
Post-Election Logic and Accuracy Testing ............................................................. 322Final Reporting of Official Canvass ........................................................................ 322
Ballot Security and Reporting Results .............................................................. 322Backup and Retention of Election Materials .......................................................... 323
Acronis Backup and Recovery .......................................................................... 323Accessing Acronis........................................................................................ 324Backup Procedures...................................................................................... 324Recovery ...................................................................................................... 326
Precinct Tabulator Election Materials ............................................................... 327Central Tabulator Election Materials ................................................................ 327
Chapter 12: Manual Recount Procedures ......................................... 328Manual Recount for Precinct Tabulators................................................................ 328
Chapter 13: Security......................................................................... 329Physical Security of System and Components ....................................................... 329
Equipment Locks and Seals .............................................................................. 330AutoMARK Locks and Seals ........................................................................ 331

CA_U3410_UseProceduresCalifornia Use ProceduresRevision 5.0. Released: June 22, 2016
Customer Confidential
M100 Locks and Seals ................................................................................. 333M650 Locks and Seals ................................................................................. 335DS200 Locks and Seals................................................................................ 336DS850 Locks and Seals................................................................................ 339
Logical Security of System and Components ........................................................ 340User-Level Security................................................................................................. 341
Password Security ............................................................................................. 342Anti-Virus Protection .............................................................................................. 343Essential Software Updates and Changes ............................................................. 343
Audit Records for Changes............................................................................... 344Security Procedures for Central Processing........................................................... 344Security Procedures for Polling Places................................................................... 345
AutoMARK ........................................................................................................ 345Scanners............................................................................................................ 345
Audit Log................................................................................................................ 346AutoMARK Operation Log ............................................................................... 346AutoMARK Scan Log or Service Log ................................................................ 347Audit Trail Checkpoints for the M100 .............................................................. 347DS200 Audit Log Reports ................................................................................. 348M650 Audit Log Reports .................................................................................. 348DS850 Audit Logs ............................................................................................. 349
Chapter 14: Biennial Hardware Certification and Notification ......... 350Certification and Notification forPrecinct Tabulation Hardware................................................................................ 350
Hardware Certification and Notificationfor the Precinct Tabulator................................................................................. 350
Certification ................................................................................................. 350Notification.................................................................................................. 350
Election Observer Panel ................................................................................... 351Logic and Accuracy Certification ...................................................................... 351Submit Ballot Tally Programs to the Secretary of State ................................... 352Election Night and Post Election Reporting..................................................... 352Preparation of Specific Written Procedures ..................................................... 352
Biennial Certification forCentral Tabulation Hardware ................................................................................. 353
Tabulation Hardware Certification and Notification......................................... 353Logic and Accuracy Tests ............................................................................ 353Certifying Logic and Accuracy..................................................................... 353
Escrow of Ballot Tally Source Code.................................................................. 354
Unity 3.4.1.0 Election Management SystemChapter 1: Introduction
CA_U3410_UseProceduresCalifornia Use ProceduresRevision 5.0. Released: June 22, 2016 12
Chapter 1: Introduction
The ES&S Unity 3.4.1.0 election management system is an integrated suite of products for conducting and reporting elections.
1.1 System Description and Components
Unity 3.4.1.0 combines election management software with accessible voting and scanning equipment, providing end-to-end election support, from defining an election to generating final reports.
Unity 3.4.1.0 enables jurisdictions to integrate digital scanner/tabulators with existing optical scanner/tabulators, and to operate results and reporting software, and optional ballot printing software, on a Windows 7 operating system.
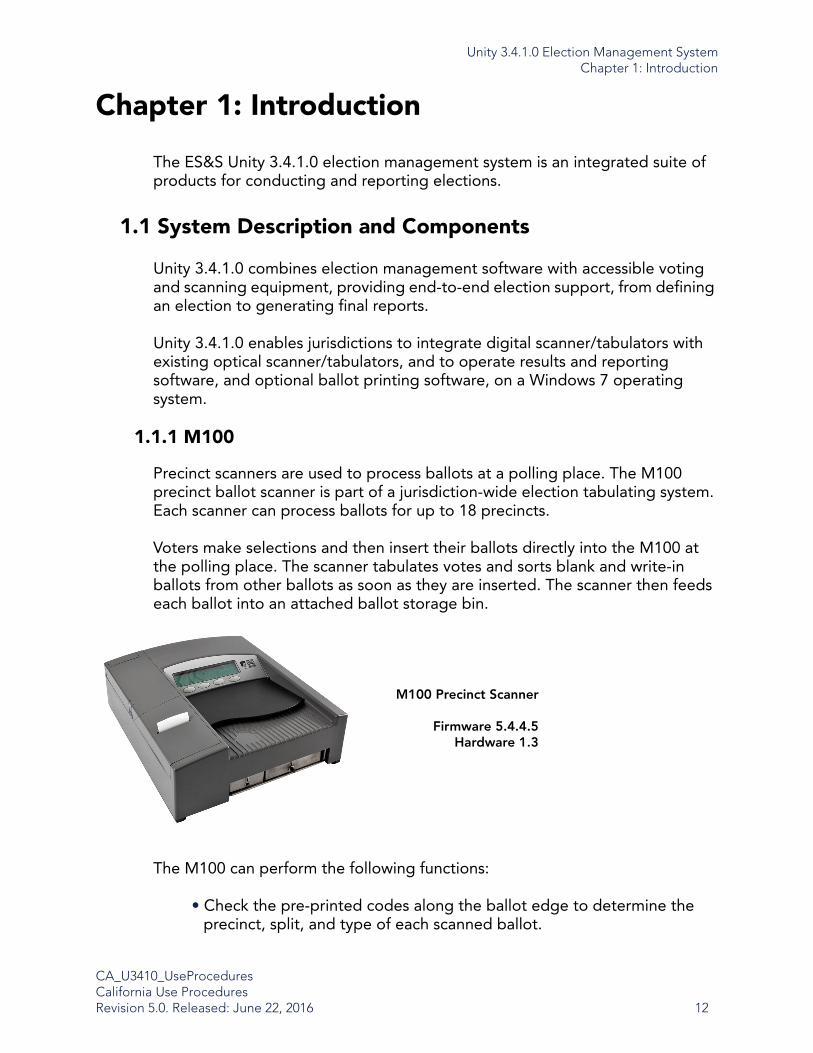
1.1.1 M100
Precinct scanners are used to process ballots at a polling place. The M100 precinct ballot scanner is part of a jurisdiction-wide election tabulating system. Each scanner can process ballots for up to 18 precincts.
Voters make selections and then insert their ballots directly into the M100 at the polling place. The scanner tabulates votes and sorts blank and write-in ballots from other ballots as soon as they are inserted. The scanner then feeds each ballot into an attached ballot storage bin.
The M100 can perform the following functions:
• Check the pre-printed codes along the ballot edge to determine the precinct, split, and type of each scanned ballot.
M100 Precinct Scanner
Firmware 5.4.4.5Hardware 1.3

Unity 3.4.1.0 Election Management SystemChapter 1: Introduction
CA_U3410_UseProceduresCalifornia Use ProceduresRevision 5.0. Released: June 22, 2016 13
• Read voter choices for candidates or issues. The entire reading process takes seconds for each ballot.
• Check for ballot irregularities. For example, if a voter opts not to vote in one race, the scanner recognizes and records that choice. Or, if the scanner detects a torn ballot, the scanner stops and provides the operator with instructions for handling the ballot.
• Tabulate votes for each race and track the race count by precinct. Tracks the total ballots counted by precinct and by ballot type.
• Generate reports to show up-to-the-minute scanner totals. Save scanner results to a PC card, which allows results from multiple scanners to be combined and tallied at a central count location. The scanner also generates a date stamped audit log of scanner activities.
1.1.2 DS200
Precinct scanners are used to process ballots at a polling place. The DS200 precinct ballot scanner is part of a jurisdiction-wide election tabulating system. Each scanner can process ballots for up to eighteen precincts.
Voters insert their ballots directly into the DS200 at the polling place. The touch-screen scanner tabulates votes and feeds inserted ballots into an attached ballot storage bin.
DS200 Precinct Scanner
Firmware 1.7.0.0Hardware 1.2+1.3

Unity 3.4.1.0 Election Management SystemChapter 1: Introduction
CA_U3410_UseProceduresCalifornia Use ProceduresRevision 5.0. Released: June 22, 2016 14
The DS200 scanner reads marks on both one- and two-sided ballots. Administrators can request custom ballot acceptance criteria, which ES&S programs onto the scanner’s election definition. These ballot acceptance criteria are loaded on a USB flash drive. For example, if a jurisdiction prohibits counting blank ballots, ES&S election coders can program the DS200 to sort blank ballots out of the general ballot count until jurisdiction officials can review the ballots. With each acceptable ballot counted, the DS200 increases the running vote totals for each race included on the election definition.
The tabulator stores accumulated totals to internal scanner memory (DRAM) and to a removable USB flash drive.
The DS200 can generate paper reports produced from the scanner's internal, thermal printer. The DS200 stores election results on a removable USB flash drive that you can use to transfer scanner results to Election Reporting Manager after the polls close.
1.1.3 AutoMARK
The AutoMARK Voter-Assist Terminal (VAT) is part of an optically scanned, precinct-based, electronic voting system comprising election definition and ballot generation software, and ballots.
The AutoMARK VAT is generally used for marking ballots by persons who are visually impaired, physically disabled, or more comfortable reading or hearing instructions and choices in an alternative language. The AutoMARK VAT does not store, count, or tabulate votes.
AutoMARKBallot Marking Device
Firmware 1.3.2907Hardware A100, A200, A300
Unity 3.4.1.0 Election Management SystemChapter 1: Introduction
CA_U3410_UseProceduresCalifornia Use ProceduresRevision 5.0. Released: June 22, 2016 15
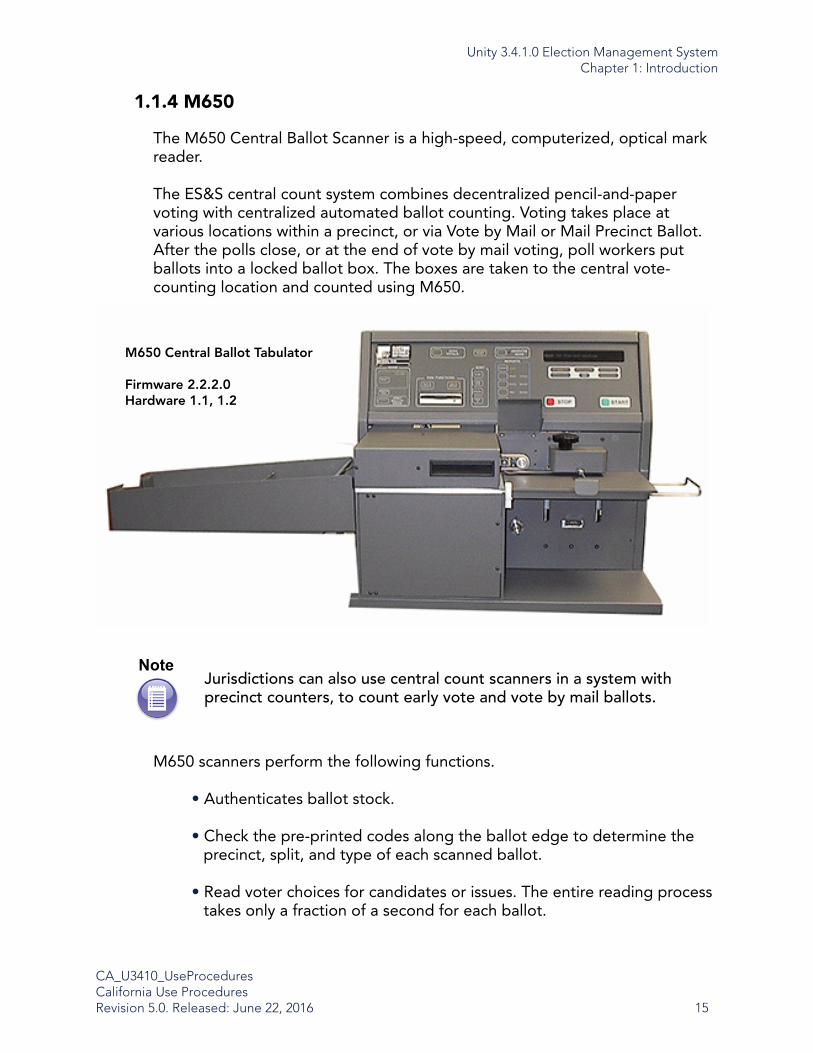
1.1.4 M650
The M650 Central Ballot Scanner is a high-speed, computerized, optical mark reader.
The ES&S central count system combines decentralized pencil-and-paper voting with centralized automated ballot counting. Voting takes place at various locations within a precinct, or via Vote by Mail or Mail Precinct Ballot. After the polls close, or at the end of vote by mail voting, poll workers put ballots into a locked ballot box. The boxes are taken to the central vote-counting location and counted using M650.
M650 scanners perform the following functions.
• Authenticates ballot stock.
• Check the pre-printed codes along the ballot edge to determine the precinct, split, and type of each scanned ballot.
• Read voter choices for candidates or issues. The entire reading process takes only a fraction of a second for each ballot.
NoteJurisdictions can also use central count scanners in a system with precinct counters, to count early vote and vote by mail ballots.
M650 Central Ballot Tabulator
Firmware 2.2.2.0Hardware 1.1, 1.2
Unity 3.4.1.0 Election Management SystemChapter 1: Introduction
CA_U3410_UseProceduresCalifornia Use ProceduresRevision 5.0. Released: June 22, 2016 16
• Check for ballot irregularities. For example, if a voter opts not to vote in one race, the scanner recognizes and records that choice. Or, if the scanner detects a torn ballot, the scanner stops and provides the operator with instructions for handling the ballot.
• Tabulate votes for each race and tracks the race count by precinct. Tracks the total ballots counted by precinct and by ballot type.
• Track vote by mail results in several ways:
• Tallies vote by mail votes with the regular precinct totals
• Tallies vote by mail votes separately from the regular precinct totals
• Tallies votes as a duplicate precinct set
• If using ERM, tallies votes as a separate group within ERM
• Generate reports to show up-to-the-minute totals by individual precinct, city, or by county. Final reports serve as unofficial election night results. The scanner also generates a date-stamped audit log of scanner activities.
• Save election results to disk, in order to save a permanent record of the election or to use as backup data.
Unity 3.4.1.0 Election Management SystemChapter 1: Introduction
CA_U3410_UseProceduresCalifornia Use ProceduresRevision 5.0. Released: June 22, 2016 17
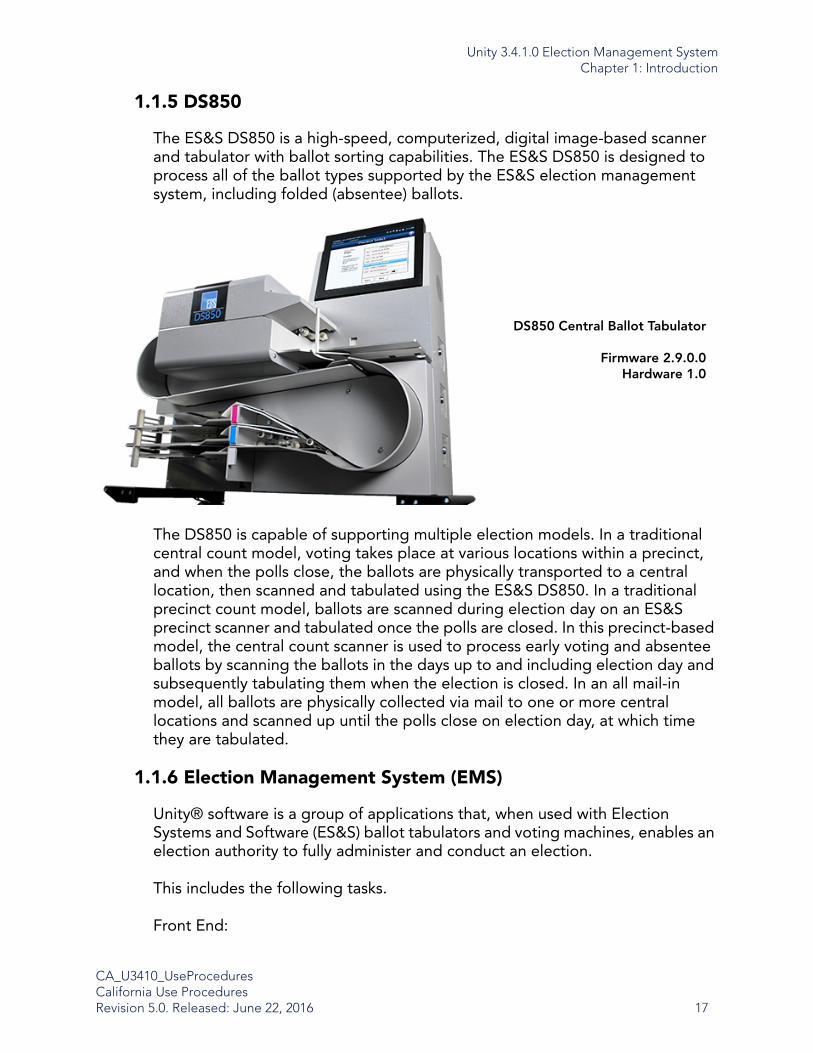
1.1.5 DS850
The ES&S DS850 is a high-speed, computerized, digital image-based scanner and tabulator with ballot sorting capabilities. The ES&S DS850 is designed to process all of the ballot types supported by the ES&S election management system, including folded (absentee) ballots.
The DS850 is capable of supporting multiple election models. In a traditional central count model, voting takes place at various locations within a precinct, and when the polls close, the ballots are physically transported to a central location, then scanned and tabulated using the ES&S DS850. In a traditional precinct count model, ballots are scanned during election day on an ES&S precinct scanner and tabulated once the polls are closed. In this precinct-based model, the central count scanner is used to process early voting and absentee ballots by scanning the ballots in the days up to and including election day and subsequently tabulating them when the election is closed. In an all mail-in model, all ballots are physically collected via mail to one or more central locations and scanned up until the polls close on election day, at which time they are tabulated.
1.1.6 Election Management System (EMS)
Unity® software is a group of applications that, when used with Election Systems and Software (ES&S) ballot tabulators and voting machines, enables an election authority to fully administer and conduct an election.
This includes the following tasks.
Front End:
DS850 Central Ballot Tabulator
Firmware 2.9.0.0Hardware 1.0

Unity 3.4.1.0 Election Management SystemChapter 1: Introduction
CA_U3410_UseProceduresCalifornia Use ProceduresRevision 5.0. Released: June 22, 2016 18
• Create and maintaining an administrative database
• Create an election definition
• Lay out ballots, whether they are paper or electronic
• Set up tabulators and voting machines.
Back End:
• Acquire election results
• Accumulate all the results and other tabulator and voting machine data
• Print all reports
• Export files, as required, to other entities.
Each of the applications may be used on a standalone basis in conjunction with the other applications in the suite, being supplied with data from or supplying data to another application running at another facility.
Each Unity application is described in the following table.
Note Unity applications require the user to have a good working knowledge of personal computers, the Microsoft® Windows 7 operating system, the election process, and election terminology.

Unity 3.4.1.0 Election Management SystemChapter 1: Introduction
CA_U3410_UseProceduresCalifornia Use ProceduresRevision 5.0. Released: June 22, 2016 19
Table 1-1: Unity 3.4.1.0 EMS Components
Functional Group Product Version Description
Unity Election Management System (EMS)
Audit Manager 7.5.2.0
Provides password security and real-time audit log of all user inputs and system outputs for EDM and ESSIM.
LogMonitor Service 1.1.0.0
Monitors Windows Event Viewer and closes any active EMS program if the system detects the improper deactivation of the Windows Event Viewer.
Election Data Manager (EDM) 7.8.2.0Defines precinct, contest and candidate data and generates the election database.
ES&S Ballot Image Manager (ESSIM) 7.7.2.0Formats paper ballots and output files for programming ballot marking devices.
AutoMARK Information Management System (AIMS)
1.3.257Generates equipment configurations for the AutoMARK Voter Assist Terminal.
Hardware Programming Manager (HPM) 5.9.0.0Generates election definition media for voting system equipment.
Election Reporting Manager (ERM) 7.9.0.0Results consolidation and reporting software.
VAT Preview 1.3.2907Provides a preview of how ballots will be presented on the AutoMARK.

Unity 3.4.1.0 Election Management SystemChapter 1: Introduction
CA_U3410_UseProceduresCalifornia Use ProceduresRevision 5.0. Released: June 22, 2016 20
1.2 Terms and Definitions
Table 1-2: Abbreviations
Term Definition
BMD Ballot Marking Device
BOD Ballot on Demand
CBT Central Ballot Tabulator
CVR Cast Vote Record
EDM Election Data Manager
ELS Event Log Service
EMS Election Management System
EQC Election Qualification Code
EQSC Election Qualification Security Code
ERM Election Reporting Manager
ESSIM ES&S Ballot Image Manager
EVS ES&S Voting System
HPM Hardware Programming Manager
L&A Logic and Accuracy (testing)
ODP On Demand Printing
PBT Precinct Ballot Tabulator
SFTP Secure File Transfer Protocol
SOP System Operations Procedures
VAT Voter Assist Terminal

Unity 3.4.1.0 Election Management SystemChapter 1: Introduction
CA_U3410_UseProceduresCalifornia Use ProceduresRevision 5.0. Released: June 22, 2016 21
Table 1-3: Glossary of Terms
Term Definition
Acceptance Testing
Examination of a voting system and its components by the purchasing election authority (usually in a simulated-use environment) to validate performance of delivered units in accordance with procurement requirements, and to validate that the delivered system is, in fact, the certified system purchased.
Ballot on Demand® (BOD)
Ballot on Demand® is a Ballot Image Manager® accessory program that prints individual ballots from a personal computer on Election Day. Many jurisdictions order ballots based on voter turnout from the previous year instead of printing a ballot for each registered voter in the jurisdiction. If ballots run short, the jurisdiction uses Ballot on Demand to print extra ballots on site.
Ballot Set
Election Data Manager users group ballot information for different political parties in a primary or data for ballots that use different scanning equipment into individual ballot databases called ballot sets. When a user generates final election files from Data Manager, the program merges all of the ballot sets created for an election into Data Manager’s output files.
Canvassing Board
A group of county officials who are responsible for making sure that the number of ballots cast on Election Day is equal to the number of ballots that are counted on election night. The canvassing board is also responsible for certifying the results of an election, certifying final canvass reports and signing off results reports from precinct and central scanners.
Code Channel
The column of numbered black boxes on the left side of a ballot immediately right of the timing track. The scanner reads the combinations of boxes in this area to determine the precinct, split, type and style of the ballot.
Election Assistance Commission (EAC)
Upon the commission’s activation, the Election Assistance Commission (EAC) will serve as a national clearinghouse for the compilation of information and review of procedures with respect to the administration of Federal elections. The EAC carries out duties related to the testing, certification, decertification and recertification of voting system hardware and software.
Election DefinitionJurisdictional, contest, and candidate data loaded into voting and scanner/tabulator machines for an individual election.
Election MediaA portable flash media device containing the election definition in encrypted form, used to transfer data to and from ES&S equipment.
Unity 3.4.1.0 Election Management SystemChapter 1: Introduction
CA_U3410_UseProceduresCalifornia Use ProceduresRevision 5.0. Released: June 22, 2016 22
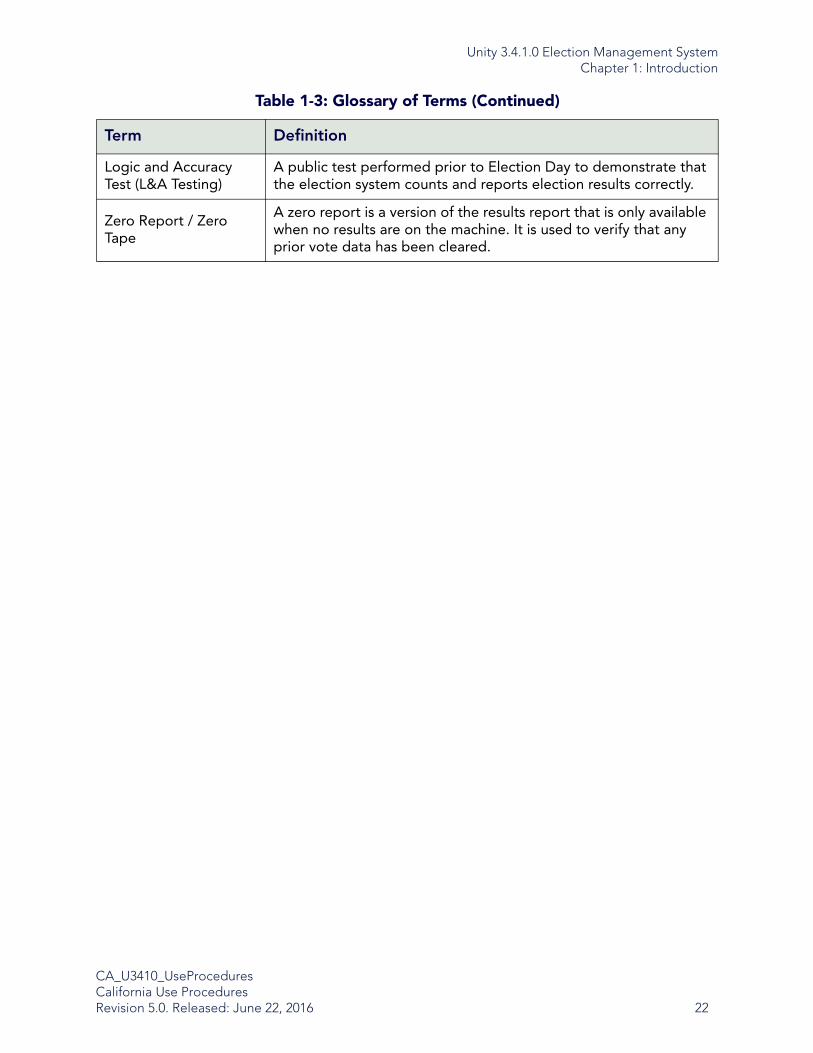
Logic and Accuracy Test (L&A Testing)
A public test performed prior to Election Day to demonstrate that the election system counts and reports election results correctly.
Zero Report / Zero Tape
A zero report is a version of the results report that is only available when no results are on the machine. It is used to verify that any prior vote data has been cleared.
Table 1-3: Glossary of Terms (Continued)
Term Definition
Unity 3.4.1.0 Election Management SystemChapter 2: Paper Ballot Specifications
CA_U3410_UseProceduresCalifornia Use ProceduresRevision 5.0. Released: June 22, 2016 23
Chapter 2: Paper Ballot Specifications
2.1 Overview
The ES&S Image Manager™ is a desktop publishing tool that enables you to design and publish Election Systems and Software (ES&S) paper ballots for central and precinct ballot scanners. Use ES&S Image Manager to create ballot formats for ES&S ballot services or a partner printer who use your layouts to print official ballots, or use the layouts you create with the program to print extra Election Day ballots with Ballot on Demand™. ES&S Image Manager reads converts the information contained in your jurisdiction’s election database (created using Election Data Manager) into finished ballot layouts.
2.2 Ballot Source Files
After creating county and election databases in Election Data Manager, the program must convert the election information into a usable format for other Unity™ software. Election Data Manager merges all of the office and candidate data contained in an election database into a single ballot data file (.bdf). Layout artists use the ballot data file to design ballots and ballot scanner programmers use the file, along with ESS Image Manager interface files (.ifc files), to generate election definitions for ballot scanners.
Election Data Manager stores all ballot data files in the election folder on your PC.
2.2.1 Format Ballots
Use the commands in ESS Image Manager under the Style Sheets menu, Ballot menu and Frames menu to design the ballots for your jurisdiction.
Use Style Sheets commands to format individual components of a ballot data file from Election Data Manager. For example, format an office style sheet to control how the office information from your election database appears on your ballots.
Ballot menu commands control the general formatting rules for all your ballots. Select a ballot type, ballot size, a number of ballot columns, and ballot serial numbers with commands under the Ballot menu. You can also use Ballot menu commands to place formatting marks on your ballots and import ballot text and graphics.
Unity 3.4.1.0 Election Management SystemChapter 2: Paper Ballot Specifications
CA_U3410_UseProceduresCalifornia Use ProceduresRevision 5.0. Released: June 22, 2016 24
Use the commands under the Frames menu to place external text or graphics on your ballots. You can either create ballot text in ESS Image Manager or Election Data Manager, or you can import any ASCII file as a ballot text file.
After you format ballots, you can use ESS Image Manager layouts to print ballots directly from your PC with Ballot on Demand or save your ballot images as PDF files for bulk printing by ES&S ballot services or a partner printer.
2.2.2 Ballot Data
Scanners draw three types of data from scanned ballots: audit information, ballot information and voter marks.
2.2.2.1 Audit Information
The scanner reads the timing track and black checks for audit information. The scanner rejects ballots with damaged or misprinted boxes in the timing track. The scanner reads black checks to calibrate sensors. ES&S prints all of the audit marks on a ballot in machine readable ink.
2.2.2.2 Ballot Information
Scanners read the code channel for ballot precinct, type, split and style information. The code channel relays ballot information that matches the ballot sequence number, the party designation of the ballot (ballot type), and ballot split information.
2.2.2.3 Voter Marks
The scanner reads and records voter marks, combines the selections for each voter and produces election results based on the combined totals. The scanner reads properly marked ovals (completely filled).
2.3 Printing Methods
Scanners will reject ballots that are printed incorrectly. A jam can occur if the ballots are damaged or cut too wide. Ballots produced out of specification may cause scanners to reject, jam, or incorrectly tabulate. Check the ballots against the specifications in this guide to ensure correct functionality.
ES&S Image Manager (ESSIM) produces the 3-column ballot.

Unity 3.4.1.0 Election Management SystemChapter 2: Paper Ballot Specifications
CA_U3410_UseProceduresCalifornia Use ProceduresRevision 5.0. Released: June 22, 2016 25
ESSIM Ballot

Unity 3.4.1.0 Election Management SystemChapter 2: Paper Ballot Specifications
CA_U3410_UseProceduresCalifornia Use ProceduresRevision 5.0. Released: June 22, 2016 26
Machine-readable components are areas of the ballot that scanners recognize to record marks (such as voting targets and code boxes). Each ballot has four machine-readable components, as shown below.
Machine-Readable Components on ESSIM Ballot
Code Channel – The scanner reads the code channel to identify the precinct, split, type, and style of the ballot. It is a bar code that differentiates one ballot from another.
Orientation Boxes (Black Check Marks) – Black checks appear above and below each ballot column, timing track, and code channel. The locations of black check marks correspond to sensor locations on M100 and M650 ballot scanners (sensor “A” on your scanner reads the black check mark above and below column “A” on the ballot) and are used as column location marks on the DS200 and DS850. Where the timing track intersects the vertical column, a potential voting mark can be programmed. Tracks A, B, and C are on the front of the ballot while D, E, and F are on the back.
Timing Track – The left-most column of boxes on the edge of the ballot. The boxes correspond to the vertical positions of the voter response areas and inform the scanner where to look for votes.
Voting Marks (Voting Targets) – A voting mark or target is the selection area next to a ballot response that voters mark to indicate ballot choices. Properly printed voting targets are invisible to optical sensors. Depending on the type of election equipment, the targets appear as ovals, incomplete arrows, touch screen boxes or punch areas. Place ballot text, tint, or ruling lines no closer than 0.20 inches (0.508 cm) from the oval voting mark and 0.06 inches (.152 cm) from the arrow voting mark. Make sure the oval pixel setting is set at 0.003 in ESSIM and that the printed oval is not thicker than 0.005.”

Unity 3.4.1.0 Election Management SystemChapter 2: Paper Ballot Specifications
CA_U3410_UseProceduresCalifornia Use ProceduresRevision 5.0. Released: June 22, 2016 27
2.3.1 Offset Production
2.3.1.1 Ballot Ink for Offset Production
Print all of the machine-readable components with high quality, commercially available black ink (extra or double-black) and note the following guidelines:
• Use inks with high tack.
• Only use readable black ink to print ballot components.
• Make sure that all offset is solid and dense, without voids, breakthroughs, dirt, foreign particles, white hickies in the timing track, or gray lines.
• Print with a minimum density of 0.95 and a maximum density of 1.5.
• For best results, use a density of 1.15.
• Do not use powder or varnish.
• Do not smear, smudge, or spray the ink when handling the ballots.
• Test the ballot ink on the press with a densitometer.
• Do not print text in the active voting tracks.
2.3.1.2 Offset Pre-Press Preparation
Before going to press:
Use the following instructions to prepare the ballot layout for mass printing:
1. Image the PDF file to film negatives or direct to plate at 100%. A PDF file can vary as much as 0.5%, depending upon how the software is handled by the output devices. Overlays are required because of the potential for variation.
2.Use the Mylar® overlay provided by ES&S to verify that the PDF is sized correctly, that all machine-readable components are aligned, and that all cut marks and score marks appear on the ballot.
3.Inspect the ballot for accuracy with Mylar master overlays, hard copy laser prints (if one is sent) and a visual inspection of the document image. Check
Unity 3.4.1.0 Election Management SystemChapter 2: Paper Ballot Specifications
CA_U3410_UseProceduresCalifornia Use ProceduresRevision 5.0. Released: June 22, 2016 28
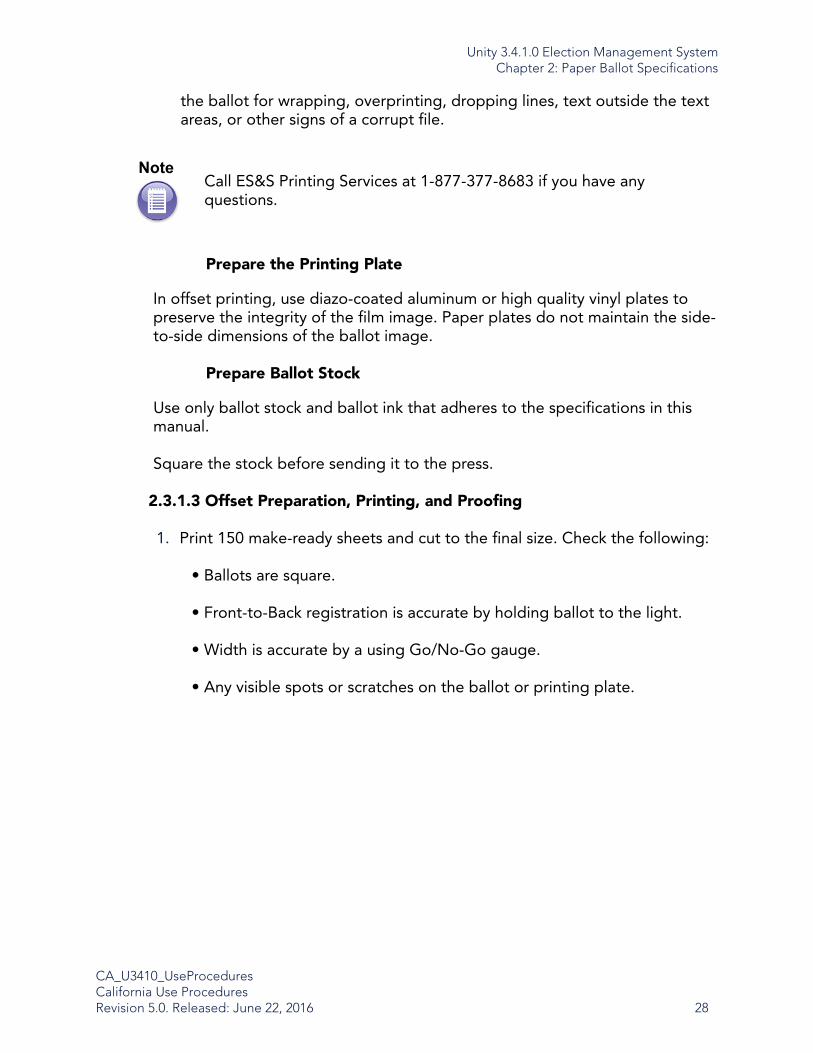
the ballot for wrapping, overprinting, dropping lines, text outside the text areas, or other signs of a corrupt file.
Prepare the Printing Plate
In offset printing, use diazo-coated aluminum or high quality vinyl plates to preserve the integrity of the film image. Paper plates do not maintain the side-to-side dimensions of the ballot image.
Prepare Ballot Stock
Use only ballot stock and ballot ink that adheres to the specifications in this manual.
Square the stock before sending it to the press.
2.3.1.3 Offset Preparation, Printing, and Proofing
1. Print 150 make-ready sheets and cut to the final size. Check the following:
• Ballots are square.
• Front-to-Back registration is accurate by holding ballot to the light.
• Width is accurate by a using Go/No-Go gauge.
• Any visible spots or scratches on the ballot or printing plate.
NoteCall ES&S Printing Services at 1-877-377-8683 if you have any questions.

Unity 3.4.1.0 Election Management SystemChapter 2: Paper Ballot Specifications
CA_U3410_UseProceduresCalifornia Use ProceduresRevision 5.0. Released: June 22, 2016 29
2.Turn the ballot over and do the tests again on the back of the ballot. If all three tests on each side fall within tolerances, the scanner will be able to read the ballot.
3.After performing registration checks, print and inspect the ballots. Allow the ballots to dry.
4.For every 500 sheets printed on the main production run, check the following and initial accordingly:
• Ink density with a densitometer.
• Overall print quality – visible flaws, spots, or marks on the ballot or printing plate.
• Make any corrections/adjustments necessary to the printer. Reprint, and replace ballots as needed.

Unity 3.4.1.0 Election Management SystemChapter 2: Paper Ballot Specifications
CA_U3410_UseProceduresCalifornia Use ProceduresRevision 5.0. Released: June 22, 2016 30
2.3.1.4 Offset Cutting, Scoring and Folding
Cutting
Check the ballot stock with a Go/No-Go Gauge to ensure that it is properly cut. If printing from a roll-fed machine, check with the Go-No-Go Gauge to make sure the ballots are cut to the correct width.
A Go/No-Go Gauge that will easily measure whether or not a ballot is the right width is available from ES&S.
Scoring and Folding Ballots
Scoring the ballots before folding them is not recommended. A folding machine should be used to expedite the process. In addition, roller pressures should be reduced to about 2 – 3X thickness of ballot stock.
NoteThe large frame on the ballot does not align front to back. They must be off by 0.030 inch (.076 cm).
Note If one or more precincts have a ballot requires duplex printing, all precincts must be printed in duplex. This setting is located in the Printing Preferences window for the printer you are using.Refer to 2.5.6.1 Duplex Printing for more information.
ES&S code stock is already printed duplex.
Caution Do not fold across timing marks, ovals, or arrows, as this may cause tabulation errors. Scoring followed by folding may result in the ballot separating at the score/fold line.

Unity 3.4.1.0 Election Management SystemChapter 2: Paper Ballot Specifications
CA_U3410_UseProceduresCalifornia Use ProceduresRevision 5.0. Released: June 22, 2016 31
Perforating and Numbering Ballot Stubs
A ballot stub is a non-readable portion of the ballot that election workers remove at the polling place for auditing purposes. Stubs usually contain at least one identification number (such as a precinct identification number or sequence code number) and a sequentially printed number that matches the number on the ballot, used to audit ballots that have been cast. Ballots should be perforated for easy separation. Use a micro-perfing wheel to place perforations on the ballot for one 3-inch (7.62-cm) stub or two 1.5-inch (3.81-cm) stubs.
Squaring
The first few sheets should be taken to the cutter immediately to determine if all is square. Stack ballots in lift sizes of 3 to 5 inches (7.62 to 12.7 cm). The weight of the ballot stock may cause offset during the drying process if stacked in higher than 5 inches (12.7 cm).
2.3.2 Digital Printing
After receiving the files, all ballot sequences need to be proofed to ensure information on the ballot is correct.
2.3.2.1 Preparation and Proofing
Overlays and Registration
A PDF can change, depending upon the software used, and although the change may not be visible (about 0.5%), it could be enough to cause read errors or ballot rejection on ES&S equipment. Using the provided Mylar overlays and the registration boxes, which are preprinted on the ballot stock, will ensure that the ballots being produced are within ES&S specifications.
Note
Stubs should always be at the bottom of the ballot.
Note Keep ballot stock clean before, during, and after printing. Avoid grease, water, ink splatter or spray, and dirt. Always wash hands before handling ballot stock.

Unity 3.4.1.0 Election Management SystemChapter 2: Paper Ballot Specifications
CA_U3410_UseProceduresCalifornia Use ProceduresRevision 5.0. Released: June 22, 2016 32
Registration Boxes
Inspect the ballots using the registration marks as a guideline. Registration targets must appear entirely within the registration boxes. If one mark is out of position, the entire ballot is out of registration. Make adjustments to the machine and reprint any misaligned ballots.
Using Registration Overlays
• Make sure that you have a “front” and a “back” overlay.
• Align the top and right edges of the ballot with the “edge of paper” lines on the overlay and inspect the printed ovals. The ovals must be printed entirely inside the boxes. If any part of the oval is outside the box, the ballot is not in registration and the PDF or printer must be adjusted and the ballots reprinted until the sizing and registration are correct.
• Verify that the black check boxes at the top and bottom of the ballot, and the timing tracks and code channels along the left side of the ballot, are within the boxes printed on the overlay. The left and bottom edges of the ballot must fall between the Min. and Max. lines when the top and right edges are on the “edge of paper” line. If any part of the boxes is outside the box, the ballot is not in registration and the PDF or printer must be adjusted and the ballots reprinted until the sizing and registration are correct.
CautionCheck front-to-back registration on the ballot by holding it up to a light. The timing track should line up evenly.

Unity 3.4.1.0 Election Management SystemChapter 2: Paper Ballot Specifications
CA_U3410_UseProceduresCalifornia Use ProceduresRevision 5.0. Released: June 22, 2016 33
2.3.2.2 Printing Inspection
When printing, use the following tools to check the following:
• Mylar Overlay
• Registration
• Ballot width
• Ballot length
• Go/No-Go Gauge
• Ballot width
• Densitometer
• Ink/toner density
• Micro-ruler
• Oval thickness
On every ballot inspected, make sure to check the following:
• Overall print quality – any visible flaws, spots or marks
• Front-to-back registration
• Proper toner/ink adhesion
Important If any of the above measurements are out of ES&S specifications, make any corrections/adjustments necessary to the printer, reprint, and replace ballots as needed.

Unity 3.4.1.0 Election Management SystemChapter 2: Paper Ballot Specifications
CA_U3410_UseProceduresCalifornia Use ProceduresRevision 5.0. Released: June 22, 2016 34
2.4 Paper Stock Requirements
2.4.1 Ballot Stock Specifications and Tolerances
Table 2-1: Ballot Specifications
Grain Direction on Finished Ballot Long
Basis Weight 80# text weight (36.2874 kg)
Thickness 0.0061 in. (0.015494 cm)
Smoothness 130 Sheffields
Moisture 5.5 percent
Opacity 97.0
Brightness 92 to 94
PPI 338
Table 2-2: Tolerances
Band Width 8.5 in. (+.027, -.02)
Ballot Length 11, 14, 17, 19 in. (+/- 0.03)
Ink Density 1.15 to 1.25 wet ink density; 1.10 to 1.15 dry ink density
Oval Thickness Oval thickness is 0.003 (maximum oval thickness is 0.005)
ImportantThe AutoMark, DS200, and DS850 can accommodate narrower ballots.
Avoid using colored ballot stock.
Avoid using adhesive stickers or labels and avoid embossing or embellishing when printing ballots. Any technique that changes the caliper of the ballot stock will cause read errors during scanning.
Unity 3.4.1.0 Election Management SystemChapter 2: Paper Ballot Specifications
CA_U3410_UseProceduresCalifornia Use ProceduresRevision 5.0. Released: June 22, 2016 35
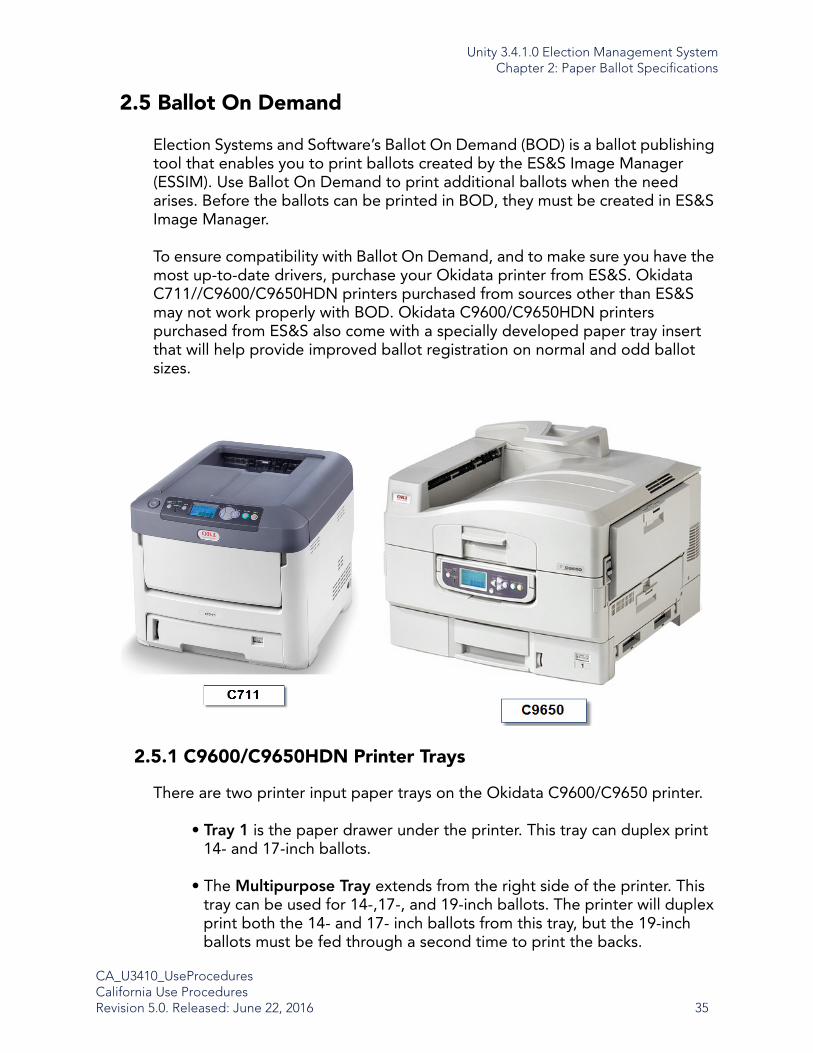
2.5 Ballot On Demand
Election Systems and Software’s Ballot On Demand (BOD) is a ballot publishing tool that enables you to print ballots created by the ES&S Image Manager (ESSIM). Use Ballot On Demand to print additional ballots when the need arises. Before the ballots can be printed in BOD, they must be created in ES&S Image Manager.
To ensure compatibility with Ballot On Demand, and to make sure you have the most up-to-date drivers, purchase your Okidata printer from ES&S. Okidata C711//C9600/C9650HDN printers purchased from sources other than ES&S may not work properly with BOD. Okidata C9600/C9650HDN printers purchased from ES&S also come with a specially developed paper tray insert that will help provide improved ballot registration on normal and odd ballot sizes.
2.5.1 C9600/C9650HDN Printer Trays
There are two printer input paper trays on the Okidata C9600/C9650 printer.
• Tray 1 is the paper drawer under the printer. This tray can duplex print 14- and 17-inch ballots.
• The Multipurpose Tray extends from the right side of the printer. This tray can be used for 14-,17-, and 19-inch ballots. The printer will duplex print both the 14- and 17- inch ballots from this tray, but the 19-inch ballots must be fed through a second time to print the backs.

Unity 3.4.1.0 Election Management SystemChapter 2: Paper Ballot Specifications
CA_U3410_UseProceduresCalifornia Use ProceduresRevision 5.0. Released: June 22, 2016 36
2.5.1.1 Paper Insertion Into Trays
It is important to insert the paper stock into the tray straight and consistently to ensure consistent ballots. If you place paper in the tray at an angle, it skews the ballot images. The printing drum in the printer is in a fixed location, so it is important to place the paper in the tray consistently to minimize any image adjustments that need to be made in Ballot On Demand when replacing paper.
2.5.1.2 Main Paper Guides
Configure the printer’s paper guides for your ballot stock. Set the main paper guides for 8.50” wide paper.
1. Lock the main guides into position. The distance between the sides should be 8.53” so they can accommodate oversized paper. The excess space will allow paper movement of .030” side to side. This will result in ballot images that vary .030” from stack to stack depending on alignment of the edge of the side guides of the paper.
2. Before inserting paper, make sure to jog the paper stack so it has smooth edges. This will ensure consistency from top to bottom of the stack.
3. Center the paper between the two side guides. To do this, hold both sides of the guide and press them against the edges of the paper as shown in the adjacent image.
4. When you release the side guides, they will move back into the normal position, and the paper is centered between the guides.
If printing two-sided ballots in duplex mode, the cut corner of the ballot stock should be in the upper left corner as shown in the adjacent image.
If you are printing single sided ballots with duplexing disabled, the cut corner should be in the upper right corner.

Unity 3.4.1.0 Election Management SystemChapter 2: Paper Ballot Specifications
CA_U3410_UseProceduresCalifornia Use ProceduresRevision 5.0. Released: June 22, 2016 37
2.5.1.3 C9600/C9650 Ballot Registration Guide
Insert the special C9600/C9650 Ballot Registration Guide into Tray 1. This guide is shipped with the printer from ES&S.
Take the following steps to configure the C9600/C9650 Ballot Registration Guide.
ES&S has developed a special C9600/C9650 Ballot Registration Guide specifically for the Okidata C9600/C9650 printer to help stabilize the far end of a 14 and 17-inch paper stack. This guide will properly position the paper stack and help prevent skewed ballot images by ensuring that the paper is not angled in the paper tray. This guide is placed into Tray 1 and can be adjusted for both 14 and 17-inch ballots. It can be adjusted for the 14 and 17-inch ballots, and can be removed for printing on letter size paper. Take the following steps to install the C9600/C9650 Ballot Registration Guide.
1. Align the two mounting pins with the mounting holes.
2. Put the far pin in first then slide it to the end.
3. Insert closest pin in the proper hole.
4. Once installed, the registration posts adjust to fit against the paper edges. To loosen the posts, turn counterclockwise. This allows them to slide within the slots to provide a firm registration edge for the ballots. This paper

Unity 3.4.1.0 Election Management SystemChapter 2: Paper Ballot Specifications
CA_U3410_UseProceduresCalifornia Use ProceduresRevision 5.0. Released: June 22, 2016 38
guide can also be used for 14-inch and 17-inch ballots by moving the registration posts into the proper slots.
5. To move the registration posts from one slot to the other, loosen the post and slide it all the way out to the side and remove. Place the registration posts in the proper slots and slide them against the ballot edge before tightening. This should be set so that the paper centers between the main paper guides as shown in the following illustrations.
Slots for 14- and 17- inch ballots
...Turn counter-clockwise to loosen and adjust
Tighten gently against ballot edges
...it should be centered between the guides.

Unity 3.4.1.0 Election Management SystemChapter 2: Paper Ballot Specifications
CA_U3410_UseProceduresCalifornia Use ProceduresRevision 5.0. Released: June 22, 2016 39
2.5.1.4 Paper Insertion in Multi-purpose Tray
1. Pull the tray from the right side of the printer. Before inserting paper, make sure to jog the paper stack so it has smooth edges.
2. Place the paper in the tray and adjust the guides against the sides of the paper. Tap the guides against the edges a few times to align the paper. When placing the ballot stock in the tray, make sure the cut corner is on the right side of the leading edge, if not duplexing. If you are duplexing, the corner should be in the upper left corner of the tray. Tap the guides against the edges of the paper to center it in the tray.
2.5.2 Printer Consumable Information
Printer consumables include the color drum, toner cartridges, and transfer belts. These consumables require replacement based on the product usage. The replacement requirements are only estimates, and can vary depending on the size, content, and layout of the ballots. ES&S recommends having a replacement for each item available at all times to prevent disruption of ballot printing during critical moments.
2.5.2.1 Color Drum Life Expectancy
The Cyan Color Drum has a life expectancy of 42,000 pages at 5% density.
2.5.2.2 Toner Cartridge Life Expectancy
Toner cartridge life depends on the amount of toner used to print a given ballot. Toner cartridges are rated at up to 15,000 pages, printed at 5% density. The following table shows estimated black toner usage for common ballot sizes.
Ballot Size Black Toner Coverage
Estimated pages per toner cartridge per side printed
Estimated number of ballots per toner cartridge
8.5 x 14” 7% (one side) 12,000 6,000
8.5 x 17” 8% (one side) 10,500 5,250
8.5 x 19” 9% (one side) 9,000 4,500

Unity 3.4.1.0 Election Management SystemChapter 2: Paper Ballot Specifications
CA_U3410_UseProceduresCalifornia Use ProceduresRevision 5.0. Released: June 22, 2016 40
2.5.3 Set Okidata C711/9600/9650HDN as Default Printer
From the Start menu, point to Settings, then to Printers and Faxes.
Right-click the C711 or 9650HDN printer icon and click Set to Default.
2.5.4 ConfigureC9650 Control Panel
Use the control panel to configure your printer. Following is a description of each button on the control panel.
Note
BOD requires the PS print driver to be the default printer.
Note See the operator’s manual for the printer or visit http://my.okidata.com/PP-C9650hdn.nsf?opendatabase for complete information on control panel settings.
1
2
3 4
5
611
8
9
7 10

Unity 3.4.1.0 Election Management SystemChapter 2: Paper Ballot Specifications
CA_U3410_UseProceduresCalifornia Use ProceduresRevision 5.0. Released: June 22, 2016 41
1. Shutdown/Restart button – Hold down this button for two seconds to shut down the printer. This button is also used to start up the machine.
2. Ready light – When lit, this light indicates the machine is ready to print. When flashing, print data is being processed. If the light is off, the machine is offline and cannot receive data.
3. Attention light – The light is off to indicate normal operation. A flashing light indicates an error has occurred but printing can continue (for example, empty paper tray). If the light is on but not flashing, an error has occurred and printing cannot continue (such as a paper jam). Consult the Okidata 9600/9650 User’s Manual on the CD for further information.
4. Display panel – Displays system information such as toner level, status messages (e.g., ready to print), different functions, setup and administrative functions.
5. Up-arrow button – Displays function menus and allows for upward movement through menu items.
6. Down-arrow button – Displays function menus and allows for downward movement through menu items.
7. Back button – Returns to the previous menu screen.
8. Enter button – Displays function menus and selects the menu item highlighted in the display panel.
9. Online button – Switches between online and offline modes.
10. Cancel button – Cancels current print job.
11. Help button – Provides additional information about what is displayed on the display panel.
NoteThe power switch on the back of the machine must be switched on to use this button to start the printer.

Unity 3.4.1.0 Election Management SystemChapter 2: Paper Ballot Specifications
CA_U3410_UseProceduresCalifornia Use ProceduresRevision 5.0. Released: June 22, 2016 42
2.5.4.1 Required Settings
Set your printer options to the following settings in order to accurately print ballots with Ballot On Demand:
2.5.4.2 Confirm Current Settings
Print a MenuMap to view the current settings for your printer.
1. Confirm that paper is loaded into the paper tray.
2. Ensure the display panel indicates the printer is ready to print.
3. Press the Up-arrow or Down-arrow buttons until Print Information is highlighted. Press Enter.
4. Press the Up-arrow or Down-arrow buttons until Configuration is highlighted.
5. Press Enter. The Configuration document will print.
6. Press the Back button until the Ready To Print screen appears.
If the current settings do not match the requirements for Ballot On Demand, follow the instructions under 2.5.4.3 Change Printer Settings to correct the settings.
Item Value
Binding Long edge
Paper Feed Tray 1
Auto Tray Switch Off
Tray 1 Papersize Custom
Tray 1 X Dimension 8.5 inch
Tray 1 Y Dimension Set value according to the length of your ballot
Tray 1 Mediaweight Medium

Unity 3.4.1.0 Election Management SystemChapter 2: Paper Ballot Specifications
CA_U3410_UseProceduresCalifornia Use ProceduresRevision 5.0. Released: June 22, 2016 43
2.5.4.3 Change Printer Settings
Use the following instructions to configure all printer settings for Ballot On Demand. The instructions describe how to set one option at a time, but you may also set all printer options at once by pressing the Up-arrow or Down-arrow buttons to scroll through system menus and commands.
Paper Feed Tray
1. Ensure that the display panel indicates the printer is ready to print. The Up-arrow and Down-arrow buttons can be used to navigate through options and access menus.
2. Access the Functions menu.
3. Highlight Menus and press Enter.
Indicates there are more options that can be viewed by scrolling down

Unity 3.4.1.0 Election Management SystemChapter 2: Paper Ballot Specifications
CA_U3410_UseProceduresCalifornia Use ProceduresRevision 5.0. Released: June 22, 2016 44
4. Highlight Tray Configuration and press Enter.
5. Highlight Paper Feed and press Enter to select Tray1. The symbol will appear next to Tray1.
6. Press the Back button until the Ready To Print screen appears.
Paper Size
1. Ensure that the display panel indicates the printer is ready to print. The Up-arrow and Down-arrow buttons can be used to navigate through options and access menus.
2. Press the Up-arrow or Down-arrow button to access the Functions menu.

Unity 3.4.1.0 Election Management SystemChapter 2: Paper Ballot Specifications
CA_U3410_UseProceduresCalifornia Use ProceduresRevision 5.0. Released: June 22, 2016 45
3. Highlight Menus and press Enter.
4. Highlight Tray Configuration and press Enter.
5. Highlight Tray1 Config and press Enter.
6. Highlight Paper Size and press Enter.
7. Highlight Custom and press Enter. The symbol will appear next to Custom.

Unity 3.4.1.0 Election Management SystemChapter 2: Paper Ballot Specifications
CA_U3410_UseProceduresCalifornia Use ProceduresRevision 5.0. Released: June 22, 2016 46
8. Press the Back button once. The Tray1 Config screen will appear with the following options:
9. Highlight X Dimension and press Enter.
10. Change the size to 8.5 inches and press Enter. The symbol will appear next to the size.
11. Press the Back button once to return to the Tray1 Config menu.
12. In the Tray1 Config menu, highlight Y Dimension and press Enter.
13. Use the Up-arrow or Down-arrow button to change the size of the length of your ballot and press Enter. The symbol will appear next to the size.
14. Press the Back button until the Ready To Print screen appears.
Print Media Weight
1. Ensure that the display panel indicates the printer is ready to print. The Up-arrow and Down-arrow buttons can be used to navigate through options and access menus.
NoteThe value on the screen may not be the length of your ballot. Consult your election official for size standards or call ES&S Technical Support.

Unity 3.4.1.0 Election Management SystemChapter 2: Paper Ballot Specifications
CA_U3410_UseProceduresCalifornia Use ProceduresRevision 5.0. Released: June 22, 2016 47
2. Access the Functions menu.
3. Highlight Menus and press Enter.
4. Highlight Tray Configuration and press Enter.
5. Highlight Tray1 Config and press Enter.

Unity 3.4.1.0 Election Management SystemChapter 2: Paper Ballot Specifications
CA_U3410_UseProceduresCalifornia Use ProceduresRevision 5.0. Released: June 22, 2016 48
6. Highlight Media Weight and press Enter.
7. Highlight Medium and press Enter. The symbol will appear beside Medium.
8. Press the Back button until the Ready To Print screen appears.
Auto Tray Switch
1. Ensure that the display panel indicates the printer is ready to print. The Up-arrow and Down-arrow buttons can be used to navigate through options and access menus.
2. Access the Functions menu.
3. Highlight Menus and press Enter.
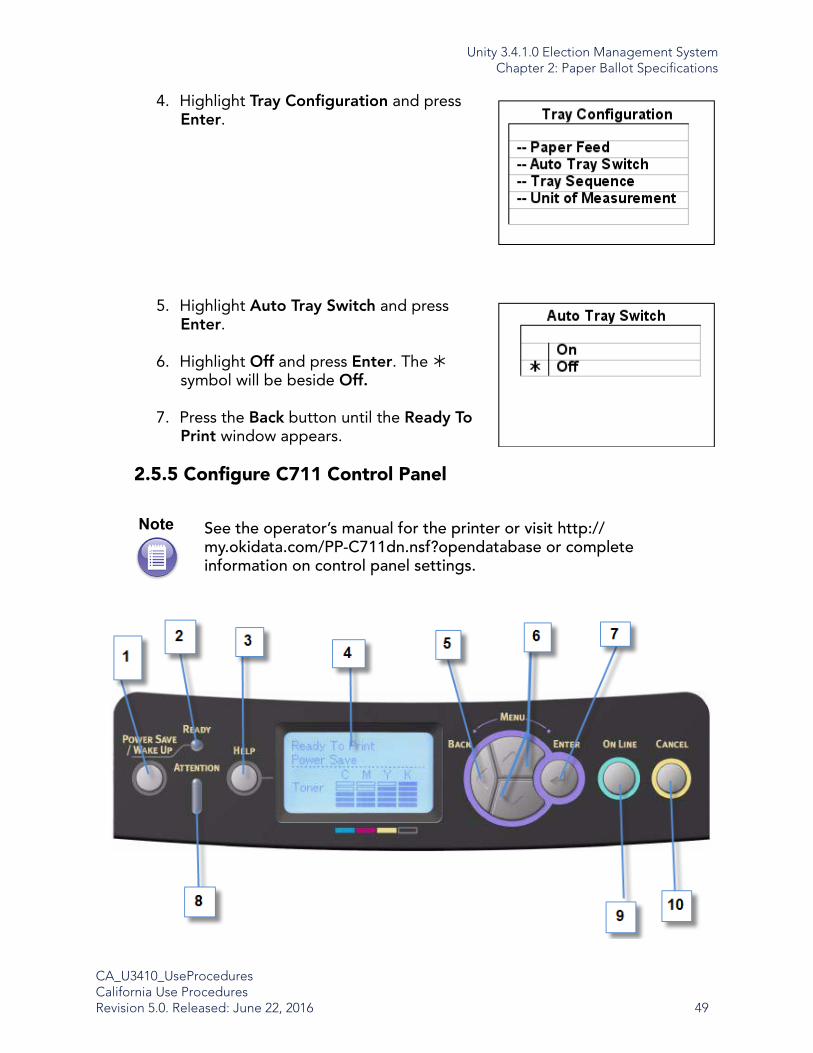
Unity 3.4.1.0 Election Management SystemChapter 2: Paper Ballot Specifications
CA_U3410_UseProceduresCalifornia Use ProceduresRevision 5.0. Released: June 22, 2016 49
4. Highlight Tray Configuration and press Enter.
5. Highlight Auto Tray Switch and press Enter.
6. Highlight Off and press Enter. The symbol will be beside Off.
7. Press the Back button until the Ready To Print window appears.
2.5.5 Configure C711 Control Panel
Note See the operator’s manual for the printer or visit http://my.okidata.com/PP-C711dn.nsf?opendatabase or complete information on control panel settings.

Unity 3.4.1.0 Election Management SystemChapter 2: Paper Ballot Specifications
CA_U3410_UseProceduresCalifornia Use ProceduresRevision 5.0. Released: June 22, 2016 50
1. Power Save/Wake Up Button - switches that machine into sleep or wake-up mode.
2. Ready LED -
• On - Ready to receive data.
• Blinking - processing data.
• Off - Offline
3. Help - provides advice when an error occurs.
4. Display - displays the printer status and error messages.
5. Back Button - Returns to previous higher level menu item.
6. Menu Scroll Buttons - In the Menu mode, forwards or reverses the menu item displayed.
7. Enter Button - enters the Menu mode.
8. Attention LED -
• On - A warning occurs
• Blinking - An error occurs
• Off - normal.
9. On Line Button- Switches between Online and Offline
10. Cancel Button -
• Deletes data being printed or received when pressed for two seconds of longer.
• Deletes data when pressed for two seconds or longer when Wrong Paper Size, Run Out of Paper, Tray 1 is Open, or Tray 1 is not found.
• Exits the menu and goes Online when pressed in the Menu mode.

Unity 3.4.1.0 Election Management SystemChapter 2: Paper Ballot Specifications
CA_U3410_UseProceduresCalifornia Use ProceduresRevision 5.0. Released: June 22, 2016 51
2.5.5.1 Required Settings
2.5.5.2 Confirm Current Settings
Print a MenuMap to view the current settings for your printer.
1. Confirm that paper is loaded into the paper tray.
2. Ensure the display panel indicates the printer is ready to print.
3. Press the Up-arrow or Down-arrow buttons until Print Information is highlighted. Press Enter.
4. Press the Up-arrow or Down-arrow buttons until Configuration is highlighted.
5. Press Enter. The Configuration document will print.
6. Press the Back button until the Ready To Print screen appears.
If the current settings do not match the requirements for Ballot On Demand, follow the instructions in the next section.
2.5.5.3 Change Printer Settings
Use the following instructions to configure all printer settings for Ballot On Demand. The instructions describe how to set one option at a time, but you may also set all printer options at once by pressing the Up-arrow or Down-arrow buttons to scroll through system menus and commands.
Item Value
Binding Long edge
Paper Feed Tray 1
Auto Tray Switch Off
Tray 1 Papersize Custom
Tray 1 X Dimension 8.5 inch
Tray 1 Y Dimension Set value according to the length of your ballot
Tray 1 Mediaweight Medium

Unity 3.4.1.0 Election Management SystemChapter 2: Paper Ballot Specifications
CA_U3410_UseProceduresCalifornia Use ProceduresRevision 5.0. Released: June 22, 2016 52
Paper Feed Tray
1. Ensure that the display panel indicates the printer is ready to print. The Up-arrow and Down-arrow buttons can be used to navigate through options and access menus.
2. Access the Functions menu.
3. Highlight Menus and press Enter.

Unity 3.4.1.0 Election Management SystemChapter 2: Paper Ballot Specifications
CA_U3410_UseProceduresCalifornia Use ProceduresRevision 5.0. Released: June 22, 2016 53
4. Highlight Tray Configuration and press Enter.
5. Highlight Paper Feed and press Enter to select Tray1. The symbol will appear next to Tray1.
6. Press the Back button until the Ready To Print screen appears.
Paper Size
1. Ensure that the display panel indicates the printer is ready to print. The Up-arrow and Down-arrow buttons can be used to navigate through options and access menus.
2. Press the Up-arrow or Down-arrow button to access the Functions menu.
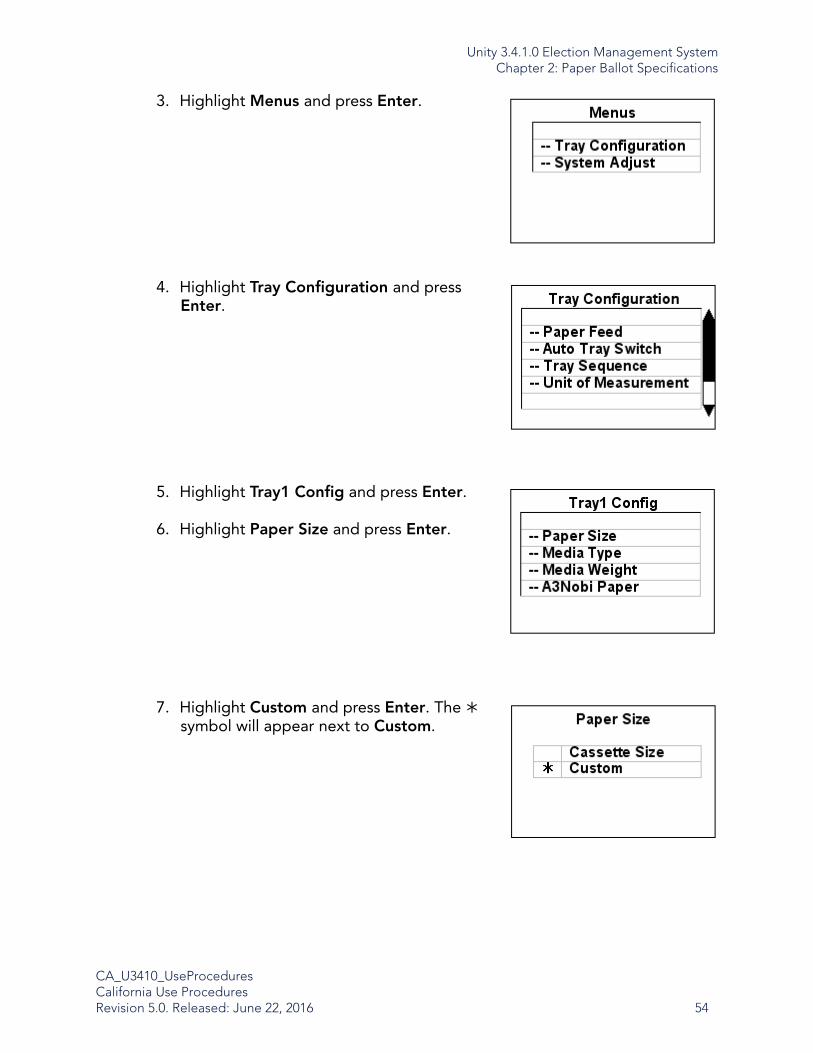
Unity 3.4.1.0 Election Management SystemChapter 2: Paper Ballot Specifications
CA_U3410_UseProceduresCalifornia Use ProceduresRevision 5.0. Released: June 22, 2016 54
3. Highlight Menus and press Enter.
4. Highlight Tray Configuration and press Enter.
5. Highlight Tray1 Config and press Enter.
6. Highlight Paper Size and press Enter.
7. Highlight Custom and press Enter. The symbol will appear next to Custom.

Unity 3.4.1.0 Election Management SystemChapter 2: Paper Ballot Specifications
CA_U3410_UseProceduresCalifornia Use ProceduresRevision 5.0. Released: June 22, 2016 55
8. Press the Back button once. The Tray1 Config screen will appear with the following options:
9. Highlight X Dimension and press Enter.
10. Change the size to 8.5 inches and press Enter. The symbol will appear next to the size.
11. Press the Back button once to return to the Tray1 Config menu.
12. In the Tray1 Config menu, highlight Y Dimension and press Enter.
13. Use the Up-arrow or Down-arrow button to change the size of the length of your ballot and press Enter. The symbol will appear next to the size.
14. Press the Back button until the Ready To Print screen appears.
Print Media Weight
1. Ensure that the display panel indicates the printer is ready to print. The Up-arrow and Down-arrow buttons can be used to navigate through options and access menus.
NoteThe value on the screen may not be the length of your ballot. Consult your election official for size standards or call ES&S Technical Support.

Unity 3.4.1.0 Election Management SystemChapter 2: Paper Ballot Specifications
CA_U3410_UseProceduresCalifornia Use ProceduresRevision 5.0. Released: June 22, 2016 56
2. Access the Functions menu.
3. Highlight Menus and press Enter.
4. Highlight Tray Configuration and press Enter.
5. Highlight Tray1 Config and press Enter.

Unity 3.4.1.0 Election Management SystemChapter 2: Paper Ballot Specifications
CA_U3410_UseProceduresCalifornia Use ProceduresRevision 5.0. Released: June 22, 2016 57
6. Highlight Media Weight and press Enter.
7. Highlight Medium and press Enter. The symbol will appear beside Medium.
8. Press the Back button until the Ready To Print screen appears.
Auto Tray Switch
1. Ensure that the display panel indicates the printer is ready to print. The Up-arrow and Down-arrow buttons can be used to navigate through options and access menus.
2. Access the Functions menu.
3. Highlight Menus and press Enter.

Unity 3.4.1.0 Election Management SystemChapter 2: Paper Ballot Specifications
CA_U3410_UseProceduresCalifornia Use ProceduresRevision 5.0. Released: June 22, 2016 58
4. Highlight Tray Configuration and press Enter.
5. Highlight Auto Tray Switch and press Enter.
6. Highlight Off and press Enter. The symbol will be beside Off.
7. Press the Back button until the Ready To Print window appears.

Unity 3.4.1.0 Election Management SystemChapter 2: Paper Ballot Specifications
CA_U3410_UseProceduresCalifornia Use ProceduresRevision 5.0. Released: June 22, 2016 59
2.5.6 Print Options
1. From the Start menu, point to Settings, then to Printers and Faxes.
2. Right-click the Okidata printer icon, then select Printing Preferences.
3. Use the tabs in the Printing Preferences window to select the Layout, Paper/Quality, Job Options, and Color of your ballots. Click Apply, then OK.
Note
Make sure to select the printer with C711/9600/9650 in its name.

Unity 3.4.1.0 Election Management SystemChapter 2: Paper Ballot Specifications
CA_U3410_UseProceduresCalifornia Use ProceduresRevision 5.0. Released: June 22, 2016 60
4.
Printing Preferences window, showing the layout tab, set for duplex printing
2.5.6.1 Duplex Printing
To print your ballots in duplex format (printed on both sides of the paper), under Print on Both Sides, select Flip on Long Edge.
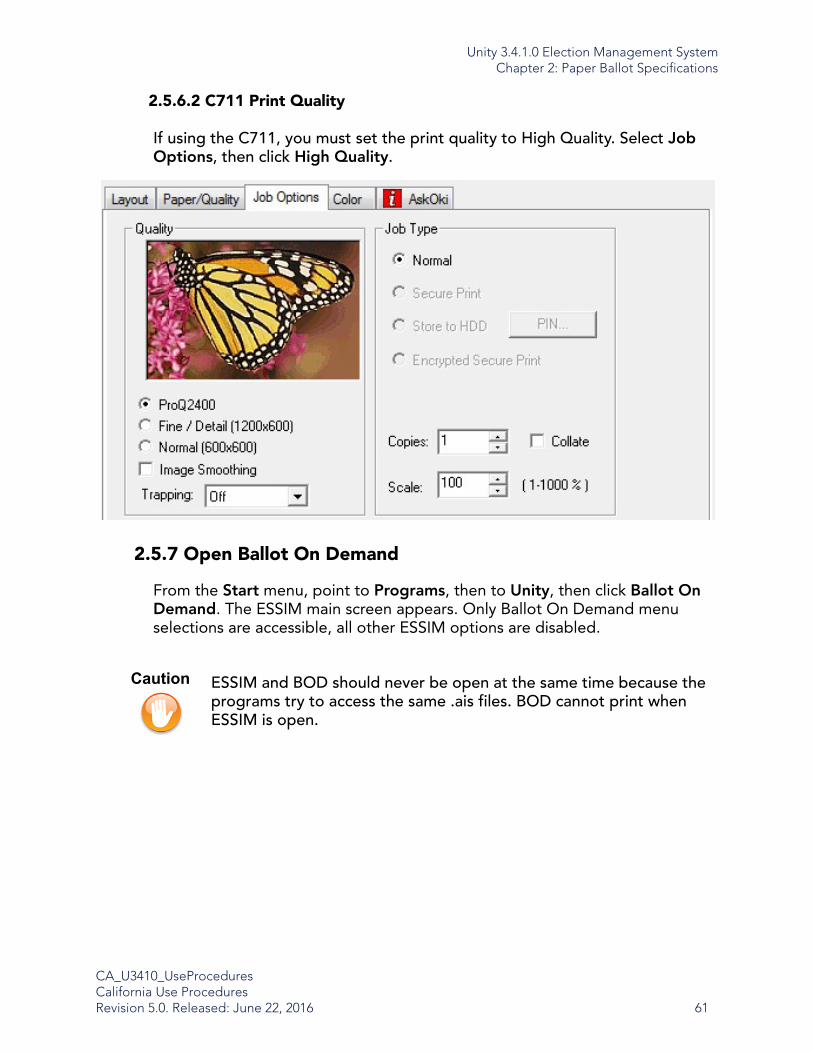
Unity 3.4.1.0 Election Management SystemChapter 2: Paper Ballot Specifications
CA_U3410_UseProceduresCalifornia Use ProceduresRevision 5.0. Released: June 22, 2016 61
2.5.6.2 C711 Print Quality
If using the C711, you must set the print quality to High Quality. Select Job Options, then click High Quality.
2.5.7 Open Ballot On Demand
From the Start menu, point to Programs, then to Unity, then click Ballot On Demand. The ESSIM main screen appears. Only Ballot On Demand menu selections are accessible, all other ESSIM options are disabled.
Caution ESSIM and BOD should never be open at the same time because the programs try to access the same .ais files. BOD cannot print when ESSIM is open.
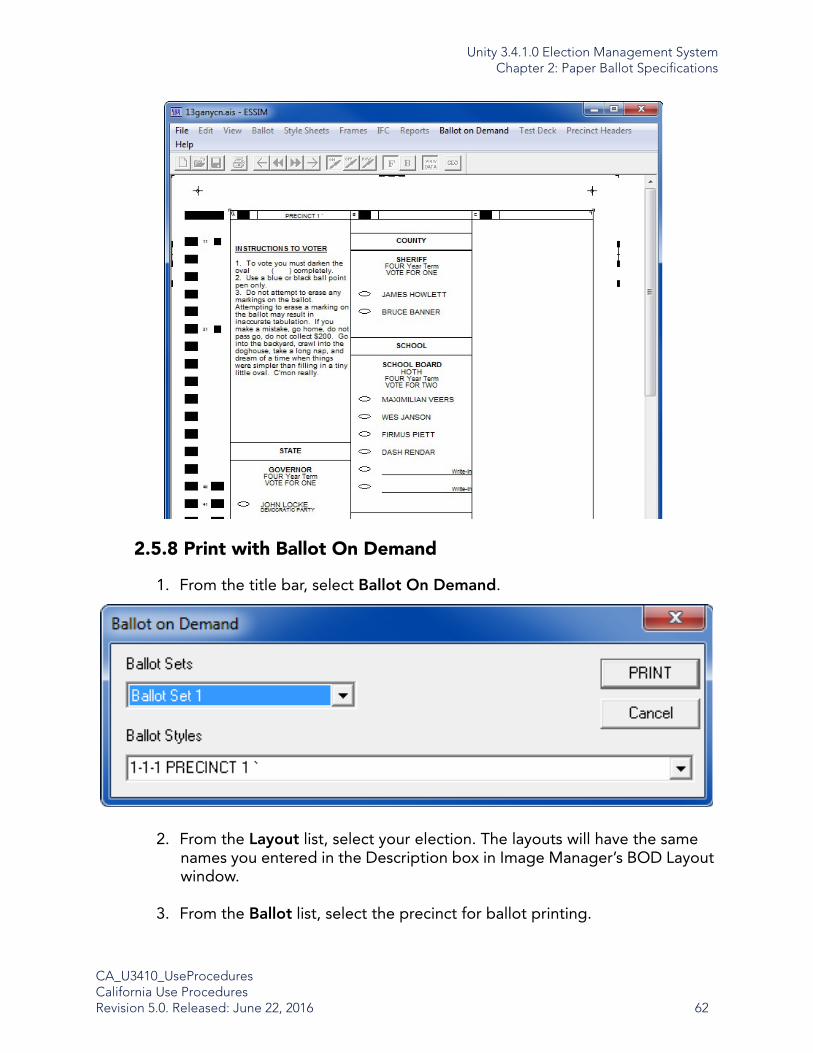
Unity 3.4.1.0 Election Management SystemChapter 2: Paper Ballot Specifications
CA_U3410_UseProceduresCalifornia Use ProceduresRevision 5.0. Released: June 22, 2016 62
2.5.8 Print with Ballot On Demand
1. From the title bar, select Ballot On Demand.
2. From the Layout list, select your election. The layouts will have the same names you entered in the Description box in Image Manager’s BOD Layout window.
3. From the Ballot list, select the precinct for ballot printing.

Unity 3.4.1.0 Election Management SystemChapter 2: Paper Ballot Specifications
CA_U3410_UseProceduresCalifornia Use ProceduresRevision 5.0. Released: June 22, 2016 63
4. After you select a format, click PRINT.
5. To print the entire ballot, under Print Range, select All.
6. In the Copies box, enter the number of copies to print.
7. Click OK to print the selected ballot.
Note
Print to File saves the ballot data as a PS or PRN file.
NoteDo not change Copies when printing from Single Ballot. If multiple copies are needed, use the Batch Ballots option instead.
Note If a second blank page or a the back of the ballot prints separately, use duplex printing. This setting is located in the Printing Preferences window for the printer you are using.Refer to 2.5.6.1 Duplex Printing for more information.

Unity 3.4.1.0 Election Management SystemChapter 2: Paper Ballot Specifications
CA_U3410_UseProceduresCalifornia Use ProceduresRevision 5.0. Released: June 22, 2016 64
2.6 Color Strip Specifications
ES&S ballots use a color strip instead of full color tinting, which helps to protect the anonymity of a voter’s ballot. The strip can be any color and darkness as it is placed on a part of the ballot that the scanner does not read. See the figure on the following page for exact specifications.
This specification is valid on any ballot length or style for the ES&S AutoMARK.
Color Strip

Unity 3.4.1.0 Election Management SystemChapter 2: Paper Ballot Specifications
CA_U3410_UseProceduresCalifornia Use ProceduresRevision 5.0. Released: June 22, 2016 65
2.7 Approved Paper Stocks
ES&S CountRight™ Ballot Stock it highly recommended, as it has been specially engineered to run on ES&S tabulators. Figure is an example of generic ballot stock.
Generic Ballot Stock

Unity 3.4.1.0 Election Management SystemChapter 3: System Configuration and Acceptance Testing
CA_U3410_UseProceduresCalifornia Use ProceduresRevision 5.0. Released: June 22, 2016
66
Chapter 3: System Configuration and Acceptance Testing
3.1 System Installation
Unity 3.4.1.0 EMS installation and configuration procedures are provided in the following accompanying documents:
• Unity EMS Server Installation Procedures
• Unity EMS Client Workstation Installation Procedures
• Unit EMS Standalone Workstation Installation Procedures
3.2 Upgrading Firmware
3.2.1 M100 Scanner Firmware Update
Use a PCMCIA firmware update card to install new firmware in the M100.
1. With the M100 powered off, insert the update card into the scanner.
2. Turn the scanner on. The card version number appears on the screen.The message “Reprogram flash memory. Load flash?” will appear.
3. Press Yes to load the flash memory.
After you have successfully loaded the firmware, you will receive a confirmation message.
4. Turn off the M100 and remove the PCMCIA card.
NoteBefore inserting the firmware card into the M100, remove any cards currently in the scanner.
Caution
Do not remove the card during this process.

Unity 3.4.1.0 Election Management SystemChapter 3: System Configuration and Acceptance Testing
CA_U3410_UseProceduresCalifornia Use ProceduresRevision 5.0. Released: June 22, 2016
67
3.2.2 DS200 Scanner Firmware Update
To install new firmware on the DS200, first obtain an official DS200 firmware update USB flash drive from the Secretary of State.
1. Unlock and open the access door on the unit.
2. Insert the USB flash drive containing the firmware update into one of the USB ports. Do not force the flash drive into the port.
3. Turn the DS200 on, and the firmware update will be automatically loaded.
When the firmware update is complete, a confirmation message will appear.
4. Turn off the DS200 and remove the flash drive.
Note
Do not remove the USB flash drive during this process.
NoteWhen the DS200 is switched on, the firmware version will appear on the initial state report.
Note If the firmware update does not complete successfully, update the DS200’s internal compact flash (CF) card with a new prod.release.image file, then repeat the steps in this section.

Unity 3.4.1.0 Election Management SystemChapter 3: System Configuration and Acceptance Testing
CA_U3410_UseProceduresCalifornia Use ProceduresRevision 5.0. Released: June 22, 2016
68
3.2.3 AutoMARK Firmware Update
3.2.3.1 VAT Firmware Compact Flash for Full Install
1. Locate the trusted firmware for performing a full install of the VAT. (These files can be located on the Product Installs DVD or have been provided for use from the trusted source).
2. Insert a blank Compact Flash card into the card reader.
3. In the ManufacturingInstalls folder, open the correct firmware version folder. Copy the \firmware\ folder and its contents to the root of the Compact Flash card.
4. Copy the \ElectionData\ folder and its contents to the root of the Compact Flash card.
5. Eject and label the Compact Flash card.
Note The card must contain an election, along with the firmware. Any election files will work as long as they have been created for the version of firmware being loaded.Test election files have been provided on the Verification Pack disc.

Unity 3.4.1.0 Election Management SystemChapter 3: System Configuration and Acceptance Testing
CA_U3410_UseProceduresCalifornia Use ProceduresRevision 5.0. Released: June 22, 2016
69
3.2.3.2 Remove AutoMARK Cover
1. With a Torx 10 screwdriver, remove the six screws on the outer edge of the unit, three to a side. These screws may be left in their holes after they are loosened.
2. Remove the four screws on the inner edge of the top cover. There are two on each side.
Electrical Unplug the AutoMARK from the wall outlet before performing these steps. Be careful whenever accessing the inside of the unit, as high voltages may be present.

Unity 3.4.1.0 Election Management SystemChapter 3: System Configuration and Acceptance Testing
CA_U3410_UseProceduresCalifornia Use ProceduresRevision 5.0. Released: June 22, 2016
70
3. Lift the rear panel. Remove the screw holding the plastic battery cover, and remove battery cover. Slide out and remove the diaper tray. (The diaper tray holds the foam pad underneath the ink cartridge.)
4. Remove the top cover, lifting the back end first.
5. Hardware 1.0 only:Remove the metal plate covering the USB connection. (This connection is already uncovered in all other hardware versions of the AutoMARK.)

Unity 3.4.1.0 Election Management SystemChapter 3: System Configuration and Acceptance Testing
CA_U3410_UseProceduresCalifornia Use ProceduresRevision 5.0. Released: June 22, 2016
71
3.2.3.3 Full Installation of AutoMARK Firmware
1. Plug the unit into a wall outlet.
2. Insert the compact flash card containing the VAT Full Firmware with the label facing left.
3. Turn the key to the TEST position and wait for the AutoMARK Main Menu to appear.
ImportantDuring this process, there cannot be a loss of power. Do not turn off the key except when instructed to do so.

Unity 3.4.1.0 Election Management SystemChapter 3: System Configuration and Acceptance Testing
CA_U3410_UseProceduresCalifornia Use ProceduresRevision 5.0. Released: June 22, 2016
72
4. Connect a USB keyboard and mouse to the machine using a USB hub.
5. To enter the Windows CE desktop, perform the following steps:
a. While still on the AutoMARK Main Menu, press and release the following keys separately and in the following order on the keyboard (there should not be long pauses between each keystroke):
i. Left arrow
ii. Up arrow
iii. Right arrow
iv. Down arrow
b. In the confirmation dialog box, Tab to the Yes button and press Enter, or touch the Yes button on the screen. (The mouse is inactive.)
c. In the AutoMARK startup window, click OK.
You now should have access to the Windows CE Desktop.
6. Double-click My Device.
7. Open Control Panel and select Storage Manager.
8. In the Storage Properties window, click Dismount.
9. Click Format.

Unity 3.4.1.0 Election Management SystemChapter 3: System Configuration and Acceptance Testing
CA_U3410_UseProceduresCalifornia Use ProceduresRevision 5.0. Released: June 22, 2016
73
10. In the Format the Selected Store? dialog box, click YES.
11. In the confirmation dialog box, click OK.
12. In the Storage Properties window, click New.
13. In the Create New Partition window, type ‘AutoMARK’ in the Name field. (The actual name of the partition does not matter.)
14. In the dialog box, click OK.
15. Verify that the Storage Properties window displays the following information:
• The statement “Unallocated: “0.00 B”(This means that nothing is unallocated.)
• The Partitions: table lists “AutoMARK *”(There must be an asterisk following the partition name.)
If either of these is incorrect, repeat the previous steps, beginning with step 8.
16. Click OK.
17. To reboot the machine, turn the key to OFF. After the red light appears behind the OFF position, turn the key to ON. Perform the next step after turning the key to ON.
18. Press and hold the Screen button. The machine will beep when the button is pressed and then beep longer after a short pause. Release the Screen button after the second beep.
Following the reboot, the Windows desktop will appear.
19. Disconnect the USB hub from the AutoMARK. After 1 second, plug the USB hub back into the AutoMARK to re-enable the keyboard and mouse.
20. Double-click My Device > Storage Card.
21. In the Storage Card folder, double-click FIRMWARE.
22. Right-click the Firmware folder and set the view to Details.
23. Open the AutoMARKService.THUMB file.

Unity 3.4.1.0 Election Management SystemChapter 3: System Configuration and Acceptance Testing
CA_U3410_UseProceduresCalifornia Use ProceduresRevision 5.0. Released: June 22, 2016
74
24. In the Install AutoMARK Tech AutoMARKS... dialog box, press OK. A progress message will flash on the screen. After it disappears, the process is complete.
25. Disconnect the USB hub from the AutoMARK.
26. To reboot the machine, turn the key to OFF. After the red light appears behind the OFF position, turn the key to ON. Perform the next step after turning the key to ON.
27. Press and hold the Screen button. The machine will beep when the button is pressed and then beep longer after a short pause. Release the Screen button after the second beep.
Following the reboot, the Calibrate Touch Screen appears.
28. Follow the on-screen calibration instructions. After completing the calibration, touch the screen to save the calibration. (Or repeat the calibration if necessary).
29. On the Please set up AutoMARK parameters screen, verify that the serial number displayed matches the one on the back of the AutoMARK.
30. Enter the remaining parameters (if known), or leave the default values as-is.
31. Press Save Parameters.
32. Wait for the message Parameters have been saved to appear. Then press the Install AutoMARK button.
The Uploading Firmware screen appears.
Wait for the Please set up AutoMARK parameters screen to reappear. The installation can take up to ten minutes.
33. When the Please set up AutoMARK parameters screen reappears, turn the key to OFF.
When the red light appears behind the OFF position, the machine has shut down.
NoteIf the Maintenance Password field is blank, enter the password VOGUE into the field.

Unity 3.4.1.0 Election Management SystemChapter 3: System Configuration and Acceptance Testing
CA_U3410_UseProceduresCalifornia Use ProceduresRevision 5.0. Released: June 22, 2016
75
3.2.3.4 Calibrate AutoMARK Scanner
This procedure requires the Unlock Compact Flash code. This code is created when the election files are created from AIMS. (If used, the code for the Test Election provided on the Verification Pack disc is 12345678.)
This procedure requires the System Maintenance password (VOGUE). This password was displayed on the Please set up AutoMARK parameters screen during the full firmware load.
1. Turn the key to ON.
2. Following bootup, an Alert! message appears.Turn the key to TEST.
3. After the AutoMARK Main Menu appears, press Unlock Flash Card.
4. Click the white text field.
5. Enter the Unlock Compact Flash code, then press Done.
6. Press Unlock.
7. Press DONE to return to the AutoMARK Main Menu.
8. Press System Maintenance, then enter the password. Press OK.
The AutoMARK System Maintenance Menu appears.
9. Press Scanner Calibration.
10. The scanner status appears below the Error title half-way down the right of the screen.
11. If no errors are reported, press DONE to return to the AutoMARK System Maintenance Menu.
12. Press Set Date/Time.
13. If the date and time are incorrect, enter the correct date and time.
14. Press DONE to return to the AutoMARK System Maintenance Menu.
15. Turn the key to OFF.

Unity 3.4.1.0 Election Management SystemChapter 3: System Configuration and Acceptance Testing
CA_U3410_UseProceduresCalifornia Use ProceduresRevision 5.0. Released: June 22, 2016
76
When the red light appears behind the OFF position, the machine has shut down.
16. Press DONE to return to the AutoMARK Main Menu.
17. Press Printer Calibration.
18. In the Printer Calibration Utility, set the X: and Y: values. Press the white field for the X: value, press CLEAR and then key -15, then press DONE. Press the white field for the Y: value press clear and then key 20, then press DONE.
19. Press SAVE VALUES and wait for the message "The values have been saved!" to appear.
20. Press DONE to return to the AutoMARK Main Menu.
21. Turn the key to OFF.
3.2.3.5 Replace AutoMARK Cover
If no additional hardware installations are required, put the cover back on the AutoMARK by reversing the steps in 3.2.3.2 Remove AutoMARK Cover.
Electrical Unplug the AutoMARK from the wall outlet before performing these steps. Be careful whenever accessing the inside of the unit, as high voltages may be present.

Unity 3.4.1.0 Election Management SystemChapter 3: System Configuration and Acceptance Testing
CA_U3410_UseProceduresCalifornia Use ProceduresRevision 5.0. Released: June 22, 2016
77
3.2.4 M650 Scanner Firmware Update
Use a firmware update zip disk to install new firmware on the M650.
1. With the M650 powered off, insert the update disk into the zip drive on the scanner.
2. Turn the scanner on. The M650 will update the firmware automatically.
When the update is complete, a message will appear asking for an election definition.
3. Remove the disk and turn the scanner off.
3.2.5 DS850 Firmware Update
To install new firmware on the DS850, first obtain an official DS850 firmware update Compact Flash (CF) card from the Secretary of State.
1. Press Exit in the lower left corner of the screen. (If there is no Exit button, press Menu to navigate to a screen that has one.)
2. Unlock and open the access door on the left side of the DS850.
3. When a message indicates that it is safe to power off the machine, flip the switch on the left side to the off position.
4. Unlock and open the rear panel on the DS850. (You do not need to remove the screen.)
Caution Contact ES&S Technical Service for instructions to return your M650 scanner to an earlier firmware version. Do not use a firmware update disk to revert a M650 firmware version back to an earlier version.
Warning Firmware updates to version 1.1.9.1 and newer modify the underlying structure of the internal flash drive, while the firmware itself is stored on the CPU board. Therefore, do not swap CPU boards or flash drives between machines, unless both boards have exactly the same firmware version.
Caution
Do not remove the disk during this process.

Unity 3.4.1.0 Election Management SystemChapter 3: System Configuration and Acceptance Testing
CA_U3410_UseProceduresCalifornia Use ProceduresRevision 5.0. Released: June 22, 2016
78
5. Unscrew the thumb screws holding the access panel in place, remove the thumb screws, and then remove the access panel.
6. If a CF card is installed, note its orientation and then remove it.
7. Insert the CF card containing the new firmware into the DS850, making sure it is properly oriented.
8. Use the thumb screws to fasten the access panel back into place.
9. Close the rear panel of the scanner and lock it.
10. Flip the power switch to the on position.
11. Close and lock the access door on the left side of the DS850.
To verify that the correct version of the firmware has been loaded, navigate to the System menu, then press Firmware. When the Firmware screen appears, check the version number of the firmware that was loaded.
3.3 Acceptance Testing
Acceptance tests are usually completed on-site at the jurisdiction’s acceptance location. The acceptance test requires the tester (jurisdictional representative) to acknowledge the performance of the requisite steps, then sign and date the acceptance form.
Acceptance testing is required to confirm the proper installation and operation of the EMS system and the election definition (the set of variables that define the specific election). The election definition media can be programmed by ES&S with client election data, or it can be created on site by the client, using the EMS.
NoteYou can also check the firmware version by opening the Election menu and pressing Setup. The Setup screen displays the firmware version.

Unity 3.4.1.0 Election Management SystemChapter 3: System Configuration and Acceptance Testing
CA_U3410_UseProceduresCalifornia Use ProceduresRevision 5.0. Released: June 22, 2016
79
3.3.1 Software Pre-Test Procedures
Perform the following steps to complete acceptance testing of the Unity 3.4.1.0 Election Management System:
• Audit Log Manager
• Election Data Manager
• ESS Image Manager
• Hardware Program Manager
• AutoMARK Image Manager
3.3.1.1 Audit Log Manager
1. Open and log into Audit Manager
2. Click Help, then select About
3. Verify the version number listed is 7.5.2.0
4. Click OK, then close Audit log manager
3.3.1.2 Election Data Manager
1. Open Election Data Manager
2. Verify the version listed on the About Screen is 7.8.2.0
3. Click OK
4. Create a new County
5. Add Languages
6. Add Precincts
7. Add District Types
8. Add District Names
9. Complete District Relations
10. Add Parties
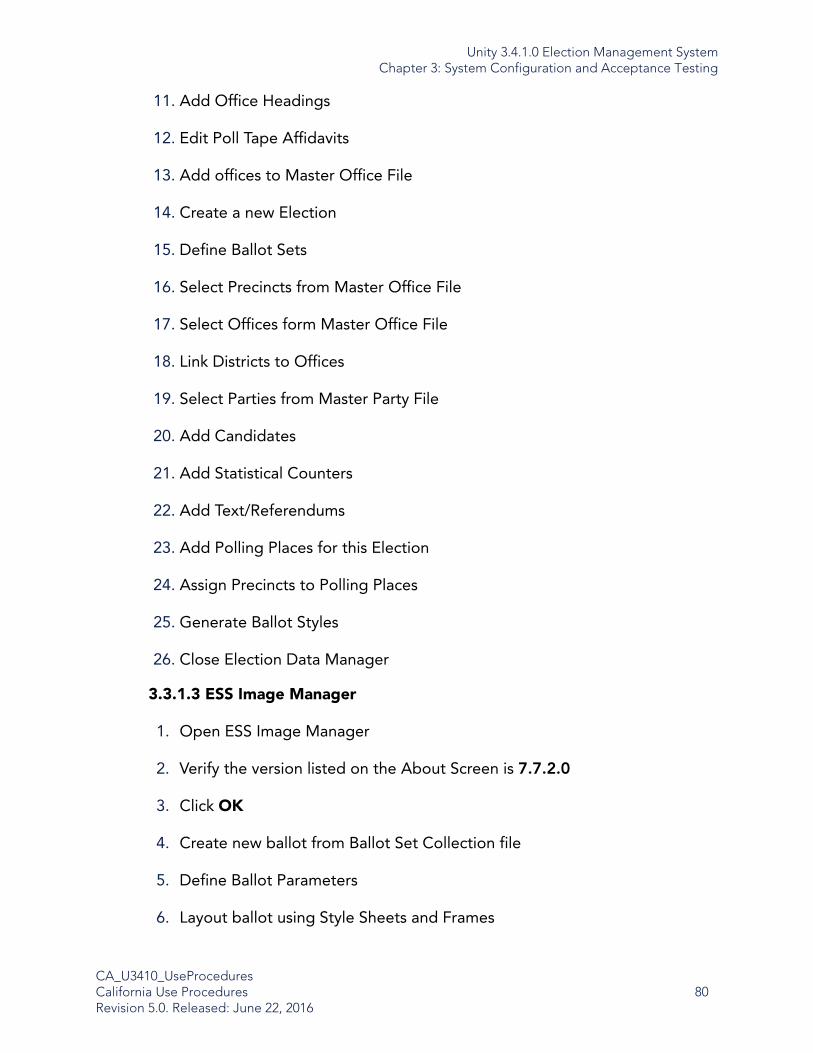
Unity 3.4.1.0 Election Management SystemChapter 3: System Configuration and Acceptance Testing
CA_U3410_UseProceduresCalifornia Use ProceduresRevision 5.0. Released: June 22, 2016
80
11. Add Office Headings
12. Edit Poll Tape Affidavits
13. Add offices to Master Office File
14. Create a new Election
15. Define Ballot Sets
16. Select Precincts from Master Office File
17. Select Offices form Master Office File
18. Link Districts to Offices
19. Select Parties from Master Party File
20. Add Candidates
21. Add Statistical Counters
22. Add Text/Referendums
23. Add Polling Places for this Election
24. Assign Precincts to Polling Places
25. Generate Ballot Styles
26. Close Election Data Manager
3.3.1.3 ESS Image Manager
1. Open ESS Image Manager
2. Verify the version listed on the About Screen is 7.7.2.0
3. Click OK
4. Create new ballot from Ballot Set Collection file
5. Define Ballot Parameters
6. Layout ballot using Style Sheets and Frames

Unity 3.4.1.0 Election Management SystemChapter 3: System Configuration and Acceptance Testing
CA_U3410_UseProceduresCalifornia Use ProceduresRevision 5.0. Released: June 22, 2016
81
7. Save Ballot Layout
8. Set Office Positions
9. Set the Code Channel and Update IFC
10. Print Ballots to PDF or by using Ballot on Demand
11. Close ESS Image Manager
3.3.1.4 Hardware Programming Manager
1. Open Hardware Programming Manager
2. Verify the version listed on the About Screen is 5.9.0.0
3. Click OK
4. Create new Election
5. Define Jurisdiction Options
6. Define Election Specifications
7. Define Headings and Certification Message
8. Create Precinct/Ballot Style Files
9. Set Digital Scan Security Passwords
10. Create the Final Database
11. Create Tabulator Parameters
12. Load Memory Devices with Parameters
13. Close Hardware Programing Manager
3.3.1.5 AutoMARK Image Manager
1. Open and log into AutoMARK Image Manager
2. Create a new election
3. Click Help and select About
Unity 3.4.1.0 Election Management SystemChapter 3: System Configuration and Acceptance Testing
CA_U3410_UseProceduresCalifornia Use ProceduresRevision 5.0. Released: June 22, 2016
82
4. Verify the version number listed is 1.3.257
5. Click OK
6. Import Vendor Election Data
7. Adjust Machine Settings
8. Review and edit Phonetics
9. Validate Election Data
10. Preview Ballots
11. Export Election to Flash Card
12. Close AutoMARK Image Manager
3.3.2 Hardware Acceptance Testing
To confirm the proper functionality of the hardware, users should follow and complete the steps detailed in the Acceptance Testing section provided for each hardware device. These steps contain in-depth, product-specific inspection of each device. Performing the procedures outlined in the hardware sections verifies that the hardware is functioning properly and has not been damaged in transport. ES&S recommends performing acceptance tests upon initial receipt of the device. Additionally, acceptance tests are recommended prior to each election. To perform acceptance testing, the jurisdictional representative must complete the steps detailed in each section. To complete the ballot processing portion of the acceptance tests, contact ES&S for ballot test decks.
3.3.2.1 M100 Acceptance Testing
1. Unpack the M100, power cord, and supplies
2. Inspect ballot box
3. Route power cord through ballot box
4. Check fit of the M100 on the ballot box and diverter connection
5. Install paper roll
6. Install PCMCIA election media

Unity 3.4.1.0 Election Management SystemChapter 3: System Configuration and Acceptance Testing
CA_U3410_UseProceduresCalifornia Use ProceduresRevision 5.0. Released: June 22, 2016
83
7. Turn key to Open/Close Poll
8. Power up unit in DC mode (on battery)
9. Plug power cord into AC power source. (NO AC indicator deactivates)
10. Verify firmware version on the configuration report
11. Check/Set Zone, Date, Time
12. Turn key to Vote
13. Press OK button to open polls
14. Verify all information on M100 report tape
15. Check multi-sheet that 2 sheets rejected in all orientations.
16. Insert ballots provided for acceptance test
17. Turn key to Open/Close Poll
18. Press Close Poll button
19. Verify results and information on the M100 results report
20. Turn key to Off
21. Remove PCMCIA card
3.3.2.2 DS200 Acceptance Testing
1. Unpack the DS200 and all supplies
2. Install the DS200 onto ballot box if separated
3. Plug in the Power cord from ballot box to the rear of the DS200
4. Plug in the power cord to AC power source
5. Unlock and lift the DS200 LED screen
6. Unlock the USB port door
7. Install paper roll

Unity 3.4.1.0 Election Management SystemChapter 3: System Configuration and Acceptance Testing
CA_U3410_UseProceduresCalifornia Use ProceduresRevision 5.0. Released: June 22, 2016
84
8. Verify firmware version on the configuration report
9. Verify the power icon shows AC power plugged in
10. Unplug the unit form AC power source
11. Verify power icon shows AC power unplugged report prints on battery power
12. Plugs the cord back into AC power source
13. Verify report prints on switched to AC power
14. Press Close Polls button to calibrate the screen
15. Press the circle in the top left of screen
16. Press the circle in the bottom right of screen
17. Press Save and Exit
18. Insert USB Election media
19. Check/Set Zone, Date, Time through Admin Menu and System Settings
20. Open Polls
21. Verify all information on DS200 report tape
22. Check multi-sheet that 2 sheets rejected in all orientations
23. Inset Ballots provided for Acceptance test
24. Press Close Polls button
25. Verify results and information on the DS200 results report
26. Press the Shutdown button
27. Press the Continue to Power Down button
28. Remove the USB election media

Unity 3.4.1.0 Election Management SystemChapter 3: System Configuration and Acceptance Testing
CA_U3410_UseProceduresCalifornia Use ProceduresRevision 5.0. Released: June 22, 2016
85
3.3.2.3 M650 Acceptance Testing
1. Unpack supplies and connect printers if not already connected
2. Load paper into printers in not already loaded
3. Install Output Hopper
4. Plug printers and M650 to AC power
5. Insert ZIP disk containing Election media
6. Turn on printers and M650
7. Press Start to load election
8. Press Start to continue
9. Verify firmware version and information on the M650 Audit report
10. Check/Set Zone, Date, Time
11. Remove ZIP disk containing Election media
12. Run Ballots provided for acceptance test
13. Print results report form M650
14. Insert formatted blank ZIP disk
15. Press Enable, then Save to save results to the ZIP disk
16. Press Start to continue
17. Remove Results ZIP disk
18. Turn off the M650
3.3.2.4 DS850 Acceptance Testing
1. Unpack supplies, connect printers and UPS if not already connected
2. Load paper into printers in not already loaded
3. Plug printers and DS850 into the UPS if not already connected

Unity 3.4.1.0 Election Management SystemChapter 3: System Configuration and Acceptance Testing
CA_U3410_UseProceduresCalifornia Use ProceduresRevision 5.0. Released: June 22, 2016
86
4. Plug UPS into AC power source
5. Turn on printers and DS850
6. Turn on the UPS
7. Press the Setup button and verify the firmware version
8. Insert the Qualification Media into a USB port
9. Press Clear and Initialize
10. Enter the Qualification Password
11. Press Yes
12. Press Done
13. Remove Qualification Media
14. Insert the Election Media into a USB port
15. Press Load Election
16. Enter the Election Password
17. Press Yes
18. Press Done
19. Remove Election Media
20. Check/Set Zone, Date, Time
21. Print a zero report
22. Run ballots provided for acceptance test
23. Save Results
24. Print a Results report
25. Insert blank formatted USB media
26. Export Results to USB media

Unity 3.4.1.0 Election Management SystemChapter 3: System Configuration and Acceptance Testing
CA_U3410_UseProceduresCalifornia Use ProceduresRevision 5.0. Released: June 22, 2016
87
27. Remove USB media
28. Exit and shut down
3.3.2.5 AutoMARK Acceptance Testing
It is possible to test the internal scanners without disassembling the AutoMARK. This test would generally only be performed at the factory and by qualified service personnel if the AutoMARK is having pre-mark detection difficulties. The AutoMARK should have a compact flash card loaded with test ballot election data. For best results the election data loaded should have many ovals in the horizontal direction, in order to test as much of the scanner area as possible.
1. Turn the key to Test Mode.
2. Select Test Ballot Print.
3. Select the check box for Enable Intensity Measurements.
4. Insert a blank ballot. A test print will begin.
During the test print, the PV scanner results are reported. This value should be 75% or higher.
5. If the ballot has been accurately marked, feed the ballot back into the AutoMARK to test the top and bottom scanners.
The values for both must be 75% or higher.
If any of the scores were below 75%, rerun the entire test to confirm your results. If the scanner(s) fail consistently, replace the scanner and repeat the entire test.
Repeat this test for every ballot style.
3.3.3 Software Post-Test Procedures
3.3.3.1 Election Reporting Manager
1. Open Election Reporting Manager
2. Verify the version listed on the About Screen is 7.9.0.0
3. Click OK

Unity 3.4.1.0 Election Management SystemChapter 3: System Configuration and Acceptance Testing
CA_U3410_UseProceduresCalifornia Use ProceduresRevision 5.0. Released: June 22, 2016
88
4. Select Change to a Different Election
5. Select the Election
6. Create the Results Database
7. Create Groups
8. Select Continue with Current Election
9. Format Reports and Report Titles
10. Print all Zero Reports
11. Load Election Results
12. Print all Results reports
13. Close Election Reporting Manager

Unity 3.4.1.0 Election Management SystemChapter 4: Election Setup and Definition
CA_U3410_UseProceduresCalifornia Use ProceduresRevision 5.0. Released: June 22, 2016 89
Chapter 4: Election Setup and Definition
The election definition media can be programmed by ES&S with client election data, or it can be created on site by the client, using the EMS.
Unity 3.4.1.0 EMS election setup and definition programming procedures are provided in the following accompanying document:
• Unity EMS Election Programming Guide

Unity 3.4.1.0 Election Management SystemChapter 5: Logic and Accuracy Testing
CA_U3410_UseProceduresCalifornia Use ProceduresRevision 5.0. Released: June 22, 2016 90
Chapter 5: Logic and Accuracy Testing
5.1 Overview
Logic and Accuracy (L&A) testing is conducted prior to Election Day to verify that the ballot counting system is correctly reading and tabulating votes.
L&A testing consists of processing a test deck. A test deck is a stack of sample ballots already marked and scanned, with known results totals. In addition to predetermined totals, the test deck will also contain examples of ballot errors that can occur. All contests in all ballot types and/or ballot styles are tested in this manner. Any deviation from the predetermined results must be rectified before the tabulating equipment can be certified for processing that specific election.
If ES&S is coding the election, ES&S will provide a hand-counted test deck for each election.
If your jurisdiction programs its own election definitions, create a test deck that includes a sequential number of votes for each office on that ballot starting with 1 vote for the first candidate. For example, in an Office with 5 candidates the first candidate on that ballot will receive 1 vote, the second candidate 2, the third 3 and so on. Also include at least one completely blank ballot, and an overvoted ballot (mark more candidates than the number specified). Complete this process for all ballot types in your election and maintain accurate records of your test ballot selections.
5.2 M100 Logic and Accuracy Testing
Test the scanner only after you install the election definition and configure the M100.
5.2.1 Load the Election Definition
1. Make sure the scanner key is in the OFF position.
2. Lift the access door on the front left of the scanner to access the M100 PC Card slots.
3. Insert the card programmed with your election definition into the top card slot.
4. Turn the key to the OPEN/CLOSE POLL position to start the scanner.
Unity 3.4.1.0 Election Management SystemChapter 5: Logic and Accuracy Testing
CA_U3410_UseProceduresCalifornia Use ProceduresRevision 5.0. Released: June 22, 2016 91
The M100 automatically loads the election definition and prints an initial state report. The “S-MODE” prompt should appear in the upper left corner of the M100 display screen.
5.2.2 Check the Election Definition for Accuracy
The M100 automatically generates an Initial State report when you start the scanner. Check the report for the following information:
• System Values: Make sure the date and time appear correctly on the report. If the information is not correct, change date and time from the DIAGNOSTIC-TEST menu.
• Election Information: Make sure that the jurisdiction name, polling place, and the number of precincts listed on the report are correct.
5.2.3 Open the Polls
When the message “ELECTION CARD INSERTED: OPEN POLLS NOW?” appears, select YES to open the polls.
Turn the key to the VOTE position. The M100 prints a Status Report, a Zero Totals Report and/or a Zero Certification Report on activation.
Verify that all results are zero.
Note An arrow on the PC Card label shows which end of the card you should insert into the scanner. After the card is inserted, the eject button to the right of the card slot sticks out. Install the card in the top slot first. If the top slot does not accept the card, try the bottom. Do not force the card into a slot.
WarningDepending on the number of precincts programmed to that polling place, it may take several minutes to print All the Precincts report.

Unity 3.4.1.0 Election Management SystemChapter 5: Logic and Accuracy Testing
CA_U3410_UseProceduresCalifornia Use ProceduresRevision 5.0. Released: June 22, 2016 92
5.2.4 Scan Test Ballots
To test an M100 election definition, scan the ballot test deck. The M100 can scan ballots inserted in any direction or orientation.
The M100 will return a questioned ballot to the voter, displaying a message describing the problem, and prompt the voter to either review and edit the ballot or cast the ballot as it is.
• Press RETURN to correct the ballot.
• Press ACCEPT to cast the ballot without editing selections.
When you press ACCEPT, the message PROCESSING BALLOT -PLEASE WAIT… will appear. After the ballot is scanned, the message INSERT BALLOT -NUMBER OF VOTERS: appears.
Be sure to monitor the M100 for system messages while scanning ballots.
5.2.5 Close the Polls
1. Open the M100 Key Access Panel, insert your control key, and turn the key to the OPEN/CLOSE POLL position to access the CLOSE POLLS command.
2. Press CLOSE POLLS to officially close the polls. Reports will automatically begin printing.
3. Verify the reports that are automatically printed match against your hand-counted test deck.
5.2.6 Upload Test Results to ERM
1. Unlock the access door on the front of the ballot box.
2. Push the eject button and remove the PC card from the scanner.
3. Take the PC card to the computer testing ERM.
NoteRefer to section 5.7.5 Process 100 Cards/200 Flash Drives for instructions about uploading results from M100 PCMCIA cards.
Unity 3.4.1.0 Election Management SystemChapter 5: Logic and Accuracy Testing
CA_U3410_UseProceduresCalifornia Use ProceduresRevision 5.0. Released: June 22, 2016 93
4. Print a Precinct Summary with Group Detail report. Use this report to verify your results match the expected test deck results and the M100 results tape.
5.2.7 Clear Test Results
After completing your logic and accuracy testing, you must clear the PCMCIA (PC) cards of the test votes before using them on Election Day.
1. Insert the PC card in the M100.
2. Turn the scanner control key to the OPEN/CLOSE POLL position to access the POLLS CLOSED menu.
3. Select MORE to open the MORE SELECTIONS menu.
4. From the MORE SELECTIONS menu, press RE-OPEN POLLS, to open a password selection screen.
5. Press the outside-left button on the control panel to cycle through the numeral positions. Use inside-left button to increase the selected number and inside-right button to decrease the number.
6. Press the button labeled ENTER after you enter the password. The message, “CLEAR ELECTION DAY TOTALS,” appears if your password is correct.
7. Select YES to clear scanner totals.
8. Click YES to continue.
9. When the system displays a message prompting you to confirm whether to open polls now, eject the PC card and store it in a safe place.
NoteIf you did not program the election contact your election administrator or ES&S customer support for the scanner password.

Unity 3.4.1.0 Election Management SystemChapter 5: Logic and Accuracy Testing
CA_U3410_UseProceduresCalifornia Use ProceduresRevision 5.0. Released: June 22, 2016 94
5.3 DS200 Logic and Accuracy Testing
Test the scanner only after you install the election definition and configure the DS200.
5.3.1 Load the Election Definition
DS200 precinct tabulators use the election definition programmed on USB media devices to recognize ballot marks and tabulate results. Once you load the election definition, you will need to calibrate the DS200.
1. Lift the access door on the front left of the scanner to access the USB media device ports.
2. If necessary, remove the protective plastic covering of the USB media device containing your election definition.
3. Insert the USB media device into one of the USB ports. Do not force the media device into the port.
4. Turn on the DS200 by pressing and holding down the POWER button. The DS200 automatically loads the election definition and prints the Initial State report. The message “Election Definition Found” appears on the screen.
5.3.2 Check the Election Definition for Accuracy
The DS200 automatically generates an Initial State report when you start the scanner. Check the report for the following information:
• System Values: Make sure the date and time appear correctly on the report. If the information is not correct, change date and time from the System Setting screen.
• Election Information: Make sure that the jurisdiction name, polling place, and the number of precincts listed on the report are correct.
Note The USB media device has a slot on top for a wire seal. If you use a wire seal to secure the media device, route the wire through this slot and through the associated seal hole on the tabs next to the USB ports.

Unity 3.4.1.0 Election Management SystemChapter 5: Logic and Accuracy Testing
CA_U3410_UseProceduresCalifornia Use ProceduresRevision 5.0. Released: June 22, 2016 95
5.3.3 Test the Election
Use the following instructions to open the polls, scan test ballots, and close the polls as you will do on election day.
1. When the message “Election Definition found” appears on the screen, press Open Polls.
The scanner checks available memory and scans the election definition for errors. Depending on options selected for the election definition, the scanner may also print a Status Report and/or a Zero Certification Report.
2. Close and lock the access panel to secure the election definition USB media device.
The Welcome screen appears and the scanner is now ready for voting.
3. Insert the ballots into the scanner. The DS200 can scan ballots inserted in any orientation. As ballots are scanned, the public count will increase by one for each ballot inserted.
4. After you finish scanning test ballots, open the DS200 access door. Press and hold down the Close Polls button for about four seconds, then release.
5. Depending on your election definition, the DS200 may automatically print one or more of the following reports:
• Status Report
• Race Results Report
• Certification Report
• Audit Log
6. Verify the reports that are automatically printed match against your hand-counted test deck.
7. On the DS200 screen, touch Shutdown.
8. When prompted, touch Continue Power Down to turn off the DS200.
9. Remove the USB media device from the DS200.

Unity 3.4.1.0 Election Management SystemChapter 5: Logic and Accuracy Testing
CA_U3410_UseProceduresCalifornia Use ProceduresRevision 5.0. Released: June 22, 2016 96
5.3.4 Upload DS200 Test Results to ERM
1. If you have not already done so, remove the USB media device from the DS200 after closing the polls and shutting down the scanner.
2. Take the USB media device and the printed election reports to the computer testing ERM.
3. Refer to 5.7.5 Process 100 Cards/200 Flash Drives and follow the procedure for uploading results from your DS200 scanner.
4. Print a Precinct Summary with Group Detail report. Use this report to verify your results match the expected test deck results and the DS200 results tape.
5.4 AutoMARK Logic and Accuracy Testing
5.4.1 Option #1
For each ballot style programmed into an AutoMARK unit:
• Insert, vote and print sufficient ballots so that every valid voting position on the ballot, including write-ins, is voted at least once
• For each contest, attempt to overvote to verify overvoting is prohibited.
• Vote and print an entirely blank ballot to verify that the undervote warning is active for each contest and that no vote positions are marked on the ballot.
Each printed ballot must be visually inspected to verify all votes were accurately recorded and printed correctly.
This testing process must be repeated on each AutoMARK VAT used in an election.
• Option #2(For counties that deploy machines configured for multiple ballot styles, at their option.)
Group AutoMARKs by the combination of ballot styles that will be programmed into the units so that all AutoMARKs in the group will have the identical programming. Designate one AutoMARK unit in each group as the “Master” unit. All others in the group are “Clones”.

Unity 3.4.1.0 Election Management SystemChapter 5: Logic and Accuracy Testing
CA_U3410_UseProceduresCalifornia Use ProceduresRevision 5.0. Released: June 22, 2016 97
For each “Master” unit, perform a complete test for each ballot style in accordance with the test described in “option 1” above.
Upon completion of the “Master” units testing, the remaining “Clone” AutoMARK units in the group that have identical programming as the “Master” shall be tested as follows:
• AutoMARK to be in “Test” mode
• Insert, print and visually inspect a “test mode” ballot style programmed into an AutoMARK unit.
• AutoMARK to be in “On” mode
• Insert, vote and print a randomly selected programmed ballot style so that every valid voting position on that ballot style, including write-ins, is voted a least once.
• For each contest, attempt to overvote to verify overvoting is prohibited
• Select a contest, attempt to skip the contest to verify that the undervote warning is active and that no vote positions are marked on the ballot
Each printed ballot must be visually inspected to verify all votes were accurately recorded and printed correctly.
The “Clone” testing process must be repeated on each AutoMARK VAT designated as a “Clone” used in an election.
5.5 M650 Logic and Accuracy Testing
Use the test deck to verify your election definition and to test scanner operation. Be sure to follow the California Elections Code. To test the election you will zero totals on the scanner and turn off the sort options, then run your test deck and check the result reports.
5.5.1 M650 Read Head Calibration
Prior to testing, calibrate the M650.

Unity 3.4.1.0 Election Management SystemChapter 5: Logic and Accuracy Testing
CA_U3410_UseProceduresCalifornia Use ProceduresRevision 5.0. Released: June 22, 2016 98
5.5.1.1 Preparation
1. Turn on the printers and verify that the paper is properly loaded.
2. To check calibration, you must temporarily load an election definition that was developed for this purpose.With the scanner turned OFF, insert the zip disk with the ES&S Calibration Program into the zip drive on the scanner.
3. Turn the scanner ON. The screen will read: “Booting M650.”
After bootup, the screen will read: “Press Stop to Keep (Election Name of current election) Press Start to Initialize (ES&S Calibration Election).”
4. Press START to transfer the election definition files from the zip disk to the scanner’s internal drive. The screen will read: “Confirm: Initialize Election? Press Stop to Cancel, Start to Continue.”
5. Press START to complete the transfer the calibration election definition to the internal drive.
Before running any ballots, the sensors must be cleaned. The sensors are small devices (approx. 1/8 inch in diameter) that read the ballots. When the scanner is turned on, they will be glowing red.
6. Hold the can upright so that you do not expel propellant into the sensors. Aim the straw of the pressurized air can as close to the sensors as possible and give it two or three good blasts of air.

Unity 3.4.1.0 Election Management SystemChapter 5: Logic and Accuracy Testing
CA_U3410_UseProceduresCalifornia Use ProceduresRevision 5.0. Released: June 22, 2016 99
5.5.1.2 Check Whitest and Darkest Levels
1. When the screen reads: “Ready for Regular Counting,” insert the ES&S 20% to 10% Shade calibration ballot into the ballot input tray, then press START.
If the ballot is successfully scanned, the message “Ready for Regular Counting” will appear again. If an error message appears, contact ES&S.
2. Press PRINT BALLOT IMAGE in the lower part of the mode section on the M650 switch panel. You will see a report that looks like the following:
WHITEST LEVELS 202 202 199 204 200 202 196 201WHITEST RESPONSE 199 203 199 202 196 200MAXIMUM BACKGROUND 192 198 193 195 189 194BACKGROUND LEVEL 192 198 193 195 189 194 MINIMUM BACKGROUND 178 182 179 182 176 180MARGINAL THRESHOLD 182 187 183 185 179 184MARK THRESHOLD 137 150 180 185 181 183 177 182 DARKEST LEVELS 100 99 94 91 94 98 94 96BLK/WHT RANGE 102 103 105 113 106 104 102 105 BASE VALUE 12 13 12 12 12 12
TT CC A B C D E F TT CC -A- -B- -C- -D- -E- -F- X X X X X X X X 100 99 94 91 94 98 95 96 X X O O O O O O 100 99 199 203 200 201 195 200 X - X X X X X X 99 201 164 168 165 168 162 166 X - X X X X X X 99 201 165 168 166 169 162 167 X - X X X X X X 100 202 165 167 165 167 163 166 X - X X X X X X 100 201 163 169 164 168 163 166 X X X X X X X X 100 99 164 168 164 168 162 167 X - O O O O O O 100 201 199 203 199 201 196 201 X - X X X X X X 100 201 166 170 167 170 164 168 X - X X X X X X 99 201 167 171 167 170 163 168 X - X X X X X X 99 202 165 171 166 169 164 168 X - X X X X X X 99 202 165 170 166 169 165 167 X - - X X X X X 98 201 166 169 167 171 165 167 X - - O O O O O 99 201 198 202 200 202 195 200
3. In the row for WHITEST LEVELS on all 8 channels shown in BOLD, the values should be between 194 and 206.
4. In the row for DARKEST LEVELS on all 8 channels shown in BOLD, the values should be between 89 and 101.

Unity 3.4.1.0 Election Management SystemChapter 5: Logic and Accuracy Testing
CA_U3410_UseProceduresCalifornia Use ProceduresRevision 5.0. Released: June 22, 2016 100
If any of the WHITEST or DARKEST LEVELS are out of range, clean the sensors again and rescan the ballot. If they are still out of range, contact ES&S. Typically, all that is required is a simple tuning procedure easily performed by the system operator.
5.5.1.3 Check 10% Shade Levels
1. After the WHITEST and DARKEST LEVELS are calibrated, observe the bottom of the last Ballot Image Report produced from the 20% to 10% sheet. It will similar to the example below:
X X X X X X X X 101 202 194 191 187 200 197 201 X X X X X X X X 101 201 195 201 186 199 198 201 X O O O O O O O 101 201 195 201 185 199 198 201 X X X X X X X X 102 200 174 180 174 179 172 176 X X X X X X X X 101 200 174 179 175 178 171 177 X X X X X X X X 101 200 175 179 175 178 172 177 X X X X X X X X 100 201 176 178 175 178 172 176 X X X X X X X X 100 200 175 179 174 178 173 175 X X X X X X X X 101 100 93 94 94 97 94 96
BV 0 1 1 0 0 1FV 3 2 3 4 3 2
2. At the bottom of the sheet in columns A-F shown in BOLD, the values from the five 10% shades should be 2 to 5 points below the MINIMUM BACKGROUND LEVEL of each channel. The MINIMUM BACKGROUND from the top of the report is shown again in the example below:
MINIMUM BACKGROUND 178 182 179 182 176 180
Example: If the Minimum Background Level is 178 as shown in Channel A, the 10% shades at the bottom of the report should be from 177 to 172.
3. If any of the 10% shade mark values are not in the proper range, clean the sensors and rescan the ballot.
As with the Whitest and Darkest levels, the numbers will typically vary 2 to 3 points each scan. This is normal behavior on optical mark detection systems. Variables such as small ballot printing variances, dust on the sensors, and normal ballot skew and “flutter” of the ballot through the read head, are responsible for these small changes.
If each channel is in the proper range in at least 1 in 5 ballot scans, the channel is properly calibrated.
4. If any of the channels are still out of range, contact ES&S

Unity 3.4.1.0 Election Management SystemChapter 5: Logic and Accuracy Testing
CA_U3410_UseProceduresCalifornia Use ProceduresRevision 5.0. Released: June 22, 2016 101
5. After all six channels are reading the 10% shades in the proper ranges, check the FV values at the bottom of the report on each channel. If all of these values are 3 or less, calibration is complete.If they exceed 3, contact ES&S Technical Support.
5.5.2 Load the Election Definition
A new zip disk containing the current election information is created for every new election.
1. Plug the scanner into the power strip/surge protector (with 6-foot cord) that ES&S sent with your scanner.
2. Turn on both printers.
3. Verify that the printer paper is loaded properly, and that the print head is at the top of the page.
4. Insert the zip disk with your election definition into the zip drive on the scanner.
5. Turn on the scanner using the toggle switch on the electrical panel on the left side of the machine.
The message, “Press Stop to Keep (Election Name 1) Press Start to Initialize (Election Name 2)” will appear.
6. Press START.
The message “Confirm: Initialize Election? Press Stop to Cancel, Start to Continue” appears.
7. Press START.
The message “Initializing Election Files” appears. The next message reads, “Printing System Ready Report,” followed by a message which reads “Ready for Regular Counting.”
ImportantInsert the disk before you turn on the scanner, so that the scanner will recognize that you are loading a new election definition.
Unity 3.4.1.0 Election Management SystemChapter 5: Logic and Accuracy Testing
CA_U3410_UseProceduresCalifornia Use ProceduresRevision 5.0. Released: June 22, 2016 102
After you load the election definition, the Ready light illuminates, and the scanner is in on-line mode. The report format is automatically set to short when the scanner starts.
8. Verify that the information on the Machine Readiness Report is correct.
Contact an ES&S support technician immediately if the printed information is not correct for the current election.
9. Remove the zip disk with the election definition and store it in a safe place.
10. Hold down the ENABLE button and press ZERO TOTALS.
11. Press START then press STOP.
The message “Ready for regular counting” appears.
5.5.3 Scan the Test Deck and Check Reports
Test each ballot type in this election using either your test deck or one that was provided to you from ES&S.
1. Press the FORMAT button to switch from short format to long format.
2. Print the GRAND TOTALS report to verify that all counts are zero.
3. Push the input hopper tray down until it latches making sure to press down on the middle of the tray and not the edges.
4. If you are tabulating an election coded by ballot style, load the Precinct Header Card for the precinct to be tested.
5. Press START to scan the header card.
6. Verify that the information printed on the header card matched the line item printed on the audit log.
7. Push the input hopper tray down until it latches making sure to press down on the middle of the tray and not the edges.
Caution Do not reuse the election definition disk to store election results. Use blank zip disks instead so that your election definition can be archived. The election definition will remain on the machine until a new election definition is loaded.
Unity 3.4.1.0 Election Management SystemChapter 5: Logic and Accuracy Testing
CA_U3410_UseProceduresCalifornia Use ProceduresRevision 5.0. Released: June 22, 2016 103
8. “Jog” the ballots by gently shuffling them until the pages separate to reduce paper jams in the scanner. Load the ballots face-up into the input hopper tray with the cut corners placed directly under the pick belt. Only one corner of each ballot is cut. When facing the front of a ballot, the cut corner is the upper-right corner. Lightly tap the ballots so that they are flush against the two metal sides of the input hopper.
9. Push the input hopper tray down until the latch releases, and then let the hopper rise.
10. Press START to scan the test deck.
11. Press SAVE to save your test results to the internal drive. A confirmation message indicating the number of ballots saved appears.
12. Press the LAST PRECINCT button to print a Precinct Total Report for the tested precinct (long format will print over and under votes).
13. Compare the Precinct Total report with your pre-determined hand count.
If totals do not match, zero totals and scan the ballots again. If the totals still do not match, contact ES&S immediately.
14. Repeat steps 3-13 for each precinct to be tested on that scanner.
15. When complete with all precincts for that scanner, press SAVE to ensure all test data is saved to the internal memory.
16. Press GRAND TOTALS to generate an accumulated results report for that scanner.
17. When the report has completed printing, insert a blank formatted zip disk to back up your test results.
18. Press SAVE to save the results to the internal drive.
19. Hold down the ENABLE button, and press SAVE again to transfer results to the zip disk.
20. Press START to confirm that you want to save totals to the transfer disk.
21. Remove the zip disk and transfer your test results to ERM.
22. Print an Election Summary with Group Detail report. Use this report to verify your results match the expected test deck results and the M650 results report.

Unity 3.4.1.0 Election Management SystemChapter 5: Logic and Accuracy Testing
CA_U3410_UseProceduresCalifornia Use ProceduresRevision 5.0. Released: June 22, 2016 104
5.6 DS850 Logic and Accuracy Testing
Use the test deck to verify your election definition and to test scanner operation. Be sure to follow the California Elections Code. To test the election you will zero totals on the scanner and turn off the sort options, then run your test deck and check the result reports.
5.6.1 Load the Election Definition
Before loading the election definition, you must clear and initialize the DS850. The clear and initialize process clears all data from the machine and loads the necessary encryption keys to load and run the election.
Election coders create the USB media devices containing the election qualification code and the election definition for every new election.
Follow the steps below to load the election:
1. Verify the scanner has been correctly connected to the printers, the uninterruptible power supply (UPS), and an external power source.
2. Turn on the scanner, then press Login.
3. Enter your login credentials.
4. Clear and initialize the scanner by taking the following steps:
a. Press Election to display the Election menu.
b. On the Election Menu, press Setup.
c. On the Setup screen, press Clear and Initialize.
d. Insert the election qualification code (EQC) media device into one of the DS850’s USB ports.
e. When prompted to do so, enter the qualification code, then press Accept.
f. When the screen displays a message that a valid EQC media was found, press Yes to continue the clear and initialize process.
g. When the screen displays a message that the process is complete, remove the EQC device from the USB port and press Done.
5. Load the election definition by taking the following steps:
a. Press Election to display the Election menu.
b. On the Election Menu, press Setup.

Unity 3.4.1.0 Election Management SystemChapter 5: Logic and Accuracy Testing
CA_U3410_UseProceduresCalifornia Use ProceduresRevision 5.0. Released: June 22, 2016 105
c. On the Setup screen, press Load Election.
d. Insert a valid election definition USB media device into one of the DS850’s USB ports.
e. When prompted to do so, enter the election code, then press Accept.
f. When the screen displays a message that a valid election definition has been found, press Yes to continue loading the election.
g. When the screen displays a message that the process is complete, remove the election definition USB media device, then press Done. Store the election definition media device in a safe place.
5.6.2 Scan the Test Deck and Check Reports
Test each ballot type in this election using either your test deck or one that was provided to you from ES&S. After loading the election, take the following steps:
1. Print the Zero Report to verify that all voting results have been cleared from the scanner.
2. Press Scanning to display the Scanning menu.
3. On the Scanning menu, press Scan Ballots.
4. Load the ballots into the input tray, as follows:
a. Adjust the length of the input and output trays to fit the length of your ballots.
b. Slide the ballot guide out of the curved opening int he input tray.
c. Place the ballots in the input tray.
d. Slide the ballot guide back into the opening in the input tray until the guide rests gently against the ballot stack.
e. If necessary, select the precinct to which the ballots belong.
5. When the Scan Ballots screen displays the message Ready to Scan, press Start. The DS850 outstacks any ballots with conditions specified in the
Note ES&S recommends using a jogger to separate the ballots and align the ballot stack before you load them into the input tray. If the ballot stack is slightly curved, place it in the tray with the convex side up (so the stack looks like a frown).

Unity 3.4.1.0 Election Management SystemChapter 5: Logic and Accuracy Testing
CA_U3410_UseProceduresCalifornia Use ProceduresRevision 5.0. Released: June 22, 2016 106
election definition (such as ballots with overvotes or write-in votes). Ballots with readable marks are also outstacked.
6. When the ballots have been scanned, the Save button on the Scan Ballots screen is enabled. Press Save to save the current batch. When prompted to confirm the request, press Save again. A popup screen displays counts of the ballots in each bin. On the Scan Ballots screen, bin counts in the Saved column will be updated with the counts from the Current column.
7. Press Done if you are finished scanning, or press Scan to load more ballots into the input tray and continue scanning.
8. When you have finished scanning all test ballots, generate the Results Report and verify the counts on the report match the expected counts.
5.6.3 Export Data
Data saved to the scanner’s internal memory can be exported to the election definition media device or to a blank USB media device. However, if a blank USB media device is used, it should be first fully formatted.
To export results, take the following steps:
1. Press Election to display the election menu.
2. From the Election menu, press Results to display the Results screen.
3. From the Results screen, press Export Results.
4. Insert a blank, formatted USB media device into one of the scanner’s USB ports.
5. When prompted to do so, enter the election code then press Accept.
6. On the Export Results selection screen, select the export location (USB Media Device or Network Server Folder), then press Export.
7. On the Export Results confirmation screen, press Confirm to initiate the export process.
8. When the screen displays the message “The results were successfully exported,” press Done to return to the Results screen.
9. Remove the USB media device and transfer your test results to ERM. Refer to 5.7.10 Update Results from DS850 (USB Media) and follow the procedure for uploading results from your DS850 scanner.

Unity 3.4.1.0 Election Management SystemChapter 5: Logic and Accuracy Testing
CA_U3410_UseProceduresCalifornia Use ProceduresRevision 5.0. Released: June 22, 2016 107
10. Print an Election Summary with Group Detail report. Use this report to verify your results match the expected test deck results and the DS850 results report.
5.7 EMS Accuracy Testing
To test the Election Management System, you must set up Election Reporting Manager (ERM) to accumulate election results.
5.7.1 Select Election
1. Open ERM. From the Election menu, select Change.
2. In the Election File Directory window, select the appropriate election from the list.
3. Click OK. A confirmation message will appear.
4. Click OK.
The selected election is now open.

Unity 3.4.1.0 Election Management SystemChapter 5: Logic and Accuracy Testing
CA_U3410_UseProceduresCalifornia Use ProceduresRevision 5.0. Released: June 22, 2016 108
5.7.2 Create Results Database
Create reporting groups to track results for specific types of ballots such as absentee ballots, mail in ballots and early voting ballots. The default group, Election Totals, is automatically updated with all results in your election. Select Create Results Database on the Election menu to set up your initial groups.
1. From the Election menu, select Create Results Database.
Important You can also select Add/Change Groups on the Miscellaneous menu to edit an existing group or to add a new reporting group for your election.
Note If the group has already been updated with election results, you will not be able to change the group. You will still be able to add groups if not all groups were used from the initial ERM database.
Caution
Selecting Create Results Database clears the system log.
Caution Creating new reporting groups erases your existing groups. All of your existing election group information is lost when you create new reporting groups.Contact ES&S if you have questions, before creating new reporting groups.

Unity 3.4.1.0 Election Management SystemChapter 5: Logic and Accuracy Testing
CA_U3410_UseProceduresCalifornia Use ProceduresRevision 5.0. Released: June 22, 2016 109
2. Click OK to create your groups.
3. Click Yes to create a new results database.
Number of groups you wish to create:
Enter the number of groups (from one to five) to create. The Election Day Totals group is automatically created, and is updated with all of the election totals loaded into ERM. At least one additional group must be created.You must have at least one group for each type of tabulator used.
Initialize the state cross-reference file (if your state filing system is supported in ERM)
If this is the first time you have created the database, select the Initialize the state cross-reference file check box. Do not check the box if your database is already created.
Note When you create the results database, be sure the Initialize the state cross reference file box is checked. If it is not checked, the .XRS file is not created.
The XRS file is an index created so the Unity numbers and state numbers are cross referenced. It provides an index worksheet that enables you to manually input the state numbers for the precincts, contests, etc. This is required if you use the state cross-reference file.

Unity 3.4.1.0 Election Management SystemChapter 5: Logic and Accuracy Testing
CA_U3410_UseProceduresCalifornia Use ProceduresRevision 5.0. Released: June 22, 2016 110
• If the state cross reference file has already been created, the following screen will appear. Click Yes to create the file again or click No to use the file that was previously created.
Unity 3.4.1.0 Election Management SystemChapter 5: Logic and Accuracy Testing
CA_U3410_UseProceduresCalifornia Use ProceduresRevision 5.0. Released: June 22, 2016 111
4. In the Add /Change Groups window, in the Group Description box, type the name of the group as it should appear on ERM reports.
5. From the Equip list, select the type of equipment that will be used for the group.
6. Click OK to create the groups.A confirmation message will appear when the new database has been created.
5.7.3 Set Up Reports
The process for generating reports in ERM is similar for all reports. The screens will have some variations, depending on the report. Following is a general process for creating and printing reports.
Create and print the following reports.
EL30, Precinct Report – List of individual precincts and contest results. Customize the Precinct Summary Report by selecting the individual contests and precincts included. You can also print a Precinct Summary Report for individual reporting groups.
EL30A, Prec Report–Group Detail – Print totals for up to fourteen active reporting groups in addition to Election Totals.
EL45, Election Summary Report – Lists the total number of votes received by each candidate/question and the percent of the total vote won by each candidate/question in the election.
NoteIf this group is absentee, elect the Absentee Group check box.Only one group can be flagged as absentee.
Note
The ERM Results Database should be created once for a given election. During testing and pre-election L&A processing, you should use the Reset Counted Precincts process to remove test results from the ERM database. In the case where election definition changes have occurred, the ERM database must be recreated and pre-election testing should be repeated. The action of creating the ERM database erases the ERM System Log, as all activity performed against the previous database is erased by this action. The ERM System Log only reflects the update actions taken since the last time the ERM database was created.

Unity 3.4.1.0 Election Management SystemChapter 5: Logic and Accuracy Testing
CA_U3410_UseProceduresCalifornia Use ProceduresRevision 5.0. Released: June 22, 2016 112
EL45A, Election Summary with Group Detail – Totals for up to fourteen active reporting groups in addition to election totals.
1. From the Reports menu, select the report to generate.
2. In the report window, click the Headings tab to enter the information to appear on your report headings.

Unity 3.4.1.0 Election Management SystemChapter 5: Logic and Accuracy Testing
CA_U3410_UseProceduresCalifornia Use ProceduresRevision 5.0. Released: June 22, 2016 113
3. Enter up to three lines of identification text to appear at the top center of your report in the Canvass Center Heading boxes.
4. Enter the text that appears at the top left of your report in the Canvass Left Edge Heading box.
5. Enter the line number on which this heading will print (1, 2, or 3) in the Line No. box.
6. In the Canvass Right Edge Heading, type L&A Report - Zero.
7. Click Apply to use your headings for all reports of the same type.
8. Click the Options tab, and select the options to include in the report.
9. Click Apply.
Note If you choose to print something on line 3, the time/date stamp and the report number and page will print on the fifth line, instead of the fourth.

Unity 3.4.1.0 Election Management SystemChapter 5: Logic and Accuracy Testing
CA_U3410_UseProceduresCalifornia Use ProceduresRevision 5.0. Released: June 22, 2016 114
5.7.4 Zero Out Ballots Cast
Select this option to zero all precincts and groups that are setup for the election, which is listed under Current Election Name.
1. Click on the radio button for Zero out ballots cast, then click OK.
2. Click Yes to zero out the ballots cast.
3. Click No if you want to do not want to zero results and it will return you to the previous screen. Then you will be able to select the current election or change to a different election.
Note This will clear all election results and all group folders. If you need to clear specific precincts without clearing the data in the group folders, use Reset Counted Precincts. Call ES&S Software Support if you have any questions about clearing results. Selecting Zero out ballots cast will not clear Voter Registration already entered.
Note The following messages will appear on EL68A, System Log, indicating that any results have been cleared.
RESET RESULTS INITIATED BY STARTUP indicates that ERM is starting the process of clearing results
Messages will appear indicating that the results have been cleared for each type of equipment in your election
RESET RESULTS INITIATED BY STARTUP COMPLETED indicates that ERM has finished clearing all results.

Unity 3.4.1.0 Election Management SystemChapter 5: Logic and Accuracy Testing
CA_U3410_UseProceduresCalifornia Use ProceduresRevision 5.0. Released: June 22, 2016 115
5.7.5 Process 100 Cards/200 Flash Drives
Use this option to create the SPP file and update your ERM database directly from the M100 PCMCIA cards and DS200 USB flash drives.
NoteAn SPP file is a single file that contains audit data from all of your tabulators.
Important ERM can only accommodate 48 statistical (i.e. Precincts Counted, Registered Voters and Ballots Cast) counters per precinct when updating M100 and DS200 results. All additional statistics will be ignored.

Unity 3.4.1.0 Election Management SystemChapter 5: Logic and Accuracy Testing
CA_U3410_UseProceduresCalifornia Use ProceduresRevision 5.0. Released: June 22, 2016 116
5.7.6 Processing for M100
1. From the Update menu, click Process 100 Cards/200 Memory Sticks.
2. In the Select Current Group window, click the reporting group using M100 equipment and click OK.
3. In the Process 100 Cards window, do one of the following:
• If you are using the OMNI Drive, select that button and then select whether the OMNI drive is connected to the parallel port or the USB.
• If you are using the IDA box, select that button and then select the COM Port it is using.
Caution The Update precincts counted (check box) is selected by default. If you would like to have precincts counted for the selected group, ensure the box is checked. Deselect this box if you DO NOT want precincts counted for the selected group. For example, If you are counting absentee totals before your election day totals do not select this check box, otherwise it will show that all precincts have been counted before Election Day totals are processed.

Unity 3.4.1.0 Election Management SystemChapter 5: Logic and Accuracy Testing
CA_U3410_UseProceduresCalifornia Use ProceduresRevision 5.0. Released: June 22, 2016 117
4. Click OK.
5. The Specify Pack drive box is normally left blank. However, if the SPP file is to be saved to a different place from the working drive, enter the letter of the drive in the Specify Pack drive box.
6. Select one of the following:
• Select Replace Mode if you want the existing group precinct results replaced if a precinct is encountered in the SPP update more than once. You will usually use this option.
• Select Add-to Mode to add to the results that are already in the file.
7. Select the Dynamic Precinct Reports check box to print precinct reports automatically as they are updated. Then select to print All Precincts or only the Key Precincts as they are updated. Whenever the results in the precinct you are updating have changed, the report will be printed.
• If an SPP file already exists, the following window will appear.
8. Select Append to the File to add to the SPP record already there; or select Create New File to delete the existing SPP file and create a new file.
WarningUse the Add-to Mode option with extreme caution because results can be doubled if it is not used correctly.
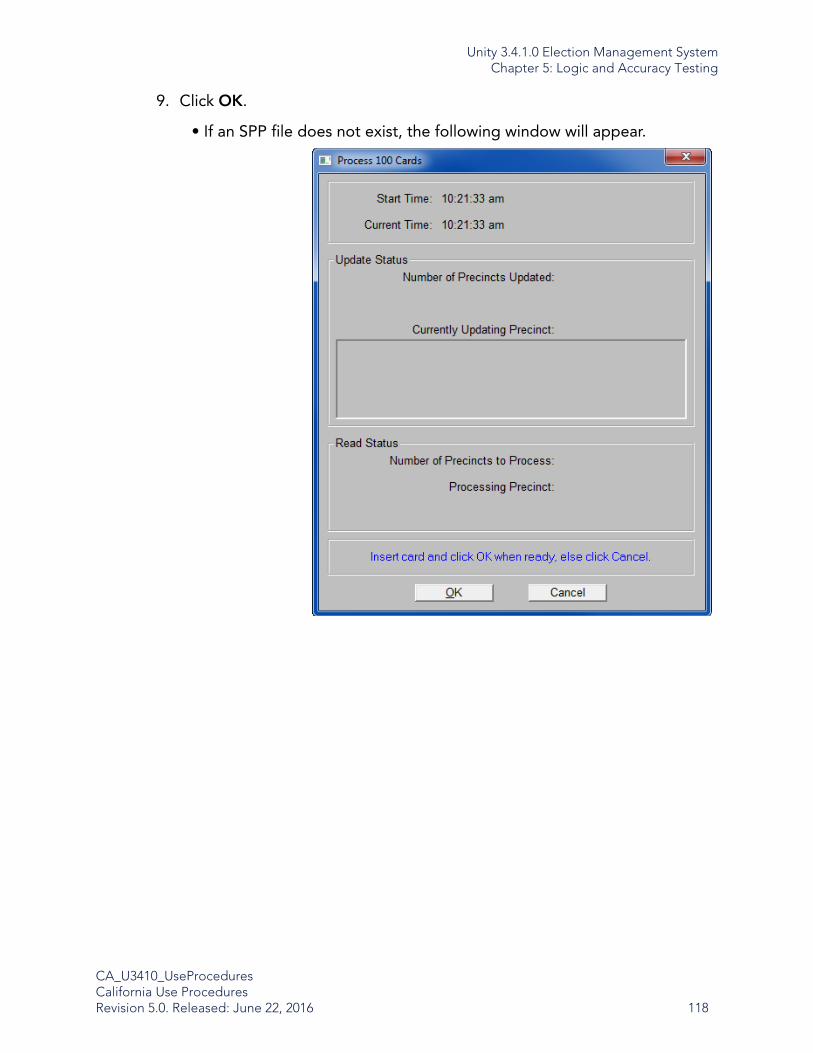
Unity 3.4.1.0 Election Management SystemChapter 5: Logic and Accuracy Testing
CA_U3410_UseProceduresCalifornia Use ProceduresRevision 5.0. Released: June 22, 2016 118
9. Click OK.
• If an SPP file does not exist, the following window will appear.

Unity 3.4.1.0 Election Management SystemChapter 5: Logic and Accuracy Testing
CA_U3410_UseProceduresCalifornia Use ProceduresRevision 5.0. Released: June 22, 2016 119
• Insert the M100 card and click OK to read the card, update the SPP record, and ERM results database.
The status areas of the screen inform you how many precincts have been updated and how many there are left to process.

Unity 3.4.1.0 Election Management SystemChapter 5: Logic and Accuracy Testing
CA_U3410_UseProceduresCalifornia Use ProceduresRevision 5.0. Released: June 22, 2016 120
5.7.7 Processing for DS200
1. From the Update menu, click Process 100 Cards/200 Memory Sticks.
2. In the Select Current Group window, click the reporting group using DS200 equipment and click OK to open the Process 200 Memory Stick window.
3. Choose the Drive letter of your USB media device and click OK.
Caution The Update precincts counted (check box) is selected by default.If you would like to have precincts counted for the selected group, ensure the box is checked.Deselect this box if you DO NOT want precincts counted for the selected group. For example, If you are counting absentee totals before your election day totals do not select this check box, otherwise it will show that all precincts have been counted before Election Day totals are processed.

Unity 3.4.1.0 Election Management SystemChapter 5: Logic and Accuracy Testing
CA_U3410_UseProceduresCalifornia Use ProceduresRevision 5.0. Released: June 22, 2016 121
4. The Specify Pack drive box is normally left blank. However, if the SPP file is to be saved to a different place from the working drive, enter the letter of the drive in the Specify Pack drive box.
5. Select the Dynamic Precinct Reports check box to print precinct reports automatically as they are updated. Then select to print All Precincts or only the Key Precincts as they are updated. Whenever the results in the precinct you are updating have changed, the report will be printed.
• If an SPP file already exists, the following window will appear.
Note You can process results from multiple DS200 scanners from the same precinct because each DS200 has its own machine ID and it is included on the corresponding USB flash drive. This enables ERM to recognize that each USB flash drive is from a different DS200. ERM automatically processes the additional USB flash drives in add-to mode.

Unity 3.4.1.0 Election Management SystemChapter 5: Logic and Accuracy Testing
CA_U3410_UseProceduresCalifornia Use ProceduresRevision 5.0. Released: June 22, 2016 122
6. Select Append to the File to add to the SPP record already there; or select Create New File to delete the existing SPP file and create a new file. Click OK.
• If an SPP file does not exist, the following window will appear.

Unity 3.4.1.0 Election Management SystemChapter 5: Logic and Accuracy Testing
CA_U3410_UseProceduresCalifornia Use ProceduresRevision 5.0. Released: June 22, 2016 123
• Insert the USB flash drive and click OK to read the card, update the SPP record, and ERM results database.
The status areas of the screen inform you about how many precincts have been updated and how many there are left to process.
5.7.8 Process Precincts Results Media
The Process Precincts Results Media option enables you to read results from either a single type of precinct tabulator or a combination of precinct tabulator machines such as the DS200 and M100 simultaneously. This means you can switch between two media types without changing screens. You can also print precinct and summary reports using this option.

Unity 3.4.1.0 Election Management SystemChapter 5: Logic and Accuracy Testing
CA_U3410_UseProceduresCalifornia Use ProceduresRevision 5.0. Released: June 22, 2016 124
Your tabulators must be set up using the Configure Media Reading Hardware under the Miscellaneous menu before you can use this option.
1. From the Update menu, click Process Precinct Results Media.
Note If the tabulator is a central tabulator, such as a M650, the group will not be available.
A maximum of two groups can be selected, and a minimum of one group must be selected as the groups to be updated.
NoteIf you have multiple groups for the same tabulator, the system will prompt you to select the group you want to update.

Unity 3.4.1.0 Election Management SystemChapter 5: Logic and Accuracy Testing
CA_U3410_UseProceduresCalifornia Use ProceduresRevision 5.0. Released: June 22, 2016 125
2. Insert the media for your precinct tabulator and click the Read button for the tabulator media. The button will be Read 200 Memory Devices for DS200 and Read 100 Cards for M100.
As memory devices are read and updated, the Update Status section will list the precincts updated in the list box.
Note The following example shows ERM after reading two USB flash drives, both of which contain results for precincts 22 and 23. The ERM update process recognizes that each USB flash drive was from a different DS200 and automatically processed the second USB flash drive in add-to mode.

Unity 3.4.1.0 Election Management SystemChapter 5: Logic and Accuracy Testing
CA_U3410_UseProceduresCalifornia Use ProceduresRevision 5.0. Released: June 22, 2016 126
• Click the Print Last Precinct(s) Report button to print results from the last processed precinct(s) using the current settings for the Precinct Report Options.
• Click Print Summary Report to print the EL45, Election Summary Report using the current settings for the Summary Report Options.
5.7.9 Process M650 Results (Zip Disk)
Use this option to transfer election results from M650 zip disks to ERM.
5.7.9.1 Store Results from Zip Disk
Use this option if your M650 scanners are not networked and you use 650 firmware version 2.0 or greater.
This program performs the functions necessary for copying an <election name>.PR file from a zip disk to the \Elecdata\NODExxx subdirectory. The NODExxx subdirectory will be determined by reading the <election name>.ID file on the zip disk. NODExxx is the 650 machine number. ERM saves the 650 results files to the Elecdata\NODExxx folder, and if there is more than one 650, to a separate NODExxx folder for each machine.
Note You can process results from multiple DS200 scanners from the same precinct because each DS200 has its own machine ID and it is included on the corresponding USB flash drive. This enables ERM to recognize that each USB flash drive is from a different DS200. ERM automatically processes the additional USB flash drives in add-to mode.

Unity 3.4.1.0 Election Management SystemChapter 5: Logic and Accuracy Testing
CA_U3410_UseProceduresCalifornia Use ProceduresRevision 5.0. Released: June 22, 2016 127
1. From the Update menu, point to Run 650 Results Update Program, and click Store Results from Zip Disk. The following window appears.
2. Insert the zip disk into the proper drive and select the letter of the zip disk drive.
3. In the Election Name box, select the name of the PR (results) file to be copied from the zip disk and stored in the \ELECDATA\NODExxx\ folder. If a .PR file with the current election name is available, it will be the first file in the list.
4. Click OK. The program will verify the existence of a matching <election name>.ID file, which will determine the appropriate NODExxx subdirectory. The program will then copy the <election name>.PR file from the zip disk to the \Elecdata\NODExxx subdirectory. While the file is being copied, the following message will appear.
5. Click Store Another to copy results from another Zip Disk, or click Done if you are finished.
5.7.9.2 Update Group With 650 Results (No Network)
This program performs the functions necessary for updating the <election name>.PR files. The M650 saves election results to a zip disk that can then be read into ERM.
Before working with M650 results, you must copy the initialization files from the tabulator to a zip disk and copy them to the \ELECDATA directory on the PC.
1. Insert a zip disk into the M650.
2. Hold down the Enable button while you press the Save button. This copies the blank results (initialization) files to the zip disk.
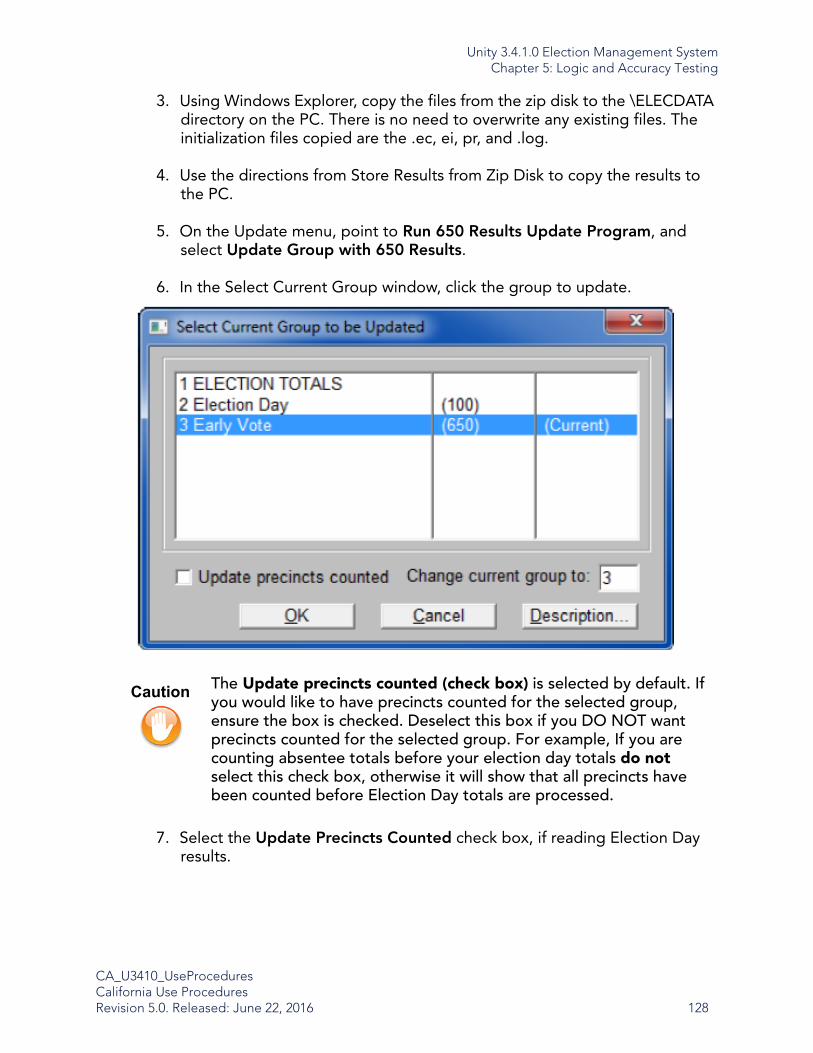
Unity 3.4.1.0 Election Management SystemChapter 5: Logic and Accuracy Testing
CA_U3410_UseProceduresCalifornia Use ProceduresRevision 5.0. Released: June 22, 2016 128
3. Using Windows Explorer, copy the files from the zip disk to the \ELECDATA directory on the PC. There is no need to overwrite any existing files. The initialization files copied are the .ec, ei, pr, and .log.
4. Use the directions from Store Results from Zip Disk to copy the results to the PC.
5. On the Update menu, point to Run 650 Results Update Program, and select Update Group with 650 Results.
6. In the Select Current Group window, click the group to update.
7. Select the Update Precincts Counted check box, if reading Election Day results.
Caution The Update precincts counted (check box) is selected by default. If you would like to have precincts counted for the selected group, ensure the box is checked. Deselect this box if you DO NOT want precincts counted for the selected group. For example, If you are counting absentee totals before your election day totals do not select this check box, otherwise it will show that all precincts have been counted before Election Day totals are processed.

Unity 3.4.1.0 Election Management SystemChapter 5: Logic and Accuracy Testing
CA_U3410_UseProceduresCalifornia Use ProceduresRevision 5.0. Released: June 22, 2016 129
8. If the Absentee Mode is set to Duplicate Block in HPM, the following window will appear.
• Choose Use Regular Precinct Results to update the results as non-absentee.
• Choose Use Absentee Precinct Results to update the results as absentee.
• Choose Use Combined Precinct Results to combine both absentee and non-absentee results.
If the System Type was set to Mixed Mode on the Change Jurisdiction Master window in HPM, the following window will appear.
• Choose Update Absentee Precinct Results to update the results as absentee.
• Choose Update Regular Precinct Results to update the results as non-absentee.
If neither of these options were selected in HPM, skip to item number 10.
NoteThese results must come from the M650 Mixed Mode results disk. The election name displayed must end with “AB”.
NoteThese results must come from the M650 results disk. The election name displayed must be the same as selected in HPM.
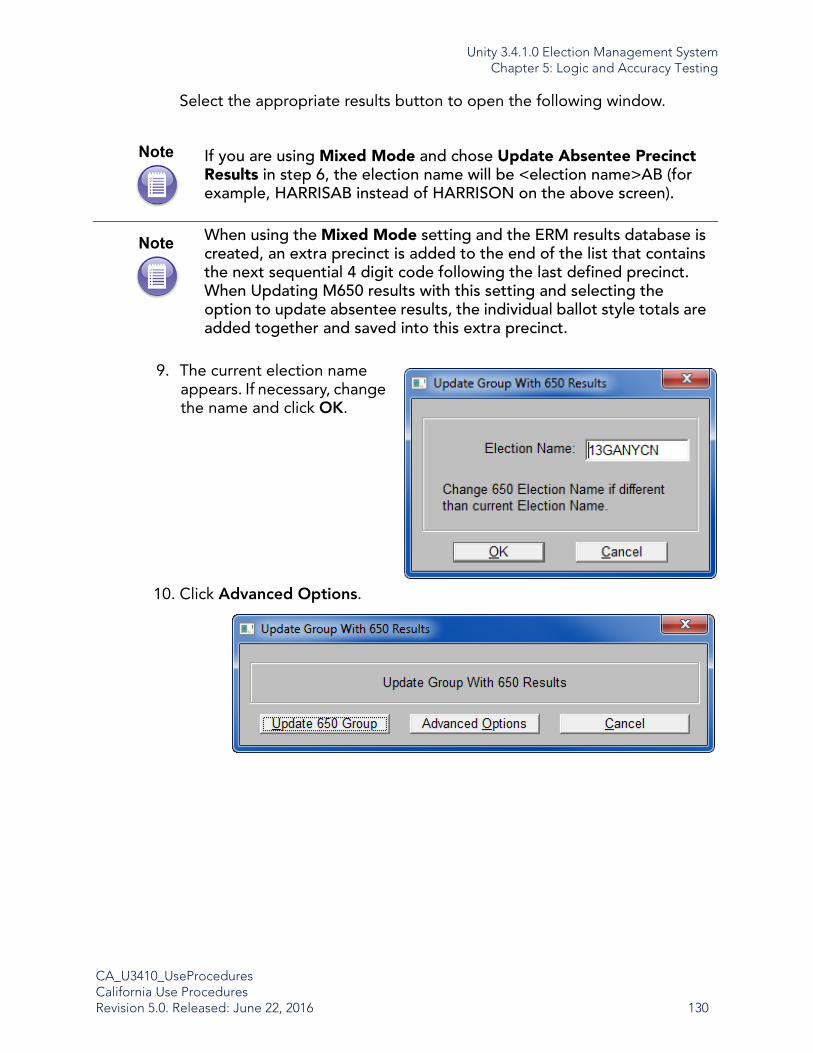
Unity 3.4.1.0 Election Management SystemChapter 5: Logic and Accuracy Testing
CA_U3410_UseProceduresCalifornia Use ProceduresRevision 5.0. Released: June 22, 2016 130
Select the appropriate results button to open the following window.
9. The current election name appears. If necessary, change the name and click OK.
10. Click Advanced Options.
Note If you are using Mixed Mode and chose Update Absentee Precinct Results in step 6, the election name will be <election name>AB (for example, HARRISAB instead of HARRISON on the above screen).
Note When using the Mixed Mode setting and the ERM results database is created, an extra precinct is added to the end of the list that contains the next sequential 4 digit code following the last defined precinct. When Updating M650 results with this setting and selecting the option to update absentee results, the individual ballot style totals are added together and saved into this extra precinct.

Unity 3.4.1.0 Election Management SystemChapter 5: Logic and Accuracy Testing
CA_U3410_UseProceduresCalifornia Use ProceduresRevision 5.0. Released: June 22, 2016 131
11. Choose to update results in Replace Mode or Add-to Mode. Click OK.
• Choose Replace Mode if you want the existing group precinct results to be replaced if a precinct is encountered in the results file more than once. This is the default and used in most scenarios.
• Chose Add-to Mode to add to the results that are already in the results file.
12. Specify the drive letter of the Zip Drive. Click OK.
13. Click Update 650 Group. This will be a complete replacement of all prior results for the group selected.
Note Saving to the Zip Disk on the M650 is considered replace mode, because all results are overwritten during the process. Unless the M650 is being reset to Zero between each disk save, use replace mode in ERM.
Note All <electionname> files (PR, LOG, EC, EI, PRE, PRF, RPT, and OFC) for this election must be present on the drive to be used for uploading the results.

Unity 3.4.1.0 Election Management SystemChapter 5: Logic and Accuracy Testing
CA_U3410_UseProceduresCalifornia Use ProceduresRevision 5.0. Released: June 22, 2016 132
14. When the update is done, you will receive a message that the update is complete.
5.7.9.3 Update Group With 650 Results (Network)
The M650 scanners can be attached to a network program that will allow loading of the election definition files to the network election directory for access by the 650 network server. The server will transfer election results files from the 650 scanners to a network drive shared by the ERM PC workstations. ERM will access these shared results files and process the results files into the ERM results database.
Note The Advanced Options button enables you to direct the updating process to look for the <election name>.PR files on a different network or drive. In addition, you may direct the updating process to use PR files with a different name than the ERM election name, which allows the results to be processed directly into ERM. Before using this option, be sure you know exactly what results are contained in the PR files.
Note All <electionname> files (PR, LOG, EC, EI, PRE, PRF, RPT, and OFC) for this election must be present on the drive to be used for uploading the results.
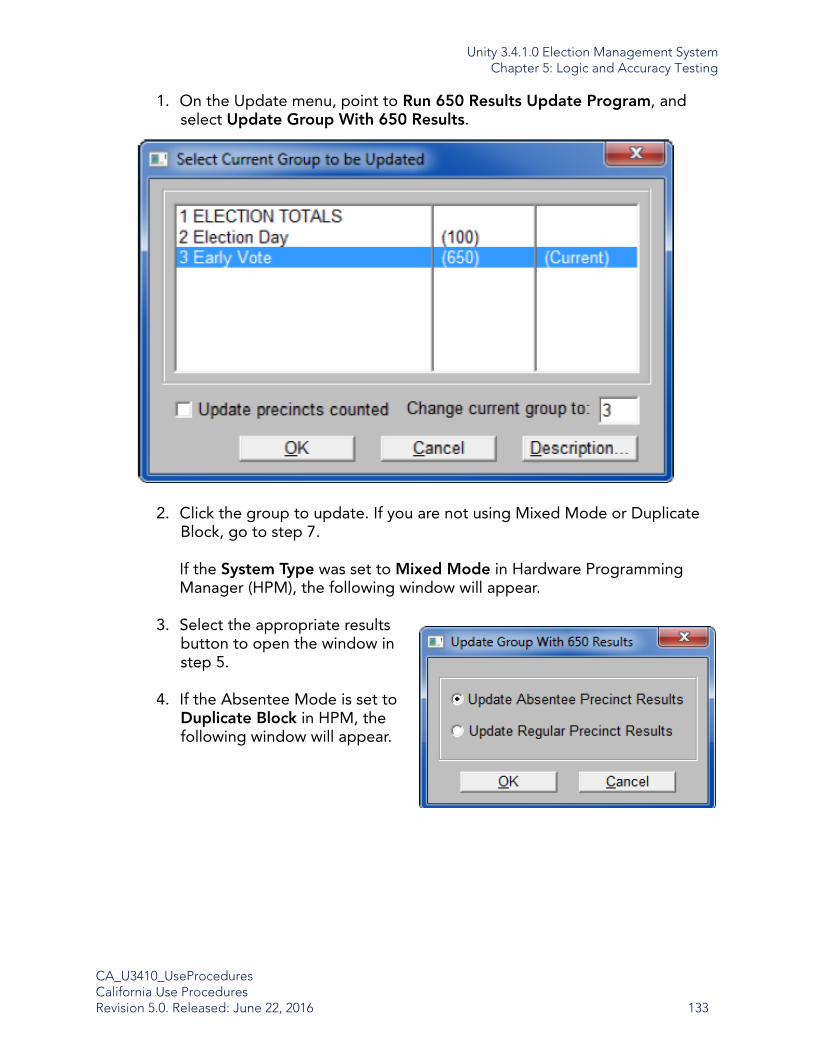
Unity 3.4.1.0 Election Management SystemChapter 5: Logic and Accuracy Testing
CA_U3410_UseProceduresCalifornia Use ProceduresRevision 5.0. Released: June 22, 2016 133
1. On the Update menu, point to Run 650 Results Update Program, and select Update Group With 650 Results.
2. Click the group to update. If you are not using Mixed Mode or Duplicate Block, go to step 7.
If the System Type was set to Mixed Mode in Hardware Programming Manager (HPM), the following window will appear.
3. Select the appropriate results button to open the window in step 5.
4. If the Absentee Mode is set to Duplicate Block in HPM, the following window will appear.

Unity 3.4.1.0 Election Management SystemChapter 5: Logic and Accuracy Testing
CA_U3410_UseProceduresCalifornia Use ProceduresRevision 5.0. Released: June 22, 2016 134
5. Select the appropriate results button to open the following window.
6. The current election name will appear in the Election Name box. You can use this window to direct the updating process to use PR files with a different name than the ERM election name, which allows the results to be processed directly into ERM. If necessary, change the name and click OK. The following window will appear.
Note If you are using Mixed Mode and chose Update Absentee Precinct Results in step 3, the election name will be <election name>AB (for example, HARRISAB instead of HARRISON on the previous screen).
Note When using the Mixed Mode setting and the ERM results database is created, an extra precinct is added to the end of the list that contains the next sequential 4 digit code following the last defined precinct. When Updating M650 results with this setting and selecting the option to update absentee results, the individual ballot style totals are added together and saved into this extra precinct.
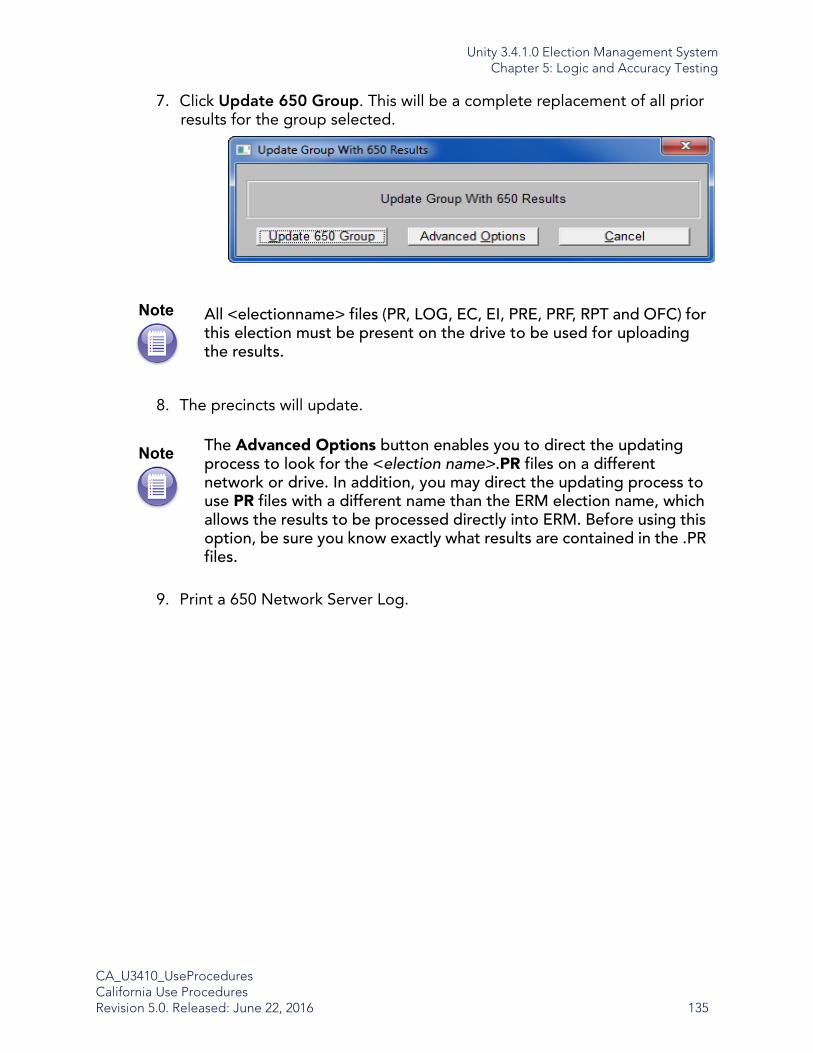
Unity 3.4.1.0 Election Management SystemChapter 5: Logic and Accuracy Testing
CA_U3410_UseProceduresCalifornia Use ProceduresRevision 5.0. Released: June 22, 2016 135
7. Click Update 650 Group. This will be a complete replacement of all prior results for the group selected.
8. The precincts will update.
9. Print a 650 Network Server Log.
Note All <electionname> files (PR, LOG, EC, EI, PRE, PRF, RPT and OFC) for this election must be present on the drive to be used for uploading the results.
Note The Advanced Options button enables you to direct the updating process to look for the <election name>.PR files on a different network or drive. In addition, you may direct the updating process to use PR files with a different name than the ERM election name, which allows the results to be processed directly into ERM. Before using this option, be sure you know exactly what results are contained in the .PR files.
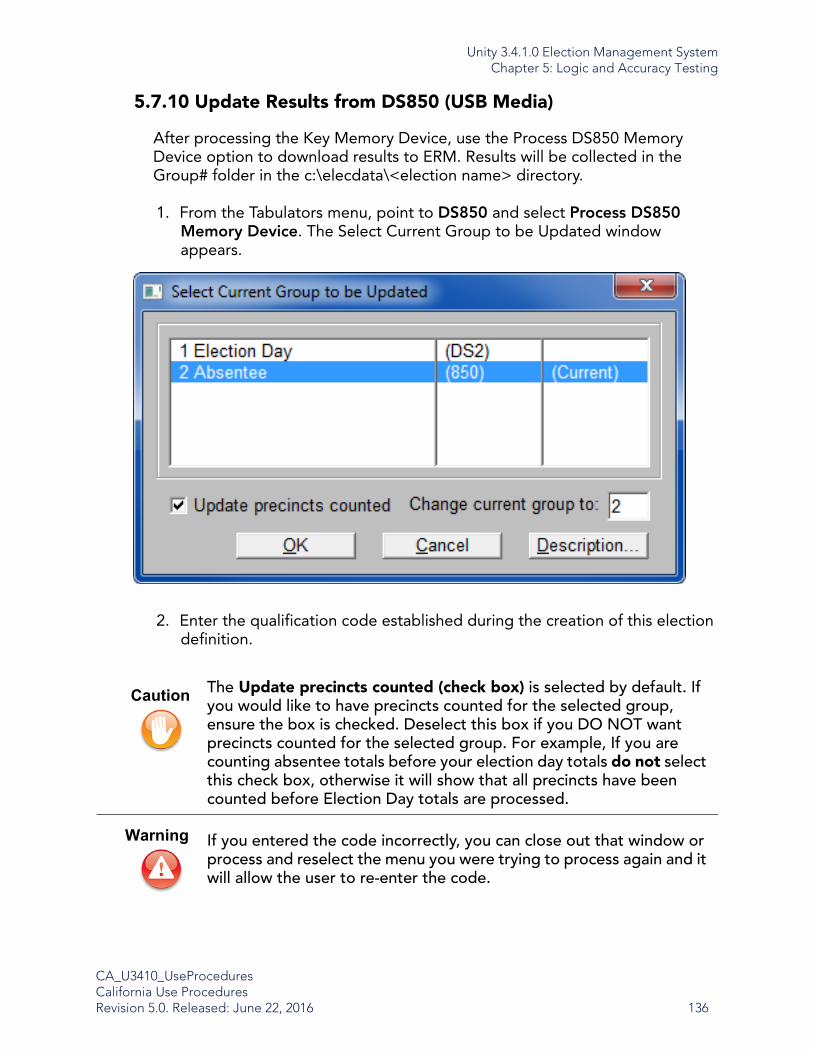
Unity 3.4.1.0 Election Management SystemChapter 5: Logic and Accuracy Testing
CA_U3410_UseProceduresCalifornia Use ProceduresRevision 5.0. Released: June 22, 2016 136
5.7.10 Update Results from DS850 (USB Media)
After processing the Key Memory Device, use the Process DS850 Memory Device option to download results to ERM. Results will be collected in the Group# folder in the c:\elecdata\<election name> directory.
1. From the Tabulators menu, point to DS850 and select Process DS850 Memory Device. The Select Current Group to be Updated window appears.
2. Enter the qualification code established during the creation of this election definition.
Caution The Update precincts counted (check box) is selected by default. If you would like to have precincts counted for the selected group, ensure the box is checked. Deselect this box if you DO NOT want precincts counted for the selected group. For example, If you are counting absentee totals before your election day totals do not select this check box, otherwise it will show that all precincts have been counted before Election Day totals are processed.
Warning If you entered the code incorrectly, you can close out that window or process and reselect the menu you were trying to process again and it will allow the user to re-enter the code.

Unity 3.4.1.0 Election Management SystemChapter 5: Logic and Accuracy Testing
CA_U3410_UseProceduresCalifornia Use ProceduresRevision 5.0. Released: June 22, 2016 137
3. Select the group to update and Click OK. The following screen appears.
4. Select from one of the following options:
• Read Media, Update Results and Archive Data - allows you to read in the media, update your results and archive the data at one time.
• Read Media and Update Results Only - this option will allow you to only read in the media and update the results.
5. After you make your selection press OK to continue or Cancel to exit the screen without updating.
6. Select the Dynamic Precinct Reports check box if you want to print precinct reports automatically as they are updated. Then select to print All Precincts or only the Key Precincts as they are updated. Whenever the results in the precinct you are updating have changed, the report will print.
NoteWhen trying to add image data but no new ballots have been scanned, use the Read Media and Archive Data Only option.

Unity 3.4.1.0 Election Management SystemChapter 5: Logic and Accuracy Testing
CA_U3410_UseProceduresCalifornia Use ProceduresRevision 5.0. Released: June 22, 2016 138
7. Click OK.
8. Insert the Poll Media into the ERM computer, and click OK to read update the .spp record and ERM results database.
9. Once ERM has processed the Poll Media, remove the device and repeat step 6 to process additional USB flash drives.
10. Click Cancel once you have processed all of the Poll Media to return to the main window.
The status areas of the screen inform you about which precincts have been updated and how many there are left to process.
11. If the data has already been processed the you will get a notification. Click OK.
Unity 3.4.1.0 Election Management SystemChapter 5: Logic and Accuracy Testing
CA_U3410_UseProceduresCalifornia Use ProceduresRevision 5.0. Released: June 22, 2016 139
5.8 Backing Up Logic and Accuracy Testing
5.8.1 Backing Up Media
Back up all election media devices to an external memory device such as a zip disk, USB flash drive, compact flash card, or compact disc.
1. Connect your election media device to the computer.
2. Connect the backup device to the computer.
3. In Windows Explorer, select all files on the election media device, then press Ctrl + c.
4. In Windows Explorer, click in the backup directory, then press Ctrl + v.
5.8.2 Backing Up EMS
Back up your election files in Windows after you configure your election and generate output files from Election Data Manager. Back up your election files to an external memory device such as a zip disk, USB flash drive, compact flash card, or compact disc.
1. Right-click the Start button in Windows and select Explore. An Explorer window appears.
2. Type c:\unity\edm in the Address bar and press Enter.
3. Select your election folder and drag it to the corresponding drive letter of your memory device to copy your election database.
Note
Delete the mrg.dbf file before copying to free up disk space.
NoteDisk space may also be saved by using a file compression application such as WinZip.

Unity 3.4.1.0 Election Management SystemChapter 5: Logic and Accuracy Testing
CA_U3410_UseProceduresCalifornia Use ProceduresRevision 5.0. Released: June 22, 2016 140
5.9 Retention of Election Material
No operation or activity that results in a revision to voting data produced by the semiofficial canvass shall be performed without the presence of a properly constituted Election Observer Panel, Logic and Accuracy Board, or an equivalent administrative and technical control body authorized to verify the correctness of the operations and responsible for maintaining accurate and complete audit records.
5.9.1 Precinct Tabulator Election Material
Upon the certification of the election results, the guidelines in the California Elections Code apply to the handling, security, and disposition of unused ballots and other election materials. Memory cards are not deemed to fall within the purview of these Elections Code sections.
5.9.1.1 Checking Unused Ballots
Unused ballots will be processed in accordance with the California Elections Code.
Precinct officers will seal or deface unused precinct ballots, and election personnel in the office of the elections official will seal or deface unused vote-by-mail ballots. The elections official may inspect and count unused ballots as necessary to reconcile the ballot count during the official canvass.
5.9.1.2 Post Official Canvass Period Disposition of Election Materials
Following certification of the election results and upon expiration of the period for recount requests, the ballots may be moved to secure storage for the required ballot retention period, during which time, the ballot containers remain sealed. The elections official shall not open any ballot containers or permit any ballot containers to be opened except as permitted in the California Elections Code, or in the event of a mandated recount. Seals used for the foregoing purposes shall be numbered, destructible seals.
5.9.1.3 Certification by Unescorted Personnel
All unescorted persons present within the security area, including visitors, media representatives, and standby personnel, shall be clearly identified by a badge or other means, and a log of their arrival and departure times. All unescorted personnel shall be subject to restrictions established by the responsible elections official to ensure the efficiency and integrity of the vote tallying process.
Unity 3.4.1.0 Election Management SystemChapter 5: Logic and Accuracy Testing
CA_U3410_UseProceduresCalifornia Use ProceduresRevision 5.0. Released: June 22, 2016 141
5.9.2 Retention of Central Tabulator Election Materials
Consult the California Elections Code for guidelines on retaining election materials. The retention period for ballots and related election materials is six months for all elections if no federal elections are involved. The federal election retention period is 22 months. Extend retention periods in the case of a court challenge.

Unity 3.4.1.0 Election Management SystemChapter 6: Election Preparation
CA_U3410_UseProceduresCalifornia Use ProceduresRevision 5.0. Released: June 22, 2016 142
Chapter 6: Election Preparation
6.1 L&A Backup
Before the logic and accuracy results are cleared from the equipment, back up the results and send them, as well as the final vote count program files, to the Secretary of State.
6.2 Clear Logic and Accuracy Results
Clear election totals before and after running your test decks to ensure that your results are not corrupted on Election Day. You must clear your election totals before every election.
6.2.1 Clear Results from the M100
6.2.2 Clear Results from the DS200
After completing your logic and accuracy testing, you must clear the voting results from the election definition USB media devices before using them on Election Day.
1. Insert the USB media device in the DS200.
2. The Polls Closed screen appears. Press Reopen Polls.
3. The password entry screen appears. Use the screen keyboard to enter your password and press ENTER.
4. The Reopen Polls screen appears. Press Clear Counts to remove all test vote results from the machine.
NoteRefer to 5.2.7 Clear Test Results for detailed instructions. The procedure for clearing test totals and electon totals is the same.
NoteIf you did not program the election, contact your election administrator or ES&S technical support for the scanner password.
Unity 3.4.1.0 Election Management SystemChapter 6: Election Preparation
CA_U3410_UseProceduresCalifornia Use ProceduresRevision 5.0. Released: June 22, 2016 143
5. The Clear Counts screen appears. Press Yes to confirm that you want to clear all results.
6. When results have been cleared, the scanner is ready for polls to be opened for live voting.
6.2.3 Clear Results from the M650
1. Hold down ENABLE and press ZERO TOTALS.
The message Confirm Zero Totals? Press Stop to Cancel, Start to Continue appears.
2. Press START.
After the scanner clears the totals, the M650 displays the message Ready for Regular Counting.
6.2.4 Clear Results from the DS850
1. Press Election to access the Election menu.
2. From the Election menu, press Results.
3. From the Results screen, press Clear All Results.
4. When prompted to do so, enter the override code and press Accept.
5. The Clear All Results screen appears. Press Confirm to begin the process of clearing all results from the scanner.
6. A confirmation message appears when the process is complete. Press OK.

Unity 3.4.1.0 Election Management SystemChapter 6: Election Preparation
CA_U3410_UseProceduresCalifornia Use ProceduresRevision 5.0. Released: June 22, 2016 144
6.2.5 Clear Results in ERM
1. On the Update menu, select Reset Counted Precincts.
2. In the Reset Counted Precincts window, select Zero all Precincts to set all precincts to zero.
Note
This option does not clear the log file.
Warning Select Reset Database with Precinct Results only if you are instructed to do so by ES&S.The Reset Database with Precinct Results option will refresh the Election Totals group with all group totals.
NoteThe following instructions do not apply to the Reset Database with Precinct Results option.

Unity 3.4.1.0 Election Management SystemChapter 6: Election Preparation
CA_U3410_UseProceduresCalifornia Use ProceduresRevision 5.0. Released: June 22, 2016 145
3. Click OK.
4. Select the group(s) to reset, then click OK.
You have now cleared the results from all the precincts for the selected groups. Reload election data from your scanners if the results are not as expected.
5. Generate a Zero (Election Summary) report after your election totals are erased to make sure that the results database is clear.
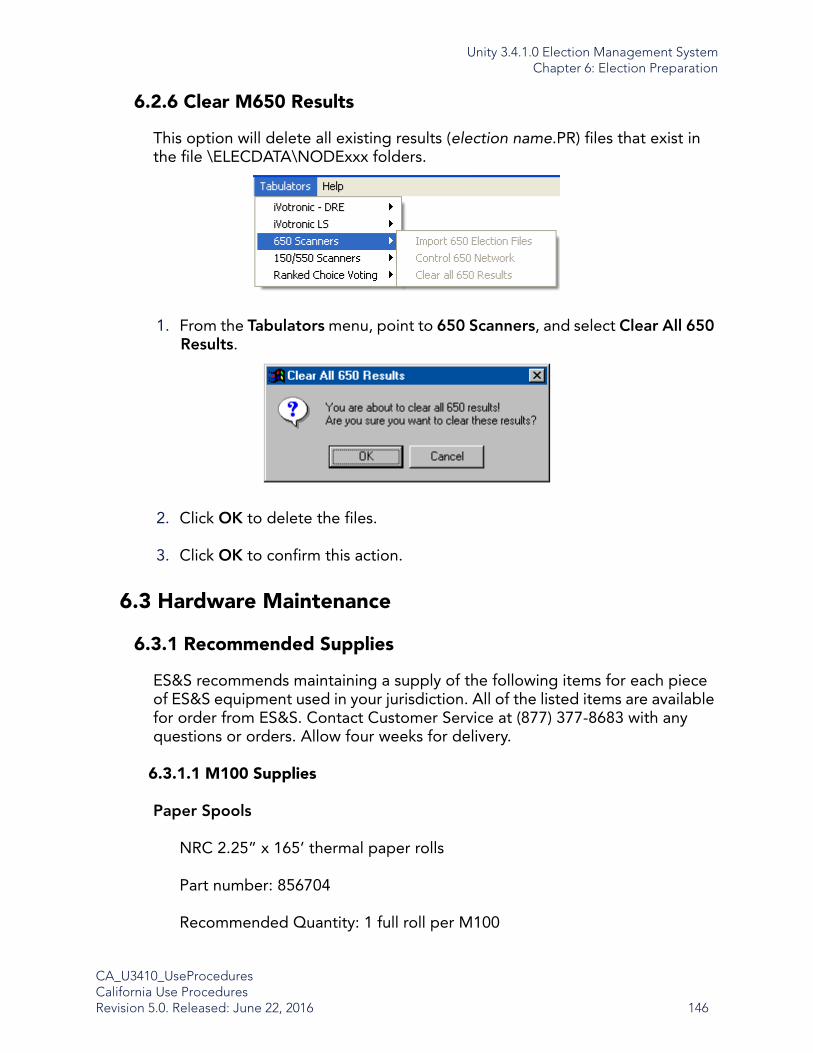
Unity 3.4.1.0 Election Management SystemChapter 6: Election Preparation
CA_U3410_UseProceduresCalifornia Use ProceduresRevision 5.0. Released: June 22, 2016 146
6.2.6 Clear M650 Results
This option will delete all existing results (election name.PR) files that exist in the file \ELECDATA\NODExxx folders.
1. From the Tabulators menu, point to 650 Scanners, and select Clear All 650 Results.
2. Click OK to delete the files.
3. Click OK to confirm this action.
6.3 Hardware Maintenance
6.3.1 Recommended Supplies
ES&S recommends maintaining a supply of the following items for each piece of ES&S equipment used in your jurisdiction. All of the listed items are available for order from ES&S. Contact Customer Service at (877) 377-8683 with any questions or orders. Allow four weeks for delivery.
6.3.1.1 M100 Supplies
Paper Spools
NRC 2.25” x 165’ thermal paper rolls
Part number: 856704
Recommended Quantity: 1 full roll per M100

Unity 3.4.1.0 Election Management SystemChapter 6: Election Preparation
CA_U3410_UseProceduresCalifornia Use ProceduresRevision 5.0. Released: June 22, 2016 147
PC Cards
Battery-backed PC cards that store the tabulator’s election definition and ballot count
Election Day Standard Memory: 512K
Early Voting Standard Memory: 4MB
Recommended Quantity: 1 per M100
Ballot Marking Devices
VL Ballot Pen (ES&S part # 6100)BIC Grip roller ball with black ink and 0.7 mm tipThis is the only marking device approved by ES&S for the use with the M100.
Pressurized Air Cans
For cleaning the M100
Recommended Quantity: 2 cans per M100
6.3.1.2 M650 Supplies
Pick Belts
These are about four inches in diameter and look like very thick rubber bands. If ES&S is programming your election, these belts will be sent with the election definition.Only order from ES&S.
Quantity: two.
Retard Pads
These thin, oval, rubbery pads are about one inch wide.Only order from ES&S.
Quantity: two
8.5” x 11”, continuous feed, three-part paper
ES&S recommends that the printer paper be carbonless to avoid smearing. If you will be using ERM, one-part paper may be used.

Unity 3.4.1.0 Election Management SystemChapter 6: Election Preparation
CA_U3410_UseProceduresCalifornia Use ProceduresRevision 5.0. Released: June 22, 2016 148
Quantity: two boxes
Pressurized air cans
Used to clean the sensors
Quantity: two
Cloth and Isopropyl alcohol
Used to clean the rollers
Quantity: one bottle
Small white adhesive labels, ½ inch wide
Use these labels to cover stray marks on the ballots.Only use labels from ES&S.
Quantity: 12 sheets
Zip Disks
These should be FAT16 formatted disks.
Quantity: three
Ballot Marking Devices
VL Ballot Pen (ES&S part # 6100)BIC Grip roller ball with black ink and 0.7 mm tip
Spare printer ribbon
Use this for a backup ribbon on your PC printer. For ribbon type, call ES&S.
Quantity: one per printer
Uninterruptible Power Supply (UPS)
ES&S provides an optional UPS Battery Backup for power loss situations.
Quantity: one

Unity 3.4.1.0 Election Management SystemChapter 6: Election Preparation
CA_U3410_UseProceduresCalifornia Use ProceduresRevision 5.0. Released: June 22, 2016 149
6.3.1.3 DS200 Supplies
Paper Rolls
NRC 3.13” by 80’ thermal paper rolls
Part number: 2200
Recommended Quantity: 1 full roll per scanner
USB Flash Drive
Stores the scanner’s election definition ballot count and ballot images.
Standard memory capacity: 1, 2, 4 and 8 GB
Recommended Quantity: 1 per DS200
Ballot Marking Devices
VL Ballot Pen (ES&S part # 6100)BIC Grip roller ball with black ink and 0.7 mm tip
Pressurized air cans
For cleaning the scanner
Recommended Quantity: 2 cans per DS200
Lint-free cloth
For general cleaning purposes.
Cleaning pad and isopropyl alcohol
For cleaning the scanner rollers, CIS sensors, and LCD screen.
Alcohol swipes are preferable to bottled isopropyl alcohol.
ES&S part identifier: ES-Cleaner
To clean the scanner rollers, pour the cleaner into a spray bottle and dampen the cleaning pad. Never spray cleaner directly on the scanner.
Recommended Quantity: 1 bottle per DS200
Unity 3.4.1.0 Election Management SystemChapter 6: Election Preparation
CA_U3410_UseProceduresCalifornia Use ProceduresRevision 5.0. Released: June 22, 2016 150
6.3.1.4 DS850 Supplies
8.5” x 11” Continuous feed, one-part paper
Used in audit log printer
ES&S recommends that the printer paper be carbonless to avoid smearing.
If you will be using ERM, the same type of one-part paper can be used for both the ERM and DS850 continuous-feed printers.
Quantity: two boxes
8.5” x 11”, standard laser printer paper
For the laser printer
Quantity: two boxes
Pressurized air cans
Used to clean the sensors
Quantity: two
Lint-free cloth and isopropyl alcohol
Used to clean the rollers
Quantity: one bottle
Small white adhesive labels, ½ inch wide
Used to cover stray marks on the ballotsOnly use labels from ES&S.
Quantity: 12 sheets
USB flash drives
FAT32 formatted drives
Depending on the number of ballots processed, you may need multiple drives to transfer all of the ballot image data.

Unity 3.4.1.0 Election Management SystemChapter 6: Election Preparation
CA_U3410_UseProceduresCalifornia Use ProceduresRevision 5.0. Released: June 22, 2016 151
Election results data will fit on a single drive.
• Minimum size 512K
• Maximum size 8 GB
• Quantity: 6
Ballot Marking Devices
Although the DS850 reads a wide variety of marking devices, ES&S recommends that you use the following devices:
VL Ballot Pen (ES&S part # 6100)BIC Grip roller ball with black ink and 0.7 mm tip
Absentee Pen (ES&S part #00500)Easily fits into an envelope for mailing
Audit log printer ribbon
ES&S part # 4778
Quantity: 1 per printer
Report Printer Toner Cartridge
ES&S part # 6826
Quantity: 1 per printer
Touch screen cleaning kit
ES&S part # 6500
Warning USB flash drives used with the DS850 must be used for the election process only. Using them for any purpose outside the election process violates security practices.
Note
The ability to view the ballot images are not supported in this version.

Unity 3.4.1.0 Election Management SystemChapter 6: Election Preparation
CA_U3410_UseProceduresCalifornia Use ProceduresRevision 5.0. Released: June 22, 2016 152
Specially formulated cleaning solution
Soft microfiber cloth
6.3.2 M100 Maintenance
6.3.2.1 Tools for M100 Maintenance
The following tools are required for the M100:
• Compressed air - 10 oz. can minimum
• #1 straight screwdriver
• #1 Phillips screwdriver
• #2 Phillips screwdriver
• 1/4” nut driver
• 3/16” nut driver
• 1/16” Allen wrench
• 3/32” Allen wrench
• 5/64” Allen wrench
6.3.2.2 Cleaning the M100
Clean your tabulator before and after each election.
1. Turn off the tabulator and unplug the power cord.
Note
Magnetized screwdrivers are recommended.
Electrical Always unplug the AC power cord, turn the tabulator’s key to the OFF position and remove the key before you clean an M100 tabulator.

Unity 3.4.1.0 Election Management SystemChapter 6: Election Preparation
CA_U3410_UseProceduresCalifornia Use ProceduresRevision 5.0. Released: June 22, 2016 153
2. Clean the ballot entry and exit slots with a can of pressurized clean, dry air or inert gas, which is available for order from ES&S. Aim the air can’s spray tube into the ballot entry slot and blow out all the debris.
3. Clean the ballot exit slot in the same way.
4. Repeat the entire procedure and inspect the entrance and exit slots with a flashlight.
5. Use pressurized air to remove dust and debris from around the menu display.
6. Use a soft cloth and water, or a mild solution of water and soap, to wipe down the tabulator. Dampen, do not soak, the cloth with the cleaning solution. Do not spray cleaning solution directly onto the tabulator.
7. Clean the menu display window with the damp cloth. Be careful not to scratch the display panel.
8. Clean the control panel buttons and the area around the buttons.
9. Use the cloth and cleaning solution to clean the tabulator’s outer case. Start at the top and work down to the base.
10. Clean the tabulator’s stainless steel base plate with the cleaning solution. Wipe all traces of the cleaning solution off the tabulator after you finish cleaning.
6.3.2.3 Clean the M100 Ballot Box
Clean your M100 ballot boxes either before or after each election. You must disassemble the nested box for cleaning. The metal box requires no disassembly.
1. If you use the nested ballot box, separate the box into its two halves.
2. Use a cloth dampened with cleaning solution to clear dust and debris from the ballot box.
3. Remove the divider from the lower ballot bin before you clean the bottom section of the ballot box.
4. Clean the inside of the bin first and then the outside. Wipe down the interior ballot divider and the box cover. Remember to periodically rinse the cleaning cloth.

Unity 3.4.1.0 Election Management SystemChapter 6: Election Preparation
CA_U3410_UseProceduresCalifornia Use ProceduresRevision 5.0. Released: June 22, 2016 154
5. Stand the ballot box upright to clean the recessed, tabulator housing.
6. Turn the mounting pedestal upside down and clean the inside of the box. Use a soft cleaning brush or feather duster to clear dust and debris.
7. Use a brush to clean the diverter vane, the diverter motor and the controller circuit board for the ballot diverter. Do not to bend or damage any of the sensitive components contained in the diverter motor assembly.
8. Use a brush to clean debris and dust from the ballot chute assembly. Do not use liquids to clean the inside of tabulator mounting pedestal.
9. Re-assemble the unit after you finish cleaning.
6.3.2.4 Replace the Paper Roll
Check the M100 printer and change the paper roll, if necessary, for Election Day.
ImportantMake sure the power cord and the diverter motor connector are not damaged or dirty.
NoteA “time out waiting for paper” message may appear when the internal printer is out of paper.

Unity 3.4.1.0 Election Management SystemChapter 6: Election Preparation
CA_U3410_UseProceduresCalifornia Use ProceduresRevision 5.0. Released: June 22, 2016 155
1. Depress the mounting brackets on each side of the empty paper roll and lift the roll out of the tabulator.
2. Remove the white plastic paper spool from the center of the empty paper roll and insert it into a new roll.
3. Press out on the paper mounting brackets and insert the new roll into the printer.
4. Manually feed the paper into the paper path.
6.3.2.5 M100 Battery Maintenance
The M100 uses a 12-volt, 7-amp lead acid battery to power the tabulator in case of an electrical power failure. Depending on the age of your tabulator, the battery is either an Exide NP7-12 or Powersonic PS-1270. A fully charged battery can power an “active” tabulator for up to one hour and an “idle” tabulator for up to three hours. The machine is “active” when counting ballots or printing reports. Estimated battery life is five years.
To check the charge for your backup battery, open the DIAGS | MORE DIAGS menu, then click BATTERY STATUS.

Unity 3.4.1.0 Election Management SystemChapter 6: Election Preparation
CA_U3410_UseProceduresCalifornia Use ProceduresRevision 5.0. Released: June 22, 2016 156
Battery Cautions
Charge the Battery
Plug the power cord into the tabulator and turn the power on for at least 12 hours to fully charge the battery. Check the condition of your power cord if the message “NO-AC” appears in the upper right quarter of the menu display after you turn the tabulator on.
6.3.3 DS200 Maintenance
6.3.3.1 Tools for DS200 Maintenance
• Isopropyl alcohol 70% - 16 fl oz. bottle minimum
• Compressed air - 10 oz. can minimum
• Lint-free cloth
• #1 Phillips screwdriver
• #2 Phillips screwdriver
• T-10 Screwdriver with security center pin
Caution You can use the backup battery under normal operating conditions, in any orientation without danger of leaking. Removing the battery from the tabulator exposes it to risks that are not present under normal operating conditions.
Warning Shorting the battery terminals together is especially hazardous even if the battery is “discharged” or “dead.” Shorting the terminals can create sparks, melt wires, and possibly start a fire. Use extreme caution when handling the backup battery.
NoteThe M100 battery may be recycled. Please dispose of the battery properly.
Note
Magnetized screwdrivers are recommended.

Unity 3.4.1.0 Election Management SystemChapter 6: Election Preparation
CA_U3410_UseProceduresCalifornia Use ProceduresRevision 5.0. Released: June 22, 2016 157
6.3.3.2 Clean the DS200
Clean your scanner before and after each election.
1. Turn off the scanner and unplug the power cord.
2. Clean the ballot entry and exit slots with a can of pressurized clean, dry air or inert gas, which is available for order from ES&S. Aim the air can’s spray tube into the ballot entry slot and blow out all the debris. Clean the ballot exit slot in the same way. Repeat the entire procedure and inspect the entrance and exit slots with a flashlight.
3. Use pressurized air to remove dust and debris from around the menu display.
4. Use a soft, lint-free cloth and water, or isopropyl alcohol (70%), to wipe down the scanner. Dampen, do not soak, the cloth with the cleaning solution. Do not spray cleaning solution directly onto the scanner.
5. Clean the LCD display window with the damp cloth. Be careful not to scratch the display panel.
6. Use the cloth and cleaning solution to clean the scanner’s outer case. Start at the top and work down to the base.
7. Clean the scanner’s stainless steel base plate with the cleaning solution. Wipe all traces of the cleaning solution off the scanner after you finish cleaning.
8. Unlock the rear access door on the back cover of the DS200.
9. Once this door is unlocked and back cover of the DS200 is raised, the ballot transport mechanism can be opened.
ElectricalAlways unplug the AC power cord and turn the scanner off before you clean a DS200 scanner.

Unity 3.4.1.0 Election Management SystemChapter 6: Election Preparation
CA_U3410_UseProceduresCalifornia Use ProceduresRevision 5.0. Released: June 22, 2016 158
10. Lift up the latches on the left and right side of the ballot transport.
11. Lift up the top cover to access the ballot transport.
12. Use a lint-free cloth and isopropyl alcohol to clean the spring plates opposite the contact image sensors.
13. Clean the rubber rollers on the bottom surface of the ballot transport.
6.3.3.3 Clean the DS200 Ballot Box
Clean your DS200 ballot boxes either before or after each election. The ballot box requires no disassembly.
1. Use a cloth dampened with cleaning solution to clear dust and debris from the ballot box.
2. Remove the divider from the lower ballot bin before you clean the bottom section of the ballot box. Clean the inside of the bin first and then the outside. Wipe down the interior ballot divider and the box cover. Remember to periodically rinse the cleaning cloth.
3. Stand the ballot box upright to clean the recessed, scanner housing.
WarningMake sure the power cord and the diverter motor connector are not damaged or dirty.

Unity 3.4.1.0 Election Management SystemChapter 6: Election Preparation
CA_U3410_UseProceduresCalifornia Use ProceduresRevision 5.0. Released: June 22, 2016 159
4. Turn the mounting pedestal upside down and clean the inside of the box. Use a soft cleaning brush or feather duster to clear dust and debris. Use a brush to clean the diverter vane, the diverter motor and the controller circuit board for the ballot diverter. Do not to bend or damage any of the sensitive components contained in the diverter motor assembly.
5. Use a brush to clean debris and dust from the ballot chute assembly. Do not use liquids to clean the inside of scanner mounting pedestal. Re-assemble the unit after you finish cleaning.
6.3.3.4 Replace the Paper Roll
Check the DS200 printer and change the paper roll, if necessary, for Election Day.
1. Unlock the access door, located above the printer. This will provide access to the printer release lever.
2. Press the lever to unlock the printer door.
3. Open the printer door.
4. Drop the paper into the printer paper compartment.
Note
A warning message may appear if the internal printer is out of paper.

Unity 3.4.1.0 Election Management SystemChapter 6: Election Preparation
CA_U3410_UseProceduresCalifornia Use ProceduresRevision 5.0. Released: June 22, 2016 160
5. Pull the end of the paper roll out toward the input tray of the DS200.
6. Close the printer door and press firmly on the door to make sure it locks into place.
7. Lock the access door above the printer.
6.3.3.5 Maintain the DS200 Battery
The DS200 uses an 18-volt, 5-amp lithium ion battery to power the scanner in case of an electrical power failure. A fully charged battery can power an “active” scanner for up to two hours and an “idle” scanner for up to three hours. The machine is “active” when counting ballots or printing reports. Estimated battery life is five years.
To check the charge for your backup battery, look at the light indicator on the back of your DS200 machine.
• If the light is flashing green, the battery is charged.
• If the light is green and not flashing, the DS200 is plugged in and the battery is fully charged.
• If the light is flashing at a slow rate, the DS200 is operating on battery power and the battery has 75 percent or more of its charge remaining.
• If the light is flashing at a medium rate, the DS200 is operating on battery power and the battery has 50 percent of its charge remaining.
• If the light is flashing at a fast rate, the DS200 is operating on battery power and the battery has 25 percent of its charge remaining.
ImportantMake sure the glossy side of the thermal paper is facing the thermal printer.

Unity 3.4.1.0 Election Management SystemChapter 6: Election Preparation
CA_U3410_UseProceduresCalifornia Use ProceduresRevision 5.0. Released: June 22, 2016 161
• If the light is amber, the battery is charging. If the light is amber, allow the DS200 to charge until the light turns green. If the battery is not charged, it will take up to six hours to charge the battery.
• If the light is flashing at a slow rate, the battery is 75 percent charged.
• If the light is flashing at a medium rate, the battery is 50 percent charged.
• If the light is flashing at a fast rate, the battery is 25 percent charged.
• If the light is flashing red, the battery is not taking a charge. This could be caused by:
• A dead battery.
• A bad connection to the battery.
• No battery is in the DS200.
Check Battery Charge
Turn on the DS200.
Note If the DS200 has not operated on battery power and was stored with a full battery charge, the charge time required to fully recharge the battery will be minimal.
Warning Removing the battery from the scanner exposes it to risks that are not present under normal operating conditions.
Shorting the battery terminals together is especially hazardous even if the battery is “discharged” or “dead.” Shorting the terminals can create sparks, melt wires, and possibly start a fire. Use extreme caution when handling the backup battery.
NoteThe DS200 battery may be recycled. Please dispose of the battery properly.

Unity 3.4.1.0 Election Management SystemChapter 6: Election Preparation
CA_U3410_UseProceduresCalifornia Use ProceduresRevision 5.0. Released: June 22, 2016 162
The battery power icon, located in the upper right area of the screen, displays the battery charge.The battery is charging whenever the power cord is plugged into the unit. If the battery does not show a full charge, continue to supply power to the unit until it reaches a full charge. The length of charge time required to fully charge the battery depends on the current status of the battery icon. Use the following charge guidelines to estimate charge time:
If the battery icon is blinking, the battery is disconnected.
You can also check the battery charge by looking at the light indicator on the back of the DS200.
Refer to the following table for light indicator state definitions.

Unity 3.4.1.0 Election Management SystemChapter 6: Election Preparation
CA_U3410_UseProceduresCalifornia Use ProceduresRevision 5.0. Released: June 22, 2016 163
6.3.4 AutoMARK Maintenance
6.3.4.1 Tools for AutoMARK Maintenance
• #10 TORX Screwdriver (4” min. length)
• #10 TORX Right-Angle Screwdriver (2” min. length)
• Compressed air - 10 oz. can minimum
• Anti-Static lint-free cleaning wipes
• Isopropyl alcohol 70%
• Conductive, no-resistive white lithium grease
• Small art paintbrush
6.3.4.2 Cleaning the AutoMARK
Before storing the AutoMARK use alcohol and wipes to clean the outside panels of the AutoMARK unit.
Light Indicator State Battery Status
Flashing green Fully charged
Solid green DS200 plugged in, battery fully charged
Flashing slowly DS200 operating on battery power, 75% or more charge remaining
Flashing medium pace DS200 operating on battery power, battery has 50% charge remaining
Flashing rapidly DS200 operating on battery power, battery has 25% charge remaining
Amber Battery is charging. Allow to charge until light turns green before operation.
Flashing slowly 75% charged
Flashing medium pace 50% charged
Flashing rapidly 25% charged
Flashing red Dead batteryBad connection to batteryNo battery connected

Unity 3.4.1.0 Election Management SystemChapter 6: Election Preparation
CA_U3410_UseProceduresCalifornia Use ProceduresRevision 5.0. Released: June 22, 2016 164
6.3.4.3 Install a New Ink Cartridge
The AutoMARK VAT system is shipped without the ink cartridge installed. The ink cartridge should be installed prior to using the system for voting. This is a black-only ink cartridge. A new print cartridge should be installed prior to each election.
The access to the print cartridge is provided by a door in the right rear corner of the unit. With the door off, the rechargeable battery is also accessible.
Ink Cartridge Access in Rear of AutoMARK
Ink Cartridge

Unity 3.4.1.0 Election Management SystemChapter 6: Election Preparation
CA_U3410_UseProceduresCalifornia Use ProceduresRevision 5.0. Released: June 22, 2016 165
1. Open the rear access door to view the holding unit for the ink cartridge (see the picture above.)
2. Open the new ink cartridge package.
3. Insert new ink cartridge into the AutoMARK.
4. Close the access door.
5. With the key switch in TEST mode, select SERVICE PRINT CARTRIDGE.
6. Select Yes to indicate you have changed the cartridge and to re-set the counter.
6.3.4.4 Connecting a DSA Device
The AutoMARK provides an access port that allows voters with disabilities to plug in a sip-and-puff, rocker panel, or similar input device. The Dual Switch Access (DSA) port provides a 3.5mm (1/8”) jack. A voter with disabilities who cannot use either the touch screen or the audio-style system with auxiliary switch panel, can plug a DSA device into this port.
6.3.4.5 Charging the AutoMARK Battery
A battery status indicator is located on the rear panel of the AutoMARK in the form of an LED bar graph. The graph can be seen through an opening to the right of the power entry connector on the rear of the enclosure.
AutoMARK units can be stored on a rack in a warehouse, positioned so that their rear panels are visible from the warehouse aisle.
The bar graph has 10 segments. The bottom segment (segment 1) signals battery charging status, as follows:
Table 6-1: Battery Indicator Segment 1: Charging Indicator
Segment Charge Status
Off Not charging
Dim Top-off charge
Bright Conditioning or Full charge

Unity 3.4.1.0 Election Management SystemChapter 6: Election Preparation
CA_U3410_UseProceduresCalifornia Use ProceduresRevision 5.0. Released: June 22, 2016 166
Segments 2 through 10 show progressively higher levels of battery charge status.
External Charger
The bar graph is active when the AutoMARK is connected to AC power, or the external charger is active. It also lights up when you press the small button on the rear panel, next to the bar graph display.
An optional external battery charger can be plugged into a small power jack on the rear panel. This jack allows the battery pack to be charged when the main line cord is not connected to AC power (i.e., during storage), with the AutoMARK in or out of its storage container, with the power switch on or off. Use of an external charger reduces heat build-up within the unit.
The LCD screen must be folded down into the storage position, for the external charger to be effective.
Charging Voltage = 12VDC
Maximum Power = 50W
Table 6-2: Battery Indicator Segments 2-9: Charge Status
Segment Capacity % Volts
2 4 7.12
3 10 7.28
4 25 7.44
5 50 7.60
6 70 7.76
7 80 7.92
8 90 8.08
9 99 8.24
10 100 8.40
Unity 3.4.1.0 Election Management SystemChapter 6: Election Preparation
CA_U3410_UseProceduresCalifornia Use ProceduresRevision 5.0. Released: June 22, 2016 167
6.3.5 M650 Maintenance
To keep the scanner in working order, ES&S trained staff must perform routine maintenance before each election. Before performing these tasks, unplug the scanner and raise the read head to avoid damaging the control panel.
6.3.5.1 Tools for M650 Maintenance
• Compressed air - 10 oz. can minimum
• Anti-Static lint-free cleaning wipes
• Isopropyl alcohol 70%
• Mild detergent solution
• Straight screwdriver
6.3.5.2 Replace the Pick Belt
The pick belt grabs, or “picks,” the top ballot and moves it into the read area. As the belt becomes old and worn, multiple ballots may pass through the scanner at once, causing the scanner to jam and stop processing ballots. For the best results, replace the pick belt before each election.
1. Pull the worn belt off the right-hand roller, and then remove it from the left-hand roller.
2. Stretch out the new pick belt as you might stretch a balloon before inflating it.
3. Loop the belt around the left roller and then around the right roller until it fits into place.
Warning Route /install the power cord to protect it from being walked on or pinched. Power the unit down completely before connecting or disconnecting the power cord. Remove the power cord before moving the unit. Place the power cord near an easily accessible outlet.
Caution To clean the scanner, disconnect the unit from its power source. Do not use liquid cleaners, aerosols, abrasive pads, scouring powders, or solvents, such as benzene or alcohol. Use a soft cloth lightly moistened with a mild detergent solution. Ensure that the surface is fully dry before reconnecting the power.

Unity 3.4.1.0 Election Management SystemChapter 6: Election Preparation
CA_U3410_UseProceduresCalifornia Use ProceduresRevision 5.0. Released: June 22, 2016 168
6.3.5.3 Clean and Replace the Retard Pads
The retard pads should be light-colored and clean. The first retard pad is an oval pad found below the pick belt. The second pad is a square pad located on the input hopper tray. You should clean these pads regularly. If either pad is dirty or discolored, cleaning them may improve the performance of the scanner. Replace the retard pad below the pick belt if it appears worn or is not performing well.
Clean the retard pads
To clean either retard pad, wipe the area with a dry cotton cloth to absorb any ink without smearing it. If more cleaning is necessary, apply isopropyl alcohol to the cloth and clean again.
Replace the retard pad
1. Use the small tuning screwdriver stored in the back of the scanner to lift the edge of the pad until it is above the metal surface.
2. Place the new pad into position beneath the pick belt with the flat surface down, and then pop it into place with the screwdriver.
6.3.5.4 Replace M650 Report Printer Ink Ribbon
Use only ribbons specifically designated for your printer model.
Note Make sure there are no exposed pad edges and that the pad is inserted flat surface down. Failure to properly insert the pad can cause ballots to jam and/or rip as the scanner feeds them through the transport.
Caution
Switch the printer off before opening or removing the access cover.
Caution
If you are replacing the ribbon, the print head may be hot.

Unity 3.4.1.0 Election Management SystemChapter 6: Election Preparation
CA_U3410_UseProceduresCalifornia Use ProceduresRevision 5.0. Released: June 22, 2016 169
1. Open the access cover, then slide the print head to the center of the platen.
2. Lift the old ribbon cartridge at the end nearest the platen, then remove and discard it.
3. Remove the new cartridge from its packaging.
ImportantLeave the ribbon shield on the cartridge.
Print head

Unity 3.4.1.0 Election Management SystemChapter 6: Election Preparation
CA_U3410_UseProceduresCalifornia Use ProceduresRevision 5.0. Released: June 22, 2016 170
4. Lower the front of the cartridge over the print head until it snaps into place, then turn the knob clockwise to take up the ribbon slack.
Knob
Ribbonplate
Ribbon shield
Platen

Unity 3.4.1.0 Election Management SystemChapter 6: Election Preparation
CA_U3410_UseProceduresCalifornia Use ProceduresRevision 5.0. Released: June 22, 2016 171
6.3.5.5 Clean the Rollers
The rollers move the ballots through the read area and into the output hopper. If the surfaces of the rollers are dirty or discolored, clean them.
To clean the rollers, apply isopropyl alcohol to a cotton cloth and clean the visible surfaces of the rollers, turning them as you clean to expose most of the surface area of the rollers.
6.3.5.6 Clean the Fiber Optic Sensors
The sensors are small devices (approximately 1/8 inch in diameter) that read ballots and detect paper jams. The sensors are embedded in metal plates in the read area.
To clean the fiber optic sensors, wipe them with a dry, cotton cloth or use a pressurized air can to clean out any debris or paper dust collected during scanner operation. It is important to hold the can upright so you do not expel propellant onto the sensors.
6.3.6 DS850 Maintenance
To keep the scanner in working order, ES&S trained staff must perform routine maintenance before each election. Before performing these tasks, unplug the scanner and raise the read head to avoid damaging the control panel.
6.3.6.1 Tools for DS850 Maintenance
• Compressed air - 10 oz. can minimum
• Anti-Static lint-free cleaning wipes
• Isopropyl alcohol 70%
• Mild detergent solution
• Straight screwdriver
Warning Route /install the power cord to protect it from being walked on or pinched. Power the unit down completely before connecting or disconnecting the power cord. Remove the power cord before moving the unit. Place the power cord near an easily accessible outlet.

Unity 3.4.1.0 Election Management SystemChapter 6: Election Preparation
CA_U3410_UseProceduresCalifornia Use ProceduresRevision 5.0. Released: June 22, 2016 172
6.3.6.2 Clean the Rollers
The rollers move each ballot, picked from the input tray, over the transport path, through the scan area (upper and lower camera housing), and into one of the three output bins (the top, middle, or bottom bin). If the surfaces of the rollers are dirty or discolored, clean them.
To clean the rollers, apply isopropyl alcohol to a cotton cloth and clean the visible surfaces of the rollers, turning them as you clean to expose most of the surface area of the rollers.
6.3.6.3 Clean the Cameras
To clean the cameras, wipe them with a dry, cotton cloth, or use a pressurized air can to clean out any debris or paper dust collected during scanner operation. It is important to hold the can upright so you do not expel propellant onto the sensors.
6.3.6.4 Clean the Scanner Case
6.3.6.5 Clean the Touch Screen
Spray the cloth with the cleaning solution and gently wipe the screen until clean. Then use a dry section of the cloth to dry any remaining cleaning solution from the screen.
Caution
Keep fingers, hands, and loose clothing clear of the rollers.
Warning Before cleaning the scanner case, disconnect the unit from its power source. Do not use full strength or harsh detergents, liquid cleaners, aerosols, abrasive pads, scouring powders, or solvents, such as benzene or alcohol. Liquids should never be applied directly to the scanner. Use a soft cotton cloth lightly moistened with a mild detergent solution. Ensure that the surface cleaned is fully dry before reconnecting the power.
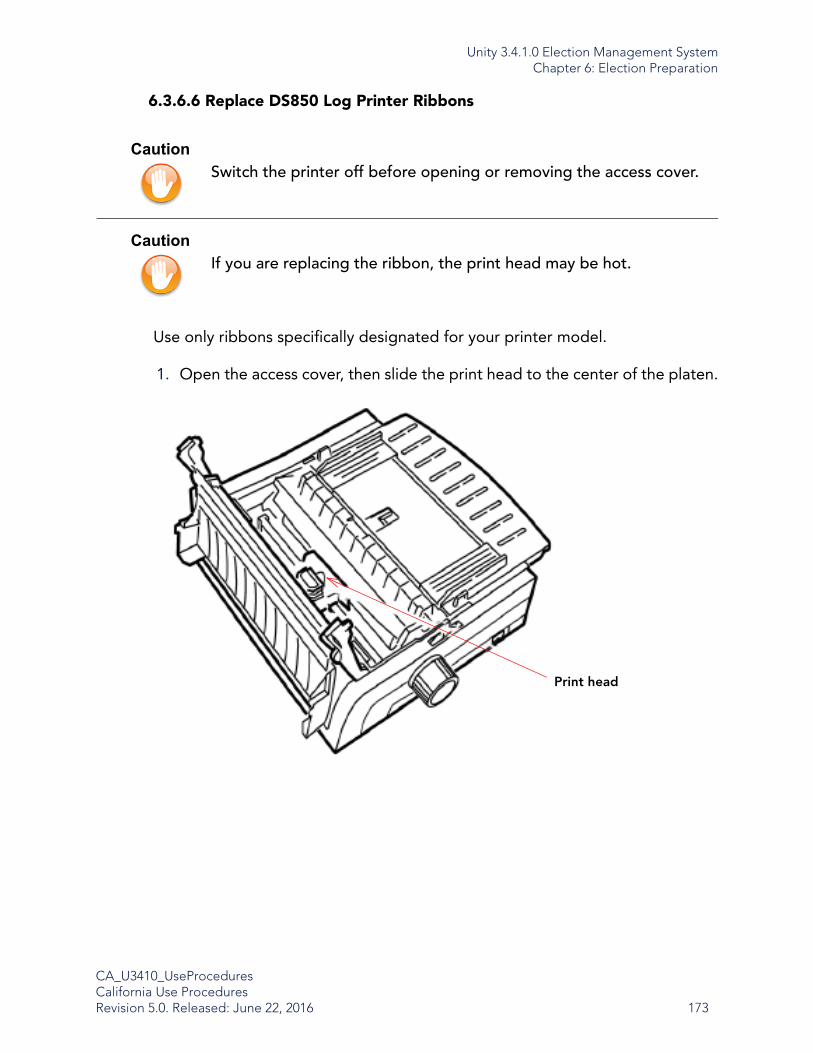
Unity 3.4.1.0 Election Management SystemChapter 6: Election Preparation
CA_U3410_UseProceduresCalifornia Use ProceduresRevision 5.0. Released: June 22, 2016 173
6.3.6.6 Replace DS850 Log Printer Ribbons
Use only ribbons specifically designated for your printer model.
1. Open the access cover, then slide the print head to the center of the platen.
Caution
Switch the printer off before opening or removing the access cover.
Caution
If you are replacing the ribbon, the print head may be hot.
Print head

Unity 3.4.1.0 Election Management SystemChapter 6: Election Preparation
CA_U3410_UseProceduresCalifornia Use ProceduresRevision 5.0. Released: June 22, 2016 174
2. Lift the old ribbon cartridge at the end nearest the platen, then remove and discard it.
3. Remove the new cartridge from its packaging.
ImportantLeave the ribbon shield on the cartridge.
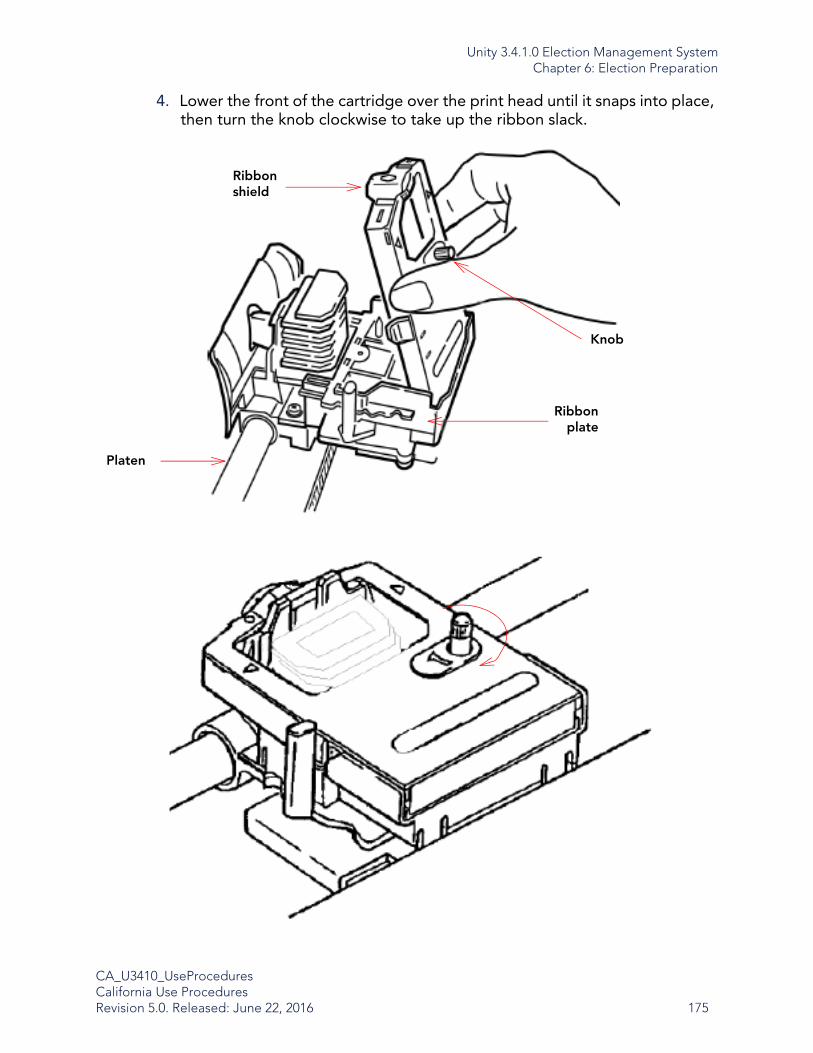
Unity 3.4.1.0 Election Management SystemChapter 6: Election Preparation
CA_U3410_UseProceduresCalifornia Use ProceduresRevision 5.0. Released: June 22, 2016 175
4. Lower the front of the cartridge over the print head until it snaps into place, then turn the knob clockwise to take up the ribbon slack.
Knob
Ribbonplate
Ribbon shield
Platen
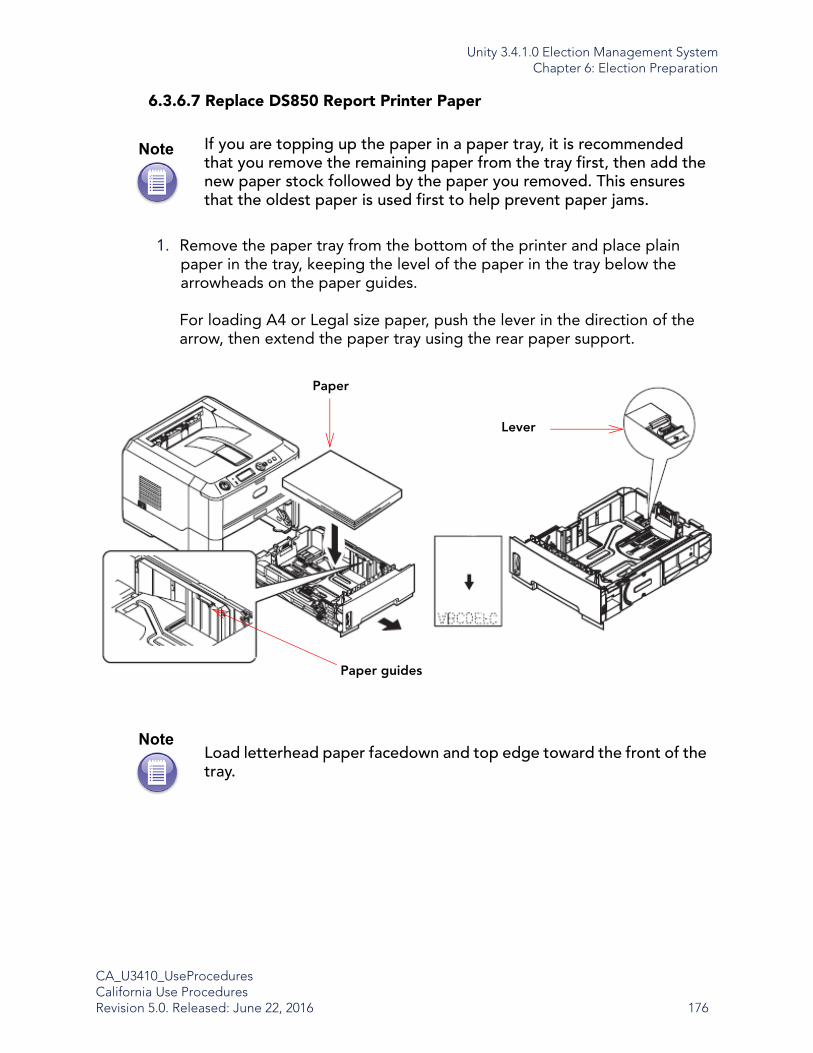
Unity 3.4.1.0 Election Management SystemChapter 6: Election Preparation
CA_U3410_UseProceduresCalifornia Use ProceduresRevision 5.0. Released: June 22, 2016 176
6.3.6.7 Replace DS850 Report Printer Paper
1. Remove the paper tray from the bottom of the printer and place plain paper in the tray, keeping the level of the paper in the tray below the arrowheads on the paper guides.
For loading A4 or Legal size paper, push the lever in the direction of the arrow, then extend the paper tray using the rear paper support.
Note If you are topping up the paper in a paper tray, it is recommended that you remove the remaining paper from the tray first, then add the new paper stock followed by the paper you removed. This ensures that the oldest paper is used first to help prevent paper jams.
NoteLoad letterhead paper facedown and top edge toward the front of the tray.
Paper
Paper guides
Lever

Unity 3.4.1.0 Election Management SystemChapter 6: Election Preparation
CA_U3410_UseProceduresCalifornia Use ProceduresRevision 5.0. Released: June 22, 2016 177
2. Adjust the rear paper support to the size of paper you are using by gripping the lugs, tilting and sliding the support forward or backward as necessary.
3. Adjust the paper guides. It is important to adjust the paper guides correctly to ensure that the paper is not skewed in the print process. Paper jams may occur if this operation is not carried out correctly.
4. Replace the tray in the printer. The paper level indicator provides a visual indication of how much paper is left in the tray.
Face-Up and Face-Down Printing
For face-down printing, make sure the rear cover is closed (the paper exits from the top of the printer). The output stacker on the top of the printer stacks printed pages face-down. Pages printed in reading order (page 1 first) will be sorted in reading order (last page on top, facing down).
Note If you have the optional second paper tray (Tray 2) and you are printing from the first (upper) tray (Tray 1), you can pull out the second (lower) tray to reload it. However, if printing from the second (lower) tray, do not pull out the first (upper) tray, as this will cause a paper jam.
Paper levelindicator
Paper guides
Rear paper support

Unity 3.4.1.0 Election Management SystemChapter 6: Election Preparation
CA_U3410_UseProceduresCalifornia Use ProceduresRevision 5.0. Released: June 22, 2016 178
For face-up printing, make sure the rear cover is open. In this condition, paper will exit via this path, regardless of driver settings.
Always use this tray in conjunction with the manual feed tray, multipurpose tray, or for heavyweight stocks, to reduce the possibility of paper jams.
6.3.6.8 Replace DS850 Report Printer Toner
When the toner is running low, TONER LOW is displayed in the LCD. After Toner Low appears, the printer will print about 100 more pages, then display Toner Empty and stop printing. Printing will resume after a new toner cartridge has been installed.
It is recommended that you clean the LED array at the same time you change the toner cartridge.
The toner used in this printer is a very fine dry powder contained in the toner cartridge.
Have a sheet of paper on hand to place the used cartridge on while you install the new one.
Dispose of the old cartridge responsibly, inside the pack the new one came in. Follow any regulations, recommendations, etc., that may be in force concerning waste recycling.
If you spill any toner powder, lightly brush it off. If this is not enough, use a cool, damp cloth to remove any residue.
Warning Never expose a toner cartridge to an open flame. It can cause an explosion and you can be burned.
Be sure to switch off and unplug the machine before accessing the interior of a machine for cleaning, maintenance or fault clearance. Access to a live machine’s interior can cause electric shock.
CautionDo not use hot water, and never use solvents of any kind. They will make stains permanent.

Unity 3.4.1.0 Election Management SystemChapter 6: Election Preparation
CA_U3410_UseProceduresCalifornia Use ProceduresRevision 5.0. Released: June 22, 2016 179
1. Switch off the printer and allow the fuser to cool for about 10 minutes before opening the top cover.
2. Press the top cover release button and open the printer’s top cover fully.
3. Pull the colored lever (1) on the right side of the toner cartridge toward the front of the printer to close the cartridge then remove the used toner cartridge (2).
4. Clean the top of the ID unit with a clean, lint free cloth.
5. Put the cartridge down gently onto a piece of paper to prevent toner from marking your furniture.
Warning If you inhale any toner or get it in your eyes, drink a little water or bathe your eyes liberally in cold water. Seek medical attention immediately.
If the printer has been powered on, the fuser may be hot. This area is clearly labeled.
NoteThe model B430dn appears in the figure above. The principles are the same for all models of this printer.

Unity 3.4.1.0 Election Management SystemChapter 6: Election Preparation
CA_U3410_UseProceduresCalifornia Use ProceduresRevision 5.0. Released: June 22, 2016 180
6. Remove the new cartridge from its box but leave its wrapping material in place for the moment.
7. Gently shake the cartridge (3) from end to end several times to loosen and distribute the toner evenly inside the cartridge.
8. Remove the wrapping material and peel off the adhesive tape from the underside of the cartridge (4).
9. Holding the cartridge by its top center with the colored lever to the right (5), lower it into the printer over the image drum unit from which the old cartridge was removed.
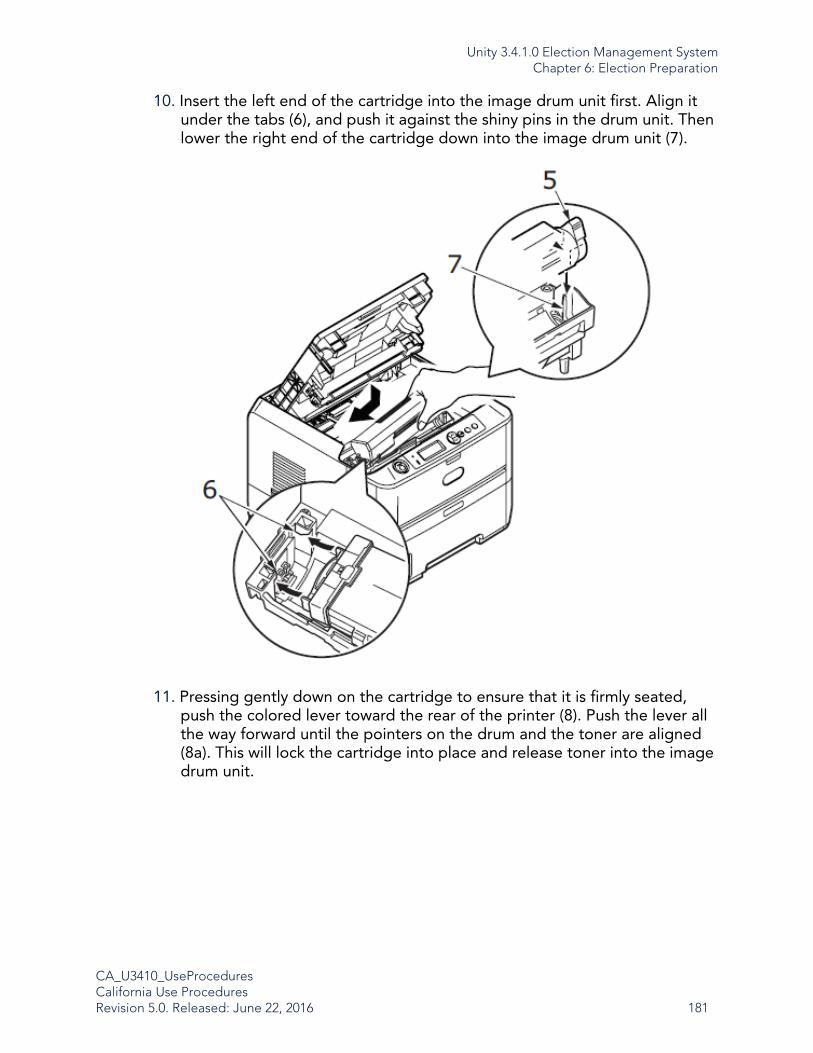
Unity 3.4.1.0 Election Management SystemChapter 6: Election Preparation
CA_U3410_UseProceduresCalifornia Use ProceduresRevision 5.0. Released: June 22, 2016 181
10. Insert the left end of the cartridge into the image drum unit first. Align it under the tabs (6), and push it against the shiny pins in the drum unit. Then lower the right end of the cartridge down into the image drum unit (7).
11. Pressing gently down on the cartridge to ensure that it is firmly seated, push the colored lever toward the rear of the printer (8). Push the lever all the way forward until the pointers on the drum and the toner are aligned (8a). This will lock the cartridge into place and release toner into the image drum unit.
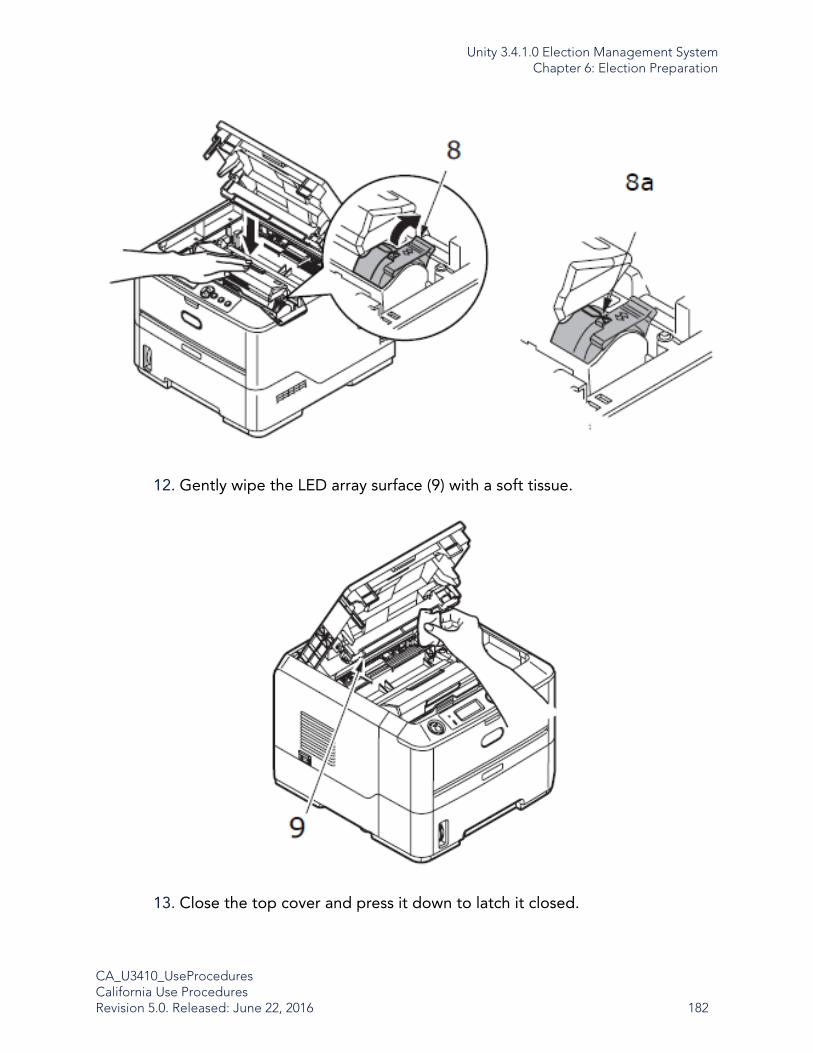
Unity 3.4.1.0 Election Management SystemChapter 6: Election Preparation
CA_U3410_UseProceduresCalifornia Use ProceduresRevision 5.0. Released: June 22, 2016 182
12. Gently wipe the LED array surface (9) with a soft tissue.
13. Close the top cover and press it down to latch it closed.
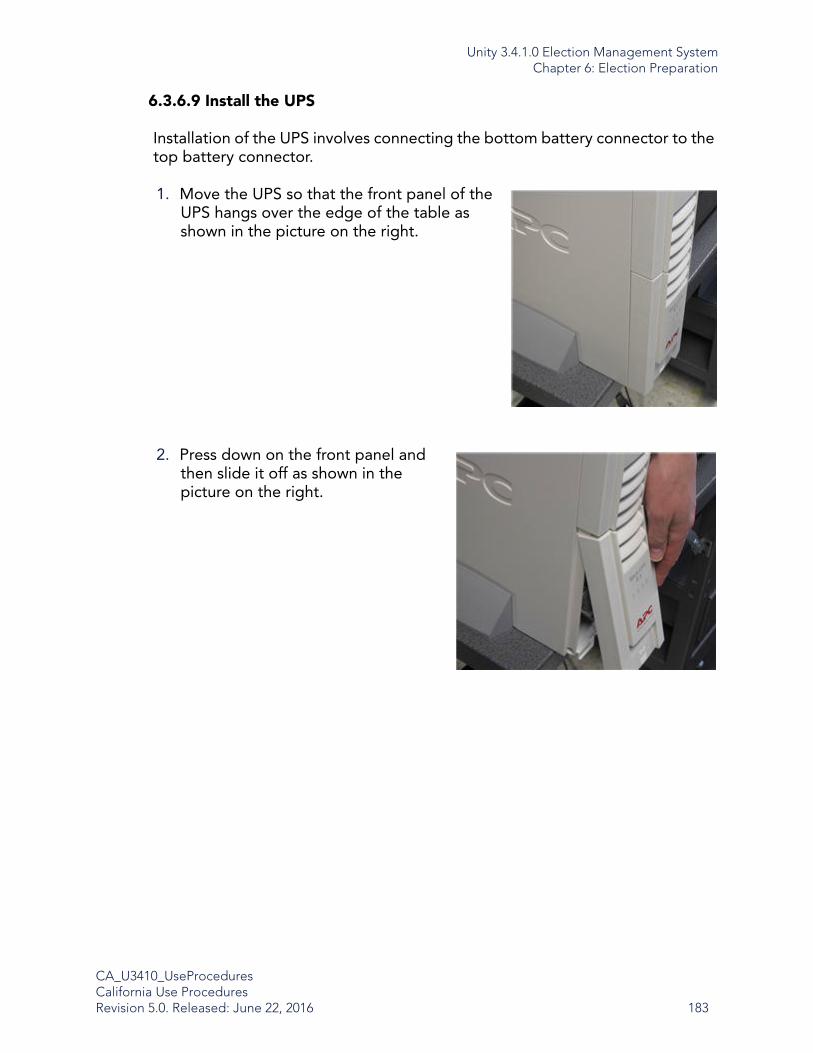
Unity 3.4.1.0 Election Management SystemChapter 6: Election Preparation
CA_U3410_UseProceduresCalifornia Use ProceduresRevision 5.0. Released: June 22, 2016 183
6.3.6.9 Install the UPS
Installation of the UPS involves connecting the bottom battery connector to the top battery connector.
1. Move the UPS so that the front panel of the UPS hangs over the edge of the table as shown in the picture on the right.
2. Press down on the front panel and then slide it off as shown in the picture on the right.

Unity 3.4.1.0 Election Management SystemChapter 6: Election Preparation
CA_U3410_UseProceduresCalifornia Use ProceduresRevision 5.0. Released: June 22, 2016 184
3. Insert the bottom battery connector into the top battery connector. The picture below on the left shows the two connectors before they are connected; the picture below on the right shows the two connectors after they have been connected.
4. Replace the front panel.
5. Move the UPS to the spot where you want it to be when the scanner is operating.
6. Plug the UPS into a power outlet.
Connect the Scanner to the UPS
Plug one end of the scanner’s power cord into the scanner, just below the power switch. Plug the other end of the power cord into one of the bottom receptacles on the UPS that provides battery backup. Connect the data communication cable to the UPS and one of the USB ports on the scanner. The data communication cable is used by the UPS to let the scanner know when the UPS is operating on battery power.

Unity 3.4.1.0 Election Management SystemChapter 7: Central Tabulations: Absentee and Mail Ballot Procedures
CA_U3410_UseProceduresCalifornia Use ProceduresRevision 5.0. Released: June 22, 2016 185
Chapter 7: Central Tabulations:Absentee and Mail Ballot Procedures
Proper care in folding, unfolding, inspecting, and preparing ballots before scanning can greatly increase the throughput of high-speed scanners such as the ES&S DS850 (and the DS200, when used for counting folded ballots). This document describes the different folding methods, best practices for unfolding, inspecting, and preparing ballots for scanning, and other key considerations.
7.1 Ballot Handling and Folding
Many considerations go into properly folding ballots to be mailed to voters. The 5 main folding methods are depicted and discussed in Folding Methods, in this document. Refer to this section to ensure that your jurisdiction takes every measure to fold the ballots for optimum final ballot scanning.
Care in preparing folded ballots for high-speed scanning can greatly improve scanning productivity by reducing misfeeds, read errors, and jams in the transport or output hopper.
Ballot handling and preparation consists of the following steps:
1. Opening the envelopes
2. Removing the ballots from the envelope and unfold them
3. Inspecting the ballots
4. Back-bending the ballots
The following sections discuss each of these steps.
7.1.1 Opening Envelopes
Whether slicing envelopes open by hand or using an automatic letter-opening machine, care must be taken not to slice or otherwise damage the ballots.
Always slice the envelope completely so the ballot is not crumpled when it is removed from the envelope.

Unity 3.4.1.0 Election Management SystemChapter 7: Central Tabulations: Absentee and Mail Ballot Procedures
CA_U3410_UseProceduresCalifornia Use ProceduresRevision 5.0. Released: June 22, 2016 186
Open the ballots as early as jurisdictional rules permit to allow time to inspect and prepare the ballots.
7.1.2 Removal and Unfolding of Ballots
Take care to remove the ballots from the envelope without crumpling the ballot by catching it on an incompletely opened envelope. If an envelope is not completely open, then open it completely in order to remove the ballot without obstruction.
Jurisdictions that are new to this type of ballot prep for central count scanning, or wish to improve the performance of their scanning, should perform the back-bending procedure covered in Back-Bending Individual Ballots on each ballot as it is opened. As jurisdictions become proficient in preparing ballots in this way (as measured by the successful, jam-free scanning of ballots), they may find it faster to unfold the ballots into stacks and then back-bend the stacks.
7.1.3 Ballot Inspection
As ballots are opened and unfolded, they should be carefully inspected for the following issues:
7.1.3.1 Tears and slices
Whether damaged by the voter or letter opening process, all torn or sliced ballots should be repaired, remade, or hand-counted per your jurisdiction’s rules and procedures. Scanning ballots with tears or slices can cause jams, further damaging the ballots and greatly decreasing scanning throughput.
Torn or sliced ballots that are not missing any of the paper can usually be taped, if allowed.

Unity 3.4.1.0 Election Management SystemChapter 7: Central Tabulations: Absentee and Mail Ballot Procedures
CA_U3410_UseProceduresCalifornia Use ProceduresRevision 5.0. Released: June 22, 2016 187
7.1.3.2 Damaged or missing timing or code channel marks
Such ballots should be repaired, remade, or hand-counted per your jurisdiction’s rules and procedures.
7.1.3.3 Smudges, smears, stains or foreign material
Such damage can cause pick errors, double feeds, and jams, greatly decreasing scanning throughput.
Ballots that are damaged or soiled enough to risk scanning or feed problems should be repaired, remade, or hand-counted per your jurisdiction’s rules and procedures.
7.1.4 Back-Bending Individual Ballots
Each fold on each ballot must be bent back in the opposite direction of the original fold to break the grain of the paper evenly in both directions. If done properly, the ballot will lie flat on a table and will not bend in either direction.
To quickly accomplish this, hold the ballot as shown on the following page, and bend it back with your thumbs and forefingers until the fold “breaks” across the entire fold.
This can also be accomplished by back-bending the ballot on the table top and gently running your fingers along the fold to break the fold.
Caution Do not over-bend the ballot or crease it aggressively, as this will cause it to bend in the opposite direction or create an additional fold line that can lead to the "stair-step."

Unity 3.4.1.0 Election Management SystemChapter 7: Central Tabulations: Absentee and Mail Ballot Procedures
CA_U3410_UseProceduresCalifornia Use ProceduresRevision 5.0. Released: June 22, 2016 188
7.1.4.1 Crimps, stair-steps, or irregular folds
These include any large bump or feature that could cause a ballot to catch on another, resulting in a jam or misfeed. These ballots should be separated and repaired as follows.

Unity 3.4.1.0 Election Management SystemChapter 7: Central Tabulations: Absentee and Mail Ballot Procedures
CA_U3410_UseProceduresCalifornia Use ProceduresRevision 5.0. Released: June 22, 2016 189
The “stair-step” occurs when a second fold is made near the original fold. This can be caused by the voter improperly refolding the ballot(s) or by incorrect unfolding and back-bending (discussed later in this document).
Stair-steps can be resolved by running a flat, dull object like the top of a fingernail or a coin along the unwanted fold. Take care not to scuff or mark the ballot by using too much force.
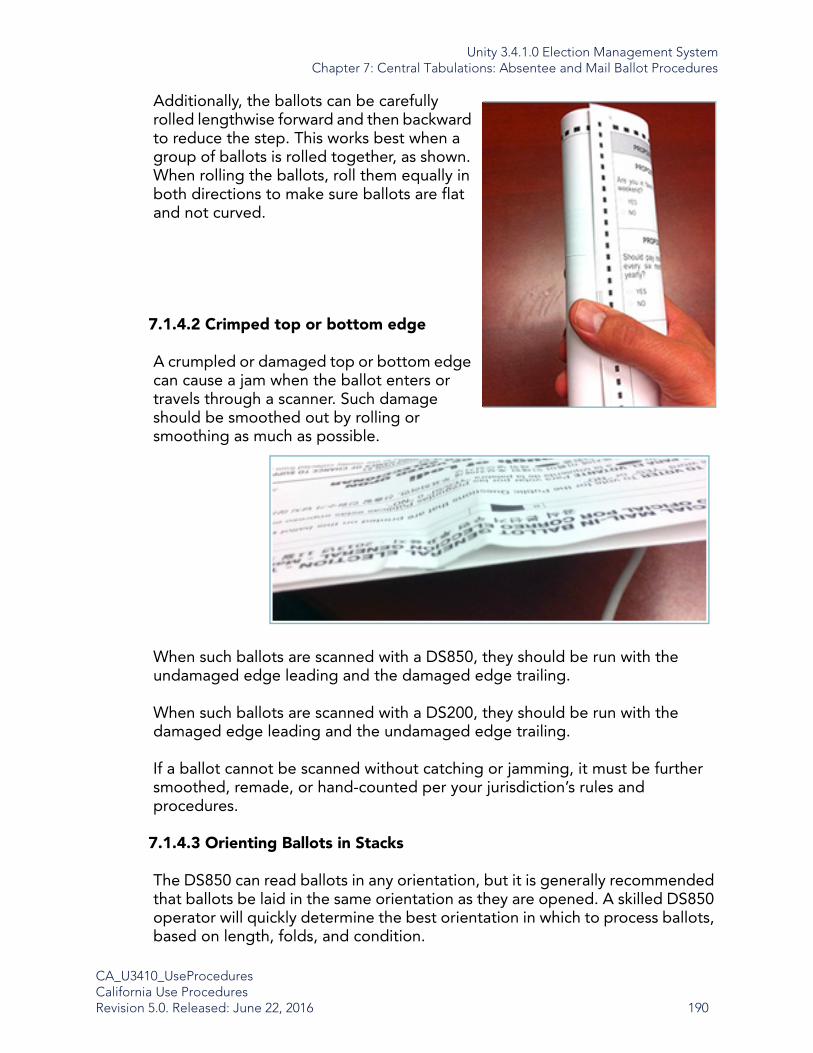
Unity 3.4.1.0 Election Management SystemChapter 7: Central Tabulations: Absentee and Mail Ballot Procedures
CA_U3410_UseProceduresCalifornia Use ProceduresRevision 5.0. Released: June 22, 2016 190
Additionally, the ballots can be carefully rolled lengthwise forward and then backward to reduce the step. This works best when a group of ballots is rolled together, as shown. When rolling the ballots, roll them equally in both directions to make sure ballots are flat and not curved.
7.1.4.2 Crimped top or bottom edge
A crumpled or damaged top or bottom edge can cause a jam when the ballot enters or travels through a scanner. Such damage should be smoothed out by rolling or smoothing as much as possible.
When such ballots are scanned with a DS850, they should be run with the undamaged edge leading and the damaged edge trailing.
When such ballots are scanned with a DS200, they should be run with the damaged edge leading and the undamaged edge trailing.
If a ballot cannot be scanned without catching or jamming, it must be further smoothed, remade, or hand-counted per your jurisdiction’s rules and procedures.
7.1.4.3 Orienting Ballots in Stacks
The DS850 can read ballots in any orientation, but it is generally recommended that ballots be laid in the same orientation as they are opened. A skilled DS850 operator will quickly determine the best orientation in which to process ballots, based on length, folds, and condition.

Unity 3.4.1.0 Election Management SystemChapter 7: Central Tabulations: Absentee and Mail Ballot Procedures
CA_U3410_UseProceduresCalifornia Use ProceduresRevision 5.0. Released: June 22, 2016 191
Orienting all of the ballots allows the operator to run them in the desired orientation and makes it easier to visually determine whether or not a stack of ballots has been sufficiently prepared. Ballot stacks that do not lie flat will require additional back-bending or rolling lengthwise until they are flat.
7.1.5 Back-Bending Stacks of Ballots
Ballots will generally be staged in stacks near the input hopper of the DS850. As the ballots rest in stacks, a skilled operator can judge how well they have been prepared by how flat the ballots lie in the stack. If there is a significant bend in the ballots in the stack, a quick back-bend is suggested.
However, care must be taken when back-bending a stack of ballots. Ballot prep staff should begin with smaller stacks of 10 or fewer ballots. With experience, staff should gain the skill to back-bend larger stacks of 25 to 50 ballots.
The ballots should be carefully jogged manually on a table top or with a powered jogger.
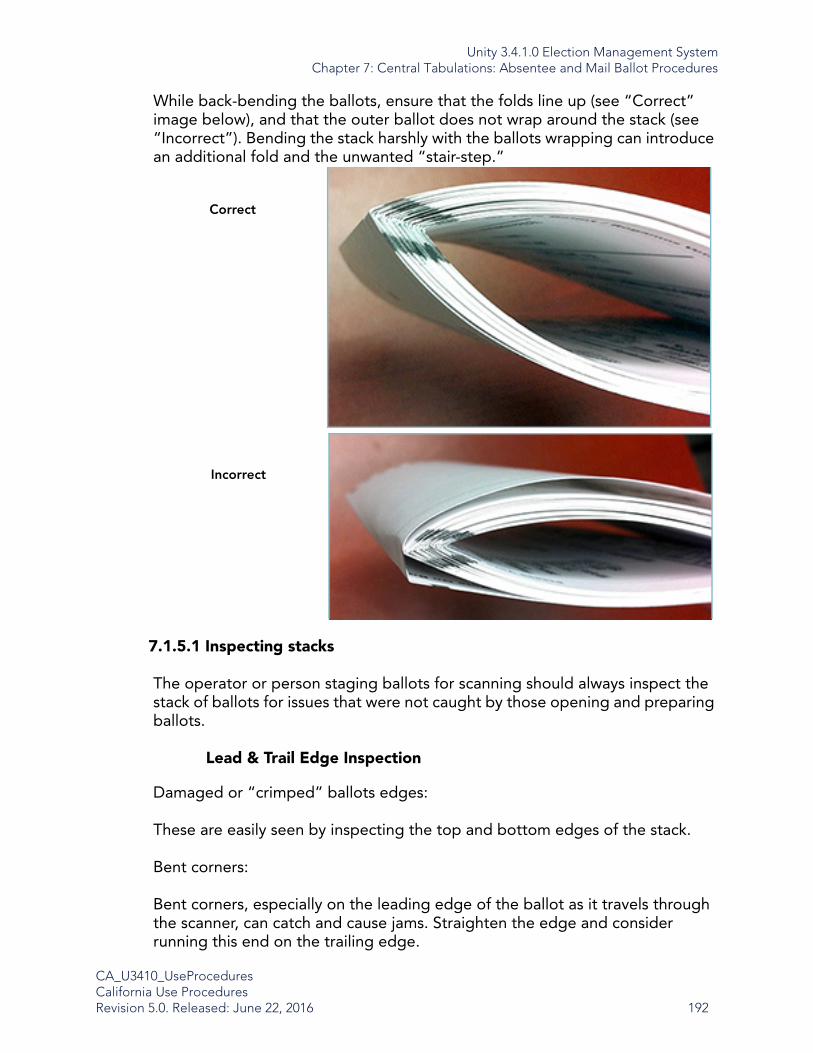
Unity 3.4.1.0 Election Management SystemChapter 7: Central Tabulations: Absentee and Mail Ballot Procedures
CA_U3410_UseProceduresCalifornia Use ProceduresRevision 5.0. Released: June 22, 2016 192
While back-bending the ballots, ensure that the folds line up (see “Correct” image below), and that the outer ballot does not wrap around the stack (see “Incorrect”). Bending the stack harshly with the ballots wrapping can introduce an additional fold and the unwanted “stair-step.”
7.1.5.1 Inspecting stacks
The operator or person staging ballots for scanning should always inspect the stack of ballots for issues that were not caught by those opening and preparing ballots.
Lead & Trail Edge Inspection
Damaged or “crimped” ballots edges:
These are easily seen by inspecting the top and bottom edges of the stack.
Bent corners:
Bent corners, especially on the leading edge of the ballot as it travels through the scanner, can catch and cause jams. Straighten the edge and consider running this end on the trailing edge.
Correct
Incorrect

Unity 3.4.1.0 Election Management SystemChapter 7: Central Tabulations: Absentee and Mail Ballot Procedures
CA_U3410_UseProceduresCalifornia Use ProceduresRevision 5.0. Released: June 22, 2016 193
Side Edge Inspection
Either look at the ballots or flip through the stack as one would with copy paper being inserted into a copy machine. In this inspection, look for the issues previously described in Ballot Inspection. Remember to inspect or flip through both sides of the ballot stack.
Below are pictures of these issues, as seen in the stack.
A stair-step is easy to spot. If left in the stack, this step can cause a subsequent ballot to catch as it passes into the output bin.
The ballot should be turned end-wise so the step faces the other way, allowing the next ballot to pass down the step. An operator can also run a fingernail or smooth coin along the step to flatten it out.
Unity 3.4.1.0 Election Management SystemChapter 7: Central Tabulations: Absentee and Mail Ballot Procedures
CA_U3410_UseProceduresCalifornia Use ProceduresRevision 5.0. Released: June 22, 2016 194
7.1.6 Avoiding Jams
Once ballots are properly unfolded and inspected, they should always be straightened and aligned using a ballot jogger so they can be read. Smaller stacks of ballots can be jogged by hand.
On the DS850, begin with smaller stacks of about 50 ballots, then work up to 100-150 ballots. A skilled operator will find an optimum number of folded ballots that can be consistently run without jamming. This number will depend on factors such as the length of the ballot, the number of folds, the condition of the ballots, and the quality of the ballot preparation.
If jams become frequent, reduce the number of ballots in the stacks and carefully evaluate the ballot prep to eliminate the causes of the jams. Review the procedures and experiment with the proper amount of back-bending, rolling lengthwise, and number of ballots in a run.
When jams occur, stop to identify and remove the offending ballot, to avoid repeated jams. If the ballot must be run, put in a run by itself, or in small batches of problem ballots.
7.1.7 Scanning Damaged Ballots
If a large number of ballots are crumpled or rippled from prior exposure to liquid, once they are dried and cleared of all foreign material, they can be run through the DS850. They should be run in small batches. The pick delay can also be set to 1-2 seconds to run them more slowly, allowing time to remove a ballot from the output tray that would otherwise cause a jam with the next ballot.

Unity 3.4.1.0 Election Management SystemChapter 7: Central Tabulations: Absentee and Mail Ballot Procedures
CA_U3410_UseProceduresCalifornia Use ProceduresRevision 5.0. Released: June 22, 2016 195
7.1.8 Folding Methods
There are numerous types of folds that can be used for ballots that will be mailed to voters. These fold types, combined with the different lengths of ballots, can give jurisdictions a number of options. The most common ballot folds are below.
Description: 1 fold, 2 panels
Names: Single-Fold, Half-Fold, 2-Panel, V-Fold
Description: 2 folds, 3 panels
Names: Z-Fold, Accordion Fold, Map Fold
Description: 2 folds, 3 panels
Names: C-Fold, Letter Fold
Description: 3 folds, 4 panels
Names: Accordion Fold, Concertina Fold
Description: 3 folds, 4 panels
Names: Double-Fold, Parallel Double-Fold

Unity 3.4.1.0 Election Management SystemChapter 7: Central Tabulations: Absentee and Mail Ballot Procedures
CA_U3410_UseProceduresCalifornia Use ProceduresRevision 5.0. Released: June 22, 2016 196
The choice of a folding method is generally determined by cost and previous practice. Cost is often driven by the size of the envelope. A jurisdiction’s equipment for handling a particular size of envelope can also be a factor.
Two rules can help when selecting folds for high-speed scanning.
Rule 1: Choose the least number of folds possible.
Most importantly: Fewer folds are best. A single fold is easier to handle than a double fold; a double fold is easier than 3 folds, and so on.
Rule 2: For multi-page elections, avoid double-fold and “C” folds.
It is important to avoid making additional folds or bends beyond those made in the initial fold process. Voters have to unfold the “by mail” ballots, mark their votes, and then refold them. When a voter refolds multiple ballots together, certain types of folds can create additional folds or creases, resulting in a “stair-step.”
Generally, the ballots are folded and inserted individually into the envelope, and the folds are crisp and even.
However, in the case of a double-fold, if the voter folds the ballots together, one of the folds can be rounded over the other ballot folds.

Unity 3.4.1.0 Election Management SystemChapter 7: Central Tabulations: Absentee and Mail Ballot Procedures
CA_U3410_UseProceduresCalifornia Use ProceduresRevision 5.0. Released: June 22, 2016 197
When this fold is opened, the result is a crimp or stair-step.
Alternately, ballots folded together in a Z or Map fold pattern have significantly fewer issues with rounded bends.
A single fold or any of the “Z” or accordion folds can greatly reduce the creation of this stair-step. Additionally, instructions on the ballots to refold and insert the ballots into the envelope one at a time would also reduce the frequency of ballots being folded over each other improperly.
Additionally, those performing the folding must be completely versed in the requirements from the ES&S Ballot Production Guide. Important points from this guide include:
• Coordination is necessary between those doing the ballot layout and those doing the folder setup to ensure that folders never go through a timing track on the ballot and risk going through a voter response (oval) area.
• The roller pressure for the folder should be reduced to about 2–3 times the thickness of the ballot stock.
• Scoring the ballot is not recommended.
Consult ES&S Ballot Management Services for ballot stock, printing, and folding considerations.

Unity 3.4.1.0 Election Management SystemChapter 7: Central Tabulations: Absentee and Mail Ballot Procedures
CA_U3410_UseProceduresCalifornia Use ProceduresRevision 5.0. Released: June 22, 2016 198
7.2 Battery Backup
Use an external Uninterruptible Power Supply (UPS) to protect against data loss. The UPS will provide continuous power to the machine, preventing it and any attached printers from being damaged in case of a power surge. A UPS must be used for compliance with EAC electrical testing requirements.
7.2.1 Install the UPS
Installation of the UPS involves connecting the bottom battery connector to the top battery connector.
1. Move the UPS so that the front panel of the UPS hangs over the edge of the table as shown in the picture on the right.
2. Press down on the front panel and then slide it off as shown in the picture on the right.
Caution Route the power cord for this product to protect it from being walked on or pinched. Power down the unit completely before connecting or disconnecting the power cord. Remove the power cord before moving the unit. Place the power cord near an easily accessible wall outlet.

Unity 3.4.1.0 Election Management SystemChapter 7: Central Tabulations: Absentee and Mail Ballot Procedures
CA_U3410_UseProceduresCalifornia Use ProceduresRevision 5.0. Released: June 22, 2016 199
3. Insert the bottom battery connector into the top battery connector. The picture below on the left shows the two connectors before they are connected; the picture below on the right shows the two connectors after they have been connected.
4. Replace the front panel.
5. Move the UPS to the spot where you want it to be when the scanner is operating.
6. Plug the UPS into a power outlet.
Connect the Scanner to the UPS
7. Plug one end of the scanner’s power cord into the scanner, just below the power switch. Plug the other end of the power cord into one of the bottom receptacles on the UPS that provides battery backup. Connect the data communication cable to the UPS and one of the USB ports on the scanner. The data communication cable is used by the UPS to let the scanner know when the UPS is operating on battery power.

Unity 3.4.1.0 Election Management SystemChapter 7: Central Tabulations: Absentee and Mail Ballot Procedures
CA_U3410_UseProceduresCalifornia Use ProceduresRevision 5.0. Released: June 22, 2016 200
7.2.2 Turn On the UPS
Before turning on the UPS, make sure it is plugged into a power outlet. Then press the power switch. The green light visible at the top of this unit indicates that the UPS is powered on and that utility power is powering battery backup outlets.
NoteThe first time the UPS is powered up, it will take eight hours for it to reach its full charge.
Unity 3.4.1.0 Election Management SystemChapter 7: Central Tabulations: Absentee and Mail Ballot Procedures
CA_U3410_UseProceduresCalifornia Use ProceduresRevision 5.0. Released: June 22, 2016 201
7.3 Operating the M650
7.3.1 Loading an Election onto the M650
1. Turn on the printers. Verify that the printer paper is loaded properly, and that the print head is at the top of the page.
2. Insert the zip disk with your election definition into the zip drive on the scanner. You must insert the disk before you turn the scanner on for the scanner to recognize that you are loading a new election definition.
3. Turn the scanner on. The message “Booting Model 650” appears.
The message, “Press Stop to Keep (Election Name 1) Press Start to Initialize (Election Name 2)” appears after the machine boots.
4. Press START to transfer the election definition files from the zip disk to the scanner’s internal drive. The message “Confirm: Initialize Election? Press Stop to Cancel, Start to Continue” appears.
5. Press START to transfer the election definition file from the zip disk to the internal drive. The message “Initializing Election Files” appears. The next message reads, “Printing System Ready Report,” followed by a message which reads “Ready for Regular Counting.”
After you load the election definition, the “Ready” light illuminates, and the scanner is in on-line mode. The report format is automatically set to short when the scanner starts.
6. Make sure the information on the Machine Readiness Report is correct.
NoteSee your printer instructions for guidance (the printer manufacturer's manual should always be kept in the drawer of the scanner stand).
NoteContact an ES&S support technician immediately if the printed information is not correct for the current election.
Unity 3.4.1.0 Election Management SystemChapter 7: Central Tabulations: Absentee and Mail Ballot Procedures
CA_U3410_UseProceduresCalifornia Use ProceduresRevision 5.0. Released: June 22, 2016 202
7. Remove the zip disk with the election definition and store it in a safe place.
7.3.2 Producing a Zero Report
Zero the scanner before you run Election Day ballots, and check your reports to ensure that all totals equal zero.
1. Press ZERO TOTALS while holding down the ENABLE button to clear scanner totals. The message “Confirm Zero Totals? Press Stop to Cancel, Start to Continue” appears. Press START then press STOP. The message, “Ready for Regular Counting” appears after the scanner clears totals.
2. In the REPORTS section, press FORMAT until you select LONG, and then press GRAND TOTALS to generate a “zero report.”
The message “Printing Grand Totals Report Summary (Long) Format” appears. The message, “Ready for Regular Counting” appears after the scanner prints the report.
3. Check the Grand Totals Report to make sure that all totals are zero. After verifying that they are all zero have the operator sign-off on the report.
4. Set the SORT options for your election. You cannot change sort options after ballot scanning begins. The ballot scanner can sort blank, over-voted, under-voted, and write-in ballots from regular ballots. Be aware of your jurisdiction’s rules for separating ballots before selecting a sort option. The scanner does not tabulate blank, over-vote, under-voted and crossover ballots when they are sorted. The scanner will only tabulate sorted write-in ballots if the election definition contains the option to tabulate write-ins.
Caution Do not reuse the election definition disk to store election data. Use blank zip disks instead so your election definition can be archived. The election definition will remain on the machine until a new election definition is loaded.
Note When you save results to a zip disk, you can use that results disk to load the election definition onto additional scanners. Initialization of these machines will be faster than it was when the election definition was loaded onto the first scanner. Zero totals on any scanners for which you load the election definition with a results disk.

Unity 3.4.1.0 Election Management SystemChapter 7: Central Tabulations: Absentee and Mail Ballot Procedures
CA_U3410_UseProceduresCalifornia Use ProceduresRevision 5.0. Released: June 22, 2016 203
The scanner lists this option on the ready report, which prints automatically when you start the scanner.
7.3.3 Scanning Ballots
Follow the guidelines of the California Elections Code when you count vote-by-mail ballots. Depending on the laws in your jurisdiction, you can sometimes count Vote-By-Mail ballots before the polls close.
Vote by Mail ballots should be counted into their respective precincts, whether they are pre-programmed duplicate precincts or the same precincts as Election Day. To separate the data between Vote-By-Mail and Election Day, use the Group function in Election Reporting Manager during the upload session to keep the totals separate.
Note If your jurisdiction counts sorted ballots immediately after the machine sorts them, be sure to turn on the appropriate sort option again before scanning the next precinct’s ballots to ensure that all ballots get sorted.
NoteProgram your election definition with your vote by mail scanning method.
Note As you are processing your ballots, be sure to verify that the header card processed is correct.
A header card that is passed and totals on multiple scanners will show as processed on each scanner. Double-check to ensure that the proper upload process is used in Election Reporting Manager to assure accurate results.
Unity 3.4.1.0 Election Management SystemChapter 7: Central Tabulations: Absentee and Mail Ballot Procedures
CA_U3410_UseProceduresCalifornia Use ProceduresRevision 5.0. Released: June 22, 2016 204
7.3.4 Sort Options
The ballot scanner can sort blank, over-voted, under-voted, crossover, and write-in ballots from regular ballots. Be aware of your jurisdiction’s rules for separating ballots before selecting a sort option.
The scanner does not tabulate blank, over-vote, under-voted and crossover ballots when they are sorted. The scanner will only tabulate sorted write-in ballots if the election definition contains the option to tabulate write-ins. The scanner lists this option on the ready report, which prints automatically when you start the scanner.
1. Press the BLANK, OVER-VOTE, or WRITE-IN buttons in the SORT section of the control panel to sort those ballots. Press the SPECIAL button to sort crossovers. You may select any or all of the sort buttons.
An indicator light will turn on next to the selected sort options. When a scanned ballot meets the selected sort criteria, the scanner stops and a message appears describing the type of ballot sorted.
2. Remove the top ballot from the output hopper and place it in an area you have designated for sorted ballots.
To sort undervoted ballots, press the Enable and Sort Blank buttons simultaneously. The display indicates whether Sort Undervote is enabled or disabled. Sort Undervote and Sort Blank cannot both be enabled. Enabling Sort Undervote, however, will enable sorting blank ballots.
7.3.5 Deleting Precinct Results
Call ES&S before flushing precincts. At times, you might find it necessary to clear the vote counts from a precinct. Situations where this occurs include accidentally counting the ballots for a given precinct twice (creating a double count); using the wrong precinct identification header when counting ballots (resulting in the vote counts being tabulated in the wrong precinct); and counting ballots from Election Day when the absentee mode is active (placing the tabulated votes in the wrong election group). To clear the tabulated votes from a precinct, use the method that corresponds to the way you counted the ballots.
Unity 3.4.1.0 Election Management SystemChapter 7: Central Tabulations: Absentee and Mail Ballot Procedures
CA_U3410_UseProceduresCalifornia Use ProceduresRevision 5.0. Released: June 22, 2016 205
7.3.5.1 Procedure to Flush a Precinct
This procedure explains how to clear a precinct on the ES&S Model 650 Central Scanner when the sequence number on the ballot identifies the precinct. If you counted absentee ballots in a duplicate set of precincts, each precinct flushed will clear both the Election Day and absentee ballot counts in that precinct. Please read these steps completely before using this procedure.
To ensure that you clear all the totals for the selected precinct, use this procedure on each central scanner in your system. You must use the procedure outlined below for each precinct that you wish to clear.
1. Save. Store the current vote counts on a zip disk. This way, you can return to the original vote tallies and repeat this procedure if you encounter a problem.
2. Activate Flush Mode. Place the flush control header on the input hopper. Press START.
After the header is read, the screen will display “Scan Ballot or Header for Precinct to Flush”.
3. Select Precinct. Place a ballot from the precinct to clear on the hopper. Press START.
After the ballot is read, the screen will display “Confirm Flush for (Precinct Name) Re-scan Ballot or Header if Correct”.
4. Confirm and Flush Precinct. Place a ballot from the precinct you want to clear on the hopper a second time. Press START.
After the ballot has been scanned, the screen will display “Precinct Flush Complete!”.
Precinct totals are now cleared.

Unity 3.4.1.0 Election Management SystemChapter 7: Central Tabulations: Absentee and Mail Ballot Procedures
CA_U3410_UseProceduresCalifornia Use ProceduresRevision 5.0. Released: June 22, 2016 206
7.3.6 Saving Results
You must save election data to the internal drive and to at least one blank zip disk. ES&S recommends that you save to the internal drive frequently, as this prevents data loss if the scanner loses power or is turned off. Save to the zip disk as often as necessary to back up results. Use the zip disk to transfer election results to Election Reporting Manager and to archive your results.
7.3.6.1 Save Results to the Internal Drive
Press SAVE to transfer vote totals from volatile memory to the internal drive.
A confirmation message indicating the number of ballots scanned, saved, and sorted appears after the scanner saves the data and then clears volatile memory.
7.3.6.2 Save Results to a Zip Disk
1. Insert a blank formatted disk into the zip drive.
2. Hold down the ENABLE button and press SAVE to save from the internal drive to the zip disk.
The screen will display the message “Confirm Save Totals to Transfer Disk? Press Stop to Cancel, Start to Continue”.
3. Press START.
Caution Do not reuse the election definition disk to store election data. Use blank zip disks instead so results data is not corrupted. Zip disks must be formatted with a FAT file system.
NoteResults saved to the internal drive will be stored there until you zero the totals.
Caution Do not reuse the election definition disk to store election data. Use blank zip disks instead so results data is not corrupted. Zip disks must be formatted with a FAT file system.

Unity 3.4.1.0 Election Management SystemChapter 7: Central Tabulations: Absentee and Mail Ballot Procedures
CA_U3410_UseProceduresCalifornia Use ProceduresRevision 5.0. Released: June 22, 2016 207
The screen will display the message “Totals copied to transfer disk” after the scanner copies the totals.
Remove the disk and label it with the date, time, election title, disk number, scanner number and total number of ballots saved to disk.
7.3.7 Producing a Results Report
There are five ballot tabulation reports that can be generated directly from the M650:
• Grand Totals Report: Jurisdiction-wide vote total for each candidate and issue option on the ballot
• Precincts Processed Report: Precincts for which the scanner has counted ballots and the total number of ballots counted. The report breaks down tabulation results by precinct.
• Precincts not Processed Report: Precincts for which the scanner has not yet counted ballots
• Totals by Precinct Report: Vote summary for each candidate and issue option on the ballot for every precinct
• Last Precinct Report: This report provides a vote summary for each candidate and issue option on the ballot for the last precinct scanned. The information in this report is the same as that in the Totals by Precinct Report, but the report only prints for the last precinct with ballots scanned.
You can use any of these reports to provide vote summary information to candidates and the media.
Note If you have not saved election data to the internal drive, a message indicating that tabulation is in progress will appear. You need to save vote counts to the internal drive before saving them to a zip disk. Press SAVE, then repeat step 2 to store election results on the zip disk.
Note To get the total number of ballots saved to the zip disk, go to the audit log printer and note the number associated with the time stamp of that save.

Unity 3.4.1.0 Election Management SystemChapter 7: Central Tabulations: Absentee and Mail Ballot Procedures
CA_U3410_UseProceduresCalifornia Use ProceduresRevision 5.0. Released: June 22, 2016 208
1. To select either short or long format, in the REPORTS area of the control panel, press FORMAT.
2. Press the button for the report to be printed.
If you have scanned ballots but not saved to the internal drive, the message “Tabulation in Progress Press SAVE” appears. Press SAVE, then press the appropriate report button.
To stop printing a report, press and hold STOP. The message, “Operator Halting Report Printing” appears. The scanner cancels any portion of the report that has not yet spooled to the printer.
7.3.8 Shutting Down the M650
When all tabulation and saves have been completed on the M650, turn off the machine using the ON/OFF switch then turn off the power strip associated with that cart. Clear out any dust in the hoppers and read head. Cover the machine for later use.
NoteWait for the READY indicator light to appear before printing additional reports.
Note If you do not expect to do any further processing, remove the pick belt. Save it if it is still in usable condition. Otherwise, discard the belt and replace it with a fresh one when processing continues.

Unity 3.4.1.0 Election Management SystemChapter 7: Central Tabulations: Absentee and Mail Ballot Procedures
CA_U3410_UseProceduresCalifornia Use ProceduresRevision 5.0. Released: June 22, 2016 209
7.4 Operating the DS850
7.4.1 Loading an Election Onto the DS850
You must clear and initialize the DS850 prior to loading the election definition. The clear and initialize process clears all data from the machine and loads the necessary encryption keys to load and run the election.
1. Press Election to access the Election menu.
2. From the Election menu, press Setup to access the Setup screen.
3. On the Setup screen, press Load Election.This displays the Searching for Election Definition Media Device pop-up screen.
4. Insert the election definition media flash drive into one of the scanner’s USB ports. The previous pop-up screen is temporarily replaced by a Detecting inserted device pop-up screen. Then, the Election Code screen appears.
5. Enter the Election Code, then press Accept.
6. When the message “A valid Election Definition was found” appears, press Yes to start the election definition load process.
7. When the message “The Election Definition was successfully loaded” appears, remove the flash drive and store it in a safe place. Then press Done.
7.4.2 Producing a Zero Report
Use the Zero Report to ensure all of your contests have zero votes before you begin scanning ballots. The report displays zeros for all contests, indicating that no ballots have been scanned. You cannot print this report after ballots have been scanned on the DS850.
To preview or print the Zero Report:
From the Reports menu, in the Report Type field, press Zero Report.
Press Preview to the view the report on the touch screen, or press Print to print the report on the laser printer.

Unity 3.4.1.0 Election Management SystemChapter 7: Central Tabulations: Absentee and Mail Ballot Procedures
CA_U3410_UseProceduresCalifornia Use ProceduresRevision 5.0. Released: June 22, 2016 210
7.4.3 Scanning the Ballots
1. Press Scanning.
2. Press Scan Ballots. The Load Ballots screen appears.In Mixed Precinct mode, the buttons at the bottom of the screen are dimmed. In By Style and Single Precinct modes, the Select Precinct button would be active.
3. Load the ballots.
a. Adjust the length of the input and output trays to accommodate the ballots.
b. Slide the ballot guide out of the curved opening in the input tray, as shown in the picture on the right.
c. Place the ballots in the input tray. The ballots can be in any orientation.
d. Slide the ballot guide back toward the opening until it rests gently against the ballot stack.
4. Once the ballots have been loaded, the Scan Ballots screen appears. Press Start to begin scanning.
Warning The ballot scanning process assumes that the scanner has been powered on, all pre-Election Day tasks have been completed, the election definition has been loaded, the user has the authority to scan ballots, and the scanner has been calibrated.
Note Before you attempt to scan ballots make sure that the camera lid and rear panel are closed. The scanner does not allow functions that engage the motors to be performed when the camera lid or rear panel is open.
Note ES&S recommends using a jogger to separate the ballots and to align the ballot stack before you place the ballots in the input hopper. If the ballot stack is slightly curved, place the stack in the input hopper with the convex side up. If the scanner cannot read a ballot because of its condition or because of the way in which it is fed into the scanner, the scanner will not process the ballot and will out stack the ballot to the Not Processed (top) bin.

Unity 3.4.1.0 Election Management SystemChapter 7: Central Tabulations: Absentee and Mail Ballot Procedures
CA_U3410_UseProceduresCalifornia Use ProceduresRevision 5.0. Released: June 22, 2016 211
While the ballots are being scanned, the Scanning screen is displayed. Only the Stop button is available on this screen. If you need to stop the machine before the input tray is empty, press Stop to stop scanning. The number of ballots that have been scanned will be displayed in the Current column.
After the ballots have been scanned, the Scan Ballots screen reappears. This time, only the Save button is active. The Current column on the screen indicates the number of ballots in each bin, as well as the total number of ballots scanned.
At this point, you can do any of the following:
• Save the current batch.
• Delete the current batch.
• Load more ballots into the input tray. The Scan Ballots screen will be displayed. Press Start to scan the additional ballots. When the ballots have been scanned, the Scan Ballots screen will be displayed again, and the numbers in the Current column will be updated.
Note If you are required to select a precinct and have not yet done so, the Start button will be dimmed. The only button you will be able to use is the Select Precinct button. Press Select Precinct to search for and select a precinct. After you have selected a precinct, you will be able to scan ballots.
Note If ballots have been out-stacked to the top (not processed) bin, you have the option of generating the Not Processed Ballots report. You can also remove the ballots from the bin and reset the top bin quantity to zero, before you save the batch. The removed ballots can later be reviewed or re-scanned.
Warning If any of the output hoppers are full or nearly full and you wish to scan more ballots into the batch, make sure you keep any ballots you remove from the output bins segregated from other batches. Ballots removed but not yet saved as part of a batch must all be segregated by the bin from which the ballots were removed.
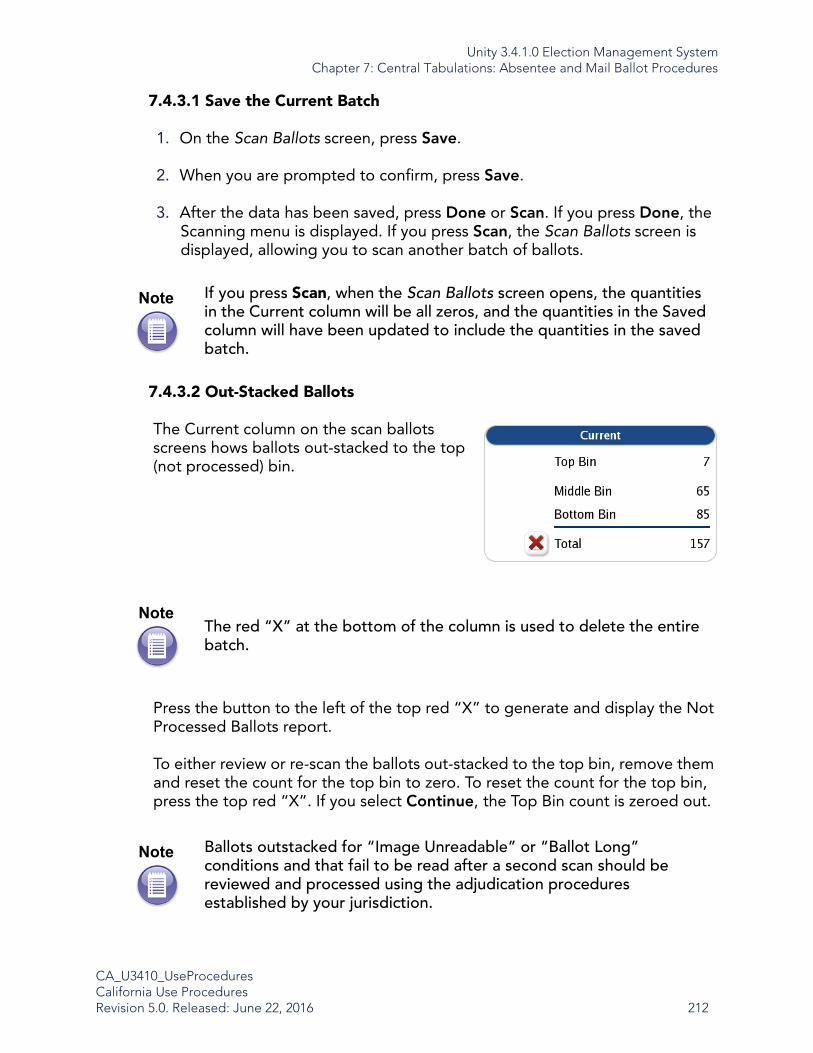
Unity 3.4.1.0 Election Management SystemChapter 7: Central Tabulations: Absentee and Mail Ballot Procedures
CA_U3410_UseProceduresCalifornia Use ProceduresRevision 5.0. Released: June 22, 2016 212
7.4.3.1 Save the Current Batch
1. On the Scan Ballots screen, press Save.
2. When you are prompted to confirm, press Save.
3. After the data has been saved, press Done or Scan. If you press Done, the Scanning menu is displayed. If you press Scan, the Scan Ballots screen is displayed, allowing you to scan another batch of ballots.
7.4.3.2 Out-Stacked Ballots
The Current column on the scan ballots screens hows ballots out-stacked to the top (not processed) bin.
Press the button to the left of the top red “X” to generate and display the Not Processed Ballots report.
To either review or re-scan the ballots out-stacked to the top bin, remove them and reset the count for the top bin to zero. To reset the count for the top bin, press the top red “X”. If you select Continue, the Top Bin count is zeroed out.
Note If you press Scan, when the Scan Ballots screen opens, the quantities in the Current column will be all zeros, and the quantities in the Saved column will have been updated to include the quantities in the saved batch.
NoteThe red “X” at the bottom of the column is used to delete the entire batch.
Note Ballots outstacked for “Image Unreadable” or “Ballot Long” conditions and that fail to be read after a second scan should be reviewed and processed using the adjudication procedures established by your jurisdiction.

Unity 3.4.1.0 Election Management SystemChapter 7: Central Tabulations: Absentee and Mail Ballot Procedures
CA_U3410_UseProceduresCalifornia Use ProceduresRevision 5.0. Released: June 22, 2016 213
7.4.4 Bin Sorting
There are two options on the Bin Sorting screen: Sort Settings and Scan Screen Sort Options.
Sort Settings
The Sort Settings option allows you to specify which output bin the ballots will be diverted to. It also allows you to specify whether undervotes, overvotes, crossovers, blank ballots, and ballots with unclear marks are to be processed.
HPM provides the ability to set bin sorting in the Election Definition.
To use settings that are different from those in the Election Definition, you can use the bin sorting screens to change the settings on the scanner.
If the Sorting on/off feature is enabled, you can override the default settings for bin sorting in the Election Definition, as well as any changes that have been made using the Bin Sorting screens, by turning sorting off from the Scan Ballots screens. When the Sorting on/off feature is enabled, there is a button on the scan ballots screens that allows the user to turn sorting on or off.
Write-In
A write-in space appears on the ballot as a voting target next to a blank line that a voter uses to fill in the name of a write-in candidate. To vote for a write-in candidate, a voter writes the name of the candidate on the write-in line and marks the ballot target that corresponds to the line.
Overvote Ballots having more than the allowed number of votes cast for one or more contests
Undervote
The election definition can designate one or more contests as an “undervote-contest”. This option out-stacks any scanned ballot that has a designated undervote contest that was undervoted. This option does not out-stack blank ballots
Blank Ballots
This option out-stacks ballots that do not contain any votes, have been marked with a non-standard marking device for the DS850, or have been marked improperly (for example, the voter circled the candidate’s name instead of filling in the appropriate oval).
Unclear Marks
Unable to interpret a mark in an oval position on the ballot.
Cross Over In an Open Primary, this option out-stacks ballots with votes for any multiple party candidate.
Invalid ID Sorts ballot that are not associated with the current election or a ballot style that is not associated with any of the election precincts.
Unreadable Not able to read or interpret the ballot. Marks on the code channel, torn ballot

Unity 3.4.1.0 Election Management SystemChapter 7: Central Tabulations: Absentee and Mail Ballot Procedures
CA_U3410_UseProceduresCalifornia Use ProceduresRevision 5.0. Released: June 22, 2016 214
When the DS850 scans a ballot, it gathers two images (front and back) and a cast vote record from the ballot. A ballot is normally scanned within a batch of ballots.The cast vote records of ballots diverted to the bins that have been processed are selected for inclusion in the collection process. The cast vote records of ballots diverted to the Not Processed bin are selected for exclusion from the collection process. These ballot images and cast vote records are then saved to the scanner’s internal memory when the batch is saved.
1. Press Bin Sorting on the Configuration screen. The Bin Sorting options screen opens.
2. On the Bin Sorting options screen, press Sort Settings.
3. The Sort Settings screen will show the current settings from HPM for each bin. Press Edit to change the settings for each bin.
4. When prompted, enter the Election Code, then press Accept.
5. To change the options for the bin sorting, press the Option button under each ballot exception to sort the ballots to the bin of your choice. You can only choose one bin per ballot exception. Press Save to save the settings and return to the Sort Setting View screen.
Scan Screen Sort Options
The Sort Option allows you to enable or disable the Sorting on/off feature. When the Sorting on/off feature is enabled, the Sorting on/off button is displayed in the top portion of the main scan ballots screen with Sorting On. When the Sorting on/off feature is disabled, the Sorting on/off button is not displayed on the main scan ballots screen, however Sorting remains on. By default, the Sort Option is disabled.
Note
The Cross Over option is only applicable for an open primary election.
Note For Logic and Accuracy Testing, you may be required to turn off bin sorting prior to scanning the test deck. Bin sorting is turned off when all the ballot the Write-ins option is set to Process and none of the ballot types for the Ballots Not Processed option are selected. When logic and accuracy testing has been completed, make certain the bin sorting options are set as required for your election.
Unity 3.4.1.0 Election Management SystemChapter 7: Central Tabulations: Absentee and Mail Ballot Procedures
CA_U3410_UseProceduresCalifornia Use ProceduresRevision 5.0. Released: June 22, 2016 215
1. Press Bin Sorting on the Configuration screen.
2. On the Bin Sorting options screen, press Scan Screen Sort Options. The Scan Screen Sort Options settings screen is displayed.
3. On the Sort Option settings screen, press Edit.
4. When prompted, enter the Administration code and then press Accept. The Sort Option selection screen is displayed.
5. On the Sort Option selection screen, press the desired option (Disabled or Enabled) to highlight it. Then press Save to save the new setting.
7.4.5 Clear Election Results
You can choose to clear all election results, or the election results for only a specified precinct. The Clear Results functions are accessed from the Results menu.
Clear All Results
1. Press Election to access the Election menu.
2. On the Election menu, press Results.
3. On the Results menu, press Clear All Results.
4. When prompted, enter the Override Code and then press Accept.
5. When the Clear All Results confirmation screen appears, press Confirm to clear all election results.
6. A pop-up screen will appear briefly to indicate that the results are being cleared. When the results have been cleared successfully, press OK to close the pop-up screen.
All counts displayed on the Main Scan Ballot screen (including the Last Export Total) are now zeroed out.
Clear a Precinct’s Results
1. Press Election to access the Election menu.
2. From the Election menu, press Results to display the Results screen.
3. On the Results screen, press Clear A Precinct.
Unity 3.4.1.0 Election Management SystemChapter 7: Central Tabulations: Absentee and Mail Ballot Procedures
CA_U3410_UseProceduresCalifornia Use ProceduresRevision 5.0. Released: June 22, 2016 216
4. When prompted, enter the Override Code and then press Accept. The initial Select Precinct screen is displayed.
5. From the sequence of Select Precinct screens, search for and select the precinct whose election results to clear.
6. When the Clear A Precinct’s Results screen appears, press Clear Results to clear the election results for the selected precinct.
7. If you press Clear Results, a pop-up screen will appear briefly to indicate that the precinct’s results are being cleared. When the results for the specified precinct have been cleared successfully, the Clear A Precinct's Results screen is displayed with a message indicating that the results for the specified precinct have been cleared. Press Done to close the screen.
In the “Saved” column on the Main Scan Ballots screen, any Middle or Bottom Bin ballot counts specifically for the cleared precincts are subtracted from their respective bin counts and added to Top Bin (Not Processed) count.
7.4.6 Exporting Data
Data saved to the scanner’s internal memory can be exported to the Election Definition Media Device flash drive or to a blank USB flash drive. However, if a blank USB flash drive is used, it should be first fully formatted. Described below are the export functions that can be performed from the scanner.
The Export Data functions are accessed from the Results menu.
• Export Results copies the poll place collection data, the election definition, and the audit log to the Election Definition Media Device flash drive or a fully-formatted ES&S Media Device flash drive. All of the copied data, except for the audit log, is encrypted. The data can be pulled into the Election Reporting Manager (ERM) to be consolidated with vote data from other devices (e.g., DS200) to generate the election results. The data can also be used in ERM to generate reports.
• Export Files copies the poll place collection data, the election definition, the gathered ballot data (including ballot images) of any scanned ballot that was not out-stacked and the audit log to a fully-
Note If you choose to use USB media device, it is strongly recommended you use fully-formatted USB media device flash drives rather than the Quick-formatted or cleared (all files deleted) flash drives. Fully formatted flash drives work faster and are more reliable.

Unity 3.4.1.0 Election Management SystemChapter 7: Central Tabulations: Absentee and Mail Ballot Procedures
CA_U3410_UseProceduresCalifornia Use ProceduresRevision 5.0. Released: June 22, 2016 217
formatted ES&S Media Device. All of the copied data, except for the audit log, is encrypted.
• Backup copies the gathered ballot images if selected, the cast vote records, the election definition, and the audit log to the USB media device. All of the copied data, except for the audit log, is encrypted.
• Export Audit Log copies the audit log to the Election Definition Media Device or a fully-formatted ES&S Media Device. The audit log is not encrypted. If a problem occurs, or if there is a question about the exact sequence of events, the audit log copied to the media device an be examined on a PC.
Export Results
1. Press Election to display the Election menu.
2. From the Election menu, press Results.
3. From the Results screen, press Export Results. This displays the Searching for ES&S Media Device pop-up screen.
4. Insert the Election Definition Media Device flash drive or a blank ES&S Media Device flash drive into one of the scanner’s USB ports. The previous pop-up screen is temporarily replaced by a Detecting inserted device pop-up screen. Then, the Election Code screen appears.
5. Enter the Election Code and then press Accept.
6. Select where to export the files.
• USB Media Device
• Network Server Folder - folder located on server
7. Press Export.
8. Press Confirm to confirm to export the data.
The DS850 clears any existing data from the media device. Then it collects the saved cast vote records that were marked for inclusion in the collection process, generates the vote results, and exports those results to the USB flash drive, along with the election definition and the audit log. While this process is occurring, a pop-up screen will display indicating that the batch data is being collected and exported.

Unity 3.4.1.0 Election Management SystemChapter 7: Central Tabulations: Absentee and Mail Ballot Procedures
CA_U3410_UseProceduresCalifornia Use ProceduresRevision 5.0. Released: June 22, 2016 218
9. The Export for Results screen will indicate when the data has been successfully exported. Remove the flash drive. Then press Done to return to the Results screen.
Export Files
1. Press Election to display the Election menu.
2. From the Election menu, press Results to display the Results screen.
3. From the Results screen, press Export Files This displays the Searching for ES&S Media Device pop-up screen.
4. Insert the Election Definition Media Device flash drive or a blank ES&S Media Device flash drive into one of the scanner’s USB ports. The previous pop-up screen is temporarily replaced by a Detecting inserted device pop-up screen. Then, the Election Code screen appears.
5. Enter the Election Code, then press Accept.
6. Select where to export the files.
• USB Media Device
• Network Server Folder - folder located on server
7. Press Export.
8. When the Export Files confirmation screen appears, press Confirm to confirm to export the data.
The DS850 clears any existing data from the media device. Then it collects the saved cast vote records that were marked for inclusion in the collection process, generates the vote results, and exports those results to the USB flash drive, along with the election definition, gathered ballot data (including ballot images) of any scanned ballot that was not out-stacked,
Note The saved cast vote records for ballots that are diverted to the Processed bins (bottom and middle bins) are marked for inclusion in the collection process. The saved cast vote records for ballots that are diverted to the Not Processed bin (top bin) are marked for exclusion from the collection process.
Unity 3.4.1.0 Election Management SystemChapter 7: Central Tabulations: Absentee and Mail Ballot Procedures
CA_U3410_UseProceduresCalifornia Use ProceduresRevision 5.0. Released: June 22, 2016 219
and the audit log. While this process is occurring, a pop-up screen will display indicating that the batch data is being collected and exported.
9. The Export Files screen will indicate when the data has been successfully exported. Remove the flash drive. Press Done to return to the Results screen.
Backup
1. Press Election to display the Election menu.
2. From the Election menu, press Results to display the Results screen.
3. From the Results screen, press Backup. The Election Code screen appears.
4. Enter the Election Code and then press Accept.
5. When you have successfully entered the Election Code, the Backup selection screen appears.
6. Select from one of the following options:
• Export
• Collect
7. Insert the Election Definition Media Device flash drive or a blank ES&S Media Device flash drive to use as the target media device. The Detecting inserted device pop-up screen is displayed briefly. The message in red on the Archive Data selection screen disappears, and the inserted flash drive is listed in the Media Devices field.
8. Select the target device from the list in the Media Devices field, by pressing it. When you press your selection, it is highlighted in blue, as shown below.
9. If you press Confirm, the Backup confirmation screen appears.
Note The saved cast vote records for ballots that are diverted to the Processed bin (bottom bin) and to the Ballots with Write-ins bin (middle bin) are marked for inclusion in the collection process. The saved cast vote records for ballots that are diverted to the Not Processed bin (top bin) are marked for exclusion from the collection process.

Unity 3.4.1.0 Election Management SystemChapter 7: Central Tabulations: Absentee and Mail Ballot Procedures
CA_U3410_UseProceduresCalifornia Use ProceduresRevision 5.0. Released: June 22, 2016 220
10. The Archive Data screen will indicate when the data has been archived successfully. Remove the flash drive. Press Done to return to the Results screen.
7.4.7 Producing a Results Report
The Results Report contains detailed election results and is available in multiple report levels.
• Election Detail - The report displays detailed contest totals for the whole election.
• Election Public - The report displays contest totals for the whole election without including overvote and undervote information.
• Precinct by Precinct Detail - The report displays detailed contest totals for the selected precinct.
• Precinct by Precinct Public - The report displays contest totals for the selected precinct without including overvote and undervote information.
You must specify a precinct if you select the Precinct by Precinct Detail or Precinct by Precinct Public report level.
To preview or print the Results Report:
1. From the Reports menu, press Results Report in the Report Type field.
2. Select the desired report level by pressing the option button to the left of the selection in the Report Level field.
3. If you selected the Election Detail or Election Public report level, skip to Step 4. If you selected the Precinct by Precinct Detail or Precinct by Precinct Public report level, a Select Precinct button is displayed. Press the Select Precinct button to select a precinct.
4. Press Preview to the view the report on the touch screen, or press Print to print the report on the laser printer.
Unity 3.4.1.0 Election Management SystemChapter 7: Central Tabulations: Absentee and Mail Ballot Procedures
CA_U3410_UseProceduresCalifornia Use ProceduresRevision 5.0. Released: June 22, 2016 221
7.4.8 Shutting Down the DS850
After the post-election day maintenance has been completed, shut down and power off the DS850, and then prepare the machine for physical storage.
1. Press Exit in the lower left-hand corner of the screen to display the Exit screen.
2. From the Exit screen, press Shutdown Scanner to access the Shutdown Scanner screen.
3. On the Shutdown Scanner screen, press Shutdown to shut down the scanner.
4. A message will confirm when it is safe to turn off the machine. Flip the power switch to the off position. The power switch is located on the left side of the machine.
5. After you have shut down and powered off the scanner, press the power switch on the UPS to turn it off.
Unity 3.4.1.0 Election Management SystemChapter 8: Early Voting Procedures: Precinct Scanners
CA_U3410_UseProceduresCalifornia Use ProceduresRevision 5.0. Released: June 22, 2016 222
Chapter 8: Early Voting Procedures: Precinct Scanners
8.1 Ballot Preparation
Many considerations go into properly folding ballots to be mailed to voters. Complete information about ballot handling and folding is provided in7.1 Ballot Handling and Folding.
8.2 M100 Procedures
8.2.1 Loading an Election Definition
M100 precinct tabulators use election definitions programmed on PC cards to recognize ballot marks and tabulate results. Make sure the tabulator key is in the OFF position when you load an Election Definition.
1. Lift the access door on the front left of the tabulator to access the PC card slots. Insert the card programmed with your election definition into either card slot.
2. Turn the key to the OPEN/CLOSE POLL position to start the tabulator. The M100 automatically loads the election definition and prints an initial state report.
The S-MODE prompt should appear in the upper left corner of the screen.
Note An arrow on the PC card label shows which end of the card to insert. After the card is inserted, the eject button to the right of the card slot protrudes. Install the card in either the top or bottom slot. Do not force the card into a slot.
Unity 3.4.1.0 Election Management SystemChapter 8: Early Voting Procedures: Precinct Scanners
CA_U3410_UseProceduresCalifornia Use ProceduresRevision 5.0. Released: June 22, 2016 223
8.2.2 Producing a Zero Report
The certification report, or zero report, is printed automatically when you open the polls for voting. The zero report lists the date and time the polls open, followed by the vote count for all of your contests and blank signature lines for poll worker certification. The M100 allows you to print an additional certification report immediately after printing a results report.
If you are using the M100 for early voting, when you turn the key to the VOTE position upon opening the poll, you will receive the message: Which zero report do you wish to print?
To print a summary report containing only the grand totals, select Totals Only.
To print a summary precinct-by-precinct breakdown report, select All Precincts.
8.2.3 Scanning Ballots
The M100 can scan ballots inserted in any direction or orientation. Depending on the options set for your election definition, the M100 will use one of the following methods for accepting or rejecting blank ballots, overvotes, and crossover votes:
Unconditional acceptance – The tabulator accepts and tabulates results for all ballots. The tabulator automatically sorts questioned ballots without storing results from those ballots. While scanning the ballot, the message PROCESSING BALLOT - PLEASE WAIT… will appear. Once the ballot is scanned, the message THANK YOU FOR VOTING appears. Then the message INSERT BALLOT - NUMBER OF VOTERS: appears.
Unconditional rejection – The M100 automatically rejects crossover, overvoted, or blank ballots. Voters must review and correct ballot selections before the tabulator will accept the ballot.
NoteDepending on the number of precincts in your district, it may take several hours to print an All Precincts report.
NoteFor complete poll opening instructions, refer to9.2.1 Open Polls on M100.

Unity 3.4.1.0 Election Management SystemChapter 8: Early Voting Procedures: Precinct Scanners
CA_U3410_UseProceduresCalifornia Use ProceduresRevision 5.0. Released: June 22, 2016 224
Query the voter for correction – The M100 returns a questioned ballot to the voter and displays a screen message that describes the problem and prompts the voter to either review and edit the ballot or cast the ballot as it is. The voter presses RETURN BALLOT to correct the ballot or presses COUNT AS MARKED to cast the ballot without editing selections. Once COUNT AS MARKED is pressed, the message PROCESSING BALLOT - PLEASE WAIT… will appear. Once the ballot is scanned, the message THANK YOU FOR VOTING appears. Then the message INSERT BALLOT - NUMBER OF VOTERS: appears.
Poll workers should closely monitor system messages during voting.
8.2.4 M100 Security Locks and Seals
There is a variety of security methods that can be used for the M100.
After you have inserted the PC Card the front of the M100 must be secured to prevent access to the PC Card slot. Place a seal as shown through the latch and secure tightly. A lock or seal must be placed to prevent access to the additional external ports.
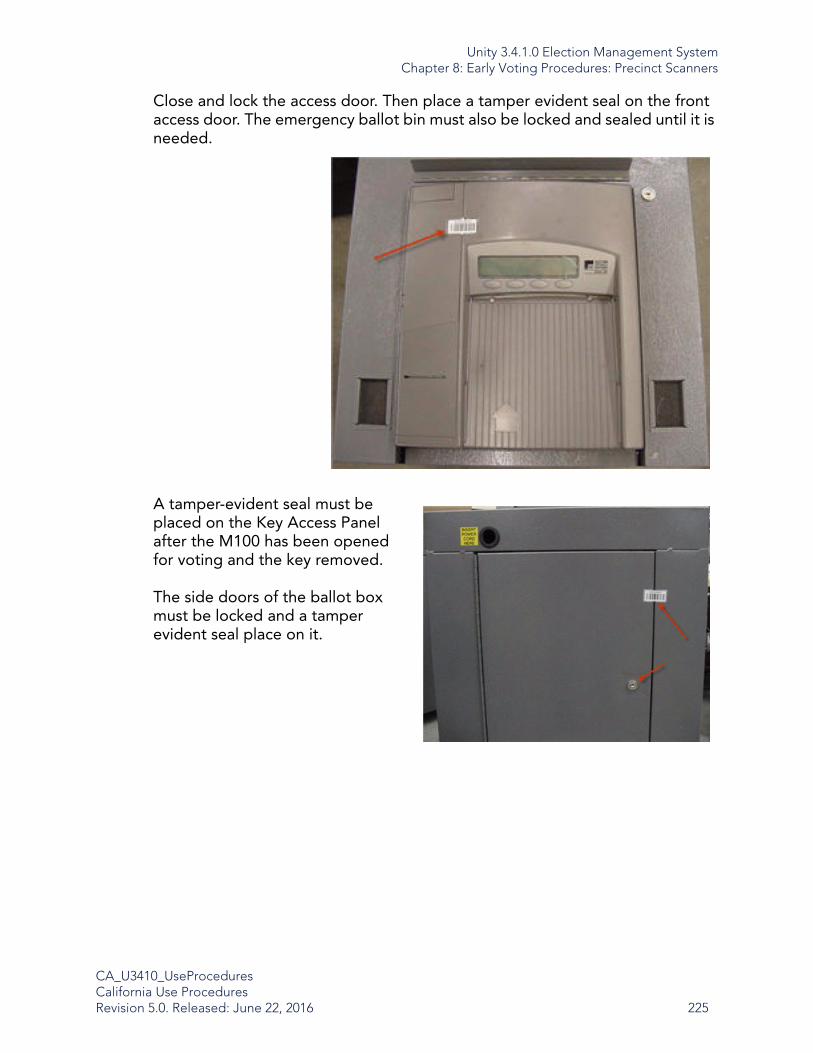
Unity 3.4.1.0 Election Management SystemChapter 8: Early Voting Procedures: Precinct Scanners
CA_U3410_UseProceduresCalifornia Use ProceduresRevision 5.0. Released: June 22, 2016 225
Close and lock the access door. Then place a tamper evident seal on the front access door. The emergency ballot bin must also be locked and sealed until it is needed.
A tamper-evident seal must be placed on the Key Access Panel after the M100 has been opened for voting and the key removed.
The side doors of the ballot box must be locked and a tamper evident seal place on it.

Unity 3.4.1.0 Election Management SystemChapter 8: Early Voting Procedures: Precinct Scanners
CA_U3410_UseProceduresCalifornia Use ProceduresRevision 5.0. Released: June 22, 2016 226
8.2.5 Closing the Polls
Close your polling place for voting at the assigned time and then, use the M100 control key to prepare tabulator results for processing. You cannot print reports, transfer results or process vote totals from the tabulator’s PC card until you properly close the polls.
You can print election, event, and audit log reports after you close the tabulator for voting. You can also transfer results to combine your tabulator totals with the final vote tallies from other polling places at a central counting location.
1. Check the ballot auxiliary bin for sorted, uncounted ballots.
Study your jurisdiction’s procedures for handling uncounted ballots before Election Day.
2. Open the M100 Key Access Panel, insert your control key and turn the key to the OPEN/CLOSE POLL position to access the CLOSE POLLS command.
3. Press CLOSE POLLS to officially close the polls. Depending on your election configuration, the tabulator may automatically print one or more of the following reports: Status report, Race Results report, Certification report and/or Audit Log report. Select CANCEL to stop printing a report at any time. The POLLS CLOSED menu appears after the tabulator finishes printing.
4. To print additional Audit Log Reports, select AUDIT – LOG REPORT from the tabulator control panel. Select CANCEL to stop printing at any time.
5. From the POLLS CLOSED menu, select SEND RESULTS to manually transmit election results over a network connection. After the M100 attempts to send results, the tabulator displays a message that indicates whether data transfer was successful. If the transfer fails, the M100 automatically attempts to send results again. Deliver the PC card to election headquarters if the transfer fails.
Note If you configured the M100 election definition to automatically transmit results over a network connection to a central PC, the data transfer begins at this time.

Unity 3.4.1.0 Election Management SystemChapter 8: Early Voting Procedures: Precinct Scanners
CA_U3410_UseProceduresCalifornia Use ProceduresRevision 5.0. Released: June 22, 2016 227
8.2.6 Producing the Results Report
The M100 generates a variety of results reports after the polls close. Depending on the options configured for your election definition, the tabulator may automatically print reports when you close the polls or you can manually select reports from the POLLS CLOSED menu.
1. Close the polls to access the POLLS CLOSED menu and select RESULTS REPORT to reprint any automatic reports generated by the polls closed. The types of reports generated depend on your election definition settings.
2. To print additional reports, return to the POLLS CLOSED menu and select MORE to access additional commands. Press MORE REPORTS to access additional report formats.
3. Select CHANGE TYPE to toggle between Media and Summary report formats.
4. From the REPORT SELECTION menu, select a report to begin printing. (Press CANCEL to stop printing at any time.)
8.2.7 Shutting Down the M100
Turn the power switch to OFF.
NoteYou can configure your election definition to require a password to access the report menus.

Unity 3.4.1.0 Election Management SystemChapter 8: Early Voting Procedures: Precinct Scanners
CA_U3410_UseProceduresCalifornia Use ProceduresRevision 5.0. Released: June 22, 2016 228
8.3 DS200 Procedures
8.3.1 Load the Election Definition
DS200 precinct tabulators use the election definition programmed on USB flash drives to recognize ballot marks and tabulate results. Once you load the election definition, you will need to calibrate the DS200.
If you do not have a definition loaded when you turn on the DS200, the message “Election Definition Not Found” appears.
1. Lift the access door on the front left of the scanner to access the USB flash drives.
2. If necessary, remove the protective plastic covering of the USB flash drive containing your election definition.
3. Insert the USB flash drive into one of the USB slots. Do not force the flash drive into the slot.
4. Turn on the DS200.
5. Verify the Election Definition accuracy, then shut down the scanner.
Note
You must insert the election definition before you turn on the DS200.
Note The flash drive has a slot on top for wire seals. If wire seals are used to secure the device, route the wire through this slot and through the associated seal hole on the tabs next to the flash drive ports.

Unity 3.4.1.0 Election Management SystemChapter 8: Early Voting Procedures: Precinct Scanners
CA_U3410_UseProceduresCalifornia Use ProceduresRevision 5.0. Released: June 22, 2016 229
8.3.1.1 Check the Election Definition for Accuracy
The DS200 automatically generates an Initial State report when you start the scanner. Check the report for the following information:
• System Values: Make sure the date and the time appear correctly on the report. If the information is not correct, change date and time from the Systems Setting screen.
• Election Information: Make sure that the jurisdiction name, polling place, and the number of precincts listed on the report are correct.
8.3.2 Producing a Zero Report
After you power up the DS200, press Open Polls.
Depending on options set for your election definition, the DS200 prints a Status Report and/or a Zero Certification Report on activation.
8.3.3 Scanning Ballots
The DS200 can scan ballots inserted in any direction or orientation.The DS200 emits two quick beeps when a ballot is accepted. Depending on the options set for your election definition, the DS200 will use one of the following methods for accepting or rejecting blank ballots, overvotes, and crossover votes:
• Unconditional acceptance: The scanner accepts and tabulates results for all ballots. Any contests that are blank, overvoted or cross voted will be logged as such and the remaining contests will be tabulated appropriately.
• Unconditional rejection: The DS200 automatically rejects crossover, overvoted or blank ballots. Voters must review and correct ballot selections before the scanner will accept the ballot.
• Query the voter for correction: The DS200 returns a questioned ballot to the voter and displays a screen message that describes the problem and prompts the voter to either review and edit the ballot or cast the ballot as it is. The voter presses Correct Your Ballot to correct the ballot or presses Cast Your Ballot with Errors to cast the ballot without editing selections. Once Cast Your Ballot with Errors is pressed, a thank you for voting message appears.
Poll workers should closely monitor system messages during voting.
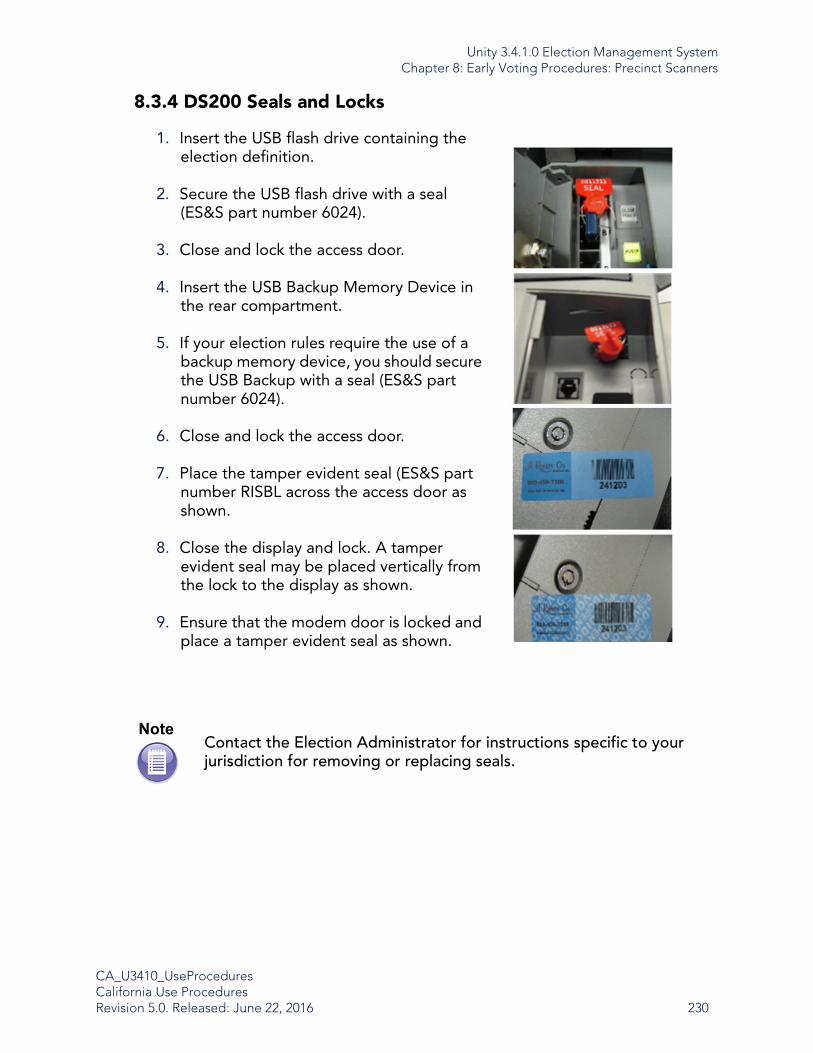
Unity 3.4.1.0 Election Management SystemChapter 8: Early Voting Procedures: Precinct Scanners
CA_U3410_UseProceduresCalifornia Use ProceduresRevision 5.0. Released: June 22, 2016 230
8.3.4 DS200 Seals and Locks
1. Insert the USB flash drive containing the election definition.
2. Secure the USB flash drive with a seal (ES&S part number 6024).
3. Close and lock the access door.
4. Insert the USB Backup Memory Device in the rear compartment.
5. If your election rules require the use of a backup memory device, you should secure the USB Backup with a seal (ES&S part number 6024).
6. Close and lock the access door.
7. Place the tamper evident seal (ES&S part number RISBL across the access door as shown.
8. Close the display and lock. A tamper evident seal may be placed vertically from the lock to the display as shown.
9. Ensure that the modem door is locked and place a tamper evident seal as shown.
NoteContact the Election Administrator for instructions specific to your jurisdiction for removing or replacing seals.

Unity 3.4.1.0 Election Management SystemChapter 8: Early Voting Procedures: Precinct Scanners
CA_U3410_UseProceduresCalifornia Use ProceduresRevision 5.0. Released: June 22, 2016 231
8.3.4.1 Carrying Case and Ballot Bin Security Seals
The DS200 carrying case and ballot bin has nine possible locations for wire-type seals.
a. To secure the carrying case to the bin, engage the locks on the sides of the bin between the handles, then place one seal on each side of the bin between the handles (two seals).
b. To secure the ballot bin, assure that both doors are locked and place one seal on each door (two seals).
c. To secure the carrying case lid, secure both lid latches and lock the lid using the lock between the two latches. Place at least one seal on the lid latch. There are two locations for seals on each latch. Only one seal should be necessary to secure the lid.
d. To secure the DS200 inside the carrying case, lock the front door and place a seal through the lock bracket.
e. Further polling site security may be attained by using the integrated anchor point on the DS200 Ballot Bin. vE
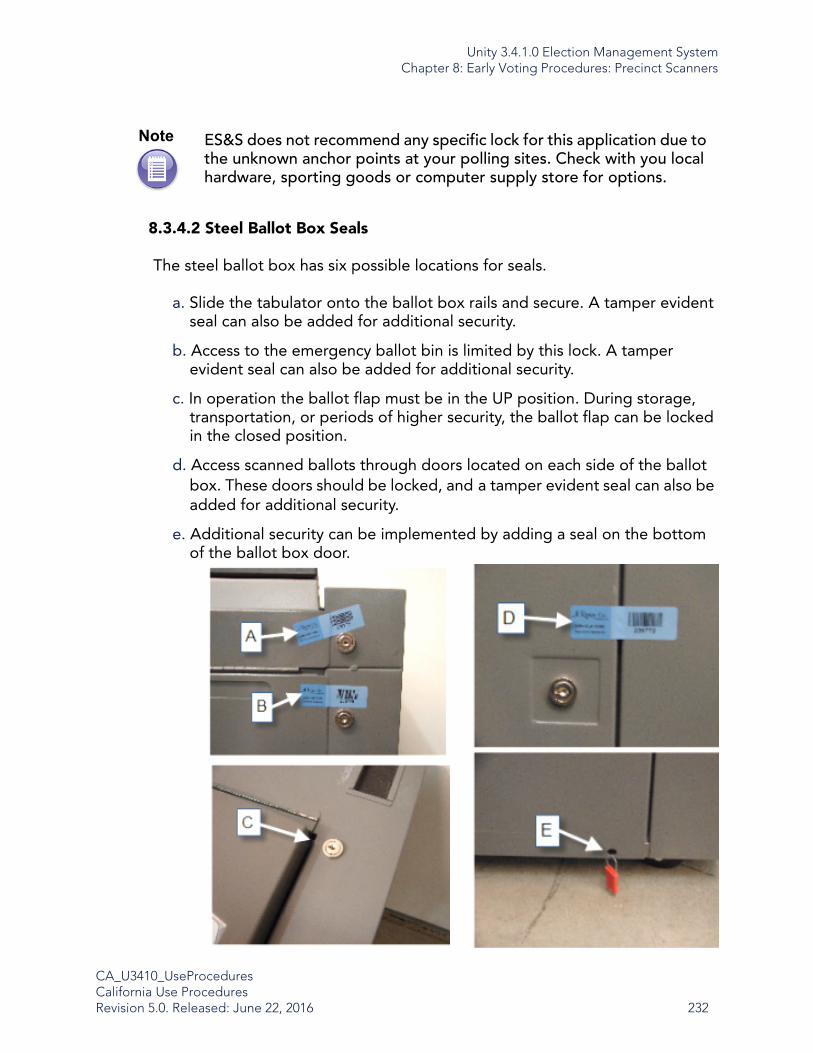
Unity 3.4.1.0 Election Management SystemChapter 8: Early Voting Procedures: Precinct Scanners
CA_U3410_UseProceduresCalifornia Use ProceduresRevision 5.0. Released: June 22, 2016 232
8.3.4.2 Steel Ballot Box Seals
The steel ballot box has six possible locations for seals.
a. Slide the tabulator onto the ballot box rails and secure. A tamper evident seal can also be added for additional security.
b. Access to the emergency ballot bin is limited by this lock. A tamper evident seal can also be added for additional security.
c. In operation the ballot flap must be in the UP position. During storage, transportation, or periods of higher security, the ballot flap can be locked in the closed position.
d. Access scanned ballots through doors located on each side of the ballot box. These doors should be locked, and a tamper evident seal can also be added for additional security.
e. Additional security can be implemented by adding a seal on the bottom of the ballot box door.
Note ES&S does not recommend any specific lock for this application due to the unknown anchor points at your polling sites. Check with you local hardware, sporting goods or computer supply store for options.

Unity 3.4.1.0 Election Management SystemChapter 8: Early Voting Procedures: Precinct Scanners
CA_U3410_UseProceduresCalifornia Use ProceduresRevision 5.0. Released: June 22, 2016 233
8.3.5 Close the Polls
Close your polling place for voting at the assigned time and then, use the DS200 Close Polls button to prepare scanner results for processing. You cannot print reports or process vote totals from the scanner’s USB flash drive until you properly close the polls.
You can print election, event, and audit log reports after you close the scanner for voting.
1. Check the ballot auxiliary bin for sorted, uncounted ballots.
2. Unlock the DS200 access door.
3. Press and hold down the CLOSE POLLS button, located above the power button, for about four seconds and then release to officially close the polls. Depending on your election configuration, the scanner may automatically print one or more of the following reports: Status report, Race Results report, Certification report and/or Audit Log report. Press CANCEL to stop printing reports at any time.
4. Press Shutdown to turn off the DS200.
5. Remove the USB flash drive from the DS200.
6. Take the USB flash drive and any printed reports to election headquarters.
8.3.6 Producing the Results Report
The DS200 generates a variety of results reports after the polls close. Depending on the options configured for your election definition, the scanner may automatically print reports when you close the polls or you can manually select reports from the POLLS CLOSED screen.
1. Close the polls to access the POLLS CLOSED screen and press RESULTS REPORT to reprint any automatic reports generated when the polls are
NoteStudy your jurisdiction’s procedures for handling uncounted ballots before Election Day.

Unity 3.4.1.0 Election Management SystemChapter 8: Early Voting Procedures: Precinct Scanners
CA_U3410_UseProceduresCalifornia Use ProceduresRevision 5.0. Released: June 22, 2016 234
closed. The types of reports generated depend on your election definition settings.
2. To print additional reports, return to the POLLS CLOSED screen and select from one of the following report options:
• Precinct Report Media
• Precinct Report Summary
• Audit Log Report
• Poll Report Media
• Poll Report Summary
8.3.6.1 Transfer Results
If your jurisdiction uses Election Reporting Manager to generate election reports, transfer election results from your precinct counters to the PC running the reporting software.
1. Unlock the access door.
2. Remove the USB flash drive from the scanner.
3. Deliver the USB flash drive to election headquarters
Note Deliver all write-in ballots to your election administrator as soon as possible after the polls close. Separate all of the write-in ballots from regular ballots.

Unity 3.4.1.0 Election Management SystemChapter 9: Election Day Procedures
CA_U3410_UseProceduresCalifornia Use ProceduresRevision 5.0. Released: June 22, 2016 235
Chapter 9: Election Day Procedures
9.1 Precinct Supplies, Equipment Delivery, and Inspection
A complete listing of precinct supplies can be found in 6.3.1 Recommended Supplies, under M100 Supplies, DS200 Supplies, and AutoMARK Supplies.
9.1.1 Equipment Delivery
1. Perform a pre-election procedure to prepare the tabulators prior to shipment.
2. Complete the final inspection sheet (provided by the jurisdiction).
3. Log the equipment serial number and operating system version.
4. Place keys in an envelope with the final inspection sheet.
5. Remove the election testing media, then insert and secure the official election media devices. Verify that the media is coded for the correct location.
6. Check the printer paper and replace it if necessary.
7. Close the ES&S election equipment, securing the envelope containing final inspection sheet and keys.
8. Secure the equipment for transport to the polling places. Precinct tabulators must be mounted on their ballot bins.
9.1.2 Inspection
Instruct the appropriate precinct worker(s) to verify the delivery and condition of supplies to the polling places, prior to Election Day, as follows:
• Check all pads of ballots to ensure that ballot style, serial numbers, and precinct numbers (if used) are printed correctly.
• Ballots shall be in the quantity and manner required by Elections Code, and demonstrator ballots marked for demonstration use only will also be included.

Unity 3.4.1.0 Election Management SystemChapter 9: Election Day Procedures
CA_U3410_UseProceduresCalifornia Use ProceduresRevision 5.0. Released: June 22, 2016 236
• In elections that contain partisan offices, ballots may, as directed by the Secretary of State, be appropriately tinted to reflect which partisan office appears on a specific ballot.
• Demonstration placards, signs, and “vote here” indicators shall be appropriately positioned.
• Voting system precinct supplies shall include ballot privacy sleeves, ballot marking devices, two sample ballots of each ballot style in each language required to be voted on in the precinct, and security seals.
• All voters voting on paper ballots in a polling place must be provided a privacy sleeve for the ballot and instructed on its use, in accordance with CA Elections Code.
• A Certificate of Packaging and Sealing, in duplicate, together with a self-addressed stamped business reply envelope, addressed to the responsible elections official shall be delivered to the polling place.
• The elections official shall verify that one sealed precinct scanner nested in its ballot box has been delivered to the polling place. If multiple precinct processing will occur at the polling place, the device shall be located so it is equally accessible to the voters and precinct officers of each precinct. Keys to the unit and the ballot box will be included in the precinct supply kits and marked as such.
• Anti-static envelopes or appropriate containers and seals to facilitate safe and secure transportation of memory cards and election results tapes shall be supplied.
If multiple precinct processing within a single polling place is to be implemented, the functions hereinafter described shall be performed by the board workers of each precinct acting jointly insofar as is practical. Where forms are to be completed, the elections official shall provide them in such a format and so written as to facilitate notations by each precinct staff. Surrendered and delivered vote by mail ballots, spoiled ballots and provisional ballots shall be maintained separately by precinct.

Unity 3.4.1.0 Election Management SystemChapter 9: Election Day Procedures
CA_U3410_UseProceduresCalifornia Use ProceduresRevision 5.0. Released: June 22, 2016 237
9.1.3 Set Up the AutoMARK Table
To meet the above standards, your precinct may have purchased an AutoMARK Table and privacy shield. If you need more information about obtaining the AutoMARK Table please contact your sales representative.
The AutoMARK Table comes in 5 pieces.
It is assembled by simply inserting the legs into the plastic cylinders located at each corner of the table. The rubber end caps should be pointed toward the floor.
Table P1-1: AutoMARK Table Dimensions
Top of table surface 33” wide by 25“deep
Bottom of table surface 34” wide by 26” deep
Leg span 37” wide by 29” deep
Height of table bottom 27”
Height of table top 31”

Unity 3.4.1.0 Election Management SystemChapter 9: Election Day Procedures
CA_U3410_UseProceduresCalifornia Use ProceduresRevision 5.0. Released: June 22, 2016 238

Unity 3.4.1.0 Election Management SystemChapter 9: Election Day Procedures
CA_U3410_UseProceduresCalifornia Use ProceduresRevision 5.0. Released: June 22, 2016 239
Table shown with privacy shield inserted into slots on table
When placed appropriately on a standard table the AutoMARK VAT meets the following standards:
• Where clear floor space only allows forward approach to an object, the maximum high forward reach shall be 48 inches. The minimum low forward reach shall be 15 inches.
• Where forward reach over an obstruction with knee space below, the maximum level forward reach is 25 inches. When the obstruction is less than 20inches deep, the maximum high forward reach is 48 inches. When the obstruction projects 20 to 25 inches, the maximum high forward reach is 44 inches.
• The position of any operable control is determined with respect to a vertical plane that is 48 inches in length, centered on the operational control, and at the maximum protrusion of the product within the 48-inch length.
• Where any operational control is 10 inches or less behind the reference plane, have a height that is between 15 inches and 54 inches above the floor.

Unity 3.4.1.0 Election Management SystemChapter 9: Election Day Procedures
CA_U3410_UseProceduresCalifornia Use ProceduresRevision 5.0. Released: June 22, 2016 240
• Where any operational control is more than 10 inches and not more than 24 inches behind the reference plane, have a height between 15 inches and 46 inches above the floor.
• Have operational controls that are not more than 24 inches behind the reference plane.
9.1.4 Install M100 Paper Roll
A “time out waiting for paper” message may appear when the internal printer is out of paper.
1. To access the M100 internal printer, open the door on the left side of the tabulator.
2. Depress the mounting brackets on each side of the empty paper roll and lift the roll out of the tabulator.
3. Remove the white plastic paper spool from the center of the empty paper roll and insert it into a new roll.

Unity 3.4.1.0 Election Management SystemChapter 9: Election Day Procedures
CA_U3410_UseProceduresCalifornia Use ProceduresRevision 5.0. Released: June 22, 2016 241
4. Press outward on the paper mounting brackets and insert the new roll into the printer.
5. Manually feed the paper into the paper path.
9.1.5 Install DS200 Paper Roll
A warning message may appear if the internal printer is out of paper.
1. Unlock the access door, located above the printer. This will provide access to the printer release lever.
2. Press the lever to unlock the printer door.
3. Open the printer door.
4. Drop the paper into the printer paper compartment.
ImportantMake sure the glossy side of the thermal paper is facing the thermal printer.

Unity 3.4.1.0 Election Management SystemChapter 9: Election Day Procedures
CA_U3410_UseProceduresCalifornia Use ProceduresRevision 5.0. Released: June 22, 2016 242
5. Pull the end of the paper roll out toward the input tray of the DS200.
6. Close the printer door and press firmly on the door to make sure it locks into place.
7. Lock the access door above the printer.
CautionIf the printer door is not properly locked in position, the printer may not function.

Unity 3.4.1.0 Election Management SystemChapter 9: Election Day Procedures
CA_U3410_UseProceduresCalifornia Use ProceduresRevision 5.0. Released: June 22, 2016 243
9.2 Opening the Polls
Before the polls are open, the precinct workers will perform the following tasks.
1. Complete Oath of Office and Declaration of Intention forms pursuant to CA Elections Code.
2. Assemble voting booths and in each booth display a copy of the required materials.
3. Ensure that a pad of demonstration ballots, markers and suitable demonstration materials are available at the point of ballot issue.
4. Before the polls are open, the precinct board shall verify that the serial number on the scanner is the same number listed on the Voting Device Report. The board shall also verify that all seals have not been tampered with and the serial numbers match what is recorded by the County office.
5. Check that the memory card plate is secure.
6. Verify that no ballots remain in any of the ballot box bins from testing or previous elections.
7. Verify that the ballot slot cover on the auxiliary bin is closed and the bin is locked.
8. Close and lock all ballot box doors.
9. Ensure that the scanner is nested into the ballot box or bin, and that the power cord is properly routed.
10. When the power cord is plugged into a 120V AC outlet and the unit is keyed on, all vote totals for all candidates must be zero. The public counter will display zero ballots cast.
11. Verify that all offices and propositions appear on the Zero Tape. The tape is signed by two board members; it can be rolled up and placed in a secure place or posted in the polling place for public display. This process is repeated at the closing of the polls. This tape becomes a permanent record of the election as it was conducted at the precinct.
Important If the scanner does not print the Zero Tape, this must be reported to the elections official. Voting may commence, but ballots are to be deposited in the front auxiliary bin until corrective action is taken. Such action must be logged.

Unity 3.4.1.0 Election Management SystemChapter 9: Election Day Procedures
CA_U3410_UseProceduresCalifornia Use ProceduresRevision 5.0. Released: June 22, 2016 244
12. Observe the poll opening time. If the recorded time is different from the actual time, note the time that the poll had opened and initial the marked time.
9.2.1 Open Polls on M100
1. Turn the control key to the OPEN/CLOSE POLL position. The Initial State Report will print.
2. After you start the tabulator with the control key, the system initializes and the message “ELECTION CARD INSERTED: OPEN POLLS NOW?” appears. Select YES to open the polls.
3. After you open the polls, the message “PLEASE TURN KEY/SWITCH TO VOTE” appears on the tabulator display screen. Turn the key to the VOTE position to initialize the following tabulator functions:
• The tabulator checks available memory and scans election definition for errors.
• Depending on options set for your election definition, the M100 prints a Status Report, a Zero Totals Report and/or a Zero Certification Report on activation. Select CANCEL at any time during printing to cancel the current report and all following reports.
• Select Totals Only to print a summary report that will only contain the grand totals.
Note The Machine ID listed on the Initial State Report represents the motherboard ID and is not related to the serial number on the back of the M100. The poll worker should record the M100 serial number on the Initial State Report or maintain a separate equipment log that associates the Machine ID to the M100 serial number.
Important If you are using the M100 for early voting, you will receive the following message when you turn the key to the VOTE position when you open the poll: Which zero report do you wish to print?

Unity 3.4.1.0 Election Management SystemChapter 9: Election Day Procedures
CA_U3410_UseProceduresCalifornia Use ProceduresRevision 5.0. Released: June 22, 2016 245
• Select All Precincts to print a summary precinct-by-precinct breakdown report.
4. After the M100 finishes printing the startup reports, make sure the tabulator key is in the VOTE position, and then remove the key and close the access panel.
5. After you remove the key, you can open the tabulator for live voting. Make sure that the public counter on the M100 display screen increases by one with each ballot cast but do not make any further adjustments to the tabulator unless a system message appears.
If you need to review a tabulator’s function history, you can print a system audit report at any time while the polls are open. Take the following steps to print an audit report.
1. Open the tabulator’s access panel.
2. Insert the control key and turn the key to the OPEN/CLOSE POLL position.
3. Select AUDIT LOG REPORT from the tabulator control panel to print the report.
You can cancel the report at any time by pressing CANCEL.
4. After you finish printing, turn the key to the VOTE position and close the key access panel to re-open the tabulator for voting.
9.2.2 Open Polls on DS200
Before your polling location opens for voting, retest and check the system configuration for each of your scanners.
After you test and configure your scanners, load the USB flash drives with the scanner election definitions and turn on the DS200 scanner. Then, use the following instructions to prepare the scanners for voting.
CautionDepending on the number of precincts in your district, it may take several hours to print the All Precincts report.

Unity 3.4.1.0 Election Management SystemChapter 9: Election Day Procedures
CA_U3410_UseProceduresCalifornia Use ProceduresRevision 5.0. Released: June 22, 2016 246
1. After you start the scanner, the following screen appears:
2. Press Open Polls to initialize the following scanner functions:
• The scanner checks available memory and scans the election definition for errors.
• Depending on options set for your election definition, the DS200 prints a Status Report and/or a Zero Certification Report on activation. To stop the current report from printing press Cancel Printing, then press Yes to confirm the print cancellation.
3. After the DS200 finishes printing the startup reports and zero report, close and lock the access panel.
4. After you remove the key, the DS200 scanner is ready for live voting. Make sure that the public counter on the DS200 display screen increases by one with each ballot cast but do not make any further adjustments to the scanner unless a system message appears.
Note To review a scanner’s function history, print a system audit report. To print an audit report, go to the Administration Menu and press Diagnostic Reports. From the Diagnostic Reports screen, press AUDIT LOG REPORT to print the report. You can cancel the report at any time by pressing CANCEL.

Unity 3.4.1.0 Election Management SystemChapter 9: Election Day Procedures
CA_U3410_UseProceduresCalifornia Use ProceduresRevision 5.0. Released: June 22, 2016 247
9.2.3 Open Polls on AutoMARK
9.2.3.1 Open the LCD for Use
1. Move the left and right sliding latches outward to unlatch the lid.
2. Fold the front portion of the lid back.

Unity 3.4.1.0 Election Management SystemChapter 9: Election Day Procedures
CA_U3410_UseProceduresCalifornia Use ProceduresRevision 5.0. Released: June 22, 2016 248
3. Rotate the lid assembly to vertical.
4. With the LCD rotated to the vertical position, close the lid leaving the front lid section rotated back.

Unity 3.4.1.0 Election Management SystemChapter 9: Election Day Procedures
CA_U3410_UseProceduresCalifornia Use ProceduresRevision 5.0. Released: June 22, 2016 249
5. Lower the ballot feed tray.
9.2.3.2 Start Up Procedure
1. Open the AutoMARK unit and position the display.
2. Locate the audio headphone jack on the front lower-right panel (below the keypad) and plug in the headphones.
3. Plug the power cord into a power connection in the back of the unit and the other end of the cord into a nearby AC power source. Make sure the cord is not in a position where it would be hazardous to anyone walking nearby.
4. Turn the security key located in the front of the unit to the ON position and remove the key before voters are allowed to use the AutoMARK.
5. To shutdown the unit when the polls are closed, insert the security key located in the front of the unit and turn it to the OFF position, to turn off the electrical power.

Unity 3.4.1.0 Election Management SystemChapter 9: Election Day Procedures
CA_U3410_UseProceduresCalifornia Use ProceduresRevision 5.0. Released: June 22, 2016 250
9.2.3.3 Set Up the AutoMARK for Voters
1. Follow the start up/shut down procedure above.
2. If headphones are being supplied by the polling place, plug the headphones into the audio jack.
3. If the voter needs to use a Puff-Sip device, plug the Puff-Sip device into the Assistive Technology (AT) access port.
4. For a blind voter, direct him to the AutoMARK, and assist him while he inserts his ballot for scanning. Tell him that the scanning process will take around 30 seconds, and that the AutoMARK will be silent during the scanning process. When the scanning process is complete, the AutoMARK will give him audio instructions for completing his ballot.
5. The AutoMARK VAT is designed for use in conjunction with the AutoMARK Table which provides the voter with a privacy shield, complies with all AT accessibility requirements, and ensures stability against movement, or overturning during entry occupancy or exit by a voter. Alternatively, the AutoMARK may be used in conjunction with any AT compliant table that provides adequate structural stability for unit of the AutoMARK’s size and weight and a privacy screen. Both of these items are commercially available from a number of sources.
9.3 Polling Place Procedures
A warning must be posted in each voting booth stating that, pursuant to CA Elections Code, tampering with voting equipment or altering vote results constitutes a felony, punishable by imprisonment.
Hourly, inspect the voting booths to ensure that there are no electioneering materials present, and that the booth/voting machine is otherwise suitable for voting.
Correct any defacement of the booth/voting machine according to jurisdictional practices and in conformance with California Election code.
Set up polling place voting devices with enough room for a voter in a wheelchair to approach the tabulator from the front as well as along the left and right sides of the voting device.

Unity 3.4.1.0 Election Management SystemChapter 9: Election Day Procedures
CA_U3410_UseProceduresCalifornia Use ProceduresRevision 5.0. Released: June 22, 2016 251
9.3.1 M100 Voting Instructions
After marking your ballot, insert it into the ballot feed tray on the M100. The M100 can scan ballots inserted in any direction or orientation.
9.3.1.1 Operating the M100 on Battery Power
The M100 is equipped with an integral backup battery unit that permits up to three hours of continuous operation in the event of a power outage.
9.3.2 DS200 Voting Instructions
After marking your ballot, insert it into the ballot feed tray on the DS200. The DS200 can scan ballots inserted in any direction or orientation. The DS200 emits two quick beeps when a ballot is accepted.
9.3.2.1 Operating the DS200 on Battery Power
An external DC power supply, which plugs into a standard120-volt AC outlet, supplies power to the scanner. If a power outage occurs, the DS200 contains an internal backup battery that can run the scanner for a minimum of two hours, depending on scanner activity. If the DS200 is plugged into a power source, the backup battery will be charged.
Observe the rear LED, located next to the Wall Power Adapter Cord Connector, if the LED is amber and blinking slowly this indicates that the Battery Pack is charging. If the LED is a solid green, the Battery Pack is completely charged.

Unity 3.4.1.0 Election Management SystemChapter 9: Election Day Procedures
CA_U3410_UseProceduresCalifornia Use ProceduresRevision 5.0. Released: June 22, 2016 252
9.3.3 AutoMARK Accessible Voting Instructions
The AutoMARK physical features and controls are labeled in the figure below.
If needed, the poll worker shall assist the voter with connecting an assistive device to the input jack on the AutoMARK.
The AutoMARK is designed so that you can use either the keys on the keypad, an AT device, or touch displayed text and buttons on the screen to enter your selections.

Unity 3.4.1.0 Election Management SystemChapter 9: Election Day Procedures
CA_U3410_UseProceduresCalifornia Use ProceduresRevision 5.0. Released: June 22, 2016 253
The buttons at the bottom of the touch screen are used for navigating the displayed screens.
BACK – Displays the previous screen
ZOOM IN/OUT – Increases and decreases the size of the text displayed
EXIT RETURN BALLOT – displays the EXIT screen
HIGH CONTRAST – Lightens or darkens the screen contrast
NEXT – Enters your selection and displays the next screen.
If you want to listen to choices and instructions in the language of your choice and use the keys on the keypad to enter your selections, plug in your headphones, or use the headphones provided.
9.3.3.1 Marking the Ballot
1. Insert an unmarked ballot into the ballot feed tray.
2. Select your language.
3. Read the voting instructions that appear.
4. Press NEXT to access the first contest screen.
5. Press the name of the desired candidate or choice to select it.
Note
Audio includes keypad instructions.
Note If one of the choices includes a write-in and you select it, a write-in pop-up screen allows you to type in the name of the write-in. Press OK when done.

Unity 3.4.1.0 Election Management SystemChapter 9: Election Day Procedures
CA_U3410_UseProceduresCalifornia Use ProceduresRevision 5.0. Released: June 22, 2016 254
6. When all contests have been voted, the AutoMARK displays a summary of your selections.
a. To change a selection, touch the contest on the summary screen, touch the original selection to deselect it, then touch your new choice. Touch NEXT to return to the summary screen.
7. Touch the Mark Ballot button.
The AutoMARK will display the printing progress as a circle filling with color, indicating the time remaining.
When printing is complete, the AutoMARK displays the REMOVE BALLOT screen and ejects your marked ballot into the paper tray.
8. Remove your marked ballot from the tray and submit it for tabulation.
9.3.3.2 Using the AutoMARK with an AT Device
The AutoMARK provides an access port that allows voters with disabilities to plug in a sip-and-puff, rocker panel, or similar input device. The Dual Switch Access (DSA) port provides a 3.5mm (1/8”) jack. A voter with disabilities who cannot use either the touch screen or the audio-style system with auxiliary switch panel, can plug an AT device into this port.
A voter with an AT device can perform all of the selections available on the key pad or touch screen. With an AT device, the system responds to a yes or no command. The AutoMARK allows you to complete a ballot entirely with the aid of an AT device.
When a screen is displayed, you may select NO to bypass that screen or YES to move to the first selectable choice on that screen.
When you are on a selectable item of the screen, the item will be highlighted in yellow. Selecting NO will move on to the next selectable item on the screen. Selecting YES will provide the same results as if you had touched that item on the screen.
YES will select or deselect a candidate.
On a scroll bar, YES will cause the screen to scroll up or down as indicated.
On a screen button, YES invokes that action. For example, entering YES when ZOOM is highlighted causes the screen to ZOOM. Entering YES again returns the screen to non-zoomed mode.
Pressing NO at any time will move to the next highlighted item.
Unity 3.4.1.0 Election Management SystemChapter 9: Election Day Procedures
CA_U3410_UseProceduresCalifornia Use ProceduresRevision 5.0. Released: June 22, 2016 255
As you enter NO repeatedly, the highlight will move down the screen, across the bottom from right to left, and then back to the top.
When you are done making selections on any given screen, enter NO repeatedly until the yellow highlight is on the NEXT button, then enter YES to move to the next screen.
If you encounter a problem operating the AutoMARK, please ask an election official for assistance.
9.3.3.3 Operating the AutoMARK on Battery Power
An internal battery pack is provided with sufficient capacity to allow continuous operation after loss of AC power, for at least two hours. The power supply automatically switches from the 12VDC provided by the brick supply to battery power if AC power is lost.
9.3.4 Provisional Voting
Pursuant to California Elections Code, a Provisional Ballot shall be issued to a voter not appearing on the polling place roster but requesting to vote. These ballots will be clearly distinguished by the County and should be kept separate from normal ballots. When voted, the ballot will be sealed in a signed envelope, similar in process and design as a vote-by-mail envelope, then deposited into the auxiliary bin of the ballot box. At the close of polls, this ballot shall be placed with the voted ballots, in its sealed envelop, for transport back to the County. Follow County-specific instructions for further detailed processing.
Prior to tabulating, the County will follow verification procedures to determine that voter’s eligibility to vote in that election.
ES&S does not provide specific procedures for the system to handle provisional voters. This is a manual process for which the jurisdiction is responsible.
Provisional Voters – In Precinct
If the ballot was cast by a provisional voter registered to that precinct, the ballot shall be cast in its entirety and in its original form.
Provisional Voters – Out of Precinct
If the ballot was cast by a provisional voter not registered in that precinct, the ballot will be duplicated to a ballot specific to that voter’s precinct. The duplication will reflect only the offices and propositions in which the voter is entitled to vote.
Unity 3.4.1.0 Election Management SystemChapter 9: Election Day Procedures
CA_U3410_UseProceduresCalifornia Use ProceduresRevision 5.0. Released: June 22, 2016 256
9.4 Closing the Polls and Vote Reporting
The following procedures and activities must be conducted in public view.
Close the polling place for voting at the assigned time.
9.4.1 Close Polls: M100
1. Check the ballot auxiliary bin for sorted, uncounted ballots.
2. Open the Key Access Panel, insert the control key, and turn it to the OPEN/CLOSE POLL position to access the CLOSE POLLS command.
3. Press CLOSE POLLS to officially close the polls.
4. On the POLLS CLOSED menu, select RESULTS REPORT to reprint any automatic reports generated by the polls closed.Depending on the election configuration, the tabulator may automatically print one or more of the following reports: Status report, Race Results report, Certification report, and/or Audit Log report.
5. Unlock the PC card access door.
6. Push the eject button and remove the PC card from the tabulator.
7. Deliver the PC card, and any printed reports, to election headquarters.
8. Deliver all write-in ballots to your election administrator as soon as possible after the polls close. Separate all of the write-in ballots from regular ballots.
Note You cannot print reports, or process vote totals from the memory device until you properly close the polls.
You can print election, event, and audit log reports after closing the tabulator for voting. You can also transfer results to combine the tabulator totals with the final vote tallies from other polling places at a central counting location.

Unity 3.4.1.0 Election Management SystemChapter 9: Election Day Procedures
CA_U3410_UseProceduresCalifornia Use ProceduresRevision 5.0. Released: June 22, 2016 257
9.4.2 Close Polls: DS200
1. Check the ballot auxiliary bin for sorted, uncounted ballots.
2. Unlock the DS200 access door.
3. Press and hold down the CLOSE POLLS button, located above the power button, for about four seconds, then release to officially close the polls. Depending on your election configuration, the scanner may automatically print one or more of the following reports: Status report, Race Results report, Certification report, and/or Audit Log report.
4. Press Shutdown to turn off the DS200.
5. Remove the USB flash drive from the DS200 and deliver it, and any printed reports, to election headquarters.
9.4.3 Close Polls on AutoMARK
1. Insert the security key in the front of the unit and turn it to the OFF position.
2. Locate the headphone jack on the front lower-right panel (below the keypad) and unplug the headphones.
3. Unplug the power cord from the power connection in the back of the unit, and the other end of the cord from the AC power source.
9.4.4 Uncounted Ballots
Save any ballots that were not counted during voting in the temporary ballot storage bin. After closing the polls, remove and scan the uncounted ballots to add the totals to the tabulator’s memory.

Unity 3.4.1.0 Election Management SystemChapter 9: Election Day Procedures
CA_U3410_UseProceduresCalifornia Use ProceduresRevision 5.0. Released: June 22, 2016 258
9.5 Audit Logs
This section provides a description of all audit log files, the file location within the voting system, and procedures to retrieve, export, and archive audit logs from the voting system.
The close of polls will automatically generate two (2) copies of the results report. One copy shall remain with the machine and the other shall be posted in an open public area. At the discretion of the County Election Administrator, the audit log report for that particular scanner can be printed at the close of polls after the results have completed printing. If the audit log is printed, keep the log, along with all related election materials, together with the results tape for processing at the County office. Each jurisdiction shall, before taking any action that could delete or overwrite any audit log, create an electronic copy, when possible, or a clean paper copy, of all audit logs, to be maintained for 22 months.
9.5.1 Audit Logs: AutoMARK
To locate audit log information, turn the key to Test to enter the Test Mode.
On the AutoMARK Main Menu screen, press Operations Log. Press the Print button to print the operations log.
9.5.2 Audit Logs: M100 Tabulator
M100 audit logs are compiled on the tabulator’s operating system. The audit log lists all of the scanner events that occur from the time you load the election definition PC Card into the scanner to the time you remove the card after the election is complete. The audit log also displays the total number of write-in votes counted by the scanner and the number of accepted and rejected blank ballots, the number of overvoted ballots, and the number of crossover ballots scanned.
While retrieving or exporting audit logs, you may encounter firmware messages about the operation. If you have questions about system messages, call ES&S Technical Support for assistance.
1. Open the tabulator’s access panel.
2. Insert the control key and turn it to the OPEN/CLOSE POLL position.
3. On the control panel, select AUDIT LOG REPORT to print the report.
4. When printing is complete, turn the key to the VOTE position and close the key access panel.

Unity 3.4.1.0 Election Management SystemChapter 9: Election Day Procedures
CA_U3410_UseProceduresCalifornia Use ProceduresRevision 5.0. Released: June 22, 2016 259
9.5.2.1 Exporting M100 Audit Logs
The M100 uses PCMCIA Cards to store the scanner’s election definition, audit log, and election results.
The log may be transferred to other memory devices for storage purposes and later placed back on the PCMCIA card for printing.
9.5.3 Audit Logs: M650 Tabulator
The M650 audit log is located on the tabulator’s operating system and is printed in real time on the audit log printer. While retrieving or exporting audit logs, you may encounter software messages about the operation. If you have questions about system messages, call ES&S Technical Support for assistance.
The audit log contains the following internal reports:
• Switch Log Messages - Identifies each action performed by the scanner.
• Ballot Count Log Messages - Identifies the number of ballots read, sorted, and saved in each run.
• Event Log Messages - Identifies the near-actual time that each scanner event occurred, providing a crosscheck of major events such as the last precinct read or when a disk was last stored.
9.5.3.1 Exporting M650 Audit Logs
To export M650 election data from the M650 to ERM, copy the initialization files from the tabulator to a zip disk, then save them to the \ELECDATA directory on the PC.
1. Insert a zip disk into the M650.
2. Hold down the Enable button while pressing the Save button. This copies the blank results (initialization) files to the zip disk.
3. Using Windows Explorer, copy the files from the zip disk to the \ELECDATA directory on the PC. The initialization files copied are the .ec, .ei, .pr, and .log files.
4. Copy the results to the PC in ERM. Audit Log information from the \ELECDATA folder can be saved to a removable memory device (zip disk, flash, CD-ROM, etc.) for the mandated time set in California statutes. You must transfer audit log information on to a zip disk and reinsert the zip disk into the M650 for printing at a later time.

Unity 3.4.1.0 Election Management SystemChapter 9: Election Day Procedures
CA_U3410_UseProceduresCalifornia Use ProceduresRevision 5.0. Released: June 22, 2016 260
9.5.4 Audit Logs: DS200 Scanner
While retrieving or exporting audit logs, you may encounter software messages about the operation. If you have questions about system messages, call ES&S Technical Support for assistance.
The Audit Log Report lists all of the scanner events that occur from the time you load the election definition USB flash drive into the scanner to the time you remove the flash drive after the election is complete. The audit log also displays the total number of write-in votes counted by the scanner, the number of accepted and rejected blank ballots, the number of overvoted ballots, and the number of crossover ballots scanned.
The System Audit Log Report lists the time and date of the last clock change, power on, and polls open.
9.5.5 Audit Logs: DS850 Scanner
Activity on the DS850 is recorded to the audit log, and the DS850 prints the contents of the audit log to the attached dot matrix printer. The log can be saved to a USB flash drive.
9.5.5.1 Exporting DS850 Audit Logs
1. Press Election. From the Election menu, press Results.
2. On the Results screen, press Export Audit Log.This displays the Searching for ES&S Media Device pop-up screen.
3. Insert the Election Definition flash drive or a blank ES&S flash drive into one of the scanner’s USB ports.
4. When the Election Code screen appears, enter the election code, then press Accept.
5. When the Export Audit Log screen appears, press Confirm.A pop-up screen will indicate that the audit log is being exported.
6. When the Export Audit Log screen indicates that the audit log has been successfully exported, remove the flash drive.
7. Press Done to return to the Results screen.

Unity 3.4.1.0 Election Management SystemChapter 9: Election Day Procedures
CA_U3410_UseProceduresCalifornia Use ProceduresRevision 5.0. Released: June 22, 2016 261
9.5.6 Audit Logs: Election Data Manager andES&S Image Manager
Election Data Manager uses Audit Manager to store detailed logs of actions performed to EDM. While retrieving or exporting audit logs, you may encounter software messages about the operation. For assistance with system messages, contact ES&S Technical Support.
1. Open Audit Manager to access audit logs and the Audit menu select View Log to open the View Log window.
2. Select the specific user whose actions you want to view from the Select User List.
Or, select <all users> for a list of all actions carried out in EDM and ESSIM.
9.5.6.1 Exporting EDM and ESSIM Audit Logs
In the View Log window, select Export Data to send audit data to another file location.
Select the location to save the audit data and click Save.
9.5.6.2 Archive EDM Audit Logs
1. From the Audit menu, select Archive Log
2. In the Archive Database window, set a date range for archiving records. Enter dates manually or click the arrows to select dates from the calendar.
3. Select Archive to archive the selected records.

Unity 3.4.1.0 Election Management SystemChapter 9: Election Day Procedures
CA_U3410_UseProceduresCalifornia Use ProceduresRevision 5.0. Released: June 22, 2016 262
9.5.7 Audit Logs: AutoMARK Information Management System
AIMS’ audit log information is specific to the current election. While retrieving or exporting audit logs, you may encounter software messages about the operation. If you have questions about system messages, call ES&S Technical Support for assistance.
From the AIMS Tools menu, select Audit Log.
Using the Preview and Print buttons at the top of the Audit Log Viewer, preview or print logged events. View additional information by clicking the View Details button.
Unity 3.4.1.0 Election Management SystemChapter 9: Election Day Procedures
CA_U3410_UseProceduresCalifornia Use ProceduresRevision 5.0. Released: June 22, 2016 263
9.5.7.1 Exporting AIMS Audit Logs
1. From the Election menu, select Export >> Election to Flash Card.
2. Click OK.
3. On the Export Tool screen, select the Export Options:
• Export an entire election
• Export all Ballots from Selected Precincts Below
4. Select the Export Destination:
• Blank Flash Card
• Empty folder on the hard drive
5. Enter the encryption key.
6. Click Export, then click Yes.
7. When the export has completed, click OK.
9.5.7.2 Backup and Archive AIMS Audit Logs
Export:
1. From the Election menu, point to Export, then click Election to Flashcard.
The AIMS Election Manager will go through the validation of the current election. (This may not be the same election you will be exporting to the flash card – but must be free of validation errors in order to proceed.)
2. Click OK to continue.
If the system detects one or more errors in the data, AIMS will automatically display error messages with links to repair the errors. Processing stops at this point until the errors are resolved. (Remember – this is not the data you
Note Encryption key provides protection from malicious tampering. The key must be remembered and kept secure. This numeric key is entered into the Voter Assist Terminal keypad when you are previewing the election data, or preparing to use the AutoMARK on Election Day.

Unity 3.4.1.0 Election Management SystemChapter 9: Election Day Procedures
CA_U3410_UseProceduresCalifornia Use ProceduresRevision 5.0. Released: June 22, 2016 264
will be exporting to a flash card, so if possible, select an election with no validation problems.)
3. In the Export Tool window, choose the appropriate Export Option.For these purposes, it does not matter which option is chosen.
4. In the Export Destination, first select To a storage folder for later export to flash (must be empty).
5. Click Browse to locate the folder where you previously exported the election data.

Unity 3.4.1.0 Election Management SystemChapter 9: Election Day Procedures
CA_U3410_UseProceduresCalifornia Use ProceduresRevision 5.0. Released: June 22, 2016 265
6. Click Copy This Stored Election to Flash Card.
7. At the prompt, insert a flash card and click OK.
8. At the confirmation screen, either click Cancel to stop exporting or click OK to export to additional cards.
Backup:
Disaster recovery and secondary security measures are handled through the AIMS Backup/restore procedure. The AIMS database should be backed up on a regular basis throughout the creation process. Backup files should be dated and stored accordingly.
1. From the Election menu, select Backup.
2. In the window that appears, select the folder and enter the filename of the file backup.
3. Enter your password twice.
Restore:
1. From the Election menu, select Restore.
2. Browse to the file.
3. Enter your password.
4. Click Restore.
Note
The flash card must be empty, with no folders or data on it.
Note If the election contains any labels that link to .WAV files, these files are not included with the backup. The audio folder containing the .WAV files should be kept with the backup file.

Unity 3.4.1.0 Election Management SystemChapter 9: Election Day Procedures
CA_U3410_UseProceduresCalifornia Use ProceduresRevision 5.0. Released: June 22, 2016 266
9.5.8 Audit Logs: Hardware Programming Manager
9.5.8.1 Printing HPM Audit Logs
Select the Print Audit Log check box to print the Log report at the end of the results tape. If you choose not to have the log printed automatically, you can use the tabulator menu to go back and print it later. You must select the appropriate equipment on the Election Specification screen to access the log. Select Print.
9.5.8.2 Exporting HPM Audit Logs
To find the HPM System Log, from the Utilities menu, click Report File Utility. All saved or printed files will appear in the Report File Utility window. To export, select one report from the Report File Utility window and click Copy. This will allow you to create a copy with a different file name, directory, or drive letter. Log files are also kept in the C:\elecdata folder and can be copied to another memory device for permanent storage.
9.5.9 Audit Logs: Election Reporting Manager
While retrieving or exporting audit logs, you may encounter software messages about the operation. If you have questions about system messages, call ES&S Technical Support for assistance.
An .spp file is created to update the ERM databases directly from the equipment memory device. To locate this file in ERM, from the Update menu, select the appropriate memory device. Then select the equipment and follow the prompts to create the .spp audit file.
9.5.9.1 Exporting ERM Audit Logs
To export audit logs, you must first generate a system log. From the Reports menu, point to Logs, then click System Log.
In the Print System Log Listing window, select each tab to verify that all settings are correct, and that the Output Destination is set to Disk.
NoteAn .spp file is a single file that contains all the audit data from the tabulators.

Unity 3.4.1.0 Election Management SystemChapter 9: Election Day Procedures
CA_U3410_UseProceduresCalifornia Use ProceduresRevision 5.0. Released: June 22, 2016 267
To export, select one report from the Report File Utility, then select Copy. This will allow you to create a copy with a different file name, directory, or drive letter. Log files are also kept in the C:\elecdata folder and can be copied to another memory device for permanent storage.
9.5.10 Audit Logs: Audit Manager
While retrieving or exporting audit logs, you may encounter software messages about the operation. If you have questions about system messages, call ES&S Technical Support for assistance.
The Audit Manager’s audit log is located in the application. From the Audit menu, select View Log.
9.5.10.1 Exporting AM Audit Logs
In the View Log window, select Export Data to send audit data to another file location.
Select the location where you want to save your audit data and click Save to send your audit file to a new location.
9.5.10.2 Archive AM Audit Logs
1. From the Audit menu, select Archive Log
2. In the Archive Database window, set a date range for archiving records. Enter dates manually or click the arrows to select dates from the calendar.
3. Select Archive to archive the selected records.

Unity 3.4.1.0 Election Management SystemChapter 10: Semi-Official Canvass Tabulation and Reporting
CA_U3410_UseProceduresCalifornia Use ProceduresRevision 5.0. Released: June 22, 2016 268
Chapter 10: Semi-Official Canvass Tabulation and Reporting
10.1 ERM Results Processing
10.1.1 Zeros Report
Before processing election results, ensure that test results have been cleared, as described in 5.7.4 Zero Out Ballots Cast.
From the ERM Reports menu, run the required precinct and election reports.
10.1.2 Process 100 Cards/200 Flash Drives
Use this option to create the SPP file and update your ERM database directly from the M100 PCMCIA cards and DS200 USB flash drives.
NoteAn SPP file is a single file that contains audit data from all of your tabulators.
Important ERM can only accommodate 48 statistical (i.e. Precincts Counted, Registered Voters and Ballots Cast) counters per precinct when updating M100 and DS200 results. All additional statistics will be ignored.

Unity 3.4.1.0 Election Management SystemChapter 10: Semi-Official Canvass Tabulation and Reporting
CA_U3410_UseProceduresCalifornia Use ProceduresRevision 5.0. Released: June 22, 2016 269
10.1.3 Processing for M100
1. From the Update menu, click Process 100 Cards/200 Memory Sticks.
2. In the Select Current Group window, click the reporting group using M100 equipment and click OK.
3. In the Process 100 Cards window, do one of the following:
• If you are using the OMNI Drive, select that button and then select whether the OMNI drive is connected to the parallel port or the USB.
• If you are using the IDA box, select that button and then select the COM Port it is using.
Caution The Update precincts counted (check box) is selected by default. If you would like to have precincts counted for the selected group, ensure the box is checked. Deselect this box if you DO NOT want precincts counted for the selected group. For example, If you are counting absentee totals before your election day totals do not select this check box, otherwise it will show that all precincts have been counted before Election Day totals are processed.
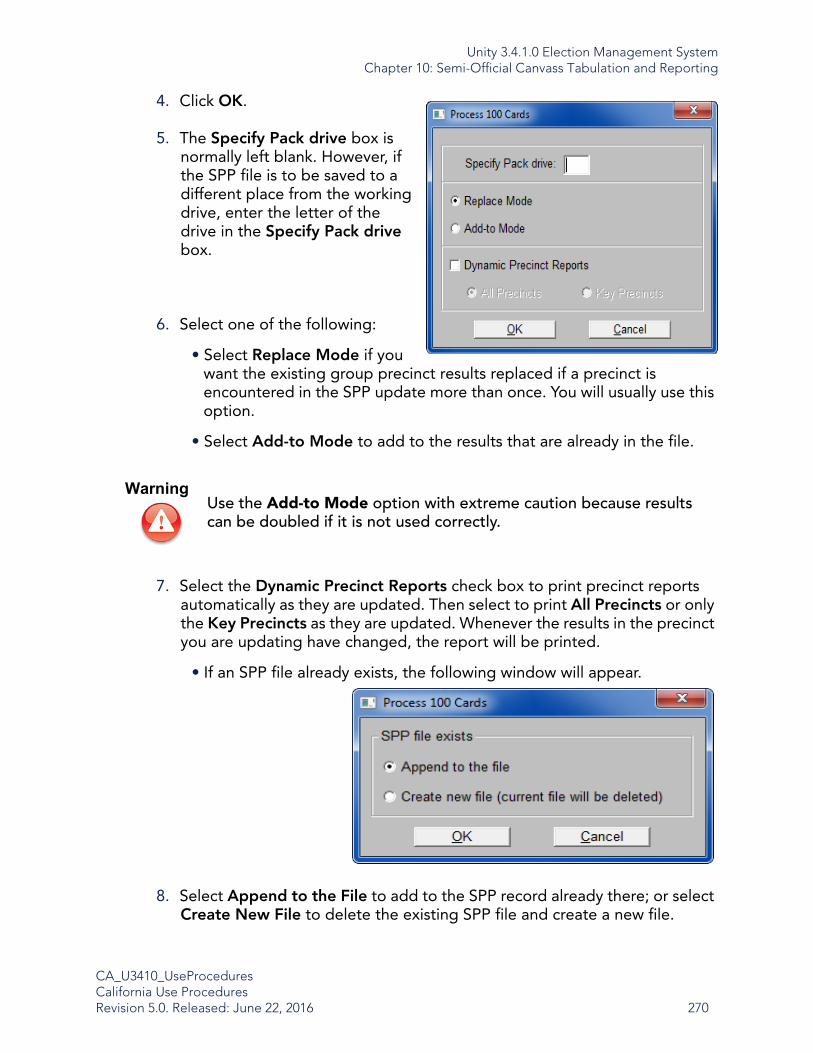
Unity 3.4.1.0 Election Management SystemChapter 10: Semi-Official Canvass Tabulation and Reporting
CA_U3410_UseProceduresCalifornia Use ProceduresRevision 5.0. Released: June 22, 2016 270
4. Click OK.
5. The Specify Pack drive box is normally left blank. However, if the SPP file is to be saved to a different place from the working drive, enter the letter of the drive in the Specify Pack drive box.
6. Select one of the following:
• Select Replace Mode if you want the existing group precinct results replaced if a precinct is encountered in the SPP update more than once. You will usually use this option.
• Select Add-to Mode to add to the results that are already in the file.
7. Select the Dynamic Precinct Reports check box to print precinct reports automatically as they are updated. Then select to print All Precincts or only the Key Precincts as they are updated. Whenever the results in the precinct you are updating have changed, the report will be printed.
• If an SPP file already exists, the following window will appear.
8. Select Append to the File to add to the SPP record already there; or select Create New File to delete the existing SPP file and create a new file.
WarningUse the Add-to Mode option with extreme caution because results can be doubled if it is not used correctly.
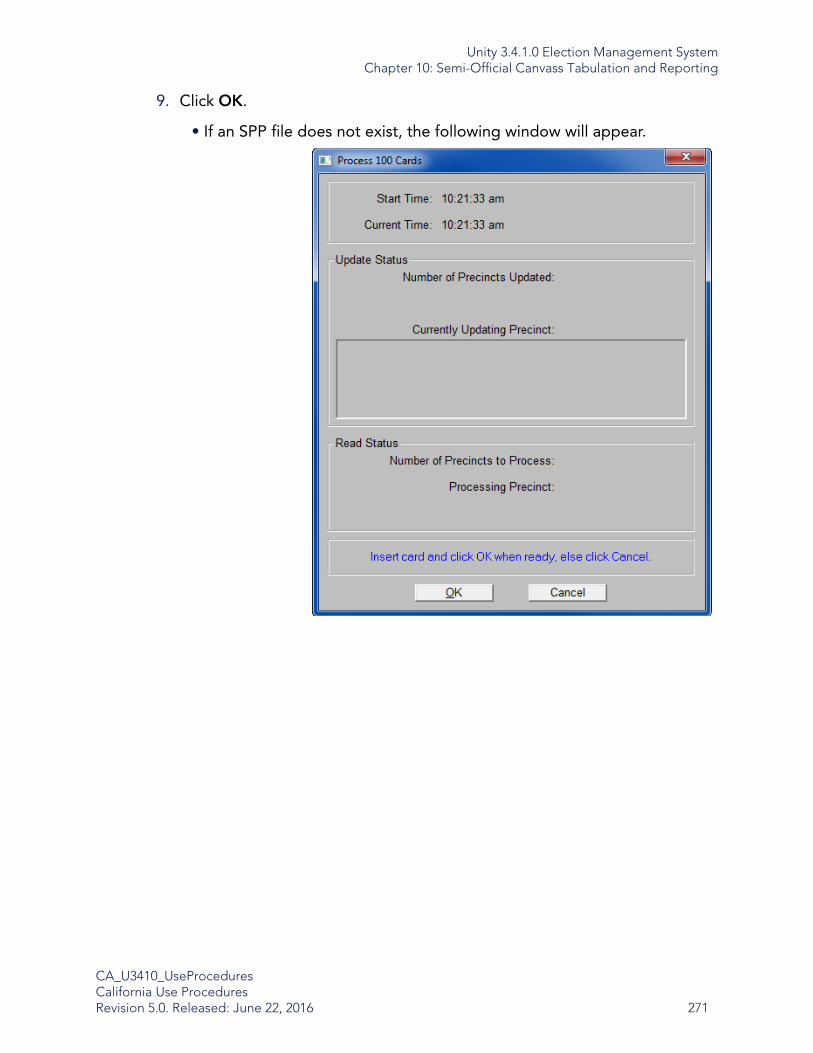
Unity 3.4.1.0 Election Management SystemChapter 10: Semi-Official Canvass Tabulation and Reporting
CA_U3410_UseProceduresCalifornia Use ProceduresRevision 5.0. Released: June 22, 2016 271
9. Click OK.
• If an SPP file does not exist, the following window will appear.

Unity 3.4.1.0 Election Management SystemChapter 10: Semi-Official Canvass Tabulation and Reporting
CA_U3410_UseProceduresCalifornia Use ProceduresRevision 5.0. Released: June 22, 2016 272
• Insert the M100 card and click OK to read the card, update the SPP record, and ERM results database.
The status areas of the screen inform you how many precincts have been updated and how many there are left to process.

Unity 3.4.1.0 Election Management SystemChapter 10: Semi-Official Canvass Tabulation and Reporting
CA_U3410_UseProceduresCalifornia Use ProceduresRevision 5.0. Released: June 22, 2016 273
10.1.3.1 Processing for DS200
1. From the Update menu, click Process 100 Cards/200 Memory Sticks.
2. In the Select Current Group window, click the reporting group using DS200 equipment and click OK to open the Process 200 Memory Stick window.
3. Choose the Drive letter of your USB media device and click OK.
Caution The Update precincts counted (check box) is selected by default.If you would like to have precincts counted for the selected group, ensure the box is checked.Deselect this box if you DO NOT want precincts counted for the selected group. For example, If you are counting absentee totals before your election day totals do not select this check box, otherwise it will show that all precincts have been counted before Election Day totals are processed.

Unity 3.4.1.0 Election Management SystemChapter 10: Semi-Official Canvass Tabulation and Reporting
CA_U3410_UseProceduresCalifornia Use ProceduresRevision 5.0. Released: June 22, 2016 274
4. The Specify Pack drive box is normally left blank. However, if the SPP file is to be saved to a different place from the working drive, enter the letter of the drive in the Specify Pack drive box.
• Select one of the following:
• Select Replace Mode if you want the existing group precinct results replaced if a precinct is encountered in the SPP update more than once. You will usually use this option.
• Select Add-to Mode to add to the results that are already in the file.
5. Select the Dynamic Precinct Reports check box to print precinct reports automatically as they are updated. Then select to print All Precincts or only the Key Precincts as they are updated. Whenever the results in the precinct you are updating have changed, the report will be printed.
Note You can process results from multiple DS200 scanners from the same precinct because each DS200 has its own machine ID and it is included on the corresponding USB flash drive. This enables ERM to recognize that each USB flash drive is from a different DS200. ERM automatically processes the additional USB flash drives in add-to mode.
WarningUse the Add-to Mode option with extreme caution because results can be doubled if it is not used correctly.

Unity 3.4.1.0 Election Management SystemChapter 10: Semi-Official Canvass Tabulation and Reporting
CA_U3410_UseProceduresCalifornia Use ProceduresRevision 5.0. Released: June 22, 2016 275
• If an SPP file already exists, the following window will appear.
6. Select Append to the File to add to the SPP record already there; or select Create New File to delete the existing SPP file and create a new file. Click OK.
• If an SPP file does not exist, the following window will appear.
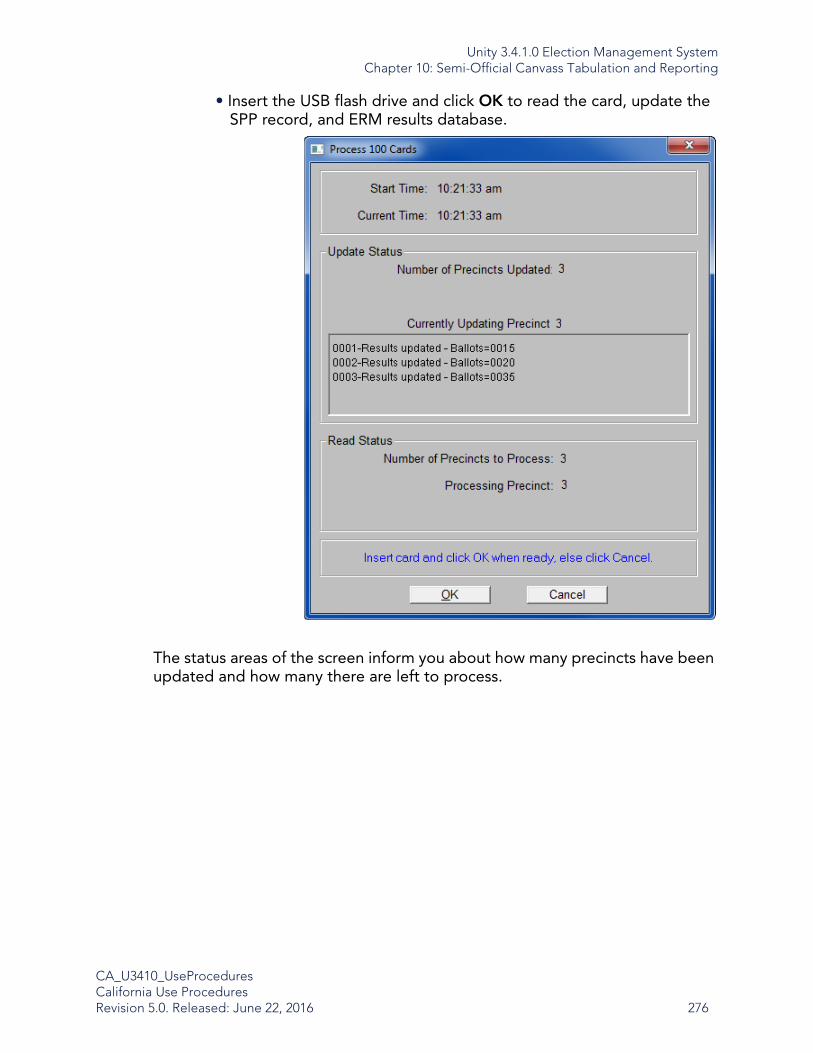
Unity 3.4.1.0 Election Management SystemChapter 10: Semi-Official Canvass Tabulation and Reporting
CA_U3410_UseProceduresCalifornia Use ProceduresRevision 5.0. Released: June 22, 2016 276
• Insert the USB flash drive and click OK to read the card, update the SPP record, and ERM results database.
The status areas of the screen inform you about how many precincts have been updated and how many there are left to process.
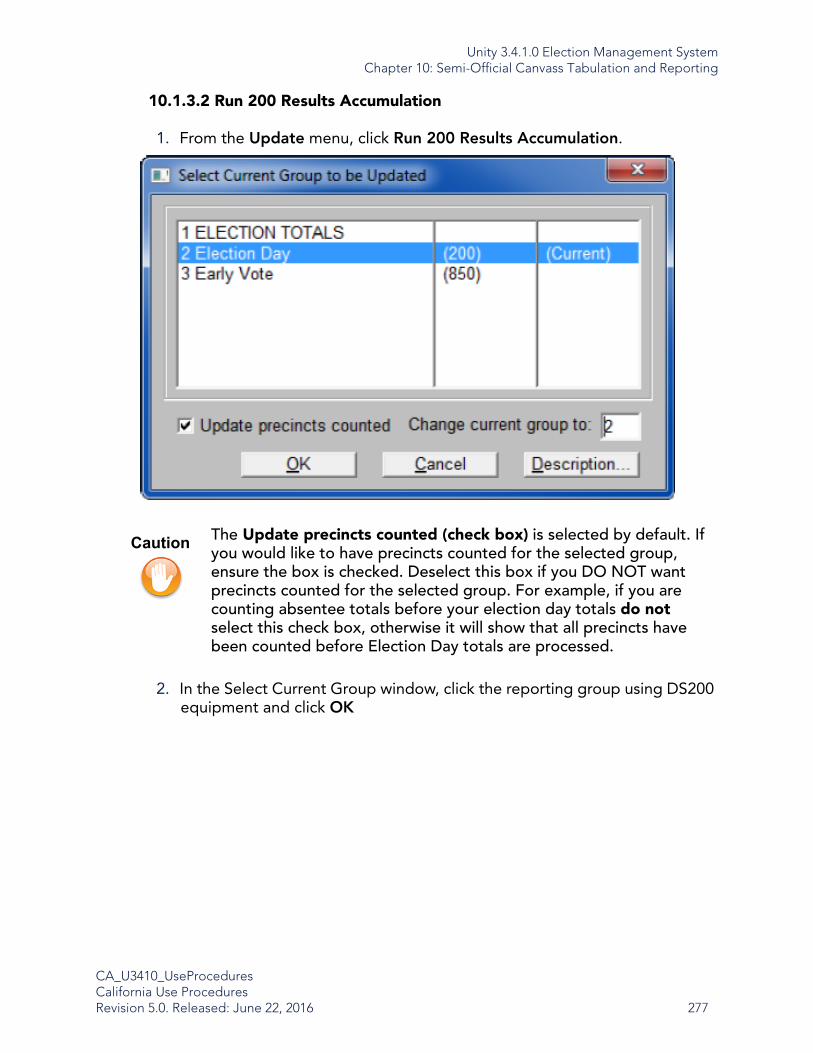
Unity 3.4.1.0 Election Management SystemChapter 10: Semi-Official Canvass Tabulation and Reporting
CA_U3410_UseProceduresCalifornia Use ProceduresRevision 5.0. Released: June 22, 2016 277
10.1.3.2 Run 200 Results Accumulation
1. From the Update menu, click Run 200 Results Accumulation.
2. In the Select Current Group window, click the reporting group using DS200 equipment and click OK
Caution The Update precincts counted (check box) is selected by default. If you would like to have precincts counted for the selected group, ensure the box is checked. Deselect this box if you DO NOT want precincts counted for the selected group. For example, if you are counting absentee totals before your election day totals do not select this check box, otherwise it will show that all precincts have been counted before Election Day totals are processed.

Unity 3.4.1.0 Election Management SystemChapter 10: Semi-Official Canvass Tabulation and Reporting
CA_U3410_UseProceduresCalifornia Use ProceduresRevision 5.0. Released: June 22, 2016 278
3. The Specify Pack drive box is normally left blank. However, if the SPP file is to be saved to a different location than the working drive, enter the letter of the drive in the Specify Pack drive box.
4. Select one of the following:
• Select Replace Mode if you want the existing group precinct results replaced if a precinct is encountered in the SPP update more than once. You will usually use this option.
• Select Add-to Mode to add to the results that are already in the file.
5. Select the Dynamic Precinct Reports check box to print precinct reports automatically as they are updated. Then select to print All Precincts or only the Key Precincts as they are updated. Whenever the results in the precinct you are updating have changed, the report will be printed.
Note You can process results from multiple DS200 scanners from the same precinct because each DS200 has its own machine ID and it is included on the corresponding USB flash drive. This enables ERM to recognize that each USB flash drive is from a different DS200. ERM automatically processes the additional USB flash drives in add-to mode.
CautionUse the Add-to Mode option with extreme caution because results can be doubled if it is not used correctly.

Unity 3.4.1.0 Election Management SystemChapter 10: Semi-Official Canvass Tabulation and Reporting
CA_U3410_UseProceduresCalifornia Use ProceduresRevision 5.0. Released: June 22, 2016 279
• If an SPP file already exists, the following window will appear.
• Select Append to the File to add to the SPP record already there
• Select Create New File to delete the existing SPP file and create a new file.
6. Click OK.
The SFTP file will process the new SPP records and update the results.
10.1.4 Process Precincts Results Media
The Process Precincts Results Media option enables you to read results from either a single type of precinct tabulator or a combination of precinct tabulator machines such as the DS200 and M100 simultaneously. This means you can switch between two media types without changing screens. You can also print precinct and summary reports using this option.
Your tabulators must be set up using the Configure Media Reading Hardware under the Miscellaneous menu before you can use this option.
NoteIf the tabulator is a central tabulator, such as a M650, the group will not be available.
NoteA maximum of two groups can be selected, and a minimum of one group must be selected as the groups to be updated.

Unity 3.4.1.0 Election Management SystemChapter 10: Semi-Official Canvass Tabulation and Reporting
CA_U3410_UseProceduresCalifornia Use ProceduresRevision 5.0. Released: June 22, 2016 280
1. From the Update menu, click Process Precinct Results Media.
2. Insert the media for your precinct tabulator and click the Read button for the tabulator media. The button will be Read 200 Memory Devices for DS200 and Read 100 Cards for M100.
NoteIf you have multiple groups for the same tabulator, the system will prompt you to select the group you want to update.
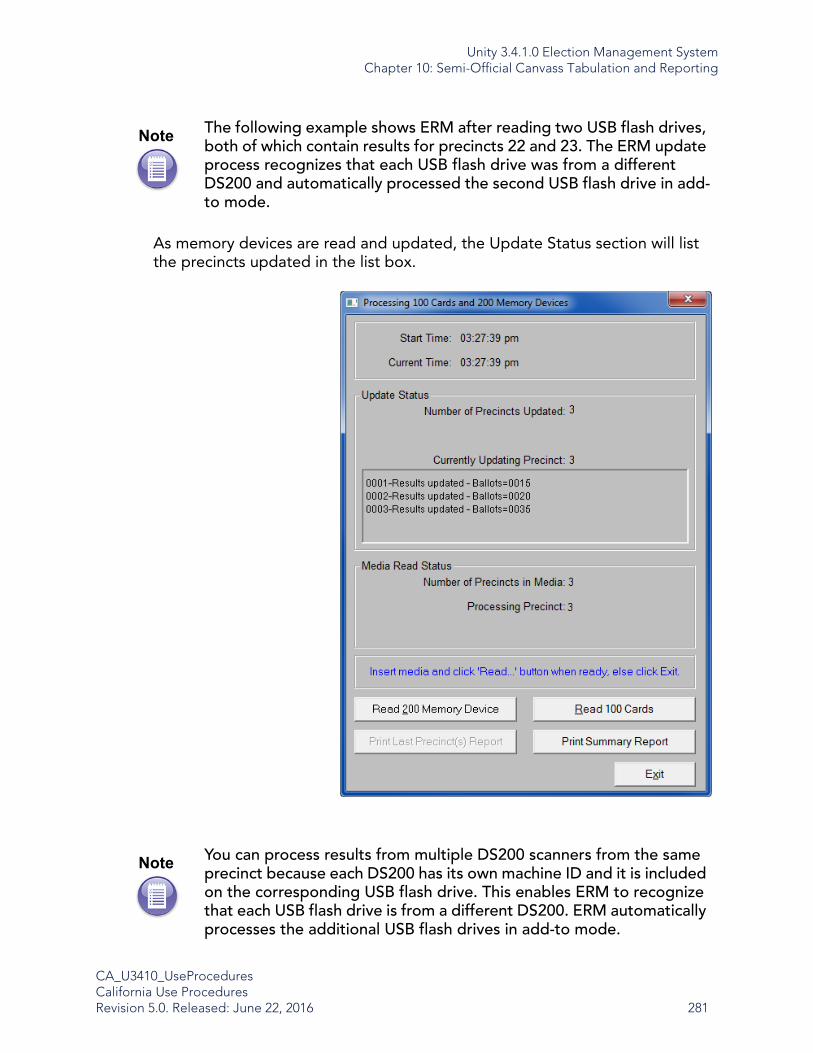
Unity 3.4.1.0 Election Management SystemChapter 10: Semi-Official Canvass Tabulation and Reporting
CA_U3410_UseProceduresCalifornia Use ProceduresRevision 5.0. Released: June 22, 2016 281
As memory devices are read and updated, the Update Status section will list the precincts updated in the list box.
Note The following example shows ERM after reading two USB flash drives, both of which contain results for precincts 22 and 23. The ERM update process recognizes that each USB flash drive was from a different DS200 and automatically processed the second USB flash drive in add-to mode.
Note You can process results from multiple DS200 scanners from the same precinct because each DS200 has its own machine ID and it is included on the corresponding USB flash drive. This enables ERM to recognize that each USB flash drive is from a different DS200. ERM automatically processes the additional USB flash drives in add-to mode.

Unity 3.4.1.0 Election Management SystemChapter 10: Semi-Official Canvass Tabulation and Reporting
CA_U3410_UseProceduresCalifornia Use ProceduresRevision 5.0. Released: June 22, 2016 282
• Click the Print Last Precinct(s) Report button to print results from the last processed precinct(s) using the current settings for the Precinct Report Options.
• Click Print Summary Report to print the EL45, Election Summary Report using the current settings for the Summary Report Options.
10.1.5 Process M650 Results (Zip Disk)
Use this option to transfer election results from M650 zip disks to ERM.
10.1.5.1 Store Results from Zip Disk
Use this option if your M650 scanners are not networked and you use 650 firmware version 2.0 or greater.
This program performs the functions necessary for copying an <election name>.PR file from a zip disk to the \Elecdata\NODExxx subdirectory. The NODExxx subdirectory will be determined by reading the <election name>.ID file on the zip disk. NODExxx is the 650 machine number. ERM saves the 650 results files to the Elecdata\NODExxx folder, and if there is more than one 650, to a separate NODExxx folder for each machine.
1. From the Update menu, point to Run 650 Results Update Program, and click Store Results from Zip Disk. The following window appears.
2. Insert the zip disk into the proper drive and select the letter of the zip disk drive.
3. In the Election Name box, select the name of the PR (results) file to be copied from the zip disk and stored in the \ELECDATA\NODExxx\ folder. If a .PR file with the current election name is available, it will be the first file in the list.

Unity 3.4.1.0 Election Management SystemChapter 10: Semi-Official Canvass Tabulation and Reporting
CA_U3410_UseProceduresCalifornia Use ProceduresRevision 5.0. Released: June 22, 2016 283
4. Click OK. The program will verify the existence of a matching <election name>.ID file, which will determine the appropriate NODExxx subdirectory. The program will then copy the <election name>.PR file from the zip disk to the \Elecdata\NODExxx subdirectory. While the file is being copied, the following message will appear.
5. Click Store Another to copy results from another Zip Disk, or click Done if you are finished.
10.1.5.2 Update Group With 650 Results (No Network)
This program performs the functions necessary for updating the <election name>.PR files. The M650 saves election results to a zip disk that can then be read into ERM.
Before working with M650 results, you must copy the initialization files from the tabulator to a zip disk and copy them to the \ELECDATA directory on the PC.
1. Insert a zip disk into the M650.
2. Hold down the Enable button while you press the Save button. This copies the blank results (initialization) files to the zip disk.
3. Using Windows Explorer, copy the files from the zip disk to the \ELECDATA directory on the PC. There is no need to overwrite any existing files. The initialization files copied are the .ec, ei, pr, and .log.
4. Use the directions from Store Results from Zip Disk to copy the results to the PC.
5. On the Update menu, point to Run 650 Results Update Program, and select Update Group with 650 Results.

Unity 3.4.1.0 Election Management SystemChapter 10: Semi-Official Canvass Tabulation and Reporting
CA_U3410_UseProceduresCalifornia Use ProceduresRevision 5.0. Released: June 22, 2016 284
6. In the Select Current Group window, click the group to update.
7. Select the Update Precincts Counted check box, if reading Election Day results.
8. If the Absentee Mode is set to Duplicate Block in HPM, the following window will appear.
• Choose Use Regular Precinct Results to update the results as non-absentee.
• Choose Use Absentee Precinct Results to update the results as absentee.
Caution The Update precincts counted (check box) is selected by default. If you would like to have precincts counted for the selected group, ensure the box is checked. Deselect this box if you DO NOT want precincts counted for the selected group. For example, if you are counting absentee totals before your election day totals do not select this check box, otherwise it will show that all precincts have been counted before Election Day totals are processed.

Unity 3.4.1.0 Election Management SystemChapter 10: Semi-Official Canvass Tabulation and Reporting
CA_U3410_UseProceduresCalifornia Use ProceduresRevision 5.0. Released: June 22, 2016 285
• Choose Use Combined Precinct Results to combine both absentee and non-absentee results.
If the System Type was set to Mixed Mode on the Change Jurisdiction Master window in HPM, the following window will appear.
• Choose Update Absentee Precinct Results to update the results as absentee.
• Choose Update Regular Precinct Results to update the results as non-absentee.
If neither of these options were selected in HPM, skip to item number 10.
Select the appropriate results button to open the following window.
NoteThese results must come from the M650 Mixed Mode results disk. The election name displayed must end with “AB”.
NoteThese results must come from the M650 results disk. The election name displayed must be the same as selected in HPM.
Note If you are using Mixed Mode and chose Update Absentee Precinct Results in step 6, the election name will be <election name>AB (for example, HARRISAB instead of HARRISON on the above screen).
Note When using the Mixed Mode setting and the ERM results database is created, an extra precinct is added to the end of the list that contains the next sequential 4 digit code following the last defined precinct. When Updating M650 results with this setting and selecting the option to update absentee results, the individual ballot style totals are added together and saved into this extra precinct.
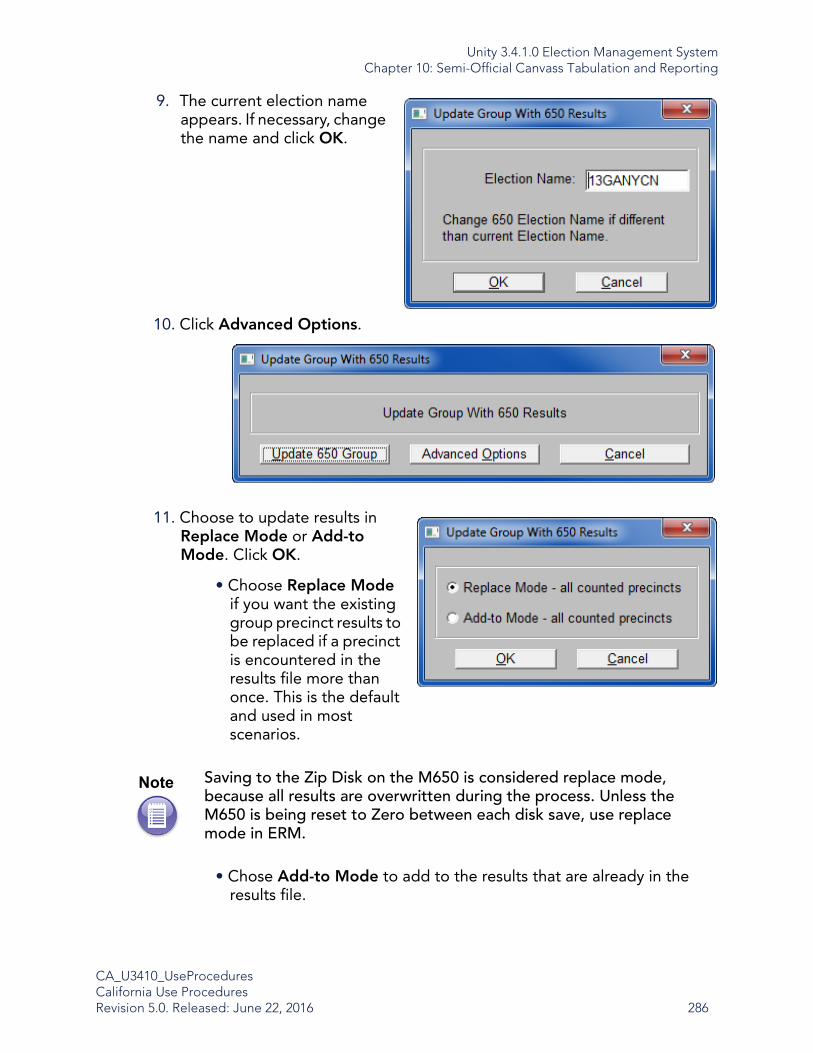
Unity 3.4.1.0 Election Management SystemChapter 10: Semi-Official Canvass Tabulation and Reporting
CA_U3410_UseProceduresCalifornia Use ProceduresRevision 5.0. Released: June 22, 2016 286
9. The current election name appears. If necessary, change the name and click OK.
10. Click Advanced Options.
11. Choose to update results in Replace Mode or Add-to Mode. Click OK.
• Choose Replace Mode if you want the existing group precinct results to be replaced if a precinct is encountered in the results file more than once. This is the default and used in most scenarios.
• Chose Add-to Mode to add to the results that are already in the results file.
Note Saving to the Zip Disk on the M650 is considered replace mode, because all results are overwritten during the process. Unless the M650 is being reset to Zero between each disk save, use replace mode in ERM.

Unity 3.4.1.0 Election Management SystemChapter 10: Semi-Official Canvass Tabulation and Reporting
CA_U3410_UseProceduresCalifornia Use ProceduresRevision 5.0. Released: June 22, 2016 287
12. Specify the drive letter of the Zip Drive. Click OK.
13. Click Update 650 Group. This will be a complete replacement of all prior results for the group selected.
14. When the update is done, you will receive a message that the update is complete.
10.1.5.3 Update Group With 650 Results (Network)
The M650 scanners can be attached to a network program that will allow loading of the election definition files to the network election directory for access by the 650 network server. The server will transfer election results files from the 650 scanners to a network drive shared by the ERM PC workstations. ERM will access these shared results files and process the results files into the ERM results database.
Note All <electionname> files (PR, LOG, EC, EI, PRE, PRF, RPT, and OFC) for this election must be present on the drive to be used for uploading the results.
Note The Advanced Options button enables you to direct the updating process to look for the <election name>.PR files on a different network or drive. In addition, you may direct the updating process to use PR files with a different name than the ERM election name, which allows the results to be processed directly into ERM. Before using this option, be sure you know exactly what results are contained in the PR files.
Note All <electionname> files (PR, LOG, EC, EI, PRE, PRF, RPT, and OFC) for this election must be present on the drive to be used for uploading the results.

Unity 3.4.1.0 Election Management SystemChapter 10: Semi-Official Canvass Tabulation and Reporting
CA_U3410_UseProceduresCalifornia Use ProceduresRevision 5.0. Released: June 22, 2016 288
1. On the Update menu, point to Run 650 Results Update Program, and select Update Group With 650 Results.
2. Click the group to update. If you are not using Mixed Mode or Duplicate Block, go to step 7.
If the System Type was set to Mixed Mode in Hardware Programming Manager (HPM), the following window will appear.
3. Select the appropriate results button to open the window in step 5.
4. If the Absentee Mode is set to Duplicate Block in HPM, the following window will appear.
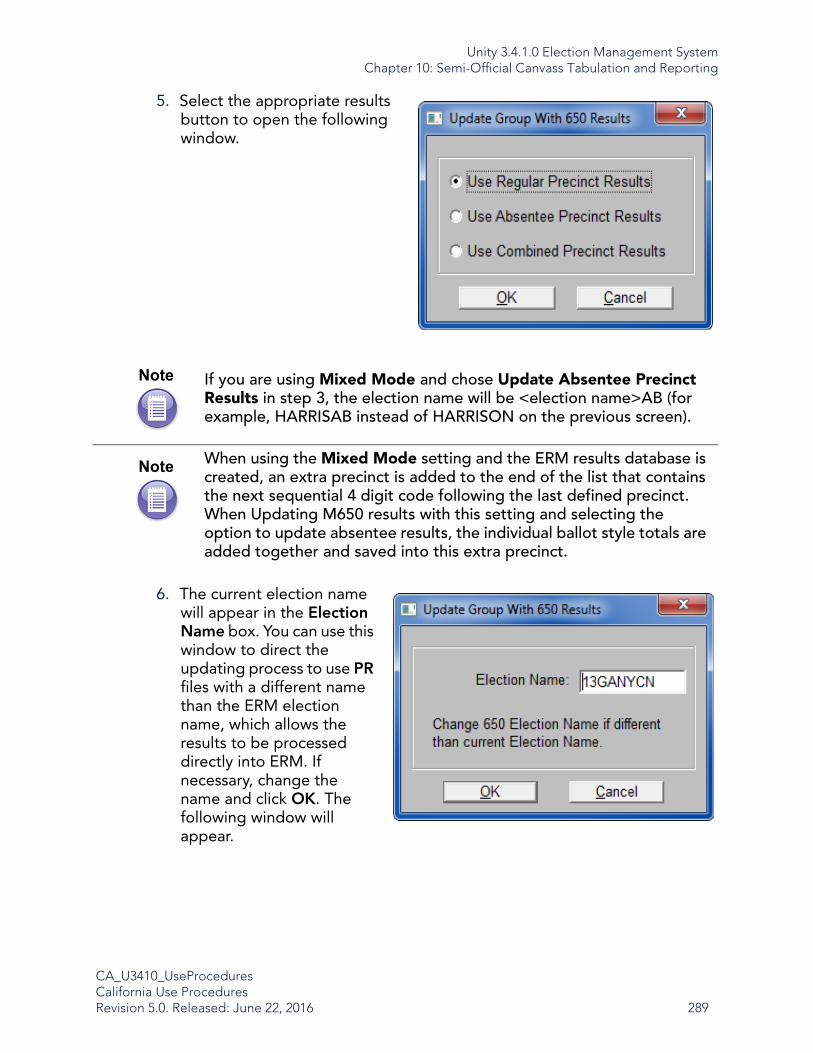
Unity 3.4.1.0 Election Management SystemChapter 10: Semi-Official Canvass Tabulation and Reporting
CA_U3410_UseProceduresCalifornia Use ProceduresRevision 5.0. Released: June 22, 2016 289
5. Select the appropriate results button to open the following window.
6. The current election name will appear in the Election Name box. You can use this window to direct the updating process to use PR files with a different name than the ERM election name, which allows the results to be processed directly into ERM. If necessary, change the name and click OK. The following window will appear.
Note If you are using Mixed Mode and chose Update Absentee Precinct Results in step 3, the election name will be <election name>AB (for example, HARRISAB instead of HARRISON on the previous screen).
Note When using the Mixed Mode setting and the ERM results database is created, an extra precinct is added to the end of the list that contains the next sequential 4 digit code following the last defined precinct. When Updating M650 results with this setting and selecting the option to update absentee results, the individual ballot style totals are added together and saved into this extra precinct.

Unity 3.4.1.0 Election Management SystemChapter 10: Semi-Official Canvass Tabulation and Reporting
CA_U3410_UseProceduresCalifornia Use ProceduresRevision 5.0. Released: June 22, 2016 290
7. Click Update 650 Group. This will be a complete replacement of all prior results for the group selected.
8. The precincts will update.
9. Print a 650 Network Server Log.
Note All <electionname> files (PR, LOG, EC, EI, PRE, PRF, RPT and OFC) for this election must be present on the drive to be used for uploading the results.
Note The Advanced Options button enables you to direct the updating process to look for the <election name>.PR files on a different network or drive. In addition, you may direct the updating process to use PR files with a different name than the ERM election name, which allows the results to be processed directly into ERM. Before using this option, be sure you know exactly what results are contained in the .PR files.
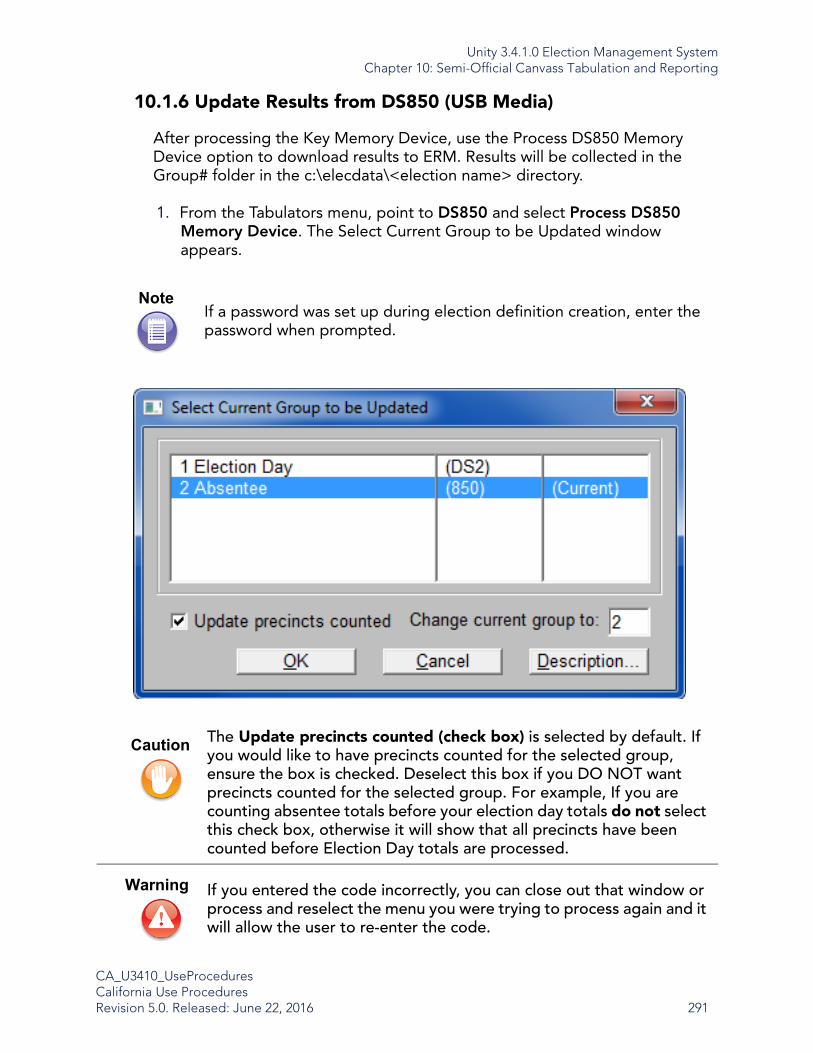
Unity 3.4.1.0 Election Management SystemChapter 10: Semi-Official Canvass Tabulation and Reporting
CA_U3410_UseProceduresCalifornia Use ProceduresRevision 5.0. Released: June 22, 2016 291
10.1.6 Update Results from DS850 (USB Media)
After processing the Key Memory Device, use the Process DS850 Memory Device option to download results to ERM. Results will be collected in the Group# folder in the c:\elecdata\<election name> directory.
1. From the Tabulators menu, point to DS850 and select Process DS850 Memory Device. The Select Current Group to be Updated window appears.
NoteIf a password was set up during election definition creation, enter the password when prompted.
Caution The Update precincts counted (check box) is selected by default. If you would like to have precincts counted for the selected group, ensure the box is checked. Deselect this box if you DO NOT want precincts counted for the selected group. For example, If you are counting absentee totals before your election day totals do not select this check box, otherwise it will show that all precincts have been counted before Election Day totals are processed.
Warning If you entered the code incorrectly, you can close out that window or process and reselect the menu you were trying to process again and it will allow the user to re-enter the code.
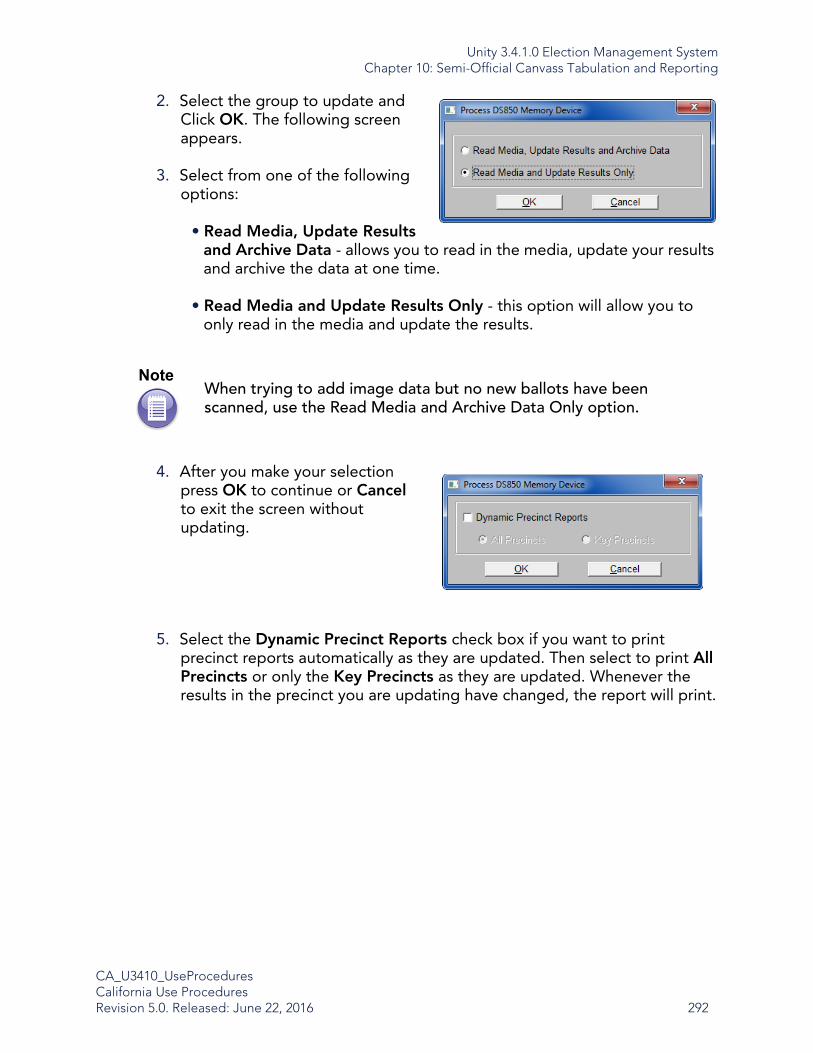
Unity 3.4.1.0 Election Management SystemChapter 10: Semi-Official Canvass Tabulation and Reporting
CA_U3410_UseProceduresCalifornia Use ProceduresRevision 5.0. Released: June 22, 2016 292
2. Select the group to update and Click OK. The following screen appears.
3. Select from one of the following options:
• Read Media, Update Results and Archive Data - allows you to read in the media, update your results and archive the data at one time.
• Read Media and Update Results Only - this option will allow you to only read in the media and update the results.
4. After you make your selection press OK to continue or Cancel to exit the screen without updating.
5. Select the Dynamic Precinct Reports check box if you want to print precinct reports automatically as they are updated. Then select to print All Precincts or only the Key Precincts as they are updated. Whenever the results in the precinct you are updating have changed, the report will print.
NoteWhen trying to add image data but no new ballots have been scanned, use the Read Media and Archive Data Only option.

Unity 3.4.1.0 Election Management SystemChapter 10: Semi-Official Canvass Tabulation and Reporting
CA_U3410_UseProceduresCalifornia Use ProceduresRevision 5.0. Released: June 22, 2016 293
6. Click OK.
7. Insert the Poll Media into the ERM computer, and click OK to read update the .spp record and ERM results database.
8. Once ERM has processed the Poll Media, remove the device and repeat step 6 to process additional USB flash drives.
9. Click Cancel once you have processed all of the Poll Media to return to the main window.
The status areas of the screen inform you about which precincts have been updated and how many there are left to process.
10. If the data has already been processed the you will get a notification. Click OK.
Unity 3.4.1.0 Election Management SystemChapter 10: Semi-Official Canvass Tabulation and Reporting
CA_U3410_UseProceduresCalifornia Use ProceduresRevision 5.0. Released: June 22, 2016 294
10.1.7 Precinct and Election Report Options
This section will explain the different report options.
1. From the Reports menu, click the report to generate.
Precinct
EL30, Precinct Report – A Precinct Summary Report is a list of individual precincts and contest results. Customize the Precinct Summary Report by selecting the individual contests and precincts that are included. You can also print a Precinct Summary Report for individual reporting groups.
EL30A, Prec Report–Group Detail – The Precinct Summary Report with Group Detail is similar to the Precinct Summary report. You can use it to print totals for up to fourteen active reporting groups in addition to Election Totals.
Election
EL45, Election Summary Report – An Election Summary Report lists the total number of votes received by each candidate/question and the percent of the total vote won by each candidate/question in your election.
EL45A, Election Summary with Group Detail – Generate an Election Summary with Group Detail to print totals for up to fourteen active reporting groups in addition to election totals.
This will open up the window to select the options for the reports.

Unity 3.4.1.0 Election Management SystemChapter 10: Semi-Official Canvass Tabulation and Reporting
CA_U3410_UseProceduresCalifornia Use ProceduresRevision 5.0. Released: June 22, 2016 295
10.1.7.1 Selection Tab
1. On the Selection tab, choose the contests and/or precincts to appear on your report.
• Select All to print all contests and precincts
• Select Contest/Precinct to generate a report for specific contests or precincts. Take the following steps to select specific contests or precincts.

Unity 3.4.1.0 Election Management SystemChapter 10: Semi-Official Canvass Tabulation and Reporting
CA_U3410_UseProceduresCalifornia Use ProceduresRevision 5.0. Released: June 22, 2016 296
a. Type a contest sequence number in the Contest field or click Contests to open the Contest window
b. Select from the list of available contests. To select several contests, press and hold the Ctrl key while clicking the contests to select. There is a limit of 71 contests on this screen.
c. Type a precinct identification number in the Precinct field or click Precincts to open the Precincts window.
d. Select from the list of precincts. To select several precincts, press and hold Ctrl while clicking the precincts to select. There is a limit of 71 precincts on this screen.
• Select File to generate a report from an existing election file you have created. Select an available file from the list or create a new file.

Unity 3.4.1.0 Election Management SystemChapter 10: Semi-Official Canvass Tabulation and Reporting
CA_U3410_UseProceduresCalifornia Use ProceduresRevision 5.0. Released: June 22, 2016 297
10.1.7.2 Headings Tab
2. Click the Headings tab to enter the information to appear on your report headings.
3. Enter up to three lines of identification text to appear at the top center of your report in the Canvass Center Heading fields.
4. Enter the text that appears at the top left of your report in the Canvass Left Edge Heading field.
5. Enter the line number on which you want this heading to print (1, 2, or 3) in the Line No. field.
6. Enter the text that appears at the top right of your report in the Canvass Right Edge Heading.
Note If you choose to print something on line 3, the time/date stamp and the report number and page will print on the fifth line, instead of the fourth.

Unity 3.4.1.0 Election Management SystemChapter 10: Semi-Official Canvass Tabulation and Reporting
CA_U3410_UseProceduresCalifornia Use ProceduresRevision 5.0. Released: June 22, 2016 298
7. Click Reset to clear your settings. Click Use For This Run Only to only use your headings with the next report you print. Click Apply to use your headings for all reports of the same type.
10.1.7.3 Options Tab
8. Click the Options tab, and choose the options to include on the report.
Option Description Active for
Include over/under reporting?
to include over-vote and under-vote totals in your report.
EL30, Precinct ReportEL30A, Prec Report–Group DetailEL45, Election Summary ReportEL45A, Election Summary with Group Detail
Include date/time stamp
Include the date and time your report was generated at the top left of the first page of your report
EL30, Precinct ReportEL30A, Prec Report–Group DetailEL45, Election Summary ReportEL45A, Election Summary with Group Detail

Unity 3.4.1.0 Election Management SystemChapter 10: Semi-Official Canvass Tabulation and Reporting
CA_U3410_UseProceduresCalifornia Use ProceduresRevision 5.0. Released: June 22, 2016 299
Include page number?
Includes page numbers
EL30, Precinct ReportEL30A, Prec Report–Group DetailEL45, Election Summary ReportEL45A, Election Summary with Group Detail
Include Precincts reported line
The number of precincts counted on your report. This will include a line for each contest and for example will show, (WITH 3 OF 9 PRECINCTS COUNTED)
EL45, Election Summary ReportEL45A, Election Summary with Group Detail
Print totals only (no detail)
Displays election totals without including precinct details.
Not available
Summarize absentee precincts?
Combines the absentee numbers for each of your precincts into a single absentee total.
Not available
Use seq. page numbering?
Numbers your pages sequentially. If it is not selected, the number of the first contest on the page, the last contest on the page and the page number within the contest set, determines your page number.
Not available
Separate Reports by Party?
Organizes your results by party in precinct sequence order. When Separate Reports by Party is not selected, your results are organized by precinct in party sequence order
Not available
Always use R/V totals?
Unchecked - will only show the registered voter totals for precincts that have been counted. Checked - will show the registered voter totals on the report for all precincts in the election.
EL45, Election Summary ReportEL45A, Election Summary with Group Detail
Include only counted precincts?
Includes only counted precincts in the report.
EL30, Precinct ReportEL30A, Prec Report–Group Detail
Option Description Active for
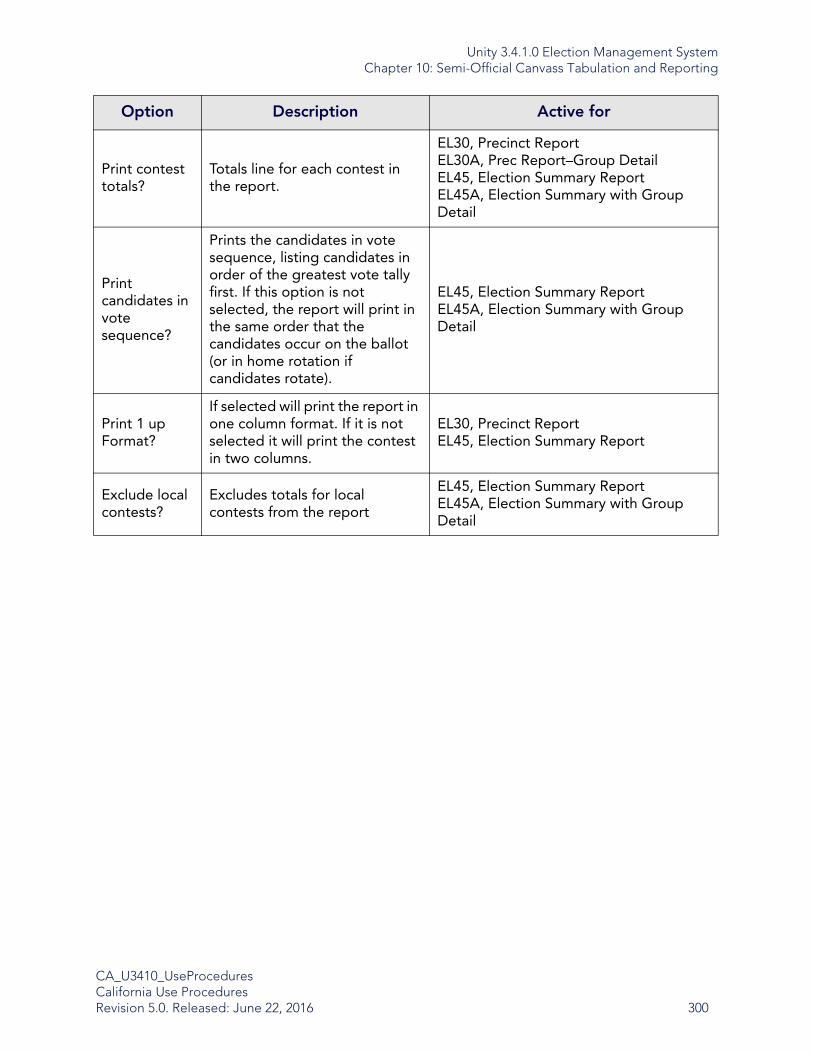
Unity 3.4.1.0 Election Management SystemChapter 10: Semi-Official Canvass Tabulation and Reporting
CA_U3410_UseProceduresCalifornia Use ProceduresRevision 5.0. Released: June 22, 2016 300
Print contest totals?
Totals line for each contest in the report.
EL30, Precinct ReportEL30A, Prec Report–Group DetailEL45, Election Summary ReportEL45A, Election Summary with Group Detail
Print candidates in vote sequence?
Prints the candidates in vote sequence, listing candidates in order of the greatest vote tally first. If this option is not selected, the report will print in the same order that the candidates occur on the ballot (or in home rotation if candidates rotate).
EL45, Election Summary ReportEL45A, Election Summary with Group Detail
Print 1 up Format?
If selected will print the report in one column format. If it is not selected it will print the contest in two columns.
EL30, Precinct ReportEL45, Election Summary Report
Exclude local contests?
Excludes totals for local contests from the report
EL45, Election Summary ReportEL45A, Election Summary with Group Detail
Option Description Active for

Unity 3.4.1.0 Election Management SystemChapter 10: Semi-Official Canvass Tabulation and Reporting
CA_U3410_UseProceduresCalifornia Use ProceduresRevision 5.0. Released: June 22, 2016 301
Percentages
Select No Cand% ? No OV/UN% - to omit all percentages from your report.Select Cand % Based on Votes Cast No. ov/uv % - to print the candidate percentages based on the number of votes cast in that contest, not including over and under votes.If Include over/under reporting? is checked these additional options are able to be selected: Cand % based on votes cast-With ov/un % - to print the candidate percentages based on the number of votes cast in that contest, including over and under votes.Cand % based on elig. votes-With ov/un % - to print the candidate percentages based on the number of eligible votes cast in that contest, including over and under votes.
EL30, Precinct ReportEL30A, Prec Report–Group DetailEL45, Election Summary ReportEL45A, Election Summary with Group Detail
Number of copies
Sets the number of reports you would like to generate.
EL30, Precinct ReportEL30A, Prec Report–Group DetailEL45, Election Summary ReportEL45A, Election Summary with Group Detail
District control file name
The District Control File is located in the \elecdata folder and has a DST extension.
Not available
Precinct terminology
Enter the term in the field used by the jurisdiction to describe precincts. Wards, Election Districts.
EL45, Election Summary ReportEL45A, Election Summary with Group Detail
Prt. CertControls how the certification message appears on the reports.
Not available
Print multiple conts on same pg
Controls how contests appear on your reports
Not available
Option Description Active for
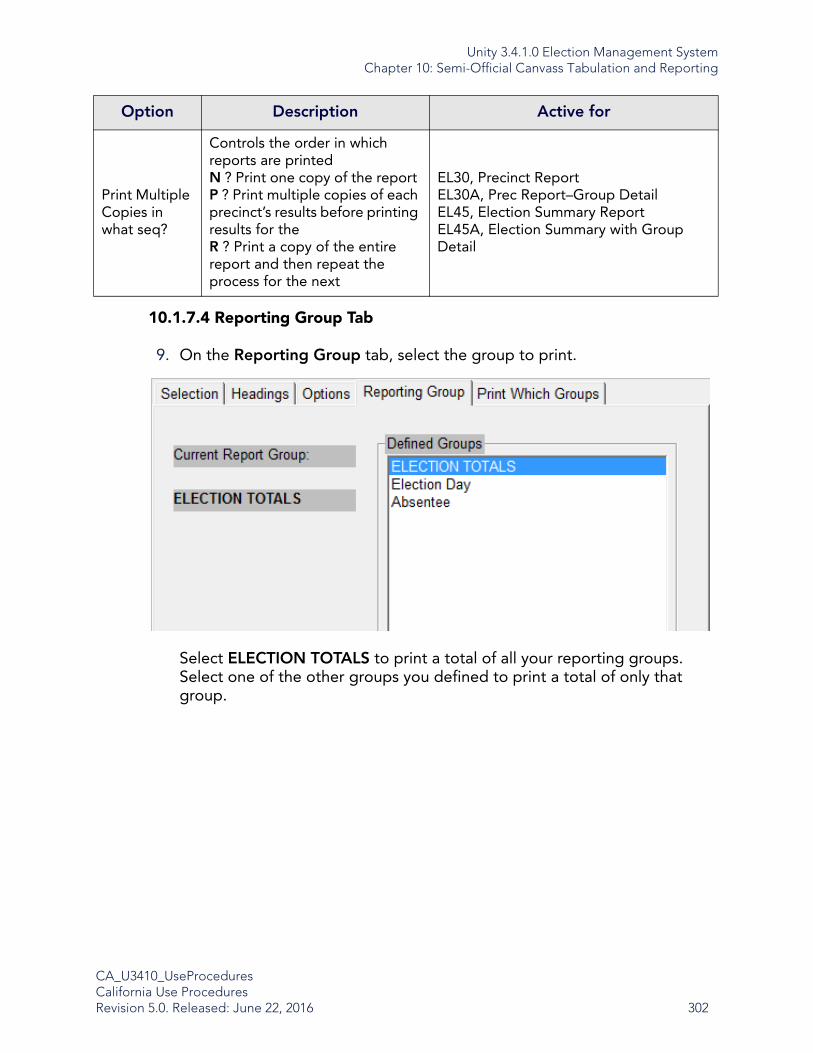
Unity 3.4.1.0 Election Management SystemChapter 10: Semi-Official Canvass Tabulation and Reporting
CA_U3410_UseProceduresCalifornia Use ProceduresRevision 5.0. Released: June 22, 2016 302
10.1.7.4 Reporting Group Tab
9. On the Reporting Group tab, select the group to print.
Select ELECTION TOTALS to print a total of all your reporting groups. Select one of the other groups you defined to print a total of only that group.
Print Multiple Copies in what seq?
Controls the order in which reports are printedN ? Print one copy of the reportP ? Print multiple copies of each precinct’s results before printing results for theR ? Print a copy of the entire report and then repeat the process for the next
EL30, Precinct ReportEL30A, Prec Report–Group DetailEL45, Election Summary ReportEL45A, Election Summary with Group Detail
Option Description Active for
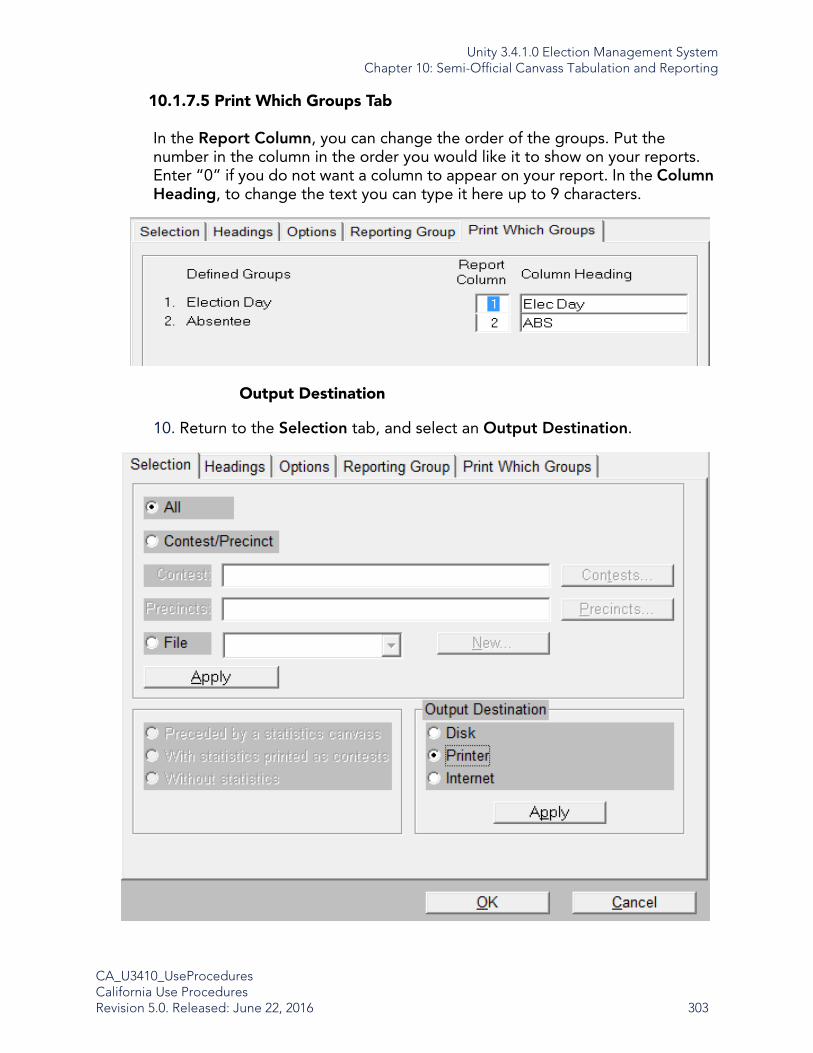
Unity 3.4.1.0 Election Management SystemChapter 10: Semi-Official Canvass Tabulation and Reporting
CA_U3410_UseProceduresCalifornia Use ProceduresRevision 5.0. Released: June 22, 2016 303
10.1.7.5 Print Which Groups Tab
In the Report Column, you can change the order of the groups. Put the number in the column in the order you would like it to show on your reports. Enter “0” if you do not want a column to appear on your report. In the Column Heading, to change the text you can type it here up to 9 characters.
Output Destination
10. Return to the Selection tab, and select an Output Destination.
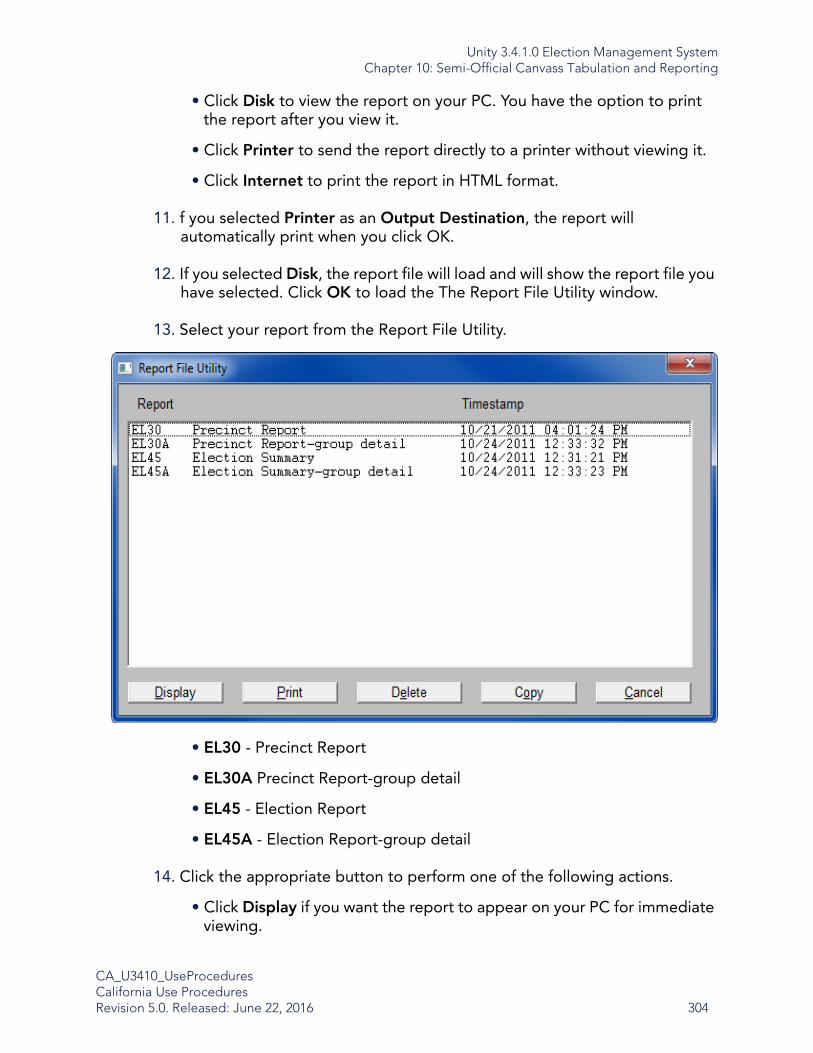
Unity 3.4.1.0 Election Management SystemChapter 10: Semi-Official Canvass Tabulation and Reporting
CA_U3410_UseProceduresCalifornia Use ProceduresRevision 5.0. Released: June 22, 2016 304
• Click Disk to view the report on your PC. You have the option to print the report after you view it.
• Click Printer to send the report directly to a printer without viewing it.
• Click Internet to print the report in HTML format.
11. f you selected Printer as an Output Destination, the report will automatically print when you click OK.
12. If you selected Disk, the report file will load and will show the report file you have selected. Click OK to load the The Report File Utility window.
13. Select your report from the Report File Utility.
• EL30 - Precinct Report
• EL30A Precinct Report-group detail
• EL45 - Election Report
• EL45A - Election Report-group detail
14. Click the appropriate button to perform one of the following actions.
• Click Display if you want the report to appear on your PC for immediate viewing.
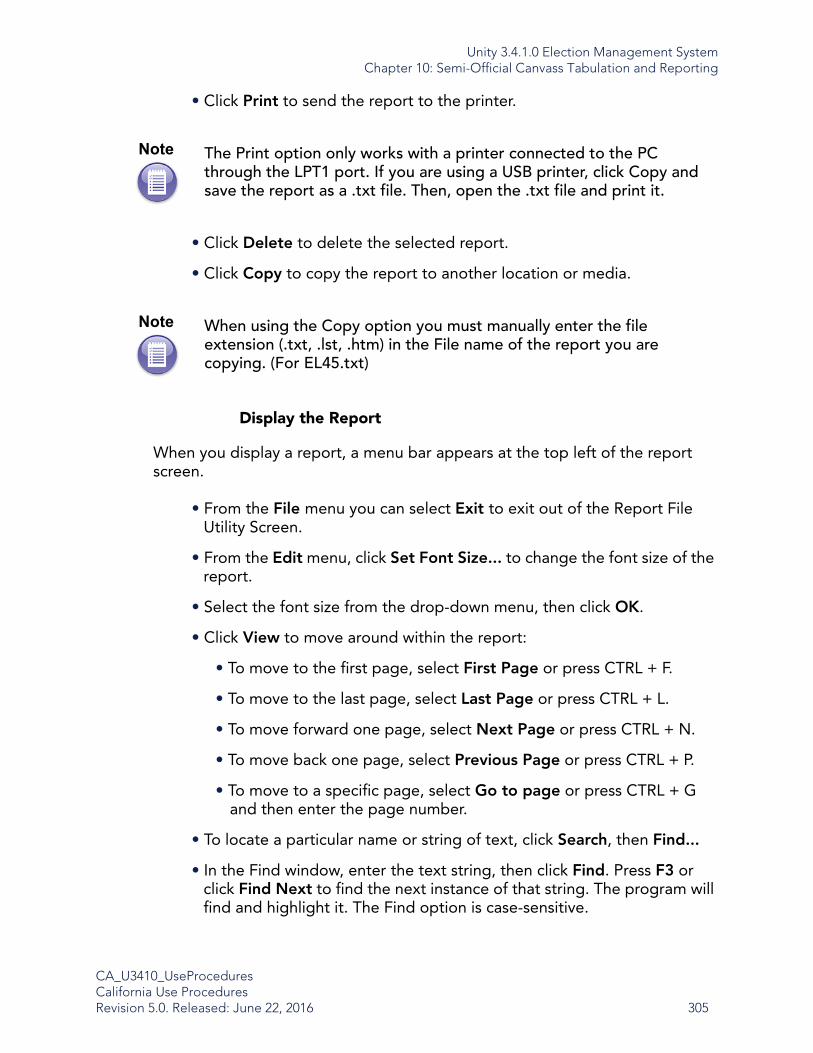
Unity 3.4.1.0 Election Management SystemChapter 10: Semi-Official Canvass Tabulation and Reporting
CA_U3410_UseProceduresCalifornia Use ProceduresRevision 5.0. Released: June 22, 2016 305
• Click Print to send the report to the printer.
• Click Delete to delete the selected report.
• Click Copy to copy the report to another location or media.
Display the Report
When you display a report, a menu bar appears at the top left of the report screen.
• From the File menu you can select Exit to exit out of the Report File Utility Screen.
• From the Edit menu, click Set Font Size... to change the font size of the report.
• Select the font size from the drop-down menu, then click OK.
• Click View to move around within the report:
• To move to the first page, select First Page or press CTRL + F.
• To move to the last page, select Last Page or press CTRL + L.
• To move forward one page, select Next Page or press CTRL + N.
• To move back one page, select Previous Page or press CTRL + P.
• To move to a specific page, select Go to page or press CTRL + G and then enter the page number.
• To locate a particular name or string of text, click Search, then Find...
• In the Find window, enter the text string, then click Find. Press F3 or click Find Next to find the next instance of that string. The program will find and highlight it. The Find option is case-sensitive.
Note The Print option only works with a printer connected to the PC through the LPT1 port. If you are using a USB printer, click Copy and save the report as a .txt file. Then, open the .txt file and print it.
Note When using the Copy option you must manually enter the file extension (.txt, .lst, .htm) in the File name of the report you are copying. (For EL45.txt)
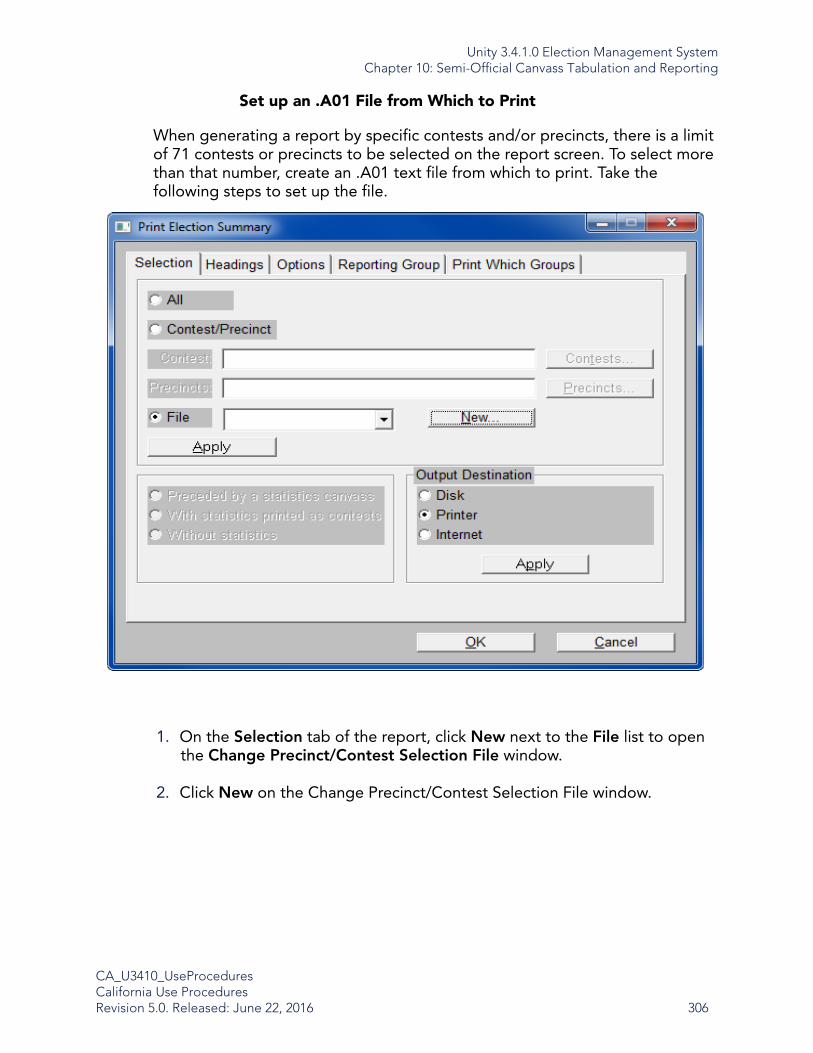
Unity 3.4.1.0 Election Management SystemChapter 10: Semi-Official Canvass Tabulation and Reporting
CA_U3410_UseProceduresCalifornia Use ProceduresRevision 5.0. Released: June 22, 2016 306
Set up an .A01 File from Which to Print
When generating a report by specific contests and/or precincts, there is a limit of 71 contests or precincts to be selected on the report screen. To select more than that number, create an .A01 text file from which to print. Take the following steps to set up the file.
1. On the Selection tab of the report, click New next to the File list to open the Change Precinct/Contest Selection File window.
2. Click New on the Change Precinct/Contest Selection File window.

Unity 3.4.1.0 Election Management SystemChapter 10: Semi-Official Canvass Tabulation and Reporting
CA_U3410_UseProceduresCalifornia Use ProceduresRevision 5.0. Released: June 22, 2016 307
3. The report option window will open to the Headings tab.
4. Enter up to three lines of identification text to appear at the top center of your report in the Canvass Center Heading fields.
You can make any necessary changes and click OK to save these changes for each additional printing of this report. Any changes you make to the headings will not appear on other reports.
5. Enter the text that appears at the top left of your report in the Canvass Left Edge Heading field.
6. Enter the text that appears at the top right of your report in the Canvass Right Edge Heading.
NoteThe Line No. field does not appear on the Headings tab for all reports.

Unity 3.4.1.0 Election Management SystemChapter 10: Semi-Official Canvass Tabulation and Reporting
CA_U3410_UseProceduresCalifornia Use ProceduresRevision 5.0. Released: June 22, 2016 308
7. Click the Contests tab.
8. Select the contests to include in your report.
9. Click OK in the contest list to continue. The Print Election Canvass window reappears with the selected contest numbers in the Contests field. Press Enter to save your selections and move the contests to the bottom window.
Note To select multiple items in a list hold down the CTRL key and select individual items. To select a group of items from a list hold down SHIFT and drag your cursor over the items to select.
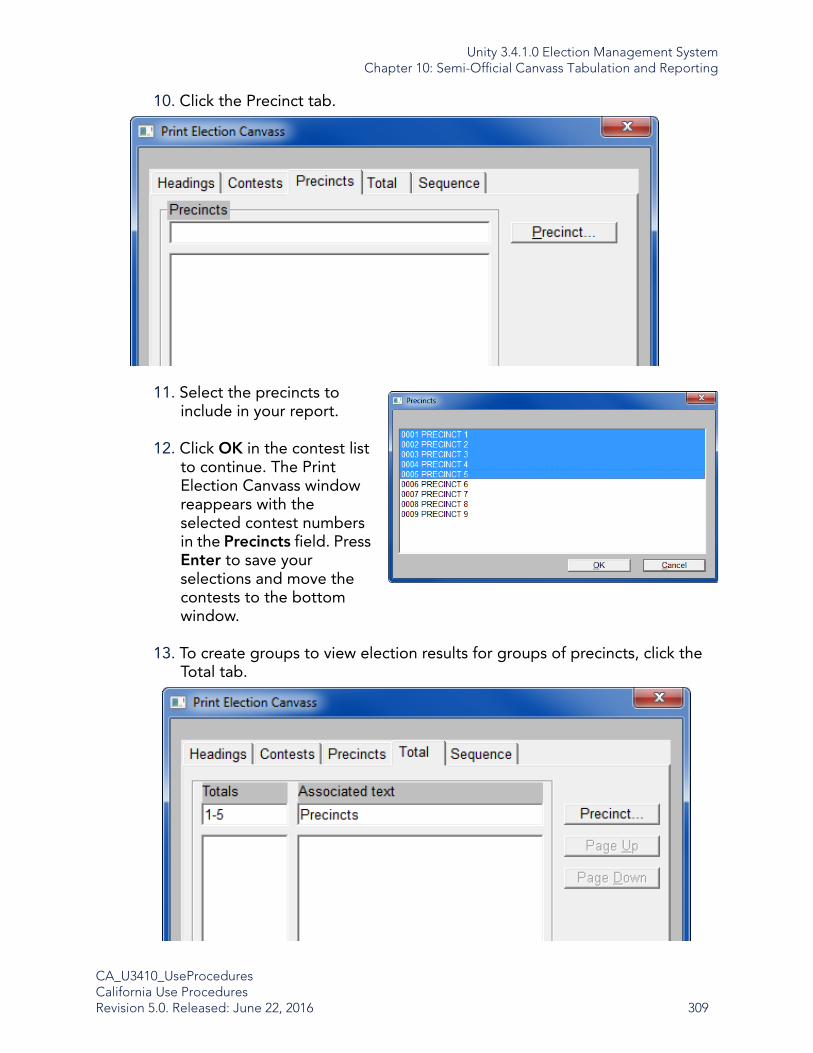
Unity 3.4.1.0 Election Management SystemChapter 10: Semi-Official Canvass Tabulation and Reporting
CA_U3410_UseProceduresCalifornia Use ProceduresRevision 5.0. Released: June 22, 2016 309
10. Click the Precinct tab.
11. Select the precincts to include in your report.
12. Click OK in the contest list to continue. The Print Election Canvass window reappears with the selected contest numbers in the Precincts field. Press Enter to save your selections and move the contests to the bottom window.
13. To create groups to view election results for groups of precincts, click the Total tab.

Unity 3.4.1.0 Election Management SystemChapter 10: Semi-Official Canvass Tabulation and Reporting
CA_U3410_UseProceduresCalifornia Use ProceduresRevision 5.0. Released: June 22, 2016 310
14. Press TAB to move to the Associated Text field and enter text that identifies your group (“Precincts 105-110,” for example). Press Enter to save your selections and move the contests to the bottom window.
15. Click OK or Save As and enter a file name in the New filename field.
16. Enter your .A01 file name in the New filename field, and click OK. The file name will appear in the File field on the Selection tab.
17. Click OK to save your file and return to the report options window.
10.1.7.6 Precinct and Election Report Examples
EL30, Precinct Report
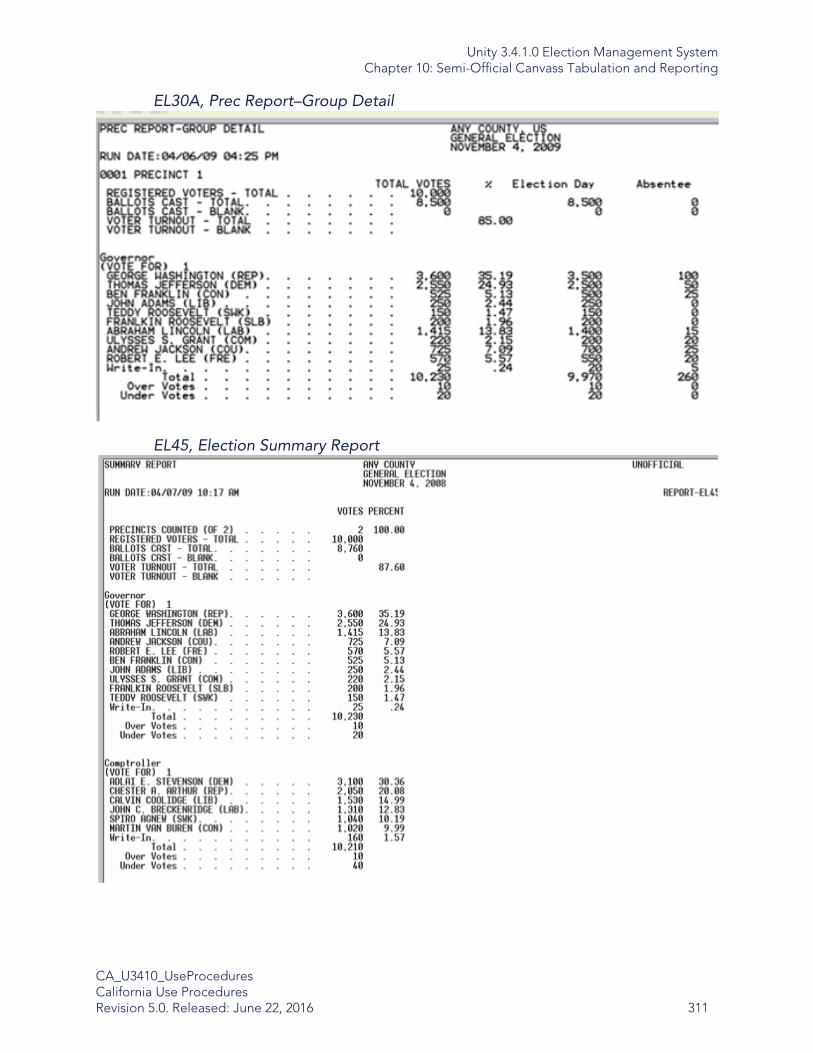
Unity 3.4.1.0 Election Management SystemChapter 10: Semi-Official Canvass Tabulation and Reporting
CA_U3410_UseProceduresCalifornia Use ProceduresRevision 5.0. Released: June 22, 2016 311
EL30A, Prec Report–Group Detail
EL45, Election Summary Report
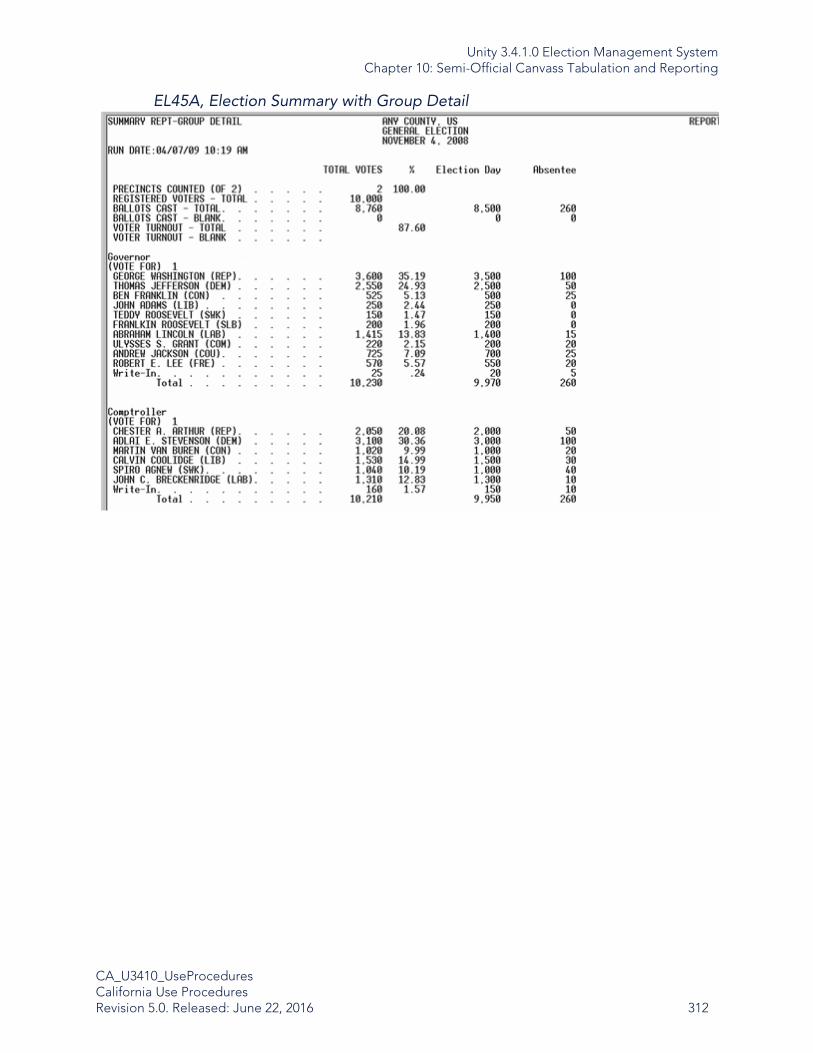
Unity 3.4.1.0 Election Management SystemChapter 10: Semi-Official Canvass Tabulation and Reporting
CA_U3410_UseProceduresCalifornia Use ProceduresRevision 5.0. Released: June 22, 2016 312
EL45A, Election Summary with Group Detail

Unity 3.4.1.0 Election Management SystemChapter 10: Semi-Official Canvass Tabulation and Reporting
CA_U3410_UseProceduresCalifornia Use ProceduresRevision 5.0. Released: June 22, 2016 313
10.2 Integration with County Systems and Calvoter
California supplies each of its counties with an election code file from the Secretary of State. Use the code file to assign contest and candidate numbers in ERM. The first two letters of the code file’s name are the county code (for example, 41 for San Mateo). The next two numbers are the last two digits of the election year (02 for 2002) and the last two letters of the code describe the election type (for example, PP for Party Primary). The code file from the state has a .txt extension.
There are three state-issued template files for an election: the SOS (Secretary of State) template file, the SOV (Statement of Vote) template file, and the SSOV (Statewide results by political subdivision) template file. Each of these files can be found on your CALVOTER workstation, when issued by the Secretary of State. When available, copy each of these files to your election’s elecdata folder.
There are three options for sending the results to the Secretary of State:
• Transmit SOV/SSOV template files via CALVOTER
• Key SOV/SSOV data directly via the CALVOTER application
• Complete and return the SOV/SSOV forms by mail (certified mail recommended)
Prior to the election, the Secretary of State (SOS) will distribute to counties the forms and/or files for election night results reporting. County Election Administrators must then decide whether to provide election night results to the SOS via fax or electronic copy. If the County chooses to submit the files electronically, the existing Election Reporting Manager database must be updated with the associated SOS office and candidate numbering scheme.
NoteVerify that the ERM database was initialized with the Initialize State Cross Reference File option checked.

Unity 3.4.1.0 Election Management SystemChapter 10: Semi-Official Canvass Tabulation and Reporting
CA_U3410_UseProceduresCalifornia Use ProceduresRevision 5.0. Released: June 22, 2016 314
10.2.1 Update ERM with SOS File Information
Perform this update as soon as you receive the data from the SOS office. This will provide you ample time to prepare and update as necessary.
1. Save a copy of the SOS file template in the root of your elecdata folder (it may be on the C or Q drive, depending on a network connection).
2. In ERM, from the State Transfer menu, select Create Copy of Initial File.
3. In the Secretary of State File field, enter the full address of the file location.
4. Click OK.
5. On the confirmation message, click OK.
6. From the State Transfer menu, point to Cross-reference, then click Print State Template File.

Unity 3.4.1.0 Election Management SystemChapter 10: Semi-Official Canvass Tabulation and Reporting
CA_U3410_UseProceduresCalifornia Use ProceduresRevision 5.0. Released: June 22, 2016 315
7. After the file is printed, form the State Transfer menu, point to Cross-reference, then click Enter State Numbering.
8. Click Change Candidate Numbers - sequential, then click OK.

Unity 3.4.1.0 Election Management SystemChapter 10: Semi-Official Canvass Tabulation and Reporting
CA_U3410_UseProceduresCalifornia Use ProceduresRevision 5.0. Released: June 22, 2016 316
9. Using the State Template File Listing you printed, in the State numbering Cross-reference Maintenance window, copy the number of the Contest into the text box in the upper-left corner. Click Enter.
10. In the same manner, copy the numbers associated with each of the candidate lines to the associated lines in the window.
The following example shows how the screen will look after you make the changes using the previous example report.
ImportantAlways click Enter to advance to the next candidate. This applies the change to the field.
Unity 3.4.1.0 Election Management SystemChapter 10: Semi-Official Canvass Tabulation and Reporting
CA_U3410_UseProceduresCalifornia Use ProceduresRevision 5.0. Released: June 22, 2016 317
11. When you have completed all the changes for a contest, click Update.
12. Click Next Cont. to continue the same process for all the contests listed on the template file.
13. When you have completed the election file, from the State Transfer menu, point to Cross-reference, then click Print State Numbering.
This will provide you a print out of the numbers you have just entered.
14. Proof this file against the State Template File that you were using earlier.
15. Verify the files are correct.
You are ready for electronic reporting.
Note If there are more candidates for a specific contest than will fit on one screen, click Next Cand. to advance to the next screen of candidates for the contest.
Caution
Do not change the numbers associated with the Write-In line.
ImportantIt is very important to click Update on each screen as it is being formatted; this applies the changes to the database.

Unity 3.4.1.0 Election Management SystemChapter 10: Semi-Official Canvass Tabulation and Reporting
CA_U3410_UseProceduresCalifornia Use ProceduresRevision 5.0. Released: June 22, 2016 318
10.2.2 Election Night Reporting
Load election totals as needed for your first report. When you have printed and verified the summary reports, you are ready to generate your electronic transfer file.
1. From the State Transfer menu, click Create State Transfer File.
2. Select from the following report types.
• REGL - File used to generate all reports on election night except for the final election night report.
• FINL - Last report upload for election night reporting.
• UPDT - Any report that is uploaded after election night. This will include intermediate report ran after further processing of Vote By Mail ballots, provisional ballots and duplicated ballots.
• SOV - Final reporting for County including all verified write-ins.
• SSOV - Final reporting for County with specific breakdown of political subdivision.

Unity 3.4.1.0 Election Management SystemChapter 10: Semi-Official Canvass Tabulation and Reporting
CA_U3410_UseProceduresCalifornia Use ProceduresRevision 5.0. Released: June 22, 2016 319
3. Click OK.
4. Type the SOS file name in the Secretary of State File Name field.This is the copy of the SOS template file that was generated earlier and has the extension CPY.
5. Click OK. The software will then run the totals through the update.
6. When the confirmation message appears, click OK.
7. In Windows Explorer, browse to the root folder of elecdata and locate the file that was initially used to generate the SOS template (for example. 2406GG.TXT).
8. Save that file to removable memory device and upload it to the Calvoter system. A copy of the Election Summary report may also be requested for submission to ensure that results are transferred correctly.
Unity 3.4.1.0 Election Management SystemChapter 11: Official Canvass and Post-Election Procedures
CA_U3410_UseProceduresCalifornia Use ProceduresRevision 5.0. Released: June 22, 2016 320
Chapter 11: Official Canvass and Post-Election Procedures
11.1 Purpose of the Official Canvass
The Official Canvass consists of a post-election audit of all of the voting precincts’ returns and the vote-by-mail voter ballot returns. Its purpose is to validate the outcome of the election by verifying that there were not more ballots cast than the sum of the numbers of voters who signed the Precinct Roster/Index and who applied for, and were issued vote-by-mail voter ballots, as well as to account for all official ballots produced for the election. Additionally, the Official Canvass verifies that all required certificates and oaths were properly executed by the precinct board. Verification of the computer or tabulator count is accomplished by manually recounting the voted ballots from at least one percent of the voting precincts and comparing the manually tallied results to the tabulator and Summary System produced results. Each of the following Official Canvass functions must be performed by a minimum of three persons.
11.2 Election Observer Panel
Before processing ballots, the election administrator appoints election boards to carry out the following tasks.
11.2.1 Canvassing Precinct Returns
• Canvassing precinct returns consists of the following tasks:
• Processing the provisional ballots returned from each precinct
• Verifying the eligibility of persons who cast ballots provisionally
• Opening the envelopes of eligible voters and removing the provisional ballots
• Examining the ballots for write-in votes
• Noting cause for rejection and damage identifying original or duplicate provisional ballots by precinct and delivering same to the designated official responsible for updating the ES&S tabulators (and/or computer tallies

Unity 3.4.1.0 Election Management SystemChapter 11: Official Canvass and Post-Election Procedures
CA_U3410_UseProceduresCalifornia Use ProceduresRevision 5.0. Released: June 22, 2016 321
• Writing the reason for rejection on the envelopes of ineligible provisional voters (these unopened envelopes are to be retained for the period prescribed by law)
• Processing the Statement of Votes (SOV) in the manner prescribed for Ballot Inspection Boards
11.3 1% Manual Recount Procedures
For the purpose of validating the accuracy of the computer count, a public, manual recount of the ballots cast in at least one percent of the precincts shall be conducted within fifteen days after every election in which the precinct tabulator system is used. This one percent precinct sample shall be chosen at random. If the random selection of precincts results in an office or ballot measure not being manually recounted, select and manually recount as many additional precincts as necessary so as to include all candidates or ballot measures not recounted in the original sample.
Precincts selected at random shall be chosen by an individual who is designated by the responsible elections official and who is not the same person, or a relative of the person responsible for election coding. Selected precinct numbers shall not be revealed to such personnel until the tally is complete.
In the event a precinct tabulator fails after the semiofficial or official ballot tally process has begun, the ballots from the last precinct tallied on the equipment prior to the failure shall be included in the automatic manual recount. If a discrepancy is discovered between the automated tally and the manual recount tally, each precinct’s ballots which had been read and processed by the failed equipment, subsequent to the time the equipment last successfully completed logic and accuracy test, shall be tallied again.
The California Secretary of State requirements concerning the interpretation and counting of valid voting position marks, shall be followed during the automatic recount of ballots.
Unity 3.4.1.0 Election Management SystemChapter 11: Official Canvass and Post-Election Procedures
CA_U3410_UseProceduresCalifornia Use ProceduresRevision 5.0. Released: June 22, 2016 322
11.3.1 Handling Ballot Exceptions(Definition of Vote, Determining Voter Intent)
The California Secretary of State requires defined procedures to determine voter intent and how to handle various incorrect markings.
11.4 Post-Election Logic and Accuracy Testing
All post-election logic and accuracy testing of election equipment must come under the direction of the county. When imposed, this test will analyze the calibration requirements as specified for election use.
Follow the same procedures described in Chapter 5: Logic and Accuracy Testing.
11.5 Final Reporting of Official Canvass
11.5.1 Ballot Security and Reporting Results
Use the following instructions as a general guideline for reporting results. Consult the California Elections Code for specific regulations governing the reporting of results.
1. Complete the official canvass and add any write-in votes or other totals to the final vote count. Then, post the final vote count at the counting location for public inspection.
2. Prepare a certified statement of the election results and submit the statement to the governing district within 28 days of the election. Show results on a precinct by precinct basis. Include the following information on your statement of results:
• The total number of votes cast
• The number of votes cast at each precinct for each candidate and for and against each measure
• The total number of votes cast for each candidate and for and against each measure
• The number of votes cast in each city, assembly district, congressional district, senatorial district, State Board of Equalization district and supervisory district located in whole or part of the county.

Unity 3.4.1.0 Election Management SystemChapter 11: Official Canvass and Post-Election Procedures
CA_U3410_UseProceduresCalifornia Use ProceduresRevision 5.0. Released: June 22, 2016 323
3. Send a copy of the results to each of the following:
• All candidates participating in your statewide election.
• All of the candidates voted for in the following offices:
• Member of the Assembly
• Member of the Senate
• Member of the U.S. House of Representatives
• Member of the State Board of Equalization
• Justice of the Court of Appeal
• Judge of the superior court
• Judge of the municipal court
• All persons voted for in a presidential primary
• The vote given for persons for electors of President and Vice President of the United States.
• All statewide measures.
11.6 Backup and Retention of Election Materials
11.6.1 Acronis Backup and Recovery
Acronis software is used for hard disk image backup. These processes require an Acronis boot disc for operation, and a portable USB hard drive or flash with a minimum of 32G available storage to save your backup files. Multiple backups of the hard disk images are recommended. Store all backup materials in a secure location.
To create the Acronis boot disc, follow the instructions provided in your Acronis documentation. During boot disc creation, if needed, you can install device drivers on the disc. Drivers can also be loaded from a separate drive after bootup.
Note For procedures to run the required reports, refer to 9.4 Closing the Polls and Vote Reporting and 10.1.7 Precinct and Election Report Options.

Unity 3.4.1.0 Election Management SystemChapter 11: Official Canvass and Post-Election Procedures
CA_U3410_UseProceduresCalifornia Use ProceduresRevision 5.0. Released: June 22, 2016 324
Dell PERC H730 RAID controller drivers are available for download on the Dell Support Website, and should be preloaded on the disc.
11.6.1.1 Accessing Acronis
1. Turn on the computer.
2. When the computer is fully running, press the appropriate key for the Boot Manager.
• EMS Server: F11
• EMS Workstation: F12
3. Insert the Acronis boot disc into the computer’s DVD-ROM drive.
4. Select the DVD-ROM drive as the boot device.
5. At the prompt, press any key to boot from the disc.
Acronis will begin loading the Windows 7 environment. This process takes several minutes.
6. When loading is complete, the Acronis Welcome screen appears.Click Disk Management.
11.6.1.2 Backup Procedures
Full system backup can be performed on the EMS server, and also any EMS workstation, as needed.
1. Access the Acronis program as previously instructed in 11.6.1.1 Accessing Acronis.
2. Connect the removable storage device that will be used to save the backup image. After a few seconds, the new disk will appear in the directory list.
If the disk does not appear after a few seconds, refresh the window. If it still does not appear, remove the drive and connect it to a different USB port.
NoteIf you have password protected the BIOS, you must enter the password to enter the Boot Manager.
Unity 3.4.1.0 Election Management SystemChapter 11: Official Canvass and Post-Election Procedures
CA_U3410_UseProceduresCalifornia Use ProceduresRevision 5.0. Released: June 22, 2016 325
3. Click Back to return to the Welcome screen.
4. Click Back up now.
5. Under “What to back up,” click Items to back up.
6. In the Data to Back Up window, select Disks/volumes.
7. The computer will display any connected disks. Each disk node can be expanded to show its contents.
Select the check boxes next to only the computer’s internal disk drives. Deselect the removable storage device.
8. Click OK.
9. Under “Where to back up,” click Location.
10. Expand the Local folders node, select your backup drive, then select the desired path. (You can create sub-folders on the drive by clicking Create folder.)
11. At the bottom of the window, enter a Name for the backup image file. The name can not end with a number.
12. Click OK twice.
The backup process lasts at least 20 minutes.
13. When the backup is complete, click Close.
14. Remove the Acronis boot disk and backup drive from the computer.
15. Close the Acronis window.
Note The drive letters that appear in Acronis Windows 7 may be different from the drive letters in standard Windows. The drives can generally still be identified by their capacity and interface type.
Note
Ignore the warning that appears under Status.
Unity 3.4.1.0 Election Management SystemChapter 11: Official Canvass and Post-Election Procedures
CA_U3410_UseProceduresCalifornia Use ProceduresRevision 5.0. Released: June 22, 2016 326
This causes Acronis to shut down and the system to reboot.
11.6.1.3 Recovery
The following steps are for hard disk image recovery.
1. Access the Acronis program as previously instructed in 11.6.1.1 Accessing Acronis.
2. Connect the removable storage device containing the backup image. After a few seconds, the new disk will appear in the directory list.
If the disk does not appear after a few seconds, refresh the window. If it still does not appear, remove the drive and connect it to a different USB port.
3. Click Back to return to the Welcome screen.
4. Select Recover.
5. Remove the Acronis boot disk and backup drive from the computer.
6. Close the Acronis window.
This causes Acronis to shut down and the system to reboot.
7. Under “What to recover,” click Select data.
8. Click Browse and navigate to the folder containing the backup images.
9. Click OK.
10. Select the backup archive.
11. Next to Backup contents, select Disks.
12. Select all of the available disks.
13. Click OK.
14. Under “Where to recover,” click Clear all.
15. Click Recover `Disk 1' to.
16. Select the destination disk for Disk 1, then click OK.

Unity 3.4.1.0 Election Management SystemChapter 11: Official Canvass and Post-Election Procedures
CA_U3410_UseProceduresCalifornia Use ProceduresRevision 5.0. Released: June 22, 2016 327
17. Click Recover `Disk 2' to.
The recovery procedure will lasts at least 20 minutes.
18. When the restoration is complete, click Close.
11.6.2 Precinct Tabulator Election Materials
Upon the certification of the election results, the guidelines in the California Elections Code apply to the handling, security and disposition of unused ballots and other election materials. As noted in various sections of this document, memory cards are not deemed to fall within the purview of these Elections Code sections.
11.6.3 Central Tabulator Election Materials
Consult the California Elections Code for guidelines on retaining election materials. The retention period for ballots and related election materials is six months for all elections if no federal elections are involved. The federal election retention period is 22 months. Extend retention periods in the case of a court challenge.
NoteOn the EMS workstation, there is only one disk to recover, so this option will not be available.
Note For information about vote reporting, refer to 9.4 Closing the Polls and Vote Reporting.
For information about printing audit logs for all devices, refer to 9.5 Audit Logs.
Note For information about vote reporting, refer to 9.4 Closing the Polls and Vote Reporting.
For information about printing audit logs for all devices, refer to 9.5 Audit Logs.
Unity 3.4.1.0 Election Management SystemChapter 12: Manual Recount Procedures
CA_U3410_UseProceduresCalifornia Use ProceduresRevision 5.0. Released: June 22, 2016 328
Chapter 12: Manual Recount Procedures
12.1 Manual Recount for Precinct Tabulators
A manual recount of an optical or digital scan voting system is straight forward in that the names of all contests, candidates, and issues appear on the ballot face. The votes/marks on the ballot are a secret, permanent record of the election and become part of the Election Audit Trail CHECKPOINT of the voting system. The ballots are manually tallied for the office(s) to be recounted, and these results are compared to the tabulator-generated Precincts Results Tape for that precinct. Should the totals not agree, then the ballots are reviewed for any ballot marking anomaly that would cause the ovals on a particular ballot to not be scanned. Once these differences are resolved, the next precinct is manually tallied. This process continues until all precincts have been tallied manually.
Note Poll workers are not permitted to participate in any post-election manual count auditing of precinct results from a precinct in which they were poll workers.

Unity 3.4.1.0 Election Management SystemChapter 13: Security
CA_U3410_UseProceduresCalifornia Use ProceduresRevision 5.0. Released: June 22, 2016 329
Chapter 13: Security
Election administration security must be a part of a jurisdiction’s overall security plan to prevent lapses in adjacent or interconnected departments and processes from compromising the election function.
Election administrators must implement strong physical controls, including employee background checks, identity verification, locks, security guards, badges, alarms, backup power, printed reports, and similar measures to control access to computers and related equipment.
Pre-election security should include proof of content on all ballots, equal distribution of poll workers among all political parties, location of all ballots, and ensure privacy at all voting booths.
Post-election security should include examination of audit logs attached to the tabulators, examination of final reports, and ensuring that all election equipment and ballots are returned to secure physical storage locations.
13.1 Physical Security of System and Components
Physical access control must be implemented for all election-related equipment, software, and supplies including, but not limited to, tabulators, PCs, software, media, ballots, logbooks, locks and seals, and keys. Secure warehouse storage and staff work areas must be maintained, with controlled access limited to authorized personnel, to store all voting related equipment, software, and supplies.
It is the responsibility of the jurisdiction to provide a secure physical and procedural environment for the storage, handling, preparation and transportation of the system hardware.
NoteComplete guidelines for Election Management System (EMS) security are provided in the CA_U3410_Installation documents.

Unity 3.4.1.0 Election Management SystemChapter 13: Security
CA_U3410_UseProceduresCalifornia Use ProceduresRevision 5.0. Released: June 22, 2016 330
13.1.1 Equipment Locks and Seals
ES&S voting and tabulation equipment has access doors to protect external communication and data ports. These access doors can be locked with an administrator key and further protected with the installation of tamper-evident seals.
Each model of equipment is either powered on and off by an administrator key, or by a power switch protected behind a lockable access door. Certain system screens require entry of a code to prevent unauthorized access to sensitive functions. Carrying cases and ballot bins are equipped with locks and locations for security seals.
Where application of tamper-evident seals directly to a system component is required to detect unauthorized access to the component, those seals must be serialized.
Upon request, members of the public must be permitted to observe and inspect, without physical contact, the integrity of all externally visible security seals used to secure voting equipment in a time and manner that do not interfere with the conduct of the election or the privacy of any voter.
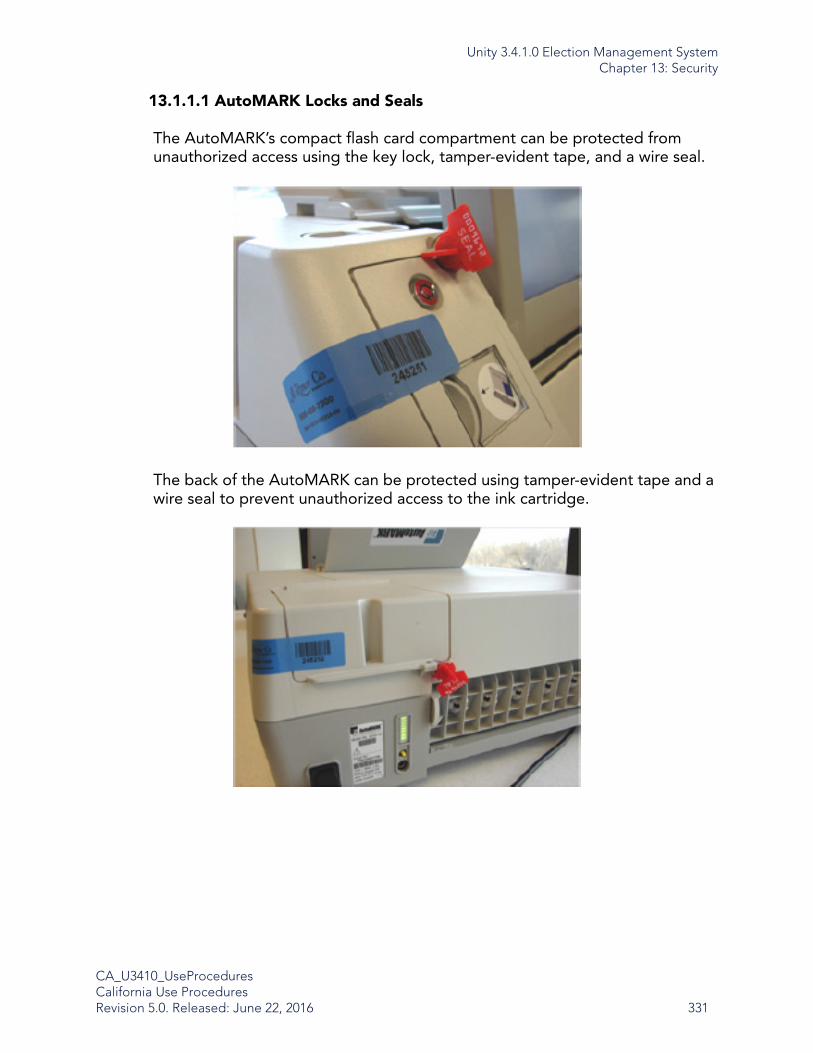
Unity 3.4.1.0 Election Management SystemChapter 13: Security
CA_U3410_UseProceduresCalifornia Use ProceduresRevision 5.0. Released: June 22, 2016 331
13.1.1.1 AutoMARK Locks and Seals
The AutoMARK’s compact flash card compartment can be protected from unauthorized access using the key lock, tamper-evident tape, and a wire seal.
The back of the AutoMARK can be protected using tamper-evident tape and a wire seal to prevent unauthorized access to the ink cartridge.

Unity 3.4.1.0 Election Management SystemChapter 13: Security
CA_U3410_UseProceduresCalifornia Use ProceduresRevision 5.0. Released: June 22, 2016 332
Additional seals can be used on the AutoMARK to prevent unauthorized access to the SBC casing and USB port. Only an ES&S-certified technician or trained vendor technician should apply these seals.

Unity 3.4.1.0 Election Management SystemChapter 13: Security
CA_U3410_UseProceduresCalifornia Use ProceduresRevision 5.0. Released: June 22, 2016 333
The AutoMARK case has an information window for displaying equipment identification.
13.1.1.2 M100 Locks and Seals
Numbered locking seals are the most appropriate protection for preventing unauthorized access to the PCMCIA card.
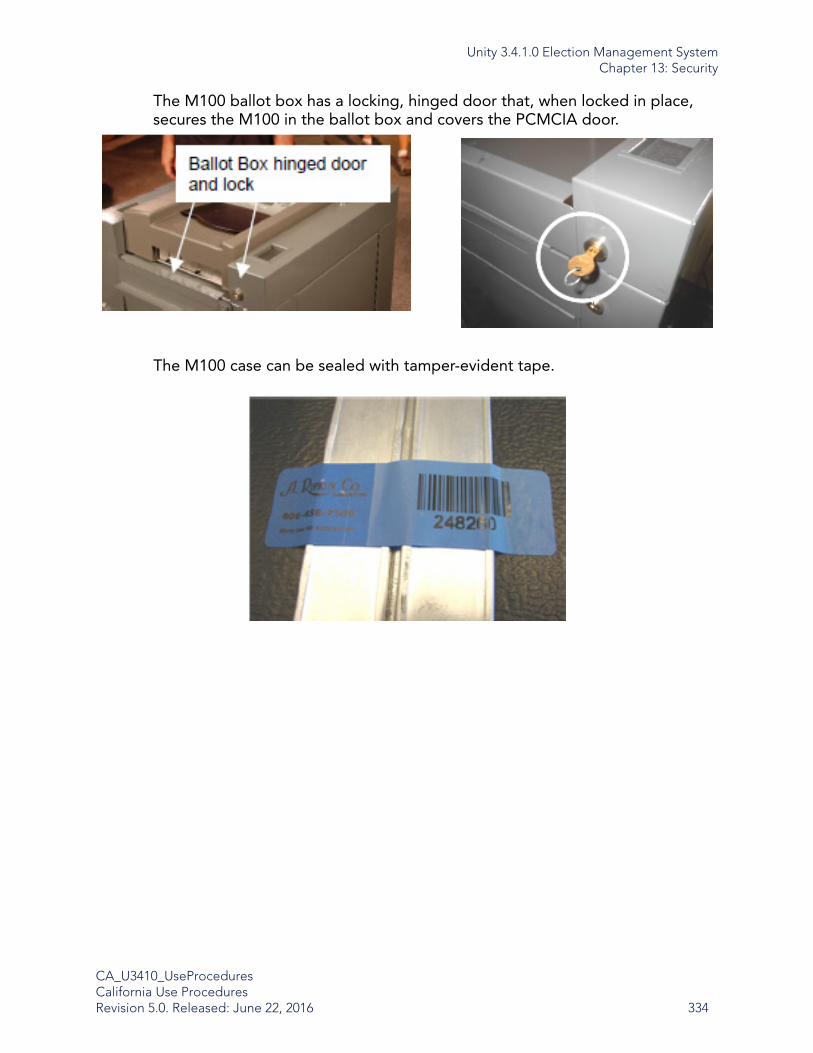
Unity 3.4.1.0 Election Management SystemChapter 13: Security
CA_U3410_UseProceduresCalifornia Use ProceduresRevision 5.0. Released: June 22, 2016 334
The M100 ballot box has a locking, hinged door that, when locked in place, secures the M100 in the ballot box and covers the PCMCIA door.
The M100 case can be sealed with tamper-evident tape.

Unity 3.4.1.0 Election Management SystemChapter 13: Security
CA_U3410_UseProceduresCalifornia Use ProceduresRevision 5.0. Released: June 22, 2016 335
13.1.1.3 M650 Locks and Seals
The rear door of the M650 tabulator has a locking, hinged door, which can be further secured with tamper-evident tape.
Use tamper-evident tape to prevent unauthorized zip disks from being inserted into the M650.
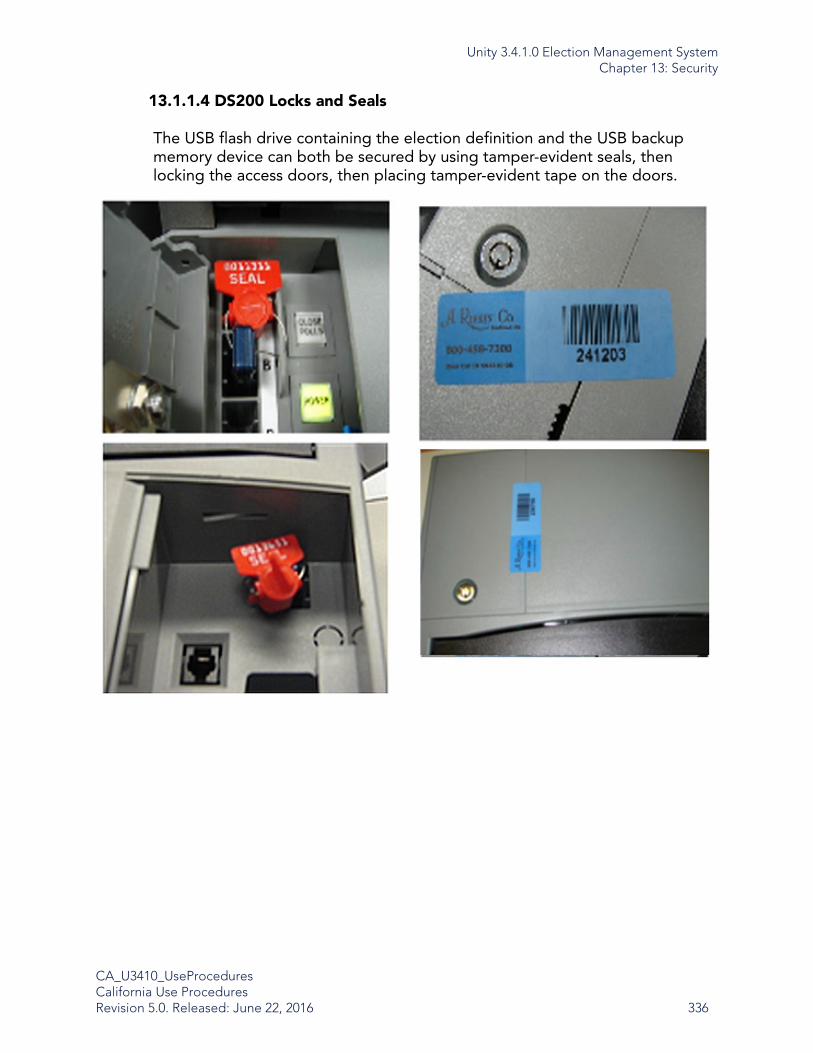
Unity 3.4.1.0 Election Management SystemChapter 13: Security
CA_U3410_UseProceduresCalifornia Use ProceduresRevision 5.0. Released: June 22, 2016 336
13.1.1.4 DS200 Locks and Seals
The USB flash drive containing the election definition and the USB backup memory device can both be secured by using tamper-evident seals, then locking the access doors, then placing tamper-evident tape on the doors.
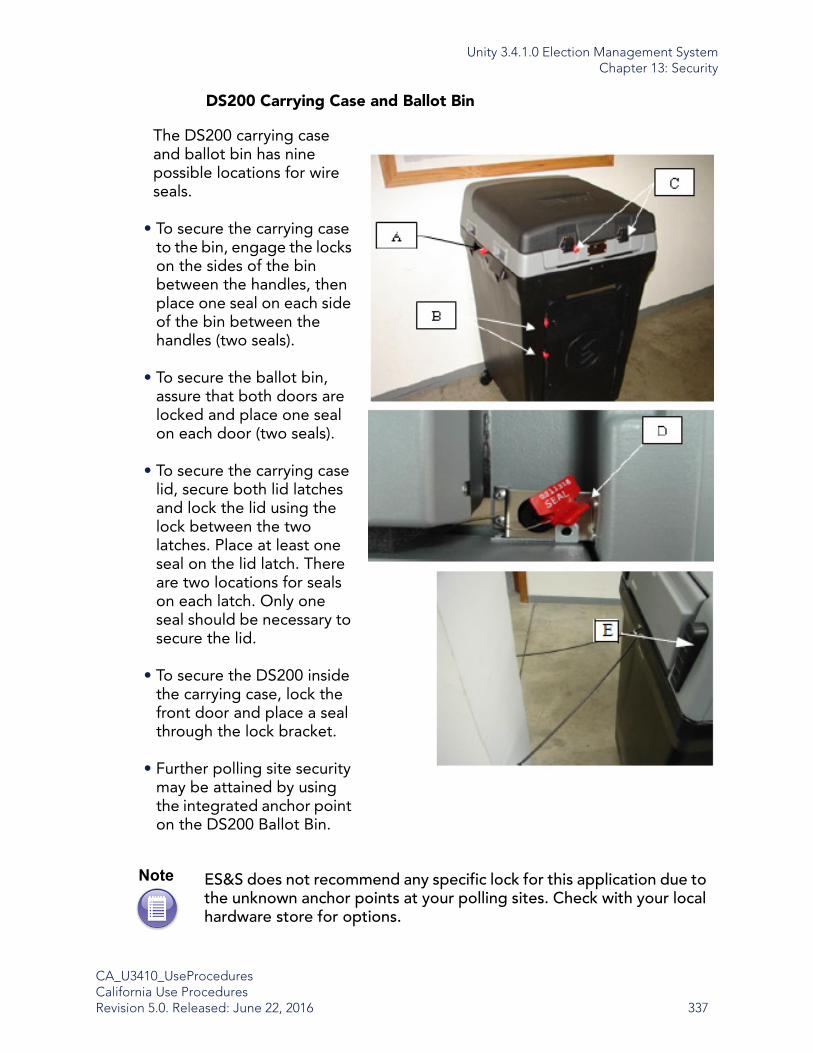
Unity 3.4.1.0 Election Management SystemChapter 13: Security
CA_U3410_UseProceduresCalifornia Use ProceduresRevision 5.0. Released: June 22, 2016 337
DS200 Carrying Case and Ballot Bin
The DS200 carrying case and ballot bin has nine possible locations for wire seals.
• To secure the carrying case to the bin, engage the locks on the sides of the bin between the handles, then place one seal on each side of the bin between the handles (two seals).
• To secure the ballot bin, assure that both doors are locked and place one seal on each door (two seals).
• To secure the carrying case lid, secure both lid latches and lock the lid using the lock between the two latches. Place at least one seal on the lid latch. There are two locations for seals on each latch. Only one seal should be necessary to secure the lid.
• To secure the DS200 inside the carrying case, lock the front door and place a seal through the lock bracket.
• Further polling site security may be attained by using the integrated anchor point on the DS200 Ballot Bin.
Note ES&S does not recommend any specific lock for this application due to the unknown anchor points at your polling sites. Check with your local hardware store for options.
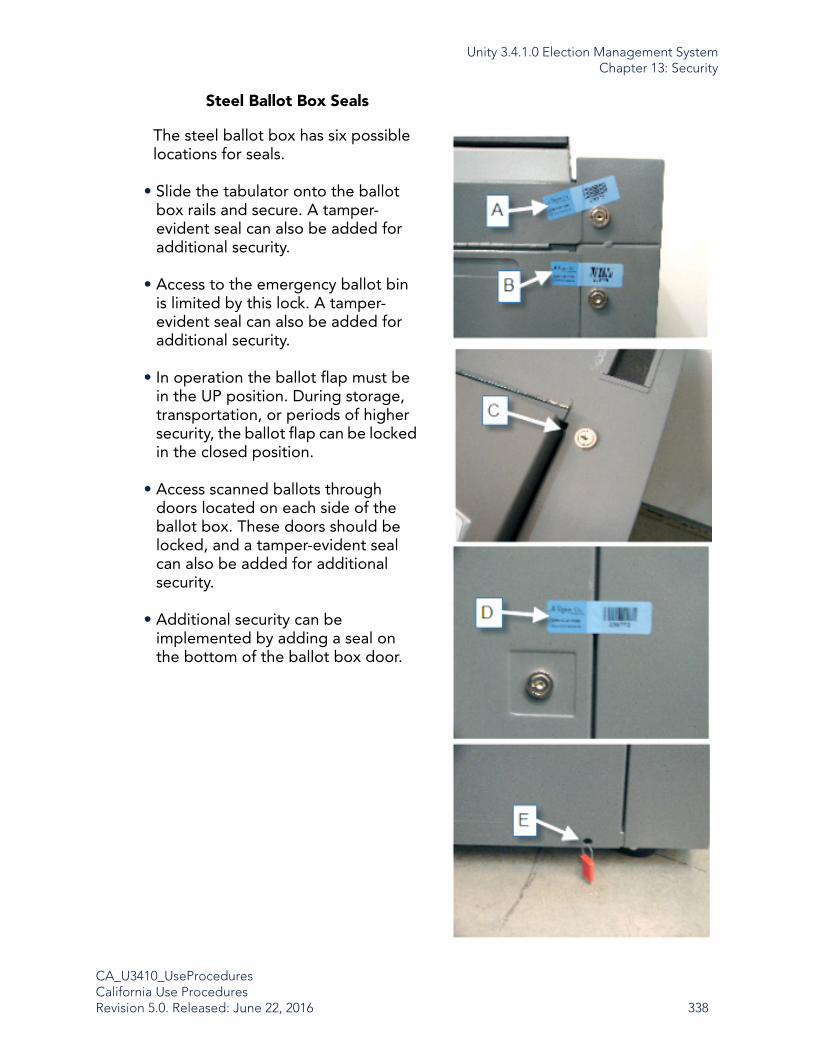
Unity 3.4.1.0 Election Management SystemChapter 13: Security
CA_U3410_UseProceduresCalifornia Use ProceduresRevision 5.0. Released: June 22, 2016 338
Steel Ballot Box Seals
The steel ballot box has six possible locations for seals.
• Slide the tabulator onto the ballot box rails and secure. A tamper-evident seal can also be added for additional security.
• Access to the emergency ballot bin is limited by this lock. A tamper-evident seal can also be added for additional security.
• In operation the ballot flap must be in the UP position. During storage, transportation, or periods of higher security, the ballot flap can be locked in the closed position.
• Access scanned ballots through doors located on each side of the ballot box. These doors should be locked, and a tamper-evident seal can also be added for additional security.
• Additional security can be implemented by adding a seal on the bottom of the ballot box door.
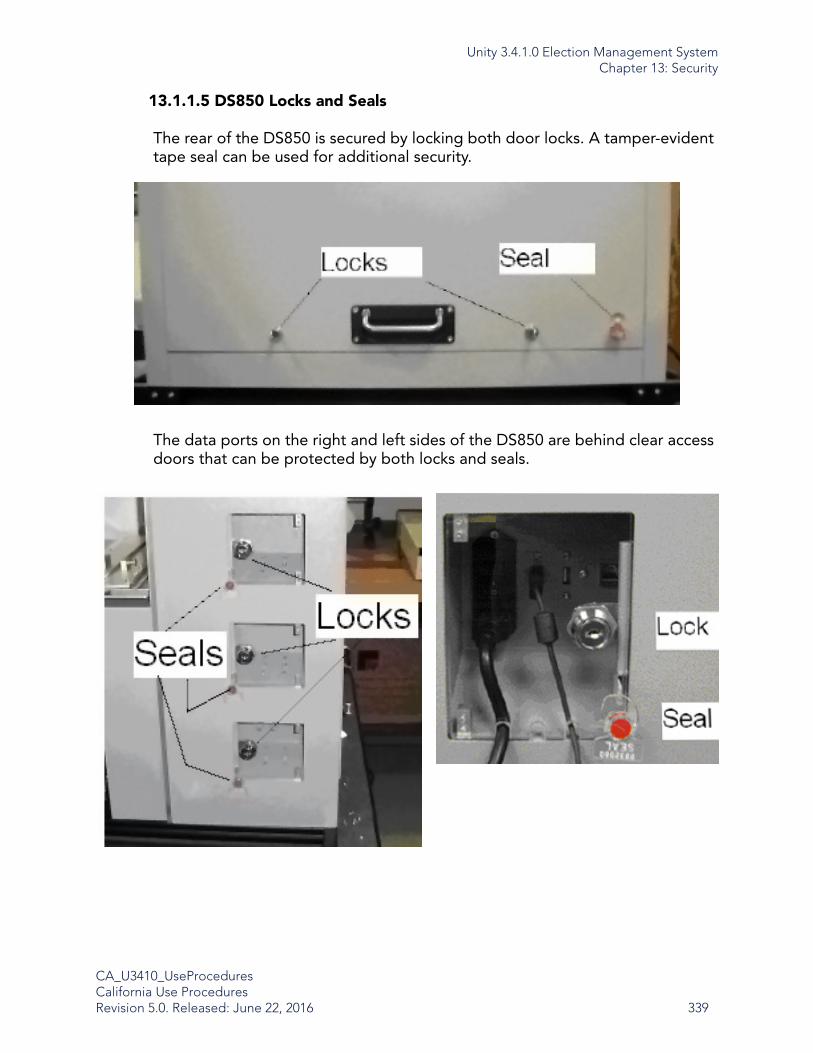
Unity 3.4.1.0 Election Management SystemChapter 13: Security
CA_U3410_UseProceduresCalifornia Use ProceduresRevision 5.0. Released: June 22, 2016 339
13.1.1.5 DS850 Locks and Seals
The rear of the DS850 is secured by locking both door locks. A tamper-evident tape seal can be used for additional security.
The data ports on the right and left sides of the DS850 are behind clear access doors that can be protected by both locks and seals.

Unity 3.4.1.0 Election Management SystemChapter 13: Security
CA_U3410_UseProceduresCalifornia Use ProceduresRevision 5.0. Released: June 22, 2016 340
13.2 Logical Security of System and Components
The EMS operates on a hardened, stand-alone (non-networked) computer. This involves completely erasing the hard drive, removing all unnecessary files, and disabling any network adapters on the system.
Election administrators should use Windows security procedures to adopt a strict access control policy.
System audit logs must be backed up and stored in a manner that allows the logs and data to be:
• Protected from tampering or destruction
• Used in a regular audit regiment to detect and prevent errors or fraudulent activity, and
• Used in any forensic investigations of suspected errors or fraudulent activities that may occur.
Data backups must be coordinated with the Disaster Recovery or Contingency Planning procedures of the jurisdiction. All system logs and application data must be backed up to write-once, non-modifiable media such as a CD or DVD. A full backup of the data should be done periodically to prevent log file data from being dropped or aged off due to retention limits.
The frequency of backups depends on the size of the jurisdiction staff and level of activity. Shorter intervals of 1-7 days are recommended initially, until a use level can be established and longer periods allowed without risk of data loss. Where large amounts of work are completed such that the loss of the resulting data would jeopardize the accuracy or timely completion of the election process, more frequent backups will be necessary. During heavy election use, ES&S recommends a daily backup stored in a safe and secure environment, and a weekly duplicate backup stored in an alternate but equally safe and secure location.
Backups should be performed by qualified system administrators under the supervision of the appropriate elections officials. All backup functions should be performed in a manner consistent with the policies for separation of duties and logged.
NoteComplete hardening procedures are provided in the CA_U3410_Installation documents.
Unity 3.4.1.0 Election Management SystemChapter 13: Security
CA_U3410_UseProceduresCalifornia Use ProceduresRevision 5.0. Released: June 22, 2016 341
13.3 User-Level Security
To ensure the separation of roles and responsibilities, security accounts/ roles should be defined such that each level of user has only sufficient privileges to perform the tasks of that role and no more. ES&S recommends that the following roles be established at a minimum:
• System Administrator – This role is responsible for computer system configuration and upkeep, such as hardware and operating system installation, setup, configuration, and password management. The system administrator role should not have access to application operations.
• Election Administrator – This role is responsible for defining and administering the election.
• Election Worker – This role is under the supervision of the Election Administrator and would perform lower-level and specialized tasks, such as results tabulation and reporting.
Roles and accounts should be reviewed and updated before each election to reflect personnel or responsibility changes, or immediately upon termination or demotion of personnel such that specific roles must be taken away from the individual.
The following checklist provides suggestions to help ensure the security of your elections. Always follow the processes and laws for your jurisdiction.
No single individual should control all election procedures. The election supervisor should systematically assign responsibilities to many individuals in order to cover all phases of the election process.
Access control policies should based on industry best practices and the jurisdiction’s unique requirements and should be consistent across all areas that interact or are physically or logically connected to any system or area that is involved with election procedures.
Perform background checks on all key election personnel.
Immediately log and report any, and all, security incidents. The ES&S user guides and operator’s manuals provide more information about ES&S software and hardware.

Unity 3.4.1.0 Election Management SystemChapter 13: Security
CA_U3410_UseProceduresCalifornia Use ProceduresRevision 5.0. Released: June 22, 2016 342
13.3.1 Password Security
• The System Administrator, under the supervision of the Election Administrator, should manage Windows® PC password management.
• In addition to Windows PC password protection, Unity also provides for application-level authentication using Audit Manager. The Election Administrator should control this application password management.
The California Secretary of State requires the following password practices:
• In general, a password should be as long as possible while still being easy to remember.
• Do not use an easily guessed password, such as:
• Names of family, pets, friends, co-workers, etc.
• Computer terms and names, commands, sites, companies, hardware, software.
• Birthdays and other personal information such as addresses and phone numbers.
• Word or number patterns like aaabbb, qwerty, zyxwvuts, 123321, etc.
• Never write down passwords or store them online.
• Change passwords on a regular basis. ES&S recommends either every 90 days, for each election, or any time there is reason to suspect that an account has been compromised or tampered with.
• Passwords should contain a combination of alphabetic, numeric, and punctuation characters, as allowed by the specific application.
• Do not share user names or passwords.
Note One way to do this is create a password based on an easy-to-remember phrase. For example, the phrase might be: “This May Be One Way To Remember” and the password could be: “TmB1w2R!” or “Tmb1W>r~” or some other variation. (Do not use either of these examples as passwords!)

Unity 3.4.1.0 Election Management SystemChapter 13: Security
CA_U3410_UseProceduresCalifornia Use ProceduresRevision 5.0. Released: June 22, 2016 343
• Lock all software each time a user leaves the protected area. Set screen savers to lock workstations after a period of inactivity, not to exceed 10 minutes, requiring the Windows password to be re-entered.
Users should log off of any application or account when they expect to be away for any appreciable length of time.
13.4 Anti-Virus Protection
The specified configuration includes commercially available and standard virus detection software. Virus detection software must be installed and enabled on all three of the referenced PCs at all times, and removable media must always be scanned by the configured PC to prevent virus entry and propagation.
13.5 Essential Software Updates and Changes
• Operating System – Prior to each election, a qualified system administrator under the supervision of the appropriate elections official should contact ES&S for any operating system updates available from the third party vendor and tested and approved for use with the Unity Suite. Depending on the scope of the updates and any regulatory approval required, ES&S will issue procedures for installation of the updates.
• Applications and Third Party Software – All applications and third party software are not to be updated unless specifically required by ES&S and approved by Federal and State Certification, or by an exception granted by the Secretary of State’s Office.
ImportantInstall Symantec virus protection software according to the instructions provided in the CA_U3410_Installation documents.
ImportantThe virus protection software and update files should only be updated if tested and approved for use with the Unity Suite.
Unity 3.4.1.0 Election Management SystemChapter 13: Security
CA_U3410_UseProceduresCalifornia Use ProceduresRevision 5.0. Released: June 22, 2016 344
13.5.1 Audit Records for Changes
ES&S recommends that a physical log be kept of all activity related to installation, configuration, and modification of any and all system components, in addition to the logging of storage, transportation, and overall chain of custody. Logging should include at a minimum:
• Printed name of the person performing the task
• Full signature or signed initials of the person performing the task
• Task performed
• Reason for performing the task
• Date and time of the task performed
• Printed name of the person witnessing, verifying, or authorizing the task (if applicable)
• Full signature or signed initials of the person witnessing, verifying, or authorizing the task (if applicable)
Completed log pages should be reviewed by the appropriate elections official, initialed and stored physically by secure means for a minimum of 22 months or as directed by State Election law.
13.6 Security Procedures for Central Processing
The following security measures are recommendations based on industry best practices.
• When ballots are prepared and stored for processing, each box should be logged with contents (such as precinct/ballot type number, date packed, etc.).
• Store ballots in a climate-controlled environment and under pass code security or lock and key.
Note The entries in this log must be complete.Example: “System Maintenance” is not an acceptable entry. The entry should state who accessed the system, exactly what maintenance was performed and why it was necessary, when the maintenance work began, and when it ended.

Unity 3.4.1.0 Election Management SystemChapter 13: Security
CA_U3410_UseProceduresCalifornia Use ProceduresRevision 5.0. Released: June 22, 2016 345
• When ballots are retrieved for processing (from a storage or collection area), two elections officials are required to monitor the transfer of ballots from the storage area to the tabulation equipment.
• Transfer custody of the ballots from the elections officials to the individuals responsible for tabulation.
• Upon completion of tabulation process, ballots are required to be:
• Logged as scanned with the tabulation operators’ initials and date\time.
• Logged and sealed in a storage container.
The central tabulation room should be secured at all times with a minimum of two elections officials having access rights to the room (one of whom must be an employee of the jurisdiction). Access to the room should be monitored or logged at all times. All access rights to the room and its components will be restricted to the individual’s rights or duties. Any need for change of access rights outside an individual’s normal realm of duty or job function shall be maintained and logged by the jurisdiction’s chief elections official.
13.7 Security Procedures for Polling Places
13.7.1 AutoMARK
The AutoMARK is powered on and off with a key. Remove this key to prevent unauthorized use when it is left unattended.
Physical security measures for the AutoMARK system include a locked compartment to prevent access to the Compact Flash card containing ballot format information. The compartment is locked with a key. The key is held by the precinct staff.
A password is required to access the System Maintenance Menu items on the AutoMARK, such as setting the time and date, or installing new firmware. The password should be reset by the designated official and kept private.
Headphones can be used to provide audio of the various ballot choices, and the display screen can be turned off to prevent unauthorized access to vote information from a voter with visual impairments.
13.7.2 Scanners
The following items are critical to tracking, auditing, and reporting the ballot counting process and must be maintained:

Unity 3.4.1.0 Election Management SystemChapter 13: Security
CA_U3410_UseProceduresCalifornia Use ProceduresRevision 5.0. Released: June 22, 2016 346
• For the election definition phase, diagnostic proof listings of candidates and active vote positions for each ballot style, ballot type or precinct must be maintained.
• The number of ballots read within each precinct, by type, including totals for each party in primary elections must be maintained.
• The total number of ballots processed must be maintained.
• Separate accumulations and reporting of the quantity of overvotes, undervotes, and write-ins within each precinct for each race or issue must be maintained. This is generally done on reports other than the report distributed Election Night.
• Availability of the above information in summary and by precinct.
13.8 Audit Log
13.8.1 AutoMARK Operation Log
The Operation Log (System Log File) is a record of all significant operations that have occurred on the machine. The log entries are stored in a circular buffer that holds 277,777 entries. The log may be viewed, or printed if desired.
1. Turn the key switch to the Test position.
2. Press the Operations Log button.
The operations log appears. Use the UP/DOWN buttons to scroll up/down. To select a specific page, touch the text box under GO TO PAGE. Use the numbered keypad to enter the page and press DONE, then press GO.
3. To print this log, press the Print button.The screen prompts: Insert blank ballot stock paper.(Ballot stock is between 80 and 110 pound index stock. Ballot stock is slightly heavier than normal paper and less likely to jam.)
4. Insert a completely blank ballot stock paper.
5. The machine automatically begins printing the operation log, 66 lines per page. If there are more than 132 entries in the operation log, you will need several pages.After the page has been ejected from the machine, if prompted, insert another blank page. Repeat this process until the message printing done appears.

Unity 3.4.1.0 Election Management SystemChapter 13: Security
CA_U3410_UseProceduresCalifornia Use ProceduresRevision 5.0. Released: June 22, 2016 347
6. Press DONE to exit the print function.
13.8.2 AutoMARK Scan Log or Service Log
These log files record scanner error events and service events.
1. Turn the key switch to the Test position.
2. On the AutoMARK Main Menu Screen, select Maintenance Menu.
3. Enter the system password.
4. Select Scan Log or Service Log.
5. To print the log, follow the steps as for printing the Operation Log (in previous section).
13.8.3 Audit Trail Checkpoints for the M100
All ballot counting operations, including mandated pre- and post-election testing, must be documented in sequential order. An automated and/or manual record or log must record the time and date of “system events” related to ballot counting. “System events” in the ballot counting process include: initiation of the ballot count program; clearing totals; running logic and accuracy tests; any hardware failures; any repaired hardware (including running accuracy tests after repairs) any system crashes and restarts; any communications between multiple systems; any lost communication to remote sites; and times any lost communication is restarted.
This log shall be continued until final certification of results, shall be retained for the same time period as ballots for that election, and shall be subject to the same physical security and integrity measures. Specific Election Audit Trail CHECKPOINTS shall, where applicable, include the following items:
• All exception handling/error messages during ballot tallying, including any messages generated by the Summary System’s error routines, shall be date/ time stamped and logged.
• System messages, such as: diagnostic and status messages upon start-up of ballot tallying; “zero totals” check. Initialization or termination of processing by the M100 shall be date/time stamped and logged.
• All operator interaction with the system shall be date/time stamped and logged.

Unity 3.4.1.0 Election Management SystemChapter 13: Security
CA_U3410_UseProceduresCalifornia Use ProceduresRevision 5.0. Released: June 22, 2016 348
• All ballot-related processing and handling exceptions, i.e., ballots not machine-readable, ballots requiring special handling, aborted or deleted precincts, etc. shall be date/time stamped and logged.
• Copies of required tests shall be securely maintained.
13.8.4 DS200 Audit Log Reports
The DS200 generates three types of audit log reports:
• Election Startup Audit Log
• Poll Closing Audit Log
• System Audit Log
The Election Startup and Poll Closing Audit Logs list all of the scanner events from the time you load the election definition USB flash drive into the scanner to the time you remove the flash drive after the election is complete. The audit log also contains the total number of write-in votes counted by the scanner, the number of accepted and rejected blank ballots, the number of overvoted ballots, and the number of crossover ballots scanned.
The System Audit Log contains the time and date of the last clock change, power on, and polls open.
Each of these log reports can be accessed manually from the DS200 Close Poll screen.
Additionally, ES&S or your jurisdiction’s election programmer can code your election definition to include the audit log with the results report printed automatically at poll closing. To do this, take the following steps:
1. Within Hardware Programming Manager, access the Model 100/200 Scanner Options screen.
2. Under the Poll Close heading, check the Print Audit Log box. Also select the number of copies to be printed.
Audit trails are saved to the inserted USB flash drive.
13.8.5 M650 Audit Log Reports
This internal report tracks scanner functions from the time you turn the scanner on, until you turn it off. Different types of messages compose the audit log, including:

Unity 3.4.1.0 Election Management SystemChapter 13: Security
CA_U3410_UseProceduresCalifornia Use ProceduresRevision 5.0. Released: June 22, 2016 349
Switch Log Messages – Identify each action performed by the scanner.
Ballot Count Log Messages – Identify the number of ballots read, sorted and saved in each run.
Event Log Messages – Identify the near-actual time each scanner event occurred, providing a crosscheck of major events such as the last precinct read or when a disk was last stored.
13.8.6 DS850 Audit Logs
Activity on the DS850 is recorded to the audit log, and the DS850 prints the contents of the audit log to the attached dot matrix printer.
The audit log print settings in the election definition enable audit log printing and prevent it from being disabled. The user also has the option to set the ability to enable or disable the Real Time Audit Log.
The audit log is saved to the inserted USB flash drive.
Unity 3.4.1.0 Election Management SystemChapter 14: Biennial Hardware Certification and Notification
CA_U3410_UseProceduresCalifornia Use ProceduresRevision 5.0. Released: June 22, 2016 350
Chapter 14: Biennial Hardware Certification and Notification
EC 19220 requires jurisdictions to examine voting systems every two years and certify the results to the Secretary of State. Requirements for examination and testing are further detailed in Article 15 of the Secretary of State Procedures for Approving, Certifying, Reviewing, Modifying, and Decertifying Voting Systems, Vote Tabulating Systems, Election Observer Panel Plans, and Auxiliary Equipment, Materials, and Procedures.
14.1 Certification and Notification forPrecinct Tabulation Hardware
Elections Code section 19220 requires each elections official to inspect and certify the accuracy of their voting or vote tabulating equipment at least once every two years. The elections official shall certify the results of their inspection to the Secretary of State.
14.1.1 Hardware Certification and Notificationfor the Precinct Tabulator
14.1.1.1 Certification
All ballot readers and specialized vote tabulating equipment must be certified prior to use in any election by the Secretary of State. Certification procedures are available upon request from the Secretary of State’s Elections Division. All firmware and software used as part of the system is subject to the notification of change requirement.
14.1.1.2 Notification
For each statewide election, the responsible county elections official shall cause to be prepared a list, including quantities, of all equipment to be used to tabulate votes during the semiofficial and official canvass.
Seven days before each statewide election, the elections official shall certify to the Secretary of State the results of the logic and accurate tests as well as the functionality of all ballot counting equipment. This certification shall also affirm the use of the same equipment for pre-election testing and for semiofficial and official vote canvasses. In the event of a change to the ballot tally program occurring after this certification, an amended certificate shall be submitted no later than the day before the election.
Unity 3.4.1.0 Election Management SystemChapter 14: Biennial Hardware Certification and Notification
CA_U3410_UseProceduresCalifornia Use ProceduresRevision 5.0. Released: June 22, 2016 351
In the event any equipment is repaired, altered or replaced following the certification, and prior to completion of the official canvass of the vote, an amended certification of logic and accuracy testing and a revised list of equipment used must be submitted to the Secretary of State. This submission shall occur not later than submission of official canvass results. The jurisdiction will have an inventory of all voting equipment available for review by the Secretary of State at all times.
14.1.2 Election Observer Panel
All procedures prescribed herein shall be carried out in full view of the public insofar as feasible. In addition, the responsible elections official shall devise a plan whereby all critical procedures of the vote tallying process are open to observation by an Election Observer Panel. Representatives of the qualified political parties and representatives of the news media may be among those invited to serve on this panel and shall be given the opportunity to observe that the correct procedures are followed in the receiving, processing, and tallying of all voted ballots.
14.1.3 Logic and Accuracy Certification
A Logic and Accuracy Board shall be appointed by the responsible elections official and insofar as is practicable, shall be comprised of the same persons prior to, during, and after the election. The Board shall have the following duties:
• Receive from the elections official all required test materials and take steps to ensure the security of said materials prior to, during, and after the election, except when the materials are properly in the possession of one of the other boards or elections officials as required by these procedures.
• Verify the correctness of the logic and accuracy of test memory cards and the logic and accuracy of test ballots. This verification shall also be required for any material which must be replaced.
• Observe the performance and verify results of all required tests.
• Note any discrepancies and problems and affirm their resolution or correction.
• Deliver into the custody of the elections official all required test materials and printed output.
• Certify to the performance of each of the above-prescribed duties as well as those otherwise established by the procedures; provided that all

Unity 3.4.1.0 Election Management SystemChapter 14: Biennial Hardware Certification and Notification
CA_U3410_UseProceduresCalifornia Use ProceduresRevision 5.0. Released: June 22, 2016 352
members of the Board shall sign the appropriate certificate or certificates. Final pre-election certification shall be made to the Secretary of State no less than seven days before each statewide election. This certification shall be made by the responsible elections official based on the Logic and Accuracy Board’s certification of successful testing. In the event an amendment to the ballot counting program is required following this certification, the elections official must immediately recertify to the Secretary of State.
14.1.4 Submit Ballot Tally Programs to the Secretary of State
Ballot tabulation programs for statewide elections are to be delivered to the Secretary of State no later than seven days prior to each statewide election. Ballot tally programs must be accompanied by the elections official’s certification of testing, the list of vote counting equipment used and a notification that he has caused memory cards to be programmed in conformity with the ballot diverter options as set forth in Table 2 herein. Refer to Elections Code section 17500. Should changes be required following certification and submission to the Secretary of State, resubmission and re-certification is required.
14.1.5 Election Night and Post Election Reporting
Any delays in election night’s semiofficial canvass reporting due to hardware, software, environmental, or human causes which result in failure to report results to the Secretary of State at least every two hours shall be reported to the Secretary of State by the 28th day following the election. The responsible elections official may also report other delays in the processing of ballots as he or she deems appropriate.
14.1.6 Preparation of Specific Written Procedures
Each elections official shall prepare specific written procedures for each phase, step and procedure in the preparation, operation of polling places, vote counting and official canvasses of elections. Written procedures must also include instructions to precinct officials regarding proper handling of Vote-By-Mail voter and provisional voter ballots as well as a description of procedures used to manually recount ballots pursuant to Elections Code section 15645. These procedures must be prepared and submitted to the Elections Division of the Secretary of State’s Office within two years following the adoption of these procedures by the Secretary of State. Upon submission, the elections jurisdiction’s procedures shall be reviewed for compliance with state procedures, and the elections official shall be advised of any necessary revisions.

Unity 3.4.1.0 Election Management SystemChapter 14: Biennial Hardware Certification and Notification
CA_U3410_UseProceduresCalifornia Use ProceduresRevision 5.0. Released: June 22, 2016 353
14.2 Biennial Certification forCentral Tabulation Hardware
Elections Code section 19220 requires each elections official to inspect and certify the accuracy of their voting or vote tabulating equipment at least once every two years. The elections official shall certify the results of their inspection to the Secretary of State.
14.2.1 Tabulation Hardware Certification and Notification
All ES&S election equipment must be certified for use in elections by the Secretary of State prior to use in any election. Certification procedures are available upon request from the Secretary of State's Elections Division.
For each statewide election, the responsible county elections official shall cause to be prepared a list, including quantities, of all equipment to be used to tabulate votes during the semiofficial and official canvass.
14.2.1.1 Logic and Accuracy Tests
Seven days before each statewide election, the elections official shall certify to the Secretary of State the results of the logic tests as well as the accurate functioning of all ballot counting equipment. This certification shall also affirm the use of the same equipment for preelection testing and for semiofficial and official vote canvasses. In the event of a change to the ballot tally program occurring after this certification, an amended certificate shall be submitted no later than the day before the election.
In the event any equipment is repaired, altered or replaced following the certification and prior to completion of the official canvass of the vote, an amended certification of logic and accuracy testing and a revised list of equipment used must be submitted to the Secretary of State not later than submission of official canvass results.
14.2.1.2 Certifying Logic and Accuracy
Appoint a logic and accuracy board to perform the following tasks:
• Receive all required test materials from the elections official.
• Verify the correctness of the election definition and test deck.
• Observe scanner performance and verify results.
• Note any discrepancies between test results and the results from ES&S.
Unity 3.4.1.0 Election Management SystemChapter 14: Biennial Hardware Certification and Notification
CA_U3410_UseProceduresCalifornia Use ProceduresRevision 5.0. Released: June 22, 2016 354
• Deliver all the required test material to the elections official.
• Certify the performance of the scanner.
14.2.2 Escrow of Ballot Tally Source Code
Prior to its use in any election, an exact copy of the source code for all ballot tally software programs shall be placed in an approved escrow facility, pursuant to the procedures and requirements of Elections Code section 19103 and Title 2, Division 7, of the California Code of Regulations, beginning with section 20610.

Unity 3.4.1.0 Election Management System
CA_U3410_UseProceduresCalifornia Use ProceduresRevision 5.0. Released: June 22, 2016 355
Revision History
Unity 3.4.1.0 Election Management SystemDocument Version: 5.0
6/22/16
Chapter(s) Description
Chapter 3: System Configuration and Acceptance
Testing
Revised AutoMARK Firmware Update procedure.
Chapter 5: Logic and Accuracy Testing
Added calibration procedures for the M650.
Unity 3.4.1.0 Election Management SystemDocument Version: 4.2
5/12/16
Chapter(s) Description
Chapter 3: System Configuration and Acceptance
Testing
Revised procedural steps in section 3.2.3 AutoMARK Firmware Update.
Unity 3.4.1.0 Election Management SystemDocument Version: 4.1
5/2/16
Chapter(s) Description
Chapter 3: System Configuration and Acceptance
Testing
Added note about updating the DS200 compact flash card to section 3.2.2 DS200 Scanner Firmware Update.
Revised procedural steps in section 3.2.3 AutoMARK Firmware Update.

Unity 3.4.1.0 Election Management System
CA_U3410_UseProceduresCalifornia Use ProceduresRevision 5.0. Released: June 22, 2016 356
Unity 3.4.1.0 Election Management SystemDocument Version: 4.0
4/29/16
Chapter(s) Description
Throughout Corrected miscellaneous typographic and formatting inconsistencies.
Chapter 4: Election Setup and Definition
Corrected reference to the Unity EMS Election Programming Guide.
Chapter 5: Logic and Accuracy Testing
Added note to procedural step 3 in section 5.2.6 Upload Test Results to ERM.
Clarified procedural steps in sections 5.2.7 Clear Test Results and 5.3.1 Load the Election Definition.
Revised procedural steps in section 5.3.3 Test the Election.
Removed or combined sections 5.3.4.1 Print Ballot Test Reports and 5.3.5 Close the Polls.
Clarified procedural step 4 in section 5.5.2 Scan the Test Deck and Check Reports.
Clarified procedural steps in sections 5.6.1 Load the Election Definition, 5.6.2 Scan the Test Deck and Check Reports, and 5.6.3 Export Data.
Removed information about Replace Mode and Add-to Mode from procedural step 4 in section 5.7.6.1 Processing for DS200.
Removed section 5.7.7 Run 200 Results Accumulation.
Clarified procedural steps in section 5.7.8 Process Precincts Results Media.
Added step 2 to section 5.7.10 Update Results from DS850 (USB Media).
Chapter 6: Election Preparation
Added reference to instructions about clearing results to section 6.2.1 Clear Results from the M100.
Numbered and added procedural steps to section 6.2.6 Clear M650 Results.
Chapter 6: Election Preparation (Continued)
Clarified step 4in section 6.3.2.4 Replace the Paper Roll.
Deleted section 6.3.2.5 Advance the Paper.

Unity 3.4.1.0 Election Management System
CA_U3410_UseProceduresCalifornia Use ProceduresRevision 5.0. Released: June 22, 2016 357
Chapter 9: Election Day Procedures
Clarified step 5 in section 9.1.4 Install M100 Paper Roll.
Deleted section 9.1.4.1 Advance the Paper.
Chapter 10: Semi-Official Canvass Tabulation and
Reporting
Added note to step 1 in section 10.1.4 Process Precincts Results Media.
Added note to step 1 in section 10.1.6 Update Results from DS850 (USB Media).
Clarified step 4 under the Set up an .A01 File from Which to Print heading in section 10.1.7.5 Print Which Groups Tab.
Unity 3.4.1.0 Election Management SystemDocument Version: 4.0 (Continued)
4/29/16
Chapter(s) Description

Index
CA_U3410_UseProceduresCalifornia Use ProceduresRevision 5.0. Released: June 22, 2016
Customer Confidential
Aabsentee and mail, 185acceptance testing, 78
hardware, 82software post-test, 87software pre-test, 79
Acronis, 323anti-virus, 343audit logs, 258, 346AutoMARK, 14
L&A, 96operation, 252table, 237
Bbackup and retention
Acronis, 323physical materials, 327
ballot handling and folding, 185Ballot On Demand, 35ballot specifications, 23
BOD, 35color strip, 64paper stock, 34, 65printing, 24
battery backup, 198biennial hardware certification and notification, 350BOD, 35
CCalvoter, 313central tabulation, 185
DS850, 209M650, 201
clear L&A results, 142close the polls, 256color strip, 64
Ddefinitions, 20delivery, 235DS200, 13
L&A, 94operation, 228paper, 241
DS850, 17L&A, 104operation, 209
duplex printing, 60
Eearly voting, 222election day procedures, 235election observer panel, 320election preparation, 142EMS, 17
accuracy testing, 107software products, 19
ERMresults processing, 268
Ffinal reporting, 322firmware, 66
Gglossary, 21
Iinspection, 235integration with county system, 313
LL&A, 90locks and seals, 330logic and accuracy testing, 90
AutoMARK, 96backup, 139clear results, 142DS200, 94DS850, 104EMS, 107M100, 90M650, 97post-election, 322
MM100, 12
L&A, 90operation, 222paper, 240
M650, 15L&A, 97operation, 201
maintenance, 146AutoMARK, 163DS200, 156DS850, 171M100, 152M650, 167supplies, 146
manual recount, 328
Oofficial canvass, 320
1% manual tally, 321open the polls, 243
Ppaper, 34, 65polling place procedures, 250post-election, 320
Index

CA_U3410_UseProceduresCalifornia Use ProceduresRevision 5.0. Released: June 22, 2016
Customer Confidential
power, 198precinct scanners, 222
DS200, 228M100, 222
print options, 59duplex, 60
printing methods, 24provisional voting, 255
Rresults processing, 268retention of election media, 140revision history, 355
Ssecurity, 329
anti-virus, 343central processing, 344locks and seals, 330logical, 340polling place, 345users, 341
semi-official canvass, 268software updates, 343software versions, 19supplies, 146system description, 12
Tterms, 20
Uupgrading firmware, 66UPS, 198
Vvote reporting, 256