Embed Size (px)
Citation preview

University System of Georgia Training Manual
1
User Manual for
ADP Manager Self Service
University System of Georgia Training Manual
2
Introduction to Manager Self Service (MSS)
In Manager Self Service (MSS), Employee related data may be entered, updated, and approved if
necessary. Practitioners and Managers will enter and submit employee changes in MSS that will
automatically feed into the Employee Record, Enterprise System (Ev5). For entries requiring
approval, Workflows will route employee change requests to the Benefits, Compensation,
Recruitment or Executive groups, and an electronic audit trail will be created. This new system
will streamline the way employee information is managed in our HRIS system by ensuring
accurate data, initiating and tracking approvals, and limiting mistakes that can be made
throughout a manual data entry system.
Introduction to Workflow in Manager Self Service
Employee data changes submitted in MSS are referred to as work events and will follow various
pre-approved workflow paths. While certain events such as Supervisor Changes required no
workflow and immediately update Ev5, other events require the approval of the Budget,
Compensation or Benefits Department, if your institutions require it. Institution Specific
business rules built into the workflows ensure events are routed to the appropriate workflow.
Work events submitted for approval but not yet approved or rejected remain pending and will not
update Ev5.
A couple examples of workflows with Business Rule Exceptions in MSS are:
• Changes to an employee’s salary or job code – requires Compensation approval.
• Increasing an employee’s salary by X% or XK or greater – requires Compensation and
Executive HR approval.
All workflows are routed automatically after the event has been submitted by a Manager. When
approval is needed, a task is assigned to each approver in MSS and email alerts, notifications, are
sent as a reminder that tasks have been generated. The Initiating Manager will receive an e-mail
alert when the event has been approved or rejected. In addition, anyone in the workflow that has
an approval or rejection responsibility has the ability to view the status of the event workflow,
after the event reaches them.
For more information regarding event approvals in MSS, please refer to “Managing Work Events
Approvals / Notifications’.

University System of Georgia Training Manual
3
Fundamentals of Manager Self Service
To setup Manager Self Service in USG’s system there are several components that must be
configured to allow the system as a whole to function.
Work Events: Work Events are the normal events that are done in institutions all around USG.
These events consist of Hiring, Rehiring, Transfers, Pay Raises, Job Changes, and Employment
Status Change.
Work Groups: Groups of people that will be given the ability to accept/reject events as they
come across their desk, as setup up in the work flow.
Work Flow: A specific approval path that an event will take. Work Flows are pre-defined by
the institutions MSS committee, and setup by the SSC. A work flow step can be directed
towards a Specific User, Transfer to Manager, Up (to managers in the reporting hierarchy) and a
Work Group. A work flow could consist of either approvals or notifications. Approvals will
pause the event work flow until the time in which the Manager or Work Group approvals or
rejects that specific event. Notification, if chosen for the activity, will send an email to the
person(s) involved, the event will pass on to the next step in the workflow.
Business Rules: Rules that define which work flow will become active. There are two types of
business rules for the USG MSS System. Default Business Rules define the specific group of
employees that have been defined as being associated to a specific work flow. Default business
rules have to be setup in the portal to make a figurative umbrella over all of the employees at a
specific institution. Exception Business Rules are rules that define exceptions to the default
business rule. For example a default business rule defines a group of employees that will be
selected as “Faculty”, the exception for this rule would be if a raise of 3% were to go through,
than an approval by the President will be required. Important: The default business rule must
cover all of the employees at an institution without creating overlaps in the overage.
Event Workflow: Define which work flow will be connected to which business rule.
Priority: An order can be defined as to which business rules the system will recognize first.
The Priority is used when exceptions are involved in the setup of the institution.
Proxy: An Alternate Manager(s) that can take the responsibility of an approval/rejection of a
work event. There are two different proxy types setup in the USG system Default and Manager
Assigned Proxies. Default Proxy is setup at the SSC to care for lost events, events that have
been stalled or employees that have not been defined in a business rule; these events will be sent
to the SSC at [email protected]. Manager Assigned Proxies are defined by a manager and
overrules the default proxy, however offers the same functions. A manager can setup a default
assigned proxy and a vacation proxy or proxy setup from Date to Date.

Logging into Manager Self Service
You will access MSS from the ADP Portal:
Launch your web browser (Internet Explorer 7 or 8 recommended) and navigate to:
www.portal.adp.com
Click on the User Login button.
ADP Portal Login Screen (www.portal.adp.com)
In the login Windows enter your ADP portal
(Three failed attempts will result in a
followed by your last name, ending with @usg. For example, John Smith’s Username is
“Jsmith@usg”. (Your specific username will be issued by the SSC HRIS department.) If you are
having trouble with logging into the portal please contact
Note: Username are not case sensitive, however, passwords are.
used; however, digital certificates are required
After you have logged in, the ADP Portal Welcome page will be displayed. From the Welcome
page you can then select which role you would like to
Practitioner, Administrator. (Not
University System of Georgia Training Manual
4
ger Self Service
You will access MSS from the ADP Portal:
your web browser (Internet Explorer 7 or 8 recommended) and navigate to:
button.
ADP Portal Login Screen (www.portal.adp.com)
In the login Windows enter your ADP portal username
(Three failed attempts will result in a frozen account). The standard username is your first initial
followed by your last name, ending with @usg. For example, John Smith’s Username is
(Your specific username will be issued by the SSC HRIS department.) If you are
with logging into the portal please contact [email protected]
Note: Username are not case sensitive, however, passwords are. (Administrator Login
digital certificates are required for Administer and Practitioner.)
After you have logged in, the ADP Portal Welcome page will be displayed. From the Welcome
page you can then select which role you would like to use the functions of; Employee,
, Administrator. (Note: A Practitioner can use the roles of a Practitioner
University System of Georgia Training Manual
your web browser (Internet Explorer 7 or 8 recommended) and navigate to:
username and password
. The standard username is your first initial
followed by your last name, ending with @usg. For example, John Smith’s Username is
(Your specific username will be issued by the SSC HRIS department.) If you are
(Administrator Logins may be
for Administer and Practitioner.)
After you have logged in, the ADP Portal Welcome page will be displayed. From the Welcome
use the functions of; Employee, Manager,
Practitioner as well as
Manager and Employee; however, a Man
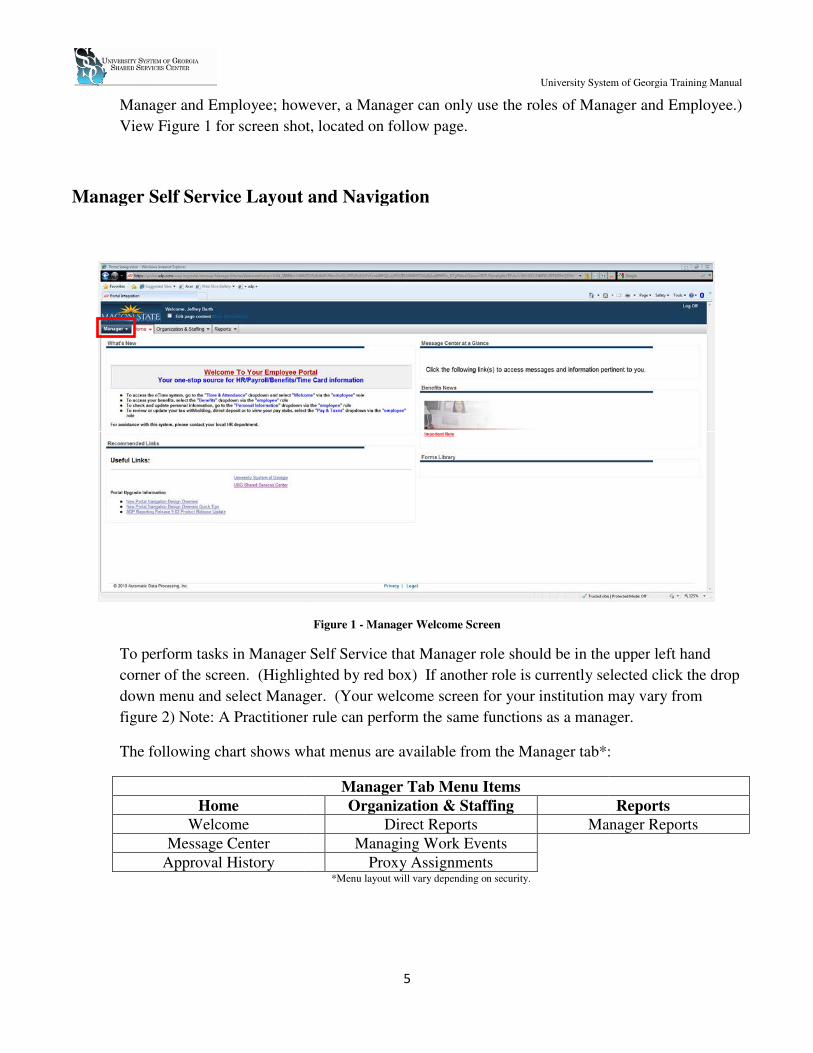
View Figure 1 for screen shot
Manager Self Service Layout and Navigation
To perform tasks in Manager
corner of the screen. (Highlighted by red box) If another role is
down menu and select Manager
figure 2) Note: A Practitioner
The following chart shows what menus are available from the Manager tab
Home
Welcome
Message Center
Approval History
University System of Georgia Training Manual
5
however, a Manager can only use the roles of Man
for screen shot, located on follow page.
Manager Self Service Layout and Navigation
Figure 1 - Manager Welcome Screen
Manager Self Service that Manager role should be in the upper
corner of the screen. (Highlighted by red box) If another role is currently selected
Manager. (Your welcome screen for your institution may vary from
Practitioner rule can perform the same functions as a manager.
what menus are available from the Manager tab*:
Manager Tab Menu Items
Organization & Staffing
Direct Reports Manager Reports
Managing Work Events
Proxy Assignments *Menu layout will vary depending on security.
University System of Georgia Training Manual
ger can only use the roles of Manager and Employee.)
Self Service that Manager role should be in the upper left hand
currently selected click the drop
. (Your welcome screen for your institution may vary from
rule can perform the same functions as a manager.
:
Reports
Manager Reports
While you are in the application you should
browser window to go back to the previous screen in ADP Portal. When available,
always click the Cancel
University System of Georgia Training Manual
6
While you are in the application you should not press the Back Arrow
browser window to go back to the previous screen in ADP Portal. When available,
always click the Cancel or Back button to return to the previous screen.
University System of Georgia Training Manual
Back Arrow button in your
browser window to go back to the previous screen in ADP Portal. When available,
button to return to the previous screen.
University System of Georgia Training Manual
7
Working with Manager Self
Service

University System of Georgia Training Manual
8
Initiating Work Events

University System of Georgia Training Manual
9
Initiate Work Events
Login to the portal under the User Login at www.portal.adp.com. (Administrator Login may be
used by required the use of a digital certification)
While logged in as a manager you can initiate work events. You can do this by selecting the
manager role from the role selector on the upper left hand of the welcome screen. See figure 1
above for details.
Once in the manager user role you can initiate the work events by going to ‘Managing Work
Events’ located under the ‘Organization & Staffing’ tab. See figure 2 below.
Figure 2
This will then bring up the ‘Managing Work Events’ home screen that is able to start work
events that have been setup in the portal. At this screen those employees that are direct reports
of a manager will be able to be viewed, and events started on them. See figure 3 below.

University System of Georgia Training Manual
10
Figure 3
From this screen all the different event types may be initiated. The events with the box next to them are
events that are initiated on an existing employee that reports to the logged in manager either as a direct
report or as a drill down report. These events consist of Employee Transfers, Changing one Job and
Salary, Changing ones Job Status, and Changing Ones Employment Status. See Figure 3 above.
To initiate one of these events an employee must have a check next to his/her name, than the event(s) that
you wish to start must have a check in the box next to the event type, then press submit. This then takes
the initiator to a screen that allows them to enter information pertaining to the event.
1. If more than one event is selected, then the 1st Screen after selecting the event type and clicking submit
allows the initiator to enter the effective date and any comments that they wish to about the specific
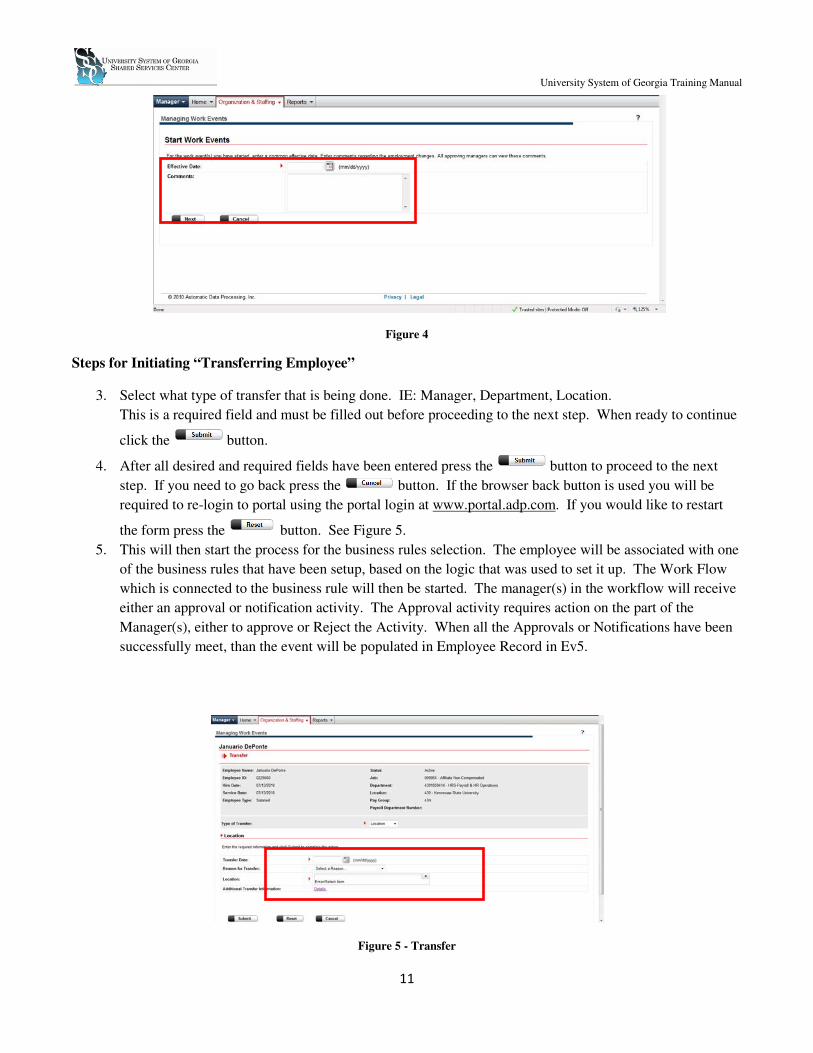
event(s) that is/are being initiated. See figure 4 below.
2. After any comments about the event have been entered click the button. Items that have a red
arrow are required items, and the system will not allow the next step to start unless those field are filled
out. For Example in figure 4 the Effective Date is required thus is must be filled out before continuing to
the next. To go back to the pervious screen press the button. (Note: If the back button of the
browser window is used the user will be logged out and it will require them to relogin and redo any steps
that they have done before.)
University System of Georgia Training Manual
11
Figure 4
Steps for Initiating “Transferring Employee”
3. Select what type of transfer that is being done. IE: Manager, Department, Location.
This is a required field and must be filled out before proceeding to the next step. When ready to continue
click the button.
4. After all desired and required fields have been entered press the button to proceed to the next
step. If you need to go back press the button. If the browser back button is used you will be
required to re-login to portal using the portal login at www.portal.adp.com. If you would like to restart
the form press the button. See Figure 5.
5. This will then start the process for the business rules selection. The employee will be associated with one
of the business rules that have been setup, based on the logic that was used to set it up. The Work Flow
which is connected to the business rule will then be started. The manager(s) in the workflow will receive
either an approval or notification activity. The Approval activity requires action on the part of the
Manager(s), either to approve or Reject the Activity. When all the Approvals or Notifications have been
successfully meet, than the event will be populated in Employee Record in Ev5.
Figure 5 - Transfer
University System of Georgia Training Manual
12
Steps for Initiating “Change Job Status”
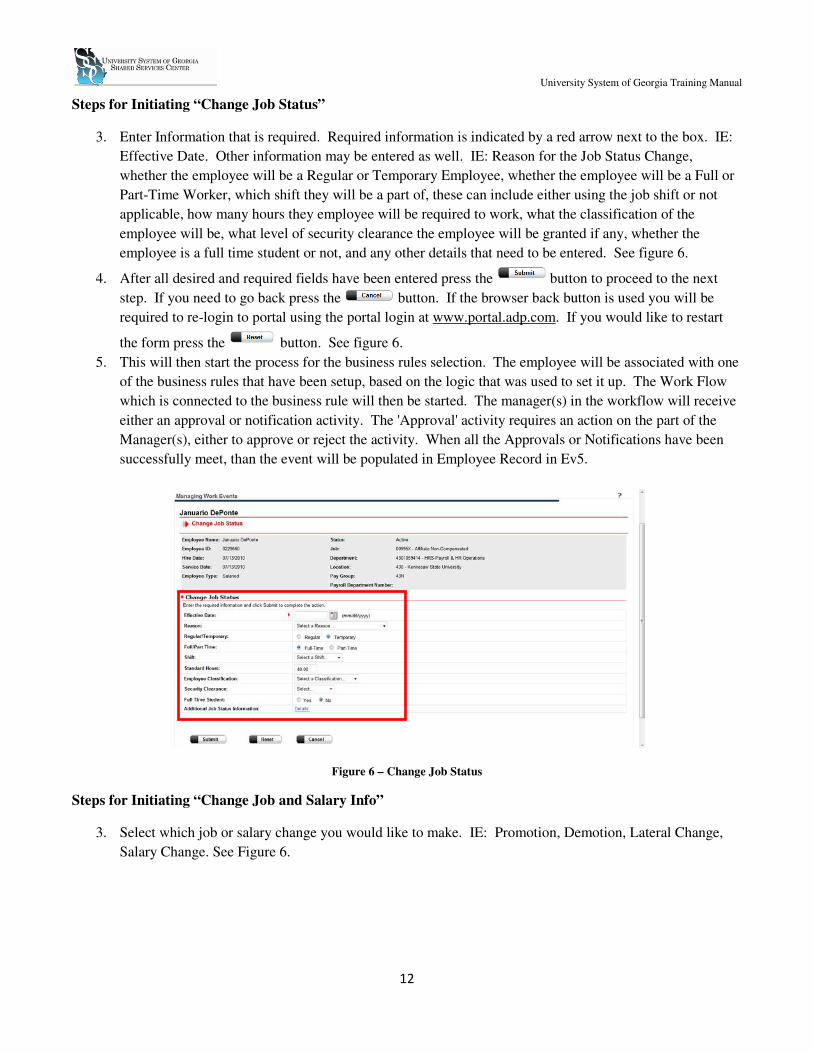
3. Enter Information that is required. Required information is indicated by a red arrow next to the box. IE:
Effective Date. Other information may be entered as well. IE: Reason for the Job Status Change,
whether the employee will be a Regular or Temporary Employee, whether the employee will be a Full or
Part-Time Worker, which shift they will be a part of, these can include either using the job shift or not
applicable, how many hours they employee will be required to work, what the classification of the
employee will be, what level of security clearance the employee will be granted if any, whether the
employee is a full time student or not, and any other details that need to be entered. See figure 6.
4. After all desired and required fields have been entered press the button to proceed to the next
step. If you need to go back press the button. If the browser back button is used you will be
required to re-login to portal using the portal login at www.portal.adp.com. If you would like to restart
the form press the button. See figure 6.
5. This will then start the process for the business rules selection. The employee will be associated with one
of the business rules that have been setup, based on the logic that was used to set it up. The Work Flow
which is connected to the business rule will then be started. The manager(s) in the workflow will receive
either an approval or notification activity. The 'Approval' activity requires an action on the part of the
Manager(s), either to approve or reject the activity. When all the Approvals or Notifications have been
successfully meet, than the event will be populated in Employee Record in Ev5.
Figure 6 – Change Job Status
Steps for Initiating “Change Job and Salary Info”
3. Select which job or salary change you would like to make. IE: Promotion, Demotion, Lateral Change,
Salary Change. See Figure 6.

University System of Georgia Training Manual
13
Figure 7
4. Enter information pertaining to the type of job or salary change selected. This information could include,
but is not limited to required information, Effective Date, non-required information, Reason for the
change, New position, New Job, Business Title, Employee Type, and Change rate either Percent or
specific amount. See Figure 8. Depending on which type of change is selected screen may differ slightly.
5. After all desired and required fields have been entered press the button to proceed to the next
step. If you need to go back press the button. If the browser back button is used you will be
required to re-login to portal using the portal login at www.portal.adp.com. If you would like to restart
the form press the button. See figure 8.
6. This will then start the process for the business rules selection. The employee will be associated with one
of the business rules that have been setup, based on the logic that was used to set it up. The Work Flow
which is connected to the business rule will then be started. The manager(s) in the workflow will receive
either an approval or notification activity. The 'Approval' activity requires an action on the part of the
Manager(s), either to approve or reject the activity. When all the Approvals or Notifications have been
successfully meet, than the event will be populated in Employee Record in Ev5.
University System of Georgia Training Manual
14
Figure 8 - Change Job and Salary Info
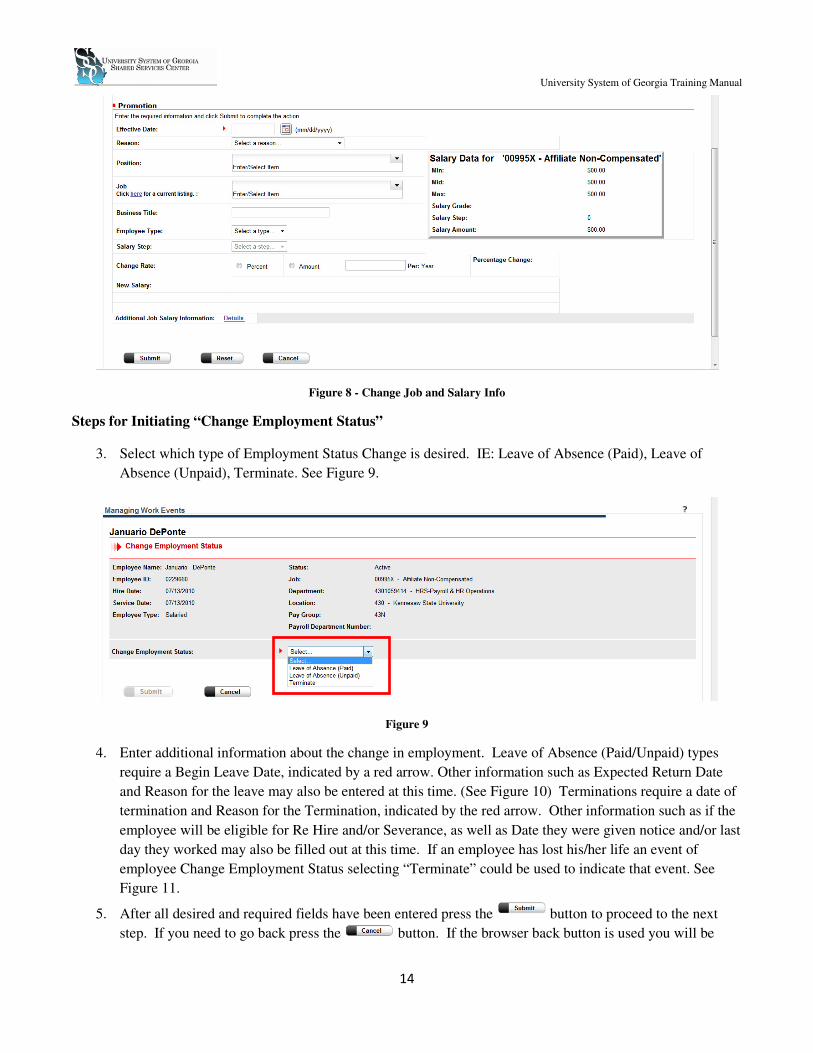
Steps for Initiating “Change Employment Status”
3. Select which type of Employment Status Change is desired. IE: Leave of Absence (Paid), Leave of
Absence (Unpaid), Terminate. See Figure 9.
Figure 9
4. Enter additional information about the change in employment. Leave of Absence (Paid/Unpaid) types
require a Begin Leave Date, indicated by a red arrow. Other information such as Expected Return Date
and Reason for the leave may also be entered at this time. (See Figure 10) Terminations require a date of
termination and Reason for the Termination, indicated by the red arrow. Other information such as if the
employee will be eligible for Re Hire and/or Severance, as well as Date they were given notice and/or last
day they worked may also be filled out at this time. If an employee has lost his/her life an event of
employee Change Employment Status selecting “Terminate” could be used to indicate that event. See
Figure 11.
5. After all desired and required fields have been entered press the button to proceed to the next
step. If you need to go back press the button. If the browser back button is used you will be
University System of Georgia Training Manual
15
required to re-login to portal using the portal login at www.portal.adp.com. If you would like to restart
the form press the button. See figure 10 or 11.
6. This will then start the process for the business rules selection. The employee will be associated with one
of the business rules that have been setup, based on the logic that was used to set it up. The Work Flow
which is connected to the business rule will then be started. The manager(s) in the workflow will receive
either an approval or notification activity. The 'Approval' activity requires an action on the part of the
Manager(s), either to approve or reject the activity. When all the Approvals or Notifications have been
successfully meet, than the event will be populated in Employee Record in Ev5.
Figure 10 - Leave of Absence Figure 11 - Terminate
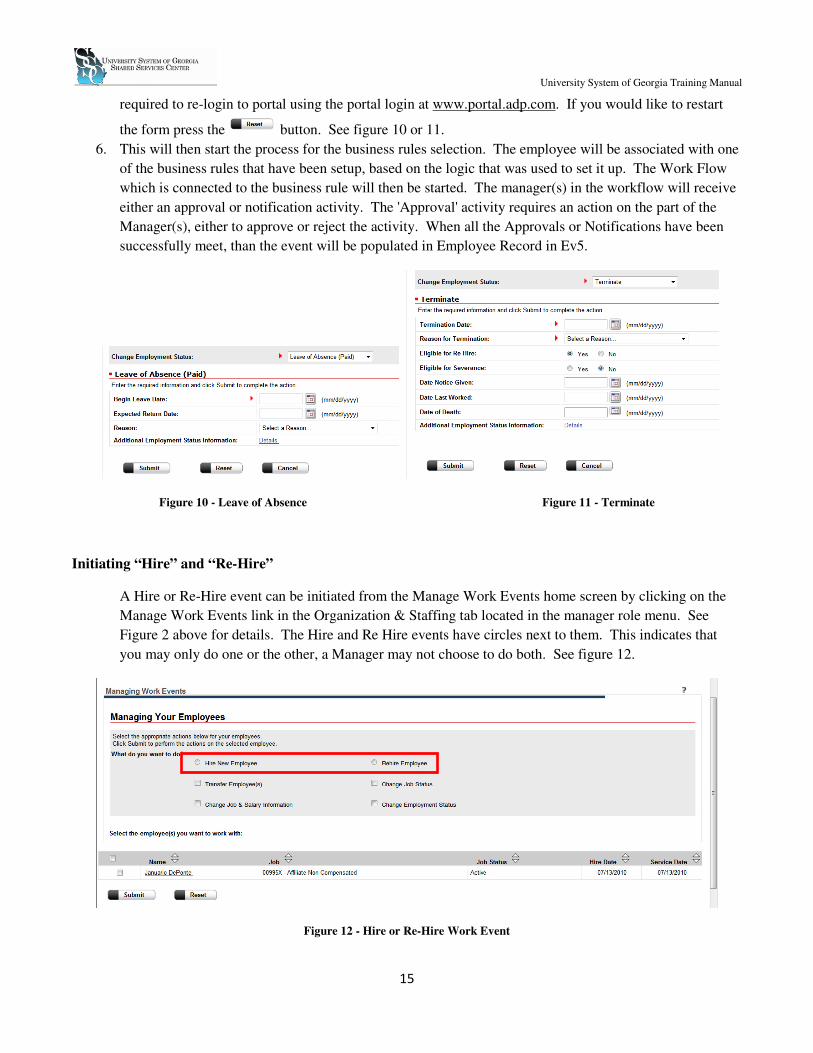
Initiating “Hire” and “Re-Hire”
A Hire or Re-Hire event can be initiated from the Manage Work Events home screen by clicking on the
Manage Work Events link in the Organization & Staffing tab located in the manager role menu. See
Figure 2 above for details. The Hire and Re Hire events have circles next to them. This indicates that
you may only do one or the other, a Manager may not choose to do both. See figure 12.
Figure 12 - Hire or Re-Hire Work Event
University System of Georgia Training Manual
16
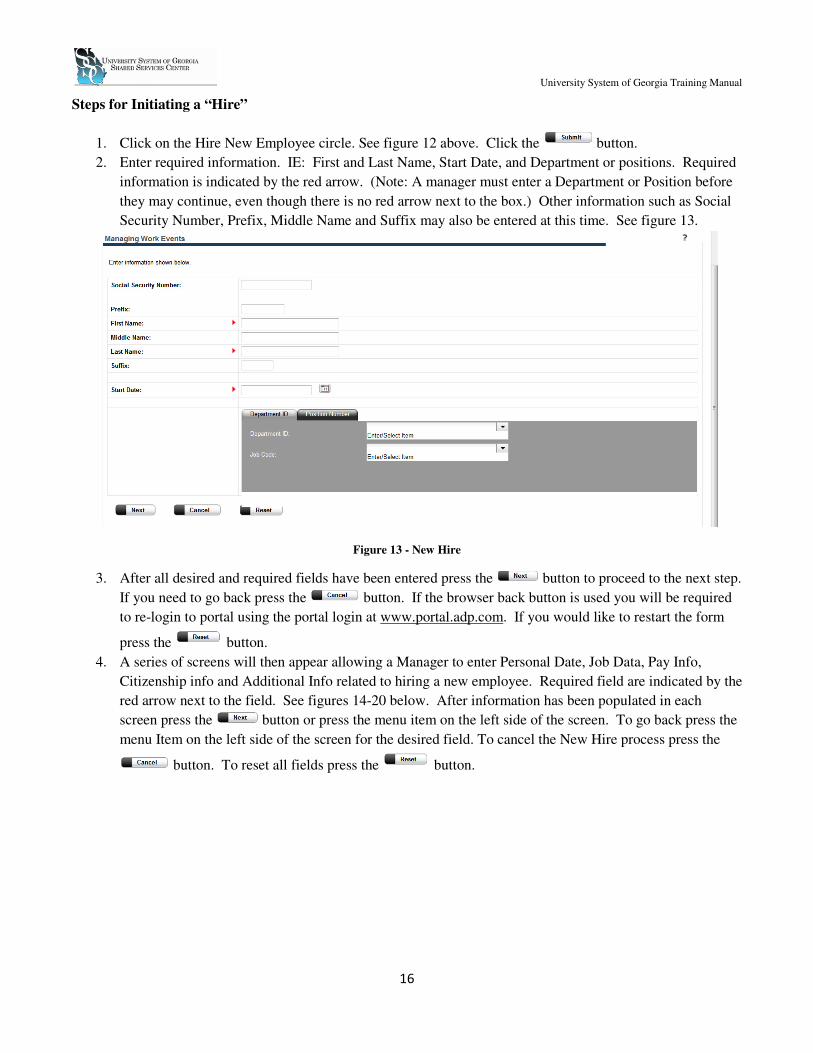
Steps for Initiating a “Hire”
1. Click on the Hire New Employee circle. See figure 12 above. Click the button.
2. Enter required information. IE: First and Last Name, Start Date, and Department or positions. Required
information is indicated by the red arrow. (Note: A manager must enter a Department or Position before
they may continue, even though there is no red arrow next to the box.) Other information such as Social
Security Number, Prefix, Middle Name and Suffix may also be entered at this time. See figure 13.
Figure 13 - New Hire
3. After all desired and required fields have been entered press the button to proceed to the next step.
If you need to go back press the button. If the browser back button is used you will be required
to re-login to portal using the portal login at www.portal.adp.com. If you would like to restart the form
press the button.
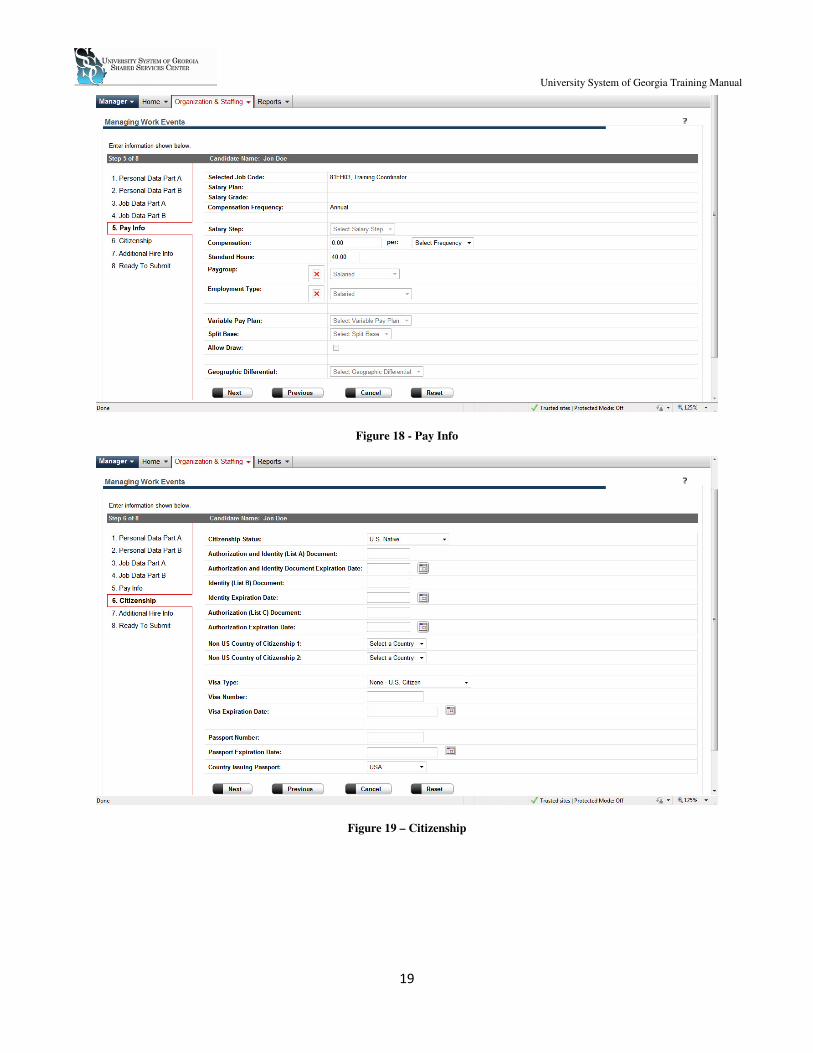
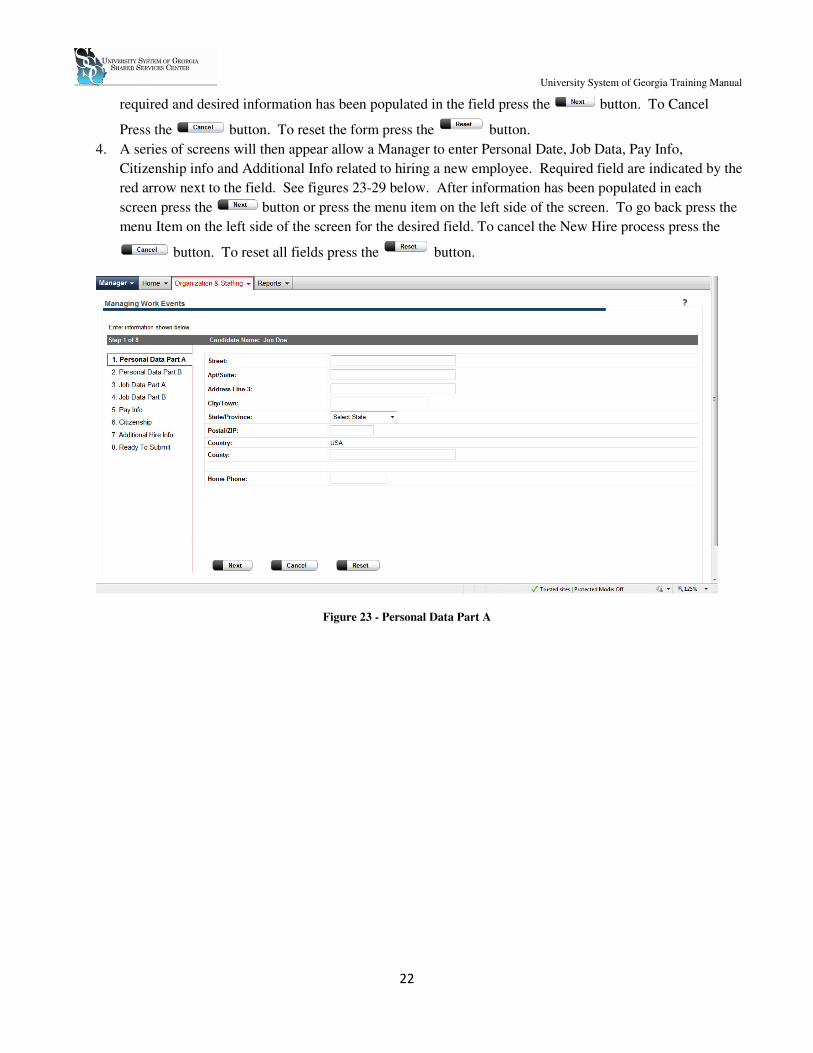
4. A series of screens will then appear allowing a Manager to enter Personal Date, Job Data, Pay Info,
Citizenship info and Additional Info related to hiring a new employee. Required field are indicated by the
red arrow next to the field. See figures 14-20 below. After information has been populated in each
screen press the button or press the menu item on the left side of the screen. To go back press the
menu Item on the left side of the screen for the desired field. To cancel the New Hire process press the
button. To reset all fields press the button.

University System of Georgia Training Manual
17
Figure 14 - Personal Data Part A
Figure 15 - Personal Data Part B

University System of Georgia Training Manual
18
Figure 16- Job Data Part A
Figure 17 - Job Data Part B
University System of Georgia Training Manual
19
Figure 18 - Pay Info
Figure 19 – Citizenship
University System of Georgia Training Manual
20
Figure 20 - Earning Distribution Fields
5. After all the information has been entered and reviewed a Manager can then add any final comments and
submit the request for the new hire. See Figure 21.
Figure 21 - Final Comments and Submit
6. This will then start the process for the business rules selection. The employee will be associated with one
of the business rules that have been setup, based on the logic that was used to set it up. The Work Flow
which is connected to the business rule will then be started. The manager(s) in the workflow will receive
either an approval or notification activity.
Manager(s), either to approve or reject the a
successfully meet, than the event will be
written to Ev5, creating the employee Record
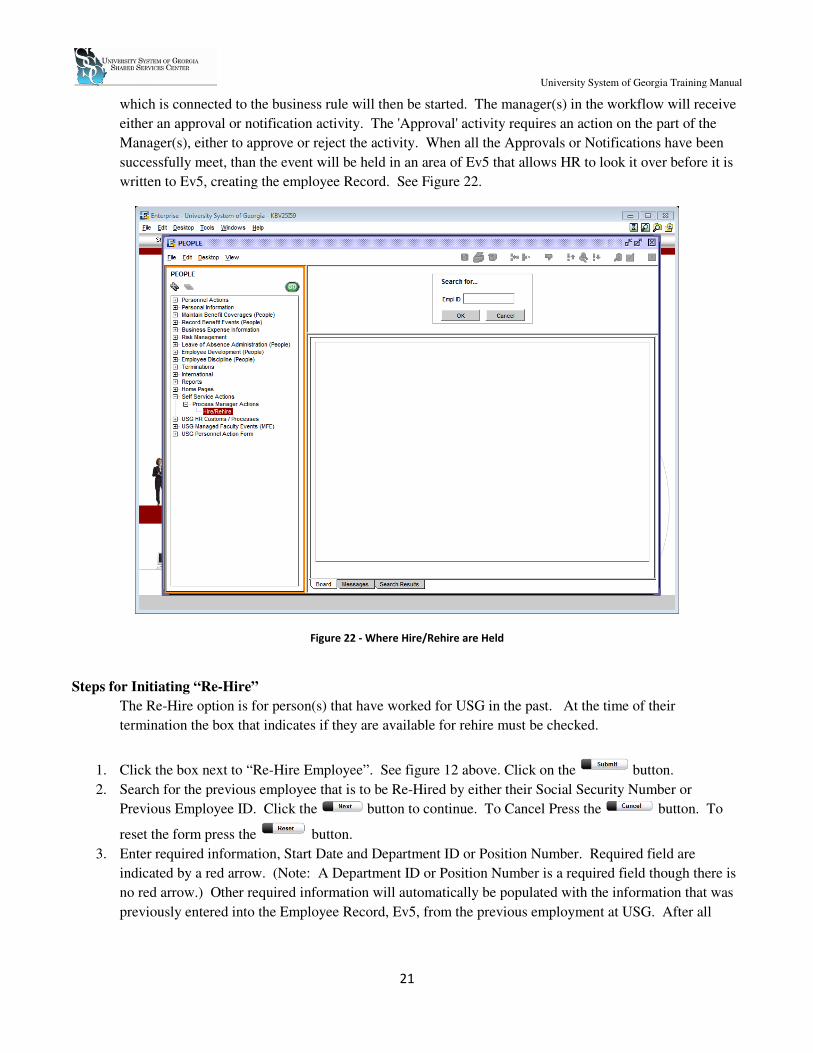
Steps for Initiating “Re-Hire”
The Re-Hire option is for person(s) that have worked for USG in
termination the box that indicates if they are available for rehire must be checked.
1. Click the box next to “Re-Hire Employee”. See figure 12 above. Click on the
2. Search for the previous employee that is to be Re
Previous Employee ID. Click the
reset the form press the
3. Enter required information, Start Date and Department ID or Position Number. Required field are
indicated by a red arrow. (Note: A Department ID or Position Number is a required field though there is
no red arrow.) Other required information will automatically be populated with the information that was
previously entered into the Employee Record, Ev5, from the previous employment at USG. After all
University System of Georgia Training Manual
21
nnected to the business rule will then be started. The manager(s) in the workflow will receive
either an approval or notification activity. The 'Approval' activity requires an action on the part of the
approve or reject the activity. When all the Approvals or Notifications have been
successfully meet, than the event will be held in an area of Ev5 that allows HR to look it
, creating the employee Record. See Figure 22.
Figure 22 - Where Hire/Rehire are Held
Hire option is for person(s) that have worked for USG in the past. At the time of their
termination the box that indicates if they are available for rehire must be checked.
Hire Employee”. See figure 12 above. Click on the
Search for the previous employee that is to be Re-Hired by either their Social Security Number or
Previous Employee ID. Click the button to continue. To Cancel Press the
button.
Enter required information, Start Date and Department ID or Position Number. Required field are
indicated by a red arrow. (Note: A Department ID or Position Number is a required field though there is
d arrow.) Other required information will automatically be populated with the information that was
into the Employee Record, Ev5, from the previous employment at USG. After all
University System of Georgia Training Manual
nnected to the business rule will then be started. The manager(s) in the workflow will receive
action on the part of the
When all the Approvals or Notifications have been
held in an area of Ev5 that allows HR to look it over before it is
. At the time of their
button.
Hired by either their Social Security Number or
button. To
Enter required information, Start Date and Department ID or Position Number. Required field are
indicated by a red arrow. (Note: A Department ID or Position Number is a required field though there is
d arrow.) Other required information will automatically be populated with the information that was
into the Employee Record, Ev5, from the previous employment at USG. After all
University System of Georgia Training Manual
22
required and desired information has been populated in the field press the button. To Cancel
Press the button. To reset the form press the button.
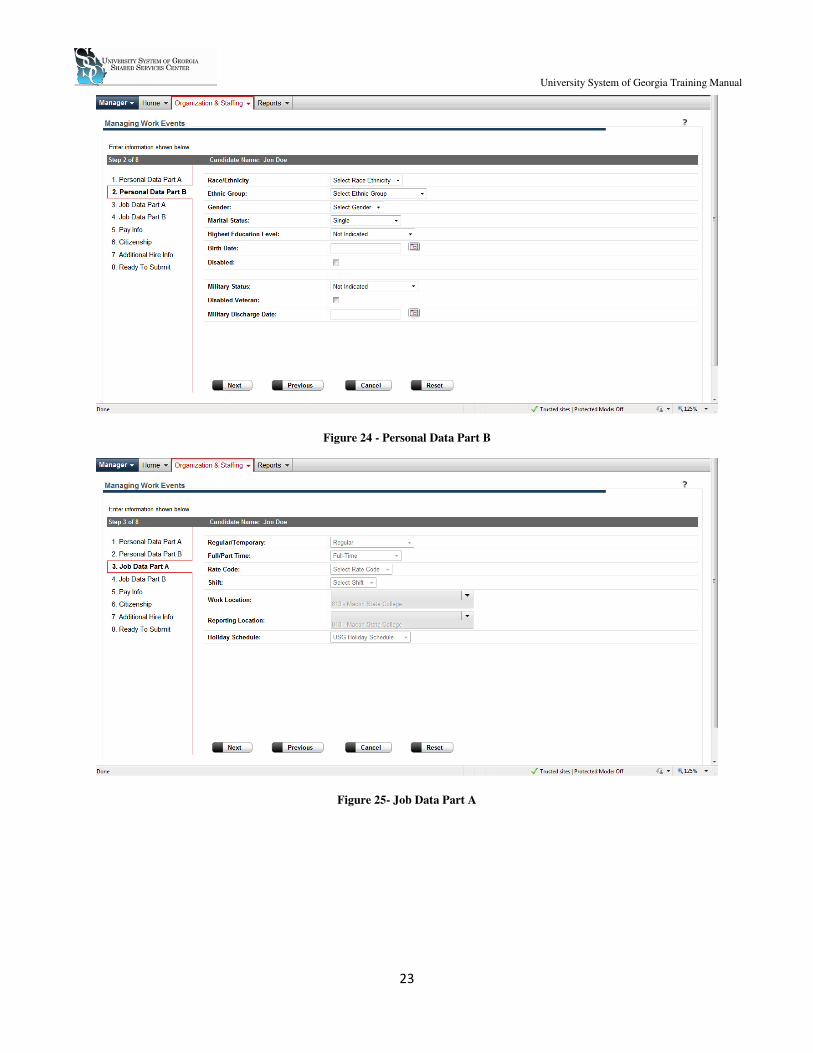
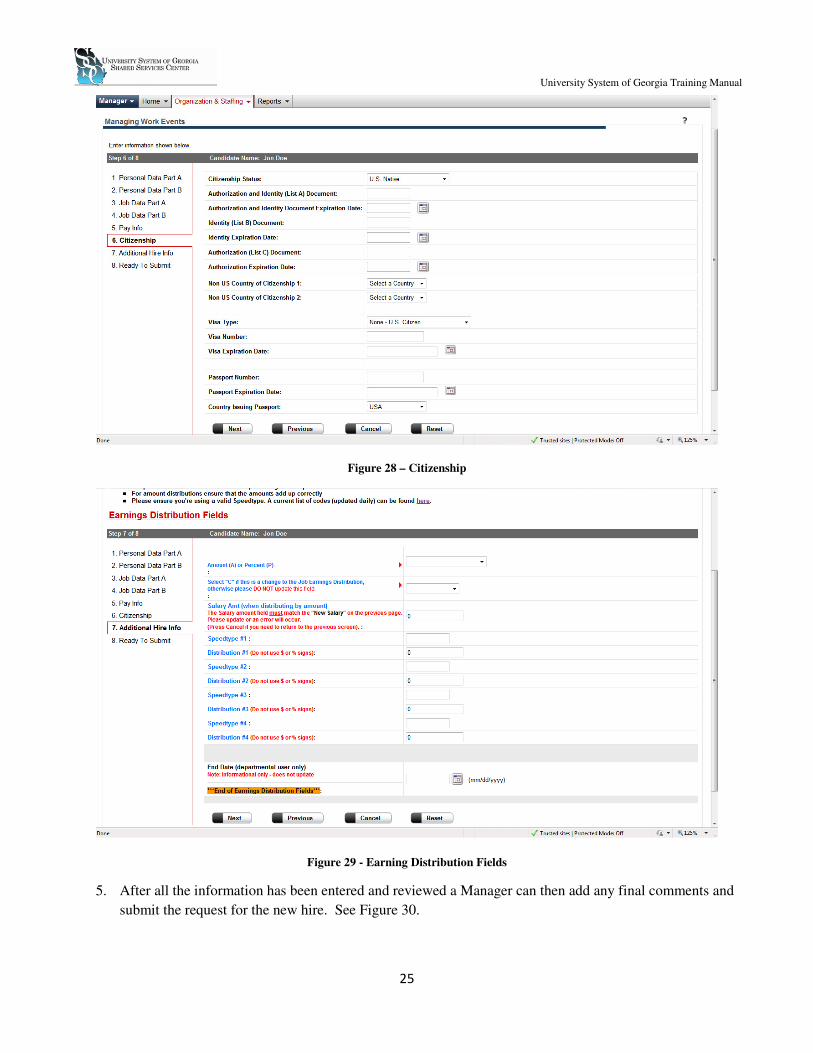
4. A series of screens will then appear allow a Manager to enter Personal Date, Job Data, Pay Info,
Citizenship info and Additional Info related to hiring a new employee. Required field are indicated by the
red arrow next to the field. See figures 23-29 below. After information has been populated in each
screen press the button or press the menu item on the left side of the screen. To go back press the
menu Item on the left side of the screen for the desired field. To cancel the New Hire process press the
button. To reset all fields press the button.
Figure 23 - Personal Data Part A
University System of Georgia Training Manual
23
Figure 24 - Personal Data Part B
Figure 25- Job Data Part A

University System of Georgia Training Manual
24
Figure 26 - Job Data Part B
Figure 27 - Pay Info
University System of Georgia Training Manual
25
Figure 28 – Citizenship
Figure 29 - Earning Distribution Fields
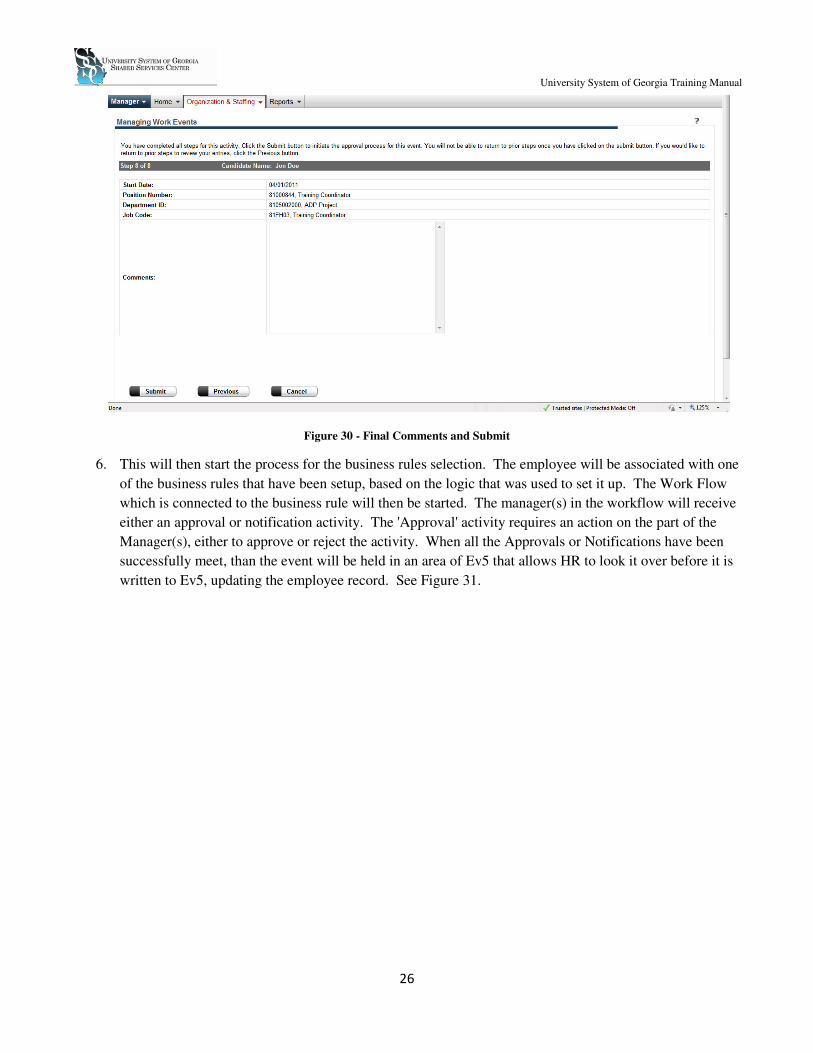
5. After all the information has been entered and reviewed a Manager can then add any final comments and
submit the request for the new hire. See Figure 30.
University System of Georgia Training Manual
26
Figure 30 - Final Comments and Submit
6. This will then start the process for the business rules selection. The employee will be associated with one
of the business rules that have been setup, based on the logic that was used to set it up. The Work Flow
which is connected to the business rule will then be started. The manager(s) in the workflow will receive
either an approval or notification activity. The 'Approval' activity requires an action on the part of the
Manager(s), either to approve or reject the activity. When all the Approvals or Notifications have been
successfully meet, than the event will be held in an area of Ev5 that allows HR to look it over before it is
written to Ev5, updating the employee record. See Figure 31.

University System of Georgia Training Manual
27
Figure 31 - Where Hire/Rehire are Held
University System of Georgia Training Manual
University System of Georgia Training Manual
28
Managing Work Event
Approvals/Rejections
University System of Georgia Training Manual
29
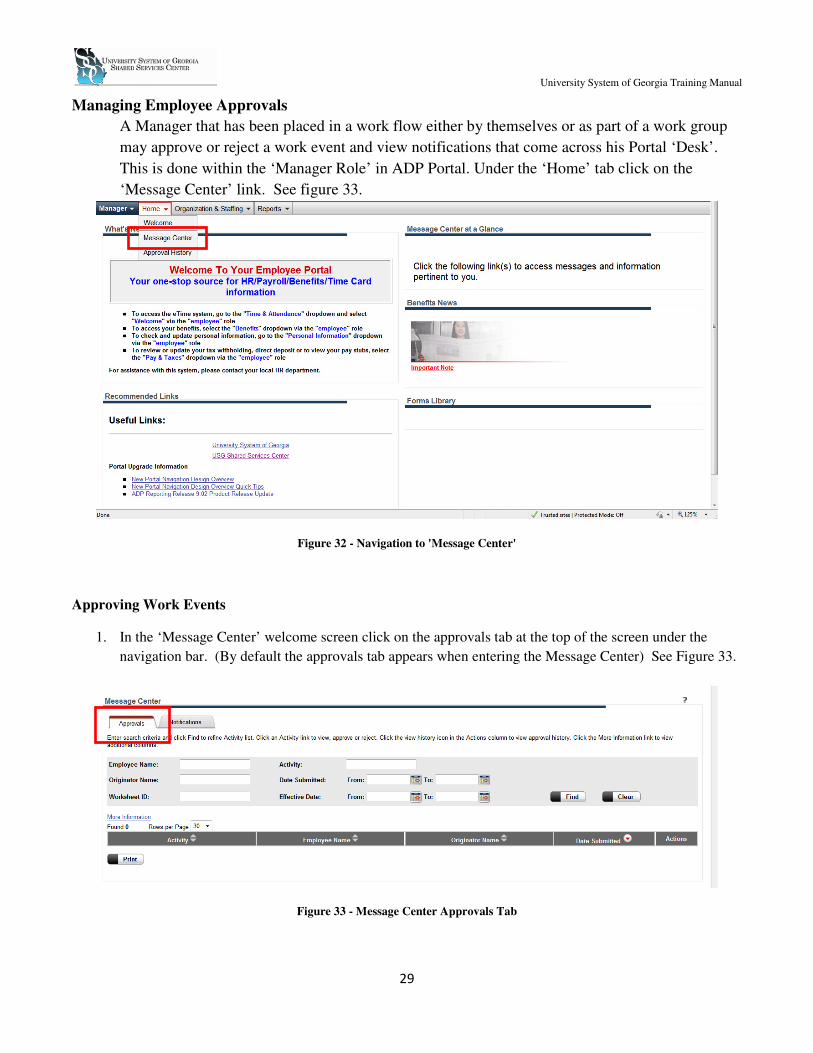
Managing Employee Approvals
A Manager that has been placed in a work flow either by themselves or as part of a work group
may approve or reject a work event and view notifications that come across his Portal ‘Desk’.
This is done within the ‘Manager Role’ in ADP Portal. Under the ‘Home’ tab click on the
‘Message Center’ link. See figure 33.
Figure 32 - Navigation to 'Message Center'
Approving Work Events
1. In the ‘Message Center’ welcome screen click on the approvals tab at the top of the screen under the
navigation bar. (By default the approvals tab appears when entering the Message Center) See Figure 33.
Figure 33 - Message Center Approvals Tab
University System of Georgia Training Manual
30
2. From the approvals tab a Manager can see any events that await his/her decision. They will be able to see
the Activity, Type of Work Event, the name of the Employee that will be affected by the event, the name
of the Manager that initiated the event, the date that the event was submitted, and they will be able to
approve or reject the event. A Manager can also click on the event in the list to receive the details of the
event that the originating Manager has keyed into the system.
3. After the approval/rejection is made the event is removed from the list of Approvals. The Event is then
populated in the Approval History page (see Approval/Rejection History Section in this manual for more
details).
Viewing Notifications Sent by a Work Flow
1. In the ‘Message Center’ welcome screen click on the Notifications tab at the top of the screen under the
navigation bar. (By default the approvals tab appears when entering the Message Center) See Figure 34.
Figure 34 - Message Center Notifications Tab
2. From the Notifications tab a Manager can see any event Notifications that were sent to him/her. They
will be able to see the Activity, Type of Work Event, the name of the Employee that will be affected by
the event, the name of the Manager that initiated the event, the date that the event was submitted, and they
will be able to approve or reject the event. A Manager can also click on the event in the list to receive the
specific details about the event. All event details are not available in the notifications.
3. After viewing the notification, the notification can be removed from the list by clicking on the delete
button to the right of the event in the list.
University System of Georgia Training Manual
31
Viewing Approval/Rejections
History

University System of Georgia Training Manual
32
Viewing Event Approval/Rejection History
A Manager may view any past approvals/rejections that he/she has made. A Manager can also
view any events that he/she originated. Login in as a User or Administrator (Administrator
Login requires a digital certification) under the Manager Role. Click on the ‘Home’ tab and then
the ‘Approval History’ link. See figure 35.
Figure 35 - Approval History
This will then bring up the ‘Approval History’ home screen. From this screen the Manager logged in can
view a history of events that he/she has approved or rejected. The Manager is also able to see Events that
originated with Him/Her. See Figure 36.

University System of Georgia Training Manual
33
Figure 36 - Approval History Home Screen
From the Approval History home screen a Manager has the ability to view work events that have been
completed by clicking on the name of the activity. As well as recall a work event that has not been
completed. (To edit or recall a work event that step must be taken before the first step in the work flow is
completed) A Manager can also delete any completed work events from the log.
Viewing Work Events
1. Click on the completed work event activity name. See figure 37.
Figure 37 - View Completed Work Events
2. In the pop up window you can view the details of the event that completed. To close the window click on
the button or the ‘X’ in the upper right hand corner of the window. See Figure 38.

University System of Georgia Training Manual
34
Figure 38 - Exit Popup window
Deleting Completed Work Events in History
1. Click on the button on the right side of the work event that you would like to delete. See figure 39.
Recalling Work Event in Progress
1. Click on the button on the right side of the work event that you would like to recall. See figure 39.
Figure 39
Viewing and Exporting Archived Approval History
Even though a manager/practitioner can delete an event in his/her personal approval history the events
are archived for retrieval at a later date by a Practitioner.
1. Login using the Administrator login portal at www.portal.adp.com. (To login as an administrator a digital
certificate is required.)
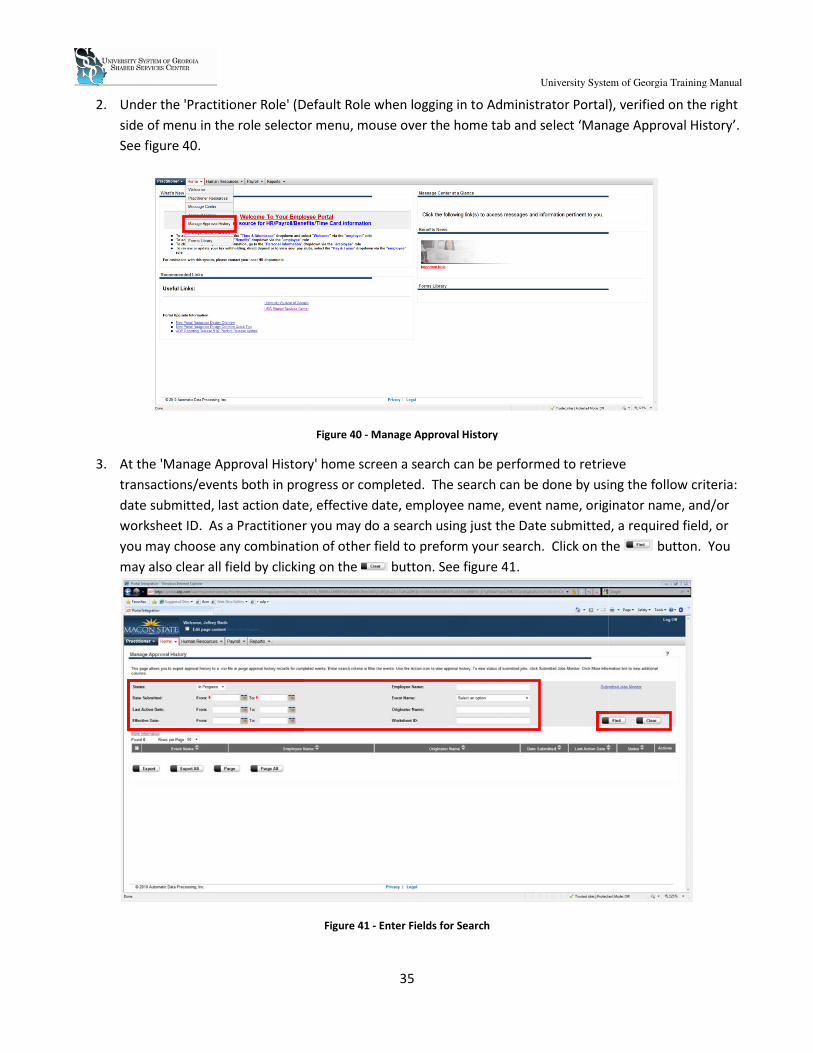
2. Under the 'Practitioner Role' (Default Role when logging in to Administrator Portal),
side of menu in the role selector menu
See figure 40.
3. At the 'Manage Approval History
transactions/events both in progress or completed.
date submitted, last action date, effective date, employee name, event name, originator name, and/or
worksheet ID. As a Practitioner you may do a search using just the Date submitted,
you may choose any combination of ot
may also clear all field by clicking on the
University System of Georgia Training Manual
35
(Default Role when logging in to Administrator Portal),
side of menu in the role selector menu, mouse over the home tab and select ‘Manage Approval History’.
Figure 40 - Manage Approval History
Manage Approval History' home screen a search can be performed to retrieve
transactions/events both in progress or completed. The search can be done by using the fol
date submitted, last action date, effective date, employee name, event name, originator name, and/or
As a Practitioner you may do a search using just the Date submitted,
you may choose any combination of other field to preform your search. Click on the
may also clear all field by clicking on the button. See figure 41.
Figure 41 - Enter Fields for Search
University System of Georgia Training Manual
(Default Role when logging in to Administrator Portal), verified on the right
, mouse over the home tab and select ‘Manage Approval History’.
home screen a search can be performed to retrieve
The search can be done by using the follow criteria:
date submitted, last action date, effective date, employee name, event name, originator name, and/or
As a Practitioner you may do a search using just the Date submitted, a required field, or
search. Click on the button. You
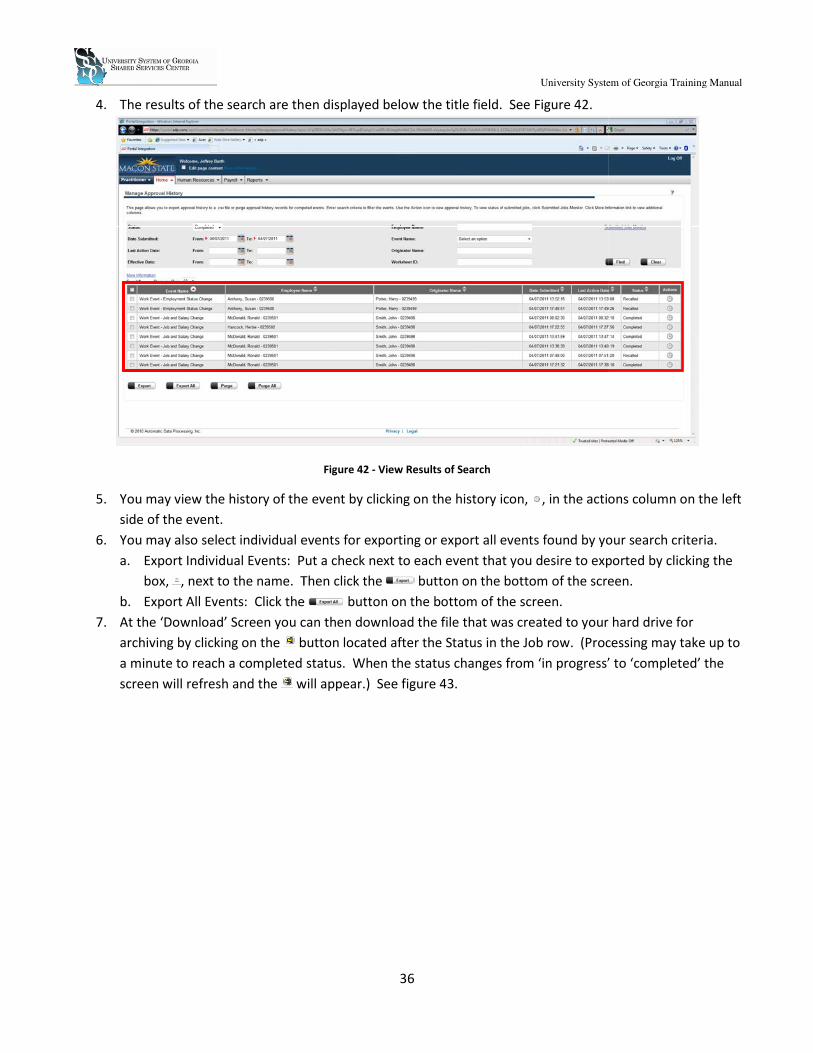
4. The results of the search are then displayed below the
5. You may view the history of the event by clicking on the history icon,
side of the event.
6. You may also select individual events
a. Export Individual Events: Put a check next to each event that you desire to exported by clicking the
box, , next to the name. Then click the
b. Export All Events: Click the
7. At the ‘Download’ Screen you can then download the file that was created to your hard
archiving by clicking on the button located after the Status in the Job row. (
a minute to reach a completed
screen will refresh and the will appear.
University System of Georgia Training Manual
36
The results of the search are then displayed below the title field. See Figure 42.
Figure 42 - View Results of Search
You may view the history of the event by clicking on the history icon, , in the actions column on the left
events for exporting or export all events found by your search criteria.
Export Individual Events: Put a check next to each event that you desire to exported by clicking the
next to the name. Then click the button on the bottom of the screen.
All Events: Click the button on the bottom of the screen.
At the ‘Download’ Screen you can then download the file that was created to your hard
button located after the Status in the Job row. (Processing m
status. When the status changes from ‘in progress’
will appear.) See figure 43.
University System of Georgia Training Manual
, in the actions column on the left
found by your search criteria.
Export Individual Events: Put a check next to each event that you desire to exported by clicking the
button on the bottom of the screen.
At the ‘Download’ Screen you can then download the file that was created to your hard drive for
Processing may take up to
’ to ‘completed’ the

University System of Georgia Training Manual
37
Figure 43 - Download Exported File
University System of Georgia Training Manual

University System of Georgia Training Manual
38
Assigning Manager Assigned
Default and Vacation Proxies
University System of Georgia Training Manual
39
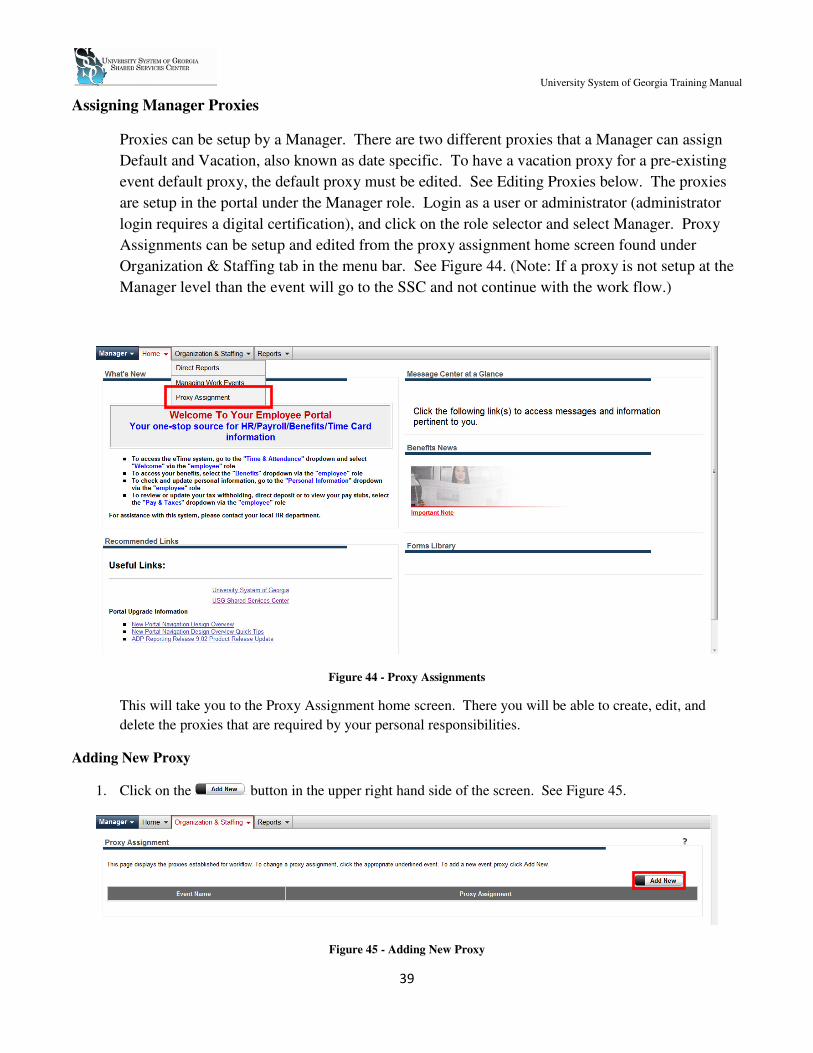
Assigning Manager Proxies
Proxies can be setup by a Manager. There are two different proxies that a Manager can assign
Default and Vacation, also known as date specific. To have a vacation proxy for a pre-existing
event default proxy, the default proxy must be edited. See Editing Proxies below. The proxies
are setup in the portal under the Manager role. Login as a user or administrator (administrator
login requires a digital certification), and click on the role selector and select Manager. Proxy
Assignments can be setup and edited from the proxy assignment home screen found under
Organization & Staffing tab in the menu bar. See Figure 44. (Note: If a proxy is not setup at the
Manager level than the event will go to the SSC and not continue with the work flow.)
Figure 44 - Proxy Assignments
This will take you to the Proxy Assignment home screen. There you will be able to create, edit, and
delete the proxies that are required by your personal responsibilities.
Adding New Proxy
1. Click on the button in the upper right hand side of the screen. See Figure 45.
Figure 45 - Adding New Proxy

University System of Georgia Training Manual
40
2. You are then taken to the entre form for New Proxies. From here you can select which event you
would like this proxy to apply to. As well as how many days will pass before the proxy will pass
this event on, in the case of a default proxy, or which specific dates in which all events will be
automatically routed to the proxy, in the case of a Specific Date Proxy, or Vacation Proxy.
Proxies can be assigned to a Work Group, Up to a ‘reports to’ Manager, maximum of 10 levels,
or to a Specific Manager. See Figure 46.
Figure 46
3. After desired information has been entered click on the button. See Figure 46 above. To cancel
the proxy creation process click the button. To reset the proxy form click the button.
4. The Proxy Assignment will then appear on the Proxy Assignment home screen. See Figure 47.
5. To enter additional proxies repeat steps 1-4.
Figure 47
Edit Proxy Assignments
Proxy Assignments need to be edited if a Manager must change a default proxy or if they would like to
change a Proxy from a default proxy to a Vacation Proxy.
1. Click on the Event Name of the Proxy that needs to be edited. This will then take you back into the proxy
details page. See Figure 47 above. Any changes that need to be made can be made here. To change a
default proxy to a vacation proxy, click on the ‘Specific Date Proxy’ button. This will then allow specific
date to be entered where if the event occurs between those two dates it is automatically be transferred to
the proxy.
2. After desired information has been entered then click on the button. See Figure 46 above. To
cancel the proxy creation process click the button. To reset the proxy form click the
button.
University System of Georgia Training Manual
41
Delete Proxy Assignments
To delete a Proxy Assignment a Manager must first edit the event. See Editing Proxy Assignments
above.
1. Once you are in the editing proxy screen, you can delete a proxy assignment. See figure 43 above.
2. To delete the proxy click the button. See figure 46 above.