Embed Size (px)
Citation preview

Integrating with ClearPass HTTP APIs
HTTP based APIs
The world of APIs is full concepts that are not immediately obvious to those of us without software development backgrounds and terms like REST, RPC, XML, JSON, SOAP, WDSL etc can be initially overwhelming. Reviewing some of the common characteristics found in many of today’s HTTP based APIs can provide a solid foundation for further research on more advanced topics such as RESTful API design.
The following high description aims to provide a basic understanding of the components that are typically used to describe an APIs design and hence the critical information needed for a successful API integration.
Who: API Authentication Typically APIs are authenticated as they are providing access to data programmatically that would otherwise only be available through a user login workflow. There are many different approaches to authenticating and authorizing API access and these often differ based on the class of data being accessed.
Some of the most common API authorization techniques used in API design are:
• Basic Authorization (presented in HTTP Header – Base64 user:password) • API Key (presented in HTTP header or in API payload) • OAuth 2.0 (Authorization framework for authorizing access to your data)
Deep discussion of each of these authorization options is outside of the scope of this overview document but given the new support for OAuth2 based authorization in ClearPass, the following section will discuss the technology and how it is applied to the new ClearPass API surface.
Where: URL Location Anyone wanting to interact with an API needs to know where to find the API server and importantly the URL path to the resource they are interested in. This is no different to a URL that would be typed into a web browser and the API documentation should detail where to find the resource you wish to interact with.
All of the new ClearPass APIs can be accessed from the root location of /api from any of the nodes in your ClearPass cluster. As with any many of the functions within the ClearPass cluster deployments, read-‐access is available from

all nodes in the cluster and ClearPass will internally proxy any write requests back to the Publisher node to ensure database consistency.
The following are examples of published API endpoints available from the ClearPass server as part of the 6.5 release.
OAuth2 endpoint for authorization:
https://<ClearPass FQDN>/api/oauth
Guest endpoint to retrieving guest accounts:
https://<ClearPass FQDN>/api/guest
How: HTTP Method The HTTP method of an API describes how the server is expecting to receive the API request. A web browser by default is using a HTTP GET when downloading a web page and a HTTP POST when a user fills out a form and submits it to a server. APIs work in a very similar fashion to the web browser with the additional capability of being able to take advantage of other HTTP methods such as PUT (replace an object on the server), DELETE (remove an object on the server) or potentially PATCH (update an object on the server). Using the HTTP method to signal the intent of an API call is at the heart of the REST API design principal which is considered a best practice for modern API design.
The new ClearPass APIs have adopted this design pattern of leveraging the HTTP method to indicate the intent of the API transaction. For example, the following table shows some examples of how the HTTP method could be applied to the /api/guest endpoint.
Endpoint HTTP Method Intention
/api/guest GET Retrieve the collection of currently managed guest accounts
/api/guest/{id} GET Retrieve the guest account identified by {id}
/api/guest POST Create a new guest account based on contents of API Payload
/api/guest/{id} PUT Update guest user (full replace)
/api/guest/{id} PATCH Partial update of guest user (merge) identified by {id}
/api/guest/{id} DELETE Delete a guest user identified by {id}

What: API Payload / Content The API content needs to be presented in a format that can be understood by the server and the specifics are the format detailed in the API documentation. Some of the more common formats supported by APIs are:
• JSON (application/json) • XML (application/xml) • Form Encoded (application/x-‐www-‐form-‐urlencoded) • Plain Text (text/plain)
Also included in the list above is the value that needs to be included the HTTP Content-‐Type header so the API server knows what format you are sending in the API payload.
The ClearPass APIs are designed to expect the JSON content type when the API call requires a HTTP body to be submitted (typically in unsafe operations such as POST, PUT, PATCH and DELETE).

API Documentation Detailed documentation is available for the ClearPass APIs by clicking on the API Explorer link from the top right hand corner of the API Services configuration page from Administration > API Services > API Clients menu option.
Alternatively the documentation can be directly accessed from the following URL:
http://<ClearPass-Server-IP-or-FQDN>/api-docs
Accessing this page will display a catalog of available API entry points based on the various sub-‐systems of ClearPass that are currently exposed through the new HTTP APIs.
Selecting one of the API entry points will then display the interactive API document for all of the API methods available for that ClearPass resource. The following screenshot shows the example of the ClearPass Guest resource and the API methods available.

API Configuration Options Several global configuration options can be modified by browsing to the Administration > Plugin Manager menu option of the ClearPass Guest administrative interface and clicking on the Configuration option of the API Framework plugin.
From the resulting page allows options such as token lifetimes, logging levels and support for cross origin access typically associated with client side technologies such as javascript.

Default Lifetimes Although token lifetimes can be configured on an individual basis for each API Client defined from the Administration > API Services > API Client configuration page, the global default token lifetimes can be updated from the plugin configuration.
Logging During development of a new App that is leveraging the ClearPass APIs, there maybe a requirement to increase the logging level from the default Standard (basic) logging detail. This level of detail can be updated from the plugin configuration and the log output is available from the Administration > Support > Application Log menu option.
It is recommended that post any development testing of APIs that the logging level be returned to the default standard (basic) logging detail.
Cross Origin Resource Sharing (CORS) Support The ClearPass APIs provide an option to enable server side support for Cross Origin Resource Sharing by specifying a whitelist of either individual servers or domains that should be permitted to access the API resources from a browser interface even though the initial webpage did not originate from the ClearPass server.
Modern web browsers have inbuilt security to protect users from malicious websites that attempt to access 3rd party websites (or post data to) whilst a user

is browsing their intended destination. By enabling the CORS support on ClearPass the APIs can be accessed in this manner and is typically used in development environments where a local webserver on the development host is used to temporarily host the basic HTML, CSS whilst the content is drawn from the API responses.
As noted in the user interface screenshot above, wildcards can be used to nominate an entire domain or potentially whitelist all origins during a development and testing phase. For a production deployment, it is recommended that only specific hosts or known domains be included in the CORS whitelist.

Summary The following table summarizes the various API conventions that make up the new ClearPass HTTP based APIs.
Who API Authentication
OAuth2 See following section for grant types supported
Where URL Location /api/<resource> All APIs available from the root /api
How HTTP Method GET, POST, PUT, PATCH, DELETE
REST based design to use HTTP Method as the intent of the API call
What API Payload JSON Not required for read-‐only GET requests

API Authorization – OAuth2
The industry has largely aligned on the use of OAuth2 and / or OpenID Connect as the solution for providing authentication and authorization for developer API access. The OAuth 2 RFC 6749 specification accommodates various different API access scenarios ranging from simple server to server integration to the increasingly common use case of a user of a particular service granting authorized access to all or a subset of their data to a 3rd party application.
Overview OAuth 2.0 is a simple and secure authorization framework. It allows applications to acquire an access token for authorized API access via various different workflows supported within the OAuth2 specification. Once an application has an access token, it can access the various API’s serviced by server platform either to configure the platform itself or act on behalf of a related user. At a very high level, authorization with OAuth can be accomplished in the following steps.
• Decide on the use case for API Access – administrative configuration of the server platform or managing the hosted data on behalf of a user.
• Create API Client definition on the server that matches the above use case • Request an Access Token using the Client ID details from the API client
definition created in the previous step. • Make authorized API calls to the server APIs by including the Bearer
<access_token> in the HTTP Authorization header.
OAuth Basics The best way to understand the different use cases for OAuth2 is to start with the various roles that make up a possible OAuth2 transaction.
Resource Owner The resource owner is the person or application that owns the data that is to be shared. For example, a user on Facebook or Twitter could be a resource owner and the resource they own is their data on these social platforms. Typically the resource owner is thought of as a person but it could also be an application. The OAuth 2.0 specification supports different workflows for each of these use cases.
Within the context of ClearPass, the resource owner can be thought of a the Sponsor or ClearPass operator that is acting upon the data stored within the ClearPass platform
Resource Server The resource server is the server hosting the resources. For example, a platform such as Facebook or Twitter would be considered a resource server. It is essentially the server hosting the protected content that will be accessed via the APIs.

Relating this back to ClearPass API use cases the resource server is the ClearPass server or cluster of server depending on the deployment type. All nodes within the ClearPass cluster can service read-‐only API calls and any unsafe API operations (POST, PUT, DELETE) will be internally proxied to the ClearPass publisher for database synchronization.
Client Application The client application is the application requesting access to the protected resources stored on the resource server.
This will be the application that is being developed to leverage the APIs and data hosted by the ClearPass platform. This App could take many forms, from a native mobile App through to a server side script that is run on a periodical basis.
Authorization Server The authorization server is authorizing the client application to access the resources of the resource owner. The authorization server and the resource server can be deployed as part of the same server, but the OAuth 2.0 specification does not dictate whether they should be collocated or separated.
In the case of the ClearPass platform and in the interests of simplicity it is fair to assume the resource server and authorization server are co-‐located on the same server.

OAuth2 Client Before any OAuth transactions can be processed, the first step is to register a new app definition. When registering a new app with the ClearPass Authorization Server, basic information such as application name and the OAuth2 grant type are specified.
From the ClearPass Guest administration interface a new OAuth2 API client can be created by browsing to the Administration > API Services > API Clients web page. Click on the Create API client button in the top right corner and following form can be completed to suit the requirements of the current API integration.
A more detailed discussion of the various options when configuring an OAuth2 client is included in Getting Started chapter of this document.
The result of registering an OAuth2 app is a client id and client secret. These will need to be retained and shared with the App developer to enable them to successfully authorize the API access and make subsequent API calls.
Client ID and Secret After registering your app, you will receive a client ID and a client secret. The client ID is considered public information, and is used to build login URLs, or

included in JavaScript source code on a page. The client secret must be kept confidential. If a deployed app cannot keep the secret confidential, such as JavaScript or native apps, then the secret is not to be used.
Authorization Grant Types OAuth 2 provides several "grant types" for different use cases. The grant types defined are:
• Authorization Code for apps running on a web server • Implicit for browser-‐based or mobile apps • Password for logging in with a username and password • Client credentials for application access
Note: For the initial release of OAuth2 support for API authentication and authorization, ClearPass 6.5 will only be supporting the password and client credentials grant types. Subsequent releases will add the additional grant types as the customer and partner uses cases drive the need for these browser based workflows. The description of how the Authorization and the Implicit Flow grant types differ from those currently supported by ClearPass, have been included in Appendix A for completeness.

Resource Owner Password OAuth 2 also provides a password grant type, which can be used to exchange a username and password for an access token directly. This is often compared with HTTP basic authentication as the same credentials are being exchanged but has the same security benefits of the other OAuth2 grant types in expiring access token and the ability to refresh the access token without the need to cache or resubmit the user credentials.
Since this requires the application to natively collect the user's credentials, this grant type should only be used for Apps with a direct relationship (first party) with the Authorization server. A real world example could be the official mobile App for a social networking site versus allowing 3rd party developers leverage API’s to develop their own mobile experience for the social platform (they should be leveraging the Implicit flow).
The following diagram shows the transaction flow of the Password grant type.
1. User enter credentials directly into the App’s native user interface
• App should not cache user credentials under any circumstances 2. The App submits the user credentials to the Authorization Server.
• Includes grant_type=password, user, password, client_id, client_secret * • *client_secret is not required is the OAuth2 App is defined as a public client
3. Resource Server returns access token for use in subsequent API calls
• Includes access_token, expiry time, token_type=bearer, refresh_token 4. The App includes access token in the HTTP Authorization header.
• Includes Bearer access_token 5. Resource Server returns authenticated API payload.

Client Credentials The simplest grant type offered by OAuth2 doesn’t include a 3rd party user at all and is essentially intended for server-‐to-‐server integrations for updating the application server configuration. In this case, applications need a way to get an access token for their own user and do this outside the context of any specific user. OAuth provides the client credentials grant type for this purpose.
Given the simplicity of this grant type, many developers may leverage its basic workflow to recover an access token so they can get and up running quickly with the API’s. That being said, client credentials should never be used in production where an untrusted 3rd party developer has access to the client secret.
The following diagram shows the transaction flow of the client credentials grant type.
1. The first party App submits an access token request to the Authorization Server.
• Includes grant_type=client_credentials, client_id, client_secret 2. Resource Server returns access token for use in subsequent API calls
• Includes access_token, expiry time, token_type=bearer 3. The App includes access token in the HTTP Authorization header.
• Includes Bearer access_token 4. Resource Server returns authenticated API payload.

Getting Started
This chapter is designed to walk a ClearPass administrator through the steps required to get a basic API integration up and running in preparation for the deployment of a mobile App, such as the QuickAccess App developed by Aruba.
The mobile App will leverage the ClearPass OAuth2 support to authenticate and authorize a mobile user. All subsequent API calls will be made on behalf of this user and reflect their privileges on the ClearPass server.
Based on this use case the appropriate OAuth2 grant type will be the Password grant type as the App is working on data associated with a specific user.
Step 1. Create API Client Browsing to the Administration > API Services > API Clients menu option, a new API Client can be defined by clicking on the Create API Client link found in the top right hand corner of the page.
The API Client definition is the method of establishing a relationship between the ClearPass Authorization Server and the client application that is being developed and wishes to leverage the API resources hosted by ClearPass.

Operator Profile The Operator Profile defines the class of user and privileges associated with the API access that will be granted to a client application based upon successful authorization.
The details of the ClearPass privileges associated with a particular operator profile can be reviewed or modified by browsing to the Administration > Operator Logins > Profiles menu option.
Grant Type Referring back to the previous OAuth2 technology overview, the API Client definition allows the administrator to currently select from the following supported grant types:
• Client Credentials • Resource Owner Password
Future versions of ClearPass will extend the OAuth2 use cases to cover Authorization Code and Implicit grant types.
Public Client In the case that the Password grant type has been selected, the default operation is to create a Client Secret as shown in the example screenshot below.
As discussed in the OAuth2 technology overview, the client secret must also be kept secret to avoid potential security breaches. In some deployment scenarios the App will be deployed as a native mobile App where the operating system and the App itself cannot be guaranteed to be trusted and any credentials stored within the App are at risk of being exposed.
For this reason the password grant type offers the ability to define the API client as a public client and in this deployment scenario the App does not need to present the client secret as part of OAuth2 authorization request.
The user of the App needs to make a determination as to whether they trust the native App before entering in their user credentials to login into the service provided.
Refresh Token The refresh token allows an App a method to recover a short-‐lived access token from the ClearPass server. The access token is typically short lived to limit the exposure to a compromised token as the attacker has a limited window in which to abuse it.

Whilst the refresh token has not expired, an authorized App is able to make subsequent authorization requests to recover new access tokens and continue to transact API calls.
The administrator can choose to enable refresh token support on each API client definition by checking the option shown in the screenshot above.
Access Token Lifetime The short lived access token lifetime can be defined for each individual API client to suit the use case of the API access being enabled.
Refresh Token Lifetime Similarly, if refresh tokens have been enabled for the API client in question, the lifetime of the refresh time can be customized to suit the use case of the API access that is being enabled.
Step 2. Ensure API Access Enabled for users Each operator profile has the ability to define whether API access is enabled for that class of users. This setting will override any individual ClearPass privileges that may have been enabled through the Operator profile elsewhere so it is critical to ensure this option is enabled for the target users of the App.

Step 3. Verify User Account As the API client has been configured based on the Password grant type, all API calls will be to be executed with the context of a user known to ClearPass. Although various external user databases are supported by ClearPass, this example will just leverage the local user database.
From the ClearPass Policy Manager administration user interface, select the Configuration > Identity > Local Users menu option to verify an account already existing and belong to the appropriate Operator Profile.
If an appropriate account doesn’t exist a new one can be quickly created by clicking on the +Add button in the top right corner and filling out the required fields as shown below.
Click the Add button to commit the new user to the ClearPass database.

Step 4. Create Policy Manager Service In order for ClearPass Policy Manager to successfully authenticate the OAuth2 authorization requests for any of the configured API clients, a new service definition must be created. ClearPass Policy Manager has a built in wizard for quickly creating the required service definition to support OAuth2 based API authorization and this can be created by browsing to the Configuration > Start Here menu option from within the administration interface.
Scrolling down the list of available service definition wizards the OAuth2 API User Access wizard can be found towards the bottom.
Click on the OAuth2 API User Access wizard and fill out a descriptive name for the service so it can be easily identified in the Policy Manager’s service list in the future. Click the Add Service button to commit the service to the policy engine.
Now referencing the ClearPass Policy Manager’s service list, the new OAuth2 service definition should be available and enabled for API access as shown in the screenshot below.

Step 5. Test API Authorization The ClearPass OAuth2 authorization endpoint is available using the following details:
Location Method Content Type Payload
/api/oauth POST JSON grant_type, username, password, client_id, client_secret*
* client_secret required if the API client definition is not configured as public client.
In order to test the OAuth2 API authorization on ClearPass any basic HTTP client can be used to craft the API call. There are many browser plugins (RESTClient, Postman etc) and command line tools available that support this style of API integration.
The following example is using a widely deployed command line tool found in many operating systems call cURL. More details on the cURL client can be found on the following website. (http://curl.haxx.se/)
curl -X POST "https://test.clearpassbeta.com/api/oauth" \
-H "Content-Type: application/json" \
-d $'{"grant_type": "password", "username": "qa", "password": "abc123", "client_id": "QuickAccess"}' \
-m 30 \
-v \
-k
* Note – if you are using the Windows version of cURL you may need to remove the slashes ( \ ) and collapse the entire command into a single line.

If the configuration of the ClearPass server is correct, a JSON object similar to the one below should be returned. The JSON object contains the following attribute value pairs:
• access_token : to token associated with the authorized user • expires_in : the above access token will expire in x seconds • token_type : bearer token will be included in all subsequent API calls • scope : reserved for future use in ClearPass • refresh_token : to be stored to recovering a new access token on expiry
{"access_token":"81d3136c9025c394222d6202375924d30330ce9a","expires_in":28800,"token_type":"Bearer","scope":null,"refresh_token":"2fb63c38824eb2c0c75bf3894eda9109019b8c86"}
Returning to the ClearPass Policy Manager administration interface, the Monitoring > Live Monitoring > Access Tracker menu option can be selected and the successful OAuth2 transactions can be reviewed.

Step 6. Test API Transaction Now that the OAuth2 authorization step is complete and an access token has been successfully retrieved from the ClearPass server, any required API calls can now be made to the server.
In order to reference the context of the authorized user, the access token must be included in every subsequent API call. As per the OAuth2 specification, this access token must be included in the HTTP Authorization Header in the following format.
Authorization: Bearer <access_token>
Using the cURL command again, an API call can be made to a defined API endpoint that will return all of the ClearPass privileges associated with the user authorized and associated with the given access token.
Location Method Content Type Payload
/api/oauth/privileges GET n/a n/a
curl -X GET "https://test.clearpassbeta.com/api/oauth/privileges" \
-H "Accept: application/json" \
-H "Authorization: Bearer cd3f7cb063d951e65b43270cfca9cb1d97276556" \
-m 30 \
-v \
-k
* Note – if you are using the Windows version of cURL you may need to remove the slashes ( \ ) and collapse the entire command into a single line.
The following JSON object details the privileges associated with the authorized user on the ClearPass server. The notation of the privileges includes a prefix which denotes the class of access that is enabled:
• # - TBD • ? – TBD
For more information of ClearPass API privileges please refer the User Guide in Chapter XX

{ "privileges": [ "#guest_sessions_history", "#guest_show_details", "#mdps_view_own_certificate", "?api_index", "?guestmanager", "?mdps_index", "apigility", "change_expiration", "create_multi", "create_user", "full-user-control", "guest_multi", "guest_sessions", "guest_users", "mac_create", "mac_list", "mdps_own_device_delete", "mdps_own_device_disable", "mdps_own_device_enable", "mdps_own_device_manage", "mdps_shared_device_delete", "mdps_shared_device_disable", "mdps_shared_device_enable", "mdps_shared_device_manage", "remove_account", "reset_password" ] }
At this point successful API access has been established and verified and the App developers should be in a position to start development and testing against the ClearPass API service.

Appendix A – OAuth2 Grant Types
Authorization Code The authorization code grant type is intended for web server applications using a server side programming language such as PHP or Python where the source code of the application is not available to the public – hence protecting the client secret.
The use case for this grant type is to allow a user of the web server application to grant access to all or some of their data to a 3rd party application. A real world example of this could a social network application requesting access to a user’s photos on a photo sharing web site. The photo sharing web site is able to expose their user profiles and data (photos) through an OAuth2 application on their platform whilst not exposing their client secret in the process.
The following diagram shows the transaction flow of the Authorization code grant type.
1. Redirect the user browser to Authorization Server.
• Includes response_type=code, client_id, redirect_uri, scope, state 2. User authenticates and grants authorization to the 3rd party App.
• User submits their credentials for the Authorization Server 3. Authorization Server now redirects back to the web application (redirect URI) including the authorization code
• Includes authorization code, state 4. Web application verifies the redirect and sends request to exchange the authorization code for an access token (query param & post body supported)

• Includes response_type=authorization_code, code, client_id, client_secret, redirect_uri 5. Authorization Server returns access token for use in subsequent API calls
• Includes access_token, expiry time, token_type=bearer, refresh_token 6. Web application includes access token in the HTTP Authorization header.
• Includes Bearer access_token 7. Resource Server returns authenticated API payload.
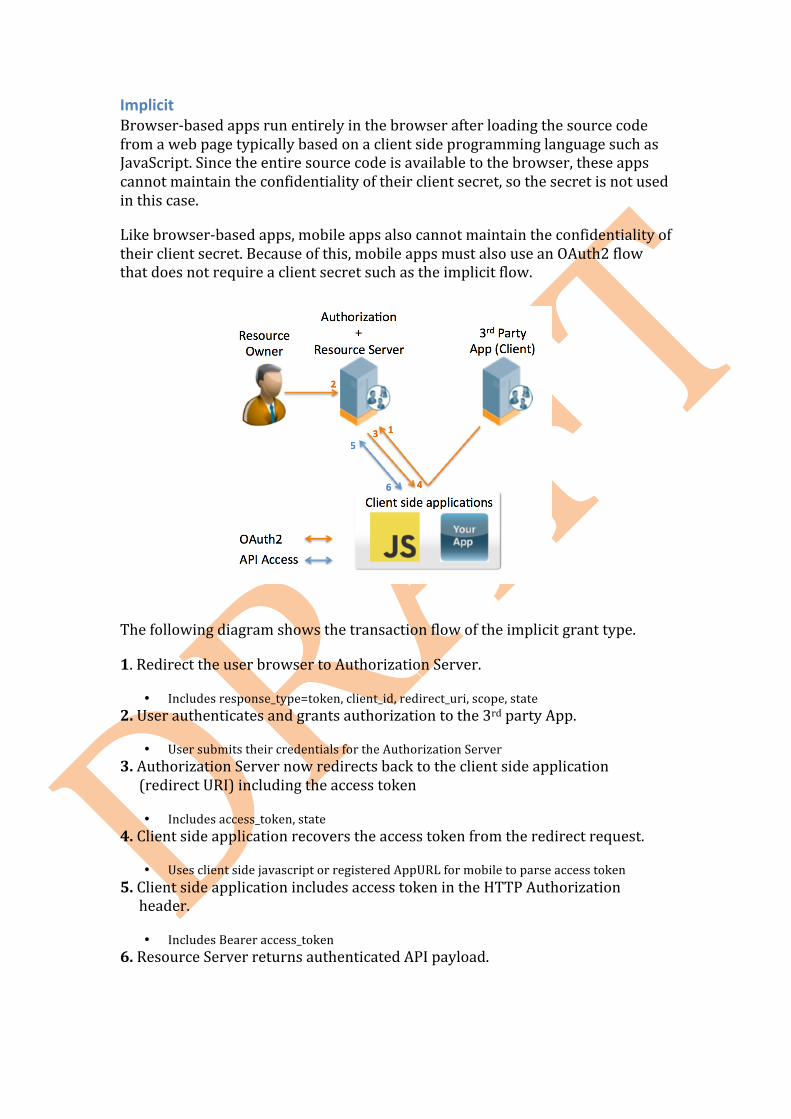
Implicit Browser-‐based apps run entirely in the browser after loading the source code from a web page typically based on a client side programming language such as JavaScript. Since the entire source code is available to the browser, these apps cannot maintain the confidentiality of their client secret, so the secret is not used in this case.
Like browser-‐based apps, mobile apps also cannot maintain the confidentiality of their client secret. Because of this, mobile apps must also use an OAuth2 flow that does not require a client secret such as the implicit flow.
The following diagram shows the transaction flow of the implicit grant type.
1. Redirect the user browser to Authorization Server.
• Includes response_type=token, client_id, redirect_uri, scope, state 2. User authenticates and grants authorization to the 3rd party App.
• User submits their credentials for the Authorization Server 3. Authorization Server now redirects back to the client side application (redirect URI) including the access token
• Includes access_token, state 4. Client side application recovers the access token from the redirect request.
• Uses client side javascript or registered AppURL for mobile to parse access token 5. Client side application includes access token in the HTTP Authorization header.
• Includes Bearer access_token 6. Resource Server returns authenticated API payload.

Appendix B -‐ OAuth2 Error Messages
{"type":"http://www.w3.org/Protocols/rfc2616/rfc2616-sec10.html","title":"invalid_client","status":400,"detail":"This client is invalid or must authenticate using a client secret"}
{"type":"http://www.w3.org/Protocols/rfc2616/rfc2616-sec10.html","title":"Forbidden","status":403,"detail":"Client does not have \u2018Allow API Access\u2019 privilege"}
{"type":"http://www.w3.org/Protocols/rfc2616/rfc2616-sec10.html","title":"Not Acceptable","status":406,"detail":"Cannot honor Accept type specified"}