Embed Size (px)
Citation preview
Verbatim 4 Paperless Debate Manual
Aaron Hardy
Ashtar Communications
8/22/2012, rev. 4.5.1
2
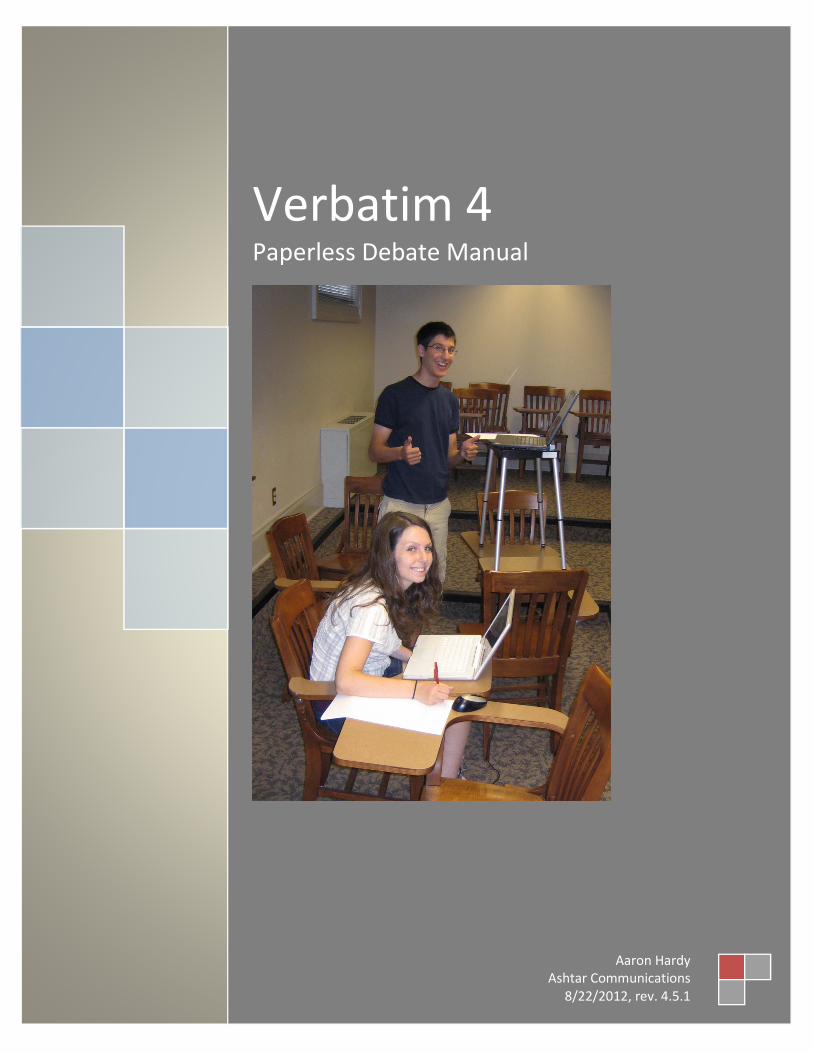
Table of Contents
INTRODUCTION ..................................................................................................................................................... 4
WHAT’S NEW? ............................................................................................................................................................. 5
QUICK START GUIDE .............................................................................................................................................. 8
PC SHORTCUT CHEAT SHEET ............................................................................................................................................ 8 MAC SHORTCUT CHEAT SHEET ......................................................................................................................................... 9 QUICK START – REQUIREMENTS ..................................................................................................................................... 10 QUICK START – INSTALLATION ........................................................................................................................................ 11 QUICK START – FILE FORMATTING .................................................................................................................................. 13 QUICK START – PAPERLESS ............................................................................................................................................ 13 QUICK START – CUSTOMIZING VERBATIM ......................................................................................................................... 14 QUICK START – CONVERTING BACKFILES .......................................................................................................................... 15 QUICK START – ADVANCED FEATURES ............................................................................................................................. 16
CHAPTER 1 – GETTING STARTED .......................................................................................................................... 17
BENEFITS OF PAPERLESS ................................................................................................................................................ 17 DESCRIPTION OF PAPERLESS ........................................................................................................................................... 18 REQUIREMENTS ........................................................................................................................................................... 19 INSTALLATION ............................................................................................................................................................. 21 CONFIGURING VERBATIM SETTINGS ................................................................................................................................. 26 GETTING ORIENTED ...................................................................................................................................................... 29
CHAPTER 2 – FILE FORMATTING ........................................................................................................................... 32
HEADINGS .................................................................................................................................................................. 32 CARD FORMATTING ...................................................................................................................................................... 34 ADDITIONAL FORMATTING FUNCTIONS ............................................................................................................................ 36 CONVERTING BACKFILES ................................................................................................................................................ 37
CHAPTER 3 – DEBATING PAPERLESS ..................................................................................................................... 38
STEP ONE – OPEN A “SPEECH” DOCUMENT ...................................................................................................................... 38 STEP TWO – OPEN FILES ............................................................................................................................................... 38 STEP THREE – SEND TO SPEECH ...................................................................................................................................... 39 STEP FOUR – ORGANIZE SPEECH ..................................................................................................................................... 40 STEP FIVE – TRANSFER SPEECH ....................................................................................................................................... 41 RECAP ....................................................................................................................................................................... 41
CHAPTER 4 – ADVANCED FEATURES .................................................................................................................... 42
TIMER ....................................................................................................................................................................... 42 WARRANTS ................................................................................................................................................................ 42 NAVPANECYCLE .......................................................................................................................................................... 42 VIRTUAL TUB .............................................................................................................................................................. 43 CASELIST FEATURES ...................................................................................................................................................... 44
CHAPTER 5 – USING VERBATIM WITH PADS......................................................................................................... 47
UPLOAD TO PADS........................................................................................................................................................ 47 AUTOMATIC CO-AUTHORING UPDATES ............................................................................................................................ 48 CONFIGURING PADS FOR AUTOSAVE .............................................................................................................................. 48
3
CHAPTER 6 – PAPERLESS BEST PRACTICES ............................................................................................................ 49
DIGITAL TUB ORGANIZATION ......................................................................................................................................... 49 SETTING UP WINDOWS................................................................................................................................................. 50 SETTING UP WORD ...................................................................................................................................................... 51 PRE-TOURNAMENT SETUP ............................................................................................................................................. 53 IN-ROUND .................................................................................................................................................................. 54 PUBLIC RELATIONS ....................................................................................................................................................... 56
CHAPTER 7 – FREQUENTLY ASKED QUESTIONS .................................................................................................... 58
THE DECISION TO SWITCH ............................................................................................................................................. 58 PRIVACY/SECURITY ...................................................................................................................................................... 60 INSTALLATION PROBLEMS .............................................................................................................................................. 61 GENERAL MACRO PROBLEMS ......................................................................................................................................... 63 SPECIFIC MACRO ERRORS .............................................................................................................................................. 66 IN-ROUND .................................................................................................................................................................. 67
APPENDIX A – KNOWN ISSUES ............................................................................................................................. 70
4
Introduction
Significant changes and improvements have been made to Verbatim in the two years since this manual
was last revised. This edition brings together documentation on the new features and major changes in
both v4.0 and v4.5+, including more extensive discussion of the Mac version of Verbatim.
There has been one other major change since the last edition. Paper is dead. Almost all college
programs are now paperless, as well as the vast majority of high school programs on the national circuit.
High school debate camps have almost entirely abandoned paper, and the last few holdouts are a dying
breed.
A certain level of technological saavy is now as fundamental to debate success as speed drills or
research skills. This manual aims to provide both a set of instructions for using Verbatim, as well as a
foundation for learning the basic skills of paperless debating. It is my hope that it can serve as a valuable
resource for a generation of debaters who will likely go their entire career without ever reading a card
off paper.
Since switching Whitman to paperless and releasing the first version of the template in 2008, I have
received thousands of emails with feedback, suggestions, and constructive criticism, and have learned
from and collaborated with dozens of other interested debate programmers. I owe a great deal of
thanks to all of them – and in particular to the students at Whitman who served for the last five years as
willing test subjects and put up with an endless progression of beta versions, bug fixes, and
undocumented “workarounds.”
Additional resources, the most recent version of Verbatim, and much more can be found at:
http://paperlessdebate.com
As always, I welcome feedback in any form – questions, feature requests, bug reports, etc. should be
directed to me at [email protected].

5
What’s New?
The basic functionality of Verbatim is the same as ever – shortcuts for speeding up research, and a set of
macros to make assembling, organizing, and giving speeches faster and easier. For a comprehensive list
of updates, upgrades, and bug fixes, see the Verbatim changelog at paperlessdebate.com.
For those upgrading from an older version of Verbatim or considering a switch from another template,
here’s a list of the most important new features since the previous version of this manual.
Heading organization
Verbatim 4+ is a change from the “Heading Levels” that most people are used to. It introduces a new
style/heading level called “Pocket” which is above “Hat.” The basic analogy is to think of each Word
document as an expando – this gives you 4 levels of headings to subdivide your files:
Heading 1 – Pocket
Heading 2 – Hat
Heading 3 – Block
Heading 4 – Tag
For additional discussion of the new heading structure, including a lengthy justification for the change
and tips on how to optimally organize your files for the new format, see Chapter 2 – File Formatting.
User Profiles
There is a new interface for “customizing” your
installation of Verbatim, such as the fonts, sizes,
formatting options, and keyboard shortcuts
(including a dynamically updating ribbon
interface). This should make it easy to personalize
the appearance of your files without needing to
dig through the Word styles or learn XML to
change the ribbon.
It also gives you the option to import and export
settings – so you can quickly share your preferred
font setup with another team member, or move
your “profile” to a different computer.
6
Best of all, it doesn’t mess up anyone else’s formatting. When you open a Verbatim file from someone
else, it will automatically appear in your settings, regardless of what fonts, etc. it was created with. This
means there’s no reason for the team to fight over Calibri vs. Times New Roman – everyone can have
their personal settings and never know the difference.
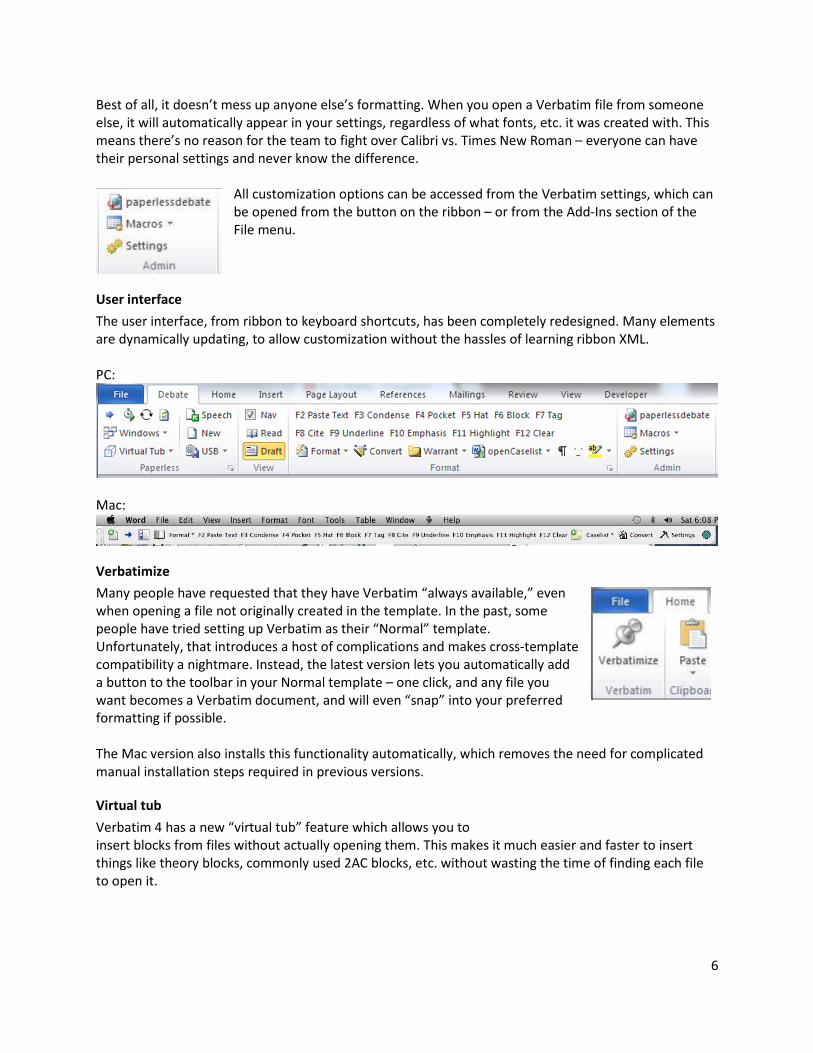
All customization options can be accessed from the Verbatim settings, which can
be opened from the button on the ribbon – or from the Add-Ins section of the
File menu.
User interface
The user interface, from ribbon to keyboard shortcuts, has been completely redesigned. Many elements
are dynamically updating, to allow customization without the hassles of learning ribbon XML.
PC:
Mac:
Verbatimize
Many people have requested that they have Verbatim “always available,” even
when opening a file not originally created in the template. In the past, some
people have tried setting up Verbatim as their “Normal” template.
Unfortunately, that introduces a host of complications and makes cross-template
compatibility a nightmare. Instead, the latest version lets you automatically add
a button to the toolbar in your Normal template – one click, and any file you
want becomes a Verbatim document, and will even “snap” into your preferred
formatting if possible.
The Mac version also installs this functionality automatically, which removes the need for complicated
manual installation steps required in previous versions.
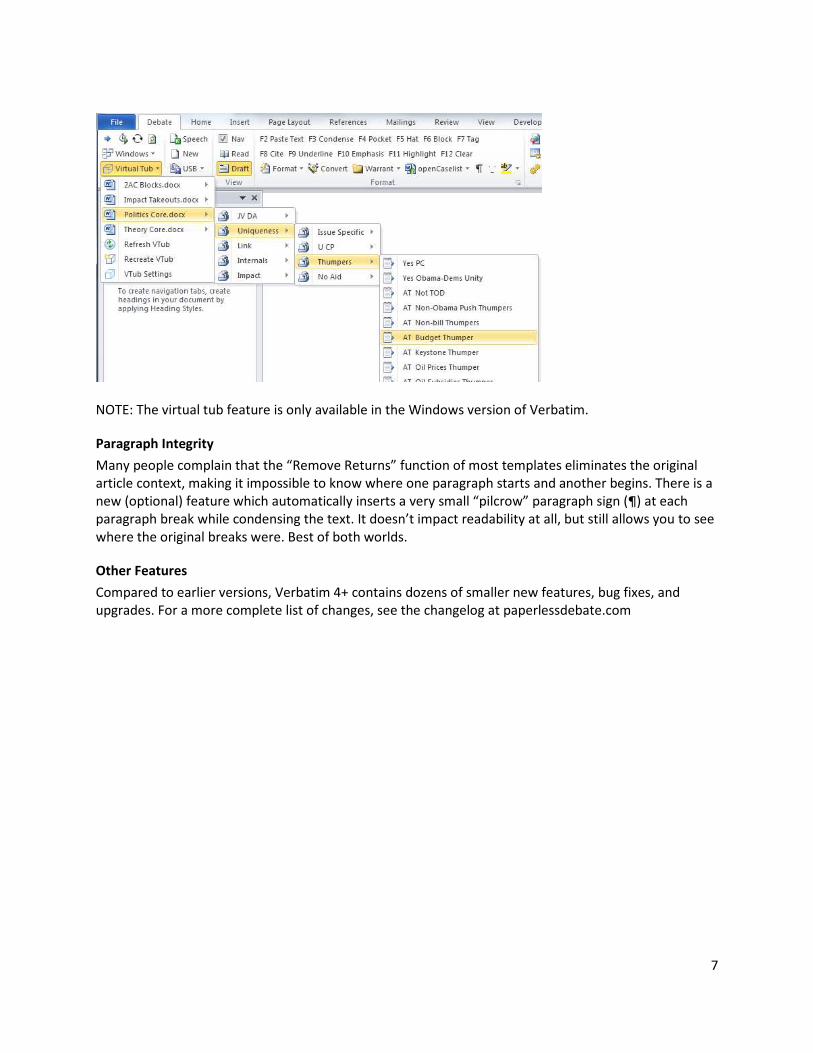
Virtual tub
Verbatim 4 has a new “virtual tub” feature which allows you to
insert blocks from files without actually opening them. This makes it much easier and faster to insert
things like theory blocks, commonly used 2AC blocks, etc. without wasting the time of finding each file
to open it.
7
NOTE: The virtual tub feature is only available in the Windows version of Verbatim.
Paragraph Integrity
Many people complain that the “Remove Returns” function of most templates eliminates the original
article context, making it impossible to know where one paragraph starts and another begins. There is a
new (optional) feature which automatically inserts a very small “pilcrow” paragraph sign (¶) at each
paragraph break while condensing the text. It doesn’t impact readability at all, but still allows you to see
where the original breaks were. Best of both worlds.
Other Features
Compared to earlier versions, Verbatim 4+ contains dozens of smaller new features, bug fixes, and
upgrades. For a more complete list of changes, see the changelog at paperlessdebate.com
8
Quick Start Guide
Here’s a condensed version of the rest of this manual for those who already know what they’re doing.
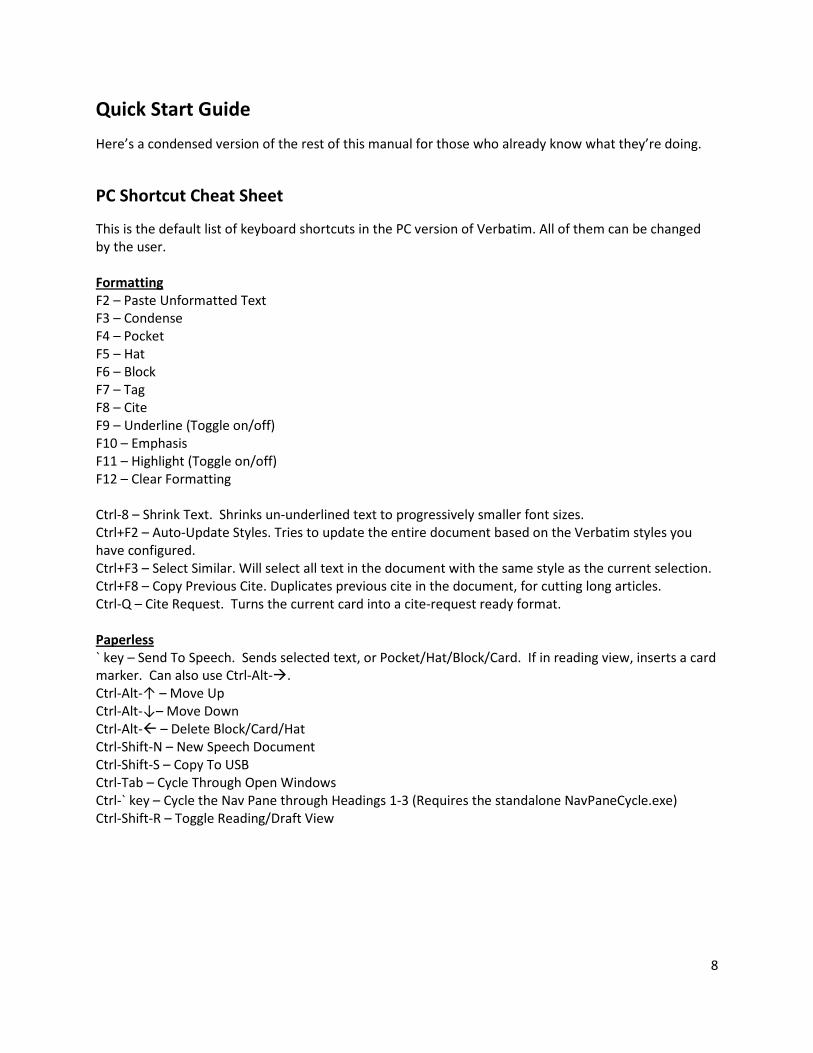
PC Shortcut Cheat Sheet
This is the default list of keyboard shortcuts in the PC version of Verbatim. All of them can be changed
by the user.
Formatting
F2 – Paste Unformatted Text
F3 – Condense
F4 – Pocket
F5 – Hat
F6 – Block
F7 – Tag
F8 – Cite
F9 – Underline (Toggle on/off)
F10 – Emphasis
F11 – Highlight (Toggle on/off)
F12 – Clear Formatting
Ctrl-8 – Shrink Text. Shrinks un-underlined text to progressively smaller font sizes.
Ctrl+F2 – Auto-Update Styles. Tries to update the entire document based on the Verbatim styles you
have configured.
Ctrl+F3 – Select Similar. Will select all text in the document with the same style as the current selection.
Ctrl+F8 – Copy Previous Cite. Duplicates previous cite in the document, for cutting long articles.
Ctrl-Q – Cite Request. Turns the current card into a cite-request ready format.
Paperless
` key – Send To Speech. Sends selected text, or Pocket/Hat/Block/Card. If in reading view, inserts a card
marker. Can also use Ctrl-Alt-�.
Ctrl-Alt-↑ – Move Up
Ctrl-Alt-↓– Move Down
Ctrl-Alt- – Delete Block/Card/Hat
Ctrl-Shift-N – New Speech Document
Ctrl-Shift-S – Copy To USB
Ctrl-Tab – Cycle Through Open Windows
Ctrl-` key – Cycle the Nav Pane through Headings 1-3 (Requires the standalone NavPaneCycle.exe)
Ctrl-Shift-R – Toggle Reading/Draft View
9
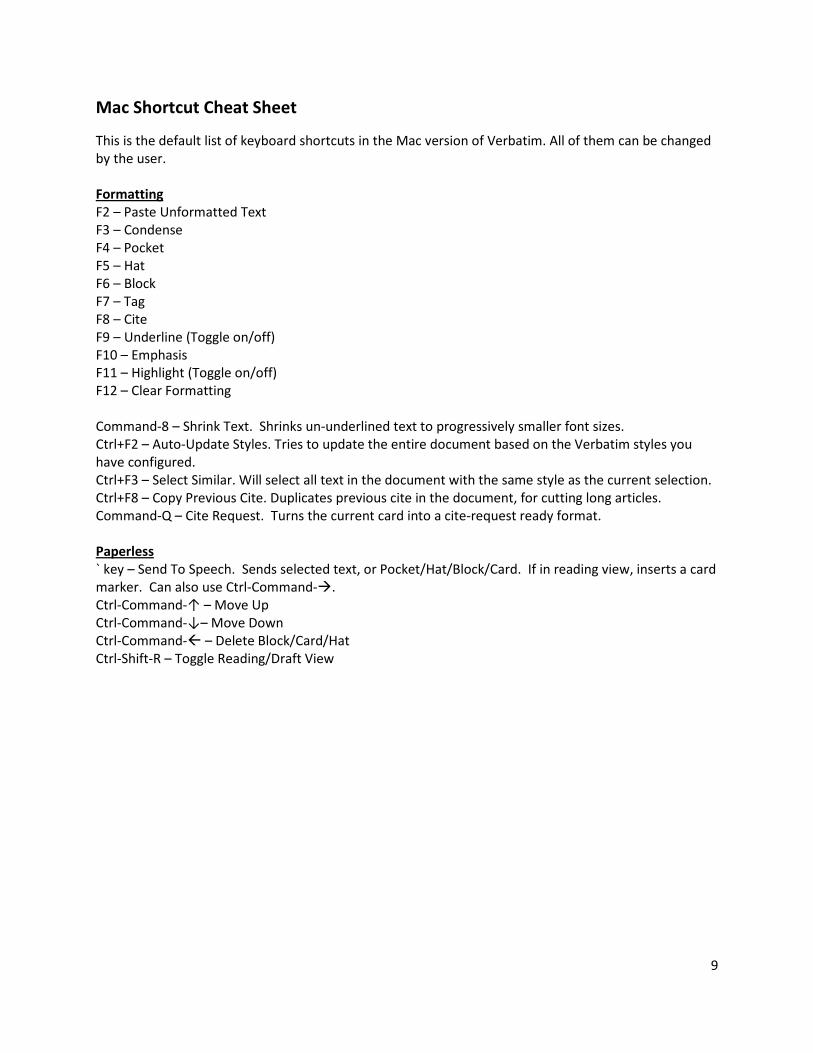
Mac Shortcut Cheat Sheet
This is the default list of keyboard shortcuts in the Mac version of Verbatim. All of them can be changed
by the user.
Formatting
F2 – Paste Unformatted Text
F3 – Condense
F4 – Pocket
F5 – Hat
F6 – Block
F7 – Tag
F8 – Cite
F9 – Underline (Toggle on/off)
F10 – Emphasis
F11 – Highlight (Toggle on/off)
F12 – Clear Formatting
Command-8 – Shrink Text. Shrinks un-underlined text to progressively smaller font sizes.
Ctrl+F2 – Auto-Update Styles. Tries to update the entire document based on the Verbatim styles you
have configured.
Ctrl+F3 – Select Similar. Will select all text in the document with the same style as the current selection.
Ctrl+F8 – Copy Previous Cite. Duplicates previous cite in the document, for cutting long articles.
Command-Q – Cite Request. Turns the current card into a cite-request ready format.
Paperless
` key – Send To Speech. Sends selected text, or Pocket/Hat/Block/Card. If in reading view, inserts a card
marker. Can also use Ctrl-Command-�.
Ctrl-Command-↑ – Move Up
Ctrl-Command-↓– Move Down
Ctrl-Command- – Delete Block/Card/Hat
Ctrl-Shift-R – Toggle Reading/Draft View
10
Quick Start – Requirements
Requirements – PC
Microsoft Word – Verbatim 4+ was designed for Word 2010, and will work best in that version. Most
functions should work fine in Word 2007, though minor errors may be encountered. Versions before
2007 are not supported. It is untested with the new preview of Word 2013, but at least some features
are likely to break.
Windows – Verbatim 4+ should work under Windows 7, Vista, or 8. Most features should work fine
under Windows XP, but Verbatim will likely need to be manually installed, and you may experience
minor errors.
Requirements – Mac
Microsoft Word – Verbatim 4+ will only work with Mac Word 2011. Earlier versions are not supported.
Mac OS X – All modern versions of Mac OS X should work, including Leopard, Snow Leopard, Lion, and
Mountain Lion. If the automatic installer fails, manual installation will need to be performed.
11
Quick Start – Installation
The most recent version of Verbatim can be downloaded from:
http://paperlessdebate.com
Both the PC and Mac versions come with an automatic installer. Download and run the .msi file (PC), or
unzip and open the .mkpg (Mac). If successful, there will either be a shortcut to Verbatim on your
desktop (PC) or an option for “Debate” in your My Templates list on the Mac. NOTE: The desktop
shortcut to Verbatim will not work on Windows XP, even if the installation was successful.
If the automatic installation fails, use the following manual installation steps. For more detailed
instructions, see the section on installation in Chapter 1.
IMPORTANT NOTE – DO NOT:
• Put the template file in another location (such as your desktop or Word Startup folder)
• Rename the file from Debate.dotm
• Make Verbatim your Normal.dotm template
Doing any of these things will make it impossible for you to use files produced by others, or vice versa.
Manual Installation – PC
1) Download Verbatim (Debate.dotm), and put it in your Word Templates folder:
Vista/7 – C:\Users\username\AppData\Roaming\Microsoft\Templates
XP – C:\Documents and Settings\username\Application Data\Microsoft\Templates.
You may also want to create a SHORTCUT to Debate.dotm (not a copy) on your desktop to make
opening Verbatim easier.
2) Check Macro Security Settings. In Word, go to Word Options – Trust Center – Trust Center Settings
and make sure “Enable All Macros” is selected
3) OPTIONAL – Install a “Verbatimize” button. Go to the Verbatim Settings and click the “Verbatimize
Normal Template” button. If successful, this will add a button to the Home tab of your ribbon which will
add Verbatim to any document. If the automatic button install doesn’t work, read the manual
installation instructions later in this manual.
4) Install optional software. If you want to use NavPaneCycle or a Timer, place those files in the Word
Templates folder as well.
Manual Installation – Mac
To install Verbatim Mac, the template file (Debate.dotm) must be placed in your “My Templates” folder.
By default, this is located at:
Username:Library: Application Support:Microsoft:Office:User Templates:My Templates
This folder frequently doesn’t exist by default, and is hidden and inaccessible even if it does – I
recommend carefully following these steps as the easier workaround:
1) Download Verbatim Mac (Debate.dotm) to your desktop
12
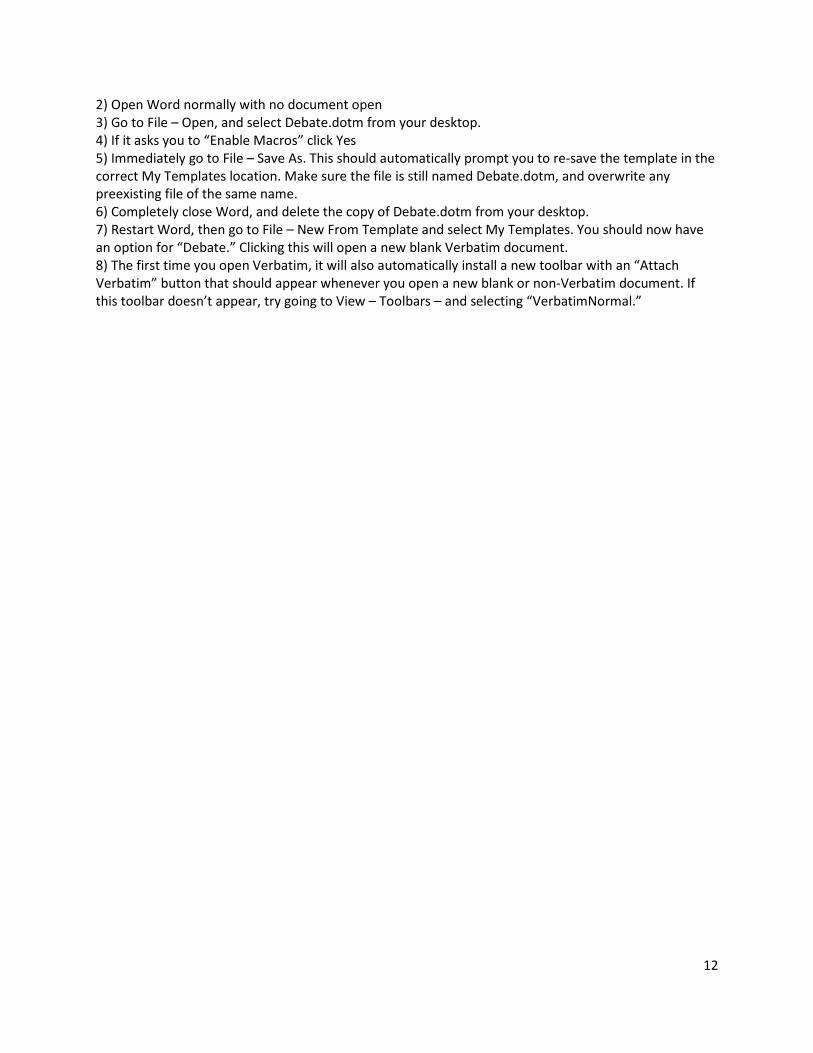
2) Open Word normally with no document open
3) Go to File – Open, and select Debate.dotm from your desktop.
4) If it asks you to “Enable Macros” click Yes
5) Immediately go to File – Save As. This should automatically prompt you to re-save the template in the
correct My Templates location. Make sure the file is still named Debate.dotm, and overwrite any
preexisting file of the same name.
6) Completely close Word, and delete the copy of Debate.dotm from your desktop.
7) Restart Word, then go to File – New From Template and select My Templates. You should now have
an option for “Debate.” Clicking this will open a new blank Verbatim document.
8) The first time you open Verbatim, it will also automatically install a new toolbar with an “Attach
Verbatim” button that should appear whenever you open a new blank or non-Verbatim document. If
this toolbar doesn’t appear, try going to View – Toolbars – and selecting “VerbatimNormal.”
13
Quick Start – File Formatting
The keyboard shortcuts are listed above. Always use “Paste Text” for pasting from the internet. F12
clears formatting if you mess up.
Don’t use manual page breaks.
Don’t include extra white space – the styles are designed to include the appropriate amount.
Use the new Navigation Pane to see the different heading levels. Right-click and select “Show Heading
Levels” to expand or collapse. Pocket = Heading 1, Hat = Heading 2, Block = Heading 3, Tag = Heading 4.
You can also drag and drop right in the Nav Pane. Recommended you install NavPaneCycle.exe to make
this easier.
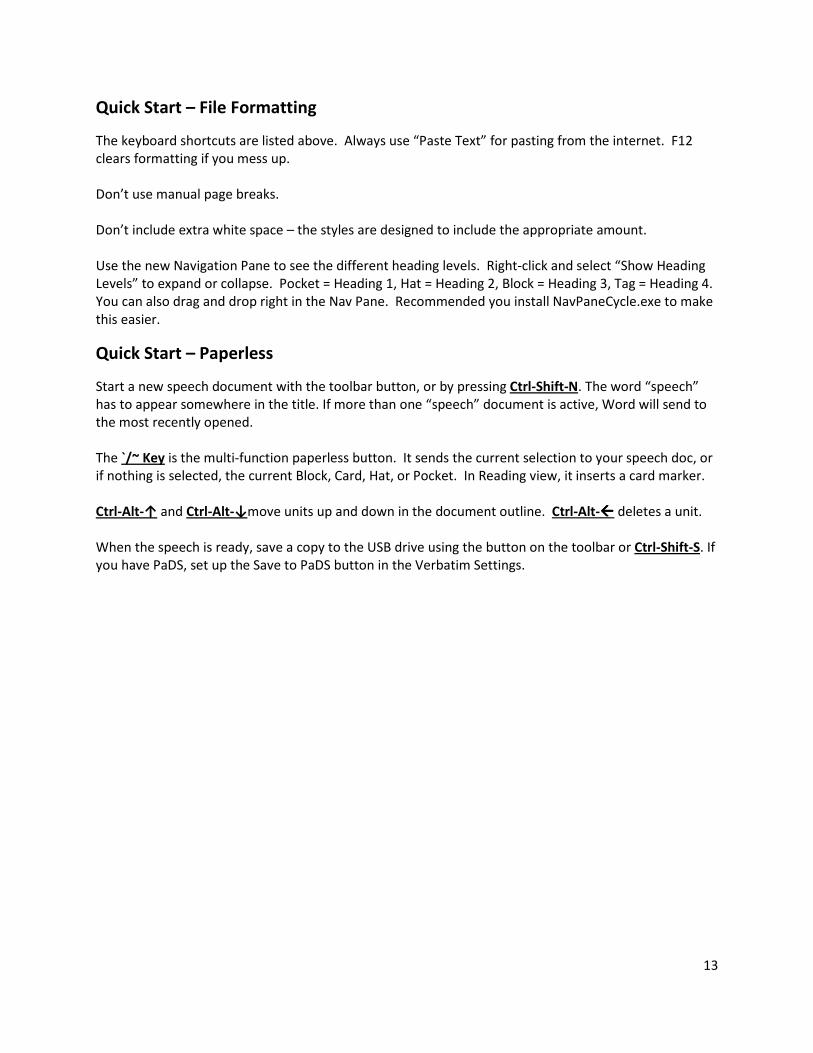
Quick Start – Paperless
Start a new speech document with the toolbar button, or by pressing Ctrl-Shift-N. The word “speech”
has to appear somewhere in the title. If more than one “speech” document is active, Word will send to
the most recently opened.
The `/~ Key is the multi-function paperless button. It sends the current selection to your speech doc, or
if nothing is selected, the current Block, Card, Hat, or Pocket. In Reading view, it inserts a card marker.
Ctrl-Alt-↑ and Ctrl-Alt-↓move units up and down in the document outline. Ctrl-Alt- deletes a unit.
When the speech is ready, save a copy to the USB drive using the button on the toolbar or Ctrl-Shift-S. If
you have PaDS, set up the Save to PaDS button in the Verbatim Settings.
14
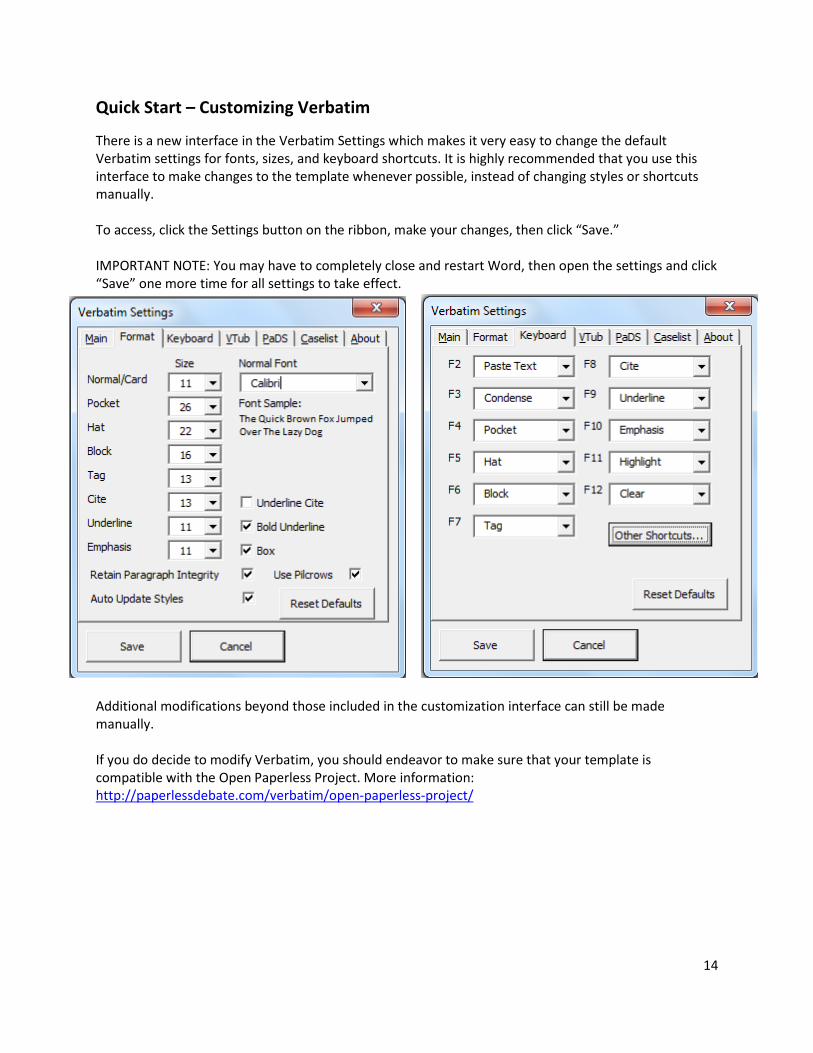
Quick Start – Customizing Verbatim
There is a new interface in the Verbatim Settings which makes it very easy to change the default
Verbatim settings for fonts, sizes, and keyboard shortcuts. It is highly recommended that you use this
interface to make changes to the template whenever possible, instead of changing styles or shortcuts
manually.
To access, click the Settings button on the ribbon, make your changes, then click “Save.”
IMPORTANT NOTE: You may have to completely close and restart Word, then open the settings and click
“Save” one more time for all settings to take effect.
Additional modifications beyond those included in the customization interface can still be made
manually.
If you do decide to modify Verbatim, you should endeavor to make sure that your template is
compatible with the Open Paperless Project. More information:
http://paperlessdebate.com/verbatim/open-paperless-project/
15
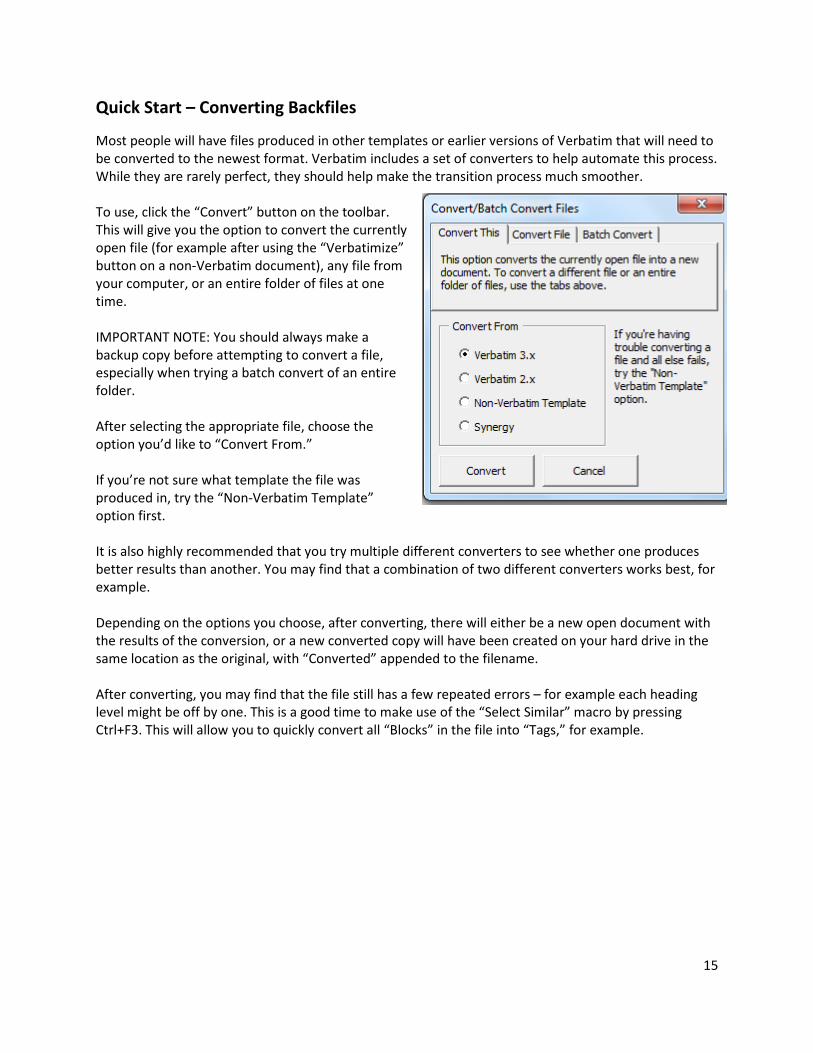
Quick Start – Converting Backfiles
Most people will have files produced in other templates or earlier versions of Verbatim that will need to
be converted to the newest format. Verbatim includes a set of converters to help automate this process.
While they are rarely perfect, they should help make the transition process much smoother.
To use, click the “Convert” button on the toolbar.
This will give you the option to convert the currently
open file (for example after using the “Verbatimize”
button on a non-Verbatim document), any file from
your computer, or an entire folder of files at one
time.
IMPORTANT NOTE: You should always make a
backup copy before attempting to convert a file,
especially when trying a batch convert of an entire
folder.
After selecting the appropriate file, choose the
option you’d like to “Convert From.”
If you’re not sure what template the file was
produced in, try the “Non-Verbatim Template”
option first.
It is also highly recommended that you try multiple different converters to see whether one produces
better results than another. You may find that a combination of two different converters works best, for
example.
Depending on the options you choose, after converting, there will either be a new open document with
the results of the conversion, or a new converted copy will have been created on your hard drive in the
same location as the original, with “Converted” appended to the filename.
After converting, you may find that the file still has a few repeated errors – for example each heading
level might be off by one. This is a good time to make use of the “Select Similar” macro by pressing
Ctrl+F3. This will allow you to quickly convert all “Blocks” in the file into “Tags,” for example.
16
Quick Start – Advanced Features
For a more extensive discussion on each of these features, see the appropriate chapter later in the
manual.
Virtual Tub
The Virtual Tub is only designed for use with a small number of well-organized files. To get started,
create a folder with a few files that you’re confident are formatted correctly. Open the Verbatim
Settings and select the location of your Virtual Tub on the VTub tab, then click “Create VTub.”
Depending on how many files you’re trying and how long they are, it may take several minutes to
complete. You should then be able to select files from the Virtual Tub menu on the ribbon and browse
the file contents.
It is only possible to paste sections of the file at the BLOCK level using the Virtual Tub. This means that if
a file appears in the Virtual Tub menu but is grayed out, this is likely due to the file not including any
headings formatted as a Block.
If the Virtual Tub creator crashes, try removing all but one file from the VTub, and rerunning it. If it’s
successful, add files back in one at a time until you find the culprit. Crashes are likely caused by
improperly formatted files, especially if created originally in a non-Verbatim template.
Note that if you make any changes to any of the files in the VTub that it will necessitate completely
recreating the VTub. That makes the VTub best suited for files which change rarely, such as theory or
impact backfiles.
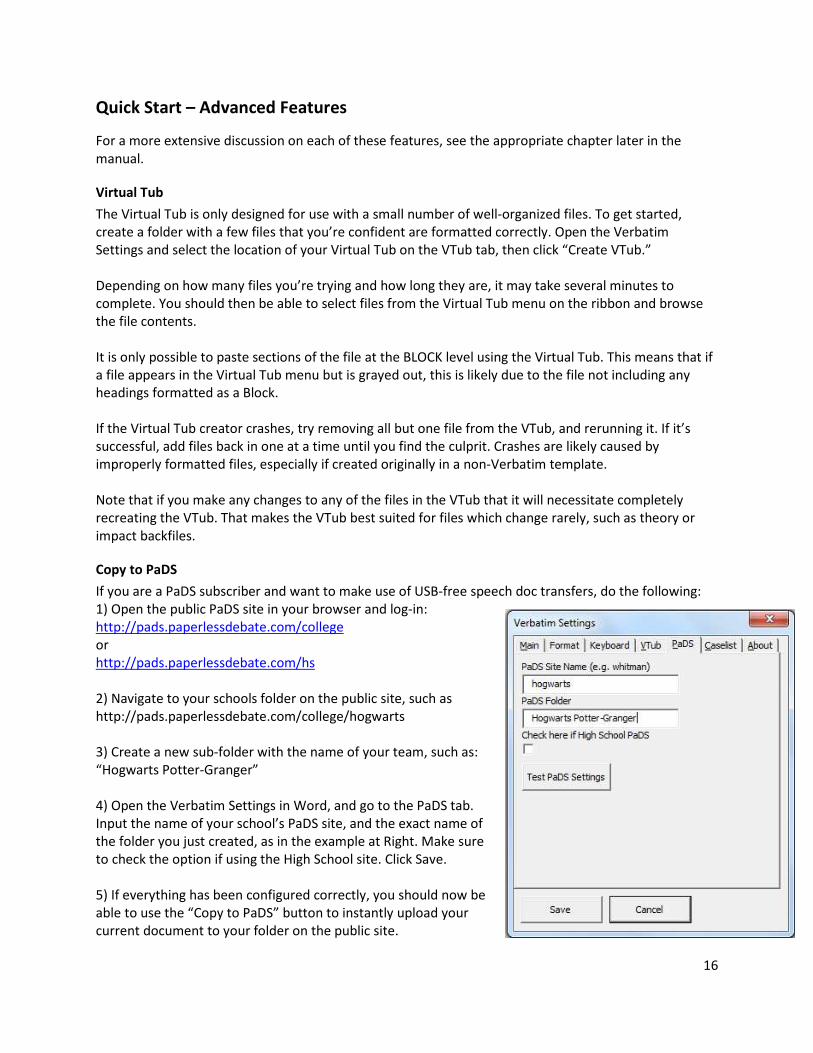
Copy to PaDS
If you are a PaDS subscriber and want to make use of USB-free speech doc transfers, do the following:
1) Open the public PaDS site in your browser and log-in:
http://pads.paperlessdebate.com/college
or
http://pads.paperlessdebate.com/hs
2) Navigate to your schools folder on the public site, such as
http://pads.paperlessdebate.com/college/hogwarts
3) Create a new sub-folder with the name of your team, such as:
“Hogwarts Potter-Granger”
4) Open the Verbatim Settings in Word, and go to the PaDS tab.
Input the name of your school’s PaDS site, and the exact name of
the folder you just created, as in the example at Right. Make sure
to check the option if using the High School site. Click Save.
5) If everything has been configured correctly, you should now be
able to use the “Copy to PaDS” button to instantly upload your
current document to your folder on the public site.
17
Chapter 1 – Getting Started
Benefits of Paperless
The benefits of debating without the need to lug multiple 50+ pound tubs of evidence all over the
country probably doesn’t bear much further explication. But, in addition to the obvious:
• Cost savings – Probably the number one factor informing most decisions to switch. It saves all the
money spent on paper, printing, copying, expandos, and other tub-related supplies, as well as costs
associated with checked baggage on airlines – with escalating fee structures, not an insignificant
amount. Somewhat less obviously, it also saves money on the size of rental vehicles needed to
transport the average team. While offset to a degree by the increased costs of the requisite
technology (laptops, etc...), the net cost savings in the first year easily reach into the multiple
thousands of dollars. In a time when many budgets across the country are at significant risk of being
cut, paperless is a no-brainer.
• At tournaments – More prep time before rounds due to not moving tubs, quicker departure due to
the lack of needed clean up, easier work sharing, cite requests, less lost files, etc.
• Environmental benefits – These are probably not very significant in the grand scheme of things, and
using more laptops might offset any benefits – but it does save a lot of paper, ink cartridges,
increased weight on planes, etc...I wouldn’t list this as an incontrovertible reason to switch, at least
without somebody doing some research – but it might be a nice icing on the cake.
• PR – Whether the environmental benefits are real or perceived, your team can get a ton of positive
press from your institution over the transition. There’s never a bad time to impress the
administration, especially when money is tight.
18
Description of Paperless
For those who haven’t yet seen a team debate paperless (do these people exist anymore?), here’s a
basic run-down of how it works.
All files are produced electronically using the same Word template, which incorporates both the normal
formatting/organizing functions of a debate template, and a few added features specifically for
paperless. Files are kept centrally organized in a digital “tub” comprised of folders, sub-folders, and
individual files.
Each team carries three laptops. The debaters will each use a laptop to prepare speeches with, placing
all cards that will be read for the upcoming speech into one Word document. This is accomplished
rapidly by using a set of simple Word macros which facilitate both transferring blocks and cards between
open documents, and organizing them into speech order.
Immediately prior to speaking, the debater will place their entire upcoming speech on a USB jump drive.
An automatic sync program such as PaDS or Dropbox may also be used to transfer the file. This is first
given to their partner, who copies it to their laptop to ensure a backup is available in the event of a tech
failure.
It is then given to the opposing team. If the other team has their own laptop(s), they’re welcome to use
them to view the file. If not, the paperless team uses their third backup laptop as a “viewing” computer
for the other teams use for the whole debate. If for some reason the other team needs a second
“viewing” computer, the paperless team can let the other team use one of their other laptops during
their prep time.
The same will repeat for each speech (at least, those with cards). After the debate, the judge is free to
use either their own laptop or one of the paperless team’s to look at the evidence.
Are there differences between this and how a round proceeds under “normal” conditions with paper?
Yes, although not as great as some have envisioned. More importantly, there’s now a large reservoir of
experience to draw from which indicates one thing conclusively – it works. A list of commonly asked
questions and concerns are included near the end of this manual, which should help give a more
complete picture of how the debate transpires in actual practice.
19
Requirements
All you need to run Verbatim is a laptop with a recent copy of Microsoft Word. If it can run Word, it can
run Verbatim.
While Verbatim will run on both the PC and the Mac, and can run on multiple different OS’s and versions
of Word, if you have a choice the best setup is Word 2010 on the PC. Eventually, Word 2013 will
supplant this, but as of this writing, Verbatim v4.5+ is designed for and works best with Word 2010 for
Windows.
If you need to do paperless on a very old laptop, for example using Word 2003, or Mac Word
2004/2008, or even on Linux, then you should use an older version of Verbatim instead, such as v3.2.
Software – PC
Microsoft Word – Verbatim 4+ was designed for Word 2010, and will work best in that version. Most
functions should work fine in Word 2007, though minor errors may be encountered. Versions before
2007 are not supported. It is untested with the new preview of Word 2013, but at least some features
are likely to break.
Windows – Verbatim 4+ should work under Windows 7, Vista, or 8. Most features should work fine
under Windows XP, but Verbatim will likely need to be manually installed, and you may experience
minor errors.
Software – Mac
Microsoft Word – Verbatim 4+ will only work with Mac Word 2011. Earlier versions are not supported.
Mac OS X – All modern versions of Mac OS X should work, including Leopard, Snow Leopard, Lion, and
Mountain Lion. If the automatic installer fails, manual installation will need to be performed.
Hardware
Laptops – Each team will need 3 laptops: one for each debater, and one “viewing” computer to
facilitate sharing evidence with the other team. While sometimes opponents have their own computers
that they would rather use, it’s certainly not universal. Essentially any machine capable of running Word
will be more than sufficient.
USB Flash Drives – Any kind will do. Each team needs at least 2, although having a store of extras on
hand is advisable. They’re easily lost, occasionally break, and are cheap enough to buy in bulk. One
caution – try to buy drives which have a relatively thin profile. Some of the wider versions can block
access to other USB ports which can make using a mouse or second drive difficult.
Power Supplies – Given the paucity of available outlets in most classrooms (especially in high schools),
it’s a good idea to make sure each team is carrying a 3 outlet power strip/surge protector, a 3 prong plug
adaptor, and a heavy duty extension cord (25 feet is probably prudent).
20
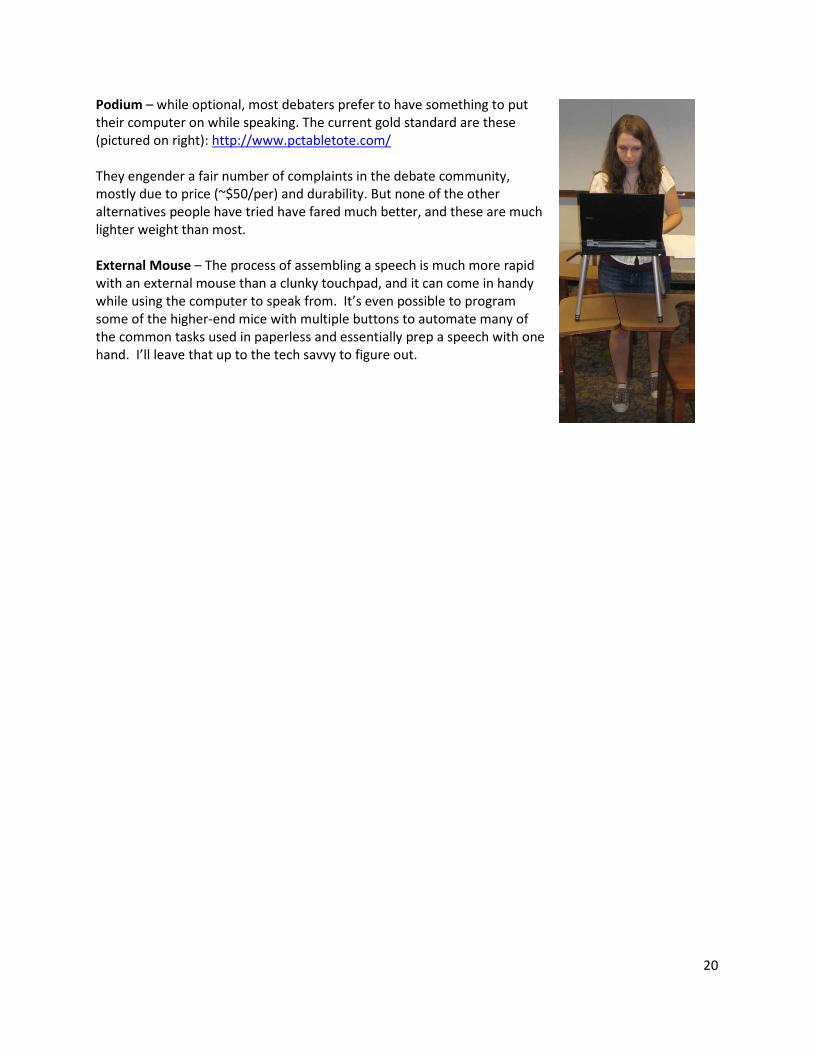
Podium – while optional, most debaters prefer to have something to put
their computer on while speaking. The current gold standard are these
(pictured on right): http://www.pctabletote.com/
They engender a fair number of complaints in the debate community,
mostly due to price (~$50/per) and durability. But none of the other
alternatives people have tried have fared much better, and these are much
lighter weight than most.
External Mouse – The process of assembling a speech is much more rapid
with an external mouse than a clunky touchpad, and it can come in handy
while using the computer to speak from. It’s even possible to program
some of the higher-end mice with multiple buttons to automate many of
the common tasks used in paperless and essentially prep a speech with one
hand. I’ll leave that up to the tech savvy to figure out.
21
Installation
The most recent version of Verbatim can be downloaded from:
http://paperlessdebate.com
Whether you use the automatic or manual installation, you should make sure to follow the “Post-
installation Steps” below to check your macro security settings and install an optional Verbatimize
button.
IMPORTANT INSTALLATION NOTE – DO NOT:
• Put the template file in any location other than your Templates folder (such as your desktop or
Word Startup folder)
• Rename the file from Debate.dotm
• Make Verbatim your Normal.dotm template
Doing any of these things will make it impossible for you to use files produced by others, or vice versa.
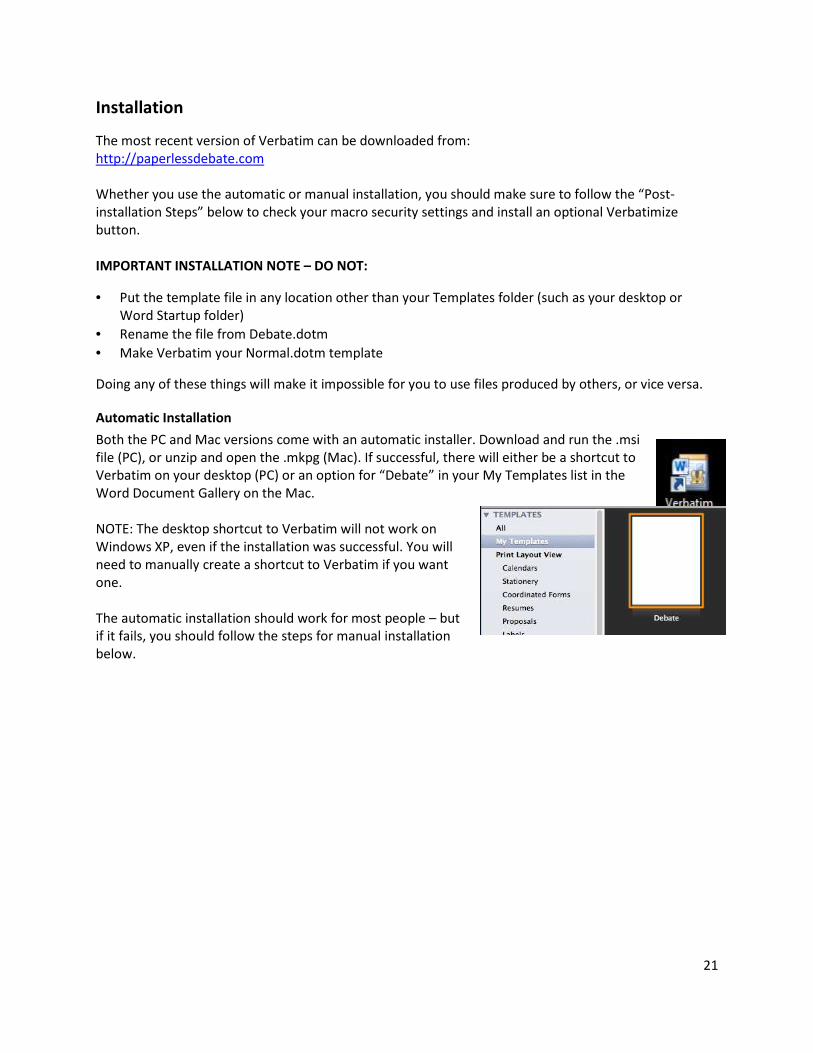
Automatic Installation
Both the PC and Mac versions come with an automatic installer. Download and run the .msi
file (PC), or unzip and open the .mkpg (Mac). If successful, there will either be a shortcut to
Verbatim on your desktop (PC) or an option for “Debate” in your My Templates list in the
Word Document Gallery on the Mac.
NOTE: The desktop shortcut to Verbatim will not work on
Windows XP, even if the installation was successful. You will
need to manually create a shortcut to Verbatim if you want
one.
The automatic installation should work for most people – but
if it fails, you should follow the steps for manual installation
below.
22
Manual Installation – PC
For the following examples, C:\ is the windows partition of your hard drive and “username” is the name
of your currently logged in user. If you use multiple user accounts, make sure to install the template for
each of them.
All that’s needed for a manual installation on the PC is to put a copy of Verbatim (Debate.dotm) in your
Word Templates folder. By default, this is located at:
Vista/7 – C:\Users\username\AppData\Roaming\Microsoft\Templates
XP – C:\Documents and Settings\username\Application Data\Microsoft\Templates.
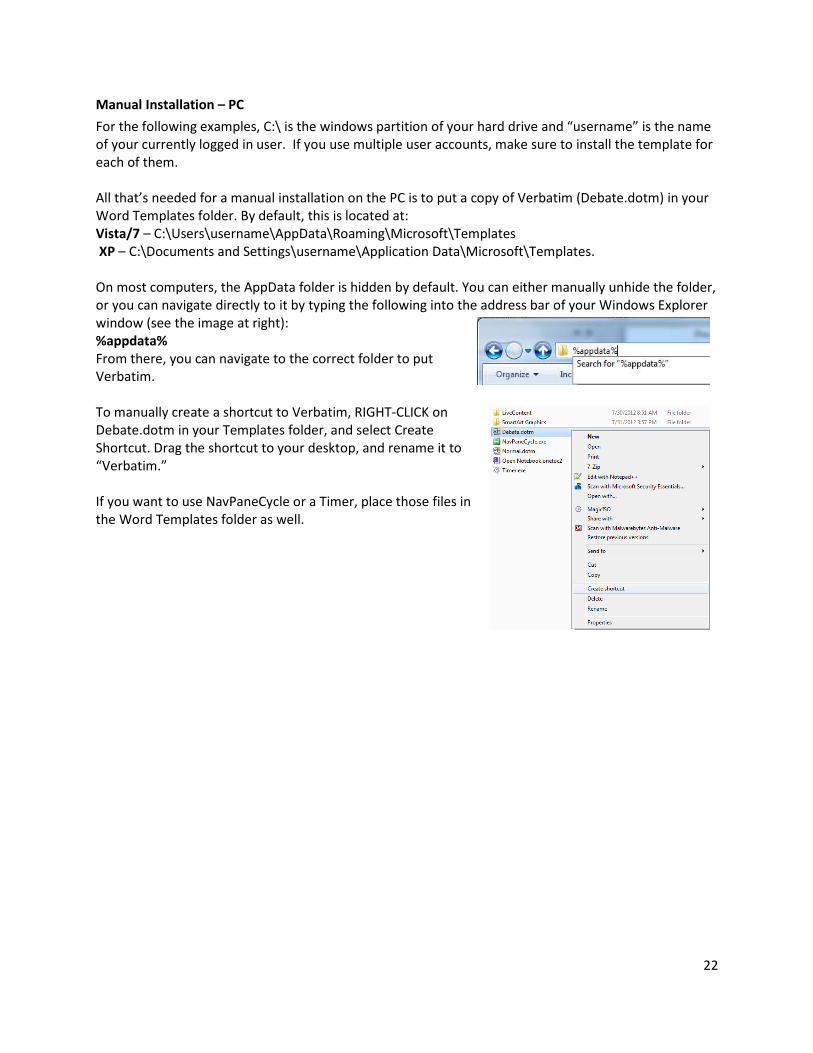
On most computers, the AppData folder is hidden by default. You can either manually unhide the folder,
or you can navigate directly to it by typing the following into the address bar of your Windows Explorer
window (see the image at right):
%appdata%
From there, you can navigate to the correct folder to put
Verbatim.
To manually create a shortcut to Verbatim, RIGHT-CLICK on
Debate.dotm in your Templates folder, and select Create
Shortcut. Drag the shortcut to your desktop, and rename it to
“Verbatim.”
If you want to use NavPaneCycle or a Timer, place those files in
the Word Templates folder as well.
23
Manual Installation – Mac
To install Verbatim Mac, the template file (Debate.dotm) must be placed in your “My Templates” folder.
By default, this is located at:
Username:Library: Application Support:Microsoft:Office:User Templates:My Templates
This folder frequently doesn’t exist by default, and is hidden and inaccessible even if it does – You can
either look up how to unhide system folders, or use the following workaround:
1) Download Verbatim Mac (Debate.dotm) to your desktop
2) Open Word normally with no document open
3) Go to File – Open, and select Debate.dotm from your desktop.
4) If it asks you to “Enable Macros” click Yes
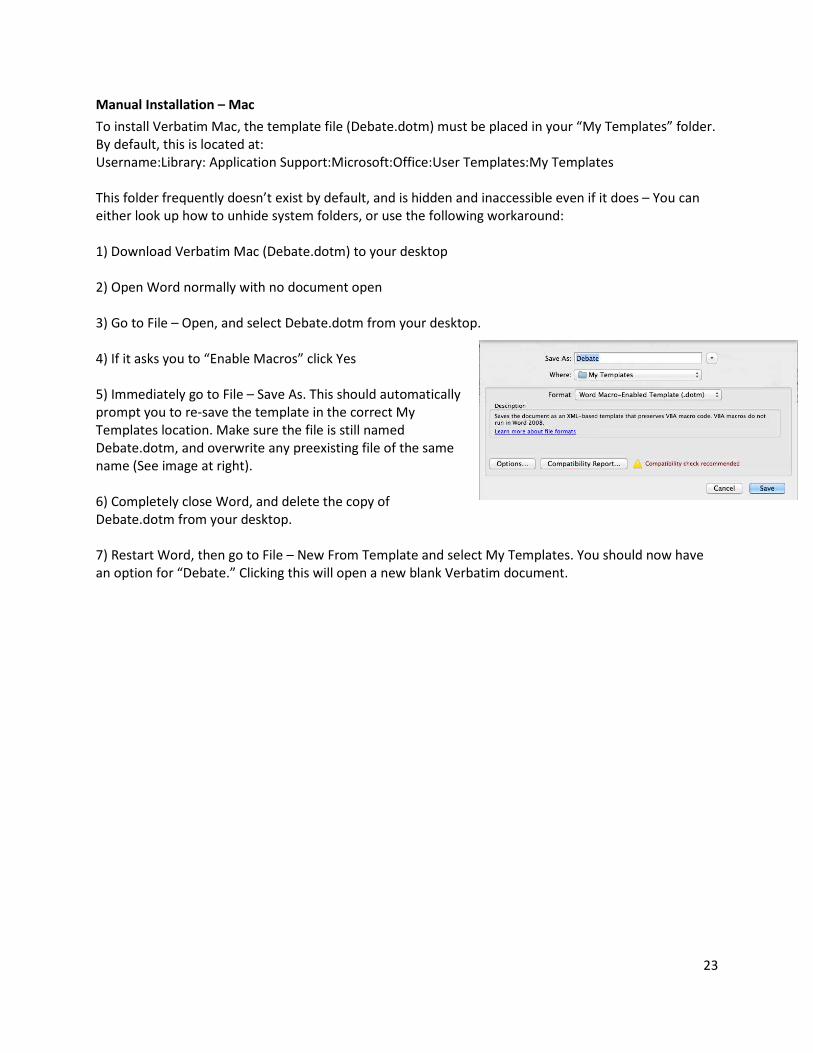
5) Immediately go to File – Save As. This should automatically
prompt you to re-save the template in the correct My
Templates location. Make sure the file is still named
Debate.dotm, and overwrite any preexisting file of the same
name (See image at right).
6) Completely close Word, and delete the copy of
Debate.dotm from your desktop.
7) Restart Word, then go to File – New From Template and select My Templates. You should now have
an option for “Debate.” Clicking this will open a new blank Verbatim document.
24
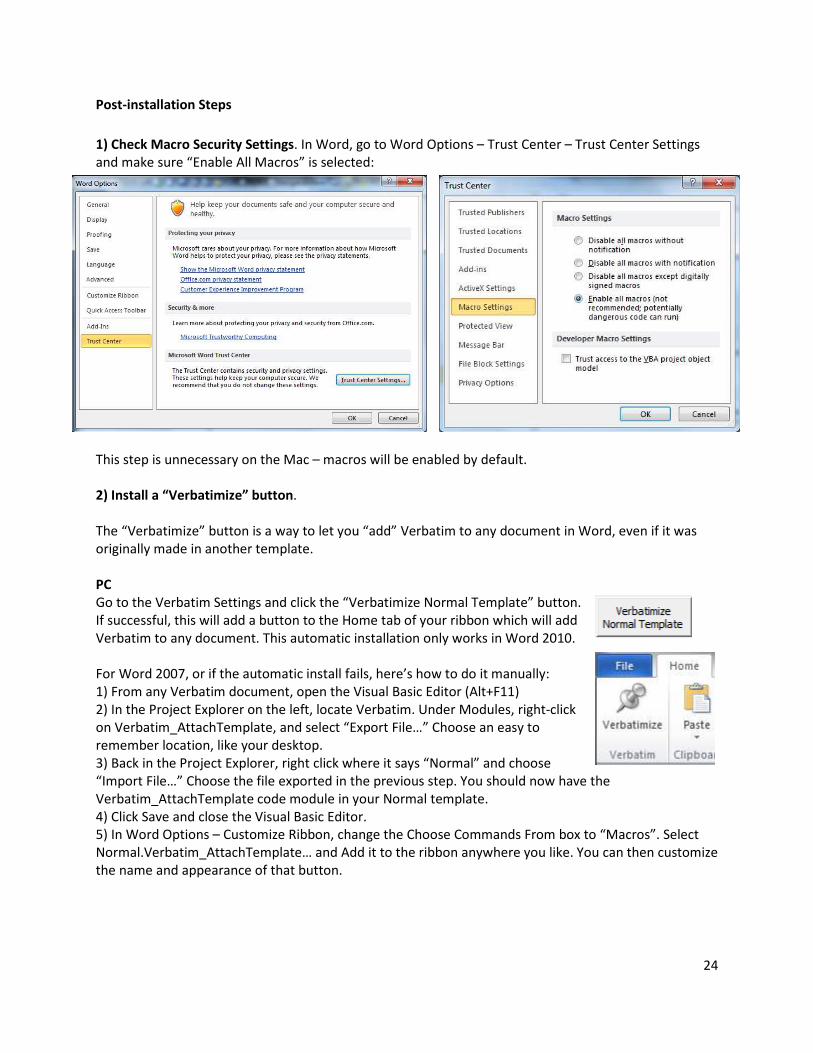
Post-installation Steps
1) Check Macro Security Settings. In Word, go to Word Options – Trust Center – Trust Center Settings
and make sure “Enable All Macros” is selected:
This step is unnecessary on the Mac – macros will be enabled by default.
2) Install a “Verbatimize” button.
The “Verbatimize” button is a way to let you “add” Verbatim to any document in Word, even if it was
originally made in another template.
PC
Go to the Verbatim Settings and click the “Verbatimize Normal Template” button.
If successful, this will add a button to the Home tab of your ribbon which will add
Verbatim to any document. This automatic installation only works in Word 2010.
For Word 2007, or if the automatic install fails, here’s how to do it manually:
1) From any Verbatim document, open the Visual Basic Editor (Alt+F11)
2) In the Project Explorer on the left, locate Verbatim. Under Modules, right-click
on Verbatim_AttachTemplate, and select “Export File…” Choose an easy to
remember location, like your desktop.
3) Back in the Project Explorer, right click where it says “Normal” and choose
“Import File…” Choose the file exported in the previous step. You should now have the
Verbatim_AttachTemplate code module in your Normal template.
4) Click Save and close the Visual Basic Editor.
5) In Word Options – Customize Ribbon, change the Choose Commands From box to “Macros”. Select
Normal.Verbatim_AttachTemplate… and Add it to the ribbon anywhere you like. You can then customize
the name and appearance of that button.
25
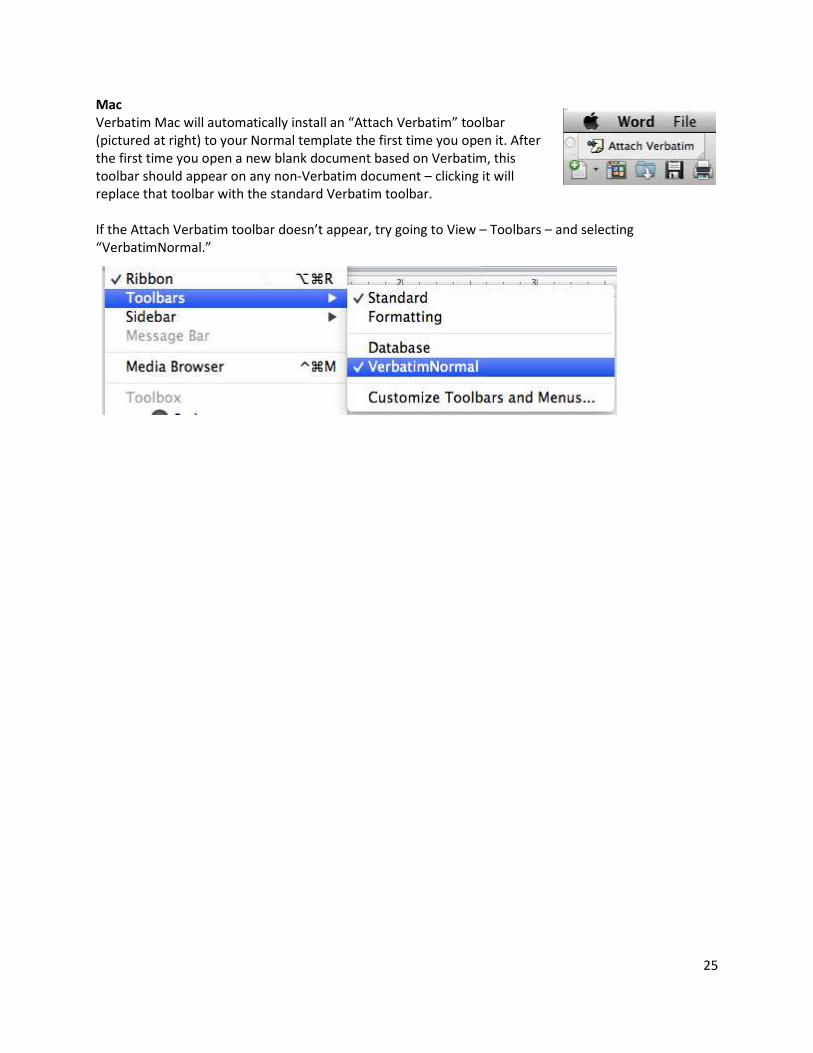
Mac
Verbatim Mac will automatically install an “Attach Verbatim” toolbar
(pictured at right) to your Normal template the first time you open it. After
the first time you open a new blank document based on Verbatim, this
toolbar should appear on any non-Verbatim document – clicking it will
replace that toolbar with the standard Verbatim toolbar.
If the Attach Verbatim toolbar doesn’t appear, try going to View – Toolbars – and selecting
“VerbatimNormal.”
26
Configuring Verbatim Settings
Verbatim is highly customizable, and many of the advanced features require setup in the Verbatim
Settings. This section of the manual will explain each page of the Verbatim Settings in detail.
Only the PC versions of the settings forms are shown here – the Mac versions are very similar, but lack
some of the PC-only options.
IMPORTANT NOTE: While pressing “Save” after making changes will save your settings for future use,
they may not fully take effect unless you close and restart Word entirely, then open the settings and
click “Save” again.
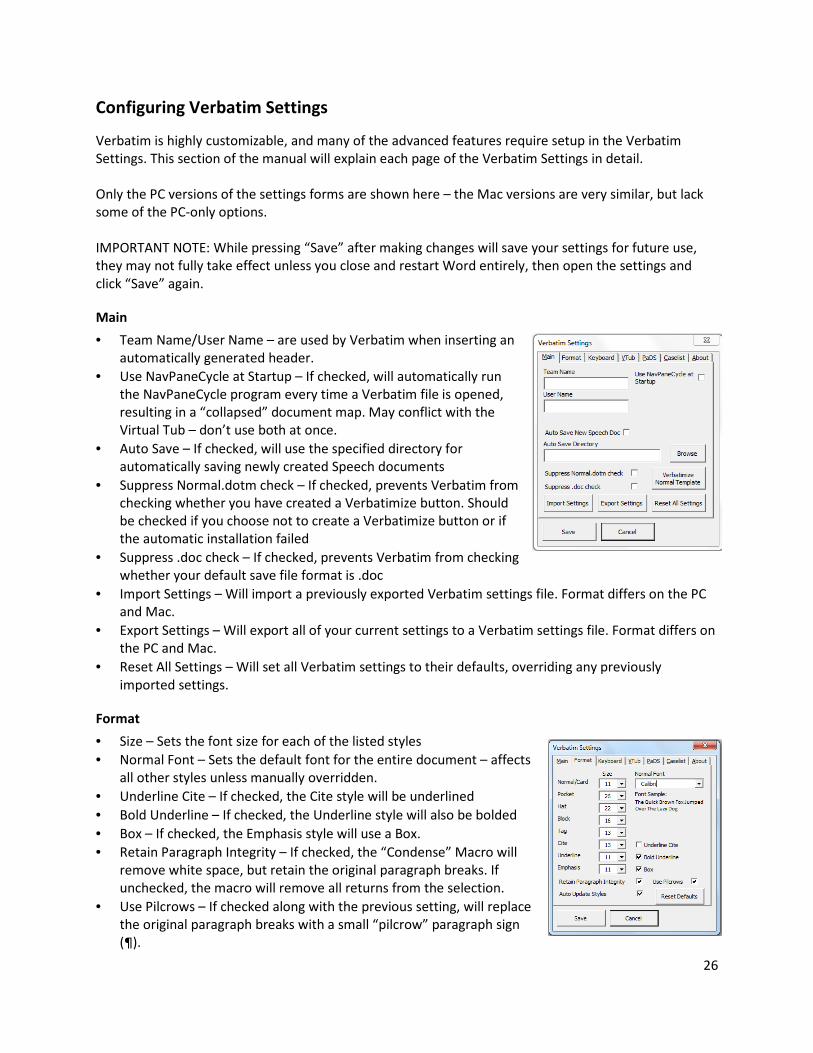
Main
• Team Name/User Name – are used by Verbatim when inserting an
automatically generated header.
• Use NavPaneCycle at Startup – If checked, will automatically run
the NavPaneCycle program every time a Verbatim file is opened,
resulting in a “collapsed” document map. May conflict with the
Virtual Tub – don’t use both at once.
• Auto Save – If checked, will use the specified directory for
automatically saving newly created Speech documents
• Suppress Normal.dotm check – If checked, prevents Verbatim from
checking whether you have created a Verbatimize button. Should
be checked if you choose not to create a Verbatimize button or if
the automatic installation failed
• Suppress .doc check – If checked, prevents Verbatim from checking
whether your default save file format is .doc
• Import Settings – Will import a previously exported Verbatim settings file. Format differs on the PC
and Mac.
• Export Settings – Will export all of your current settings to a Verbatim settings file. Format differs on
the PC and Mac.
• Reset All Settings – Will set all Verbatim settings to their defaults, overriding any previously
imported settings.
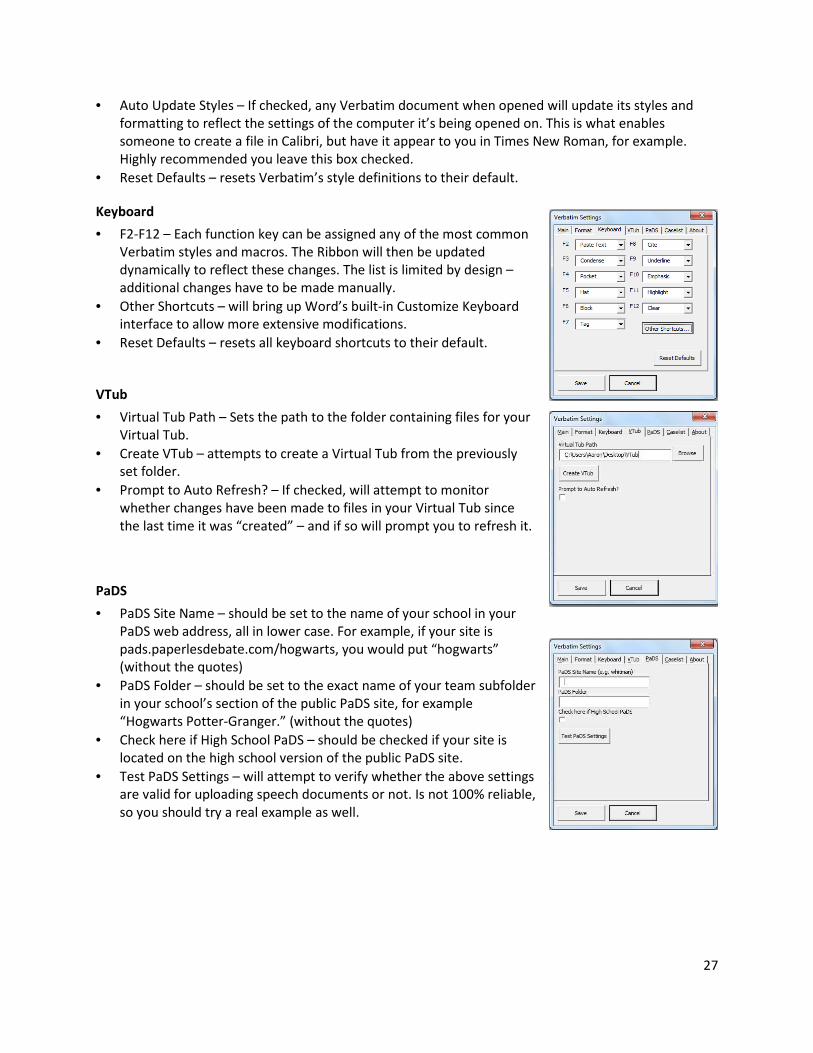
Format
• Size – Sets the font size for each of the listed styles
• Normal Font – Sets the default font for the entire document – affects
all other styles unless manually overridden.
• Underline Cite – If checked, the Cite style will be underlined
• Bold Underline – If checked, the Underline style will also be bolded
• Box – If checked, the Emphasis style will use a Box.
• Retain Paragraph Integrity – If checked, the “Condense” Macro will
remove white space, but retain the original paragraph breaks. If
unchecked, the macro will remove all returns from the selection.
• Use Pilcrows – If checked along with the previous setting, will replace
the original paragraph breaks with a small “pilcrow” paragraph sign
(¶).
27
• Auto Update Styles – If checked, any Verbatim document when opened will update its styles and
formatting to reflect the settings of the computer it’s being opened on. This is what enables
someone to create a file in Calibri, but have it appear to you in Times New Roman, for example.
Highly recommended you leave this box checked.
• Reset Defaults – resets Verbatim’s style definitions to their default.
Keyboard
• F2-F12 – Each function key can be assigned any of the most common
Verbatim styles and macros. The Ribbon will then be updated
dynamically to reflect these changes. The list is limited by design –
additional changes have to be made manually.
• Other Shortcuts – will bring up Word’s built-in Customize Keyboard
interface to allow more extensive modifications.
• Reset Defaults – resets all keyboard shortcuts to their default.
VTub
• Virtual Tub Path – Sets the path to the folder containing files for your
Virtual Tub.
• Create VTub – attempts to create a Virtual Tub from the previously
set folder.
• Prompt to Auto Refresh? – If checked, will attempt to monitor
whether changes have been made to files in your Virtual Tub since
the last time it was “created” – and if so will prompt you to refresh it.
PaDS
• PaDS Site Name – should be set to the name of your school in your
PaDS web address, all in lower case. For example, if your site is
pads.paperlesdebate.com/hogwarts, you would put “hogwarts”
(without the quotes)
• PaDS Folder – should be set to the exact name of your team subfolder
in your school’s section of the public PaDS site, for example
“Hogwarts Potter-Granger.” (without the quotes)
• Check here if High School PaDS – should be checked if your site is
located on the high school version of the public PaDS site.
• Test PaDS Settings – will attempt to verify whether the above settings
are valid for uploading speech documents or not. Is not 100% reliable,
so you should try a real example as well.
28
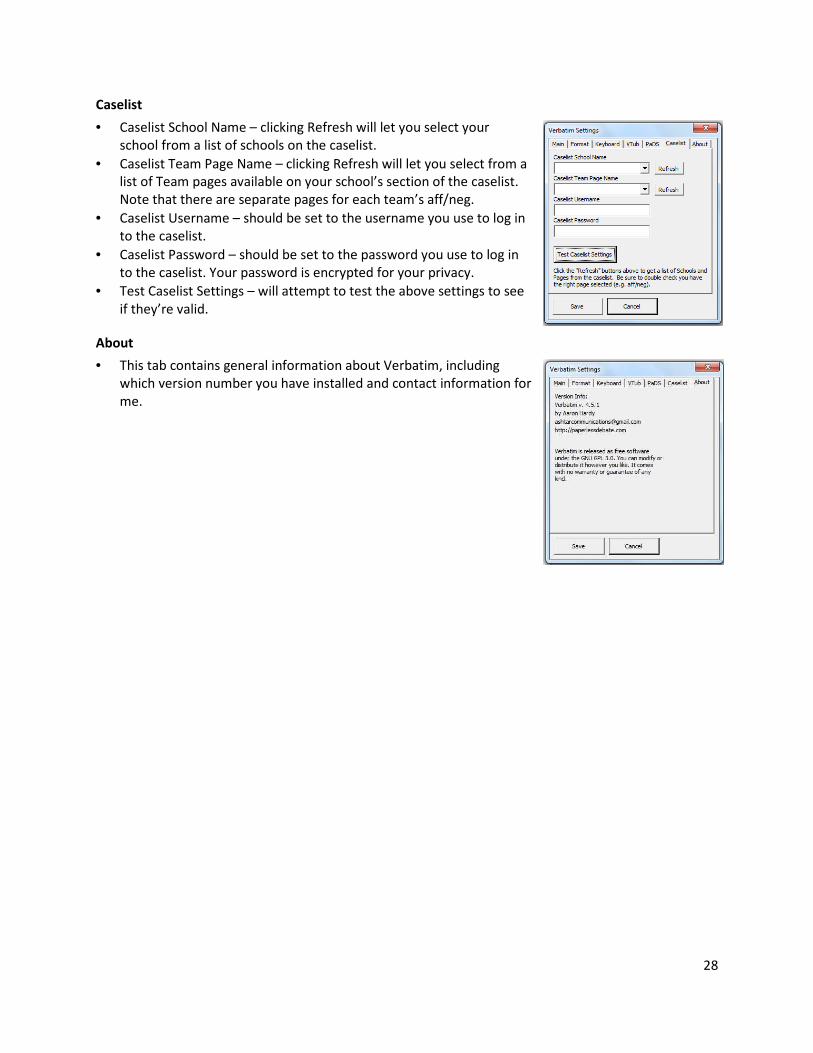
Caselist
• Caselist School Name – clicking Refresh will let you select your
school from a list of schools on the caselist.
• Caselist Team Page Name – clicking Refresh will let you select from a
list of Team pages available on your school’s section of the caselist.
Note that there are separate pages for each team’s aff/neg.
• Caselist Username – should be set to the username you use to log in
to the caselist.
• Caselist Password – should be set to the password you use to log in
to the caselist. Your password is encrypted for your privacy.
• Test Caselist Settings – will attempt to test the above settings to see
if they’re valid.
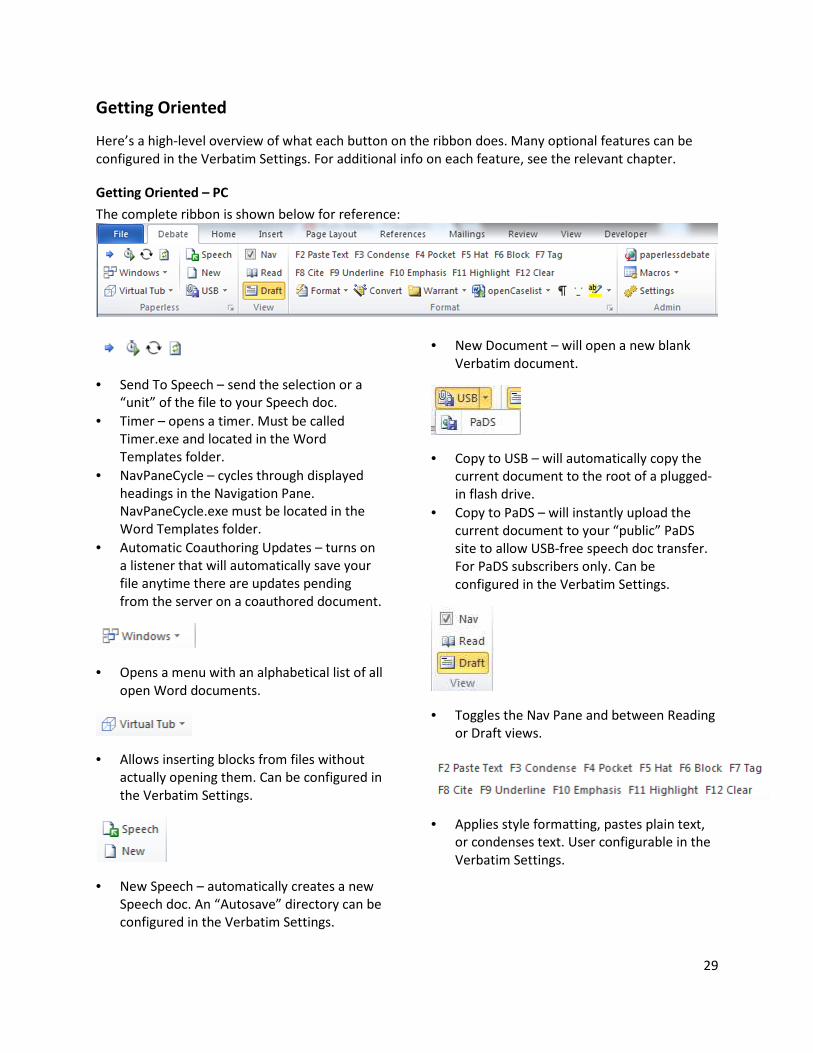
About
• This tab contains general information about Verbatim, including
which version number you have installed and contact information for
me.
29
Getting Oriented
Here’s a high-level overview of what each button on the ribbon does. Many optional features can be
configured in the Verbatim Settings. For additional info on each feature, see the relevant chapter.
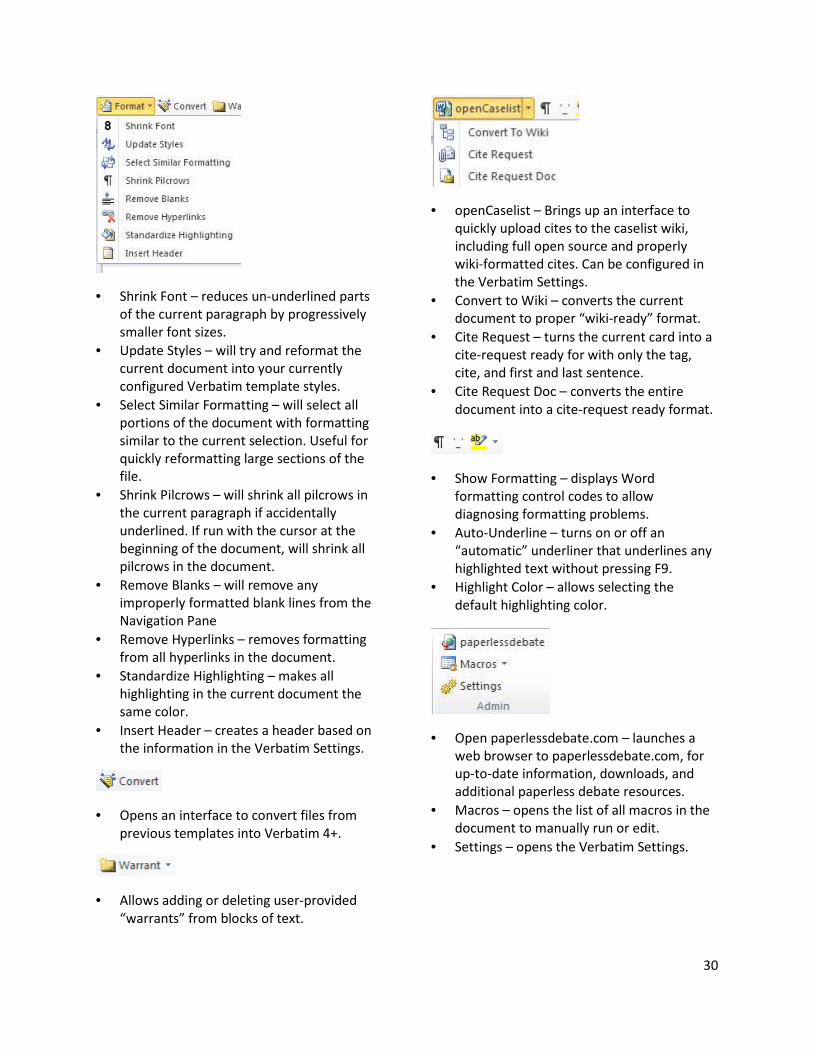
Getting Oriented – PC
The complete ribbon is shown below for reference:
• Send To Speech – send the selection or a
“unit” of the file to your Speech doc.
• Timer – opens a timer. Must be called
Timer.exe and located in the Word
Templates folder.
• NavPaneCycle – cycles through displayed
headings in the Navigation Pane.
NavPaneCycle.exe must be located in the
Word Templates folder.
• Automatic Coauthoring Updates – turns on
a listener that will automatically save your
file anytime there are updates pending
from the server on a coauthored document.
• Opens a menu with an alphabetical list of all
open Word documents.
• Allows inserting blocks from files without
actually opening them. Can be configured in
the Verbatim Settings.
• New Speech – automatically creates a new
Speech doc. An “Autosave” directory can be
configured in the Verbatim Settings.
• New Document – will open a new blank
Verbatim document.
• Copy to USB – will automatically copy the
current document to the root of a plugged-
in flash drive.
• Copy to PaDS – will instantly upload the
current document to your “public” PaDS
site to allow USB-free speech doc transfer.
For PaDS subscribers only. Can be
configured in the Verbatim Settings.
• Toggles the Nav Pane and between Reading
or Draft views.
• Applies style formatting, pastes plain text,
or condenses text. User configurable in the
Verbatim Settings.
30
• Shrink Font – reduces un-underlined parts
of the current paragraph by progressively
smaller font sizes.
• Update Styles – will try and reformat the
current document into your currently
configured Verbatim template styles.
• Select Similar Formatting – will select all
portions of the document with formatting
similar to the current selection. Useful for
quickly reformatting large sections of the
file.
• Shrink Pilcrows – will shrink all pilcrows in
the current paragraph if accidentally
underlined. If run with the cursor at the
beginning of the document, will shrink all
pilcrows in the document.
• Remove Blanks – will remove any
improperly formatted blank lines from the
Navigation Pane
• Remove Hyperlinks – removes formatting
from all hyperlinks in the document.
• Standardize Highlighting – makes all
highlighting in the current document the
same color.
• Insert Header – creates a header based on
the information in the Verbatim Settings.
• Opens an interface to convert files from
previous templates into Verbatim 4+.
• Allows adding or deleting user-provided
“warrants” from blocks of text.
• openCaselist – Brings up an interface to
quickly upload cites to the caselist wiki,
including full open source and properly
wiki-formatted cites. Can be configured in
the Verbatim Settings.
• Convert to Wiki – converts the current
document to proper “wiki-ready” format.
• Cite Request – turns the current card into a
cite-request ready for with only the tag,
cite, and first and last sentence.
• Cite Request Doc – converts the entire
document into a cite-request ready format.
• Show Formatting – displays Word
formatting control codes to allow
diagnosing formatting problems.
• Auto-Underline – turns on or off an
“automatic” underliner that underlines any
highlighted text without pressing F9.
• Highlight Color – allows selecting the
default highlighting color.
• Open paperlessdebate.com – launches a
web browser to paperlessdebate.com, for
up-to-date information, downloads, and
additional paperless debate resources.
• Macros – opens the list of all macros in the
document to manually run or edit.
• Settings – opens the Verbatim Settings.
31
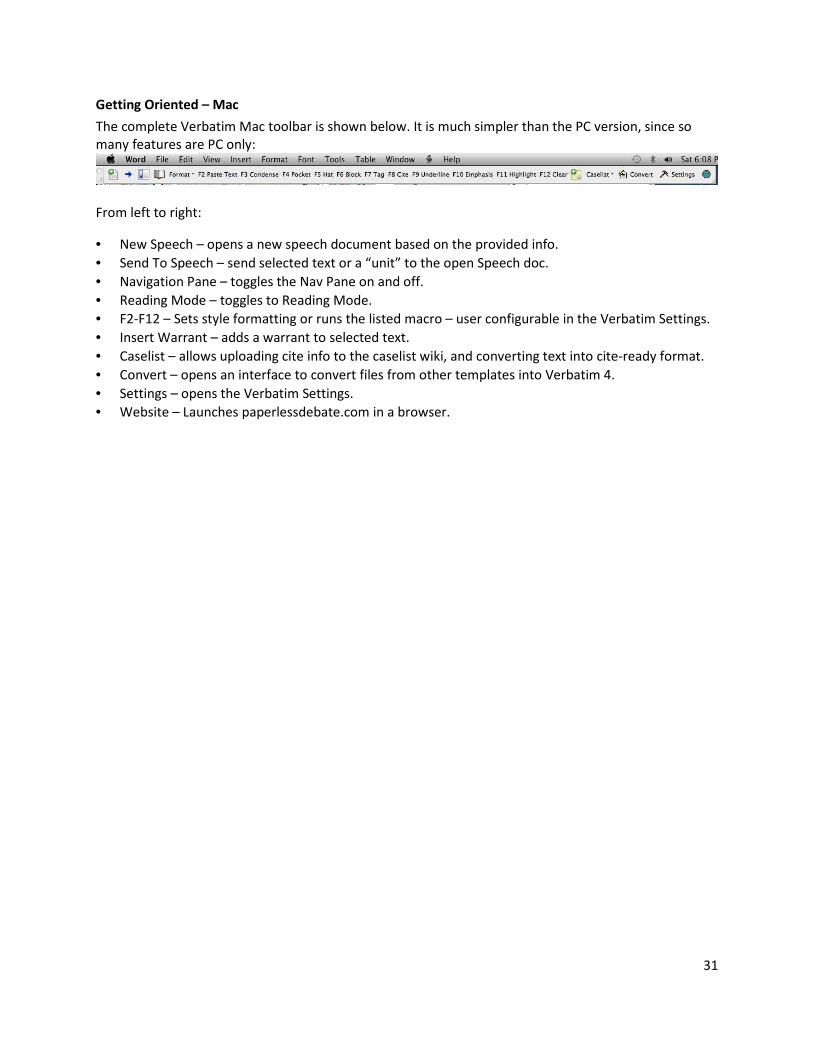
Getting Oriented – Mac
The complete Verbatim Mac toolbar is shown below. It is much simpler than the PC version, since so
many features are PC only:
From left to right:
• New Speech – opens a new speech document based on the provided info.
• Send To Speech – send selected text or a “unit” to the open Speech doc.
• Navigation Pane – toggles the Nav Pane on and off.
• Reading Mode – toggles to Reading Mode.
• F2-F12 – Sets style formatting or runs the listed macro – user configurable in the Verbatim Settings.
• Insert Warrant – adds a warrant to selected text.
• Caselist – allows uploading cite info to the caselist wiki, and converting text into cite-ready format.
• Convert – opens an interface to convert files from other templates into Verbatim 4.
• Settings – opens the Verbatim Settings.
• Website – Launches paperlessdebate.com in a browser.
32
Chapter 2 – File Formatting
Properly formatting your files is the foundation of all the rest of the features in Verbatim. Almost every
macro failure or unexpected behavior can be traced to a mistake with file formatting. While much of this
is self-explanatory, this chapter is written as a general overview to using Verbatim’s built-in formatting
functions. It also includes a section on converting backfiles.
It probably goes without saying that you should avoid manually applying formatting whenever possible.
Instead, you should rely on the built-in shortcuts and macros to style your document, and make any
desired changes via the Verbatim Settings.
Headings
The most important part of formatting your files is proper use of Heading Levels to subdivide and
organize your document. These Headings are also what enable the use of Word’s Navigation Pane to see
the contents of the file at a glance, much like a traditional index. This means that you should generally
shy away from the use of “white space,” or blank lines in the Navigation Pane. Verbatim’s heading levels
are designed to be modular and hierarchical – properly formatted, the Navigation Pane will let you
condense or expand any section of the document you like.
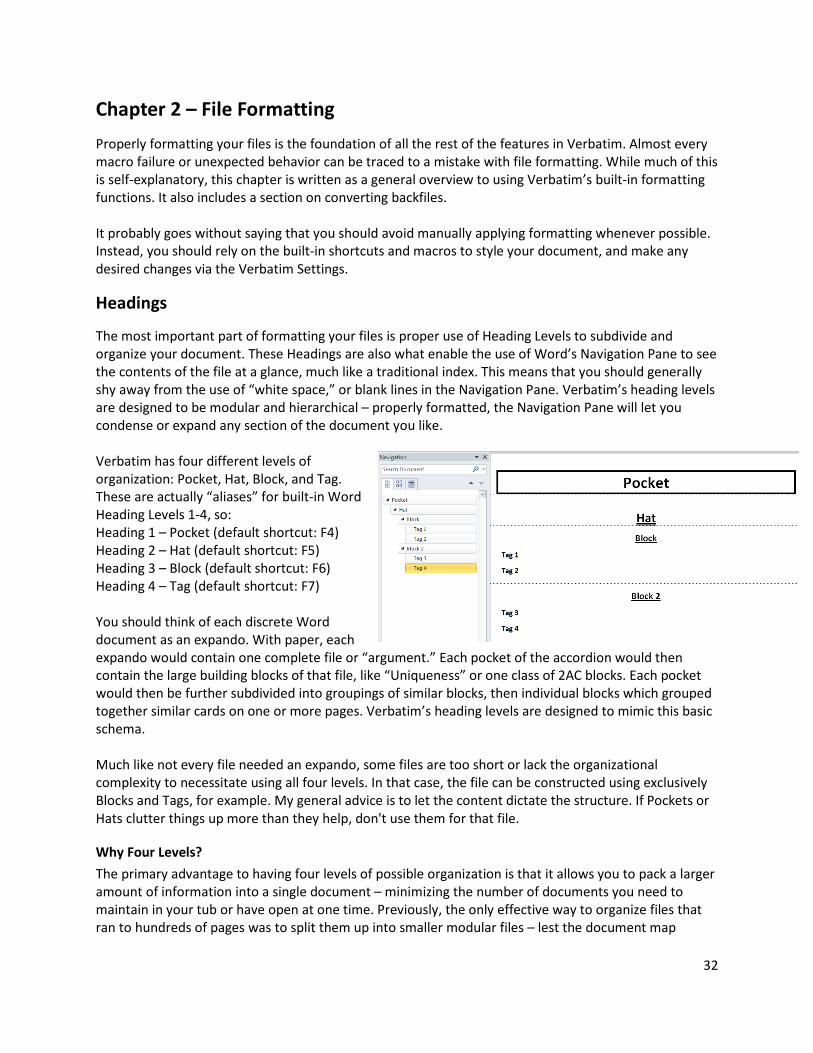
Verbatim has four different levels of
organization: Pocket, Hat, Block, and Tag.
These are actually “aliases” for built-in Word
Heading Levels 1-4, so:
Heading 1 – Pocket (default shortcut: F4)
Heading 2 – Hat (default shortcut: F5)
Heading 3 – Block (default shortcut: F6)
Heading 4 – Tag (default shortcut: F7)
You should think of each discrete Word
document as an expando. With paper, each
expando would contain one complete file or “argument.” Each pocket of the accordion would then
contain the large building blocks of that file, like “Uniqueness” or one class of 2AC blocks. Each pocket
would then be further subdivided into groupings of similar blocks, then individual blocks which grouped
together similar cards on one or more pages. Verbatim’s heading levels are designed to mimic this basic
schema.
Much like not every file needed an expando, some files are too short or lack the organizational
complexity to necessitate using all four levels. In that case, the file can be constructed using exclusively
Blocks and Tags, for example. My general advice is to let the content dictate the structure. If Pockets or
Hats clutter things up more than they help, don't use them for that file.
Why Four Levels?
The primary advantage to having four levels of possible organization is that it allows you to pack a larger
amount of information into a single document – minimizing the number of documents you need to
maintain in your tub or have open at one time. Previously, the only effective way to organize files that
ran to hundreds of pages was to split them up into smaller modular files – lest the document map
33
become unreadable. With the addition of a fourth heading level and the “nesting” features of the Word
2010 Navigation Pane, it has become preferable to include as much in a single file as possible.
The Word 2010 Navigation Pane also makes it possible to “Drag and Drop” sections of your file, from
individual cards to whole pockets. With four heading levels, this makes file organization a breeze,
whether in the research phase or when constructing a speech document.
Many people are used to creating files with only one or two heading levels, and sometimes find the
additional organization disorienting at first. Trust me when I say that you want this feature – I know of
zero cases where someone has tried it out and not ultimately become a fan.
Word 2010 Navigation Pane vs. Word 2007 Document Map
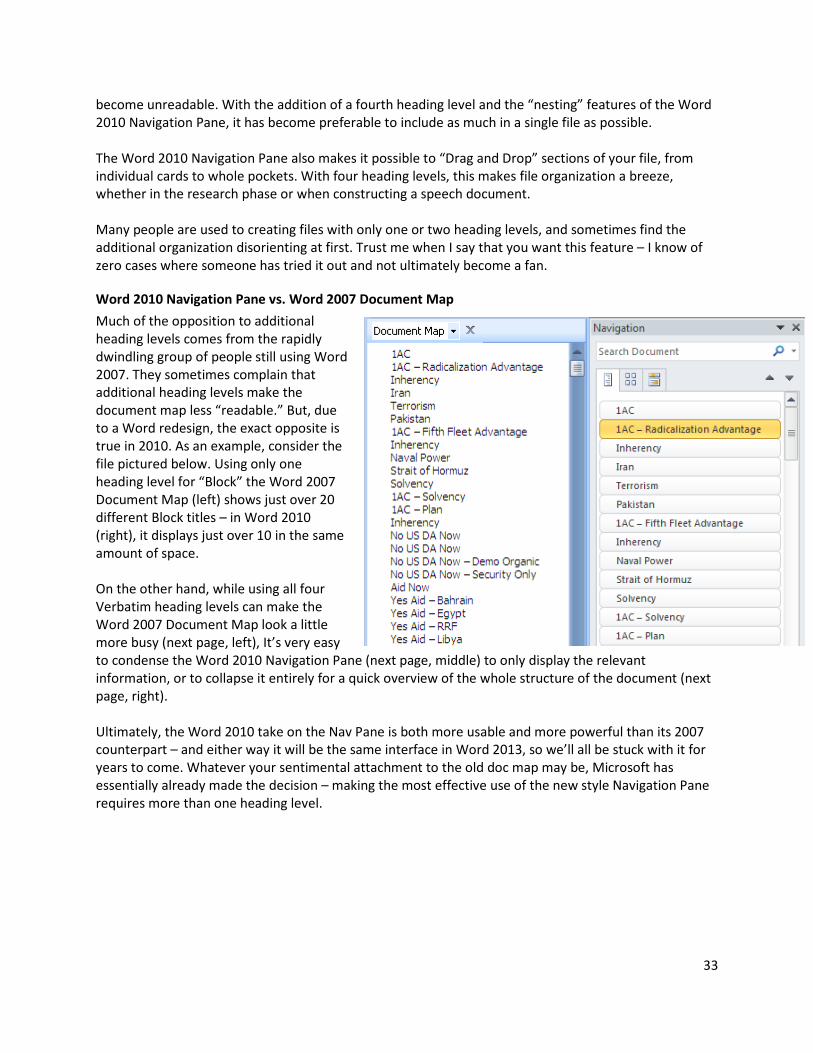
Much of the opposition to additional
heading levels comes from the rapidly
dwindling group of people still using Word
2007. They sometimes complain that
additional heading levels make the
document map less “readable.” But, due
to a Word redesign, the exact opposite is
true in 2010. As an example, consider the
file pictured below. Using only one
heading level for “Block” the Word 2007
Document Map (left) shows just over 20
different Block titles – in Word 2010
(right), it displays just over 10 in the same
amount of space.
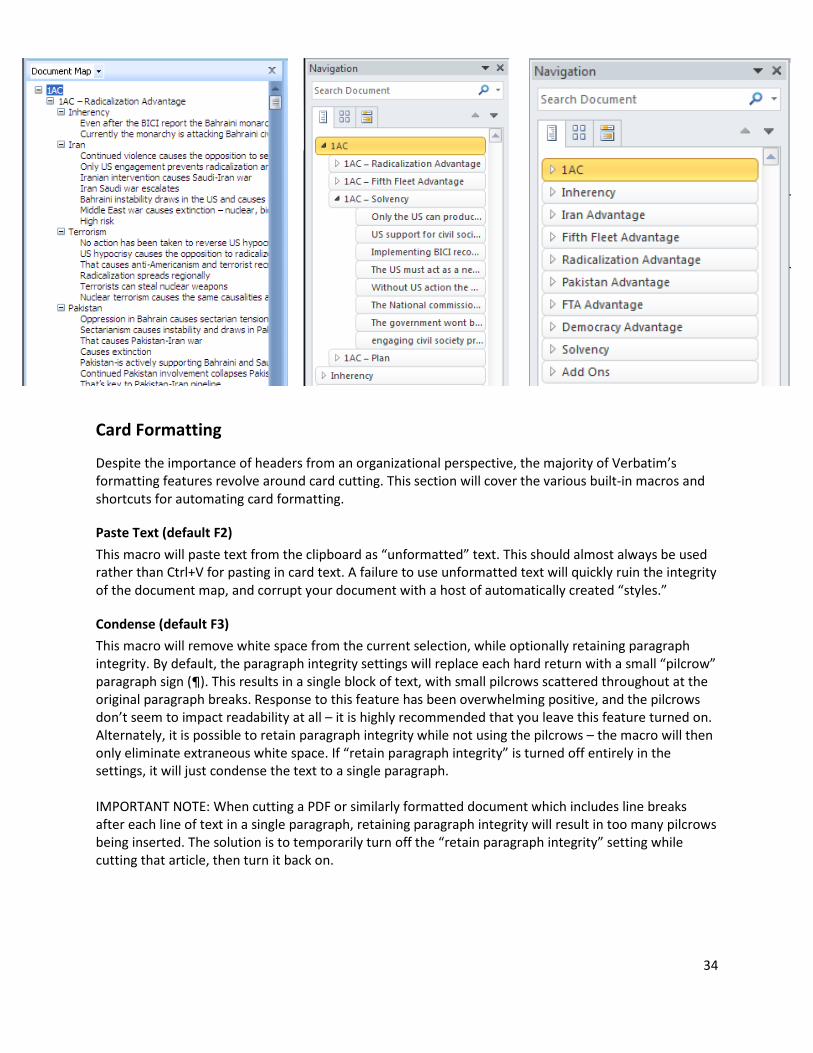
On the other hand, while using all four
Verbatim heading levels can make the
Word 2007 Document Map look a little
more busy (next page, left), It’s very easy
to condense the Word 2010 Navigation Pane (next page, middle) to only display the relevant
information, or to collapse it entirely for a quick overview of the whole structure of the document (next
page, right).
Ultimately, the Word 2010 take on the Nav Pane is both more usable and more powerful than its 2007
counterpart – and either way it will be the same interface in Word 2013, so we’ll all be stuck with it for
years to come. Whatever your sentimental attachment to the old doc map may be, Microsoft has
essentially already made the decision – making the most effective use of the new style Navigation Pane
requires more than one heading level.
34
Card Formatting
Despite the importance of headers from an organizational perspective, the majority of Verbatim’s
formatting features revolve around card cutting. This section will cover the various built-in macros and
shortcuts for automating card formatting.
Paste Text (default F2)
This macro will paste text from the clipboard as “unformatted” text. This should almost always be used
rather than Ctrl+V for pasting in card text. A failure to use unformatted text will quickly ruin the integrity
of the document map, and corrupt your document with a host of automatically created “styles.”
Condense (default F3)
This macro will remove white space from the current selection, while optionally retaining paragraph
integrity. By default, the paragraph integrity settings will replace each hard return with a small “pilcrow”
paragraph sign (¶). This results in a single block of text, with small pilcrows scattered throughout at the
original paragraph breaks. Response to this feature has been overwhelming positive, and the pilcrows
don’t seem to impact readability at all – it is highly recommended that you leave this feature turned on.
Alternately, it is possible to retain paragraph integrity while not using the pilcrows – the macro will then
only eliminate extraneous white space. If “retain paragraph integrity” is turned off entirely in the
settings, it will just condense the text to a single paragraph.
IMPORTANT NOTE: When cutting a PDF or similarly formatted document which includes line breaks
after each line of text in a single paragraph, retaining paragraph integrity will result in too many pilcrows
being inserted. The solution is to temporarily turn off the “retain paragraph integrity” setting while
cutting that article, then turn it back on.
35
Cite (default F8)
The cite style is designed to be applied only to the last name and date – unlike the “tag” style it only
applies to a single word or set of characters, not to the whole line.
Underlining (default F9)
The underline function is fairly self-explanatory. You can configure whether to bold underlined text as
well in the Verbatim settings. The underline macro is also written to “toggle” between underlined and
un-underlined text. This makes it easy to quickly correct underlining mistakes on the fly.
There is also an included “auto-underliner” on the ribbon – when turned on, this will immediately toggle
the underlining for any highlighted text, without needing to press an additional shortcut key.
Emphasis (default F10)
By default, Emphasis will add a box around the current selection. Whether to use a box or just leave text
bold (or larger) can be configured in the Verbatim settings.
Highlight (default F11)
Highlight will toggle the highlighting of the current selection on and off using the default highlighting
color. The default color can be set with the “highlight color picker” on the ribbon. It is strongly
recommended that you not use “light gray” as the highlight color. There is a known bug in Word which
sometimes “loses” highlighting in saved files when this color is used.
Clear Formatting (default F12)
The Clear Formatting function will completely remove any formatting from the selection and return it to
Normal text. The only thing it doesn’t remove is highlighting – this can be removed separately by
toggling it with the highlighting function. When facing an intractable formatting problem, it is usually
quickest to just clear the formatting of the offending text and start over.
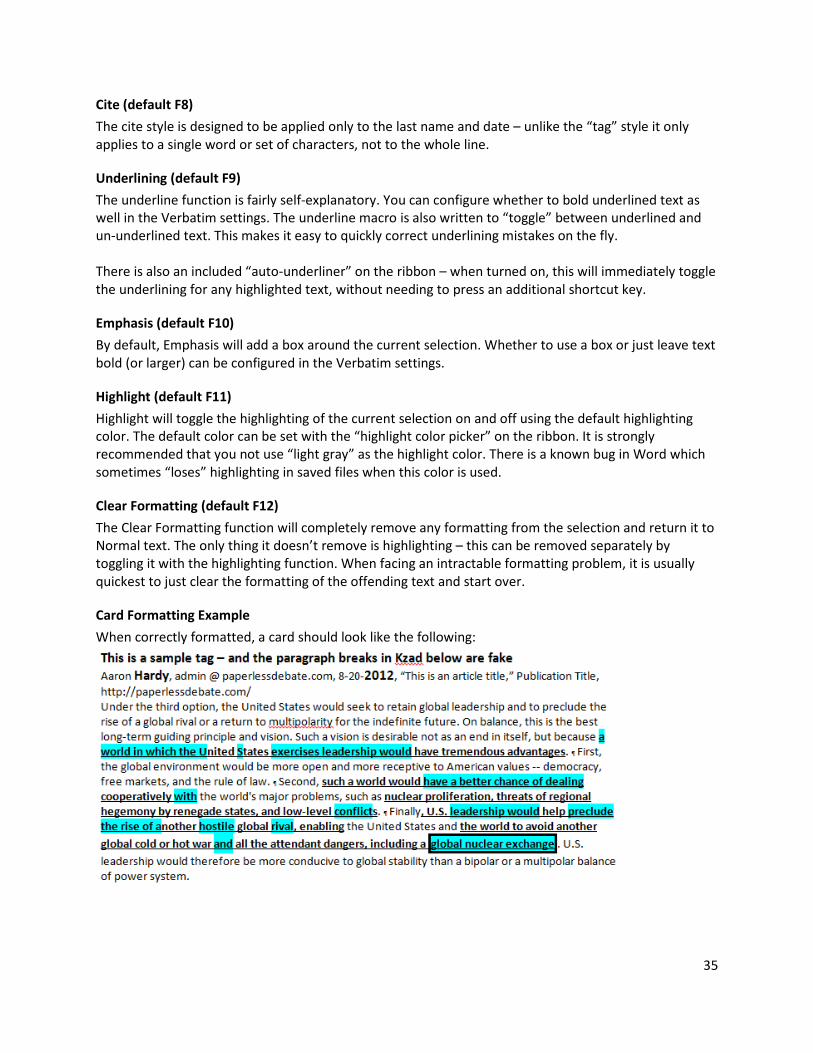
Card Formatting Example
When correctly formatted, a card should look like the following:
36
Additional Formatting Functions
The majority of the following formatting macros can be accessed via the “Format” menu on the Debate
ribbon. The default keyboard shortcut is also included here for reference.
Shrink Font (default Ctrl+8)
Reduces un-underlined parts of the current paragraph by progressively smaller font sizes, until it cycles
back to the normal font size. Note that there must be at least some underlining in the paragraph to
shrink the text.
Update Styles (default Ctrl+F2)
This will attempt to reformat the current document in your currently configured Verbatim template
styles. Is mostly useful when opening a backfile that appears incorrectly, or after pasting in a card from a
different source.
Select Similar Formatting (default Ctrl+F3)
Will select all portions of the document with formatting similar to the current selection – for example
will select all “Tags” in the document so you can apply a uniform style change. Useful for quickly
reformatting large sections of the file. Discussed in more detail below in the Converting Backfiles
section.
Shrink Pilcrows
If you accidentally underline a pilcrow sign in your card, it will appear much larger and more annoying
than it should. This macro will re-shrink and un-underline all pilcrows in the current paragraph. If run
with the cursor at the very beginning of the document, it will shrink all pilcrows in the entire document.
Remove Blanks
Will delete any improperly formatted blank lines (accidentally formatted as a Heading Level), removing
them from the Navigation Pane.
Remove Hyperlinks
Removes formatting from all hyperlinks in the document, to avoid inadvertently clicking on one.
Standardize Highlighting
Makes all highlighting in the current document the default color.
Insert Header
Creates a header based on the “Team Name” and “User Name” provided in the Verbatim settings.
Copy Previous Cite (default Ctrl+F8)
Will paste a copy of the previous cite at the current insertion point. Useful for cutting long documents
with a lot of cards by the same author. Only works if the cite is contained in one paragraph (i.e. the
author and date are not contained on a totally separate line). Works by finding the previous “Cite” style,
so won’t work if you format your cites incorrectly.
37
Converting Backfiles
Verbatim 4 includes a set of converters to help with upgrading to the latest version. It will attempt to
take files produced in previous versions of Verbatim (or other templates, like Synergy) and turn them
into the most recent format. How well these work will vary proportionately with how well and how
consistently your backfiles are formatted. If all of your files are in to-spec Verbatim 3.x format,
upgrading should be a breeze. If you’re at the other end of the spectrum, good luck.
IMPORTANT NOTE: These converters are not perfect. It is impossible to design a converter that will work
in every scenario with every possible template. Upgrading your backfiles will likely require a process of
trial and error to see which converter or combination of them produces the best outcome, and even
then your files are likely to require at least a degree of manual fixing. You should always experiment on
a copy of your files, not the originals – I can’t guarantee it won’t screw something of yours up.
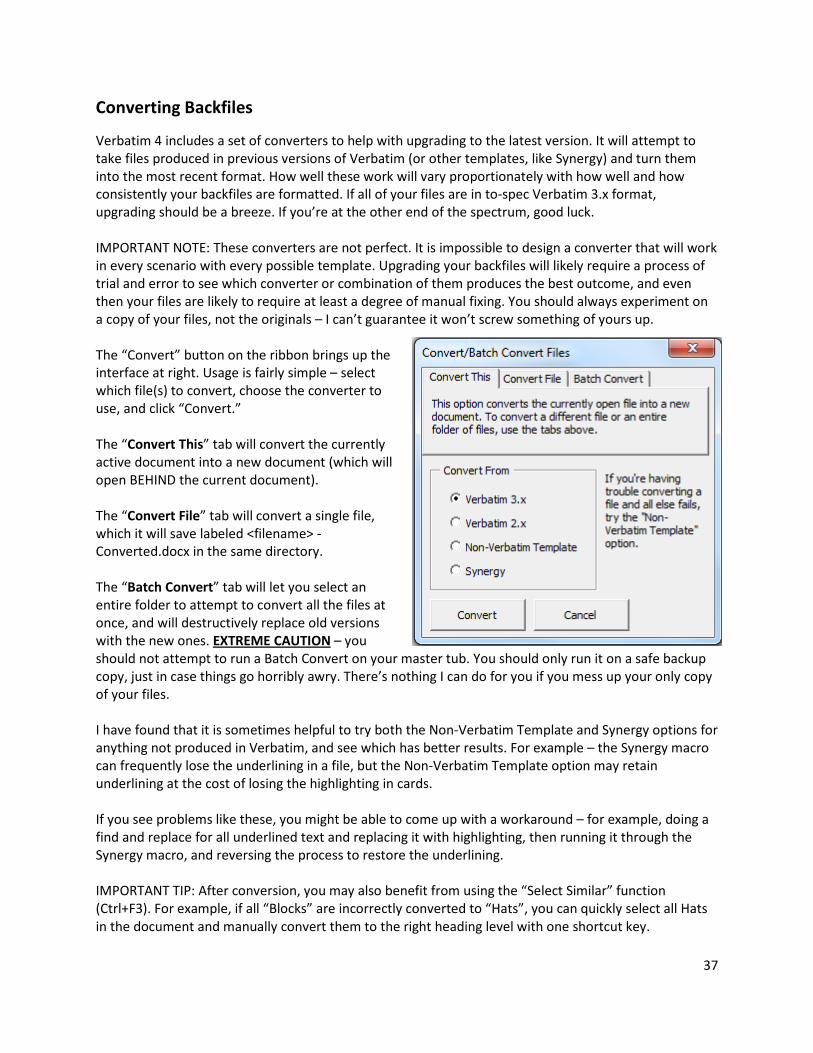
The “Convert” button on the ribbon brings up the
interface at right. Usage is fairly simple – select
which file(s) to convert, choose the converter to
use, and click “Convert.”
The “Convert This” tab will convert the currently
active document into a new document (which will
open BEHIND the current document).
The “Convert File” tab will convert a single file,
which it will save labeled <filename> -
Converted.docx in the same directory.
The “Batch Convert” tab will let you select an
entire folder to attempt to convert all the files at
once, and will destructively replace old versions
with the new ones. EXTREME CAUTION – you
should not attempt to run a Batch Convert on your master tub. You should only run it on a safe backup
copy, just in case things go horribly awry. There’s nothing I can do for you if you mess up your only copy
of your files.
I have found that it is sometimes helpful to try both the Non-Verbatim Template and Synergy options for
anything not produced in Verbatim, and see which has better results. For example – the Synergy macro
can frequently lose the underlining in a file, but the Non-Verbatim Template option may retain
underlining at the cost of losing the highlighting in cards.
If you see problems like these, you might be able to come up with a workaround – for example, doing a
find and replace for all underlined text and replacing it with highlighting, then running it through the
Synergy macro, and reversing the process to restore the underlining.
IMPORTANT TIP: After conversion, you may also benefit from using the “Select Similar” function
(Ctrl+F3). For example, if all “Blocks” are incorrectly converted to “Hats”, you can quickly select all Hats
in the document and manually convert them to the right heading level with one shortcut key.
38
Chapter 3 – Debating Paperless
This chapter covers how to use Verbatim for in-round paperless debating. At root, the idea is very
simple. You take blocks and cards from a variety of files, and put them all in one master “Speech”
document, where you further organize them into the order you expect to read them in your speech.
In reality, this process could be accomplished with nothing other than the built-in Cut and Paste
functions in Word. However, this is far too time-consuming to be practicable, as the effort required to
switch between documents, select the exact text you want to copy, and then move to the correct place
to paste it would eat up an inordinate amount of prep time.
This is where the paperless macros come in. Assembling a speech using this system is a simple five step
process.
Step One – Open a “Speech” Document
A “Speech” document is any document that contains the word “speech” somewhere in the name, such
as speech 2AC.docx,” “Whitman at Wake Speech.docx,” or even “sPeEcH Round 3 2Ac.DOCX”
A Speech document must be open for the rest of the steps to work – if it’s not, the macros will prompt
you to create one. Note: If more than one document with “speech” in the name are open
simultaneously, Verbatim will use the most recently opened one.
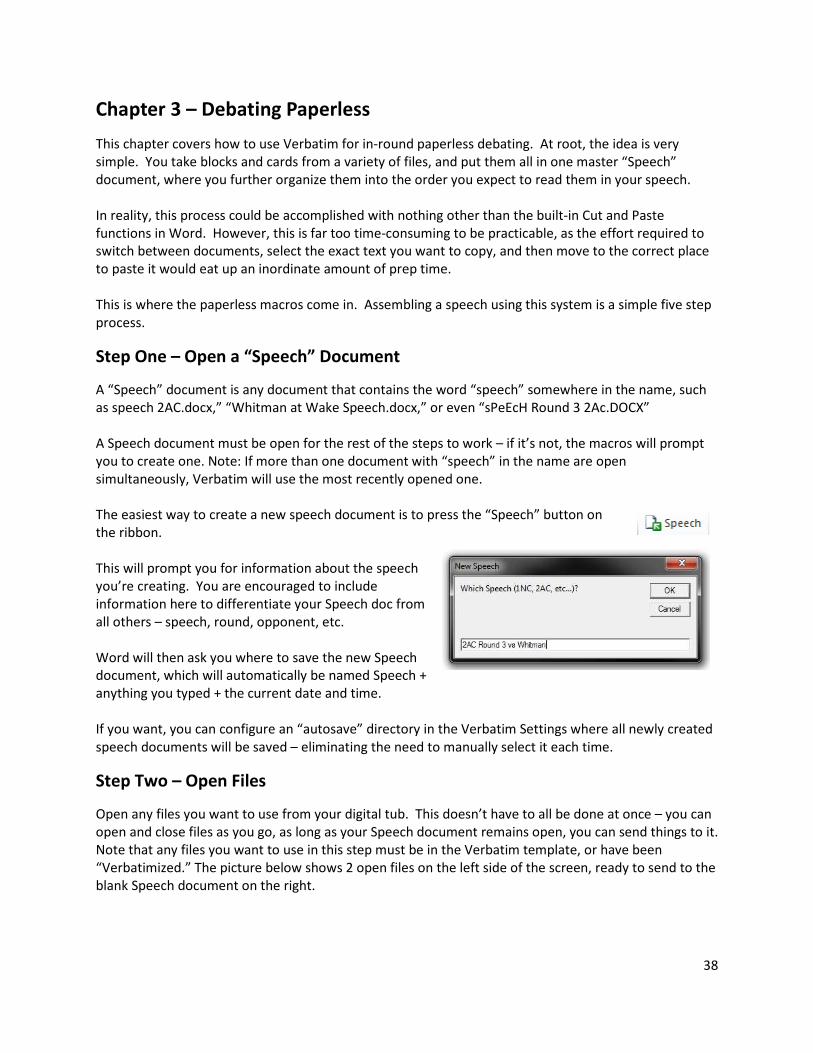
The easiest way to create a new speech document is to press the “Speech” button on
the ribbon.
This will prompt you for information about the speech
you’re creating. You are encouraged to include
information here to differentiate your Speech doc from
all others – speech, round, opponent, etc.
Word will then ask you where to save the new Speech
document, which will automatically be named Speech +
anything you typed + the current date and time.
If you want, you can configure an “autosave” directory in the Verbatim Settings where all newly created
speech documents will be saved – eliminating the need to manually select it each time.
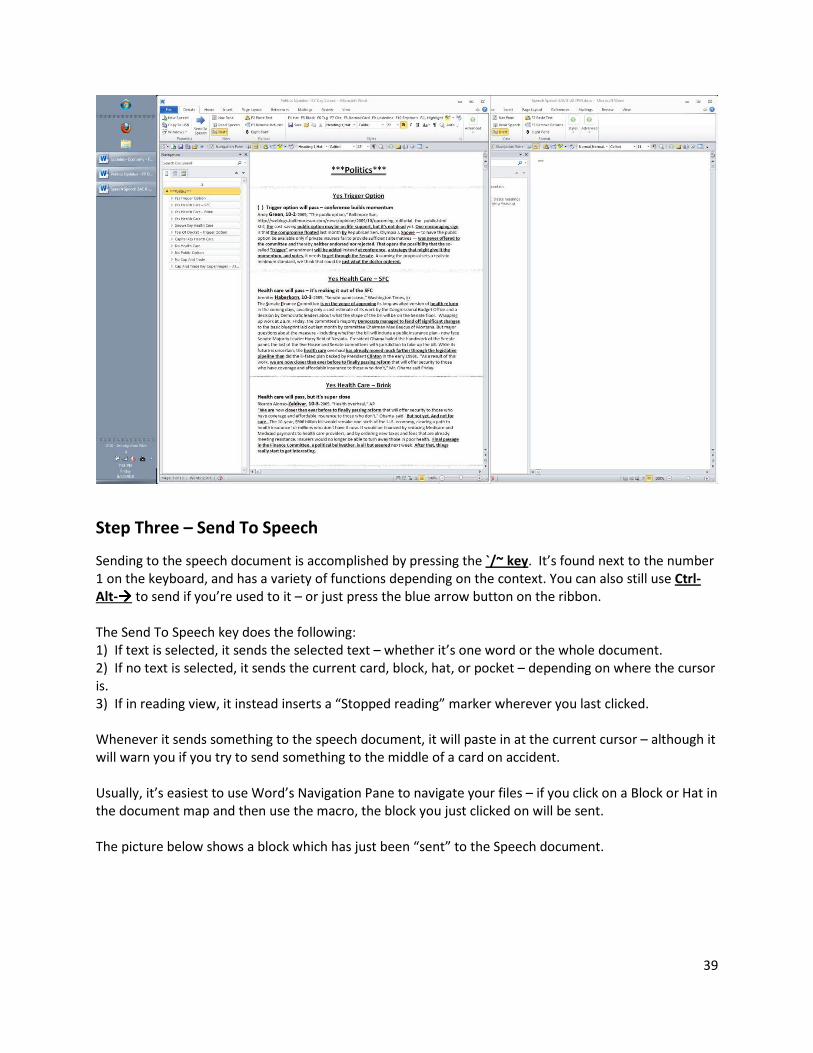
Step Two – Open Files
Open any files you want to use from your digital tub. This doesn’t have to all be done at once – you can
open and close files as you go, as long as your Speech document remains open, you can send things to it.
Note that any files you want to use in this step must be in the Verbatim template, or have been
“Verbatimized.” The picture below shows 2 open files on the left side of the screen, ready to send to the
blank Speech document on the right.
39
Step Three – Send To Speech
Sending to the speech document is accomplished by pressing the `/~ key. It’s found next to the number
1 on the keyboard, and has a variety of functions depending on the context. You can also still use Ctrl-
Alt-���� to send if you’re used to it – or just press the blue arrow button on the ribbon.
The Send To Speech key does the following:
1) If text is selected, it sends the selected text – whether it’s one word or the whole document.
2) If no text is selected, it sends the current card, block, hat, or pocket – depending on where the cursor
is.
3) If in reading view, it instead inserts a “Stopped reading” marker wherever you last clicked.
Whenever it sends something to the speech document, it will paste in at the current cursor – although it
will warn you if you try to send something to the middle of a card on accident.
Usually, it’s easiest to use Word’s Navigation Pane to navigate your files – if you click on a Block or Hat in
the document map and then use the macro, the block you just clicked on will be sent.
The picture below shows a block which has just been “sent” to the Speech document.
40
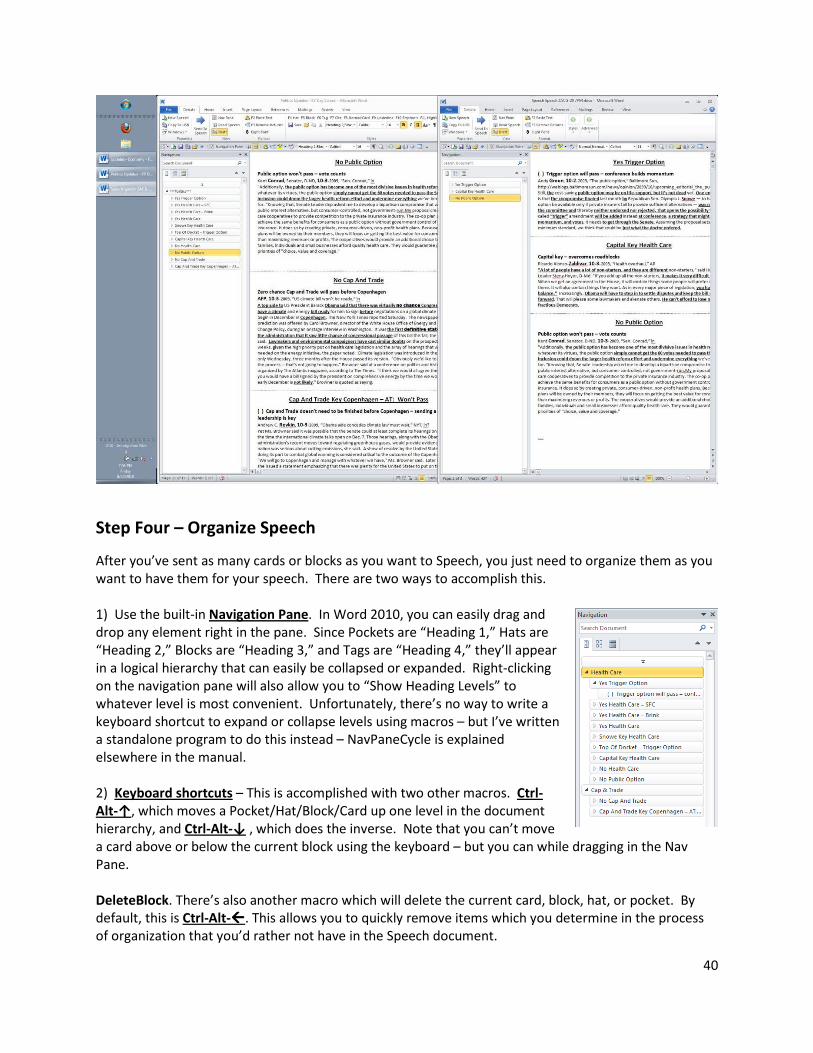
Step Four – Organize Speech
After you’ve sent as many cards or blocks as you want to Speech, you just need to organize them as you
want to have them for your speech. There are two ways to accomplish this.
1) Use the built-in Navigation Pane. In Word 2010, you can easily drag and
drop any element right in the pane. Since Pockets are “Heading 1,” Hats are
“Heading 2,” Blocks are “Heading 3,” and Tags are “Heading 4,” they’ll appear
in a logical hierarchy that can easily be collapsed or expanded. Right-clicking
on the navigation pane will also allow you to “Show Heading Levels” to
whatever level is most convenient. Unfortunately, there’s no way to write a
keyboard shortcut to expand or collapse levels using macros – but I’ve written
a standalone program to do this instead – NavPaneCycle is explained
elsewhere in the manual.
2) Keyboard shortcuts – This is accomplished with two other macros. Ctrl-
Alt-↑, which moves a Pocket/Hat/Block/Card up one level in the document
hierarchy, and Ctrl-Alt-↓ , which does the inverse. Note that you can’t move
a card above or below the current block using the keyboard – but you can while dragging in the Nav
Pane.
DeleteBlock. There’s also another macro which will delete the current card, block, hat, or pocket. By
default, this is Ctrl-Alt-. This allows you to quickly remove items which you determine in the process
of organization that you’d rather not have in the Speech document.
41
Taken together, these three macros let you quickly move blocks into whatever order you would like
them for the speech.
Keep in mind you can also organize blocks in the Speech document, change tags, highlight cards,
etc...and then return to sending more cards later. In practice, steps three and four blur together quite a
bit.
Step Five – Transfer Speech
Once your Speech document is complete, organized, and you’re ready to speak, you just need to copy
the file to your partner (for backup) and the other team (for viewing). To do this, you can use either a
USB drive, or the public PaDS site (explained elsewhere in the manual).
First, you should always remember to save the working Speech document before starting the transfer –
that way if something crashes you still have a complete copy. It’s also important to save the document
to your local hard drive or PaDS site, not directly on a USB drive. This is because Word tends to get
angry when a drive is removed containing an open document.
To transfer via USB, you can either copy the file manually or use the built-in “Copy to
USB” feature.
You should have a USB drive already plugged into the computer. Then, just press the “USB” button (Ctrl-
Shift-S). This will copy the current document automatically to the root of the first found USB drive.
It’s recommended that you first give the USB drive to your partner for them to copy to their desktop and
have open during your speech. This way, if the speaker’s computer were to crash during a speech, it can
quickly be replaced with the identical document on their partners computer.
The final step is to give the other team the Speech document – which entails either giving the USB drive
to them for use on their own computers, or opening the relevant document on the 3rd viewing laptop.
That’s it – you’re ready to speak.
Recap
Open a Speech document, and all needed files. There are only four macros needed to assemble a
speech paperlessly:
`/~ Key– Sends highlighted text, or one card, block, hat, or pocket at a time, depending on your cursor
Ctrl-Alt-↑ – Moves the current card, block, hat, or pocket up one position in the document.
Ctrl-Alt-↓ – Moves the current card, block, hat, or pocket down one position in the document.
Ctrl-Alt- – Deletes the current card, block, hat, or pocket
Save your file, transfer it to a USB drive, jump it to your partner and opponents, and you’re done.
Something not working? Macros seem broken? Check the “Common Concerns” section later in the
manual.

42
Chapter 4 – Advanced Features
Verbatim has many features built-in which are not essential to debating paperless but add advanced
functionality. They are briefly explained here, but are mostly self-explanatory. With the exception of
“Warrants” and some of the “Caselist” features, these are PC-only.
Timer
Verbatim 4 comes packaged with Alex Gulakov’s Debate Synergy
timer, but can be configured to launch any user supplied timer
program. To install a different timer, just make sure the Timer’s
executable is named Timer.exe and is located in the Word Templates
folder. To start, click the Timer button on the ribbon:
If using the Debate Synergy timer, it is recommended that you turn
on “Auto Shrink” and “Transparent” from the Window menu. When
started, this will result in the timer only displaying the
time overlaid on your other windows, making it much less
obtrusive.
Warrants
Verbatim uses Word’s built-in commenting functions to allow the addition of “warrant
boxes” next to cards. Pressing the “New Warrant” button while selecting a tag will add
a new warrant. Warrants can be hidden/shown or deleted using the options in the drop-down menu.
To see them more easily, you should use Full-Screen Reading view or Page Layout view. If comments
don’t appear, make sure they’re turned on in the view options.
NavPaneCycle
Word’s Navigation Pane is very powerful, but can sometimes be very cluttered, especially in long files
making full use of all four Verbatim heading levels. Unfortunately, the NavPane cannot be automated
from within Word, and cannot be set to open “collapsed” to only Heading 1.
The first alternative is to manually change which Heading Levels are displayed in the Navigation Pane by
right clicking anywhere in it and selecting “Show Heading Levels – Show Heading X.”
The downside of this approach is that it’s slow and repetitive.
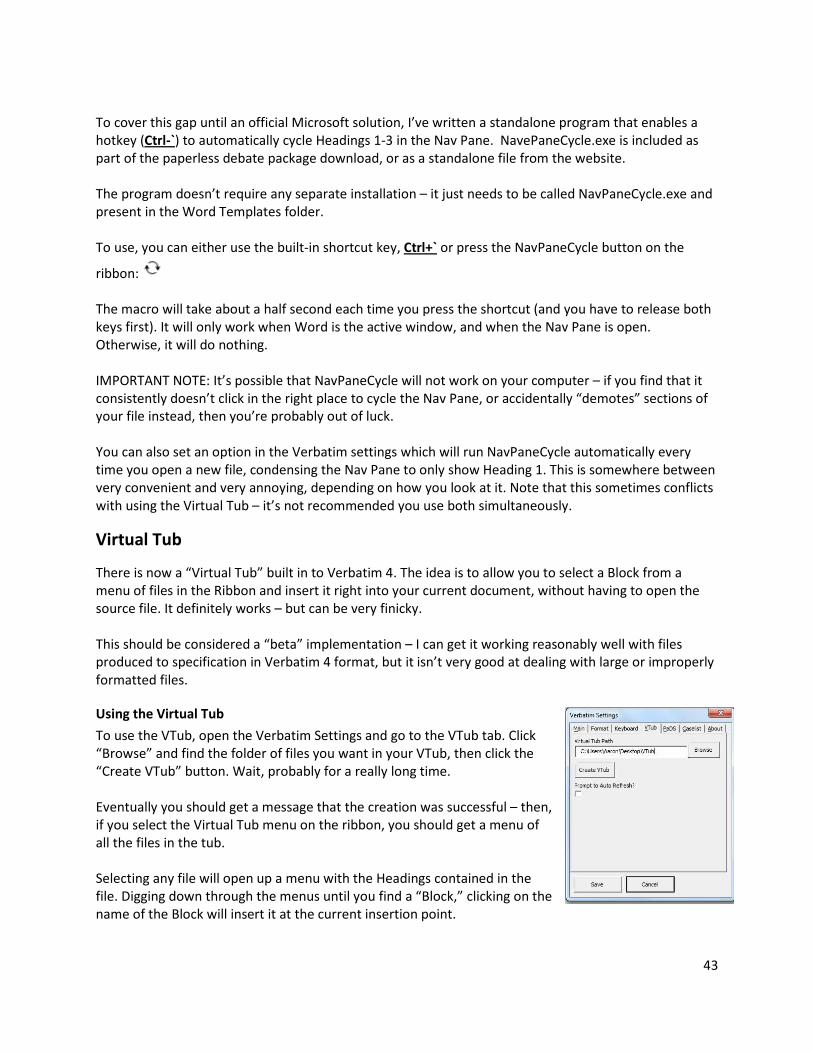
43
To cover this gap until an official Microsoft solution, I’ve written a standalone program that enables a
hotkey (Ctrl-`) to automatically cycle Headings 1-3 in the Nav Pane. NavePaneCycle.exe is included as
part of the paperless debate package download, or as a standalone file from the website.
The program doesn’t require any separate installation – it just needs to be called NavPaneCycle.exe and
present in the Word Templates folder.
To use, you can either use the built-in shortcut key, Ctrl+` or press the NavPaneCycle button on the
ribbon:
The macro will take about a half second each time you press the shortcut (and you have to release both
keys first). It will only work when Word is the active window, and when the Nav Pane is open.
Otherwise, it will do nothing.
IMPORTANT NOTE: It’s possible that NavPaneCycle will not work on your computer – if you find that it
consistently doesn’t click in the right place to cycle the Nav Pane, or accidentally “demotes” sections of
your file instead, then you’re probably out of luck.
You can also set an option in the Verbatim settings which will run NavPaneCycle automatically every
time you open a new file, condensing the Nav Pane to only show Heading 1. This is somewhere between
very convenient and very annoying, depending on how you look at it. Note that this sometimes conflicts
with using the Virtual Tub – it’s not recommended you use both simultaneously.
Virtual Tub
There is now a “Virtual Tub” built in to Verbatim 4. The idea is to allow you to select a Block from a
menu of files in the Ribbon and insert it right into your current document, without having to open the
source file. It definitely works – but can be very finicky.
This should be considered a “beta” implementation – I can get it working reasonably well with files
produced to specification in Verbatim 4 format, but it isn’t very good at dealing with large or improperly
formatted files.
Using the Virtual Tub
To use the VTub, open the Verbatim Settings and go to the VTub tab. Click
“Browse” and find the folder of files you want in your VTub, then click the
“Create VTub” button. Wait, probably for a really long time.
Eventually you should get a message that the creation was successful – then,
if you select the Virtual Tub menu on the ribbon, you should get a menu of
all the files in the tub.
Selecting any file will open up a menu with the Headings contained in the
file. Digging down through the menus until you find a “Block,” clicking on the
name of the Block will insert it at the current insertion point.
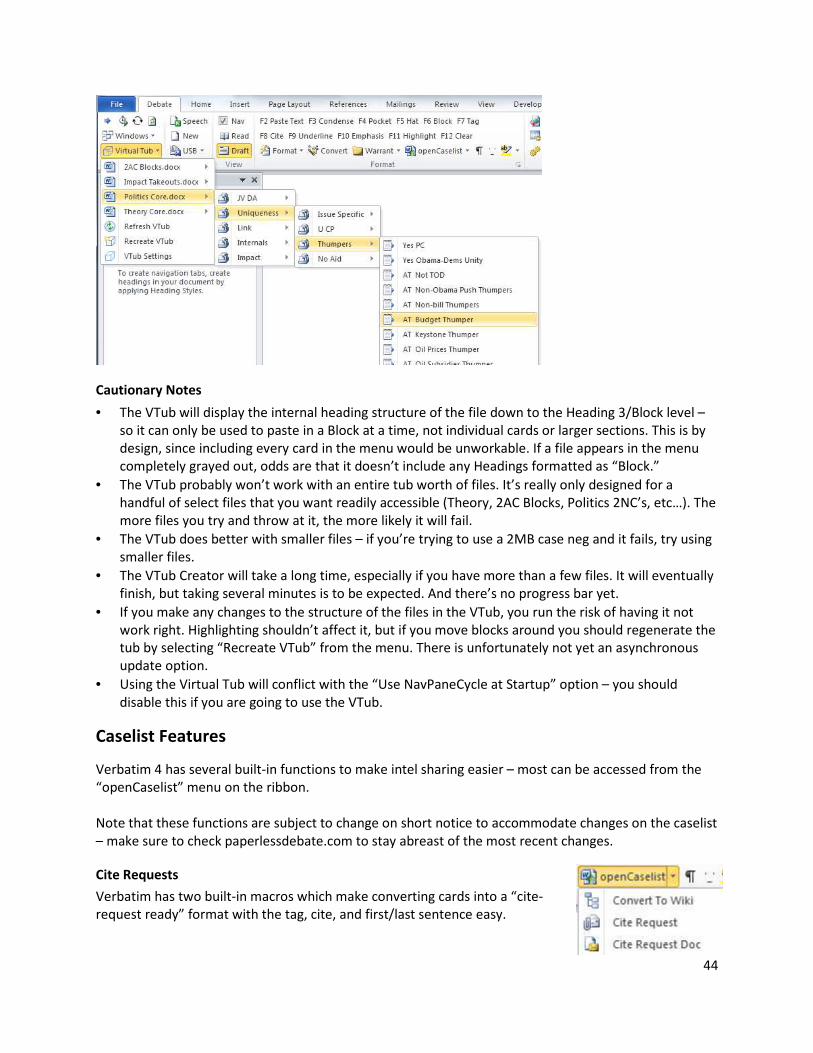
44
Cautionary Notes
• The VTub will display the internal heading structure of the file down to the Heading 3/Block level –
so it can only be used to paste in a Block at a time, not individual cards or larger sections. This is by
design, since including every card in the menu would be unworkable. If a file appears in the menu
completely grayed out, odds are that it doesn’t include any Headings formatted as “Block.”
• The VTub probably won’t work with an entire tub worth of files. It’s really only designed for a
handful of select files that you want readily accessible (Theory, 2AC Blocks, Politics 2NC’s, etc…). The
more files you try and throw at it, the more likely it will fail.
• The VTub does better with smaller files – if you’re trying to use a 2MB case neg and it fails, try using
smaller files.
• The VTub Creator will take a long time, especially if you have more than a few files. It will eventually
finish, but taking several minutes is to be expected. And there’s no progress bar yet.
• If you make any changes to the structure of the files in the VTub, you run the risk of having it not
work right. Highlighting shouldn’t affect it, but if you move blocks around you should regenerate the
tub by selecting “Recreate VTub” from the menu. There is unfortunately not yet an asynchronous
update option.
• Using the Virtual Tub will conflict with the “Use NavPaneCycle at Startup” option – you should
disable this if you are going to use the VTub.
Caselist Features
Verbatim 4 has several built-in functions to make intel sharing easier – most can be accessed from the
“openCaselist” menu on the ribbon.
Note that these functions are subject to change on short notice to accommodate changes on the caselist
– make sure to check paperlessdebate.com to stay abreast of the most recent changes.
Cite Requests
Verbatim has two built-in macros which make converting cards into a “cite-
request ready” format with the tag, cite, and first/last sentence easy.
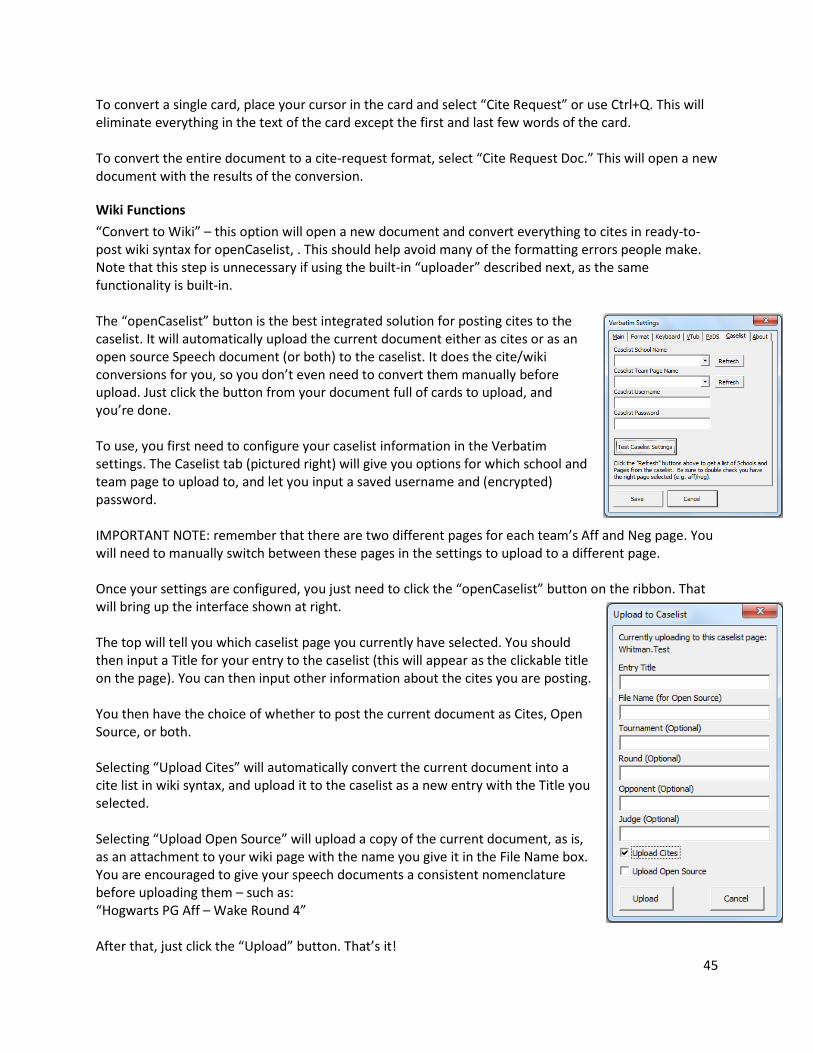
45
To convert a single card, place your cursor in the card and select “Cite Request” or use Ctrl+Q. This will
eliminate everything in the text of the card except the first and last few words of the card.
To convert the entire document to a cite-request format, select “Cite Request Doc.” This will open a new
document with the results of the conversion.
Wiki Functions
“Convert to Wiki” – this option will open a new document and convert everything to cites in ready-to-
post wiki syntax for openCaselist, . This should help avoid many of the formatting errors people make.
Note that this step is unnecessary if using the built-in “uploader” described next, as the same
functionality is built-in.
The “openCaselist” button is the best integrated solution for posting cites to the
caselist. It will automatically upload the current document either as cites or as an
open source Speech document (or both) to the caselist. It does the cite/wiki
conversions for you, so you don’t even need to convert them manually before
upload. Just click the button from your document full of cards to upload, and
you’re done.
To use, you first need to configure your caselist information in the Verbatim
settings. The Caselist tab (pictured right) will give you options for which school and
team page to upload to, and let you input a saved username and (encrypted)
password.
IMPORTANT NOTE: remember that there are two different pages for each team’s Aff and Neg page. You
will need to manually switch between these pages in the settings to upload to a different page.
Once your settings are configured, you just need to click the “openCaselist” button on the ribbon. That
will bring up the interface shown at right.
The top will tell you which caselist page you currently have selected. You should
then input a Title for your entry to the caselist (this will appear as the clickable title
on the page). You can then input other information about the cites you are posting.
You then have the choice of whether to post the current document as Cites, Open
Source, or both.
Selecting “Upload Cites” will automatically convert the current document into a
cite list in wiki syntax, and upload it to the caselist as a new entry with the Title you
selected.
Selecting “Upload Open Source” will upload a copy of the current document, as is,
as an attachment to your wiki page with the name you give it in the File Name box.
You are encouraged to give your speech documents a consistent nomenclature
before uploading them – such as:
“Hogwarts PG Aff – Wake Round 4”
After that, just click the “Upload” button. That’s it!
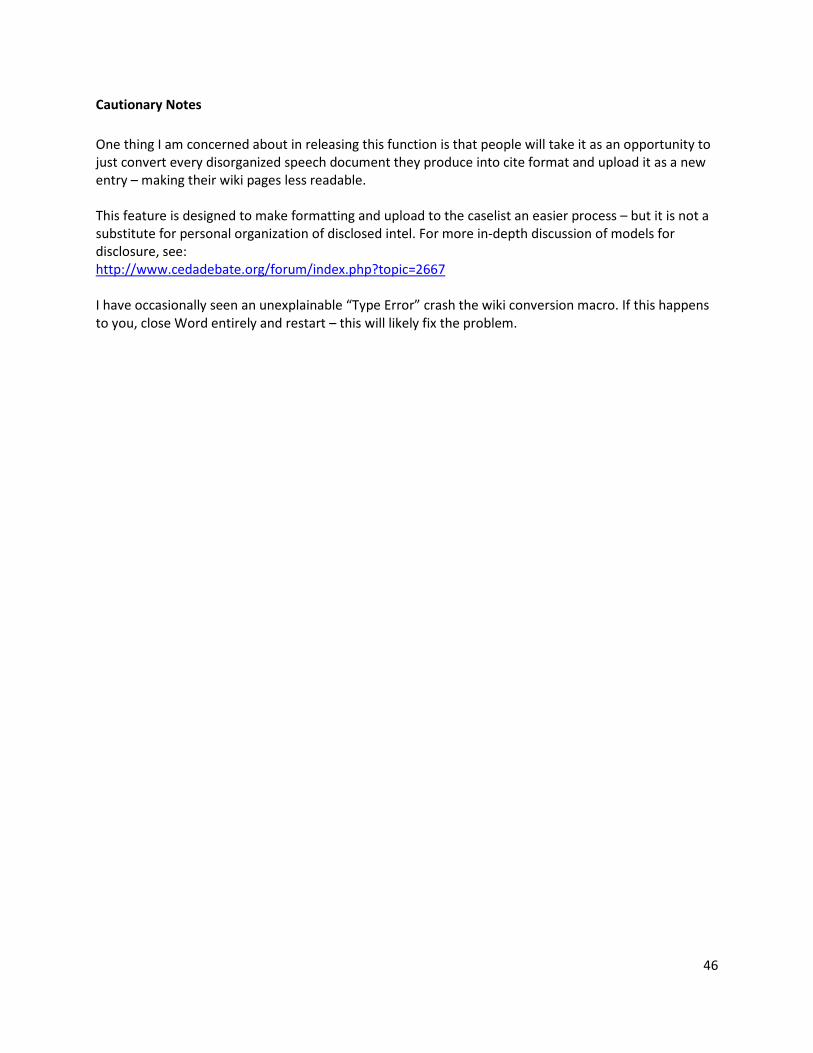
46
Cautionary Notes
One thing I am concerned about in releasing this function is that people will take it as an opportunity to
just convert every disorganized speech document they produce into cite format and upload it as a new
entry – making their wiki pages less readable.
This feature is designed to make formatting and upload to the caselist an easier process – but it is not a
substitute for personal organization of disclosed intel. For more in-depth discussion of models for
disclosure, see:
http://www.cedadebate.org/forum/index.php?topic=2667
I have occasionally seen an unexplainable “Type Error” crash the wiki conversion macro. If this happens
to you, close Word entirely and restart – this will likely fix the problem.
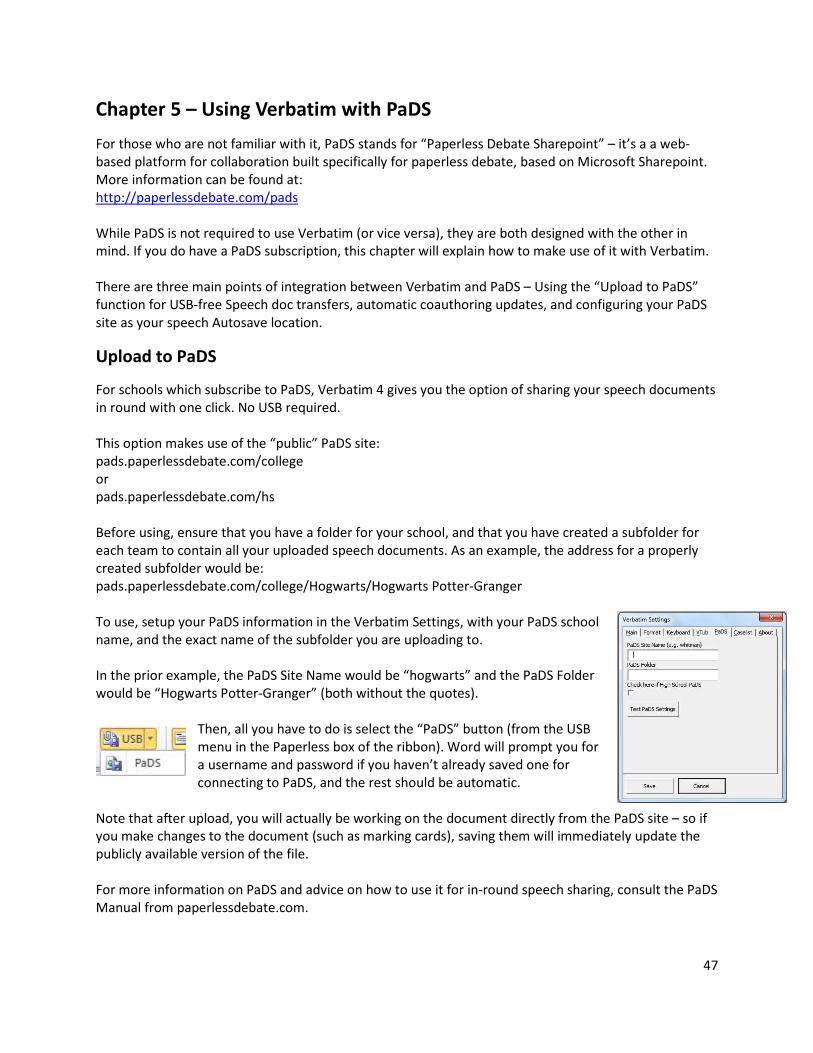
47
Chapter 5 – Using Verbatim with PaDS
For those who are not familiar with it, PaDS stands for “Paperless Debate Sharepoint” – it’s a a web-
based platform for collaboration built specifically for paperless debate, based on Microsoft Sharepoint.
More information can be found at:
http://paperlessdebate.com/pads
While PaDS is not required to use Verbatim (or vice versa), they are both designed with the other in
mind. If you do have a PaDS subscription, this chapter will explain how to make use of it with Verbatim.
There are three main points of integration between Verbatim and PaDS – Using the “Upload to PaDS”
function for USB-free Speech doc transfers, automatic coauthoring updates, and configuring your PaDS
site as your speech Autosave location.
Upload to PaDS
For schools which subscribe to PaDS, Verbatim 4 gives you the option of sharing your speech documents
in round with one click. No USB required.
This option makes use of the “public” PaDS site:
pads.paperlessdebate.com/college
or
pads.paperlessdebate.com/hs
Before using, ensure that you have a folder for your school, and that you have created a subfolder for
each team to contain all your uploaded speech documents. As an example, the address for a properly
created subfolder would be:
pads.paperlessdebate.com/college/Hogwarts/Hogwarts Potter-Granger
To use, setup your PaDS information in the Verbatim Settings, with your PaDS school
name, and the exact name of the subfolder you are uploading to.
In the prior example, the PaDS Site Name would be “hogwarts” and the PaDS Folder
would be “Hogwarts Potter-Granger” (both without the quotes).
Then, all you have to do is select the “PaDS” button (from the USB
menu in the Paperless box of the ribbon). Word will prompt you for
a username and password if you haven’t already saved one for
connecting to PaDS, and the rest should be automatic.
Note that after upload, you will actually be working on the document directly from the PaDS site – so if
you make changes to the document (such as marking cards), saving them will immediately update the
publicly available version of the file.
For more information on PaDS and advice on how to use it for in-round speech sharing, consult the PaDS
Manual from paperlessdebate.com.
48
Automatic Co-Authoring Updates
Word 2010 introduced a new feature called “Co-Authoring.” Basically, it allows multiple users to
simultaneously edit a single Word document in real time, with tools for merging edits and keeping
things straight. It’s like Google Docs, but within Word.
Co-Authoring works by integrating changes to your document from the server each time you press
“Save.” Under certain circumstances, you might want to receive updates made to the document in real-
time – such as while giving a speech or during time-pressured pre-round prep. Verbatim has a feature
will can be toggled on and off which will save your document for you (hence receiving updates from the
server) each time there are updates available that have been saved by someone else.
To use, just click the “Auto Co-Authoring” button on the Ribbon:
Note that while active, your document can in essence be “saved” by other people. Therefore, you
should only use this feature while coauthoring with someone you can trust. Note also that when your
document is saved you lose the ability to “Undo” changes you made to the document prior to the save.
For these reasons, it is not recommended that you keep this feature turned on by default – only when
you find it useful.
Configuring PaDS For Autosave
If you are using PaDS in conjunction with Sharepoint Workspace 2010, then it is possible to access files
in your Workspace directly via Word or Windows Explorer. You can take advantage of this to configure
your Speech “autosave” directory to be a folder on your PaDS site.
Note that the same basic principle applies even if you are using a different program for offline sync with
your PaDS site – you can configure your autosave directory to any location which will be synced
automatically.
Start by ensuring that your PaDS site is configured in Sharepoint Workspace. Then, in the Verbatim
settings, click the “Browse” button to set your autosave directory. Navigate to your desktop, then the
folder with your Name (your user profile folder). You should now see a folder named “Workspaces.”
Navigate to this folder and select the subfolder you want to use for your Speech documents.
That’s it – now as long as you have internet access, your Speech documents will automatically be saved
to a location which is co-authorable and automatically synced.
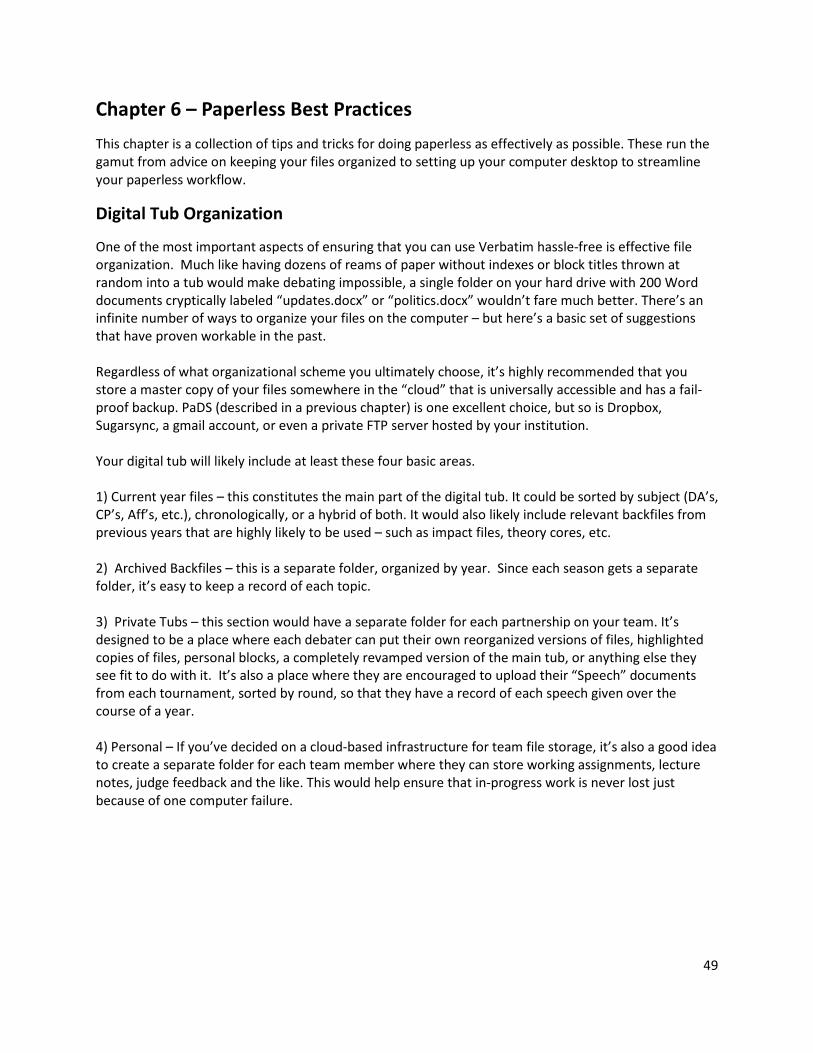
49
Chapter 6 – Paperless Best Practices
This chapter is a collection of tips and tricks for doing paperless as effectively as possible. These run the
gamut from advice on keeping your files organized to setting up your computer desktop to streamline
your paperless workflow.
Digital Tub Organization
One of the most important aspects of ensuring that you can use Verbatim hassle-free is effective file
organization. Much like having dozens of reams of paper without indexes or block titles thrown at
random into a tub would make debating impossible, a single folder on your hard drive with 200 Word
documents cryptically labeled “updates.docx” or “politics.docx” wouldn’t fare much better. There’s an
infinite number of ways to organize your files on the computer – but here’s a basic set of suggestions
that have proven workable in the past.
Regardless of what organizational scheme you ultimately choose, it’s highly recommended that you
store a master copy of your files somewhere in the “cloud” that is universally accessible and has a fail-
proof backup. PaDS (described in a previous chapter) is one excellent choice, but so is Dropbox,
Sugarsync, a gmail account, or even a private FTP server hosted by your institution.
Your digital tub will likely include at least these four basic areas.
1) Current year files – this constitutes the main part of the digital tub. It could be sorted by subject (DA’s,
CP’s, Aff’s, etc.), chronologically, or a hybrid of both. It would also likely include relevant backfiles from
previous years that are highly likely to be used – such as impact files, theory cores, etc.
2) Archived Backfiles – this is a separate folder, organized by year. Since each season gets a separate
folder, it’s easy to keep a record of each topic.
3) Private Tubs – this section would have a separate folder for each partnership on your team. It’s
designed to be a place where each debater can put their own reorganized versions of files, highlighted
copies of files, personal blocks, a completely revamped version of the main tub, or anything else they
see fit to do with it. It’s also a place where they are encouraged to upload their “Speech” documents
from each tournament, sorted by round, so that they have a record of each speech given over the
course of a year.
4) Personal – If you’ve decided on a cloud-based infrastructure for team file storage, it’s also a good idea
to create a separate folder for each team member where they can store working assignments, lecture
notes, judge feedback and the like. This would help ensure that in-progress work is never lost just
because of one computer failure.
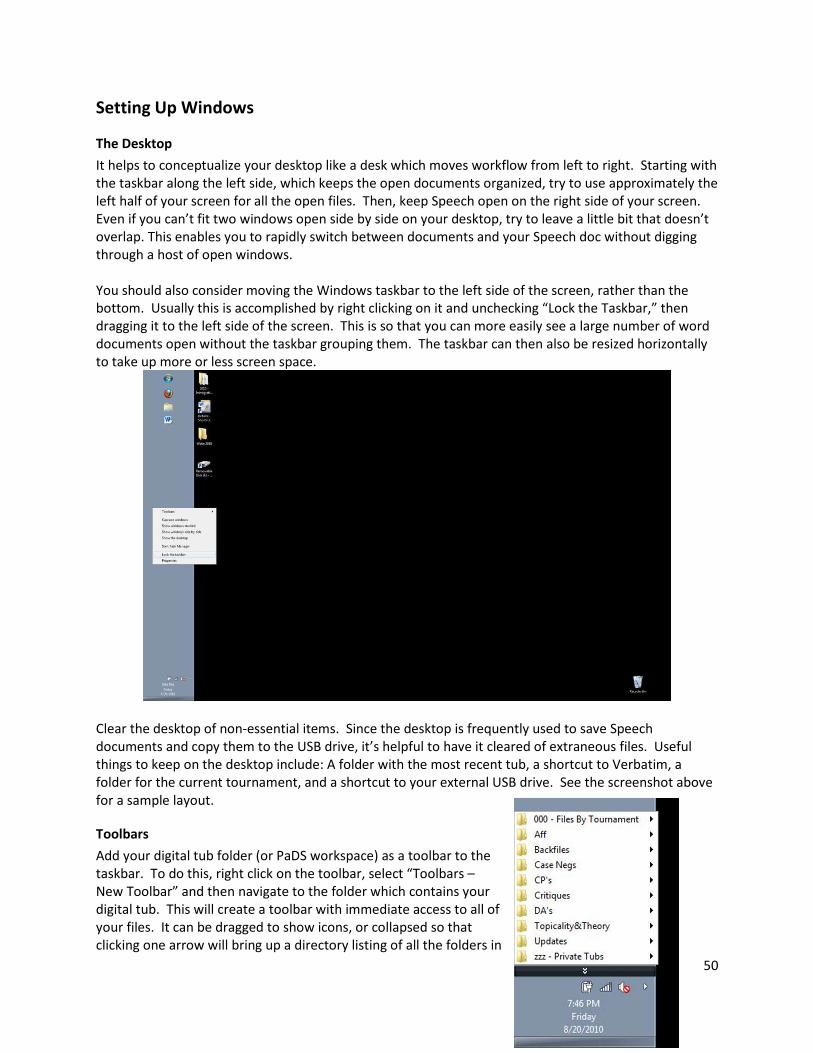
50
Setting Up Windows
The Desktop
It helps to conceptualize your desktop like a desk which moves workflow from left to right. Starting with
the taskbar along the left side, which keeps the open documents organized, try to use approximately the
left half of your screen for all the open files. Then, keep Speech open on the right side of your screen.
Even if you can’t fit two windows open side by side on your desktop, try to leave a little bit that doesn’t
overlap. This enables you to rapidly switch between documents and your Speech doc without digging
through a host of open windows.
You should also consider moving the Windows taskbar to the left side of the screen, rather than the
bottom. Usually this is accomplished by right clicking on it and unchecking “Lock the Taskbar,” then
dragging it to the left side of the screen. This is so that you can more easily see a large number of word
documents open without the taskbar grouping them. The taskbar can then also be resized horizontally
to take up more or less screen space.
Clear the desktop of non-essential items. Since the desktop is frequently used to save Speech
documents and copy them to the USB drive, it’s helpful to have it cleared of extraneous files. Useful
things to keep on the desktop include: A folder with the most recent tub, a shortcut to Verbatim, a
folder for the current tournament, and a shortcut to your external USB drive. See the screenshot above
for a sample layout.
Toolbars
Add your digital tub folder (or PaDS workspace) as a toolbar to the
taskbar. To do this, right click on the toolbar, select “Toolbars –
New Toolbar” and then navigate to the folder which contains your
digital tub. This will create a toolbar with immediate access to all of
your files. It can be dragged to show icons, or collapsed so that
clicking one arrow will bring up a directory listing of all the folders in

51
your tub. You can even create multiple toolbars for different folders, such as one for backfiles, one for
current files, and one for the affirmative. A helpful tip – holding down “shift” while clicking to open a
file will keep the taskbar open, rather than closing it and forcing you to re-click through the levels of a
tub. This is very helpful when opening more than one document at a time.
Operating System Tweaks
Turn off updates. It’s recommended that you temporarily turn off any program which will try to update
itself automatically, including Windows Update, just for the duration of the round (or the tournament).
This is to avoid the computer trying to reboot itself automatically, or popping up annoying reminders
about updates in the middle of a speech.
Turn off hibernation/standby/screen savers. You should set your computer to never go into sleep mode,
hibernate, or turn the screen off, including when the lid is shut. This is usually accomplished by right-
clicking on the desktop and selecting “Properties.” The power settings are included on the Screen Saver
tab, under the “Power” button.
Turn off any programs which could interfere with using the macros by utilizing “hot-keys.” Some
programs running in the background of your computer may already have assigned certain keystrokes
that are used by the paperless macro. A prominent example is certain NVidia graphics cards which
assign hotkeys which rotate the screen. This can be turned off by right-clicking the desktop, selecting
“Graphics Properties – Hot Keys” – and selecting “Disable Hot Keys.” Other programs may also exhibit
similar behavior – if macros aren’t behaving correctly, check your computer for other hidden programs
which might have hot-keys.
Consider a separate user account for paperless. Since most people will not want their screen set up the
same way for every day use as for paperless, consider adding a separate account in Windows used
exclusively for debate. This will allow you to set up the desktop to your specifications without
interfering with everyday work.
Setting Up Word
Document Navigation
Use “Draft” view. This removes the header, footer, and extraneous white space from your document
view. It’s better than Web view in my opinion because it doesn’t make the text unreadably long
horizontally.
Use the Navigation Pane– Most of you will be familiar with this from creating files electronically. In
paperless debate, its importance is elevated even further. It functions like an index, allowing you to see
the entire file at once – and makes moving around within a file substantially faster. It also enables you
to see where you’re moving blocks to while using MoveUp and MoveDown. I’d recommend leaving the
Nav Pane turned on in all documents, at all times.
Use the mouse wheel to zoom – On many computers, holding down the Ctrl key while scrolling the
mouse wheel will cause Word to zoom in and out quickly. This can help you see more of the document
or an individual card easily, especially if you’re working on a smaller screen.
You can cycle through all open Word docs using the “Windows” button on the ribbon (Ctrl-Tab).
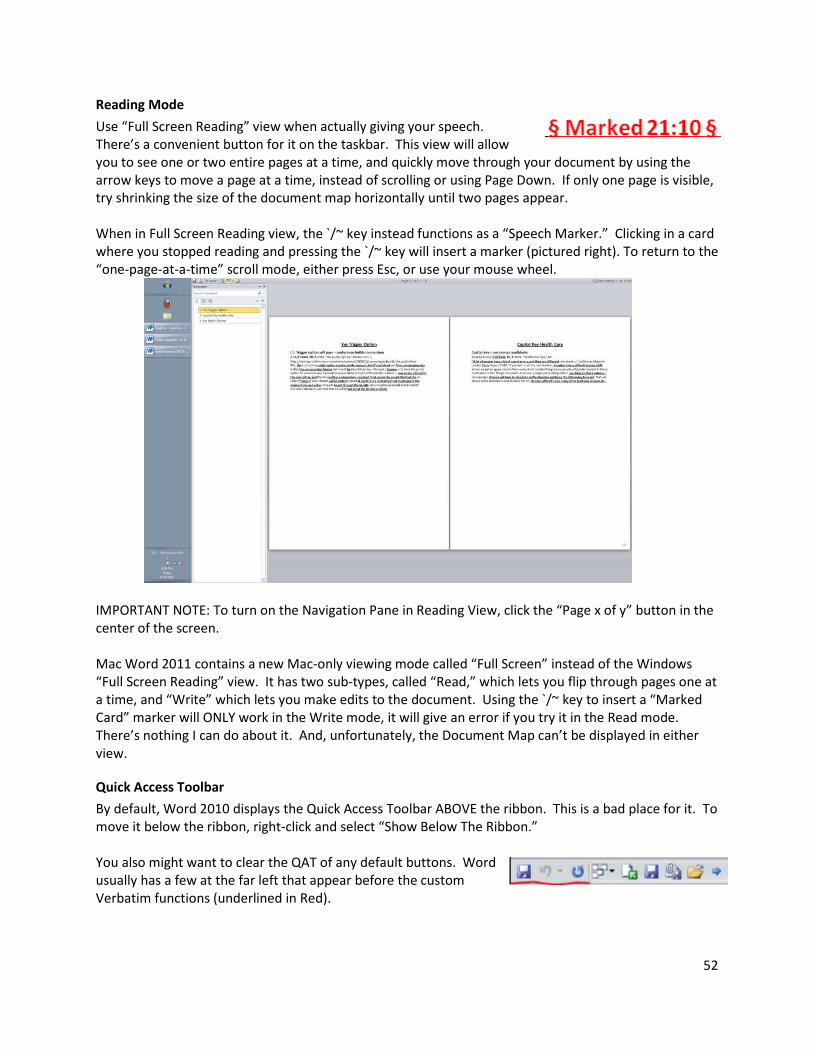
52
Reading Mode
Use “Full Screen Reading” view when actually giving your speech.
There’s a convenient button for it on the taskbar. This view will allow
you to see one or two entire pages at a time, and quickly move through your document by using the
arrow keys to move a page at a time, instead of scrolling or using Page Down. If only one page is visible,
try shrinking the size of the document map horizontally until two pages appear.
When in Full Screen Reading view, the `/~ key instead functions as a “Speech Marker.” Clicking in a card
where you stopped reading and pressing the `/~ key will insert a marker (pictured right). To return to the
“one-page-at-a-time” scroll mode, either press Esc, or use your mouse wheel.
IMPORTANT NOTE: To turn on the Navigation Pane in Reading View, click the “Page x of y” button in the
center of the screen.
Mac Word 2011 contains a new Mac-only viewing mode called “Full Screen” instead of the Windows
“Full Screen Reading” view. It has two sub-types, called “Read,” which lets you flip through pages one at
a time, and “Write” which lets you make edits to the document. Using the `/~ key to insert a “Marked
Card” marker will ONLY work in the Write mode, it will give an error if you try it in the Read mode.
There’s nothing I can do about it. And, unfortunately, the Document Map can’t be displayed in either
view.
Quick Access Toolbar
By default, Word 2010 displays the Quick Access Toolbar ABOVE the ribbon. This is a bad place for it. To
move it below the ribbon, right-click and select “Show Below The Ribbon.”
You also might want to clear the QAT of any default buttons. Word
usually has a few at the far left that appear before the custom
Verbatim functions (underlined in Red).
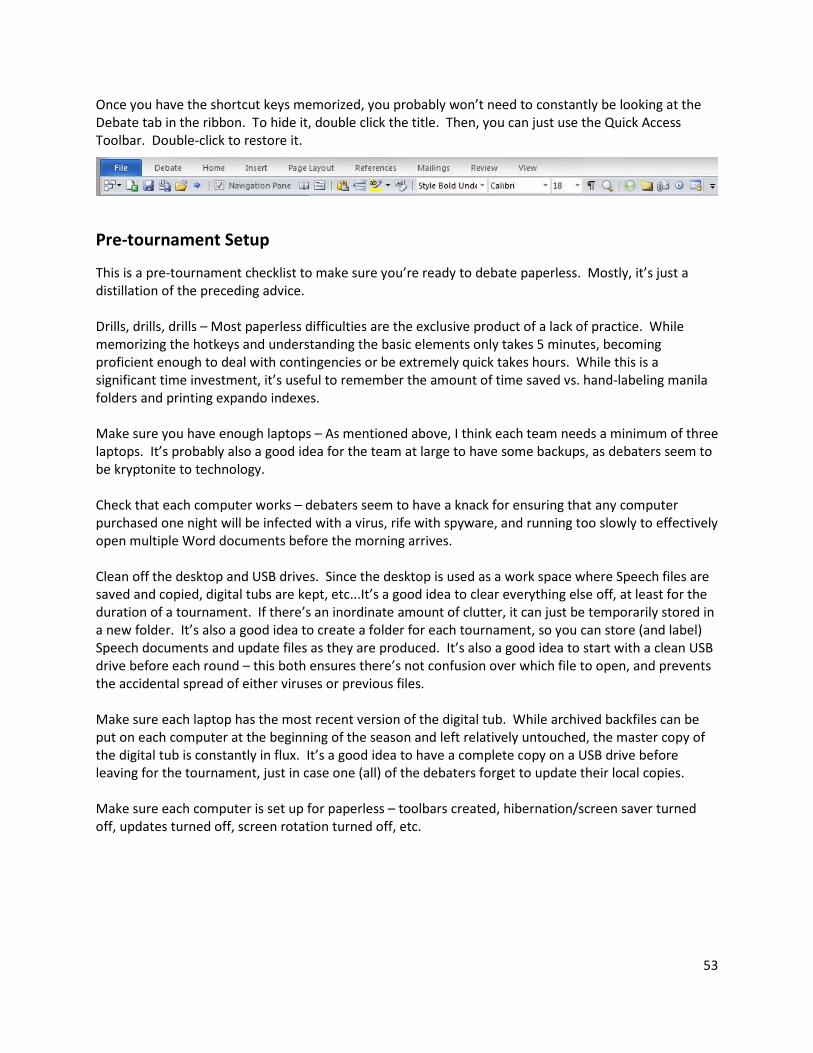
53
Once you have the shortcut keys memorized, you probably won’t need to constantly be looking at the
Debate tab in the ribbon. To hide it, double click the title. Then, you can just use the Quick Access
Toolbar. Double-click to restore it.
Pre-tournament Setup
This is a pre-tournament checklist to make sure you’re ready to debate paperless. Mostly, it’s just a
distillation of the preceding advice.
Drills, drills, drills – Most paperless difficulties are the exclusive product of a lack of practice. While
memorizing the hotkeys and understanding the basic elements only takes 5 minutes, becoming
proficient enough to deal with contingencies or be extremely quick takes hours. While this is a
significant time investment, it’s useful to remember the amount of time saved vs. hand-labeling manila
folders and printing expando indexes.
Make sure you have enough laptops – As mentioned above, I think each team needs a minimum of three
laptops. It’s probably also a good idea for the team at large to have some backups, as debaters seem to
be kryptonite to technology.
Check that each computer works – debaters seem to have a knack for ensuring that any computer
purchased one night will be infected with a virus, rife with spyware, and running too slowly to effectively
open multiple Word documents before the morning arrives.
Clean off the desktop and USB drives. Since the desktop is used as a work space where Speech files are
saved and copied, digital tubs are kept, etc...It’s a good idea to clear everything else off, at least for the
duration of a tournament. If there’s an inordinate amount of clutter, it can just be temporarily stored in
a new folder. It’s also a good idea to create a folder for each tournament, so you can store (and label)
Speech documents and update files as they are produced. It’s also a good idea to start with a clean USB
drive before each round – this both ensures there’s not confusion over which file to open, and prevents
the accidental spread of either viruses or previous files.
Make sure each laptop has the most recent version of the digital tub. While archived backfiles can be
put on each computer at the beginning of the season and left relatively untouched, the master copy of
the digital tub is constantly in flux. It’s a good idea to have a complete copy on a USB drive before
leaving for the tournament, just in case one (all) of the debaters forget to update their local copies.
Make sure each computer is set up for paperless – toolbars created, hibernation/screen saver turned
off, updates turned off, screen rotation turned off, etc.
54
In-round
Here are a few tips for making sure paperless goes well during an actual debate, in roughly chronological
order.
Pre-round
Make sure you know if the other team wants to use their own computers to view your evidence, or
would prefer to use the viewing laptop – they take time to plug in, set up, etc. so don’t wait until the
round has already started.
If you have concerns about the other team “stealing” your evidence instead of just looking at it on the
USB drive, talk to them about it in advance. You can also ask the other team not to “look ahead” in the
document while you’re giving your speech if this is something which concerns you.
Plug in and set up – when you get to the debate, immediately get both computers plugged in so there’s
no battery problems. Figure out if you need extension cords, power strips, etc…Also, set up your laptop
stand in advance if you need it for a podium.
Work out in advance with your judge whether you can “stop prep” before doing the USB transfer, or
whether they consider that prep time. Trying not to irritate the judge is generally good practice, never
more so than when doing something alien to “normal” debate.
Get a USB drive plugged in to the computer in advance, with a folder open to quickly facilitate copying
to it from the desktop. This is important to facilitate rapidly moving files – it can take a long time for a
computer to recognize a drive, open a folder, etc.
Both debaters should get a Speech document open on their computers. It should be saved on the
desktop. You can also use the top page of your speech document or a blank “notepad” document to jot
down coaching notes.
During the debate
Minimize the number of open Word files. If you’re clearly done with a file, close it. Word can pretty
easily handle a large number of open documents, but the more you push it, the more likely it is to
freeze, or become unbearably slow. This is especially true right before you’re about to speak – the most
important time for your computer to not have tech problems.
Once you’re done prepping your speech, save it. Then, copy it to the USB (or PadS). VERY IMPORTANT
NOTE: Do NOT save the file directly from Word on to the jumpdrive. If you do, Word sometimes gets
very angry when you remove the drive.
You should first hand the jumpdrive to your partner, who should copy it to their desktop and open it on
their computer as a backup. Then you should set up on your podium, give the roadmap, etc. while your
partner hands it to the other team or sets up the viewing laptop for them.
It’s helpful to maintain a consistent naming convention for all your speech docs, as well as a consistent
organizational scheme on your desktop and jumpdrive. Since every speech starts out as “Speech.docx”
55
it would quickly become impossible to keep them straight unless they’re given more accurate names
and organization.
Use “Reading View” during your speech – as described above, this makes scrolling through a document
much easier, using only the arrow keys. Alternately, Page Up and Page Down should always work to
advance pages.
Post-round
After the debate, you can politely remind your opponent and/or judge to delete their copies of your
speech documents if anyone transferred them instead of leaving them on the USB drive.
Keep every speech you give. This makes writing blocks, sharing work and intel, etc. much easier.
What do I do if I have a catastrophic crash? – If you’ve done everything right, there won’t be a problem.
If something really insane happens, like in a speech, then you should be able to quickly switch to your
partners laptop if you’ve done the backup process correctly. In an absolute disaster, you should beg for
mercy from the judge while you figure out what went wrong. Hopefully, they’ll be nice…
56
Public Relations
At the very beginning of the paperless transition, Whitman proposed two “community norms” we
thought would help facilitate fairness during paperless debates, as well as alleviate some of the
concerns people had over switching: 1) no taking speech docs, and 2) no “looking ahead.”
To a certain degree, these norms seem to have shifted in the past few years. Anecdotally, it seems very
common for people to take their opponents speech documents (at least for cites) without prior
approval, and most paperless teams don’t really seem to mind. Additionally, tales of teams “reading
ahead” and shooting themselves in the foot by failing to flow something not in the speech doc are
legion.
The original statement of these “norms” is reproduced below for the sake of completeness – whether
these still represent “community consensus” or are merely of historical interest is an open question.
• The opposing team should, to as reasonable a degree as possible, minimize “looking ahead” in the
speech document to try and gain a competitive advantage by figuring out what will be read later in
the speech. This is especially applicable in rounds where something such as a new affirmative is
being read. While obviously only so practicable, we feel that an honest attempt is still better than
nothing.
• Opposing teams or judges who opt to transfer the “speech” document to their personal computers
should delete them at the conclusion of the debate. We feel that taking evidence wholesale is the
equivalent of taking a paper file. We’d hope the majority of the community would agree that
stealing files crosses the line, especially given the easy availability of cites.
To this, I would add a third proposed “norm” which onus falls not on the opponents but on the speaking
debater:
• Debaters should, to as reasonable a degree as possible, attempt to give their opponents a speech
document which accurately represents the likely order and length of content to be read during the
speech.
This is designed to discourage the practice (inadvertent or otherwise) of giving the other team a speech
document with significantly more evidence than is feasible to read, or “jumping around” at random in
an attempt to confuse the other team.
Two other issues bear mentioning in relation to paperless teams interacting with community at large,
especially judges.
Prep Time – Some judges express concern that the process of jumping files, setting up computers, etc.
takes too much time. In particular, they seem to be frustrated that it appears as if the paperless team is
“stealing prep” while waiting for something such as a Word document to open on the viewing computer.
Debaters are STRONGLY encouraged to minimize the time it takes to transfer files, and to be cognizant
of not “stealing prep” during this period.
Tech problems – To a certain extent, these can’t be avoided – but it’s probably worth thinking through
how people (especially judges) will deal with it. If a few debates a year have to conclude 5 minutes later

57
while a debater gets one free “reboot,” it seems worth the myriad other benefits it brings to the debate
community. In general, I would just hope for patience on the part of the judges and debaters when this
problem inevitably arises.
58
Chapter 7 – Frequently Asked Questions
This chapter will hopefully answer the most common problems people have when using Verbatim or
dealing with paperless debate in general. Much of the advice given here is repeated elsewhere, but this
is an attempt to present it in a form more easily accessible when something goes wrong.
The Decision To Switch
What do I do if my computer crashes?
Enough programs have now gone paperless to demonstrate that while this remains a legitimate
concern, it doesn’t happen with great enough frequency to truly be a bar to widespread adoption. First,
keep in mind that it’s important to minimize the chance of a crash by practicing good preventative care
on your computer. Ensuring your operating system is up to date, that you’re running anti-virus
software, and that the machine is physically well taken care of will go a long ways towards avoiding any
problems.
That said, if it does happen, there are several backups in place. Since each debater puts their speech on
a jump drive and gives it to both their partner and their opponents, there should be at least 2 other
computers looking at the current speech at any given time. After doing contingency drills with my
debaters, they can swap out a crashed laptop in no more than a few seconds. If a computer crashes
before the speech, a reboot will usually solve the problem – and if the debater has been saving
regularly, not much work should be lost.
Can’t we switch half-way and still use some paper or printers?
It’s obviously possible to develop a debating method that falls somewhere in-between fully paperless
and relying entirely on tubs. Several suggestions have been made, such as printing evidence before
each speech, printing the evidence for the judge after the round, carrying only the most frequently used
files in one tub, carrying everything in tubs except a few backfiles, etc.
In my opinion, these ideas defeat much of the purpose. Since the primary motivations for switching are
to eliminate baggage costs, printing costs, etc. and simplify the process of traveling with a large number
of teams, creating another headache by making each team carry a printer, for example, doesn’t solve
many problems. While I’m sure that some teams will effectively implement a hybrid system, I know of
no program which regrets their decision to remain completely paperless.
There’s lots of paperless implementations out now, which should I pick?
Totally up to you – there’s advantages and disadvantages to any system you decide on, and I’m sure that
the more teams that go paperless, the more options you’ll have. Ultimately, most versions of paperless
are pretty similar, so it’s hard to go wrong. There are a lot of different needs and opinions on how
various features should be implemented, how the macros should behave, etc.
My goal has been to make Verbatim both as simple as possible, minimizing the number of macros,
things to remember, etc. while ensuring that it’s as powerful as possible. I’ve also tried to incorporate a
wide variety of suggestions, new features, and bug fixes sent to me by other people. As other people
venture into the paperless world and come up with innovations, I’ll definitely keep making Verbatim
better.
59
What about Debate Synergy?
Again, up to you. In some ways, the functionality of Verbatim overlaps with that of Synergy. In other
ways, they’re designed to do totally different things. For example, Verbatim isn’t (currently) designed to
integrate with Excel, because I generally discourage debaters from flowing on the computer. Similarly,
both programs take a different approach to implementing some of the same basic functionality – like
sending to Speech. Try out both and see what you like and what you don’t like. Several features of
Synergy are totally awesome – and I’ve borrowed liberally from them in designing Verbatim.
One factor that may help influence your decision about which paperless platform to pick – Synergy
hadn’t been updated in a number of years, and is unlikely to see any significant development in the
short term. Verbatim has been updated every few months with additional features and bug fixes, and
remains under active development. You may also have an easier time getting tech support for it – I’m
readily available at tournaments and by email, and Verbatim has an installed user base in the thousands
that can help you answer any questions you may have. On balance though, Synergy is a great program –
it ultimately comes down to a matter of taste.
Can these macros be written in Applescript?
A number of years ago, some paperless capabilities were replicated in Applescript by Brad Bolman and
Peter Vale, but it’s nowhere near as fully-featured as a Windows based solution. As far as I know this
project is defunct.
Can’t we just use a printer before each speech?
I think that it could work for some, and it's obviously each team's prerogative – but it’s not my personal
recommendation. First, the logistics of each team carrying a printer are significantly more of a hassle
than one spare laptop per team. A laptop fits in a backpack, a printer doesn't. Printers small enough to
carry tend to print very few pages per minute and require cartridge replacement every couple hundred
pages. Even with the perfect printer, it requires locating boxes of paper, toner, etc. for every
tournament, which is a hassle I’m glad to have left behind. Second, printers just aren't very reliable –
even less so than computers, and they hold up to travel abuse very poorly. Lastly, printers present a
unique set of tech problems, like stalled print queues, incorrect drivers, or spooling errors – which just
add to the potential for things to go wrong during a debate.
How do novices adapt to this system?
My experience so far has been that novices are even better at using Verbatim than more experienced
debaters. The technological sophistication of the average 18 year old has skyrocketed in the past five
years, and younger students are frequently much better at using a laptop and quickly digesting
electronic info than older students. I’m fairly optimistic that novices could quickly adapt and learn
paperless – they also tend to have problems keeping large stacks of paper organized.
Can this work on Linux, or with Open Office?
Not yet. Open Office isn’t good enough yet. It’s pretty close to replicating most of the needed
functionality, but support for macros is still pretty lagging, and it’s lacking “Draft View,” which is a deal
breaker. Hopefully in years to come this becomes a more viable option.
I’m also very confident that porting the whole VBA code base into Open Office’s native macro format
shouldn’t be that hard. In many ways, it’s better than VBA – but the other failings of Open Office make
this a very low priority right now.
60
How do we integrate backfiles produced in other templates?
This is largely discussed above in the section on Converting Backfiles – the short version is that great
effort has been made to help transition from other templates. You could also theoretically adapt the
important Verbatim macros to work in most other templates.
Isn’t highlighting files harder?
To a certain degree, yes. Our template has a built-in highlighter function which is fairly rapid with
practice. It is, however, slightly slower than doing it by hand. I think that this is made up for by the
benefits of only needing to highlight any card once – it can then be copied to other files, or complete
files can be shared by the team, saving duplicative highlighting efforts.
What if I want to use an older version of Verbatim?
Old versions of Verbatim (and accompanying documentation) are still available from
paperlessdebate.com.
What resources are currently available for paperless?
The single best resource for all things paperless debate is at:
http://paperlesdebate.com
You should also look into the Open Paperless Project – it’s an emerging Open Standard for encouraging
debate template interoperability. The idea is to allow cards to be cut and pasted between differing
templates, while ensuring that they all work seamlessly regardless of which implementation of paperless
people choose to use. You can find links to more information about this project at the link above.
Privacy/Security
Won’t people steal your Speech documents and keep all your cards?
Probably. First, I choose to have a more optimistic view of the debate community, and assume until
proven otherwise that opponents will ask for cites rather than wholesale take evidence, or at least that
they would delete speech documents when asked to do so.
More importantly, even if it happens frequently, it doesn’t confer much of a competitive advantage to
the team who chooses to do so. In an era of massive caselists and prolific cite requests, access to any
piece of evidence read in a debate is already a matter of a few minutes work. I think that this concern
also buys into the myth that “not letting your opponents see your evidence” somehow confers an
important strategic benefit. In reality, most debates are won because of superior technique,
argumentative capabilities, or ethos – not because the other team didn’t have a chance to digest your
evidence. I’ve frequently told my debaters that if we prepare effectively, we should be able to give the
other team access to all our files for an hour prior to the debate and not have it affect our chances to
win. Either way, I can’t point to a single debate I’m aware of that was won or lost due to “file stealing.”
What happens if I break a new (advantage/disad/etc...) and don’t want to give it to the other team
before my speech?
There are several solutions to this problem. First, take care with labeling the block titles in your Speech
document something less descriptive than the argument name, such as “New Advantage.” Combined
61
with asking the other team not to “scroll ahead” since you’ll be breaking something new should go a
long way towards restoring the strategic benefit of a few extra minutes of “surprise.” Secondly, you
could save the new argument to a separate word document on the jump drive, and ask the opponent to
only open that file once you reach that part of your speech. Finally, you could theoretically bring a
paper copy of just your new argument.
Much like the concern about stolen Speech files, I think this falls under the category of “scarier in theory
than in practice.” This ranked near the top of my debaters concerns before doing paperless – now, they
no longer even bother with any of the aforementioned “solutions” (except perhaps changing block
titles). It became clear to them that the extra minute in which the other team doesn’t know what your
new advantage is just doesn’t have much tangible bearing on the debate.
Won’t people read ahead in the Speech document and gain a competitive advantage?
This concern is pretty much the same as the previous two – not as frequent or as big of a deal as people
seem to expect. If anything, this works in the other direction – our experience has borne out that
opponents who have tried to read ahead have been much more likely to stop flowing, miss arguments,
or even waste speech time answering arguments which were never made.
Doesn’t sharing USB drives so widely present a virus risk?
Yes. You should use PaDS instead.
Ensuring that each computer is up to date with current anti-virus and spyware software is an important
element of ensuring paperless is as safe as possible. It’s also recommended that the USB drives used for
paperless be used exclusively for that task – if they are kept clean and wiped before each debate (or at
least before each tournament), the virus risk can be minimized. In this age of widespread file sharing,
other risks seem much higher.
Installation Problems
I ran the automatic installer – how do I know if it’s installed right?
On the PC, you should have a shortcut to Verbatim on your desktop. If this doesn’t appear, you can also
check to see if it’s installed by opening Word and selecting File – New, and looking for Debate.dotm in
your “My Templates” section.
On the Mac, there will be no immediately apparent sign that Verbatim installed correctly. The only way
to check is to start Word, go to File – New from Template, and see if Debate appears under My
Templates.
I’m still using Windows XP, and the Verbatim shortcut doesn’t work.
You’ll need to manually create one. Go to your Word Templates folder:
C:\Documents and Settings\username\Application Data\Microsoft\Templates.
Right-click on Debate.dotm, select “Create Shortcut” and drag the resulting shortcut file to the desktop.
You can rename it “Verbatim” if you like as well.
62
The “Verbatimize Normal Template” button in the Settings didn’t work for me. How do I manually
create one (PC Only)?
If you’re using Word 2007 the automatic Verbatimize buttoninstaller won’t work. There are also a
variety of other reasons why the automatic install might fail. To manually create a Verbatimize button,
follow the instructions in the Post-Installation Steps section of Chapter 1.
Why can’t I just install Verbatim as my Normal template or leave it on my desktop?
Because for files you produce to be recognized as Verbatim documents by other people, you both need
to have the same template, in the same place, with the same. When you install Verbatim as your
“Normal” template, you are breaking compatibility with everyone else.
Verbatim is also not designed to be your “default” template when you open Word. That’s because most
people that use Word still use it more for non-debate stuff (like paper writing or business stuff, etc.) and
don’t always want to open every document with that template.
The solution to wanting Verbatim to be “always available” is to make use of the Verbatimize button, as
described elsewhere in this manual.
For similar reasons, it is highly recommended that you put the template in your Templates folder, not
just on your desktop or in your Startup folder. This is because all documents based on a template don’t
actually include the macros from the original. Instead, they include a “reference” to what template they
are based on. So if you start a new blank document from a template, it will think it is tied to the file on
your desktop, not to the one in your Templates folder. If you then send your file to someone else on
your team, it will fail to find the template on their desktop, and the macros will be “missing.” The
obvious solution is for everyone to keep the template installed in the same location. After installing, just
put a shortcut to the file in your Templates folder on your desktop. Upgrading or changing the template
is then as simple as replacing the old version with the updated one in the Word template folder.
If you want a shortcut on your desktop, you should create a shortcut to Debate.dotm that opens a new
blank document based on that template, and use that to start a new “Verbatim document” each time,
instead of the normal Word icon. If you right-click and drag Debate.dotm to the desktop from your
Templates folder you will get an option to “create shortcut here.” If you’re running Windows 7 you can
also drag Debate.dotm to your Word icon on the taskbar and “pin” the file as a shortcut for easy access.
Running the installation package for Verbatim 4 should have also created that shortcut for you. You can
also manually open a new Verbatim doc within word by using the File – New menu.
How do I uninstall the Verbatimize button?
To completely uninstall the Verbatimize button, you need to do 2 things.
1) Delete the following file:
c:\Users\<username>\AppData\Local\Microsoft\Office\Word14.customUI
If you manually installed the button, you should instead just delete the button using the built-in
“Customize Ribbon” interface in the Word options.
2) Remove the Verbatim_AttachNormal module from your Normal.dotm file.
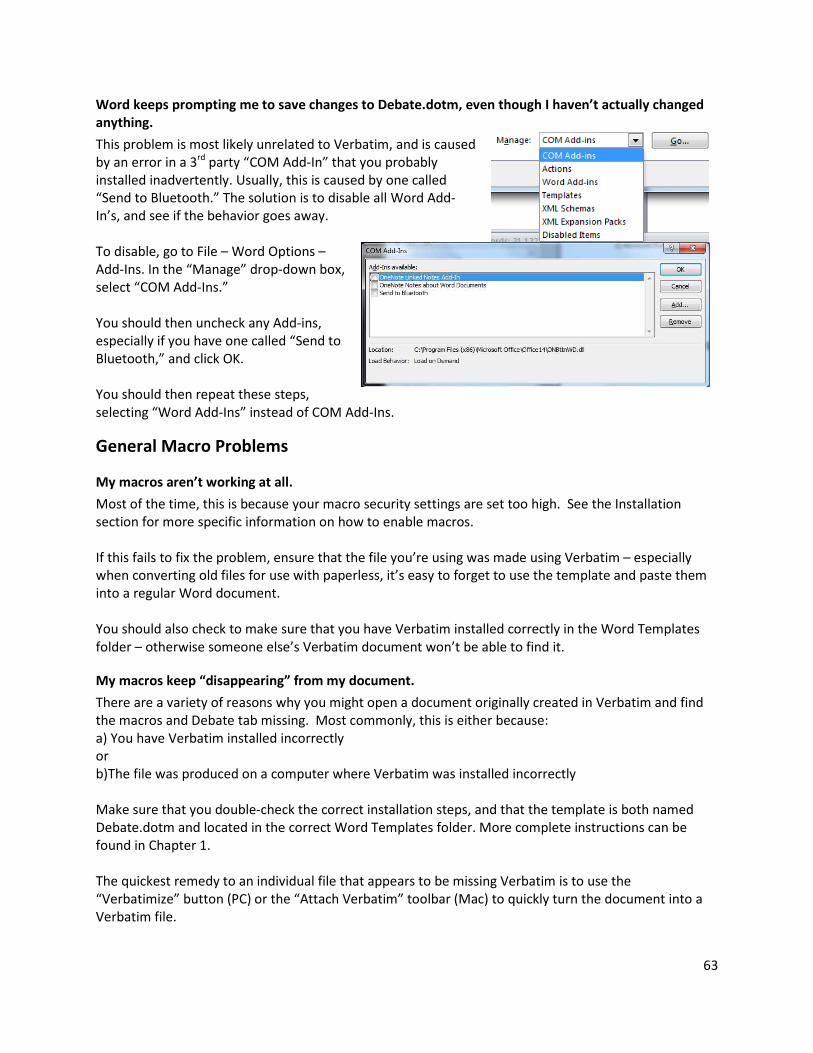
63
Word keeps prompting me to save changes to Debate.dotm, even though I haven’t actually changed
anything.
This problem is most likely unrelated to Verbatim, and is caused
by an error in a 3rd party “COM Add-In” that you probably
installed inadvertently. Usually, this is caused by one called
“Send to Bluetooth.” The solution is to disable all Word Add-
In’s, and see if the behavior goes away.
To disable, go to File – Word Options –
Add-Ins. In the “Manage” drop-down box,
select “COM Add-Ins.”
You should then uncheck any Add-ins,
especially if you have one called “Send to
Bluetooth,” and click OK.
You should then repeat these steps,
selecting “Word Add-Ins” instead of COM Add-Ins.
General Macro Problems
My macros aren’t working at all.
Most of the time, this is because your macro security settings are set too high. See the Installation
section for more specific information on how to enable macros.
If this fails to fix the problem, ensure that the file you’re using was made using Verbatim – especially
when converting old files for use with paperless, it’s easy to forget to use the template and paste them
into a regular Word document.
You should also check to make sure that you have Verbatim installed correctly in the Word Templates
folder – otherwise someone else’s Verbatim document won’t be able to find it.
My macros keep “disappearing” from my document.
There are a variety of reasons why you might open a document originally created in Verbatim and find
the macros and Debate tab missing. Most commonly, this is either because:
a) You have Verbatim installed incorrectly
or
b)The file was produced on a computer where Verbatim was installed incorrectly
Make sure that you double-check the correct installation steps, and that the template is both named
Debate.dotm and located in the correct Word Templates folder. More complete instructions can be
found in Chapter 1.
The quickest remedy to an individual file that appears to be missing Verbatim is to use the
“Verbatimize” button (PC) or the “Attach Verbatim” toolbar (Mac) to quickly turn the document into a
Verbatim file.
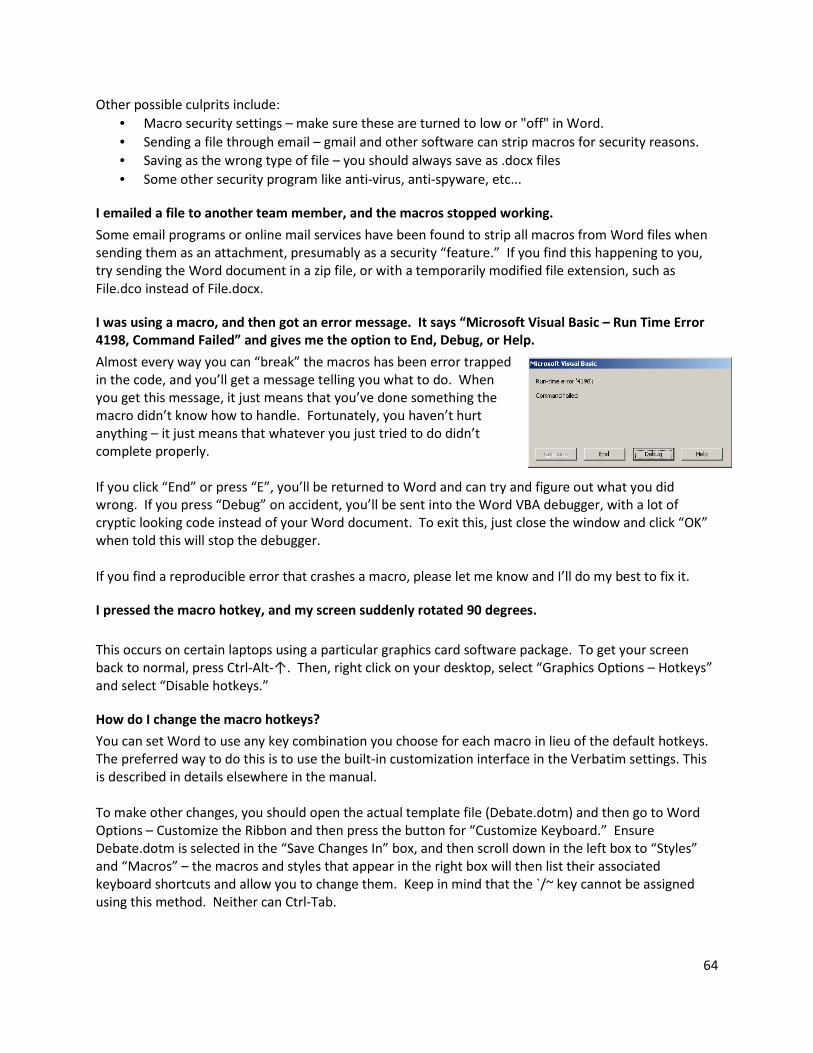
64
Other possible culprits include:
• Macro security settings – make sure these are turned to low or "off" in Word.
• Sending a file through email – gmail and other software can strip macros for security reasons.
• Saving as the wrong type of file – you should always save as .docx files
• Some other security program like anti-virus, anti-spyware, etc...
I emailed a file to another team member, and the macros stopped working.
Some email programs or online mail services have been found to strip all macros from Word files when
sending them as an attachment, presumably as a security “feature.” If you find this happening to you,
try sending the Word document in a zip file, or with a temporarily modified file extension, such as
File.dco instead of File.docx.
I was using a macro, and then got an error message. It says “Microsoft Visual Basic – Run Time Error
4198, Command Failed” and gives me the option to End, Debug, or Help.
Almost every way you can “break” the macros has been error trapped
in the code, and you’ll get a message telling you what to do. When
you get this message, it just means that you’ve done something the
macro didn’t know how to handle. Fortunately, you haven’t hurt
anything – it just means that whatever you just tried to do didn’t
complete properly.
If you click “End” or press “E”, you’ll be returned to Word and can try and figure out what you did
wrong. If you press “Debug” on accident, you’ll be sent into the Word VBA debugger, with a lot of
cryptic looking code instead of your Word document. To exit this, just close the window and click “OK”
when told this will stop the debugger.
If you find a reproducible error that crashes a macro, please let me know and I’ll do my best to fix it.
I pressed the macro hotkey, and my screen suddenly rotated 90 degrees.
This occurs on certain laptops using a particular graphics card software package. To get your screen
back to normal, press Ctrl-Alt-↑. Then, right click on your desktop, select “Graphics Op^ons – Hotkeys”
and select “Disable hotkeys.”
How do I change the macro hotkeys?
You can set Word to use any key combination you choose for each macro in lieu of the default hotkeys.
The preferred way to do this is to use the built-in customization interface in the Verbatim settings. This
is described in details elsewhere in the manual.
To make other changes, you should open the actual template file (Debate.dotm) and then go to Word
Options – Customize the Ribbon and then press the button for “Customize Keyboard.” Ensure
Debate.dotm is selected in the “Save Changes In” box, and then scroll down in the left box to “Styles”
and “Macros” – the macros and styles that appear in the right box will then list their associated
keyboard shortcuts and allow you to change them. Keep in mind that the `/~ key cannot be assigned
using this method. Neither can Ctrl-Tab.

65
Move Up/Move Down don’t work correctly – it doesn’t move what I expect it to.
First, check the position of your cursor – remember that the Move macros are designed to automatically
select what to move based on whether you’re currently in a card, block, hat, or pocket.
If that’s not it, then this is likely caused by improperly formatted blocks in your source documents. This
arises most frequently when attempting to use backfiles which weren’t formatted in Verbatim. Turn on
“Show Formatting,” and look into how the stuff you’re trying to move is formatted – odds are good
you’ve just accidentally formatted something incorrectly.
For example – if you have a bunch of blank lines in a block formatted as “tag” without any text, you’ll
sometimes have to run MoveUp or MoveDown several times to move a card down below the next
“actual” card.
Word stops responding with one of the macros – all I get is an hourglass.
This is probably caused because a macro is in an infinite loop. I’m pretty sure this won’t happen,
because any circumstance where an infinite loop is possible has been coded around. But, if all else fails,
you can manually stop a macro by pressing Ctrl-Break. Break is also sometimes labeled “Pause” on the
keyboard.
I get a “Code execution has been interrupted” error when I run any macro.
This usually happens after having pressed Ctrl-Break, and VBA can get grumpy. Try pressing Ctrl-Break
again. It’s also worth pressing “Debug” and manually pressing the Stop button in the VBA Editor. This
error is quite rare, and frequently doesn’t have an exact cause.
Every time I open a document, I get a prompt that the file is in “Protected View,” which prevents me
from editing it.
This is an annoying “security” measure in Word that it’s relatively easy to turn off. Go to File – Word
Options – Trust Center – Trust Center Settings, and then Protected View. Uncheck all of the available
options and click OK.
Word appears to be randomly typing gibberish text even when I’m not touching the keyboard.
This is perhaps the strangest behavior I’ve seen while using Verbatim. Some versions of Office come
with the Microsoft Language Bar, which includes a rudimentary Speech-to-Text tool. This can be turned
on inadvertently while using Word, which will then attempt to convert speech picked up by the
66
computers built-in microphone into text in your open document. If you find random words and
fragments of sentences appearing seemingly out of nowhere in your Word documents, try disabling the
Language Bar. Somewhat embarrassingly, this took two days and four people to figure out.
Specific Macro Errors
When I type my apostrophe key, it tries to Send To Speech – my keyboard confuses the ‘ with the `
This bug occurs very rarely, and seems mostly limited to Macbooks. Recent code changes have limited
the scope of this bug even further, but if it’s still happening to you, your best bet is to manually change
the keyboard shortcut for the Send To Speech macro. You’ll have to edit the AutoOpen and AutoNew
macros to remove the lines that start with “KeyBindings.Add” and then manually assign a different
keyboard shortcut in the Customize Keyboard interface. Additional fixes to this will happen in the next
version of Verbatim.
When I select text and run the “Shrink Text” (Ctrl+8) macro, it only shrinks text in the first paragraph.
That’s because the Shrink Text macro is designed to work on a single paragraph at a time – after you
have Condensed the text to a single paragraph. There’s no need to select text – just put the cursor in the
paragraph and click the Shrink macro. This functionality may change in a future version, but for now it
will only work for a paragraph at a time.
Why is there no “Card” style?
Because there’s not much in the document which isn’t already a different heading which is NOT card
text. This is done to simplify many of the macros, and because it makes sense to identify the contents of
a card by the associated Tag. Since every card (pretty much) already comes with a Tag, a separate style
for Card is inefficient.
If what you’re really looking to do is just indent you card text, that function is already built into Word –
by default the keyboard shortcut is Ctrl+M.
Every time I paste text, it comes in as totally unformatted – even when I just use Ctrl+V.
This is not a Verbatim-specific issue, but it is one of the strangest behaviors I’ve ever seen in Word. The
solution is to uninstall a program called “Skype Click-To-Call.” You may not even have installed this on
purpose – it is sometimes included as part of an automatic Skype upgrade. Go to Control Panel –
Add/Remove Programs and uninstall it – your cut and paste functionality should return to normal
immediately. Don’t ask me to even kinda explain this one.
When I use the Condense macro on text from a PDF with columns, it puts in too many Pilcrow signs.
This is a known limitation on the Condense macro – a workaround will be included in a future version.
For now, the best option is to open the Verbatim settings and temporarily disable the “Retain Paragraph
Integrity” option until you’re done cutting that article.
I re-opened my file after saving it, and all my highlighting was gone.
This isn’t caused by Verbatim, but is a known bug in Word for which there is no permanent solution.
The first thing to try is highlighting in a different color. Light gray (25%) is more prone to this bug than
other colors - so if you're using grey, try changing your default highlighting color and see if the problem
disappears.
67
You can also try saving your document as a .doc or .rtf file instead of .docx - generally not
recommended, but it might help save the highlighting. It might even bring the highlighting back from the
dead if you save a file with disappeared highlighting as a .doc and then reopen it.
You should also verify your copy of Office is totally up to date (all relevant Service Packs and etc.)
Especially if you're still using an old version like 2007.
I ran the Convert macro, but I can’t find the converted file – it still looks exactly the same.
If you ran the “Convert This” option, the converted version of your file was opened in a new Word
window, but is probably behind the original – try going through the list of open Word windows to see if
you can find it.
If you ran the “Convert File” option on a file on your computer, the Converter will create a copy of the
file in the same location with “ – Converted.docx” appended to the name.
If you ran the “Batch Convert” option, the Converter replaced all the files in the folder you selected with
the updated versions.
I tried to use the openCaselist macro to upload to the wiki, but I get a “Type” error.
Try closing and restarting Word entirely – it usually fixes the problem.
I tried to upload cites to the wiki but it failed for unknown reasons.
Probably, this is due to some strange formatting in your original cites. Things to check are:
a) Make sure you have deleted all “Comments/Warrants” from your cites
b) Try splitting up any particularly long URL’s into multiple lines
c) Try uploading in smaller pieces to see if you can isolate which cite is causing the uploader to hang –
then see if that cite has something going on with its formatting.
Every time I paste in a block with the Virtual Tub, Word runs NavPaneCycle.
This is a known conflict with the “Use NavPaneCycle on Startup” option in the Verbatim settings. You
should disable this option while you’re using the Virtual Tub.
The “New Speech” button doesn’t appear to work in Word 2007.
Known bug, will be fixed in a future version. For now, you can manually create a Speech doc by naming
any blank Verbatim document with “Speech” somewhere in the name.
In-Round
What about prepping before the block? There’s only one viewing computer, but both negative
debaters might need to see evidence.
In reality, this hasn’t presented much problem – most opponents have been happy with one viewing
computer, as the 1NR has a sufficient amount of prep time during the 2NC to look at any evidence they
need. They can also prep without looking at the cards for at least a few minutes – there’s usually
analytics to write out, evidence to pull, etc...
For opponents who insist that having two computers is important, there are two solutions, both of
which have worked – either they use their own computer as a second viewing laptop, or the 2AC offers

68
their computer as a stand-in until the 2NC is done prepping. Since the affirmative is usually backflowing
until the 2NC is ready to speak, and the 2AC doesn’t have to give another speech which requires pulling
evidence, their need for a laptop is minimal for those few minutes.
Doesn’t paperless make debates take longer?
No – if anything, I think debates conclude faster. Occasionally, paperless can cause a short delay while
transferring files between laptops, and some judges have commented on this as a source of irritation. I
think this is largely an issue of perception – those delays tend to occur at moments in the debate which
people aren’t used to.
On the other hand, paperless completely removes time spent looking for lost cards in jumbled stacks of
paper all over the room – saving time both during the debate (when debaters ask for cards and have to
stop prep), and lots of time when the judge is calling for cards. To my knowledge, no tab room has ever
complained about paperless rounds taking longer.
I just like paper – tactile feel and organization are important to me.
This would be my number one problem with paperless as a debater – there is admittedly no easy
substitute for spreading out lots of files, or the feel of holding a stack of cards in hand. Partly, I think this
is just an issue of familiarity and training – my younger students have a much easier time with this than
my older debaters. It’s fairly clear from observation that my debaters are much more organized using
the computer – the inability to “lose” cards during a debate is a boon.
How do I mark a card while giving a speech?
While in Full Screen Reading View, click on the part of the card where you stopped and press the `\~ key.
It will insert a marker, like this:
Most debaters have also taken to saying “marked at xxxxxx” when marking to let the other team know
where they stopped if they’re following along. In practice, this system has presented no problems that
I’m aware of.
What if I send over more cards than I’m going to read to my Speech document?
This is no different than giving the other team a block with multiple cards but only reading the top one.
Some responsibility is on the other team to flow the speaker and pay attention to which cards are read –
or to clarify in cross-ex if there’s any confusion. This also provides an incentive for the opposing team to
follow along in real time, rather than skip ahead. The speaker can also opt to keep a file or two open on
their computer to read a few extra cards should they have time – and then jump those last couple cards
to the other team during cross-ex.
What about using Dropbox (or other cloud-based storage) for transferring files instead of USB drives?
Dropbox, etc. can be very useful, and in some circumstances could replace using a USB drive. However,
many tournaments have pretty spotty internet access, so having USB as a backup is probably wise.
I sent something to my Speech document, and now it looks weird (bigger font, out of order, etc...)
Keep in mind that the “Send To Speech” macro will send your selection to the current insert point in the
Speech document. Odds are good that you accidentally had the cursor in a Block Title or other area of
formatted text – and Word attempted to apply that formatting to everything you sent. Try pressing

69
Undo and then resending the blocks to the bottom. This is now largely error-trapped to prevent you
from doing it – but it’s still possible to get around.
Can I flow on my laptop?
In short, yes. With a little practice you should be able to use Alt-Tab to switch between your flow and
your Speech document during the speech. Another suggestion that I haven’t tried personally is to keep
two columns of your flow open on the far left of the screen, and put the Speech document to the right
so you can see both at the same time.
Nonetheless, I recommend to my students that they flow on paper. I think that it helps them to see
connections between arguments and focus on the big picture. It also helps to minimize computer
distractions during the speech.
Doesn’t the laptop hurt my ethos?
It certainly runs the risk of getting in the way, but perhaps not appreciably more so than a stack of tubs
and expandos. Suggestions to think about when learning to speak exclusively off a computer:
• Make sure the laptop doesn’t block your view of the judge – putting it slightly to one side helps.
• Remember to look up – doing drills where you practice not remaining glued to your computer are
worthwhile.
• Practice reading off the computer and experiment with different layouts, zoom levels, resolutions,
fonts, etc. You may find one combination works significantly better for you than others.
70
Appendix A – Known Issues
Most of the macro code is error trapped to ensure stability and avoid annoying error messages – in
general, it’s pretty hard to “break” the program. I’ve also gotten rid of most of the previous “known
bugs” since the last version of the manual. I would expect most “bugs” to be caused by improper
formatting. However, if you come across anything strange, please let me know.
A few minor bugs remain – this is a list of issues which will be addressed in future releases as time
permits.
• Condense macro – can’t differentiate between “real” paragraph breaks and ones from a columned
PDF.
• Condense macro – sometimes randomly inserts one new line of white space instead of condensing
correctly – only occurs on some computers, even with the same exact file.
• Some models of computer confuse the ‘ and ` keys – making the apostrophe Send To Speech. Using
the VkKeyScan method didn’t fix this, apparently.
• Pasting blocks from the Virtual Tub will trigger the NavPaneCycle at Startup option.
• Automatic installer for the Verbatimize button doesn’t work on Word 2007.
• “New Speech” button – doesn’t work on Word 2007 because the macro uses the SaveAs2 method
instead of the SaveAs method.
• Rare – “Type Mismatch” error on AutoOpen/AutoNew, with no additional debug info.
• Rare – “424 Object Required” error when opening the Settings form, seemingly without reason.
Exporting and re-importing the frmSettings form will solve this temporarily.
• Rare – “91 Object variable or with block not set” when using the Save button in the Verbatim
settings, occurs when attempting to invalidate and refresh the Ribbon. Settings usually still save
successfully, so restarting Word fixes temporarily.
• Rare – MoveDown macro very occasionally crashes for what appears to be no reason. It will give a
“4198” error, but then work flawlessly when rerunning the macro on the same block of text. If you
figure this out, please let me know.