Embed Size (px)
Citation preview
IBMTivoli®
Version 5.5.0
Configuration and Customization Guide
SC32-9356-00
OMEGAMON II for IMS

12
1
2
IBMTivoli®
Version 5.5.0
OMEGAMON II for IMS
Configuration and Customization Guide
SC32-9356-00
12
1
First Edition (December 2005)
This edition applies to version 3, release 1, modification 0 of IBM Tivoli OMEGAMON XE for IMS on z/OS (product number 5698-A39) and to all subsequent releases and modifications until otherwise indicated in new editions.
This edition replaces GC32-9262-00.
© Copyright Sun Microsystems, Inc. 1999
© Copyright International Business Machines Corporation 1996, 2005. All rights reserved.
Note to U.S. Government Users Restricted Rights -- Use, duplication or disclosure restricted by GSA ADP Schedule Contract with IBM Corp.
2
Before using this information and the product it supports, read the information in "Notices" on page 285.
Note
Contents 5
Figures . . . . . . . . . . . . . . . . . . . . . . . . . . . . . . . . . . . . . . . . . . . . . . . . . . . . . . . . . . . . . . 9
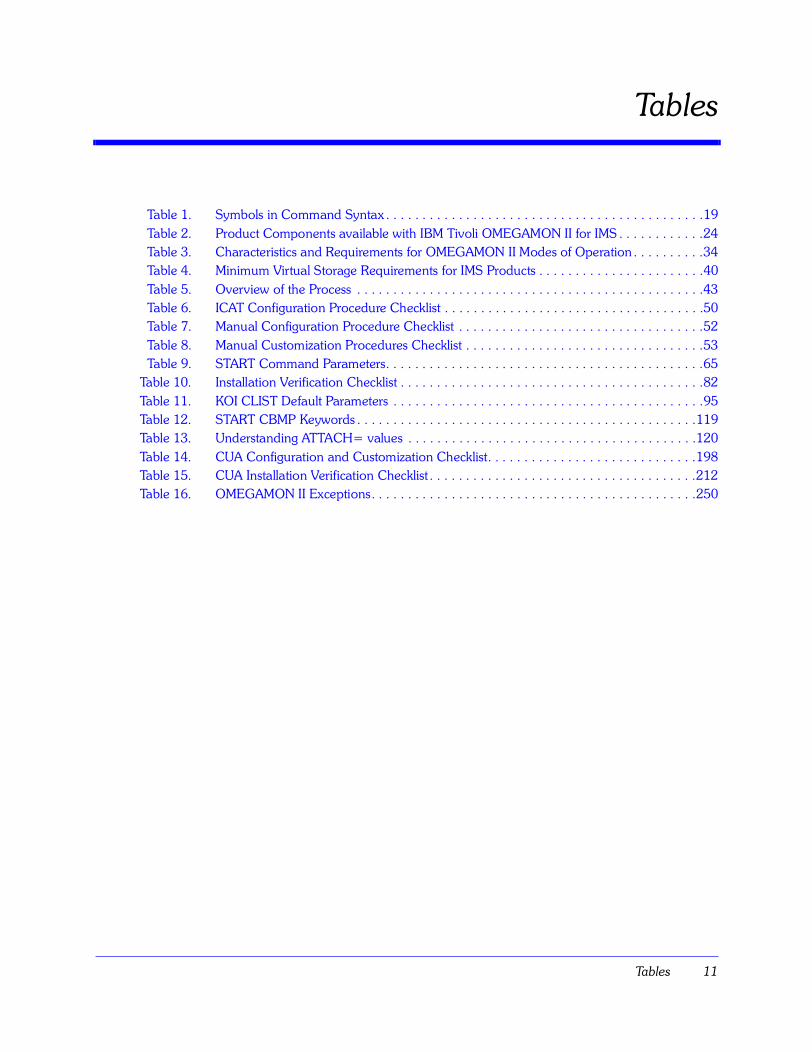
Tables . . . . . . . . . . . . . . . . . . . . . . . . . . . . . . . . . . . . . . . . . . . . . . . . . . . . . . . . . . . . .11
Preface . . . . . . . . . . . . . . . . . . . . . . . . . . . . . . . . . . . . . . . . . . . . . . . . . . . . . . . . . . . . . 13About This Guide . . . . . . . . . . . . . . . . . . . . . . . . . . . . . . . . . . . . . . . . . . . . . . . . . . . . .14Documentation Conventions. . . . . . . . . . . . . . . . . . . . . . . . . . . . . . . . . . . . . . . . . . . . .19
Chapter 1. Background about Components and Modes of Operation. . . . . . . . . . . . . . . . . 23Product Components . . . . . . . . . . . . . . . . . . . . . . . . . . . . . . . . . . . . . . . . . . . . . . . . . .24Details about the User Interfaces . . . . . . . . . . . . . . . . . . . . . . . . . . . . . . . . . . . . . . . . . .26Details about the Response Time Analysis Component . . . . . . . . . . . . . . . . . . . . . . . . .28Details about the Bottleneck Analysis Component . . . . . . . . . . . . . . . . . . . . . . . . . . . . .29Details about the Historical Component . . . . . . . . . . . . . . . . . . . . . . . . . . . . . . . . . . . .30Details about the Candle Subsystem . . . . . . . . . . . . . . . . . . . . . . . . . . . . . . . . . . . . . . .32Modes of Operation . . . . . . . . . . . . . . . . . . . . . . . . . . . . . . . . . . . . . . . . . . . . . . . . . . .34
Chapter 2. Installing, Configuring, and Customizing IBM Tivoli OMEGAMON II for IMS. .37Configuration Planning and Considerations . . . . . . . . . . . . . . . . . . . . . . . . . . . . . . . . .38Overview of the Process . . . . . . . . . . . . . . . . . . . . . . . . . . . . . . . . . . . . . . . . . . . . . . . .43Getting Help with ICAT . . . . . . . . . . . . . . . . . . . . . . . . . . . . . . . . . . . . . . . . . . . . . . . . .44ICAT Background and Requirements. . . . . . . . . . . . . . . . . . . . . . . . . . . . . . . . . . . . . . .45Accessing the Configure OMEGAMON II for IMS Menu . . . . . . . . . . . . . . . . . . . . . . . .47ICAT Configuration Procedures . . . . . . . . . . . . . . . . . . . . . . . . . . . . . . . . . . . . . . . . . . .50Manual Configuration Procedures . . . . . . . . . . . . . . . . . . . . . . . . . . . . . . . . . . . . . . . . .52Manual Customization Procedures . . . . . . . . . . . . . . . . . . . . . . . . . . . . . . . . . . . . . . . .53
Chapter 3. Configuration Procedures for the Realtime Performance Monitor . . . . . . . . . . . 57Background about the Process . . . . . . . . . . . . . . . . . . . . . . . . . . . . . . . . . . . . . . . . . . .58Verifying the Installation of ETE . . . . . . . . . . . . . . . . . . . . . . . . . . . . . . . . . . . . . . . . . .59APF-Authorizing the Load Library . . . . . . . . . . . . . . . . . . . . . . . . . . . . . . . . . . . . . . . . .60Startup Files and Flow. . . . . . . . . . . . . . . . . . . . . . . . . . . . . . . . . . . . . . . . . . . . . . . . . .61Adding Command Level Security . . . . . . . . . . . . . . . . . . . . . . . . . . . . . . . . . . . . . . . . .70Installing VTAM Support . . . . . . . . . . . . . . . . . . . . . . . . . . . . . . . . . . . . . . . . . . . . . . . .71Preparing the EPILOG Reporter and Adjusting Collection Options . . . . . . . . . . . . . . . .72Running the Reporter in ISPF Split-Screen Mode . . . . . . . . . . . . . . . . . . . . . . . . . . . . .73 Modifying the SAP Monitor Exit . . . . . . . . . . . . . . . . . . . . . . . . . . . . . . . . . . . . . . . . . .75Extending IMS Support for Generic Command Parameters . . . . . . . . . . . . . . . . . . . . . .76Start VSAM Message Logging . . . . . . . . . . . . . . . . . . . . . . . . . . . . . . . . . . . . . . . . . . . .79
Contents
6 IBM Tivoli OMEGAMON II for IMS Configuration and Customization Guide, Version 5.5.0
Chapter 4. Installation Verification of the Realtime Performance Monitor . . . . . . . . . . . . . . 81Installation Verification Checklist . . . . . . . . . . . . . . . . . . . . . . . . . . . . . . . . . . . . . . . . . .82Start the Candle Subsystem. . . . . . . . . . . . . . . . . . . . . . . . . . . . . . . . . . . . . . . . . . . . . .83Start the End-to-End Response Time Feature . . . . . . . . . . . . . . . . . . . . . . . . . . . . . . . .85Start OMEGAMON II Realtime Performance Monitor . . . . . . . . . . . . . . . . . . . . . . . . . .87Start OMEGAMON II Realtime Performance Monitor in VTAM Mode . . . . . . . . . . . . . .88Start OMEGAMON II Realtime Performance Monitor in Dedicated Mode . . . . . . . . . . .90Install and Start OMEGAMON II in TSO Mode . . . . . . . . . . . . . . . . . . . . . . . . . . . . . . .92Install and Start OMEGAMON II in ISPF Mode . . . . . . . . . . . . . . . . . . . . . . . . . . . . . . .97Start and Stop SAP . . . . . . . . . . . . . . . . . . . . . . . . . . . . . . . . . . . . . . . . . . . . . . . . . . . .99Exit OMEGAMON II . . . . . . . . . . . . . . . . . . . . . . . . . . . . . . . . . . . . . . . . . . . . . . . . . .101
Chapter 5. Customization Procedures for Realtime Performance Monitor. . . . . . . . . . . . . 103Reviewing OMEGAMON II Profiles . . . . . . . . . . . . . . . . . . . . . . . . . . . . . . . . . . . . . . .104Reviewing Exception Analysis . . . . . . . . . . . . . . . . . . . . . . . . . . . . . . . . . . . . . . . . . . .107Creating an Installation-Defined Profile . . . . . . . . . . . . . . . . . . . . . . . . . . . . . . . . . . . .109Implementing the Installation-Defined Profile. . . . . . . . . . . . . . . . . . . . . . . . . . . . . . . .113Setting Exception Analysis Thresholds from the CUA Interface . . . . . . . . . . . . . . . . . .115Implementing Your BMP Interface . . . . . . . . . . . . . . . . . . . . . . . . . . . . . . . . . . . . . . . .117Implementing the SAP Interface . . . . . . . . . . . . . . . . . . . . . . . . . . . . . . . . . . . . . . . . .122Using KOIGBL to Customize Workload Parameters . . . . . . . . . . . . . . . . . . . . . . . . . . .125Concatenating Screen Space and Profile Datasets . . . . . . . . . . . . . . . . . . . . . . . . . . . .134
Chapter 6. OMEGAMON II�s Realtime Performance Monitor Security Facility . . . . . . . . .139Use Internal Security for Authorized Commands . . . . . . . . . . . . . . . . . . . . . . . . . . . . .140Supplying the Password . . . . . . . . . . . . . . . . . . . . . . . . . . . . . . . . . . . . . . . . . . . . . . .141Use External Security . . . . . . . . . . . . . . . . . . . . . . . . . . . . . . . . . . . . . . . . . . . . . . . . .142Log On Using External Security in VTAM, TSO, and ISPF Modes . . . . . . . . . . . . . . . .143Log On Using External Security in Dedicated Mode . . . . . . . . . . . . . . . . . . . . . . . . . .144Access Security from an Active Session . . . . . . . . . . . . . . . . . . . . . . . . . . . . . . . . . . . .145Implement External Security . . . . . . . . . . . . . . . . . . . . . . . . . . . . . . . . . . . . . . . . . . . .146Modify RACF Rules to Interface with OMEGAMON II . . . . . . . . . . . . . . . . . . . . . . . . .147Modify ACF2 Rules to Interface with OMEGAMON II . . . . . . . . . . . . . . . . . . . . . . . . .149Modify TOP SECRET Rules . . . . . . . . . . . . . . . . . . . . . . . . . . . . . . . . . . . . . . . . . . . .150
Chapter 7. Using Security Exit Routines . . . . . . . . . . . . . . . . . . . . . . . . . . . . . . . . . . . . . . 151Create Your Exit Routine . . . . . . . . . . . . . . . . . . . . . . . . . . . . . . . . . . . . . . . . . . . . . . .152Use OMEGAMON II�s Calling Conventions for Security Exit Routines . . . . . . . . . . . . .153Review OMEGAMON II�s Calling Flow for Security Exit Routines . . . . . . . . . . . . . . . .154
Chapter 8. Modifying The Security Table . . . . . . . . . . . . . . . . . . . . . . . . . . . . . . . . . . . . . 157Modify the Security Table . . . . . . . . . . . . . . . . . . . . . . . . . . . . . . . . . . . . . . . . . . . . . .158Use Control Statements to Modify the Security Table. . . . . . . . . . . . . . . . . . . . . . . . . .160Use Control Statements to Update the Security Table . . . . . . . . . . . . . . . . . . . . . . . . .175Update the Security Table . . . . . . . . . . . . . . . . . . . . . . . . . . . . . . . . . . . . . . . . . . . . . .177
Contents 7
Chapter 9. Security Update Program Listing . . . . . . . . . . . . . . . . . . . . . . . . . . . . . . . . . . 179Interpret the Security Update Program Listing . . . . . . . . . . . . . . . . . . . . . . . . . . . . . . .180
Chapter 10. The System Management Facilities Audit . . . . . . . . . . . . . . . . . . . . . . . . . . . .185Generate the System Management Facilities Audit . . . . . . . . . . . . . . . . . . . . . . . . . . .186
Chapter 11. Optional External Security Features . . . . . . . . . . . . . . . . . . . . . . . . . . . . . . . . 189Customize with Optional External Security Features . . . . . . . . . . . . . . . . . . . . . . . . . .190
Chapter 12. Configuration and Customization Procedures for the CUA Interface . . . . . . . . 197Configuration and Customization Checklist . . . . . . . . . . . . . . . . . . . . . . . . . . . . . . . . .198Set Up Logon Security . . . . . . . . . . . . . . . . . . . . . . . . . . . . . . . . . . . . . . . . . . . . . . . .199Executing the CUA JCL Procedure . . . . . . . . . . . . . . . . . . . . . . . . . . . . . . . . . . . . . . .206Connecting your CUA system to OMEGAVIEW . . . . . . . . . . . . . . . . . . . . . . . . . . . . .207Profile Security . . . . . . . . . . . . . . . . . . . . . . . . . . . . . . . . . . . . . . . . . . . . . . . . . . . . . .208
Chapter 13. Installation Verification of the CUA Interface . . . . . . . . . . . . . . . . . . . . . . . . . . 211CUA Installation Verification Checklist . . . . . . . . . . . . . . . . . . . . . . . . . . . . . . . . . . . . .212Start the OMEGAMON II CUA System . . . . . . . . . . . . . . . . . . . . . . . . . . . . . . . . . . . .213Log on to the OMEGAMON II CUA System . . . . . . . . . . . . . . . . . . . . . . . . . . . . . . . .214Stop the OMEGAMON II CUA Interface . . . . . . . . . . . . . . . . . . . . . . . . . . . . . . . . . . .215
Appendix A. OMEGAMON II Product Interface . . . . . . . . . . . . . . . . . . . . . . . . . . . . . . . . . 219Startup Operation . . . . . . . . . . . . . . . . . . . . . . . . . . . . . . . . . . . . . . . . . . . . . . . . . . . .220Interface Commands . . . . . . . . . . . . . . . . . . . . . . . . . . . . . . . . . . . . . . . . . . . . . . . . . .223Comment . . . . . . . . . . . . . . . . . . . . . . . . . . . . . . . . . . . . . . . . . . . . . . . . . . . . . . . . . .224DISPLAY. . . . . . . . . . . . . . . . . . . . . . . . . . . . . . . . . . . . . . . . . . . . . . . . . . . . . . . . . . .225EXEC . . . . . . . . . . . . . . . . . . . . . . . . . . . . . . . . . . . . . . . . . . . . . . . . . . . . . . . . . . . . .226HELP . . . . . . . . . . . . . . . . . . . . . . . . . . . . . . . . . . . . . . . . . . . . . . . . . . . . . . . . . . . . .228IF . . . . . . . . . . . . . . . . . . . . . . . . . . . . . . . . . . . . . . . . . . . . . . . . . . . . . . . . . . . . . . . .229LIST . . . . . . . . . . . . . . . . . . . . . . . . . . . . . . . . . . . . . . . . . . . . . . . . . . . . . . . . . . . . . .231LOG . . . . . . . . . . . . . . . . . . . . . . . . . . . . . . . . . . . . . . . . . . . . . . . . . . . . . . . . . . . . . .232MODIFY MERGE . . . . . . . . . . . . . . . . . . . . . . . . . . . . . . . . . . . . . . . . . . . . . . . . . . . .233START . . . . . . . . . . . . . . . . . . . . . . . . . . . . . . . . . . . . . . . . . . . . . . . . . . . . . . . . . . . .234STOP . . . . . . . . . . . . . . . . . . . . . . . . . . . . . . . . . . . . . . . . . . . . . . . . . . . . . . . . . . . . .241
Appendix B. Sharing VTPOOL in a Multi-Host Environment . . . . . . . . . . . . . . . . . . . . . . . 243Sample Network . . . . . . . . . . . . . . . . . . . . . . . . . . . . . . . . . . . . . . . . . . . . . . . . . . . . .244Defining the Virtual Terminal Pool to VTM1 . . . . . . . . . . . . . . . . . . . . . . . . . . . . . . . .245Defining the Virtual Terminal Pool (VTPOOL) to VTAM . . . . . . . . . . . . . . . . . . . . . . .246Providing Access to VTPOOL . . . . . . . . . . . . . . . . . . . . . . . . . . . . . . . . . . . . . . . . . . .247
Appendix C. OMEGAMON II Exceptions Table. . . . . . . . . . . . . . . . . . . . . . . . . . . . . . . . . .249Exceptions Table . . . . . . . . . . . . . . . . . . . . . . . . . . . . . . . . . . . . . . . . . . . . . . . . . . . . .250
8 IBM Tivoli OMEGAMON II for IMS Configuration and Customization Guide, Version 5.5.0
Appendix D. Support Information . . . . . . . . . . . . . . . . . . . . . . . . . . . . . . . . . . . . . . . . . . . .279
Appendix E. Notices . . . . . . . . . . . . . . . . . . . . . . . . . . . . . . . . . . . . . . . . . . . . . . . . . . . . . . 285
Index . . . . . . . . . . . . . . . . . . . . . . . . . . . . . . . . . . . . . . . . . . . . . . . . . . . . . . . . . . . . 289
Figures 9
FIGURE 1. OMEGAMON II User Interfaces and Components . . . . . . . . . . . . . . . . . . . . . . . . . . . . .25FIGURE 2. EPILOG Components . . . . . . . . . . . . . . . . . . . . . . . . . . . . . . . . . . . . . . . . . . . . . . . . . .31FIGURE 3. Startup Procedure Flow . . . . . . . . . . . . . . . . . . . . . . . . . . . . . . . . . . . . . . . . . . . . . . . .61FIGURE 4. OMEGAMON II Startup Files . . . . . . . . . . . . . . . . . . . . . . . . . . . . . . . . . . . . . . . . . . . .62FIGURE 5. ETE USERS Command Output. . . . . . . . . . . . . . . . . . . . . . . . . . . . . . . . . . . . . . . . . . .86FIGURE 6. Profile Maintenance and Session Controls Menu . . . . . . . . . . . . . . . . . . . . . . . . . . . . .110FIGURE 7. Format of $OIGROUP ID to Name a Group and/or Specify RTA Values . . . . . . . . . . .131
Figures

10 IBM Tivoli OMEGAMON II for IMS Configuration and Customization Guide, Version 5.5.0
Tables 11
Table 1. Symbols in Command Syntax . . . . . . . . . . . . . . . . . . . . . . . . . . . . . . . . . . . . . . . . . . . .19Table 2. Product Components available with IBM Tivoli OMEGAMON II for IMS . . . . . . . . . . . .24Table 3. Characteristics and Requirements for OMEGAMON II Modes of Operation . . . . . . . . . .34Table 4. Minimum Virtual Storage Requirements for IMS Products . . . . . . . . . . . . . . . . . . . . . . .40Table 5. Overview of the Process . . . . . . . . . . . . . . . . . . . . . . . . . . . . . . . . . . . . . . . . . . . . . . . .43Table 6. ICAT Configuration Procedure Checklist . . . . . . . . . . . . . . . . . . . . . . . . . . . . . . . . . . . .50Table 7. Manual Configuration Procedure Checklist . . . . . . . . . . . . . . . . . . . . . . . . . . . . . . . . . .52Table 8. Manual Customization Procedures Checklist . . . . . . . . . . . . . . . . . . . . . . . . . . . . . . . . .53Table 9. START Command Parameters. . . . . . . . . . . . . . . . . . . . . . . . . . . . . . . . . . . . . . . . . . . .65
Table 10. Installation Verification Checklist . . . . . . . . . . . . . . . . . . . . . . . . . . . . . . . . . . . . . . . . . .82Table 11. KOI CLIST Default Parameters . . . . . . . . . . . . . . . . . . . . . . . . . . . . . . . . . . . . . . . . . . .95Table 12. START CBMP Keywords . . . . . . . . . . . . . . . . . . . . . . . . . . . . . . . . . . . . . . . . . . . . . . .119Table 13. Understanding ATTACH= values . . . . . . . . . . . . . . . . . . . . . . . . . . . . . . . . . . . . . . . .120Table 14. CUA Configuration and Customization Checklist. . . . . . . . . . . . . . . . . . . . . . . . . . . . .198Table 15. CUA Installation Verification Checklist . . . . . . . . . . . . . . . . . . . . . . . . . . . . . . . . . . . . .212Table 16. OMEGAMON II Exceptions. . . . . . . . . . . . . . . . . . . . . . . . . . . . . . . . . . . . . . . . . . . . .250
Tables

12 IBM Tivoli OMEGAMON II for IMS Configuration and Customization Guide, Version 5.5.0
Preface 13
Preface
This guide describes how to configure and customize IBM® Tivoli® OMEGAMON II® for IMS after installation. It assumes that you have already installed the product as described in the Installation & Configuration of Candle Products on OS/390 and z/OS manual.
This guide contains the following types of information to help you prepare for and perform the configuration and customization:
� a list of product publications
� background about the product components
� considerations that you need to review before you configure or customize
� an overview of the installation, configuration, and customization process
� configuration instructions
� customization instructions
P
About This Guide
14 IBM Tivoli OMEGAMON II for IMS Configuration and Customization Guide, Version 5.5.0
About This Guide
Who should read this guideThis guide is intended for those responsible for configuring and customizing IBM Tivoli OMEGAMON II for IMS. It is a hands-on guide that provides the information you need to configure IBM Tivoli OMEGAMON II for IMS for your site, and quickly start monitoring your IMS network.
This manual is for users who are familiar with performance monitoring software and IMS. For introductory, step-by-step instructions on how to use IBM Tivoli OMEGAMON II for IMS�s command interface as well as the primary CUA� interface and menu interface, see the IBM Tivoli OMEGAMON II for IMS User�s Guide.
This manual does not include information about the commands used by the bottleneck analysis (DEXAN), response time analysis (RTA), or historical (EPILOG) components of IBM Tivoli OMEGAMON II for IMS. For descriptions of these commands, see the:
� IBM Tivoli OMEGAMON II for IMS Bottleneck Analysis Reference Manual,
� IBM Tivoli OMEGAMON II for IMS Response Time Analysis (RTA) Reference Manual,
� IBM Tivoli OMEGAMON II for IMS Historical Component (EPILOG) Reference Manual
In this manual, OMEGAMON II refers to the IBM Tivoli OMEGAMON II for IMS product, and OMEGAMON refers to the command interface of the realtime performance component of IBM Tivoli OMEGAMON II for IMS, unless the context indicates otherwise.
Document set informationThis section lists publications in the IBM Tivoli OMEGAMON XE for IMS on z/OS library and related documents. It also describes how to access Tivoli publications online and how to order Tivoli publications.
IBM Tivoli OMEGAMON XE for IMS on z/OS library
The following documents are available in the library:
� Getting Started with IBM Tivoli OMEGAMON XE for IMS on z/OS, SC32-9469
Provides planning information for installing IBM Tivoli OMEGAMON XE for IMS on z/OS and information about the OMEGAMON XE zSeries® products.
� Configuring IBM Tivoli OMEGAMON XE for IMS on z/OS, SC32-9354
Explains how to configure and customize IBM Tivoli OMEGAMON XE for IMS on z/OS and its user interfaces and components.
� Using IBM Tivoli OMEGAMON XE for IMS on z/OS, GC32-9351
Describes the basics of using IBM Tivoli OMEGAMON XE for IMS on z/OS to manage real-time IMS environments.
Preface 15
About This Guide
� IBM Tivoli OMEGAMON XE for IMS on z/OS Release Notes, GI11-4037
Contains information about what is new in this release, including new or revised OMEGAMON II® panels. Also contains information about problems discovered late in the testing cycle that are not included in the other publications and work-around procedures for those problems.
IBM Tivoli OMEGAMON II for IMS library
The following documents are available in the library:
� IBM Tivoli OMEGAMON II for IMS User�s Guide, GC32-9355
Describes the basics of using IBM Tivoli OMEGAMON II for IMS to manage realtime IMS environments.
� IBM Tivoli OMEGAMON II for IMS Configuration and Customization Guide, SC32-9356
Explains how to configure and customize OMEGAMON II and its user interfaces and components.
� IBM Tivoli OMEGAMON II for IMS IMS Console Facility, SC32-9357
Provides a comprehensive description of the features of the IMS Console Facility (ICF) component.
� IBM Tivoli OMEGAMON II for IMS Transaction Reporting Facility, SC32-9358
Provides user and reference information about the features of the Transaction Reporting Facility (TRF) component.
� IBM Tivoli OMEGAMON II for IMS Bottleneck Analysis Reference Manual, SC32-9359
Provides reference information and descriptions of the features of the bottleneck analysis component.
� IBM Tivoli OMEGAMON II for IMS Historical Component (EPILOG) Reference Manual, SC32-9360
Provides a comprehensive description of the features of the historical component (EPILOG®).
� IBM Tivoli OMEGAMON II for IMS Historical Component (EPILOG) User�s Guide, GC32-9361
Teaches you, step-by-step, how to operate the historical component (EPILOG) reporter after installation.
� IBM Tivoli OMEGAMON II for IMS Realtime Commands Reference Manual, SC32-9362
Describes in detail all of the features of the OMEGAMON II command interface.
� IBM Tivoli OMEGAMON II for IMS Response Time Analysis (RTA) Reference Manual, SC32-9363
About This Guide
16 IBM Tivoli OMEGAMON II for IMS Configuration and Customization Guide, Version 5.5.0
Provides reference information and descriptions of the features of the response time analysis (RTA) component.
� IBM Tivoli OMEGAMON II for IMS Application Trace Facility, SC32-9470
Explains how the Application Trace Facility (ATF) monitors and collects detailed information on IMS and Data base Control (DBCTL) transactions to help you analyze and improve performance.
� IBM Tivoli End-to-End Response Time Feature Reference Manual, SC32-9376
Provides a description of the ETE Response Time feature and explains how to start ETE after installation and customization have been completed. Also includes a description of each ETE command argument and descriptions of the ETE error messages, return codes, and sense codes.
IBM Tivoli OMEGAMON Platform Messages
The following books document the messages issued by the OMEGAMON Platform components and products that run on it.
� IBM Tivoli Candle Products Messages Volume 1 (AOP�ETX), SC32-9416
� IBM Tivoli Candle Products Messages Volume 2 (EU�KLVGM), SC32-9417
� IBM Tivoli Candle Products Messages Volume 3 (KLVHS-KONCT), SC32-9418
� IBM Tivoli Candle Products Messages Volume 4 (KONCV-OC), SC32-9419
� IBM Tivoli Candle Products Messages Volume 5 (ODC�VEB and Appendixes), SC32-9420
Related publications
To use the information in this guide effectively, you must have some prerequisite knowledge, which you can obtain from the following guides:
� Installing and Setting up OMEGAMON Platform and CandleNet Portal on Windows and UNIX, SC32-1768
Provides information on installing and setting up the component products of the OMEGAMON Platform: Candle Management Server®, CandleNet Portal, Candle Management Workstation®, Warehouse Proxy, Alert Adapter for AF/REMOTE®, Alert Adapter for Tivoli Enterprise Console®, and Alert Emitter for Tivoli Enterprise Console on Windows® and UNIX®.
� Administering OMEGAMON Products: CandleNet Portal, GC32-9180
This document describes the support tasks and functions required for the OMEGAMON platform, including CandleNet Portal user administration.
� Using OMEGAMON Products: CandleNet Portal, GC32-9182
This guide describes the features of CandleNet Portal and how best to use them with your OMEGAMON products.
Preface 17
About This Guide
� Historical Data Collection Guide for IBM Tivoli OMEGAMON XE Products, GC32-9429
Describes the process of collecting historical data and either warehousing it or converting it to delimited flat files for reporting purposes. Also describes how to configure historical data collection and warehousing intervals using the CandleNet Portal describes how to maintain the Persistent Data Store used to collect and store historical data on z/OS.
� Configuring IBM Tivoli Candle Management Server on z/OS, GC32-9414
Provides instructions for configuring and customizing the Candle Management Server on z/OS.
The online glossary for the CandleNet Portal includes definitions for many of the technical terms related to OMEGAMON XE software.
Accessing publications online
The documentation CD contains the publications that are in the product library. The format of the publications is PDF. Refer to the readme file on the CD for instructions on how to access the documentation.
IBM posts publications for this and all other Tivoli products, as they become available and whenever they are updated, to the Tivoli software information center Web site. Access the Tivoli software information center by first going to the Tivoli software library at the following Web address:
http://www.ibm.com/software/tivoli/library
Scroll down and click the Product manuals link. In the Tivoli Technical Product Documents Alphabetical Listing window, click the Tivoli OMEGAMON XE for IMS link to access the product library at the Tivoli software information center.
If you print PDF documents on other than letter-sized paper, set the option in the File -> Print window that allows Adobe Reader to print letter-sized pages on your local paper.
Ordering publications
You can order many Tivoli publications online at the following Web site:
http://www.elink.ibmlink.ibm.com/public/applications/publications/cgibin/pbi.cgi
You can also order by telephone by calling one of these numbers:
� In the United States: 800-879-2755
� In Canada: 800-426-4968
In other countries, contact your software account representative to order Tivoli publications.
Tivoli technical trainingFor Tivoli technical training information, refer to the following IBM Tivoli Education Web site:
About This Guide
18 IBM Tivoli OMEGAMON II for IMS Configuration and Customization Guide, Version 5.5.0
http://www.ibm.com/software/tivoli/education
Support informationIf you have a problem with your IBM software, you want to resolve it quickly. IBM provides the following ways for you to obtain the support you need:
� Searching knowledge bases: You can search across a large collection of known problems and workarounds, Technotes, and other information.
� Obtaining fixes: You can locate the latest fixes that are already available for your product.
� Contacting IBM Software Support: If you still cannot solve your problem, and you need to work with someone from IBM, you can use a variety of ways to contact IBM Software Support.
For more information about these three ways of resolving problems, see �Support Information� on page 279.
Participating in newsgroupsUser groups provide software professionals with a forum for communicating ideas, technical expertise, and experiences related to the product. They are located on the Internet and are available using standard news reader programs. These groups are primarily intended for user-to-user communication and are not a replacement for formal support.
To access a newsgroup, use the instructions appropriate for your browser.
Preface 19
Documentation Conventions
Documentation Conventions
OverviewThis guide uses several conventions for special terms and actions, and operating system-dependent commands and paths.
Panels and figuresThe panels and figures in this document are representations. Actual product panels may differ.
Required blanksThe slashed-b (!) character in examples represents a required blank. The following example illustrates the location of two required blanks.
!!!!eBA*ServiceMonitor!!!!0990221161551000
Revision barsRevision bars (|) may appear in the left margin to identify new or updated material.
Variables and literalsIn examples of z/OS® command syntax, uppercase letters are actual values (literals) that the user should type; lowercase letters are used for variables that represent data supplied by the user. Default values are underscored.
LOGON APPLID (cccccccc)
In the above example, you type LOGON APPLID followed by an application identifier (represented by cccccccc) within parentheses.
SymbolsThe following symbols may appear in command syntax:
Table 1. Symbols in Command Syntax
Symbol Usage
| The �or� symbol is used to denote a choice. Either the argument on the left or the argument on the right may be used. Example:
YES | NOIn this example, YES or NO may be specified.
[ ] Denotes optional arguments. Those arguments not enclosed in square brackets are required. Example:
APPLDEST DEST [ALTDEST]In this example, DEST is a required argument and ALTDEST is optional.

Documentation Conventions
20 IBM Tivoli OMEGAMON II for IMS Configuration and Customization Guide, Version 5.5.0
{ } Some documents use braces to denote required arguments, or to group arguments for clarity. Example:
COMPARE {workload} -REPORT={SUMMARY | HISTOGRAM}
The workload variable is required. The REPORT keyword must be specified with a value of SUMMARY or HISTOGRAM.
_ Default values are underscored. Example:
COPY infile outfile - [COMPRESS={YES | NO}]In this example, the COMPRESS keyword is optional. If specified, the only valid values are YES or NO. If omitted, the default is YES.
Table 1. Symbols in Command Syntax
Symbol Usage

Section 1. Before You Begin 21
Section 1. Before You Begin

22 IBM Tivoli OMEGAMON II for IMS Configuration and Customization Guide, Version 5.5.0
Background about Components and Modes of Operation 23
Background about Componentsand Modes of Operation
Chapter OverviewThis chapter contains information about the components and modes of operation for IBM Tivoli OMEGAMON II for IMS. The chapter provides background information about the
� product components
� user interfaces
� Candle Subsystem
� Response Time Analysis component
� Bottleneck Analysis component
� historical component
� modes of operation
Chapter ContentsProduct Components . . . . . . . . . . . . . . . . . . . . . . . . . . . . . . . . . . . . . . . . . . . . . . . . . 24Details about the User Interfaces. . . . . . . . . . . . . . . . . . . . . . . . . . . . . . . . . . . . . . . . . 26Details about the Response Time Analysis Component. . . . . . . . . . . . . . . . . . . . . . . . 28Details about the Bottleneck Analysis Component . . . . . . . . . . . . . . . . . . . . . . . . . . . 29Details about the Historical Component . . . . . . . . . . . . . . . . . . . . . . . . . . . . . . . . . . . 30Details about the Candle Subsystem. . . . . . . . . . . . . . . . . . . . . . . . . . . . . . . . . . . . . . 32Modes of Operation . . . . . . . . . . . . . . . . . . . . . . . . . . . . . . . . . . . . . . . . . . . . . . . . . . 34
1
Product Components
24 IBM Tivoli OMEGAMON II for IMS Configuration and Customization Guide, Version 5.5.0
Product Components
This section provides background information about the product components for IBM Tivoli OMEGAMON II for IMS.
Product components available with IBM Tivoli OMEGAMON II for IMSThe following table lists the components available when you install IBM Tivoli OMEGAMON II for IMS, provides a brief description of each component, and indicates whether the component is required or optional.
Process for components that are optionalWhen you install the product using ICAT, ICAT automatically installs the components that are optional. For example, ICAT automatically installs the Candle Subsystem. To make these components available, you must also:
� configure the component using ICAT
� complete the configuration and customization steps for the component using the instructions in this guide (if any).
Table 2. Product Components available with IBM Tivoli OMEGAMON II for IMS
Component Description
CUA interface for the realtime monitor (required)
Provides realtime information about an IMS subsystem using a graphical user interface
Realtime Performance Monitor component (required)
Provides basic realtime information about the IMS environment
Menu interface for the realtime monitor (required)
Provides realtime information about an IMS subsystem using the original OMEGAMON II menu system interface
Command interface for the realtime monitor (required
Provides realtime information about an IMS subsystem using an extensive set of flexible commands
Candle Subsystem (optional) Provides dynamic I/O information to OMEGAMON II
End-to-End Response Time (required)
Provides OMEGAMON II with response time data
Note: Does not apply to DBCTL.
Response Time Analysis (optional)
Provides monitoring of IMS transaction and end-to-end response time
Note: Does not apply to DBCTL.
Application Trace Facility (ATF) (optional)
Tracks activity on a transaction by transaction basis and records the individual events for transactions
Bottleneck Analysis (optional) Provides information for degradation analysis
Historical component (optional) Provides historical information about the IMS environment
IMS Console Facility (optional) Provides a complete IMS Master Console for OMEGAMON II
Background about Components and Modes of Operation 25
Product Components
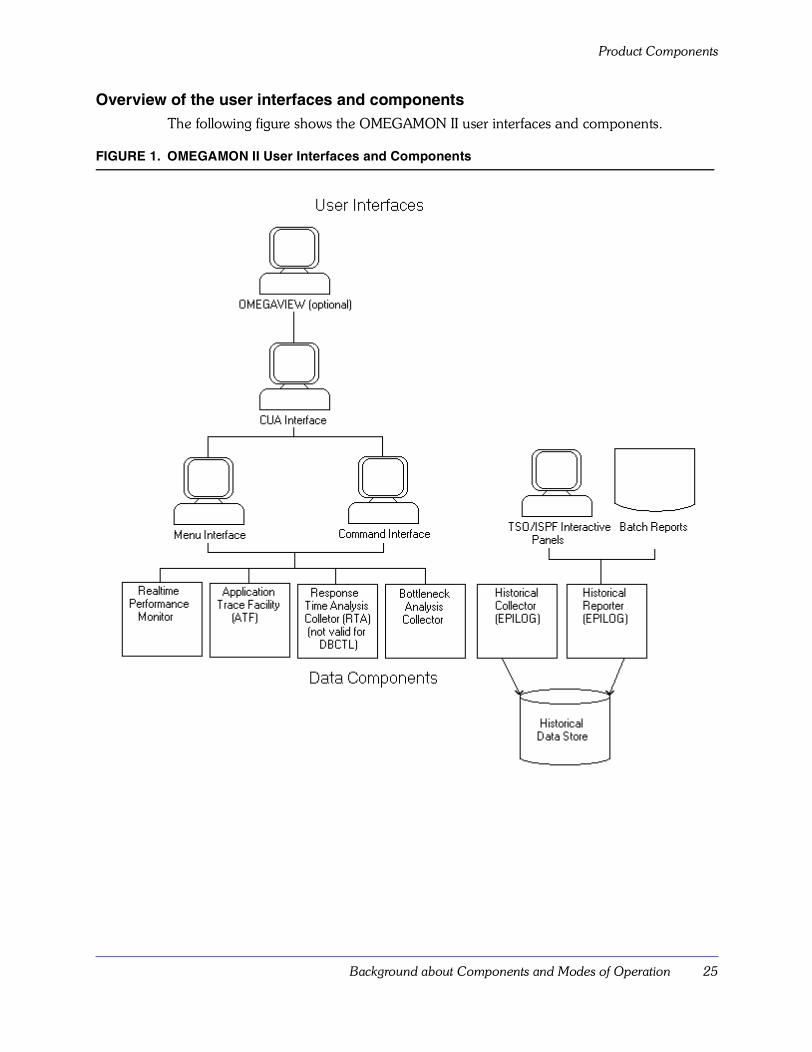
Overview of the user interfaces and componentsThe following figure shows the OMEGAMON II user interfaces and components.
FIGURE 1. OMEGAMON II User Interfaces and Components
Details about the User Interfaces
26 IBM Tivoli OMEGAMON II for IMS Configuration and Customization Guide, Version 5.5.0
Details about the User Interfaces
This section provides background information about the OMEGAMON II user interfaces.
OMEGAMON II has several user interfaces that you can use to:
� monitor performance
� view and/or print historical performance data
� look for exception conditions
� enter IMS operator commands
CUA interface� Systems Application Architecture
� Common User Access model
� SAA
� CUA model
OMEGAMON II�s primary user interface is an easy-to-use, graphical interface that follows the guidelines of IBM�s SAA®./CUA �(Systems Application Architecture®/Common User Access) model for consistent graphical user interfaces across products.
The main CUA interface gives you access to OMEGAMON II�s key realtime status information, and provides an operator assist feature for very efficiently and easily issuing IMS commands without having to remember command names or syntax.
From the main CUA interface, you can also zoom into OMEGAMON II�s menu and command interfaces for additional information.
You must install the CUA interface as part of the installation process.
Background about Components and Modes of Operation 27
Details about the User Interfaces
Menu and command interfacesIf you need more detailed information, OMEGAMON II also has two additional user interfaces to the product�s realtime IMS information.
The menu and command interfaces are standard with OMEGAMON II. If you choose to access these interfaces directly (rather than zooming from the main CUA interface), you can use several optional modes of operation, including dedicated, TSO, and ISPF modes.
Note: TSO and ISPF modes require additional installation steps.
For more information about TSO and ISPF installation, see �Install and Start OMEGAMON II in TSO Mode� on page 92 and �Install and Start OMEGAMON II in ISPF Mode� on page 97.
Historical information interfacesFor historical information, you can request printed reports via a batch report generator, or make interactive queries through a series of TSO or ISPF panels.
These interfaces are a standard part of OMEGAMON for IMS.
Command Interface
Allows the user to enter a set of extensive and very flexible commands in any order or combination covering every aspect of the IMS environment in realtime.
Menu Interface Enables the user to access realtime data using an easy-to-use menu system. Each menu option leads to a panel displaying appropriate OMEGAMON II commands and output.
Details about the Response Time Analysis Component
28 IBM Tivoli OMEGAMON II for IMS Configuration and Customization Guide, Version 5.5.0
Details about the Response Time Analysis Component
This section provides background information about the Response Time Analysis (RTA) component of OMEGAMON II.
Background about RTAThe Response Time Analysis component (RTA) monitors IMS transaction response time and End-to-End Response Time Feature.
IMS transaction response time is the time it takes IMS to acknowledge an input message from the teleprocessing network and initiate a response. RTA measures queuing and service times within IMS, and summarizes its measurements into user-defined groups.
End-to-End� (ETE) response time is the time interval between pressing Enter and the appearance of a response on the screen. The information that ETE gathers helps you determine whether a response problem is in the network or on the host system.
RTA information is available through the CUA interface�s graphical status displays, or in the form of tables and graphs that you can access throughOMEGAMON II�s command and menu interfaces.
Note: RTA does not pertain to DBCTL users.
For more information on RTA, see the Response Time Analysis (RTA) Reference Manual
Background about Components and Modes of Operation 29
Details about the Bottleneck Analysis Component
Details about the Bottleneck Analysis Component
This section provides background information about the Bottleneck Analysis (DEXAN) component of OMEGAMON II.
Background about DEXANThe bottleneck analysis component (DEXAN) helps a system tuner perform bottleneck, or degradation, analysis. Bottleneck Analysis focuses on workloads rather than resources. Bottleneck Analysis breaks down IMS transaction response time or DBCTL executing threads into times spent in various executing states: CPU usage, MVS waits, IMS scheduling waits, database I/O waits, output waits, and external subsystem waits.
This information is available through the CUA interface�s graphical status displays, or in the form of tables and graphs you access through OMEGAMON II�s command and menu interfaces.
For more information on bottleneck analysis, see the Bottleneck Analysis (RTA) Reference Manual.
Details about the Historical Component
30 IBM Tivoli OMEGAMON II for IMS Configuration and Customization Guide, Version 5.5.0
Details about the Historical Component
This section provides background information about the historical component (EPILOG) of OMEGAMON II.
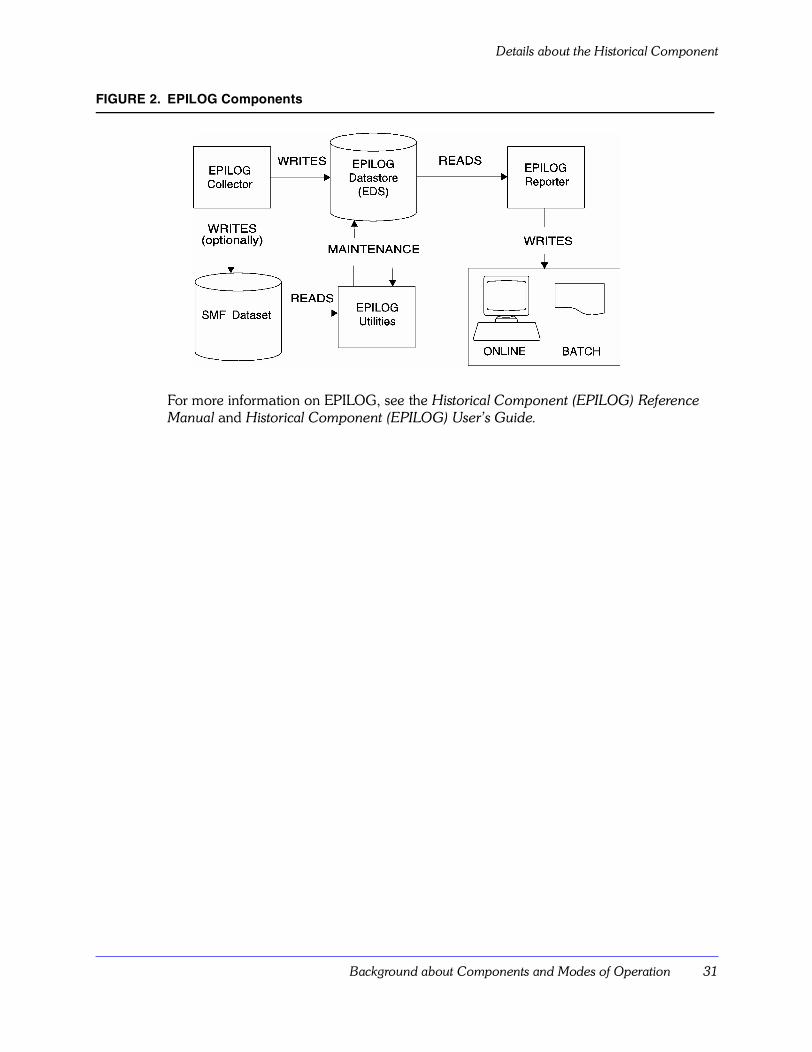
Background about EPILOGThe historical component (EPILOG) provides historical information about your IMS or DBCTL environment.
EPILOG collects, analyzes, and reports on resource and response time information, and provides bottleneck analysis like DEXAN. However, EPILOG collects the data over substantial periods of time, hours, or days.
EPILOG has three major subcomponents:
� EPILOG collector
� EPILOG reporter
� maintenance utilities
The EPILOG collector gathers system performance data of various kinds. At regular intervals the collector writes the data to the EPILOG datastore (EDS), a VSAM KSDS, and to SMF (optionally).
You can either invoke the EPILOG collector interactively through TSO or run it in batch for reporting purposes. The EPILOG collector is a standard part of OMEGAMON for IMS.
The EPILOG reporter produces reports from data recorded in the EDS. You can view these reports online through TSO or print the reports. You will prepare the EPILOG reporter and adjust its collection parameters as the final steps in the standard installation process.
The maintenance utilities allow you to create, initialize, backup, and restore the EDS.
Following is a functional diagram of the EPILOG components.
Background about Components and Modes of Operation 31
Details about the Historical Component
FIGURE 2. EPILOG Components
For more information on EPILOG, see the Historical Component (EPILOG) Reference Manual and Historical Component (EPILOG) User�s Guide.
Details about the Candle Subsystem
32 IBM Tivoli OMEGAMON II for IMS Configuration and Customization Guide, Version 5.5.0
Details about the Candle Subsystem
This section provides background information about the Candle Subsystem.
Candle Subsystem componentThe Candle Subsystem is an MVS subsystem that enables OMEGAMON II to monitor dynamic device activity in MVS/ESA� SP4 and higher.
When installed, the Candle Subsystem runs in its own address space, providing dynamic I/O device information to OMEGAMONs running in other address spaces.
Sharing the Candle SubsystemYou only need one Candle Subsystem for an MVS system image. A single Candle Subsystem can support multiple copies of OMEGAMON II and multiple OMEGAMON II products on a single MVS image.
The subsystem ID identifies a copy of the Candle Subsystem. To use the same Candle Subsystem for all OMEGAMON II runtime environments on a single MVS image, IBM recommends that you specify the same subsystem ID during the configuration of each OMEGAMON II product. The default Candle Subsystem ID is CNDL.
System requirementsThe Candle Subsystem has the following system requirements:
� The Candle Subsystem requires 4K of ECSA.
� The Candle Subsystem must be defined to MVS as a subsystem.
� The initialization module, KCNDLINT, must reside in a link list authorized library.
� An IPL is required to initialize the Candle Subsystem unless the keyword parameter form of the IEFSSNxx PARMLIB member, supported in MVS/SP 5 or above, is used. In this case, MVS dynamic SSI services can be invoked.
Note: The example for IEFSSNxx, a positional parameter, works as shown on OS/390 systems. If you would like to update SYS1.PARMLIB(IEFSSNxx) in accordance with IBM OS/390 documentation, then use the following syntax:
SUBSYS SUBNAME(CNDL)
INITRTN(KCNDLINT)
INITPARM(‘SSPROC=CANSCN’)
Background about Components and Modes of Operation 33
Details about the Candle Subsystem
Starting the Candle Subsystem automaticallyMember rhilev.RKANSAM(CANSCN) contains a sample JCL procedure for creating the Candle Subsystem. You can modify this to fit your configuration standards, and then copy it to a system procedure library.
If you want the Candle Subsystem address space to be started automatically at system IPL, then the name given to the JCL procedure must match the value of the SSPROC keyword in the IEFSSNxx member of SYS1.PARMLIB.
Determining whether or not to install the Candle SubsystemYou should migrate from your current Candle Subsystem,V120 FMID AKOB400 to the current version, V500 from FMID AKOB500. This will ensure that new PTF maintenance gets properly installed. However, V120 is currently compatible with V500 of the OMEGAMONs and other Generally Available (GA) products. For example, you can use V120 of the Candle Subsystem with V500 of OMEGAMON II for IMS.
The latest version of the Candle Subsystem, V500, can be used with earlier versions (GA-1) of the OMEGAMON products. For example, V500 of the Candle Subsystem can be used with V400 of an OMEGAMON II product.
If you have installed another OMEGAMON II product at your site, at the same level as shipped with the OMEGAMON II product you are currently installing, you may have already installed the Candle Subsystem.

Modes of Operation
34 IBM Tivoli OMEGAMON II for IMS Configuration and Customization Guide, Version 5.5.0
Modes of Operation
This section provides background information about operating modes.
During configuration, you will be asked to select and customize an operating mode. Available operating modes are:
� VTAM mode
� TSO/ISPF mode
� dedicated mode
VTAM mode is required to run the CUA interface.
See �Overview of the user interfaces and components� on page 25, which shows the relationship of OMEGAMON II�s components in VTAM, TSO, and ISPF modes.
Operating mode characteristics and requirementsThe following table describes each operating mode and its requirements.
Table 3. Characteristics and Requirements for OMEGAMON II Modes of Operation
Mode Characteristics Configuration Requirements
VTAM VTAM mode enables you to run OMEGAMON II sessions from a VTAM terminal without an intermediate online application, such as TSO. You can set automatic update mode so that the screen refreshes automatically.
VTAM mode allows all VTAM terminal users to share a single copy of OMEGAMON II.
Define a VTAM applid for OBVTAM.
TSO and ISPF The TSO address space communicates with the OMEGAMON II address space via a VTAM application, VTM1. In this mode there is no auto screen refresh; the screen refreshes when you press the Enter key. TSO mode enables you to access OMEGAMON II without logging off TSO.
ISPF mode includes split-screen capability that lets you swap between multiple OMEGAMON II sessions, or between OMEGAMON II and another ISPF application.
� Define a VTAM applid for OBVTAM.
� Requires an active OBVTAM application.
� Define a set of virtual terminals to VTAM. You can define up to 99 virtual terminals in the virtual terminal pool (VTPOOL).

Background about Components and Modes of Operation 35
Modes of Operation
Dedicated Dedicated mode offers high availability and does not require VTAM services. Dedicated mode uses EXCP to communicate with a terminal and refreshes the screen every few seconds.
Dedicated mode allows OMEGAMON II to provide realtime data even when VTAM is not available.
Availability of a locally attached non-SNA terminal.
Table 3. Characteristics and Requirements for OMEGAMON II Modes of Operation
Mode Characteristics Configuration Requirements

Modes of Operation
36 IBM Tivoli OMEGAMON II for IMS Configuration and Customization Guide, Version 5.5.0
Installing, Configuring, and Customizing IBM Tivoli OMEGAMON II for IMS 37
Installing, Configuring, and CustomizingIBM Tivoli OMEGAMON II for IMS
Chapter OverviewThis chapter provides information about installing, configuring, and customizing the product.
This chapter provides:
� the considerations you should review before you begin to configure and customize
� an overview of how you use ICAT to perform part of the configuration and a checklist listing the steps for the ICAT configuration procedure
� a checklist listing the steps for the manual configuration procedures
� a checklist listing the steps for the manual customization procedures
If you are installing the product for the first time or you need a reminder about the different components and modes of operation, see Chapter 1.
Chapter ContentsConfiguration Planning and Considerations . . . . . . . . . . . . . . . . . . . . . . . . . . . . . . . . 38Overview of the Process . . . . . . . . . . . . . . . . . . . . . . . . . . . . . . . . . . . . . . . . . . . . . . . 43Getting Help with ICAT . . . . . . . . . . . . . . . . . . . . . . . . . . . . . . . . . . . . . . . . . . . . . . . 44ICAT Background and Requirements . . . . . . . . . . . . . . . . . . . . . . . . . . . . . . . . . . . . . 45Accessing the Configure OMEGAMON II for IMS Menu . . . . . . . . . . . . . . . . . . . . . . . 47ICAT Configuration Procedures . . . . . . . . . . . . . . . . . . . . . . . . . . . . . . . . . . . . . . . . . 50Manual Configuration Procedures. . . . . . . . . . . . . . . . . . . . . . . . . . . . . . . . . . . . . . . . 52Manual Customization Procedures . . . . . . . . . . . . . . . . . . . . . . . . . . . . . . . . . . . . . . . 53
2
Configuration Planning and Considerations
38 IBM Tivoli OMEGAMON II for IMS Configuration and Customization Guide, Version 5.5.0
Configuration Planning and Considerations
This section provides the considerations you must review before you begin to configure and customize IBM Tivoli OMEGAMON II for IMS.
Requirements for hardware and softwareFor information about hardware and software requirements, see Installation & Configuration of Candle Products on OS/390 and z/OS.
Installing OMEGAMON II in a shared CSIIBM has designed some of its products to share a target and distribution zone of an SMP/E CSI with other IBM products.
Running multiple IMS systemsThe following rules apply when you want to use the Realtime Performance Monitor in a multiple IMS systems environment:
� For each IMS system you are monitoring, you must have at least one OMEGAMON II Realtime performance Monitor running on the same MVS system as the IMS system you are monitoring.
� For multiple IMS systems, you need only one OMEGAMON II CUA system on a single MVS image.
Communication protocolIBM Tivoli OMEGAMON II for IMS uses the LU2 communication protocol for program to terminal communications.
Important
Before you install this product in a target or distribution zone with any other IBM products, check the Installation & Configuration of Candle Products on OS/390 and z/OS manual to verify that those products can coexist in a common CSI zone.
Installing, Configuring, and Customizing IBM Tivoli OMEGAMON II for IMS 39
Configuration Planning and Considerations
Autostarting RTM componentsDuring ICAT configuration you can set the autostart values for the following Realtime Monitor (RTM) components/features:
� VTAM connection to IMS region
� RTM dedicated session
� Attach command BMP
� Response Time Analysis (RTA)
� Transaction Reporting Facility (TRF)
� Bottleneck Analysis (DEXAN)
� EPILOG
� VSAM message logging
� SAP support
Requirements for runtime datasetsSeveral VSAM and non-VSAM datasets need to be allocated and initialized. This requires approximately 2.75 tracks (measured in 3390 tracks) of additional storage. High-level qualifiers are required and mid-level qualifiers can be used, if desired.
Qualifiers for runtime datasetsIn some cases, the runtime datasets may have been created while installing other IBM products. These preallocated datasets can be used for OMEGAMON II.
The configuration process allows a unique set of qualifiers for the following groups of runtime datasets:
� VSAM datasets
� non-VSAM datasets
� Candle Subsystem datasets
The mid-level qualifier is used to distinguish multiple copies of the runtime environment. This qualifier allows a unique name to be created for each copy while allowing for a common high-level qualifier. Together these two qualifiers are described in this document as rhilev. Be sure to specify the correct qualifiers when referring to datasets that already exist.
Configuration Planning and Considerations
40 IBM Tivoli OMEGAMON II for IMS Configuration and Customization Guide, Version 5.5.0
Requirements for virtual storageThe following table lists the minimum bytes of virtual storage that OMEGAMON II Versions 300 and up require in conjunction with other OMEGAMON II product components.
Table 4. Minimum Virtual Storage Requirements for IMS Products
Storage (in Kb)
Product Private Extended Private
Common Extended Common
OMEGAMON II CUA interface uses
5634 31744 105 150
OMEGAMON II Realtime Performance Monitor uses
644 832 8 68 per firstuser, 35 per
additional user
DEXAN adds 24 24 0 72
Dexan Notebelow
RTA adds 512 1229 4 13
EPILOG adds 292 12 2 12
TRF adds 4 20 See TRFNote
See TRF Note
ATF adds 5 0 See ATFNote
See ATF Note
Note: OMEGAMON II and OMEGAMON run in separate address spaces. DEXAN, RTA, EPILOG and TRF are incremental to the storage required for the OMEGAMON address space.
TRF Note: TRF CSA/ECSA utilization is� CSA = 4k� ECSA = 4k per IMS region + 256 bytes per databaseATF Note: ATF CSA/ESA utilization is� CSA = 2k � ECSA = 7.5k + 650k per OMEGAMON region
Dexan Note: Depending on the use of groups, the Extended Common Area may be larger than 72.
Installing, Configuring, and Customizing IBM Tivoli OMEGAMON II for IMS 41
Configuration Planning and Considerations
Migrating elements from a previous version to Version 550After configuring IBM Tivoli OMEGAMON II for IMS, you will need to migrate the elements you want to keep.
Following is a list of the system elements you can migrate from previous versions of OMEGAMON II to Version 550. If you do not migrate an element, OMEGAMON II uses the Version 550 default. The migration process is handled through ICAT.
� Product-level security (VSAM)
� Internal tables database (VSAM)
� Screen spaces and menus
� Profiles and exception thresholds
� EPILOG. Historical Datastore List
� EPILOG Historical Collector options
� EPILOG default PF key definition ($)
� EPILOG default PF key definition (@)
Note: You can keep the IBM-supplied OMEGAMON II default profile settings and use them until you know how you want to customize the OMEGAMON II realtime controls.
Migrating from Version 400When migrating from Version 400 to Version 550, for the EPILOG Historical Collector Options RKANPAR(KEIOPTMO) you will need to change the Version 400 M0 to the actual m prefix defined.
Migrating started task namesWhen migrating started task names:
Note: You cannot migrate started task JCL.
IF you... THEN...
discontinue using Version 400 you can reuse the started task names you defined in Version 300 or 400
continue to use Version 400 or 500 concurrently with Version 550
you must define new started tasks for Version 550
Configuration Planning and Considerations
42 IBM Tivoli OMEGAMON II for IMS Configuration and Customization Guide, Version 5.5.0
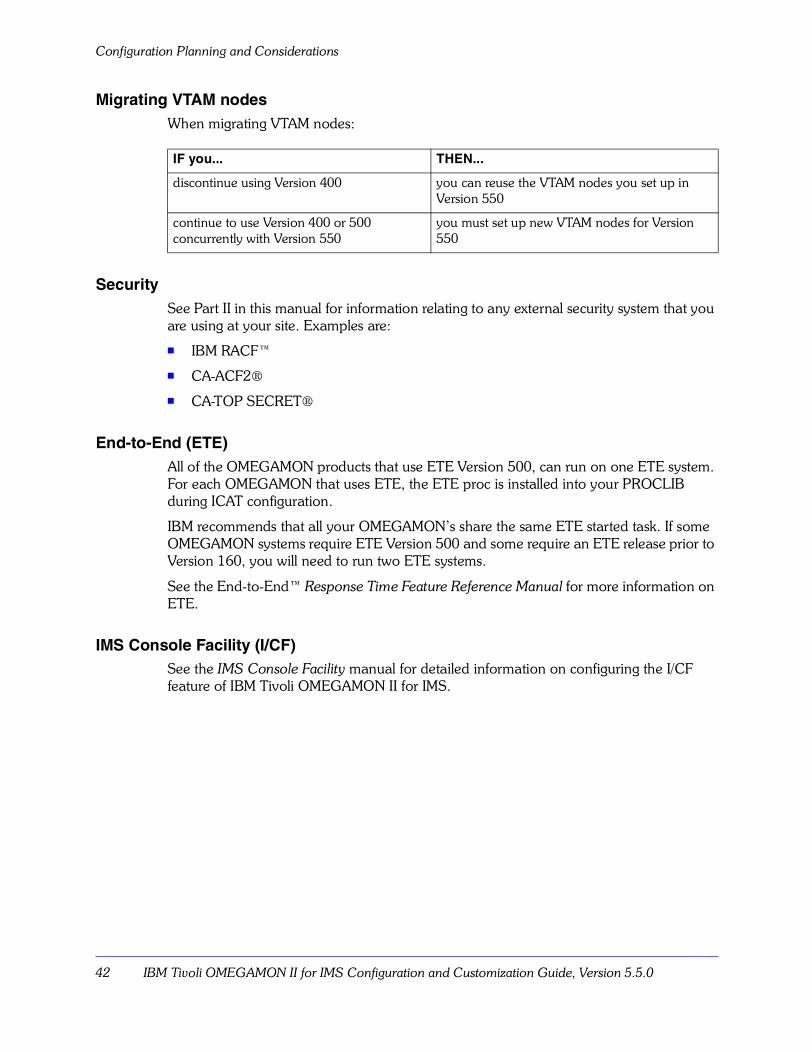
Migrating VTAM nodesWhen migrating VTAM nodes:
SecuritySee Part II in this manual for information relating to any external security system that you are using at your site. Examples are:
� IBM RACF�
� CA-ACF2®
� CA-TOP SECRET®
End-to-End (ETE)All of the OMEGAMON products that use ETE Version 500, can run on one ETE system. For each OMEGAMON that uses ETE, the ETE proc is installed into your PROCLIB during ICAT configuration.
IBM recommends that all your OMEGAMON�s share the same ETE started task. If some OMEGAMON systems require ETE Version 500 and some require an ETE release prior to Version 160, you will need to run two ETE systems.
See the End-to-End� Response Time Feature Reference Manual for more information on ETE.
IMS Console Facility (I/CF)See the IMS Console Facility manual for detailed information on configuring the I/CF feature of IBM Tivoli OMEGAMON II for IMS.
IF you... THEN...
discontinue using Version 400 you can reuse the VTAM nodes you set up in Version 550
continue to use Version 400 or 500 concurrently with Version 550
you must set up new VTAM nodes for Version 550
Installing, Configuring, and Customizing IBM Tivoli OMEGAMON II for IMS 43
Overview of the Process
Overview of the Process
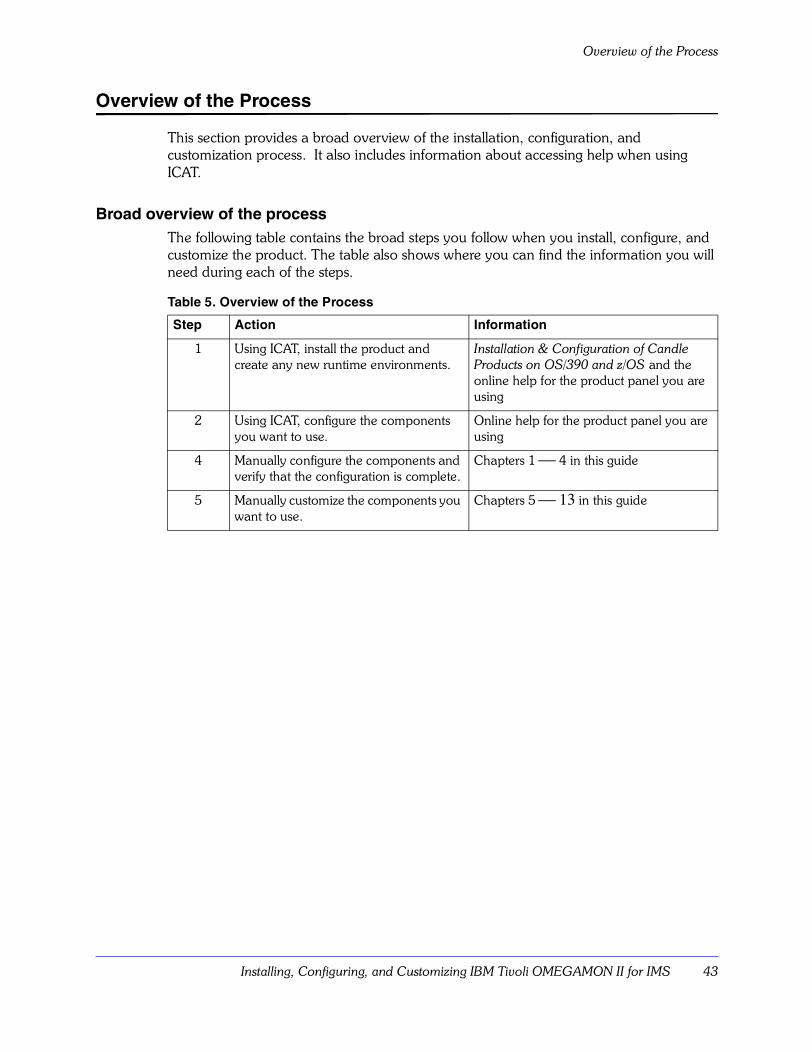
This section provides a broad overview of the installation, configuration, and customization process. It also includes information about accessing help when using ICAT.
Broad overview of the processThe following table contains the broad steps you follow when you install, configure, and customize the product. The table also shows where you can find the information you will need during each of the steps.
Table 5. Overview of the Process
Step Action Information
1 Using ICAT, install the product and create any new runtime environments.
Installation & Configuration of Candle Products on OS/390 and z/OS and the online help for the product panel you are using
2 Using ICAT, configure the components you want to use.
Online help for the product panel you are using
4 Manually configure the components and verify that the configuration is complete.
Chapters 1 4 in this guide
5 Manually customize the components you want to use.
Chapters 5 13 in this guide
Getting Help with ICAT
44 IBM Tivoli OMEGAMON II for IMS Configuration and Customization Guide, Version 5.5.0
Getting Help with ICAT
The help for ICAT contains detailed information about using the ICAT panels. For example, the help contains information about:
� how to use the panel
� why parameters are required
� what the available action codes provide
� what the input fields mean
� what you are required to supply
To display help from any ICAT panel, press the Help key (F1) or enter HELP on the command line.
You can also display help for the help. For example, you can display information about the command to use to return to the previous topic in the help system. To display the help for help from any help panel, press the Help key (F1) or enter HELP on the command line.

Installing, Configuring, and Customizing IBM Tivoli OMEGAMON II for IMS 45
ICAT Background and Requirements
ICAT Background and Requirements
This section describes using the Installation and Configuration Assistance Tool (ICAT).
Background about ICATYou must use ICAT to install and configure the product. ICAT is an ISPF dialog that guides you through the installation and configuration steps required to install this product. Data entry panels assist you in understanding your site-specific parameter values. Associated help panels assist you in understanding the ICAT process and describe the input fields on the entry panels.
ICAT is restartable. If necessary, you can end the dialog, start it again, and continue from the point of interruption. ISPF V2.3 or above is required to use ICAT.
If you have not previously installed ICAT during installation of this or any other IBM product, you must do so now. For instructions on installing ICAT, see the Installing Candle Products on MVS manual. If you want to use ICAT from a previous installation, you must ensure that it is the most current version of ICAT. The Installing Candle Products on MVS manual will help you make this determination.
Restrictions on specifying values in ICATImportant Note: Entering ampersand (&) in any ICAT parameter string, whether you are in interactive or batch mode, results in a ICAT abend.
Reminder about the information availableIf you need information about installing the product using ICAT, you can locate information in the
� Installing Candle Products on MVS manual
� online help for the product panel you are using
ICAT Background and Requirements
46 IBM Tivoli OMEGAMON II for IMS Configuration and Customization Guide, Version 5.5.0
Examples of the tasks performed by ICATICAT performs tasks that make the product operational with a basic set of defaults. You use ICAT to:
� modify JCL
� allocate datasets
� define VTAM applids
� configure I/CF console and trap commands
� create runtime libraries
� run the migration utility
� install the Candle Subsystem
Installing, Configuring, and Customizing IBM Tivoli OMEGAMON II for IMS 47
Accessing the Configure OMEGAMON II for IMS Menu
Accessing the Configure OMEGAMON II for IMS Menu
Prerequisites for configuring IBM Tivoli OMEGAMON II for IMSBefore you start to configure IBM Tivoli OMEGAMON II for IMS, be sure that you have reviewed the considerations and planning information in this chapter.
The following configuration procedures assume that you have:
✒ Completed SMP/E installation and applied maintenance, or for a MultiProduct Quick Install tape that includes the product, as described in your Installation & Configuration of Candle Products on OS/390 and z/OS manual.
Reminder about the information availableIf you need information about configuring IBM Tivoli OMEGAMON II for IMS using ICAT or specific information about the values you specify using ICAT, see the online help for the product panel you are using.
Accessing ICATFor information about starting ICAT, see Installation & Configuration of Candle Products on OS/390 and z/OS.
Accessing the Configure OMEGAMON II for IMS Menu in ICATThere are two versions of ICAT available to install and configure IBM products. These include:
� CICAT Version 200
� CICAT Version 300
The method you use to access the Configure OMEGAMON II for IMS Menu will vary depending on the version of ICAT you are using.
Accessing the Configure OMEGAMON II for IMS Menu
48 IBM Tivoli OMEGAMON II for IMS Configuration and Customization Guide, Version 5.5.0
Accessing the menu in CICAT Version 200 Follow these instructions to access the Configure OMEGAMON II for IMS Menu in CICAT Version 200.
Accessing the menu in CICAT Version 300 Follow these instructions to access the Configure OMEGAMON II for IMS Menu in CICAT Version 300.
Step Action
1 On the CICAT Main Menu, perform the appropriate action. � If you are installing the MultiProduct Quick Install tape, select MultiProduct Quick
Install. � If you are installing IBM Tivoli OMEGAMON II for IMS as a separate product, select the
product.
2 On the Installation/Configuration Primary Menu, select Assist configuration and manage runtime environments.
3 On the Runtime Environments (RTE) panel, use C (Configure) to select a runtime environment.
Result: CICAT displays the Product Configuration Selection Menu.
4 On the Product Configuration Selection Menu, select OMEGAMON II for IMS.
Result: CICAT displays the Configure OMEGAMON II for IMS Menu.
Step Action
1 On the Main Menu, select Configure products.
2 On the Configure Products menu, select Setup Configuration Environment.
3 On the Setup Configuration Environment panel, specify the values.
4 Return to the Configure Products menu.
5 On the Configure Products menu, select Configure Products.
Result: CICAT displays the Product Selection Menu.
6 On the Product Selection Menu, select OMEGAMON II for IMS.
Result: CICAT displays the Configure OMEGAMON II for IMS Menu.
Installing, Configuring, and Customizing IBM Tivoli OMEGAMON II for IMS 49
Accessing the Configure OMEGAMON II for IMS Menu
Example of the Configure OMEGAMON II for IMS MenuThe following illustration shows an example of the Configure OMEGAMON II for IMS Menu in ICAT.
.Example of the Configure OMEGAMON II for IMS Menu in ICAT
------------- CONFIGURE OMEGAMON II FOR IMS ------------OPTION ===> Last selected Perform these configuration steps in order: Date Time 1 Specify configuration values 2 Allocate additional runtime datasets 3 Create runtime members 4 Modify Classic interface command security 5 Complete the configuration Optional: 5 Configure I/CF console commands 6 Configure I/CF trap commands 7 Install Candle Subsystem 8 Run migration utility
F1=Help F3=Back
ICAT Configuration Procedures
50 IBM Tivoli OMEGAMON II for IMS Configuration and Customization Guide, Version 5.5.0
ICAT Configuration Procedures
ICAT configuration checklistThe following table contains the steps you perform on the ICAT Configure OMEGAMON II for IMS menu. The steps are listed in the sequence in which they are to be performed. Use the ✔ column to check off steps as you complete them.
Table 6. ICAT Configuration Procedure Checklist
✔ ICAT Configuration Step
Use Specify configuration values to:� specify the IMS Realtime Monitor (RTM) parameters, IMS VTAM parameters, and
autostart RTM components to start and run the RTM tasks� modify the IMS Realtime Monitor parameters for your site� specify the CUA and VTAM parameters required to configure the runtime members
Use Allocate additional runtime datasets to review the JCL that ICAT generates to allocate other required libraries in addition to the standard set of runtime datasets.
Use Create runtime members to review the JCL that ICAT generates to:� create the members for the interfaces for the IMS Realtime Monitor� select the IMS subsystem and install the related members for the subsystem � specify the IMS IDs and generate the job for IMS Callable Services (if configured)
Use Modify Classic interface command security to customize the security exit and to install security information into each runtime environment that requires Classic interface security.
Use Complete the configuration to view a list of procedures that you must perform outside of ICAT to finalize the installation of IBM Tivoli OMEGAMON II for IMS. See �Manual Configuration Procedures� on page 52 and �Manual Customization Procedures� on page 53 for more information on these procedures.
If you want to configure I/CF console commands, use Configure I/CF console commands. See the IMS Console Facility manual for details on executing this step. (This step is optional.)
If you want to install a Candle subsystem, specify the values using Install Candle Subsystem. (This step is optional and is not required if you performed the step when you installed another IBM product.)
If you want to migrate data from a previous version, specify the version of OMEGAMON II from which you are migrating using Run migration utility. (This step is optional.)
Load the runtime libraries using �When to load runtime libraries� on page 51.
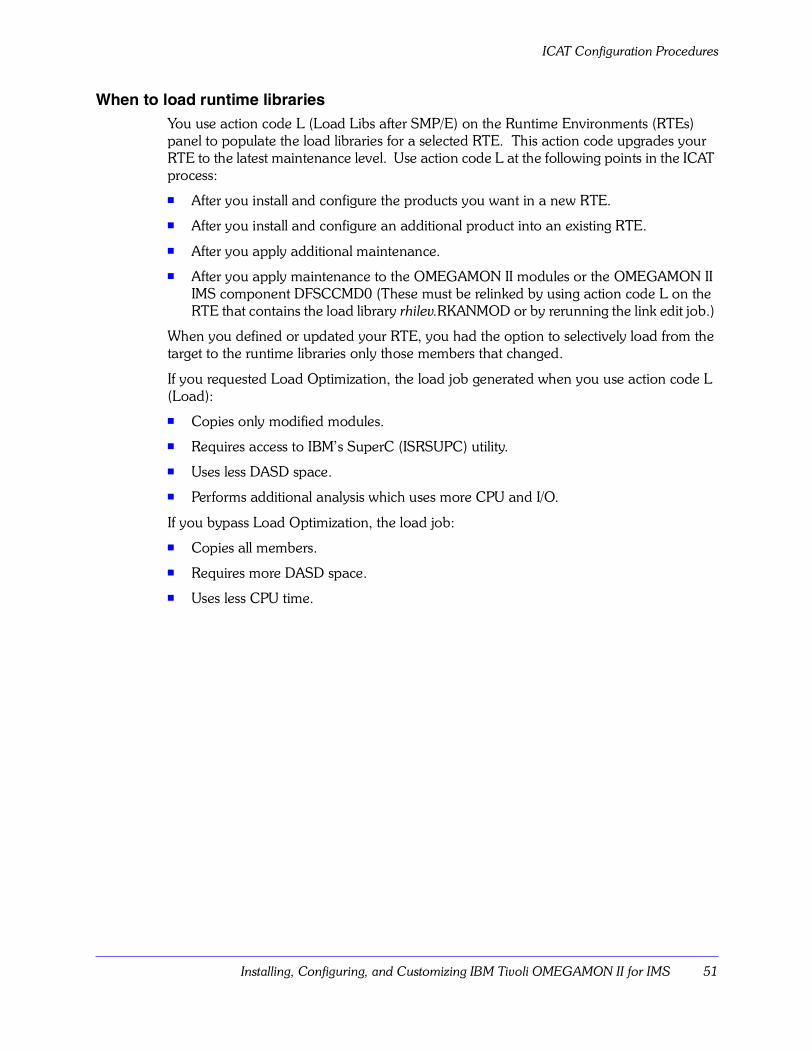
Installing, Configuring, and Customizing IBM Tivoli OMEGAMON II for IMS 51
ICAT Configuration Procedures
When to load runtime librariesYou use action code L (Load Libs after SMP/E) on the Runtime Environments (RTEs) panel to populate the load libraries for a selected RTE. This action code upgrades your RTE to the latest maintenance level. Use action code L at the following points in the ICAT process:
� After you install and configure the products you want in a new RTE.
� After you install and configure an additional product into an existing RTE.
� After you apply additional maintenance.
� After you apply maintenance to the OMEGAMON II modules or the OMEGAMON II IMS component DFSCCMD0 (These must be relinked by using action code L on the RTE that contains the load library rhilev.RKANMOD or by rerunning the link edit job.)
When you defined or updated your RTE, you had the option to selectively load from the target to the runtime libraries only those members that changed.
If you requested Load Optimization, the load job generated when you use action code L (Load):
� Copies only modified modules.
� Requires access to IBM�s SuperC (ISRSUPC) utility.
� Uses less DASD space.
� Performs additional analysis which uses more CPU and I/O.
If you bypass Load Optimization, the load job:
� Copies all members.
� Requires more DASD space.
� Uses less CPU time.
Manual Configuration Procedures
52 IBM Tivoli OMEGAMON II for IMS Configuration and Customization Guide, Version 5.5.0
Manual Configuration Procedures
This section provides information about performing manual configuration procedures outside of ICAT.
Reminder about the information availableThe checklist in the following table contains the location where you can find the information you will need.
Manual configuration checklistThe following table contains the steps you perform manually to configure the product. The steps are listed in the sequence in which they are to be performed. Use the ✔ column to check off steps as you complete them.
Table 7. Manual Configuration Procedure Checklist
✔ Manual Configuration Step
Verify ETE installation using �Verifying the Installation of ETE� on page 59. (This does not pertain to DBCTL.)
APF-authorize the detests using �APF-Authorizing the Load Library� on page 60.
Prepare to start OMEGAMON II using �Startup Files and Flow� on page 61.
Add default security using �Adding Command Level Security� on page 70.
Define OMEGAMON II to VTAM using �Installing VTAM Support� on page 71.
Configure I/CF IMS SYSGEN changes using the IMS Console Facility manual.
Configure I/CF VTAM changes using the IMS Console Facility manual.
Implement the BMP interface using �Implementing the Installation-Defined Profile� on page 113.
Review EPILOG Reporter usage using �Preparing the EPILOG Reporter and Adjusting Collection Options� on page 72.
Modify the SAP monitor exit using �Modifying the SAP Monitor Exit� on page 75. (This does not pertain to DBCTL.)
Install the command authorization user exit using �Extending IMS Support for Generic Command Parameters� on page 76.
Verify the installation of OMEGAMON II using �Installation Verification Checklist� on page 82.
Installing, Configuring, and Customizing IBM Tivoli OMEGAMON II for IMS 53
Manual Customization Procedures
Manual Customization Procedures
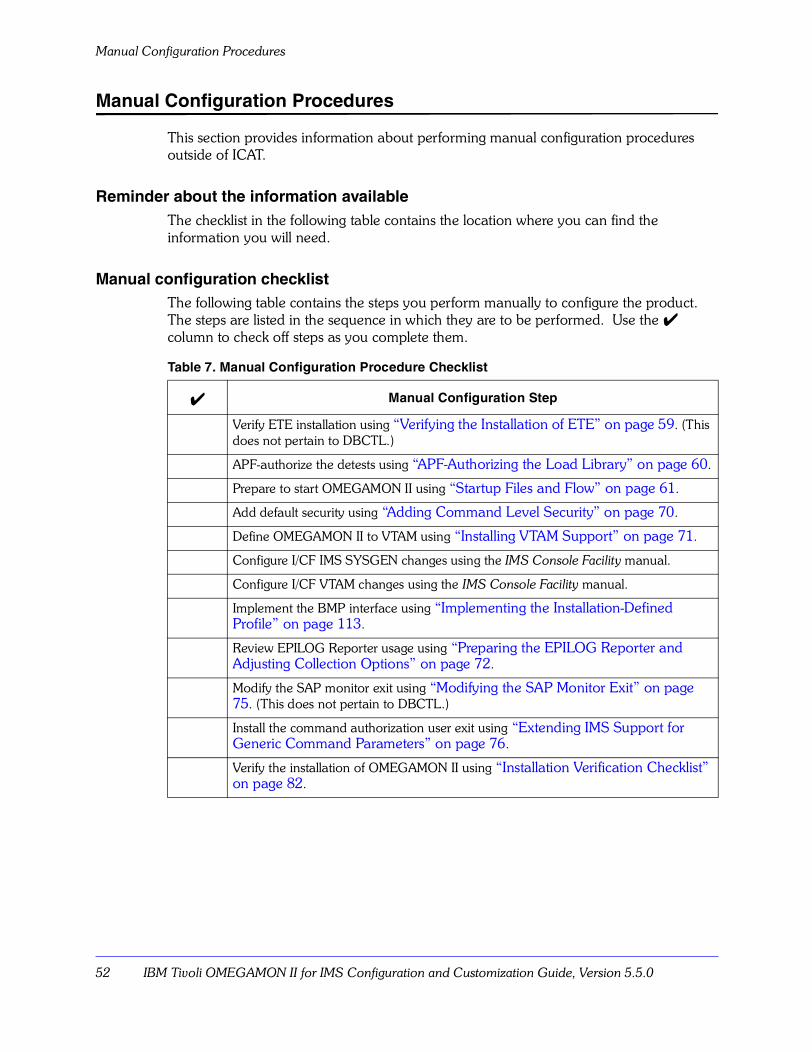
This section provides information about performing the manual customization procedures outside of ICAT.
Reminder about the information availableThe checklist in the following table contains the location where you can find the information you will need.
Manual customization checklistThe following table contains the steps you perform manually to customize the product. The steps are listed in the sequence in which they are to be performed. Use the ✔ column to check off steps as you complete them. IBM recommends that you review the entire process before you begin customizing the product.
Table 8. Manual Customization Procedures Checklist
✔ Manual Customization Step
Review OMEGAMON II profiles using �Reviewing OMEGAMON II Profiles� on page 104.
Review exception analysis using �Reviewing Exception Analysis� on page 107.
Create an installation-defined profile using �Creating an Installation-Defined Profile� on page 109.
Implement an installation-defined profile using �Implementing the Installation-Defined Profile� on page 113.
Customize exceptions for your site using �Setting Exception Analysis Thresholds from the CUA Interface� on page 115.
Implement the BMP interface using �Implementing Your BMP Interface� on page 117. (This does not pertain to DBCTL.)
Implement the SAP interface using �Implementing the SAP Interface� on page 122. (This does not pertain to DBCTL.)
Customize workload parameters using �Using KOIGBL to Customize Workload Parameters� on page 125.
Concatenate screen spaces and profile datasets using �Concatenating Screen Space and Profile Datasets� on page 134.
Manual Customization Procedures
54 IBM Tivoli OMEGAMON II for IMS Configuration and Customization Guide, Version 5.5.0
Section 2. Configuring and Customizing OMEGAMON II 55
Section 2. Configuring and Customizing
OMEGAMON II

56 IBM Tivoli OMEGAMON II for IMS Configuration and Customization Guide, Version 5.5.0
Configuration Procedures for the Realtime Performance Monitor 57
Configuration Procedures for theRealtime Performance Monitor
Chapter OverviewThis chapter guides you through the configuration of the OMEGAMON II Realtime Performance Monitor.
Chapter ContentsBackground about the Process . . . . . . . . . . . . . . . . . . . . . . . . . . . . . . . . . . . . . . . . . . 58Verifying the Installation of ETE . . . . . . . . . . . . . . . . . . . . . . . . . . . . . . . . . . . . . . . . . 59APF-Authorizing the Load Library . . . . . . . . . . . . . . . . . . . . . . . . . . . . . . . . . . . . . . . 60Startup Files and Flow . . . . . . . . . . . . . . . . . . . . . . . . . . . . . . . . . . . . . . . . . . . . . . . . 61Adding Command Level Security . . . . . . . . . . . . . . . . . . . . . . . . . . . . . . . . . . . . . . . . 70Installing VTAM Support. . . . . . . . . . . . . . . . . . . . . . . . . . . . . . . . . . . . . . . . . . . . . . . 71Preparing the EPILOG Reporter and Adjusting Collection Options . . . . . . . . . . . . . . . 72Running the Reporter in ISPF Split-Screen Mode . . . . . . . . . . . . . . . . . . . . . . . . . . . . 73Modifying the SAP Monitor Exit . . . . . . . . . . . . . . . . . . . . . . . . . . . . . . . . . . . . . . . . . 75Extending IMS Support for Generic Command Parameters . . . . . . . . . . . . . . . . . . . . 76Start VSAM Message Logging. . . . . . . . . . . . . . . . . . . . . . . . . . . . . . . . . . . . . . . . . . . 79
3
Background about the Process
58 IBM Tivoli OMEGAMON II for IMS Configuration and Customization Guide, Version 5.5.0
Background about the Process
Background about the configuration of the Realtime Performance MonitorThe configuration process includes tasks you must perform to make the product operational with a basic set of defaults. Review the entire procedure before you begin configuring OMEGAMON II for your environment.
Upon completion of these steps, you will be able to start, execute, and stop your OMEGAMON II product. However, before you can put the product to work in your environment, you must complete the procedures in this chapter.
Note: You must RECEIVE and APPLY the preventive maintenance tape that IBM includes in your product package, prior to performing the steps in this chapter.
If you want to use the End-to-End Response Time feature for the Realtime Performance Monitor, see the information on using the $OIGROUP macro with the NODE parameter in this chapter.
If you are using the Historical Component (EPILOG) and want to use the End-to-End Response Time feature, see the information on using the NODE parameter at startup in the Historical Component (EPILOG) Reference Manual, Collector Operation chapter, Data Collection Groups section.
Note: References to OMEGAMON II in this chapter are to the Realtime Performance Monitor, unless we specify otherwise.
Before you beginIt is important that you read �Installing, Configuring, and Customizing IBM Tivoli OMEGAMON II for IMS� on page 37 before you begin the configuration procedures.
Configuration Procedures for the Realtime Performance Monitor 59
Verifying the Installation of ETE
Verifying the Installation of ETE
Verify that someone has installed the End-to-End (ETE) Response Time feature on your system and if not, you will need to install ETE.
Note: The ETE Response Time feature does not pertain to DBCTL users.
Verifying ETE installationSince all OMEGAMONs on the same MVS system at your site share a single copy of ETE Version 500, someone may have already installed ETE on your system.
From an SMP/E inquiry, FMID AKET500 will be present if someone at your site has installed ETE.
APF-Authorizing the Load Library
60 IBM Tivoli OMEGAMON II for IMS Configuration and Customization Guide, Version 5.5.0
APF-Authorizing the Load Library
The OMEGAMON II load modules must reside in an APF (Authorized Program Facility) library.
Planning the APF-authorizationIn planning the authorization procedure, remember that most of the OMEGAMON II modules link-edit with an authorization code of (AC=0).
You must preserve this code if you copy modules with the linkage editor.
Authorizing the OMEGAMON II load libraryOMEGAMON II requires APF-authorization for the JOBLIB or STEPLIB dataset(s) that OMEGAMON II uses for execution.
Use one of the standard procedures IBM has defined to accomplish the APF-authorization. For example, you can either authorize the OMEGAMON II load library or move the OMEGAMON II load modules into a library that already has authorization.
Note: Whenever you authorize a new library, you must IPL MVS. However, moving modules into a previously authorized library does not require an IPL.
You can APF-authorize OMEGAMON II by adding the dataset name or names with the appropriate volume identification to your current SYS1.PARMLIB(IEAAPFxx) member and doing an IPL of your MVS operating environment. You need to authorize the following datasets:
� rhilev.RKANMOD
� rhilev.RKANMODL
Notes:
1. If one library in a STEPLIB or JOBLIB concatenation requires APF-authorization, all libraries in the concatenation require APF-authorization or all libraries will lose their APF status. You may already have APF authorization if you have installed other IBM products.
2. ETE does not pertain to DBCTL users.
Caution
If you make changes in the load modules after you move them into the library, you will have to replace those members.
Configuration Procedures for the Realtime Performance Monitor 61
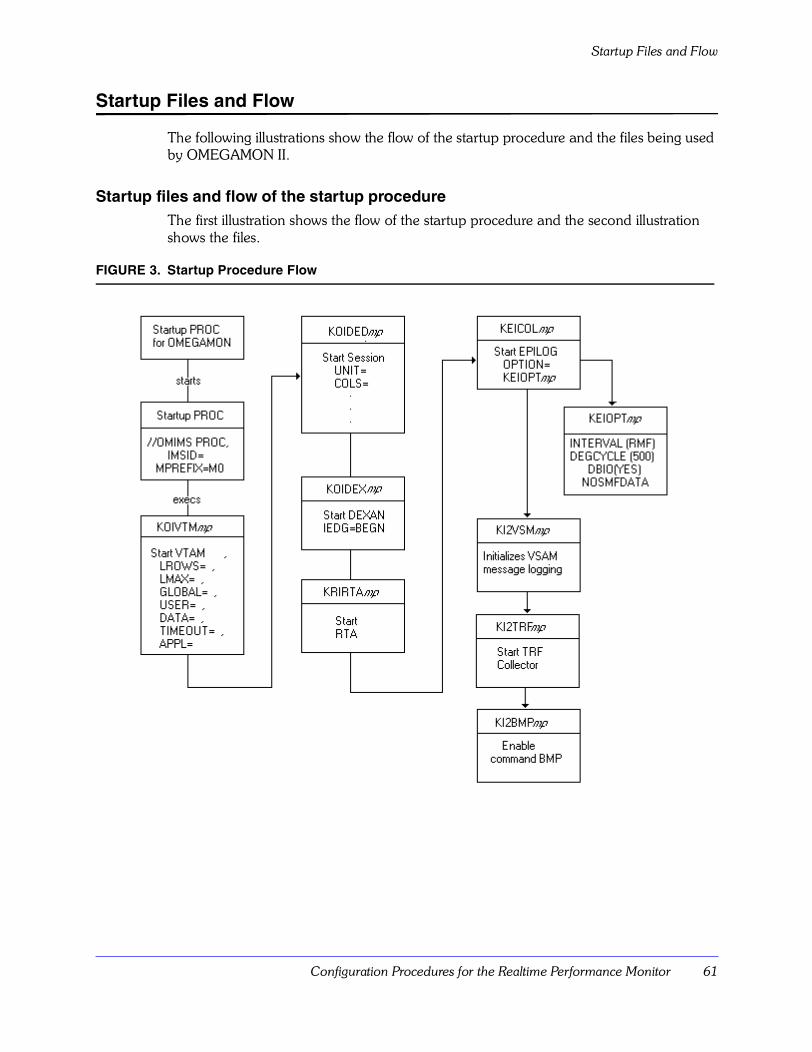
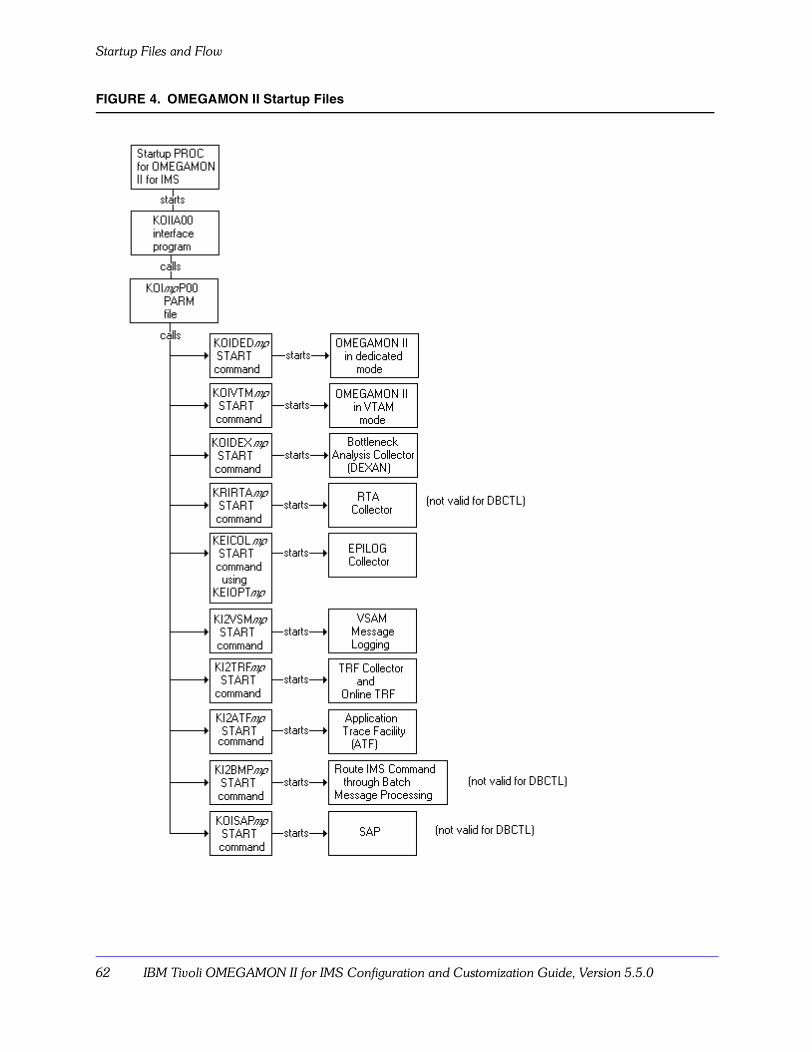
Startup Files and Flow
Startup Files and Flow
The following illustrations show the flow of the startup procedure and the files being used by OMEGAMON II.
Startup files and flow of the startup procedureThe first illustration shows the flow of the startup procedure and the second illustration shows the files.
FIGURE 3. Startup Procedure Flow
Startup Files and Flow
62 IBM Tivoli OMEGAMON II for IMS Configuration and Customization Guide, Version 5.5.0
FIGURE 4. OMEGAMON II Startup Files
Configuration Procedures for the Realtime Performance Monitor 63
Startup Files and Flow
Using the startup PROCTo use the startup PROC, copy the PROC to a system PROCLIB. For example, SYS1.PROCLIB.
Defining the MVS modify ID MPREFIX and IMSIDWhen you execute the startup PROC, the product interface defines a new MVS modify ID that you use to communicate with the interface. This modify ID consists of:
� a 2-character MPREFIX specified in the PROC. The value entered for the MVS suffix is used as the value for the MPREFIX parm in the startup proc.
� an IMSID specified in the PROC
For example, if the default prefix is M0 and your IMSID is IMSA, then the MVS modify ID is M0IMSA.
Also, when you execute the startup PROC, the startup PROC calls the PARM file rhilev.RKANPAR(KOImpP00), where mp is the 2-character MPREFIX. OMEGAMON II will automatically execute any interface commands in this PARM file. You may choose the characters of an MPREFIX arbitrarily, as long as each MPREFIX is unique.
Note: You cannot specify a stepname that is the same as this modify ID.
Using IBM standard DDNAMESThe startup procedure contains DD statements pointing to standard IBM datasets. The procedure has the started task name you specified for OMEGAMON II using ICAT.
RKANHENU The OMEGAMON II command help dataset.
RKOIPROC The datasets from which OMEGAMON II reads screen spaces that the command and menu interfaces use.
The concatenation includes the rhilev.RKOIPROC dataset, which contains IBM-defined screen spaces and the rhilev.IMSID.RKOIPCSV dataset, which may contain user-defined screen spaces. The datasets in the RKOIPROC DD statements are read-only.
RKOIPCSV The rhilev.IMSID.RKOIPCSV dataset.(ICAT allocates one data set for each IMS ID.)
RKOIPCSV is initially empty, but any screen spaces that your site creates or modifies will be written to and subsequently read from RKOIPCSV. The RKOIPCSV DD statement cannot consist of concatenated datasets.
RKOIPROF The RKOIPROF dataset from which OMEGAMON II reads user profiles.
RKOIPFSV The rhilev.IMSID.RKOIPFSV dataset to which OMEGAMON II writes user profiles. This DD statement does not have concatenated datasets.(ICAT allocates one data set for each IMS ID.)
RKANPAR The dataset from which the product interface start commands are read.
RKEIEDS The EPILOG datastore in rhilev.IMSID.RKEIEDS.(ICAT allocates one data set for each IMS ID.)

Startup Files and Flow
64 IBM Tivoli OMEGAMON II for IMS Configuration and Customization Guide, Version 5.5.0
Editing the PARM fileWhen you execute the startup PROC, the startup PROC calls the PARM file rhilev.RKANPAR(KOImpP00), where mp is the 2-character MPREFIX. The default member is KOIM0P00.
You must edit KOIM0P00 to activate various product components, following the instructions in KOIM0P00. Since OMEGAMON II automatically executes any interface commands in the KOIM0P00 PARM file, OMEGAMON II can automatically start any combination of the following components.
Notes:
1. We address each of the programs in the above table as separate topics in this manual.
2. The BMP for IMS command program and SAP do not pertain to DBCTL users.
3. During ICAT configuration, member KI2ATFmp is created in rhilev.RKANPAR. It contains the start command for the Application Trace Facility (ATF) component. The ATF component is not meant to be automatically started upon OMEGAMON II startup and is NOT included in the PARM file. Refer to the Application Trace Facility manual for information on starting the Application Trace Facility.To use OMEGAMON II with its standard CUA interface, be sure to remove the asterisk in front of the EXEC statements for KOIVTMmp, KOIDEXmp, KEICOL.mp, KI2VSMmp, and KI2TRFmp.
Follow the procedures in �Start VSAM Message Logging� on page 79 to customize KI2VSMmp and other related members for VSAM message logging, and in �Adjusting EPILOG collection parameters� on page 74 to customize KEICOLmp forEPILOG collection parameters.
IF you want to automatically start THEN remove the asterisk (*) in front of
OMEGAMON II in dedicated mode EXEC KOIDEDmp
OMEGAMON II in VTAM mode EXEC KOIVTMmp
You do not need to remove the comments for this command. The default is to start automatically.
Bottleneck Analysis (DEXAN) collector EXEC KOIDEXmp
EPILOG collector EXEC KEICOLmp
BMP for IMS commands (not valid for DBCTL)
EXEC KI2BMPmp
VSAM message logging EXEC KI2VSMmp
Transaction Reporting Facility EXEC KI2TRFmp
SAP (not valid for DBCTL) EXEC KOISAPmp
Response Time Analysis EXEC KRIRTAmp
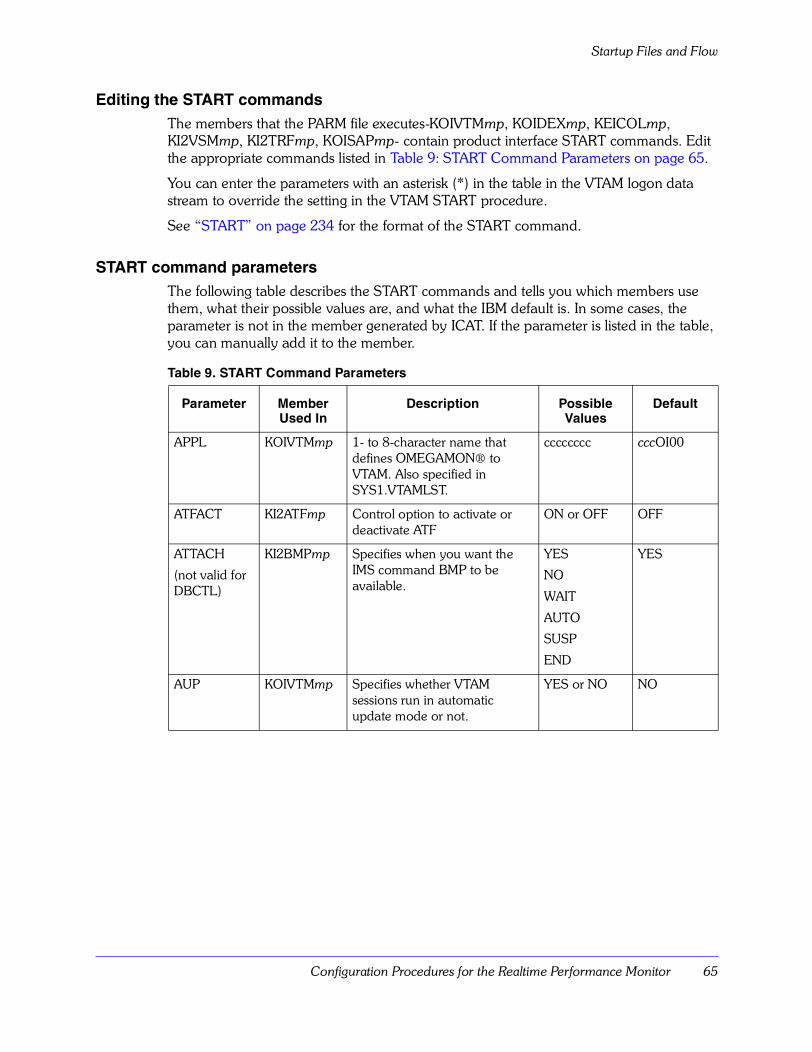
Configuration Procedures for the Realtime Performance Monitor 65
Startup Files and Flow
Editing the START commandsThe members that the PARM file executes-KOIVTMmp, KOIDEXmp, KEICOLmp, KI2VSMmp, KI2TRFmp, KOISAPmp- contain product interface START commands. Edit the appropriate commands listed in Table 9: START Command Parameters on page 65.
You can enter the parameters with an asterisk (*) in the table in the VTAM logon data stream to override the setting in the VTAM START procedure.
See �START� on page 234 for the format of the START command.
START command parametersThe following table describes the START commands and tells you which members use them, what their possible values are, and what the IBM default is. In some cases, the parameter is not in the member generated by ICAT. If the parameter is listed in the table, you can manually add it to the member.
Table 9. START Command Parameters
Parameter Member Used In
Description Possible Values
Default
APPL KOIVTMmp 1- to 8-character name that defines OMEGAMON® to VTAM. Also specified in SYS1.VTAMLST.
cccccccc cccOI00
ATFACT KI2ATFmp Control option to activate or deactivate ATF
ON or OFF OFF
ATTACH
(not valid for DBCTL)
KI2BMPmp Specifies when you want the IMS command BMP to be available.
YES
NO
WAIT
AUTO
SUSP
END
YES
AUP KOIVTMmp Specifies whether VTAM sessions run in automatic update mode or not.
YES or NO NO
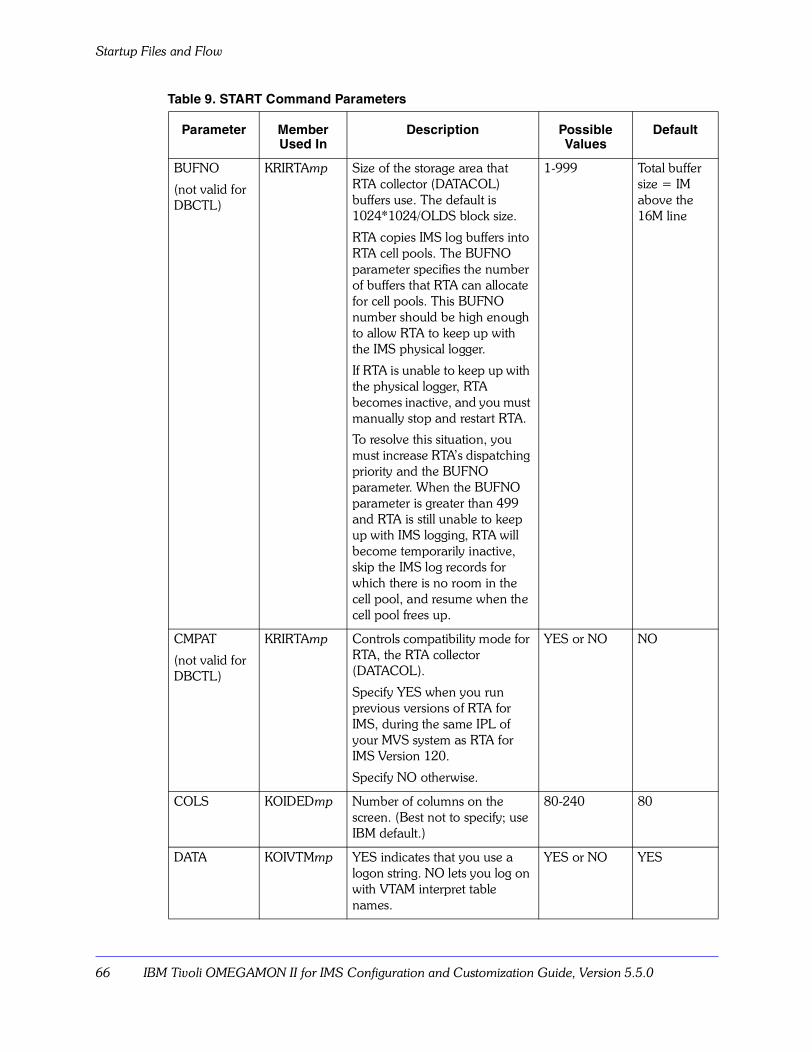
Startup Files and Flow
66 IBM Tivoli OMEGAMON II for IMS Configuration and Customization Guide, Version 5.5.0
BUFNO
(not valid for DBCTL)
KRIRTAmp Size of the storage area that RTA collector (DATACOL) buffers use. The default is 1024*1024/OLDS block size.
RTA copies IMS log buffers into RTA cell pools. The BUFNO parameter specifies the number of buffers that RTA can allocate for cell pools. This BUFNO number should be high enough to allow RTA to keep up with the IMS physical logger.
If RTA is unable to keep up with the physical logger, RTA becomes inactive, and you must manually stop and restart RTA.
To resolve this situation, you must increase RTA�s dispatching priority and the BUFNO parameter. When the BUFNO parameter is greater than 499 and RTA is still unable to keep up with IMS logging, RTA will become temporarily inactive, skip the IMS log records for which there is no room in the cell pool, and resume when the cell pool frees up.
1-999 Total buffer size = IM above the 16M line
CMPAT
(not valid for DBCTL)
KRIRTAmp Controls compatibility mode for RTA, the RTA collector (DATACOL).
Specify YES when you run previous versions of RTA for IMS, during the same IPL of your MVS system as RTA for IMS Version 120.
Specify NO otherwise.
YES or NO NO
COLS KOIDEDmp Number of columns on the screen. (Best not to specify; use IBM default.)
80-240 80
DATA KOIVTMmp YES indicates that you use a logon string. NO lets you log on with VTAM interpret table names.
YES or NO YES
Table 9. START Command Parameters
Parameter Member Used In
Description Possible Values
Default
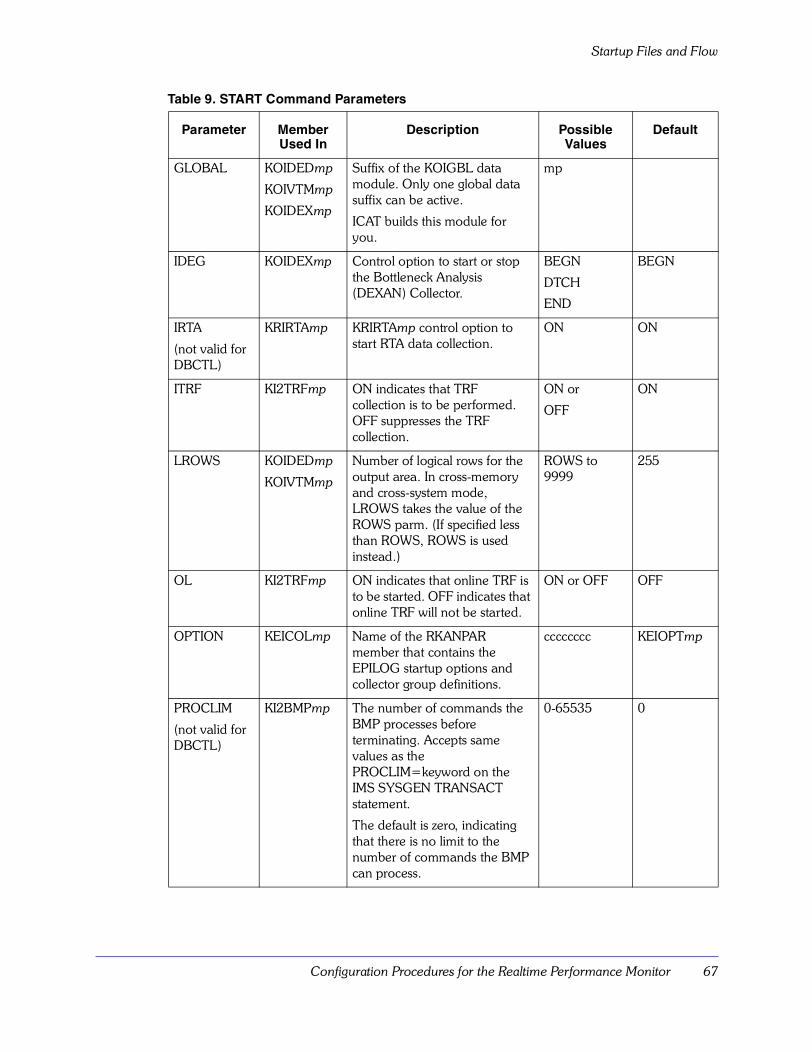
Configuration Procedures for the Realtime Performance Monitor 67
Startup Files and Flow
GLOBAL KOIDEDmp
KOIVTMmp
KOIDEXmp
Suffix of the KOIGBL data module. Only one global data suffix can be active.
ICAT builds this module for you.
mp
IDEG KOIDEXmp Control option to start or stop the Bottleneck Analysis (DEXAN) Collector.
BEGN
DTCH
END
BEGN
IRTA
(not valid for DBCTL)
KRIRTAmp KRIRTAmp control option to start RTA data collection.
ON ON
ITRF KI2TRFmp ON indicates that TRF collection is to be performed. OFF suppresses the TRF collection.
ON or
OFF
ON
LROWS KOIDEDmp
KOIVTMmp
Number of logical rows for the output area. In cross-memory and cross-system mode, LROWS takes the value of the ROWS parm. (If specified less than ROWS, ROWS is used instead.)
ROWS to 9999
255
OL KI2TRFmp ON indicates that online TRF is to be started. OFF indicates that online TRF will not be started.
ON or OFF OFF
OPTION KEICOLmp Name of the RKANPAR member that contains the EPILOG startup options and collector group definitions.
cccccccc KEIOPTmp
PROCLIM
(not valid for DBCTL)
KI2BMPmp The number of commands the BMP processes before terminating. Accepts same values as the PROCLIM=keyword on the IMS SYSGEN TRANSACT statement.
The default is zero, indicating that there is no limit to the number of commands the BMP can process.
0-65535 0
Table 9. START Command Parameters
Parameter Member Used In
Description Possible Values
Default
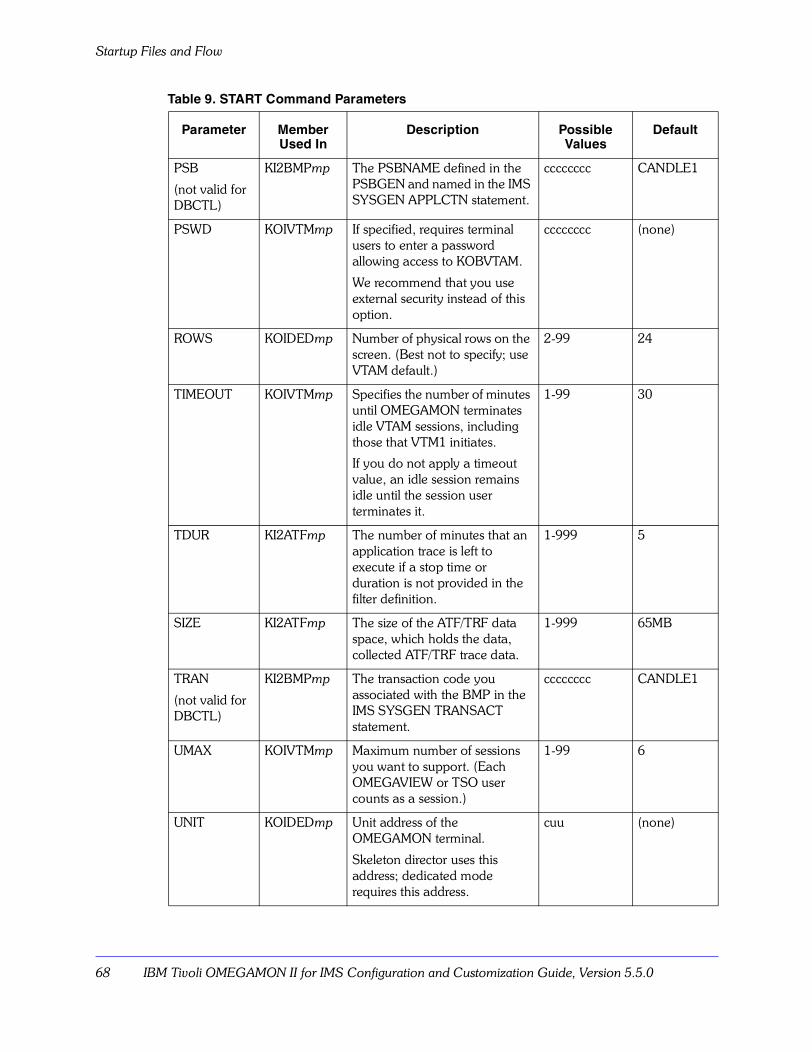
Startup Files and Flow
68 IBM Tivoli OMEGAMON II for IMS Configuration and Customization Guide, Version 5.5.0
PSB
(not valid for DBCTL)
KI2BMPmp The PSBNAME defined in the PSBGEN and named in the IMS SYSGEN APPLCTN statement.
cccccccc CANDLE1
PSWD KOIVTMmp If specified, requires terminal users to enter a password allowing access to KOBVTAM.
We recommend that you use external security instead of this option.
cccccccc (none)
ROWS KOIDEDmp Number of physical rows on the screen. (Best not to specify; use VTAM default.)
2-99 24
TIMEOUT KOIVTMmp Specifies the number of minutes until OMEGAMON terminates idle VTAM sessions, including those that VTM1 initiates.
If you do not apply a timeout value, an idle session remains idle until the session user terminates it.
1-99 30
TDUR KI2ATFmp The number of minutes that an application trace is left to execute if a stop time or duration is not provided in the filter definition.
1-999 5
SIZE KI2ATFmp The size of the ATF/TRF data space, which holds the data, collected ATF/TRF trace data.
1-999 65MB
TRAN
(not valid for DBCTL)
KI2BMPmp The transaction code you associated with the BMP in the IMS SYSGEN TRANSACT statement.
cccccccc CANDLE1
UMAX KOIVTMmp Maximum number of sessions you want to support. (Each OMEGAVIEW or TSO user counts as a session.)
1-99 6
UNIT KOIDEDmp Unit address of the OMEGAMON terminal.
Skeleton director uses this address; dedicated mode requires this address.
cuu (none)
Table 9. START Command Parameters
Parameter Member Used In
Description Possible Values
Default
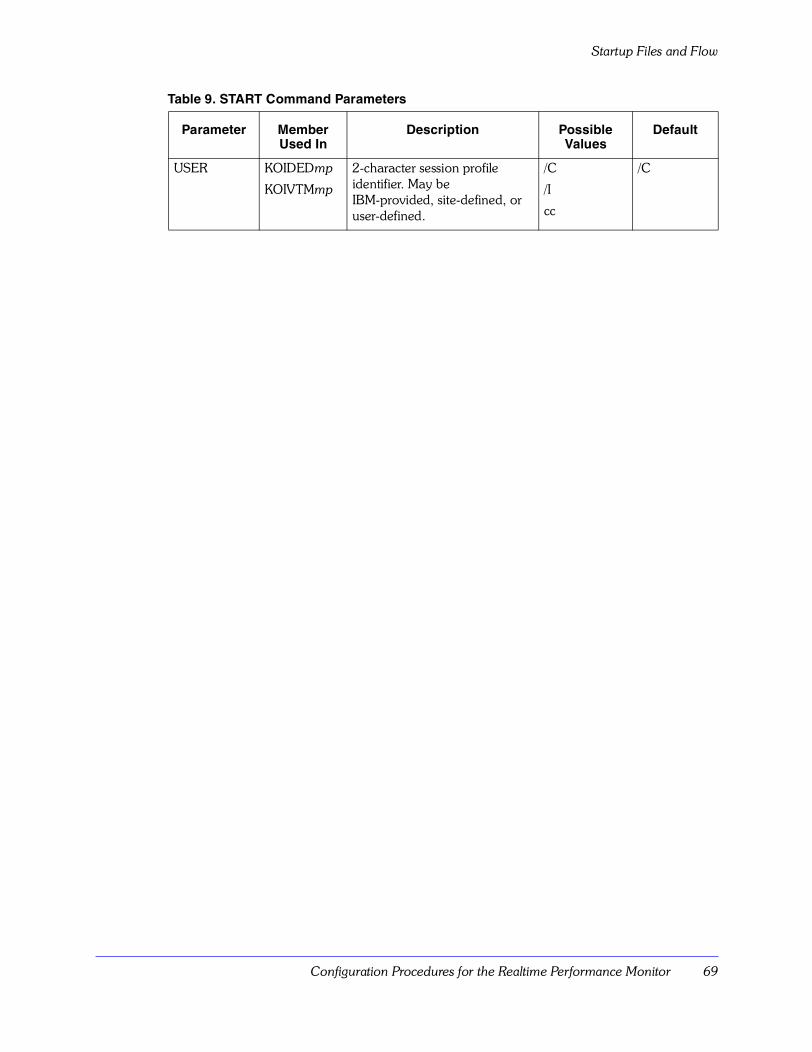
Configuration Procedures for the Realtime Performance Monitor 69
Startup Files and Flow
USER KOIDEDmp
KOIVTMmp
2-character session profile identifier. May be IBM-provided, site-defined, or user-defined.
/C
/I
cc
/C
Table 9. START Command Parameters
Parameter Member Used In
Description Possible Values
Default
Adding Command Level Security
70 IBM Tivoli OMEGAMON II for IMS Configuration and Customization Guide, Version 5.5.0
Adding Command Level Security
Before starting OMEGAMON II, you might want to add password security to several sensitive commands.
Setting default securityYou can establish default security by following these steps:
1. Update rhilev.RKANSAM(KOISUPDI) with your site requirements.
2. Create a KOISUPD security update job using the sample KOISUPD job in rhilev.RKANSAM.
3. In the KOISUPD job you create, use the KOISUPDI job you updated in rhilev.RKANSAM as the input.
4. Submit the KOISUPD security update job you created.See the comments in these dataset members for further details.
Configuration Procedures for the Realtime Performance Monitor 71
Installing VTAM Support
Installing VTAM Support
You can now install VTAM support as follows:
1. Define OMEGAMON II to VTAM.
2. Optionally, simplify the logon process.
Defining OMEGAMON II to VTAMTo define OMEGAMON II to VTAM, perform the following steps:
Note: The optional TSO and ISPF modes require additional VTAM definitions for the application program VTM1, which uses VTAM services to provide access between TSO address spaces and OMEGAMON II. If your site plans to support these modes, review the information in the section �Defining virtual terminals to VTAM� on page 92 in this manual, to allow the VTAM systems programmer to perform all VTAMLST edits at one time.
Starting the VTAM connection to IMS region automaticallyDuring ICAT configuration of OMEGAMON II, you can specify that you want the VTAM connection to IMS region to start automatically when you start OMEGAMON II. See �Autostarting RTM components� on page 39 and the ICAT online help for more information.
Simplifying the logon process (optional)You may simplify the user logon process by creating or modifying the VTAM Unformatted System Services (USS) table(s) or the VTAM Interpret table(s).
Contact your VTAM systems programmer, or refer to the IBM Manual VTAM Resource Definition Reference for assistance.
Step Action
1 Define the KOBVTAM application program as an application to VTAM in SYS1.VTAMLST.
IBM supplies a sample application major node definition in &rhilev.RKANSAM(cccccccc), where cccccccc is the major node name you specified for VTAM using ICAT.
2 Provide this information to your VTAM systems programmer, requesting an update of SYS1.VTAMLST to include the major node definition.
Preparing the EPILOG Reporter and Adjusting Collection Options
72 IBM Tivoli OMEGAMON II for IMS Configuration and Customization Guide, Version 5.5.0
Preparing the EPILOG Reporter and Adjusting Collection Options
You can run the EPILOG reporter component of OMEGAMON II in one of the following ways:
� from a TSO CLIST, in TSO full-screen mode
� in ISPF split-screen mode
� as a batch job
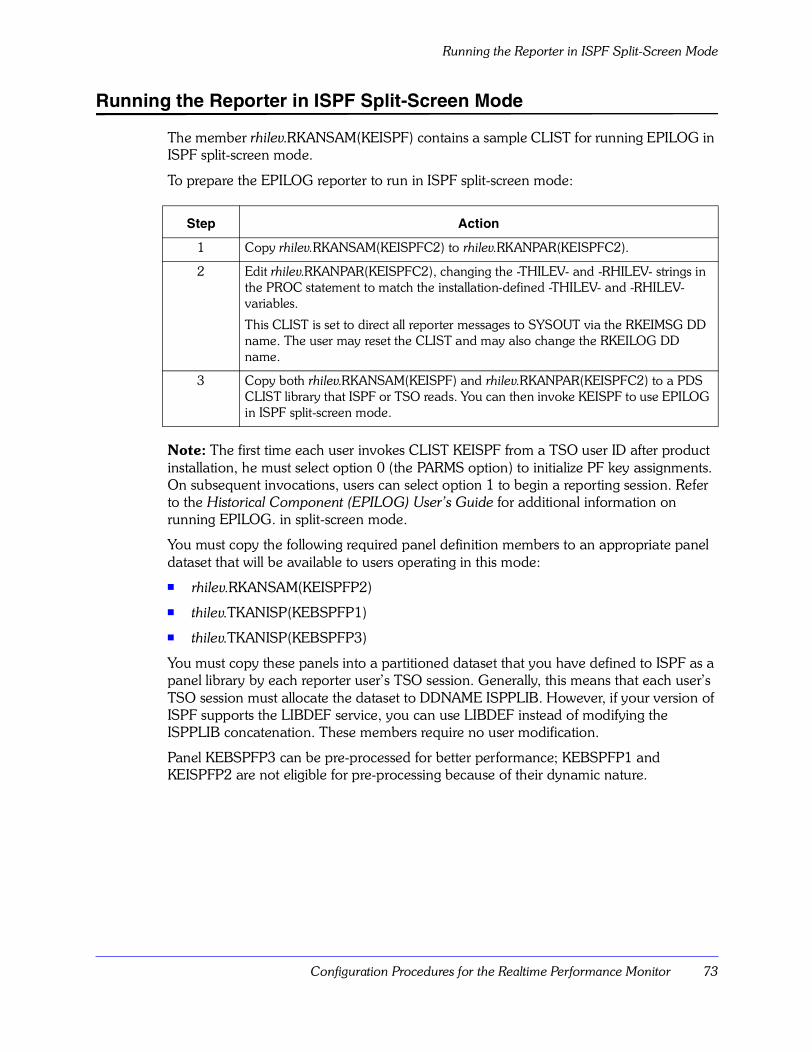
Configuration Procedures for the Realtime Performance Monitor 73
Running the Reporter in ISPF Split-Screen Mode
Running the Reporter in ISPF Split-Screen Mode
The member rhilev.RKANSAM(KEISPF) contains a sample CLIST for running EPILOG in ISPF split-screen mode.
To prepare the EPILOG reporter to run in ISPF split-screen mode:
Note: The first time each user invokes CLIST KEISPF from a TSO user ID after product installation, he must select option 0 (the PARMS option) to initialize PF key assignments. On subsequent invocations, users can select option 1 to begin a reporting session. Refer to the Historical Component (EPILOG) User�s Guide for additional information on running EPILOG. in split-screen mode.
You must copy the following required panel definition members to an appropriate panel dataset that will be available to users operating in this mode:
� rhilev.RKANSAM(KEISPFP2)
� thilev.TKANISP(KEBSPFP1)
� thilev.TKANISP(KEBSPFP3)
You must copy these panels into a partitioned dataset that you have defined to ISPF as a panel library by each reporter user�s TSO session. Generally, this means that each user�s TSO session must allocate the dataset to DDNAME ISPPLIB. However, if your version of ISPF supports the LIBDEF service, you can use LIBDEF instead of modifying the ISPPLIB concatenation. These members require no user modification.
Panel KEBSPFP3 can be pre-processed for better performance; KEBSPFP1 and KEISPFP2 are not eligible for pre-processing because of their dynamic nature.
Step Action
1 Copy rhilev.RKANSAM(KEISPFC2) to rhilev.RKANPAR(KEISPFC2).
2 Edit rhilev.RKANPAR(KEISPFC2), changing the -THILEV- and -RHILEV- strings in the PROC statement to match the installation-defined -THILEV- and -RHILEV- variables.
This CLIST is set to direct all reporter messages to SYSOUT via the RKEIMSG DD name. The user may reset the CLIST and may also change the RKEILOG DD name.
3 Copy both rhilev.RKANSAM(KEISPF) and rhilev.RKANPAR(KEISPFC2) to a PDS CLIST library that ISPF or TSO reads. You can then invoke KEISPF to use EPILOG in ISPF split-screen mode.
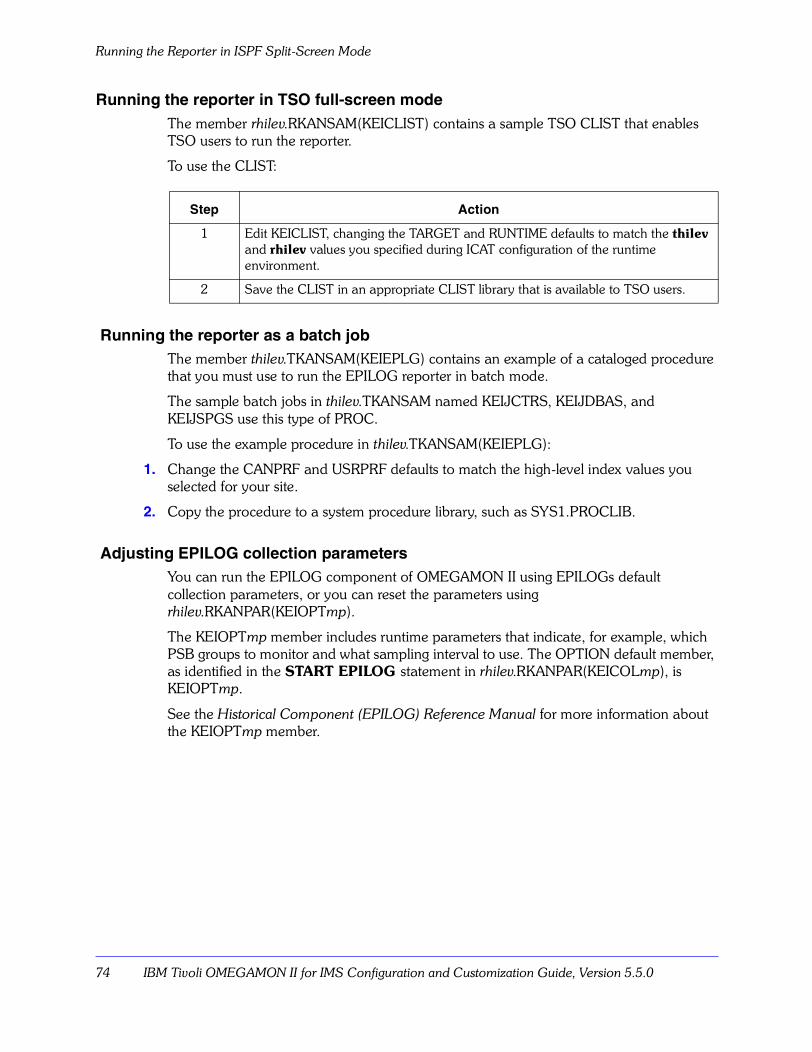
Running the Reporter in ISPF Split-Screen Mode
74 IBM Tivoli OMEGAMON II for IMS Configuration and Customization Guide, Version 5.5.0
Running the reporter in TSO full-screen modeThe member rhilev.RKANSAM(KEICLIST) contains a sample TSO CLIST that enables TSO users to run the reporter.
To use the CLIST:
Running the reporter as a batch jobThe member thilev.TKANSAM(KEIEPLG) contains an example of a cataloged procedure that you must use to run the EPILOG reporter in batch mode.
The sample batch jobs in thilev.TKANSAM named KEIJCTRS, KEIJDBAS, and KEIJSPGS use this type of PROC.
To use the example procedure in thilev.TKANSAM(KEIEPLG):
1. Change the CANPRF and USRPRF defaults to match the high-level index values you selected for your site.
2. Copy the procedure to a system procedure library, such as SYS1.PROCLIB.
Adjusting EPILOG collection parametersYou can run the EPILOG component of OMEGAMON II using EPILOGs default collection parameters, or you can reset the parameters using rhilev.RKANPAR(KEIOPTmp).
The KEIOPTmp member includes runtime parameters that indicate, for example, which PSB groups to monitor and what sampling interval to use. The OPTION default member, as identified in the START EPILOG statement in rhilev.RKANPAR(KEICOLmp), is KEIOPTmp.
See the Historical Component (EPILOG) Reference Manual for more information about the KEIOPTmp member.
Step Action
1 Edit KEICLIST, changing the TARGET and RUNTIME defaults to match the thilev and rhilev values you specified during ICAT configuration of the runtime environment.
2 Save the CLIST in an appropriate CLIST library that is available to TSO users.
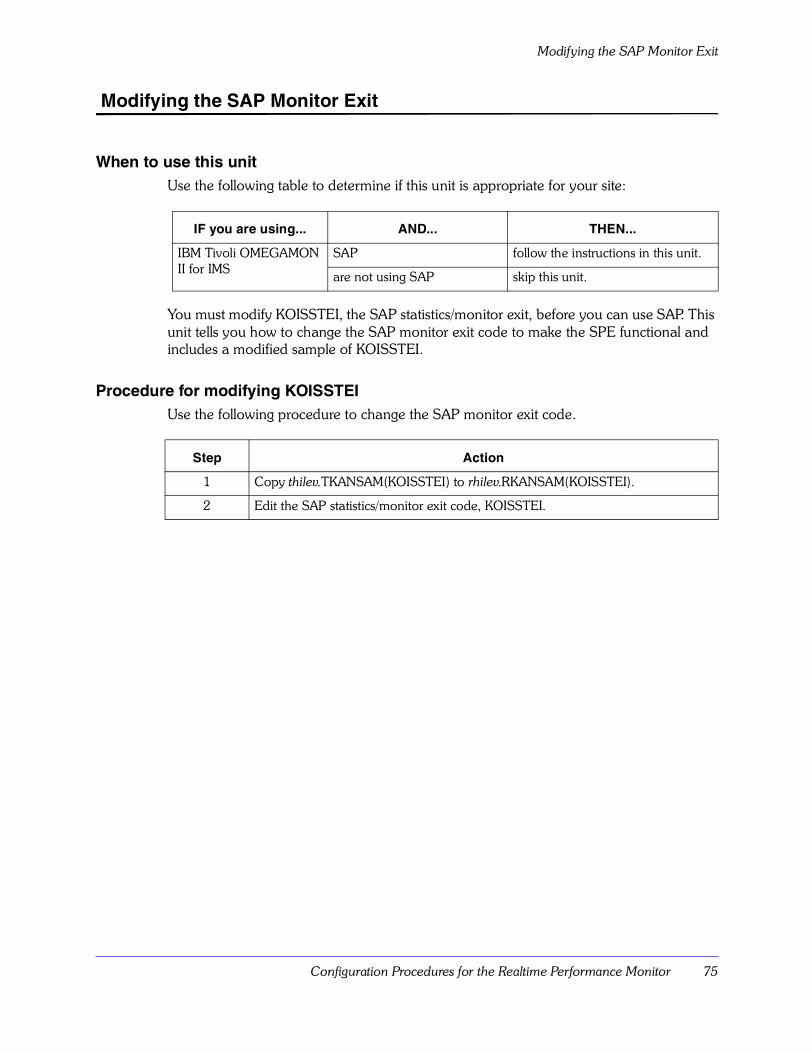
Configuration Procedures for the Realtime Performance Monitor 75
Modifying the SAP Monitor Exit
Modifying the SAP Monitor Exit
When to use this unitUse the following table to determine if this unit is appropriate for your site:
You must modify KOISSTEI, the SAP statistics/monitor exit, before you can use SAP. This unit tells you how to change the SAP monitor exit code to make the SPE functional and includes a modified sample of KOISSTEI.
Procedure for modifying KOISSTEIUse the following procedure to change the SAP monitor exit code.
IF you are using... AND... THEN...
IBM Tivoli OMEGAMON II for IMS
SAP follow the instructions in this unit.
are not using SAP skip this unit.
Step Action
1 Copy thilev.TKANSAM(KOISSTEI) to rhilev.RKANSAM(KOISSTEI).
2 Edit the SAP statistics/monitor exit code, KOISSTEI.
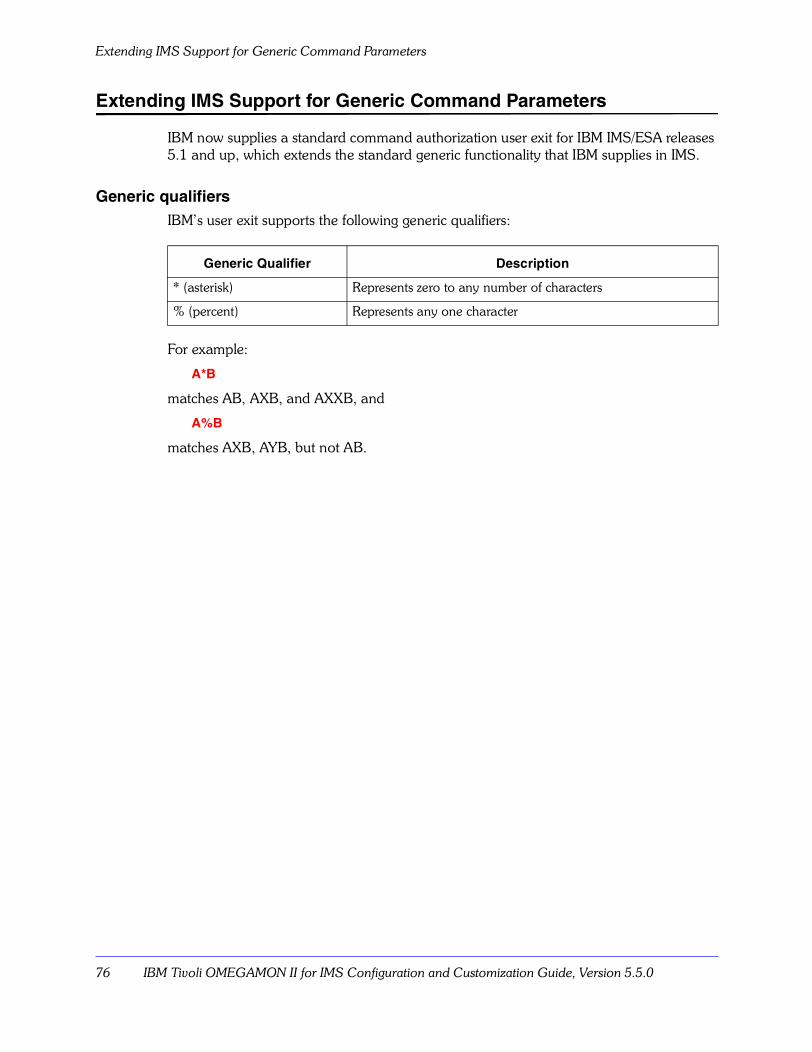
Extending IMS Support for Generic Command Parameters
76 IBM Tivoli OMEGAMON II for IMS Configuration and Customization Guide, Version 5.5.0
Extending IMS Support for Generic Command Parameters
IBM now supplies a standard command authorization user exit for IBM IMS/ESA releases 5.1 and up, which extends the standard generic functionality that IBM supplies in IMS.
Generic qualifiersIBM�s user exit supports the following generic qualifiers:
For example:
A*B
matches AB, AXB, and AXXB, and
A%B
matches AXB, AYB, but not AB.
Generic Qualifier Description
* (asterisk) Represents zero to any number of characters
% (percent) Represents any one character
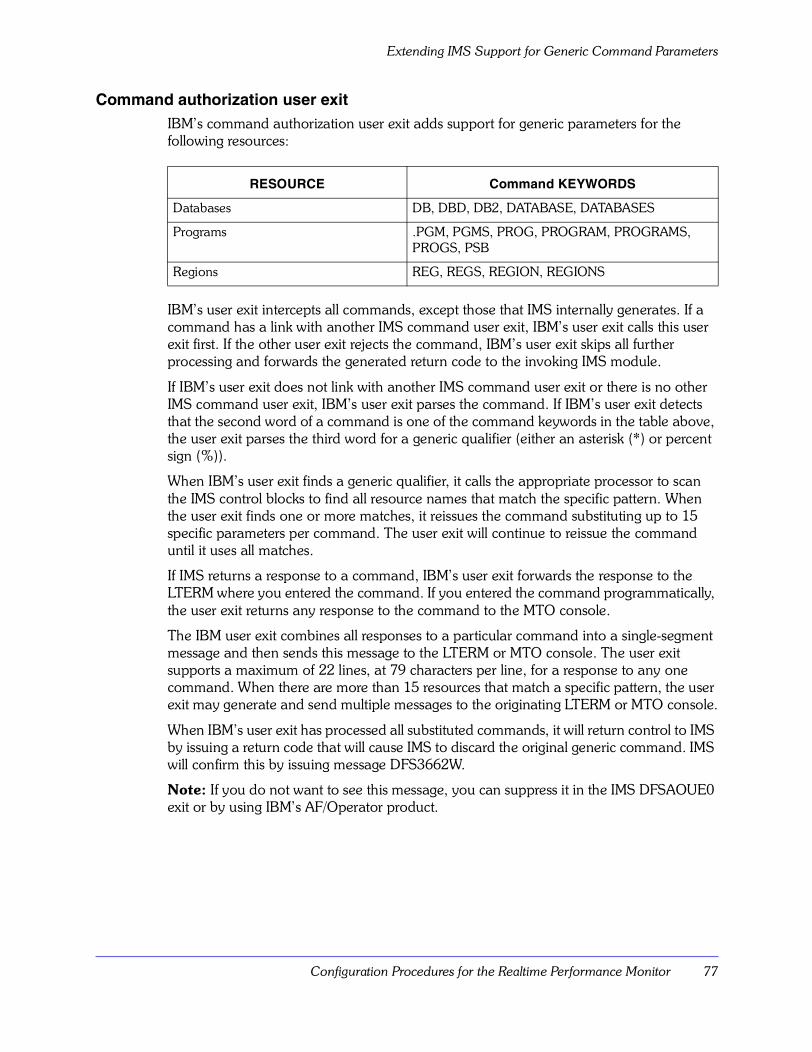
Configuration Procedures for the Realtime Performance Monitor 77
Extending IMS Support for Generic Command Parameters
Command authorization user exitIBM�s command authorization user exit adds support for generic parameters for the following resources:
IBM�s user exit intercepts all commands, except those that IMS internally generates. If a command has a link with another IMS command user exit, IBM�s user exit calls this user exit first. If the other user exit rejects the command, IBM�s user exit skips all further processing and forwards the generated return code to the invoking IMS module.
If IBM�s user exit does not link with another IMS command user exit or there is no other IMS command user exit, IBM�s user exit parses the command. If IBM�s user exit detects that the second word of a command is one of the command keywords in the table above, the user exit parses the third word for a generic qualifier (either an asterisk (*) or percent sign (%)).
When IBM�s user exit finds a generic qualifier, it calls the appropriate processor to scan the IMS control blocks to find all resource names that match the specific pattern. When the user exit finds one or more matches, it reissues the command substituting up to 15 specific parameters per command. The user exit will continue to reissue the command until it uses all matches.
If IMS returns a response to a command, IBM�s user exit forwards the response to the LTERM where you entered the command. If you entered the command programmatically, the user exit returns any response to the command to the MTO console.
The IBM user exit combines all responses to a particular command into a single-segment message and then sends this message to the LTERM or MTO console. The user exit supports a maximum of 22 lines, at 79 characters per line, for a response to any one command. When there are more than 15 resources that match a specific pattern, the user exit may generate and send multiple messages to the originating LTERM or MTO console.
When IBM�s user exit has processed all substituted commands, it will return control to IMS by issuing a return code that will cause IMS to discard the original generic command. IMS will confirm this by issuing message DFS3662W.
Note: If you do not want to see this message, you can suppress it in the IMS DFSAOUE0 exit or by using IBM�s AF/Operator product.
RESOURCE Command KEYWORDS
Databases DB, DBD, DB2, DATABASE, DATABASES
Programs .PGM, PGMS, PROG, PROGRAM, PROGRAMS, PROGS, PSB
Regions REG, REGS, REGION, REGIONS
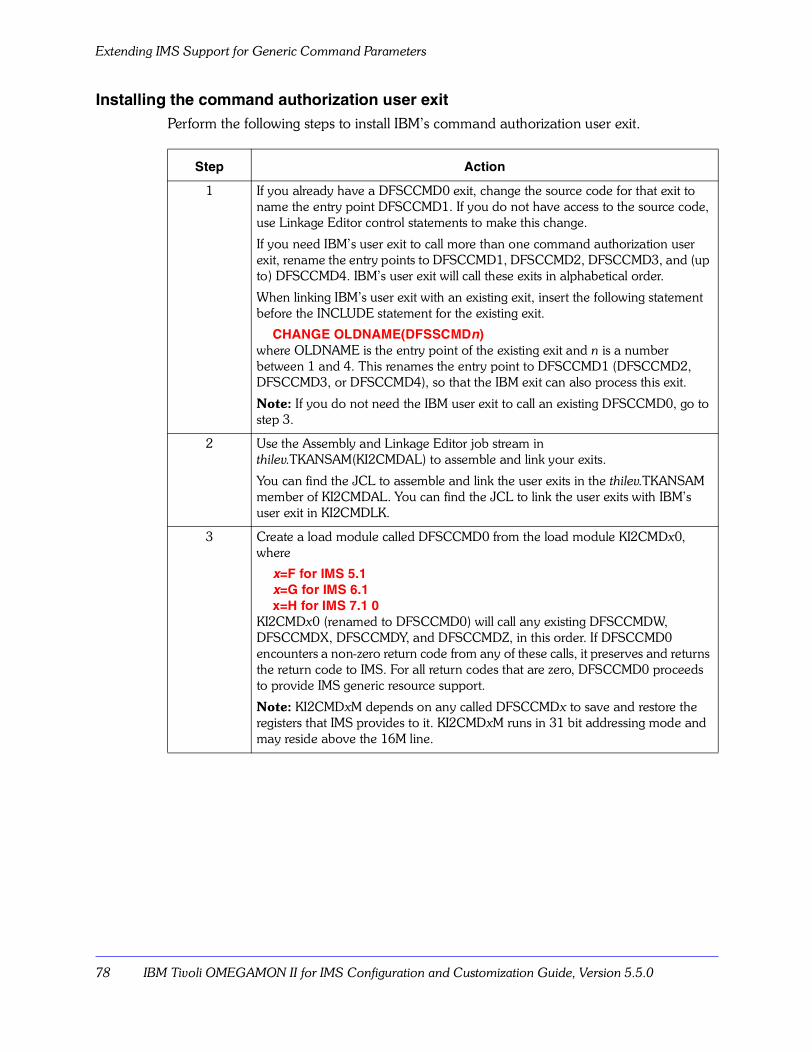
Extending IMS Support for Generic Command Parameters
78 IBM Tivoli OMEGAMON II for IMS Configuration and Customization Guide, Version 5.5.0
Installing the command authorization user exitPerform the following steps to install IBM�s command authorization user exit.
Step Action
1 If you already have a DFSCCMD0 exit, change the source code for that exit to name the entry point DFSCCMD1. If you do not have access to the source code, use Linkage Editor control statements to make this change.
If you need IBM�s user exit to call more than one command authorization user exit, rename the entry points to DFSCCMD1, DFSCCMD2, DFSCCMD3, and (up to) DFSCCMD4. IBM�s user exit will call these exits in alphabetical order.
When linking IBM�s user exit with an existing exit, insert the following statement before the INCLUDE statement for the existing exit.
CHANGE OLDNAME(DFSSCMDn)where OLDNAME is the entry point of the existing exit and n is a number between 1 and 4. This renames the entry point to DFSCCMD1 (DFSCCMD2, DFSCCMD3, or DFSCCMD4), so that the IBM exit can also process this exit.
Note: If you do not need the IBM user exit to call an existing DFSCCMD0, go to step 3.
2 Use the Assembly and Linkage Editor job stream in thilev.TKANSAM(KI2CMDAL) to assemble and link your exits.
You can find the JCL to assemble and link the user exits in the thilev.TKANSAM member of KI2CMDAL. You can find the JCL to link the user exits with IBM�s user exit in KI2CMDLK.
3 Create a load module called DFSCCMD0 from the load module KI2CMDx0, where
x=F for IMS 5.1x=G for IMS 6.1x=H for IMS 7.1 0
KI2CMDx0 (renamed to DFSCCMD0) will call any existing DFSCCMDW, DFSCCMDX, DFSCCMDY, and DFSCCMDZ, in this order. If DFSCCMD0 encounters a non-zero return code from any of these calls, it preserves and returns the return code to IMS. For all return codes that are zero, DFSCCMD0 proceeds to provide IMS generic resource support.
Note: KI2CMDxM depends on any called DFSCCMDx to save and restore the registers that IMS provides to it. KI2CMDxM runs in 31 bit addressing mode and may reside above the 16M line.

Configuration Procedures for the Realtime Performance Monitor 79
Start VSAM Message Logging
Start VSAM Message Logging
The OMEGAMON II CUA interface enables you to browse the messages that IMS generates. OMEGAMON II writes these messages to a pair of VSAM datasets. When a VSAM dataset fills, OMEGAMON II automatically switches to the second dataset and then archives and reinitializes the first dataset.
This unit tells you how to prepare the VSAM datasets for message logging.
Starting VSAM message logging automaticallyDuring ICAT configuration of OMEGAMON II, you can specify that you want VSAM message logging to start automatically when you start OMEGAMON II. See �Autostarting RTM components� on page 39 and the ICAT online help for more information.
Start VSAM message logging manuallyTo manually start VSAM message logging, remove the asterisk in from of the EXEC KI2VSMmp command in rhlievRKANPAR(KOImpP00) (where mp is the two-character MPREFIX). The default member is KOIM0P00.
You can also activate VSAM message logging by issuing the EXEC KI2VSMmp interface command. VSAM message logging can be active whether users are logged onto the OMEGAMON II CUA interface or not.
Note: To start the VSAM message logging, at least one initialized message log dataset must be available.

Start VSAM Message Logging
80 IBM Tivoli OMEGAMON II for IMS Configuration and Customization Guide, Version 5.5.0
Installation Verification of the Realtime Performance Monitor 81
Installation Verification of theRealtime Performance Monitor
Chapter OverviewThis chapter will guide you through the installation verification of the OMEGAMON II Realtime Performance Monitor. You must perform the steps in this section to verify your installation, before you begin customizing OMEGAMON II.
Note: References to OMEGAMON II in this chapter are to the Realtime Performance Monitor, unless we specify otherwise.
Chapter ContentsInstallation Verification Checklist. . . . . . . . . . . . . . . . . . . . . . . . . . . . . . . . . . . . . . . . . 82Start the Candle Subsystem . . . . . . . . . . . . . . . . . . . . . . . . . . . . . . . . . . . . . . . . . . . . 83Start the End-to-End Response Time Feature . . . . . . . . . . . . . . . . . . . . . . . . . . . . . . . 85Start OMEGAMON II Realtime Performance Monitor . . . . . . . . . . . . . . . . . . . . . . . . . 87Start OMEGAMON II Realtime Performance Monitor in VTAM Mode. . . . . . . . . . . . . 88Start OMEGAMON II Realtime Performance Monitor in Dedicated Mode. . . . . . . . . . 90Install and Start OMEGAMON II in TSO Mode. . . . . . . . . . . . . . . . . . . . . . . . . . . . . . 92Install and Start OMEGAMON II in ISPF Mode. . . . . . . . . . . . . . . . . . . . . . . . . . . . . . 97Start and Stop SAP . . . . . . . . . . . . . . . . . . . . . . . . . . . . . . . . . . . . . . . . . . . . . . . . . . 99Exit OMEGAMON II . . . . . . . . . . . . . . . . . . . . . . . . . . . . . . . . . . . . . . . . . . . . . . . . . 101
4
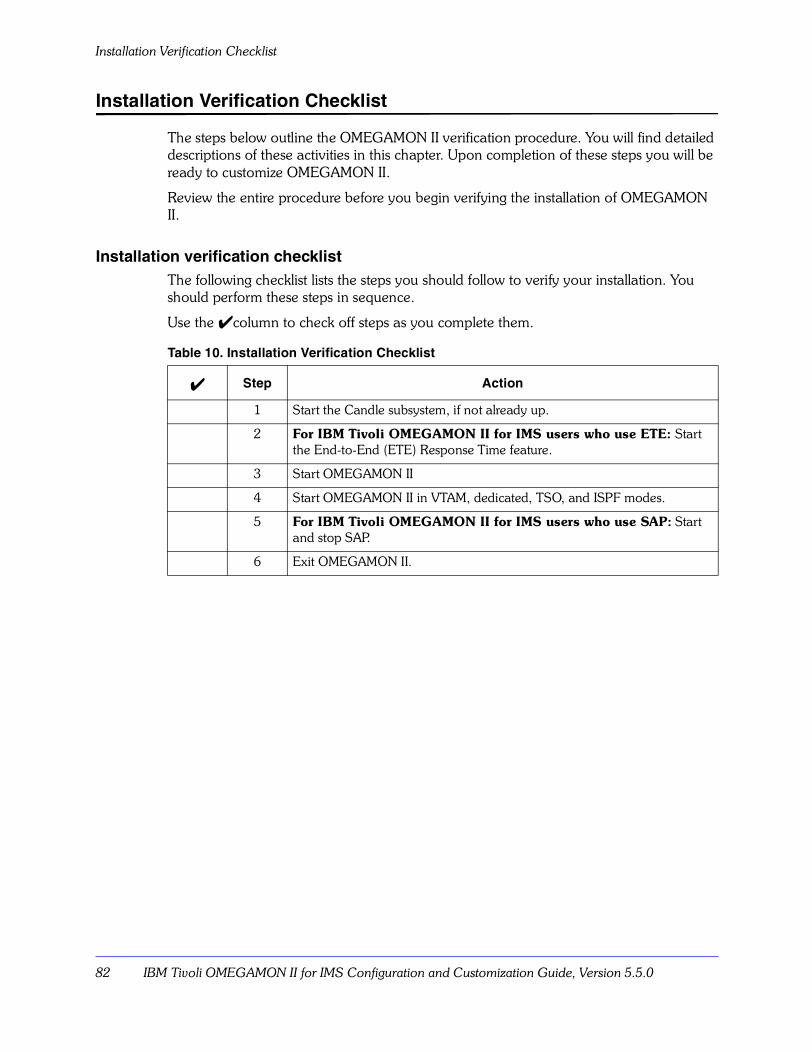
Installation Verification Checklist
82 IBM Tivoli OMEGAMON II for IMS Configuration and Customization Guide, Version 5.5.0
Installation Verification Checklist
The steps below outline the OMEGAMON II verification procedure. You will find detailed descriptions of these activities in this chapter. Upon completion of these steps you will be ready to customize OMEGAMON II.
Review the entire procedure before you begin verifying the installation of OMEGAMON II.
Installation verification checklistThe following checklist lists the steps you should follow to verify your installation. You should perform these steps in sequence.
Use the ✔column to check off steps as you complete them.
Table 10. Installation Verification Checklist
✔ Step Action
1 Start the Candle subsystem, if not already up.
2 For IBM Tivoli OMEGAMON II for IMS users who use ETE: Start the End-to-End (ETE) Response Time feature.
3 Start OMEGAMON II
4 Start OMEGAMON II in VTAM, dedicated, TSO, and ISPF modes.
5 For IBM Tivoli OMEGAMON II for IMS users who use SAP: Start and stop SAP.
6 Exit OMEGAMON II.
Installation Verification of the Realtime Performance Monitor 83
Start the Candle Subsystem
Start the Candle Subsystem
This section explains how to start the
Candle subsystem. You can start the Candle subsystem either:
� at IPL
� after IPL
Note: If your MVS operating system level is not ESA 4.2 or higher, do not continue with the installation of the Candle subsystem. The Candle subsystem will not run on a pre-ESA 4.2 system. You should continue the install of the Candle subsystem after upgrading your operating system to ESA 4.2 or higher.
Starting the Candle subsystem at IPLTo start the Candle subsystem at IPL:
✒ Make sure the definition statement includes the statement SSPROC=CANSCN.
Result: The IPL automatically invokes the Candle subsystem CANSCN startup procedure.
Start the Candle Subsystem
84 IBM Tivoli OMEGAMON II for IMS Configuration and Customization Guide, Version 5.5.0
Starting the Candle subsystem after IPLTo start the Candle subsystem after IPL:
✒ Issue the START command from the operator console START CANSCN where CANSCN is the name of the subsystem startup procedure.
START CANSCN
where CANSCN is the name of the subsystem startup procedure.
Using the RESTART parameterThe optional RESTART parameter forces the subsystem to complete initialization, bypassing checks we designed to prevent the start of a second address space.
RESTART requires the FORCE operand, as in the following example:
START CANSCN,RESTART=’,RESTART=FORCE’
where CANSCN is the name of the subsystem startup procedure.
Important
Use RESTART only if the subsystem address space terminates abnormally and, when you subsequently attempt to start the Subsystem, message CNDL018I appears.
Message CNDL018I indicates that the subsystem is already active. Verify that the subsystem address space is not active before using RESTART.
If you use RESTART when the subsystem is already active, results are unpredictable.
Installation Verification of the Realtime Performance Monitor 85
Start the End-to-End Response Time Feature
Start the End-to-End Response Time Feature
This section explains how to start the End-to-End (ETE) Response Time feature.
Note: ETE does not pertain to DBCTL users.
Starting ETEFollow these steps to start ETE:
Step Action
1 If you already have ETE Version 500 running, you must stop ETE by issuing the following command on the MVS operator console:
ETE QUIESCETo be sure that both the ETE subsystem and the address space are shut down completely, wait for the following messages:
ETE0086: ETE ADDR SPACE TERMINATED BYSYSBSYSTEM QUIESCEETE0051:QUIESCE COMPLETEETE0003: COMPLETE
2 To start ETE, issue the following command on the MVS operator console:
START ccccccccwhere cccccccc is the started task name you specified for ETE using ICAT.
The member in rhilev.RKANSAM contains the JCL procedure that starts the ETE address space.
3 To verify that ETE started successfully, look on the operator console for the message:
ETE009 ETE VERSION 500 SUCCESSFULLY INITIALIZEDAt an MVS console, enter the ETE USERS command to verify that ETE started, as shown in Figure 5 on page 86

Start the End-to-End Response Time Feature
86 IBM Tivoli OMEGAMON II for IMS Configuration and Customization Guide, Version 5.5.0
ETE USERS command outputThe following figure shows the output from the ETE USERS command which includes the ETE version number and the load libraries from which you have installed ETE.
FIGURE 5. ETE USERS Command Output
Note: If you want to run concurrent versions of ETE, refer to the End-to-End Response Time Feature Reference Manual.
ETE USERSETE0002: ETE V500 #00 LOAD DSN=CANDLE.RKANMODETE0040: JOBNAME ASID TCB TYPEETE0041: USER001 00176 007BE458 RSPTIMEETE0041: ETE500 OO175 007EDB80 CAPTUREETE0041: ETE500 00175 007EF1F8 CAPTUREETE0041: ETE500 00175 007EF1F8 CAPTUREETE0003: COMPLETE
Installation Verification of the Realtime Performance Monitor 87
Start OMEGAMON II Realtime Performance Monitor
Start OMEGAMON II Realtime Performance Monitor
This section explains how to start the OMEGAMON II Realtime Performance Monitor.
Starting OMEGAMON II Realtime Performance Monitor automaticallyTo automatically start the product interface and the OMEGAMON II address space under VTAM, follow these steps:
Step Action
1 Issue the VTAM command
VARY NET,ACT,ID=ccccccccwhere cccccccc is the major node name you specified for OMEGAMON II to VTAM using ICAT.
Example: If CTDOIN00 is CTDOI00, issue the command
VARY NET,ACT,ID=CTDOI00
2 Make sure the IMS system you are monitoring is active.
3 Issue the start command from a system console to activate the monitor:
START procwhere proc is the name of the OMEGAMON procedure member name in your PROCLIB.
4 Log on to the OMEGAMON II Realtime Performance Monitor.
Start OMEGAMON II Realtime Performance Monitor in VTAM Mode
88 IBM Tivoli OMEGAMON II for IMS Configuration and Customization Guide, Version 5.5.0
Start OMEGAMON II Realtime Performance Monitor in VTAM Mode
You installed VTAM support as part of the standard installation procedure, because you must have VTAM support to access the OMEGAMON II CUA interface.
In VTAM mode:
� OMEGAMON II is connected directly to VTAM terminals, without the intervention of an intermediate online application such as TSO.
� You have up to 99 sessions for accessing OMEGAMON II, each from an individual terminal, without requiring access to TSO.
� You can set OMEGAMON II so that the screen refreshes automatically as in dedicated mode, but also responds immediately when you press Enter or any program function key, as in TSO mode.
� You have the assurance that if TSO is experiencing problems or is inoperable, you can access OMEGAMON II.
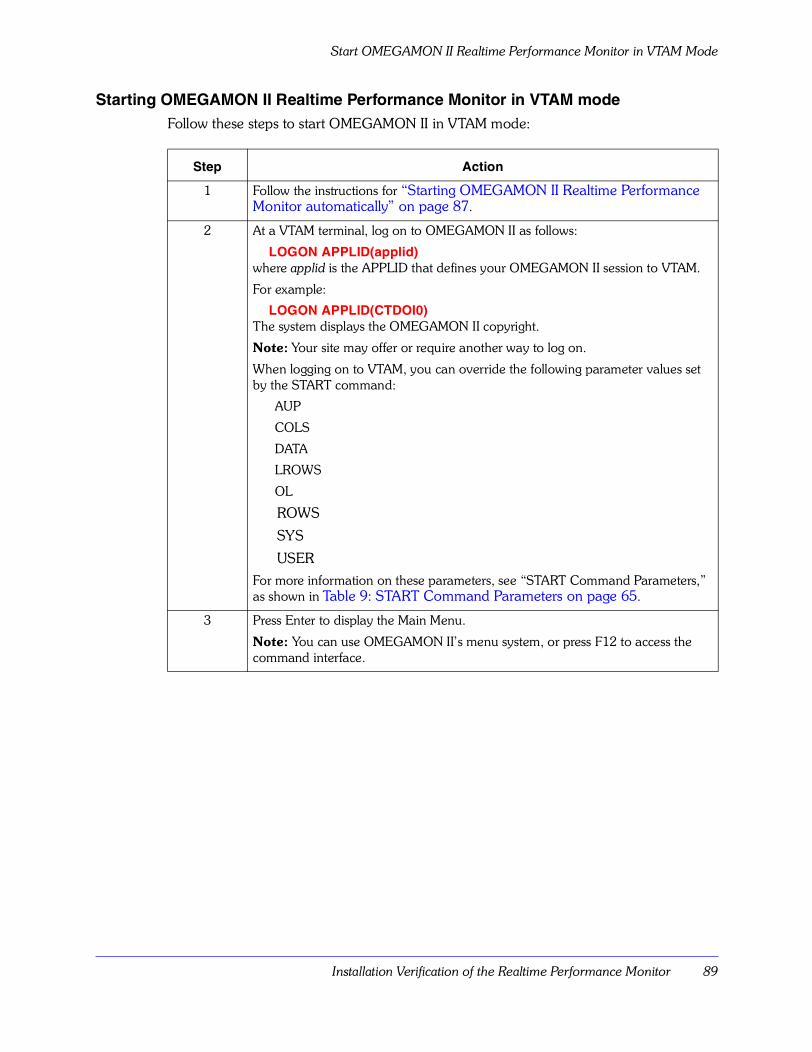
Installation Verification of the Realtime Performance Monitor 89
Start OMEGAMON II Realtime Performance Monitor in VTAM Mode
Starting OMEGAMON II Realtime Performance Monitor in VTAM modeFollow these steps to start OMEGAMON II in VTAM mode:
Step Action
1 Follow the instructions for �Starting OMEGAMON II Realtime Performance Monitor automatically� on page 87.
2 At a VTAM terminal, log on to OMEGAMON II as follows:
LOGON APPLID(applid)where applid is the APPLID that defines your OMEGAMON II session to VTAM.
For example:
LOGON APPLID(CTDOI0)The system displays the OMEGAMON II copyright.
Note: Your site may offer or require another way to log on.
When logging on to VTAM, you can override the following parameter values set by the START command:
AUP
COLS
DATA
LROWS
OL
ROWS
SYS
USER
For more information on these parameters, see �START Command Parameters,� as shown in Table 9: START Command Parameters on page 65.
3 Press Enter to display the Main Menu.
Note: You can use OMEGAMON II�s menu system, or press F12 to access the command interface.
Start OMEGAMON II Realtime Performance Monitor in Dedicated Mode
90 IBM Tivoli OMEGAMON II for IMS Configuration and Customization Guide, Version 5.5.0
Start OMEGAMON II Realtime Performance Monitor in Dedicated Mode
The standard installation procedure automatically installs in dedicated mode. In dedicated mode:
� OMEGAMON II is connected to one or, optionally, two dedicated consoles, each of which is a local, non-SNA device.
� You have the smallest amount of down time (the highest OMEGAMON II availability).
� OMEGAMON II uses no telecommunications access methods. OMEGAMON II communicates with the terminal via EXCP. By operating this way, OMEGAMON IIcan report hardware and software problems so severe that they disable other mechanisms, including MVS system consoles.
� OMEGAMON II refreshes the screen automatically every few seconds without operator intervention.
The default refresh cycle is 5 seconds. You can change this interval using the SET command to suit your reporting requirements. See �Customization Procedures for Realtime Performance Monitor� on page 103. for information on how to change the refresh cycle interval.
Automatically starting an RTM dedicated sessionDuring ICAT configuration of OMEGAMON II, you can specify that you want a Realtime Performance Monitor (RTM) dedicated session to start automatically when you start OMEGAMON II. See �Autostarting RTM components� on page 39 and the ICAT online help for more information.
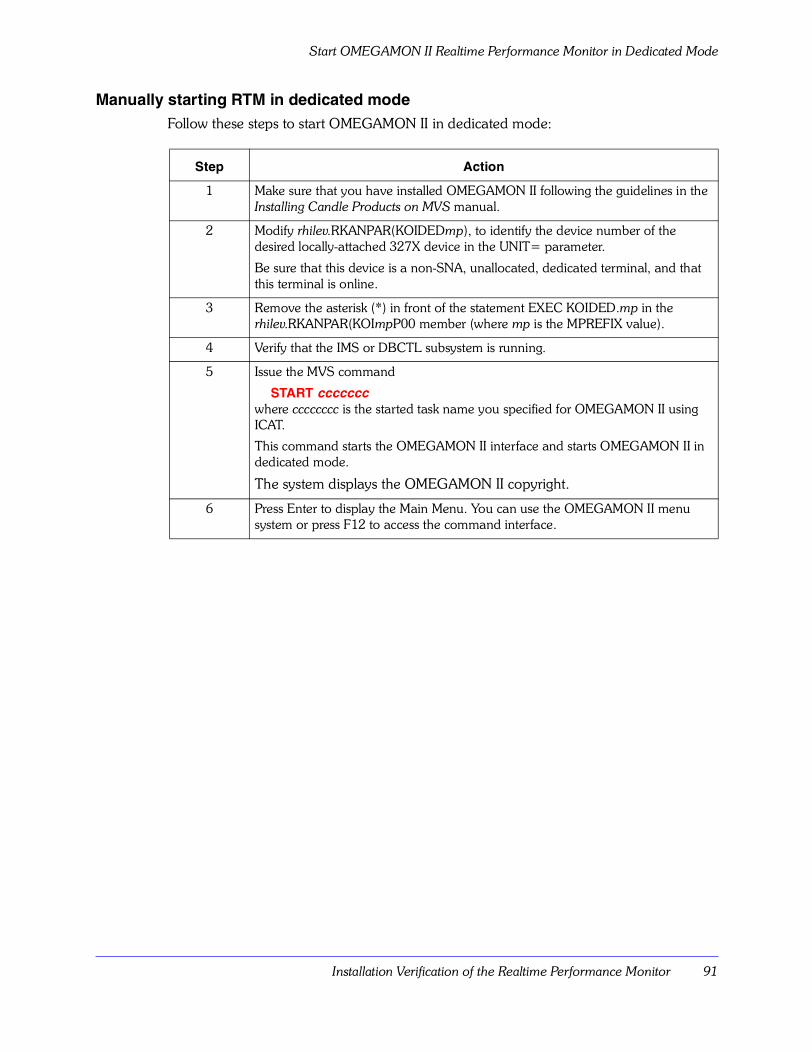
Installation Verification of the Realtime Performance Monitor 91
Start OMEGAMON II Realtime Performance Monitor in Dedicated Mode
Manually starting RTM in dedicated modeFollow these steps to start OMEGAMON II in dedicated mode:
Step Action
1 Make sure that you have installed OMEGAMON II following the guidelines in the Installing Candle Products on MVS manual.
2 Modify rhilev.RKANPAR(KOIDEDmp), to identify the device number of the desired locally-attached 327X device in the UNIT= parameter.
Be sure that this device is a non-SNA, unallocated, dedicated terminal, and that this terminal is online.
3 Remove the asterisk (*) in front of the statement EXEC KOIDED.mp in the rhilev.RKANPAR(KOImpP00 member (where mp is the MPREFIX value).
4 Verify that the IMS or DBCTL subsystem is running.
5 Issue the MVS command
START cccccccwhere cccccccc is the started task name you specified for OMEGAMON II using ICAT.
This command starts the OMEGAMON II interface and starts OMEGAMON II in dedicated mode.
The system displays the OMEGAMON II copyright.
6 Press Enter to display the Main Menu. You can use the OMEGAMON II menu system or press F12 to access the command interface.
Install and Start OMEGAMON II in TSO Mode
92 IBM Tivoli OMEGAMON II for IMS Configuration and Customization Guide, Version 5.5.0
Install and Start OMEGAMON II in TSO Mode
Installing the OMEGAMON II Realtime Performance Monitor in TSO mode is more complicated than installing the OMEGAMON II Realtime Performance Monitor in VTAM or dedicated mode. In TSO mode:
� OMEGAMON II communicates with the TSO address space using VTM1, a IBM-supplied VTAM application.
� Up to 99 persons can operate OMEGAMON II, each from an individual terminal. Because TSO is in widespread use, many users can have convenient access to OMEGAMON II.
� The screen does not refresh automatically; press Enter to refresh the screen.
Starting TSO supportTo start OMEGAMON II in TSO mode,
1. Define virtual terminals to VTAM.
2. Define the VTPOOL to VTM1.
3. Define the virtual terminals.
4. Install TSO CLISTs.The following sections explain each of these steps in detail.
Defining virtual terminals to VTAMTo define virtual terminals to VTAM:
Step Action
1 Define the VTM1 application program as an application to VTAM in SYS1.VTAMLST. The VTM1 program communicates between OMEGAMON II and TSO address spaces through a virtual terminal interface.
IBM supplies a sample application major node definition in rhilev.RKANSAM(cccccccmp), where ccccccmp is the major node name you specified for VTAM using ICAT.
2 To provide support for OMEGAMON II sessions under more than one TSO (orISPF), you must install VTM1 in every VTAM domain that controls a TSO.
See �Sharing VTPOOL in a Multi-Host Environment� on page 243 for more information.
Installation Verification of the Realtime Performance Monitor 93
Install and Start OMEGAMON II in TSO Mode
Defining VTPOOL to VTM1To define a virtual terminal pool for VTM1:
Defining the virtual terminalsYou must define each virtual terminal, that you defined to VTM1, to VTAM. To define virtual terminals:
Step Action
1 Use member KOBVTPL in dataset thilev.TKANSAM, which contains a sample VTPOOL definition. This sample defines a virtual terminal pool containing 25 terminals, and establishes default VTAM LOGMODE names for models 2, 3, 4, and 5; 3270-type devices; and a native-mode 3290.
The normal product installation installs the sample VTPOOL definition.
2 If the sample suits your installation�s requirements, the definition for VTM1 is complete.
If the sample is inadequate, you can edit KOBVTPL in thilev.TKANSAM(KOBVTPL). (The member also contains information about any additional steps you must perform.)
The sample definition might require change for any of the following reasons:� size of the virtual terminal pool does not meet your site�s requirements.� names of the virtual terminals do not meet your site�s naming conventions.� VTAM LOGMODE name defaults are inappropriate.
3 Remember that OMEGAMON products can share VTPOOL, when changing the number of virtual terminals in the pool. You must consider the number of all concurrent OMEGAMON users when determining the size of the pool.
To make VTPOOL changes, such as changing the sample VTPOOL definition, you can change KOBVTPL in thilev.TKANSAM. (The member also contains information about any additional steps you must perform.)
Step Action
1 Use dataset member KOBVT1AP in thilev.TKANSAM, which contains a VTAM application major node definition that includes an APPL definition statement for every virtual terminal that the sample VTPOOL defines.
If you do not need to make changes to the sample VTPOOL, save this major node definition in SYS1.VTAMLST.
2 If you make changes to VTPOOL that affect either the number of virtual terminals or the names of the virtual terminals, you must make corresponding changes to the major node definition before you save it.
Install and Start OMEGAMON II in TSO Mode
94 IBM Tivoli OMEGAMON II for IMS Configuration and Customization Guide, Version 5.5.0
3 Be aware of the following limitations for network and ACB names:� VTPOOL defines the ACB name to VTM1, so the VTAM definition must reflect
the name defined to VTM1.� The network name may differ from the ACB name. This may be useful to you in
situations where you must support multiple VTAM hosts.� The VTPOOL $VTAPPL definition statement determines the ACB names of the
virtual terminalsThe first portion of the names (up to 6 characters) is taken from the value of the VTAPPL keyword. A two-character suffix is added based on the value of the APPL# keyword, which may range from 01 to 99, inclusive.
For example, if a $VTAPPL statement is coded with VTAPPL=OBVTM1 and APPL#=25, a combination of the two keyword values results in 25 ACB names, OBVTM101 through OBVTM125.
Step Action
Installation Verification of the Realtime Performance Monitor 95
Install and Start OMEGAMON II in TSO Mode
Installing TSO CLISTs
To run in TSO or ISPF mode you must install TSO CLISTs:
You can now use OMEGAMON II in TSO mode or ISPF.
The following table lists KOI CLIST default parameters, including the parameter name, description, range of possible values, and the defaults that IBM provides.
Step Action
1 The sample CLIST members that IBM provides for TSO operation are in thilev.TKANSAM. You can use any of the six executable CLIST members that IBM supplies either as is or as templates for creating your own CLISTs.
2 Use the sample jobstream in member KOICPYCV to copy the six executable CLIST members from the sample dataset to a CLIST dataset of your choice.
3 Copy member KOICPYCV to rhilev.RKANPAR.
4 Edit KOICPYCV with the changes that the comments in the member indicate.
5 Submit this IEBGENER job stream for execution, to copy the CLIST member.
6 Modify any parameter as appropriate for your site.
We list the default parameters for the KOICLSTV member in your selected destination dataset below.
7 Add your CLIST dataset to the concatenation of CLISTs in each user�s logon procedure, to make your CLIST available to users who access OMEGAMON through TSO or ISPF.
Table 11. KOI CLIST Default Parameters
Parameter Description Possible Values
IBM Default
CLIST Dataset that contains the CLIST library. cccccccc USER.CLIST
LROWS Number of logical rows for scrolling. 24-999 255
OIAPPL The OMEGAMON II VTAM application to start an OMEGAMON II session under VTAM.
cccccccc ccccccnn
OIPREFX High-level qualifier ISPF/TSO mode load library.
cccccccc CANDLE
OIUSER 2-character suffix for the OMEGAMON II user profile.
cc /C
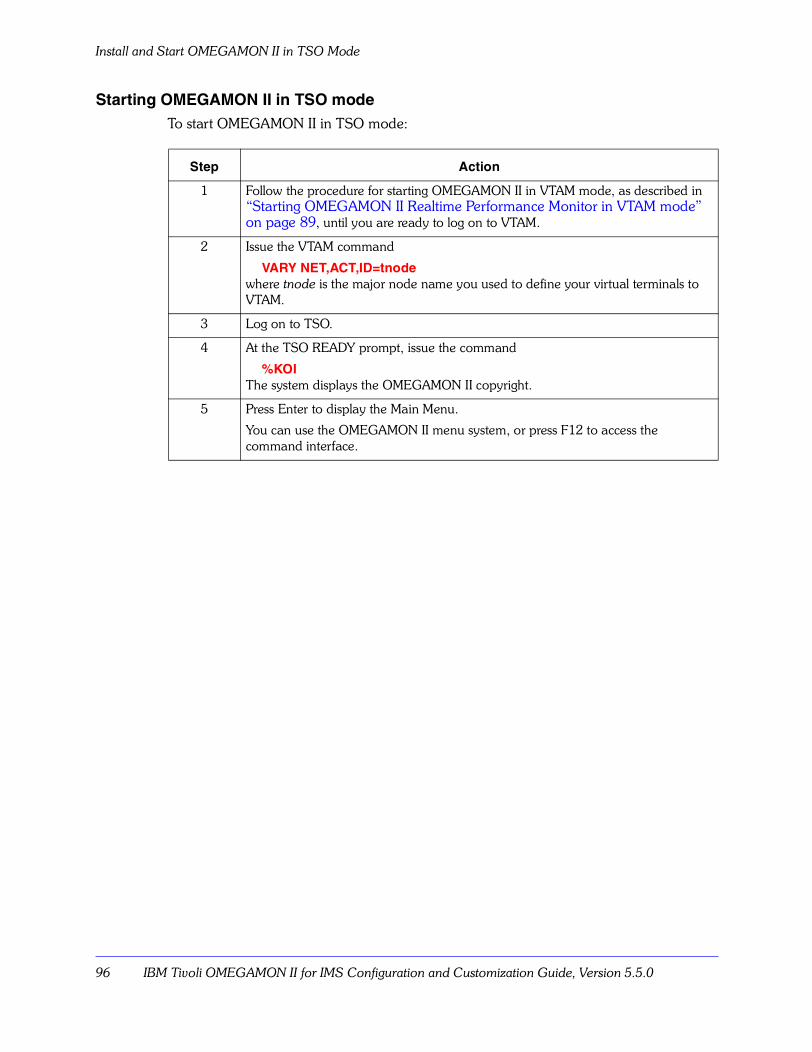
Install and Start OMEGAMON II in TSO Mode
96 IBM Tivoli OMEGAMON II for IMS Configuration and Customization Guide, Version 5.5.0
Starting OMEGAMON II in TSO modeTo start OMEGAMON II in TSO mode:
Step Action
1 Follow the procedure for starting OMEGAMON II in VTAM mode, as described in �Starting OMEGAMON II Realtime Performance Monitor in VTAM mode� on page 89, until you are ready to log on to VTAM.
2 Issue the VTAM command
VARY NET,ACT,ID=tnodewhere tnode is the major node name you used to define your virtual terminals to VTAM.
3 Log on to TSO.
4 At the TSO READY prompt, issue the command
%KOIThe system displays the OMEGAMON II copyright.
5 Press Enter to display the Main Menu.
You can use the OMEGAMON II menu system, or press F12 to access the command interface.
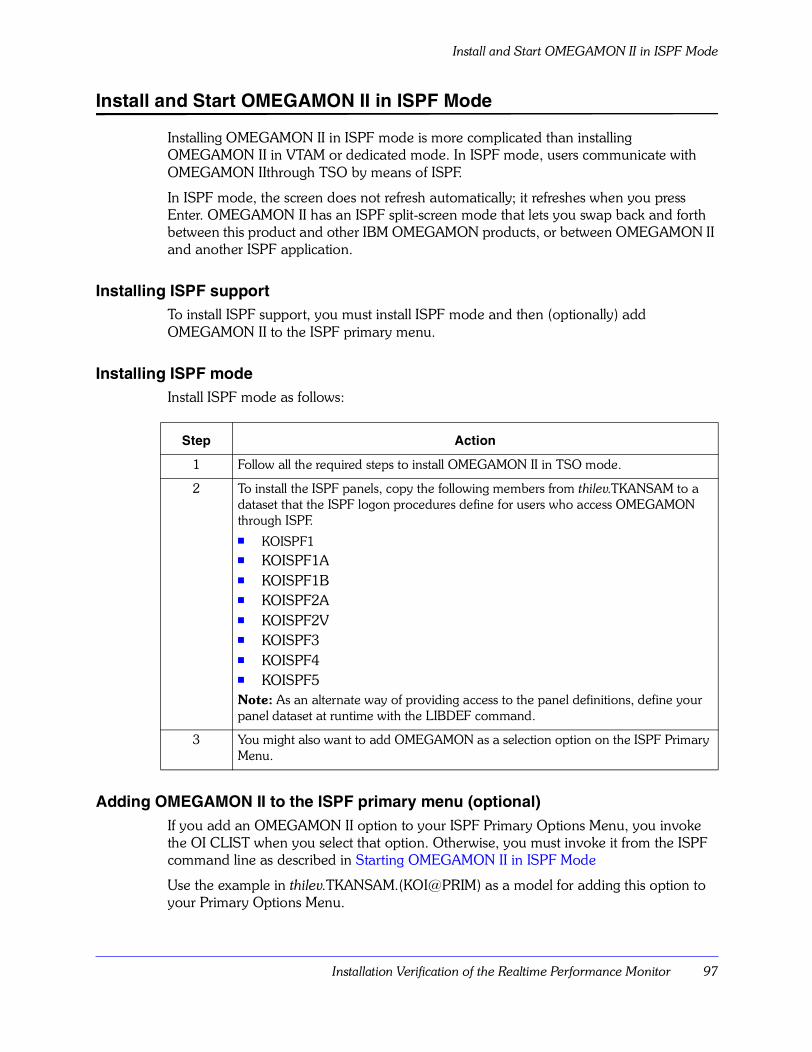
Installation Verification of the Realtime Performance Monitor 97
Install and Start OMEGAMON II in ISPF Mode
Install and Start OMEGAMON II in ISPF Mode
Installing OMEGAMON II in ISPF mode is more complicated than installing OMEGAMON II in VTAM or dedicated mode. In ISPF mode, users communicate with OMEGAMON IIthrough TSO by means of ISPF.
In ISPF mode, the screen does not refresh automatically; it refreshes when you press Enter. OMEGAMON II has an ISPF split-screen mode that lets you swap back and forth between this product and other IBM OMEGAMON products, or between OMEGAMON II and another ISPF application.
Installing ISPF supportTo install ISPF support, you must install ISPF mode and then (optionally) add OMEGAMON II to the ISPF primary menu.
Installing ISPF modeInstall ISPF mode as follows:
Adding OMEGAMON II to the ISPF primary menu (optional)If you add an OMEGAMON II option to your ISPF Primary Options Menu, you invoke the OI CLIST when you select that option. Otherwise, you must invoke it from the ISPF command line as described in Starting OMEGAMON II in ISPF Mode
Use the example in thilev.TKANSAM.(KOI@PRIM) as a model for adding this option to your Primary Options Menu.
Step Action
1 Follow all the required steps to install OMEGAMON II in TSO mode.
2 To install the ISPF panels, copy the following members from thilev.TKANSAM to a dataset that the ISPF logon procedures define for users who access OMEGAMON through ISPF.� KOISPF1� KOISPF1A� KOISPF1B� KOISPF2A� KOISPF2V� KOISPF3� KOISPF4� KOISPF5Note: As an alternate way of providing access to the panel definitions, define your panel dataset at runtime with the LIBDEF command.
3 You might also want to add OMEGAMON as a selection option on the ISPF Primary Menu.
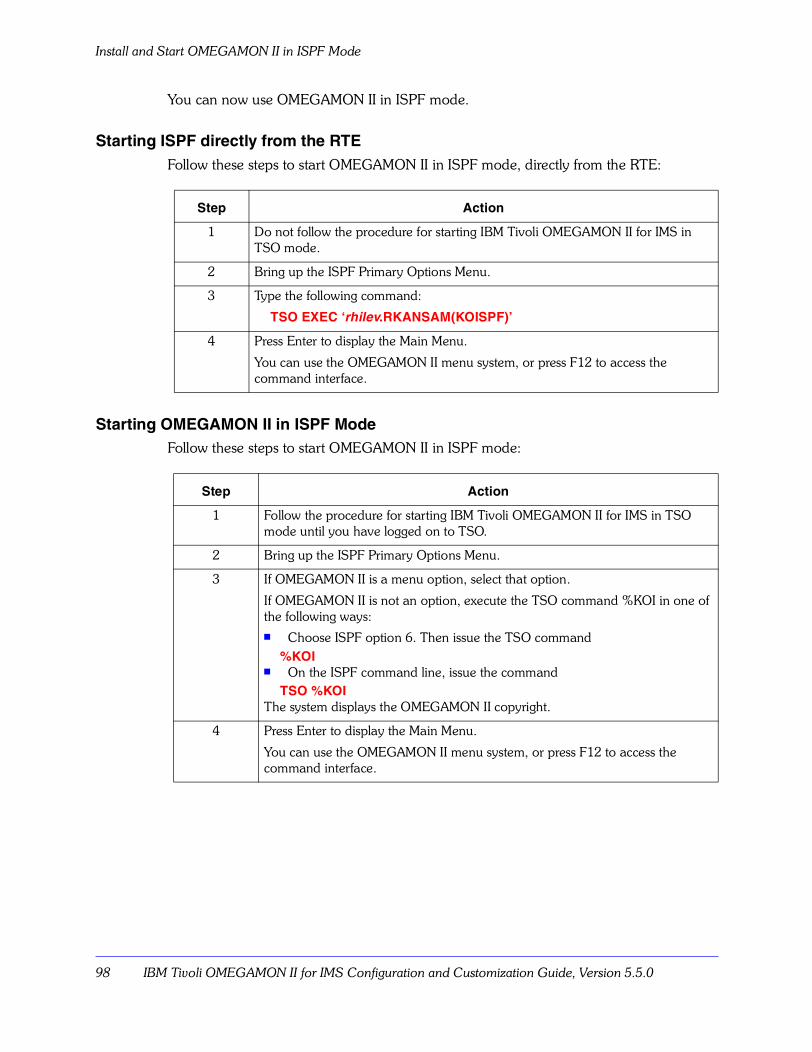
Install and Start OMEGAMON II in ISPF Mode
98 IBM Tivoli OMEGAMON II for IMS Configuration and Customization Guide, Version 5.5.0
You can now use OMEGAMON II in ISPF mode.
Starting ISPF directly from the RTEFollow these steps to start OMEGAMON II in ISPF mode, directly from the RTE:
Starting OMEGAMON II in ISPF ModeFollow these steps to start OMEGAMON II in ISPF mode:
Step Action
1 Do not follow the procedure for starting IBM Tivoli OMEGAMON II for IMS in TSO mode.
2 Bring up the ISPF Primary Options Menu.
3 Type the following command:
TSO EXEC ‘rhilev.RKANSAM(KOISPF)’
4 Press Enter to display the Main Menu.
You can use the OMEGAMON II menu system, or press F12 to access the command interface.
Step Action
1 Follow the procedure for starting IBM Tivoli OMEGAMON II for IMS in TSO mode until you have logged on to TSO.
2 Bring up the ISPF Primary Options Menu.
3 If OMEGAMON II is a menu option, select that option.
If OMEGAMON II is not an option, execute the TSO command %KOI in one of the following ways:� Choose ISPF option 6. Then issue the TSO command
%KOI� On the ISPF command line, issue the command
TSO %KOI The system displays the OMEGAMON II copyright.
4 Press Enter to display the Main Menu.
You can use the OMEGAMON II menu system, or press F12 to access the command interface.
Installation Verification of the Realtime Performance Monitor 99
Start and Stop SAP
Start and Stop SAP
This section tells you how to verify that you have modified the SAP monitor exit correctly.
When to use this unitUse the following table to determine if this unit is appropriate for your site:
Before you beginPick an MPP region where you have SAP transactions running.
Automatically starting SAP supportDuring ICAT configuration of OMEGAMON II, you can specify that you want SAP support to start automatically when you start OMEGAMON II. See �Autostarting RTM components� on page 39 and the ICAT online help for more information.
IF you are using... AND... THEN...
IBM Tivoli OMEGAMON II for IMS
SAP follow the instructions in this unit.
are not using SAP skip this unit.
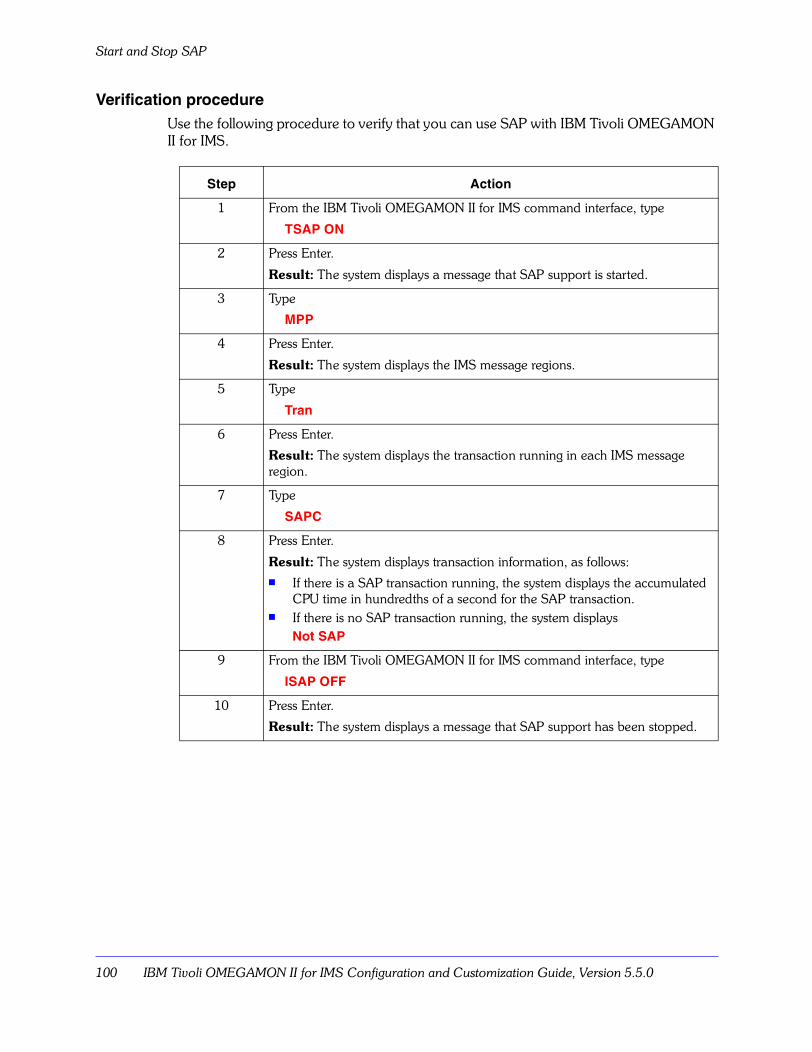
Start and Stop SAP
100 IBM Tivoli OMEGAMON II for IMS Configuration and Customization Guide, Version 5.5.0
Verification procedureUse the following procedure to verify that you can use SAP with IBM Tivoli OMEGAMON II for IMS.
Step Action
1 From the IBM Tivoli OMEGAMON II for IMS command interface, type
TSAP ON
2 Press Enter.
Result: The system displays a message that SAP support is started.
3 Type
MPP
4 Press Enter.
Result: The system displays the IMS message regions.
5 Type
Tran
6 Press Enter.
Result: The system displays the transaction running in each IMS message region.
7 Type
SAPC
8 Press Enter.
Result: The system displays transaction information, as follows:� If there is a SAP transaction running, the system displays the accumulated
CPU time in hundredths of a second for the SAP transaction.� If there is no SAP transaction running, the system displays
Not SAP
9 From the IBM Tivoli OMEGAMON II for IMS command interface, type
ISAP OFF
10 Press Enter.
Result: The system displays a message that SAP support has been stopped.
Installation Verification of the Realtime Performance Monitor 101
Exit OMEGAMON II
Exit OMEGAMON II
This section explains how to exit:
� an OMEGAMON II session in OMEGAVIEW
� the OMEGAMON II address space
� the OMEGAMON II interface
� the Candle subsystem
� the End-to-End (ETE) Response Time feature
Exiting an OMEGAMON II session in OMEGAVIEWTo exit an IBM Tivoli OMEGAMON II for IMS session in OMEGAVIEW:
✒ Press the PA2 key.
Result: The system exits OMEGAMON II and returns to OMEGAVIEW.
Stopping the OMEGAMON II VTAM applicationsTo stop the OMEGAMON II VTAM applications:
✒ Issue the MODIFY command
M0imsid,STOP=cccccccc
where M0imsid is the mprefix concatenated to the IMSID specified in the OMEGAMON II startup proc, and cccccccc is the literal for VTAM.
Result: The OMEGAMON II VTAM interface stops. It is no longer possible to log on OMEGAMON through VTAM.
The virtual terminal interface remains active after all OMEGAMON II sessions terminate.
Exit OMEGAMON II
102 IBM Tivoli OMEGAMON II for IMS Configuration and Customization Guide, Version 5.5.0
Stopping the OMEGAMON II interfaceThe OMEGAMON II interface remains active after all OMEGAMON II sessions terminate.
To stop the OMEGAMON II address space after all OMEGAMON II sessions terminate:
✒ Issue the MVS command
MODIFY stepname,STOP
where stepname is the name of the started procedure.
Result: The OMEGAMON II interface stops.
You should normally use KOIEPROC when running with EPILOG; use KOIXPROC when running without EPILOG.
Note: You can also issue commands to bring down IMS.
When the interface detects that IMS is terminated, the interface shuts down any OMEGAMON II sessions that are still active, and the OMEGAMON II address space terminates.
Stopping ETEWe have designed the End-to-End Response Time feature to run continuously. Other IBM products on the host system may be using ETE.
Note: ETE does not pertain to DBCTL users.
Stopping the Candle subsystemWe have designed the Candle subsystem to start and stop during the IPL process. Multiple IBM monitors on the same MVS image can use the Candle subsystem.
✒ To stop the Candle subsystem, issue the STOP command from the operator console:
STOP CANSCN
where CANSCN is the name of the Subsystem startup procedure.
Result: The Candle subsystem stops.
Important
We recommend that you do not stop ETE if there are other IBM products executing that are dependent on the services that ETE furnishes.
Important
Do not stop the Candle subsystem unless you are sure that no other product is currently using it.

Customization Procedures for Realtime Performance Monitor 103
Customization Procedures forRealtime Performance Monitor
Chapter OverviewYou are now ready to customize your system, including modifying defaults and making other changes that reflect your site�s needs and preferences.
This chapter will guide you through the customization of the OMEGAMON II Realtime Performance Monitor, explains levels of CUA user authority, and assumes that you have installed and configured OMEGAMON II.
Notes:
� See the Installing Candle Products on MVS manual for detailed instructions on installing OMEGAMON II.
� See chapters 1-3 of this manual for detailed instructions on configuring OMEGAMON II and verifying your installation.
� References to OMEGAMON II in this chapter are to the Realtime Performance Monitor, unless we specify otherwise.
Chapter ContentsReviewing OMEGAMON II Profiles. . . . . . . . . . . . . . . . . . . . . . . . . . . . . . . . . . . . . . 104Reviewing Exception Analysis. . . . . . . . . . . . . . . . . . . . . . . . . . . . . . . . . . . . . . . . . . 107Creating an Installation-Defined Profile . . . . . . . . . . . . . . . . . . . . . . . . . . . . . . . . . . . 109Implementing the Installation-Defined Profile . . . . . . . . . . . . . . . . . . . . . . . . . . . . . . 113Setting Exception Analysis Thresholds from the CUA Interface . . . . . . . . . . . . . . . . . 115Implementing Your BMP Interface . . . . . . . . . . . . . . . . . . . . . . . . . . . . . . . . . . . . . . 117Implementing the SAP Interface . . . . . . . . . . . . . . . . . . . . . . . . . . . . . . . . . . . . . . . . 122Using KOIGBL to Customize Workload Parameters . . . . . . . . . . . . . . . . . . . . . . . . . 125Concatenating Screen Space and Profile Datasets . . . . . . . . . . . . . . . . . . . . . . . . . . 134
5
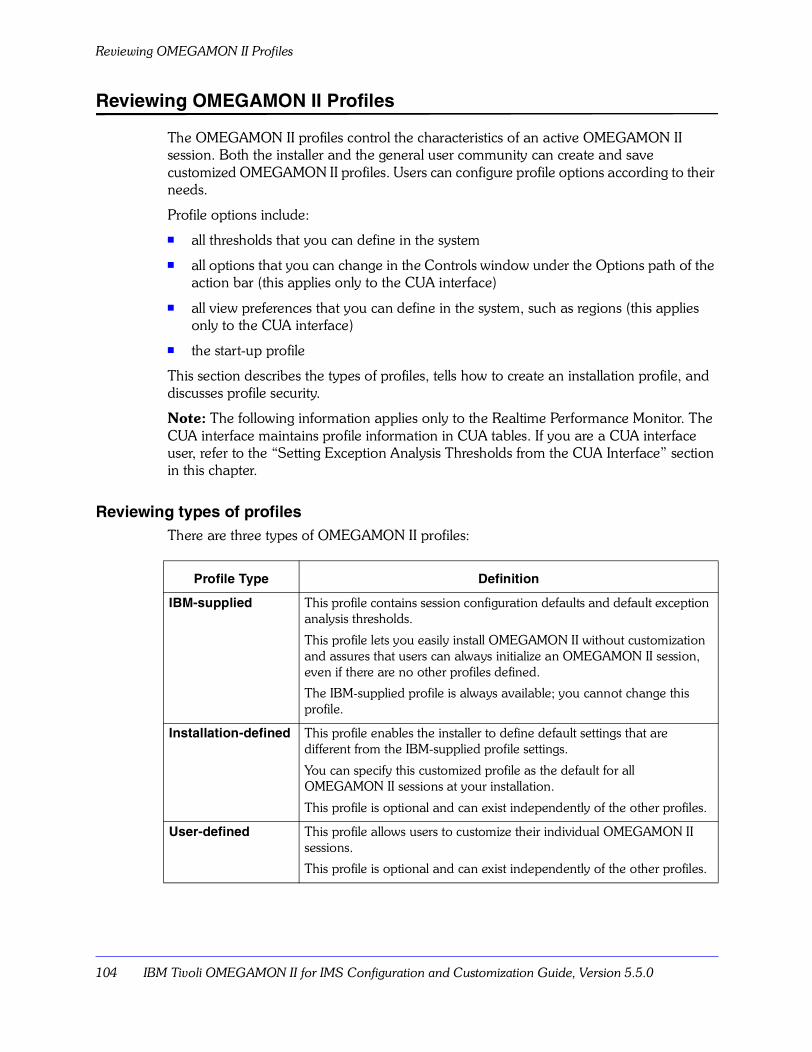
Reviewing OMEGAMON II Profiles
104 IBM Tivoli OMEGAMON II for IMS Configuration and Customization Guide, Version 5.5.0
Reviewing OMEGAMON II Profiles
The OMEGAMON II profiles control the characteristics of an active OMEGAMON II session. Both the installer and the general user community can create and save customized OMEGAMON II profiles. Users can configure profile options according to their needs.
Profile options include:
� all thresholds that you can define in the system
� all options that you can change in the Controls window under the Options path of the action bar (this applies only to the CUA interface)
� all view preferences that you can define in the system, such as regions (this applies only to the CUA interface)
� the start-up profile
This section describes the types of profiles, tells how to create an installation profile, and discusses profile security.
Note: The following information applies only to the Realtime Performance Monitor. The CUA interface maintains profile information in CUA tables. If you are a CUA interface user, refer to the �Setting Exception Analysis Thresholds from the CUA Interface� section in this chapter.
Reviewing types of profilesThere are three types of OMEGAMON II profiles:
Profile Type Definition
IBM-supplied This profile contains session configuration defaults and default exception analysis thresholds.
This profile lets you easily install OMEGAMON II without customization and assures that users can always initialize an OMEGAMON II session, even if there are no other profiles defined.
The IBM-supplied profile is always available; you cannot change this profile.
Installation-defined This profile enables the installer to define default settings that are different from the IBM-supplied profile settings.
You can specify this customized profile as the default for all OMEGAMON II sessions at your installation.
This profile is optional and can exist independently of the other profiles.
User-defined This profile allows users to customize their individual OMEGAMON II sessions.
This profile is optional and can exist independently of the other profiles.
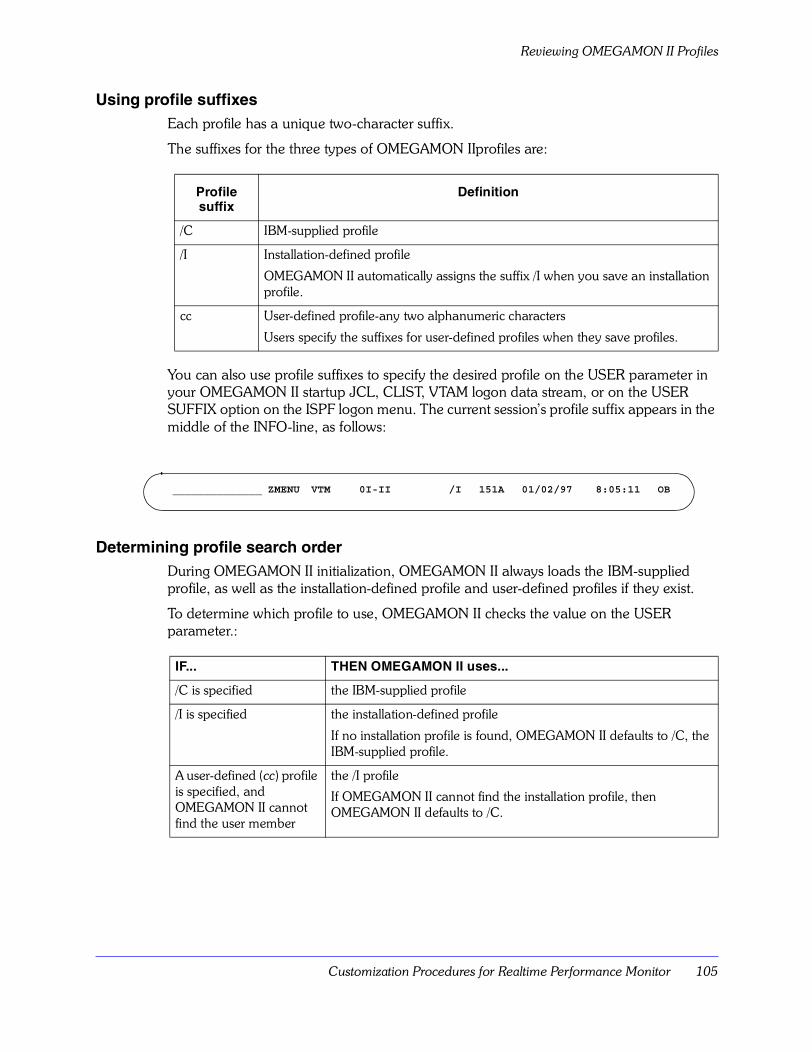
Customization Procedures for Realtime Performance Monitor 105
Reviewing OMEGAMON II Profiles
Using profile suffixesEach profile has a unique two-character suffix.
The suffixes for the three types of OMEGAMON IIprofiles are:
You can also use profile suffixes to specify the desired profile on the USER parameter in your OMEGAMON II startup JCL, CLIST, VTAM logon data stream, or on the USER SUFFIX option on the ISPF logon menu. The current session�s profile suffix appears in the middle of the INFO-line, as follows:
Determining profile search orderDuring OMEGAMON II initialization, OMEGAMON II always loads the IBM-supplied profile, as well as the installation-defined profile and user-defined profiles if they exist.
To determine which profile to use, OMEGAMON II checks the value on the USER parameter.:
Profile suffix
Definition
/C IBM-supplied profile
/I Installation-defined profile
OMEGAMON II automatically assigns the suffix /I when you save an installation profile.
cc User-defined profile-any two alphanumeric characters
Users specify the suffixes for user-defined profiles when they save profiles.
IF... THEN OMEGAMON II uses...
/C is specified the IBM-supplied profile
/I is specified the installation-defined profile
If no installation profile is found, OMEGAMON II defaults to /C, the IBM-supplied profile.
A user-defined (cc) profile is specified, and OMEGAMON II cannot find the user member
the /I profile
If OMEGAMON II cannot find the installation profile, then OMEGAMON II defaults to /C.
______________ ZMENU VTM 0I-II /I 151A 01/02/97 8:05:11 OB
Reviewing OMEGAMON II Profiles
106 IBM Tivoli OMEGAMON II for IMS Configuration and Customization Guide, Version 5.5.0
Storing profile datasetsIBM stores the IBM-supplied command/menu interface profile in the load library; you cannot change this profile. Therefore, the IBM-supplied values are always available as shipped.
OMEGAMON II stores both the installation-defined profile and the user-defined profiles in the same profile datasets that the DD statement RKOIPFSV references (rhilev.IMSID.RKOIPFSV). Both types of profiles use the same naming conventions as their DD name statements.
Customization Procedures for Realtime Performance Monitor 107
Reviewing Exception Analysis
Reviewing Exception Analysis
Exception analysis is one of the most powerful features of OMEGAMON II. An exception is an unusual condition or situation which might affect system availability and/or performance.
IBM ships OMEGAMON II with defaults for each exception. However, because each IMS environment is different, you will probably want to adjust some exceptions to meet the needs of your site.
This section tells you how to tailor exceptions to your site. For information on how to use exception analysis to improve your system�s performance, see your product�s User�s Guide.
Using OMEGAMON II exceptionsYou can use exceptions to specify
� which system activities you want to monitor
� at what points you want the system to notify you about potential problems associated with those activities� performance
There are two kinds of exceptions:
Alerts Alerts represent incidents or conditions. If you are monitoring a given alert, a yellow light displays when the associated incident occurs, or when the associated condition exists.
Thresholds Thresholds represent levels of activity, and allow you to define acceptable and unacceptable performance. There are high and low thresholds to represent high and low activity levels. Both kinds of thresholds have warning and critical values.
If you are monitoring a threshold and you specified a warning value, a yellow light displays when the associated activity reaches or falls to that value (depending on the threshold type, high or low).
If you specified a critical value, a red light displays when the activity reaches or falls to that value.
Reviewing Exception Analysis
108 IBM Tivoli OMEGAMON II for IMS Configuration and Customization Guide, Version 5.5.0
Each exception belongs to a group of related exceptions-an exception group. You can choose to monitor any of the following:
� an entire exception group
� an individual exception
� either the warning or the critical component of an individual threshold
Each exception maps to a light on the System Overview panel. The help for each exception group explains the exception light mapping.
If multiple exceptions trip at their critical thresholds, the corresponding light turns red. If multiple exceptions trip at their warning thresholds, the corresponding light turns yellow.
Warning
You must follow the procedure in step 3 of �Creating an Installation-Defined Profile� on page 109 to customize exceptions.
An administrator who has access to the CUA interface can override the profiles defined through the Realtime Performance monitor. This includes the installation-defined profile. When you log off the CUA interface, you are given the option of saving the profile (defined during logon to the CUA) in the Realtime Performance Monitor. If you take the option and the profile already exists in the Realtime Performance monitor profile datasets, it will be overridden by the values contained in the CUA profile table.
Customization Procedures for Realtime Performance Monitor 109
Creating an Installation-Defined Profile
Creating an Installation-Defined Profile
You can change some or all of the IBM-supplied profile defaults to customize OMEGAMON II for your system.
Customization includes determining, selecting, and saving appropriate options and thresholds to create an installation-defined profile. Customization also includes specifying the installation-defined profile as the default for your system.
The customization options for user-defined profiles are the same as those discussed in this section for the installation-defined profile.
You must follow a three-step process to customize your profiles:
Step 1: Establishing default optionsTo establish default options for your installation-defined profile, run OMEGAMON II with the IBM-supplied profile to become familiar with basic OMEGAMON II session and exception analysis options. You can then determine what options your installation requires, so that you can create an installation-defined profile.
Step Action
1 Establish the default options.
2 Select the appropriate session and exception analysis options.
3 Set a default startup configuration.
Creating an Installation-Defined Profile
110 IBM Tivoli OMEGAMON II for IMS Configuration and Customization Guide, Version 5.5.0
Step 2: Selecting session and exception analysis optionsTo display the following Profile Maintenance and Session Controls Menu, select the Profile (P) option from the OMEGAMON II Main Menu.
FIGURE 6. Profile Maintenance and Session Controls Menu
You can specify settings through the Profile menu and use them for the current session only or you can save them in a profile for subsequent sessions.
You can choose as many or as few of the menu options as you wish in customizing your profile.
Press PF1 for online help on each option or consult the Realtime Commands Reference Manual for details on individual commands.
__________ KOIPOPT VTM 0I-II /C 16ID 08/18/99 12:00:00 B > Help PF1 Exit PF3 Save Profile PF22 > Type a selection letter on the top line and press ENTER. ================================================================================ > PROFILE MAINTENANCE AND SESSION CONTROLS > Exceptions _ A POOLS ............... Set pool utilization and fragmentation exceptions _ B DATABASE/FAST PATH... Set database, DASD logging, and fast path exceptions _ C IMS MISC ............ Set miscellaneous IMS-related exceptions _ D OPERATING SYSTEM .... Set operating system-related exceptions _ E VSAM/STATIC ......... Set VSAM, trace, and other static exceptions _ F MESSAGES ............ Set exception messages > Configuration _ G CONFIGURE ........... Set default start-up configuration _ H SAVE/DELETE ......... Create, delete, save profiles > Quick-set Options _ I COLOR ............... set color mode and colors _ J BACKGROUND .......... Set background processing (XLF, ASF, and TSF) _ K AUTO ON ............. Set automatic updating ON _ L AUTO OFF ............ Set automatic updating OFF _ M LOGGING ............. Log on, log off, log out, log options > > Changes you make from this menu become permanent when you save your profile. > Use PF22 to save the profile. ===============================================
Customization Procedures for Realtime Performance Monitor 111
Creating an Installation-Defined Profile
Step 3: Setting default startup configurationUse the following options to set the default startup parameters for OMEGAMON II:
The following table summarizes the display, control, and routing options that you access from the Set Startup Configuration Menu. In addition, the table summarizes the IOPT command, which the installer can issue in command mode. (Press PF24 from the menu system to access command mode.)
Command Function
Command
Description
Controls session and display options
OPTN Activates and deactivates:� the automatic screen facility (ASF)� the timed screen facility (TSF)� the exception logging facility (XLF)� the terminal bell� the logControls display characteristics:� the date (USA or EUROPEAN)� minor commands (UPPER or LOWER case)� all command output (UPPER or MIXED case)� scroll amount (PAGE or CSR)� the first screen when you start OMEGAMON II� the interval for the terminal bellImportant: OMEGAMON II does not save the setting for the ZEROS keyword in a profile.
Sets color options .SCC Allows you to set color, highlighting, and extended attribute options for each field on the OMEGAMON II display.
________________ KOIOPTE > Help PF1 Back PF3 Save Profile PF22 > Type a selection letter on the top line and press ENTER. ================================================================================ > Set Startup Configuration _ A DISPLAY ............... Display options _ B CONTROL ............... Control function options _ C ROUTING ............... Log sysout class, destination, and printer options _ D PLOT .................. IMS plot thresholds > Most changes you make from this menu path become permanent when you save your > profile. Press PF22 to save your profile. ================================================================================
Creating an Installation-Defined Profile
112 IBM Tivoli OMEGAMON II for IMS Configuration and Customization Guide, Version 5.5.0
Sets operational parameters
.SET Sets parameters for:� the screen space fetch feature (.FGO)� the interval for OMEGAMON II cycles� the number of entries in the device name table� guarding against loops caused by the PEEK command� the automatic updating delay cycle� the size of the REPORT file for logging screens� the size of the work area for the PEEK command
Sets installation profile options
IOPT Controls installation options, such as:� issuing DASD reserves when OMEGAMON II saves
members in rhilev.IMSID.RKOIPCSV� whether OMEGAMON II storage is page-fixed in
memory
Sets print output options
OUTP The minor command settings saved in a profile are:
COPY Specifies number of copies to print.
DDNM Specifies ddname to override standard ddname.
DEST Specifies the report destination.
DSTU Specifies the userid for a report.
FOLD Specifies whether lowercase is folded to uppercase.
FORM Specifies the name of the form on which to print.
HOLD Specifies that OMEGAMON II place the output in the hold queue and retrieve the output from TSO.
ID1 Requests separator pages and page headers that identify output from different OMEGAMON II sessions.
ID2 Defines up to 16 characters on the left of the separator page.
ID3 Defines up to 16 characters in the center of the separator page.
ID4 Defines up to 16 characters on the right of the separator page.
LNCT Sets number of lines per page on report.
SOUT Defines the SYSOUT class of the report.
Command Function
Command
Description
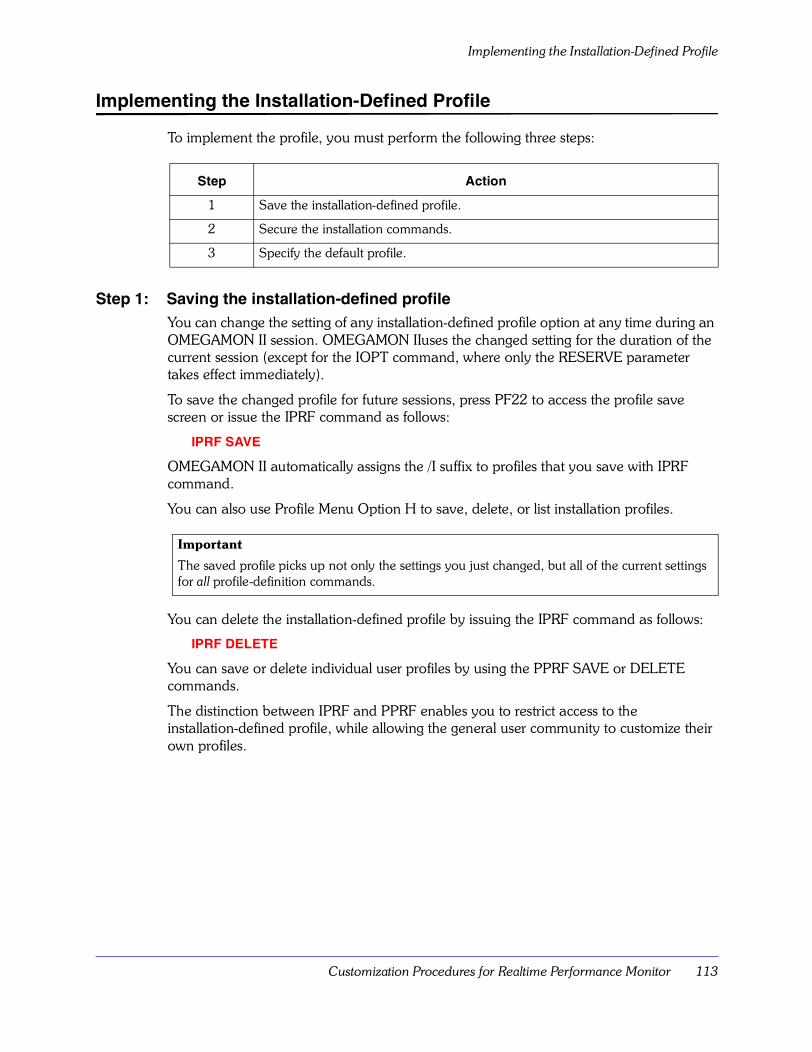
Customization Procedures for Realtime Performance Monitor 113
Implementing the Installation-Defined Profile
Implementing the Installation-Defined Profile
To implement the profile, you must perform the following three steps:
Step 1: Saving the installation-defined profileYou can change the setting of any installation-defined profile option at any time during an OMEGAMON II session. OMEGAMON IIuses the changed setting for the duration of the current session (except for the IOPT command, where only the RESERVE parameter takes effect immediately).
To save the changed profile for future sessions, press PF22 to access the profile save screen or issue the IPRF command as follows:
IPRF SAVE
OMEGAMON II automatically assigns the /I suffix to profiles that you save with IPRF command.
You can also use Profile Menu Option H to save, delete, or list installation profiles.
You can delete the installation-defined profile by issuing the IPRF command as follows:
IPRF DELETE
You can save or delete individual user profiles by using the PPRF SAVE or DELETE commands.
The distinction between IPRF and PPRF enables you to restrict access to the installation-defined profile, while allowing the general user community to customize their own profiles.
Step Action
1 Save the installation-defined profile.
2 Secure the installation commands.
3 Specify the default profile.
Important
The saved profile picks up not only the settings you just changed, but all of the current settings for all profile-definition commands.
Implementing the Installation-Defined Profile
114 IBM Tivoli OMEGAMON II for IMS Configuration and Customization Guide, Version 5.5.0
Step 2: Securing the installation commandsProfile security is available in the CUA system. See �Configuring and Customizing the OMEGAMON II CUA Interface� on page 195 for complete information.
IBM ships IPRF and IOPT, the commands specific to the installation-defined profile, unsecured so that you can easily install and start OMEGAMON II.
However, if you create an installation-defined profile, you may want to protect the profile. There is no need for users to have access to the installation-defined profile, because each user can create and save a unique profile using the PPRF command. This profile overrides the installation-defined and IBM default profiles.
To protect the installation-defined profile, you can use either OMEGAMON II�s default internal security or OMEGAMON II�s interface to external security packages, such as RACF or CA-ACF2.
See �OMEGAMON II�s Realtime Performance Monitor Security Facility� on page 139 for complete information.
Step 3: Specifying the default profileIf you want the installation-defined profile to be your site�s default profile, set the USER parameter to /I in your startup procedure, CLIST, or VTAM logon data stream. See �Modes of Operation� on page 34 for information on modifying your startup parameters.
For ISPF mode, specify /I in the USER SUFFIX field on the ISPF invocation panel.
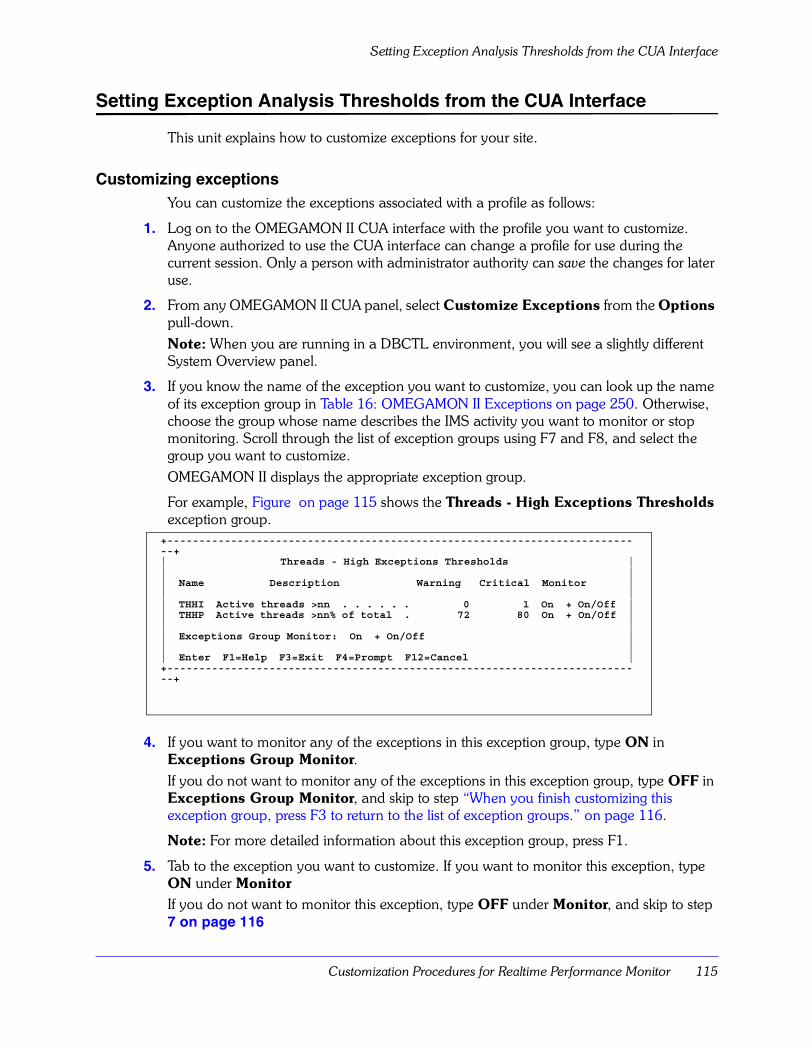
Customization Procedures for Realtime Performance Monitor 115
Setting Exception Analysis Thresholds from the CUA Interface
Setting Exception Analysis Thresholds from the CUA Interface
This unit explains how to customize exceptions for your site.
Customizing exceptionsYou can customize the exceptions associated with a profile as follows:
1. Log on to the OMEGAMON II CUA interface with the profile you want to customize. Anyone authorized to use the CUA interface can change a profile for use during the current session. Only a person with administrator authority can save the changes for later use.
2. From any OMEGAMON II CUA panel, select Customize Exceptions from the Options pull-down.Note: When you are running in a DBCTL environment, you will see a slightly different System Overview panel.
3. If you know the name of the exception you want to customize, you can look up the name of its exception group in Table 16: OMEGAMON II Exceptions on page 250. Otherwise, choose the group whose name describes the IMS activity you want to monitor or stop monitoring. Scroll through the list of exception groups using F7 and F8, and select the group you want to customize.OMEGAMON II displays the appropriate exception group.
For example, Figure on page 115 shows the Threads - High Exceptions Thresholds exception group.
4. If you want to monitor any of the exceptions in this exception group, type ON in Exceptions Group Monitor.If you do not want to monitor any of the exceptions in this exception group, type OFF in Exceptions Group Monitor, and skip to step �When you finish customizing this exception group, press F3 to return to the list of exception groups.� on page 116.
Note: For more detailed information about this exception group, press F1.
5. Tab to the exception you want to customize. If you want to monitor this exception, type ON under MonitorIf you do not want to monitor this exception, type OFF under Monitor, and skip to step 7 on page 116
+---------------------------------------------------------------------------+| Threads - High Exceptions Thresholds || || Name Description Warning Critical Monitor || || THHI Active threads >nn . . . . . . 0 1 On + On/Off || THHP Active threads >nn% of total . 72 80 On + On/Off || || Exceptions Group Monitor: On + On/Off || || Enter F1=Help F3=Exit F4=Prompt F12=Cancel |+---------------------------------------------------------------------------+
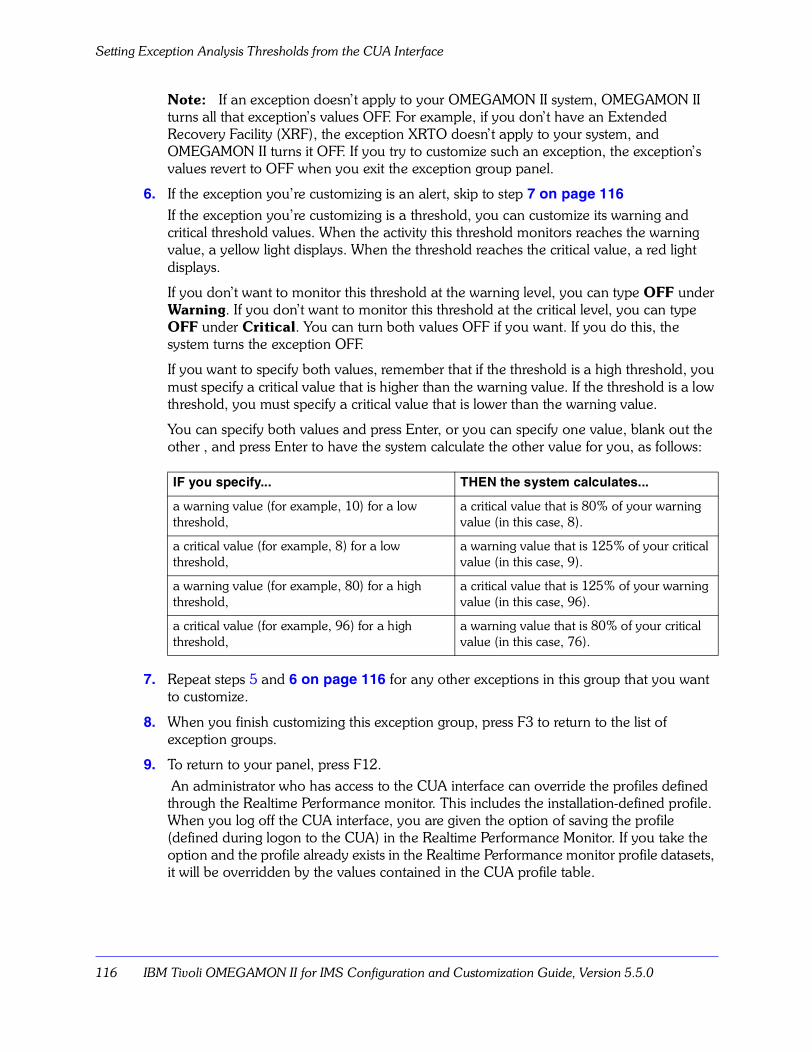
Setting Exception Analysis Thresholds from the CUA Interface
116 IBM Tivoli OMEGAMON II for IMS Configuration and Customization Guide, Version 5.5.0
Note: If an exception doesn�t apply to your OMEGAMON II system, OMEGAMON II turns all that exception�s values OFF. For example, if you don�t have an Extended Recovery Facility (XRF), the exception XRTO doesn�t apply to your system, and OMEGAMON II turns it OFF. If you try to customize such an exception, the exception�s values revert to OFF when you exit the exception group panel.
6. If the exception you�re customizing is an alert, skip to step 7 on page 116
If the exception you�re customizing is a threshold, you can customize its warning and critical threshold values. When the activity this threshold monitors reaches the warning value, a yellow light displays. When the threshold reaches the critical value, a red light displays.
If you don�t want to monitor this threshold at the warning level, you can type OFF under Warning. If you don�t want to monitor this threshold at the critical level, you can type OFF under Critical. You can turn both values OFF if you want. If you do this, the system turns the exception OFF.
If you want to specify both values, remember that if the threshold is a high threshold, you must specify a critical value that is higher than the warning value. If the threshold is a low threshold, you must specify a critical value that is lower than the warning value.
You can specify both values and press Enter, or you can specify one value, blank out the other , and press Enter to have the system calculate the other value for you, as follows:
7. Repeat steps 5 and 6 on page 116 for any other exceptions in this group that you want to customize.
8. When you finish customizing this exception group, press F3 to return to the list of exception groups.
9. To return to your panel, press F12. An administrator who has access to the CUA interface can override the profiles defined through the Realtime Performance monitor. This includes the installation-defined profile. When you log off the CUA interface, you are given the option of saving the profile (defined during logon to the CUA) in the Realtime Performance Monitor. If you take the option and the profile already exists in the Realtime Performance monitor profile datasets, it will be overridden by the values contained in the CUA profile table.
IF you specify... THEN the system calculates...
a warning value (for example, 10) for a low threshold,
a critical value that is 80% of your warning value (in this case, 8).
a critical value (for example, 8) for a low threshold,
a warning value that is 125% of your critical value (in this case, 9).
a warning value (for example, 80) for a high threshold,
a critical value that is 125% of your warning value (in this case, 96).
a critical value (for example, 96) for a high threshold,
a warning value that is 80% of your critical value (in this case, 76).
Customization Procedures for Realtime Performance Monitor 117
Implementing Your BMP Interface
Implementing Your BMP Interface
IBM has designed the IMS Command BMP Interface subfunction (hereafter referred to as the BMP interface) to supplement (not replace) the WTOR interface, which the ICMD command of the menu and common interface employs. You can choose to use both interfaces, or only one of them.
Using the BMP interface in addition to the WTOR interface has the following advantages:
� reduces contention for the WTOR interface if you are using the WTOR interface to control IMS, or if you have other software products that use the WTOR interface
� increases command throughput
� provides additional features, such as:
� a user security exit, which allows you to control which users can issue which IMS commands
� an option which allows you to wait for IMS commands to complete
Note: You cannot use BMP if you are monitoring a DBCTL system.
Setting up your BMP interfaceTo setup your BMP interface, you must perform the following steps:
Step 1: Define your BMP to IMS
To define your BMP to IMS:
1. Run the PSBGEN utility, using the sample JCL and instructions in rhilev.RKANSAM(KI2BPGEN).
2. Run the ACBGEN utility, using the sample JCL and instructions in rhilev.RKANSAM(KI2BAGEN).
3. Update the IMS SYSGEN to define your BMP to IMS. Sample IMS SYSGEN statements are in rhilev.RKANSAM(KI2BIGEN).
4. Update IMS security to allow the BMP to enter IMS commands. If your site uses the IMS Security Maintenance Utility (SMU), you can use the sample input statements in rhilev.RKANSAM(KI2BSGEN).
Step 2: Link-edit DL/I into your BMP
Link-edit DL/I into your BMP, using the sample JCL and instructions in rhilev.RKANSAM(KI2BLDLI).
Step 3: Remove the comment character from the IMS RESLIB dataset
Remove the comment character from the IMS RESLIB dataset to include it with your OI online PROC again.
Implementing Your BMP Interface
118 IBM Tivoli OMEGAMON II for IMS Configuration and Customization Guide, Version 5.5.0
Step 4: Optionally implement command-level security
If your site has implemented OMEGAMON II command-level security, you must update that security in order to use the BMP interface. You need to give each user who is going to use the BMP interface access to the BCMD command. Only the BMP interface actually uses this internal command.
Step 5: Optionally implement a security exit
You can choose to secure individual IMS commands with an external security product such as CA-ACF2 or RACF. If you do so, you must write a standalone security exit using the following guidelines:
� Use standard OS linkage.
Note: Register 1 at entry to the user exit points to an 8-byte user ID field, followed immediately by an LLZZ field, a slash, and an IMS command.
� Implement the following return code standard:
� To allow an IMS command, return a return code of zero.
� To disallow an IMS command, return a return code that is greater than zero.
� Name your standalone load module KI2BMPX1, and place it in rhilev.RKANMOD.
Starting and stopping your BMP interface automaticallyDuring ICAT configuration of OMEGAMON II, you can specify that you want the BMP interface to start automatically when you start OMEGAMON II. See �Autostarting RTM components� on page 39 and the ICAT online help for more information.
If you want to start and stop your BMP interface automatically at the same time you start and stop your OMEGAMON II address space, you can also do so using the instructions and sample EXEC card in rhilev.RKANPAR members KOImpP00 and KI2BMPmp.
Important
If your security exit abends, OMEGAMON II turns the exit off. You must stop and restart OMEGAMON II to reimplement your security exit. No IMS command security is in force between the time your security exit abends, and the time you stop OMEGAMON II.
If the BMP abends, IMS stops the associated PSB and transaction. The BMP cannot reATTACH until you:
1. /START the PSB.
2. /START the transaction.
3. Restart your BMP interface. For more detailed information, see Starting your BMP interface manually
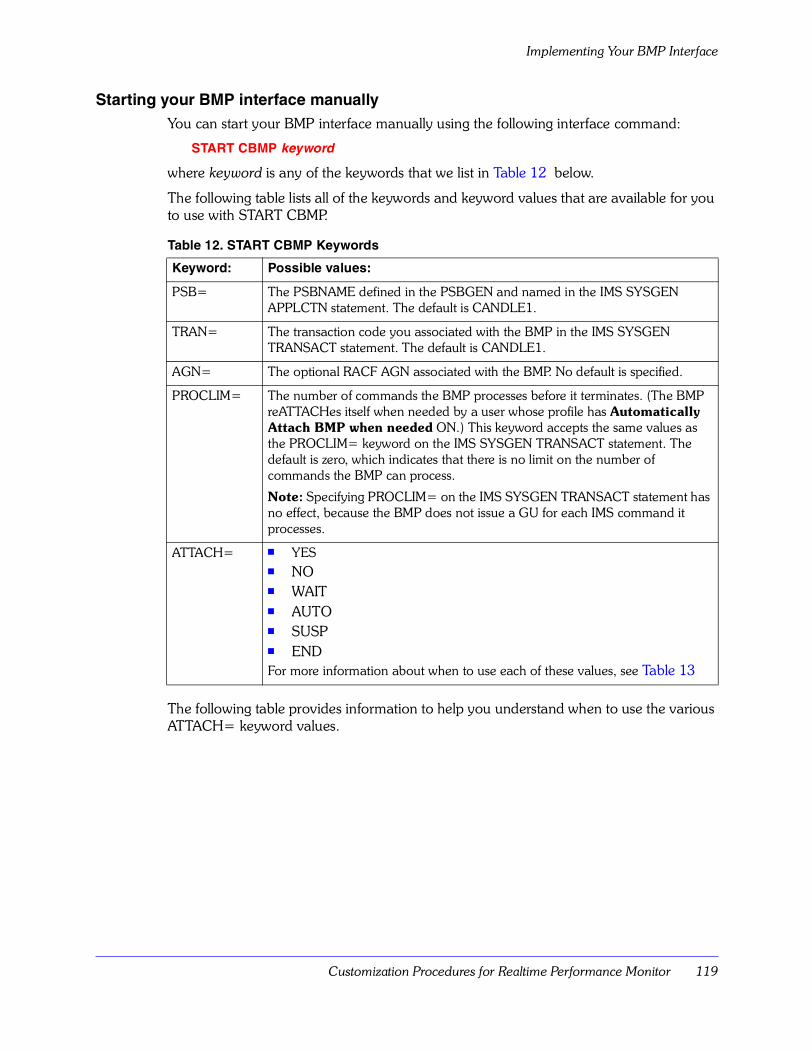
Customization Procedures for Realtime Performance Monitor 119
Implementing Your BMP Interface
Starting your BMP interface manuallyYou can start your BMP interface manually using the following interface command:
START CBMP keyword
where keyword is any of the keywords that we list in Table 12 below.
The following table lists all of the keywords and keyword values that are available for you to use with START CBMP.
The following table provides information to help you understand when to use the various ATTACH= keyword values.
Table 12. START CBMP Keywords
Keyword: Possible values:
PSB= The PSBNAME defined in the PSBGEN and named in the IMS SYSGEN APPLCTN statement. The default is CANDLE1.
TRAN= The transaction code you associated with the BMP in the IMS SYSGEN TRANSACT statement. The default is CANDLE1.
AGN= The optional RACF AGN associated with the BMP. No default is specified.
PROCLIM= The number of commands the BMP processes before it terminates. (The BMP reATTACHes itself when needed by a user whose profile has Automatically Attach BMP when needed ON.) This keyword accepts the same values as the PROCLIM= keyword on the IMS SYSGEN TRANSACT statement. The default is zero, which indicates that there is no limit on the number of commands the BMP can process.
Note: Specifying PROCLIM= on the IMS SYSGEN TRANSACT statement has no effect, because the BMP does not issue a GU for each IMS command it processes.
ATTACH= � YES� NO� WAIT� AUTO � SUSP� ENDFor more information about when to use each of these values, see Table 13
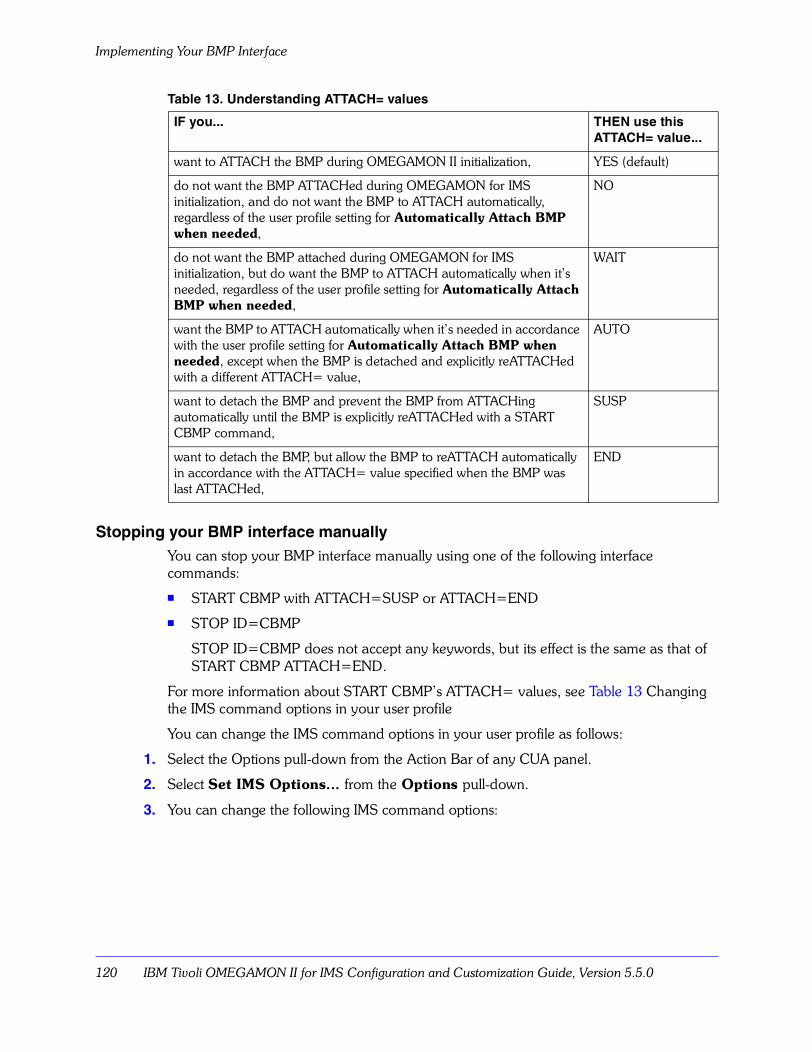
Implementing Your BMP Interface
120 IBM Tivoli OMEGAMON II for IMS Configuration and Customization Guide, Version 5.5.0
Stopping your BMP interface manuallyYou can stop your BMP interface manually using one of the following interface commands:
� START CBMP with ATTACH=SUSP or ATTACH=END
� STOP ID=CBMP
STOP ID=CBMP does not accept any keywords, but its effect is the same as that of START CBMP ATTACH=END.
For more information about START CBMP�s ATTACH= values, see Table 13 Changing the IMS command options in your user profile
You can change the IMS command options in your user profile as follows:
1. Select the Options pull-down from the Action Bar of any CUA panel.
2. Select Set IMS Options... from the Options pull-down.
3. You can change the following IMS command options:
Table 13. Understanding ATTACH= values
IF you... THEN use this ATTACH= value...
want to ATTACH the BMP during OMEGAMON II initialization, YES (default)
do not want the BMP ATTACHed during OMEGAMON for IMS initialization, and do not want the BMP to ATTACH automatically, regardless of the user profile setting for Automatically Attach BMP when needed,
NO
do not want the BMP attached during OMEGAMON for IMS initialization, but do want the BMP to ATTACH automatically when it�s needed, regardless of the user profile setting for Automatically Attach BMP when needed,
WAIT
want the BMP to ATTACH automatically when it�s needed in accordance with the user profile setting for Automatically Attach BMP when needed, except when the BMP is detached and explicitly reATTACHed with a different ATTACH= value,
AUTO
want to detach the BMP and prevent the BMP from ATTACHing automatically until the BMP is explicitly reATTACHed with a START CBMP command,
SUSP
want to detach the BMP, but allow the BMP to reATTACH automatically in accordance with the ATTACH= value specified when the BMP was last ATTACHed,
END
Customization Procedures for Realtime Performance Monitor 121
Implementing Your BMP Interface
Note: If you are going to use the BMP facility to submit IMS commands, you must be authorized to enter the BCMD command.
Submit Commands via BMP Interface
On This is the default. OMEGAMON II submits your commands through the BMP interface whenever possible. If OMEGAMON II cannot use the BMP interface, OMEGAMON II attempts to submit your commands using the WTOR interface.
Off Turn this option OFF if you don�t want to submit any commands using the BMP interface.
Wait for IMS to Process Each Command
On Turn this option ON if you want to wait for each IMS command that you submit using the BMP interface to process. If you submit multiple commands, or if you request an action that requires OMEGAMON II to submit multiple IMS commands, you�ll wait a maximum of 30 seconds for the last of these commands to process.
Note: After 30 seconds the system terminates the wait; the IMS command continues to process.
Off This is the default; you don�t wait for your IMS commands to process. IMS responses to your commands appear on the console and Operator Assist panels.
Automatically Attach BMP when needed
On Turn this option ON if you want the BMP to attach automatically when you need it (for example, if the BMP has terminated itself due to having processed the number of commands specified on PROCLIM=).
Note: The BMP cannot attach automatically if the current CBMP ATTACH= value is either NO or SUSP.
Off This is the default. The BMP does not ATTACH automatically for you unless you started the BMP with ATTACH=WAIT and you have Submit Commands via BMP interface set ON. If the BMP is not currently
ATTACHed, and you are submitting commands using the BMP interface only (Automatically Use WTOR if needed OFF), your IMS commands queue in memory until the BMP is reATTACHed.
Automatically Use WTOR if needed
On This is the default. OMEGAMON II uses the WTOR interface as a backup interface for submitting your IMS commands.
Off Turn this option OFF if you don�t want your commands submitted using the WTOR interface under any circumstances.
Note: You cannot submit some IMS commands using a BMP interface. For a list of these commands, see your IBM IMS Operator�s Reference If you turn this option OFF, you won�t be able to issue any of these IMS commands. And if the BMP is not ATTACHed and cannot ATTACH automatically, you won�t be able to issue any IMS commands.
Implementing the SAP Interface
122 IBM Tivoli OMEGAMON II for IMS Configuration and Customization Guide, Version 5.5.0
Implementing the SAP Interface
You can customize IBM Tivoli OMEGAMON II for IMS to start SAP automatically or manually. You can also check the status of SAP. This unit tells you when and how to customize IBM Tivoli OMEGAMON II for IMS to work with SAP. It also tells you how to start SAP, stop SAP, and check the status of SAP.
When to customize IBM Tivoli OMEGAMON II for IMSfor SAPUse the following chart to determine if you want to customize OMEGAMON II to use it with SAP.
Customizing IBM Tivoli OMEGAMON II for IMS to start SAP automaticallyDuring ICAT configuration of OMEGAMON II, you can specify that you want SAP support to start automatically when you start OMEGAMON II. See �Autostarting RTM components� on page 39 and the ICAT online help for more information.
You can also start SAP support by including the START SAP command or the EXEC KOISAPmp command in your automatic start member KOImpP00. The mp in KOImpP00 is the modify prefix assigned in your IBM Tivoli OMEGAMON II for IMS procedure.
Starting SAP support from the MVS consoleYou can start SAP support with an IBM Tivoli OMEGAMON II for IMS interface command, as shown in the following chart.
IF you are using... AND... THEN...
IBM Tivoli OMEGAMON II for IMS
SAP read the information in this unit.
are not using SAP skip this unit.
Step Action
1 From the MVS console, type
MODIFY interface_name, START SAP
2 Press Enter.
Result: The system displays the OSP050 SAP SUPPORT STARTED message.
Customization Procedures for Realtime Performance Monitor 123
Implementing the SAP Interface
Starting SAP support from IBM Tivoli OMEGAMON II for IMSYou can start SAP support using the ISAP immediate command from the IBM Tivoli OMEGAMON II for IMS command interface as shown in the following chart.
Customizing IBM Tivoli OMEGAMON II for IMS to start SAP automaticallyYou can start SAP support by including the START SAP command or the EXEC KOISAPmp command in your automatic start member KOImpP00. The mp in KOImpP00 is the modify prefix assigned in your IBM Tivoli OMEGAMON II for IMS procedure.
Stopping SAP from the MVS consoleUse the procedure below to stop SAP support.
Stopping SAP support from IBM Tivoli OMEGAMON II for IMSYou can stop SAP support using the ISAP immediate command from the IBM Tivoli OMEGAMON II for IMS command interface as shown in the following chart.
Step Action
1 From the IBM Tivoli OMEGAMON II for IMS command interface, type
ISAP ON
2 Press Enter.
Result: The system displays a message that SAP support is started.
Step Action
1 From the MVS console, type
MODIFY interface_name, STOP ID=SAP
2 Press Enter.
Result: The system displays a message indicating that SAP support has been stopped.
Step Action
1 From the IBM Tivoli OMEGAMON II for IMS command interface, type
ISAP OFF
2 Press Enter.
Result: The system displays a message that SAP support has been stopped.
Implementing the SAP Interface
124 IBM Tivoli OMEGAMON II for IMS Configuration and Customization Guide, Version 5.5.0
Checking the status of SAPYou can check the status of SAP support by using the ISAP immediate command from the IBM Tivoli OMEGAMON II for IMS command interface as shown in the following chart.
Step Action
1 From the IBM Tivoli OMEGAMON II for IMS command interface, type
ISAP
2 Press Enter.
Result: The system displays the status of SAP support.
Customization Procedures for Realtime Performance Monitor 125
Using KOIGBL to Customize Workload Parameters
Using KOIGBL to Customize Workload Parameters
Defining workload groups using the KOIGBL load moduleAfter you install OMEGAMON II, there are a number of items that you may wish to change to suit your installation�s needs.
The OMEGAMON II realtime performance component and the DEXAN component let you segregate specific workloads into groups. You can define these workload groups using the KOIGBL load module.
You can also set defaults for parameters related to this support; for example, MAXIDS, the maximum number of PSB groups which you can define.
Specifying workload group definition versionsThe 2-character suffix on the global data module (KOIGBL) lets you specify which version of the workload group definitions you want to use for a particular execution of IMS.
In this manner, the test IMS system can use a different set of PSB group definitions from those of the production IMS system.
Note: The 2-character suffix on the global data module is different from the 2-character suffix on the user profile.
KOIGBL defines all workload group definitionsAll OMEGAMON II users monitoring the same IMS system share the same workload group definitions.
OMEGAMON II uses the KOIGBL module the first user selects to start all subsequent OMEGAMON II users, regardless of the GLOBAL parameter these users specify on their START command.
Defining OMEGAMON II’s workload groupsThe $OIGROUP macro defines the workload groups which OMEGAMON II uses.
There are three types of $OIGROUP macros:
� $OIGROUP INITIAL
Important
Be sure that the suffix you select for the GLOBAL=mp parameter is reflected in the PARM file members KOIVTMmp and KOIDEXmp. You edited these members previously during the installation process.
If you have different members, IBM Tivoli OMEGAMON II for IMS executes the first member loaded.
All OMEGAMON II users monitoring the same IMS system share the same workload definitions. The GLBL command loads a new KOIGBLmp global data module regardless of what you specify on the GLOBAL=mp parameter in the PARM file members.
Using KOIGBL to Customize Workload Parameters
126 IBM Tivoli OMEGAMON II for IMS Configuration and Customization Guide, Version 5.5.0
� $OIGROUP ID
� $OIGROUP FINAL
Defining targeted programs or program groups using the KOIGBL datasetThe rhilev.RKANSAM(KOIGBLmp) member allows you to define workload groups that you can use to target the OMEGAMON II analysis to individual programs or groups of programs.
Assembling and linking KOIGBL (Batch)
After you edit the KOIGBLmp member, you must assemble it to generate a new KOIGBL load module, linking into your OMEGAMON IIload module dataset:
Note: The member KI2GBLmp in rhilev.RKANSAM contains a model of the JCL you should use to assemble and link a new KOIGBL under Batch
The GLOBAL=mp parameter on the START OMEGAMON II statement at execution time tells OMEGAMON II which KOIGBL module to use. In this way, you can build up a library of different program group definitions, and select among them when you invoke OMEGAMON II.
You can also use the GLBL command to dynamically reload a new copy of a reassembled KOIGBL module, or to dynamically load a KOIGBL module with a suffix different from the one currently in use. For more information on the GLBL command, refer to the Realtime Commands Reference Manual
The same KOIGBL modules work with any version of MVS or IMS. Remember, however, that your KOIGBL modules require reassembly when you install a new version of OMEGAMON II, because the thilev.TKANMAC library often changes between versions.
Modifying workload group definitions using the KOIGBL macrosIBM provides macro instructions that allow you to modify the workload group definitions. Comments within the KOIGBLmp describe these macros.
The macros that we provide for defining workload groups are:
� $OIGROUP INITIAL
� $OIGROUP ID
� $OIGROUP FINAL
� $OIDEXAN
The following sections discuss each macro and its parameters.
Step Action
1 Change the -THILEV- value to reflect what you specified for &thilev.
2 Change the -RHILEV- value to the high-level qualifier for your runtime library.
Customization Procedures for Realtime Performance Monitor 127
Using KOIGBL to Customize Workload Parameters
Modifying the default workload groups macros ($OIGROUP)Use the $OIGROUP macros to modify the default workload groups for Bottleneck Analysis (DEXAN).
$OIGROUP INITIAL macro
The $OIGROUP INITIAL macro is required. Define the macro only once. The INITIAL macro must precede any other $OIGROUP macro.
Determine which format of the $OIGROUP INITIAL macro to use, as follows:
� If you are modifying workload group definitions for IBM Tivoli OMEGAMON II for IMS, then the format for $OIGROUP INITIAL is...
$OIGROUP INITIAL,MAXGRPS=nn, X
MAXIDS=nnnn, X
MAXTERM=nnnn, X
MAXNODE=nnnn
MAXGRPS Specifies the maximum number of groups. The valid range is from 1-30 groups. You can change this value dynamically using the MAXG command. For more information about the MAXG command, see the Realtime Commands Reference Manual.
MAXIDS Specifies the maximum number of PSBs, transactions, and classes. Transactions and classes are only valid for IBM Tivoli OMEGAMON II for IMS. The valid range is from 1-1000 IDs.
MAXTERM Specifies the maximum number of logical terminal names. The valid range is from 1-1000 IDs. This parameter is only valid for IBM Tivoli OMEGAMON II for IMS.
MAXNODE Specifies the maximum number of VTAM node names. The valid range is from 1-1000. This parameter is only valid for IBM Tivoli OMEGAMON II for IMS.
Using KOIGBL to Customize Workload Parameters
128 IBM Tivoli OMEGAMON II for IMS Configuration and Customization Guide, Version 5.5.0
Defining a group using the $OIGROUP macro
Use the $OIGROUP ID macro to specify to which group or groups the entry belongs, and optionally give the group a name. You can also specify threshold and display characteristics with this macro.
Use the following chart to determine which format of the $OIGROUP ID macro to use.
� If you are modifying workload group definitions for IBM Tivoli OMEGAMON II for IMS, then the format for $OIGROUP ID is
$OIGROUP ID, item=cccccccc, X
GROUPS=(nn,.,nn) X
THRESH=(nnnn,...,nnnn) X
EXPTHR=(nnnn,...,nnnn)
item Can be one of the following
PSB Code cccccccc with 1-8 characters as follows:
� Use an asterisk (*) to define generic PSB names. For example, if you want to include all PSB names that begin with the letters AB in PSB group 1, code the following macro:
$OIGROUP ID,PSB=AB*,GROUPS=1
� If you want to include all PSB names containing the letters CD in the third and fourth position of the name in PSB groups 2 and 4, code the following macro:
$OIGROUP ID,PSB=**CD*,GROUPS=(2,4)
TRAN Defines a transaction name (1-8 characters). You can use asterisks to specify generic names as outlined in the PSB description above. This parameter is only valid for IBM Tivoli OMEGAMON II for IMS.
CLASS Defines transaction classes that the specified transaction group(s) includes. The valid range is from 1-255. If the number exceeds the maximum class number you specify in the IMS SYSGEN, the system ignores the maximum class number. This parameter is only valid for IBM Tivoli OMEGAMON II for IMS.
TERM Defines logical terminal names. The logical terminal name is 1-8 characters. As with the PSB parameter, you can use asterisks to specify generic names. This parameter is only valid for IBM Tivoli OMEGAMON II for IMS.
NODE Specifies a VTAM node name used in collecting end-to-end response time data. Generic node names are not allowed. This parameter is only valid for IBM Tivoli OMEGAMON II for IMS.
GROUPS Specifies which group or groups include the given ID. You can code the group in the form GROUPS=n or GROUPS=(nn,..,nn).
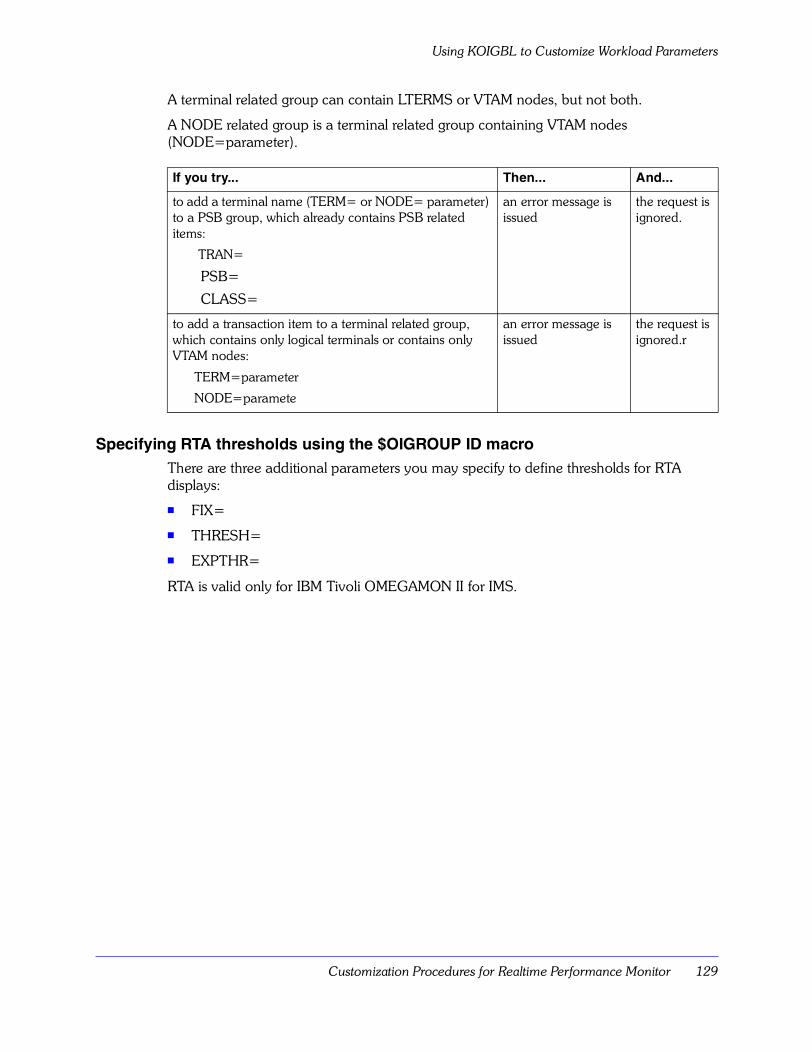
Customization Procedures for Realtime Performance Monitor 129
Using KOIGBL to Customize Workload Parameters
A terminal related group can contain LTERMS or VTAM nodes, but not both.
A NODE related group is a terminal related group containing VTAM nodes (NODE=parameter).
Specifying RTA thresholds using the $OIGROUP ID macroThere are three additional parameters you may specify to define thresholds for RTA displays:
� FIX=
� THRESH=
� EXPTHR=
RTA is valid only for IBM Tivoli OMEGAMON II for IMS.
If you try... Then... And...
to add a terminal name (TERM= or NODE= parameter) to a PSB group, which already contains PSB related items:
TRAN=
PSB=
CLASS=
an error message is issued
the request is ignored.
to add a transaction item to a terminal related group, which contains only logical terminals or contains only VTAM nodes:
TERM=parameter
NODE=paramete
an error message is issued
the request is ignored.r
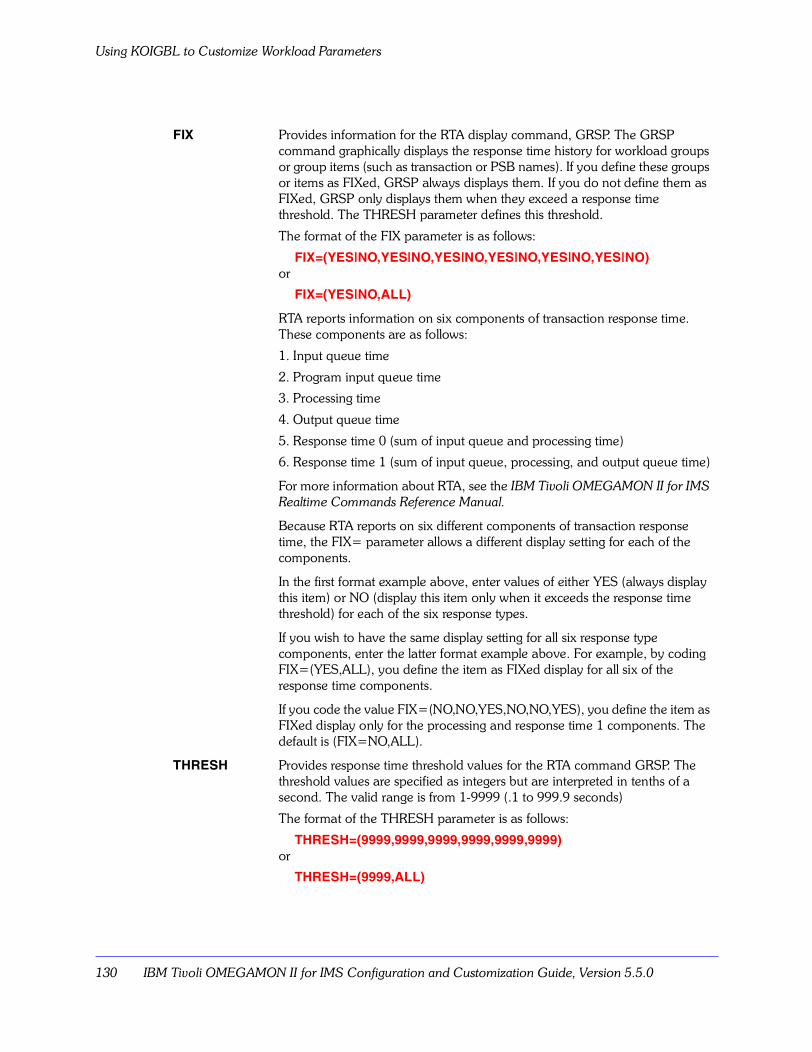
Using KOIGBL to Customize Workload Parameters
130 IBM Tivoli OMEGAMON II for IMS Configuration and Customization Guide, Version 5.5.0
FIX Provides information for the RTA display command, GRSP. The GRSP command graphically displays the response time history for workload groups or group items (such as transaction or PSB names). If you define these groups or items as FIXed, GRSP always displays them. If you do not define them as FIXed, GRSP only displays them when they exceed a response time threshold. The THRESH parameter defines this threshold.
The format of the FIX parameter is as follows:
FIX=(YES|NO,YES|NO,YES|NO,YES|NO,YES|NO,YES|NO)or
FIX=(YES|NO,ALL)
RTA reports information on six components of transaction response time. These components are as follows:
1. Input queue time
2. Program input queue time
3. Processing time
4. Output queue time
5. Response time 0 (sum of input queue and processing time)
6. Response time 1 (sum of input queue, processing, and output queue time)
For more information about RTA, see the IBM Tivoli OMEGAMON II for IMS Realtime Commands Reference Manual.
Because RTA reports on six different components of transaction response time, the FIX= parameter allows a different display setting for each of the components.
In the first format example above, enter values of either YES (always display this item) or NO (display this item only when it exceeds the response time threshold) for each of the six response types.
If you wish to have the same display setting for all six response type components, enter the latter format example above. For example, by coding FIX=(YES,ALL), you define the item as FIXed display for all six of the response time components.
If you code the value FIX=(NO,NO,YES,NO,NO,YES), you define the item as FIXed display only for the processing and response time 1 components. The default is (FIX=NO,ALL).
THRESH Provides response time threshold values for the RTA command GRSP. The threshold values are specified as integers but are interpreted in tenths of a second. The valid range is from 1-9999 (.1 to 999.9 seconds)
The format of the THRESH parameter is as follows:
THRESH=(9999,9999,9999,9999,9999,9999)or
THRESH=(9999,ALL)
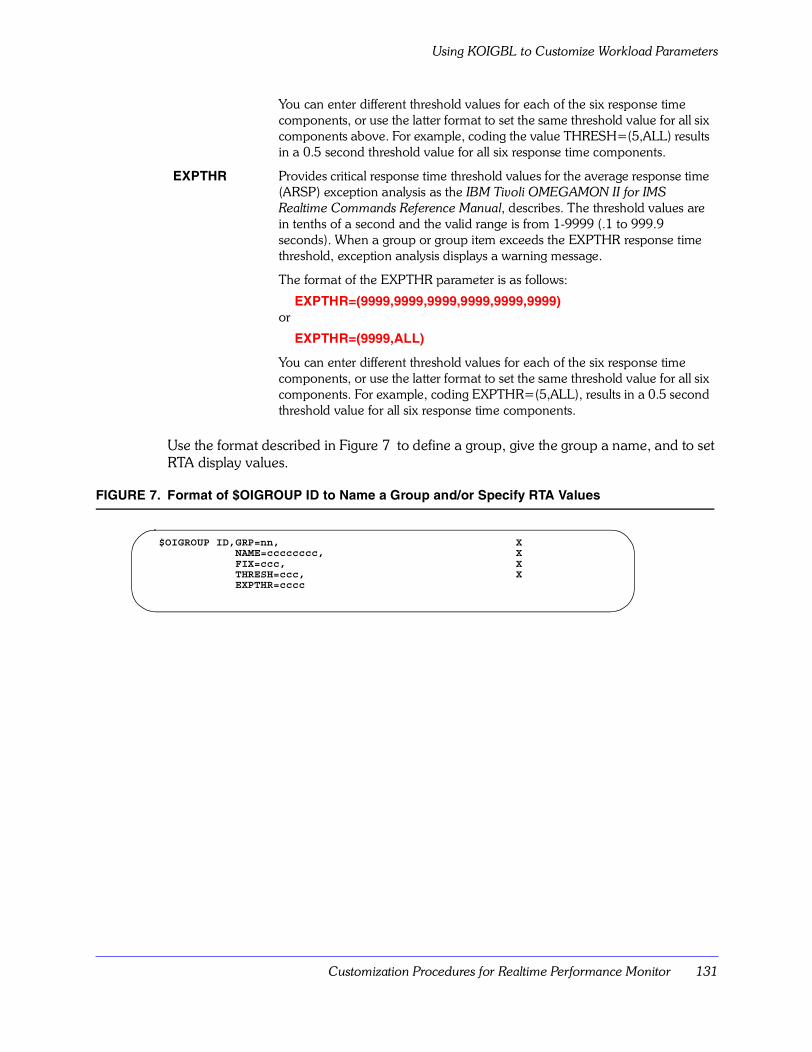
Customization Procedures for Realtime Performance Monitor 131
Using KOIGBL to Customize Workload Parameters
Use the format described in Figure 7 to define a group, give the group a name, and to set RTA display values.
FIGURE 7. Format of $OIGROUP ID to Name a Group and/or Specify RTA Values
You can enter different threshold values for each of the six response time components, or use the latter format to set the same threshold value for all six components above. For example, coding the value THRESH=(5,ALL) results in a 0.5 second threshold value for all six response time components.
EXPTHR Provides critical response time threshold values for the average response time (ARSP) exception analysis as the IBM Tivoli OMEGAMON II for IMS Realtime Commands Reference Manual, describes. The threshold values are in tenths of a second and the valid range is from 1-9999 (.1 to 999.9 seconds). When a group or group item exceeds the EXPTHR response time threshold, exception analysis displays a warning message.
The format of the EXPTHR parameter is as follows:
EXPTHR=(9999,9999,9999,9999,9999,9999)or
EXPTHR=(9999,ALL)
You can enter different threshold values for each of the six response time components, or use the latter format to set the same threshold value for all six components. For example, coding EXPTHR=(5,ALL), results in a 0.5 second threshold value for all six response time components.
$OIGROUP ID,GRP=nn, X NAME=cccccccc, X FIX=ccc, X THRESH=ccc, X EXPTHR=cccc
Using KOIGBL to Customize Workload Parameters
132 IBM Tivoli OMEGAMON II for IMS Configuration and Customization Guide, Version 5.5.0
You can change all of the group definitions that we describe above via the SETG command. See the OMEGAMON II for IMS Realtime Commands Reference Manual for more information about SETG.
You can change the RTA response time thresholds via the ISET command. See the IBM Tivoli OMEGAMON II for IMS Realtime Commands Reference Manual, for more information about ISET.
$OIGROUP FINAL macro
OMEGAMON II requires the $OIGROUP FINAL macro and it must be the last $OIGROUP macro. This macro indicates the end of all the KOIGBLmp group definition macros.
The $OIGROUP FINAL macro sorts the ID entries in alphabetical order and prints a KOIGBLmp group summary list. The format of the macro is as follows:
$OIGROUP FINAL
GRP Identifies a group number, for which you assign a group name (NAME parameter).
NAME Assigns a group name to the group you specify in GRP. This value can include blanks, but you must enclose the value in single quotes.
FIX Works the same way as the FIX parameter for defining transaction, node, or terminal group items. See that FIX description under �Specifying RTA thresholds using the $OIGROUP ID macro� on page 129.
THRESH Works the same way as the THRESH parameter for defining transaction, node, or terminal group items. (See that THRESH description under �Specifying RTA thresholds using the $OIGROUP ID macro� on page 129.
EXPTHR Works the same way as the EXPTHR parameter for defining transaction, node, or terminal group items. (See that EXPTHR description under�Specifying RTA thresholds using the $OIGROUP ID macro� on page 129.
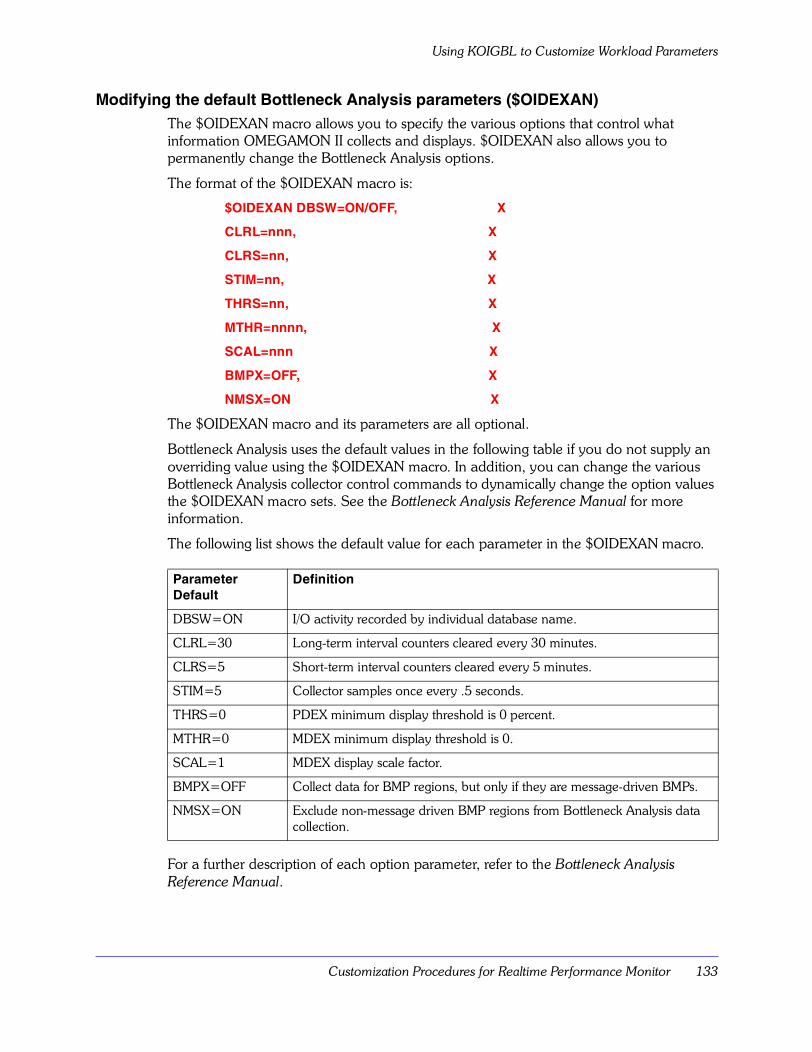
Customization Procedures for Realtime Performance Monitor 133
Using KOIGBL to Customize Workload Parameters
Modifying the default Bottleneck Analysis parameters ($OIDEXAN)The $OIDEXAN macro allows you to specify the various options that control what information OMEGAMON II collects and displays. $OIDEXAN also allows you to permanently change the Bottleneck Analysis options.
The format of the $OIDEXAN macro is:
$OIDEXAN DBSW=ON/OFF, X
CLRL=nnn, X
CLRS=nn, X
STIM=nn, X
THRS=nn, X
MTHR=nnnn, X
SCAL=nnn X
BMPX=OFF, X
NMSX=ON X
The $OIDEXAN macro and its parameters are all optional.
Bottleneck Analysis uses the default values in the following table if you do not supply an overriding value using the $OIDEXAN macro. In addition, you can change the various Bottleneck Analysis collector control commands to dynamically change the option values the $OIDEXAN macro sets. See the Bottleneck Analysis Reference Manual for more information.
The following list shows the default value for each parameter in the $OIDEXAN macro.
For a further description of each option parameter, refer to the Bottleneck Analysis Reference Manual.
Parameter Default
Definition
DBSW=ON I/O activity recorded by individual database name.
CLRL=30 Long-term interval counters cleared every 30 minutes.
CLRS=5 Short-term interval counters cleared every 5 minutes.
STIM=5 Collector samples once every .5 seconds.
THRS=0 PDEX minimum display threshold is 0 percent.
MTHR=0 MDEX minimum display threshold is 0.
SCAL=1 MDEX display scale factor.
BMPX=OFF Collect data for BMP regions, but only if they are message-driven BMPs.
NMSX=ON Exclude non-message driven BMP regions from Bottleneck Analysis data collection.
Concatenating Screen Space and Profile Datasets
134 IBM Tivoli OMEGAMON II for IMS Configuration and Customization Guide, Version 5.5.0
Concatenating Screen Space and Profile Datasets
IBM stores the standard screen spaces, that we ship with OMEGAMON II, use in the menu and command interfaces, and that the DD statement RKOIPROC references, in the rhilev.RKOIPROC dataset.
If you want to create, modify, or delete screen spaces for your use without modifying either the standard screens or other users� screens, create one or more additional datasets called cccccccc.RKOIPCSV. The prefix cccccccc can be for your site or for an individual user.
OMEGAMON II writes the members you change to the dataset that the DD statement RKOIPCSV references.
Saving and reading screen space datasets exampleOMEGAMON II accesses the datasets in the following order:
� personal datasets in cccccccc.RKOIPCSV
� installation
� rhilev.IMSID.RKOIPCSV
� rhilev.RKOIPROC
The following example shows how OMEGAMON II saves and reads the screen space datasets:
You can concatenate profile datasets in the same manner as above, to allow general users the freedom to use their own personal profiles, or to restrict users to installation-defined parameters.
OMEGAMON II saves screen spaces in this file://RKOIPCSV DD DISP=SHR,DSNAME=cccccccc.RKOIPCSV.OMEGAMON II reads screen spaces from these files://RKOIPROC DD DISP=SHR,DSNAME=cccccccc.RKOIPCSV.// DD DISP=SHR,DSNAME=rhilev.RKOIPROC.
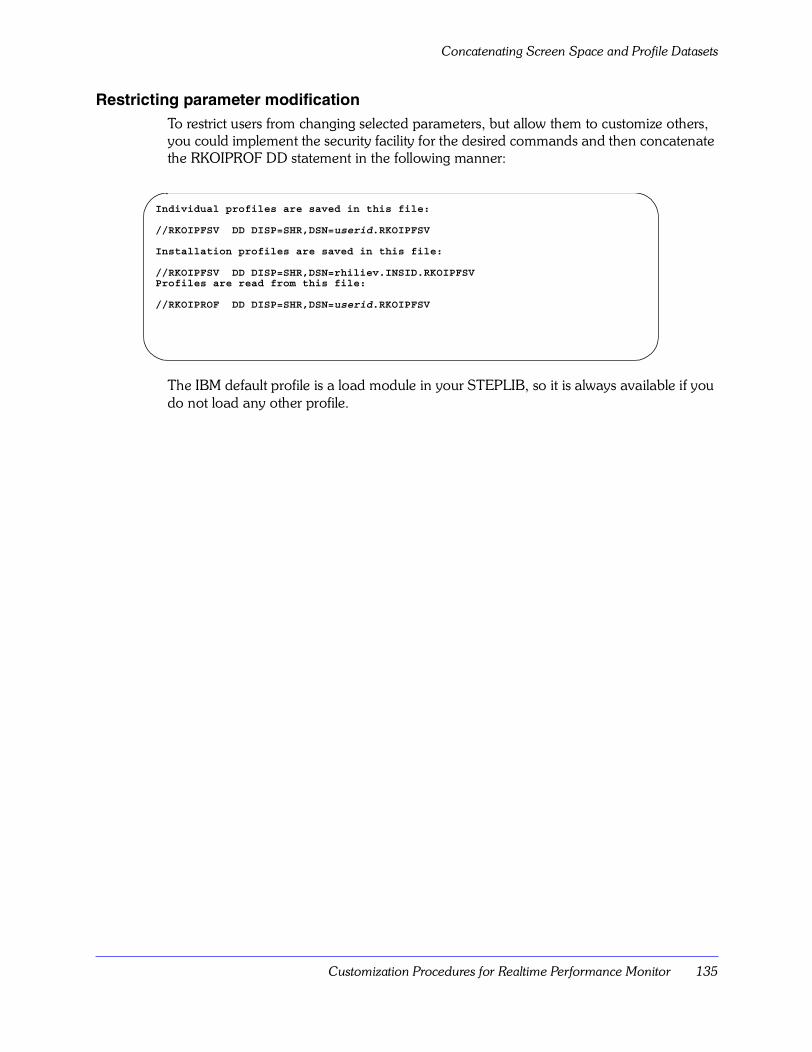
Customization Procedures for Realtime Performance Monitor 135
Concatenating Screen Space and Profile Datasets
Restricting parameter modificationTo restrict users from changing selected parameters, but allow them to customize others, you could implement the security facility for the desired commands and then concatenate the RKOIPROF DD statement in the following manner:
The IBM default profile is a load module in your STEPLIB, so it is always available if you do not load any other profile.
Individual profiles are saved in this file: //RKOIPFSV DD DISP=SHR,DSN=userid.RKOIPFSV Installation profiles are saved in this file: //RKOIPFSV DD DISP=SHR,DSN=rhiliev.INSID.RKOIPFSV Profiles are read from this file: //RKOIPROF DD DISP=SHR,DSN=userid.RKOIPFSV
Concatenating Screen Space and Profile Datasets
136 IBM Tivoli OMEGAMON II for IMS Configuration and Customization Guide, Version 5.5.0
Section 3. Setting Security 137
Section 3. Setting Security

138 IBM Tivoli OMEGAMON II for IMS Configuration and Customization Guide, Version 5.5.0
OMEGAMON II�s Realtime Performance Monitor Security Facility 139
OMEGAMON II’s Realtime PerformanceMonitor Security Facility
Chapter OverviewIBM provides a security facility in OMEGAMON II to prevent unauthorized use of OMEGAMON for IMS commands. IBM ships OMEGAMON II with the internal security feature as the default.
For an added level of security, you can set up an interface between OMEGAMON II and an external security package, such as RACF or CA-ACF2.
Whether you use internal security, external security, or a combination of the two, you can customize the OMEGAMON II security table to meet the needs of your installation.
Note: References to OMEGAMON II in this chapter are to the Realtime Performance Monitor, unless we specify otherwise.
Chapter ContentsUse Internal Security for Authorized Commands. . . . . . . . . . . . . . . . . . . . . . . . . . . . 140Supplying the Password . . . . . . . . . . . . . . . . . . . . . . . . . . . . . . . . . . . . . . . . . . . . . . 141Use External Security . . . . . . . . . . . . . . . . . . . . . . . . . . . . . . . . . . . . . . . . . . . . . . . . 142Log On Using External Security in VTAM, TSO, and ISPF Modes. . . . . . . . . . . . . . . 143Log On Using External Security in Dedicated Mode . . . . . . . . . . . . . . . . . . . . . . . . . 144Access Security from an Active Session. . . . . . . . . . . . . . . . . . . . . . . . . . . . . . . . . . . 145Implement External Security . . . . . . . . . . . . . . . . . . . . . . . . . . . . . . . . . . . . . . . . . . . 146Modify RACF Rules to Interface with OMEGAMON II . . . . . . . . . . . . . . . . . . . . . . . 147Modify ACF2 Rules to Interface with OMEGAMON II. . . . . . . . . . . . . . . . . . . . . . . . 149Modify TOP SECRET Rules . . . . . . . . . . . . . . . . . . . . . . . . . . . . . . . . . . . . . . . . . . . 150
6
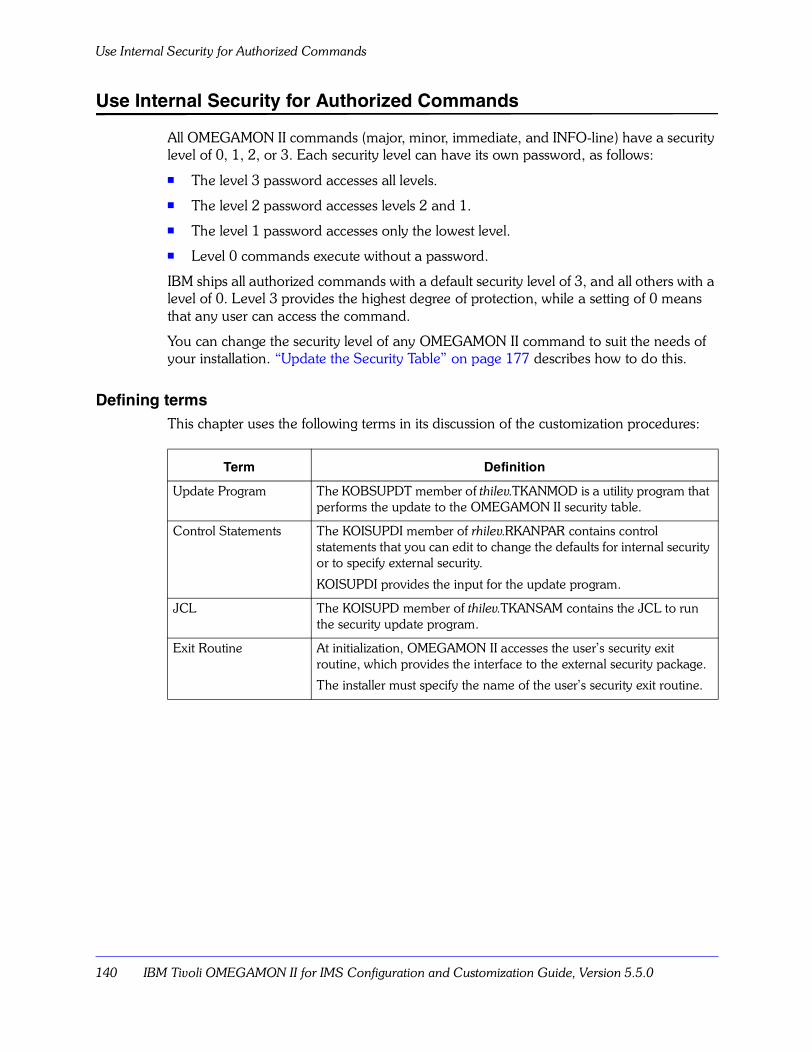
Use Internal Security for Authorized Commands
140 IBM Tivoli OMEGAMON II for IMS Configuration and Customization Guide, Version 5.5.0
Use Internal Security for Authorized Commands
All OMEGAMON II commands (major, minor, immediate, and INFO-line) have a security level of 0, 1, 2, or 3. Each security level can have its own password, as follows:
� The level 3 password accesses all levels.
� The level 2 password accesses levels 2 and 1.
� The level 1 password accesses only the lowest level.
� Level 0 commands execute without a password.
IBM ships all authorized commands with a default security level of 3, and all others with a level of 0. Level 3 provides the highest degree of protection, while a setting of 0 means that any user can access the command.
You can change the security level of any OMEGAMON II command to suit the needs of your installation. �Update the Security Table� on page 177 describes how to do this.
Defining termsThis chapter uses the following terms in its discussion of the customization procedures:
Term Definition
Update Program The KOBSUPDT member of thilev.TKANMOD is a utility program that performs the update to the OMEGAMON II security table.
Control Statements The KOISUPDI member of rhilev.RKANPAR contains control statements that you can edit to change the defaults for internal security or to specify external security.
KOISUPDI provides the input for the update program.
JCL The KOISUPD member of thilev.TKANSAM contains the JCL to run the security update program.
Exit Routine At initialization, OMEGAMON II accesses the user�s security exit routine, which provides the interface to the external security package.
The installer must specify the name of the user�s security exit routine.
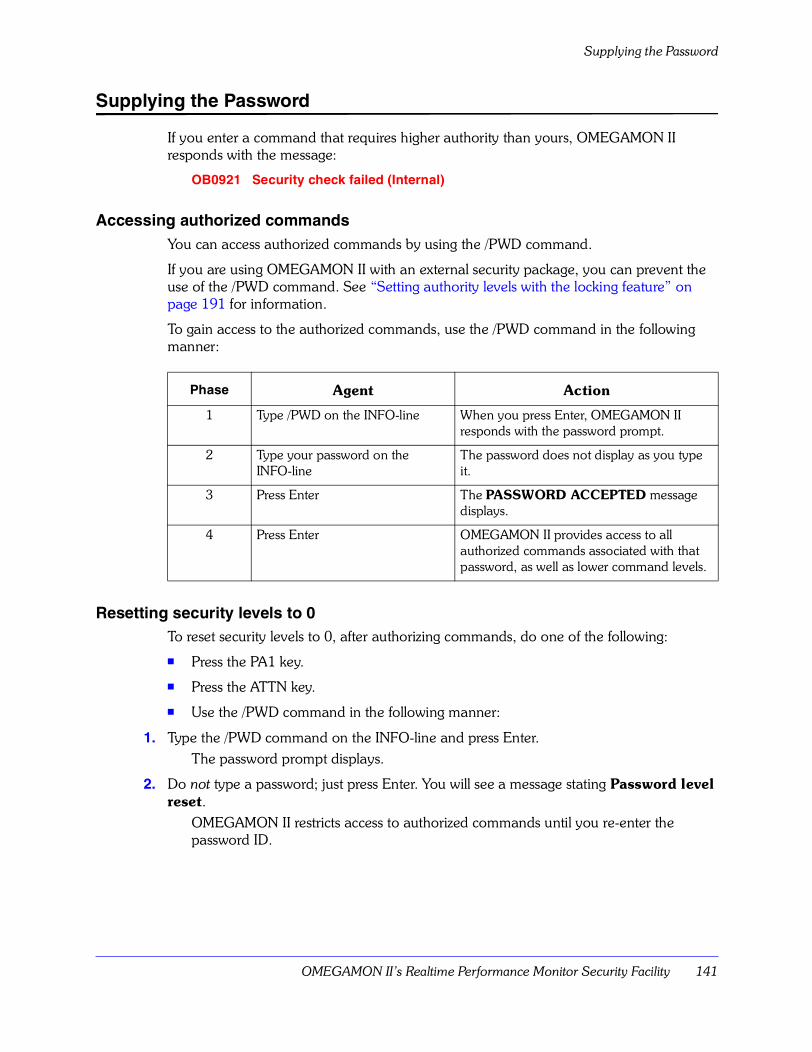
OMEGAMON II�s Realtime Performance Monitor Security Facility 141
Supplying the Password
Supplying the Password
If you enter a command that requires higher authority than yours, OMEGAMON II responds with the message:
OB0921 Security check failed (Internal)
Accessing authorized commandsYou can access authorized commands by using the /PWD command.
If you are using OMEGAMON II with an external security package, you can prevent the use of the /PWD command. See �Setting authority levels with the locking feature� on page 191 for information.
To gain access to the authorized commands, use the /PWD command in the following manner:
Resetting security levels to 0To reset security levels to 0, after authorizing commands, do one of the following:
� Press the PA1 key.
� Press the ATTN key.
� Use the /PWD command in the following manner:
1. Type the /PWD command on the INFO-line and press Enter. The password prompt displays.
2. Do not type a password; just press Enter. You will see a message stating Password level reset.
OMEGAMON II restricts access to authorized commands until you re-enter the password ID.
Phase Agent Action
1 Type /PWD on the INFO-line When you press Enter, OMEGAMON II responds with the password prompt.
2 Type your password on the INFO-line
The password does not display as you type it.
3 Press Enter The PASSWORD ACCEPTED message displays.
4 Press Enter OMEGAMON II provides access to all authorized commands associated with that password, as well as lower command levels.
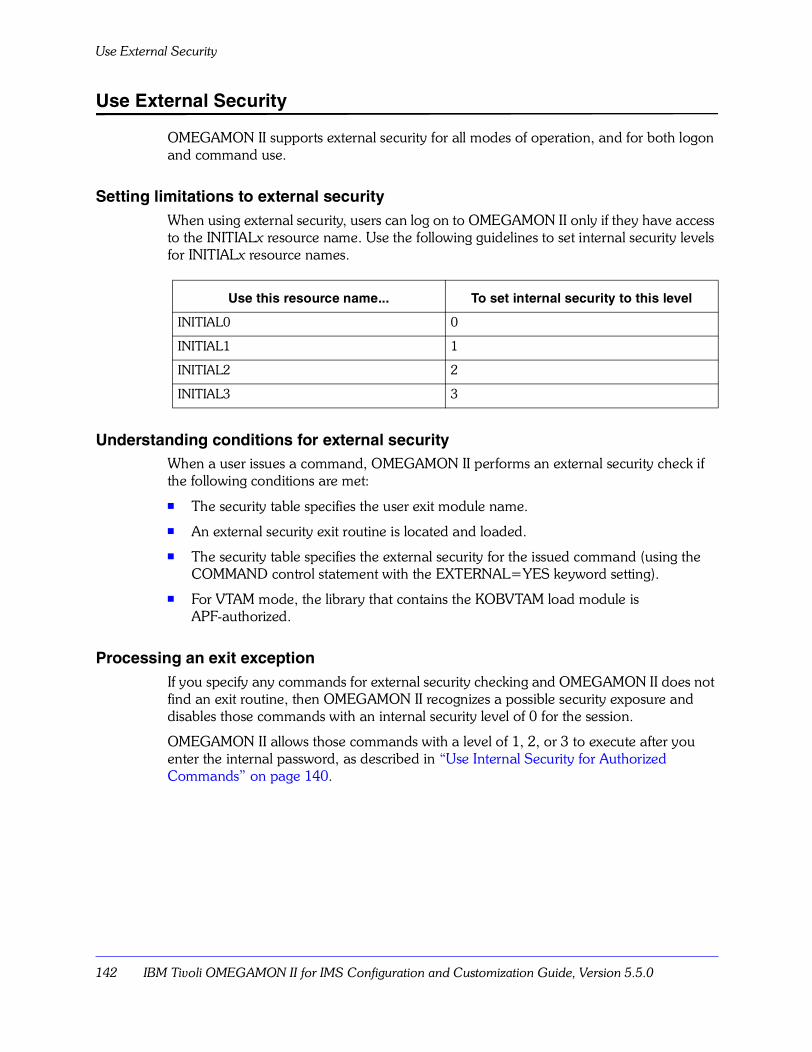
Use External Security
142 IBM Tivoli OMEGAMON II for IMS Configuration and Customization Guide, Version 5.5.0
Use External Security
OMEGAMON II supports external security for all modes of operation, and for both logon and command use.
Setting limitations to external securityWhen using external security, users can log on to OMEGAMON II only if they have access to the INITIALx resource name. Use the following guidelines to set internal security levels for INITIALx resource names.
Understanding conditions for external securityWhen a user issues a command, OMEGAMON II performs an external security check if the following conditions are met:
� The security table specifies the user exit module name.
� An external security exit routine is located and loaded.
� The security table specifies the external security for the issued command (using the COMMAND control statement with the EXTERNAL=YES keyword setting).
� For VTAM mode, the library that contains the KOBVTAM load module is APF-authorized.
Processing an exit exceptionIf you specify any commands for external security checking and OMEGAMON II does not find an exit routine, then OMEGAMON II recognizes a possible security exposure and disables those commands with an internal security level of 0 for the session.
OMEGAMON II allows those commands with a level of 1, 2, or 3 to execute after you enter the internal password, as described in �Use Internal Security for Authorized Commands� on page 140.
Use this resource name... To set internal security to this level
INITIAL0 0
INITIAL1 1
INITIAL2 2
INITIAL3 3
OMEGAMON II�s Realtime Performance Monitor Security Facility 143
Log On Using External Security in VTAM, TSO, and ISPF Modes
Log On Using External Security in VTAM, TSO, and ISPF Modes
When you log on through VTAM, OMEGAMON II presents a logon panel for the OMEGAMON II VTAM application program (KOBVTAM). The same VTAM logon panel also appears for ISPF and TSO modes, because OMEGAMON II uses the OMEGAMON II VTAM application program for these modes as well.
The copyright screen you normally see at logon time has additional fields for User ID, Password, Group, and New Password.
Using the KOBVTAM logon screenThe advantages of using the KOBVTAM logon screen are that the exit routine
� can cause OMEGAMON II to stop an unauthorized logon
� makes all security checks based on the user�s logon ID and not on the OMEGAMON II address space�s authority
If you are in an active VTAM session and you want to alter the external security level of authorization, you can use the relogon feature we discussed in �Access Security from an Active Session� on page 145.
Log On Using External Security in Dedicated Mode
144 IBM Tivoli OMEGAMON II for IMS Configuration and Customization Guide, Version 5.5.0
Log On Using External Security in Dedicated Mode
Security in dedicated mode differs from the other modes because, at startup time, there is no user ID or password associated with the session.
Accessing external securityThe only security available by default is internal security.
You must enter the /PWD command, using the relogon feature we discussed in �Access Security from an Active Session� on page 145, to access external security.

OMEGAMON II�s Realtime Performance Monitor Security Facility 145
Access Security from an Active Session
Access Security from an Active Session
The relogon feature is a function of the /PWD command that allows you to enter your user ID and password for the external security package from an active OMEGAMON II session.
In dedicated mode, you can use the relogon feature to log on to external security. In VTAM mode, the relogon feature enables users to alter the security level without having to bring down a current VTAM session.
Using the relogon featureTo use the relogon feature:
Follow these rules when using the relogon feature:
� Do not mark the /PWD command as EXTERNAL=YES in the security table, because in dedicated mode you must use /PWD to log on to external security.
� You can determine in your user exit what the default action should be when the user ID or logon password supplied is not valid.
For example, you can specify the disabling of all OMEGAMON II commands marked as EXTERNAL=YES, or you can specify that the session reverts to the previous user ID.
The sample exit routines contain an explanation of the available options.
� If you use the relogon feature and your password has expired, you cannot enter a new password using the /PWD command.
Step Action
1 Type in the /PWD INFO-line command and your user ID as in this example:
2 Press Enter.
3 Type your external security password at the prompt.
/PWD user01_____KOIMENU DEXO1 DED LOG OIDIRIEI /C IMSA 01/02/97 9:20:
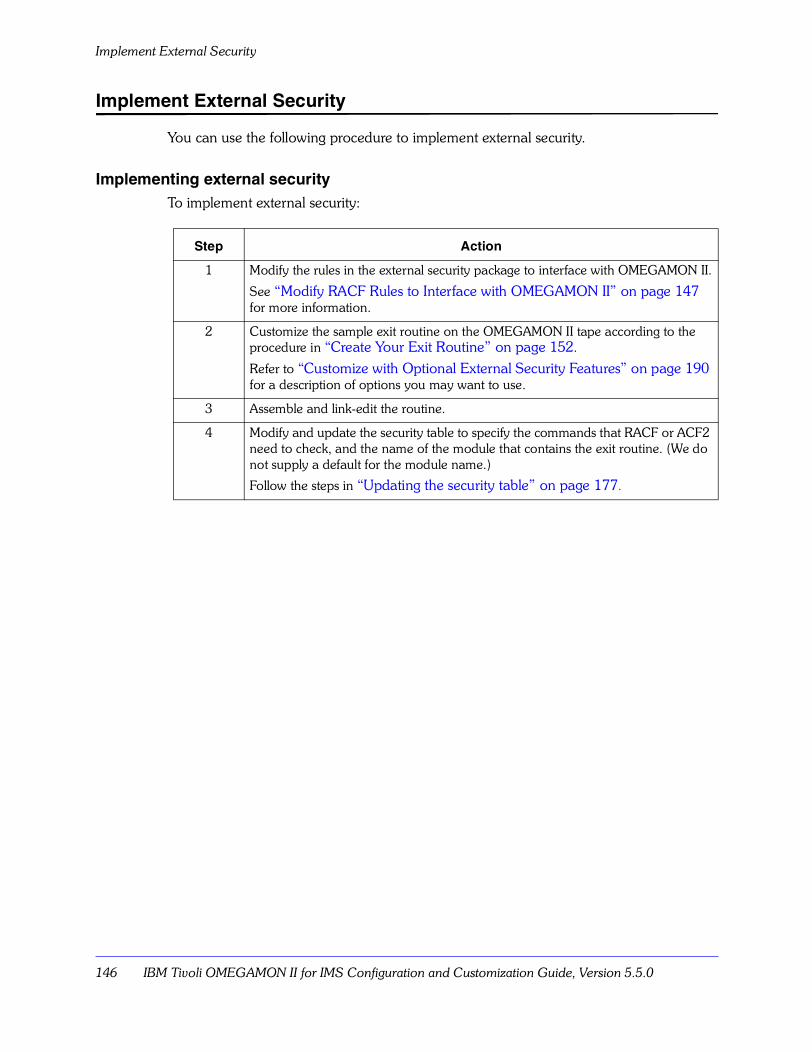
Implement External Security
146 IBM Tivoli OMEGAMON II for IMS Configuration and Customization Guide, Version 5.5.0
Implement External Security
You can use the following procedure to implement external security.
Implementing external securityTo implement external security:
Step Action
1 Modify the rules in the external security package to interface with OMEGAMON II.
See �Modify RACF Rules to Interface with OMEGAMON II� on page 147 for more information.
2 Customize the sample exit routine on the OMEGAMON II tape according to the procedure in �Create Your Exit Routine� on page 152.
Refer to �Customize with Optional External Security Features� on page 190 for a description of options you may want to use.
3 Assemble and link-edit the routine.
4 Modify and update the security table to specify the commands that RACF or ACF2 need to check, and the name of the module that contains the exit routine. (We do not supply a default for the module name.)
Follow the steps in �Updating the security table� on page 177.
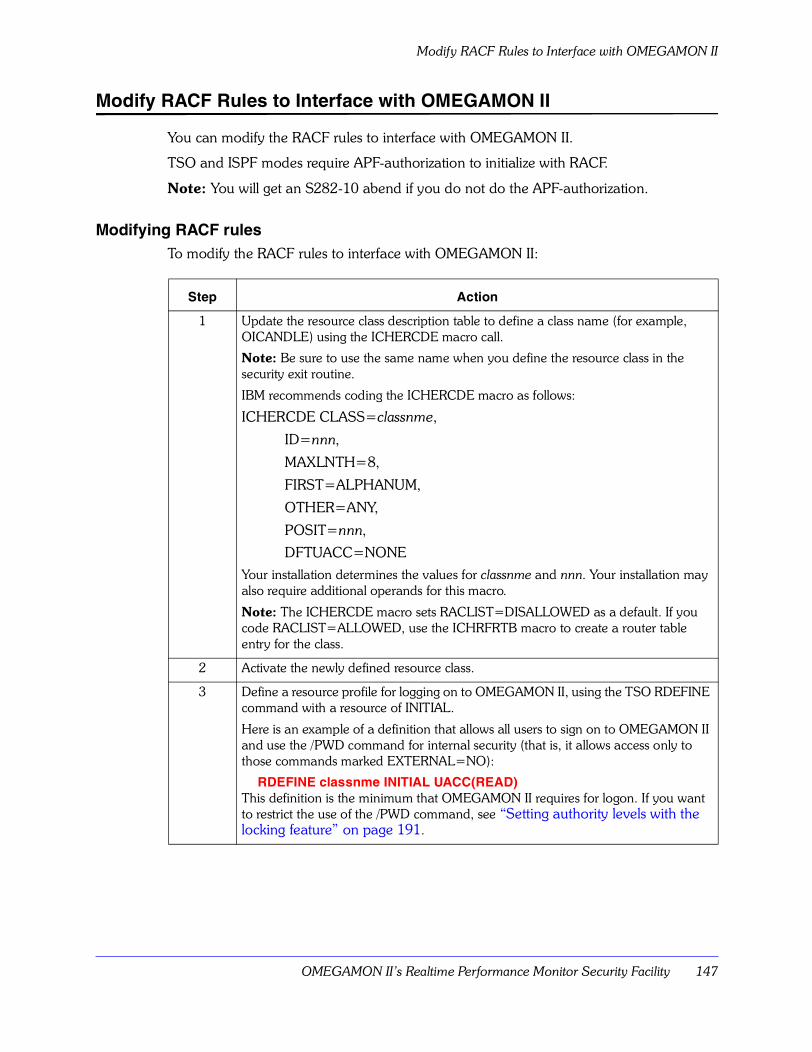
OMEGAMON II�s Realtime Performance Monitor Security Facility 147
Modify RACF Rules to Interface with OMEGAMON II
Modify RACF Rules to Interface with OMEGAMON II
You can modify the RACF rules to interface with OMEGAMON II.
TSO and ISPF modes require APF-authorization to initialize with RACF.
Note: You will get an S282-10 abend if you do not do the APF-authorization.
Modifying RACF rulesTo modify the RACF rules to interface with OMEGAMON II:
Step Action
1 Update the resource class description table to define a class name (for example, OICANDLE) using the ICHERCDE macro call.
Note: Be sure to use the same name when you define the resource class in the security exit routine.
IBM recommends coding the ICHERCDE macro as follows:
ICHERCDE CLASS=classnme,
ID=nnn,
MAXLNTH=8,
FIRST=ALPHANUM,
OTHER=ANY,
POSIT=nnn,
DFTUACC=NONE
Your installation determines the values for classnme and nnn. Your installation may also require additional operands for this macro.
Note: The ICHERCDE macro sets RACLIST=DISALLOWED as a default. If you code RACLIST=ALLOWED, use the ICHRFRTB macro to create a router table entry for the class.
2 Activate the newly defined resource class.
3 Define a resource profile for logging on to OMEGAMON II, using the TSO RDEFINE command with a resource of INITIAL.
Here is an example of a definition that allows all users to sign on to OMEGAMON II and use the /PWD command for internal security (that is, it allows access only to those commands marked EXTERNAL=NO):
RDEFINE classnme INITIAL UACC(READ)This definition is the minimum that OMEGAMON II requires for logon. If you want to restrict the use of the /PWD command, see �Setting authority levels with the locking feature� on page 191.
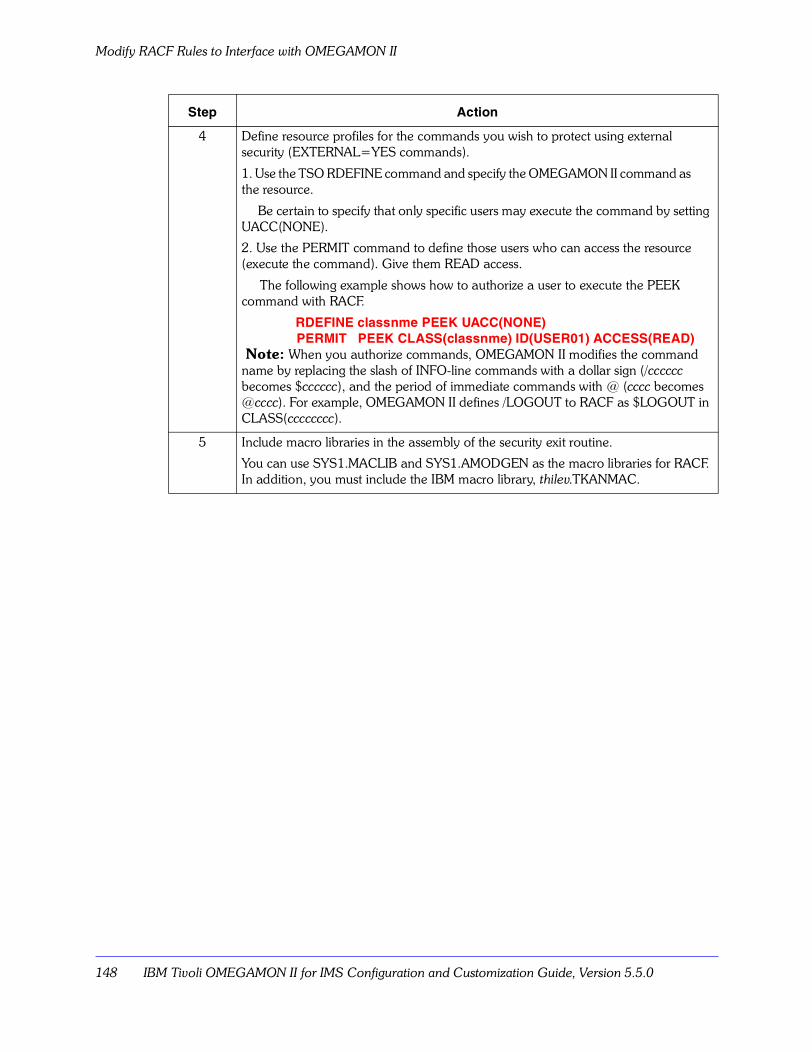
Modify RACF Rules to Interface with OMEGAMON II
148 IBM Tivoli OMEGAMON II for IMS Configuration and Customization Guide, Version 5.5.0
4 Define resource profiles for the commands you wish to protect using external security (EXTERNAL=YES commands).
1. Use the TSO RDEFINE command and specify the OMEGAMON II command as the resource.
Be certain to specify that only specific users may execute the command by setting UACC(NONE).
2. Use the PERMIT command to define those users who can access the resource (execute the command). Give them READ access.
The following example shows how to authorize a user to execute the PEEK command with RACF.
RDEFINE classnme PEEK UACC(NONE)PERMIT PEEK CLASS(classnme) ID(USER01) ACCESS(READ)
Note: When you authorize commands, OMEGAMON II modifies the command name by replacing the slash of INFO-line commands with a dollar sign (/cccccc becomes $cccccc), and the period of immediate commands with @ (cccc becomes @cccc). For example, OMEGAMON II defines /LOGOUT to RACF as $LOGOUT in CLASS(cccccccc).
5 Include macro libraries in the assembly of the security exit routine.
You can use SYS1.MACLIB and SYS1.AMODGEN as the macro libraries for RACF. In addition, you must include the IBM macro library, thilev.TKANMAC.
Step Action
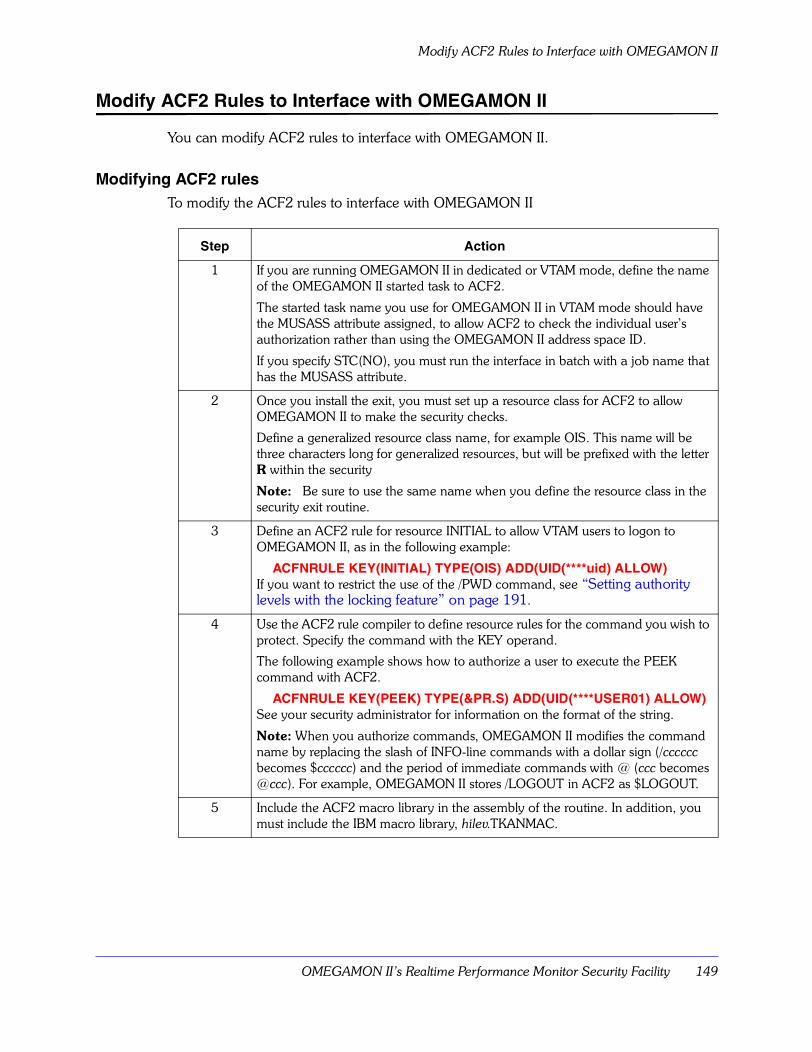
OMEGAMON II�s Realtime Performance Monitor Security Facility 149
Modify ACF2 Rules to Interface with OMEGAMON II
Modify ACF2 Rules to Interface with OMEGAMON II
You can modify ACF2 rules to interface with OMEGAMON II.
Modifying ACF2 rulesTo modify the ACF2 rules to interface with OMEGAMON II
Step Action
1 If you are running OMEGAMON II in dedicated or VTAM mode, define the name of the OMEGAMON II started task to ACF2.
The started task name you use for OMEGAMON II in VTAM mode should have the MUSASS attribute assigned, to allow ACF2 to check the individual user�s authorization rather than using the OMEGAMON II address space ID.
If you specify STC(NO), you must run the interface in batch with a job name that has the MUSASS attribute.
2 Once you install the exit, you must set up a resource class for ACF2 to allow OMEGAMON II to make the security checks.
Define a generalized resource class name, for example OIS. This name will be three characters long for generalized resources, but will be prefixed with the letter R within the security
Note: Be sure to use the same name when you define the resource class in the security exit routine.
3 Define an ACF2 rule for resource INITIAL to allow VTAM users to logon to OMEGAMON II, as in the following example:
ACFNRULE KEY(INITIAL) TYPE(OIS) ADD(UID(****uid) ALLOW)If you want to restrict the use of the /PWD command, see �Setting authority levels with the locking feature� on page 191.
4 Use the ACF2 rule compiler to define resource rules for the command you wish to protect. Specify the command with the KEY operand.
The following example shows how to authorize a user to execute the PEEK command with ACF2.
ACFNRULE KEY(PEEK) TYPE(&PR.S) ADD(UID(****USER01) ALLOW)See your security administrator for information on the format of the string.
Note: When you authorize commands, OMEGAMON II modifies the command name by replacing the slash of INFO-line commands with a dollar sign (/cccccc becomes $cccccc) and the period of immediate commands with @ (ccc becomes @ccc). For example, OMEGAMON II stores /LOGOUT in ACF2 as $LOGOUT.
5 Include the ACF2 macro library in the assembly of the routine. In addition, you must include the IBM macro library, hilev.TKANMAC.
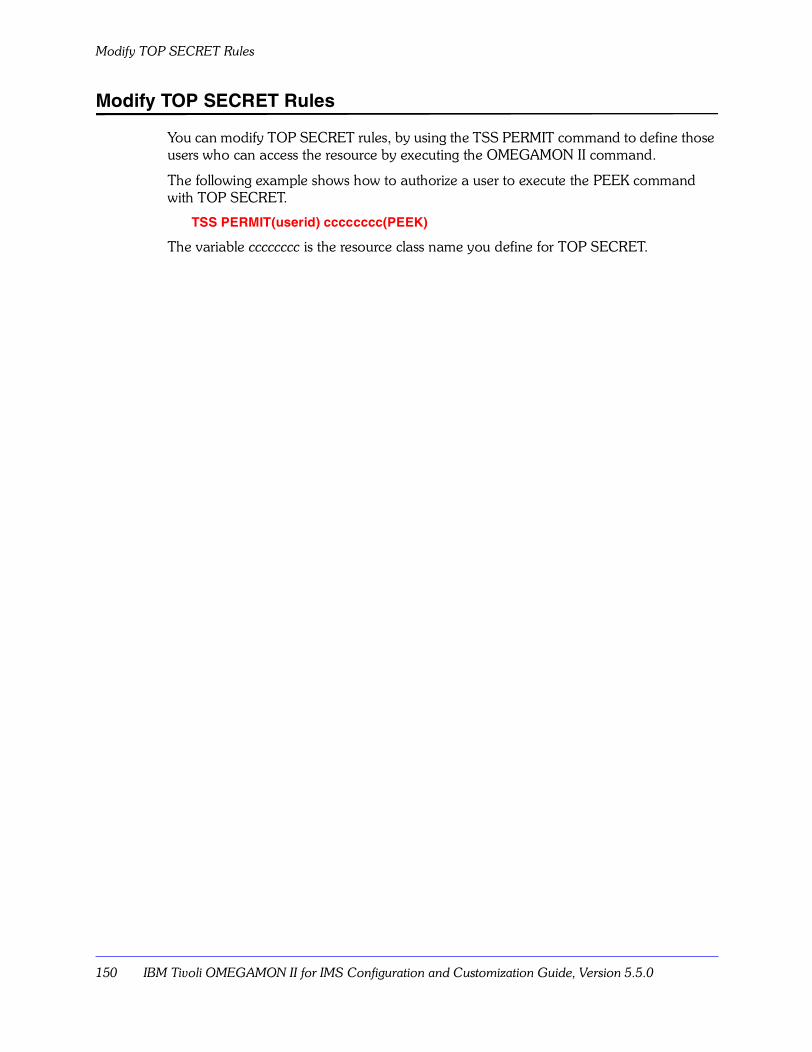
Modify TOP SECRET Rules
150 IBM Tivoli OMEGAMON II for IMS Configuration and Customization Guide, Version 5.5.0
Modify TOP SECRET Rules
You can modify TOP SECRET rules, by using the TSS PERMIT command to define those users who can access the resource by executing the OMEGAMON II command.
The following example shows how to authorize a user to execute the PEEK command with TOP SECRET.
TSS PERMIT(userid) cccccccc(PEEK)
The variable cccccccc is the resource class name you define for TOP SECRET.
Using Security Exit Routines 151
Using Security Exit Routines
Chapter OverviewThis chapter explains how to use security exit routines for OMEGAMON II, including how to:
� create an OMEGAMON II exit routine
� use call conventions for OMEGAMON II exit routines
� review call flow for OMEGAMON II exit routines
Note: References to OMEGAMON II in this chapter are to the Realtime Performance Monitor, unless we specify otherwise.
Chapter ContentsCreate Your Exit Routine . . . . . . . . . . . . . . . . . . . . . . . . . . . . . . . . . . . . . . . . . . . . . 152Use OMEGAMON II�s Calling Conventions for Security Exit Routines . . . . . . . . . . . 153Review OMEGAMON II�s Calling Flow for Security Exit Routines. . . . . . . . . . . . . . . 154
7
Create Your Exit Routine
152 IBM Tivoli OMEGAMON II for IMS Configuration and Customization Guide, Version 5.5.0
Create Your Exit Routine
The OMEGAMON II exit routine provides an interface between OMEGAMON II and the security product.
You can specify any unique name for your exit routine, but you must also specify that name in the control statements that update the security table. Multiple systems can share one exit routine.
For more information, see Using MODULE under �Use Control Statements to Modify the Security Table� on page 160.
Locating example ACF2 and RACF exit routinesThe KOIACF2X and KOIRACFX members of thilev.TKANSAM contain models of ACF2 and RACF routines. Many installations use these members without modification, but because security procedures are installation-dependent, we have documented these members with comments to enable you to modify them.
Note: Be sure that the resource class you define in the exit routine has the same name as the resource class you defined when modifying RACF/ACF2 rules.
The thilev.TKANSAM dataset contains members called KOIRACF2A and KOIRRACFA that supply sample JCL to help you assemble and link-edit your routine.
Using your exit routine for multiple OMEGAMON IIsYou can use the same exit routine to define security for multiple OMEGAMON IIs, by using the same name on the MODULE= statement for each OMEGAMON II (see �Using MODULE� on page 168).
Note: You could use the value of the B#DDPRFX field in the $BIA data area as part of a resource name for the OMEGAMON II currently in use.
Using other security systemsIf you have a security system other than RACF or ACF2, you can still implement a security interface using their models. Use the sample RACF and ACF2 exits as guides to see what information passes to the exit routine and what information returns to OMEGAMON II.
Using Security Exit Routines 153
Use OMEGAMON II�s Calling Conventions for Security Exit Routines
Use OMEGAMON II’s Calling Conventions for Security Exit Routines
OMEGAMON II uses a single control block to pass information to the exit routine and certain conventions to call the user exit module.
Using the $UCHECK control blockOMEGAMON II uses the $UCHECK control block to pass information to the exit routine. The exit routine also uses $UCHECK to pass information back to OMEGAMON II.
The $UCHECK macro maps the $UCHECK control block. Member KOBGMAC of thilev.TKANMAC. defines $UCHECK.
OMEGAMON II maintains the $UCHECK control block for the entire life of the session, and gives the installation a 512-byte work area for its own use.
Using calling conventionsOMEGAMON II calls the user exit module using the following conventions:
Important
The $UCHECK work area is limited to 512 bytes.
If your installation requires a larger work area, GETMAIN the additional storage required and place the pointer to this GETMAINed area in $UCHECK.
An attempt to enlarge this work area beyond its 512-byte limit in any other way causes an overlay of essential OMEGAMON II control blocks. Results are unpredictable.
If you modify the RACF RACROUTE macro, you must GETMAIN at least 512 bytes for use as the WORKA parameter.
Register Number Contents
1 Address of parameter list.
13 Address of standard save area.
14 Return address.
15 Entry point address (in).
15 Return code (out).
Parameter List
Contents
Word 1 Address of control block.
Review OMEGAMON II�s Calling Flow for Security Exit Routines
154 IBM Tivoli OMEGAMON II for IMS Configuration and Customization Guide, Version 5.5.0
Review OMEGAMON II’s Calling Flow for Security Exit Routines
This section describes the flow for calls to your user security exit routine
� at initialization
� during command verification
� at termination
Note: This unit does not apply to the IMS command BMP security exit. See �Implementing Your BMP Interface� on page 117 for more information.
Reviewing call flow at initializationAt initialization, when OMEGAMON II passes control to your user exit routine, the initialization call is indicated by an I in the U#CHTYP field. This indicates that OMEGAMON II requires a logon validation.
IF... THEN...
the user ID field length is non-zero
the user ID and password are available.
additional information or some form of retry is required
the user exit routine can request a reshow of the screen and reset any field lengths to indicate that no data is present (user ID, password, group, or new password).
To perform a reshow in VTAM mode, set a message into the U#CHMSG field (120 bytes maximum length), set the U@CHRSHO bit in U#CHRESP, and return to the caller.
The message displays below the panel, with appropriate fields filled in (original user ID and password), unless overridden (length = 0).
validation is complete a return code of 0 from the user exit indicates that the user should be allowed to log on.
Any other return code causes the session to abort.
logon acceptance is successful
the validation routine can perform resource validation and optionally assign a command security level (0, 1, 2, or 3) to the user.
The default is 0.
Place the appropriate number into U#CHAUT4. To force the user to use only this level, also set the U@CH1LOK bit in U#CHAUT1.
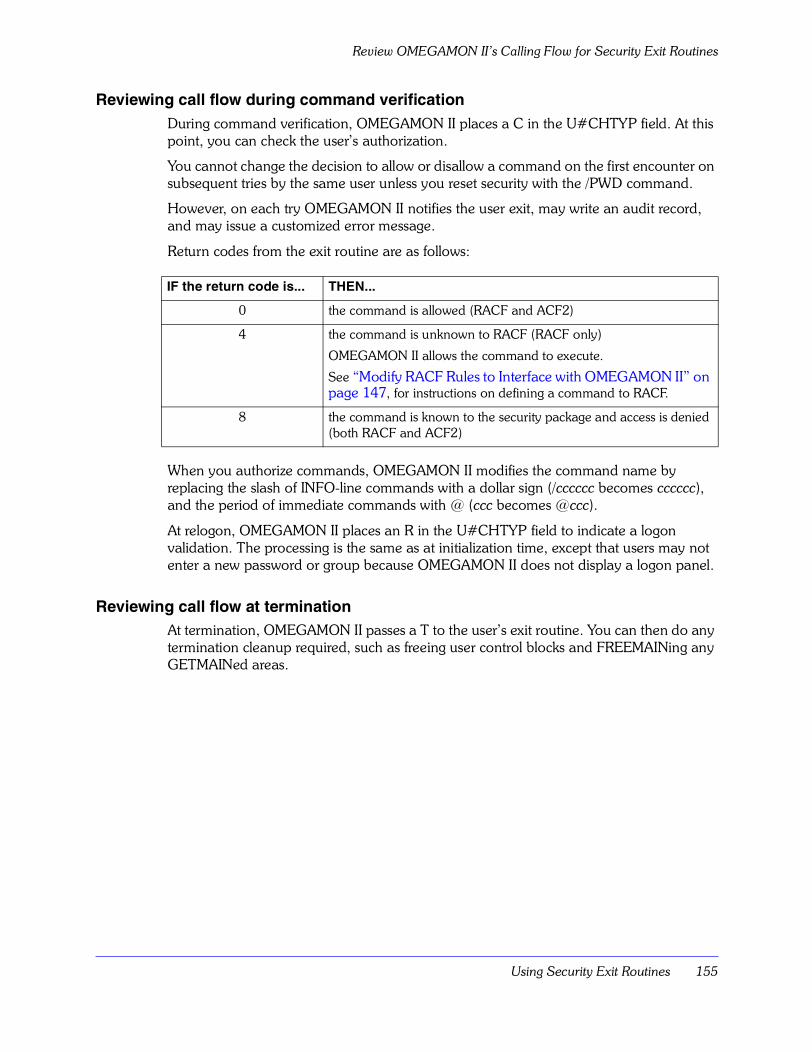
Using Security Exit Routines 155
Review OMEGAMON II�s Calling Flow for Security Exit Routines
Reviewing call flow during command verificationDuring command verification, OMEGAMON II places a C in the U#CHTYP field. At this point, you can check the user�s authorization.
You cannot change the decision to allow or disallow a command on the first encounter on subsequent tries by the same user unless you reset security with the /PWD command.
However, on each try OMEGAMON II notifies the user exit, may write an audit record, and may issue a customized error message.
Return codes from the exit routine are as follows:
When you authorize commands, OMEGAMON II modifies the command name by replacing the slash of INFO-line commands with a dollar sign (/cccccc becomes cccccc), and the period of immediate commands with @ (ccc becomes @ccc).
At relogon, OMEGAMON II places an R in the U#CHTYP field to indicate a logon validation. The processing is the same as at initialization time, except that users may not enter a new password or group because OMEGAMON II does not display a logon panel.
Reviewing call flow at terminationAt termination, OMEGAMON II passes a T to the user�s exit routine. You can then do any termination cleanup required, such as freeing user control blocks and FREEMAINing any GETMAINed areas.
IF the return code is... THEN...
0 the command is allowed (RACF and ACF2)
4 the command is unknown to RACF (RACF only)
OMEGAMON II allows the command to execute.
See �Modify RACF Rules to Interface with OMEGAMON II� on page 147, for instructions on defining a command to RACF.
8 the command is known to the security package and access is denied (both RACF and ACF2)
Review OMEGAMON II�s Calling Flow for Security Exit Routines
156 IBM Tivoli OMEGAMON II for IMS Configuration and Customization Guide, Version 5.5.0

Modifying The Security Table 157
Modifying The Security Table
Chapter OverviewThis chapter explains how to modify the OMEGAMON II security table and includes:
� a review of format rules for control statements
� detailed explanations of each control statement
� an example of using control statements to update the security table
Note: References to OMEGAMON II in this chapter are to the Realtime Performance Monitor, unless we specify otherwise.
Chapter ContentsModify the Security Table . . . . . . . . . . . . . . . . . . . . . . . . . . . . . . . . . . . . . . . . . . . . . 158Use Control Statements to Modify the Security Table . . . . . . . . . . . . . . . . . . . . . . . . 160Use Control Statements to Update the Security Table . . . . . . . . . . . . . . . . . . . . . . . . 175Update the Security Table. . . . . . . . . . . . . . . . . . . . . . . . . . . . . . . . . . . . . . . . . . . . . 177
8
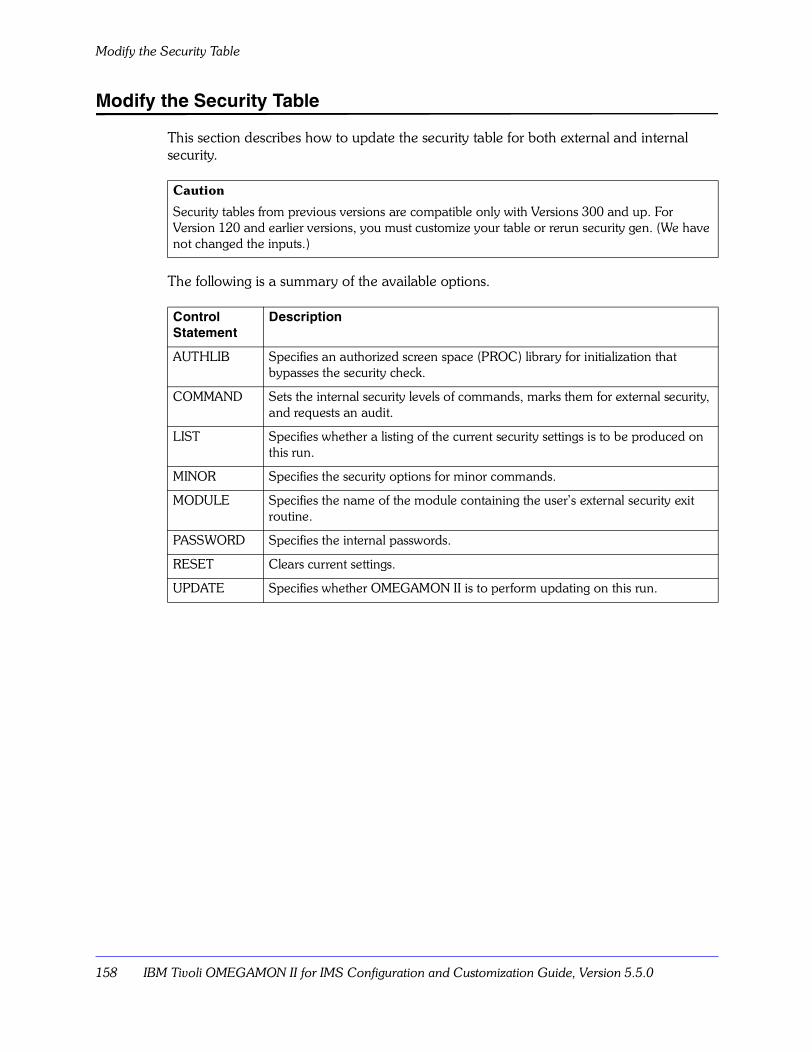
Modify the Security Table
158 IBM Tivoli OMEGAMON II for IMS Configuration and Customization Guide, Version 5.5.0
Modify the Security Table
This section describes how to update the security table for both external and internal security.
The following is a summary of the available options.
Caution
Security tables from previous versions are compatible only with Versions 300 and up. For Version 120 and earlier versions, you must customize your table or rerun security gen. (We have not changed the inputs.)
Control Statement
Description
AUTHLIB Specifies an authorized screen space (PROC) library for initialization that bypasses the security check.
COMMAND Sets the internal security levels of commands, marks them for external security, and requests an audit.
LIST Specifies whether a listing of the current security settings is to be produced on this run.
MINOR Specifies the security options for minor commands.
MODULE Specifies the name of the module containing the user�s external security exit routine.
PASSWORD Specifies the internal passwords.
RESET Clears current settings.
UPDATE Specifies whether OMEGAMON II is to perform updating on this run.
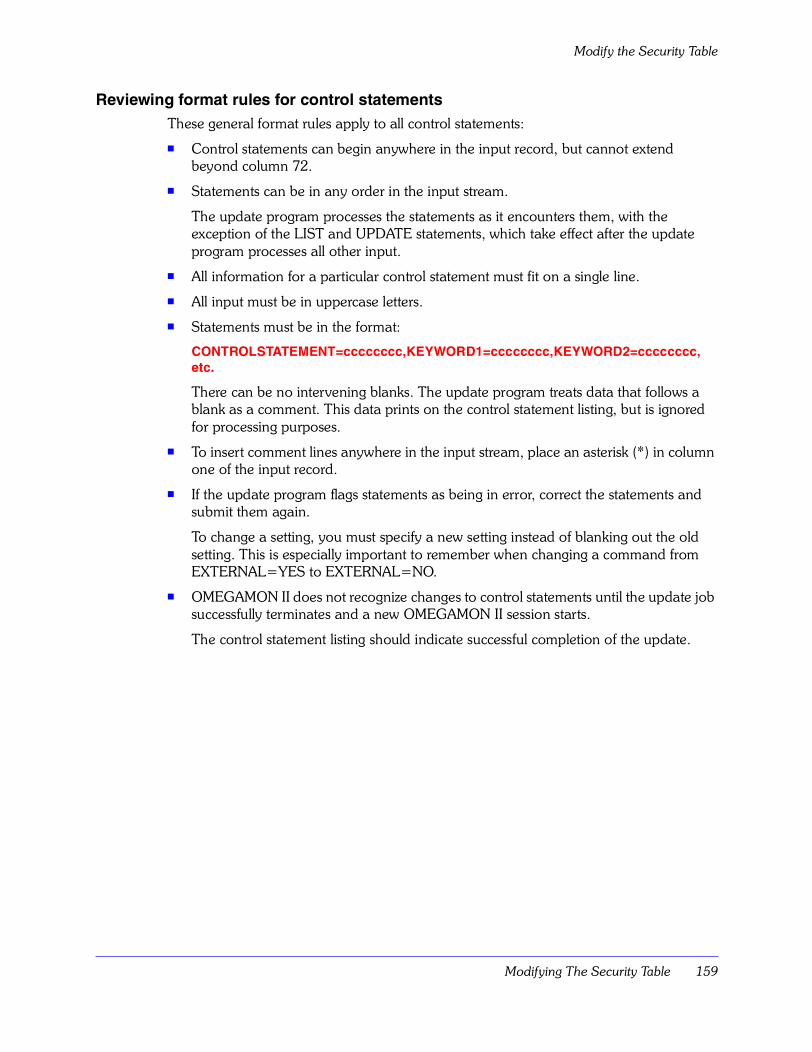
Modifying The Security Table 159
Modify the Security Table
Reviewing format rules for control statementsThese general format rules apply to all control statements:
� Control statements can begin anywhere in the input record, but cannot extend beyond column 72.
� Statements can be in any order in the input stream.
The update program processes the statements as it encounters them, with the exception of the LIST and UPDATE statements, which take effect after the update program processes all other input.
� All information for a particular control statement must fit on a single line.
� All input must be in uppercase letters.
� Statements must be in the format:
CONTROLSTATEMENT=cccccccc,KEYWORD1=cccccccc,KEYWORD2=cccccccc, etc.
There can be no intervening blanks. The update program treats data that follows a blank as a comment. This data prints on the control statement listing, but is ignored for processing purposes.
� To insert comment lines anywhere in the input stream, place an asterisk (*) in column one of the input record.
� If the update program flags statements as being in error, correct the statements and submit them again.
To change a setting, you must specify a new setting instead of blanking out the old setting. This is especially important to remember when changing a command from EXTERNAL=YES to EXTERNAL=NO.
� OMEGAMON II does not recognize changes to control statements until the update job successfully terminates and a new OMEGAMON II session starts.
The control statement listing should indicate successful completion of the update.
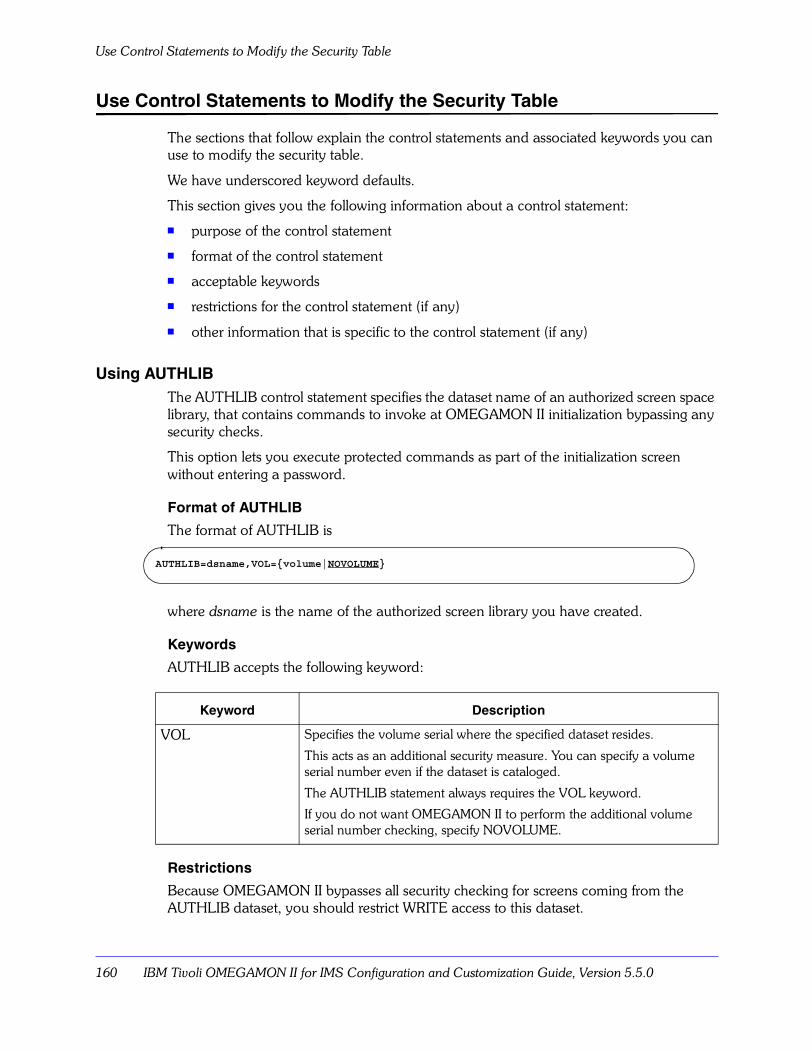
Use Control Statements to Modify the Security Table
160 IBM Tivoli OMEGAMON II for IMS Configuration and Customization Guide, Version 5.5.0
Use Control Statements to Modify the Security Table
The sections that follow explain the control statements and associated keywords you can use to modify the security table.
We have underscored keyword defaults.
This section gives you the following information about a control statement:
� purpose of the control statement
� format of the control statement
� acceptable keywords
� restrictions for the control statement (if any)
� other information that is specific to the control statement (if any)
Using AUTHLIBThe AUTHLIB control statement specifies the dataset name of an authorized screen space library, that contains commands to invoke at OMEGAMON II initialization bypassing any security checks.
This option lets you execute protected commands as part of the initialization screen without entering a password.
Format of AUTHLIB
The format of AUTHLIB is
where dsname is the name of the authorized screen library you have created.
Keywords
AUTHLIB accepts the following keyword:
Restrictions
Because OMEGAMON II bypasses all security checking for screens coming from the AUTHLIB dataset, you should restrict WRITE access to this dataset.
Keyword Description
VOL Specifies the volume serial where the specified dataset resides.
This acts as an additional security measure. You can specify a volume serial number even if the dataset is cataloged.
The AUTHLIB statement always requires the VOL keyword.
If you do not want OMEGAMON II to perform the additional volume serial number checking, specify NOVOLUME.
AUTHLIB=dsname,VOL={volume|NOVOLUME}
Modifying The Security Table 161
Use Control Statements to Modify the Security Table
Security check points
Security checking resumes when OMEGAMON II fetches a screen from:
� an unauthorized library
� a screen that has been loaded into memory
� when a user enters any keystroke, including a cursor movement
Concatenate the dataset containing the authorized screens in your RKOIPROC DD statement.
Note: The dataset that contains the authorized screen libraries is not an APF-authorized dataset.
Important
If you create an authorized screen library and use the OMEGAMON II menu system, security checking will cause initialization to fail when:� OMEGAMON II fetches a screen containing an authorized command. (Menu system users
should leave the .FGO and .VAR commands unprotected).� OMEGAMON II fetches a screen space that has been loaded into memory. (@ZSCRNDF
is the screen that loads screen spaces into memory).
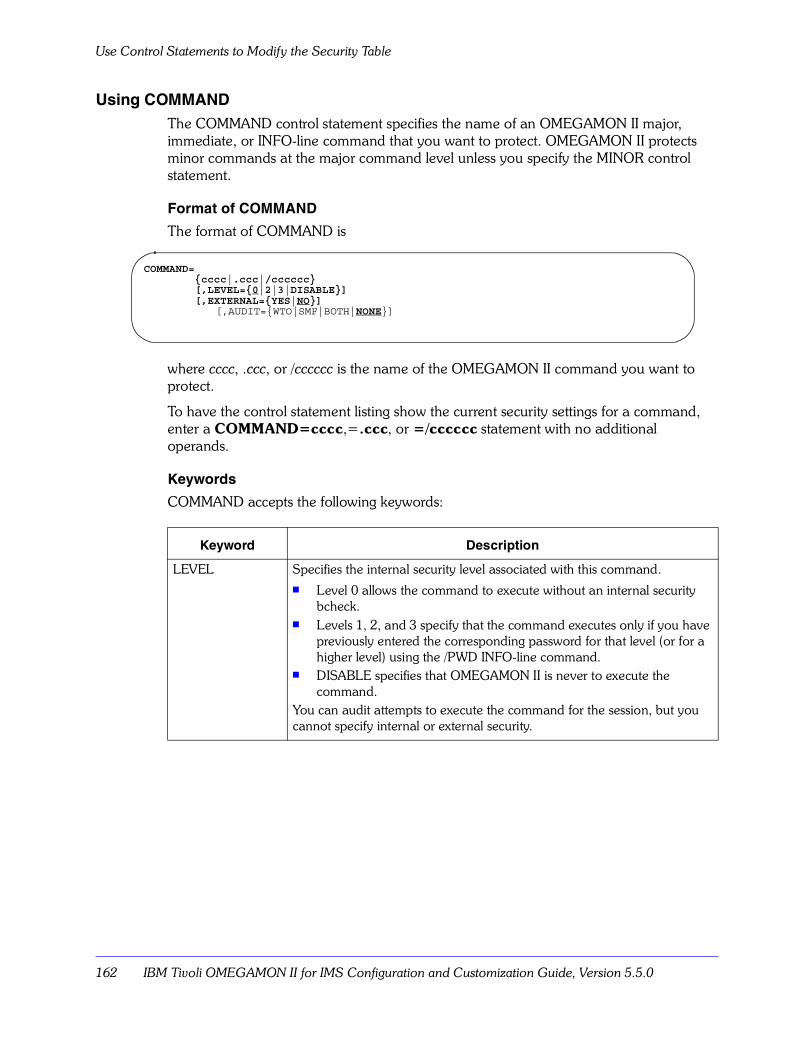
Use Control Statements to Modify the Security Table
162 IBM Tivoli OMEGAMON II for IMS Configuration and Customization Guide, Version 5.5.0
Using COMMANDThe COMMAND control statement specifies the name of an OMEGAMON II major, immediate, or INFO-line command that you want to protect. OMEGAMON II protects minor commands at the major command level unless you specify the MINOR control statement.
Format of COMMAND
The format of COMMAND is
where cccc, .ccc, or /cccccc is the name of the OMEGAMON II command you want to protect.
To have the control statement listing show the current security settings for a command, enter a COMMAND=cccc,=.ccc, or =/cccccc statement with no additional operands.
Keywords
COMMAND accepts the following keywords:
Keyword Description
LEVEL Specifies the internal security level associated with this command.� Level 0 allows the command to execute without an internal security
bcheck.� Levels 1, 2, and 3 specify that the command executes only if you have
previously entered the corresponding password for that level (or for a higher level) using the /PWD INFO-line command.
� DISABLE specifies that OMEGAMON II is never to execute the command.
You can audit attempts to execute the command for the session, but you cannot specify internal or external security.
COMMAND= {cccc|.ccc|/cccccc} [,LEVEL={0|2|3|DISABLE}] [,EXTERNAL={YES|NO}]
[,AUDIT={WTO|SMF|BOTH|NONE}]

Modifying The Security Table 163
Use Control Statements to Modify the Security Table
EXTERNAL Specifies whether an external security package checks this command.
OMEGAMON II ignores the EXTERNAL keyword if you specify LEVEL=DISABLE.
If you code EXTERNAL=YES for a command and no exit routine is available, OMEGAMON II does one of the following:� disables the command for the session if it has an associated security
level of 0� defaults to internal security if the command has a security level of 1, 2,
or 3Once you specify EXTERNAL=YES, you can change EXTERNAL only by specifying EXTERNAL=NO and rerunning the security update program.
AUDIT Specifies whether OMEGAMON II is to audit the command each time a user invokes it. The possible values are:
WTO Produces a one line message on the master console.
SMF Specifies that OMEGAMON II write an SMF record. You must specify the SMF record number in the SMFNUM control statement.
If OMEGAMON II cannot perform the SMF audit, OMEGAMON II defaults to a WTO audit. See �Generate the System Management Facilities Audit� on page 186 for details about setting up the SMF audit.
BOTH Specifies that OMEGAMON II issue a WTO message to a console and write an SMF record.
NONE Specifies no auditing. This is the default setting.
If you specify an audit for a disabled command, OMEGAMON II notifies you of attempts to execute the command.
Keyword Description
Use Control Statements to Modify the Security Table
164 IBM Tivoli OMEGAMON II for IMS Configuration and Customization Guide, Version 5.5.0
Restrictions
When you update an INFO-line command, you must use the actual command name and not its alias. OMEGAMON II automatically assigns the same protection attributes to all aliases of the command.
How OMEGAMON II treats multiple COMMAND statements
OMEGAMON II always processes the last COMMAND statement for the command. OMEGAMON II does not check for multiple COMMAND statements for the same command in the same run.
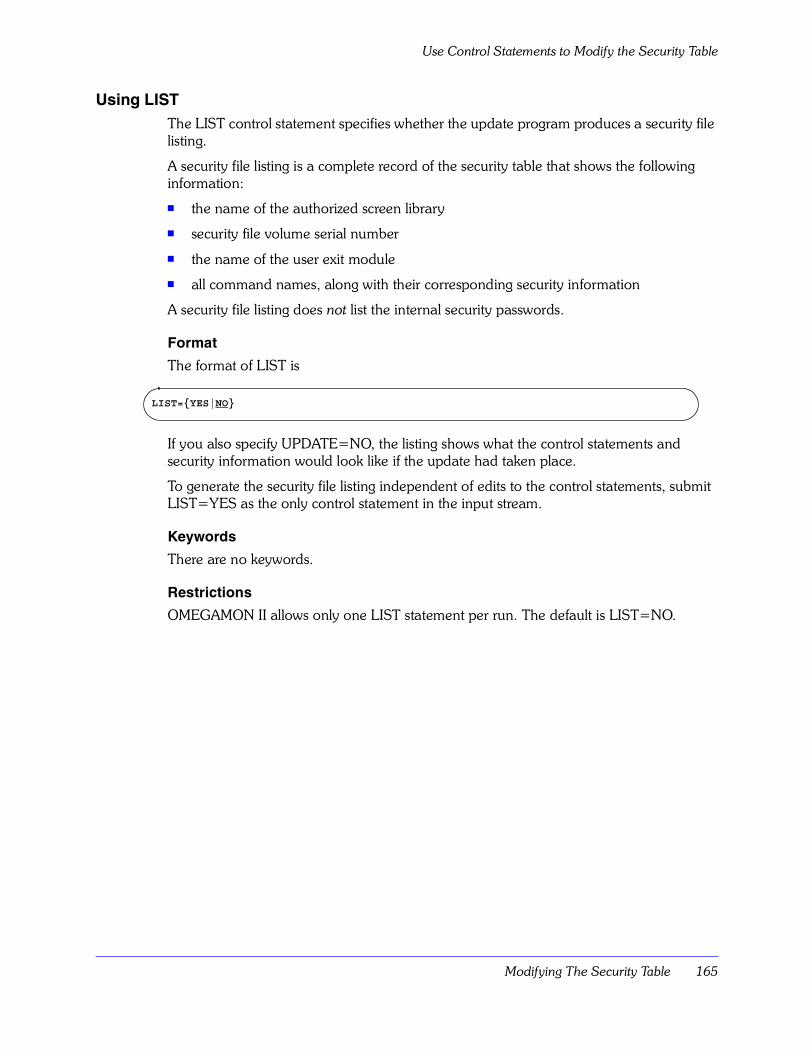
Modifying The Security Table 165
Use Control Statements to Modify the Security Table
Using LISTThe LIST control statement specifies whether the update program produces a security file listing.
A security file listing is a complete record of the security table that shows the following information:
� the name of the authorized screen library
� security file volume serial number
� the name of the user exit module
� all command names, along with their corresponding security information
A security file listing does not list the internal security passwords.
Format
The format of LIST is
If you also specify UPDATE=NO, the listing shows what the control statements and security information would look like if the update had taken place.
To generate the security file listing independent of edits to the control statements, submit LIST=YES as the only control statement in the input stream.
Keywords
There are no keywords.
Restrictions
OMEGAMON II allows only one LIST statement per run. The default is LIST=NO.
LIST={YES|NO}
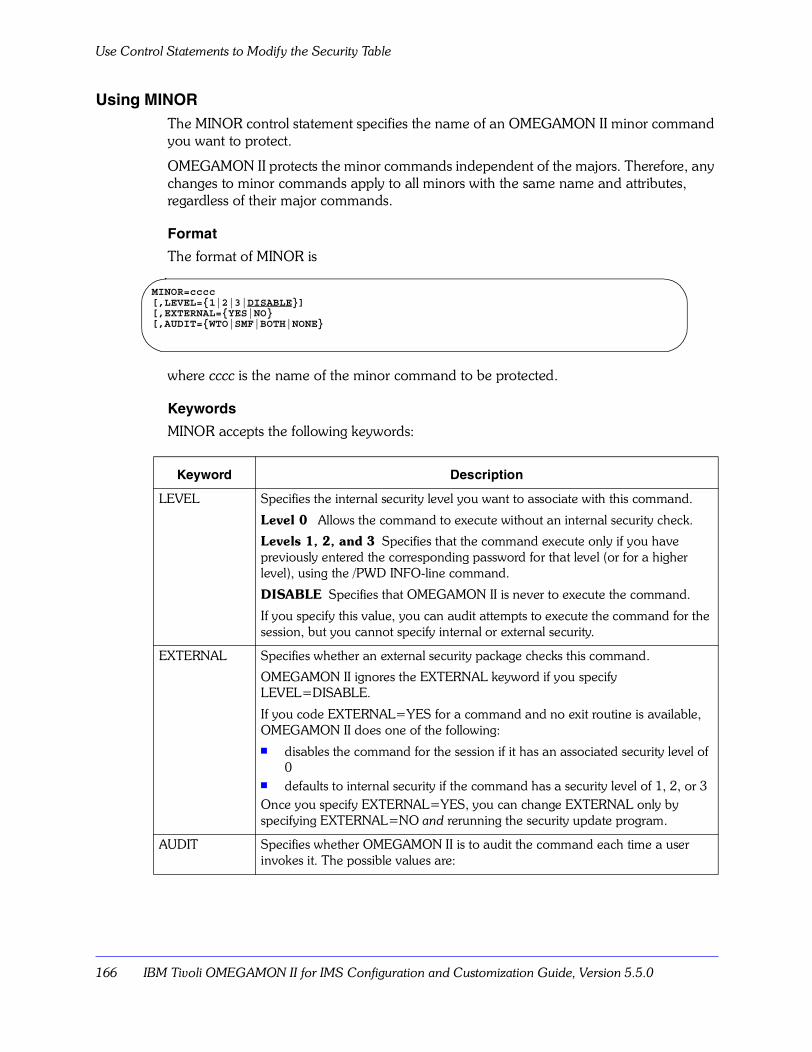
Use Control Statements to Modify the Security Table
166 IBM Tivoli OMEGAMON II for IMS Configuration and Customization Guide, Version 5.5.0
Using MINORThe MINOR control statement specifies the name of an OMEGAMON II minor command you want to protect.
OMEGAMON II protects the minor commands independent of the majors. Therefore, any changes to minor commands apply to all minors with the same name and attributes, regardless of their major commands.
Format
The format of MINOR is
where cccc is the name of the minor command to be protected.
Keywords
MINOR accepts the following keywords:
Keyword Description
LEVEL Specifies the internal security level you want to associate with this command.
Level 0 Allows the command to execute without an internal security check.
Levels 1, 2, and 3 Specifies that the command execute only if you have previously entered the corresponding password for that level (or for a higher level), using the /PWD INFO-line command.
DISABLE Specifies that OMEGAMON II is never to execute the command.
If you specify this value, you can audit attempts to execute the command for the session, but you cannot specify internal or external security.
EXTERNAL Specifies whether an external security package checks this command.
OMEGAMON II ignores the EXTERNAL keyword if you specify LEVEL=DISABLE.
If you code EXTERNAL=YES for a command and no exit routine is available, OMEGAMON II does one of the following:� disables the command for the session if it has an associated security level of
0� defaults to internal security if the command has a security level of 1, 2, or 3Once you specify EXTERNAL=YES, you can change EXTERNAL only by specifying EXTERNAL=NO and rerunning the security update program.
AUDIT Specifies whether OMEGAMON II is to audit the command each time a user invokes it. The possible values are:
MINOR=cccc[,LEVEL={1|2|3|DISABLE}][,EXTERNAL={YES|NO}[,AUDIT={WTO|SMF|BOTH|NONE}
Modifying The Security Table 167
Use Control Statements to Modify the Security Table
Restrictions
Access to a minor command requires access to the appropriate major -command. If you do not specify an EXTERNAL keyword, the associated major command controls access to this minor command.
Multiple MINOR statements
OMEGAMON II always processes the last MINOR statement for the command. OMEGAMON II does not check for multiple MINOR statements for the same command in the same run.
WTO Produces a one-line message on the master console.
SMF Specifies that OMEGAMON II write an SMF record. You must specify the SMF record number in the SMFNUM control statement.
If OMEGAMON II cannot perform the SMF audit, OMEGAMON II defaults to a WTO audit.
See �Generate the System Management Facilities Audit� on page 186 for details about setting up the SMF audit. This option requires APF-authorization.
BOTH Specifies that OMEGAMON II issue a WTO message to a console and write an SMF record.
NONE Specifies no auditing. This is the default setting
If you specify an audit for a disabled command, OMEGAMON II notifies you of attempts to execute the command.
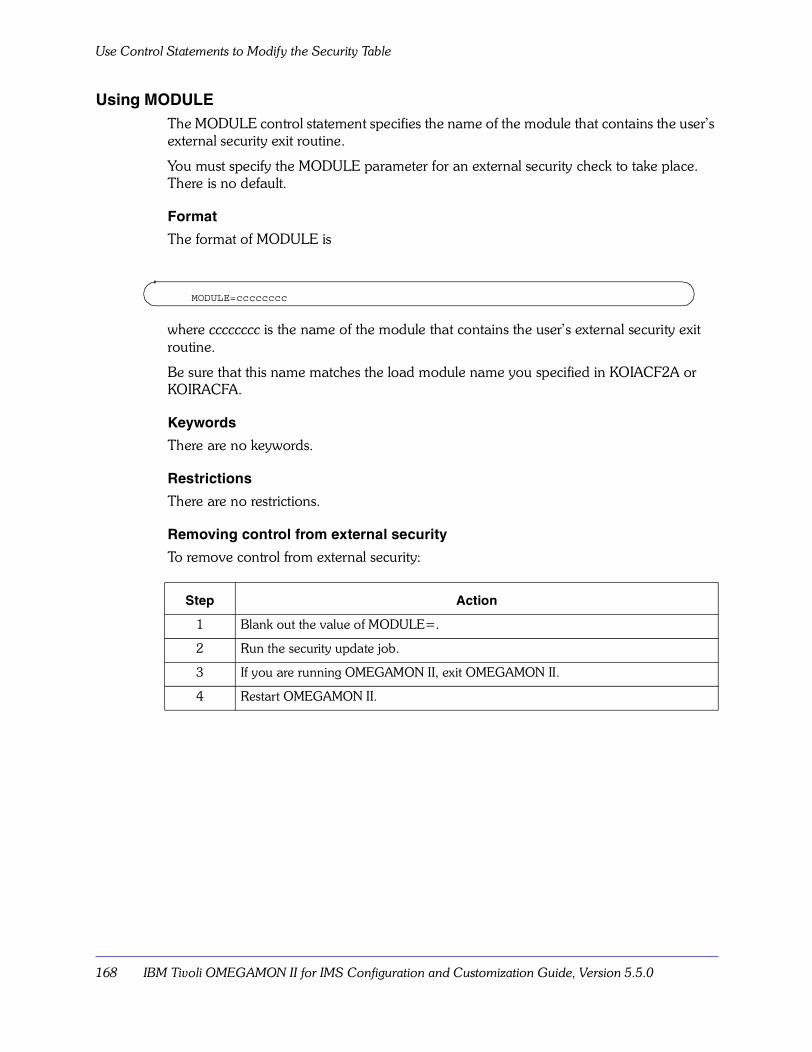
Use Control Statements to Modify the Security Table
168 IBM Tivoli OMEGAMON II for IMS Configuration and Customization Guide, Version 5.5.0
Using MODULEThe MODULE control statement specifies the name of the module that contains the user�s external security exit routine.
You must specify the MODULE parameter for an external security check to take place. There is no default.
Format
The format of MODULE is
where cccccccc is the name of the module that contains the user�s external security exit routine.
Be sure that this name matches the load module name you specified in KOIACF2A or KOIRACFA.
Keywords
There are no keywords.
Restrictions
There are no restrictions.
Removing control from external security
To remove control from external security:
Step Action
1 Blank out the value of MODULE=.
2 Run the security update job.
3 If you are running OMEGAMON II, exit OMEGAMON II.
4 Restart OMEGAMON II.
MODULE=cccccccc
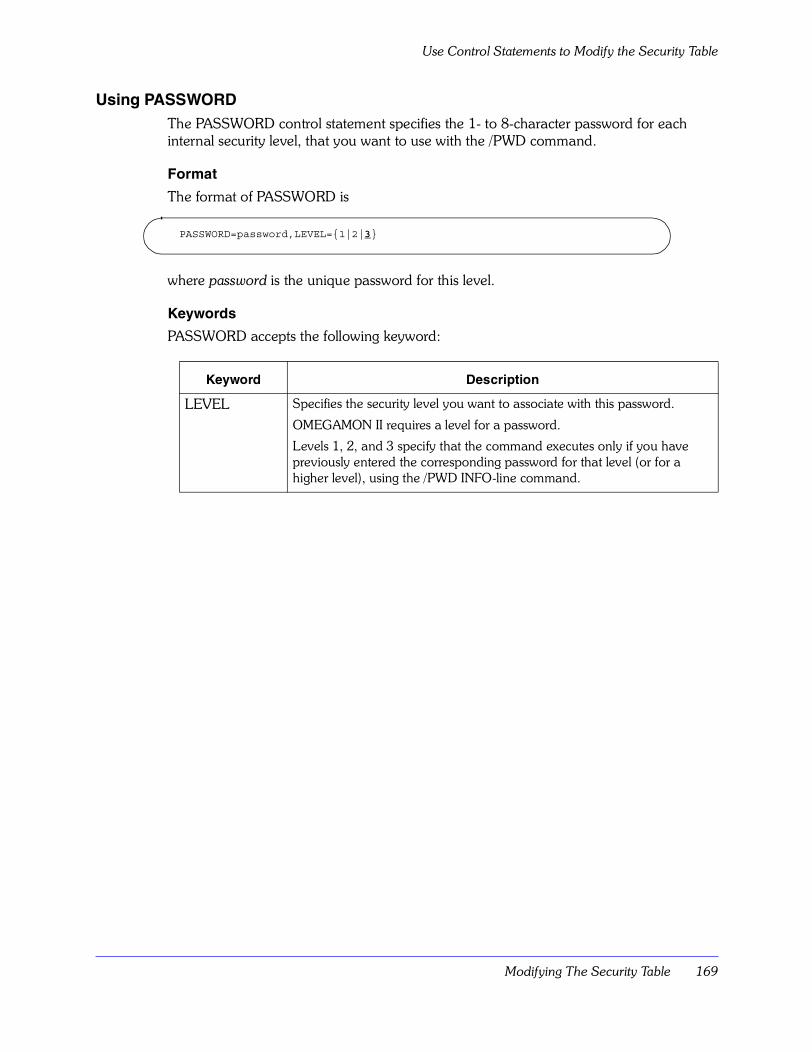
Modifying The Security Table 169
Use Control Statements to Modify the Security Table
Using PASSWORDThe PASSWORD control statement specifies the 1- to 8-character password for each internal security level, that you want to use with the /PWD command.
Format
The format of PASSWORD is
where password is the unique password for this level.
Keywords
PASSWORD accepts the following keyword:
Keyword Description
LEVEL Specifies the security level you want to associate with this password.
OMEGAMON II requires a level for a password.
Levels 1, 2, and 3 specify that the command executes only if you have previously entered the corresponding password for that level (or for a higher level), using the /PWD INFO-line command.
PASSWORD=password,LEVEL={1|2|3}

Use Control Statements to Modify the Security Table
170 IBM Tivoli OMEGAMON II for IMS Configuration and Customization Guide, Version 5.5.0
Restrictions
You must use a separate PASSWORD control statement for each security level.
Use unique passwords for each security level. If you assign the same password to more than one level, OMEGAMON II will match it only at the lowest level, and deny access to commands protected at higher levels.
When you enter a valid password for one security level, OMEGAMON II allows access to commands secured at that level, and commands secured at lower levels. OMEGAMON II checks the password for a match in the following order:
1. Level 12. Level 23. Level 3
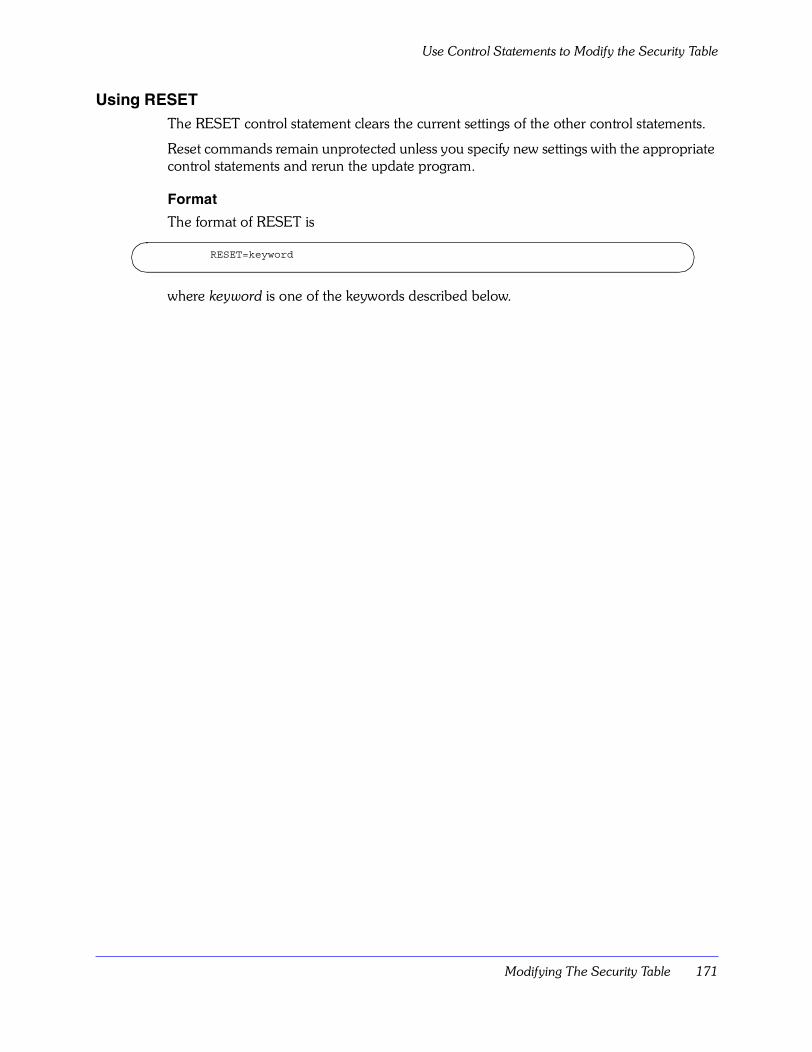
Modifying The Security Table 171
Use Control Statements to Modify the Security Table
Using RESETThe RESET control statement clears the current settings of the other control statements.
Reset commands remain unprotected unless you specify new settings with the appropriate control statements and rerun the update program.
Format
The format of RESET is
where keyword is one of the keywords described below.
RESET=keyword
Use Control Statements to Modify the Security Table
172 IBM Tivoli OMEGAMON II for IMS Configuration and Customization Guide, Version 5.5.0
Keywords
RESET accepts the following keywords:
Restrictions
OMEGAMON IIonly allows one RESET statement per run.
Keyword Description
ALL Clears settings for all control statements and all keywords in OMEGAMON II�s security table.
AUTHLIB Clears the name and volume serial number of the authorized library.
INFO Clears settings for all INFO-line commands (on the COMMAND control statement).
For example, if you do not want to use the IBM default security levels for INFO-line commands and want to start over, enter RESET=INFO.
For INFO-line commands, this resets all LEVEL settings to security level 0 and also clears any existing EXTERNAL and AUDIT settings.
MAJOR Clears settings for all major and immediate commands (on the COMMAND control statement).
MINOR Clears settings for all minor commands.
MODULE Clears the name of the user�s exit routine module.
PASSWORD Clears the internal passwords.
SLASH Clears settings for all INFO-line commands (on the COMMAND control statement).
For example, if you do not want to use the IBM default security levels for INFO-line commands and want to start over, enter RESET=SLASH.
For INFO-line commands, this resets all LEVEL settings to security level 0 and also clears any existing EXTERNAL and AUDIT settings.
SMFNUM Clears the record number for SMF audits.
YES Clears settings for all control statements and all keywords in OMEGAMON II�s security table.
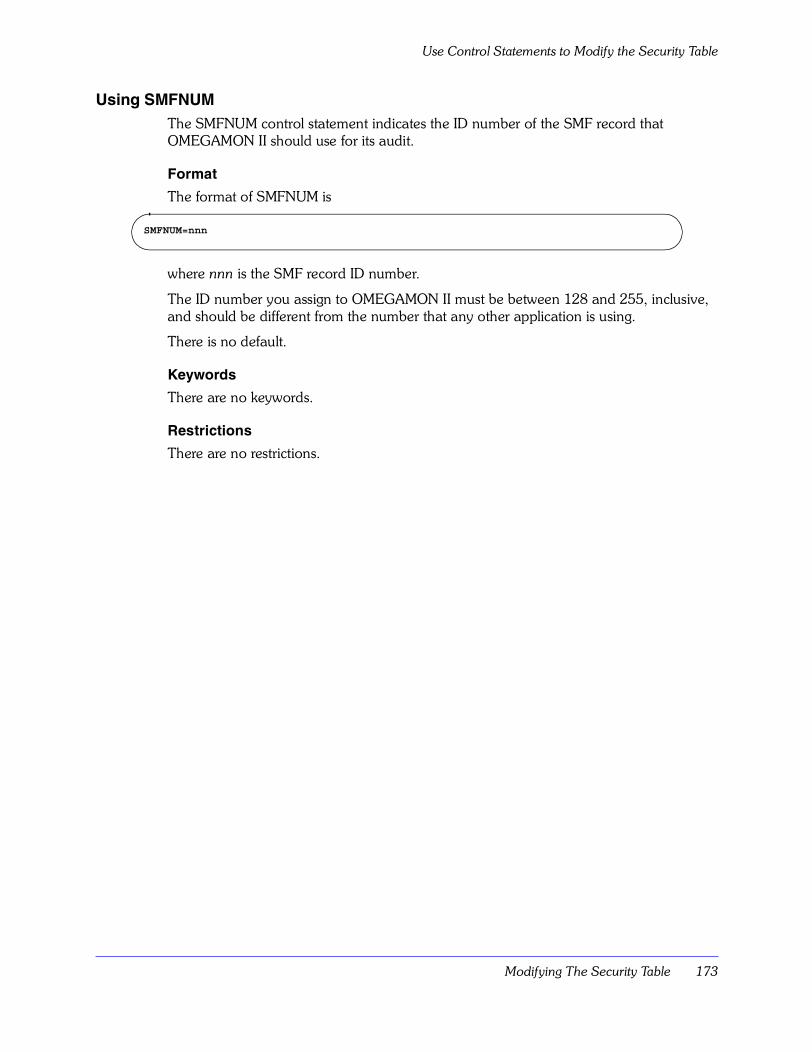
Modifying The Security Table 173
Use Control Statements to Modify the Security Table
Using SMFNUMThe SMFNUM control statement indicates the ID number of the SMF record that OMEGAMON II should use for its audit.
Format
The format of SMFNUM is
where nnn is the SMF record ID number.
The ID number you assign to OMEGAMON II must be between 128 and 255, inclusive, and should be different from the number that any other application is using.
There is no default.
Keywords
There are no keywords.
Restrictions
There are no restrictions.
SMFNUM=nnn
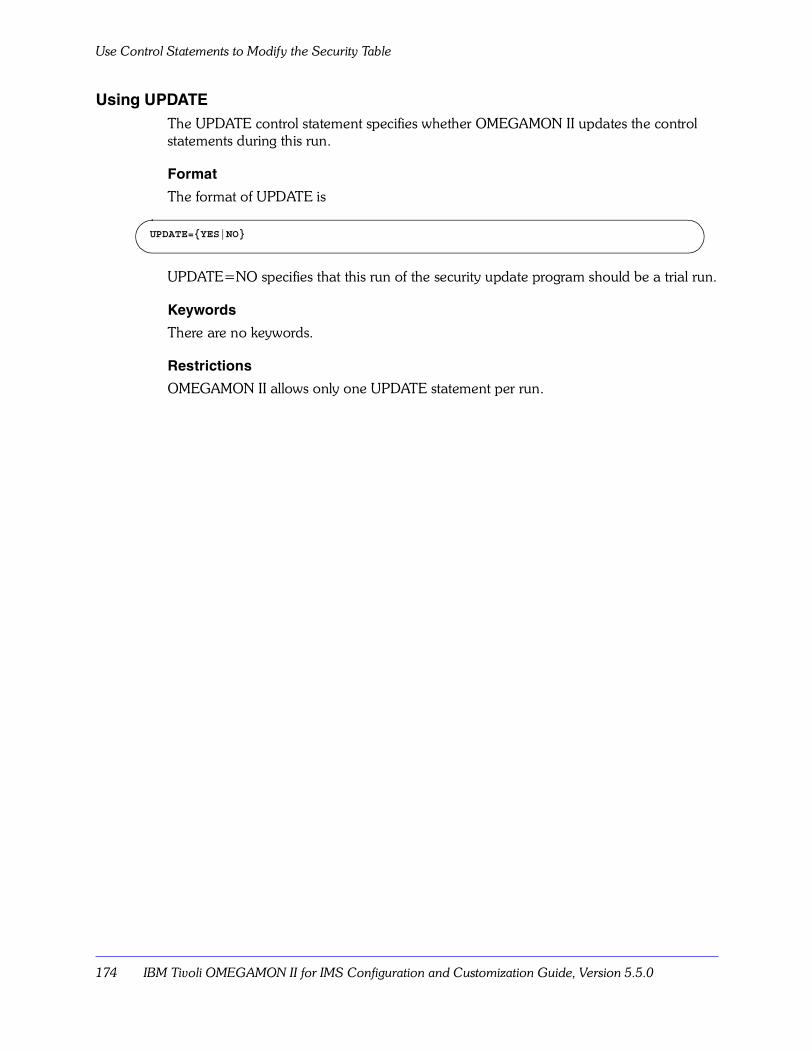
Use Control Statements to Modify the Security Table
174 IBM Tivoli OMEGAMON II for IMS Configuration and Customization Guide, Version 5.5.0
Using UPDATEThe UPDATE control statement specifies whether OMEGAMON II updates the control statements during this run.
Format
The format of UPDATE is
UPDATE=NO specifies that this run of the security update program should be a trial run.
Keywords
There are no keywords.
Restrictions
OMEGAMON II allows only one UPDATE statement per run.
UPDATE={YES|NO}
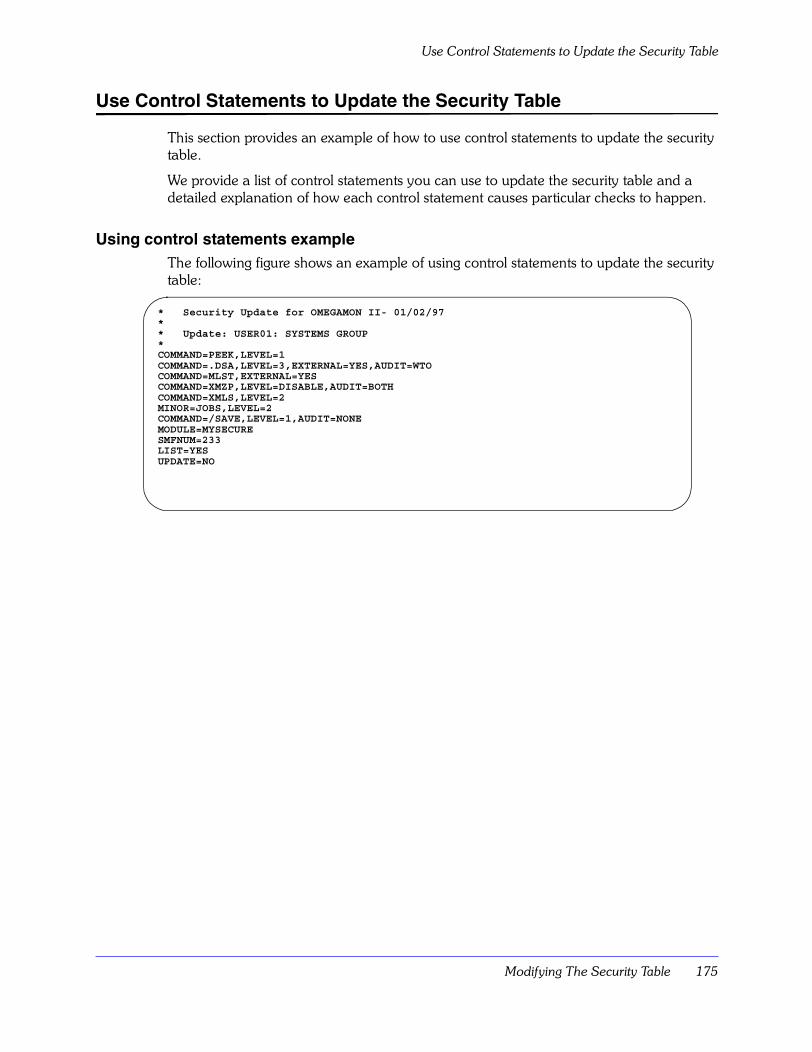
Modifying The Security Table 175
Use Control Statements to Update the Security Table
Use Control Statements to Update the Security Table
This section provides an example of how to use control statements to update the security table.
We provide a list of control statements you can use to update the security table and a detailed explanation of how each control statement causes particular checks to happen.
Using control statements exampleThe following figure shows an example of using control statements to update the security table:
* Security Update for OMEGAMON II- 01/02/97** Update: USER01: SYSTEMS GROUP*COMMAND=PEEK,LEVEL=1COMMAND=.DSA,LEVEL=3,EXTERNAL=YES,AUDIT=WTOCOMMAND=MLST,EXTERNAL=YESCOMMAND=XMZP,LEVEL=DISABLE,AUDIT=BOTHCOMMAND=XMLS,LEVEL=2MINOR=JOBS,LEVEL=2COMMAND=/SAVE,LEVEL=1,AUDIT=NONEMODULE=MYSECURESMFNUM=233LIST=YES UPDATE=NO
Use Control Statements to Update the Security Table
176 IBM Tivoli OMEGAMON II for IMS Configuration and Customization Guide, Version 5.5.0
Explaining control statement settingsThe command control statements in the previous figure specify the following settings:
Control Statement Result
COMMAND=PEEK, LEVEL=1
A user who specifies the internal security level 1 or higher password can execute PEEK and its minors.
OMEGAMON II does not perform external security checking at command execution.
COMMAND=.DSA, LEVEL=3, EXTERNAL=YES, AUDIT=WTO
OMEGAMON II performs external security checking and writes a message to the master console each time .DSA is invoked.
If external security is unavailable, only a user who specified the internal security level 3 password can execute .DSA.
COMMAND=MLST, EXTERNAL=YES
OMEGAMON II performs external security checking, but no auditing.
COMMAND=XMZP, LEVEL=DISABLE, AUDIT=BOTH
The command cannot be executed.
OMEGAMON II writes a message to the master console and writes an SMF record when XMZP is issued.
There is no external security checking.
COMMAND=XML, LEVEL=2
A user who has specified either the level 2 or level 3 internal security password can execute XMLS.
MINOR=JOBS, LEVEL=2
JOBS is a minor of the PEEK command., which we specified above as a level 1 authorized command; however, the LEVEL=2 setting on JOBS specifies that only level 2 or 3 users can access it.
COMMAND=/SAVE,
LEVEL=1,
AUDIT=NONE
A user who has specified either the level 1, level 2, or level 3 password can execute the /SAVE command.
The SAVE command is not audited.
MODULE=
MYSECURE
MYSECURE is the name of the module that contains the security exit routine.
SMFNUM=233 The SMF ID is set to 233.
LIST=YES YES indicates that OMEGAMON II produces a listing.
UPDATE=NO NO indicates that OMEGAMON II does not update the security table. This is a trial run.
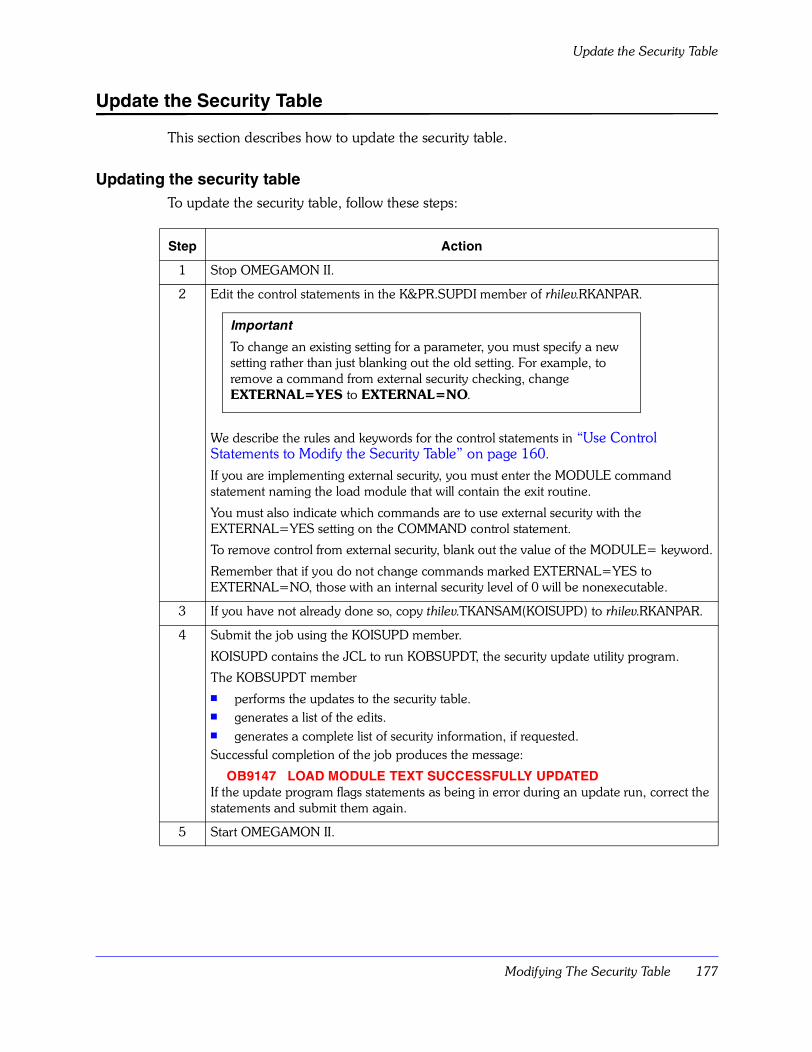
Modifying The Security Table 177
Update the Security Table
Update the Security Table
This section describes how to update the security table.
Updating the security tableTo update the security table, follow these steps:
Step Action
1 Stop OMEGAMON II.
2 Edit the control statements in the K&PR.SUPDI member of rhilev.RKANPAR.
We describe the rules and keywords for the control statements in �Use Control Statements to Modify the Security Table� on page 160.
If you are implementing external security, you must enter the MODULE command statement naming the load module that will contain the exit routine.
You must also indicate which commands are to use external security with the EXTERNAL=YES setting on the COMMAND control statement.
To remove control from external security, blank out the value of the MODULE= keyword.
Remember that if you do not change commands marked EXTERNAL=YES to EXTERNAL=NO, those with an internal security level of 0 will be nonexecutable.
3 If you have not already done so, copy thilev.TKANSAM(KOISUPD) to rhilev.RKANPAR.
4 Submit the job using the KOISUPD member.
KOISUPD contains the JCL to run KOBSUPDT, the security update utility program.
The KOBSUPDT member� performs the updates to the security table.� generates a list of the edits.� generates a complete list of security information, if requested.Successful completion of the job produces the message:
OB9147 LOAD MODULE TEXT SUCCESSFULLY UPDATEDIf the update program flags statements as being in error during an update run, correct the statements and submit them again.
5 Start OMEGAMON II.
Important
To change an existing setting for a parameter, you must specify a new setting rather than just blanking out the old setting. For example, to remove a command from external security checking, change EXTERNAL=YES to EXTERNAL=NO.

Update the Security Table
178 IBM Tivoli OMEGAMON II for IMS Configuration and Customization Guide, Version 5.5.0
Security Update Program Listing 179
Security Update Program Listing
Chapter OverviewThis chapter provides information to help you interpret the Security Update Program listing, including explanations of the:
� header
� control statement listing
� security file listing
� security update program trace
Note: References to OMEGAMON II in this chapter are to the Realtime Performance Monitor, unless we specify otherwise.
Chapter ContentsInterpret the Security Update Program Listing. . . . . . . . . . . . . . . . . . . . . . . . . . . . . . 180
9
Interpret the Security Update Program Listing
180 IBM Tivoli OMEGAMON II for IMS Configuration and Customization Guide, Version 5.5.0
Interpret the Security Update Program Listing
The security update program generates a listing of the control statement modifications that you have made. With the LIST control statement, you have the option of producing an additional listing that includes all of the security information.
The security update program listing consists of 4 parts:
� Header
� Control Statement listing
� Security File Listing
� Security Update Program Trace
We explain each of these parts more fully in the sections that follow.
Explaining the headerThe Security Update Program Listing contains the following information in the header:
� dataset name where the load module resides
� module name of the security table (OICMDccc)
� OMEGAMON II version number (nnn) in the format VnnnCOM
� messages indicating successful completion of the job or error conditions, such as a failure to open the SYSLIB dataset or read the security table
Explaining the control statement listingThe Security Update Program Report contains a listing of the control statements that you have edited. The listing shows the previous contents (except for previous passwords), as well as the new contents.
If you specified UPDATE=YES, OMEGAMON II reports the date and time of the previous update.
The following figure shows a typical control statement listing:
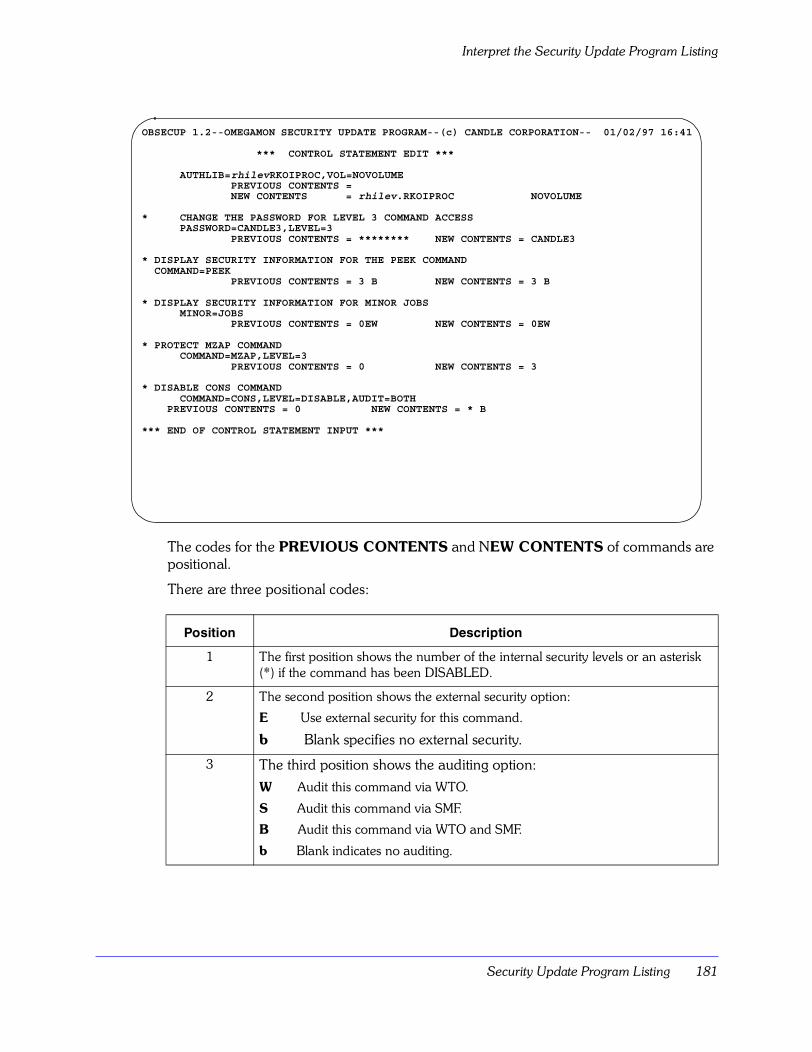
Security Update Program Listing 181
Interpret the Security Update Program Listing
The codes for the PREVIOUS CONTENTS and NEW CONTENTS of commands are positional.
There are three positional codes:
Position Description
1 The first position shows the number of the internal security levels or an asterisk (*) if the command has been DISABLED.
2 The second position shows the external security option:
E Use external security for this command.
b Blank specifies no external security.
3 The third position shows the auditing option:
W Audit this command via WTO.
S Audit this command via SMF.
B Audit this command via WTO and SMF.
b Blank indicates no auditing.
OBSECUP 1.2--OMEGAMON SECURITY UPDATE PROGRAM--(c) CANDLE CORPORATION-- 01/02/97 16:41 *** CONTROL STATEMENT EDIT *** AUTHLIB=rhilevRKOIPROC,VOL=NOVOLUME PREVIOUS CONTENTS = NEW CONTENTS = rhilev.RKOIPROC NOVOLUME * CHANGE THE PASSWORD FOR LEVEL 3 COMMAND ACCESS PASSWORD=CANDLE3,LEVEL=3 PREVIOUS CONTENTS = ******** NEW CONTENTS = CANDLE3 * DISPLAY SECURITY INFORMATION FOR THE PEEK COMMAND COMMAND=PEEK PREVIOUS CONTENTS = 3 B NEW CONTENTS = 3 B * DISPLAY SECURITY INFORMATION FOR MINOR JOBS MINOR=JOBS PREVIOUS CONTENTS = 0EW NEW CONTENTS = 0EW * PROTECT MZAP COMMAND COMMAND=MZAP,LEVEL=3 PREVIOUS CONTENTS = 0 NEW CONTENTS = 3 * DISABLE CONS COMMAND COMMAND=CONS,LEVEL=DISABLE,AUDIT=BOTH PREVIOUS CONTENTS = 0 NEW CONTENTS = * B
*** END OF CONTROL STATEMENT INPUT ***
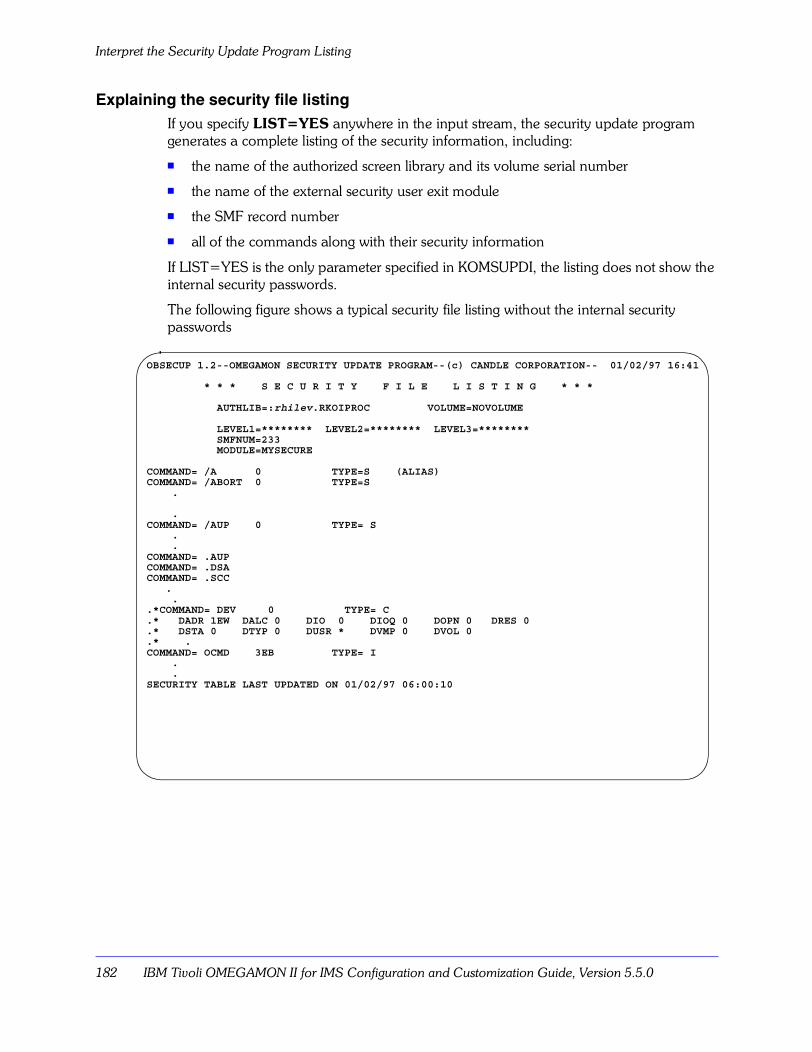
Interpret the Security Update Program Listing
182 IBM Tivoli OMEGAMON II for IMS Configuration and Customization Guide, Version 5.5.0
Explaining the security file listingIf you specify LIST=YES anywhere in the input stream, the security update program generates a complete listing of the security information, including:
� the name of the authorized screen library and its volume serial number
� the name of the external security user exit module
� the SMF record number
� all of the commands along with their security information
If LIST=YES is the only parameter specified in KOMSUPDI, the listing does not show the internal security passwords.
The following figure shows a typical security file listing without the internal security passwords
OBSECUP 1.2--OMEGAMON SECURITY UPDATE PROGRAM--(c) CANDLE CORPORATION-- 01/02/97 16:41 * * * S E C U R I T Y F I L E L I S T I N G * * * AUTHLIB=:rhilev.RKOIPROC VOLUME=NOVOLUME LEVEL1=******** LEVEL2=******** LEVEL3=******** SMFNUM=233 MODULE=MYSECURE COMMAND= /A 0 TYPE=S (ALIAS)COMMAND= /ABORT 0 TYPE=S .
.COMMAND= /AUP 0 TYPE= S . .COMMAND= .AUPCOMMAND= .DSACOMMAND= .SCC . ..*COMMAND= DEV 0 TYPE= C.* DADR 1EW DALC 0 DIO 0 DIOQ 0 DOPN 0 DRES 0.* DSTA 0 DTYP 0 DUSR * DVMP 0 DVOL 0.* .COMMAND= OCMD 3EB TYPE= I . .SECURITY TABLE LAST UPDATED ON 01/02/97 06:00:10
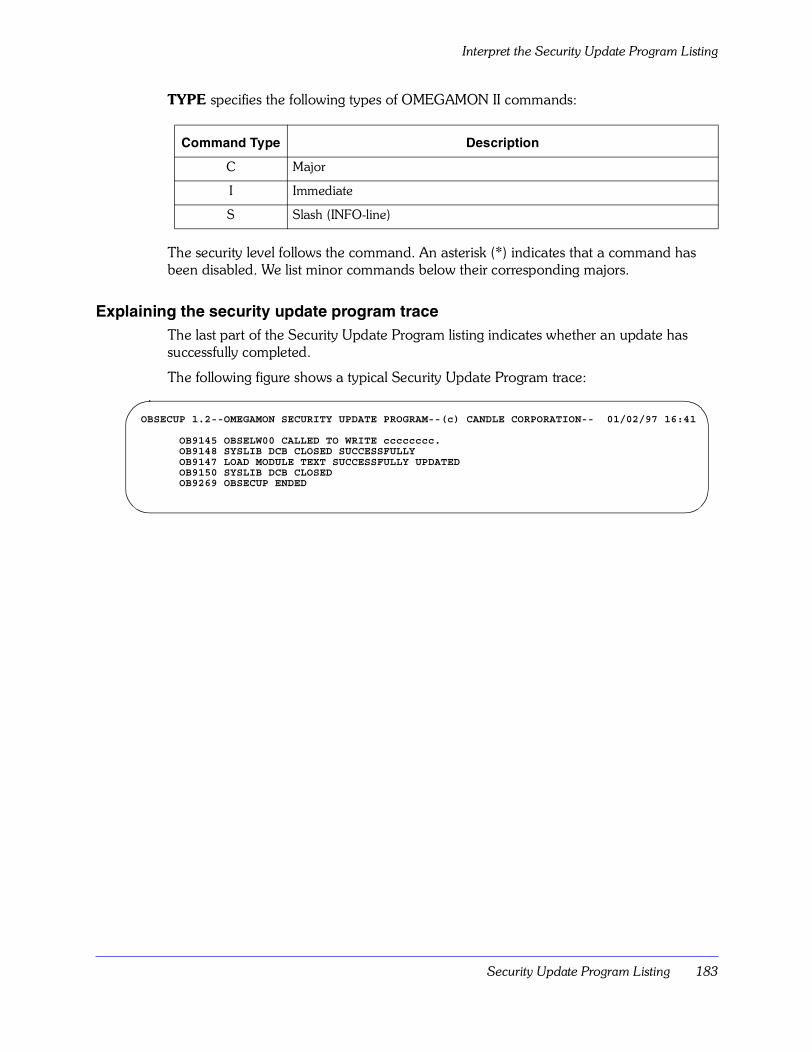
Security Update Program Listing 183
Interpret the Security Update Program Listing
TYPE specifies the following types of OMEGAMON II commands:
The security level follows the command. An asterisk (*) indicates that a command has been disabled. We list minor commands below their corresponding majors.
Explaining the security update program traceThe last part of the Security Update Program listing indicates whether an update has successfully completed.
The following figure shows a typical Security Update Program trace:
Command Type Description
C Major
I Immediate
S Slash (INFO-line)
OBSECUP 1.2--OMEGAMON SECURITY UPDATE PROGRAM--(c) CANDLE CORPORATION-- 01/02/97 16:41 OB9145 OBSELW00 CALLED TO WRITE cccccccc. OB9148 SYSLIB DCB CLOSED SUCCESSFULLY OB9147 LOAD MODULE TEXT SUCCESSFULLY UPDATED OB9150 SYSLIB DCB CLOSED OB9269 OBSECUP ENDED
Interpret the Security Update Program Listing
184 IBM Tivoli OMEGAMON II for IMS Configuration and Customization Guide, Version 5.5.0
The System Management Facilities Audit 185
The System Management Facilities Audit
Chapter OverviewThis chapter explains how to generate the System Management Facilities (SMF) audit.
Note: References to OMEGAMON II in this chapter are to the Realtime Performance Monitor, unless we specify otherwise.
Chapter ContentsGenerate the System Management Facilities Audit . . . . . . . . . . . . . . . . . . . . . . . . . . 186
10
Generate the System Management Facilities Audit
186 IBM Tivoli OMEGAMON II for IMS Configuration and Customization Guide, Version 5.5.0
Generate the System Management Facilities Audit
When you generate the System Management Facilities (SMF) audit, make sure that both
� SMF record exits (IEFU83 and IEFU84)
� the SMF system parameters specifications (SMFPRMcc) do not suppress the ability of OMEGAMON II to log the audit activity records.
Understanding the SMF and audit recordsThe SMF record contains:
� IBM header (IFASMFR maps)
� Candle Corporation Common Header ($CANHDR maps)
You define these maps in member KOBGMAC of thilev.TKANMAC.
� security audit record ($AUDIT maps)
� You define these maps in member KOBGMAC of thilev.TKANMAC.
The audit record contains:
� date/time/system stamp
� user ID/jobname associated with the session
� actual command text as you entered it on the OMEGAMON II screen
Records of minor commands also reference their associated major commands.
Caution
The SMF audit has a high overhead, so use it sparingly. Because the overhead for producing SMF records is high, you should use the audit only with sensitive commands, such as those that could disrupt the system (for example, ICMD and IZAP).
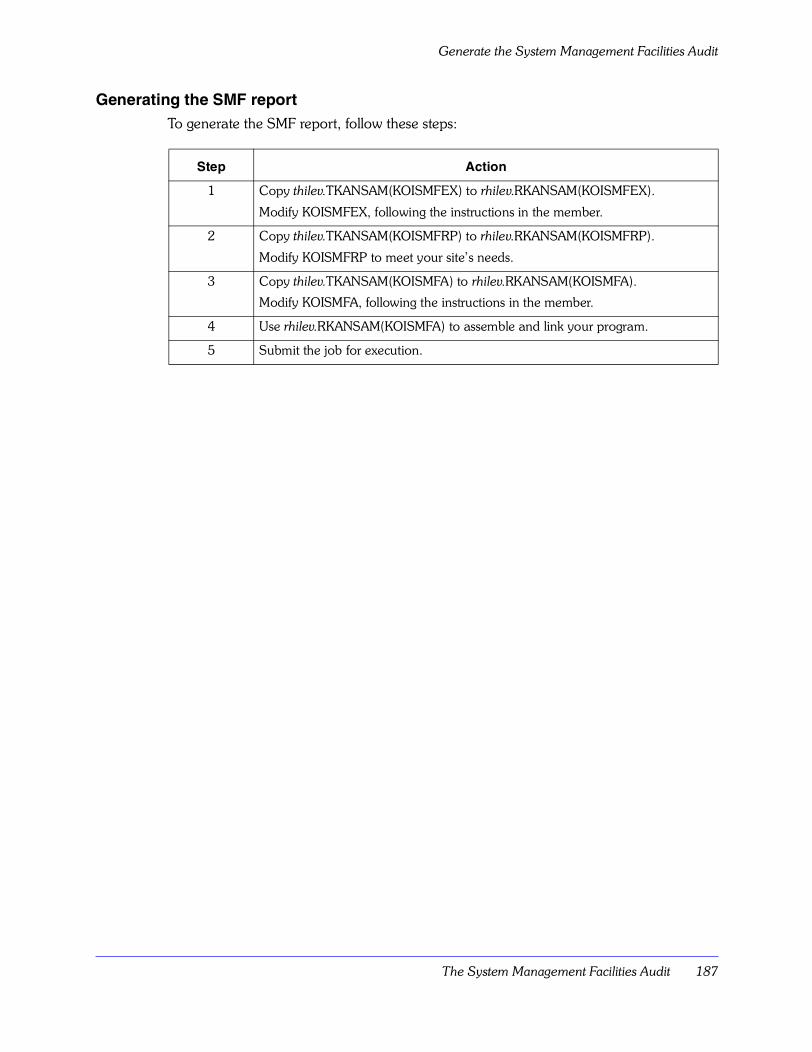
The System Management Facilities Audit 187
Generate the System Management Facilities Audit
Generating the SMF reportTo generate the SMF report, follow these steps:
Step Action
1 Copy thilev.TKANSAM(KOISMFEX) to rhilev.RKANSAM(KOISMFEX).
Modify KOISMFEX, following the instructions in the member.
2 Copy thilev.TKANSAM(KOISMFRP) to rhilev.RKANSAM(KOISMFRP).
Modify KOISMFRP to meet your site�s needs.
3 Copy thilev.TKANSAM(KOISMFA) to rhilev.RKANSAM(KOISMFA).
Modify KOISMFA, following the instructions in the member.
4 Use rhilev.RKANSAM(KOISMFA) to assemble and link your program.
5 Submit the job for execution.
Generate the System Management Facilities Audit
188 IBM Tivoli OMEGAMON II for IMS Configuration and Customization Guide, Version 5.5.0
Optional External Security Features 189
Optional External Security Features
Chapter OverviewThis chapter explains the options you have for implementing external security packages such as RACF or ACF2, including:
� customization of error messages
� password updating
� audit suppression
� supplemental auditing
� locking feature
� validation with RACF and ACF2 user exit routines
You can set up your user exit routine (as explained in �Create Your Exit Routine� on page 152) to use any of the options we discuss in this section.
Notes:
� Remember that you can also use the control options that the security package supplies, such as SHIFT validation and SOURCE validation. Mark the commands EXTERNAL=YES and implement the option as the security package directs.
� References to OMEGAMON II in this chapter are to the Realtime Performance Monitor, unless we specify otherwise.
Chapter ContentsCustomize with Optional External Security Features . . . . . . . . . . . . . . . . . . . . . . . . . 190
11
Customize with Optional External Security Features
190 IBM Tivoli OMEGAMON II for IMS Configuration and Customization Guide, Version 5.5.0
Customize with Optional External Security Features
You can customize your site with any of the following optional external security features:
� customize error messages
� give password update capability
� suppress auditing
� supplement command tracking
� set authority levels with the locking feature
� validate users with RACF
� validate users with ACF2
We discuss each of these options in the sections that follow.
Customizing error messagesTo suit your individual requirements, your site can create custom error messages to display when a user has insufficient authority, or enters an invalid user ID or password.
Sample exit routines
See the sample exit routines in the members KOIRACFX and KOIACF2X in the thilev.TKANSAM dataset for information on creating custom error messages.
Restrictions
The user security message can be up to 120 bytes long, except for INFO-line messages (for example, /PWD re-logon messages), which can be a maximum of 60 bytes.
Giving password update capabilityYou can give the user the capability of interactive communication when logging on to external security.
Example
For example, if a user logs on with an expired password, the security exit might prompt the user for a new password and update the security database.
Restrictions
Password update capability is not available when logging back on with the /PWD command.
Optional External Security Features 191
Customize with Optional External Security Features
Suppressing auditingOMEGAMON II gives you the flexibility of suppressing WTO or SMF auditing.
Example
At initialization or re-logon, your exit routine may set a flag in $UCHECK to indicate WTO or SMF suppression.
Restrictions
There are no restrictions.
Supplementing command trackingIn addition to the WTO and SMF audits available with OMEGAMON II, you can use the audit features of the external security package to supplement command tracking.
Examples
The RACF Report Writer and ACF2 ACFRPT utility programs are examples of this supplemental audit capability.
Restrictions
There are no restrictions.
Setting authority levels with the locking featureWe have designed the locking feature to prevent users from changing their internal security level with the /PWD command. You set their level of authority only once and only at logon.
You can set the level of authority to one of four levels (level 0, 1, 2, or 3).
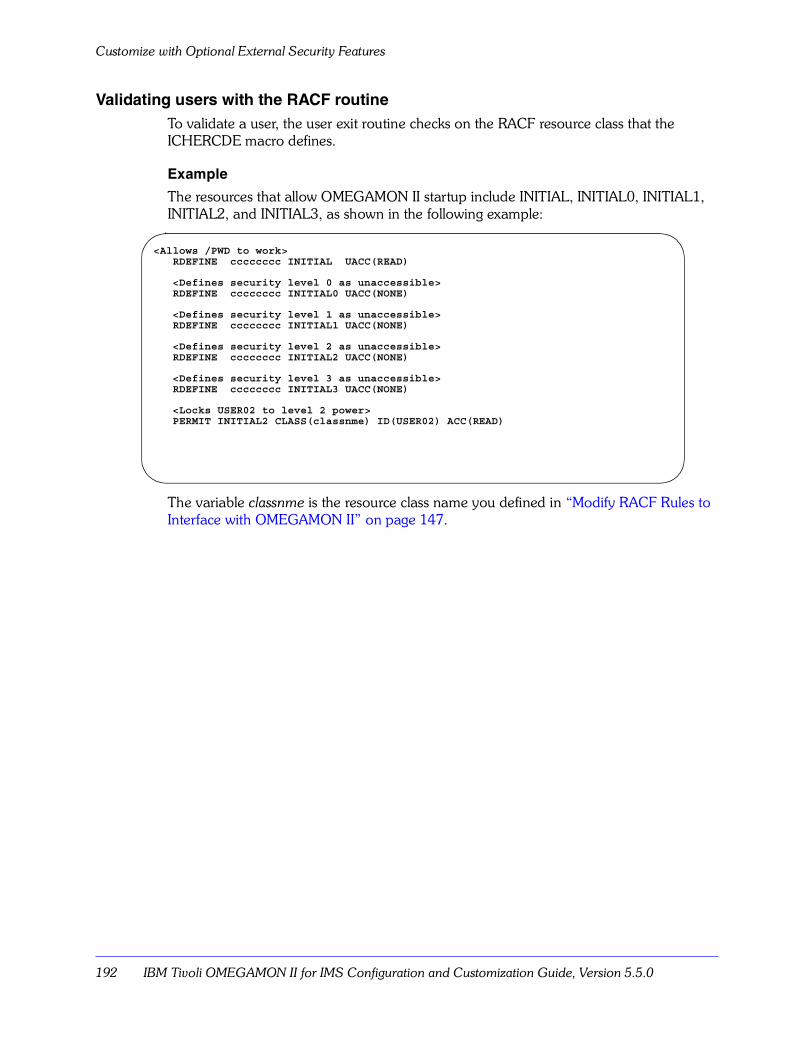
Customize with Optional External Security Features
192 IBM Tivoli OMEGAMON II for IMS Configuration and Customization Guide, Version 5.5.0
Validating users with the RACF routineTo validate a user, the user exit routine checks on the RACF resource class that the ICHERCDE macro defines.
Example
The resources that allow OMEGAMON II startup include INITIAL, INITIAL0, INITIAL1, INITIAL2, and INITIAL3, as shown in the following example:
The variable classnme is the resource class name you defined in �Modify RACF Rules to Interface with OMEGAMON II� on page 147.
<Allows /PWD to work> RDEFINE cccccccc INITIAL UACC(READ) <Defines security level 0 as unaccessible> RDEFINE cccccccc INITIAL0 UACC(NONE) <Defines security level 1 as unaccessible> RDEFINE cccccccc INITIAL1 UACC(NONE) <Defines security level 2 as unaccessible> RDEFINE cccccccc INITIAL2 UACC(NONE) <Defines security level 3 as unaccessible> RDEFINE cccccccc INITIAL3 UACC(NONE) <Locks USER02 to level 2 power> PERMIT INITIAL2 CLASS(classnme) ID(USER02) ACC(READ)
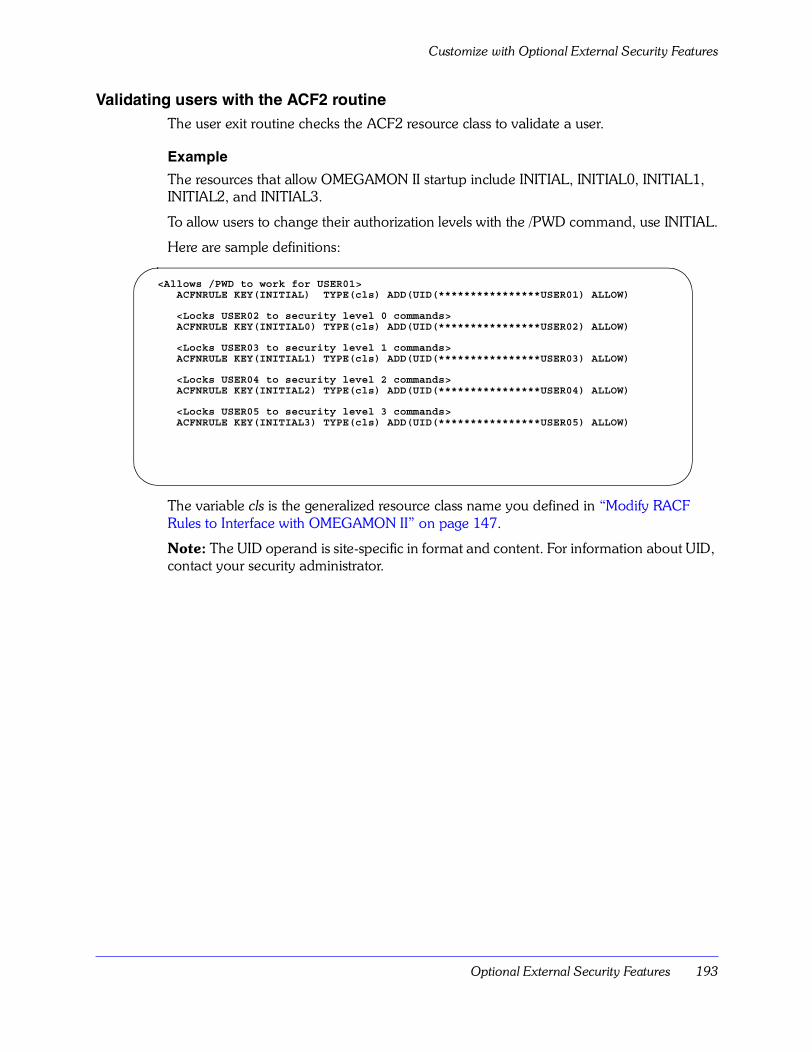
Optional External Security Features 193
Customize with Optional External Security Features
Validating users with the ACF2 routineThe user exit routine checks the ACF2 resource class to validate a user.
Example
The resources that allow OMEGAMON II startup include INITIAL, INITIAL0, INITIAL1, INITIAL2, and INITIAL3.
To allow users to change their authorization levels with the /PWD command, use INITIAL.
Here are sample definitions:
The variable cls is the generalized resource class name you defined in �Modify RACF Rules to Interface with OMEGAMON II� on page 147.
Note: The UID operand is site-specific in format and content. For information about UID, contact your security administrator.
<Allows /PWD to work for USER01> ACFNRULE KEY(INITIAL) TYPE(cls) ADD(UID(****************USER01) ALLOW) <Locks USER02 to security level 0 commands> ACFNRULE KEY(INITIAL0) TYPE(cls) ADD(UID(****************USER02) ALLOW) <Locks USER03 to security level 1 commands> ACFNRULE KEY(INITIAL1) TYPE(cls) ADD(UID(****************USER03) ALLOW) <Locks USER04 to security level 2 commands> ACFNRULE KEY(INITIAL2) TYPE(cls) ADD(UID(****************USER04) ALLOW) <Locks USER05 to security level 3 commands> ACFNRULE KEY(INITIAL3) TYPE(cls) ADD(UID(****************USER05) ALLOW)

Customize with Optional External Security Features
194 IBM Tivoli OMEGAMON II for IMS Configuration and Customization Guide, Version 5.5.0
Section 4. Configuring and Customizing the OMEGAMON II CUA Interface 195
Section 4. Configuring and Customizing the
OMEGAMON II CUA Interface

196 IBM Tivoli OMEGAMON II for IMS Configuration and Customization Guide, Version 5.5.0

Configuration and Customization Procedures for the CUA Interface 197
Configuration and CustomizationProcedures for the CUA Interface
Chapter OverviewThis chapter will guide you through the configuration and customization of the OMEGAMON II CUA interface.
This chapter assumes that you have completed the configuration and customization of the OMEGAMON II Realtime Performance Monitor.
Note: References to OMEGAMON II in this chapter are to the CUA interface, unless we specify otherwise.
Chapter ContentsConfiguration and Customization Checklist . . . . . . . . . . . . . . . . . . . . . . . . . . . . . . . 198Set Up Logon Security . . . . . . . . . . . . . . . . . . . . . . . . . . . . . . . . . . . . . . . . . . . . . . . 199Executing the CUA JCL Procedure . . . . . . . . . . . . . . . . . . . . . . . . . . . . . . . . . . . . . . 206Connecting your CUA system to OMEGAVIEW . . . . . . . . . . . . . . . . . . . . . . . . . . . . 207Profile Security . . . . . . . . . . . . . . . . . . . . . . . . . . . . . . . . . . . . . . . . . . . . . . . . . . . . . 208
12
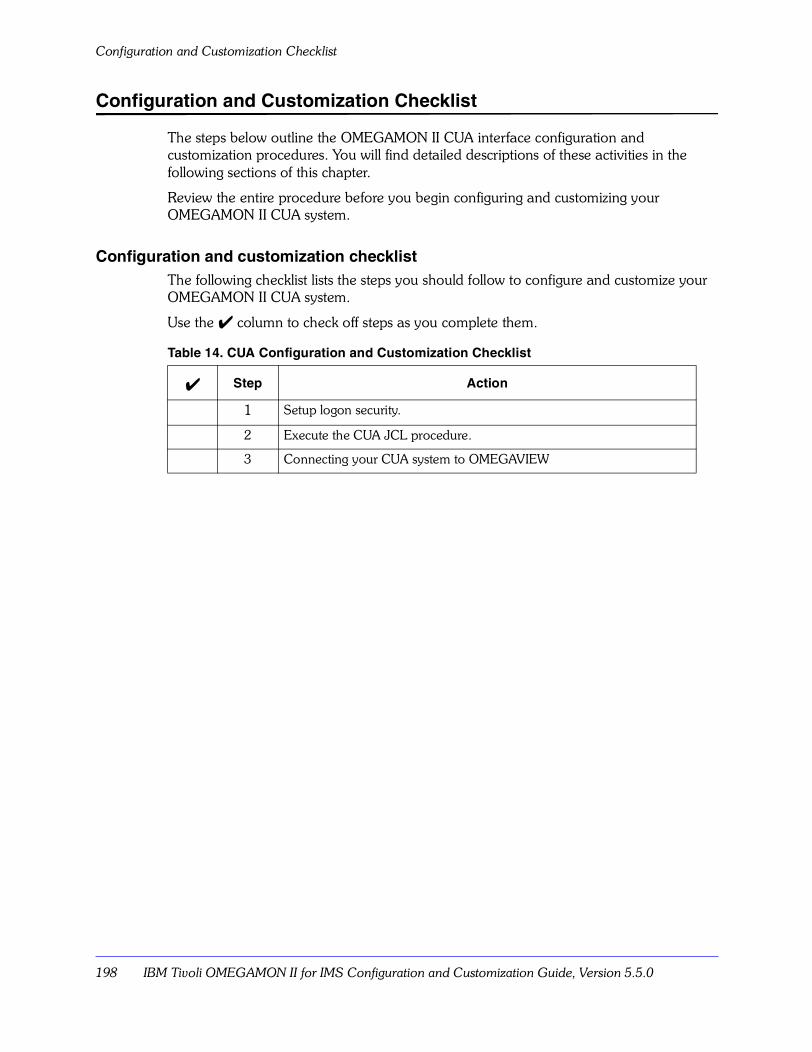
Configuration and Customization Checklist
198 IBM Tivoli OMEGAMON II for IMS Configuration and Customization Guide, Version 5.5.0
Configuration and Customization Checklist
The steps below outline the OMEGAMON II CUA interface configuration and customization procedures. You will find detailed descriptions of these activities in the following sections of this chapter.
Review the entire procedure before you begin configuring and customizing your OMEGAMON II CUA system.
Configuration and customization checklistThe following checklist lists the steps you should follow to configure and customize your OMEGAMON II CUA system.
Use the ✔ column to check off steps as you complete them.
Table 14. CUA Configuration and Customization Checklist
✔ Step Action
1 Setup logon security.
2 Execute the CUA JCL procedure.
3 Connecting your CUA system to OMEGAVIEW
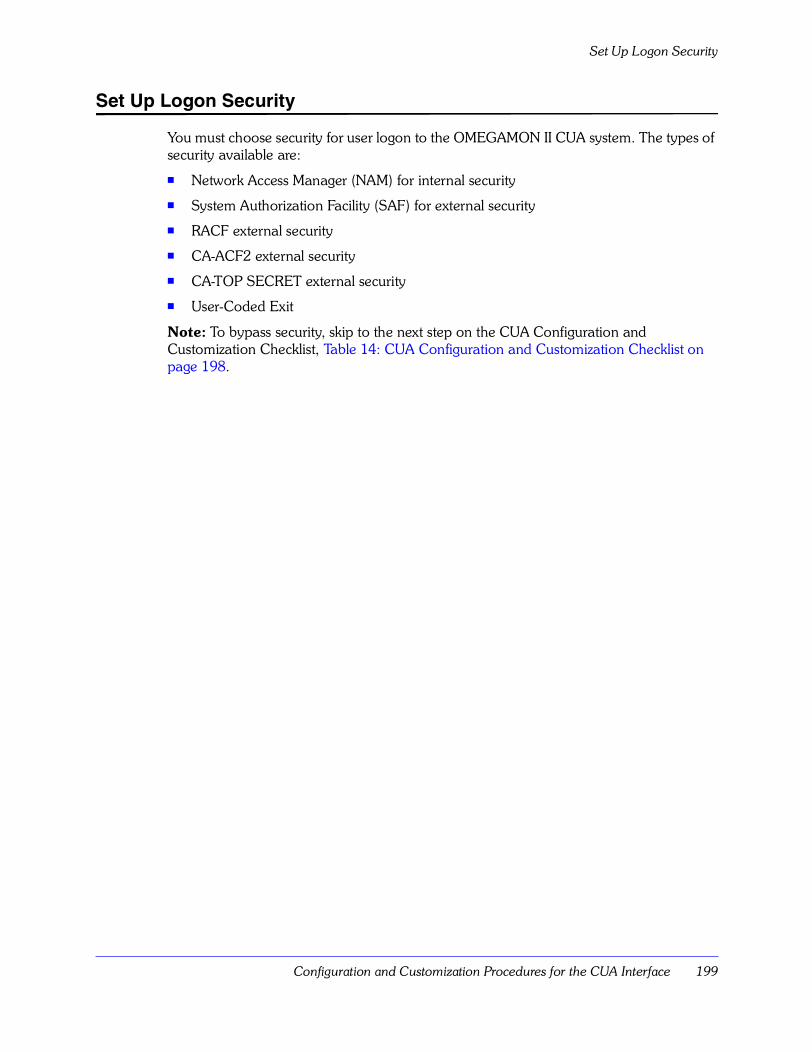
Configuration and Customization Procedures for the CUA Interface 199
Set Up Logon Security
Set Up Logon Security
You must choose security for user logon to the OMEGAMON II CUA system. The types of security available are:
� Network Access Manager (NAM) for internal security
� System Authorization Facility (SAF) for external security
� RACF external security
� CA-ACF2 external security
� CA-TOP SECRET external security
� User-Coded Exit
Note: To bypass security, skip to the next step on the CUA Configuration and Customization Checklist, Table 14: CUA Configuration and Customization Checklist on page 198.
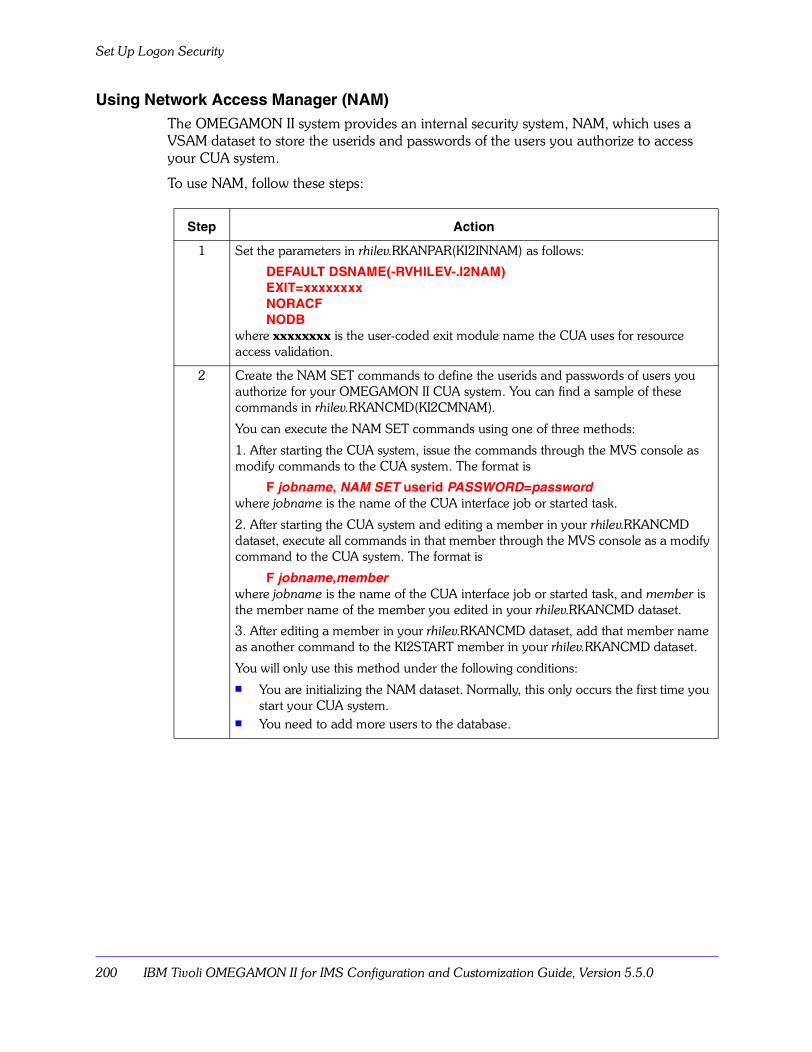
Set Up Logon Security
200 IBM Tivoli OMEGAMON II for IMS Configuration and Customization Guide, Version 5.5.0
Using Network Access Manager (NAM)The OMEGAMON II system provides an internal security system, NAM, which uses a VSAM dataset to store the userids and passwords of the users you authorize to access your CUA system.
To use NAM, follow these steps:
Step Action
1 Set the parameters in rhilev.RKANPAR(KI2INNAM) as follows:
DEFAULT DSNAME(-RVHILEV-.I2NAM) EXIT=xxxxxxxx NORACF NODB
where xxxxxxxx is the user-coded exit module name the CUA uses for resource access validation.
2 Create the NAM SET commands to define the userids and passwords of users you authorize for your OMEGAMON II CUA system. You can find a sample of these commands in rhilev.RKANCMD(KI2CMNAM).
You can execute the NAM SET commands using one of three methods:
1. After starting the CUA system, issue the commands through the MVS console as modify commands to the CUA system. The format is
F jobname, NAM SET userid PASSWORD=passwordwhere jobname is the name of the CUA interface job or started task.
2. After starting the CUA system and editing a member in your rhilev.RKANCMD dataset, execute all commands in that member through the MVS console as a modify command to the CUA system. The format is
F jobname,memberwhere jobname is the name of the CUA interface job or started task, and member is the member name of the member you edited in your rhilev.RKANCMD dataset.
3. After editing a member in your rhilev.RKANCMD dataset, add that member name as another command to the KI2START member in your rhilev.RKANCMD dataset.
You will only use this method under the following conditions:� You are initializing the NAM dataset. Normally, this only occurs the first time you
start your CUA system.� You need to add more users to the database.
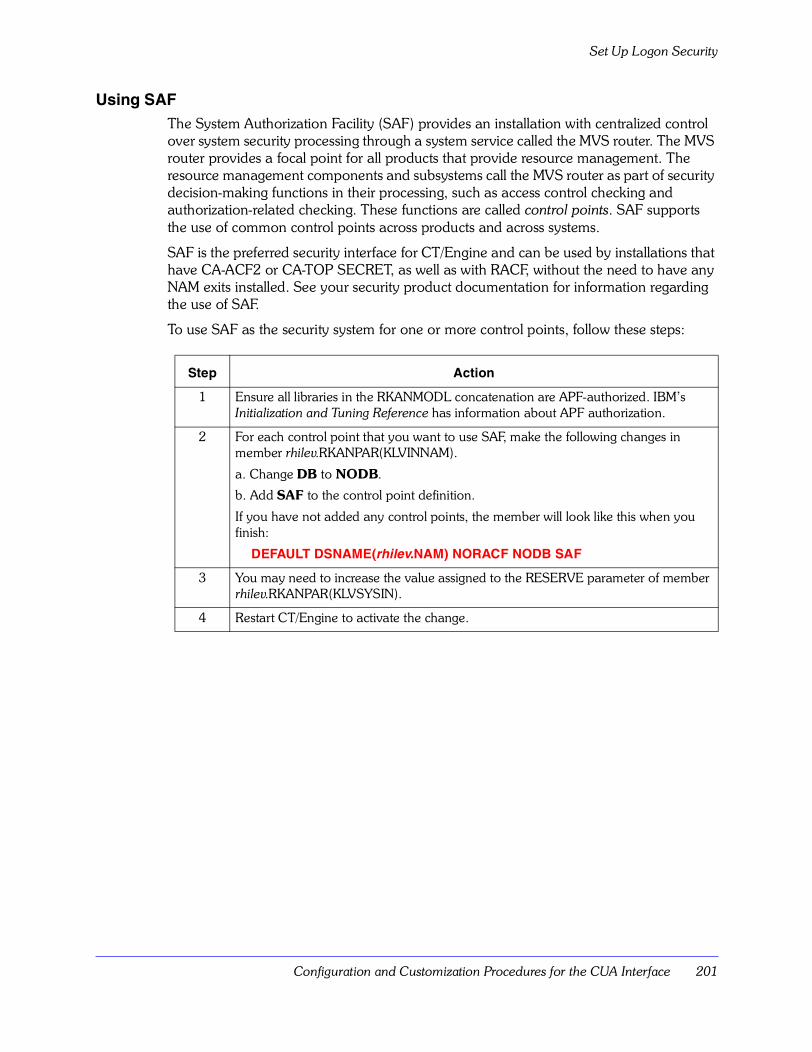
Configuration and Customization Procedures for the CUA Interface 201
Set Up Logon Security
Using SAFThe System Authorization Facility (SAF) provides an installation with centralized control over system security processing through a system service called the MVS router. The MVS router provides a focal point for all products that provide resource management. The resource management components and subsystems call the MVS router as part of security decision-making functions in their processing, such as access control checking and authorization-related checking. These functions are called control points. SAF supports the use of common control points across products and across systems.
SAF is the preferred security interface for CT/Engine and can be used by installations that have CA-ACF2 or CA-TOP SECRET, as well as with RACF, without the need to have any NAM exits installed. See your security product documentation for information regarding the use of SAF.
To use SAF as the security system for one or more control points, follow these steps:
Step Action
1 Ensure all libraries in the RKANMODL concatenation are APF-authorized. IBM�s Initialization and Tuning Reference has information about APF authorization.
2 For each control point that you want to use SAF, make the following changes in member rhilev.RKANPAR(KLVINNAM).
a. Change DB to NODB.
b. Add SAF to the control point definition.
If you have not added any control points, the member will look like this when you finish:
DEFAULT DSNAME(rhilev.NAM) NORACF NODB SAF
3 You may need to increase the value assigned to the RESERVE parameter of member rhilev.RKANPAR(KLVSYSIN).
4 Restart CT/Engine to activate the change.
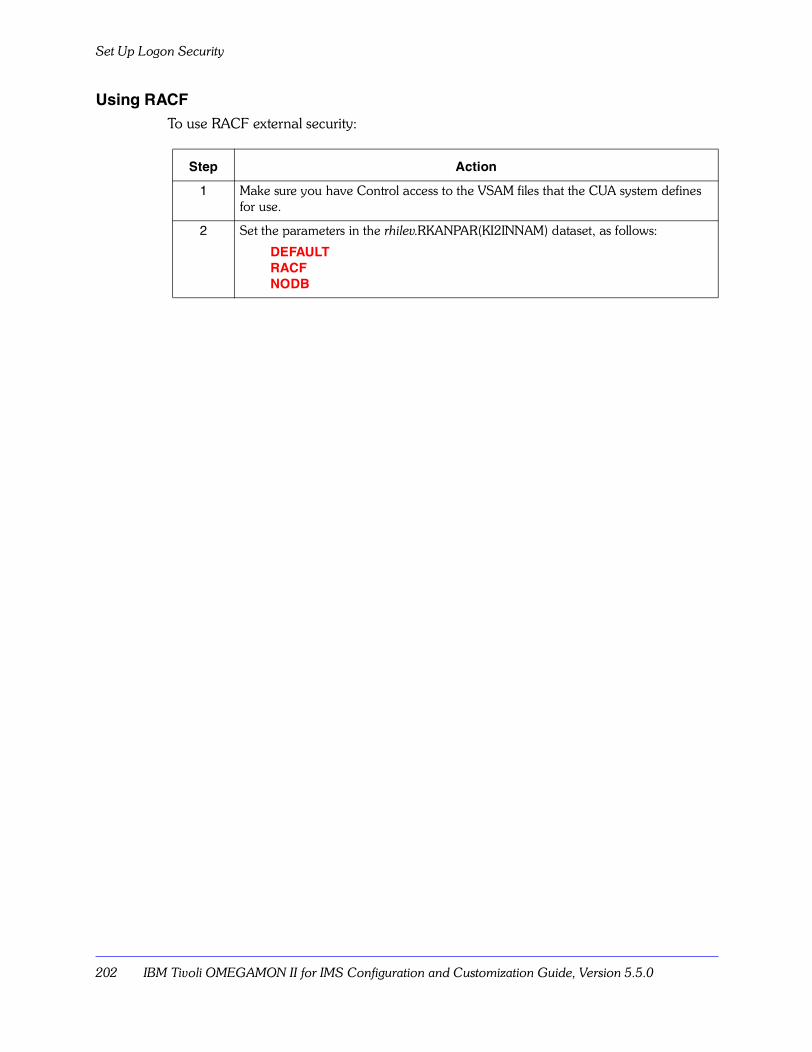
Set Up Logon Security
202 IBM Tivoli OMEGAMON II for IMS Configuration and Customization Guide, Version 5.5.0
Using RACFTo use RACF external security:
Step Action
1 Make sure you have Control access to the VSAM files that the CUA system defines for use.
2 Set the parameters in the rhilev.RKANPAR(KI2INNAM) dataset, as follows:
DEFAULT RACF NODB
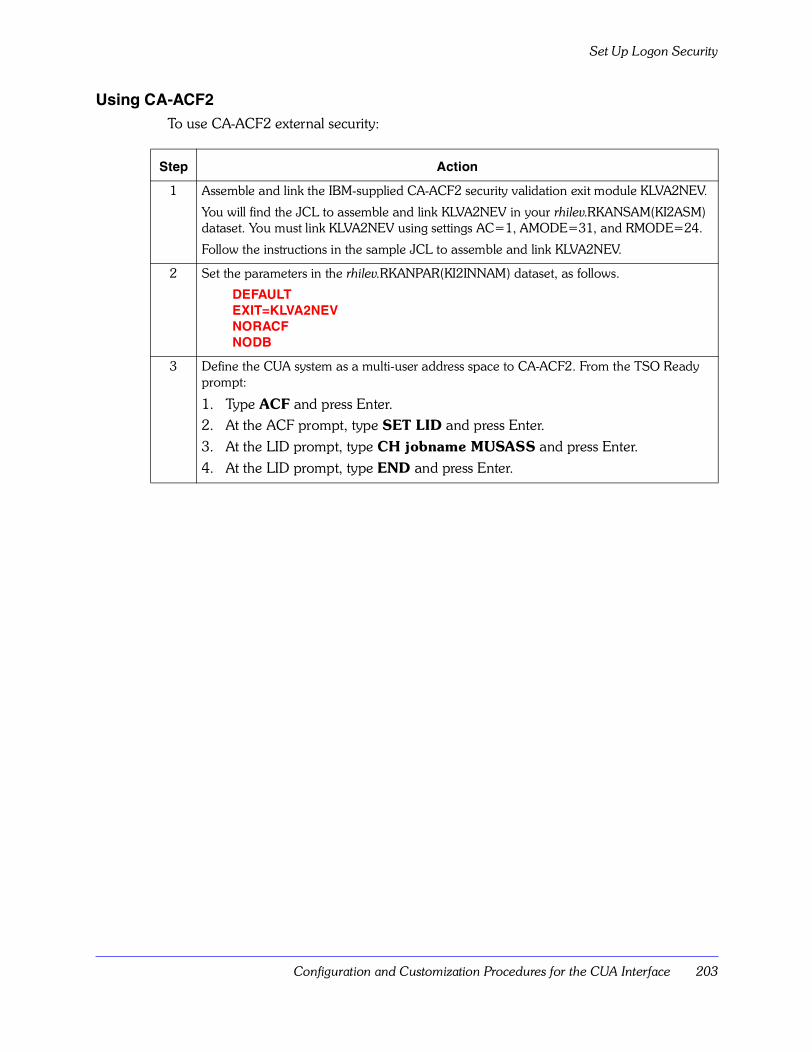
Configuration and Customization Procedures for the CUA Interface 203
Set Up Logon Security
Using CA-ACF2To use CA-ACF2 external security:
Step Action
1 Assemble and link the IBM-supplied CA-ACF2 security validation exit module KLVA2NEV.
You will find the JCL to assemble and link KLVA2NEV in your rhilev.RKANSAM(KI2ASM) dataset. You must link KLVA2NEV using settings AC=1, AMODE=31, and RMODE=24.
Follow the instructions in the sample JCL to assemble and link KLVA2NEV.
2 Set the parameters in the rhilev.RKANPAR(KI2INNAM) dataset, as follows.
DEFAULT EXIT=KLVA2NEV NORACF NODB
3 Define the CUA system as a multi-user address space to CA-ACF2. From the TSO Ready prompt:
1. Type ACF and press Enter.2. At the ACF prompt, type SET LID and press Enter.3. At the LID prompt, type CH jobname MUSASS and press Enter.4. At the LID prompt, type END and press Enter.
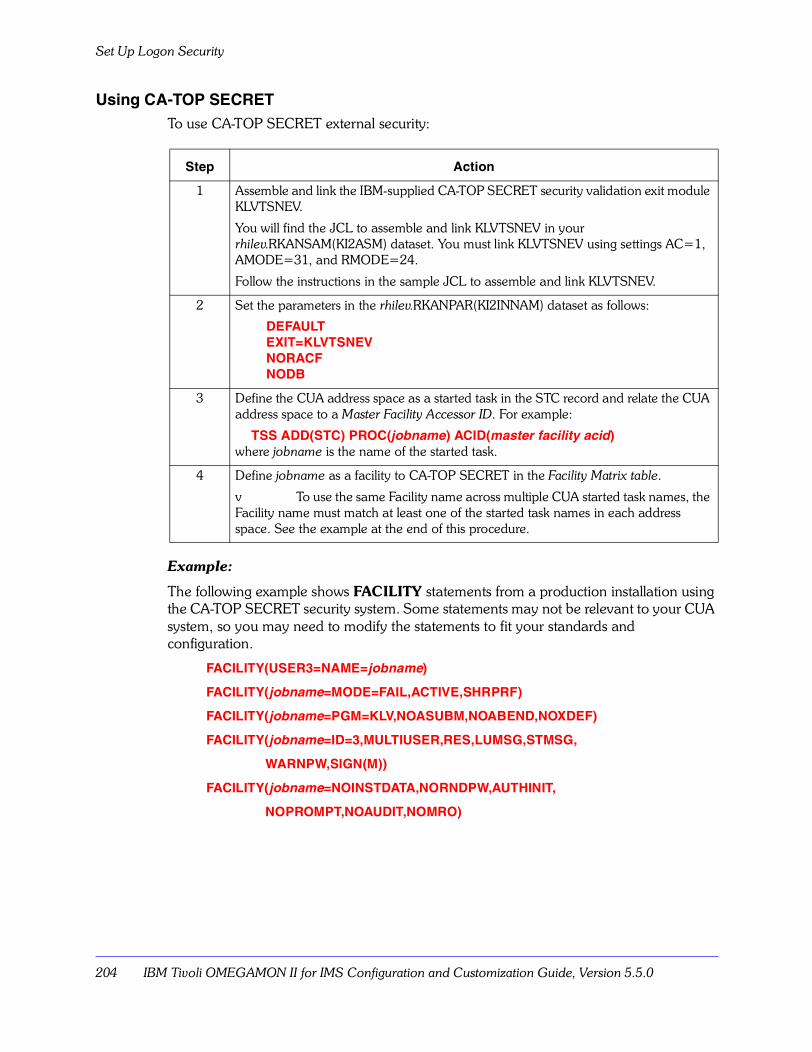
Set Up Logon Security
204 IBM Tivoli OMEGAMON II for IMS Configuration and Customization Guide, Version 5.5.0
Using CA-TOP SECRETTo use CA-TOP SECRET external security:
Example:
The following example shows FACILITY statements from a production installation using the CA-TOP SECRET security system. Some statements may not be relevant to your CUA system, so you may need to modify the statements to fit your standards and configuration.
FACILITY(USER3=NAME=jobname)
FACILITY(jobname=MODE=FAIL,ACTIVE,SHRPRF)
FACILITY(jobname=PGM=KLV,NOASUBM,NOABEND,NOXDEF)
FACILITY(jobname=ID=3,MULTIUSER,RES,LUMSG,STMSG,
WARNPW,SIGN(M))
FACILITY(jobname=NOINSTDATA,NORNDPW,AUTHINIT,
NOPROMPT,NOAUDIT,NOMRO)
Step Action
1 Assemble and link the IBM-supplied CA-TOP SECRET security validation exit module KLVTSNEV.
You will find the JCL to assemble and link KLVTSNEV in your rhilev.RKANSAM(KI2ASM) dataset. You must link KLVTSNEV using settings AC=1, AMODE=31, and RMODE=24.
Follow the instructions in the sample JCL to assemble and link KLVTSNEV.
2 Set the parameters in the rhilev.RKANPAR(KI2INNAM) dataset as follows:
DEFAULT EXIT=KLVTSNEV NORACF NODB
3 Define the CUA address space as a started task in the STC record and relate the CUA address space to a Master Facility Accessor ID. For example:
TSS ADD(STC) PROC(jobname) ACID(master facility acid)where jobname is the name of the started task.
4 Define jobname as a facility to CA-TOP SECRET in the Facility Matrix table.
v To use the same Facility name across multiple CUA started task names, the Facility name must match at least one of the started task names in each address space. See the example at the end of this procedure.
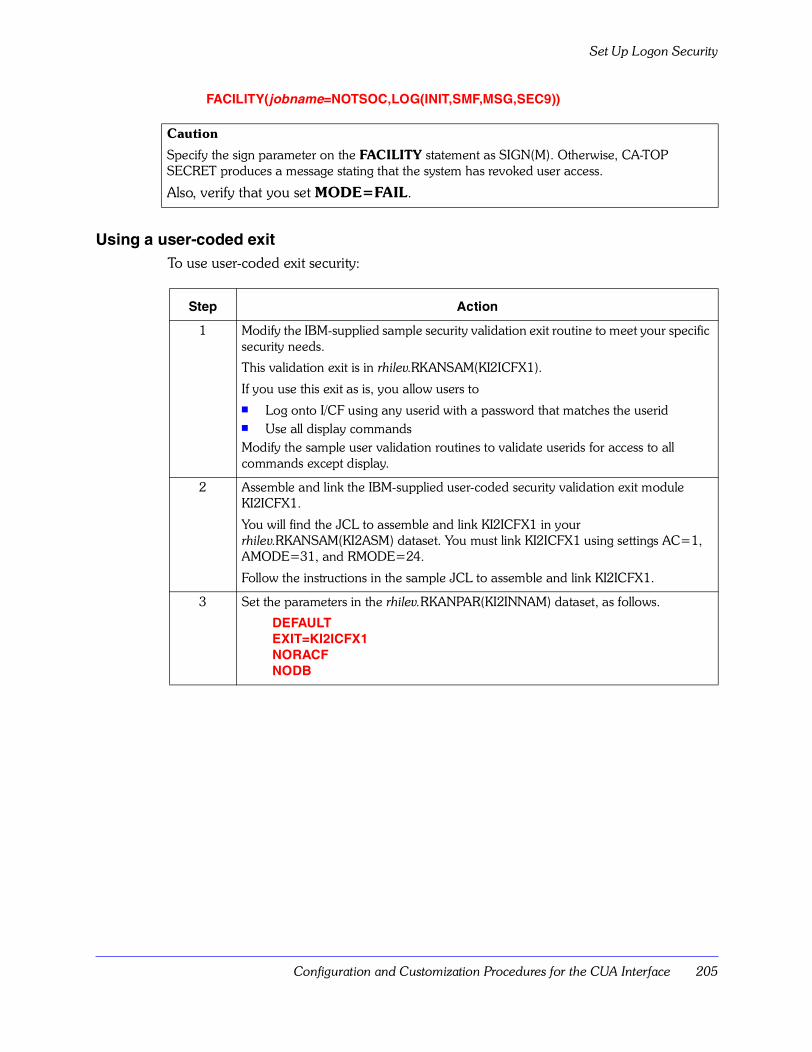
Configuration and Customization Procedures for the CUA Interface 205
Set Up Logon Security
FACILITY(jobname=NOTSOC,LOG(INIT,SMF,MSG,SEC9))
Using a user-coded exitTo use user-coded exit security:
Caution
Specify the sign parameter on the FACILITY statement as SIGN(M). Otherwise, CA-TOP SECRET produces a message stating that the system has revoked user access.
Also, verify that you set MODE=FAIL.
Step Action
1 Modify the IBM-supplied sample security validation exit routine to meet your specific security needs.
This validation exit is in rhilev.RKANSAM(KI2ICFX1).
If you use this exit as is, you allow users to� Log onto I/CF using any userid with a password that matches the userid� Use all display commandsModify the sample user validation routines to validate userids for access to all commands except display.
2 Assemble and link the IBM-supplied user-coded security validation exit module KI2ICFX1.
You will find the JCL to assemble and link KI2ICFX1 in your rhilev.RKANSAM(KI2ASM) dataset. You must link KI2ICFX1 using settings AC=1, AMODE=31, and RMODE=24.
Follow the instructions in the sample JCL to assemble and link KI2ICFX1.
3 Set the parameters in the rhilev.RKANPAR(KI2INNAM) dataset, as follows.
DEFAULT EXIT=KI2ICFX1 NORACF NODB
Executing the CUA JCL Procedure
206 IBM Tivoli OMEGAMON II for IMS Configuration and Customization Guide, Version 5.5.0
Executing the CUA JCL Procedure
This unit tells you how to execute the CUA JCL procedure.
CUA JCL procedureMove rhilev.RKANSAM(CANSI2) to your system JCL procedure library.
Note: Contact your MVS Systems Programmer if you need further assistance.
Configuration and Customization Procedures for the CUA Interface 207
Connecting your CUA system to OMEGAVIEW
Connecting your CUA system to OMEGAVIEW
This unit provides information about an OMEGAVIEW connection.
OMEGAVIEW ConnectionOMEGAMON II Versions 300 and above give you the capability of running an OMEGAMON II CUA system without OMEGAVIEW.
However, to use the transplexing and remote transfer features of OMEGAMON II, you must have an OMEGAVIEW connection to your CUA system.
If you are running OMEGAVIEW it is not necessary for your OMEGAVIEW system to reside on the same MVS system as your OMEGAMON II CUA system.
Profile Security
208 IBM Tivoli OMEGAMON II for IMS Configuration and Customization Guide, Version 5.5.0
Profile Security
Profile security is available in the CUA system. Setting profile security is accomplished by using selections from the Options pull-down.
If you are a CUA Administrator or you have the appropriate level of authority, you can assign different authorization levels to users. You can add, change, or delete the level of authority for each user.
Other users can change their profiles for use in their current session. See the person with the appropriate authorization to save profile changes for future use.
Setting levels of user authorityThere are three levels of user authority:
Change startup profileThis selection from the Options pull-down allows you to change or create a new startup profile. If you specify a two-character suffix to change your startup profile, your old profile remains as it was. The changes you make affect only your new profile.
List of administratorsThis selection from the Options pull-down shows you the names of those who have administrator authority.
Note:
The first user to logon to the CUA interface after installation is automatically given administrator authority. Having more than one user with administrator authority is highly recommended.
Administrator This user can add, change, or delete the level of authority for any user and has access to all product functions.
User This user has access to all product functions except saving changes to the Installation Profile (/I).
Basic This user has access to all product functions except saving changes to profiles.
Note:
No one has authority to change the IBM default profile (/C). See the section, Table : Reviewing OMEGAMON II Profiles on page 104, for detailed information on profiles, including the IBM default profile and the Installation profile.
Configuration and Customization Procedures for the CUA Interface 209
Profile Security
User authoritiesThis selection from the Options pull-down gives you a panel where you can change the level of authority for a user.
The KEIDEFLT user id contains the authority granted to users who are not specifically authorized. The default user id is Basic.
For user authorization to take effect, users must log off OMEGAMON II and log back on.

Profile Security
210 IBM Tivoli OMEGAMON II for IMS Configuration and Customization Guide, Version 5.5.0
Installation Verification of the CUA Interface 211
Installation Verification ofthe CUA Interface
Chapter OverviewThis chapter will guide you through the installation verification of your OMEGAMON II CUA system.
Note: References to OMEGAMON II in this chapter are to the CUA interface, unless we specify otherwise.
Chapter ContentsCUA Installation Verification Checklist . . . . . . . . . . . . . . . . . . . . . . . . . . . . . . . . . . . 212Start the OMEGAMON II CUA System . . . . . . . . . . . . . . . . . . . . . . . . . . . . . . . . . . . 213Log on to the OMEGAMON II CUA System . . . . . . . . . . . . . . . . . . . . . . . . . . . . . . . 214Stop the OMEGAMON II CUA Interface . . . . . . . . . . . . . . . . . . . . . . . . . . . . . . . . . . 215
13
CUA Installation Verification Checklist
212 IBM Tivoli OMEGAMON II for IMS Configuration and Customization Guide, Version 5.5.0
CUA Installation Verification Checklist
The steps below outline the installation verification of your OMEGAMON II CUA system. You will find detailed descriptions of these activities in this chapter.
Review the entire procedure before you begin verifying your installation.
CUA installation verification checklistThe following checklist lists the steps you should follow to verify your CUA system installation. You should perform these steps in sequence.
Use the ✔ column to check off steps as you complete them.
Table 15. CUA Installation Verification Checklist
✔ Step Action
1 Start your OMEGAMON II CUA system.
2 Log on to your OMEGAMON II CUA system.
3 Stop the OMEGAMON II CUA interface.
Installation Verification of the CUA Interface 213
Start the OMEGAMON II CUA System
Start the OMEGAMON II CUA System
This section explains how to start your OMEGAMON II CUA system.
Starting your OMEGAMON II CUA systemTo start your OMEGAMON II CUA system:
✔ Step Action
1 Activate the VTAM major node containing the VTAM applids for your CUA system. Issue the following command from an MVS console:
VARY NET,ACT,ID=ccccccccc,Ewhere ccccccccc is the member name in the VTAM system definition library, which contains your VTAM applids.
Note: This information should be available from earlier when you or the VTAM systems programmer copied rhilev.RKANSAM(ccccccccc) to the VTAM system definition library.
2 Issue the following command from an MVS console:
START jobnamewhere jobname is the member name in the system JCL library, which contains your startup JCL procedure.
Note: This information should be available from earlier when you or the MVS systems programmer copied rhilev.RKANSAM(ccccccccc) to the system JCL procedure library.
Log on to the OMEGAMON II CUA System
214 IBM Tivoli OMEGAMON II for IMS Configuration and Customization Guide, Version 5.5.0
Log on to the OMEGAMON II CUA System
This section explains how to log on to your OMEGAMON II CUA system.
Logging on to your OMEGAMON II CUA systemTo log on to your OMEGAMON II CUA system:
Step Action
1 Issue the following command from any 3270 SNA device that you have connected to your network:
LOGON APPLID(cccccccccc)where ccccccccc is the VTAM applid you specified for your CUA system logon applid using ICAT.
The OMEGAMON II logon screen displays.
Note: If you are running a stand-alone OMEGAMON II product (no OMEGAVIEW), the logo screen will always be IBM Tivoli OMEGAMON II for IMS. There are no negative effects resulting from this.
2 From the OMEGAMON II logo screen, press Enter to display the user signon screen.
3 To validate that your security system is working properly, attempt to logon with both valid and invalid userid and password combinations.
Note: To continue to step 4, enter a valid userid and password. Once you enter a valid userid and password, the Reconnection Confirmation panel displays.
4 From the Reconnection Confirmation panel:
1. Select option 2 to view the Modify Configuration Values panel.
2. Move your cursor to the APPLICATION ID field and press PF4. A pop-up displays containing a list of all the IMS systems you defined using the IMSDEF command. Move your cursor to the IMS system you want to monitor and press Enter.
Note: This pop-up is scrollable, so you may need to scroll to the following pages to find the IMS system you want to monitor.
After pressing Enter on the pop-up panel, the Modify Configuration Values panel redisplays with the values you selected for APPLICATION ID.
5 Press Enter from the Modify Configuration Values panel, to start the initialization of your OMEGAMON II CUA environment. The INITIALIZATION pop-up highlights the current initialization step during the process.
Once initialization completes, the OMEGAMON II System Overview panel displays.
Installation Verification of the CUA Interface 215
Stop the OMEGAMON II CUA Interface
Stop the OMEGAMON II CUA Interface
This section explains how to stop the OMEGAMON II CUA interface.
Stopping the OMEGAMON II CUA interfaceTo stop the OMEGAMON II CUA interface address space, issue the MVS command:
P jobname
where jobname is the MVS jobname or started task name of the OMEGAMON II CUA address space.
Stop the OMEGAMON II CUA Interface
216 IBM Tivoli OMEGAMON II for IMS Configuration and Customization Guide, Version 5.5.0
Section 5. Appendixes 217
Section 5. Appendixes

218 IBM Tivoli OMEGAMON II for IMS Configuration and Customization Guide, Version 5.5.0
OMEGAMON II Product Interface 219
OMEGAMON II Product Interface
Appendix OverviewThe OMEGAMON II product interface is a set of MVS console commands and associated displays that you can use to communicate with or control OMEGAMON II�s various tasks.
During normal operation, the interface is transparent. Once you start your system, the system defaults to take all necessary actions automatically.
This chapter will acquaint you with the functions and facilities of the product interface, including:
� OMEGAMON II startup operation of the interface
� commands to the interface
Appendix ContentsStartup Operation. . . . . . . . . . . . . . . . . . . . . . . . . . . . . . . . . . . . . . . . . . . . . . . . . . . 220Interface Commands . . . . . . . . . . . . . . . . . . . . . . . . . . . . . . . . . . . . . . . . . . . . . . . . 223Comment . . . . . . . . . . . . . . . . . . . . . . . . . . . . . . . . . . . . . . . . . . . . . . . . . . . . . . . . . 224DISPLAY . . . . . . . . . . . . . . . . . . . . . . . . . . . . . . . . . . . . . . . . . . . . . . . . . . . . . . . . . 225EXEC . . . . . . . . . . . . . . . . . . . . . . . . . . . . . . . . . . . . . . . . . . . . . . . . . . . . . . . . . . . . 226HELP . . . . . . . . . . . . . . . . . . . . . . . . . . . . . . . . . . . . . . . . . . . . . . . . . . . . . . . . . . . . 228IF . . . . . . . . . . . . . . . . . . . . . . . . . . . . . . . . . . . . . . . . . . . . . . . . . . . . . . . . . . . . . . . 229LIST . . . . . . . . . . . . . . . . . . . . . . . . . . . . . . . . . . . . . . . . . . . . . . . . . . . . . . . . . . . . . 231LOG . . . . . . . . . . . . . . . . . . . . . . . . . . . . . . . . . . . . . . . . . . . . . . . . . . . . . . . . . . . . . 232MODIFY MERGE . . . . . . . . . . . . . . . . . . . . . . . . . . . . . . . . . . . . . . . . . . . . . . . . . . . 233START . . . . . . . . . . . . . . . . . . . . . . . . . . . . . . . . . . . . . . . . . . . . . . . . . . . . . . . . . . . 234STOP . . . . . . . . . . . . . . . . . . . . . . . . . . . . . . . . . . . . . . . . . . . . . . . . . . . . . . . . . . . . 241
A
Startup Operation
220 IBM Tivoli OMEGAMON II for IMS Configuration and Customization Guide, Version 5.5.0
Startup Operation
The startup parameters to KOIIA00 (the product interface) determine how the interface will run and which IMS system the interface will monitor based on the IMSID.
When you start OMEGAMON II, it checks the dispatching priority to ensure that OMEGAMON II�s priority is higher than IMSs. If it is not, OMEGAMON II issues a warning message to the console.
Note: DEXAN values may be inaccurate when OMEGAMON II has a lower priority than IMS does.
Interface MVS IDsThe product interface has two MVS IDs:
� stepname
� internal ID
The MVS console operator can address the stepname MVS ID and issue MVS STOP and MODIFY commands. These commands terminate the OMEGAMON II address space.
The internal ID, which the interface uses to communicate with the OMEGAMON, DEXAN, and EPILOG components, accepts only MVS MODIFY commands from an MVS operator. The interface does not accept MVS STOP commands.
Note: The security routines may restrict the MVS Modify command. Contact your security administrator for assistance.
Important
These two MVS IDs cannot be the same.
Note that the task name is used as the stepname, unless you override it.
OMEGAMON II Product Interface 221
Startup Operation
Creating an internal MVS IDTo create an internal ID for itself, the product interface prefixes two characters to the IMSID of the IMS system it is monitoring.
The product interface notifies MVS that it will accept MVS MODIFY commands addressed to that ID. The default prefix is M0.
Use the MPREFIX= parameter to specify the prefix in the M0 startup JCL. When OMEGAMON II initializes, it displays the following message on the MVS console:
OIB425i MODIFY ID ASSIGND 15: M0IMSA
For example, if you run the IMS control region with an IMSID of IMSA, the interface asks MVS to pass it all MVS MODIFY commands you enter for ID M0IMSA.
The interface processes only MVS MODIFY commands; the interface rejects MVS STOP commands for the internal ID with an error message.
Starting the interfaceWhen the interface starts, it first executes a series of commands automatically. These commands are in member KOIM0P00. in the rhilev.RKANPAR library. KOIM0P00. is the default.
Note: IBM supplies a default series of commands with OMEGAMON II. You can tailor these commands for your installation.
For the interface to operate automatically, the interface issues its first command to execute the default startup member, KOIM0P00., for example:
EXEC KOIM0P00.
The startup member processes automatically only at initial region startup.
After the interface performs all actions that KOIM0P00. defines, you can issue more interface commands using the special internal ID of the interface and the MVS MODIFY command.
Example using the MODIFY commandHere is an example of a MODIFY command with an IMSID of IMSA and the default prefix:
MODIFY M0imsa,START SESSION,UNIT=560
This command starts a dedicated session.
Showing Identifiers for the IBM monitor jobOnce you start the interface, the system command D A,L displays a line that shows identifiers for the IBM monitor job and internal MODIFY ID that the interface uses.
Startup Operation
222 IBM Tivoli OMEGAMON II for IMS Configuration and Customization Guide, Version 5.5.0
Displaying identifiers for an interface started as a started taskIf you start the interface as a started task, modify the STEPname to produce a unique MVS MODIFY ID (for example, IMSMON) as follows:
START OMIMS.IMSMON
Now D A,L shows the following:
JOBname STEPname PROCSTEPname
------- -------- ------------
OMIMS IMSMON IMSPROD NSW S
OMIMS M0IMSA IMSMON NSW S
In this case the interface MODIFY ID is M0IMSA and the MVS MODIFY ID is IMSMON. The second line is the internal MODIFY ID that the interface builds.
Displaying identifiers for an interface started as a batch jobSuppose you start the interface as a batch job, with an IMSID of IMSA and JOBname MONIMS. The display active command (D A,L) shows the following:
JOBname STEPname PROCSTEPname
------- -------- ------------
MONIMS IMS IMSPROD NSW J
M0IMSA M0IMSA IMSMON NSW J
In this case, the MVS modify ID is MONIMS, and the interface MODIFY ID is M0IMSA. The second line is the internal MODIFY ID that the interface builds.
In this started task example, you can terminate the interface with any of the following MODIFY or STOP commands.
STOP MONIMS
P MONIMS
MODIFY MONIMS,STOP
F MONIMS,STOP
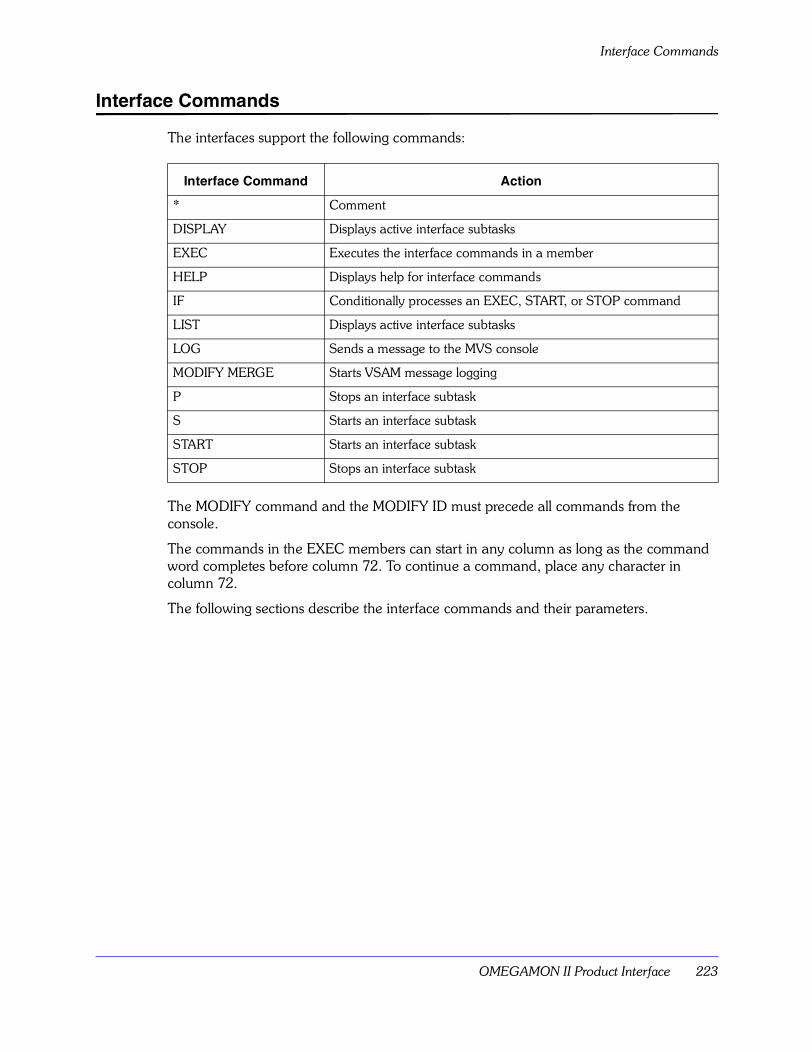
OMEGAMON II Product Interface 223
Interface Commands
Interface Commands
The interfaces support the following commands:
The MODIFY command and the MODIFY ID must precede all commands from the console.
The commands in the EXEC members can start in any column as long as the command word completes before column 72. To continue a command, place any character in column 72.
The following sections describe the interface commands and their parameters.
Interface Command Action
* Comment
DISPLAY Displays active interface subtasks
EXEC Executes the interface commands in a member
HELP Displays help for interface commands
IF Conditionally processes an EXEC, START, or STOP command
LIST Displays active interface subtasks
LOG Sends a message to the MVS console
MODIFY MERGE Starts VSAM message logging
P Stops an interface subtask
S Starts an interface subtask
START Starts an interface subtask
STOP Stops an interface subtask
Comment
224 IBM Tivoli OMEGAMON II for IMS Configuration and Customization Guide, Version 5.5.0
Comment
PurposeThe COMMENT command places comments in the members of the thilev.TKANPAR library. The interface ignores these comments.
FormatThe format is
*<comment>
A non-blank character in column 72 indicates a continuation of the comment.
ExampleThe following example shows a sample comment line in an EXEC member.
* THIS COMMENT CAN SAY ANYTHING YOU WISH.
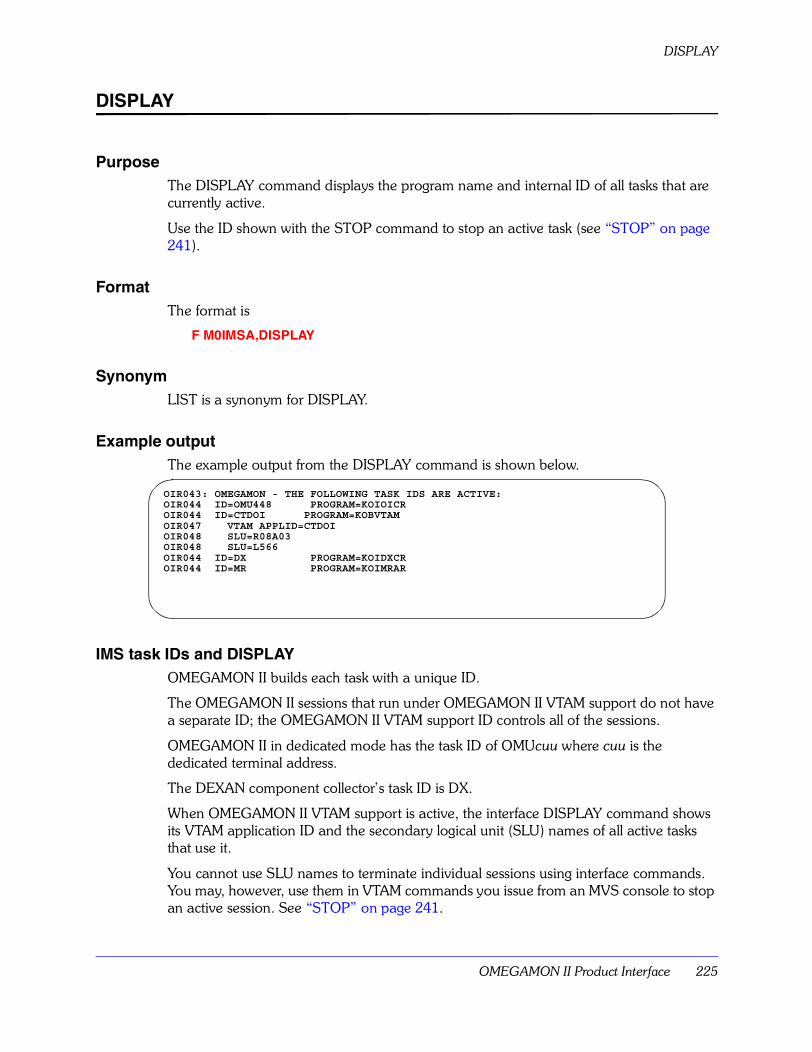
OMEGAMON II Product Interface 225
DISPLAY
DISPLAY
PurposeThe DISPLAY command displays the program name and internal ID of all tasks that are currently active.
Use the ID shown with the STOP command to stop an active task (see �STOP� on page 241).
FormatThe format is
F M0IMSA,DISPLAY
SynonymLIST is a synonym for DISPLAY.
Example outputThe example output from the DISPLAY command is shown below.
IMS task IDs and DISPLAYOMEGAMON II builds each task with a unique ID.
The OMEGAMON II sessions that run under OMEGAMON II VTAM support do not have a separate ID; the OMEGAMON II VTAM support ID controls all of the sessions.
OMEGAMON II in dedicated mode has the task ID of OMUcuu where cuu is the dedicated terminal address.
The DEXAN component collector�s task ID is DX.
When OMEGAMON II VTAM support is active, the interface DISPLAY command shows its VTAM application ID and the secondary logical unit (SLU) names of all active tasks that use it.
You cannot use SLU names to terminate individual sessions using interface commands. You may, however, use them in VTAM commands you issue from an MVS console to stop an active session. See �STOP� on page 241.
OIR043: OMEGAMON - THE FOLLOWING TASK IDS ARE ACTIVE:OIR044 ID=OMU448 PROGRAM=KOIOICROIR044 ID=CTDOI PROGRAM=KOBVTAMOIR047 VTAM APPLID=CTDOIOIR048 SLU=R08A03OIR048 SLU=L566OIR044 ID=DX PROGRAM=KOIDXCROIR044 ID=MR PROGRAM=KOIMRAR
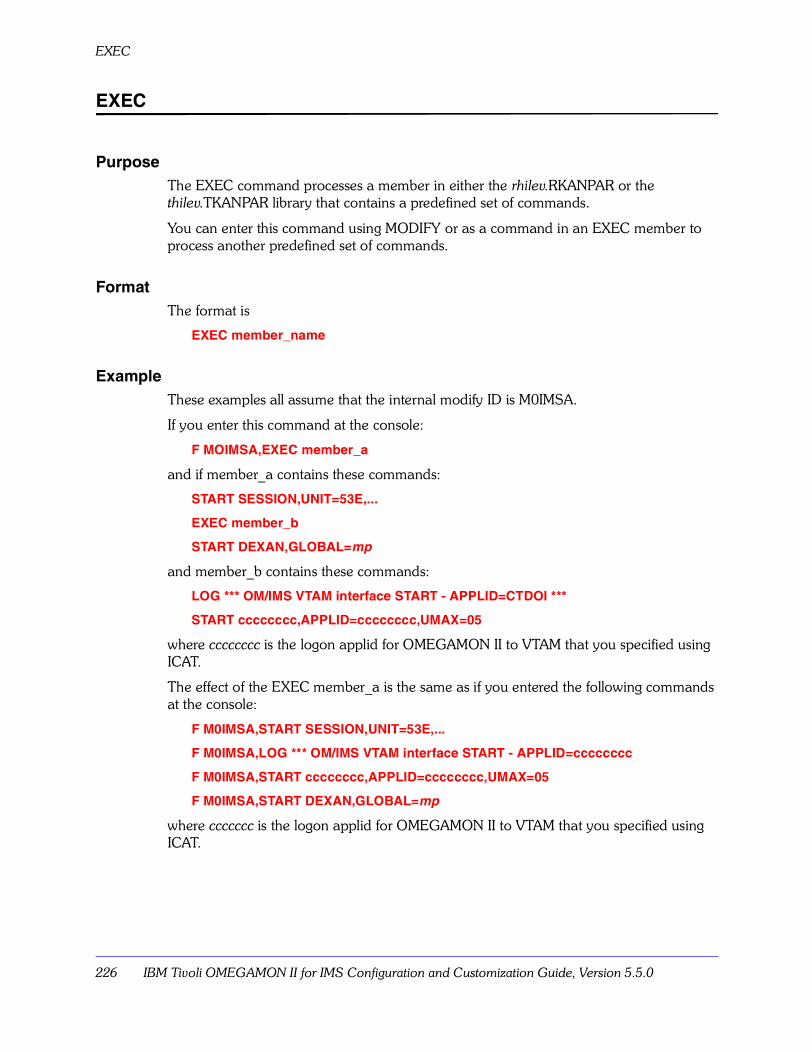
EXEC
226 IBM Tivoli OMEGAMON II for IMS Configuration and Customization Guide, Version 5.5.0
EXEC
PurposeThe EXEC command processes a member in either the rhilev.RKANPAR or the thilev.TKANPAR library that contains a predefined set of commands.
You can enter this command using MODIFY or as a command in an EXEC member to process another predefined set of commands.
FormatThe format is
EXEC member_name
ExampleThese examples all assume that the internal modify ID is M0IMSA.
If you enter this command at the console:
F MOIMSA,EXEC member_a
and if member_a contains these commands:
START SESSION,UNIT=53E,...
EXEC member_b
START DEXAN,GLOBAL=mp
and member_b contains these commands:
LOG *** OM/IMS VTAM interface START - APPLID=CTDOI ***
START cccccccc,APPLID=cccccccc,UMAX=05
where cccccccc is the logon applid for OMEGAMON II to VTAM that you specified using ICAT.
The effect of the EXEC member_a is the same as if you entered the following commands at the console:
F M0IMSA,START SESSION,UNIT=53E,...
F M0IMSA,LOG *** OM/IMS VTAM interface START - APPLID=cccccccc
F M0IMSA,START cccccccc,APPLID=cccccccc,UMAX=05
F M0IMSA,START DEXAN,GLOBAL=mp
where ccccccc is the logon applid for OMEGAMON II to VTAM that you specified using ICAT.
OMEGAMON II Product Interface 227
EXEC
LimitationsYou cannot nest EXEC commands more than ten deep at any one command invocation. This prevents EXEC loops where A EXECs B and B EXECs A.
EXEC members are a procedureYou can think of these members as a JCL procedure or as a TSO CLIST.
The EXEC member may contain any interface command, including another EXEC command.
When an EXEC command processes while inside another EXEC member, it is as if the calling EXEC places all the commands of the called EXEC member into itself in the same position as they were in the called member.

HELP
228 IBM Tivoli OMEGAMON II for IMS Configuration and Customization Guide, Version 5.5.0
HELP
PurposeThe HELP command
� displays the commands the interface supports
� finds information about a specific command, typed as an operand.
FormatThe format is
HELP <command-name>
ExampleThis example assumes that the internal modify ID is M0IMSA.
Type the following command to display help about all of the available interface commands.
F M0IMSA,HELP
The result of this command looks similar to the following figure.
Follow HELP with the name of a command to obtain information about that command.
If you don�t specify a command name or if OMEGAMON II doesn�t recognize the command name you specify, then the help text for HELP appears at the console.
LOG ‘HELP’ CommandSyntax: HELP <command-name> Description: The ‘HELP’ command is used to display the help information available on the commands that are used to control the OMEGAMON for IMS interface. HELP is available for all the commands below: * - Comment (ignored by the interface)EXEC - Execute the commands in the member specifiedDISPLAY - Display active interface subtasksHELP - Displays help for all or specific interface commandsLIST - Alias of DISPLAY - Display active interface subtasksLOG - Send a message to the MVS ConsoleSTART - Start an interface Subtask (for example, OMEGAMON II)STOP - Stop an interface Subtask
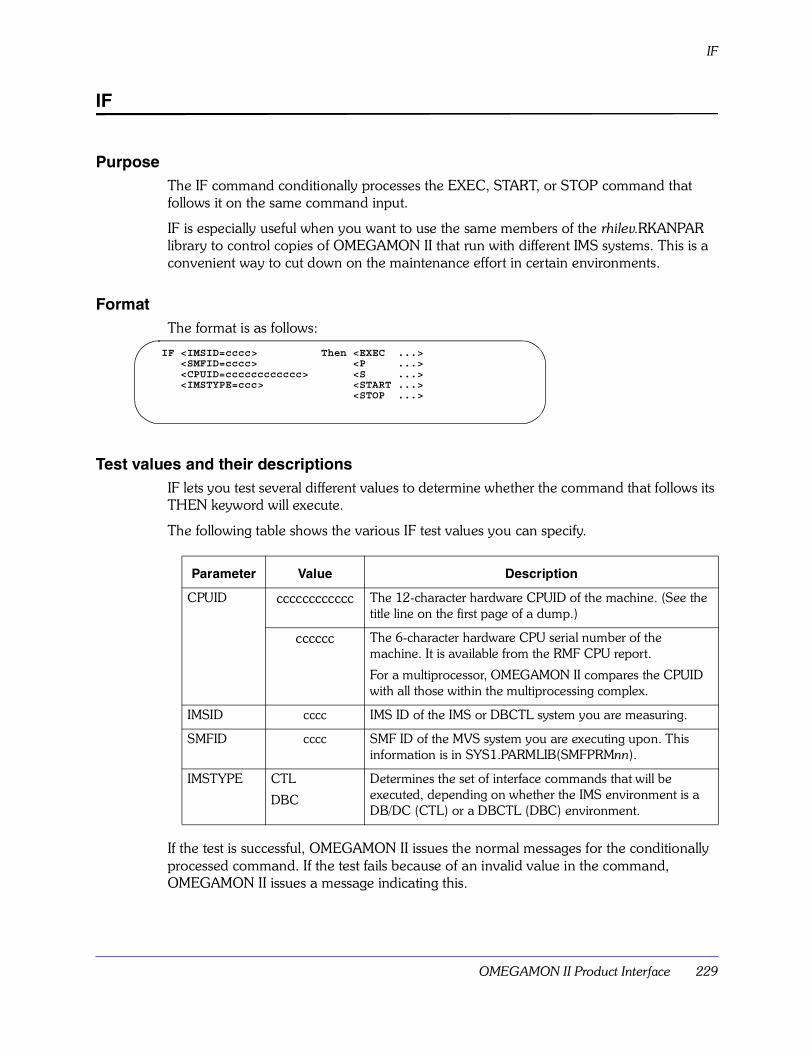
OMEGAMON II Product Interface 229
IF
IF
PurposeThe IF command conditionally processes the EXEC, START, or STOP command that follows it on the same command input.
IF is especially useful when you want to use the same members of the rhilev.RKANPAR library to control copies of OMEGAMON II that run with different IMS systems. This is a convenient way to cut down on the maintenance effort in certain environments.
FormatThe format is as follows:
Test values and their descriptionsIF lets you test several different values to determine whether the command that follows its THEN keyword will execute.
The following table shows the various IF test values you can specify.
If the test is successful, OMEGAMON II issues the normal messages for the conditionally processed command. If the test fails because of an invalid value in the command, OMEGAMON II issues a message indicating this.
Parameter Value Description
CPUID cccccccccccc The 12-character hardware CPUID of the machine. (See the title line on the first page of a dump.)
cccccc The 6-character hardware CPU serial number of the machine. It is available from the RMF CPU report.
For a multiprocessor, OMEGAMON II compares the CPUID with all those within the multiprocessing complex.
IMSID cccc IMS ID of the IMS or DBCTL system you are measuring.
SMFID cccc SMF ID of the MVS system you are executing upon. This information is in SYS1.PARMLIB(SMFPRMnn).
IMSTYPE CTL
DBC
Determines the set of interface commands that will be executed, depending on whether the IMS environment is a DB/DC (CTL) or a DBCTL (DBC) environment.
IF <IMSID=cccc> Then <EXEC ...> <SMFID=cccc> <P ...> <CPUID=cccccccccccc> <S ...> <IMSTYPE=ccc> <START ...> <STOP ...>
IF
230 IBM Tivoli OMEGAMON II for IMS Configuration and Customization Guide, Version 5.5.0
IF lets you test several different values to determine whether the command that follows its THEN keyword will execute.
OutputThe output of the IF command depends upon the success of its tests.
OMEGAMON II Product Interface 231
LIST
LIST
PurposeThe LIST command displays the program name and internal ID of each currently active task. The LIST command is an alternate name for the DISPLAY command. For a description of the DISPLAY command see �DISPLAY� on page 225.
FormatThe format of the LIST command is:
F M0IMSA,LIST
LOG
232 IBM Tivoli OMEGAMON II for IMS Configuration and Customization Guide, Version 5.5.0
LOG
PurposeThe LOG command displays a message at the system console.
Use this command in your EXEC members to indicate what commands you process in that member.
FormatThe format is
LOG OMEGAMON sends this message to the system console
Example 1You can use log messages to display the name of the currently processing member, such as:
LOG *** Processing KOIM0P00. ***
Example 2Another typical use is to indicate the start of a task such as the Bottleneck Analysis (DEXAN) collector. For example:
LOG *** Starting DEXAN ***
OutputThe output from the LOG command looks exactly like its input.
OMEGAMON II Product Interface 233
MODIFY MERGE
MODIFY MERGE
PurposeThe MODIFY MERGE command merges and chronologically sorts a copy of IMS messages going to the MVS console and to the Master Terminal Operator (MTO) console.
The command writes the messages to a VSAM dataset for viewing in the OMEGAMON II CUA interface.
FormatThe format is
F M0IMSA, MODIFY MERGE DSN=’rhilev’,ARCH=prefix
where:
This syntax assumes that M0IMSA is the internal modify ID.
How MODIFY MERGE worksThe MERGE task sets up a pair of VSAM datasets (rhilev.ims.LOG1 and rhilev.ims.LOG2) for logging. When one of the datasets fills, OMEGAMON II automatically switches to the second dataset, and archives and reinitializes the first dataset.
Another way to execute MODIFY MERGEYou can also execute MODIFY MERGE by entering the EXEC KI2VSMmp interface command, because the KI2VSMmp member contains the MODIFY MERGE command.
For information on how to customize this member for your installation, see �START Command Parameters�, as shown in Table 9: START Command Parameters on page 65.
Variable Definition
ims The imsid being monitored.
�rhilev� The high-level qualifier of the VSAM dataset to which messages will be logged.
This high-level qualifier may be different from the high-level qualifier for other OMEGAMON II datasets.
prefix The prefix of the archive job to copy a full VSAM dataset to a backup dataset.
OMEGAMON II appends 1 or 2 to the job name specified.
It uses prefix1 to archive rhilev.ims.LOG1, and prefix2 to archive rhilev.ims.LOG2. KI2ARCH is the default name for prefix.
If you use a different name, it must not exceed 7 characters.
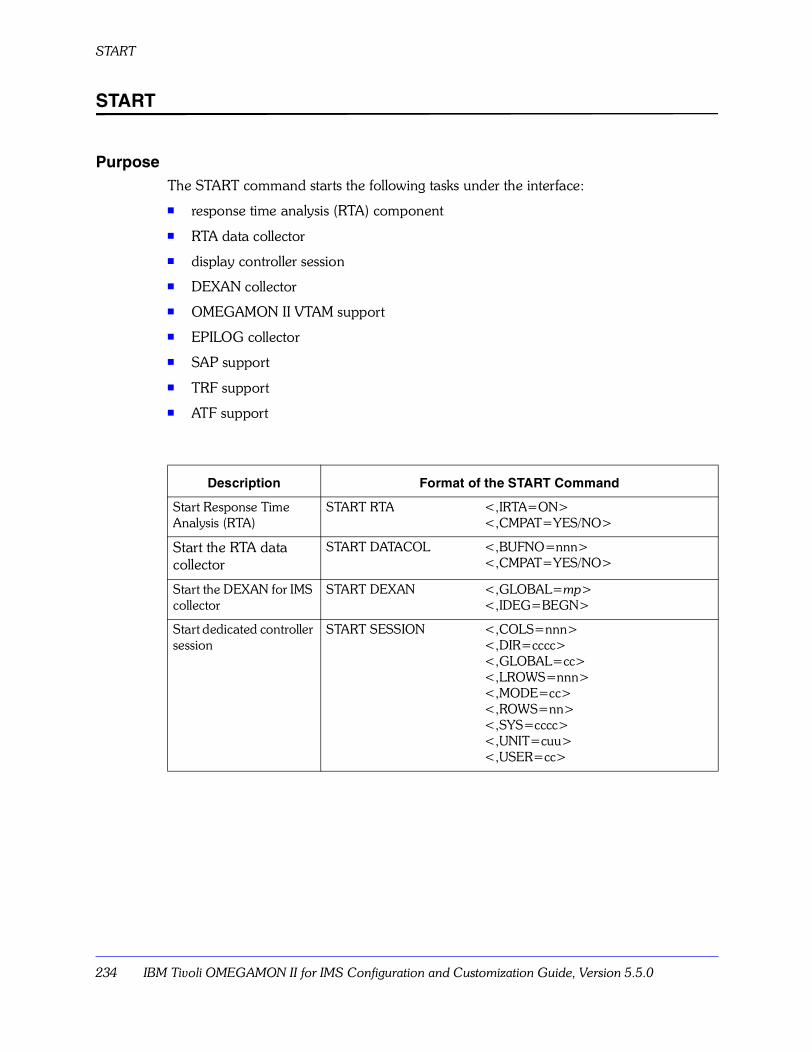
START
234 IBM Tivoli OMEGAMON II for IMS Configuration and Customization Guide, Version 5.5.0
START
PurposeThe START command starts the following tasks under the interface:
� response time analysis (RTA) component
� RTA data collector
� display controller session
� DEXAN collector
� OMEGAMON II VTAM support
� EPILOG collector
� SAP support
� TRF support
� ATF support
Description Format of the START Command
Start Response Time Analysis (RTA)
START RTA <,IRTA=ON> <,CMPAT=YES/NO>
Start the RTA data collector
START DATACOL <,BUFNO=nnn><,CMPAT=YES/NO>
Start the DEXAN for IMS collector
START DEXAN <,GLOBAL=mp><,IDEG=BEGN>
Start dedicated controller session
START SESSION <,COLS=nnn> <,DIR=cccc><,GLOBAL=cc> <,LROWS=nnn><,MODE=cc> <,ROWS=nn><,SYS=cccc> <,UNIT=cuu> <,USER=cc>
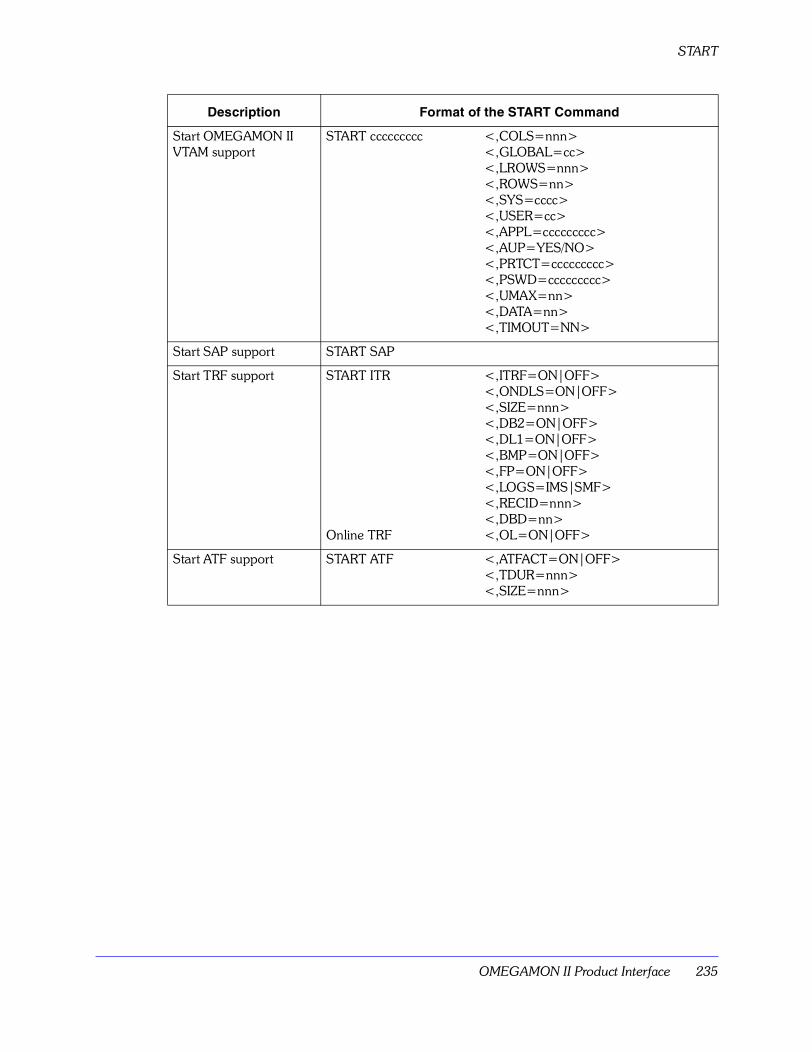
OMEGAMON II Product Interface 235
START
Start OMEGAMON II VTAM support
START ccccccccc <,COLS=nnn><,GLOBAL=cc> <,LROWS=nnn><,ROWS=nn><,SYS=cccc> <,USER=cc> <,APPL=ccccccccc><,AUP=YES/NO> <,PRTCT=ccccccccc><,PSWD=ccccccccc><,UMAX=nn> <,DATA=nn><,TIMOUT=NN>
Start SAP support START SAP
Start TRF support START ITR
Online TRF
<,ITRF=ON|OFF> <,ONDLS=ON|OFF> <,SIZE=nnn><,DB2=ON|OFF> <,DL1=ON|OFF> <,BMP=ON|OFF> <,FP=ON|OFF> <,LOGS=IMS|SMF><,RECID=nnn> <,DBD=nn> <,OL=ON|OFF>
Start ATF support START ATF <,ATFACT=ON|OFF><,TDUR=nnn> <,SIZE=nnn>
Description Format of the START Command
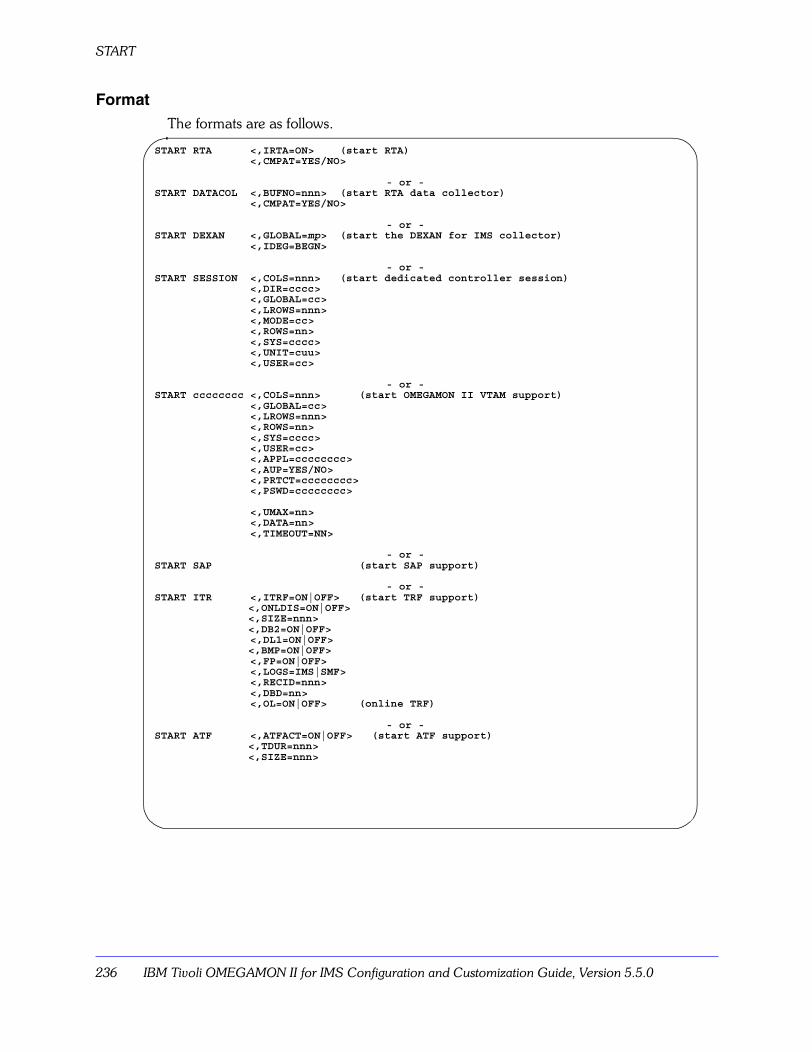
START
236 IBM Tivoli OMEGAMON II for IMS Configuration and Customization Guide, Version 5.5.0
FormatThe formats are as follows.
START RTA <,IRTA=ON> (start RTA) <,CMPAT=YES/NO>
- or -START DATACOL <,BUFNO=nnn> (start RTA data collector) <,CMPAT=YES/NO>
- or -START DEXAN <,GLOBAL=mp> (start the DEXAN for IMS collector) <,IDEG=BEGN>
- or -START SESSION <,COLS=nnn> (start dedicated controller session) <,DIR=cccc> <,GLOBAL=cc> <,LROWS=nnn> <,MODE=cc> <,ROWS=nn> <,SYS=cccc> <,UNIT=cuu> <,USER=cc>
- or -START cccccccc <,COLS=nnn> (start OMEGAMON II VTAM support) <,GLOBAL=cc> <,LROWS=nnn> <,ROWS=nn> <,SYS=cccc> <,USER=cc> <,APPL=cccccccc> <,AUP=YES/NO> <,PRTCT=cccccccc> <,PSWD=cccccccc>
<,UMAX=nn> <,DATA=nn> <,TIMEOUT=NN>
- or -START SAP (start SAP support)
- or -START ITR <,ITRF=ON|OFF> (start TRF support)
<,ONLDIS=ON|OFF><,SIZE=nnn><,DB2=ON|OFF>
<,DL1=ON|OFF><,BMP=ON|OFF>
<,FP=ON|OFF> <,LOGS=IMS|SMF> <,RECID=nnn> <,DBD=nn> <,OL=ON|OFF> (online TRF)
- or -START ATF <,ATFACT=ON|OFF> (start ATF support)
<,TDUR=nnn> <,SIZE=nnn>
OMEGAMON II Product Interface 237
START
START command parametersThe figure above and in Table 9: START Command Parameters on page 65 use the following notation conventions:
� n denotes operands which are numeric only
� c denotes operands which are character data
� cuu denotes a control unit address
Numbers are allowed in character data, however, for some operands the first character must be a letter.
The length of the strings of n or c show you the maximum length of the operand.
Operands can be shorter than the figure shows, if that is appropriate in the individual case.
For example, you can code the UMAX= parameter as UMAX=1 or UMAX=01 to limit the number of VTAM terminals which can access OMEGAMON II.
Items enclosed in angle brackets (< >) can be written in any order and can have defaults. OMEGAMON II does not require you to specify those parameters that have defaults.
You can enter the parameters marked with an asterisk (*) in Table 9: START Command Parameters on page 65 in the VTAM logon data stream to override the setting in the VTAM START procedure.
Most of the parameters that you can specify have defaults taken from the interface or from the started task. You can change some of these defaults if you use an installation or user profile.
See the table describing START command parameters on page 65.
SynonymS is a synonym for START.
START
238 IBM Tivoli OMEGAMON II for IMS Configuration and Customization Guide, Version 5.5.0
Starting OMEGAMON II VTAM supportStart OMEGAMON II VTAM support with the START command.
The parameters you specify with the START command become the defaults for any OMEGAMON II sessions that OMEGAMON II VTAM support creates in response to LOGON requests.
If you want to change a default value or any other command at logon time, use the DATA keyword of the VTAM LOGON command to override it.
The following example shows the DATA parameter in the LOGON command:
LOGON APPLID(cccccccc) DATA(‘USER=01’)
where cccccccc is the logon applid for OMEGAMON II to VTAM that you specified using ICAT.
OMEGAMON II Product Interface 239
START
What to do if you stop OMEGAMON II VTAM supportIf you stop OMEGAMON II VTAM support, any OMEGAMON II display controller sessions that run underneath it also stop, and you must restart them manually. The EPILOG collector, however, continues to collect data, even if you stop the EPILOG display controller session or OMEGAMON IIVTAM support.
ExamplesThe following examples all assume that M0IMSA is your OMEGAMON II installation modify ID. For more information on the modify ID, see pages page 221 through page 223 in this chapter.
Type these commands at the SDSF MVS console to restart sessions:
� To start a Bottleneck Analysis (DEXAN) collector with a global module of KOIGBL2424, type
/F M0IMSA, START DEXAN,GLOBAL=24
� To start a display controller to the dedicated terminal at 53E using global module KOIGLBL.24, enter:
/F M0IMSA, START SESSION,UNIT=53E,GLOBAL=24
� To start a display controller to the dedicated terminal at 53A with 43 physical rows and 255 logical rows, enter:
/F M0IMSA, START SESSION,ROWS=43,LROWS=255,UNIT=53A
� To start VTAM support, enter:
/F M0IMSA, START cccccccc APPL=OIAPPLID,UMAX=05
where cccccccc is the logon applid for OMEGAMON II to VTAM that you specified using ICAT.
� To start a display controller in cross system mode, enter:
/F M0IMSA, START SESSION,MODE=XS,LROWS=255,SYS=IMSA,DIR=*
where * implies use of cross system mode using a collector ID of IMSA.
� To start a display controller in cross memory mode with an ID of SYSA, enter
/F M0IMSA, START SESSION,MODE=XM,LROWS=255,SYS=IMSA,DIR=SYSA
START
240 IBM Tivoli OMEGAMON II for IMS Configuration and Customization Guide, Version 5.5.0
Location of sample START commandThe rhilev.RKANPAR(KOImpP00) contains a sample START command for OMEGAMON II for your installation.
OMEGAMON II Product Interface 241
STOP
STOP
PurposeThe STOP command stops any interface subtask (for example, OMEGAMON II VTAM support) that may not be functioning, due to a problem such as a terminal error.
The system console operator usually enters the STOP command using the MVS MODIFY command. The STOP command needs a task ID to know which task to stop. To find this ID, use the DISPLAY or LIST command.
FormatThe format is:
F M0IMSA,STOP ID=cccccccc
where cccccccc is the logon applid for OMEGAMON II to VTAM that you specified using ICAT.
SynonymP is a synonym for STOP.
OutputThe output from the STOP command is one or more task termination messages followed by a task detached message. If the task does not promptly honor the interface request for termination, the interface detaches it.
STOP
242 IBM Tivoli OMEGAMON II for IMS Configuration and Customization Guide, Version 5.5.0
Stopping VTAM tasksSessions that run under OMEGAMON II VTAM support do not have an interface task ID that you can use to stop them. You can use VTAM commands to detach an individual session that runs under OMEGAMON II VTAM support.
The commands you enter from an MVS console are:
V NET,INACT,I,ID=sluname
and
V NET,ACT,ID=sluname
The first command causes OMEGAMON II VTAM support to stop the task running at that secondary logical unit (or terminal). The message NODE NOW INACTIVE appears to indicate that OMEGAMON II VTAM support has removed the task.
Wait until OMEGAMON II VTAM support removes the task before you issue the second command. The second command makes the terminal available for use again by VTAM.
Note:
If you use the STOP command in the above format for RTA, the buckets are not cleared.

Sharing VTPOOL in a Multi-Host Environment 243
Sharing VTPOOL in a Multi-HostEnvironment
Appendix OverviewTo provide support for OMEGAMON II sessions under more than one TSO (or ISPF), you must install VTM1 in every VTAM domain that controls a TSO.
What VTPOOL doesVTM1 uses a virtual terminal for each OMEGAMON II session.
VTPOOL defines this virtual terminal pool. Normally, each installation of VTM1 includes a VTPOOL definition.
The following sections describe how multiple VTM1 installations can share a single VTPOOL definition.
Appendix ContentsSample Network . . . . . . . . . . . . . . . . . . . . . . . . . . . . . . . . . . . . . . . . . . . . . . . . . . . . 244Defining the Virtual Terminal Pool to VTM1 . . . . . . . . . . . . . . . . . . . . . . . . . . . . . . . 245Defining the Virtual Terminal Pool (VTPOOL) to VTAM . . . . . . . . . . . . . . . . . . . . . . 246Providing Access to VTPOOL . . . . . . . . . . . . . . . . . . . . . . . . . . . . . . . . . . . . . . . . . . 247
B
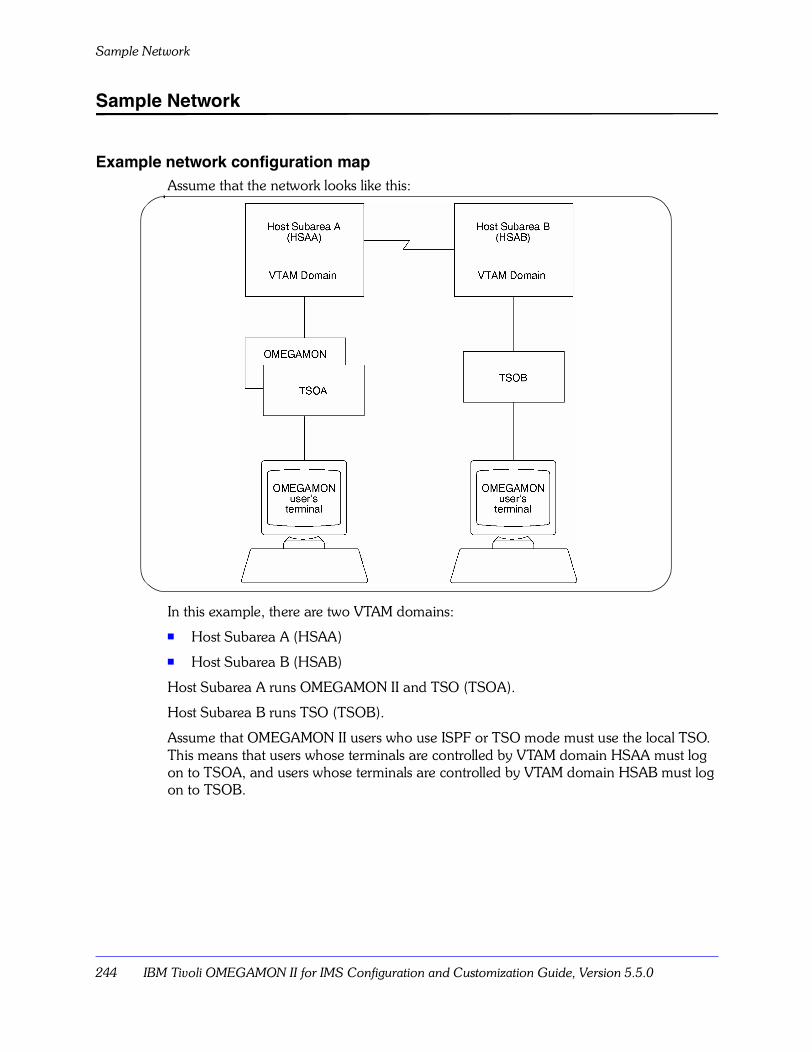
Sample Network
244 IBM Tivoli OMEGAMON II for IMS Configuration and Customization Guide, Version 5.5.0
Sample Network
Example network configuration mapAssume that the network looks like this:
In this example, there are two VTAM domains:
� Host Subarea A (HSAA)
� Host Subarea B (HSAB)
Host Subarea A runs OMEGAMON II and TSO (TSOA).
Host Subarea B runs TSO (TSOB).
Assume that OMEGAMON II users who use ISPF or TSO mode must use the local TSO. This means that users whose terminals are controlled by VTAM domain HSAA must log on to TSOA, and users whose terminals are controlled by VTAM domain HSAB must log on to TSOB.
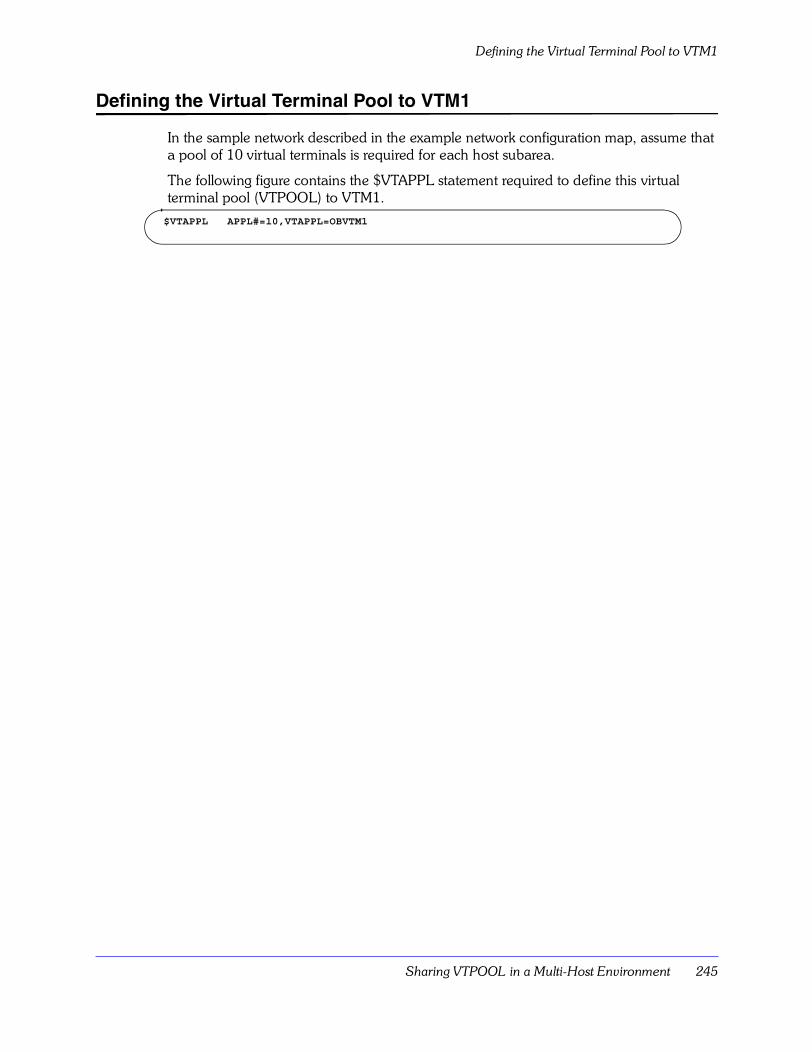
Sharing VTPOOL in a Multi-Host Environment 245
Defining the Virtual Terminal Pool to VTM1
Defining the Virtual Terminal Pool to VTM1
In the sample network described in the example network configuration map, assume that a pool of 10 virtual terminals is required for each host subarea.
The following figure contains the $VTAPPL statement required to define this virtual terminal pool (VTPOOL) to VTM1.
$VTAPPL APPL#=10,VTAPPL=OBVTM1
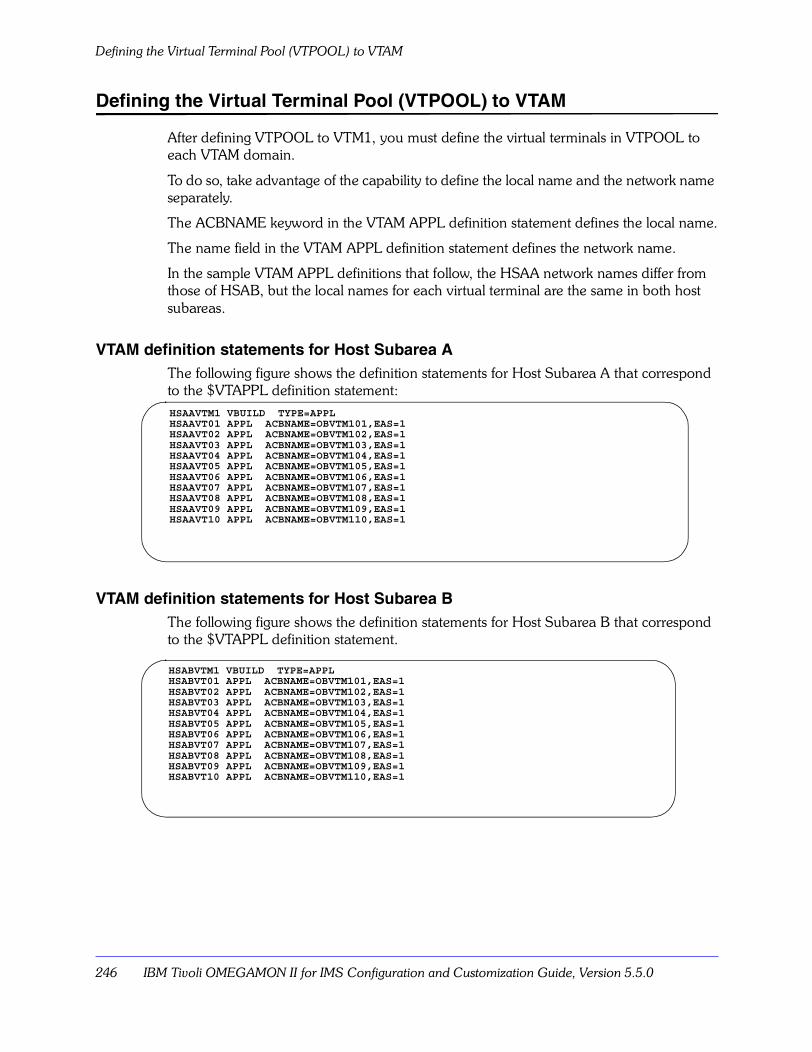
Defining the Virtual Terminal Pool (VTPOOL) to VTAM
246 IBM Tivoli OMEGAMON II for IMS Configuration and Customization Guide, Version 5.5.0
Defining the Virtual Terminal Pool (VTPOOL) to VTAM
After defining VTPOOL to VTM1, you must define the virtual terminals in VTPOOL to each VTAM domain.
To do so, take advantage of the capability to define the local name and the network name separately.
The ACBNAME keyword in the VTAM APPL definition statement defines the local name.
The name field in the VTAM APPL definition statement defines the network name.
In the sample VTAM APPL definitions that follow, the HSAA network names differ from those of HSAB, but the local names for each virtual terminal are the same in both host subareas.
VTAM definition statements for Host Subarea AThe following figure shows the definition statements for Host Subarea A that correspond to the $VTAPPL definition statement:
VTAM definition statements for Host Subarea BThe following figure shows the definition statements for Host Subarea B that correspond to the $VTAPPL definition statement.
HSAAVTM1 VBUILD TYPE=APPLHSAAVT01 APPL ACBNAME=OBVTM101,EAS=1HSAAVT02 APPL ACBNAME=OBVTM102,EAS=1HSAAVT03 APPL ACBNAME=OBVTM103,EAS=1HSAAVT04 APPL ACBNAME=OBVTM104,EAS=1HSAAVT05 APPL ACBNAME=OBVTM105,EAS=1HSAAVT06 APPL ACBNAME=OBVTM106,EAS=1HSAAVT07 APPL ACBNAME=OBVTM107,EAS=1HSAAVT08 APPL ACBNAME=OBVTM108,EAS=1HSAAVT09 APPL ACBNAME=OBVTM109,EAS=1HSAAVT10 APPL ACBNAME=OBVTM110,EAS=1
HSABVTM1 VBUILD TYPE=APPLHSABVT01 APPL ACBNAME=OBVTM101,EAS=1HSABVT02 APPL ACBNAME=OBVTM102,EAS=1HSABVT03 APPL ACBNAME=OBVTM103,EAS=1HSABVT04 APPL ACBNAME=OBVTM104,EAS=1HSABVT05 APPL ACBNAME=OBVTM105,EAS=1HSABVT06 APPL ACBNAME=OBVTM106,EAS=1HSABVT07 APPL ACBNAME=OBVTM107,EAS=1HSABVT08 APPL ACBNAME=OBVTM108,EAS=1HSABVT09 APPL ACBNAME=OBVTM109,EAS=1HSABVT10 APPL ACBNAME=OBVTM110,EAS=1
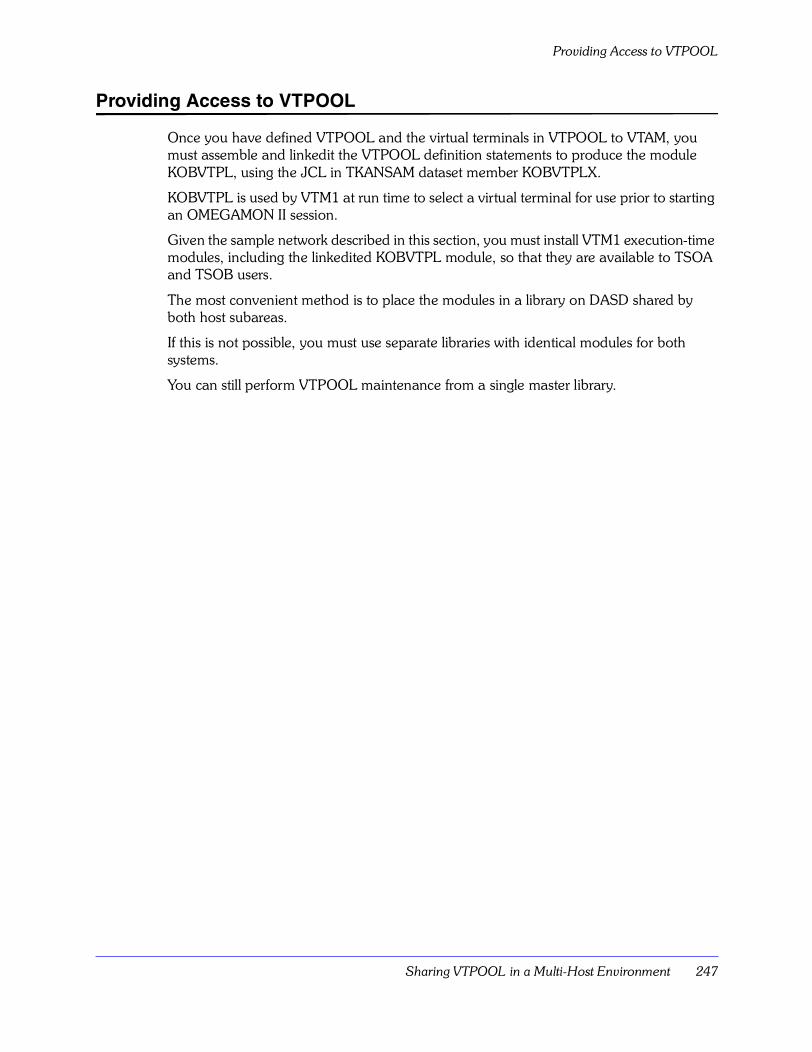
Sharing VTPOOL in a Multi-Host Environment 247
Providing Access to VTPOOL
Providing Access to VTPOOL
Once you have defined VTPOOL and the virtual terminals in VTPOOL to VTAM, you must assemble and linkedit the VTPOOL definition statements to produce the module KOBVTPL, using the JCL in TKANSAM dataset member KOBVTPLX.
KOBVTPL is used by VTM1 at run time to select a virtual terminal for use prior to starting an OMEGAMON II session.
Given the sample network described in this section, you must install VTM1 execution-time modules, including the linkedited KOBVTPL module, so that they are available to TSOA and TSOB users.
The most convenient method is to place the modules in a library on DASD shared by both host subareas.
If this is not possible, you must use separate libraries with identical modules for both systems.
You can still perform VTPOOL maintenance from a single master library.
Providing Access to VTPOOL
248 IBM Tivoli OMEGAMON II for IMS Configuration and Customization Guide, Version 5.5.0
OMEGAMON II Exceptions Table 249
OMEGAMON II Exceptions Table
About this AppendixThis appendix contains the Exceptions Table, which lists all of the OMEGAMON II exceptions in alphabetical order, a description of what activity each monitors, its default setting, its default threshold, and the name of its exception group.
Appendix ContentsExceptions Table. . . . . . . . . . . . . . . . . . . . . . . . . . . . . . . . . . . . . . . . . . . . . . . . . . . . 250
C
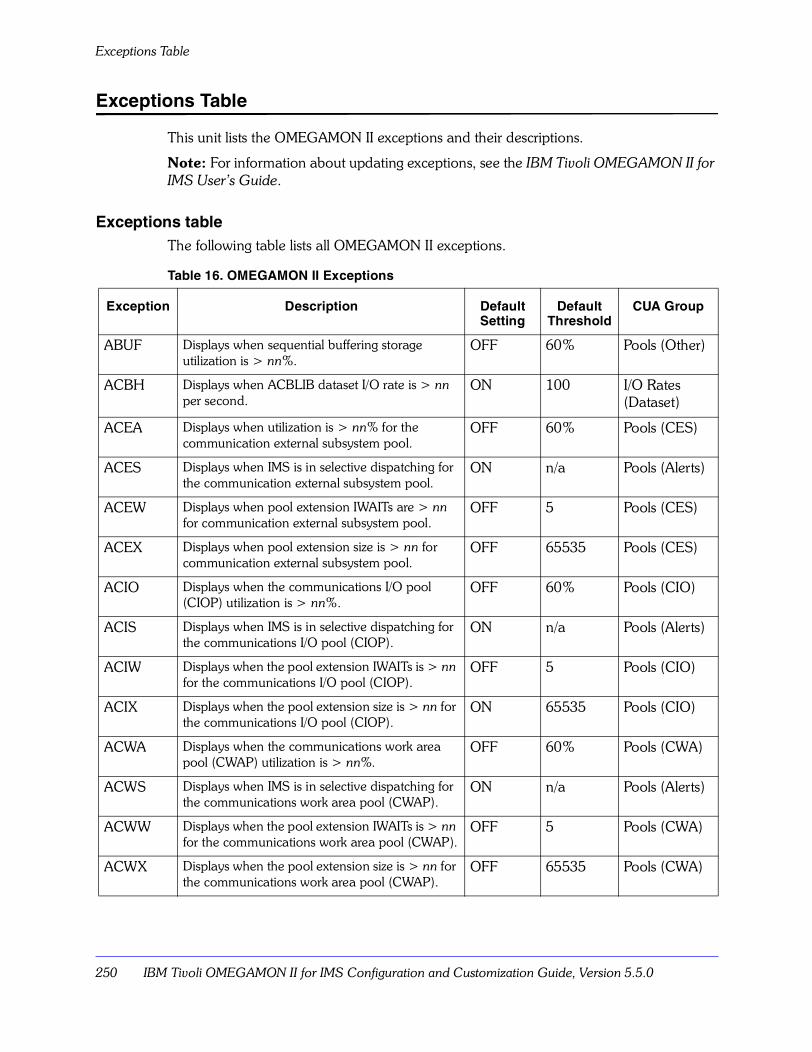
Exceptions Table
250 IBM Tivoli OMEGAMON II for IMS Configuration and Customization Guide, Version 5.5.0
Exceptions Table
This unit lists the OMEGAMON II exceptions and their descriptions.
Note: For information about updating exceptions, see the IBM Tivoli OMEGAMON II for IMS User�s Guide.
Exceptions tableThe following table lists all OMEGAMON II exceptions.
Table 16. OMEGAMON II Exceptions
Exception Description Default Setting
Default Threshold
CUA Group
ABUF Displays when sequential buffering storage utilization is > nn%.
OFF 60% Pools (Other)
ACBH Displays when ACBLIB dataset I/O rate is > nn per second.
ON 100 I/O Rates (Dataset)
ACEA Displays when utilization is > nn% for the communication external subsystem pool.
OFF 60% Pools (CES)
ACES Displays when IMS is in selective dispatching for the communication external subsystem pool.
ON n/a Pools (Alerts)
ACEW Displays when pool extension IWAITs are > nn for communication external subsystem pool.
OFF 5 Pools (CES)
ACEX Displays when pool extension size is > nn for communication external subsystem pool.
OFF 65535 Pools (CES)
ACIO Displays when the communications I/O pool (CIOP) utilization is > nn%.
OFF 60% Pools (CIO)
ACIS Displays when IMS is in selective dispatching for the communications I/O pool (CIOP).
ON n/a Pools (Alerts)
ACIW Displays when the pool extension IWAITs is > nn for the communications I/O pool (CIOP).
OFF 5 Pools (CIO)
ACIX Displays when the pool extension size is > nn for the communications I/O pool (CIOP).
ON 65535 Pools (CIO)
ACWA Displays when the communications work area pool (CWAP) utilization is > nn%.
OFF 60% Pools (CWA)
ACWS Displays when IMS is in selective dispatching for the communications work area pool (CWAP).
ON n/a Pools (Alerts)
ACWW Displays when the pool extension IWAITs is > nn for the communications work area pool (CWAP).
OFF 5 Pools (CWA)
ACWX Displays when the pool extension size is > nn for the communications work area pool (CWAP).
OFF 65535 Pools (CWA)
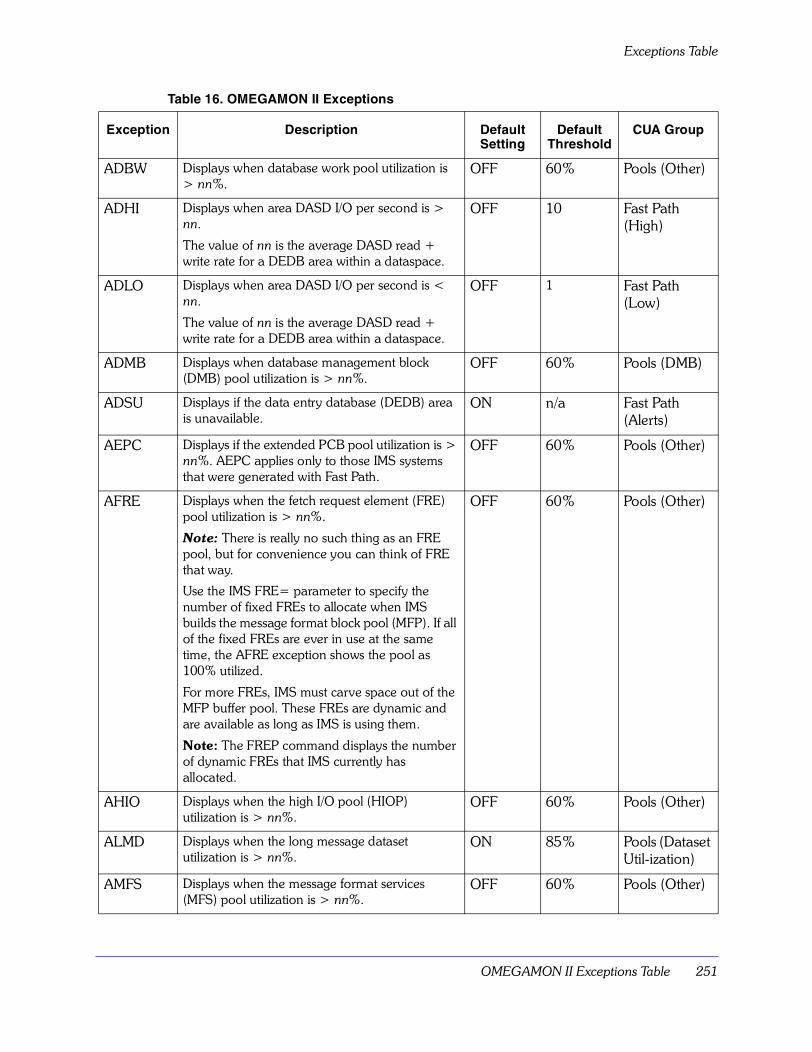
OMEGAMON II Exceptions Table 251
Exceptions Table
ADBW Displays when database work pool utilization is > nn%.
OFF 60% Pools (Other)
ADHI Displays when area DASD I/O per second is > nn.
The value of nn is the average DASD read + write rate for a DEDB area within a dataspace.
OFF 10 Fast Path (High)
ADLO Displays when area DASD I/O per second is < nn.
The value of nn is the average DASD read + write rate for a DEDB area within a dataspace.
OFF 1 Fast Path (Low)
ADMB Displays when database management block (DMB) pool utilization is > nn%.
OFF 60% Pools (DMB)
ADSU Displays if the data entry database (DEDB) area is unavailable.
ON n/a Fast Path (Alerts)
AEPC Displays if the extended PCB pool utilization is > nn%. AEPC applies only to those IMS systems that were generated with Fast Path.
OFF 60% Pools (Other)
AFRE Displays when the fetch request element (FRE) pool utilization is > nn%.
Note: There is really no such thing as an FRE pool, but for convenience you can think of FRE that way.
Use the IMS FRE= parameter to specify the number of fixed FREs to allocate when IMS builds the message format block pool (MFP). If all of the fixed FREs are ever in use at the same time, the AFRE exception shows the pool as 100% utilized.
For more FREs, IMS must carve space out of the MFP buffer pool. These FREs are dynamic and are available as long as IMS is using them.
Note: The FREP command displays the number of dynamic FREs that IMS currently has allocated.
OFF 60% Pools (Other)
AHIO Displays when the high I/O pool (HIOP) utilization is > nn%.
OFF 60% Pools (Other)
ALMD Displays when the long message dataset utilization is > nn%.
ON 85% Pools (Dataset Util-ization)
AMFS Displays when the message format services (MFS) pool utilization is > nn%.
OFF 60% Pools (Other)
Table 16. OMEGAMON II Exceptions
Exception Description Default Setting
Default Threshold
CUA Group
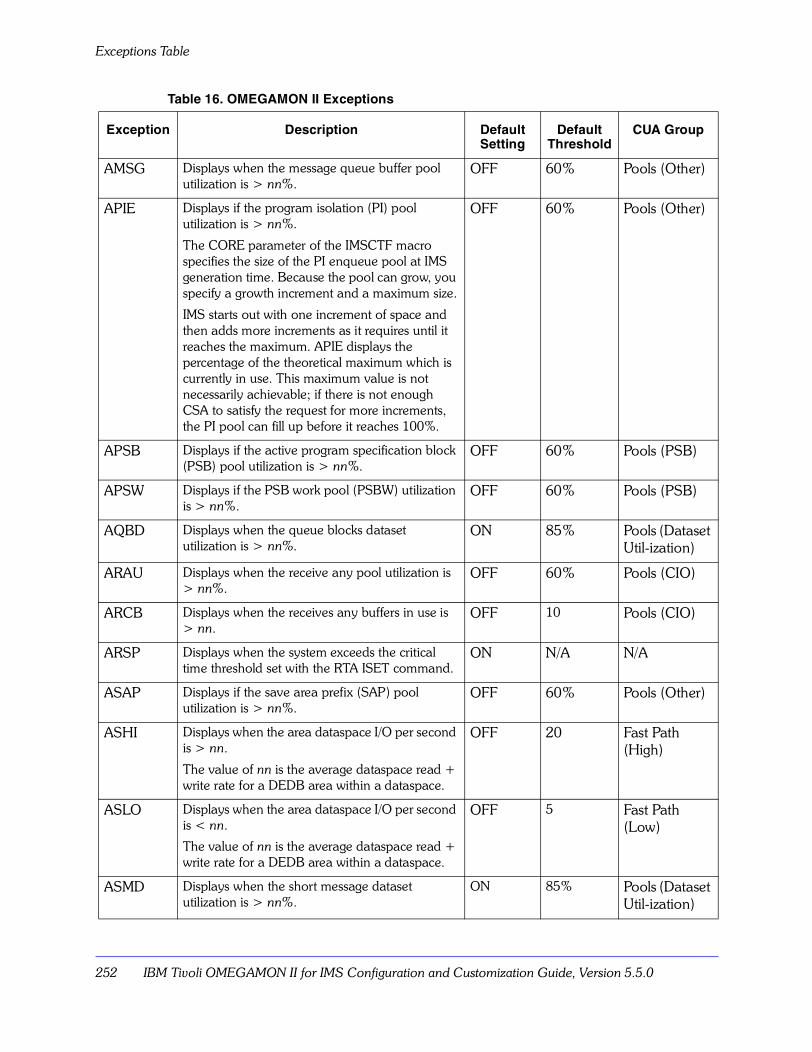
Exceptions Table
252 IBM Tivoli OMEGAMON II for IMS Configuration and Customization Guide, Version 5.5.0
AMSG Displays when the message queue buffer pool utilization is > nn%.
OFF 60% Pools (Other)
APIE Displays if the program isolation (PI) pool utilization is > nn%.
The CORE parameter of the IMSCTF macro specifies the size of the PI enqueue pool at IMS generation time. Because the pool can grow, you specify a growth increment and a maximum size.
IMS starts out with one increment of space and then adds more increments as it requires until it reaches the maximum. APIE displays the percentage of the theoretical maximum which is currently in use. This maximum value is not necessarily achievable; if there is not enough CSA to satisfy the request for more increments, the PI pool can fill up before it reaches 100%.
OFF 60% Pools (Other)
APSB Displays if the active program specification block (PSB) pool utilization is > nn%.
OFF 60% Pools (PSB)
APSW Displays if the PSB work pool (PSBW) utilization is > nn%.
OFF 60% Pools (PSB)
AQBD Displays when the queue blocks dataset utilization is > nn%.
ON 85% Pools (Dataset Util-ization)
ARAU Displays when the receive any pool utilization is > nn%.
OFF 60% Pools (CIO)
ARCB Displays when the receives any buffers in use is > nn.
OFF 10 Pools (CIO)
ARSP Displays when the system exceeds the critical time threshold set with the RTA ISET command.
ON N/A N/A
ASAP Displays if the save area prefix (SAP) pool utilization is > nn%.
OFF 60% Pools (Other)
ASHI Displays when the area dataspace I/O per second is > nn.
The value of nn is the average dataspace read + write rate for a DEDB area within a dataspace.
OFF 20 Fast Path (High)
ASLO Displays when the area dataspace I/O per second is < nn.
The value of nn is the average dataspace read + write rate for a DEDB area within a dataspace.
OFF 5 Fast Path (Low)
ASMD Displays when the short message dataset utilization is > nn%.
ON 85% Pools (Dataset Util-ization)
Table 16. OMEGAMON II Exceptions
Exception Description Default Setting
Default Threshold
CUA Group
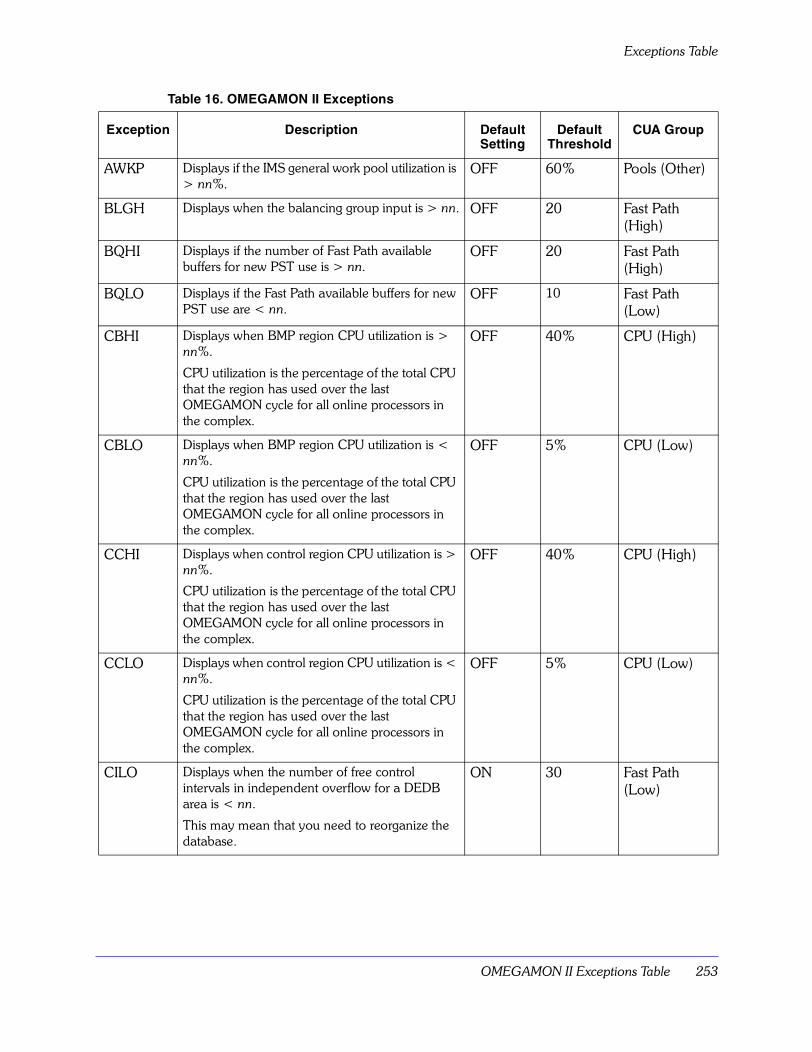
OMEGAMON II Exceptions Table 253
Exceptions Table
AWKP Displays if the IMS general work pool utilization is > nn%.
OFF 60% Pools (Other)
BLGH Displays when the balancing group input is > nn. OFF 20 Fast Path (High)
BQHI Displays if the number of Fast Path available buffers for new PST use is > nn.
OFF 20 Fast Path (High)
BQLO Displays if the Fast Path available buffers for new PST use are < nn.
OFF 10 Fast Path (Low)
CBHI Displays when BMP region CPU utilization is > nn%.
CPU utilization is the percentage of the total CPU that the region has used over the last OMEGAMON cycle for all online processors in the complex.
OFF 40% CPU (High)
CBLO Displays when BMP region CPU utilization is < nn%.
CPU utilization is the percentage of the total CPU that the region has used over the last OMEGAMON cycle for all online processors in the complex.
OFF 5% CPU (Low)
CCHI Displays when control region CPU utilization is > nn%.
CPU utilization is the percentage of the total CPU that the region has used over the last OMEGAMON cycle for all online processors in the complex.
OFF 40% CPU (High)
CCLO Displays when control region CPU utilization is < nn%.
CPU utilization is the percentage of the total CPU that the region has used over the last OMEGAMON cycle for all online processors in the complex.
OFF 5% CPU (Low)
CILO Displays when the number of free control intervals in independent overflow for a DEDB area is < nn.
This may mean that you need to reorganize the database.
ON 30 Fast Path (Low)
Table 16. OMEGAMON II Exceptions
Exception Description Default Setting
Default Threshold
CUA Group
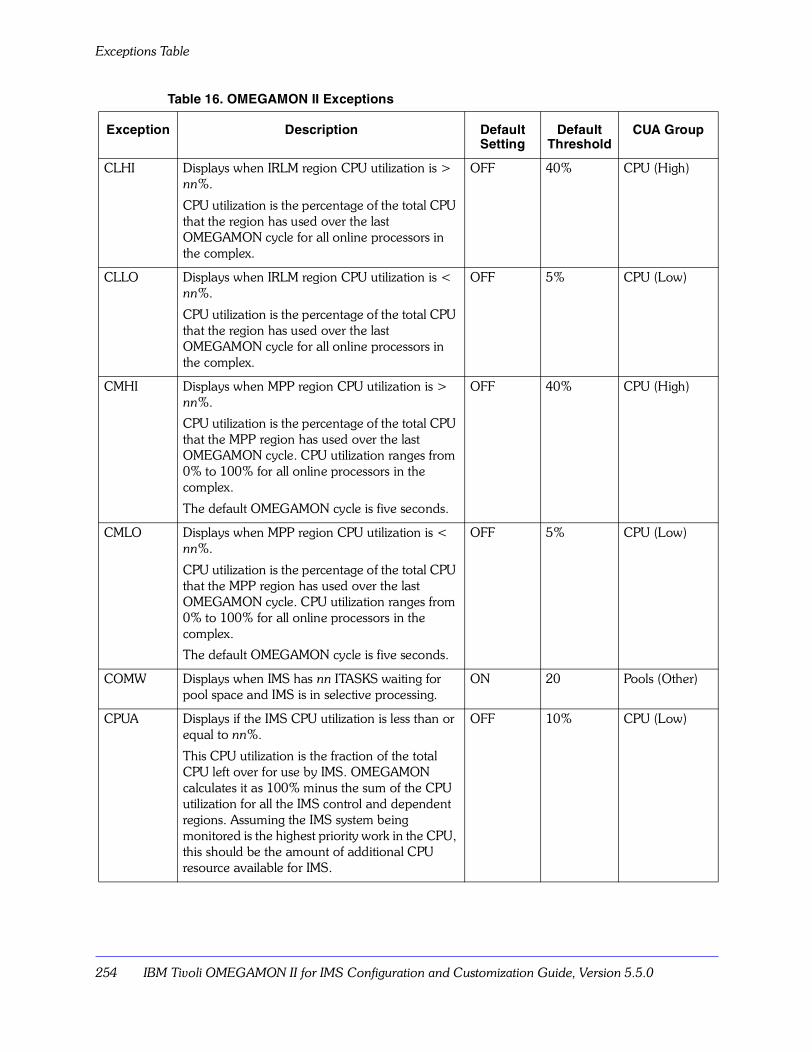
Exceptions Table
254 IBM Tivoli OMEGAMON II for IMS Configuration and Customization Guide, Version 5.5.0
CLHI Displays when IRLM region CPU utilization is > nn%.
CPU utilization is the percentage of the total CPU that the region has used over the last OMEGAMON cycle for all online processors in the complex.
OFF 40% CPU (High)
CLLO Displays when IRLM region CPU utilization is < nn%.
CPU utilization is the percentage of the total CPU that the region has used over the last OMEGAMON cycle for all online processors in the complex.
OFF 5% CPU (Low)
CMHI Displays when MPP region CPU utilization is > nn%.
CPU utilization is the percentage of the total CPU that the MPP region has used over the last OMEGAMON cycle. CPU utilization ranges from 0% to 100% for all online processors in the complex.
The default OMEGAMON cycle is five seconds.
OFF 40% CPU (High)
CMLO Displays when MPP region CPU utilization is < nn%.
CPU utilization is the percentage of the total CPU that the MPP region has used over the last OMEGAMON cycle. CPU utilization ranges from 0% to 100% for all online processors in the complex.
The default OMEGAMON cycle is five seconds.
OFF 5% CPU (Low)
COMW Displays when IMS has nn ITASKS waiting for pool space and IMS is in selective processing.
ON 20 Pools (Other)
CPUA Displays if the IMS CPU utilization is less than or equal to nn%.
This CPU utilization is the fraction of the total CPU left over for use by IMS. OMEGAMON calculates it as 100% minus the sum of the CPU utilization for all the IMS control and dependent regions. Assuming the IMS system being monitored is the highest priority work in the CPU, this should be the amount of additional CPU resource available for IMS.
OFF 10% CPU (Low)
Table 16. OMEGAMON II Exceptions
Exception Description Default Setting
Default Threshold
CUA Group
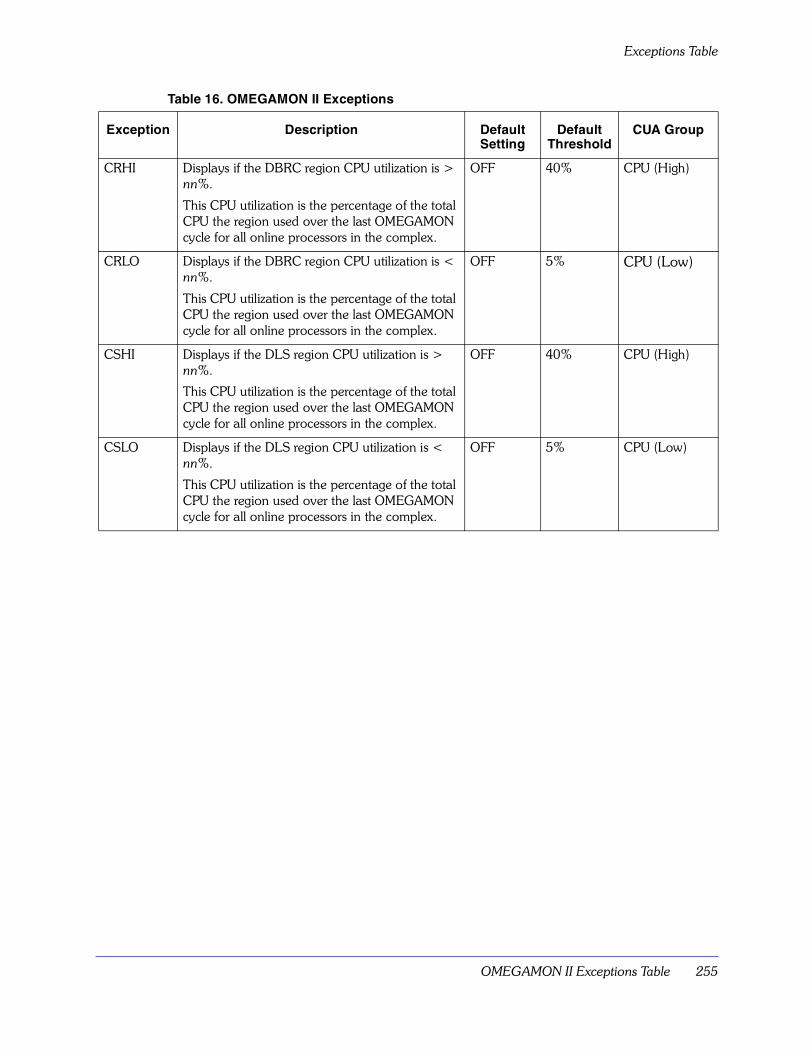
OMEGAMON II Exceptions Table 255
Exceptions Table
CRHI Displays if the DBRC region CPU utilization is > nn%.
This CPU utilization is the percentage of the total CPU the region used over the last OMEGAMON cycle for all online processors in the complex.
OFF 40% CPU (High)
CRLO Displays if the DBRC region CPU utilization is < nn%.
This CPU utilization is the percentage of the total CPU the region used over the last OMEGAMON cycle for all online processors in the complex.
OFF 5% CPU (Low)
CSHI Displays if the DLS region CPU utilization is > nn%.
This CPU utilization is the percentage of the total CPU the region used over the last OMEGAMON cycle for all online processors in the complex.
OFF 40% CPU (High)
CSLO Displays if the DLS region CPU utilization is < nn%.
This CPU utilization is the percentage of the total CPU the region used over the last OMEGAMON cycle for all online processors in the complex.
OFF 5% CPU (Low)
Table 16. OMEGAMON II Exceptions
Exception Description Default Setting
Default Threshold
CUA Group
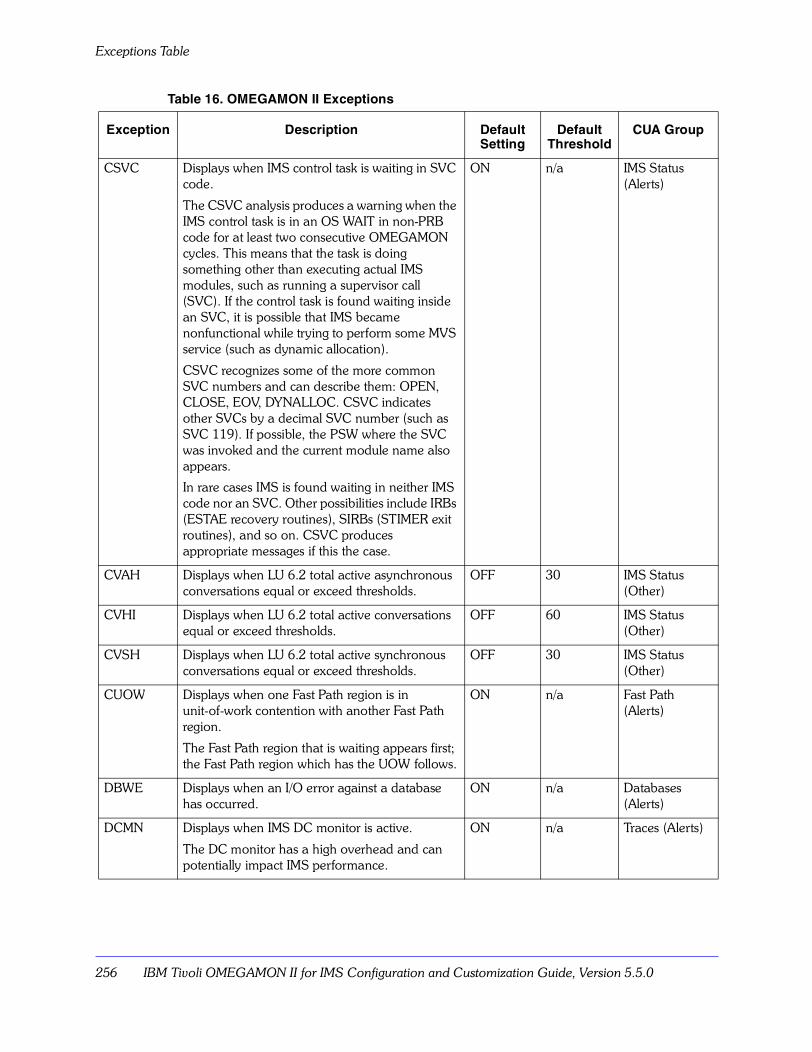
Exceptions Table
256 IBM Tivoli OMEGAMON II for IMS Configuration and Customization Guide, Version 5.5.0
CSVC Displays when IMS control task is waiting in SVC code.
The CSVC analysis produces a warning when the IMS control task is in an OS WAIT in non-PRB code for at least two consecutive OMEGAMON cycles. This means that the task is doing something other than executing actual IMS modules, such as running a supervisor call (SVC). If the control task is found waiting inside an SVC, it is possible that IMS became nonfunctional while trying to perform some MVS service (such as dynamic allocation).
CSVC recognizes some of the more common SVC numbers and can describe them: OPEN, CLOSE, EOV, DYNALLOC. CSVC indicates other SVCs by a decimal SVC number (such as SVC 119). If possible, the PSW where the SVC was invoked and the current module name also appears.
In rare cases IMS is found waiting in neither IMS code nor an SVC. Other possibilities include IRBs (ESTAE recovery routines), SIRBs (STIMER exit routines), and so on. CSVC produces appropriate messages if this the case.
ON n/a IMS Status (Alerts)
CVAH Displays when LU 6.2 total active asynchronous conversations equal or exceed thresholds.
OFF 30 IMS Status (Other)
CVHI Displays when LU 6.2 total active conversations equal or exceed thresholds.
OFF 60 IMS Status (Other)
CVSH Displays when LU 6.2 total active synchronous conversations equal or exceed thresholds.
OFF 30 IMS Status (Other)
CUOW Displays when one Fast Path region is in unit-of-work contention with another Fast Path region.
The Fast Path region that is waiting appears first; the Fast Path region which has the UOW follows.
ON n/a Fast Path (Alerts)
DBWE Displays when an I/O error against a database has occurred.
ON n/a Databases (Alerts)
DCMN Displays when IMS DC monitor is active.
The DC monitor has a high overhead and can potentially impact IMS performance.
ON n/a Traces (Alerts)
Table 16. OMEGAMON II Exceptions
Exception Description Default Setting
Default Threshold
CUA Group
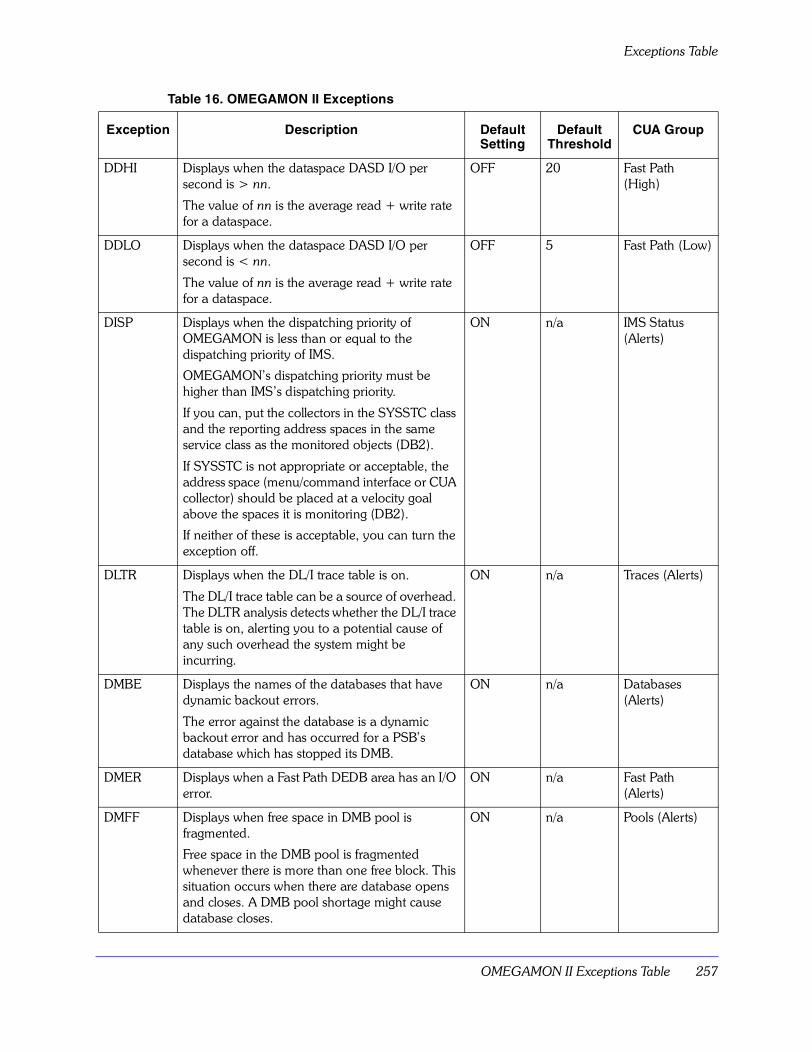
OMEGAMON II Exceptions Table 257
Exceptions Table
DDHI Displays when the dataspace DASD I/O per second is > nn.
The value of nn is the average read + write rate for a dataspace.
OFF 20 Fast Path (High)
DDLO Displays when the dataspace DASD I/O per second is < nn.
The value of nn is the average read + write rate for a dataspace.
OFF 5 Fast Path (Low)
DISP Displays when the dispatching priority of OMEGAMON is less than or equal to the dispatching priority of IMS.
OMEGAMON�s dispatching priority must be higher than IMS�s dispatching priority.
If you can, put the collectors in the SYSSTC class and the reporting address spaces in the same service class as the monitored objects (DB2).
If SYSSTC is not appropriate or acceptable, the address space (menu/command interface or CUA collector) should be placed at a velocity goal above the spaces it is monitoring (DB2).
If neither of these is acceptable, you can turn the exception off.
ON n/a IMS Status (Alerts)
DLTR Displays when the DL/I trace table is on.
The DL/I trace table can be a source of overhead. The DLTR analysis detects whether the DL/I trace table is on, alerting you to a potential cause of any such overhead the system might be incurring.
ON n/a Traces (Alerts)
DMBE Displays the names of the databases that have dynamic backout errors.
The error against the database is a dynamic backout error and has occurred for a PSB�s database which has stopped its DMB.
ON n/a Databases (Alerts)
DMER Displays when a Fast Path DEDB area has an I/O error.
ON n/a Fast Path (Alerts)
DMFF Displays when free space in DMB pool is fragmented.
Free space in the DMB pool is fragmented whenever there is more than one free block. This situation occurs when there are database opens and closes. A DMB pool shortage might cause database closes.
ON n/a Pools (Alerts)
Table 16. OMEGAMON II Exceptions
Exception Description Default Setting
Default Threshold
CUA Group
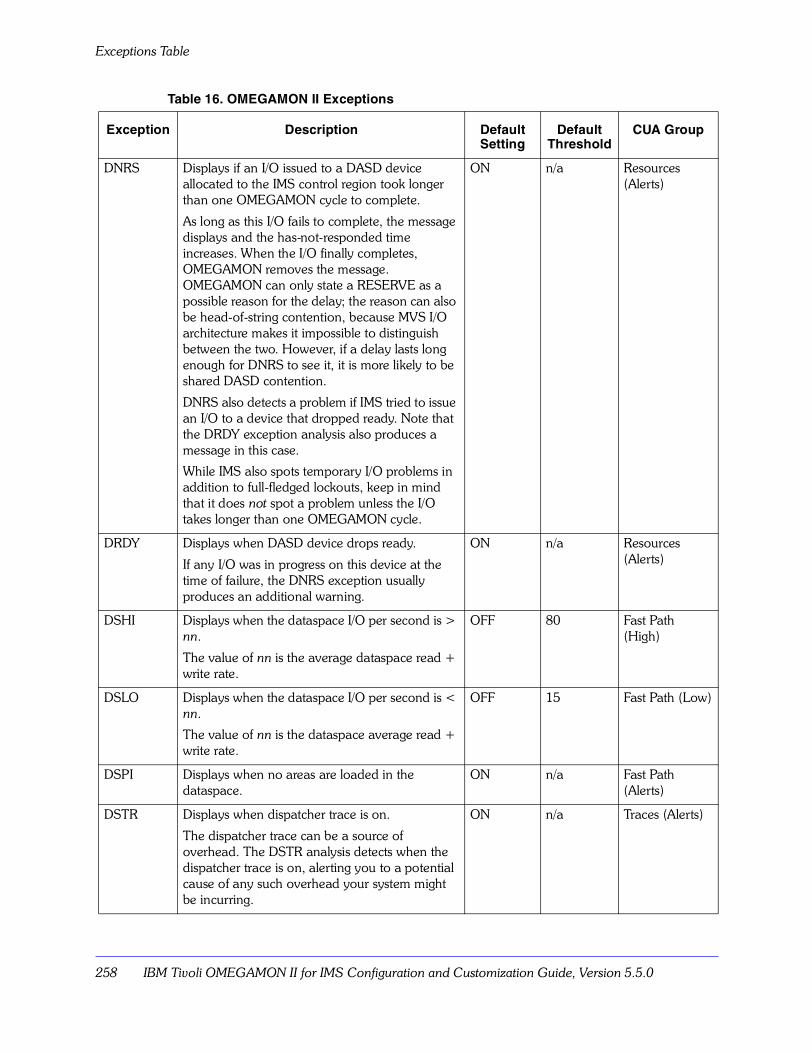
Exceptions Table
258 IBM Tivoli OMEGAMON II for IMS Configuration and Customization Guide, Version 5.5.0
DNRS Displays if an I/O issued to a DASD device allocated to the IMS control region took longer than one OMEGAMON cycle to complete.
As long as this I/O fails to complete, the message displays and the has-not-responded time increases. When the I/O finally completes, OMEGAMON removes the message. OMEGAMON can only state a RESERVE as a possible reason for the delay; the reason can also be head-of-string contention, because MVS I/O architecture makes it impossible to distinguish between the two. However, if a delay lasts long enough for DNRS to see it, it is more likely to be shared DASD contention.
DNRS also detects a problem if IMS tried to issue an I/O to a device that dropped ready. Note that the DRDY exception analysis also produces a message in this case.
While IMS also spots temporary I/O problems in addition to full-fledged lockouts, keep in mind that it does not spot a problem unless the I/O takes longer than one OMEGAMON cycle.
ON n/a Resources (Alerts)
DRDY Displays when DASD device drops ready.
If any I/O was in progress on this device at the time of failure, the DNRS exception usually produces an additional warning.
ON n/a Resources (Alerts)
DSHI Displays when the dataspace I/O per second is > nn.
The value of nn is the average dataspace read + write rate.
OFF 80 Fast Path (High)
DSLO Displays when the dataspace I/O per second is < nn.
The value of nn is the dataspace average read + write rate.
OFF 15 Fast Path (Low)
DSPI Displays when no areas are loaded in the dataspace.
ON n/a Fast Path (Alerts)
DSTR Displays when dispatcher trace is on.
The dispatcher trace can be a source of overhead. The DSTR analysis detects when the dispatcher trace is on, alerting you to a potential cause of any such overhead your system might be incurring.
ON n/a Traces (Alerts)
Table 16. OMEGAMON II Exceptions
Exception Description Default Setting
Default Threshold
CUA Group
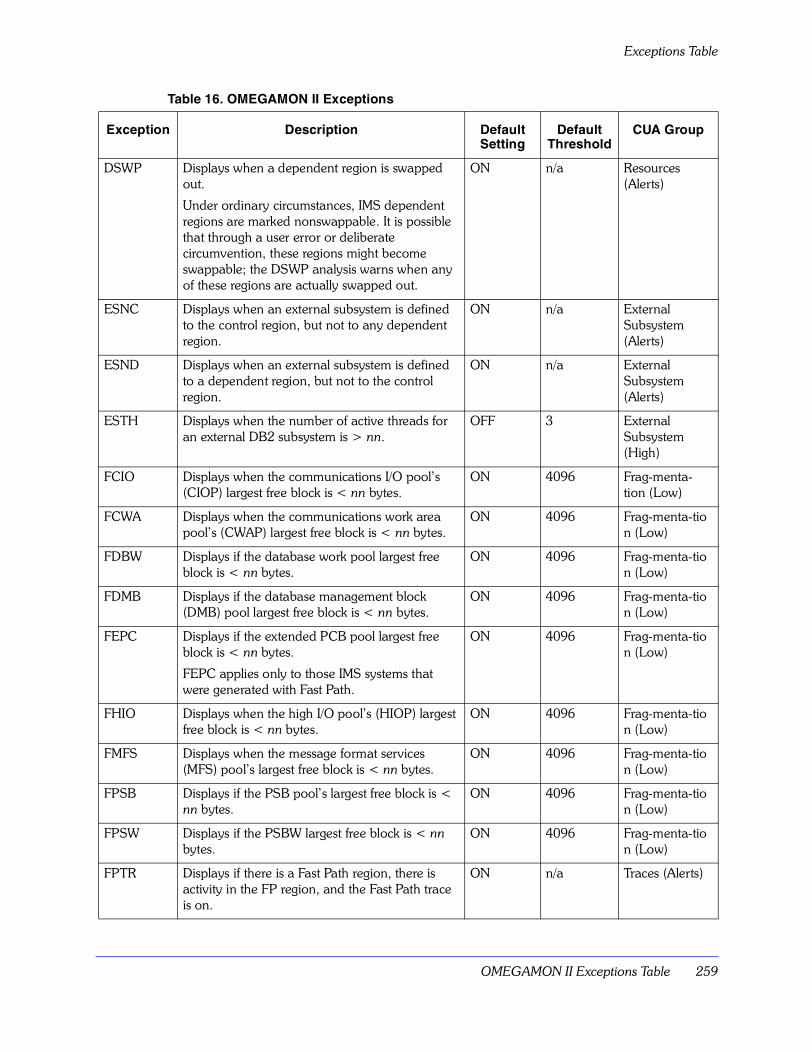
OMEGAMON II Exceptions Table 259
Exceptions Table
DSWP Displays when a dependent region is swapped out.
Under ordinary circumstances, IMS dependent regions are marked nonswappable. It is possible that through a user error or deliberate circumvention, these regions might become swappable; the DSWP analysis warns when any of these regions are actually swapped out.
ON n/a Resources (Alerts)
ESNC Displays when an external subsystem is defined to the control region, but not to any dependent region.
ON n/a External Subsystem (Alerts)
ESND Displays when an external subsystem is defined to a dependent region, but not to the control region.
ON n/a External Subsystem (Alerts)
ESTH Displays when the number of active threads for an external DB2 subsystem is > nn.
OFF 3 External Subsystem (High)
FCIO Displays when the communications I/O pool�s (CIOP) largest free block is < nn bytes.
ON 4096 Frag-menta- tion (Low)
FCWA Displays when the communications work area pool�s (CWAP) largest free block is < nn bytes.
ON 4096 Frag-menta-tion (Low)
FDBW Displays if the database work pool largest free block is < nn bytes.
ON 4096 Frag-menta-tion (Low)
FDMB Displays if the database management block (DMB) pool largest free block is < nn bytes.
ON 4096 Frag-menta-tion (Low)
FEPC Displays if the extended PCB pool largest free block is < nn bytes.
FEPC applies only to those IMS systems that were generated with Fast Path.
ON 4096 Frag-menta-tion (Low)
FHIO Displays when the high I/O pool�s (HIOP) largest free block is < nn bytes.
ON 4096 Frag-menta-tion (Low)
FMFS Displays when the message format services (MFS) pool�s largest free block is < nn bytes.
ON 4096 Frag-menta-tion (Low)
FPSB Displays if the PSB pool�s largest free block is < nn bytes.
ON 4096 Frag-menta-tion (Low)
FPSW Displays if the PSBW largest free block is < nn bytes.
ON 4096 Frag-menta-tion (Low)
FPTR Displays if there is a Fast Path region, there is activity in the FP region, and the Fast Path trace is on.
ON n/a Traces (Alerts)
Table 16. OMEGAMON II Exceptions
Exception Description Default Setting
Default Threshold
CUA Group
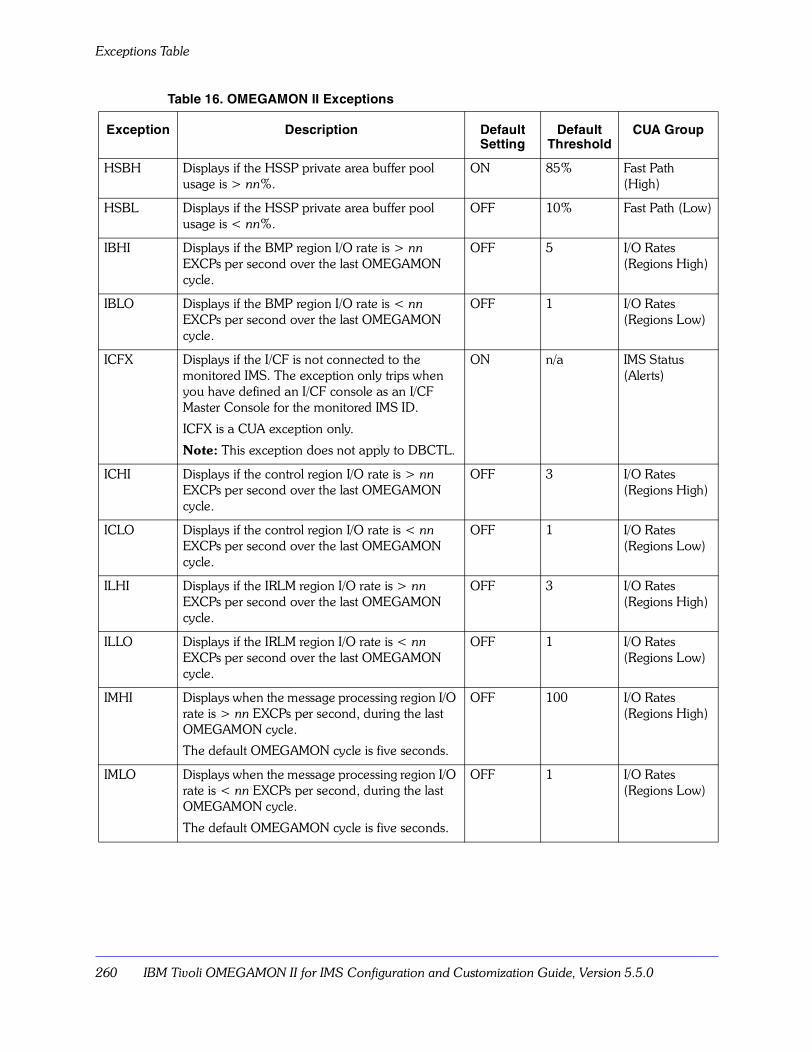
Exceptions Table
260 IBM Tivoli OMEGAMON II for IMS Configuration and Customization Guide, Version 5.5.0
HSBH Displays if the HSSP private area buffer pool usage is > nn%.
ON 85% Fast Path (High)
HSBL Displays if the HSSP private area buffer pool usage is < nn%.
OFF 10% Fast Path (Low)
IBHI Displays if the BMP region I/O rate is > nn EXCPs per second over the last OMEGAMON cycle.
OFF 5 I/O Rates (Regions High)
IBLO Displays if the BMP region I/O rate is < nn EXCPs per second over the last OMEGAMON cycle.
OFF 1 I/O Rates (Regions Low)
ICFX Displays if the I/CF is not connected to the monitored IMS. The exception only trips when you have defined an I/CF console as an I/CF Master Console for the monitored IMS ID.
ICFX is a CUA exception only.
Note: This exception does not apply to DBCTL.
ON n/a IMS Status (Alerts)
ICHI Displays if the control region I/O rate is > nn EXCPs per second over the last OMEGAMON cycle.
OFF 3 I/O Rates (Regions High)
ICLO Displays if the control region I/O rate is < nn EXCPs per second over the last OMEGAMON cycle.
OFF 1 I/O Rates (Regions Low)
ILHI Displays if the IRLM region I/O rate is > nn EXCPs per second over the last OMEGAMON cycle.
OFF 3 I/O Rates (Regions High)
ILLO Displays if the IRLM region I/O rate is < nn EXCPs per second over the last OMEGAMON cycle.
OFF 1 I/O Rates (Regions Low)
IMHI Displays when the message processing region I/O rate is > nn EXCPs per second, during the last OMEGAMON cycle.
The default OMEGAMON cycle is five seconds.
OFF 100 I/O Rates (Regions High)
IMLO Displays when the message processing region I/O rate is < nn EXCPs per second, during the last OMEGAMON cycle.
The default OMEGAMON cycle is five seconds.
OFF 1 I/O Rates (Regions Low)
Table 16. OMEGAMON II Exceptions
Exception Description Default Setting
Default Threshold
CUA Group
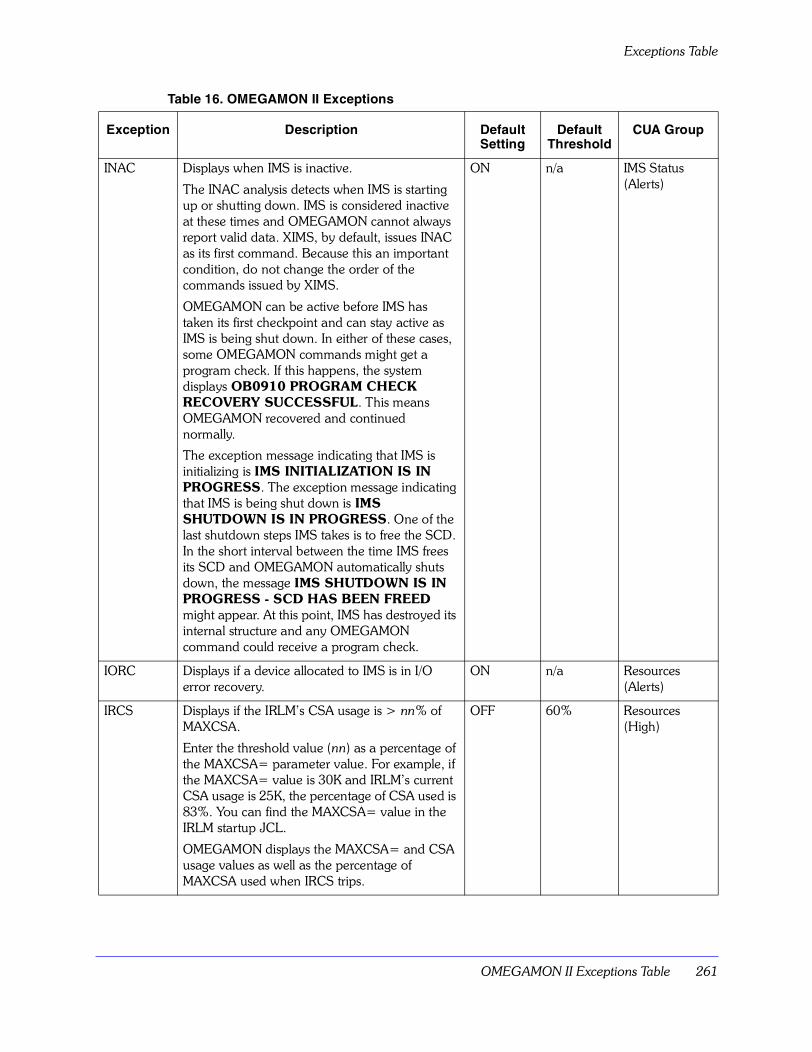
OMEGAMON II Exceptions Table 261
Exceptions Table
INAC Displays when IMS is inactive.
The INAC analysis detects when IMS is starting up or shutting down. IMS is considered inactive at these times and OMEGAMON cannot always report valid data. XIMS, by default, issues INAC as its first command. Because this an important condition, do not change the order of the commands issued by XIMS.
OMEGAMON can be active before IMS has taken its first checkpoint and can stay active as IMS is being shut down. In either of these cases, some OMEGAMON commands might get a program check. If this happens, the system displays OB0910 PROGRAM CHECK RECOVERY SUCCESSFUL. This means OMEGAMON recovered and continued normally.
The exception message indicating that IMS is initializing is IMS INITIALIZATION IS IN PROGRESS. The exception message indicating that IMS is being shut down is IMS SHUTDOWN IS IN PROGRESS. One of the last shutdown steps IMS takes is to free the SCD. In the short interval between the time IMS frees its SCD and OMEGAMON automatically shuts down, the message IMS SHUTDOWN IS IN PROGRESS - SCD HAS BEEN FREED might appear. At this point, IMS has destroyed its internal structure and any OMEGAMON command could receive a program check.
ON n/a IMS Status (Alerts)
IORC Displays if a device allocated to IMS is in I/O error recovery.
ON n/a Resources (Alerts)
IRCS Displays if the IRLM�s CSA usage is > nn% of MAXCSA.
Enter the threshold value (nn) as a percentage of the MAXCSA= parameter value. For example, if the MAXCSA= value is 30K and IRLM�s current CSA usage is 25K, the percentage of CSA used is 83%. You can find the MAXCSA= value in the IRLM startup JCL.
OMEGAMON displays the MAXCSA= and CSA usage values as well as the percentage of MAXCSA used when IRCS trips.
OFF 60% Resources (High)
Table 16. OMEGAMON II Exceptions
Exception Description Default Setting
Default Threshold
CUA Group
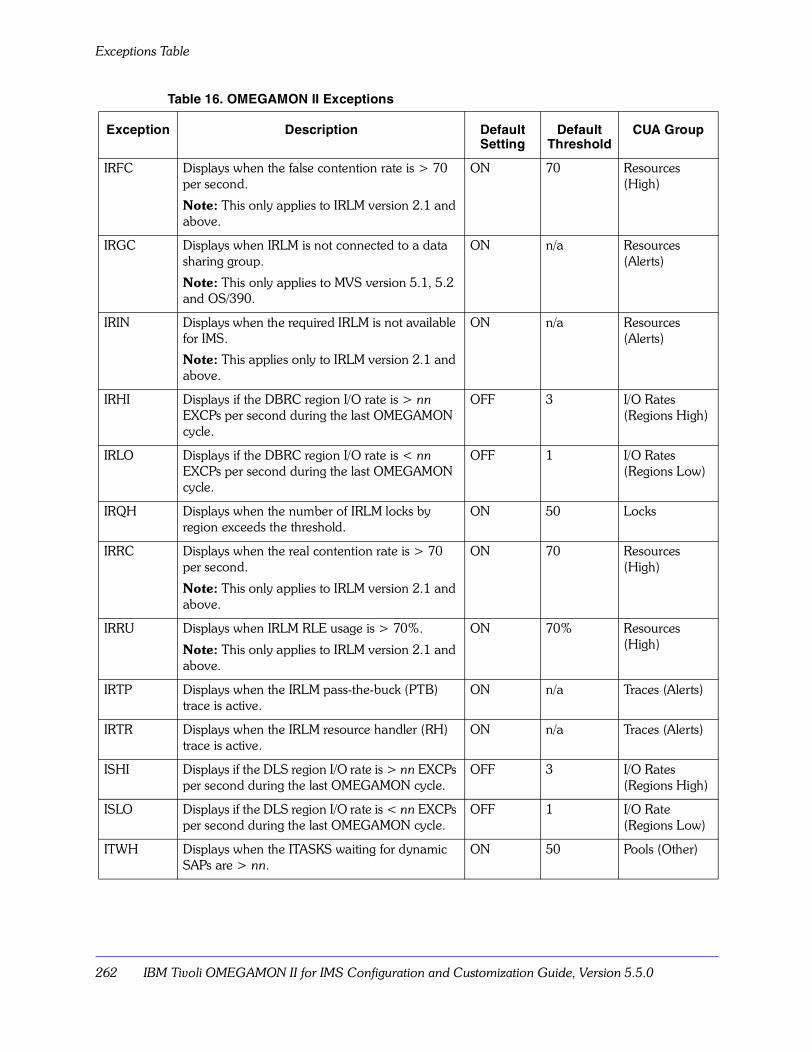
Exceptions Table
262 IBM Tivoli OMEGAMON II for IMS Configuration and Customization Guide, Version 5.5.0
IRFC Displays when the false contention rate is > 70 per second.
Note: This only applies to IRLM version 2.1 and above.
ON 70 Resources (High)
IRGC Displays when IRLM is not connected to a data sharing group.
Note: This only applies to MVS version 5.1, 5.2 and OS/390.
ON n/a Resources (Alerts)
IRIN Displays when the required IRLM is not available for IMS.
Note: This applies only to IRLM version 2.1 and above.
ON n/a Resources (Alerts)
IRHI Displays if the DBRC region I/O rate is > nn EXCPs per second during the last OMEGAMON cycle.
OFF 3 I/O Rates (Regions High)
IRLO Displays if the DBRC region I/O rate is < nn EXCPs per second during the last OMEGAMON cycle.
OFF 1 I/O Rates (Regions Low)
IRQH Displays when the number of IRLM locks by region exceeds the threshold.
ON 50 Locks
IRRC Displays when the real contention rate is > 70 per second.
Note: This only applies to IRLM version 2.1 and above.
ON 70 Resources (High)
IRRU Displays when IRLM RLE usage is > 70%.
Note: This only applies to IRLM version 2.1 and above.
ON 70% Resources (High)
IRTP Displays when the IRLM pass-the-buck (PTB) trace is active.
ON n/a Traces (Alerts)
IRTR Displays when the IRLM resource handler (RH) trace is active.
ON n/a Traces (Alerts)
ISHI Displays if the DLS region I/O rate is > nn EXCPs per second during the last OMEGAMON cycle.
OFF 3 I/O Rates (Regions High)
ISLO Displays if the DLS region I/O rate is < nn EXCPs per second during the last OMEGAMON cycle.
OFF 1 I/O Rate (Regions Low)
ITWH Displays when the ITASKS waiting for dynamic SAPs are > nn.
ON 50 Pools (Other)
Table 16. OMEGAMON II Exceptions
Exception Description Default Setting
Default Threshold
CUA Group
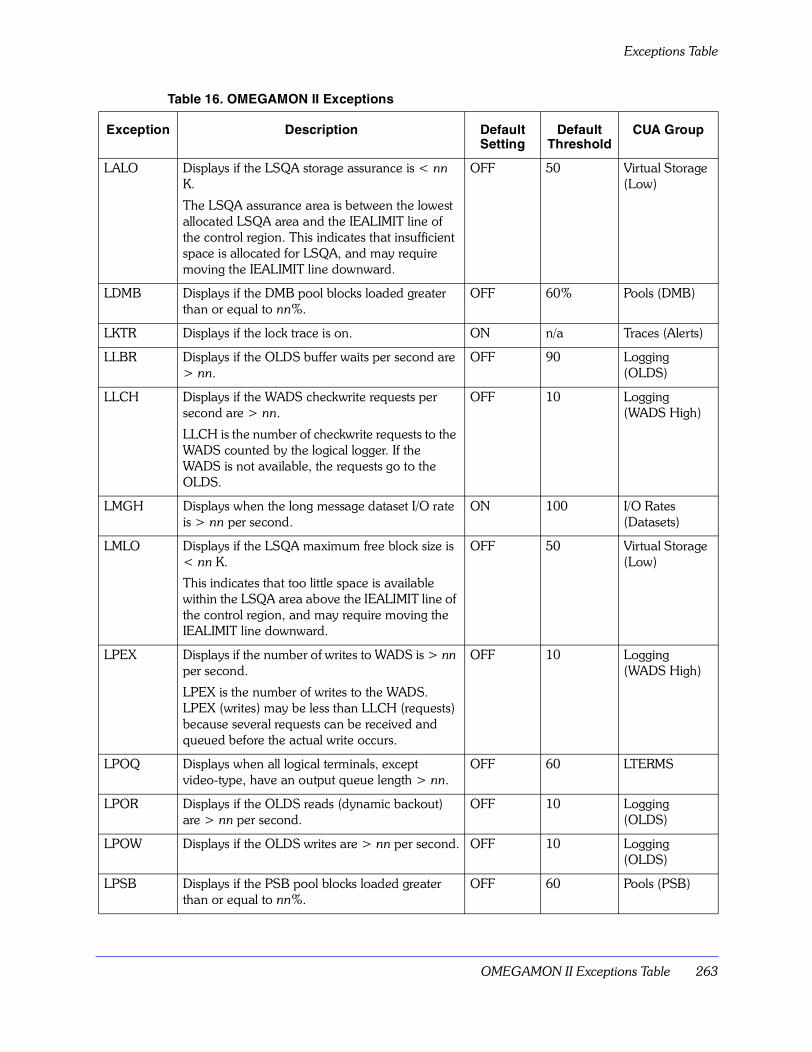
OMEGAMON II Exceptions Table 263
Exceptions Table
LALO Displays if the LSQA storage assurance is < nn K.
The LSQA assurance area is between the lowest allocated LSQA area and the IEALIMIT line of the control region. This indicates that insufficient space is allocated for LSQA, and may require moving the IEALIMIT line downward.
OFF 50 Virtual Storage (Low)
LDMB Displays if the DMB pool blocks loaded greater than or equal to nn%.
OFF 60% Pools (DMB)
LKTR Displays if the lock trace is on. ON n/a Traces (Alerts)
LLBR Displays if the OLDS buffer waits per second are > nn.
OFF 90 Logging (OLDS)
LLCH Displays if the WADS checkwrite requests per second are > nn.
LLCH is the number of checkwrite requests to the WADS counted by the logical logger. If the WADS is not available, the requests go to the OLDS.
OFF 10 Logging (WADS High)
LMGH Displays when the long message dataset I/O rate is > nn per second.
ON 100 I/O Rates (Datasets)
LMLO Displays if the LSQA maximum free block size is < nn K.
This indicates that too little space is available within the LSQA area above the IEALIMIT line of the control region, and may require moving the IEALIMIT line downward.
OFF 50 Virtual Storage (Low)
LPEX Displays if the number of writes to WADS is > nn per second.
LPEX is the number of writes to the WADS. LPEX (writes) may be less than LLCH (requests) because several requests can be received and queued before the actual write occurs.
OFF 10 Logging (WADS High)
LPOQ Displays when all logical terminals, except video-type, have an output queue length > nn.
OFF 60 LTERMS
LPOR Displays if the OLDS reads (dynamic backout) are > nn per second.
OFF 10 Logging (OLDS)
LPOW Displays if the OLDS writes are > nn per second. OFF 10 Logging (OLDS)
LPSB Displays if the PSB pool blocks loaded greater than or equal to nn%.
OFF 60 Pools (PSB)
Table 16. OMEGAMON II Exceptions
Exception Description Default Setting
Default Threshold
CUA Group
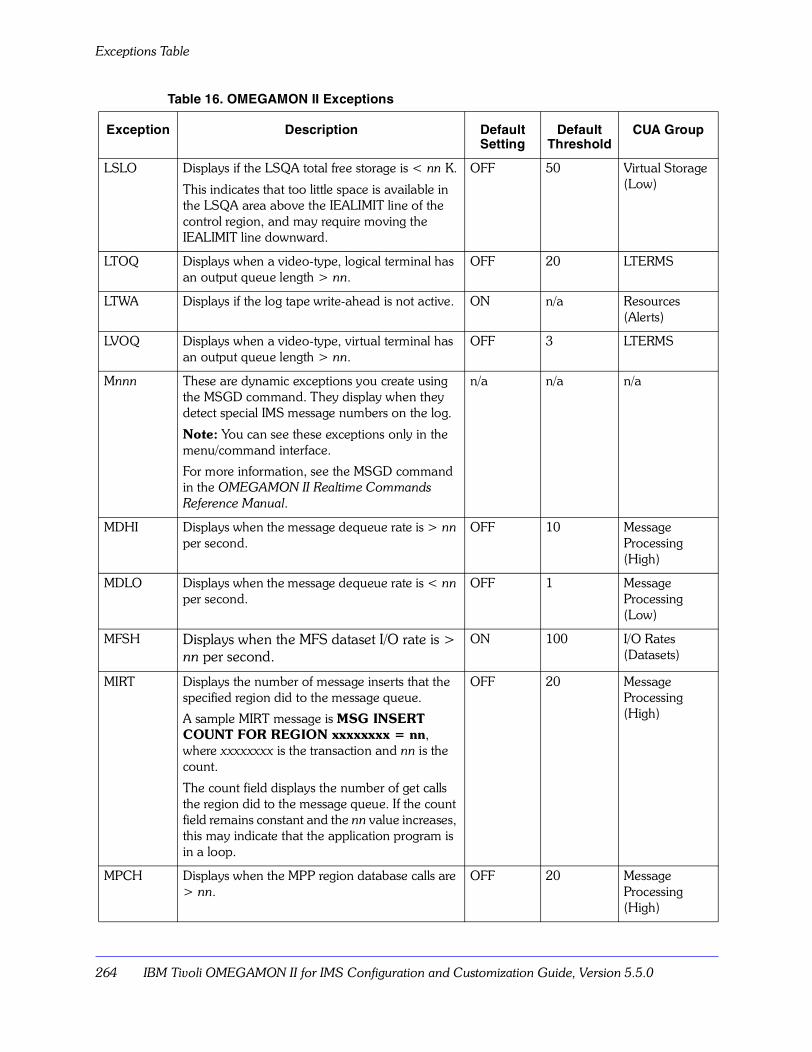
Exceptions Table
264 IBM Tivoli OMEGAMON II for IMS Configuration and Customization Guide, Version 5.5.0
LSLO Displays if the LSQA total free storage is < nn K.
This indicates that too little space is available in the LSQA area above the IEALIMIT line of the control region, and may require moving the IEALIMIT line downward.
OFF 50 Virtual Storage (Low)
LTOQ Displays when a video-type, logical terminal has an output queue length > nn.
OFF 20 LTERMS
LTWA Displays if the log tape write-ahead is not active. ON n/a Resources (Alerts)
LVOQ Displays when a video-type, virtual terminal has an output queue length > nn.
OFF 3 LTERMS
Mnnn These are dynamic exceptions you create using the MSGD command. They display when they detect special IMS message numbers on the log.
Note: You can see these exceptions only in the menu/command interface.
For more information, see the MSGD command in the OMEGAMON II Realtime Commands Reference Manual.
n/a n/a n/a
MDHI Displays when the message dequeue rate is > nn per second.
OFF 10 Message Processing (High)
MDLO Displays when the message dequeue rate is < nn per second.
OFF 1 Message Processing (Low)
MFSH Displays when the MFS dataset I/O rate is > nn per second.
ON 100 I/O Rates (Datasets)
MIRT Displays the number of message inserts that the specified region did to the message queue.
A sample MIRT message is MSG INSERT COUNT FOR REGION xxxxxxxx = nn, where xxxxxxxx is the transaction and nn is the count.
The count field displays the number of get calls the region did to the message queue. If the count field remains constant and the nn value increases, this may indicate that the application program is in a loop.
OFF 20 Message Processing (High)
MPCH Displays when the MPP region database calls are > nn.
OFF 20 Message Processing (High)
Table 16. OMEGAMON II Exceptions
Exception Description Default Setting
Default Threshold
CUA Group

OMEGAMON II Exceptions Table 265
Exceptions Table
MSDI Displays when an MSDB has an invalid packed field.
Note: IMS only resets the packed field when IMS restarts.
ON n/a Fast Path (Alerts)
MSDO Displays when an MSDB has an overflowing field.
IMS resets the overflowing field at the next synchronization point.
ON n/a Fast Path (Alerts)
MSGE Displays when the ICNS command has not been issued.
The ICNS command starts message exception analysis. For more information on message exception analysis, see the MSGD immediate command.
OFF n/a IMS Status (Alerts)
NDIR Displays when the systems programmer has not defined the $$IMSDIR table.
The NDIR analysis detects an undefined $$IMSDIR table and alerts you to the potential cause of any MFS overhead your system may be incurring.
ON n/a Resources (Alerts)
NACB Displays when the VTAM ACB is not open. ON n/a IMS Status
NDRE Displays when the $$IMSDIR table entry is not in the MFS format library.
OMEGAMON did not find a $$IMSDIR table entry in the MFS format library; you are using critical storage incorrectly.
ON n/a Resources (Alerts)
NILU Displays when the IMSLU connection with APPC/MVS is not enabled. This exception trips only on START and FAILED.
ON n/a IMS Status (Alerts)
NLOQ Displays when there are unavailable video-type, logical terminals with an output queue length > nn.
ON 20 LTERMS
NOFB Displays when a region is in buffer wait due to a lack of available Fast Path buffers.
ON n/a Fast Path (Alerts)
NOOT Displays when all output threads are in use and there are buffers queuing up for OTHRs.
The message also displays the number of buffers waiting for OTHR scheduling.
ON n/a Fast Path (Alerts)
Table 16. OMEGAMON II Exceptions
Exception Description Default Setting
Default Threshold
CUA Group
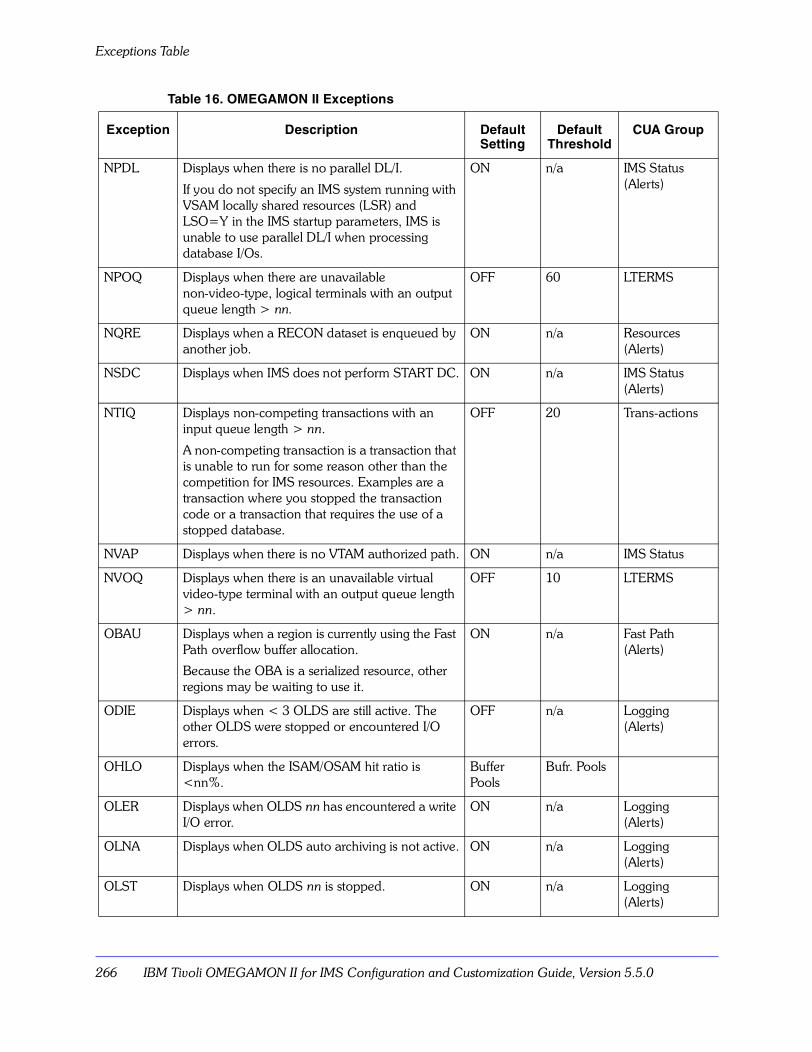
Exceptions Table
266 IBM Tivoli OMEGAMON II for IMS Configuration and Customization Guide, Version 5.5.0
NPDL Displays when there is no parallel DL/I.
If you do not specify an IMS system running with VSAM locally shared resources (LSR) and LSO=Y in the IMS startup parameters, IMS is unable to use parallel DL/I when processing database I/Os.
ON n/a IMS Status (Alerts)
NPOQ Displays when there are unavailable non-video-type, logical terminals with an output queue length > nn.
OFF 60 LTERMS
NQRE Displays when a RECON dataset is enqueued by another job.
ON n/a Resources (Alerts)
NSDC Displays when IMS does not perform START DC. ON n/a IMS Status (Alerts)
NTIQ Displays non-competing transactions with an input queue length > nn.
A non-competing transaction is a transaction that is unable to run for some reason other than the competition for IMS resources. Examples are a transaction where you stopped the transaction code or a transaction that requires the use of a stopped database.
OFF 20 Trans-actions
NVAP Displays when there is no VTAM authorized path. ON n/a IMS Status
NVOQ Displays when there is an unavailable virtual video-type terminal with an output queue length > nn.
OFF 10 LTERMS
OBAU Displays when a region is currently using the Fast Path overflow buffer allocation.
Because the OBA is a serialized resource, other regions may be waiting to use it.
ON n/a Fast Path (Alerts)
ODIE Displays when < 3 OLDS are still active. The other OLDS were stopped or encountered I/O errors.
OFF n/a Logging (Alerts)
OHLO Displays when the ISAM/OSAM hit ratio is <nn%.
Buffer Pools
Bufr. Pools
OLER Displays when OLDS nn has encountered a write I/O error.
ON n/a Logging (Alerts)
OLNA Displays when OLDS auto archiving is not active. ON n/a Logging (Alerts)
OLST Displays when OLDS nn is stopped. ON n/a Logging (Alerts)
Table 16. OMEGAMON II Exceptions
Exception Description Default Setting
Default Threshold
CUA Group
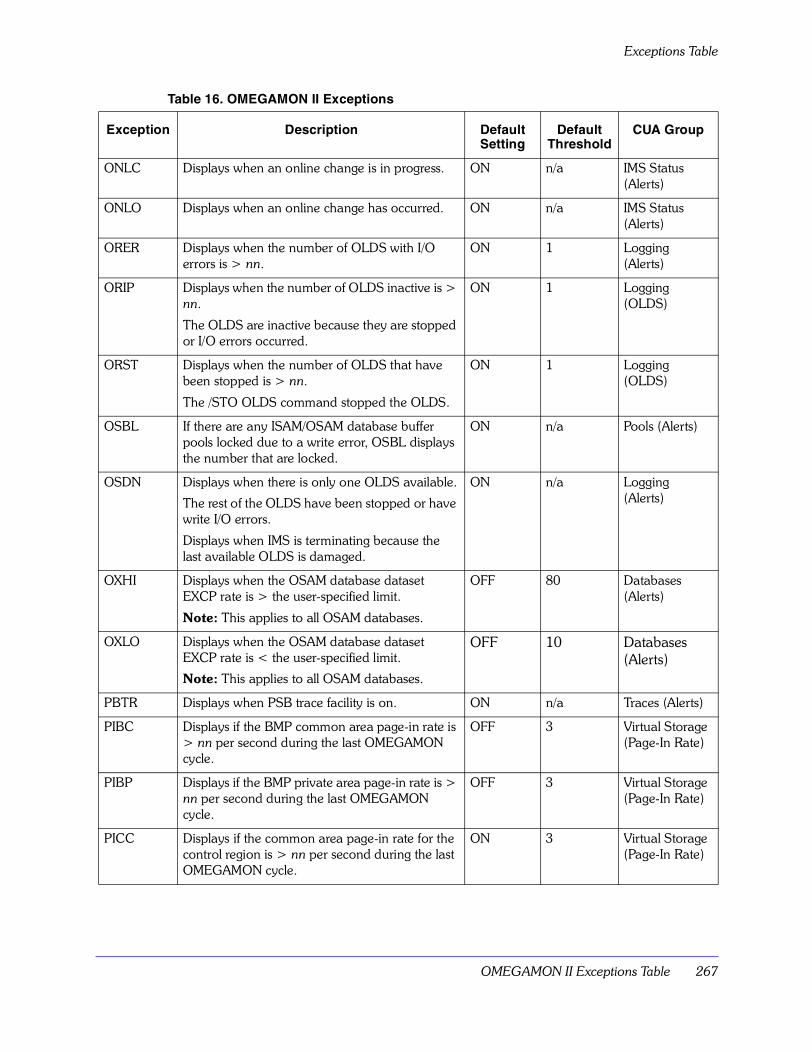
OMEGAMON II Exceptions Table 267
Exceptions Table
ONLC Displays when an online change is in progress. ON n/a IMS Status (Alerts)
ONLO Displays when an online change has occurred. ON n/a IMS Status (Alerts)
ORER Displays when the number of OLDS with I/O errors is > nn.
ON 1 Logging (Alerts)
ORIP Displays when the number of OLDS inactive is > nn.
The OLDS are inactive because they are stopped or I/O errors occurred.
ON 1 Logging (OLDS)
ORST Displays when the number of OLDS that have been stopped is > nn.
The /STO OLDS command stopped the OLDS.
ON 1 Logging (OLDS)
OSBL If there are any ISAM/OSAM database buffer pools locked due to a write error, OSBL displays the number that are locked.
ON n/a Pools (Alerts)
OSDN Displays when there is only one OLDS available.
The rest of the OLDS have been stopped or have write I/O errors.
Displays when IMS is terminating because the last available OLDS is damaged.
ON n/a Logging (Alerts)
OXHI Displays when the OSAM database dataset EXCP rate is > the user-specified limit.
Note: This applies to all OSAM databases.
OFF 80 Databases (Alerts)
OXLO Displays when the OSAM database dataset EXCP rate is < the user-specified limit.
Note: This applies to all OSAM databases.
OFF 10 Databases (Alerts)
PBTR Displays when PSB trace facility is on. ON n/a Traces (Alerts)
PIBC Displays if the BMP common area page-in rate is > nn per second during the last OMEGAMON cycle.
OFF 3 Virtual Storage (Page-In Rate)
PIBP Displays if the BMP private area page-in rate is > nn per second during the last OMEGAMON cycle.
OFF 3 Virtual Storage (Page-In Rate)
PICC Displays if the common area page-in rate for the control region is > nn per second during the last OMEGAMON cycle.
ON 3 Virtual Storage (Page-In Rate)
Table 16. OMEGAMON II Exceptions
Exception Description Default Setting
Default Threshold
CUA Group
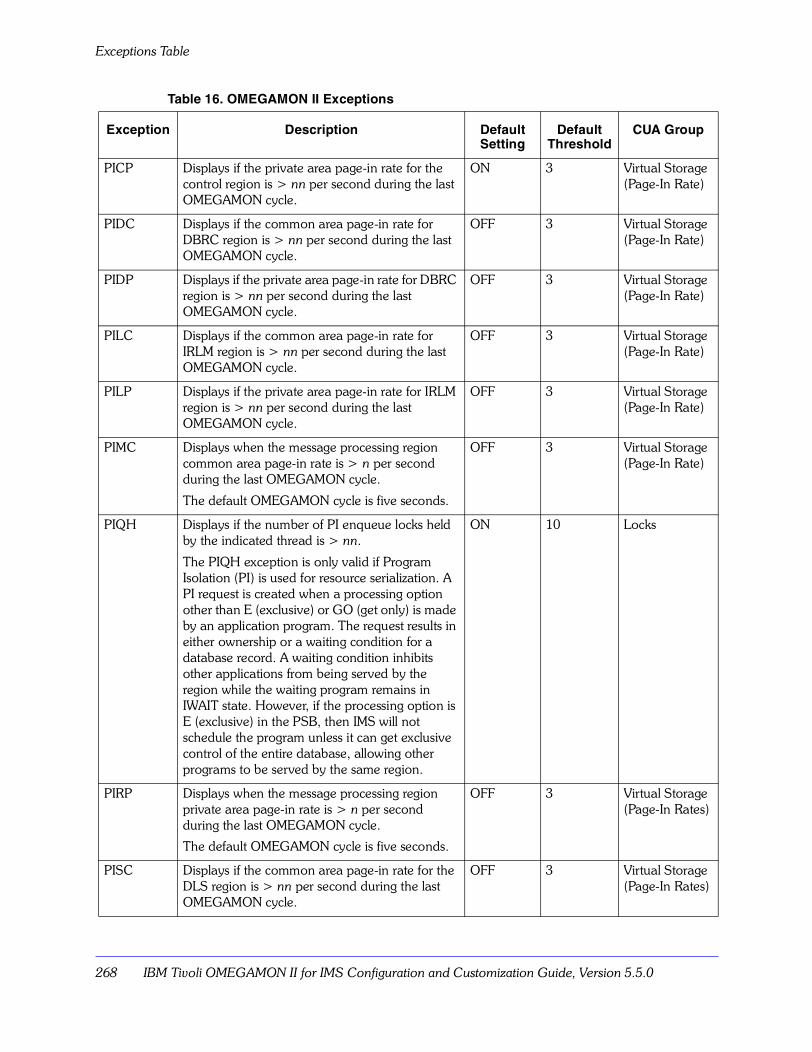
Exceptions Table
268 IBM Tivoli OMEGAMON II for IMS Configuration and Customization Guide, Version 5.5.0
PICP Displays if the private area page-in rate for the control region is > nn per second during the last OMEGAMON cycle.
ON 3 Virtual Storage (Page-In Rate)
PIDC Displays if the common area page-in rate for DBRC region is > nn per second during the last OMEGAMON cycle.
OFF 3 Virtual Storage (Page-In Rate)
PIDP Displays if the private area page-in rate for DBRC region is > nn per second during the last OMEGAMON cycle.
OFF 3 Virtual Storage (Page-In Rate)
PILC Displays if the common area page-in rate for IRLM region is > nn per second during the last OMEGAMON cycle.
OFF 3 Virtual Storage (Page-In Rate)
PILP Displays if the private area page-in rate for IRLM region is > nn per second during the last OMEGAMON cycle.
OFF 3 Virtual Storage (Page-In Rate)
PIMC Displays when the message processing region common area page-in rate is > n per second during the last OMEGAMON cycle.
The default OMEGAMON cycle is five seconds.
OFF 3 Virtual Storage (Page-In Rate)
PIQH Displays if the number of PI enqueue locks held by the indicated thread is > nn.
The PIQH exception is only valid if Program Isolation (PI) is used for resource serialization. A PI request is created when a processing option other than E (exclusive) or GO (get only) is made by an application program. The request results in either ownership or a waiting condition for a database record. A waiting condition inhibits other applications from being served by the region while the waiting program remains in IWAIT state. However, if the processing option is E (exclusive) in the PSB, then IMS will not schedule the program unless it can get exclusive control of the entire database, allowing other programs to be served by the same region.
ON 10 Locks
PIRP Displays when the message processing region private area page-in rate is > n per second during the last OMEGAMON cycle.
The default OMEGAMON cycle is five seconds.
OFF 3 Virtual Storage (Page-In Rates)
PISC Displays if the common area page-in rate for the DLS region is > nn per second during the last OMEGAMON cycle.
OFF 3 Virtual Storage (Page-In Rates)
Table 16. OMEGAMON II Exceptions
Exception Description Default Setting
Default Threshold
CUA Group

OMEGAMON II Exceptions Table 269
Exceptions Table
PISP Displays if the private area page-in rate for the DLS region is > nn per second during the last OMEGAMON cycle.
OFF 3 Virtual Storage (Page-In Rates)
PITR Displays when the program isolation trace facility is on.
ON n/a Traces (Alerts)
PROQ Displays when the printer is unable to receive output.
ON n/a Resources (Alerts)
PSVC Displays when IMS physical logger task waiting in SVC code.
The PSVC analysis produces a warning when it sees that the IMS physical logger task is in an OS WAIT in non-PRB code for at least two consecutive OMEGAMON cycles. This means that the task is doing something other than executing actual IMS modules, such as running a supervisor call (SVC). If the IMS physical logger task is found waiting inside an SVC, IMS might have become nonfunctional while trying to perform some MVS service (dataset OPEN, for example).
PSVC recognizes some of the more common SVC numbers and can describe them: other SVCs by a decimal SVC number (such as SVC 119). If possible, PSVC also indicates the PSW where the SVC was invoked and the current module name.
In rare cases, IMS is found waiting in neither IMS code nor in an SVC. Other possibilities include IRBs (ESTAE recovery routines), SIRBs (STIMER exit routines), and so on; PSVC produces appropriate messages if this the case.
ON n/a Resources (Alerts)
QBKH Displays when the queue blocks dataset I/O rate is > n per second.
ON 100 I/O Rates (Datasets)
RDSH Displays if the restart dataset I/O rate is > nn per second.
ON 100 I/O Rates (Datasets)
RGNW Displays when region waiting time is > nn minutes.
OFF 1 Regions
RGSH Displays when checkpoints taken for an IMS BMP are > nn.
ON 50 Regions
Table 16. OMEGAMON II Exceptions
Exception Description Default Setting
Default Threshold
CUA Group
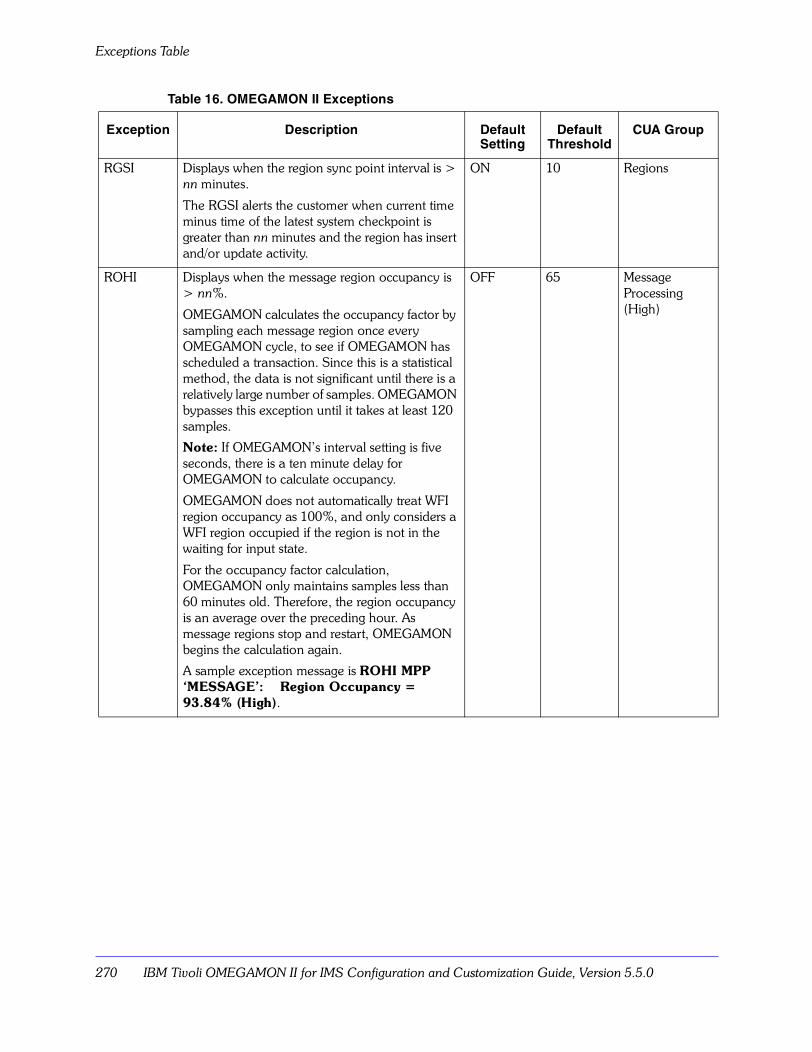
Exceptions Table
270 IBM Tivoli OMEGAMON II for IMS Configuration and Customization Guide, Version 5.5.0
RGSI Displays when the region sync point interval is > nn minutes.
The RGSI alerts the customer when current time minus time of the latest system checkpoint is greater than nn minutes and the region has insert and/or update activity.
ON 10 Regions
ROHI Displays when the message region occupancy is > nn%.
OMEGAMON calculates the occupancy factor by sampling each message region once every OMEGAMON cycle, to see if OMEGAMON has scheduled a transaction. Since this is a statistical method, the data is not significant until there is a relatively large number of samples. OMEGAMON bypasses this exception until it takes at least 120 samples.
Note: If OMEGAMON�s interval setting is five seconds, there is a ten minute delay for OMEGAMON to calculate occupancy.
OMEGAMON does not automatically treat WFI region occupancy as 100%, and only considers a WFI region occupied if the region is not in the waiting for input state.
For the occupancy factor calculation, OMEGAMON only maintains samples less than 60 minutes old. Therefore, the region occupancy is an average over the preceding hour. As message regions stop and restart, OMEGAMON begins the calculation again.
A sample exception message is ROHI MPP �MESSAGE�: Region Occupancy = 93.84% (High).
OFF 65 Message Processing (High)
Table 16. OMEGAMON II Exceptions
Exception Description Default Setting
Default Threshold
CUA Group
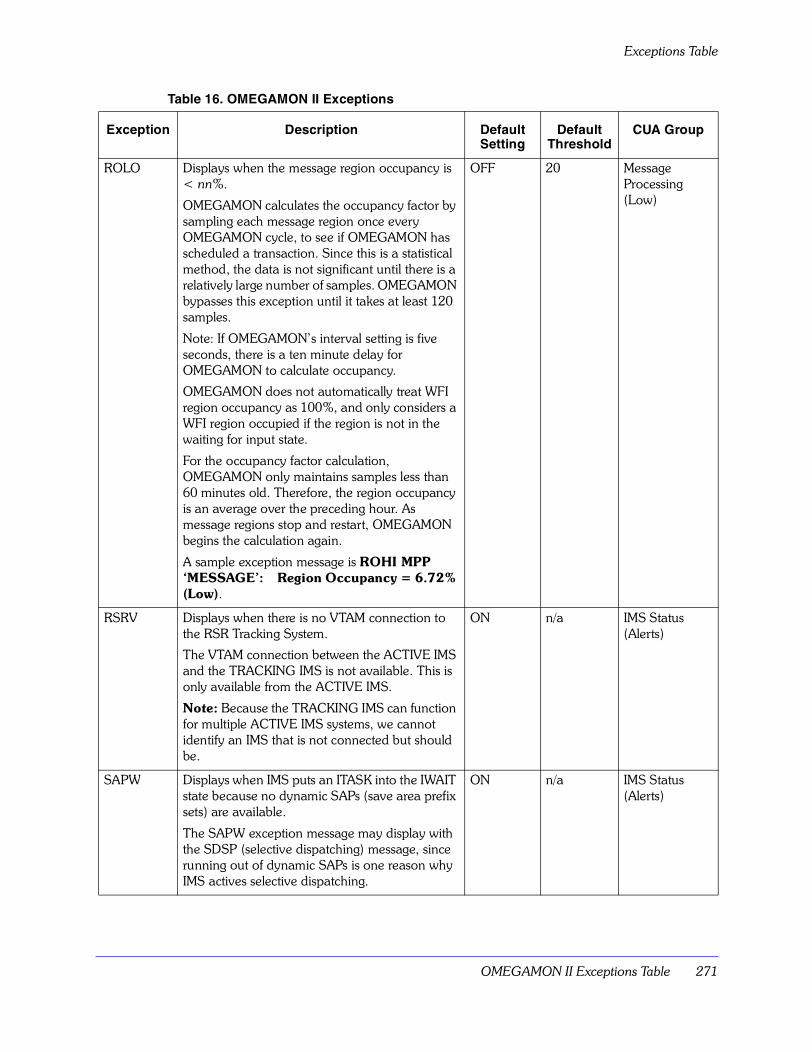
OMEGAMON II Exceptions Table 271
Exceptions Table
ROLO Displays when the message region occupancy is < nn%.
OMEGAMON calculates the occupancy factor by sampling each message region once every OMEGAMON cycle, to see if OMEGAMON has scheduled a transaction. Since this is a statistical method, the data is not significant until there is a relatively large number of samples. OMEGAMON bypasses this exception until it takes at least 120 samples.
Note: If OMEGAMON�s interval setting is five seconds, there is a ten minute delay for OMEGAMON to calculate occupancy.
OMEGAMON does not automatically treat WFI region occupancy as 100%, and only considers a WFI region occupied if the region is not in the waiting for input state.
For the occupancy factor calculation, OMEGAMON only maintains samples less than 60 minutes old. Therefore, the region occupancy is an average over the preceding hour. As message regions stop and restart, OMEGAMON begins the calculation again.
A sample exception message is ROHI MPP �MESSAGE�: Region Occupancy = 6.72% (Low).
OFF 20 Message Processing (Low)
RSRV Displays when there is no VTAM connection to the RSR Tracking System.
The VTAM connection between the ACTIVE IMS and the TRACKING IMS is not available. This is only available from the ACTIVE IMS.
Note: Because the TRACKING IMS can function for multiple ACTIVE IMS systems, we cannot identify an IMS that is not connected but should be.
ON n/a IMS Status (Alerts)
SAPW Displays when IMS puts an ITASK into the IWAIT state because no dynamic SAPs (save area prefix sets) are available.
The SAPW exception message may display with the SDSP (selective dispatching) message, since running out of dynamic SAPs is one reason why IMS actives selective dispatching.
ON n/a IMS Status (Alerts)
Table 16. OMEGAMON II Exceptions
Exception Description Default Setting
Default Threshold
CUA Group
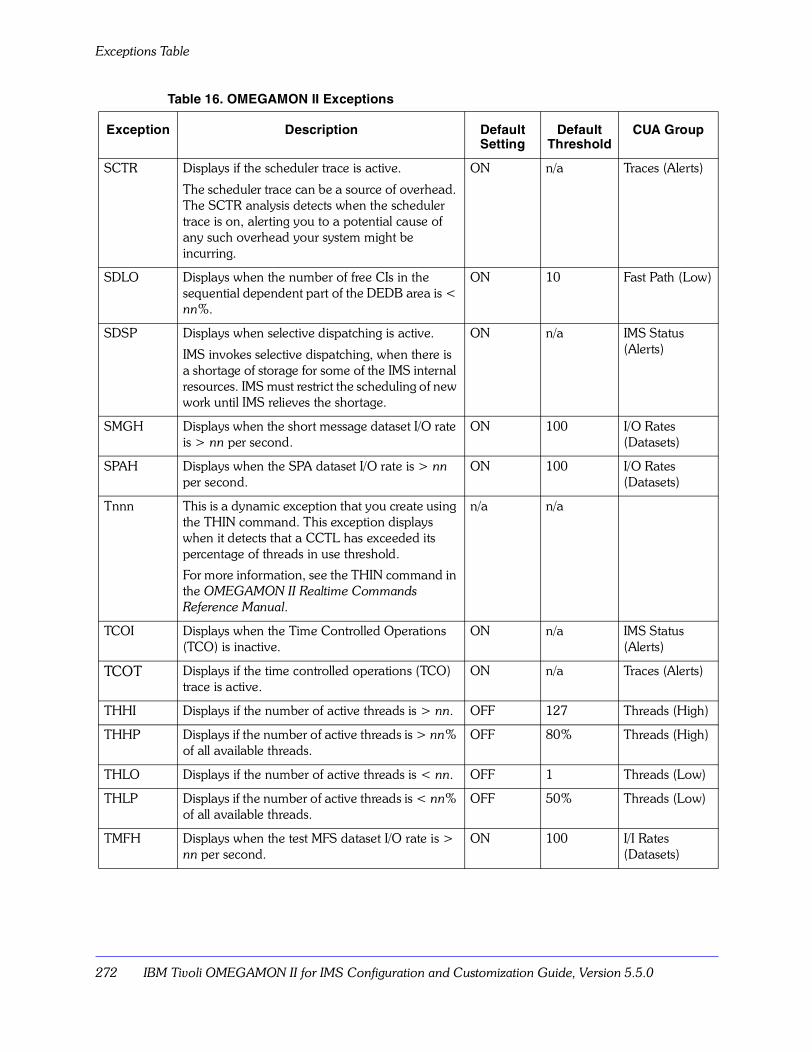
Exceptions Table
272 IBM Tivoli OMEGAMON II for IMS Configuration and Customization Guide, Version 5.5.0
SCTR Displays if the scheduler trace is active.
The scheduler trace can be a source of overhead. The SCTR analysis detects when the scheduler trace is on, alerting you to a potential cause of any such overhead your system might be incurring.
ON n/a Traces (Alerts)
SDLO Displays when the number of free CIs in the sequential dependent part of the DEDB area is < nn%.
ON 10 Fast Path (Low)
SDSP Displays when selective dispatching is active.
IMS invokes selective dispatching, when there is a shortage of storage for some of the IMS internal resources. IMS must restrict the scheduling of new work until IMS relieves the shortage.
ON n/a IMS Status (Alerts)
SMGH Displays when the short message dataset I/O rate is > nn per second.
ON 100 I/O Rates (Datasets)
SPAH Displays when the SPA dataset I/O rate is > nn per second.
ON 100 I/O Rates (Datasets)
Tnnn This is a dynamic exception that you create using the THIN command. This exception displays when it detects that a CCTL has exceeded its percentage of threads in use threshold.
For more information, see the THIN command in the OMEGAMON II Realtime Commands Reference Manual.
n/a n/a
TCOI Displays when the Time Controlled Operations (TCO) is inactive.
ON n/a IMS Status (Alerts)
TCOT Displays if the time controlled operations (TCO) trace is active.
ON n/a Traces (Alerts)
THHI Displays if the number of active threads is > nn. OFF 127 Threads (High)
THHP Displays if the number of active threads is > nn% of all available threads.
OFF 80% Threads (High)
THLO Displays if the number of active threads is < nn. OFF 1 Threads (Low)
THLP Displays if the number of active threads is < nn% of all available threads.
OFF 50% Threads (Low)
TMFH Displays when the test MFS dataset I/O rate is > nn per second.
ON 100 I/I Rates (Datasets)
Table 16. OMEGAMON II Exceptions
Exception Description Default Setting
Default Threshold
CUA Group
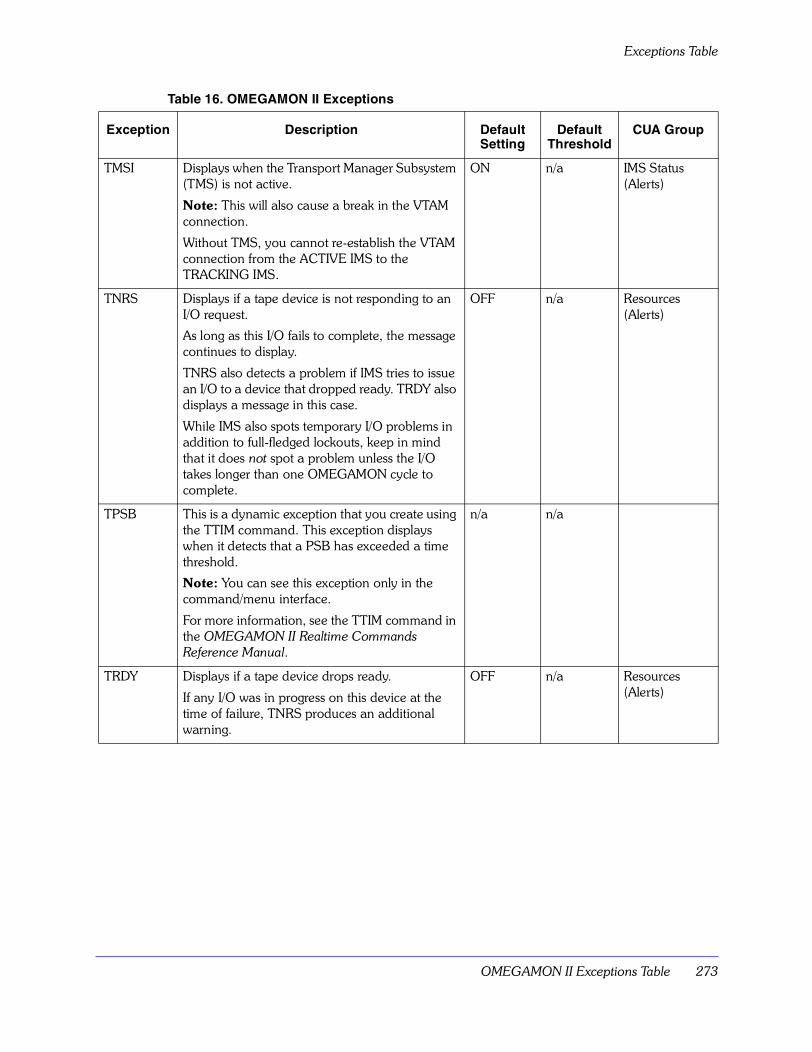
OMEGAMON II Exceptions Table 273
Exceptions Table
TMSI Displays when the Transport Manager Subsystem (TMS) is not active.
Note: This will also cause a break in the VTAM connection.
Without TMS, you cannot re-establish the VTAM connection from the ACTIVE IMS to the TRACKING IMS.
ON n/a IMS Status (Alerts)
TNRS Displays if a tape device is not responding to an I/O request.
As long as this I/O fails to complete, the message continues to display.
TNRS also detects a problem if IMS tries to issue an I/O to a device that dropped ready. TRDY also displays a message in this case.
While IMS also spots temporary I/O problems in addition to full-fledged lockouts, keep in mind that it does not spot a problem unless the I/O takes longer than one OMEGAMON cycle to complete.
OFF n/a Resources (Alerts)
TPSB This is a dynamic exception that you create using the TTIM command. This exception displays when it detects that a PSB has exceeded a time threshold.
Note: You can see this exception only in the command/menu interface.
For more information, see the TTIM command in the OMEGAMON II Realtime Commands Reference Manual.
n/a n/a
TRDY Displays if a tape device drops ready.
If any I/O was in progress on this device at the time of failure, TNRS produces an additional warning.
OFF n/a Resources (Alerts)
Table 16. OMEGAMON II Exceptions
Exception Description Default Setting
Default Threshold
CUA Group
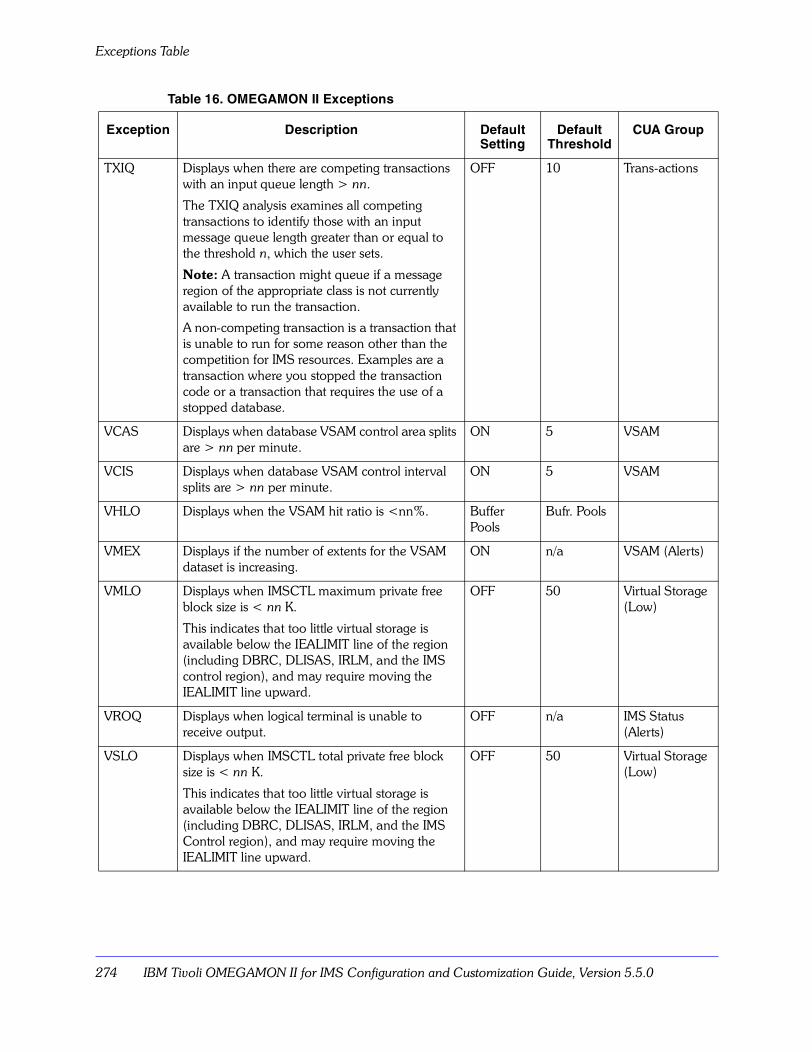
Exceptions Table
274 IBM Tivoli OMEGAMON II for IMS Configuration and Customization Guide, Version 5.5.0
TXIQ Displays when there are competing transactions with an input queue length > nn.
The TXIQ analysis examines all competing transactions to identify those with an input message queue length greater than or equal to the threshold n, which the user sets.
Note: A transaction might queue if a message region of the appropriate class is not currently available to run the transaction.
A non-competing transaction is a transaction that is unable to run for some reason other than the competition for IMS resources. Examples are a transaction where you stopped the transaction code or a transaction that requires the use of a stopped database.
OFF 10 Trans-actions
VCAS Displays when database VSAM control area splits are > nn per minute.
ON 5 VSAM
VCIS Displays when database VSAM control interval splits are > nn per minute.
ON 5 VSAM
VHLO Displays when the VSAM hit ratio is <nn%. Buffer Pools
Bufr. Pools
VMEX Displays if the number of extents for the VSAM dataset is increasing.
ON n/a VSAM (Alerts)
VMLO Displays when IMSCTL maximum private free block size is < nn K.
This indicates that too little virtual storage is available below the IEALIMIT line of the region (including DBRC, DLISAS, IRLM, and the IMS control region), and may require moving the IEALIMIT line upward.
OFF 50 Virtual Storage (Low)
VROQ Displays when logical terminal is unable to receive output.
OFF n/a IMS Status (Alerts)
VSLO Displays when IMSCTL total private free block size is < nn K.
This indicates that too little virtual storage is available below the IEALIMIT line of the region (including DBRC, DLISAS, IRLM, and the IMS Control region), and may require moving the IEALIMIT line upward.
OFF 50 Virtual Storage (Low)
Table 16. OMEGAMON II Exceptions
Exception Description Default Setting
Default Threshold
CUA Group
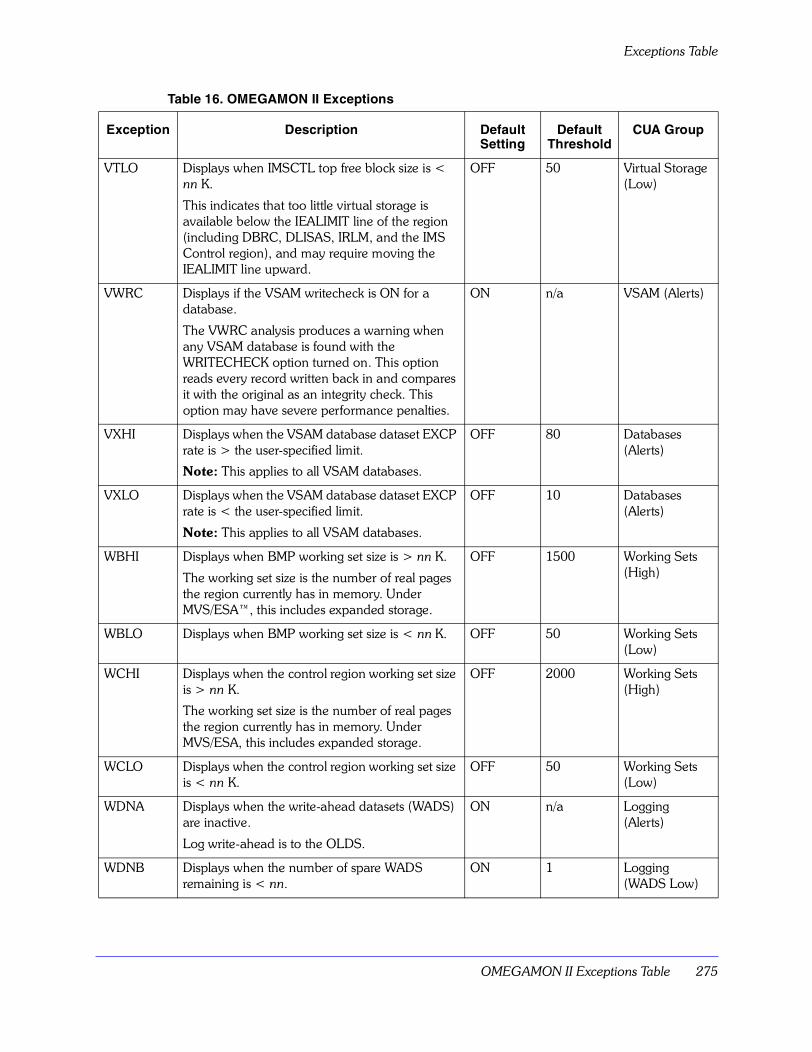
OMEGAMON II Exceptions Table 275
Exceptions Table
VTLO Displays when IMSCTL top free block size is < nn K.
This indicates that too little virtual storage is available below the IEALIMIT line of the region (including DBRC, DLISAS, IRLM, and the IMS Control region), and may require moving the IEALIMIT line upward.
OFF 50 Virtual Storage (Low)
VWRC Displays if the VSAM writecheck is ON for a database.
The VWRC analysis produces a warning when any VSAM database is found with the WRITECHECK option turned on. This option reads every record written back in and compares it with the original as an integrity check. This option may have severe performance penalties.
ON n/a VSAM (Alerts)
VXHI Displays when the VSAM database dataset EXCP rate is > the user-specified limit.
Note: This applies to all VSAM databases.
OFF 80 Databases (Alerts)
VXLO Displays when the VSAM database dataset EXCP rate is < the user-specified limit.
Note: This applies to all VSAM databases.
OFF 10 Databases (Alerts)
WBHI Displays when BMP working set size is > nn K.
The working set size is the number of real pages the region currently has in memory. Under MVS/ESA�, this includes expanded storage.
OFF 1500 Working Sets (High)
WBLO Displays when BMP working set size is < nn K. OFF 50 Working Sets (Low)
WCHI Displays when the control region working set size is > nn K.
The working set size is the number of real pages the region currently has in memory. Under MVS/ESA, this includes expanded storage.
OFF 2000 Working Sets (High)
WCLO Displays when the control region working set size is < nn K.
OFF 50 Working Sets (Low)
WDNA Displays when the write-ahead datasets (WADS) are inactive.
Log write-ahead is to the OLDS.
ON n/a Logging (Alerts)
WDNB Displays when the number of spare WADS remaining is < nn.
ON 1 Logging (WADS Low)
Table 16. OMEGAMON II Exceptions
Exception Description Default Setting
Default Threshold
CUA Group

Exceptions Table
276 IBM Tivoli OMEGAMON II for IMS Configuration and Customization Guide, Version 5.5.0
WLHI Displays when IRLM working set size is > nn K.
The working set size is the number of real pages the region currently has in memory. Under MVS/ESA, this includes expanded storage.
OFF 2000 Working Sets (High)
WLLO Displays when IRLM working set size is < nn K. OFF 50 Working Sets (Low)
WMHI Displays when the message processing region working set size is > nnK.
The working set size is the number of real pages the region currently has in memory. Under MVS/ESA, the working set size includes expanded storage.
OFF 1500 Working Sets (High)
WMLO Displays when the message processing region working set size is < nnK.
The working set size is the number of real pages the region currently has in memory. Under MVS/ESA, the working set size includes expanded storage.
OFF 50 Working Sets (Low)
WRHI Displays when DBRC working set size is > nn K.
The working set size is the number of real pages the region currently has in memory. Under MVS/ESA, this includes expanded storage.
OFF 2000 Working Sets (High)
WRLO Displays when DBRC working set size is < nn K. OFF 50 Working Sets (Low)
WSHI Displays when DLS working set size is > nn K.
The working set size is the number of real pages the region currently has in memory. Under MVS/ESA, this includes expanded storage.
OFF 2000 Working Sets (High)
WSLO Displays when DLS working set size is < nn K. OFF 50 Working Sets (Low)
XCNF Displays when a Program Isolation (PI) or IMS/VS Resource Lock Manager (IRLM) resource conflict exists.
OFF n/a Locks (Alerts)
XRAT Displays when XRF automatic takeover is not active.
XRAT only applies to systems which were installed with XRF.
ON n/a XRF (Alerts)
Table 16. OMEGAMON II Exceptions
Exception Description Default Setting
Default Threshold
CUA Group
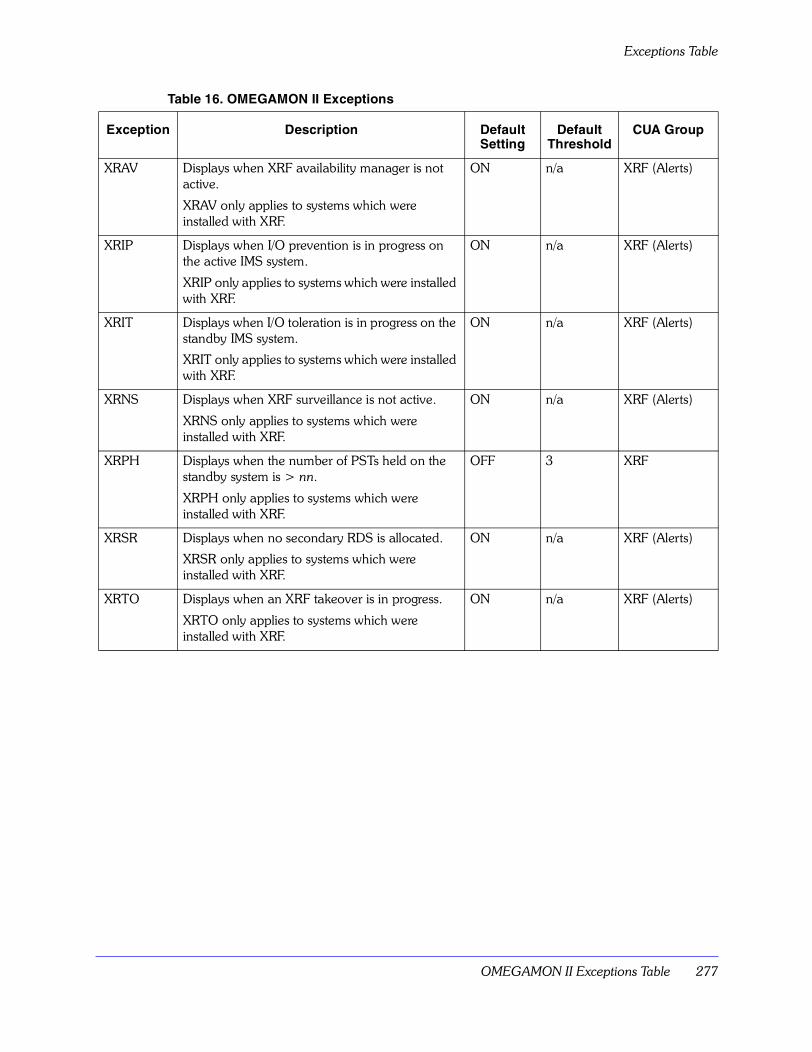
OMEGAMON II Exceptions Table 277
Exceptions Table
XRAV Displays when XRF availability manager is not active.
XRAV only applies to systems which were installed with XRF.
ON n/a XRF (Alerts)
XRIP Displays when I/O prevention is in progress on the active IMS system.
XRIP only applies to systems which were installed with XRF.
ON n/a XRF (Alerts)
XRIT Displays when I/O toleration is in progress on the standby IMS system.
XRIT only applies to systems which were installed with XRF.
ON n/a XRF (Alerts)
XRNS Displays when XRF surveillance is not active.
XRNS only applies to systems which were installed with XRF.
ON n/a XRF (Alerts)
XRPH Displays when the number of PSTs held on the standby system is > nn.
XRPH only applies to systems which were installed with XRF.
OFF 3 XRF
XRSR Displays when no secondary RDS is allocated.
XRSR only applies to systems which were installed with XRF.
ON n/a XRF (Alerts)
XRTO Displays when an XRF takeover is in progress.
XRTO only applies to systems which were installed with XRF.
ON n/a XRF (Alerts)
Table 16. OMEGAMON II Exceptions
Exception Description Default Setting
Default Threshold
CUA Group

Exceptions Table
278 IBM Tivoli OMEGAMON II for IMS Configuration and Customization Guide, Version 5.5.0
Support Information 279
Support Information
If you have a problem with your IBM software, you want to resolve it quickly. This section describes the following options for obtaining support for IBM software products:
� �Searching knowledge bases� on page 279
� �Obtaining fixes� on page 280
� �Receiving weekly support updates� on page 280
� �Contacting IBM Software Support� on page 281
Searching knowledge basesYou can search the available knowledge bases to determine whether your problem was already encountered and is already documented.
Searching the information center
IBM provides extensive documentation that can be installed on your local computer or on an intranet server. You can use the search function of this information center to query conceptual information, instructions for completing tasks, and reference information.
Searching the Internet
If you cannot find an answer to your question in the information center, search the Internet for the latest, most complete information that might help you resolve your problem.
To search multiple Internet resources for your product, use the Web search topic in your information center. In the navigation frame, click Troubleshooting and support > Searching knowledge bases and select Web search. From this topic, you can search a variety of resources, including the following:
� IBM technotes
� IBM downloads
� IBM Redbooks®
� IBM developerWorks®
� Forums and newsgroups
D
280 IBM Tivoli OMEGAMON II for IMS Configuration and Customization Guide, Version 5.5.0
Obtaining fixesA product fix might be available to resolve your problem. To determine what fixes are available for your IBM software product, follow these steps:
1. Go to the IBM Software Support Web site at (http://www.ibm.com/software/support).
2. Click Downloads and drivers in the Support topics section.
3. Select the Software category.
4. Select a product in the Sub-category list.
5. In the Find downloads and drivers by product section, select one software category from the Category list.
6. Select one product from the Sub-category list.
7. Type more search terms in the Search within results if you want to refine your search.
8. Click Search.
9. From the list of downloads returned by your search, click the name of a fix to read the description of the fix and to optionally download the fix.For more information about the types of fixes that are available, refer to the IBM Software Support Handbook at http://techsupport.services.ibm.com/guides/handbook.html.
Receiving weekly support updatesTo receive weekly e-mail notifications about fixes and other software support news, follow these steps:
1. Go to the IBM Software Support Web site at http:/www.ibm.com/software/support.
2. Click My Support in the upper right corner of the page.
3. If you have already registered for My Support, sign in and skip to the next step. If you have not registered, click register now. Complete the registration form using your e-mail address as your IBM ID and click Submit.
4. Click Edit Profile.
5. In the Products list, select Software. A second list is displayed.
6. In the second list, select a product segment, for example, Application servers. A third list is displayed.
7. In the third list, select a product sub-segment, for example, Distributed Application & Web Servers. A list of applicable products is displayed.
8. Select the products for which you want to receive updates, for example, IBM HTTP Server and WebSphere Application Server.
9. Click Add products.
10. After selecting all products that are of interest to you, click Subscribe to email on the Edit profile tab.
11. Select Please send these documents by weekly email.
Support Information 281
12. Update your e-mail address as needed.
13. In the Documents list, select Software.
14. Select the types of documents that you want to receive information about.
15. Click Update. If you experience problems with the My support feature, you can obtain help in one of the following ways:
Online: Send an e-mail message to [email protected], describing your problem.
By phone: Call 1-800-IBM-4You (1-800-426-4968).
Contacting IBM Software SupportIBM Software Support provides assistance with product defects.
Before contacting IBM Software Support, your company must have an active IBM software maintenance contract, and you must be authorized to submit problems to IBM. The type of software maintenance contract that you need depends on the type of product you have:
� For IBM distributed software products (including, but not limited to, Tivoli, Lotus®, and Rational® products, as well as DB2® and WebSphere® products that run on Windows or UNIX operating systems), enroll in Passport Advantage® in one of the following ways:
� Online: Go to the Passport Advantage Web page (http://www.lotus.com/services/passport.nsf/WebDocs/ Passport_Advantage_Home) and click How to Enroll
� By phone: For the phone number to call in your country, go to the IBM Software Support Web site at http://techsupport.services.ibm.com/guides/contacts.html and click the name of your geographic region.
� For customers with Subscription and Support (S & S) contracts, go to the Software Service Request Web site at https://techsupport.services.ibm.com/ssr/login.
� For customers with IBMLink�, CATIA, Linux�, S/390®, iSeries�, pSeries®, zSeries®, and other support agreements, go to the Support Line Web site at http://www.ibm.com/services/us/index.wss/so/its/a1000030/dt006.
� For IBM eServer� software products (including, but not limited to, DB2 and WebSphere products that run in zSeries, pSeries, and iSeries environments), you can purchase a software maintenance agreement by working directly with an IBM sales representative or an IBM Business Partner. For more information about support for eServer software products, go to the IBM Technical Support Advantage Web site at http://www.ibm.com/servers/eserver/techsupport.html.
If you are not sure what type of software maintenance contract you need, call 1-800-IBMSERV (1-800-426-7378) in the United States. From other countries, go to the contacts page of the IBM Software Support Handbook on the Web at
282 IBM Tivoli OMEGAMON II for IMS Configuration and Customization Guide, Version 5.5.0
http://techsupport.services.ibm.com/guides/contacts.html and click the name of your geographic region for phone numbers of people who provide support for your location.
To contact IBM Software Support, follow these steps:
1. �Determining the business impact� on page 2822. �Describing problems and gathering information� on page 2823. �Submitting problems� on page 283
Determining the business impactWhen you report a problem to IBM, you are asked to supply a severity level. Therefore, you need to understand and assess the business impact of the problem that you are reporting. Use the following criteria:
Describing problems and gathering informationWhen explaining a problem to IBM, be as specific as possible. Include all relevant background information so that IBM Software Support specialists can help you solve the problem efficiently. To save time, know the answers to these questions:
� What software versions were you running when the problem occurred?
� Do you have logs, traces, and messages that are related to the problem symptoms? IBM Software Support is likely to ask for this information.
� Can you re-create the problem? If so, what steps were performed to re-create the problem?
� Did you make any changes to the system? For example, did you make changes to the hardware, operating system, networking software, and so on.
� Are you currently using a workaround for the problem? If so, be prepared to explain the workaround when you report the problem.
� What software versions were you running when the problem occurred?
Severity 1 The problem has a critical business impact. You are unable to use the program, resulting in a critical impact on operations. This condition requires an immediate solution.
Severity 2 The problem has a significant business impact. The program is usable, but it is severely limited.
Severity 3 The problem has some business impact. The program is usable, but less significant features (not critical to operations) are unavailable.
Severity 4 The problem has minimal business impact. The problem causes little impact on operations, or a reasonable circumvention to the problem was implemented.
Support Information 283
Submitting problemsYou can submit your problem to IBM Software Support in one of two ways:
� Online: Click Submit and track problems on the IBM Software Support site at http://www.ibm.com/software/support/probsub.html. Type your information into the appropriate problem submission form.
� By phone: For the phone number to call in your country, go to the contacts page of the IBM Software Support Handbook (http://techsupport.services.ibm.com/guides/contacts.html) and click the name of your geographic region.
If the problem you submit is for a software defect or for missing or inaccurate documentation, IBM Software Support creates an Authorized Program Analysis Report (APAR). The APAR describes the problem in detail. Whenever possible, IBM Software Support provides a workaround that you can implement until the APAR is resolved and a fix is delivered. IBM publishes resolved APARs on the Software Support Web site daily, so that other users who experience the same problem can benefit from the same resolution.

284 IBM Tivoli OMEGAMON II for IMS Configuration and Customization Guide, Version 5.5.0
Notices 285
Notices
OverviewThis information was developed for products and services offered in the U.S.A. IBM may not offer the products, services, or features discussed in this document in other countries. Consult your local IBM representative for information on the products and services currently available in your area. Any reference to an IBM product, program, or service is not intended to state or imply that only that IBM product, program, or service may be used. Any functionally equivalent product, program, or service that does not infringe any IBM intellectual property right may be used instead. However, it is the user's responsibility to evaluate and verify the operation of any non-IBM product, program, or service.
IBM may have patents or pending patent applications covering subject matter described in this document. The furnishing of this document does not give you any license to these patents. You can send license inquiries, in writing, to:
IBM Director of LicensingIBM CorporationNorth Castle DriveArmonk, NY 10504-1785 U.S.A.
For license inquiries regarding double-byte (DBCS) information, contact the IBM Intellectual Property Department in your country or send inquiries, in writing, to:
IBM World Trade Asia CorporationLicensing2-31 Roppongi 3-chome, Minato-kuTokyo 106, Japan
The following paragraph does not apply to the United Kingdom or any other country where such provisions are inconsistent with local law:
INTERNATIONAL BUSINESS MACHINES CORPORATION PROVIDES THIS PUBLICATION "AS IS" WITHOUT WARRANTY OF ANY KIND, EITHER EXPRESS OR IMPLIED, INCLUDING, BUT NOT LIMITED TO, THE IMPLIED WARRANTIES OF NON-INFRINGEMENT, MERCHANTABILITY OR FITNESS FOR A PARTICULAR PURPOSE.
Some states do not allow disclaimer of express or implied warranties in certain transactions, therefore, this statement might not apply to you.
This information could include technical inaccuracies or typographical errors. Changes are periodically made to the information herein; these changes will be incorporated in
E
286 IBM Tivoli OMEGAMON II for IMS Configuration and Customization Guide, Version 5.5.0
new editions of the publication. IBM may make improvements and/or changes in the product(s) and/or the program(s) described in this publication at any time without notice.
Any references in this information to non-IBM Web sites are provided for convenience only and do not in any manner serve as an endorsement of those Web sites. The materials at those Web sites are not part of the materials for this IBM product and use of those Web sites is at your own risk.
IBM may use or distribute any of the information you supply in any way it believes appropriate without incurring any obligation to you.
Licensees of this program who wish to have information about it for the purpose of enabling: (i) the exchange of information between independently created programs and other programs (including this one) and (ii) the mutual use of the information which has been exchanged, should contact:
IBM Corporation2Z4A/10111400 Burnet RoadAustin, TX 78758 U.S.A.
Such information may be available, subject to appropriate terms and conditions, including in some cases payment of a fee.
The licensed program described in this document and all licensed material available for it are provided by IBM under terms of the IBM Customer Agreement, IBM International Program License Agreement or any equivalent agreement between us.
Any performance data contained herein was determined in a controlled environment. Therefore, the results obtained in other operating environments may vary significantly. Some measurements may have been made on development-level systems and there is no guarantee that these measurements will be the same on generally available systems. Furthermore, some measurement may have been estimated through extrapolation. Actual results may vary. Users of this document should verify the applicable data for their specific environment.
Information concerning non-IBM products was obtained from the suppliers of those products, their published announcements or other publicly available sources. IBM has not tested those products and cannot confirm the accuracy of performance, compatibility or any other claims related to non-IBM products. Questions on the capabilities of non-IBM products should be addressed to the suppliers of those products.
All statements regarding IBM's future direction or intent are subject to change or withdrawal without notice, and represent goals and objectives only.
All IBM prices shown are IBM's suggested retail prices, are current and are subject to change without notice. Dealer prices may vary.
This information is for planning purposes only. The information herein is subject to change before the products described become available.
This information contains examples of data and reports used in daily business operations. To illustrate them as completely as possible, the examples include the names of individuals, companies, brands, and products. All of these names are fictitious and any
Notices 287
similarity to the names and addresses used by an actual business enterprise is entirely coincidental.
COPYRIGHT LICENSE:
This information contains sample application programs in source language, which illustrate programming techniques on various operating platforms. You may copy, modify, and distribute these sample programs in any form without payment to IBM, for the purposes of developing, using, marketing or distributing application programs conforming to the application programming interface for the operating platform for which the sample programs are written. These examples have not been thoroughly tested under all conditions. IBM, therefore, cannot guarantee or imply reliability, serviceability, or function of these programs. You may copy, modify, and distribute these sample programs in any form without payment to IBM for the purposes of developing, using, marketing, or distributing application programs conforming to IBM�s application programming interfaces.
Each copy or any portion of these sample programs or any derivative work, must include a copyright notice as follows:
© (your company name) (year). Portions of this code are derived from IBM Corp. Sample Programs. © Copyright IBM Corp. _enter the year or years_. All rights reserved.
If you are viewing this information in softcopy form, the photographs and color illustrations might not display.
TrademarksIBM, the IBM logo, AIX, DB2, developerWorks, eServer, IBMLink, Informix, iSeries, Lotus, Passport Advantage, pSeries, Rational, Redbooks, S/390, Tivoli, the Tivoli logo, Tivoli Enterprise Console, TME, WebSphere, and zSeries are trademarks or registered trademarks of International Business Machines Corporation in the United States, other countries, or both.
Intel, Intel Inside (logos), MMX, Celeron, Intel Centrino, Intel Xeon, Itanium, Pentium and Pentium III Xeon are trademarks or registered trademarks of Intel Corporation or its subsidiaries in the United States, other countries, or both.
Linux is a trademark of Linus Torvalds in the United States, other countries, or both.
Microsoft, Windows, Windows NT, and the Windows logo are trademarks of Microsoft Corporation in the United States, other countries, or both.
UNIX is a registered trademark of The Open Group in the United States and other countries.
Java and all Java-based trademarks and logos are trademarks or registered trademarks of Sun Microsystems, Inc. in the United States, other countries, or both.
288 IBM Tivoli OMEGAMON II for IMS Configuration and Customization Guide, Version 5.5.0
Other company, product, and service names may be trademarks or service marks of others.
Index 289
Symbols$$IMSDIR table 265$OIDEXAN macro 133$OIGROUP FINAL 125$OIGROUP FINAL macro 132$OIGROUP ID 125$OIGROUP ID macro 128$OIGROUP INITIAL 125$OIGROUP INITIAL macro 127$OIGROUP macro 126–129$UCHECK macro 153.ASF immediate
see OPTN immediate.BEL immediate
see OPTN immediate.LOGOFF immediate
see OPTN immediate.LOGON immediate
see OPTN immediate.SET command
changing refresh cycle time 90.SMT immediate
see OPTN immediate.TSF immediate
see OPTN immediate.XLF immediate
see OPTN immediate.ZER immediate
see OPTN immediate/ASF INFO-line
see OPTN immediate/BELL INFO-line
see OPTN immediate/LOG OFF INFO-line
see OPTN immediate/LOG ON INFO-line
see OPTN immediate/PWD command 141, 162, 166, 169, 191
relogon feature 145/TSF immediate
see OPTN immediate/XLF INFO-line
see OPTN immediate/ZER INFO-Line
see OPTN immediate
AABUF exception 250ACBH exception 250ACBLIB
exceptions 250accessing ICAT 49ACEA exception 250ACES exception 250ACEW exception 250ACEX exception 250ACF2
auditing 191locking facility 193macro library 149modifying rules for OMEGAMON II 149resourse class 149restricting a command 149rule compiler 149security 152
ACIS exception 250ACIW exception 250ACIX exception 250ACWA exception 250ACWS exception 250ACWW exception 250ACWX exception 250ADBW exception 251address space
TSO 92ADHI exception 251ADLO exception 251ADMB exception 251ADSU exception 251AEPC exception 251AFRE exception 251AHIO exception 251alerts 107alerts, customizing 115ALMD exception 251AMFS exception 251AMSG exception 252APF
authorizing the load library 60
Index
290 IBM Tivoli OMEGAMON II for IMS Configuration and Customization Guide, Version 5.5.0
load libraryplanning authorization 60
APF authorization 163, 166for VTAM mode 142
APF-authorizationload library
APIE exception 252APPL parameter 65Application Trace Facility (ATF) 236APSB exception 252APSW exception 252AQBD exception 252ARAU exception 252ARCB exception 252area DASD I/O
area DASD I/O 251area dataspace I/O
fast path exception 252ARSP exception 252ASAP exception 252ASHI exception 252ASLO exception 252ASMD exception 252assembling 126Assigns 132asterisk (*) 224
comment line 159disabled commands 183
ATF 236ATTACH parameter 65ATTN key 141audit
ACF2 ACFRPT 191RACF Report Writer 191SMF 163, 166, 186supplemental 191suppression 191WTO 163
AUDIT keyword 163, 166AUP parameter 65
overriding 89AUTHLIB control statement 160
format 160authority levels 208authorization
planning 60authorized commands
access 140removing access 141
Authorized Program Facilitysee APF
authorized screen library 160, 177automatic screen facility (ASF)
activating 111automatic takeover
in progress 277status 276
automatic updatesetting cycles 111
autostarting VSAM message logging 79autostarting VTAM connection to IMS region 71availability manager not active 277AWKP exception 253
Bbalancing group 253batch job
displaying identifiers 222batch message processing
exceptions 267, 275batch reports
illustration 25bell
activating 111setting interval 111
BLGH exception 253BMP
exceptions 253, 260interface 117region I/O rate 260swapped out 259
BMP for IMSstarting automatically 64
bookssee publications 14, 17
Bottleneck Analysisillustration 25
bottleneck analysisaccuracy of values 220starting 236
Bottleneck Analysis (DEXAN) 64Bottleneck Analysis collector
illustration 25bottleneck analysis component (DEXAN) 29Bottleneck Anaysis (DEXAN)
starting automatically 64BQHI exception 253BQLO exception 253buffer pool usage, HSSP
HSBH exception 260
Index 291
HSBL exception 260BUFNO parameter 66
CCA-ACF2
security considerations 42CA-ACF2 security
CUA interface 203calling
conventions 153flow 154
Candle Subsystem 32Candle subsystem
commandsSTART CASCN 84
CANPRG defaultmodifying 74
CANSCN 83, 84CA-TOP SECRET
security considerations 42CA-TOP SECRET security
CUA interface 204CBHI exception 253CBLO exception 253CCHI exception 253CCLO exception 253Changing IMS Command Options 120checklist
CUA installation verification 212CILO exception 253CIO exception 250CIs, number of free 272CLASS parameter 128CLHI exception 254CLIST parameter 95CLLO exception 254CLRL
in macro 133CLRS
in macro 133CMHI exception 254CMLO exception 254CMPAT parameter 66collector, EPILOG 30color support
setting options 111COLS parameter 66
overriding 89command 111
options 120
COMMAND control statement 162format 162
Command interfaceillustration 25
command level security 70commands 84, 86, 89, 213, 221, 229, 237, 240
.SET 90auditing 163, 167comment 224D A,L
display active 222DISPLAY 225display active
D A,LD A,L command 221
ETE QUIESCEETE USERS 85
EXEC 226START
STOP 229F 222, 225HELP 228IF 229in ACF2 149in RACF 148ITR 236LIBDEF 97LIST 225
DISPLAY 231LOG 232MODIFY 222
MODIFY ID 223MODIFY MERGE 233P 222protection 162, 166S 237START 234START CANSCN 84STOP 222
MODIFYsecurity 220
P 241types 183VTAM LOGON 238
comment 224common area page-in rate for
DBRC region 268DLS region 268IRLM region 268
292 IBM Tivoli OMEGAMON II for IMS Configuration and Customization Guide, Version 5.5.0
message processing region 268Common User Access model 26communications
I/O pool (CIOP) 259work area pool (CWAP) 259
communications external subsystem poolexceptions 250
communications I/O pool (CIOP)pool extension IWAITs 250pool extension size 250selective dispatching 250utilization 250
communications work area pool (CWAP)pool extension IWAITs 250pool extension size 250selective dispatching 250utilization 250
components of OMEGAMON II 28, 30Bottleneck Analysis 29bottleneck analysis component (DEXAN) 29historical component (EPILOG) 30illustration 25Response Time Analysis (RTA) 28
COMW exception 254concatenating screen space and profile datasets 134conditional processing commands 229configuration
procedures 57sample network map 244
configuration with ICAT 46configuring IBM Tivoli OMEGAMON II for IMS 37console
using LOG command to display messages 232control region 274
CPU utilization 253I/O rate 260working set size 275
control statement listingcodes 181
control statements 140, 158, 160–174, 181AUTHLIB 160COMMAND 162control statement listing 164example 175format rules 160LIST 165listing 180MINOR 166MODULE 168
PASSWORD 169RESET 171SMFNUM 173UPDATE 174
control statements editcodes 181
CPUA exception 254CPUID parameter 229CRHI exception 255critical time threshold
exceeding 252CRLO exception 255CSHI exception 255CSLO exception 255CSVC exception 256CUA 206CUA interface 26, 201, 202, 203, 204
illustration 25installation verification checklist 212logging on 214stopping 215system startup 213VTAM support requirement 88
CUA model 26CUOW exception 256customer support
see Software Support 281customization
requirements for each mode 34Customize 125customize OMEGAMON II 109customizing
exceptionsprofiles 115
customizing IBM Tivoli OMEGAMON II for IMS 37CVAH exception 256CVHI exception 256CVSH 256
DD A,L command 222DASD
device dropped ready 258DASD reserve 111data collection
starting 236data components
illustration 25data entry
database area unavailable 251
Index 293
DATA parameter 66, 238overriding 89
data sets 221, 224, 226, 229, 233, 240database 259, 274
dynamic backout error alert 257I/O error exception 256management block (DMB) 251VSAM control
area splits 274work pool 251
DATACOLstarting 236
dataset I/O ratelong message 263MFS 264queue blocks 269short message 272SPA 272test MFS 272
dataset requirements 39dataset restart 269datasets 200, 206, 213
KOIVTPL 93SYS1.VTAMLST 92thilev.TKANSAM
KOIVT1AP 92dataspace DASD I/O
fast path exception 257dataspace I/O
fast path exception 258datastore, EPILOG 30date
format 111DBRC 255, 262, 268
working set size 276DBSW
in macro 133DBWE exception 256DCMN exception 256DDHI exception 257DDLO exception 257ddnames
standard 63DEDB area
independent overflow exception 253dedicated mode 34, 90, 145dedicated mode, OMEGAMON II
starting automatically 64Dedicated operating mode 34default
starting the interface 221default Bottleneck Analysis (DEXAN) parameters
modifying 133default options 109default parameters
EPILOG collection 74defaults
setting 126defining virtual terminals to VTAM 92device
name table entries 111device I/O error recovery 261DEXAN
accuracy of values 220starting 236
DEXAN (Bottleneck Analysis) 64DEXAN bottleneck analysis component 29DEXAN macro 133DISABLE parameter
LEVEL keyword 162, 166DISP exception 257dispatcher trace status 258dispatching priority 257display active command 222DISPLAY command 225, 231DL/I trace table status 257DL/I, no parallel 266DLS 255, 262, 268
working set size 276DLTR exception 257DMB pool
blocks loaded 263fragmented 257
DMBE exception 257DMER exception 257DMFF exception 257DNRS exception 258documentation conventions 19DRDY exception 258DSHI exception 258DSLO exception 258DSPI exception 258DSTR exception 258DSWP exception 259dynamic exceptions 264dynamic save area prefix sets (SAPS) 271
Eediting
294 IBM Tivoli OMEGAMON II for IMS Configuration and Customization Guide, Version 5.5.0
KOIGBL 126START commands 65
End-to-End 28End-to-End Response Time
monitoring with RTA 28environments
creating KOIGBL modules 125EPILOG 30
collector 30historical component 30illustration 25reporter 30starting automatically 64
EPILOG collection parametersadjusting default values 74
EPILOG collectorstopping VTAM support 239
EPILOG historical componentfunctional diagram 30
EPILOG interfaces 27EPILOG reporter
preparing 72running as batch job 74running in split-screen mode 73
EPILOGreporterrunning in full-screen mode 74
error messagecreating 190
ESNC exception 259ESND exception 259ESTH exception 259ETE 59
configuration considerations 42ETE Response Time Feature
commands 85running concurrent versions 86starting 85
ETE Response Time featureverifying installation 59
ETE USERSoutput 86
ETE USERS commandoutput 86
exceptionBMP 260CVAH 256CVHI 256CVSH 256ICFX 260IMS Status 256
NILU 265exception analysis 107exception logging facility (XLF)
activating 111exceptions 249, 253
ABUF 250ACBLIB 250ACEA 250ACES 250ACEW 250ACEX 250ACIO 250ACIS 250ACIW 250ACIX 250ACWA 250ACWS 250ACWW 250ACWX 250ADBW 251ADHI 251ADLO 251ADMB 251ADSU 251AEPC 251AFRE 251AHIO 251ALMD 251AMFS 251AMSG 252APIE 252APSB 252APSW 252AQBD 252ARAU 252ARCB 252area DASD I/O 251ARSP 252ASAP 252ASHI
area dataspace I/Ofast path exception 252
ASLO 252ASMD 252AWKP 253batch message processing 267, 275BLGH 253BMP 253, 260
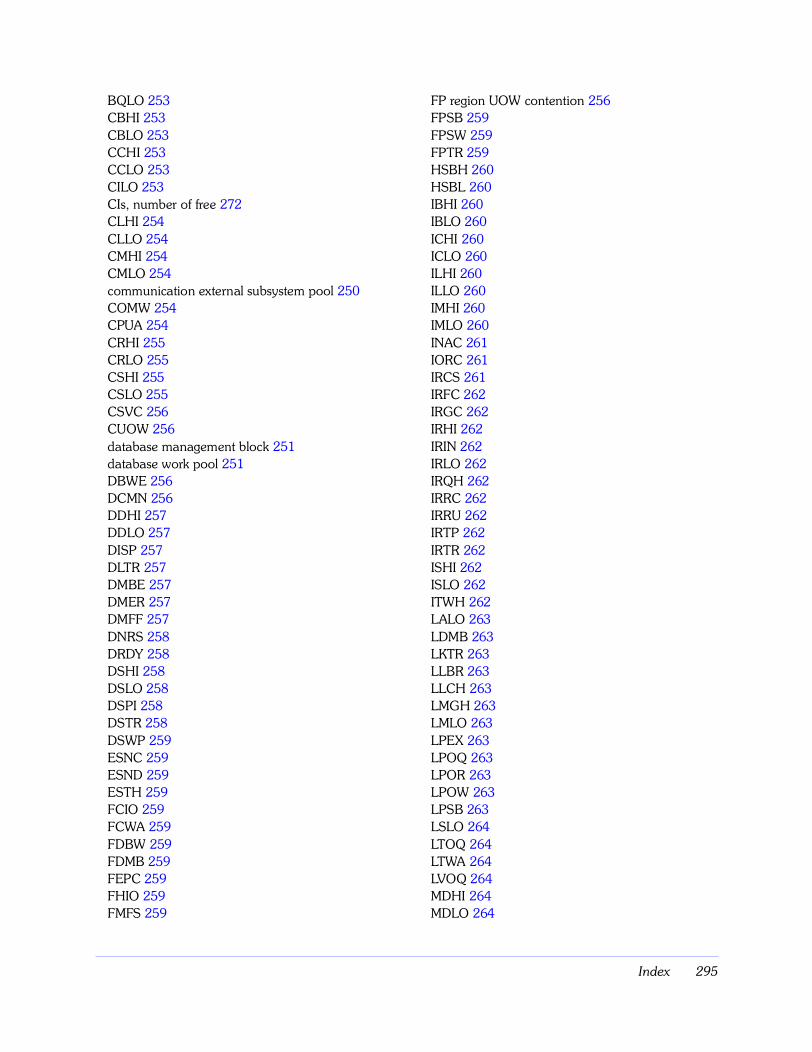
Index 295
BQLO 253CBHI 253CBLO 253CCHI 253CCLO 253CILO 253CIs, number of free 272CLHI 254CLLO 254CMHI 254CMLO 254communication external subsystem pool 250COMW 254CPUA 254CRHI 255CRLO 255CSHI 255CSLO 255CSVC 256CUOW 256database management block 251database work pool 251DBWE 256DCMN 256DDHI 257DDLO 257DISP 257DLTR 257DMBE 257DMER 257DMFF 257DNRS 258DRDY 258DSHI 258DSLO 258DSPI 258DSTR 258DSWP 259ESNC 259ESND 259ESTH 259FCIO 259FCWA 259FDBW 259FDMB 259FEPC 259FHIO 259FMFS 259
FP region UOW contention 256FPSB 259FPSW 259FPTR 259HSBH 260HSBL 260IBHI 260IBLO 260ICHI 260ICLO 260ILHI 260ILLO 260IMHI 260IMLO 260INAC 261IORC 261IRCS 261IRFC 262IRGC 262IRHI 262IRIN 262IRLO 262IRQH 262IRRC 262IRRU 262IRTP 262IRTR 262ISHI 262ISLO 262ITWH 262LALO 263LDMB 263LKTR 263LLBR 263LLCH 263LMGH 263LMLO 263LPEX 263LPOQ 263LPOR 263LPOW 263LPSB 263LSLO 264LTOQ 264LTWA 264LVOQ 264MDHI 264MDLO 264
296 IBM Tivoli OMEGAMON II for IMS Configuration and Customization Guide, Version 5.5.0
MFSH 264MIRT 264Mnnn 264MPCH 264MSDI 265MSDO 265MSGE 265NACB 265NDIR 265NDRE 265NLOQ 265NOFB 265NOOT 265NPDL 266NPOQ 266NQRE 266NSDC 266NTIQ 266NVAP 266NVOQ 266OBAU 266ODIE 266OHLO 266OLDS 263OLER 266OLNA 266OLST 266ONLC 267ONLO 267ORER 267ORIP 267ORST 267OSBL 267OSDN 267output threads 265OXHI 267OXLO 267PBTR 267PIBC 267PIBP 267PICC 267PICP 268PIDC 268PIDP 268PILC 268PILP 268PIMC 268PIQH 268
PIRP 268PISC 268PISP 269PITR 269private area 268, 269PROQ 269PSB 252PSVC 269QBKH 269RDSH 269region in buffer wait 265region using Fast Path OBA 266RGNW 269RGSH 269RGSI 270ROHI 270ROLO 271RSRV 271SAPW 271SCTR 272SDLO 272SDSP 272SMGH 272SPAH 272TCOI 272TCOT 272THHI 272THHP 272THLO 272THLP 272TMFH 272TMSI 273Tnnn 272TNRS 273TPSB 273TRDY 273TXIQ 274VCAS 274VCIS 274VHLO 274VMEX 274VMLO 274VROQ 274VSLO 274VTLO 275VWRC 275VXHI 275VXLO 275
Index 297
WBHI 275WBLO 275WCHI 275WCLO 275WDNA 275WDNB 275WLHI 276WLLO 276WMHI 276WMLO 276WRHI 276WRLO 276WSHI 276WSLO 276XCNF 276XRAT 276XRAV 277XRIP 277XRIT 277XRNS 277XRPH 277XRSR 277XRTO 277
exceptions, customizing 115EXEC command 226, 229
starting VSAM message logging 79exeption group 115exit routine 142, 152
calling conventions 153calling flow 154calling sequence 153creating 152module 168
exit, user-coded 205exiting OMEGAMON II 101EXPTHR 132
FIX 132EXPTHR parameter 131, 132EXPTHR= parameter 131extended PCB pool 251, 259external
subsystem 259EXTERNAL keyword 142, 163, 166external security 142–145
CA-ACF2 203CA-TOP SECRET 204checking 163, 166creating exit routine 152
exit routine 168, 177EXTERNAL keyword 163, 166interface 153KOISUPDI 177locking feature 191logon 145mapping 153modifying ACF2 rules 149modifying RACF rules 147MODULE 168options 189procedure 146RACF 202SAF 201
external security optional features 189external subsystem 259
FF command 222, 225Fast Path 256, 265, 266, 272
BQHI exception 253BQLO exception 253DEDB area I/O error 257trace on 259
FCIO exception 259FCWA exception 259FDBW exception 259FDMB exception 259FEPC exception 259fetch (.FGO)
setting parameters 111fetch request element
(FRE) pool utilization 251FHIO exception 259FIX 132FIX parameter 129, 132FMFS exception 259FMID AKET50
verifying ETE installation 59formats
macro 127FP region UOW contention 256FPSB exception 259FPSW exception 259FPTR exception 259free space
DMB pool, fragmented 257FREP command 251FREs
298 IBM Tivoli OMEGAMON II for IMS Configuration and Customization Guide, Version 5.5.0
fixeddynamic 251
Ggenerating the system management facilities audit
185GETMAIN 153GLOBAL parameter 67group 129group number 131, 132GROUPS parameter 128GRP paramerter 132GRP parameter 131GRSP 132
SETG 132
HHELP command 228high I/O pool (HIOP) 259high I/O pool utilization 251Historical Collector
illustration 25Historical component 30historical component
functional diagram 30historical component (EPILOG) 30
functional diagram 30Historical Data Store
illustration 25historical information interfaces 27Historical Reporter
illustration 25how to migrate elements 41HSBH exception 260HSBL exception 260
II/CF
configuration considerations 42I/O
error to database 256prevention in progress 277toleration in progress 277
I2MAJNDlocation of member name 213
IBHI exception 260IBLO exception 260IBM monitor job
showing identifiers 221IBM RACF
security considerations 42IBM Tivoli OMEGAMON II for IMS
configuring 58installation verification 82preparing VSAM datasets for message logging 79
IBM-supplied profile 104ICAT
accessing 47ICFX exception 260ICHERCDE macro call 147ICHI exception 260ICLO exception 260ICNS command 265IDEG parameter 67identifiers
batch job 222IBM monitor job 221started task 222
IDs, MVSsee MVS IDs 220
IEBGENERinstalling TSO CLISTs 95
IFtesting values 229
IF command 229testing values 229
ILHI exception 260ILLO exception 260IMHI exception 260IMLO exception 260IMS
command options 120control task waiting 256CPU utilization 254DC monitor active 256I/O error recovery alert 261inactive alert 261physical logger task waiting 269using MODIFY MERGE command 233wait alert 267
IMSIDdefining 63startup files 63
IMSID parameter 229IMSTYPE parameter 229in dedicated mode
automatically 90INAC exception 261INACTIVE 242information centers, searching to find software
Index 299
problem resolution 279INITIAL resources 192input queue length 266, 274input queue time 130installation
CUA verification checklist 212verification 81verification procedure 82
installation profileIOPT command 111
installation-defined profilecreate 109save 113
installing IBM Tivoli OMEGAMON II for IMS 37installing TSO CLISTs 95interface 220, 222
conditional execution of 229see interface commandsstarting 221startup parameters 220terminating 222
interface MVS IDssee MVS IDs
interfaceshistorical information (EPILOG) interfaces 27illustration 25menu
command 27user
CUA 26internal
displaying 225internal security 140–141
NAM 200interval
setting 111IORC exception 261IPRF command
delete profile 113save profile 113
IRCS exception 261IRFC exception 262IRGC exception 262IRHI exception 262IRIN exception 262IRLM 254, 260, 262, 268
CSA usage exception 261data sharing group connection 262false contention rate 262locks 262
PTB trace 262real contention rate 262resource conflict 276RH trace 262RLE usage 262working set size 276
IRLO exception 262IRQH exception 262IRRC exception 262IRRU exception 262IRTA parameter 67IRTP exception 262IRTR exception 262ISAM/OSAM
database buffer pool locked 267ISET 132ISHI exception 262ISLO exception 262ISPF
mode 97primary menu
adding OMEGAMON II 97slip-screen 97
ISPF mode 34using with VTM1 71
ISPF operating mode 34ISPF split-screen mode
KEISPF sample CLIST 73ITASK 271ITASKS waiting for dynamic SAPs 262ITASKS waiting for pool space 254ITR command 236ITRF parameter 67ITWH exception 262IWAIT state 271
JJCL 206
security update 140JCL model 126jobname
where to get for starting CUA 213
KKEICLIST 74KEICOLmp 64
editing 65KEIEPLG 74KEIJCTRS 74
300 IBM Tivoli OMEGAMON II for IMS Configuration and Customization Guide, Version 5.5.0
KEIJDBAS 74KEIJSPGS 74KEIOPTnn
EPILOG runtime parameters 74KEISPFC2 73KI2ARCH 233KI2ASM 205KI2BMPmp 64KI2CMNAM 200KI2EPROC
JCL for CUA 206location of jobname 213
KI2ICFX1 205KI2INNAM 205KI2SAPmp 64KI2START
setting up CUA interface security 200KI2TRFmp 64
editing 65KI2VSM00
executing MODIFY MERGE command 233KI2VSMmp 64
editing 65knowledge bases, searching to find software problem
resolution 279KOBSUPDT 140, 177KOBVTAM
load module 142location 71sample application program 71
KOBVTPLproviding access to VTPOOL 247
KOIACF2X 152KOIDED00
modifying to start OMEGAMON II in dedicated mode 91
KOIDEDmp 64KOIDEXmp 64
editing 65KOIEPROC
issuing START 91KOIGBL
dataset 126macros 126module 125
KOIGBL modules 126KOIGBLA
in TKANSAM 126KOIIAOO
startup parameter 220
KOIM0P00 221KOImpP00
location of sample START command 240modifying to start OMEGAMON II in dedicated
mode 91KOIRACFX 152KOISAMP
KOISUPDI 177KOISAPmp
editing 65KOISSTEI
modifying 75KOISUPD 140, 177
adding security 70KOISUPDI 140, 158
example 175KOIVTMmp 64
editing 65KOIVTPL 92
LLALO exception 263LDMB exception 263level
change 177reset 141
LEVEL keyword 162, 166, 169LIBDEF 97libraries 200, 206, 213, 221, 224, 226, 229, 233,
240linking
KOIGBL 126LIST command 225, 231LIST control statement 159, 165, 182
format 165listing 181, 183
codes 181control statements edit 180security file listing 182security update program 180
LKTR exception 263LLBR exception 263LLCH exception 263LMGH exception 263LMLO exception 263load
module dataset 126load library
authorizingplanning authorization 60
Index 301
lock trace alert 263locking
use of /PWD command 191log
activating 111LOG command 232log message for processing member 232log tape write-ahead alert 264logging on 89
to CUA interface 214logging on to external security 145logon
external security 145external security by mode 143
long messagedataset utilization 251
loopingsetting parameters 111
low control regiontop free block size in private 275total private free storage 274
low IMSCTLsee IMSCTL 274
low LSQAmaximum free block size 263storage assurance 263
low maximumprivate free block size 274
LPEX exception 263LPOQ exception 263LPOR exception 263LPOW exception 263LPSB exception 263LROWS parameter 67, 95
overriding 89LSLO exception 264LSQA
maximum free block size 263see LSQAstorage assurance 263total free storage 264
LTOQ exception 264LTWA exception 264LVOQ exception 264
Mmacro formats 127Macro instructions 126macro instructions 126macro libraries in security routine 148
maintenance utilities 30major node definition 71management block (DMB)
pool 259manuals
see publications 14, 17MDHI exception 264MDLO exception 264member name
where to get for starting CUA 213Menu interface
illustration 25menu interface 27menus
Profile Maintenance 113message dequeue rate 264message format services
(MFS) pool utilization 251message format services (MFS) 259message inserts 264message logging
preparing VSAM datasets 79message processing region
common areapage-in rate 268
private areapage-in rate 268
working set size 276message queue 264
buffer pool utilization 252message region occupancy 270, 271messages 232, 233
CNDL0181 84ETE0003 85ETE0051 85ETE0086 85ETE009 85
messages, CUA interfacebrowsing 79
MFS format library 265MFS overhead 265MFSH exception 264migrating
elements 41started task names 41VTAM nodes 42
migration processelements 41
minor commandslisting 183
302 IBM Tivoli OMEGAMON II for IMS Configuration and Customization Guide, Version 5.5.0
protecting 166setting case 111
MINOR control statement 166format 166
MIRT exception 264Mnnn exception 264modes of operation 34MODIFY
example 221strating the interface 221
MODIFY command 220, 222, 223example 221starting the interface 221
MODIFY ID command 223MODIFY MERGE command 233MODULE control statement 168
format 168monitor job, IBM
showing identifiersdisplay active command 221
MPCH exception 264MPP region utilization 254MPREFIX
defining 63startup files 63
MSDB command 265MSDI exception 265MSDO exception 265MSGD command 264MSGE exception 265MTHR
in macro 133multi-host environments 92multiple 125MVS IDs
creatingdefault 221
NNACB exception 265NAME parameter 132NDIR exception 265NDRE exception 265network access manager 200network configuration map
sample 244newsgroups 18NILU exception 265NLOQ exception 265
no secondary RDS allocated 277NODE parameter 128, 129NOFB exception 265NOOT exception 265NPDL exception 266NPOQ exception 266NQRE exception 266NSDC exception 266NTIQ exception 266number of
PSTs held on the standby system 277receive any buffers in use 252
NVAP exception 266NVOQ exception 266
OOBAU exception 266occupancy factor 270, 271ODIE exception 266OHLO exception 266OIAPPL parameter 95OIMLEV.LOGn
archiving 233OIPREFX parameter 95OIUSER parameter 95OL parameter 67OLDS
buffer waits 263exceptions 263
OLER exception 266OLNA exception 266OLST exception 266OMEGAMON for IMS DATA (KOIGBLmp) 125OMEGAMON II
sessionsmultiple users 92
OMEGAMON II components 30historical component (EPILOG) 30Response Time Analysis (RTA) 28
OMEGAMON II CUA 206OMEGAMON II CUA interface 26, 201, 202, 203,
204installation verification checklist 212logging on 214stopping 215system startup 213
OMEGAMON II in dedicated modestarting automatically 64
OMEGAMON II in VTAM mode
Index 303
starting automatically 64OMEGAMON II profiles 104OMEGAMON II RPM 25OMEGAMON IIcomponents
bottleneck analysis component (DEXAN) 29OMEGAVIEW 25ONLC exception 267online publications
accessing 17ONLO exception 267operating mode requirements 34operating modes 34operation modes 34operational modes 92
dedicated 90ISPF 97VTAM 88
operational parameterssetting 111
OPTION parameter 67ordering publications 17ORER exception 267ORIP exception 267ORST exception 267OSAM EXCP rate
databases alerts 267OSBL exception 267OSDN exception 267output
setting case 111output queue length
logical terminals (not video-type) 263, 266logical terminals (video-type) 264, 265virtual terminals (video-type) 264, 266
output queue time 130output threads 265overflowing field 265OXHI exception 267OXLO exception 267
PP command 222, 241PA1 key 141packed field 265page-fixing OMEGAMON II 111parameters 84
CPUID 229DATA 238IMSID 229
IMSTYPE 229interface startup
startup parameter, interface 220KOIIAOO,startup 220MPREFIX=
MPREFIX= parameter 221SMFID 229START command 65
PARM field 126PARM file 65
editing 64password 141
change 177to relogon feature 145
PASSWORD control statement 169format 169
PBTR exception 267PERMIT command 148PI resource conflict 276PIBC exception 267PIBP exception 267PICC exception 267PICP exception 268PIDC exception 268PIDP exception 268PILC exception 268PILP exception 268PIMC exception 268PIQH exception 268PIRP exception 268PISC exception 268PISP exception 269PITR exception 269pool extension
IWAITs 250size 250
preparing the EPILOG reporter 72preparing the startup files 61printer unable to receive output 269printing
setting output options 111private area
exceptions 268, 269page-in rate 268
problemsaccessing OMEGAMON II 88
process, migration 41processing time 130PROCLIM parameter 67
304 IBM Tivoli OMEGAMON II for IMS Configuration and Customization Guide, Version 5.5.0
product component 24product components 24profile
security 208profile maintenance and session controls menu 110profile security 208profiles
customizing 115defining 109IBM 110search order 105select options 110storage 106suffix 105types 104
program input queue time 130program isolation
enqueue pool 252trace facility on 269
program namedisplaying 225using LIST command to display 231
PROQ exception 269PSB
exceptions 252pool 259, 263trace 267work pool 252, 259
PSB parameter 68, 128PSTs
number held on the standby system 277PSVC exception 269PSWD parameter 68publications 14
accessing online 17ordering 17
QQBKH exception 269qualifiers 39
rhilev 39queue blocks
dataset utilization 252
RRACF
locking /PWD 192locking facility 192modifying rules for OMEGAMON II 147
Report Writer 191security 152
RACF securityCUA interface 202
ration 220RDEFINE command 148RDS no secondary allocated 277RDSH exception 269realtime
operating modes overview 34Realtime Performance Monitor
illustration 25Realtime Performane Monitor 87receive any pool utilization 252RECON dataset 266refresh cycle 90regio
I/O rate 262utilization 254, 255
regionbuffer wait 265common area page-in rate 268Fast Path OBA 266I/O rate 262I/O rate message processing 260MPP database calls 264sync point interval 270utilization 254, 255waiting time 269
region I/O ratemessage processing 260
relationship to OMEGAMON IIillustration 25
relogon feature 145REPORT file
defining size 111reporter 74reporter, EPILOG 30RESET control statement 171
format 171reset facility 171reshow 154resource class (ACF2) 149response time 0 130Response Time Analysis 28Response Time Analysis Collector
illustration 25response time1 130Respose Time Analysis component (RTA) 28RESTART
Index 305
on the START command 84START parameter 84
restart dataset 269return codes in security 154RGNW exception 269RGSH exception 269RGSI exception 270rhilev 39RKANCMD(KI2CMNAM)
setting up CUA interface security 200RKANCMD(KI2START)
setting up CUA interface security 200RKANPAR 63
using the EXEC command 226RKANPAR(KEISPFC2) 73RKANPAR(KI2INNAM) 205RKANPAR(KOIM0P00)
starting the interface 221RKANPAR(KOImpP00)
location of sample START command 240modifying to start OMEGAMON II in dedicated
mode 91RKANSAM(I2MAJND)
location of member name 213RKANSAM(KI2ASM) 205RKANSAM(KI2EPROC)
JCL for CUA 206location of jobname 213
RKANSAM(KI2ICFX1) 205RKANSAM(KOIDED00)
modifying to start OMEGAMON II in dedicated mode 91
RKEIEDS 63RKOIPCSV 63, 134RKOIPFSV 63RKOIPROC 63, 134RKOIPROF 63RKOIPROF DD 135ROHI exception 270ROLO exception 271ROWS parameter 68
overriding 89RSR tracking system 271, 273RSRV exception 271RTA 130, 132
starting 236THRESH 132thresholds 129
RTA component 28runtime datasets
considerations 39qualifiers 39rhilev 39
SS command 237SAA 26SAF security
CUA interface 201sample CLIST
running EPILOG reporter in full-screen mode 74running EPILOG reporter in split-screen mode 73
sample JCLrunning EPILOG reporter as a batch job 74TKANSAM(KOIEPROC) 61
sample procedurerunning EPILOG reporter as a bacth job 74running EPILOG reporter as a batch job 74
SAPchecking the status 124implementing 122starting
stopping 99starting automatically 64, 122starting from IBM Tivoli OMEGAMON II for IMS
122starting from MVS console 122stopping from IBM Tivoli OMEGAMON II for IMS
123stopping from the MVS console 123
SAP monitor exitmodifying 75
SAP supportstarting 236
SAPW exception 271save
installation-defined profile 113save area
prefix exception 252SCAL
in macro 133scheduler trace status 272screen
authorized 160display options 111
screen space 111first 111
scrollingsetting 111
SCTR exception 272
306 IBM Tivoli OMEGAMON II for IMS Configuration and Customization Guide, Version 5.5.0
SDLO exception 272SDSP exception 272security 141, 158, 165, 177, 180, 183
ACF2 rules 149audit 163, 167, 173, 177, 186available types 199command level 70considerations 114console commands 220control statements 160exit module 177exit routine 152, 177external 142–??, 177file listing 182interfaces 153internal 140JCL 140level 140, 154listing 165, 177profile 208RACF 147resetting defaults 171SMF record 186table 140terms 140update 174, 177update job 177update procedure 158update program 140update program listing 180–183using a user-coded exit 205
security considerationsCA-ACF2 42CA-TOP SECRET 42IBM RACF 42
security update programtrace 183
selective dispatching 250, 272selective processing 254session
starting 236session options command 111SETG 132setting exceptions 115setting levels of user authority 208short message dataset
utilization 252SMF
audit record 163, 166, 173, 186
Record Exits (IEFU83/84) 186record number 163, 166, 173system parameters 186using for historical data 30
SMFID parameter 229SMFNUM control statement 163, 166, 173
format 173SMGH exception 272Software Support
contacting 281SPAH exception 272SSPROC=CANSCN 83START
overriding parameter values 89parameters 237RESTART parameter
CNDL0181 message 84sample 240starting the CUA interface 213
START CANSCN 84START command 229, 234
overriding parameter values 89parameters 237sample 240starting the CUA interface 213
START command parameters 65START commands
editingparameter values 65
START DC command 266start parameters 65started as started task
displaying identifiers 222started task
ACF2 149displaying identifiers 222RACF 147
started task namesmigrating 41
starting ATF 236starting ETE 85starting in VTAM mode
automatically 87starting ISPF from RTE 98starting OMEGAMON II 89, 90
in dedicated mode 91in ISPF mode 98in TSO mode 96TSO mode 92
starting OMEGAMON II Realtime Performance
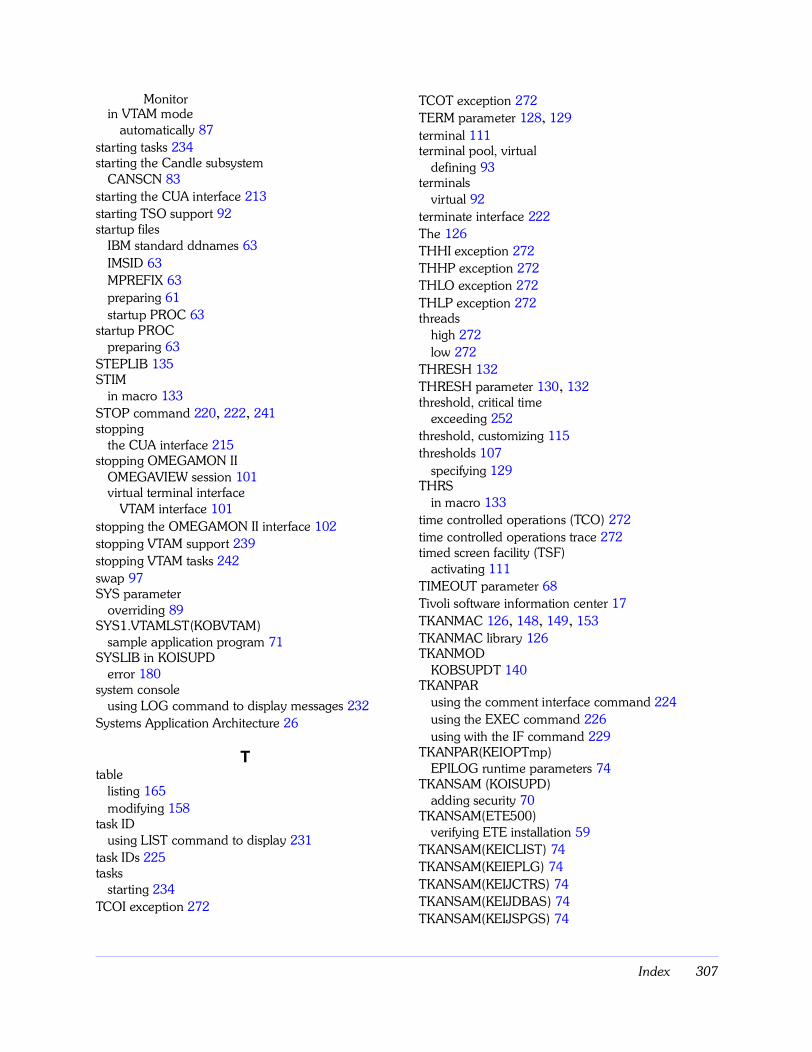
Index 307
Monitorin VTAM mode
automatically 87starting tasks 234starting the Candle subsystem
CANSCN 83starting the CUA interface 213starting TSO support 92startup files
IBM standard ddnames 63IMSID 63MPREFIX 63preparing 61startup PROC 63
startup PROCpreparing 63
STEPLIB 135STIM
in macro 133STOP command 220, 222, 241stopping
the CUA interface 215stopping OMEGAMON II
OMEGAVIEW session 101virtual terminal interface
VTAM interface 101stopping the OMEGAMON II interface 102stopping VTAM support 239stopping VTAM tasks 242swap 97SYS parameter
overriding 89SYS1.VTAMLST(KOBVTAM)
sample application program 71SYSLIB in KOISUPD
error 180system console
using LOG command to display messages 232Systems Application Architecture 26
Ttable
listing 165modifying 158
task IDusing LIST command to display 231
task IDs 225tasks
starting 234TCOI exception 272
TCOT exception 272TERM parameter 128, 129terminal 111terminal pool, virtual
defining 93terminals
virtual 92terminate interface 222The 126THHI exception 272THHP exception 272THLO exception 272THLP exception 272threads
high 272low 272
THRESH 132THRESH parameter 130, 132threshold, critical time
exceeding 252threshold, customizing 115thresholds 107
specifying 129THRS
in macro 133time controlled operations (TCO) 272time controlled operations trace 272timed screen facility (TSF)
activating 111TIMEOUT parameter 68Tivoli software information center 17TKANMAC 126, 148, 149, 153TKANMAC library 126TKANMOD
KOBSUPDT 140TKANPAR
using the comment interface command 224using the EXEC command 226using with the IF command 229
TKANPAR(KEIOPTmp)EPILOG runtime parameters 74
TKANSAM (KOISUPD)adding security 70
TKANSAM(ETE500)verifying ETE installation 59
TKANSAM(KEICLIST) 74TKANSAM(KEIEPLG) 74TKANSAM(KEIJCTRS) 74TKANSAM(KEIJDBAS) 74TKANSAM(KEIJSPGS) 74
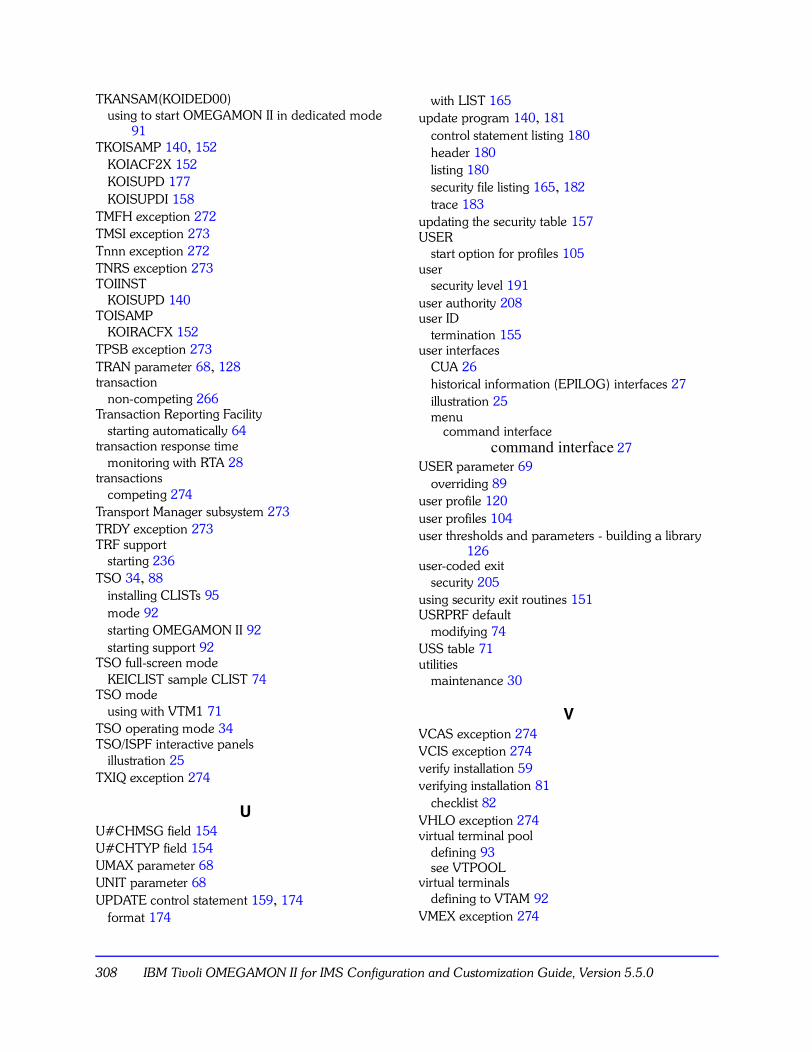
308 IBM Tivoli OMEGAMON II for IMS Configuration and Customization Guide, Version 5.5.0
TKANSAM(KOIDED00)using to start OMEGAMON II in dedicated mode
91TKOISAMP 140, 152
KOIACF2X 152KOISUPD 177KOISUPDI 158
TMFH exception 272TMSI exception 273Tnnn exception 272TNRS exception 273TOIINST
KOISUPD 140TOISAMP
KOIRACFX 152TPSB exception 273TRAN parameter 68, 128transaction
non-competing 266Transaction Reporting Facility
starting automatically 64transaction response time
monitoring with RTA 28transactions
competing 274Transport Manager subsystem 273TRDY exception 273TRF support
starting 236TSO 34, 88
installing CLISTs 95mode 92starting OMEGAMON II 92starting support 92
TSO full-screen modeKEICLIST sample CLIST 74
TSO modeusing with VTM1 71
TSO operating mode 34TSO/ISPF interactive panels
illustration 25TXIQ exception 274
UU#CHMSG field 154U#CHTYP field 154UMAX parameter 68UNIT parameter 68UPDATE control statement 159, 174
format 174
with LIST 165update program 140, 181
control statement listing 180header 180listing 180security file listing 165, 182trace 183
updating the security table 157USER
start option for profiles 105user
security level 191user authority 208user ID
termination 155user interfaces
CUA 26historical information (EPILOG) interfaces 27illustration 25menu
command interfacecommand interface 27
USER parameter 69overriding 89
user profile 120user profiles 104user thresholds and parameters - building a library
126user-coded exit
security 205using security exit routines 151USRPRF default
modifying 74USS table 71utilities
maintenance 30
VVCAS exception 274VCIS exception 274verify installation 59verifying installation 81
checklist 82VHLO exception 274virtual terminal pool
defining 93see VTPOOL
virtual terminalsdefining to VTAM 92
VMEX exception 274
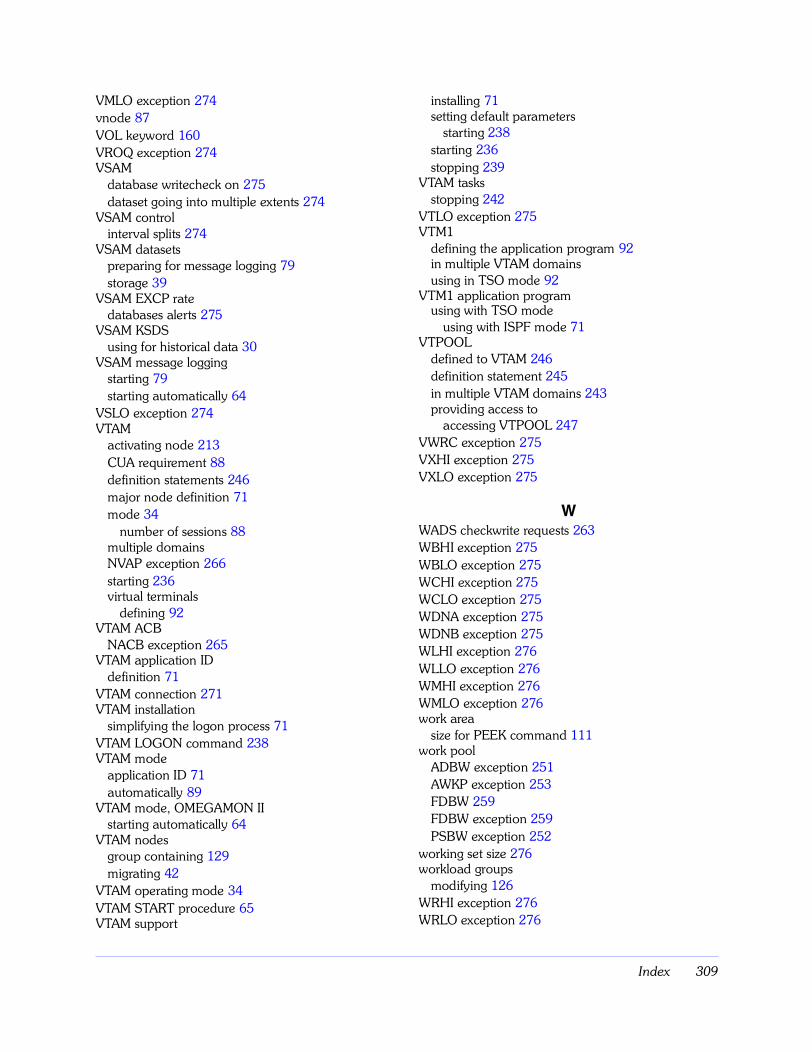
Index 309
VMLO exception 274vnode 87VOL keyword 160VROQ exception 274VSAM
database writecheck on 275dataset going into multiple extents 274
VSAM controlinterval splits 274
VSAM datasetspreparing for message logging 79storage 39
VSAM EXCP ratedatabases alerts 275
VSAM KSDSusing for historical data 30
VSAM message loggingstarting 79starting automatically 64
VSLO exception 274VTAM
activating node 213CUA requirement 88definition statements 246major node definition 71mode 34
number of sessions 88multiple domainsNVAP exception 266starting 236virtual terminals
defining 92VTAM ACB
NACB exception 265VTAM application ID
definition 71VTAM connection 271VTAM installation
simplifying the logon process 71VTAM LOGON command 238VTAM mode
application ID 71automatically 89
VTAM mode, OMEGAMON IIstarting automatically 64
VTAM nodesgroup containing 129migrating 42
VTAM operating mode 34VTAM START procedure 65VTAM support
installing 71setting default parameters
starting 238starting 236stopping 239
VTAM tasksstopping 242
VTLO exception 275VTM1
defining the application program 92in multiple VTAM domainsusing in TSO mode 92
VTM1 application programusing with TSO mode
using with ISPF mode 71VTPOOL
defined to VTAM 246definition statement 245in multiple VTAM domains 243providing access to
accessing VTPOOL 247VWRC exception 275VXHI exception 275VXLO exception 275
WWADS checkwrite requests 263WBHI exception 275WBLO exception 275WCHI exception 275WCLO exception 275WDNA exception 275WDNB exception 275WLHI exception 276WLLO exception 276WMHI exception 276WMLO exception 276work area
size for PEEK command 111work pool
ADBW exception 251AWKP exception 253FDBW 259FDBW exception 259PSBW exception 252
working set size 276workload groups
modifying 126WRHI exception 276WRLO exception 276
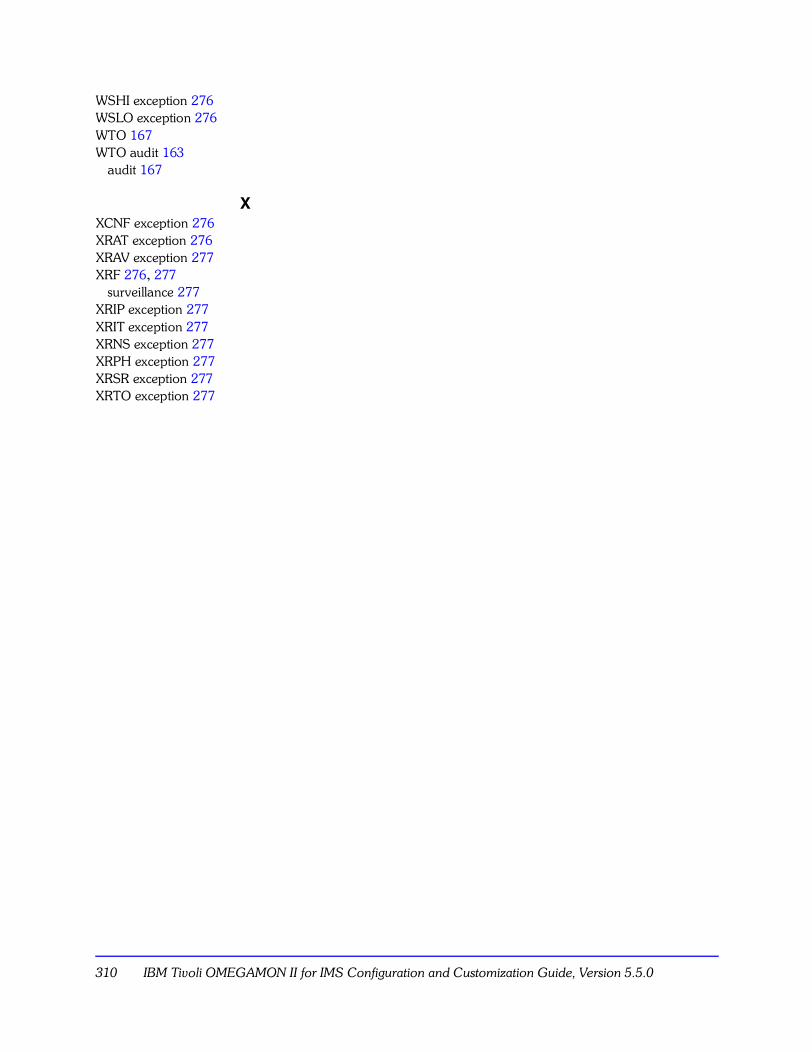
310 IBM Tivoli OMEGAMON II for IMS Configuration and Customization Guide, Version 5.5.0
WSHI exception 276WSLO exception 276WTO 167WTO audit 163
audit 167
XXCNF exception 276XRAT exception 276XRAV exception 277XRF 276, 277
surveillance 277XRIP exception 277XRIT exception 277XRNS exception 277XRPH exception 277XRSR exception 277XRTO exception 277


IBM@
Part Number: SC32-9356-00
Printed in USA
SC32-9356-00
SC32-9356-00