Embed Size (px)
Citation preview
1
1.0 COMPONENTSThis Mini Game is complete if it includes: 40 game pieces (units), 18 Saga and Voyage Cards, one 11 x 17” map, and this rules booklet. If any parts are missing or damaged, please write to:Decision Games, Mini Game Support, PO Box 21598, Bakersfield, CA 93390-1598. Please register this game purchase on-line at: www.decisiongames.com
Players must provide one or more six-sided dice (six is good). 2.0 INTRODUCTIONVikings is a solitaire wargame system in which the player takes command of a Viking Band, engaged on great expeditions (called Sagas). The Opposition Force (hostiles) is controlled by the game system. A deck of Voyage cards provides various voyages and encounters along the way.
2.1 Scenario Rules PrecedentEach game is played in scenarios called Sagas. The system rules include a campaign game, allowing you to link the individual Sagas into a larger campaign. Scenario rules supersede or modify the system rules. Instructions on cards take precedent over the scenario and system rules.
Note: Vikings is similar to DG’s Commando system but there are some significant differences.
2.2 Game TermsMay: You can choose to take the action or not.Must: You have to take the action.Pick or pick at random: Pick at random from the designated marker pool.
Roll against a value: Roll a die and then compare it to a unit combat strength. If the die roll is less than or equal to the factor, the die roll succeeds. If it is greater than the combat factor, it fails.
Example: A unit has a combat value of three. To destroy an enemy unit, it would require a die roll of one, two or three. A roll of four or higher would miss.
Saga: Each of these four cards has your mission information—what resources you begin the Saga with and what you must accomplish to complete the Saga successfully.Select: Sort through the markers and choose the one you want.Voyaging Force: A group of units operationg or taking an action together.
3.0 THE MAPThe map depicts the following.
Viking Homelands: Special spaces where you start Sagas.Spaces: Locations where you place units. Different types of spaces are described on the Terrain Effects Chart. Routes: The lines connecting spaces. Players move their units via routes. Leidang (Recruit): Place your Viking units that are not in play to the right of the map. Quests Completed: Place completed quest markers above the map (near the compass rose).Edda: Your reputation level. Gold: The amount of wealth you control. Hostiles Bin: A wide mouth opaque container, such as a coffee mug or bowl, a convenient place to put hostile units when not on the map and from which they are picked.
CREDITSSystem Design: Joseph MirandaDeveloper: Christopher CumminsPlaytesters: Vince Hoffman, Darin Leviloff, Paul Reigel-Green, Terry Rooker, Terry TurnovskyMap Graphics: Joe YoustCounter Graphics: Nadir ElfarraRules Booklet: Callie Cummins, Chris Cummins, & Chris DicksonCover & Card Design: Chris Dickson & Lisé Patterson
© 2018 Decision Games, Bakersfield, CA. Made & printed in the USA.[Mini-T_VikingComplete_V8]
INDEX1.0 COMPONENTS2.0 INTRODUCTION3.0 THE MAP4.0 PLAYING PIECES5.0 CARDS6.0 HOW TO WIN7.0 HOW TO SET UP THE GAME8.0 SAGA CARDS9.0 LEIDANG: GOLD & RECRUITING10.0 HOW TO PLAY THE GAME (GENERAL)11.0 VOYAGES12.0 MOVEMENT13.0 VOYAGE CARDS14.0 HOSTILE UNITS15.0 COMBAT (BATTLE)16.0 POST BATTLE17.0 EDDA18.0 QUESTS19.0 JARLS (LEADERS)20.0 PILLAGE & SETTLEMENTS21.0 SPECIAL UNITS22.0 APPEAL TO THE HIGH KING\23.0 OLD OR NEW RELIGION24.0 CAMPAIGN GAME
OPTIONAL RULES25.0 SUPPLIES26.0 SCOUTING
VikingsVikings
2018-T-MINI_Viking Complete_V8F.indd 1 5/8/18 2:51 PM
2
4.0 PLAYING PIECESThe square cardboard pieces are called units. Saga rules provide more information about their set-up. The following game definitions apply to the various playing pieces. Viking (player) UnitsThese are the combat units controlled by the player. There are three general types of mobile units: Jarls (leaders), Land (warbands) and Naval (ships).
Jarl: A leader of extraordinary abilities.
Huskarl: Warriors. Berserkirs: Fierce warriors & shamans.Varangians: Professional warriors. Long Ship: A group of Viking shipsOrmr Ship: A really long, long ship.Settlement: Colonies, forts, trading posts. Pillage: Pillaged area.
Hostile UnitsThese are the combat units controlled by the game system; they will sometimes fight friendly forces and vice versa. Leaders: Elite combat unit. Warriors: Combat unit. Elite Fleet: This provides the elite symbol only if in a sea or river space. Otherwise replace with another hostile unit. Berserkir: a unit with enhanced tactical abilities.
MarkersQuest: These are special markers, indicating goals for a Saga.
Edda: Your reputation. Gold: Your total wealth (resources).
DefinitionsCombat: The basic combat power of the unit; in combat, a die result of this number or less eliminates one opposing unit. Movement: Land units have a movement allowance of one space. Ships roll a die to determine their movement allowance (see 12.1). Ships are also marked with an “N” for easy identification.
5.0 CARDSThere are two types of cards: Saga and Voyage. These are explained under their rules sections (8.0 and 13.0, respectively).
6.0 HOW TO WIN The game is played in missions called Sagas. At the beginning of each Saga draw one Saga Card. The card will state the starting number of Voyage cards and gold, and the quests and objectives that must be completed (settlements placed, towns or fortresses pillaged, and/or Edda level achieved). If you have fulfilled the objectives and accomplished the quests by the end of the Saga, you win. If you fail to fulfill the objectives or complete the quests, you lose. 6.1 SettlementsThere must be at least the total number of pillage or settlement markers on the map by the Saga end.
6.2 EddaThe Edda marker must be at or above the objective level.
6.3 Return Also, to win, you must have at least one of your Jarls in either a Viking Homeland space, or a space with a settlement marker by the end of the Saga.
7.0 HOW TO SET UP THE GAME1) Place all hostile units in the Hostiles Bin (or
face down to the left of the game map). 2) Shuffle the Saga cards together and
place them face down in a pile.3) Draw at random one Saga card and read it.4) Shuffle the voyage cards together and deal
(face down) the number called for by the voyages line on the Saga card forming the draw deck. Place the other voyage cards aside forming the reserve deck.
5) You start with one Jarl (randomly selected). You can recruit other units during initial setup. Place them in a Viking Homeland space, or (campaign game) any settlement.
6) Quest Marker PlacementFor all Sagas: To place quest markers, consult
the Random Placement Table. Roll two dice, add the results, and cross-index the
total on the table. This will state several spaces. Place one quest marker in each (face down). Then roll two dice again, and cross-index the total on the table for additional locations for quest markers. (Reroll if a previous result occurs; only one quest marker per location.) If the remaining markers are less than the number of spaces in the next result, randomly determine which locations will receive quest markers. If markers still remain un-deployed, roll the dice a third time. Quest accomplishment is necessary for Saga success. It may also help the player attain the objective(s).
7) Create your starting force(s) by purchasing Viking units for the Saga with the gold received.
8) Place all un-purchased Viking units to the right side of the map.
9) The Saga is now ready to be played.
8.0 SAGA CARDSEach Saga card has the following information.Voyages: The number of voyage cards shuffled to form the draw deck.Gold: The starting number of gold if just playing a Saga.Objective: The total number of pillage or settlement markers you need to have on the map and/or Edda level achieved.Quests: The number of quests that must be accomplished.Success: This is for the campaign game—it’s what you receive for the ensuing Saga if successful.
8.1 Saga DescriptionsEirikSaga: Explore new lands and establish settlements.Floamanna: Seek new lands and pillage them. Heimskringla: Build a new kingdom. Note that settlements already built count towards the three settlement objective. Also, a space that has more than one of the types counts towards fulfilling each type. For example, a fortress space with a trading center and a warrior kingdom meets that requirement so any two other settlements would meet the three total settlements requirement. Volsunga: The epic struggle against the Huns.
Elite Status (“+” symbol)
Combat Strength
Name
Name
Elite Status (“+” symbol)
Combat & Transport Value
“N” indicates a naval unit (ship)
Elite Status (“+” symbol)
Combat Strength
Type
Land Unit Information
Leader Unit Information
Naval Unit Information
2018-T-MINI_Viking Complete_V8F.indd 2 5/8/18 2:51 PM
3
9.0 LEIDANG: GOLD & RECRUITINGYou account for your total gold on the Gold Index, using the gold marker. As the amount of gold goes up and down, move the marker on the Index. Gold can never go below zero nor higher than nineteen.
9.1 Recruiting Units & Buying StuffEach Viking combat unit costs gold points (GP) as listed on the Recruiting Chart. Place recruited land and naval units in any of the following spaces: your Viking homeland, a settlement, or with any Jarl. Additionally, naval units must be placed in spaces on coasts or rivers. Certain units have additional requirements to be recruited. See the Recruiting Chart.
9.2 HoardingGold you did not expend during initial deployment can be saved to recruit units during the game. This is done in the Leidang segment of the turn. You can then recruit per above. Various cards may bring in more gold, or cause it to be expended. Cards may also provide reinforcements—these do not cost gold.
9.3 ReplacementsGenerally, you may replace any eliminated Viking units. However, a Jarl who is eliminated is out of play for the rest of the Saga.
10.0 HOW TO PLAY THE GAME (GENERAL)
10.1 Game lengthEach Saga begins with the number of voyage cards in the draw deck. If you draw all of the cards in the draw deck, the Saga is over. Because the player may gain or lose voyage cards during the Saga, the Saga length varies according to the number of voyage cards remaining in the draw deck.
10.2 StackingStacking is having more than one unit in a single space. You may have four Viking units plus a number equal to your current Edda level. Stacking does not apply to settlement, pillaged, or quest markers, or to hostile units. However, you can never have more than one quest marker in a space. Also, you may have only one settlement or pillaged marker in a space—never both.
Stacking is checked only at the end of a movement segment. If for some reason you have an excess number of units in a space, you must eliminate the excess units. You may otherwise move any number of units through a particular space.
Stacking does not apply to a homeland space. An unlimited number of units may be stacked there.
10.3 ForceA “force” is a group of units in the same space, conducting a voyage together. A force can consist of a single unit or more (up to the stacking limit).
11.0 VOYAGES Each Saga card will assign you a number of voyages to use during a Saga. The number of voyage cards remaining in the draw deck is the number of turns remaining in the Saga. One voyage is defined as one force of units taking the following actions. The force conducting a voyage is called the voyaging force.
1) Trade Segment. Receive one gold if the voyaging force is in a Trade Center space with a settlement.
2) Leidang Segment. The voyaging force can recruit units (per 9.1 or via special rule or card).
3) Movement Segment. Move the voyaging force per the movement rules.
4) Voyage Card Segment. Pick one voyage card from the draw deck and implement the instructions.
5) Combat Segment. If there are any hostile units generated by the voyage card, engage in combat.
6) Quest Segment. If there is a face down quest marker in the space in which a force completed its move, flip it face up. There will be another combat to accomplish the quest. See the Quests Rule (18.0) for details.
7) Pillage/Settlement. If in a town or fortress space, the voyaging force may pillage the space or build a settlement.
Example. In one voyage, you may recruit, move one force, then you must draw a voyage card. If enemy forces are present in the voyaging force’s space, you must engage in combat. Then conduct any quest actions including any additional combat. Lastly, if in a town or fortress space, you may pillage or place a settlement. 11.1 Multiple OperationsA single unit or force of units can conduct any number of voyages per Saga, as long as you play a voyage card for each one. You do not have to go through the entire Voyage deck for a Saga if you win before then.
11.2 Saga EndThe Saga comes to an end when: 1) you accomplish the victory conditions; or 2) you have picked and played the last voyage card from the draw deck; or 3) you have no Jarls on the map. At this point evaluate victory.
Note: certain cards and special actions will recruit a Jarl at the end of a battle. This negates condition (3)—in these cases, the game continues.
11.3 Variable VoyagesCertain voyage cards or Saga rules will cause a gain or loss of voyage cards in a Saga.
Gain of Voyage: Pick one (or more) voyage card(s) (face down) from the reserve deck and place it (them) on the bottom of the draw deck. If the reserve deck has been exhausted, shuffle the discards to form a new reserve deck.
Loss of Voyage: Pick the top voyage card from the draw deck and discard it, face down. If there are no more cards in the deck, or if this is the last card, the Saga ends.
12.0 MOVEMENTThere are two general types of movement: land and naval. During a voyaging force’s Movement segment, you may move the force any number of spaces, up to its movement allowance (one if by land, one to three if by naval). If you have more than one unit starting in a space, you may form some of them into a force and leave the rest behind in the starting space. If there is more than one unit in a force, they must move together. After leaving the starting space, you may not pick up or drop off units from a moving force—they must stick together.
Example. A force with a movement of “2” may move two, one, or zero spaces during a movement segment.
If the force is using Naval Movement, then use the Naval Movement rule (below). Otherwise, use the Land Movement rule.
Example. You have three units in a space. You could form them into one combined force (of three units), or two forces (one of two units which then moves, and a second of one unit which stays behind, or vice versa).
A force must stop regardless of remaining movement allowance and move no farther this voyage if it enters a space for which the Terrain Effects Chart indicates “STOP.” Also, a force must stop if it enters a space with a quest marker. The force can move out of such a space on a subsequent voyage.
2018-T-MINI_Viking Complete_V8F.indd 3 5/8/18 2:51 PM
4
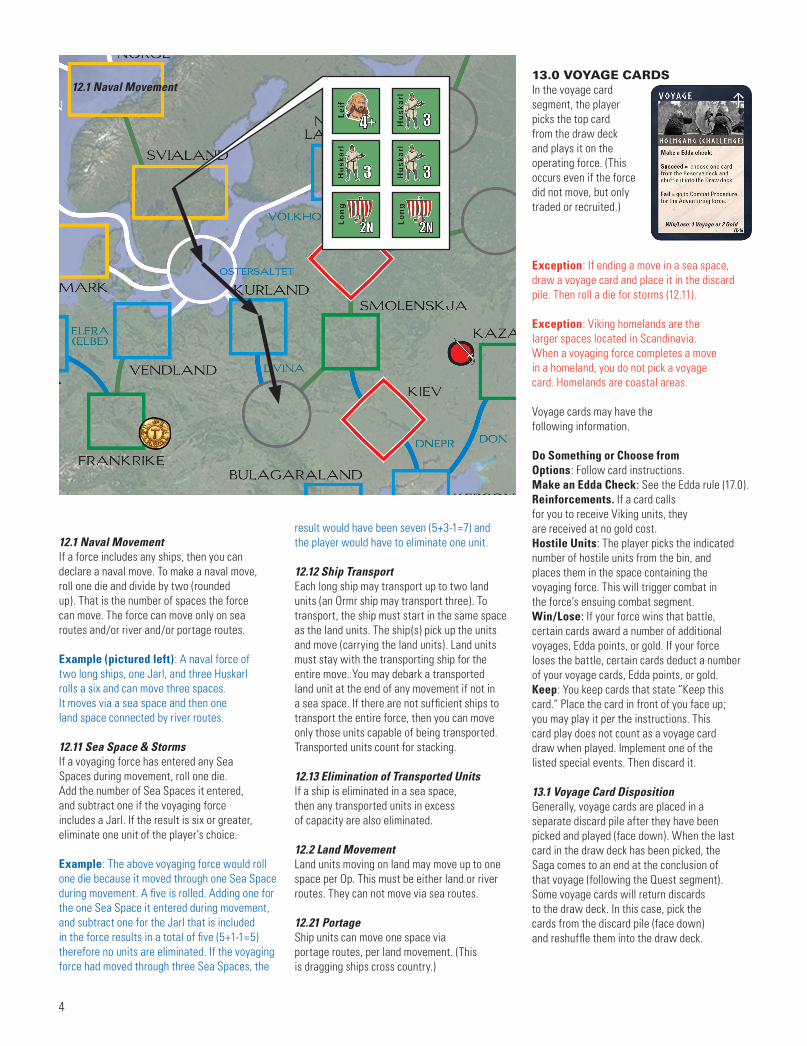
12.1 Naval MovementIf a force includes any ships, then you can declare a naval move. To make a naval move, roll one die and divide by two (rounded up). That is the number of spaces the force can move. The force can move only on sea routes and/or river and/or portage routes.
Example (pictured left): A naval force of two long ships, one Jarl, and three Huskarl rolls a six and can move three spaces. It moves via a sea space and then one land space connected by river routes.
12.11 Sea Space & StormsIf a voyaging force has entered any Sea Spaces during movement, roll one die. Add the number of Sea Spaces it entered, and subtract one if the voyaging force includes a Jarl. If the result is six or greater, eliminate one unit of the player’s choice.
Example: The above voyaging force would roll one die because it moved through one Sea Space during movement. A five is rolled. Adding one for the one Sea Space it entered during movement, and subtract one for the Jarl that is included in the force results in a total of five (5+1-1=5) therefore no units are eliminated. If the voyaging force had moved through three Sea Spaces, the
12.1 Naval Movement
result would have been seven (5+3-1=7) and the player would have to eliminate one unit.
12.12 Ship TransportEach long ship may transport up to two land units (an Ormr ship may transport three). To transport, the ship must start in the same space as the land units. The ship(s) pick up the units and move (carrying the land units). Land units must stay with the transporting ship for the entire move. You may debark a transported land unit at the end of any movement if not in a sea space. If there are not sufficient ships to transport the entire force, then you can move only those units capable of being transported. Transported units count for stacking.
12.13 Elimination of Transported UnitsIf a ship is eliminated in a sea space, then any transported units in excess of capacity are also eliminated. 12.2 Land MovementLand units moving on land may move up to one space per Op. This must be either land or river routes. They can not move via sea routes. 12.21 PortageShip units can move one space via portage routes, per land movement. (This is dragging ships cross country.)
13.0 VOYAGE CARDSIn the voyage card segment, the player picks the top card from the draw deck and plays it on the operating force. (This occurs even if the force did not move, but only traded or recruited.)
Exception: If ending a move in a sea space, draw a voyage card and place it in the discard pile. Then roll a die for storms (12.11).
Exception: Viking homelands are the larger spaces located in Scandinavia. When a voyaging force completes a move in a homeland, you do not pick a voyage card. Homelands are coastal areas.
Voyage cards may have the following information.
Do Something or Choose from Options: Follow card instructions.Make an Edda Check: See the Edda rule (17.0).Reinforcements. If a card calls for you to receive Viking units, they are received at no gold cost.Hostile Units: The player picks the indicated number of hostile units from the bin, and places them in the space containing the voyaging force. This will trigger combat in the force’s ensuing combat segment. Win/Lose: If your force wins that battle, certain cards award a number of additional voyages, Edda points, or gold. If your force loses the battle, certain cards deduct a number of your voyage cards, Edda points, or gold. Keep: You keep cards that state “Keep this card.” Place the card in front of you face up; you may play it per the instructions. This card play does not count as a voyage card draw when played. Implement one of the listed special events. Then discard it.
13.1 Voyage Card DispositionGenerally, voyage cards are placed in a separate discard pile after they have been picked and played (face down). When the last card in the draw deck has been picked, the Saga comes to an end at the conclusion of that voyage (following the Quest segment). Some voyage cards will return discards to the draw deck. In this case, pick the cards from the discard pile (face down) and reshuffle them into the draw deck.
2018-T-MINI_Viking Complete_V8F.indd 4 5/8/18 2:51 PM
5
14.0 HOSTILE UNITSHostile units are temporarily placed on the map as the result of voyages and quest resolution. They are placed in the same space as the force that triggered the card draw. Hostile units are automatically removed from the map after the battle concludes, and placed back to the Hostiles Bin (left of the map). They may be temporarily eliminated by combat, but are always returned to the Hostiles Bin.
14.1 Number of Hostiles Units Generally, you roll one die, divide by two (rounded up) and that is the number of units you pick (1-3). If the space has a sword on it, it means that you pick one additional unit. Some cards may call for an additional unit (and if this is a sword space, then this means two additional units total). If the hostiles draw a ship in an inland space, draw another hostile unit. If playing the campaign game, add one unit to every combat for every Saga completed successfully (0-3).
15.0 COMBAT (BATTLE)Combat is initiated when a force of your units is in the same space as hostile units. This will occur as a result of voyage card draws and quest resolution. All combat occurs during the Combat Segment. Because each force must move individually,
generally, you will not be able to combine different forces in the same combat. However, if there were other units already in the space, and a moving force entered that same space, those units will also participate in combat generated by a voyage card draw.
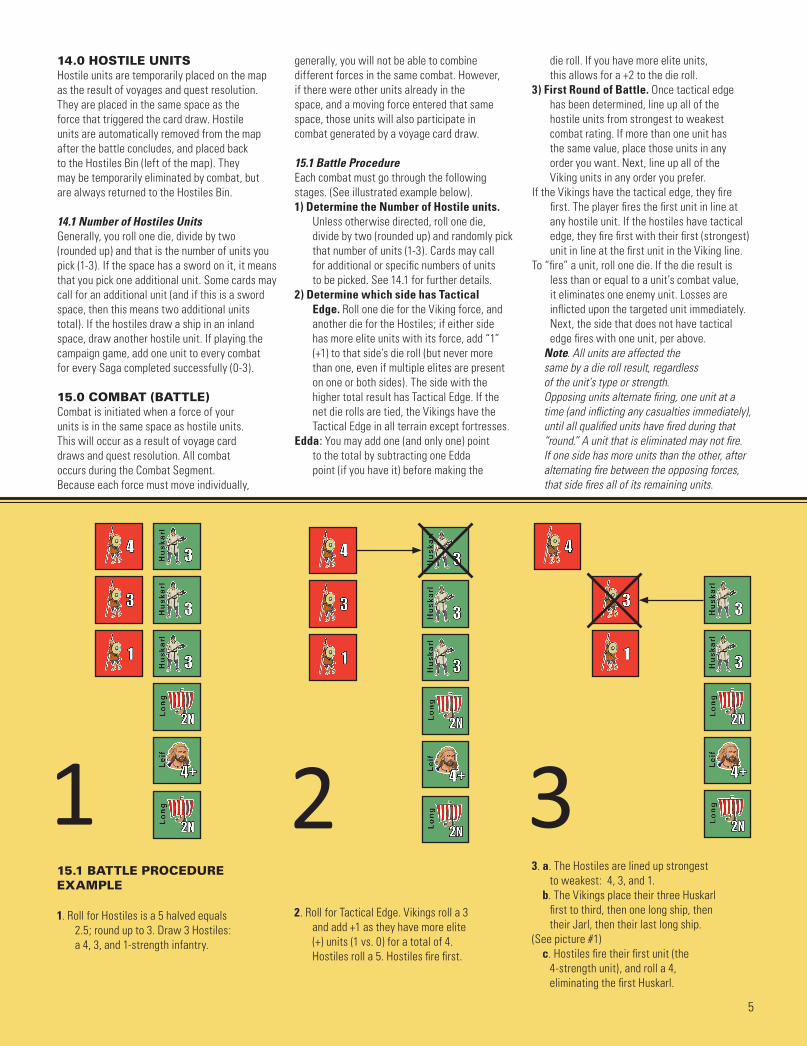
15.1 Battle ProcedureEach combat must go through the following stages. (See illustrated example below).1) Determine the Number of Hostile units.
Unless otherwise directed, roll one die, divide by two (rounded up) and randomly pick that number of units (1-3). Cards may call for additional or specific numbers of units to be picked. See 14.1 for further details.
2) Determine which side has Tactical Edge. Roll one die for the Viking force, and another die for the Hostiles; if either side has more elite units with its force, add “1” (+1) to that side’s die roll (but never more than one, even if multiple elites are present on one or both sides). The side with the higher total result has Tactical Edge. If the net die rolls are tied, the Vikings have the Tactical Edge in all terrain except fortresses.
Edda: You may add one (and only one) point to the total by subtracting one Edda point (if you have it) before making the
die roll. If you have more elite units, this allows for a +2 to the die roll.
3) First Round of Battle. Once tactical edge has been determined, line up all of the hostile units from strongest to weakest combat rating. If more than one unit has the same value, place those units in any order you want. Next, line up all of the Viking units in any order you prefer.
If the Vikings have the tactical edge, they fire first. The player fires the first unit in line at any hostile unit. If the hostiles have tactical edge, they fire first with their first (strongest) unit in line at the first unit in the Viking line.
To “fire” a unit, roll one die. If the die result is less than or equal to a unit’s combat value, it eliminates one enemy unit. Losses are inflicted upon the targeted unit immediately. Next, the side that does not have tactical edge fires with one unit, per above.
Note. All units are affected the same by a die roll result, regardless of the unit’s type or strength. Opposing units alternate firing, one unit at a time (and inflicting any casualties immediately), until all qualified units have fired during that “round.” A unit that is eliminated may not fire. If one side has more units than the other, after alternating fire between the opposing forces, that side fires all of its remaining units.
15.1 BATTLE PROCEDURE ExAMPLE
1. Roll for Hostiles is a 5 halved equals 2.5; round up to 3. Draw 3 Hostiles: a 4, 3, and 1-strength infantry.
2. Roll for Tactical Edge. Vikings roll a 3 and add +1 as they have more elite (+) units (1 vs. 0) for a total of 4. Hostiles roll a 5. Hostiles fire first.
3. a. The Hostiles are lined up strongest to weakest: 4, 3, and 1.
b. The Vikings place their three Huskarl first to third, then one long ship, then their Jarl, then their last long ship.
(See picture #1) c. Hostiles fire their first unit (the
4-strength unit), and roll a 4, eliminating the first Huskarl.
5
2018-T-MINI_Viking Complete_V8F.indd 5 5/8/18 2:51 PM
6
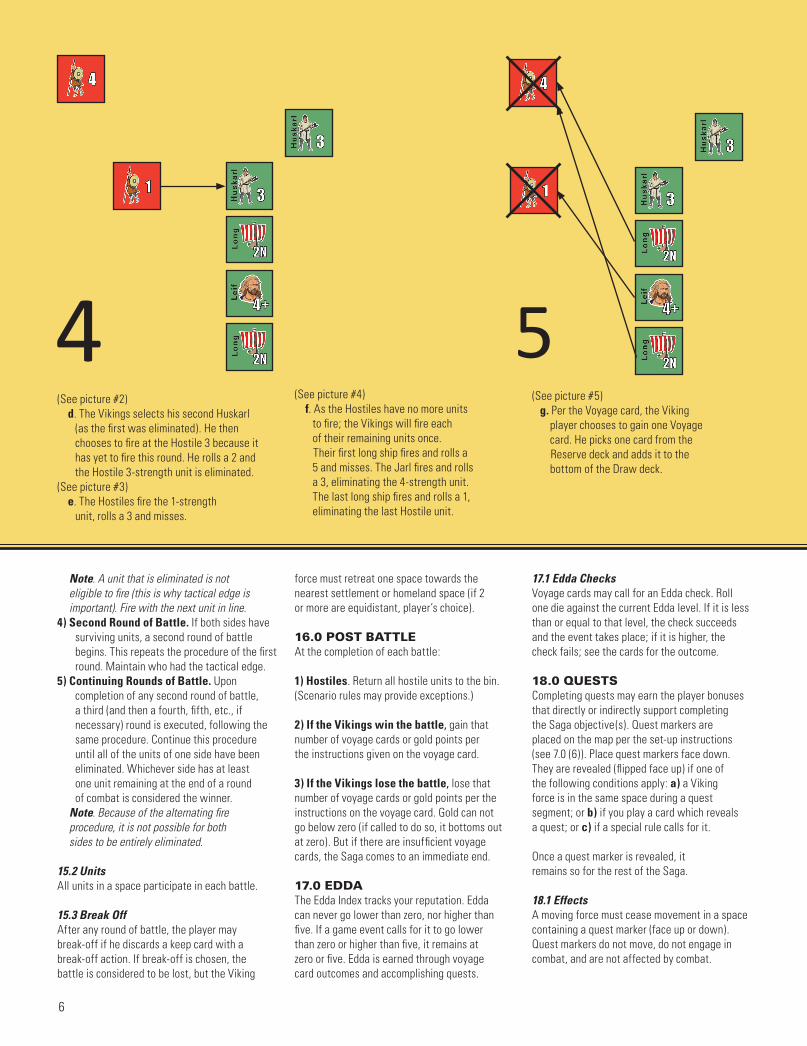
Note. A unit that is eliminated is not eligible to fire (this is why tactical edge is important). Fire with the next unit in line.
4) Second Round of Battle. If both sides have surviving units, a second round of battle begins. This repeats the procedure of the first round. Maintain who had the tactical edge.
5) Continuing Rounds of Battle. Upon completion of any second round of battle, a third (and then a fourth, fifth, etc., if necessary) round is executed, following the same procedure. Continue this procedure until all of the units of one side have been eliminated. Whichever side has at least one unit remaining at the end of a round of combat is considered the winner.
Note. Because of the alternating fire procedure, it is not possible for both sides to be entirely eliminated.
15.2 Units All units in a space participate in each battle.
15.3 Break Off After any round of battle, the player may break-off if he discards a keep card with a break-off action. If break-off is chosen, the battle is considered to be lost, but the Viking
force must retreat one space towards the nearest settlement or homeland space (if 2 or more are equidistant, player’s choice).
16.0 POST BATTLEAt the completion of each battle:
1) Hostiles. Return all hostile units to the bin. (Scenario rules may provide exceptions.)
2) If the Vikings win the battle, gain that number of voyage cards or gold points per the instructions given on the voyage card.
3) If the Vikings lose the battle, lose that number of voyage cards or gold points per the instructions on the voyage card. Gold can not go below zero (if called to do so, it bottoms out at zero). But if there are insufficient voyage cards, the Saga comes to an immediate end.
17.0 EDDAThe Edda Index tracks your reputation. Edda can never go lower than zero, nor higher than five. If a game event calls for it to go lower than zero or higher than five, it remains at zero or five. Edda is earned through voyage card outcomes and accomplishing quests.
17.1 Edda ChecksVoyage cards may call for an Edda check. Roll one die against the current Edda level. If it is less than or equal to that level, the check succeeds and the event takes place; if it is higher, the check fails; see the cards for the outcome.
18.0 QUESTS Completing quests may earn the player bonuses that directly or indirectly support completing the Saga objective(s). Quest markers are placed on the map per the set-up instructions (see 7.0 (6)). Place quest markers face down. They are revealed (flipped face up) if one of the following conditions apply: a) a Viking force is in the same space during a quest segment; or b) if you play a card which reveals a quest; or c) if a special rule calls for it.
Once a quest marker is revealed, it remains so for the rest of the Saga.
18.1 EffectsA moving force must cease movement in a space containing a quest marker (face up or down). Quest markers do not move, do not engage in combat, and are not affected by combat.
5(See picture #2) d. The Vikings selects his second Huskarl
(as the first was eliminated). He then chooses to fire at the Hostile 3 because it has yet to fire this round. He rolls a 2 and the Hostile 3-strength unit is eliminated.
(See picture #3) e. The Hostiles fire the 1-strength
unit, rolls a 3 and misses.
(See picture #5) g. Per the Voyage card, the Viking
player chooses to gain one Voyage card. He picks one card from the
Reserve deck and adds it to the bottom of the Draw deck.
(See picture #4) f. As the Hostiles have no more units
to fire; the Vikings will fire each of their remaining units once.
Their first long ship fires and rolls a 5 and misses. The Jarl fires and rolls a 3, eliminating the 4-strength unit. The last long ship fires and rolls a 1, eliminating the last Hostile unit.
2018-T-MINI_Viking Complete_V8F.indd 6 5/8/18 2:51 PM
7
18.2 CombatIf a voyaging force is in the same space as a quest marker, a special round of combat occurs, even if there was a combat in the space due to a voyage card event. This is conducted per the combat rule, but there are no gains or losses in the post battle (other than winning the battle accomplishes the quest).
18.3 Completing the QuestA quest marker remains face up on the map until you have a voyaging force in the space at the completion of all combat there. If the entire voyaging force was eliminated or a break-off was chosen, then it does not accomplish the quest.
18.4 Quest AccomplishmentPlace the Accomplished Quest marker next to the Edda track and receive the bonuses listed below. Jomsburg: Place one available settlement in this space at no cost (if this space is not a coastal town place in a coastal town of player’s choice) and the quest marker is available for placement in the next Saga, OR gain one Edda and remove this quest for the rest of the campaign game.
Niflung Horde: Roll one die and add your Edda level. Gain that amount of gold. Runes: Select any one of the quest markers not revealed, reveal it and receive the bonus described, and place the Runes quest marker above the Edda Track. If all quest markers have been revealed, gain one voyage or two gold. The revealed quest is considered accomplished and placed above the map near the compass rose.
Note: The Runes quest marker does NOT count as an Accomplished Quest.
Silk Road: Gain the number of voyage cards equal to your current Edda. Sword Oath: Recruit one Berserkir or Jarl (at no cost). Place the unit in this space.
Ginnungagap: Gain one Jarl at no cost in this space and the quest marker is available for placement in the next Saga, OR gain one Edda and remove this quest for the rest of the campaign.
19.0 JARLS (LEADERS)Jarls represent superlative commanders. One Jarl is randomly selected at the start of each Saga (including Sagas in a campaign game). Additional (randomly selected) Jarls may be gained by certain voyage cards and special rules. Jarls are land units for all game purposes. If a Jarl is killed, he may not be replaced in a Saga or in a campaign game; if all four Jarls are eliminated in a campaign game, the player loses the campaign game. Jarls are
elite units; they have other special abilities per the Jarl boxes at the right of the map. Note: these boxes are a good holding place to put the forces with that Jarl.
19.1 Rally to Jarl MoveThis is a special movement. Initiate a voyage. You may move any or all friendly forces within one space to the Jarl ending their move in his space. Then pick one voyage card (for the combined force).
19.2 Jarls Each Jarl has a display—this is a convenient place to put all units accompanying that Jarl.
19.3 Special Abilities Leif: Increases the movement of any force he is part of by one space (can be combined with optional Forced March (25.0 #1). Erik: Gains one extra gold point for each pillage. Harald: Counts as two elite units in determing tactical edge.Rurik: Builds settlements at a cost of 1 gold each. Recruiting: After initial deployment, pick recruited Jarls at random.
20.0 PILLAGE & SETTLEMENTS You can use either the settlement side of the marker or the pillage side (to record settlement and pillage, respectively). The number of markers in the game is a limit. Pillage markers are always
removed at the end of a Saga and settlement markers may be removed at player option.
During the Pillage & Settlement segment, the voyaging force can do one of the following a) pillage the space; or b) build a settlement or c) do nothing. You can pillage or settle town and fortress spaces (but not homelands and other spaces). You cannot pillage or settle a space that already has a pillage or settlement marker. Pillage and settlement markers have no combat strength, do not count for stacking, and can not be part of a voyaging force.
20.1 PillagingDeclare Pillage. Roll one die. For a fortress, receive that number of gold; for a town, receive half that number (rounded up). Place a pillaged marker.
20.2 Settlements Declare Settlement. Expend the number of gold indicated. Place a settlement marker.20.21 Settlement EffectsTrade: If a voyaging force is in a space with a Trade Center with the settlement, gain one gold.Leidang: A Viking force that starts a voyage in the same space as a settlement may recruit units there. 20.22 Settlement DestructionA settlement is destroyed if: a) the Vikings fight and lose a battle in the same space; or b) a hostile force appears in the space
2018-T-MINI_Viking Complete_V8F.indd 7 5/8/18 2:51 PM
8
(owing to a card) and there are no Viking units in it; or c) a card calls for it.
21.0 SPECIAL UNITS21.1 Varangians You can recruit the Varangian unit if you have a Jarl in a space with a warrior kingdom symbol. You do not need a settlement there. You must make a successful Edda check. If you pass, then expend the gold, and place the Varangians.
21.2 Ormr ShipYou can recruit the Ormr ship if you have a Jarl in a Viking homeland or coastal space with a settlement. You must make a successful Edda check. If you pass, then expend the gold, and place the ship. The Ormr ship can transport up to three land units. 21.3 LimitsYou can attempt to recruit one Varangian or build one Ormr ship (not both) only once per Leidang segment.
21.4 Berserkirs These have the following special capabilities Combat: During the first round of a battle, you ignore one hit for each Berserkir you have in the engaged force. For the second and subsequent rounds, apply hits normally.
21.41 Berserkir UnpredictabilityAfter the conclusion of the first battle of each Saga in which at least one Berserkir unit participates (regardless of outcome), you must roll on the Berserkir Table (see 23.0). If the battle was lost (or a break-off), add one (+1) to the die roll.
22.0 APPEAL TO THE HIGH KINGIf a Jarl is in a Viking Homeland then you can make an appeal to the High King. An appeal can be made once per Saga, and this does not count as a voyage. Make an Edda Check. If you succeed, then you can select one Result from the following list; if you fail, lose gold equal to the Edda level.
Funding: Roll one die and gain that number of gold.Reinforcements: Recruit one Jarl, Ormr Ship, or Berserkir and place in the space with the Jarl.Information: Select any two concealed quest markers and reveal them.Norns/Papal legate: Sort through the reserve deck and discards, select one card, and shuffle it into the voyage (draw) deck.
23.0 OLD OR NEW RELIGION SCENARIO At the start of play, decide if you want to play an Old (Norse) Religion or new
(Christian) Religion scenario. If you choose Old, then use the standard rules.
If you choose Christian, you cannot recruit Berserkirs. But at the conclusion of the first battle that at least one Jarl participated in (regardless of outcome), you may roll on the New Religion Table (see charts). If the battle was lost (or a break-off), add one (+1) to the die roll.
Berserkir Table1= Gain one Edda2= Gain one voyage card3= Reveal one concealed quest marker4= Lose one gold5= Lose one Berserkir6= Lose one Edda
New Religion Table1= Gain one Edda2= Gain one voyage card3= Reveal one concealed quest marker4= Lose one gold5= Lose two gold6= Lose one Edda
24.0 CAMPAIGN GAMEVikings can be played as a series of games. At the conclusion of a Saga, return all Viking units to the Recruit Pool. You can recruit them normally in the ensuing Saga. Place the Volsunga Saga to the side; it will be the last Saga. Place the Edda marker at zero at the start of the campaign game.
After each Saga, do the following.
24.1 Win or Lose
Pillage markers: Remove them from the map.
Settlements: Receive one gold for each settlement in a Trade Center on the map at the end of the Saga. You then choose whether to keep all settlements on the map, or return some or all of them to the available pool.
Gold: After the first Saga, ignore the gold line on the Saga cards.
Quests: After each Saga, remove any quest markers still on the map. Set aside any quest markers used to increase Edda. Randomly place the remaining per the Quest Placement procedure (See 7.0 #6).
Keep cards: If you end a Saga with any Keep cards, you choose one to continue into the next Saga.
24.2 If you win the Saga1) Remove that Saga card from the deck.2) Keep any un-expended gold. 3) For the next Saga, keep your Edda level. 4) For the next Saga, the Saga card Success
section gives you a bonus. This bonus applies only to the next Saga played.
24.3 If you did not win a Saga 1) Reshuffle that Saga card back into the deck; you can potentially pick it again. 2) Keep half of any un-expended gold (rounded up). 3) For the next Saga, your Edda level goes down one level.
24.4 Hostiles PickFor each Saga you win, add one to the number of hostiles you pick to begin a combat, to the limit of the counter mix. For example, after winning the first three Sagas, each combat in the final Saga will add +3 hostiles.
24.5 Winning the CampaignYou win the campaign when you have won all four Sagas. If you lose any Saga twice or lose two different Sagas once each, you lose the campaign. It is also possible to lose the Campaign game by all four Jarls being eliminated. The Volsunga Saga will always be the final Saga.
OPTIONAL RULES
25.0 SUPPLIESA force can expend gold during the course of a voyage:
1) Forced March: At the start of a Movement segment to move a Viking force one extra space. Expend one gold for each unit. The extra space is moved before regular movement. OR
2) Pay the Troops: At the end of a Movement segment, you can maintain extra units in a space by expending one gold for each unit in excess of stacking limits (10.2)—thereby not having to eliminate the excess units. 26.0 SCOUTING A force conducting a voyage may attempt one scouting. Conduct scouting at the start of movement. The voyaging force must have at least one leader and be adjacent to a space containing a face down quest marker. Execute the Scouting procedure.
Scouting ProcedureMake an Edda check. If successful, reveal the quest; otherwise nothing happens.
2018-T-MINI_Viking Complete_V8F.indd 8 5/8/18 2:51 PM