Embed Size (px)
DESCRIPTION
VisualStyler.Net is the ultimate skinning component for WinForms developers, it includes an advanced Skin editor, Visual Studio Add-in and direct support for Microsoft Visual Styles along with 31 built-in Skins, including Office 2010,Office 2007 and Mac-OSX themesOverviewVisualStyler.Net is the premium skinning component for Windows Forms .Net developers, the product is supplied with an advanced skin editor and 31 professional skins including Office 2007, Office 2010, Windows 7, Windows Aero, Windows Metro, Windows XP and Mac-OSX and you can also use any Microsoft Visual Style to skin your applications. With currently over 2000 visual styles to choose from, your applications can really stand out from crowd.General FeaturesAutomatically skins your entire .NET application. Supplied with 31 professional visual styles. Choose from 3 translucent form shadow effects. Choose from 7 professional ToolStrip rendering styles. Skins the entire set of window forms .NET controls.Skins all forms and MDI forms applications.Skins all of the native system scrollbars.Skins all of the common dialogs such as OpenFileDialog, PrintDialog etc.Full support for control image and background image properties.Full support for WinForms control background transparency.Full support for multithreaded forms and user interfaces.High quality rendering produces smooth flicker free drawing.Easy to use component API lets you customize what is skinned.Uses hardware accelerated drawing methods on all platforms.Supports 16-bit, 24-bit and 32-bit color depths.Does not require uxtheme or 'theme aware' OS platforms.Written entirely in 100% managed C#.Compatible with NET 2.0, NET 3.0, NET 3.5 and NET 4.0.Implemented as a single .NET component assembly dll.
Citation preview
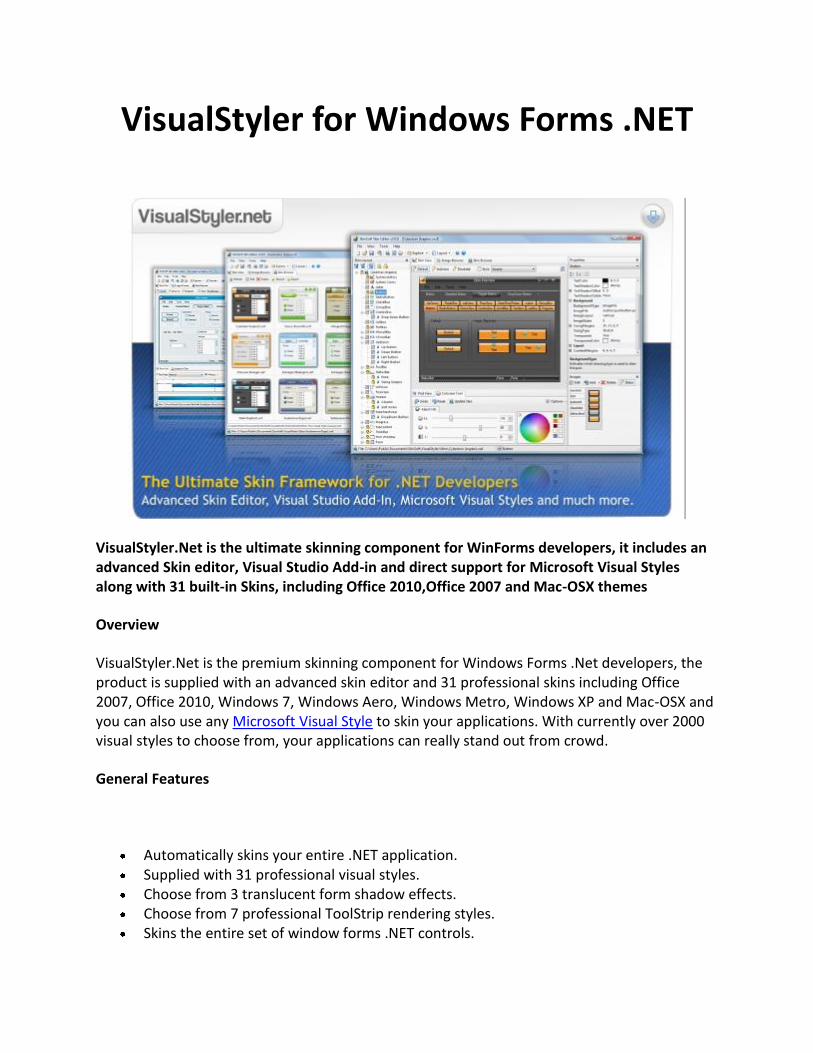
VisualStyler.Net is the ultimate skinning component for WinForms developers, it includes an advanced Skin editor, Visual Studio Add-in and direct support for Microsoft Visual Styles along with 31 built-in Skins, including Office 2010,Office 2007 and Mac-OSX themes
Overview
VisualStyler.Net is the premium skinning component for Windows Forms .Net developers, the product is supplied with an advanced skin editor and 31 professional skins including Office 2007, Office 2010, Windows 7, Windows Aero, Windows Metro, Windows XP and Mac-OSX and you can also use any Microsoft Visual Style to skin your applications. With currently over 2000 visual styles to choose from, your applications can really stand out from crowd.
General Features
Automatically skins your entire .NET application. Supplied with 31 professional visual styles. Choose from 3 translucent form shadow effects. Choose from 7 professional ToolStrip rendering styles. Skins the entire set of window forms .NET controls.
Skins all forms and MDI forms applications. Skins all of the native system scrollbars. Skins all of the common dialogs such as OpenFileDialog, PrintDialog etc. Full support for control image and background image properties. Full support for WinForms control background transparency. Full support for multithreaded forms and user interfaces. High quality rendering produces smooth flicker free drawing. Easy to use component API lets you customize what is skinned. Uses hardware accelerated drawing methods on all platforms. Supports 16-bit, 24-bit and 32-bit color depths. Does not require uxtheme or 'theme aware' OS platforms. Written entirely in 100% managed C#. Compatible with NET 2.0, NET 3.0, NET 3.5 and NET 4.0. Implemented as a single .NET component assembly dll.
Supported Environments
VB.Net, C#.Net, MC++.Net Visual Studio .NET 2005 Visual Studio .NET 2008 Visual Studio .NET 2010 Visual Studio .NET 2012 Visual Studio .NET 2013 Visual C# Express Editions Visual VB.Net Express Editions Visual C++.NET Express Editions
Supported Platforms
Windows 2000 Windows 2003 Windows 2003 64-bit Windows XP Windows XP 64-bit Windows Vista Windows Vista 64-bit Windows 7 Windows 7 64-bit Windows 8 Windows 8 64-bit
© 2014 CSS Ltd All rights reserved
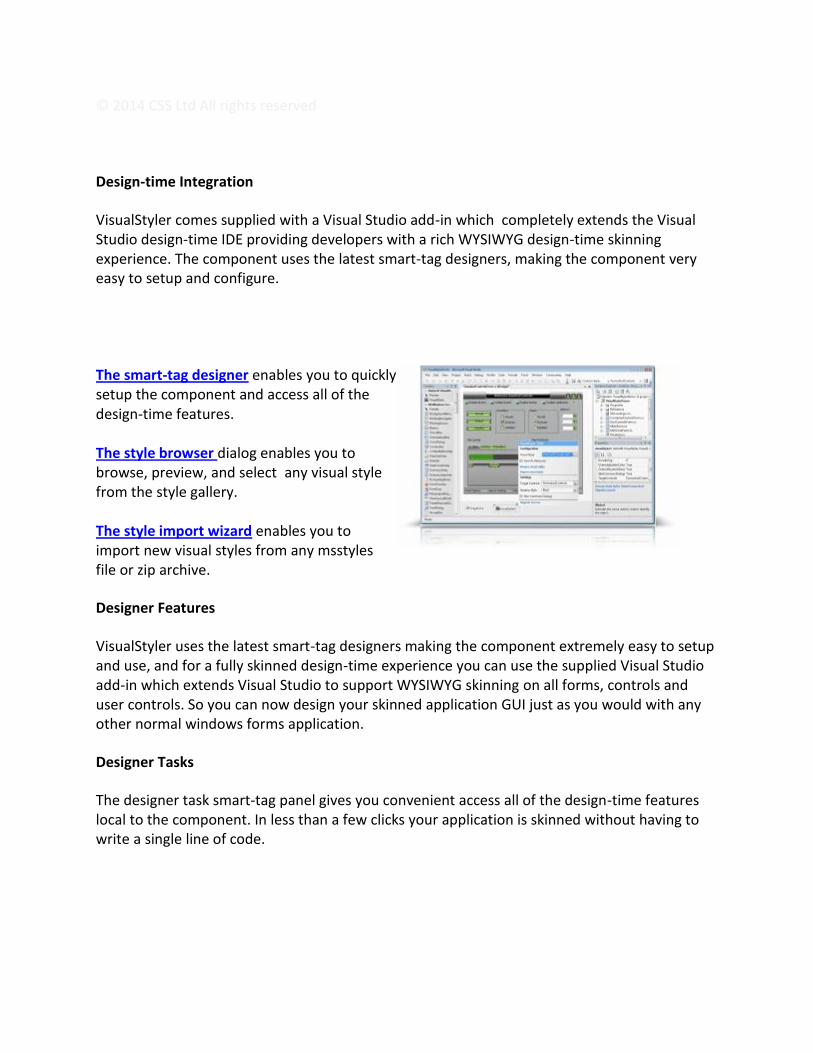
Design-time Integration
VisualStyler comes supplied with a Visual Studio add-in which completely extends the Visual Studio design-time IDE providing developers with a rich WYSIWYG design-time skinning experience. The component uses the latest smart-tag designers, making the component very easy to setup and configure.
The smart-tag designer enables you to quickly setup the component and access all of the design-time features. The style browser dialog enables you to browse, preview, and select any visual style from the style gallery. The style import wizard enables you to import new visual styles from any msstyles file or zip archive.
Designer Features
VisualStyler uses the latest smart-tag designers making the component extremely easy to setup and use, and for a fully skinned design-time experience you can use the supplied Visual Studio add-in which extends Visual Studio to support WYSIWYG skinning on all forms, controls and user controls. So you can now design your skinned application GUI just as you would with any other normal windows forms application.
Designer Tasks
The designer task smart-tag panel gives you convenient access all of the design-time features local to the component. In less than a few clicks your application is skinned without having to write a single line of code.
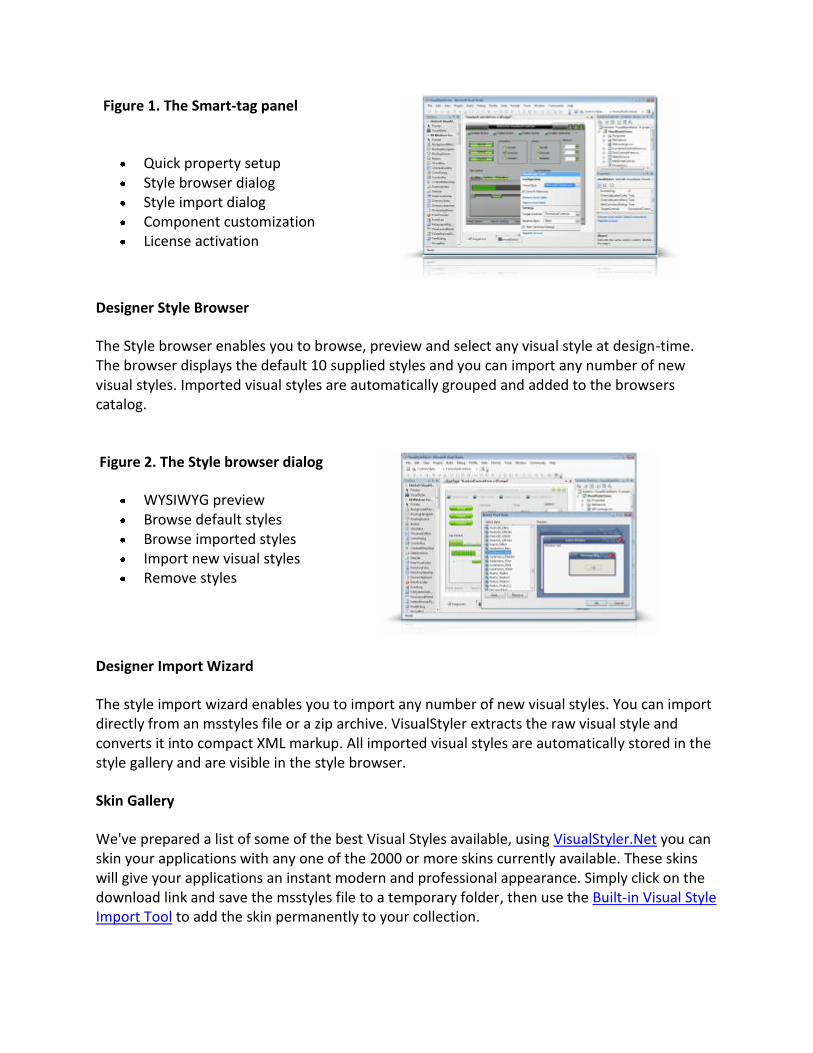
Figure 1. The Smart-tag panel
Quick property setup Style browser dialog Style import dialog Component customization License activation
Designer Style Browser
The Style browser enables you to browse, preview and select any visual style at design-time. The browser displays the default 10 supplied styles and you can import any number of new visual styles. Imported visual styles are automatically grouped and added to the browsers catalog.
Figure 2. The Style browser dialog
WYSIWYG preview Browse default styles Browse imported styles Import new visual styles Remove styles
Designer Import Wizard
The style import wizard enables you to import any number of new visual styles. You can import directly from an msstyles file or a zip archive. VisualStyler extracts the raw visual style and converts it into compact XML markup. All imported visual styles are automatically stored in the style gallery and are visible in the style browser.
Skin Gallery
We've prepared a list of some of the best Visual Styles available, using VisualStyler.Net you can skin your applications with any one of the 2000 or more skins currently available. These skins will give your applications an instant modern and professional appearance. Simply click on the download link and save the msstyles file to a temporary folder, then use the Built-in Visual Style Import Tool to add the skin permanently to your collection.
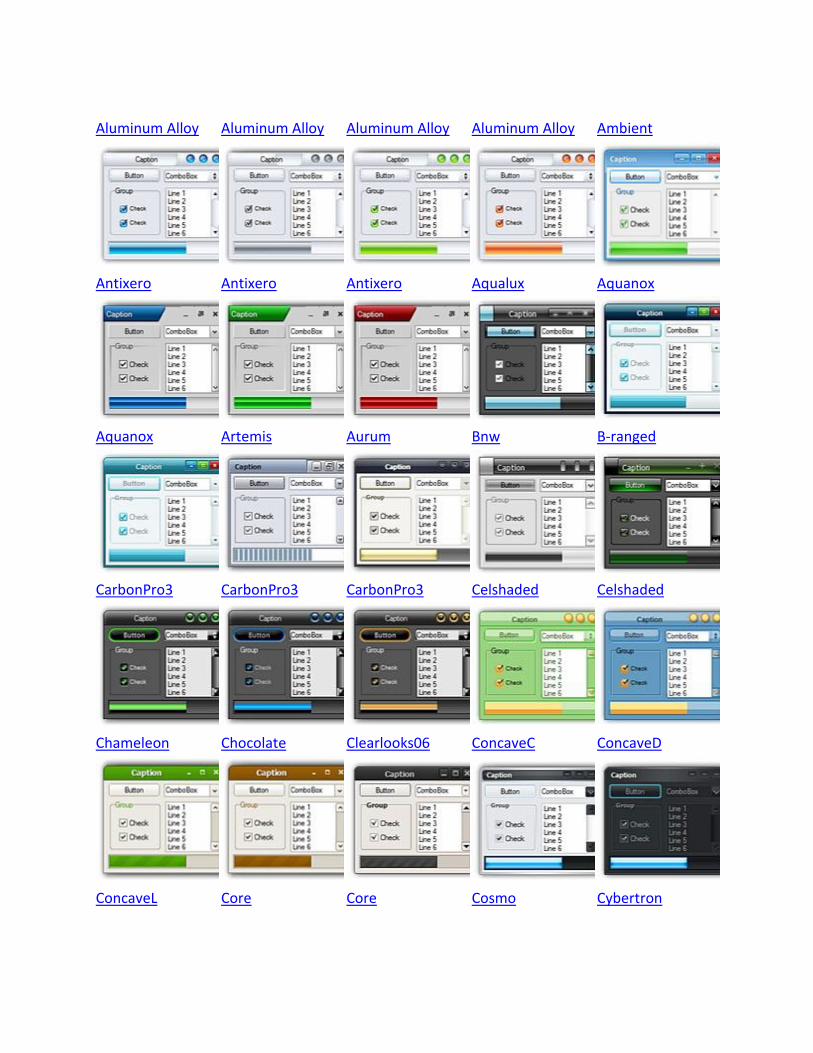
Aluminum Alloy Aluminum Alloy Aluminum Alloy Aluminum Alloy Ambient
Antixero Antixero Antixero Aqualux Aquanox
Aquanox Artemis Aurum Bnw B-ranged
CarbonPro3 CarbonPro3 CarbonPro3 Celshaded Celshaded
Chameleon Chocolate Clearlooks06 ConcaveC ConcaveD
ConcaveL Core Core Cosmo Cybertron
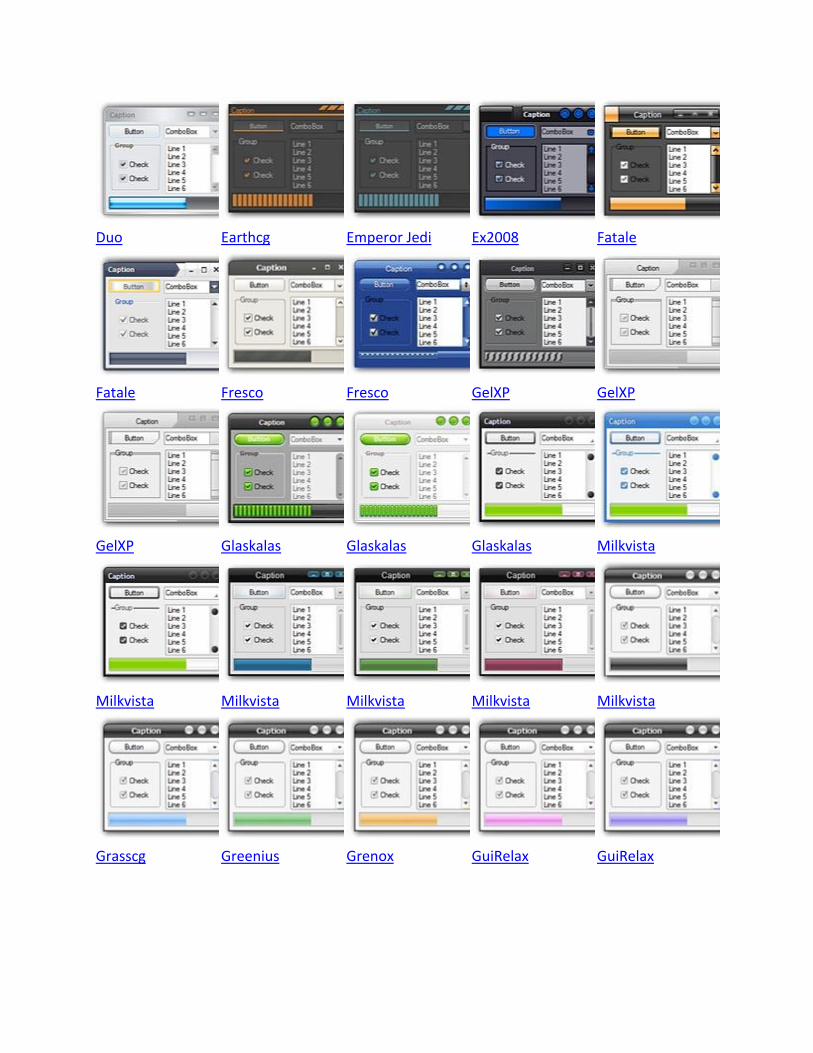
Duo Earthcg Emperor Jedi Ex2008 Fatale
Fatale Fresco Fresco GelXP GelXP
GelXP Glaskalas Glaskalas Glaskalas Milkvista
Milkvista Milkvista Milkvista Milkvista Milkvista
Grasscg Greenius Grenox GuiRelax GuiRelax
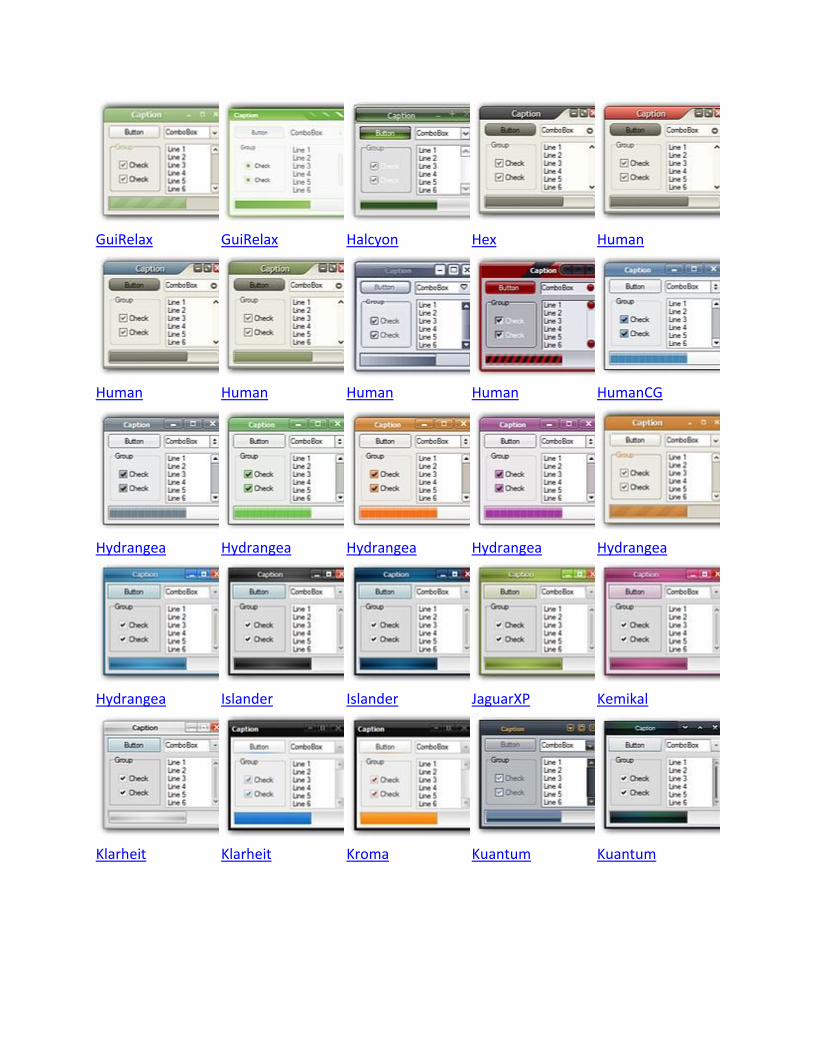
GuiRelax GuiRelax Halcyon Hex Human
Human Human Human Human HumanCG
Hydrangea Hydrangea Hydrangea Hydrangea Hydrangea
Hydrangea Islander Islander JaguarXP Kemikal
Klarheit Klarheit Kroma Kuantum Kuantum

KupoXP KupoXP KupoXP KupoXP KupoXP
KupoXP KupoXP KupoXP KupoXP Lakrits
LK Luder Luder Luder Luna Inspirat
Luna Inspirat Sleek Sustenance Sustenance Sustenance
Sustenance Sustenance Titan Black Titan Blue Violex
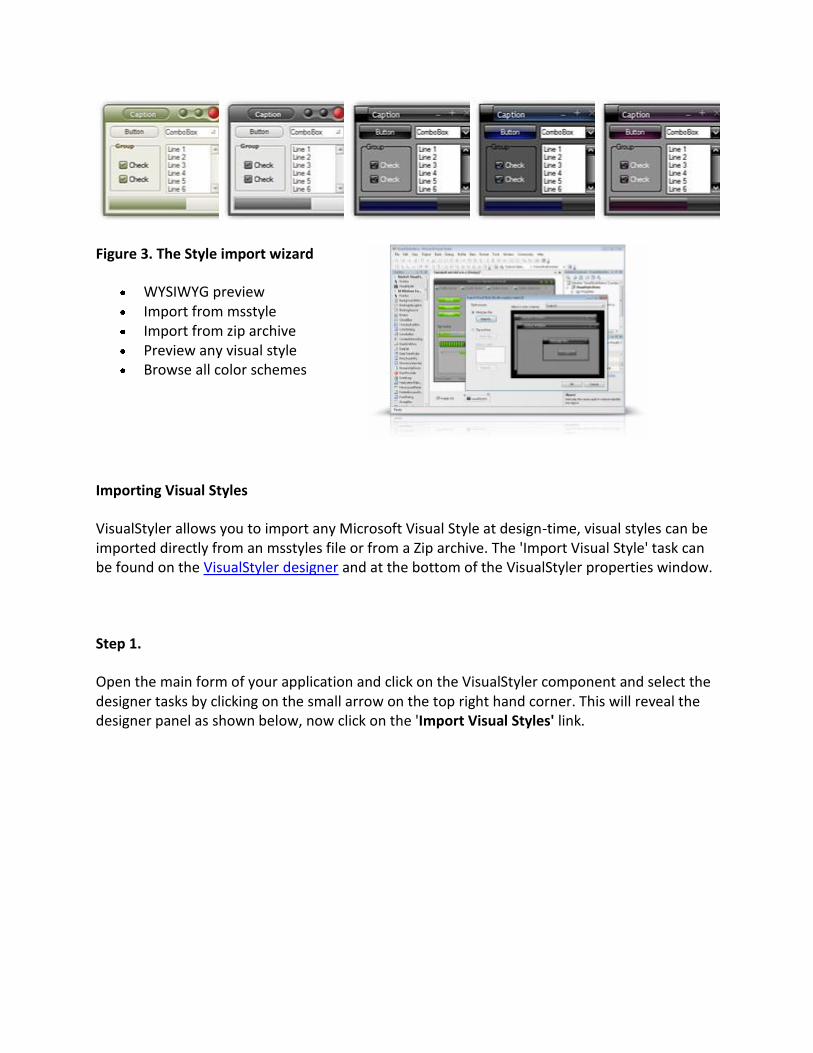
Figure 3. The Style import wizard
WYSIWYG preview Import from msstyle Import from zip archive Preview any visual style Browse all color schemes
Importing Visual Styles
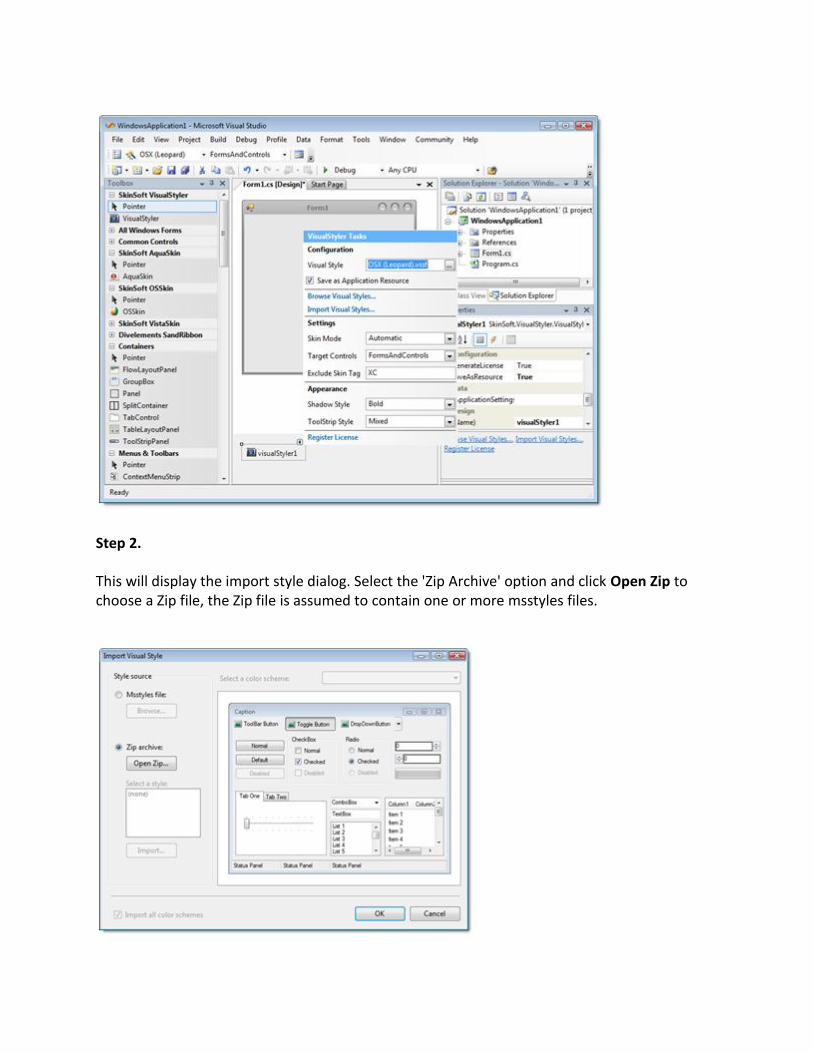
VisualStyler allows you to import any Microsoft Visual Style at design-time, visual styles can be imported directly from an msstyles file or from a Zip archive. The 'Import Visual Style' task can be found on the VisualStyler designer and at the bottom of the VisualStyler properties window.
Step 1.
Open the main form of your application and click on the VisualStyler component and select the designer tasks by clicking on the small arrow on the top right hand corner. This will reveal the designer panel as shown below, now click on the 'Import Visual Styles' link.
Step 2.
This will display the import style dialog. Select the 'Zip Archive' option and click Open Zip to choose a Zip file, the Zip file is assumed to contain one or more msstyles files.
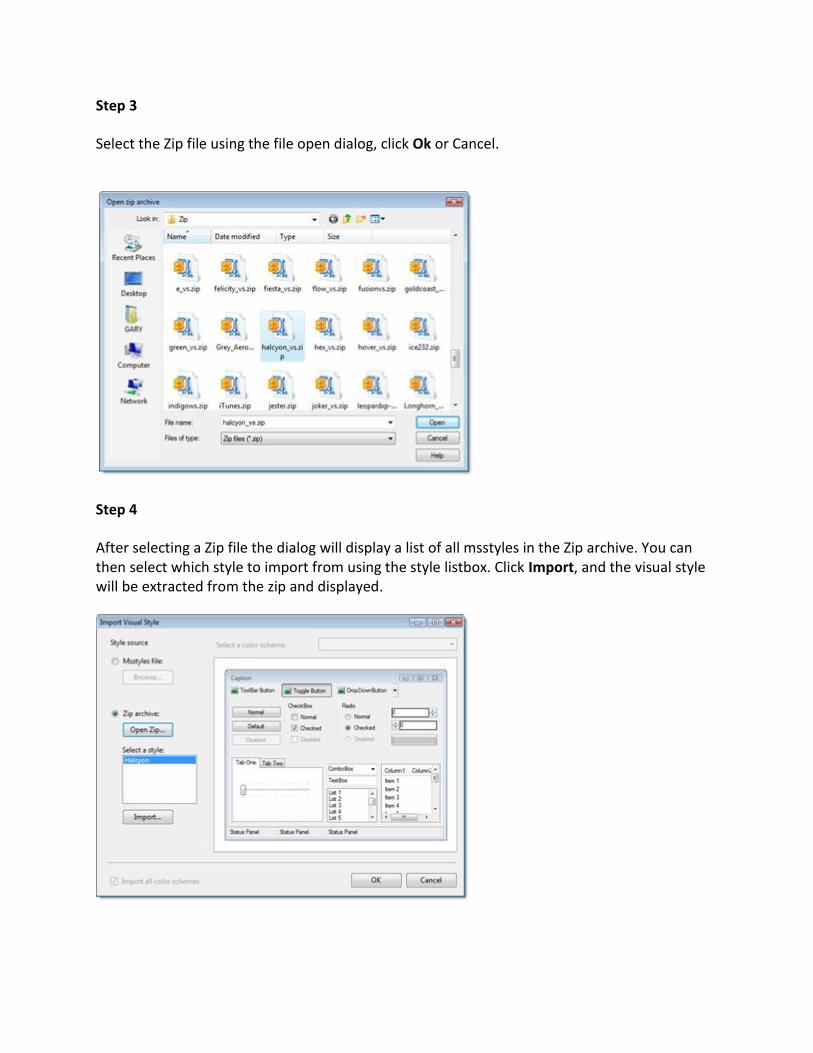
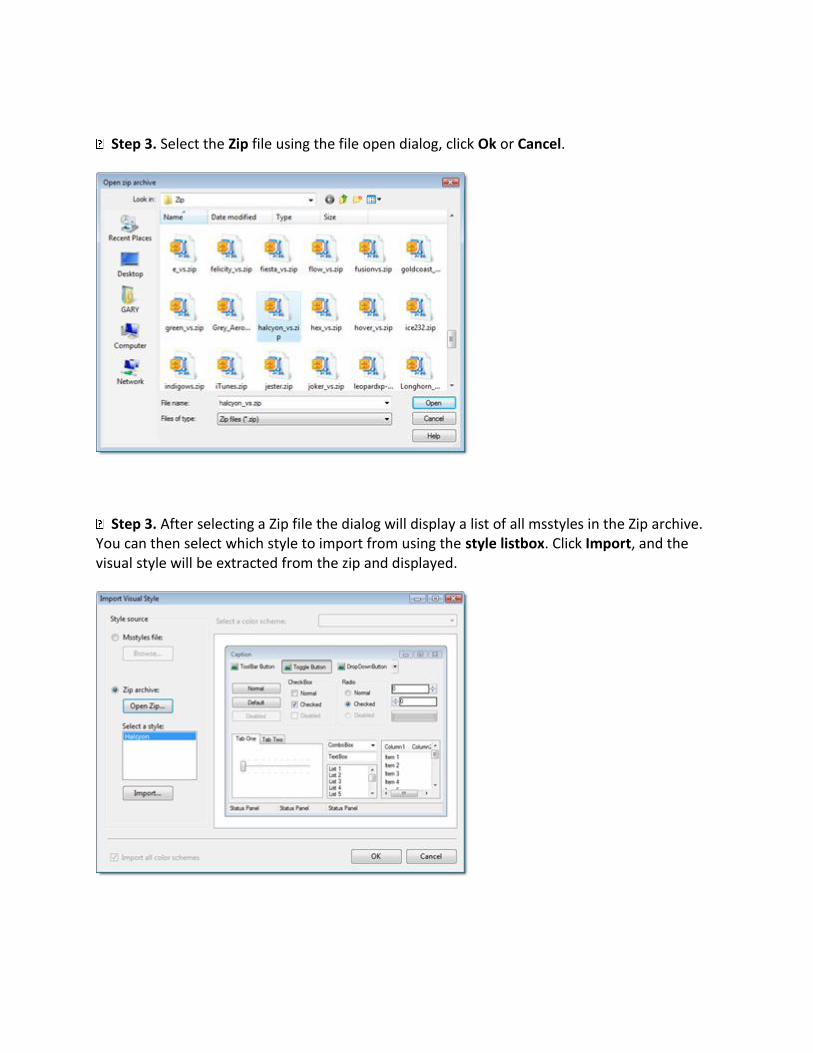
Step 3
Select the Zip file using the file open dialog, click Ok or Cancel.
Step 4
After selecting a Zip file the dialog will display a list of all msstyles in the Zip archive. You can then select which style to import from using the style listbox. Click Import, and the visual style will be extracted from the zip and displayed.
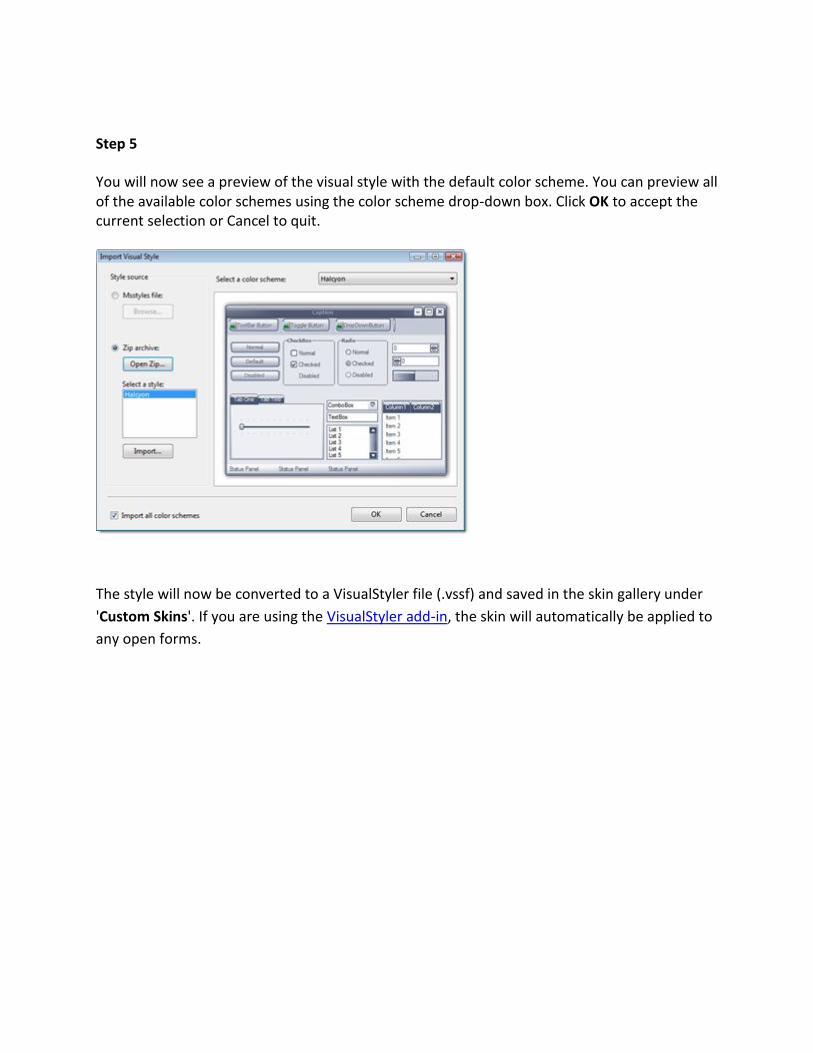
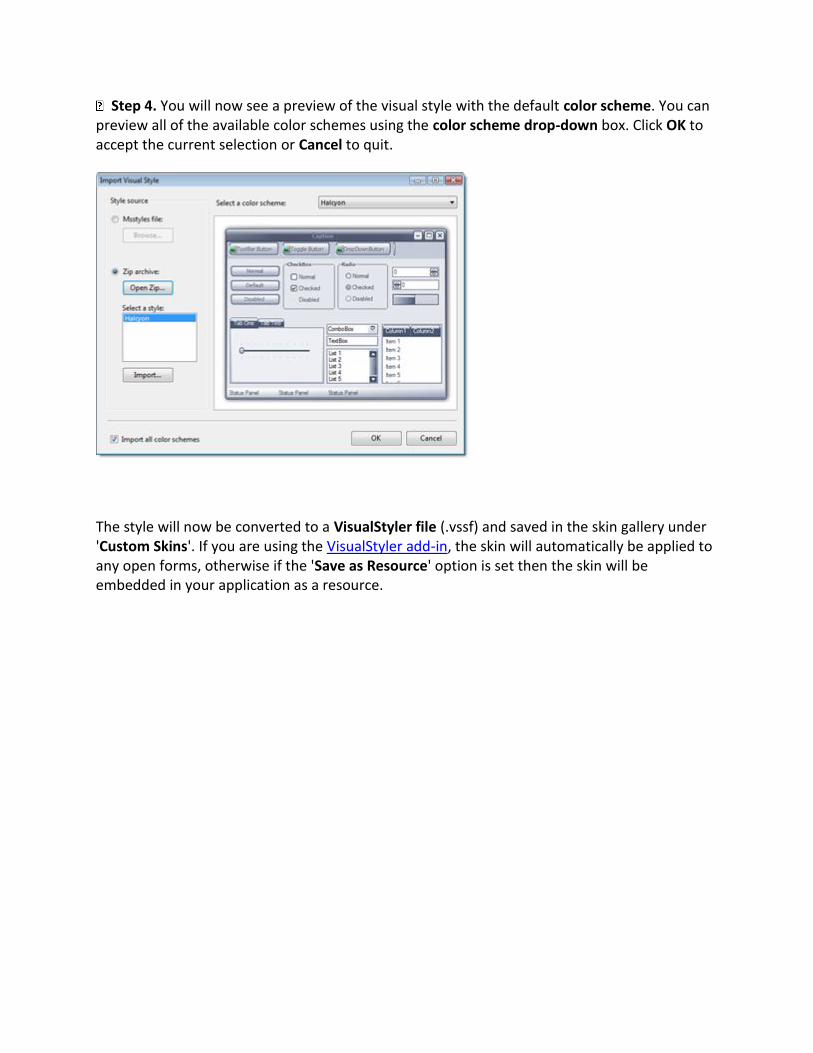
Step 5
You will now see a preview of the visual style with the default color scheme. You can preview all of the available color schemes using the color scheme drop-down box. Click OK to accept the current selection or Cancel to quit.
The style will now be converted to a VisualStyler file (.vssf) and saved in the skin gallery under
'Custom Skins'. If you are using the VisualStyler add-in, the skin will automatically be applied to
any open forms.

Visual Studio Edition Setup After the VisualStyler.Net setup has completed, start Visual Studio and then open or create a new Windows Forms Project. Open the main application Form in the forms designer, and you will notice a new Toolbox tab named 'SkinSoft VisualStyler' with the VisualStyler component in this tab. Visual Studio Express uses will need to manually add VisualStyler to the toolbox using the following steps

Installing the VisualStyler Add-in
The VisualStyler add-in supports the Visual Studio 2005, 2008 and 2010 IDE's. If you wish to use the VisualStyler design-time skinning features then you will need to activate the VisualStyler add-in. On the main Visual Studio toolbar select Tools->Add-in Manager to show the Add-in Manager dialog. Please note, if you are using Visual Studio 2008 on Windows Vista, then you will need Administrator permissions in order to configure Add-in settings on this platform.
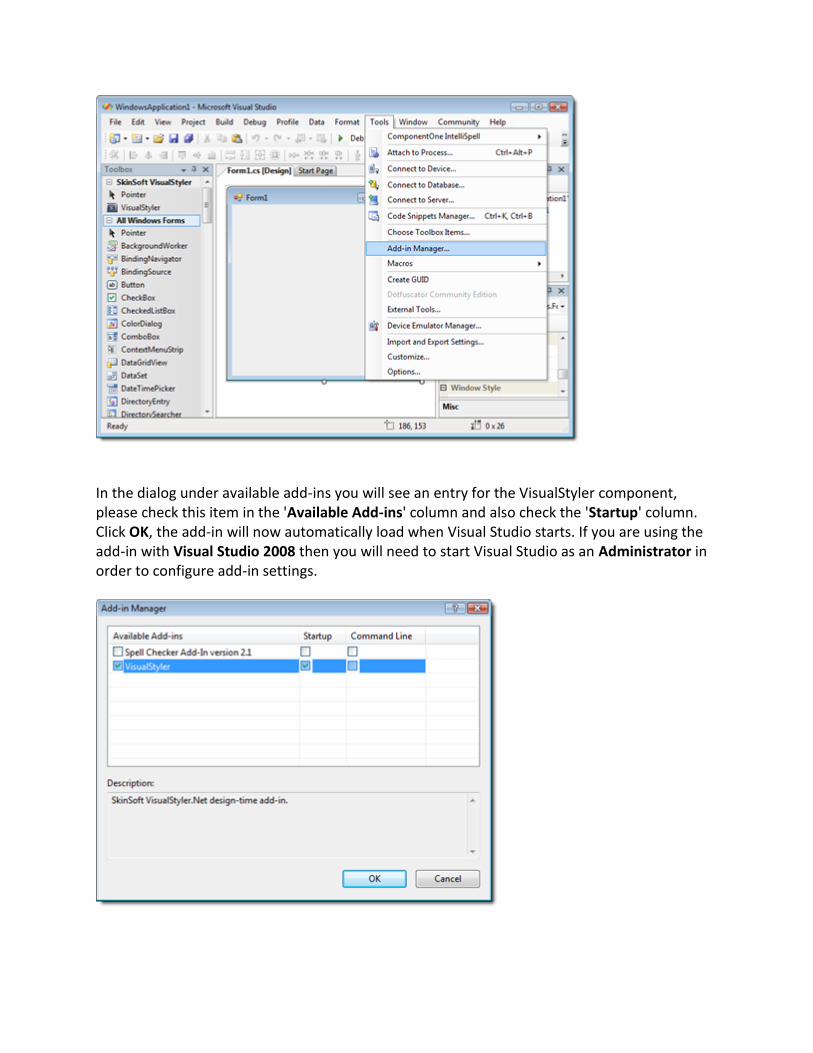
In the dialog under available add-ins you will see an entry for the VisualStyler component, please check this item in the 'Available Add-ins' column and also check the 'Startup' column. Click OK, the add-in will now automatically load when Visual Studio starts. If you are using the add-in with Visual Studio 2008 then you will need to start Visual Studio as an Administrator in order to configure add-in settings.
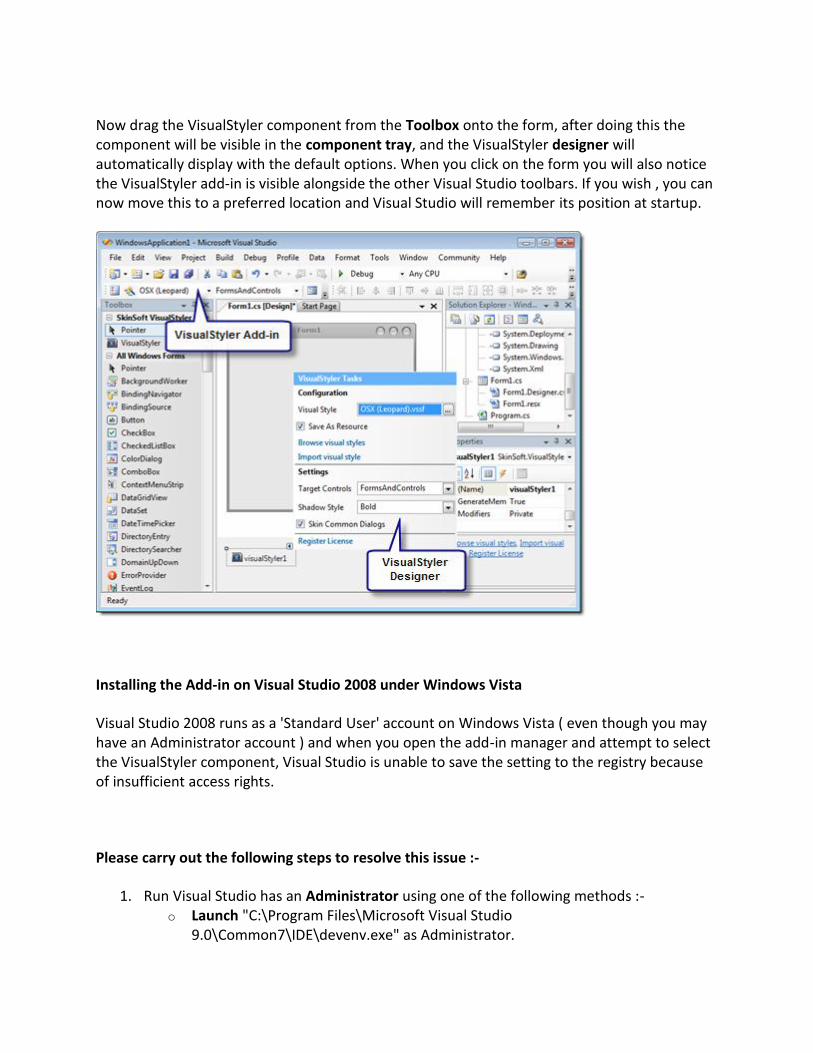
Now drag the VisualStyler component from the Toolbox onto the form, after doing this the component will be visible in the component tray, and the VisualStyler designer will automatically display with the default options. When you click on the form you will also notice the VisualStyler add-in is visible alongside the other Visual Studio toolbars. If you wish , you can now move this to a preferred location and Visual Studio will remember its position at startup.
Installing the Add-in on Visual Studio 2008 under Windows Vista
Visual Studio 2008 runs as a 'Standard User' account on Windows Vista ( even though you may have an Administrator account ) and when you open the add-in manager and attempt to select the VisualStyler component, Visual Studio is unable to save the setting to the registry because of insufficient access rights.
Please carry out the following steps to resolve this issue :-
1. Run Visual Studio has an Administrator using one of the following methods :- o Launch "C:\Program Files\Microsoft Visual Studio
9.0\Common7\IDE\devenv.exe" as Administrator.
o Modify your shortcut to VS2008 by bringing up the shortcut properties, click Advanced and check the 'Run as Administrator' box.
2. Bring up the Add-In manager you will see the Startup checkbox is now enabled, you need to check just this column.
3. You could could continue to run VS2008 has Administrator by modifying the shortcut as described above, or run in the standard user mode in which case the Startup checkbox will be checked but disabled.
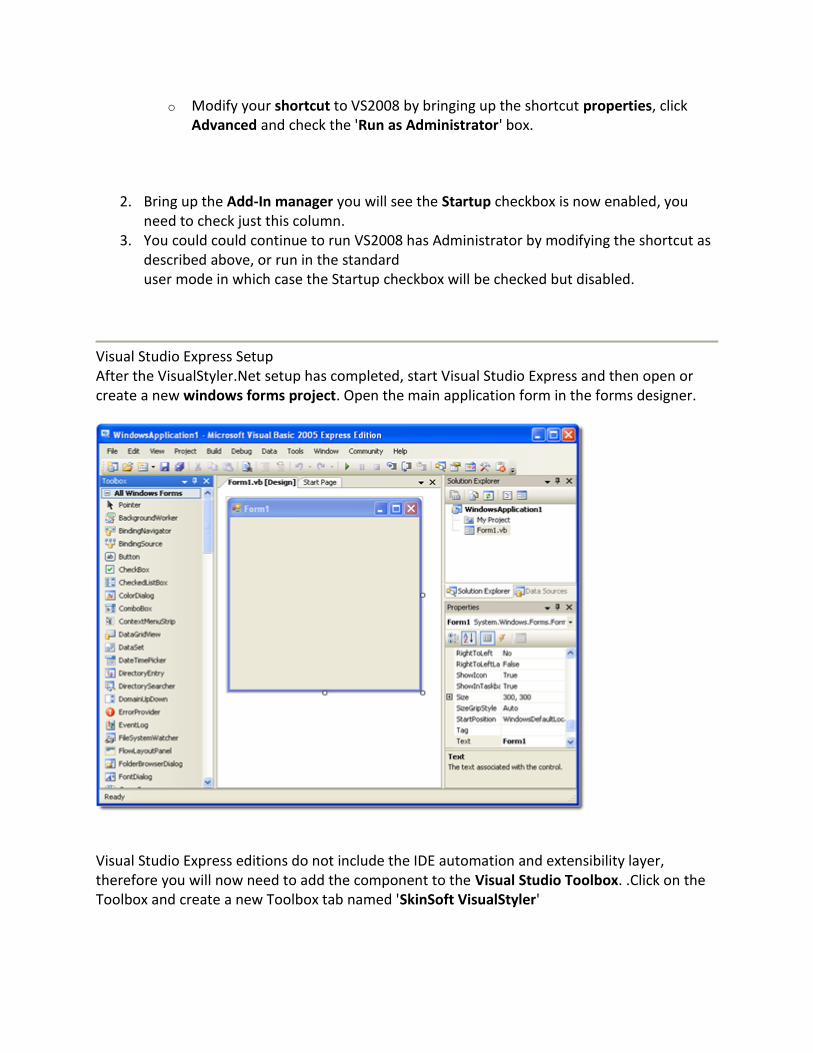
Visual Studio Express Setup After the VisualStyler.Net setup has completed, start Visual Studio Express and then open or create a new windows forms project. Open the main application form in the forms designer.
Visual Studio Express editions do not include the IDE automation and extensibility layer, therefore you will now need to add the component to the Visual Studio Toolbox. .Click on the Toolbox and create a new Toolbox tab named 'SkinSoft VisualStyler'
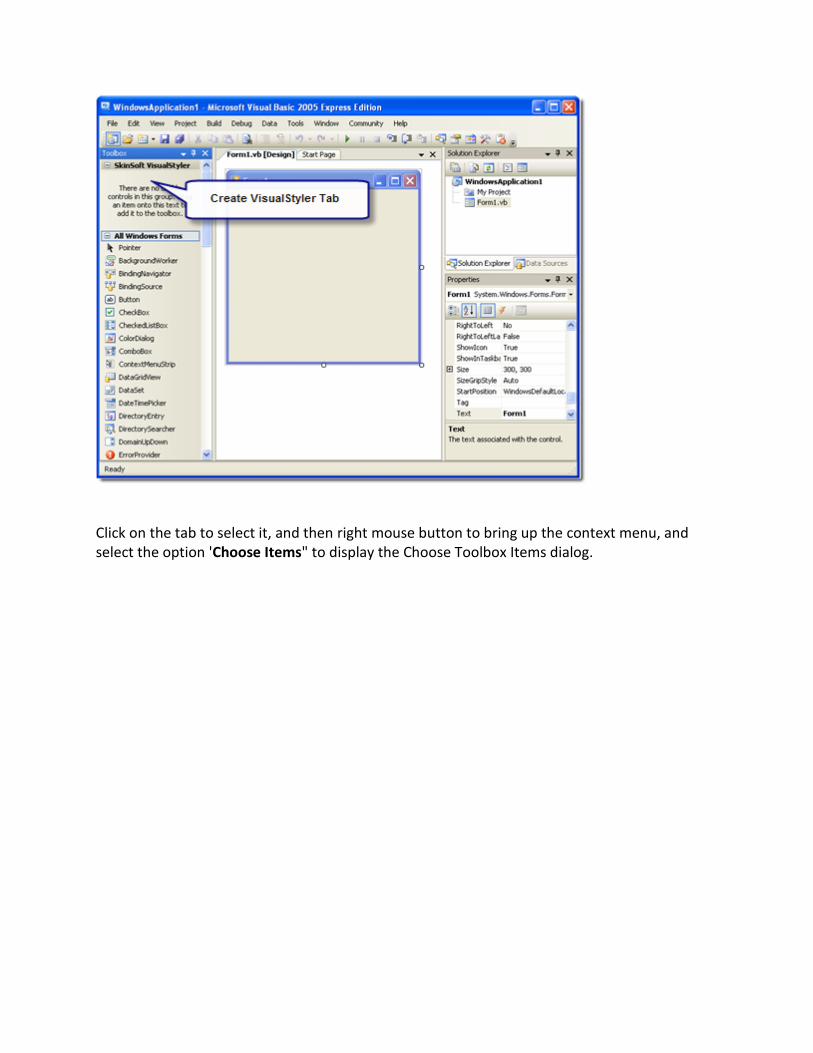
Click on the tab to select it, and then right mouse button to bring up the context menu, and select the option 'Choose Items" to display the Choose Toolbox Items dialog.
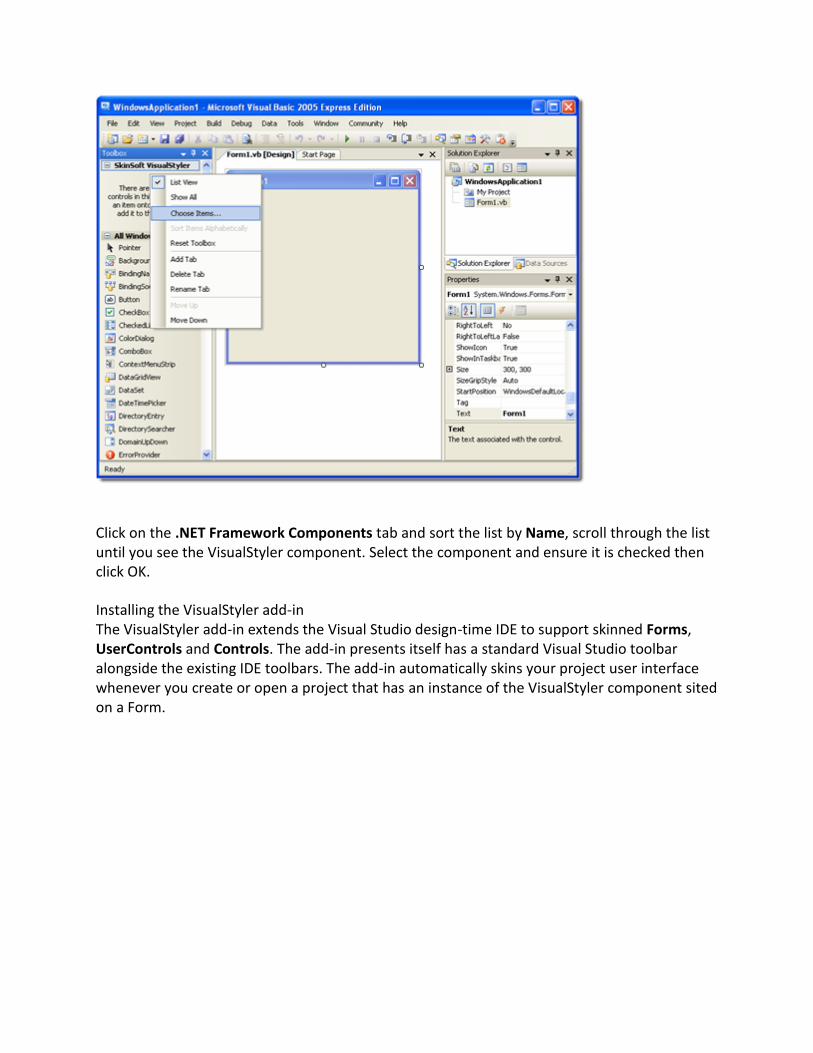
Click on the .NET Framework Components tab and sort the list by Name, scroll through the list until you see the VisualStyler component. Select the component and ensure it is checked then click OK.
Installing the VisualStyler add-in The VisualStyler add-in extends the Visual Studio design-time IDE to support skinned Forms, UserControls and Controls. The add-in presents itself has a standard Visual Studio toolbar alongside the existing IDE toolbars. The add-in automatically skins your project user interface whenever you create or open a project that has an instance of the VisualStyler component sited on a Form.
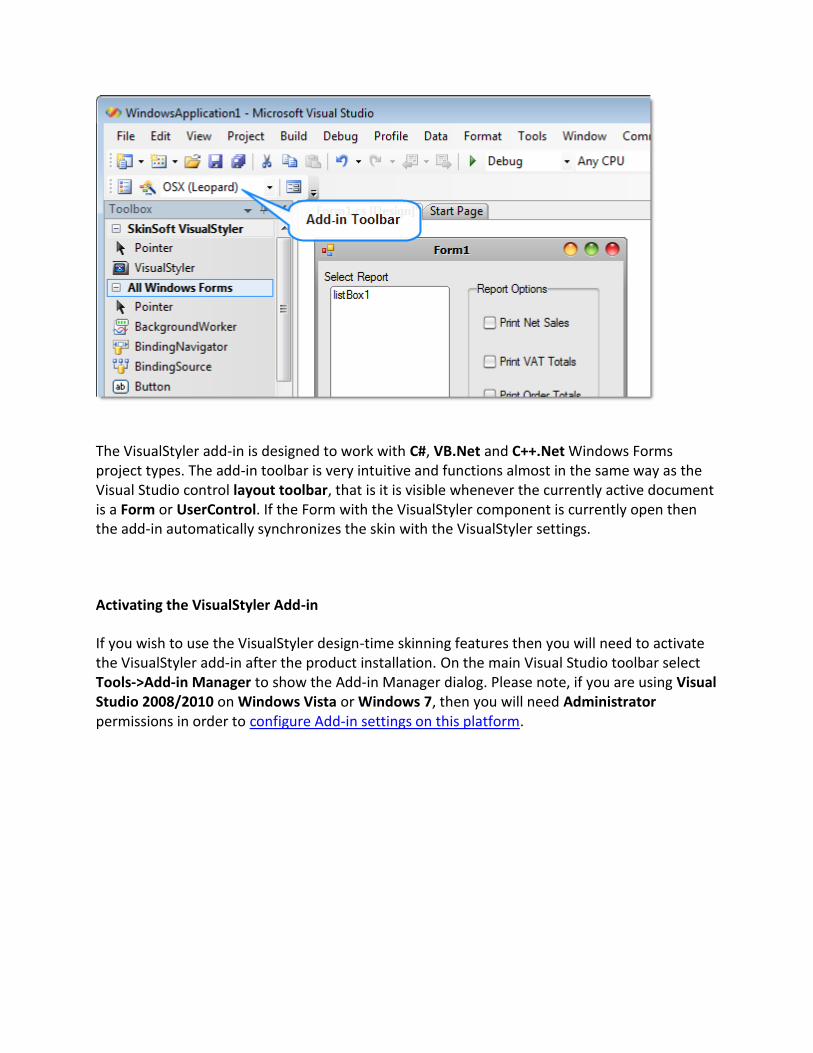
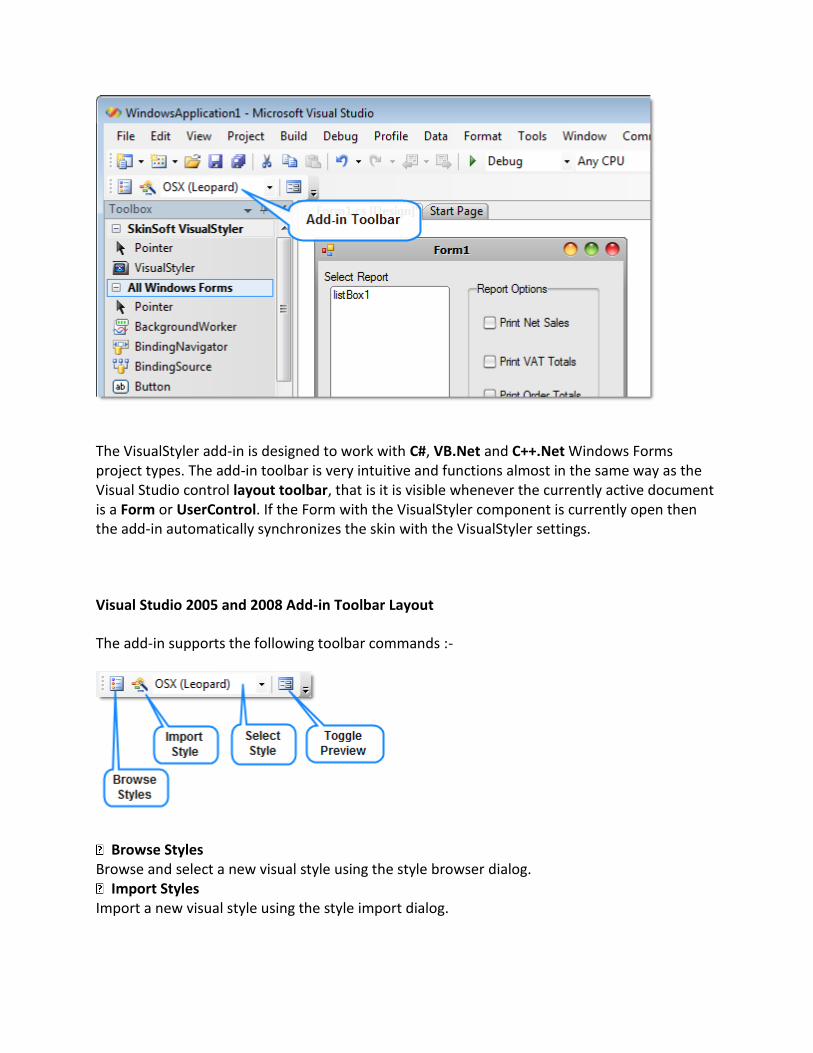
The VisualStyler add-in is designed to work with C#, VB.Net and C++.Net Windows Forms project types. The add-in toolbar is very intuitive and functions almost in the same way as the Visual Studio control layout toolbar, that is it is visible whenever the currently active document is a Form or UserControl. If the Form with the VisualStyler component is currently open then the add-in automatically synchronizes the skin with the VisualStyler settings.
Activating the VisualStyler Add-in
If you wish to use the VisualStyler design-time skinning features then you will need to activate the VisualStyler add-in after the product installation. On the main Visual Studio toolbar select Tools->Add-in Manager to show the Add-in Manager dialog. Please note, if you are using Visual Studio 2008/2010 on Windows Vista or Windows 7, then you will need Administrator permissions in order to configure Add-in settings on this platform.
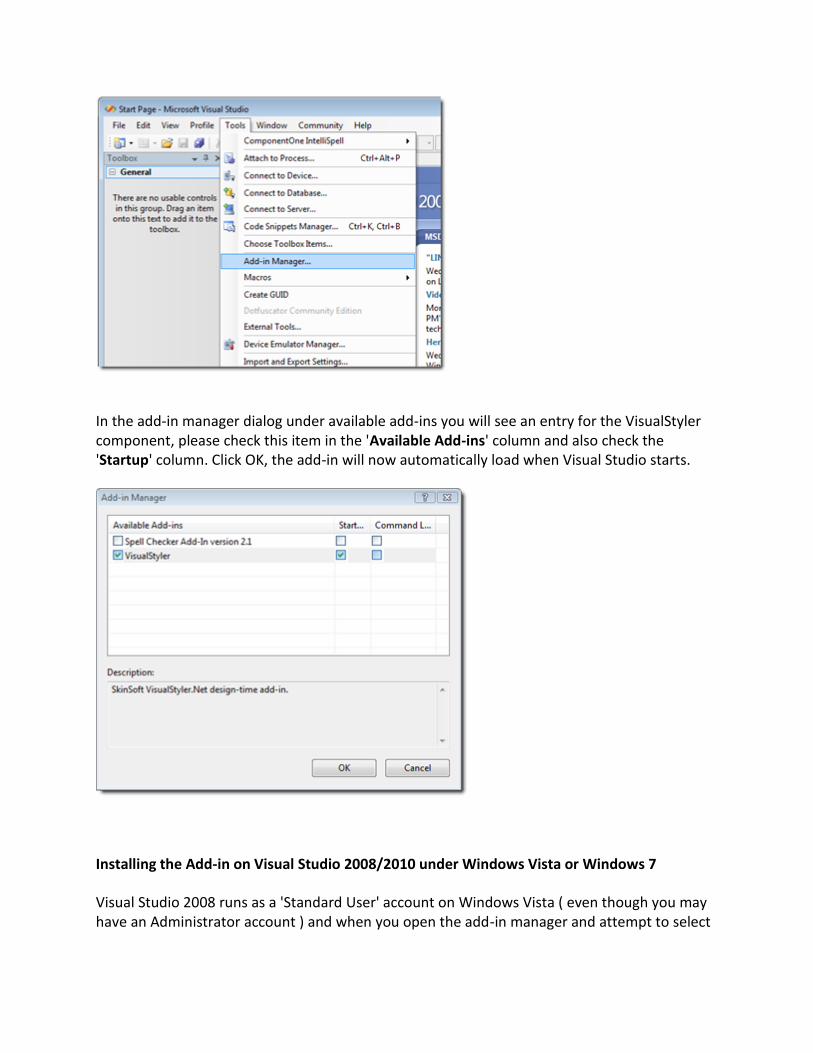
In the add-in manager dialog under available add-ins you will see an entry for the VisualStyler component, please check this item in the 'Available Add-ins' column and also check the 'Startup' column. Click OK, the add-in will now automatically load when Visual Studio starts.
Installing the Add-in on Visual Studio 2008/2010 under Windows Vista or Windows 7
Visual Studio 2008 runs as a 'Standard User' account on Windows Vista ( even though you may have an Administrator account ) and when you open the add-in manager and attempt to select
the VisualStyler component, Visual Studio is unable to save the setting to the registry because of insufficient access rights.
Please carry out the following steps to resolve this issue :-
1. Run Visual Studio has an Administrator using one of the following methods :- o Launch "C:\Program Files\Microsoft Visual Studio
9.0\Common7\IDE\devenv.exe" as Administrator. o Modify your shortcut to VS2008 by bringing up the shortcut properties, click
Advanced and check the 'Run as Administrator' box.
2. Bring up the Add-In manager you will see the Startup checkbox is now enabled, you need to check just this column.
3. You could could continue to run VS2008 has Administrator by modifying the shortcut as described above, or run in the standard user mode in which case the Startup checkbox will be checked but disabled.
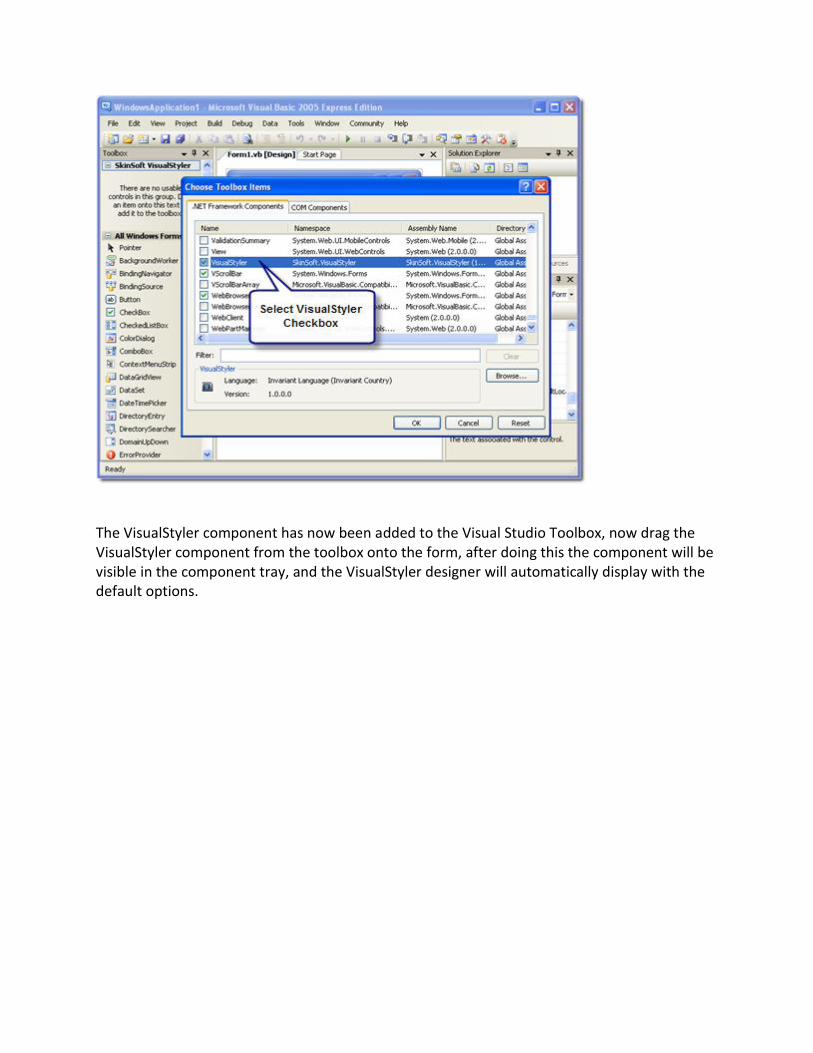
The VisualStyler component has now been added to the Visual Studio Toolbox, now drag the VisualStyler component from the toolbox onto the form, after doing this the component will be visible in the component tray, and the VisualStyler designer will automatically display with the default options.
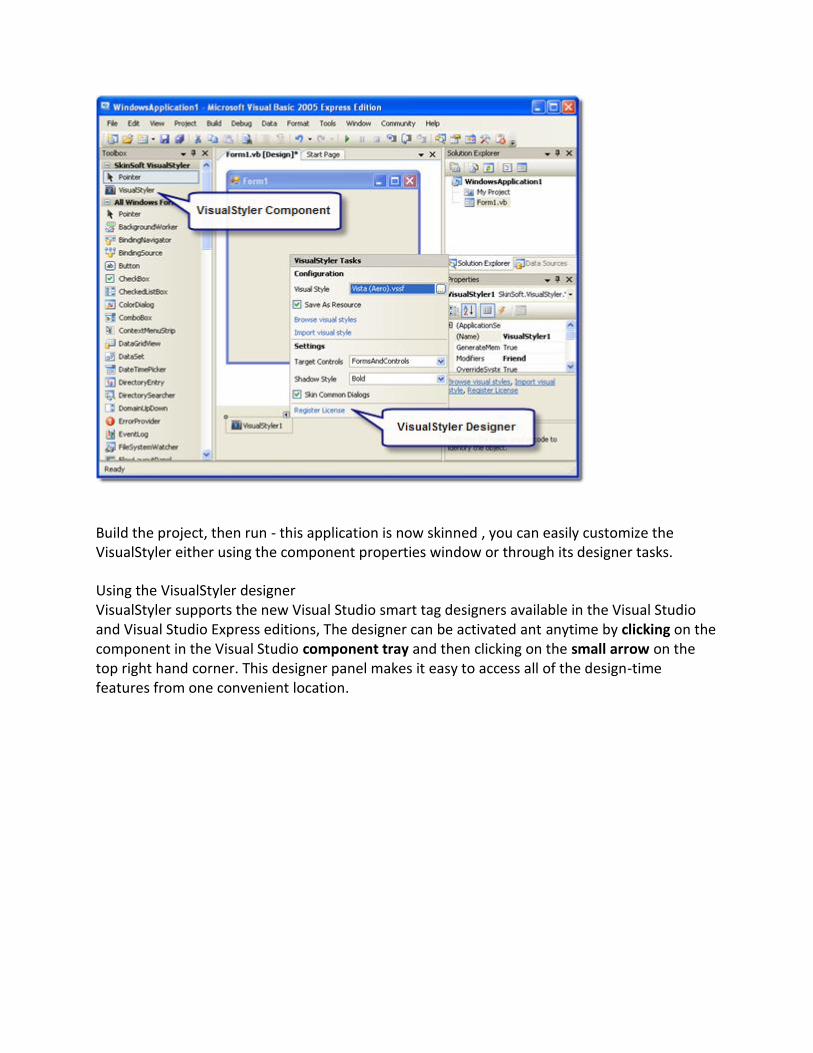
Build the project, then run - this application is now skinned , you can easily customize the VisualStyler either using the component properties window or through its designer tasks.
Using the VisualStyler designer VisualStyler supports the new Visual Studio smart tag designers available in the Visual Studio and Visual Studio Express editions, The designer can be activated ant anytime by clicking on the component in the Visual Studio component tray and then clicking on the small arrow on the top right hand corner. This designer panel makes it easy to access all of the design-time features from one convenient location.
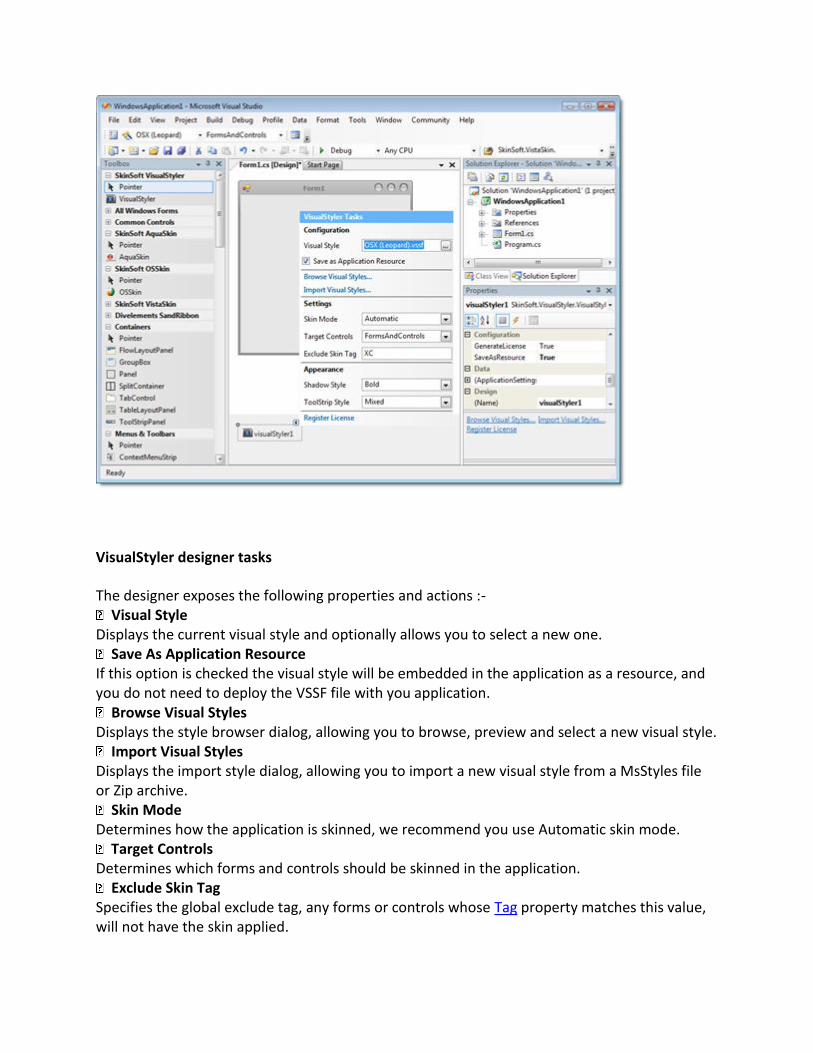
VisualStyler designer tasks
The designer exposes the following properties and actions :- Visual Style
Displays the current visual style and optionally allows you to select a new one. Save As Application Resource
If this option is checked the visual style will be embedded in the application as a resource, and you do not need to deploy the VSSF file with you application.
Browse Visual Styles Displays the style browser dialog, allowing you to browse, preview and select a new visual style.
Import Visual Styles Displays the import style dialog, allowing you to import a new visual style from a MsStyles file or Zip archive.
Skin Mode Determines how the application is skinned, we recommend you use Automatic skin mode.
Target Controls Determines which forms and controls should be skinned in the application.
Exclude Skin Tag Specifies the global exclude tag, any forms or controls whose Tag property matches this value, will not have the skin applied.
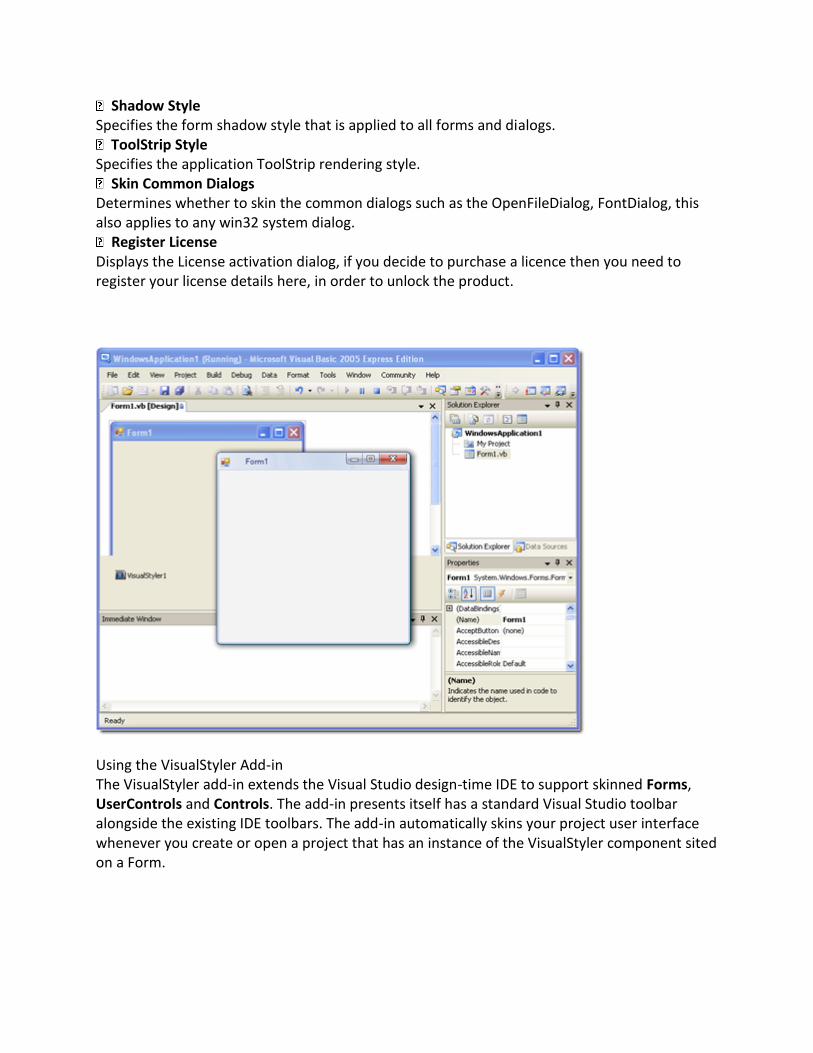
Shadow Style Specifies the form shadow style that is applied to all forms and dialogs.
ToolStrip Style Specifies the application ToolStrip rendering style.
Skin Common Dialogs Determines whether to skin the common dialogs such as the OpenFileDialog, FontDialog, this also applies to any win32 system dialog.
Register License Displays the License activation dialog, if you decide to purchase a licence then you need to register your license details here, in order to unlock the product.
Using the VisualStyler Add-in The VisualStyler add-in extends the Visual Studio design-time IDE to support skinned Forms, UserControls and Controls. The add-in presents itself has a standard Visual Studio toolbar alongside the existing IDE toolbars. The add-in automatically skins your project user interface whenever you create or open a project that has an instance of the VisualStyler component sited on a Form.
The VisualStyler add-in is designed to work with C#, VB.Net and C++.Net Windows Forms project types. The add-in toolbar is very intuitive and functions almost in the same way as the Visual Studio control layout toolbar, that is it is visible whenever the currently active document is a Form or UserControl. If the Form with the VisualStyler component is currently open then the add-in automatically synchronizes the skin with the VisualStyler settings.
Visual Studio 2005 and 2008 Add-in Toolbar Layout
The add-in supports the following toolbar commands :-
Browse Styles Browse and select a new visual style using the style browser dialog.
Import Styles Import a new visual style using the style import dialog.

Select Style Selects one of the default styles, the drop down list provides quick access to the following built-in styles :-
XP (Blue) XP (Olive) XP (Silver) XP (Royale) Vista (Basic) Vista (Aero) Vista (Black) Vista (Silver) Vista (Green) Vista (Teal) Aero (Blue) Aero (Black) Aero (Silver) Office (Blue) Office (Black) Office (Silver) OSX (Aqua) OSX (Panther) OSX (Tiger) OSX (Leopard) OSX (iTunes) OSX (Brushed) Custom Style...
Toggle Preview Toggle the design-time skin preview, The skin can be shown / removed at any time this applies to all forms and controls.
Visual Studio 2010 Add-in Toolbar Layout
The add-in supports the following toolbar commands :-
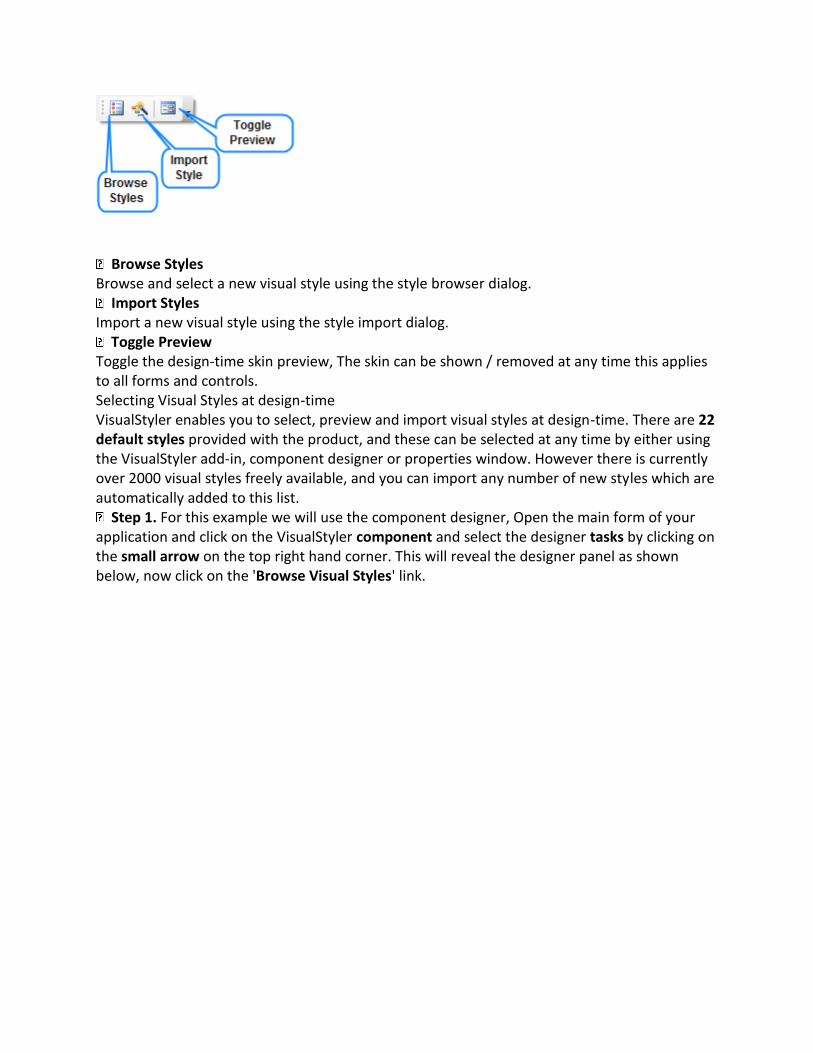
Browse Styles Browse and select a new visual style using the style browser dialog.
Import Styles Import a new visual style using the style import dialog.
Toggle Preview Toggle the design-time skin preview, The skin can be shown / removed at any time this applies to all forms and controls. Selecting Visual Styles at design-time VisualStyler enables you to select, preview and import visual styles at design-time. There are 22 default styles provided with the product, and these can be selected at any time by either using the VisualStyler add-in, component designer or properties window. However there is currently over 2000 visual styles freely available, and you can import any number of new styles which are automatically added to this list.
Step 1. For this example we will use the component designer, Open the main form of your application and click on the VisualStyler component and select the designer tasks by clicking on the small arrow on the top right hand corner. This will reveal the designer panel as shown below, now click on the 'Browse Visual Styles' link.
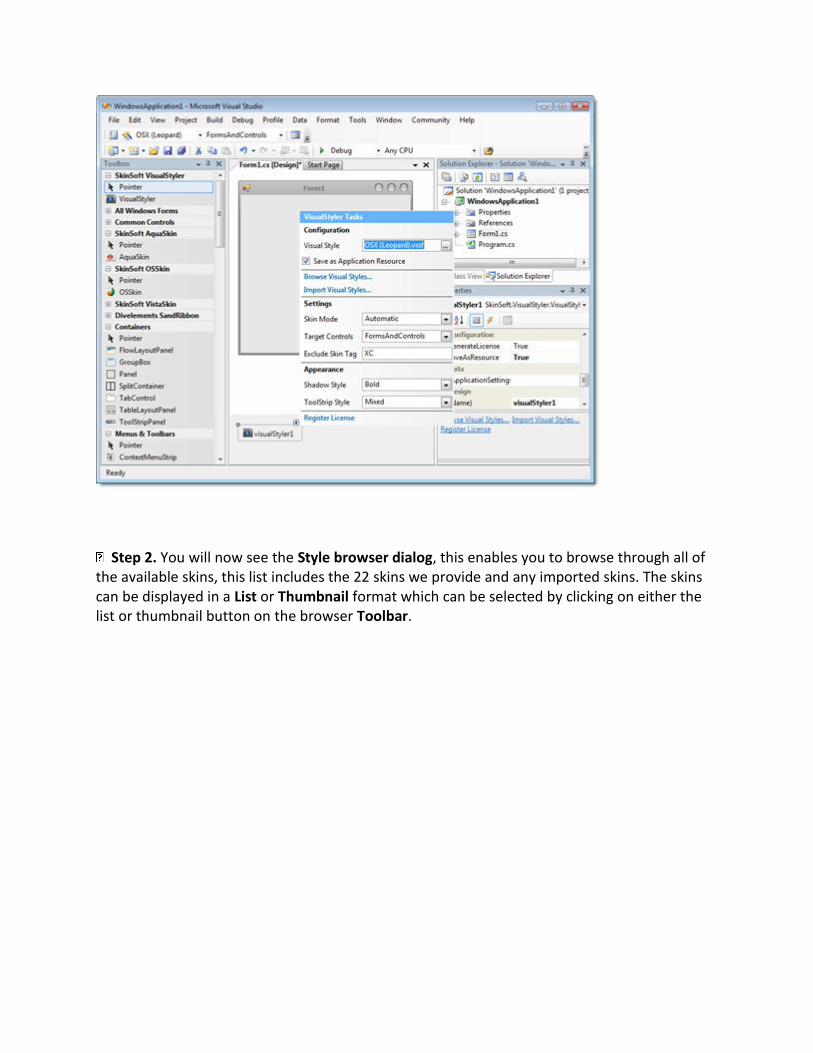
Step 2. You will now see the Style browser dialog, this enables you to browse through all of the available skins, this list includes the 22 skins we provide and any imported skins. The skins can be displayed in a List or Thumbnail format which can be selected by clicking on either the list or thumbnail button on the browser Toolbar.
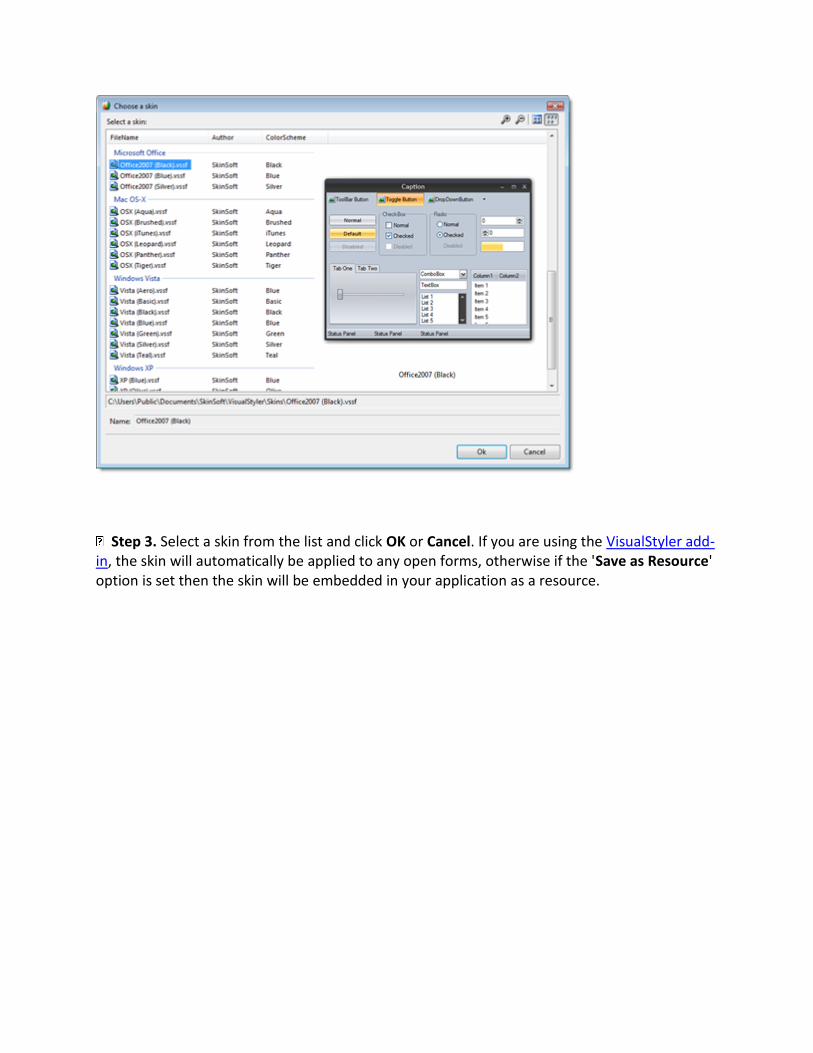
Step 3. Select a skin from the list and click OK or Cancel. If you are using the VisualStyler add-in, the skin will automatically be applied to any open forms, otherwise if the 'Save as Resource' option is set then the skin will be embedded in your application as a resource.

Importing skins from MsStyles VisualStyler allows you to import new visual styles at design-time, visual styles can be imported directly from an msstyles file or from a zip archive. The import visual style task can be found on the VisualStyle designer and at the bottom of the VisualStyler properties window. By default visual styles are automatically embedded into your application as a resource, unless the SaveAsResource property is false.
Step 1. For this example we will use the component designer, Open the main form of your application and click on the VisualStyler component and select the designer tasks by clicking on the small arrow on the top right hand corner. This will reveal the designer panel as shown below, now click on the 'Import Visual Styles' link.
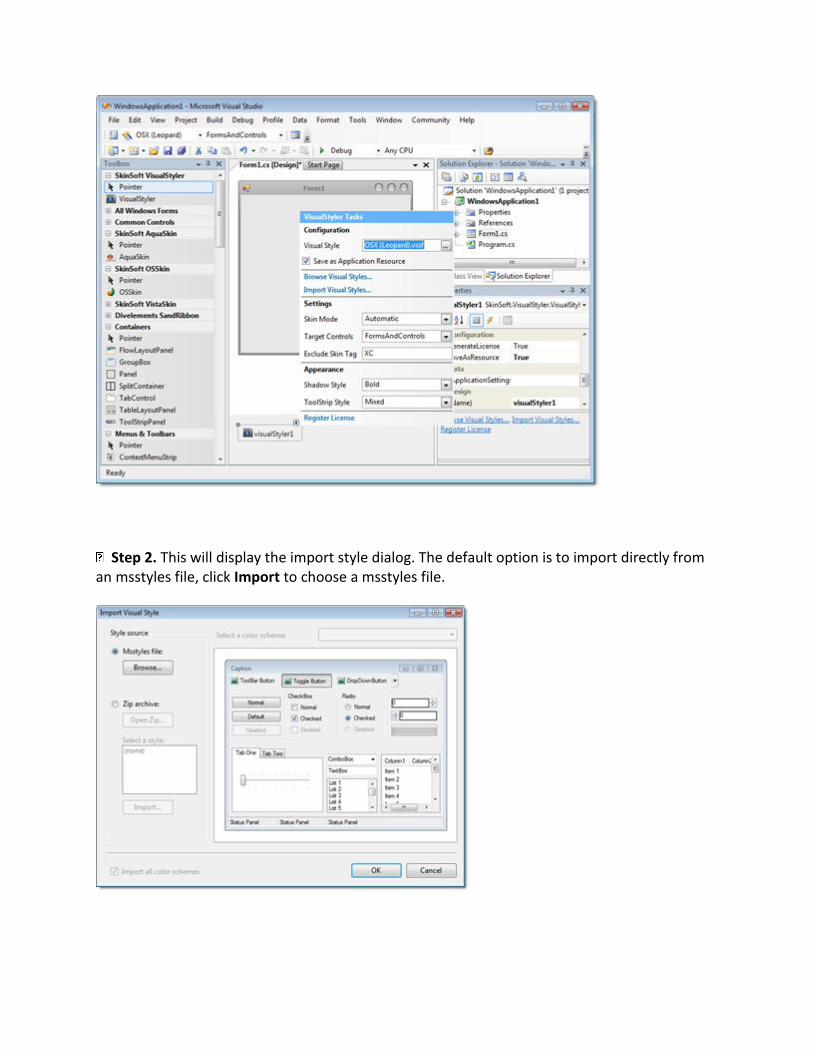
Step 2. This will display the import style dialog. The default option is to import directly from an msstyles file, click Import to choose a msstyles file.
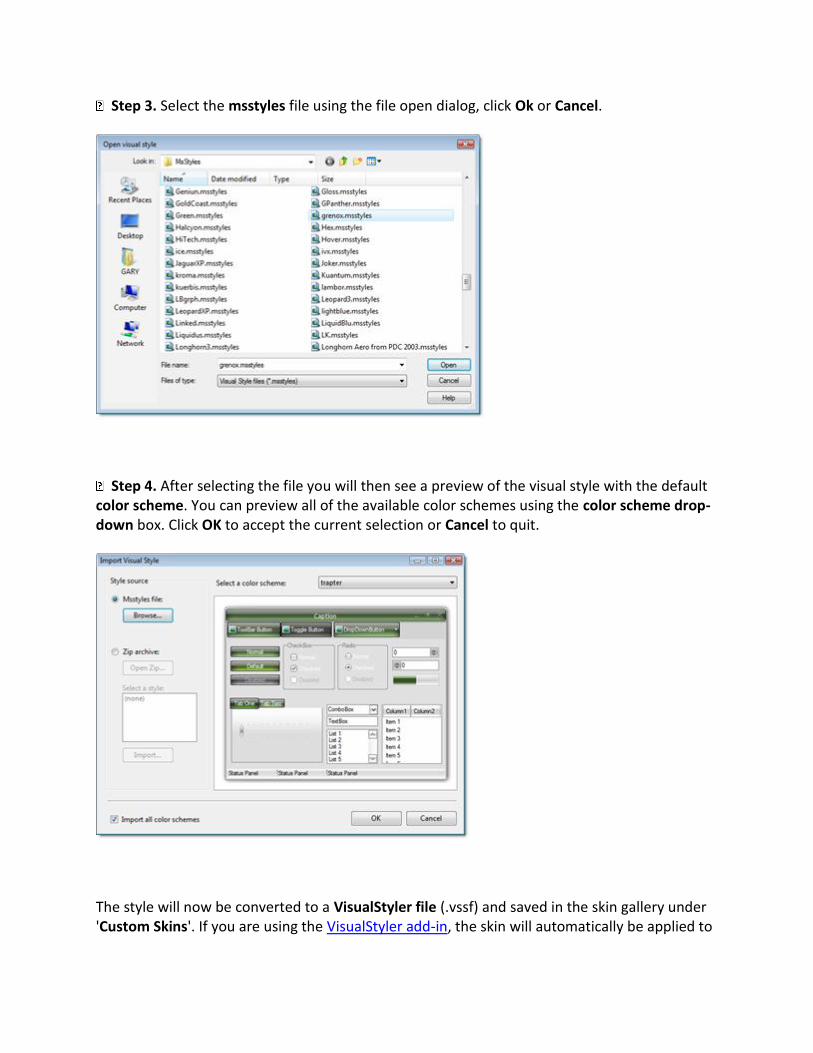
Step 3. Select the msstyles file using the file open dialog, click Ok or Cancel.
Step 4. After selecting the file you will then see a preview of the visual style with the default color scheme. You can preview all of the available color schemes using the color scheme drop-down box. Click OK to accept the current selection or Cancel to quit.
The style will now be converted to a VisualStyler file (.vssf) and saved in the skin gallery under 'Custom Skins'. If you are using the VisualStyler add-in, the skin will automatically be applied to
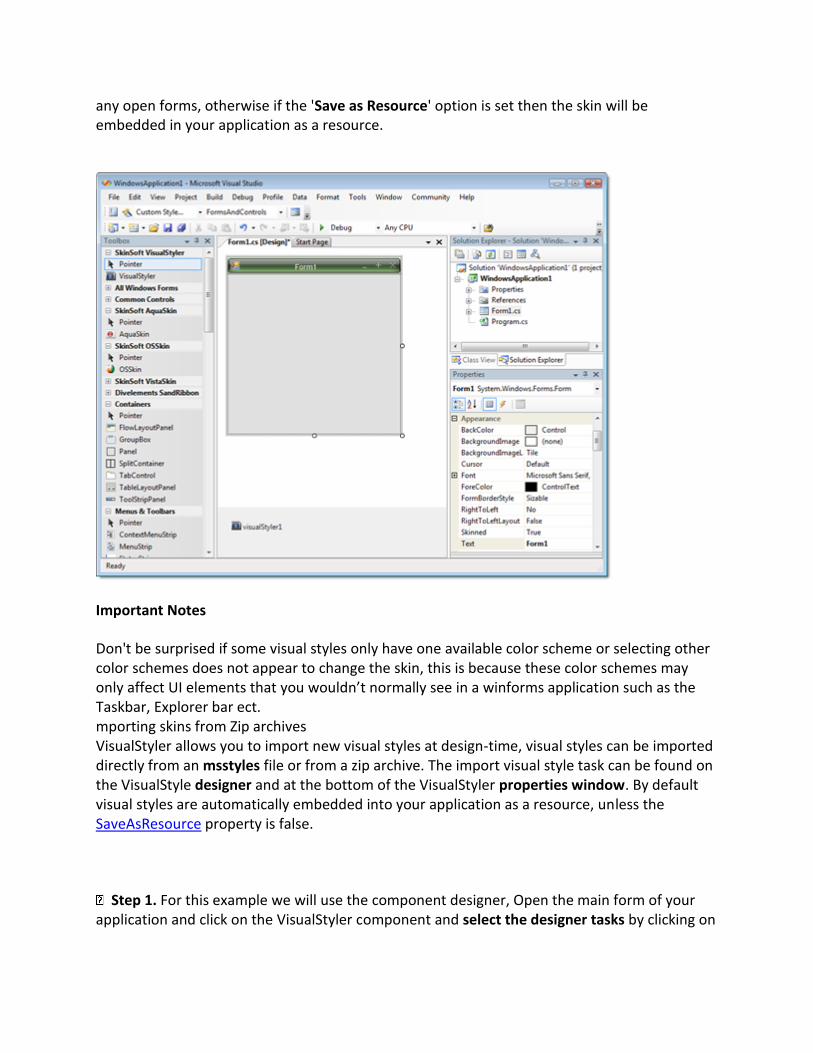
any open forms, otherwise if the 'Save as Resource' option is set then the skin will be embedded in your application as a resource.
Important Notes
Don't be surprised if some visual styles only have one available color scheme or selecting other color schemes does not appear to change the skin, this is because these color schemes may only affect UI elements that you wouldn’t normally see in a winforms application such as the Taskbar, Explorer bar ect. mporting skins from Zip archives VisualStyler allows you to import new visual styles at design-time, visual styles can be imported directly from an msstyles file or from a zip archive. The import visual style task can be found on the VisualStyle designer and at the bottom of the VisualStyler properties window. By default visual styles are automatically embedded into your application as a resource, unless the SaveAsResource property is false.
Step 1. For this example we will use the component designer, Open the main form of your application and click on the VisualStyler component and select the designer tasks by clicking on
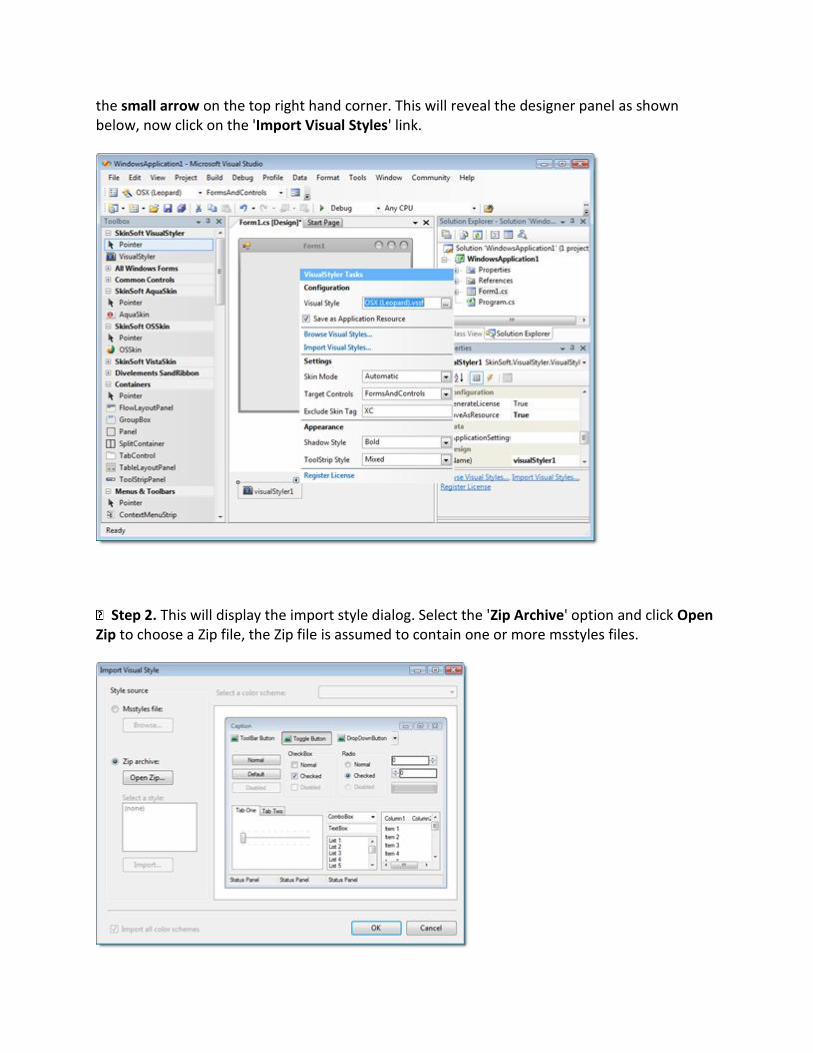
the small arrow on the top right hand corner. This will reveal the designer panel as shown below, now click on the 'Import Visual Styles' link.
Step 2. This will display the import style dialog. Select the 'Zip Archive' option and click Open Zip to choose a Zip file, the Zip file is assumed to contain one or more msstyles files.
Step 3. Select the Zip file using the file open dialog, click Ok or Cancel.
Step 3. After selecting a Zip file the dialog will display a list of all msstyles in the Zip archive. You can then select which style to import from using the style listbox. Click Import, and the visual style will be extracted from the zip and displayed.
Step 4. You will now see a preview of the visual style with the default color scheme. You can preview all of the available color schemes using the color scheme drop-down box. Click OK to accept the current selection or Cancel to quit.
The style will now be converted to a VisualStyler file (.vssf) and saved in the skin gallery under 'Custom Skins'. If you are using the VisualStyler add-in, the skin will automatically be applied to any open forms, otherwise if the 'Save as Resource' option is set then the skin will be embedded in your application as a resource.
Important Notes
Don't be surprised if some visual styles only have one available color scheme or selecting other color schemes does not appear to change the skin, this is because these color schemes may only affect UI elements that you wouldn’t normally see in a winforms application such as the Taskbar, Explorer bar ect. Embedding VisualStyler skins By default VisualStyler will automatically embed the selected visual style into your applications at design-time, and you do not need to write any code. This behaviour is controlled by the SaveAsResource setting on the component designer, if this is set to false then you will need to deploy the skin file separately.
However you might want to provide your users with a choice of skins, and this is very easy to do, in the following example we have a simple application that provides two skins at runtime. Both skins are embedded into the application and are loaded when the user clicks the appropriate button, you will need to carry the following tasks :-
Example solution layout
Create a folder 'Skins' in the root of your application solution.
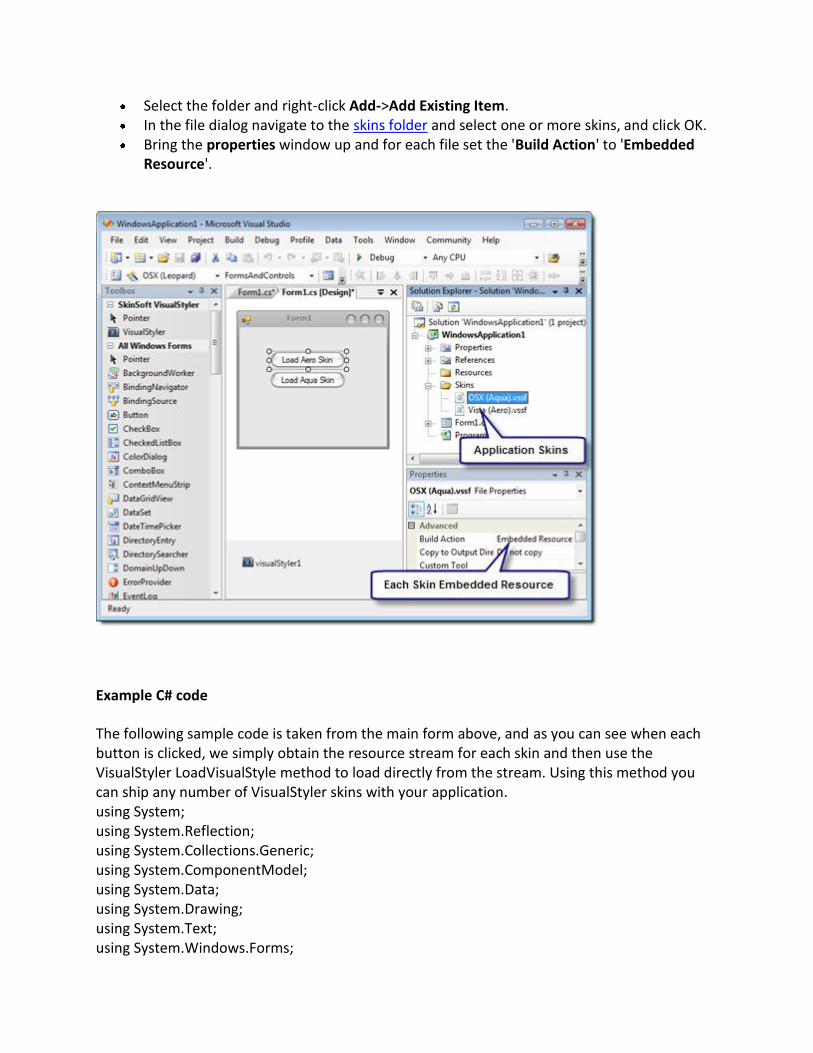
Select the folder and right-click Add->Add Existing Item. In the file dialog navigate to the skins folder and select one or more skins, and click OK. Bring the properties window up and for each file set the 'Build Action' to 'Embedded
Resource'.
Example C# code
The following sample code is taken from the main form above, and as you can see when each button is clicked, we simply obtain the resource stream for each skin and then use the VisualStyler LoadVisualStyle method to load directly from the stream. Using this method you can ship any number of VisualStyler skins with your application. using System; using System.Reflection; using System.Collections.Generic; using System.ComponentModel; using System.Data; using System.Drawing; using System.Text; using System.Windows.Forms;

namespace WindowsApplication1 { public partial class Form1 : Form { public Form1() { InitializeComponent(); } //<-------------------------------------------------------------------> /// <summary> /// Handles the LoadVistaAeroSkin button click event /// </summary> /// <param name="sender"></param> /// <param name="e"></param> private void btnLoadVistaAeroSkin_Click(object sender, EventArgs e) { // Get the resource path for the Aero skin string skinName = @"WindowsApplication1.Skins.Vista (Aero).vssf"; // Load the skin directly from the resource stream visualStyler1.LoadVisualStyle(Assembly.GetExecutingAssembly().GetManifestResourceStream(skinName)); } //<-------------------------------------------------------------------> /// <summary> /// Handles the LoadAquaSkin button click event /// </summary> /// <param name="sender"></param> /// <param name="e"></param> private void btnLoadAquaSkin_Click(object sender, EventArgs e) { // Get the resource path for the Aqua skin string skinName = @"WindowsApplication1.Skins.OSX (Aqua).vssf"; // Load the skin directly from the resource stream
visualStyler1.LoadVisualStyle(Assembly.GetExecutingAssembly().GetManifestResourceStream(skinName)); } } }
Example VB.Net code
The code for Visual Basic is identical except that Visual Basic stores assembly resources differently than C#, in Visual Basic the resource is accessed through the root namespace and then the resource name i.e MyApplication.MySkin.vssf, where as resources in C# are accessed using there fully qualified name. Imports System Imports System.Reflection Imports System.Collections.Generic Imports System.ComponentModel Imports System.Data Imports System.Drawing Imports System.Text Imports System.Windows.Forms Namespace WindowsApplication1 Partial Public Class Form1 Inherits Form Public Sub New() InitializeComponent() End Sub '<-------------------------------------------------------------------> ''' <summary> ''' Handles the LoadVistaAeroSkin button click event ''' </summary> ''' <param name="sender"></param> ''' <param name="e"></param> Private Sub btnLoadVistaAeroSkin_Click(ByVal sender As Object, ByVal e As EventArgs) ' Get the resource path for the Aero skin Dim skinName As String = "WindowsApplication1.Vista (Aero).vssf" ' Load the skin directly from the resource stream
visualStyler1.LoadVisualStyle(System.Reflection.Assembly.GetExecutingAssembly().GetManifestResourceStream(skinName)) End Sub '<-------------------------------------------------------------------> ''' <summary> ''' Handles the LoadAquaSkin button click event ''' </summary> ''' <param name="sender"></param> ''' <param name="e"></param> Private Sub btnLoadAquaSkin_Click(ByVal sender As Object, ByVal e As EventArgs) ' Get the resource path for the Aqua skin Dim skinName As String = "WindowsApplication1.OSX (Aqua).vssf" ' Load the skin directly from the resource stream visualStyler1.LoadVisualStyle(System.Reflection.Assembly.GetExecutingAssembly().GetManifestResourceStream(skinName)) End Sub End Class End Namespace VisualStyler skin folder paths VisualStyler skins are implemented in XML markup with the extension vssf. At design-time the VisualStyler component automatically stores all default styles and imported styles in the public documents folder as follows :-
Windows XP Skins Folder
C:\Documents and Settings\All Users\Documents\SkinSoft\VisualStyler\Skins\.
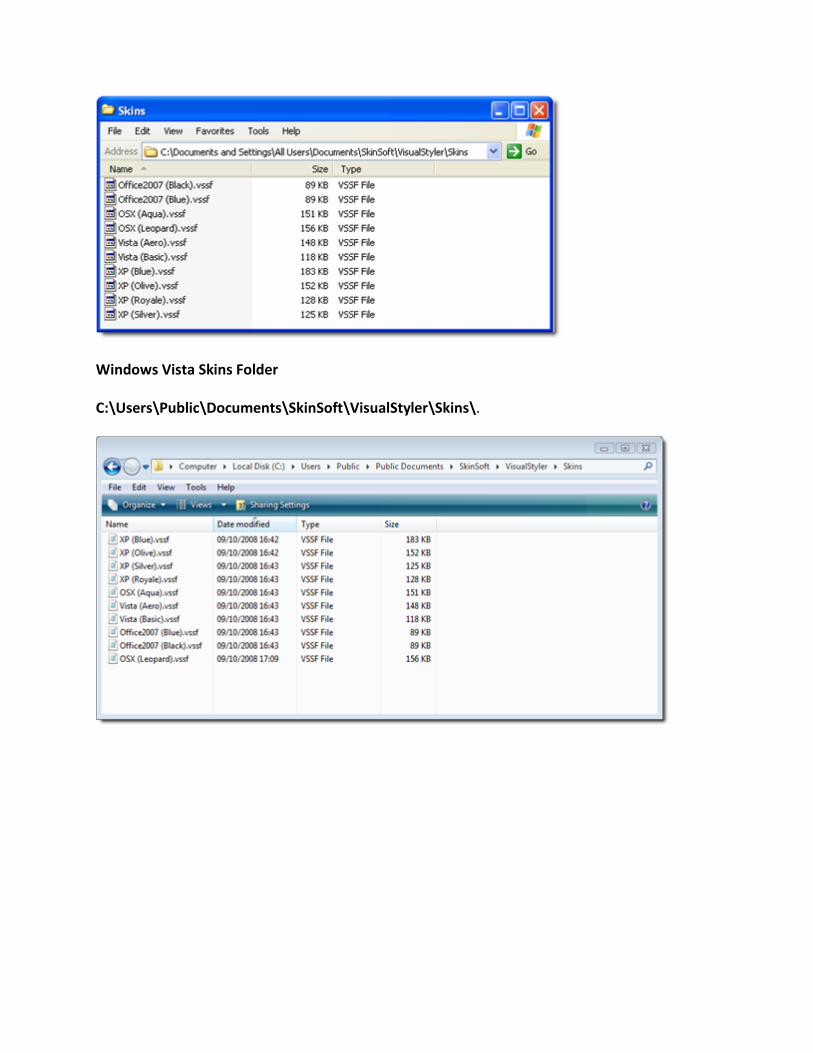
Windows Vista Skins Folder
C:\Users\Public\Documents\SkinSoft\VisualStyler\Skins\.