Embed Size (px)
Citation preview
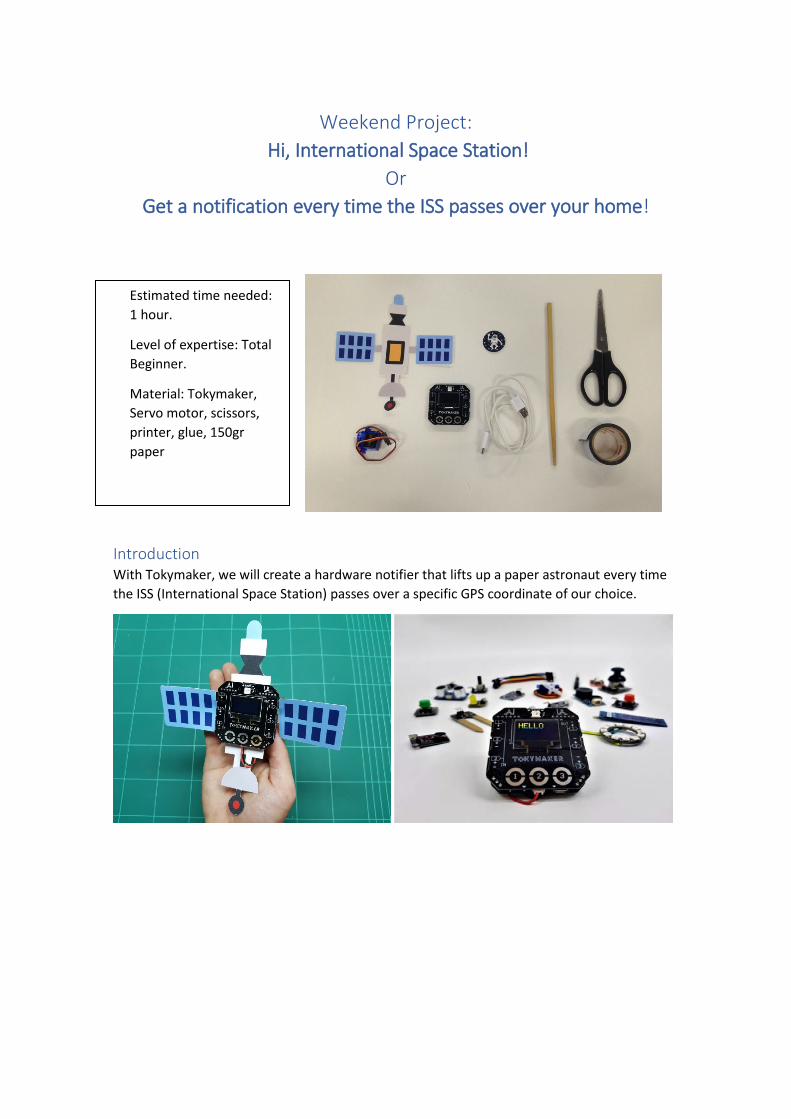
Weekend Project: Hi, International Space Station!
Or Get a notification every time the ISS passes over your home!
Introduction With Tokymaker, we will create a hardware notifier that lifts up a paper astronaut every time the ISS (International Space Station) passes over a specific GPS coordinate of our choice.
Estimated time needed: 1 hour.
Level of expertise: Total Beginner.
Material: Tokymaker, Servo motor, scissors, printer, glue, 150gr paper
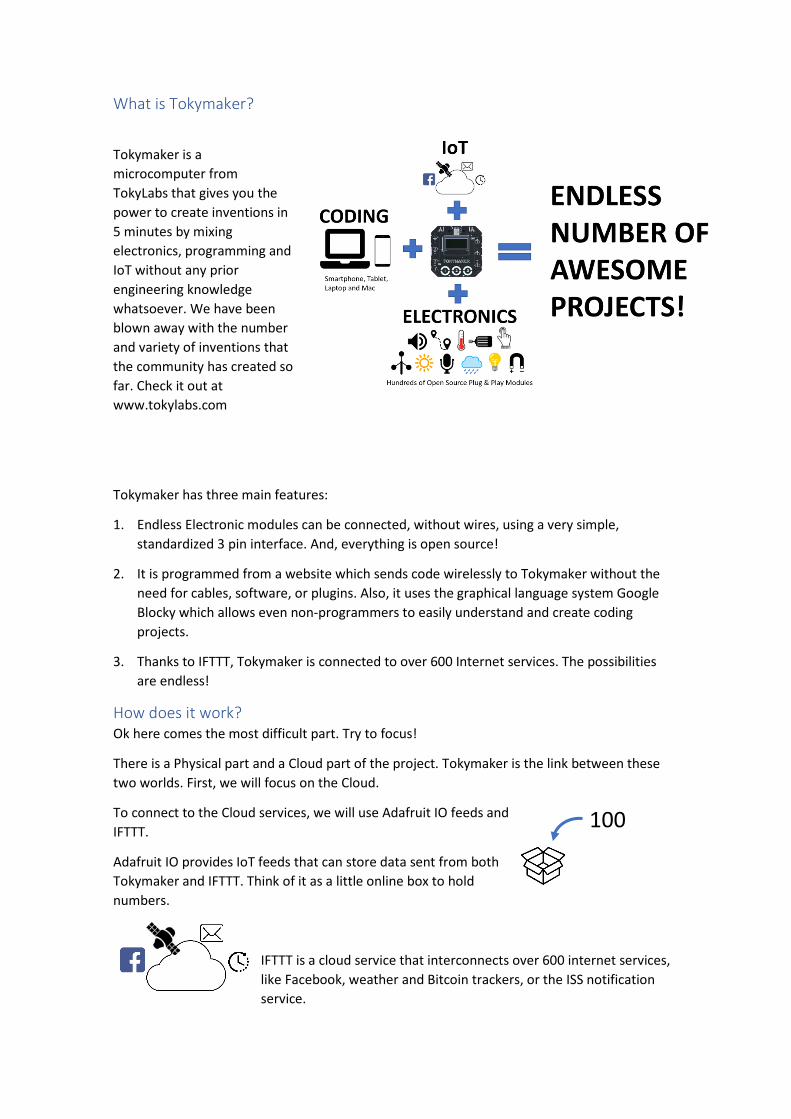
What is Tokymaker?
Tokymaker is a microcomputer from TokyLabs that gives you the power to create inventions in 5 minutes by mixing electronics, programming and IoT without any prior engineering knowledge whatsoever. We have been blown away with the number and variety of inventions that the community has created so far. Check it out at www.tokylabs.com
Tokymaker has three main features:
1. Endless Electronic modules can be connected, without wires, using a very simple, standardized 3 pin interface. And, everything is open source!
2. It is programmed from a website which sends code wirelessly to Tokymaker without the need for cables, software, or plugins. Also, it uses the graphical language system Google Blocky which allows even non-programmers to easily understand and create coding projects.
3. Thanks to IFTTT, Tokymaker is connected to over 600 Internet services. The possibilities are endless!
How does it work? Ok here comes the most difficult part. Try to focus!
There is a Physical part and a Cloud part of the project. Tokymaker is the link between these two worlds. First, we will focus on the Cloud.
To connect to the Cloud services, we will use Adafruit IO feeds and IFTTT.
Adafruit IO provides IoT feeds that can store data sent from both Tokymaker and IFTTT. Think of it as a little online box to hold numbers.
IFTTT is a cloud service that interconnects over 600 internet services, like Facebook, weather and Bitcoin trackers, or the ISS notification service.
100

In this project, IFTTT connects the ISS notification service with Adafruit IO. It will store a specific number of our choice (the number 100, for example) on an Adafruit IO feed every time the ISS passes by certain GPS coordinates.
Meanwhile, Tokymaker will constantly be checking what value is stored in the Adafruit IO feed. Any time the number we specified earlier (100) is found in the feed, Tokymaker will run the code we programmed beforehand.
Basically, Adafruit IO is acting like a mailman between Tokymaker and IFTTT. A mailman whose letters (feeds) can contain only numbers.
Graphically, it looks like this:
First Part: IFTTT and Adafruit IO (Cloud Part)
Let’s set up the Cloud part by configuring IFTTT Services and Adafruit IO feed
100
ISS passes nearby
Put number 100 in Adafruit IO Feed
ISS
There is a 100 in Adafruit IO Feed
Run code in Tokymaker
100
100
ISS passes nearby Put number 100 into Adafruit Feed
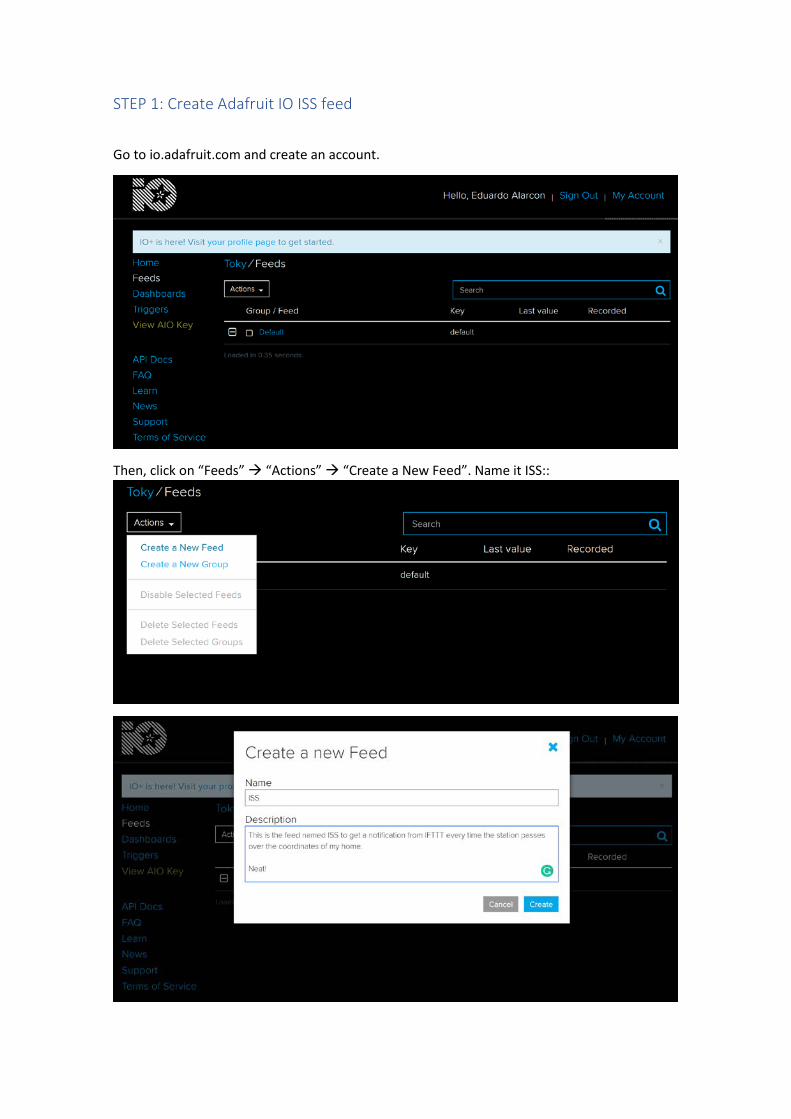
STEP 1: Create Adafruit IO ISS feed
Go to io.adafruit.com and create an account.
Then, click on “Feeds” “Actions” “Create a New Feed”. Name it ISS::
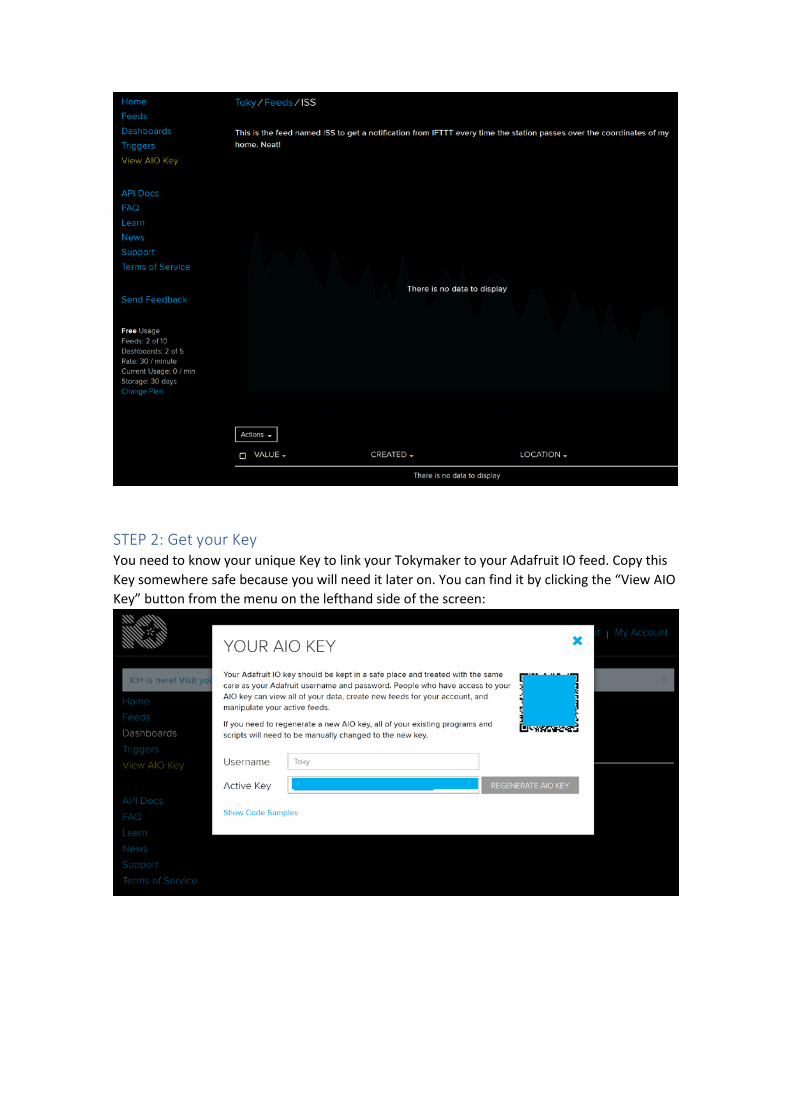
STEP 2: Get your Key You need to know your unique Key to link your Tokymaker to your Adafruit IO feed. Copy this Key somewhere safe because you will need it later on. You can find it by clicking the “View AIO Key” button from the menu on the lefthand side of the screen:

Step 3: IFTTT Go to www.ifttt.com and create an account. It links 600 Internet services in a very simple way:
Some examples could be:
If “I receive twitter with hashtag #tokymaker” then “store the tweet text in Google Drive”
If “It is sunny in Barcelona” then “send you an email with subject: Let’s go to the beach!”
In this case we are doing:
If “The ISS passes over a specific address” then “send a number 100 to Adafruit ISS feed”
To set this up, you must first choose the trigger:
Click on the “+ this” of the “If this then that” sentence and write “Space”
Click on the “Space” icon and the menu below will appear. Choose the “ISS passes ove ra specific location” option:
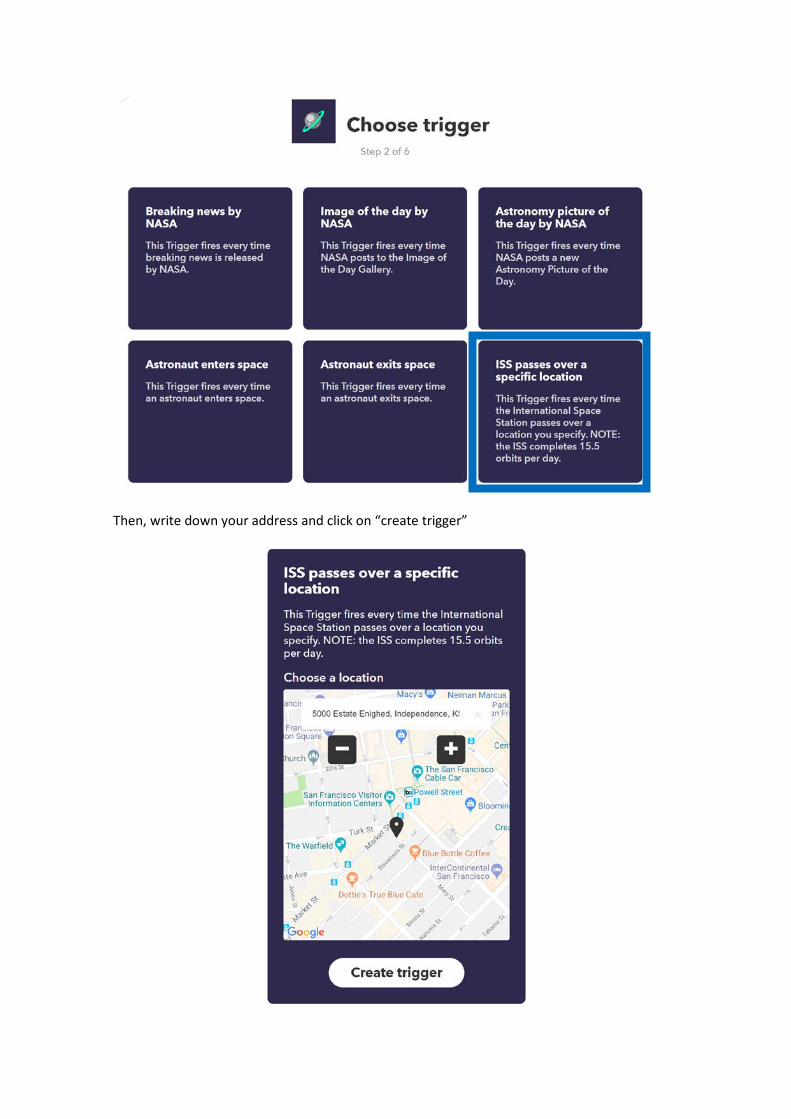
Then, write down your address and click on “create trigger”
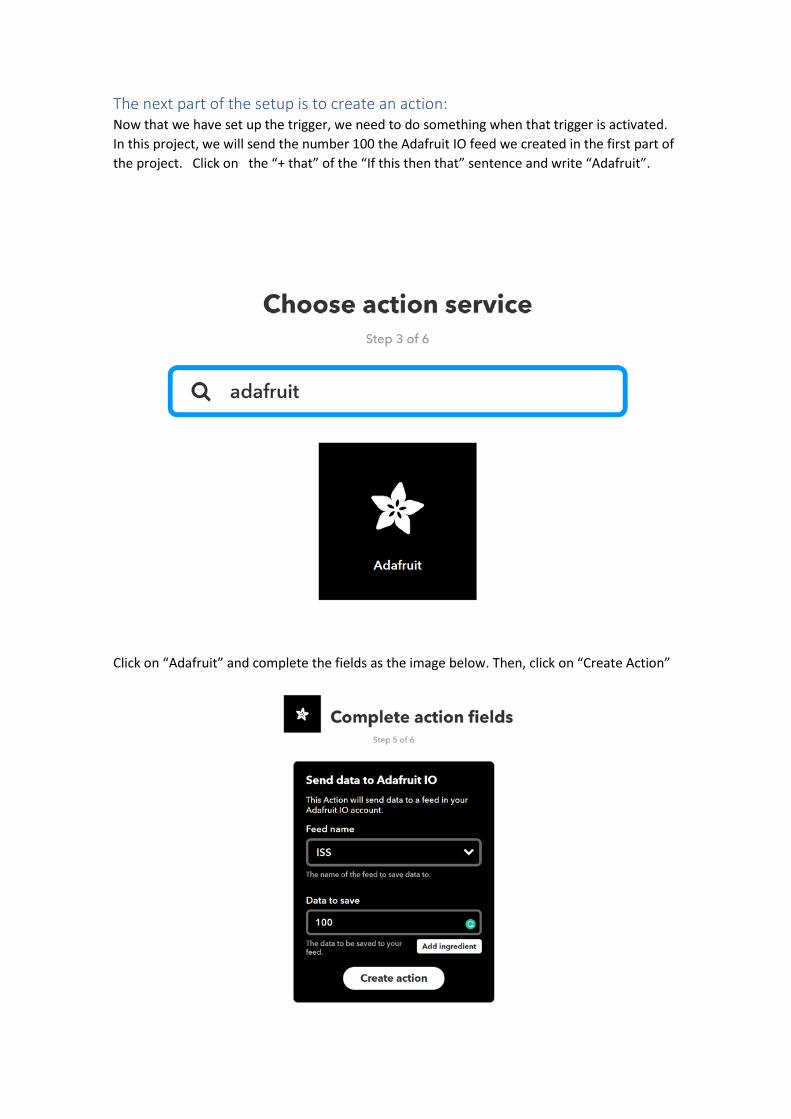
The next part of the setup is to create an action: Now that we have set up the trigger, we need to do something when that trigger is activated. In this project, we will send the number 100 the Adafruit IO feed we created in the first part of the project. Click on the “+ that” of the “If this then that” sentence and write “Adafruit”.
Click on “Adafruit” and complete the fields as the image below. Then, click on “Create Action”
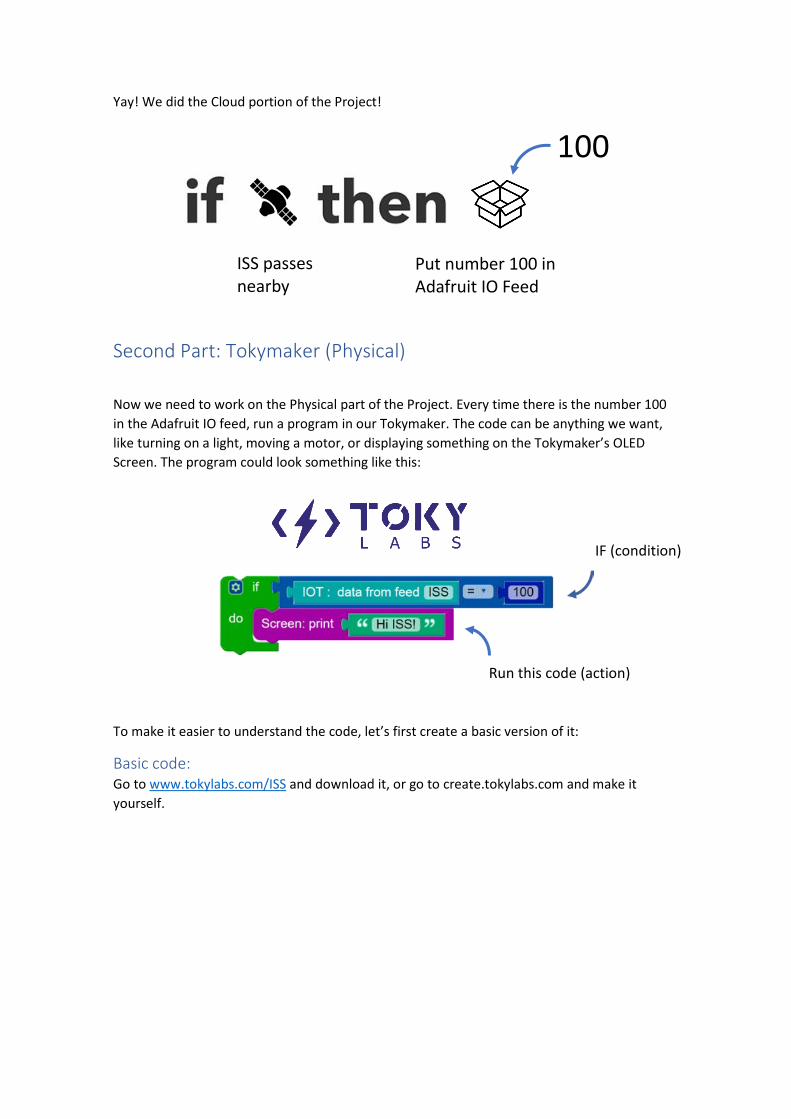
Yay! We did the Cloud portion of the Project!
Second Part: Tokymaker (Physical)
Now we need to work on the Physical part of the Project. Every time there is the number 100 in the Adafruit IO feed, run a program in our Tokymaker. The code can be anything we want, like turning on a light, moving a motor, or displaying something on the Tokymaker’s OLED Screen. The program could look something like this:
To make it easier to understand the code, let’s first create a basic version of it:
Basic code: Go to www.tokylabs.com/ISS and download it, or go to create.tokylabs.com and make it yourself.
100
ISS passes nearby
Put number 100 in Adafruit IO Feed
Run this code (action)
IF (condition)
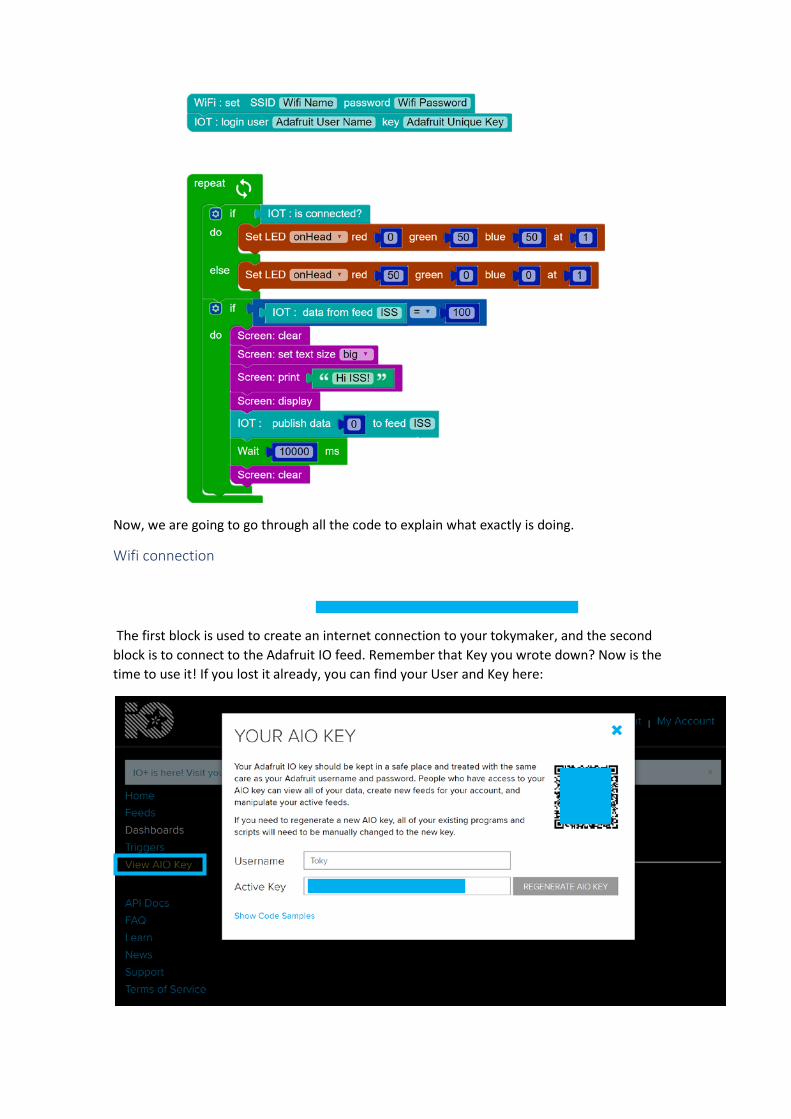
Now, we are going to go through all the code to explain what exactly is doing.
Wifi connection
The first block is used to create an internet connection to your tokymaker, and the second block is to connect to the Adafruit IO feed. Remember that Key you wrote down? Now is the time to use it! If you lost it already, you can find your User and Key here:
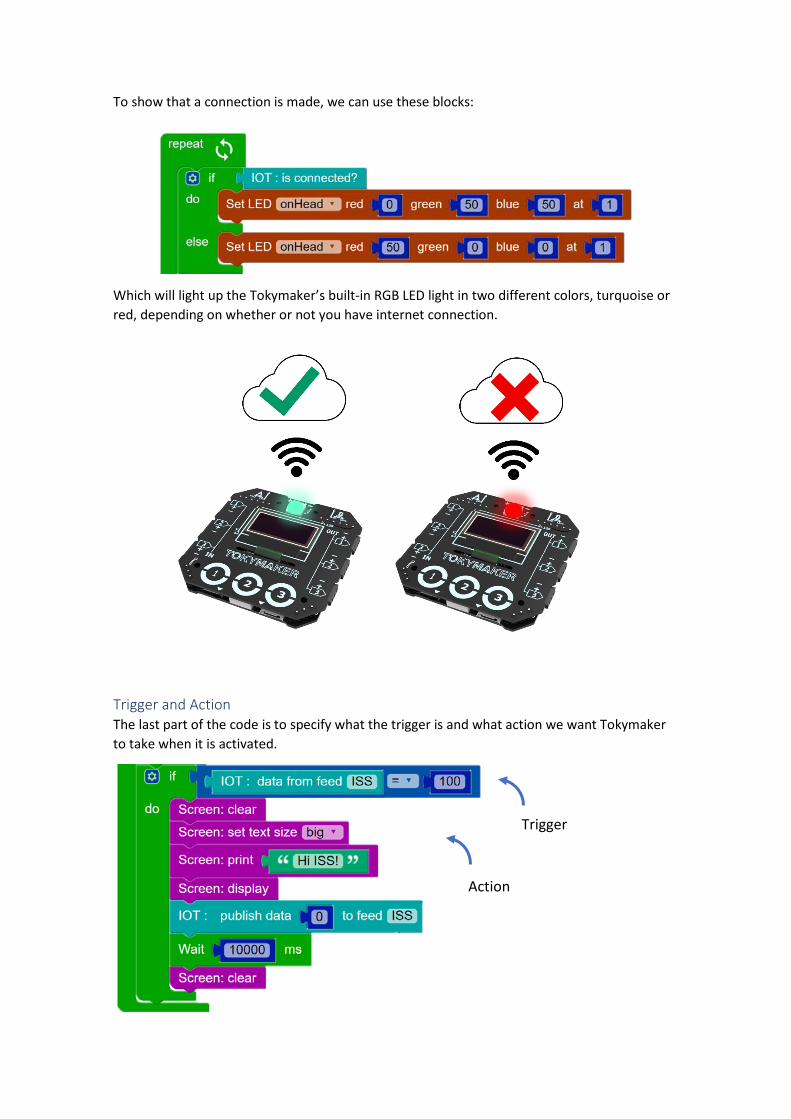
To show that a connection is made, we can use these blocks:
Which will light up the Tokymaker’s built-in RGB LED light in two different colors, turquoise or red, depending on whether or not you have internet connection.
Trigger and Action The last part of the code is to specify what the trigger is and what action we want Tokymaker to take when it is activated.
Trigger
Action

If it reads a number 100 in the feed “ISS”, then will show in the screen “Hi ISS!” and will send a number 0 back to the feed “ISS” to aknowledge that the message is received and avoid to repeat the same action again.
Done! To test that code out, you can set a different trigger in IFTTT, such as email or a button in your smartphone. This way you can trigger it whenever you decide, for test purposes.
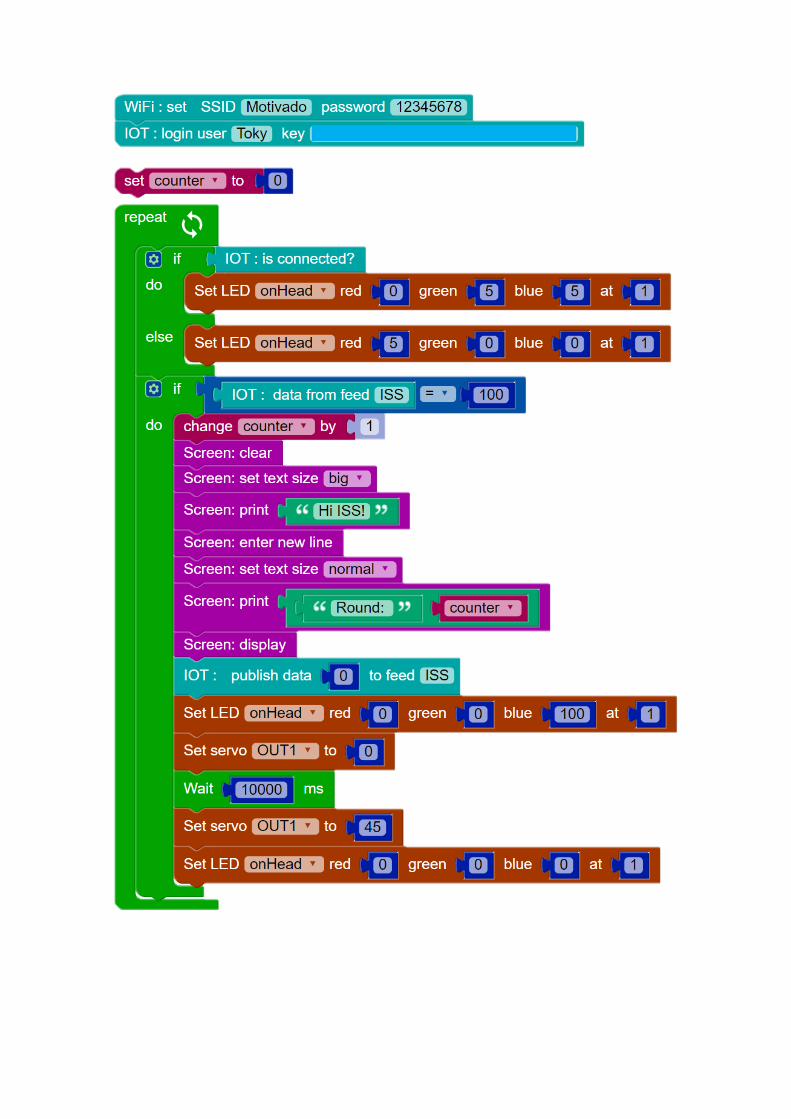
Take a look to the full version of the code:
If you also want to be an inventor and make your own ideas happen, go to www.tokylabs.com/shop
If you have any question, suggestion or improvement, feel free to contact us at [email protected]
Assembly instructions
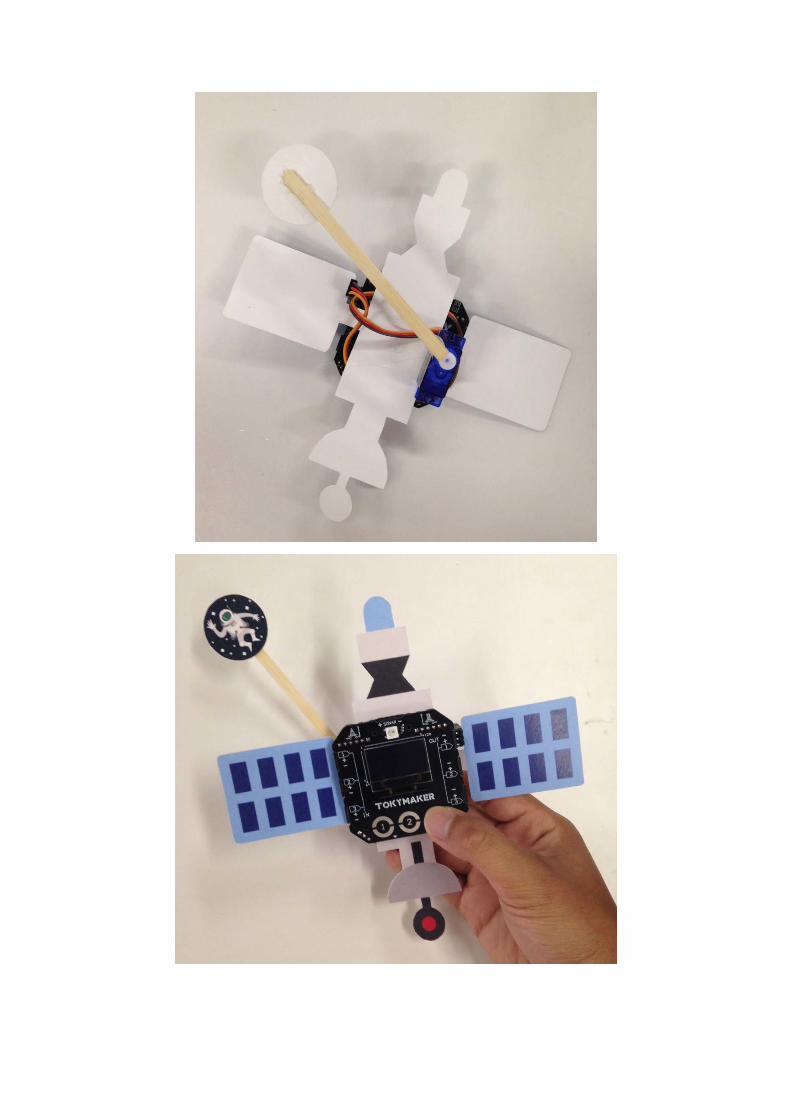
You can make your own satellite design, or print any image that can be easily found in internet.
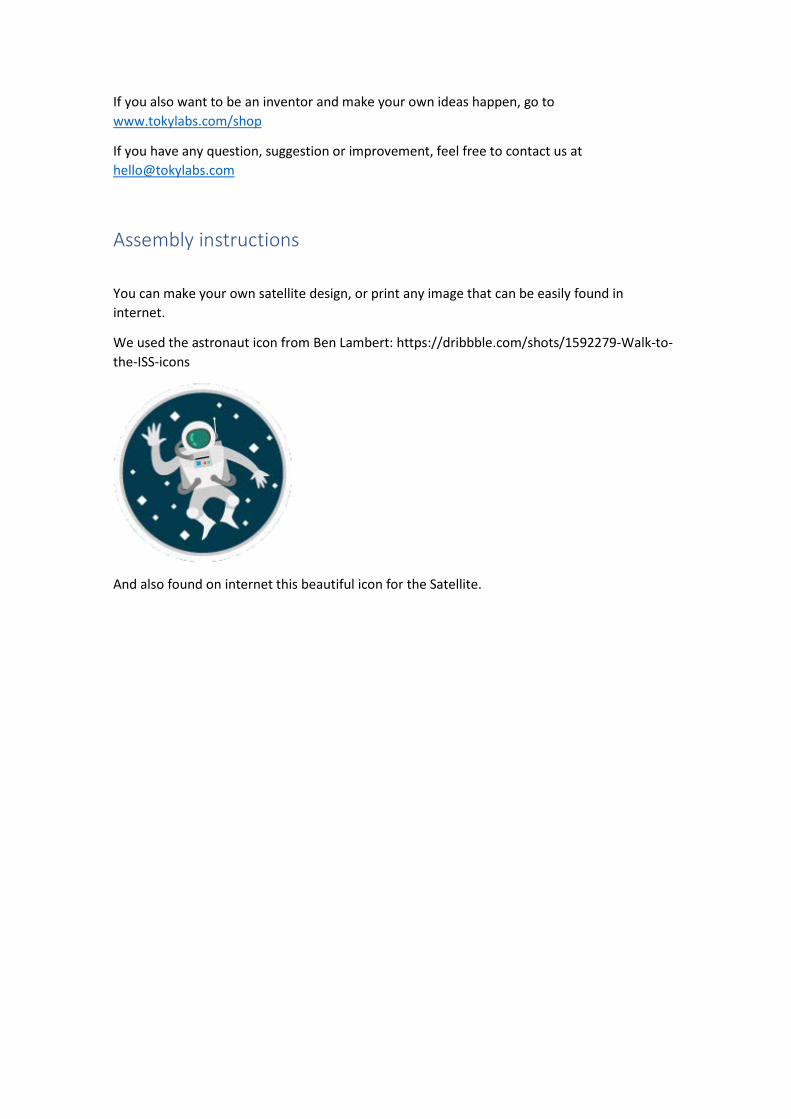
We used the astronaut icon from Ben Lambert: https://dribbble.com/shots/1592279-Walk-to-the-ISS-icons
And also found on internet this beautiful icon for the Satellite.

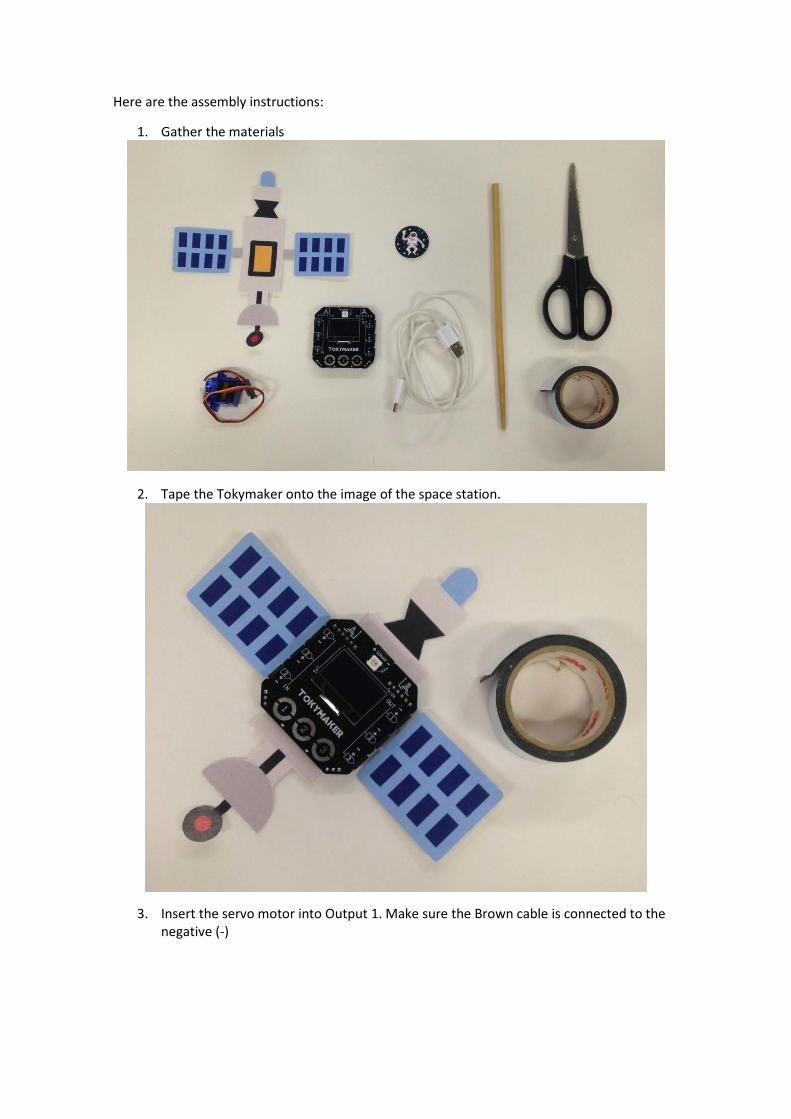
Here are the assembly instructions:
1. Gather the materials
2. Tape the Tokymaker onto the image of the space station.
3. Insert the servo motor into Output 1. Make sure the Brown cable is connected to the negative (-)
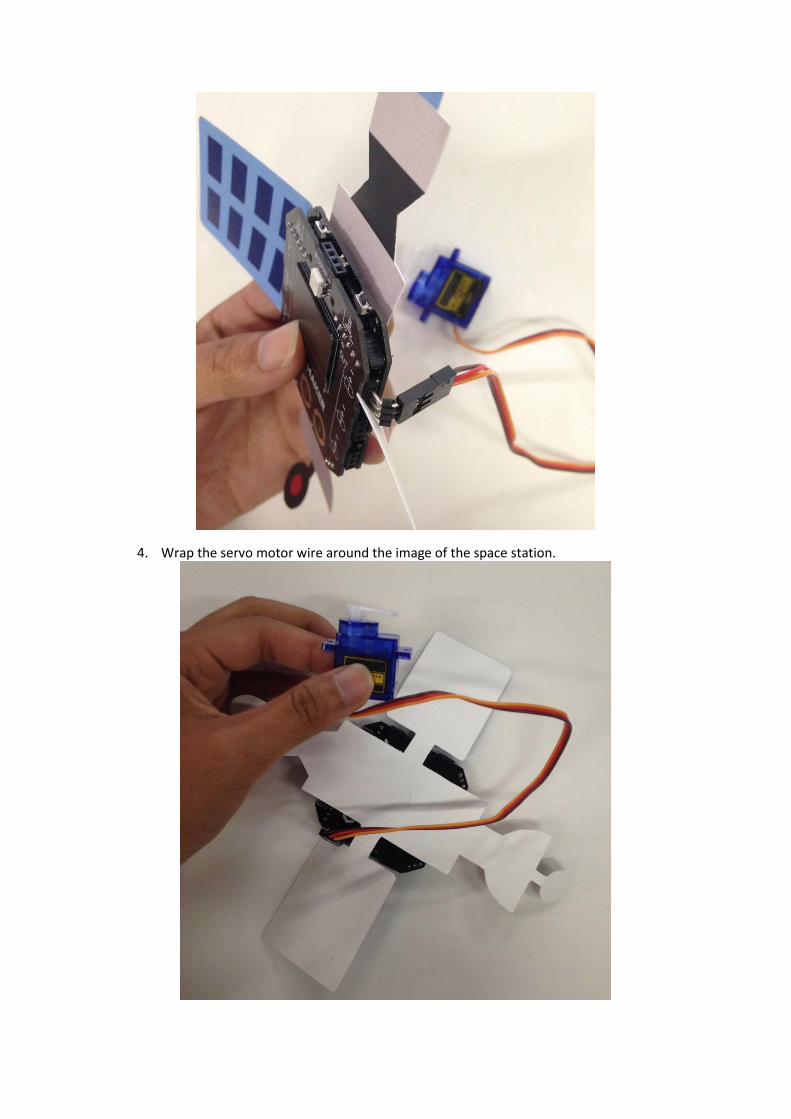
4. Wrap the servo motor wire around the image of the space station.
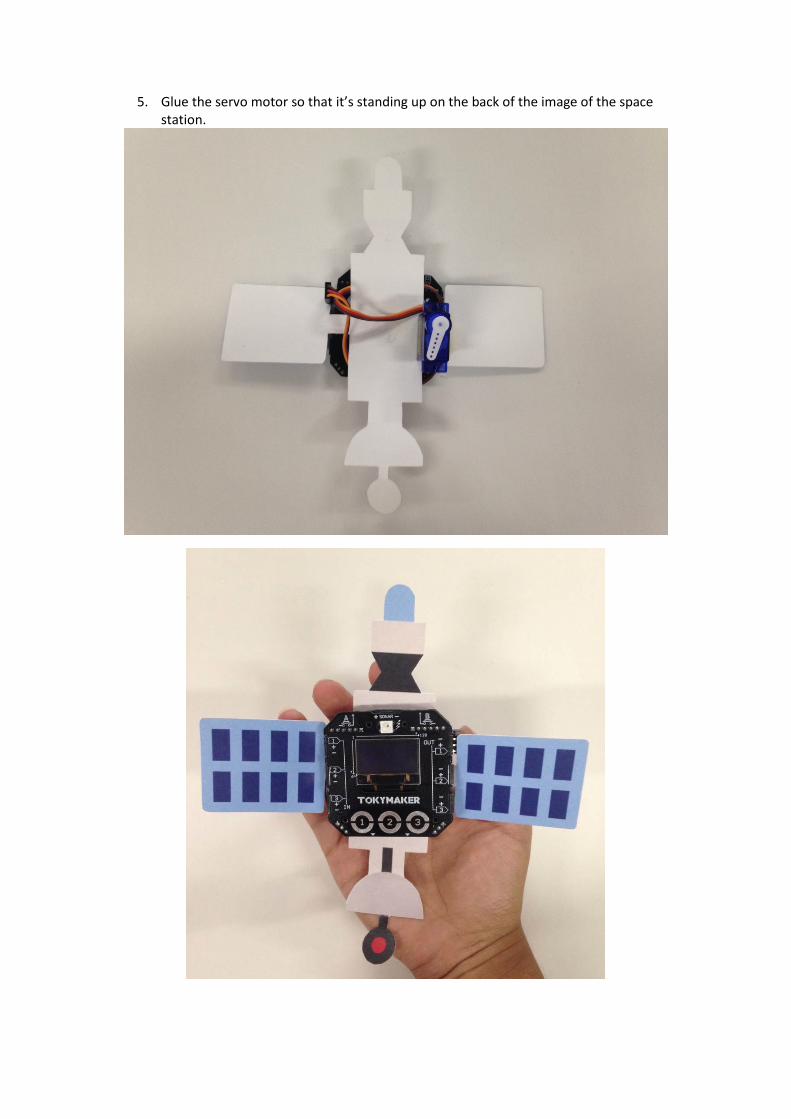
5. Glue the servo motor so that it’s standing up on the back of the image of the space station.
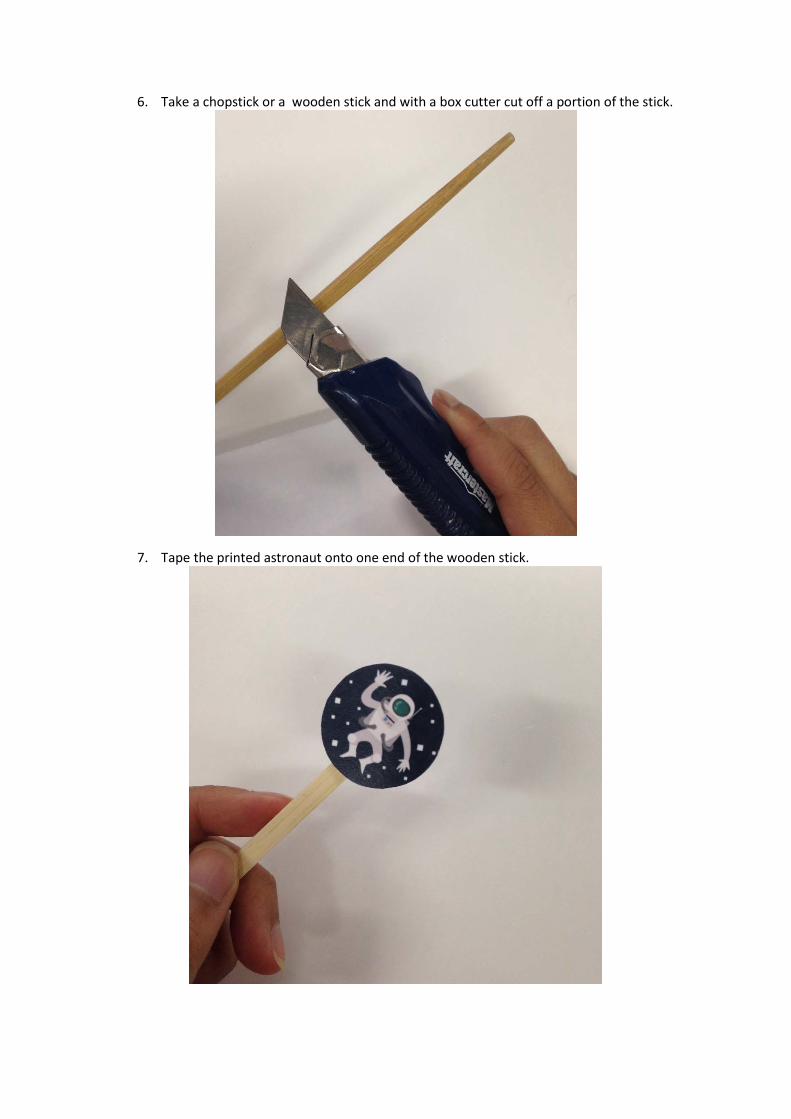
6. Take a chopstick or a wooden stick and with a box cutter cut off a portion of the stick.
7. Tape the printed astronaut onto one end of the wooden stick.
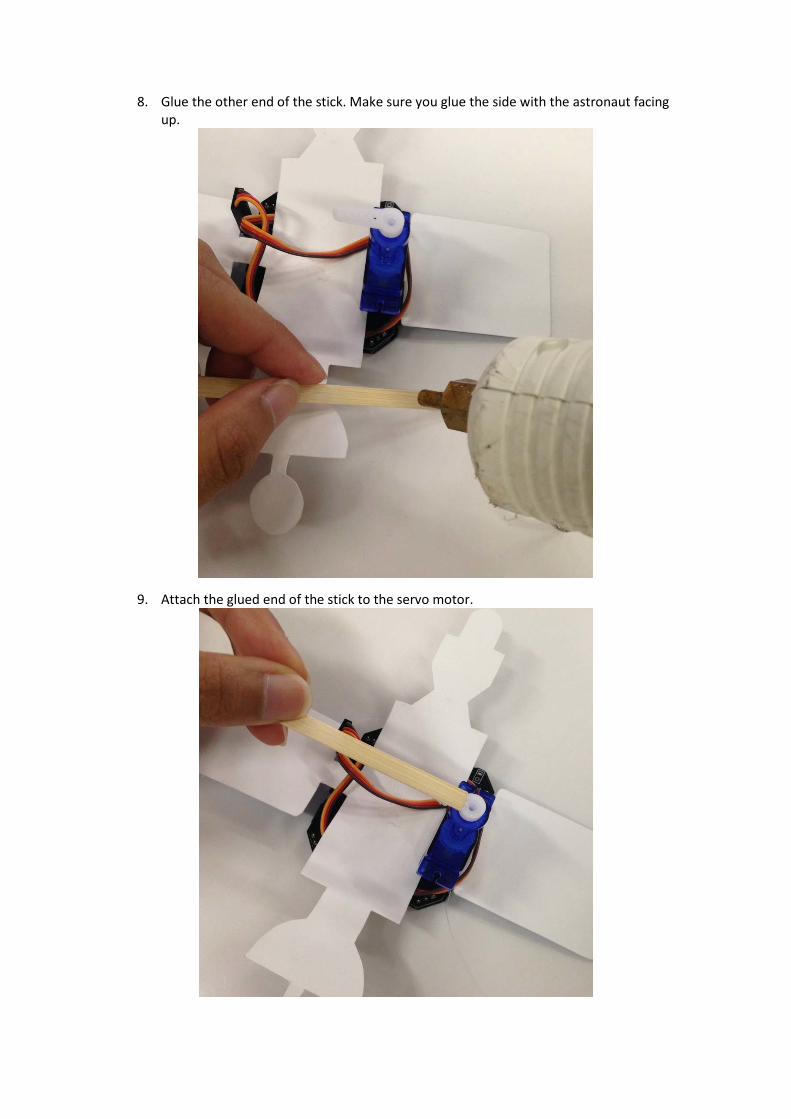
8. Glue the other end of the stick. Make sure you glue the side with the astronaut facing up.
9. Attach the glued end of the stick to the servo motor.

This Project has been created and edited by TokyLabs Team: Bram Torrekens, Mendy Yu and Spencer Chlebina.