Embed Size (px)
Citation preview
Will Stokes-Roberts 2016
To Create a Quadcopter and Evaluate it against Pre-built AlternativesExtended Research Project by Will Stokes-Roberts
Brief
In modern times the word ‘drone’ is ubiquitous on the internet, in stores and in the media. Often these are small and designed for kids to fly around their kitchen but there are ‘drones’ out there capable of so much more. There are dozens of high flying news articles out there about ‘near-misses’ with aircraft thousands of feet in the air and so for a drone to be at that altitude, these must be very developed machines.
A few years ago to hear or search the word drone one would likely envisage a Predator UAV (top-right) from the US Air Force performing a mission over the Middle East, but in 2016, the word drone has very little mention of these aircraft as it is almost entirely made up of consumer grade quadcopters.
My aim in my Project is to research how to and then build a quadcopter that will rival a quadcopter of a much higher price point. I will research what is currently on the market, what an increased cost gives you in terms of features and then how to build one for yourself.
Things I hope to learn from this project:
To understand how a quadcopter works Develop my research skills and recording skills Develop skills such as soldering, cutting/manufacturing, my electrical understanding, maths
skills Important health and safety laws surrounding drones (CAA rules and regulations) Learn how to create a very coherent, high quality project and complete project so I can take
those skills into future life.
Things I would like to take away from this project:
After completing the build I hope to have built a high quality quadcopter that I fully understand down to how it works, how to fix anything efficiently and what to pass onto other people in learning about how to use drones safely and legally so to avoid conflict in the skies and with people on the ground as unfortunately, some people don’t seem to understand these rules and conflicts occur.
Will Stokes-Roberts
Will Stokes-Roberts 2016
ResearchIntro
To start my research I am going to search the internet and get an idea of what drone products are currently on the market and get an idea as to what features come with different price levels so to come to a conclusion as to what I should try to include in mine. When looking at these drones I will be only looking at Ready to Fly (RTF) models as anything else requires the customer to buy something as well, so RTF only. Here is what I have found:
Research
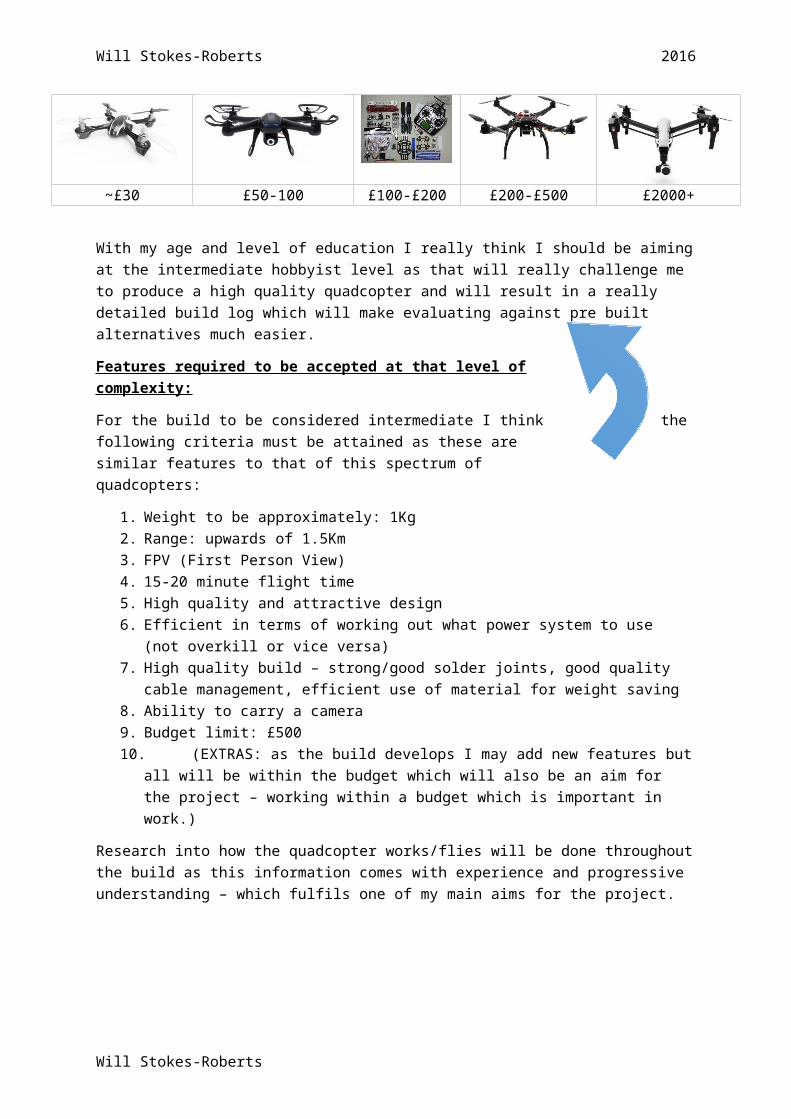
Starting at the bottom we have the ‘micro to mini class’ of quadcopters, these are no larger than the palm of your hand and are very popular in toy shops and tech shops as they are relatively cheap-ranging from £15~£35 and can be sold to the masses licence free. With a small price tag the feature list of these quadcopters is not extensive, the radio transmitter can only bind to one quadcopter and the range is maximum 100m, there is no ability to carry a camera etc. so these are the absolute basic quadcopter models. The next price range seems to be the £35 ~£100 category, these quadcopters are on average at this price slightly larger and have features like FPV, longer ranges, can carry small cameras and have higher quality parts. They are still considered toys but higher end toys as they can’t match a high enough quality of recording to be used properly.
Once we get into the £100~£200 price range we start to see more and more basic hobbyist quadcopters, for example starter mini-race quadcopters that sometimes require you to build them yourself. However with the larger frames come larger motors, ESCs and thus more expensive parts, so in these kits you don’t get the features that you do in the toy grade quadcopters as the manufacturer expects you to have the experience and knowledge to be able to progress your quadcopter yourself. Now that we have finally entered the Hobbyist level we start seeing some quality and advanced aircraft with features like longer ranges (up to 1km) ability to program the quadcopter, computerised radios that can bind with other models and the ability to make easy repairs without dealing with the manufacturer. It is from this point that the sky is really the limit when it comes to quadcopters.
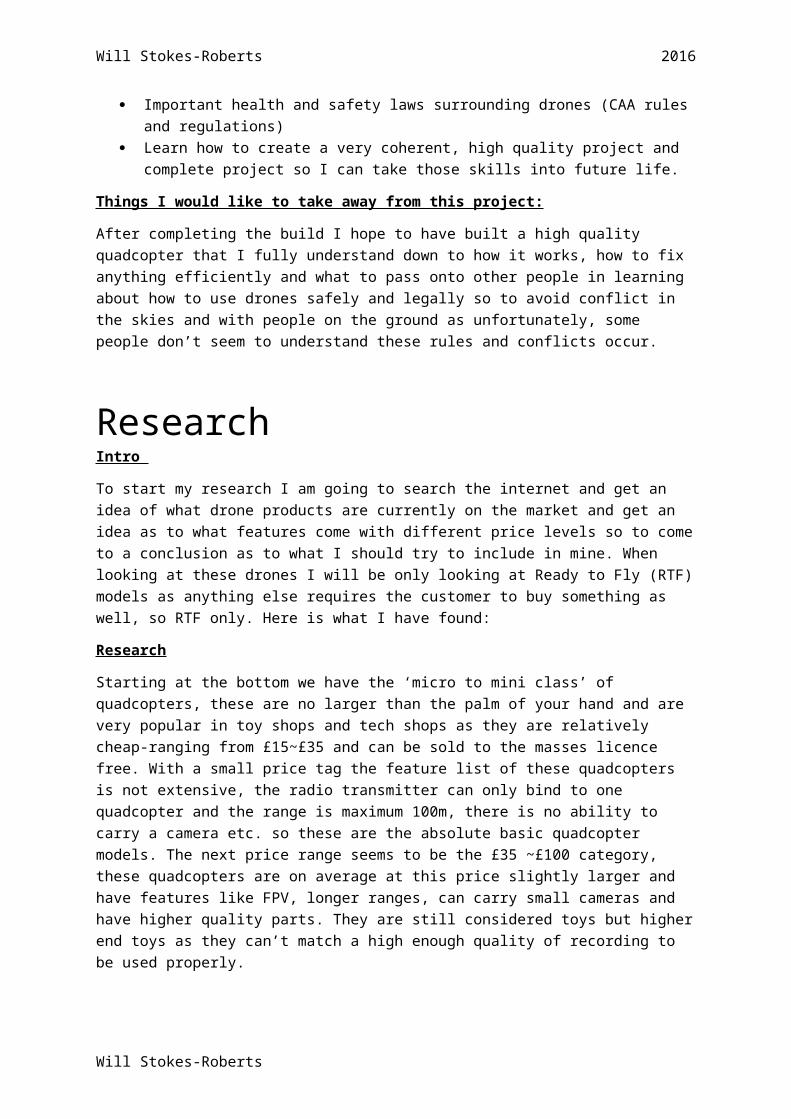
Upwards of £200 can buy you anywhere from the Blade brand style quadcopter at around £350 all the way up to the famous (if not infamous) DJI range of quadcopters like the Inspire 1 where different packages range from £2000-£4000! However these vastly different price points don’t actually result in the huge jump like with the earlier categories, I will explain. So the standard features of these high end quadcopters are things like GPS functionality; altitude hold autonomous flight, return to home modes, higher quality electronics, higher quality radios, ease of use, warranties, customer support and with increased price these features all improve. They improve in that additional sensors and code are added but the base principles are the same which is where the concept of pro-grade objects come in. Similar to many different fields the pro-grade range is always very expensive as these people want the best quality and the best support as their jobs depend upon it, so not for regular consumers. I think the best way to depict this is with a graph.
The exponential graph shows where the feature set slows but the price sky rockets for the pro users.
Will Stokes-Roberts
Price
Will Stokes-Roberts 2016
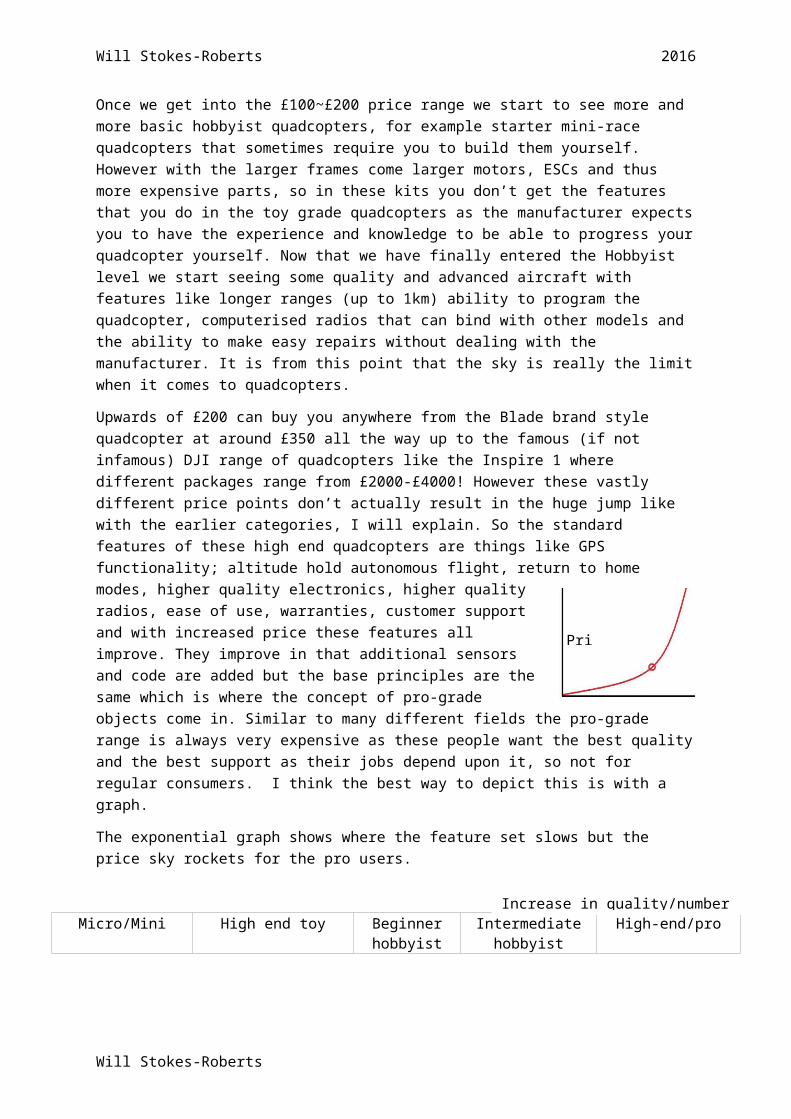
Micro/Mini High end toy Beginner hobbyist
Intermediate hobbyist
High-end/pro
~£30 £50-100 £100-£200 £200-£500 £2000+
With my age and level of education I really think I should be aiming at the intermediate hobbyist level as that will really challenge me to produce a high quality quadcopter and will result in a really detailed build log which will make evaluating against pre built alternatives much easier.
Features required to be accepted at that level of complexity:
For the build to be considered intermediate I think the following criteria must be attained as these are similar features to that of this spectrum of quadcopters:
1. Weight to be approximately: 1Kg2. Range: upwards of 1.5Km3. FPV (First Person View)4. 15-20 minute flight time5. High quality and attractive design 6. Efficient in terms of working out what power system to use (not overkill or vice versa)7. High quality build – strong/good solder joints, good quality cable management, efficient use
of material for weight saving8. Ability to carry a camera9. Budget limit: £50010. (EXTRAS: as the build develops I may add new features but all will be within the budget
which will also be an aim for the project – working within a budget which is important in work.)
Research into how the quadcopter works/flies will be done throughout the build as this information comes with experience and progressive understanding – which fulfils one of my main aims for the project.
Will Stokes-Roberts
Increase in quality/number of features
Will Stokes-Roberts 2016
Extended Project Qualification: The PartsI read around many websites finding information for how to make a quadcopter and the fundamentals behind them, I found that the following parts are crucial but more information will follow about why later. My report will first overview what I need and then I will explain why they are needed and how they tie into my research aim.
Radio system
In the UK radio-controllers are limited to the 2.4GHz band due to other higher frequency bands interfering with other public communication devices. I would need a physical radio transmitter in my hand and a receiver on the aircraft itself.
The aircraft
1. An airframe to mount all of the electronics 2. Four brushless motors3. Four Electronic Speed Controllers (ESCs)4. A Flight control board with inbuilt accelerometers and gyroscopes 5. 2.4GHz radio receiver and transmitter set6. Four propellers7. Power network and source
These are the bare minimum parts to create a fully functioning quadcopter. However, after reading around and seeing some of the amazing things other people have created I intend on building an autonomous quadcopter that is capable of more than line-of-sight flying. Here is what else I will be adding on to accommodate these features:
Extras
1. FPV (First Person View) system2. GPS (Global Positioning System)-incorporated into the flight controller3. Video camera4. Lost model alarm5. LED strips (remote activation)6. (depending on budget) pan and tilt mechanism for on board video camera
Explanation
Firstly the radio system. Modern computerised radios for RC (remote controlled) hobbyists are mostly using the 2.4GHz band, this is because the old frequency they used of 72MHz didn’t provide a very good quality signal, the range and penetration was better due to increased wavelength and lower frequency but fewer packets of information could be sent. 2.4GHz has a lower range but a much higher quality signal which is required for high quality RC aircraft to be flown- not your everyday store-bought RC product. The 2.4GHz receiver that goes on the aircraft takes all of the input signals from the transmitter and sends them to the flight controller.
Will Stokes-Roberts
Will Stokes-Roberts 2016
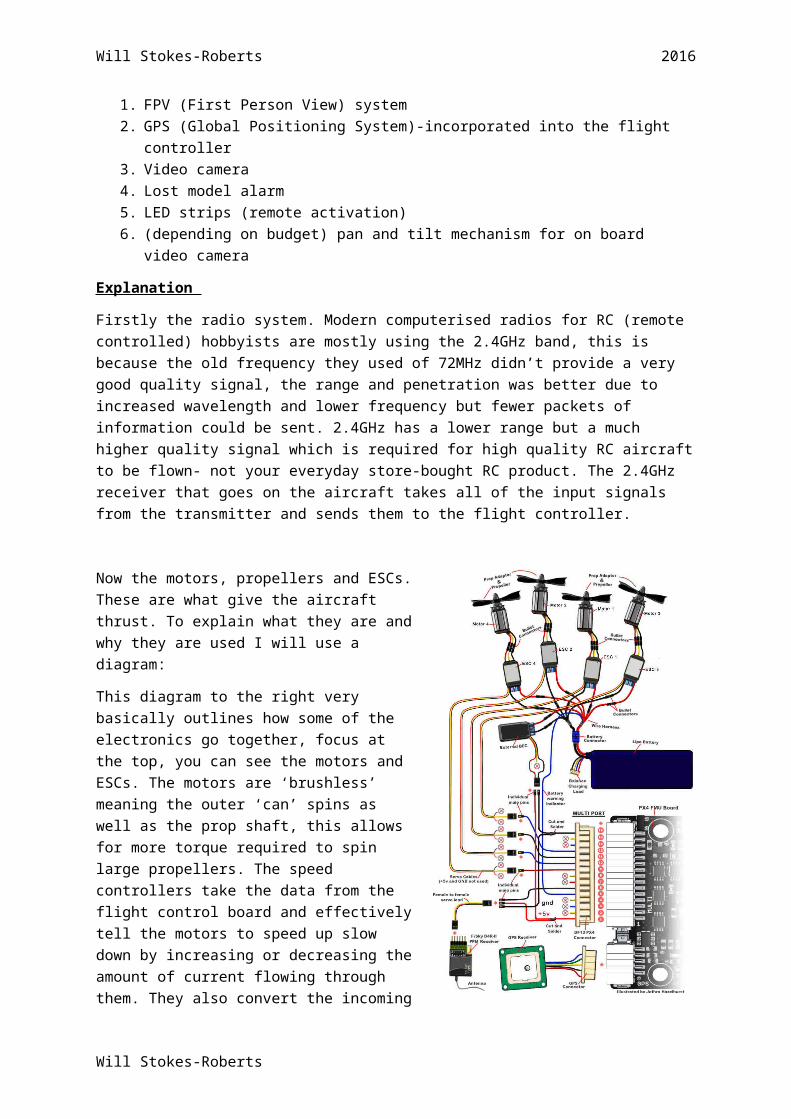
Now the motors, propellers and ESCs. These are what give the aircraft thrust. To explain what they are and why they are used I will use a diagram:
This diagram to the right very basically outlines how some of the electronics go together, focus at the top, you can see the motors and ESCs. The motors are ‘brushless’ meaning the outer ‘can’ spins as well as the prop shaft, this allows for more torque required to spin large propellers. The speed controllers take the data from the flight control board and effectively tell the motors to speed up slow down by increasing or decreasing the amount of current flowing through them. They also convert the incoming DC (direct current) power source to AC (alternating current) so that the power oscillates back and forth between positive and negative so the electromagnets can spin the motor bell. That is how they work but this alone does not allow the quadcopter to fly.
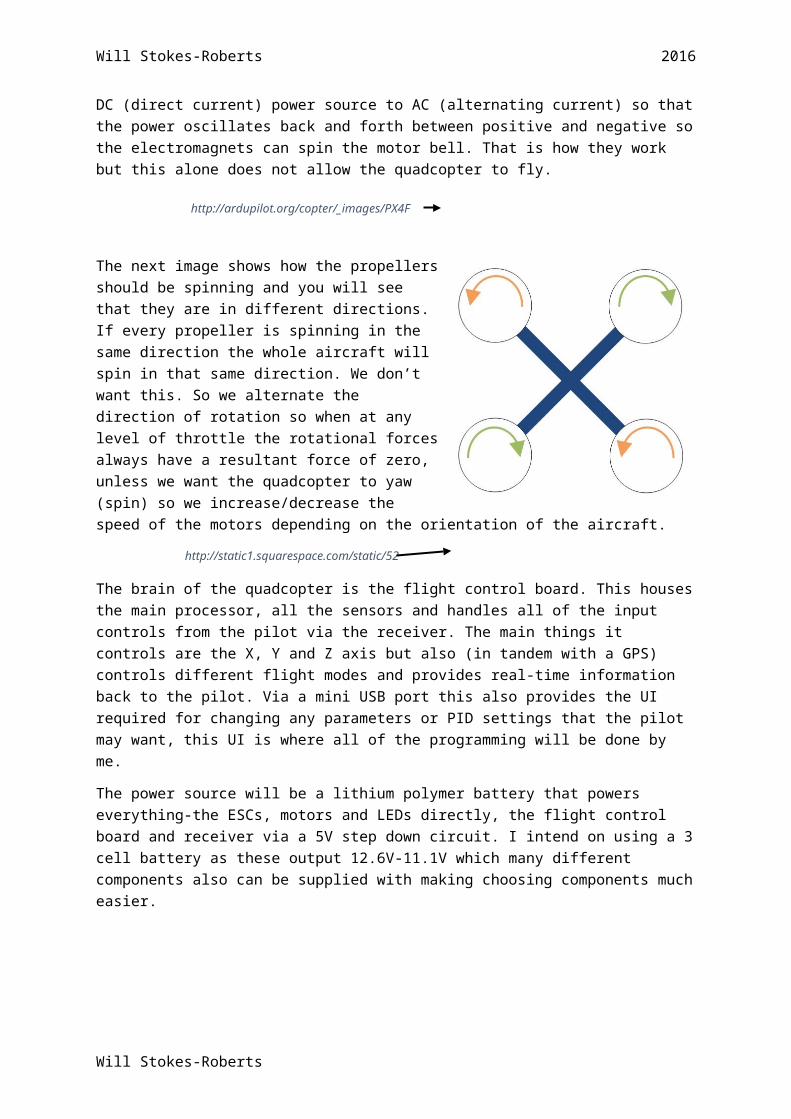
The next image shows how the propellers should be spinning and you will see that they are in different directions. If every propeller is spinning in the same direction the whole aircraft will spin in that same direction. We don’t want this. So we alternate the direction of rotation so when at any level of throttle the rotational forces always have a resultant force of zero, unless we want the quadcopter to yaw (spin) so we increase/decrease the speed of the motors depending on the orientation of the aircraft.
The brain of the quadcopter is the flight control board. This houses the main processor, all the sensors and handles all of the input controls from the pilot via the receiver. The main things it controls are the X, Y and Z axis but also (in tandem with a GPS) controls different flight modes and provides real-time information back to the pilot. Via a mini USB port this also provides the UI required for changing any parameters or PID settings that the pilot may want, this UI is where all of the programming will be done by me.
The power source will be a lithium polymer battery that powers everything-the ESCs, motors and LEDs directly, the flight control board and receiver via a 5V step down circuit. I intend on using a 3 cell battery as these output 12.6V-11.1V which many different components also can be supplied with making choosing components much easier.
Will Stokes-Roberts
http://ardupilot.org/copter/_images/PX4F
http://static1.squarespace.com/static/52
Will Stokes-Roberts 2016
Choice of PartsRadio system
I have chosen to use the FrSky Taranis X9D+ and its 2.4GHz ACCST protocol. This is because many RC hobbyists use this radio and say it has many fantastic features including one of the things I liked most about it, which was that the software is Open-source so anything I would like to change I can do so with some coding. The ACCST is a really well engineered 2.4GHz frequency hopper which time has tested to be bullet proof in its design and so my aircraft has a reliable connection.
2.4GHz Receiver
I chose FrSky’s X8R receiver for this build as it has 8 channels and built in support for telemetry (more on than that later)
Economical Very good range Very good reliability FrSky is a reputable company Packed with features like SBUS and Smart Port features
Motors and ESCs
Since this project will be quite a large investment in the air I wanted a reliable set of motors and ESCs. I chose the T-motor Air Gear 350 combo pack which comes with 4 motors, 4 ESCs and 4 propellers. The reasons I chose this set over piecing myself are:
Top quality brand Very good standard of manufacturing Economical Low amperages for lots of thrust- efficient
Flight controller
I chose the APM2.8 as it is a very capable controller with a very user friendly UI and a wealth of upgrade options, it’s a design which allows for it to work standalone with no extra external sensors, however as time goes on and I want to add more sensors like air speed etc. I can do so simply by plugging in and configuring in the UI. (I will start my kit with a GPS and Current Sensor as I want to see how much power the aircraft is pulling at any one point.)
Will Stokes-Roberts
http://www.frsky-rc.co.uk/_app_/resource
http://team-blacksheep.com/img/gallery/3
http://www.nyplatform.com/image/cache/da
Will Stokes-Roberts 2016
The APM’s successor ‘Pixhawk’ is a 32-bit controller versus APM’s 8, this gives better performance but at a much higher price so I am sticking with the mature APM board. With the board I am including a GPS with external compass for different flight modes, a power module which gives me real time current draws which is important for calculating flight times which is something I want to do, finally a MinimOSD, the OSD stands for Onscreen Display and Minim is the brand, this gives me an overlay on my FPV screen that gives me information such as my current draw previously mentioned.
Power network and source
The power source will be a 5200mAh 10C 3 cell lithium polymer battery which will power everything either directly or by step down voltage regulators. This means that I only need one flight battery which will decrease the overall weight. Now for the power network/distribution, this diagram is a general depiction of how it will be soldered together but this will likely change here and there throughout the build due to different options at the time of building but these will be made clear.
This is a very basic wiring diagram but it is to just show how the main components go together, there are many more cables in the build and solder joints but this helps to visualise it.
FPV System
I already have some of the components for this system (more on this in the build log), all I need to buy is a CCD board camera. To record the video I want a stable platform that I can use to record scenery, to do this (sticking to the budget) I will buy a BaseCam board with motors and mounts and make the gimbal system myself, this is because high quality gimbals and their controller can be hundreds of pounds which I obviously can’t afford with this budget. For the camera I am using an SJ4000 GoPro-clone that I bought a few years ago.
Will Stokes-Roberts