Embed Size (px)
Citation preview
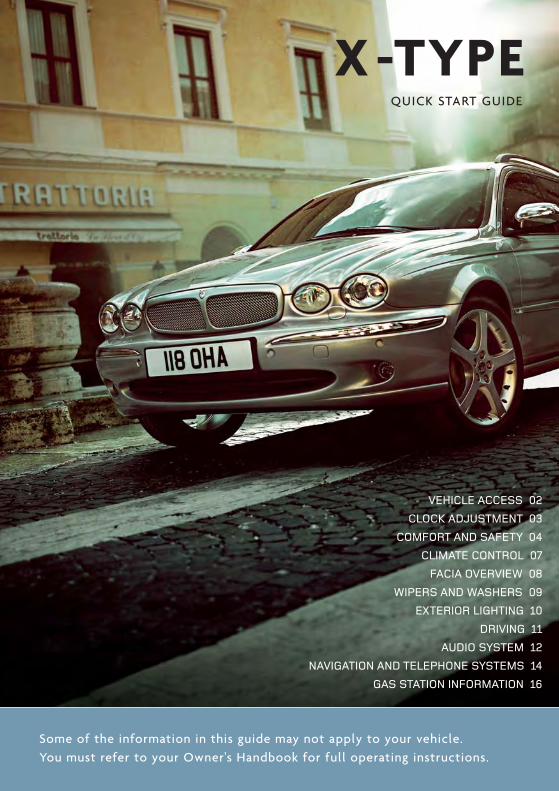
Some of the information in this guide may not apply to your vehicle.You must refer to your Owner's Handbook for full operating instructions.
QUICK START GUIDE
X -TYPE
VEHICLE ACCESS 02
CLOCK ADJUSTMENT 03
COMFORT AND SAFETY 04
CLIMATE CONTROL 07
FACIA OVERVIEW 08
WIPERS AND WASHERS 09
EXTERIOR LIGHTING 10
DRIVING 11
AUDIO SYSTEM 12
NAVIGATION AND TELEPHONE SYSTEMS 14
GAS STATION INFORMATION 16

• Press to release door key.
• Press once to lock the vehicle and armthe alarm.
• Press once to disarm the alarm, unlockthe driver’s door and unlock theluggage compartment.
• Press again to unlock remaining doors.
• Press once to switch the headlampson for 25 seconds.
• Press to unlock and open the luggagecompartment. Note: Operation of thisbutton is inhibited when the key is inthe starter switch.
2
Vehicle access and Clock adjustment
Locking and unlocking
Central door locking
Dependent upon specification and vehicle configuration, the operationof the remote handset may differ from the following.
To lock all doors, press the lock lever on eitherof the front doors.
To unlock all doors, pull the lock lever on eitherof the front doors.
Drive away door locking
The doors and luggage compartment willautomatically lock when the vehicle’s forwardspeed exceeds 7 km/h (5 mph).
This feature can be disabled by your JaguarDealer.
Unlocking with the door key
If the vehicle is unlocked manually via thedoor lock, the key must be inserted into thestarter switch within 15 seconds to preventthe alarm being activated.
Remote handset
Unlocking mode alternatives
Single stage unlocking will unlock the vehiclewith a single press. Two stage unlocking willunlock the driver's door and luggagecompartment with a single press and allother doors with a second press.
To change between modes, press and holdthe lock and unlock buttons for four seconds.The direction indicators will flash twice toconfirm the change.

The luggage compartment is electrically lockedand unlocked in conjunction with the driver’s door.
To open the luggage compartment with thevehicle locked, press the luggage compartmentbutton on the remote handset.
To open the luggage compartment with the vehicle unlocked, press the release button 1on the luggage compartment lid/tailgate.
Tailgate glass - Wagon
To open the tailgate glass, press the release button 2, located on the reverse of the tailgate handle and lift the glass.
Care Point
The release button on the luggage compartmentlid/tailgate is disabled when the vehicle islocked with the remote control.
3
Luggage compartment
1
2
Clock adjustment
Non-touch screen
1. Repeatedly press and release the MODEbutton (on the audio unit) until ADV MODEN/Y is displayed.
2. Rotate the volume control to select ADVMODE YES and then press MODE.
3. CLOCK SET will be displayed with the 12/24hours indicator flashing. Rotate the volumecontrol clockwise for 24-hour display;counterclockwise for 12-hour display.
4. Press MODE to select the hour setting.Rotate the volume control clockwise orcounterclockwise to adjust the setting.
5. Press MODE to select the minutes setting.Rotate the volume control clockwise orcounterclockwise to adjust the setting.
6. To exit press and hold MODE or waitapproximately five seconds until the displayreverts to audio mode.
Touch screen
1. Press the MENU button on the touch-screensurround to access the MENU screen.
2. Touch System Setup to access theSYSTEM SETUP screen.
3. Touch the Set Clock icon.
4. Adjust the time by touching the hour andminute up or down arrow icons.
5. Touch the 12/24 icon to select between 12 or24 hour display.
6. Touch Set to confirm your new settings.
12/24 Set
Cancel
PM
SET CLOCK
PM
TP ST
4
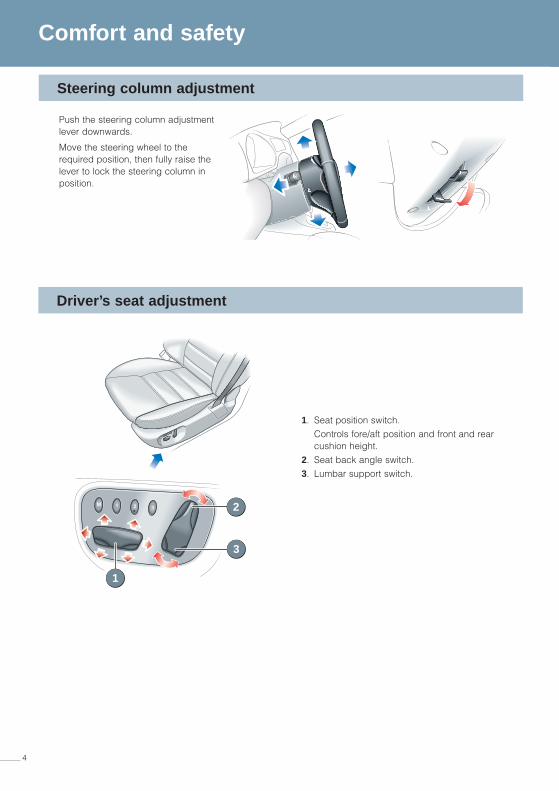
Comfort and safety
Steering column adjustment
Driver’s seat adjustment
1. Seat position switch. Controls fore/aft position and front and rearcushion height.
2. Seat back angle switch.3. Lumbar support switch.
2
3
1
Push the steering column adjustmentlever downwards.
Move the steering wheel to therequired position, then fully raise thelever to lock the steering column inposition.

43
2
1
5
Windows and door mirrors
Driving position memory
Windows
The windows can be fully opened or closedwith a single operation of the switch.
• To open a window, fully press the respective switch. Press the switch again to stop the window from fully opening.
• To close a window, pull the switch fullyupwards. Pull the switch again to stop thewindow from fully closing.
To partially open a window, lightly press theappropriate switch and release when thewindow reaches the required position.
Press button 1 to inhibit the operation of therear window switches.
Door mirrors
Select the appropriate mirror using selectorswitch 3. Use the four-way switch 2 to adjustthe position of the mirror glass.
1. With the starter switch in position I or II, press the M button on the driver’s seat switchpack. A chime will sound to indicate the seat is in memory mode.
2. Within five seconds, press button 1, 2 or 3 tomemorize the current settings.
A double chime will sound to confirm that thesettings are memorized. Any existing settingswill be overwritten.
To recall a memorized driving position, pressbutton 1, 2 or 3. This feature will only operate ifthe automatic transmission is in P (Park) or N(Neutral).
Once you have adjusted the driver’s seat andexterior mirrors for your ideal driving position,the vehicle can memorize these settings forfuture use.
Power fold mirrors (when fitted)
The mirrors can be folded towards the door forbetter clearance and protection. With the starterswitch in position I or II, press button 4 to foldthe mirrors. A second press returns the mirrorsto their normal position.
Resonance with lowered windows
If a resonance/booming sound occurs whena rear window is open, lowering an adjacentfront window about 25 mm (1 inch) willeliminate the condition.

6
Comfort and safety
Seat belts and child restraints
A warning indicator on the instrument pack will illuminate to alert you that the driver’s and/orfront passenger’s seat belt is unbuckled. Dependent upon specification this may be
accompanied by an intermittent chime.
With ALR enabled, as the seat belt retracts, itwill automatically lock preventing re-extension.
Ensure passengers do not fully extend therestraints and inadvertently engage thisfeature during normal use.
Rear centre seat belt interlock - Wagon only
The centre rear seat belt is anchored to theback of the seat. If the seat backrest is notcorrectly latched, the seat belt reel will notextend.
Automatic Locking Reels (ALR) (when fitted)
Passenger seat belts have ALR fitted for usewith child seats.
• To engage: extend the belt to maximum length to enable locking mechanism.
• To disengage: unbuckle the belt and allow the belt to fully retract.
Child Seats
It is important to remember that your child’sweight, rather than age, determines the type ofseat that is required.
Refer to Child Safety in the Owner’s Handbookto determine the correct seat for your child.
Overhead console
1
2
Sunroof
The sunroof is fitted with a facility that allows itto be fully opened or closed with a singleoperation of switch 1.
Garage door opener
The buttons 2 on the overhead console can beprogrammed to transmit radio frequencies thatcan operate external devices e.g. garagedoors, entry gates, security systems, etc.
For more information, refer to the Owner’sHandbook.
Parking assist care points
Sensors may activate on detection of water,snow or ice on their surface. This is entirelynormal and regular cleaning will aidperformance.
Parking assist may sound if it detects a signaloperating at the same frequency to that of thesensors (e.g. motorcycles, airbrakes).
Parking assist
With the starter switch in position II, parkingassist is switched on whenever reverse gear isselected.
If an obstruction is detected by the sensors, anintermittent tone will sound. As the vehiclemoves closer to the obstruction, the intermittenttone increases in frequency.
When the distance between the sensor and theobstruction is less than about 30 cm (1 foot), the tone becomes continuous.
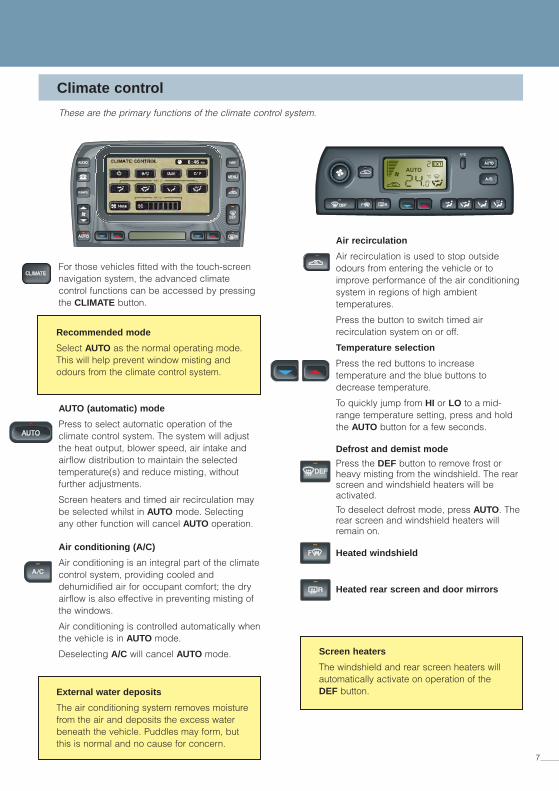
Air recirculation
Air recirculation is used to stop outsideodours from entering the vehicle or toimprove performance of the air conditioningsystem in regions of high ambienttemperatures.
Press the button to switch timed airrecirculation system on or off.
Temperature selection
Press the red buttons to increasetemperature and the blue buttons todecrease temperature.
To quickly jump from HI or LO to a mid-range temperature setting, press and holdthe AUTO button for a few seconds.
Defrost and demist mode
Press the DEF button to remove frost orheavy misting from the windshield. The rearscreen and windshield heaters will beactivated.
To deselect defrost mode, press AUTO. Therear screen and windshield heaters willremain on.
Heated windshield
Heated rear screen and door mirrors
7
Climate control
These are the primary functions of the climate control system.
For those vehicles fitted with the touch-screennavigation system, the advanced climatecontrol functions can be accessed by pressingthe CLIMATE button.
AUTO (automatic) mode
Press to select automatic operation of theclimate control system. The system will adjustthe heat output, blower speed, air intake andairflow distribution to maintain the selectedtemperature(s) and reduce misting, withoutfurther adjustments.
Screen heaters and timed air recirculation maybe selected whilst in AUTO mode. Selectingany other function will cancel AUTO operation.
Air conditioning (A/C)
Air conditioning is an integral part of the climatecontrol system, providing cooled anddehumidified air for occupant comfort; the dryairflow is also effective in preventing misting ofthe windows.
Air conditioning is controlled automatically whenthe vehicle is in AUTO mode.
Deselecting A/C will cancel AUTO mode.
C/ F
6 : 46 PM
Recommended mode
Select AUTO as the normal operating mode.This will help prevent window misting andodours from the climate control system.
Screen heaters
The windshield and rear screen heaters willautomatically activate on operation of theDEF button.External water deposits
The air conditioning system removes moisturefrom the air and deposits the excess waterbeneath the vehicle. Puddles may form, butthis is normal and no cause for concern.

8
Facia overview
Direction indicators and trip computer switch
Instrument pack and warning indicators
Wiper and washer switch
Hazard warning switch
Audio system
Heating and ventilation system
Passenger air bag deactivation indicator
Gear selector lever
7
16
15
14 8
9
12 13 11
10
31 2 4 5 6
2
1
3
4
6
5
7
8
Dynamic Stability Control (DSC) switch
Sport mode button
Cruise control switches
Horn
Audio switches
Hood release
Trip computer reset switch
Lamps master switch
10
9
11
12
14
13
15
16
Passenger air bag indicator
The front passenger seat is fitted with anoccupancy sensor system that determinesthe state of seat occupancy and sets theair bag status to suit:
• Seat unoccupied - air bag deactivatedand indicator off.
• Seat occupied - air bag activated andindicator off.
• Seat occupied by a child seat or low weightobject - air bag deactivated and indicator on.
• Passenger position too close to an airbag -air bag deactivated and indicator on.
For further information refer to OccupantProtection in the Owner’s Handbook.

Automatic operation
The wiper lever must be in position 1 andAUTO selected on the collar to enableautomatic operation of the wipers.
9
Warning indicators (information)
Windshield wipers
0. Off position.
1. Intermittent wipe.
2. Low speed operation.
3. High speed operation.
4. Rotary collar.When intermittent wipe is selected, the intervalbetween wipes can be varied by turning collar 4.
Windshield washer
Press the button for windshield wash and wipe.
0
1
2
3
4
Front fog lamps on
Rear fog lamps on
Direction indicator
Cruise control active
Wipers and washers
Seat belt reminder
Parkbrake on
Door or luggage compartment open
Side lamps on
Headlamp high beam on
Rear wiper and washer
1
2
Push the lever to position 1 for intermittentoperation of the rear wiper. Push and hold thelever in position 2 to operate the rear washerand wiper.
Operation of single wipe
Sedan models - Pull the lever towards you fora single wipe. Holding the lever in this positionwill operate the wiper continuously untilreleased.
Wagon models - Push the lever downwardsthrough the off position 0 for a single wipe.Holding the lever in this position will operatethe wiper continuously until released.
The following will illuminate during normal driving to indicate that a particular system orfeature is operating. If any other warning indicator illuminates, refer to the Owner’s Handbook.

10
Driving
Exterior lighting
1
4
3
2
B
A
Operating note
Fog lamps can only be operated when themaster switch is in either position 2 or 3.
1. Exterior lamps off2. Side lamps3. Dipped headlamps4. Autolamps
Exterior lamps master switch
Direction Indicators
Move the lever up or down to activatethe direction indicators.
Headlamp high beam
Pull the lever to the first position andrelease to flash the headlamps. Pull thelever to the second position and release
to switch on the high beam. To switch off thehigh beam, again pull the lever to the secondposition and release.
A. Front fog lampsPull the switch to position A to switch on thefront fog lamps.
B. Rear fog lampsPull the switch to position B to switch on thefront and rear fog lamps.
Autolamps
If Autolamps is selected, a sensor monitorsthe exterior light levels and will automaticallyswitch the side lamps and dipped headlampson and off. With Autolamps selected, if thewindshield wipers are operated continuouslyfor more than 20 seconds, then the exteriorlamps will be switched on automatically.
11
The system is controlled via switches on thesteering wheel:
1. SET - Rotate the thumb wheel to the +position and release the accelerator pedal toset and maintain the vehicle’s current speed.The message CRUISE ENGAGED brieflyappears in the message centre. The speed can be increased or decreasedby rotating the thumb wheel to the + or -positions.
2. RESUME - to resume a set speed retainedin memory.
3. CANCEL - cancels cruise control but retainsthe set speed in memory.
When the vehicle is accelerated above the setspeed, cruise control cancels, but resumeswhen the vehicle slows down to the set speed.The message CRUISE CANCELLED orCRUISE ENGAGED appears in the messagecentre to indicate the status of the system.
SET
1
32
The cruise control system will maintain a set road speed until either cruisecontrol is cancelled, or the brake or clutch pedal is used.
Cruise (speed) control
Operating note
Cruise control will automatically disengagewhen the vehicle speed falls below 28 km/h(18 mph).
Cruise control will only be engaged when therequired speed has been set and theaccelerator pedal released.
With the gear selector in D (Drive) and Sportmode active, the transmission will use 5thgear less at higher cruising speeds.
Fuel consumption will be adversely affected.
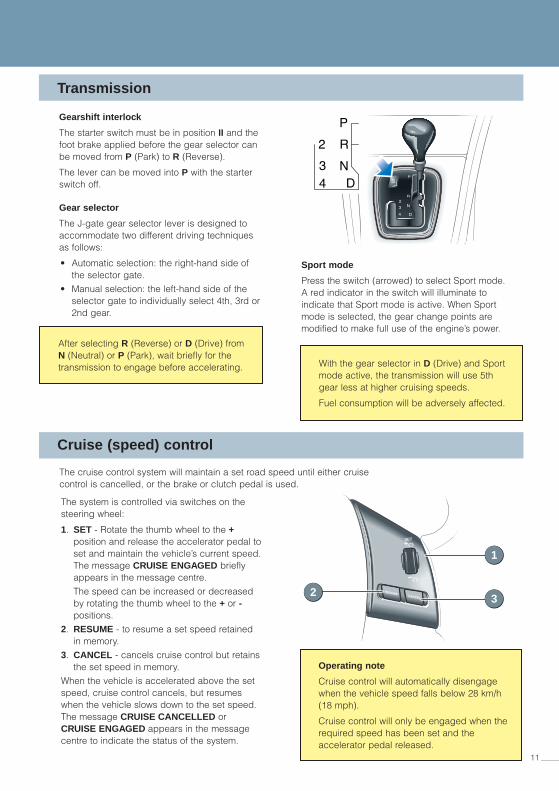
Transmission
Gearshift interlock
The starter switch must be in position II and thefoot brake applied before the gear selector canbe moved from P (Park) to R (Reverse).
The lever can be moved into P with the starterswitch off.
Gear selector
The J-gate gear selector lever is designed toaccommodate two different driving techniquesas follows:
• Automatic selection: the right-hand side of the selector gate.
• Manual selection: the left-hand side of the selector gate to individually select 4th, 3rd or2nd gear.
Sport mode
Press the switch (arrowed) to select Sport mode.A red indicator in the switch will illuminate toindicate that Sport mode is active. When Sportmode is selected, the gear change points aremodified to make full use of the engine’s power.
After selecting R (Reverse) or D (Drive) fromN (Neutral) or P (Park), wait briefly for thetransmission to engage before accelerating.
12
Audio system
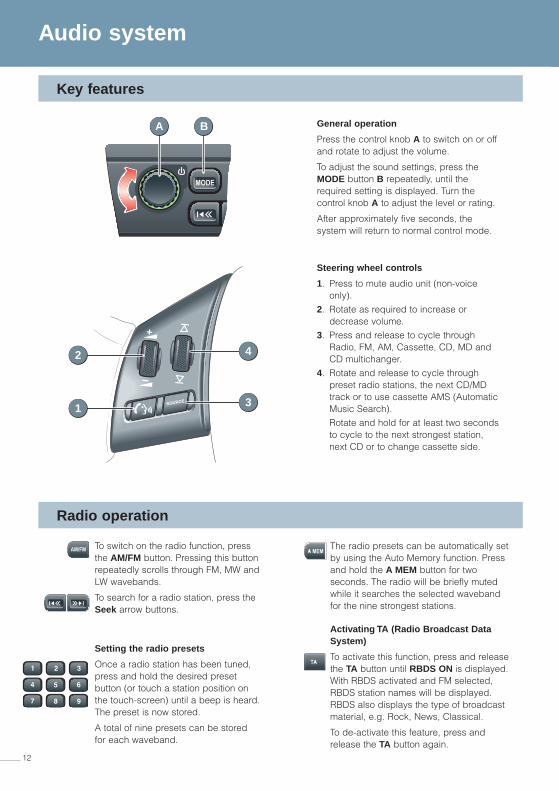
Key features
Radio operation
To switch on the radio function, pressthe AM/FM button. Pressing this buttonrepeatedly scrolls through FM, MW andLW wavebands.
To search for a radio station, press theSeek arrow buttons.
Setting the radio presets
Once a radio station has been tuned,press and hold the desired presetbutton (or touch a station position onthe touch-screen) until a beep is heard.The preset is now stored.
A total of nine presets can be storedfor each waveband.
General operation
Press the control knob A to switch on or offand rotate to adjust the volume.
To adjust the sound settings, press theMODE button B repeatedly, until therequired setting is displayed. Turn thecontrol knob A to adjust the level or rating.
After approximately five seconds, thesystem will return to normal control mode.
Steering wheel controls
1. Press to mute audio unit (non-voice only).
2. Rotate as required to increase or decrease volume.
3. Press and release to cycle throughRadio, FM, AM, Cassette, CD, MD and CD multichanger.
4. Rotate and release to cycle through preset radio stations, the next CD/MD track or to use cassette AMS (Automatic Music Search).Rotate and hold for at least two seconds to cycle to the next strongest station, next CD or to change cassette side.
The radio presets can be automatically setby using the Auto Memory function. Pressand hold the A MEM button for twoseconds. The radio will be briefly mutedwhile it searches the selected wavebandfor the nine strongest stations.
Activating TA (Radio Broadcast DataSystem)
To activate this function, press and releasethe TA button until RBDS ON is displayed.With RBDS activated and FM selected,RBDS station names will be displayed.RBDS also displays the type of broadcastmaterial, e.g. Rock, News, Classical.
To de-activate this feature, press andrelease the TA button again.
A B
2
1
4
3
13
CD operation
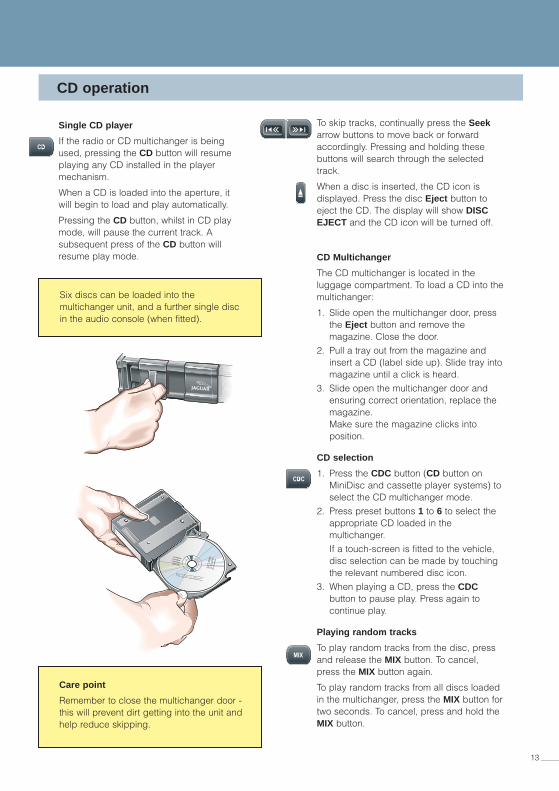
Single CD player
If the radio or CD multichanger is beingused, pressing the CD button will resumeplaying any CD installed in the playermechanism.
When a CD is loaded into the aperture, itwill begin to load and play automatically.
Pressing the CD button, whilst in CD playmode, will pause the current track. Asubsequent press of the CD button willresume play mode. CD Multichanger
The CD multichanger is located in theluggage compartment. To load a CD into themultichanger:
1. Slide open the multichanger door, press the Eject button and remove the magazine. Close the door.
2. Pull a tray out from the magazine and insert a CD (label side up). Slide tray intomagazine until a click is heard.
3. Slide open the multichanger door and ensuring correct orientation, replace the magazine. Make sure the magazine clicks intoposition.
CD selection
1. Press the CDC button (CD button on MiniDisc and cassette player systems) to select the CD multichanger mode.
2. Press preset buttons 1 to 6 to select the appropriate CD loaded in the multichanger. If a touch-screen is fitted to the vehicle, disc selection can be made by touching the relevant numbered disc icon.
3. When playing a CD, press the CDCbutton to pause play. Press again to continue play.
Playing random tracks
To play random tracks from the disc, pressand release the MIX button. To cancel,press the MIX button again.
To play random tracks from all discs loadedin the multichanger, press the MIX button fortwo seconds. To cancel, press and hold theMIX button.
Six discs can be loaded into themultichanger unit, and a further single discin the audio console (when fitted).
Care point
Remember to close the multichanger door -this will prevent dirt getting into the unit andhelp reduce skipping.
To skip tracks, continually press the Seekarrow buttons to move back or forwardaccordingly. Pressing and holding thesebuttons will search through the selectedtrack.
When a disc is inserted, the CD icon isdisplayed. Press the disc Eject button toeject the CD. The display will show DISCEJECT and the CD icon will be turned off.
14
Navigation and telephone systems
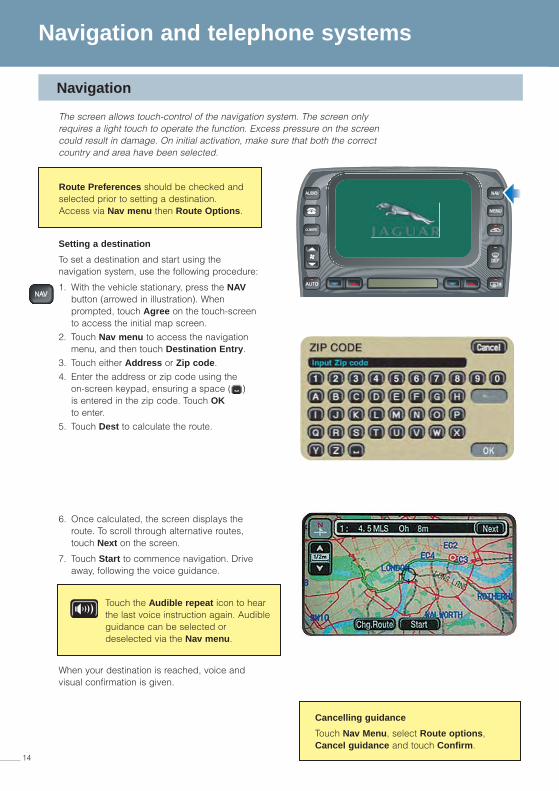
Navigation
Setting a destination
To set a destination and start using thenavigation system, use the following procedure:
1. With the vehicle stationary, press the NAVbutton (arrowed in illustration). When prompted, touch Agree on the touch-screen to access the initial map screen.
2. Touch Nav menu to access the navigation menu, and then touch Destination Entry.
3. Touch either Address or Zip code.4. Enter the address or zip code using the
on-screen keypad, ensuring a space ( ) is entered in the zip code. Touch OKto enter.
5. Touch Dest to calculate the route.
6. Once calculated, the screen displays the route. To scroll through alternative routes, touch Next on the screen.
7. Touch Start to commence navigation. Drive away, following the voice guidance.
When your destination is reached, voice andvisual confirmation is given.
The screen allows touch-control of the navigation system. The screen onlyrequires a light touch to operate the function. Excess pressure on the screencould result in damage. On initial activation, make sure that both the correctcountry and area have been selected.
Route Preferences should be checked andselected prior to setting a destination.Access via Nav menu then Route Options.
Touch the Audible repeat icon to hearthe last voice instruction again. Audibleguidance can be selected ordeselected via the Nav menu.
Cancelling guidance
Touch Nav Menu, select Route options,Cancel guidance and touch Confirm.
15
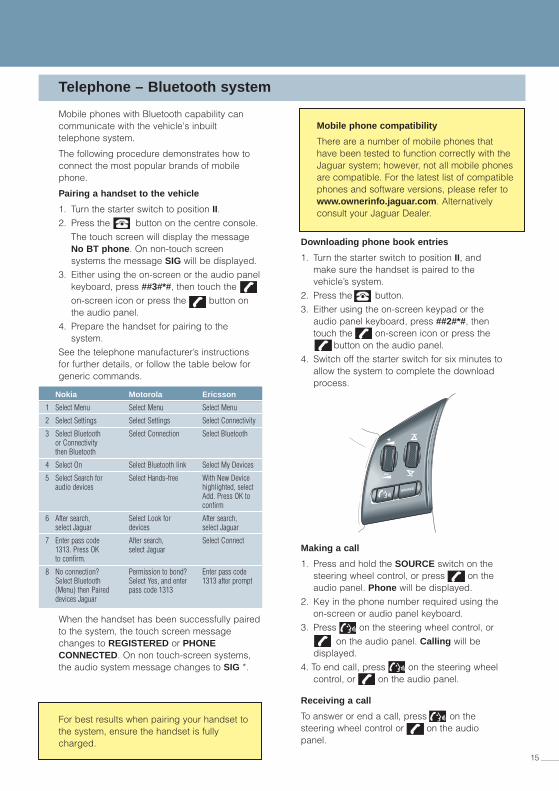
Telephone – Bluetooth system
Mobile phones with Bluetooth capability cancommunicate with the vehicle's inbuilttelephone system.
The following procedure demonstrates how toconnect the most popular brands of mobilephone.
Pairing a handset to the vehicle
1. Turn the starter switch to position II.2. Press the button on the centre console.
The touch screen will display the message No BT phone. On non-touch screen systems the message SIG will be displayed.
3. Either using the on-screen or the audio panelkeyboard, press ##3#*#, then touch the on-screen icon or press the button on the audio panel.
4. Prepare the handset for pairing to the system.
See the telephone manufacturer’s instructionsfor further details, or follow the table below forgeneric commands.
When the handset has been successfully pairedto the system, the touch screen messagechanges to REGISTERED or PHONECONNECTED. On non touch-screen systems,the audio system message changes to SIG *.
Downloading phone book entries
1. Turn the starter switch to position II, and make sure the handset is paired to thevehicle’s system.
2. Press the button.3. Either using the on-screen keypad or the
audio panel keyboard, press ##2#*#, then touch the on-screen icon or press the
button on the audio panel.4. Switch off the starter switch for six minutes to
allow the system to complete the download process.
Making a call
1. Press and hold the SOURCE switch on the steering wheel control, or press on the audio panel. Phone will be displayed.
2. Key in the phone number required using the on-screen or audio panel keyboard.
3. Press on the steering wheel control, or on the audio panel. Calling will be
displayed.4. To end call, press on the steering wheel
control, or on the audio panel.
Receiving a call
To answer or end a call, press on thesteering wheel control or on the audiopanel.
Mobile phone compatibility
There are a number of mobile phones thathave been tested to function correctly with theJaguar system; however, not all mobile phonesare compatible. For the latest list of compatiblephones and software versions, please refer towww.ownerinfo.jaguar.com. Alternativelyconsult your Jaguar Dealer.
For best results when pairing your handset tothe system, ensure the handset is fullycharged.
Nokia Motorola Ericsson
1 Select Menu Select Menu Select Menu
2 Select Settings Select Settings Select Connectivity
3 Select Bluetooth Select Connection Select Bluetoothor Connectivity then Bluetooth
4 Select On Select Bluetooth link Select My Devices
5 Select Search for Select Hands-free With New Device audio devices highlighted, select
Add. Press OK to confirm
6 After search, Select Look for After search,select Jaguar devices select Jaguar
7 Enter pass code After search, Select Connect1313. Press OK select Jaguarto confirm.
8 No connection? Permission to bond? Enter pass codeSelect Bluetooth Select Yes, and enter 1313 after prompt(Menu) then Paired pass code 1313devices Jaguar
16
Gas station information
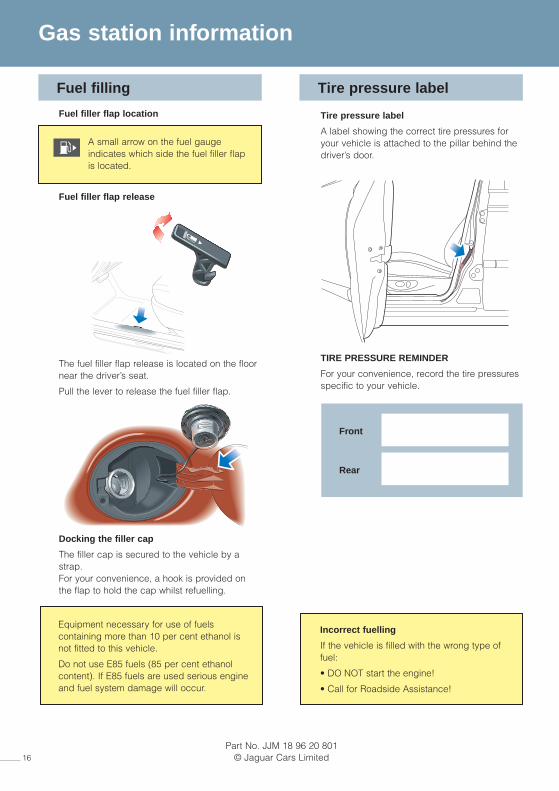
Fuel filling Tire pressure label
Fuel filler flap location
Fuel filler flap release
The fuel filler flap release is located on the floornear the driver’s seat.
Pull the lever to release the fuel filler flap.
Docking the filler cap
The filler cap is secured to the vehicle by astrap. For your convenience, a hook is provided onthe flap to hold the cap whilst refuelling.
A small arrow on the fuel gaugeindicates which side the fuel filler flapis located.
Tire pressure label
A label showing the correct tire pressures foryour vehicle is attached to the pillar behind thedriver’s door.
TIRE PRESSURE REMINDER
For your convenience, record the tire pressuresspecific to your vehicle.
Part No. JJM 18 96 20 801© Jaguar Cars Limited
Equipment necessary for use of fuelscontaining more than 10 per cent ethanol isnot fitted to this vehicle.
Do not use E85 fuels (85 per cent ethanolcontent). If E85 fuels are used serious engineand fuel system damage will occur.
Front
Rear
Incorrect fuelling
If the vehicle is filled with the wrong type offuel:
• DO NOT start the engine!
• Call for Roadside Assistance!