Embed Size (px)
Citation preview
Xactly Objectives 1.6Reference Guide

First Edition (December 2013). This edition applies to the Xactly Objectives Reference Guide.
© 2005-2013 Xactly Corporation. All rights reserved. Xactly, Xactly Analytics, Xactly Connect, Xactly Credit Assignment, Xactly DELTA, Xactly Document Management, Xactly eDocs & Approvals, Xactly Incent, Xactly Incent Express, Xactly Incentive Estimator, Xactly Modeling, and “Incent right” are trademarks or registered trademarks of Xactly Corporation. All other trademarks are the property of their respective owners.
ii Xactly Objectives Reference Guide
Table of Contents
Chapter 1 Getting StartedApplication Layout . . . . . . . . . . . . . . . . . . . . . . . . . . . . . . . . . . . . . . . . . . . 2Using Xactly Objectives . . . . . . . . . . . . . . . . . . . . . . . . . . . . . . . . . . . . . . . 3
Launching ObjectivesScreen . . . . . . . . . . . . . . . . . . . . . . . . . . . . . . . . . . . . . . . . . . . . . . . . . . . . . 5How ToLaunch Objectives . . . . . . . . . . . . . . . . . . . . . . . . . . . . . . . . . . . . . . . . . . . 5
Setting Up ObjectivesScreen . . . . . . . . . . . . . . . . . . . . . . . . . . . . . . . . . . . . . . . . . . . . . . . . . . . . . 6FieldsDisplayed Fields. . . . . . . . . . . . . . . . . . . . . . . . . . . . . . . . . . . . . . . . . . . . . . 7How ToDisplay All Users . . . . . . . . . . . . . . . . . . . . . . . . . . . . . . . . . . . . . . . . . . . . . . 7Edit a User Role . . . . . . . . . . . . . . . . . . . . . . . . . . . . . . . . . . . . . . . . . . . . . . 8Reset a User Password . . . . . . . . . . . . . . . . . . . . . . . . . . . . . . . . . . . . . . . . 9Upload User Roles . . . . . . . . . . . . . . . . . . . . . . . . . . . . . . . . . . . . . . . . . . . . 9Download User Roles . . . . . . . . . . . . . . . . . . . . . . . . . . . . . . . . . . . . . . . . . 9Set Payment Caps . . . . . . . . . . . . . . . . . . . . . . . . . . . . . . . . . . . . . . . . . . 10
Chapter 2 Managing ObjectivesWhat You Can Do. . . . . . . . . . . . . . . . . . . . . . . . . . . . . . . . . . . . . . . . . . . 12
DashboardScreen . . . . . . . . . . . . . . . . . . . . . . . . . . . . . . . . . . . . . . . . . . . . . . . . . . . . 13How ToDisplay the To Do List . . . . . . . . . . . . . . . . . . . . . . . . . . . . . . . . . . . . . . . . 13
NotificationsScreen . . . . . . . . . . . . . . . . . . . . . . . . . . . . . . . . . . . . . . . . . . . . . . . . . . . . 14How ToConfigure Notifications . . . . . . . . . . . . . . . . . . . . . . . . . . . . . . . . . . . . . . 14
PeriodsScreen . . . . . . . . . . . . . . . . . . . . . . . . . . . . . . . . . . . . . . . . . . . . . . . . . . . . 15How ToConfigure Periods . . . . . . . . . . . . . . . . . . . . . . . . . . . . . . . . . . . . . . . . . . . 16
Bonus TargetsScreen . . . . . . . . . . . . . . . . . . . . . . . . . . . . . . . . . . . . . . . . . . . . . . . . . . . . 18FieldsDisplayed Fields. . . . . . . . . . . . . . . . . . . . . . . . . . . . . . . . . . . . . . . . . . . . . 19How ToDisplay All Bonus Results . . . . . . . . . . . . . . . . . . . . . . . . . . . . . . . . . . . . . . 19Edit a Personal Plan Cap . . . . . . . . . . . . . . . . . . . . . . . . . . . . . . . . . . . . . 20Edit a Bonus Target . . . . . . . . . . . . . . . . . . . . . . . . . . . . . . . . . . . . . . . . . . 20Upload Bonus Targets. . . . . . . . . . . . . . . . . . . . . . . . . . . . . . . . . . . . . . . . 20Download Bonus Targets . . . . . . . . . . . . . . . . . . . . . . . . . . . . . . . . . . . . . 21
iii
ObjectivesScreen . . . . . . . . . . . . . . . . . . . . . . . . . . . . . . . . . . . . . . . . . . . . . . . . . . . . 22FieldsDisplayed Fields. . . . . . . . . . . . . . . . . . . . . . . . . . . . . . . . . . . . . . . . . . . . . 22How ToDisplay All Company Objectives . . . . . . . . . . . . . . . . . . . . . . . . . . . . . . 23Create a Company Objective . . . . . . . . . . . . . . . . . . . . . . . . . . . . . . . . 23View a Company Objective . . . . . . . . . . . . . . . . . . . . . . . . . . . . . . . . . . 24Edit a Company Objective . . . . . . . . . . . . . . . . . . . . . . . . . . . . . . . . . . . 24Copy a Company Objective . . . . . . . . . . . . . . . . . . . . . . . . . . . . . . . . . 25Delete a Company Objective . . . . . . . . . . . . . . . . . . . . . . . . . . . . . . . . 25
MeasureScreen . . . . . . . . . . . . . . . . . . . . . . . . . . . . . . . . . . . . . . . . . . . . . . . . . . . . 26How ToDisplay All Company Objectives . . . . . . . . . . . . . . . . . . . . . . . . . . . . . . 26Measure Objectives . . . . . . . . . . . . . . . . . . . . . . . . . . . . . . . . . . . . . . . . . 27
PlansScreen . . . . . . . . . . . . . . . . . . . . . . . . . . . . . . . . . . . . . . . . . . . . . . . . . . . . 28FieldsDisplayed Fields. . . . . . . . . . . . . . . . . . . . . . . . . . . . . . . . . . . . . . . . . . . . . 28How ToDisplay Plans . . . . . . . . . . . . . . . . . . . . . . . . . . . . . . . . . . . . . . . . . . . . . . . 29Display a Person’s Plan. . . . . . . . . . . . . . . . . . . . . . . . . . . . . . . . . . . . . . . 29Reset the Plan Status . . . . . . . . . . . . . . . . . . . . . . . . . . . . . . . . . . . . . . . . 30
PaymentsScreen . . . . . . . . . . . . . . . . . . . . . . . . . . . . . . . . . . . . . . . . . . . . . . . . . . . . 31FieldsDisplayed Fields. . . . . . . . . . . . . . . . . . . . . . . . . . . . . . . . . . . . . . . . . . . . . 31How ToDisplay All Payments. . . . . . . . . . . . . . . . . . . . . . . . . . . . . . . . . . . . . . . . . 32Release Payments . . . . . . . . . . . . . . . . . . . . . . . . . . . . . . . . . . . . . . . . . . 32Download Results . . . . . . . . . . . . . . . . . . . . . . . . . . . . . . . . . . . . . . . . . . . 32
iv Xactly Objectives Reference Guide

Getting Started
1
Welcome
Welcome to the Xactly Objectives Reference Guide. Xactly Objectives provides a set of tools and features that makes it easy to employ Management by Objectives (MBO) within your organization to provide a clear line of sight between employee perfor-mance objectives, their actions, and company goals.
Management by Objectives is a process that allows management and employees to define and agree on specific objectives within an organization, increasing the perfor-mance of each individual by aligning their goals with overall company goals, and providing a bonus for successful efforts.
Using Xactly Objectives, administrators and managers can create, monitor, and eval-uate objectives, offering employees visibility into attainment and payouts based on the objectives assigned to them.
This guide describes how administrators can use Xactly Objectives to do the following:• Manage user roles and access to the application• Define objectives and bonus targets within the organization• Configure periods and notifications• Measure objectives and release payments
With Xactly Objectives, administrators and managers have a direct way to communi-cate the individual and team goals that matter. Employees, similarly, know exactly what to do to attain their incentive and performance goals, tracking progress as it happens.
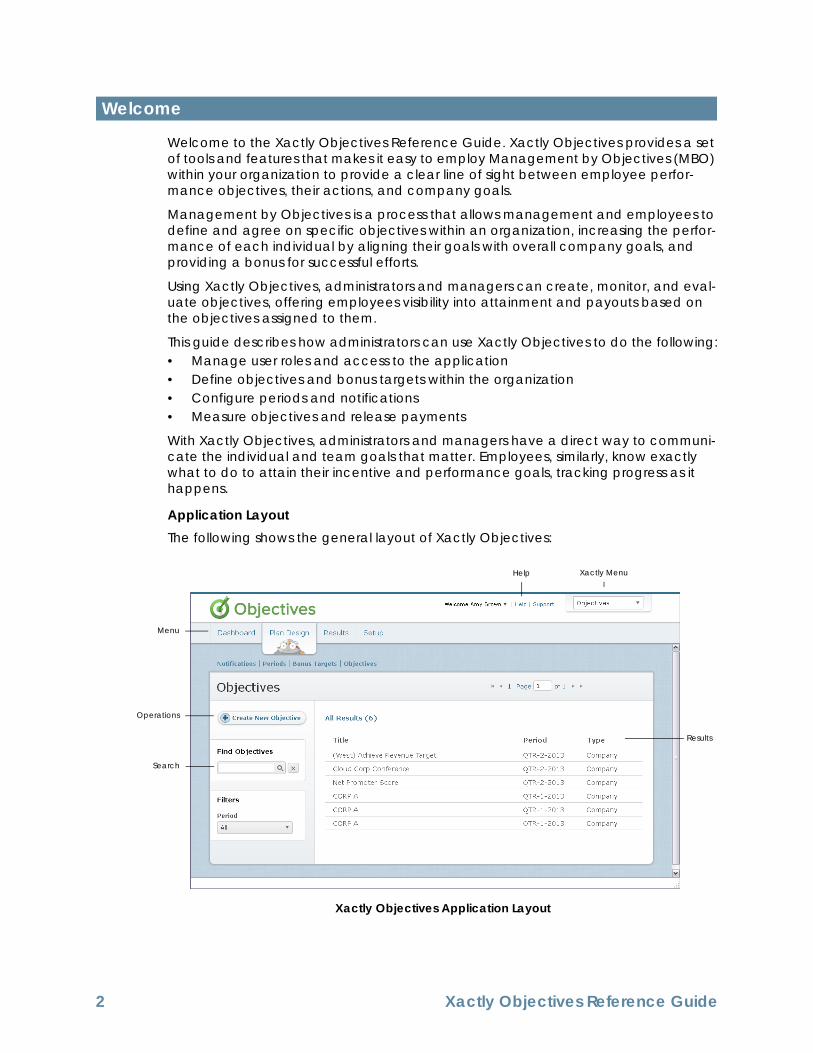
Application LayoutThe following shows the general layout of Xactly Objectives:
Xactly Objectives Application Layout
Welcome
Operations
Xactly MenuHelp
Results
Menu
Search
2 Xactly Objectives Reference Guide
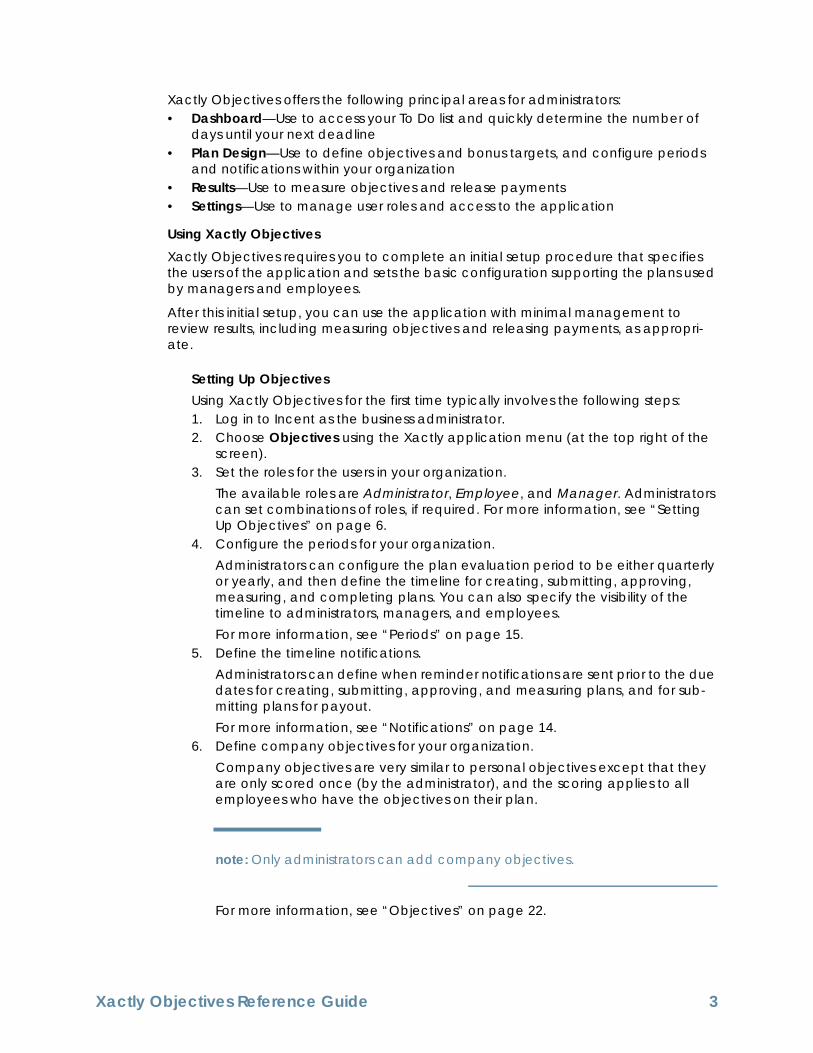
Xactly Objectives offers the following principal areas for administrators:• Dashboard—Use to access your To Do list and quickly determine the number of
days until your next deadline• Plan Design—Use to define objectives and bonus targets, and configure periods
and notifications within your organization• Results—Use to measure objectives and release payments• Settings—Use to manage user roles and access to the application
Using Xactly ObjectivesXactly Objectives requires you to complete an initial setup procedure that specifies the users of the application and sets the basic configuration supporting the plans used by managers and employees.
After this initial setup, you can use the application with minimal management to review results, including measuring objectives and releasing payments, as appropri-ate.
Setting Up ObjectivesUsing Xactly Objectives for the first time typically involves the following steps:1. Log in to Incent as the business administrator.2. Choose Objectives using the Xactly application menu (at the top right of the
screen).3. Set the roles for the users in your organization.
The available roles are Administrator, Employee, and Manager. Administrators can set combinations of roles, if required. For more information, see “Setting Up Objectives” on page 6.
4. Configure the periods for your organization.Administrators can configure the plan evaluation period to be either quarterly or yearly, and then define the timeline for creating, submitting, approving, measuring, and completing plans. You can also specify the visibility of the timeline to administrators, managers, and employees.For more information, see “Periods” on page 15.
5. Define the timeline notifications.Administrators can define when reminder notifications are sent prior to the due dates for creating, submitting, approving, and measuring plans, and for sub-mitting plans for payout.For more information, see “Notifications” on page 14.
6. Define company objectives for your organization.Company objectives are very similar to personal objectives except that they are only scored once (by the administrator), and the scoring applies to all employees who have the objectives on their plan.
note: Only administrators can add company objectives.
For more information, see “Objectives” on page 22.
Xactly Objectives Reference Guide 3
7. Assign bonus targets for employees.Administrators can set the bonus target value and bonus currency for each employee. For more information, see “Bonus Targets” on page 18.
note: Bonus values in Xactly Incent are distinct from bonuses in Objectives.
Managing ObjectivesManaging objectives involves measuring your company’s objectives, and review-ing and releasing payments, both completed later in the period (after you have completed the initial setup).Specifically, managing objectives involves the following steps:1. Log in to Incent as the business administrator.2. Choose Objectives using the Xactly application menu (at the top right of the
screen).3. Measure the company objectives within your organization.
For more information, see “Measure” on page 26.4. Review and release payments to employees.
For more information, see “Payments” on page 31.
note: Administrators need to run the payment process in both Xactly Incent and Objectives. The payment data are processed separately in both applica-tions.
4 Xactly Objectives Reference Guide
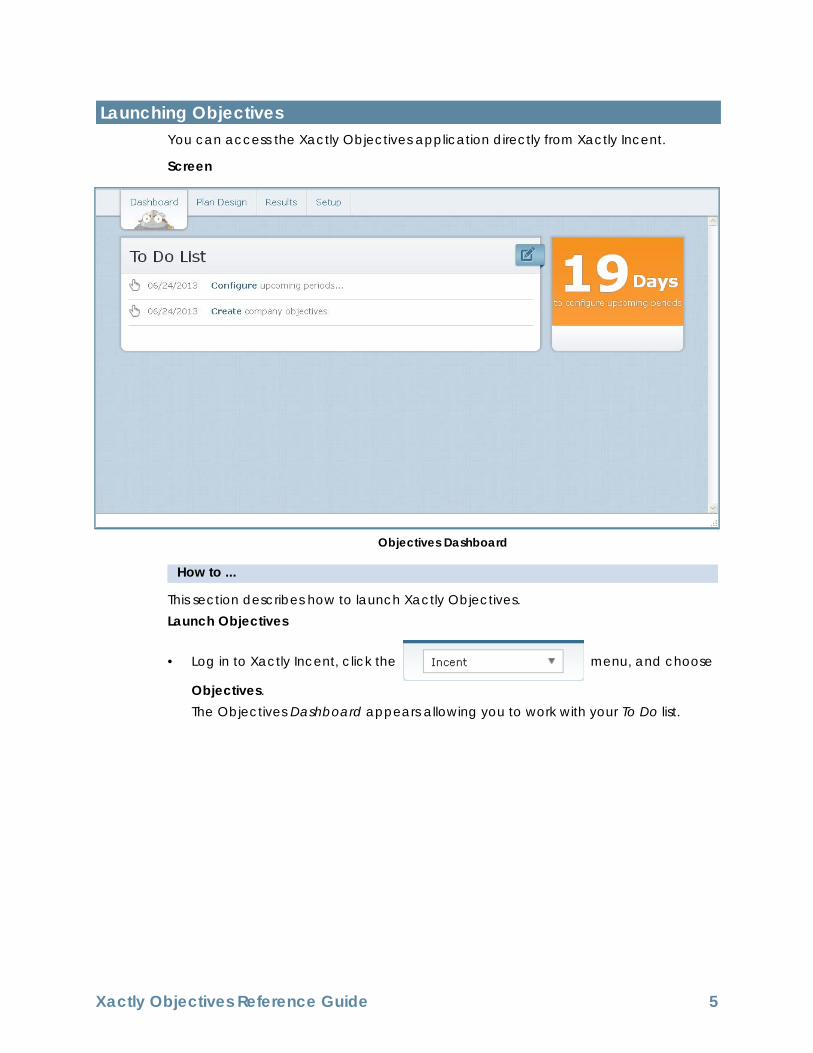
Launching Objectives
You can access the Xactly Objectives application directly from Xactly Incent.
Screen
Objectives Dashboard
How to ...How To
This section describes how to launch Xactly Objectives.Launch Objectives
• Log in to Xactly Incent, click the menu, and choose
Objectives.The Objectives Dashboard appears allowing you to work with your To Do list.
Launching Objectives
Xactly Objectives Reference Guide 5

Setting Up Objectives
You can use the Setup area to manage roles and user access in the Objectives appli-cation. All users defined in Incent automatically appear on the User Access page of the Setup area.
note: Roles defined in Xactly Incent do not apply to the Objectives application. You need to define roles for the Objectives application using this area. Assigning a role in Objectives automatically gives the user access to the Objectives application in the Xactly menu.
Screen
User Access Screen
Setting Up Objectives
6 Xactly Objectives Reference Guide

FieldsHow To
Displayed FieldsThe following table describes the information displayed when managing roles and user access:
How to ...How To
This section describes how to set up Xactly Objectives and manage user access.Display All UsersClick the Setup tab. The User Access screen appears displaying all users and corre-sponding roles in the results area.• To find specific users, type part of the user name or user email in the Find Users text
box, and click the button. The search results appear.
Click the button to clear the Find Users text box and reset the search results.
• To filter users, select the appropriate radio button in the Filters section.You can filter users based on the following Objectives roles:• All Users• Administrators• Employees• ManagersYou can also filter and display Xactly Support users.
note: The Xactly Support users are provided for your convenience. By default, they have no role assigned and hence no access to your data. However, when work-ing with Xactly Support, you might want to provide access to your data to help troubleshoot or solve an issue. You can ignore these users unless directed to use them by Xactly Support.
• Use the page navigation buttons to navigate between the pages of user results.
Field Description
User Name The name of the user.
User Email The email address of the user.
Primary Objectives Role The primary role of the user in the Xactly Objectives.
Xactly Objectives Reference Guide 7

Edit a User Role1. Click the Setup tab. The User Access screen appears.2. Select the user in the list. A panel appears allowing you to select the user role
within Objectives.3. Select the appropriate user roles.
Setting a role enables the corresponding user to access Xactly Objectives. The roles assigned to a user also determines the areas (application tabs) the user can see after launching Objectives.You can choose from among the following options:• Administrator—Responsible for administering the application and creating
new company objectives. Selecting this role enables access to all administra-tive functions and all user information.
• Employee—Enables users to define and manage their own objectives (only)• Manager— Responsible for creating, approving, and scoring the objectives of
the employees on their teams.
note: You can assign more than one role to each user. For example, the Human Resources administrator might also be a manager and an employee.
Assigning an Objectives role requires a license. You cannot assign roles to addi-tional users when the Remaining Licenses count reaches 0 (zero). Deselecting all roles for a user and saving allows you to reclaim a license.
4. Click the button. The user role is saved and the Remaining Licenses count is updated accordingly.Objectives sends an email notification to users in the following cases:• An Objectives role is assigned to a new user (without Incent access). In this
case, the user needs to activate their account using a link in the email mes-sage.
• An Objectives role is added or removed for a user.• An Objectives role is assigned to a user who already has Incent access. In this
case, the user is informed about how to access Objectives.
note: Note that Xactly Objectives does not send an email notification when you remove all roles from a user. Also, removing all roles from a user does not modify or remove their corresponding password. If you add a role again later, the user retains the same password.
8 Xactly Objectives Reference Guide
Reset a User PasswordYou can send an email to a user to have them reset their password.1. Click the Setup tab. The User Access screen appears.2. Select the user in the list. A panel appears allowing you to reset the password.
3. Click the button. An email is sent to the user.
Upload User Roles1. Click the Setup tab. The User Access screen appears.2. Click the Download Template link. A dialog appears allowing you to save the tem-
plate.Save the download template to your local machine.
3. Add the user and roles data to the template file, and save the file.4. Click the Upload Roles link. A pane appears allow you to locate and submit the
upload file.
5. Click the button. A dialog appears allowing you to locate the
upload file. Select the appropriate file.
The file name appears in the pane. Click the button to remove the file.
6. Click the button. The roles are uploaded to Xactly Objectives.
Alternatively, click the Cancel link to dismiss the pane without uploading the roles.When uploading roles, assigning or removing roles can modify the license count. If an upload requires more licenses than are available, Objectives displays an error.
note: When uploading roles, Xactly Objectives processes rows in order and contin-ues until the end of the file. This means that rows which only modify existing user roles continue to be processed, even in cases when the license count is exceeded.
Download User Roles1. Click the Setup tab. The User Access screen appears.
2. Click the button. A dialog appears allowing you to
save the file.3. Save the roles file to your local machine.
Xactly Objectives Reference Guide 9
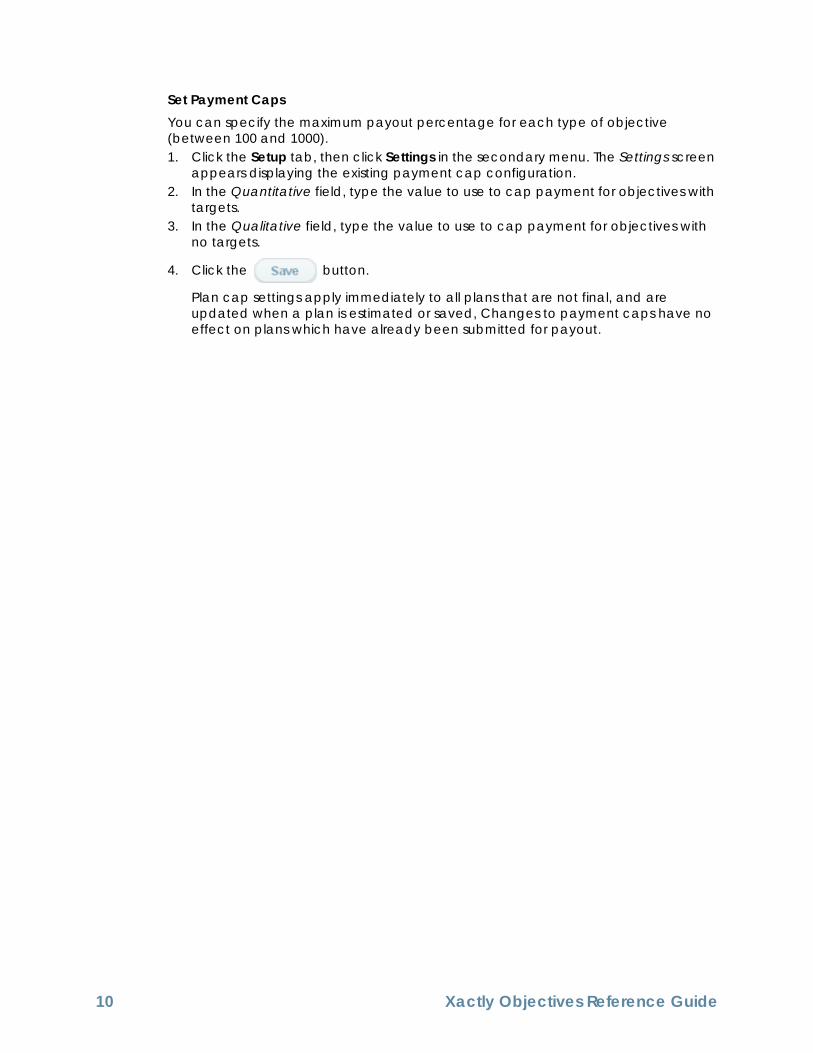
Set Payment CapsYou can specify the maximum payout percentage for each type of objective (between 100 and 1000).1. Click the Setup tab, then click Settings in the secondary menu. The Settings screen
appears displaying the existing payment cap configuration.2. In the Quantitative field, type the value to use to cap payment for objectives with
targets.3. In the Qualitative field, type the value to use to cap payment for objectives with
no targets.
4. Click the button.
Plan cap settings apply immediately to all plans that are not final, and are updated when a plan is estimated or saved, Changes to payment caps have no effect on plans which have already been submitted for payout.
10 Xactly Objectives Reference Guide
Managing Objectives
2
Managing Objectives
Administrators can use Xactly Objectives to manage key aspects of the application, including defining the plan evaluation period, managing notification reminders, set-ting bonus targets, measuring objectives, and releasing payments.
These basic administrator operations make it easier for managers to create, monitor, and evaluate objectives, and for employees to gain greater visibility into attainment and payouts, based on assigned objectives.
What You Can DoAs an administrator, you can complete the following tasks on the Dashboard:• Check which action items are due• Click an item to take you directly to the corresponding page (for the item)
You can complete the following tasks in the Plan Design area:• Define and manage when reminder notifications are sent prior to the important
due dates• Configure and manage periods within Objectives• Set bonus targets for people in your organization• Create and manage company objectives (which can then be added to plans)
You can complete the following tasks in the Results area:• Estimate and measure company objectives• Display and manage (release) payments• Download payment results to your local machine
Managing Objectives
12 Xactly Objectives Reference Guide
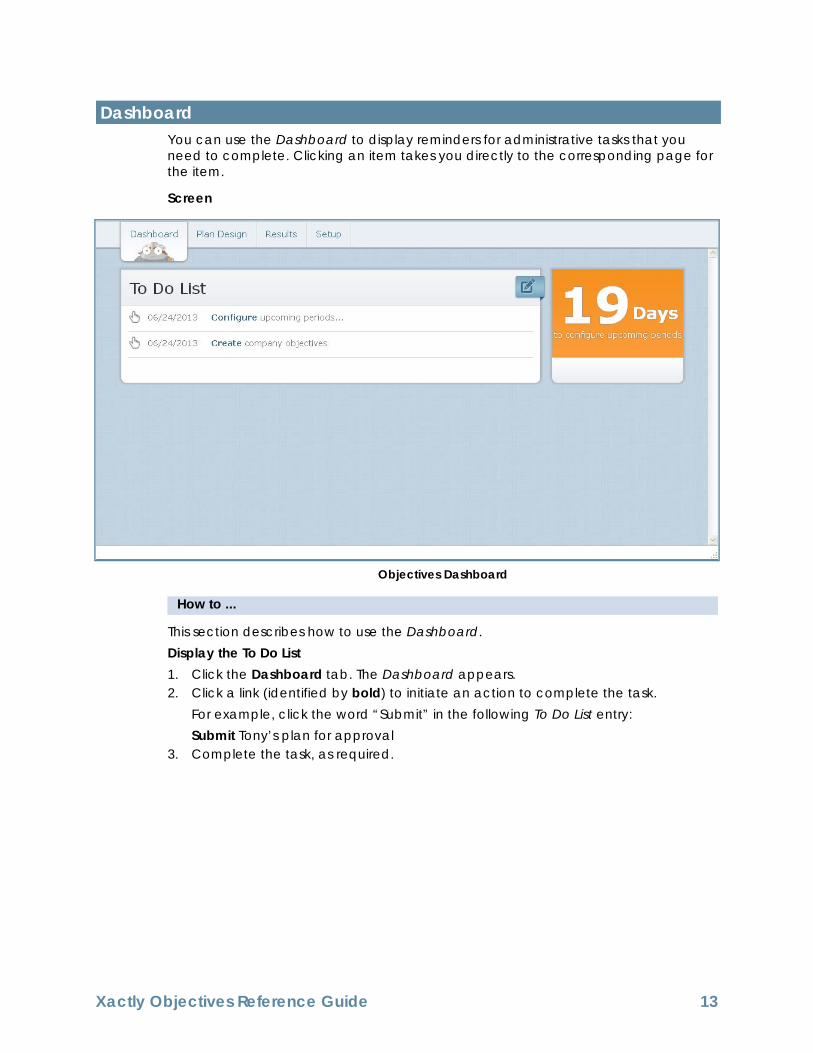
Dashboard
You can use the Dashboard to display reminders for administrative tasks that you need to complete. Clicking an item takes you directly to the corresponding page for the item.
Screen
Objectives Dashboard
How to ...How To
This section describes how to use the Dashboard.Display the To Do List1. Click the Dashboard tab. The Dashboard appears.2. Click a link (identified by bold) to initiate an action to complete the task.
For example, click the word “Submit” in the following To Do List entry:Submit Tony’s plan for approval
3. Complete the task, as required.
Dashboard
Xactly Objectives Reference Guide 13
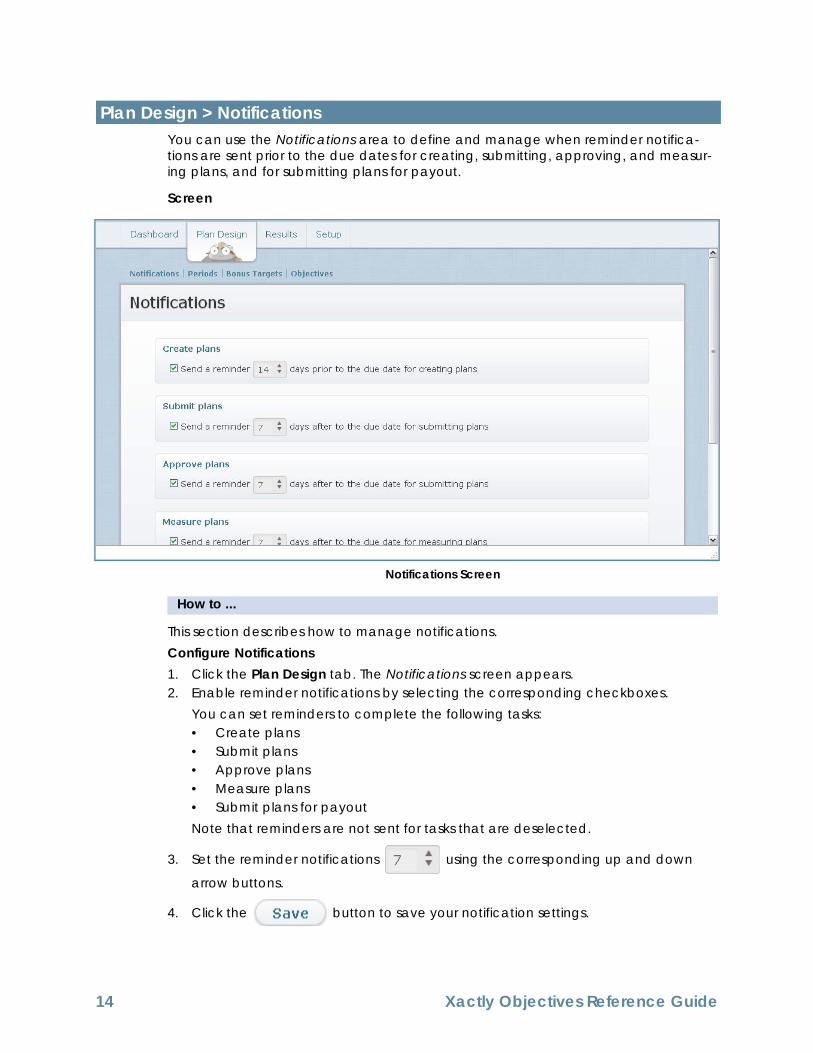
Notifications
You can use the Notifications area to define and manage when reminder notifica-tions are sent prior to the due dates for creating, submitting, approving, and measur-ing plans, and for submitting plans for payout.
Screen
Notifications Screen
How to ...How To
This section describes how to manage notifications.Configure Notifications1. Click the Plan Design tab. The Notifications screen appears.2. Enable reminder notifications by selecting the corresponding checkboxes.
You can set reminders to complete the following tasks:• Create plans• Submit plans• Approve plans• Measure plans• Submit plans for payoutNote that reminders are not sent for tasks that are deselected.
3. Set the reminder notifications using the corresponding up and down
arrow buttons.
4. Click the button to save your notification settings.
Plan Design > Notifications
14 Xactly Objectives Reference Guide
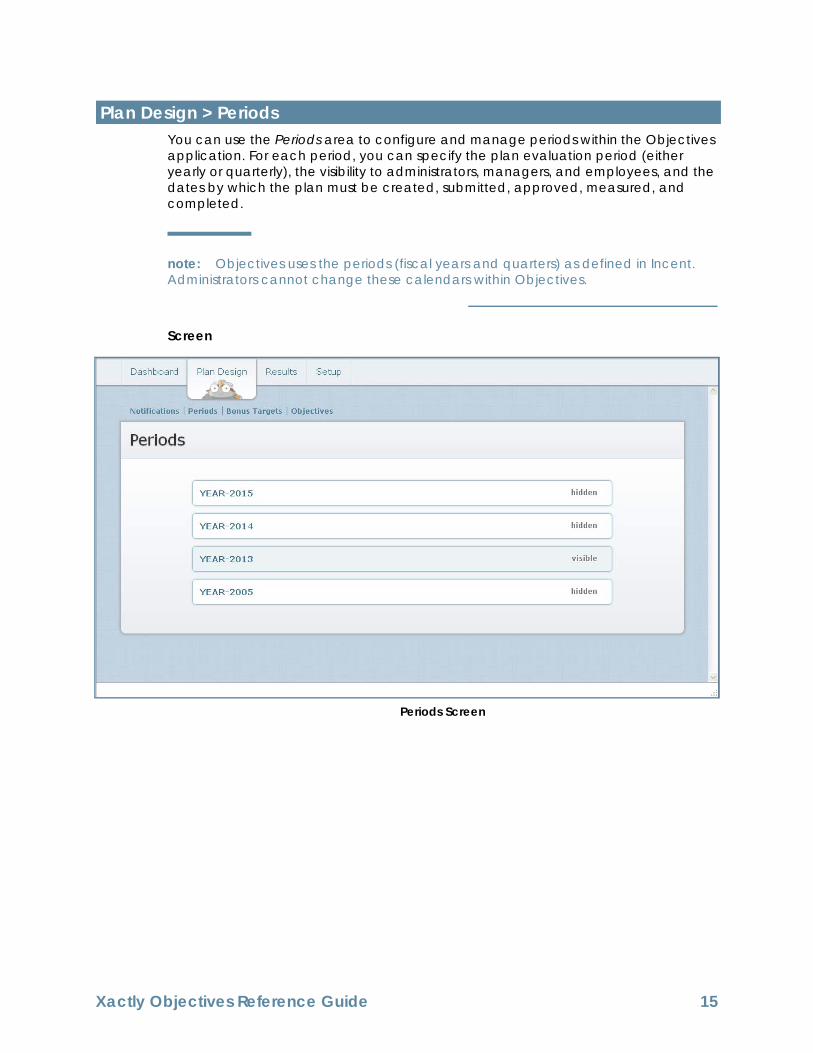
Periods
You can use the Periods area to configure and manage periods within the Objectives application. For each period, you can specify the plan evaluation period (either yearly or quarterly), the visibility to administrators, managers, and employees, and the dates by which the plan must be created, submitted, approved, measured, and completed.
note: Objectives uses the periods (fiscal years and quarters) as defined in Incent. Administrators cannot change these calendars within Objectives.
Screen
Periods Screen
Plan Design > Periods
Xactly Objectives Reference Guide 15
How to ...How To
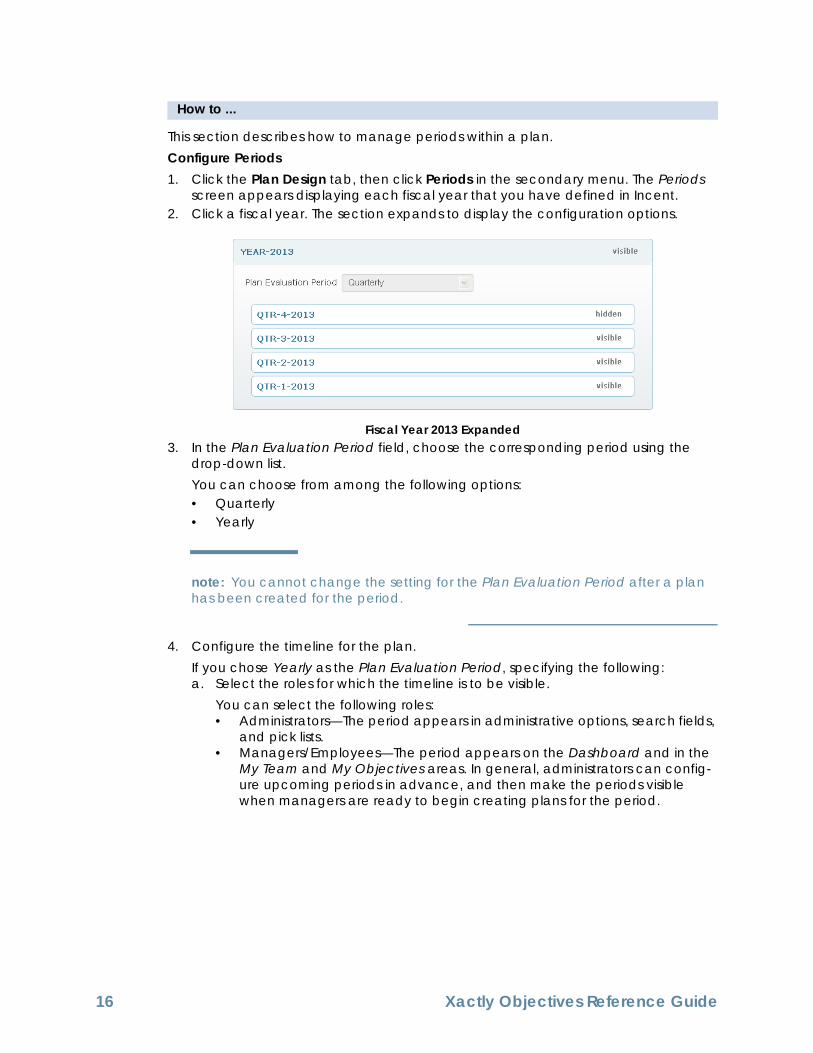
This section describes how to manage periods within a plan.Configure Periods1. Click the Plan Design tab, then click Periods in the secondary menu. The Periods
screen appears displaying each fiscal year that you have defined in Incent.2. Click a fiscal year. The section expands to display the configuration options.
Fiscal Year 2013 Expanded3. In the Plan Evaluation Period field, choose the corresponding period using the
drop-down list.You can choose from among the following options:• Quarterly• Yearly
note: You cannot change the setting for the Plan Evaluation Period after a plan has been created for the period.
4. Configure the timeline for the plan.If you chose Yearly as the Plan Evaluation Period, specifying the following:a. Select the roles for which the timeline is to be visible.
You can select the following roles:• Administrators—The period appears in administrative options, search fields,
and pick lists.• Managers/Employees—The period appears on the Dashboard and in the
My Team and My Objectives areas. In general, administrators can config-ure upcoming periods in advance, and then make the periods visible when managers are ready to begin creating plans for the period.
16 Xactly Objectives Reference Guide
b. In the remaining fields, click the button and choose the corresponding dates using the calendar pop-ups that appear.You can specify the following dates:• Plan must be created by—The date by which the manager must create
the plan for an employee. The default is one week prior to the start of the quarter or year.
• Plan must be submitted by—The date by which the manager must submit the plan to an employee for approval. The default is two weeks after the start of the quarter or year.
• Plan must be approved by—The date by which the employee must approve the plan. The default is three weeks after the start of the quarter or year.
• Plan must be measured by—The date by which the manager must enter the measurement values for the plan. The default is the end of the quarter or year.
• Plan must be completed by—The date by which the manager must submit the final plan. The default is one week after the end of the quarter or year.
note: Since these steps form part of a workflow, the dates you specify must be in chronological order (from top to bottom).
If you chose Quarterly as the Plan Evaluation Period, specifying the same informa-tion for each quarter.
5. Click the button to save the timeline.
Alternatively, click the button to close the panel without saving the timeline.
Xactly Objectives Reference Guide 17
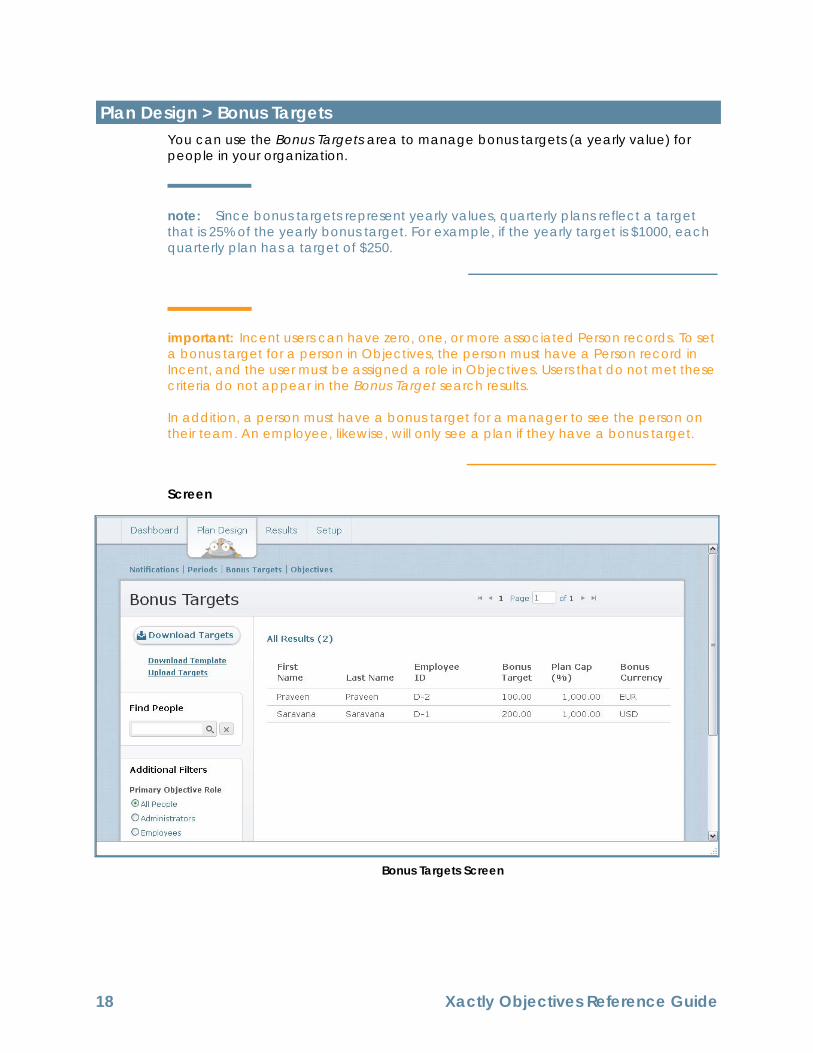
Bonus Targets
You can use the Bonus Targets area to manage bonus targets (a yearly value) for people in your organization.
note: Since bonus targets represent yearly values, quarterly plans reflect a target that is 25% of the yearly bonus target. For example, if the yearly target is $1000, each quarterly plan has a target of $250.
important: Incent users can have zero, one, or more associated Person records. To set a bonus target for a person in Objectives, the person must have a Person record in Incent, and the user must be assigned a role in Objectives. Users that do not met these criteria do not appear in the Bonus Target search results.
In addition, a person must have a bonus target for a manager to see the person on their team. An employee, likewise, will only see a plan if they have a bonus target.
Screen
Bonus Targets Screen
Plan Design > Bonus Targets
18 Xactly Objectives Reference Guide
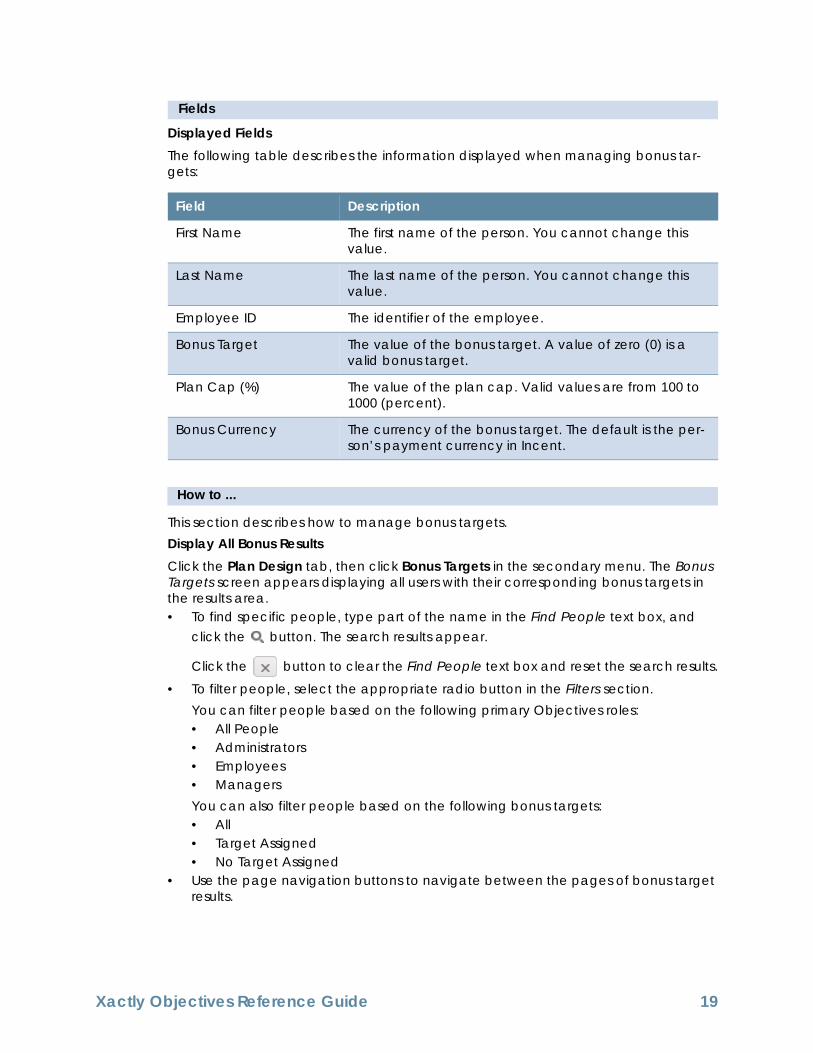
FieldsHow To
Displayed FieldsThe following table describes the information displayed when managing bonus tar-gets:
How to ...How To
This section describes how to manage bonus targets.Display All Bonus ResultsClick the Plan Design tab, then click Bonus Targets in the secondary menu. The Bonus Targets screen appears displaying all users with their corresponding bonus targets in the results area.• To find specific people, type part of the name in the Find People text box, and
click the button. The search results appear.
Click the button to clear the Find People text box and reset the search results.
• To filter people, select the appropriate radio button in the Filters section.You can filter people based on the following primary Objectives roles:• All People• Administrators• Employees• ManagersYou can also filter people based on the following bonus targets:• All• Target Assigned• No Target Assigned
• Use the page navigation buttons to navigate between the pages of bonus target results.
Field Description
First Name The first name of the person. You cannot change this value.
Last Name The last name of the person. You cannot change this value.
Employee ID The identifier of the employee.
Bonus Target The value of the bonus target. A value of zero (0) is a valid bonus target.
Plan Cap (%) The value of the plan cap. Valid values are from 100 to 1000 (percent).
Bonus Currency The currency of the bonus target. The default is the per-son’s payment currency in Incent.
Xactly Objectives Reference Guide 19
Edit a Personal Plan Cap1. Click the Plan Design tab, then click Bonus Targets in the secondary menu. The
Bonus Targets screen appears.2. Click the plan cap value for a person, and modify the value in the text box that
appears. Valid values are 100 to 1000.
3. Click the button. The plan cap is saved.
Alternatively, click the button to close the panel without saving your changes.Plan cap settings apply immediately to all plans that are not final, and are updated when a plan is estimated or saved, Changes to payment caps have no effect on plans which have already been submitted for payout.
Edit a Bonus Target1. Click the Plan Design tab, then click Bonus Targets in the secondary menu. The
Bonus Targets screen appears.2. Click the bonus target value for a person, and modify the value in the text box
that appears.3. Click the bonus currency setting for a person, and choose a new currency in the
drop-down list that appears.
4. Click the button. The bonus target and bonus currency are saved.
Alternatively, click the button to close the panel without saving your changes.
Upload Bonus Targets1. Click the Plan Design tab, then click Bonus Targets in the secondary menu. The
Bonus Targets screen appears.2. Click the Download Template link. A dialog appears allowing you to save the tem-
plate.Save the download template to your local machine.
3. Add the bonus target data to the template file, and save the file.4. Click the Upload Targets link. A pane appears allow you to locate and submit the
upload file.
5. Click the button. A dialog appears allowing you to locate the
upload file. Select the appropriate file.
The file name appears in the pane. Click the button to remove the file.
6. Click the button. The roles are uploaded to Xactly Objectives.
Alternatively, click the Cancel link to dismiss the pane without uploading the bonus targets.
20 Xactly Objectives Reference Guide
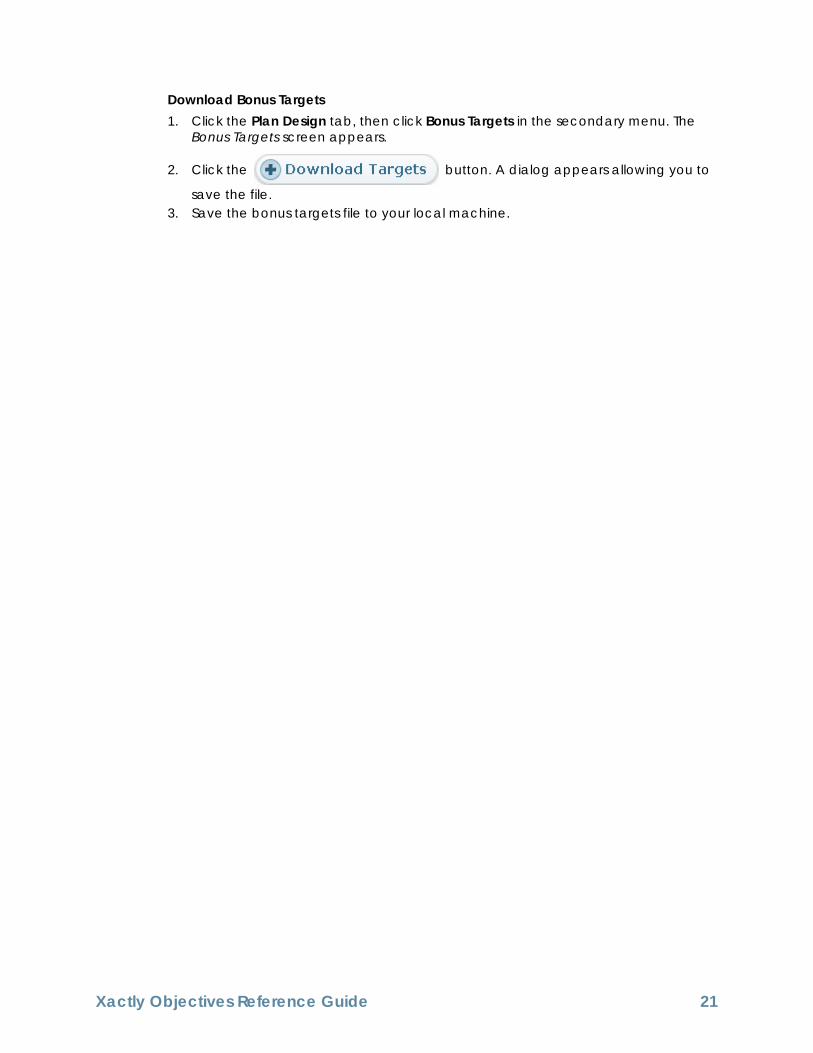
Download Bonus Targets1. Click the Plan Design tab, then click Bonus Targets in the secondary menu. The
Bonus Targets screen appears.
2. Click the button. A dialog appears allowing you to
save the file.3. Save the bonus targets file to your local machine.
Xactly Objectives Reference Guide 21
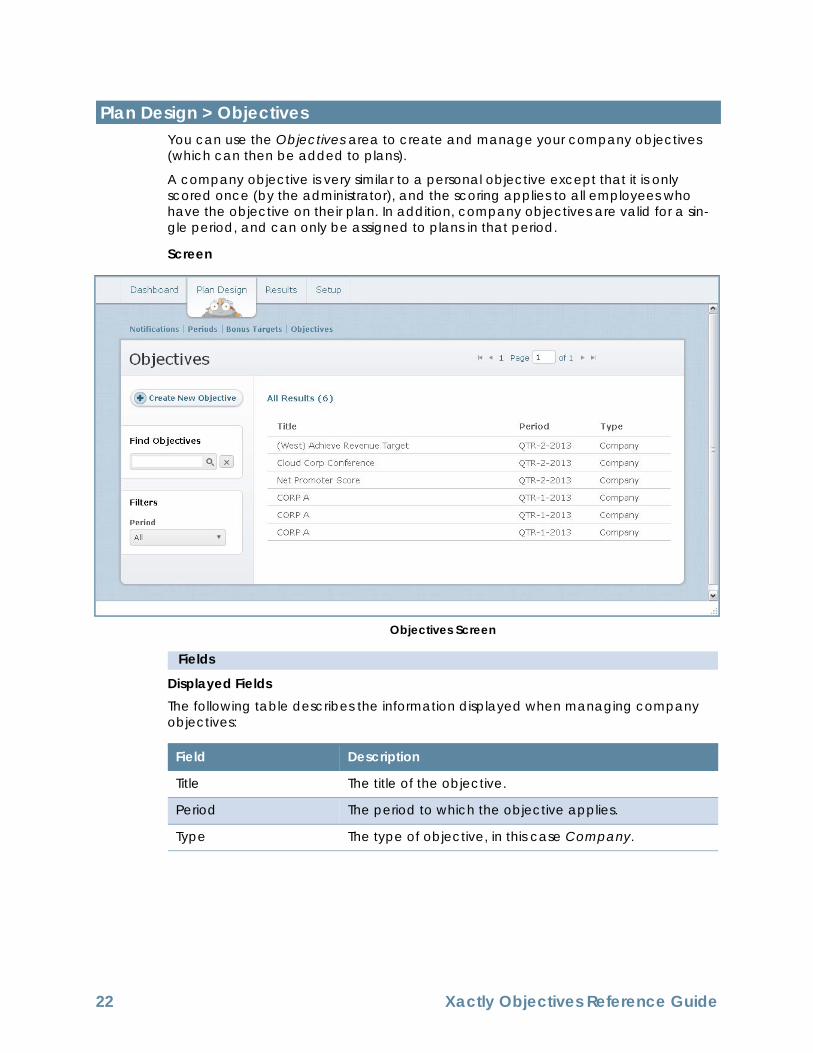
Objectives
You can use the Objectives area to create and manage your company objectives (which can then be added to plans).
A company objective is very similar to a personal objective except that it is only scored once (by the administrator), and the scoring applies to all employees who have the objective on their plan. In addition, company objectives are valid for a sin-gle period, and can only be assigned to plans in that period.
Screen
Objectives Screen
FieldsHow To
Displayed FieldsThe following table describes the information displayed when managing company objectives:
Plan Design > Objectives
Field Description
Title The title of the objective.
Period The period to which the objective applies.
Type The type of objective, in this case Company.
22 Xactly Objectives Reference Guide
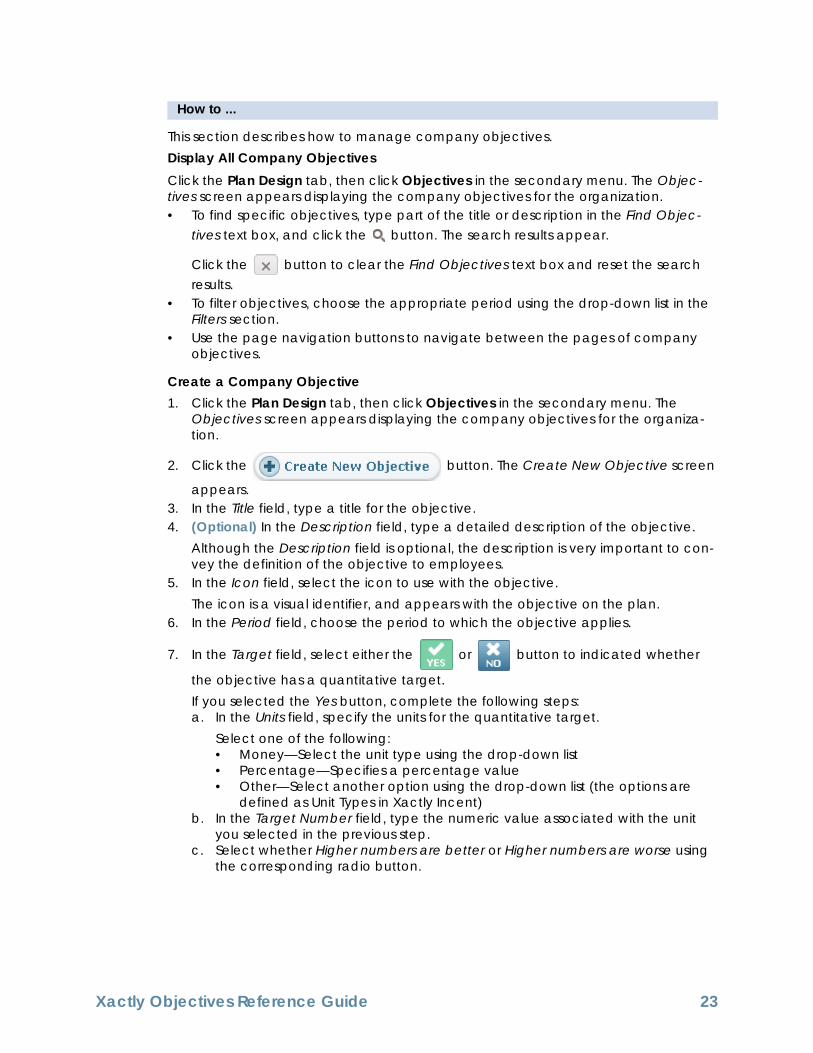
How to ...How To
This section describes how to manage company objectives.Display All Company ObjectivesClick the Plan Design tab, then click Objectives in the secondary menu. The Objec-tives screen appears displaying the company objectives for the organization.• To find specific objectives, type part of the title or description in the Find Objec-
tives text box, and click the button. The search results appear.
Click the button to clear the Find Objectives text box and reset the search results.
• To filter objectives, choose the appropriate period using the drop-down list in the Filters section.
• Use the page navigation buttons to navigate between the pages of company objectives.
Create a Company Objective1. Click the Plan Design tab, then click Objectives in the secondary menu. The
Objectives screen appears displaying the company objectives for the organiza-tion.
2. Click the button. The Create New Objective screen
appears.3. In the Title field, type a title for the objective.4. (Optional) In the Description field, type a detailed description of the objective.
Although the Description field is optional, the description is very important to con-vey the definition of the objective to employees.
5. In the Icon field, select the icon to use with the objective.The icon is a visual identifier, and appears with the objective on the plan.
6. In the Period field, choose the period to which the objective applies.
7. In the Target field, select either the or button to indicated whether
the objective has a quantitative target.If you selected the Yes button, complete the following steps:a. In the Units field, specify the units for the quantitative target.
Select one of the following:• Money—Select the unit type using the drop-down list• Percentage—Specifies a percentage value• Other—Select another option using the drop-down list (the options are
defined as Unit Types in Xactly Incent)b. In the Target Number field, type the numeric value associated with the unit
you selected in the previous step.c. Select whether Higher numbers are better or Higher numbers are worse using
the corresponding radio button.
Xactly Objectives Reference Guide 23
8. In the Measurement field, select how the objective is to be measure at the end of the quarter.Select one of the following:• Yes/No• Percent• Rating ScaleIf you select Rating Scale, you can customize the rating scale by adding or delet-ing values, as appropriate.
9. Click the button to save the new company objective. Alternatively,
click the button to dismiss the screen without creating the objective.
View a Company ObjectiveYou can view the details of objectives that are no longer available for editing.1. Click the Plan Design tab, then click Objectives in the secondary menu. The
Objectives screen appears displaying the company objectives for the organiza-tion.
2. Hover over the objective, and click the View button that appears. The Edit Objec-tive screen appears.
3. Click the button to dismiss the screen.
Edit a Company Objective1. Click the Plan Design tab, then click Objectives in the secondary menu. The
Objectives screen appears displaying the company objectives for the organiza-tion.
2. Hover over the objective, and click the Edit button that appears. The Edit Objec-tive screen appears.
note: You cannot edit an objective that has been added to a plan.
3. Modify the fields, as required.
4. Click the button. Alternatively, click the button to dismiss the screen without saving your changes.
24 Xactly Objectives Reference Guide

Copy a Company Objective1. Click the Plan Design tab, then click Objectives in the secondary menu. The
Objectives screen appears displaying the company objectives for the organiza-tion.
2. Hover over the objective, and click the Copy button that appears as a pop-up. The Create New Objective screen appears with the fields already populated using values from the objective you are copying.
3. In the Title field, type a new title for the objective.4. Modify any other fields, as required.
In most cases, you will probably want to choose a new period.
5. Click the button to save the new company objective. Alternatively,
click the button to dismiss the screen without creating the objective.
Delete a Company Objective1. Click the Plan Design tab, then click Objectives in the secondary menu. The
Objectives screen appears displaying the company objectives for the organiza-tion.
2. Hover over the objective, and click the Delete button that appears as a pop-up. A confirmation dialog appears.
3. Click the button to delete the company objective.
Alternatively, click the button to dismiss the dialog with-
out deleting the objective.
Xactly Objectives Reference Guide 25

Measure
You can use the Measure area to estimate and measure company objectives (during periods and at the end of periods, respectively). The ratings appear on plans which contain the corresponding objectives.
Screen
Measure Screen
How to ...How To
This section describes how to measure company objectives.Display All Company Objectives1. Click the Results tab. The Objectives screen appears displaying the company
objectives for the organization.• To find specific objectives, type part of the title or description in the Find Objec-
tives text box, and click the button. The search results appear.
Click the button to clear the Find Objectives text box and reset the search results.
• To filter objectives, choose the appropriate period using the drop-down list in the Filters section.
Results > Measure
26 Xactly Objectives Reference Guide
Measure Objectives1. Click the Results tab. The Objectives screen appears displaying the company
objectives for the organization.2. Click an objective to reveal details about the objective.
3. Click the tab to display additional information about the objective.
The following information is available:• Title• By (creator of the objective)• Last Updated• Description• Target• Measurement (yes or no)
4. Click the tab to measure the achievement of the corresponding
objective.Do the following:• For quantitative objectives, type a value in the Actual field. The maximum
value is 200.• For qualitative objectives, indicate whether the target was achieved.Optionally, in the Comments field, type a comment to associate with the objec-tive measure.
Xactly Objectives Reference Guide 27
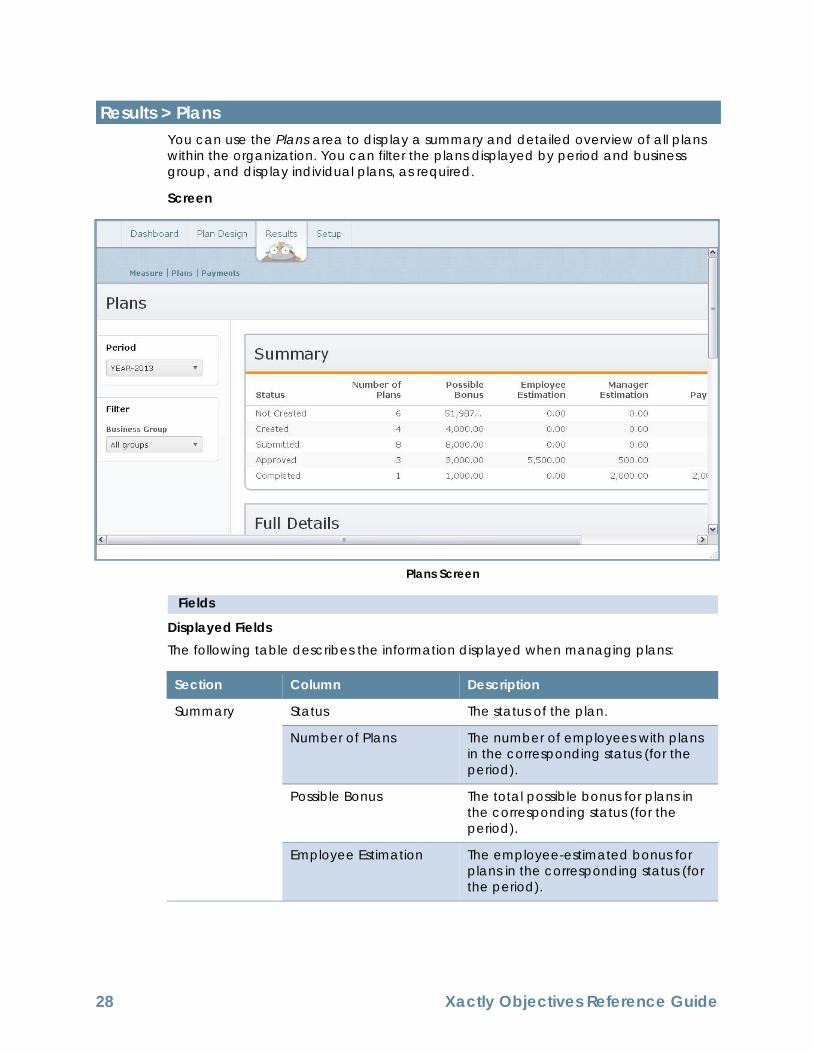
Plans
You can use the Plans area to display a summary and detailed overview of all plans within the organization. You can filter the plans displayed by period and business group, and display individual plans, as required.
Screen
Plans Screen
FieldsHow To
Displayed FieldsThe following table describes the information displayed when managing plans:
Results > Plans
Section Column Description
Summary Status The status of the plan.
Number of Plans The number of employees with plans in the corresponding status (for the period).
Possible Bonus The total possible bonus for plans in the corresponding status (for the period).
Employee Estimation The employee-estimated bonus for plans in the corresponding status (for the period).
28 Xactly Objectives Reference Guide
How to ...How To
This section describes how to display plans.Display PlansClick the Results tab, then click Plans in the secondary menu. The Plans screen appears displaying all plans in the results area.• To filter plans by period, choose the corresponding period using the Period drop-
down menu.• To filter plans by business group, choose the corresponding group using the Busi-
ness Group drop-down menu.• Use the page navigation buttons to navigate between the pages of results.
Display a Person’s Plan1. Click the Results tab, then click Plans in the secondary menu. The Plans screen
appears displaying all plans in the results area.2. In the Full Details section, click the entry corresponding to the person whose plan
you want to display. The Plan Details dialog appears.3. Click the button to close the dialog.
Summary Manager Estimation The manager-estimated bonus for plans in the corresponding status (for the period).
Payment The payments for the completed plans (for the period).
Full Details Name The name of the person.
Manager The name of the manager.
Possible Bonus The possible bonus (for the period).
Employee Estimation The employee-estimated bonus (for the period).
Manager Estimation The manager-estimated bonus (for the period).
Payment The actual payout (for the period).
Status The status of the plan.
Section Column Description
Xactly Objectives Reference Guide 29
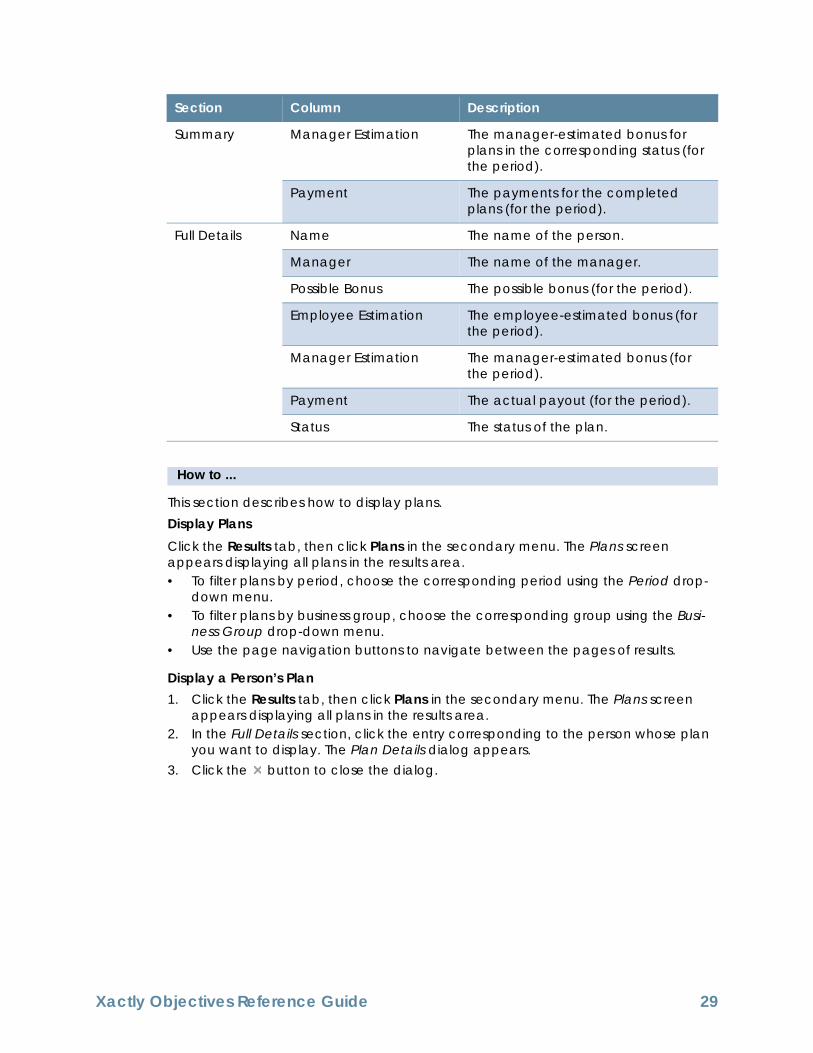
Reset the Plan StatusYou can reset a plan after it has been submitted for approval, allowing you to edit the plan, if necessary, and resubmit the plan to employees for approval.
note: Resetting a plan reverts the status of the plan back to Created. Both manag-ers and employees receive notification emails alerting that the plan has been reset, and a note appears in the Discuss This Plan section. All existing discussion and estima-tion comments remain in place when a plan is reset. However, estimation values are removed.
1. Click the Results tab, then click Plans in the secondary menu. The Plans screen appears displaying all plans in the results area.
2. In the Full Details section, click the entry corresponding to the person whose plan you want to display. The Plan Details dialog appears.
3. Click the button. The Reset Plan Status dialog appears.4. (Optional) In the Message field, type a message explaining why the plan is being
reset.There is a 250 character limit for each message (Objectives displays the number of remaining characters below the text box as you type).
5. Click the button.
The plan is resubmitted to the employee.
30 Xactly Objectives Reference Guide
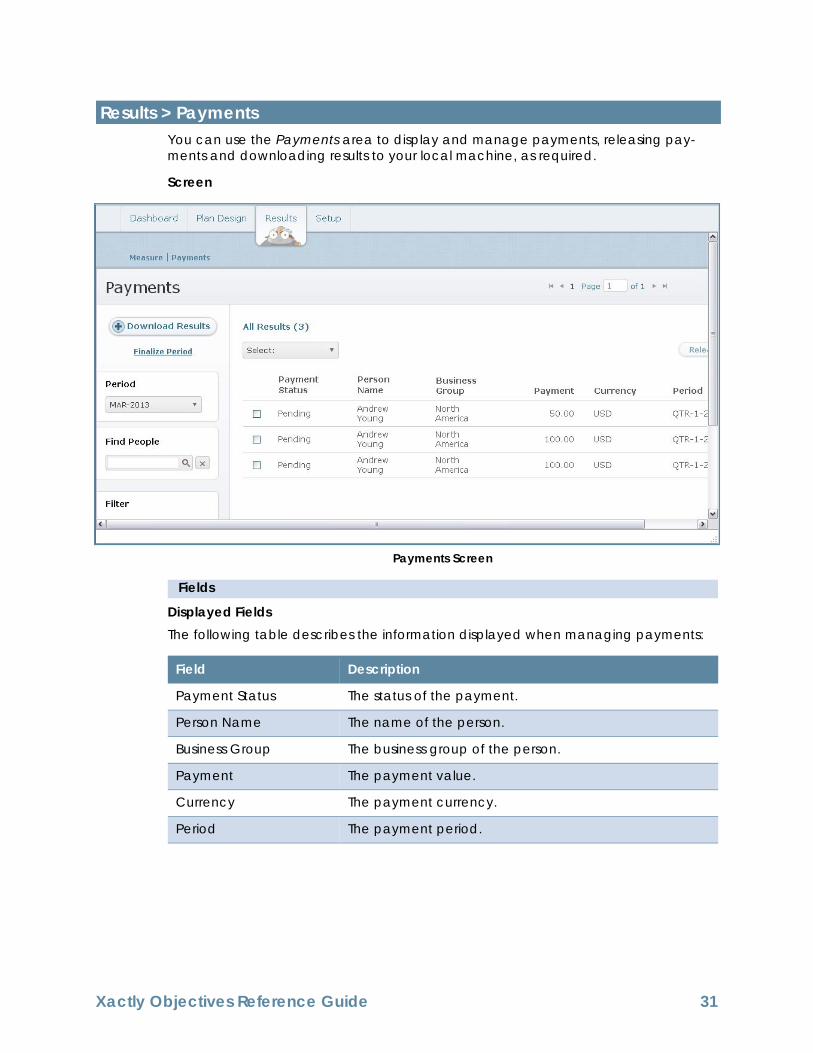
Payments
You can use the Payments area to display and manage payments, releasing pay-ments and downloading results to your local machine, as required.
Screen
Payments Screen
FieldsHow To
Displayed FieldsThe following table describes the information displayed when managing payments:
Results > Payments
Field Description
Payment Status The status of the payment.
Person Name The name of the person.
Business Group The business group of the person.
Payment The payment value.
Currency The payment currency.
Period The payment period.
Xactly Objectives Reference Guide 31

How to ...How To
This section describes how to manage payments.Display All PaymentsClick the Results tab, then click Payments in the secondary menu. The Payments screen appears displaying all payments in the results area.• To filter payments by period, choose the corresponding period using the Period
drop-down menu.• To find payments to specific people, type part of the person’s name in the Find
People text box, and click the button. The search results appear.
Click the button to clear the Find People text box and reset the search results.
• To filter the payment status, select the appropriate radio button in the Filter sec-tion.You can filter payments based on the following statuses:• All• Pending• ReleasedPending payments are the bonus amounts for plans that have been submitted for payout by managers. The payment is associated with the last month of the plan period.
• Use the page navigation buttons to navigate between the pages of results.
Release Payments1. Click the Results tab, then click Payments in the secondary menu. The Payments
screen appears displaying all payments in the results area.2. Select the payments you want to release.
Releasing a payment is a way of tagging the payment as having been transferred to your financial application.To select all or none of the payments, choose the corresponding option using the
drop-down menu.
3. Click the button to release the selected payments.
Download Results1. Click the Results tab, then click Payments in the secondary menu. The Payments
screen appears displaying all payments in the results area.2. Filter the results, as appropriate.
3. Click the button. A dialog appears allowing you to
save the file.4. Save the results file to your local machine.
32 Xactly Objectives Reference Guide
INDEX
AApplication Layout 2
BBonus Targets
FieldsDisplayed 19
How toDisplay All Bonus Results 19Download Bonus Targets 21Edit a Bonus Target 20Edit a Personal Plan Cap 20Upload Bonus Targets 20
Screen 18
DDashboard
How toDisplay To Do List 13
Screen 5, 13
LLaunch Objectives 5
MMeasure
How toDisplay All Company Objectives 26Measure Objectives 27
Screen 26My Team
How toReset the Plan Status 30
NNotifications
How toConfigure Notifications 14
Screen 14
OObjectives
FieldsDisplayed 22
How toCopy a Company Objective 25Create a Company Objective 23Delete a Company Objective 25Display All Company Objectives 23Edit a Company Objective 24View a Company Objective 24
Screen 22
PPayments
FieldsDisplayed 31
How toDisplay All Payments 32Download Results 32Release Payments 32
Screen 31Periods
How toConfigure Periods 16
Screen 15Plans
FieldsDisplayed 28
How toDisplay a Person’s Plan 29Display Plans 29
Screen 28
SSetup
FieldsDisplayed 7
How toDisplay All Users 7Download User Roles 9Edit a User Role 8Reset a User Password 9Set Payment Caps 10Upload User Roles 9
Screen 6What You Can Do 12
33

34
Xactly Objectives Reference Guide