Embed Size (px)
Citation preview
Your system for safe handl ing & success in implanto logy!
Tr ias ® Implant System
The main advantage of the Trias® implant system is its simplicity as far as the surgical and
prosthetic procedures are concerned – this reduces medical costs and at the same time optimizes
the success prognosis.
Implantation & Prosthetic Treatment
1. Planning
The preprosthetic and preoperative diagnostics include a detailed anamnesis and a thorough
clinical examination. Important parameters to be assessed are: width of the attached gingiva at the
prospective implant site, width and shape of the alveolar processus and localisation of sensitive ana-
tomical structures adjacent to the probable implant position. The objective is to place the implant in
a prosthetically favourable position taking into account the anatomy and bone physiology (ideal posi-
tion: the implant should be surrounded by at least 1mm of vital bone). Study casts of both jaws
should be made and analyzed since this is the only way to determine the correct position and incli-
nation of the implants. Diagnostic set up will provide a basis for the fabrication of a template which
can be used for diagnostics (radiography) and the transfer of desired implant positions to the jaws.
Tr ias ® Implant System
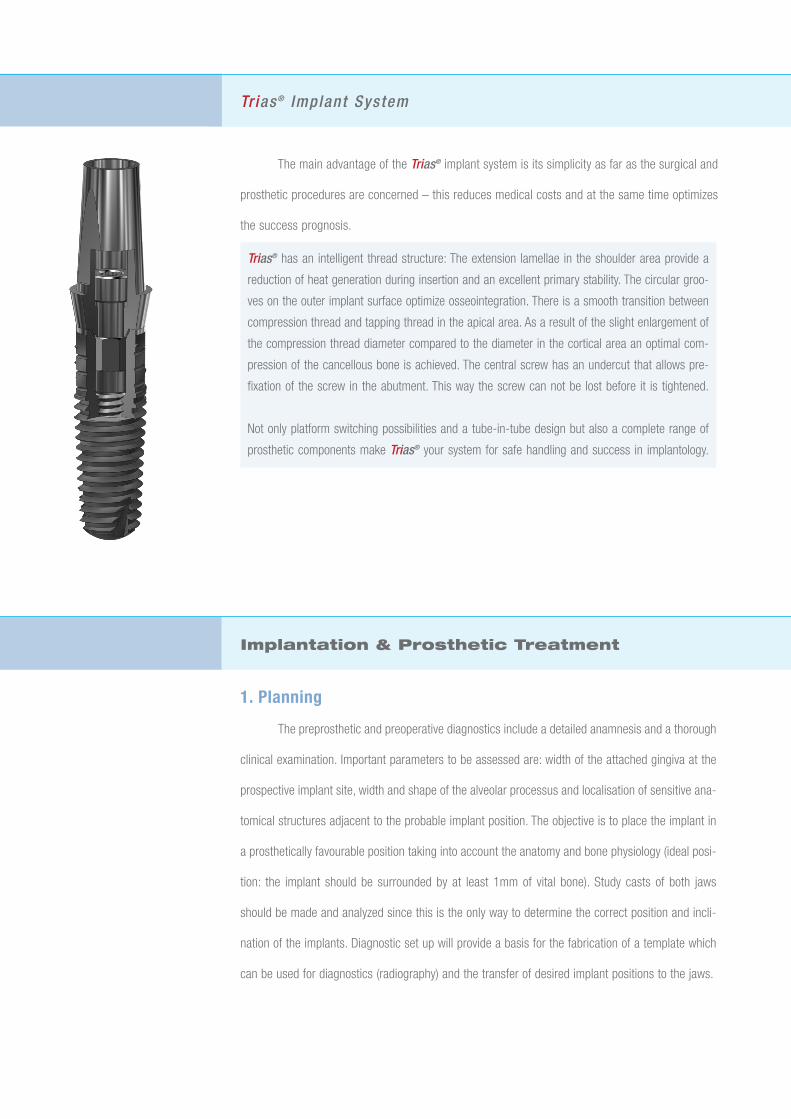
Trias® has an intelligent thread structure: The extension lamellae in the shoulder area provide a
reduction of heat generation during insertion and an excellent primary stability. The circular groo-
ves on the outer implant surface optimize osseointegration. There is a smooth transition between
compression thread and tapping thread in the apical area. As a result of the slight enlargement of
the compression thread diameter compared to the diameter in the cortical area an optimal com-
pression of the cancellous bone is achieved. The central screw has an undercut that allows pre-
fixation of the screw in the abutment. This way the screw can not be lost before it is tightened.
Not only platform switching possibilities and a tube-in-tube design but also a complete range of
prosthetic components make Trias® your system for safe handling and success in implantology.
3. Preparation of the implant bed
2. Tools and Instruments
Implantation & Prosthetic Treatment
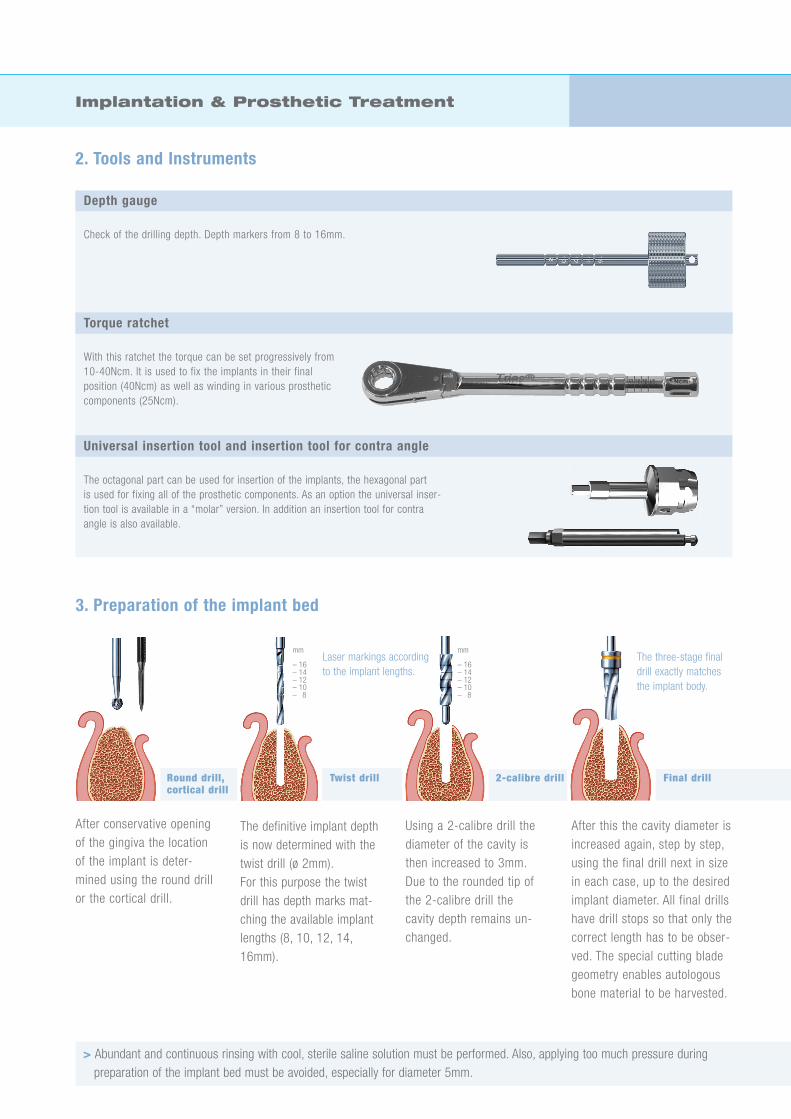
Depth gauge
Check of the drilling depth. Depth markers from 8 to 16mm.
Torque ratchet
With this ratchet the torque can be set progressively from10-40Ncm. It is used to fix the implants in their finalposition (40Ncm) as well as winding in various prostheticcomponents (25Ncm).
Universal insertion tool and insertion tool for contra angle
The octagonal part can be used for insertion of the implants, the hexagonal partis used for fixing all of the prosthetic components. As an option the universal inser-tion tool is available in a “molar” version. In addition an insertion tool for contraangle is also available.
Final drillRound drill, cortical drill
Twist drill 2-calibre drill
After conservative openingof the gingiva the locationof the implant is deter-mined using the round drillor the cortical drill.
The definitive implant depthis now determined with thetwist drill (ø 2mm). For this purpose the twistdrill has depth marks mat-ching the available implantlengths (8, 10, 12, 14,16mm).
Using a 2-calibre drill thediameter of the cavity isthen increased to 3mm.Due to the rounded tip ofthe 2-calibre drill the cavity depth remains un-changed.
After this the cavity diameter isincreased again, step by step,using the final drill next in sizein each case, up to the desiredimplant diameter. All final drillshave drill stops so that only thecorrect length has to be obser-ved. The special cutting bladegeometry enables autologousbone material to be harvested.
The three-stage finaldrill exactly matchesthe implant body.
mm
– 16– 14– 12– 10– 8
mm
– 16– 14– 12– 10– 8
Laser markings accordingto the implant lengths.
> Abundant and continuous rinsing with cool, sterile saline solution must be performed. Also, applying too much pressure duringpreparation of the implant bed must be avoided, especially for diameter 5mm.
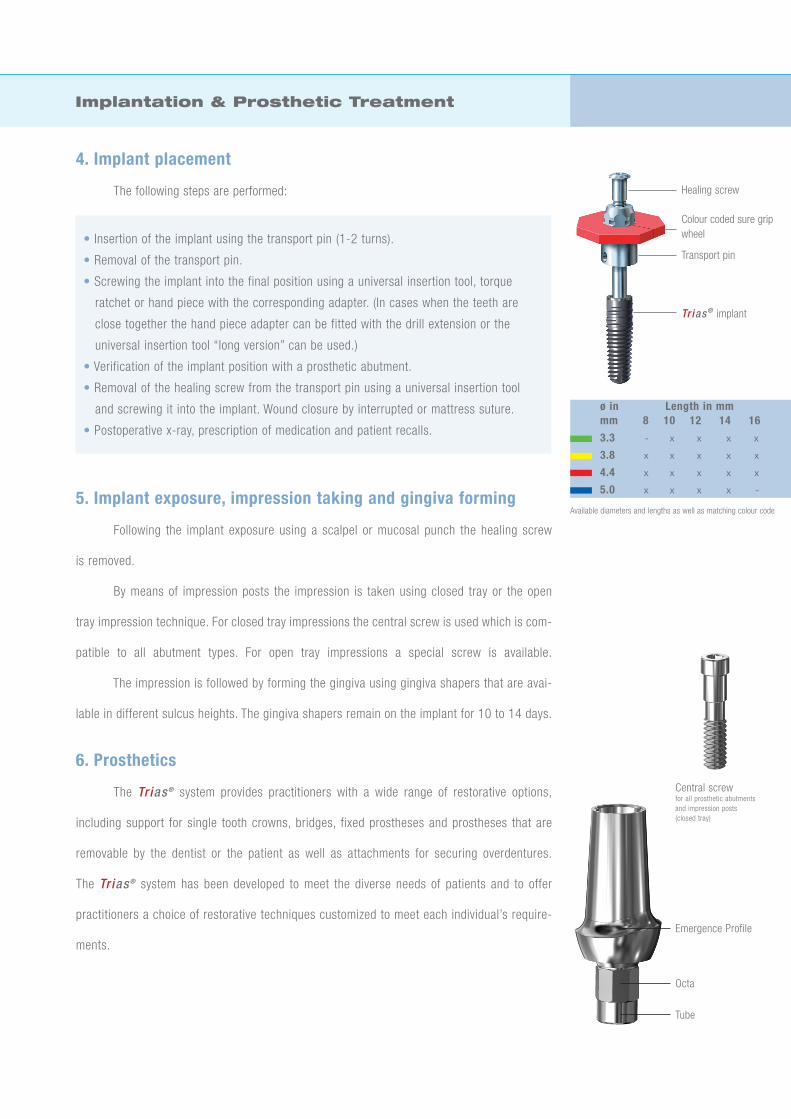
Healing screw
Colour coded sure gripwheel
Transport pin
Tr ias ® implant
Central screwfor all prosthetic abutments and impression posts (closed tray)
Emergence Profile
Octa
Tube
Implantation & Prosthetic Treatment
ø in Length in mmmm 8 10 12 14 16
3.3 - x x x x
3.8 x x x x x
4.4 x x x x x
5.0 x x x x -
4. Implant placement
The following steps are performed:
• Insertion of the implant using the transport pin (1-2 turns).
• Removal of the transport pin.
• Screwing the implant into the final position using a universal insertion tool, torque
ratchet or hand piece with the corresponding adapter. (In cases when the teeth are
close together the hand piece adapter can be fitted with the drill extension or the
universal insertion tool “long version” can be used.)
• Verification of the implant position with a prosthetic abutment.
• Removal of the healing screw from the transport pin using a universal insertion tool
and screwing it into the implant. Wound closure by interrupted or mattress suture.
• Postoperative x-ray, prescription of medication and patient recalls.
5. Implant exposure, impression taking and gingiva forming
Following the implant exposure using a scalpel or mucosal punch the healing screw
is removed.
By means of impression posts the impression is taken using closed tray or the open
tray impression technique. For closed tray impressions the central screw is used which is com-
patible to all abutment types. For open tray impressions a special screw is available.
The impression is followed by forming the gingiva using gingiva shapers that are avai-
lable in different sulcus heights. The gingiva shapers remain on the implant for 10 to 14 days.
6. Prosthetics
The Tr ias ® system provides practitioners with a wide range of restorative options,
including support for single tooth crowns, bridges, fixed prostheses and prostheses that are
removable by the dentist or the patient as well as attachments for securing overdentures.
The Tr ias ® system has been developed to meet the diverse needs of patients and to offer
practitioners a choice of restorative techniques customized to meet each individual’s require-
ments.
Available diameters and lengths as well as matching colour code

Tr ias ® Implant System
> Gingiva forming
> Impression taking
> Master cast preparation
> Temporary treatment
> Final treatment
Restorations with:
> Self-locating anchor systems
> Magnetic abutment systems
> Ball anchor systems
> Bar restorations
> Restorations with shock absorber systems
Prosthetic OptionsP
re
pa
ra
tio
nD
en
tu
re
s r
em
ov
ab
le b
y t
he
de
ntis
t
Fix
ed
De
ntu
re
s
De
ntu
re
s r
em
ov
ab
le b
y t
he
pa
tie
nt
Gingiva shaper
Impression post (Closed tray)Impression screw
Model analog
Central screw (Matches all abutment types)
Titanium abutment
Temporary acrylic abutment
Plastic sleeves(As an option)
Titanium abutment 0° (Standard Profile)
Titanium abutment 0° (Emergence Profile)
Titanium abutment 15° (Emergence Profile)
Titanium abutment 25° (Emergence Profile)
Individual titanium abutment
Ti-base for ZrO2 abutments Scan abutment
Dyna Magnetic abutment
Locator® abutment Prosthetic kit for Locator® abutments
Magnet S3, removal force 300g
Magnet S5, removal force 500g
Ball abutment,ball diam. 1.8mm
Ball abutment,ball diam. 2.5mm
Prosthetic kit for ball abutments, ball diam. 1.8mm
Prosthetic kit for ball abutments, ball diam. 2.5mm
Bar segment incl. connector and bar screw
Central screw Impression post (Open tray)
Tsa® abutment for fixed dentures
1) Dyna Dental Engineering B.V., the Netherlands, 4600 Bergen Op Zoom 2) Locator® is a registered trademark of Zest Anchors Inc., USA, 2029 CA Escondido 3)Tsa® abutment is manufactured by BonecareTM GmbH, Germany, 86150 Augsburg
Tsa® abutment for removable dentures
Female for tsa® abutments
Tr ias ® Implant System
CAVE:
The implantation and all corresponding procedures are based on the principle of lege
artis. For courses, training and information about the Tr ias ® implant system please ask Servo-
Dental. It is mandatory that the criteria for the selection of patients (indications and contra
indications) are strictly observed before using Tr ias ® implants. The practitioner has to ensure
adequate operative skills and sterile conditions for endosseous implantations as well as for
precise and proper restaurations. He is also responsible for the qualification of the assistants.
Product illustrations may differ from the original parts.