
Blue Coat ProxySG First StepsTransparent Proxy Deployments
SGOS 6.7

Legal NoticeCopyright © 2018 Symantec Corp. All rights reserved. Symantec, the Symantec Logo, the Checkmark Logo, Blue Coat,and the Blue Coat logo are trademarks or registered trademarks of Symantec Corp. or its affiliates in the U.S. and othercountries. Other names may be trademarks of their respective owners. This document is provided for informationalpurposes only and is not intended as advertising. All warranties relating to the information in this document, either expressor implied, are disclaimed to themaximum extent allowed by law. The information in this document is subject to changewithout notice.
THE DOCUMENTATION IS PROVIDED "AS IS" AND ALL EXPRESS OR IMPLIED CONDITIONS,REPRESENTATIONS AND WARRANTIES, INCLUDINGANY IMPLIED WARRANTY OFMERCHANTABILITY,FITNESS FOR A PARTICULAR PURPOSE OR NON-INFRINGEMENT, ARE DISCLAIMED, EXCEPT TO THEEXTENT THAT SUCH DISCLAIMERS ARE HELD TOBE LEGALLY INVALID. SYMANTEC CORPORATION SHALLNOT BE LIABLE FOR INCIDENTALOR CONSEQUENTIAL DAMAGES IN CONNECTION WITH THE FURNISHING,PERFORMANCE, OR USE OF THIS DOCUMENTATION. THE INFORMATION CONTAINED IN THISDOCUMENTATION IS SUBJECT TOCHANGEWITHOUT NOTICE. SYMANTEC CORPORATION PRODUCTS,TECHNICAL SERVICES, AND ANY OTHER TECHNICALDATA REFERENCED IN THIS DOCUMENT ARESUBJECT TOU.S. EXPORT CONTROLAND SANCTIONS LAWS, REGULATIONS AND REQUIREMENTS, ANDMAY BE SUBJECT TOEXPORTOR IMPORT REGULATIONS IN OTHER COUNTRIES. YOU AGREE TOCOMPLYSTRICTLY WITH THESE LAWS, REGULATIONS AND REQUIREMENTS, AND ACKNOWLEDGE THAT YOU HAVETHE RESPONSIBILITY TOOBTAIN ANY LICENSES, PERMITS OR OTHER APPROVALS THATMAY BEREQUIRED IN ORDER TOEXPORT, RE-EXPORT, TRANSFER IN COUNTRY OR IMPORT AFTER DELIVERY TOYOU.
Symantec Corporation350 Ellis StreetMountain View, CA 94043
www.symantec.com
3/12/2018

Blue Coat ProxySG First Steps
Contents
Solution: Deploy a Transparent Proxy 4
Configure In-Path Proxy 6
Configure WCCP Redirection 8
3

Transparent Proxy Deployments
Solution: Deploy a Transparent ProxyWith a transparent proxy deployment, you can configure your ProxySG appliance to control and filter traffic for users,without having to do any configuration on the client workstations. Select one of the followingmethods to send traffic toyour ProxySG appliance transparently.
Physically in-pathThis deployment method places the ProxySG appliance in the physical network path, between users and the Internetegress point, using two bridged interfaces on the appliance; these interfaces handle traffic without redirection. Thisdeployment method ensures that the ProxySG appliance has the potential to control all user traffic destined for theInternet.
See "Configure In-Path Proxy" on page 6.
Virtually in-path: WCCP
WebCache Control Protocol (WCCP) relies on Cisco and Cisco-compatible routers, firewalls, or switches that supportthe redirection of intercepted traffic to a cache control device, such as the ProxySG appliance. You can useWCCP tocapture traffic destined for the Internet and redirect it to the ProxySG for processing and policy evaluation.WCCP provides options for balancing load among several ProxySG appliances and is fault tolerant, sending traffic to theInternet directly, should the ProxySG appliance be unable to handle requests.
4

Blue Coat ProxySG First Steps
See "ConfigureWCCP Redirection" on page 8.
5
Transparent Proxy Deployments
Configure In-Path Proxy
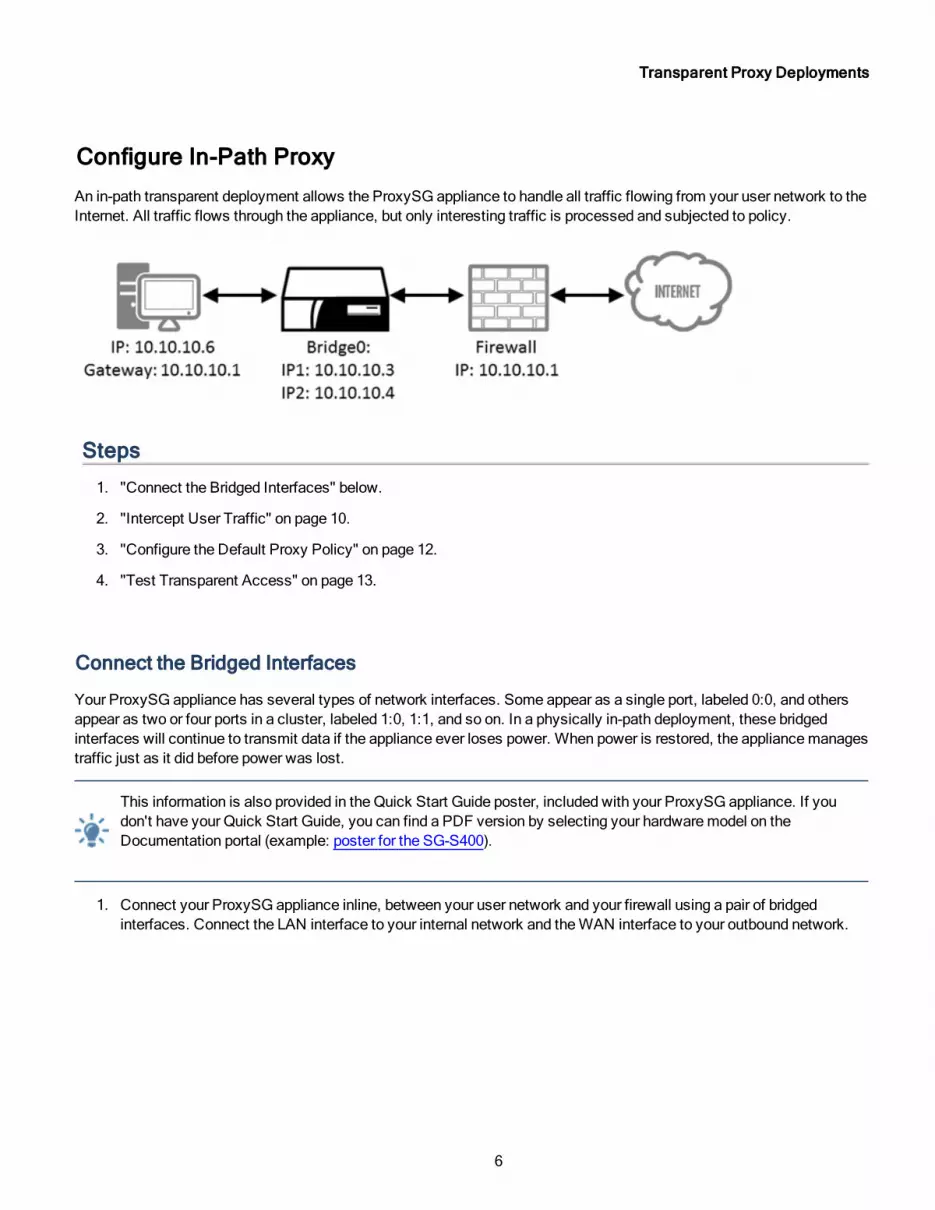
An in-path transparent deployment allows the ProxySG appliance to handle all traffic flowing from your user network to theInternet. All traffic flows through the appliance, but only interesting traffic is processed and subjected to policy.
Steps
1. "Connect the Bridged Interfaces" below.
2. "Intercept User Traffic" on page 10.
3. "Configure the Default Proxy Policy" on page 12.
4. "Test Transparent Access" on page 13.
Connect the Bridged Interfaces
Your ProxySG appliance has several types of network interfaces. Some appear as a single port, labeled 0:0, and othersappear as two or four ports in a cluster, labeled 1:0, 1:1, and so on. In a physically in-path deployment, these bridgedinterfaces will continue to transmit data if the appliance ever loses power. When power is restored, the appliancemanagestraffic just as it did before power was lost.
This information is also provided in the Quick Start Guide poster, included with your ProxySG appliance. If youdon't have your Quick Start Guide, you can find a PDF version by selecting your hardwaremodel on theDocumentation portal (example: poster for the SG-S400).
1. Connect your ProxySG appliance inline, between your user network and your firewall using a pair of bridgedinterfaces. Connect the LAN interface to your internal network and theWAN interface to your outbound network.
6

Blue Coat ProxySG First Steps
2. Connect a null-modem cable to the serial port at the rear of the appliance and to a computer with a terminalapplication such as Hyperterminal, Tera Term, or Putty. The terminal settings are as follows:
l Baud rate: 9600 bpsl Parity: nonel Flow control: nonel Data bits: 8l Stop bits: 1
3. Power on the appliance andmonitor the boot process in your terminal application. When prompted, select Manualsetup and the Forward Proxy license. This wizard will request the following information:
l IP address and subnet mask for the primary passthru interfacel Primary DNS server addressl Default Gateway IP addressl Link settings (speed and duplex)l Administrator ID and Password
4. Log in to the ProxyAV Management Console by browsing to https://x.x.x.x:8082 (replace x.x.x.x with the bridge IPaddress you assigned in the serial console).
Next Steps: "Intercept User Traffic" on page 10, "Configure the Default Proxy Policy" onpage 12, "Test Transparent Access" on page 13
7
Transparent Proxy Deployments
Configure WCCP Redirection
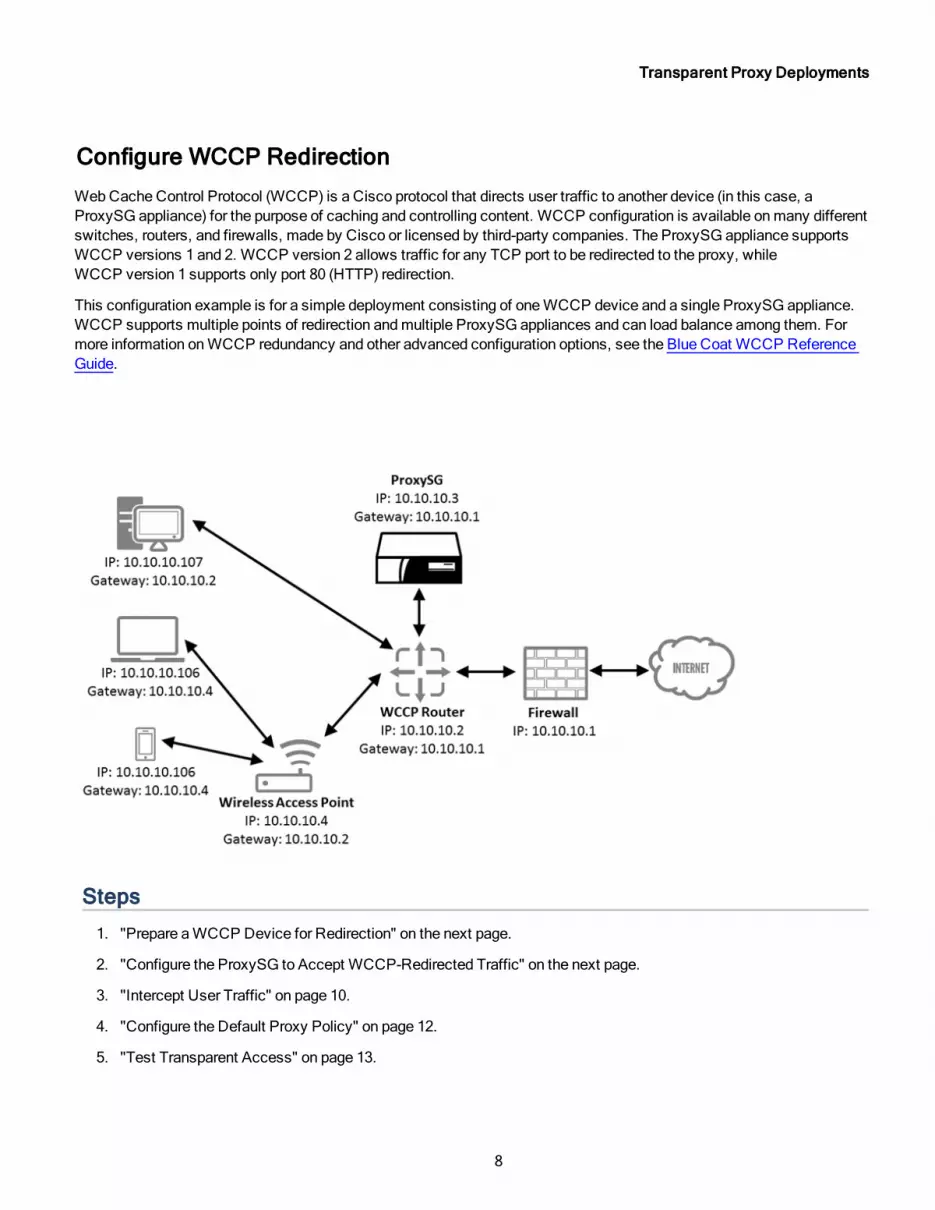
WebCache Control Protocol (WCCP) is a Cisco protocol that directs user traffic to another device (in this case, aProxySG appliance) for the purpose of caching and controlling content. WCCP configuration is available onmany differentswitches, routers, and firewalls, made by Cisco or licensed by third-party companies. The ProxySG appliance supportsWCCP versions 1 and 2. WCCP version 2 allows traffic for any TCP port to be redirected to the proxy, whileWCCP version 1 supports only port 80 (HTTP) redirection.
This configuration example is for a simple deployment consisting of oneWCCP device and a single ProxySG appliance.WCCP supports multiple points of redirection andmultiple ProxySG appliances and can load balance among them. Formore information onWCCP redundancy and other advanced configuration options, see the Blue Coat WCCP ReferenceGuide.
Steps
1. "Prepare aWCCP Device for Redirection" on the next page.
2. "Configure the ProxySG to Accept WCCP-Redirected Traffic" on the next page.
3. "Intercept User Traffic" on page 10.
4. "Configure the Default Proxy Policy" on page 12.
5. "Test Transparent Access" on page 13.
8

Blue Coat ProxySG First Steps
Prepare a WCCP Device for Redirection
WithWCCP, the ProxySG appliance works with a Cisco switch, router, or firewall to redirect traffic on its way out to theInternet. The simplified steps here will prepare your Cisco device forWCCP redirection. This sample configurationinvolves creating a redirect list (wccp 99) and an Access Control List (access-list 101) to direct all Internet-bound trafficto the ProxySG appliance.
1. Log on to your switch or router's command line interface (SSH or Telnet, as appropriate).2. Identify the router interface that will be used to transmit data to and from the ProxySG appliance. This example
uses interface e0.3. Enter the following commands to configureWCCP and create an associated Access Control List, (ACL).
router(conf)# conf trouter(conf)# ip wccp 99 redirect-list 101router(conf)# int e0router(conf-if)# ip wccp 99 redirect outrouter(conf)# access-list 101 permit ip host anyrouter(conf)# access-list 101 deny ip any any
Remember the access list number you define here (101 in this example), as you will need to configure the ProxySGappliance with that information. The ProxySG refers to the access list as a service group.
Configure the ProxySG to Accept WCCP-Redirected Traffic
This configuration example is for a simple deployment consisting of oneWCCP device and one ProxySG appliance.
Configure your ProxySG appliance to accept redirected traffic from theWCCP device.
1. In the ProxySGManagement Console, select Configuration > Network > WCCP.2. Select Enable WCCP.3. Click New. The New Service dialog opens.4. Enter the Service Group you defined as an access list in the router configuration (101 in this example).5. Select or define the TCP ports you want the ProxySG appliance to intercept andmanage. This example redirects
HTTP, HTTPS, and RTSP.6. Select Individual Home Router Addresses and click Add. The New HomeRouter dialog displays.7. Enter the IP address for the router that will performWCCP redirection and click OK.
9

Transparent Proxy Deployments
8. Click OK and Apply to save the configuration.
When users request Internet resources, those requests will now be sent to the ProxySG appliance. In order to control thattraffic, you will have to define the ports to intercept.
Intercept User Traffic
After configuring how your ProxySG appliance receives user traffic, you need to configure proxy services. Without theappropriate services set to Intercept, that traffic will pass through the proxy without being subjected to policy. Themostcommon ports to intercept are 80 (HTTP), 443 (HTTPS), and 554 (RTSP).
Transparent Proxy Services
1. In theManagement Console, select Configuration > Services > Proxy Services.2. Under Predefined Service Groups, expand the Standard group. A list of services displays.3. Locate the service you want to set to Intercept.4. From the drop-downmenu next to the service, select Intercept. In this example, the External HTTP service is set
to Intercept.
10

Blue Coat ProxySG First Steps
5. Repeat steps 3 and 4 for each additional service you want to intercept.6. (Optional) To intercept traffic types that are not predefined:
a. Click New Service.b. Enter a name for the service and select the service group, under which the new service will be listed.
c. Select a proxy type from the Proxy drop-downmenu. This menu lists all of the types of traffic the ProxySGunderstands. If the type of traffic you are intercepting is not listed, select TCP Tunnel.
Tunneled traffic can only be controlled based on the information contained in the TCP header of therequest: client IP, destination IP, and source and destination ports.
d. Click Edit/Add Listeners. The New Listener dialog opens.
e. In the Port range field, enter the port your application uses to communicate.
11

Transparent Proxy Deployments
f. Ensure that the Action field is set to Intercept and click OK.g. If enabled, uncheck Enable ADN.
h. Click OK .7. Click Apply. The appliance confirms your changes.
If your network has servers or devices that require a direct connection to the Internet, use the Static Bypass List todefine the IP addresses for those servers or clients to be exempted from proxy service interception.
Configure the Default Proxy Policy
Now that traffic is being directed to and intercepted by the appliance, it's time to consider how client requests will interactwith policy. The first step is to set the default policy action. This controls traffic that does not match any rules in yourVisual Policy Manager Reference (VPM) or local CPL policy.
1. In the ProxySGManagement Console, select Configuration > Policy > Policy Options.2. Set the Default Proxy Policy to Allow and click Apply.
Setting the default proxy policy determines what the proxy will do with a request that doesn't match any rules
12

Blue Coat ProxySG First Steps
you've configured in either the VPM or in CPL-based policy sets such as local and central. By default, the defaultproxy policy is set to deny. Though your scenario may differ, most administrators favor a default allow policy. Keepthis in mind as you define policy in the VPM: if a URL or category is not explicitly denied, users will be able to getthere.
Test Transparent Access
To identify the sites and URL categories your users are permitted or denied access through the proxy, you need to createpolicy rules in the Visual Policy Manager (VPM). The proceeding sample policy will introduce you to working with the VPMand help to test transparent access to the Internet.
1. Select Configuration > Policy > Visual Policy Manager > Launch. The Visual Policy Manager opens.2. In the VPM, select Policy > Add Web Access Layer, specify a name (such as Test Web Access), and click OK.
A new policy layer displays, with a single rule.3. Right-click the Destination column and select Set > New > Request URL.4. Enter a URL to use for testing, www.symantec.com. Click Add, Close andOK.5. Note the action in this rule. By default, it is Deny. Click Install policy to commit this rule to your configuration.
6. From aworkstation in the network, browse to www.google.com. Access is granted.7. From the sameworkstation, browse to www.symantec.com. A deny exception page displays.8. (Optional) Configure logging to verify your testing results.
You can customize the deny pages users see when their requests match a deny rule. This type of page is called anexception page.
13
Recommended


