Embed Size (px)
Citation preview
MHG Series
Models: MHG-110/W664-08 MHG-130/WT664-08 MHG-140/WT664-35
Thank you for purchasing Pegasus’ automatic unit. Study this manual very carefully before beginning any of the procedure and then use the device correctly and safely. Keep this manual in a convenient place for quick reference when needed.
9A2154E9A2154E9A2154E9A2154E
INSTRUCTIONS
Hemming bottoms of tubular goods and/or flat sleeves Versatile sewing unit for hemming

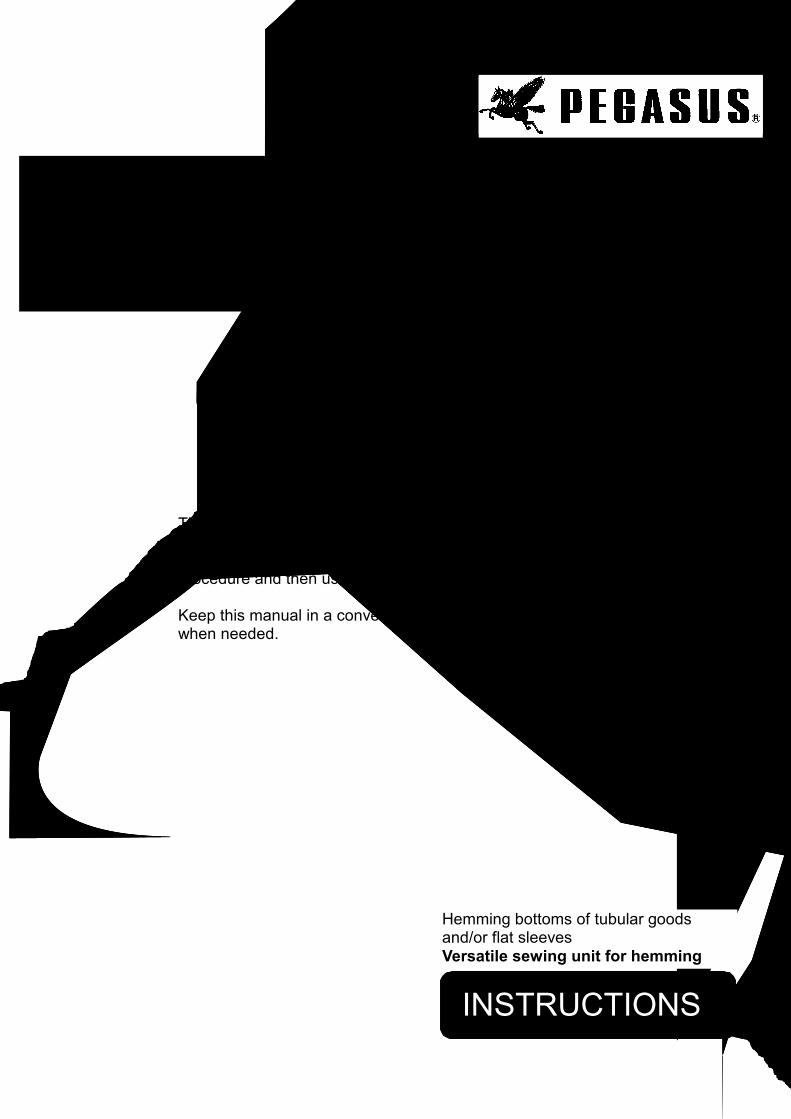
1.Introduction..............................................................................................................................................................1
2.Symbols and/or icons of dangers, warnings and cautions ................................................................................1
3.Safety precautions...................................................................................................................................................2
4.Warnings and cautions in each procedure ...........................................................................................................3
Applications and performance..................................................................................................................................5
Installation...................................................................................................................................................................6 Description of each part ............................................................................................................................................7 Installing the device ..................................................................................................................................................8 Connecting the cords ................................................................................................................................................9 Connecting the air lines (MHG-110, 130) ............................................................................................................... 11 Connecting the air lines (MHG-140) .......................................................................................................................12 Adjusting the filter regulator ....................................................................................................................................13 Installing the optional parts for hemming flat sleeves.............................................................................................14 Installing the knee switch that operates the fabric guide manually (option).........................................................16
Basic Adjustment .....................................................................................................................................................17 Adjusting the hem width..........................................................................................................................................18 Changing the spacer (for the fabric thickness) .......................................................................................................19 Adjusting the spacer (for the fabric edge) ............................................................................................................20 Adjusting the air blowers.........................................................................................................................................21
Sewing .......................................................................................................................................................................22 Hemming tubular goods..........................................................................................................................................23 Hemming flat sleeves..............................................................................................................................................25
Entering sewing data................................................................................................................................................28 Adjusting the machine speed..................................................................................................................................29 Adjusting the overlapping length.............................................................................................................................30 Adjusting the machine speed at the start of sewing ...............................................................................................31 Adjusting the machine speed at the end of sewing ................................................................................................34 Adjusting the stitch counter for the air blower for uncurling....................................................................................35 Adjusting the output counter ...................................................................................................................................36 Resetting the machine ............................................................................................................................................39
CCOONNTTEENNTTSS
1
1.Introduction 2.Symbols and/or icons of dangers, warnings and cautions
Be sure to study very carefully ffoorr ssaaffeettyy.
●This instruction manual describes the instructions for using this automatic sewing unit safely.
●Study this instruction manual very carefully and understand fully how to operate, check, adjust and maintainthe automatic unit before beginning any of the procedures.
●You always perform operations close to moving parts such as needles when using industrial sewing machines. Therefore, you have to keep in mind you could easily touch them. To prevent accidents, it is essential that you use the safe products supplied by Pegasus correctly. All the people who will use the automatic sewing unit must study this instruction manual and one for the sewing machine very carefully and then take necessary safety measures before beginning any of the procedures.
The symbols and/or icons shown below are used according to the degree of danger. To prevent accidents, study the contents very carefully and follow the instructions.
Warning labels should be plainly visible.
Attach new labels when they are stained or removed.
Contact our sales office when new labels are needed.
Symbols and/or icons of dangers, warnings and cautions that attract users’ attention
Indicates an immediate hazard to life or limb.
Indicates potential hazards to life or limb.
Indicates possible mistakes that could result in injury or damage.
DANGER
WARNING
CAUTION
2
3.Safety precautions
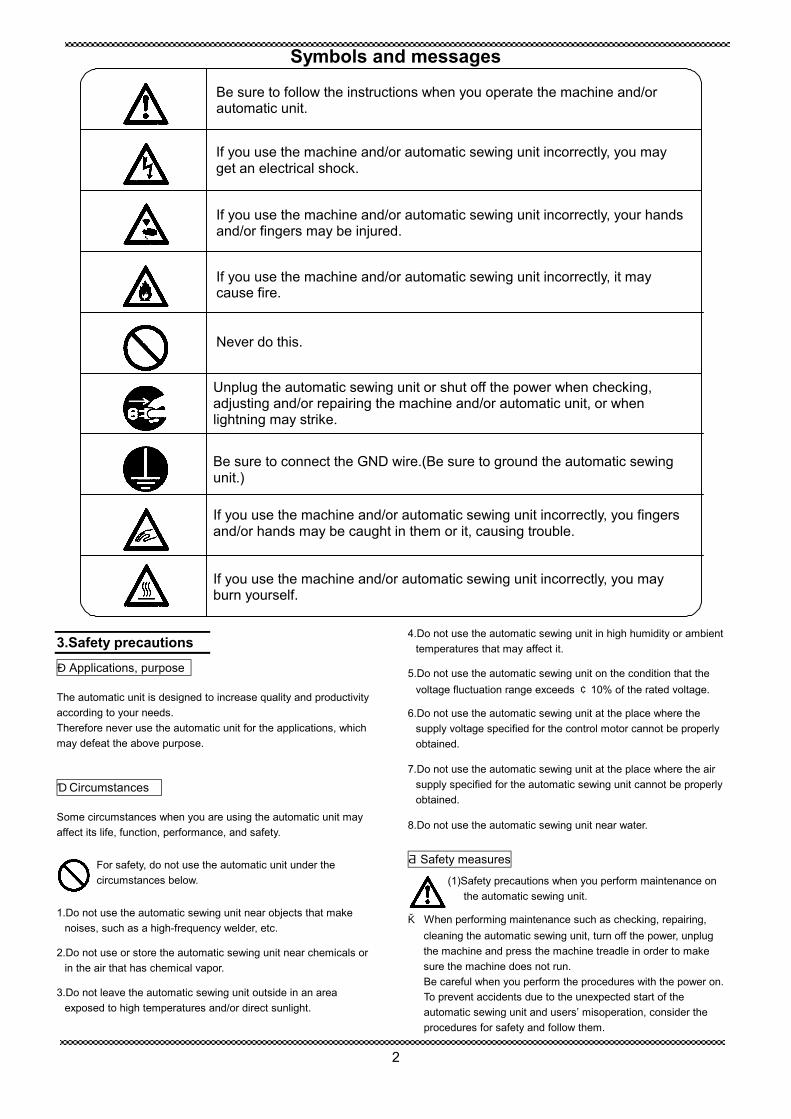
Symbols and messages
Be sure to follow the instructions when you operate the machine and/or automatic unit.
If you use the machine and/or automatic sewing unit incorrectly, your hands and/or fingers may be injured.
Never do this.
Unplug the automatic sewing unit or shut off the power when checking, adjusting and/or repairing the machine and/or automatic unit, or when lightning may strike.
If you use the machine and/or automatic sewing unit incorrectly, it may cause fire.
Be sure to connect the GND wire.(Be sure to ground the automatic sewing unit.)
If you use the machine and/or automatic sewing unit incorrectly, you fingers and/or hands may be caught in them or it, causing trouble.
If you use the machine and/or automatic sewing unit incorrectly, you may burn yourself.
If you use the machine and/or automatic sewing unit incorrectly, you may get an electrical shock.
①Applications, purpose
The automatic unit is designed to increase quality and productivity according to your needs. Therefore never use the automatic unit for the applications, which may defeat the above purpose.
②Circumstances
Some circumstances when you are using the automatic unit may affect its life, function, performance, and safety.
For safety, do not use the automatic unit under the circumstances below.
1.Do not use the automatic sewing unit near objects that make noises, such as a high-frequency welder, etc.
2.Do not use or store the automatic sewing unit near chemicals or in the air that has chemical vapor.
3.Do not leave the automatic sewing unit outside in an area exposed to high temperatures and/or direct sunlight.
4.Do not use the automatic sewing unit in high humidity or ambient temperatures that may affect it.
5.Do not use the automatic sewing unit on the condition that the voltage fluctuation range exceeds ±10% of the rated voltage.
6.Do not use the automatic sewing unit at the place where the supply voltage specified for the control motor cannot be properly obtained.
7.Do not use the automatic sewing unit at the place where the air supply specified for the automatic sewing unit cannot be properly obtained.
8.Do not use the automatic sewing unit near water.
③Safety measures
(1)Safety precautions when you perform maintenance on the automatic sewing unit.
● When performing maintenance such as checking, repairing, cleaning the automatic sewing unit, turn off the power, unplug the machine and press the machine treadle in order to make sure the machine does not run. Be careful when you perform the procedures with the power on. To prevent accidents due to the unexpected start of the automatic sewing unit and users’ misoperation, consider the procedures for safety and follow them.
3
4.Warnings and cautions in each procedure
● Only well-trained people should perform routine daily maintenance and/or repair the machine and/or automatic unit.
● Do not modify the machine and automatic unit yourself.
※ Consult your local Pegasus’ sales office or representative for modification.
(2) Before operating the automatic sewing unit
● Before operating the automatic sewing unit, check the machine head and automatic sewing unit to make sure they do not have any damage and/or defects. Repair or replace any defective parts immediately.
● To prevent accidents, always make sure the safety covers and safety guards are properly secured. Never remove the safety covers and safety guards.
(3)Training
To prevent accidents, operators and service/maintenance personnel should have proper knowledge and skills for safe operation. Supervisors should make educational plans for these people in advance and carry them out.
①Unpacking
The machine and automatic unit are packed in boxes (and plastic bags) in the factory before shipment. Unpack the boxes and bags properly and sequentially while checking the contents are not upside down by following the instructions on them.
② Transportation
1.More than two people should move the automatic sewing unit.
2. When moving the automatic sewing unit, considerable care should be taken not to apply excessive physical shock and shake because the sewing machine head could be removed and dropped from the unit.
③Installation , preparation
Connecting the air lines
1.Always turn off the power first and then connect the air lines to the joints. Be sure to connect all the air lines before connecting them to the air source.
2.When connecting the air lines to the joints, be sure to insert the joints to the proper depth of the air lines and fasten securely.
3.Do not allow excessive force to be exerted on the air lines while using the automatic sewing unit.
4. Do not bend the air lines too much.
5.If necessary, protect the air lines by positioning them safely and/or using the cover.
6. Never use staples to secure the air lines. Otherwise it may cause damage.
Connecting the cords
1. When connecting the power cord, be sure to turn off the power and disconnect the power plug from the outlet.
2. Check the voltage designation to make sure the power relay cord matches the local supply voltage. The use of wrong cord may cause damage to parts and/or fire.
3.Do not allow excessive force to be exerted on the cords while using the automatic sewing unit.
4. Do not bend the cords too much.
5.When connecting the cords, check to make sure there is at least 25mm between the moving parts, such as the pulley or V belt and the cords.
6.If necessary, protect the cords by positioning them safely and/or using the cover.
7. Never use staples to secure the cords. Otherwise it may cause damage, a short circuit and/or a fire.
Ground
1.Connect the GND wire correctly. Do not connect the GND wires of other machines to the GND terminal of this unit.
2. Connect the GND wire securely to the specified terminal onthe machine bed.
4
④Before operation
1.Check the cords, connector and air lines to make sure they do nothave any damage, disconnection’s or tangles and then turn on thepower.
2. Never bring your hands and/or any part of your body close to the needle when turning on the power.
3.Well-trained people who have studied this instruction manual verycarefully should use the automatic sewing unit.
4.Read ad study the contents on “2. Symbols and/or icons of dangers, warnings and cautions” very carefully and then provide users with safety training if necessary.
⑤Precautions for work and operation
1. The area near the presser foot is very dangerous during sewing. Do not bring your hands and/or any part of your body close to the presser foot.
2.To prevent accidents, be careful that any foreign matter such as water, other liquids or metals do not get into the automatic sewing unit.
3.Wear clothes that cannot be caught in the automatic unit.
4. Do not leave tools or other unnecessary objects near the automatic unit.
5.To prevent accidents, always make sure the safety cover are properly secured.
6.Drain and clean the filter regulator periodically if the automatic sewing unit is pneumatic. Otherwise drainage will flow into the solenoid valve and/or air cylinder, causing trouble.
7.Always turn off the power before leaving the automatic unit.
8.If any trouble occurs, stop using the automatic unit and turn off the power. Check, repair and/or perform other necessary procedures immediately.
9. To prevent injury to your hands and/or fingers by the cutting edge of the knife, great care should be taken when you perform the procedures.
⑥Maintenance, check, repair
1.Well-trained people who have studied this instruction manual verycarefully should maintain, check and repair the machine and automatic unit.
2.Perform routine daily maintenance and periodical maintenance byfollowing this instruction manual.
3.Use Pegasus’ genuine parts when repairing and/or replacing parts. Pegasus assumes no responsibility for accidents caused by improper repair/adjustment and/or use of parts which are not genuine.
4. Do not modify the automatic unit yourself. Pegasus assumes no responsibility for accidents caused by modification.
5.After maintaining, checking, and/or repairing the machine and automatic unit, always make sure that any trouble dose not occur when the power is turned on.
6.To avoid trouble, before and after operation clean the automatic sewing unit by removing lint and contaminants.
7.If the safety covers are removed for a check and maintenance, besure to replace them.
5
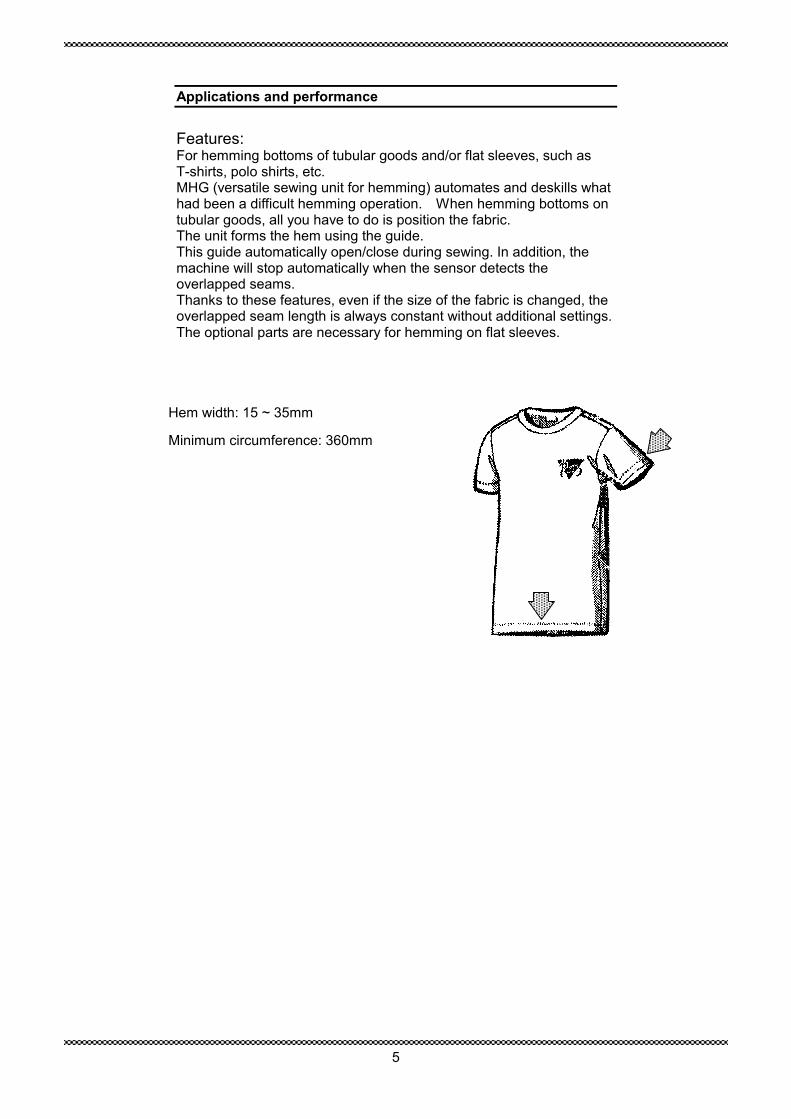
Applications and performance
Features: For hemming bottoms of tubular goods and/or flat sleeves, such as T-shirts, polo shirts, etc. MHG (versatile sewing unit for hemming) automates and deskills what had been a difficult hemming operation. When hemming bottoms on tubular goods, all you have to do is position the fabric. The unit forms the hem using the guide. This guide automatically open/close during sewing. In addition, the machine will stop automatically when the sensor detects the overlapped seams. Thanks to these features, even if the size of the fabric is changed, the overlapped seam length is always constant without additional settings. The optional parts are necessary for hemming on flat sleeves.
Hem width: 15 ~ 35mm
Minimum circumference: 360mm

6
IInnssttaallllaattiioonn
MHG -100 Series Versatile sewing unit for hemming
7
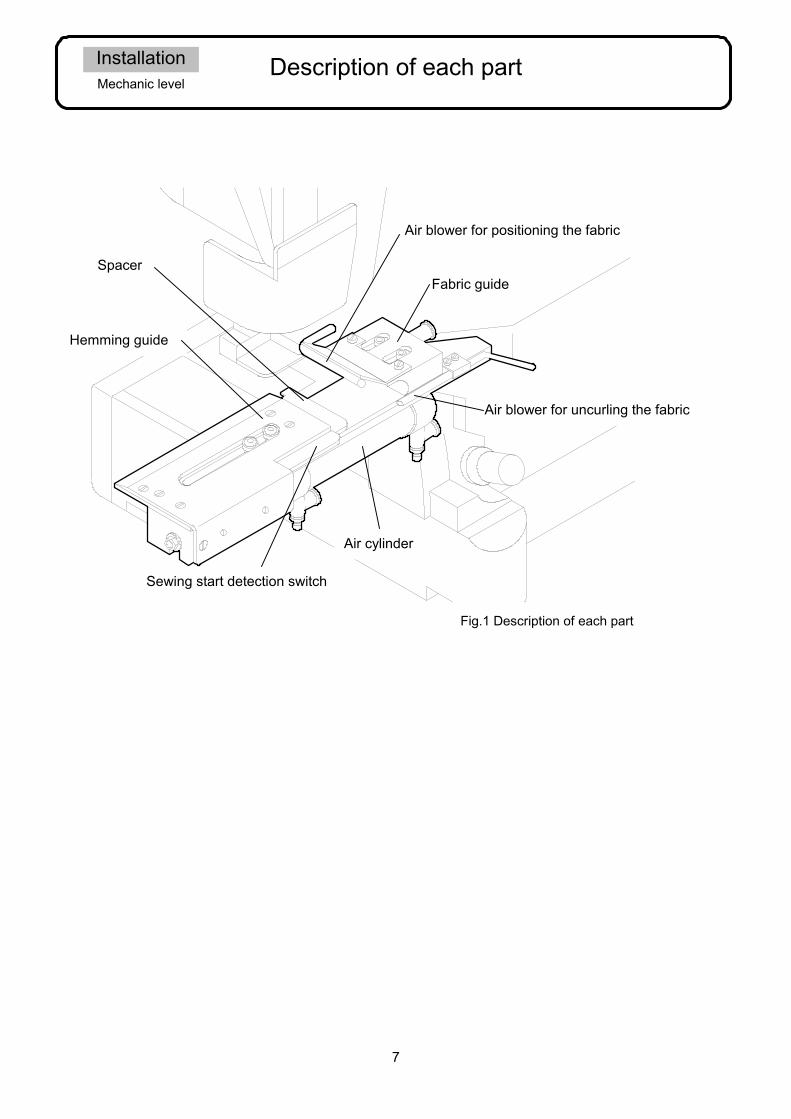
Installation Mechanic level
Description of each part
Fig.1 Description of each part
Spacer
Hemming guide
Sewing start detection switch
Air cylinder
Air blower for uncurling the fabric
Fabric guide
Air blower for positioning the fabric
8
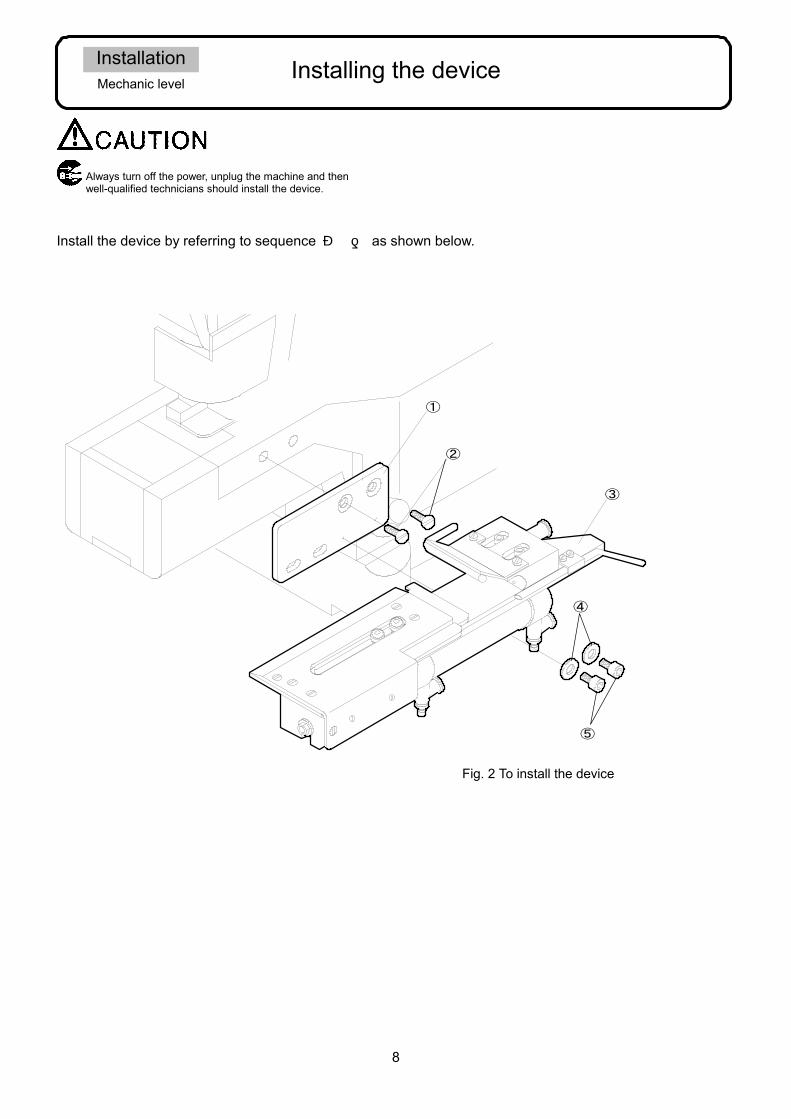
Installation Mechanic level
Installing the device
Fig. 2 To install the device
①
②
③
④
⑤
Always turn off the power, unplug the machine and then well-qualified technicians should install the device.
Install the device by referring to sequence ①~⑤ as shown below.
9
Installation Mechanic level
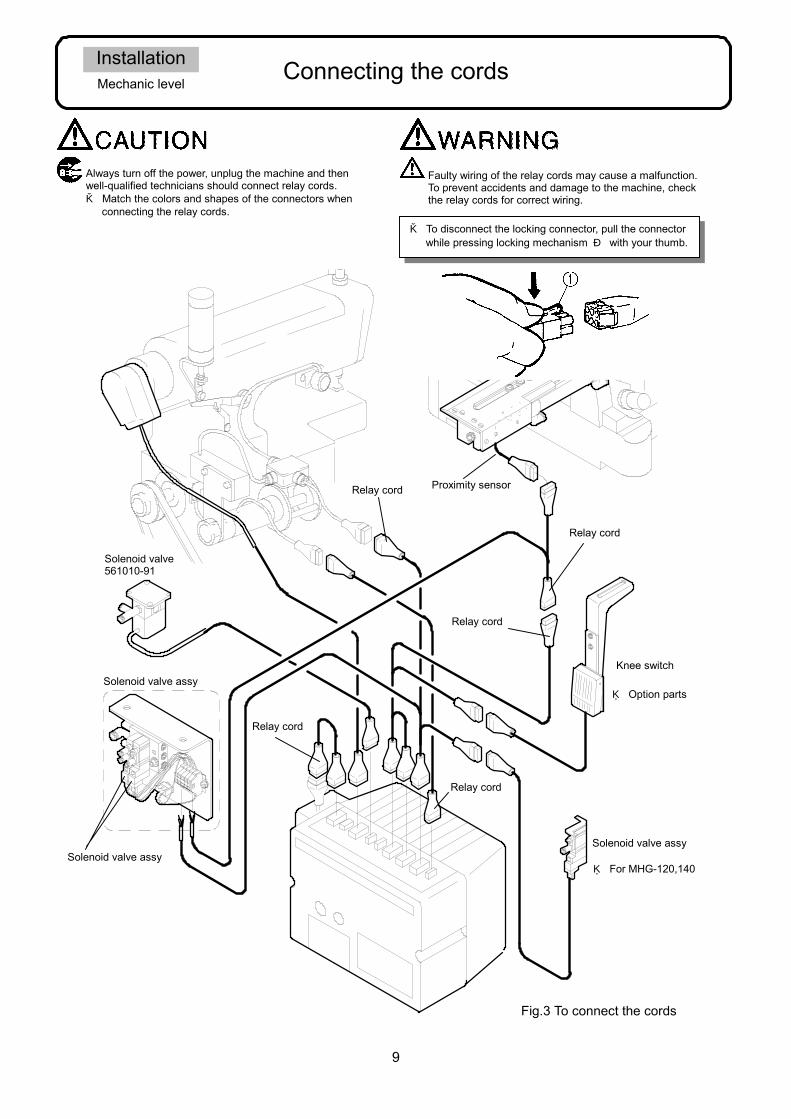
Connecting the cords
Always turn off the power, unplug the machine and then well-qualified technicians should connect relay cords. ● Match the colors and shapes of the connectors when
connecting the relay cords.
Faulty wiring of the relay cords may cause a malfunction. To prevent accidents and damage to the machine, check the relay cords for correct wiring.
Proximity sensor Relay cord
Relay cord
Relay cord
Solenoid valve 561010-91
Solenoid valve assy
Solenoid valve assy
Relay cord
Relay cord
Knee switch
※ Option parts
Solenoid valve assy
※ For MHG-120,140
Fig.3 To connect the cords
● To disconnect the locking connector, pull the connector while pressing locking mechanism ① with your thumb.
10
Installation Mechanic level
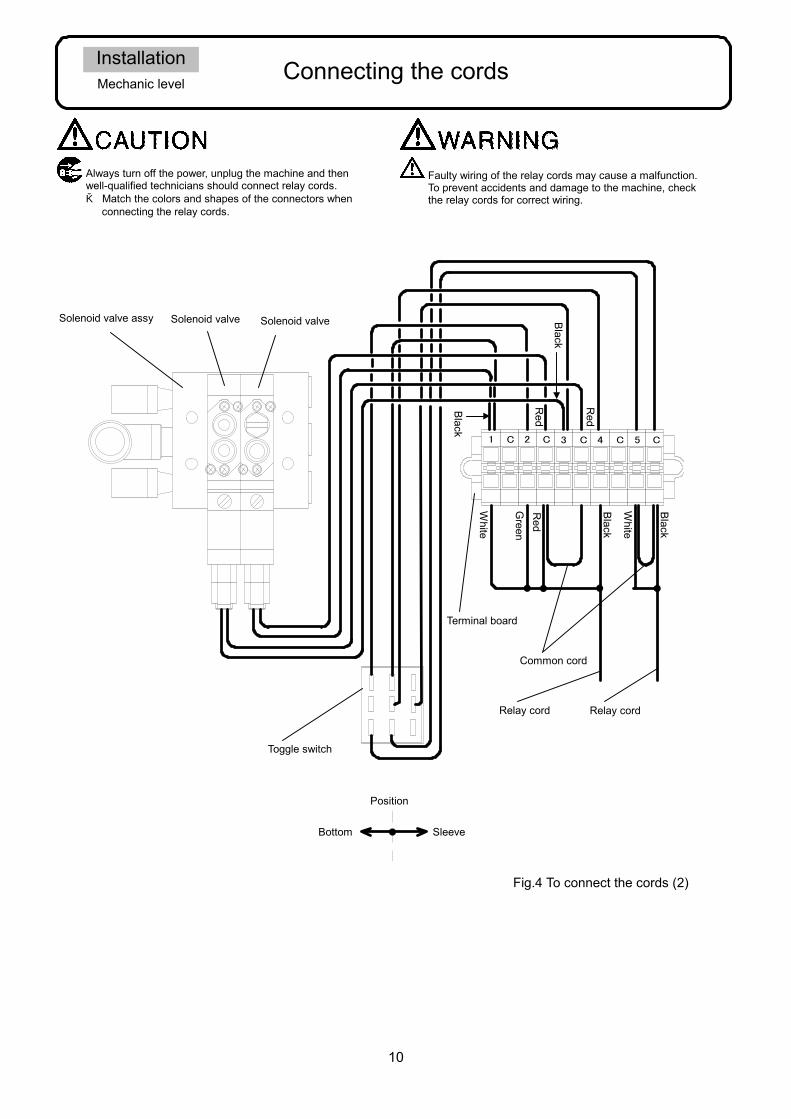
Connecting the cords
Always turn off the power, unplug the machine and then well-qualified technicians should connect relay cords. ● Match the colors and shapes of the connectors when
connecting the relay cords.
Faulty wiring of the relay cords may cause a malfunction. To prevent accidents and damage to the machine, check the relay cords for correct wiring.
Fig.4 To connect the cords (2)
1 C C2 3 C 4 C 5 C
Solenoid valve assy Solenoid valve Solenoid valve Black
Red
Black
Red
White
White
Black
Black
Red
Green
Terminal board
Common cord
Relay cord Relay cord
Position
Sleeve Bottom
Toggle switch
11
Installation Mechanic level
1
2
3
4
5
Connecting the air lines
(MHG-110, 130)
Fig.5 To connect the air lines (MHG-110, 130)
Always turn off the power and shut down the air compressor first and well-qualified technicians should connect the air line. Before connecting to the air compressor (air source), all the air lines should be connected completely.
Improper piping of the air lines may cause a malfunction. To prevent accidents and damage to the machine, check all the air lines for correct piping.
12
Installation Mechanic level
Connecting the air lines
(MHG-140)
Fig.6 To connect the air lines (MHG-140)
1
2
3
4
5
Always turn off the power and shut down the air compressor first and well-qualified technicians should connect the air line. Before connecting to the air compressor (air source), all the air lines should be connected completely.
Improper piping of the air lines may cause a malfunction. To prevent accidents and damage to the machine, check all the air lines for correct piping.
13
Installation Mechanic level
Adjusting the filter regulator
Fig. 8. To adjust the filter regulator
To increase pressure
To decrease pressure
④
⑤
⑥
① ②
③
To adjust the filter regulator, turn off the power and finish air piping and then turn on the air compressor.
Be sure to drain periodically before drainage level reaches the baffle. Otherwise the drainage will flow into the solenoid valve or air cylinder and may cause trouble. Note that drainage spouts downward with air.
(1) Connecting the air hose Fasten coupler ① firmly onto the air hose from the air compressor with hose clamp ②. Pull collar ③ toward you (see the illustration) and then press the air hose onto the joint on the filter regulator. Replace collar ③.
(2) Adjusting air pressure
Pull up knob ④ on filter regulator until it clicks. Then set the air pressure at 0.5Mpa. (5kgf/cm2).
●To increase the air pressure, turn knob ④ clockwise. ●To decrease the air pressure, turn knob ④
counterclockwise.
(3) Draining the filter regulator
Drain the filter regulator by pressing button ⑥ before drainage level reaches baffle ⑤.
Fig. 7. To connect the air hose
14
Installation Mechanic level
Installing the optional parts for hemming flat sleeves
Toggle Switch
Fig.9 Toggle switch
Fig. 10 To install the optional parts for hemming flat sleeves.
Always turn off the power, unplug the machine and then well-qualified technicians should install the device.
1.Flip the switch to [Hemming sleeve].
2. Install the optional part for sleeve hemming.
15
Installation Mechanic level
Installing the optional parts for hemming flat sleeves
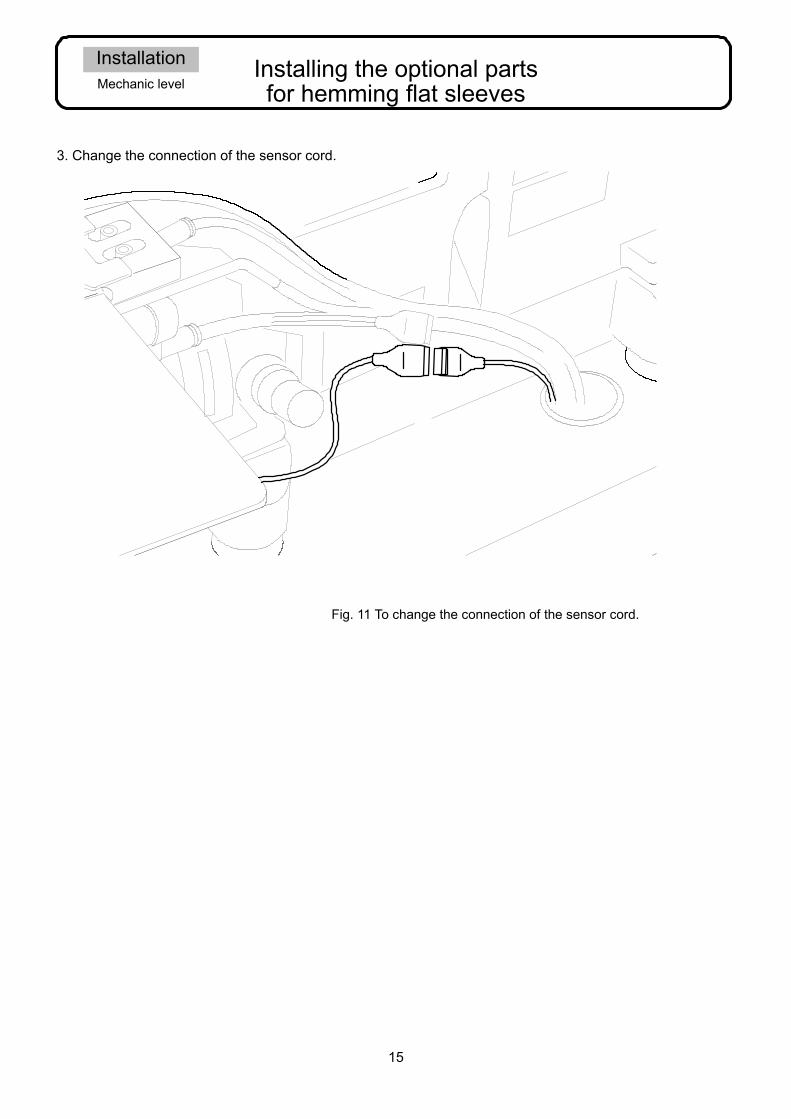
Fig. 11 To change the connection of the sensor cord.
3. Change the connection of the sensor cord.
16
Installation Mechanic level
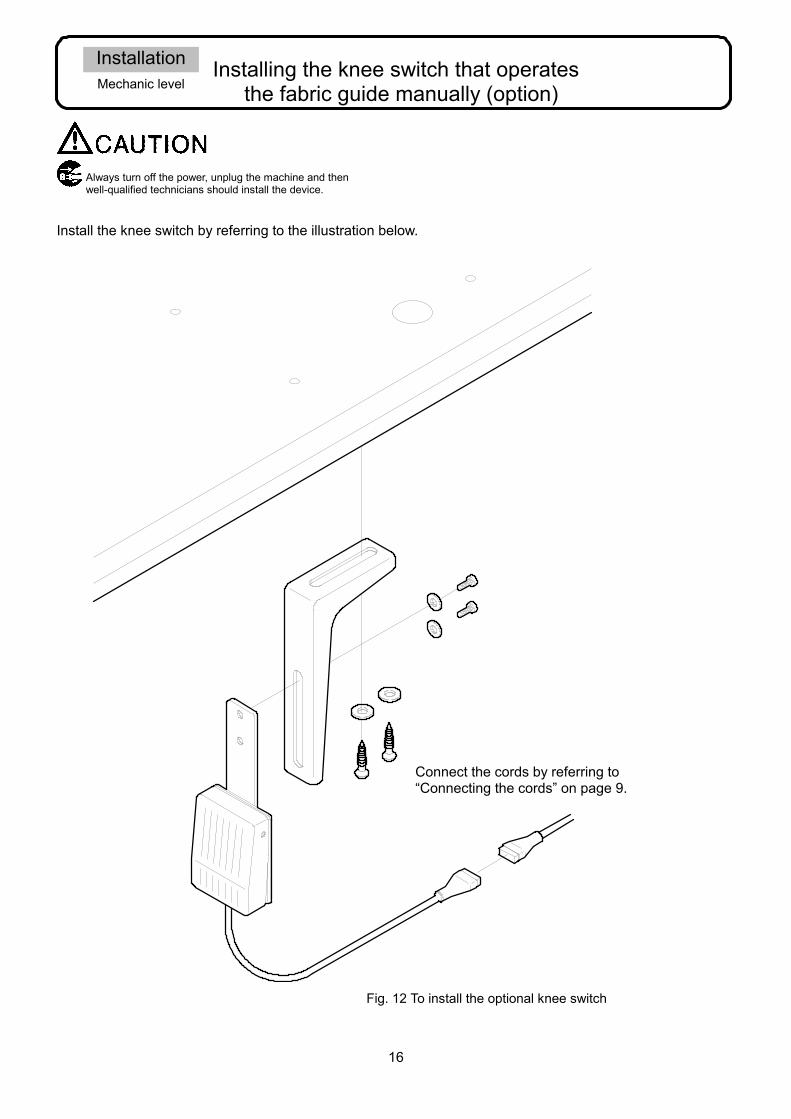
Installing the knee switch that operates
the fabric guide manually (option)
Fig. 12 To install the optional knee switch
Connect the cords by referring to “Connecting the cords” on page 9.
Always turn off the power, unplug the machine and then well-qualified technicians should install the device.
Install the knee switch by referring to the illustration below.
17
BBaassiicc AAddjjuussttmmeenntt
MHG -100 series Versatile sewing unit for hemming
18
Basic Adjustment Mechanic level
Adjusting the hem width
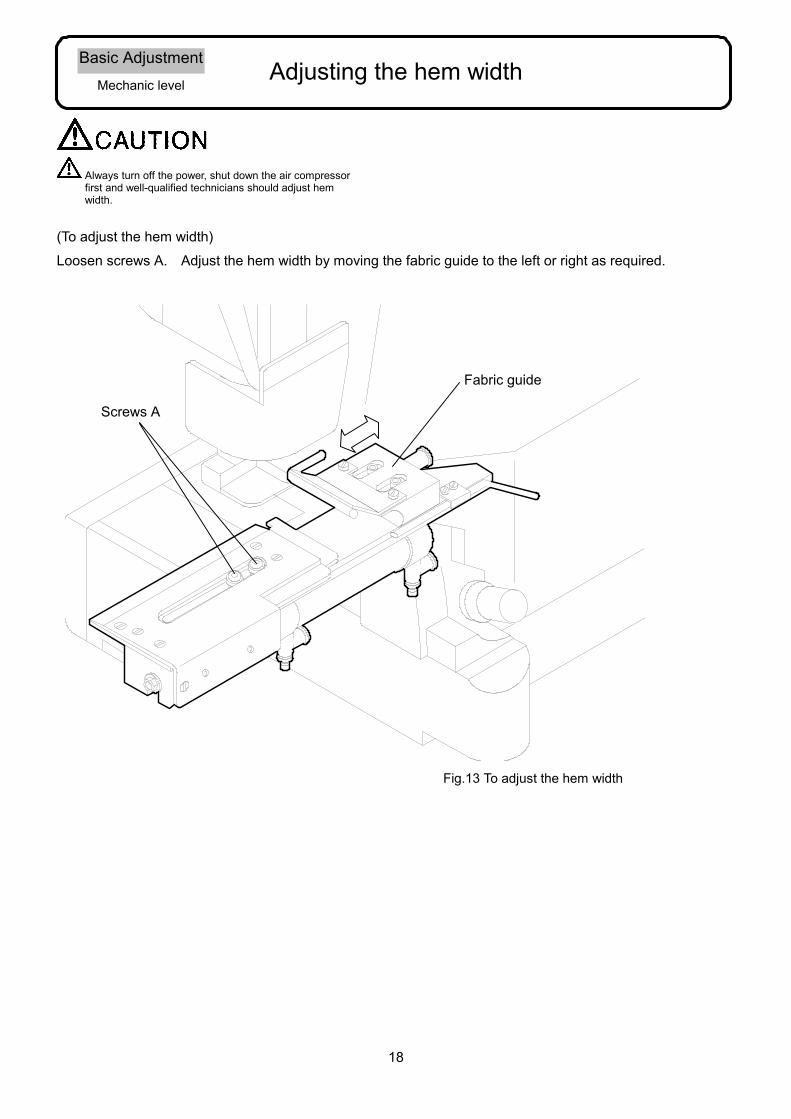
Always turn off the power, shut down the air compressor first and well-qualified technicians should adjust hem width.
Fig.13 To adjust the hem width
Screws A
Fabric guide
(To adjust the hem width)
Loosen screws A. Adjust the hem width by moving the fabric guide to the left or right as required.

19
Basic Adjustment Mechanic level
Changing the spacer (for the fabric thickness)
Always turn off the power shut down the air compressor first and well-qualified technicians should change the spacer.
Fig.14 To change the spacer
Spacer
t=1mm,2mm,3mm
Screws A
(To change the spacer.)
Remove screws A. Change the spacer according to the fabric thickness.
Option parts t=1.5mm,2.5mm
※ The fabric guide for light weight fabrics is also available as an optionai part.
20
Basic Adjustment Mechanic level
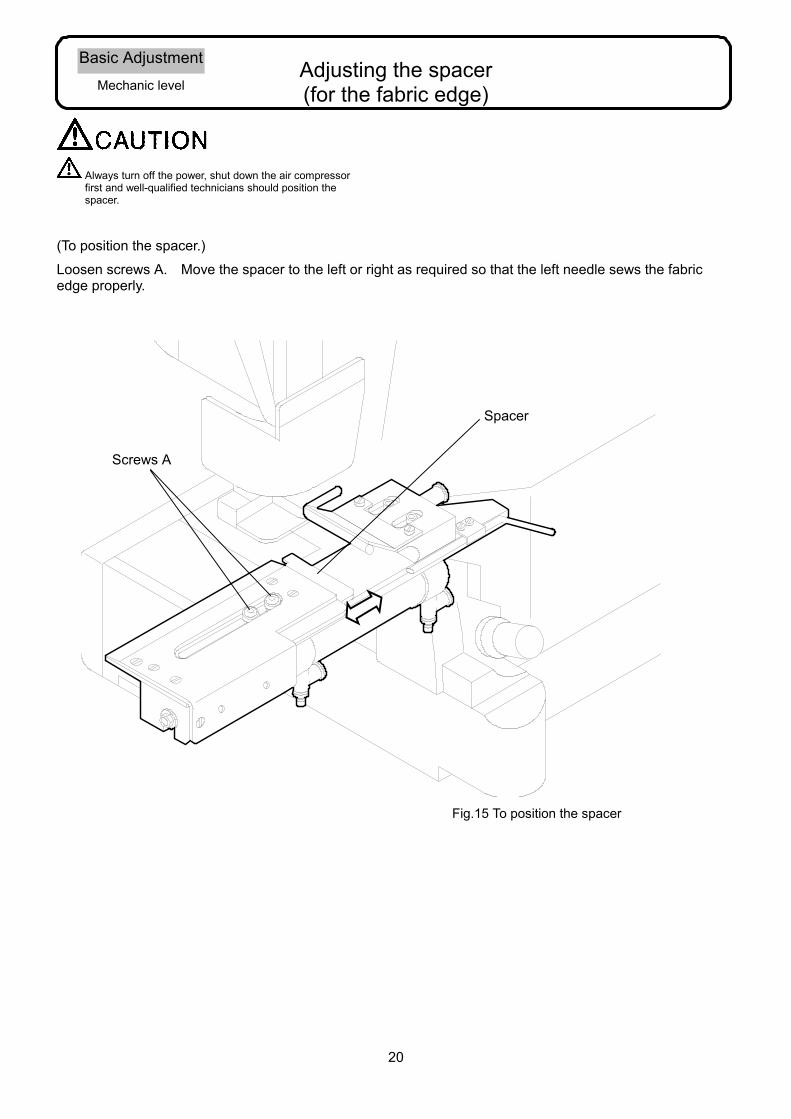
Adjusting the spacer (for the fabric edge)
Always turn off the power, shut down the air compressor first and well-qualified technicians should position the spacer.
Fig.15 To position the spacer
Screws A
Spacer
(To position the spacer.) Loosen screws A. Move the spacer to the left or right as required so that the left needle sews the fabric edge properly.
21
Basic Adjustment Mechanic level
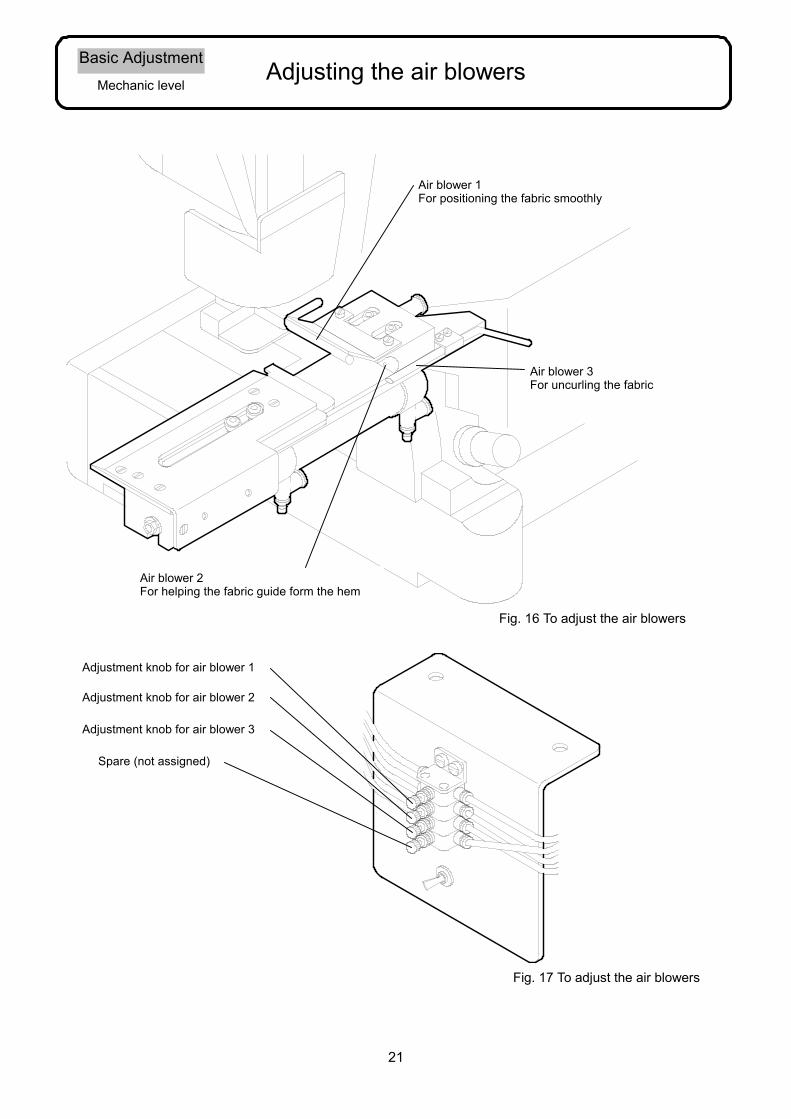
Adjusting the air blowers
Fig. 16 To adjust the air blowers
Air blower 1 For positioning the fabric smoothly
Air blower 3 For uncurling the fabric
Air blower 2 For helping the fabric guide form the hem
Fig. 17 To adjust the air blowers
Adjustment knob for air blower 1
Adjustment knob for air blower 2
Adjustment knob for air blower 3
Spare (not assigned)
22
SSeewwiinngg
MHG -100 series Versatile sewing unit for hemming
23
Sewing
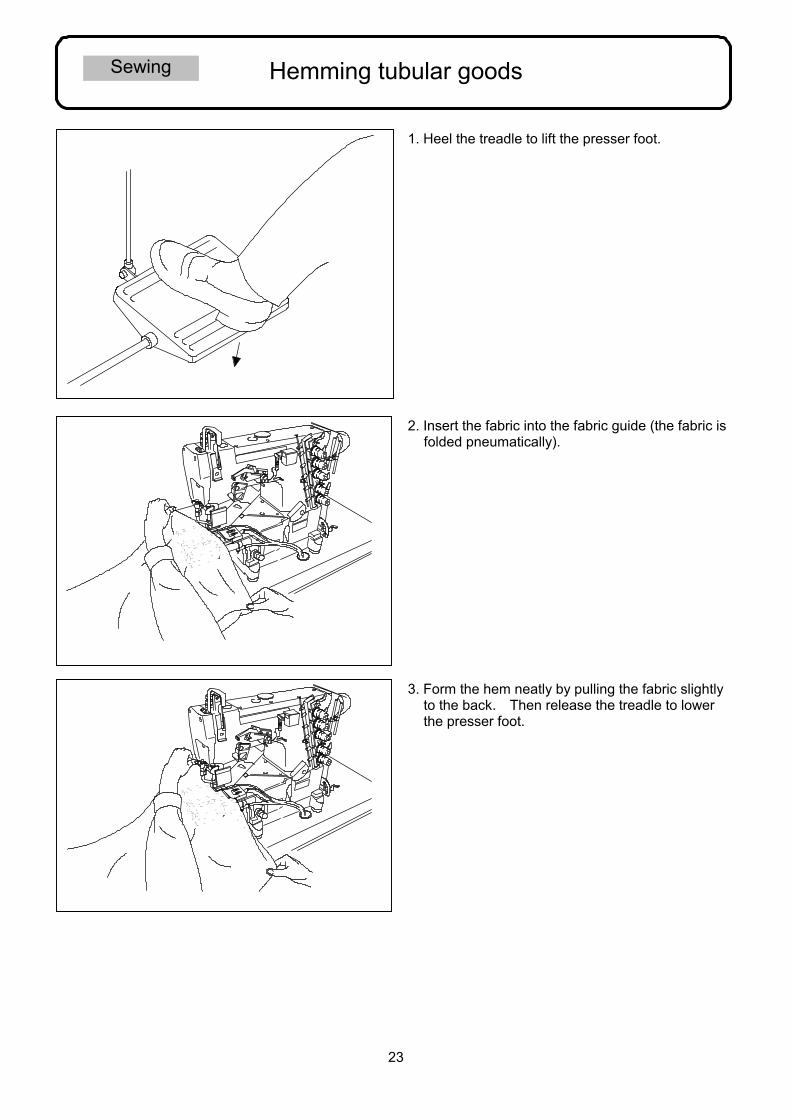
Hemming tubular goods
1. Heel the treadle to lift the presser foot.
2. Insert the fabric into the fabric guide (the fabric is folded pneumatically).
3. Form the hem neatly by pulling the fabric slightly to the back. Then release the treadle to lower the presser foot.
24
Sewing
Hemming tubular goods
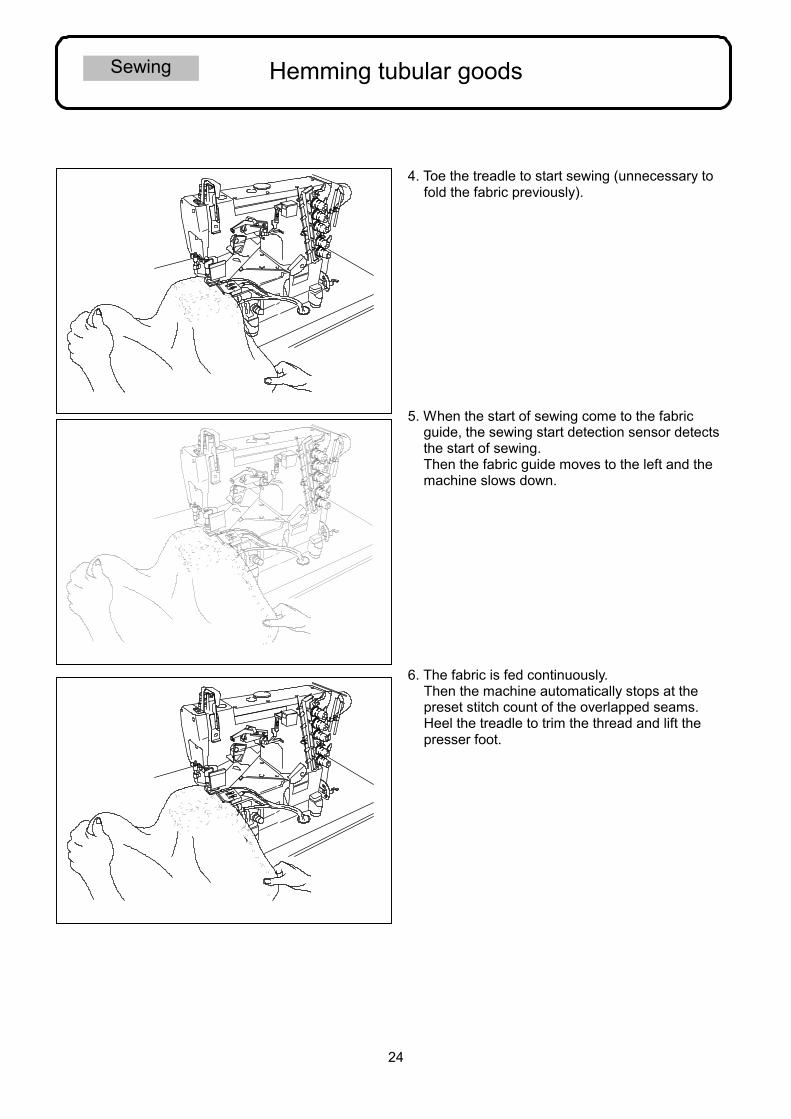
4. Toe the treadle to start sewing (unnecessary to fold the fabric previously).
5. When the start of sewing come to the fabric guide, the sewing start detection sensor detects the start of sewing. Then the fabric guide moves to the left and the machine slows down.
6. The fabric is fed continuously. Then the machine automatically stops at the preset stitch count of the overlapped seams. Heel the treadle to trim the thread and lift the presser foot.
25
Sewing
Hemming flat sleeves
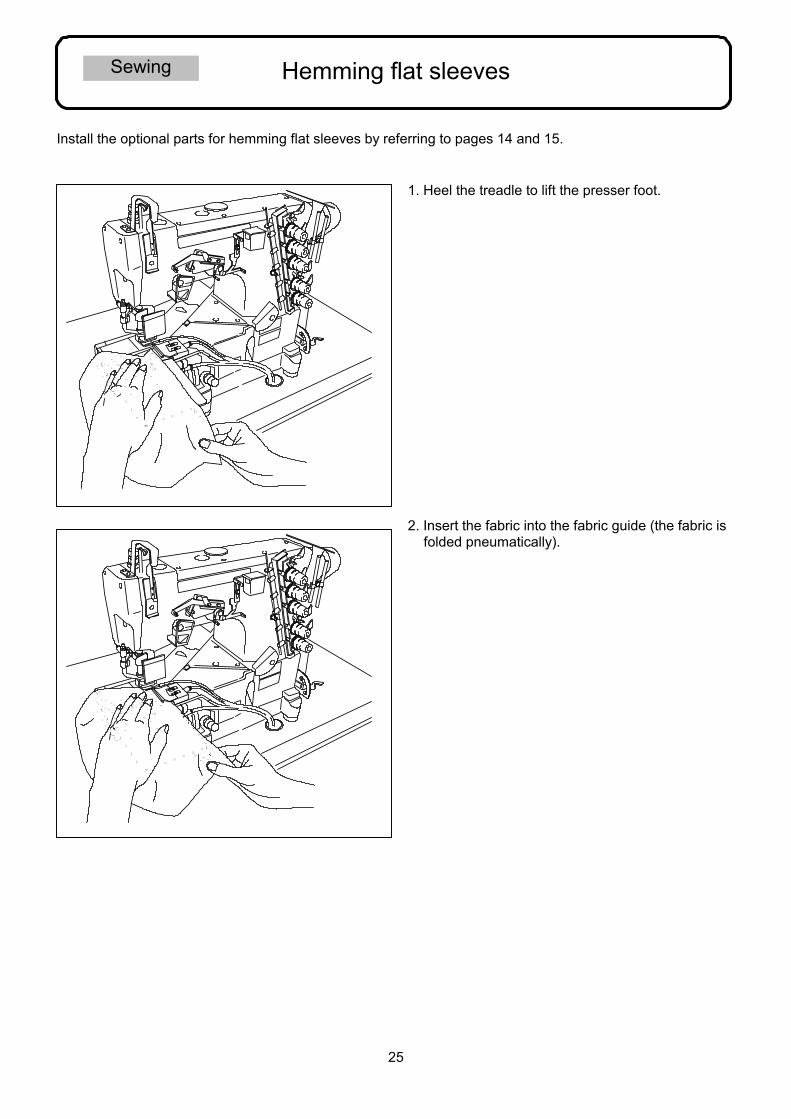
Install the optional parts for hemming flat sleeves by referring to pages 14 and 15.
2. Insert the fabric into the fabric guide (the fabric is folded pneumatically).
1. Heel the treadle to lift the presser foot.
26
Sewing
Hemming flat sleeves
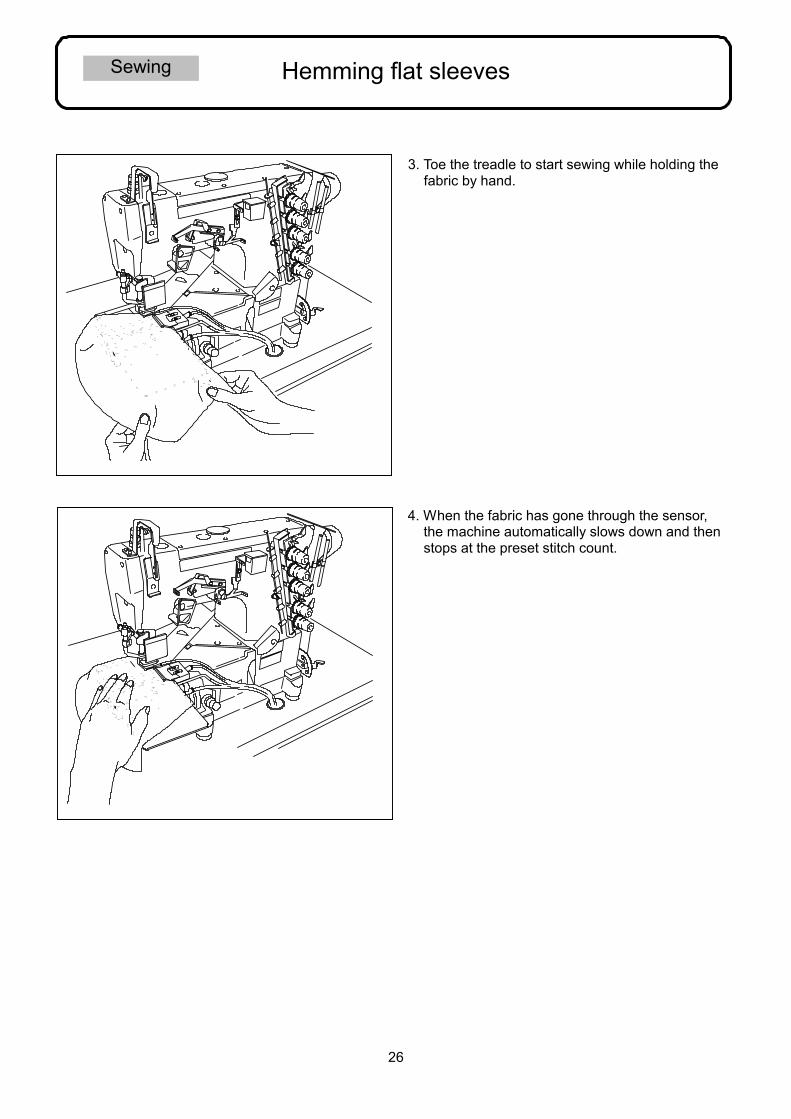
3. Toe the treadle to start sewing while holding the fabric by hand.
4. When the fabric has gone through the sensor, the machine automatically slows down and then stops at the preset stitch count.
27
Sewing
Hemming flat sleeves
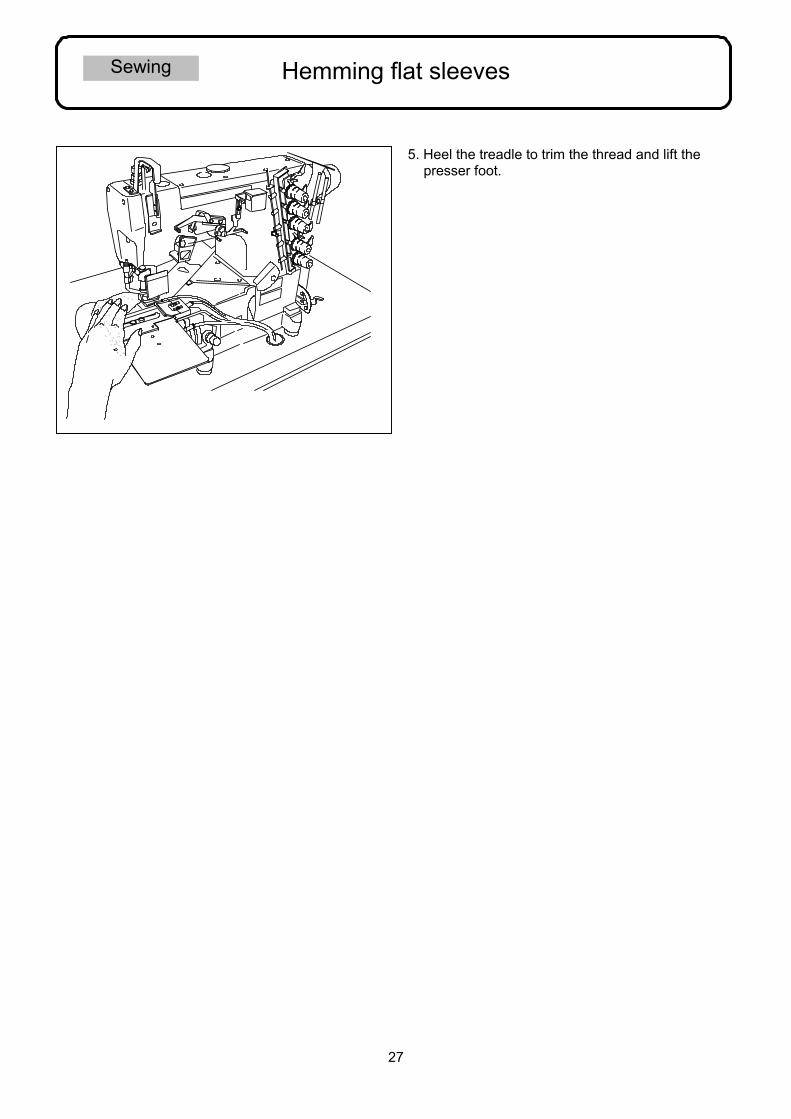
5. Heel the treadle to trim the thread and lift the presser foot.
28
EEnntteerriinngg sseewwiinngg ddaattaa
MHG -100 series Versatile sewing unit for hemming
29
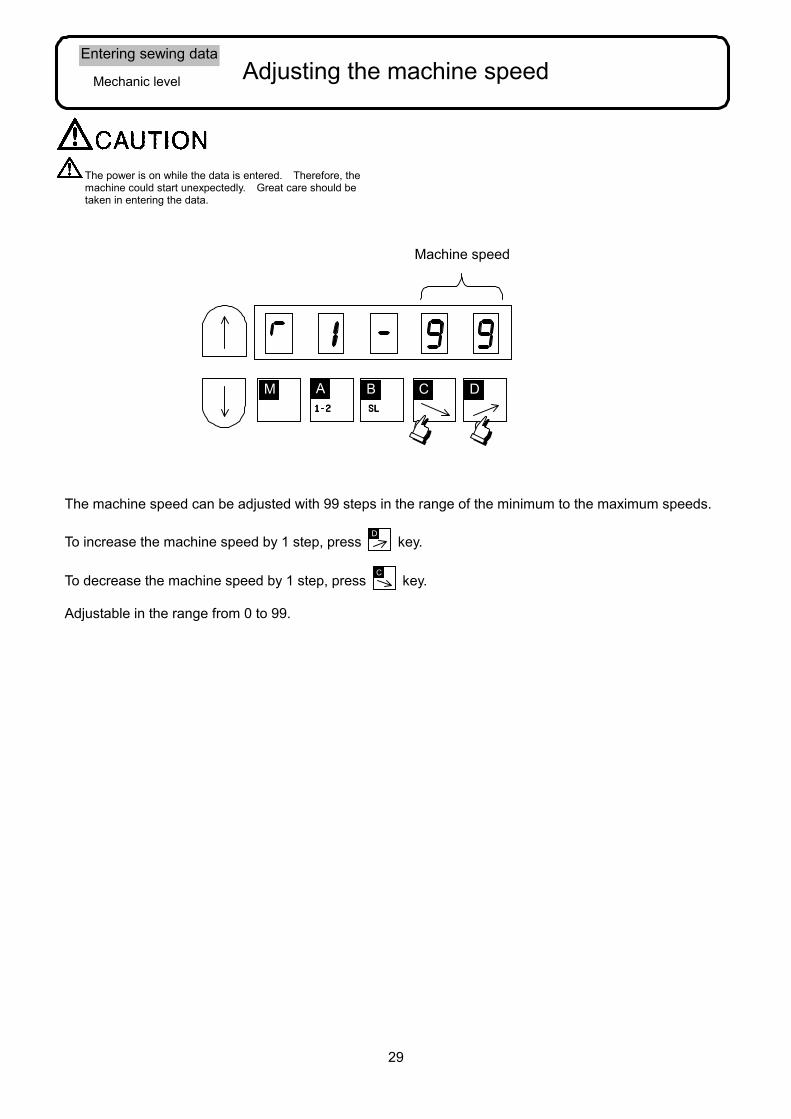
Entering sewing data
Mechanic level
Adjusting the machine speed
The power is on while the data is entered. Therefore, the machine could start unexpectedly. Great care should be taken in entering the data.
The machine speed can be adjusted with 99 steps in the range of the minimum to the maximum speeds. To increase the machine speed by 1 step, press
D key.
To decrease the machine speed by 1 step, press
C key.
Adjustable in the range from 0 to 99.
M 1111----2222 SLSLSLSL
A B C D
Machine speed
30
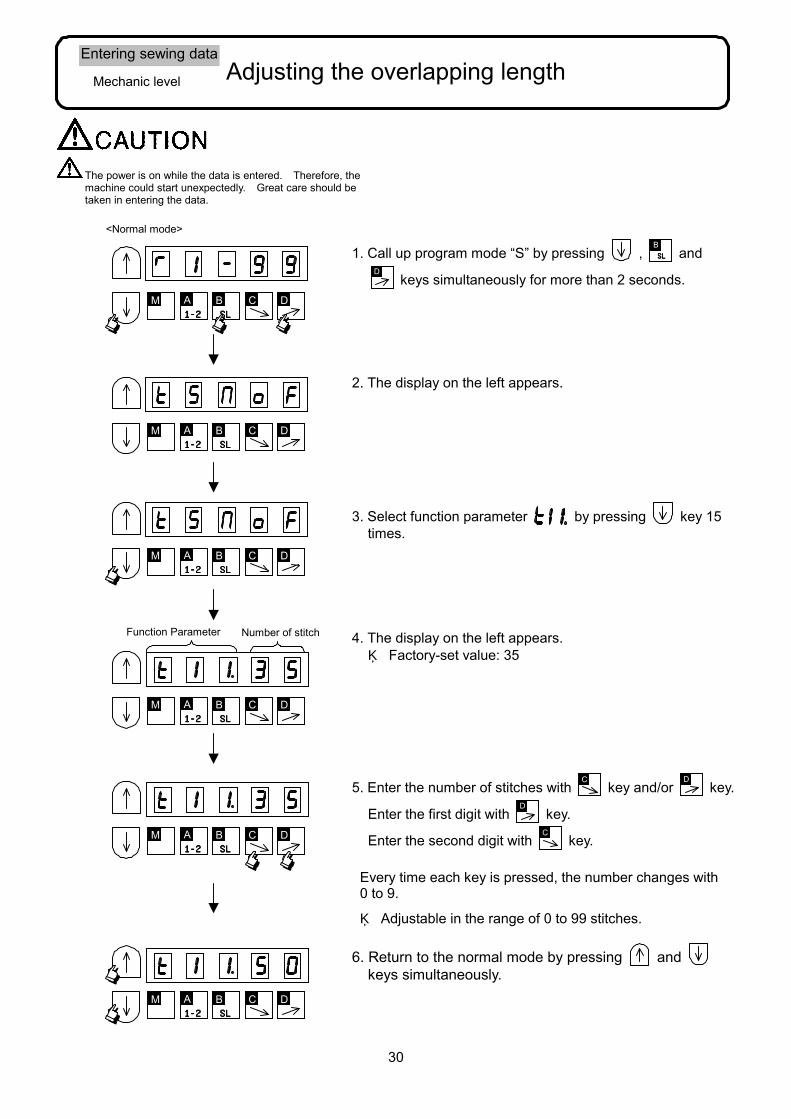
Entering sewing data
Mechanic level
Adjusting the overlapping length
The power is on while the data is entered. Therefore, the machine could start unexpectedly. Great care should be taken in entering the data.
3. Select function parameter by pressing key 15 times.
M 1111----2222 SLSLSLSL A B C D
M 1111----2222 SLSLSLSL A B C D
M 1111----2222 SLSLSLSL A B C D
M 1111----2222 SLSLSLSL A B C D
M 1111----2222 SLSLSLSL A B C D
Function Parameter Number of stitch
M 1111----2222 SLSLSLSL A B C D
<Normal mode>
1. Call up program mode “S” by pressing , SLSLSLSLB
and D
keys simultaneously for more than 2 seconds.
5. Enter the number of stitches with C
key and/or D
key.
Enter the first digit with D
key.
Enter the second digit with C
key.
6. Return to the normal mode by pressing and keys simultaneously.
2. The display on the left appears.
4. The display on the left appears. ※ Factory-set value: 35
Every time each key is pressed, the number changes with 0 to 9.
※ Adjustable in the range of 0 to 99 stitches.
31
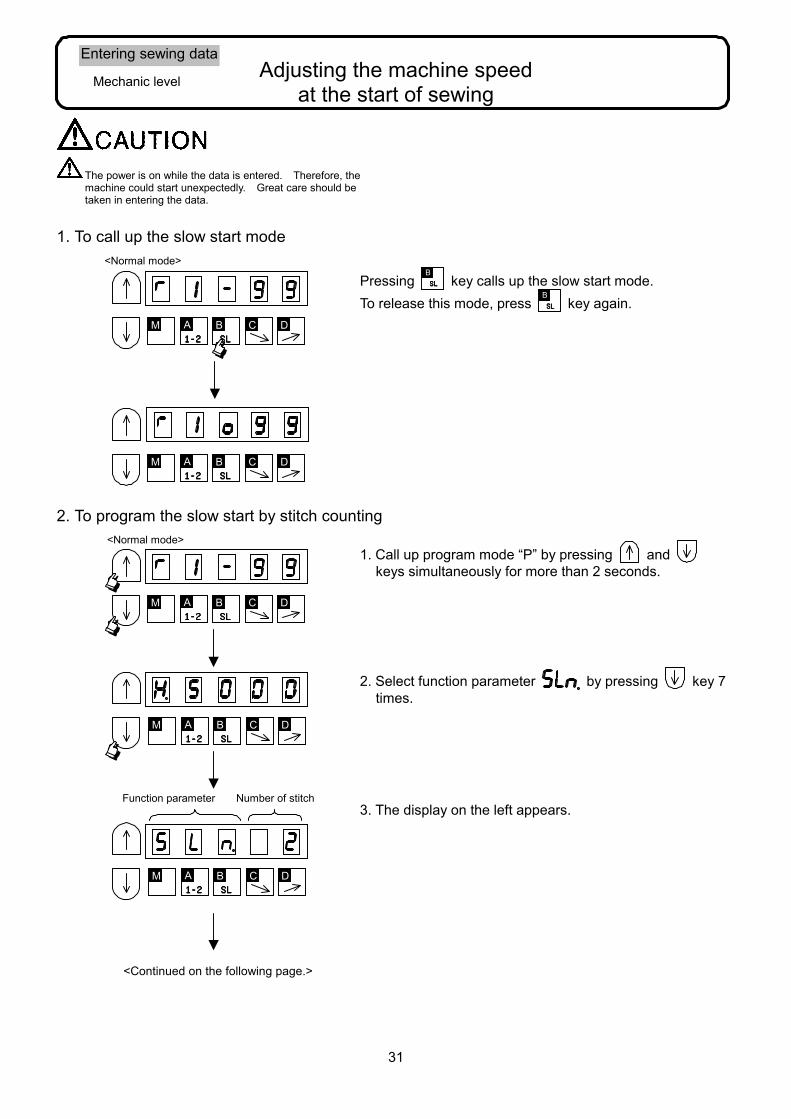
Entering sewing data
Mechanic level
Adjusting the machine speed at the start of sewing
1. Call up program mode “P” by pressing and keys simultaneously for more than 2 seconds.
The power is on while the data is entered. Therefore, the machine could start unexpectedly. Great care should be taken in entering the data.
Pressing SLSLSLSLB
key calls up the slow start mode. To release this mode, press SLSLSLSL
B
key again. M
1111----2222 SLSLSLSL A B C D
M 1111----2222 SLSLSLSL A B C D
<Normal mode>
M 1111----2222 SLSLSLSL A B C D
M 1111----2222 SLSLSLSL A B C D
M 1111----2222 SLSLSLSL A B C D
<Continued on the following page.>
Function parameter Number of stitch
<Normal mode>
1. To call up the slow start mode
2. To program the slow start by stitch counting
2. Select function parameter by pressing key 7 times.
3. The display on the left appears.
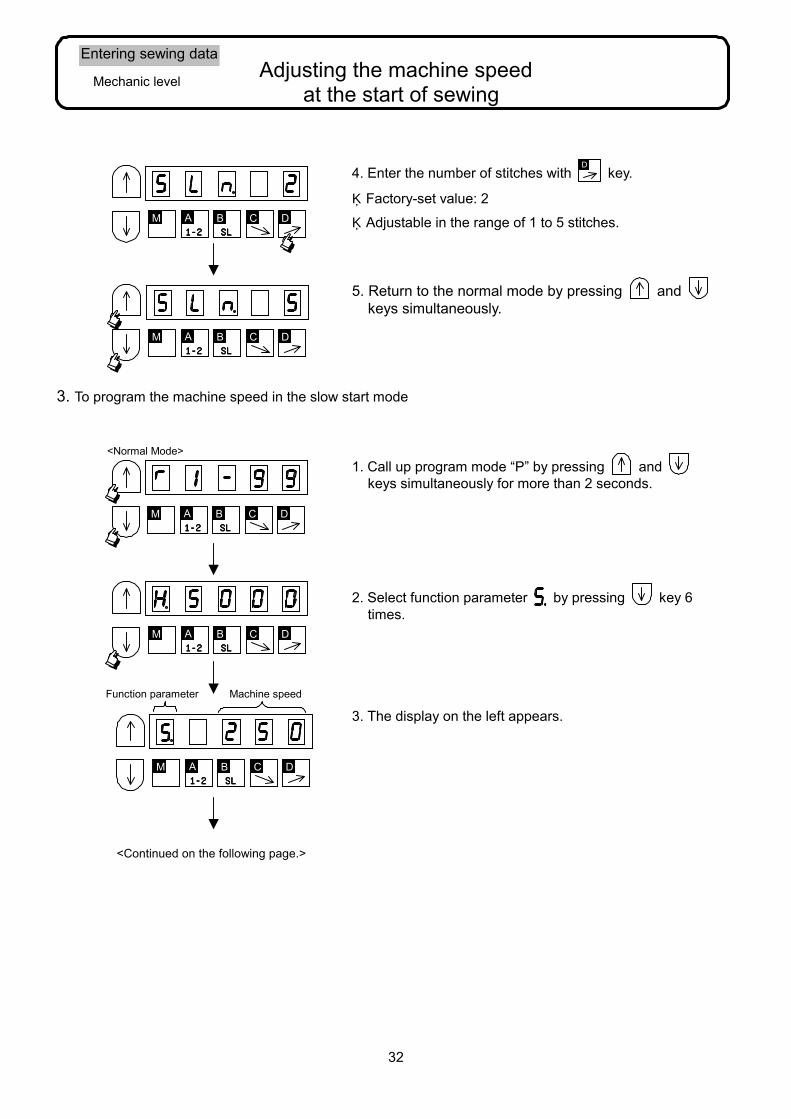
32
Entering sewing data
Mechanic level
Adjusting the machine speed at the start of sewing
4. Enter the number of stitches with D
key.
M 1111----2222 SLSLSLSL A B C D
M 1111----2222 SLSLSLSL A B C D
M 1111----2222 SLSLSLSL A B C D
<Normal Mode>
Function parameter Machine speed
M 1111----2222 SLSLSLSL A B C D
M 1111----2222 SLSLSLSL A B C D
<Continued on the following page.>
※Factory-set value: 2
※Adjustable in the range of 1 to 5 stitches.
3. To program the machine speed in the slow start mode
2. Select function parameter by pressing key 6 times.
3. The display on the left appears.
5. Return to the normal mode by pressing and keys simultaneously.
1. Call up program mode “P” by pressing and keys simultaneously for more than 2 seconds.
33
Entering sewing data
Mechanic level
Adjusting the machine speed at the start of sewing
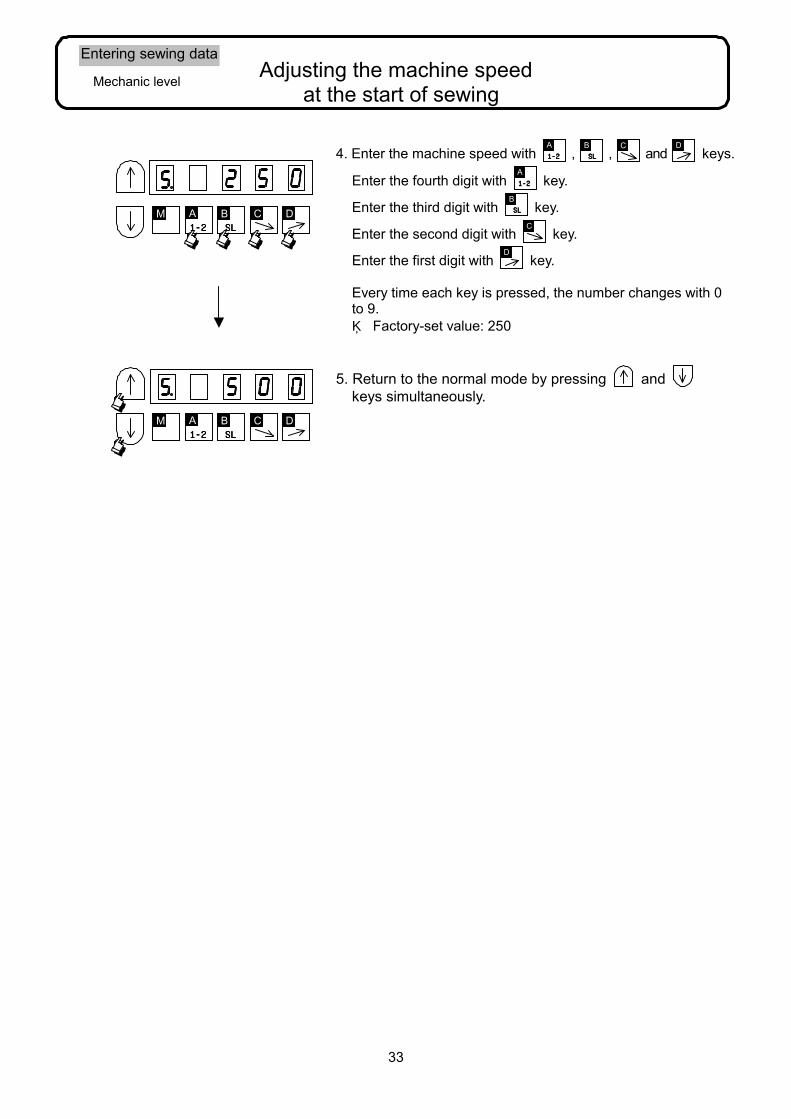
4. Enter the machine speed with 1-21-21-21-2A
, SLSLSLSLB
, C
and D
keys.
Enter the fourth digit with 1-21-21-21-2A
key.
Enter the third digit with SLSLSLSLB
key.
Enter the second digit with C
key.
Enter the first digit with D
key.
Every time each key is pressed, the number changes with 0 to 9. ※ Factory-set value: 250
5. Return to the normal mode by pressing and keys simultaneously.
M 1111----2222 SLSLSLSL A B C D
M 1111----2222 SLSLSLSL A B C D
34
Entering sewing data
Mechanic level
Adjusting the machine speed at the end of sewing
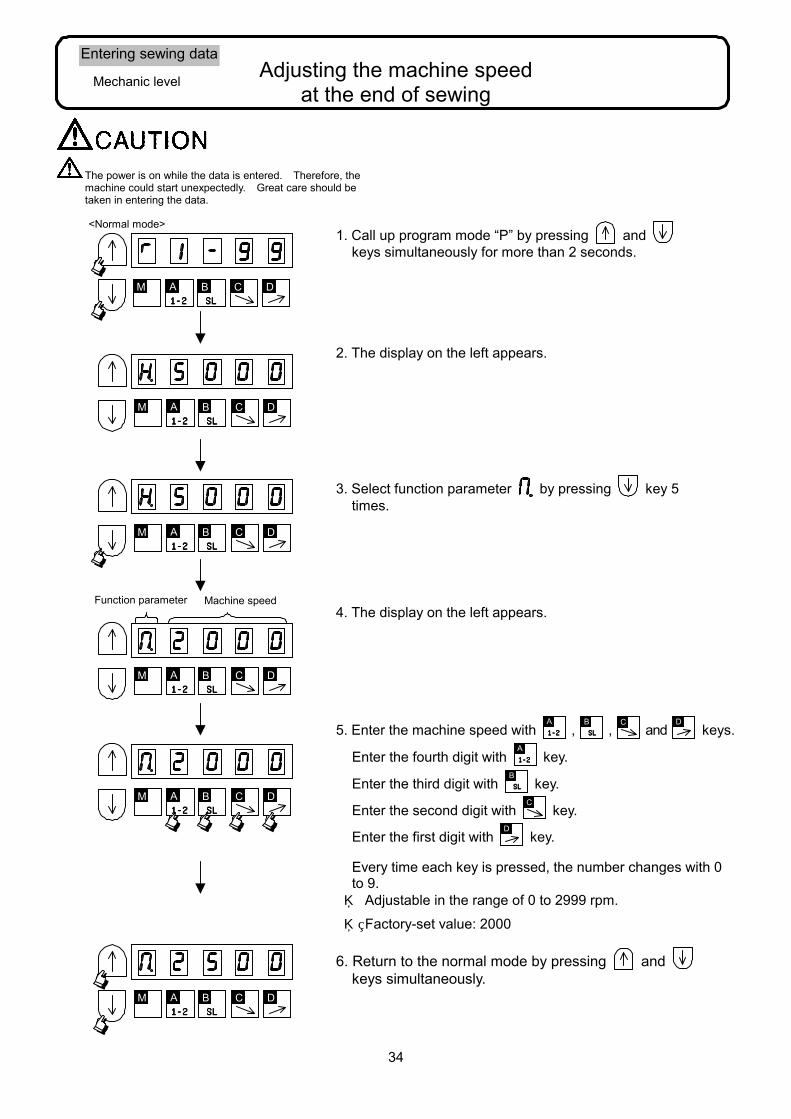
The power is on while the data is entered. Therefore, the machine could start unexpectedly. Great care should be taken in entering the data.
2. The display on the left appears.
3. Select function parameter by pressing key 5 times.
4. The display on the left appears.
Every time each key is pressed, the number changes with 0 to 9. ※ Adjustable in the range of 0 to 2999 rpm. ※ Factory-set value: 2000
1. Call up program mode “P” by pressing and keys simultaneously for more than 2 seconds.
5. Enter the machine speed with 1-21-21-21-2A
, SLSLSLSLB
, C
and D
keys.
Enter the fourth digit with 1-21-21-21-2A
key.
Enter the third digit with SLSLSLSLB
key.
Enter the second digit with C
key.
Enter the first digit with D
key.
6. Return to the normal mode by pressing and keys simultaneously.
M 1111----2222 SLSLSLSL A B C D
M 1111----2222 SLSLSLSL A B C D
M 1111----2222 SLSLSLSL A B C D
M 1111----2222 SLSLSLSL A B C D
<Normal mode>
M 1111----2222 SLSLSLSL A B C D
Function parameter Machine speed
M 1111----2222 SLSLSLSL A B C D
35
Entering sewing data
Mechanic level
Adjusting the stitch counter for the air blower for uncurling
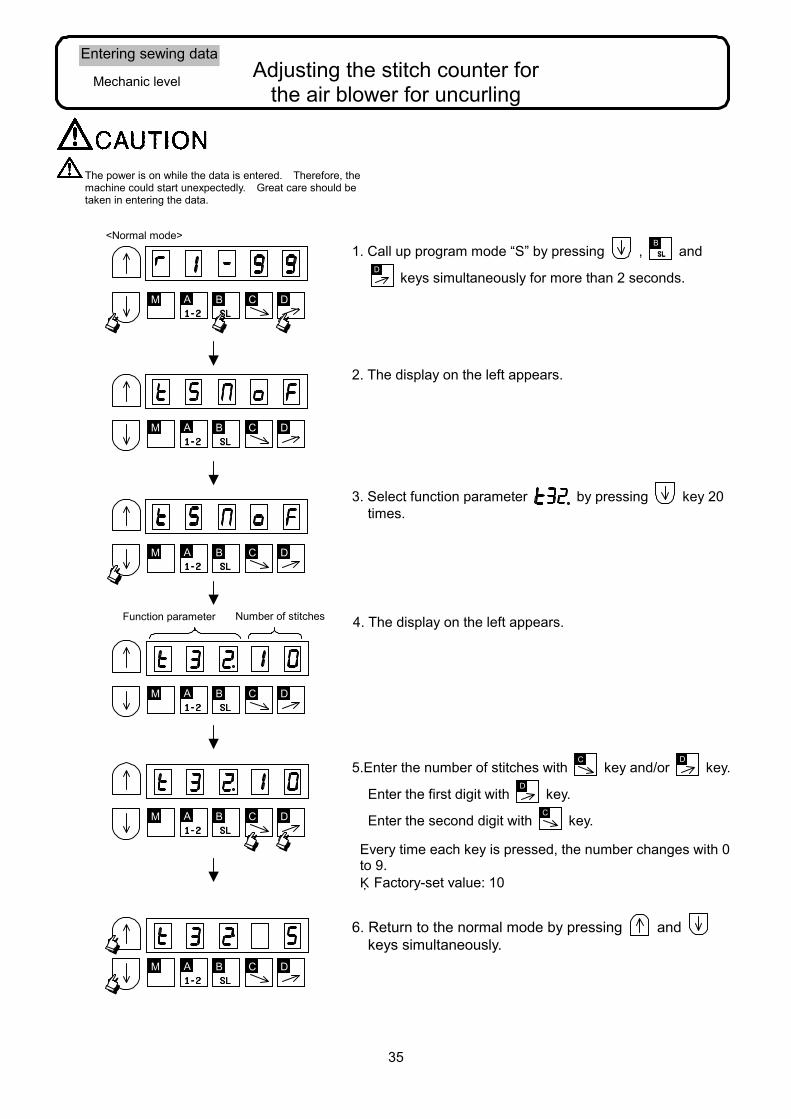
3. Select function parameter by pressing key 20 times.
M 1111----2222 SLSLSLSL A B C D
M 1111----2222 SLSLSLSL A B C D
M 1111----2222 SLSLSLSL A B C D
M 1111----2222 SLSLSLSL A B C D
Function parameter Number of stitches
<Normal mode>
M 1111----2222 SLSLSLSL A B C D
M 1111----2222 SLSLSLSL A B C D
The power is on while the data is entered. Therefore, the machine could start unexpectedly. Great care should be taken in entering the data.
2. The display on the left appears.
4. The display on the left appears.
Every time each key is pressed, the number changes with 0 to 9. ※Factory-set value: 10
1. Call up program mode “S” by pressing , SLSLSLSLB
and D
keys simultaneously for more than 2 seconds.
5.Enter the number of stitches with C
key and/or D
key.
Enter the first digit with D
key.
Enter the second digit with C
key.
6. Return to the normal mode by pressing and keys simultaneously.
36
Entering sewing data
Mechanic level
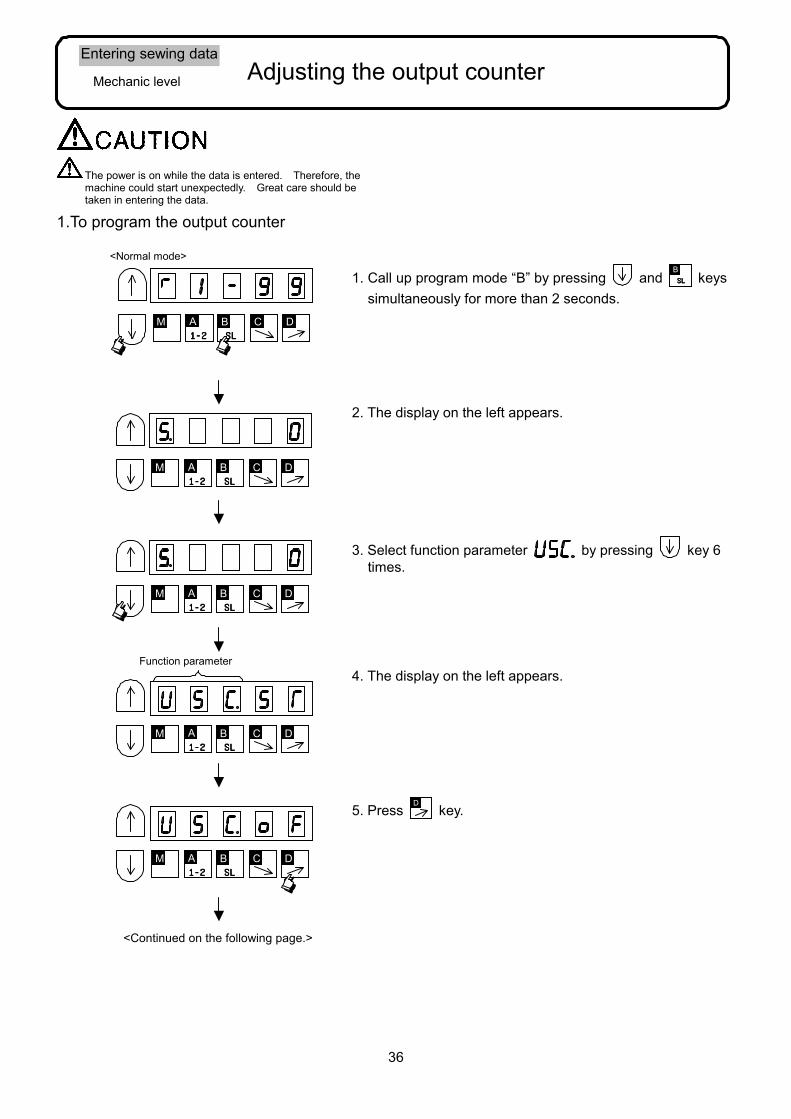
Adjusting the output counter
The power is on while the data is entered. Therefore, the machine could start unexpectedly. Great care should be taken in entering the data.
1.To program the output counter
1. Call up program mode “B” by pressing and SLSLSLSLB
keyssimultaneously for more than 2 seconds.
2. The display on the left appears.
3. Select function parameter by pressing key 6 times.
4. The display on the left appears.
5. Press D
key.
M 1111----2222 SLSLSLSL A B C D
M 1111----2222 SLSLSLSL A B C D
M 1111----2222 SLSLSLSL A B C D
Function parameter
<Continued on the following page.>
M 1111----2222 SLSLSLSL A B C D
<Normal mode>
M 1111----2222 SLSLSLSL A B C D
37
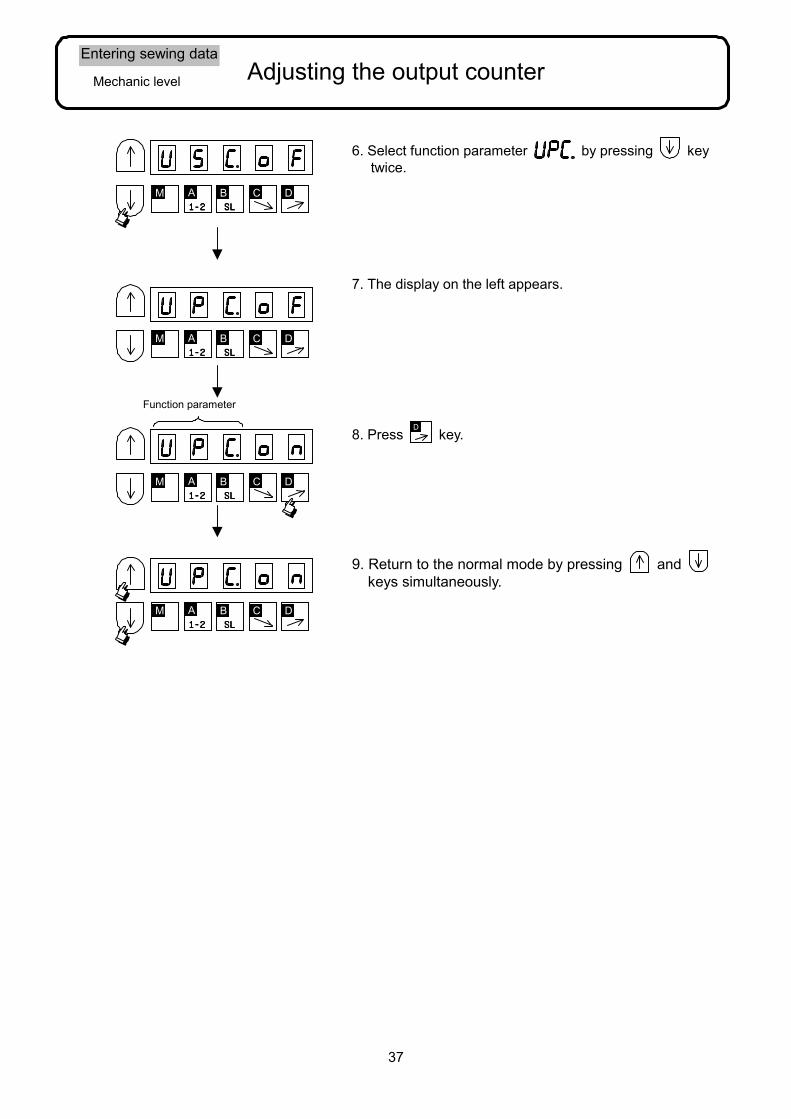
Entering sewing data
Mechanic level
Adjusting the output counter
6. Select function parameter by pressing key twice.
7. The display on the left appears.
8. Press D
key.
9. Return to the normal mode by pressing and keys simultaneously.
M 1111----2222 SLSLSLSL A B C D
M 1111----2222 SLSLSLSL A B C D
M 1111----2222 SLSLSLSL A B C D
Function parameter
M 1111----2222 SLSLSLSL A B C D
38
Entering sewing data
Mechanic level
Adjusting the output counter
3. Select function parameter by pressing key 4 times.
4. The display on the left appears. Then entering is completed.
※ To show “0” or to correct the number on the counter, press 1-21-21-21-2
A
, SLSLSLSLB
, C
and/or D
key.
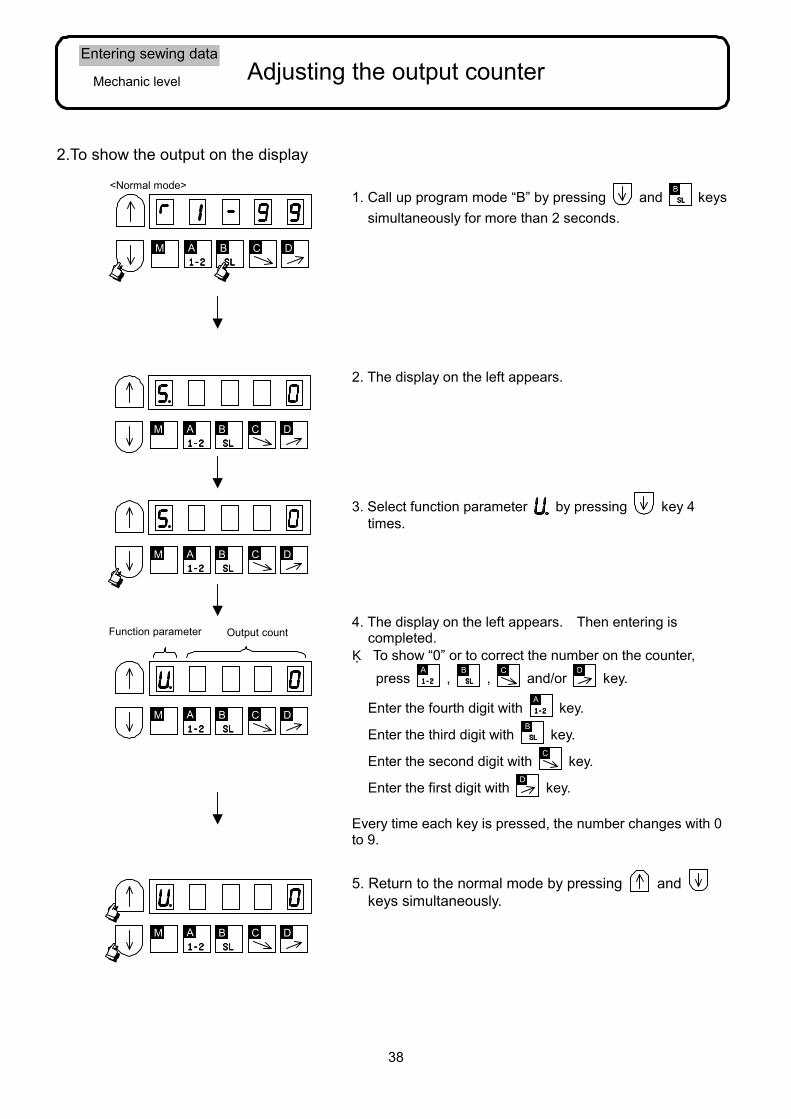
2.To show the output on the display
2. The display on the left appears.
Every time each key is pressed, the number changes with 0 to 9.
1. Call up program mode “B” by pressing and SLSLSLSLB
keyssimultaneously for more than 2 seconds.
Enter the fourth digit with 1-21-21-21-2A
key.
Enter the third digit with SLSLSLSLB
key.
Enter the second digit with C
key.
Enter the first digit with D
key.
5. Return to the normal mode by pressing and keys simultaneously.
M 1111----2222 SLSLSLSL A B C D
M 1111----2222 SLSLSLSL A B C D
M 1111----2222 SLSLSLSL A B C D
Function parameter Output count
M 1111----2222 SLSLSLSL A B C D
M 1111----2222 SLSLSLSL A B C D
<Normal mode>
39
Entering sewing data
Mechanic level
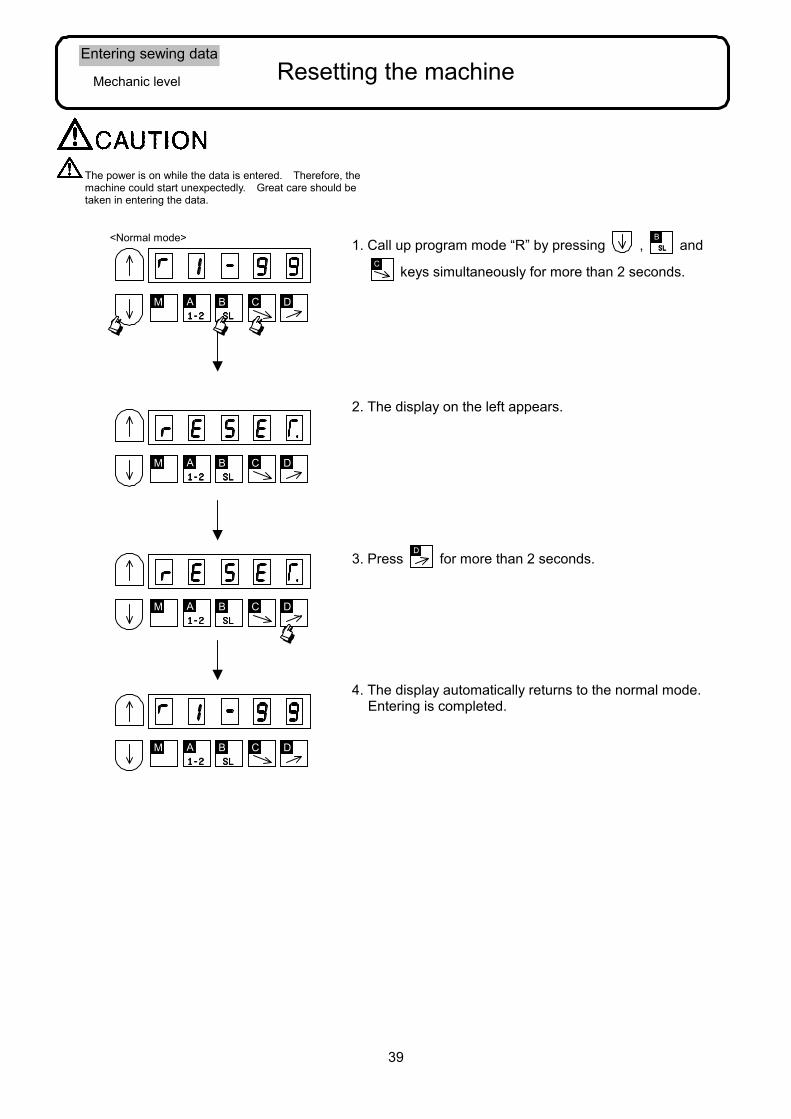
Resetting the machine
3. Press D
for more than 2 seconds.
The power is on while the data is entered. Therefore, the machine could start unexpectedly. Great care should be taken in entering the data.
2. The display on the left appears.
4. The display automatically returns to the normal mode. Entering is completed.
1. Call up program mode “R” by pressing , SLSLSLSLB
and C
keys simultaneously for more than 2 seconds.
M 1111----2222 SLSLSLSL A B C D
M 1111----2222 SSSSLLLL A B C D
M 1111----2222 SLSLSLSL A B C D
M 1111----2222 SLSLSLSL A B C D
<Normal mode>


©Printed June, 2000 Printed in Japan.
The description in this INSTRUCTION is subject to change without notice.
PPEEGGAASSUUSS SSEEWWIINNGG MMAACCHHIINNEE MMFFGG.. CCOO..,, LLTTDD 5-7-2, Sagisu, Fukushima-ku, Osaka 553-0002, Japan. Phone: (06)6458-4739
Telefax: (06)6454-8785


![[Archived] ACTT Workshop - Project Pegasus, Dallas, Texas](https://img.pdfslide.net/doc/110x75/6322de3d28c445989105f40b/archived-actt-workshop-project-pegasus-dallas-texas.jpg)