Embed Size (px)
Citation preview

Netop Remote Control Agent User’s Guide
25th of October 2021

Netop Remote Control Agent User’s Guide
Contents 1. Introduction ....................................................................................................................................... 3
1.1. Technical requirements – Netop Agent .............................................................................. 3
1.2. Technical requirements – Browser Based Support Console ........................................ 4
2. Installation ......................................................................................................................................... 5
2.1. Windows ..................................................................................................................................... 5
2.1.1. Install the Netop Agent via the installer ...................................................................... 5
2.1.2. Install the Netop Agent via mass deployment .......................................................... 9
2.2. macOS ....................................................................................................................................... 10
2.2.1. Install the Netop Agent via the installer ................................................................... 10
2.2.2. macOS permissions ....................................................................................................... 14
2.3. Updating the Agent ............................................................................................................... 21
3. Remote control a device ............................................................................................................. 23
4. Debug logs ...................................................................................................................................... 26
5. Quit the Netop Agent ................................................................................................................... 26
5.1. Windows ................................................................................................................................... 26
5.2. macOS ....................................................................................................................................... 26

Netop Remote Control Agent User’s Guide
1. Introduction
The Netop Remote Control Agent is a desktop application that is required for
enabling remote control access using the Impero Connect Portal.
The Impero Connect Browser Based Support Console is a browser-based
interface in the Portal that allows supporters to remote control devices.
The new Netop Remote Control Agent is moving away from proprietary
screen transfer technology to a modern, cloud-native architecture using secure
WebSocket and WebRTC. In addition to improving screen transfer speeds, this
change will allow us to provide open and accessible APIs in the near future,
thus creating a more extensible and flexible solution.
1.1. Technical requirements – Netop Agent
Operating system Supported Platforms Windows Platform: 32 & 64-bit
Windows 10: Home, Pro, Enterprise, Education Windows 8.1: Professional, Enterprise Windows 7: Starter, Home Basic, Home Premium, Professional, Ultimate, Enterprise (SP 0,1)
macOS macOS 10.13 High Sierra macOS 10.14 Mojave macOS 10.15 Catalina macOS 11 Big Sur

Netop Remote Control Agent User’s Guide
1.2. Technical requirements – Browser Based Support Console
Operating system Supported browser Windows Chrome latest version, Firefox latest
version, and Microsoft Edge based on Chromium latest version
macOS Chrome latest version, Firefox latest version, and Safari latest version
Linux Chrome latest version, Firefox latest version

Netop Remote Control Agent User’s Guide
2. Installation
2.1. Windows
2.1.1. Install the Netop Agent via the installer
You can download the Netop Agent from the following links:
• 64-bit version
• 32-bit version
To install the Netop Agent on your Windows device, proceed as follows:
1. Run the MSI file on your device. The Netop Agent installer window is
displayed.
2. Click on the Next button to continue with the installation process.

Netop Remote Control Agent User’s Guide
3. Click on the Next button to accept the End User License Agreement.
4. The installer displays the location it is being installed to. Click on the Change
button to install it to a different location or Next otherwise.

Netop Remote Control Agent User’s Guide
5. Click on the Install button to install the Netop Agent application.
6. Once the installation is complete, click on the Finish button to exit the install
wizard and launch the Netop Agent.

Netop Remote Control Agent User’s Guide
7. Insert an enrollment key to configure the Netop Agent and register it in your
Portal account.
a. To retrieve the enrollment key, go to the Portal under Downloads and
click on the deployment package that you want to use.
You can find the enrollment key in the Package details section.
Netop Remote Control Agent User’s Guide
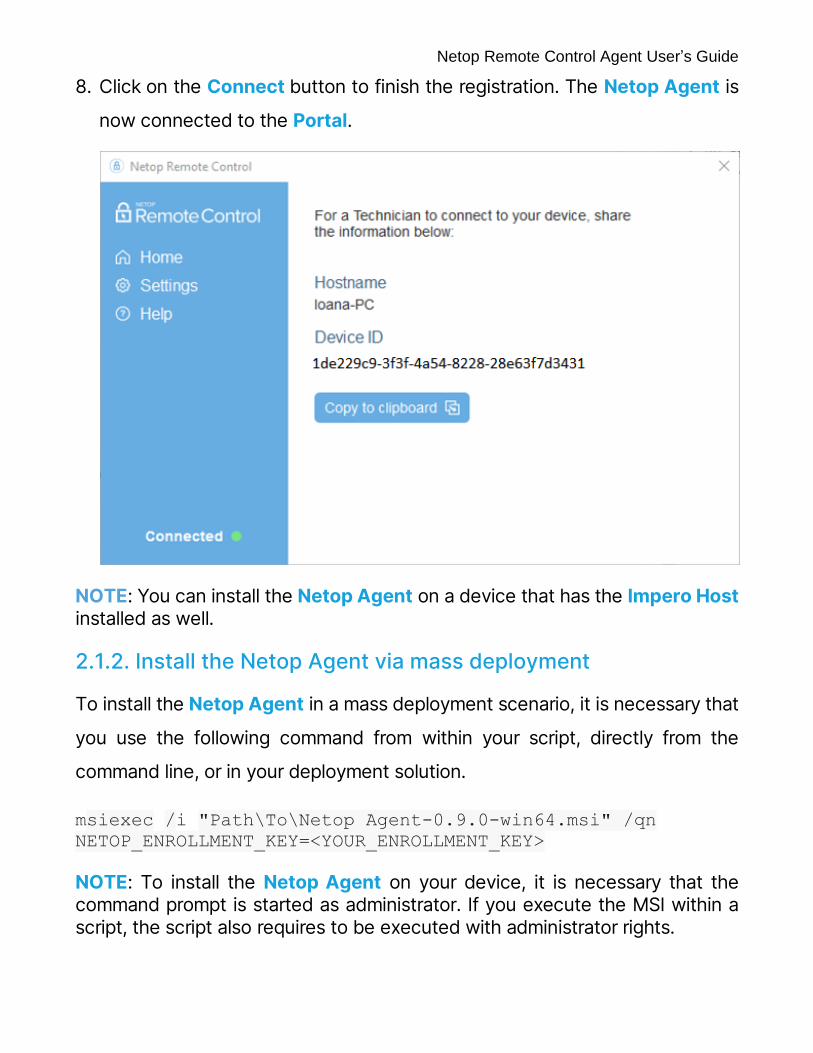
8. Click on the Connect button to finish the registration. The Netop Agent is
now connected to the Portal.
NOTE: You can install the Netop Agent on a device that has the Impero Host installed as well.
2.1.2. Install the Netop Agent via mass deployment
To install the Netop Agent in a mass deployment scenario, it is necessary that
you use the following command from within your script, directly from the
command line, or in your deployment solution.
msiexec /i "Path\To\Netop Agent-0.9.0-win64.msi" /qn
NETOP_ENROLLMENT_KEY=<YOUR_ENROLLMENT_KEY>
NOTE: To install the Netop Agent on your device, it is necessary that the command prompt is started as administrator. If you execute the MSI within a script, the script also requires to be executed with administrator rights.

Netop Remote Control Agent User’s Guide
NOTE: The Netop Agent cannot be mass deployed with the Impero Pack’n’Deploy application.
2.2. macOS
2.2.1. Install the Netop Agent via the installer
You can download the macOS Netop Agent from the following link.
To install the Netop Agent on your macOS device, proceed as follows:
1. Open the Netop Agent.dmg file and run the PKG file. The Netop Agent
installer window is displayed.
2. Click on the Continue button to proceed with the installation process.

Netop Remote Control Agent User’s Guide
3. Click on the Continue button and accept the End User License Agreement.
4. The Netop Agent installs for all users of your computer. Click on the Install
button to continue.

Netop Remote Control Agent User’s Guide
5. Specify the administrator’s credentials and click on the Install Software
button to proceed with the installation.
6. Once the installation is complete, click on the Close button to exit the
install wizard.

Netop Remote Control Agent User’s Guide
7. Insert an enrollment key to configure the Netop Agent and register it in your
Portal account.
a. To retrieve the enrollment key, go to the Portal under Downloads and
click on the deployment package that you want to use.
You can find the enrollment key in the Package details section.

Netop Remote Control Agent User’s Guide
8. Click on the Connect button to finish the registration. The Netop Agent is
now connected to the Portal.
2.2.2. macOS permissions
To use the Netop Agent on a macOS device, it is necessary that the following
permissions are manually granted by the user.
These permissions require to be set only once.
• Screen Recording (applies for macOS 10.15 and above)
• Accessibility (applies for macOS 10.14 and above)
Without these permissions, the Netop Agent functionality can be restricted to:
• Viewing the desktop background, but no other applications
• Not being able to control the keyboard and mouse remotely

Netop Remote Control Agent User’s Guide
2.2.2.1. Screen Recording
Netop Agent requires Screen Recording access so remote users can view
your screen during remote control sessions.
The first time you open the Agent application on your device, you are prompted
by the Agent to allow the Screen Recording permission.
To grant the permission, proceed as follows:
1. Click on the Grant permission button
2. Open System Preferences when the Screen Recording dialog appears on
the screen.

Netop Remote Control Agent User’s Guide
3. Click on the lock to make changes.
4. Select the NetopAgentDesktop checkbox to grant the Screen Recording
permission.

Netop Remote Control Agent User’s Guide
5. NetopAgentDesktop requires to quit and reopen to use the permission.
Click on the Quit & Reopen button to restart the application.
6. Click on Next.

Netop Remote Control Agent User’s Guide
2.2.2.2. Accessibility
Netop Agent requires Accessibility access so your mouse and keyboard can
be controlled remotely.
Once you granted the Screen Recording permission, the Agent prompts you
to allow the Accessibility permission.

Netop Remote Control Agent User’s Guide
To grant the permission, proceed as follows:
1. Click on the Grant permission button.
2. Open System Preferences when the Accessibility dialog appears on the
screen.
3. Click on the lock to make changes.

Netop Remote Control Agent User’s Guide
4. Select the NetopAgentDesktop checkbox to grant the Accessibility
permission.

Netop Remote Control Agent User’s Guide
5. Click on Next.
2.3. Updating the Agent
The Agent automatically verifies for a new version and installs it when one is
available.
The download and install is performed between 5 AM and 6 AM local machine
time, if no remote session is ongoing. You cannot opt out of the automatic
updates.

Netop Remote Control Agent User’s Guide
You can also choose to update the Agent from the Help page at any time, by
clicking the Update button.

Netop Remote Control Agent User’s Guide
3. Remote control a device
To remote control a device that runs the Netop Agent application, you need
to access the My Devices page in the Portal. Make sure that your user profile
is part of a group from a valid role assignment that gives you access to the
device.
You can find out more about Roles and Role assignments in the Impero Portal
User’s Guide.
NOTE: Only the View remote screen, Use keyboard and mouse, and Browser Based Support Console permissions apply to Netop Agents.
You can start the remote session by clicking on the Remote control button.

Netop Remote Control Agent User’s Guide
Once clicked, the remote control session starts. During the session, you can
view the screen of the device and control its keyboard and mouse, depending
on the permissions that you have set up.
The Browser Based Support Console toolbar includes virtual key modifiers to
use during the remote session. Each of the 4 key modifiers has 3 possible
states: off, on, and always on (use it by double-clicking on the key modifier).
These key modifiers help send various key combinations to the remote
machine, whenever the physical keyboard cannot be used for this.
The View menu allows the support technician to switch between Fit To
Screen and Actual Size for the displayed image. If your device has multiple
monitors connected to it, you can select the monitor you want to view from the
same View menu.

Netop Remote Control Agent User’s Guide
A remote session can be closed either by the Technician, in the Browser
Based Support Console, or by the remote user by clicking the Disconnect
button, or by using the keyboard hotkey (CTRL + SHIFT + X).
NOTE: If you have both the Netop Agent and Impero Host installed on your device, you can see that the device can appear as a duplicate in your My Devices list. To start a remote session with the Netop Agent, it is necessary that you select the device that only offers one option to remote control it.

Netop Remote Control Agent User’s Guide
4. Debug logs
The Netop Agent log file can be found in this location:
Operating system Location Windows C:\ProgramData\Netop\Agent\NetopAgent.log
macOS /Library/Logs/Netop/Agent/NetopAgent.log
On macOS, you can access the log files from the Console application as well.
5. Quit the Netop Agent
5.1. Windows
To quit the Windows Netop Agent application and disconnect from the Impero
Portal it is necessary that you open the system tray, right-click on the Netop
Agent icon and select the Quit option.
5.2. macOS
To quit the macOS Netop Agent application and disconnect from the Netop
Portal, right-click on the Netop Agent icon in the menu bar and select the Quit
option.