Embed Size (px)
Citation preview

Page | 1
Autodesk® 3ds Max Entertainment Creation Suites 2011
Release Notes
These Release Notes document last minute updates to the Autodesk 3ds Max Entertainment Creation Suite 2011. Contents
What’s New
Supported Operating Systems
Hardware Minimum Requirements
Installing the Autodesk Entertainment Creation Suite
Uninstalling Instructions
Upgrading to a Suite License
Online Registration and Activation
Known Issues and Limitations
3ds Max Release Notes
MotionBuilder Release Notes
Mudbox Release Notes
Autodesk ECS 2011
Release Notes – April 7th 2010
Page | 2
What’s New The following describes the new features and enhancements in the Autodesk® Entertainment Creation Suite 2011. The Release Note information for each of the products in this Suite – 3ds Max, MotionBuilder and Mudbox – are also included immediately after. Autodesk Installation and Licensing
This release supports the standard Autodesk Installation and Licensing scheme to align Suites with other Autodesk software products and to improve user experience.
Support of Autodesk FBX
All products shipping in the Autodesk® Entertainment Creation Suite 2011 integrate the same version of FBX.
Configurable Keyboard and Navigation Mechanisms
Mudbox 2011 and MotionBuilder 2011 provide the ability to customize their keyboard layout and navigation mechanisms.
IPv6 Support
This release supports the Internet Protocol version 6 (the successor of IPv4). IPv6 supports the use of a 128-bit address whereas IPv4 only supports a 32-bit address.
Windows 7 Support
This release is supported on Microsoft Windows 7 Professional on 64-bit operating systems.
Supported Operating Systems The 32‐bit version of the Autodesk® Entertainment Creation Suite 2011 software is supported by the following operating systems:
Microsoft® Windows® XP Professional Service Pack 3
The 64‐bit version of the Autodesk® Entertainment Creation Suite 2011 software is supported by the following operating systems:
Microsoft® Windows® 7 Professional Service Pack 1 Microsoft Windows Vista Business Service Pack 1 Microsoft Windows XP x64 Edition Service Pack 2
Autodesk ECS 2011
Release Notes – April 7th 2010
Page | 3
Hardware Minimum Requirements Note: The system requirements below are for users running several of the following products on the same system:
Autodesk® 3ds Max® 2011 software
Autodesk® Maya® 2011 software
Autodesk® MotionBuilder® 2011 software
Autodesk® Mudbox™ 2011 software
Autodesk® Softimage® 2011 software
Be aware that the systems requirements for individual products may differ from those in this document.
At a minimum, the Autodesk® Entertainment Creation Suite 2011 software requires a system with the following hardware:
Minimum processor o Intel® Core™ two Quad 64-bit processor o Dual-Core Intel® Xeon® 64-bit processor o Dual-Core AMD Opteron™ 64-bit processor
Recommended processor o Intel® Core™ i7 64-bit processor o Dual Quad-Core Intel® Xeon® 64-bit processor o Quad-Core AMD Opteron™ 64-bit processor
2 GB RAM minimum, 4 GB RAM recommended for the 32-bit version 4 GB RAM minimum, 8 GB RAM recommended for the 64-bit version 6 GB free hard drive space is required to install all commercial applications on the same
system o The Education Suite for Entertainment Creation will require a minimum of 10 GB
free disk space 512 MB hardware-accelerated OpenGL® 2.0 (and higher) professional graphics cards with
recommended driver from Autodesk hardware certification pages. Three-button mouse with mouse driver software.
o DirectX 9.0c application programming interface or higher Three-button mouse with mouse driver software or certified Wacom® tablet DVD-ROM drive Ethernet adapter or wireless internet card 1280 x 1024 screen resolution
Autodesk ECS 2011
Release Notes – April 7th 2010
Page | 4
Installing the Autodesk Entertainment Creation Suite Load your DVD or navigate to the folder where you downloaded the Autodesk® Entertainment Creation Suite 2011 executable file and double‐click on the file. Note: During the Suite 2011 installation process, you are requested to enter the software serial number and product key. Make sure you have the suite serial number and product key handy. Important: You will need the serial number to activate your software. Install and activate your products by following the on-screen installation instructions. Note for Autodesk Backburner 2011 Users: Maya Entertainment Creation Suite 2011 includes Autodesk Backburner 2011. Note that Backburner 2011 cannot be run on a machine with older versions of Backburner. It also cannot be used with releases of 3ds Max prior to 2011.
Uninstalling Instructions
Windows XP
1. Open the Add/Remove Programs dialog in Start > Settings > Control Panel. 2. Select the program to remove. 3. Click on the Remove button. 4. Click Yes to confirm the Uninstall.
Windows Vista and Windows 7
1. Open Start > Control Panel > Programs > Programs and Features. 2. Select the program to remove: 3. Click Uninstall.
Upgrading to a Suite License If you have a standalone license for a product included in a Suite, you can upgrade to a Suite license to take advantage of the additional product offerings. To convert the license, you will have to uninstall the product, and then reinstall it using the Suite license information (serial number and product key). Before you uninstall the product, we recommend you transfer your standalone license to another user or system using the License Transfer Utility, accessible through: Start Menu>Programs>Autodesk<your product>License Transfer Utility. This exports the license to the Autodesk server so that another system can import it. Note: when a product is activated and registered on a computer system, the product is bound to that license. If you want to use a different license, you will have to reinstall the product and enter the new license information (serial number & product key).
Autodesk ECS 2011
Release Notes – April 7th 2010
Page | 5
Online Registration and Activation You must register and activate your license for the Autodesk® Media & Entertainment Suite you have purchased. You can do this either by clicking on Activate from the Activation dialog when launching a software product or from the product’s Help menu. Once you have activated one product in the Suite, you do not need to repeat this process for the others. Note: If you do not enter the license serial number and product key during the initial installation process, you will have to register each product separately. To create a new user account and activate your license, perform the following: 1. Launch one of the products you just installed.
2. In the Product Activation dialog, select “Activate” or select Help > About and click the Product License Information button. From there you can click “Activate”.
3. Enter the serial number and product key located on the back of the DVD case.
4. On the Register Today page, select “Get an Activation Code” and click Next.
5. From the Log In page, click the “Create a User ID Now” link.
6. Fill out the Create User ID form and click Next.
7. Fill out the Account Information form and click Next.
8. On the Choose Account page, select your user account and click Next.
You are notified of your registration and activation status on the Registration Activation Confirmation page. 9. Click Finish.
You will receive an email confirmation. Keep this for your records.
If you already have a user account on autodesk.com, you can use it to activate your new license as follows:
1. Launch one of the products included in your suite.
2. In the Product Activation dialog box, select Activate and click Next.
3. On the Register Today page, select Get an Activation Code and click Next.
Autodesk ECS 2011
Release Notes – April 7th 2010
Page | 6
4. Enter your User ID and Password and then click Log In.
5. On the Choose Account form, select your user account and click Next.
You are notified of registration and activation status on the Registration Activation Confirmation page. 6. Click Finish.
You will receive an email confirmation. Keep this for your records.
Known Issues and Limitations
Network licensing:
o Suites licenses that are installed on the network can only be checked out by one system at a time (refer to the Network Licensing section above). For another user to be able to run any of the products on another machine using the same Suite license, all products must be closed on the first system.
Page | 1
3ds Max 2011
Release Notes
This readme contains the latest information regarding the installation and use of Autodesk® 3ds Max® 2011 and Autodesk® 3ds Max® Design 2011 software. It is strongly recommended that you read this entire document before installing the software. For reference, you should save this readme to your hard drive. For complete installation and networking instructions refer to the Autodesk 3ds Max 2011/3ds Max Design 2011 Installation Guide (which includes information about regular installation and network deployment). Access this guide in the Documentation menu of the installer.
Contents
Prerequisites
Release Version with Beta
Customer Involvement Program (CIP)
Customer Error Reports (CERs)
Feature Limitations and Notes
Find new feature information in the "What's New" section of the 3ds Max / 3ds Max Design Help.
Find learning resources at: www.autodesk.com/3dsmax-learningpath or www.autodesk.com/3dsmaxdesign-learningpath
Find support resources at: www.autodesk.com/3dsmax-support or www.autodesk.com/3dsmaxdesign-support
Find the Readme (Release Notes) for 3ds Max Composite at: www.autodesk.com/3dsmax-releasenotes
Autodesk ECS 2011
Release Notes – April 7th 2010
Page | 2
Prerequisites
The following are a few points related to installing and licensing of Autodesk 3ds Max 2011 / Autodesk 3ds Max Design 2011:
Before an end-user with restricted Windows operating system privileges can use Autodesk 3ds Max 2011/Autodesk 3ds Max Design 2011, an administrator, with full privileges, must install and start the software one time in order to generate the Windows operating system registry information needed to complete the installation.
Before installing any third-party plug-ins for Autodesk 3ds Max 2011 / Autodesk 3ds Max Design 2011, an administrator, with full privileges, must install and start 3ds Max 2011/3ds Max Design 2011 at least one time to generate the necessary folders for these third-party plug-ins.
(Windows 7 operating system) When installing 3ds Max 2011 or 3ds Max Design 2011 with 3ds Max 2010 or 3ds Max Design 2010, you must install the 3ds Max 2010 Hot Fix 7 (2009.09.22). To download this Hot Fix go to: http://www.autodesk.com/3dsmax-hotfix-v20090922.
Release Version with Beta
If you previously installed any beta version (including Release Candidate (RC) versions) of Autodesk 3ds Max 2011/Autodesk 3ds Max Design 2011, you must uninstall and delete all system folders pertaining to these prerelease versions before you can install the commercial version. Instructions on how to uninstall the software are posted on the beta portal in the Beta and RC Readme files.
Customer Involvement Program (CIP)
The first time you start 3ds Max/3ds Max Design, the Customer Involvement Program dialog opens. If you choose to participate in the Customer Involvement Program, 3ds Max or 3ds Max Design will automatically send Autodesk information about system configuration, what features you use most, any problems that you encounter, and other information helpful to the future direction of the product. For further information, see www.autodesk.com/cip.
To enable CIP:
1. Start 3ds Max/3ds Max Design. 2. If the Customer Involvement Program dialog box is not displayed automatically, then in
the Help menu, click Customer Involvement Program. 3. In the Customer Involvement Program dialog box, select "Participate - with contact
information."
Enter a valid email address and company name. Click OK
Autodesk ECS 2011
Release Notes – April 7th 2010
Page | 3
Customer Error Reports (CERs)
We are able to improve the stability of Autodesk 3ds Max/Autodesk 3ds Max Design largely because of the Customer Error Reports (CERs) that end-users submit. We thank you for taking the time to fill out these reports and ask you to include as much information as possible about what actions you were performing at the time the error occurred. These details raise the value of the report immensely and are very much appreciated by the Autodesk 3ds Max Quality Engineering team.
For further information about CERs refer to www.autodesk.com/cer.
Feature Limitations and Notes
The following are the known feature limitations and notes for RC1:
Feature Limitations and Notes 3ds Max Composite
Issues related to 3ds Max Composite are tracked in a separate release note. See www.autodesk.com/3dsmax-releasenotes.
Also see the Installation Issues related to 3ds Max Composite.
Autodesk® Backburner™
Autodesk Backburner 2008.1 is the default version of Backburner installed with 3ds Max 2011/3ds Max Design 2011. There are two other versions of Backburner shipped on the DVD: 2011, and 2008.2 (iPv6). For information about the various versions of Autodesk Backburner available with 3ds Max/3ds Max Design 2011, refer to the Autodesk 3ds Max 2011/Autodesk 3ds Max Design 2011 Installation Guide. Click Documentation in the Installer.
Important: Autodesk Backburner 2011 is not compatible with any version of 3ds Max/3ds Max Design before 2011.
Autodesk® FBX®
For the best interoperability and smoothest Autodesk FBX workflows it is recommended that you work with Autodesk 3ds Max 2011 / Autodesk 3ds Max Design 2011 and Autodesk® Revit® 2011.
3ds Max 2011/3ds Max Design 2011 is required to import any Autodesk Revit 2011 FBX files and retain materials, environments, RPCs, and lights.
3ds Max 2010/2009 or 3ds Max Design 2010/2009 can import Revit FBX 2011 files; however, only geometry and cameras will import (losing materials, lights and environments).
Revit 2010/2009 FBX files will import without issue into 3ds Max 2011/2010/2009 or 3ds Max Design 2011/2010/2009.
Filelink for FBX: Scaling issues occur when importing Autodesk Revit 2011 FBX files into 3ds Max 2011/3ds Max Design 2011, when the system units for 3ds Max/3ds Max Design are set to anything other than feet. If a Revit FBX file is imported into 3ds Max/3ds Max Design, while system units are set to inches, the photometric light emitter shapes will not be scaled correctly. The length and width will be 12 times smaller than they should

Autodesk ECS 2011
Release Notes – April 7th 2010
Page | 4
be. Workaround: Set 3ds Max/3ds Max Design to use Feet System Units before performing the FBX import or File Link.
Autodesk Material Library: FBX AutoCAD embedded or referenced textures are not being imported. When exporting you must select "Copy textures to a single location". The texture assets will come through labeled as GUID and will not be located in the location specified in AutoCAD; instead they will exist in a temp folder.
Autodesk Inventor® Import
Variable Radius Fillets are not supported when added as Body Objects. Springs do not import correctly as Body Objects. Files created from imported IGES files in old versions of Autodesk Inventor
will not import as Body Objects. When imported as Body objects, materials of weldment objects in an
Inventor assembly are not supported. When imported as Body objects with an assembly that has body overrides,
materials of the corresponding bodies are not supported. WIRE files import with transparent material. Transparency can be changed
to fully opaque in the Material Editor if required or the Assembly file can be imported with "Import Inventor Materials" set to off.
WIRE files imported as Body Objects cannot be converted to NURBS to be exported as IGES files for use in Autodesk Alias Studio.
WIRE imports do not import surface names. Older Inventor files can give incorrect error messages on import. Some objects can import with missing or misplaced geometry. If this occurs
you can try exporting as SAT and reading it in. Also, changing the SAT version can give you different results as surfaces are represented differently for different versions.
Autodesk® Material Library
Advanced parameters for Autodesk Materials (ambient occlusion, rounded corners, and performance tuning) are not yet supported.
Libraries must be uninstalled in reverse order:
1. First uninstall Autodesk Material Library 2011 Medium Image Library.
2. Next uninstall Autodesk Material Library 2011 Base Image Library.
AutoCAD files using the Metal Cutout presets will not import correctly. The Water Reflecting Pool material can render a different color than blue
when loaded, and might need to be adjusted. Scene files can load more slowly if they use Autodesk Materials, compared
to other 3ds Max / 3ds Max Design materials. Instancing large numbers of Autodesk Material via MAXScript can cause an
eventual program error. Autodesk Material bitmaps do not support the 3ds Max or 3ds Max Design
Bitmap Proxies feature.
Warning: Uninstalling the Autodesk Material Library can adversely affect
Autodesk ECS 2011
Release Notes – April 7th 2010
Page | 5
other Autodesk products such as AutoCAD, Autodesk Revit, and Autodesk Inventor.
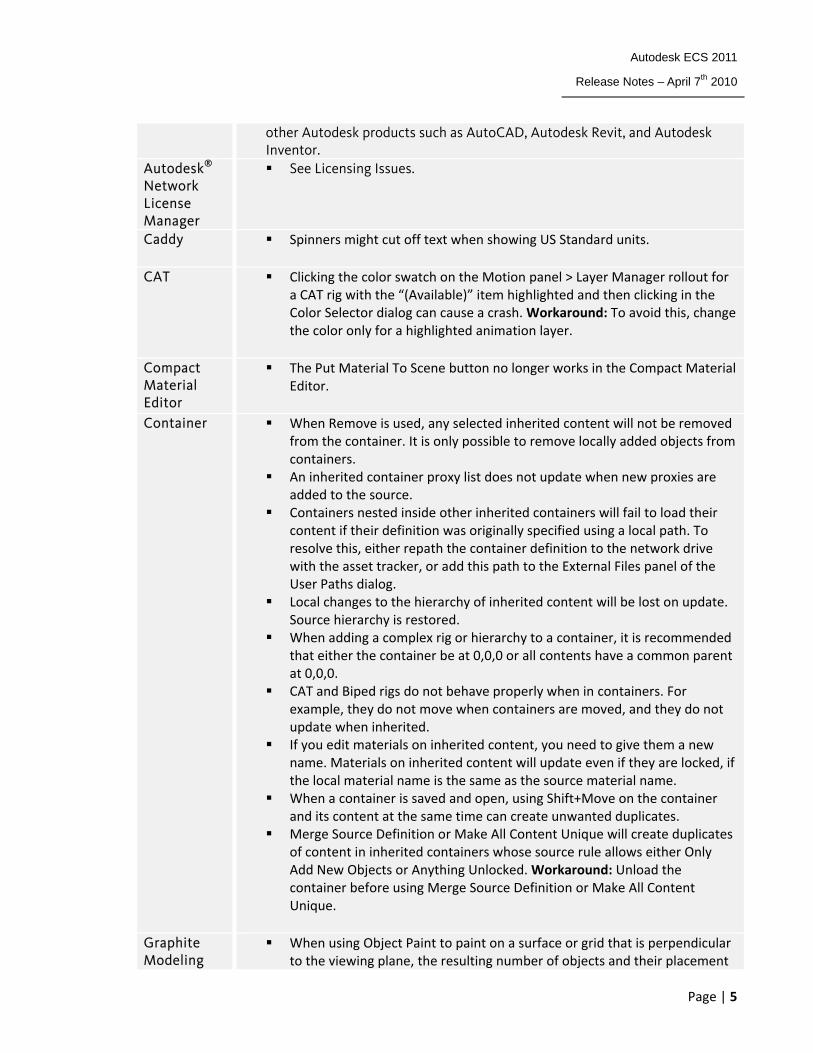
Autodesk® Network License Manager
See Licensing Issues.
Caddy Spinners might cut off text when showing US Standard units.
CAT Clicking the color swatch on the Motion panel > Layer Manager rollout for a CAT rig with the “(Available)” item highlighted and then clicking in the Color Selector dialog can cause a crash. Workaround: To avoid this, change the color only for a highlighted animation layer.
Compact Material Editor
The Put Material To Scene button no longer works in the Compact Material Editor.
Container When Remove is used, any selected inherited content will not be removed from the container. It is only possible to remove locally added objects from containers.
An inherited container proxy list does not update when new proxies are added to the source.
Containers nested inside other inherited containers will fail to load their content if their definition was originally specified using a local path. To resolve this, either repath the container definition to the network drive with the asset tracker, or add this path to the External Files panel of the User Paths dialog.
Local changes to the hierarchy of inherited content will be lost on update. Source hierarchy is restored.
When adding a complex rig or hierarchy to a container, it is recommended that either the container be at 0,0,0 or all contents have a common parent at 0,0,0.
CAT and Biped rigs do not behave properly when in containers. For example, they do not move when containers are moved, and they do not update when inherited.
If you edit materials on inherited content, you need to give them a new name. Materials on inherited content will update even if they are locked, if the local material name is the same as the source material name.
When a container is saved and open, using Shift+Move on the container and its content at the same time can create unwanted duplicates.
Merge Source Definition or Make All Content Unique will create duplicates of content in inherited containers whose source rule allows either Only Add New Objects or Anything Unlocked. Workaround: Unload the container before using Merge Source Definition or Make All Content Unique.
Graphite Modeling
When using Object Paint to paint on a surface or grid that is perpendicular to the viewing plane, the resulting number of objects and their placement
Autodesk ECS 2011
Release Notes – April 7th 2010
Page | 6
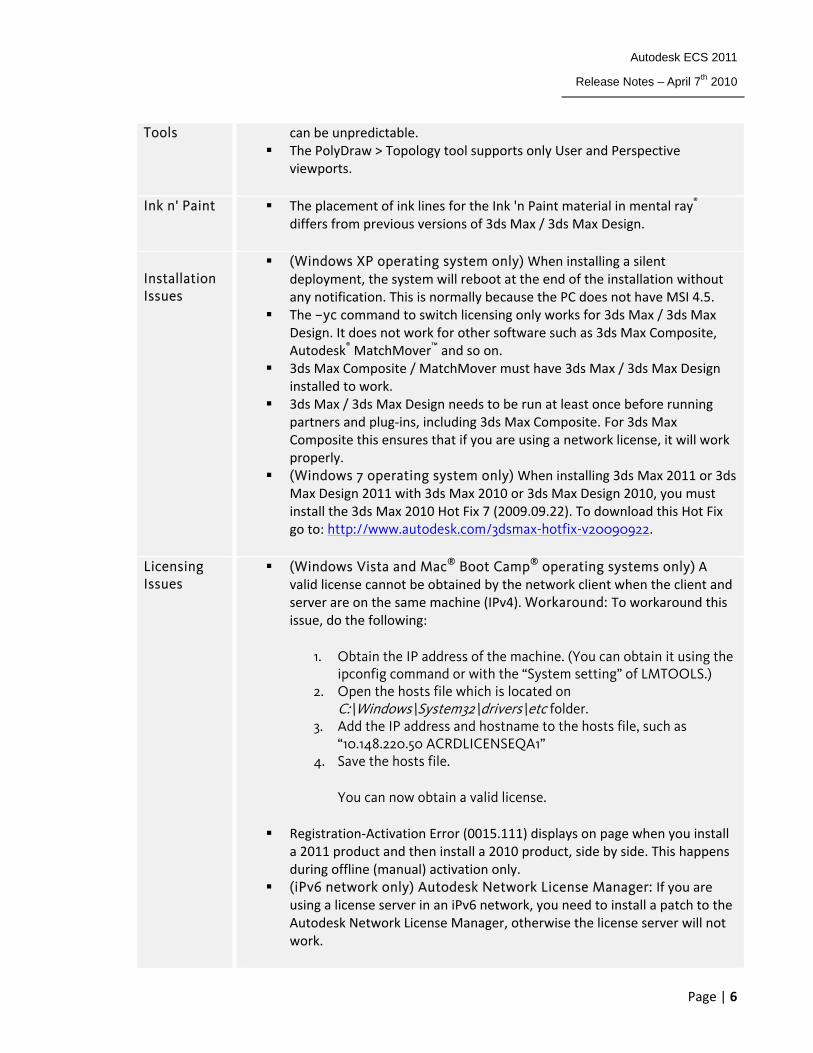
Tools can be unpredictable. The PolyDraw > Topology tool supports only User and Perspective
viewports.
Ink n' Paint The placement of ink lines for the Ink 'n Paint material in mental ray® differs from previous versions of 3ds Max / 3ds Max Design.
Installation Issues
(Windows XP operating system only) When installing a silent deployment, the system will reboot at the end of the installation without any notification. This is normally because the PC does not have MSI 4.5.
The –yc command to switch licensing only works for 3ds Max / 3ds Max Design. It does not work for other software such as 3ds Max Composite, Autodesk® MatchMover™ and so on.
3ds Max Composite / MatchMover must have 3ds Max / 3ds Max Design installed to work.
3ds Max / 3ds Max Design needs to be run at least once before running partners and plug‐ins, including 3ds Max Composite. For 3ds Max Composite this ensures that if you are using a network license, it will work properly.
(Windows 7 operating system only) When installing 3ds Max 2011 or 3ds Max Design 2011 with 3ds Max 2010 or 3ds Max Design 2010, you must install the 3ds Max 2010 Hot Fix 7 (2009.09.22). To download this Hot Fix go to: http://www.autodesk.com/3dsmax-hotfix-v20090922.
Licensing Issues
(Windows Vista and Mac® Boot Camp® operating systems only) A valid license cannot be obtained by the network client when the client and server are on the same machine (IPv4). Workaround: To workaround this issue, do the following:
1. Obtain the IP address of the machine. (You can obtain it using the ipconfig command or with the “System setting” of LMTOOLS.)
2. Open the hosts file which is located on C:\Windows\System32\drivers\etc folder.
3. Add the IP address and hostname to the hosts file, such as “10.148.220.50 ACRDLICENSEQA1”
4. Save the hosts file.
You can now obtain a valid license.
Registration‐Activation Error (0015.111) displays on page when you install a 2011 product and then install a 2010 product, side by side. This happens during offline (manual) activation only.
(iPv6 network only) Autodesk Network License Manager: If you are using a license server in an iPv6 network, you need to install a patch to the Autodesk Network License Manager, otherwise the license server will not work.
Autodesk ECS 2011
Release Notes – April 7th 2010
Page | 7
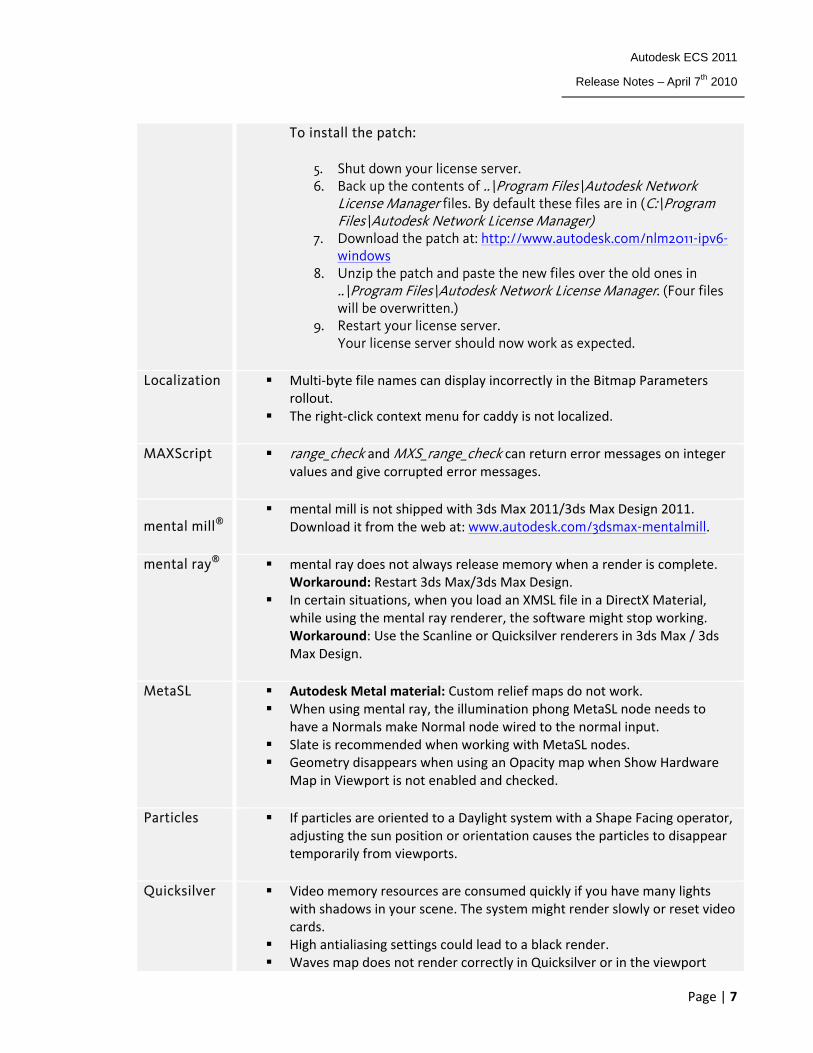
To install the patch:
5. Shut down your license server. 6. Back up the contents of ..\Program Files\Autodesk Network
License Manager files. By default these files are in (C:\Program Files\Autodesk Network License Manager)
7. Download the patch at: http://www.autodesk.com/nlm2011-ipv6-windows
8. Unzip the patch and paste the new files over the old ones in ..\Program Files\Autodesk Network License Manager. (Four files will be overwritten.)
9. Restart your license server. Your license server should now work as expected.
Localization Multi‐byte file names can display incorrectly in the Bitmap Parameters rollout.
The right‐click context menu for caddy is not localized.
MAXScript range_check and MXS_range_check can return error messages on integer values and give corrupted error messages.
mental mill®
mental mill is not shipped with 3ds Max 2011/3ds Max Design 2011. Download it from the web at: www.autodesk.com/3dsmax-mentalmill.
mental ray® mental ray does not always release memory when a render is complete. Workaround: Restart 3ds Max/3ds Max Design.
In certain situations, when you load an XMSL file in a DirectX Material, while using the mental ray renderer, the software might stop working. Workaround: Use the Scanline or Quicksilver renderers in 3ds Max / 3ds Max Design.
MetaSL Autodesk Metal material: Custom relief maps do not work. When using mental ray, the illumination phong MetaSL node needs to
have a Normals make Normal node wired to the normal input. Slate is recommended when working with MetaSL nodes. Geometry disappears when using an Opacity map when Show Hardware
Map in Viewport is not enabled and checked.
Particles If particles are oriented to a Daylight system with a Shape Facing operator, adjusting the sun position or orientation causes the particles to disappear temporarily from viewports.
Quicksilver Video memory resources are consumed quickly if you have many lights with shadows in your scene. The system might render slowly or reset video cards.
High antialiasing settings could lead to a black render. Waves map does not render correctly in Quicksilver or in the viewport
Autodesk ECS 2011
Release Notes – April 7th 2010
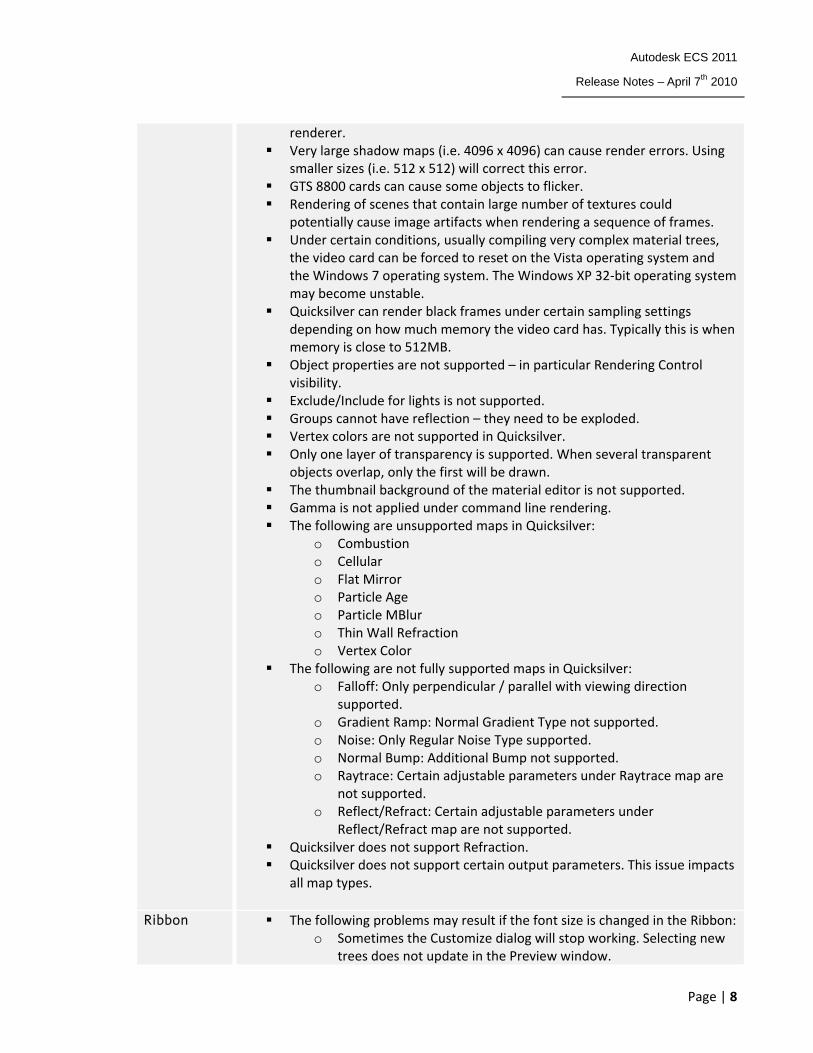
Page | 8
renderer. Very large shadow maps (i.e. 4096 x 4096) can cause render errors. Using
smaller sizes (i.e. 512 x 512) will correct this error. GTS 8800 cards can cause some objects to flicker. Rendering of scenes that contain large number of textures could
potentially cause image artifacts when rendering a sequence of frames. Under certain conditions, usually compiling very complex material trees,
the video card can be forced to reset on the Vista operating system and the Windows 7 operating system. The Windows XP 32‐bit operating system may become unstable.
Quicksilver can render black frames under certain sampling settings depending on how much memory the video card has. Typically this is when memory is close to 512MB.
Object properties are not supported – in particular Rendering Control visibility.
Exclude/Include for lights is not supported. Groups cannot have reflection – they need to be exploded. Vertex colors are not supported in Quicksilver. Only one layer of transparency is supported. When several transparent
objects overlap, only the first will be drawn. The thumbnail background of the material editor is not supported. Gamma is not applied under command line rendering. The following are unsupported maps in Quicksilver:
o Combustion o Cellular o Flat Mirror o Particle Age o Particle MBlur o Thin Wall Refraction o Vertex Color
The following are not fully supported maps in Quicksilver: o Falloff: Only perpendicular / parallel with viewing direction
supported. o Gradient Ramp: Normal Gradient Type not supported. o Noise: Only Regular Noise Type supported. o Normal Bump: Additional Bump not supported. o Raytrace: Certain adjustable parameters under Raytrace map are
not supported. o Reflect/Refract: Certain adjustable parameters under
Reflect/Refract map are not supported. Quicksilver does not support Refraction. Quicksilver does not support certain output parameters. This issue impacts
all map types.
Ribbon The following problems may result if the font size is changed in the Ribbon: o Sometimes the Customize dialog will stop working. Selecting new
trees does not update in the Preview window.
Autodesk ECS 2011
Release Notes – April 7th 2010
Page | 9
o Sometimes, after changing the font size, the Ribbon loses all text except tab and panel names. The text reappears in floating panels but not in the main Ribbon.
o Changing the font size with the Ribbon minimized and then selecting a tab such as the Graphite Modeling Tools tab may cause the system to stop working.
o Sometimes unselected geometries keep selection and transfer gizmos as though they were still selected.
Tab Export and conditional UI elements are not supported in third‐party extensions.
ToolClips, the movies in some ribbon tooltips, do not work on the Windows XP 64‐bit operating system.
ToolClips might not play in certain dual‐monitor setups.
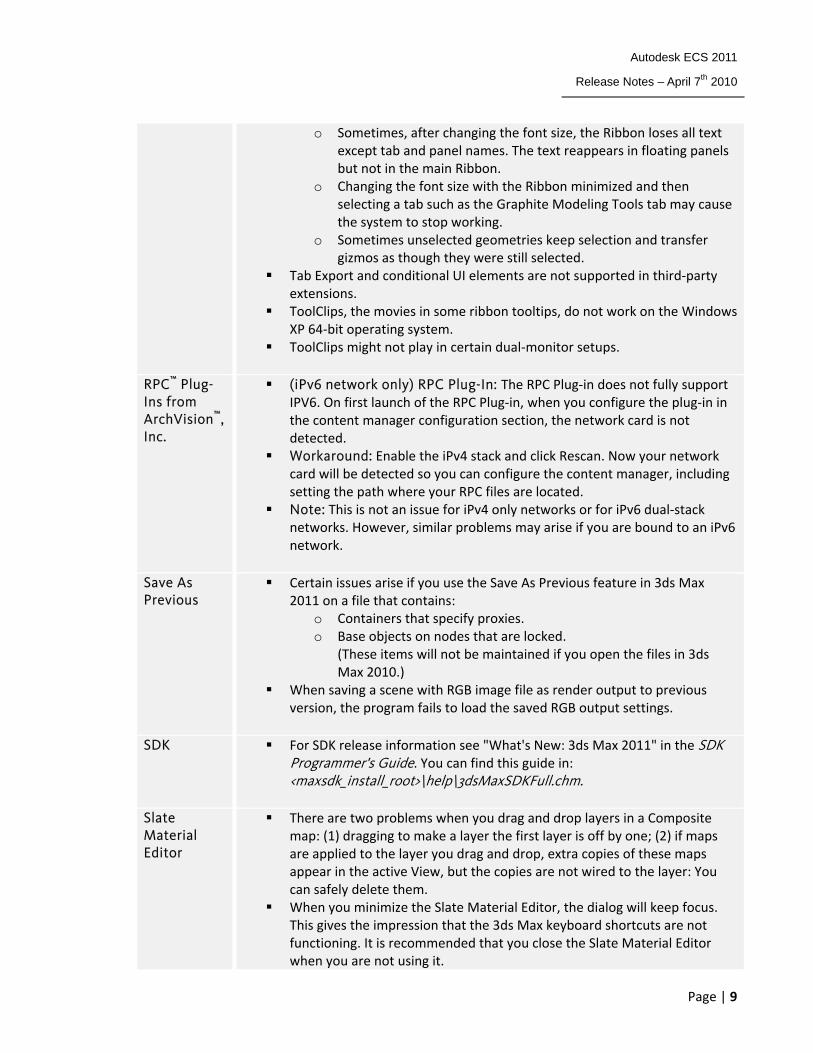
RPC™ Plug-Ins from ArchVision™, Inc.
(iPv6 network only) RPC Plug-In: The RPC Plug‐in does not fully support IPV6. On first launch of the RPC Plug‐in, when you configure the plug‐in in the content manager configuration section, the network card is not detected.
Workaround: Enable the iPv4 stack and click Rescan. Now your network card will be detected so you can configure the content manager, including setting the path where your RPC files are located.
Note: This is not an issue for iPv4 only networks or for iPv6 dual‐stack networks. However, similar problems may arise if you are bound to an iPv6 network.
Save As Previous
Certain issues arise if you use the Save As Previous feature in 3ds Max 2011 on a file that contains:
o Containers that specify proxies. o Base objects on nodes that are locked.
(These items will not be maintained if you open the files in 3ds Max 2010.)
When saving a scene with RGB image file as render output to previous version, the program fails to load the saved RGB output settings.
SDK For SDK release information see "What's New: 3ds Max 2011" in the SDK Programmer's Guide. You can find this guide in: <maxsdk_install_root>\help\3dsMaxSDKFull.chm.
Slate Material Editor
There are two problems when you drag and drop layers in a Composite map: (1) dragging to make a layer the first layer is off by one; (2) if maps are applied to the layer you drag and drop, extra copies of these maps appear in the active View, but the copies are not wired to the layer: You can safely delete them.
When you minimize the Slate Material Editor, the dialog will keep focus. This gives the impression that the 3ds Max keyboard shortcuts are not functioning. It is recommended that you close the Slate Material Editor when you are not using it.
Autodesk ECS 2011
Release Notes – April 7th 2010
Page | 10
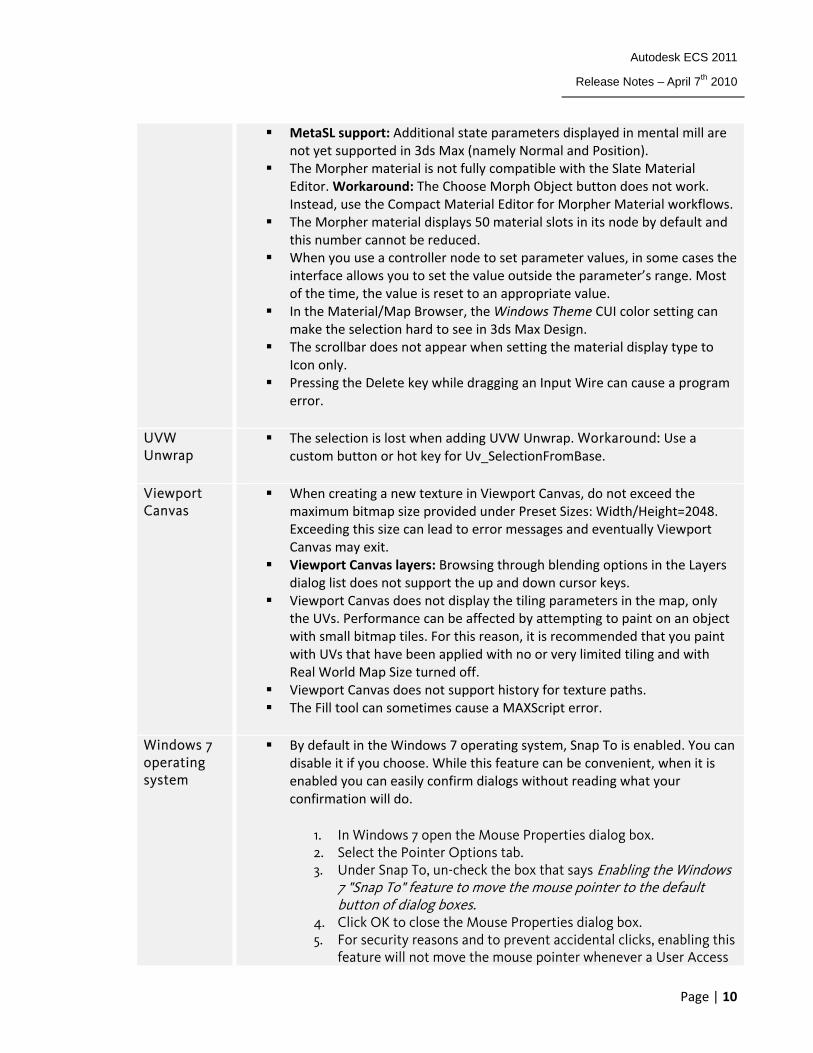
MetaSL support: Additional state parameters displayed in mental mill are not yet supported in 3ds Max (namely Normal and Position).
The Morpher material is not fully compatible with the Slate Material Editor. Workaround: The Choose Morph Object button does not work. Instead, use the Compact Material Editor for Morpher Material workflows.
The Morpher material displays 50 material slots in its node by default and this number cannot be reduced.
When you use a controller node to set parameter values, in some cases the interface allows you to set the value outside the parameter’s range. Most of the time, the value is reset to an appropriate value.
In the Material/Map Browser, the Windows Theme CUI color setting can make the selection hard to see in 3ds Max Design.
The scrollbar does not appear when setting the material display type to Icon only.
Pressing the Delete key while dragging an Input Wire can cause a program error.
UVW Unwrap
The selection is lost when adding UVW Unwrap. Workaround: Use a custom button or hot key for Uv_SelectionFromBase.
Viewport Canvas
When creating a new texture in Viewport Canvas, do not exceed the maximum bitmap size provided under Preset Sizes: Width/Height=2048. Exceeding this size can lead to error messages and eventually Viewport Canvas may exit.
Viewport Canvas layers: Browsing through blending options in the Layers dialog list does not support the up and down cursor keys.
Viewport Canvas does not display the tiling parameters in the map, only the UVs. Performance can be affected by attempting to paint on an object with small bitmap tiles. For this reason, it is recommended that you paint with UVs that have been applied with no or very limited tiling and with Real World Map Size turned off.
Viewport Canvas does not support history for texture paths. The Fill tool can sometimes cause a MAXScript error.
Windows 7 operating system
By default in the Windows 7 operating system, Snap To is enabled. You can disable it if you choose. While this feature can be convenient, when it is enabled you can easily confirm dialogs without reading what your confirmation will do.
1. In Windows 7 open the Mouse Properties dialog box. 2. Select the Pointer Options tab. 3. Under Snap To, un-check the box that says Enabling the Windows
7 "Snap To" feature to move the mouse pointer to the default button of dialog boxes.
4. Click OK to close the Mouse Properties dialog box. 5. For security reasons and to prevent accidental clicks, enabling this
feature will not move the mouse pointer whenever a User Access
Autodesk ECS 2011
Release Notes – April 7th 2010
Page | 11
Control dialog box appears.
When installing 3ds Max 2011 or 3ds Max Design 2011 with 3ds Max 2010 or 3ds Max Design 2010, you must install the 3ds Max 2010 Hot Fix 7 (2009.09.22). To download this Hot Fix go to: http://www.autodesk.com/3dsmax-hotfix-v20090922.
XMSL files In certain situations, when you load an XMSL file in a DirectX Material, while using the mental ray renderer, the software might stop working. Workaround: Use the Scanline or Quicksilver renderers in 3ds Max / 3ds Max Design.
If you use Materials > Export To XSML File, parameters saved in the shader tree are lost.
Exported XMSL files do not contain the correct parameter values.
Page | 1
MotionBuilder 2011
Release Notes
These Release Notes document last minute updates to the Autodesk MotionBuilder 2011 software product/documentation. Contents
New features and enhancements in this Release
Additional Changes in this Release
Resolved Issues
Unresolved Issues and Limitations
Documentation Updates
The Autodesk MotionBuilder 2011 software for Microsoft Windows is now available for purchase through Autodesk resellers. Go to http://www.autodesk.com/motionbuilder and click the “Buy” link at the top right of the page.
For current MotionBuilder Subscription customers, the Autodesk MotionBuilder 2011 software can be downloaded through the Autodesk Subscription Center (Subscription with Gold Support) at: http://www.autodesk.com/subscription.
For information about the MotionBuilder software, or for any downloads, go to: http://www.autodesk.com/motionbuilder‐support.
For updates to the MotionBuilder 2011 documentation, go to: http://www.autodesk.com/motionbuilder2011‐documentation.
Whether you are new to MotionBuilder, somewhat familiar with MotionBuilder, or an advanced MotionBuilder user/software developer, we invite you to consult the following Autodesk web pages.
http://www.autodesk.com/motionbuilder‐learningpath http://www.the‐area.com http://www.autodesk.com/fbx http://www.autodesk.com/developmotionbuilder http://www.autodesk.com/motionbuilder‐hardware
For information about the Autodesk Entertainment and Creation Suites, go to: http://www.autodesk.com/entertainmentcreationsuites.
For information about the Autodesk featured software trials, go to: http://www.autodesk.com/freetrials.
Autodesk ECS 2011 Release Notes – April 7th 2010
New features and enhancements in this Release The following describes the new features and enhancements in the MotionBuilder 2011 software product release.
File I/O Support This release uses the FBX SDK 7.0 as the mechanism to handle file I/O, thus allowing optimum compatibility with other Autodesk 3D software products such as Autodesk® Maya® and Autodesk® 3ds Max®. The following summarizes the changes to the file I/O.
You can now open in MotionBuilder 2011 .fbx files created in earlier versions of MotionBuilder, however, all files saved in MotionBuilder 2011are saved by default in the new FBX file format (version 7.0).
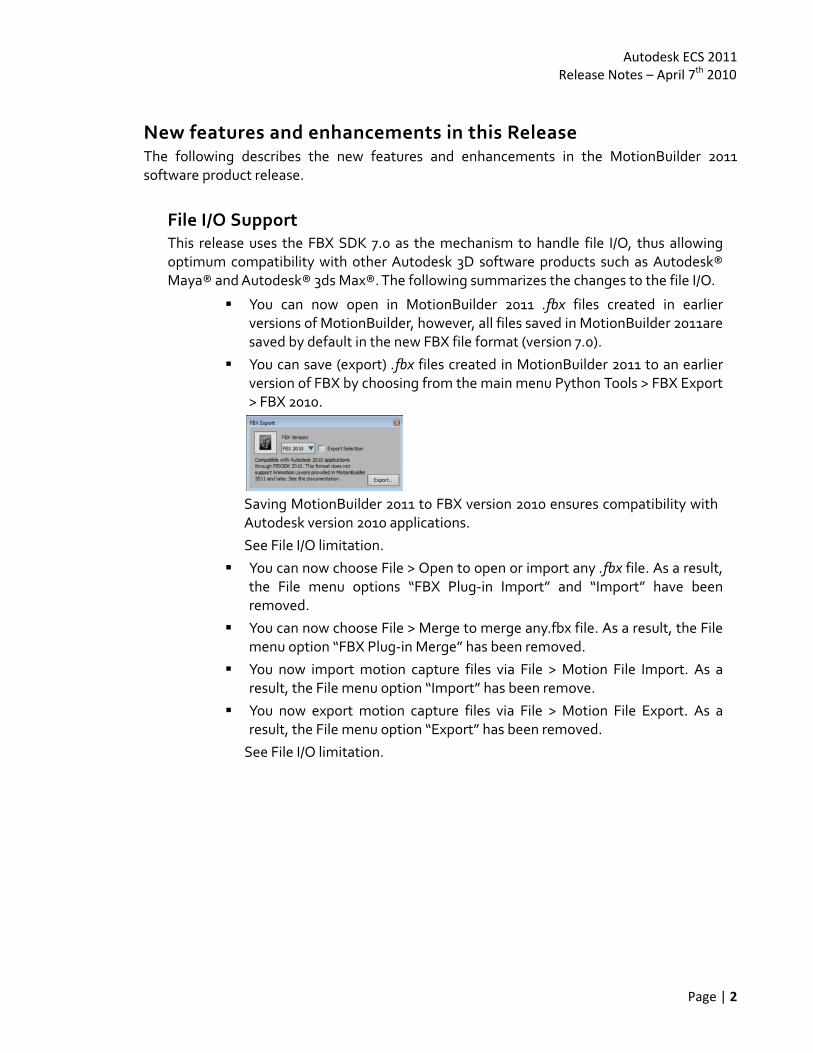
You can save (export) .fbx files created in MotionBuilder 2011 to an earlier version of FBX by choosing from the main menu Python Tools > FBX Export > FBX 2010.
Saving MotionBuilder 2011 to FBX version 2010 ensures compatibility with Autodesk version 2010 applications. See File I/O limitation.
You can now choose File > Open to open or import any .fbx file. As a result, the File menu options “FBX Plug‐in Import” and “Import” have been removed.
You can now choose File > Merge to merge any.fbx file. As a result, the File menu option “FBX Plug‐in Merge” has been removed.
You now import motion capture files via File > Motion File Import. As a result, the File menu option “Import” has been remove.
You now export motion capture files via File > Motion File Export. As a result, the File menu option “Export” has been removed. See File I/O limitation.
Page | 2
Autodesk ECS 2011 Release Notes – April 7th 2010
Animation Layers Enhancements The new Animation Layer editor replaces the Layer pane in the FCurves window. The Animation Layer editor lets you create, select, and merge layers of animation. The Animation Layer editor lets you manage layer order, and parent, mute, solo, and lock layers. It also lets you select various layer blending modes, such as Additive and Override, and layer accumulation modes. Each layer has a Weight value that can be changed and animated to determine how much of its animation plays in the result animation.
The shades of green used to indicate selected layers in the Animation Layer editor and the current layer have been modified to improve visibility.
In addition, Animation layer functionality is exposed through the new FBAnimationLayer class.
Animation Layers Naming Convention The default layer naming convention for layers in the Animation Layer editor has been updated to ensure proper interoperability between the MotionBuilder and Maya software. As a result, the “Base Layer” is now named “BaseAnimation”, the “Layer 1” is now named “AnimLayer1”, and layers you create are now named “AnimLayer2” and so on. The same is true when layers are duplicated.
Note: If you open a file containing older animation layers, the layers are not renamed. For example, you may still see a layer called "Layer 1". When you import to the Maya software, “Layer 1” is renamed “Layer_1” and when you import back to MotionBuilder, the layer name “Layer_1” is retained.
Materials and Textures Enhancements Various enhancements have been made to the materials and textures. The following summarizes the main improvements.
The material, texture, and shader assets are now grouped under the new Asset browser's Shading Elements directory. The Shading Elements folder contains the Material asset, as well as a Texture asset and a Layered Texture asset meant for use with materials. The Global Lighting Texture folder under the Shading Elements directory contains various texture and Layered texture assets meant for use with shaders. The Shaders folder under the same directory contains all the shaders, including any custom shaders you may have on your system.
Page | 3
Autodesk ECS 2011 Release Notes – April 7th 2010
Materials The Material settings include new properties and settings. The new properties are Displacement, Bump Map, and Normal Map. The new settings include the Intensity (or Factor) settings and the Texture list and button. The Intensity settings let you adjust and animate each property's influence on the material result. The Texture list and button let you attach and detach textures to each property.
Note: To see the results of textures attached to material properties other than Diffuse, Bump Map, and Normal Map, use custom shaders (created using the Open Reality® SDK).
The Material settings can be sorted into two categories: basic and advanced settings. The advanced settings require a corresponding shader to display the result in the Viewer. For example, to see the result of a texture attached to the Bump Map property, a Bump Map or Dynamic Lighting shader needs to be applied to the model. Some advanced settings, such as Specularity textures or Reflectivity RGB, need custom shaders created using the Open Reality SDK to display the result in the Viewer. You can use the Advanced Mode option to disable or activate the advanced settings.
When a model has more than one material (such as a Multi/Sub‐Object material) applied to it when you import it from a 3D modeling software, such as Autodesk 3ds Max, these materials are now listed in the Scene browser and are attached to the model. MotionBuilder includes all the materials imported with the model, and assumes that material has a corresponding polygon region (also called material IDs) on the model. You can modify, replace, or delete materials applied to regions. However these regions are set in the 3D modeling software and cannot be altered using MotionBuilder.
Textures The material, texture, and shader assets are now organized differently in the Asset browser. In addition, textures are now sorted under two categories: textures to be used with materials, and Global Lighting textures. In previous versions of MotionBuilder, the Texture asset was attached directly to the model. Now, textures, meant to add color and detail to a model's appearance, are attached to a material property, such as the Diffuse and Bump Map properties. To create textures to be used with materials, drag the asset from the Shading Elements folder in the Asset browser. Either drop the texture onto a model in the Viewer, or drop it onto a material in the Scene browser. A menu appears to let you select the material property to which you want to attach the texture.
Note: To see the results of textures attached to material properties other than Diffuse, Bump Map, and Normal Map, use custom shaders created using the Open Reality SDK.
Global Lighting textures are applied directly to the model and are generated by or interact with various shaders, such as Shadow Map, Lighted, and Reflection shaders. To create Global Lighting textures, expand the Shading Elements folder and drag the asset from the Global Lighting Texture folder.
Page | 4
Autodesk ECS 2011 Release Notes – April 7th 2010
The new Layered Texture assets let you blend multiple textures and then adjust the result as if it were a single texture. The Layered Texture settings consist of the Texture Settings pane (which contain the usual settings), and the Layer Settings pane, where you add, manage, and blend multiple textures.
In Texture settings, there is a new UV Set field that lets you select different UV sets (also known as Map Channels) when a model has more than one. Also, the Rotation settings have additional functionality.
Note: The Use Material option has been removed, and the Texture Type menu remains only to indicate which type of texture you created.
Materials and Textures Handling The handling of materials and textures has been updated to support the FBX geometry model and provide better interoperability with Autodesk Maya and 3ds Max, and to improve shader performance.
The texture / material model now allows transport of currently‐dropped channels, and all materials now contain mapping channels where you can apply textures to different components of the material. This change impacts the SDK as follows: FBFastTessellator has been removed.
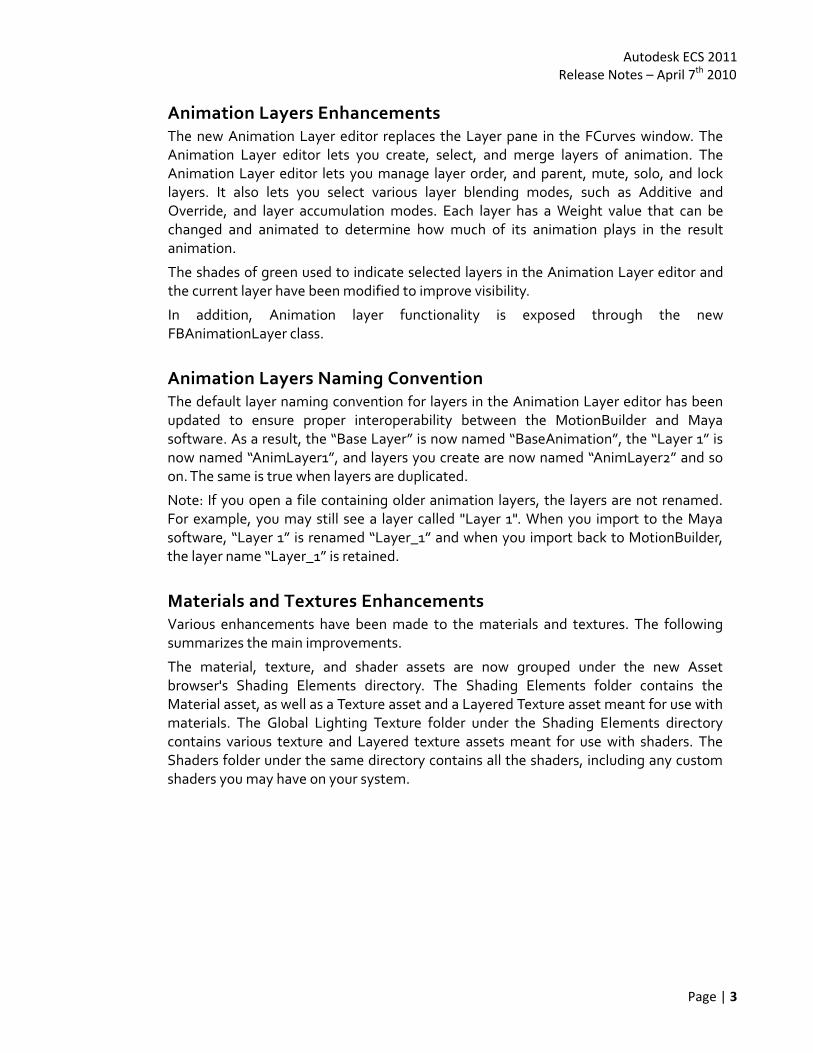
Python Tools Menu You can now access the Python tools via the Python Tools menu.
The Python tools now include a batch tool script and an FBX Export option to save MotionBuilder 2011 files to FBX 2010.
Note: The FBX 2010 files are not MotionBuilder files. Therefore, anything specific to MotionBuilder (such as Story information, devices, etc.) is discarded when using Python Tools > FBX Export or when using the FBX Converter.
Page | 5
Autodesk ECS 2011 Release Notes – April 7th 2010
Joint Physical Property Enhancements Two options have been added to the Joints solver: Disable collision and Creation type.
Disable Collision The Disable collision option gives you the ability to deactivate the collision effect during a solve, letting you control whether the Rigid body objects strike or pass through each other. When you activate the Disable collision option, the Rigid body objects affected by the solve collide and react with each other. When you disable the Disable Collision option, the Rigid Body object reaction to the Joint solve is not affected if it collides with another Rigid body object. This ability to disable the collision behavior of the solve is useful when you want joint behavior from Rigid Body objects but do not want them to collide.
Creation Type The Creation type menu has been added to the Joints solver to let you choose between the default Joint solve behavior or the ability to activate the Joint behavior only upon setting the solve to live. In previous versions of MotionBuilder, joint behavior was created only at the moment when the solver is set to Online. Because of this, you must position the affected rigid body objects correctly at the moment of solver initialization. To use this behavior, select At Solver Initialization from the Joint > Setup > Creation type menu. If you want to activate the joint solve at a specific time other than the start of the simulation, select At enable from the Joints > Setup > Creation type menu. This new Joint option lets you lets you activate the joint at a point in the simulation other than the start, for example when you want a character to catch something. This behavior is similar to being able to key and animate the joint behavior, much the same way you can turn a constraint on after a certain time has elapsed.
Dynamic Lighting Shader Two settings have been added to the Dynamic Lighting shader: Transparency Factor slider and the Affecting Lights field.
Transparency Factor slider The Transparency Factor slider lets you manipulate or animate the Transparency value for the Dynamic Lighting shader. The default setting is 1.00. A material's Transparency settings can also interact with the Dynamic Lighting shader's Transparency values and affect the result.
Page | 6

Autodesk ECS 2011 Release Notes – April 7th 2010
Affecting Lights field The Affecting Lights field lets you specify which lights illuminate the object to which the Dynamic Lighting shader is applied. Since there is a maximum of eight lights available in any given MotionBuilder scene due to OpenGL limitations, you can use the Affecting Lights field to add lights to the scene.
Alt‐drag any light in your scene into the Affecting Lights field. You can also click the Affecting Lights button next to the field to display the Asset list, where you can choose from the lights in your scene.
Note: The Affecting Lights field has the same function as the Selective Lighting shader. Do not use the Selective Lighting shader with the Dynamic Lighting shader; this may cause problems. Use the Dynamic Lighting shader's Affecting Lights field instead.
Time‐independent Keyframes Changes have been made to preserve the Bezier‐Auto and Bezier‐Clamp key types when transferring animation in a Maya‐MotionBuilder‐Maya workflow.
Bezier‐Auto and Bezier‐Clamp keyframe types have a new "time‐independent" mode. When exported to Maya, the new "time‐independent" key types are not converted to "Fixed" (User) keys. They preserve instead the exact same key type (Maya exact equivalent). So when "time‐independent", Bezier‐Auto keys are Spline in Maya, and Clamp keys are Clamp keys in Maya.
The behavior of the Bezier‐Auto and Bezier‐Clamp keyframes created in previous versions of MotionBuilder is supported in this release. When exported to Maya, these keyframes are still converted to a "Fixed" (User) key type.
Note: Changing the interpolation of any keyframe "resets" the key and the key uses the new "time‐independent" mode from then on.
Camera Back/Front Plate Image and video files are no longer directly attached to a camera's Back Plate or Front Plate. To apply an image or video clip to a camera's Back or Front Plate, drag a texture onto the camera or into the Background Texture field in the Camera settings.
Page | 7

Autodesk ECS 2011 Release Notes – April 7th 2010
New Default Layouts The default layouts have been revisited and updated. In addition, new default layouts have been added to support screen resolutions of 1920 x 1200.
The updates to the default layouts include the following:
The Dynamic Editor window is replaced by the Animation Layer editor. The Navigator window in the Editing layout no longer includes the Motion
Blend tab. You can however access the Motion Blend window via the MotionBuilder Window menu.
The Creation, Animation, Editing, Preview, and Story default layouts now include a default layout configuration for monitors with a display resolution of 1920 x 1200.
The default layouts reside in the MotionBuilder root directory under \bin\config\Layouts\base. These default layouts are also added under C:\Users\<username>\AppData\Local\Autodesk\MB2011\config\Layouts\Base after first launching the application.
The custom layouts are saved under C:\Users\<username>\AppData\Local\Autodesk\MB2011\config\Layouts on a Vista and Windows 7 OS, and in the MotionBuilder root directory under \bin\config\Layouts on a Windows XP OS.
Note: If you installed MotionBuilder 2011 on a Windows Vista or Windows 7 operating system, make sure to delete your MB2011 user data saved under C:\Users\<username>\AppData\Local\Autodesk before first launching MotionBuilder 2011. Otherwise, the new default layouts will not overwrite the old default layouts saved in the user data.
Motion Capture on Bones Motion capture sensor data can now be associated directly in the motion capture hardware with a character's skeleton nodes. This mechanism is demonstrated by the new sample Skeleton mocap: deviceskeleton.
Python Batch Tool Script There is a new Python‐UI‐based batch tool script. The Python code (BatchTool.py) can be found in the MotionBuilder root directory under the bin\config\PythonStartup\ folder.
The Python Batch Tool is accessible via the MotionBuilder Python Tools menu and via the Python Editor Tool Manager button.
New FBFCurve Functions With FBFCurve::KeyDelete you can delete keys within an index range, which is much faster than multiple uses of FBFCurve::KeyRemove.
Page | 8
Autodesk ECS 2011 Release Notes – April 7th 2010
Embedding .cgfx Shader Files When saving a file, enabling the Embed Medias option in the Save File dialog box now embeds CgFX shader media files in the .fbx file. When you reopen the file with the embedded media, the media files are extracted to an .fbm folder and the path in the CgFX shader settings is updated to point to this .fbm folder.
New Shape Editing Interface The shape editing interface is now exposed to ORSDK & Python. For usage, see ShapeCreation.py.
New function FBComponent::HardSelect() In the Viewer or Navigator this both selects and item and shows it in the right pane, ready for the user to edit.
New Sample Code FBKeyingGroupLocal.py: shows how to create a cube and add translation, rotation and scaling properties of the cube into a custom keying group.
Autodesk Installation and Licensing This release supports the standard Autodesk Installation and licensing scheme to align MotionBuilder with the other Autodesk software products and to improve the user‐experience.
Additional Changes in this Release The following describes additional changes to this release of the MotionBuilder software product.
Story Tool Optimization The work on Story tool optimization to improve the overall stability and performance is ongoing.
The Story tool evaluation is now part of the MotionBuilder engine.
Updated Qt Support This release of MotionBuilder supports Qt™ version 4.5.2.
Page | 9
Autodesk ECS 2011 Release Notes – April 7th 2010
Updated Python Support The MotionBuilder libraries are upgraded to Python® version 2.6.4 (released in October 2009) – the same version used in the latest Autodesk Maya product.
This release (as the previous release) of the MotionBuilder software includes the entire Python Package – a benefit to users who no longer need to download the entire package from http://www.python.org to make use of specific functions that ship with the standard Python install.
NVIDIA PhysX Support This release support the NVIDIA® PhysX® solver plug‐in.
Note: You need the NVIDIA PhysX driver to be able to use this plug‐in.
Perforce Support This release supports Perforce®.
Customer Involvement Program Support This release enables you to preview your CIP data. To preview your CIP data, go to the MotionBuilder Help menu and choose the Customer Involvement Program menu, then click the Preview MY CIP Data at the bottom‐right corner of the Autodesk Customer Involvement Program window.
Windows 7 Support This release of MotionBuilder is supported on the Microsoft Windows® 7 Professional on 64‐bit Operating Systems (OS).
IPv6 Support This release supports the Internet Protocol version 6 (IPv6, the successor of IPv4). IPv6 supports the use of a 128‐bit address whereas IPv4 supports only the use of a 32‐bit address.
Note: IPv6 is on by default.
See the IPv6 Network limitations.
Page | 10
Autodesk ECS 2011 Release Notes – April 7th 2010
Resolved Issues The following describes the issues addressed in the MotionBuilder 2011 software product release.
Plotting to a New Clip When you use “Process Tracks/Subtrack To New Clip”, the processed clip now contains all the animation from the selected clips.
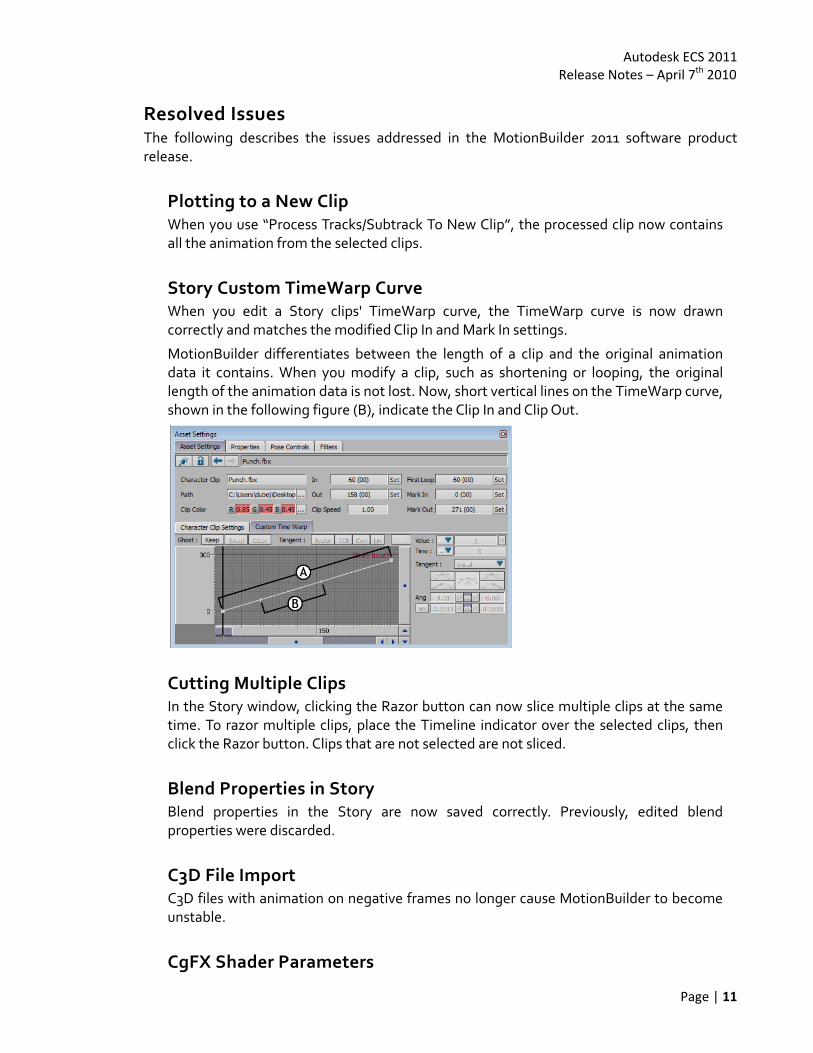
Story Custom TimeWarp Curve When you edit a Story clips' TimeWarp curve, the TimeWarp curve is now drawn correctly and matches the modified Clip In and Mark In settings.
MotionBuilder differentiates between the length of a clip and the original animation data it contains. When you modify a clip, such as shortening or looping, the original length of the animation data is not lost. Now, short vertical lines on the TimeWarp curve, shown in the following figure (B), indicate the Clip In and Clip Out.
Cutting Multiple Clips In the Story window, clicking the Razor button can now slice multiple clips at the same time. To razor multiple clips, place the Timeline indicator over the selected clips, then click the Razor button. Clips that are not selected are not sliced.
Blend Properties in Story Blend properties in the Story are now saved correctly. Previously, edited blend properties were discarded.
C3D File Import C3D files with animation on negative frames no longer cause MotionBuilder to become unstable.
CgFX Shader Parameters
Page | 11
Autodesk ECS 2011 Release Notes – April 7th 2010
Changing the path to CgFX shaders no longer resets its parameters. The CgFX shader settings now include the Merge Parameters option. When loading or reloading CgFX shaders, activate the Merge Parameters option to keep the shader's property settings and references to .dds files. Disable the option to clear these settings when you load or reload CgFX shaders.
Constrained Lights Selected as Affecting Lights When lights are part of a constraint, selecting them as the Dynamic Lighting shader's Affecting Lights no longer causes MotionBuilder to crash.
Auxiliary Effectors in the Story Window Auxiliary effectors included in additive Character tracks in the Story window now retain their Reach and pinning values when the file is saved and reopened. Before, the influence of Auxiliary effectors was lost.
Clip Mark In/Out Values in the Story Window In the Story window, when you insert a clip from the current take, and then trim and copy/paste the clip, the modified Mark In and Mark Out values are retained. Before, these values for the pasted clip were lost.
Using Box Connectors in Relations Constraint In a Relations constraint, clicking a box connector and then pressing Delete no longer causes MotionBuilder to crash.
Bezier Curve Box in Relations Constraint When you use a Bezier Curve box in a Relations constraint, switching from Global to Local no longer reassigns the connections. The Bezier Curve box now has Vector connectors instead of Translation connectors.
Use Constant Key Reducer Option In the Filters preferences of the Preferences window, disabling the Use Constant Key Reducer option now turns off both the Constant Key reducer and the Runtime Constant Key Reducer.
Selecting Takes in the Scene Browser When you select takes from the Navigator's Scene browser, the Zoom bar in the Transport Controls now remains the correct length for each Take. The Zoom bar no longer resizes to fit the length of the previously selected take.
Resizing the Zoom Bar and Merging Scenes
Page | 12
Autodesk ECS 2011 Release Notes – April 7th 2010
When you resize the zoom bar in the Transport controls, then merge a file that contains a take, the Zoom bar remains the same and no longer resets to the full length of the timeline.
Pose Controls and Namespace Stored poses now work correctly when you merge a scene containing a character with the same namespace. You can paste the poses on both characters and obtain the expected results. This fix includes poses that involve Character Extensions.
Far Plane for Producer Top Camera When using the Producer Top orthographic camera, you can now use the Far Plane value in the Camera Settings to affect clipping beyond 4000 in the Y‐axis. In previous versions, the maximum functioning value for the Far Plane was 4000.
Importing Layers: Scale Additive Accumulation Mode Since MotionBuilder does not support Maya animation layers that use the Scale Additive Accumulation mode, a warning dialog now appears when you import a scene that uses this type of layer. You can either use Scale Multiply Accumulation mode in Maya and export the file again or you can bake your layers to retain the visual fidelity of your animation.
Reloading Local Keying Group When you create a custom Local Keying Group, then save and reload the file, MotionBuilder no longer crashes.
FBPlotPopup in OR SDK and Python The dialog that is used to set Plot options is now exposed in the OR SDK and Python. FBPlotPopup now displays this dialog that enables users to retrieve FBPlotOptions.
Accessing Properties on Custom User Object You can now access properties on a custom C++ user objects from Python or from C++.
OR SDK FBProgress Class An interrupt callback function has been exposed into the FBProgress class to enable users to interrupt operations. See FBProgress.py for usage. Also, Progress bars created with FBProgress can now be cancelled in the UI by pressing the escape key.
Page | 13
Autodesk ECS 2011 Release Notes – April 7th 2010
OR SDK Sample Constraint Position The OR SDK sample constraintposition has been modified. A change to SetupAllAnimationNodes()in orconstraintposition.cxx fixes an issue where local FBAnimationNodes could not be created on custom constraints.
New Functions in FBFCurve With FBFCurve::KeyDelete you can delete keys within an index range, which is more efficient than multiple uses of FBFCurve::KeyRemove.New functionality is demonstrated in CopyAninamation.py.
Python FBProgress Object The Python version of FBProgress:: ProgressDone() now resets the progress bar UI after finishing a task.
FBGeometry Issues with Python Exposure The Python versions of FBGeometry::VertexGet and FBGeometry::VertexUVGet now function correctly
FBApplication::FileAppend() This function did not work correctly in previous releases and is now fixed.
BoxLayout in Python You can now center a control inside a BoxLayout in Python using the AddRelative method. This is demonstrated in the updated BoxLayout.py script.
Auto Completion in Python Editor In the Python editor, the auto completion popup no longer appears off the visible screen area in some circumstances.
Multibyte Characters in Python If you edit a script outside of MotionBuilder, it must be encoded with UTF‐8 before you can open it in the MotionBuilder Python editor. By default, Python assumes all scripts are written in ASCII. To use Unicode, declare the encoding in the first or second line of your script according to the instructions found at: http://www.python.org/dev/peps/pep‐0263/.
FBVector4d in C++ In MotionBuilder version 2009 and version 2010, it was not possible to create custom properties for this type FBVector4d in C++. This is now fixed
Page | 14

Autodesk ECS 2011 Release Notes – April 7th 2010
Optical Device Template C++ sample updated The OR ‐ Optical Device Template has been updated to correct a behavior in MotionBuilder version 2009 and version 2010 where the incoming data stream was not being mapped to an optical marker.
Setting Values with FBSpread In previous versions of MotionBuilder, with FBSpread it was only possible to set the cell value with SetCellValue. It was not possible to set the value after having chosen a specific 'Style' enumeration. This is now fixed.
Unresolved Issues and Limitations The following describes the unresolved issues as well as any limitations in the MotionBuilder 2011 software product release deemed important to document.
File I/O The following describes the File I/O limitations.
FBX files saved in MotionBuilder 2011 cannot be loaded in previous versions of MotionBuilder. A workaround for this limitation is to either export the MotionBuilder 2011 .fbx files to an earlier version of FBX by choosing from the main menu Python Tools > FBX Export > FBX 2010 or by using the Autodesk FBX Converter. Note: You can download the latest FBX Converter from http://www.autodesk.com/fbx.
FBX files saved in MotionBuilder 2011 cannot be loaded in previous versions of MotionBuilder.
FBX files exported via Python Tools > FBX Export > FBX 2010 tool or the FBX Converter tool are FBX SDK files and not MotionBuilder files. This means that anything specific to MotionBuilder will be discarded (story information, Devices, etc.).
FBX file format version 2010 does not support the MotionBuilder 2011 Animation layers.
Updating Templates Directory Changing the Templates directory via the Asset browser prevents you from subsequently launching MotionBuilder.
On a Windows 7 and Windows Vista OS, to be able to launch MotionBuilder after changing the Templates directory, you need to delete your MotionBuilder user data in C:\Documents and Settings\<user name>\Application Data\Autodesk\MB2011 or in C:\Users\<user name>\AppData\Local\Autodesk\MB2011 or MB2011x64 (to void the change to the Templates directory) before launching MotionBuilder.
Page | 15
Autodesk ECS 2011 Release Notes – April 7th 2010
On a Windows XP Professional OS, to be able to launch MotionBuilder after changing the Templates directory, you need to delete the <computername>.History.txt configuration file located in C:\Program Files\Autodesk\Autodesk MotionBuilder 2011\bin\config (to void the change to the Templates directory) before launching MotionBuilder.
Namespaces Specified with FBFbxOptions In previous versions of MotionBuilder, a namespace could be specified with FBApplication::FileAppend. This is now done with FBFbxOptions::CustomImportNamespace.
Receiver Type Box in a Relation Constraint There is a problem getting animation nodes when a sender and receiver box has local nodes on both sides. A workaround for this issue is to set them to global.
IPv6 Network The following describes issues related to IPv6 network:
Network server and Network client don’t work between Windows 7 and Windows Vista in IPv6.
On Windows® XP Professional OS, the Autodesk Network License Manager doesn’t come with IPv6 packages.
The license server cannot be detected when activating a network license on IPv6. If you are using a license server on an iPv6 network, the license server will not work.
The license server cannot be detected when activating a network license on IPv6. If you are using a license server on an iPv6 network, the license server will not work.
A workaround for this issue is to download an updated version of the Autodesk Network License Manager from http://www.autodesk.com/nlm2011‐ipv6‐windows. This update enables the Autodesk Network License Manager to support IPv6 networks using Microsoft Windows Server 2008, Windows Vista 32‐bit and Windows Vista 64‐bit. To install the patch:
1. Shut down your license server. 2. Back up the contents of the license manager files. By default, these are in C:\Program Files\Autodesk Network License Manager.
3. Download the patch from http://www.autodesk.com/nlm2011‐ipv6‐windows.
4.Unzip the patch and paste the new files over the old ones; these are located by default in \Program Files\Autodesk Network License Manager. (Four files will be overwritten.)
Page | 16
Autodesk ECS 2011 Release Notes – April 7th 2010
5. Restart your license server.
Autodesk Network License Manager IPv6 Support The following describes issues related to the updated version of the Autodesk Network License Manager:
The Autodesk Network License Manager version that ships with the Autodesk version 2011 products does not support early return of borrowed licenses.
The Autodesk Network License Manager version that ships with the Autodesk version 2011 products supports only a mixed IPv4 and IPv6 environment. It does not support network license checkouts in an IPv6‐only environment.
OpenGL There is a maximum number of eight lights available in any given MotionBuilder scene due to OpenGL® limitations.
The workaround for this limitation is to use Selective Lighting shaders to add lights to the scene. For example, you can use Selective Lighting shaders to set up an association between lights and objects to increase the number of lights in your scene to eight per object.
Do not append a Selective Lighting shader on the same object to which a Dynamic Lighting shader is applied. To work around the OpenGL limitation, you can use the Dynamic Lighting shader’s Affecting Lights field instead.
Dynamic Lighting Shader If you select Append to apply the Dynamic Lighting shader when the Default shader is also applied to the model, you may see undesirable results, such as flickering. Select Replace By Type or Replace All when you apply the Dynamic Lighting shader to detach the Default shader.
FCurves Interpolation Some interpolations are lost on merge back to MotionBuilder regardless of how you set the Smart Plot option.
Note: This issue does not occur when merging to a layer other than the BaseAnimation layer.
Layered Textures Set to Additive Layered textures set to Additive become combined and clamped between 0 and 1.
Customizing Control Rigs and HIK The Control rig properties "Solid" look does not show the Extra FK Models.
Page | 17
Autodesk ECS 2011 Release Notes – April 7th 2010
The workaround to this limitation is to use the "Default" setting in the Properties Look menu when customizing the look of HIK rigs.
Appending Takes to a Scene If you use FBTake to append a take to a scene, the new take does not register with the Transport Controls, as it should.
The workaround for this issue is to use FBTake::CopyTake. For more information, see the FBTake Class Reference in the Python or C++ Reference.
NVIDIA PhysX Soft Body The PhysX Soft Body feature is not supported on a 64‐bit OS.
Physics Solving The Physics solver does not process degenerated polygons or invalid normals correctly. The following issues occur:
The Elements > Primitives folder Sphere element contains geometry that may produce unpredictable results during these solves. To avoid this issue, use the polySphere element in the Asset browser Primitives folder when you require a sphere model for Physics solves (such as Rigid body, Joint, or Ragdoll).
On 64‐bit systems, the Physics solver cannot process objects that have degenerated polygons or invalid normals. When this occurs, a warning message appears to identify the models that have this problematic geometry, stating bounding boxes will be used to approximate these shapes instead. These bounding boxes provided by MotionBuilder in these cases may produce solve results that differ from the expected behavior. If possible, use the Cube, Capsule, or Sphere approximations to match your geometry with more precision. For more complex geometry, reconstruct the model with the degenerated geometry or invalid polygons using 3D software to avoid these non‐standard geometry problems.
Page | 18
Autodesk ECS 2011 Release Notes – April 7th 2010
Page | 19
Documentation Updates The following describes the updates to the documentation and learning material since the release of the MotionBuilder 2011 product. You can download these updated documents from: http://www.autodesk.com/motionbuilder2011‐documentation.
MotionBuilder Help The Autodesk MotionBuilder 2011 Help has been updated since the MotionBuilder 2011 release to incorporate minor updates.
Note: Extract the contents of the .zip file to your default Autodesk MotionBuilder 2011 64‐bit\Help directory or default Autodesk MotionBuilder 2011 32‐bit\Help directory.
MotionBuilder What’s New The Autodesk MotionBuilder 2011 What’s New document has been updated since the MotionBuilder 2011 release to include an unresolved issue pertaining to the updating of the Templates directory.
MotionBuilder User’s Guide The Autodesk MotionBuilder 2011 User’s Guide has been updated since the MotionBuilder 2011 release to incorporate minor updates, resolve graphic issues, and optimize the file size.
MotionBuilder Tutorials The Autodesk MotionBuilder 2011 Tutorials has been updated since the MotionBuilder 2011 release to include minor updates to graphics, resolve graphic issues, and optimize the file size.
MotionBuilder Installation and Licensing Guide The Autodesk MotionBuilder 2011 Installation and Licensing Guide has been updated since the MotionBuilder 2011 release to incorporate minor editorial updates and updates pertaining to the license borrowing.

Autodesk ECS 2011 Release Notes – April 7th 2010
Page | 20
Page | 1
Autodesk® Mudbox 2011
Release Notes
This Release Notes contains links to the latest information regarding the installation and use of Autodesk® Mudbox® 2011 software. It is strongly recommended that you read this document before installing the software.
Find new feature information in the "What's New" section of the Mudbox Help. http://www.autodesk.com/mudbox-docs-v2011-whatsnew Find Mudbox 2011 release notes in the "Release Notes" section of the Mudbox Help. http://www.autodesk.com/mudbox-v2011-releasenotes Find learning resources for Mudbox at: www.autodesk.com/mudbox-learningpath Watch videos to learn how to use Mudbox at: www.autodesk.com/mudbox-trainingvideos Find support resources at: http://www.autodesk.com/mudbox-support For the latest list of certified hardware, including graphics cards, to run Mudbox 2011, refer to the Mudbox 2011 certification chart located at: www.autodesk.com/mudbox-hardware Find the Mudbox 2011 minimum system requirements at: http://www.autodesk.com/mudbox-system-requirements Find documentation and examples for the Mudbox SDK with your installed version of Mudbox here: \Mudbox2011\SDK or online here: http://www.autodesk.com/mudbox-docs-v2011-sdkguide

Autodesk ECS 2011
Release Notes – April 7th 2010
Page | 2
Customer Involvement Program (CIP) The first time you start Mudbox, the Customer Involvement Program dialog appears. If you choose to participate in the Customer Involvement Program, Mudbox will automatically send Autodesk information about system configuration, what features you use most, any problems that you encounter, and other information helpful to the future direction of the product. For further information, see www.autodesk.com/cip. Customer Error Reports (CERs) We are able to improve the stability of Mudbox largely because of the Customer Error Reports (CERs) that end-users of our products submit. We thank you for taking the time to fill out these reports and ask that you include as much information as possible about what actions you were performing at the time the error occurred. These details raise the value of the report immensely and are very much appreciated by the Autodesk Mudbox Engineering team. For further information about CERs refer to www.autodesk.com/cer.

Autodesk ECS 2011
Release Notes – April 7th 2010
Page | 3
Autodesk, 3ds Max, Maya, MotionBuilder, Mudbox, FBX and Backburner are registered trademarks or trademarks of Autodesk, Inc., in the USA and/or other countries. All other brand names, product names, or trademarks belong to their respective holders. Autodesk reserves the right to alter product offerings and specifications at any time without notice, and is not responsible for typographical or graphical errors that may appear in this document.
© 2010 Autodesk, Inc. All rights reserved.