Embed Size (px)
Citation preview
Page 1 of 10 Office of Distance Education and Learning Technologies • (O) 361-825-2122 • (F) 361-825-3666
Texas A&M University-Corpus Christi • 6300 Ocean Drive, Unit 5779
Corpus Christi, Texas 78412 - 5779
Camtasia Studio 8 Basics This tutorial is for use with a PC computer
Objectives
At the completion of this tutorial, you will be able to:
1. Identify the ways in which you can purchase Camtasia. 2. Identify the features and functions of Camtasia. 3. Record voice narration and actions on your computer screen.
4. Perform basic editing. 5. Add on-screen captioning. 6. Publish and share video.
The activity for this workshop is to create an orientation video showing your Bb course or a website.
1. How to Purchase Camtasia:
The cost per license is $17 To order for the department: http://sell.tamu.edu/Departments/Departmental_Software_List.php/ To order for personal use: https://software.tamu.edu
SnagIt is bundled with Camtasia Studio 8. It allows the selection and capture of anything on your computer screen.
2. Identify the features and functions of Camtasia:
a. Open Camtasia.
b. View Getting Started Project located in the Help menu. To pause, click the arrow
below the video canvas.
3. Create Project
a. From the File dropdown menu in the upper left corner, select New Project.
b. Choose the dimensions and size of the video you want to record using the Editing Dimensions tool by
clicking on the Editing Dimensions button directly above the canvas window to choose the dimensions for
the video. Select the size recommended for You Tube.
4. Record voice narration and actions on your computer screen:
a. Select a website or Blackboard course to use for the project.
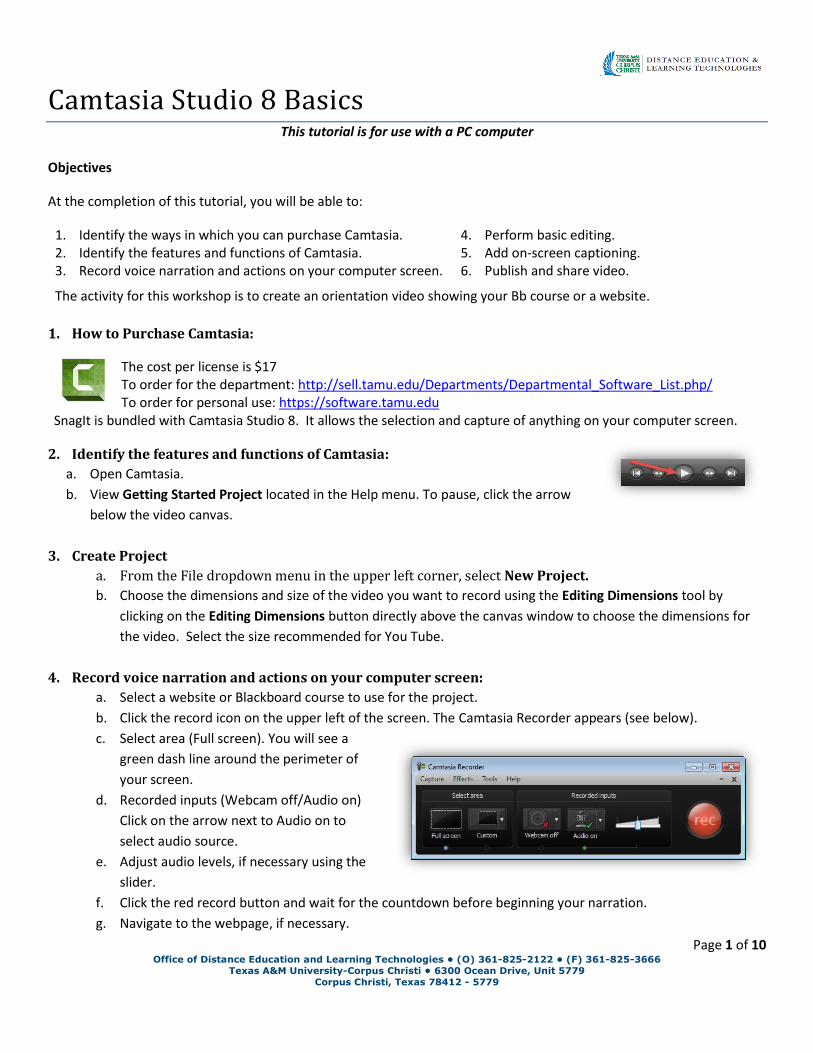
b. Click the record icon on the upper left of the screen. The Camtasia Recorder appears (see below).
c. Select area (Full screen). You will see a
green dash line around the perimeter of
your screen.
d. Recorded inputs (Webcam off/Audio on)
Click on the arrow next to Audio on to
select audio source.
e. Adjust audio levels, if necessary using the
slider.
f. Click the red record button and wait for the countdown before beginning your narration.
g. Navigate to the webpage, if necessary.
Page 2 of 10 Office of Distance Education and Learning Technologies • (O) 361-825-2122 • (F) 361-825-3666
Texas A&M University-Corpus Christi • 6300 Ocean Drive, Unit 5779
Corpus Christi, Texas 78412 - 5779
h. Begin narrating, moving your cursor to points of interest and clicking links to other pages.
i. Press F10 to stop recording.
j. The Preview window will automatically play your recording.
k. Select Save and edit.
l. Choose a location on your computer to save and name the file. Once you have saved your .trec file,
recording will appear in the editor.
NOTE: The file will be saved as a .trec file. It is the raw unedited video file and is only viewable in Camtasia.
Review Overview of Camtasia Editor Features for details on editor features.
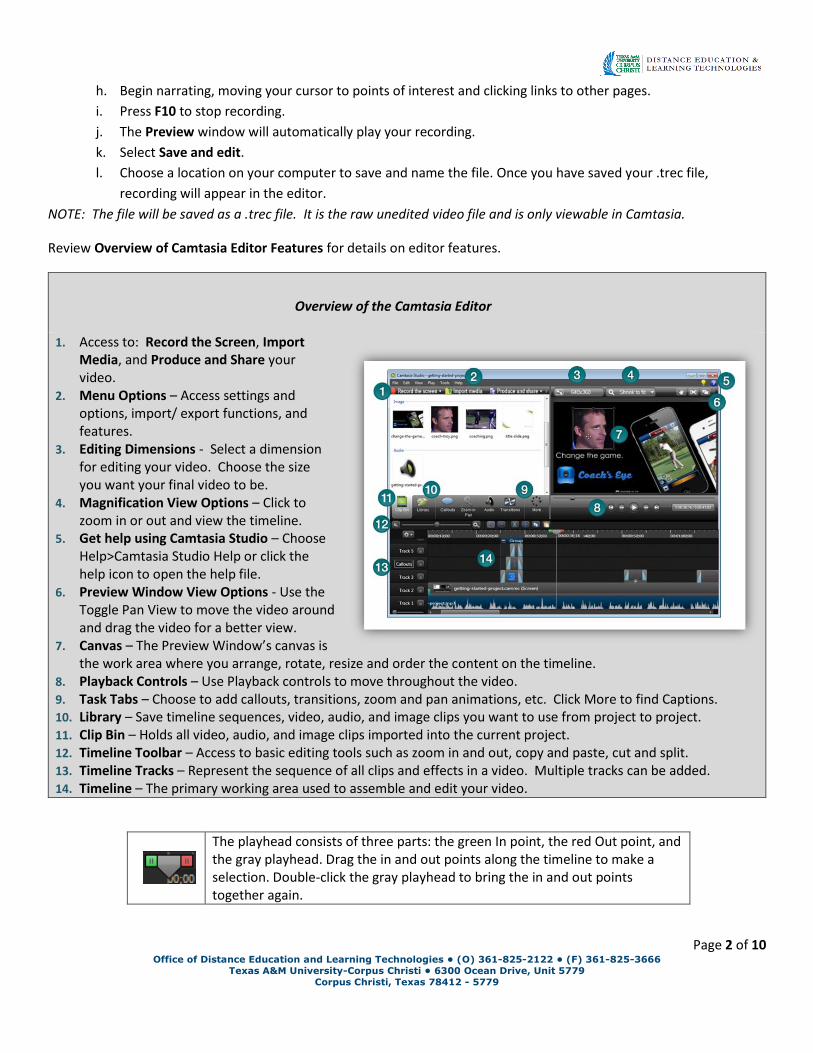
Overview of the Camtasia Editor
1. Access to: Record the Screen, Import Media, and Produce and Share your video.
2. Menu Options – Access settings and options, import/ export functions, and features.
3. Editing Dimensions - Select a dimension for editing your video. Choose the size you want your final video to be.
4. Magnification View Options – Click to zoom in or out and view the timeline.
5. Get help using Camtasia Studio – Choose Help>Camtasia Studio Help or click the help icon to open the help file.
6. Preview Window View Options - Use the Toggle Pan View to move the video around and drag the video for a better view.
7. Canvas – The Preview Window’s canvas is the work area where you arrange, rotate, resize and order the content on the timeline.
8. Playback Controls – Use Playback controls to move throughout the video. 9. Task Tabs – Choose to add callouts, transitions, zoom and pan animations, etc. Click More to find Captions. 10. Library – Save timeline sequences, video, audio, and image clips you want to use from project to project. 11. Clip Bin – Holds all video, audio, and image clips imported into the current project. 12. Timeline Toolbar – Access to basic editing tools such as zoom in and out, copy and paste, cut and split. 13. Timeline Tracks – Represent the sequence of all clips and effects in a video. Multiple tracks can be added. 14. Timeline – The primary working area used to assemble and edit your video.
The playhead consists of three parts: the green In point, the red Out point, and the gray playhead. Drag the in and out points along the timeline to make a selection. Double-click the gray playhead to bring the in and out points together again.
Page 3 of 10 Office of Distance Education and Learning Technologies • (O) 361-825-2122 • (F) 361-825-3666
Texas A&M University-Corpus Christi • 6300 Ocean Drive, Unit 5779
Corpus Christi, Texas 78412 - 5779
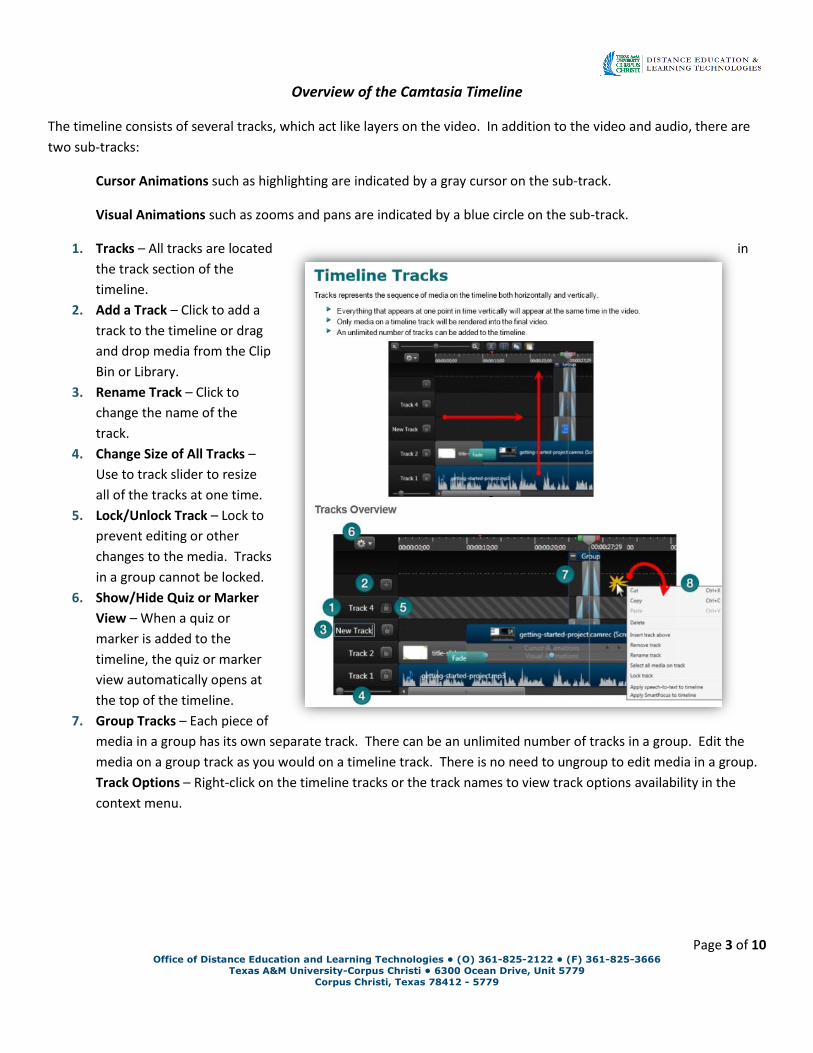
Overview of the Camtasia Timeline
The timeline consists of several tracks, which act like layers on the video. In addition to the video and audio, there are
two sub-tracks:
Cursor Animations such as highlighting are indicated by a gray cursor on the sub-track.
Visual Animations such as zooms and pans are indicated by a blue circle on the sub-track.
1. Tracks – All tracks are located in
the track section of the
timeline.
2. Add a Track – Click to add a
track to the timeline or drag
and drop media from the Clip
Bin or Library.
3. Rename Track – Click to
change the name of the
track.
4. Change Size of All Tracks –
Use to track slider to resize
all of the tracks at one time.
5. Lock/Unlock Track – Lock to
prevent editing or other
changes to the media. Tracks
in a group cannot be locked.
6. Show/Hide Quiz or Marker
View – When a quiz or
marker is added to the
timeline, the quiz or marker
view automatically opens at
the top of the timeline.
7. Group Tracks – Each piece of
media in a group has its own separate track. There can be an unlimited number of tracks in a group. Edit the
media on a group track as you would on a timeline track. There is no need to ungroup to edit media in a group.
Track Options – Right-click on the timeline tracks or the track names to view track options availability in the
context menu.
Page 4 of 10 Office of Distance Education and Learning Technologies • (O) 361-825-2122 • (F) 361-825-3666
Texas A&M University-Corpus Christi • 6300 Ocean Drive, Unit 5779
Corpus Christi, Texas 78412 - 5779
5. Perform basic editing:
NOTE: Edits on the timeline do not affect the clips in the Clip Bin. The Clip Bin maintains the original files.
a. Cut a Selection- a Cut removes a selection from the timeline and puts it on the clipboard. The selection can
then be pasted elsewhere on the timeline, if desired. You can cut within a single clip or across multiple clips.
1) Click to highlight the track(s) to edit and lock any tracks on the timeline that contain clips or elements you
do not want to cut.
2) Drag the in or out points to make the selection. Use the zoom slider to get a better view of the timeline, if
necessary. The selected area is highlighted in blue.
3) Click the Cut Selection button.
4) To paste the selection elsewhere on the timeline, move the playhead to a new location and click the Paste
button.
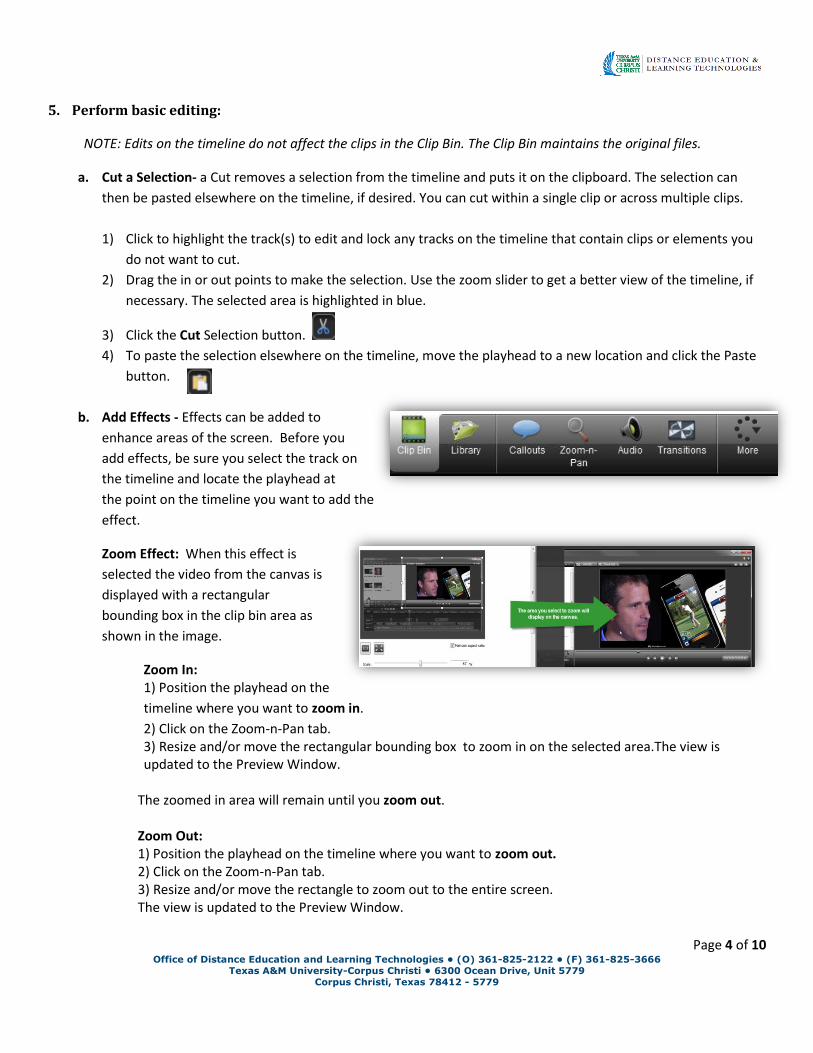
b. Add Effects - Effects can be added to
enhance areas of the screen. Before you
add effects, be sure you select the track on
the timeline and locate the playhead at
the point on the timeline you want to add the
effect.
Zoom Effect: When this effect is
selected the video from the canvas is
displayed with a rectangular
bounding box in the clip bin area as
shown in the image.
Zoom In: 1) Position the playhead on the
timeline where you want to zoom in.
2) Click on the Zoom-n-Pan tab. 3) Resize and/or move the rectangular bounding box to zoom in on the selected area.The view is updated to the Preview Window.
The zoomed in area will remain until you zoom out. Zoom Out: 1) Position the playhead on the timeline where you want to zoom out. 2) Click on the Zoom-n-Pan tab. 3) Resize and/or move the rectangle to zoom out to the entire screen. The view is updated to the Preview Window.
Page 5 of 10 Office of Distance Education and Learning Technologies • (O) 361-825-2122 • (F) 361-825-3666
Texas A&M University-Corpus Christi • 6300 Ocean Drive, Unit 5779
Corpus Christi, Texas 78412 - 5779
Optional Activities
Split a Clip (optional) - the Split tool divides one clip into two
clips. You can move and edit each clip separately.
Split clips to insert transitions, title slides, or graphics
between scenes. Use the split tool when you do not want to
cut or trim any of the clip. NOTE: You cannot split callouts or
transitions on the timeline. Use caution when arranging and
editing the split clips on the timeline. Both clips have the same name.
1) Click to highlight the track(s) to edit lock any tracks on the timeline that contain clips or elements you do
not want to split.
2) Position the playhead on the timeline.
3) Click Split or press S. The clip splits into two separate clips.
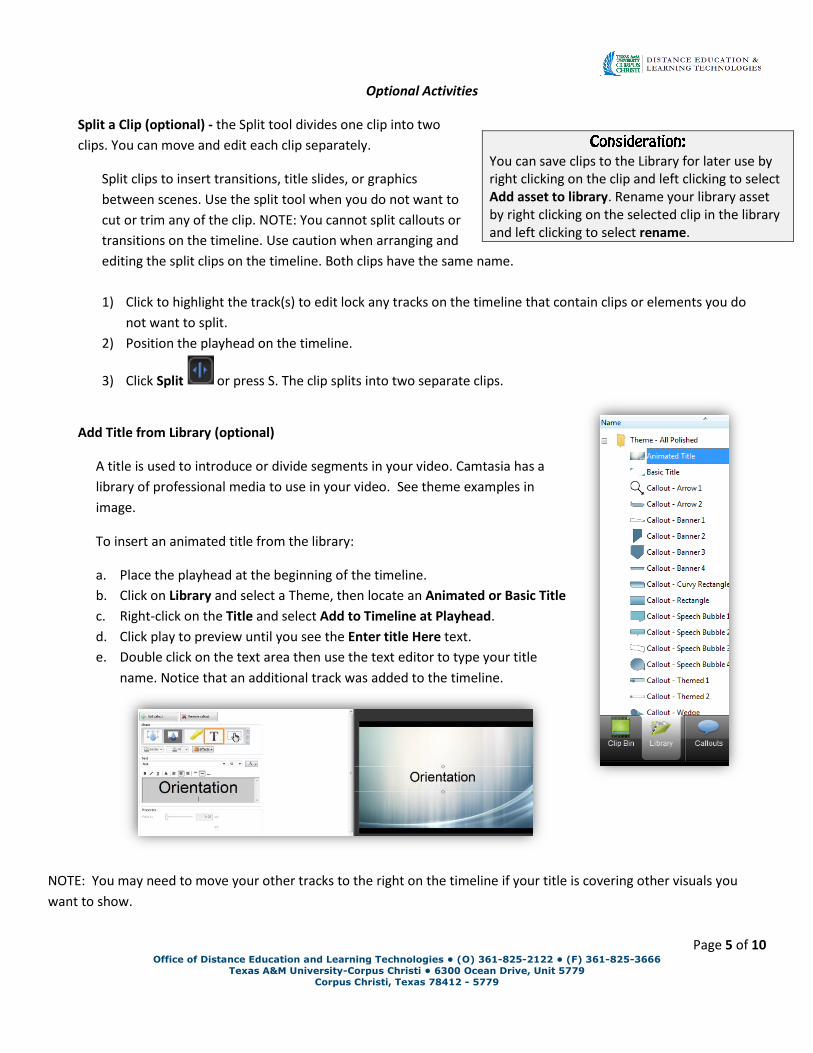
Add Title from Library (optional)
A title is used to introduce or divide segments in your video. Camtasia has a
library of professional media to use in your video. See theme examples in
image.
To insert an animated title from the library:
a. Place the playhead at the beginning of the timeline.
b. Click on Library and select a Theme, then locate an Animated or Basic Title
c. Right-click on the Title and select Add to Timeline at Playhead.
d. Click play to preview until you see the Enter title Here text.
e. Double click on the text area then use the text editor to type your title
name. Notice that an additional track was added to the timeline.
NOTE: You may need to move your other tracks to the right on the timeline if your title is covering other visuals you
want to show.
You can save clips to the Library for later use by right clicking on the clip and left clicking to select Add asset to library. Rename your library asset by right clicking on the selected clip in the library and left clicking to select rename.
Page 6 of 10 Office of Distance Education and Learning Technologies • (O) 361-825-2122 • (F) 361-825-3666
Texas A&M University-Corpus Christi • 6300 Ocean Drive, Unit 5779
Corpus Christi, Texas 78412 - 5779
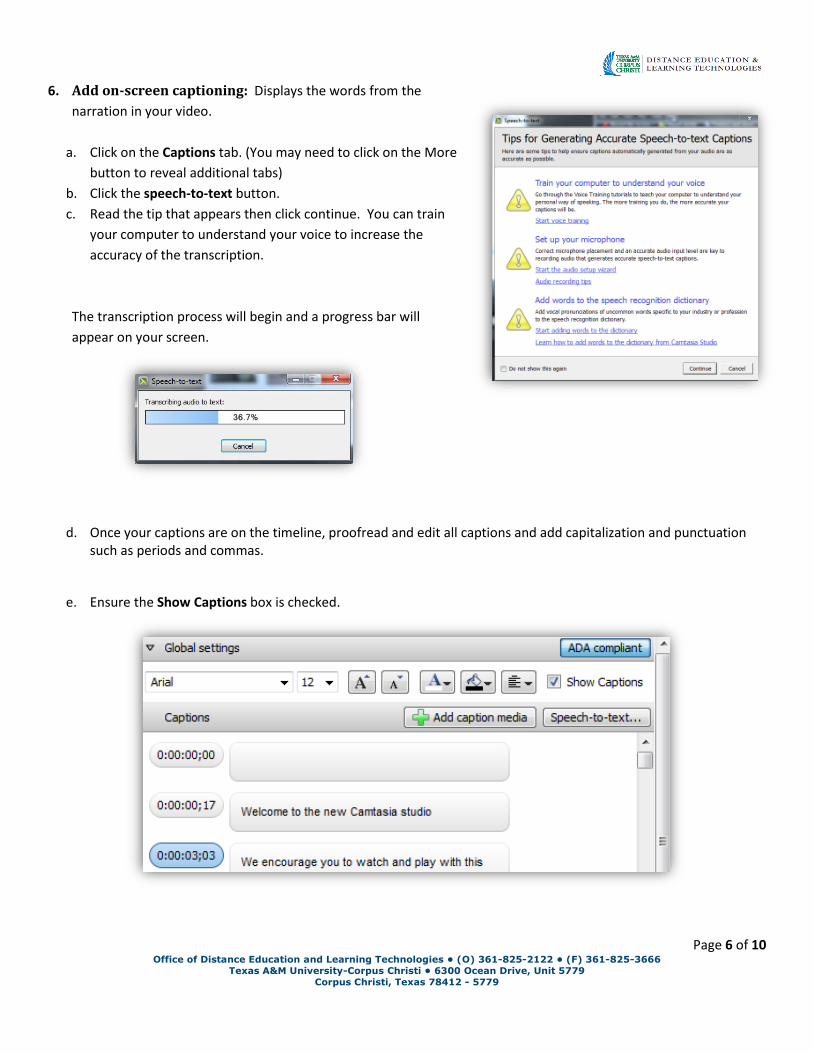
6. Add on-screen captioning: Displays the words from the
narration in your video.
a. Click on the Captions tab. (You may need to click on the More
button to reveal additional tabs)
b. Click the speech-to-text button.
c. Read the tip that appears then click continue. You can train
your computer to understand your voice to increase the
accuracy of the transcription.
The transcription process will begin and a progress bar will
appear on your screen.
d. Once your captions are on the timeline, proofread and edit all captions and add capitalization and punctuation such as periods and commas.
e. Ensure the Show Captions box is checked.
Page 7 of 10 Office of Distance Education and Learning Technologies • (O) 361-825-2122 • (F) 361-825-3666
Texas A&M University-Corpus Christi • 6300 Ocean Drive, Unit 5779
Corpus Christi, Texas 78412 - 5779
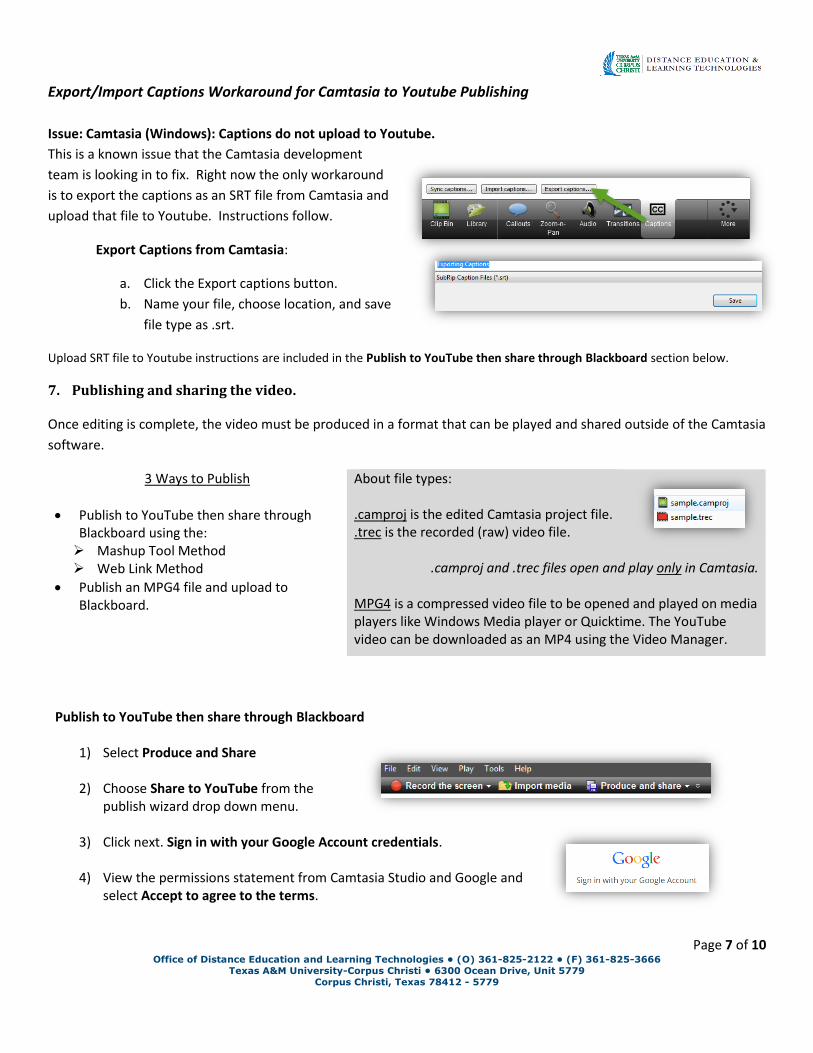
Export/Import Captions Workaround for Camtasia to Youtube Publishing
Issue: Camtasia (Windows): Captions do not upload to Youtube.
This is a known issue that the Camtasia development
team is looking in to fix. Right now the only workaround
is to export the captions as an SRT file from Camtasia and
upload that file to Youtube. Instructions follow.
Export Captions from Camtasia:
a. Click the Export captions button.
b. Name your file, choose location, and save
file type as .srt.
Upload SRT file to Youtube instructions are included in the Publish to YouTube then share through Blackboard section below.
7. Publishing and sharing the video.
Once editing is complete, the video must be produced in a format that can be played and shared outside of the Camtasia
software.
3 Ways to Publish
Publish to YouTube then share through Blackboard using the: Mashup Tool Method Web Link Method
Publish an MPG4 file and upload to Blackboard.
About file types: .camproj is the edited Camtasia project file. .trec is the recorded (raw) video file.
.camproj and .trec files open and play only in Camtasia. MPG4 is a compressed video file to be opened and played on media players like Windows Media player or Quicktime. The YouTube video can be downloaded as an MP4 using the Video Manager.
Publish to YouTube then share through Blackboard
1) Select Produce and Share
2) Choose Share to YouTube from the
publish wizard drop down menu.
3) Click next. Sign in with your Google Account credentials.
4) View the permissions statement from Camtasia Studio and Google and select Accept to agree to the terms.
Page 8 of 10 Office of Distance Education and Learning Technologies • (O) 361-825-2122 • (F) 361-825-3666
Texas A&M University-Corpus Christi • 6300 Ocean Drive, Unit 5779
Corpus Christi, Texas 78412 - 5779
5) Complete the information in the boxes provided including: Title (choose something unique so it is easily searchable in YouTube), Description, and Tags. Also, select Category, Privacy options and check the Upload captions box.
Select the Public option for Privacy at this point so the video can be found using the search feature in the Blackboard Mash-up tool. It can be set to Private after it is embedded in Blackboard.
6) Click Finish. The rendering and uploading process begins. When rendering is complete, the screen is
redirected to your YouTube account where you may see a message indicating “This video is currently being processed.”
Meanwhile, as the video is rendering in YouTube, go back to Camtasia. Save the edited Camtasia project file by selecting File > Save Project As > (name your file) > (select file location). Close Camtasia.
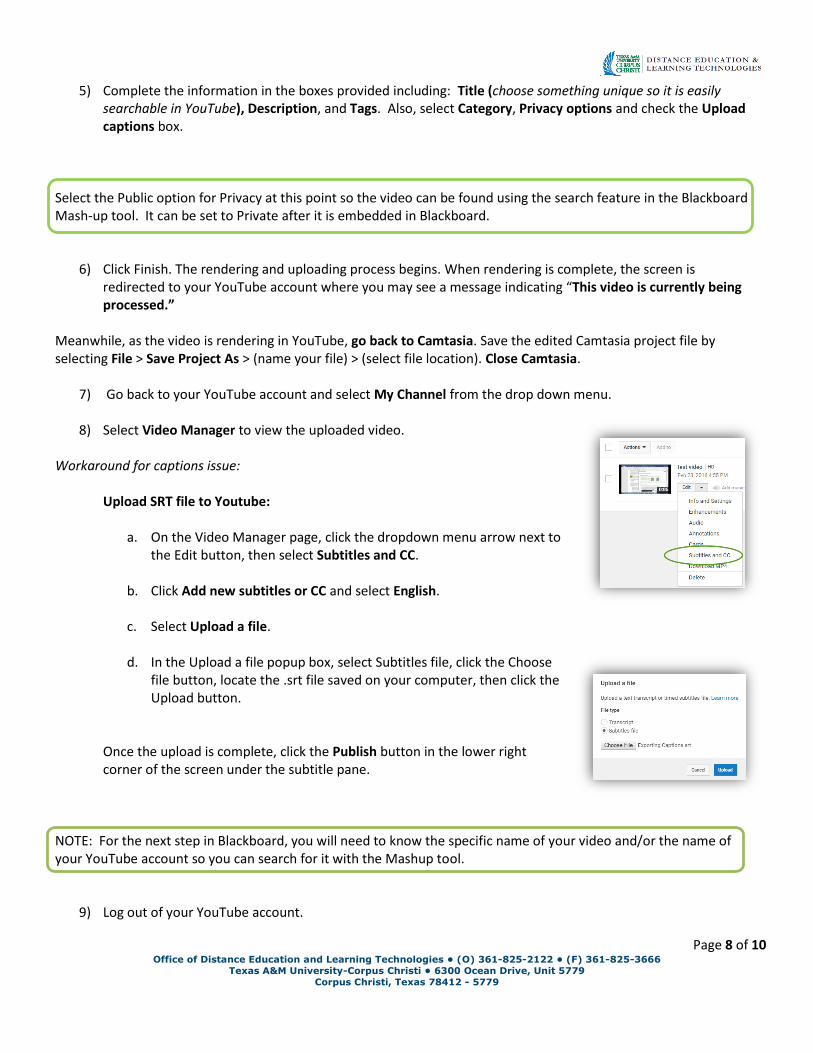
7) Go back to your YouTube account and select My Channel from the drop down menu.
8) Select Video Manager to view the uploaded video.
Workaround for captions issue:
Upload SRT file to Youtube:
a. On the Video Manager page, click the dropdown menu arrow next to the Edit button, then select Subtitles and CC.
b. Click Add new subtitles or CC and select English.
c. Select Upload a file.
d. In the Upload a file popup box, select Subtitles file, click the Choose file button, locate the .srt file saved on your computer, then click the Upload button.
Once the upload is complete, click the Publish button in the lower right corner of the screen under the subtitle pane.
NOTE: For the next step in Blackboard, you will need to know the specific name of your video and/or the name of your YouTube account so you can search for it with the Mashup tool.
9) Log out of your YouTube account.
Page 9 of 10 Office of Distance Education and Learning Technologies • (O) 361-825-2122 • (F) 361-825-3666
Texas A&M University-Corpus Christi • 6300 Ocean Drive, Unit 5779
Corpus Christi, Texas 78412 - 5779
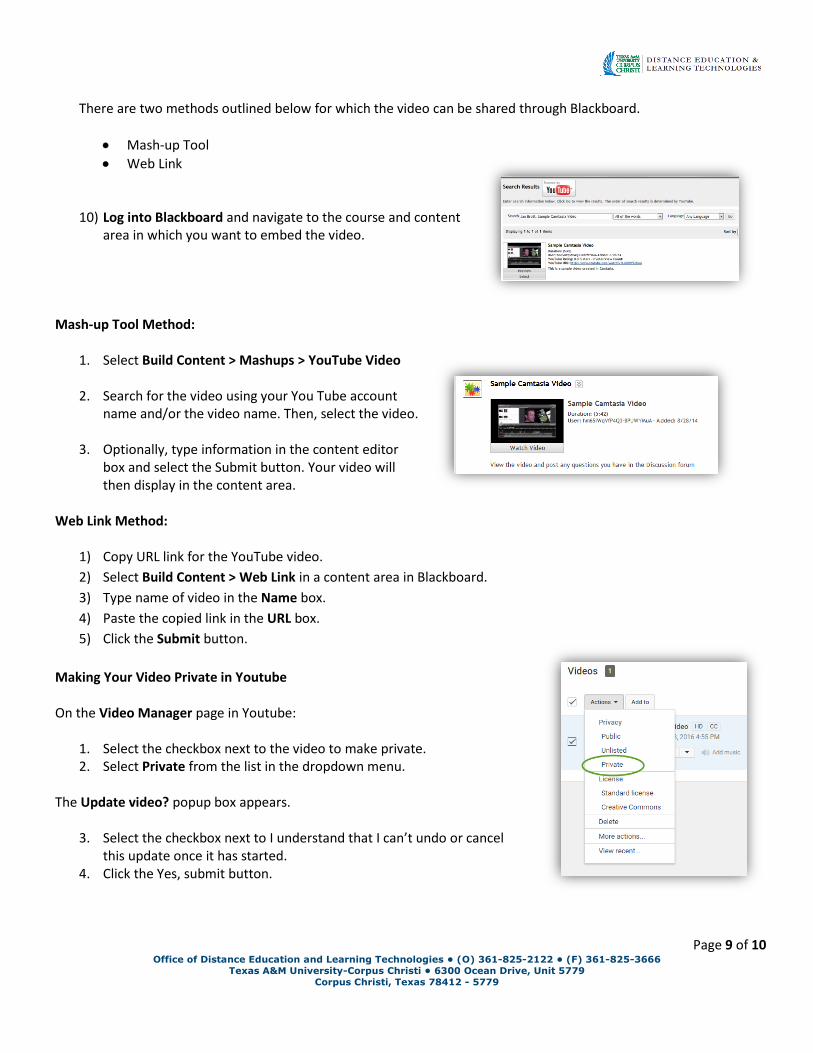
There are two methods outlined below for which the video can be shared through Blackboard.
Mash-up Tool
Web Link
10) Log into Blackboard and navigate to the course and content
area in which you want to embed the video. Mash-up Tool Method:
1. Select Build Content > Mashups > YouTube Video
2. Search for the video using your You Tube account name and/or the video name. Then, select the video.
3. Optionally, type information in the content editor
box and select the Submit button. Your video will then display in the content area.
Web Link Method:
1) Copy URL link for the YouTube video.
2) Select Build Content > Web Link in a content area in Blackboard.
3) Type name of video in the Name box.
4) Paste the copied link in the URL box.
5) Click the Submit button.
Making Your Video Private in Youtube
On the Video Manager page in Youtube:
1. Select the checkbox next to the video to make private. 2. Select Private from the list in the dropdown menu.
The Update video? popup box appears.
3. Select the checkbox next to I understand that I can’t undo or cancel this update once it has started.
4. Click the Yes, submit button.
Page 10 of 10 Office of Distance Education and Learning Technologies • (O) 361-825-2122 • (F) 361-825-3666
Texas A&M University-Corpus Christi • 6300 Ocean Drive, Unit 5779
Corpus Christi, Texas 78412 - 5779
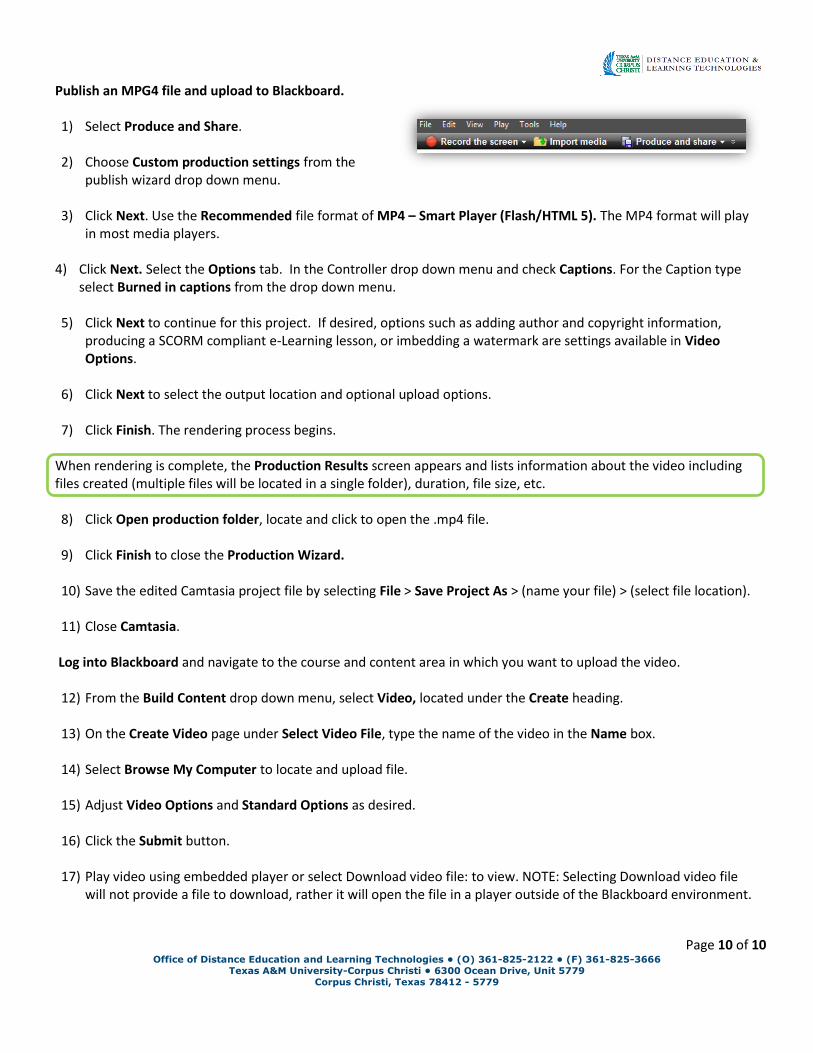
Publish an MPG4 file and upload to Blackboard.
1) Select Produce and Share. 2) Choose Custom production settings from the
publish wizard drop down menu.
3) Click Next. Use the Recommended file format of MP4 – Smart Player (Flash/HTML 5). The MP4 format will play in most media players.
4) Click Next. Select the Options tab. In the Controller drop down menu and check Captions. For the Caption type
select Burned in captions from the drop down menu.
5) Click Next to continue for this project. If desired, options such as adding author and copyright information, producing a SCORM compliant e-Learning lesson, or imbedding a watermark are settings available in Video Options.
6) Click Next to select the output location and optional upload options.
7) Click Finish. The rendering process begins.
When rendering is complete, the Production Results screen appears and lists information about the video including files created (multiple files will be located in a single folder), duration, file size, etc. 8) Click Open production folder, locate and click to open the .mp4 file.
9) Click Finish to close the Production Wizard.
10) Save the edited Camtasia project file by selecting File > Save Project As > (name your file) > (select file location).
11) Close Camtasia.
Log into Blackboard and navigate to the course and content area in which you want to upload the video.
12) From the Build Content drop down menu, select Video, located under the Create heading.
13) On the Create Video page under Select Video File, type the name of the video in the Name box.
14) Select Browse My Computer to locate and upload file.
15) Adjust Video Options and Standard Options as desired.
16) Click the Submit button.
17) Play video using embedded player or select Download video file: to view. NOTE: Selecting Download video file
will not provide a file to download, rather it will open the file in a player outside of the Blackboard environment.


![Camtasia Studio [.pdf]](https://img.pdfslide.net/doc/110x75/58a2fc2b1a28ab722c8bac6b/camtasia-studio-pdf.jpg)