Embed Size (px)
Citation preview
Copyright 2009 Heather Mulder Peterson, Anka's Treasures Page 1
~ CHARMED ~ Size: 27” x 33”
Cutting Instructions: From the CREAM fabric, cut: 1 – 14 ½” x 20 ½”
From the YELLOW fabric, cut: 2 strips – 3” x 20 ½” and 2 strips, 3” x 14 ½”
From the GREEN fabric, cut: Cut 2 - 1 ¾” x 25 ½” and 2 – 1 ¾” x 22” Cut enough strips on the bias at 2” wide to total 35” in length.
From the RED fabric, cut: Cut 2 - 3” x 27” and 2 – 3” x 28” Cut 8 - 2 ⅛” squares
From the YELLOW PLAID fabric, cut: Cut 8 - 2 ⅛” squares
From the BINDING fabric, cut: Enough 2 ½” wide strips cut on the bias to total 125” in length when sewn together. For help with cutting the bias strips, go to my blog at www.ankastreasures.wordpress.com. Under the Tutorials tab along the top, you will find instructions for cutting bias binding.
FABRIC REQUIREMENTS:
CREAM: ½ yard for center square YELLOW: ¼ yard for first border
GREEN: ½ yard for second border, stems, and leaves
RED: ½ yard for outer border and pinwheels YELLOW PLAID: ⅛ yard for pinwheels
Scraps of RED AND BLACK for appliqués BINDING: ½ yard of black stripe to be
cut on the bias BACKING: ⅞ yard
BATTING: 30” x 36”
Thread for the appliqué is also required. I used clear nylon thread for the stems and black
topstitching thread for the flowers. The brand I recommend is Dual Duty by Coats and it says Topstitching or Heavy on the end of the spool.
Fusible Web is also required

Copyright 2009 Heather Mulder Peterson, Anka's Treasures Page 2
ASSEMBLY INSTRUCTIONS 1. Draw a diagonal line across the back side of the red 2 ⅛" squares. Lay the red and yellow plaid 2 ⅛” squares right sides together and sew ¼" away from both sides of the drawn line. Cut on the drawn to make 16 half square triangle blocks. Press all seams toward the red (or in the direction of the arrows). Proof the blocks to 1 ¾”. Make 16
2. Sew the Step 1 blocks together to make 4 pinwheel blocks and proof them to 3”. Sew the yellow borders to the cream center, along with the pinwheel blocks as shown. Make 4
3. Press the green bias strip in half with wrong sides together. Press over again, centering the raw edge in the back of the strip. Position on the quilt as shown in the color photo and machine appliqué in place with a small zigzag and nylon thread. I used a size 9 needle to help hide the stitching.
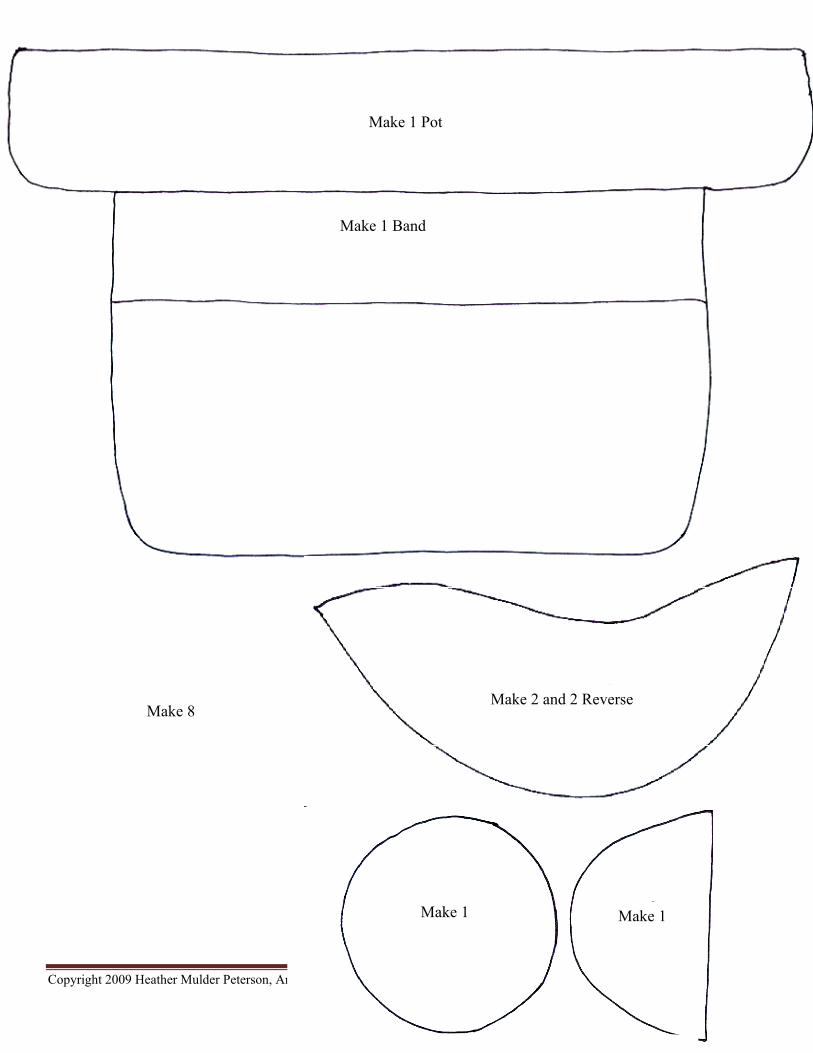
4. Prepare the appliqué shapes - Trace the appliqué templates onto the paper side of the fusible material. Roughly cut out around the shapes. On the larger shapes like the basket and the petals, I trimmed the center of the fusible material out, leaving roughly 1/4" of the fusible material around the edges. This helps reduce some of the bulk. Iron the shapes onto the wrong side of the fabric, following the manufacturer's instructions. Cut out the shapes on the drawn line and peel off the paper backing. Fuse to the quilt referring to the color photo for placement. Machine appliqué using a blanket stitch and black topstitching/heavy thread.
5. Sew the green 1 ¾” x 25 ½” strips to the sides of the quilt as shown in Step 6. Sew the green 1 ¾” x 22” to the top and bottom of the quilt. Press the seams toward the green.
6. Sew the red 3” x 28” strips to the sides of the quilt. Sew the red 3” x 27” to the top and bottom of the quilt. Press the seams toward the green. 7. Quilt and bind. For help with the hand stitching, refer to the tutorials tab on my blog.
Copyright 2009 Heather Mulder Peterson, Anka's Treasures Page 3
Make 1 Pot
Make 1 Band
Make 2 and 2 Reverse Make 8
Make 1 Make 1